

Page 1

FORM NO. 3322–658
Model
No. 79174
Loose
Parts
Note: Use the chart below to identify parts used for assembly.
DESCRIPTION QTY. USE
Kicker
Carriage bolt 5/16–18 x 3/4” (19mm)
Spacer
Locknut 5/16” (7.9 mm)
High–lift blade
Baf
fle, left side
Baf
fle, right side
Bolt 5/16–18 x 1-1/4” (31.8mm)
Bellville washer
4
4
4
4
3
1
1
4
4
Install kickers
Replace standard blades on mower
Install Recycler baf
INSTALLATION
INSTRUCTIONS
fles
Locknut 5/16” (7.9mm)
Decal 1
Preparing
the Mower
1. Remove the mower from tractor; refer to
Removing the Mower, in Mower Operator’s
Manual.
2. Thoroughly clean the mower. All debris must be
removed to ensure that the baffles and kickers
will fit properly against cutting chamber.
3. Tip the mower upside down and block up the
ends to ease installation of the
Recycler
baffle.
IMPORTANT: There are bolts (washers and
locknuts) installed in some of the open holes
of the cutter deck for safety. Remove this
8
Install onto mower
hardware if the hole is needed for installation
of the Recycler
kit. Save these fasteners and
reinstall them in the same open holes when
any portion of the Recycler
kit is removed.
1
Page 2
Installation
Installing
the Kickers
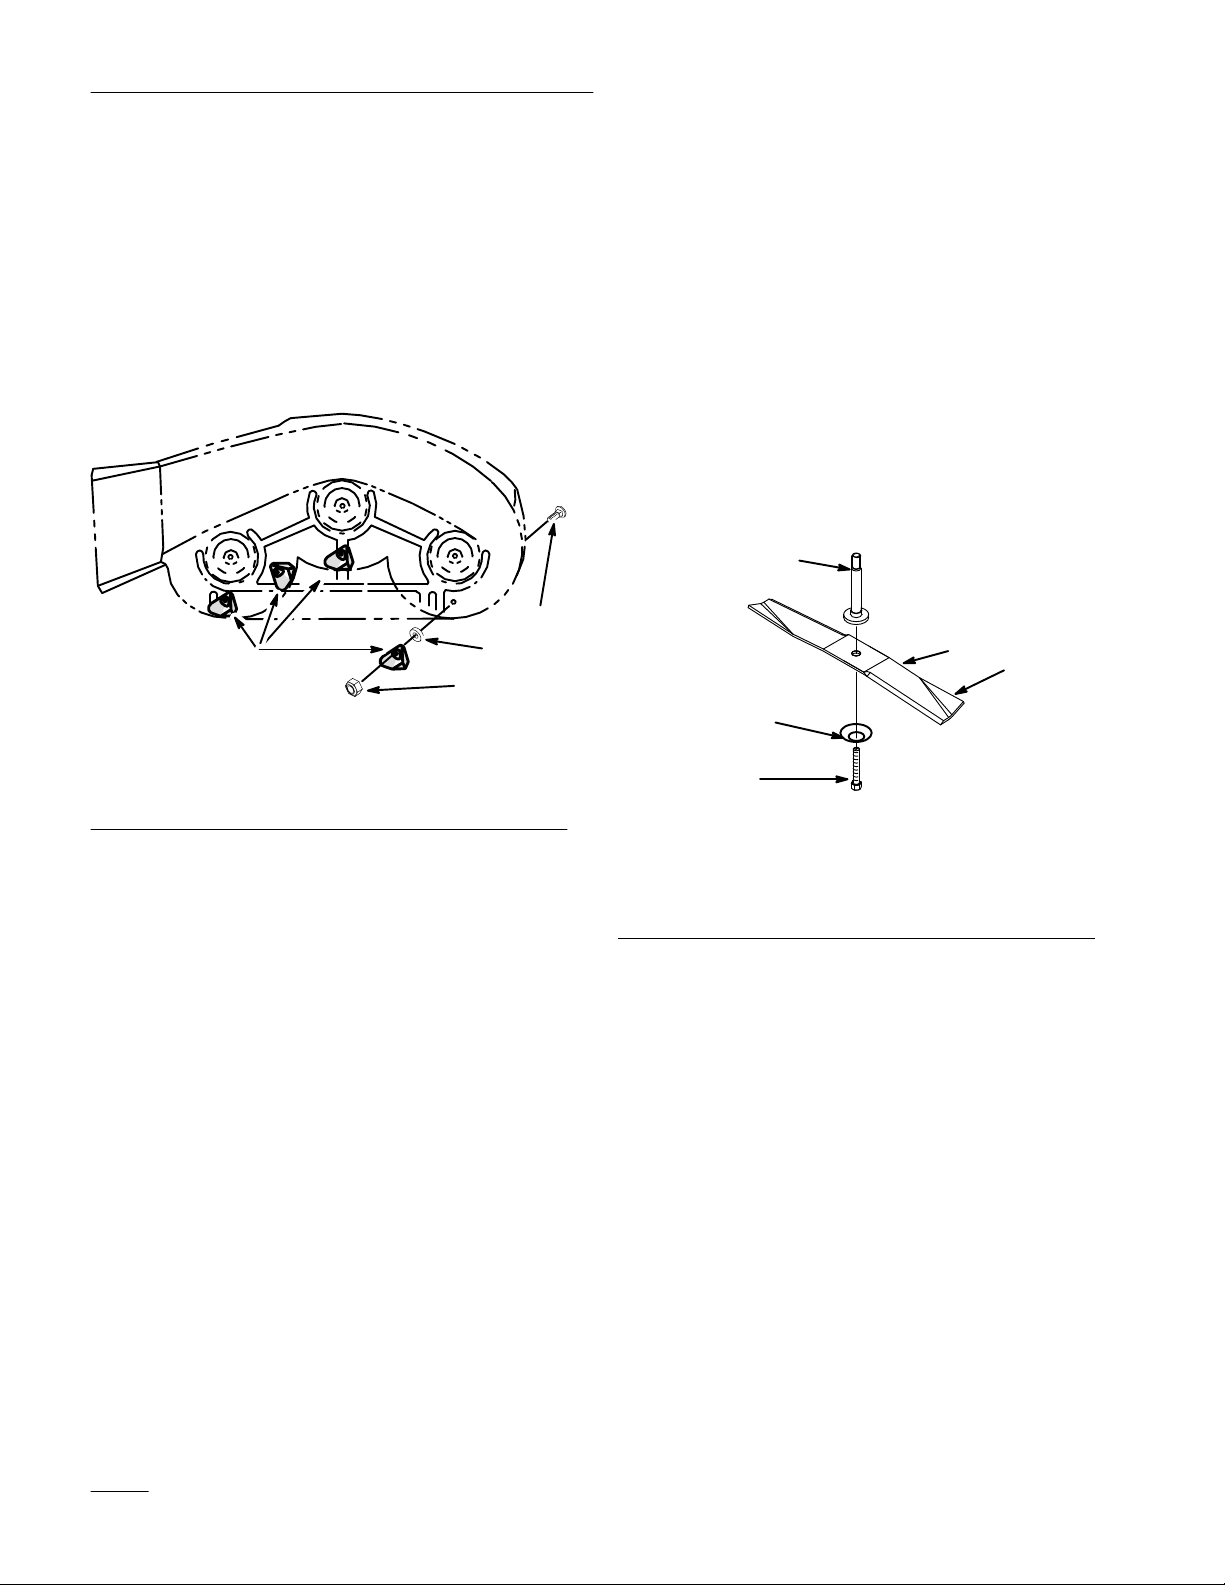
Place spacers and kickers inside the mower, over the
holes provided (Fig. 1). Remove any hardware
installed in these holes and save for reinstallation if
the kickers are removed. Secure the kickers with (4)
5/16–18 x 3/4” (19 mm) carriage bolts, (through from
the top side of the mower) and (4) 5/16” locknuts
(Fig. 1).
.
3
2
2034
4
1. Kicker
2. Spacer
1
Figure 1
3. Bolt
5/16–18 x 3/4”
(19mm)
4.
Locknut 5/16” (7.9mm)
Installing
the High-lift Blades
1. Remove standard blades (Fig. 2).
2. Holding the blade end using a rag or thickly
padded glove, install each high–lift blade,
Belleville washer (concave side toward the
blade) and the blade bolt (Fig. 2).
IMPORTANT: The sail (curved part of the
blade) must be pointing toward the top of the
mower to ensure proper cutting.
3. Tighten the blade bolt to the torque specified in
the Mower Operator’
1
1. Blade
2. Belleville
bolt
washer—concave side
toward blade
4
2
s Manual.
Figure 2
3. Blade
4. Spindle
5. Sail
3
5
1796
2
Page 3

Installation
Installing
Recycler Decal
1. Remove backing paper and apply decal to left
side of mower (Fig. 4). Smooth from center to
edges to remove air bubbles.
2
1
Figure 3
1. Mower
Assemble
left side
2. Decal
the Recycler
Baffles
2036
Installing
the Recycler Baffles
1. Place the left side baffle inside the cutting
chamber. Secure it with (2) 5/16” locknuts and
(2) Bellville washers (Fig. 5).
Note:
Concave side of Bellville washers goes
toward the mower
2. Place the right side baffle inside the cutting
chamber so the extended lug interlocks with the
left side baffle, and secure it with (2) locknuts
and 2 Bellville washers (Fig. 5).
3
2
5
3
1
5
1. Place (4) 5/16”–18 x 1 1/4 bolts into the deep
recessed holes in the left and right baffles.
Secure the bolts with (4) 5/16” locknuts in the
shallow recesses. Refer to Figures 4 and 5 for
correct assembly and hole usage.
2
Locknut 5/16” (7.9mm)
1. Deep recess
2.
Bolt 5/16–18 x 1-1/4”
(31.8mm)
3
1
Figure 4
3.
2033
2031
4
5
1. Baffle
2. Baf
3.
left side
fle right side
Bolt 5/16–18 x 1-1/4”
(31.8mm)
4
Figure 5
4
Bellville washer
4.
5.
Locknut 5/16” (7.9mm)
5
3. Tighten all mounting hardware securely.
4. Rotate blades to assure there is at least 1/8”
clearance between blades and baffle.
5. Install mower onto tractor; refer to Installing the
Mower, in Mower Operator’
s Manual.
3
Page 4

Installation
Removing
the Right
Baffle
for
Side Discharge Cutting
1. Thoroughly clean the mower.
2. Remove the locknuts and Bellville washers from
the right side baffle (Fig. 5).
Note: Only the right side baffle needs to be
removed for side discharge mowing.
Note: Save the hardware for use when
reinstalling the baffle.
3. Lift the baffle and slide it out of the interlock
with the left side baffle.
4. For safety, install the previously removed bolts,
washers and locknuts into the open holes of the
mower, wherever hardware was removed.
POTENTIAL HAZARD
• Open holes in the mower expose you and
others to thrown debris.
WHAT CAN HAPPEN
• Debris thrown out of holes in the mower
can cause injury.
HOW TO AV
OID THE HAZARD
• Never operate the mower without hardware
mounted in all holes in the mower.
• Install hardware in mounting holes when
the baffle is removed.
4
 Loading...