

Page 1

FormNo.3360-528RevA
48inand52inBagger
TitanZero-Turn-RadiusRidingMower
ModelNo.79171—SerialNo.280000001andUp
Registeratwww.T oro.com.OriginalInstructions(EN)
Page 2
Introduction
Readthisinformationcarefullytolearnhowtooperate
andmaintainyourproductproperlyandtoavoidinjury
andproductdamage.Youareresponsibleforoperating
theproductproperlyandsafely.
YoumaycontactTorodirectlyatwww.Toro.comfor
productandaccessoryinformation,helpndinga
dealer,ortoregisteryourproduct.
Wheneveryouneedservice,genuineToroparts,or
additionalinformation,contactanAuthorizedService
DealerorToroCustomerServiceandhavethemodel
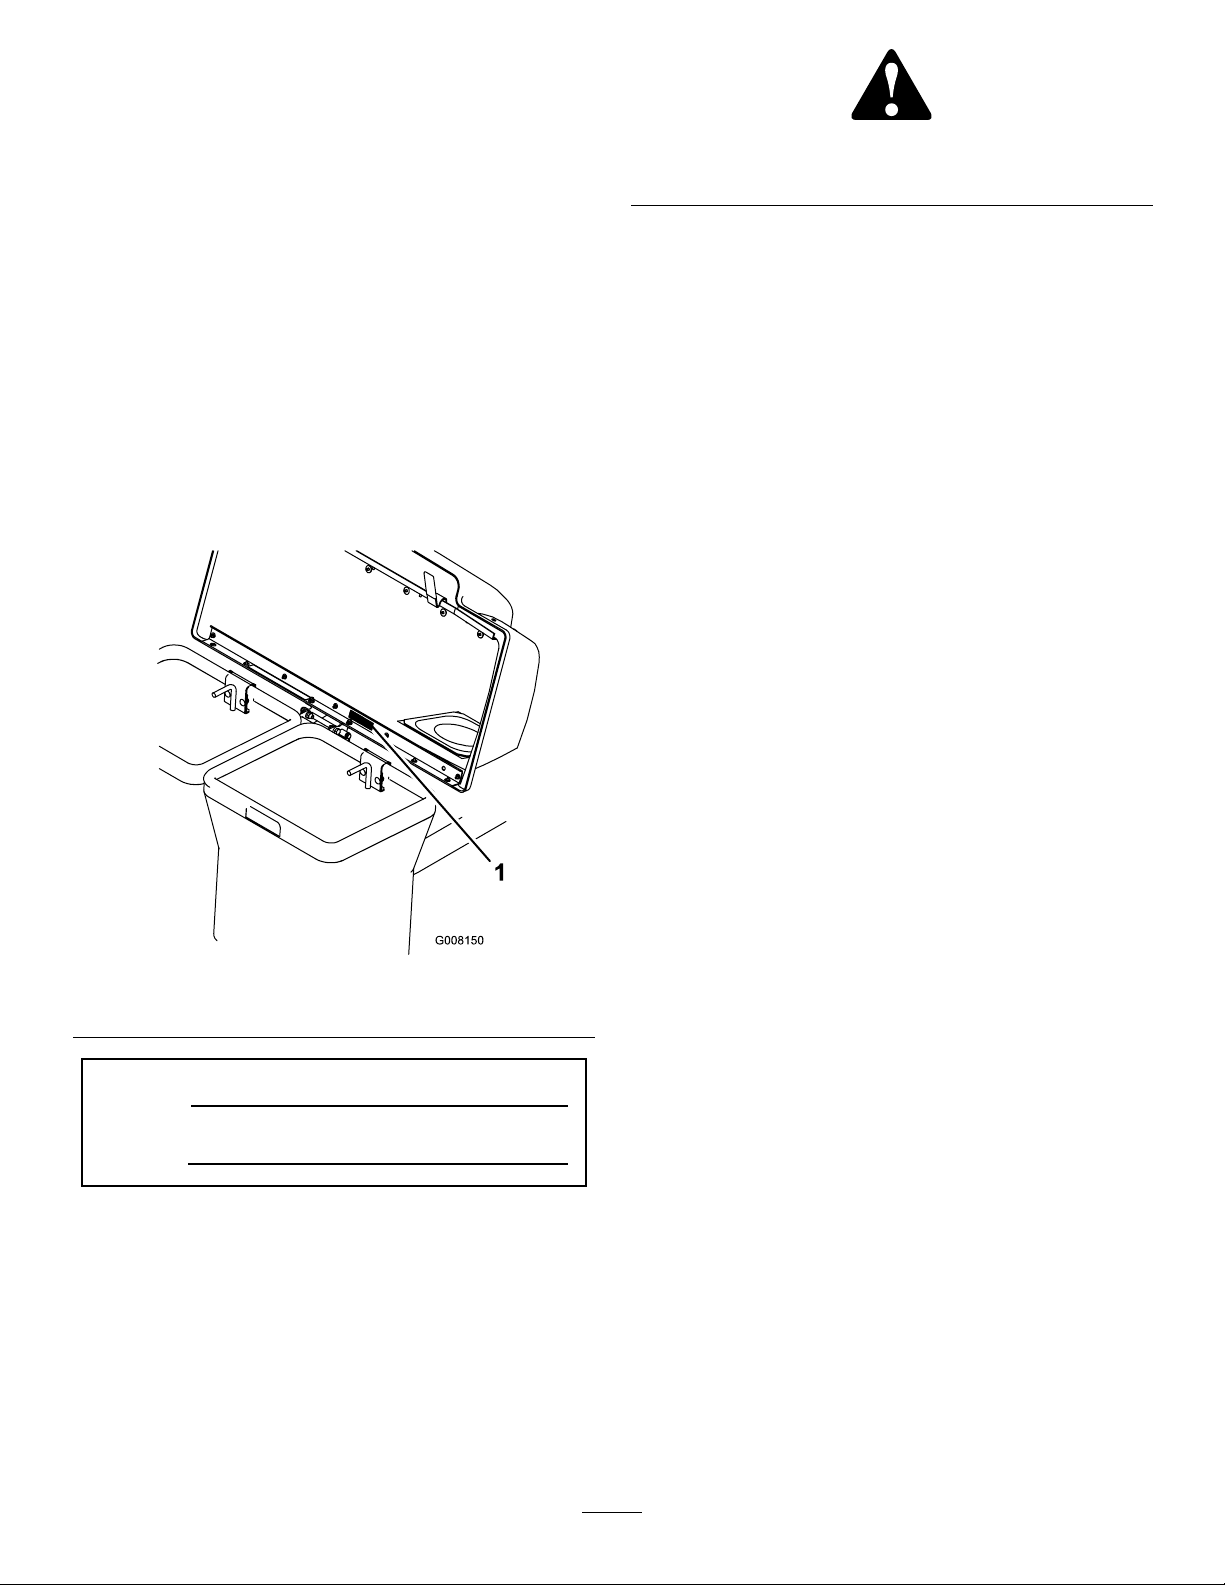
andserialnumbersofyourproductready.identies
thelocationofthemodelandserialnumbersonthe
product.Writethenumbersinthespaceprovided.
Figure1
1.Modelandserialnumberlocation
ModelNo.
SerialNo.
Figure2
1.Safetyalertsymbol
Thismanualuses2otherwordstohighlightinformation.
Importantcallsattentiontospecialmechanical
informationandNoteemphasizesgeneralinformation
worthyofspecialattention.
Contents
Introduction.................................................................2
Safety...........................................................................3
Training................................................................3
Preparation..........................................................3
Operation.............................................................3
SlopeChart..........................................................5
SafetyandInstructionalDecals.............................6
Setup............................................................................7
1InstallingtheWeight..........................................8
2InstallingtheHitchBracket................................8
3InstallingtheHoodandBags..............................9
4InstallingtheBootMountBracketand
Tubes.............................................................10
5InstallingtheDischargeBafe..........................11
Operation...................................................................11
EmptyingtheGrassBags....................................11
ClearingObstructionsfromtheBagger...............12
RemovingtheBagger.........................................12
ReplacingtheDischargeDeector......................13
OperatingTips...................................................13
Maintenance...............................................................15
RecommendedMaintenanceSchedule(s)................15
InspectingtheBaggerAttachment......................15
InspectingtheMowerBlades..............................16
CaringfortheGrassBags...................................16
CleaningtheBaggerAttachment.........................16
Storage.......................................................................16
StoringtheBaggerAttachment...........................16
Thismanualidentiespotentialhazardsandhas
safetymessagesidentiedbythesafetyalertsymbol
(Figure2),whichsignalsahazardthatmaycauseserious
injuryordeathifyoudonotfollowtherecommended
precautions.
©2008—TheToro®Company
8111LyndaleAvenueSouth
Bloomington,MN55420
Contactusatwww.Toro.com.
2
PrintedintheUSA.
AllRightsReserved
Page 3

Safety
Pleasecarefullyreadallofthesafetyinstructionsand
decalsinthesafetysection.Knowingthisinformation
couldhelpyou,yourfamily,petsorbystandersavoid
injury.
Operation
Enginescanbecomehotwhentheyare
operating.Severeburnscanoccurfrom
contactinghotsurfaces.
Training
•RegardtheToroBaggerasapieceofpower
equipmentandteachthisregardtoallwhooperate
thisunit.
•BeforeoperatingyourBagger,carefullyreadand
understandthismanualandtheOperator’sManual
foryourmowerintheirentirety.Familiarize
yourselfwiththecontrolsandtheproperuseofthe
equipment.Iftheoperator(s)ormechanic(s)can
notreadEnglish,itistheowner’sresponsibilityto
explainthismaterialtothem.
•Donotallowoperationofthismachinebyuntrained
personnel.Neverallowchildren,teenagers,orpeople
unfamiliarwiththeseinstructionstousethemower.
Localregulationsmayrestricttheageoftheoperator.
•Avoidmowingwhilepeople,especiallychildren,or
pets,arenearby.Keepinmindthattheoperatoror
userisresponsibleforaccidentsorhazardsoccurring
tootherpeopleortheirproperty.
Preparation
•Evaluatetheterraintodeterminewhataccessories
andattachmentsareneededtoproperlyand
safelyperformthejob.Onlyuseaccessoriesand
attachmentsapprovedbyToro.
•Theuseofpersonalprotectiveequipment,suchas
(butnotlimitedto)protectionfortheeyes,ears,feet,
andheadisrecommended.
Allowengines,especiallythemufer,tocool
beforetouching.
Debris,suchasleaves,grass,orbrushcancatch
re.Areintheengineareacancausepersonal
injuryandpropertydamage.
•Keeptheengineandmuferareafreeof
debrisaccumulation.
•Takecarewhenopeningthebaggercover
tokeepdebrisfromfallingontotheengine
andmuferarea.
•Allowthemachinetocoolbeforestoringit.
Althoughhazardcontrolandaccidentpreventionare
partiallydependentuponthedesignandconguration
oftheequipment,thesefactorsarealsodependent
upontheawareness,concern,prudence,andproper
trainingofthepersonnelinvolvedintheoperation,
transport,maintenance,andstorageoftheequipment.
ItisessentialthatallOperatorSafetyMechanismsbe
connectedandinoperatingconditionpriortousefor
mowing.RefertotheOperator’sManualforthemower
foradditionalhazardcontrolandaccidentprevention
information.
•Whilemowing,alwayswearsubstantialfootwear
andlongtrousers.Donotoperateequipmentwhen
barefootorwhenwearingopensandals.
•Thoroughlyinspecttheareawheretheequipmentis
tobeusedandremoveallstones,sticks,wires,bones,
andotherforeignobjectswhichmaydamagethe
equipmentorcausepersonalinjurytotheoperator
orbystanders.
3
Page 4
ThinkSafetyFirst
Toavoidpersonalinjury,followthese
procedures:
•Becomefamiliarwithalloperatingand
safetyinstructioninthe
forthemowerbeforeusingthisattachment.
•Neverremovethedischargetube,bags,
baggertopordischargedeectorwhilethe
engineisrunning.
Operator’ s Man ual
•Alwaysshuttheengineoff,engageparking
brake,waitforallmovingpartstostopand
removekeybeforeclearinganobstruction
fromthebaggingsystem.
•Neverdomaintenanceorrepairswhilethe
engineisrunning.
•Neveroperatethelawnmowerunlessyou
installamulchplate,dischargedeector,or
entiregrasscollectionsystem.
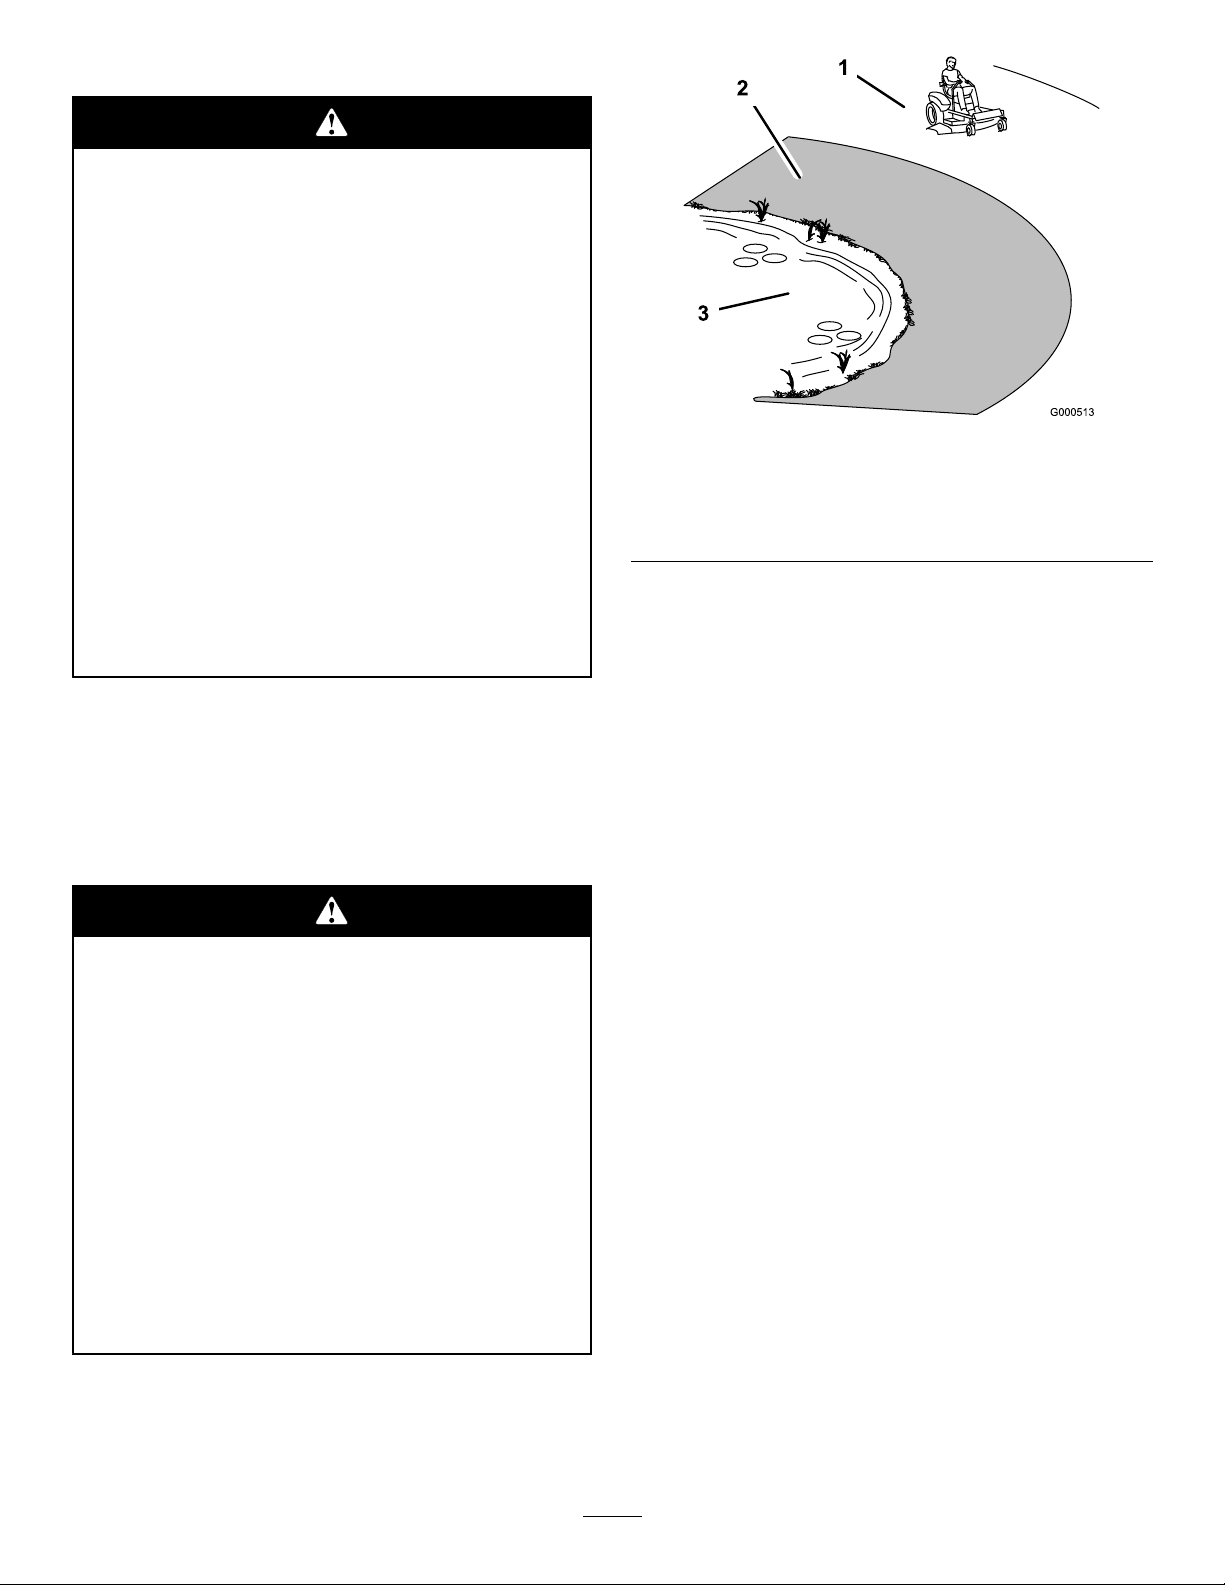
Slopes
•Useextremecautionwhenmowingand/orturning
onslopesaslossoftractionand/ortip-overcould
occur.Theoperatorisresponsibleforsafeoperation
onslopes.
Mowingonwetgrassorsteepslopescancause
slidingandlossofcontrol.
Wheelsdroppingoveredgescancauserollovers,
whichmayresultinseriousinjury,deathor
drowning.
Toavoidlossofcontrolandpossibilityof
rollover:
–Donotmowneardrop-offsornearwater.
–Donotmowslopesgreaterthan15degrees.
–Reducespeedanduseextremecautionon
slopes.
–Avoidsuddenturnsorrapidspeedchanges.
Figure3
1.SafeZone-usethemachinehere
2.Usewalkbehindmowerand/orhandtrimmerneardrop-offs
andwater.
3.Water
RefertotheSlopeCharttodeterminethe
approximateslopeangletobemowed.
•Progressivelygreatercareisneededastheslope
increases.
•Alwaysavoidsuddenstartingorstoppingona
slope.Iftireslosetraction,disengagethebladesand
proceedslowlyofftheslope.
•Avoidsuddenstartswhenmowinguphill.Mower
maytipbackwards.
•Beawarethatlossoftractionmayoccurgoing
downhill.Weighttransfertothefrontwheelsmay
causedrivewheelstoslipandcauselossofbraking
andsteering.
•Watchforditches,holes,rocks,dips,andrisesthat
changetheoperatingangle,asroughterraincould
overturnthemachine.
•Removeormarkobstaclessuchasrocks,treelimbs,
etc.fromthemowingarea.Tallgrasscanhide
obstacles.
•Theoperatingcharacteristicsofthemachinewill
changewiththeBaggerinstalled.Thestabilityand
tractionofthemachinewillchangeastheBagger
llswithgrassclippings.Useprogressivelygreater
careonslopesastheBaggerlls.
•AlwaysinstallandremovetheBagger,including
counterweights,asinstructed.Failuretodosowill
causeareductioninstabilityortraction.Donot
operatethemowerwithonlyaportionoftheBagger
installed.
4
Page 5
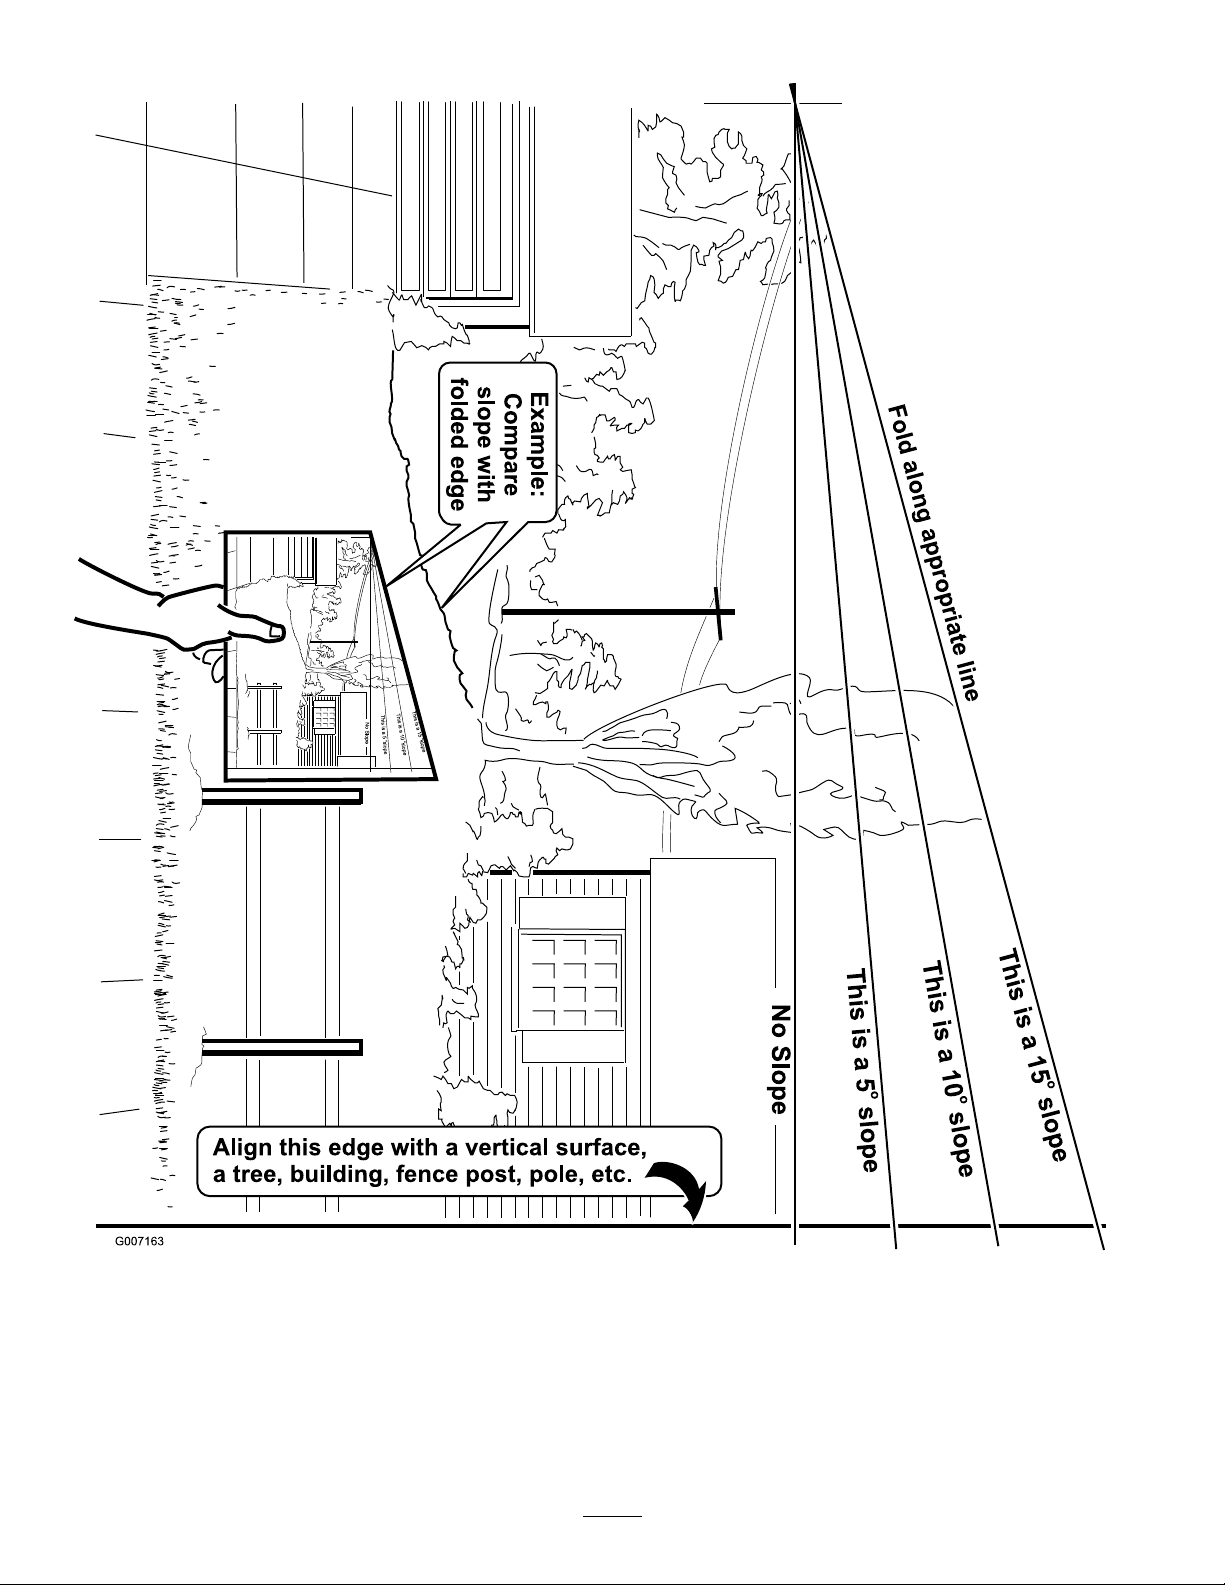
SlopeChart5SafetyandInstructionalDecals
Page 6

Safetydecalsandinstructionsareeasilyvisibletotheoperatorandarelocatednearanyareaof
potentialdanger.Replaceanydecalthatisdamagedorlost.
109-6809
1.Crushinghazardofhand—donotremovethewholebaggerfromthemachine;openthebaggertopandthenremovethebag(s)
fromthebagger .Donotremovethebaggertopwhenitisclosed;openthebaggertopandthenremoveit.
6
Page 7

Setup
LooseParts
Usethechartbelowtoverifythatallpartshavebeenshipped.
ProcedureDescription
1
2
3
4
5
Locknut(3/8inch)
Weight,25lb1
Screw,hexbuttonhead(3/8x1inch)
Weightsupportassembly1
Weightlockrod1
Carriagebolt(3/8x5inch)
Stiffenerplate,large
Locknut(3/8inch)
Baggertube2
Carriagebolt(3/8x3inch)
Stiffenerplate,small
Baggerhitch1
Screw(1/4x3/4)
Baggermountassembly1
Locknut(1/4inch)
Hoodbaggerassembly1
Bag2
Locknut(5/16inch)
Bootmountbracket1
Lowertubeassembly1
Carriagebolt(5/16x3/4inch)
Uppertubeassembly1
Dischargebafe
Carriagebolt(5/16x3/4inch)
Locknut(5/16inch)
Qty.
Use
2
2
4
4
8
4
2
2
2
1
1
1
2
2
Installtheweight.
Installthehitchbracket.
Installthehoodandbags.
Installthebootmountbracketandtubes
Installthedischargebafe.
7
Page 8

1
InstallingtheWeight
Partsneededforthisprocedure:
2
Locknut(3/8inch)
1Weight,25lb
2
Screw,hexbuttonhead(3/8x1inch)
1Weightsupportassembly
1Weightlockrod
Note:Ifyourmowerdoesnothavemountingholes
onthefootrest,positionthebackoftheweight
supportassemblyonthecrossbarunderthefoot
rest.Centertheweightsupportassemblyandmark
thetwomountingholesonthelipofthefootrest.
Drillholesusinga13/32inchdrillbit.Installweight
supportassemblyasstatedinstep1.
2.Inserttheweightontotheweightsupportassembly
(Figure4).
3.ThelockrodFigure4)hasakeyononeend.Slide
thelockrodthroughtheweightsupportassembly,
notchintheweightandtheovalholeintheframe
bracket.
4.Rotatethelockrodtosecureitintoplace.
Procedure
Thefrontweightinstalledwithoutthebagger
maycauselossoftractionandsteeringcontrol
oranunstableconditionwhichcouldresultin
injuryordeath.
Installthefrontweightonlywhenthebagger
isinstalled.
Note:Theremovableweightisheavy .Usecarewhen
liftingit.Makesurethatyoucanholditsecurelybefore
liftingit.Usecautionwhenpositioningyourhandsso
thatyoudonotsetitdownonyourhandsorngers.
1.Attachtheweightsupportassemblytothefront
panelfootrestwithtwohexbutton-headscrews
(3/8x1inch)andtwolocknuts(3/8inch)asshown
inFigure4.
Note:Theweightsupportassemblycanstaymounted
totheunitwhenthebaggerandweightareremoved.
2
InstallingtheHitchBracket
Partsneededforthisprocedure:
4
Carriagebolt(3/8x5inch)
4
Stiffenerplate,large
8
Locknut(3/8inch)
2Baggertube
4
Carriagebolt(3/8x3inch)
2
Stiffenerplate,small
1Baggerhitch
Procedure
1.Frontpanelfootrest
2.Nut(3/8inch)
3.Weight
4.Hexbutton-headscrew
(3/8x1inch)
Figure4
1.Removethetwocarriagebolts(3/8-16)attherear
ofeachframerail.Retainforreuseifthebaggeris
removed.
2.Installthetwocarriagebolts(3/8-16x5)through
theholesontheframeasshowninFigure5.Place
twostiffenersonthetopandbottomofthebagger
tubeandinstalloncarriagebolts.Fastenwithtwo
locknuts(3/8inch);leaveloosetoaidinstallation.
Repeatprocedureforotherside.
5.Weightsupportassembly
6.Weightlockrod
7.Ovalhole
8
Page 9

Figure5
1.Carriagebolts(3/8-16x5)5.Screws
2.Stiffenerplate,large6.Stiffenerplate,small
3.Locknut(3/8inch)
4.Baggertube
7.Baggerhitch
3.Aligntheholesinthebaggertubewiththebagger
hitch.Fastenwithhardwareandstiffenerasshown
inFigure5;leaveloosetoaidininstallation.
4.Tightenallhardware.
3
InstallingtheHoodandBags
Partsneededforthisprocedure:
2
Screw(1/4x3/4)
1Baggermountassembly
2
Locknut(1/4inch)
1Hoodbaggerassembly
2Bag
Procedure
Operatingthemowerwiththebaggerinstalled
andthefrontweightremovedmaycauseloss
oftractionandsteeringcontroloranunstable
conditionwhichcouldresultininjuryordeath.
Installthebaggeronlywhenthefrontweight
isinstalled.
1.Installthebaggermountassembly(item2)ontoto
thehoodassembly(item3)usingtwoscrews(1/4
x3/4inch)andtwolocknuts(1/4inch)asshown
inFigure6.
Figure6
1.Screw(1/4x3/4inch)4.Locknut(1/4inch)
2.Baggermountassembly5.Baggerhitch
3.Hoodassembly
2.Installthemountassemblyontothehitch.
9
Page 10

Ifyouremovethespring-loadedhoodwhenit
isclosed(inthedownposition),thehoodmay
suddenlyyopenandyouorsomeoneelsemay
bebruised,pinched,orinjuredinanotherway.
Alwaysopen(raise)thehoodbeforeyouremove
orinstallitonthequick-attachbracket.
3.Installthebagsbyslidingthebagframehooksonto
theretainingbrackets.
4
InstallingtheBootMount
BracketandTubes
Partsneededforthisprocedure:
1
Locknut(5/16inch)
1Bootmountbracket
1Lowertubeassembly
1
Carriagebolt(5/16x3/4inch)
1Uppertubeassembly
Procedure
1.Removethedischargedeectorfromthedeck.
Retainallcomponentsforreuseifthebaggeris
removed.
Figure7
1.Retainingbracket
2.Bagframehook
4.Lowerthehoodontothebags.Thenpushdownon
bothbaggerretainerlatchesuntiltheylockonthe
bagframeasshowninFigure8.
Figure8
1.Hood2.Baggerretainerlatches
2.Installthebootmountbracketontothedeckframe
usingthecarriagebolt(5/16x3/4inch)andlocknut
(5/16inch)asshowninFigure9.Thebracketmay
stayonwhenconvertingtosidedischargemode.
Figure9
1.Locknut(5/16inch)
2.Bootmountbracket6.Rubberlatch
3.Carriagebolt(5/16x3/4
inch)
4.Mountbracket
5.Lowertube
7.Uppertube
3.Insertthetabonthelowertubeassemblyintothe
bootmountbracketasshowninFigure9.
4.Usethelatchonthelowertubeassemblytolock
thebrackettothedeck.Adjustthetensiononthe
latchtoholdthebracketuptothedeck,yetallow
forreleasebyhand.
10
Page 11

5.Sliptheuppertubeintosealofthehoodopening–
pushinandthenpulloutsothatthesealisextended
outward.
6.Slidetheuppertubeontothelowertubeandfasten
therubberlatches(Figure9).
Operation
Note:Theleftandrightsidesofthemachineare
determinedwhilesittingintheseatinthenormal
operatingposition.
EmptyingtheGrassBags
5
InstallingtheDischargeBafe
Partsneededforthisprocedure:
1
Dischargebafe
2
Carriagebolt(5/16x3/4inch)
2
Locknut(5/16inch)
Procedure
1.Removethefastenersinthedeckasshownin
Figure10.Retainforreuseifthedischargebafe
isremoved.
2.InstallthedischargebafeasshowninFigure10.
Becarefulwhenliftingorhandlingagrassbagthatis
full.Toemptythegrassbags:
1.Movethemotioncontrolleversoutwardtoneutral
position,disengagethepowertakeoff(PTO),
engageparkingbrake,stoptheengine,removethe
key,andwaitforallmovingpartstostopbefore
leavingtheoperatingposition.
2.Pulluponbothbaggerretainerlachesuntilthey
unlockfromthebagframe(Figure11).Open(raise)
thehood.
Figure11
1.Hood2.Bagretainerlatches
Figure10
1.Locknut(5/16inch)3.Carriagebolt(5/16x3/4
inch)
2.Dischargebafe
Note:Thisbafecanstayonthemachinewhile
sidedischargingormulching.
3.Compressdebrisintothebags.Withbothhands,
liftuponthebagandunhookitfromtheretaining
bracket.Emptythebag.Repeattheprocedurefor
theotherbag.
4.Installthebagsbyslidingthebagframehooksonto
theretainingbrackets(Figure12).
11
Page 12

1.Retainingbracket
Figure12
2.Bagframehook
key,andwaitforallmovingpartstostopbefore
leavingtheoperatingposition.
2.Unlatchtheuppertubeandthelowertube.Remove
theuppertubefromthehoodseal.
Operatingthemowerwiththebaggerinstalled
andthefrontweightremovedmaycauseloss
oftractionandsteeringcontroloranunstable
conditionwhichcouldresultininjuryordeath.
Installthebaggeronlywhenthefrontweight
isinstalled.
5.Lowerthehoodontothebags.Thenpushdown
onbothbagretainerhandlesuntiltheylockonthe
bagframe.
ClearingObstructionsfrom
theBagger
1.Movethemotioncontrolleversoutwardtoneutral
position,disengagethepowertakeoff(PTO),
engageparkingbrake,stoptheengine,removethe
key,andwaitforallmovingpartstostopbefore
leavingtheoperatingposition.
2.Checkthegrassbagsandemptythemiftheyarefull.
3.Removeandseparatethedischargetubeandchute
fromthebaggerhoodandmower.Usingastick
orsimilarobject,carefullyremoveandclearthe
obstructionfromthemower,dischargetube,chute,
andthehood.
4.Afteryouremovetheobstruction,installthe
completebaggersystemandresumeoperation.
RemovingtheBagger
3.Removethebaggermountbracketfromthedeck
andretainallhardwareseeFigure9.
Note:Thebootmountbracketdoesnothaveto
beremovedfromthedeck.
Ifyouremovethespring-loadedhoodwhenit
isclosed(inthedownposition),thehoodmay
suddenlyyopenandyouorsomeoneelsemay
bebruised,pinched,orinjuredinanotherway.
Alwaysopen(raise)thehoodbeforeyouremove
orinstallitonthequick-attachbracket.
4.Openthehoodandremovethetwobagsfromthe
bagframehooks(Figure12).
5.Liftthebaggermountassemblyandhoodoffthe
baggerhitch.
Note:Thebaggerhitchdoesnothavetobe
removedfromtheunit.
Anuncovereddischargeopeningwillallow
objectstobethrowninoperator’sorbystander’s
direction.Also,contactwithbladecouldoccur.
Thrownobjectsorbladecontactcancause
seriousinjuryorkillyouorbystanders.
Neveroperatemowerunlessdischarge
deector,orentiregrasscollectionsystem,or
mulchkitisinstalled.
1.Movethemotioncontrolleversoutwardtoneutral
position,disengagethepowertakeoff(PTO),
engageparkingbrake,stoptheengine,removethe
Operatingthemowerwiththefrontweight
installedandthebaggerremovedmaycause
lossoftractionandsteeringcontroloran
unstableconditionwhichcouldresultininjury
ordeath.
Installthefrontweightonlywhenthebagger
isinstalled.
Important:Theremovableweightisheavy.
Usecarewhenliftingit.Makesurethatyoucan
holditsecurelybeforeliftingit.Usecaution
whenpositioningyourhandssothatyoudonot
setitdownonyourhandsorngers.
12
Page 13

6.Removetheweightonthefrontofthemower.
Note:Theweightsupportassemblycanstay
mountedtotheunitwhenthebaggerandweight
areremoved.
7.Storeallhardwareinaconvenientlocation.
Note:Thedischargebafedoesnothavetobe
removedfromthedeck;youmaynoticebetter
dischargewithitinstalled.Ifremoved,replacethe
originalhardwareinthedeckholes.
ReplacingtheDischarge
Deector
Anuncovereddischargeopeningcouldallow
thelawnmowertothrowobjectsinthe
operator’sorbystander’sdirectionandresult
inseriousinjury.Also,contactwiththeblade
couldoccur.
2.Slidetherodoutoftheshortstand-off,spring,and
dischargedeector.Removethedamagedorworn
dischargedeector.
3.Installnewdischargedeector
4.Orientthespringsothattheshortlegpoints
towardsthedischargedeectorandthelongerleg
pointstowardsthedeckasshowninFigure13.
Placespringonrodandsliderod,straightend,
throughthefrontdischargedeectorbracket,
dischargedeector,andreardeectorbracket.
5.Makesurethatthespringandrodareinstalledso
thattherodisretainedfromslidingoutbythefront
bracketandthespringholdsthedischargedeector
inthedownposition.Referto(Figure13)for
properorientation.
Important:Thedischargedeectormustbe
springloadedinthedownposition.Liftthe
deectoruptotestthatitsnapstothefulldown
position.
OperatingTips
Neveroperatethelawnmowerunlessyou
installamulchplate,dischargedeector,or
grasscollectionsystem.
1.LocateitemsshowninFigure13.
LargerMachinewithBagger
Rememberthatthemowerislongerandwiderwiththis
attachmentinstalled.Byturningtoosharplyinconned
placesyoumaydamagetheattachment.
Trimming
Alwaystrimwiththeleftsideofthemower.Donot
trimwiththerightsideofthemowerbecauseyoucould
damagethebagger’schuteanddischargetube.
CuttingHeight
Donotsetthemowercuttingheighttoolowbecause
longgrasssurroundingthemowercanpreventairfrom
gettingunderthemowerandenteringthebagging
system.Ifenoughairdoesn’tgetunderthemower,the
baggingsystemwillplug.
CuttingFrequency
Cutthegrassoften,especiallywhenitgrowsrapidly.
Youwillhavetocutyourgrasstwiceifitgetsexcessively
long.
Figure13
1.Rod4.Mowerdeck
2.Spring5.Dischargedeector
3.Dischargedeector
bracket
6.Assembledview
CuttingTechnique
Forbestlawnappearance,besuretoslightlyoverlap
themowerintothepreviouslycutarea.Thishelps
reducetheloadontheengineandreducesthechance
ofpluggingthechuteanddischargetube.
13
Page 14

BaggingSpeed
Mostoftenyouwillbagwiththemowerthrottlein
theFastpositionanddriveatanormalgroundspeed.
However,inextremelydryanddustygrass,youmay
wanttoslightlyreducethethrottlespeedandincrease
thegroundspeedofthemower.Thebaggingsystem
mayplugifyoudrivetoofastandtheenginespeed
getstooslow .Onhillsitmaybenecessarytoslowthe
mowergroundspeed.Thishelpsmaintaintheengine
speedandbaggingefciency.
Asthebaggerlls,extraweightisaddedto
thebackofthemachine.Ifyoustopandstart
suddenlyonhills,youmaylosetractionand
steeringcontrolorthemachinemaytip.
•Donotstartorstopsuddenlywhengoing
uphillordownhill.Avoiduphillstarts.
•Ifyoudostopthemachinewhengoing
uphill,disengagethePTO.Thenbackdown
thehillusingaslowspeed.
•Donotchangespeedsorstoponslopes.
BaggingLongGrass
Excessivelylonggrassisheavyandmaynotbe
propelledcompletelyintothegrassbags.Ifthis
happens,thedischargetubeandchutemayplug.To
avoidpluggingthebaggingsystem,mowthegrassat
ahighheightofcut,thenlowerthemowertoyour
normalcuttingheightandrepeatthebaggingprocess.
BaggingWetGrass
Alwaystrytocutgrasswhenitisdrybecauseyour
lawnwillhaveaneatappearance.Ifyoumustcutwet
grass,usetheconventionalsidedischargefeatureofthe
mower.Severalhourslater,whentheclippingsaredry,
installthecompletebaggerattachmentandvacuumup
thegrassclippings.
SignsofPlugging
Asyouarebagging,asmallamountofgrassclippings
normallyblowoutthefrontofthemower.Anexcessive
amountofclippingsblowingoutindicatesthatthebags
arefullorthesystemisplugged.
14
Page 15

Maintenance
RecommendedMaintenanceSchedule(s)
MaintenanceService
Interval
Aftertherst10hours
Beforestorage
Ifyouleavethekeyintheignitionswitch,someonecouldaccidentallystarttheengineandseriously
injureyouorotherbystanders.
Removethekeyfromtheignitionanddisconnectthewirefromthesparkplugbeforeyoudoany
maintenance.Setthewireasidesothatitdoesnotaccidentallycontactthesparkplug.
Enginescanbecomehotwhentheyareoperating.Severeburnscanoccurfromcontactinghotsurfaces.
Allowengines,especiallythemufer,tocoolbeforetouching.
MaintenanceProcedure
•Inspectthebaggerattachment.
•Inspectthebaggerattachment.
Debris,suchasleaves,grass,orbrushcancatchre.Areintheengineareacancausepersonal
injuryandpropertydamage.
•Keeptheengineandmuferareafreeofdebrisaccumulation.
•Takecarewhenopeningthebaggercovertokeepdebrisfromfallingontotheengineandmufer
area.
•Allowthemachinetocoolbeforestoringit.
InspectingtheBagger
Attachment
ServiceInterval:Aftertherst10hours
Beforestorage
1.Checkthechute,dischargetube,andthebaggertop.
Replacethesepartsiftheyarecrackedorbroken.
2.Tightenallnuts,bolts,andscrews.
3.Undernormalusethebagswilldeteriorateandwear.
Inspectthegrassbagsfordeterioration.
Youorbystanderscouldbeseverelyinjuredby
yingdebrisorthrownobjectsthatmaypass
throughtorn,wornordeterioratedgrassbags.
•Frequentlycheckthegrassbagsforholes,
rips,wear,andotherdeterioration.
•Donotwashthegrassbags.
•Ifthebaghasdeteriorated,installnewgrass
bagssuppliedbythemanufacturerofthis
baggerattachment.
15
Page 16

InspectingtheMowerBlades
RefertoyourmowerOperator’sManualforcomplete
blademaintenance.
CaringfortheGrassBags
Washingthegrassbagsisnotrecommended.
Undernormalusethebagswilldeteriorateandwear.T o
preventrapiddeteriorationofthebagmaterial,storethe
bagswheretheywilldrycompletelyaftereachuse.
CleaningtheBagger
Attachment
1.Aftereachuse,removeandwashtheinsideand
outsideofthebaggertop,dischargetube,chute,and
theundersideofthemower,usingwatersprayed
fromagardenhose.Useamildautomotivedetergent
toremovestubborndirt.
2.Makesureyouremovemattedgrassfromallparts.
Storage
StoringtheBaggerAttachment
1.Cleanthebaggerattachment;refertoCleaningthe
BaggerAttachment.
2.Inspectthebaggerattachmentfordamage;referto
InspectingtheBaggerAttachment.
3.Makesurethegrassbagsareemptyandthoroughly
dry.
4.Storethebaggerinaclean,dryplace,outofdirect
sunlight.Thisprotectstheplasticpartsandextends
thelifeofthebagger.Ifyoumuststorethebagger
outside,coveritwithaweatherproofcover.
3.Afterwashing,letallofthepartsdrythoroughly.Do
notwashthegrassbags.
16
Page 17

Notes:
17
Page 18

Notes:
18
Page 19

Notes:
19
Page 20

 Loading...