

Page 1

FormNo.3373-568RevA
TwinSoftBagger
XLSLawnTractor
ModelNo.79118—SerialNo.313000001andUp
Registeratwww.T oro.com.
OriginalInstructions(EN)
*3373-568*A
Page 2
andNoteemphasizesgeneralinformationworthyofspecial
attention.
Introduction
Readthisinformationcarefullytolearnhowtooperateand
maintainyourproductproperlyandtoavoidinjuryand
productdamage.Y ouareresponsibleforoperatingthe
productproperlyandsafely.
YoumaycontactTorodirectlyatwww .Toro.comforproduct
andaccessoryinformation,helpndingadealer,ortoregister
yourproduct.
Wheneveryouneedservice,genuineToroparts,oradditional
information,contactanAuthorizedServiceDealerorToro
CustomerServiceandhavethemodelandserialnumbersof
yourproductready.
modelandserialnumbersontheproduct.Writethenumbers
inthespaceprovided.
Figure1identiesthelocationofthe
Contents
Introduction..................................................................2
Safety...........................................................................3
SafetyandInstructionalDecals.................................4
Setup............................................................................5
1InstallingtheBaggerFrame....................................5
2InstallingtheBaggerTop.......................................6
3InstallingtheChutefor38inchMower
Decks.................................................................8
4InstallingtheChutefor42inchMower
Decks.................................................................8
5ConnectingwiththeDischargeTube.......................9
Operation....................................................................10
EmptyingtheGrassBags.........................................10
ClearingObstructionsfromtheBagger.....................11
RemovingtheBagger..............................................11
OperatingTips......................................................11
Maintenance.................................................................13
RecommendedMaintenanceSchedule(s)......................13
InspectingtheBaggerAttachment............................13
InspectingtheMowerBlades...................................13
ChangingtheBlades...............................................14
CaringfortheGrassBags........................................14
CleaningtheBaggerAttachment..............................14
Storage........................................................................15
StoringtheBaggerAttachment.................................15
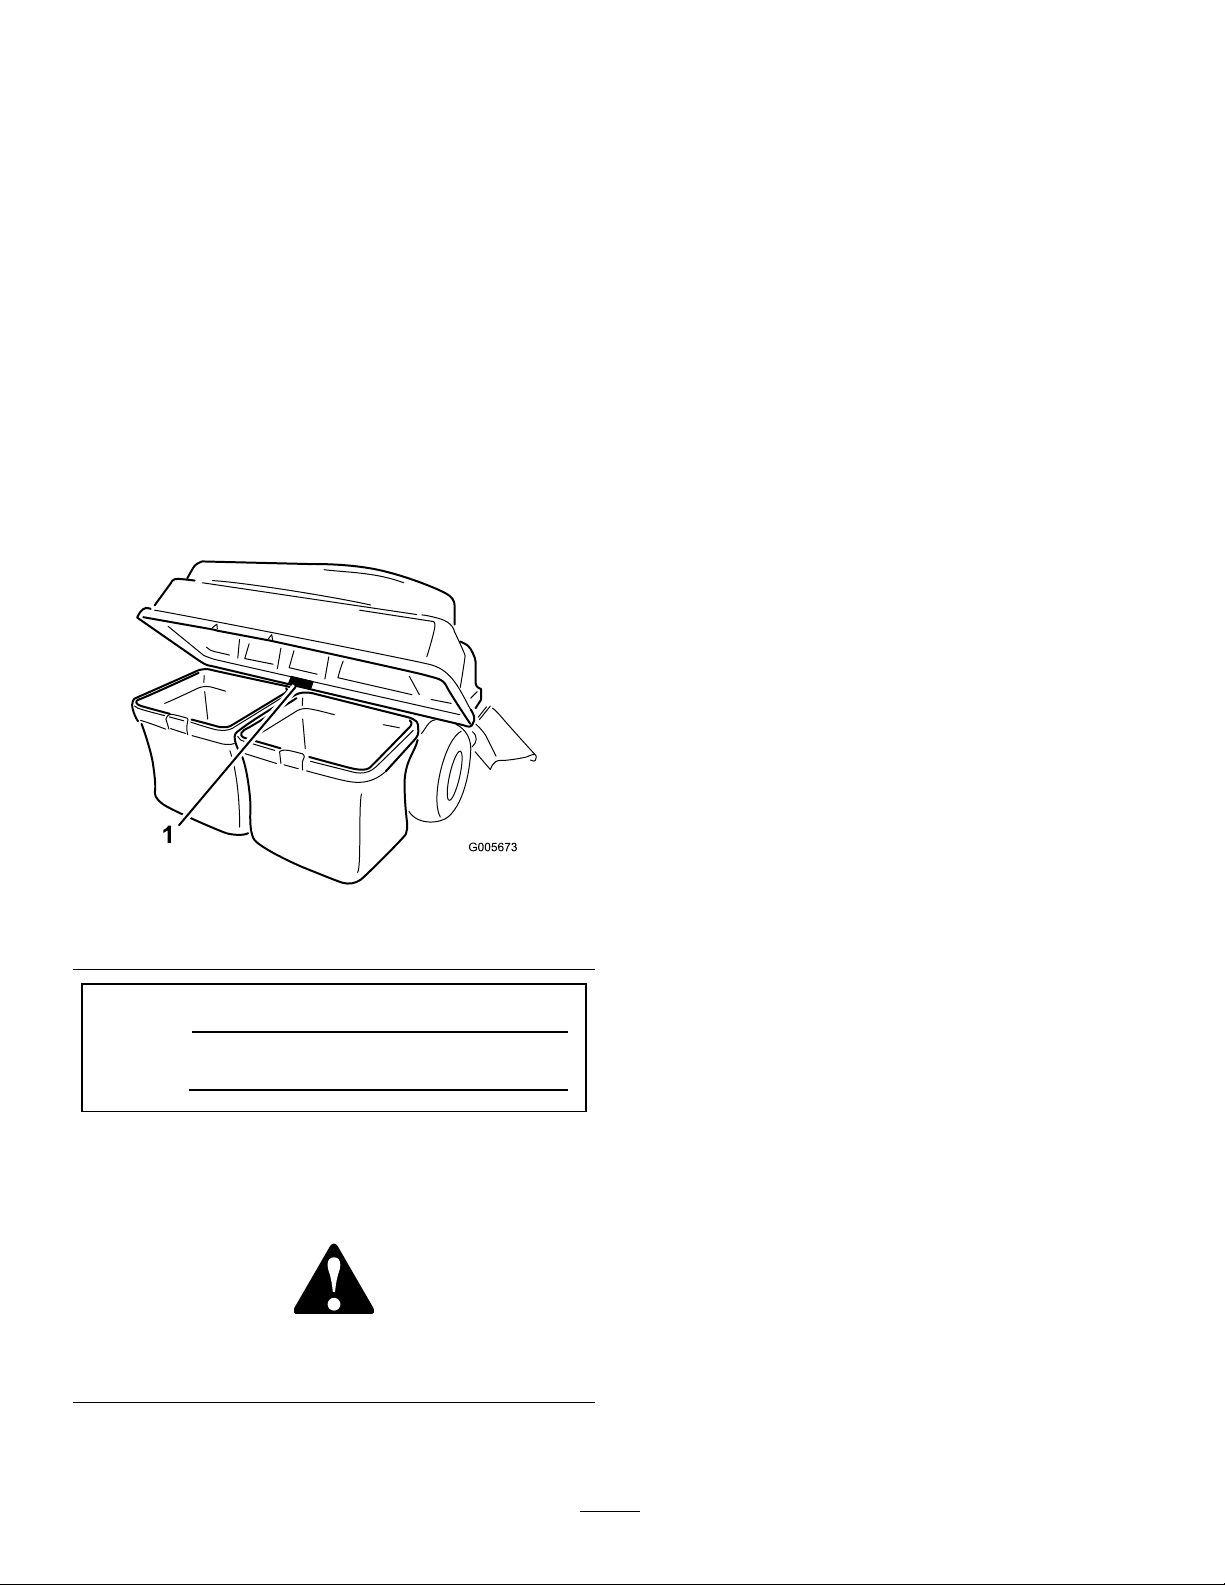
Figure1
1.Modelandserialnumberlocation
ModelNo.
SerialNo.
Thismanualidentiespotentialhazardsandhassafety
messagesidentiedbythesafetyalertsymbol(
Figure2),
whichsignalsahazardthatmaycauseseriousinjuryordeath
ifyoudonotfollowtherecommendedprecautions.
Figure2
1.Safetyalertsymbol
Thismanualuses2otherwordstohighlightinformation.
Importantcallsattentiontospecialmechanicalinformation
©2012—TheToro®Company
8111LyndaleAvenueSouth
Bloomington,MN55420
Contactusatwww.Toro.com.
2
PrintedintheUSA.
AllRightsReserved
Page 3

Safety
DANGER
Enginescanbecomehotwhentheyareoperating.
Severeburnscanoccurfromcontactinghot
surfaces.
Allowengines,especiallythemufer,tocoolbefore
touching.
DANGER
Debris,suchasleaves,grass,orbrushcancatch
re.Areintheengineareacancausepersonal
injuryandpropertydamage.
•Keeptheengineandmuferareafreeofdebris
accumulation.
•Takecarewhenopeningthebaggercoverto
keepdebrisfromfallingontotheengineand
muferarea.
•Allowthemachinetocoolbeforestoringit.
3
Page 4
SafetyandInstructionalDecals
Safetydecalsandinstructionsareeasilyvisibletotheoperatorandarelocatednearanyareaofpotential
danger.Replaceanydecalthatisdamagedorlost.
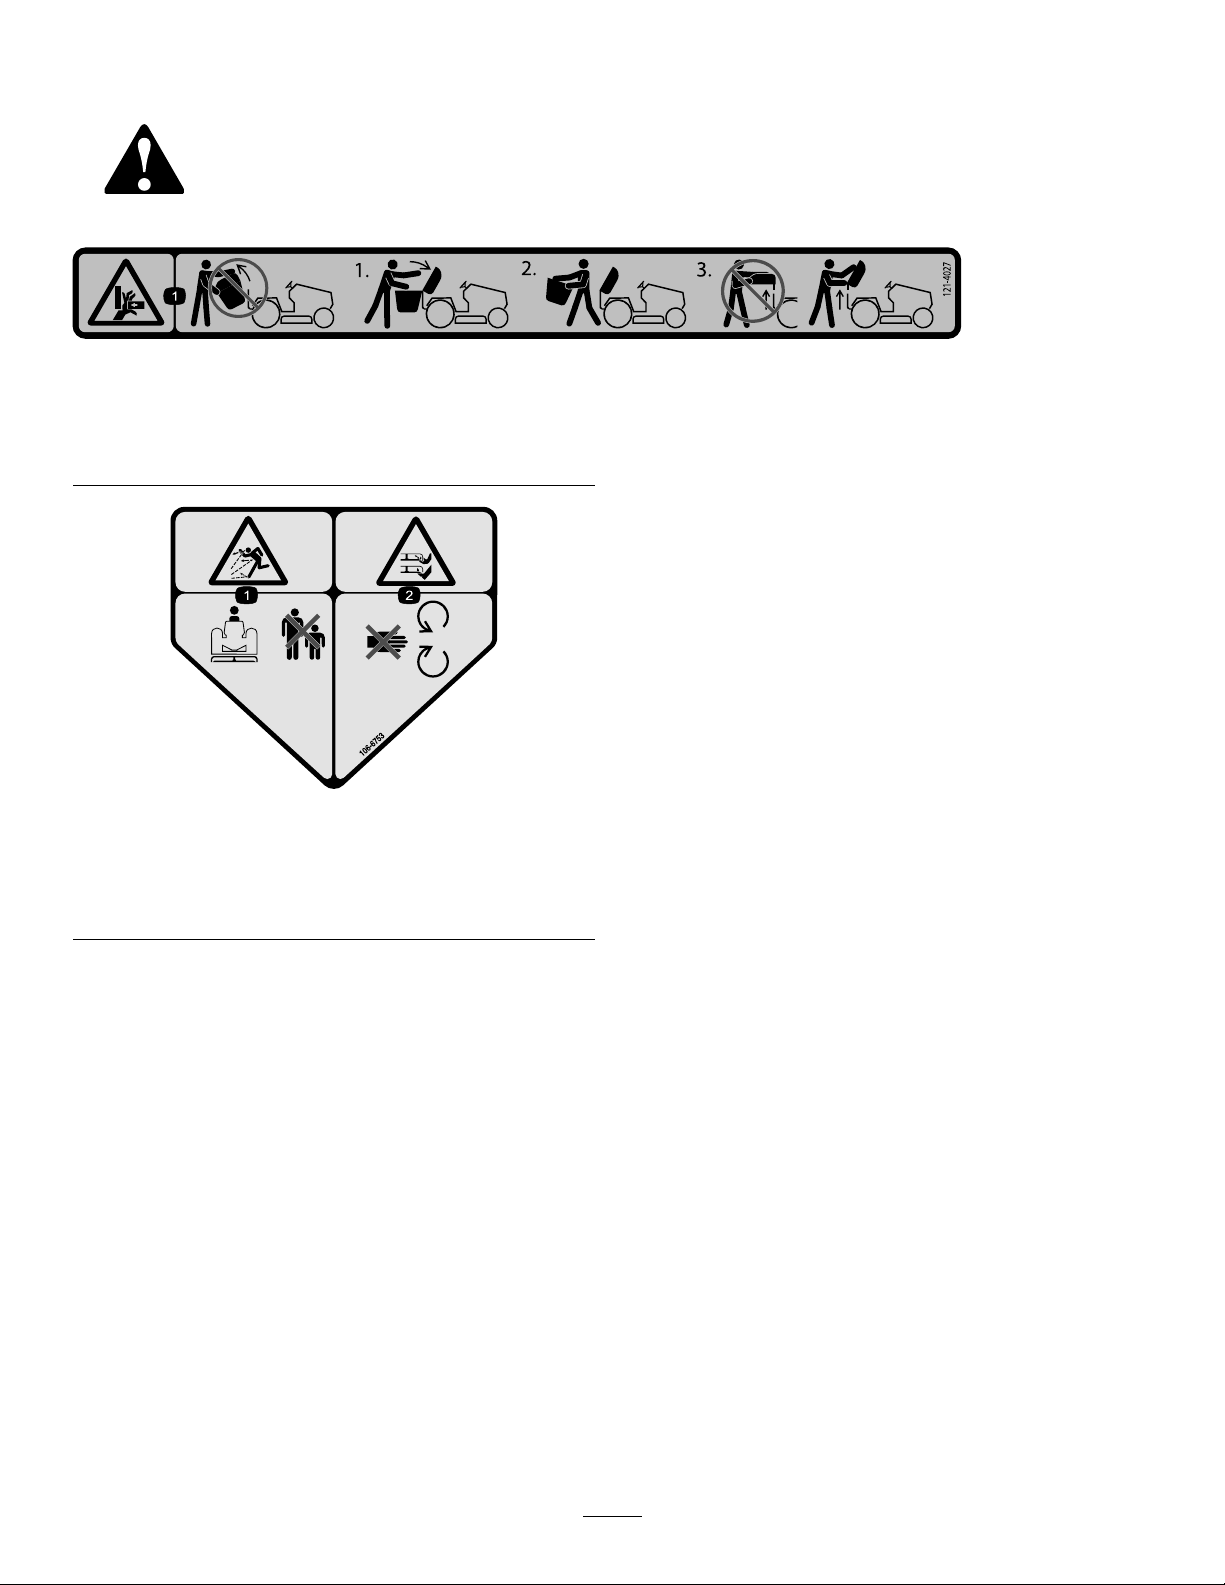
121–4027
1.Crushinghazard,handorfoot—donotremovetheentire
bagger;1)Openthebagger2)Removethebottomportion
rst3)Donotremovethebaggercoverintheclosed
position;removethebaggercoverintheopenposition.
106-6753
1.Thrownobjecthazard—keepbystandersasafedistance
fromthemachine.
2.Cutting/dismembermenthazardofhandorfoot,mower
blade—stayawayfrommovingparts.
4
Page 5
Setup
LooseParts
Usethechartbelowtoverifythatallpartshavebeenshipped.
ProcedureDescription
1
2
3
4
5
Uppermountingbracket1
Bolt(5/16x1inch)
Locknut(5/16inch)
Baggerframe
Hitchpin1
Bolt(5/16x3/4inch)
Hairpincotterpin2
Baggertop1
Baggerscreen1
GrassBag
Upperbaggertube1
Chute
Chute
Chute
Qty.
Use
2
2
1
1
2
1
1
1
Installthebaggerframe.
Installthebaggertop.
Installthechutefor38inchmower
decks.
Installthechutefor42inchmower
decks.
Connectwiththedischargetube.
1
InstallingtheBaggerFrame
Partsneededforthisprocedure:
1Uppermountingbracket
2
Bolt(5/16x1inch)
2
Locknut(5/16inch)
1
Baggerframe
1Hitchpin
1
Bolt(5/16x3/4inch)
2Hairpincotterpin
Procedure
1.Removethewiresfromthesparkplugsontheengine.
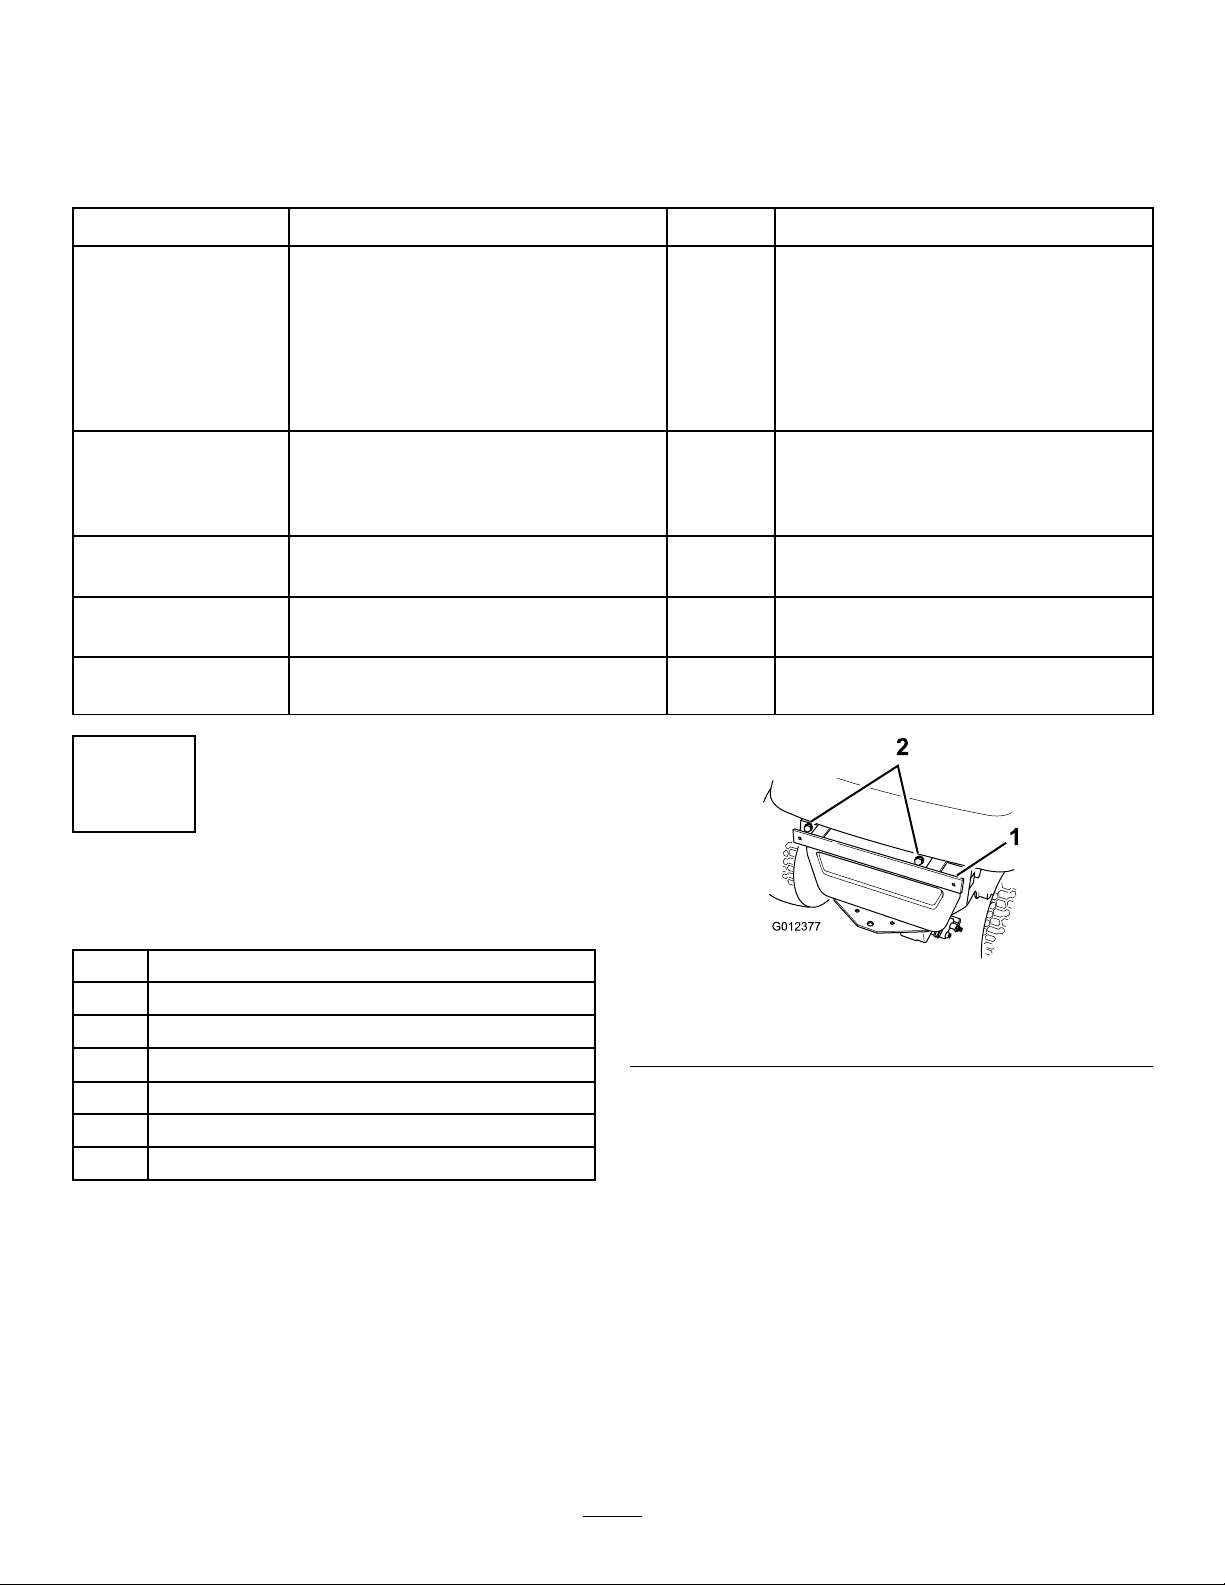
2.Installtheuppermountingbrackettotherearofthe
tractorusing2bolts(5/16x1inch)and2locknuts
(5/16inch)(
Figure3).
Figure3
1.Uppermountingbracket
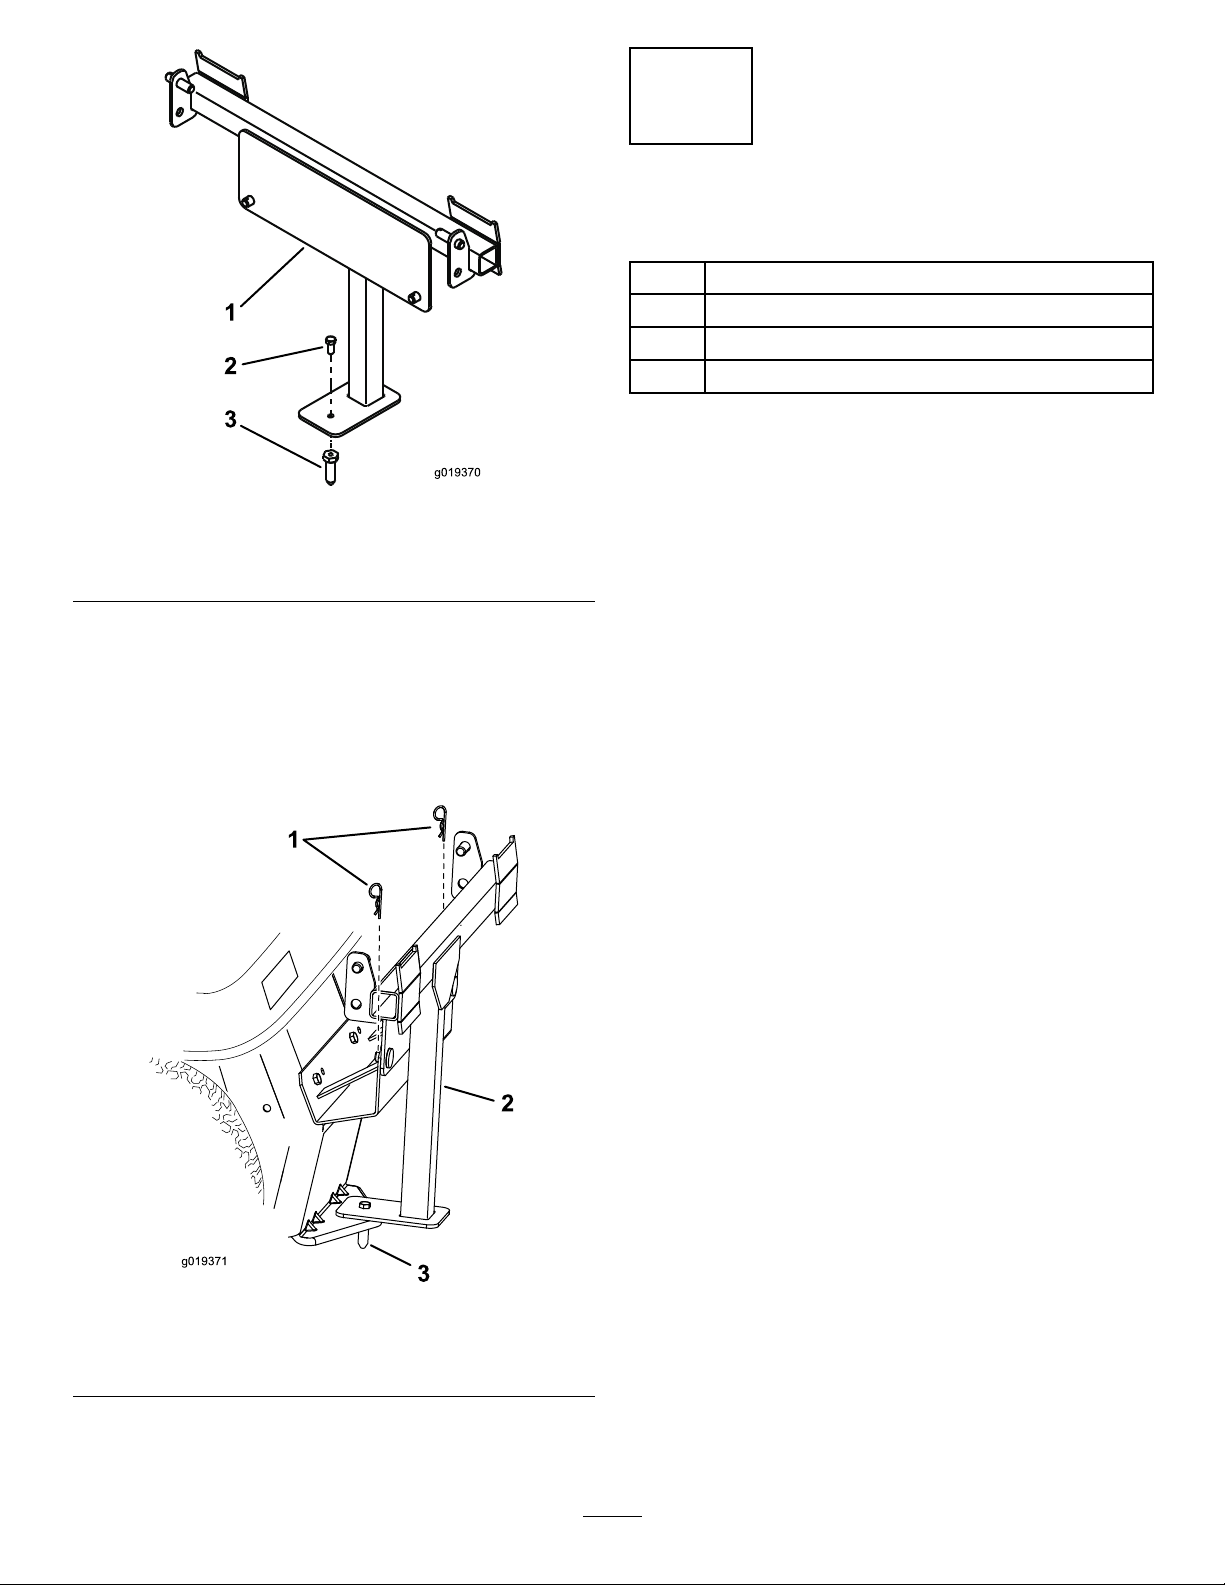
3.Installthehitchpinintheholeinthebaggerframe
usingabolt(5/16x3/4inch)(Figure4).
2.Bolt(5/16x1inch)and
locknut(5/16inch)
Note:Usetheleft-mostsetofholesinthebracketas
youarelookingattherearofthetractor.
5
Page 6
g019370
1
2
3
g019371
1
2
3
2
InstallingtheBaggerTop
Partsneededforthisprocedure:
1Baggertop
1Baggerscreen
2
GrassBag
1Upperbaggertube
Procedure
Figure4
1.Baggerframe
2.Bolt(5/16x3/4inch)
4.Insertthehitchpinintothemountingholeinthe
tractorhitch.
5.Rotatethemountingframeupsothatthepinsslide
throughtheholesintheuppermountingbracketon
thetractor(Figure5).
6.Securethepinswiththehairpincotterpins(Figure5).
3.Hitchpin
1.Turnthebaggertopover.Installthescreenasshown
inFigure6soitslopesdowntowardthecollection
bags.Makesurethescreenssnapintoplaceandthe
tabsengagethebaggertop.
1.Hairpincotterpin3.Hitchpin
2.Mountingframe
Figure5
6
Page 7

G005666
1
2
3
4
g019372
3
4
5
1
2
Figure7
1.Baggertop
2.Baggerframe
3.Bracket,baggertop
4.Circularcotterpin
5.Post
Figure6
1.Baggertop
2.Screen4.Slotinbaggertop
3.Screentab
2.Raisetheseatupbeforeinstallingthebaggertop.
3.Installthebaggertoptothepostsonthebaggerframe
(Figure7).Slidethebracketsoverthepostsandrotate
thecircularcotterpinsintotheposts.
Note:Thebaggertopiseasiertoinstalliftwopeople
worktogether.
7
Page 8

4.Liftthebaggertopandinstallthebagsbyslidingthe
G005672
1
2
3
4
G005757
g019397
1 2
3 4
5
bagframehooksontotheretainingbrackets(Figure8).
3
InstallingtheChutefor38inch MowerDecks
Partsneededforthisprocedure:
1
Chute
Procedure
1.Raisethegrassdeectoronthemower(Figure10).
2.Slidethechuteintopositionwiththerearhookaround
thedeectorrod,alignthepivothinge,andsecurethe
pivothingewiththelockingpin(Figure10).
3.Pivotthechutebackandtowardthedecksochuteis
ushwiththemowerdeck(Figure10).
4.Securethechutetothedeck.Hooktheexiblelatchon
thechutetotheretainingclaspweldedonthemower
decktotherearoftheopening(Figure10).
Figure8
1.Bag3.Retainingbracket
2.Baggerframe4.Bagframehook
5.Lowerthebaggertopontothebag(Figure9).
Figure9
6.Installtheupperbaggertube.Insertthecurvedend
intotheopeninginthebaggertop.Makesurethe
aredendwiththeretentionpostispointingdownand
frowardinpreparationtobematedwiththeFinishing
Kit.
Figure10
1.Retainingclasp4.Pivothinge
2.Flexiblelatch5.Lockingpin
3.Chute
8
Page 9

4
G015203
1
2
3
G015204
G005670
1
2
3
4
5
InstallingtheChutefor42inch
MowerDecks
Partsneededforthisprocedure:
1
Chute
Procedure
1.Anglethemetaltabatthefrontofthechuteintothe
slotinthebracketweldedtothemowerdeckjustin
frontofthecutoff(Figure11).
Figure12
Note:Makesuretheretaininghookonthechuteis
outofthewaysothechuteopeningmountsushto
thedeck.
3.Securethechutetothedeck.Hooktheexiblelatchon
thechutetotheretainingclaspweldedonthemower
decktotherearoftheopening(Figure13).Fasten
theretaininghookaroundthepivotrodtosecurethe
chuteintoposition.
1.Chute4.Deectorrod
2.Lockingpin5.Flexiblelatch
3.Rearhook6.Notchedbracket
2.Pivotthechutebackandtowardthedecksochuteis
ushwiththemowerdeck(Figure12).
Figure11
Figure13
1.Chute
2.Flexiblelatch5.Pivotrod
3.Retainingclasp
9
4.Retaininghook
Page 10

Operation
G005758
5
ConnectingwiththeDischarge
Tube
Partsneededforthisprocedure:
1
Chute
Procedure
1.Slidethecurvedendofthedischargetubeintothe
openinginthebaggertop(Figure14).
2.Slidethesquareendofthedischargetubeovertheend
ofthechute,ensuringthetabonthechutesnapsinto
thesquareholeinthedischargetube(Figure14).
3.Afterthebaggerinstallation,installthewireontothe
sparkplug(s).
Note:Determinetheleftandrightsidesofthemachine
fromthenormaloperatingposition.
WARNING
Toavoidpersonalinjury,followtheseprocedures:
•Becomefamiliarwithalloperatingandsafety
instructionsinthe
mowerbeforeusingthisattachment.
•Neverremovethedischargetube,bags,bagger
top,orthechutewhiletheengineisrunning.
•Alwaysshuttheengineoffandwaitforall
movingpartstostopbeforeclearingan
obstructionfromthebaggingsystem.
•Neverdomaintenanceorrepairswhilethe
engineisrunning.
Operator's Man ual
forthe
EmptyingtheGrassBags
Becarefulwhenliftingorhandlingagrassbagthatisfull.To
emptythegrassbags:
Figure14
1.Dischargetube3.Tab
2.Chute
1.Parkthemachineonalevelsurfaceanddisengagethe
bladecontrolswitch.
2.Stoptheengine,removethekey,andwaitforallmoving
partstostopbeforeleavingtheoperatingposition.
3.Raisetheseatup.
4.Open(raise)thebaggertop(Figure15).
Figure15
5.Compressdebrisintothebags.Withbothhands,liftup
onthebagandunhookitfromtheretainingbracket.
Emptythebag.Repeattheprocedurefortheotherbag.
6.Installthebagsbyslidingthebagframehooksontothe
retainingbrackets(Figure16).
10
Page 11

G005672
1
2
3
4
OperatingTips
TipsforBagging
Size
Rememberthatthemowerislongerandwiderwiththis
attachmentinstalled.Byturningtoosharplyinconned
placesyoumaydamagetheattachment.
Trimming
Alwaystrimwiththeleftsideofthemower.Donottrim
withtherightsideofthemowerbecauseyoucoulddamage
thebagger'schuteanddischargetube.
CuttingHeight
Donotsetthemowercuttingheighttoolowbecauselong
grasssurroundingthemowercanpreventairfromgetting
underthemowerandenteringthebaggingsystem.Ifenough
airdoesn'tgetunderthemower,thebaggingsystemwillplug.
Figure16
1.Bag3.Retainingbracket
2.Baggerframe4.Bagframehook
7.Lowerthebaggertopontothebags.
ClearingObstructionsfrom theBagger
1.Parkthemachineonalevelsurfaceanddisengagethe
bladecontrolswitch.
2.Stoptheengine,removethekey,andwaitforallmoving
partstostopbeforeleavingtheoperatingposition.
3.Checkthegrassbagsandemptythemiftheyarefull.
4.Removeandseparatethedischargetubeandchute
fromthebaggertopandmower.Usingastickorsimilar
object,carefullyremoveandcleartheobstructionfrom
themower,dischargetube,chute,andthebaggertop.
5.Afteryouremovetheobstruction,installthecomplete
baggersystemandresumeoperation.
CuttingFrequency
Cutthegrassoften,especiallywhenitgrowsrapidly.Youwill
havetocutyourgrasstwiceifitgetsexcessivelylong.
CuttingTechnique
Forbestlawnappearance,besuretoslightlyoverlapthe
mowerintothepreviouslycutarea.Thishelpsreducethe
loadontheengineandreducesthechanceofpluggingthe
chuteanddischargetube.
BaggingSpeed
MostoftenyouwillbagwiththemowerthrottleintheFast
positionanddriveatanormalgroundspeed.However,
inextremelydryanddustygrass,youmaywanttoslightly
reducethethrottlespeedandincreasethegroundspeed
ofthemower.Thebaggingsystemmayplugifyoudrive
toofastandtheenginespeedgetstooslow.Onhillsitmay
benecessarytoslowthemowergroundspeed.Thishelps
maintaintheenginespeedandbaggingefciency.Mow
downhillwheneverpossible.
RemovingtheBagger
ThebaggercanberemovedbyrepeatingtheSetupsections
fromallinstalledbaggerrelatedkitsinreverseorder.If
weightsareinstalled,alwaysremovethefrontbaggerweights
whenremovingthebaggerattachments.
11
Page 12

CAUTION
Asthebaggerlls,extraweightisaddedtotheback
ofthemachine.Ifyoustopandstartsuddenlyon
hills,youmaylosesteeringcontrolorthemachine
maytip.
•Donotstartorstopsuddenlywhengoinguphill
ordownhill.Avoiduphillstarts.
•Ifyoudostopthemachinewhengoinguphill,
disengagethebladecontrol.Thenbackdown
thehillusingaslowspeed.
•Donotchangespeedsorstoponslopes.
BaggingLongGrass
BaggingLongGrassExcessivelylonggrassisheavyand
maynotbepropelledcompletelyintothegrassbags.Ifthis
happens,thedischargetubeandchutemayplug.Toavoid
pluggingthebaggingsystem,mowthegrassatahighheight
ofcut,thenlowerthemowertoyournormalcuttingheight
andrepeatthebaggingprocess.
BaggingWetGrass
Alwaystrytocutgrasswhenitisdrybecauseyourlawnwill
haveaneatappearance.Ifyoumustcutwetgrass,usethe
conventionalsidedischargefeatureofthemower.Several
hourslater,whentheclippingsaredry,installthecomplete
baggerattachmentandvacuumupthegrassclippings.
SignsofPlugging
Asyouarebagging,asmallamountofgrassclippings
normallyblowoutthefrontofthemower.Anexcessive
amountofclippingsblowingoutindicatesthatthebagsare
fullorthesystemisplugged.
12
Page 13

Maintenance
Note:Determinetheleftandrightsidesofthemachinefromthenormaloperatingposition.
RecommendedMaintenanceSchedule(s)
MaintenanceService
Interval
Aftertherst10hours
Beforeeachuseordaily
Beforestorage
MaintenanceProcedure
•Inspectthebagger
•Cleanthebagger
•Inspectthebagger
•Cleanthebagger
CAUTION
Ifyouleavethekeyintheignitionswitch,someonecouldaccidentlystarttheengineandseriouslyinjure
youorotherbystanders.
Removethekeyfromtheignitionanddisconnectthewirefromthesparkplugbeforeyoudoany
maintenance.Setthewireasidesothatitdoesnotaccidentallycontactthesparkplug.
DANGER
Enginescanbecomehotwhentheyareoperating.Severeburnscanoccurfromcontactinghotsurfaces.
Allowengines,especiallythemufer,tocoolbeforetouching.
DANGER
Debris,suchasleaves,grass,orbrushcancatchre.Areintheengineareacancausepersonalinjury
andpropertydamage.
•Keeptheengineandmuferareafreeofdebrisaccumulation.
•Takecarewhenopeningthebaggercovertokeepdebrisfromfallingontotheengineandmuferarea.
•Allowthemachinetocoolbeforestoringit.
InspectingtheBagger Attachment
ServiceInterval:Aftertherst10hours
Beforestorage
Inspectthebaggerattachmentaftertherst10hoursof
operation,andmonthlythereafter.
1.Checkthechute,dischargetube,andthebaggertop.
Replacethesepartsiftheyarecrackedorbroken.
2.Tightenallnuts,bolts,andscrews.
3.Inspectallfastenersandlatches;replaceanymissing
ordamaged.
4.Inspectthegrassbagsfordeterioration.
InspectingtheMowerBlades
Inspectthemowerbladesregularlyandwheneverablade
strikesaforeignobject.
WARNING
Youorbystanderscouldbeseverelyinjuredby
yingdebrisorthrownobjectsthatmaypass
throughtorn,worn,ordeterioratedgrassbags.
•Checkthegrassbagsforholes,rips,wear,
andotherdeterioration.
•Donotwashthegrassbags.
•Ifthebaghasdeteriorated,installnew
grassbagssuppliedbythemanufacturer
ofthisbaggerattachment.
Ifthebladesarebadlywornordamaged,installnewblades.
RefertoyourmowerormowerOperator'sManualforcomplete
blademaintenance.
13
Page 14

ChangingtheBlades
g019510
6
6
1.Removethemower;refertoRemovingtheMowerin
thetractorOperator’ sManual.
2.Carefullytipthemowerover.
3.Removethebladebolts,curvedwashers,retainers,and
blades(Figure17).Useablockofwoodasawedge
betweenthebladeandthemowertolocktheblade
whenyouareremovingthebolt.
4.Inspectallparts;replaceanypartsthataredamaged.
Figure17
gardenhose.Useamilddetergenttoremovestubborn
dirt.
2.Makesureyouremovemattedgrassfromallparts.
3.Flushthegrassbagswithwaterusinggardenhoseto
removeanydebris.
4.Afterwashing,letallofthepartsdrythoroughly.
1.Bladebolt
2.Retainer
3.Blade
5.Installnewblades,bladeretainers,curvedwashers
(cuppedsidetowardblade),andthebladebolts
Figure17).
(
Important:Thecurvedpartoftheblade(blade
sail)mustbepointinguptowardtheinsideofthe
mowertoensurepropercutting .
6.Tightenthebladeboltto45to60ft-lb(61to81N-m).
7.Installthemower;refertoInstallingtheMowerinthe
tractorOperator’sManual.
4.Spindle
5.Curvedwasher
6.Curvedpartoftheblade
(bladesail)
CaringfortheGrassBags
Washingthegrassbagsisnotrecommended.
Topreventrapiddeteriorationofthebagmaterial,storethe
bagswheretheywilldrycompletelyaftereachuse.
CleaningtheBagger Attachment
ServiceInterval:Beforeeachuseordaily
Beforestorage
1.Aftereachuse,removeandwashtheinsideandoutside
ofthebaggertop,dischargetube,chute,andthe
undersideofthemower,usingwatersprayedfroma
14
Page 15

Storage
StoringtheBaggerAttachment
1.Cleanthebaggerattachment;refertoCleaningthe
BaggerAttachment.
2.Inspectthebaggerattachmentfordamage;referto
InspectingtheBaggerAttachment.
3.Makesurethegrassbagsareemptyandthoroughlydry.
4.Storethebaggerinaclean,dryplace,outofdirect
sunlight.Thisprotectstheplasticpartsandextendsthe
lifeofthebagger.Ifyoumuststorethebaggeroutside,
coveritwithaweatherproofcover.
15
Page 16

Notes:
16
Page 17

Notes:
17
Page 18

Notes:
18
Page 19

InternationalDistributorList
Distributor:
AtlantisSuveSulamaSisstemleriLt
BalamaPrimaEngineeringEquip.HongKong85221552163
B-RayCorporation
CascoSalesCompany
CeresS.A.CostaRica
CSSCTurfEquipment(pvt)Ltd.SriLanka
CyrilJohnston&Co.
EquiverMexico525553995444
FemcoS.A.Guatemala
G.Y .K.CompanyLtd.
GeomechanikiofAthensGreece
GuandongGoldenStarChina
HakoGroundandGardenSweden
HakoGroundandGarden
HayterLimited(U.K.)
HydroturfInt.CoDubai
HydroturfEgyptLLC
IbeaS.P.A.
IrriamcPortugal351212388260ToroEuropeNVBelgium3214562960
IrrigationProductsInt'lPvtLtd.India862283960789
Country:
Turkey902163448674JeanHeybroekb.v.Netherlands3130639461 1
Korea82325512076
PuertoRico7877888383
NorthernIreland442890813121
Japan81726325861
Norway4722907760
UnitedKingdom441279723444
UnitedArabEmirates97143479479
Egypt2025194308T-MarktLogisticsLtd.Hungary3626525500
Italy390331853611ToroAustraliaAustralia61395807355
PhoneNumber:Distributor:
MaquiverS.A.Colombia
MaruyamaMfg.Co.Inc.
AgrolancKft
5062391138
94112746100
5024423277ParklandProductsLtd.NewZealand6433493760
30109350054
862087651338Riversa
4635100000
Mountelda.s.CzechRepublic
MunditolS.A.
OslingerTurfEquipmentSA
OyHakoGroundandGardenAb
Prochaska&Cie
RTCohen2004Ltd.
ScSvendCarlsenA/S
SolvertS.A.S.
SpyprosStavrinidesLimitedCyprus
SurgeSystemsIndiaLimited
Country:
Japan81332522285
Hungary3627539640
Argentina541148219999
Ecuador59342396970
Finland35898700733
Austria4312785100
Israel97298617979
Spain
Denmark4566109200
France33130817700
India911292299901
PhoneNumber:
5712364079
420255704220
34952837500
35722434131
EuropeanPrivacyNotice
TheInformationT oroCollects
ToroWarrantyCompany(T oro)respectsyourprivacy.Inordertoprocessyourwarrantyclaimandcontactyouintheeventofaproductrecall,weaskyou
tosharecertainpersonalinformationwithus,eitherdirectlyorthroughyourlocalT orocompanyordealer .
TheT orowarrantysystemishostedonserverslocatedwithintheUnitedStateswhereprivacylawmaynotprovidethesameprotectionasapplies
inyourcountry .
BYSHARINGYOURPERSONALINFORMATIONWITHUS,YOUARECONSENTINGTOTHEPROCESSINGOFYOURPERSONALINFORMA TION
ASDESCRIBEDINTHISPRIV ACYNOTICE.
TheWayT oroUsesInformation
Toromayuseyourpersonalinformationtoprocesswarrantyclaims,tocontactyouintheeventofaproductrecallandforanyotherpurposewhichwetell
youabout.T oromayshareyourinformationwithT oro'safliates,dealersorotherbusinesspartnersinconnectionwithanyoftheseactivities.Wewillnot
sellyourpersonalinformationtoanyothercompany .Wereservetherighttodisclosepersonalinformationinordertocomplywithapplicablelawsand
withrequestsbytheappropriateauthorities,tooperateoursystemsproperlyorforourownprotectionorthatofotherusers.
RetentionofyourPersonalInformation
Wewillkeepyourpersonalinformationaslongasweneeditforthepurposesforwhichitwasoriginallycollectedorforotherlegitimatepurposes
(suchasregulatorycompliance),orasrequiredbyapplicablelaw.
Toro'sCommitmenttoSecurityofY ourPersonalInformation
Wetakereasonableprecautionsinordertoprotectthesecurityofyourpersonalinformation.Wealsotakestepstomaintaintheaccuracyandcurrent
statusofpersonalinformation.
AccessandCorrectionofyourPersonalInformation
Ifyouwouldliketorevieworcorrectyourpersonalinformation,pleasecontactusbyemailatlegal@toro.com.
AustralianConsumerLaw
AustraliancustomerswillnddetailsrelatingtotheAustralianConsumerLaweitherinsidetheboxoratyourlocalT oroDealer.
374-0269RevE
Page 20

TheT oroWarranty
ConditionsandProductsCovered
TheT oroCompanyanditsafliate,T oroWarrantyCompany,pursuantto
anagreementbetweenthem,jointlypromisetotheoriginalpurchaser*
torepairtheT oroProductslistedbelowifdefectiveinmaterialsor
workmanship.
Thefollowingtimeperiodsapplyfromthedateofpurchase:
ProductsWarrantyPeriod
WalkPowerMowers
•CastDeck
5yearsResidentialUse
45DaysCommercialUse
•Engine
5yearsGTSPromise
Seeenginemanufacturer'swarranty
•SteelDeck
2yearsResidentialUse
45DaysCommercialUse
•Engine
2yearsGTSPromise
Seeenginemanufacturer'swarranty
ElectricHandHeldProducts2yearlimitedwarranty
Snowthrowers
•SingleStage
2yearsResidentialUse
45DaysCommercialUse
•TwoStage
3yearsResidentialUse
45DaysCommercialUse
•Electric2yearsResidentialUse
AllRide-OnUnitsBelow
•Engine
Seeenginemanufacturer'swarranty
1yearPartsonly
•Attachments1year
RearEngineRiders2yearsResidentialUse
90DaysCommercialUse
Lawn&GardenTractors
2yearsResidentialUse
90DaysCommercialUse
TimeCutterZMowers
3yearsResidentialUse
30DaysCommercialUse
TITANMowers3yearsor240hours
•Frame
Lifetime(originalowneronly)
TITANMXMowers3yearsor400hours
•Frame
ZMasterMowers—2000Series
•Frame
Lifetime(originalowneronly)
5yearsor1200hours
Lifetime(originalowneronly)
2
2
2
2
2
2
2
2
3
4
3
4
3
4
OwnerResponsibilities
YoumustmaintainyourT oroProductbyfollowingthemaintenance
proceduresdescribedintheOperator'sManual.Suchroutine
maintenance,whetherperformedbyadealerorbyyou,isatyourexpense.
InstructionsforObtainingWarrantyService
IfyouthinkthatyourT oroProductcontainsadefectinmaterialsor
workmanship,followthisprocedure:
1.Contactyoursellertoarrangeserviceoftheproduct.Ifforany
reasonitisimpossibleforyoutocontactyourseller,youmaycontact
anyT oroAuthorizedDistributortoarrangeservice.
1
2.Bringtheproductandyourproofofpurchase(salesreceipt)tothe
ServiceDealer.IfforanyreasonyouaredissatisedwiththeService
Dealer’sanalysisorwiththeassistanceprovided,contactusat:
1
CustomerCareDepartment,RLCDivision
TheToroCompany
811 1LyndaleAvenueSouth
Bloomington,MN55420-1 196
Manager:T echnicalProductSupport:001–952–887–8248
SeeattachedDistributorList
ItemsandConditionsNotCovered
1
Thisexpresswarrantydoesnotcoverthefollowing:
•Costofregularmaintenanceserviceorwearparts,suchasblades,
rotorblades(paddles),scraperblades,belts,fuel,lubricants,oil
changes,sparkplugs,cable/linkageorbrakeadjustments
•Anyproductorpartwhichhasbeenalteredormisusedandrequires
replacementorrepairduetoaccidentsorlackofpropermaintenance
•Repairsnecessaryduetofailuretousefreshfuel(lessthanone
monthold),orfailuretoproperlypreparetheunitpriortoanyperiod
ofnon-useoveronemonth
•Engineandtransmission.Thesearecoveredbytheappropriate
manufacturer’sguaranteeswithseparatetermsandconditions
Allrepairscoveredbythesewarrantiesmustbeperformedbyan
AuthorizedT oroServiceDealerusingT oroapprovedreplacementparts.
*OriginalPurchasermeansthepersonwhooriginallypurchasedtheToroProduct.
1
SomeenginesusedonToroProductsarewarrantedbytheenginemanufacturer .
2
Residentialusemeansuseoftheproductonthesamelotasyourhome.Useatmorethanone
locationisconsideredcommercialuseandthecommercialusewarrantywouldapply.
3
Whicheveroccursrst.
4
LifetimeFrameWarranty-Ifthemainframe,consistingofthepartsweldedtogethertoformthe
tractorstructurethatothercomponentssuchastheenginearesecuredto,cracksorbreaksin
normaluse,itwillberepairedorreplaced,atToro'soption,underwarrantyatnocostforparts
andlabor .Framefailureduetomisuseorabuseandfailureorrepairrequiredduetorustor
corrosionarenotcovered.
Thiswarrantyincludesthecostofpartsandlabor,butyoumustpay
transportationcosts.
Warrantymaybedeniedifthehourmeterisdisconnected,altered,or
showssignsofbeingtamperedwith.
GeneralConditions
Thepurchaseriscoveredbythenationallawsofeachcountry .Therights
towhichthepurchaserisentitledwiththesupportoftheselawsarenot
restrictedbythiswarranty.
374-0268RevD
 Loading...