

Page 1

FormNo.3415-700RevA
Broom
GrandStand
ModelNo.78596—SerialNo.400000000andUp
®
MultiForceMower
Registeratwww.T oro.com.
OriginalInstructions(EN)
*3415-700*A
Page 2
WARNING
CALIFORNIA
Proposition65Warning
Thisproductcontainsachemical
orchemicalsknowntotheStateof
Californiatocausecancer,birthdefects,
orreproductiveharm.
Introduction
ModelNo.
SerialNo.
Thismanualidentiespotentialhazardsandhas
safetymessagesidentiedbythesafety-alertsymbol
(Figure2),whichsignalsahazardthatmaycause
seriousinjuryordeathifyoudonotfollowthe
recommendedprecautions.
g000502
Figure2
Thebroomattachmentisusedtosweepwalkways
anddrivewaysofdirtorsnow.Readthisinformation
carefullytolearnhowtooperateandmaintainyour
productproperlyandtoavoidinjuryandproduct
damage.Youareresponsibleforoperatingthe
productproperlyandsafely.
YoumaycontactT orodirectlyatwww.Toro.com
forproductsafetyandoperationtrainingmaterials,
accessoryinformation,helpndingadealer,orto
registeryourproduct.
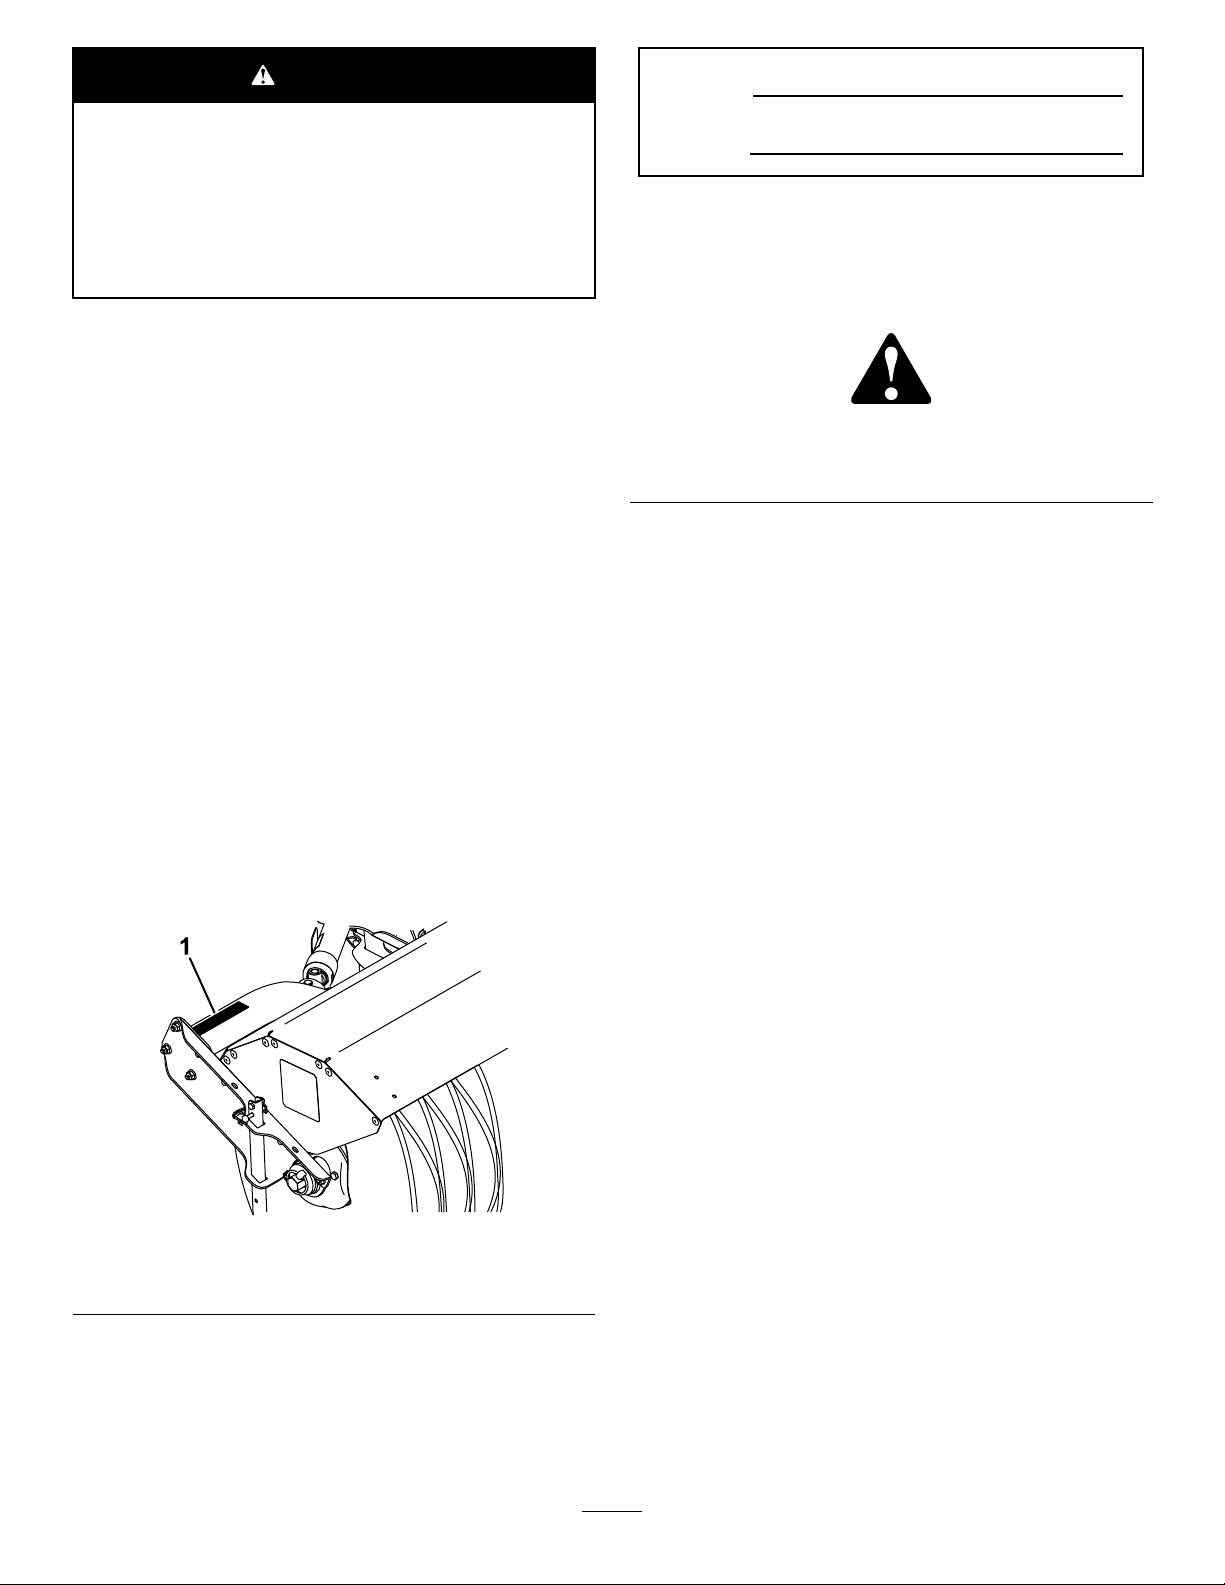
Wheneveryouneedservice,genuineToroparts,or
additionalinformation,contactanAuthorizedService
DealerorToroCustomerServiceandhavethemodel
andserialnumbersofyourproductready.Figure1
identiesthelocationofthemodelandserialnumbers
ontheproduct.Writethenumbersinthespace
provided.
Figure1
1.Modelandserialnumberplate
Writetheproductmodelandserialnumbersinthe
spacebelow:
1.Safety-alertsymbol
Thismanualuses2wordstohighlightinformation.
Importantcallsattentiontospecialmechanical
informationandNoteemphasizesgeneralinformation
worthyofspecialattention.
Contents
Safety.......................................................................3
Training..............................................................3
Preparation.........................................................3
Operation............................................................3
MaintenanceandStorage...................................4
SafetyandInstructionalDecals..........................4
Setup........................................................................5
1PreparingtheMachine.....................................5
2PositioningtheCasters....................................5
3InstallingtheBroomLockBracket....................5
4InstallingtheBroomtotheMachine..................6
Operation..................................................................8
OperatingtheBroom..........................................8
CheckingtheSweepingPath..............................9
UsingtheKickstands........................................10
ClearingaCloggedBroom................................10
RemovingtheBroom.........................................11
OperatingTips..................................................11
Maintenance...........................................................12
g209748
RecommendedMaintenanceSchedule(s)...........12
OilingtheChain................................................12
TensioningtheChain........................................12
ReplacingtheBristles.......................................13
CheckingtheHydraulicFluidLevel...................15
Storage...................................................................15
Troubleshooting......................................................16
©2017—TheToro®Company
8111LyndaleAvenueSouth
Bloomington,MN55420
Contactusatwww.Toro.com.
2
PrintedintheUSA
AllRightsReserved
Page 3

Safety
Readandunderstandthecontentsofthismanual
beforetheengineisrststarted.
Improperlyusingormaintainingthismachine
couldresultininjuryordeath.T oreducethis
potential,complywiththefollowingsafety
instructions.
Training
•Readtheoperatingandserviceinstructionmanual
carefully.Bethoroughlyfamiliarwiththecontrols
andtheproperuseofthemachine.Knowhow
tostopthemachineanddisengagethecontrols
quickly.
•Donotallowadultstooperatethemachinewithout
properinstruction.
Preparation
CAUTION
Operatingapoweredmachinecanresultin
foreignobjectsbeingthrownintoyoureyes.
Alwayswearsafetyglassesoreyeshields
duringoperationorwhileperformingan
adjustmentorrepair.
•Keeptheareaofoperationclearofallpersons,
particularlysmallchildren,andpets.
•Thoroughlyinspecttheareawhereyouwillusethe
machineandremovealldoormats,sleds,boards,
wires,andotherforeignobjects.
•Donotoperatethemachinewithoutwearing
appropriatepersonalprotectiveequipmentsuch
ashearingprotection,safetyglassesorgoggles,
dustmask,andlongpants.Tuckinscarfends.
Wearsubstantial,slip-resistantfootwear.Tieback
longhair.Donotwearjewelry .
•Lettheengineandmachineadjusttooutdoor
temperaturesbeforestartingtoclearsnow.
Operation
•Neverallowchildrentooperatethemachine.
•Donotputhandsorfeetnearorunderrotating
parts.Keepclearofthedischargeopeningatall
times.
•Neverdirectdischargeatbystandersorallow
anyoneinfrontofthemachine.
•Takeallpossibleprecautionswhenleavingthe
machineunattended.Releasethebroom-drive
lever,traction-drivelever,shutofftheengine,and
removethekey.
•Alwaysbesureofyourfooting,andkeeparm
holdonthehandles.Walk;neverrun.
•Neveroperatethemachinewithoutgoodvisibility
orlight.
•Donotoperatethemachinewhileill,tired,or
undertheinuenceofalcoholordrugs.
•Exercisecautiontoavoidslippingorfalling,
especiallywhenoperatingthemachineinthe
reversetraveldirection.
•Shutofftheenginewheneveryouleavethe
operatingposition,beforeuncloggingthe
broomhousing,andwhenmakinganyrepairs,
adjustments,orinspections.
•Exerciseextremecautionwhenoperatingonor
crossinggraveldrives,walks,orroads.Stayalert
forhiddenhazardsortrafc.
•Neveroperatethemachineathightransport
speedsonslipperysurfaces.Usecarewhen
reversing.
•Donotclearsnow,dirt,orthatchacrossthefaceof
slopes.Exerciseextremecautionwhenchanging
directiononslopes.Donotattempttoclearsteep
slopes.
•Neveroperatethemachinenearglassenclosures,
automobiles,windowwells,dropoffs,etc.without
properadjustmentofthedischargeangle.Keep
childrenandpetsaway.
•Donotoverloadthemachinecapacityby
attemptingtoclearsnow,dirt,orthatchattoofast
ofarate.
•Donotruntheengineindoors,exceptwhen
startingitandwhenmovingthemachineinorout
ofthebuilding.Opentheoutsidedoors;exhaust
fumesaredangerous.
•Whencleaning,repairing,orinspecting,shutoff
theengineandremovethekey.Ensurethatthe
rotarybroomandallmovingpartshavestopped.
•Disengagethepowertotherotarybroomwhen
themachineistransportedornotinuse.
•Afterstrikingaforeignobject,shutofftheengine,
removethekey,thoroughlyinspectthemachine
foranydamage,andrepairthedamagebefore
startingandoperatingthemachine.
3
Page 4
•Ifthemachineshouldstarttovibrateabnormally ,
shutofftheengineandcheckimmediatelyforthe
cause.Vibrationisgenerallyawarningoftrouble.
•Neveroperatethemachinewithoutproperguards,
plates,orothersafetyprotectivedevicesinplace.
•Useonlyattachmentsandaccessoriesapproved
bythemanufacturerofthemachine(suchas
wheelweights,counterweights,cabs,etc.).
MaintenanceandStorage
•Neverattempttomakeanyadjustmentswhile
theengineisrunning(exceptwherespecically
recommendedbythemanufacturer).
•Checkallofthefastenersatfrequentintervalsfor
propertightnesstoensurethatthemachineisin
safe,workingcondition.
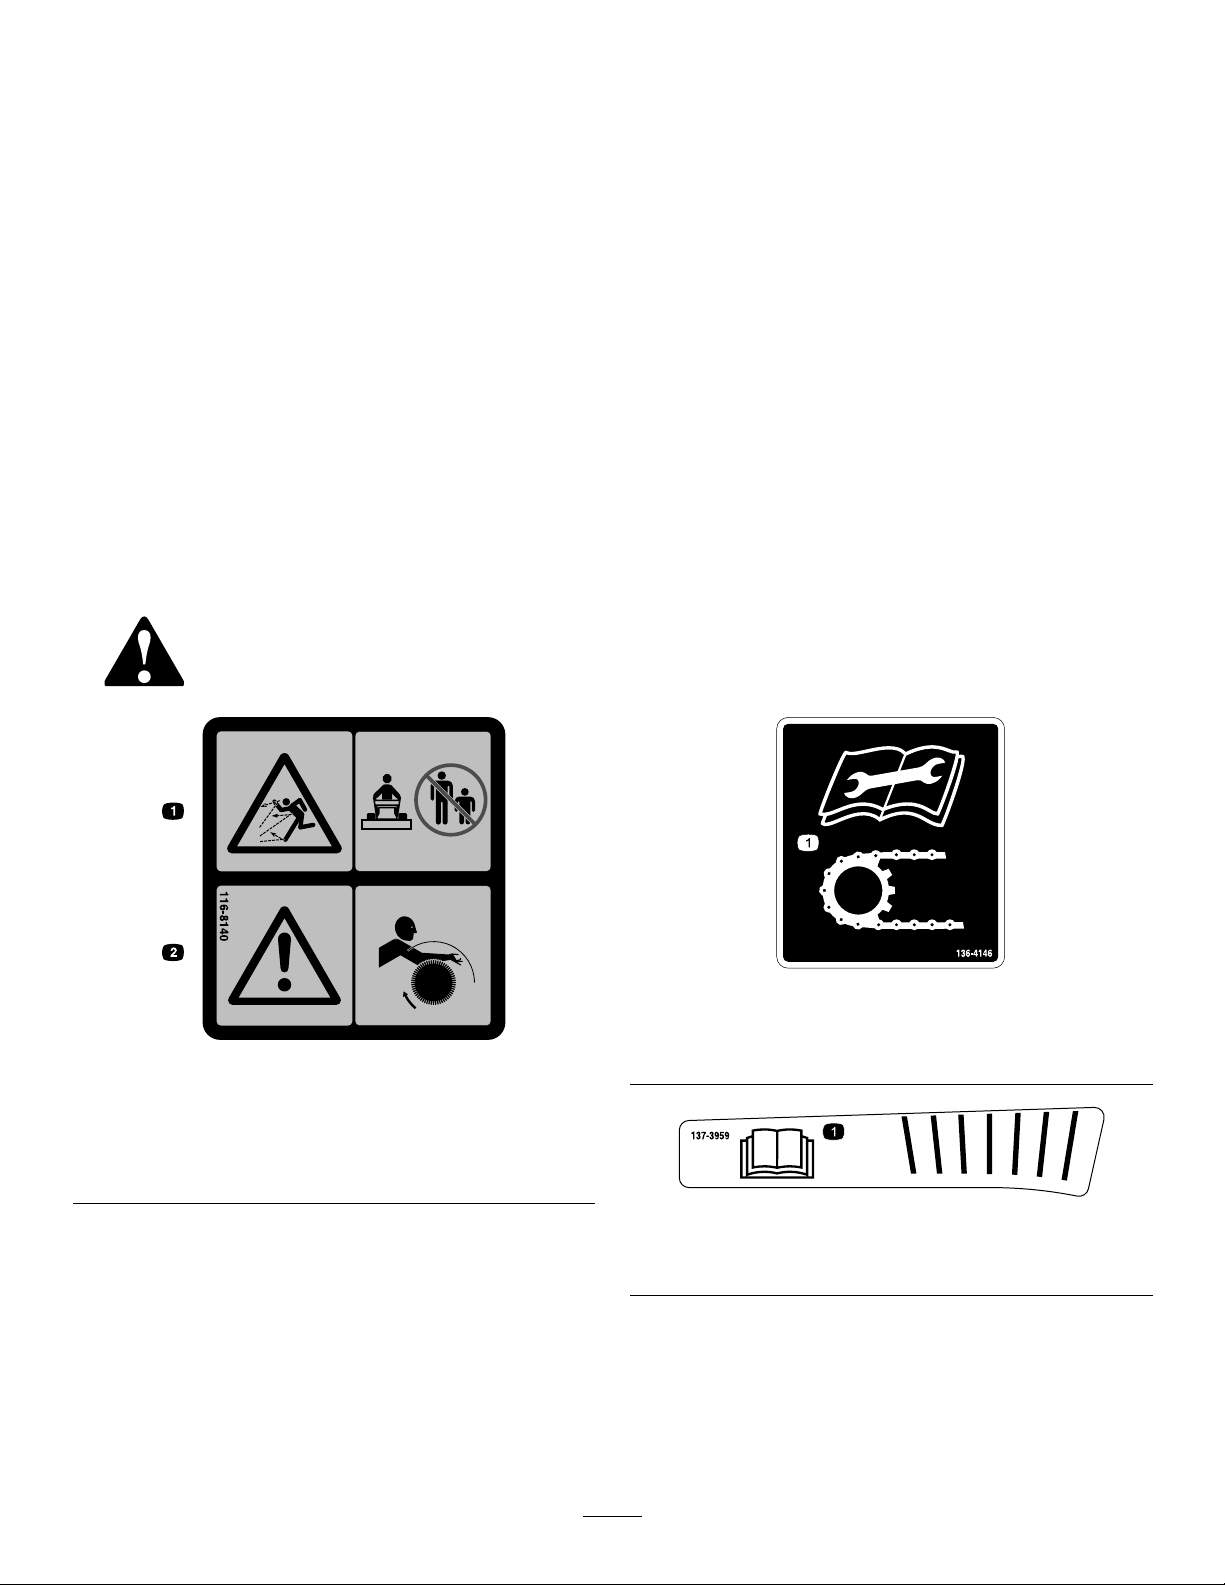
SafetyandInstructionalDecals
Safetydecalsandinstructionsareeasilyvisibletotheoperatorandarelocatednearanyarea
ofpotentialdanger.Replaceanydecalthatisdamagedormissing.
•Neverstorethemachinewithfuelinthefuel
tankinsideabuildingwhereignitionsourcesare
present,suchashotwaterandspaceheaters,
clothingdryers,etc.Allowtheenginetocool
beforestoringthemachineinanyenclosure.
•AlwaysrefertotheinstructionsintheOperator’s
Manualforimportantdetailsifthemachineistobe
storedforanextendedperiod.
•Maintainorreplacethesafetyandinstruction
decals,asnecessary.
•Whenoperatinginsnowconditions,runthe
machineforafewminutesaftersweepingsnowto
preventfreezeupofthebroomandhousing.
116-8140
1.Thrownobjecthazard—Donotoperatewhenpeopleand
petsareinthearea.
2.Warning—Entanglementhazard—stayclearoftherotating
broom.
decal136-4146
136-4146
decal116-8140
1.ReadtheOperator’sManualbeforeperforming
maintenanceonthechain.
decal137-3959
137-3959
1.ReadtheOperator’sManual.
4
Page 5
Setup
Installthefollowingonyourmachinebeforeyouinstall
thebroom:
•FloatKit(optional)
•HighFlowHydraulicKit(required)
•LowFlowHydraulicKit(required)
•Pneumaticcasters(recommended)
•Quick-AttachKit(required)
•SnowTires(requiredforwinterapplication)
•WheelWeightKit(recommended)
ALiftCylinderLockKit(Toropartno.137-4106)is
availabletosecuretheA-framewhenyouraiseitfor
setupormaintenance;contactyourAuthorizedT oro
Dealer.
1
PreparingtheMachine
NoPartsRequired
Procedure
1.Parkthemachineonalevelsurface.
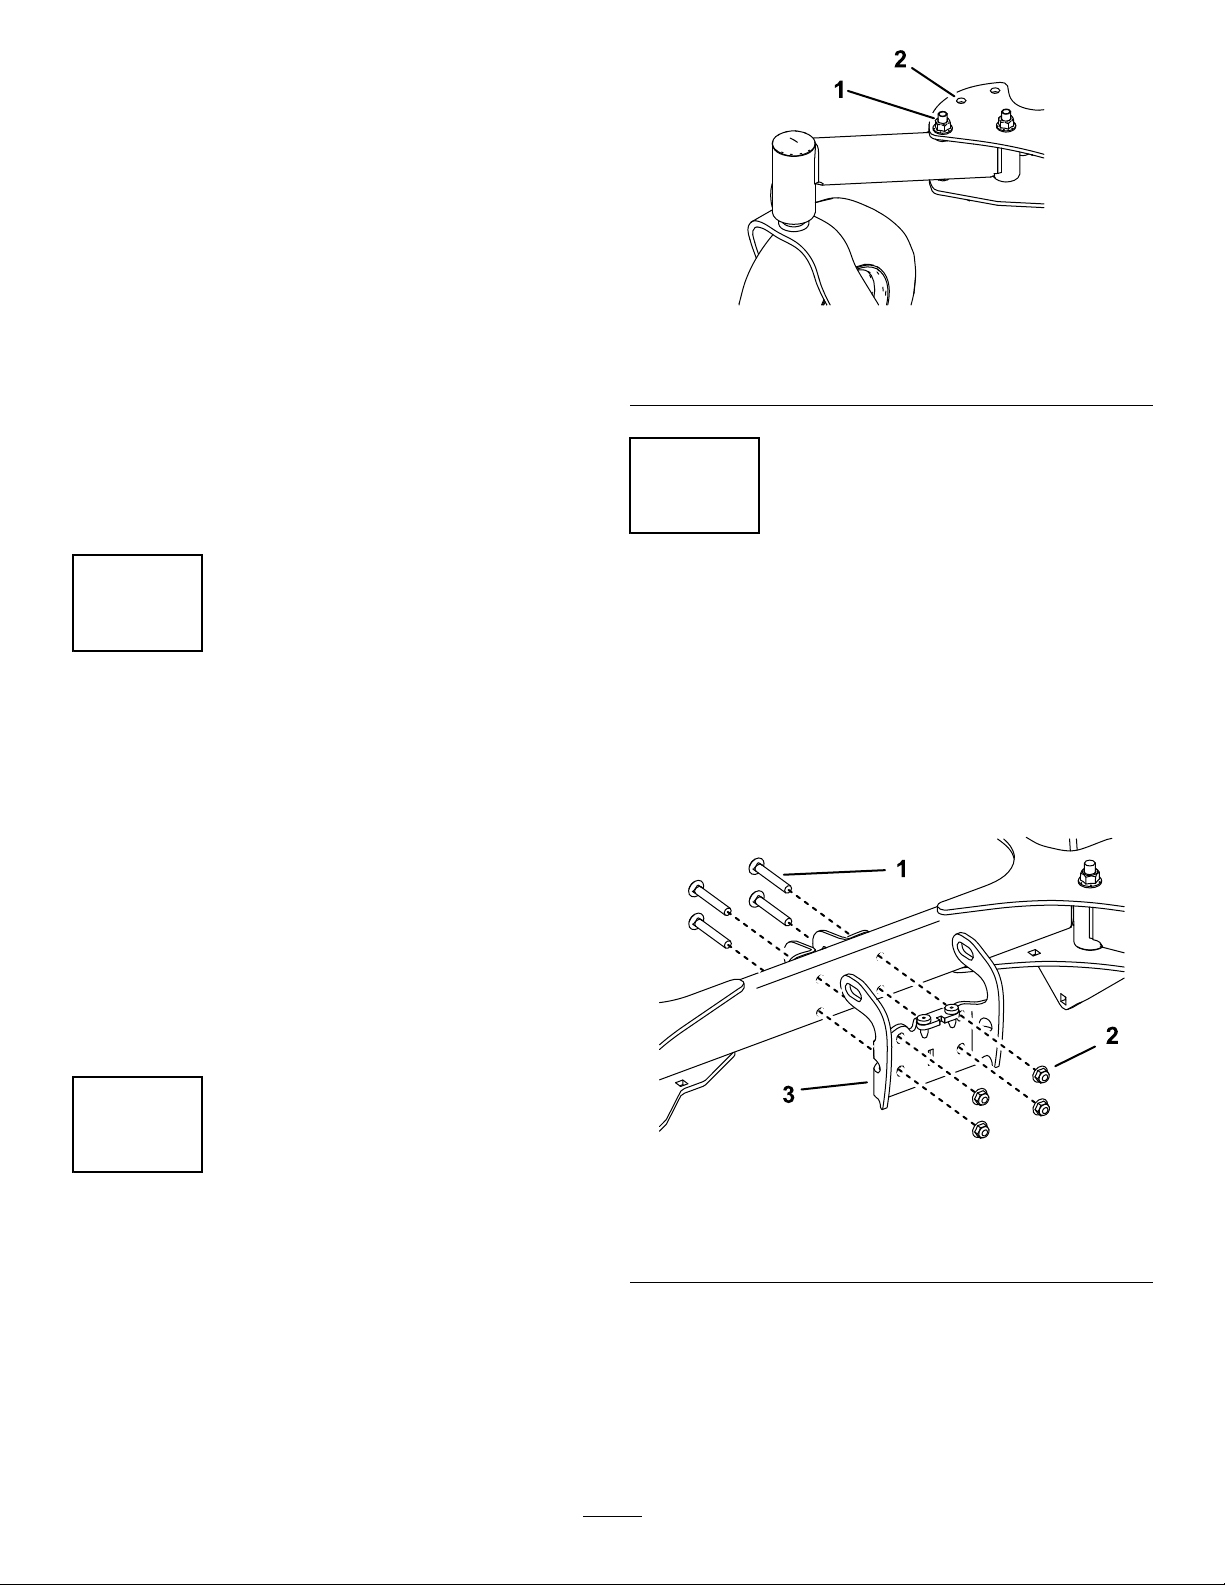
g210119
Figure3
1.Nutandbolt2.Middleposition
3
InstallingtheBroomLock Bracket
NoPartsRequired
Procedure
1.Removethe4carriagebolts(3/8x2-1/2inches),
4nuts(3/8inch),andthelockbracket(Figure4).
2.DisengagethePTO,engagetheparkingbrake,
andmovethemotion-controlleversoutwardto
theNEUTRAL-LOCKposition.
3.RaisetheA-frameandsupportitusingblocks
oracylinderlock.
4.Shutofftheengineandremovethekey.
2
PositioningtheCasters
NoPartsRequired
Procedure
Removethenutandboltfromeachcaster,movethe
castertothemiddleposition,andinstallthenutand
bolt(Figure3).T orqueto91to1 13N∙m(67to83ft-lb).
Figure4
1.Carriagebolt(3/8x2-1/2
inches)
2.Nut
2.Usethefastenersthatyoujustremovedtoinstall
thebroomlockbracket(Figure5).Torqueto37
to45N∙m(27to33ft-lb).
3.Lockbracket
g210329
5
Page 6
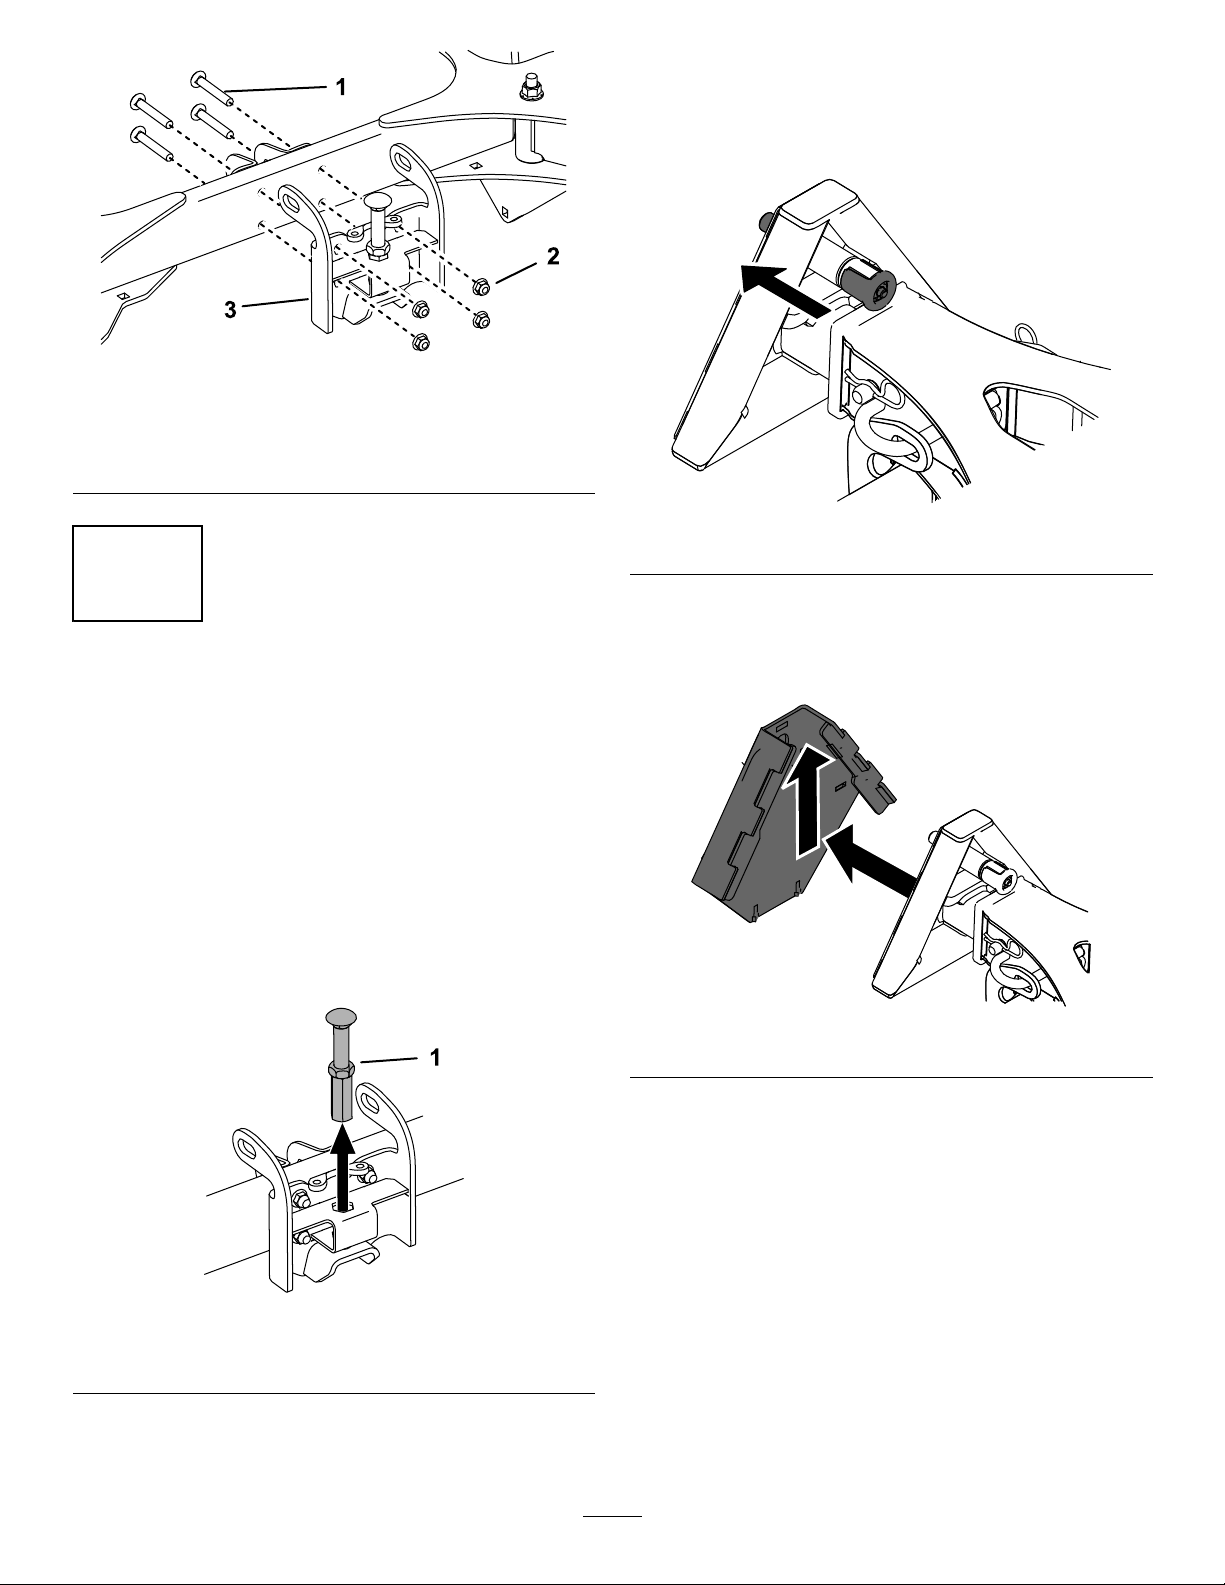
Figure5
4.Engagethequickpinonthemachine
quick-attachassembly(Figure7).
Note:Thepinwillprotrudefromthequick-attach
triangle.
g210328
1.Carriagebolt(3/8x2-1/2
inches)
2.Nut
3.Broomlockbracket
4
InstallingtheBroomtothe Machine
NoPartsRequired
Procedure
1.Placethebroomonaleveloorwiththekick
standsinthedownposition;refertoUsingthe
Kickstands(page10).
2.Removethestopassemblyfromthebroomlock
bracket(Figure6).
g196445
Figure7
5.Slowlymovethemachineuptothebroomso
thatthequick-attachtriangleofthemachine
entersthebroomquick-attachtriangleand
pressestheengagementpin(Figure8).
g196446
Figure8
Figure6
1.Stopassembly
3.Ensurethatthehydraulichosesareoutofthe
wayfromthebroomquick-attachtriangle.
6.Ifnecessary,adjustthecouplerchannelas
follows:
A.Loosenthefastenersonthechannel,slide
thechannelupordown,andtightenthe
fasteners(Figure9).
g214226
6
Page 7

Figure9
7.Installthestopassembly(Figure6).
8.UsetheA-frameswitchfromthelowowkitto
raisethequick-attachtriangleuntilthepinsnaps
intoplaceonthebroomquick-attachtriangle.
Note:Ensurethatthequickpinisfullyseated;
lowerandraisethemachinequick-attach
triangletoassisttheengagement.
9.Routethehosesthoughthehoseguidesonthe
leftandrightsidesofthebroomquick-attach
triangle(Figure11).
g210217
1.Couplerchannel
2.Channelfasteners
3.Hexnut
4.Turnbuckle
B.Loosenthehexnutstoadjustthelengthof
theturnbuckleasneeded(Figure9).Asyou
adjusttheturnbuckle,ensurethatthereis
enoughspacebetweentheupperplateand
upperchannelthatyoucanslideasheetof
paperbetweenthem(Figure10).
g210818
Figure11
1.Hose2.Hoseguide
10.Connectthehosesfromthebroommotortothe
highowassembly.
Note:Donotengagethehighowpump
withoutthebroomhydraulichosesattached.
11.Connectthehosesfromthebroomcylinders
tothequickconnectsontheleftsideofthe
machineA-frame.
12.Setthebristleengagement;refertoChecking
theSweepingPath(page9).
Figure10
1.Upperchannel3.Upperplate
2.Enoughspacetoslidea
sheetofpaper
g210218
7
Page 8

Operation
G009174
OperatingtheBroom
DANGER
Whenthemachineisinoperation,contact
witharotatingbroomcanresultinserious
personalinjurytoyouorbystanders.
•Beforeadjusting,cleaning,inspecting,
troubleshooting,orrepairingthemachine,
shutofftheengineandwaitforallmoving
partstostop.Removethekeytoprevent
someonefromaccidentallystartingthe
engine.
UsetheswitchesfromtheLowFlowHydraulickitto
operatethebroom(Figure13).
•Movetheleftswitchupordowntoraiseorlower
thebroom.
•Movetherightswitchleftorrighttoanglethe
broom.
•Staybehindthehandlesandawayfromthe
broomwhileoperatingthemachine.
•Keepyourface,hands,feet,andanyother
partofyourbodyorclothingawayfrom
concealed,moving,orrotatingparts.
WARNING
Therotatingbroomcanthrowstonesand
otherforeignobjects,causingserious
personalinjurytoyouorbystanders.
•Keeptheworkingareaclearandfreeofall
objectsthatthebroomcouldpickupand
throw.
•Keepallchildrenandpetsawayfromthe
areaofoperation.
EngagethePTOswitchtostartthebroom(Figure12).
Figure13
1.A-frameswitch
DisengagethePTOtostopthebroom(Figure14).
IfthemachinehasanoptionalFloatKitinstalled,
movetheswitchtotheFLOA Tpositiontoallowthe
broomtofollowthecontouroftheground(Figure15).
Movetheswitchtothenormaloperatingpositionto
controlthebroomusinghydraulics.
2.Angleswitch
Figure14
g037041
g009174
Checkthesweepingpathofthebristleswhenyou
movetheswitchtotheFLOA Tpositionsothatyoulimit
theengagementofthebristleswiththeground;refer
toCheckingtheSweepingPath(page9).
g197269
Figure12
8
Page 9

Figure15
g210832
1.Lowertonormaloperating
position
2.Floatposition
CheckingtheSweeping Path
ServiceInterval:Beforeeachuseordaily
Abroomsweepswiththetipsofitsbristles.Whenyou
applytoomuchdownwardpressure,thebroomno
longerusesitstips;thebroomisnowworkingwiththe
sidesofthebristles.Thislimitstheickingactionof
thebristlesandsweepingeffectiveness,decreasing
theservicelifeofthebroom.
1.Drivetoaat,dustyorsnowyareaandstop
themachine.
2.Engagethebroom,lowerittothegroundto
sweepawaysomesnowordebris,andthen
raiseit.
3.Disengagethebroomandshutoffthemachine.
Figure16
1.51to102mm(2to4
inches)maximumwidth
2.Lengthofbroom
3.Sweptarea
6.Ifthewidthoftheareasweptisincorrect,adjust
themachineA-framestopasfollows:
A.SupporttheA-frameusingblocksora
cylinderlock.
B.Loosenthejamnut.
C.AdjustthestopboltuntilitholdstheA-frame
atthecorrectheightabovethemachine
frame(Figure17).
g197271
4.Waitforallmovingpartstostopbeforeleaving
theoperatingposition.
5.Makesurethattheareasweptequalsthelength
ofthebroomandamaximumwidthof51to102
mm(2to4inches)asshowninFigure16.
Note:IfyouareusingaFloatKitwiththebroom,
themaximumwidthshouldbeapproximately
102mm(4inches).
Figure17
1.Stopbolt
2.Jamnut
D.Tightenthejamnuttolocktheboltin
position.
E.Removetheblocksorcylinderlockand
repeattheproceduretoverifythecorrect
sweepingpath.
g210244
9
Page 10

UsingtheKickstands
Usethekickstandstoraisethebroomofftheground
whenyouarenotusingthemachine,performing
maintenance,orstoringthebroom.Thiseliminates
unnecessarypressureonthebristles.
Important:Donotoperatethemachinewiththe
kickstandsdown.
1.Parkthemachineonalevelsurface,disengage
thePTO,movethemotion-controlleverstothe
NEUTRAL-LOCKposition,andengagetheparking
brake.
2.Shutofftheengine,removethekey,andwait
forallmovingpartstostopbeforeleavingthe
operatingposition.
3.RaisetheA-frameandsupportitusingblocks
oracylinderlock.
4.Lowertheleft,right,andrearkickstands(Figure
18).
ClearingaCloggedBroom
WARNING
Therotatingbroomcouldcauseserious
injury.
Shutoffthemachineandallowallrotating
partstostopbeforecleaningthebroom.
1.Stayintheoperatingpositionandreleasethe
lefttraction-drivelever.
2.Whileengagingthebroom,raisethebroom
abovetheground.
Ifyoucannotunclogthebroombyliftingitintotheair,
clearthebroomasfollows:
1.Parkthemachineonalevelsurface,disengage
thePTO,movethemotion-controlleversto
theNEUTRAL-LOCKposition,andengagethe
parkingbrake.
2.Shutofftheengine,removethekey,andwait
forallmovingpartstostopbeforeleavingthe
operatingposition.
Figure18
3.Whilewearingthickly-paddedgloves,use
cautiontomanuallyclearforeignobjectsoutof
thebroom.
CAUTION
g196494
Sharpobjectscanbecomeentangledinthe
bristlesandcancausepersonalinjury.
Wearglovesandusecautionwhencleaning
foreignobjectsoutofthebroom;neveruse
yourbarehands.
10
Page 11

RemovingtheBroom
OperatingTips
1.Parkthemachineonalevelsurface,disengage
thePTO,movethemotion-controlleverstothe
NEUTRAL-LOCKposition,andengagetheparking
brake.
2.RaisetheA-frameandsupportitusingblocks
oracylinderlock.
3.Shutofftheengine,removethekey,andwait
forallmovingpartstostopbeforeleavingthe
operatingposition.
4.Lowerthekickstandsonthebroom;referto
UsingtheKickstands(page10).
5.Removethestopassembly.
•Ifthegroundspeedistoofast,debriswillpileupin
frontofthebroom,causingittobulldozeinsteadof
sweep.Thiscandamagethebroom.
•Morepressuredoesnotgiveabettersweep,but
itwillwearoutthebroomfaster.
•Alevelbroomlastslonger.
Figure19
1.Stopassembly
6.Removetheblocksorcylinderlock.
7.Disconnectthehosesfromthelow-ow
assemblyandplugthemtogether.
8.Disconnectthehosesfromthehigh-ow
assemblyandplugthemtogether.
9.Plugtherubbercapsintothequick-disconnect
ttingsonthemachine.
10.Disengagethequickpinonthemachine
quick-attachassembly(Figure7).
11.Usethemachinehydraulicstolowerthebroom
sothatthereisnoweightonthemachine
quick-attachtriangle.
12.Movethebroomhosesawayfromthemachine
andbackthemachineoutofthebroomtriangle.
13.InstallthestopassemblyasshowninFigure19
orstoreitinasafelocation.
g214226
11
Page 12

Maintenance
RecommendedMaintenanceSchedule(s)
MaintenanceService
Interval
Beforeeachuseordaily
Every40hours
Beforestorage
MaintenanceProcedure
•Checkthesweepingpath.
•Oilthechain.
•Checkthehydraulicuid.
•Checkthechaintension.
•Oilthechain.
•Cleanthemachine.
OilingtheChain
ServiceInterval:Beforeeachuseordaily
Beforestorage
UseT oroPremiumAllSeasonHydraulicOilorSAE
20oil.
1.Raisethebroomallthewayupusingthe
hydrauliccontrols.
2.Lowerthekickstands;refertoUsingthe
Kickstands(page10).
7.Removetheplugandinstallitwiththeatface
uptopreventitfromllingwithdebrisduring
operation.
TensioningtheChain
ServiceInterval:Every40hours
1.Loosen,butdonotremove,the3mountingbolts
onthebroommotoruntilyoucanrotatethe
motoraroundthelowerbolt(Figure21).
3.Removetherubberplugonthechainhousing
andinsertitintothehousingwiththecupside
up(Figure20).
Figure20
1.Rubberplug
4.Filltherubberplugwithoil.
5.Startthemachineandrunitatlowidle.
6.EngagethePTOandrunthebroomatlowidle
untiltheplugisoutofoil.
g196561
Figure21
Hosesnotshownforclarity
g196532
1.Notches3.Lowermountingbolt
2.Topmountingbolts
2.Rotatethemotorclockwiseuntilthechainis
tight,thenrotateitcounterclockwise6mm(1/4
inch)or1notchtoallowsomeslackinthechain.
3.T orquethemountingboltsto102N∙m(75ft-lb).
12
Page 13

ReplacingtheBristles
Replacethebristleswhentheyareworn.Checkthe
conditionofthewearplatewhenyoureplacethe
bristles(seeFigure25);ifthewearplateisworn
through,replaceit.
Note:Replaceallbristlesatthesametime;
otherwise,amixofoldandnewbristleswillreduce
performance.
1.Parkthemachineonalevelsurface,disengage
thePTO,engagetheparkingbrake,and
movethemotion-controlleversoutwardtothe
NEUTRAL-LOCKposition.
2.RaisetheA-frameandsupportitusingablock
orcylinderlock.
3.Shutofftheengineandremovethekey.
4.Lowerthekickstands;refertoUsingthe
Kickstands(page10).
1.Rearbolt(1/4x3/4inch)
g210851
Figure23
2.Driveassembly
5.Removethe2bolts(1/4x3/4inch)ontheleft
andrightsidesofthebroom(Figure22).
Figure22
1.Nut—3/8inch(4)
2.Carriagebolt—3/8x1inch
(4)
3.Hood
4.Lynchpin
5.Broombracket
6.Bolt—1/4x3/4inch(2)
7.Removethe4carriagebolts(3/8x1inch),4
nuts(3/8inch),andthelynchpinontheleftand
rightsidesofthebroomtoseparatethebroom
fromtheassembly(Figure22).
8.On1sideofthebroom,removethewasher,
slidethebroomoutofthebracket,andremove
thespacer(Figure24).
g210320
g210321
Figure24
1.Washer
2.Spacer4.Coverplate
3.Bolt(3/8x1-1/2inches)
6.Removearearboltfrombothsidesofthedrive
assemblyandremovethehood(Figure23).
9.Removethe3bolts(3/8x1-1/2inches)andthe
coverplate(Figure24).
10.Slidethebrushesoffthebroom.
13
Page 14

11.Ifyouarereplacingthewearplate,removethe
boltandwearplate,andusethebolttoinstall
thenewwearplate(Figure25).
Figure25
1.Wearplate2.Bolt
12.Withthebristlescurvedtowardthecenterof
thebroom,slidethenewcenterbrushontothe
axlesothattheprongsstraddle1oftherods
(Figure26).
Note:Themiddleringofthecenterbrushis
atterthantheringontheotherbrushes.
g210322
g214257
Figure26
1.Prongs4.Brushes
2.Rod
3.Prongsstraddlingan
adjacentrod
5.Centerbrush
13.Slideabrushontotheaxlesothattheprongs
straddleanadjacentrodandcurveawayfrom
thecenterbrush(Figure26).
14.Slidethenextbrushontotheaxle,withthe
brushrotatedsothatthepinsstraddlethethird
rodandthecurvesareoppositetotheprevious
brush(Figure26).
15.Continueslidingthebrushesontotheaxle,
rotatingtheprongsaroundtheaxleand
alternatingthecurveofthebrushes,untilallthe
brushesareinstalled(Figure27).
Note:Ifyoudonotrotatetheprongsaround
theaxleoralternatethedirectionofthebrush
curves,itmaybedifculttosecurethecover
plate.Theprongsonthelastbrushneedto
curveinward.
14
Page 15

Storage
1.Parkthemachineonalevelsurface,disengage
thePTO,engagetheparkingbrake,and
movethemotion-controlleversoutwardtothe
NEUTRAL-LOCKposition.
2.RaisetheA-frameandsupportitwithablockor
cylinderlock.
Figure27
1.Centerbrush
16.InstallthecoverplateasshowninFigure24
untilitisushagainsttheaxleface.
17.Installthespacer,slidethebroomontothe
bracket,andinstallthewasher(Figure24).
18.Installthelynchpin(Figure22).
19.Repeatsteps8through18fortheothersideof
thebroom.
20.Installthehoodusing2bolts(1/4x3/4inch)on
therearofthebroom(Figure23)andthe2bolts
oneachsideofthebroom(Figure22).T orque
theboltsto11N∙m(100in-lb).
CheckingtheHydraulic FluidLevel
ServiceInterval:Beforeeachuseordaily
RefertotheOperator’sManualforthemachine
andtheInstallationInstructionsfortheHighFlow
HydraulicsKit.
g214268
3.Shutofftheengineandremovethekey.
4.Lowerthekickstandssothatthebristlesare
nottouchingtheground;refertoUsingthe
Kickstands(page10).
Note:Thebristleswillbecomedeformedand
thebroomwillbeoutofalignmentifthebristles
aretouchingthegroundforanextendedperiod
oftime.
5.Removethebroomfromthemachine,ifdesired;
refertoRemovingtheBroom(page11).
6.Disconnectthehosesfromthelow-ow
assemblyandplugthemtogether.
7.Disconnectthehosesfromthehigh-ow
assemblyandplugthemtogether.
8.Coverthecouplersofthehigh-owandlow-ow
assembliesusingcapsorabag.
9.Oilthechain;refertoOilingtheChain(page12).
10.Thoroughlycleanthebroomandensurethatitis
freeofallcausticchemicalsand/orresidue.
11.Checkandtightenallbolts,nuts,andscrews.
Repairorreplaceanypartthatisdamagedor
defective.
12.Paintallscratchedorbaremetalsurfaces.Paint
isavailablefromyourAuthorizedServiceDealer.
13.Storethebroominaclean,drygarageor
storagearea.Coverittoprotectitandkeepit
clean.
15
Page 16

Troubleshooting
Problem
Thebroomdoesnotcleanthesurface.
Thebroomdoesnotrotate.
Thebroomwearsoutprematurely .1.Y ouareusingtheincorrectbroom
1.Thebroomheightisincorrect.1.Adjustthebroomheight.
2.Thetirepressureinthedrivetiresis
notcorrect.
3.Y ouarecleaningtoomuchdebrisat
onetime.
1.Thebroomisclogged.1.Unclogthebroom.
2.Thebroomdriveleverisnotengaged.2.Engagethebroomdrivelever.
3.Thebroomdrivebeltisslipping.3.Adjustorreplacethebelt.
4.Thebeltisbroken.4.Replacethebelt.
5.Thedrivechainisloose.5.Adjustthemotorchaintension.
height.
PossibleCauseCorrectiveAction
2.Adjustthetirepressureinthedrive
tires.
3.Slowdownandclearsmallerareasof
debris.
1.Adjustthebroomheight.
16
Page 17

Notes:
Page 18

Notes:
Page 19

Notes:
Page 20

TheToroWarranty
ALimitedWarranty(seewarrantyperiodsbelow)Contractor
Landscape
Equipment(LCE)
RidingProduct
ConditionsandProductsCovered
TheToroCompanyanditsafliate,T oroWarrantyCompany,pursuanttoanagreement
betweenthem,jointlypromisetorepairtheT oroProductslistedbelowifdefectivein
materialsorworkmanship.
Thefollowingtimeperiodsapplyfromtheoriginaldateofpurchase:
ProductsWarrantyPeriod
GrandStand
•Engines
ZMaster
•Engines
ZMaster
•Engines
ZMaster
•Engines
ZMaster
•Engines
ZMaster
•Engines
TITANHD1500Series
3
®
3
®
3
®
3
®
7000SeriesMowers
3
®
8000SeriesMowers
3
®
3000SeriesMowers
5000SeriesMowers
6000SeriesMowers
Mowers
5yearsor1,200hours
3years
5yearsor1,200hours
3years
5yearsor1,200hours
3years
5yearsor1,400hours
3years
4yearsor1,200hours
2years
2years
3years
4yearsor500Hours
2
2
2
2
2
2
•EnginesToro–4yearsor500hours
TITANHD2000Series
•Engines
TITANHD2500Series
•Engines
3
Kohler–3years
4yearsor1000Hours
4yearsor750Hours
3
Kawasaki–3years
2
2
AllMowers
•Battery90daysPartsandLabor
1yearPartsonly
•BeltsandTires90days
•Attachments1year
1
Residentialusemeansuseoftheproductonthesamelotasyourhome.Useatmorethanone
locationisconsideredcommercialuseandthecommercialwarrantywouldapply.
2
Whicheveroccursrst.
3
SomeenginesusedonT oroProductsarewarrantedbytheenginemanufacturer.
OwnerResponsibilities
YoumustmaintainyourT oroProductbyfollowingthemaintenanceprocedures
describedintheOperator'sManual.Suchroutinemaintenance,whetherperformedby
adealerorbyyou,isatyourexpense.
InstructionsforObtainingWarrantyService
IfyouthinkthatyourT oroProductcontainsadefectinmaterialsorworkmanship,
followthisprocedure:
1.ContactanyAuthorizedT oroServiceDealertoarrangeserviceattheir
dealership.Tolocateadealerconvenienttoyou,accessourwebsiteat
www.T oro.com.Youmayalsocallthenumberslistedinitem#3tousethe
24-hourT oroDealerlocatorsystem.
2.Bringtheproductandyourproofofpurchase(salesreceipt)totheService
Dealer.Thedealerwilldiagnosetheproblemanddetermineifitiscovered
underwarranty.
3.IfforanyreasonyouaredissatisedwiththeServiceDealer’sanalysisorwith
theassistanceprovided,contactusat:
ToroWarrantyCompany
CustomerCareDepartment,RLCDivision
811 1LyndaleAvenueSouth
Bloomington,MN55420-1 196
888-865-5676(U.S.Customers)
888-865-5691(Canadacustomers)
ItemsandConditionsNotCovered
Thereisnootherexpresswarrantyexceptforspecialemissionsystemcoverage
andenginewarrantycoverageonsomeproducts.Thisexpresswarrantydoesnot
coverthefollowing:
•Costofregularmaintenanceserviceorparts,suchaslters,fuel,lubricants,oil
changes,sparkplugs,airlters,bladesharpeningorwornblades,cable/linkage
adjustments,orbrakeandclutchadjustments
•Componentsfailingduetonormalwear
•Anyproductorpartwhichhasbeenaltered,misused,neglected,orrequires
replacementorrepairduetoaccidentsorlackofpropermaintenance
•Pickupanddeliverycharges
•RepairsorattemptedrepairsbyanyoneotherthananAuthorizedT oroService
Dealer
•Repairsnecessaryduetofailuretofollowrecommendedfuelprocedure(consult
Operator'sManualformoredetails)
–Removingcontaminantsfromthefuelsystemisnotcovered
–Useofoldfuel(morethanonemonthold)orfuelwhichcontainsmorethan
10%ethanolormorethat15%MTBE
–Failuretodrainthefuelsystempriortoanyperiodofnon-useoverone
month
GeneralConditions
AllrepairscoveredbythesewarrantiesmustbeperformedbyanAuthorizedT oro
ServiceDealerusingToroapprovedreplacementparts.
NeitherTheToroCompanynorToroWarrantyCompanyisliableforindirect,
incidentalorconsequentialdamagesinconnectionwiththeuseoftheToro
Productscoveredbythiswarranty ,includinganycostorexpenseofproviding
substituteequipmentorserviceduringreasonableperiodsofmalfunctionor
non-usependingcompletionofrepairsunderthiswarranty .
Allimpliedwarrantiesofmerchantability(thattheproductistforordinaryuse)
andtnessforuse(thattheproductistforaparticularpurpose)arelimitedto
thedurationoftheexpresswarranty.
Somestatesdonotallowexclusionsofincidentalorconsequentialdamages,
orlimitationsonhowlonganimpliedwarrantylasts,sotheaboveexclusions
andlimitationsmaynotapplytoyou.
Thiswarrantygivesyouspeciclegalrights,andyoumayalsohaveotherrights
whichvaryfromstatetostate.
CountriesOtherthantheUnitedStatesorCanada
CustomerswhohavepurchasedToroproductsoutsidetheUnitedStatesorCanadashouldcontacttheirToroDistributor(Dealer)toobtainguaranteepoliciesforyourcountry,
province,orstate.IfforanyreasonyouaredissatisedwithyourDistributor'sserviceorhavedifcultyobtainingguaranteeinformation,contacttheToroimporter.Ifallother
remediesfail,youmaycontactusatT oroWarrantyCompany .
AustralianConsumerLaw:AustraliancustomerswillnddetailsrelatingtotheAustralianConsumerLaweitherinsidetheboxoratyourlocalToroDealer.
374-0252RevK
 Loading...