

Page 1

48in,52inor60inE-ZVac™BlowerandDriveKit
ZMaster
ModelNo.78571—SerialNo.312000001andUp
ModelNo.78572—SerialNo.312000001andUp
ModelNo.78573—SerialNo.312000001andUp
Note:Determinetheleftandrightsidesofthemachinefromthenormaloperatingposition.
LooseParts
Usethechartbelowtoverifythatallpartshavebeenshipped.
®
2000SeriesMower
FormNo.3373-881RevC
InstallationInstructions
ProcedureDescription
1
2
3
4
5
6
7
8
Nopartsrequired
Nopartsrequired
Pulleyassembly1
Pulleymount1
Locknuts(3/8inch)
Bafe
Bolt(5/16x7/8inch)
Bolt(3/8x7/8inch)
Flangenut(5/16inch)
Flangenut(3/8inch)
Pivotpin1
BlowerAssembly1
Rollpin3/16x7/8inches
Beltcoverbracket1
Carriagebolt(1/4x3/4inches)
Locknut(1/4inch)
Beltcoverbracket1
Carriagebolt(1/4x3/4inches)
Locknut(1/4inch)
Baggerbelt1
Blowerbeltcover1
Spring
Qty.
Use
–
–
3
1
1
2
1
2
1
2
2
2
2
1
Preparethemower.
Removetheexistingbeltcover,bracket
andthedischargechute.
Installthepulleyassembly.
Installthebafe.
Installtheblowerassembly.
Installthenewbeltcoverbracketfor48
and52inchmowers.
Installthenewbeltcoverbracketfor60
inchmowers.
Installthebaggerbelt,spring,andbelt
cover.
1
PreparingtheMower
NoPartsRequired
Procedure
Performthefollowingproceduretopreparethemowerfor
attachingtheblowerandnishingkit.
©2013—TheToro®Company
8111LyndaleAvenueSouth
Bloomington,MN55420
Registeratwww.Toro.com.
1.DisengagethePTO,movethemotioncontrolleversto
theneutrallockedposition,andsettheparkingbrake.
2.Stoptheengine,removethekey ,andwaitforallmoving
partstostopbeforeleavingtheoperatingposition.
3.Repairallbentordamagedareasofthemowerdeck
andreplaceanymissingparts.
4.Cleanthemowerofanydebrisonthedeckorrearpart
ofthemowertoeaseinstallation.
OriginalInstructions(EN)
PrintedintheUSA.
AllRightsReserved
*3373-881*C
Page 2
2
G009036
1
2
g018602
1
2
3
4
g015594
1
6 2
4
7
3
5
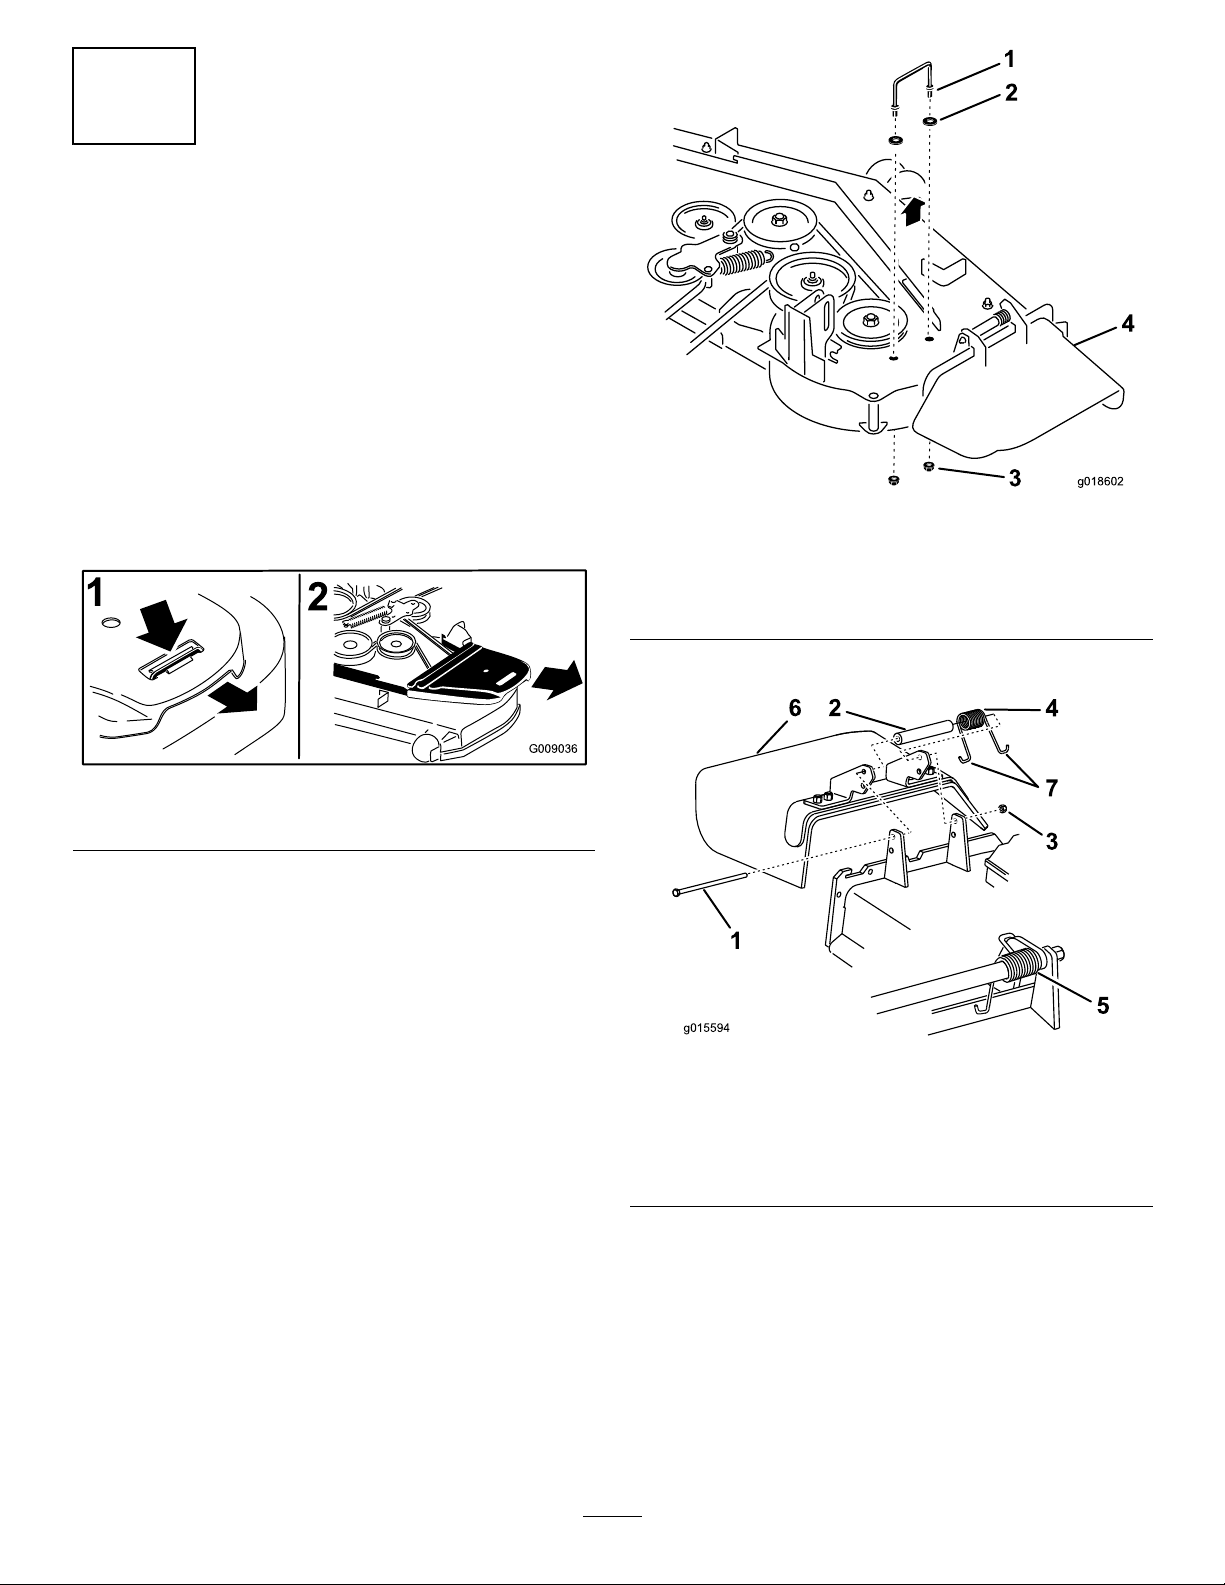
RemovingtheExistingBelt
Cover,Bracketandthe
DischargeChute
NoPartsRequired
Procedure
Note:Cleantheareaaroundthebeltcoverbeforeremoving
it.
1.Lowerthemowerdecktothelowestheight-of-cut
position.
Figure2
2.Removetheright-handbeltcover(Figure1).
Figure1
1.Pushtabdown2.Removebeltcover
3.Removetheexistingright-handbeltcoverbracketand
savethehardwareforwhenyouremovethebagger
andtheblower(Figure2).
1.Right-handbeltcover
bracket
2.Washer(onlypresenton
60inchdecks)
4.Removethedischargechuteandsavethehardware.
1.Bolt
2.Spacer
3.Locknut
4.Spring
3.Flangenut
4.Dischargechute
Figure3
5.Springinstalled
6.Dischargechute
7.“J”hookendofthespring
5.Storetherighthandbeltcover,bracketandthe
dischargechuteforlateruse.Theseshouldbereusedif
thebagger,blowerandthepulleyareremoved.
2
Page 3
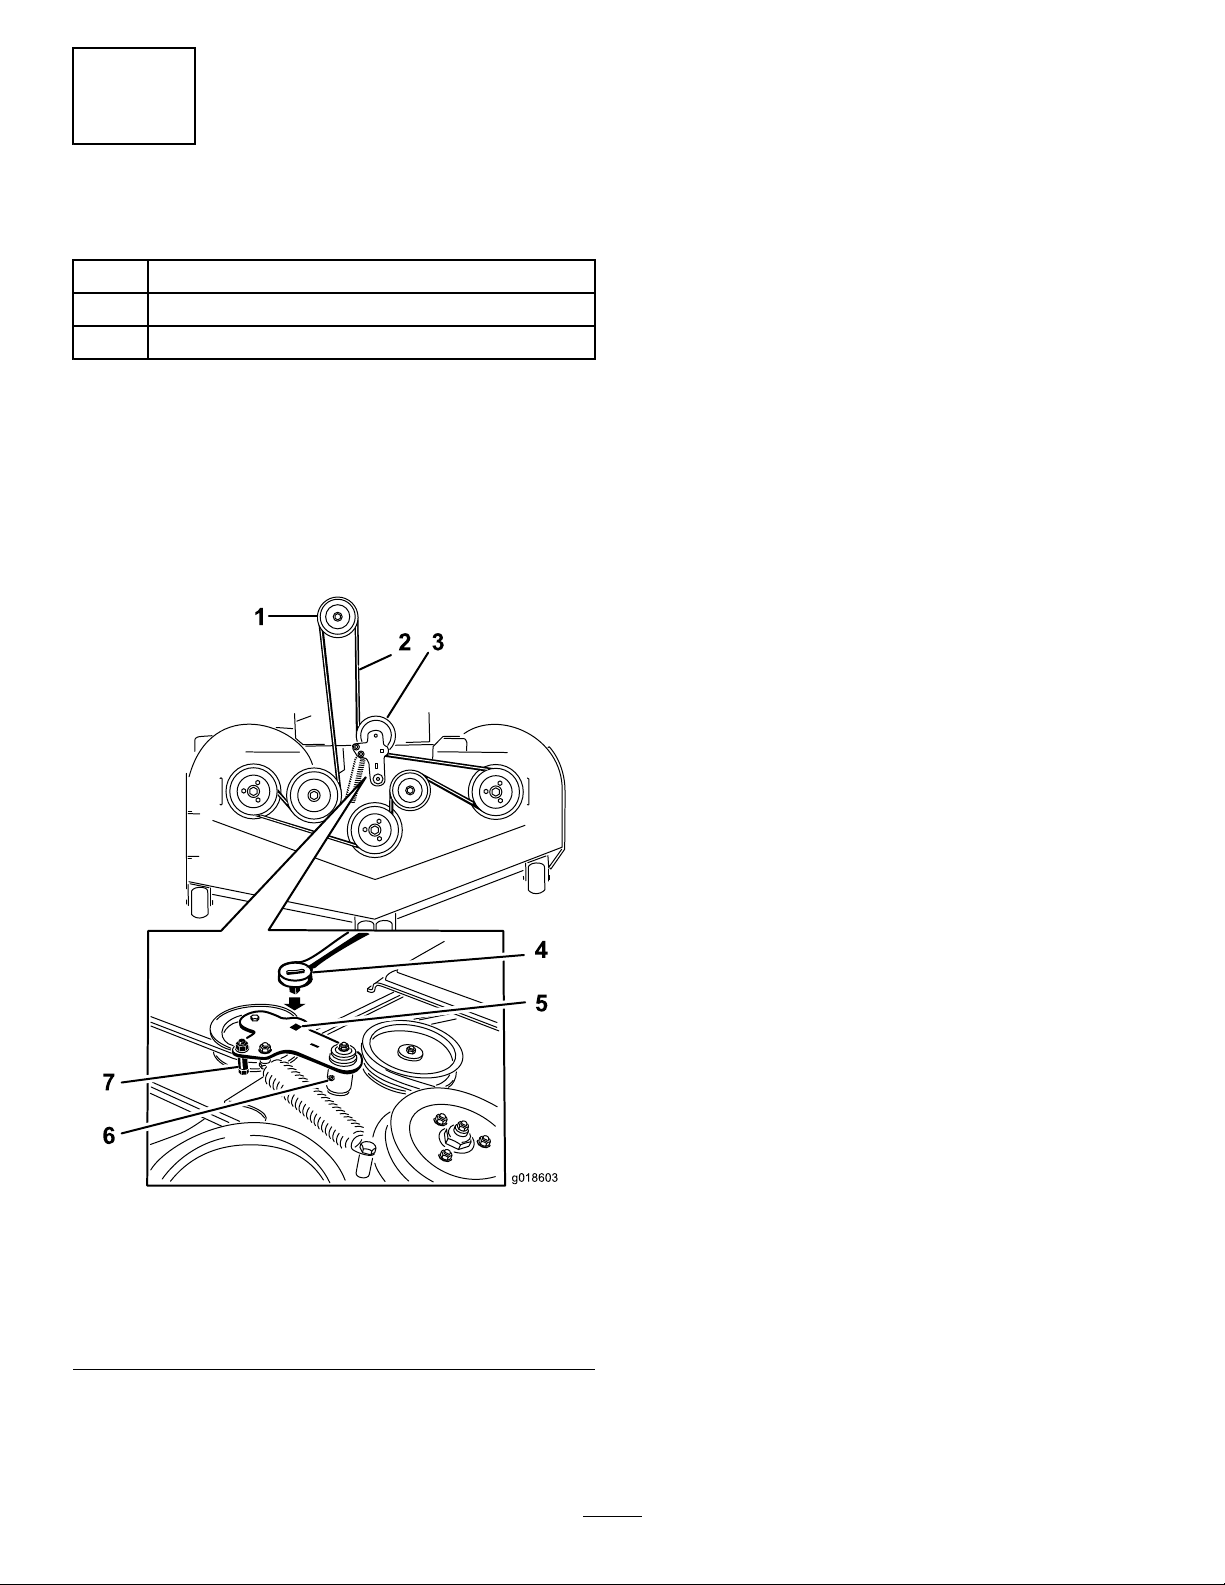
g018603
6.Installthepulleymountintothespindlepulley(
5).
Figure
3
InstallingthePulleyAssembly
Partsneededforthisprocedure:
1Pulleyassembly
1Pulleymount
3
Locknuts(3/8inch)
Procedure
1.Liftuptheoorpanandremoveitfromtheunit.
2.Insertaratchetintothesquareholeinthedeckidler
(Figure4).
3.Rotatethedeckidlerclockwiseandremovethedeck
belt(Figure4).
7.Installthethree(blowerpulley)nutssothattheyare
ngertight(Figure5).
8.Installthepulleymount/spindlepulleyassemblyonto
thedeck(Figure5).
9.Installtheexistingpulleywasherandnutonthepulley
spindle(
Note:Torquethenutto136–149N-m(100–110ft-lb)
10.Slidetheblowerpulleyintothepulleymount/spindle
pulleyassembly(Figure5).
Note:Reachunderthepulleywithyourngeror
screwdrivertoliftthepulleymounttoeaseinstallation
ofblowerpulley.
11.Turnthepulley ,lockingitintoposition.
12.Holdtheblowerpulleyintopositionandtightenthe3
nuts,ensuringthatthepulleystayslockedintoposition.
Note:Torquethenutsto41to46N-m±3N-m(30
to34ft-lb).
Figure5).
Figure4
1.Clutchpulley5.Squareholeintheidler
2.Deckbelt6.Idlergreasezerk
3.Springloadedidlerpulley
4.Ratchet
4.Removethenutandwasherontheexistingmower
deck(spindle)pulley(Figure5).
5.Removethespindlepulley(
armfortheratchet
7.Beltguide
Figure5).
3
Page 4

g018604
5
6
7
1
2
3
4
4
1
5
2
3
4
1
4
6
g018605
InstallingtheBafe
Partsneededforthisprocedure:
1
Bafe
1
Bolt(5/16x7/8inch)
2
Bolt(3/8x7/8inch)
1
Flangenut(5/16inch)
2
Flangenut(3/8inch)
Procedure
1.Removethe2existingnutsandbolts(Figure6).
2.Installthebafeusingthenewnutsandboltssupplied
withthiskit(Figure6).
Figure5
1.Existingpulleynut
2.Existingpulleywasher6.Pulleymount
3.Blowerpulley7.Pulleyspindle
4.Locknuts
13.Installthedeckbelt(Figure4).
14.Installtheoorpan.
5.Existingdeck(spindle)
pulley
Figure6
1.Bolt(3/8x7/8)4.Flangenut(3/8inch)
2.Flangenut(5/16inch)
3.Bolt(5/16x7/8)6.Bafe
5.Deck
4
Page 5

5
1
2
3
4
5
g018382
g018606
6
InstallingtheBlowerAssembly
Partsneededforthisprocedure:
1Pivotpin
1BlowerAssembly
1
Rollpin3/16x7/8inches
Procedure
Verifythepivotpinissecuredontheblowerassemblyinthe
correctlocation(Figure7).
•Ifyouhavea48inchor52inchdeck,installthepivotpin
intheforwardhole(Figure7).
•Ifyouhavea60inchdeck,installthepivotpininthe
backhole(Figure7).
InstallingtheNewBeltCover
Bracketfor48and52inch
Mowers
Partsneededforthisprocedure:
1Beltcoverbracket
2
Carriagebolt(1/4x3/4inches)
2
Locknut(1/4inch)
Procedure
Installthebeltcoverbracketwith2carriagebolts(1/4x3/4
inches)and2locknuts(1/4inch)(Figure8).
Figure7
1.Blowerassembly4.Rollpin
2.Forwardhole5.Pivotpin
3.Backhole
Figure8
1.Locknut(1/4inch)3.Bracketfor48inchand52
inchmowerdecks
2.Carriagebolt(1/4x3/4
inches)
5
Page 6

7
g018607
8
InstallingtheNewBeltCover Bracketfor60inchMowers
Partsneededforthisprocedure:
1Beltcoverbracket
2
Carriagebolt(1/4x3/4inches)
2
Locknut(1/4inch)
Procedure
Installthebeltcoverbracketwith2carriagebolts(1/4x3/4
inches)and2locknuts(1/4inch)(Figure9).
InstallingtheBaggerBelt, SpringandBlowerBeltCover
Partsneededforthisprocedure:
1Baggerbelt
1Blowerbeltcover
1
Spring
Procedure
RefertotheTwinSoftBaggerOperator'sManualforthecorrect
proceduretoinstalltheblower,baggerbelt,spring,and
blowerbeltcover.
Figure9
1.Locknut(1/4inch)3.Carriagebolt(1/4x3/4
2.Bracketfor60inchmower
decks
inches)
6
Page 7

Notes:
7
Page 8

 Loading...