

Page 1
BlowerandDriveKit
48in,52in,60inor72inE-ZVac™forZMaster
ModelNo.78551—SerialNo.290000001andUp
ModelNo.78552—SerialNo.290000001andUp
ModelNo.78553—SerialNo.290000001andUp
ModelNo.78554—SerialNo.290000001andUp
WARNING
CALIFORNIA
Proposition65Warning
ThisproductcontainsachemicalorchemicalsknowntotheStateofCaliforniato
causecancer,birthdefects,orreproductiveharm.
Note:Determinetheleftandrightsidesofthemachinefromthenormaloperatingposition.
FormNo.3371-270RevD
®
RidingMower
InstallationInstructions
LooseParts
Usethechartbelowtoverifythatallpartshavebeenshipped.
ProcedureDescription
1
2
3
4
5
6
Nopartsrequired
Nopartsrequired
Pulleyassembly1Installthepulleyassemblyandbelt.
Beltcoverbracket1
Carriagebolt(1/4x3/4inches)
Locknut(1/4inch)
Beltcoverbracket1
Carriagebolt(1/4x3/4inches)
Locknut(1/4inch)
Blowerassembly1
Baggerbelt1
Blowerbeltcover1
Spring
Qty.
Use
–
–
2
2
2
2
1
Preparethemower.
Removetheexistingbeltcover,belt,
andbracket.
Installthenewbeltcoverbracketfor48and52-inchmowers.
Installthenewbeltcoverbracketfor60and72-inchmowers.
Installtheblower,baggerbelt,spring,
andbeltcover .
©2015—TheT oro®Company
8111LyndaleAvenueSouth
Bloomington,MN55420
Registeratwww.T oro.com.
OriginalInstructions(EN)
PrintedintheUSA
AllRightsReserved
*3371-270*D
Page 2
1
G009036
1
2
2
PreparingtheMower
NoPartsRequired
Procedure
Performthefollowingproceduretopreparethemowerfor
attachingtheblowerandnishingkit.
1.DisengagethePTO ,movethemotion-controllevers
totheNEUTRAL-LOCKEDpositionandsettheparking
brake.
2.Stoptheengine,removethekey,andwaitforallmoving
partstostopbeforeleavingtheoperatingposition.
3.Repairallbentordamagedareasofmowerdeckand
replaceanymissingparts.
4.Cleanthemowerofanydebrisonthedeckorrearpart
ofthemowertoeaseinstallation.
RemovingtheExistingBelt
Cover,Belt,andBracket
NoPartsRequired
Procedure
Note:Cleantheareaaroundthebeltcoverbeforeremoving.
1.Lowerthemowerdecktothelowestheight-of-cut
position.
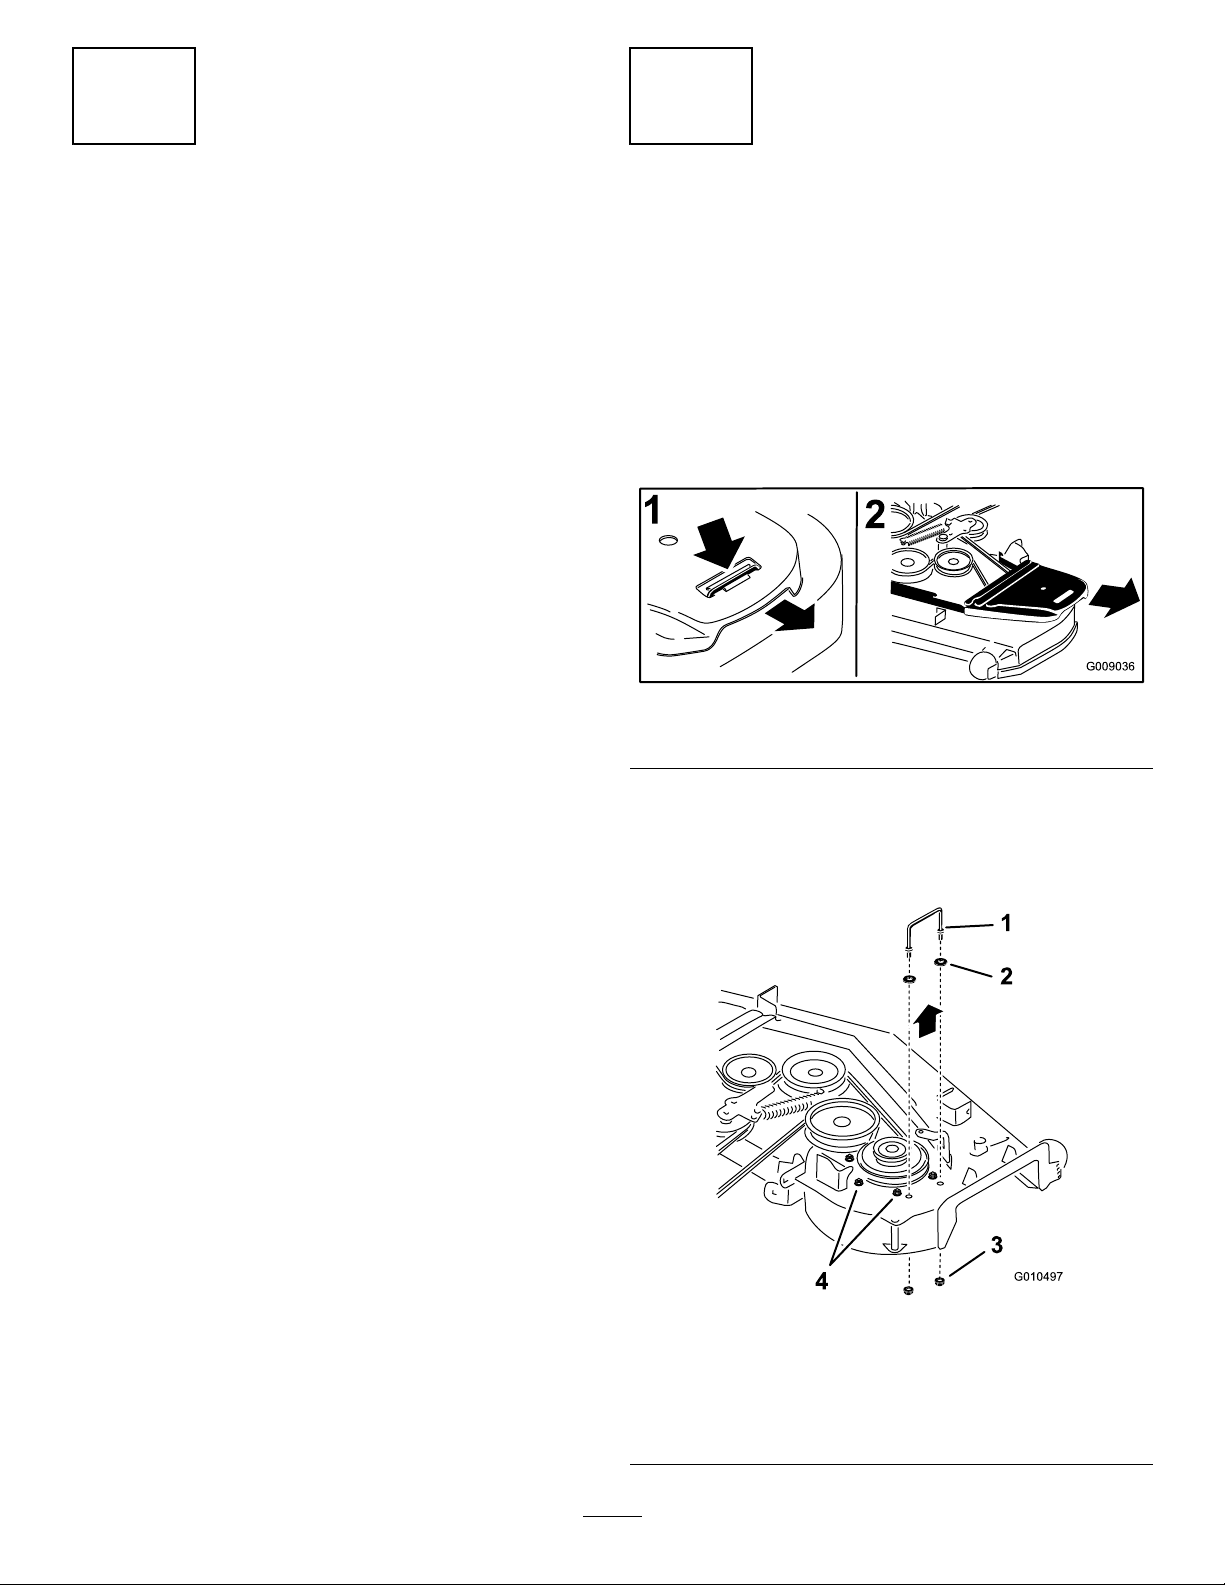
2.Removetherightbeltcover(Figure1).
Figure1
1.Pushtabdown.2.Removebeltcover.
3.For48-and52-inchmowersonly:Loosenthebolts
holdingtherightspindletothemowerdeck(Figure2).
Note:Thiswillallowaccesstothenutsholdingthe
rightbeltcoverbrackettothemowerdeck.
Figure2
48-and52-inchmowerdeckshown
1.Rightbeltcoverbracket3.Flangenut
2.Washer4.Loosenthesebolts.
2
Page 3
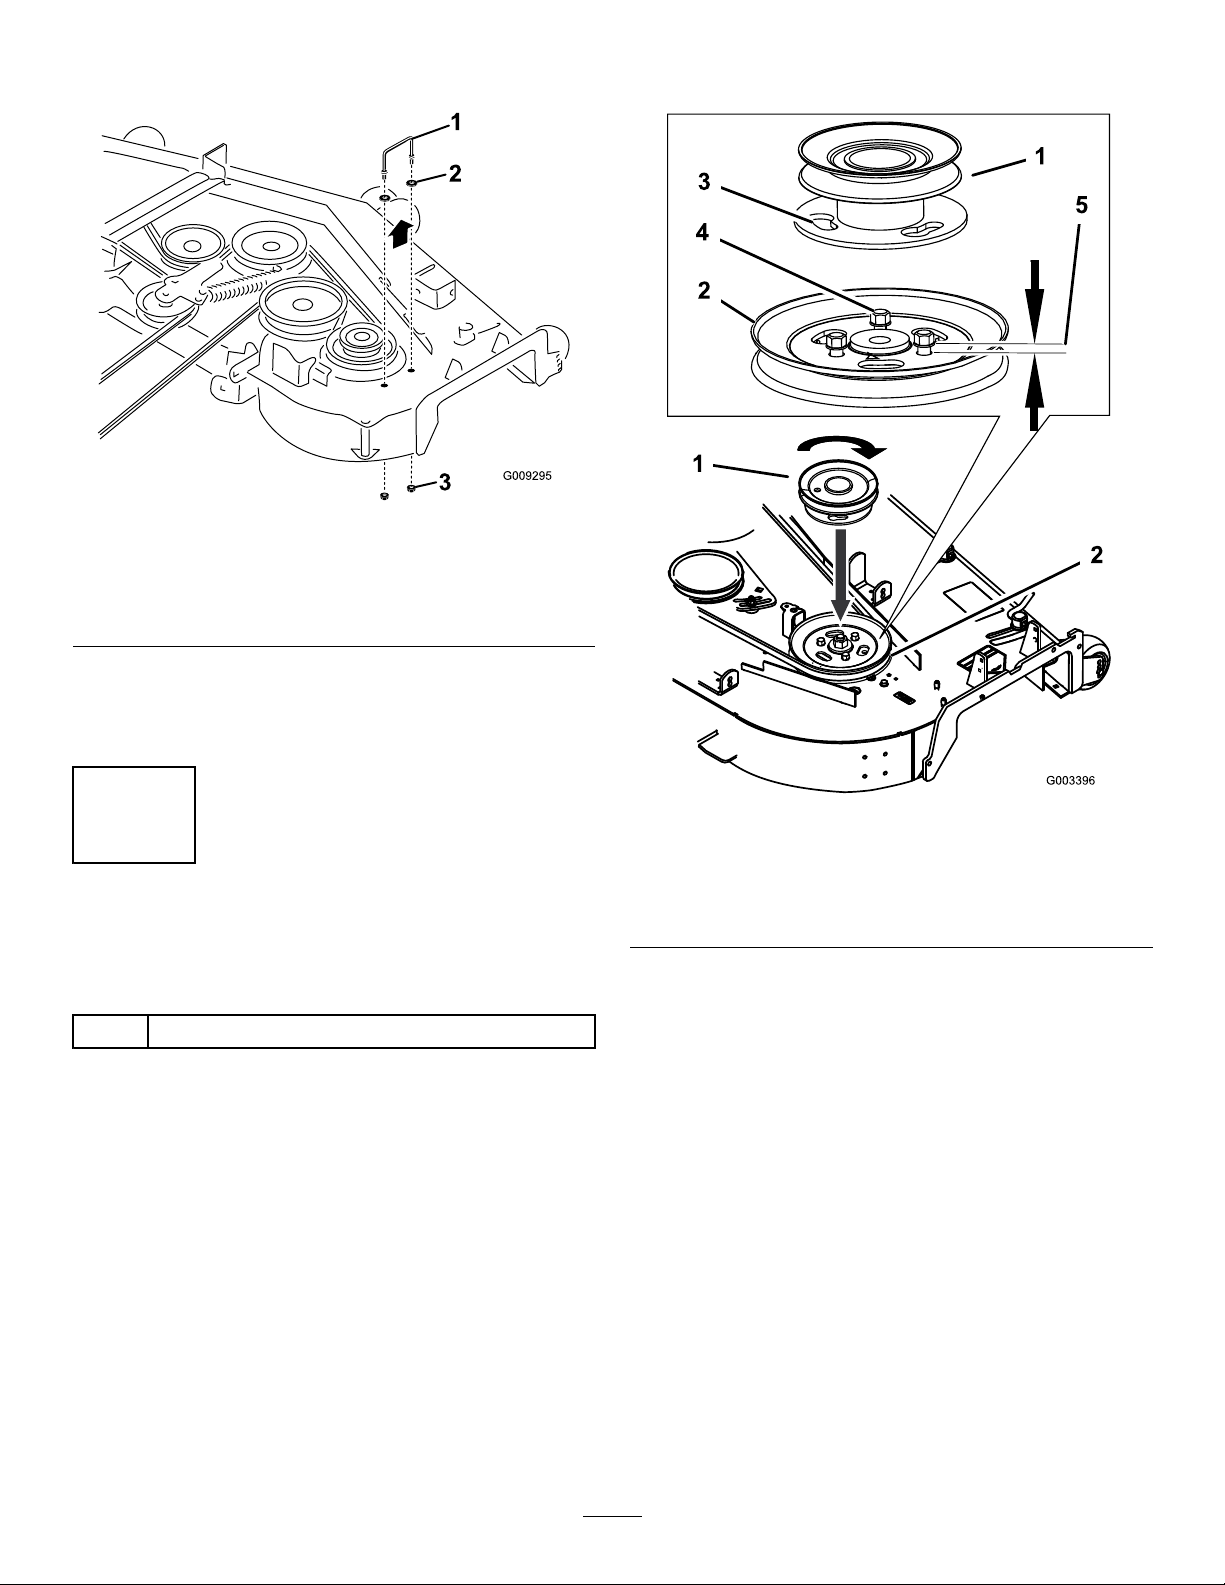
4.Removetheexistingrightbeltcoverbracket(Figure
2andFigure3).
Figure3
60-and72-inchmowerdeckshown
1.Rightbeltcoverbracket3.Flangenut
2.Washer
Note:Torquetheboltsto28to34N-m(21to25
ft-lb).
5.Storetherightbeltcover,bracket,andhardwarefor
lateruseifyouremovethebaggerblowerandpulley .
6.Removeandretainthedeckbelt.
3
InstallingthePulleyAssembly
andBelt
Partsneededforthisprocedure:
1Pulleyassembly
ForUnitswithBolts
1.Loosen,butdonotremove,thetappingboltsonthe
existingmower-deckpulley(Figure4).
Note:Thereshouldbea5mm(3/16inch)clearance
betweentheboltheadandpulley.
1.Pulley
assembly
2.Mower-deck
pulley
5.Installthedeckbelt.
Figure4
3.Lockingslots
4.Boltheads
5.Clearance—5
mm(3/16inch)
2.Alignthenewpulleyassemblysothattheopeningst
overthepulleyboltheads(Figure4).
3.Turnthepulleytolockitintoposition(Figure4).
Note:Ifthepulleydoesnotturn,loosenthebolts
moretoraisetheboltheadsandallowthepulleyto
lockintoposition.
4.Afterthenewpulleyassemblyisinposition,tightenthe
existingboltstosecurenewpulleyassembly.
3
Page 4

ForUnitswithoutBolts
g017234
1
2
3
4
1
2
1.Removethenutsontheexistingmower-deckpulley
(Figure5).
2.Installthenewpulleyassemblyontothemower-deck
pulleybolts(Figure5).
3.Turnthepulleytolockitintoposition(Figure5).
4.Afterthenewpulleyassemblyisinposition,installthe
nutstosecurenewpulleyassembly.
Note:Torquethenutsto28to34N-m(21to25ft-lb).
4
InstallingtheNewBeltCover
Bracket
48-and52-inchMowers
Partsneededforthisprocedure:
1Beltcoverbracket
2
Carriagebolt(1/4x3/4inches)
2
Locknut(1/4inch)
Procedure
Installthebeltcoverbracketwith2carriagebolts(1/4x3/4
inches)and2locknuts(1/4inch)asshowninFigure6.
1.Pulley
5.Installthedeckbelt.
Figure6
1.Locknut,(1/4inch)3.Carriagebolt(1/4x3/4
Figure5
assembly
2.Mower-deck
pulley
3.Locking
slots
4.Nuts
2.Bracketfor48-and52-inch
mowerdecks
inches)
4
Page 5

5
6
InstallingtheNewBeltCover
Bracket
60-and72-inchMowers
Partsneededforthisprocedure:
1Beltcoverbracket
2
Carriagebolt(1/4x3/4inches)
2
Locknut(1/4inch)
Procedure
Installthebeltcoverbracketwith2carriagebolts(1/4x3/4
inches)and2locknuts(1/4inch)asshowninFigure7.
InstallingtheBlower
Assembly,BaggerBelt,
SpringandBlower-BeltCover
Partsneededforthisprocedure:
1Blowerassembly
1Baggerbelt
1Blowerbeltcover
1
Spring
Procedure
RefertothebaggerOperator'sManualforthecorrectprocedure
toinstalltheblower,baggerbelt,spring,andblower-belt
cover.
Figure7
1.Locknut,(1/4inch)3.Carriagebolt(1/4x3/4
inches)
2.Bracketfor60-and72-inch
mowerdecks
5
Page 6

Notes:
6
Page 7

Notes:
7
Page 8

 Loading...