

Page 1
Form No. 3357-831 Rev A
TimeCutter® ZX440 Riding
Mower
Model No. 74603 —Serial No. 270000001 and Up
Register your product at www.Toro.com Original Instructions (EN)
Page 2
Warning
CALIFORNIA
Pr oposition 65 W ar ning
T he engine exhaust fr om this pr oduct
contains chemicals kno wn to the State of
Calif or nia to cause cancer , bir th defects, or
other r epr oducti v e har m.
Important: T his engine is not equipped
with a spar k ar r ester muf fler . It is a
violation of Calif or nia Public R esource Code
Section 4442 to use or operate the engine
on an y f or est-co v er ed, br ush-co v er ed, or
g rass-co v er ed land. Other states or federal
ar eas may ha v e similar la ws.
and serial n umbers on the product. W rite the
n umbers in the space pro vided.
T his spark ignition system complies with Canadian
ICES-002
T he enclosed Engine Owner’ s Man ual is
supplied f or inf or mation r egarding the US
En vir onmental Pr otection Agency (EP A) and
the Calif or nia Emission Contr ol R egulation of
emission systems, maintenance, and w ar ranty .
R eplacements may be order ed thr ough the
engine man uf actur er .
F or models with stated engine horse po w er , the
g ross horse po w er of the engine w as laborator y
rated b y the engine man ufacturer in accordance
with SAE J1940. As configured to meet safety ,
emission, and operating requirements , the actual
engine horse po w er on this class of la wn mo w er
will be significantly lo w er .
Introduction
R ead this infor mation carefully to lear n ho w to
operate and maintain y our product properly and
to a v oid injur y and product damag e . Y ou are
responsible for operating the product properly
and safely .
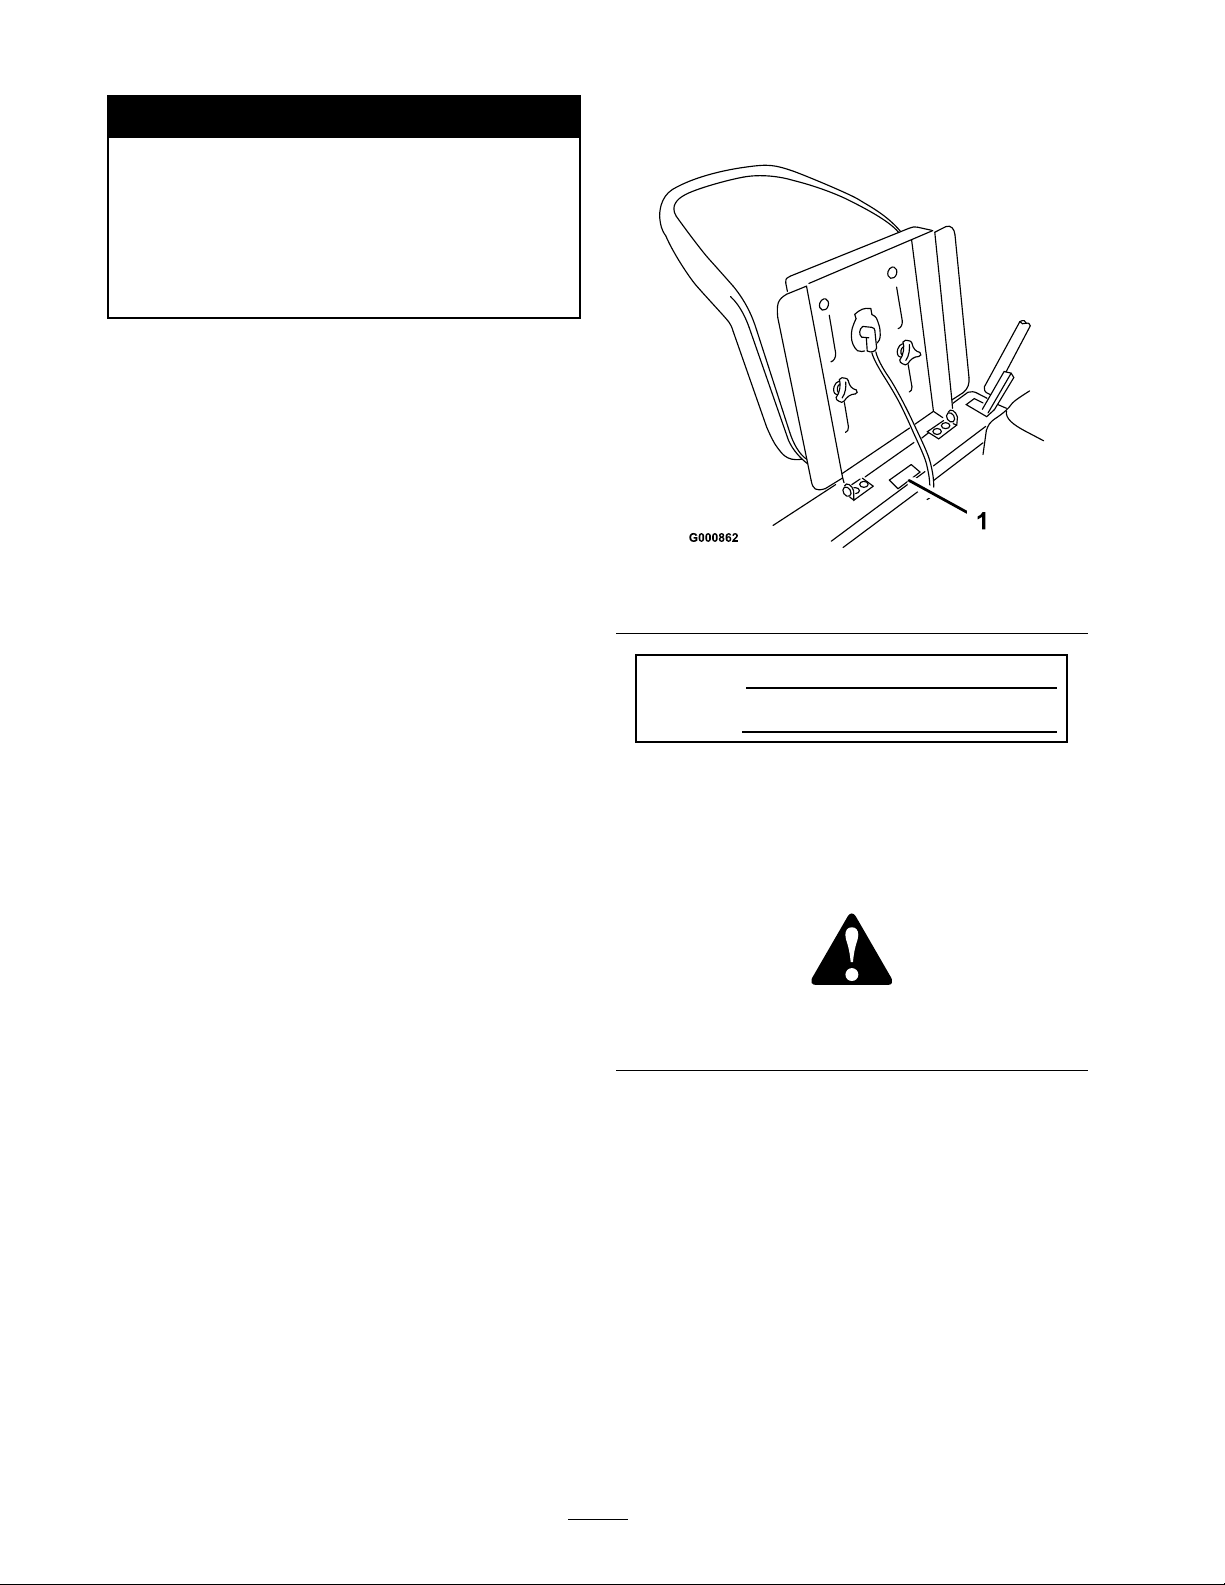
Figure 1
1. Model and serial number plate
Model No.
Serial No.
T his man ual identifies potential hazards and has
safety messag es identified b y the safety aler t
symbol ( Figure 2 ), whic h signals a hazard that ma y
cause serious injur y or death if y ou do not follo w
the recommended precautions .
Figure 2
1. Safety alert symbol.
T his man ual uses tw o other w ords to highlight
infor mation. Impor tant calls attention to special
mec hanical infor mation and Note emphasizes
g eneral infor mation w or th y of special attention.
Y ou ma y contact T oro directly at www .T oro .com
for product and accessor y infor mation, help
finding a dealer , or to register y our product.
W henev er y ou need ser vice , g en uine T oro par ts ,
or additional infor mation, contact an A uthorized
Ser vice Dealer or T oro Customer Ser vice and ha v e
the model and serial n umbers of y our product
ready . Figure 1 identifies the location of the model
© 2006—The Toro® Company
8111 Lyndale Avenue South
Bloomington, MN 55420
Contact us at www.Toro.com.
2
Printed in the USA.
All Rights Reserved
Page 3

Contents
Introduction . . . . . . . . . . . . . . . . . . . . . . . . . . . . . . . . . . . . . . . . . . . . . . . . . . . . . . . 2
Safety . . . . . . . . . . . . . . . . . . . . . . . . . . . . . . . . . . . . . . . . . . . . . . . . . . . . . . . . . . . . . . . . . . 4
Safe Operating Practices . . . . . . . . . . . . . . . . . . . . . . 4
T oro Riding Mo w er Safety . . . . . . . . . . . . . . . . . . . 6
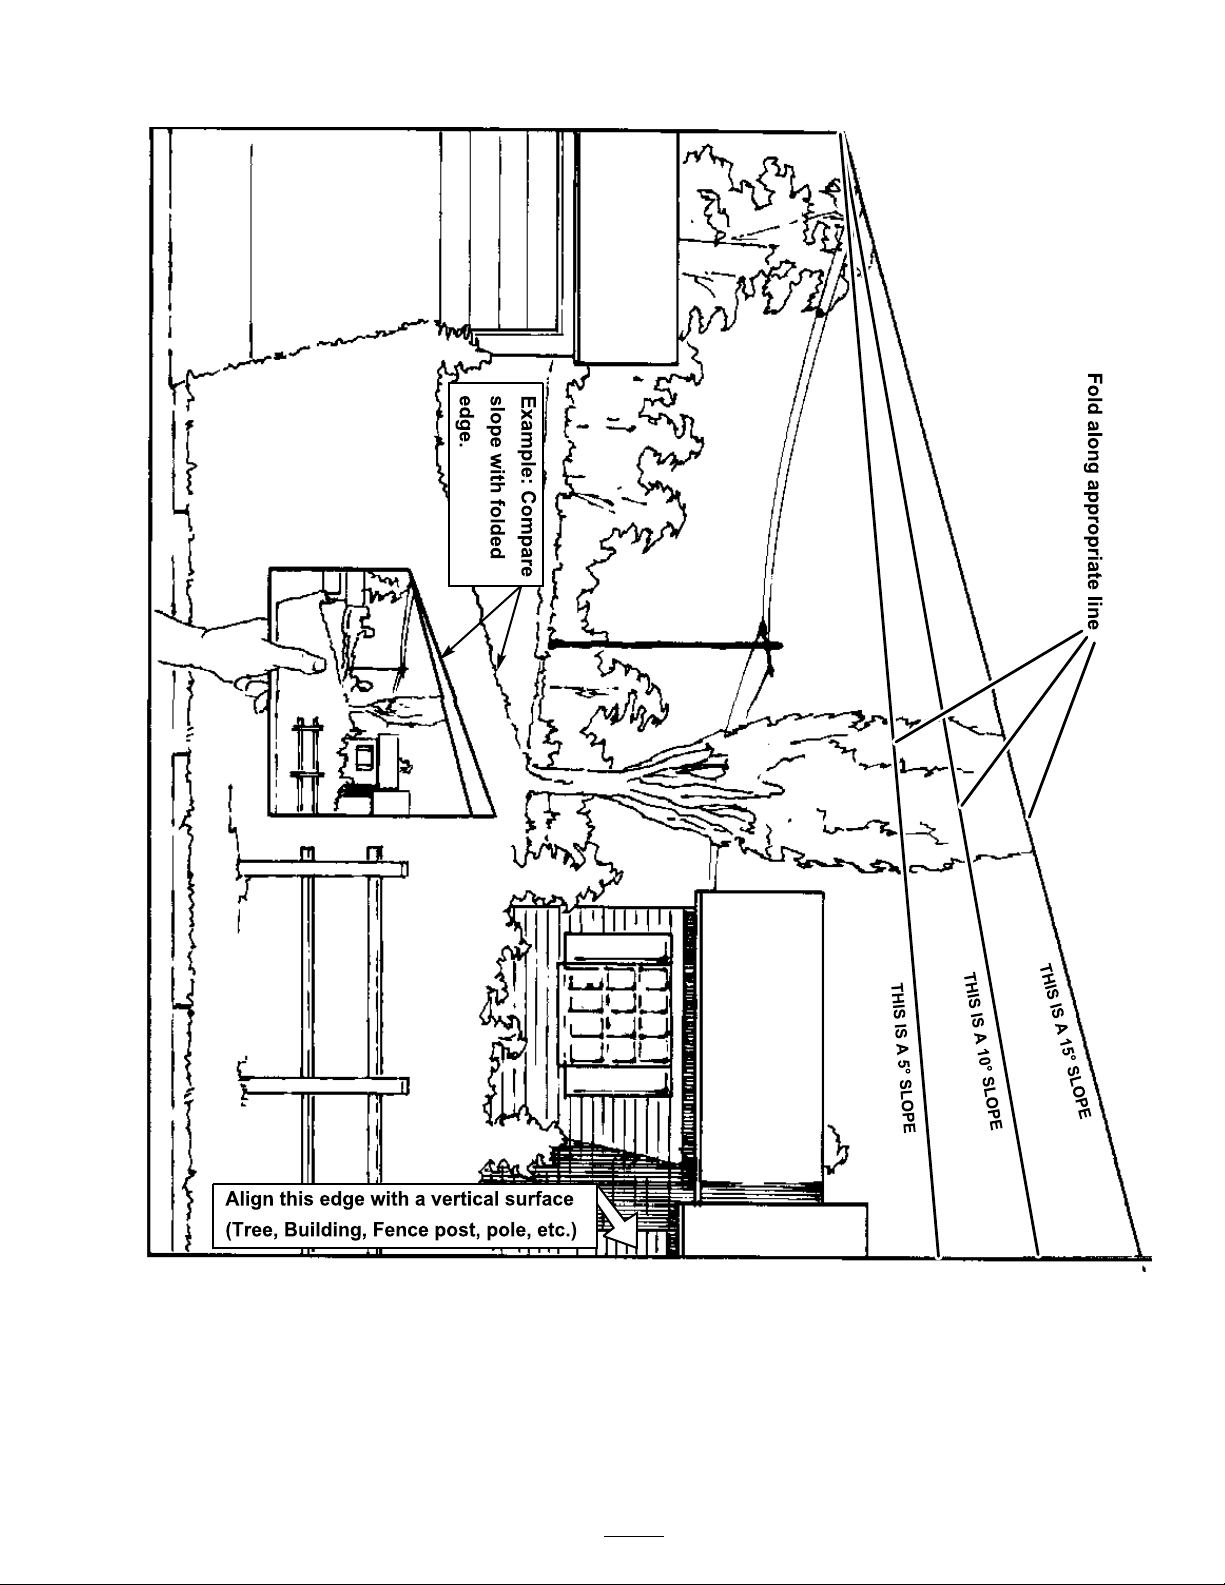
Slope Char t . . . . . . . . . . . . . . . . . . . . . . . . . . . . . . . . . . . . . . . . . 7
Safety and Instr uctional Decals . . . . . . . . . . . . 8
Product Ov er view . . . . . . . . . . . . . . . . . . . . . . . . . . . . . . . . . . . . . . . . . . . . . 11
Controls . . . . . . . . . . . . . . . . . . . . . . . . . . . . . . . . . . . . . . . . . . . 11
Operation . . . . . . . . . . . . . . . . . . . . . . . . . . . . . . . . . . . . . . . . . . . . . . . . . . . . . . . . . . 12
T hink Safety First . . . . . . . . . . . . . . . . . . . . . . . . . . . . . . 12
R ecommended Gasoline . . . . . . . . . . . . . . . . . . . . 12
Chec king the Engine Oil Lev el . . . . . . . . . . . 14
Using the P arking Brak e . . . . . . . . . . . . . . . . . . . . . 14
Star ting and Stopping the
Engine . . . . . . . . . . . . . . . . . . . . . . . . . . . . . . 14
Operating the Blades . . . . . . . . . . . . . . . . . . . . . . . . . 15
T he Safety Interloc k System . . . . . . . . . . . . . . . 15
Dri ving F orw ard or Bac kw ard . . . . . . . . . . . . 16
Stopping the Mac hine . . . . . . . . . . . . . . . . . . . . . . . . 17
Adjusting the Height of Cut . . . . . . . . . . . . . . . 17
Adjusting the Anti-Scalp
R ollers . . . . . . . . . . . . . . . . . . . . . . . . . . . . . . . 17
P ositioning the Seat . . . . . . . . . . . . . . . . . . . . . . . . . . . 18
Adjusting the Motion Control
Lev ers . . . . . . . . . . . . . . . . . . . . . . . . . . . . . . . 18
Pushing the Mac hine b y Hand . . . . . . . . . . . . 18
Side Disc harg e . . . . . . . . . . . . . . . . . . . . . . . . . . . . . . . . . . . 19
Operating Tips . . . . . . . . . . . . . . . . . . . . . . . . . . . . . . . . . . 19
Maintenance . . . . . . . . . . . . . . . . . . . . . . . . . . . . . . . . . . . . . . . . . . . . . . . . . . . . . . 21
R ecommended Maintenance
Sc hedule(s) . . . . . . . . . . . . . . . . . . . . . . . . . . . . . . . 21
Lubrication . . . . . . . . . . . . . . . . . . . . . . . . . . . . . . . . . . . . . . . . . . . . . . . . 21
Ho w to Grease . . . . . . . . . . . . . . . . . . . . . . . . . . . . . . . . . . 21
W here to Add Grease . . . . . . . . . . . . . . . . . . . . . . . . 22
Engine Maintenance . . . . . . . . . . . . . . . . . . . . . . . . . . . . . . . . . . 22
Ser vicing the Engine Oil . . . . . . . . . . . . . . . . . . . . 22
Ser vicing the Air Cleaner . . . . . . . . . . . . . . . . . . . 23
Spark Plug . . . . . . . . . . . . . . . . . . . . . . . . . . . . . . . . . . . . . . . . . 25
Fuel System Maintenance . . . . . . . . . . . . . . . . . . . . . . . . . . 25
Draining the Fuel T ank . . . . . . . . . . . . . . . . . . . . . . 25
R e placing the Fuel Filter . . . . . . . . . . . . . . . . . . . . 26
Electrical System Maintenance . . . . . . . . . . . . . . . . . . . 26
Ser vicing the Batter y . . . . . . . . . . . . . . . . . . . . . . . . . . 26
Ser vicing the Fuses . . . . . . . . . . . . . . . . . . . . . . . . . . . . 28
Dri v e System Maintenance . . . . . . . . . . . . . . . . . . . . . . . . . 29
Chec king the Tire Pressure . . . . . . . . . . . . . . . . . 29
Mo w er Maintenance . . . . . . . . . . . . . . . . . . . . . . . . . . . . . . . . . . 29
Ser vicing the Cutting Blades . . . . . . . . . . . . . . . 29
Lev eling the Mo w er from
Side-to-Side . . . . . . . . . . . . . . . . . . . . . . . 31
Adjusting the F ront-to-R ear Blade
Slope . . . . . . . . . . . . . . . . . . . . . . . . . . . . . . . . . 32
R emo ving the Mo w er . . . . . . . . . . . . . . . . . . . . . . . . 33
Inspecting the Belts . . . . . . . . . . . . . . . . . . . . . . . . . . . 33
R e placing the Mo w er Belt . . . . . . . . . . . . . . . . . . 33
Installing the Mo w er . . . . . . . . . . . . . . . . . . . . . . . . . . 34
R e placing the Grass Deflector . . . . . . . . . . . . 35
Cleaning . . . . . . . . . . . . . . . . . . . . . . . . . . . . . . . . . . . . . . . . . . . . . . . . . . . . 35
W ashing the Underside of the
Mo w er . . . . . . . . . . . . . . . . . . . . . . . . . . . . . . . 35
Storag e . . . . . . . . . . . . . . . . . . . . . . . . . . . . . . . . . . . . . . . . . . . . . . . . . . . . . . . . . . . . . . 37
Cleaning and Storag e . . . . . . . . . . . . . . . . . . . . . . . . . 37
T roubleshooting . . . . . . . . . . . . . . . . . . . . . . . . . . . . . . . . . . . . . . . . . . . . . . . . 38
Sc hematics . . . . . . . . . . . . . . . . . . . . . . . . . . . . . . . . . . . . . . . . . . . . . . . . . . . . . . . . 41
3
Page 4

Safety
• Do not operate the mo w er without either the
entire g rass catc her or the guard in place .
T his machine meets or ex ceeds the B71.1-2003
specifications of the American National
Standards Institute, in ef fect at the time
of pr oduction. Ho w ev er , impr oper use or
maintenance by the operator or o wner can
r esult in injur y . T o r educe the potential f or
injur y , compl y with these safety instr uctions
and al w ays pay attention to the safety
aler t symbol, which means CA UTION ,
W ARNING , or D ANGER-"per sonal safety
instr uction." F ailur e to compl y with the
instr uction may r esult in per sonal injur y or
death.
Safe Operating Practices
T he follo wing instr uctions are from ANSI
standard B71.1-2003.
T his product is capable of amputating hands and
feet and thro wing objects . Alw a ys follo w all safety
instr uctions to a v oid serious injur y or death.
General Operation
• R ead, understand, and follo w all instr uctions
in the operator’ s man ual and on the mac hine
before star ting .
• Do not place hands or feet near rotating par ts
or under the mac hine . K ee p clear of the
disc harg e opening at all times .
• Allo w only responsible adults who are familiar
with the instr uctions to operate the mac hine .
• Clear the area of objects suc h as roc ks , to ys ,
wire , etc ., whic h could be pic k ed up and
thro wn b y the blade .
• Be sure the area is clear of other people before
mo wing . Stop the mac hine if any one enters
the area.
• Nev er car r y passeng ers .
• Do not mo w in rev erse unless absolutely
necessar y . Alw a ys look do wn and behind
before and while bac king up .
• Be a w are of the mo w er disc harg e direction and
do not point it at any one . A v oid disc harging
material ag ainst a w all or obstr uction. Material
ma y ricoc het bac k to w ard the operator . Stop
the blade(s) when crossing g ra v el surfaces .
• Be aler t, slo w do wn and use caution when
making tur ns . Look behind and to the side
before c hanging directions .
• Nev er lea v e a r unning mac hine unattended.
Alw a ys tur n off blades , set parking brak e , stop
engine , and remo v e k ey before dismounting .
• T ur n off blades when not mo wing . Stop the
engine and w ait for all par ts to come to a
complete stop before cleaning the mac hine ,
remo ving the g rass catc her or unclog ging the
disc harg e c hute .
• Operate the mac hine only in da ylight or g ood
ar tificial light.
• Do not operate the mac hine while under the
influence of alcohol or dr ugs .
• W atc h for traffic when operating near or
crossing roadw a ys .
• Use extra care when loading or unloading the
mac hine into a trailer or tr uc k.
• Alw a ys w ear eye protection when operating
the mo w er .
• Data indicates that operators , ag e 60 years and
abo v e , are in v olv ed in a larg e percentag e of
riding mo w er -related injuries . T hese operators
should ev aluate their ability to operate the
riding mo w er safely enough to protect
themselv es and others from serious injur y .
• Alw a ys follo w the recommendations for wheel
w eights or counterw eights .
Slope Operation
Slopes are a major factor related to loss of control
and tip-o v er accidents , whic h can result in sev ere
injur y or death. Operation on all slopes requires
extra caution. If y ou cannot bac k up the slope or
if y ou feel uneasy on it, do not mo w it.
• Do not mo w slopes g reater than 15 deg rees .
• W atc h for ditc hes , holes , roc ks , dips , and rises
that c hang e the operating angle , as rough
ter rain could o v er tur n the mac hine .
• Choose a lo w g round speed so y ou will not
ha v e to stop while operating on a slope .
• Do not mo w slopes when g rass is w et. Slipper y
conditions reduce traction and could cause
sliding and loss of control.
4
Page 5

• Alw a ys k ee p the wheel motors eng ag ed when
g oing do wn slopes . Do not mo v e the motion
control lev ers to the neutral position and coast
do wnhill.
• R educe speed and use extreme caution on
slopes .
• Do not mak e sudden tur ns or rapid speed
c hang es .
• R emo v e or mark obstacles suc h as roc ks , tree
limbs , etc . from the mo wing area. T all g rass
can hide obstacles .
• A v oid sudden star ts when mo wing uphill
because the mo w er ma y tip bac kw ards .
• Be a w are that loss of traction ma y occur g oing
do wnhill. W eight transfer to the front wheels
ma y cause dri v e wheels to slip and cause loss
of braking and steering .
• Alw a ys a v oid sudden star ting or stopping on
a slope . If tires lose traction, diseng ag e the
blades and proceed slo wly off the slope .
• Use extreme care with g rass catc hers or other
attac hments . T hese can c hang e the stability of
the mac hine and cause loss of control.
• Do not tr y to stabilize the mac hine b y putting
y our foot on the g round.
• Do not mo w near drop-offs , ditc hes , stee p
banks or w ater . W heels dropping o v er edg es
can cause rollo v ers , whic h ma y result in serious
injur y , death or dro wning .
• Nev er car r y c hildren, ev en with the blades off .
T hey ma y fall off and be seriously injured or
interfere with safe mac hine operation.
• Children who ha v e been gi v en rides in the past
ma y suddenly appear in the mo wing area for
another ride and be r un o v er or bac k ed o v er
b y the mo w er .
• Nev er allo w c hildren to operate the mac hine .
• Use extra care when approac hing blind cor ners ,
shr ubs , trees , the end of a fence or other
objects that ma y obscure vision.
Towing
• T o w only with a mac hine that has a hitc h
designed for to wing . Do not attac h to w ed
equipment ex ce pt at the hitc h point.
• T his product has a limited to wing capacity
for small attac hments up to 100 lbs; suc h
as leaf sw ee pers and spreaders . T o wing of
attac hments should be limited to flat g round.
• Nev er allo w c hildren or others in or on to w ed
equipment.
• On slopes , the w eight of to w ed equipment ma y
cause a loss of traction and control. T o wing on
slopes is not recommended.
• T ra v el slo wly and allo w extra distance to stop .
Service
• Use a w alk behind mo w er and/or a hand
trimmer near drop-offs , ditc hes , stee p banks
or w ater .
Children
T ragic accidents can occur if the operator is not
aler t to the presence of c hildren. Children are
often attracted to the mac hine and the mo wing
acti vity . Nev er assume that c hildren will remain
where y ou last sa w them.
• K ee p c hildren out of the mo wing area and
under the w atc hful care of another responsible
adult, not the operator .
• Be aler t and tur n the mac hine off if c hildren
enter the area.
• Before and while bac king or c hanging
direction, look behind, do wn, and side-to-side
for small c hildren.
Safe Handling of Gasoline:
T o a v oid personal injur y or proper ty damag e , use
extra care when handling g asoline and other fuels .
T hey are flammable and the v apors are explosi v e .
• Extinguish all cig arettes , cig ars , pipes and other
sources of ignition.
• Use only an appro v ed container .
• Nev er remo v e the g as cap or add fuel when
the engine is r unning . Allo w the engine to cool
before refueling .
• Nev er refuel the mac hine indoors .
• Nev er store the mac hine or fuel container
inside where there is an open flame , suc h as
near a w ater heater or fur nace .
• Nev er fill containers inside a v ehicle or on
a tr uc k or trailer with a plastic liner . Alw a ys
5
Page 6

place containers on the g round a w a y from y our
v ehicle before filling .
• R emo v e g as-po w ered equipment from the
tr uc k or trailer and refuel it on the g round. If
this is not possible , then refuel suc h equipment
with a por table container , rather than from a
g asoline dispenser nozzle .
• K ee p the nozzle in contact with the rim of the
fuel tank or container opening at all times until
the fueling is complete . Do not use a nozzle
loc k-open device .
Toro Riding Mower Safety
T he follo wing list contains safety infor mation
specific to T oro products or other safety
infor mation that y ou m ust kno w that is not
included in the ANSI standards .
• Do not mo w slopes g reater than 15 deg rees .
• Engine exhaust contains carbon mono xide ,
whic h is an odorless , deadly poison that can
kill y ou. Do not r un engine indoors or in an
enclosed area.
• If fuel is spilled on clothing, c hang e clothing
immediately .
• Nev er o v erfill the fuel tank. R e place g as cap
and tighten securely .
General Ser vice:
• Nev er r un a mac hine inside a closed area.
• K ee p n uts and bolts tight, especially the blade
attac hment bolts . K ee p equipment in g ood
condition.
• Nev er tamper with safety devices . Chec k their
proper operation regularly .
• K ee p the mac hine free of g rass , lea v es , or other
debris build-up . Clean up oil or fuel spillag e
and remo v e fuel soak ed debris . Allo w the
mac hine to cool before storing .
• Stop and inspect the equipment if y ou strik e an
object. R e pair , if necessar y , before restar ting .
• Nev er mak e any adjustments or re pairs with
the engine r unning .
• Grass catc her components are subject to w ear ,
damag e and deterioration, whic h could expose
mo ving par ts or allo w objects to be thro wn.
F requently c hec k components and re place
with man ufacturer’ s recommended par ts , when
necessar y .
• Mo w er blades are shar p and can cut. W rap the
blade(s) or w ear glo v es , and use extra caution
when ser vicing them.
• Stop the engine , disconnect spark plug wire(s)
and remo v e k ey before perfor ming any ser vice ,
re pairs , maintenance or adjustments .
• K ee p hands , feet, hair , and loose clothing a w a y
from attac hment disc harg e area, underside of
mo w er and any mo ving par ts while engine is
r unning .
• Do not touc h equipment or attac hment par ts
whic h ma y be hot from operation. Allo w to
cool before attempting to maintain, adjust or
ser vice .
• Batter y acid is poisonous and can cause bur ns .
A v oid contact with skin, eyes , and clothing .
Protect y our face , eyes , and clothing when
w orking with a batter y .
• Batter y g ases can explode . K ee p cig arettes ,
sparks and flames a w a y from batter y .
• Use only T oro appro v ed attac hments .
W ar ranty ma y be v oided if used with
unappro v ed attac hments .
• If loading the mac hine onto a trailer or tr uc k,
use a single , full-width ramp only . T he ramp
angle should not ex ceed 15 deg rees .
Note: Deter mine the left and right sides
of the mac hine from the nor mal operating
position.
• Chec k for proper brak e operation frequently .
Adjust and ser vice as required.
• Maintain or re place safety and instr uction
decals as necessar y .
• Use only g en uine T oro re placement par ts to
ensure that original standards are maintained.
6
Page 7
Slope Chart
7
Page 8
Safety and Instructional
Decals
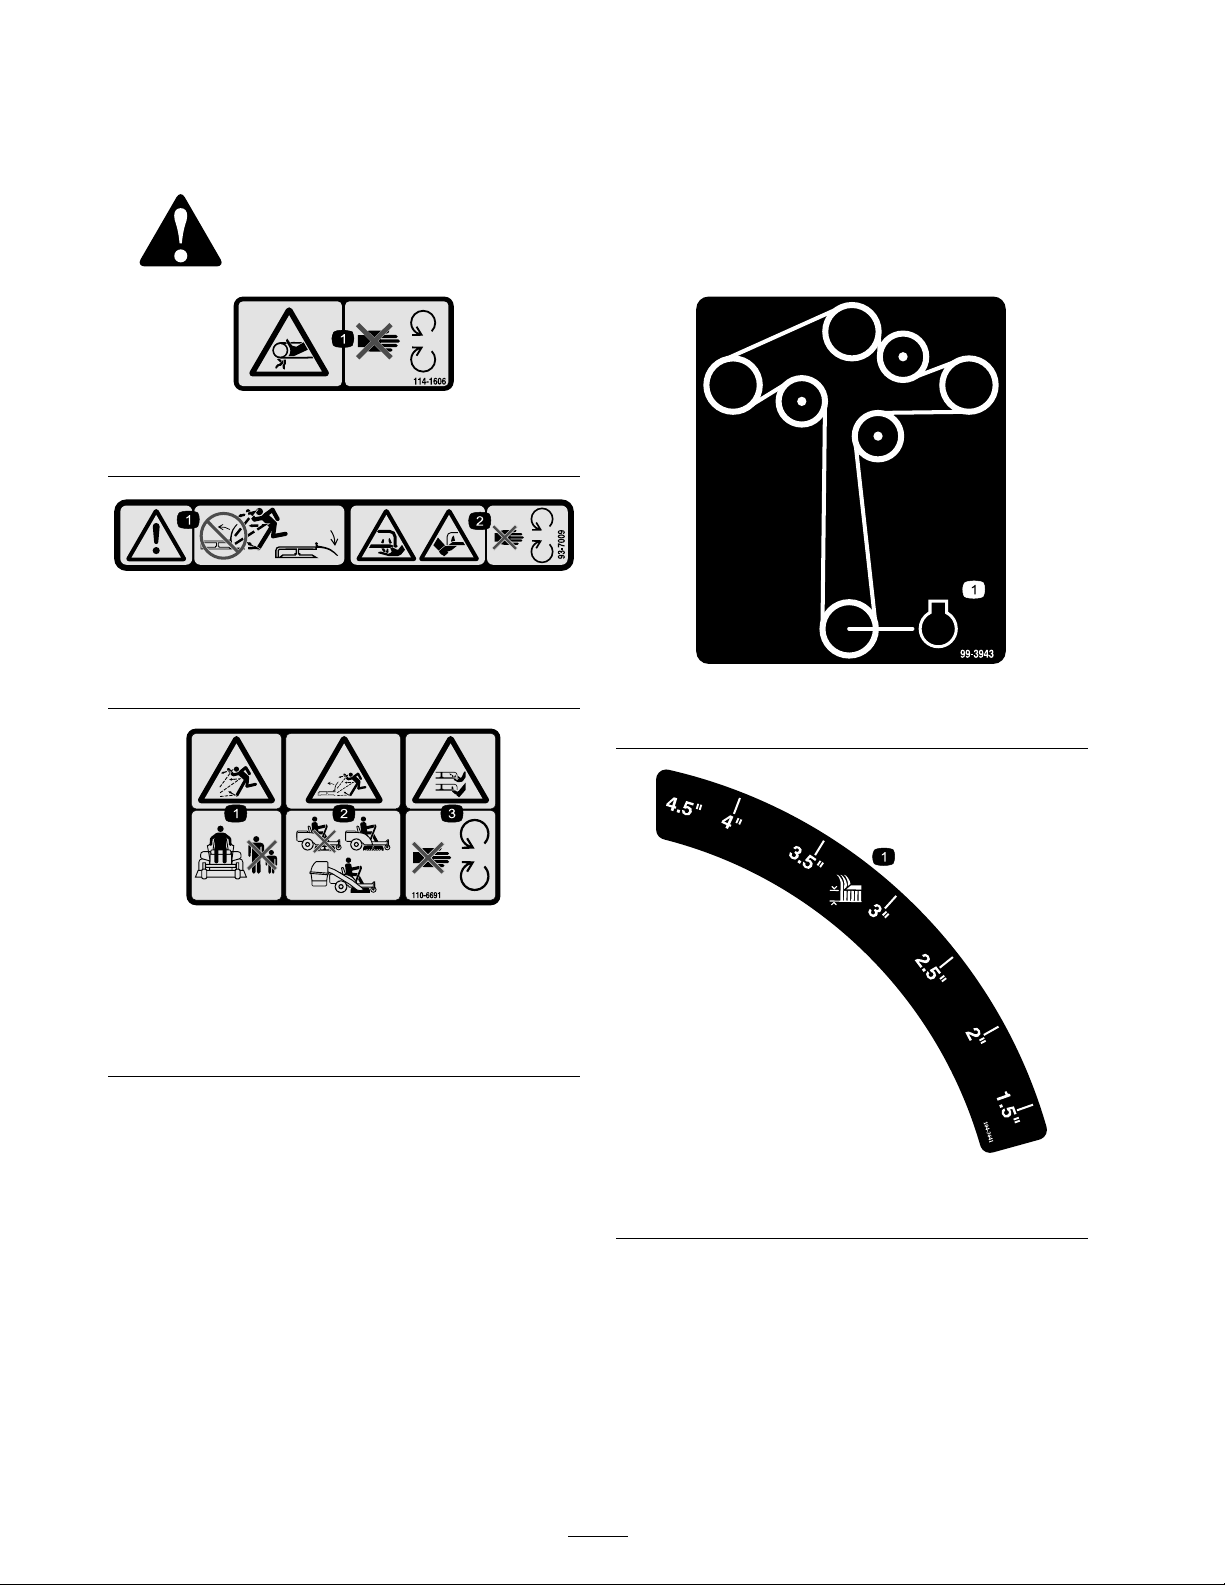
Safety decals and instr uctions are easily visible to the operator and are located near any
area of potential dang er . R e place any decal that is damag ed or lost.
114-1606
1. Entanglement hazard, belt—keep all guards in place.
93-7009
1. Warning—don’t operate the mower with the deector up or
removed; keep the deector in place.
2. Cutting/dismemberment hazard of hand or foot, mower
blade—stay away from moving parts.
99-3943
1. Engine
110-6691
1. Thrown object hazard—keep bystanders a safe distance from
the machine.
2. Thrown object hazard, mower—do not operate the without
deector or grass collection system in place.
3. Cutting/dismemberment of hand or foot—stay away from
moving parts.
104-3641
1. Height of cut
8
Page 9
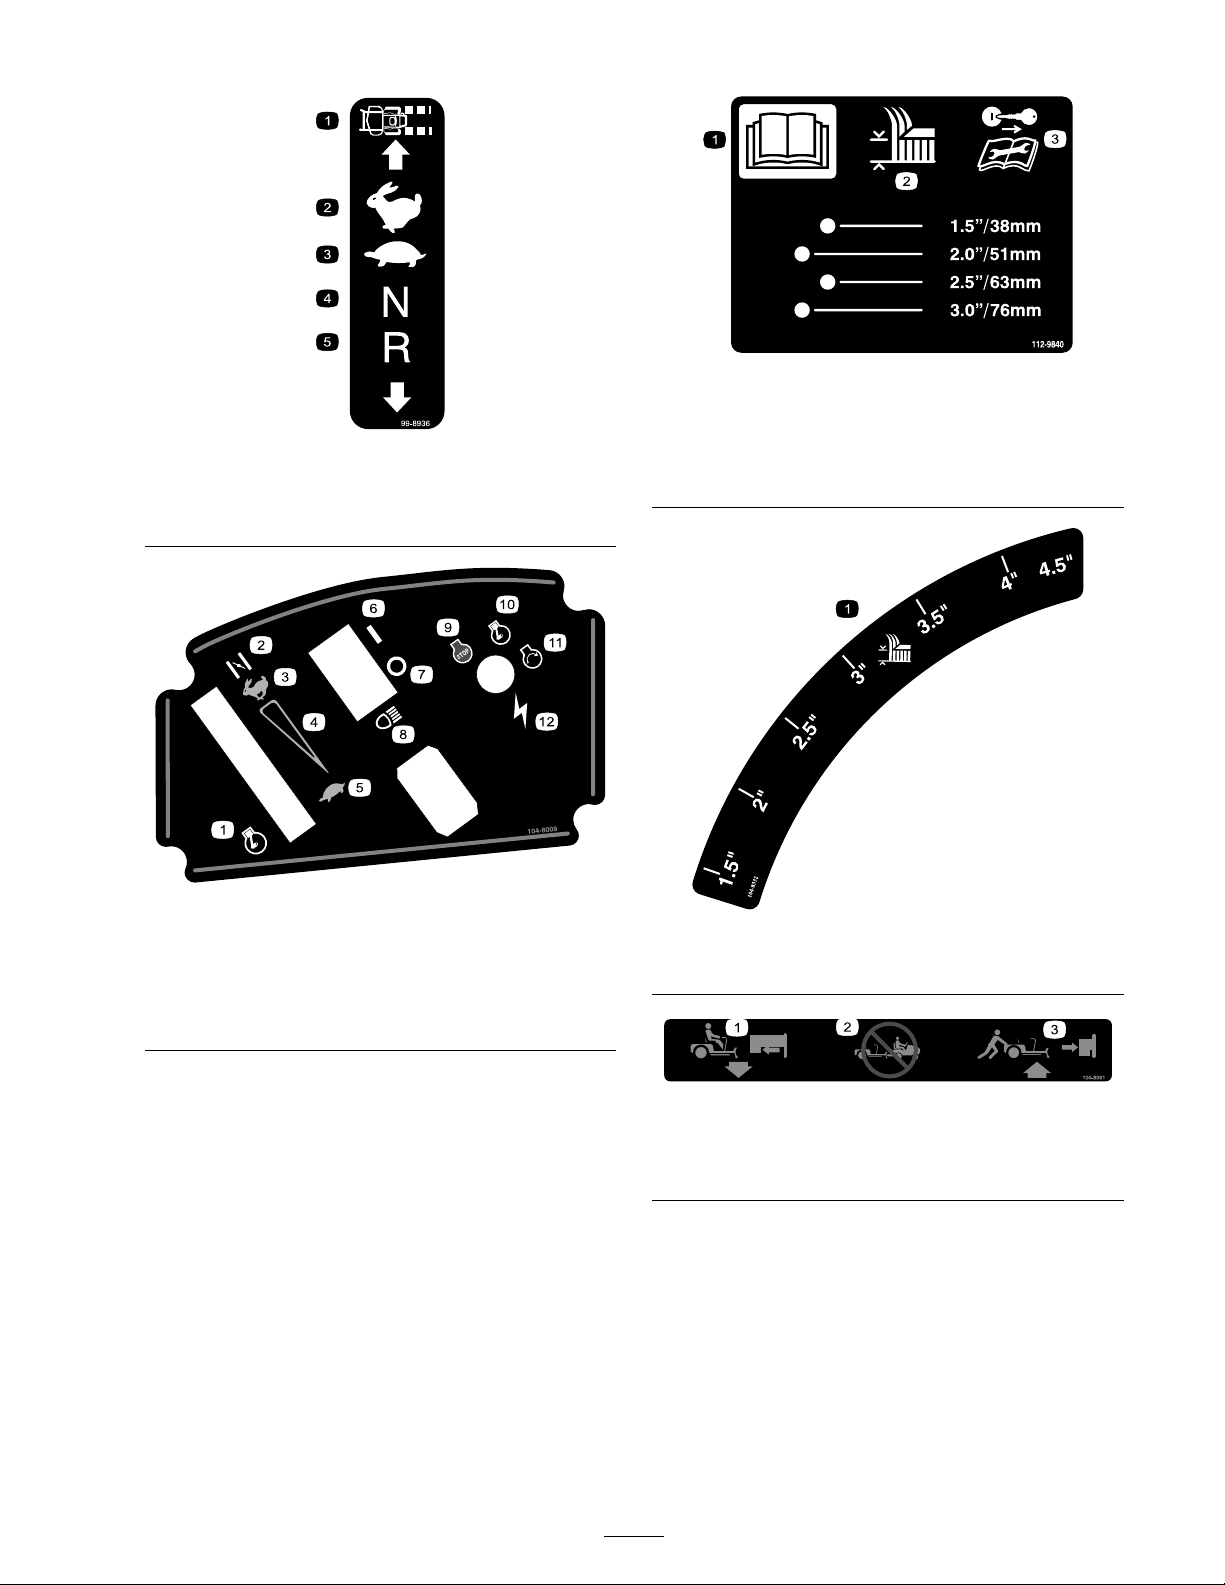
99-8936
1. Machine speed 4. Neutral
2. Fast
3. Slow
104-8009
1. Throttle 7. Headlights
2. Choke
3. Continuous variable setting
4. Slow
5. On
6. Off
112-9840
1. Read the Operator’s
Manual .
2. Height of cut
5. Reverse
3. Remove the ignition key
and read the instructions
before servicing or
performing maintenance.
104-8032
8. Engine—stop
9. Engine—run
10. Engine—start
11. Ignition
1. Height of cut
1. To ride the machine, pull
the lever out.
2. Do not tow the machine.
9
104-8061
3. To push the machine, push
the lever in.
Page 10
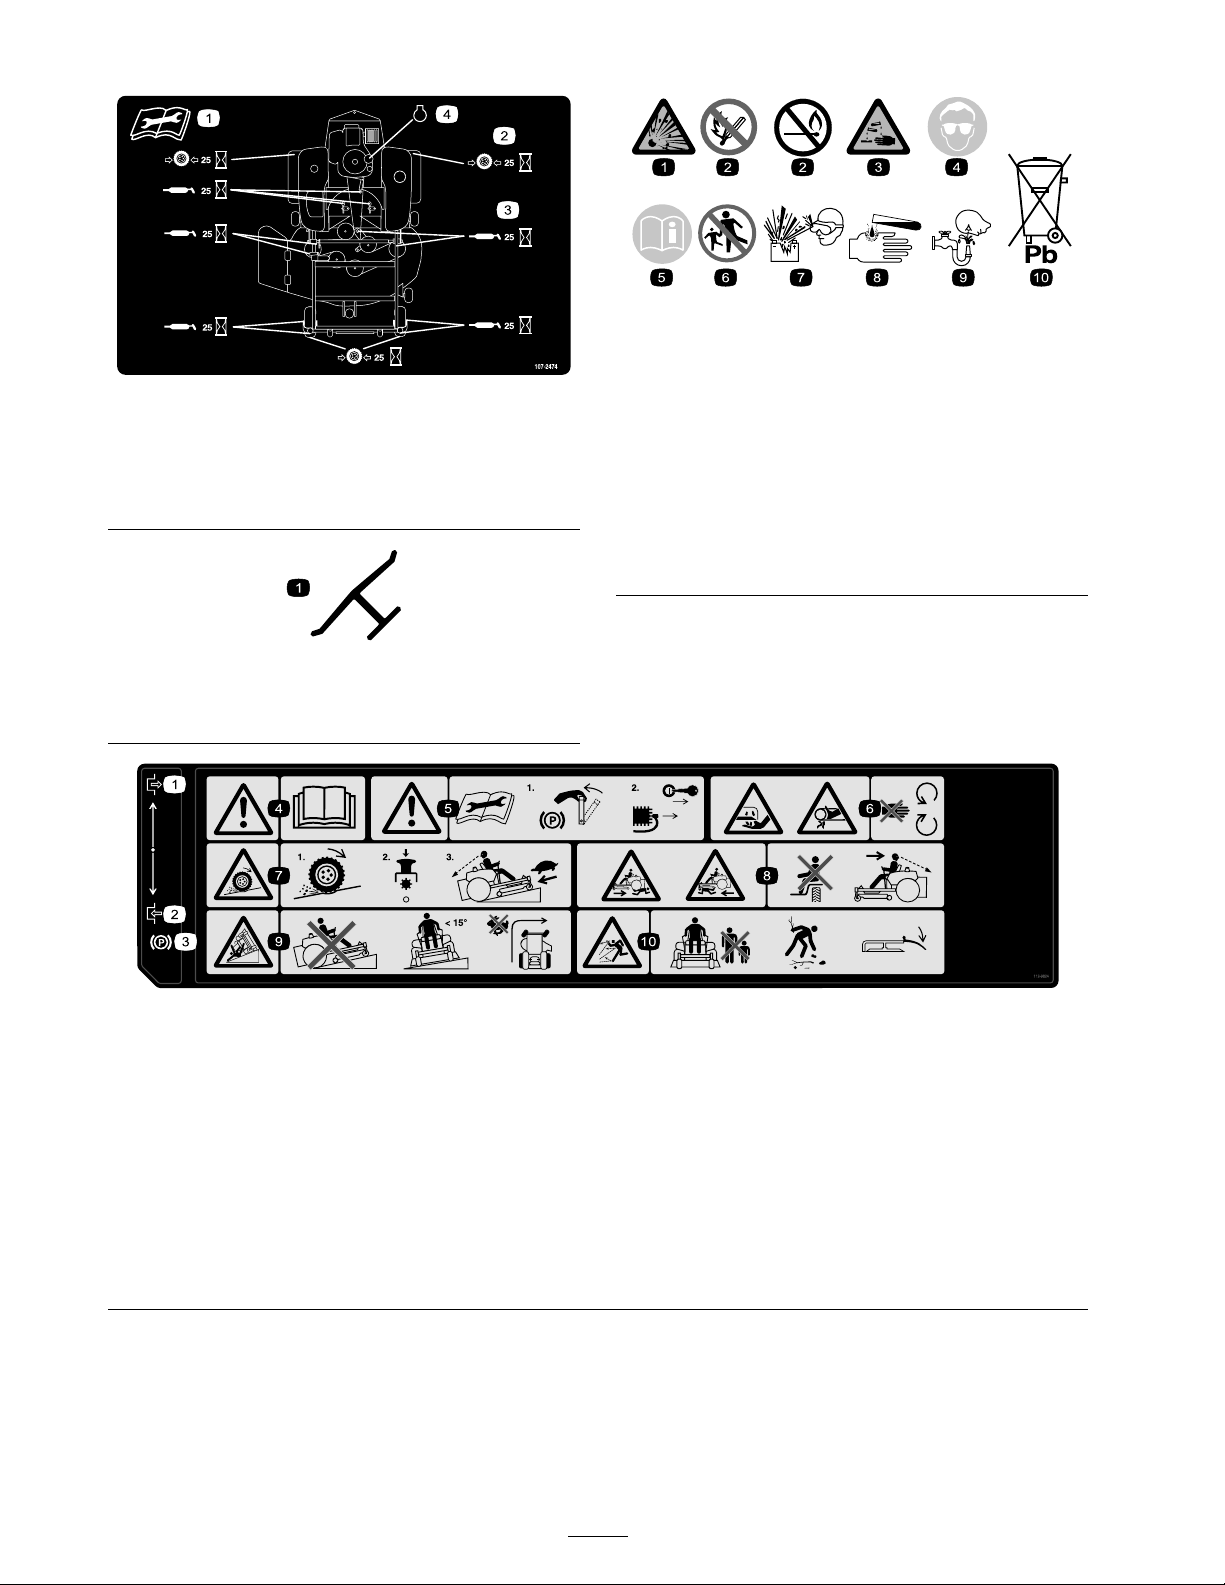
107-2474
1. Read the instructions before
servicing or performing
maintenance.
2. Check the tire pressure
every 25 operating hours.
3. Grease every 25 operating
hours.
4. Engine
Manufacturer’s Mark
1. Indicates the blade is identied as a part from the original
machine manufacturer.
Battery Symbols
Some or all of these symbols are on your battery
1. Explosion hazard 6. Keep bystanders a safe
2. No re, open ame, or
smoking.
3. Caustic liquid/chemical
burn hazard
4. Wear eye protection
5. Read the Operator’s
Manual.
distance from the battery.
7. Wear eye protection;
explosive gases can cause
blindness and other injuries
8. Battery acid can cause
blindness or severe burns.
9. Flush eyes immediately
with water and get medical
help fast.
10. Contains lead; do not
discard.
112-9824
1. Engage
2. Disengage
3. Parking brake
4. Warning—read the Operator’s Manual.
5. Warning—before servicing or performing maintenance, read the instructions; set the parking brake, remove the ignition key and
disconnect the spark plug.
6. Cutting/dismemberment hazard, mower blade; entanglement hazard, belt—do not open or remove safety shields while engine is
running.
7. Loss of traction/control hazard, slopes—loss of traction/control on a slope, disengage the blade control switch (PTO), proceed
off the slope slowly.
8. Crushing/dismemberment hazard of bystanders, reversing; crushing/dismemberment hazard of bystanders—do not carry
passengers, look behind and down when reversing.
9. Tipping hazard—do not mow up and down slopes, only mow across slopes less than 15 degrees, avoid sudden and sharp
turns while on slopes.
10. Thrown object hazard—keep bystanders a safe distance from the machine, pick up debris before operating, keep deector in place.
10
Page 11
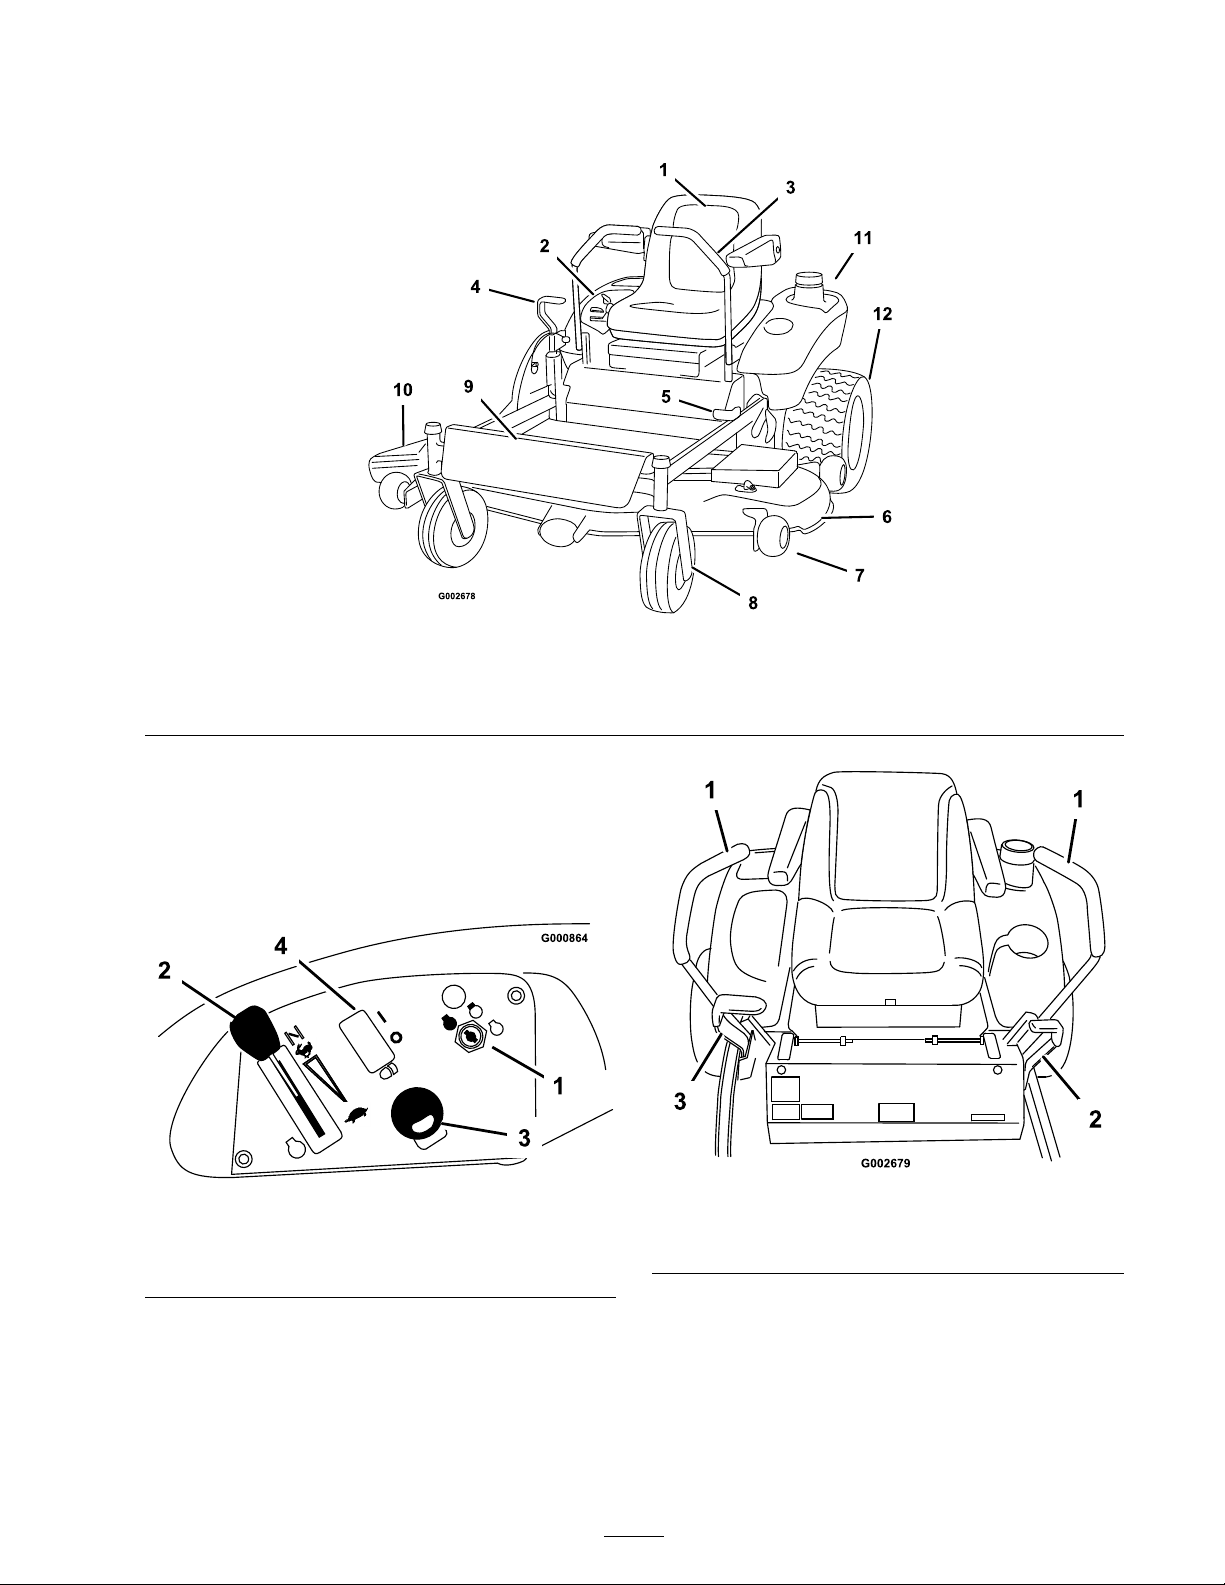
Product Overview
Figure 3
1. Seat
2. Control panel 5. Parking brake 8. Front castor wheel 11. Gas tank
3. Motion control levers 6. Mower deck
4. Height of cut lever 7. Anti-scalp wheel 10. Discharge chute
9. Footrest
12. Rear drive wheel
Controls
Become familiar with all of the controls ( Figure 4
and Figure 5 ) before y ou star t the engine and
operate the mac hine .
Figure 4
1. Ignition switch 3. Blade control switch
(power take-off)
2. Throttle/Choke 4. Headlights-optional
Figure 5
1. Motion control lever 3. Height-of-cut lever
2. Parking brake lever
11
Page 12
Operation
Note: Deter mine the left and right sides of the
mac hine from the nor mal operating position.
Think Safety First
Please carefully read all of the safety instr uctions
and decals in the safety section. Kno wing this
infor mation could help y ou, y our family , pets or
b ystanders a v oid injur y .
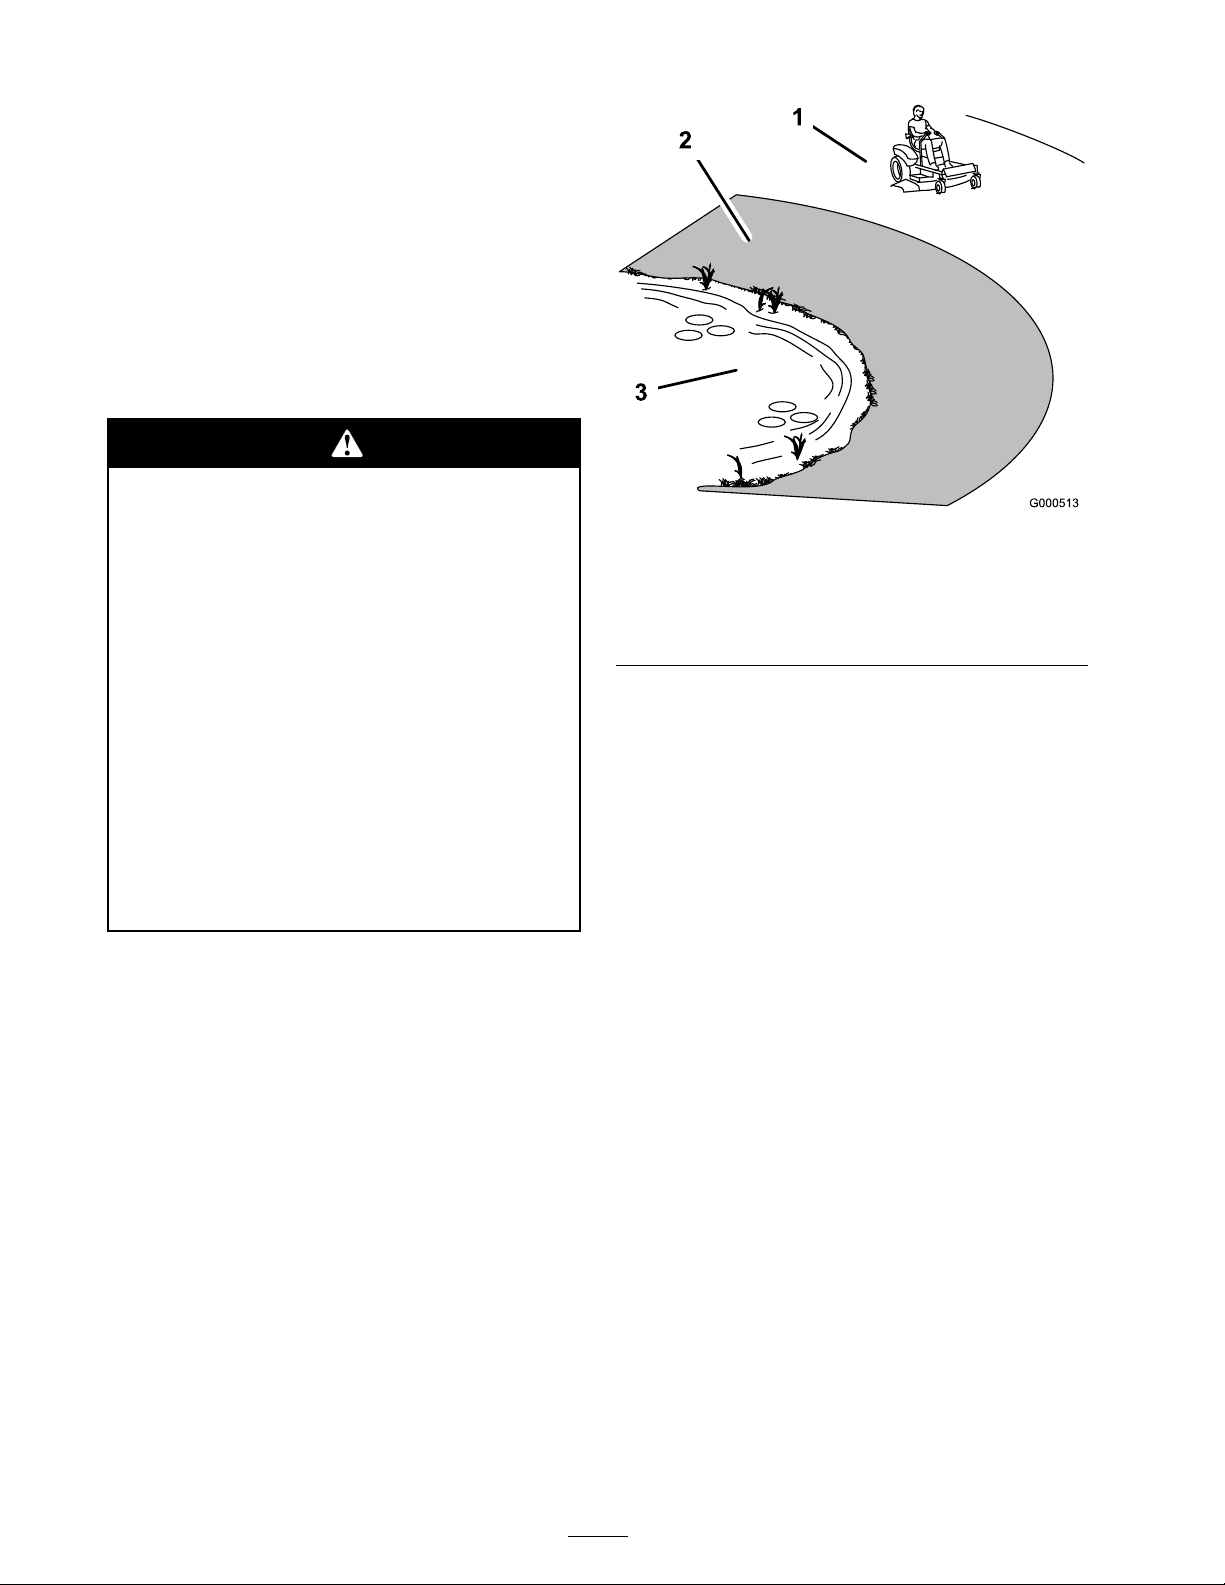
Mo wing on w et g rass or steep slopes can
cause sliding and loss of contr ol.
W heels dr opping o v er edges can cause
r ollo v er s, which may r esult in serious injur y ,
death or dr o wning .
T o a v oid loss of contr ol and possibility of
r ollo v er :
1. Safe Zone-use the
TimeCutter here
2. Use walk behind mower
and/or hand trimmer near
drop-offs and water.
Figure 6
3. Water
• Do not mo w near dr op-of fs or near w ater .
• Do not mo w slopes g r eater than
15 deg r ees.
• R educe speed and use extr eme caution
on slopes.
• A v oid sudden tur ns or rapid speed
changes.
Recommended Gasoline
Use UNLEADED R egular Gasoline suitable
for automoti v e use (87 pump octane minim um).
Leaded regular g asoline ma y be used if unleaded
regular is not a v ailable .
Important: Nev er use methanol, gasoline
containing methanol, or gasohol containing
mor e than 10% ethanol because the fuel
system could be dama ged. Do not mix oil
with gasoline.
12
Page 13
In cer tain conditions, gasoline is extr emel y
flamma ble and highl y explosi v e. A fir e or
explosion fr om gasoline can bur n y ou and
other s and can dama ge pr oper ty .
• Fill the fuel tank outdoor s, in an open
ar ea, when the engine is cold. W ipe up
an y gasoline that spills.
• Nev er fill the fuel tank inside an enclosed
trailer .
• Do not fill the fuel tank completel y full.
Add gasoline to the fuel tank until the
lev el is 1/4 to 1/2 inch (6 to 13 mm)
belo w the bottom of the filler neck. T his
empty space in the tank allo ws gasoline
to expand.
• Nev er smok e when handling gasoline,
and stay a w ay fr om an open flame or
wher e gasoline fumes may be ignited by
a spar k.
• Stor e gasoline in an appr o v ed container
and k eep it out of the r each of childr en.
Nev er buy mor e than a 30-day suppl y of
gasoline.
• Do not operate without entir e exhaust
system in place and in pr oper w or king
condition.
In cer tain conditions during fueling , static
electricity can be r eleased causing a spar k
which can ignite the gasoline v apor s. A fir e
or explosion fr om gasoline can bur n y ou and
other s and can dama ge pr oper ty .
• Al w ays place gasoline container s on the
g r ound a w ay fr om y our v ehicle bef or e
filling .
• Do not fill gasoline container s inside
a v ehicle or on a tr uck or trailer bed
because interior car pets or plastic tr uck
bed liner s may insulate the container and
slo w the loss of an y static charge.
• W hen practical, r emo v e gas-po w er ed
equipment fr om the tr uck or trailer and
r efuel the equipment with its wheels on
the g r ound.
• If this is not possible, then r efuel such
equipment on a tr uck or trailer fr om a
por ta ble container , rather than fr om a
gasoline dispenser nozzle.
• If a gasoline dispenser nozzle must be
used, k eep the nozzle in contact with the
rim of the fuel tank or container opening
at all times until fueling is complete.
Gasoline is har mful or f atal if s w allo w ed.
Long-ter m exposur e to v apor s can cause
serious injur y and illness.
• A v oid pr olonged br eathing of v apor s.
• K eep f ace a w ay fr om nozzle and gas tank
or conditioner opening .
• K eep gas a w ay fr om ey es and skin.
Using Stabilizer/Conditioner
Use a fuel stabilizer/conditioner in the mac hine to
pro vide the follo wing benefits:
• K ee ps g asoline fresh during storag e of 30 da ys
or less . F or long er storag e it is recommended
that the fuel tank be drained.
13
Page 14
• Cleans the engine while it r uns
• Eliminates gum-lik e v ar nish buildup in the fuel
system, whic h causes hard star ting
Important: Do not use fuel additi v es
containing methanol or ethanol.
Add the cor rect amount of g as
stabilizer/conditioner to the g as .
Note: A fuel stabilizer/conditioner is most
effecti v e when mix ed with fresh g asoline . T o
minimize the c hance of v ar nish de posits in the
fuel system, use fuel stabilizer at all times .
Filling the Fuel Tank
1. Shut the engine off and set the parking brak e .
2. Clean around the fuel tank cap and remo v e
the cap . Add unleaded regular g asoline to the
fuel tank until the lev el is 1/4 to 1/2 inc h
(6 to 13 mm) belo w the bottom of the filler
nec k. T his space in the tank allo ws g asoline to
expand. Do not fill the fuel tank completely
full.
3. Install the fuel tank cap securely . Wipe up any
g asoline that ma y ha v e spilled.
Checking the Engine Oil
Level
Before y ou star t the engine and use the mac hine ,
c hec k the oil lev el in the engine crankcase; refer to
Chec king the Oil Lev el in Engine Maintenance ,
pag e 22 .
Figure 7
1. Parking brake-On 2. Parking brake-Off
Releasing the Parking Brake
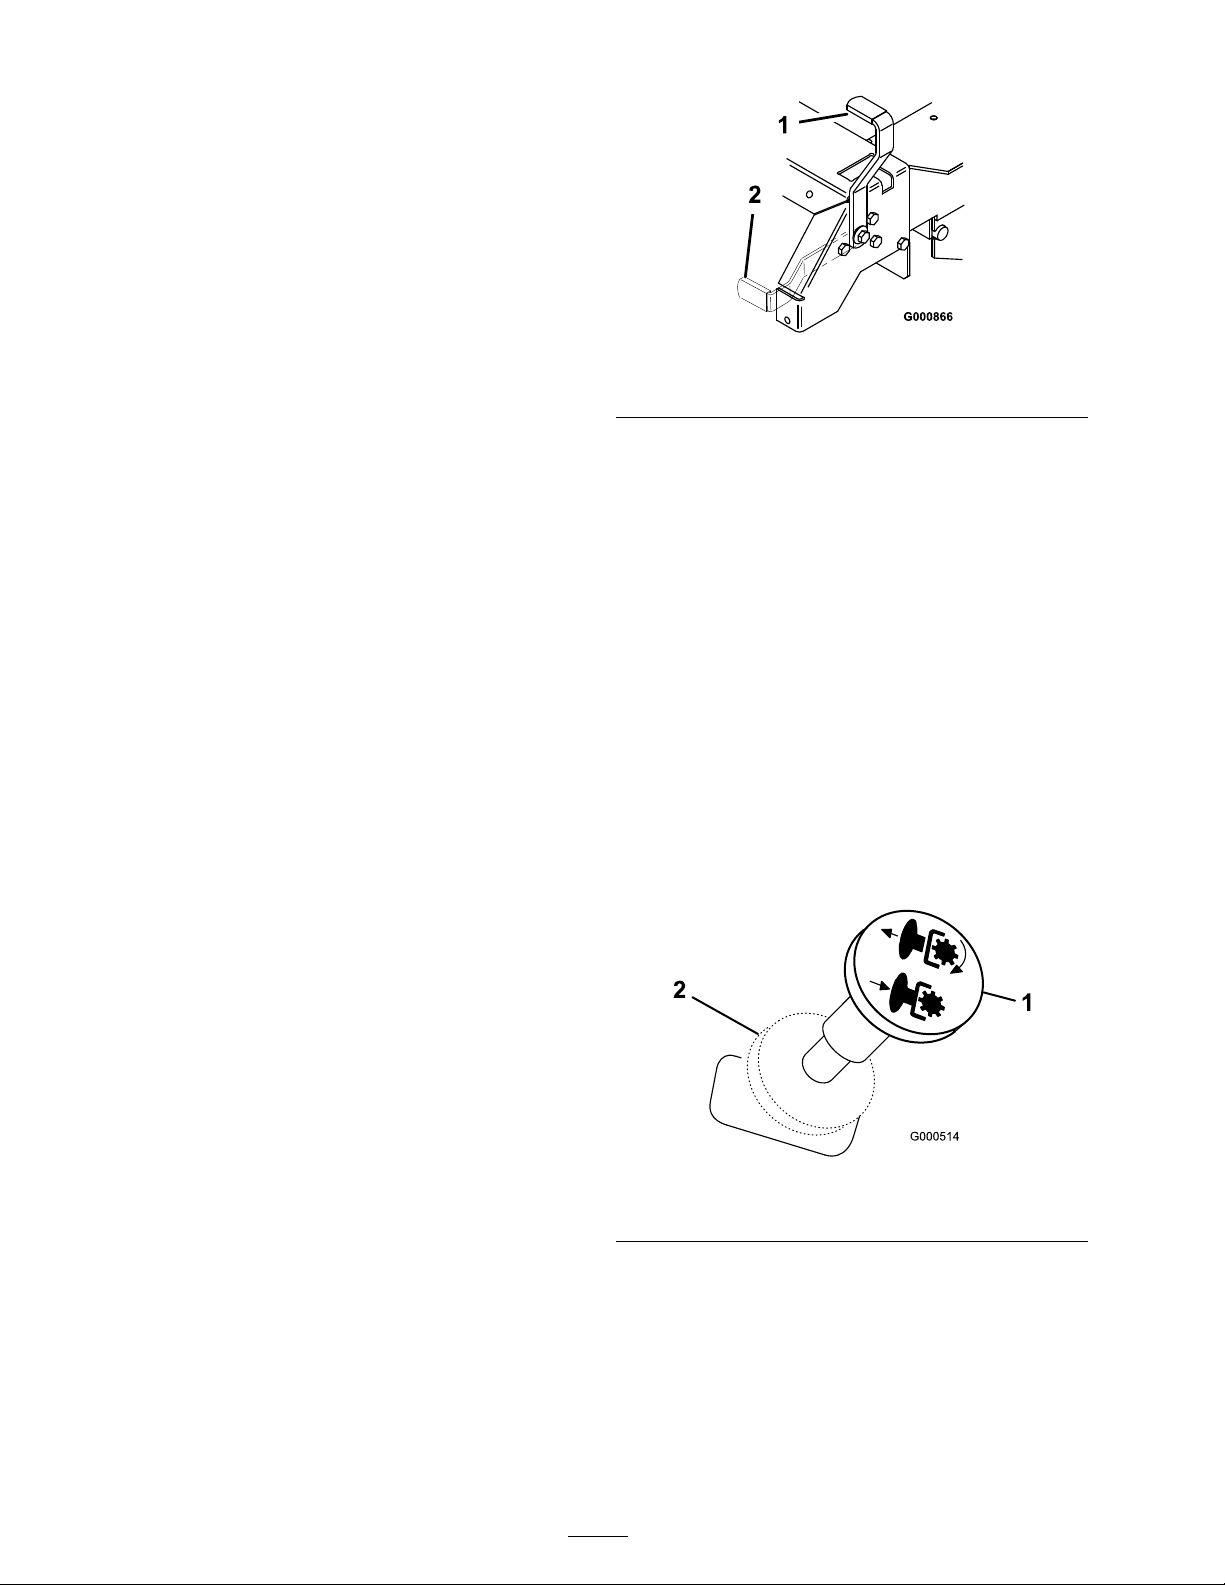
Push forw ard and do wn on the parking brak e lev er
to release the parking brak e ( Figure 7 ).
Starting and Stopping the
Engine
Starting the Engine
1. Sit do wn on the seat and mo v e the motion
controls to neutral loc k ed position.
2. Set the parking brak e; refer to Setting the
P arking Brak e abo v e .
3. Diseng ag e the blades b y mo ving the blade
control switc h to Off ( Figure 8 ).
Using the Parking Brake
Alw a ys set the parking brak e when y ou stop the
mac hine or lea v e it unattended.
Setting the Parking Brake
1. Mo v e the motion control lev ers ( Figure 5 ) out
to the neutral loc k position.
2. Pull bac k and up on the parking brak e lev er to
set the parking brak e ( Figure 7 ). T he parking
brak e lev er should sta y fir mly in the Eng ag ed
position.
Important: Do not enga ge the par king
brak e while the machine is mo ving .
Dama ge to the dri v e system may occur .
Figure 8
1. Blade control switch—On 2. Blade control switch—Off
4. Mo v e the throttle lev er to Chok e before
star ting a cold engine .
Note: A w ar m or hot engine ma y require
c hoking . After the engine star ts , mo v e the
throttle lev er to F ast.
5. T ur n the ignition k ey to Star t to energize the
star ter . W hen the engine star ts , release the k ey .
14
Page 15
Important: Do not enga ge the star ter
f or mor e than 10 seconds at a time. If the
engine f ails to star t, allo w a 60 second
cool-do wn period betw een attempts.
F ailur e to f ollo w these instr uctions can
bur n out the star ter motor .
6. After the engine star ts , mo v e the throttle
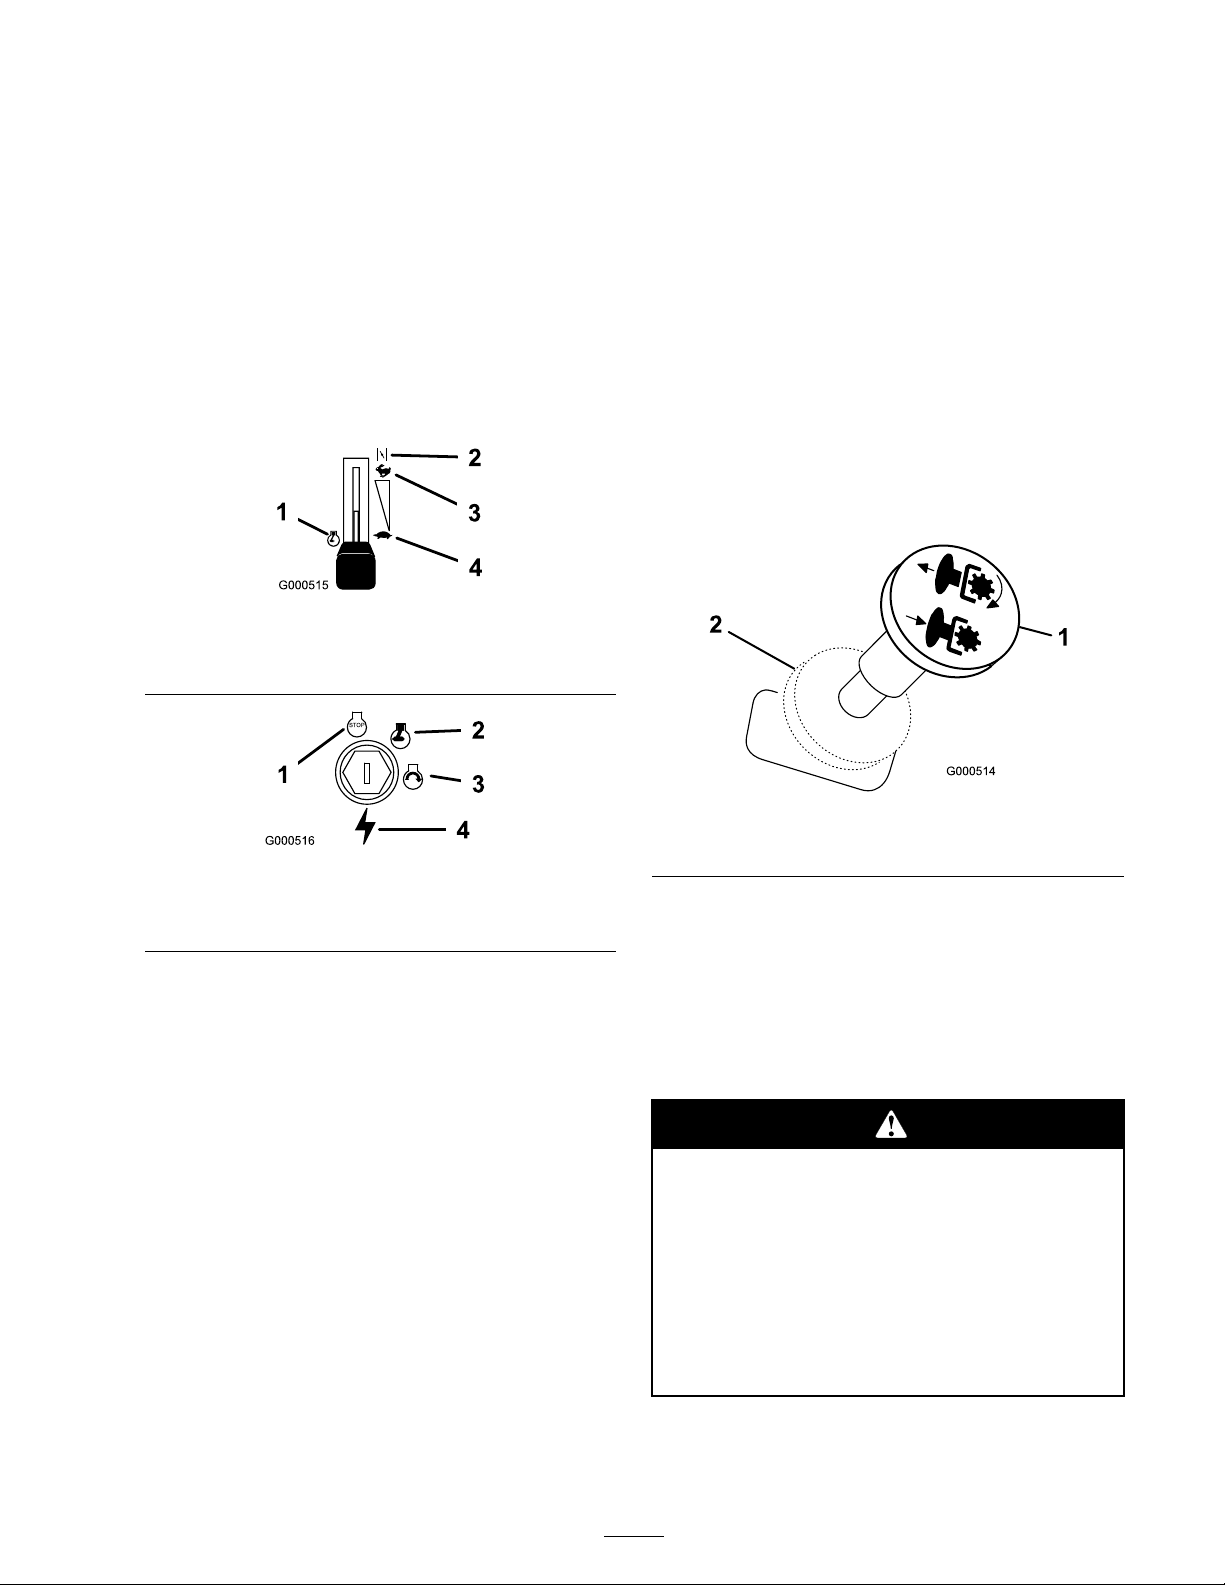
lev er to F ast ( Figure 9 ). If the engine stalls
or hesitates , mo v e the throttle lev er bac k to
Chok e for a few seconds . T hen mo v e the
throttle lev er to the desired setting . R e peat this
as required.
Figure 9
1. Engine
2. Choke 4. Slow
3. Fast
Operating the Blades
T he blade control switc h, re presented b y a po w er
tak e-off (PTO) symbol, eng ag es and diseng ag es
po w er to the mo w er blades . T his switc h controls
po w er to any attac hments that dra w po w er from
the engine , including the mo w er dec k and cutting
blades .
Engaging the Blades
1. R elease pressure on the traction control lev ers
and place the mac hine in neutral.
2. Mo v e the throttle to the F ast position.
3. Pull out on the blade control switc h to eng ag e
blades ( Figure 11 ).
Figure 10
1. Off
2. Run
3. Start
4. Ignition
Stopping the Engine
1. Mo v e the throttle lev er to Slo w ( Figure 9 ).
2. Diseng ag e the blades b y mo ving the blade
control switc h to Off ( Figure 8 ).
3. T ur n the ignition k ey to Off ( Figure 10 ).
4. Pull the wire off of the spark plug(s) to prev ent
the possibility of someone accidentally star ting
the mac hine before transpor ting or storing the
mac hine .
5. Close the fuel shut-off v alv e under the front
of the fuel tank before transpor ting or storing
the mac hine .
Important: Mak e sur e the fuel shut-of f
v alv e is closed bef or e transpor ting or
storing machine, as fuel leaka ge may
occur .
Figure 11
1. Blade control switch-On 2. Blade control switch-Off
Disengaging the Blades
Push the blade control switc h to Off to diseng ag e
the blades ( Figure 11 ).
The Safety Interlock System
If safety inter lock s witches ar e disconnected
or dama ged the machine could operate
unexpectedl y causing per sonal injur y .
• Do not tamper with the inter lock
s witches.
• Check the operation of the inter lock
s witches dail y and r eplace an y dama ged
s witches bef or e operating the machine.
15
Page 16
Understanding the Safety Interlock
System
T he safety interloc k system is designed to prev ent
the engine from star ting unless:
• T he parking brak e is eng ag ed.
• T he blades are diseng ag ed.
• T he motion control lev ers are in the neutral
loc k ed position.
T he safety interloc k system also is designed to
stop the engine when the traction controls are
mo v ed with the parking brak e on or if y ou rise
from the seat when the blades are eng ag ed.
the throttle control in the F ast position for best
perfor mance . Alw a ys operate in the full throttle
position.
T he machine can spin v er y rapidl y . T he
operator may lose contr ol of the machine
and cause per sonal injur y or dama ge to the
machine.
• Use caution when making tur ns.
• Slo w the machine do wn bef or e making
shar p tur ns.
Testing the Safety Interlock System
T est the safety interloc k system before y ou use
the mac hine eac h time . If the safety system
does not operate as described belo w , ha v e an
A uthorized Ser vice Dealer re pair the safety system
immediately .
1. W hile sitting on the seat, eng ag e the parking
brak e and mo v e the blade control switc h to
On. T r y star ting the engine; the engine should
not crank.
2. W hile sitting on the seat, eng ag e the parking
brak e and mo v e the blade control switc h
to Off . Mo v e either motion control lev er
(forw ard or rev erse). T r y star ting the engine;
the engine should not crank. R e peat with the
other motion control lev er .
3. W hile sitting on the seat, eng ag e the parking
brak e , mo v e the blade control switc h to Off ,
and loc k the motion control lev ers in neutral.
Star t the engine . W hile the engine is r unning,
release the parking brak e , eng ag e the blade
control switc h, and rise slightly from the seat;
the engine should stop .
Forward
1. R elease the parking brak e .
2. Mo v e the lev ers to the center , unloc k ed
position.
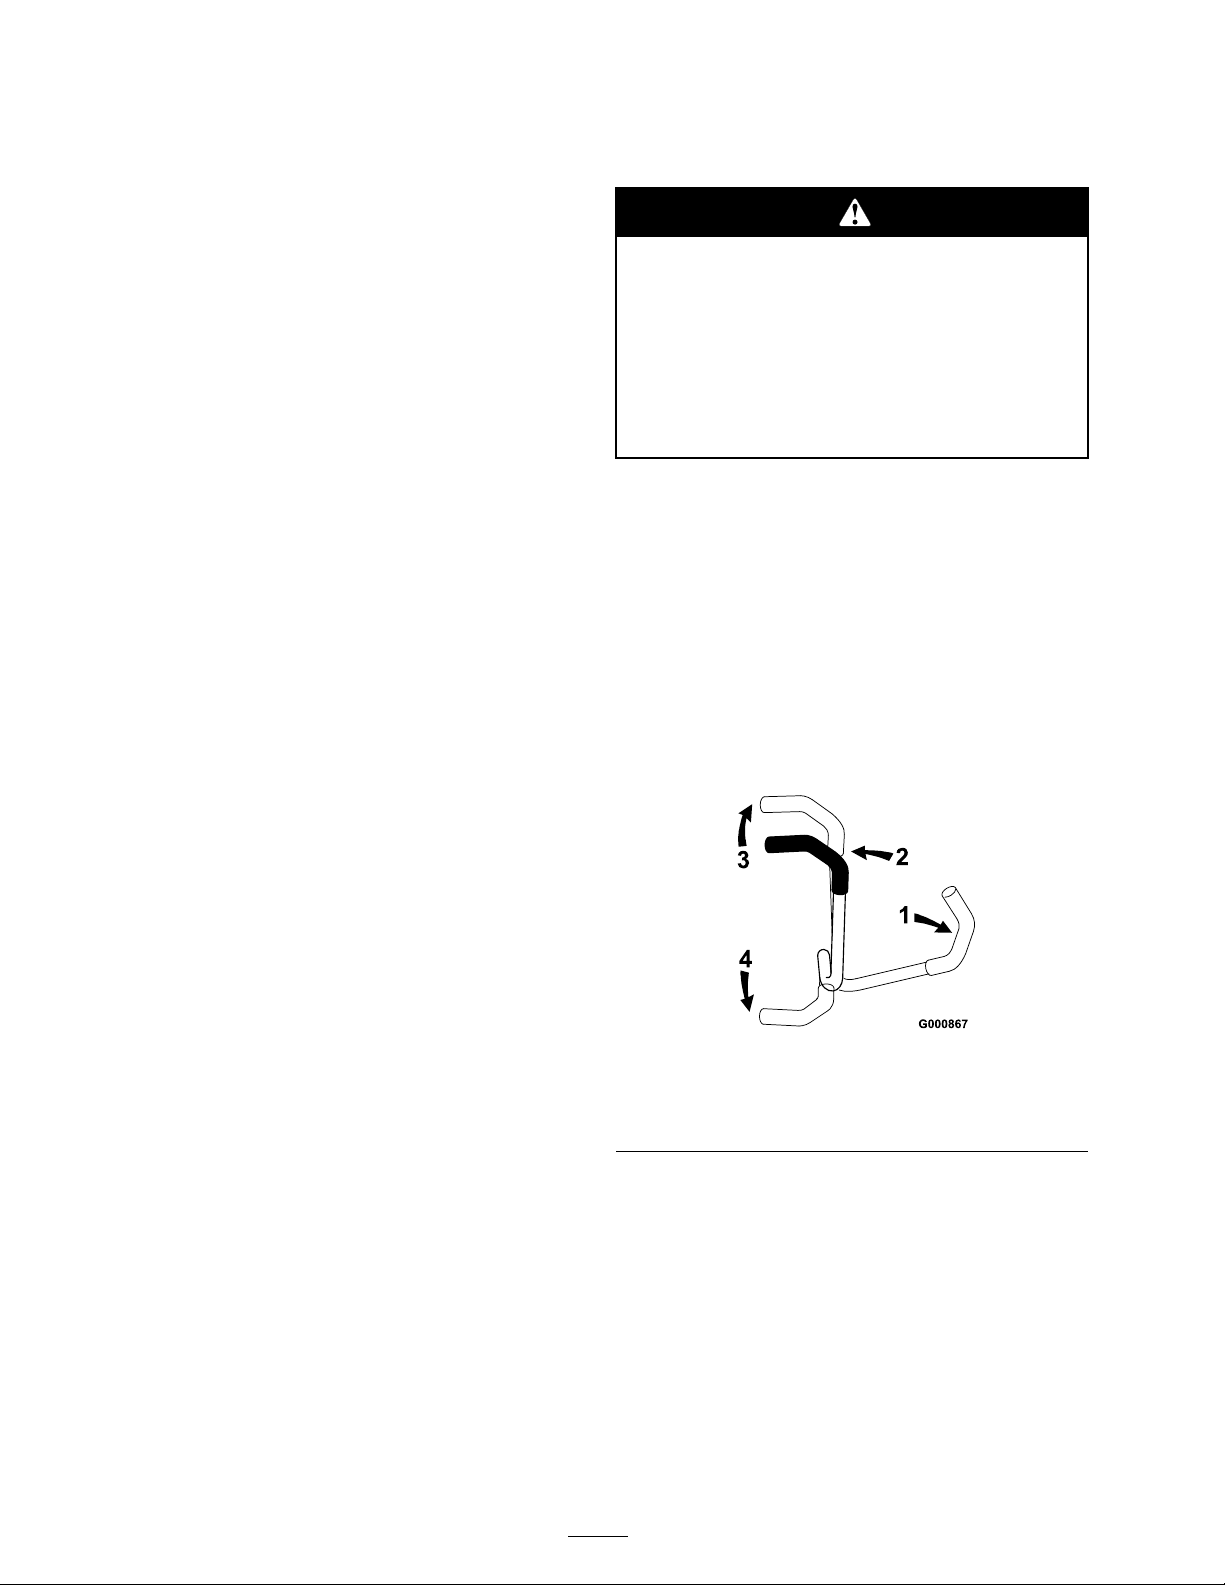
3. T o g o forw ard, slo wly push the motion control
lev ers forw ard ( Figure 12 ).
Note: T he engine will kill if the traction
control lev ers are mo v ed with the parking
brak e eng ag ed.
Figure 12
1. Motion control
lever-neutral lock position
2. Center unlock position 4. Backward
3. Forward
4. W hile sitting on the seat, eng ag e the parking
brak e , mo v e the blade control switc h to Off ,
and loc k the motion control lev ers in neutral.
Star t the engine . W hile the engine is r unning,
center the motion controls and mo v e (forw ard
or rev erse); the engine should stop .
Driving Forward or
Backward
T he throttle control regulates the engine speed as
measured in r pm (rev olutions per min ute). Place
T o g o straight, apply equal pressure to both
motion control lev ers ( Figure 12 ).
T o tur n, release pressure on the motion control
lev er to w ard the direction y ou w ant to tur n
( Figure 12 ).
T he far ther y ou mo v e the traction control
lev ers in either direction, the faster the mac hine
will mo v e in that direction.
T o stop , pull the motion control lev ers to
neutral.
16
Page 17
Backward
1. Mo v e the lev ers to the center , unloc k ed
position.
2. T o g o bac kw ard, slo wly pull the motion control
lev ers rearw ard ( Figure 12 ).
T o g o straight, apply equal pressure to both
motion control lev ers ( Figure 12 ).
T o tur n, release the pressure on the motion
control lev er to w ard the direction y ou w ant to
tur n ( Figure 12 ).
T o stop , push the motion control lev ers to
neutral.
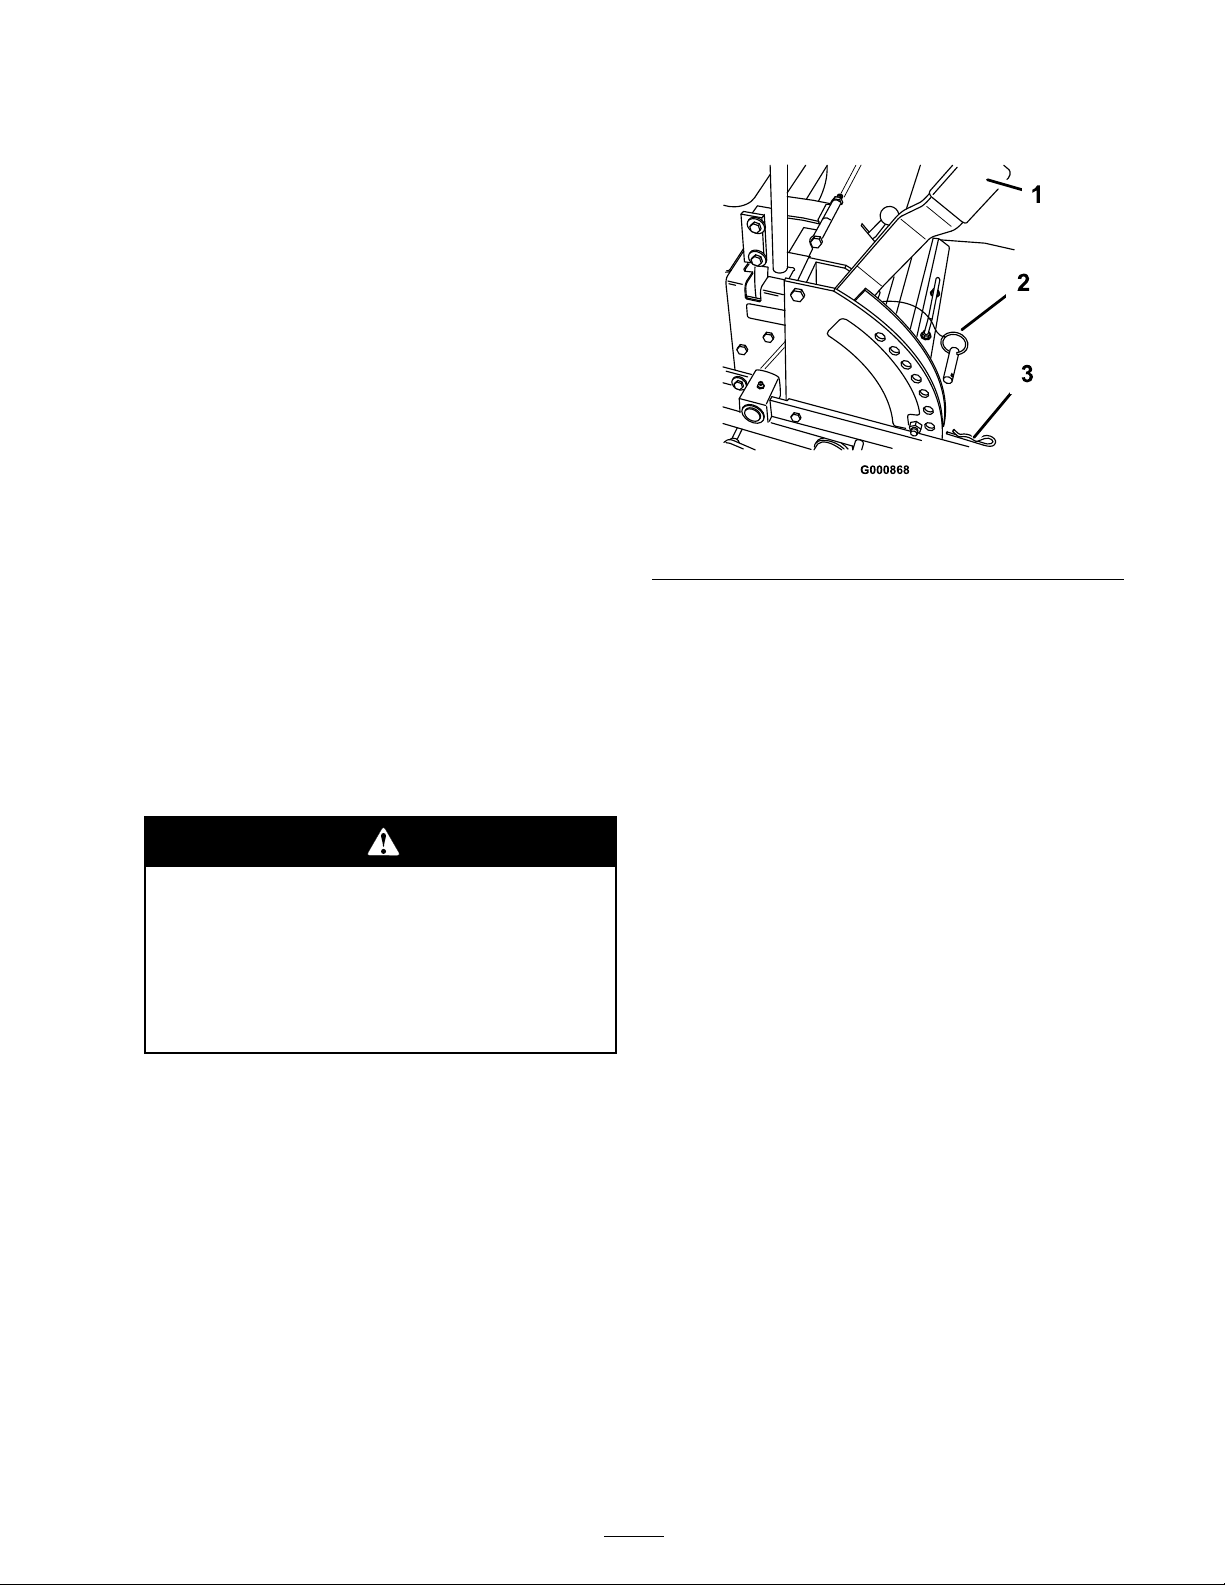
4. Secure the clevis pin with the hair pin cotter
( Figure 13 ).
Stopping the Machine
T o stop the mac hine , mo v e the traction control
lev ers to neutral and se parate to loc k, diseng ag e
the blade control switc h, and tur n the ignition k ey
to Off to stop the engine . Also set the parking
brak e when y ou lea v e the mac hine; refer to Setting
the P arking Brak e . R emember to remo v e the k ey
from the ignition switc h.
Important: Do not enga ge the par king
brak e while the machine is mo ving . Dama ge
to the dri v e system may occur .
Childr en or bystander s may be injur ed if
they mo v e or attempt to operate the tractor
while it is unattended.
Al w ays r emo v e the ignition k ey and set the
par king brak e when lea ving the machine
unattended, ev en if just f or a few min utes.
Adjusting the Height of Cut
Figure 13
1. Height-of-cut lever
2. Clevis pin
5. Lo w er the height-of-cut lev er onto the clevis
pin.
3. Hairpin cotter
Adjusting the Anti-Scalp
Rollers
W henev er y ou c hang e the height-of-cut it is
recommended to adjust the height of the anti-scalp
rollers .
1. Diseng ag e the blade control switc h and mo v e
the control lev ers to the neutral loc k ed position
and apply the parking brak e .
2. Stop the engine , remo v e the k ey , and w ait for
all mo ving par ts to stop before lea ving the
operating position.
A. After adjusting the height-of-cut, remo v e
the n ut and w asher while holding the stud
with a wrenc h ( Figure 14 ).
T he height of cut is adjusted from 1-1/2 to
4-1/2 inc h (38 to 114 mm) in 1/2 inc h (13 mm)
increments b y relocating the clevis pin in different
hole locations .
1. Raise the height-of-cut lev er to the transpor t
position (also the 4-1/2 inc h (114 mm) cutting
height position) ( Figure 13 ).
2. T o adjust, remo v e the hair pin cotter and clevis
pin from the height-of-cut brac k et ( Figure 13 ).
3. Select the hole in the height-of-cut brac k et
cor responding to the height-of-cut desired,
and inser t the clevis pin ( Figure 13 ).
Note: Do not remo v e the wheel n ut and
w asher ( Figure 14 ).
17
Page 18
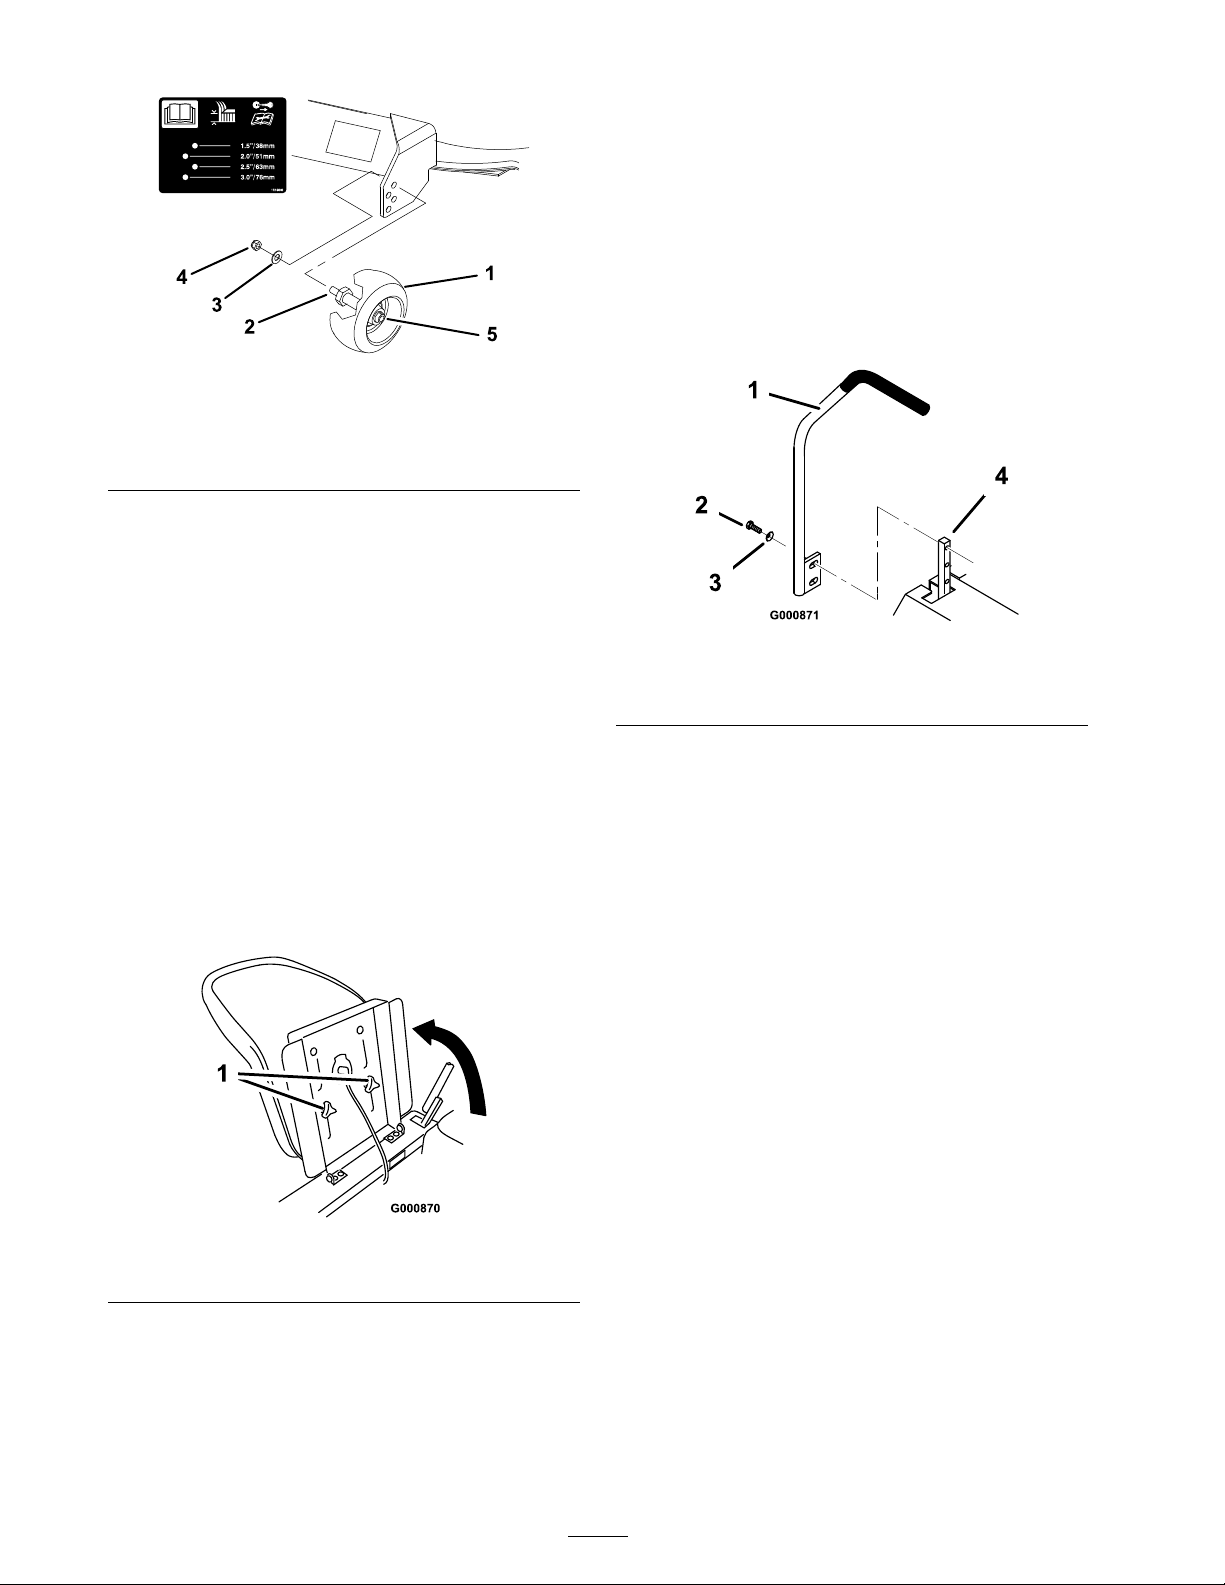
G000911
Figure 14
1. Gage wheel
2. Stud 5. Wheel nut and washer.
3. Washer
4. Nut
Do not remove.
B . Select a hole so that the g ag e wheel is
positioned to the nearest cor responding
height-of-cut desired ( Figure 14 ).
3. Install the stud n ut and w asher ( Figure 14 ).
4. R e peat the adjustment on the other g ag e
wheels .
1. R emo v e the 2 screws and cur v ed w ashers
holding the control lev er to the control ar m
shaft ( Figure 16 ).
2. Mo v e the control lev er to the next set of holes .
Secure the lev er with the 2 screws and cur v ed
w ashers . T he cupped side of the w asher should
be to w ard the control ar m shaft ( Figure 16 ).
3. R e peat the adjustment on the other control
lev er .
Figure 16
1. Control lever 3. Curved washer
2. Screw
4. Control arm shaft
Positioning the Seat
T he seat can mo v e forw ard and bac kw ard.
P osition the seat where y ou ha v e the best control
of the mac hine and are most comfor table .
1. Raise the seat and loosen the adjustment knobs
( Figure 15 ).
2. Mo v e the seat to the desired position and
tighten the knobs .
Figure 15
1. Adjustment knobs
Pushing the Machine by
Hand
Important: Al w ays push the machine
by hand. Nev er to w the machine because
dama ge may occur .
To Push the Machine
1. Diseng ag e the blade control switc h and mo v e
the control lev ers to the neutral loc k ed position
and apply the parking brak e .
2. Stop the engine , remo v e the k ey , and w ait for
all mo ving par ts to stop before lea ving the
operating position.
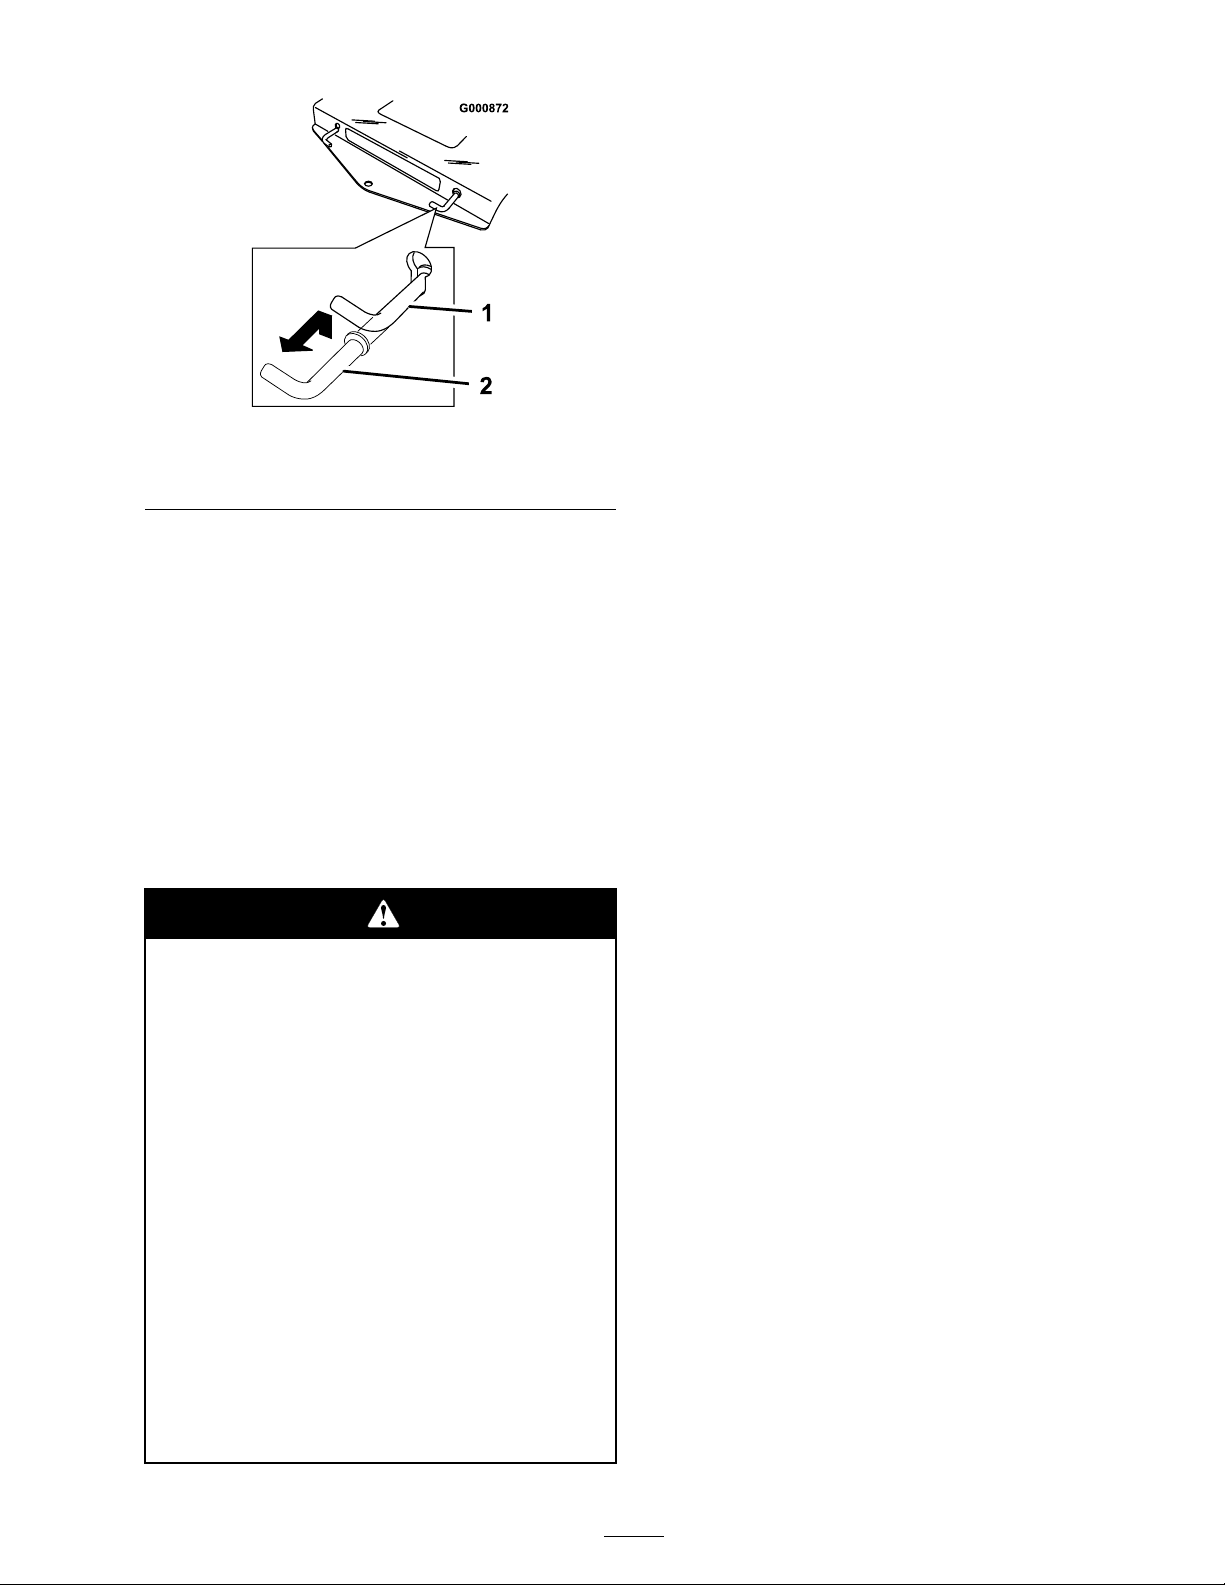
3. Pull the tw o b ypass lev ers up and push them
until the w asher on the rod passes through the
slot. Push the lev ers do wn to loc k them in
place ( Figure 17 ).
Adjusting the Motion
Control Levers
T he motion control lev ers can be adjusted higher
or lo w er for maxim um operator comfor t.
4. Diseng ag e the parking brak e to push the
mac hine .
18
Page 19
Operating Tips
Fast Throttle Setting
F or best mo wing and maxim um air circulation,
operate the engine at F ast. Air is required to
thoroughly cut g rass clippings , so do not set the
height-of-cut so lo w as to totally sur round the
mo w er b y uncut g rass . Alw a ys tr y to ha v e one side
of the mo w er free from uncut g rass , whic h allo ws
air to be dra wn into the mo w er .
Figure 17
1. Position for pushing the
machine
2. Position for operating the
machine
To Operate the Machine
Pull eac h b ypass lev er up and pull them completely
out. Push the lev ers do wn ( Figure 17 ).
Note: T he mac hine will not dri v e unless the
b ypass lev ers are pulled out.
Side Discharge
T he mo w er has a hing ed g rass deflector that
disperses clippings to the side and do wn to w ard
the turf .
W ithout the g rass deflector , discharge
co v er , or complete g rass catcher assembl y
mounted in place, y ou and other s ar e
exposed to blade contact and thr o wn de bris.
Contact with r otating mo w er blade(s) and
thr o wn de bris will cause injur y or death.
• Nev er r emo v e the g rass deflector fr om
the mo w er because the g rass deflector
r outes material do wn to w ard the turf.
If the g rass deflector is ev er dama ged,
r eplace it immediatel y .
• Nev er put y our hands or feet under the
mo w er .
• Nev er tr y to clear discharge ar ea or
mo w er blades unless y ou mo v e the blade
contr ol s witch to Of f and r otate the
ignition k ey to Of f. Also r emo v e the k ey
and pull the wir e of f the spar k plug(s).
Cutting a Lawn for the First Time
Cut g rass slightly long er than nor mal to ensure
that the cutting height of the mo w er does not
scalp any unev en g round. Ho w ev er , the cutting
height used in the past is g enerally the best one to
use . W hen cutting g rass long er than six inc hes tall,
y ou ma y w ant to cut the la wn twice to ensure an
acce ptable quality of cut.
Cut 1/3 of the Grass Blade
It is best to cut only about 1/3 of the g rass blade .
Cutting more than that is not recommended unless
g rass is sparse , or it is late fall when g rass g ro ws
more slo wly .
Mowing Direction
Alter nate mo wing direction to k ee p the g rass
standing straight. T his also helps disperse clippings
whic h enhances decomposition and fer tilization.
Mow at Correct Intervals
Nor mally , mo w ev er y four da ys . But remember ,
g rass g ro ws at different rates at different times .
So to maintain the same cutting height, whic h is a
g ood practice , mo w more often in early spring . As
the g rass g ro wth rate slo ws in mid summer , mo w
less frequently . If y ou cannot mo w for an extended
period, first mo w at a high cutting height; then
mo w ag ain tw o da ys later at a lo w er height setting .
Cutting Speed
T o impro v e cut quality , use a slo w er g round speed.
Avoid Cutting Too Low
If the cutting width of the mo w er is wider than the
mo w er y ou previously used, raise the cutting height
to ensure that unev en turf is not cut too shor t.
19
Page 20

Long Grass
If the g rass is ev er allo w ed to g ro w slightly long er
than nor mal, or if it contains a high deg ree of
moisture , raise the cutting height higher than usual
and cut the g rass at this setting . T hen cut the g rass
ag ain using the lo w er , nor mal setting .
When Stopping
If the mac hine’ s forw ard motion m ust be stopped
while mo wing, a clump of g rass clippings ma y
drop onto y our la wn. T o a v oid this , mo v e onto a
previously cut area with the blades eng ag ed.
Keep the Underside of the Mower
Clean
Clean clippings and dir t from the underside of the
mo w er after eac h use . If g rass and dir t build up
inside the mo w er , cutting quality will ev entually
become unsatisfactor y .
Blade Maintenance
Maintain a shar p blade throughout the cutting
season because a shar p blade cuts cleanly without
tearing or shredding the g rass blades . T earing and
shredding tur ns g rass bro wn at the edg es , whic h
slo ws g ro wth and increases the c hance of disease .
Chec k the cutter blades daily for shar pness , and
for any w ear or damag e . File do wn any nic ks
and shar pen the blades as necessar y . If a blade is
damag ed or w or n, re place it immediately with a
g en uine T oro re placement blade .
Safe Towing Practices
T o w only with a mac hine that has a hitc h designed
for to wing . Do not attac h to w ed equipment ex ce pt
at the hitc h point. T his product has a limited
to wing capacity for small attac hments up to 100
lbs (45 kg); suc h as leaf sw ee pers and spreaders .
T o wing of attac hments should be limited to flat
g round. Nev er allo w c hildren or others in or on
to w ed equipment. On slopes , the w eight of to w ed
equipment ma y cause a loss of traction and control.
T o wing on slopes is not r ecommended. T ra v el
slo wly and allo w extra distance to stop .
20
Page 21
Maintenance
Note: Deter mine the left and right sides of the mac hine from the nor mal operating position.
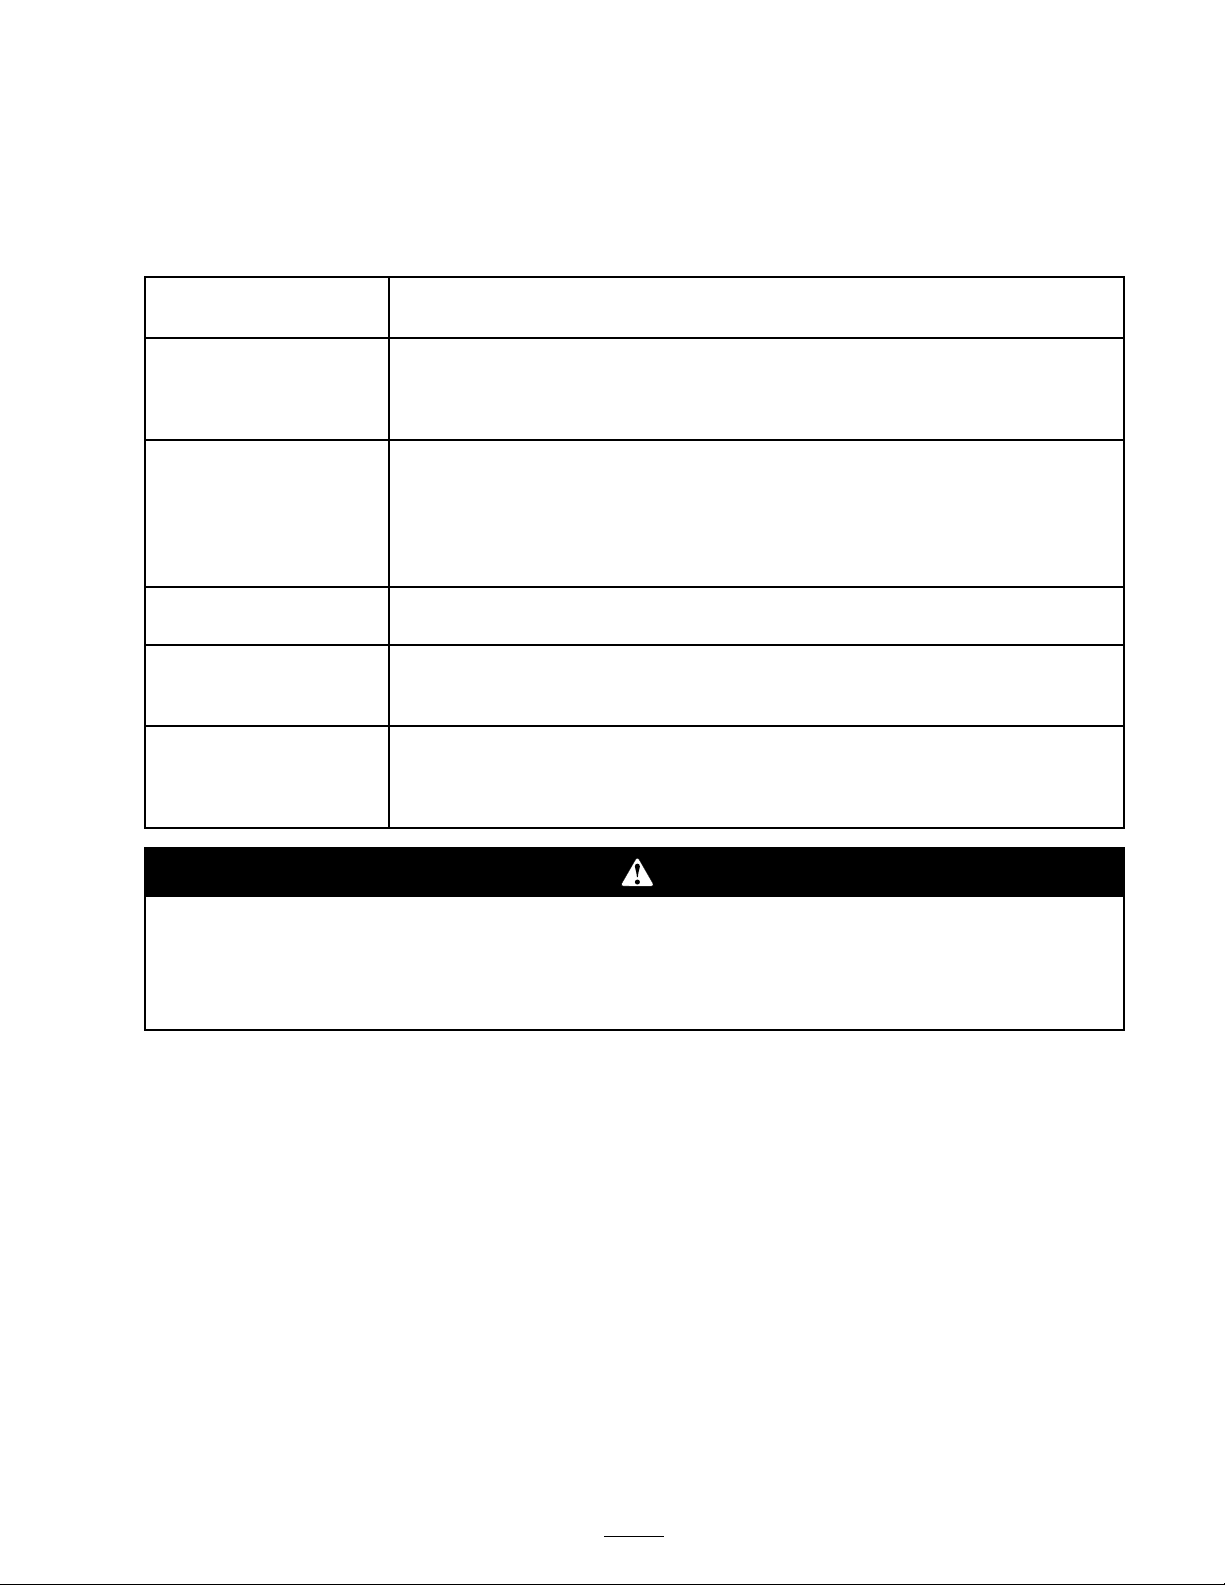
Recommended Maintenance Schedule(s)
Maintenance Service
Interval
Before each use or daily
Every 25 hours
Every 100 hours
Every 200 hours
Before storage
Maintenance Procedure
• Check the safety system.
• Check the engine oil level (more often in dirty or dusty conditions).
• Check the cutting blades.
• Clean the mower housing.
• Grease all lubrication points (more often in dusty, dirty conditions).
• Service the foam air cleaner (more often in dusty, dirty conditions).
• Service the paper air cleaner (more often in dusty, dirty conditions).
• Check the battery electrolyte.
• Check the tire pressure.
• Check belts for wear/cracks.
• Change the engine oil (more often in dusty, dirty conditions).
• Replace the air cleaner elements (more often in dusty, dirty conditions).
• Change the oil lter.
• Check the spark plug(s).
• Replace the fuel lter.
• Perform all maintenance procedures listed above before storage.
• Drain the fuel tank.
• Charge the battery and disconnect the battery cables.
• Paint any chipped surfaces.
If y ou lea v e the k ey in the ignition s witch, someone could accidentl y star t the engine and
seriousl y injur e y ou or other bystander s.
R emo v e the k ey fr om the ignition and disconnect the wir e fr om the spar k plug(s) bef or e y ou
do an y maintenance. Set the wir e aside so that it does not accidentall y contact the spar k plug .
Lubrication
2. Stop the engine , remo v e the k ey , and w ait for
all mo ving par ts to stop before lea ving the
Lubricate the mac hine when sho wn on the Chec k
operating position.
Ser vice R eference Aid decal ( Figure 18 ) located
beneath the seat. Grease more frequently when
operating conditions are extremely dusty or sandy .
3. Clean the g rease fittings with a rag . Mak e sure
to scrape any paint off of the front of the
fitting(s).
Grease with No . 2 g eneral pur pose lithium base or
molybden um base g rease .
4. Connect a g rease gun to the fitting . Pump
g rease into the fittings until g rease begins to
ooze out of the bearings .
How to Grease
5. Wipe up any ex cess g rease .
1. Diseng ag e the blade control switc h and mo v e
the control lev ers to the neutral loc k ed position
and apply the parking brak e .
21
Page 22
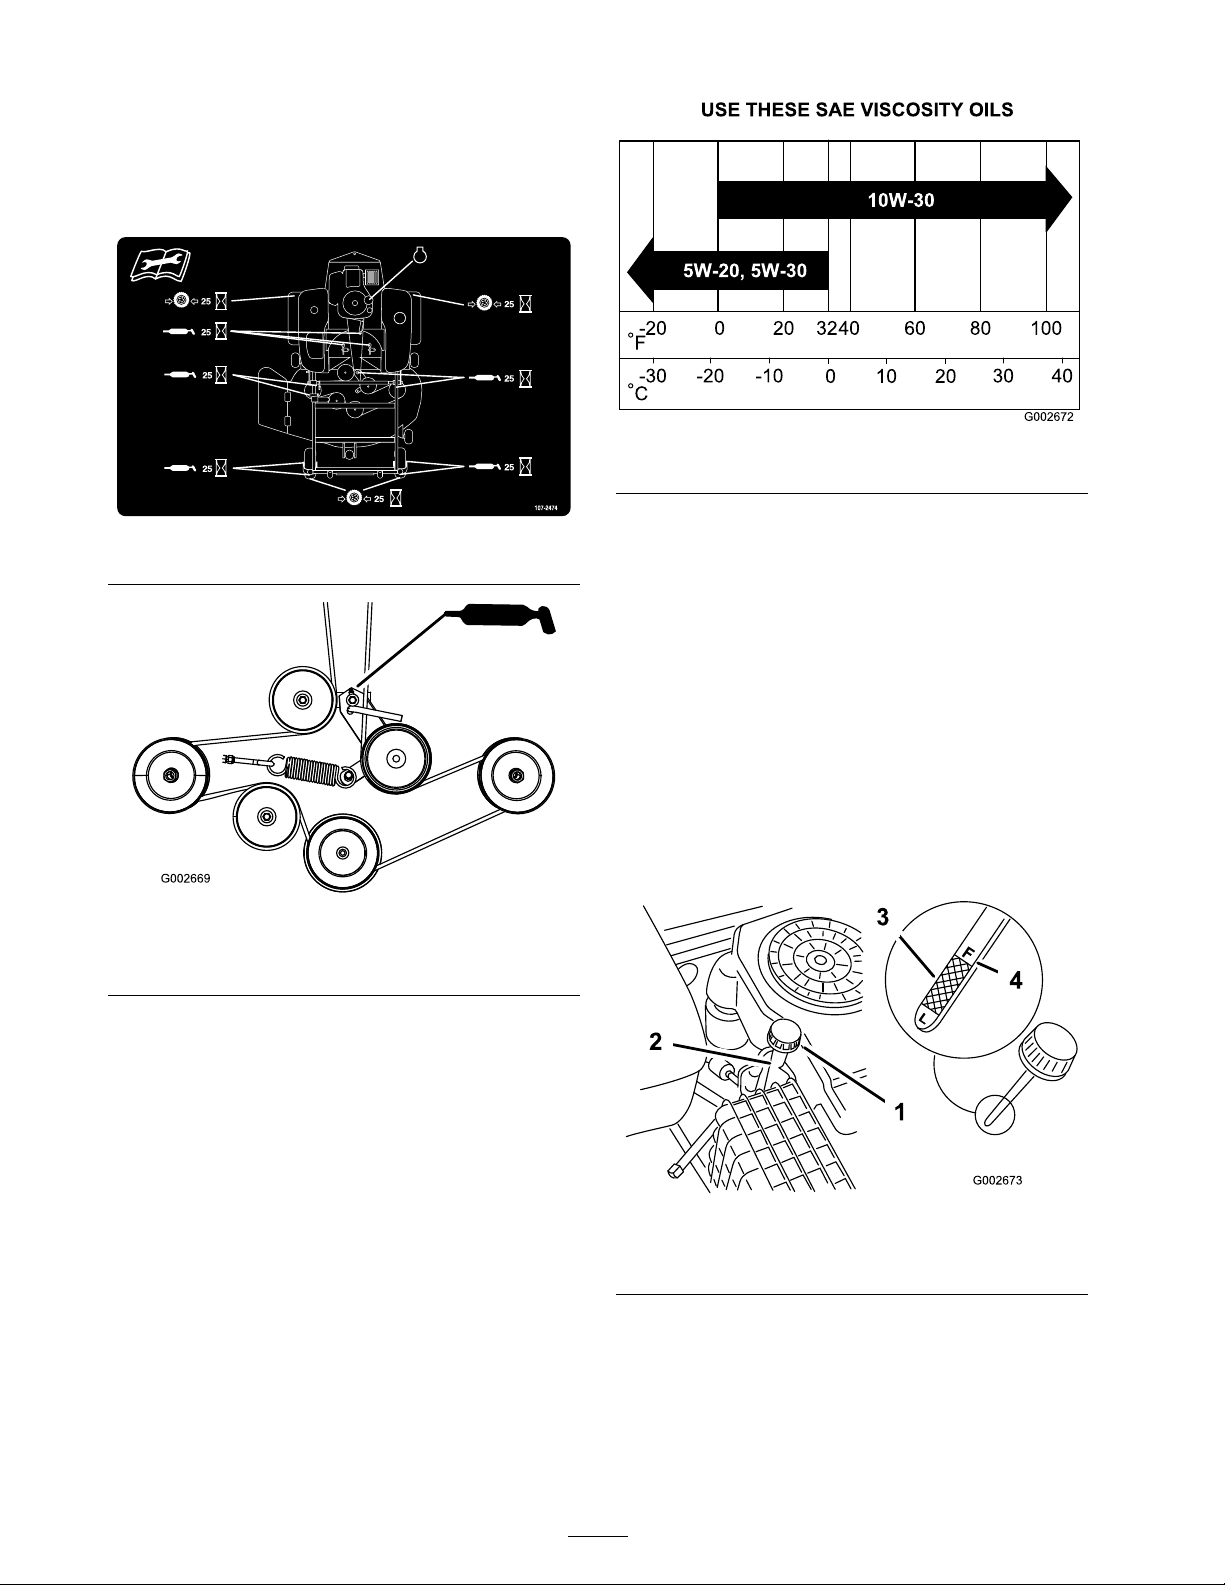
Where to Add Grease
Lubricate the g rease fittings as sho wn on the Chec k
Ser vice R eference Aid decal ( Figure 18 ) located
beneath the seat and the mo w er ( Figure 19 ).
Figure 20
Figure 18
Checking the Oil Level
1. P ark the mac hine on a lev el surface , diseng ag e
the blade control switc h, stop the engine , and
remo v e the k ey .
2. Diseng ag e the blade control switc h and mo v e
the control lev ers to the neutral loc k ed position
and apply the parking brak e .
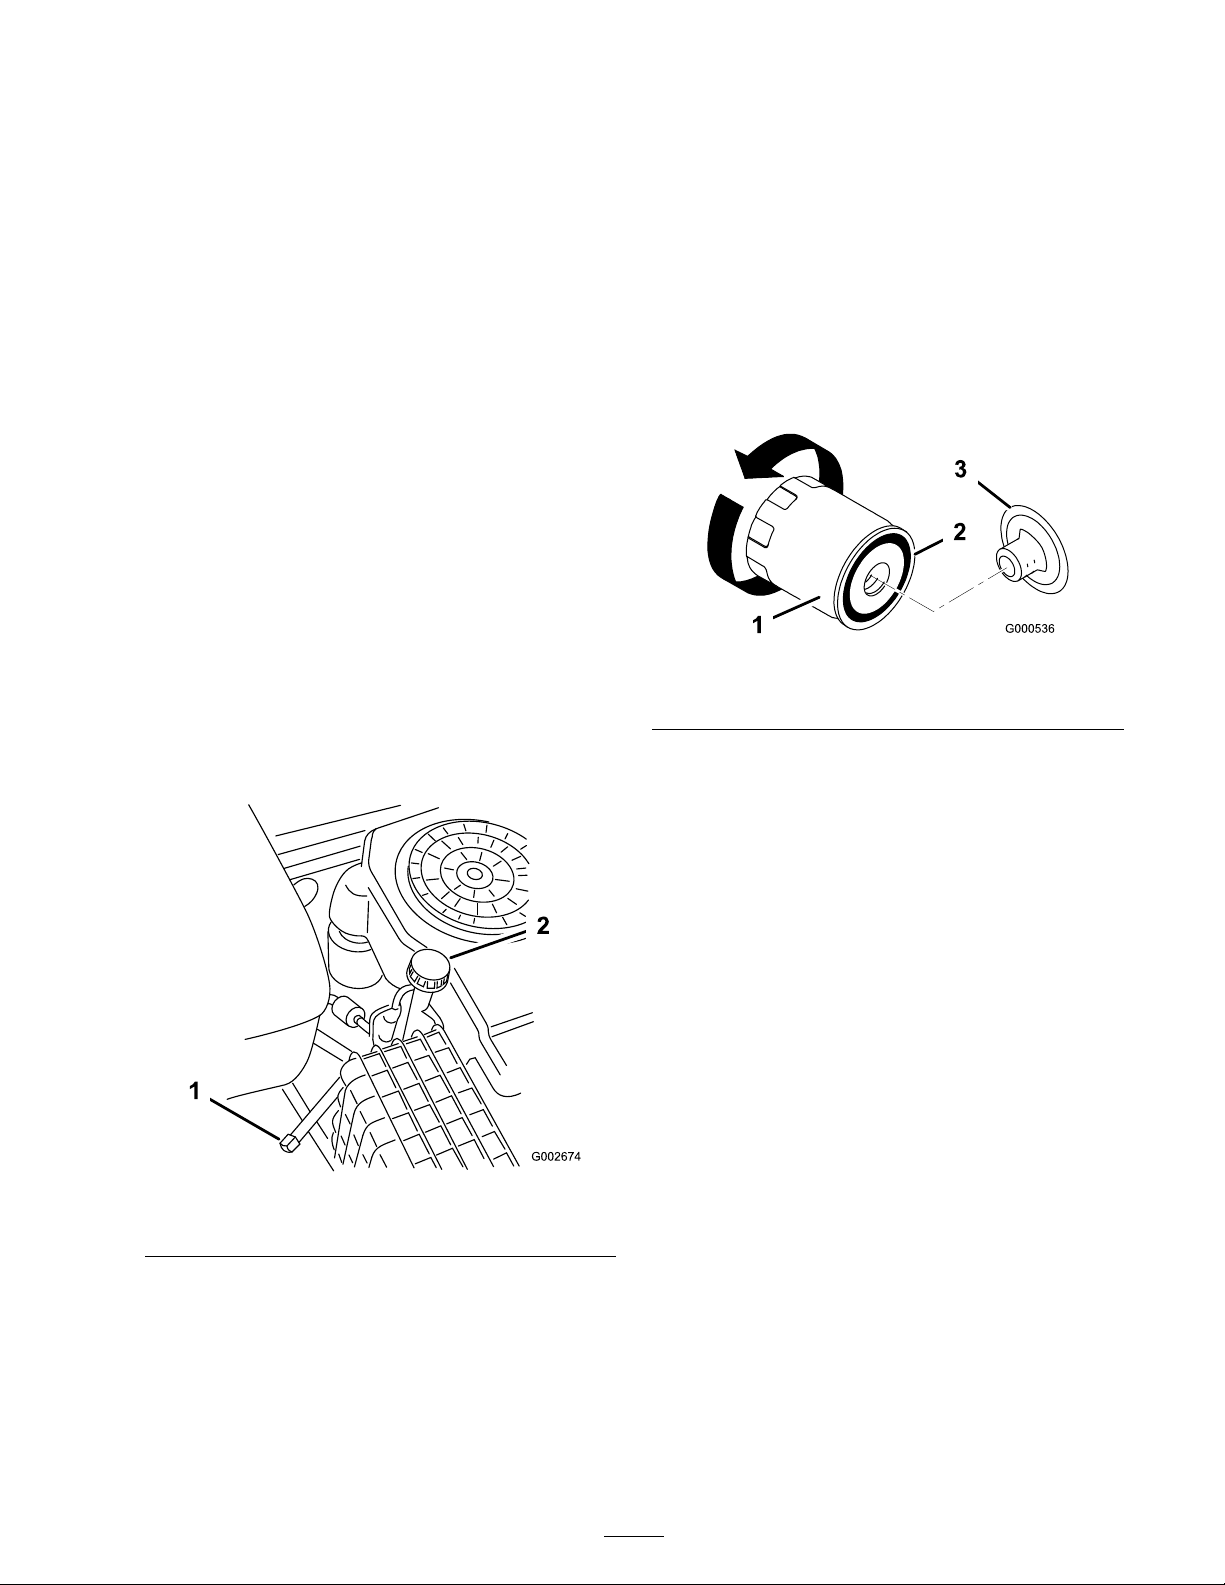
3. Clean around the oil dipstic k ( Figure 21 ) so
that dir t cannot fall into the fill hole and
damag e the engine .
4. Unscrew the oil dipstic k and wipe the metal
end clean ( Figure 21 ).
Figure 19
Top View
Engine Maintenance
Servicing the Engine Oil
Chang e the oil ev er y 100 operating hours
thereafter .
Oil T ype: Deterg ent oil (API ser vice SG , SH, SJ ,
or higher)
Crankcase Capacity: with filter , 2.1 qt. (2 L)
Viscosity: See the table belo w .
Figure 21
1. Oil dipstick 3. Metal end, dipstick
2. Filler tube 4. Full mark
5. Screw the oil dipstic k fully onto the fill hole .
Unscrew the dipstic k, pull it out, and look at
the metal end. If the oil lev el is lo w , slo wly
pour only enough oil into the fill hole to raise
the lev el to , but not o v er , the Full mark on the
dipstic k.
22
Page 23
Important: Do not o v erfill the crankcase
with oil because the engine may be
dama ged.
Changing the Oil Filter
R e place the oil filter ev er y 200 hours or ev er y
other oil c hang e .
Changing and Draining the Oil
1. Star t the engine and let it r un until w ar m. T his
w ar ms the oil so that it drains better .
2. P ark the mac hine so that the drain side is
slightly lo w er than the opposite side to ensure
that the oil drains completely .
3. Diseng ag e the blade control switc h and mo v e
the control lev ers to the neutral loc k ed position
and apply the parking brak e .
4. Stop the engine , remo v e the k ey , and w ait for
all mo ving par ts to stop before lea ving the
operating position.
5. Place a pan belo w the oil drain. R emo v e the oil
drain cap ( Figure 22 ).
6. W hen the oil has drained completely , install the
drain cap . ( Figure 22 ).
Note: Dispose of the used oil at a cer tified
recycling center .
7. Clean around the oil dipstic k and unscrew the
cap ( Figure 22 ).
Note: Chang e the oil filter more frequently when
operating conditions are extremely dusty or sandy .
1. Drain the oil from the engine; refer to
Changing and Draining the Oil.
2. R emo v e the old filter ( Figure 23 ).
3. Apply a thin coat of new oil to the r ubber
g ask et on the re placement filter .
Figure 23
1. Oil lter 2. Adapter
4. Install the re placement oil filter to the adapter .
T ur n the oil filter cloc kwise until the r ubber
g ask et contacts the filter adapter , then tighten
the filter an additional 2/3 to 1 tur n ( Figure 23 ).
Figure 22
1. Oil drain 2. Oil dipstick
8. Slo wly pour appro ximately 80% of the
specified oil into the filler cap ( Figure 22 ).
R efer to Ser vicing the Engine Oil.
9. Chec k the oil lev el; refer to Chec king the Oil
Lev el.
10. Slo wly add additional oil to bring it to the full
mark.
5. Fill the crankcase with the proper type of new
oil; refer to Changing and Draining the Oil.
Servicing the Air Cleaner
F oam Element: Clean and oil after ev er y
25 operating hours .
P aper Element: R e place after ev er y 200 operating
hours or yearly , whic hev er comes first.
Note: Ser vice the air cleaner more frequently
(ev er y few hours) if operating conditions are
extremely dusty or sandy .
Removing the Foam and Paper
Elements
1. Diseng ag e the blade control switc h and mo v e
the control lev ers to the neutral loc k ed position
and apply the parking brak e .
2. Stop the engine , remo v e the k ey , and w ait for
all mo ving par ts to stop before lea ving the
operating position.
23
Page 24
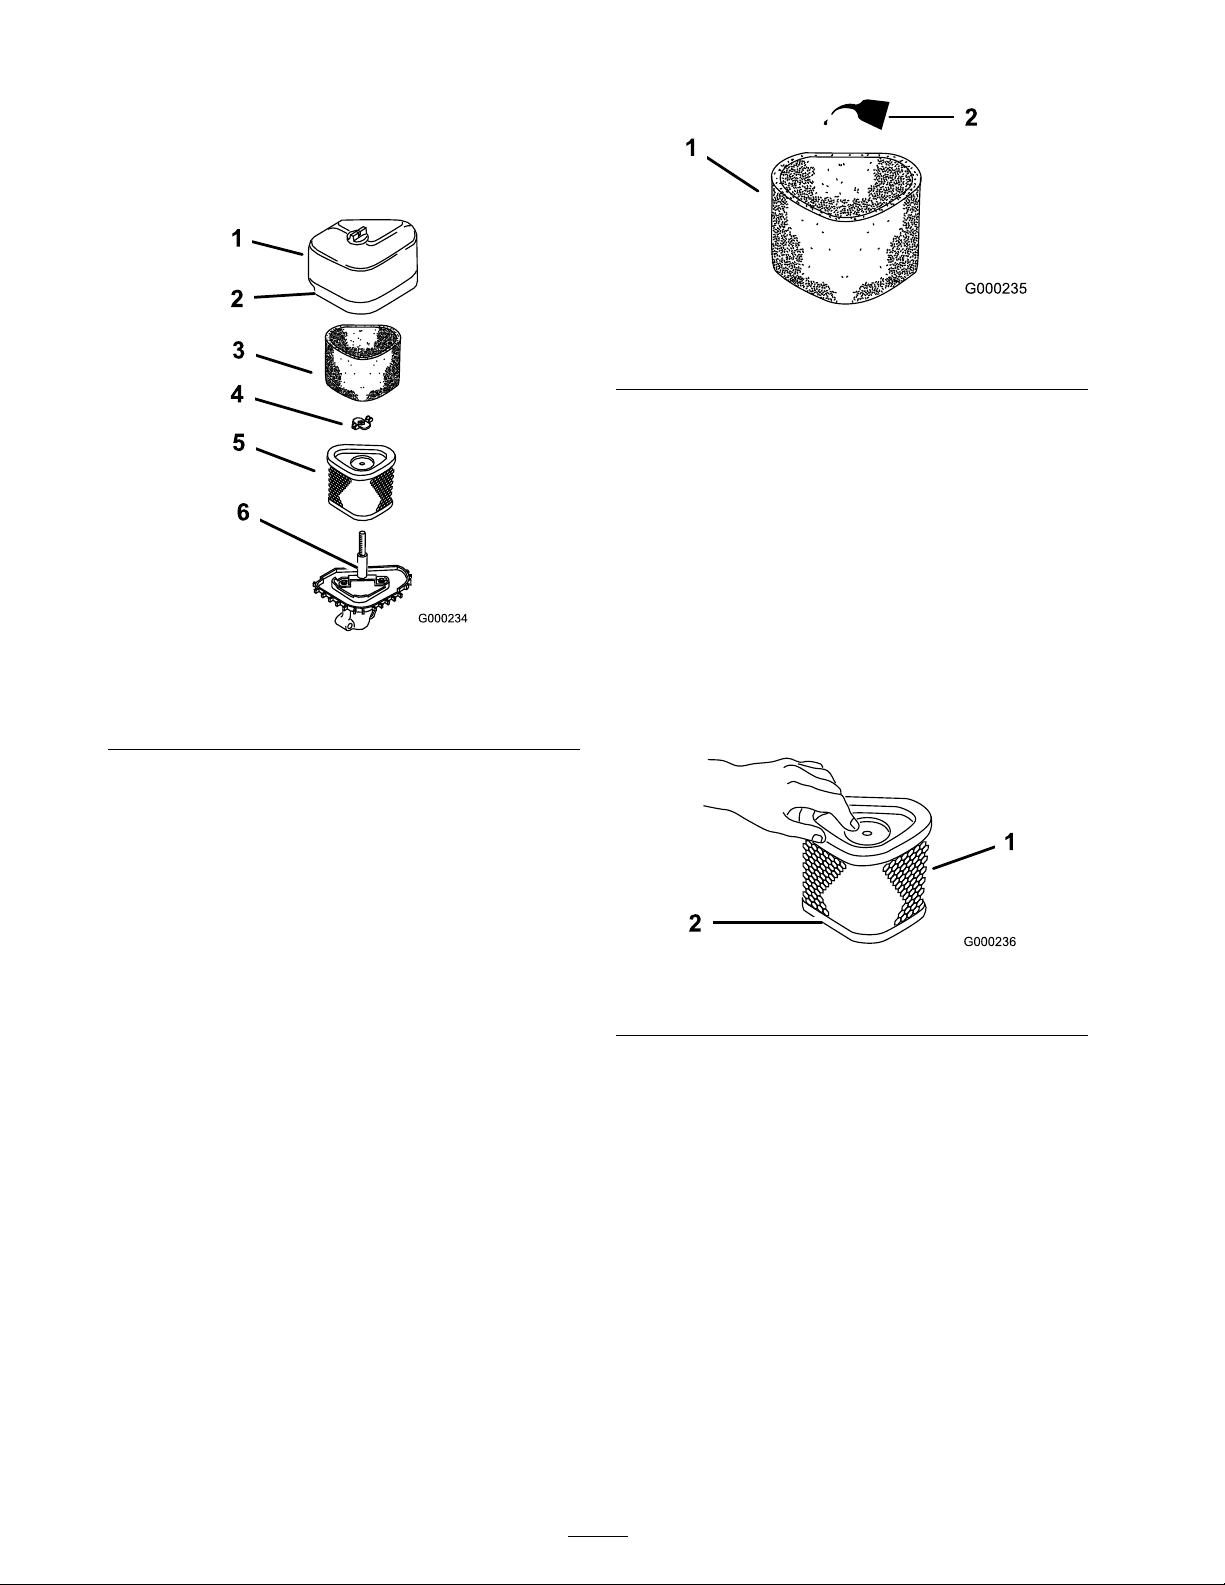
3. Clean around the air cleaner to prev ent dir t
from g etting into the engine and causing
damag e . Unscrew the knob and remo v e the air
cleaner co v er ( Figure 24 ).
Figure 24
1. Knob
2. Air cleaner cover 5. Paper element
3. Foam element 6. Stud
4. Wing nut
Figure 25
1. Foam element 2. Oil
2. P aper Element
A. Lightly tap the element on a flat surface to
remo v e dust and dir t ( Figure 26 ).
B . Inspect the element for tears , an oily film,
and damag e to the r ubber seal.
Important: Nev er clean the paper
element with pr essuriz ed air or liquids,
such as solv ent, gas, or k er osene.
R eplace the paper element if it
is dama ged or cannot be cleaned
thor oughl y .
4. R emo v e the wing n ut and slide the foam and
paper air cleaner assembly off of the stud
( Figure 24 ).
5. Carefully remo v e the foam element from the
paper element ( Figure 24 ).
Cleaning the Foam and Paper
Elements
1. F oam Element
A. W ash the foam element in liquid soap and
w ar m w ater . W hen the element is clean,
rinse it thoroughly .
B . Dr y the element b y squeezing it in a clean
cloth (do not wring). Allo w the element to
air dr y .
C . Soak the element in new engine oil.
( Figure 25 ). Squeeze the element to remo v e
ex cess oil.
Important: R eplace the f oam
element if it is tor n or w or n.
Figure 26
1. Paper element 2. Rubber seal
Installing the Foam and Paper
Elements
Important: T o pr ev ent engine dama ge,
al w ays operate the engine with the complete
f oam and paper air cleaner assembl y installed.
1. Carefully slide the foam element onto the
paper air cleaner element ( Figure 24 ).
2. Place the air cleaner assembly onto the air
cleaner base and secure it with the wing n ut
( Figure 24 ).
3. Install the air cleaner co v er and secure it with
the knob ( Figure 24 ).
24
Page 25
Spark Plug
Chec k the spark plug(s) after ev er y 200 operating
hours . Mak e sure that the air g ap betw een the
center and side electrodes is cor rect before
installing the spark plug . Use a spark plug wrenc h
for remo ving and installing the spark plug(s) and a
g apping tool/feeler g aug e to c hec k and adjust the
air g ap . Install a new spark plug(s) if necessar y .
T ype: Champion R C12Y C (or equi v alent)
Air Gap: 0.030 inc h (0.76 mm)
Removing the Spark Plug(s)
1. Diseng ag e the blade control switc h and mo v e
the control lev ers to the neutral loc k ed position
and apply the parking brak e .
2. Stop the engine , remo v e the k ey , and w ait for
all mo ving par ts to stop before lea ving the
operating position.
Important: Nev er clean the spar k
plug(s). Al w ays r eplace the spar k plug(s)
when it has a black coating , w or n
electr odes, an oil y film, or cracks.
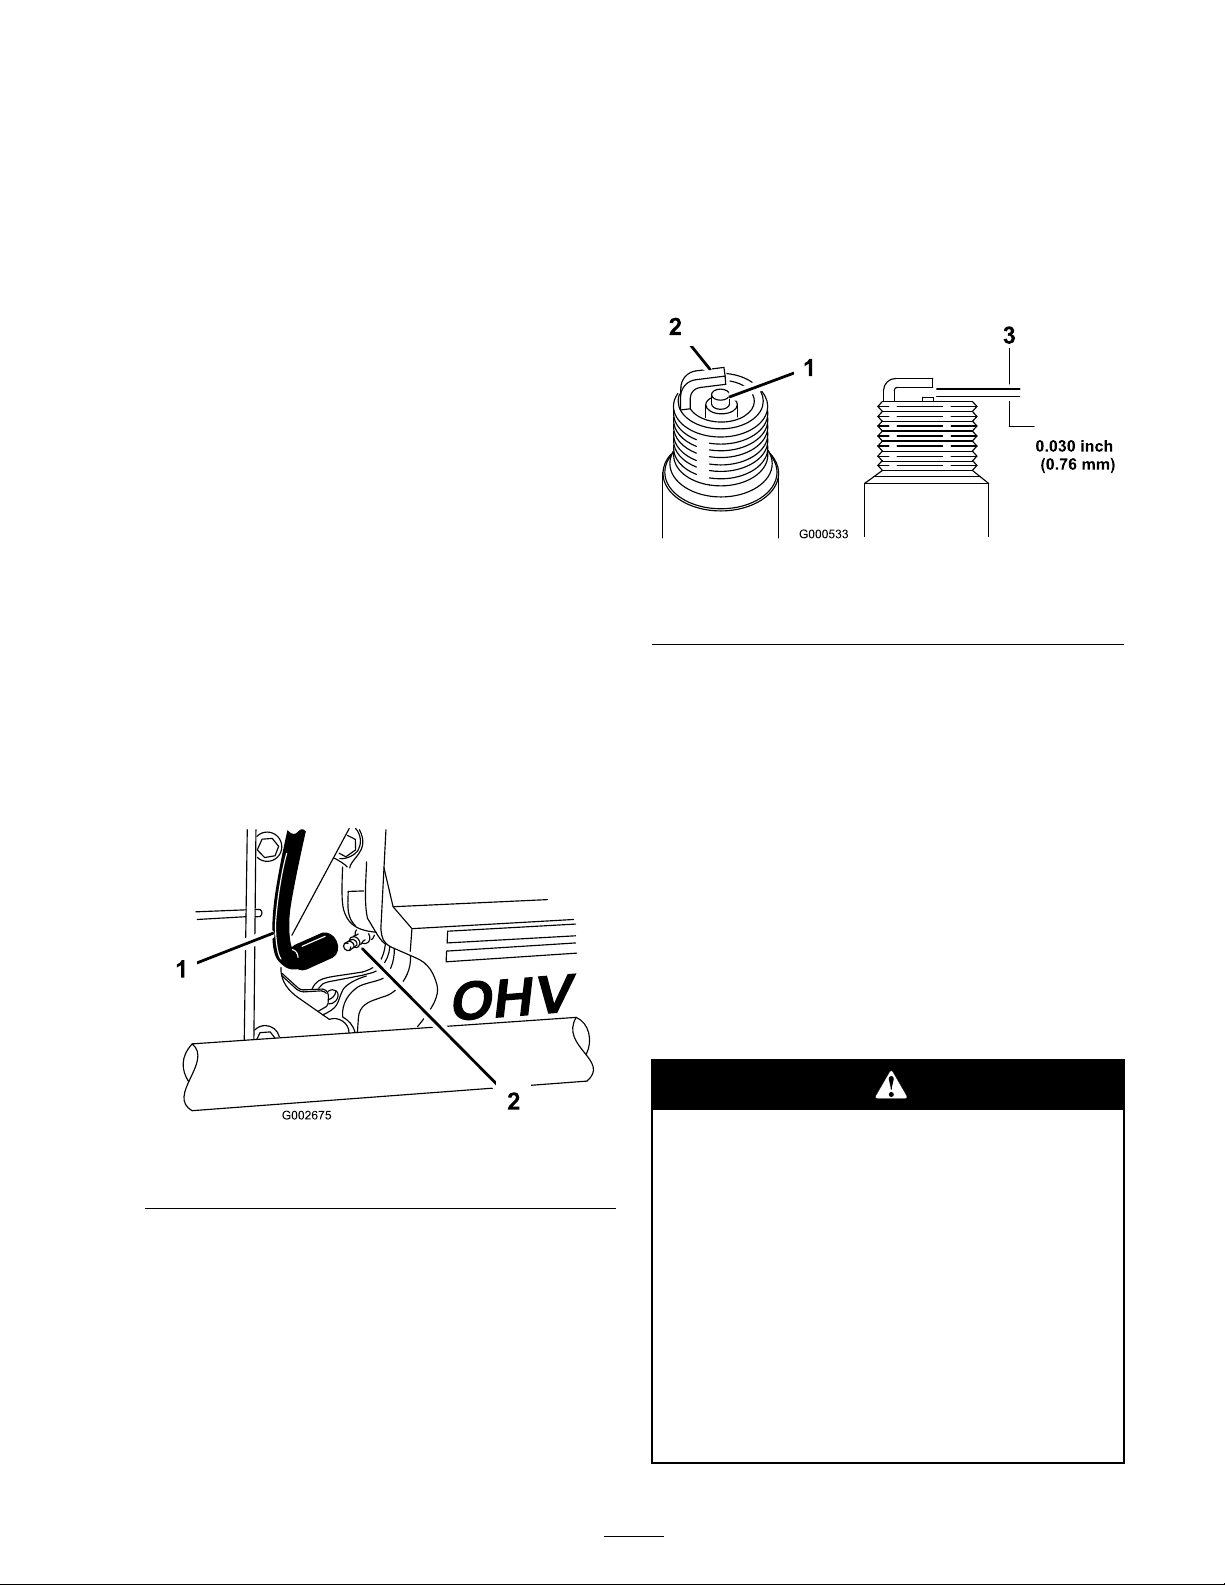
2. Chec k the g ap betw een the center and side
electrodes ( Figure 28 ). Bend the side electrode
( Figure 28 ) if the g ap is not cor rect.
Figure 28
1. Center electrode insulator
2. Side electrode
3. Air gap (not to scale)
3. Pull the wire(s) off of the spark plug(s)
( Figure 27 ). Clean around the spark plug(s) to
prev ent dir t from falling into the engine and
potentially causing damag e .
4. R emo v e the spark plug(s) and metal w asher .
Figure 27
1. Spark plug wire 2. Spark plug
Checking the Spark Plug
1. Look at the center of the spark plug(s)
( Figure 28 ). If y ou see light bro wn or g ra y on
the insulator , the engine is operating properly .
A blac k coating on the insulator usually means
the air cleaner is dir ty .
Installing the Spark Plug(s)
1. Install the spark plug(s). Mak e sure that the
air g ap is set cor rectly .
2. Tighten the spark plug(s) to 30 ft.-lb . (41 N ⋅ m).
3. Push the wire(s) onto the spark plug(s)
( Figure 27 ).
Fuel System
Maintenance
Draining the Fuel Tank
In cer tain conditions, gasoline is extr emel y
flamma ble and highl y explosi v e. A fir e or
explosion fr om gasoline can bur n y ou and
other s and can dama ge pr oper ty .
• Drain gasoline fr om the fuel tank when
the engine is cold. Do this outdoor s in
an open ar ea. W ipe up an y gasoline that
spills.
• Nev er smok e when draining gasoline,
and stay a w ay fr om an open flame or
wher e a spar k may ignite the gasoline
fumes.
25
Page 26
1. P ark the mac hine on a lev el surface , to ensure
that the fuel tank drains completely .
2. Diseng ag e the blade control switc h and mo v e
the control lev ers to the neutral loc k ed position
and apply the parking brak e .
2. Stop the engine , remo v e the k ey , and w ait for
all mo ving par ts to stop before lea ving the
operating position.
3. Close the fuel shut-off v alv e located under the
front of the fuel tank.
3. Stop the engine , remo v e the k ey , and w ait for
all mo ving par ts to stop before lea ving the
operating position.
4. Close the fuel shut-off v alv e located under the
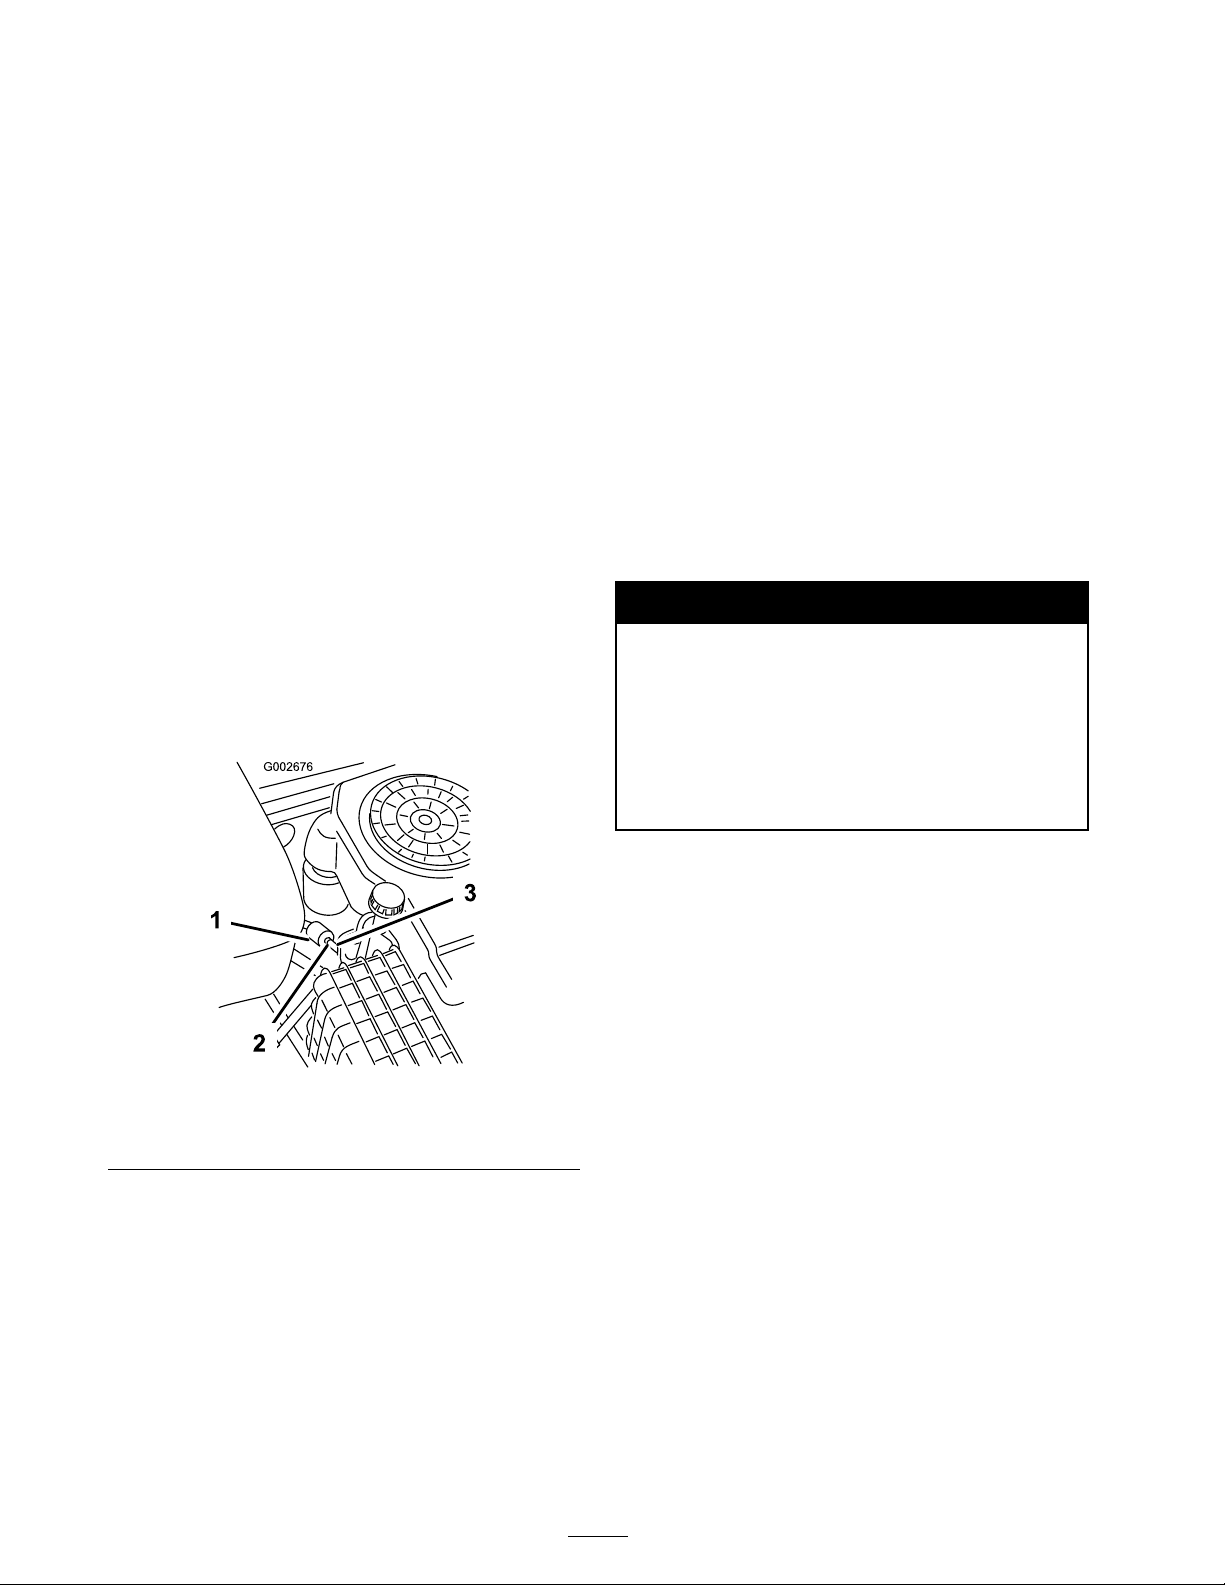
front of the fuel tank.
5. Loosen the hose clamp at the fuel filter and
slide it up the fuel line a w a y from the fuel filter
( Figure 29 ).
6. Pull the fuel line off of the fuel filter ( Figure 29 ).
7. Open the fuel shut-off v alv e . Allo w g asoline to
drain into a g as can or drain pan.
Note: No w is the best time to install a new
fuel filter because the fuel tank is empty .
8. Install the fuel line onto the fuel filter . Slide
the hose clamp close to the fuel filter to secure
the fuel line ( Figure 29 ).
4. Squeeze the ends of the hose clamps tog ether
and slide them a w a y from the filter ( Figure 29 ).
5. R emo v e the filter from the fuel lines .
6. Install a new filter and mo v e the hose clamps
close to the filter ( Figure 29 ).
7. Open the fuel shut-off v alv e .
Electrical System
Maintenance
Warning
CALIFORNIA
Pr oposition 65 W ar ning
Batter y posts, ter minals, and r elated
accessories contain lead and lead
compounds, chemicals kno wn to the State of
Calif or nia to cause cancer and r epr oducti v e
har m. W ash hands after handling .
Figure 29
1. Fuel lter 3. Fuel line
2. Hose clamp
Replacing the Fuel Filter
R e place the fuel filter after ev er y 200 operating
hours or yearly , whic hev er occurs first.
Nev er install a dir ty filter if it is remo v ed from the
fuel line .
1. Diseng ag e the blade control switc h and mo v e
the control lev ers to the neutral loc k ed position
and apply the parking brak e .
Servicing the Battery
Chec k the electrolyte lev el in the batter y ev er y
25 hours . Alw a ys k ee p the batter y clean and fully
c harg ed. Use a paper to w el to clean the batter y
case . If the batter y ter minals are cor roded, clean
them with a solution of four par ts w ater and one
par t baking soda. Apply a light coating of g rease
to the batter y ter minals to prev ent cor rosion.
V oltag e: 12 v
26
Page 27
Removing the Battery
Batter y ter minals or metal tools could shor t
a gainst metal tractor components causing
spar ks. Spar ks can cause the batter y gasses
to explode, r esulting in per sonal injur y .
• W hen r emo ving or installing the batter y ,
do not allo w the batter y ter minals to
touch an y metal par ts of the tractor .
• Do not allo w metal tools to shor t betw een
the batter y ter minals and metal par ts of
the tractor .
1. Diseng ag e the blade control switc h and mo v e
the control lev ers to the neutral loc k ed position
and apply the parking brak e .
Figure 30
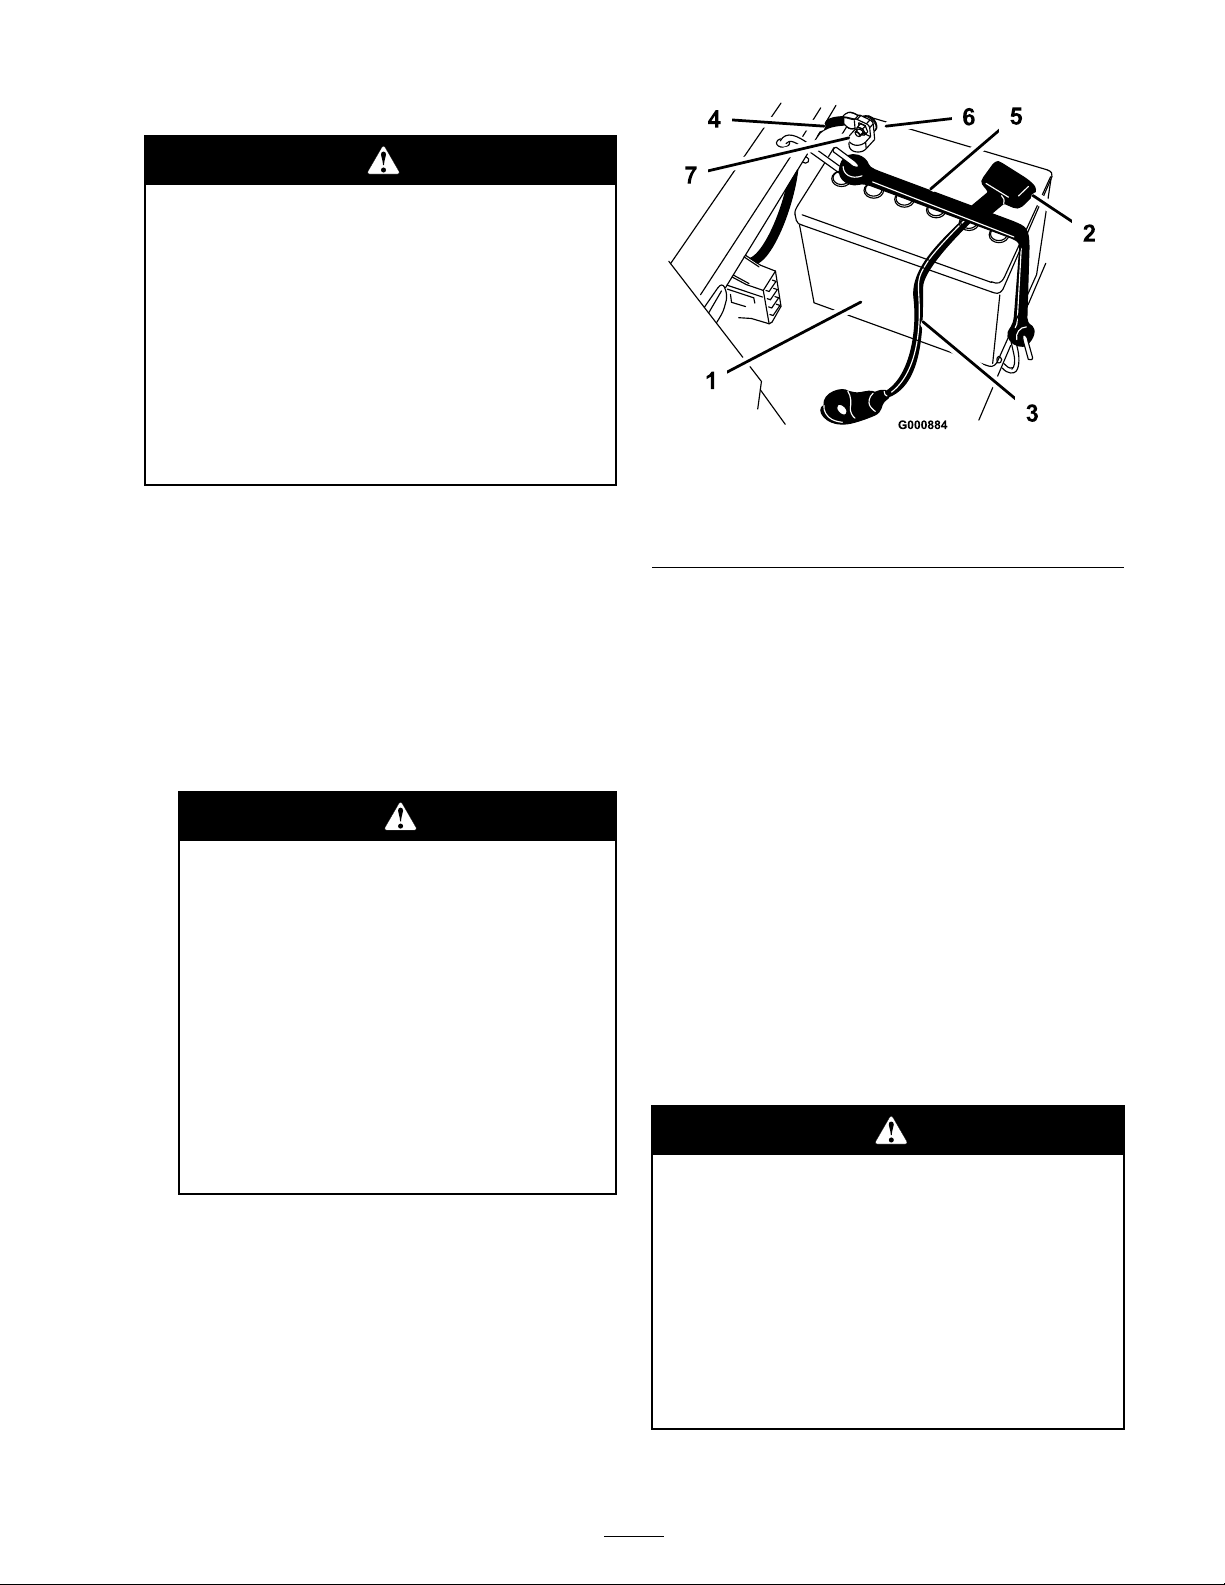
1. Battery
2. Terminal boot 6. Bolt and washer
3. Positive battery cable
4. Negative battery cable
5. Battery hold-down
7. Nut
2. Stop the engine , remo v e the k ey , and w ait for
all mo ving par ts to stop before lea ving the
operating position.
3. Tip the seat forw ard to see the batter y .
4. Disconnect the neg ati v e (blac k) g round cable
from the batter y post ( Figure 30 ).
Incor r ect batter y ca ble r outing could
dama ge the tractor and ca bles causing
spar ks. Spar ks can cause the batter y
gasses to explode, r esulting in per sonal
injur y .
• Al w ays disconnect the negati v e
(black) batter y ca ble bef or e
disconnecting the positi v e (r ed)
ca ble.
• Al w ays connect the positi v e (r ed)
batter y ca ble bef or e connecting the
negati v e (black) ca ble.
5. Slide the r ubber co v er up the positi v e (red)
cable . Disconnect the positi v e (red) cable from
the batter y post ( Figure 30 ).
6. R emo v e the batter y hold-do wn ( Figure 30 ) and
lift the batter y from the batter y tra y .
Installing the Battery
1. P osition the batter y in the tra y with the
ter minal posts a w a y from the control panel
( Figure 30 ).
2. Install the positi v e (red) batter y cable to the
positi v e (+) batter y ter minal.
3. Install the neg ati v e batter y cable to the neg ati v e
(-) batter y ter minal.
4. Secure the cables with 2 bolts (1/4 x 3/4 inc h),
w ashers (1/4 inc h), and n uts (1/4 inc h)
( Figure 30 ).
5. Slide the red ter minal boot onto the positi v e
(red) batter y post.
6. Secure the batter y with the hold-do wn
( Figure 30 ).
Checking the Electrolyte Level
Batter y electr ol yte contains sulfuric acid
which is a deadl y poison and causes sev er e
bur ns.
• Do not drink electr ol yte and a v oid
contact with skin, ey es or clothing . W ear
safety g lasses to shield y our ey es and
r ub ber g lo v es to pr otect y our hands.
• Fill the batter y wher e clean w ater is
al w ays a v aila ble f or flushing the skin.
1. Tip the seat forw ard to see the batter y .
27
Page 28
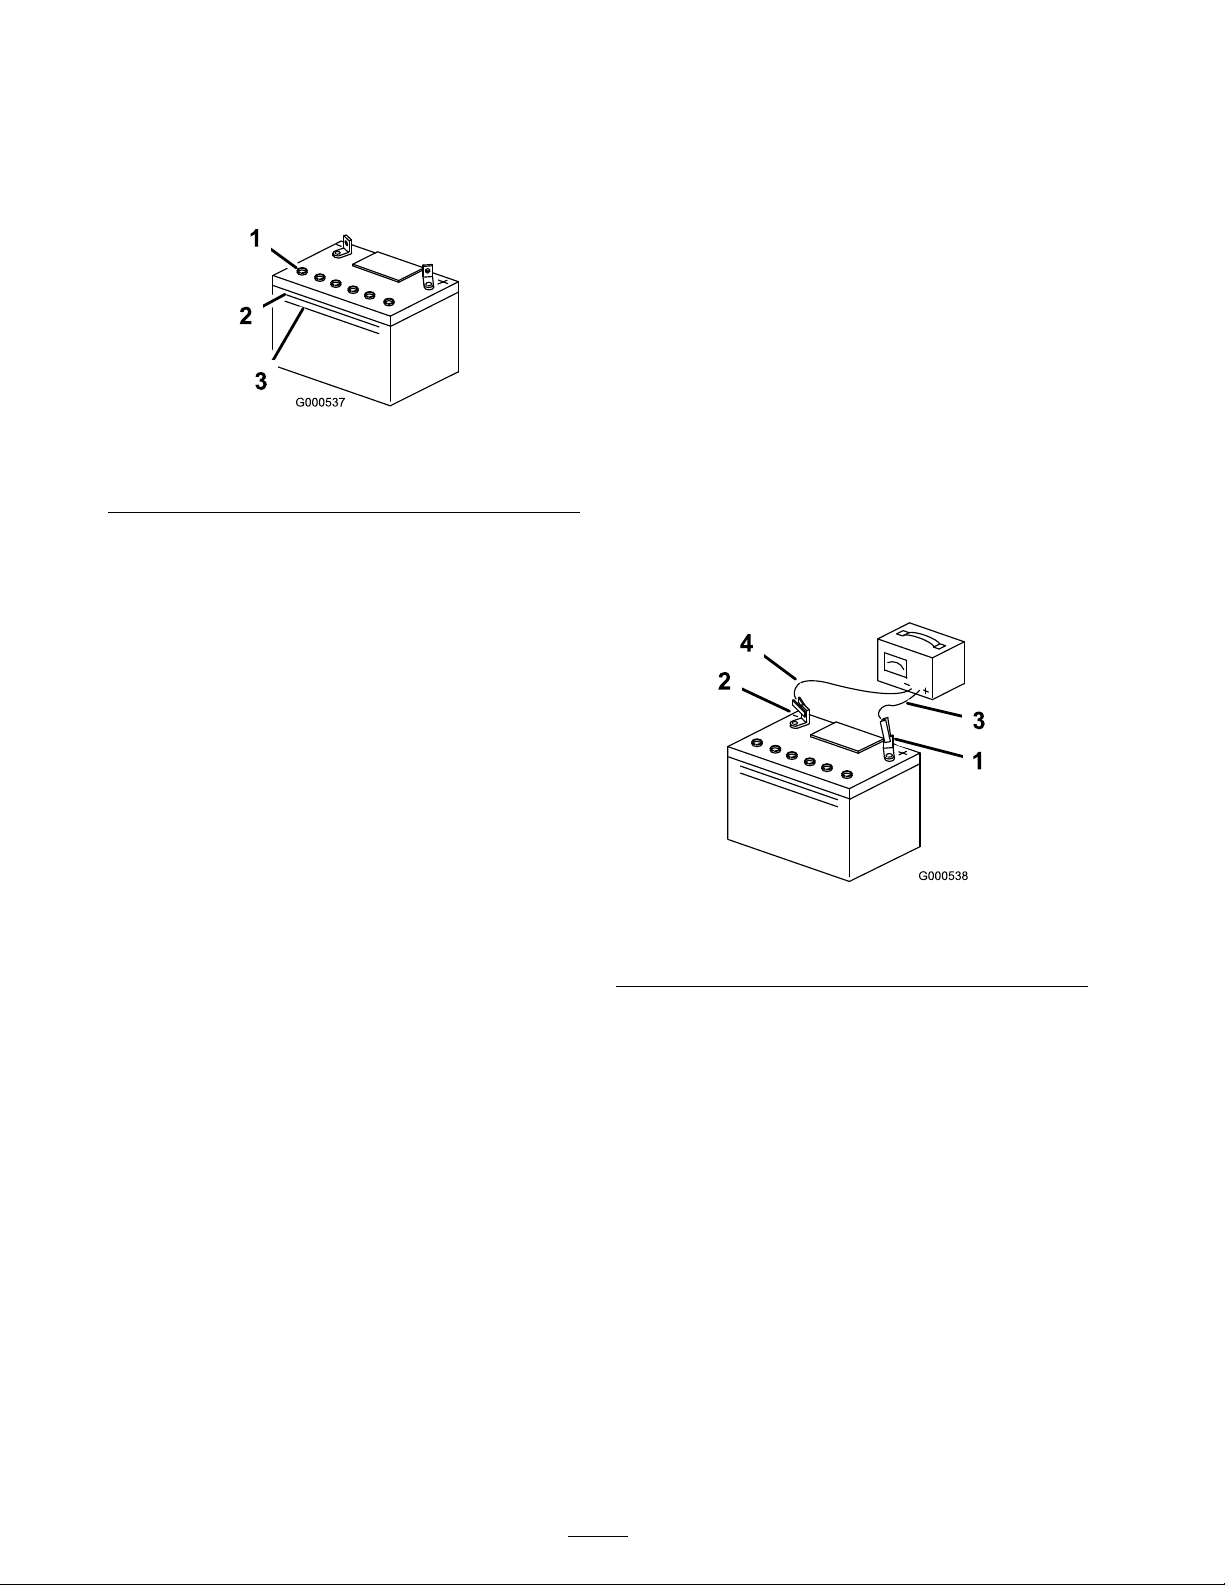
2. Look at the side of the batter y . T he electrolyte
m ust be up to the Upper line ( Figure 31 ).
Do not allo w the electrolyte to fall belo w the
Lo w er line ( Figure 31 ).
Figure 31
1. Vent caps
2. Upper line
3. Lower line
3. If the electrolyte is lo w , add the required
amount of distilled w ater; refer to Adding
W ater to the Batter y .
Adding Water to the Battery
Charging the Battery
Important: Al w ays k eep the batter y
full y charged (1.260 specific g ra vity). T his
is especiall y impor tant to pr ev ent batter y
dama ge when the temperatur e is belo w 32°F
(0°C).
1. R emo v e the batter y from the c hassis; refer to
R emo ving the Batter y .
2. Chec k the electrolyte lev el; refer to Chec king
the Electrolyte Lev el.
3. Mak e sure that the v ent caps are installed in
the batter y . Charg e the batter y for 1 hour at 25
to 30 amps or 6 hours at 4-6 amps . Do not
o v erc harg e the batter y .
4. W hen the batter y is fully c harg ed, unplug
the c harg er from the electrical outlet, then
disconnect the c harg er leads from the batter y
posts ( Figure 32 ).
T he best time to add distilled w ater to the batter y is
just before y ou operate the mac hine . T his lets the
w ater mix thoroughly with the electrolyte solution.
1. R emo v e the batter y from the tractor; refer to
R emo ving the Batter y .
Important: Nev er fill the batter y with
distilled w ater while the batter y installed in
the tractor . Electr ol yte could be spilled on
other par ts and cause cor r osion.
2. Clean the top of the batter y with a paper to w el.
3. R emo v e the v ent caps from the batter y
( Figure 31 ).
4. Slo wly pour distilled w ater into eac h batter y
cell until the electrolyte lev el is up to the Upper
line ( Figure 31 ) on the batter y case .
Important: Do not o v erfill the batter y
because electr ol yte (sulfuric acid) can
cause sev er e cor r osion and dama ge to the
chassis.
5. W ait fiv e to ten min utes after filling the batter y
cells . Add distilled w ater , if necessar y , until
the electrolyte lev el is up to the Upper line
( Figure 31 ) on the batter y case .
6. R einstall the batter y v ent caps .
Figure 32
1. Positive battery post
2. Negative battery post
3. Red (+) charger lead
4. Black (-) charger lead
5. Install the batter y in the tractor and connect the
batter y cables; refer to Installing the Batter y .
Note: Do not r un the tractor with the batter y
disconnected, electrical damag e ma y occur .
Servicing the Fuses
Ser vice Inter v al/Specification
T he electrical system is protected b y fuses . It
requires no maintenance; ho w ev er , if a fuse blo ws ,
c hec k the component/circuit for a malfunction
or shor t.
Fuse:
• Main F1–30 amp , blade-type
• Charg e Circuit F2–25 amp , blade-type
• Optional Headlight Kit–10 amp , blade type
28
Page 29
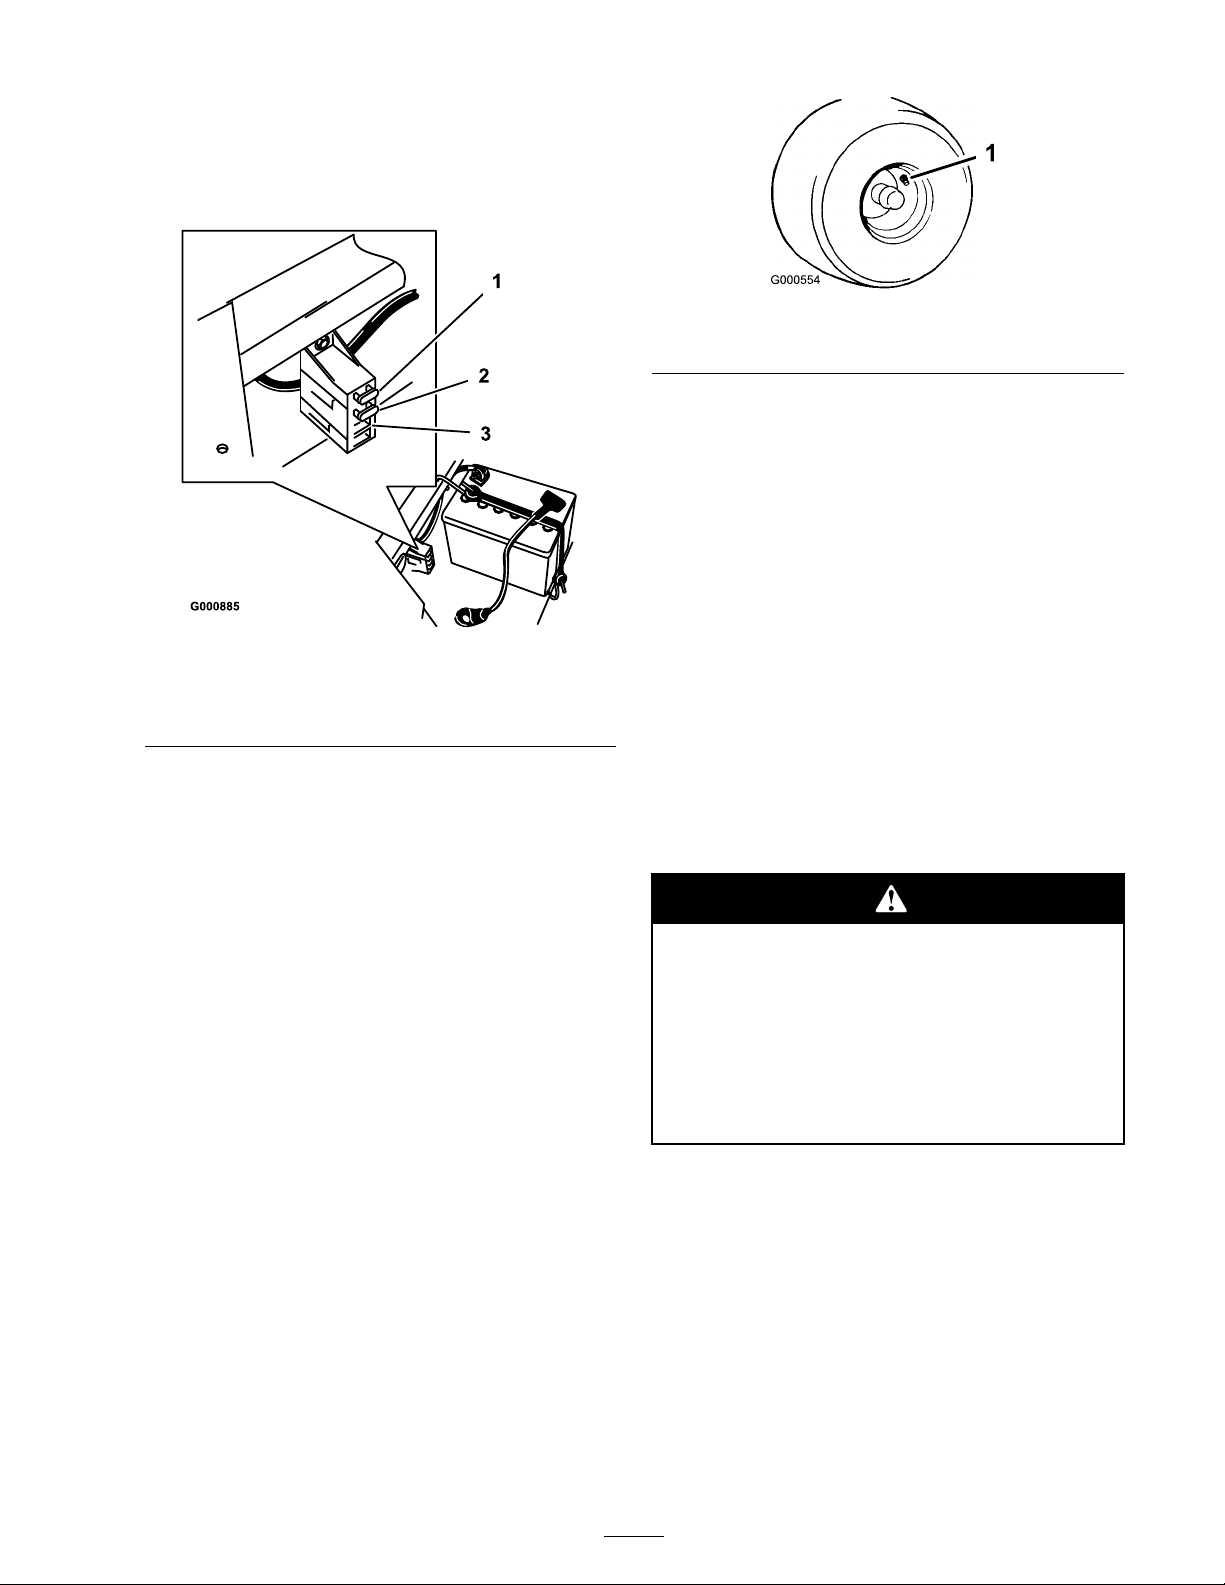
1. Raise the seat to g ain access to the fuse holder
( Figure 33 ).
2. T o re place a fuse , pull out on the fuse to
remo v e it ( Figure 33 ).
Figure 33
1. Main–30 amp
2. Charge circuit–25 amp
3. For optional Headlight
Kit–10 amp
Drive System
Maintenance
Figure 34
1. Valve stem
Mower Maintenance
Servicing the Cutting Blades
Maintain shar p blades throughout the cutting
season because shar p blades cut cleanly without
tearing or shredding the g rass blades . T earing and
shredding tur ns g rass bro wn at the edg es , whic h
slo ws g ro wth and increases the c hance of disease .
Chec k the cutter blades daily for shar pness , and
for any w ear or damag e . File do wn any nic ks
and shar pen the blades as necessar y . If a blade is
damag ed or w or n, re place it immediately with a
g en uine T oro re placement blade . F or con v enient
shar pening and re placement, y ou ma y w ant to
k ee p extra blades on hand.
Checking the Tire Pressure
Maintain the air pressure in the front and rear
tires as specified. Unev en tire pressure can cause
unev en cut. Chec k the pressure at the v alv e
stem after ev er y 50 operating hours or monthly ,
whic hev er occurs first ( Figure 34 ). Chec k the
tires when they are cold to g et the most accurate
pressure reading .
R ear Tires: 13 psi (90 kP a)
F ront Tires (castor wheels): 35 psi (139 kP a)
A w or n or dama ged blade can br eak, and a
piece of the blade could be thr o wn into the
operator’ s or bystander’ s ar ea, r esulting in
serious per sonal injur y or death.
• Inspect the blade periodicall y f or w ear
or dama ge.
• R eplace a w or n or dama ged blade.
Before Inspecting or Servicing the
Blades
P ark the mac hine on a lev el surface , diseng ag e the
blade control switc h, and set the parking brak e .
Stop the engine , remo v e the k ey , and disconnect
the spark plug wire(s) from the spark plug(s).
Inspecting the Blades
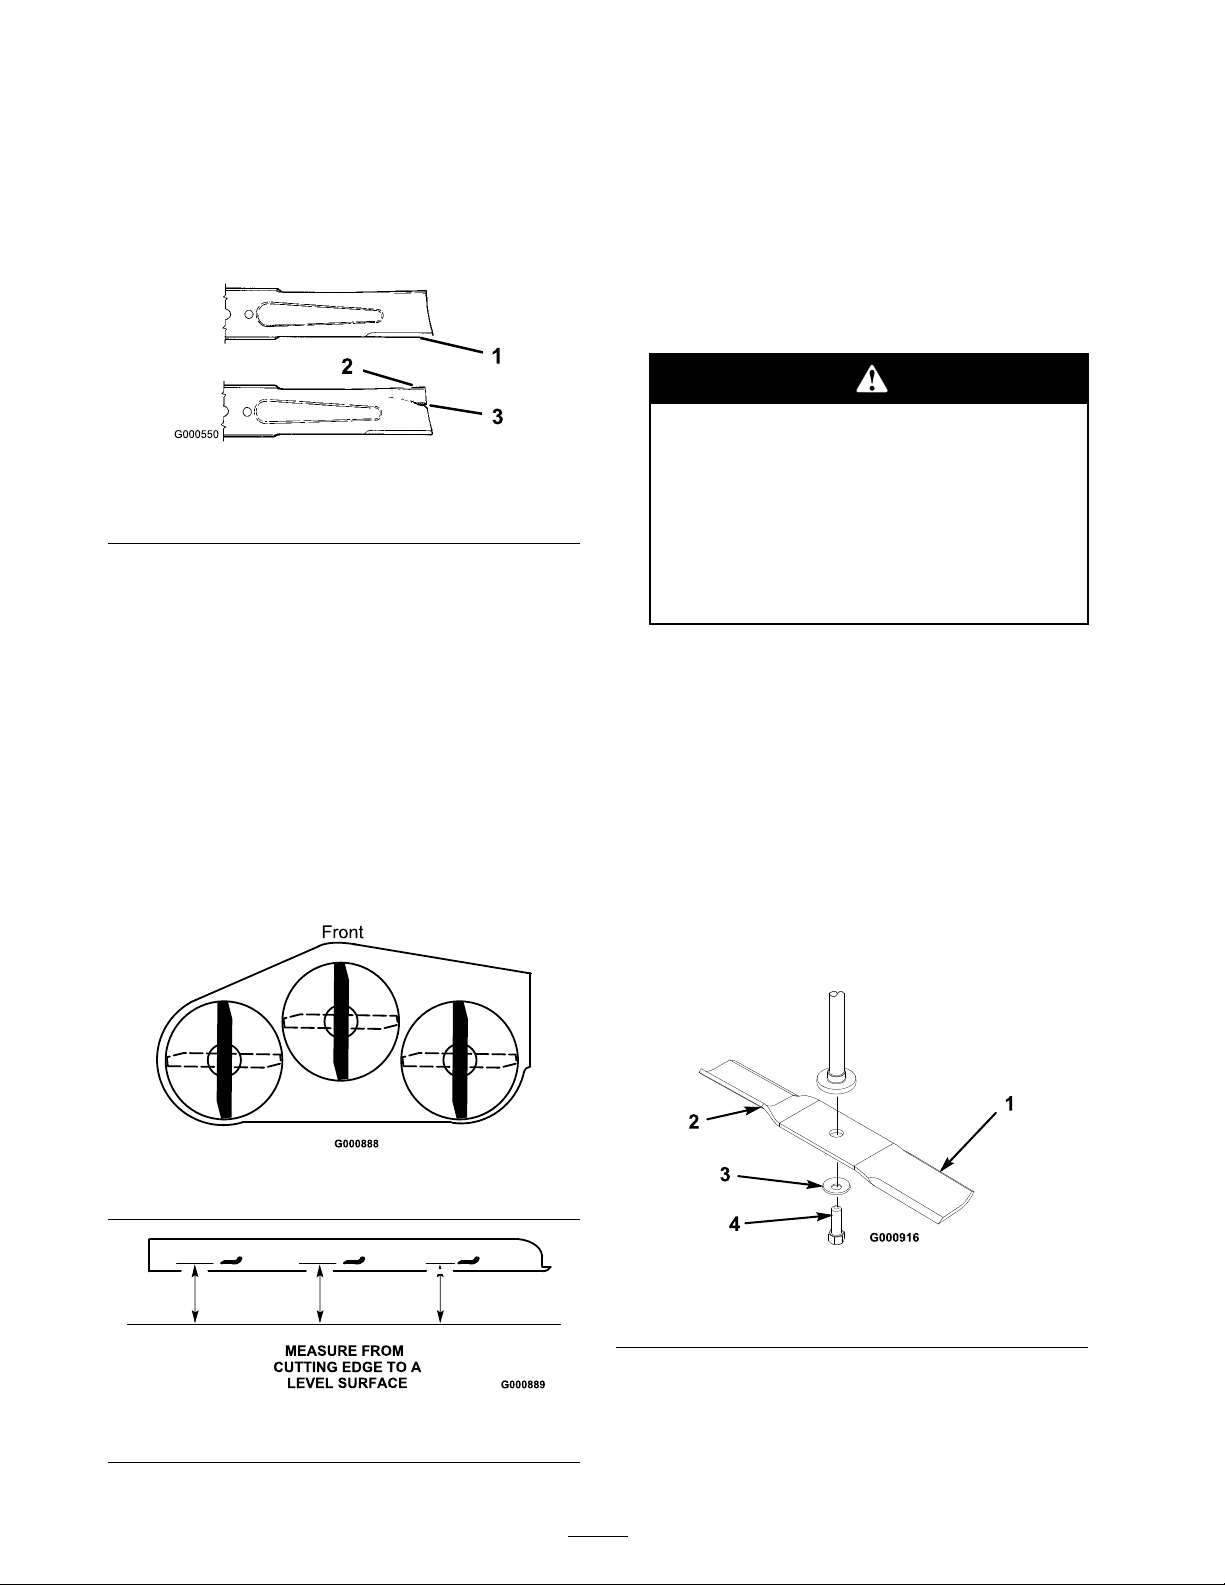
1. Inspect the cutting edg es ( Figure 35 ). If the
edg es are not shar p or ha v e nic ks , remo v e and
29
Page 30
shar pen the blades; refer to Shar pening the
Blades .
2. Inspect the blades , especially the cur v ed area
( Figure 35 ). If y ou notice any damag e , w ear , or
a slot for ming in this area (item 3 in Figure 35 ),
immediately install a new blade .
Figure 35
1. Cutting edge 3. Wear/slot forming
2. Curved area
4. R otate the opposite ends of the blades forw ard.
5. Measure from a lev el surface to the cutting
edg e of the blades at the same position as
in ste p 3 abo v e . T he difference betw een the
dimensions obtained in ste ps 3 and 4 m ust not
ex ceed 1/8 inc h (3 mm). If this dimension
ex ceeds 1/8 inc h (3 mm), the blade is bent
and m ust be re placed; refer to R emo ving the
Blades and Installing the Blades .
A blade that is bent or dama ged could
br eak apar t and could seriousl y injur e or
kill y ou or bystander s.
• Al w ays r eplace bent or dama ged
blade with a new blade.
Checking for Bent Blades
1. Diseng ag e the blade control switc h and mo v e
the control lev ers to the neutral loc k ed position
and apply the parking brak e .
2. Stop the engine , remo v e the k ey , and w ait for
all mo ving par ts to stop before lea ving the
operating position.
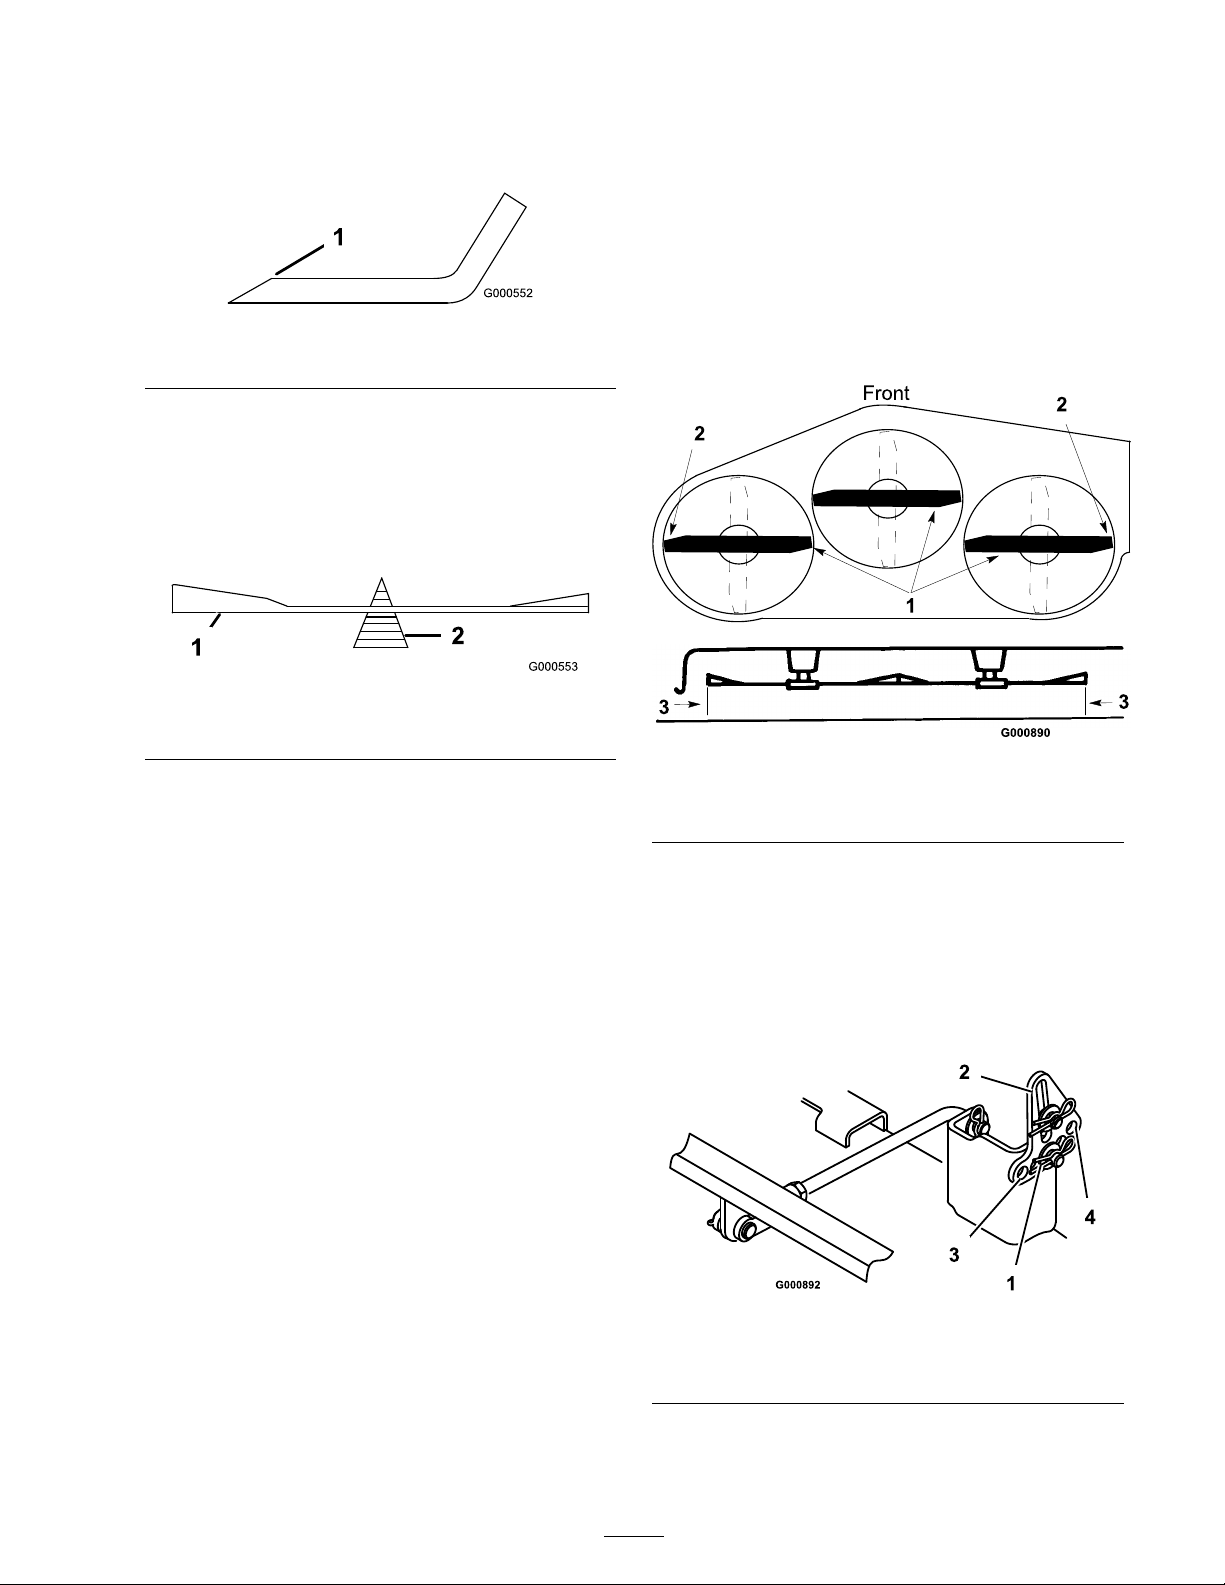
3. R otate the blades until the ends face forw ard
and bac kw ard ( Figure 36 ). Measure from a
lev el surface to the cutting edg e of the blades
( Figure 37 ). Note this dimension.
• Nev er file or cr eate shar p notches in
the edges or surf aces of blade.
Removing the Blades
T he blades m ust be re placed if a solid object is
hit, if the blade is out of balance , or the blade
is bent. T o ensure optim um perfor mance and
contin ued safety confor mance of the mac hine , use
g en uine T oro re placement blades . R e placement
blades made b y other man ufacturers ma y result in
non-confor mance with safety standards .
Hold the blade end using a rag or thic kly-padded
glo v e . R emo v e the blade bolt, cur v ed w asher , and
blade from the spindle shaft ( Figure 38 ).
Figure 36
Figure 37
Figure 38
1. Sail area of blade 3. Curved washer
2. Blade 4. Blade bolt
Sharpening the Blades
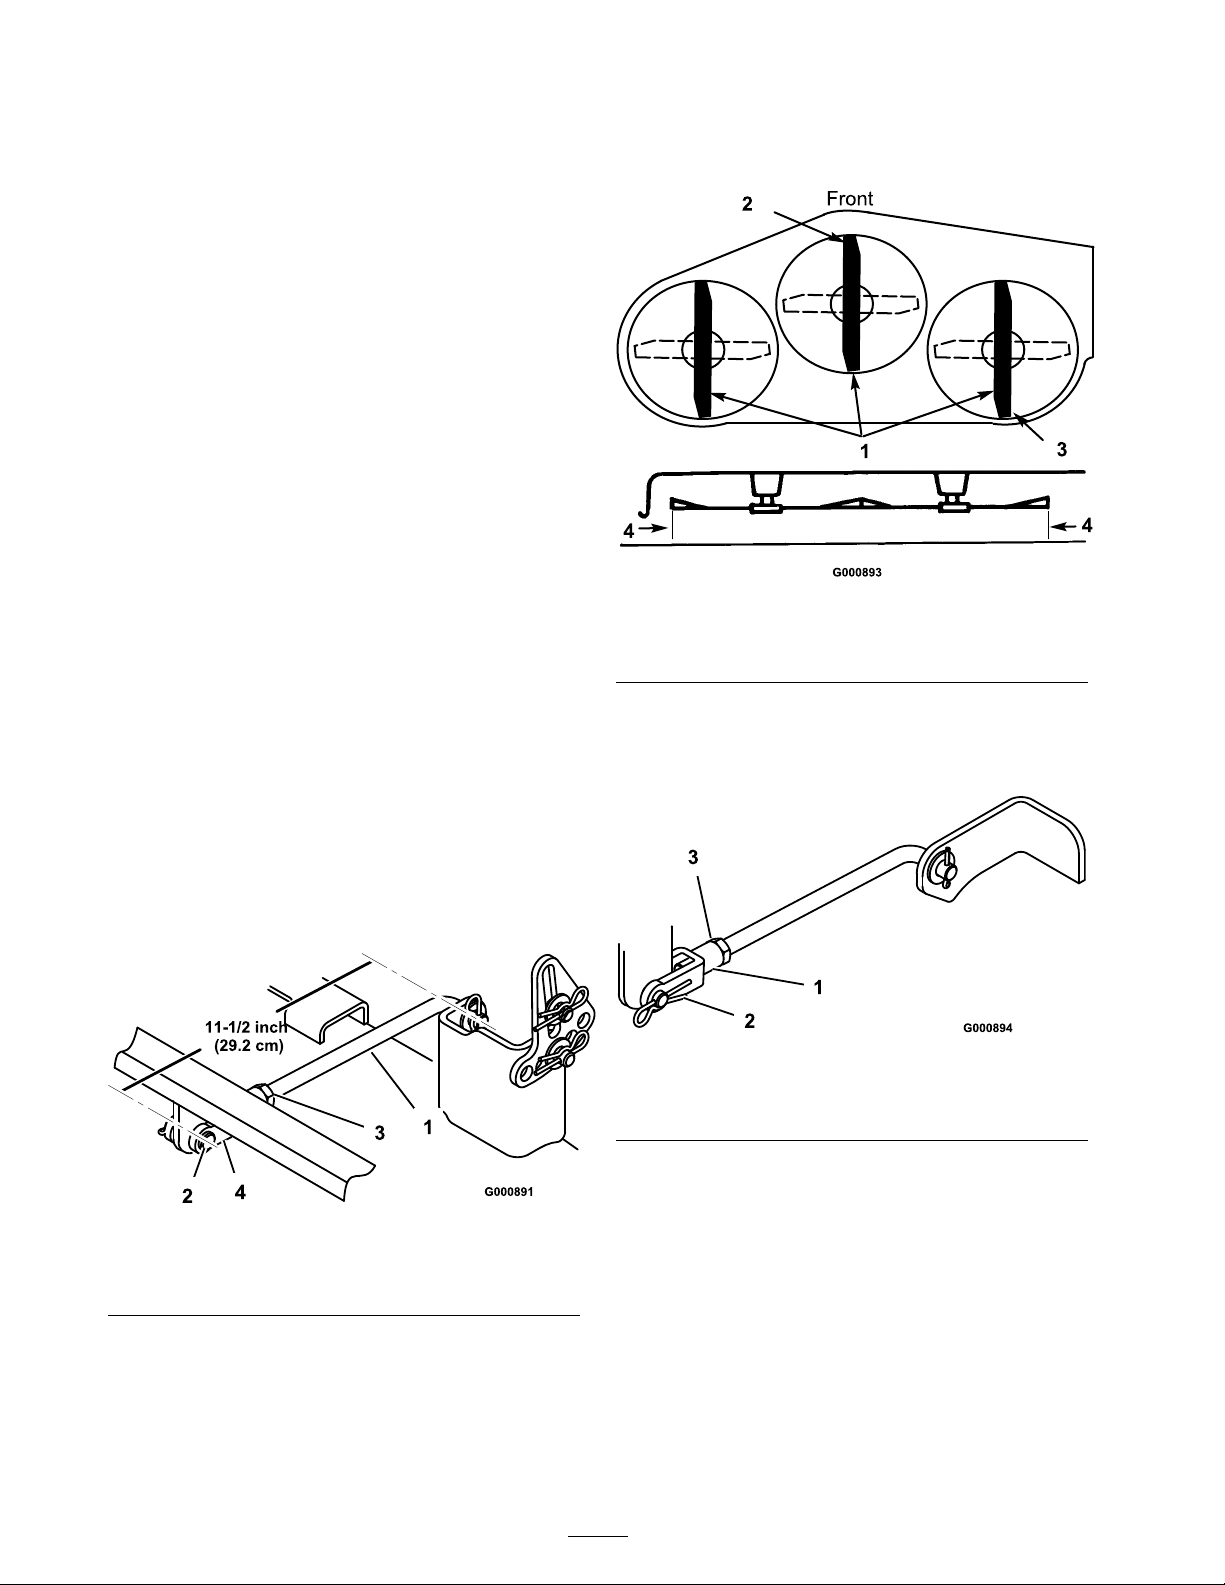
1. Use a file to shar pen the cutting edg e at both
ends of the blade ( Figure 39 ). Maintain the
30
Page 31
original angle . T he blade retains its balance if
the same amount of material is remo v ed from
both cutting edg es .
Figure 39
1. Sharpen at original angle
2. Chec k the balance of the blade b y putting it on
a blade balancer ( Figure 40 ). If the blade sta ys
in a horizontal position, the blade is balanced
and can be used. If the blade is not balanced,
re peat the shar pening procedure on the hea vier
side until the blade is balanced.
2. Chec k the air pressure of all four tires . If
needed, adjust to the recommended inflation;
refer to Tire Press .
3. Set the height-of-cut at 3 inc h (76 mm).
4. Carefully rotate the blade(s) from side to side
( Figure 41 ). Measure betw een the outside
cutting edg es and the flat surface ( Figure 41 ).
If both measurements are not within 3/16 inc h
(4.75 mm), an adjustment is required; refer to
ste ps 5 and 6.
Figure 40
1. Blade 2. Balancer
Installing the Blades
1. Install the blade onto the spindle shaft
( Figure 38 ).
Important: T he cur v ed par t of the blade
must be pointing up w ard to w ard the inside
of the mo w er to ensur e pr oper cutting .
2. Install the cur v ed w asher (cupped side to w ard
the blade) and blade bolt ( Figure 38 ). T or que
the blade bolt to 35-65 ft-lb (47-88 N·m).
Leveling the Mower from
Side-to-Side
T he mo w er blades m ust be lev el from side to side .
Chec k the side-to-side lev el any time y ou install
the mo w er or when y ou see an unev en cut on y our
la wn.
1. P osition the mo w er on a flat surface .
Diseng ag e the blade control switc h, set the
parking brak e , stop the engine , and remo v e the
k ey . Disconnect the spark plug wire(s) from
the spark plug(s).
Figure 41
1. Blades side to side 3. Measure here
2. Outside cutting edges
5. R emo v e the hair pin cotter and w asher from
the lev eling brac k et ( Figure 42 ). T o lev el the
blade(s), re position the lev eling brac k et(s) in
a different hole and install the w asher and
hair pin cotter . ( Figure 42 ). A front hole lo w ers
the blade height and a rear hole raises its
height. Adjust both sides as required.
Figure 42
1. Hairpin cotter and washer 3. Front hole
2. Leveling bracket 4. Rear hole
6. Chec k the front-to-rear blade slope; refer to
Adjusting the F ront-to-R ear Blade Slope .
31
Page 32
Adjusting the Front-to-Rear
Blade Slope
Chec k the front-to-rear blade lev el any time y ou
install the mo w er . If the front of the mo w er is
more than 5/16 inc h (7.9 mm) lo w er than the
rear of the mo w er , adjust the blade lev el using the
follo wing instr uctions:
1. P osition the mo w er on a flat surface .
2. Diseng ag e the blade control switc h and mo v e
the control lev ers to the neutral loc k ed position
and apply the parking brak e .
3. Stop the engine , remo v e the k ey , and w ait for
all mo ving par ts to stop before lea ving the
operating position.
4. Chec k the air pressure of all four tires . If
needed, adjust to the recommended inflation;
refer to Tire Pressure .
5. Chec k and adjust the side-to-side blade lev el
if y ou ha v e not c hec k ed the setting; refer to
Lev eling the Mo w er from Side-to-Side .
6. Measure the length of the rear tr union rod
( Figure 43 ). If the rod length is not 11-1/2 inc h
(29.2 cm), remo v e the clevis pin and cotter
pin from the end of the rod ( Figure 43 ),
loosen the jam n ut, and tur n the y ok e until the
11-1/2 inc h (29.3 cm) dimension is obtained.
7. T hen secure the y ok e with the clevis pin and
cotter pin. R e peat this procedure on the
opposite side of the mo w er .
the flat surface . If the front blade tip is not
1/16-5/16 inc h (1.6-7.9 mm) lo w er than the
rear blade tip , adjust the front tr union rods .
Figure 44
1. Blade front to rear 3. Measure rear blade tip
2. Measure front blade tip 4. Measure here
10. T o adjust the front-to-rear blade slope , remo v e
the hair pin cotter from the front tr union y ok es
and loosen the jam n uts ( Figure 45 ).
Figure 43
1. Rear trunion rod
2. Clevis pin and cotter pin 4. Yoke
3. Jam nut
8. Set the height-of-cut at 3 inc h (76 mm) and
carefully rotate the blades so they are facing
front to rear ( Figure 44 ).
9. Measure betw een the tip of the front blade
( Figure 44 ) and the tip of the rear blade to
Figure 45
1. Front trunion rod yoke
2. Hairpin cotter
3. Jam nut
11. R otate the y ok es on the rods to c hang e the
adjustment ( Figure 45 ). T o raise the front
of the mo w er , tighten the y ok es (shor ten the
rods). T o lo w er the front of the mo w er , loosen
the y ok es (lengthen the rods).
12. After adjusting both tr union rod y ok es ev enly ,
secure the y ok es with the hair pin cotters .
Chec k the front-to-rear lev el ag ain. Contin ue
adjusting the y ok es until the front blade tip is
1/16-5/16 inc h (1.6-7.9 mm) lo w er than the
rear blade tip ( Figure 44 ).
32
Page 33
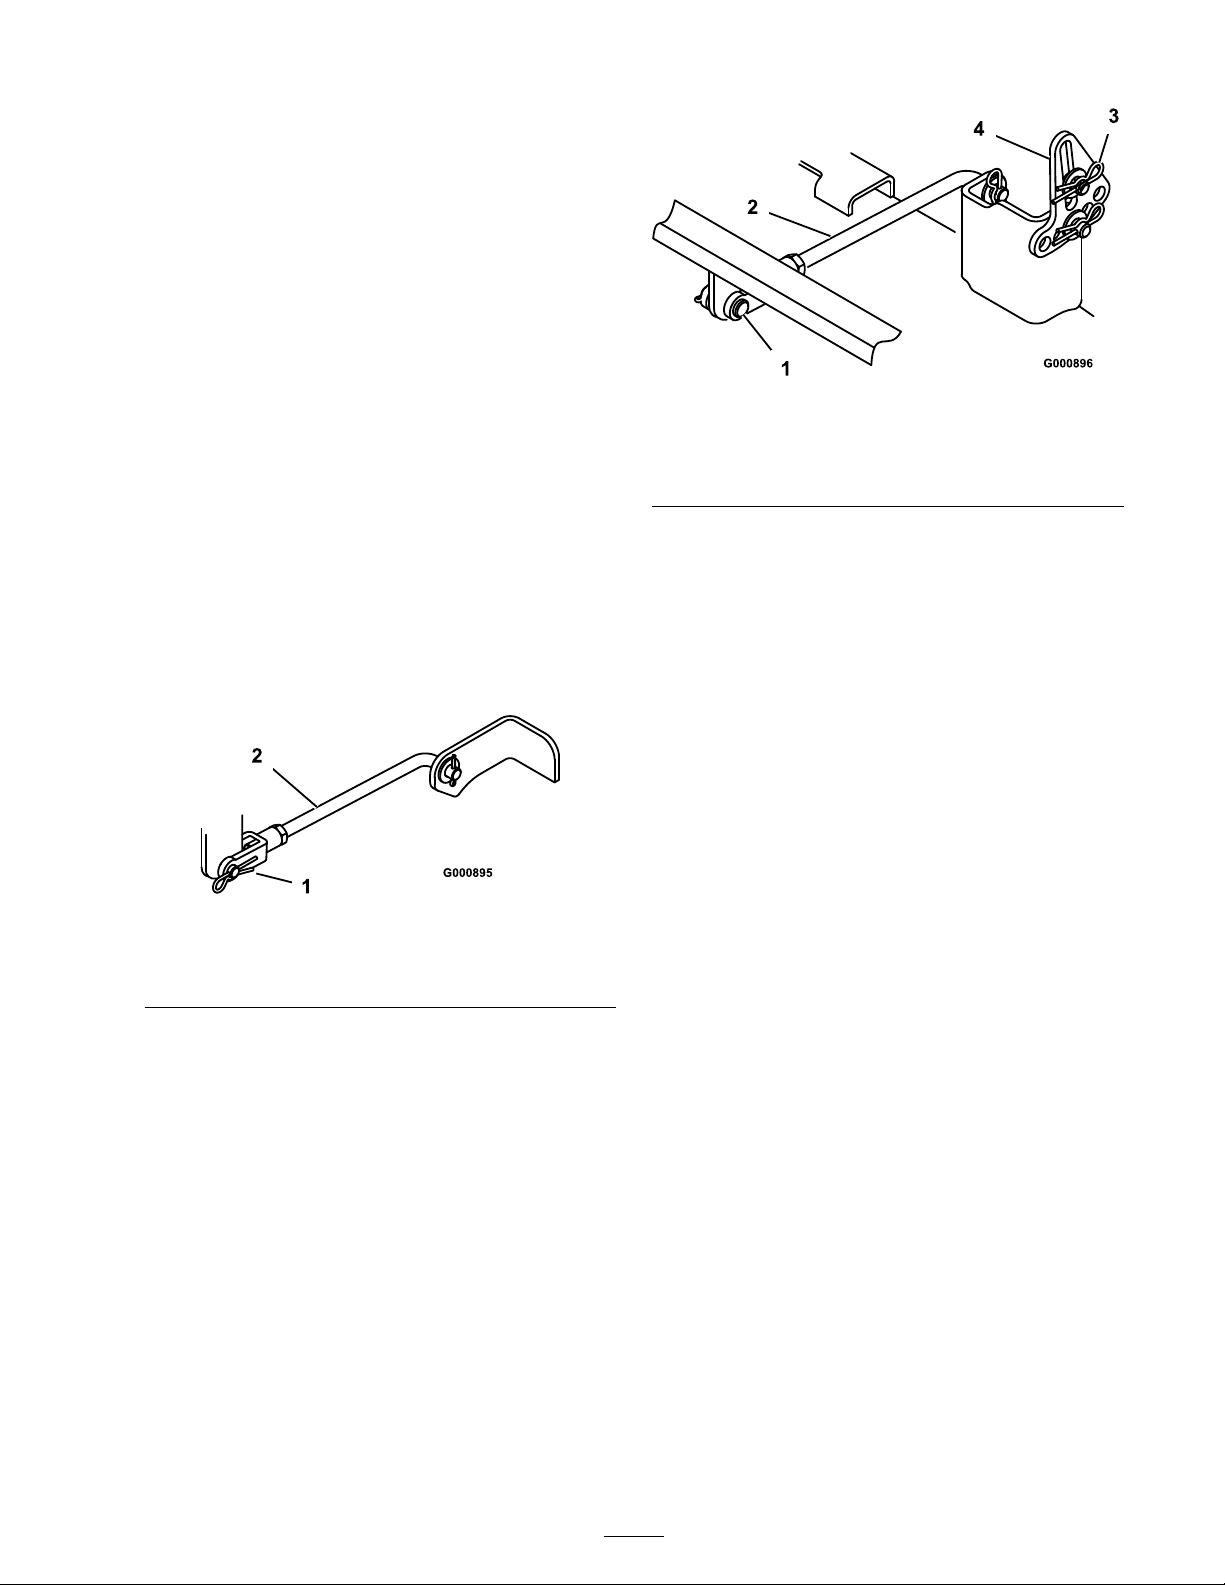
13. W hen the front-to-rear blade slope is cor rect,
tighten the jam n uts ( Figure 43 and Figure 45 ).
14. R ec hec k the side-to-side lev el of the mo w er;
refer to Lev eling the Mo w er from Side-to-Side .
15. Chec k the height of the anti-scalp rollers; refer
to Adjusting the Anti-Scalp R ollers .
Removing the Mower
1. P ark the mac hine on a lev el surface .
2. Diseng ag e the blade control switc h and mo v e
the control lev ers to the neutral loc k ed position
and apply the parking brak e .
3. Stop the engine , remo v e the k ey , and w ait for
all mo ving par ts to stop before lea ving the
operating position.
4. Lo w er the height-of-cut lev er to the lo w est
position.
5. R emo v e the hair pin cotter and clevis pin from
the front tr union y ok es ( Figure 46 ).
Figure 47
1. Hairpin cotter and clevis
pin
2. Rear trunion rod 4. Leveling bracket
3. Hairpin cotter and washer
8. Slide the mo w er rearw ard to remo v e the
mo w er belt from the engine pulley .
9. Slide the mo w er out from under neath the
tractor .
Note: R etain all par ts for future installation.
Figure 46
1. Hairpin cotter and clevis
pin
2. Front trunion
6. R emo v e the hair pin cotter and clevis pin from
the rear tr union rod ( Figure 47 ) on eac h side
of the mo w er .
7. R emo v e the hair pin cotter and w asher at
the mo w er lev eling brac k ets ( Figure 47 ) on
eac h side of the mo w er . Note whic h hole
the lev eling brac k et is mounted in for future
installation. Slide the brac k ets off of the
mounting pin.
Inspecting the Belts
Inspect all belts ev er y 100 hours .
Chec k the belts for crac ks , fra yed edg es , bur n
marks , or any other damag e . R e place damag ed
belts .
Squealing when the belt is rotating, blades slipping
when cutting g rass , fra yed belt edg es , bur n marks ,
and crac ks are signs of a w or n mo w er belt. R e place
the mo w er belt if any of these conditions are
evident.
Replacing the Mower Belt
1. Stop the engine , set the parking brak e , remo v e
the k ey , and disconnect the spark plug wire(s)
from the spark plug(s).
2. Set the height-of-cut at 1-1/2 inc h (38 mm).
3. R emo v e the belt co v ers o v er the outside
spindles .
4. Pull the idler pulley in the direction sho wn in
Figure 48 and roll the belt off of the pulleys .
Note: Do not remo v e the spring .
33
Page 34
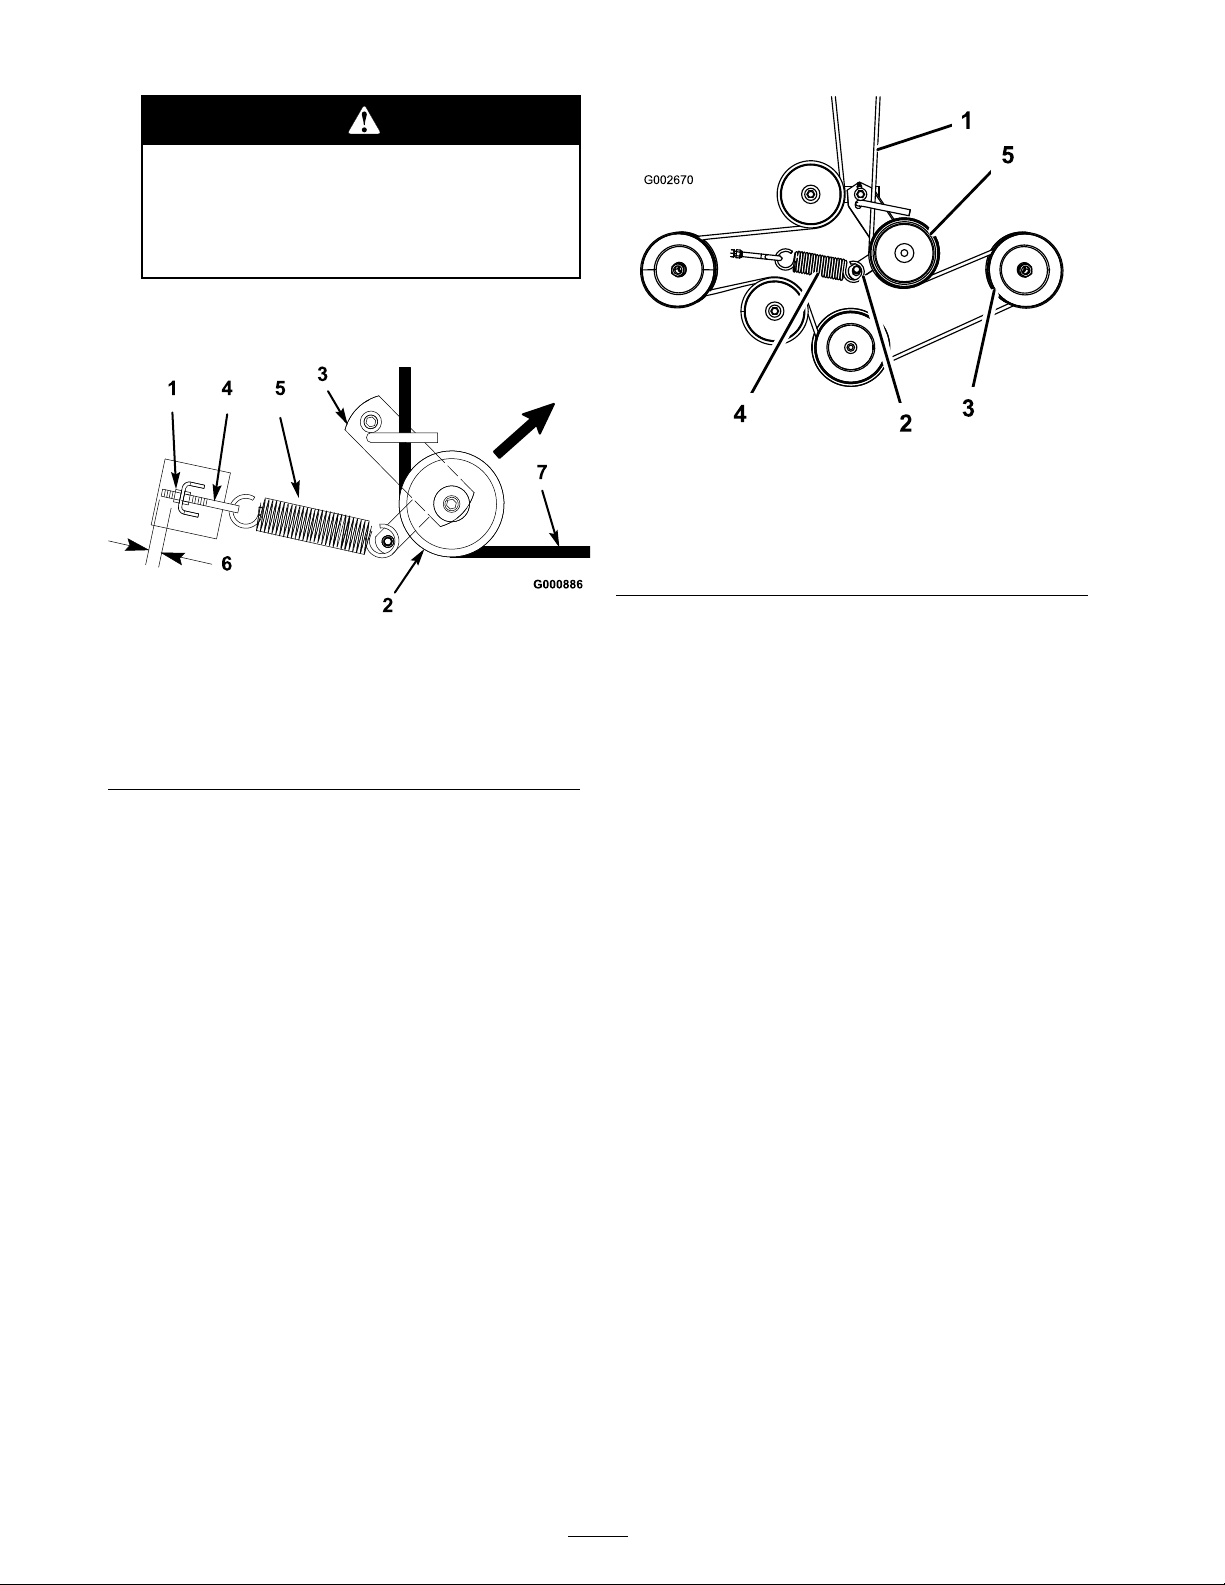
T he spring is under tension when
installed and can cause per sonal injur y .
Do not r emo v e the spring fr om the spring
ey e bolt.
5. R oute the new belt through the idler ar m and
around the idler pulley ( Figure 48 ).
Figure 48
Top View
1. Outer nut
2. Idler pulley
3. Idler arm 7. Mower belt
4. Spring eye bolt
5. Spring
6. 1/8 inch (3 mm)
Figure 49
Top View
1. Mower belt
2. Idler arm 5. Idler pulley
3. Outside pulley
4. Spring
Installing the Mower
1. P ark the mac hine on a lev el surface .
2. Diseng ag e the blade control switc h and mo v e
the control lev ers to the neutral loc k ed position
and apply the parking brak e .
6. Pull the idler pulley in the direction sho wn in
Figure 48 and route the belt onto the other
pulleys ( Figure 49 ).
Note: Chec k to ensure that the length of
exposed thread on the spring eye bolt is 1/8 in.
(3 mm) ( Figure 48 ).
7. Install the belt co v ers o v er the outside spindles .
3. Stop the engine , remo v e the k ey , and w ait for
all mo ving par ts to stop before lea ving the
operating position.
4. Slide the mo w er under the tractor .
5. Lo w er the height-of-cut lev er to the lo w est
position.
6. Attac h the rear tr union rod to the tractor with
the clevis pin and hair pin cotter ( Figure 47 ) on
eac h side of the mo w er .
7. Slide the lev eling brac k ets onto the mounting
pins and secure them with the w ashers and
hair pin cotters ( Figure 47 ).
8. Attac h the front tr union rods to the tractor
with the clevis pins and hair pin cotters
( Figure 46 ).
9. Install the mo w er belt onto the engine pulley;
refer to R e placing the Mo w er Belt.
34
Page 35
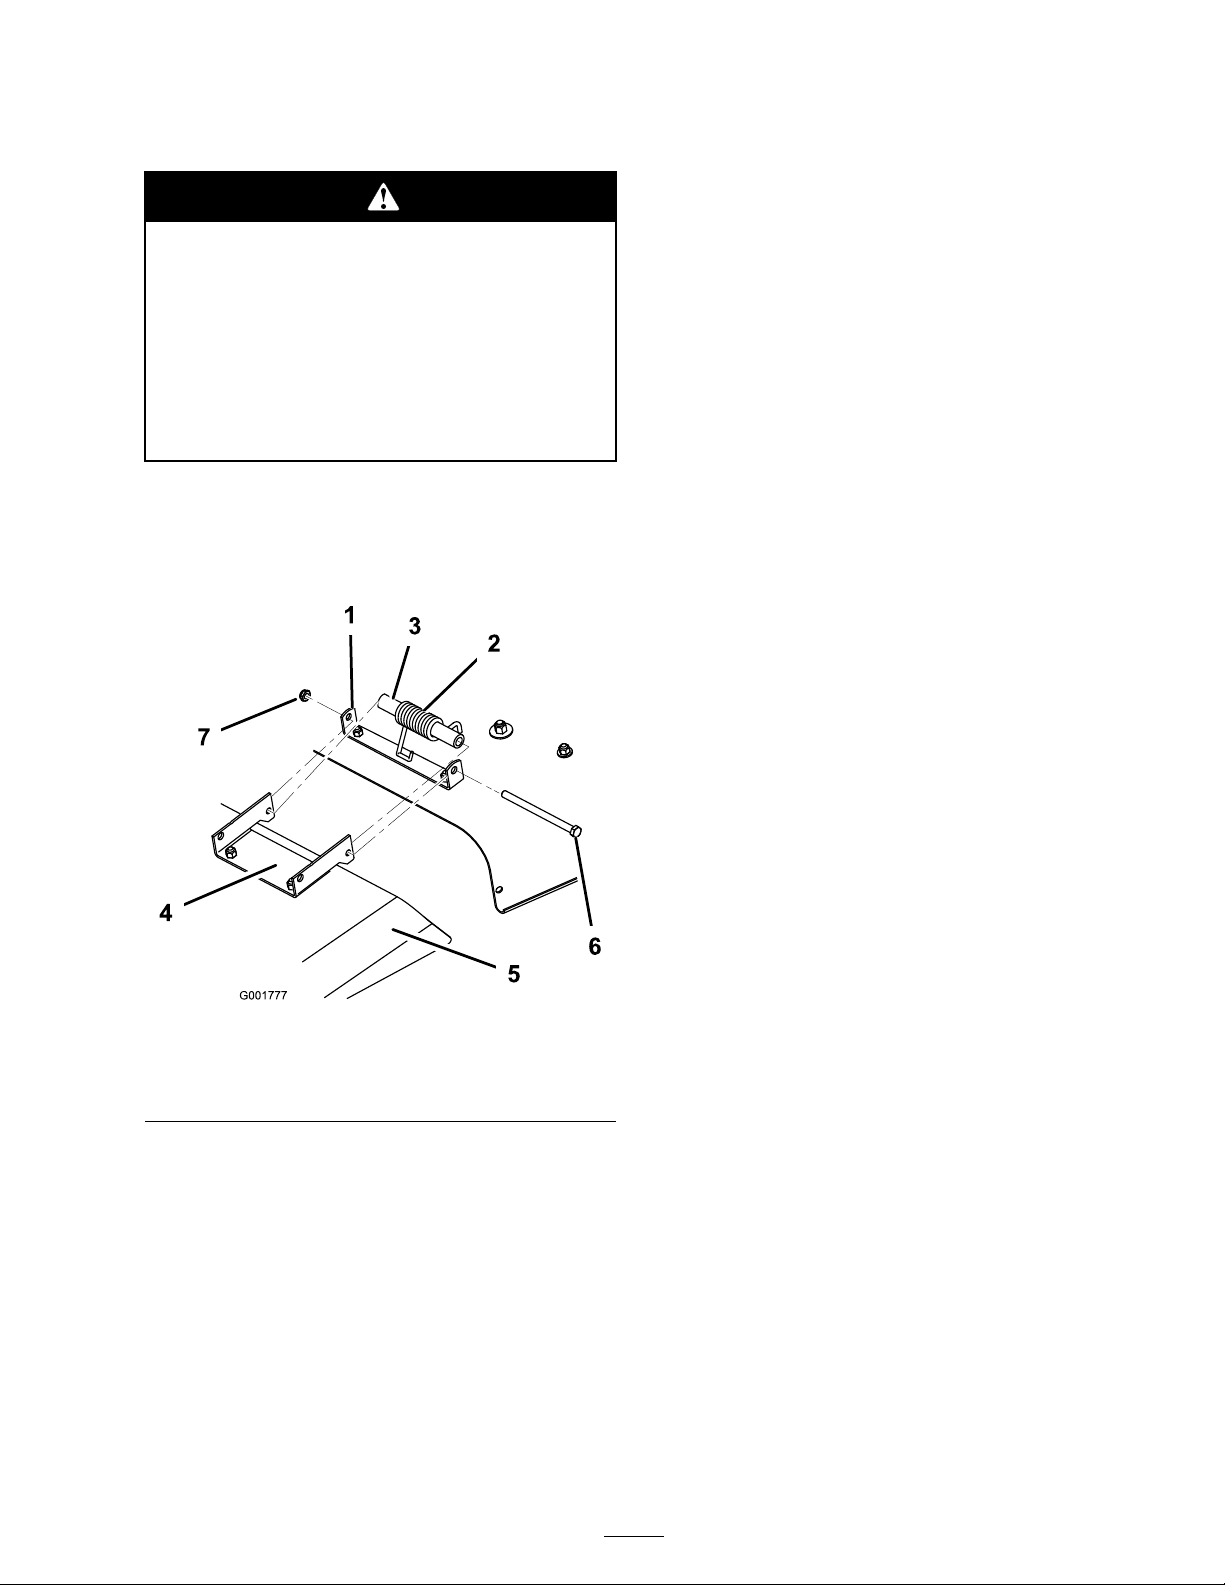
Replacing the Grass
Deector
Note: It ma y be helpful to press do wn near
the end of the bolt with a 9/16 inc h open end
wrenc h to align the bolt with the second hole
on the mo w er brac k et and g rass deflector .
An unco v er ed discharge opening could
allo w the la wn mo w er to thr o w objects in
the operator’ s or bystander’ s dir ection and
r esult in serious injur y . Also, contact with
the blade could occur .
Nev er operate the la wn mo w er unless y ou
install a co v er plate, a mulch plate, or a g rass
chute and catcher .
1. R emo v e the loc kn ut, bolt, spacer , and spring
holding the deflector to the mo w er brac k ets
( Figure 50 ). R emo v e the damag ed or w or n
g rass deflector .
5. Lift the g rass deflector and c hec k that it is
spring loaded and pi v ots freely to the full do wn
position.
Important: T he g rass deflector must be
spring loaded in the do wn position. Lift
the deflector up to test that it snaps to the
full do wn position.
Cleaning
Washing the Underside of
the Mower
After eac h use , w ash the underside of the mo w er
to prev ent g rass buildup , for impro v ed m ulc h
action, and clipping dispersal.
1. P ark the mac hine on a hard lev el surface .
2. Diseng ag e the blade control switc h and mo v e
the control lev ers to the neutral loc k ed position
and apply the parking brak e .
Figure 50
1. Mower bracket 4. Grass deector
2. Spring hook end 5. Bolt
3. Space for spring 6. Locknut
2. Align the g rass deflector with the holes in the
brac k ets and the spring and spacer straight
ends in the space betw een the brac k ets and
abo v e the deflector ( Figure 50 ).
3. Place the spring and spacer so that the hook ed
ends of the spring are pointing do wn, with one
end contacting on the mo w er dec k and the
other o v er the deflector ( Figure 50 ).
4. Secure the deflector to the mo w er brac k et with
the bolt. T he bolt should pass through the
g rass deflector , spring, spacer , and brac k ets .
Secure with the loc kn ut.
3. Stop the engine , remo v e the k ey , and w ait for
all mo ving par ts to stop before lea ving the
operating position.
4. Attac h the hose coupling to the end of the
mo w er w ashout fitting, and tur n the w ater on
high ( Figure 51 ).
Note: Spread petroleum jelly on the w ashout
fitting O-ring to mak e the coupling slide on
easier and protect the O-ring .
35
Page 36
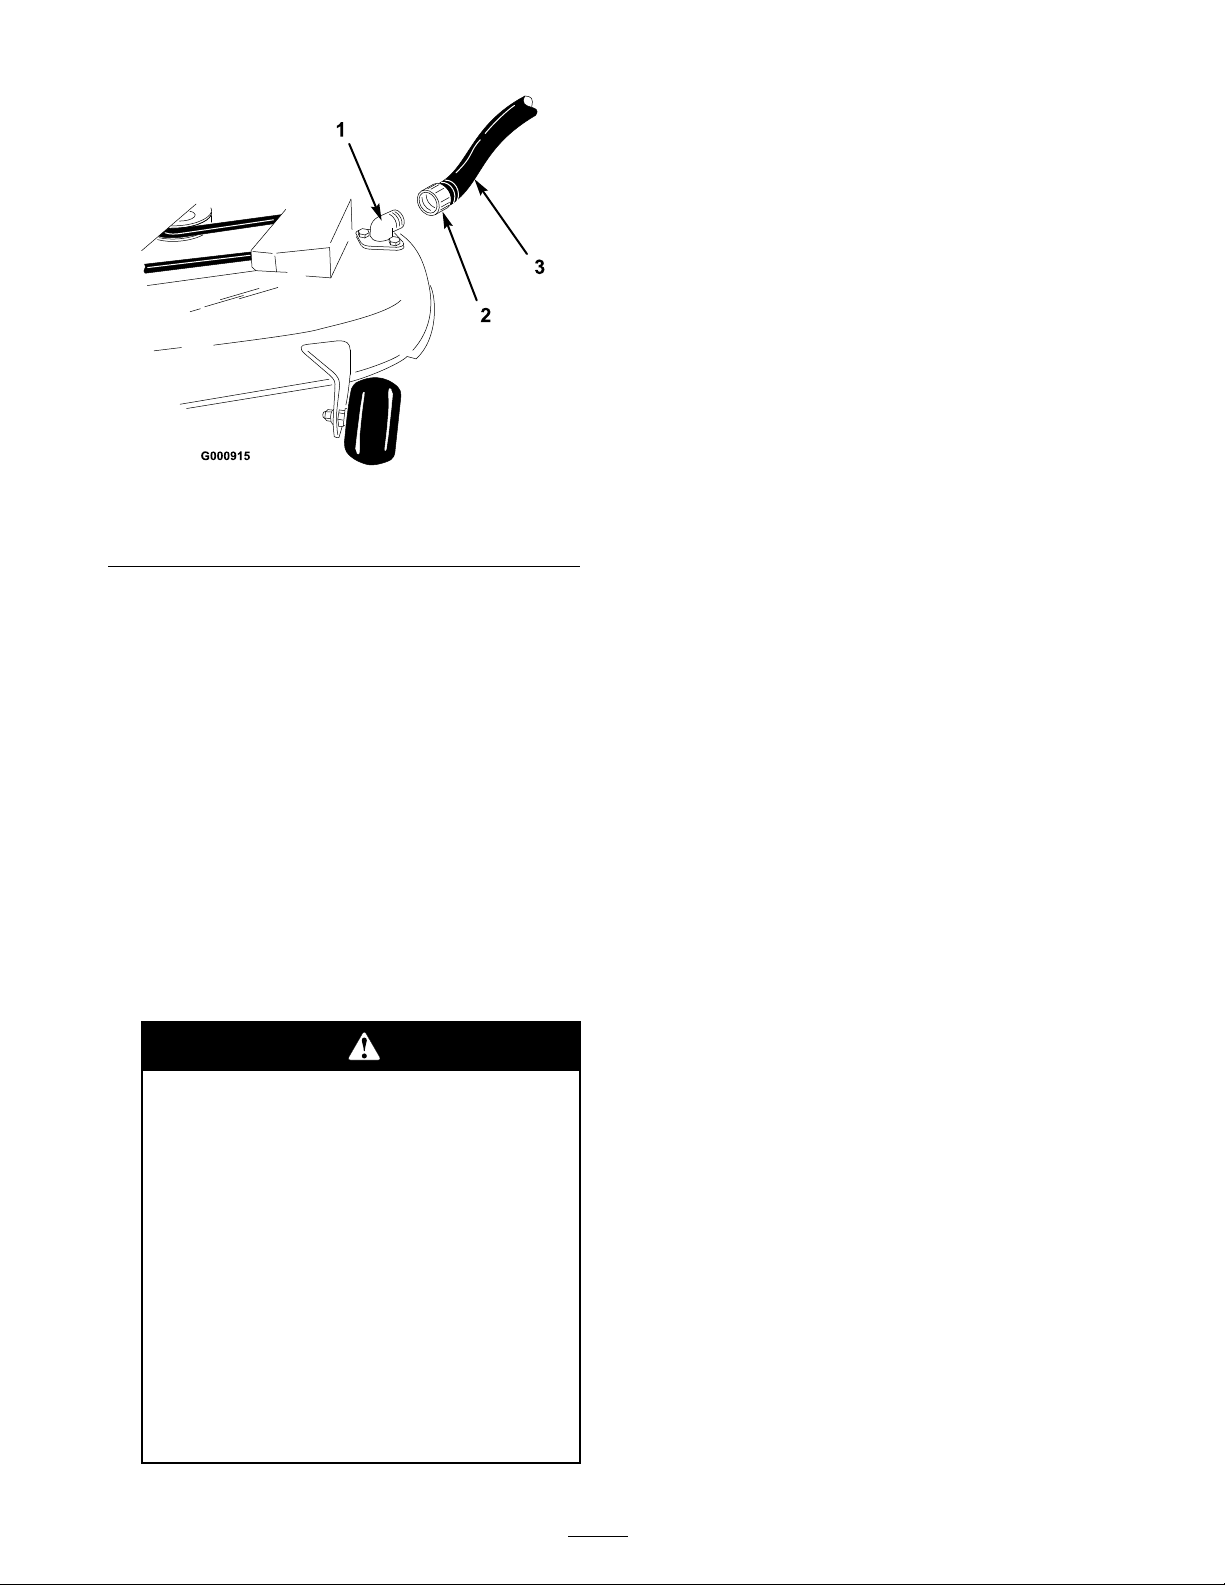
Figure 51
1. Washout tting
2. Coupling
3. Hose
5. Lo w er the mo w er to the lo w est height-of-cut.
6. Sit on the seat and star t the engine . Eng ag e the
blade control switc h and let the mo w er r un for
one to three min utes .
7. Diseng ag e the blade control switc h, stop the
engine , and remo v e the ignition k ey . W ait for
all mo ving par ts to stop .
8. T ur n the w ater off and remo v e the coupling
from the w ashout fitting .
Note: If the mo w er is not clean after one
w ashing, soak it and let it stand for 30 min utes .
T hen re peat the process .
9. R un the mo w er ag ain for one to three min utes
to remo v e ex cess w ater .
A br ok en or missing w ashout fitting
could expose y ou and other s to thr o wn
objects or blade contact. Contact with
blade or thr o wn de bris contact will cause
injur y or death.
• R eplace br ok en or missing w ashout
fitting immediatel y , bef or e using
mo w er a gain.
• Plug an y hole(s) in mo w er with bolts
and lockn uts.
• Nev er put y our hands or feet under
the mo w er or thr ough openings in
the mo w er .
36
Page 37

Storage
Cleaning and Storage
1. Diseng ag e the blade control switc h, set the
parking brak e , stop the engine , and remo v e
the k ey .
2. R emo v e g rass clippings , dir t, and g rime from
the exter nal par ts of the entire mac hine ,
especially the engine . Clean dir t and c haff from
the outside of the engine cylinder head fins
and blo w er housing .
Important: Y ou can w ash the machine
with mild detergent and w ater . Do
not pr essur e w ash the machine. A v oid
ex cessi v e use of w ater , especiall y near the
contr ol panel, engine, h y draulic pumps,
and motor s.
3. Ser vice the air cleaner; refer to Ser vicing the
Air Cleaner , Engine Maintenance , pag e 22 .
4. Grease and oil the mac hine; refer to Greasing
and Lubrication, Lubrication , pag e 21 .
C . R estar t the engine and r un it until it stops .
D . Chok e or prime the engine . Star t and r un
the engine until it will not star t. Operate the
primer , if equipped, sev eral times to ensure
no fuel remains in the primer system.
E. Dispose of fuel properly . R ecycle as per
local codes .
Important: Do not stor e
sta biliz er/conditioned gasoline
o v er 30 days.
11. R emo v e the spark plug(s) and c hec k
its condition; refer to Spark Plug,
Electrical System Maintenance , pag e 26 .
With the spark plug(s) remo v ed from the
engine , pour tw o tablespoons of engine oil
into the spark plug hole . Use the star ter to
crank the engine and distribute the oil inside
the cylinder . Install the spark plug(s). Do not
install the wire on the spark plug(s).
12. Clean any dir t and c haff from the top of the
mo w er .
5. Chang e the crankcase oil and filter; refer to
Engine Oil, Engine Maintenance , pag e 22 .
6. Chec k the tire pressure; refer to Tire Pressure ,
Dri v e System Maintenance , pag e 29 .
7. Charg e the batter y; refer to Ser vicing the
Batter y , Electrical System Maintenance ,
pag e 26 .
8. Chec k the condition of the blades; refer to
Cutting Blades , Mo w er Maintenance , pag e 29 .
9. Pre pare the mac hine for storag e when non-use
occurs o v er 30 da ys . Pre pare the mac hine for
storag e as follo ws .
10. Add a petroleum based stabilizer/conditioner
to the fuel in the tank. F ollo w the mixing
instr uctions from the stabilizer man ufacturer .
Do not use an alcohol based stabilizer (ethanol
or methanol).
Note: A fuel stabilizer/conditioner is most
effecti v e when mix ed with fresh g asoline and
used at all times .
13. Scrape any hea vy buildup of g rass and dir t
from the underside of the mo w er , then w ash
the mo w er with a g arden hose .
14. Chec k the condition of the dri v e and mo w er
belts .
15. Chec k and tighten all bolts , n uts , and screws .
R e pair or re place any par t that is w or n or
damag ed.
16. P aint all scratc hed or bare metal surfaces . P aint
is a v ailable from y our A uthorized Ser vice
Dealer .
17. Store the mac hine in a clean, dr y g arag e or
storag e area. R emo v e the k ey from the ignition
switc h and k ee p it in a memorable place . Co v er
the mac hine to protect it and k ee p it clean.
A. R un the engine to distribute the conditioned
fuel through the fuel system (5 min utes).
B . Stop the engine , allo w it to cool, and drain
the fuel tank; refer to Draining the Fuel
T ank, Fuel System Maintenance , pag e 25 .
37
Page 38

Troubleshooting
Problem
The engine overheats.
The starter does not crank
Possible Cause Corrective Action
1. The engine load is
excessive.
2. The oil level in the
crankcase is low.
3. The cooling ns and
air passages under the
engine blower housing
are plugged.
4. The air cleaner is dirty. 4. Clean or replace the air
5. Dirt, water, or stale fuel
is in fuel system.
1. The blade control switch
(PTO) is engaged.
2. The parking brake is not
on.
3. The operator is not
seated.
4. The battery is dead. 4. Charge the battery.
5. The electrical
connections are
corroded or loose.
6. A fuse is blown. 6. Replace the fuse.
7. A relay or switch is
damaged.
1. Reduce ground speed.
2. Add oil to the crankcase.
3. Remove the obstruction
from the cooling ns and
air passages.
cleaner element.
5. Contact an Authorized
Service Dealer
1. Move the blade control
switch to Off.
2. Move the motion control
levers to the brake
position.
3. Sit on the seat.
5. Check the electrical
connections for good
contact.
7. Contact an Authorized
Service Dealer.
38
Page 39

Problem
Possible Cause Corrective Action
The engine will not start,
starts hard, or fails to keep
running.
The engine loses power.
1. The fuel tank is empty. 1. Fill the fuel tank.
2. The fuel valve turned off. 2. Open the fuel valve.
3. The choke is not on. 3. Move the choke lever to
On.
4. The air cleaner is dirty. 4. Clean or replace the air
cleaner element.
5. The spark plug wire(s) is
loose or disconnected.
6. The spark plug(s) is
pitted, fouled, or the gap
5. Install the wire(s) on the
spark plug.
6. Install a new, correctly
gapped spark plug(s).
is incorrect.
7. There is dirt in fuel lter. 7. Replace the fuel lter.
8. Dirt, water, or stale fuel
is in fuel system.
9. There is incorrect fuel in
the fuel tank.
8. Contact an Authorized
Service Dealer.
9. Drain the tank and
replace the fuel with the
proper type.
10. The oil level in the
10. Add oil to the crankcase.
crankcase is low.
1. The engine load is
1. Reduce ground speed.
excessive.
The machine does not drive.
2. The air cleaner is dirty. 2. Clean the air cleaner
element.
3. The oil level in the
3. Add oil to the crankcase.
crankcase is low.
4. The cooling ns and
air passages under the
engine blower housing
4. Remove the obstruction
from the cooling ns and
air passages.
are plugged.
5. The spark plug(s) is
pitted, fouled, or the gap
5. Install a new, correctly
gapped spark plug(s).
is incorrect.
6. The vent in the fuel cap
is closed.
7. There is dirt in the fuel
6. Open the vent in the fuel
cap.
7. Replace the fuel lter.
lter.
8. Dirt, water, or stale fuel
is in the fuel system.
9. There is incorrect fuel in
the fuel tank.
8. Contact an Authorized
Service Dealer.
9. Drain the tank and
replace the fuel with the
proper type.
1. The traction belts are
worn, loose, or broken.
1. Contact an Authorized
Service Dealer.
2. The traction belts are off
of the pulleys.
39
2. Contact an Authorized
Service Dealer.
Page 40

Problem
Possible Cause Corrective Action
There is abnormal vibration.
Uneven cutting height.
1. The engine mounting
bolts are loose.
2. The engine pulley, idler
pulley, or blade pulley is
1. Tighten the engine
mounting bolts.
2. Tighten the appropriate
pulley.
loose.
3. The engine pulley is
damaged.
4. The cutting blade(s)
is/are bent or
3. Contact an Authorized
Service Dealer.
4. Install a new cutting
blade(s).
unbalanced.
5. A blade mounting bolt is
loose.
5. Tighten the blade
mounting bolt.
6. A blade spindle is bent. 6. Contact an Authorized
Service Dealer.
1. The blade(s) is not sharp. 1. Sharpen the blade(s).
2. A cutting blade(s) is/are
bent.
2. Install a new cutting
blade(s).
3. The mower is not level. 3. Level the mower
from side-to-side and
front-to-rear.
4. An anti-scalp wheel is
not set correctly.
5. The underside of the
mower is dirty.
6. The tire pressure is
4. Adjust the anti-scalp
wheel height.
5. Clean the underside of
the mower.
6. Adjust the tire pressure.
incorrect.
7. A blade spindle is bent. 7. Contact an Authorized
Service Dealer.
The blades do not rotate.
1. The drive belt is worn,
loose or broken.
2. The drive belt is off of the
pulley.
3. The mower belt is worn,
loose, or broken.
40
1. Install a new drive belt.
2. Install the drive belt
and check the adjusting
shafts and belt guides for
the correct position.
3. Install a new mower belt.
Page 41
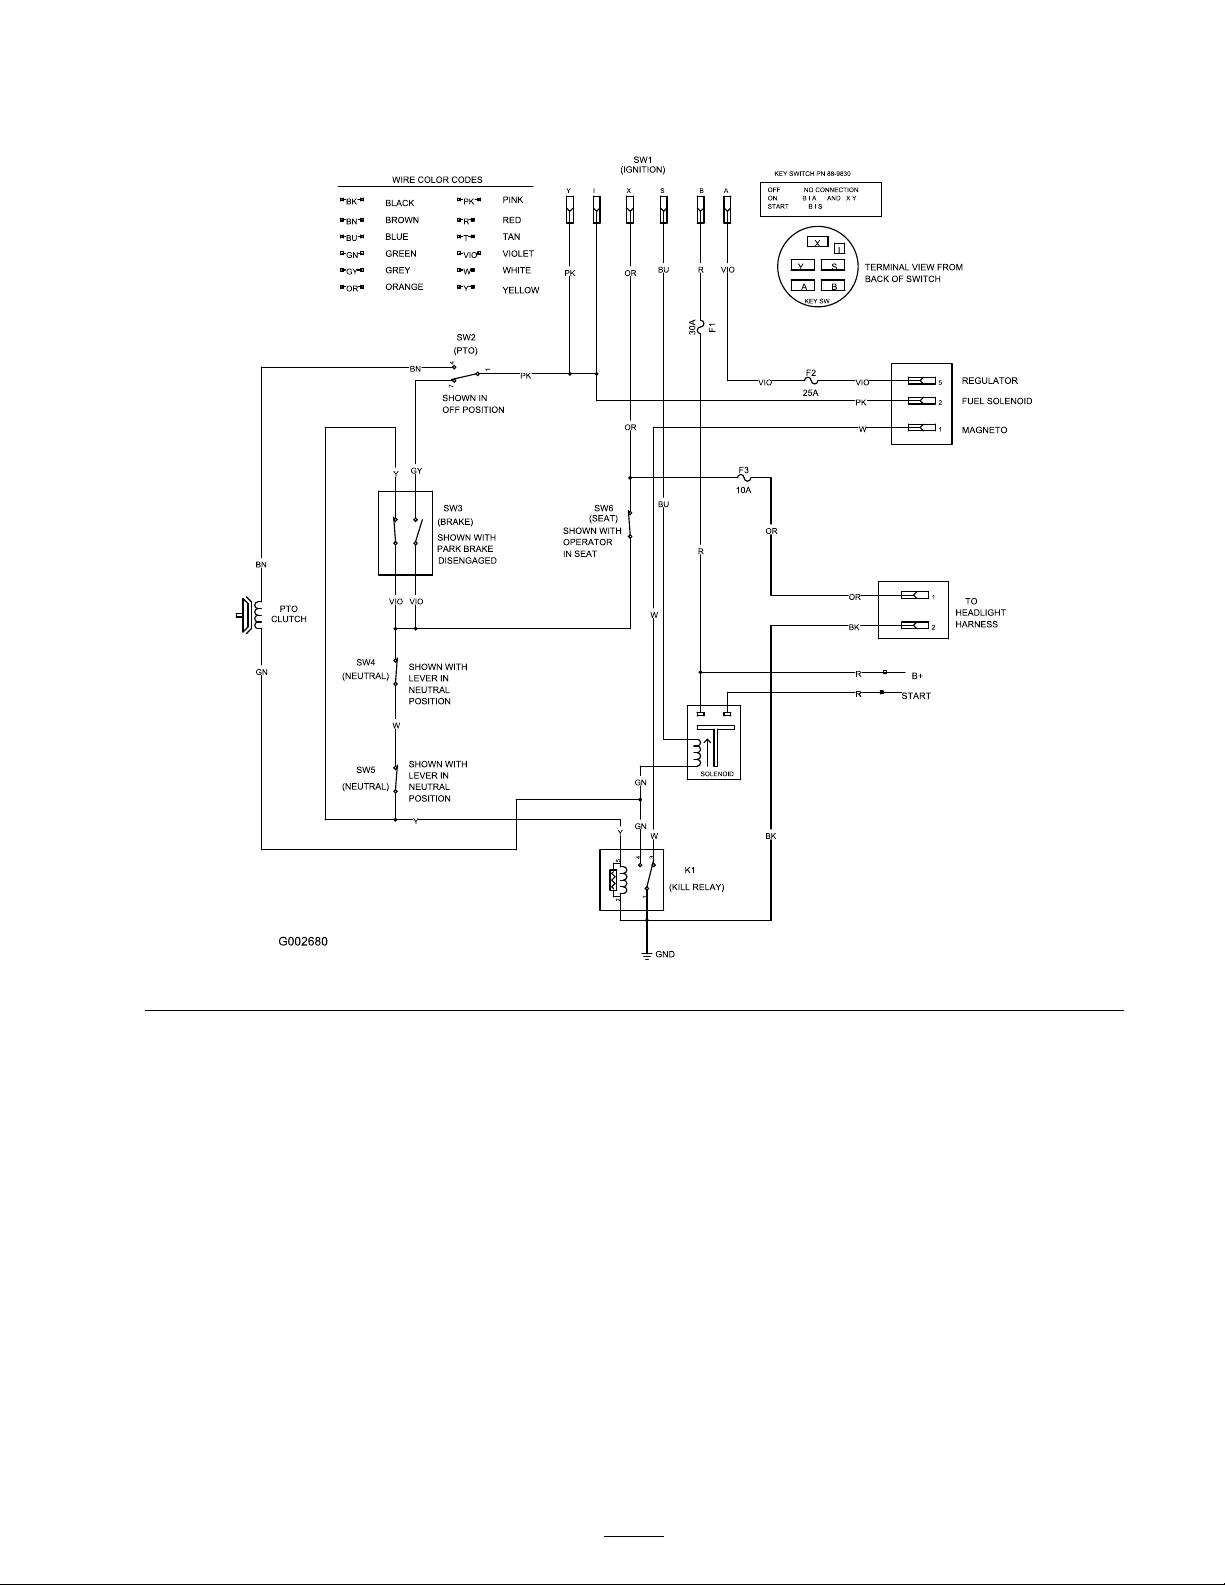
Schematics
Electrical Schematic (Rev. A)
41
Page 42

Page 43

Evaporative Emission Control Warranty Statement
California Evaporative Emission Control Warranty Statement
Your Warranty Rights and Obligations
Introduction
The California Air Resources Board and The Toro® Company are pleased to explain the evaporative emission control system’s warranty
on your 2006 model year equipment. In California, new equipment that use small off-road engines must be designed, built, and
equipped to meet the State’s stringent anti-smog standards. The Toro® Company must warrant the evaporative emission control
system on your equipment for two years provided there has been no abuse, neglect or improper maintenance of your equipment.
Your evaporative emission control system may include parts such as: fuel lines, fuel line ttings, and clamps.
Manufacturer’s Warranty Coverage:
This evaporative emission control system is warranted for two years. If any evaporative emission-related part on your equipment is
defective, the part will be repaired or replaced by The Toro® Company.
Owner’s Warranty Responsibilities:
• As the equipment owner, you are responsible for performance of the required maintenance listed in your Operator’s Manual.
The Toro® Company recommends that you retain all receipts covering maintenance on your equipment, but The Toro® Company
cannot deny warranty solely for the lack of receipts.
• As the equipment owner, you should however be aware that The Toro® Company may deny you warranty coverage if your emission
warranty parts have failed due to abuse, neglect, or improper maintenance or unapproved modications.
• You are responsible for presenting your equipment to an Authorized Service Dealer as soon as the problem exists. The warranty
repairs should be completed in a reasonable amount of time, not to exceed 30 days. If you have a question regarding your warranty
coverage, you should contact The Toro® Company at 1-952–948–4027 or call us toll free at the number listed in your Toro
Warranty statement.
Defects Warranty Requirements:
1. The warranty period begins on the date the engine or equipment is delivered to an ultimate purchaser.
2. General Evaporative Emissions Warranty Coverage. The emission warranty parts must be warranted to the ultimate purchaser and
any subsequent owner that the evaporative emission control system when installed was:
A. Designed, built, and equipped so as to conform with all applicable regulations; and
B. Free from defects in materials and workmanship that causes the failure of a warranted part for a period of two years.
3. The warranty on evaporative emissions-related parts will be interpreted as follows:
A. Any warranted part that is not scheduled for replacement as required maintenance in the written instructions must be
warranted for the warranty period of two years. If any such part fails during the period of warranty coverage, it must be
repaired or replaced by The Toro® Company. Any such part repaired or replaced under the warranty must be warranted for a
time not less than the remaining warranty period.
B. Any warranted part that is scheduled only for regular inspection in the written instructions must be warranted for the warranty
period of two years. A statement in such written instructions to the effect of “repair or replace as necessary” will not reduce
the period of warranty coverage. Any such part repaired or replaced under warranty must be warranted for a time not less
than the remaining warranty period.
C. Any warranted part that is scheduled for replacement as required maintenance in the written instructions must be warranted
for the period of time prior to the rst scheduled replacement point for that part. If the part fails prior to the rst scheduled
replacement, the part must be repaired or replaced by The Toro® Company. Any such part repaired or replaced under
warranty must be warranted for a time not less than the remainder of the period prior to the rst scheduled replacement point
for the part.
D. Repair or replacement of any warranted part under the warranty provisions of this article must be performed at no charge to
the owner at an Authorized Service Dealer.
E. Notwithstanding the provisions of subsection (D) above, warranty services or repairs must be provided at an Authorized
Service Dealer.
F. The owner must not be charged for diagnostic labor that leads to the determination that a warranted part is in fact defective,
provided that such diagnostic work is performed at an Authorized Service Dealer.
G. Throughout the evaporative emission control system’s two year warranty period, The Toro® Company must maintain a supply
of warranted parts sufcient to meet the expected demand for such parts.
H. Manufacturer approved replacement parts must be used in the performance of any warranty maintenance or repairs and must
be provided without charge to the owner. Such use will not reduce the warranty obligations of The Toro® Company.
I. The use of any add-on or modied parts will be grounds for disallowing a warranty claim made in accordance with this
article. The Toro® Company will not be liable under this Article to warrant failures of warranted parts caused by the use of an
add-on or modied part.
J. The Toro® Company shall provide any documents that describe the warranty procedures or policies within ve working
days of request by the Air Resources Board.
The following lists includes the parts covered under this warranty:
• Fuel Lines
• Fuel Line Fittings
• Clamps
Emission Warranty Parts List:
374-0092 Rev A
Page 44

Consumer
TimeCutter
ZX (Model
74603 only)
A Three-Year Full Warranty (Limited Warranty for Commercial Use)
The Toro Total Coverage Guarantee
Conditions and Products Covered
The Toro Company and its afliate, Toro Warranty Company,
pursuant to an agreement between them, jointly promise to
repair any Toro Product used for normal residential purposes*
if defective in materials or workmanship. The following time
periods apply from the date of purchase:
Products Warranty Period
TimeCutter ZX (Model
74603) Mowers and
Attachments
Battery
This warranty covers both the cost of parts and labor, and
transportation within a fteen mile radius of the servicing dealer.
This warranty applies to all consumer TimeCutter ZX (Model
74603) Mowers and their attachments.
* Normal residential purposes means use of the product on
the same lot as your home. Use at more than one location is
considered commercial use, and the commercial use warranty
would apply.
3 year full warranty
1 year full warranty
Limited Warranty for Commercial Use
Toro Consumer Products and attachments used for commercial,
institutional, or rental use are warranted against defects in
materials or workmanship for the following time periods from the
date of purchase:
Products Warranty Period
Air Cooled Gas Engines 90 day limited warranty
All other items 30 day limited warranty
Instructions for Obtaining Warranty Service
If you think that your Toro Product contains a defect in materials
or workmanship, follow this procedure:
1. Contact any Toro Authorized or Master Service Dealer
to arrange service at their dealership. To locate a dealer
convenient to you, refer to the Yellow Pages of your
telephone directory (look under “Lawn Mowers") or access
our web site at www.Toro.com. U.S. Customers may also
call toll free: 866-854–9035 to use our 24-hour Toro dealer
locator system.
2. Bring the product and your proof of purchase (sales receipt)
to the Service Dealer.
If for any reason you are dissatised with the Service Dealer’s
analysis or with the assistance provided, contact us at:
Owner Responsibilities
You must maintain your Toro Product by following the
maintenance procedures described in the Operator’s Manual .
Such routine maintenance, whether performed by a dealer or by
you, is at your expense.
Items and Conditions Not Covered
There is no other express warranty except for special emission
system coverage on some products. This express warranty does
not cover:
• Cost of regular maintenance service or parts, such as lters,
fuel, lubricants, tune-up parts, blade sharpening, brake and
clutch adjustments.
• Any product or part which has been altered or misused
or required replacement or repair due to normal wear,
accidents, or lack of proper maintenance.
• Repairs necessary due to improper fuel, contaminants in the
fuel system, or failure to properly prepare the fuel system
prior to any period of non-use over three months.
• Pickup and delivery charges for distances beyond a fteen
mile radius from an Authorized Toro Service Dealer.
General Conditions
All repairs covered by this warranty must be performed by an
Authorized Toro Service Dealer using Toro approved replacement
parts.
Repair by an Authorized Toro Service Dealer is your sole
remedy under this warranty.
Neither The Toro Company nor Toro Warranty Company
is liable for indirect, incidental or consequential
damages in connection with the use of the Toro Products
covered by this warranty, including any cost or expense
of providing substitute equipment or service during
reasonable periods of malfunction or non-use pending
completion of repairs under this warranty.
Some states do not allow exclusions of incidental or
consequential damages, or limitations on how long an
implied warranty lasts, so the above exclusions and
limitations may not apply to you.
This warranty gives you specic legal rights, and you
may also have other rights which vary from state to
state.
Customer Care Department, Consumer Division
Toro Warranty Company
8111 Lyndale Avenue South
Bloomington, MN 55420-1196
Toll Free: 866-216-6029 (U.S. customers)
Toll Free: 866-216-6030 (Canada customers)
Countries Other than the United States or Canada
Customers who have purchased Toro products exported from the United States or Canada should contact their Toro Distributor
(Dealer) to obtain guarantee policies for your country, province, or state. If for any reason you are dissatised with your Distributor’s
service or have difculty obtaining guarantee information, contact the Toro importer. If all other remedies fail, you may contact us
at Toro Warranty Company.
374-0073 Rev C
 Loading...