

Toro 74441, 74442 Operator's Manual
FormNo.3358-822RevA
Z441ZMaster
TURBOFORCE
®
with48inor52in
®
SideDischarge
Mower
ModelNo.74441—SerialNo.280000001andUp
ModelNo.74442—SerialNo.280000001andUp
Registeratwww.T oro.com.OriginalInstructions(EN)
Warning
CALIFORNIA
Proposition65Warning
Theengineexhaustfromthisproduct
containschemicalsknowntotheStateof
Californiatocausecancer,birthdefects,
orotherreproductiveharm.
Important:Thisengineisnotequippedwitha
sparkarrestermufer.ItisaviolationofCalifornia
PublicResourceCodeSection4442touseoroperate
theengineonanyforest-covered,brush-covered,or
grass-coveredland.Otherstatesorfederalareas
mayhavesimilarlaws.
ThissparkignitionsystemcomplieswithCanadian
ICES-002.
Theenclosed
Engine Owner’ s Man ual
issupplied
forinformationregardingtheUSEnvironmental
ProtectionAgency(EPA)andtheCalifornia
EmissionControlRegulationofemissionsystems,
maintenance,andwarranty.Replacementsmaybe
orderedthroughtheenginemanufacturer.
Introduction
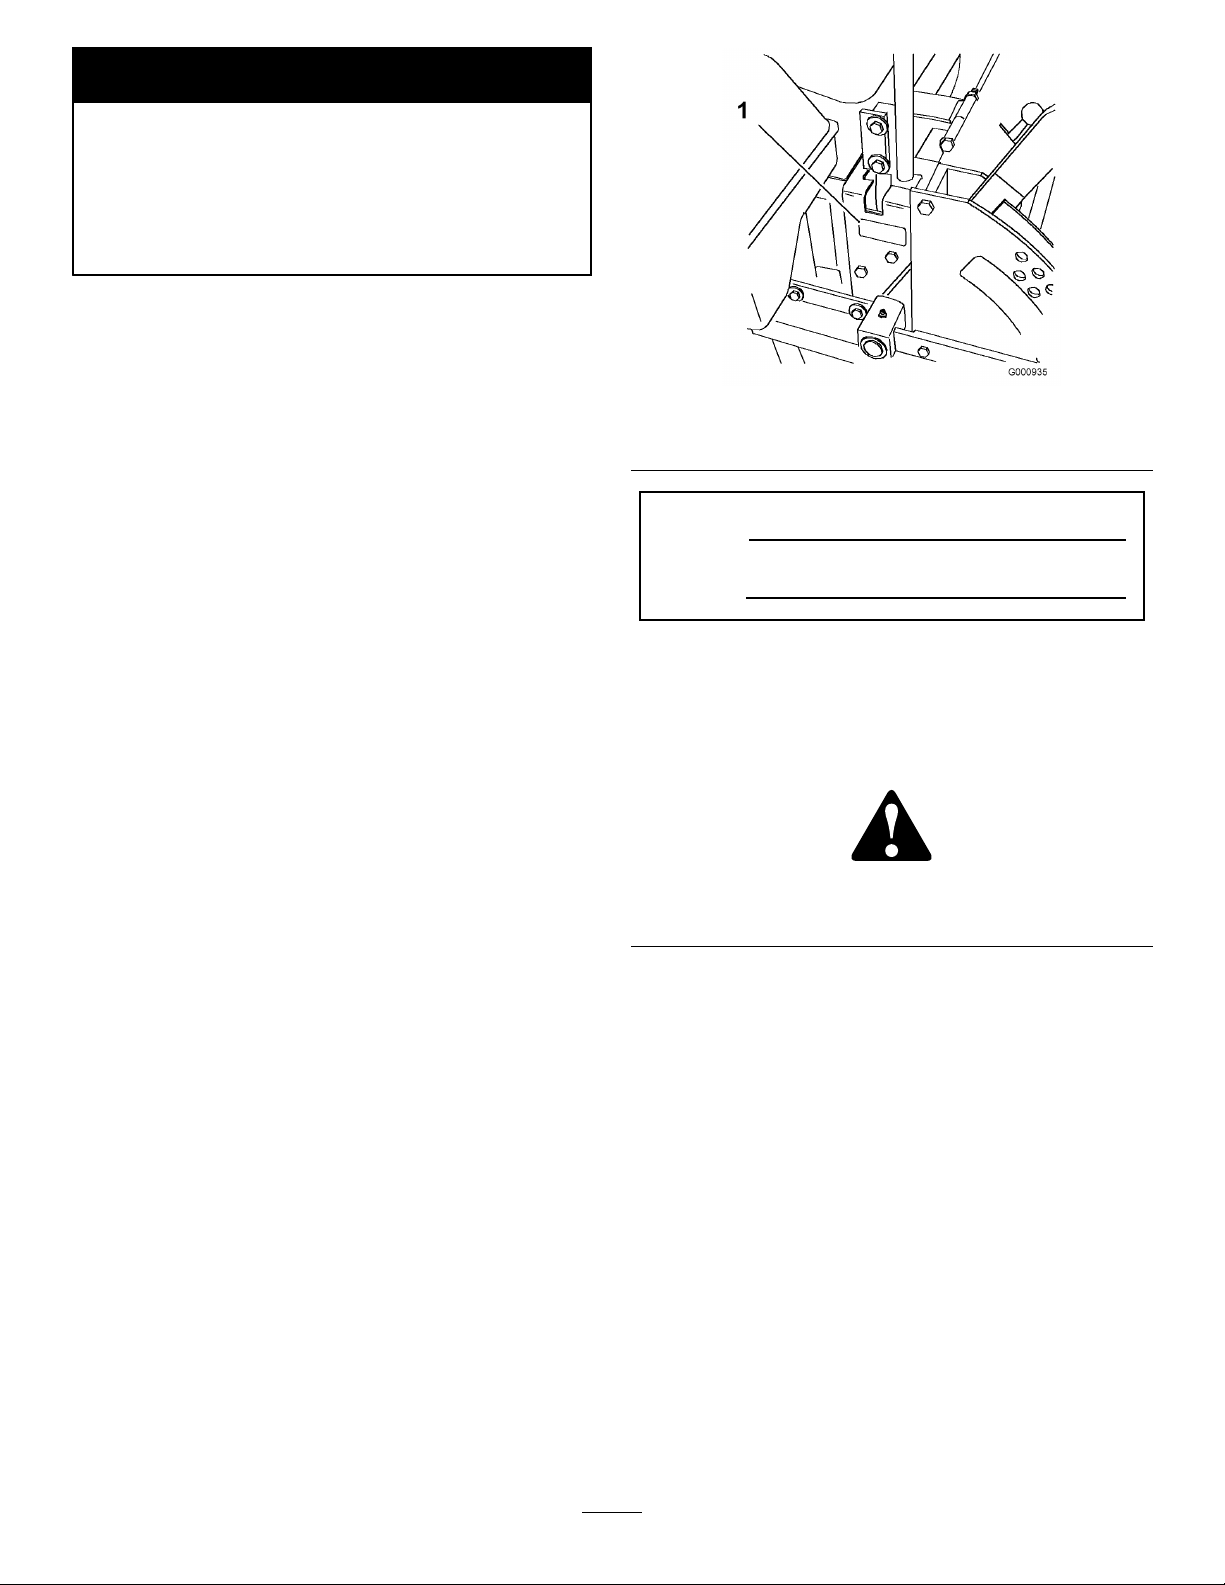
Figure1
1.Modelandserialnumberlocation
ModelNo.
SerialNo.
Thismanualidentiespotentialhazardsandhas
safetymessagesidentiedbythesafetyalertsymbol
(Figure2),whichsignalsahazardthatmaycauseserious
injuryordeathifyoudonotfollowtherecommended
precautions.
Readthisinformationcarefullytolearnhowtooperate
andmaintainyourproductproperlyandtoavoidinjury
andproductdamage.Youareresponsibleforoperating
theproductproperlyandsafely.
YoumaycontactTorodirectlyatwww .Toro.comfor
productandaccessoryinformation,helpndinga
dealer,ortoregisteryourproduct.
Wheneveryouneedservice,genuineToroparts,
oradditionalinformation,contactanAuthorized
ServiceDealerorToroCustomerServiceandhave
themodelandserialnumbersofyourproductready .
Figure1identiesthelocationofthemodelandserial
numbersontheproduct.Writethenumbersinthe
spaceprovided.
Figure2
1.Safetyalertsymbol
Thismanualuses2otherwordstohighlightinformation.
Importantcallsattentiontospecialmechanical
informationandNoteemphasizesgeneralinformation
worthyofspecialattention.
Contents
Introduction.................................................................2
Safety...........................................................................4
SafeOperatingPractices.......................................4
SlopeChart..........................................................6
SafetyandInstructionalDecals.............................7
ProductOverview......................................................10
Controls.............................................................11
Operation...................................................................12
AddingFuel.......................................................12
CheckingtheEngineOilLevel............................13
©2007—TheToro®Company
8111LyndaleAvenueSouth
Bloomington,MN55420
Contactusatwww.Toro.com.
2
PrintedintheUSA.
AllRightsReserved

UsingtheRolloverProtectionSystem
(ROPS)..........................................................13
ThinkSafetyFirst...............................................14
OperatingtheParkingBrake...............................15
StartingandStoppingtheEngine........................15
OperatingthePowerTakeOff(PTO).................17
TheSafetyInterlockSystem................................17
DrivingForwardorBackward.............................18
StoppingtheMachine.........................................18
AdjustingtheHeight-of-Cut...............................19
AdjustingtheAnti-ScalpRollers.........................19
AdjustingtheFlowBafe...................................20
PositioningtheFlowBafe.................................20
PositioningtheSeat............................................21
UnlatchingtheSeat.............................................21
PushingtheMachinebyHand.............................21
UsingtheSideDischarge....................................22
TransportingMachines.......................................22
LoadingMachines..............................................23
OperatingTips...................................................23
Maintenance...............................................................25
RecommendedMaintenanceSchedule(s)................25
Lubrication.............................................................25
GreasingandLubrication...................................25
GreasingtheMowerDeckandBelt
Idlers..............................................................26
EngineMaintenance...............................................27
ServicingtheAirCleaner....................................27
ServicingtheEngineOil.....................................28
ServicingtheSparkPlugs....................................29
FuelSystemMaintenance.......................................31
ReplacingtheFuelFilter.....................................31
ServicingtheFuelTank......................................31
ElectricalSystemMaintenance................................32
ServicingtheBattery...........................................32
ServicingtheFuses.............................................33
DriveSystemMaintenance.....................................34
AdjustingtheTracking........................................34
CheckingtheTirePressure.................................34
CheckingtheWheelHubSlottedNut..................35
AdjustingtheCasterPivotBearing......................35
CoolingSystemMaintenance..................................36
CleaningtheAirIntakeScreen............................36
CleaningtheCoolingSystem...............................36
BrakeMaintenance.................................................37
AdjustingtheParkingBrake................................37
BeltMaintenance....................................................38
InspectingtheBelts............................................38
ReplacingtheMowerBelt...................................38
ReplacingthePumpDriveBelt...........................38
AdjustingthePushArms....................................39
ControlsSystemMaintenance.................................39
AdjustingtheControlHandleNeutral
Position..........................................................39
HydraulicSystemMaintenance...............................40
ServicingtheHydraulicSystem...........................40
SettingtheHydraulicPumpNeutral
Position..........................................................42
MowerDeckMaintenance......................................44
LevelingtheMoweratThreePositions................44
ServicingtheCuttingBlades...............................46
ReplacingtheGrassDeector.............................48
Cleaning.................................................................49
CleaningUndertheMower.................................49
WasteDisposal...................................................49
Storage.......................................................................49
Troubleshooting.........................................................51
Schematics.................................................................53
3

Safety
•Useextracarewhenhandlinggasolineandother
fuels.Theyareammableandvaporsareexplosive.
Improperuseormaintenancebytheoperatororowner
canresultininjury.Toreducethepotentialforinjury,
complywiththesesafetyinstructionsandalwayspay
attentiontothesafetyalertsymbol,whichmeans
CAUTION,WARNING,orDANGER-“personal
safetyinstruction."Failuretocomplywiththe
instructionmayresultinpersonalinjuryordeath.
Thisproductiscapableofamputatinghandsand
feetandthrowingobjects.Alwaysfollowallsafety
instructionstoavoidseriousinjuryordeath.
Thisproductisdesignedforcuttingandrecyclinggrass
or,whenequippedwithagrassbagger,forcatching
cutgrass.Anyuseforpurposesotherthanthesecould
provedangeroustouserandbystanders.
SafeOperatingPractices
ThefollowinginstructionsarefromANSIstandard
B71.4-2004.
Training
•ReadtheOperator’sManualandothertraining
material.Iftheoperator(s)ormechanic(s)cannot
readEnglishitistheowner’ sresponsibilitytoexplain
thismaterialtothem.
•Becomefamiliarwiththesafeoperationofthe
equipment,operatorcontrols,andsafetysigns.
•Alloperatorsandmechanicsshouldbetrained.The
ownerisresponsiblefortrainingtheusers.
•Neverletchildrenoruntrainedpeopleoperateor
servicetheequipment.Localregulationsmayrestrict
theageoftheoperator.
•Theowner/usercanpreventandisresponsiblefor
accidentsorinjuriesoccurringtohimselforherself,
otherpeopleorproperty.
–Useonlyanapprovedcontainer
–Neverrefuelordrainthemachineindoors.
–Neverremovegascaporaddfuelwithengine
running.Allowenginetocoolbeforerefueling.
Donotsmoke.
•Checkthatoperator’spresencecontrols,safety
switchesandshieldsareattachedandfunctioning
properly.Donotoperateunlesstheyarefunctioning
properly.
Operation
•Neverrunanengineinanenclosedarea.
•Onlyoperateingoodlight,keepingawayfromholes
andhiddenhazards.
•Besurealldrivesareinneutralandparkingbrakeis
engagedbeforestartingengine.Starttheengineonly
fromtheoperator’sposition.
•Neverraisemowerwiththebladesrunning.
•NeveroperatewithoutthePTOshield,orother
guardssecurelyinplace.Besureallinterlocksare
attached,adjustedproperly,andfunctioningproperly.
•Neveroperatewiththedischargedeectorraised,
removedoraltered,unlessusingagrasscatcher.
•Donotchangetheenginegovernorsettingor
overspeedtheengine.
•Stoponlevelground,lowerimplements,disengage
drives,engageparkingbrake,shutoffenginebefore
leavingtheoperator’spositionforanyreason
includingemptyingthecatchersoruncloggingthe
chute.
•Stopequipmentandinspectbladesafterstriking
objectsorifanabnormalvibrationoccurs.Make
necessaryrepairsbeforeresumingoperations.
•Keephandsandfeetawayfromthecuttingunits.
Preparation
•Evaluatetheterraintodeterminewhataccessories
andattachmentsareneededtoproperlyand
safelyperformthejob.Onlyuseaccessoriesand
attachmentsapprovedbythemanufacturer.
•Wearappropriateclothingincludinghardhat,safety
glassesandhearingprotection.Longhair,loose
clothingorjewelrymaygettangledinmovingparts.
•Inspecttheareawheretheequipmentistobeused
andremoveallobjectssuchasrocks,toysandwire
whichcanbethrownbythemachine.
•Nevercarrypassengersandkeeppetsandbystanders
away.
•Bealert,slowdownandusecautionwhenmaking
turns.Lookbehindandtothesidebeforechanging
directions.
•Slowdownandusecautionwhencrossingroadsand
sidewalks.Stopbladesifnotmowing.
•Beawareofthemowerdischargedirectionanddo
notpointitatanyone.
•Donotoperatethemowerundertheinuenceof
alcoholordrugs.
4

•Useextremecarewhenloadingorunloadingthe
machineintoatrailerortruck.
•Usecarewhenapproachingblindcorners,shrubs,
trees,orotherobjectsthatmayobscurevision.
SlopeOperation
•Donotmowslopesgreaterthan15degrees.
•Donotmowneardrop-offs,ditches,steepbanks
orwater.Wheelsdroppingoveredgescancause
rollovers,whichmayresultinseriousinjury,death
ordrowning.
•Checktheareatobemowedandneverfoldthe
ROPSinareaswherethereareslopes,dropoffsor
water.
•Lowertherollbaronlywhenabsolutelynecessary.
Donotweartheseatbeltwiththerollbarfolded
down.
•Checkcarefullyforoverheadclearances(i.e.
branches,doorways,electricalwires)beforedriving
underanyobjectsanddonotcontactthem.
Maintenanceandstorage
•Donotmowslopeswhengrassiswet.Slippery
conditionsreducetractionandcouldcausesliding
andlossofcontrol.
•Donotmakesuddenturnsorrapidspeedchanges.
•Useawalkbehindmowerand/orahandtrimmer
neardrop-offs,ditches,steepbanksorwater.
•Reducespeedanduseextremecautiononslopes.
•Removeormarkobstaclessuchasrocks,treelimbs,
etc.fromthemowingarea.Tallgrasscanhide
obstacles.
•Watchforditches,holes,rocks,dips,andrisesthat
changetheoperatingangle,asroughterraincould
overturnthemachine.
•Avoidsuddenstartswhenmowinguphillbecause
themowermaytipbackwards.
•Beawarethatlossoftractionmayoccurgoing
downhill.Weighttransfertothefrontwheelsmay
causedrivewheelstoslipandcauselossofbraking
andsteering.
•Alwaysavoidsuddenstartingorstoppingona
slope.Iftireslosetraction,disengagethebladesand
proceedslowlyofftheslope.
•Followthemanufacturer’srecommendationsfor
wheelweightsorcounterweightstoimprovestability.
•Useextremecarewithgrasscatchersorother
attachments.Thesecanchangethestabilityofthe
machineandcauselossofcontrol.
•Disengagedrives,lowerimplement,setparking
brake,stopengineandremovekeyordisconnect
sparkplugwire.Waitforallmovementtostop
beforeadjusting,cleaningorrepairing.
•Cleangrassanddebrisfromcuttingunits,drives,
mufers,andenginetohelppreventres.Cleanup
oilorfuelspillage.
•Letenginecoolbeforestoringanddonotstorenear
ame.
•Shutofffuelwhilestoringortransporting.Donot
storefuelnearamesordrainindoors.
•Parkmachineonlevelground.Neverallowuntrained
personneltoservicemachine.
•Usejackstandstosupportcomponentswhen
required.
•Carefullyreleasepressurefromcomponentswith
storedenergy.
•Disconnectbatteryorremovesparkplugwirebefore
makinganyrepairs.Disconnectthenegativeterminal
rstandthepositivelast.Reconnectpositiverst
andnegativelast.
•Usecarewhencheckingblades.Wraptheblade(s)or
weargloves,andusecautionwhenservicingthem.
Onlyreplaceblades.Neverstraightenorweldthem.
•Keephandsandfeetawayfrommovingparts.If
possible,donotmakeadjustmentswiththeengine
running.
UsingtheRolloverProtectionSystem
(ROPS)
•Keeptherollbarintheraisedandlockedposition
andusetheseatbeltwhenoperatingthemachine.
•Becertainthattheseatbeltcanbereleasedquickly
intheeventofanemergency.
•Beawarethereisnorolloverprotectionwhenthe
rollbarisdown.
•Chargebatteriesinanopenwellventilatedarea,
awayfromsparkandames.Unplugchargerbefore
connectingordisconnectingfrombattery.W ear
protectiveclothinganduseinsulatedtools.
•Keepallpartsingoodworkingconditionandall
hardwaretightened.Replaceallwornordamaged
decals.
•UseonlyToroapprovedattachments.Warrantymay
bevoidedifusedwithunapprovedattachments.
5
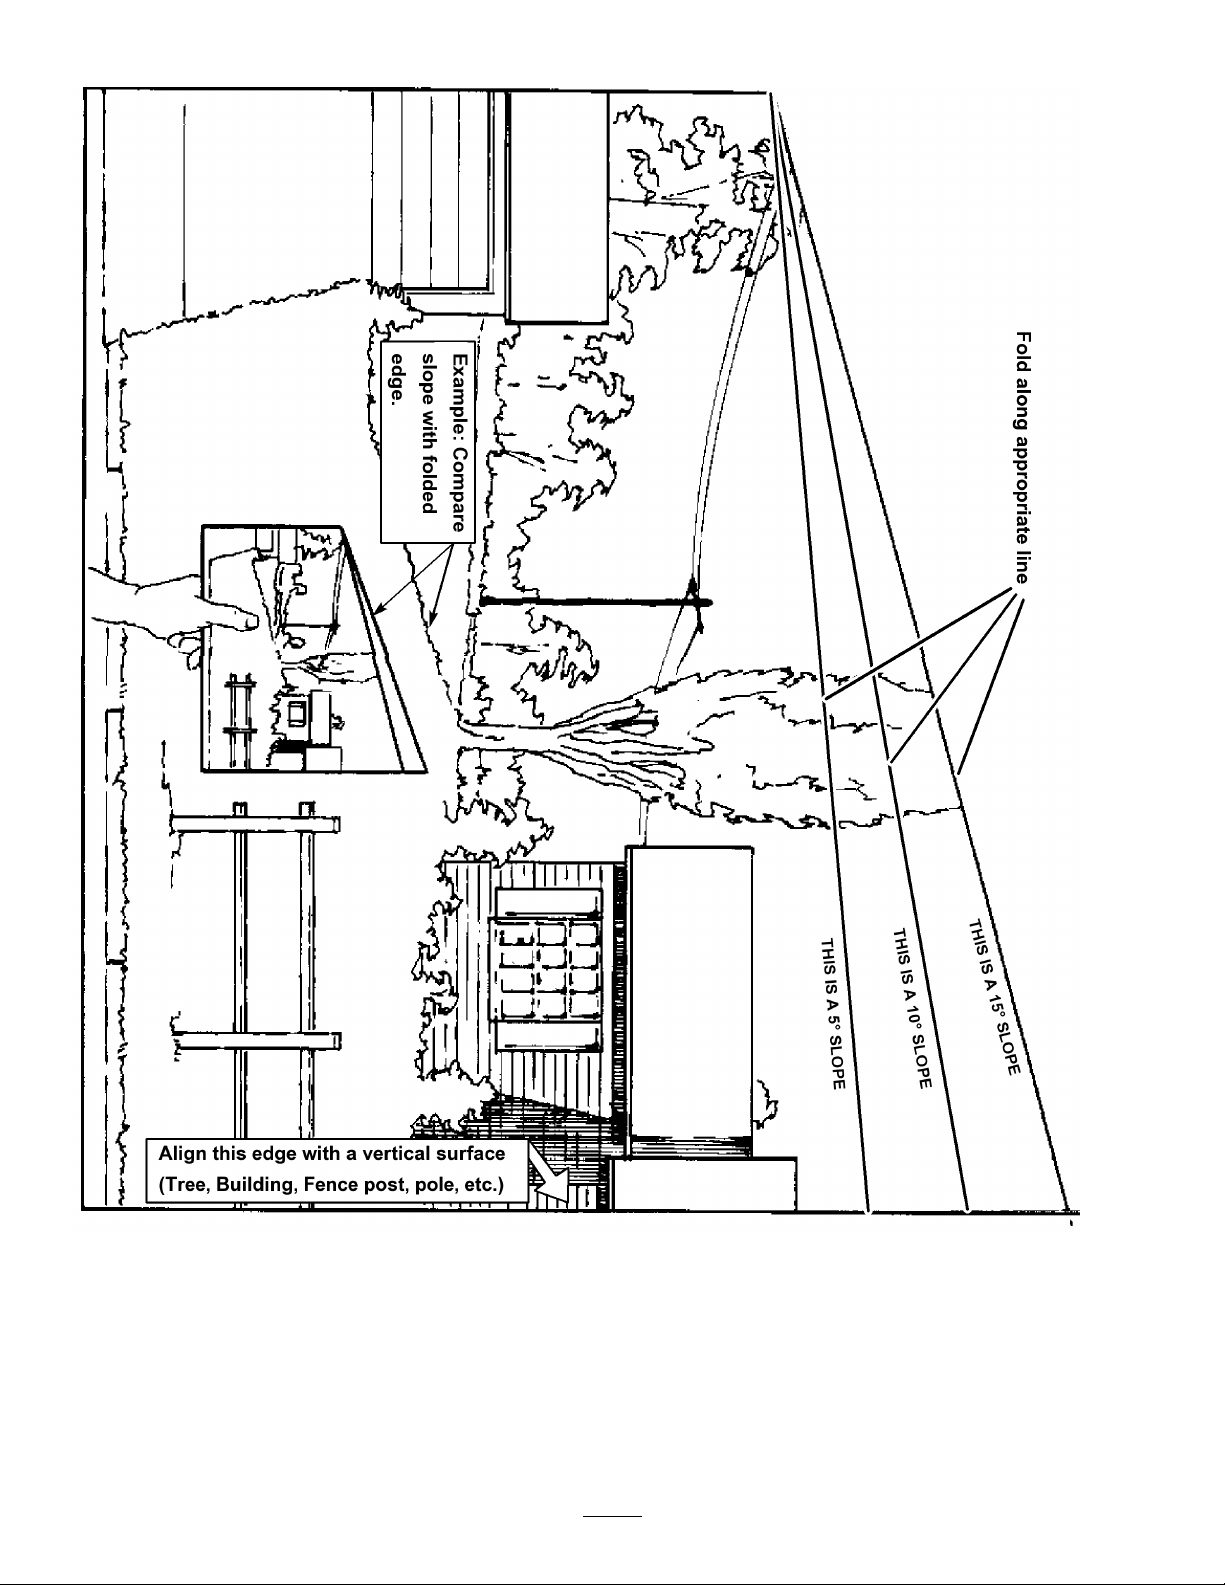
SlopeChart6SafetyandInstructional
Decals
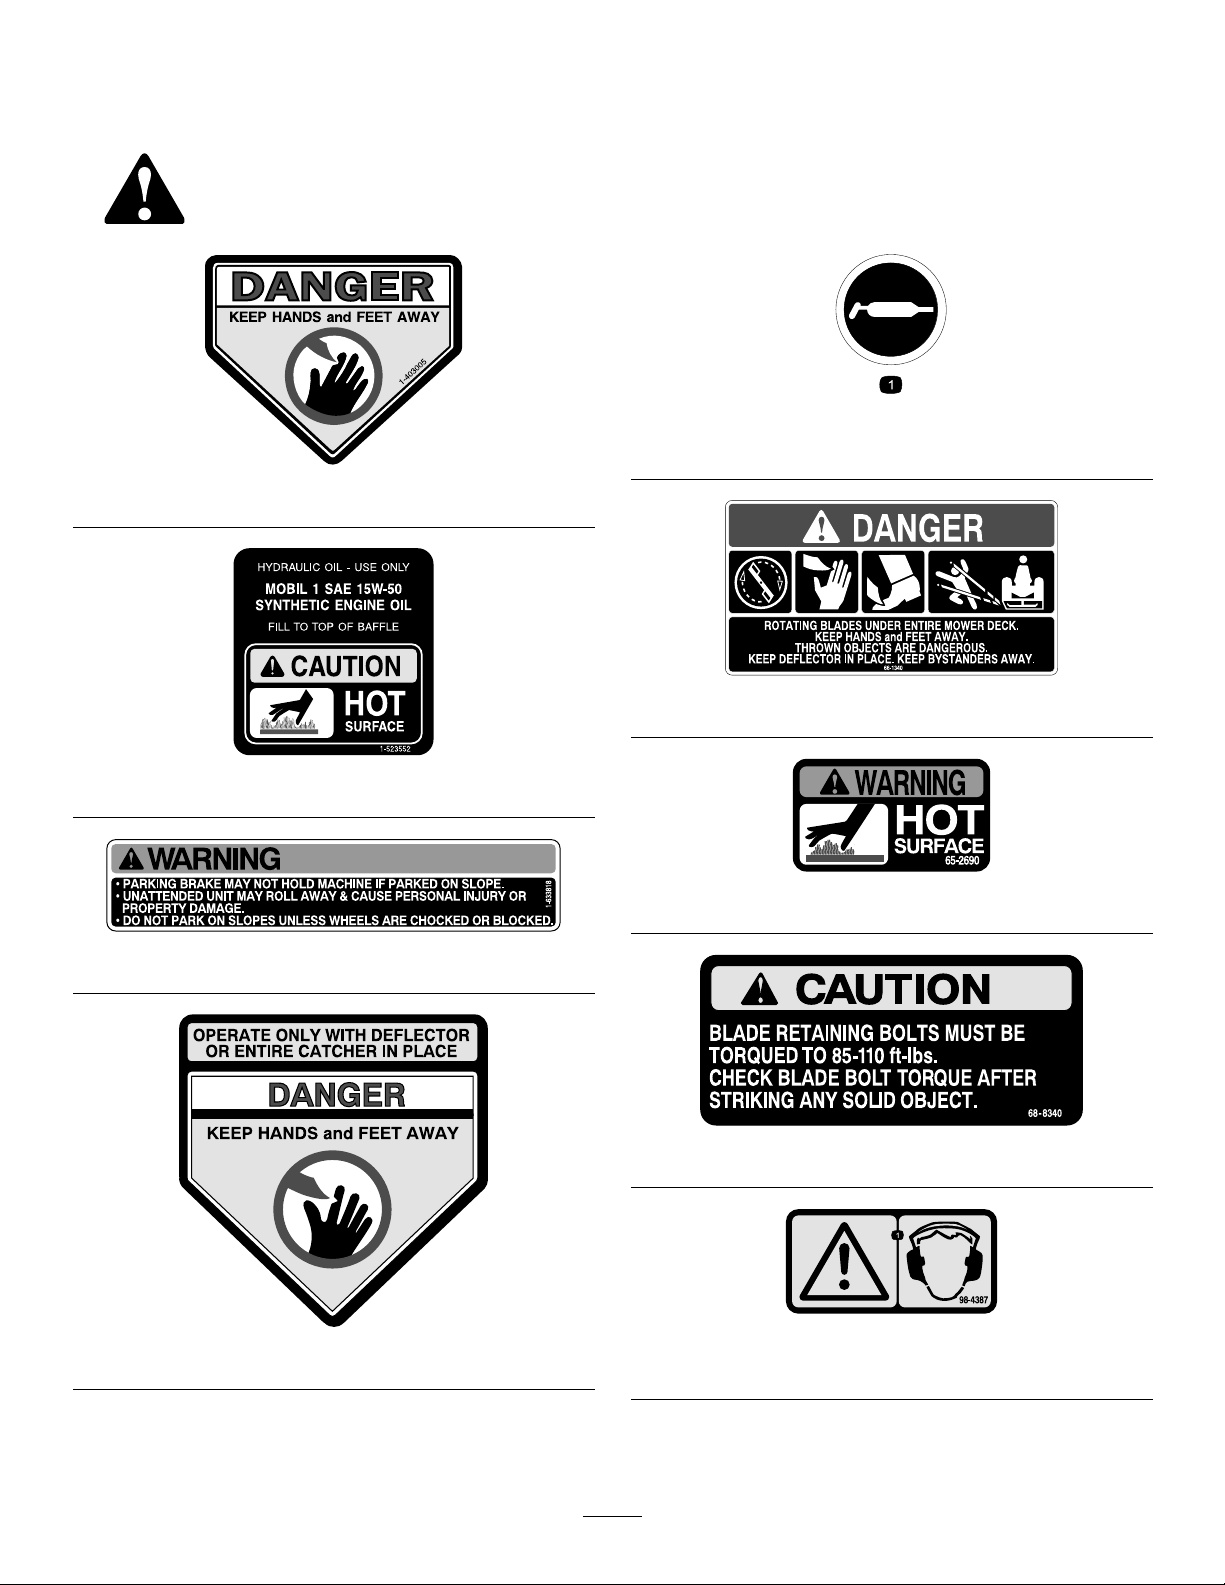
Safetydecalsandinstructionsareeasilyvisibletotheoperatorandarelocatednearanyareaof
potentialdanger.Replaceanydecalthatisdamagedorlost.
58-6520
1.Grease
1-403005
66-1340
1-523552
65-2690
1-633818
68-8340
54-9220
1.Warning—wearhearingprotection.
7
98-4387
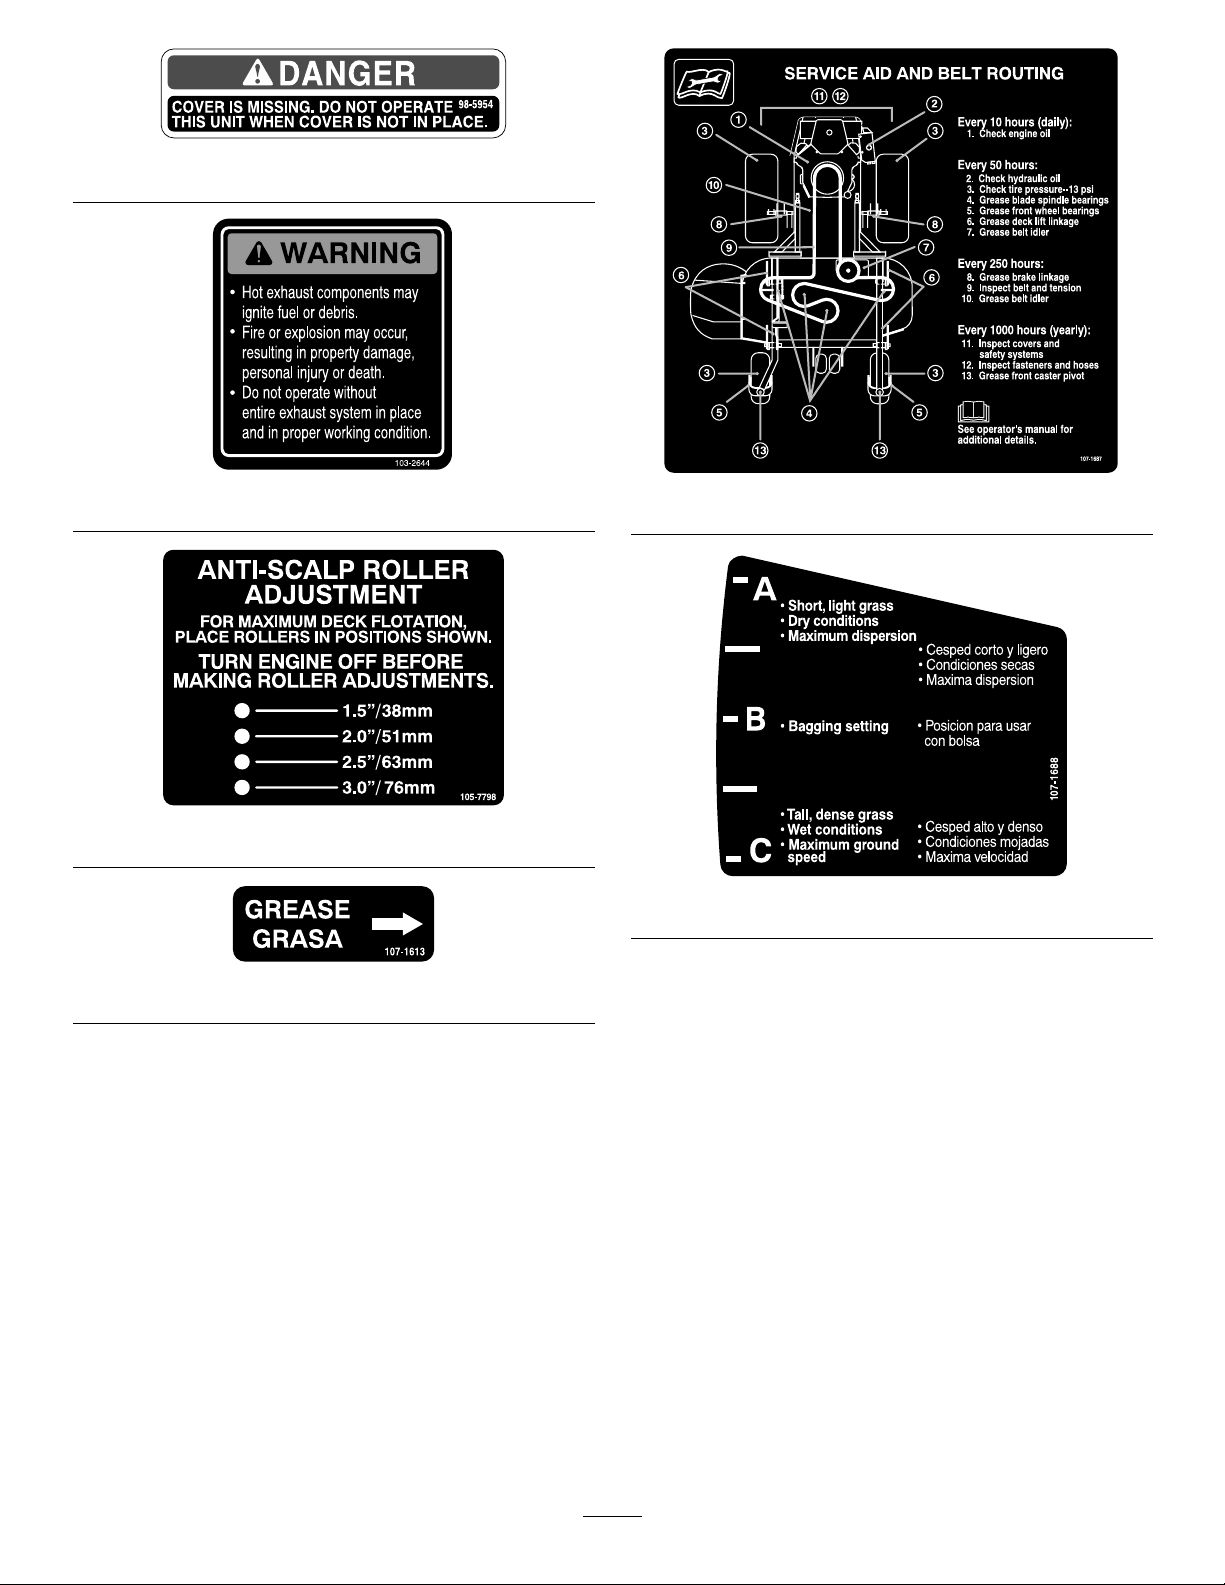
98-5954
103-2644
105-7798
107-1613
107-1687
107-1688
8

BatterySymbols
Someorallofthesesymbolsareonyourbattery
1.Explosionhazard
2.Nore,opename,or
smoking.
3.Causticliquid/chemical
burnhazard
4.Weareyeprotection9.Flusheyesimmediately
5.ReadtheOperator’s
Manual.
6.Keepbystandersasafe
7.Weareyeprotection;
8.Batteryacidcancause
10.Containslead;donot
107-2112
distancefromthebattery.
explosivegasescan
causeblindnessandother
injuries
blindnessorsevereburns.
withwaterandgetmedical
helpfast.
discard.
108-1050
108-1051
107-2102
1.Indicatesthebladeisidentiedasapartfromtheoriginal
machinemanufacturer.
Manufacturer’sMark
9

107-8445
107-9309
1.Warning—readtheOperator’sManualforinformationonchargingthebattery;containslead;donotdiscard.
2.ReadtheOperator’sManual.
108-5995
1.Fast
2.Slow
3.Neutral4.Reverse
1.Choke
2.Engine—stop4.Engine—start
ProductOverview
110-0439
3.Engine—run5.Fast
10
7.Slow
6.Continuousvariablesetting8.Powertake-off(PTO)

Figure3
1.Rollbar
2.Fuelcap(bothsides)
3.Seatbelt8.Controls
4.Motioncontrollever9.Mowerdeck
5.Height-of-cutlever
6.Sidedischargechute
7.Frontcasterwheel
10.Parkingbrakelever
isrunning.Usethesetimesforschedulingregular
maintenance.
Figure5
1.Hourmeter
UsingtheFuelShutoffValve
Themachinehas2fueltanks,oneontheleftsideand
theotherontherightside.Eachtankconnectstoa
checkvalveandthentoatee.Fromthereacommon
fuellineleadstotheengine(Figure6).
Closethefuelshutoffvalvebeforetransportingor
storingthemachine.
Controls
Becomefamiliarwithallthecontrolsbeforeyoustartthe
engineandoperatethemachine(Figure3andFigure4).
Figure4
1.Ignitionswitch
2.Motioncontrollever
3.Brakelever
4.Throttlecontrol9.Hourmeter
5.Choke
6.PTOSwitch
7.Height-of-cutlever
8.Fuelcap(bothsides)
Figure6
1.Fuelshutoffvalve
UsingtheHourMeter
Thehourmeter(Figure5)recordsthenumberofhours
theenginehasoperated.Itoperateswhentheengine
11

Operation
Note:Determinetheleftandrightsidesofthe
machinefromthenormaloperatingposition.
AddingFuel
UseUnleadedRegularGasolinesuitablefor
automotiveuse(85pumpoctaneminimum).Leaded
regulargasolinemaybeusedifunleadedregularisnot
available.
Important:Neverusemethanol,gasoline
containingmethanol,orgasoholcontainingmore
than10%ethanolbecausethefuelsystemcouldbe
damaged.Donotmixoilwithgasoline.
Incertainconditions,gasolineisextremely
ammableandhighlyexplosive.Areor
explosionfromgasolinecanburnyouand
othersandcandamageproperty.
•Fillthefueltankoutdoors,inanopenarea,
whentheengineiscold.Wipeupany
gasolinethatspills.
•Neverllthefueltankinsideanenclosed
trailer.
Incertainconditionsduringfueling,static
electricitycanbereleasedcausingaspark
whichcanignitethegasolinevapors.Are
orexplosionfromgasolinecanburnyouand
othersandcandamageproperty.
•Alwaysplacegasolinecontainersonthe
groundawayfromyourvehiclebeforelling.
•Donotllgasolinecontainersinsidea
vehicleoronatruckortrailerbedbecause
interiorcarpetsorplastictruckbedliners
mayinsulatethecontainerandslowtheloss
ofanystaticcharge.
•Whenpractical,removegas-powered
equipmentfromthetruckortrailerand
refueltheequipmentwithitswheelsonthe
ground.
•Ifthisisnotpossible,thenrefuelsuch
equipmentonatruckortrailerfroma
portablecontainer,ratherthanfroma
gasolinedispensernozzle.
•Ifagasolinedispensernozzlemustbeused,
keepthenozzleincontactwiththerimof
thefueltankorcontaineropeningatall
timesuntilfuelingiscomplete.
•Donotllthefueltankcompletelyfull.Add
gasolinetothefueltankuntilthelevelis1/4
to1/2inch(6to13mm)belowthebottomof
thellerneck.Thisemptyspaceinthetank
allowsgasolinetoexpand.
•Neversmokewhenhandlinggasoline,and
stayawayfromanopenameorwhere
gasolinefumesmaybeignitedbyaspark.
•Storegasolineinanapprovedcontainerand
keepitoutofthereachofchildren.Never
buymorethana30-daysupplyofgasoline.
•Donotoperatewithoutentireexhaust
systeminplaceandinproperworking
condition.
Gasolineisharmfulorfatalifswallowed.
Long-termexposuretovaporscancauseserious
injuryandillness.
•Avoidprolongedbreathingofvapors.
•Keepfaceawayfromnozzleandgastankor
conditioneropening.
•Keepgasawayfromeyesandskin.
UsingStabilizer/Conditioner
Useafuelstabilizer/conditionerinthemachineto
providethefollowingbenets:
•Keepsgasolinefreshduringstorageof90daysor
less.Forlongerstorageitisrecommendedthatthe
fueltankbedrained.
•Cleanstheenginewhileitruns
•Eliminatesgum-likevarnishbuildupinthefuel
system,whichcauseshardstarting
12

Important:Donotusefueladditivescontaining
methanolorethanol.
Addthecorrectamountofgasstabilizer/conditioner
tothegas.
Note:Afuelstabilizer/conditionerismosteffective
whenmixedwithfreshgasoline.Tominimizethe
chanceofvarnishdepositsinthefuelsystem,usefuel
stabilizeratalltimes.
FillingtheFuelTank
1.Shuttheengineoffandsettheparkingbrake.
2.Cleanaroundeachfueltankcapandremovethecap.
3.Addunleadedregulargasolinetobothfueltanks,
untilthelevelis1/4to1/2inch(6mmto13mm)
belowthebottomofthellerneck.
Thisspaceinthetankallowsgasolinetoexpand.
Donotllthefueltankscompletelyfull.
4.Installfueltankcapssecurely.
5.Wipeupanygasolinethatmayhavespilled.
CheckingtheEngineOilLevel
Beforeyoustarttheengineandusethemachine,check
theoillevelintheenginecrankcase;refertoChecking
OilLevelinEngineMaintenance,page27
Thereisnorolloverprotectionwhentherollbar
isinthedownposition.
•Lowertherollbaronlywhenabsolutely
necessary.
•Donotweartheseatbeltwhentherollbaris
inthedownposition.
•Driveslowlyandcarefully.
•Raisetherollbarassoonasclearance
permits.
•Checkcarefullyforoverheadclearances(i.e.
branches,doorways,electricalwires)before
drivingunderanyobjectsanddonotcontact
them.
Important:Lowertherollbaronlywhen
absolutelynecessary.
1.Tolowertherollbar,loosenthefrontknobs
(Figure9).
2.Removethehairpincotterpinsandremovethetwo
pins(Figure8).
3.Lowertherollbartothedownposition.Thereare
twodownpositions.SeeFigure7forthepositions.
4.Installthetwopinsandsecurethemwiththe
hairpincotterpins(Figure8).
UsingtheRolloverProtection
System(ROPS)
Toavoidinjuryordeathfromrollover:keepthe
rollbarintheraisedlockedpositionanduse
theseatbelt.
Ensurethattherearpartoftheseatissecured
withtheseatlatch.
Figure7
1.Fulldownposition2.Downpositionwithbagger
installed
Important:Ensurethattherearpartofthe
seatissecuredwiththeseatlatch.
13
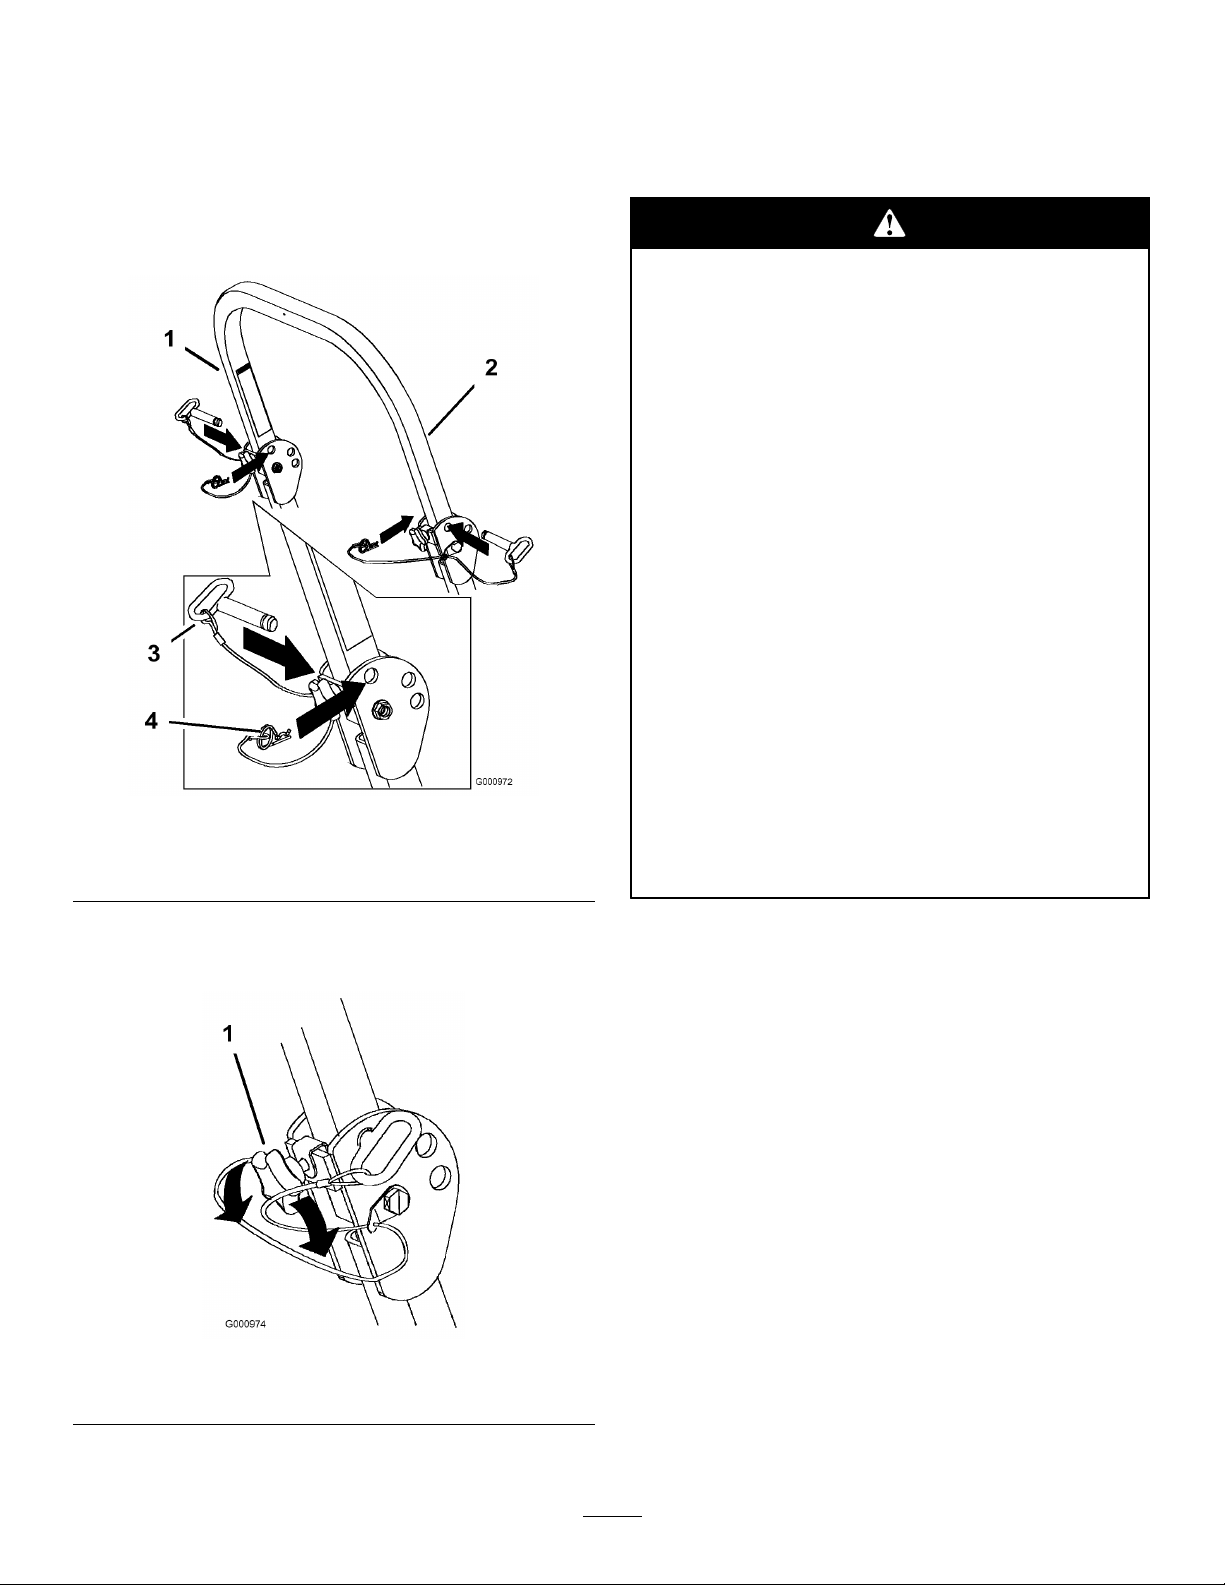
5.Toraisetherollbar,removethehairpincotterpins
andremovethetwopins(Figure8).
6.Raisetherollbartotheuprightpositionandinstall
thetwopinsandsecurethemwiththehairpincotter
pins(Figure8).
Important:Alwaysusetheseatbeltwiththe
rollbarintheraisedposition.
ThinkSafetyFirst
Pleasereadallsafetyinstructionsandsymbolsinthe
safetysection.Knowingthisinformationcouldhelp
youorbystandersavoidinjury.
Operatingonwetgrassorsteepslopescan
causeslidingandlossofcontrol.
Wheelsdroppingoveredgescancauserollovers,
whichmayresultinseriousinjury,deathor
drowning.
Thereisnorolloverprotectionwhentheroll
barisdown.
Alwayskeeptherollbarintheraisedandlocked
positionandusetheseatbelt.
Readandfollowtherolloverprotection
instructionsandwarnings.
Toavoidlossofcontrolandpossibilityof
rollover:
Figure8
1.Rollbar3.Pin
2.Raisedposition4.Hairpincotterpin
Important:Tightenthefrontknobsagainst
thecenterrollbarends(Figure9).
•Donotoperateneardrop-offsornearwater.
•Donotoperateonslopesgreaterthan
15degrees.
•Reducespeedanduseextremecautionon
slopes.
•Avoidsuddenturnsorrapidspeedchanges.
1.Fronthandle
Figure9
14
SettingtheParkingBrake
1.Movethemotioncontrollevers(Figure18)outto
theneutrallockposition.
2.Pullupandbackontheparkingbrakelevertoset
theparkingbrake(Figure12).Theparkingbrake
levershouldstayrmlyintheengagedposition.
Parkingbrakemaynotholdmachineparked
onaslopeandcouldcausepersonalinjuryor
propertydamage.
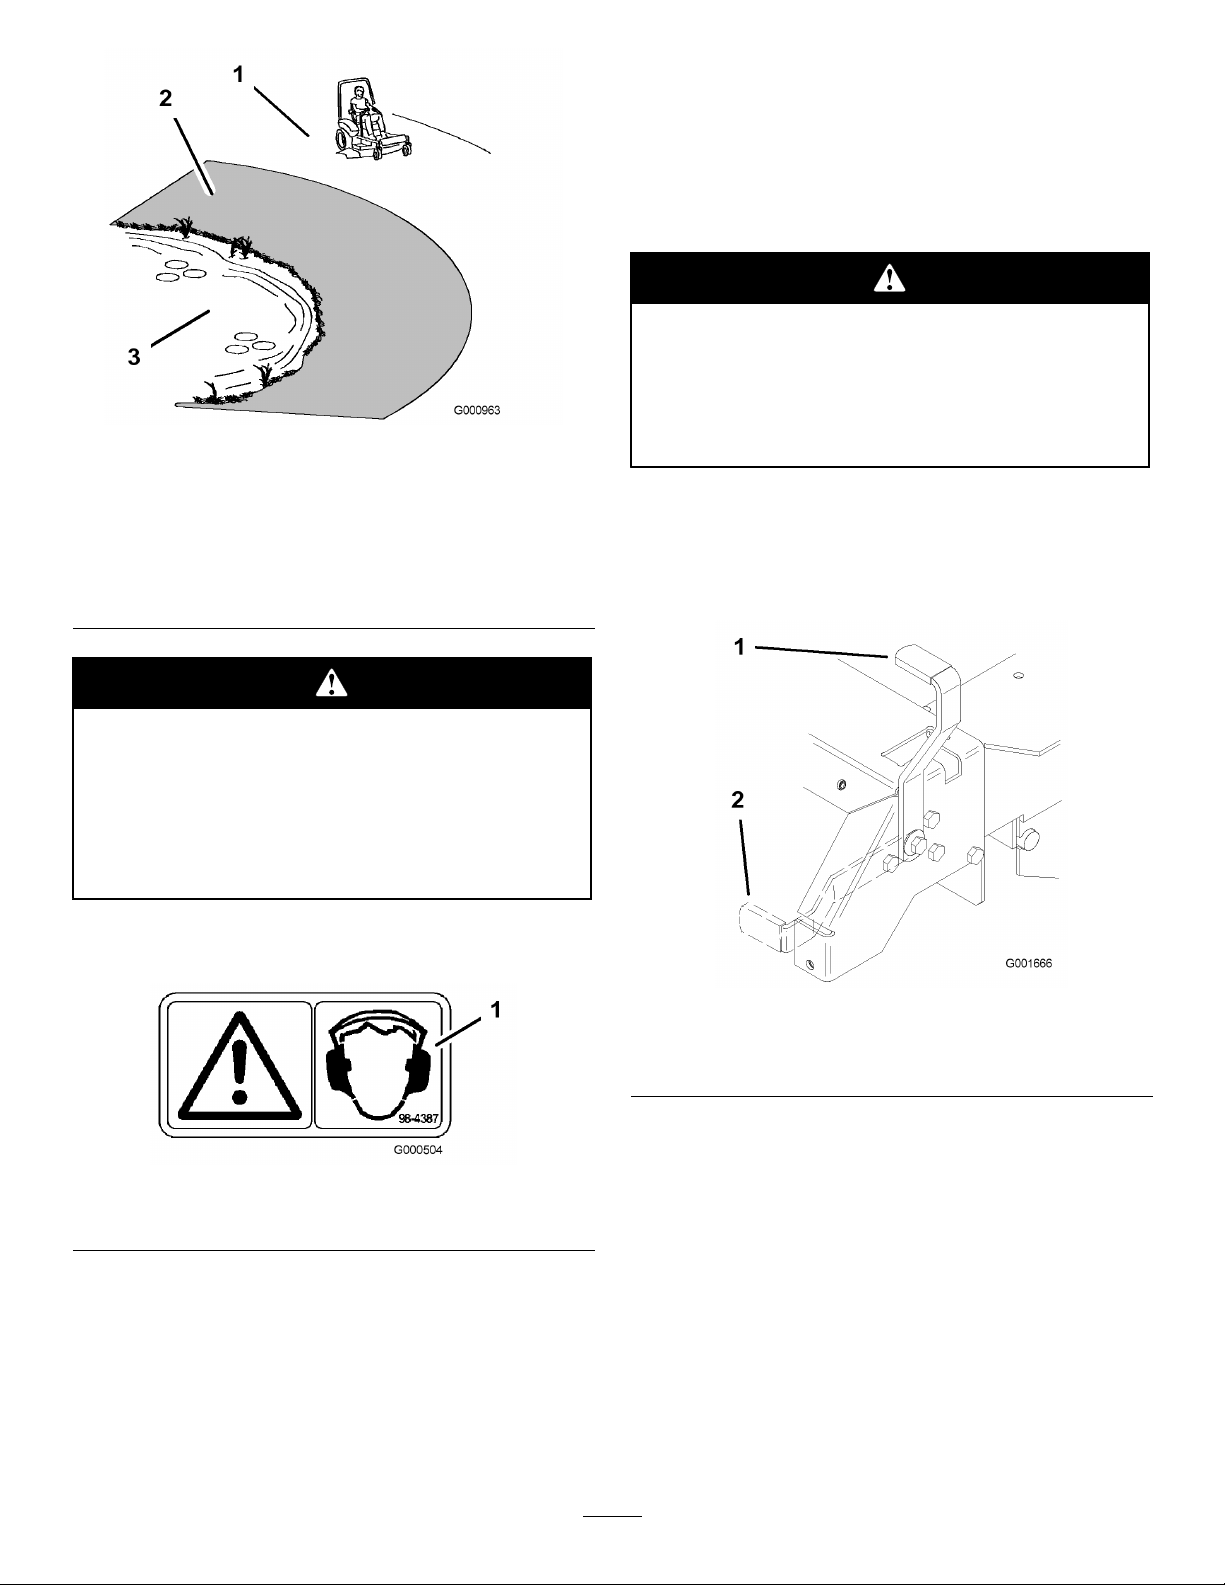
Figure10
1.SafeZone-usethe
ZMasterhereonslopes
lessthan15degreesor
atareas.
2.Usewalkbehindmower
and/orhandtrimmernear
drop-offsandwater.
3.Water
Thismachineproducessoundlevelsinexcess
of85dBAattheoperatorsearandcancause
hearinglossthroughextendedperiodsof
exposure.
Wearhearingprotectionwhenoperatingthis
machine.
Theuseofprotectiveequipmentforeyes,ears,feetand
headisrecommended.
Donotparkonslopesunlesswheelsare
chockedorblocked
ReleasingtheParkingBrake
Pushforwardanddownontheparkingbrakeleverto
releasetheparkingbrake(Figure12).
Figure11
1.Warning—wearhearingprotection
OperatingtheParkingBrake
Alwayssettheparkingbrakewhenyoustopthe
machineorleaveitunattended.
Figure12
1.Parkingbrake-ON3.BrakeStop
2.Parkingbrake-OFF
StartingandStoppingthe
Engine
StartingtheEngine
1.Sitontheseatandmovethemotioncontrolsto
neutrallockedposition.
2.Settheparkingbrake;refertoSettingtheParking
Brake.
3.MovethePTO(powertakeoff)switchtotheOff
position(Figure13).
15
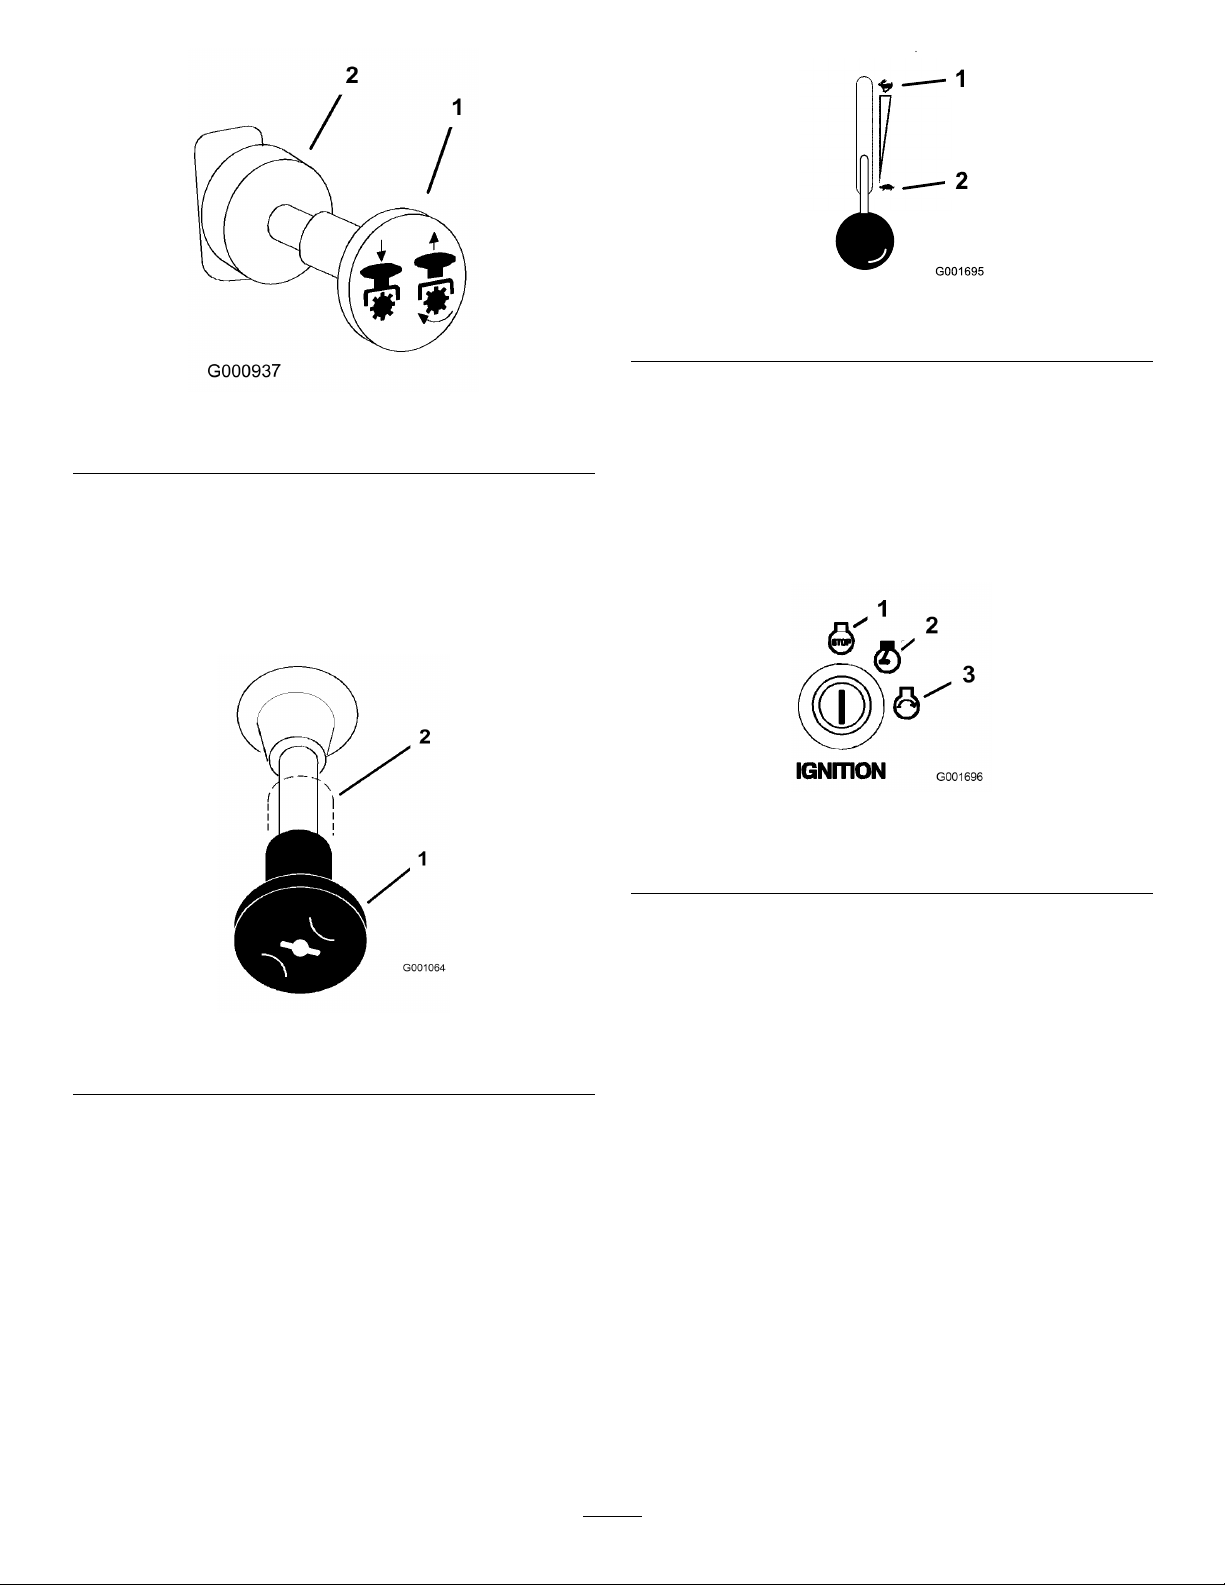
Figure15
1.Throttle—fast
2.Throttle—slow
Figure13
1.PTO—on2.PTO—off
4.Movethechokecontroltotheonpositionbefore
startingacoldengine(Figure14).
Note:Awarmorhotenginemaynotrequire
choking.Afterenginestarts,movechokecontrolto
Runposition.
Figure14
1.Choke—on2.Choke—off
6.TurntheignitionkeytoStart.Whentheengines
starts,releasethekey(Figure16).
Important:Donotengagestarterformore
than10secondsatatime.Ifenginefailsto
startallow30secondcool-downperiodbetween
attempts.Failuretofollowtheseinstructions
canburnoutstartermotor.
Figure16
1.Off3.Start
2.Run
7.Aftertheenginestarts,movethechoketooff
(Figure14).Iftheenginestallsorhesitates,move
thechokebacktoonforafewseconds,thenmove
thethrottlelevertodesiredsetting.Repeatthisas
required.
StoppingtheEngine
5.MovethethrottlecontroltotheFastposition
beforestartingacoldengine(Figure15).
1.PushthePTOtotheoffposition(Figure13).
2.Movethethrottlelevermidwaybetweentheslow
andfastpositions(Figure15).
3.Lettheengineidlefor60seconds.
4.Turntheignitionkeytotheoffpositionandremove
thekey(Figure16).
5.Closethefuelshutoffvalvebeforetransporting
orstoringthemachine.
Important:Makesurethatthefuelshutoff
valveisclosedbeforetransportingorstoring
themachine,asfuelleakagemayoccur.Setthe
parkingbrakebeforetransporting.Makesure
16
toremovethekeyasthefuelpumpmayrun
andcausethebatterytolosecharge.
Childrenorbystandersmaybeinjuredifthey
moveorattempttooperatethetractorwhileit
isunattended.
Alwaysremovetheignitionkeyandsetthe
parkingbrakewhenleavingthemachine
unattended,evenifjustforafewminutes.
TheSafetyInterlockSystem
Ifsafetyinterlockswitchesaredisconnected
ordamagedthemachinecouldoperate
unexpectedlycausingpersonalinjury.
•Donottamperwiththeinterlockswitches.
•Checktheoperationoftheinterlock
switchesdailyandreplaceanydamaged
switchesbeforeoperatingthemachine.
OperatingthePowerTakeOff
(PTO)
Thepowertakeoff(PTO)switchstartsandstopsthe
mowerbladesandanypoweredattachments.
EngagingthePTO
1.Iftheengineiscold,allowtheenginetowarmup5
to10minutesbeforeengagingthePTO.
2.Whileseatedintheseat,releasethepressureonthe
tractioncontrolleversandplaceinneutral.
3.Placethethrottleinthefastposition.
Note:EngagingthePTOwiththethrottleatthe
halforlesspositionwillcauseexcessiveweartothe
drivebelts.
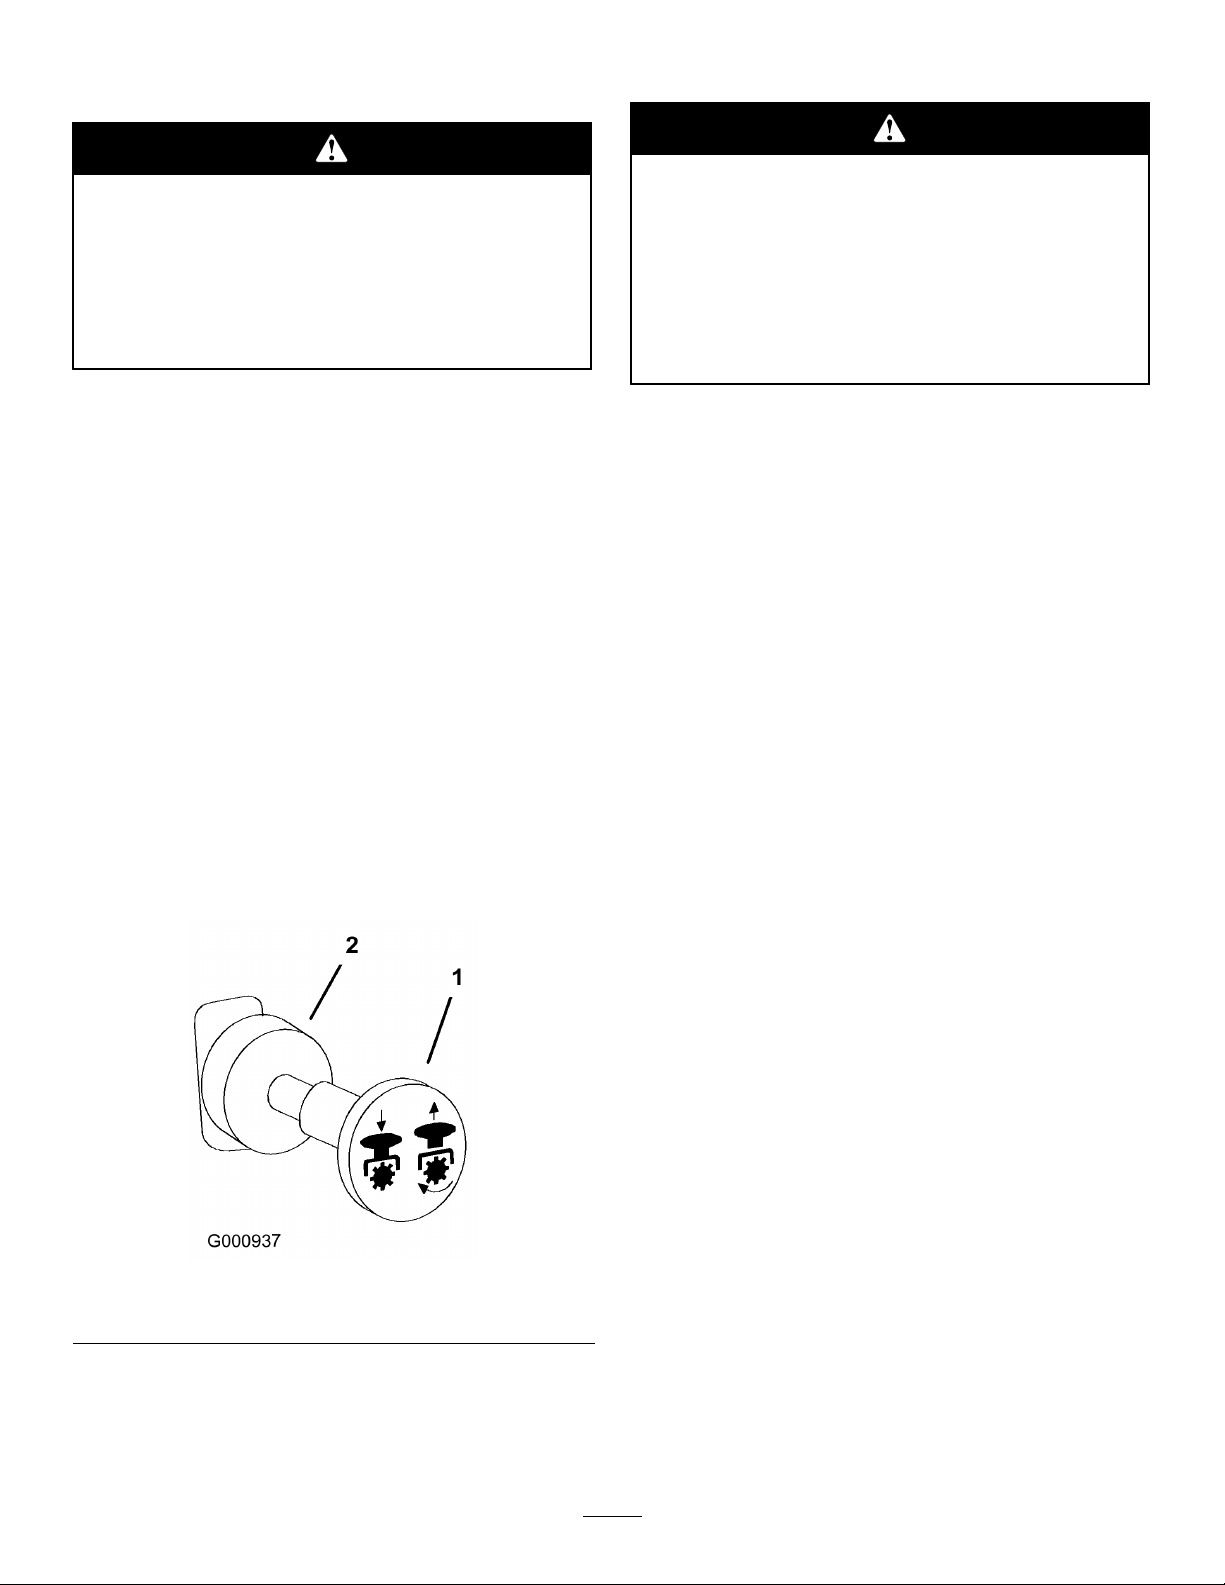
4.Pulloutonthepowertakeoff(PTO)switchto
engageit(Figure17).
UnderstandingtheSafetyInterlock
System
Thesafetyinterlocksystemisdesignedtopreventthe
enginefromstartingunless:
•Youaresittingontheseat.
•Theparkingbrakeisengaged.
•Thepowertakeoff(PTO)isdisengaged.
•Themotioncontrolleversareintheneutrallocked
position
Thesafetyinterlocksystemalsoisdesignedtostopthe
enginewhenthetractioncontrolsaremovedfromthe
lockedpositionwiththeparkingbrakeengagedorif
yourisefromtheseatwhenthePTOisengaged.
TestingtheSafetyInterlockSystem
ServiceInterval:Beforeeachuseordaily
Testthesafetyinterlocksystembeforeyouusethe
machineeachtime.Ifthesafetysystemdoesnot
operateasdescribedbelow ,haveanAuthorizedService
Dealerrepairthesafetysystemimmediately .
Figure17
1.PTO-On2.PTO-Off
DisengagingthePTO
Todisengage,pushthePTOswitchtotheoffposition
(Figure17).
1.Sittingontheseat,engagetheparkingbrakeand
movethePTOtoon.Trystartingtheengine;the
engineshouldnotcrank.
2.Sittingontheseat,engagetheparkingbrakeand
movethePTOtooff.Moveeithermotioncontrol
lever(outofneutrallockedposition).Trystarting
theengine;theengineshouldnotcrank.Repeatfor
othercontrollever.
3.Sittingontheseat,engagetheparkingbrake,
movethePTOswitchtooffandmovethemotion
controlleverstoneutrallockposition.Nowstart
theengine.Whiletheengineisrunning,release
theparkingbrake,engagethePTOandriseslightly
fromtheseat;theengineshouldstop.
17
 Loading...