

Toro Z580-D Z Master 74266, Z580-D Z Master 74267, Z580-D Z Master 74274, 74266CP Z580-D Z Master, 74267CP Z580-D Z Master Operator's Manual
FormNo.3361-740RevB
Z580-DZMaster
®
witha52in,
60inor72inTURBOFORCE
SideDischargeMower
ModelNo.74266—SerialNo.290000001andUp
ModelNo.74267—SerialNo.290000001andUp
ModelNo.74274—SerialNo.290000001andUp
®
ToregisteryourproductordownloadanOperator'sManualorPartsCatalogatnocharge,gotowww.T oro.com.OriginalInstructions(EN)
Warning
CALIFORNIA
Proposition65Warning
Theengineexhaustfromthisproduct
containschemicalsknowntotheStateof
Californiatocausecancer,birthdefects,
orotherreproductiveharm.
Important:Thisengineisnotequippedwitha
sparkarrestermufer.ItisaviolationofCalifornia
PublicResourceCodeSection4442touseoroperate
theengineonanyforest-covered,brush-covered,or
grass-coveredland.Otherstatesorfederalareas
mayhavesimilarlaws.
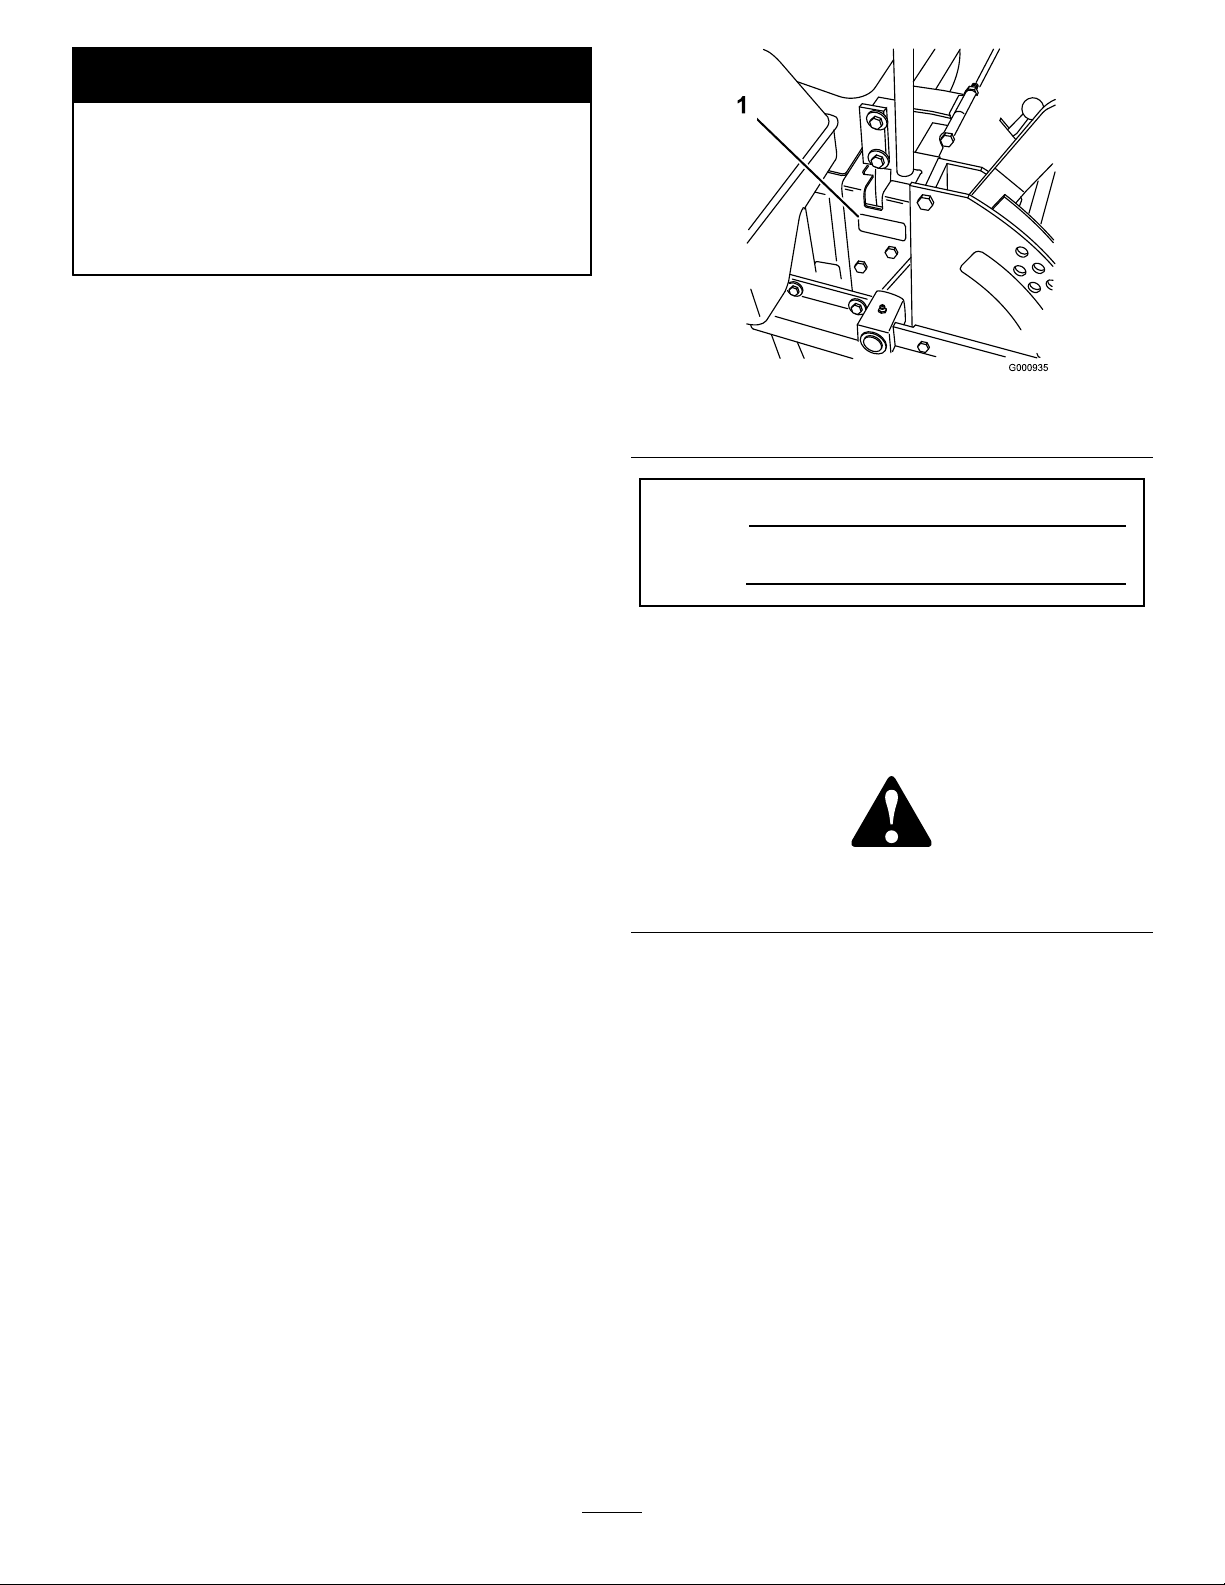
Figure1
1.Modelandserialnumberlocation
Theenclosed
Engine Owner’ s Man ual
issupplied
forinformationregardingtheUSEnvironmental
ProtectionAgency(EPA)andtheCalifornia
EmissionControlRegulationofemissionsystems,
maintenance,andwarranty.Replacementsmaybe
orderedthroughtheenginemanufacturer.
Introduction
Readthisinformationcarefullytolearnhowtooperate
andmaintainyourproductproperlyandtoavoidinjury
andproductdamage.Youareresponsibleforoperating
theproductproperlyandsafely.
YoumaycontactTorodirectlyatwww .T oro.comfor
productandaccessoryinformation,helpndinga
dealer,ortoregisteryourproduct.
Wheneveryouneedservice,genuineToroparts,or
additionalinformation,contactanAuthorizedService
DealerorToroCustomerServiceandhavethemodel
andserialnumbersofyourproductready .Figure1
identiesthelocationofthemodelandserialnumbers
ontheproduct.Writethenumbersinthespace
provided.
ModelNo.
SerialNo.
Thismanualidentiespotentialhazardsandhas
safetymessagesidentiedbythesafetyalertsymbol
(Figure2),whichsignalsahazardthatmaycauseserious
injuryordeathifyoudonotfollowtherecommended
precautions.
Figure2
1.Safetyalertsymbol
Thismanualuses2otherwordstohighlightinformation.
Importantcallsattentiontospecialmechanical
informationandNoteemphasizesgeneralinformation
worthyofspecialattention.
Contents
©2008—TheT oro®Company
8111LyndaleAvenueSouth
Bloomington,MN55420
Introduction.................................................................2
Safety...........................................................................4
SafeOperatingPractices.......................................4
SlopeChart..........................................................6
SafetyandInstructionalDecals.............................7
ProductOverview......................................................13
Controls.............................................................13
Operation...................................................................15
AddingFuel.......................................................15
BiodieselReady..................................................15
FillingtheFuelTank...........................................16
Contactusatwww.T oro.com.
2
PrintedintheUSA.
AllRightsReserved

CheckingtheEngineOilLevel............................16
SwitchingtheFuelTanks....................................16
UsingtheRolloverProtectionSystem
(ROPS)..........................................................16
ThinkSafetyFirst...............................................17
OperatingtheParkingBrake...............................18
StartingandStoppingtheEngine........................19
OperatingthePowerTakeOff(PTO).................20
TheSafetyInterlockSystem................................21
DrivingForwardorBackward.............................21
StoppingtheMachine.........................................22
AdjustingtheHeight-of-Cut...............................23
AdjustingtheAnti-ScalpRollers.........................23
AdjustingtheFlowBafe...................................24
PositioningtheFlowBafe.................................24
PositioningtheSeat............................................25
UnlatchingtheSeat.............................................25
PushingtheMachinebyHand.............................25
UsingtheSideDischarge....................................26
TransportingMachines.......................................26
LoadingMachines..............................................27
OperatingTips...................................................27
Maintenance...............................................................29
RecommendedMaintenanceSchedule(s)................29
Lubrication.............................................................30
GreasingandLubrication...................................30
GreasingtheMowerDeckandBelt
Idlers..............................................................30
LubricateCasterWheelHubs.............................31
EngineMaintenance...............................................32
ServicingtheAirCleaner....................................32
ServicingtheEngineOil.....................................33
FuelSystemMaintenance.......................................37
ServicingtheFuelFilterandWater
Seperator........................................................37
ServicingtheFuelTank......................................38
ElectricalSystemMaintenance................................38
ServicingtheBattery...........................................38
ServicingtheFuses.............................................40
DriveSystemMaintenance.....................................41
AdjustingtheTracking........................................41
CheckingtheTirePressure.................................41
CheckingtheWheelHubSlottedNut..................42
AdjustingtheCasterPivotBearing......................42
ServicingtheGearBox.......................................42
AdjustingtheElectricClutch..............................43
CoolingSystemMaintenance..................................44
ServicingtheCoolingSystem..............................44
BrakeMaintenance.................................................46
AdjustingtheParkingBrake................................46
BeltMaintenance....................................................46
InspectingtheBelts............................................46
ReplacingtheMowerBelt...................................46
AdjustingtheMowerBeltTensionfor72in
MowersOnly..................................................47
ReplacingthePTODriveBelt.............................48
ReplacingthePumpDriveBelt...........................48
ReplacingandTensioningtheAlternator
Belt................................................................49
ControlsSystemMaintenance.................................50
AdjustingtheControlHandleNeutral
Position..........................................................50
HydraulicSystemMaintenance...............................51
ServicingtheHydraulicSystem...........................51
SettingtheHydraulicPumpNeutral
Position..........................................................53
MowerDeckMaintenance......................................55
LevelingtheMoweratThreePositions................55
ServicingtheCuttingBlades...............................57
ReplacingtheGrassDeector.............................59
Cleaning.................................................................60
CleaningUndertheMower.................................60
WasteDisposal...................................................60
Storage.......................................................................60
CleaningandStorage..........................................60
Troubleshooting.........................................................62
Schematics.................................................................64
3

Safety
•Useextracarewhenhandlingdieselandotherfuels.
Theyareammableandvaporsareexplosive.
Improperuseormaintenancebytheoperatororowner
canresultininjury.Toreducethepotentialforinjury,
complywiththesesafetyinstructionsandalwayspay
attentiontothesafetyalertsymbol,whichmeans
CAUTION,WARNING,orDANGER-“personal
safetyinstruction."Failuretocomplywiththe
instructionmayresultinpersonalinjuryordeath.
Thisproductiscapableofamputatinghandsand
feetandthrowingobjects.Alwaysfollowallsafety
instructionstoavoidseriousinjuryordeath.
Thisproductisdesignedforcuttingandrecyclinggrass
or,whenequippedwithagrassbagger,forcatching
cutgrass.Anyuseforpurposesotherthanthesecould
provedangeroustouserandbystanders.
SafeOperatingPractices
ThefollowinginstructionsarefromANSIstandard
B71.4-2004.
Training
•ReadtheOperator’sManualandothertraining
material.Iftheoperator(s)ormechanic(s)cannot
readEnglishitistheowner’sresponsibilitytoexplain
thismaterialtothem.
•Becomefamiliarwiththesafeoperationofthe
equipment,operatorcontrols,andsafetysigns.
•Alloperatorsandmechanicsshouldbetrained.The
ownerisresponsiblefortrainingtheusers.
•Neverletchildrenoruntrainedpeopleoperateor
servicetheequipment.Localregulationsmayrestrict
theageoftheoperator.
•Theowner/usercanpreventandisresponsiblefor
accidentsorinjuriesoccurringtohimselforherself,
otherpeopleorproperty.
–Useonlyanapprovedcontainer
–Neverrefuelordrainthemachineindoors.
–Neverremovefuelcaporaddfuelwithengine
running.Allowenginetocoolbeforerefueling.
Donotsmoke.
•Checkthatoperator’spresencecontrols,safety
switchesandshieldsareattachedandfunctioning
properly.Donotoperateunlesstheyarefunctioning
properly.
Operation
•Neverrunanengineinanenclosedarea.
•Onlyoperateingoodlight,keepingawayfromholes
andhiddenhazards.
•Besurealldrivesareinneutralandparkingbrakeis
engagedbeforestartingengine.Starttheengineonly
fromtheoperator’sposition.Useseatbelts.
•Neverraisemowerwiththebladesrunning.
•NeveroperatewithoutthePTOshield,orother
guardssecurelyinplace.Besureallinterlocksare
attached,adjustedproperly,andfunctioningproperly .
•Neveroperatewiththedischargedeectorraised,
removedoraltered,unlessusingagrasscatcher.
•Donotchangetheenginegovernorsettingor
overspeedtheengine.
•Stoponlevelground,lowerimplements,disengage
drives,engageparkingbrake,shutoffenginebefore
leavingtheoperator’spositionforanyreason
includingemptyingthecatchersoruncloggingthe
chute.
•Stopequipmentandinspectbladesafterstriking
objectsorifanabnormalvibrationoccurs.Make
necessaryrepairsbeforeresumingoperations.
•Keephandsandfeetawayfromthecuttingunits.
Preparation
•Evaluatetheterraintodeterminewhataccessories
andattachmentsareneededtoproperlyand
safelyperformthejob.Onlyuseaccessoriesand
attachmentsapprovedbythemanufacturer.
•Wearappropriateclothingincludinghardhat,safety
glassesandhearingprotection.Longhair,loose
clothingorjewelrymaygettangledinmovingparts.
•Inspecttheareawheretheequipmentistobeused
andremoveallobjectssuchasrocks,toysandwire
whichcanbethrownbythemachine.
•Nevercarrypassengersandkeeppetsandbystanders
away.
•Bealert,slowdownandusecautionwhenmaking
turns.Lookbehindandtothesidebeforechanging
directions.
•Slowdownandusecautionwhencrossingroadsand
sidewalks.Stopbladesifnotmowing.
•Beawareofthemowerdischargedirectionanddo
notpointitatanyone.
•Donotoperatethemowerundertheinuenceof
alcoholordrugs.
4

•Useextremecarewhenloadingorunloadingthe
machineintoatrailerortruck.
•Usecarewhenapproachingblindcorners,shrubs,
trees,orotherobjectsthatmayobscurevision.
SlopeOperation
•Donotmowslopesgreaterthan15degrees.
•Donotmowneardrop-offs,ditches,steepbanks
orwater.Wheelsdroppingoveredgescancause
rollovers,whichmayresultinseriousinjury,death
ordrowning.
•Checktheareatobemowedandneverfoldthe
ROPSinareaswherethereareslopes,dropoffsor
water.
•Lowertherollbaronlywhenabsolutelynecessary.
Donotweartheseatbeltwiththerollbarfolded
down.
•Checkcarefullyforoverheadclearances(i.e.
branches,doorways,electricalwires)beforedriving
underanyobjectsanddonotcontactthem.
Maintenanceandstorage
•Donotmowslopeswhengrassiswet.Slippery
conditionsreducetractionandcouldcausesliding
andlossofcontrol.
•Donotmakesuddenturnsorrapidspeedchanges.
•Useawalkbehindmowerand/orahandtrimmer
neardrop-offs,ditches,steepbanksorwater.
•Reducespeedanduseextremecautiononslopes.
•Removeormarkobstaclessuchasrocks,treelimbs,
etc.fromthemowingarea.Tallgrasscanhide
obstacles.
•Watchforditches,holes,rocks,dips,andrisesthat
changetheoperatingangle,asroughterraincould
overturnthemachine.
•Avoidsuddenstartswhenmowinguphillbecause
themowermaytipbackwards.
•Beawarethatlossoftractionmayoccurgoing
downhill.Weighttransfertothefrontwheelsmay
causedrivewheelstoslipandcauselossofbraking
andsteering.
•Alwaysavoidsuddenstartingorstoppingona
slope.Iftireslosetraction,disengagethebladesand
proceedslowlyofftheslope.
•Followthemanufacturer’srecommendationsfor
wheelweightsorcounterweightstoimprovestability.
•Useextremecarewithgrasscatchersorother
attachments.Thesecanchangethestabilityofthe
machineandcauselossofcontrol.
•Disengagedrives,lowerimplement,setparking
brake,stopengineandremovekey.Waitforall
movementtostopbeforeadjusting,cleaningor
repairing.
•Cleangrassanddebrisfromcuttingunits,drives,
mufers,andenginetohelppreventres.Cleanup
oilorfuelspillage.
•Letenginecoolbeforestoringanddonotstorenear
ame.
•Shutofffuelwhilestoringortransporting.Donot
storefuelnearamesordrainindoors.
•Parkmachineonlevelground.Neverallowuntrained
personneltoservicemachine.
•Usejackstandstosupportcomponentswhen
required.
•Carefullyreleasepressurefromcomponentswith
storedenergy.
•Disconnectbatterybeforemakinganyrepairs.
Disconnectthenegativeterminalrstandthe
positivelast.Reconnectpositiverstandnegative
last.
•Usecarewhencheckingblades.Wraptheblade(s)or
weargloves,andusecautionwhenservicingthem.
Onlyreplaceblades.Neverstraightenorweldthem.
•Keephandsandfeetawayfrommovingparts.If
possible,donotmakeadjustmentswiththeengine
running.
UsingtheRolloverProtectionSystem
(ROPS)
•Keeptherollbarintheraisedandlockedposition
andusetheseatbeltwhenoperatingthemachine.
•Becertainthattheseatbeltcanbereleasedquickly
intheeventofanemergency.
•Beawarethereisnorolloverprotectionwhenthe
rollbarisdown.
•Chargebatteriesinanopenwellventilatedarea,
awayfromsparkandames.Unplugchargerbefore
connectingordisconnectingfrombattery.W ear
protectiveclothinganduseinsulatedtools.
•Keepallpartsingoodworkingconditionandall
hardwaretightened.Replaceallwornordamaged
decals.
•UseonlyToroapprovedattachments.W arrantymay
bevoidedifusedwithunapprovedattachments.
5
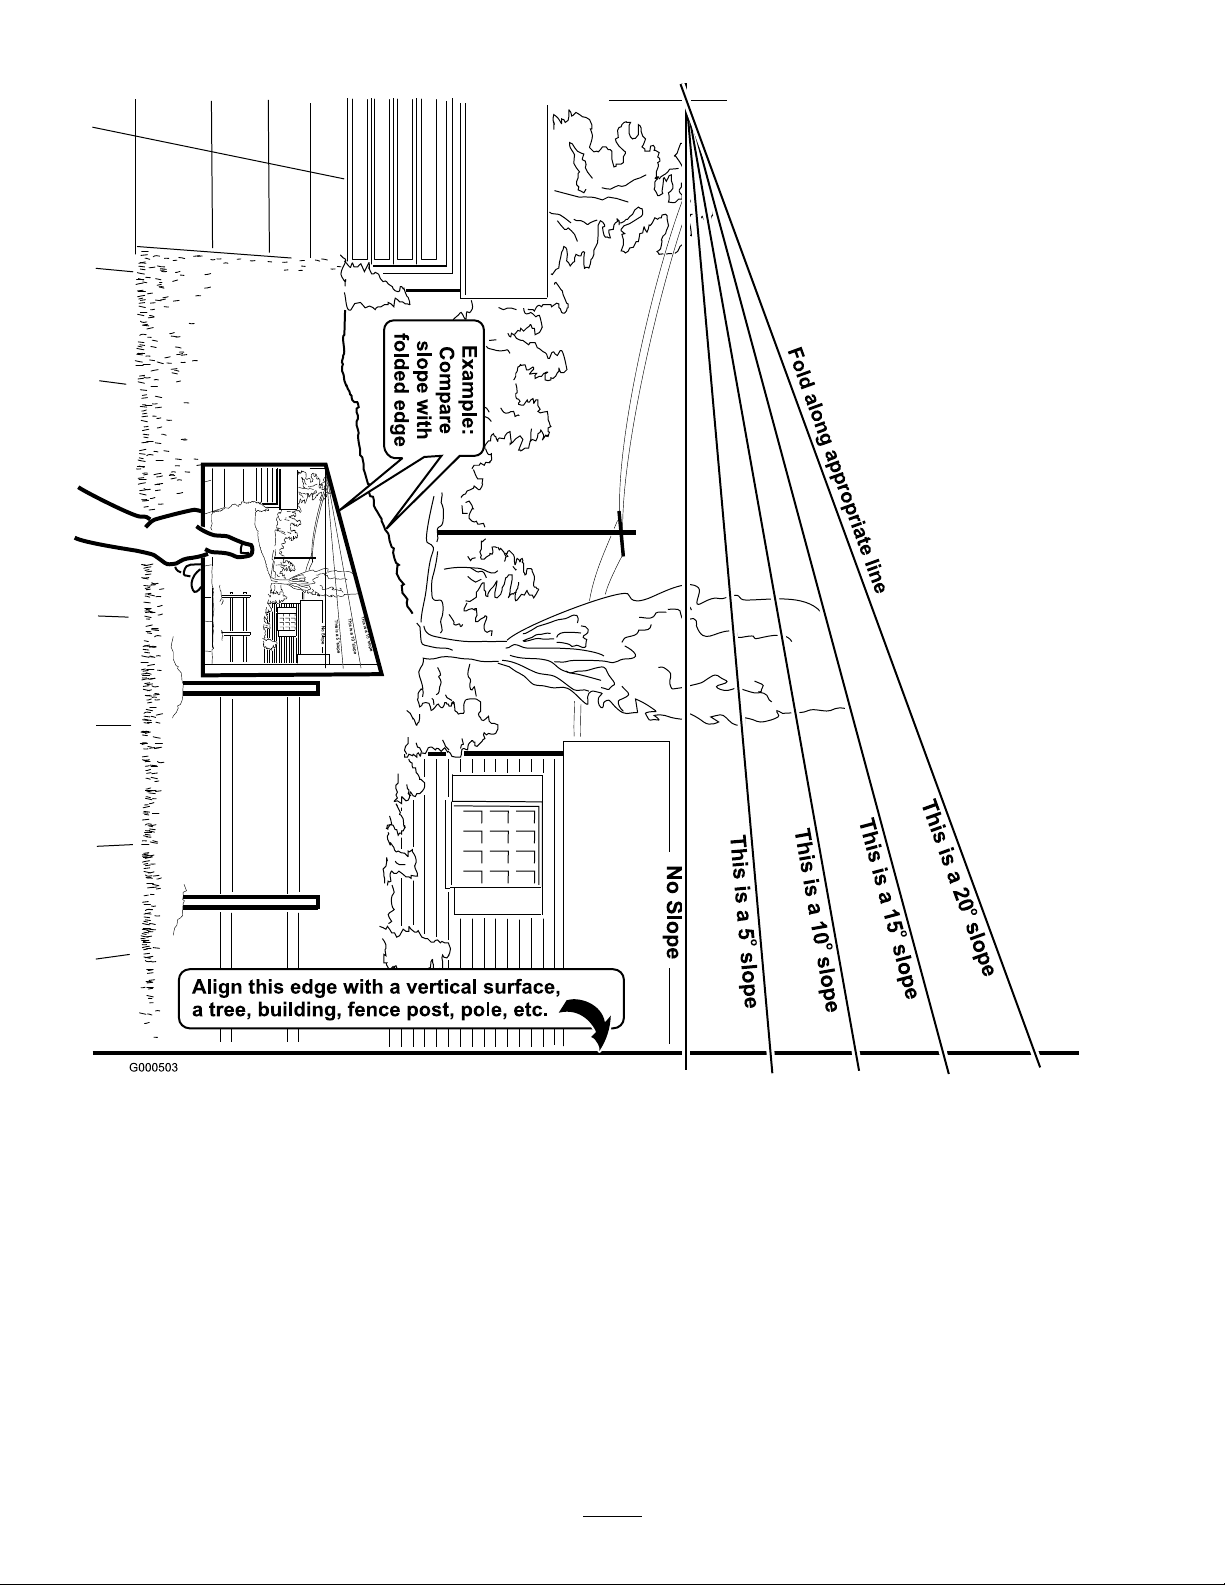
SlopeChart6SafetyandInstructional
Decals
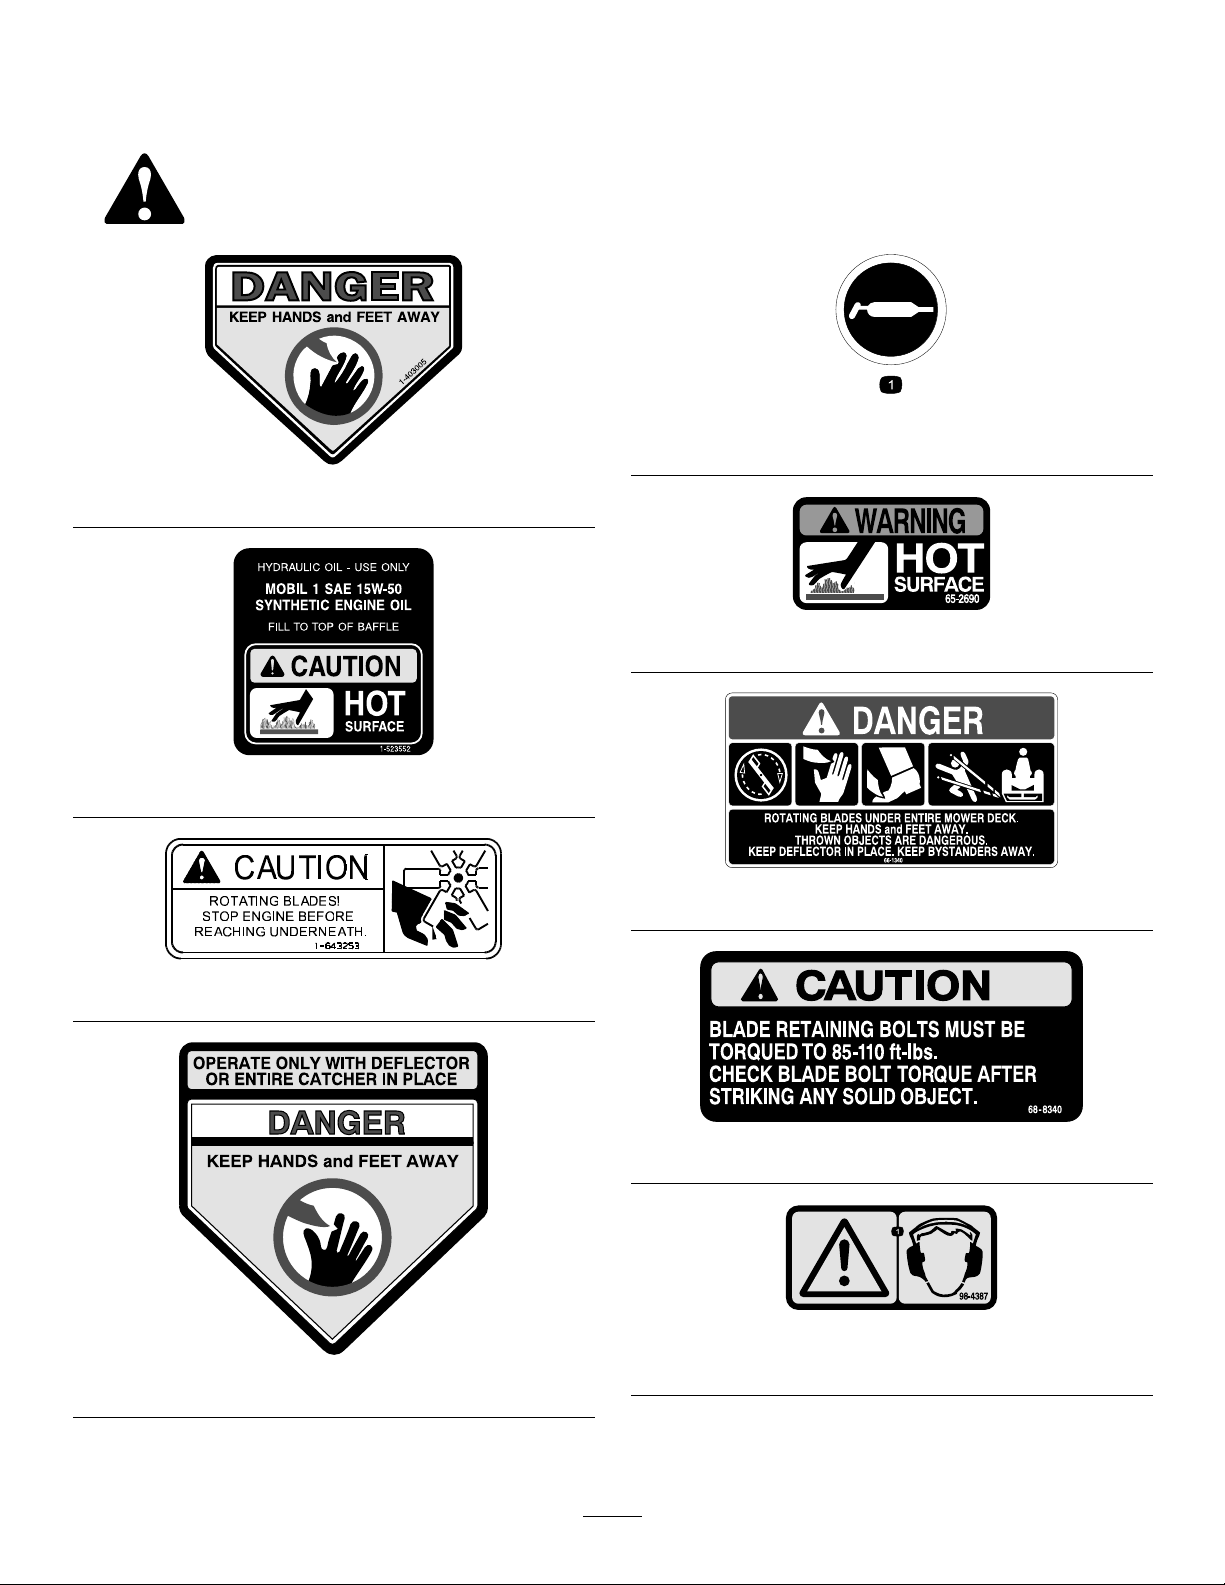
Safetydecalsandinstructionsareeasilyvisibletotheoperatorandarelocatednearanyareaof
potentialdanger.Replaceanydecalthatisdamagedorlost.
58-6520
1.Grease
1-403005
65-2690
1-523552
66-1340
1-643253
68-8340
98-4387
54-9220
1.Warning—wearhearingprotection.
7

98-5954
107-1857
104-2449
107-1860
105-7798
107-1613
8

107-1861
107-2102
107-1864
107-2112
107-2114
9
110–0806
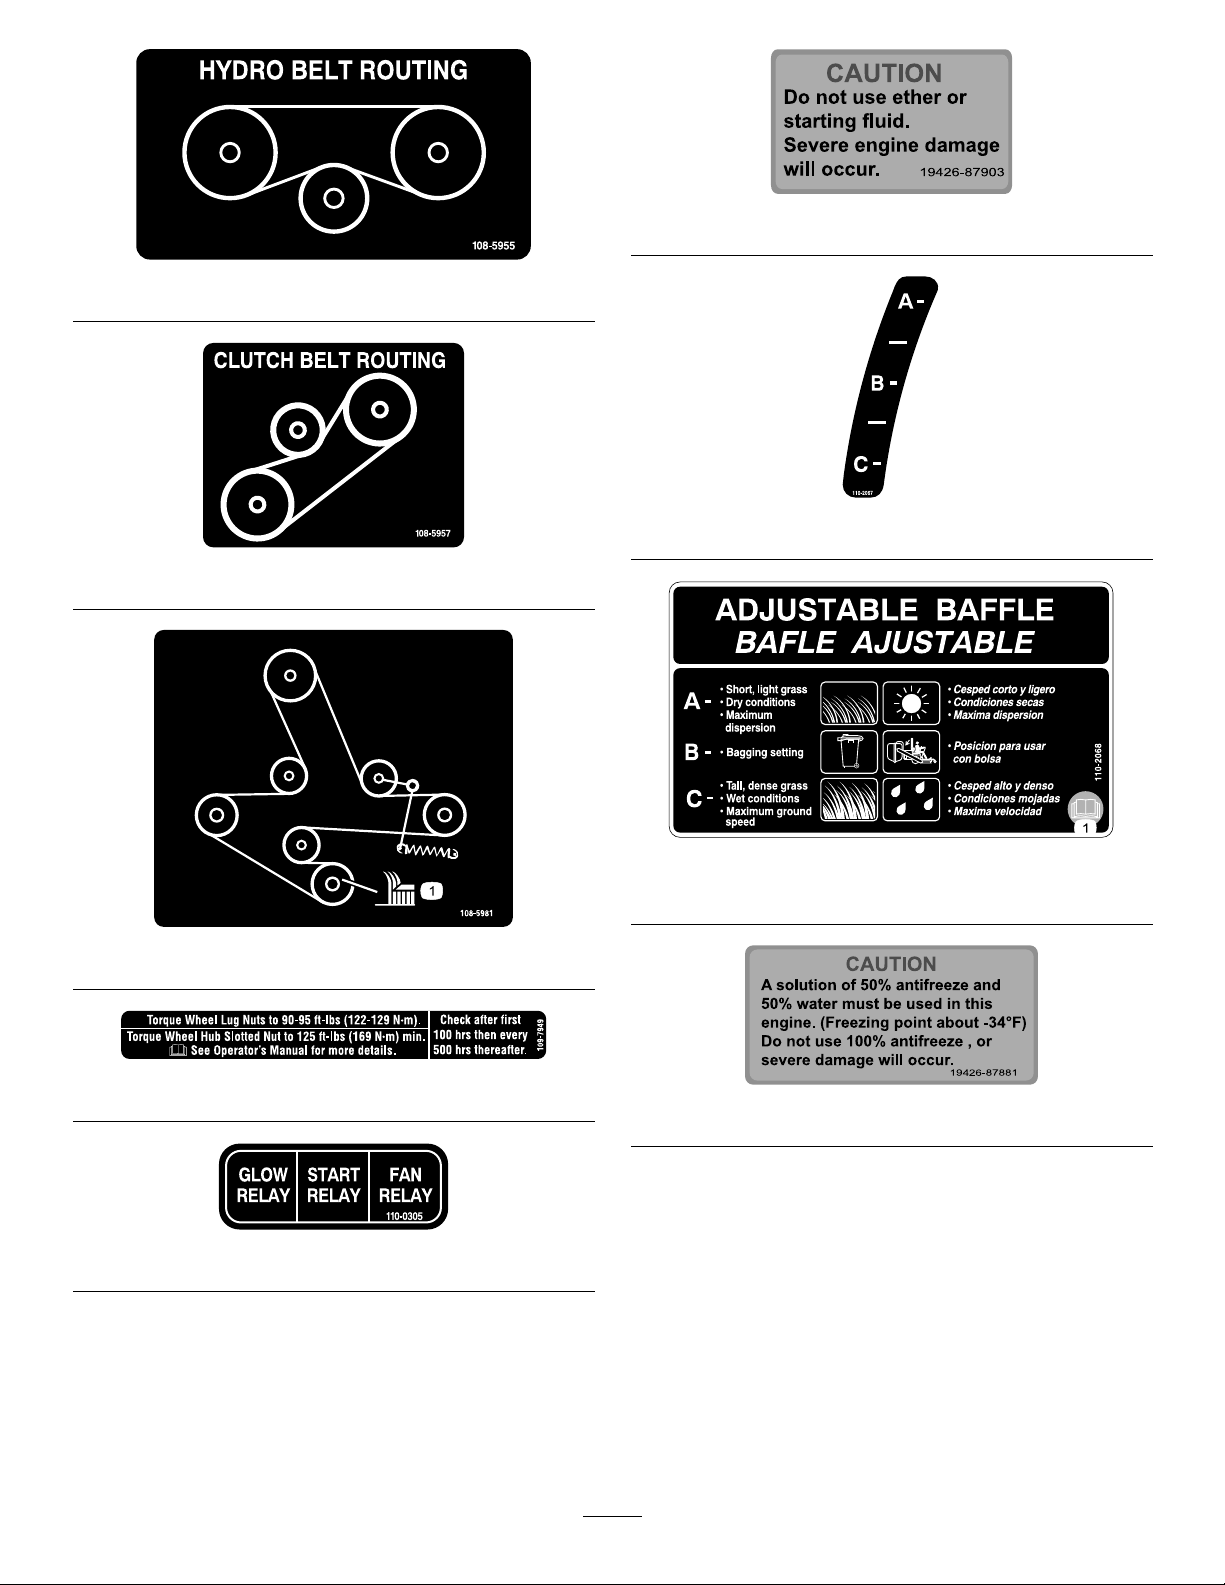
108-5955
110-2067
108-5957
110-2068
1.ReadtheOperator’sManual.
108-5981
109-7949
110–3842
110-0305
10
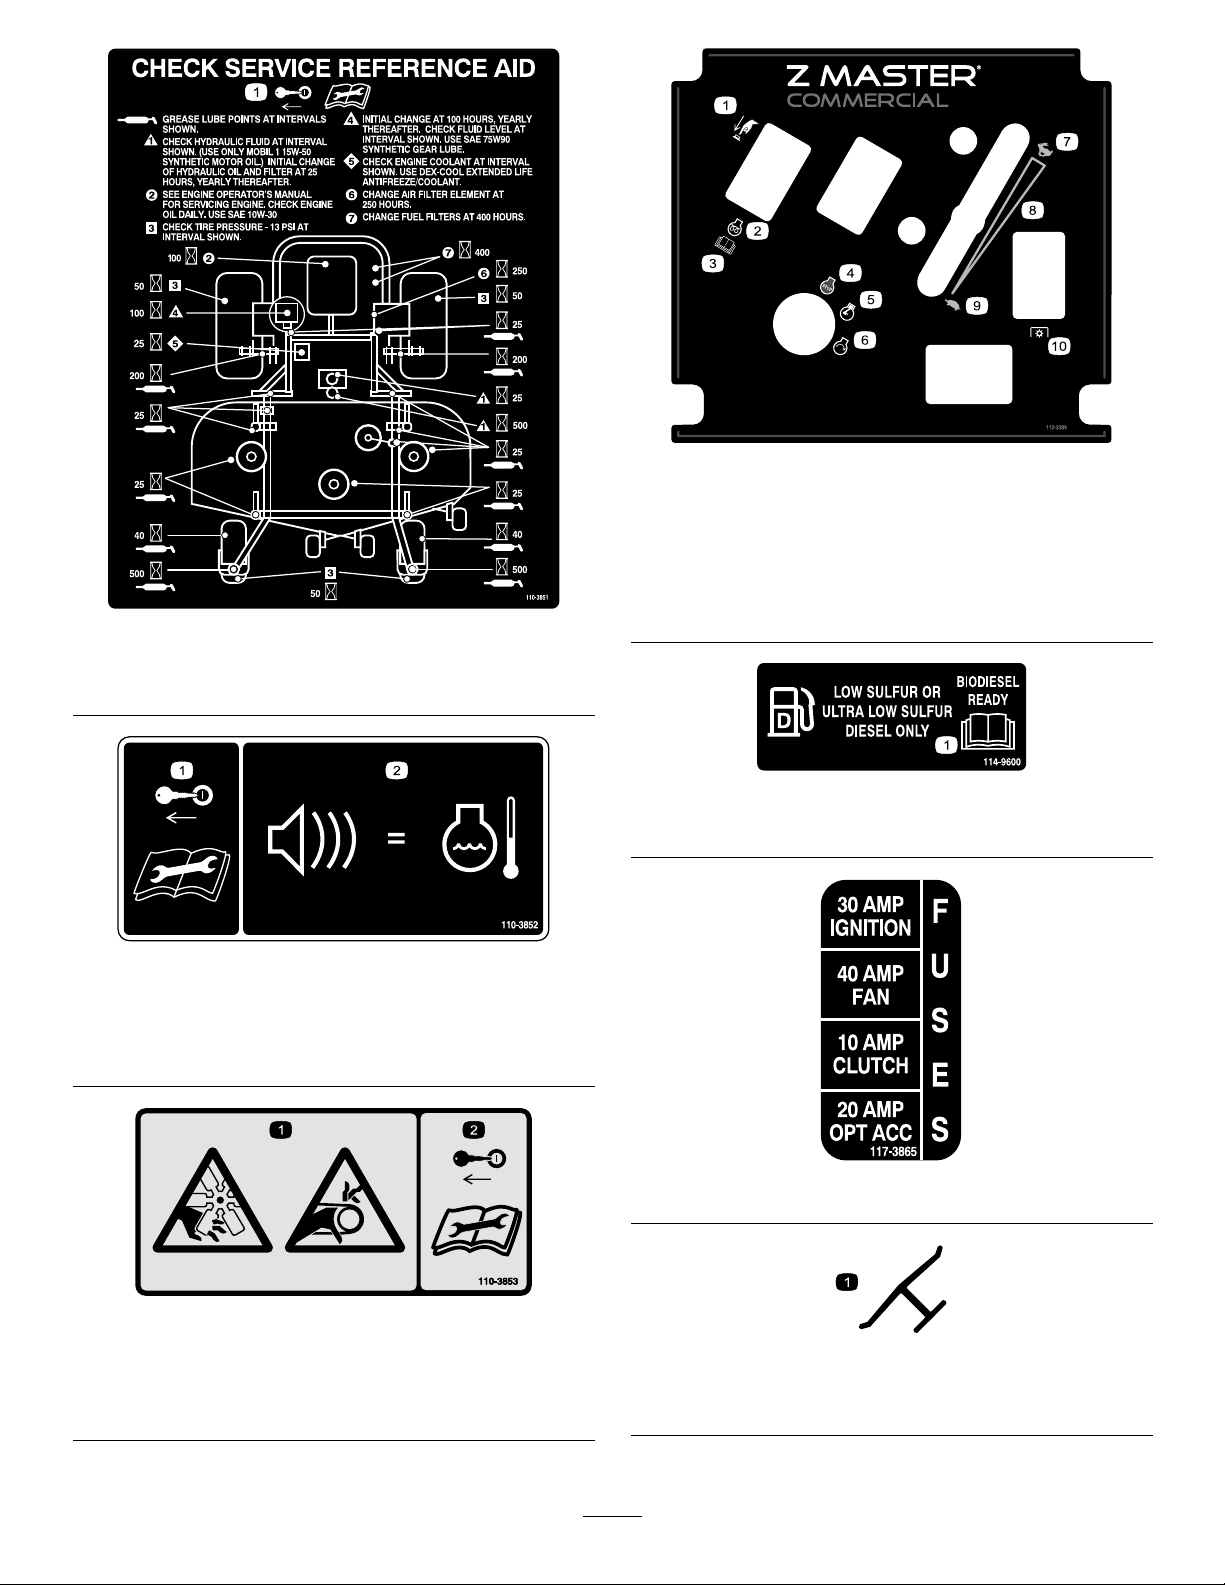
110-3851
1.Removetheignitionkeyandreadtheinstructionsbefore
servicingorperformingmaintenance.
110-3852
1.Removetheignitionkey
andreadtheinstructions
beforeservicingor
performingmaintenance.
2.Continuoustonesignals
theuserthatengineis
overheating.
112-2389
1.Pushtoengage6.Engine—start
2.Engine—preheat7.Fast
3.ReadtheOperator’s
Manual.
4.Engine—stop
5.Engine—run
114-9600
1.ReadtheOperator’sManual.
8.Continuousvariable
setting
9.Slow
10.PTO(Powertakeoff)
1.Cutting/dismemberment
hazard,fanand
entanglementhazard,
belt.
110-3853
2.Removetheignitionkey
andreadtheinstructions
beforeservicingor
performingmaintenance.
117-3865
Manufacturer’sMark
1.Indicatesthebladeisidentiedasapartfromtheoriginal
machinemanufacturer.
11

106-7492
106-9989
107-9309
1.Warning—readtheOperator’sManualforinformationonchargingthebattery;containslead;donotdiscard.
2.ReadtheOperator’sManual.
12
ProductOverview
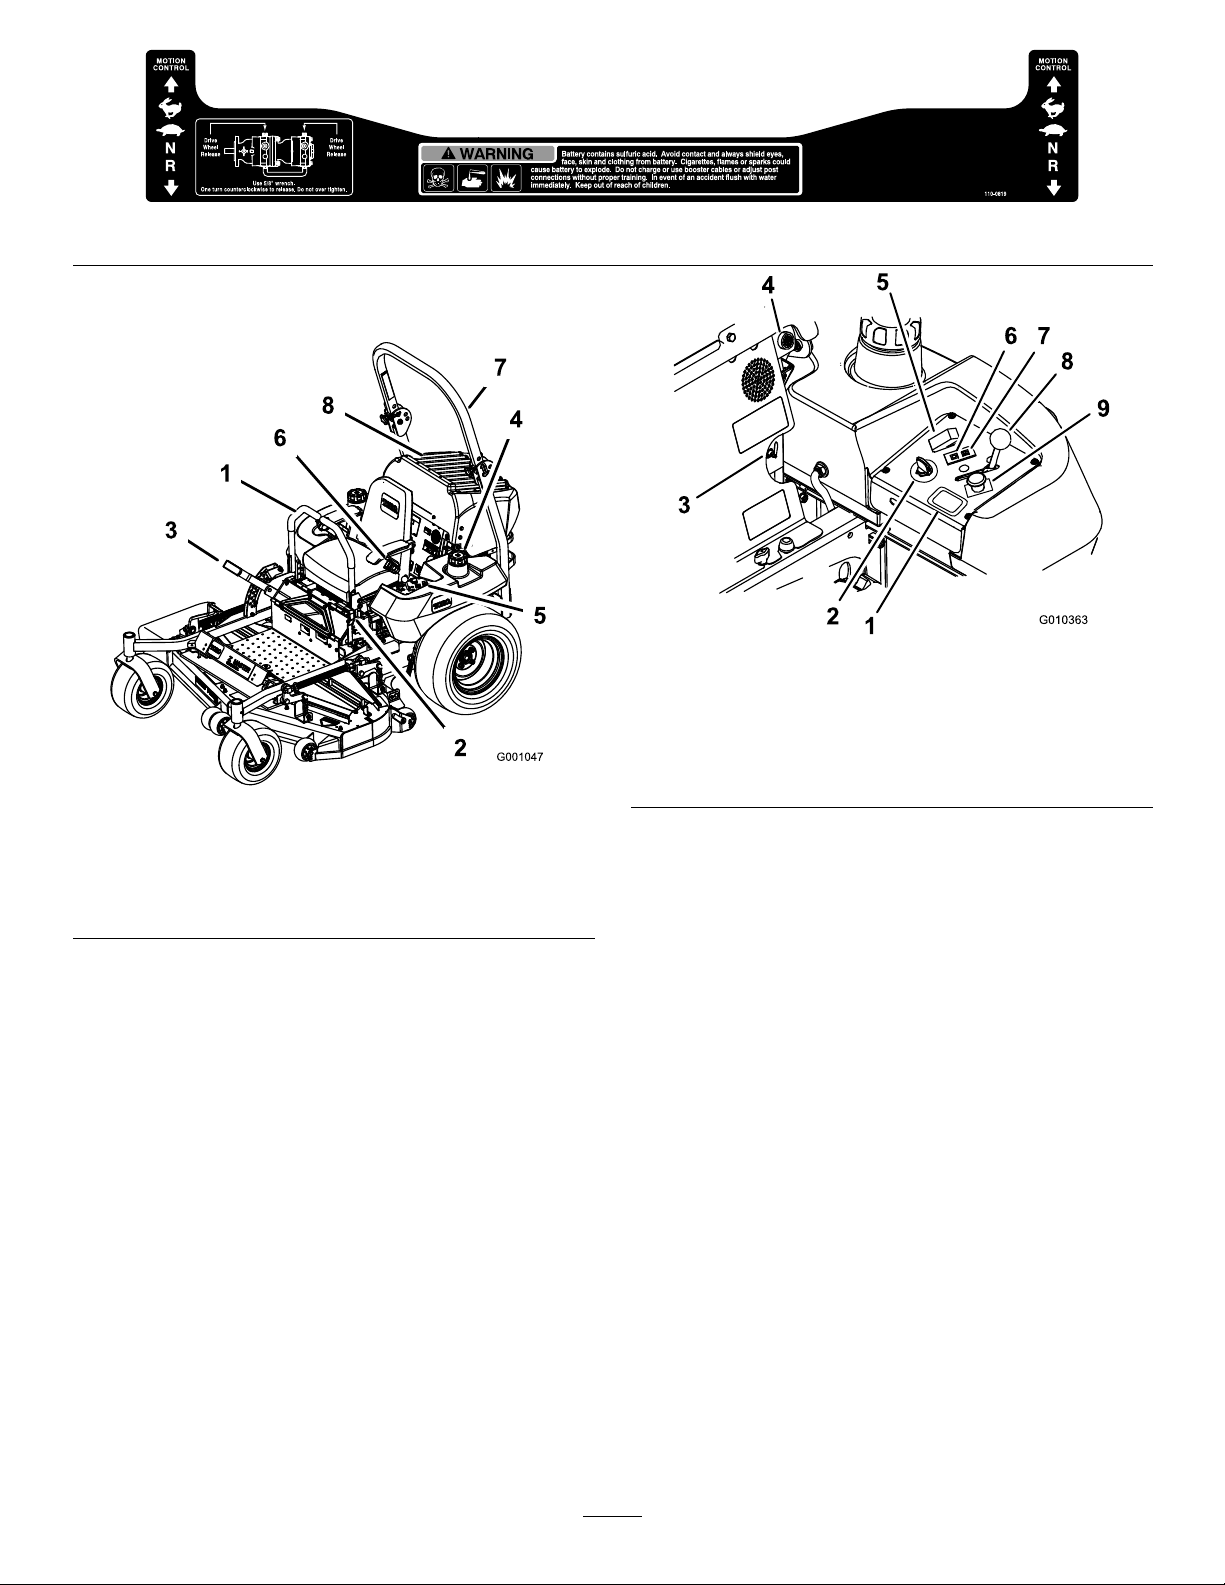
1.Motioncontrollever
2.Parkingbrakelever
3.Height-of-cutlever
4.Fuelcap(bothsides)
Controls
Figure3
5.Controls
6.Seatbelt
7.Rollbar
8.Enginescreen
110-0819
Figure4
1.Hourmeter
2.Ignitionswitch7.EngineT emperaturelight
3.Fuelselectorvalve8.Throttlecontrol
4.Audiblealarm
5.Glowplugswitch
6.Glowpluglight
9.PTOSwitch
HourMeter
Thehourmeterrecordsthenumberofhourstheengine
hasoperated.Itoperateswhentheengineisrunning.
Usethesetimesforschedulingregularmaintenance
(Figure4).
Becomefamiliarwithallthecontrolsbeforeyoustartthe
engineandoperatethemachine(Figure3andFigure4).
SafetyInterlockIndicators
Therearesymbolsonthehourmeterandtheyindicate
withablacktrianglethattheinterlockcomponentisin
thecorrectposition(Figure5).
BatteryIndicatorLight
WhentheignitionkeyisinitiallyturnedtotheRun
positionforafewseconds,thebatteryvoltagewillbe
displayedintheareawherethehoursarenormally
displayed.
Thebatterylightturnsonwhentheignitionisturned
onandwhenthechargeisbelowthecorrectoperating
level(Figure5).
13

overheating.RefertoServicingtheCoolingSystemin,
page.
FuelSelectorValve
Thefuelselectorvalveislocatedbehindtheseat.
Closethefuelselectorvalvewhentransportingor
storingmower.
Figure5
1.Safetyinterlocksymbols
2.Hourmeter
3.Batterylight
ThrottleControl
ThethrottlecontrolisvariablebetweenFastandSlow.
BladeControlSwitch(PTO)
Thebladecontrolswitch(PTO)isusedtoengagethe
electricclutchtodrivethemowerbladeswiththemotion
controlleversinthecenter,un-lockedposition.Pullthe
switchuptoengagethebladesandrelease.Todisengage
theblades,pushthebladecontrolswitch(PTO)down.
NeutralLockPosition
Theneutrallockpositionisusedwiththesafetyinterlock
systemandtodetermineneutralposition.
IgnitionSwitch
Movetheselectorvalvetothelefthand(LH)or
righthand(RH)positionforoperation.
Attachments/Accessories
AselectionofToroapprovedattachmentsand
accessoriesareavailableforusewiththemachineto
enhanceandexpanditscapabilities.Contactyour
AuthorizedServiceDealerorDistributororgoto
www.Toro.comforalistofallapprovedattachments
andaccessories.
Thisswitchisusedtostartthemowerengineandhas
threepositions:Start,RunandOff.
GlowPlugLight
Theglowplugindicatorlightturnsonwhentheglow
plugbuttonisengaged(Figure4).
GlowPlugSwitch
Thisswitchactivatestheglowplugsandisindicatedby
theglowpluglight.Holddowntheglowplugswitchfor
10secondspriortostarting.
TemperatureLight
Thetemperaturelightcomesonwhentheengineisover
heating(Figure4).
AudibleAlarm
Thismachinehasanaudiblealarmthatalertstheuser
toturnofftheengineorenginedamagecanoccurfrom
14

Operation
Note:Determinetheleftandrightsidesofthe
machinefromthenormaloperatingposition.
AddingFuel
Theenginerunsonclean,freshdieselfuelwith
aminimumcetaneratingof40.Purchasefuelin
quantitiesthatcanbeusedwithin30daystoensure
fuelfreshness.
Usesummergradedieselfuel(No.2-D)attemperatures
above20°F(-7°C)andwintergradedieselfuel(No.
1-DorNo.1-D/2-Dblend)below20°F(-7°C).Useof
wintergradedieselfuelatlowertemperaturesprovides
lowerashpointandpourpointcharacteristics,
thereforeeasingstartabilityandlesseningchances
ofchemicalseparationofthefuelduetolower
temperatures(waxappearance,whichmaypluglters).
Useofsummergradedieselfuelabove20°F(-7°C)will
contributetowardlongerlifeofthepumpcomponents.
Important:Donotusekeroseneorgasoline
insteadofdieselfuel.Failuretoobservethis
cautionwilldamagetheengine.
Incertainconditions,fuelisextremely
ammableandhighlyexplosive.Areor
explosionfromfuelcanburnyouandothers
andcandamageproperty.
•Fillthefueltankoutdoors,inanopenarea,
whentheengineiscold.Wipeupanyfuel
thatspills.
•Neverllthefueltankinsideanenclosed
trailer.
•Donotllthefueltankcompletelyfull.Add
fueltothefueltankuntilthelevelis1/4to
1/2inch(6to13mm)belowthebottomof
thellerneck.Thisemptyspaceinthetank
allowsfueltoexpand.
•Neversmokewhenhandlingfuel,andstay
awayfromanopenameorwherefuel
fumesmaybeignitedbyaspark.
•Storefuelinanapprovedcontainerandkeep
itoutofthereachofchildren.Neverbuy
morethana30-daysupplyoffuel.
•Alwaysplacefuelcontainersontheground
awayfromyourvehiclebeforelling.
Fuelisharmfulorfatalifswallowed.Long-term
exposuretovaporscancauseseriousinjuryand
illness.
•Avoidprolongedbreathingofvapors.
•Keepfaceawayfromnozzleandgastankor
conditioneropening.
•Keepgasawayfromeyesandskin.
•Donotllfuelcontainersinsideavehicle
oronatruckortrailerbedbecauseinterior
carpetsorplastictruckbedlinersmay
insulatethecontainerandslowthelossof
anystaticcharge.
•Whenpractical,removegas-powered
equipmentfromthetruckortrailerand
refueltheequipmentwithitswheelsonthe
ground.
•Ifthisisnotpossible,thenrefuelsuch
equipmentonatruckortrailerfroma
portablecontainer,ratherthanfromafuel
dispensernozzle.
•Ifafueldispensernozzlemustbeused,keep
thenozzleincontactwiththerimofthefuel
tankorcontaineropeningatalltimesuntil
fuelingiscomplete.
BiodieselReady
Thismachinecanalsouseabiodieselblendedfuel
ofuptoB20(20%biodiesel,80%petrodiesel).The
petrodieselportionshouldbeloworultralowsulfur.
Observethefollowingprecautions:
15
•Thebiodieselportionofthefuelmeetspecication
ASTMD6751orEN14214.
•TheblendedfuelcompositionshouldmeetASTM
D975orEN590.
•Paintedsurfacesmaybedamagedbybiodiesel
blends.
•UseB5(biodieselcontendof5%)orlesserblend
incoldweather.
•Monitorseals,hoses,gasketsincontactwithfuelas
theymaybedegradeovertime.
•Fuellterpluggingmaybeexpectedforatimeafter
convertingtobiodieselblends.
•Contactyourdistributorifyouwishformore
informationonbiodiesel.
FillingtheFuelTank
1.Shuttheengineoffandsettheparkingbrake.
2.Cleanaroundeachfueltankcapandremovethe
cap.Addfueltobothfueltanks,untilthelevelis
1/4to1/2inch(6to13mm)belowthebottomof
thellerneck.Thisspaceinthetankallowsthefuel
toexpand.Donotllthefueltankscompletelyfull.
3.Installfueltankcapssecurely.Wipeupanyfuelthat
mayhavespilled.
Closethefuelselectorvalvebeforetransportingor
storingmachine.
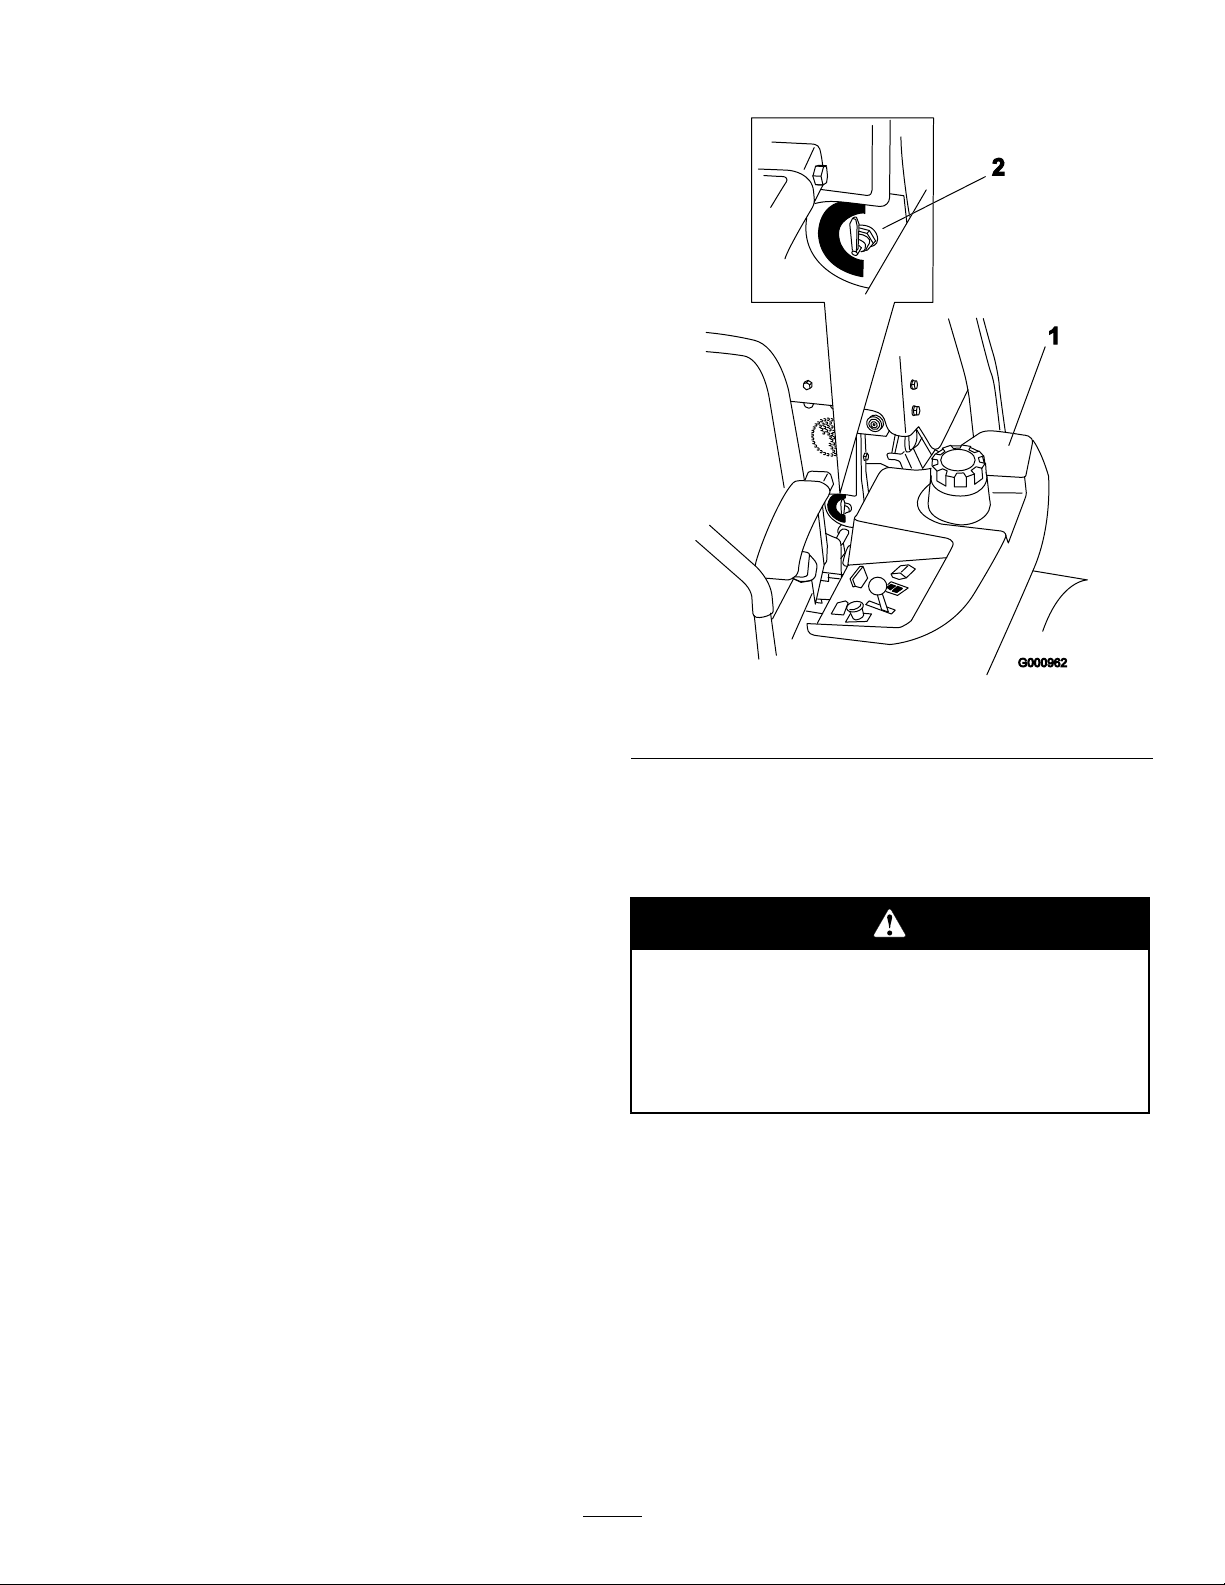
Figure6
1.Leftsidefueltank
2.Fuelselectorvalve
4.Ifpossible,llthefueltankaftereachuse.Thiswill
minimizepossiblebuildupofcondensationinside
thefueltank.
CheckingtheEngineOilLevel
Beforeyoustarttheengineandusethemachine,check
theoillevelintheenginecrankcase;refertoChecking
OilLevelin,page
SwitchingtheFuelTanks
Important:Donotrunthemachineoutoffuel.
Thefuelselectorvalveislocatedbehindtheleftside
oftheseat.
Theunithastwofueltanks.Onetankisontheleft
sideandoneontherightside.Eachtankconnectsto
thefuelselectorvalve.Fromthereacommonfuelline
leadstotheengine(Figure6).
Tousetheleftsidefueltankrotatethefuelselector
valvetotheLH,lefthandlocation.Tousetheright
sidefueltankrotatethefuelselectorvalvetotheRH,
righthandlocation(Figure6)
UsingtheRolloverProtection
System(ROPS)
Toavoidinjuryordeathfromrollover:keepthe
rollbarintheraisedlockedpositionanduse
theseatbelt.
Ensurethattherearpartoftheseatissecured
withtheseatlatch.
16
Thereisnorolloverprotectionwhentherollbar
G004955
1
2
3
4
isinthedownposition.
•Lowertherollbaronlywhenabsolutely
necessary.
•Donotweartheseatbeltwhentherollbaris
inthedownposition.
•Driveslowlyandcarefully.
•Raisetherollbarassoonasclearance
permits.
•Checkcarefullyforoverheadclearances(i.e.
branches,doorways,electricalwires)before
drivingunderanyobjectsanddonotcontact
them.
Important:Lowertherollbaronlywhen
absolutelynecessary.
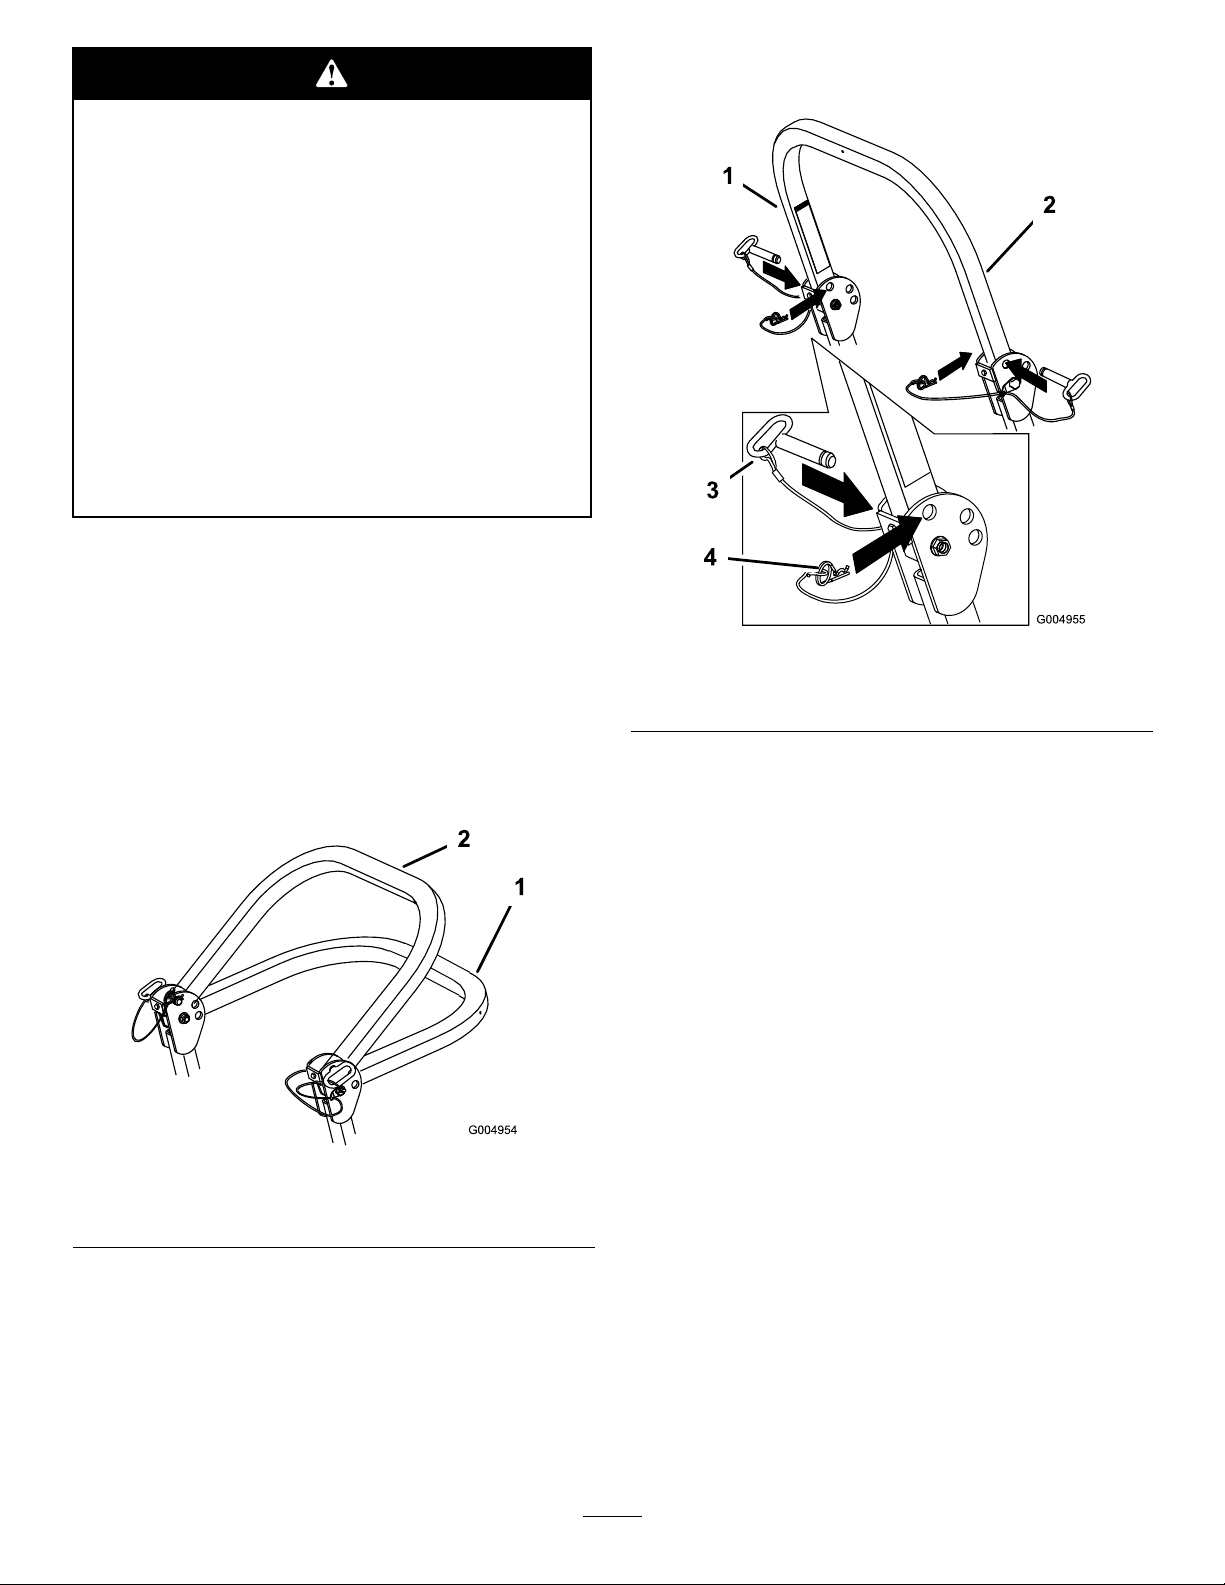
1.Removethehairpincotterpinsandremovethetwo
pins(Figure8).
2.Lowerthetherollbartothedownposition.There
aretwodownpositions.SeeFigure7forthe
positions.
Important:Alwaysusetheseatbeltwiththe
rollbarintheraisedposition.
Figure8
1.Rollbar3.Pin
2.Raisedposition4.Hairpincotterpin
3.Installthetwopinsandsecurethemwiththe
hairpincotterpins(Figure8).
Figure7
1.Fulldownposition2.Downpositionwithbagger
installed
Important:Ensurethattherearpartofthe
seatissecuredwiththeseatlatch.
4.Toraisetherollbar,removethehairpincotterpins
andremovethetwopins(Figure8).
ThinkSafetyFirst
Pleasereadallsafetyinstructionsandsymbolsinthe
safetysection.Knowingthisinformationcouldhelp
youorbystandersavoidinjury.
5.Raisetherollbartotheuprightpositionandinstall
thetwopinsandsecurethemwiththehairpincotter
pins(Figure8).
17
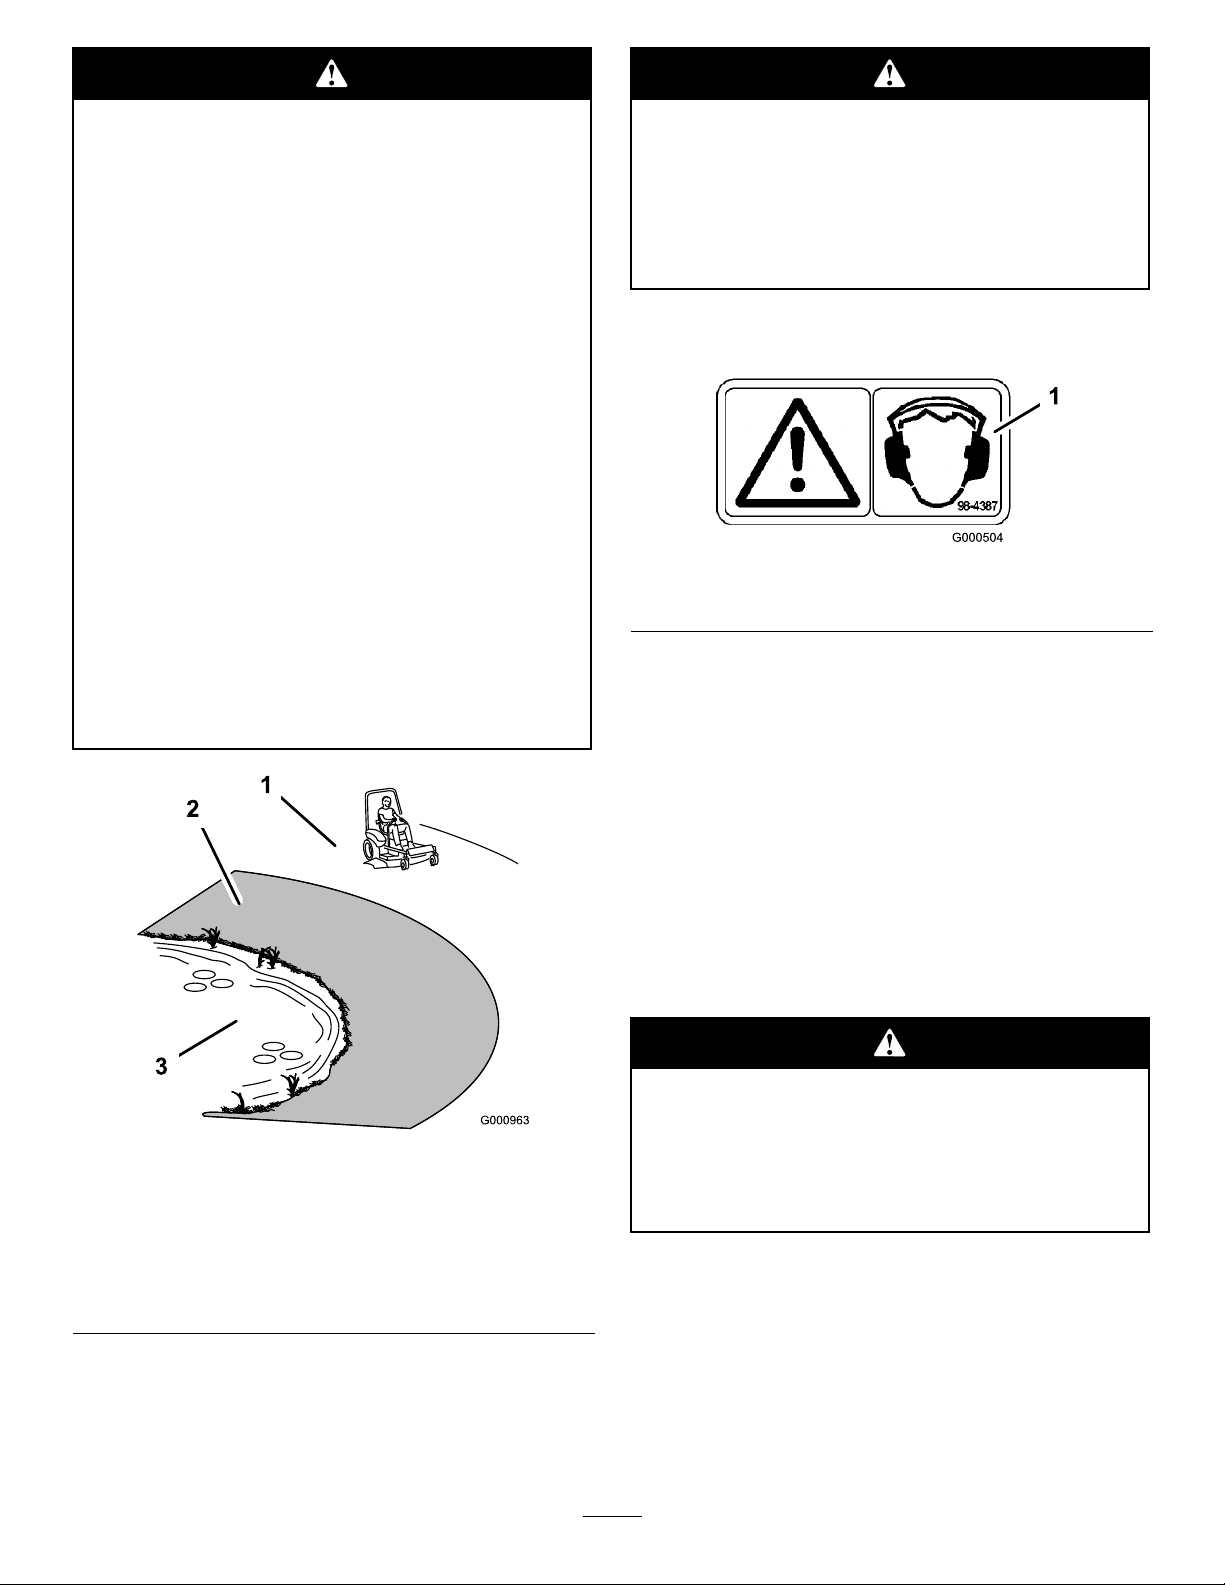
Operatingonwetgrassorsteepslopescan
causeslidingandlossofcontrol.
Wheelsdroppingoveredgescancauserollovers,
whichmayresultinseriousinjury,deathor
drowning.
Thereisnorolloverprotectionwhentheroll
barisdown.
Alwayskeeptherollbarintheraisedandlocked
positionandusetheseatbelt.
Readandfollowtherolloverprotection
instructionsandwarnings.
Toavoidlossofcontrolandpossibilityof
rollover:
Thismachineproducessoundlevelsinexcess
of85dBAattheoperatorsearandcancause
hearinglossthroughextendedperiodsof
exposure.
Wearhearingprotectionwhenoperatingthis
machine.
Theuseofprotectiveequipmentforeyes,ears,feetand
headisrecommended.
•Donotoperateneardrop-offsornearwater.
•Donotoperateonslopesgreaterthan
15degrees.
•Reducespeedanduseextremecautionon
slopes.
•Avoidsuddenturnsorrapidspeedchanges.
Figure9
1.SafeZone-usethe
ZMasterhereonslopes
lessthan15degreesor
atareas.
2.Usewalkbehindmower
and/orhandtrimmernear
drop-offsandwater.
3.Water
Figure10
1.Warning—wearhearingprotection
OperatingtheParkingBrake
Alwayssettheparkingbrakewhenyoustopthe
machineorleaveitunattended.
SettingtheParkingBrake
1.Movethemotioncontrollevers(Figure17)outto
theneutrallockposition.
2.Pullupandbackontheparkingbrakelevertoset
theparkingbrake(Figure11).Theparkingbrake
levershouldstayrmlyintheengagedposition.
Parkingbrakemaynotholdmachineparked
onaslopeandcouldcausepersonalinjuryor
propertydamage.
Donotparkonslopesunlesswheelsare
chockedorblocked
ReleasingtheParkingBrake
Pushforwardanddownontheparkingbrakelever
toreleasetheparkingbrake(Figure11).Theparking
brakeisdisengagedandtheleverwillrestagainstthe
brakestop.
18

Figure11
1.Parkingbrake-ON3.BrakeStop
2.Parkingbrake-OFF
StartingandStoppingthe
Engine
StartingtheEngineinNormalWeather
1.RaisetheROPSupandlockintoplace,sitonthe
seatandfastentheseatbelt.
2.Movethemotioncontrolstotheneutrallocked
position.
3.Settheparkingbrake;refertoSettingtheParking
Brake.
4.MovethePTO(powertakeoff)switchtotheoff
position(Figure12).
5.Movethethrottlelevertothemiddleposition
(Figure14).
6.Turntheignitionkeyclockwisetotherunposition
(Figure13).
7.Pushtheglowplugswitchfor10seconds.Thelight
willturnon.
Figure12
1.Hourmeter5.EngineT emperaturelight
2.Ignitionswitch6.Throttlecontrol
3.Glowplugswitch7.PTOSwitch
4.Glowpluglight
9.Turnthekeytothestartpositionandtheglowplug
indicatorlightwillcomebackon.Whentheengine
starts,releasethekey(Figure13).
Important:Usestartingcyclesofnomorethan
30secondsperminutetoavoidoverheatingthe
startermotor.
10.Iftheenginedoesnotstartimmediately,movethe
throttlecontroltofastandturnthekeytothestart
position.
Note:Additionalstartingcyclesmayberequired
whenstartingtheengineforthersttimeafterthe
fuelsystemhasbeencompletelywithoutfuel.
8.Releasetheswitchafter10seconds.Thelightwill
turnoff.
Figure13
1.Ignitionswitch3.Run
2.Off4.Start
19
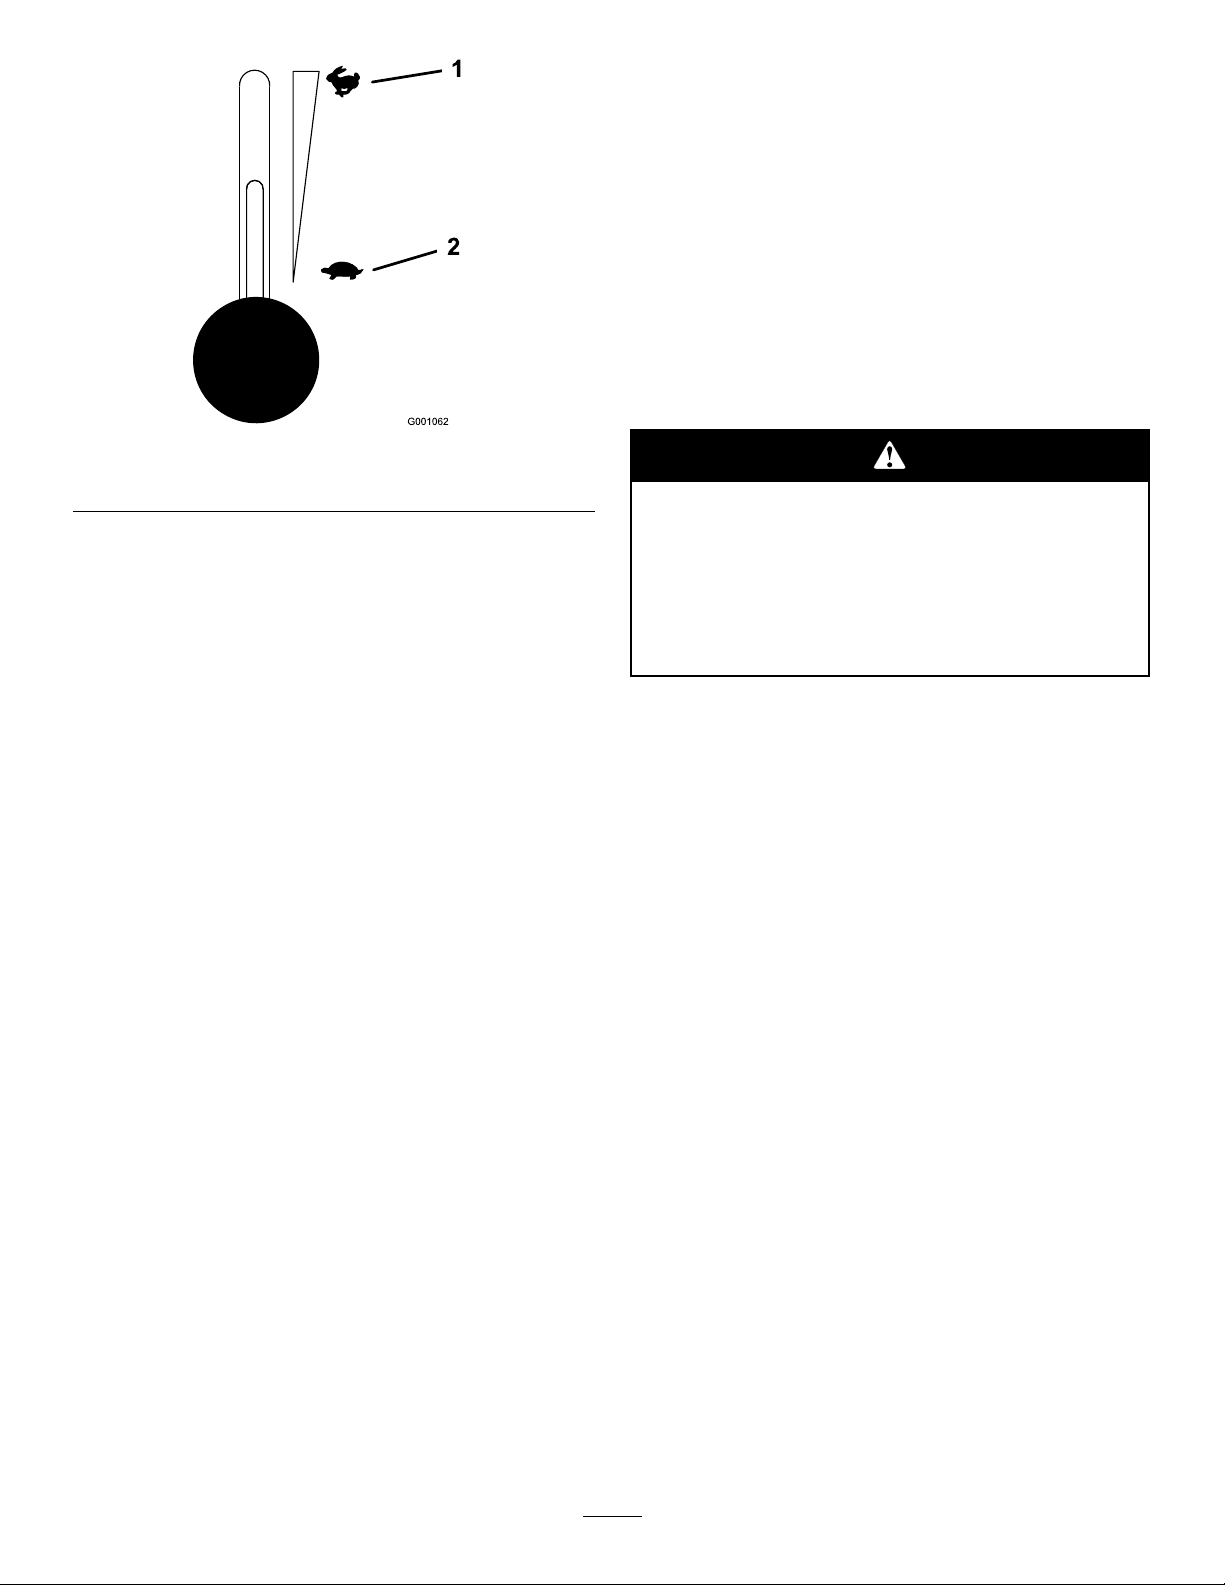
Figure14
1.Throttle—fast
2.Throttle—slow
StartingtheEngineinColdWeather
(Below23°For-5°C)
Usethecorrectengineoilforthestartingtemperature.
RefertoServicingtheEngineOilin,page.
1.StarttheenginewiththethrottleintheFast
position.
2.Turntheignitionkeyclockwisetotherunposition
(Figure13).
3.Pushtheglowplugswitchfor10to15seconds.
Thelightwillturnon.
4.Releasetheswitchafter10to15seconds.Thelight
willturnoff.
5.Turnthekeytothestartpositionandtheglowplug
indicatorlightwillcomebackon.Whentheengine
starts,releasethekey .
Important:Usestartingcyclesofnomorethan
30secondsperminutetoavoidoverheatingthe
startermotor.
Note:Donotusefuelleftoverfromthesummer.
Useonlyfreshwintergradedieselfuel.
StoppingtheEngine
1.DisengagethePTO,movethemotioncontrollevers
totheneutrallockedpositionandsettheparking
brake(Figure15).
2.Movethethrottlelevermidwaybetweentheslow
andfastpositions(Figure14).
3.Lettheengineidlefor60seconds.
4.Turntheignitionkeytotheoffposition(Figure13).
Waitforallmovingpartstostopbeforeleavingthe
operatingposition.
5.Removethekeytopreventpossibilityofsomeone
accidentallystartingthemachinebeforetransporting
orstoringmachine.
6.Closethefuelselectorvalvebeforetransportingor
storingthemachine.
Important:Makesurethatthefuelselector
valveisclosedbeforetransportingorstoring
themachine,asfuelleakagemayoccur.Setthe
parkingbrakebeforetransporting.
Important:Makesuretoremovethekeyas
thefuelpumpmayrunandcausethebattery
tolosecharge.
Childrenorbystandersmaybeinjuredifthey
moveorattempttooperatethetractorwhileit
isunattended.
Alwaysremovetheignitionkeyandsetthe
parkingbrakewhenleavingthemachine
unattended,evenifjustforafewminutes.
OperatingthePowerTakeOff
(PTO)
Thepowertakeoff(PTO)switchstartsandstopsthe
mowerbladesandanypoweredattachments.
EngagingthePTO
1.Iftheengineiscold,allowtheenginetowarmup5
to10minutesbeforeengagingthePTO.
2.Whileseatedintheseat,releasethepressureonthe
tractioncontrolleversandplaceinneutral.
3.Placethethrottleinthefastposition.
Note:EngagingthePTOwiththethrottleatthe
halforlesspositionwillcauseexcessiveweartothe
drivebelts.
4.Pulloutonthepowertakeoff(PTO)switchto
engageit(Figure15).
20
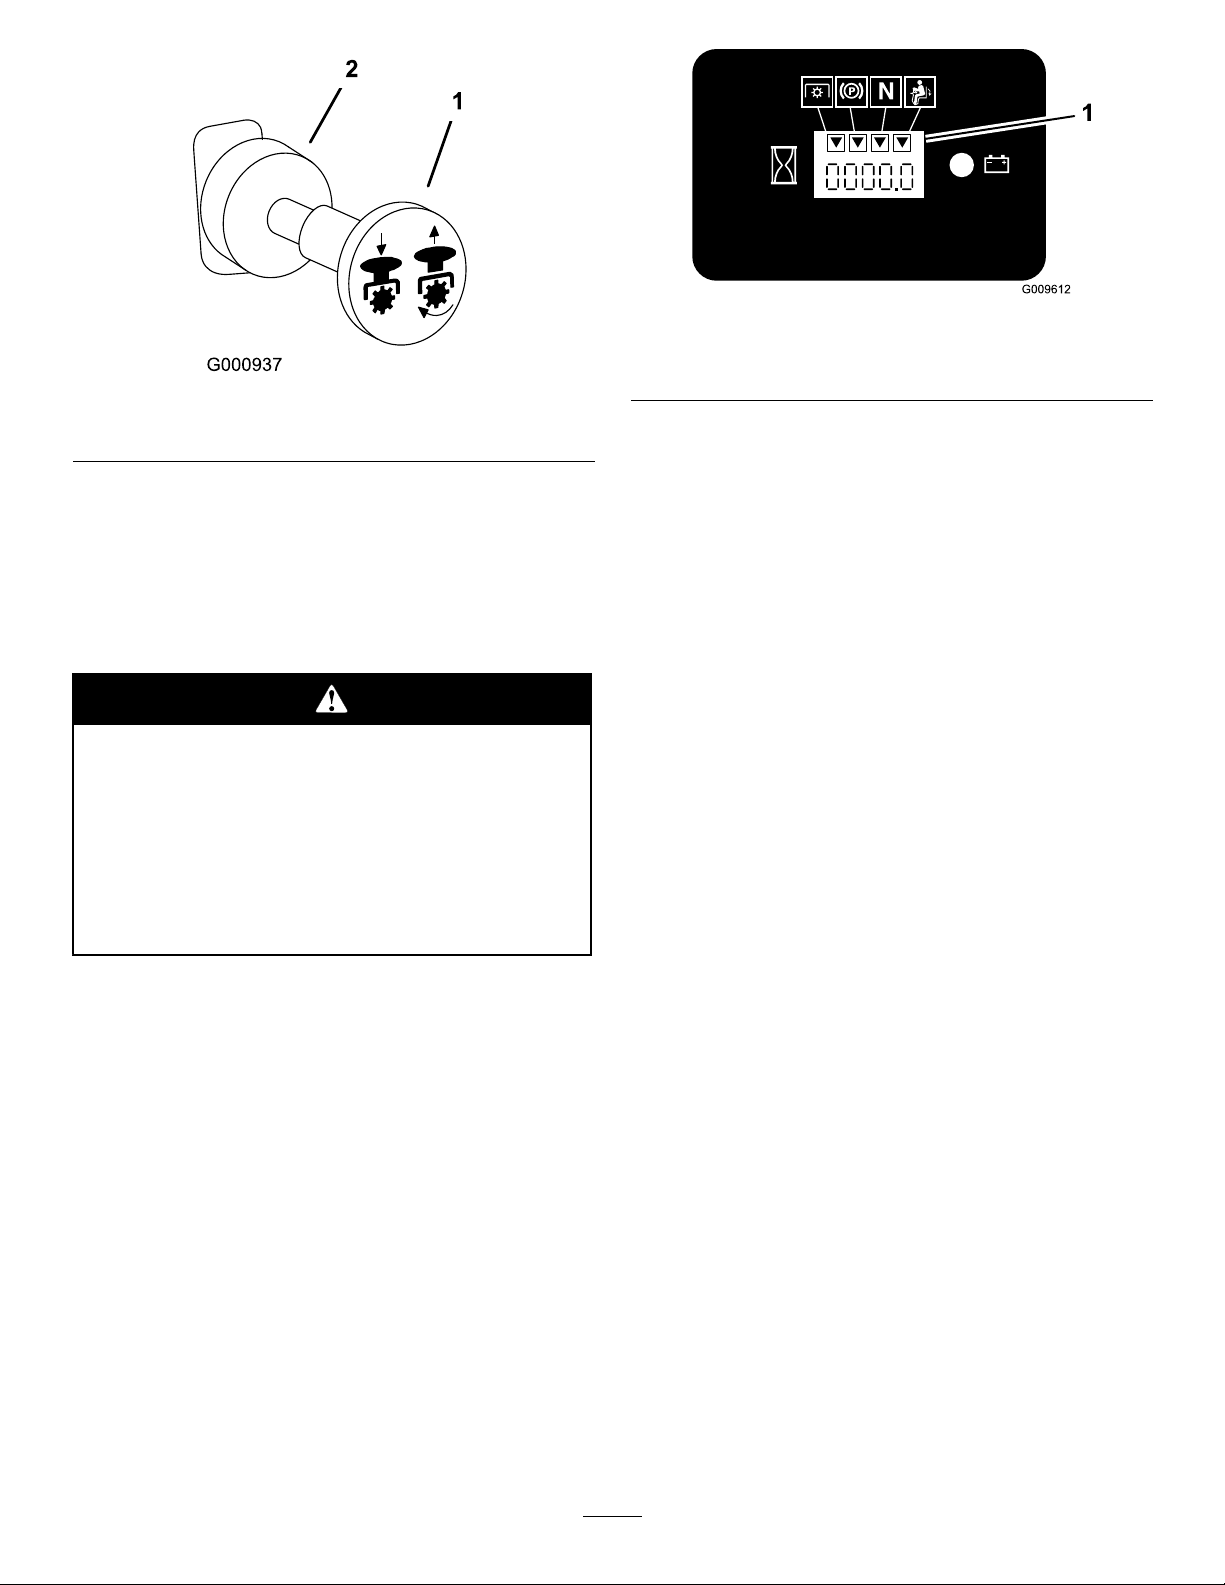
Figure15
1.PTO-On2.PTO-Off
DisengagingthePTO
Todisengage,pushthePTOswitchtotheoffposition
(Figure15).
TheSafetyInterlockSystem
Ifsafetyinterlockswitchesaredisconnected
ordamagedthemachinecouldoperate
unexpectedlycausingpersonalinjury.
•Donottamperwiththeinterlockswitches.
•Checktheoperationoftheinterlock
switchesdailyandreplaceanydamaged
switchesbeforeoperatingthemachine.
UnderstandingtheSafetyInterlock
System
Thesafetyinterlocksystemisdesignedtopreventthe
enginefromstartingunless:
•Theparkingbrakeisengaged.
•Thepowertakeoff(PTO)isdisengaged.
•Themotioncontrolleversareintheneutrallocked
position
Thesafetyinterlocksystemalsoisdesignedtostopthe
enginewhenthetractioncontrolsaremovedfromthe
lockedpositionwiththeparkingbrakeengagedorif
yourisefromtheseatwhenthePTOisengaged.
Thehourmeterhassymbolstonotifytheuserwhenthe
interlockcomponentisinthecorrectposition.When
thecomponentisinthecorrectposition,atrianglewill
lightupinthecorrespondingsquare.
Figure16
1.Triangleslightupwhentheinterlockcomponentsareinthe
correctposition
TestingtheSafetyInterlockSystem
ServiceInterval:Beforeeachuseordaily
Ifthesafetysystemdoesnotoperateasdescribed
below,haveanAuthorizedServiceDealerrepairthe
safetysystemimmediately .
1.Sittingontheseat,engagetheparkingbrakeand
movethePTOtoon.Trystartingtheengine;the
engineshouldnotcrank.
2.Sittingontheseat,engagetheparkingbrakeand
movethePTOtooff.Moveeithermotioncontrol
lever(outofneutrallockedposition).Trystarting
theengine;theengineshouldnotcrank.Repeatfor
othercontrollever.
3.Sittingontheseat,engagetheparkingbrake,
movethePTOswitchtooffandmovethemotion
controlleverstoneutrallockposition.Nowstart
theengine.Whiletheengineisrunning,release
theparkingbrake,engagethePTOandriseslightly
fromtheseat;theengineshouldstop.
4.Sittingontheseat,engagetheparkingbrake,move
thePTOswitchtooffandmovethemotioncontrol
leverstoneutrallockposition.Nowstarttheengine.
Whiletheengineisrunning,centereithermotion
controlandmove(forwardorreverse);theengine
shouldstop.Repeatforothermotioncontrol.
5.Sittingontheseat,disengagetheparkingbrake,
movethePTOswitchtooffandmovethemotion
controlleverstoneutrallockposition.Trystarting
theengine;theengineshouldnotcrank.
DrivingForwardorBackward
Thethrottlecontrolregulatestheenginespeedas
measuredinrpm(revolutionsperminute).Place
thethrottlecontrolinthefastpositionforbest
performance.Alwaysoperateinthefullthrottle
positionwhenmowing.
21
 Loading...