

Page 1
FormNo.3383-608RevA
RP-1200DandRP-1400D
ReversiblePlateCompactor
ModelNo.68074—SerialNo.313000001andUp
ModelNo.68075—SerialNo.313000001andUp
Registeratwww.T oro.com.
OriginalInstructions(EN)
*3383-608*A
Page 2
Introduction
WARNING
CALIFORNIA
Proposition65Warning
Thisproductcontainsachemicalorchemicals
knowntotheStateofCaliforniatocausecancer,
birthdefects,orreproductiveharm.
Theengineexhaustfromthisproduct
containschemicalsknowntotheStateof
Californiatocausecancer,birthdefects,
orotherreproductiveharm.
Useofthisproductmaycauseexposureto
chemicalsknowntotheStateofCalifornia
tocausecancer,birthdefects,orother
reproductiveharm.
Readthisinformationcarefullytolearnhowtooperateand
maintainyourproductproperlyandtoavoidinjuryand
productdamage.Youareresponsibleforoperatingthe
productproperlyandsafely.
YoumaycontactTorodirectlyatwww .Toro.comforproduct
andaccessoryinformation,helpndingadealer,ortoregister
yourproduct.
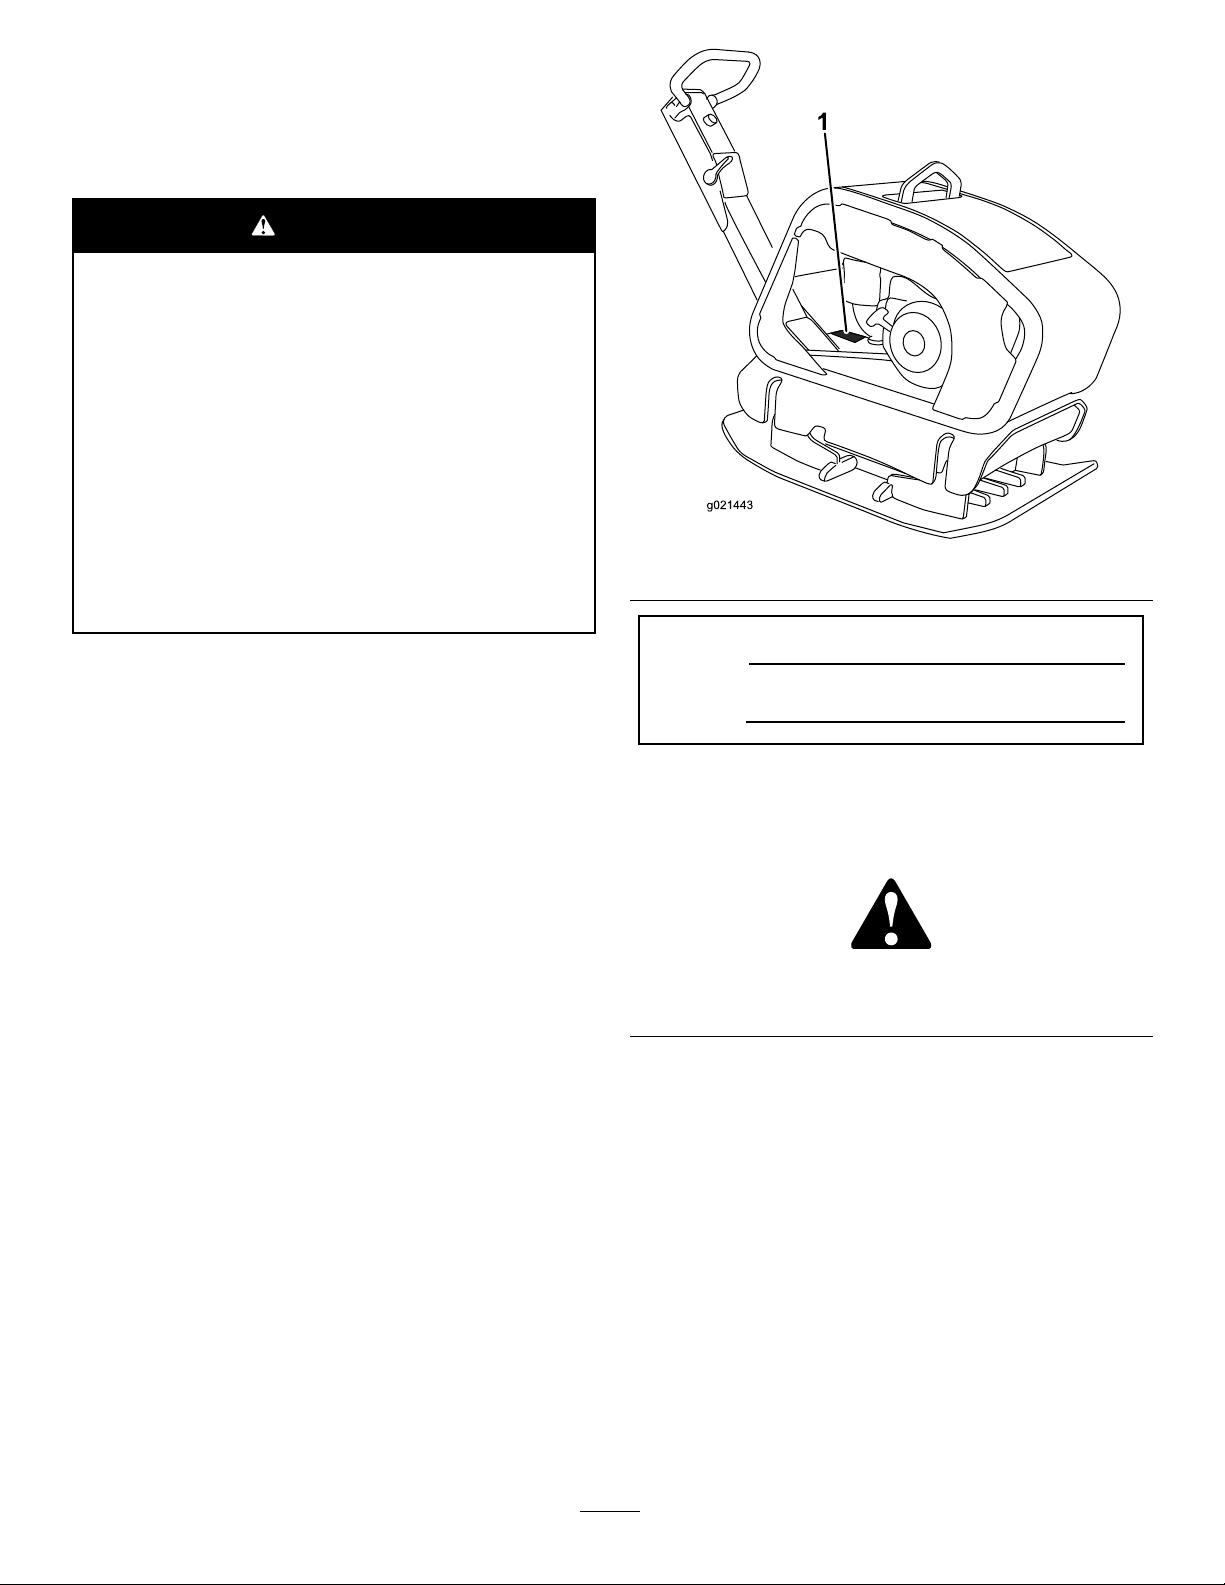
Figure1
ModelNo.
SerialNo.
Thismanualidentiespotentialhazardsandhassafety
messagesidentiedbythesafetyalertsymbol(Figure2),
whichsignalsahazardthatmaycauseseriousinjuryordeath
ifyoudonotfollowtherecommendedprecautions.
Wheneveryouneedservice,genuineT oroparts,oradditional
information,contactanAuthorizedServiceDealerorToro
CustomerServiceandhavethemodelandserialnumbersof
yourproductready.
modelandserialnumbersontheproduct.Writethenumbers
inthespaceprovided.
Figure1illustratesthelocationofthe
Figure2
1.Safetyalertsymbol
Thismanualuses2wordstohighlightinformation.
Importantcallsattentiontospecialmechanicalinformation
andNoteemphasizesgeneralinformationworthyofspecial
attention.
©2014—TheToro®Company
8111LyndaleAvenueSouth
Bloomington,MN55420
Contactusatwww.Toro.com.
2
PrintedintheUSA
AllRightsReserved
Page 3

Contents
Safety
Introduction..................................................................2
Safety...........................................................................3
SafeOperatingPractices...........................................3
SafetyandInstructionalDecals.................................5
Setup............................................................................7
CheckingtheEngine-OilLevel..................................7
CheckingtheEccentric-OilLevel..............................7
ProductOverview..........................................................7
Controls................................................................8
Specications.........................................................8
Operation.....................................................................8
CheckingtheEngine-OilLevel..................................8
CheckingtheW aterTrap..........................................9
CleaningDebrisfromtheMachine.............................9
AddingFuel...........................................................10
StartingandStoppingtheEngine..............................11
OperatingtheCompactor........................................12
TransportingtheMachine........................................12
Maintenance.................................................................13
RecommendedMaintenanceSchedule(s)......................13
ServicingtheAirCleaner.........................................13
ReplacingtheFuelFilter..........................................14
ServicingtheEngineOil..........................................15
ServicingtheEccentricOil......................................16
ServicingtheBattery(Model68075only)...................17
ServicingtheBelt...................................................18
Storage........................................................................19
Troubleshooting...........................................................20
Improperuseormaintenancebytheoperatoror
ownercanresultininjury.Toreducethepotential
forinjury,complywiththesesafetyinstructionsand
alwayspayattentiontothesafetyalertsymbol,which
means
instruction.Failuretocomplywiththeinstructionmay
resultinpersonalinjuryordeath.
Caution
,
W ar ning
,or
Danger
—personalsafety
SafeOperatingPractices
Thisproductiscapableofcrushingoramputatinghandsand
feet.Alwaysfollowallsafetyinstructionstoavoidserious
injuryordeath.
WARNING
Engineexhaustcontainscarbonmonoxide,and
odorless,deadlypoisonthatcankillyou
Donotruntheengineindoorsorinanenclosed
area.
Training
•ReadtheOperator'sManualandothertrainingmaterial.If
theoperator(s)ormechanic(s)cannotreadEnglish,itis
theowner'sresponsibilitytoexplainthismaterialtothem.
•Becomefamiliarwiththesafeoperationoftheequipment,
operatorcontrols,andsafetysigns.
•Alloperatorsandmechanicsshouldbetrained.The
ownerisresponsiblefortrainingtheusers.
•Neverletchildrenoruntrainedpeopleoperateorservice
theequipment.Localregulationsmayrestricttheageof
theoperator.
•Theowner/usercanpreventandisresponsiblefor
accidentsorinjuriesoccurringtohimselforherself,other
peopleorproperty.
Preparation
•Evaluatetheterraintodeterminetheproperandsafe
actionstoperformthejob.Onlyuseaccessoriesand
attachmentsapprovedbythemanufacturer.
•Wearappropriateclothingincludinghardhat,safety
glasses,longpants,safetyshoes,andhearingprotection.
Longhair,looseclothingorjewelrymaygettangledin
movingparts.
•Inspecttheareawheretheequipmentistobeusedand
removeallobjectssuchastools,buildingmaterials,and
personalitemswhichcanbedamagedbythemachine.
•Useextracarewhenhandlingfuels.Theyareammable
andvaporsareexplosive.
–Useonlyanapprovedcontainer
–Neverremovethefuelcaporaddfuelwiththeengine
running.Allowtheenginetocoolbeforerefueling.
Donotsmoke.
3
Page 4

–Neverrefuelordrainthemachineindoors.
MaintenanceandStorage
•Checkthattheoperator'spresencecontrols,safety
switches,andshieldsareattachedandfunctioning
properly.Donotoperateunlesstheyarefunctioning
properly.
Operation
•Neverrunanengineinanenclosedarea.
•Onlyoperateingoodlight,keepingawayfromholesand
hiddenhazards.
•Donotoperateinstandingwater.
•Ensurethattheareaisclearofotherpeoplebefore
operatingthemachine.Stopthemachineifanyoneenters
thearea.
•Keeppetsandbystandersaway .
•Keepfeetclearoftheplatecompactor.
•Earprotectionisrequiredwhenoperatingthisequipment.
•Donotoperatethemachineundertheinuenceof
alcoholordrugs.
•Forfootprotection,wearsteeltoeshoesortoepads.
•Neveroperatewiththeguardsnotsecurelyinplace.Be
sureallinterlocksareattached,adjustedproperly ,and
functioningproperty.
•Donotchangetheenginegovernorsettingoroverspeed
theengine.
•Usecarewhenloadingorunloadingthemachineintoa
trailerortruck.
•Neverleavethemachinerunningunattended.Always
setthethrottletoslow ,stoptheengine,andwaitforall
movingpartstostopbeforeleaving.
•Donottouchpartswhichmaybehotfromoperation.
Allowthemtocoolbeforeattemptingtomaintain,adjust,
orservice.
•Beforecompactingsoil,havetheareamarkedfor
undergroundutilities.
•Lightningcancausesevereinjuryordeath.Iflightning
isseenorthunderisheardinthearea,donotoperate
themachine;seekshelter.
•Parkthemachineonalevelsurface,setthethrottleto
slow,andstoptheengine.Waitforallmovementtostop
beforeadjusting,cleaning,orrepairing.
•Cleandebrisfromthedrives,mufers,andenginetohelp
preventres.Cleanupfuelandoilspillage.
•Lettheenginecoolbeforestoringanddonotstorenear
ame.
•Donotstorefuelnearamesordrainindoors.
•Parkthemachineonlevelground.Neverallowuntrained
personneltoservicethemachine.
•Carefullyreleasepressurefromcomponentswithstored
energy.
•Keephandsandfeetawayfrommovingparts.Ifpossible,
donotmakeadjustmentswiththeenginerunning.
•Keepallpartsingoodworkingconditionandallhardware
tightened.Replaceallwornordamageddecals.
•Keepnutsandboltstight.Keepequipmentingood
condition.
•Keepthemachinefreefromthebuild-upofmud,rocks,
orotherdebris.Cleanupoilorfuelspillage.Allowthe
machinetocoolbeforestoring.
•Useextracarewhenhandlingfuels.Theyareammable
andvaporsareexplosive.
–Useonlyanapprovedcontainer.
–Neverremovethefuelcaporaddfuelwhenthe
engineisrunning.Allowtheenginetocoolbefore
refueling.Donotsmoke.
–Neverrefuelthemachineindoors.
–Neverstorethemachineorfuelcontainerinside
wherethereisanopename,suchasnearawater
heaterorfurnace.
–Neverllafuelcontainerwhileitisinsideavehicle,
trunk,pick-upbed,oranysurfaceotherthanthe
ground.
–Keepcontainernozzleincontactwiththetankduring
lling.
•Stopandinspecttheequipmentifyoustrikeanobject.
Makeanynecessaryrepairsbeforerestarting.
•Tobestprotectyourinvestmentandmaintainoptimal
performanceofyourToroequipment,countonToro
genuineparts.Whenitcomestoreliability ,Torodelivers
replacementpartsdesignedtotheexactengineering
specicationsofourequipment.Forpeaceofmind,insist
onTorogenuineparts.
4
Page 5

SafetyandInstructionalDecals
Safetydecalsandinstructionsareeasilyvisibletotheoperatorandarelocatednearanyareaofpotential
danger.Replaceanydecalthatisdamagedorlost.
117–2718
125–8206
1.Engineoil
1.Caution3.ReadtheOperator’s
Manualforinformationon
liftingthemachine.
2.Donotliftthecompactor
bythehandle.
125–8207
1.Liftpoint
125–8205
1.Pushthehandleforward
tomovethecompactor
93–9084
forward.
2.Pullthehandlebackward
tomovethecompactor
backward.
5
Page 6
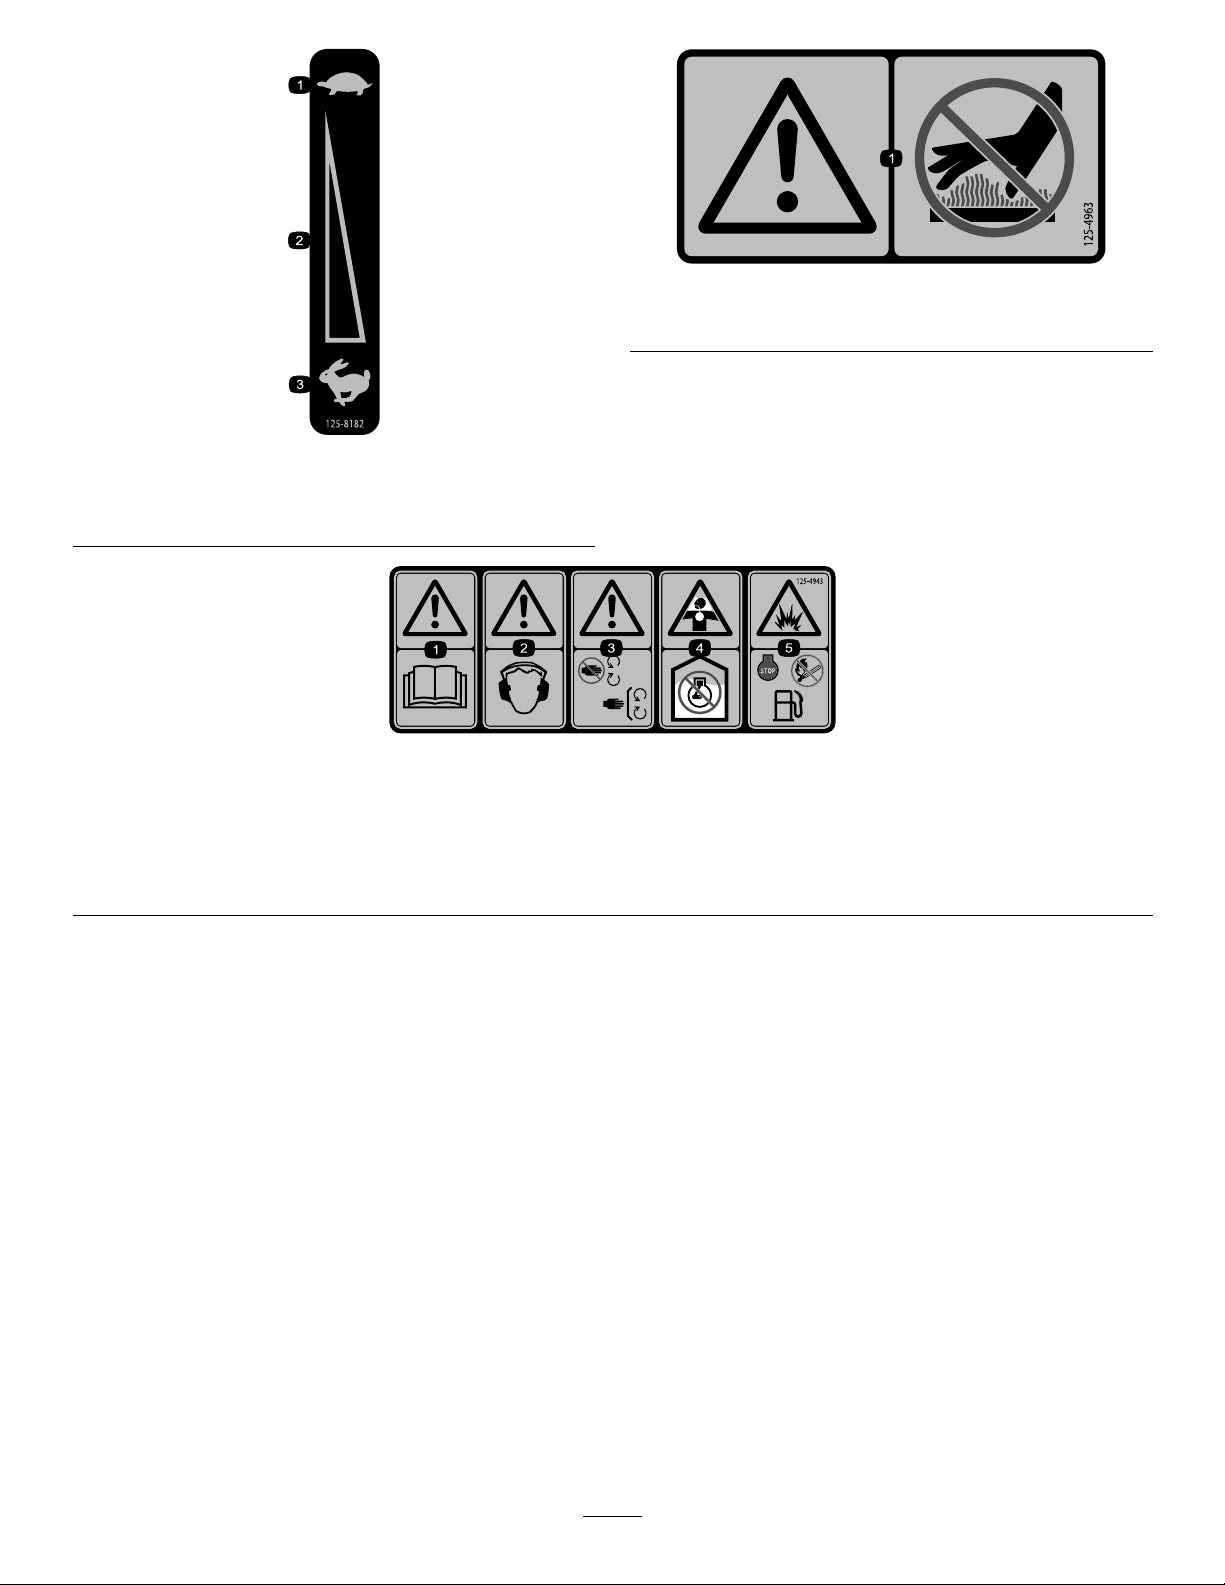
125–4963
1.Warning—keephandsawayfromhotsurfaces
125–8182
1.Slow
2.V ariablespeedcontrol
3.Fast
125–4943
1.Warning—readtheOperator’sManual.4.Chokinghazard—donotoperatethemachineindoors.
2.Warning—wearhearingprotection.
3.Warning—keepawayfrommovingparts;keepallguardsand
shieldsinplace.
5.Explosionhazard—stoptheengineandextinguishallames
beforerefuelingthemachine.
6
Page 7
Setup
CheckingtheEngine-OilLevel
Themachinecomesfromthefactorywithoilintheengine
crankcase;however,itmaybenecessarytoaddoil.Referto
CheckingtheEngine-OilLevel(page8).Addonlyenoughoil
toraisetheleveltotheFullmarkonthedipstick.
CheckingtheEccentric-Oil
Level
Themachinecomesfromthefactorywitheccentricoilinthe
eccentrichousing;however,itmaybenecessarytoaddoil.
RefertoCheckingtheEccentric-OilLevel(page16).Add
onlyenoughoilsothattheoillevelisushwiththeoilplug
onthesideoftheeccentrichousing.
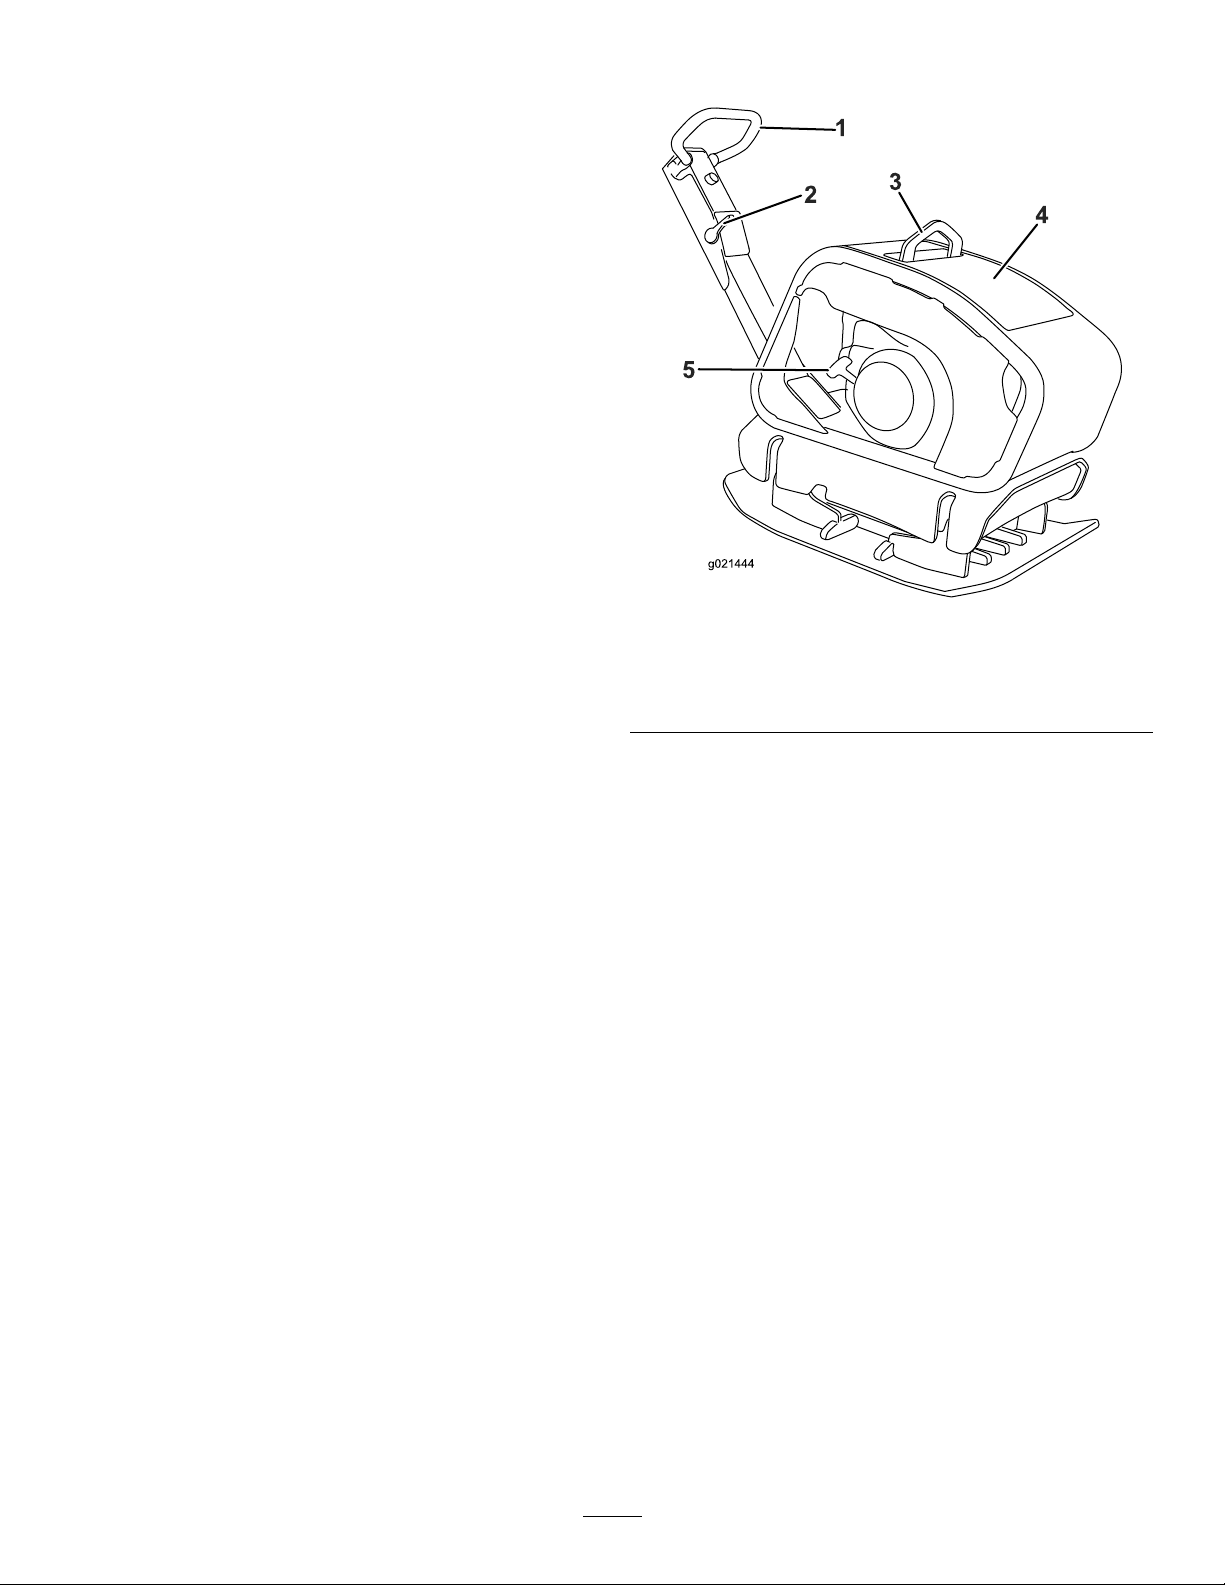
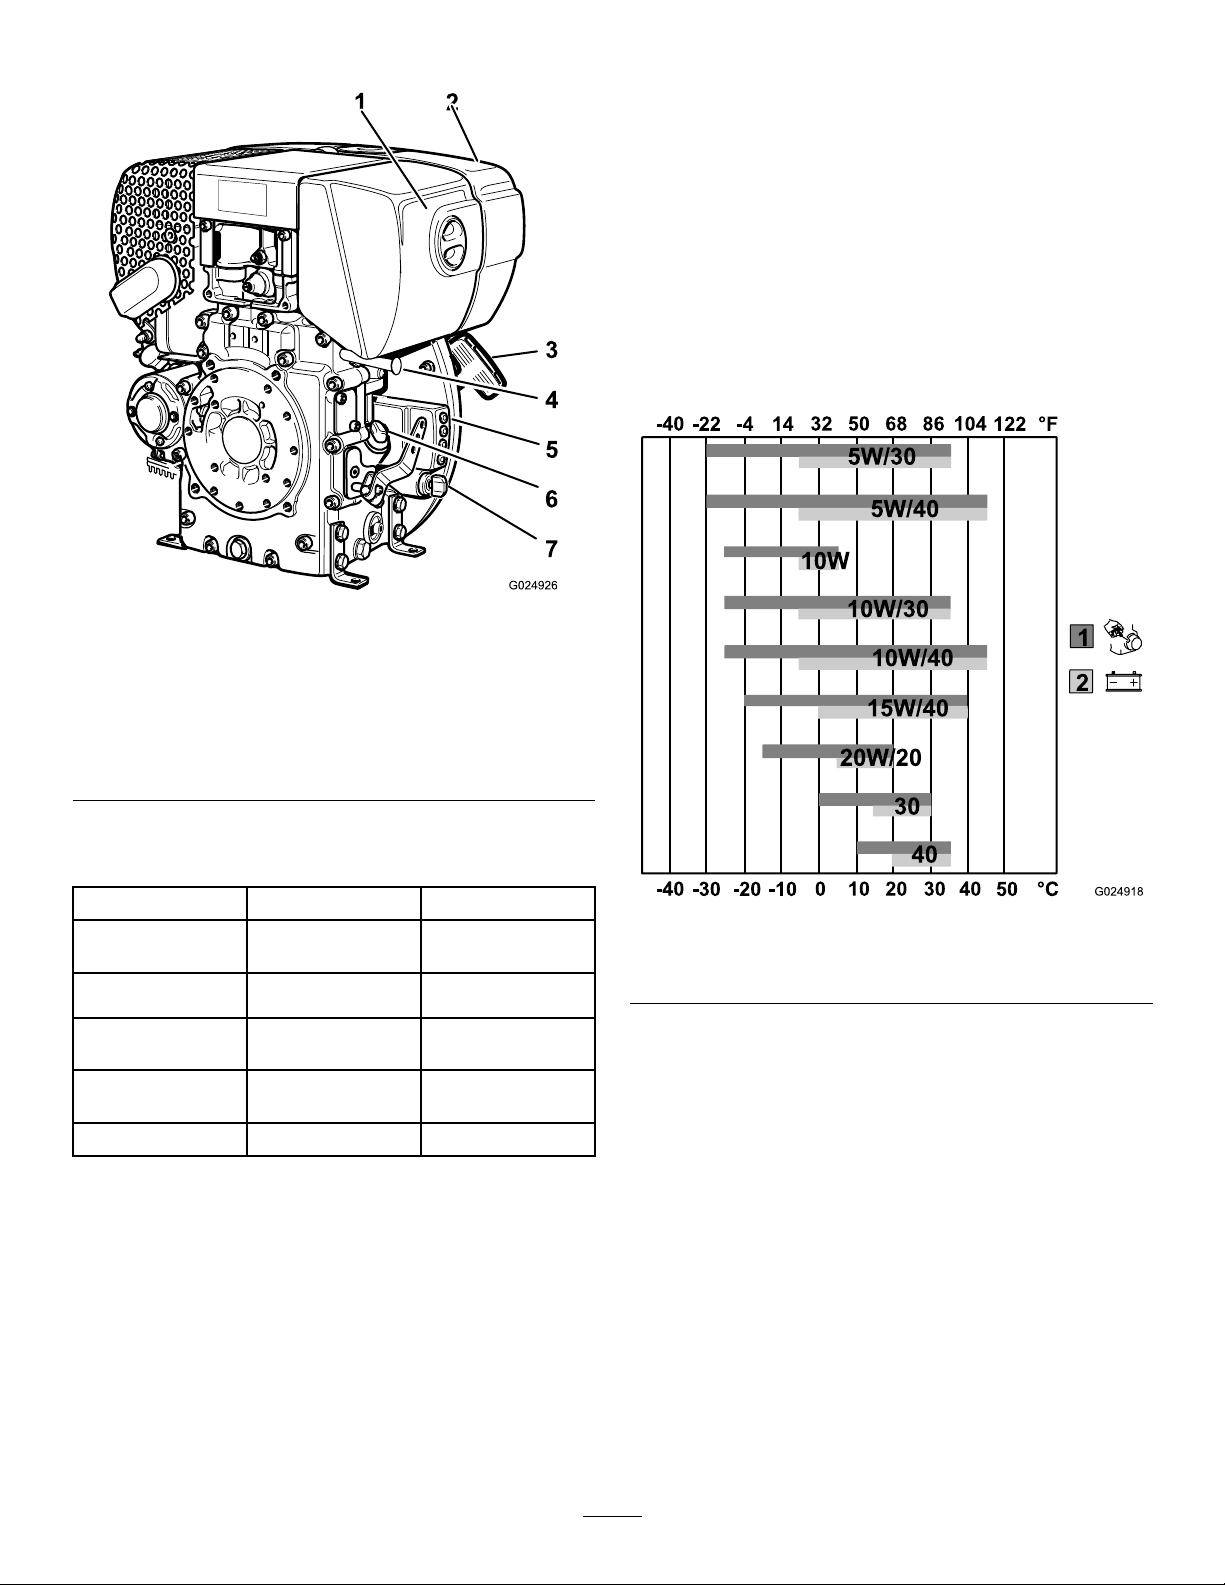
ProductOverview
Figure3
1.Travel-controllever
2.Throttlecontrol5.Recoil-starthandle
3.Liftpoint
4.Cover
7
Page 8
Controls
Operation
Note:Determinetheleftandrightsidesofthemachine
fromthenormaloperatingposition.
CheckingtheEngine-OilLevel
ServiceInterval:Beforeeachuseordaily
Oiltype:APICD,CE,CF,CF-4,CG-4orhigher
Refertothetablebelowtodeterminethecorrectoilviscosity
fortheambientairtemperatureinwhichthemachineis
operated:
Figure4
1.Airlter
2.Fueltank6.Dipstick
3.Recoil-starthandle
4.Engine-shutoffswitch
Specications
ModelnumberRP-1200DRP-1400D
Length
Width
Height(handle
lowered)
Height(handle
raised)
Weight
142cm(55.9
inches)
60cm(23.6inches)75cm(29.5inches)
106cm(41.5
inches)
115cm(45.3
inches)
350kg(771.6lb)440kg(970lb)
5.Engineindicatorlights
(Model68075only)
7.Startswitch(Model68075
only)
150cm(59inches)
104cm(40.9
inches)
113cm(44.5
inches)
Figure5
1.Pull-starttemperature
range
2.Electric-starttemperature
range
1.Stopthemachineonalevelsurface.
2.Setthethrottletoslow ,presstheredbuttonforthe
engine-shutoffswitch,andwaitforallmovingparts
tostop.
3.Cleanaroundthedipstick(Figure6)sothatdirtcannot
fallintothellerholeanddamagetheengine.
8
Page 9
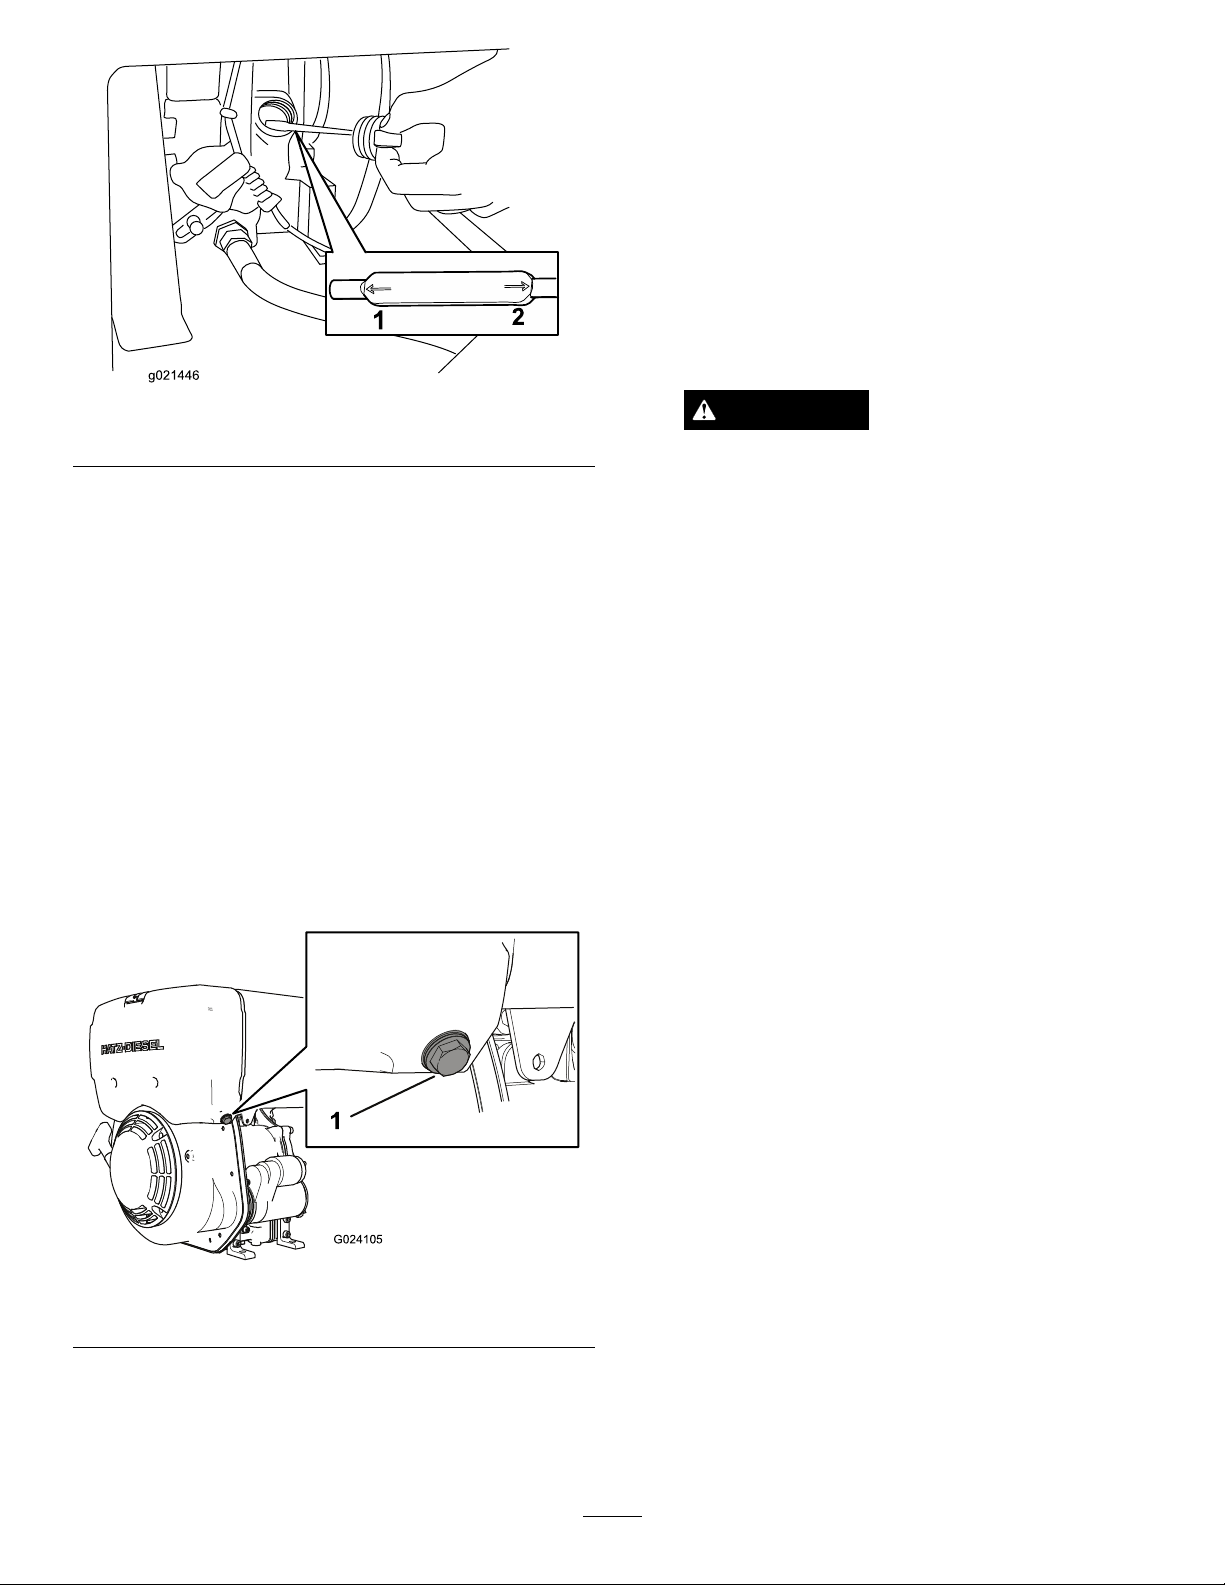
1
G024105
4.Assoonasdieselfuelemerges,tightenthewater-trap
bolt.
5.Disposeofthewaterandthefuelaccordingto
environmentalregulations.
CleaningDebrisfromthe Machine
ServiceInterval:Beforeeachuseordaily
1.Setthethrottletoslow,stoptheengine,andwaitfor
allmovingpartstostop.
Figure6
1.Minimumoillevel2.Maximumoillevel
4.Unscrewthedipstickandwipetheendclean(Figure6).
5.Screwthedipstickfullyontothellertube(Figure6).
6.Unscrewthedipstickagainandlookattheend.Ifthe
engineoillevelislow,slowlypouronlyenoughofthe
speciedoilintothellertubetoraisetheleveltothe
Fullmarkonthedipstick.
Important:Donotoverllthecrankcasewith
engineoilandruntheengine;enginedamage
mayresult.
CheckingtheWaterTrap
ServiceInterval:Beforeeachuseordaily
1.Setthethrottletoslow,stoptheengine,andwaitfor
allmovingpartstostop.
2.Loosenthewater-trapbolt3to4rotations(Figure7).
WARNING
Contactwithhotpartsonthemachinecan
causesevereburns.
Waitforallpartstocoolbeforetouchingthe
machine.
2.Brushdirtanddebrisawayfromtheair-cleanerhousing
andengineopenings.
3.Checkthesprinklertubeandremoveanydirtordebris.
Figure7
1.Water-trapbolt
3.Useatransparentcontainertocatchthedripsfrom
thebolt.
Note:Becausewaterisdenserthandieselfuel,any
waterthatispresentwillemergerst.
9
Page 10

AddingFuel
DieselFuelSpecications
•Theenginerunsonclean,freshultra-lowsulfurdiesel
fuelwithaminimumcetaneratingof40.
•Purchasefuelinquantitiesthatcanbeusedwithin30days
toensurefuelfreshness.
•Usesummergradedieselfuel(No.2-D)attemperatures
above-7°C(20°F)andwintergradedieselfuel(No.
1-D)or(No.1-D/2-Dblend)below-7°C(20°F).
•Nevermixkerosene,usedengineoil,orresidualfuels
withthedieselfuel.
•Donotstorefueleitherinthefueltankorfuelcontainers
overthewinter.
•Fueladditivesarenotrecommended.Somefueladditives
maycausepoorengineperformance.
DANGER
Incertainconditions,dieselfuelisextremely
ammableandhighlyexplosive.Areorexplosion
fromdieselcanburnyouandothersandcan
damageproperty.
•Onlyllthefueltankwithdieselfuel.Fillingthe
fueltankwithgasolinemayresultinare.
•Fillthefueltankandstorefuelina
well-ventilatedarea.
Important:Donotmixoilwithdiesel.
Useultra-lowsulfurdieselfuelthatcomplieswiththe
followingspecication.Thetablelists7worldwide
specicationsfordieselfuels.
DieselFuelSpecications
No.2–D,No.1–D,ASTM
D975–94
EN590:96EuropeanUnion
ISO8217DMX
BS2869–A1orA2
JISK2204GradeNo.2
KSM-2610
GB252China
Location
U.S.A.
International
UnitedKingdom
Japan
Korea
FillingtheFuelTank
Note:Beforestartingforthersttimeorifthefuelsystem
isempty ,llthefueltankfullywithdieselfuel.Thiscauses
thefuelsystemtobebledautomatically.
Automaticbleedingiscompletedafterawaitingperiodof1
to2minutes.Theengineisreadytostart.
1.Parkthemachineonalevelsurface,stoptheengine,
andallowtheenginetocool.
•Neverrefuelthefueltankwithenginerunning.
•Donotllthefueltankcompletelyfull.Addfuel
untilitisatthesamelevelastheredring.This
emptyspaceinthetankallowsfueltoexpand.
•Neversmokewhenhandlingdiesel,andstay
awayfromanopenameorwheredieselmay
beignitedbyaspark.
•Storedieselinanapprovedcontainerandkeep
itoutofthereachofchildren.Neverbuymore
thana30-daysupplyofdiesel.
•Donotoperatewithoutentireexhaustsystemin
placeandinproperworkingcondition.
WARNING
Dieselisharmfulorfatalifswallowed.Long-term
exposuretovaporscancauseseriousinjuryand
illness.
•Avoidprolongedbreathingofvapors.
2.Liftthecover(Figure8).
Figure8
1.Coverhandle
3.Cleanaroundthefueltankcapandremoveit(Figure9).
•Keepfaceawayfromnozzleanddieseltankor
conditioneropening.
•Keepdieselawayfromeyesandskin.
10
Page 11

Figure9
1.Fuelcap3.Redring
2.Inletfuelscreen
4.Adddieseltothefueltank.(Figure10).
Important:Donotoverllthefueltank.
Figure10
Figure11
1.Throttlecontrol(slow
position)
2.Slowlypulltherecoil-starthandleuntilyouencountera
slightresistance(Figure12).
2.Throttlecontrol(fast
position)
5.Installthefuel-tankcapsecurely(Figure9).
6.Wipeupanydieselfuelthatmayhavespilled.
7.Lowerthecover.
StartingandStoppingthe Engine
StartingtheEngine
Model68074:
1.SetthethrottletotheSlowposition(Figure11).
Figure12
3.Lettheroperunbackinrecoilstarter.
4.Holdtherecoil-starthandlewithbothhands.
5.Pullthestartingropeevenlyandwithincreasingspeed
untiltheenginestarts.
Note:Donotsharplypulltherecoil-starthandle.
6.Movethethrottlelevertothefastposition(Figure11).
Note:Thecompactorwillbeginvibratingwhenthe
throttleissettofastthrottle.
Model68075:
1.Setthethrottletotheslowposition(
2.Insertthekeyintothestarterswitchandrotateit
clockwisetostarttheengine(
Note:Releasethekeyoncetheenginebeginstorun.
11
Figure11).
Figure13).
Page 12

Figure13
g021448
1
1.Engine-runlight4.Engine-temperaturelight
2.Battery-chargelight5.Engine-preheatlight
3.Oil-pressure-warninglight
6.Key
OperatingtheCompactor
ControllingtheDirectionofTravel
•Movethetravel-controlhandleforwardtodrivethe
machineforward(Figure15).
3.MovethethrottlelevertotheFastposition(Figure11).
Note:Thecompactorwillbeginvibratingwhenthe
throttleissettofastthrottle.
StoppingtheEngine
1.Movethethrottle-controllevertotheSlowposition
(Figure11).
2.Pushtheredbuttonoftheengine-shutoffswitchfor3
secondstostoptheengine(Figure14).
Figure15
1.Travel-controlhandle
(forwardtravelposition)
2.Travel-controlhandle
(backwardtravelposition)
•Pullthetraveltravel-controlhandlebackwardtodrivethe
machinebackward(Figure15).
TransportingtheMachine
Liftingequipmentcapacity:440kg(970lb)
Usetherollcageliftpointtoliftandtransportthemachine
withstrapsoracrane(
Figure16).
Figure14
1.Redbutton
3.Model68075only:Rotatethekeycounterclockwiseto
theOffposition(allindicatorlampswillturnoff)and
removekeyfromthestarterswitch(Figure13).
Note:Whenthemachineisnotrunning,turnthe
startingkeytoOffpositionorelsethebatterymay
becomefullydischarged.
Figure16
1.Rollcageliftpoint
12
Page 13

Maintenance
RecommendedMaintenanceSchedule(s)
MaintenanceService
Interval
Aftertherst25hours
Beforeeachuseordaily
Every50hours
Every100hours
Every300hours
Every500hours
Every1,000hours
Monthly
Yearly
MaintenanceProcedure
•Changetheengineoil.
•Checktheengineoillevel.
•Checkthewatertrap.
•Cleandebrisfromtheair-cleanerhousing.
•Inspecttheaircleanerelement.
•Cleantheairlterelement.Cleanitmorefrequentlyindustyoperatingconditions.
•Changetheengineoil.
•Checkthebatterycableconnections.
•Replacethepaperair-cleanerelement.Replaceitmorefrequentlyindustyoperating
conditions.
•Changetheeccentricoil.
•Replacethefuellter.
•Adjustthebelt.
•Cleantheoillter.
•Checktheeccentric-oillevel.
•Changetheeccentricoil.
ServicingtheAirCleaner
ServiceInterval:Beforeeachuseordaily—Inspecttheair
cleanerelement.
Every50hours—Cleantheairlterelement.Cleanit
morefrequentlyindustyoperatingconditions.
Every300hours/Yearly(whichevercomes
rst)—Replacethepaperair-cleanerelement.Replace
itmorefrequentlyindustyoperatingconditions.
Important:Donotoperatetheenginewithouttheair
lterassembly;extremeenginedamagewilloccur.
1.Setthethrottletoslow,stoptheengine,andwaitfor
allmovingpartstostop.
2.Unscrewtheplasticwingnutandremovethecover
(Figure17).
Figure17
1.Wingnut
3.Unscrewthenutandremovethepaperelement(Figure
18).
13
Page 14

Figure18
1
G024104
2
1.Knurlednut
2.Air-ltercartridge
4.Inspectthepaperelement,andreplaceair-lter
cartridgeiftheelementisdamagedorexcessivelydirty.
Note:Nevertrytobrushdirtoffthepaperelement;
brushingforcesthedirtintothebers.
5.Wipedirtfromthebaseandthecoverwithamoistrag.
6.Installtheaircleanercartridge,ensurethatitisproperly
positioned,andsecureitwiththeknurlednut(Figure
).
18
7.Securelyinstallthecoverwiththewingnut(
Figure17).
ReplacingtheFuelFilter
ServiceInterval:Every500hours
Note:Theenginehasadual-ltersystem.Replaceonlythe
externallter.
1.Stoptheengine,removethekey,andwaitforthe
enginetocooldown.
Figure19
1.Fuel-tankcap
2.Fuellter
4.Pullthelteroffthefuelhose.
5.Installanewlterintothefuelhose.
6.Placethelterintothefueltank,andinstallthe
fuel-tankcap.
2.Removethefuel-tankcap.
3.Pullthefuellteroutofthefueltank(Figure19).
Note:Thelteristetheredtothefuel-tankcap.
14
Page 15

ServicingtheEngineOil
CrankcaseCapacity:RP-1200D–1.1liter(37oz)
CrankcaseCapacity:RP-1400D–1.5liter(50.7oz)
Oiltype:APICD,CE,CF,CF-4,CG-4orhigher
Refertothetablebelowtodeterminethecorrectoilviscosity
fortheambientairtemperatureinwhichthemachineis
operated:
Figure21
1.Drainplug
3.Removethedrainplug(Figure21).
Figure20
1.Pull-starttemperature
range
2.Electric-starttemperature
range
ChangingtheEngineOil
ServiceInterval:Aftertherst25hours
Every100hours
WARNING
Oilmaybehotaftertheenginehasbeenrun,and
contactwithhotoilcancauseseverepersonalinjury.
Avoidcontactingthehotengineoilwhenyoudrain
it.
Note:Youmayhavetotipthecompactorbackward
todraintheoil.
4.Whentheoilhasdrainedcompletely,replacetheplug.
Note:Disposeoftheusedoilatacertiedrecycling
center.
5.Removethedipstick(Figure6)andslowlypourthe
speciedquantityandtypeofoilintothellerhole.
6.Insertthedipstickandchecktheengineoillevel;refer
toCheckingtheEngine-OilLevel(page8).
7.Replaceandsecurethedipstick.
8.Wipeupanyspilledoil.
1.Stoptheengineandwaitforallmovingpartstostop.
2.Placeadrainpanunderthedrainplug(
Figure21).
15
Page 16

CleaningtheOilFilter
ServicingtheEccentricOil
ServiceInterval:Every1,000hours
1.Draintheengineoil;referto
ChangingtheEngineOil
(page15).
2.Loosenthesocket-hexboltapproximately5turns
counterclockwise(Figure22).
Figure22
Oilcapacity:0.5liter(6.9oz)
OilType:Detergentoil(APIserviceSJorhigher)
Oilviscosity:15W -40
CheckingtheEccentric-OilLevel
ServiceInterval:Monthly
1.Movethemachinetoalevelsurface.
2.Setthethrottletoslow,stoptheengine,andwaitfor
allmovingpartstostop.
3.Placeragsbelowtheoilplugattherightsideofthe
eccentrichousing(
Figure23).
1.T ensionspring
2.Filterhousing
3.Socket-hexbolt
4.Oillter
5.Airgun(compressedair)
3.Pulltheoillteroutofthelterhousing(Figure22).
4.Blowouttheoillterwithcompressedairfromthe
insidetotheoutside(Figure22).
5.Checkthegasketontheoillterfordamage.
Note:Ifthegasketisdamaged,replaceitbefore
installingtheoillter.
6.Inserttheoillterintothelterhousing(Figure22).
Note:Ensurethatthelterisfullyseatedinthe
housing.
7.Beforetighteningthescrew,ensurethatthetension
springrestagainsttheoillteratbothends(
Figure22).
8.Tightenthesocket-hexbolt(Figure22).
9.Addoiltotheengine;referto
ChangingtheEngine
Oil(page15).
Figure23
1.Oilplug
4.Removetheoilplug(Figure23).
5.Verifythattheeccentricoilislevelwiththebolthole.
Note:Ifaddingoilisrequired,useafunnelwitha
hosetoaddthespeciedoilintotheeccentrichousing
untiltheoillevelislevelwiththeoilplughole.
6.Wipeupanyspilledoil.
7.Replacetheoilplug(Figure23).
16
Page 17

ChangingtheEccentricOil
ServicingtheBattery(Model
ServiceInterval:Yearly
Every300hours
1.Movethemachinetoalevelsurface.
2.Setthethrottletoslow,stoptheengine,andwaitfor
allmovingpartstostop.
3.Raisethemachinewithliftingequipmentwitha440kg
(970lb)liftcapacity.
4.Placeanoildrainpanundertheoilplugandremove
theplugfromtheeccentrichousing(
5.Tiptheplatecompactorslightlytotheright,anduse
asuctionguntoremovetheoilthroughtheoilplug
hole(Figure23).
6.Tiptheplatecompactorslightlytotheleft,andslowly
pour0.5liter(6.9oz)ofthespeciedoilintotheoil
plughole(Figure23).
Note:Useafunnelwithahosetopouroilintothe
oilplugholeifnecessary.
7.Lowerthemachineontothelevelsurface.
8.Verifythattheoilleveliscorrectwhenthereisaslight
owofoiloutoftheoilplugholewhenthecompactor
islevel.
Figure23).
68075only)
CheckingandCleaningtheBattery
ServiceInterval:Every100hours—Checkthebatterycable
connections.
Keepthetopofthebatteryclean.Ifthemachineisstoredin
alocationwheretemperaturesareextremelyhigh,thebattery
willdischargemorerapidlythanifthemachineisstoredin
acoolerlocation.
Keepthetopofthebatterycleanbywashingitwithabrush
dippedinammoniaorasolutionofsodiumbicarbonate.
Flushthetopsurfacewithwateraftercleaning.Donot
removethellcapwhilecleaningthebattery.
Thebatterycablesmustbetightontheterminalstoprovide
goodelectricalcontact.
Ifcorrosionoccursatthebatteryterminals,disconnectthe
cables,negative(-)cablerst,andscrapetheclampsand
terminalsseparately.Connectthecables,positive(+)cable
rst,andcoattheterminalswithpetroleumjelly.
ChargingtheBattery
Note:Ifadditionaloilisrequired,useafunnelwitha
hosetoaddthespeciedoilintotheeccentrichousing
untiltheoillevelislevelwiththeoilplughole.
9.Wipeupanyspilledoil.
10.Replacetheoilplugscrew .
WARNING
Chargingthebatteryproducesgasesthatcan
explode,seriouslyinjuringyouorbystanders.
Neversmokenearthebattery,andkeepsparksand
amesawayfromthebattery.
Important:Alwayskeepthebatteryfullycharged.This
isespeciallyimportanttopreventbatterydamagewhen
thetemperatureisbelow0°C(32°F).
1.Chargethebatteryfor10to15minutesat25to30
amps,or30minutesat10amps.
2.Whenthebatteryisfullycharged,unplugthecharger
fromtheelectricaloutlet,anddisconnectthecharger
leadsfromthebatteryposts(Figure24).
3.Installthebatteryinthemachineandconnectthe
batterycables;refertoReplacingtheBattery(page18).
Important:Donotrunthemachinewiththe
batterydisconnected;electricaldamagemay
occur.
17
Page 18

4.Removethebattery.
Note:Recycletheoldbatteryatanauthorizedfacility .
5.Placethenewbatteryinthetray .
6.Installthepositive(red)batterycabletothepositive
(+)batteryterminal,andtightenthenutontothebolt.
7.Installthenegative(black)groundcabletothenegative
(-)batteryterminal,andtightenthenutontothebolt.
8.Installthecoverofthebatterybox,andsecureitwith
thestrap.
Figure24
1.Positivebatterypost
2.Negativebatterypost
Ifthebatterynolongerholdsacharge,replaceit;referto
ReplacingtheBattery(page18).
3.Red(+)chargerlead
4.Black(-)chargerlead
ReplacingtheBattery
1.Removethecoverofthebatterybox.
2.Disconnectthenegative(black)groundcablefromthe
batterypost.
WARNING
Incorrectbatterycableroutingcoulddamage
themachineandcables,causingsparks.
Sparkscancausethebatterygasestoexplode,
resultinginpersonalinjury.
•Alwaysdisconnectthenegative(black)
batterycablebeforedisconnectingthe
positive(red)cable.
•Alwaysconnectthepositive(red)battery
cablebeforeconnectingthenegative
(black)cable.
ServicingtheBelt
CheckingtheBeltTension
1.Removetheboltsholdingthebeltcoverinplace
(Figure25).
Figure25
1.Bolts
2.Apply2kg(4.4lb)ofpressuretothemiddleofthebelt.
Note:Whenthebeltistensionedcorrectly,itshould
deectapproximately0.5cm(0.2inches).
WARNING
Batteryterminalsormetaltoolscouldshort
againstmetalmachinecomponents,causing
sparks.Sparkscancausethebatterygasesto
explode,resultinginpersonalinjury.
•Whenremovingorinstallingthebattery,
donotallowthebatteryterminalstotouch
anymetalpartsofthemachine.
•Donotallowmetaltoolstoshortbetween
thebatteryterminalsandmetalpartsof
themachine.
3.Removethepositive(red)batterycable.
3.Ifthebeltisnottensionedproperly ,refertoAdjusting
theBeltTension(page18).
AdjustingtheBeltTension
ServiceInterval:Every500hours
1.Removetheboltsholdingthebeltcoverinplace
(
Figure25).
2.Loosentheenginemountingbolts.
3.Adjustthepositionoftheengineuntilyouobtainthe
belttensionspeciedin2ofCheckingtheBeltTension
(page18).
4.Tightentheenginemountingboltsandreplacethebelt
cover.
18
Page 19

Storage
1.Stoptheengine.
2.Removedirtandgrimefromtheentiremachine.
Important:Youcanwashthemachinewithmild
detergentandwater.Donotpressurewashthe
machine.Avoidexcessiveuseofwater,especially
neartheengine.
3.Servicetheaircleaner;refertoServicingtheAir
Cleaner(page13).
4.Changetheengineoil;refertoChangingtheEngine
Oil(page15).
5.Fillthefueltank;refertoFillingtheFuelTank(page
10).
6.Checkandtightenallbolts,nuts,andscrews.Repairor
replaceanypartthatisdamaged.
7.Paintallscratchedorbaremetalsurfaces.Paintis
availablefromyourAuthorizedServiceDealer.
8.Storethemachineinaclean,drygarageorstoragearea.
9.Coverthemachinetoprotectitandkeepitclean.
19
Page 20

Troubleshooting
Problem
Theenginewillnotstart,startshard,or
failstokeeprunning.
Theplatedoesnotvibrateatfullspeed.
Theclutchisextremelyhot.
Theplatedoesnotvibratewhenthe
engineisrunning.
PossibleCauseCorrectiveAction
1.Thefueltankisempty.1.Fillthefueltankwithfuel.
2.Theaircleanerisdirty.
1.Theoillevelintheeccentrichousing
istoohigh.
2.Thebeltisloose.2.Adustthebelttension.
1.Aforeignobjectislodgedagainstthe
eccentricsheave.
2.Theoillevelintheeccentrichousing
istoohigh.
3.Theclutchisslipping.
4.Theenginespeedisnotreachingfull
rpm.
1.Thebeltisbroken.1.Replacethebelt.
2.Theclutchisbrokenorwornout.2.Replacetheclutch.
3.Theeccentrichasseized.
2.Cleanorreplacetheaircleaner
element.
1.Checktheoillevelanddrainas
necessary.
1.Removetheobstruction.
2.Checktheoillevelanddrainas
necessary.
3.SeeyourauthroizedToroservice
dealer.
4.SeeyourauthroizedToroservice
dealer.
3.Ensuretheeccentricisfreeturning.
20
Page 21

Notes:
21
Page 22

Notes:
22
Page 23

Notes:
23
Page 24

Alimitedwarranty(seewarrantyperiodsbelow)
TheToroWarranty
Concrete,Masonry,
andCompaction
Equipment
ConditionsandProductsCovered
TheT oroCompanyanditsafliate,T oroWarrantyCompany,pursuantto
anagreementbetweenthem,jointlywarrantyourT oroConcrete,Masonry ,
andCompactionEquipmentProductslistedbelowtobefreefromdefects
inmaterialsorworkmanship.
Thiswarrantycoversthecostofpartsandlabor,butyoumustpay
transportationcosts.
Thefollowingtimeperiodsapplyfromthedateofpurchase:
ProductsWarrantyPeriod
ConcreteMixers
•SpindleBearingsLifetime*(originalowneronly)
MortarMixers1year
•DrumBearingsandSealsLifetime*(originalowneronly)
ForwardPlateCompactors
ReversiblePlates1year
RammerCompactors
MudBuggy1year
VibratingTrenchRoller2years
ConcreteSaws
MasonrySaws
PowerTrowels1year
Screeds
ConcreteVibrators
Whereawarrantableconditionexists,wewillrepairtheProductatnocost
toyouincludingdiagnosis,labor,andparts.
*
LifetimeWarranty-Ifthebearing(s)orseal(s)onyourmixerfail,itwillbereplacedunderwarranty ,
atnocostforpartsorlabor.
1year
2years
2years
1year
1year
1year
1year
InstructionsforObtainingWarrantyService
IfyouthinkthatyourT oroProductcontainsadefectinmaterialsor
workmanship,followthisprocedure
1.ContactanyAuthorizedServicingOutlettoarrangeserviceattheir
dealership.T olocateoneconvenienttoyou,accessourwebsiteat
www.T oro.com.Select“WheretoBuy”andselect“Contractor”under
producttype.Y oumayalsocallourtollfreenumberbelow .
2.Bringtheproductandyourproofofpurchase(salesreceipt)tothem.
3.IfforanyreasonyouaredissatisedwiththeServiceOutlet’s
analysisorwiththeassistanceprovided,contactusat:
SWSCustomerCareDepartment
ToroWarrantyCompany
811 1LyndaleAvenueSouth
Bloomington,MN55420-1196
TollFree:800-888-9926
**
ToroAuthorizedRentalCustomerswhohavepurchasedproductsdirectlyfromToroandhave
signedtheToroRentalCustomerAgreementhavetheabilitytoperformtheirownwarrantywork.
PleasevisitToro’ sRentalPortalforelectronicwarrantyclamlingproceduresorcallthetollfree
numberabove.
**
:
OwnerResponsibilities
YoumustmaintainyourToroProductbyfollowingthemaintenance
proceduresdescribedintheOperator’sManual.Suchroutine
maintenance,whetherperformedbyadealerorbyyou,isatyourexpense.
Partsscheduledforreplacementasrequiredmaintenance(“Maintenance
Parts”),arewarrantedfortheperiodoftimeuptothescheduled
replacementtimeforthatpart.Failuretoperformrequiredmaintenance
andadjustmentscanbegroundsfordisallowingawarrantyclaim.
ItemsandConditionsNotCovered
Notallproductfailuresormalfunctionsthatoccurduringthewarranty
periodaredefectsinmaterialsorworkmanship.Thisexpresswarranty
doesnotcoverthefollowing:
•Productfailureswhichresultfromtheuseofnon-Tororeplacement
parts,orfrominstallationanduseofadd-on,modied,orunapproved
accessories
•Productfailureswhichresultfromfailuretoperformrequired
maintenanceand/oradjustments
•ProductfailureswhichresultfromoperatingtheProductinan
abusive,negligentorrecklessmanner
•Partssubjecttoconsumptionthroughuseunlessfoundtobe
defective.Examplesofpartswhichareconsumed,orusedup,during
normalproductoperationinclude,butarenotlimitedto,belts,wipers,
sparkplugs,tires,lters,gaskets,wearplates,seals,O-rings,drive
chains,clutches.
•Failurescausedbyoutsideinuence.Itemsconsideredtobeoutside
inuenceinclude,butarenotlimitedto,weather,storagepractices,
contamination,useofunapprovedcoolants,lubricants,additives,or
chemicals,etc.
•Normal“wearandtear”items.Normal“wearandtear”includes,butis
notlimitedto,wornpaintedsurfaces,scratcheddecals,etc.
•Anycomponentcoveredbyaseparatemanufacturer’swarranty
•Pickupanddeliverycharges
GeneralConditions
RepairbyanAuthorizedServicingOutletorSelf-ServiceasanAuthorized
RentalCustomerisyoursoleremedyunderthewarranty.
NeitherTheToroCompanynorToroWarrantyCompanyisliablefor
indirect,incidentalorconsequentialdamagesinconnectionwith
theuseoftheToroProductscoveredbythiswarranty ,including
anycostorexpenseofprovidingsubstituteequipmentorservice
duringreasonableperiodsofmalfunctionornon-usepending
completionofrepairsunderthiswarranty.Allimpliedwarranties
ofmerchantabilityandtnessforusearelimitedtotheduration
ofthisexpresswarranty.Somestatesdonotallowexclusionsof
incidentalorconsequentialdamages,orlimitationsonhowlong
animpliedwarrantylasts,sotheaboveexclusionsandlimitations
maynotapplytoyou.
Thiswarrantygivesyouspeciclegalrights,andyoumayalsohaveother
rightswhichvaryfromstatetostate.
ExceptfortheenginewarrantycoverageandtheEmissionswarranty
referencedbelow,ifapplicable,thereisnootherexpresswarranty .The
EmissionsControlSystemonyourProductmaybecoveredbyaseparate
warrantymeetingrequirementsestablishedbytheU.S.Environmental
ProtectionAgency(EPA)ortheCaliforniaAirResourcesBoard(CARB).
RefertotheCaliforniaEmissionControlWarrantyStatementsuppliedwith
yourProductorcontainedintheenginemanufacturer’sdocumentationfor
details.
CountriesOtherthantheUnitedStatesorCanada
CustomerswhohavepurchasedT oroproductsoutsidetheUnitedStatesorCanadashouldcontacttheirT oroDistributor(Dealer)toobtainguarantee
policiesforyourcountry,province,orstate.IfforanyreasonyouaredissatisedwithyourDistributor'sserviceorhavedifcultyobtainingguarantee
information,contacttheT oroimporter.Ifallotherremediesfail,youmaycontactusatT oroWarrantyCompany.
AustralianConsumerLaw:AustraliancustomerswillnddetailsrelatingtotheAustralianConsumerLaweitherinsidetheboxoratyourlocalT oro
Dealer.
374-0288RevB
 Loading...