

Page 1
FormNo.3377-563RevB
g021465
VS-70andVS-80Screed
ModelNo.68054—SerialNo.313000001andUp
ModelNo.68055—SerialNo.313000001andUp
Registeratwww.T oro.com.
OriginalInstructions(EN)
*3377-563*B
Page 2
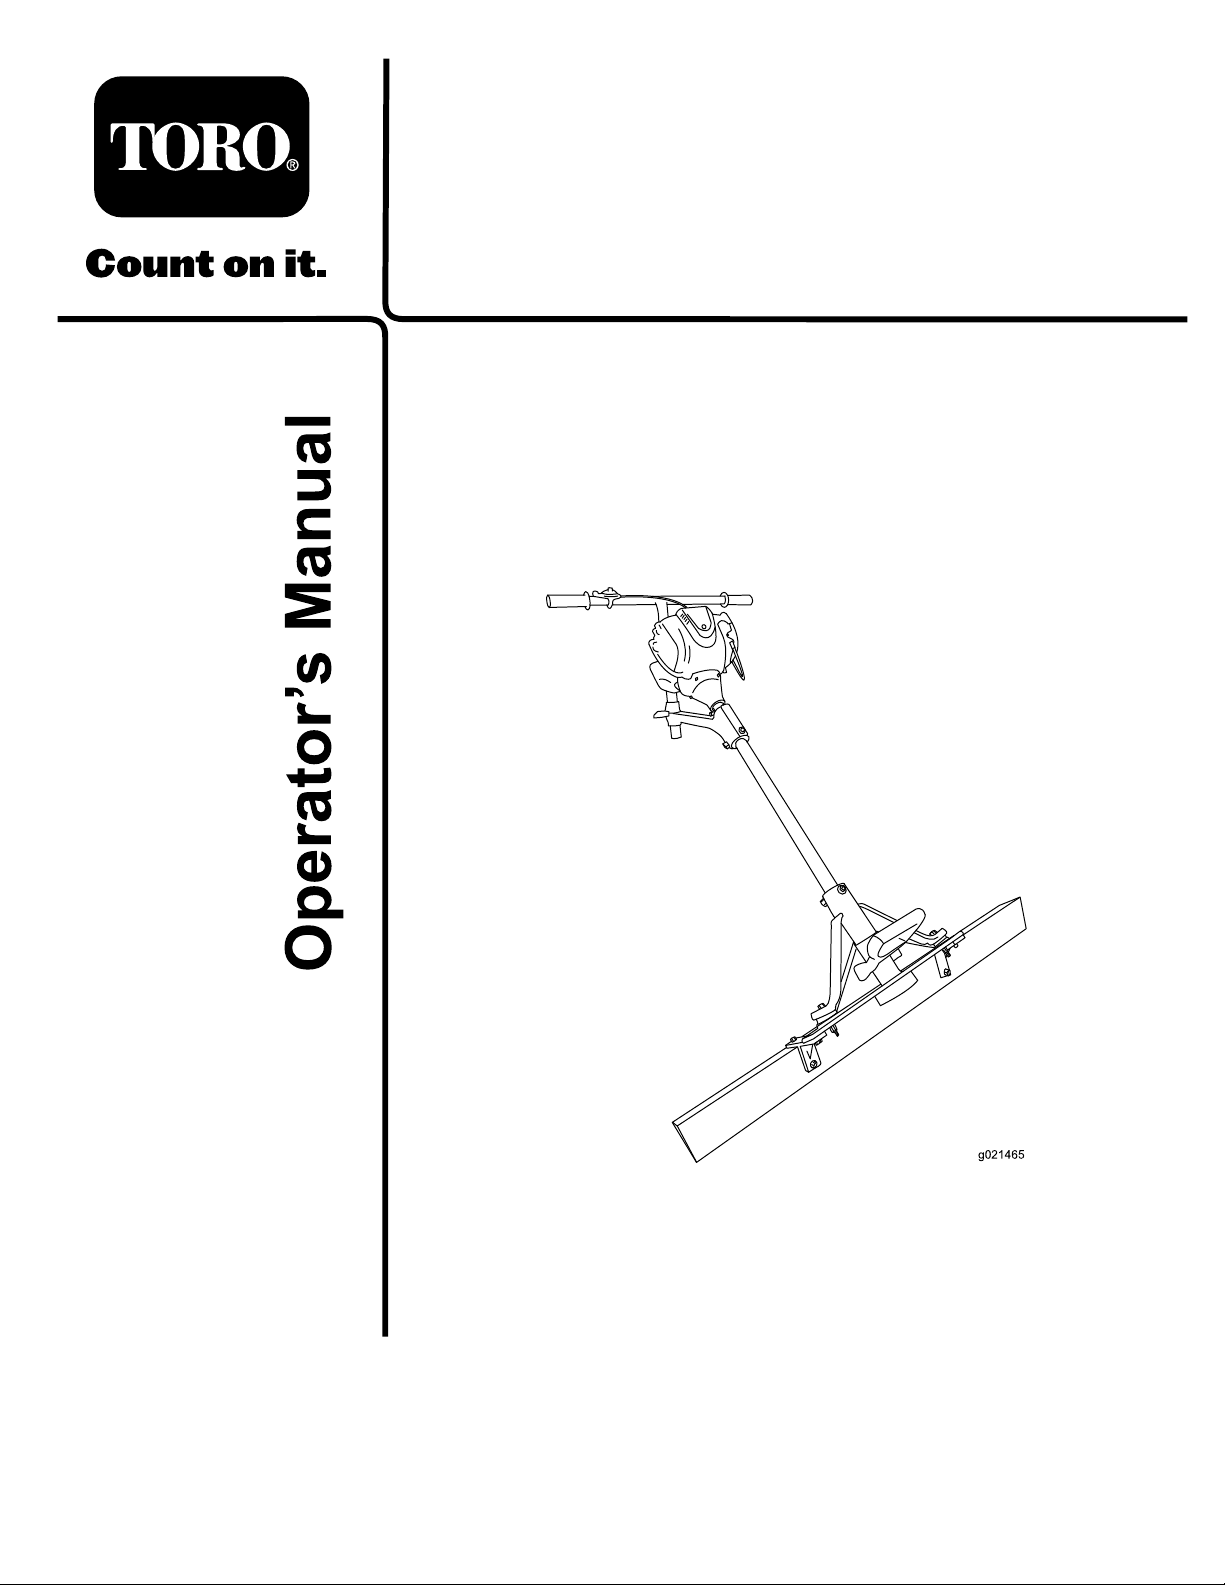
WARNING
g021641
1
CALIFORNIA
Proposition65Warning
Thisproductcontainsachemicalorchemicals
knowntotheStateofCaliforniatocausecancer,
birthdefects,orreproductiveharm.
Theengineexhaustfromthisproduct
containschemicalsknowntotheStateof
Californiatocausecancer,birthdefects,
orotherreproductiveharm.
Becauseinsomeareastherearelocal,state,orfederal
regulationsrequiringthatasparkarresterbeusedonthe
engineofthismachine,asparkarresterisincorporatedwith
themuferassembly.
GenuineTorosparkarrestersareapprovedbytheUSDA
ForestryService.
Important:Thisengineisequippedwithaspark
arrestermufer.ItisaviolationofCaliforniaPublic
ResourceCodeSection4442touseoroperatetheengine
onanyforest-covered,brush-covered,orgrass-covered
landwithoutasparkarrestermufermaintainedin
workingorder,ortheengineconstricted,equipped,and
maintainedforthepreventionofre.Otherstatesor
federalareasmayhavesimilarlaws.
Wheneveryouneedservice,genuineToroparts,oradditional
information,contactanAuthorizedServiceDealerorToro
CustomerServiceandhavethemodelandserialnumbersof
yourproductready .
Figure1identiesthelocationofthe
modelandserialnumbersontheproduct.Writethenumbers
inthespaceprovided.
Figure1
ThissparkignitionsystemcomplieswithCanadianICES-002.
Theenclosed
Engine Owner's Man ual
issuppliedfor
informationregardingtheUSEnvironmentalProtection
Agency(EPA)andtheCaliforniaEmissionControl
Regulationofemissionsystems,maintenance,and
warranty.Replacementsmaybeorderedthroughthe
enginemanufacturer.
Introduction
Thismachineisavibratingconcretescreedintendedforuse
invariousconcrete-formingwork.Themachineisdesigned
tooperatewithaluminumscreedboards.
Readthisinformationcarefullytolearnhowtooperateand
maintainyourproductproperlyandtoavoidinjuryand
productdamage.Youareresponsibleforoperatingthe
machineproperlyandsafely.
YoumaycontactTorodirectlyatwww .Toro.comforproduct
andaccessoryinformation,helpndingadealer,ortoregister
yourproduct.
1.Modelandserialnumberlocation
ModelNo.
SerialNo.
Thismanualidentiespotentialhazardsandhassafety
messagesidentiedbythesafetyalertsymbol(Figure2),
whichsignalsahazardthatmaycauseseriousinjuryordeath
ifyoudonotfollowtherecommendedprecautions.
Figure2
1.Safetyalertsymbol
Thismanualuses2wordstohighlightinformation.
Importantcallsattentiontospecialmechanicalinformation
andNoteemphasizesgeneralinformationworthyofspecial
attention.
©2013—TheToro®Company
8111LyndaleAvenueSouth
Bloomington,MN55420
Contactusatwww.T oro.com.
2
PrintedintheUSA
AllRightsReserved
Page 3

Contents
Safety
Introduction..................................................................2
Safety...........................................................................3
SafeOperatingPractices...........................................3
SafetyandInstructionalDecals.................................5
Setup............................................................................6
1InstallingtheHandlebarandThrottle
Cable.................................................................6
2AddingOiltotheEngine.......................................6
ProductOverview..........................................................7
Controls................................................................7
Specications.........................................................9
Operation....................................................................10
PreparingtoUsetheMachine...................................10
OperatorPositions.................................................10
AddingFuel...........................................................11
CheckingtheEngineOilLevel.................................13
StartingandStoppingtheEngine..............................13
ScreedingaConcreteSurface...................................14
TransportingtheMachine........................................15
Maintenance.................................................................16
RecommendedMaintenanceSchedule(s)......................16
PremaintenanceProcedures........................................17
PreparingtheMachineforMaintenance.....................17
DisconnectingtheSpark-plugWire...........................17
EngineMaintenance..................................................18
ServicingtheAirCleaner.........................................18
ChangingtheEngineOil.........................................19
ServicingtheSparkPlug..........................................20
FuelSystemMaintenance...........................................22
ServicingtheFuelSystem........................................22
Cleaning...................................................................23
CleaningtheMachine..............................................23
Storage........................................................................23
Troubleshooting...........................................................24
Improperuseormaintenancebytheoperatororowner
canresultininjury.Toreducethepotentialforinjury,
complywiththesesafetyinstructionsandalways
payattentiontothesafetyalertsymbol,which
means:
instruction.Failuretocomplywiththeinstructionmay
resultinpersonalinjuryordeath.
Caution
,
W ar ning
,or
Danger
—personalsafety
SafeOperatingPractices
WARNING
Engineexhaustcontainscarbonmonoxide,an
odorless,deadlypoisonthatcankillyou.
Donotruntheengineindoorsorinanenclosed
area.
Training
•ReadtheOperator'sManualandothertrainingmaterial.If
theoperator(s)ormechanic(s)cannotreadEnglish,itis
theowner'sresponsibilitytoexplainthismaterialtothem.
•Becomefamiliarwiththesafeoperationofthemachine,
operatorcontrols,andsafetysigns.
•Alloperatorsandmechanicsshouldbetrained.The
ownerisresponsiblefortrainingtheusers.
•Neverletchildrenoruntrainedpeopleoperateorservice
themachine.Localregulationsmayrestricttheageof
theoperator.
•Theowner/usercanpreventandisresponsiblefor
accidentsorinjuriesoccurringtopeople,ordamageto
property.
Preparation
•Wearappropriateclothingincludinghardhat,safety
glasses,longpants,safetyshoes,andhearingprotection.
Longhair,looseclothingorjewelrymaygettangledin
movingparts.
•Useextracarewhenhandlinggasolineandotherfuels.
Theyareammableandvaporsareexplosive.
–Useonlyanapproved-fuelcontainer.
–Neverremovethefuel-tankcaporaddfuelwiththe
enginerunning.
–Allowtheenginetocoolbeforefueling.
–Donotsmokewhilefueling.
–Neverrefuelordrainthemachineindoors.
•Checkthattheswitches,enginecontrols,andcoversare
attachedandfunctioningproperly.Donotoperateunless
theyarefunctioningproperly.
3
Page 4

Operation
MaintenanceandStorage
•Neverrunanengineinanenclosedarea.
•Onlyoperatethemachineingoodlight.
•Onlystarttheenginefromtheoperator'sposition.
•Neveroperatewiththecoversnotsecurelyinplace.
•Donotchangetheenginegovernorsettingoroverspeed
theengine.
•Stoponlevelgroundandshutofftheenginebefore
leavingtheoperator'spositionforanyreason.
•Keeppetsandbystandersawaywhileoperatingthe
machine.
•Donotoperatethemachineundertheinuenceof
alcoholordrugs.
•Usecarewhenloadingorunloadingthemachineintoa
trailerortruck.
•Movetheenginecontrolsinasmooth,steadymotion.
•Watchfortrafcwhenoperatingonornearroadways.
•Donottouchpartswhichmaybehotfromoperation.
Allowthemtocoolbeforeattemptingtomaintain,adjust,
orservice.
•Stoptheengineandwaitforallmovementtostopbefore
adjusting,cleaning,orrepairingthemachine.
•Cleandebrisfromthemufer,sparkarrester,andengine
tohelppreventres.
•Lettheenginecoolbeforestoringthemachine,anddo
notstoreitnearanopename.
•Donotstorefuelnearamesordrainfuelfromthe
machineindoors.
•Neverallowuntrainedpersonneltoservicethemachine.
•Donotmakeadjustmentswiththeenginerunning.
•Keepallpartsingoodworkingcondition.Replaceall
wornordamageddecals.
•Keepallhardwareofthemachinetight.Keepthe
machineingoodcondition.
•Nevertamperwithsafetydevices.
•Whenpresent,cleanupoilorfuelspillage.
•Useextracarewhenhandlinggasolineandotherfuels.
Theyareammableandvaporsareexplosive.
•Storefuelinanapprovedcontainer.
•Ensurethatyouoperatethemachineinareaswherethere
arenoobstaclesincloseproximitytotheoperator.Only
operatetheunitinareaswherethereissufcientclearance
fortheoperatortosafelymaneuvertheproduct.
•Donotplaceyourfeetunderthescreedboards.
•Lightningcancausesevereinjuryordeath.Iflightning
isseenorthunderisheardinthearea,donotoperate
themachine;seekshelter.
•Makeanynecessaryrepairstothemachinebeforestarting.
•UseonlygenuineTororeplacementpartstoensurethat
originalstandardsaremaintained.
4
Page 5
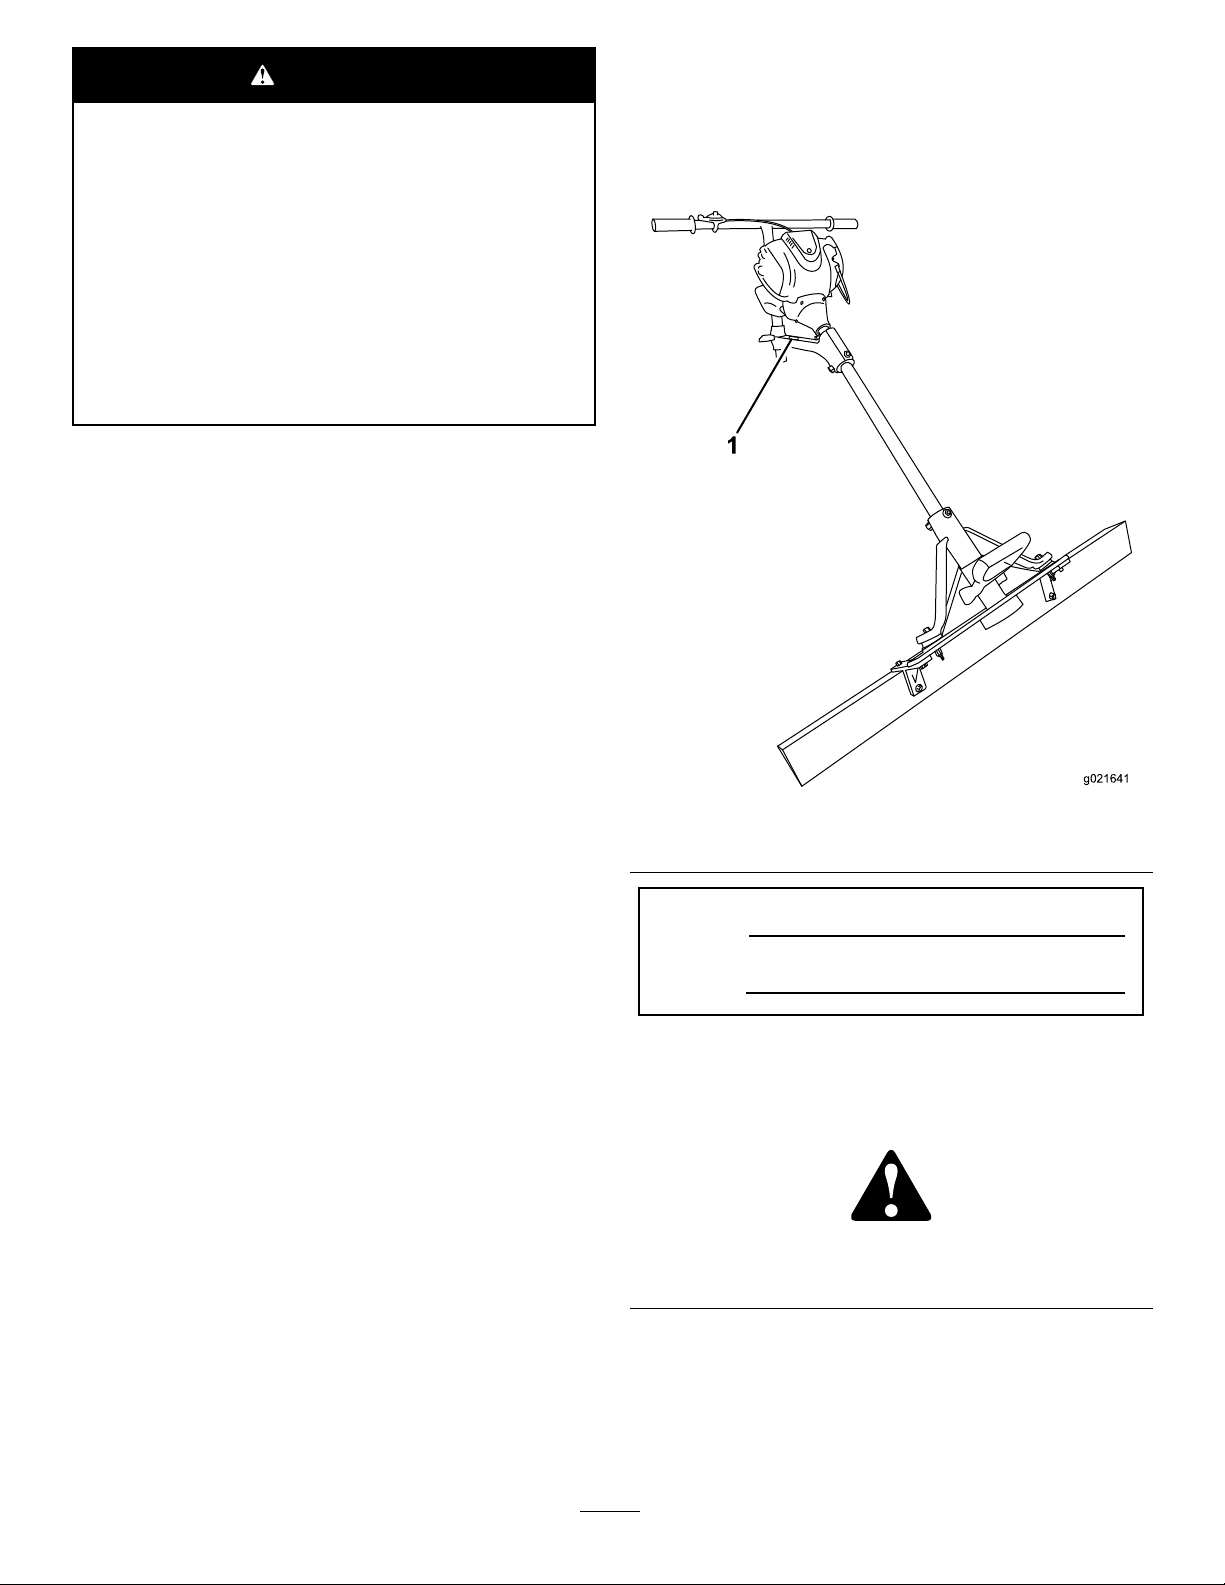
SafetyandInstructionalDecals
Safetydecalsandinstructionsareeasilyvisibletotheoperatorandarelocatednearanyareaofpotential
danger.Replaceanydecalthatisdamagedorlost.
117–2718
125–8192
1.ReadtheOperator’sManualfor
informationonstartingtheengine—1)
Turntheengineswitchon;2)Closethe
choke;3)Pulltherecoilstarthandle;
4)Openthechoke.
2.ReadtheOperator’sManual
forinformationonstoppingthe
engine—turntheengineswitchoff.
3.Warning—readtheOperator’sManual;
wearhearingprotection.
4.Warning—keepawayfrommoving
parts;keepallguardsandshieldsin
place.
5.Warning—keepbystandersawaywhen
operatingthemachine.
6.Chokinghazard—donotruntheengine
indoors.
7.Explosionhazard—stoptheengineand
extinguishallamesbeforerefueling.
5
Page 6
Setup
g021481
4
1
2
3
1
2
3
4
5
6
g022042
1 2
3
4
5
6
g022043
1
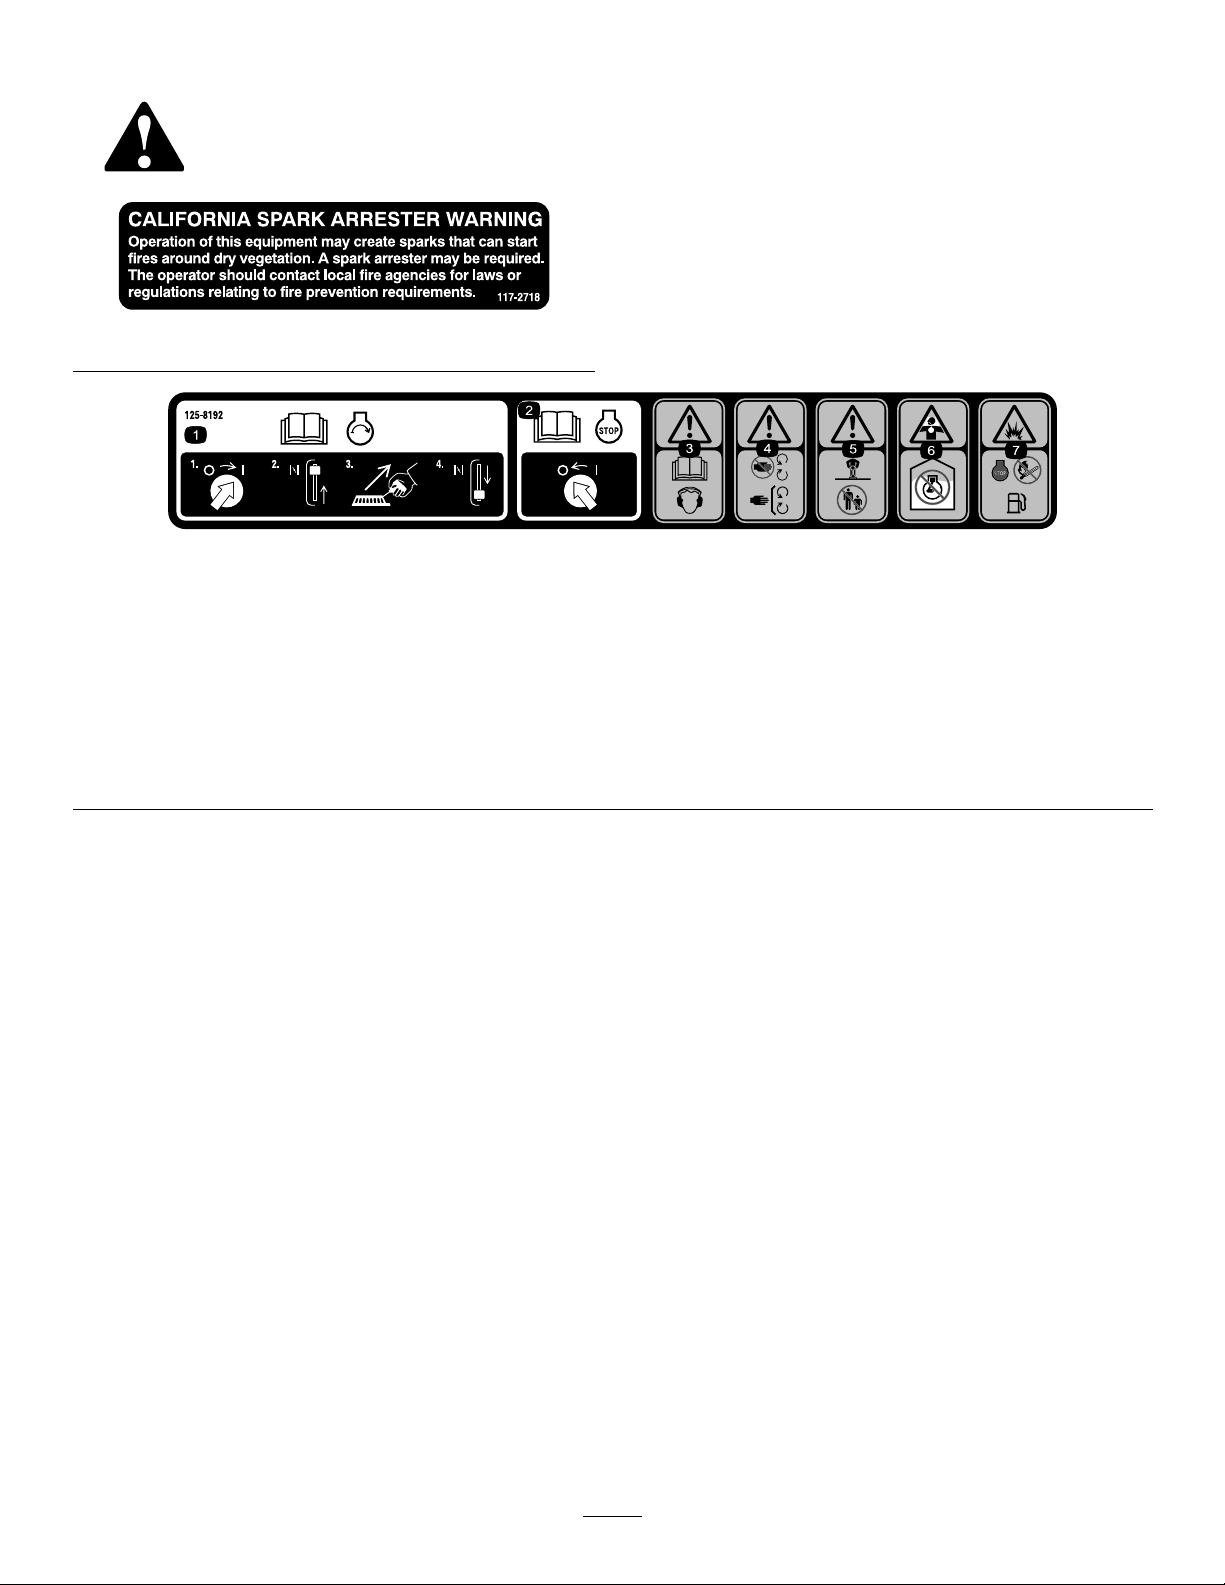
InstallingtheHandlebarand ThrottleCable
NoPartsRequired
Procedure
1.Slidethehandlebarintoposition(Figure3).
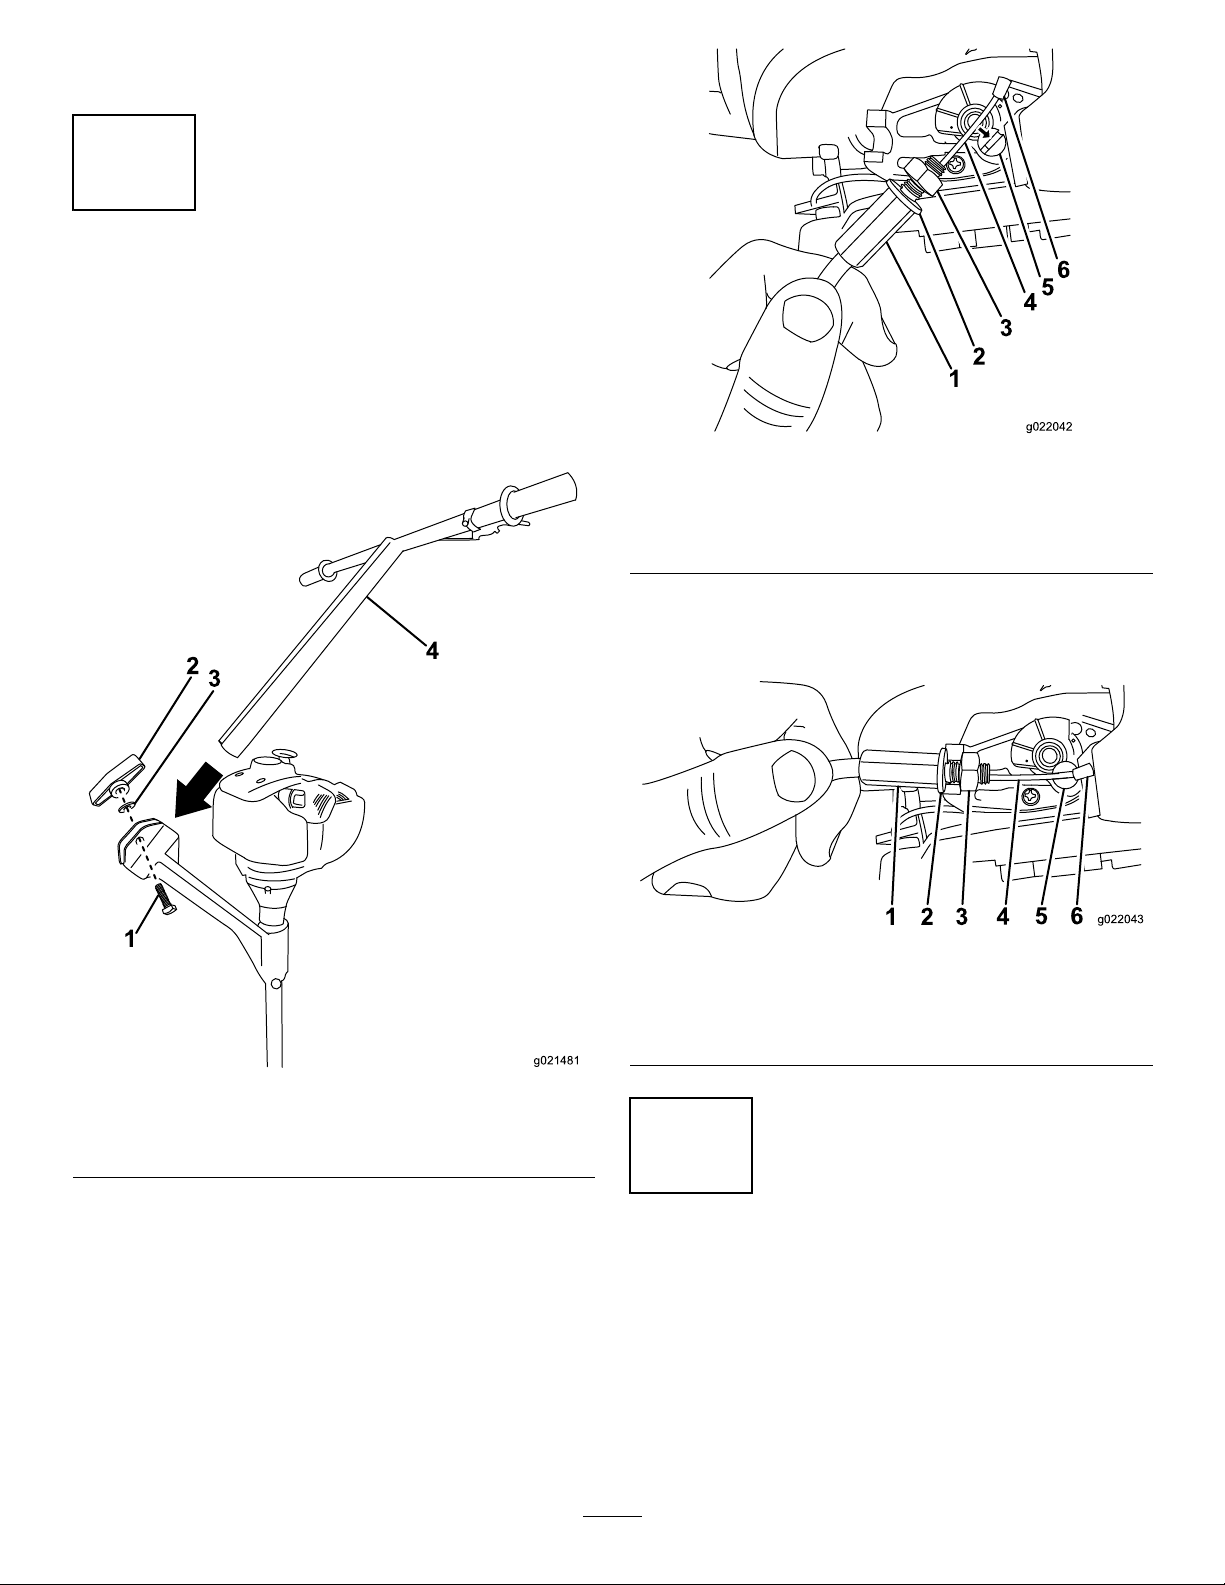
Figure4
1.Cabletting4.Cable
2.Washer
3.Nut
5.Movetheassemblyintoplace,letthecablestopslide
intoplace,andtightenthecablettingandnut;refer
toFigure5.
1.Cabletting4.Cable
2.Washer
3.Nut
5.Cableanchor
6.Cablestop
Figure5
5.Cableanchor
6.Cablestop
Figure3
1.Bolt3.Washer
2.Knob4.Handlebar
2.Installthebolt,washer,andknobtosecurethe
handlebartothemachine(Figure3).
3.Removetheaircleanercover;refertoFigure24.
4.Attachthethrottlecablebyplacingthecableintothe
cableanchor(
Figure4).
2
AddingOiltotheEngine
NoPartsRequired
Procedure
Thismachinedoesnotcomewithoil.Whenthemachineis
beingusedforthersttime,llwithoil.RefertoFillingthe
EngineCrankcasewithOil(page19).
6
Page 7
ProductOverview
g021466
1
2
3
4
5
6
g021468
6
5
4
1
2
3
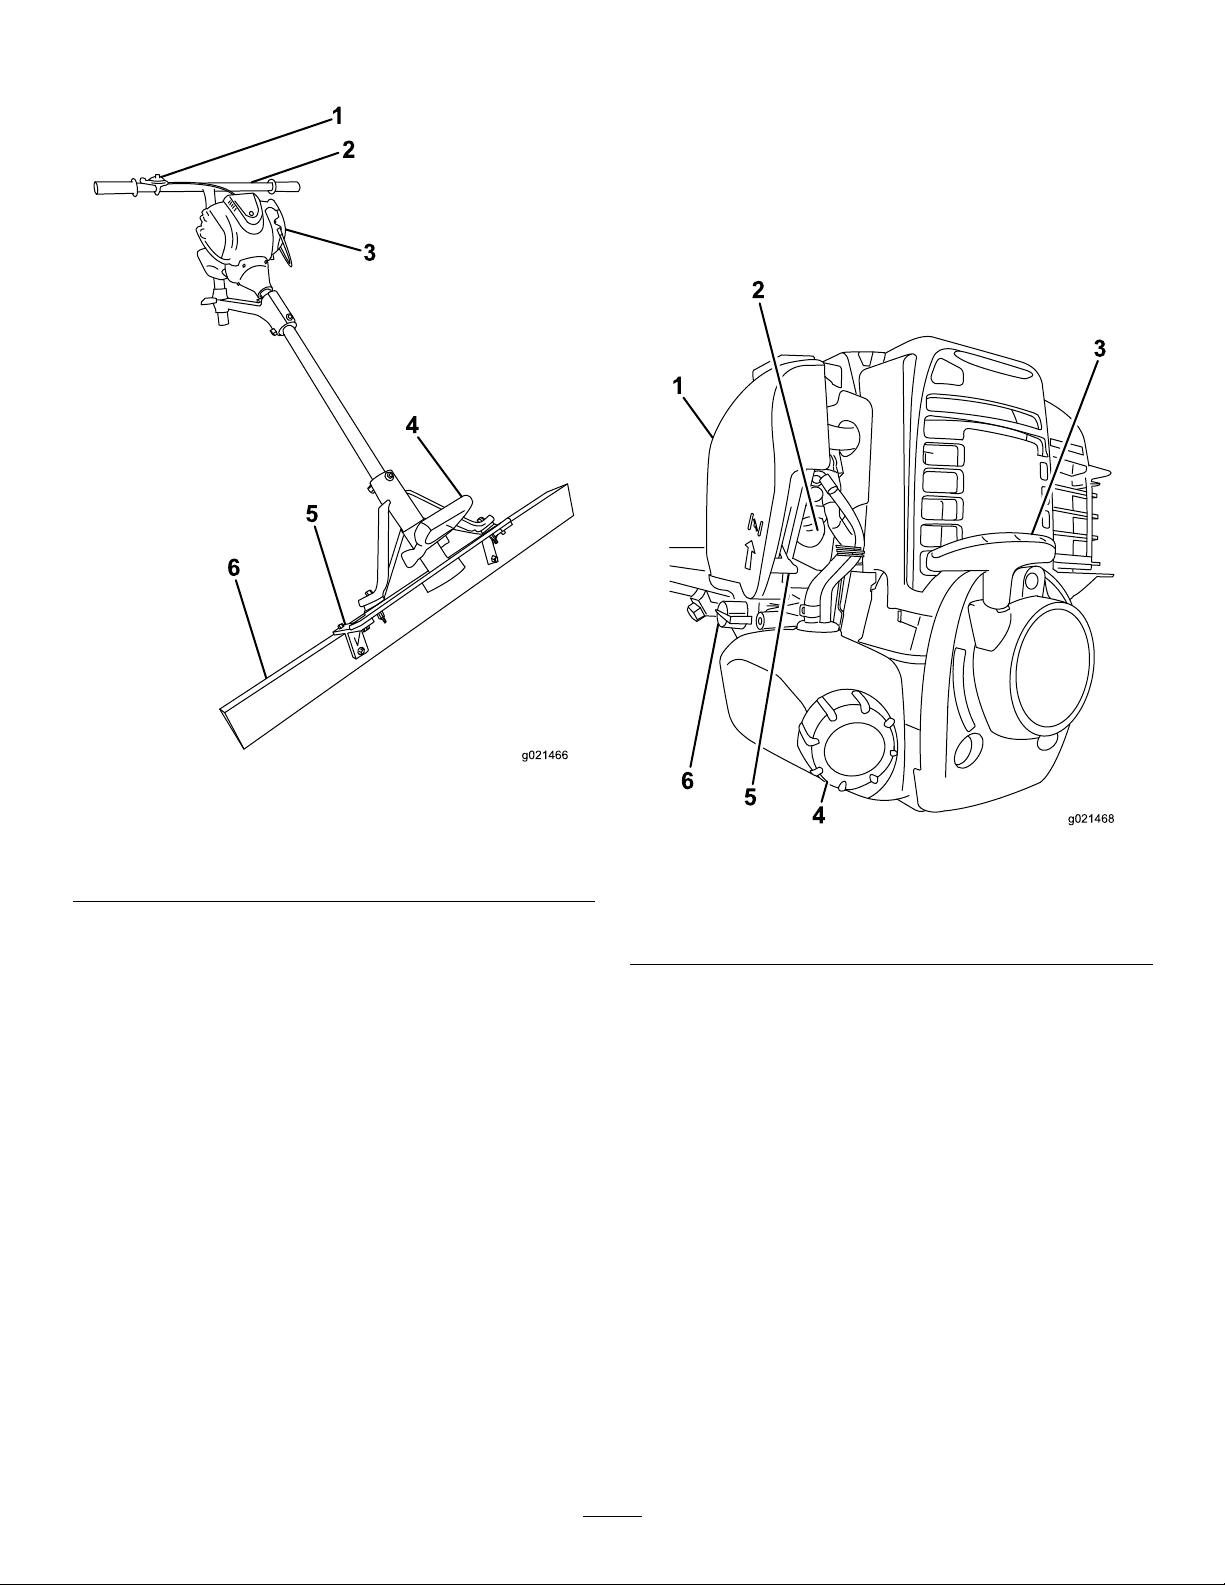
Controls
Becomefamiliarwithalltheenginecontrolsbeforeyoustart
andoperatethemachine.
EngineControls
Figure6
1.Throttlelever
2.handlebar5.Boardclamp
3.Engine6.Aluminumboard
4.Lifthandle
Figure7
1.Aircleanercover4.Fuelcap
2.Primingbulb
3.Recoilstarter
5.Chokelever
6.On/Offswitch
7
Page 8
g021469
1
2
g021470
2
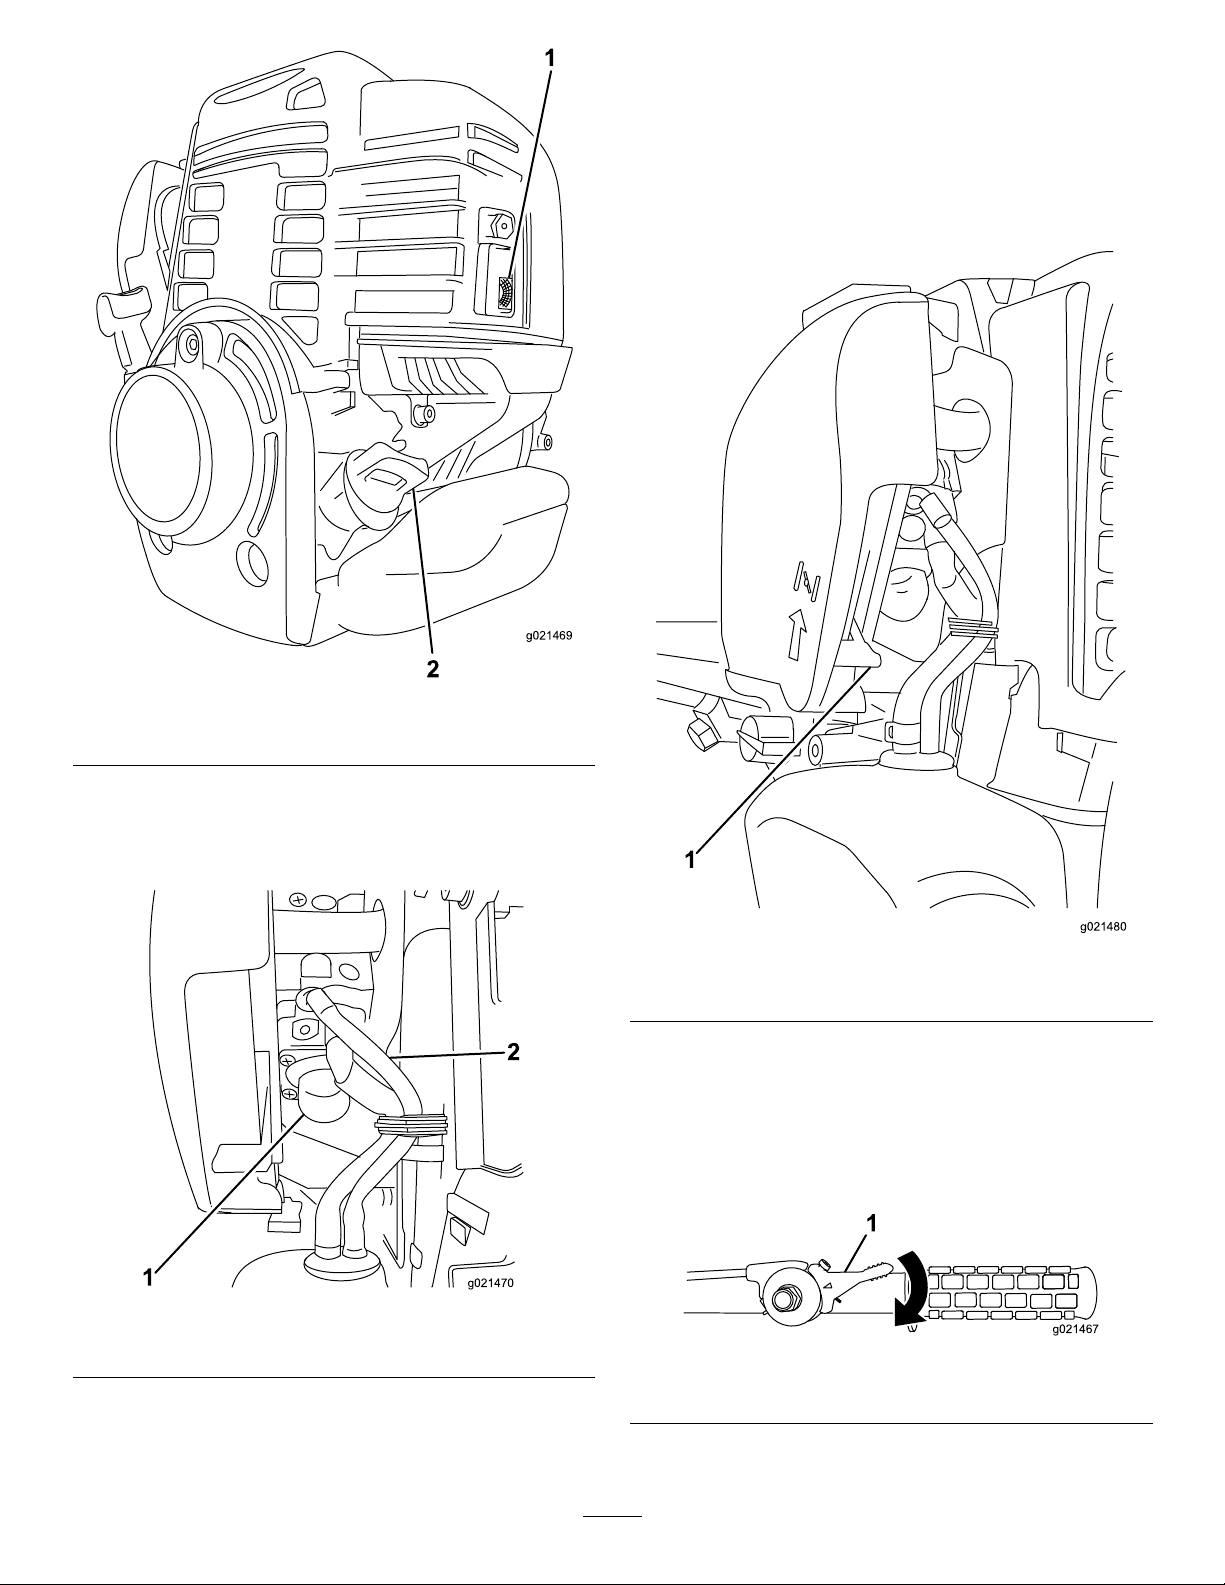
ChokeLever
g021480
1
g021467
1
Thechokelever(Figure10)isrequiredwhenstartinga
coldengine.Beforepullingontherecoil-starthandle,move
thechokelevertotheclosedposition.Oncetheengineis
running,movethechokelevertotheopenposition.Do
notusethechokeiftheengineisalreadywarmeduporthe
airtemperatureishigh.
Figure8
1.Sparkarrestor2.Oilcap
Primingbulb
Theprimingbulb(Figure9)islocatedabovethefuelcap.
Figure10
1.Chokeleverinopenposition
ThrottleLever
Thethrottlelever(Figure11)controlsthespeed(rpm)of
theengine.Itislocatedonthehandlebar.Moveittowards
themaximumpositionasshownin
throttle.
Figure11toincreasethe
Figure9
1.Primingbulb2.Fuelreturnpump
Figure11
1.Throttleleverinminimumposition
8
Page 9

Recoil-startHandle
g021471
OFF
ON
Tostarttheengine,pulltherecoil-starthandle(Figure7).
EngineOn/OffSwitch
TheOn/Offswitch(Figure12)allowstheoperatorofthe
machinetostartandstoptheengine.Thisswitchislocated
onthefrontoftheengine.Itismarkedl(On)andO(Off).
RotatetheOn/OffswitchtotheOnpositiontostartandrun
theengine.RotatetheOn/OffswitchtotheOffpositionto
stoptheengine.
Specications
Note:Specicationsanddesignaresubjecttochangewithoutnotice.
Figure12
VS-70VS-80
Width(withoutscreedboard)70.0cm(27.5inch)89.0cm(35.0inch)
Length
Height(withoutscreedboard)73.7cm(29.0inch)122.0cm(48.0inch)
Weight(withoutscreedboard)11.3kg(25.0lb)14.5kg(32.0lb)
Maximumscreedboardwidth
119.4cm(47.0inch)56.0cm(22.0inch)
3.7m(12.0ft)4.9m(16.0ft)
9
Page 10

Operation
g021642
g021643
Important:Beforeoperatingthemachine,checkthe
fuelandoillevels,andremovedebrisfromthemachine.
PreparingtoUsetheMachine
•Reviewallofthesafetydecalsonthemachine.
•Useahardhat,hearingprotection,tight-ttinggloves
withoutdrawstringsorloosecuffs,andeyeprotection.
Ameshvisoralonedoesnotprovidesufcienteye
protection;supplementwithprotectiveglasses.
•Ensurethatyouarefamiliarwithsafetyregulationsand
theshutdownproceduresdescribedintheOperator’s
ManualandtheEngineManual.
•Ensurethatallguardsareinplaceandingoodcondition.
•Ensurethatthescreedboardisingoodcondition,aligned
correctlyandsecuredtothemachine.
•Checkthefuelandoillevelsoftheengine.
OperatorPositions
Youmustbefamiliarwiththreepositionswhenusingthe
machine.
•Usetheoperatingposition(Figure13)whenrunningthe
machinetoscreedconcrete.
•Usetherestingpositionwhenleavingthemachine.
(Figure14).Neverleavetheenginerunningwhilethe
machineisintherestposition.Alwayssetthemachine
onaatsurface.
Figure13
Figure14
10
Page 11

•Usethegas-llingpositionwheneveryoullthegas
g021644
tank(Figure15).Witharmhandontheshaftofthe
machineandagascannexttotheoperator,unscrewthe
gascap,pickupthegascan,andllupthegastankon
themachine.
DANGER
Incertainconditions,gasolineisextremely
ammableandhighlyexplosive.Areorexplosion
fromgasolinecanburnyouandothersandcan
damageproperty.
•Fillthefueltankoutdoors,inanopenarea,
whentheengineiscold.Wipeupanygasoline
thatspills.
•Neverllthefueltankinsideanenclosedtrailer.
•Donotllthefueltankcompletelyfull.Add
gasolinetothefueltankuntilthelevelisno
higherthanthescreenonthelterinthefuel
tank.Thisemptyspaceinthetankallows
gasolinetoexpand.
•Neversmokewhenhandlinggasoline,andstay
awayfromanopenameorwheregasoline
fumesmaybeignitedbyaspark.
•Storegasolineinanapprovedcontainerand
keepitoutofthereachofchildren.Neverbuy
morethana30-daysupplyofgasoline.
Figure15
AddingFuel
•Oxygenatedfuelwithupto10%ethanolor15%MTBE
byvolumeisacceptable.
•Donotuseethanolblendsofgasoline(suchasE15
orE85)withmorethan10%ethanolbyvolume.
Performanceproblemsand/orenginedamagemayresult
whichmaynotbecoveredunderwarranty.
•Donotusegasolinecontainingmethanol.
•Donotstorefueleitherinthefueltankorfuelcontainers
overthewinterunlessyouuseafuelstabilizer.
•Donotaddoiltothefuel.
•Donotoperatethemachinewithoutentire
exhaustsysteminplaceandinproperworking
condition.
DANGER
Incertainconditionsduringfueling,static
electricitycanbereleasedcausingasparkwhich
canignitethegasolinevapors.Areorexplosion
fromgasolinecanburnyouandothersandcan
damageproperty.
•Alwaysplacethegasolinecontainersonthe
groundawayfromyourvehiclebeforelling.
•Donotllgasolinecontainersinsideavehicleor
onatruckortrailerbedbecauseinteriorcarpets
orplastictruckbedlinersmayinsulatethe
containerandslowthelossofanystaticcharge.
•Whenpractical,removegas-poweredequipment
fromthetruckortrailerandrefuelthemachine
ontheground.
•Ifthisisnotpossible,thenrefuelsuch
equipmentonatruckortrailerfromaportable
container,ratherthanfromagasolinedispenser
nozzle.
•Ifagasolinedispensernozzlemustbeused,
keepthenozzleincontactwiththerimofthe
fueltankorcontaineropeningatalltimesuntil
fuelingiscomplete.
11
Page 12

WARNING
g021472
1
Gasolineisharmfulorfatalifswallowed.Long-term
exposuretovaporscancauseseriousinjuryand
illness.
•Avoidprolongedbreathingofvapors.
•Keepfaceawayfromnozzleandgastankor
fuel-containeropening.
•Keepgasawayfromeyesandskin.
FillingtheFuelTank
Fueltankcapacity:0.65L(0.172USgallon)
Important:Theunusedspaceinthetankallowsthe
gasolinetoexpandwithchangesintemperature.Donot
llthefueltankcompletelyfull.
1.Stoptheengine;refertoStoppingtheEngine(page
14),movethemachinetoalevelsurface,andallowthe
enginetocool.
2.Placeacanofunleadedgasolinenexttoyourmachine.
Important:Donotmixoilwiththefuel.
RecommendedFuel
UnleadedGasoline
U.S.
Except
U.S.
Pumpoctanerating86orhigher
Researchoctanerating91orhigher
Pumpoctanerating86orhigher
UsingFuelStabilizer/Conditioner
Useafuelstabilizer/conditionerinthemachinetokeepthe
fuelfreshduringstorage.
Important:Donotusefueladditivescontaining
methanolorethanol.
Addthecorrectamountoffuelstabilizer/conditionertothe
fuel,andfollowthedirectionsofthemanufacturerofthe
stabilizer.
Note:Fuelstabilizer/conditionerismosteffectivewhen
mixedwithfreshgasoline.Tominimizethechanceofvarnish
depositsinthefuelsystem,usefuelstabilizeratalltimes.
3.Movethemachinetothegas-llingposition(Figure
15).
4.Cleanaroundthefuelcapandremoveit(Figure16).
Figure16
1.Fuelcap
5.Pickupthecanandaddunleadedgasolinetothefuel
tankasshowninFigure17.
Note:W atchthetankasitllswithgasolineandstop
pouringbeforethetankisfull.Thiswillallowforthe
gastoexpandinthetank.
12
Page 13

g021474
Figure17
g013375
0 20 40 60 80 100 F
-20 -10 0 10 20 30 40 C
o
o
30
5W - 30 / 10W - 30
1
2
g021473
6.Installthefuelcapsecurely(Figure16).
7.Wipeupanyspilledgasoline.
CheckingtheEngineOilLevel
1.Movethemachineonaat,levelsurface,andstop
theengine.
2.Allowtheenginetocool.
3.Cleanaroundtheoildipstick.
4.Removetheoilcap/dipstickandwipetheendclean
Figure19).
(
ServiceInterval:Beforeeachuseordaily
Important:Use4-cyclemotoroilthatmeetsorexceeds
therequirementsforAPIservicecategory
equivalent).AlwayschecktheAPIservicelabelonthe
oilcontainertobesureitincludestheSJorlater(or
equivalent)rating .
Donotoverllthecrankcasewithoilbecausetheengine
maybedamaged.
Runningtheenginewithalowoillevelcancauseengine
damage.Thistypeofdamageisnotcoveredbythe
warranty.
Note:SAE10W -30isrecommendedforgeneraluse.The
otheroilviscositiesshowninthechartmaybeusedwhenthe
averagetemperatureinyourareaiswithintheindicatedrange.
Crankcasecapacity:0.10L(0.11USqt)
SJ or later
(or
Figure19
1.Fillport
5.Slidethedipstickfullyintothellportwithout
threadingitintotheport(Figure19).
6.Removethedipstickandlookattheend.Iftheengine
oillevelislow ,slowlypouronlyenoughoilintothell
porttoraisetheleveltotheFullmarkonthedipstick
(Figure19).
7.Replaceandsecurethedipstick(Figure19).
2.Oilcap/dipstick
StartingandStoppingthe Engine
StartingtheEngine
Figure18
Note:T oroPremiumEngineOilisavailablefromyour
AuthorizedToroDealer.
1.Ensurethethrottleisatitslowestsetting(Figure11).
2.Tostartacoldengine,movethechokelevertothe
closedposition.Torestartawarmengine,leavethe
chokeleverintheopenposition(
3.Presstheprimingbulbrepeatedlyuntilfuelcanbeseen
intheprimingbulb(Figure9).
4.TurntheengineswitchtotheOnposition.
13
Figure10).
Page 14

5.Pulltherecoil-starthandlelightlyuntilyoufeel
g021475
1
2
3
4
5
6
7
g021484
resistance,thenpullthehandlebriskly(Figure20).
ScreedingaConcreteSurface
Note:Returntherecoil-starthandlegently.
Figure20
6.IfthechokeleverissettotheClosedpositionto
starttheengine,graduallymovethechokeleverback
towardtheOpenpositionastheenginewarmsup.
Iftheenginestallsorhesitates,movethechokelever
backtowardtheClosedpositionuntiltheengineruns
smooth.Allowtheenginetowarmup,thenmovethe
chokelevertotheOpenposition;referto(Figure10).
InstallingtheAluminumScreedBoard
Note:Onlyuseequilateraltrianglealuminumscreedboards
designedforthismachine.
Screedboardwidths:
VS-70VS-80
1.2meters(4feet)
1.8meters(6feet)
2.4meters(8feet)
3.0meters(10feet)
3.7meters(12feet)
4.3meters(14feet)
4.9meters(16feet)
1.Installtheboardclamptotheframeofthemachine
usingsquareboltsandsplit-lockwashers(
xx
xx
xx
xx
x
x
x
Figure21).
7.Allowtheenginetowarmupfor2to5minutes.
StoppingtheEngine
WARNING
Inanemergencysituation,stoptheengine
immediately.
Important:Duringnormaloperation,iftheengine
hasbeenworkinghardorishot,letitidleforaminute
beforestoppingtheengine.Thishelpstocoolthe
enginebeforestopping.
1.Movethethrottlelevertotheminimumposition
(Figure11).
2.RotatetheengineswitchtotheOffposition(Figure
12).
1.Nut
2.Split-lockwasher
3.Squarebolt
4.Hexbolt
Figure21
5.Split-lockwasher
6.Aluminumboard
7.Boardclamp
2.Installthealuminumboardtotheboardclampusing
hexboltsandsplit-lockwashers(Figure21).
14
Page 15

Note:Toremovethescreedboard,reversethesteps
1
2
3
4
g021668
ofthisprocedure.
LevelingtheConcreteSurface
Thismachinecanoatoverwetconcretewithorwithout
theaidofforms.
1.Applyaconcretedeactivatortothesurfaceofthe
aluminumscreedboardandanyotherpartofthe
machinethatmaycomeincontactwithconcrete.
Note:Donotputconcretedeactivatorontheengine.
2.Liftthescreedontotheconcrete.
3.Starttheengine;referto
4.Movethethrottlelevertothemaximumposition;refer
toFigure11.
StartingtheEngine(page13).
7.Attheendofthescreedpass,movetheenginethrottle
totheidlepositionandallowtheenginetoidlefor1
minute.
8.Stoptheengineandmovethescreedoffthecement;
referto
9.Cleanthescreedofcement,sand,andaggregateafter
eachpasswithwaterandasoft-bristlebrush.
StoppingtheEngine(page14).
TransportingtheMachine
Whentransportingthemachine,makesureto;
1.Emptythegastank;refertoFigure33.
2.Removethesquareboltssecuringthemachinetothe
boardclamps(Figure21).
Note:Alwaysoperatetheengineatfullthrottlewhen
smoothingmaterial.
5.Pullthescreedinaslow ,steadymotionalongthe
concretewhilewalkingbackward.Raisetheleading
edgeofscreedboardtoallowforcompaction;refer
to
Figure22.
3.Removethehandlebar(Figure3)
4.Placethemachineandscreedboardsecurelyinyour
vehicle.
Figure22
1.Aluminumscreedboard3.Leadingedge
2.Trailingedgeatgrade
Note:Makesuretheareabehindtheoperatoris
clear.Havesomeoneguidetheoperatorastheymove
backwards.
Note:Ensurethatanadequateamountofconcreteis
loadedaheadoftheleadingedgeofthescreedboard
fortheentirescreedingpass.
6.Allowforabout2.5cm(1inch)ofconcretetobuildup
infrontofscreedboard;referto
importantasitkeepsthetrailingedgeongrade.
Note:Y ouwillhavetohaveatleastoneotherperson
toconstantlykeepconcretebuilduponthebar.
4.Concretebuildup
Figure22.Thisisvery
15
Page 16

Maintenance
Note:Determinetheleftandrightsidesofthemachinefromthenormaloperatingposition.
RecommendedMaintenanceSchedule(s)
MaintenanceService
Interval
Aftertherst50hours
Beforeeachuseordaily
Aftereachuse
Every25hours
Every50hours
Every100hours
Every300hours
Yearlyorbeforestorage
Important:Refertoyour
MaintenanceProcedure
•Changetheoil.
•Checktheengineoillevel.
•Inspecttheaircleanerelements.
•Checkforloosefasteners.
•Cleanthemachine.
•Changetheoilwhenoperatedunderheavyloadsorinhightemperatures.
•Cleantheairlterelements.Cleanthemmorefrequentlyindustyoperating
conditions.
•Changetheoil.
•Checkthesparkplug.
•Cleanthefuellter .
•Replacethepaperaircleanerelement.Replaceitmorefrequentlyindustyoperating
conditions.
•Replacethesparkplug.
•Changetheoil.
•T ouchupchippedpaint.
Engine Operator's Man ual
foradditionalmaintenanceprocedures.
16
Page 17

CAUTION
g021476
1
2
1
2
g021477
Disconnectthewirefromthesparkplugbeforeyoudoanymaintenance.Setthewireasidesothatitdoes
notaccidentallycontactthesparkplug .
Premaintenance
Procedures
PreparingtheMachinefor Maintenance
1.Turnthemachineoff,moveittoalevelsurface,and
setitdownintherestposition.
2.Ensurethattheengineandmuferarecool.
3.Removethetopcoverandthespark-plugwire.
4.Removethescreedboardsfromthemachine.
DisconnectingtheSpark-plug Wire
1.Removethetopcover.
2.Pullthespark-plugwireofftheterminalofthespark
plug(Figure24).
Figure24
1.Sparkplug2.Spark-plugwire
Figure23
1.Topcover2.Hexbolt
17
Page 18

EngineMaintenance
g021486
1
ServicingtheAirCleaner
ServiceInterval:Beforeeachuseordaily—Inspecttheair
cleanerelements.
Every50hours—Cleantheairlterelements.Clean
themmorefrequentlyindustyoperatingconditions.
Every300hours/Yearly(whichevercomes
rst)—Replacethepaperaircleanerelement.Replace
itmorefrequentlyindustyoperatingconditions.
Important:Donotoperatetheenginewithouttheair
lterassembly;extremeenginedamagewilloccur.
1.Stoptheengineandwaitfortheenginetocooldown.
2.Disconnectthewirefromthesparkplug;referto
RemovingtheSparkPlug(page20).
3.Unclipandremovetheaircleanercover(Figure25).
9.Wipedirtfromthebaseandthecoverwithamoistrag.
Note:Becarefultopreventdirtanddebrisfrom
enteringtheairductleadingtothecarburetor.
10.Installthefoamelementsandensurethatitisproperly
positioned.
11.Securelyinstalltheaircleanercover.
12.Reconnectthespark-plugwire.
13.Installthetopcoverandsecurewithbolt.
Figure25
1.Aircleanercover
Note:Becarefultopreventdirtanddebrisfrom
fallingintothebase.
4.Removethefoamelementfromthebase.
5.Inspectthefoamelement,andreplaceitifdamaged
orexcessivelydirty.
6.Cleanthefoamelementinwarm,soapywaterorina
nonammablesolvent.
Note:Donotusegasolinetocleanthefoamelement
becauseitcouldcreateariskofreorexplosion.
7.Rinseanddrythefoamelementthoroughly.
8.Dipthefoamelementincleanengineoil,thensqueeze
outtheexcessoil.
Note:Excessoilinthefoamelementrestrictstheair
owthroughtheelementandmayreachthepaper
lterandclogit.
18
Page 19

ChangingtheEngineOil
g021483
0 20 40 60
80
10 0°F
-20 -10 0 10 20 30 40 °C
5W–30 · 10 W– 30
30
1
G019298
1
2
g021473
ServiceInterval:Aftertherst50hours/Monthly
(whichevercomesrst)—Changetheoil.
Every100hours/Every6months(whichevercomes
rst)—Changetheoil.
Every25hours—Changetheoilwhenoperatedunder
heavyloadsorinhightemperatures.
Yearlyorbeforestorage—Changetheoil.
FillingtheEngineCrankcasewithOil
Important:Use4-strokemotoroilthatmeetsorexceeds
therequirementsforAPIservicecategory
equivalent).AlwayschecktheAPIservicelabelonthe
oilcontainertobesureitincludestheSJorlater(or
equivalent).
Runningtheenginewithalowoillevelcancauseengine
damage.Thistypeofdamageisnotcoveredbywarranty.
Donotoverllthecrankcasewithoilbecausetheengine
maybedamaged.
SJ or later
(or
DrainingtheEngineOil
1.Starttheengineandletitrun5minutesStartingthe
Engine(page13)thenturnitoff.
Note:Thiswarmstheoilsoitdrainsbetter.
2.Removescreedboardsiftheyareattached.
3.Placeadrainpan,witha1.9L(2USqt)capacityor
greaterontheground
4.Removetheoilcap.
5.Witharmgriponthehandlebarsandtheshaftofthe
machine,pourtheoilintothepan(
Figure26).
Note:SAE10W-30isrecommendedforgeneraluse.
Otherviscositiesshowninthechartmaybeusedwhenthe
averagetemperatureinyourareaiswithintheindicatedrange.
Crankcaseoilcapacity:0.10L(0.11USqt)
Figure27
1.Oilviscosityrangeforambientoperatingtemperatures
Note:T oroPremiumEngineOilisavailablefromyour
AuthorizedToroDealer.
1.Removetheoilcap/dipstick(Figure28).
Figure26
6.Whentheoilhasdrainedcompletely,installtheoilcap,
andwipeupanyspilledoil(Figure26).
Note:Disposeoftheusedoilatacertiedrecycling
center.
Figure28
1.Fillport
19
2.Oilcap/dipstick
Page 20

2.Slowlypourapproximately80%ofthespecied
1
2
g021477
G019300
1 2
4
3
amountofoilintothellport(Figure28).
3.Addadditionaloiltobringtheoilleveltotheproper
llamount;referto(Figure28).
4.Installtheoilcap/dipstick(Figure28).
ServicingtheSparkPlug
ServiceInterval:Every100hours/Every6months
(whichevercomesrst)—Checkthe
sparkplug.
Every300hours/Yearly(whichevercomes
rst)—Replacethesparkplug.
Note:Usea5/8inchsparkplugwrenchforremovingand
installingthesparkplug.
RemovingtheSparkPlug
1.TurnofftheengineStoppingtheEngine(page14)and
placethemachineintherestingposition(Figure14).
2.Ensurethatthemachinesurfacesarecool.
3.Removethetopcover.
4.Pullthespark-plugwireofftheterminalofthespark
plug(
Figure29).
CheckingtheSparkPlug
Note:Useagappingtool/feelergaugetocheckandadjust
theairgap.Installanewsparkplugifnecessary.
AirGap:0.6to0.7mm(0.024to0.028inch)
Sparkplugtype:CM5H(NKG),CMR5H(NGK),or
equivalent
1.Lookatthecenterofthesparkplug(
seelightbrownorgrayontheinsulator,theengineis
operatingproperly.
Important:Nevercleanthesparkplug .Always
replacethesparkplugwhenithasablackcoating,
wornelectrodes,anoilylm,orcracks.
Figure30
1.Sideelectrode
2.Centerelectrode4.0.6to0.7mm(0.024to
3.Insulator
0.028inch)gap
Figure30).Ifyou
1.Sparkplug
5.Cleanaroundthesparkplug.
6.Rotatethesparkplugcounterclockwiseusinga5/8
inchspark-plugwrenchtoremovetheplugandsealing
washer.
2.Useagappingtoolforsparkplugsorafeelergaugeto
measurethegapbetweenthesideelectrodeandcenter
electrode(
Figure30).
3.Ifthemeasuredgapisnotwithinthespeciedrange,
dothefollowing:
A.Ifthegapistoosmall,carefullybendtheside
electrodeawayfromthecenterelectrodeuntilthe
gapbetweentheelectrodesiswithinthemeasured
airgaprange.
B.Ifthegapistoolarge,carefullybendtheside
electrodetowardfromthecenterelectrodeuntil
thegapbetweentheelectrodesiswithinthe
measuredairgaprange.
InstallingtheSparkPlug
Important:Ensurethatthegapbetweenthesideand
centerelectrodesiscorrectbeforeinstallingthespark
plug.
Figure29
2.Wire
1.Threadthesparkplugclockwiseintothespark-plug
holebyhand.
Note:Avoidcrossthreadingthesparkplugwiththe
threadsofthespark-plughole.
2.Rotatesparkplugclockwiseusinga5/8inchspark-plug
wrenchuntiltheplugandsealingwasherareseated.
3.Tightentheplugasfollows:
20
Page 21

•Wheninstallinganin-servicesparkplug,tighten
1
2
g021479
g021487
1
thepluganadditional1/8to1/4turn.
•Wheninstallinganewsparkplug,tightentheplug
anadditional1/2turn.
4.Installthespark-plugwirepushingthewireontothe
terminaloftheplug(Figure29).
CleaningtheSparkArrester
1.Removethetopcoverandsparkplugwire.
2.Removethesparkarrester(Figure31).
Figure32
1.Sparkarrestor
Figure31
1.Screw2.Sparkarrestor
3.Useabrushtoremovecarbondepositsfromthespark
arresterscreen(Figure32).
21
Page 22

FuelSystem
g021482
1
2
g021478
Maintenance
ServicingtheFuelSystem
Cleaningthefuellter
ServiceInterval:Every100hours/Yearly(whichevercomes
rst)—Cleanthefuellter.
Insidethefueltankisafuelltertocatchdirtinthefuel.
1.Turnofftheengine;refertoStoppingtheEngine
(page14)andplacethemachineintherestingposition
(Figure14).
2.Ensurethattheengineandtheexhaustsystemsurfaces
arecool.
3.Disconnectthewirefromthesparkplug;referto
RemovingtheSparkPlug(page20).
4.Emptythefueltank(Figure33).
Figure33
5.Useabentpapercliptocarefullypullthefuellterout
ofthefueltank(Figure34).
Figure34
1.Paperclip
6.Cleanthefuellterbygentlywashingwitha
nonammablesolvent.
Note:Ifthefuellterisexcessivelydirty,replaceit.
7.Insertthefuellterintothefueltankandtightenthe
fuelcap.
2.Fuellter
22
Page 23

Cleaning
CleaningtheMachine
Storage
Important:Youcanwashthemachinewithmild
detergentandwater.Donotpressurewashtheengine.
Regularcleaningandwashingwillincreasethelifespanof
themachine.Cleanthemachineaftereachuse,beforethe
cementdries.
Ensurethatthefueltankcapandoilcap/dipstickaresecure
toavoidgettingwaterinthetank.
Usecarewhenusingahigh-pressuresprayer,becauseitcan
damagewarningdecals,instructionsigns,andtheengine.
Cleanthescreedofcement,sand,andaggregateaftereach
usewithwaterandasoft-bristlebrush.
1.Removeconcrete,sand,andaggregatefromthe
externalpartsofthemachine,especiallytheengine.
Cleandirtfromtheoutsideoftheengine'scylinder
headnsandhousing.
2.Servicetheaircleaner;referto
Cleaner(page18).
3.Changetheengineoil;referto
Oil(page19).
4.Removethesparkplugandchecktheconditionof
each;referto
5.Forstorageover30days,conditionthefuelsystemas
follows:
Important:Donotuseanalcohol-basedstabilizer
(ethanolormethanol).
Note:Afuelstabilizer/conditionerismosteffective
whenmixedwithfreshfuelandusedatalltimes.
Donotstorestabilizerconditionedfuelforover90
days.
A.Addapetroleumbasedstabilizer/conditionerto
fuelinthetank.Followmixinginstructionsfrom
stabilizermanufacturer.
ServicingtheSparkPlug(page20).
ServicingtheAir
ChangingtheEngine
B.Starttheengineandrunituntilitstops.
C.Choketheengine.
D.Startandruntheengineuntilitwillnotstartagain.
E.Disposeoffuelproperly .Recycleasperlocal
codes.
6.Forstorageover90days,conditiontheengineas
follows:
A.Removethespark-plugwirefromthesparkplug
B.Removethesparkplugfromtheengineandpour
twotablespoonsofengineoilintothesparkplug
hole.
C.Placeragsoverthesparkplugholetocatchany
oilsprayandthenpulltherecoil-starthandleto
distributetheoilinsidethecylinder.
D.Installthesparkplug,butdonotinstallthe
spark-plugwire.
7.Checkandtightenallbolts,nuts,andscrews.Repairor
replaceanypartthatisdamagedordefective.
8.Paintallscratchedorbaremetalsurfaces.Paintis
availablefromyourAuthorizedServiceDealer.
9.Storethemachineunitinaclean,drygarageorstorage
area.
10.Coverthemachinetoprotectitandkeepitclean.
23
Page 24

Troubleshooting
Problem
Theenginewillnotstart.
Theenginelackspowerorrunsrough.
PossibleCauseCorrectiveAction
1.Thefuel-valveleverisintheOff
position.
2.Thechokeisclosed.
3.Thechokeisopen.
4.TheengineOn/OffswitchisintheOff
position.
5.Thefueltankisempty.5.Fillthefueltankwithfreshfuel.
6.Theenginecontainsbad/oldfuel.6.Drainthefueltankandcarburetor.Fuel
7.Thesparkplugisfouledorimproperly
gapped.
8.Thesparkplugiswetwithfuel(ooded
engine).
9.Thespark-plugwireislooseor
disconnected.
1.Theairlterisrestricted.1.Cleanorreplacetheairlterelement(s).
2.Theenginecontainsbad/oldfuel.2.Drainthefueltankandcarburetor.
3.Thereiswaterorcontaminationinthe
fuel.
4.Thefuellineisrestricted.4.Cleanthefuellterandsedimentcup.
5.Thechokeisclosed
6.Thesparkplugiswornorhasbuildup
ontheelectrodes.
7.Thereistoomuchoilintheengine
crankcase.
1.Movethefuel-valvelevertotheOn
position.
2.Openthechokewhenstartingahot
engine.
3.Closethechokewhenstartingacold
engine.
4.RotatetheswitchtotheOnposition.
themachinewithfreshgasoline.
7.Gaporreplacethesparkplug.
8.Removethesparkplug,dryit,and
installtheplug.Starttheenginewith
thethrottleintheMaxposition.
9.Removethespark-plugwire,cleanthe
spark-plugterminalandtheterminal
socketinthebootofthespark-plug
wire,andreinstallthespark-plugwire.
Refuelwithfreshgasoline.
3.Drainthefueltankandcarburetor.Fuel
themachinewithfreshgasoline.
5.Openthechoke.
6.Checktheelectrodegapandadjustor
replacethesparkplug.
7.Draintheoiltotheproperlevel.
Themachineisnotsmoothingthe
concreteproperly .
1.Thereisanexcessiveamountof
concretebuildupalongtheedgesof
theboard.
2.Theoperatorismovingtooslowly.
3.Thereistoomuchvibrationforthetype
ofconcrete.
4.Theconcreteistoohighorlowonone
side.
5.Theboardisnotpositionedcorrectly.5.Repositiontheboard.
1.Removeexcessiveconcretefromthe
board.
2.Movethescreedatafasterpace.
3.Reduceenginespeedandmovethe
screedatafasterpace.
4.Haveworkersshapetheconcreteas
closeaspossibletograde.Maintain
about1inchofconcreteacrossthe
frontoftheboardatalltimes.
24
Page 25

Notes:
25
Page 26

Notes:
26
Page 27

Notes:
27
Page 28

Alimitedwarranty(seewarrantyperiodsbelow)
TheToroWarranty
Concrete,Masonry,
andCompaction
Equipment
ConditionsandProductsCovered
TheT oroCompanyanditsafliate,T oroWarrantyCompany,pursuantto
anagreementbetweenthem,jointlywarrantyourT oroConcrete,Masonry ,
andCompactionEquipmentProductslistedbelowtobefreefromdefects
inmaterialsorworkmanship.
Thiswarrantycoversthecostofpartsandlabor,butyoumustpay
transportationcosts.
Thefollowingtimeperiodsapplyfromthedateofpurchase:
ProductsWarrantyPeriod
ConcreteMixers
•SpindleBearingsLifetime*(originalowneronly)
MortarMixers1year
•DrumBearingsandSealsLifetime*(originalowneronly)
ForwardPlateCompactors
ReversiblePlates1year
RammerCompactors
MudBuggy1year
VibratingTrenchRoller2years
ConcreteSaws
MasonrySaws
PowerTrowels1year
Screeds
ConcreteVibrators
Whereawarrantableconditionexists,wewillrepairtheProductatnocost
toyouincludingdiagnosis,labor,andparts.
*
LifetimeWarranty-Ifthebearing(s)orseal(s)onyourmixerfail,itwillbereplacedunderwarranty,
atnocostforpartsorlabor.
1year
2years
2years
1year
1year
1year
1year
InstructionsforObtainingWarrantyService
IfyouthinkthatyourT oroProductcontainsadefectinmaterialsor
workmanship,followthisprocedure
1.ContactanyAuthorizedServicingOutlettoarrangeserviceattheir
dealership.Tolocateoneconvenienttoyou,accessourwebsiteat
www.T oro.com.Select“WheretoBuy”andselect“Contractor”under
producttype.Y oumayalsocallourtollfreenumberbelow.
2.Bringtheproductandyourproofofpurchase(salesreceipt)tothem.
3.IfforanyreasonyouaredissatisedwiththeServiceOutlet’s
analysisorwiththeassistanceprovided,contactusat:
SWSCustomerCareDepartment
ToroWarrantyCompany
811 1LyndaleAvenueSouth
Bloomington,MN55420-1 196
TollFree:800-888-9926
**
ToroAuthorizedRentalCustomerswhohavepurchasedproductsdirectlyfromToroandhave
signedtheToroRentalCustomerAgreementhavetheabilitytoperformtheirownwarrantywork.
PleasevisitToro’ sRentalPortalforelectronicwarrantyclamlingproceduresorcallthetollfree
numberabove.
**
:
OwnerResponsibilities
YoumustmaintainyourT oroProductbyfollowingthemaintenance
proceduresdescribedintheOperator’sManual.Suchroutine
maintenance,whetherperformedbyadealerorbyyou,isatyourexpense.
Partsscheduledforreplacementasrequiredmaintenance(“Maintenance
Parts”),arewarrantedfortheperiodoftimeuptothescheduled
replacementtimeforthatpart.Failuretoperformrequiredmaintenance
andadjustmentscanbegroundsfordisallowingawarrantyclaim.
ItemsandConditionsNotCovered
Notallproductfailuresormalfunctionsthatoccurduringthewarranty
periodaredefectsinmaterialsorworkmanship.Thisexpresswarranty
doesnotcoverthefollowing:
•Productfailureswhichresultfromtheuseofnon-Tororeplacement
parts,orfrominstallationanduseofadd-on,modied,orunapproved
accessories
•Productfailureswhichresultfromfailuretoperformrequired
maintenanceand/oradjustments
•ProductfailureswhichresultfromoperatingtheProductinan
abusive,negligentorrecklessmanner
•Partssubjecttoconsumptionthroughuseunlessfoundtobe
defective.Examplesofpartswhichareconsumed,orusedup,during
normalproductoperationinclude,butarenotlimitedto,belts,wipers,
sparkplugs,tires,lters,gaskets,wearplates,seals,O-rings,drive
chains,clutches.
•Failurescausedbyoutsideinuence.Itemsconsideredtobeoutside
inuenceinclude,butarenotlimitedto,weather,storagepractices,
contamination,useofunapprovedcoolants,lubricants,additives,or
chemicals,etc.
•Normal“wearandtear”items.Normal“wearandtear”includes,butis
notlimitedto,wornpaintedsurfaces,scratcheddecals,etc.
•Anycomponentcoveredbyaseparatemanufacturer’swarranty
•Pickupanddeliverycharges
GeneralConditions
RepairbyanAuthorizedServicingOutletorSelf-ServiceasanAuthorized
RentalCustomerisyoursoleremedyunderthewarranty.
NeitherTheToroCompanynorToroWarrantyCompanyisliablefor
indirect,incidentalorconsequentialdamagesinconnectionwith
theuseoftheToroProductscoveredbythiswarranty ,including
anycostorexpenseofprovidingsubstituteequipmentorservice
duringreasonableperiodsofmalfunctionornon-usepending
completionofrepairsunderthiswarranty.Allimpliedwarranties
ofmerchantabilityandtnessforusearelimitedtotheduration
ofthisexpresswarranty.Somestatesdonotallowexclusionsof
incidentalorconsequentialdamages,orlimitationsonhowlong
animpliedwarrantylasts,sotheaboveexclusionsandlimitations
maynotapplytoyou.
Thiswarrantygivesyouspeciclegalrights,andyoumayalsohaveother
rightswhichvaryfromstatetostate.
ExceptfortheenginewarrantycoverageandtheEmissionswarranty
referencedbelow,ifapplicable,thereisnootherexpresswarranty .The
EmissionsControlSystemonyourProductmaybecoveredbyaseparate
warrantymeetingrequirementsestablishedbytheU.S.Environmental
ProtectionAgency(EPA)ortheCaliforniaAirResourcesBoard(CARB).
RefertotheCaliforniaEmissionControlWarrantyStatementsuppliedwith
yourProductorcontainedintheenginemanufacturer’sdocumentationfor
details.
CountriesOtherthantheUnitedStatesorCanada
CustomerswhohavepurchasedT oroproductsoutsidetheUnitedStatesorCanadashouldcontacttheirT oroDistributor(Dealer)toobtainguarantee
policiesforyourcountry,province,orstate.IfforanyreasonyouaredissatisedwithyourDistributor'sserviceorhavedifcultyobtainingguarantee
information,contacttheT oroimporter.Ifallotherremediesfail,youmaycontactusatT oroWarrantyCompany.
AustralianConsumerLaw:AustraliancustomerswillnddetailsrelatingtotheAustralianConsumerLaweitherinsidetheboxoratyourlocalT oro
Dealer.
374-0288RevB
 Loading...