

Page 1
FormNo.3421-181RevA
VR-2650RammerCompactor
ModelNo.68034—SerialNo.402000000andUp
ModelNo.68035—SerialNo.402000000andUp
ModelNo.68036—SerialNo.402000000andUp
Registeratwww.T oro.com.
OriginalInstructions(EN)
*3421-181*A
Page 2
WARNING
Introduction
CALIFORNIA
Proposition65Warning
Thisproductcontainsachemical
orchemicalsknowntotheStateof
Californiatocausecancer,birthdefects,
orreproductiveharm.
Theengineexhaustfromthisproduct
containschemicalsknowntotheStateof
Californiatocausecancer,birthdefects,
orotherreproductiveharm.
Becauseinsomeareastherearelocal,state,or
federalregulationsrequiringthatasparkarresterbe
usedontheengineofthismachine,asparkarresteris
availableasanoption.Ifyourequireasparkarrester,
contactyourAuthorizedServiceDealer.GenuineToro
sparkarrestersareapprovedbytheUSDAForestry
Service.
ItisaviolationofCaliforniaPublicResourceCode
Section4442touseoroperatetheengineonany
forest-covered,brush-covered,orgrass-covered
landwithoutasparkarrestermufermaintainedin
workingorder,ortheengineconstricted,equipped,
andmaintainedforthepreventionofre.Otherstates
orfederalareasmayhavesimilarlaws.
Thismachineisdesignedtocompactawidearrayof
soilsubstances,includingclay,silt,gravel,sand,and
loam.
Readthisinformationcarefullytolearnhowtooperate
andmaintainyourproductproperlyandtoavoid
injuryandproductdamage.Youareresponsiblefor
operatingtheproductproperlyandsafely .
YoumaycontactTorodirectlyatwww.Toro.comfor
productandaccessoryinformation,helpndinga
dealer,ortoregisteryourproduct.
Wheneveryouneedservice,genuineToroparts,or
additionalinformation,contactanAuthorizedService
DealerorToroCustomerServiceandhavethemodel
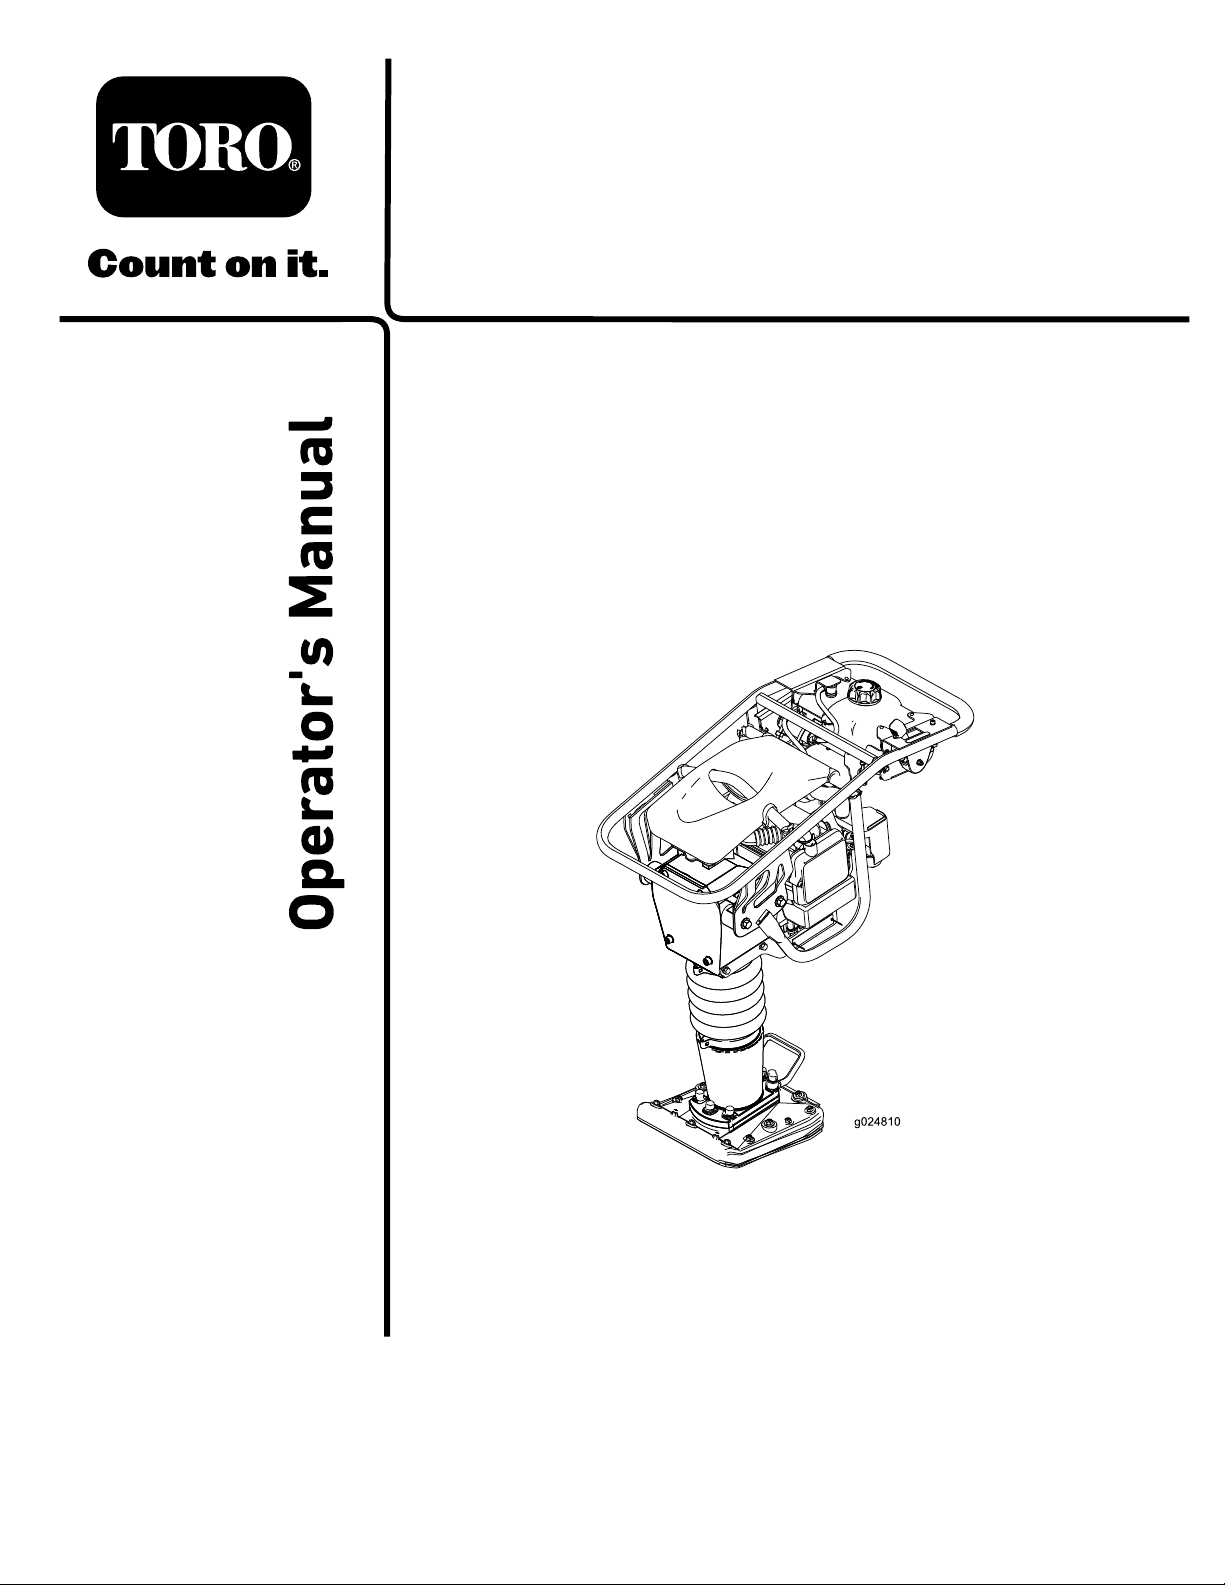
andserialnumbersofyourproductready.Figure
1illustratesthelocationofthemodelandserial
numbersontheproduct.Writethenumbersinthe
spaceprovided.
Important:Withyourmobiledevice,youcan
scantheQRcodeontheserialnumberdecal(if
equipped)toaccesswarranty,parts,andother
productinformation.
Theenclosedengineowner'smanualissupplied
forinformationregardingtheUSEnvironmental
ProtectionAgency(EPA)andtheCaliforniaEmission
ControlRegulationofemissionsystems,maintenance,
andwarranty.Replacementsmaybeorderedthrough
theenginemanufacturer.
g240400
Figure1
1.Modelandserialnumberplate
©2017—TheToro®Company
8111LyndaleAvenueSouth
Bloomington,MN55420
Contactusatwww.Toro.com.
2
PrintedintheUSA
AllRightsReserved
Page 3

ModelNo.
SerialNo.
Thismanualidentiespotentialhazardsandhas
safetymessagesidentiedbythesafetyalertsymbol
(Figure2),whichsignalsahazardthatmaycause
seriousinjuryordeathifyoudonotfollowthe
recommendedprecautions.
Figure2
1.Safetyalertsymbol
Thismanualuses2wordstohighlightinformation.
Importantcallsattentiontospecialmechanical
informationandNoteemphasizesgeneralinformation
worthyofspecialattention.
Contents
Safety.......................................................................4
SafeOperatingPractices....................................4
SafetyandInstructionalDecals..........................5
ProductOverview.....................................................7
Controls.............................................................7
Specications....................................................9
Operation..................................................................9
PreparingtoUsetheMachine.............................9
AddingFuel........................................................9
CheckingtheMachine-FluidLevels..................12
StartingtheEngine...........................................12
g000502
ShuttingOfftheEngine.....................................12
TransportingtheMachine.................................12
OperatingTips.................................................13
Maintenance...........................................................14
RecommendedMaintenanceSchedule(s)...........14
Pre-MaintenanceProcedures..............................14
DisconnectingtheSpark-PlugWire..................15
EngineMaintenance...........................................15
ServicingtheAirCleaner..................................15
ServicingtheEngineOil....................................17
ServicingtheSpring-HousingOil......................18
ServicingtheSparkPlug...................................20
CompactorShoeMaintenance.............................21
CheckingtheCompactorShoe.........................21
Cleaning..............................................................21
RemovingDebrisfromtheMachine..................21
Storage...................................................................22
.........................................................................22
RemovingtheMachinefromStorage................22
Troubleshooting......................................................23
3
Page 4

Safety
–Extinguishallcigarettes,cigars,pipes,and
othersourcesofignition.
Improperuseormaintenancebytheoperatororowner
canresultininjury.Toreducethepotentialforinjury,
complywiththesesafetyinstructionsandalwayspay
attentiontothesafetyalertsymbol,whichmeans:
Caution,Warning,orDanger—personalsafety
instruction.Failuretocomplywiththeinstructionmay
resultinpersonalinjuryordeath.
SafeOperatingPractices
Thisproductiscapableofcausingseriousinjury .
Alwaysfollowallsafetyinstructionstoavoidserious
injuryordeath.
WARNING
Engineexhaustcontainscarbonmonoxide,
anodorless,deadlypoisonwhichislethalif
inhaled.
Donotruntheengineindoorsorinan
enclosedarea.
–Useonlyanapprovedcontainer
–Donotremovethefuelcaporllthefueltank
whiletheengineisrunningorhot.
–Donotaddordrainfuelinanenclosedspace.
–Donotstorethemachineorfuelcontainer
wherethereisanopename,spark,orpilot
light,suchasonawaterheaterorother
appliance.
–Ifyouspillfuel,donotattempttostartthe
engine;avoidcreatinganysourceofignition
untilthefuelvaporshavedissipated.
•Checkthattheshieldsareattachedand
functioningproperly.Donotoperateunlessthey
arefunctioningproperly.
Operation
•Useyourfullattentionwhileoperatingthe
machine.Donotengageinanyactivitythat
causesdistractions;otherwise,injuryorproperty
damagemayoccur.
Training
•ReadtheOperator'sManualandothertraining
material.Iftheoperator(s)ormechanic(s)cannot
readorunderstandtheinformation,itisthe
owner'sresponsibilitytoexplainthismaterialto
them.
•Becomefamiliarwiththesafeoperationofthe
equipment,operatorcontrols,andsafetysigns.
•Alloperatorsandmechanicsshouldbetrained.
Theownerisresponsiblefortrainingtheusers.
•Neverletchildrenoruntrainedpeopleoperateor
servicetheequipment.Localregulationsmay
restricttheageoftheoperator.
•Theowner/usercanpreventandisresponsiblefor
accidentsorinjuriesoccurringpeopleordamage
toproperty.
Preparation
•Wearappropriateclothingincludinghardhat,eye
protection,longpants,substantial,slip-resistant
footwear,andhearingprotection.Tiebacklong
hair,securelooseclothing,anddonotwearloose
jewelry.
•Inspecttheareawheretheequipmentistobe
usedandensurethatallobjectsareremovedfrom
theareabeforeuse.
•Useextracarewhenhandlingfuel.Theyare
ammableandvaporsareexplosive.
•Neverrunanengineinanenclosedorpoorly
ventilatedarea.
•Operatethemachineonlyingoodlight,keeping
awayfromholesandhiddenhazards.
•Stoponlevelground,setthethrottletoslow,and
shutofftheenginebeforeleavingtheoperator's
positionforanyreason.
•Ensurethattheareaisclearofotherpeoplebefore
operatingthemachine.Shutoffthemachineif
anyoneentersthearea.
•Keepbystandersoutoftheoperatingarea.Stop
themachineifanyoneentersthearea.
•Keepyourfeetclearoftheplatecompactor.
•Donotoperatethemachinewhileill,tired,or
undertheinuenceofalcoholordrugs.
•Donotchangetheenginegovernorsettingor
overspeedtheengine.
•Usecarewhenloadingorunloadingthemachine
intoatrailerortruck.
•Donottouchpartswhichmaybehotfrom
operation.Allowthemtocoolbeforeattemptingto
maintain,adjust,orservice.
•Lightningcancausesevereinjuryordeath.If
lightningisseenorthunderisheardinthearea,do
notoperatethemachine;seekshelter.
4
Page 5
MaintenanceandStorage
•Lettheenginecoolbeforestoringanddonotstore
themachinenearanopename.
•Positionthemachineonalevelsurface,setthe
throttletoslow,andshutofftheengine.Waitfor
allmovementtostopbeforeadjusting,cleaning,
orrepairing.
•Cleandebrisfromdrives,mufers,andtheengine
tohelppreventres.Cleanupoilorfuelspills.
•Donotstorefuelnearamesordrainindoors.
•Neverallowuntrainedpersonneltoservicethe
machine.
•Disconnectthesparkplugbeforemakingany
repairs.
•Keephandsandfeetawayfrommovingparts.If
possible,donotmakeadjustmentswiththeengine
running.
•Keepallpartsingoodworkingconditionandall
hardwaretightened.Replaceallwornordamaged
decals.
•Keepnutsandboltstight.Keepequipmentin
goodcondition.
•Stopandinspecttheequipmentifyoustrike
anobject.Makeanynecessaryrepairsbefore
restarting.
•Carefullyreleasepressurefromcomponentswith
storedenergy.
SafetyandInstructionalDecals
Safetydecalsandinstructionsareeasilyvisibletotheoperatorandarelocatednearanyarea
ofpotentialdanger.Replaceanydecalthatisdamagedormissing.
133-5619
•UseonlygenuineT ororeplacementpartsto
ensurethatoriginalstandardsaremaintained.
decal133-5619
1.Movelefttostartthe
engine.
decal125-8181
125-8181
1.Kickbackhazard—readtheOperator’sManualbefore
performingmaintenance.
decal125-4966
125-4966
2.Moveuptoshutoffthe
engine.
5
Page 6
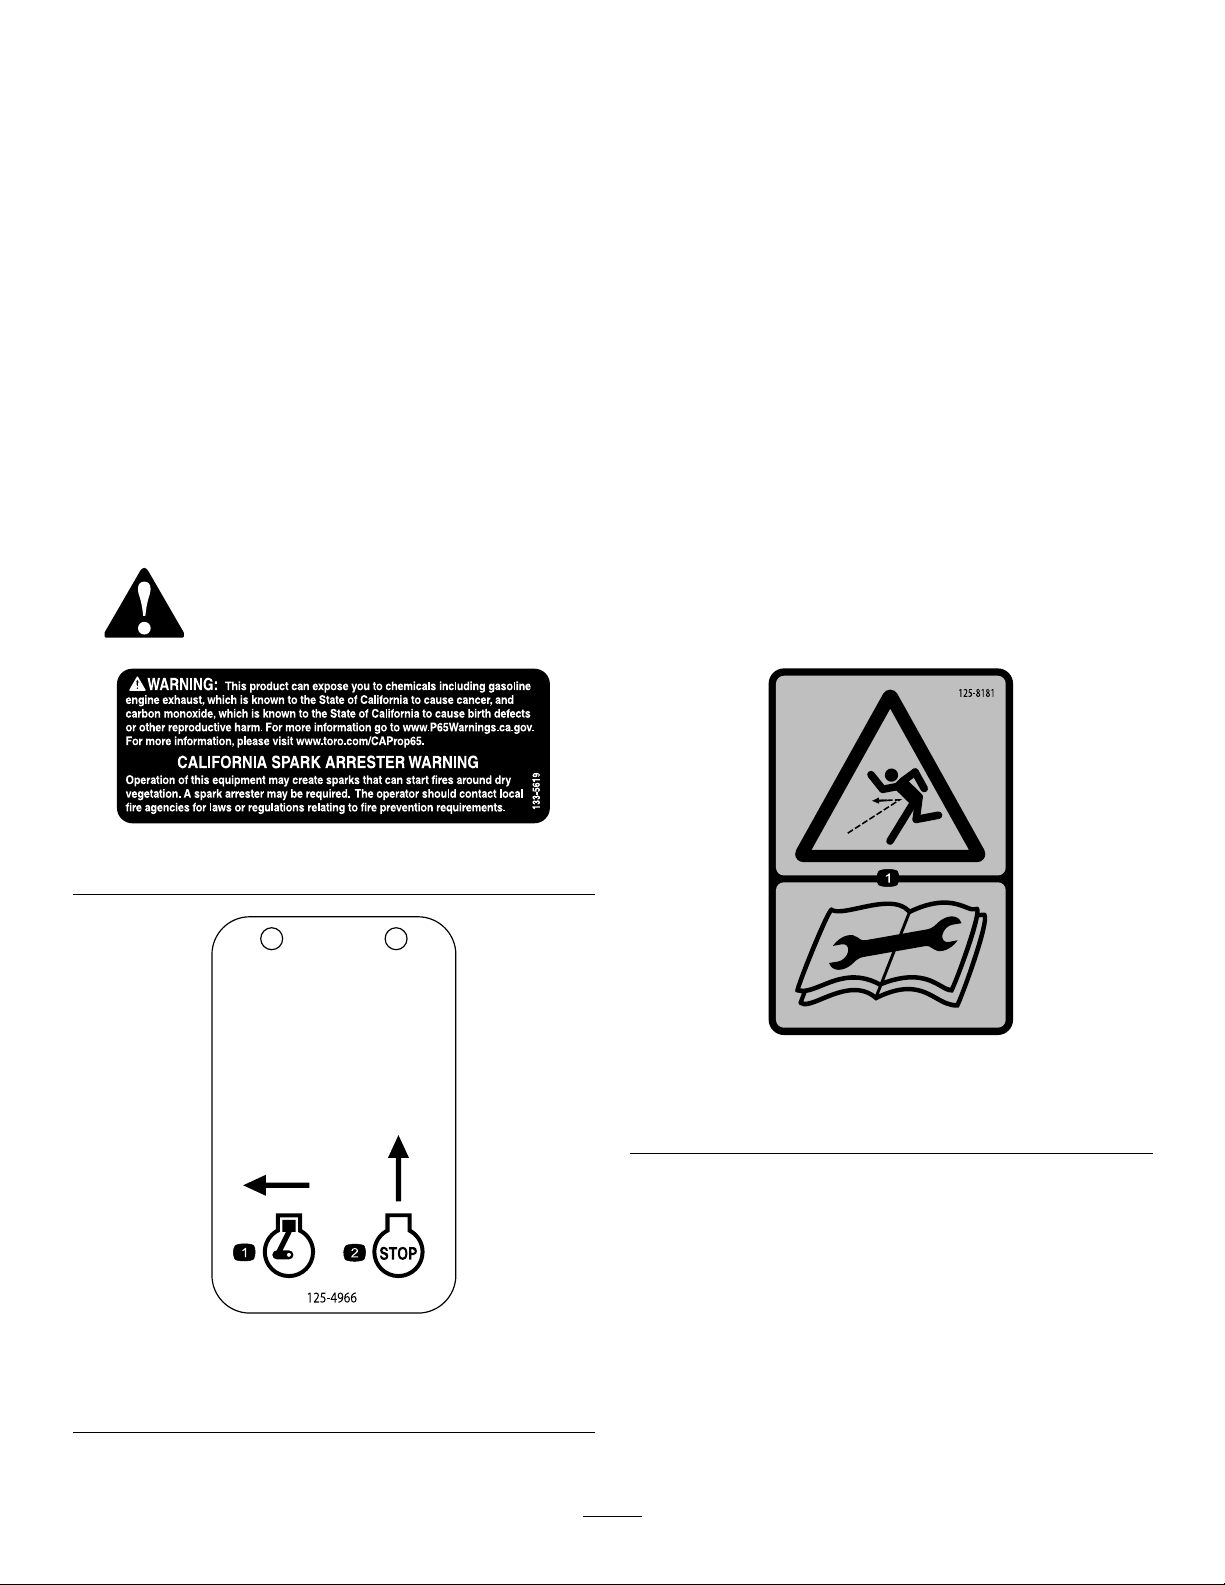
decal125-8183
125-8183
1.ReadtheOperator’sManual—checktheoillevel.
decal125-8182
125-8182
1.Slow
3.Fast
2.Variablespeedcontrol
1.ReadtheOperator’sManualforinformationonstartingthe
engine—1)Turnlevertotheenginestartposition;2)Closethe
choke;3)Pulltherecoilstarter;4)Openthechoke.
2.ReadtheOperator’sManualforinformationonshuttingoffthe
engine—turnlevertoenginestopposition.
3.Warning—readtheOperator’sManual;wearhearing
protection.
4.Warning—keepawayfrommovingparts;keepallguardsand
shieldsinplace.
decal125-8191
125-8191
5.Warning—keepbystandersawaywhenoperatingthe
machine.
6.Chokinghazard—donotruntheengineinanenclosed
location.
7.Explosionhazard—shutofftheengineandextinguishall
amesbeforerefuelingthemachine.
6
Page 7
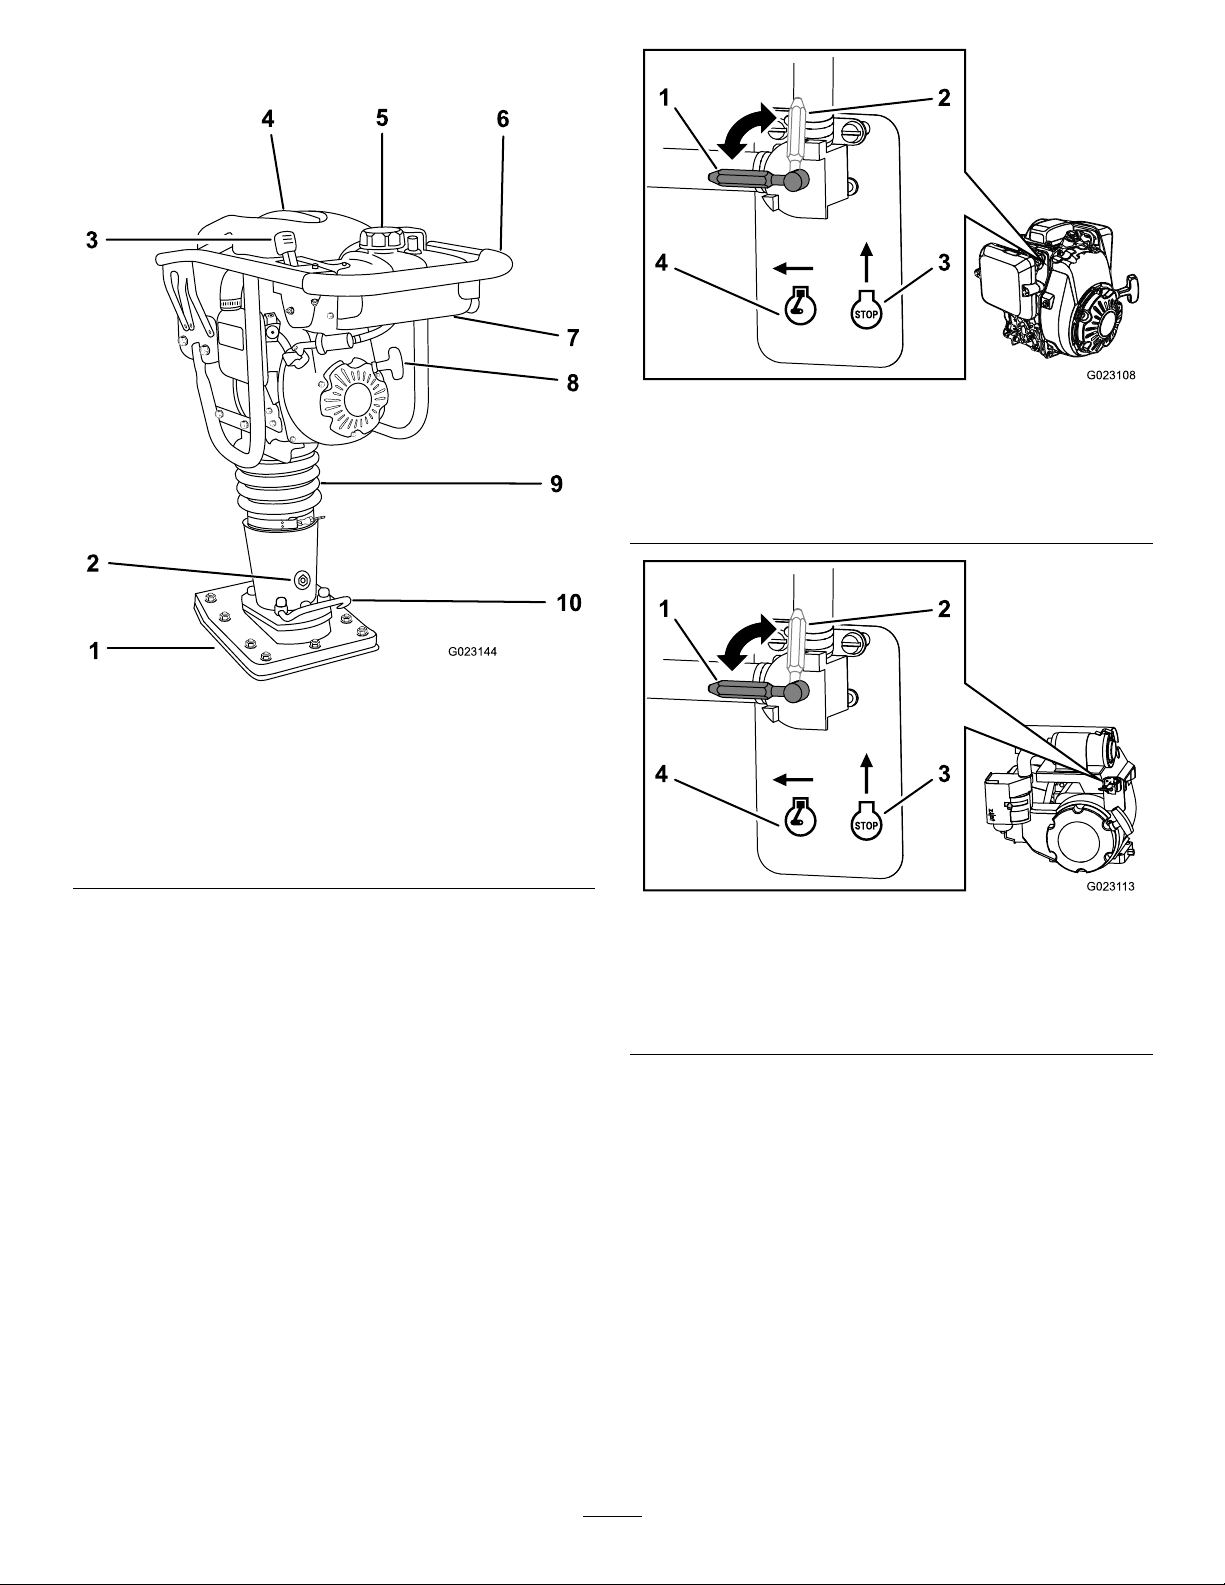
ProductOverview
g023108
Figure4
Models68034and68035
1.Switch—RUNposition3.Stop
2.Switch—STOPposition
4.Run
Figure3
1.Compactorshoe
2.Oilllplugandsightgauge
3.Throttlelever8.Recoil-starterhandle
4.Lifteye9.Springhousing
5.Fuel-tankcap
6.Handle
7.Fueltank
10.Lifthandle
Controls
Becomefamiliarwithallthecontrolsbeforeyoustart
theengineandoperatethemachine.
EngineOn/OffSwitch
Theengineon/offswitchallowstheenginetorun
whenitisintheRUNposition.IntheSTOPposition,it
stopsthefuelfromowingtotheengineandprevents
theenginefromrunning(Figure4orFigure5).
g023144
g023113
Figure5
Model68036
1.Switch—RUNposition3.Stop
2.Switch—STOPposition
4.Run
ChokeLever
Usethechokelever(Figure6orFigure7)tostarta
coldengine.Beforepullingtherecoil-starterhandle,
movethechokelevertotheclosedposition.Oncethe
engineisrunning,movethechokelevertotheopen
position.Donotusethechokeiftheengineisalready
warmeduporiftheairtemperatureishigh.
7
Page 8
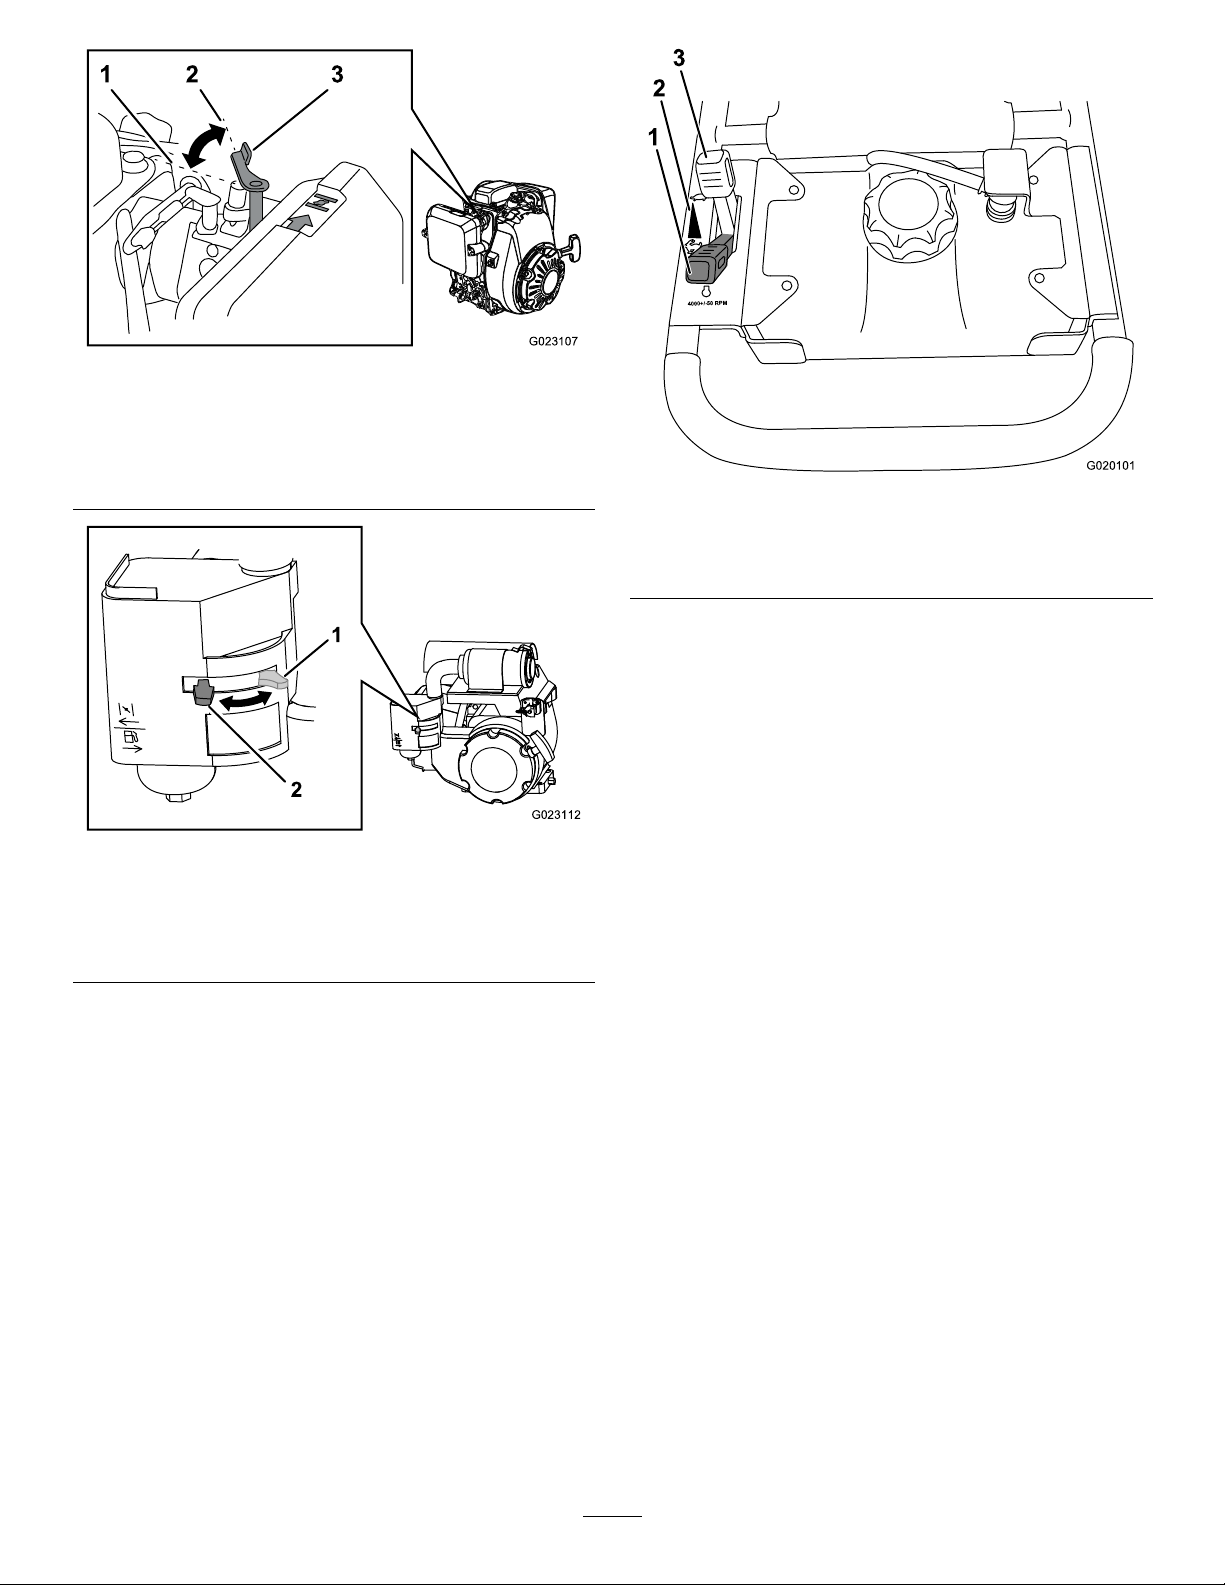
Figure6
Models68034and68035
1.OPENposition3.Chokelever
2.CLOSEDposition
g023107
g020101
Figure8
Figure7
Model68036
1.ChokeleverintheOPEN
position
2.ChokeleverintheCLOSED
position
ThrottleLever
Thethrottlelevercontrolstheenginespeed.Whenthe
leverisintheSLOWposition,theenginerunsatidle
speed.Thisisalsothestartingposition.Whenyou
movethelevertotheFASTposition,thecentrifugal
clutchengages,andtheshoeofthemachinevibrates
andcompacts.
1.FASTposition
2.Variablecontrolspeed
g023112
3.SLOWposition
8
Page 9

Specications
Note:Specicationsanddesignaresubjectto
changewithoutnotice.
Model680346803568036
Weight
Length
Width
Height
Engine
ImpactForce1205kg
Maximum
Blows/Minute
60kg(132lb)65kg(144lb)70kg(154lb)
77cm(30.6
inches)
34cm(13.5
inches)
106cm(42
inches)
Honda®
GX100
(2,650lb)
727690655
75cm(29.7
inches)
37cm(14.9
inches)
106cm(42
inches)
Honda®
GX100
1409kg
(3,100lb)
85cm(33.8
inches)
41cm(16.4
inches)
11 1cm(44
inches)
Honda®
GX120
1591kg
(3,500lb)
Operation
Note:Determinetheleftandrightsidesofthe
machinefromthenormaloperatingposition.
Important:Beforeoperating,checkthefueland
oillevelsandremovedebrisfromthemachine.
Also,ensurethattheareaisclearofpeopleand
debris.Youshouldalsoknowandhavemarked
thelocationsofallutilitylines.
PreparingtoUsethe Machine
•Checkthatthegroundisfreeofforeignobjects,
suchaselectricalcables,barbedwire,etc.
•Reviewallthesafetydecalsonthemachine.
•Usesteel-toeshoes,ahard-hat,hearing
protection,andeyeprotection.Ameshvisor
alonedoesnotprovidesufcienteyeprotection;
supplementwithprotectiveglasses.
•Ensurethatyouarefamiliarwithsafetyregulations
andshutdownproceduresdescribedinthe
Operator’sManual.
•Ensurethatallguardsareinplaceandingood
condition.
•Ensurethatthecompactorshoeisinplaceand
ingoodcondition.
•Ensurethateveryone,includingchildrenand
animals,maintainadistanceofatleast15m(50
ft)fromthemachine.
AddingFuel
•Forbestresults,useonlyclean,fresh(lessthan
30daysold),unleadedgasolinewithanoctane
ratingof87orhigher((R+M)/2ratingmethod).
•Ethanol:Gasolinewithupto10%ethanol
(gasohol)or15%MTBE(methyltertiarybutyl
ether)byvolumeisacceptable.Ethanoland
MTBEarenotthesame.Gasolinewith15%
ethanol(E15)byvolumeisnotapprovedforuse.
Neverusegasolinethatcontainsmorethan
10%ethanolbyvolume,suchasE15(contains
15%ethanol),E20(contains20%ethanol),orE85
(containsupto85%ethanol).Usingunapproved
gasolinemaycauseperformanceproblemsand/or
enginedamagewhichmaynotbecoveredunder
warranty.
•Donotusegasolinecontainingmethanol.
•Donotstorefueleitherinthefueltankorfuel
containersoverthewinterunlessafuelstabilizer
isused.
•Donotaddoiltogasoline.
9
Page 10

DANGER
DANGER
Incertainconditions,fuelisextremely
ammableandhighlyexplosive.Areor
explosionfromfuelcanburnyouandothers
andcandamageproperty.
•Fillthefueltankoutdoors,inanopenarea,
whentheengineiscold.Wipeupanyfuel
thatspills.
•Neverllthefueltankinsideanenclosed
trailer.
•Donotllthefueltankcompletelyfull.
Addfueltothefueltankuntilthelevelis6
to13mm(1/4to1/2inch)belowthebottom
ofthellerneck.Thisemptyspaceinthe
tankallowsfueltoexpand.
•Neversmokewhenhandlingfuel,andstay
awayfromanopenameorwherefuel
fumesmaybeignitedbyaspark.
•Storefuelinanapprovedcontainerand
keepitoutofthereachofchildren.Donot
usefuelthathasbeenstoredformorethan
30days.
•Donotoperatewithoutentireexhaust
systeminplaceandinproperworking
condition.
Incertainconditionsduringfueling,static
electricitycanbereleasedcausingaspark
whichcanignitethefuelvapors.Areor
explosionfromfuelcanburnyouandothers
andcandamageproperty.
•Alwaysplacefuelcontainersontheground
awayfromyourvehiclebeforelling.
•Donotllfuelcontainersinsideavehicle
oronatruckortrailerbedbecauseinterior
carpetsorplastictruckbedlinersmay
insulatethecontainerandslowthelossof
anystaticcharge.
•Whenpractical,removefuel-powered
equipmentfromthetruckortrailerand
refueltheequipmentwithitswheelsonthe
ground.
•Ifthisisnotpossible,thenrefuelsuch
equipmentonatruckortrailerfroma
portablecontainerratherthanfromafuel
dispensernozzle.
•Ifafueldispensernozzlemustbeused,
keepthenozzleincontactwiththerimof
thefueltankorcontaineropeningatall
timesuntilfuelingiscomplete.
WARNING
Fuelisharmfulorfatalifswallowed.
Long-termexposuretovaporscancause
seriousinjuryandillness.
•Avoidprolongedbreathingofvapors.
•Keepyourfaceawayfromnozzleandfuel
tankorconditionerbottleopening.
•Avoidcontactwithskin;washoffspills
withsoapandwater.
10
Page 11

UsingStabilizer/Conditioner
FillingtheFuelTank
Useafuelstabilizer/conditionerinthemachineto
providethefollowingbenets:
•Keepsfuelfreshduringstorageof90daysorless.
Forlongerstorageitisrecommendedthatthefuel
tankbedrained.
•Cleanstheenginewhileitruns
•Eliminatesgum-likevarnishbuildupinthefuel
system,whichcauseshardstarting
Important:Donotusefueladditives
containingmethanolorethanol.
Addthecorrectamountoffuelstabilizer/conditioner
tothefuel.
Note:Afuelstabilizer/conditionerismost
effectivewhenmixedwithfreshfuel.T ominimize
thechanceofvarnishdepositsinthefuelsystem,
usefuelstabilizeratalltimes.
1.Parkthemachineonalevelsurfaceandstop
theengine.
2.Allowtheenginetocool.
3.Cleanaroundthefueltankcapandremoveit
(Figure9).
Figure9
1.Fillwithfuelhere
2.Fuelcap
4.Addfueltothefueltank,untilthelevelis6to
13mm(1/4to1/2inch)belowthebottomofthe
llerneck.
3.Fuelcontainer
Important:Thisspaceinthetankallows
fueltoexpand.Donotllthefueltank
completelyfull.
5.Installthefueltankcapsecurely.
6.Wipeupanyspilledfuel.
11
g020337
Page 12

CheckingtheMachine-Fluid Levels
•Checktheengine-oillevel;refertoCheckingthe
Engine-OilLevel(page17).
•Checkthespring-housing-oillevel;referto
CheckingtheSpring-HousingOil(page18).
TransportingtheMachine
CAUTION
Ifyoutipthemachinewhentheengineon/off
switchisintheRUNposition,fuelcanleakout
ofthefueltank.Afuelleakcouldleadtoare
andcauseseriouspersonalinjury.
StartingtheEngine
1.Movetheengineon/offswitchtotheRUN
position(counterclockwise);refertoEngine
On/OffSwitch(page7).
2.MovethechokelevertotheCLOSEDpositionif
youarestartingacoldengine;refertoChoke
Lever(page7).
Note:Awarmorhotenginemaynotrequire
choking.
3.MovethethrottlelevertotheSLOWposition;
refertoThrottleLever(page8).
4.Pulltherecoil-starterhandlelightlyuntilyoufeel
resistance,thenpullthehandlebriskly.Gently
returnthehandletotheoriginalposition.
5.Aftertheenginestarts,graduallymovethe
chokeleverbacktotheOPENposition.Ifthe
enginestallsorhesitates,movethechokelever
backtotheCLOSEDpositionagainuntilthe
enginewarmsup.ThenmoveittotheOPEN
position.
ShuttingOfftheEngine
1.MovethethrottlelevertotheSLOWposition.If
theenginehasbeenworkinghardorishot,letit
runforaminute.Thishelpstocooltheengine
beforestopping.
Important:Toshutofftheengine
immediately,youcanmovetheengineon/off
switchtotheSTOPpositionbeforemoving
thethrottlelevertotheSLOWposition.
2.Movetheengineon/offswitchtotheSTOP
position(clockwise).
Drainthefueltankorensurethattheengine
on/offswitchisintheSTOPpositionbefore
tippingthemachine.
Important:Beforetransportingthemachine,
secureitwithstrapsorchainstopreventitfrom
fallingortippingover.
Ensurethattheliftingdeviceandstrapsorchains
areproperlyrated;refertoSpecications(page9).
Ifpossible,keepthemachinestandinguprightwhen
transportingit.Secureitwithstrapsorchains;donot
letitfallover.
Ifyoumusttransportthemachinehorizontally,doso
asfollows:
1.Shutofftheengineandallowittocoolfor15
minutes.Ensurethattheengineon/offswitch
isintheSTOPposition.
Theengineon/offswitchisalsoafuelvalve.
EnsuringthatitisintheSTOPpositionprevents
fuelfromleakingoutofthefueltank.
2.Usealiftingdevicewithadequateliftingcapacity
(atleast75kg,or165.3lb)toliftthemachine
intothetransportvehicle.
Important:Attachchainsorother
lifting-devicecomponentstoonlythelifteye
ofthemachine;refertoFigure3.
3.Carefullypositionthemachineasshownin
Figure10,andsecureitwithstrapsorchainsto
preventitfrommovingortipping.
Important:Donotlaythemachineontothe
rightorleftside;theengineoilcanleakinto
theairintakeortheexhaustsystem.Laythe
machinetippedforwardonly,sothatitrests
onthefrontbar.
12
Page 13

Figure10
4.Aftertransportingthemachine,standthe
machineinanuprightpositiontoallowtheoil
todrainthroughtheengineandsettlebackinto
thecrankcase.
Important:Allowtheoiltosettleforatleast
2minutesafterstandingthemachineupright
beforeyoustarttheengine.
OperatingTips
•Keepthemachineuprightsothatitcontactsthe
groundwiththeentireshoe,ratherthanwithjust
thefrontorbackedgeoftheshoe.
•Allowthemachinetodothework;pushing
downwardonthehandlelimitstheeffectivenessof
themachine.
•Onlevelsurfaces,themachinemovesforwardin
rapidjumps.Onunevensurfaces,tiltthemachine
asnecessarytoassisttheforwardmovement.
g023106
•Thejumpheightofthemachineincreasesasthe
groundbecomesmorecompacted.
13
Page 14

Maintenance
Note:Determinetheleftandrightsidesofthemachinefromthenormaloperatingposition.
Important:Youmaytipthemachineforward,ifyoudrainthefueltankormovetheengineon/offswitch
totheSTOPposition,tomakecleaningorservicingthemachineeasier.Ifyoulaythemachineontothe
side,oilcandrainoutofthecrankcaseintotheaircleanerorthemufer.
Allowtheoiltosettleforatleast2minutesafterstandingthemachineuprightbeforeyoustartthe
engine.
RecommendedMaintenanceSchedule(s)
MaintenanceService
Interval
Aftertherst25hours
Beforeeachuseordaily
Every50hours
Every100hours
Every200hours
Yearlyorbeforestorage
MaintenanceProcedure
•Changetheengineoil.
•Changethespring-housingoil.
•Checktheairlter.
•Checkthespring-housingoil.
•Checkthecompactorshoe.
•Removedebrisfromthemachine.
•Cleantheair-lterelements(morefrequentlyifconditionsaredustyorsandy).
•Cleantheprelter(Models68034and68035).
•Changetheengineoil(morefrequentlyiftheoperatingconditionsareextremely
dustyorsandy).
•Changethespring-housingoil.
•Checkthesparkplug.
•Replacethepaperair-lterelement(morefrequentlyifconditionsaredustyor
sandy).
•Changetheengineoil.
•Changethespring-housingoil.
Important:Refertoyourengineowner’smanualforadditionalmaintenanceprocedures.
Pre-Maintenance
Procedures
Beforeperformingmaintenanceonthemachine,do
thefollowing:
1.Ensurethattheengineandmuferarecool.
2.Disabletheenginebydisconnectingthe
spark-plugwire;refertoDisconnectingthe
Spark-PlugWire(page15).
14
Page 15

Disconnectingthe Spark-PlugWire
Pullthespark-plugwireofftheterminalofthespark
plug(Figure11orFigure12).
Figure11
Models68034and68035
EngineMaintenance
ServicingtheAirCleaner
ServiceInterval:Beforeeachuseordaily—Check
theairlter.
Every50hours—Cleantheair-lterelements
(morefrequentlyifconditionsaredustyor
sandy).
Every200hours—Replacethepaperair-lter
element(morefrequentlyifconditionsaredusty
orsandy).
Important:Donotoperatetheenginewithout
theair-lterassembly;extremeenginedamage
canoccur.
Note:Iftheengineislowonpower,producesblack
g023119
smoke,orrunsunevenly,theairltermaybeclogged.
CleaningthePrelter
1.Spark-plugwire
1.Spark-plugwire
Figure12
Model68036
Models68034and68035
ServiceInterval:Every50hours
1.Openthecoverofthemachine(Figure13).
g020404
Figure13
g023120
2.Removethescrewsthatsecurethecoverto
theprelterhousing(Figure14),andremove
thecover.
1.Prelterhousing2.Prelter
3.Removetheprelter.
4.Cleantheprelterasfollows:
15
g023121
Figure14
Page 16

A.Washtheprelterusingamilddetergent
andwater.
B.Squeezeitdrywithacleancloth.
C.Soakitwithnewengineoil.
D.Gentlywindtheprelterinanabsorbent
cloth,andsqueezeouttheexcessoil.
5.Installtheprelterasfollows:
A.Aligntheprelterinsideofthecover.
B.Alignthepreltercovertothehousing.
C.Securethecovertothehousingwiththe
screws.
ServicingtheAirFilter
Models68034and68035
1.Removethescrewsthatsecurethecovertothe
air-lterhousing(Figure15)
ServicingtheAirFilter
Model68036
1.Openthelatchoftheair-ltercover(Figure16).
Figure15
1.Air-lterhousing2.Airlter
2.Removetheairlterfromthehousingasshown
inFigure15.
3.Inspecttheairlterandreplaceitifitis
damaged,excessivelydirty,orsaturatedwith
oilorfuel.
4.Aligntheairlterinsideofthecover.
5.Aligntheairltercovertothehousing.
6.Securethecoverhousingwiththescrews.
g023124
Figure16
1.Latch3.Paperelement
2.Cover
g023122
2.Removetheairlterfromthehousingasshown
inFigure16.
4.Foamelement
3.Removethefoamelementfromthepaper
element.
4.Inspecttheelementsandreplacethemifthey
aredamagedorexcessivelydirty.
Note:Ifthepaperelementissaturatedwithoil
orfuel,replaceit.
5.Tapthepaperelementseveraltimesonahard
surfacetoremovethedirt.
6.Cleanthefoamelementinwarm,soapywater
orinanonammablesolvent.
Note:Donotusefueltocleanthefoamelement
becauseitcouldcreateariskofreorexplosion.
7.Rinseanddrythefoamelementthoroughly .
8.Dipthefoamelementincleanengineoil,then
squeezeouttheexcessoil.
Note:Excessoilinthefoamelementrestricts
theairowthroughtheelementandmayreach
thepaperlterandclogit.
9.Wipedirtfromthehousingandthecoverwitha
moistrag.
16
Page 17

Note:Becarefultopreventdirtanddebrisfrom
enteringtheairductleadingtothecarburetor.
10.Installtheair-cleanerelementsandensurethat
theyareproperlypositioned(Figure17).
Important:Ensurethattheopenendof
theair-cleanerelementsarefacinginward
towardthemachine,asthemachinewill
notruniftheelementsarenotplacedinthe
properairorientationduetoairrestriction
(Figure17).
6.Pullthedipstickoutandlookattheend.
Theoilshouldbelevelwiththeupper-limitmark
(Figure18).
g019686
Figure18
Figure17
1.Openendofthepaper
element
2.Openendofthefoam
element
11.Securethecovertothehousingwiththelatch.
ServicingtheEngineOil
OilType:4-cycleengineoilthatmeetsorexceeds
therequirementsforAPIservicecategorySJ,SL,
SM,orhigher.
CrankcaseCapacity:
•0.28L(9.47oz)formodels68034and68035
•0.40L(13.53oz)formodel68036
Viscosity:SAE10W-30isrecommendedforgeneral
use.
CheckingtheEngine-OilLevel
1.Shutofftheengineandallowittocool.
2.Tiltthemachinesothattheengineislevel.
Important:Propthemachineinthisposition
toensurethatitdoesnotfallover.
3.Cleanaroundtheoildipstick.
4.Removethedipstickandwipetheendclean.
5.Slidethedipstickfullyintothedipsticktube
withoutthreadingitintothellerneck.
g024809
1.Fillertube4.Lowerlimit
2.Dipstick
3.Upperlimit
5.Oil-drainbolt
Important:Runningtheenginewithalow
oillevelcancauseenginedamage.Thistype
ofdamageisnotcoveredbywarranty.
7.Iftheoillevelislow,slowlypouronlyenough
oilintothecrankcasetoraisetheleveltothe
upperlimit.
Important:Donotoverllthecrankcase
withoilbecausetheenginemaybedamaged.
8.Installandsecurethedipstick.
ChangingtheEngineOil
ServiceInterval:Aftertherst25hours
Every100hours
Yearlyorbeforestorage
ToroPremiumEngineOilisavailablefromyour
authorizedT orodistributor.
1.Starttheengineandletitrunfor5minutes;refer
toStartingtheEngine(page12).
2.Shutofftheengine;refertoShuttingOffthe
Engine(page12).
3.Tiltthemachinesothatthedrainsideisslightly
lowerthantheoppositesidetoensurethatthe
oildrainscompletely.
17
Page 18

4.Placeadrainpanundertheoil-drainhole.
5.Removethedrainpluganddraintheoilfromthe
engine(Figure19).
Figure19
Servicingthe Spring-HousingOil
OilType:4-cycleengineoilthatmeetsorexceeds
therequirementsforAPIservicecategorySJ,SL,
SM,orhigher.
Capacity:0.47L(15.89oz)
Viscosity:SAE10W-30isrecommendedforgeneral
use.
CheckingtheSpring-HousingOil
ServiceInterval:Beforeeachuseordaily
Checkthespring-housingoilasfollows:
1.Carefullytipthemachineslightlybackwardso
thatthemachinestandscompletelyuprightand
vertical.
Important:Propthemachineinthisposition
toensurethatitdoesnotfallover.
2.Checktheoilsightplug(Figure20),andensure
thattheoillevelishalfwaybetweenthetopand
g020104
bottomoftheoilsightplug.
1.Oilpan3.Oil-llhole
2.Oil-drainhole
6.Whentheoilhasdrainedcompletely,installthe
plugandwipeupanyspilledoil.
Note:Disposeoftheusedoilatacertied
recyclingcenter.
7.Removethedipstickandslowlypour
approximately80percentofthespecied
amountofoilintotheengine(Figure19).
8.Slowlyaddadditionaloiltobringtheoillevel
totheupper-limitmarkonthedipstick;referto
CheckingtheEngine-OilLevel(page17).
9.Installandsecurethedipstick.
g023141
Figure20
1.Oilsightplug
3.Iftheoillevelislow,addoil;refertoAddingOil
totheSpringHousing(page19).
ChangingtheSpring-HousingOil
ServiceInterval:Aftertherst25hours
18
Page 19

Every100hours
Yearlyorbeforestorage
1.Starttheengineandletitrunfor5minutes;refer
toStartingtheEngine(page12).
2.Shutofftheengine;refertoShuttingOffthe
Engine(page12).
3.Ensurethattheengineon/offswitchisinthe
STOPpositionsothatthefueldoesnotleakout
ofthefueltank.
4.Tiltthemachinesothattheoilsightplug
facesdownwardtoensurethattheoildrains
completely(Figure21).
AddingOiltotheSpringHousing
1.Tiltthemachinesothattheoilsightplugis
facingupward(Figure22).
g023143
Figure22
Figure21
1.Oilsightplug
2.Drainpan
5.Placeadrainpanundertheoilsightplug(Figure
21).
6.Removetheoilsightplug(Figure21).
7.Draintheoiloutoftheholeinthehousing
(Figure21).
8.Cleanthethreadsontheoilsightplugandapply
3layersofPTFEthread-sealingtape.
1.Openingfortheoil
2.Removetheoilsightplug.
3.Cleanthethreadsontheoilsightplugandapply
3layersofPTFEthread-sealingtape.
4.Addtheoiltothespringhousinginincrements
toensurethatyoudonotoverllthemachine;
refertoCheckingtheSpring-HousingOil(page
g023142
18)toensurethattheoilisatthecorrectlevel.
Note:Theoilcapacityofthespringhousingis
0.47L(0.5USqt);addthefullamountonlyifthe
springhousingisempty.
5.Installandtorquetheoilsightplugto54N∙m
(39.8ft-lb).
Important:Allowtheoiltosettleforatleast2
minutesafterstandingthemachineuprightbefore
startingtheengine.
9.Addoiltothespringhousing;refertoAddingOil
totheSpringHousing(page19).
10.Installandtorquetheoilsightplugto54N∙m
(39.8ft-lb).
Important:Allowtheoiltosettleforatleast2
minutesafterstandingthemachineuprightbefore
startingtheengine.
19
Page 20

ServicingtheSparkPlug
ServiceInterval:Every100hours—Checkthespark
plug.
Ensurethattheairgapbetweenthecenterelectrode
andthesideelectrodeiscorrectbeforeinstallingthe
sparkplug.Useaspark-plugwrenchforremoving
andinstallingthesparkplugandagappingtool/feeler
gaugetocheckandadjusttheairgap.Installanew
sparkplugifnecessary.
Models68034and68035:UseaDENSO
U16FSR-UBoranNGKCR5HSBsparkplug.
Model68036:UseaDENSOW14EPR-UoranNGK
BP4ESsparkplug.
RemovingtheSparkPlug
1.Shutoffthemachineandletitcool.
2.Disconnectthewirefromthesparkplug(Figure
23).
CheckingtheSparkPlug
1.Lookatthecenterofthesparkplug(Figure24).
Ifyouseelightbrownorgrayontheinsulator,
theengineisoperatingproperly.Ablackcoating
ontheinsulatorusuallymeansthattheair
cleanerisdirty.
Important:Donotcleanthesparkplug.
Alwaysreplacethesparkplugwhenithasa
blackcoating,wornelectrodes,anoilylm,
orcracks.
g023105
Figure24
Figure23
1.Sparkplug
2.Wire
3.Cleanaroundthesparkplug.
4.Useaspark-plugwrenchtoremovethespark
plugandthemetalwasher.
1.Sideelectrode4.0.60to0.70mm(0.024to
2.Centerelectrode5.0.70to0.80mm(0.028
3.Insulator
0.028inch)gap(Models
68034and68035)
to0.031inch)gap(Model
68036)
2.Checkthegapbetweenthecenterandside
electrodes(Figure24).
g014506
3.Ifthegapisnotwithinthespeciedrange,do
thefollowing:
A.Ifthegapistoosmall,carefullybend
thesideelectrodeawayfromthecenter
electrodeuntilthegapbetweenthe
electrodesiscorrect.
B.Ifthegapistoolarge,carefullybendthe
sideelectrodetowardthecenterelectrode
untilthegapbetweentheelectrodesis
correct.
InstallingtheSparkPlug
1.Threadthesparkplugintothespark-plughole.
2.Tightenthesparkplugto27N∙m(20ft-lb).
Important:Ensurethatthesparkplugis
tightenedtothespeciedtorquevalue.A
loosesparkplugmaycausedamagetothe
cylinder,whileanovertightenedsparkplug
maycausedamagetothecylinder-head
threads.
3.Connectthewiretothesparkplug.
20
Page 21

CompactorShoe Maintenance
Cleaning
RemovingDebrisfromthe
CheckingtheCompactor Shoe
ServiceInterval:Beforeeachuseordaily
Amongthemostcriticalelementsofthemachineis
thecompactorshoe.Itisalsothemostsubjectto
damageandwear.Inthecourseofcompactingawide
arrayofgranularobjects,themachineencounters
numerousabrasivesandobjects,suchasdirt,stones,
andoccasionallyalargerockorburiedscrap.
Thewearofthecompactorshoecansignicantly
impairtheefciencyandperformanceofthemachine.
Therefore,itisimportanttomakefrequentchecksof
theconditionofthecompactorshoeforleaksand
cracks.(Figure25).
Machine
Regularcleaningandwashingwillincreasethelife
spanofthemachine.Cleanthemachineimmediately
afteruse,beforethedirthardens.
Checkbeforecleaningthatthefueltankcapis
properlyinplacetoavoidgettingwaterinthetank.
Usecarewhenusingahigh-pressuresprayer
becauseitcandamagewarningdecals,instruction
signs,andtheengine.
1.Compactorshoe
g020338
Figure25
21
Page 22

Storage
Forstorageover30days,preparethemachineas
follows:
1.Removedirtandgrimefromtheexternalparts
oftheentiremachine,especiallytheengine.
Cleanallgranularobjectsfromtheoutsideof
theenginecylinder-headnsandtheblower
housing.
Important:Storethemachineintheupright
position.Donottipthemachineonitsside,
orleavethemachinetippedforwardwiththe
frontbardownforalongperiodoftime.
17.Coverthemachinetoprotectitandkeepitclean.
RemovingtheMachine fromStorage
Important:Youcanwashthemachinewith
milddetergentandwater.
2.Addapetroleum-basedstabilizer/conditioner
tothefuelinthetank.Followthemixing
instructionsfromthestabilizermanufacturer.Do
notuseanalcohol-basedstabilizer(ethanolor
methanol).
Note:Fuelstabilizer/conditionerismost
effectivewhenmixedwithfreshfuelandused
atalltimes.
Important:Donotstore
stabilizer/conditionedfuelover90days.
3.Runtheenginetodistributeconditionedfuel
throughthefuelsystem(5minutes).
4.Shutofftheengine,allowittocool,anddrainthe
fueltankusingapump-typesiphon.Disposeof
fuelproperly;recycleitaccordingtolocalcodes.
5.Starttheengineandrunituntilitstops.
6.Choketheengine.
7.Startandruntheengineuntilitwillnotstart
again.
1.Checkandtightenallfasteners.
2.Inspectthesparkplugandreplaceitifitisdirty,
worn,orcracked;refertotheengineOperator’s
Manual.
3.Installthesparkpluguntilitishand-tight,then
anadditional1/2turnifitisnew,otherwise,
tightenitanadditional1/8to1/4turn.
4.Performanyneededmaintenanceprocedures.
5.Checktheengine-oillevel;refertoCheckingthe
Engine-OilLevel(page17).
Important:Storethemachineintheupright
position.Donottipthemachineonitsside,
orleavethemachinetippedforwardwiththe
frontbardownforalongperiodoftime.
6.Checkthespring-housingoillevel;referto
CheckingtheSpring-HousingOil(page18).
7.Fillthefueltankwithfreshfuel;refertoFilling
theFuelT ank(page1 1).
8.Connectthewiretothesparkplug.
8.Servicetheaircleaner;refertoFigure13.
9.Changetheenginecrankcaseoil;refertoFigure
19.
10.Removethesparkplugandcheckthecondition;
refertoFigure23andFigure24.
11.Withthesparkplugremovedfromtheengine,
pour30ml(2tablespoons)ofengineoilintothe
spark-plughole.
12.Pulltherecoil-starterhandleslowlytocrankthe
engineanddistributetheoilinsidethecylinder.
13.Installthesparkplug,butdonotinstallthewire
onthesparkplug.
14.Checkandtightenallbolts,nuts,andscrews.
Repairorreplaceanypartthatisdamaged.
15.Paintallscratchedorbaremetalsurfaces.Paint
isavailablefromyourAuthorizedServiceDealer.
16.Storethemachineinaclean,drygarageor
storagearea.
22
Page 23

Troubleshooting
Theenginedoesnotstart.
Theenginerunsrough.
Problem
1.TheairlterforModel68036isplaced
backwardsintheair-ltercover.
2.Theengineon/offswitchisinthestop
position.
3.Thechokeisopen.
4.Thefueltankisempty.4.Fillthetankwithfreshfuel.
5.Thespark-plugwireislooseor
disconnected.
6.Thesparkplugisfouledorimproperly
gapped.
1.Thechokeisclosed.
2.Theairlterisclogged.2.Cleanorreplacetheairlter.
3.Thereiswaterorcontaminantsinthe
fuel.
4.Thesparkplugiswornorhasbuildup
ontheelectrodes.
PossibleCauseCorrectiveAction
1.Switchtheorientationoftheairlterin
theair-ltercover.
2.Movetheswitchtotherunposition.
3.Closethechokewhenstartingacold
engine.
5.Connectthespark-plugwire.
6.Correcttheelectrodegaporreplace
thesparkplug.
1.Openthechoke.
3.Drainandllthetankwithfreshfuel.
4.Correcttheelectrodegaporreplace
thesparkplug.
23
Page 24

CaliforniaProposition65WarningInformation
Whatisthiswarning?
Youmayseeaproductforsalethathasawarninglabellikethefollowing:
WARNING:CancerandReproductiveHarm—www.p65Warnings.ca.gov.
WhatisProp65?
Prop65appliestoanycompanyoperatinginCalifornia,sellingproductsinCalifornia,ormanufacturingproductsthatmaybesoldinorbroughtinto
California.ItmandatesthattheGovernorofCaliforniamaintainandpublishalistofchemicalsknowntocausecancer,birthdefects,and/orother
reproductiveharm.Thelist,whichisupdatedannually,includeshundredsofchemicalsfoundinmanyeverydayitems.ThepurposeofProp65isto
informthepublicaboutexposuretothesechemicals.
Prop65doesnotbanthesaleofproductscontainingthesechemicalsbutinsteadrequireswarningsonanyproduct,productpackaging,orliteraturewith
theproduct.Moreover,aProp65warningdoesnotmeanthataproductisinviolationofanyproductsafetystandardsorrequirements.Infact,the
CaliforniagovernmenthasclariedthataProp65warning“isnotthesameasaregulatorydecisionthataproductis‘safe’or‘unsafe.’”Manyofthese
chemicalshavebeenusedineverydayproductsforyearswithoutdocumentedharm.Formoreinformation,gotohttps://oag.ca.gov/prop65/faqs-view-all
AProp65warningmeansthatacompanyhaseither(1)evaluatedtheexposureandhasconcludedthatitexceedsthe“nosignicantrisklevel”;or(2)
haschosentoprovideawarningbasedonitsunderstandingaboutthepresenceofalistedchemicalwithoutattemptingtoevaluatetheexposure.
Doesthislawapplyeverywhere?
Prop65warningsarerequiredunderCalifornialawonly .ThesewarningsareseenthroughoutCaliforniainawiderangeofsettings,includingbutnot
limitedtorestaurants,grocerystores,hotels,schools,andhospitals,andonawidevarietyofproductsAdditionally,someonlineandmailorder
retailersprovideProp65warningsontheirwebsitesorincatalogs.
.
HowdotheCaliforniawarningscomparetofederallimits?
Prop65standardsareoftenmorestringentthanfederalandinternationalstandards.TherearevarioussubstancesthatrequireaProp65warning
atlevelsthatarefarlowerthanfederalactionlimits.Forexample,theProp65standardforwarningsforleadis0.5μg/day,whichiswellbelow
thefederalandinternationalstandards.
Whydon’tallsimilarproductscarrythewarning?
•ProductssoldinCaliforniarequireProp65labellingwhilesimilarproductssoldelsewheredonot.
•AcompanyinvolvedinaProp65lawsuitreachingasettlementmayberequiredtouseProp65warningsforitsproducts,butothercompanies
makingsimilarproductsmayhavenosuchrequirement.
•TheenforcementofProp65isinconsistent.
•CompaniesmayelectnottoprovidewarningsbecausetheyconcludethattheyarenotrequiredtodosounderProp65;alackofwarningsfora
productdoesnotmeanthattheproductisfreeoflistedchemicalsatsimilarlevels.
WhydoesToroincludethiswarning?
Torohaschosentoprovideconsumerwithasmuchinformationaspossiblesothattheycanmakeinformeddecisionsabouttheproductstheybuyand
use.T oroprovideswarningsincertaincasesbasedonitsknowledgeofthepresenceofoneormorelistedchemicalswithoutevaluatingthelevelof
exposure,asnotallthelistedchemicalprovideexposurelimitrequirements.WhiletheexposurefromT oroproductsmaybenegligibleorwellwithinthe
“nosignicantrisk”range,outofanabundanceofcaution,T orohaselectedtoprovidetheProp65warnings.Moreover ,ifT orodoesnotprovidethese
warnings,itcouldbesuedbytheStateofCaliforniaorbyprivatepartiesseekingtoenforceProp65andsubjecttosubstantialpenalties.
RevA
 Loading...