

Page 1
FormNo.3421-187RevA
FP-2200ForwardPlate
Compactor
ModelNo.68025—SerialNo.402300000andUp
ModelNo.68026—SerialNo.402300000andUp
ModelNo.68027—SerialNo.402300000andUp
Registeratwww.T oro.com.
OriginalInstructions(EN)
*3421-187*A
Page 2
WARNING
CALIFORNIA
Proposition65Warning
Thisproductcontainsachemical
orchemicalsknowntotheStateof
Californiatocausecancer,birthdefects,
orreproductiveharm.
Theengineexhaustfromthisproduct
containschemicalsknowntotheStateof
Californiatocausecancer,birthdefects,
orotherreproductiveharm.
Thisengineisnotequippedwithasparkarrester
mufer.ItisaviolationofCaliforniaPublicResource
CodeSection4442touseoroperatetheengineon
anyforest-covered,brush-covered,orgrass-covered
land.Otherstatesorfederalareasmayhavesimilar
laws.
Introduction
Thismachineisdesignedtocompactawidearrayof
soilsubstances,includingclay,silt,gravel,sand,and
loam.
Readthisinformationcarefullytolearnhowtooperate
andmaintainyourproductproperlyandtoavoid
injuryandproductdamage.Youareresponsiblefor
operatingtheproductproperlyandsafely .
YoumaycontactTorodirectlyatwww.Toro.comfor
productandaccessoryinformation,helpndinga
dealer,ortoregisteryourproduct.
Wheneveryouneedservice,genuineToroparts,or
additionalinformation,contactanAuthorizedService
DealerorToroCustomerServiceandhavethemodel
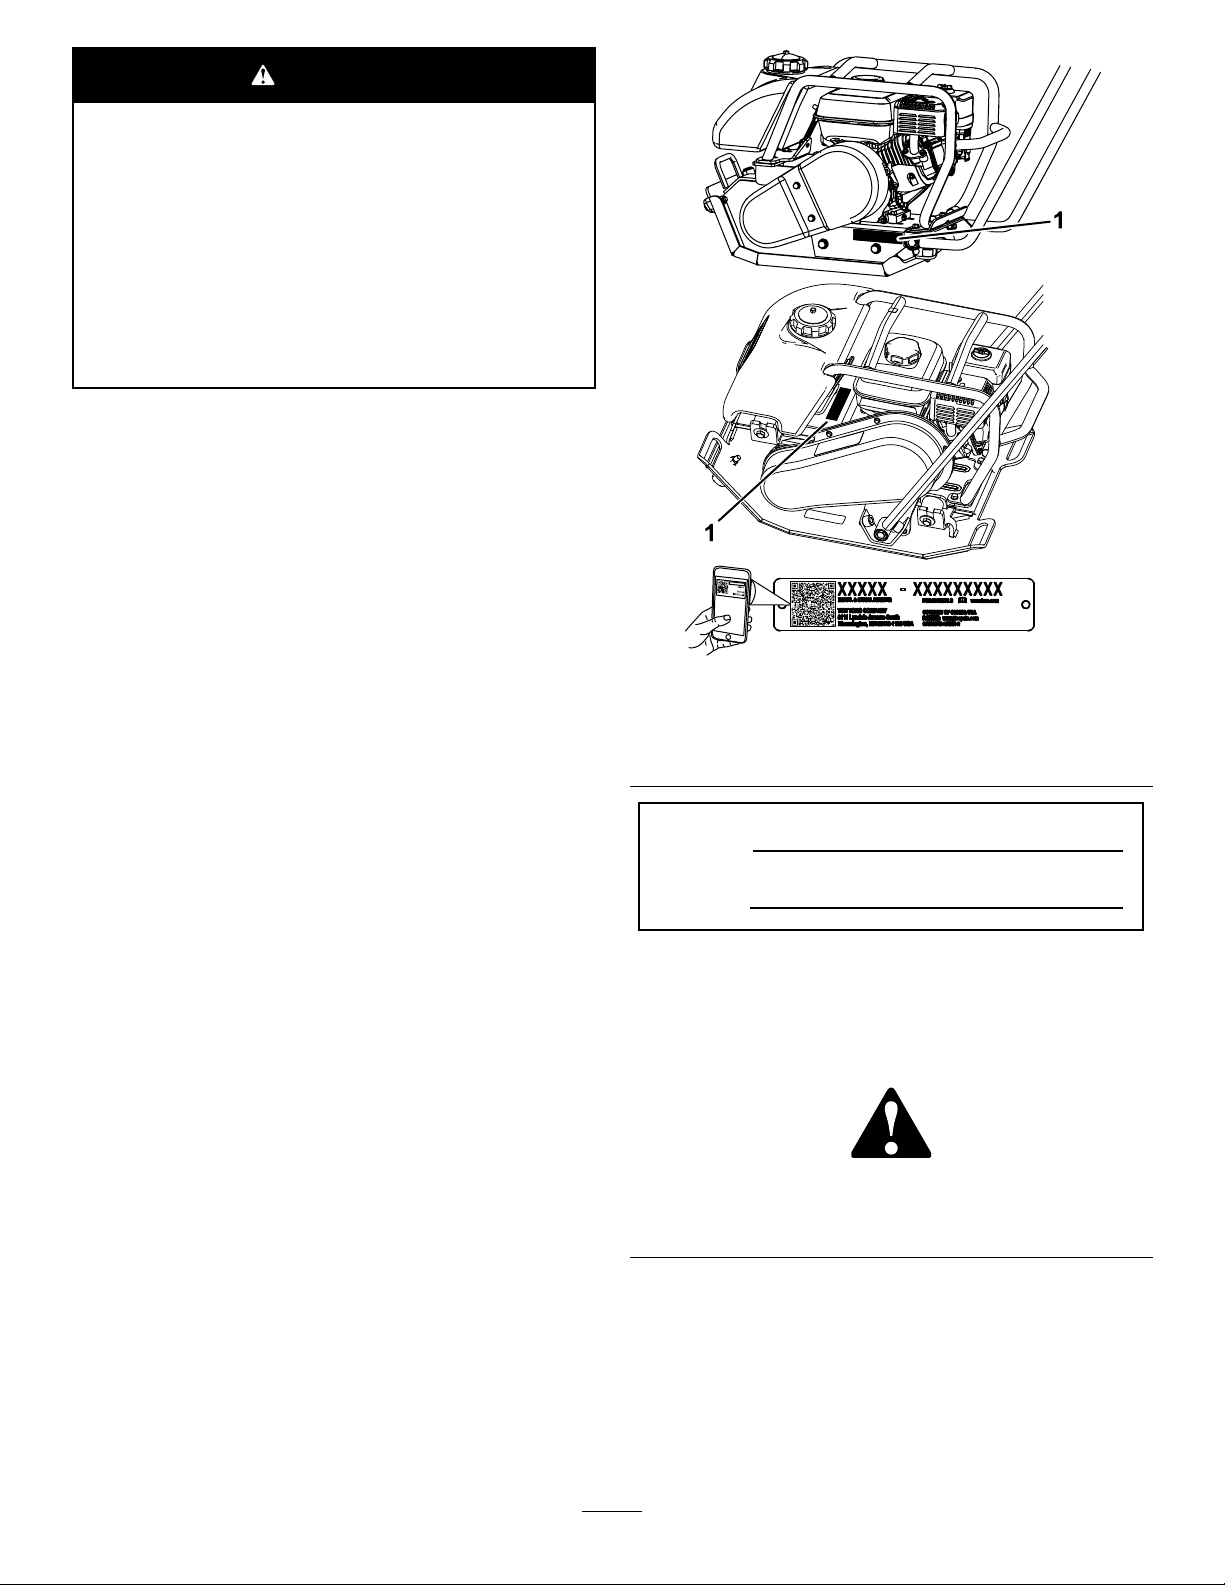
andserialnumbersofyourproductready.Figure
1illustratesthelocationofthemodelandserial
numbersontheproduct.Writethenumbersinthe
spaceprovided.
Important:Withyourmobiledevice,youcan
scantheQRcodeontheserialnumberdecal(if
equipped)toaccesswarranty,parts,andother
productinformation.
g239795
Figure1
2200—Top;3000/4000—Bottom
1.Modelandserialnumberlocation
ModelNo.
SerialNo.
Thismanualidentiespotentialhazardsandhas
safetymessagesidentiedbythesafety-alertsymbol
(Figure2),whichsignalsahazardthatmaycause
seriousinjuryordeathifyoudonotfollowthe
recommendedprecautions.
g000502
Figure2
1.Safetyalertsymbol
Thismanualuses2wordstohighlightinformation.
Importantcallsattentiontospecialmechanical
informationandNoteemphasizesgeneralinformation
worthyofspecialattention.
©2018—TheToro®Company
8111LyndaleAvenueSouth
Bloomington,MN55420
Contactusatwww.Toro.com.
2
PrintedintheUSA
AllRightsReserved
Page 3

Contents
Safety
Safety.......................................................................3
SafeOperatingPractices....................................3
SafetyandInstructionalDecals..........................5
Setup........................................................................6
InstallingtheHandle...........................................6
CheckingtheEngine-OilLevel............................6
CheckingtheEccentric-OilLevel........................6
ProductOverview.....................................................7
Operation..................................................................7
CheckingtheEngine-OilLevel............................7
CleaningDebrisfromtheMachine......................8
AddingFuel........................................................8
CompactingAsphalt.........................................10
StartingtheEngine............................................11
ShuttingOfftheEngine.....................................12
OperatingtheCompactor.................................12
TransportingtheMachine.................................12
Maintenance...........................................................13
RecommendedMaintenanceSchedule(s)...........13
DisconnectingtheSpark-PlugWire..................13
EngineMaintenance.........................................13
BeltMaintenance..............................................18
Storage...................................................................20
Troubleshooting......................................................21
Improperuseormaintenancebytheoperatororowner
canresultininjury.Toreducethepotentialforinjury,
complywiththesesafetyinstructionsandalwayspay
attentiontothesafetyalertsymbol,whichmeans
Caution,Warning,orDanger—personalsafety
instruction.Failuretocomplywiththeinstructionmay
resultinpersonalinjuryordeath.
SafeOperatingPractices
Thisproductiscapableofcausingseriousinjury .
Alwaysfollowallsafetyinstructionstoavoidserious
injuryordeath.
WARNING
Engineexhaustcontainscarbonmonoxide,
anodorless,deadlypoisonwhichislethalif
inhaled.
Donotruntheengineindoorsorinan
enclosedarea.
Training
•ReadtheOperator'sManualandothertraining
material.Iftheoperator(s)ormechanic(s)cannot
readorunderstandtheinformation,itisthe
owner'sresponsibilitytoexplainthismaterialto
them.
•Becomefamiliarwiththesafeoperationofthe
equipment,operatorcontrols,andsafetysigns.
•Alloperatorsandmechanicsshouldbetrained.
Theownerisresponsiblefortrainingtheusers.
•Neverletchildrenoruntrainedpeopleoperateor
servicetheequipment.Localregulationsmay
restricttheageoftheoperator.
•Theowner/usercanpreventandisresponsiblefor
accidentsorinjuriesoccurringpeopleordamage
toproperty.
Preparation
•Wearappropriateclothingincludinghardhat,eye
protection,longpants,substantial,slip-resistant
footwear,andhearingprotection.Tiebacklong
hair,securelooseclothing,anddonotwearloose
jewelry.
•Inspecttheareawheretheequipmentistobe
usedandensurethatallobjectsareremovedfrom
theareabeforeuse.
•Useextracarewhenhandlingfuel.Theyare
ammableandvaporsareexplosive.
–Extinguishallcigarettes,cigars,pipes,and
othersourcesofignition.
3
Page 4

–Useonlyanapprovedcontainer
–Donotremovethefuelcaporllthefueltank
whiletheengineisrunningorhot.
–Donotaddordrainfuelinanenclosedspace.
–Donotstorethemachineorfuelcontainer
wherethereisanopename,spark,orpilot
light,suchasonawaterheaterorother
appliance.
–Ifyouspillfuel,donotattempttostartthe
engine;avoidcreatinganysourceofignition
untilthefuelvaporshavedissipated.
•Checkthattheshieldsareattachedand
functioningproperly.Donotoperateunlessthey
arefunctioningproperly.
MaintenanceandStorage
•Lettheenginecoolbeforestoringanddonotstore
themachinenearanopename.
•Positionthemachineonalevelsurface,setthe
throttletoslow,andshutofftheengine.Waitfor
allmovementtostopbeforeadjusting,cleaning,
orrepairing.
•Cleandebrisfromdrives,mufers,andtheengine
tohelppreventres.Cleanupoilorfuelspills.
•Donotstorefuelnearamesordrainindoors.
•Neverallowuntrainedpersonneltoservicethe
machine.
•Carefullyreleasepressurefromcomponentswith
storedenergy.
Operation
•Useyourfullattentionwhileoperatingthe
machine.Donotengageinanyactivitythat
causesdistractions;otherwise,injuryorproperty
damagemayoccur.
•Neverrunanengineinanenclosedorpoorly
ventilatedarea.
•Operatethemachineonlyingoodlight,keeping
awayfromholesandhiddenhazards.
•Stoponlevelground,setthethrottletoslow,and
shutofftheenginebeforeleavingtheoperator's
positionforanyreason.
•Ensurethattheareaisclearofotherpeoplebefore
operatingthemachine.Shutoffthemachineif
anyoneentersthearea.
•Keepbystandersoutoftheoperatingarea.Stop
themachineifanyoneentersthearea.
•Keepyourfeetclearoftheplatecompactor.
•Donotoperatethemachinewhileill,tired,or
undertheinuenceofalcoholordrugs.
•Disconnectthesparkplugbeforemakingany
repairs.
•Keephandsandfeetawayfrommovingparts.If
possible,donotmakeadjustmentswiththeengine
running.
•Keepallpartsingoodworkingconditionandall
hardwaretightened.Replaceallwornordamaged
decals.
•Keepnutsandboltstight.Keepequipmentin
goodcondition.
•Stopandinspecttheequipmentifyoustrike
anobject.Makeanynecessaryrepairsbefore
restarting.
•UseonlygenuineT ororeplacementpartsto
ensurethatoriginalstandardsaremaintained.
•Donotchangetheenginegovernorsettingor
overspeedtheengine.
•Usecarewhenloadingorunloadingthemachine
intoatrailerortruck.
•Donottouchpartswhichmaybehotfrom
operation.Allowthemtocoolbeforeattemptingto
maintain,adjust,orservice.
•Lightningcancausesevereinjuryordeath.If
lightningisseenorthunderisheardinthearea,do
notoperatethemachine;seekshelter.
4
Page 5

SafetyandInstructionalDecals
Safetydecalsandinstructionsareeasilyvisibletotheoperatorandarelocatednearanyarea
ofpotentialdanger.Replaceanydecalthatisdamagedormissing.
93-9084
1.Liftpoint
decal133-5619
133-5619
decal93-9084
decal117-4979
117-4979
1.Entanglementhazard,belt—keepawayfrommovingparts;
keepallguardsandshieldsinplace
125-4943
1.Warning—readtheOperator’sManual.4.Chokinghazard—donotoperatethemachineindoors.
2.Warning—wearhearingprotection.
3.Warning—keepawayfrommovingparts;keepallguardsand
shieldsinplace.
5.Explosionhazard—shutofftheengineandextinguishall
amesbeforerefuelingthemachine.
decal125-4943
5
Page 6
Setup
InstallingtheHandle
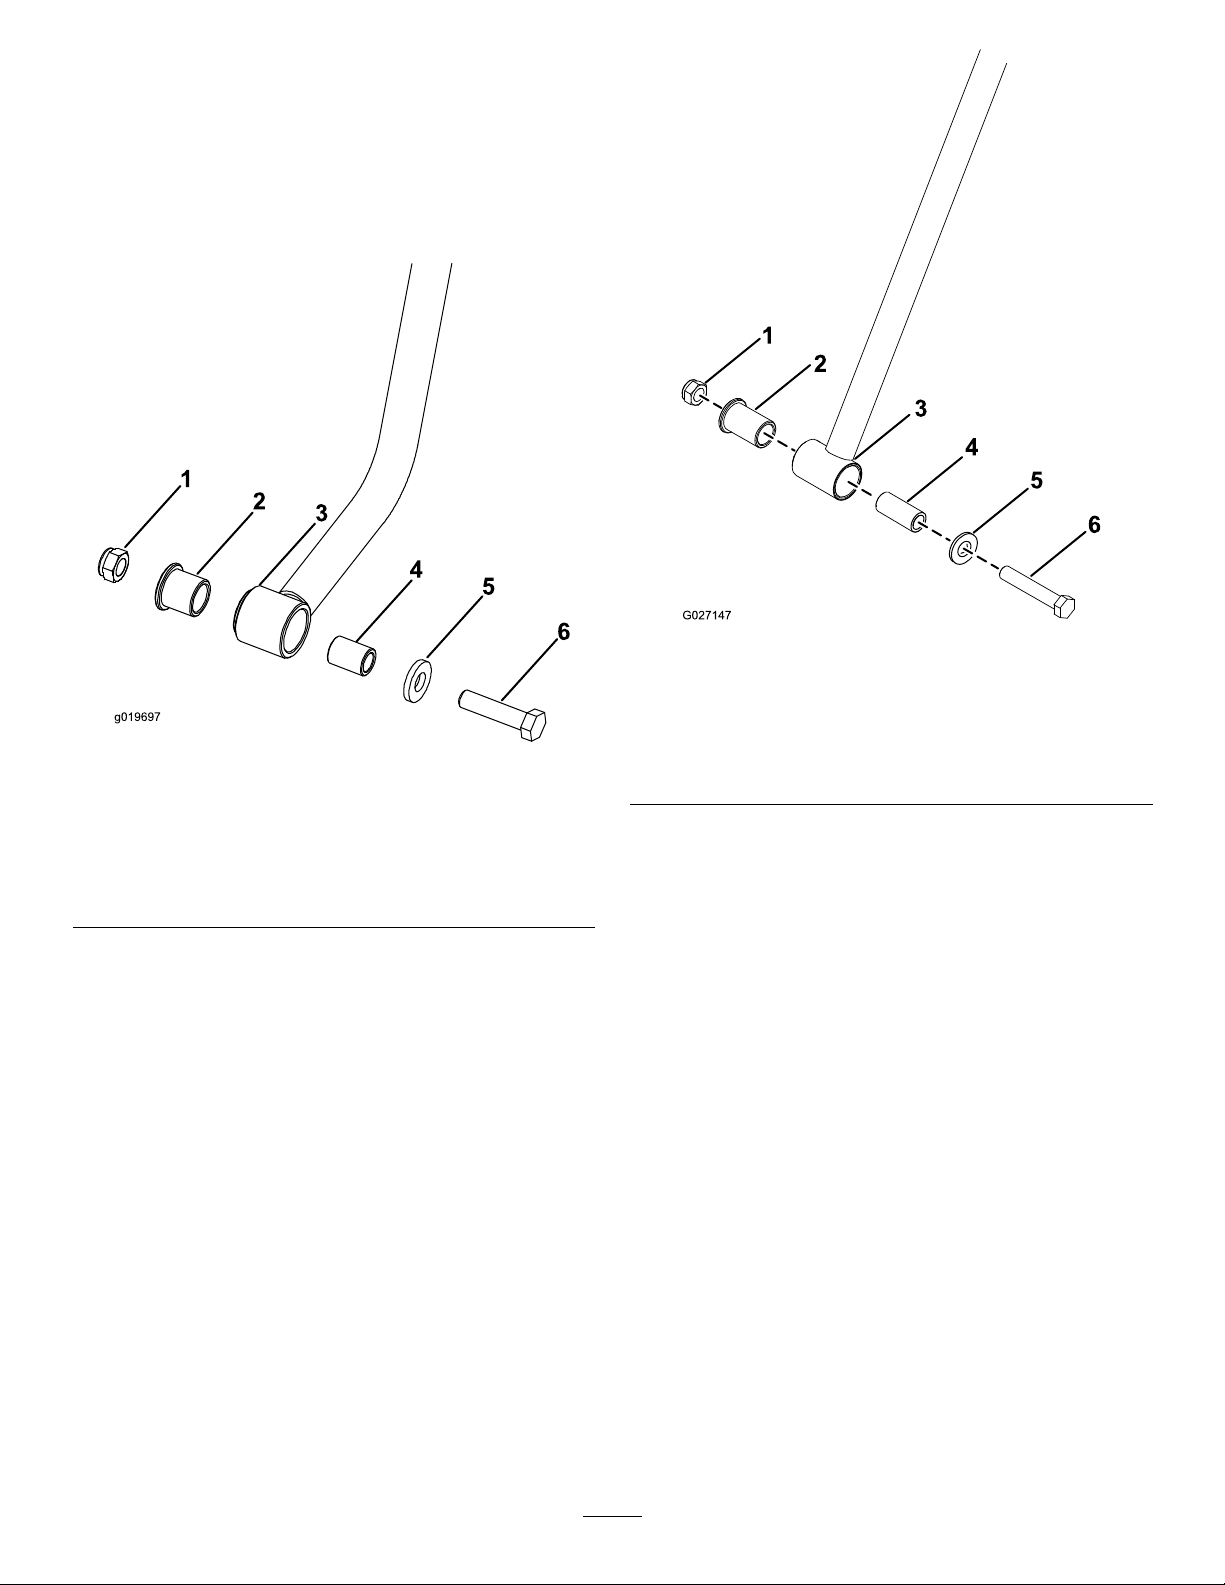
Secureeachsideofthehandletotheplatecompactor
frameusingabolt,atwasher,spacer,bearing,and
locknut(Figure3orFigure4).
g027147
Figure4
Model3000/4000
Figure3
Model2200
1.Locknut
2.Bearing5.Flatwasher
3.Handle6.Bolt
1.Locknut
g019697
4.Spacer
2.Bearing5.Flatwasher
3.Handle6.Bolt
4.Spacer
CheckingtheEngine-Oil
Level
Themachinecomesfromthefactorywithoilinthe
enginecrankcase;however,itmaybenecessaryto
addoil;refertoCheckingtheEngine-OilLevel(page
7).AddonlyenoughoiltoraisetheleveltotheFull
markonthedipstick.
CheckingtheEccentric-Oil
Level
Themachinecomesfromthefactorywitheccentricoil
intheeccentrichousing;however,itmaybenecessary
toaddoil;refertoServicingtheEccentricOil(page
17).Addonlyenoughoilsothattheoillevelisush
withtheoilplugonthesideoftheeccentrichousing.
6
Page 7
ProductOverview
Operation
Note:Determinetheleftandrightsidesofthe
machinefromthenormaloperatingposition.
CheckingtheEngine-Oil Level
ServiceInterval:Beforeeachuseordaily
Oilcrankcasecapacity:
•0.56L(0.59USqt)forModel68025
•0.58L(0.61USqt)forModels68026and68027
1.Positionthemachineonalevelsurface.
2.Setthethrottletoslow,shutofftheengine,and
waitforallmovingpartstostop.
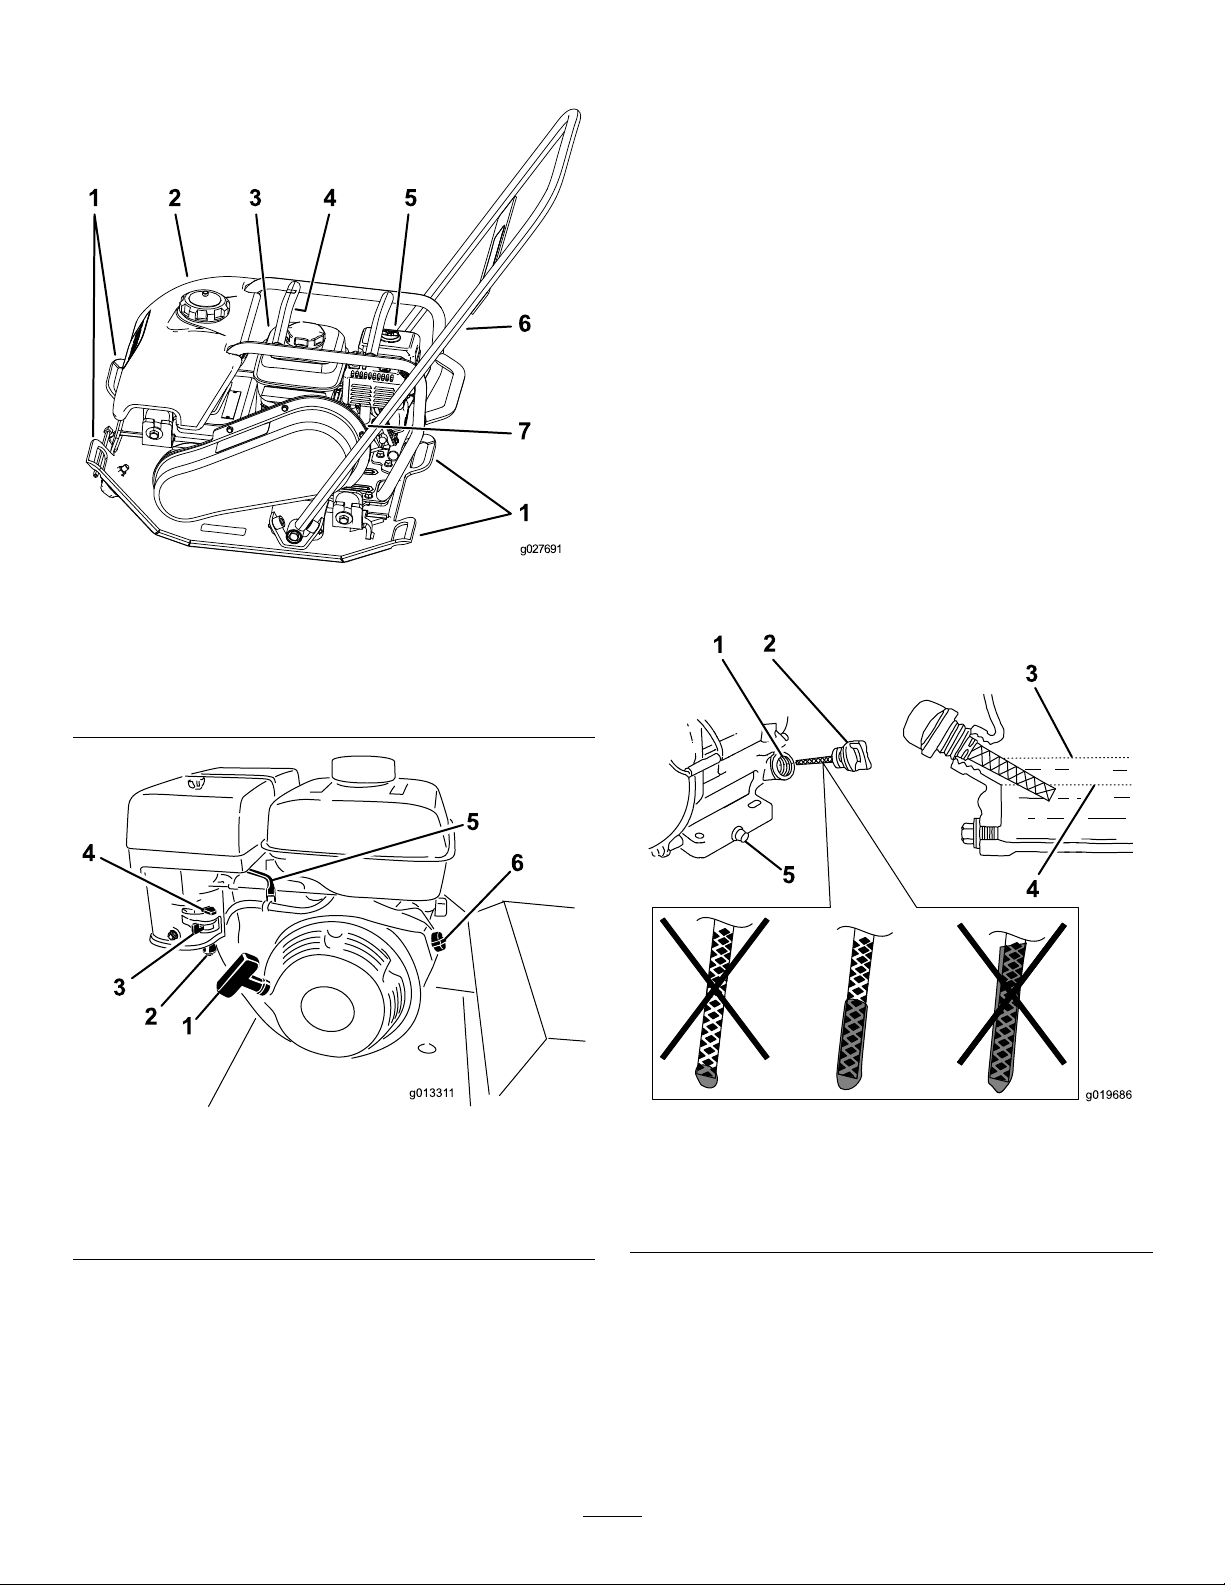
Figure5
1.Lifthandles5.Airlter
2.Watertank6.Handle
3.Engine7.Beltcover
4.Rollcagelifteye
Figure6
1.Recoilstarter
2.Sedimentcup
3.Fuel-shutoffvalve6.EngineOn/Offswitch
4.Chokelever
5.Throttlelever
g027691
g013311
3.Cleanaroundthedipsticksothatdirtcannot
fallintothellerholeanddamagetheengine
(Figure7).
Figure7
1.Fillertube4.Lowerlimit
2.Dipstick
3.Upperlimit
5.Oil-drainbolt
g019686
4.Removethedipstickandwipetheendclean.
5.Slidethedipstickfullyintothedipsticktube
withoutthreadingitintothellerneck.
6.Pullthedipstickoutandinspecttheend.
Note:Theoilshouldbelevelwiththeupper-limit
mark(Figure7).
7
Page 8

Important:Runningtheenginewithalow
oillevelcancauseenginedamage.Thistype
ofdamageisnotcoveredbywarranty.
Theengineisequippedwithanoilalert
systemthatwillautomaticallyshutoffthe
enginebeforetheoillevelfallsbelowthe
safelimit.
7.Iftheoillevelislow,slowlypouronlyenough
oilintothecrankcasetoraisetheleveltothe
upperlimit.
Important:Donotoverllthecrankcase
withoil,becausetheenginemaybe
damaged.
8.Installandsecurethedipstick.
CleaningDebrisfromthe Machine
ServiceInterval:Beforeeachuseordaily
1.Setthethrottletoslow,shutofftheengine,and
waitforallmovingpartstostop.
WARNING
Contactwithhotpartsonthemachine
cancausesevereburns.
Waitforallpartstocoolbeforetouching
themachine.
2.Brushdirtanddebrisawayfromtheaircleaner
andengineopenings.
•Donotstorefueleitherinthefueltankorfuel
containersoverthewinterunlessafuelstabilizer
isused.
•Donotaddoiltogasoline.
DANGER
Incertainconditions,fuelisextremely
ammableandhighlyexplosive.Areor
explosionfromfuelcanburnyouandothers
andcandamageproperty.
•Fillthefueltankoutdoors,inanopenarea,
whentheengineiscold.Wipeupanyfuel
thatspills.
•Neverllthefueltankinsideanenclosed
trailer.
•Donotllthefueltankcompletelyfull.
Addfueltothefueltankuntilthelevelis6
to13mm(1/4to1/2inch)belowthebottom
ofthellerneck.Thisemptyspaceinthe
tankallowsfueltoexpand.
•Neversmokewhenhandlingfuel,andstay
awayfromanopenameorwherefuel
fumesmaybeignitedbyaspark.
•Storefuelinanapprovedcontainerand
keepitoutofthereachofchildren.Never
buymorethana30-daysupplyoffuel.
•Donotoperatewithoutentireexhaust
systeminplaceandinproperworking
condition.
3.Checkthesprinklermanifold(Figure10)and
removeanydirtordebris.
AddingFuel
•Forbestresults,useonlyclean,fresh(lessthan
30daysold),unleadedgasolinewithanoctane
ratingof87orhigher((R+M)/2ratingmethod).
•Ethanol:Gasolinewithupto10%ethanol
(gasohol)or15%MTBE(methyltertiarybutyl
ether)byvolumeisacceptable.Ethanoland
MTBEarenotthesame.Gasolinewith15%
ethanol(E15)byvolumeisnotapprovedforuse.
Neverusegasolinethatcontainsmorethan
10%ethanolbyvolume,suchasE15(contains
15%ethanol),E20(contains20%ethanol),orE85
(containsupto85%ethanol).Usingunapproved
gasolinemaycauseperformanceproblemsand/or
enginedamagewhichmaynotbecoveredunder
warranty.
•Donotusegasolinecontainingmethanol.
8
Page 9

DANGER
Incertainconditionsduringfueling,static
electricitycanbereleasedcausingaspark
whichcanignitethefuelvapors.Areor
explosionfromfuelcanburnyouandothers
andcandamageproperty.
Addthecorrectamountofgasstabilizer/conditioner
tothegas.
Note:Afuelstabilizer/conditionerismost
effectivewhenmixedwithfreshfuel.T ominimize
thechanceofvarnishdepositsinthefuelsystem,
usefuelstabilizeratalltimes.
•Alwaysplacefuelcontainersontheground
awayfromyourvehiclebeforelling.
•Donotllfuelcontainersinsideavehicle
oronatruckortrailerbedbecauseinterior
carpetsorplastictruckbedlinersmay
insulatethecontainerandslowthelossof
anystaticcharge.
•Whenpractical,removegas-powered
equipmentfromthetruckortrailerand
refueltheequipmentwithitswheelsonthe
ground.
•Ifthisisnotpossible,thenrefuelsuch
equipmentonatruckortrailerfroma
portablecontainer,ratherthanfromafuel
dispensernozzle.
•Ifyoumustuseafueldispensernozzle,
keepthenozzleincontactwiththerimof
thefueltankorcontaineropeningatall
timesuntilfuelingiscomplete.
WARNING
FillingtheFuelTank
1.Setthethrottletoslow,shutofftheengine,and
waitforallmovingpartstostop.
2.Allowtheenginetocool.
3.Cleanaroundthefueltankcapandremoveit
(Figure8).
Note:Thecapistetheredtothefueltank.
g013315
Figure8
Fuelisharmfulorfatalifswallowed.
Long-termexposuretovaporscancause
seriousinjuryandillness.
•Avoidprolongedbreathingofvapors.
•Keepfaceawayfromnozzleandgastank
orconditionerbottleopening.
•Avoidcontactwithskin;washoffspills
withsoapandwater.
UsingStabilizer/Conditioner
Useafuelstabilizer/conditionerinthemachineto
providethefollowingbenets:
•Keepsfuelfreshduringstorageof90daysorless.
Forlongerstorageitisrecommendedthatthefuel
tankbedrained.
•Cleanstheenginewhileitruns
•Eliminatesgum-likevarnishbuildupinthefuel
system,whichcauseshardstarting
Important:Donotusefueladditives
containingmethanolorethanol.
4.Addunleadedfueltothefueltankuntilthelevel
isjustinsidethemeshlterbasket.
Important:Thisspaceinthetankallows
fueltoexpand.Donotllthefueltank
completelyfull.
5.Installthefueltankcapsecurely.
6.Wipeupanyspilledfuel.
9
Page 10

CompactingAsphalt
Whenusingthemachineonasphalt,thewatersystem
isusedtowetthesurfaceofthecompactortoprevent
theasphaltfromstickingtothecompactor.
AddingWaterwiththeTank Installed
1.Removethecapfromthewatertank(Figure9).
AddingWaterwiththeTank Removed
1.Detachthevalvecoupler(Figure10).
Figure9
1.Water-tankcap3.Watertank
2.Water
2.Fillthetankwithwater(Figure9).
3.Installthecapontothewatertank(Figure9).
g024875
g024848
1.Shutoffvalve
2.Femalecoupler
Figure10
3.Malecoupler
4.Sprinklermanifold
2.Removethewatertankfromtheframebypulling
upontheelastictanklatch(Figure11).
g019702
Figure11
1.Elastictanklatch
3.Fillthetankwithwater,assembleittotheframe,
andattachthecoupler.
10
Page 11

StartingtheEngine
1.MovetheengineswitchtotheONposition
(Figure12).
g019774
Figure14
1.Choke
Figure12
1.Engineswitch
2.MovethefuelvalvetotheONposition(Figure
13).
g019703
4.Movethethrottlelevermidwaybetweenthe
SLOW(turtle)andFAST(rabbit)positions(Figure
15).
Note:Awarmorhotenginemaynotrequire
choking.
Figure13
1.Fuelvalve
3.Movethechokelevertotheleftifyouare
startingacoldengine(Figure14).
g019704
1.Throttle
Figure15
g019775
5.Pulltherecoilhandlesharplytostarttheengine.
6.Aftertheenginestarts,graduallymovethe
choketotheright.
11
Page 12

Important:Iftheenginestallsorhesitates,
movethechokeleftagainuntiltheengine
warmsup.
7.Movethethrottlelevertomaximumthrottle.
ShuttingOfftheEngine
1.MovethethrottlelevertotheSLOW(turtle)
position.
2.Turntheengineswitchandfuelvalveoff.
OperatingtheCompactor
Withtheengineatfullthrottle,thecompactormoves
forwardwhilevibrating.
Graspthehandlelightlywithbothhandsandallowthe
compactortomoveforwardonitsown.Usethehandle
toguidethedirectionoftraveltoavoidobstructions.
TransportingtheMachine
Model68025weighs64kg(140lb)
Model68026weighs93kg(205lb)
Model68027weighs98kg(215lb)
Youcanusetherollcagelifteyetoliftandtransportthe
machinewithstrapsoracrane(Figure16).
Alternatively,2peoplecantransportthemachine
byliftingthecompactorusingthefrontandrearlift
handles(Figure16).
Figure16
1.Rollcagelifteye2.Lifthandles
g027692
12
Page 13

Maintenance
RecommendedMaintenanceSchedule(s)
MaintenanceService
Interval
Aftertherst25hours
Beforeeachuseordaily
Every50hours
Every100hours
Every200hours
Every300hours
Monthly
Disconnectingthe
MaintenanceProcedure
•Changetheengineoil.
•Checktheengine-oillevel.
•Cleandebrisfromtheaircleaner.
•Inspecttheair-cleanerelements.
•Cleantheair-lterelements.Cleanthemmorefrequentlyindustyoperating
conditions.
•Inspect,clean,andadjustthesparkplug;replaceitifnecessary.
•Cleanthesedimentcup.
•Changetheengineoil.
•Checkthebelttension.Adjustthebelttensionifnecessary.
•Replacethesparkplug.
•Replacethepaperair-cleanerelement.Replaceitmorefrequentlyindusty
operatingconditions.
•Changetheeccentricoil.
•Checktheeccentric-oillevel.
EngineMaintenance
Spark-PlugWire
Beforeperforminganymaintenanceontheengine,
disconnectthespark-plugwirefromthesparkplug
(Figure17).
Figure17
ServicingtheSparkPlug
ServiceInterval:Every100hours—Inspect,clean,
andadjustthesparkplug;replaceit
ifnecessary.
Every200hours—Replacethesparkplug.
UseanNGKBPR6ESsparkplugorequivalent.
1.Shutofftheengineandwaitforallmovingparts
tostop.
2.Disconnectthewirefromthesparkplug.
3.Cleanaroundthesparkplug.
4.Removethesparkplugfromthecylinderhead.
Important:Replaceacracked,fouled,or
dirtysparkplug.Donotcleantheelectrodes
becausegritenteringthecylindercan
damagetheengine.
5.Setthegapontheplugto0.76mm(0.03inch)
g019690
asshowninFigure18.
1.Spark-plugwire
13
Page 14

1.Centerelectrodeinsulator
2.Sideelectrode
3.Airgap(nottoscale)
r:\g000533
Figure18
6.Carefullyinstallthesparkplugbyhand(toavoid
crossthreading)untilitishandtight.
7.Tightenthesparkpluganadditional1/2turnif
itisnew;otherwise,tightenitanadditional1/8
to1/4turn.
Important:Aloosesparkplugcanbecome
veryhotandcandamagetheengine;
overtighteningasparkplugmaydamagethe
threadsinthecylinderhead.
8.Connectthewiretothesparkplug.
ServicingtheAirCleaner
ServiceInterval:Beforeeachuseordaily—Inspect
theair-cleanerelements.
Every50hours—Cleantheair-lterelements.
Cleanthemmorefrequentlyindustyoperating
conditions.
Every300hours/Y early(whichevercomes
rst)—Replacethepaperair-cleanerelement.
Replaceitmorefrequentlyindustyoperating
conditions.
RemovingtheAirFilter
Important:Donotoperatetheenginewithout
theairlterassembly;extremeenginedamage
willoccur.
1.Setthethrottletoslow,shutofftheengine,and
waitforallmovingpartstostop.
g027313
Figure19
1.Wingnut(cover)5.Foamlterelement
2.Air-ltercover6.Seal(rubber)
3.Wingnut(lter)7.Carburetorbase
4.Paperlterelement
4.Removethewingnutthatsecurestheair-lter
covertothecarburetorandremovethecover
(Figure19).
Note:Becarefultopreventdirtanddebrisfrom
fallingintothebase.
5.Removethefoamlterelementfromthepaper
lterelement(Figure19).
6.Inspectthefoamelementfordamage.
Note:Ifthefoamlterelementisdamaged,
replaceit.Ifthefoamelementisdirty,cleanit;
refertoCleaningtheFoamFilter(page14).
7.Removethewingnutthatsecuresthepaper
lterelementtothecarburetor(Figure19).
8.Removethepaperelementandinspectthe
paperlterelementfordamageandexcessive
amountsofdirtintheelement.
Note:Replacethepaperlterelementifitis
damagedorexcessivelydirty.
Note:Nevertrytocleanthepaperelement;
onlyreplaceit.
2.Disconnectthespark-plugwirefromthespark
plug.
3.Wipetheairltercover(Figure19)sothatitis
clean.
CleaningtheFoamFilter
1.Cleanthefoamlterelementinwarmsoapy
waterandrinsetheelementincleanwater,or
cleanthefoamlterelementinanonammable
solvent.
Note:Donotusefueltocleanthefoamelement
becauseitcouldcreateariskofreorexplosion.
14
Page 15

2.Allowthefoamlterelementtocompletelydry.
3.Dipthefoamelementincleanengineoil,then
squeezeouttheexcessoil.
Note:Iftoomuchoilisleftinthefoamelement
whentheengineisstarted,theenginewill
smoke.Excessoilinthefoamelementmayalso
restricttheairowthroughtheelementandmay
reachthepaperlterandclogit.
4.Assemblethefoamelementontothepaperlter
element(Figure19).
InstallingtheAirFilter
1.Wipecleanthedirtfromthecarburetorbaseand
theinsideofthecoverwithamoistrag(Figure
19).
Note:Donotallowdirtanddebristoenterthe
airductleadingintothecarburetor.
2.Ensurethattherubbergasketisalignedand
seatedontothemountingbaseofthecarburetor
(Figure19).
Note:Therubbergasketmightsticktothe
bottomoftheoldpaperlterelement.Remove
itfromtheoldpaperelementandinstallitonto
thecarburetor.
3.Alignthepaperlterelementwiththecarburetor
andensurethatthehold-downrodofthe
carburetorpassesthroughthetopplateofthe
lter(Figure19).
4.Securetheltertothecarburetorwiththelter
wingnutandtightenitngertight(Figure19).
5.Aligntheair-ltercoverovertheairlter
elementswiththehold-downrodofthe
carburetorpassingthroughthetopcover(Figure
19).
6.Securethecovertotheenginewiththecover
wingnutandtightenitngertight(Figure19).
1.Shutofftheengineandwaitforallmovingparts
tostop.
2.Disconnectthewirefromthesparkplug.
3.Movethefuel-shutoffvalvetotheOFFposition.
4.RemovethesedimentcupandO-ring(Figure6).
Figure20
1.Fuel-shutoffvalve(OFF
positionshown)
2.O-ring
5.Washthesedimentcupinanonammable
solventanddryitthoroughly.
6.PlacetheO-ringinthefuelvalveandinstallthe
sedimentcup,tighteningitsecurely.
7.Movethefuel-shutofflevertotheOnposition.
3.Sedimentcup
Note:Ifanyfuelleaks,repeatthisprocedure
andreplacetheO-ring.
g025917
CleaningtheSedimentCup
ServiceInterval:Every100hours/Every6months
(whichevercomesrst)
DANGER
Incertainconditions,fuelisextremely
ammableandhighlyexplosive.Areor
explosionfromfuelcanburnyouandothers
andcandamageproperty.
•Setthethrottletoslow,shutofftheengine
andkeepheat,sparks,andameaway .
•Handlefuelonlyoutdoors.
•Wipeupspillsimmediately.
•Donotsmokewhilehandlingfuel.
15
Page 16

ServicingtheEngineOil
OilType:Detergentoil(APIserviceSJorhigher)
Oilcrankcasecapacity:
•0.56L(0.59USqt)forModel68025
•0.58L(0.61USqt)forModels68026and68027
Viscosity:Seetablebelow
Figure21
ChangingtheEngineOil
g019692
Figure22
1.Drainplug
Note:Y oumayhavetotipthecompactor
g013375
backwardstodraintheoil.
4.Whentheoilhasdrainedcompletely ,replace
theplug.
Note:Disposeoftheusedoilatacertied
recyclingcenter.
ServiceInterval:Aftertherst25hours
Every100hours
WARNING
Oilmaybehotaftertheenginehasbeenrun,
andcontactwithhotoilcancausesevere
personalinjury .
Avoidcontactingthehotengineoilwhenyou
drainit.
1.Shutofftheengineandwaitforallmovingparts
tostop.
2.Disconnectthewirefromthesparkplug.
3.Removethedrainplug(Figure22).
5.Removethedipstick(Figure7)andslowlypour
oilintothellerholeuntiltheoilpoursoutofthe
llerhole.
6.Replaceandsecurethedipstick.
7.Wipeupanyspilledoil.
16
Page 17

ServicingtheEccentricOil
ChangingtheEccentricOil
Oiltype:10W30(APIserviceSJorhigher)
Oilcapacity:
•1.3L(1.4USqt)forModel68025
•3.3L(3.5USqt)forModel68026
•3.5L(3.7USqt)forModel68027
CheckingtheEccentric-OilLevel
ServiceInterval:Monthly
1.Setthethrottletoslow,shutofftheengine,and
waitforallmovingpartstostop.
2.Placeadrainpanundertheoilplugandremove
theoil-plugscrewonthesideoftheeccentric
housing(Figure23).
ServiceInterval:Every300hours
1.Setthethrottletoslow,shutofftheengine,and
waitforallmovingpartstostop.
2.Placeanoildrainpanundertheoilplugand
removethellplugandtheoilplugscrew
(Figure23).
3.Tiptheplatecompactorforwardslightlyanduse
asuctionguntoremovetheoilthroughtheller
hole(Figure23).
4.Slowlypouroilintothellerholeuntiltheoil
comesouttheoilplug(Figure23).
5.Wipeupanyspilledoil.
6.Replacethellplugandtheoilplugscrew.
Figure23
1.Oilplug2.Eccentric-oil-llerhole
3.Verifythattheeccentricoilislevelwiththebolt
hole.
4.Wipeupanyspilledoil.
5.Replacetheoil-plugscrew.
g020132
17
Page 18

BeltMaintenance
RemovingtheBeltCover
1.Removetheanged-headboltsthatsecurethe
beltcovertotheengine(Figure24orFigure25).
Figure24
Model2200
1.Boltlocations2.Flanged-headbolt
CheckingtheBeltTension
ServiceInterval:Every100hours
Important:Thebestbelttensionforthemachine
isthelowesttensionatwhichthebeltsdonotslip
underfullpower.
1.Layastraightedgeonthebeltandacrossthe
pulleys(Figure26).
g027329
g024879
Figure26
Figure25
Model3000/4000
1.Boltlocations2.Flanged-headbolt
2.Removethebeltcover.
1.Straightedge2.Beltdeected7.6mm(0.3
inch)at1.4to2.3kg(3to
5lb)offorce
2.Withaforcegauge,pushdownonthebelt,
midwaybetweenthepulleys(Figure26).
Note:Thebeltshoulddeect7.6mm(0.3inch)
fromthestraightedgewhenpushingdownon
thebeltwith1.4to2.3kg(3to5lb)offorce
(Figure26).
Note:Ifthebelttensionistoolowortoohigh,
adjustthebelttension;refertoAdjustingtheBelt
g027330
Tension(page19).
18
Page 19

AdjustingtheBeltTension
1.Removethewatertank;refertoAddingWater
withtheT ankRemoved(page10).
2.Loosenthe2hex-socketbolts(5/16-24x1.75
inches)thatsecurethefrontoftheengine
(Figure27).
Figure27
1.Hex-socketbolts(5/16-24x1.75inches)
8.Tightenthe2angenuts(8mm)thatsecurethe
backoftheengineto23to29N∙m(17to21
ft-lb)asshowninFigure28.
9.Applymedium-gradethread-lockingcompound
tothethreadsoftheanged-headboltsthatyou
removedinstep1ofRemovingtheBeltCover
(page18).
10.Alignthebeltcovertothemachineandsecure
thecoverwiththeanged-headboltsthatyou
removedinstep1ofRemovingtheBeltCover
(page18).
11.Torquetheboltsto972to1198N∙cm(86to106
in-lb).
g024877
3.Loosenthe2angenuts(8mm)thatsecurethe
backoftheengine(Figure28).
Figure28
1.Flangenuts(8mm)
2.Belt-tensioningbolt
4.Loosenthejamnut,androtatethe
belt-tensioningboltclockwisetotension
thebelt,orrotatethebelt-tensioningbolt
counterclockwisetoloosenthetensiononthe
belt(Figure28).
g024878
5.Checkthebelttension;refertoCheckingthe
BeltT ension(page18).
6.Whenthecorrecttensionisreached,tightenthe
jamnutonthebelt-tensioningbolt.
7.Tightenthe2hex-socketbolts(5/16-24x1-3/4
inches)thatsecurethefrontoftheengineto
12.5to16.4N∙m(9.2to12.1ft-lb)asshownin
Figure27.
19
Page 20

Storage
1.Shutofftheengineanddisconnectthe
spark-plugwirefromthesparkplug.
2.Removedirtandgrimefromtheentiremachine.
Important:Youcanwashthemachinewith
milddetergentandwater.Donotpressure
washthemachine.Avoidexcessiveuseof
water,especiallyneartheengine.
3.Servicetheaircleaner;refertoServicingtheAir
Cleaner(page14).
4.Changetheengineoil;refertoChangingthe
EngineOil(page16).
5.Forstorageover30days,preparetheunitas
follows:
A.Addapetroleum-basedfuel
stabilizer/conditionertofuelinthe
tank.Followmixinginstructionsfrom
stabilizermanufacturer(1ozpergallon).
Donotuseanalcohol-basedstabilizer
(ethanolormethanol).
Note:Afuelstabilizer/conditionerismost
effectivewhenmixedwithfreshfueland
usedatalltimes.
B.Runtheengineuntilitstopsfromrunning
outoffuel.
C.Choketheengine.
D.Startandruntheengineuntilitdoesnot
startagain.
E.Disposeoffuelproperly.Recycleasper
localcodes.
Important:Donotstore
stabilizer/conditionedfuelover90days.
6.Checkandtightenallbolts,nuts,andscrews.
Repairorreplaceanypartthatisdamaged.
7.Paintallscratchedorbaremetalsurfaces.Paint
isavailablefromyourAuthorizedServiceDealer.
8.Storethemachineinaclean,drygarageor
storagearea.
9.Coverthemachinetoprotectitandkeepitclean.
20
Page 21

Troubleshooting
Problem
Theenginedoesnotstart,startshard,or
failstokeeprunning.
Theplatedoesnotvibrateatfullspeed.
Theclutchisextremelyhot.
Theplatedoesnotvibratewhenthe
engineisrunning.
Thereisinsufcientwaterow.
PossibleCauseCorrectiveAction
1.Thefueltankisempty.1.Fillthefueltankwithfuel.
2.Thesparkplugispitted,fouled,orthe
gapisincorrect.
3.Theaircleanerisdirty.
1.Theoillevelintheeccentrichousing
istoohigh.
2.Thebeltisloose.2.Adustthebelttension.
1.Aforeignobjectislodgedagainstthe
eccentricsheave.
2.Theoillevelintheeccentrichousing
istoohigh.
3.Theclutchhasslipped.3.Adjustthecarburetor.
4.Engineisnotreachingfullspeed.
1.Thebeltisbroken.1.Replacethebelt.
2.Theclutchisbrokenorwornout.2.Replacetheclutch.
3.Theeccentrichasseized.
1.Thewatertankisempty.1.Fillthewatertank.
2.Thesprinklerisclosed.
3.Thesprinklermanifoldisclogged.3.Removeandcleanthemanifold.
2.Installanew,correctlygappedspark
plug.
3.Cleanorreplacetheaircleaner
elements.
1.Checktheoillevelanddrainas
necessary.
1.Removetheobstruction.
2.Checktheoillevelanddrainas
necessary.
4.Adjustthethrottlesotheengineruns
at3,400rpm.
3.Ensuretheeccentricisfreeturning.
2.Openthesprinklervalve.
21
Page 22

Notes:
Page 23

Notes:
Page 24

CaliforniaProposition65WarningInformation
Whatisthiswarning?
Youmayseeaproductforsalethathasawarninglabellikethefollowing:
WARNING:CancerandReproductiveHarm—www.p65Warnings.ca.gov.
WhatisProp65?
Prop65appliestoanycompanyoperatinginCalifornia,sellingproductsinCalifornia,ormanufacturingproductsthatmaybesoldinorbroughtinto
California.ItmandatesthattheGovernorofCaliforniamaintainandpublishalistofchemicalsknowntocausecancer,birthdefects,and/orother
reproductiveharm.Thelist,whichisupdatedannually,includeshundredsofchemicalsfoundinmanyeverydayitems.ThepurposeofProp65isto
informthepublicaboutexposuretothesechemicals.
Prop65doesnotbanthesaleofproductscontainingthesechemicalsbutinsteadrequireswarningsonanyproduct,productpackaging,orliteraturewith
theproduct.Moreover,aProp65warningdoesnotmeanthataproductisinviolationofanyproductsafetystandardsorrequirements.Infact,the
CaliforniagovernmenthasclariedthataProp65warning“isnotthesameasaregulatorydecisionthataproductis‘safe’or‘unsafe.’”Manyofthese
chemicalshavebeenusedineverydayproductsforyearswithoutdocumentedharm.Formoreinformation,gotohttps://oag.ca.gov/prop65/faqs-view-all
AProp65warningmeansthatacompanyhaseither(1)evaluatedtheexposureandhasconcludedthatitexceedsthe“nosignicantrisklevel”;or(2)
haschosentoprovideawarningbasedonitsunderstandingaboutthepresenceofalistedchemicalwithoutattemptingtoevaluatetheexposure.
Doesthislawapplyeverywhere?
Prop65warningsarerequiredunderCalifornialawonly.ThesewarningsareseenthroughoutCaliforniainawiderangeofsettings,includingbutnot
limitedtorestaurants,grocerystores,hotels,schools,andhospitals,andonawidevarietyofproductsAdditionally,someonlineandmailorder
retailersprovideProp65warningsontheirwebsitesorincatalogs.
.
HowdotheCaliforniawarningscomparetofederallimits?
Prop65standardsareoftenmorestringentthanfederalandinternationalstandards.TherearevarioussubstancesthatrequireaProp65warning
atlevelsthatarefarlowerthanfederalactionlimits.Forexample,theProp65standardforwarningsforleadis0.5μg/day,whichiswellbelow
thefederalandinternationalstandards.
Whydon’tallsimilarproductscarrythewarning?
•ProductssoldinCaliforniarequireProp65labellingwhilesimilarproductssoldelsewheredonot.
•AcompanyinvolvedinaProp65lawsuitreachingasettlementmayberequiredtouseProp65warningsforitsproducts,butothercompanies
makingsimilarproductsmayhavenosuchrequirement.
•TheenforcementofProp65isinconsistent.
•CompaniesmayelectnottoprovidewarningsbecausetheyconcludethattheyarenotrequiredtodosounderProp65;alackofwarningsfora
productdoesnotmeanthattheproductisfreeoflistedchemicalsatsimilarlevels.
WhydoesToroincludethiswarning?
Torohaschosentoprovideconsumerwithasmuchinformationaspossiblesothattheycanmakeinformeddecisionsabouttheproductstheybuyand
use.T oroprovideswarningsincertaincasesbasedonitsknowledgeofthepresenceofoneormorelistedchemicalswithoutevaluatingthelevelof
exposure,asnotallthelistedchemicalprovideexposurelimitrequirements.WhiletheexposurefromT oroproductsmaybenegligibleorwellwithinthe
“nosignicantrisk”range,outofanabundanceofcaution,T orohaselectedtoprovidetheProp65warnings.Moreover ,ifTorodoesnotprovidethese
warnings,itcouldbesuedbytheStateofCaliforniaorbyprivatepartiesseekingtoenforceProp65andsubjecttosubstantialpenalties.
RevA
 Loading...