

Toro 68013, 68014, 68017, 68020, 68021 Operator's Manual

FormNo.3405-112RevB
MM-SeriesMortarMixer
ModelNo.68013—SerialNo.314000001andUp
ModelNo.68014—SerialNo.314000001andUp
ModelNo.68016—SerialNo.314000001andUp
ModelNo.68017—SerialNo.314000001andUp
ModelNo.68020—SerialNo.314000001andUp
ModelNo.68021—SerialNo.314000001andUp
ModelNo.68024—SerialNo.314000001andUp
Registeratwww.T oro.com.
OriginalInstructions(EN)
*3405-112*B

ItisaviolationofCaliforniaPublicResourceCode
Section4442or4443touseoroperatetheengineon
anyforest-covered,brush-covered,orgrass-covered
landunlesstheengineisequippedwithaspark
arrester,asdenedinSection4442,maintainedin
effectiveworkingorderortheengineisconstructed,
equipped,andmaintainedforthepreventionofre.
Theenclosedengineowner'smanualissupplied
forinformationregardingtheUSEnvironmental
ProtectionAgency(EPA)andtheCaliforniaEmission
ControlRegulationofemissionsystems,maintenance,
andwarranty.Replacementsmaybeorderedthrough
theenginemanufacturer.
TireInformation—TheDOTtireinformationislocated
onthesideofeachtire.Thisinformationgivesload
andspeedratings.Replacementtiresshouldhavethe
sameorbetterratings;refertoSpecications(page
16)toensurethatthetiresonyourmachinemeetor
exceedtheweightrequirementsofyourmachine.
WARNING
CALIFORNIA
Proposition65Warning
Theengineexhaustfromthisproduct
containschemicalsknowntotheStateof
Californiatocausecancer,birthdefects,
orotherreproductiveharm.
Useofthisproductmaycauseexposure
tochemicalsknowntotheStateof
Californiatocausecancer,birthdefects,
orotherreproductiveharm.
DealerorToroCustomerServiceandhavethemodel
andserialnumbersofyourproductready.Figure1
identiesthelocationofthemodelandserialnumbers
ontheproduct.Writethenumbersinthespace
provided.
Important:Withyourmobiledevice,youcan
scantheQRcodeontheserialnumberdecal(if
equipped)toaccesswarranty,parts,andother
productinformation.
Introduction
Thismachineisdesignedtomixmortar,plaster,
reproongmaterial,grout,andothersmall-grained
Portlandcementproducts.Avehicleequippedwith
anappropriatepintlehitchorballhitchcantowthe
machine.
Readthisinformationcarefullytolearnhowtooperate
andmaintainyourproductproperlyandtoavoid
injuryandproductdamage.Youareresponsiblefor
operatingtheproductproperlyandsafely .
YoumaycontactT orodirectlyatwww.Toro.com
forproductsafetyandoperationtrainingmaterials,
accessoryinformation,helpndingadealer,orto
registeryourproduct.
Wheneveryouneedservice,genuineToroparts,or
additionalinformation,contactanAuthorizedService
©2018—TheToro®Company
8111LyndaleAvenueSouth
Bloomington,MN55420
1.Modelandserialnumberlocation
ModelNo.
SerialNo.
2
g249232
Figure1
Contactusatwww.Toro.com.
PrintedintheUSA
AllRightsReserved

Thismanualidentiespotentialhazardsandhas
safetymessagesidentiedbythesafety-alertsymbol
(Figure2),whichsignalsahazardthatmaycause
seriousinjuryordeathifyoudonotfollowthe
recommendedprecautions.
Figure2
Safety-alertsymbol
Thismanualuses2wordstohighlightinformation.
Importantcallsattentiontospecialmechanical
informationandNoteemphasizesgeneralinformation
worthyofspecialattention.
Contents
Safety.......................................................................4
SafeOperatingPractices....................................4
SafetyandInstructionalDecals..........................7
Setup......................................................................10
1InstallingtheDumpHandle............................10
2InstallingtheT owPole....................................11
3InstallingtheSafetyChain..............................12
ProductOverview...................................................13
Controls...........................................................14
EngineControls............................................15
Specications..................................................16
Operation................................................................17
ThinkSafetyFirst..............................................17
TowingtheMachine..........................................17
AdjustingtheAxleWidth...................................20
PreparingtoUsetheMachine...........................21
OpeningtheCowl.............................................21
ClosingtheCowl...............................................22
AddingFuel......................................................22
PerformingDailyMaintenance..........................24
StartingtheEngine...........................................24
ShuttingOfftheEngine.....................................24
MixingtheMaterial...........................................25
DumpingtheMaterial........................................26
CleaningtheDrum............................................26
Maintenance...........................................................27
RecommendedMaintenanceSchedule(s)...........27
Pre-MaintenanceProcedures..............................28
PreparingtheMachineforMaintenance............28
DisconnectingtheSpark-PlugWire..................28
RemovingtheDividerPlate..............................28
InstallingtheDividerPlate................................28
Lubrication..........................................................29
LubricatingtheBearingsandSeals...................29
EngineMaintenance...........................................30
ServicingtheAirCleaner..................................30
ServicingtheEngineOil....................................31
ServicingtheSparkPlug...................................33
CleaningtheSparkArrester..............................34
RemovingandInstallingtheEngine..................35
FuelSystemMaintenance...................................36
CleaningtheFuel-SedimentCup......................36
DrainingtheFuelT ank......................................37
DriveSystemMaintenance..................................37
g000502
TireAirPressure...............................................37
InspectingtheTires..........................................37
TorquingtheWheelLugNuts............................38
ServicingtheReductionCase...........................38
ServicingtheGearbox......................................40
BeltMaintenance................................................42
InspectingtheBelts..........................................42
AdjustingtheBeltT ension.................................42
ReplacingtheBelts...........................................43
AligningthePulleys..........................................45
PaddleMaintenance............................................46
AdjustingthePaddleBlades.............................46
Cleaning..............................................................47
CleaningtheMachine.......................................47
Storage...................................................................48
Troubleshooting......................................................49
3

Safety
Improperuseormaintenancebytheoperatoror
ownercanresultininjury.Toreducethepotential
forinjury ,complywiththesesafetyinstructions
andalwayspayattentiontothesafety-alertsymbol
(Figure2),whichmeans:Caution,Warning,or
Danger—personalsafetyinstruction.Failureto
complywiththeinstructionmayresultinpersonal
injuryordeath.
SafeOperatingPractices
Thisproductiscapableofamputatinghands.Always
followallsafetyinstructionstoavoidseriousinjuryor
death.
WARNING
Machiningorhandlingstone,masonry,
concrete,metal,andothermaterialscan
generatedust,mists,andfumescontaining
chemicals,suchassilica,knowntocause
seriousorfatalinjuryorillness,suchas
respiratorydisease,silicosis,cancer,birth
defects,orotherreproductiveharm.
•Controldust,mist,andfumesatthe
sourcewherepossible.Usewaterfordust
suppressionwheneverpossible.
•Usegoodworkpracticesandfollowthe
recommendationsofthemanufactureror
suppliers,OSHA,andotheroccupational
andtradeassociations.
•Alwaysfollowrespiratoryprecautions.
•Whenyoucannoteliminatethehazards
frominhalation,youandallbystanders
shouldweararespiratorapprovedby
OSHAforthematerialthatyouare
handling.
WARNING
Engineexhaustcontainscarbonmonoxide,
whichislethalifinhaled.
Donotruntheengineindoorsorinan
enclosedarea.
•Readandunderstandthecontentsofthis
Operator’sManualbeforeyoustarttheengine.
Ensurethateveryoneusingthisproductknows
howtouseitandunderstandsthewarnings.
•Becomefamiliarwiththesafeoperationofthe
equipment,operatorcontrols,andsafetysigns.
•Alloperatorsandmechanicsshouldbetrained.
Theownerisresponsiblefortrainingthem.
•Neverletchildrenoruntrainedpeopleoperateor
servicetheequipment.Localregulationsmay
restricttheageoftheoperator.
•Theowner/usercanpreventandisresponsible
foraccidentsorinjuriestopeopleordamageto
property.
Towing
•Checkwithyourlocalcountyorstatetowingsafety
regulationsbeforetowingthemachine.
•Toreducethepossibilityofanaccidentwhile
transportingthemachineonpublicroads,ensure
thatthetowingvehicleismechanicallysoundand
ingoodoperatingcondition.
•Shutofftheenginebeforetransportingthe
machine.
•Whentowingwithaballhitch,ensurethatitisthe
propersizeforthehitchcoupleronthemachine.
•Whentowingwithapintlehitch,ensurethatthe
eyeofthetowpoleisthecorrectdimensionfor
thepintlehook.
•Inspectthehitchandcouplingforwear.Donot
towthemachinewithdamagedorwornhitches,
couplings,chains,orothercomponents.
•Checktheairpressureofthetiresonthetowing
vehicleandadjustthepressureasneeded.
•Checkthetiretreadandsidewallfordamageand
wearandreplacethetireifnecessary.
•Properlyattachthesafetychainstothetowing
vehiclebycrossingthechainsandremovingany
extraslack.
•Ensurethatthedirectionalandbrakelightsare
workingproperly(ifequipped).
•Ensurethatthedirectional,backup,andbrake
lightsofthetowvehicleareworkingproperly(if
equipped).
Training
•Parkthemachineonalevelsurface,shutoffthe
engine,waitforallmovingpartstostop,andallow
themachinetocoolbeforeadjusting,cleaning,
storing,orrepairingthemachine.
•Beforetowing,ensurethatyourmachineis
correctlyandsecurelyattachedtothetowing
vehicle.
•Ensurethatthesafetychainsareproperlysecured
tothevehicle,andleaveenoughslackforturning.
4

•Donotcarryanymaterialinthemachinewhen
towing.
•Avoidsuddenstopsandstarts.Thiscancause
skiddingorjackkning.Smooth,gradualstartsand
stopsimprovestowing.
•Avoidsharpturnstopreventrolling.T owonlywith
avehiclethathasahitchdesignedfortowing.Do
notattachtowedequipmentexceptatthehitch
point.
•Donottowthemachinefasterthan88km/h(55
mph).
•Usecautionwhenbackingup;useaspotter
outsidethevehicletoguideyou.
•Donotallowanyonetositorrideonthemachine.
•Disconnectthemachinefromthetowvehicle
beforeusingit.
•Placechocksunderneaththetirestopreventthem
fromrollingwhilethemachineisparked.
Preparation
–Ensurethatthelugnutsaretightandtorqued
properly.
–Ensurethatthemachineisproperlysecured.
FuelSafety
•Useextremecareinhandlingfuel.Itisammable
anditsvaporsareexplosive.
•Extinguishallcigarettes,cigars,pipes,andother
sourcesofignition.
•Useonlyanapprovedfuelcontainer.
•Donotremovethefuelcaporllthefueltank
whiletheengineisrunningorhot.
•Donotaddordrainfuelinanenclosedspace.
•Donotstorethemachineorfuelcontainerwhere
thereisanopename,spark,orpilotlight,such
asonawaterheaterorotherappliance.
•Ifyouspillfuel,donotattempttostarttheengine;
avoidcreatinganysourceofignitionuntilthefuel
vaporshavedissipated.
Becomefamiliarwiththesafeoperationofthe
equipment,operatorcontrols,andsafetysigns.
•Useonlyaccessoriesandattachmentsapproved
bythemanufacturer.
•Wearpersonalprotectiveequipmentand
appropriateclothingincluding:
–Hardhat
–Respiratorordustmask
–Faceshield
–Safetyglasses
–Hearingprotection
–Safetyshoes
–Longpants
–Shirtwithlongsleevesthataretightatthe
wrists
–Tight-ttinggloveswithoutdrawstringsorloose
cuffs
•Wearappropriateclothing,includingeye
protection;longpants;substantial,slip-resistant
footwear;andhearingprotection.Tiebacklong
hairanddonotwearloosejewelry .
•Ensurethatthemachineisonalevelsurface
beforeoperatingit.
•Chockthetiresofthemachinetoprevent
unintendedmovement.
•Beforeeveryuse,dothefollowing:
–Inspectthecoupler,ball,andhitch.
–Ensurethatalllightsarefunctioningproperly
(ifequipped).
–Ensurethatthetiresareproperlyinated.
Operation
•Useyourfullattentionwhileoperatingthe
machine.Donotengageinanyactivitythat
causesdistractions;otherwise,injuryorproperty
damagemayoccur.
•Donotrunanengineinanenclosedorpoorly
ventilatedarea.
•Operatethemachineonlyingoodlighting
conditions.
•Beforestartingthemachine,ensurethatthereare
nopeopleorobstaclesnearorunderthemachine.
•Shutofftheenginebeforeleavingthemachinefor
anyreason.
Neverleavearunningmachineunattended.
Alwaysshutofftheengineandverifythatall
movingpartshavestopped.
•Chockthetiresofthemachineorkeepitattached
tothetowingvehiclewhenitisnotinuse.
•Keepyourhandsawayfromanymovingparts.
Keepyourfeetawayfromthetiresandthefront
post.
•Donotoperatethemachineundertheinuence
ofalcoholordrugs.
•Donotplaceyourhandsoranysolidobjectinto
thedrumwhenthemachineisinoperation.
•Donottouchpartsthatmaybehotfromoperation.
Allowthemtocoolbeforeattemptingtomaintain,
adjust,orservicethemachine.
•Nevermovethemachinewhiletheengineis
running.
•Keepthecowlclosedandlatchedduringoperation.
5

•Ensurethatalltheguardsandshieldsaresecurely
inplacebeforeoperatingthemachine.
•Ifthemixingpaddlesstrikeanobjectorifthe
machinestartsmakinganunusualnoiseor
vibration,shutofftheengine,waitforallmoving
partstostop,andemptythedrum.Inspectfor
cloggingordamage.Clean,repair,and/orreplace
anydamagedparts.
•Donotchangetheenginegovernorsettingor
overspeedtheengine.
•Donotoperatethemachinewhenthereistherisk
oflightning.
MaintenanceandStorage
•Beforeperformingmaintenance,dothefollowing:
–Parkthemachineonalevelsurface.
–Shutofftheengineandwaitforallmovement
tostopbeforeadjusting,cleaning,orrepairing
themachine.
–Lettheenginecoolbeforeperforming
maintenanceorstoringthemachine.
–Disengageallpowerandoperationcontrols.
•Neverlubricate,service,repair,oradjustthe
machinewiththeenginerunning.
•Keepequipmentmaterialsclearfromthemufer
andenginetopreventres.Cleanupoilorfuel
spills.
•Neverallowuntrainedpersonneltoservicethe
machine.
•Keepyourhands,feet,andclothingawayfrom
movingparts.Ifpossible,donotmakeadjustments
withtheenginerunning.
•Keepallpartsingoodworkingconditionandall
fastenerstightened.Replaceallwornordamaged
decals.
•Removeanybuildupofgrease,oil,ordebrisfrom
themachine.
•Stopandinspectthemachineifanobjectenters
thedrumorcausesanotherobstruction.Makeall
necessaryrepairsbeforestartingthemachine.
•Donottamperwithsafetydevices.
•Chockthetireswhenstoringthemachine.
•Keepallfastenersandhoseclampssecurely
tightenedandallequipmentingoodcondition.
•UseonlygenuineTororeplacementparts.
6
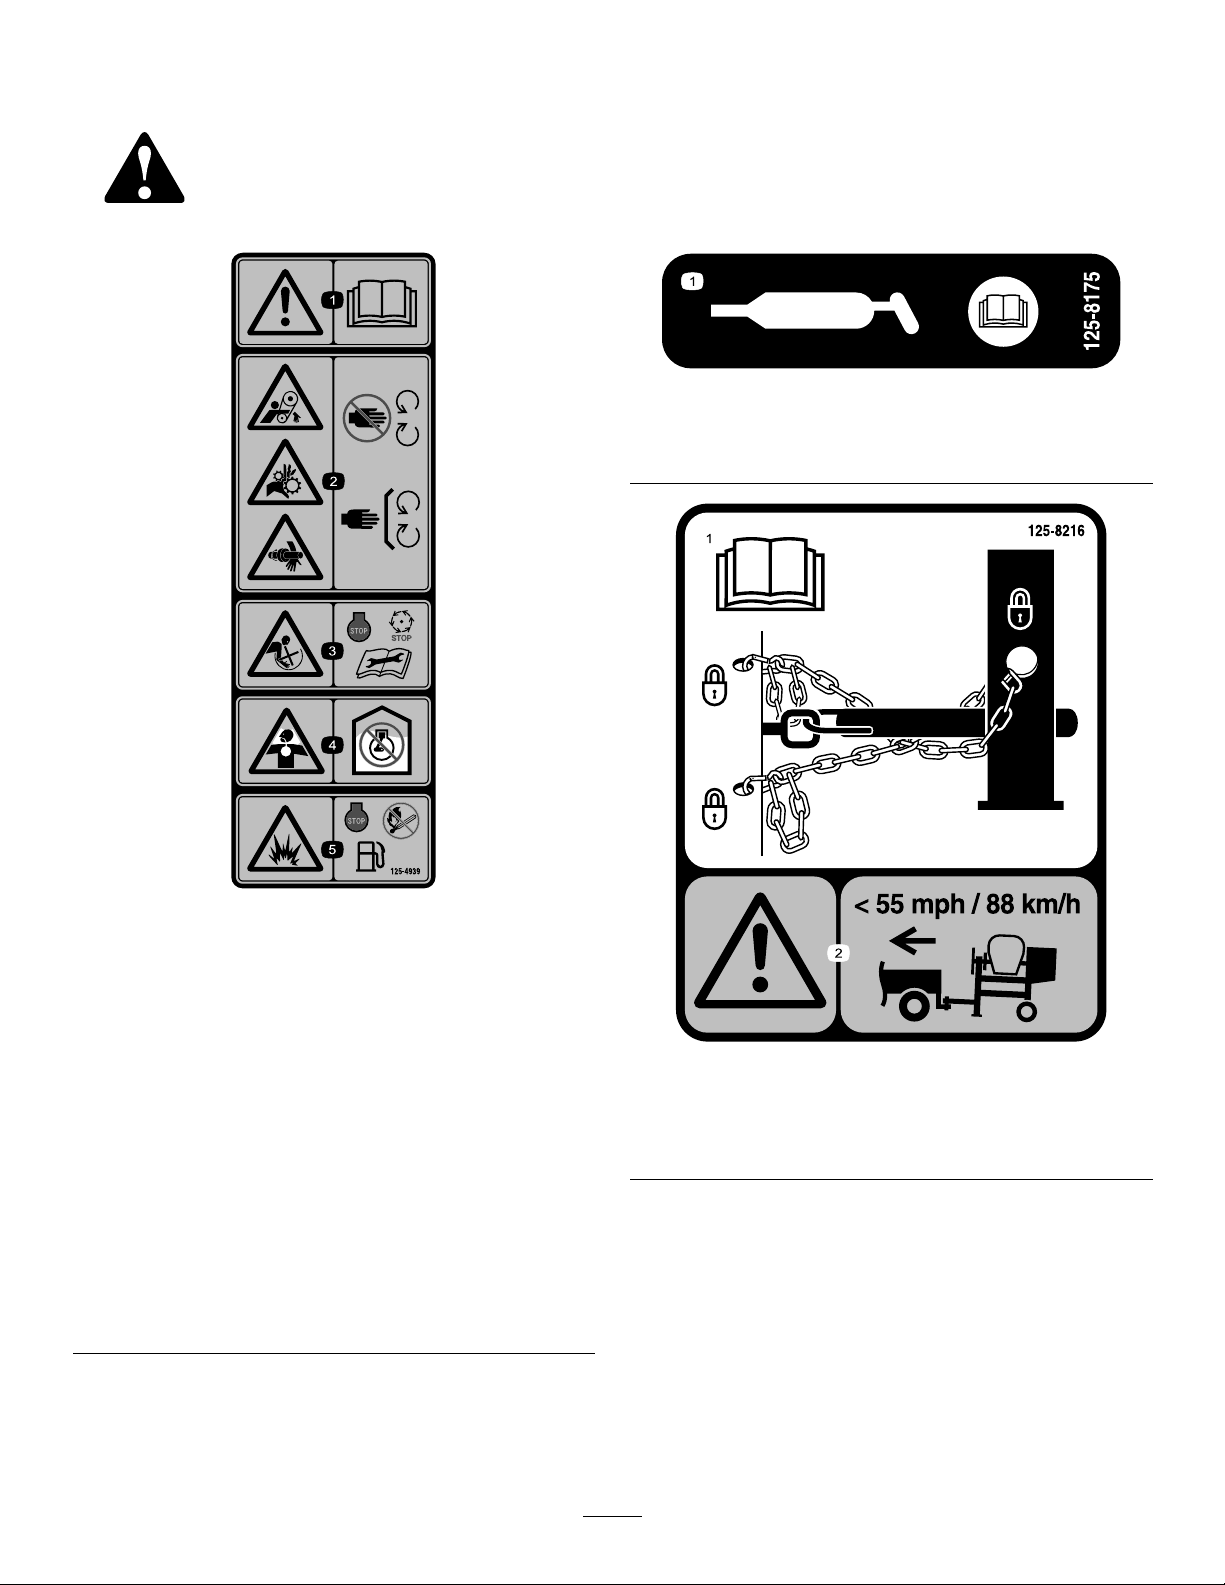
SafetyandInstructionalDecals
Safetydecalsandinstructionsareeasilyvisibletotheoperatorandarelocatednearanyarea
ofpotentialdanger.Replaceanydecalthatisdamagedorlost.
decal125-8175
125-8175
1.ReadtheOperator’sManualforinformationongreasing
themachine.
1.Warning—readthe
Operator’sManual.
2.Handandarm
entanglementatthe
beltdrive;crushinghazard
ofhand;entanglement
hazardofhandatthe
shaft—keepyourhands
awayfrommovingparts;
keepallguardsand
shieldsinplace.
3.Entanglementhazard
atpaddles—shutoff
theengineandwait
forallmovingpartsto
stopbeforeperforming
maintenance.
decal125-4939
125-4939
4.Toxicgasinhalation
hazard—Donotrunthe
engineinanenclosed
space.
5.Explosionhazard—shut
offtheengineandkeep
awayfromameswhen
refueling.
1.ReadtheOperator’s
Manualforinformationon
howtotowthemachine.
125-8216
2.Warning—limittowing
speedtolessthan88km/h
(55mph).
decal125-8216
7

decal133-5619
decal130-8322
133-5619
130-8322
1.Usefuelwithanalcohol
contentbyvolumeunder
10%only.
2.ReadtheOperator's
Manualformore
informationonfuel.
3.Donotusefuelwithan
alcoholcontentgreater
than10%byvolume.
1.ReadtheOperator'sManualformoreinformationonservicingthemachine.
decal132-3997
132-3997
8

1.ReadtheOperator'sManualformoreinformationonservicingthemachine.
decal132-4043
132-4043
9

Setup
LooseParts
Usethechartbelowtoverifythatallpartshavebeenshipped.
ProcedureDescription
Dumphandle1
1
2
3
Bolt2
Nut2
Towpolekit(soldseparately)
Safetychain(includedwiththetowpole
kit)
Connectinglink(includedwiththetow
polekit)
1
InstallingtheDumpHandle
Partsneededforthisprocedure:
1Dumphandle
2Bolt
2Nut
Qty.
Use
Installthedumphandle.
1
1
2
Installthetowpole(side-dumpmodels
only).
Installthesafetychain.
Procedure
1.Cutthecabletiestoremovethedumphandle
fromtheundersideofthegrate.
2.Installthedumphandletothesideofthedrum
using2boltsandnutsasshowninFigure3,
Figure4,orFigure5,asappropriateforyour
model.
g022169
Figure3
Models68013,68016,68020
g022150
Figure4
Models68014,68017,68021
10

Figure5
Model68024
g022149
g019804
Figure6
1.Towpole4.Bolthole
2.Frontpost
3.Bolt6.Nut
5.Frametting
2
InstallingtheTowPole
Partsneededforthisprocedure:
1
Towpolekit(soldseparately)
TowPoleSpecications
Purchasethetowpolekit(includingfasteners)that
meetsyourneedsfromyourAuthorizedService
Dealer.Themachinehasthefollowingtowpole
options:
HitchTypeLength
50mm(2inch)ball—stamped78.7cm(31inches)or127cm
50mm(2inch)ball—forged78.7cm(31inches)or127cm
Pintle
(50inches)
(50inches)
78.7cm(31inches)or127cm
(50inches)
2.Slidethetowpoleforwardandaligntheholein
thepolewiththeholeintheframetting(Figure
6).
3.Inserttheboltthroughtheholesinthettingand
thepole(Figure6).
4.Threadthenutontotheboltandtightenthem
untiltheyaretightagainsttheframetting
(Figure6).
Note:Iftheself-lockingnyloninsertinthe
locknutwearswithuse,replacethenutwitha
newGrade5orGrade8locknut.
InstallingtheTowPole
1.Removetheboltandnutfromthetowpole
(Figure6).
11
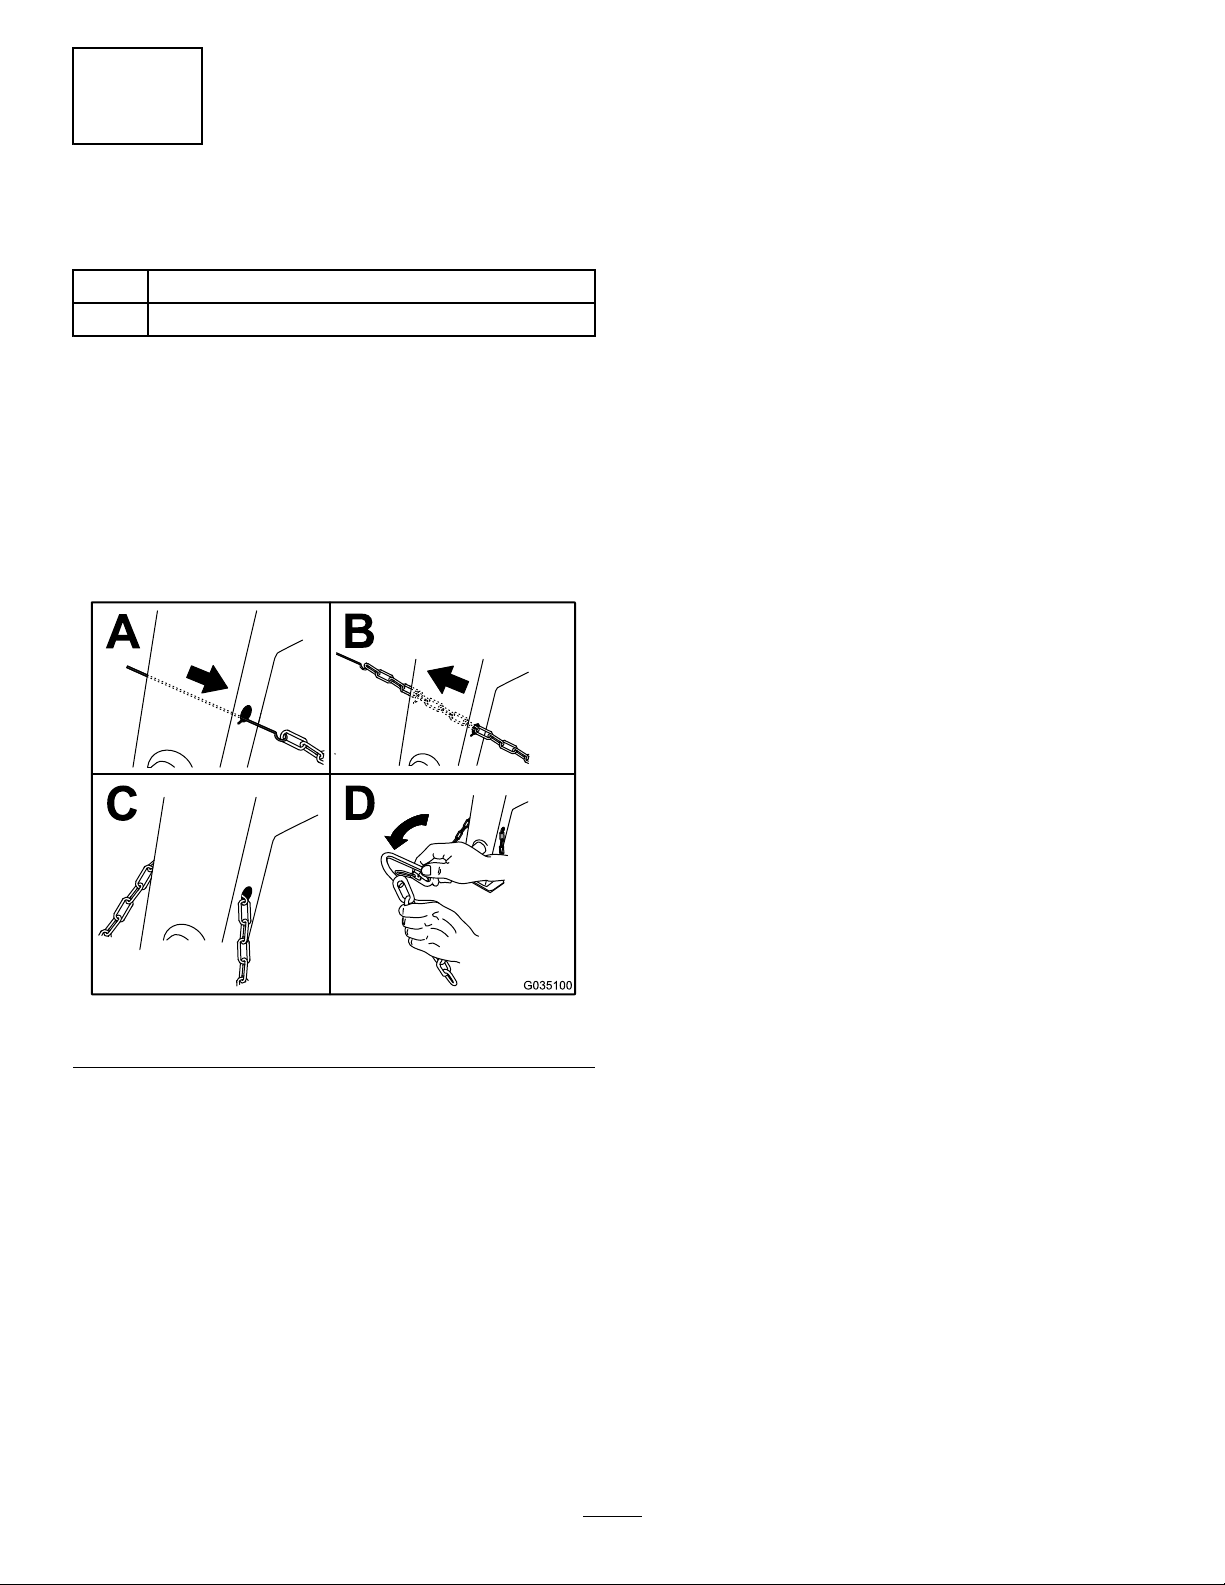
3
InstallingtheSafetyChain
Partsneededforthisprocedure:
1
Safetychain(includedwiththetowpolekit)
2
Connectinglink(includedwiththetowpolekit)
Procedure
Safetychainandconnectinglinkareincludedinthe
towpolekit(soldseparately);referto2Installingthe
TowPole(page1 1).
Formahookontheendofabendablepieceofrodor
stiffwire(notincluded)andinstallthesafetychainand
connectinglinksasshowninFigure7.
Figure7
Note:Ensurethatapproximatelyequallengthsof
safetychainextendfromeithersideofthefrontpost.
g035100
12
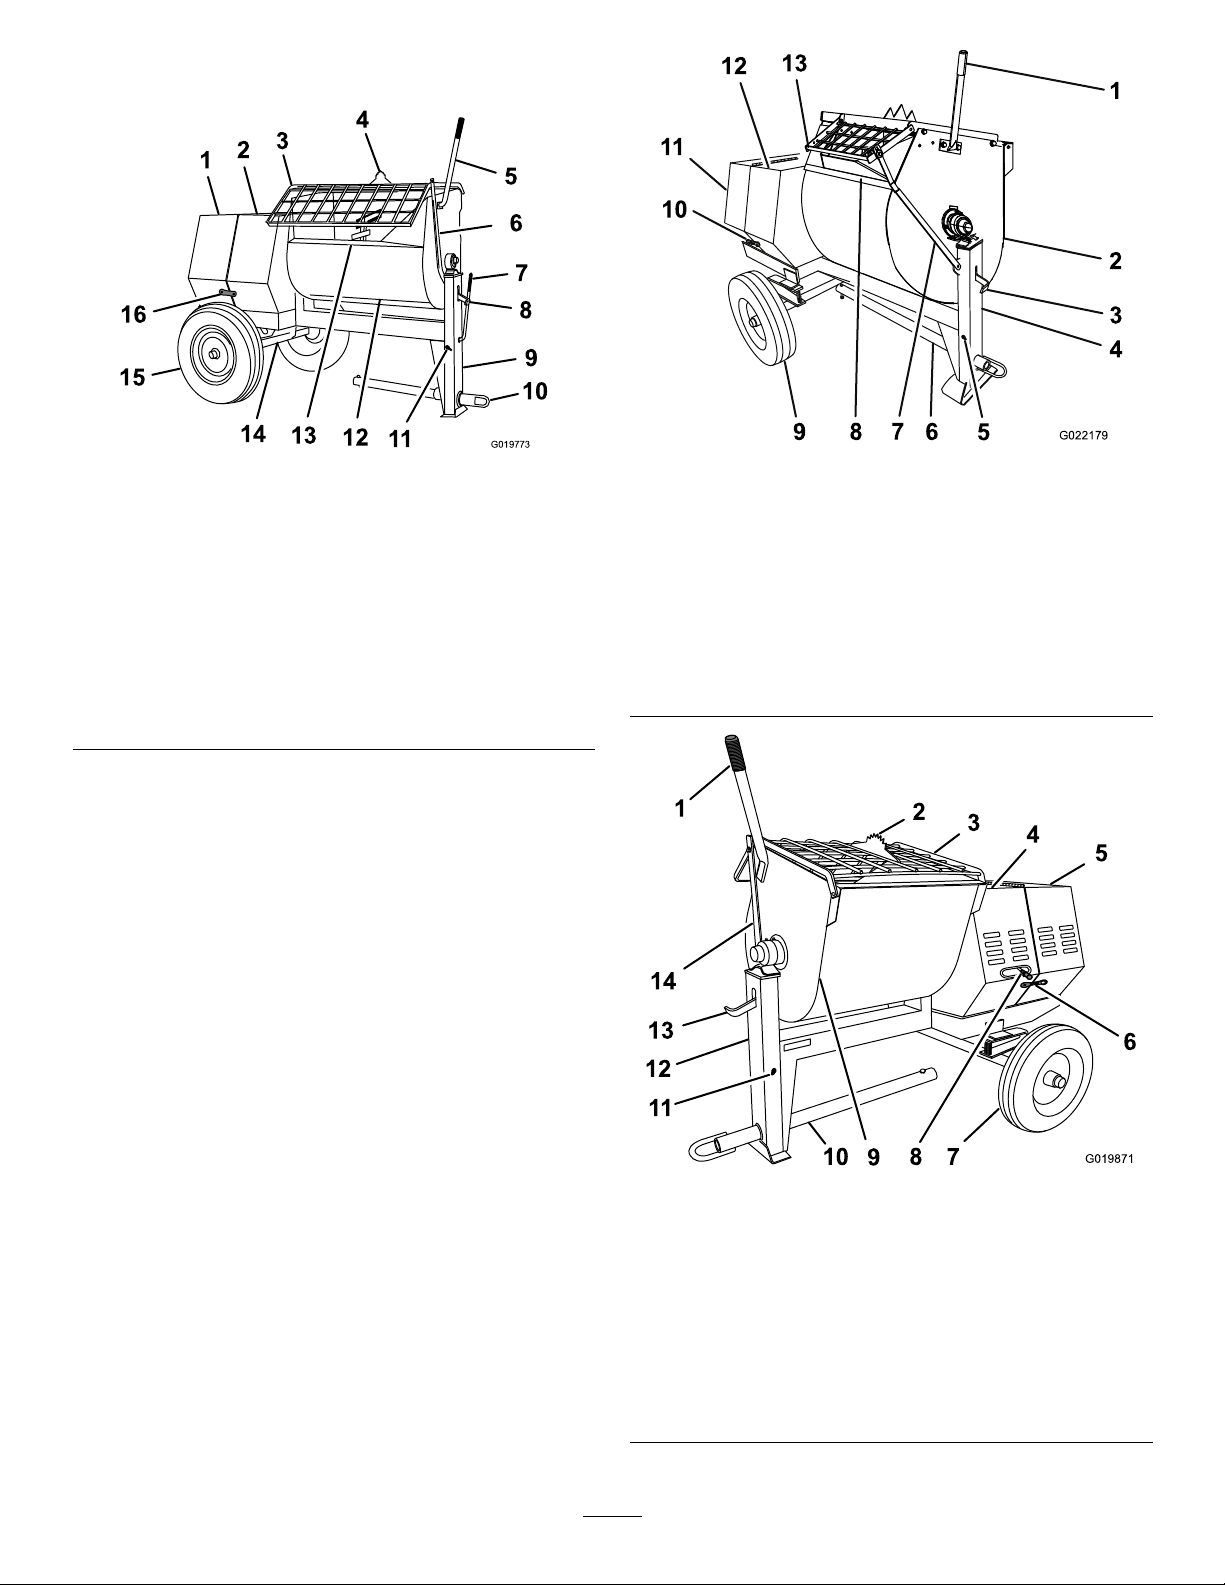
ProductOverview
Figure8
RightSide(Belt-DriveModels)
1.Rearcowl
2.Frontcowl8.Drumlatch14.Axle
3.Grate
4.Bagsplitter10.Towpole
5.Dumphandle
6.Grateliftarm
7.Clutchlever13.Chute
9.Frontpost15.Wheel
11.Safety-chain
keyhole
12.Drum
16.Cowllatch
g019773
Figure9
g022179
RightSide(GearboxModel)
1.Dumphandle6.Towpole11.Rearcowl
2.Drum
3.Drumlatch
assembly
4.Frontpost9.Wheel
5.Safety-chain
keyhole
7.Grateliftarm
8.Chute13.Grate
assembly
10.Cowllatch
12.Frontcowl
1.Dumphandle
2.Bagsplitter7.Wheel
3.Grate8.Clutchlever
4.Frontcowl9.Drum
5.Rearcowl10.T owpole
13
g019871
Figure10
LeftSide(GearboxModel)
6.Cowllatch11.Safety-chain
keyhole
12.Frontpost
assembly
13.Drumlatch
14.Grateliftarm
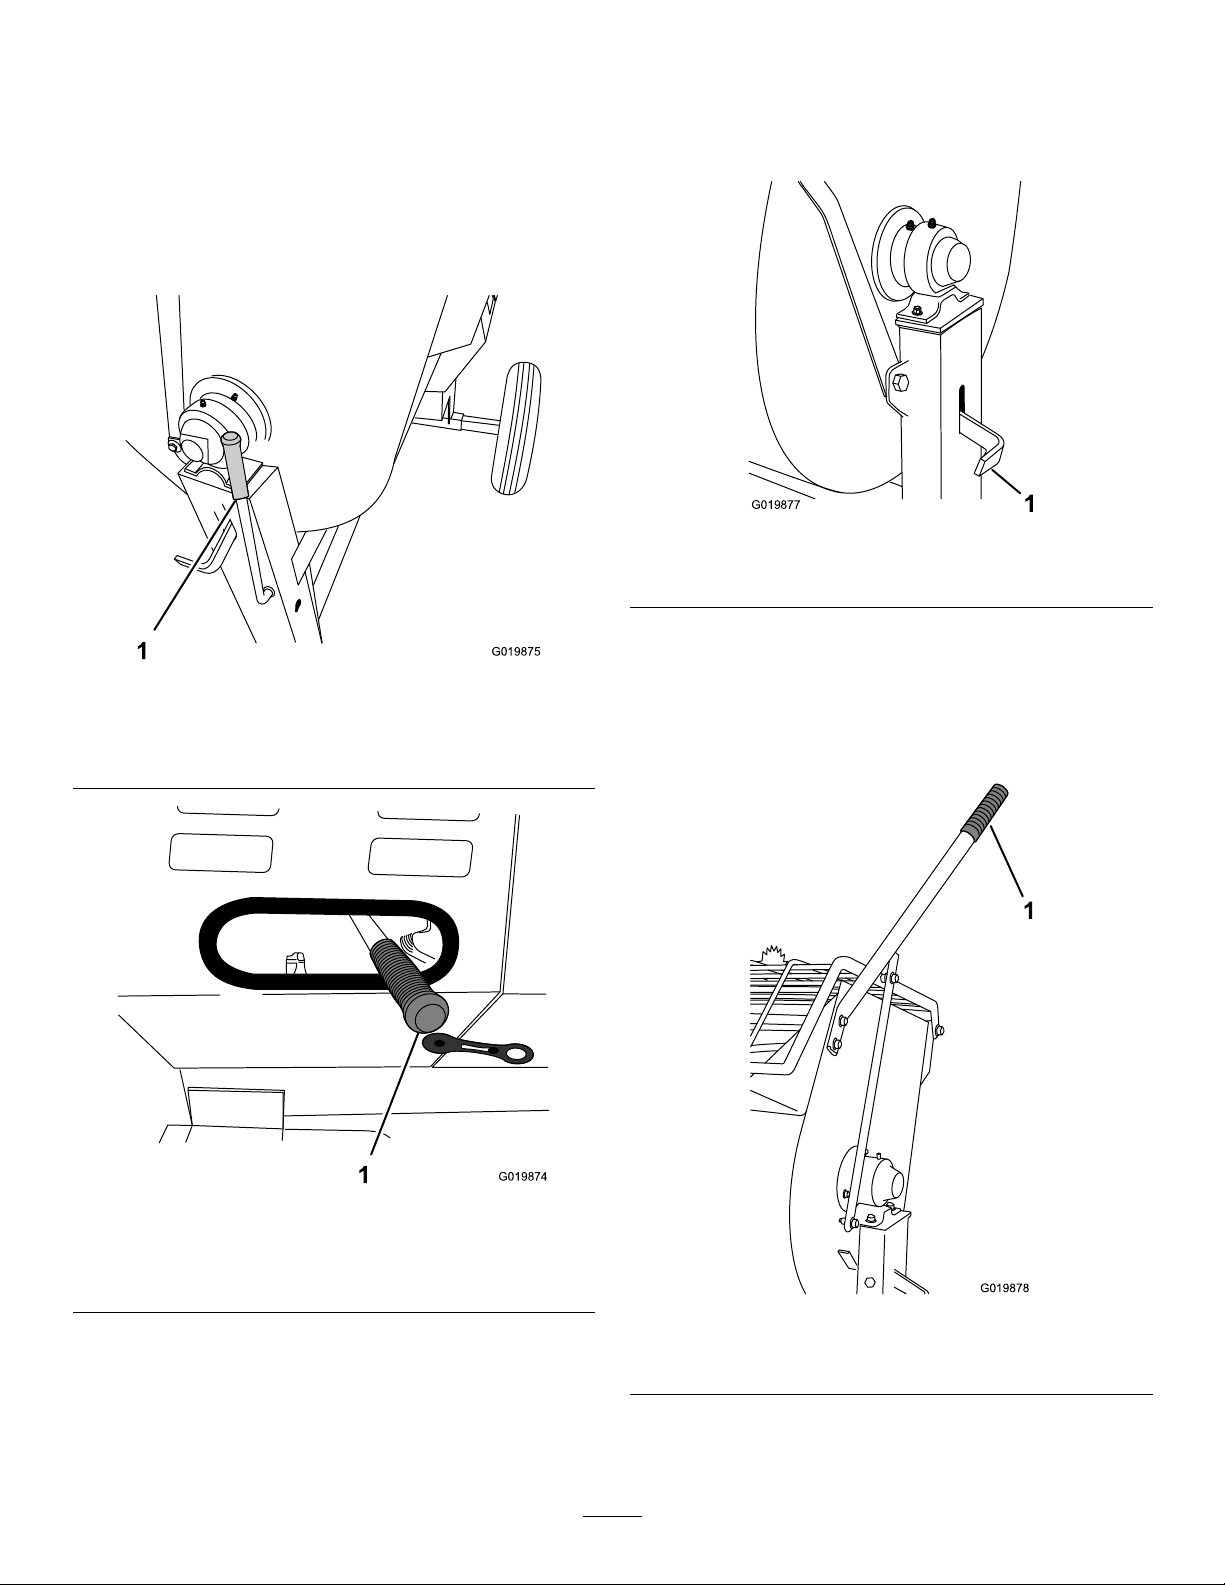
Controls
Becomefamiliarwithallthecontrolsbeforeyoustart
theengineandoperatethemachine.
ClutchLever
Usetheclutchlevertoengageanddisengagethe
paddles.
DrumLatch
Usethedrumlatchtosecurethedrumtothemix
position(upright)formixingoperationsandwhen
transportingthemachine.
g019877
Figure13
1.Drumlatch
1.Clutchlever
Belt-DriveModels
GearboxModel
Figure11
Figure12
g019875
DumpHandle
Usethedumphandletorotatethedrumtothedump
positionandtorotatethedrumtothemixposition
(upright).
g019874
1.Clutchlever
g019878
Figure14
1.Dumphandle
14
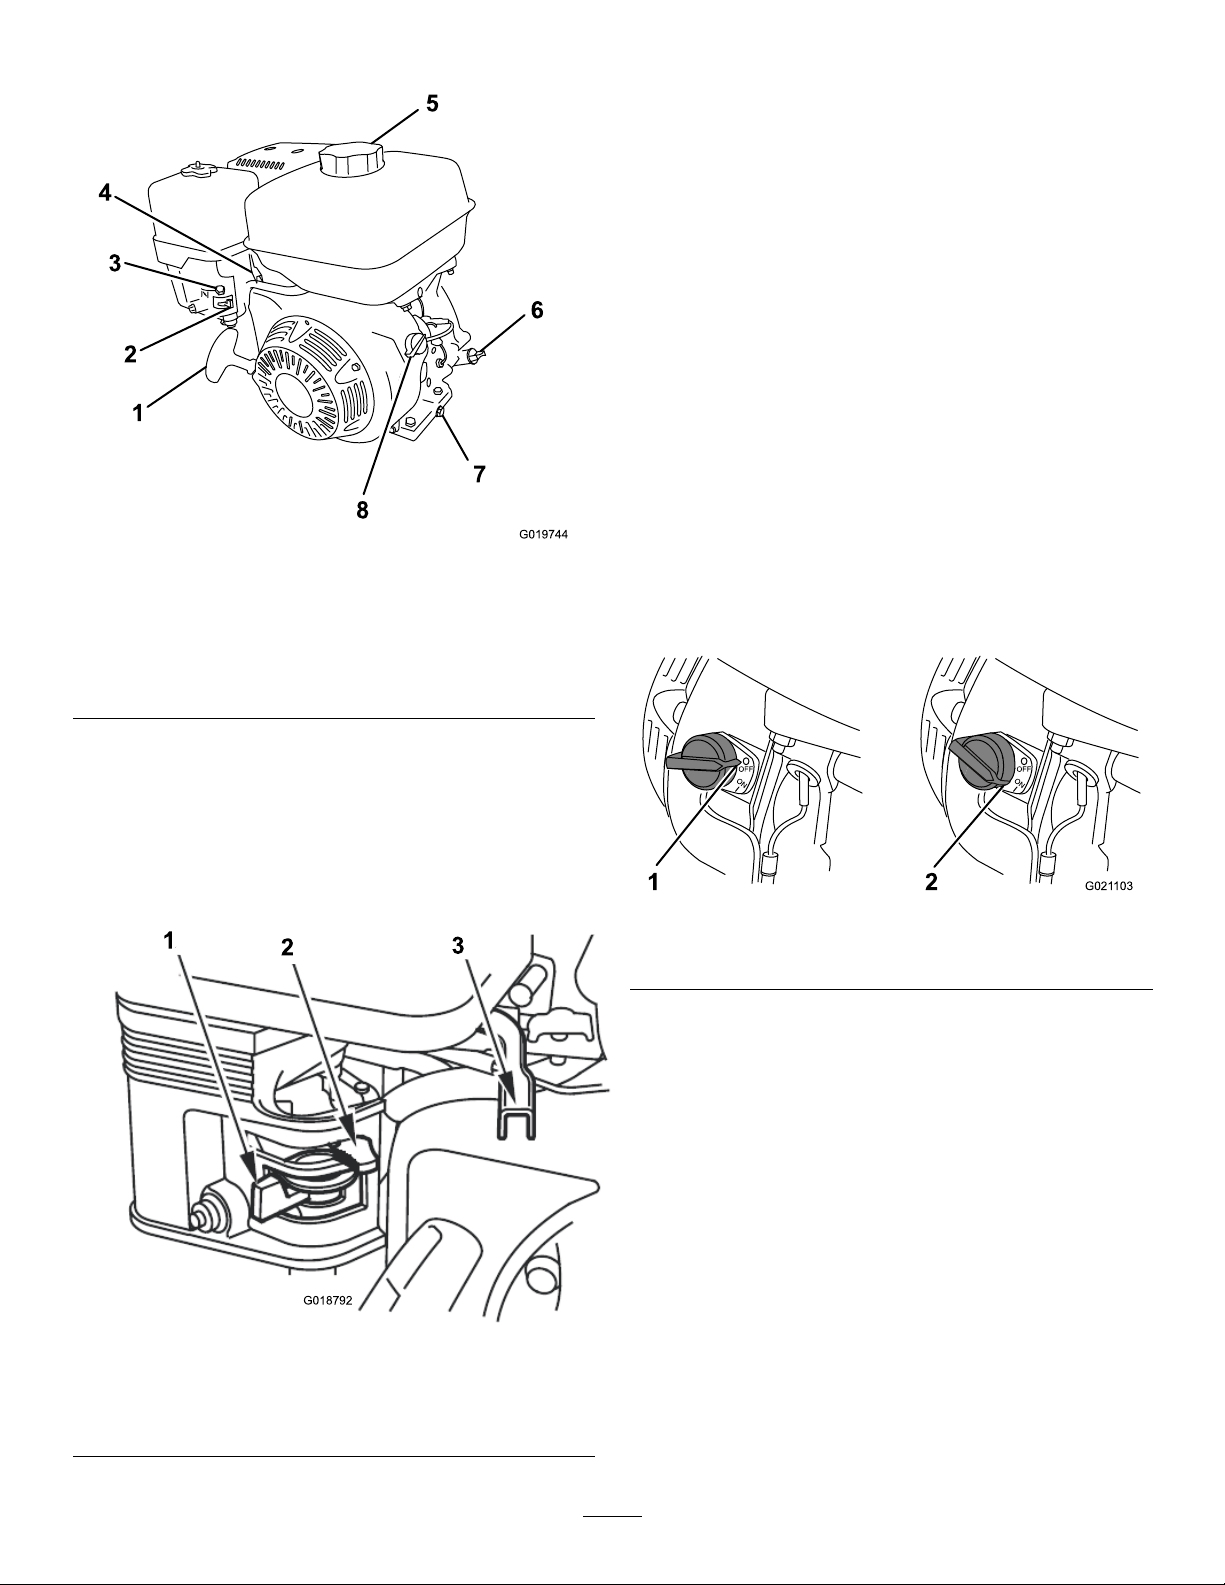
EngineControls
ChokeLever
Usethechokelever(Figure16)tostartacoldengine.
Beforepullingtherecoil-starthandle,movethechoke
levertotheCLOSEDposition.Oncetheengineis
running,movethechokelevertotheOPENposition.
Donotusethechokeiftheengineisalreadywarmed
uporiftheairtemperatureishigh.
ThrottleLever
Thethrottlelever(Figure16)controlsthespeed(rpm)
oftheengine.Itislocatednexttothechokelever.It
setstheenginespeedandthereforecanincreaseand
decreasetherotationspeedofthemixingpaddles.
Forbestperformance,setthiscontroltotheFAST
positionwhenmixingmaterial.
EngineOn/OffSwitch
Figure15
1.Recoil-starthandle5.Fuelcap
2.Fuelvalve
3.Chokelever
4.Throttlelever
FuelValve
6.Oildipstick
7.Oil-drainplug
8.On/Offswitch
Thefuelvalve(Figure16)islocatedunderneaththe
chokelever.Movetheleverforthefuelvalvetothe
ONpositionbeforeattemptingtostarttheengine.
Whenyouhavenishedmixing,shutofftheengine
andmovethefuel-valvelevertotheOFFposition.
g019744
TheOn/Offswitchislocatedonthefrontoftheengine.
•RotateittotheONpositiontostartandrunthe
engine.
•RotateittotheOFFpositiontoshutofftheengine.
g021103
Figure17
1.OFFposition2.ONposition
Recoil-StartHandle
Tostarttheengine,pulltherecoil-starthandle(Figure
15)quicklytoturntheengineover.Theengine
controlsdescribedabovemustallbesetcorrectlyfor
theenginetostart.
Figure16
1.Fuelvalve3.Throttlelever
2.Chokelever
Oil-LevelSwitch
Theoil-levelswitchislocatedinsidetheengine,andit
doesnotallowtheenginetorunintheeventtheoil
levelisbelowthesafeoperatinglimit.
g018792
15

Specications
Note:Specicationsanddesignaresubjecttochangewithoutnotice.
MachineSpecications
Model68013680146801668017680206802168024
Batch
Capacity
TotalV olume
Drum
Material
Length
(withouttow
pole)
Width86cm
0.17m
(6.0ft3)
0.20m
ft3)
Steel
163cm
(64inches)
(34inches)
3
3
(6.9
0.17m
(6.0ft3)
0.20m
ft3)
Polyethylene
163cm
(64inches)
86cm
(34inches)
3
3
(6.9
0.17m
(6.0ft3)
0.20m
ft3)
Steel
163cm
(64inches)
86cm
(34inches)
3
3
(6.9
0.17m
(6.0ft3)
0.20m
ft3)
Polyethylene
163cm
(64inches)
86cm
(34inches)
3
3
(6.9
0.23m
(8.0ft3)
0.25m
ft3)
Steel
193cm
(86inches)
86cm
(34inches)
3
0.23m
(8.0ft3)
3
(9.0
0.25m
ft3)
Polyethylene
193cm
(86inches)
86cm
(34inches)
3
0.34m
3
(12.0ft3)
3
(9.0
0.42m
3
(14.8
ft3)
Steel
205.7cm
(81inches)
142.2cm
(50inches)
Height137cm
(54inches)
Weight250kg
(550lb)
Axle86to1 17
cm(34to
46inches)
extendable
EngineHonda
GX160
®
137cm
(54inches)
241kg
(530lb)
86to1 17
cm(34to
46inches)
extendable
Honda
GX160
137cm
(54inches)
250kg
(550lb)
86to1 17
cm(34to
46inches)
extendable
®
®
Honda
GX240
137cm
(54inches)
241kg
(530lb)
86to1 17
cm(34to
46inches)
extendable
Honda
GX240
137cm
(54inches)
275kg
(605lb)
86to1 17
cm(34to
46inches)
extendable
®
®
Honda
GX240
DriveBeltBeltBeltBeltBeltBelt
137cm
0(54inches)
266kg
(585lb)
86to1 17
cm(34to
46inches)
extendable
Honda
GX240
150cm
(59inches)
508kg
(1120lb)
142cm
(56inches)
xed
®
®
Honda
GX340
Gearbox
16
 Loading...