

Page 1
FormNo.3377-518RevB
G021302
CM-1258Y-SDConcreteMixer
ModelNo.68011C—SerialNo.313000001andUp
Registeratwww.T oro.com.
OriginalInstructions(EN)
*3377-518*B
Page 2

WARNING
CALIFORNIA
Proposition65Warning
Thisproductcontainsachemicalorchemicals
knowntotheStateofCaliforniatocausecancer,
birthdefects,orreproductiveharm.
Dieselengineexhaustandsomeofits
constituentsareknowntotheStateof
Californiatocausecancer,birthdefects,
andotherreproductiveharm.
Useofthisproductmaycauseexposureto
chemicalsknowntotheStateofCalifornia
tocausecancer,birthdefects,orother
reproductiveharm.
Becauseinsomeareastherearelocal,state,orfederal
regulationsrequiringthatasparkarresterbeusedonthe
engineofthismachine,asparkarresterisavailableas
anoption.Ifyourequireasparkarrester,contactyour
AuthorizedToroServiceDealer.
GenuineTorosparkarrestersareapprovedbytheUSDA
ForestryService.
Important:ItisaviolationofCaliforniaPublic
ResourceCodeSection4442touseoroperatetheengine
onanyforest-covered,brush-covered,orgrass-covered
landwithoutasparkarrestermufermaintainedin
workingorder,ortheengineconstricted,equipped,and
maintainedforthepreventionofre.Otherstatesor
federalareasmayhavesimilarlaws.
1-800-424-9153);gotohttp://www .safercar.gov;orwrite
to:Administrator,NHTSA,1200NewJerseyAvenue,
SEWestBuilding,Washington,DC20590.Youcanalso
obtainotherinformationaboutmotorvehiclesafetyfrom
http://www.safercar.gov.
•TocontactTransportCanada,youmaycall
1-800-333-0510or(819)994-3328;goto
http://www.tc.gc.ca/roadsafety/;writeto:Road
SafetyandMotorVehicleRegulationDirectorate,
TransportCanada,TowerC,PlacedeVille,330
SparksStreet,Ottawa,Ontario,K1A0N5;oremail
[email protected].
Introduction
Thismachineisdesignedtomixconcrete,plaster,reproong
material,grout,andothersmall-grainedconcreteproducts.
Themachinecanbetowedbehindavehicleequippedwith
ahitchappropriateforthetypeoftowpoleyourmachine
has(ballorpintlehitch).
Readthisinformationcarefullytolearnhowtooperateand
maintainyourproductproperlyandtoavoidinjuryand
productdamage.Youareresponsibleforoperatingthe
productproperlyandsafely .
YoumaycontactTorodirectlyatwww .Toro.comforproduct
andaccessoryinformation,helpndingadealer,ortoregister
yourproduct.
Wheneveryouneedservice,genuineToroparts,oradditional
information,contactanAuthorizedServiceDealerorToro
CustomerServiceandhavethemodelandserialnumbersof
yourproductready.Writethenumbersinthespaceprovided.
Theenclosed
informationregardingtheUSEnvironmentalProtection
Agency(EPA)andtheCaliforniaEmissionControl
Regulationofemissionsystems,maintenance,and
warranty.Replacementsmaybeorderedthroughthe
enginemanufacturer.
Ifyoubelievethatyourmachinehasadefectwhichcould
causeacrashorcouldcauseinjuryordeath,youshould
immediatelyinformtheNationalHighwayTrafcSafety
Administration(NHTSA)ifyouliveintheUnitedStates,
orTransportCanadaifyouliveinCanada,inadditionto
notifyingTheToroCompany.
IfNHTSAorTransportCanadareceivessimilarcomplaints,
itmayopenaninvestigation,andifitndsthatasafetydefect
existsinagroupofmachines,itmayorderarecallandremedy
campaign.However,NHTSAorTransportCanadacannot
becomeinvolvedinindividualproblemsbetweenyou,your
dealer,orTheToroCompany.
Engine Owner's Man ual
issuppliedfor
•TocontactNHTSA,youmaycalltheV ehicle
SafetyHotlinetoll-freeat1-888-327-4236(TTY:
©2013—TheToro®Company
8111LyndaleAvenueSouth
Bloomington,MN55420
Contactusatwww.T oro.com.
2
PrintedintheUSA
AllRightsReserved
Page 3
G021303
2
1
Figure1
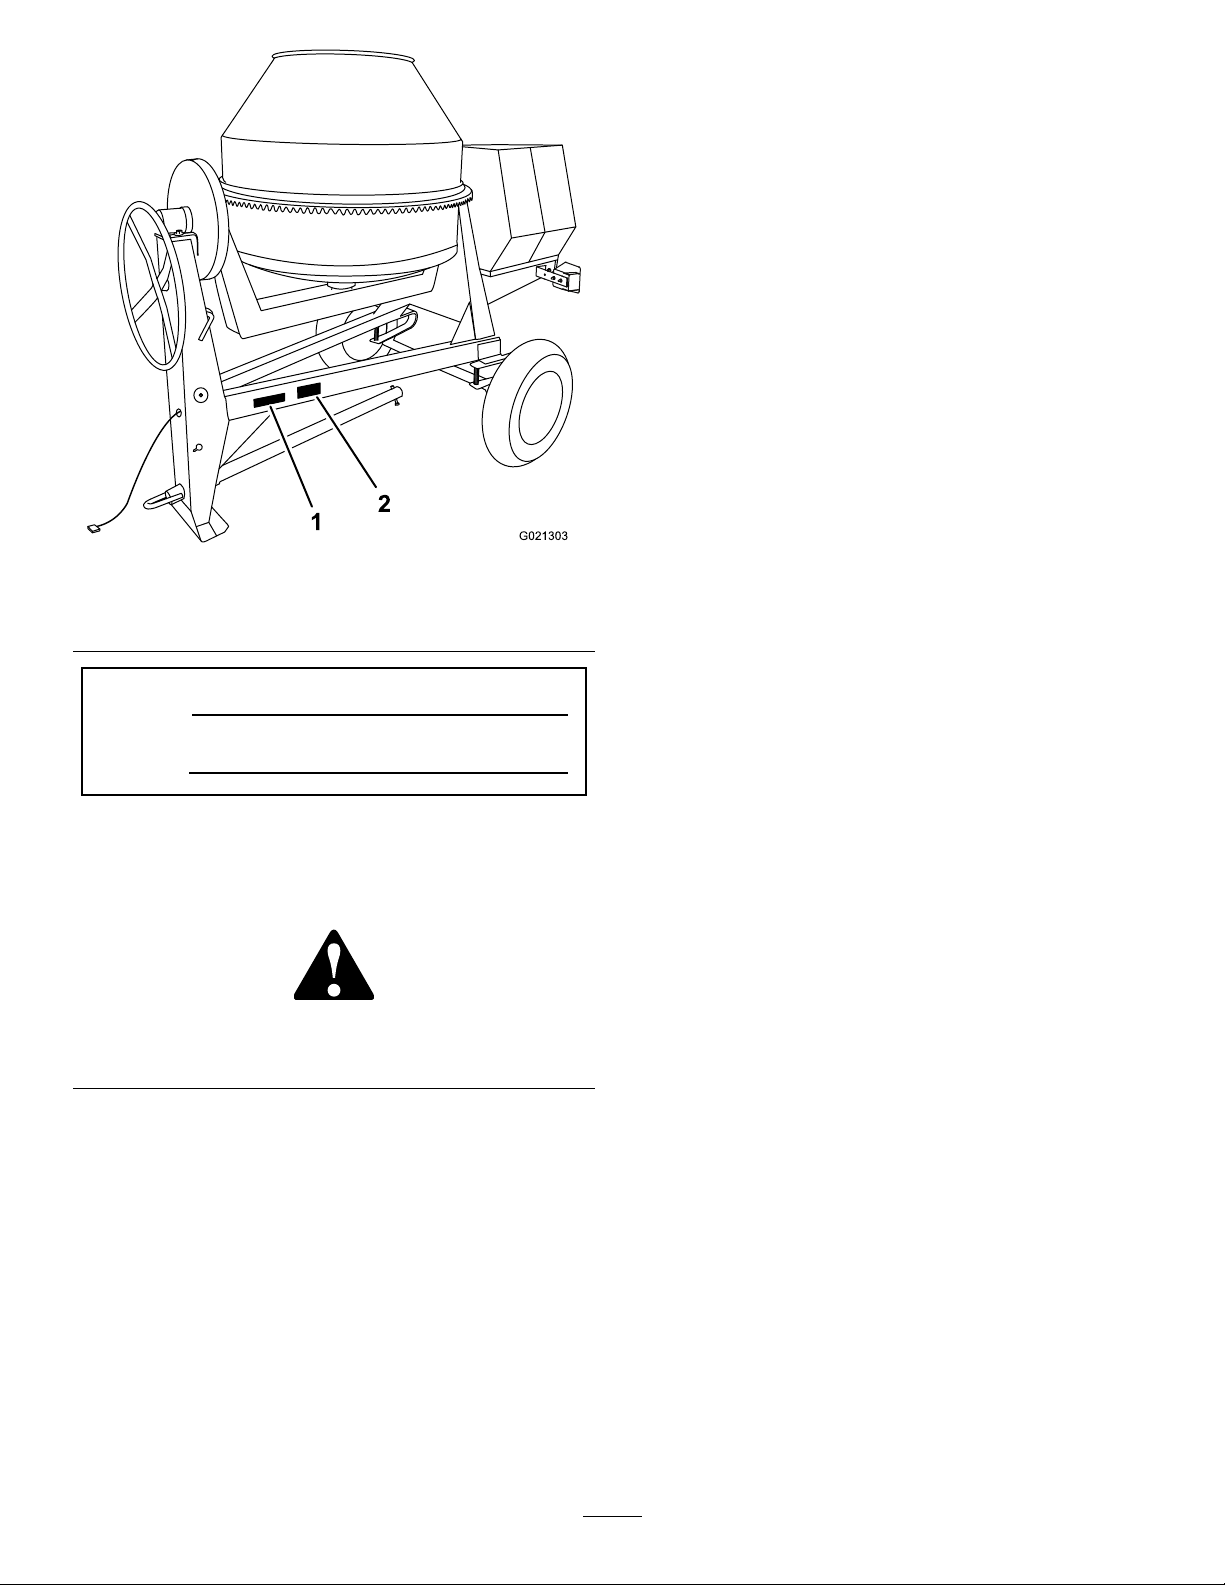
1.Modelandserialnumber
location
ModelNo.
SerialNo.
2.Vehicleidentication
number(VIN)location
Thismanualidentiespotentialhazardsandhassafety
messagesidentiedbythesafetyalertsymbol(Figure2),
whichsignalsahazardthatmaycauseseriousinjuryordeath
ifyoudonotfollowtherecommendedprecautions.
Figure2
1.Safetyalertsymbol
Thismanualuses2wordstohighlightinformation.
Importantcallsattentiontospecialmechanicalinformation
andNoteemphasizesgeneralinformationworthyofspecial
attention.
TheDOTtireinformationislocatedontheside
ofeachtire.Thisinformationgivesloadandspeed
ratings.Replacementtiresshouldhavethesame
orbetterratings.Formoreinformationgoto
http://www.nhtsa.gov/Vehicle+Safety/Tires.
Contents
Introduction..................................................................2
Safety...........................................................................4
SafeOperatingPractices...........................................4
SafetyandInstructionalDecals.................................7
Setup............................................................................9
1InstallingtheTowPole..........................................9
2InstallingtheSafetyChain......................................9
ProductOverview.........................................................10
Controls...............................................................10
Specications........................................................12
Operation....................................................................13
PreparingtoT owtheMachine..................................13
TowingtheMachine...............................................17
PreparingtoUsetheMachine...................................17
OpeningandClosingtheCowl.................................18
AddingFuel...........................................................18
CheckingtheEngineOilLevel.................................20
StartingandStoppingtheEngine..............................21
UsingtheMachine..................................................22
MixingtheMaterial.................................................22
UsingtheDrum.....................................................23
Maintenance.................................................................24
RecommendedMaintenanceSchedule(s)......................24
PremaintenanceProcedures........................................24
PreparingtheMachineforMaintenance.....................24
RemovingandInstallingtheDividerPlate..................24
Lubrication...............................................................25
LubricatingtheMachine..........................................25
LubricatingtheDriveChain.....................................26
EngineMaintenance..................................................26
ServicingtheAirCleaner.........................................26
ChangingtheEngineOil.........................................27
ServicingtheEngineOilFilter..................................28
RemovingandInstallingtheEngine..........................29
FuelSystemMaintenance...........................................29
ServicingtheFuelSystem........................................29
DriveSystemMaintenance.........................................31
ServicingtheReductionCase...................................31
ServicingtheDriveChain........................................31
ReplacingtheLightBulbs............................................32
ReplacingtheRear-facingBulbs................................32
ReplacingtheSide-facingBulbs................................33
Cleaning...................................................................33
CleaningtheMachine..............................................33
Storage........................................................................34
StoringtheMachine................................................34
Troubleshooting...........................................................35
Note:Referto
Specications(page12)andensurethatall
replacementtiresmeetorexceedtheratingsforthismachine.
3
Page 4

Safety
Improperuseormaintenanceofthemachinecanresult
ininjury.T oreducethepotentialforinjury,complywith
thesesafetyinstructionsandalwayspayattentiontothe
safetyalertsymbol,whichmeans:
or
Danger
complywiththeinstructionmayresultinpersonalinjury
ordeath.
—personalsafetyinstruction.Failureto
SafeOperatingPractices
Thismachineiscapableofamputatinghands.Alwaysfollow
allsafetyinstructionstoavoidseriousinjuryordeath.
WARNING
Machiningorhandlingstone,masonry,concrete,
metal,andothermaterialscangeneratedust,mists,
andfumescontainingchemicals,suchassilica,
knowntocauseseriousorfatalinjuryorillness,
suchasrespiratorydisease,silicosis,cancer,birth
defects,orotherreproductiveharm.
•Controldust,mist,andfumesatthesource
wherepossible.Usewaterfordustsuppression,
whenfeasible.
•Usegoodworkpracticesandfollowthe
recommendationsofthemanufacturer
orsupplier,CCOHS,OSHA,andother
occupationalandtradeassociations.
•Alwaysfollowrespiratoryprecautions.
•Whenthehazardsfrominhalationcannotbe
eliminated,theoperatorandanybystanders
shouldweararespiratorapprovedbyCCOHSor
OSHAforthematerialbeinghandled.
WARNING
Engineexhaustcontainscarbonmonoxide,an
odorless,deadlypoisonthatcankillyou.
Donotruntheengineindoorsorinanenclosed
area.
Training
•ReadtheOperator'sManualandothertrainingmaterial.If
theoperator(s)ormechanic(s)cannotreadorunderstand
theinformation,itistheowner'sresponsibilitytoexplain
thismaterialtothem.
•Becomefamiliarwiththesafeoperationoftheequipment,
operatorcontrols,andsafetysigns.
•Alloperatorsandmechanicsshouldbetrained.The
ownerisresponsiblefortrainingtheusers.
Caution
,
W ar ning
•Neverletchildrenoruntrainedpeopleoperateorservice
theequipment.Localregulationsmayrestricttheageof
theoperator.
•Theowner/usercanpreventandisresponsiblefor
accidentsorinjuriestopeopleordamagetoproperty.
,
Towing
Checkwithyourlocalcountyorstatetowingsafety
regulations,inadditiontomeetingTransportCanada(or
DepartmentofTransportationifintheU.S.)towingsafety
regulations,beforetowingthemachine.
•Inordertoreducethepossibilityofanaccidentwhile
transportingthemachineonpublicroads,makesurethat
thetowingvehicleismechanicallysoundandingood
operatingcondition.
•Shutdowntheenginebeforetransportingthemachine.
•Whentowingwithaballhitch,ensurethattheballhitch
youareusingisthepropersizeforthehitchcoupleron
themachine.
•Whentowingwithapintlehitch,ensurethattheeyeof
thetowpoleisthecorrectdimensionforthepintlehook.
•Inspectthehitchandcouplingforwear.Nevertowthe
machinewithdamagedordefectivehitches,couplings,
chains,orothercomponents.
•Checkthetireairpressureonthetowingvehicleandthe
machine.
•Checkthetiretreadandsidewallfordamageandwear.
•Properlyattachthesafetychainstothetowingvehicle.
•Ensurethatthedirectionalandbrakelightsareworking
properly.
•Ensurethatthedirectional,backup,andbrakelightsof
thetowvehicleareworkingproperly .
•Beforetowing,checktomakecertainyourmachineis
correctlyandsecurelyattachedtothetowingvehicle.
•Ensurethatthesafetychainsareproperlysecuredtothe
vehicle,andleaveenoughslackforturning.
•Donotcarryanymaterialinthemachinewhentowing.
•Avoidsuddenstopsandstarts.Thiscancauseskidding,
orjackkning.Smooth,gradualstartsandstopswill
improvetowing.
•Avoidsharpturnstopreventrolling.Towonlywitha
vehiclethathasahitchdesignedfortowing.Donot
attachtowedequipmentexceptatthehitchpoint.
•Donottowthemachinefasterthan88km/h(55mph).
•Usecautionwhenbackingup;useaspotteroutsidethe
vehicletoguideyou.
•Donotallowanyonetositorrideonthemachine.
•Disconnectthemachinefromthetowvehiclebefore
usingit.
•Placechockblocksunderneaththetirestopreventthem
fromrollingwhilethemachineisparked.
4
Page 5

Preparation
Becomefamiliarwiththesafeoperationoftheequipment,
operatorcontrols,andsafetysigns.
•Useonlyaccessoriesandattachmentsapprovedbythe
manufacturer.
•Wearpersonalprotectiveequipmentandappropriate
clothing,includingthefollowing:
–Hardhat
–Respiratorordustmask
–Faceshield
–Safetyglasses
–Hearingprotection
–Safetyshoes
–Longpants
–Shirtwithlongsleevesthataretightatthewrists
–Tight-ttinggloveswithoutdrawstringsorloosecuffs
•Securelonghair,looseclothing,orjewelrythatmayget
tangledinmovingparts.
•Operatingtheequipmentsafelyrequiresthefullattention
oftheoperator.Donotwearradioormusicheadphones
whileoperatingthemachine.
•Useextracarewhenhandlingfuels.Theyareammable
andthevaporsareexplosive.Usethefollowingpractices
whenhandlingfuel:
–Useonlyanapprovedfuelcontainer.
–Neverremovethefuelcaporaddfuelwiththeengine
running.
–Allowtheenginetocoolbeforerefueling.
–Donotsmoke.
–Neverrefuelordrainthemachineindoors.
–Installthefuelcapandtightenitsecurely.
–Keepthecontainernozzleincontactwiththetank
duringlling.
–Neverllacontainerwhileitisinsideavehicle,trunk,
pick-upbed,oranysurfaceotherthantheground.
–Neverstorethemachineorfuelcontainerinside
wherethereisanopename,suchasnearawater
heaterorfurnace.
–Iffuelisspilled,wipeitofftheengineandequipment.
•Ensurethatthemachineisonalevelsurfacebefore
operatingthemachine.
•Chockthetiresofthemachinetopreventunintended
movement.
•Beforeeveryuse,dothefollowing:
–Inspectthecoupler,ball,andhitch.
–Ensurethatalllightsarefunctioningproperly(ifthe
machineisequippedwithalightkit).
–Ensurethatthetiresareproperlyinatedas
recommended.
–Ensurethatthelugnutsaretightandtorqued
properly.
–Ensurethatthemachineisproperlysecured.
Operation
•Neverrunanengineinanenclosedorpoorlyventilated
area.
•Onlyoperatethemachineingoodlightingconditions.
•Beforestartingthemachine,makesurethatthereareno
personsorobstaclesnearorunderthemachine.
•Shutofftheenginebeforeleavingthemachineforany
reason.
Neverleavearunningmachineunattended.Alwaysstop
theengineandverifythatallmovingpartshavestopped.
•Chockthetiresofthemachineorkeepitattachedtothe
towingvehiclewhenitisnotinuse,topreventitfrom
rolling.
•Avoidprolongedbreathingofexhaustfumes.Engine
exhaustfumescancausesicknessordeath.
•Keephandsawayfromanymovingparts.Keepfeetaway
fromthetiresandthefrontpost.
•Donotoperatethemachineundertheinuenceof
alcoholordrugs.
•Ensurethattheareaisclearofotherpeopleorpetsbefore
operatingthemachine.Stopthemachineifanyoneenters
thearea.
•Neverplaceyourhandsoranysolidobjectintothedrum
whenthemachineisinoperation.
•Donottouchpartswhichmaybehotfromoperation.
Allowthemtocoolbeforeattemptingtomaintain,adjust,
orservicethemachine.
•Nevermovethemachinewhiletheengineisrunning.
•Keepthecowlclosedandlatchedduringoperation.
•Ensurethatalltheguardsandshieldsaresecurelyinplace
beforeoperatingthemachine.
•Ifthemixingpaddlesstrikeaforeignobjectorifthe
machineshouldstartmakinganunusualnoiseor
vibration,stoptheengineandemptythedrum.Waitfor
allmovingpartstocometoacompletestopandcool.
Vibrationisgenerallyawarningoftrouble.Inspectfor
cloggingordamage.Cleanandrepairand/orreplace
damagedparts.
•Donotchangetheenginegovernorsettingoroverspeed
theengine.
•Lightningcancausesevereinjuryordeath.Ifyousee
lightningorhearthunderinthearea,donotoperatethe
machine;seekshelter.
MaintenanceandStorage
•Beforeperformingmaintenance,dothefollowing:
–Parkthemachineonlevelground.
5
Page 6

–Stoptheengine.W aitforallmovementtostopbefore
adjusting,cleaning,orrepairing.
–Lettheenginecoolbeforeperformingmaintenance
orstoring.
–Disengageallpowerandoperationcontrols.
•Neverlubricate,service,repair,oradjustthemachine
whileitisrunning.
•Keepequipmentmaterialsclearfromthemuferand
enginetohelppreventres.Cleanupanyoilorfuel
spillage.
•Neverallowuntrainedpersonneltoservicethemachine.
•Keephands,feet,andclothingawayfrommovingparts.
Ifpossible,donotmakeadjustmentswiththeengine
running.
•Keepallpartsingoodworkingconditionandallhardware
tightened.Replaceallwornordamageddecals.
•Removeanybuildupofgrease,oil,ordebrisfromthe
machine.
•Stopandinspectthemachineifaforeignobjectentersthe
drumorcausesanotherobstruction.Makeanynecessary
repairsbeforestartingthemachine.
•Donottamperwithsafetydevices.
•Chockthetireswhenstoringthemachine.
•Keepallnuts,bolts,screws,andhoseclampssecurely
tightened.Keepequipmentingoodcondition.
•UseonlygenuineTororeplacementpartstoensurethat
theoriginalstandardsaremaintained.
6
Page 7
SafetyandInstructionalDecals
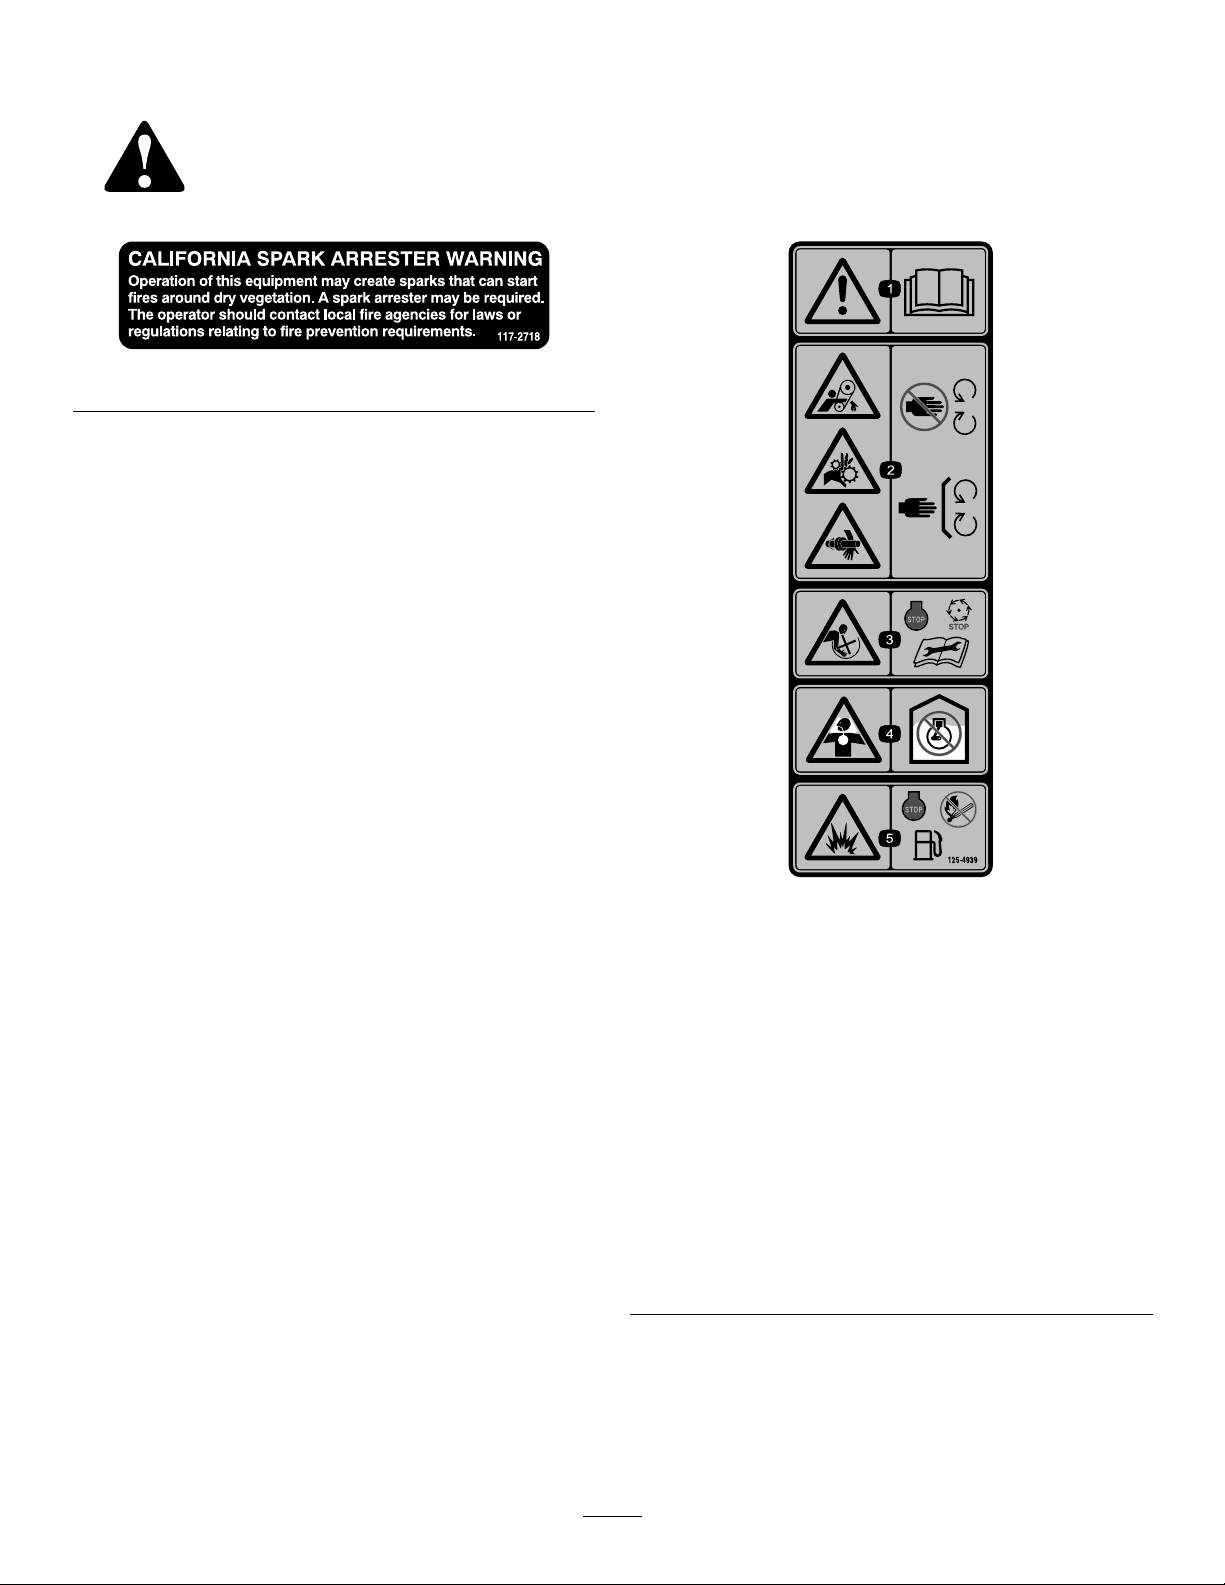
Safetydecalsandinstructionsareeasilyvisibletotheoperatorandarelocatednearanyareaofpotential
danger.Replaceanydecalthatisdamagedorlost.
117–2718
1.Warning—readthe
Operator’sManual.
2.Handandarm
entanglementatthechain
drive;crushinghazard
ofhand;entanglement
hazardofhandatthe
shaft—keephandsaway
frommovingparts;keep
allguardsandshieldsin
place.
3.Entanglementhazardat
paddles—stoptheengine
andwaitforallmoving
partstostopbefore
performingmaintenance.
125–4939
4.Toxicgasinhalation
hazard—Don’trunthe
engineinanenclosed
space.
5.Explosionhazard—stop
theengineandkeep
awayfromameswhen
refueling.
7
Page 8
125–8175
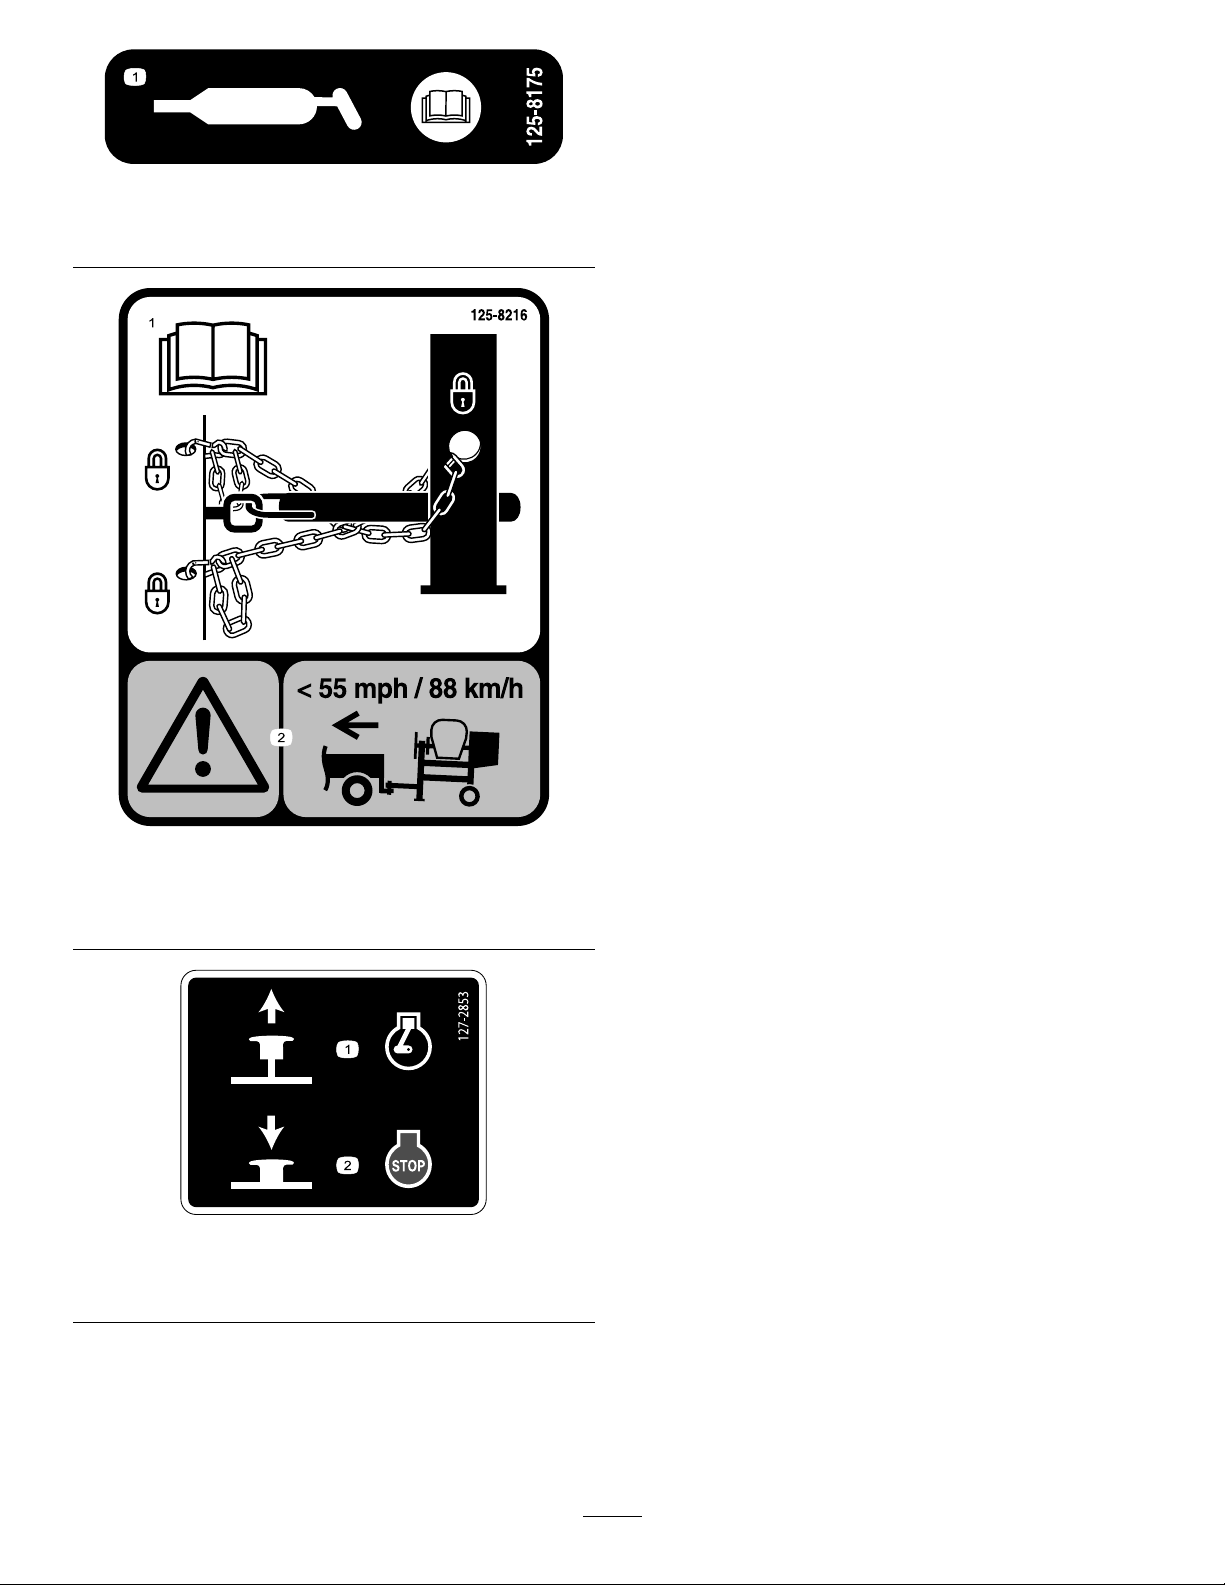
1.ReadtheOperator’sManualforinformationongreasing
themachine.
125–8216
1.ReadtheOperator’s
Manualforinformationon
howtotowthemachine.
2.Warning—limittowing
speedtolessthan55mph
/88km/h.
127–2853
1.Pulluptostarttheengine.2.Pushdowntostopthe
engine.
8
Page 9

Setup
5
1
2
4
6
3
G019804
LooseParts
Usethechartbelowtoverifythatallpartshavebeenshipped.
ProcedureDescription
1
2
Towpolekit(soldseparately)
Safetychain
Connectinglink
1
InstallingtheTowPole
Partsneededforthisprocedure:
1
Towpolekit(soldseparately)
InstallingtheTowPoletotheMachine
Note:Thetowpoleispurchasedseparatelyandincludesthe
nutandboltneededforinstallation.
Themachinehasthefollowingtowpoleoptions:
HitchT ypeLength
50mm(2inch)ball—stamped127cm(50inches)
50mm(2inch)ball—forged127cm(50inches)
Pintle
127cm(50inches)
Qty.
1Installthetowpole.
1
2
3.Inserttheboltthroughtheholesinthettingandthe
pole(
4.Threadthenutontotheboltandtightenthemuntil
theyaretightagainsttheframetting(Figure3).
Note:Iftheself-lockingnyloninsertinthelocknut
wearswithuse,replacethenutwithanewGrade5or
Grade8locknut.
Installthesafetychain.
Figure3).
Use
2
InstallingtheSafetyChain
Partsneededforthisprocedure:
1
Safetychain
2
Connectinglink
1.Removetheboltandnutfromthetowpole(Figure3).
1.Towpole4.Bolthole
2.Frontpost
3.Bolt6.Nut
2.Slidethetowpoleforwardandaligntheholeinthe
polewiththeholeintheframetting(Figure3).
Figure3
5.Frametting
InstallingtheSafetyChain
1.Formahookontheendofabendablepieceofrod
orstiffwire(notincluded),andinsertitthroughboth
keyholesinthefrontpostofthemachine(Figure4A).
9
Page 10
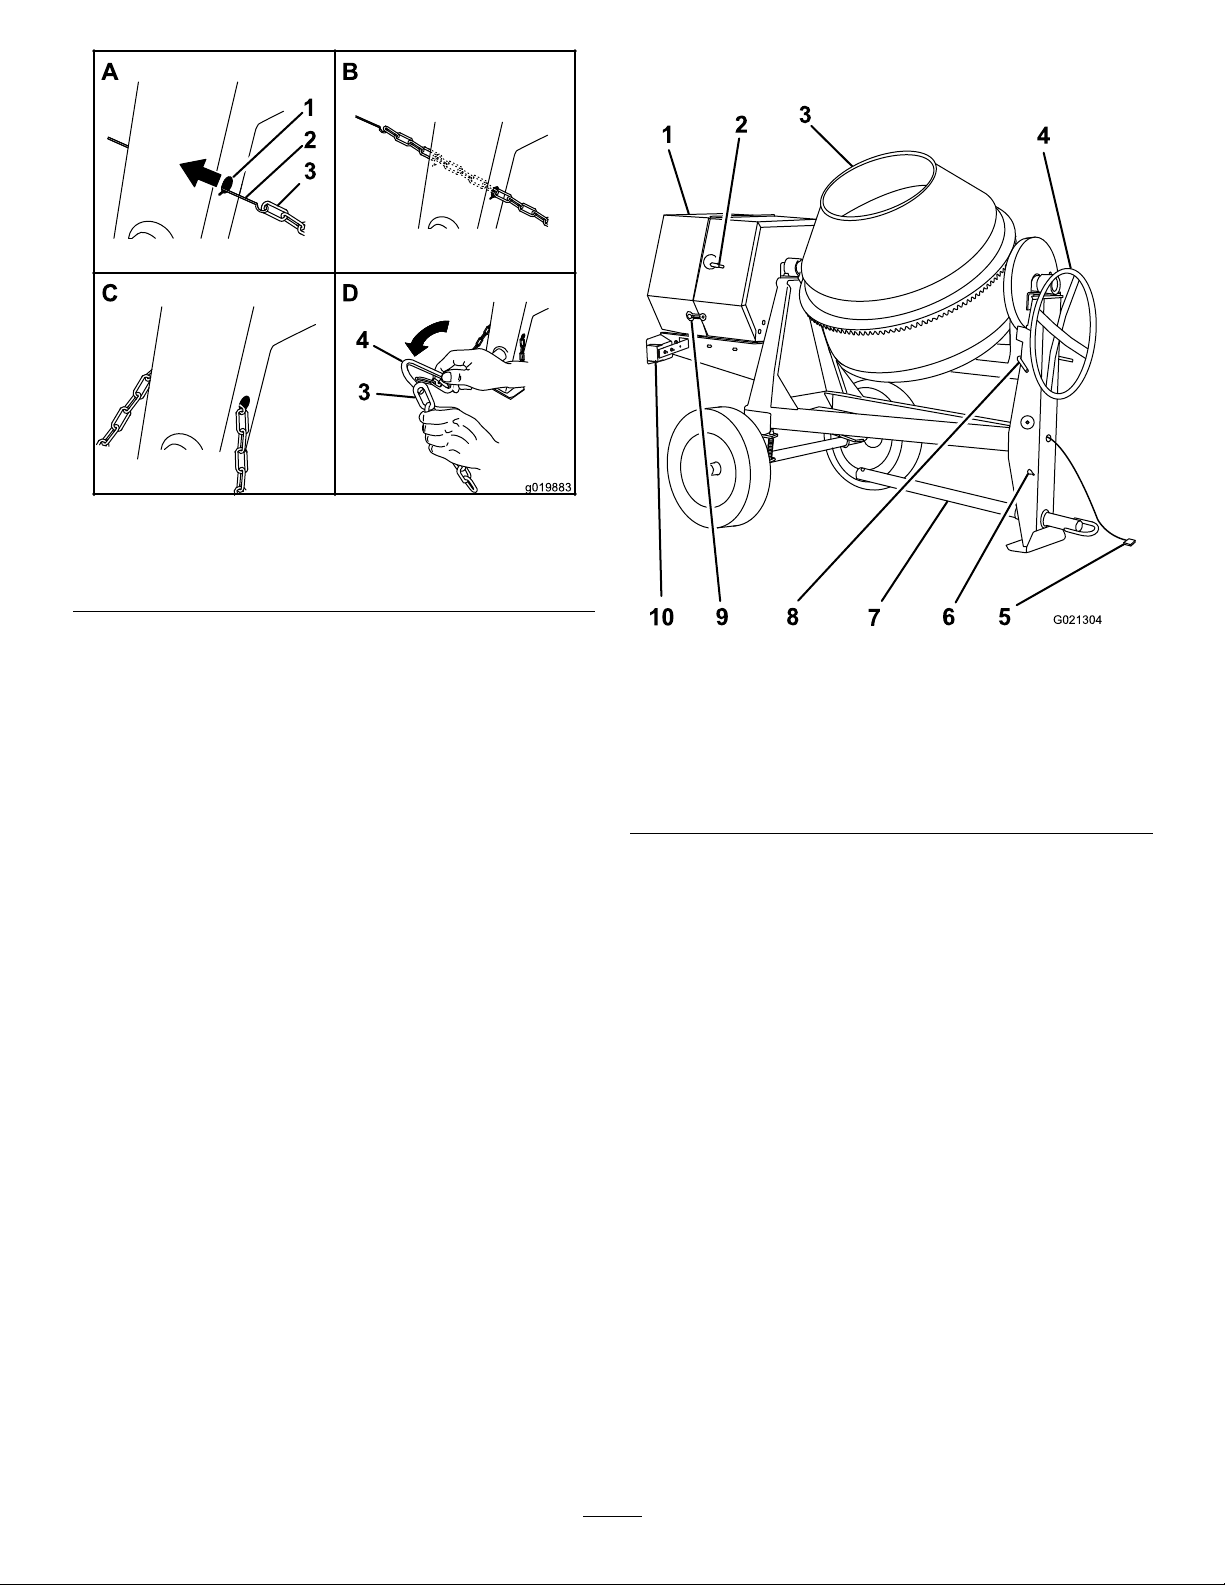
A
B
D
g019883
2
3
4
3
1
Figure4
G021304
1
3
4
6
7
8
9
2
5
10
ProductOverview
1.Keyhole
2.Rodorwire(notincluded)4.Connectinglink
2.Attachthesafetychaintothelengthofrodorwire
(Figure4A).
3.Pulltherod,orwire,andthesafetychainthroughboth
keyholes(Figure4B).
Note:Ensurethatapproximatelyequallengthsof
safetychainextendfromeithersideofthefrontpost.
InstallingtheConnectingLinks
1.Aligntheconnectinglinktothelastlinkinoneendof
thesafetychain(Figure4D).
2.Inserttheconnectinglinkthroughthechainlinkuntil
theconnectinglinksnapsclosed.
3.Repeatsteps1and2toinstalltheotherconnectinglink
intheotherendofthesafetychain.
3.Safetychain
Figure5
1.Enginecowl
2.Enginespeedcontrol
handle
3.Drum8.Drum-tiltbrake
4.Handwheel9.Rubberlatch
5.Lightingwireharness
6.Safety-chainkeyholes
7.Towpole
10.Trailerlight(2)
Controls
Becomefamiliarwithallofthecontrolsbeforeyoustartthe
engineandoperatethemachine.
Handwheel
Thehandwheelcontrolsthetiltofthedrum.
Drum-tiltBrake
Thedrum-tiltbrakelocksthedrumintoposition.
10
Page 11
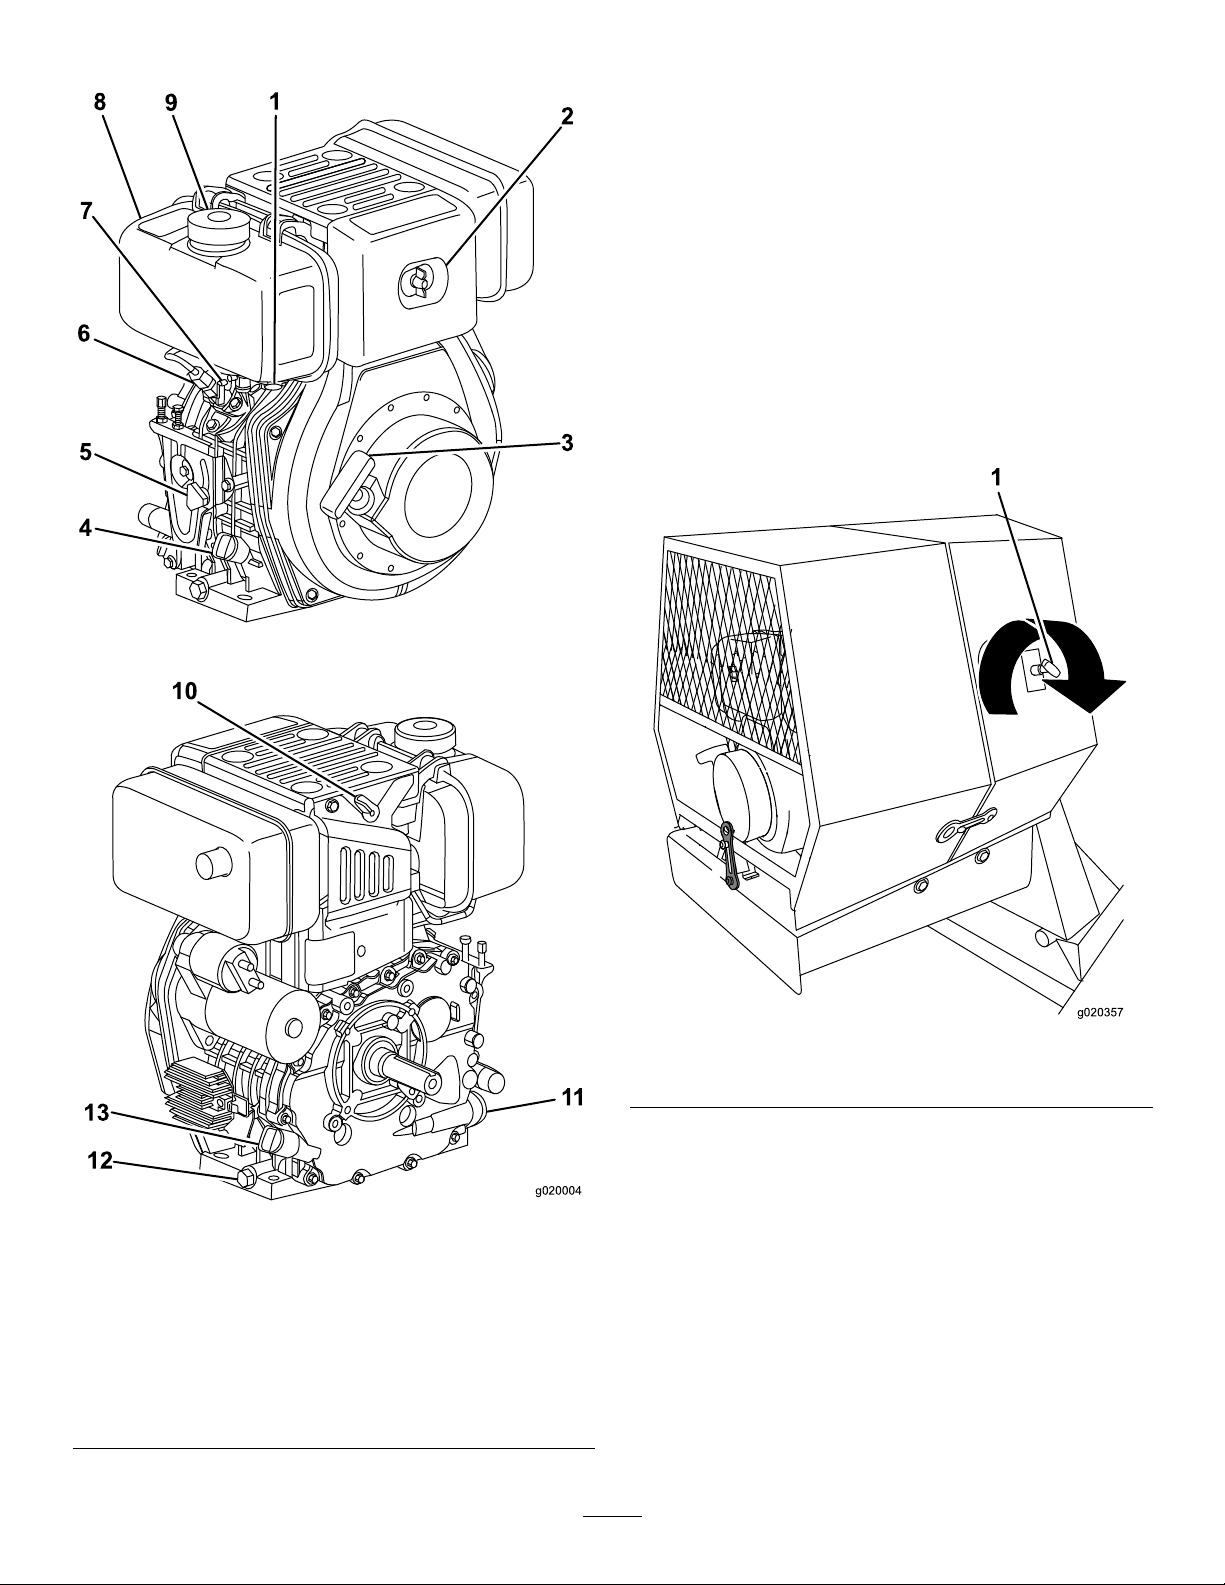
EngineControls
g020004
8
9
1
7
6
5
4
3
2
13
10
12
11
1
g020357
EngineSpeedControlHandle
Theenginespeedcontrolhandle(Figure7)allowsthe
operatortostartandstoptheengine.Itislocatedonthe
enginecowl,andisconnectedtotheenginespeedcontrol
knob,whichislocatedontheengine(Figure8).T ocontrol
theenginespeedcontrolhandle:
1.Rotatetheenginespeedcontrolhandle
counterclockwisetounlockit.
2.Pullitallthewayoutandlockitbyrotatingitclockwise.
3.Rotateitcounterclockwiseandpushitintostopthe
engine.
Note:Thespeedcontrolknobontheenginemustbeloose
(rotatedcounterclockwise)forthecowl-mountedspeed
controlhandletowork.
Figure7
1.Enginespeedcontrolhandle
Figure6
1.Fueldrainplug8.Fueltank
2.Aircleaner9.Fuelcap
3.Recoil-starthandle10.Decompressionlever
4.Oilcap/dipstick11.Oillter
5.Enginespeedcontrolknob
6.Fuelinjectionpump
7.Fuelshutofflever
12.Oildrainplug
13.Oilcap/dipstick
11
Page 12
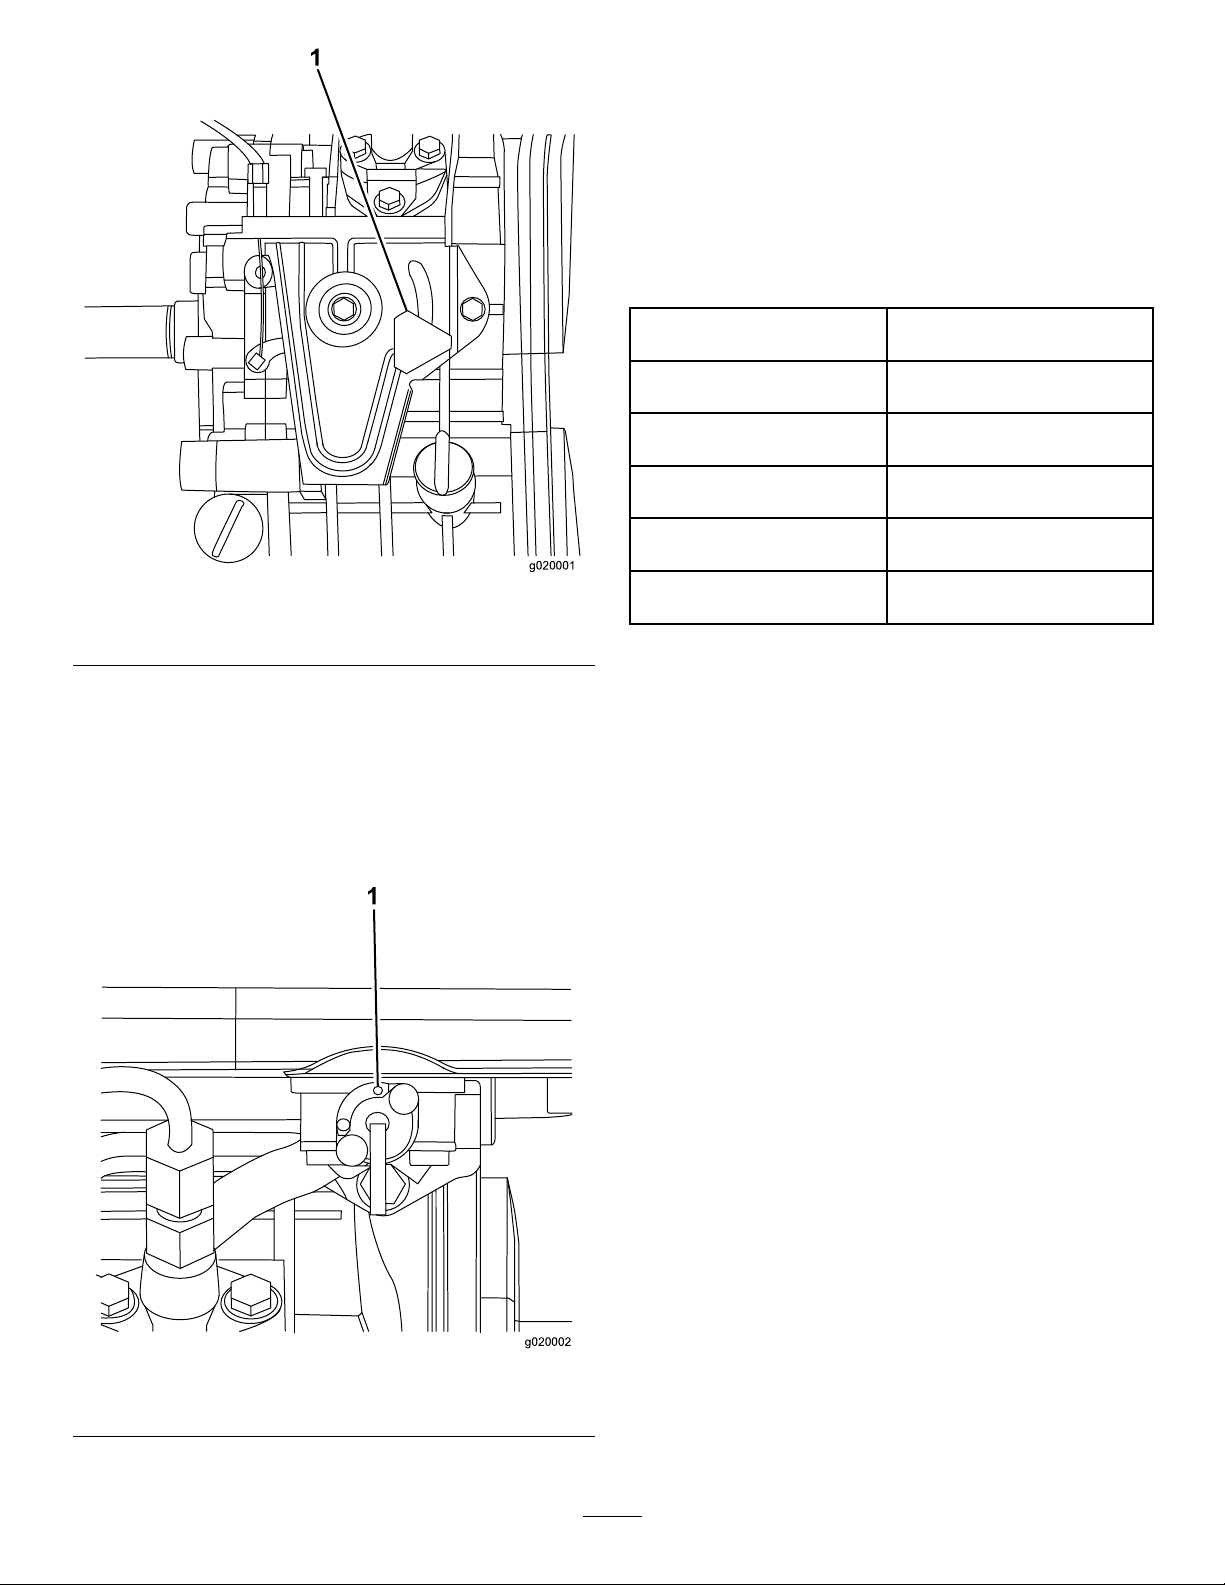
g020001
1
g020002
1
Recoil-startHandle
Tostarttheengine,pulltherecoil-starthandle(Figure6)
quicklytoturntheengineover.Theenginecontrolsdescribed
abovemustallbesetcorrectlyfortheenginetostart.
Specications
Note:Specicationsanddesignaresubjecttochange
withoutnotice.
Figure8
1.Enginespeedcontrolknob
FuelShutoffLever
Thefuelshutoffleverislocatedunderneaththefueltank.
MovethefuelshutofflevertotheOnpositionbefore
attemptingtostarttheengine.Onceyouhavenishedusing
themachineandyouhaveturnedtheengineoff,movethe
fuelshutofflevertotheOffposition.
BatchCapacity
TotalVolume0.56cubicmeters
Length241cm
Width142cm
Height178cm
Weight407kg
0.34cubicmeters
(12cubicfeet)
(19.8cubicfeet)
(95inches)
(56inches)
(70inches)
(897lb)
1.FuelshutoffleverinOnposition
Figure9
12
Page 13
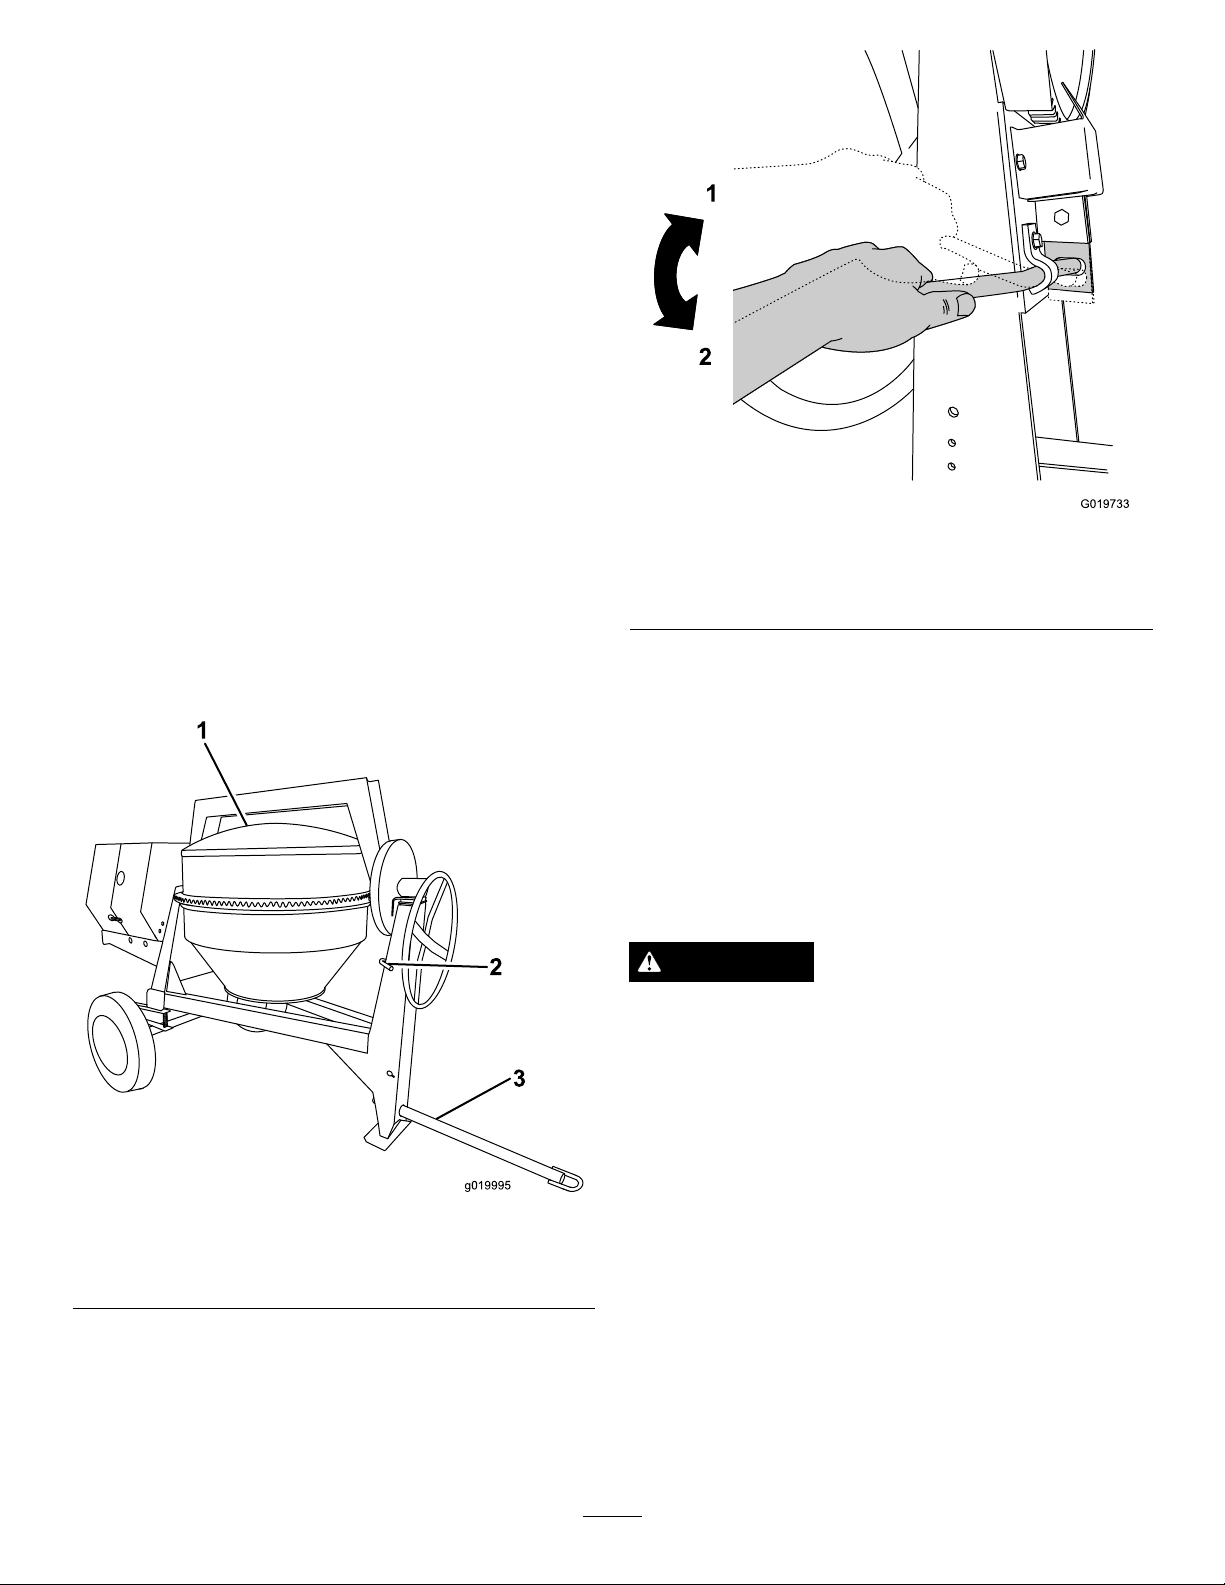
Operation
g019995
1
2
3
1
2
G019733
Important:Beforeoperating,checkthefuelandoil
levels,andremovedebrisfromthemachine.Ensurethat
theareaisclearofpeople.
PreparingtoTowtheMachine
Important:Ensurethatyourtowvehiclehastowing
capacityfortheweightofthemachine.
Important:UseaClass2orlargerreceiver.
Note:Ensurethatyourtowvehiclehastheappropriatehitch
totowthemachine;optionsincludea50mm(2inch)ball
hitchorapintlehitch.
Note:Ensurethattheelectricalconnectorofthetowvehicle
iscompatiblewiththeelectricalconnectorofthemachine.
Themachineusesastandard4-atplug.Ifyourtowvehicle
hasadifferenttypeofplug,obtainanadapterfroman
automotivepartsstore.
1.Ensurethattheengineisstopped,thefuelshutofflever
isoff,andthedrumisempty.
2.Usingthehandwheel,positionthedrumsothatitis
pointingdowntowardtheground(Figure10).
Figure11
Drum-tiltBrake
1.Unlockedposition2.Lockedposition
4.Ensurethattheenginecowlisclosedandlatched;refer
to
ClosingtheCowl(page18).
5.Inspectthetiresandwheels;referto
TiresandWheels(page13).
Checkingthe
Figure10
1.Drumpointingdown3.Towpoleboltedinplace
2.Drum-tiltbrakeengaged
3.Lockthedrumintopositionbypushingdownonthe
drum-tiltbrakehandle(Figure11).
CheckingtheTiresandWheels
ServiceInterval:Beforeeachuseordaily—Inspectthetires
andwheels.
Aftereachuse—Torquethelugnutsto108to122
N-m(80to90ft-lb)aftertowing.
WARNING
Failuretomaintaincorrecttirepressuremayresult
intirefailureandlossofcontrol,resultingin
propertydamageandseriousinjuryordeath.
•Checkthetirepressurefrequentlytoensure
properination.Ifthetiresarenotinatedto
thecorrectpressure,theywillwearprematurely.
•Inspectthetireconditionbeforetowingand
afteranyoperatingaccident.
TheDOTtireinformationislocatedontheside
ofeachtire.Thisinformationgivesloadandspeed
ratings.Replacementtiresshouldhavethesame
orbetterratings.Formoreinformationgoto
http://www.nhtsa.gov/Vehicle+Safety/Tires.
Note:Referto
replacementtiresmeetorexceedtheratingsforthismachine.
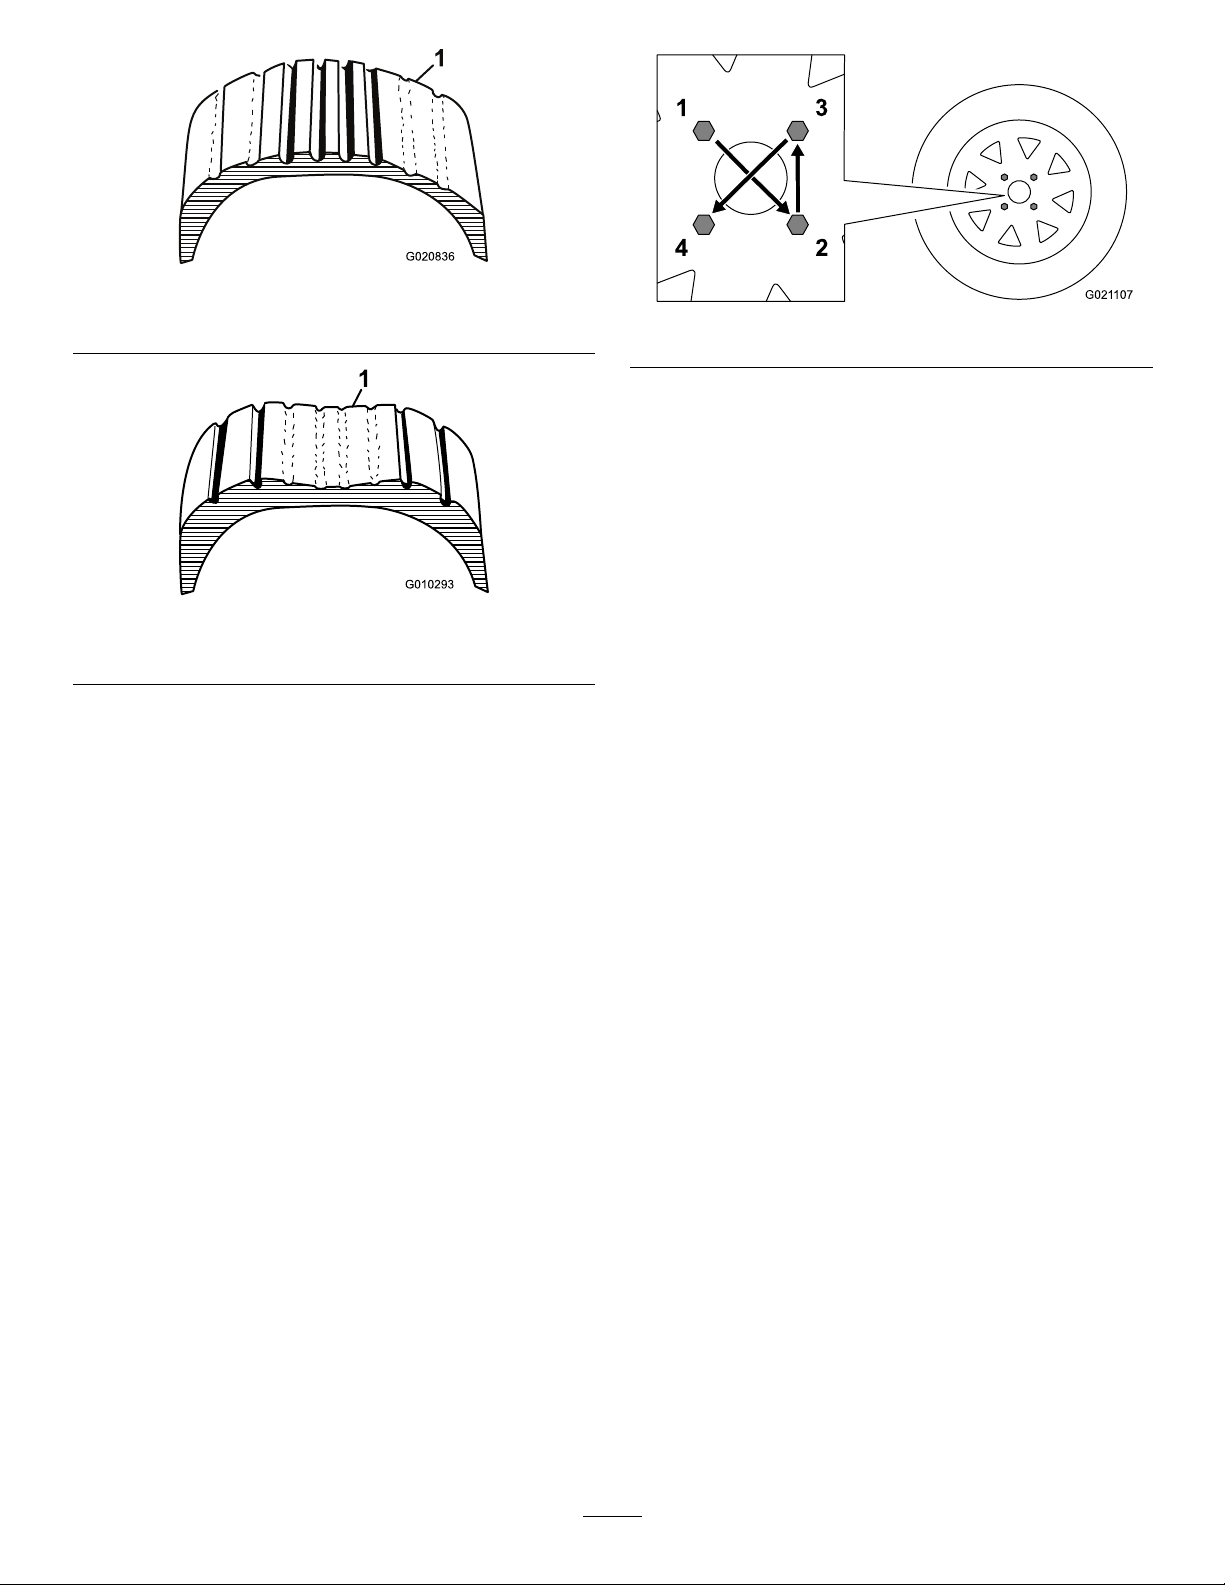
1.Visuallyinspectthetiresfordamageandwear(Figure
12andFigure13).
Specications(page12)andensurethatall
13
Page 14
G020836
Figure12
1
2
3
4
G021 107
1.Exampleoftirewearcausedbyunderination
Figure13
1.Exampleoftirewearcausedbyoverination
2.Ensurethatthetiresareinatedtothecorrectair
pressure.Thefollowingratingindicatestheappropriate
airpressureforthetiresasinstalledatthefactory.
Important:Alwayschecktheinformation
ontheactualtiresforthecorrectairpressure
requirement.
Important:Themostcommoncauseoftire
troubleisunderination.Maintainfullair
pressure.
Figure14
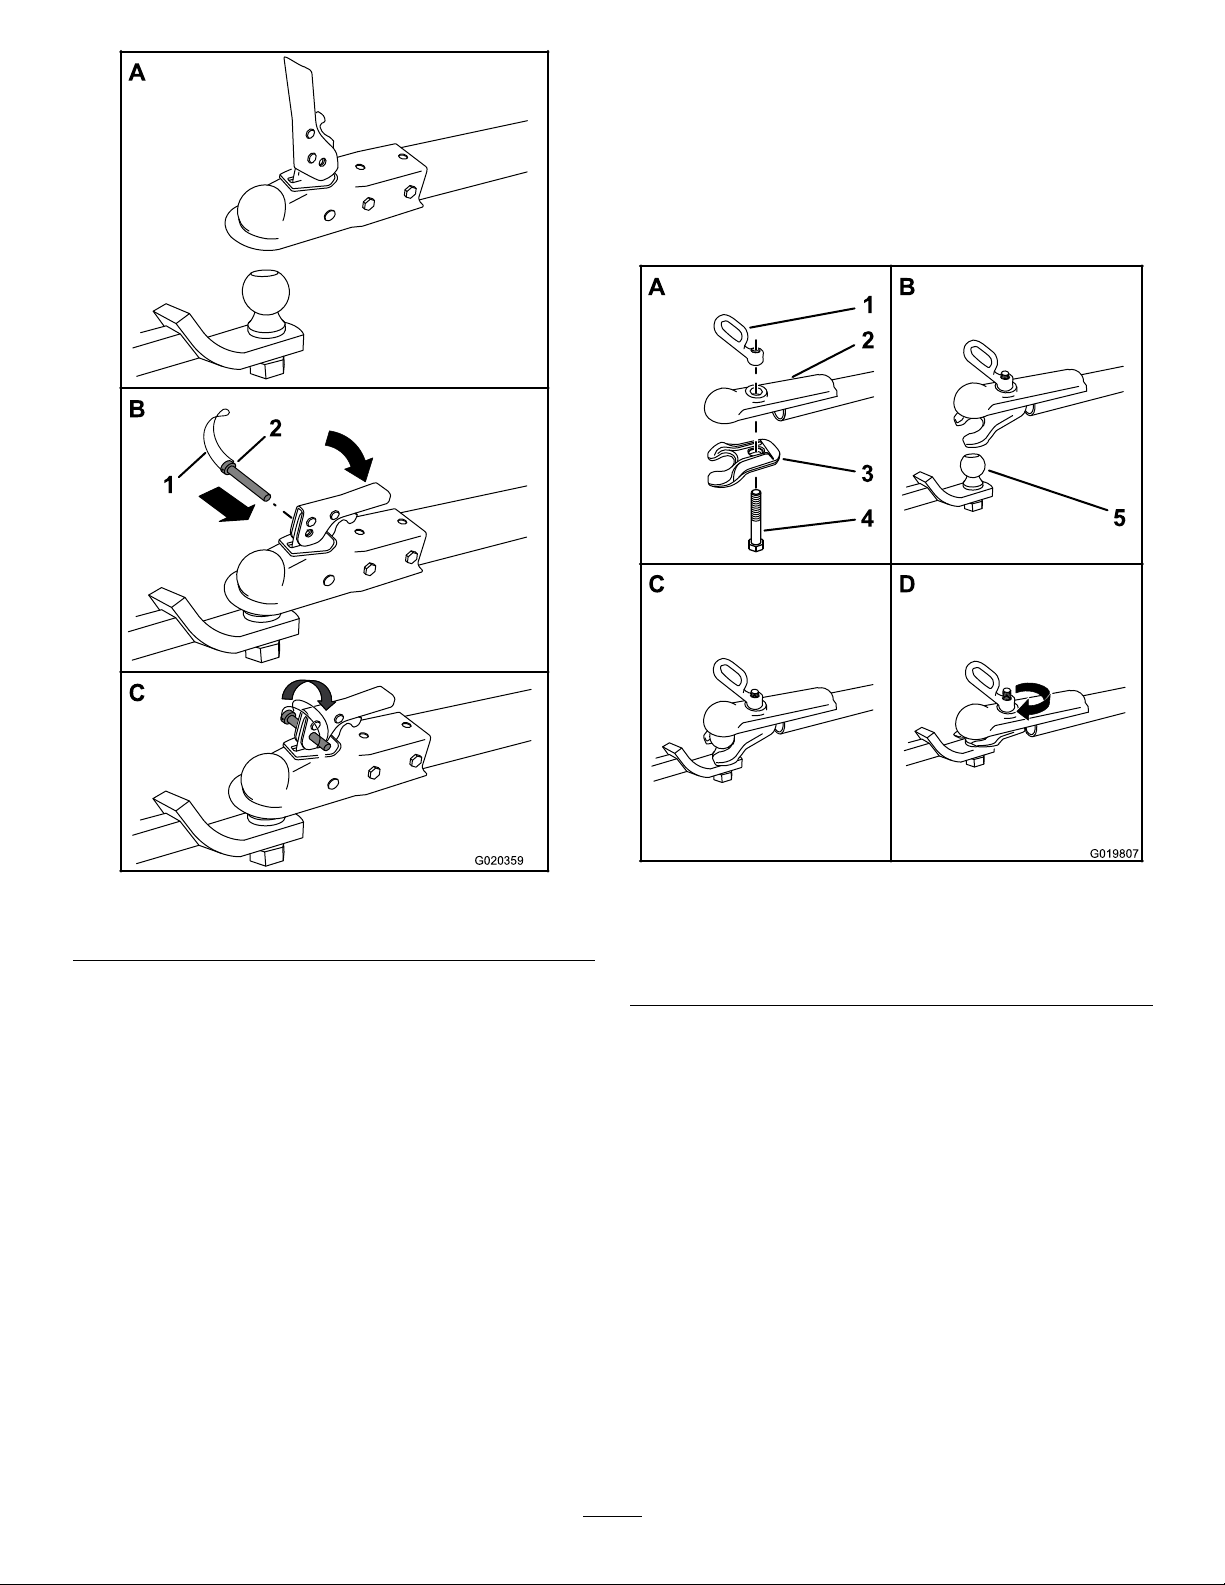
HitchingaMachinewithaStampedBall
Coupler
1.Applychassisgreasetothesocketofthecouplerand
theareaoftheclampthatcontactstheball.
2.Oilthepivotpointsandslidingsurfacesofthecoupler
withSAE30motoroil.
3.Openthecouplerlatch(Figure15).
AirPressure:Max241kPa(35psi)
3.Ensurethatthewheellugnutsaretorquedto108to
122N-m(80to90ft-lb).
Note:Checkthetorqueofthewheellugnutsinitially
andaftertowing.
Note:Torquethelugnutsinthesequenceshownin
Figure14.
14
Page 15
A
B
C
G020359
2
1
HitchingaMachinewithaForgedBall
A
B
D
G019807
5
1
2
3
4
Coupler
1.Applyremovablethread-lockingcompoundtothe
threadsofthecouplerbolttopreventthecoupler
handlefromcomingloose(Figure16).
Important:Applythread-lockingcompoundas
neededinthefuture.
Figure15
1.Bail
2.Safetypin
4.Positionthecouplerontopofthehitchball(Figure
15A).
5.Closethecouplerlatch(Figure15B).
6.Openthebailonthesafetypinandinsertthepin
throughtheholeinthelatch(Figure15B).
7.Rotatethefreeendofthebailovertheendofthesafety
pinthatisprotrudingthroughthelatch(Figure15C).
8.Connectthewireplugofthetowvehicletothewire
plugofthemachine;refertoConnectingtheLighting
WireHarness(page17).
Figure16
1.Couplerhandle
2.Coupler
3.Clamp
4.Bolt
5.Hitchball
2.Applychassisgreasetothesocketofthecouplerand
theareaoftheclampthatcontactstheball.
3.Pushthecouplerboltupthroughthecouplerclamp
andthecouplertop,andconnectthecouplerhandle
tothebolt(
Figure16A).
4.Positionthecouplersothatthesocketisontopofthe
hitchballandtheclampisundertheball(Figure16C).
5.Turnthecouplerhandleclockwisetothreaditontothe
boltuntilitissecure(Figure16D).
Note:Useawrenchtokeeptheboltfromspinning.
6.Connectthewireplugofthetowvehicletothewire
plugofthemachine;referto
ConnectingtheLighting
WireHarness(page17).
15
Page 16
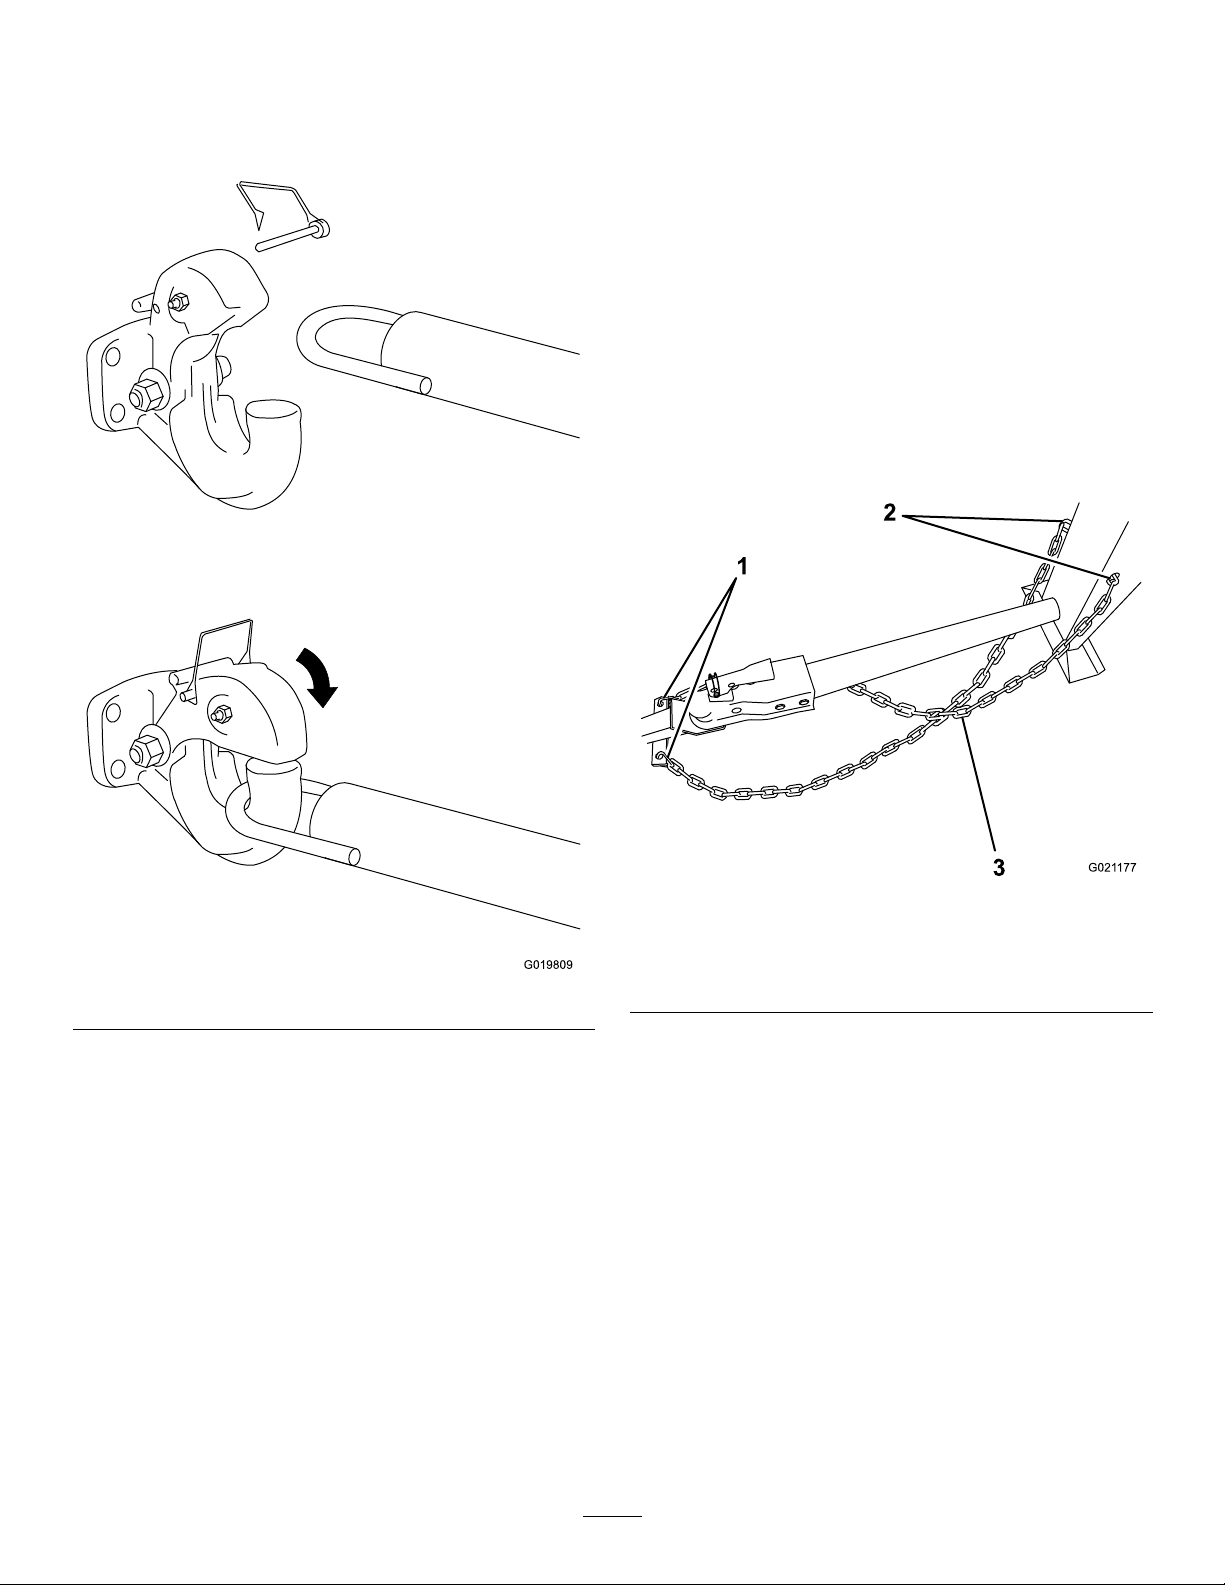
HitchingaMachinewithaPintleHitch
G019809
1
2
3
G021 177
TowPole
ConnectingtheSafetyChainstothe
TowVehicle
1.Removethepinfromthepintlehitchandopenit
(Figure17).
Connectthesafetychaintothemachineandthetowvehicle
asfollows:
1.Pullthesafetychainthroughtheslotsinthekeyholes
locatedinthefrontpostofthemachine,sothatthere
isjustenoughslackoneachsideforturningaround
cornerswhentowingthemachineFigure18).
Note:Stowtheexcesschaininsidethebottomofthe
frontpostbypushingitintothekeyholesandlatching
theappropriatelinksintothekeyholeslots.
2.Crossbothlengthsofchainunderthetowpole.
Note:Crossingthechainsdecreasesthechancesof
thefrontofthemachinedroppingtothegroundifthe
hitchdoesnotholdtheconnection.
Figure17
2.Positiontheringonthetowpoleontothehookofthe
pintlehitch(
Figure17).
3.Closethetopofthepintlehitchandsecureitwiththe
Figure17).
pin(
4.Connectthewireplugofthetowvehicletothewire
plugofthemachine;refertoConnectingtheLighting
WireHarness(page17).
Figure18
1.Connectinglinks3.Chaincrossedundertow
pole
2.Keyholesinfrontpost
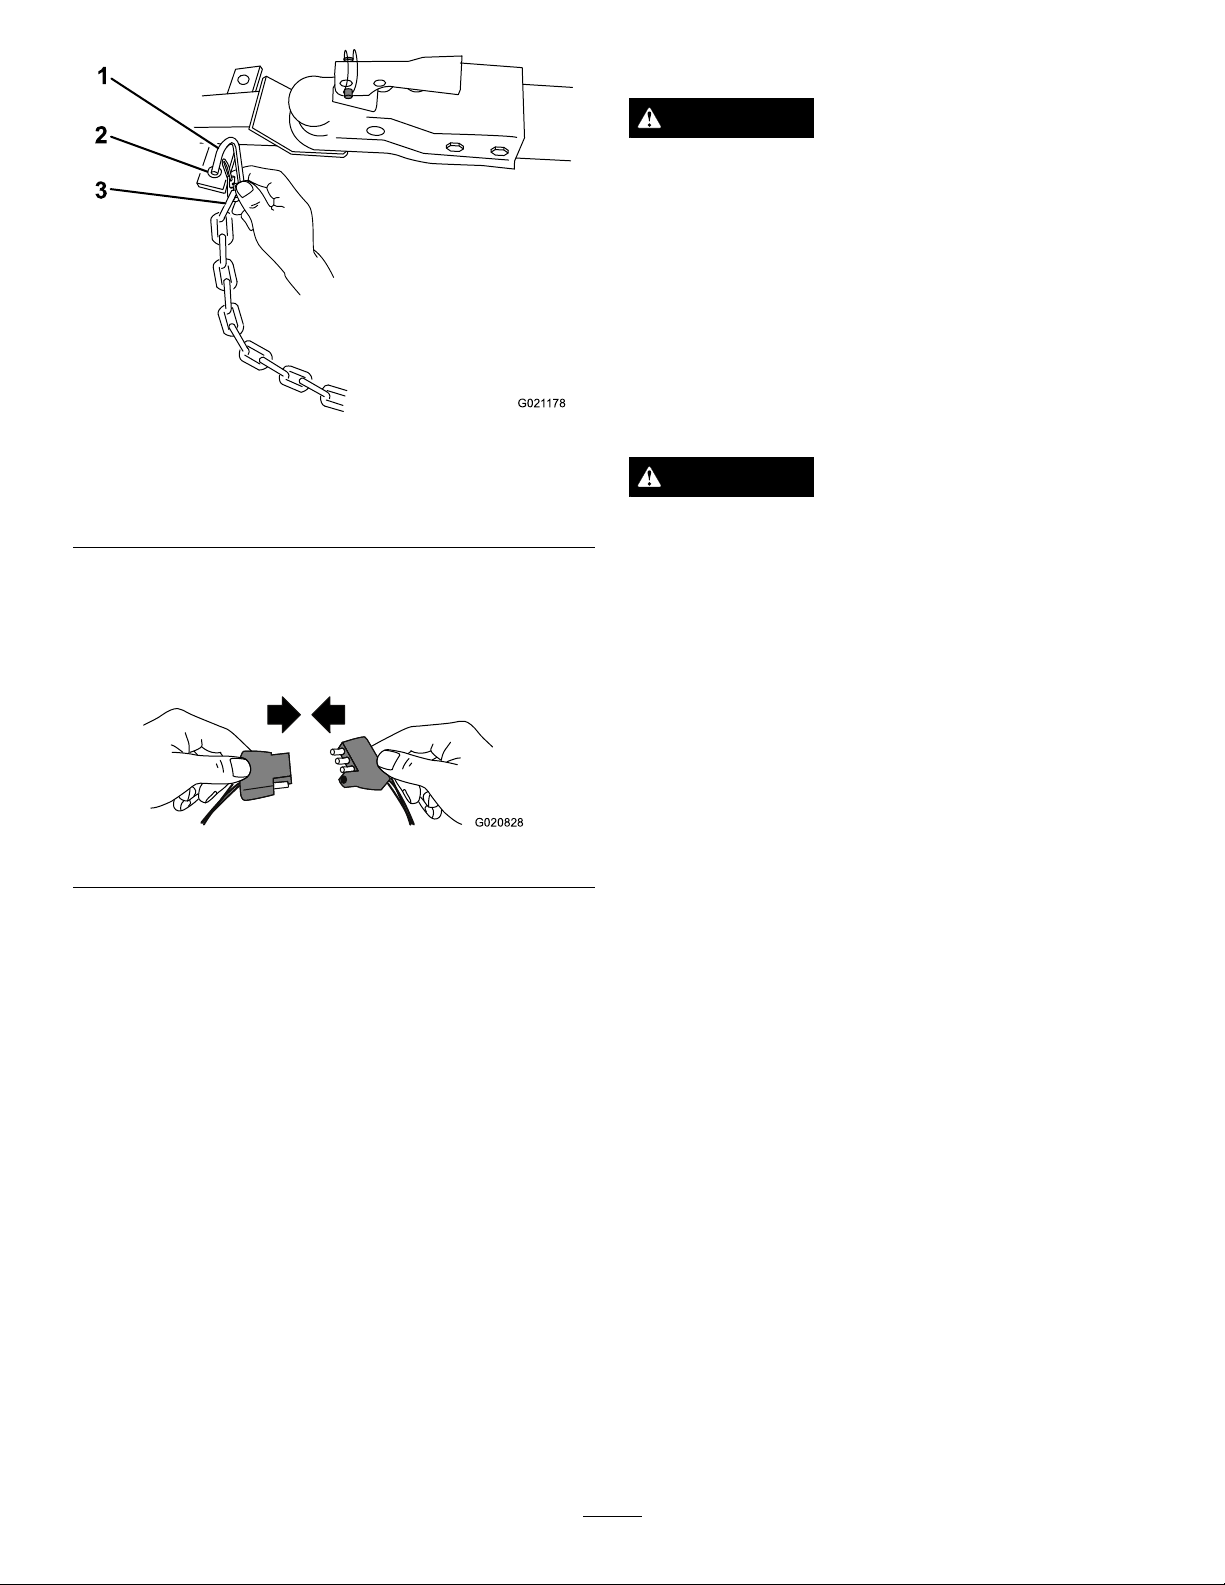
3.Connecteachlengthofchaintothesafetychain
mountingpointonthetowvehiclewiththeconnecting
links(Figure19).
16
Page 17
G021 178
1
2
3
Figure19
G020828
TowingtheMachine
WARNING
Towingthemachineathighspeedincreasesthe
riskofahitchmalfunctionandtirefailure.Higher
speedsalsoincreasethemomentumofthemachine
andbrakingdistance.Ifthemachinebecomes
detachedfromthetowvehicleathighspeed,it
couldcausedamagetoproperty,orinjuryordeath
tobystanders.
Donotexceed88km/h(55mph)whentowingthe
machine.Forpoorroadconditionsorinclement
weather,reducespeedaccordingly .
1.Connectinglink3.Chainlink
2.Safetychainmounting
pointontowvehicle
WARNING
Towingthemachinewithmaterialinthedrum
increasestheriskofahitchmalfunctionandtire
failure.Inaddition,materialcouldbounceoutof
ConnectingtheLightingWireHarness
thedrumandhitothervehiclesand/orpeople.
Materialinthedrumincreasestheweight,which
Connecttheelectricalplugofthemachinewiththeelectrical
plugofthetowvehicle,asshowninFigure20.
affectsmomentumandbrakingdistance.
Donottowthemachinewithmaterialinthedrum.
•ReviewandunderstandSafeOperatingPractices(page4).
•Testthebrakesofthetowvehiclebeforetowing.
•Avoidsuddenstartsandstopswhiletowingthemachine.
Figure20
PreparingtoUsetheMachine
•Reviewallofthesafetydecalsonthemachine.
Note:Themachineusesastandard4-atplug.Ifyourtow
vehiclehasadifferenttypeofplug,obtainanadapterfroman
automotivepartsstore.
Important:Routinelycheckthelightstoensurethat
theyareworkingproperly,includingthetaillights,brake
lights,andeachappropriateturnsignal.
CheckingtheLights
•Ensurethatthetaillightsofthemachineilluminatewhen
youturnontheheadlightsoftowvehicle.
•Ensurethatthebrakelightsofthemachineilluminate
whenyoupressthebrakepedalofthetowvehicle.
•Ensurethattheappropriateturnsignalasheswhenyou
operatethecorrespondingturnsignalofthetowvehicle.
•Useahard-hat,hearingprotection,ashirtwithlong
sleevesthataretightatthewrists,tight-ttinggloves
withoutdrawstringsorloosecuffs,eyeprotection,and
adustmaskorrespirator.Ameshvisoralonedoes
notprovidesufcienteyeprotection;supplementwith
protectiveglasses.
•Ensurethatyouarefamiliarwiththesafetyregulations
andshutdownproceduresdescribedintheOperator’ s
ManualandtheEngineOwner’ sManual.
•Ensurethatallguardsareinplaceandingoodcondition.
•Ensurethatthepaddlesareinplaceandingood
condition.
•Checkthefuelandoillevelsoftheengine.
•Whenpreparingtomixmaterial:
1.Movethemachinetoaleveljob-sitesurface.
2.Removethemachinefromthetowvehicle.
3.Chockthefrontandbackofthetirestoprevent
themachinefrommoving.
4.Ensurethatthedrumisinthemixposition
(upright).
17
Page 18
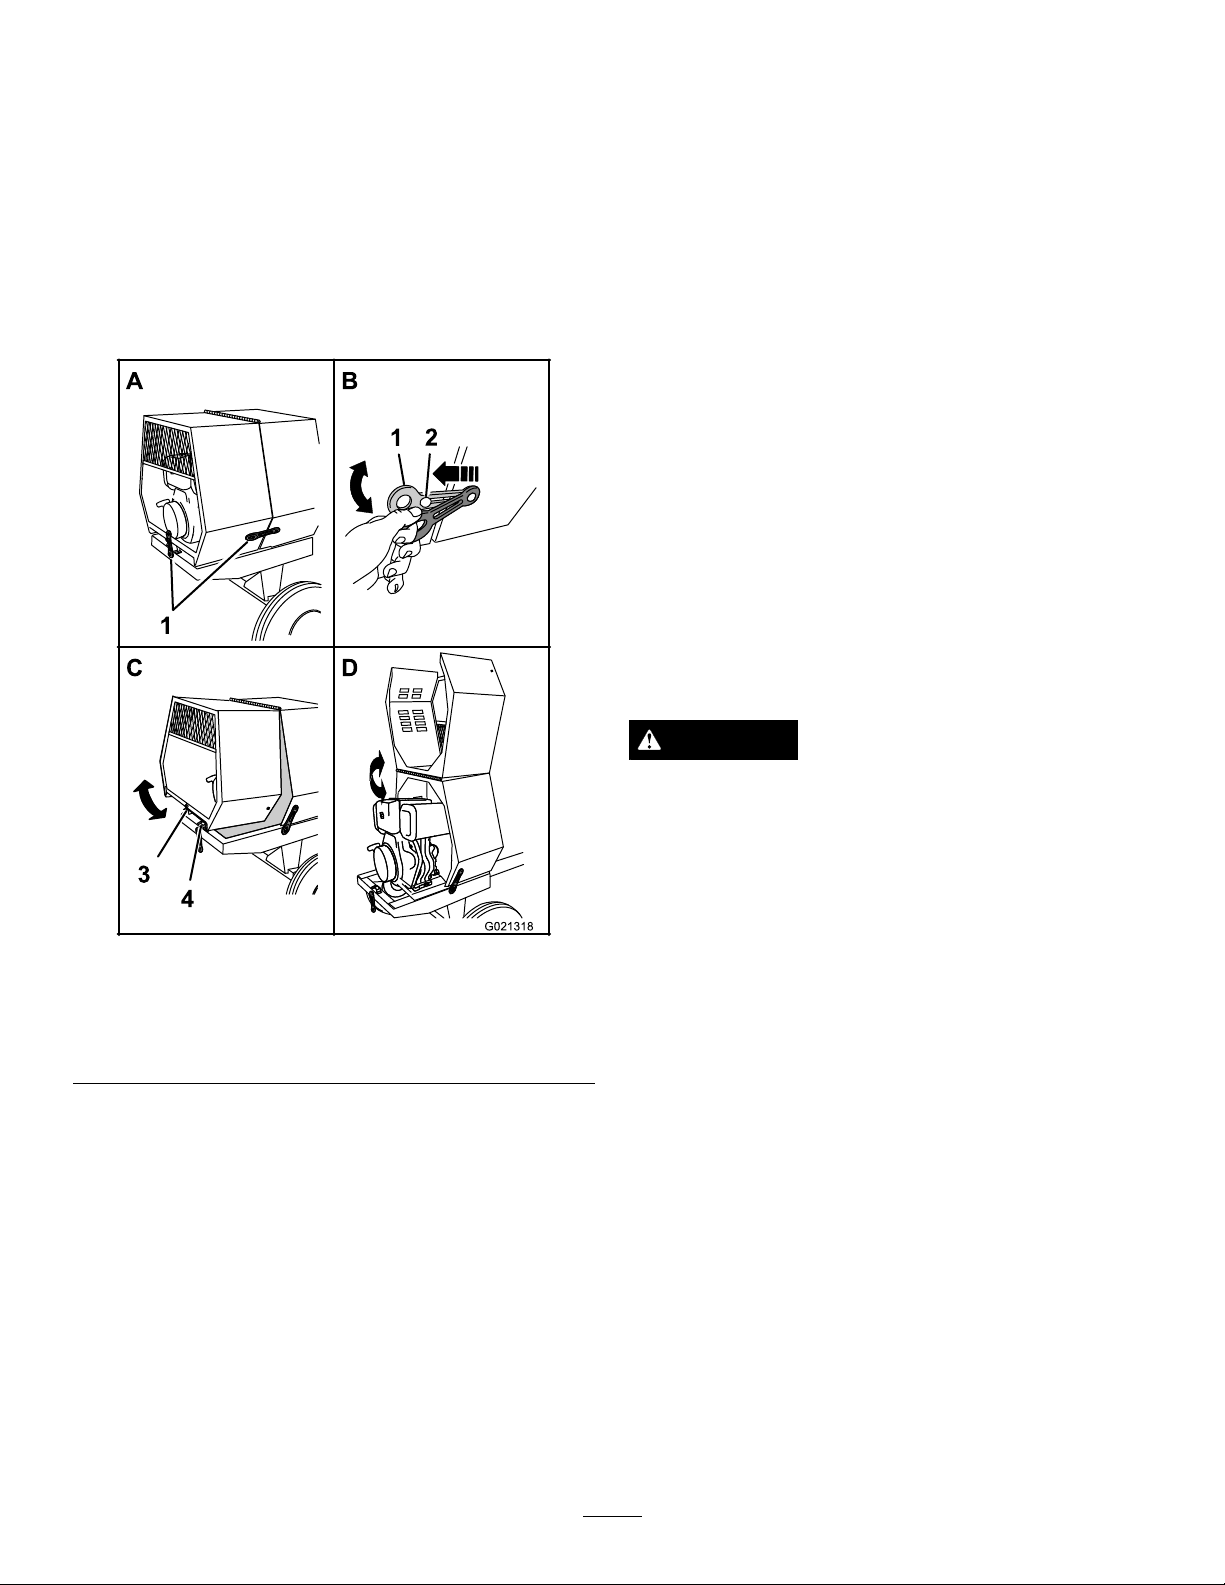
5.Ensurethatthedrum-tiltbrakeisengagedand
A
B
D
1
G021318
2
3
4
1
thatthedrumdoesnotrotatetowardthedump
position.
2.Atthebackofthemachine,grasptheringofthelatch
andpullitontothelatchanchorontherearcowl.
3.Atthesideofthemachine,grasptheringofthelatch
andpullitontothelatchanchorontherearcowl.
OpeningandClosingtheCowl
OpeningtheCowl
1.Atthesideofthemachinewherethefrontcowland
rearcowlmeet,grasptheringofthelatchandpullit
offfromthelatchanchorontherearcowl(Figure21).
4.Repeatstep3ontheoppositesideofthemachine
(Figure21).
AddingFuel
•Theenginerunsonclean,freshdieselfuelwitha
minimumcetaneratingof40.
•Purchasefuelinquantitiesthatcanbeusedwithin30days
toensurefuelfreshness.
•Usesummergradedieselfuel(Number2-D)at
temperaturesabove-7°C(20°F)andwintergradediesel
fuel(Number1-DorNumber1-D/2-Dblend)below
-7°C(20°F).
•Nevermixkerosene,usedengineoil,orresidualfuels
withthedieselfuel.
•Donotstorefueleitherinthefueltankorfuelcontainers
overthewinter.
•Fueladditivesarenotrecommended.Somefueladditives
maycausepoorengineperformance.
DANGER
Figure21
Openingandclosingthecowl
1.Latch3.Receiver
2.Latchanchor
2.Repeat1ontheoppositesideofthemachine.
3.Atthebackofthemachinewheretherearcowlmeets
theframeofthemachine,grasptheringofthelatch
andpullitofffromthelatchanchoronthecowl
(Figure21).
4.Rotatetherearcowlupandforwarduntilitisfully
positionedontopofthefrontcowl(Figure21).
4.V-tting
ClosingtheCowl
1.Rotatetherearcowlrearwardanddownuntilthe
receiveratthebottomcenterofthecowlisalignedwith
theV-ttingandushontheframeofthemachine
(
Figure21).
Incertainconditions,dieselfuelisextremely
ammableandhighlyexplosive.Areorexplosion
fromdieselcanburnyouandothersandcan
damageproperty.
Useonlydieselfuel.Fillingthefueltankwith
gasolinemayresultinare.
•Fillthefueltankandstorefuelina
well-ventilatedarea.
•Neverrefuelthefueltankwhiletheengineis
running.
•Donotllthefueltankcompletelyfull.Addfuel
untilitisatthesamelevelastheredring.This
emptyspaceinthetankallowsfueltoexpand.
•Neversmokewhenhandlingfuel,andstayaway
fromanopenameorwherefuelmaybeignited
byaspark.
•Storedieselinanapprovedcontainerandkeep
itoutofthereachofchildren.Donotbuymore
thana30-daysupplyoffuel.
•Donotoperatewithouttheentireexhaust
systeminplaceandinproperworkingcondition.
18
Page 19
DANGER
g019997
1
2
3
Incertainconditionsduringfueling,static
electricitycanbereleasedcausingasparkwhich
canignitethefuelvapors.Areorexplosionfrom
fuelcanburnyouandothersandcandamage
property.
•Alwaysplacefuelcontainersonthegroundaway
fromyourvehiclebeforelling.
•Donotllfuelcontainersinsideavehicleoron
atruckortrailerbedbecauseinteriorcarpets
orplastictruckbedlinersmayinsulatethe
containerandslowthelossofanystaticcharge.
•Whenpractical,removefuel-poweredequipment
fromthetruckortrailerandfueltheequipment
withthewheelsontheground.
•Ifthisisnotpossible,thenrefuelsuch
equipmentonatruckortrailerfromaportable
container,ratherthanfromafueldispenser
nozzle.
•Ifafueldispensernozzlemustbeused,keepthe
nozzleincontactwiththerimofthefueltank
orcontaineropeningatalltimesuntilfuelingis
complete.
UsingFuelStabilizer/Conditioner
Useadieselfuelstabilizer/conditionerinthemachineto
keepthefuelfreshduringstorageof90daysorless.Ifyou
arestoringthemachineforlonger,drainthefueltank;refer
toStoringtheMachine(page34).
Important:Donotusefueladditivescontaining
methanolorethanol.
Addthecorrectamountoffuelstabilizer/conditionertothe
fuel,andfollowthedirectionsofthemanufacturer.
Note:Fuelstabilizer/conditionerismosteffectivewhen
mixedwithfreshfuel.
FillingtheFuelTank
Capacity:4.7L(1.25USgallons)
1.Parkthemachineonalevelsurface,stoptheengine,
andallowtheenginetocool.
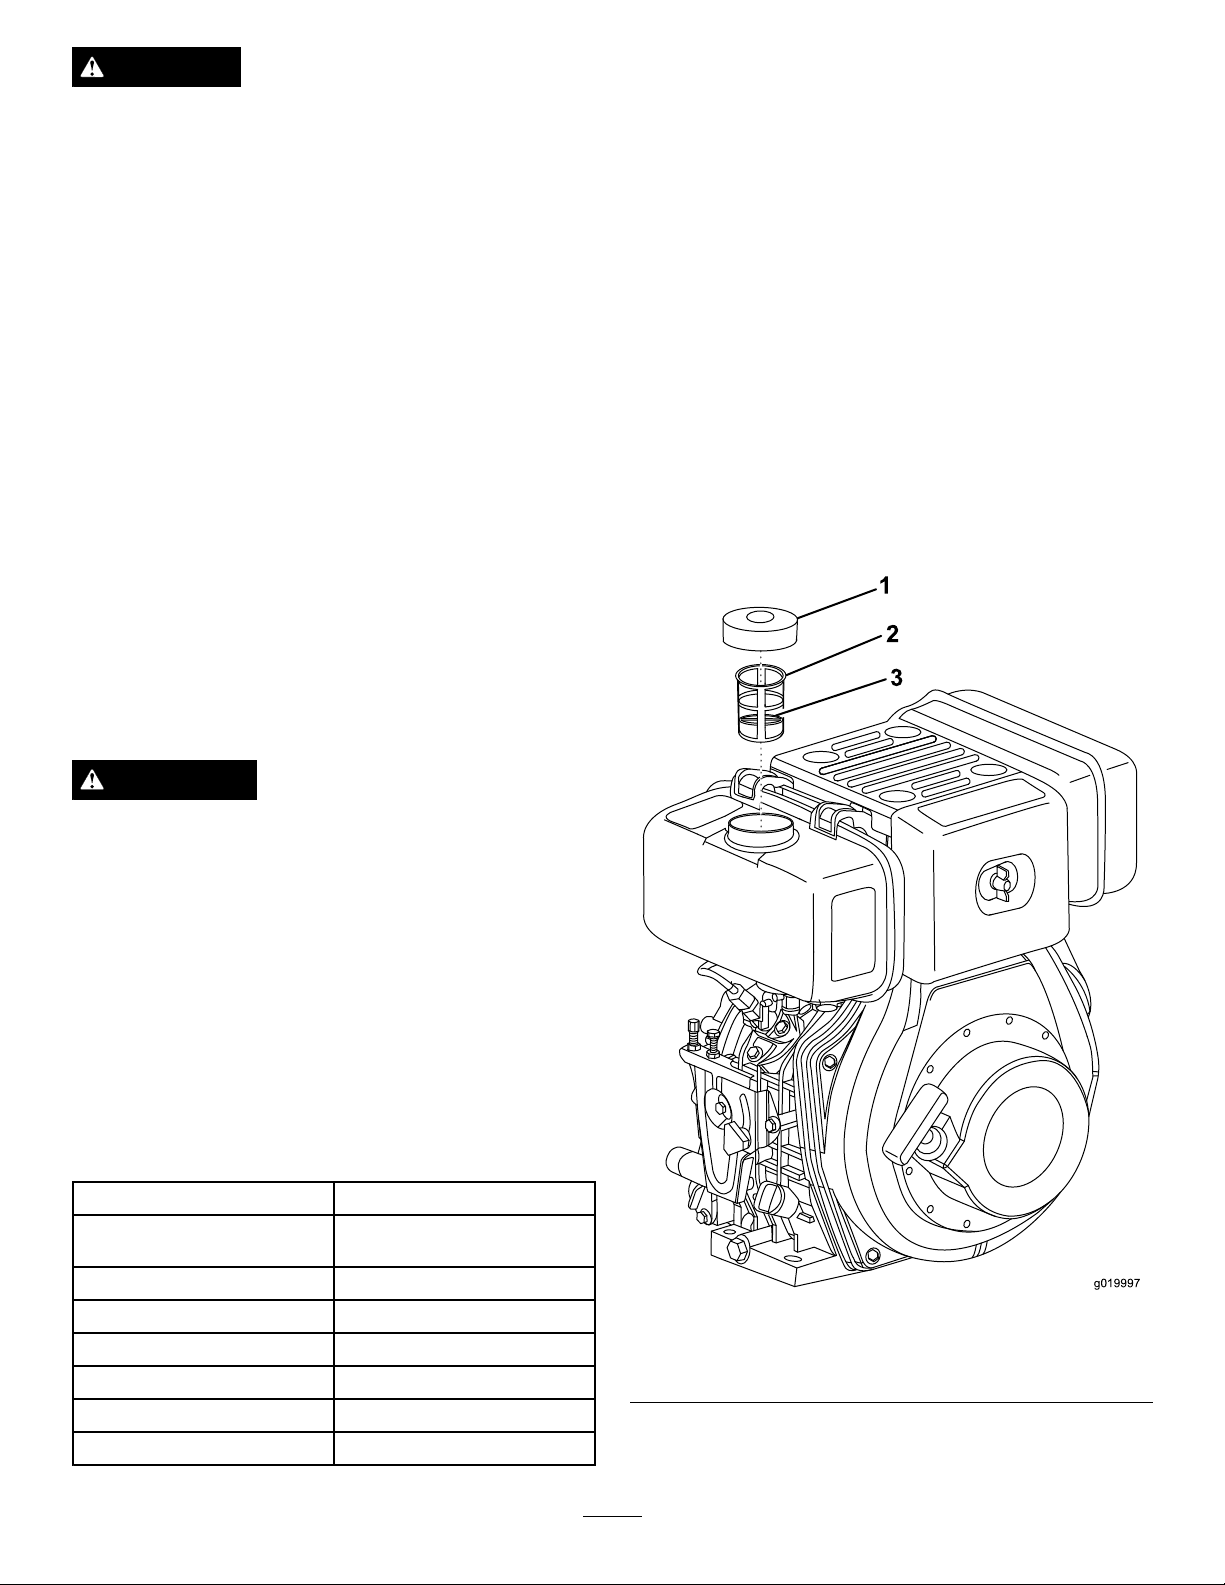
2.Cleanaroundthefuelcapandremoveit(Figure22).
WARNING
Fuelisharmfulorfatalifswallowed.Long-term
exposuretovaporscancauseseriousinjuryand
illness.
•Avoidprolongedbreathingofvapors.
•Keepyourfaceawayfromthenozzleandthe
fueltankorconditioneropening.
•Keepfuelawayfromyoureyesandskin.
DieselFuelSpecications
Important:Donotmixoilwithdiesel.
Dieselfuelshouldcomplywiththefollowingspecication.
Thetablelists7worldwidespecicationsfordieselfuels.
DieselFuelSpecications
Number2-D,Number1-D,
ASTMD975-94
EN590:96EuropeanUnion
ISO8217DMX
BS2869-A1orA2
JISK2204GradeNumber2
KSM-2610
GB252China
Location
U.S.A.
International
UnitedKingdom
Japan
Korea
Figure22
1.Fuelcap3.Redring
2.Inletfuelscreen
Important:Keeptheinletfuelscreenandthered
ringinthefueltankwhilepouringthefuel.
19
Page 20
3.Addfueltothefueltankuntilthelevelisuptothered
g020005
SAE 10W
SAE 20W
SAE 10W -30
SAE 15W -40
SAE 20
SAE 30
SAE 40
(-4 F)
o
(14 F)o(32oF)
(50oF)
(68oF)
(86oF) (104oF)
-20oC -10oC 0oC
10oC
20oC
30oC
40oC
g020376
g019993
1
2
3
ring(Figure23).
Important:Thisspaceinthetankallowsthefuel
toexpand.Donotllthefueltankcompletelyfull.
Figure24
Important:Besurethattheengineoil,engineoil
storagecontainers,andengineoilllingequipmentare
freeofsedimentsandwater.
1.Placethemachineonaat,levelsurface,andstopthe
engine.
2.Allowtheenginetocool.
Figure23
4.Securelyinstallthefuelcap(Figure22).
5.Wipeupanyfuelthatmayhavespilled.
CheckingtheEngineOilLevel
ServiceInterval:Beforeeachuseordaily—Checktheengine
oillevel.
ToroPremiumEngineOilisavailablefromyourAuthorized
ToroDealer.
Important:Use4-cycleengineoilthatmeetsorexceeds
thefollowingguidelinesandclassications:
•APIServiceCategoriesCH-4,CI-4,CJ-4orhigher
•ACEAServiceCategoriesE-3,E-4,andE-5
•JASOServiceCategoryDH-1
3.Cleanaroundthedipstick.
4.Removethedipstickandwipetheendclean(Figure25).
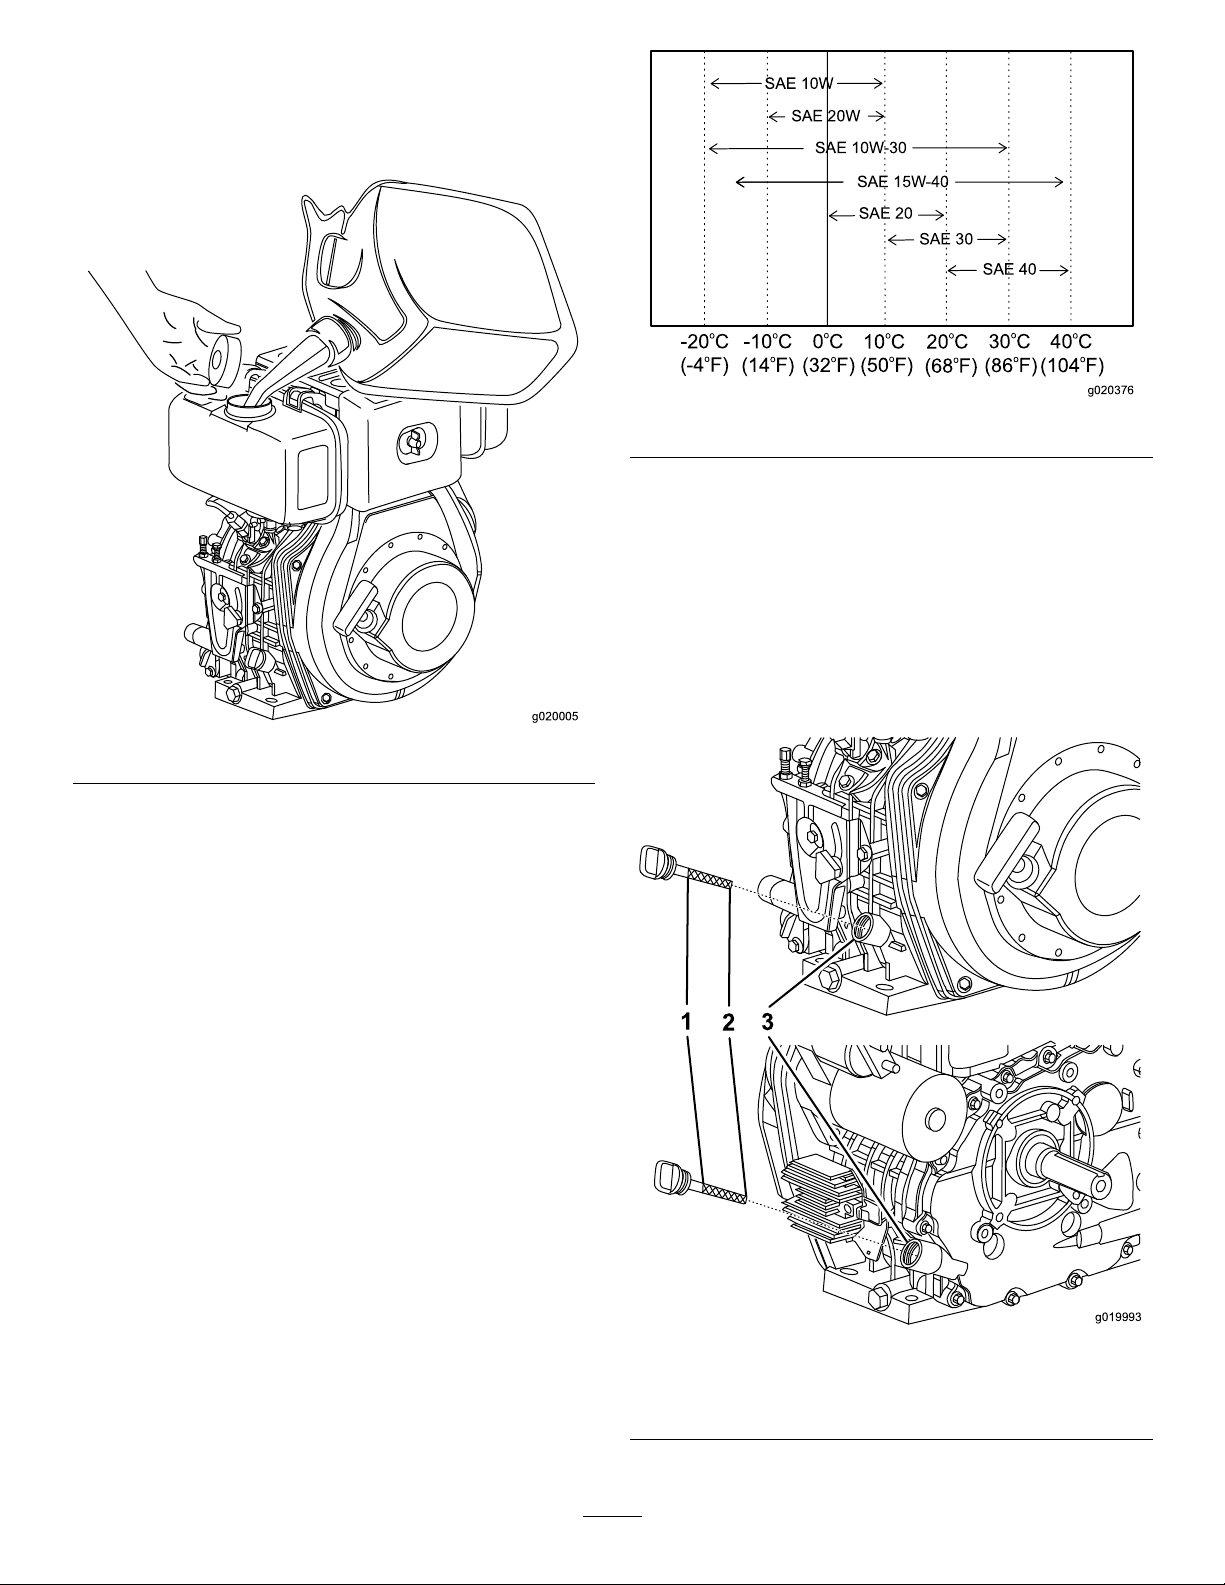
CrankcaseCapacity:1.6L(1.7USqt)
Important:Iftheoillevelinthecrankcaseistoolow
ortoohighandyouruntheengine,youmaydamage
theengine.Thistypeofdamageisnotcoveredbythe
warranty.
Viscosity:Referto
Figure24.
Figure25
1.Dipstickupperlimit3.Fillport
2.Dipsticklowerlimit
20
Page 21
5.Slidethedipstickfullyintothellportwithout
g020002
1
g020001
1
1
g020357
threadingitintotheport(Figure25).
6.Removethedipstickandlookattheend.Iftheengine
oillevelisbelowthehalfwaypointonthehatchmarks,
slowlypouronlyenoughoilintothellporttoraise
theleveltothehalfwaypointonthedipstick.
7.Installandsecurethedipstick(Figure25).
StartingandStoppingthe Engine
StartingtheEngine
1.ReadSafeOperatingPractices(page4)andunderstand
Controls(page10)beforeattemptingtostartthe
machine.
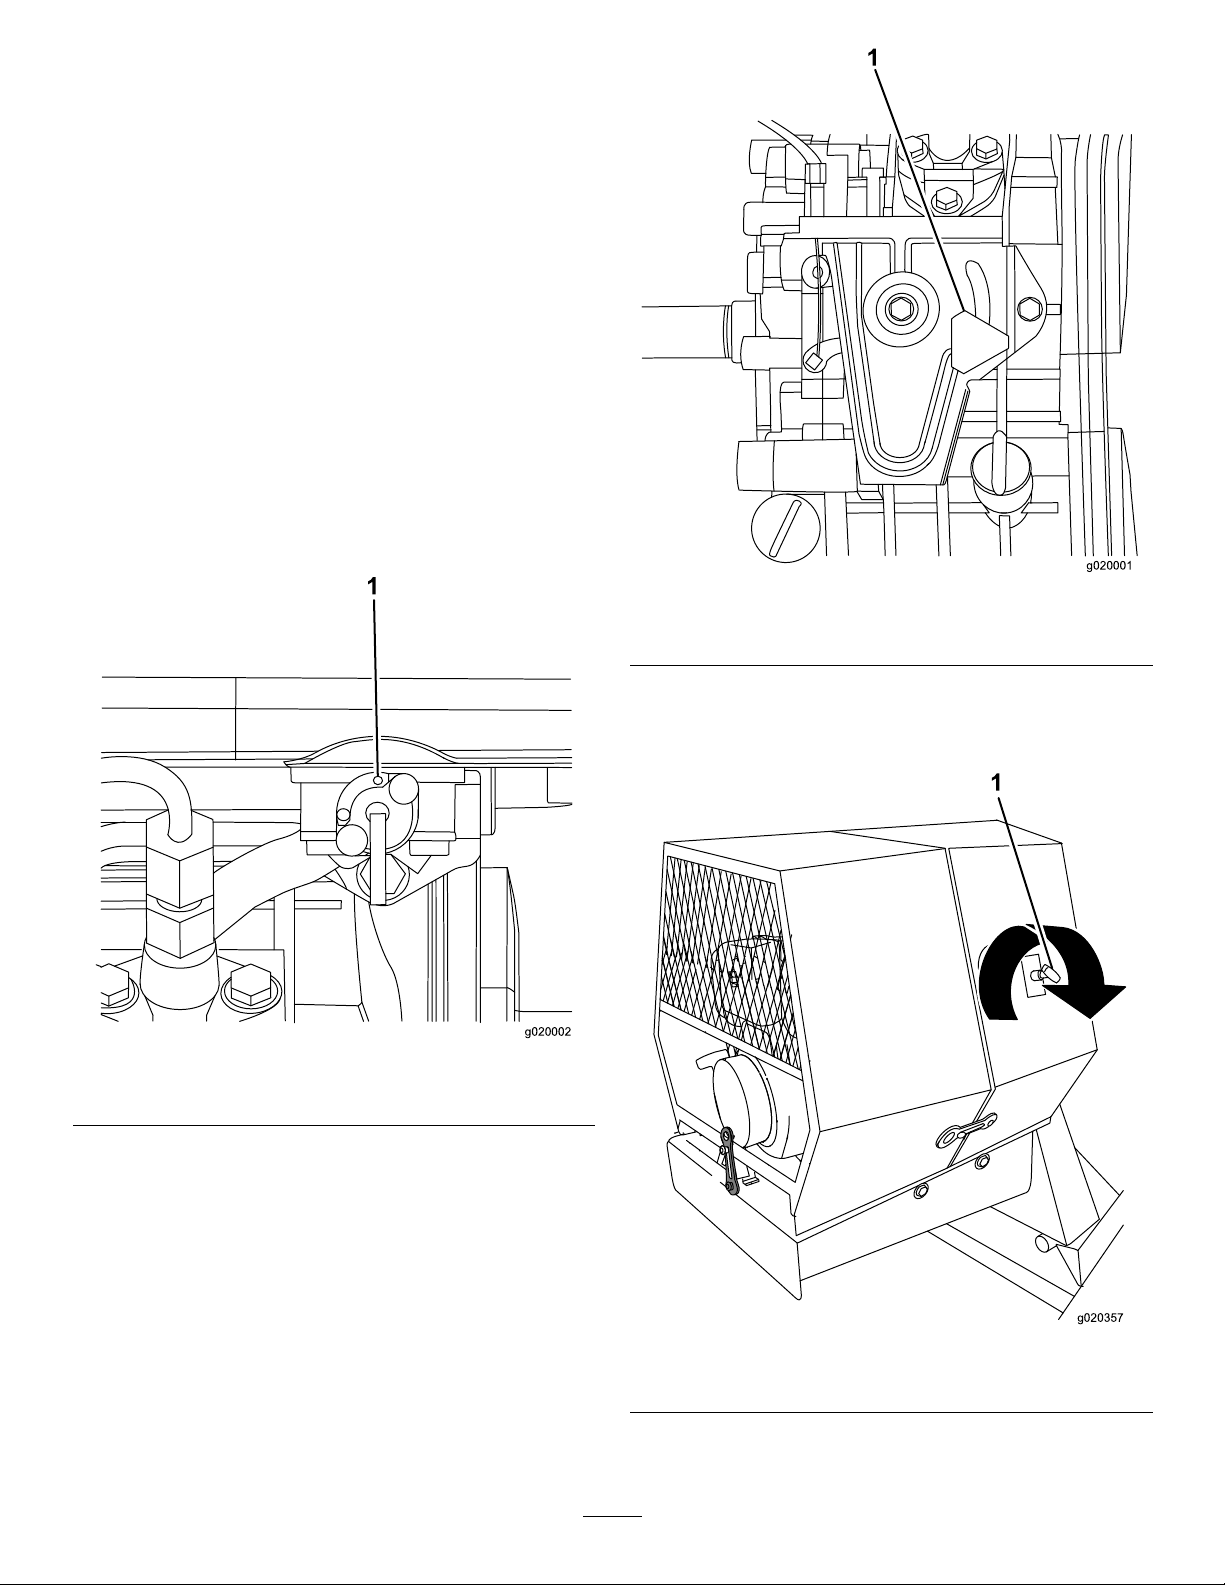
2.MakesurethatthefuelshutoffleverisintheOn
position.
Figure27
1.Enginespeedcontrolknob
1.FuelshutoffleverintheOnposition
Figure26
3.Ensurethattheenginespeedcontrolknobonthe
engineisloosebyrotatingitcounterclockwise(Figure
27).
4.Rotatetheenginespeedcontrolhandle
counterclockwisetounlockit,pullitallthe
wayout,andlockitbyrotatingitclockwise(Figure28).
Figure28
1.Enginespeedcontrolhandle
5.Pushthedecompressionlevertotheleft(Figure6).
21
Page 22
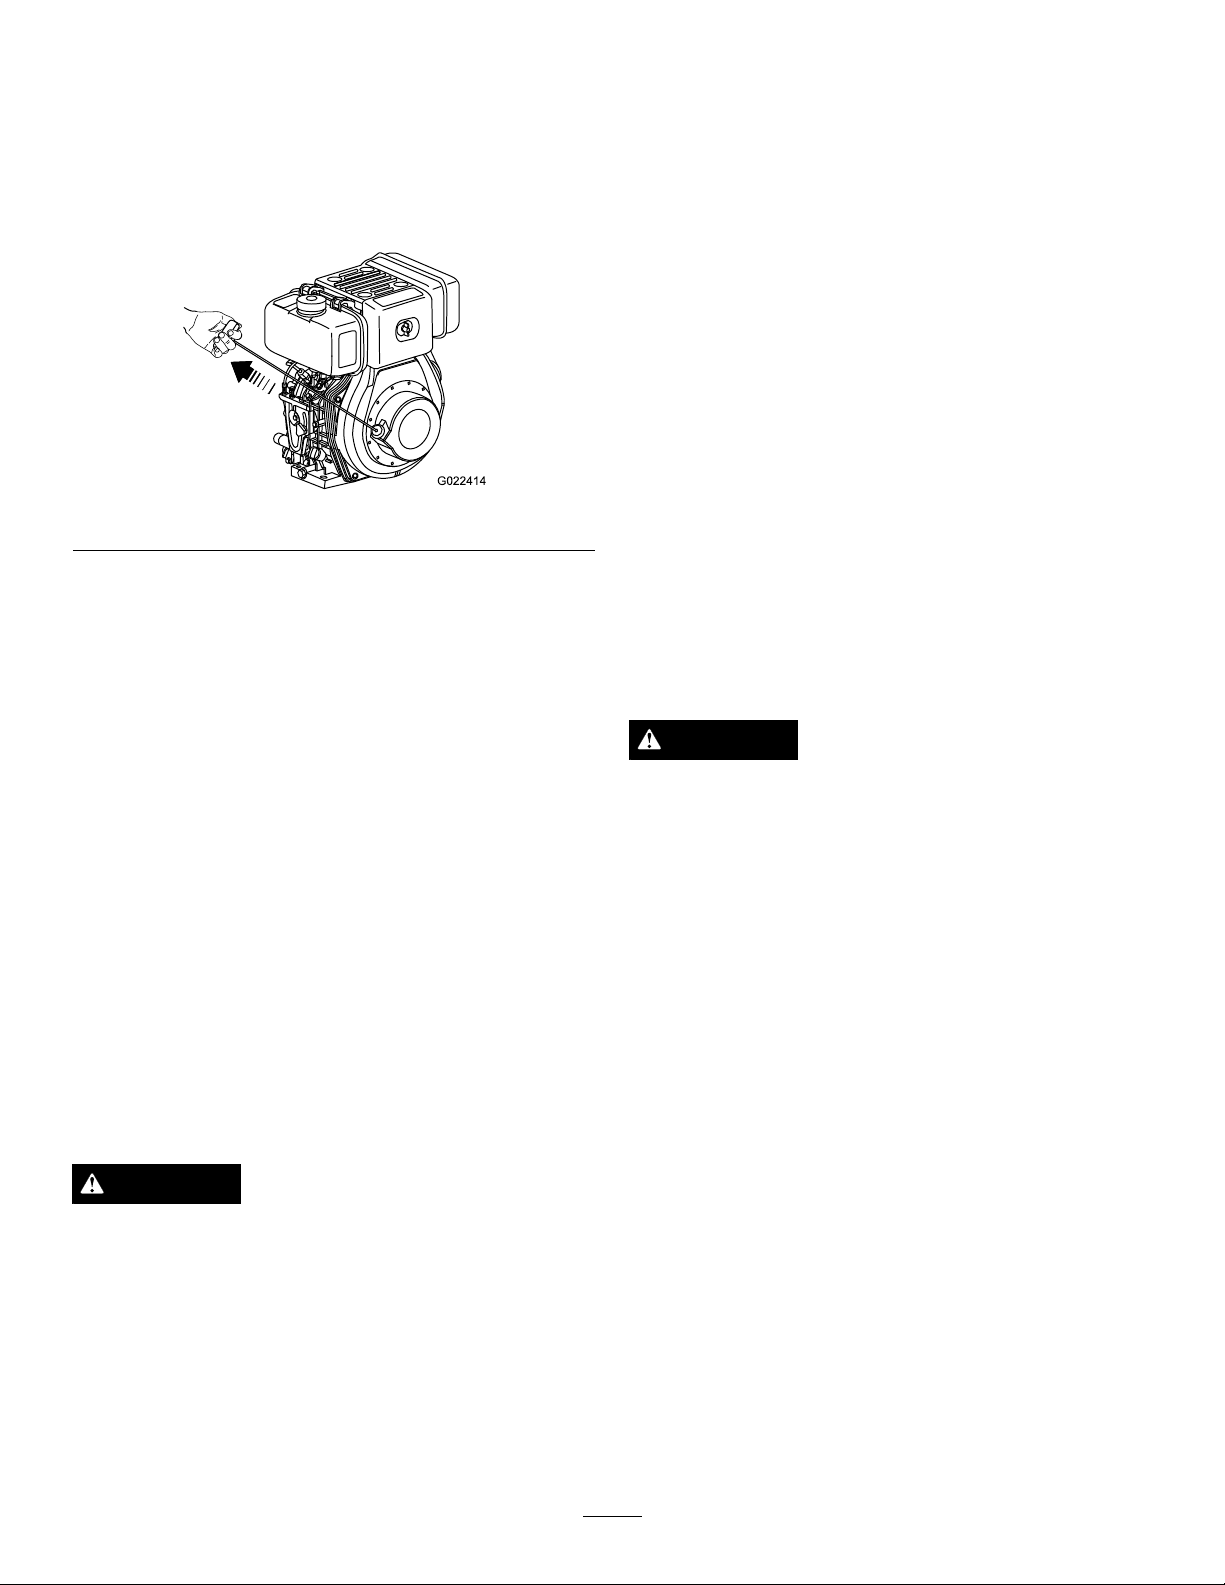
Note:Thedecompressionleverwillstaycockedto
G022414
theleftandwillautomaticallyreturntotheoriginal
positionwhentherecoilstarterhandleispulledagain.
6.Grasptherecoil-starthandle,pullitoutslowlyuntil
youfeelresistance,thenpullitallthewayoutwitha
strongandevenmotion(Figure29).
Note:Use2handsifnecessary.
Figure29
1.Ensurethatthemachineisonlevelgroundandthatthe
surroundingareaisclearofobstacles.
Note:Disconnectthemachinefromthetowvehicle
andchockthefrontandbackofbothtirestoprevent
anymovement.
2.Makesurethatyoureadalltherecommendationsfrom
theSafetysection;refertoSafety(page4)beforeusing
themachine.
3.Starttheengineandclosetheenginecowl.Allow
theenginetowarmupatidlefor2minutes;referto
StartingtheEngine(page21).
4.Usethehandwheeltomovethedrumintoanupright,
slightlytiltedpositiontoallowaccessforpouring
materialsintothedrum.
Note:Thispositionalsoallowsthemixingpaddlesto
mixthematerialsmoreeffectively.
5.Pushthedrum-tiltbrakedowntolockthedruminto
positionandavoidaccidentallydumpingthematerial.
7.Slowlyreturntherecoil-starthandletotheinitial
position.
8.Iftheenginedoesnotstart,repeatsteps2through7.
StoppingtheEngine
1.Unlocktheenginespeedcontrolhandlebyrotating
itcounterclockwise,andpushitinslightly ,totheidle
setting.
2.Runtheengineatlowidlespeedandwithoutaload
foratleast5minutestoallowenginecomponentsthat
operateatahightemperaturetocooldown.
3.Pushtheenginespeedcontrolhandletherestofthe
wayintostopengine.
4.Movethefuelshutofflevertotheclosedpositionafter
theenginestops.
Note:Iftheenginedoesnotstopafteryoupushthe
enginespeedcontrolhandleallthewayin,stopthe
enginebymovingthefuelshutofflevertotheclosed
position.
UsingtheMachine
Important:Ifyouneedtostopthemachine,usethe
enginespeedcontrolhandlelocatedonthecowl;referto
EngineSpeedControlHandle(page11).
MixingtheMaterial
DANGER
Eyeandskincontactwithconcretematerialsand
breathingthedustinvolvedishazardoustoyour
health.
•Ensurethatthereisadequateairventilation.
•Wearadustmasktopreventinhalationofdust
whileusingthemachine;referto
Practices(page4).
•Avoiddirectcontactofcementandconcrete
materialswithskinandeyes.
Important:Donotaddmorematerialthanthebatch
capacityofthemachine;refertoSpecications(page12).
Note:Followthemanufacturer’sinstructionsthatareprinted
onthepackagingoftheproduct.
SafeOperating
DANGER
Thismachineiscapableofamputatinghands.
•Stayintheoperator’spositionwhilethemachine
isrunning.
•Keepallbystandersasafedistancefromthe
machine.
•Stopthemachineimmediatelyifanypeopleor
animalsentertheworkarea.
•Neverplaceanypartofyourbodyintoaposition
thatcausesanunsafeoperatingcondition.
Concretehasthefollowing4basicingredients:
•Sand
•Gravel
•Portlandcement
•Water
Dependingontheapplication,youcanusedifferentratios
ofthese4ingredients.
Therearemanyvariationsofconcretemixrecipes,depending
ontheapplication.Itisimportanttousetheappropriate
quantityofwater.Usingtoolittlewaterwillresultindryareas
22
Page 23

inthemix,butusingtoomuchwaterwillresultinweaker
concrete.Theamountofwaterneededwillvarydepending
onmoisturecontentofthesandandgravel.Themixshould
haveathicknesssimilarthatofpeanutbutter.
Keepthepouredconcretedampforseveraldaystoobtain
propercuring.Evaporationresultsinweakerconcrete.
Concretecuresthroughhydration,areactionbetweenwater
andcement.
MixingPre-mixConcrete
1.Ensurethatthetiltbrakeisfullyengagedandthatthe
drumisoperatingatfullspeed.
2.Pourwaterintothedrum.
3.Addtherequiredamountofdrypre-mix.
4.Allowthedrumtoturnwhilethemixreachesthe
appropriateconsistency.
3.Usingyourotherhand,pullupwardsonthedrum-tilt
brakehandletoreleasethebrake.
4.Usingbothhands,slowlyturnthehandwheel,allowing
thedrumtotiltinthedesireddirectionanddumpthe
desiredamountofmaterial.
5.Turnthehandwheelintheoppositedirectiontoreturn
thedrumintoanuprightposition.
6.Pushdownonthedrum-tiltbraketolockthedrum
intoposition,avoidingaccidentaldischargingof
concretemix.
7.Afterdumpingabatchofmaterial,cleanthedrum;
refertoCleaningtheDrum(page23).
Note:Thisstepwillcleanthepaddlesanddrum
betweenbatchesandpreventdriedmaterialfrom
formingandcontaminatingthenextbatchofmaterial
CleaningtheDrum
MixingSand,Gravel,andCement
Thetypicalratioformixingconcreteis1partPortland
cement,2partssand,and3partsgravel.
1.Ensurethatthetiltbrakeisfullyengagedandthatthe
drumisoperatingatfullspeed.
2.Pourwaterintothedrum.
3.Addtherequiredamountofgravel.
4.AddtherequiredamountofPortlandcement.
5.Addtherequiredamountofsand.
6.Allowthedrumtoturnwhilethemixreachesthe
appropriateconsistency.
Note:Addingwaterandgravelbeforecementandsand
allowsthemixleftinthedrumfromthepreviousbatchtobe
tumbledoffthedrumandpaddlesandintothenextbatch.
UsingtheDrum
DANGER
Contactwiththemixingpaddlescouldcause
damageorinjury.
ServiceInterval:Aftereachuse
Important:Donotstrikeonthedrumwithashovel,
hammer,oranyotherdevicetoloosenaccumulationof
driedmaterials.
1.Whilethemachineisrunning,usethehandwheelto
tiltthedrumslightly.
2.Engagethedrum-tiltbraketopreventthedrumfrom
tiltingfurtheranddischargingthewater.
3.Asthedrumisrotating,sprayitthoroughlywithwater
beforethematerialdries.
4.Allowthedrumtorotateandtumbletheloosematerial
andwater,furtherlooseningtherestofthematerial.
5.Continuetospraythedrumwithwatertoremoveallof
thematerialfromthedrumandmixingpaddles.
6.Whenallofthematerialhasbeenremovedfromthe
surfacesofthedrumandmixingpaddles,disengagethe
drum-tiltbrakeandusethehandwheeltotiltthedrum
anddumpthewaterfromthedrum.
7.Ifsomematerialstillremainsinthedrum,spraythe
drumwithwaterwhileitistilteddownward,allowing
thewaterandmaterialtorunout.
Neverputyourhandsinsidethedrumatanytime.
DumpingtheDrum
Note:Whendumpingabatchofmaterial,leavetheengine
runningsothattherotatingdrumhelpsdumpthematerial.
1.Alignawheelbarroworsimilarcontainerofadequate
capacityinthepathofthedrumopening.
2.Whilethedrumisturning,rmlygraspthehandwheel
withonehand.
23
Page 24
Maintenance
G020752
Important:Beforeperforminganymaintenanceprocedures,rststoptheengine,andwait5minutestoallow
allmovingpartstocometoacompletestopandcool.
RecommendedMaintenanceSchedule(s)
MaintenanceService
Interval
Aftertherst25hours
Aftertherst50hours
Beforeeachuseordaily
Aftereachuse
Every20hours
Every40hours
Every50hours
Every100hours
Every200hours
Every400hours
Every1,000hours
MaintenanceProcedure
•Changetheengineoil.
•Cleantheengineoillter.Replaceitifitisdamaged.
•Inspectthetiresandwheels.
•Checktheengineoillevel.
•Inspecttheaircleanerelements.
•T orquethelugnutsto108to122N-m(80to90ft-lb)aftertowing.
•Cleanthedrum.
•Inspectthedrivechainforrustanddebris.
•Inspectthedrivechaintensionandadjustitasnecessary .
•Lubricatethedrivechainwithanon-stickychainlubricant.
•Cleantheinletfuelscreen.
•Changetheengineoil.
•Cleantheaircleanerelements.Cleanthemmorefrequentlyindustyoperating
conditions.
•Replacetheoutletfuellter.
•Cleantheengineoillter.Replaceitifitisdamaged.
•Changethereductioncaseoil.
Monthly
•Greasethetrunnionsandthedrumspindle.
Premaintenance
Procedures
PreparingtheMachinefor Maintenance
1.Parkthemachineonalevelsurface.
2.Removethemachinefromthetowvehicle.
3.Chockthetires.
4.Opentherearcowl;referto
18).
5.Ensurethattheengineandmuferarecool.
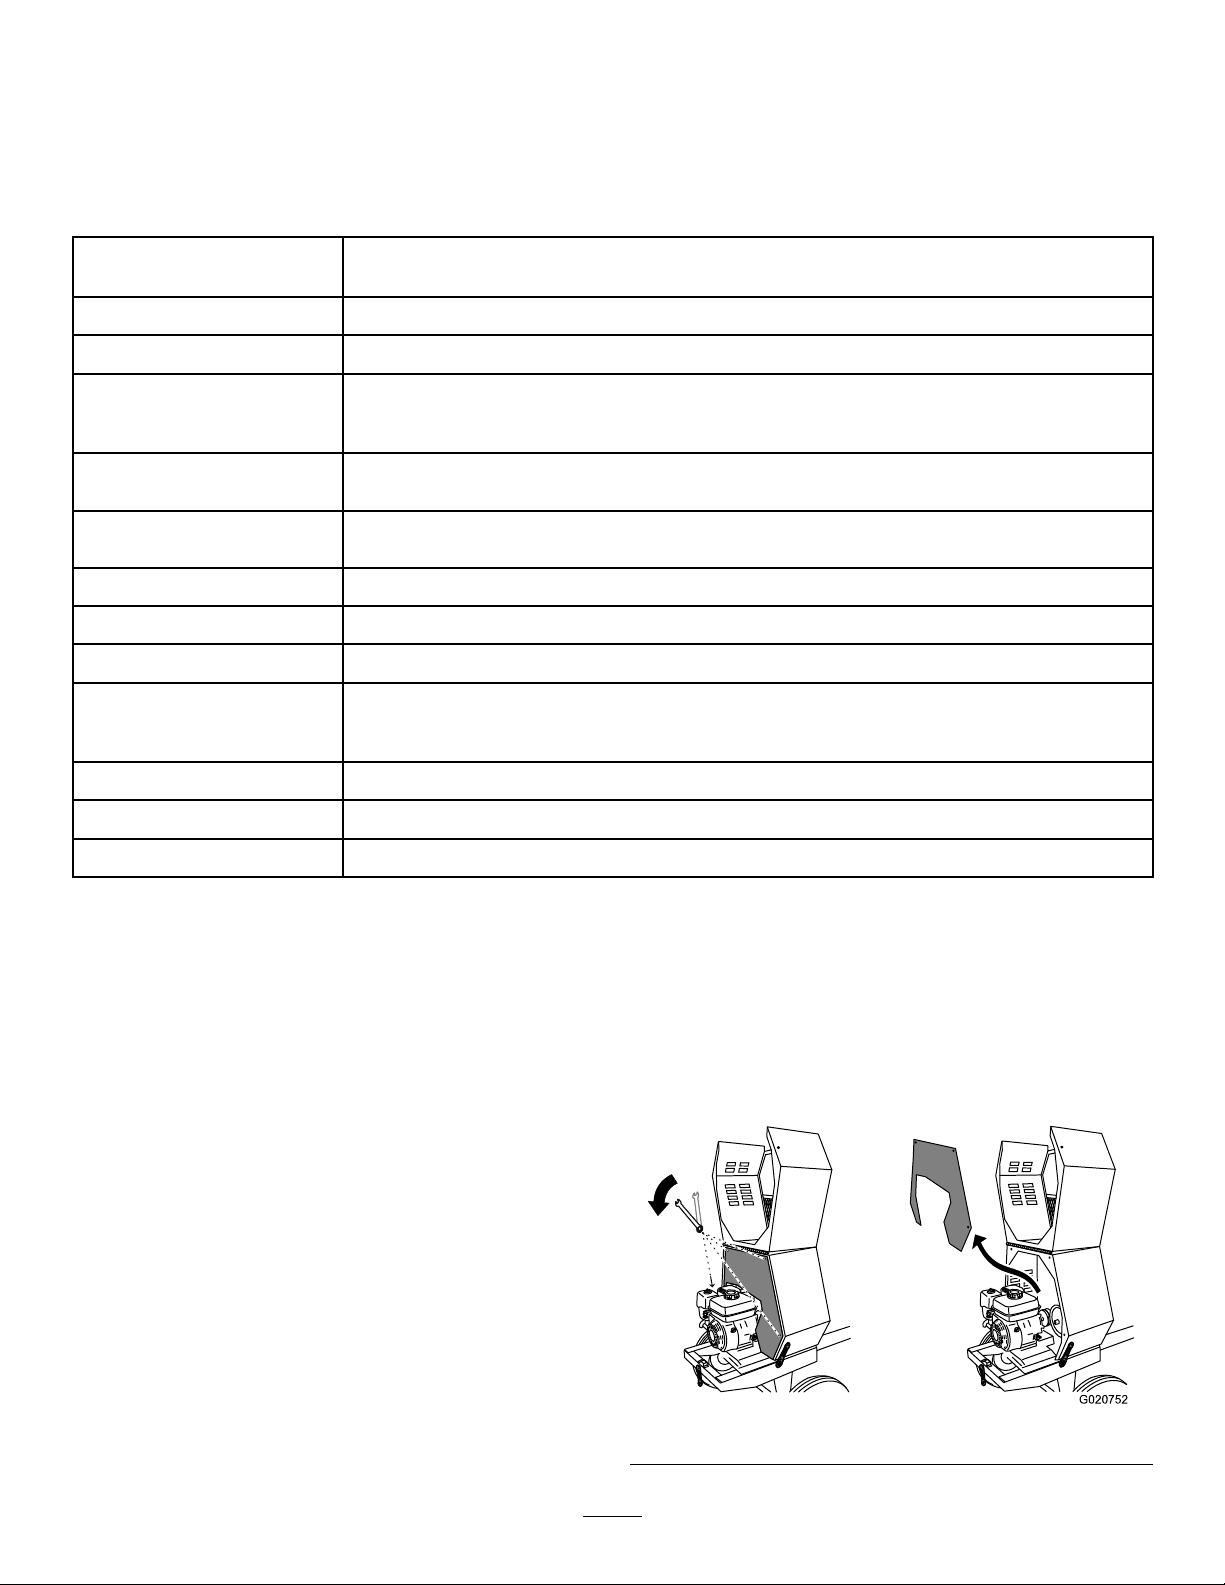
RemovingandInstallingthe DividerPlate
Youneedtoremovethedividerplatetoprovideaccessbefore
performingsomemaintenanceprocedures.
OpeningtheCowl(page
RemovingtheDividerPlate
1.Unlatchandopenthecowl;refertoOpeningtheCowl
(page18).
2.Useawrenchtoremovethe4boltsthatsecurethe
dividerplatetothefrontcowl.
Note:Keeptheboltsforinstallingthedividerplate.
Figure30
24
Page 25
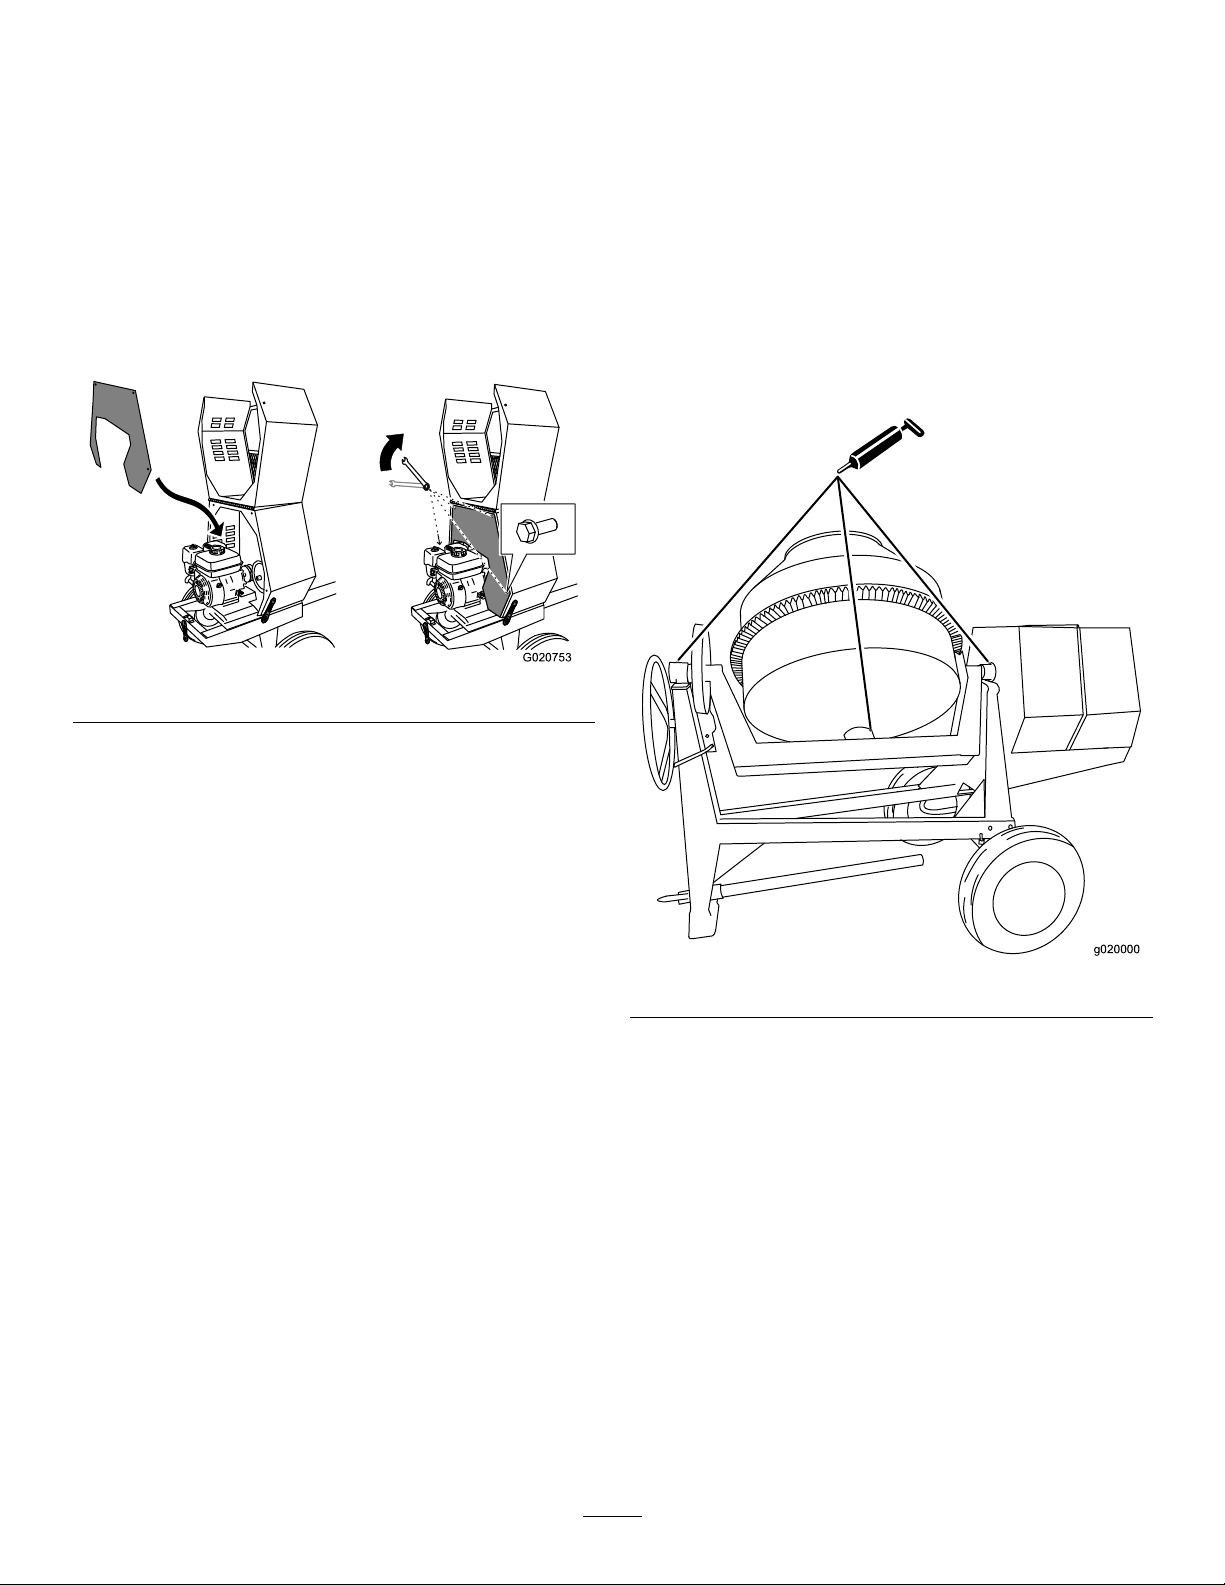
3.Toremovethedividerplate,liftitupwardandrotate
G020753
g020000
itcounterclockwisesothatitclearsvariousengine
components.
InstallingtheDividerPlate
1.Guidethedividerplateintopositionagainstthefront
cowl.
Note:Startwiththedividerplaterotatedslightly
counterclockwise,andthenrotateitclockwisewhile
loweringitintoposition.
Ensurethatthedividerplateisnotbackward.
Lubrication
LubricatingtheMachine
ServiceInterval:Monthly—Greasethetrunnionsandthe
drumspindle.
1.Cleanaroundeachgreasettingwitharag,andliftthe
plasticcapoffthegreasetting(Figure32).
2.Useagreaseguntolubricatethegreasettingsofboth
trunnionsandthedrumspindlewithgeneral-purpose
lithiumgrease(Figure32).
3.Wipeupanyexcessgrease.
Figure31
2.Aligntheboltholesinthedividerplateandthefront
cowl.
3.Installeachofthe4bolts,andhand-tightenthemto
preventcross-threading.
4.Tightentheboltswithawrenchuntiltheyaresecure.
Figure32
Important:Donotlubricatethepiniongearandring
gear.Lubricationwillcausethemtocollectabrasive
materialsandacceleratewear.
25
Page 26
LubricatingtheDriveChain
G021306
1 2
3
g019996
1
2
3
4
ServiceInterval:Every40hours—Lubricatethedrivechain
withanon-stickychainlubricant.
EngineMaintenance
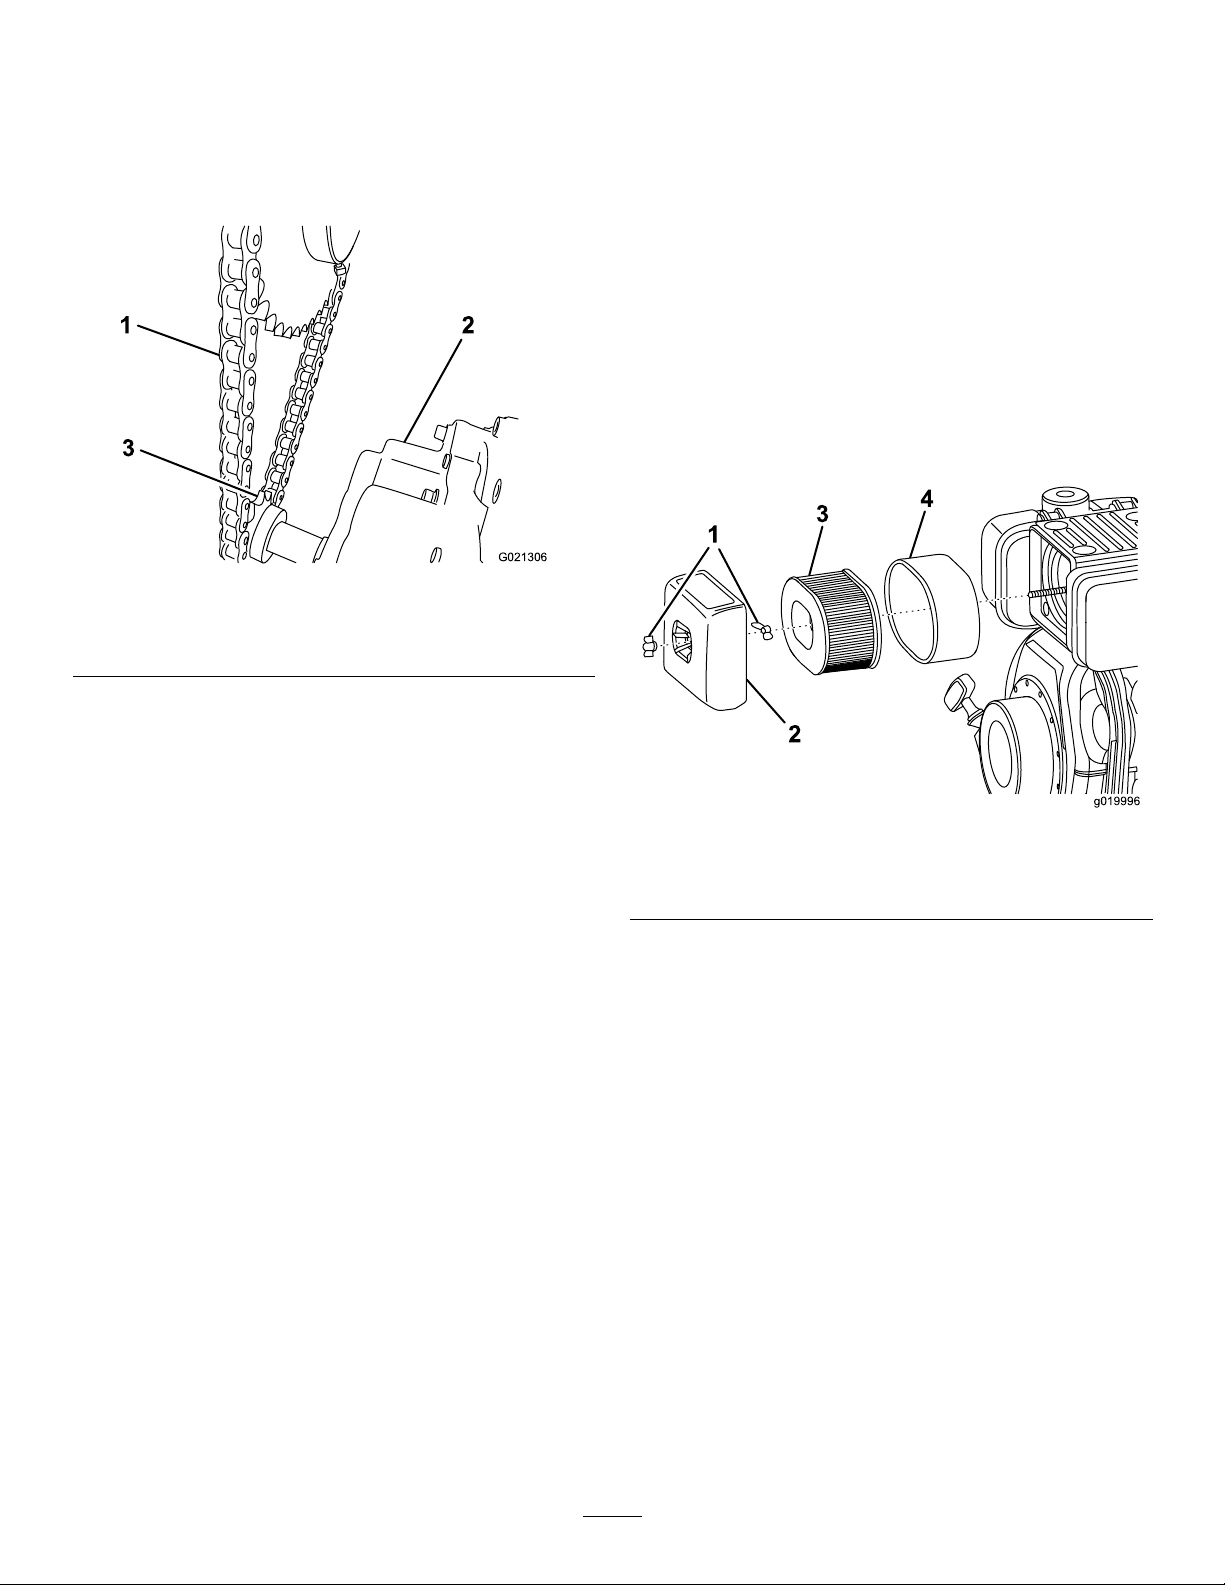
ServicingtheAirCleaner
Applyachainlubricantthatisnon-stickytohelppreventdirt
andabrasiveparticlesfromstickingtothechain(Figure33).
Figure33
1.Drivechain3.Enginesprocket
2.Reductioncase
ServiceInterval:Beforeeachuseordaily—Inspecttheair
cleanerelements.
Every200hours/Yearly(whichevercomes
rst)—Cleantheaircleanerelements.Cleanthem
morefrequentlyindustyoperatingconditions.
Important:Donotoperatetheenginewithouttheair
lterassembly;extremeenginedamagewilloccur.
1.Stoptheengineandwaitforallmovingpartstostop.
2.Turnthefuelshutofflevertotheoffposition.
3.Removethewingnutthatsecurestheair-cleanercover
(Figure34).
Figure34
1.Wingnut3.Paperelement
2.Air-cleanercover4.Foamelement
4.Removetheair-cleanercover.
5.Removetheinternalwingnut.
6.Removethefoamandpaperelementsfromthebase
Figure34).
(
7.Removethefoamelementfromthepaperelement
(Figure34).
8.Inspectthefoamandpaperelements,andreplacethem
iftheyaredamagedorexcessivelydirty.
Note:Nevertrytobrushdirtoffthepaperelement;
brushingforcesthedirtintothebers.
9.Wipedirtfromthebaseandthecoverwithamoistrag.
Note:Becarefultopreventdirtanddebrisfrom
enteringtheairductinsidetheair-cleanerhousing.
10.Slidetheouterfoamelementoverthepaperelement.
11.Installtheaircleanerelementsandensurethattheyare
properlypositioned.
12.Installtheinternalwingnut
13.Securelyinstallthecoverwiththeotherwingnut.
26
Page 27
ChangingtheEngineOil
SAE 10W
SAE 20W
SAE 10W -30
SAE 15W -40
SAE 20
SAE 30
SAE 40
(-4 F)
o
(14 F)o(32oF)
(50oF)
(68oF)
(86oF) (104oF)
-20oC -10oC 0oC
10oC
20oC
30oC
40oC
g020376
1
2
3
g020382
ServiceInterval:Aftertherst25hours—Changethe
engineoil.
Every100hours—Changetheengineoil.
ToroPremiumEngineOilisavailablefromyourAuthorized
ToroDealer.
Important:Use4-cycleengineoilthatmeetsorexceeds
thefollowingguidelinesandclassications:
•APIServiceCategoriesCH-4,CI-4,CJ-4orhigher
•ACEAServiceCategoriesE-3,E-4,andE-5
•JASOServiceCategoryDH-1
CrankcaseCapacity:1.6L(1.7USqt)
Important:Iftheoillevelinthecrankcaseistoolow
ortoohighandyouruntheengine,youmaydamage
theengine.Thistypeofdamageisnotcoveredbythe
warranty.
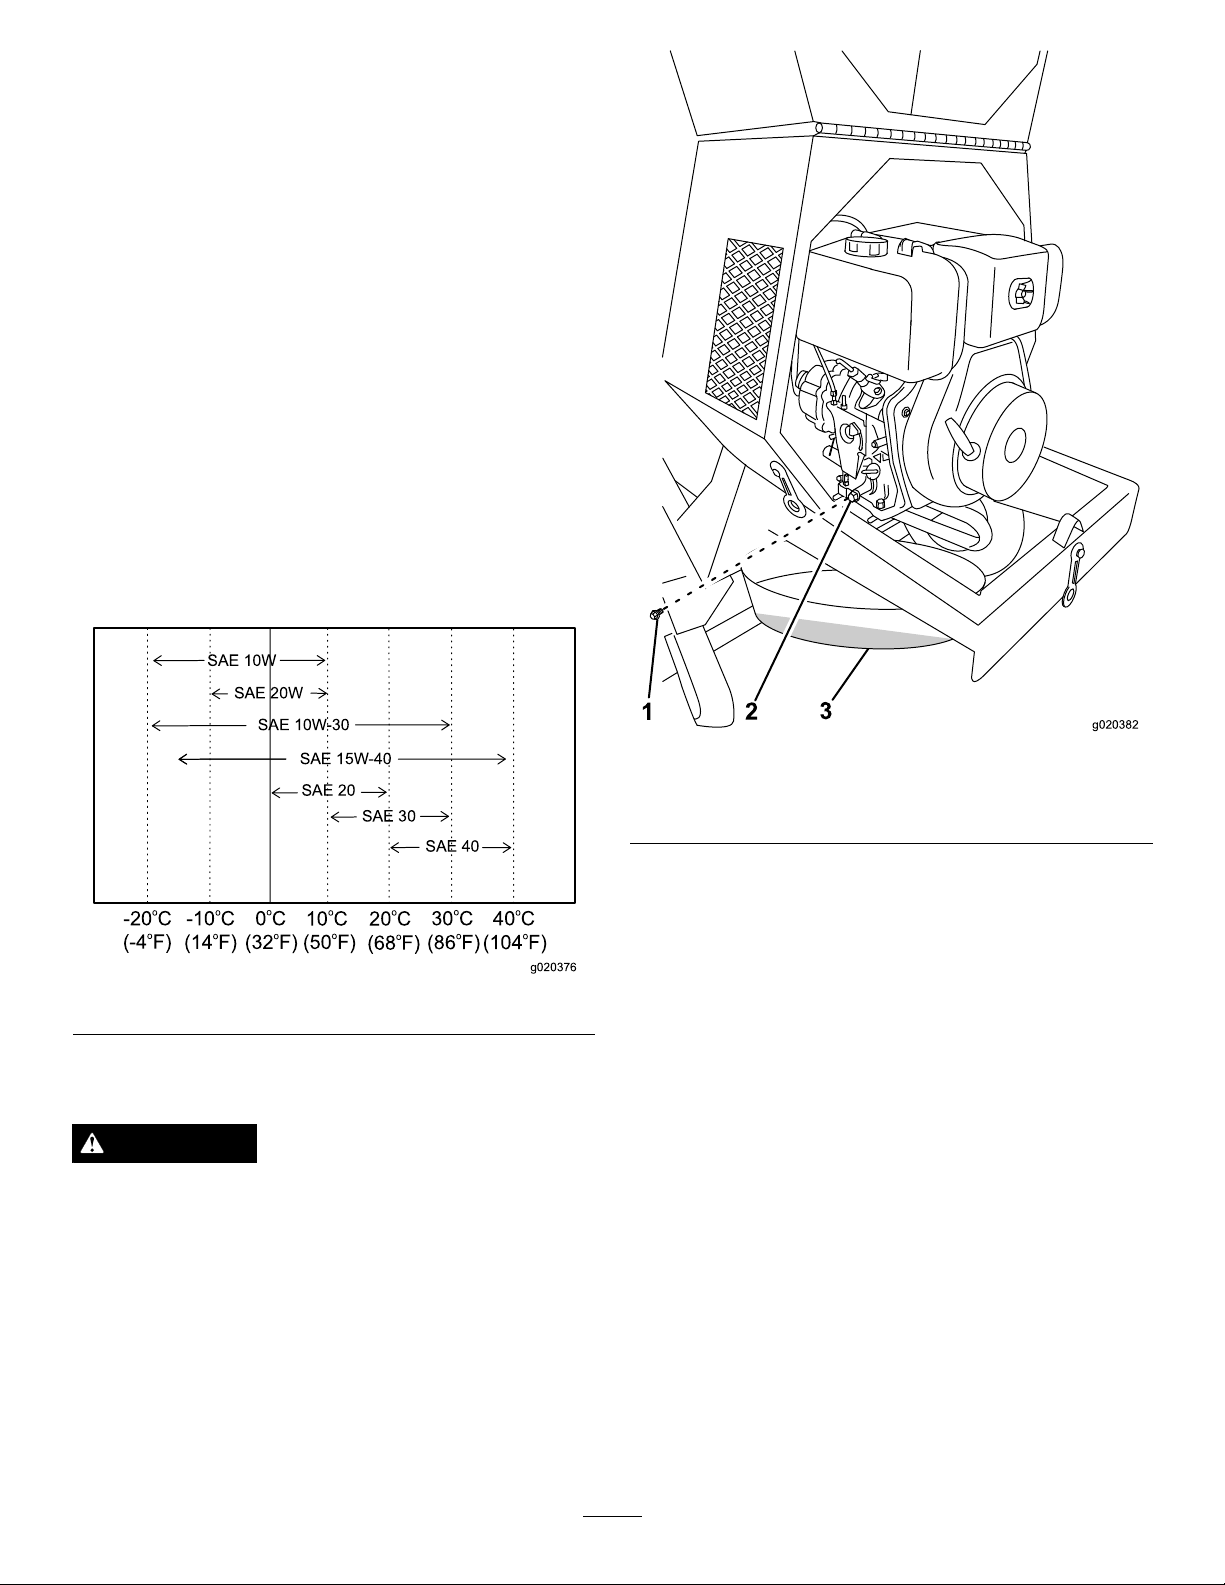
Viscosity:RefertoFigure35.
Figure35
DrainingtheEngineOil
WARNING
Oilmaybehotaftertheenginehasbeenrun,and
contactwithhotoilcancauseseverepersonalinjury.
Avoidcontactingthehotengineoilwhenyoudrain
it.
1.Stoptheengineandwaitforallmovingpartstostop.
2.Placeadrainpanundertheoildrainholeoftheengine
(
Figure36).
Figure36
1.Oildrainplug3.Oildrainpan
2.Oildrainhole
3.Removethedrainplugandcatchtheoilintheoildrain
pan(Figure36).
4.Whentheoilhasdrainedcompletely,installthedrain
plugwithanewwasher(Figure36).
Note:Disposeoftheusedoilatacertiedrecycling
center.
27
Page 28
FillingtheEngineCrankcasewithOil
g019993
1
2
3
g020389
1
2
3
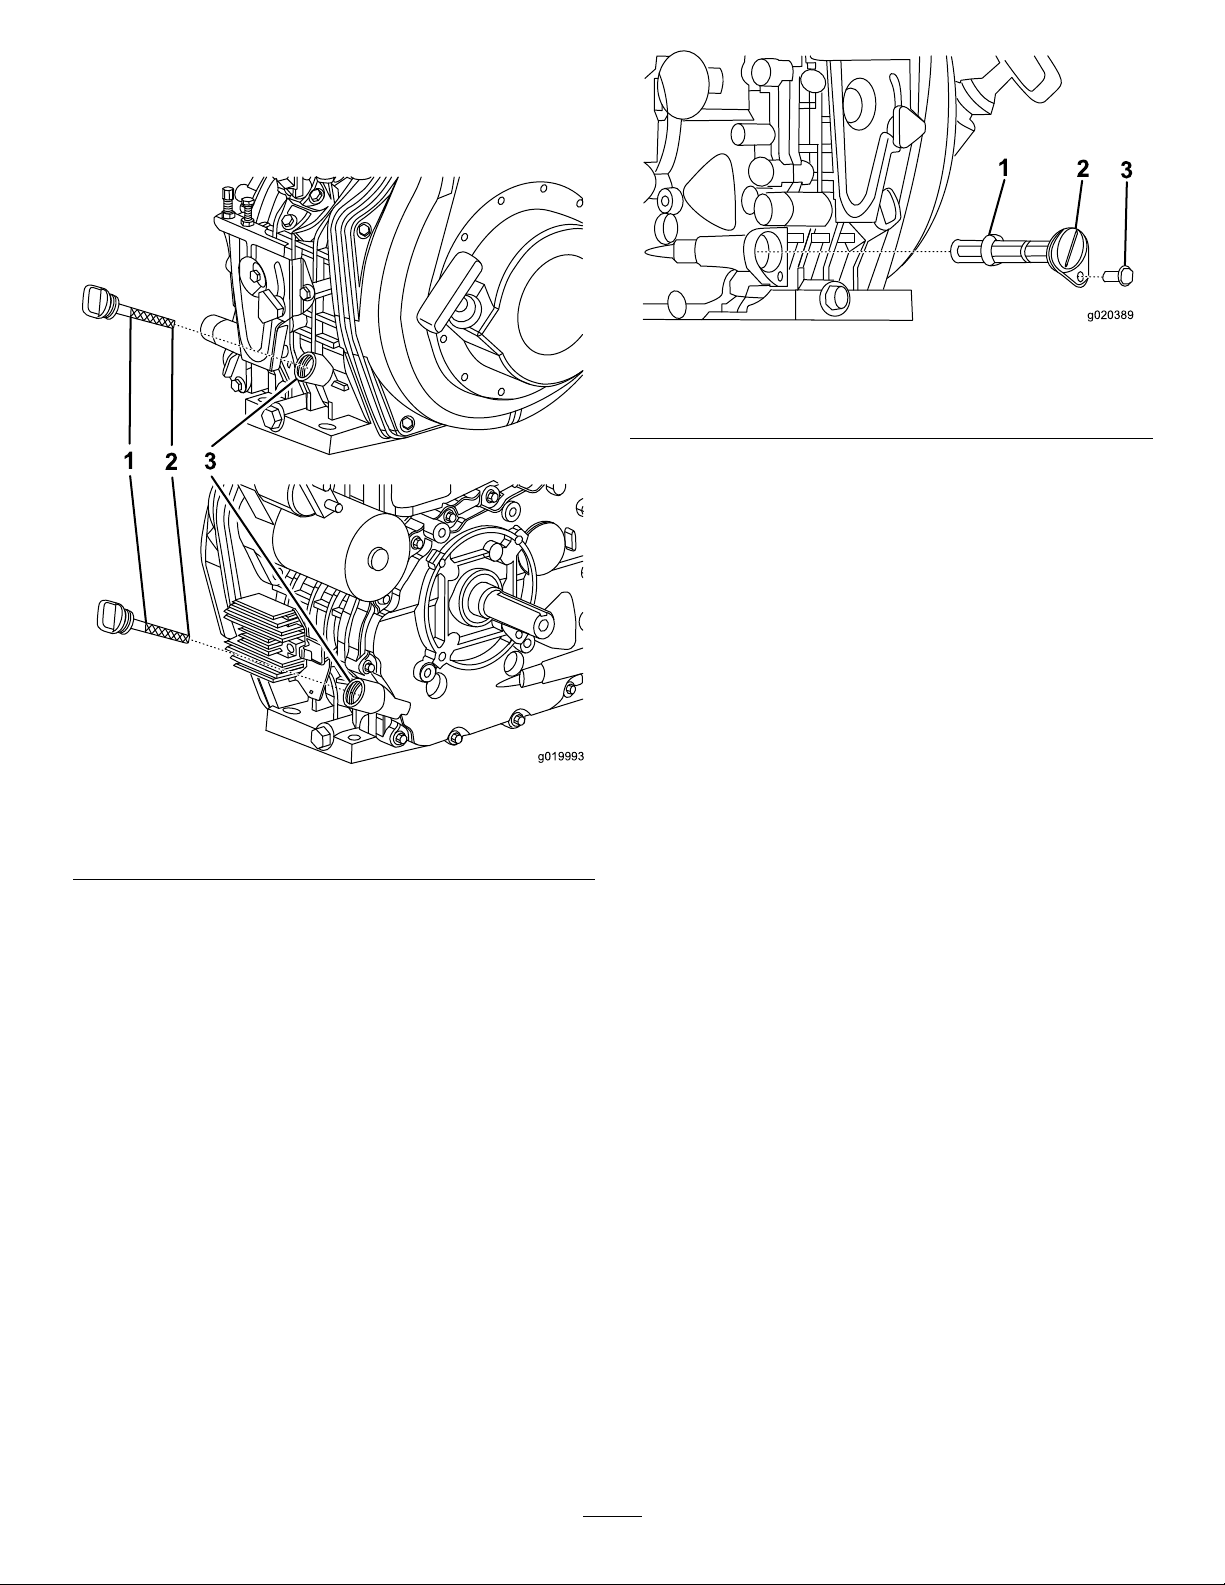
1.Removethedipstick(Figure37)andslowlypouroil
intothellholeuntiltheoilisbetweentheupperand
lowerlimitonthedipstick.
Figure38
1.Oillter3.Oil-lterretainingbolt
2.Oil-ltercap
3.Cleantheoillterorreplaceitifitisdamaged.
4.Installtheoillter.
5.Makesurethattheoil-ltercapisfullyseated.
6.Installandtightentheoil-lterretainingbolt.
Figure37
1.Dipstickupperlimit
2.Dipsticklowerlimit
3.Oilllerport
2.Installandsecurethedipstick.
3.Wipeupanyspilledoil.
ServicingtheEngineOilFilter
ServiceInterval:Aftertherst50hours—Cleantheengine
oillter.Replaceitifitisdamaged.
Every400hours—Cleantheengineoillter.Replace
itifitisdamaged.
7.Addnewengineoil;referto
FillingtheEngine
CrankcasewithOil(page28).
8.Warmuptheenginebyrunningitfor5minutes,and
checkforanyengineoilleaks.
9.Aftertheengineiswarm,turnitoffandletitsitfor
10minutes.
10.Checktheengineoillevelbyfullyinserting,butnot
screwingin,thedipstick.
11.Addengineoilasneeded;referto
CheckingtheEngine
OilLevel(page20)
InspectingandCleaningtheEngineOil
Filter
1.Removetheoil-lterretainingbolt.
2.Pulltheoil-ltercapoutandremovetheoillter.
28
Page 29
RemovingandInstallingthe
1
g020391
G021309
1
2
3
Engine
RemovingtheEngine
1.Opentherearcowl;refertoOpeningtheCowl(page
18).
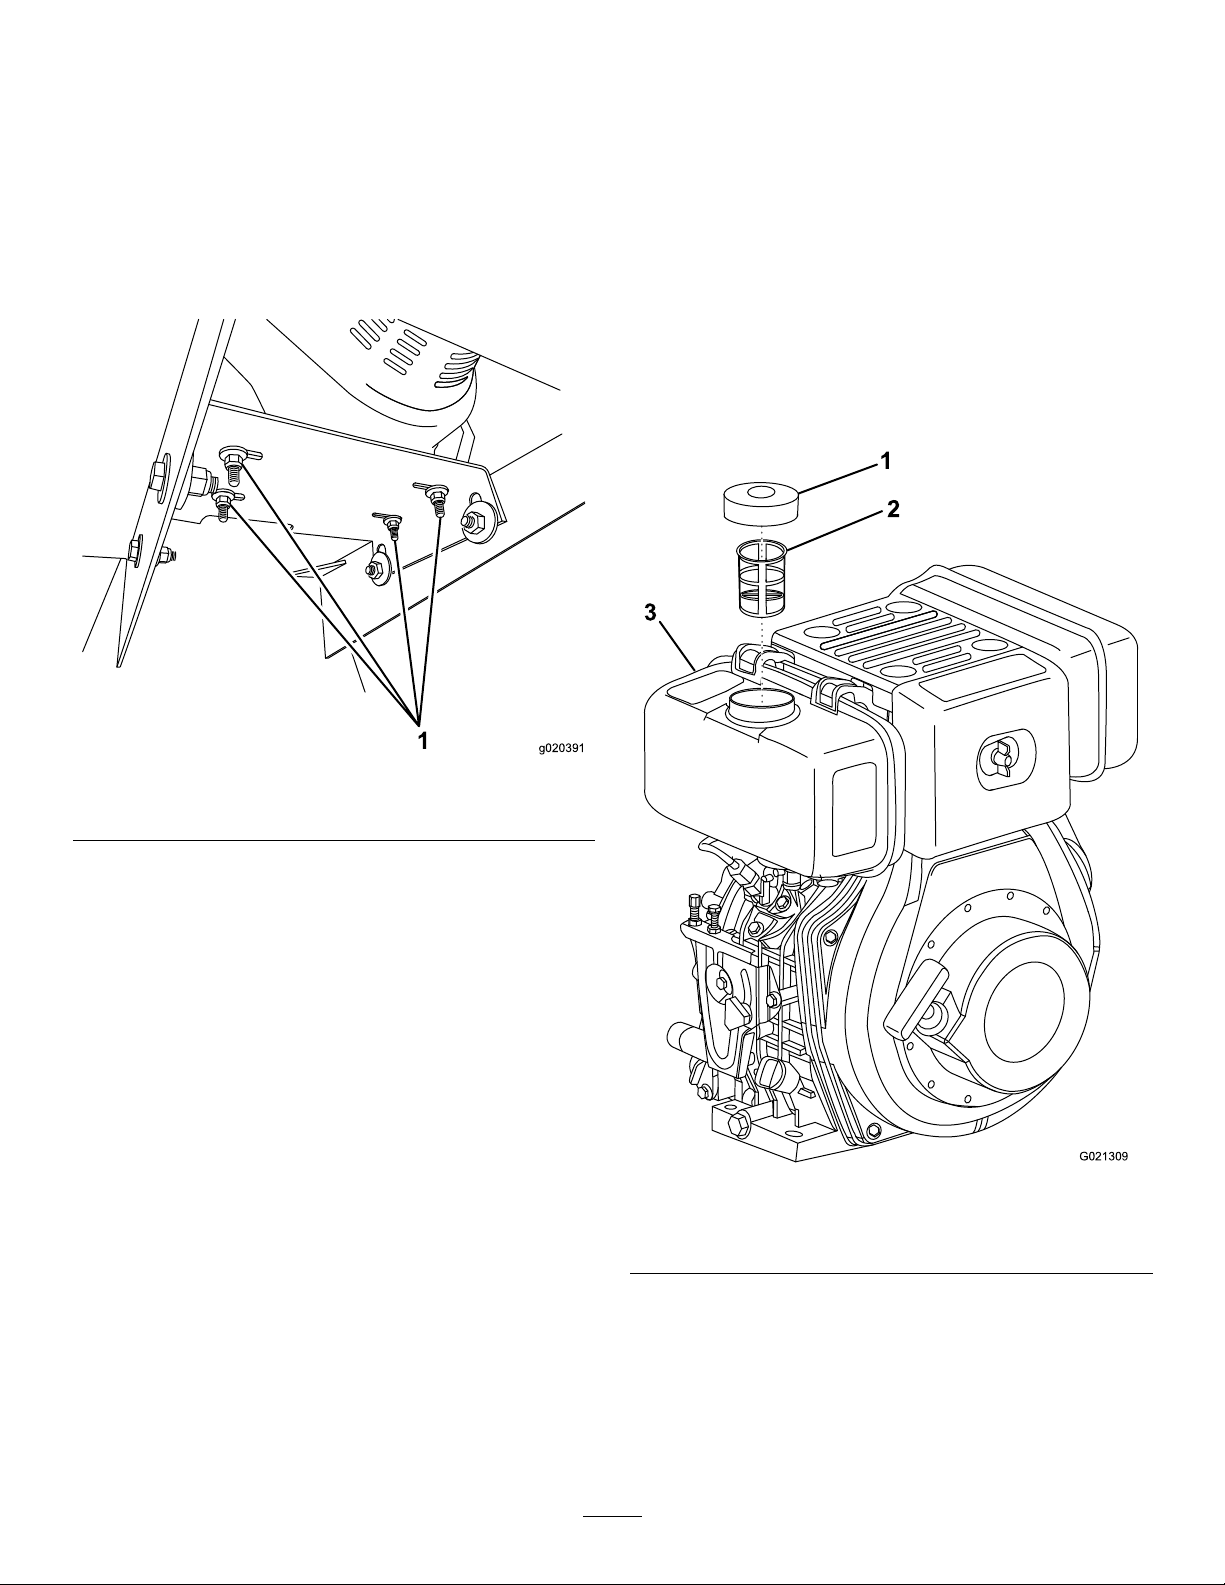
2.Removethe4nutsandboltsthatsecuretheengineto
theenginemountingplate(Figure39).
FuelSystem
Maintenance
ServicingtheFuelSystem
CleaningtheInletFuelScreen
ServiceInterval:Every50hours—Cleantheinletfuel
screen.
1.Cleantheareaaroundthefuelcap.
2.Removethefuelcap.
3.Lifttheinletfuelscreenoutofthefueltank.
Figure39
1.Nutsandbolts
3.Slidetheenginetotheright,andmovethedrivechain
awayfromtheenginesprocket.
4.Carefullylifttheengineupandofftheenginemounting
plate.
InstallingtheEngine
1.Settheengineontheenginemountingplate,andalign
theboltholes(Figure39).
2.Installthe4boltsandsecurethemwiththenuts
torquedto24N-m(18ft-lb).
3.Checkthedrivechaintension,andadjustitifnecessary;
refertoCheckingtheDriveChainTension(page31)
andAdjustingtheDriveChainTension(page31).
4.Closetherearcowl;refertoClosingtheCowl(page18).
Figure40
1.Fuelcap3.Fueltank
2.Inletfuelscreen
4.Cleantheinletfuelscreenorreplaceitifitisdamaged.
5.Installtheinletfuelscreen.
6.Installthefuelcapandhandtightenit.
Note:Overtighteningthefuelcapwilldamageit.
29
Page 30
DrainingtheFuelTankandReplacing
1
2
G02131 1
3
G021307
1
2
3
4
5
6
theOutletFuelFilter
ServiceInterval:Every200hours—Replacetheoutletfuel
lter.
1.Stoptheengineandwaitforallmovingpartstostop.
2.Placeanapprovedcontainerunderthefueltankto
collectthefuel.
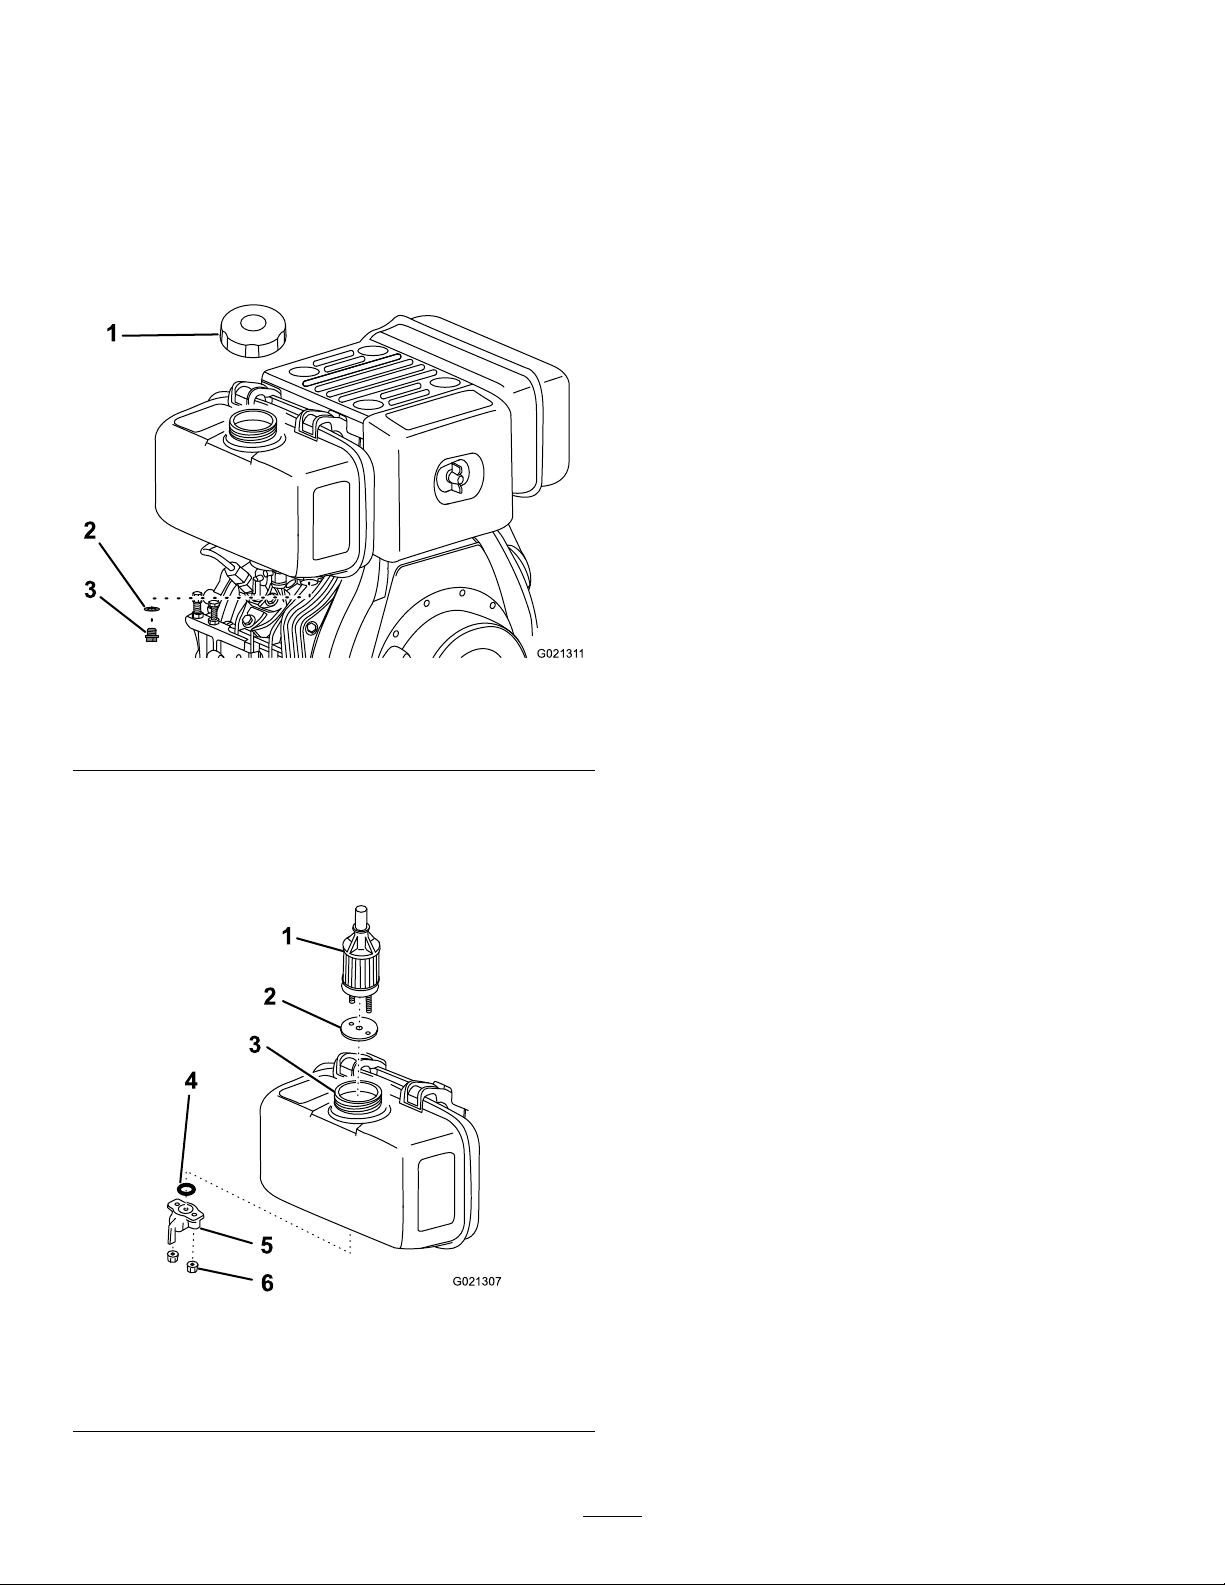
3.Removethefuelcap(
Figure41).
7.Pulltheoutletfuellterandgasketoutoftheller
port(Figure42).
8.Installanewoutletfuellterandgasketthroughthe
llerport,andseattheminthefueltank(Figure42).
9.InstallanewO-ringonthefuelshutofflever,and
installtheassemblytothefueltankusingthenuts
underthefuelshutofflever(Figure42).
10.Installthedrainplugwithanewgasket(
Figure41).
11.Installthefuelcapandhandtightenit.
Note:Overtighteningthefuelcapwilldamageit.
Figure41
1.Fuelcap3.Drainplug
2.Gasket
4.Removethedrainplugandgaskettodrainthefuel
Figure41).
(
5.Loosenthenutsunderthefuelshutofflever(
Figure
42).
Figure42
1.Outletfuellter4.O-ring
2.Gasket5.Fuelshutofflever
3.Fillerport
6.Nut(2)
6.RemoveanddiscardtheO-ring(Figure42).
30
Page 31
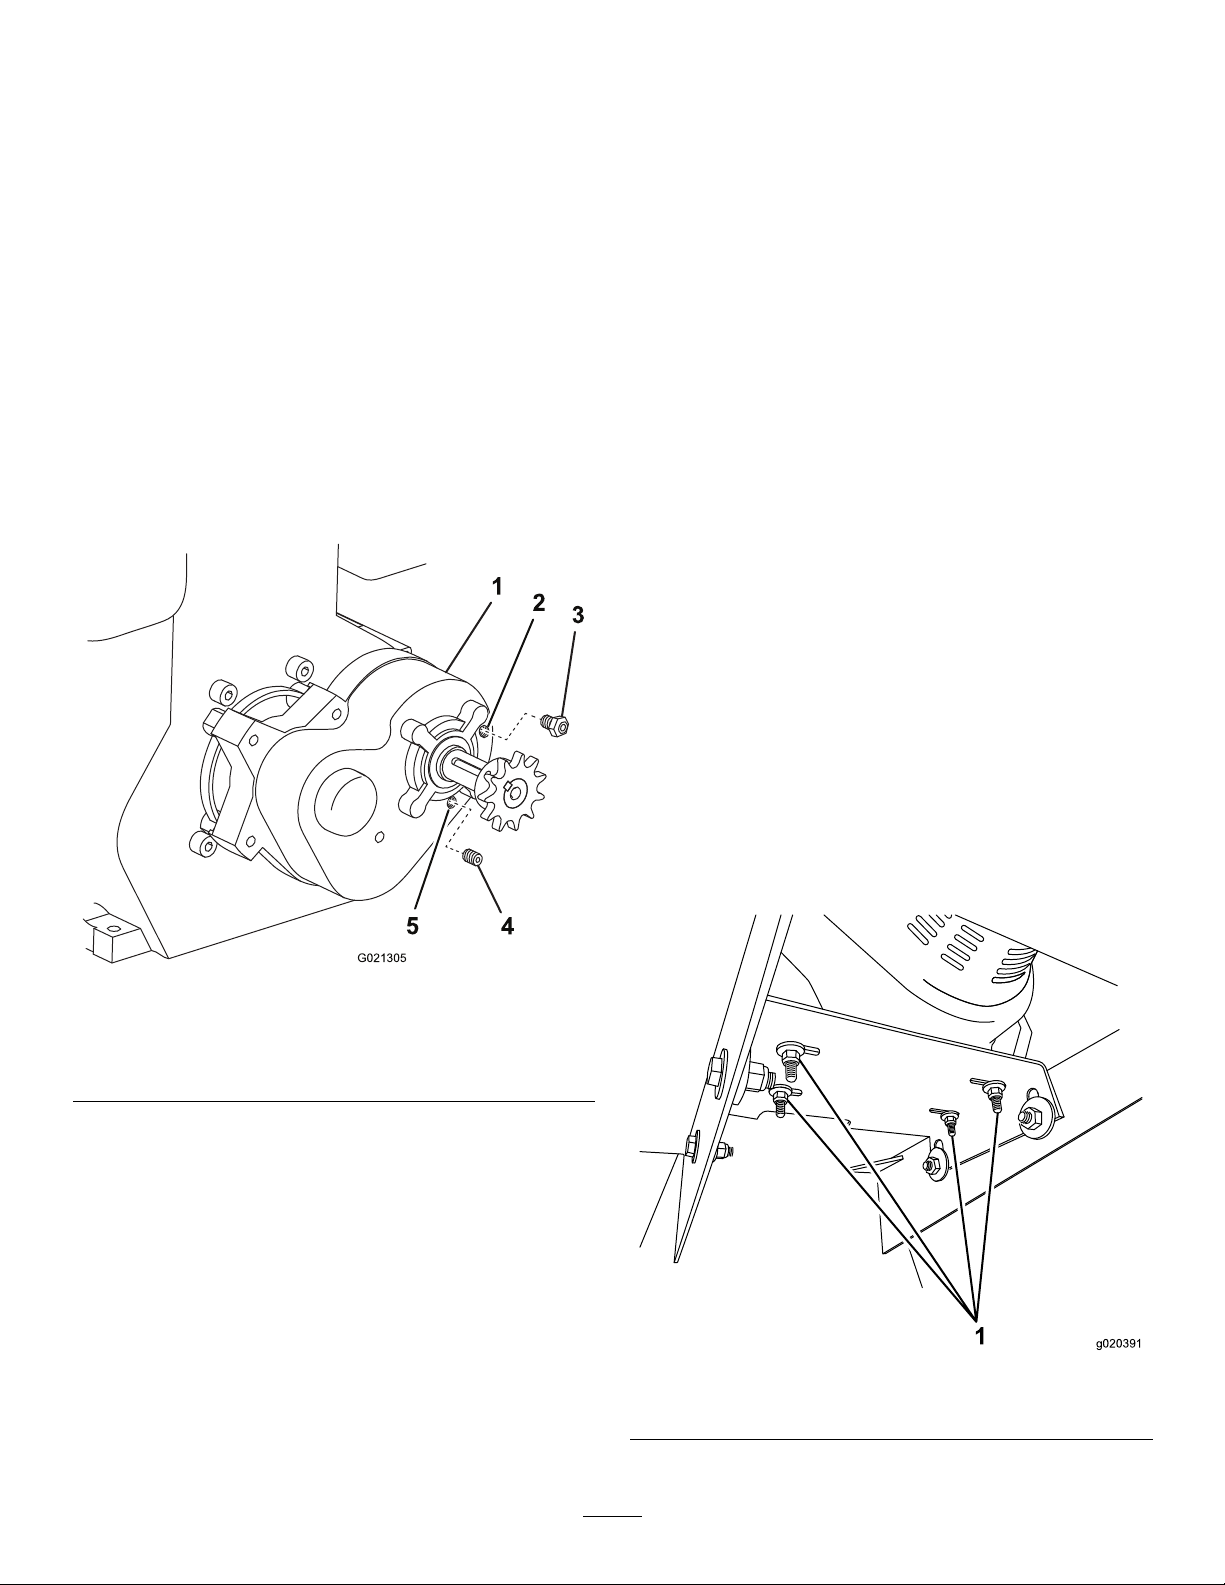
DriveSystem
1
2
4
G021305
3
5
1
g020391
ServicingtheDriveChain
Maintenance
ServicingtheReductionCase
ChangingtheReductionCaseOil
ServiceInterval:Every1,000hours
OilType:non-detergentmotoroilwithaviscosityofSAE
50orless
Capacity:8oz(0.24L)
1.Removetheengine;refertoRemovingtheEngine
(page29).
2.Removethedrainplugandtheventedllerbolton
thereductioncase.
ServiceInterval:Every20hours—Inspectthedrivechain
forrustanddebris.
Every20hours—Inspectthedrivechaintensionand
adjustitasnecessary.
CheckingtheDriveChain
1.Stoptheengineandlocktheenginespeedcontrol
handletotheStopposition;refertoStoppingthe
Engine(page22),andmovethefuelshutoffleverto
theOffposition.
2.Usingaashlight,carefullyinspectthechain.Ifrust
anddebrisarepresent,removethemwithabrush.
CheckingtheDriveChainTension
1.Layastraightedgealongthedrivechainfromone
sprockettotheother.
2.Pushonthechainwith6.8kg(15lb)ofpressure,
midwaybetweenthesprockets.
3.Measurethedistancefromthechaintothestraightedge.
Thedistanceshouldbeapproximately2.5cm(1inch).
Figure43
1.Reductioncase4.Drainplug
2.Fillhole5.Drainhole
3.Ventedllerbolt
3.Tiptheenginesothattheoildrainscompletely,to
avoidmixingdifferenttypesofoil.
Important:Toavoiddamagingpartsofthe
engineorthereductioncase,becarefulwhen
tippingtheengine.
4.Installthedrainplugintothedrainhole.
4.Ifthechaintensionneedsadjustment,referto
AdjustingtheDriveChainTension(page31).
AdjustingtheDriveChainTension
1.Stoptheengineandwaitforallmovingpartstostop.
2.Loosenthe4nutsandboltsthatsecuretheengineto
theenginemountingplate(Figure44).
5.Ensurethattheengineislevel,andpour8ozofoil
intothellhole.
6.Installtheventedllerboltintothellhole.
7.Installtheengine;referto
29)
.
InstallingtheEngine(page
Figure44
1.Enginemountingnutsandbolts(4each)
31
Page 32
3.Slidetheenginelefttoincreasetensiononthedrive
A
B
C
E
F
G020829
chainorrighttodecreasetension.
ReplacingtheLight
4.Whenthechainhastheappropriateamountoftension;
refertoCheckingtheDriveChainTension(page31),
torquethe4nutsandboltsto24N-m(18ft-lb)each.
Bulbs
ReplacingtheRear-facing Bulbs
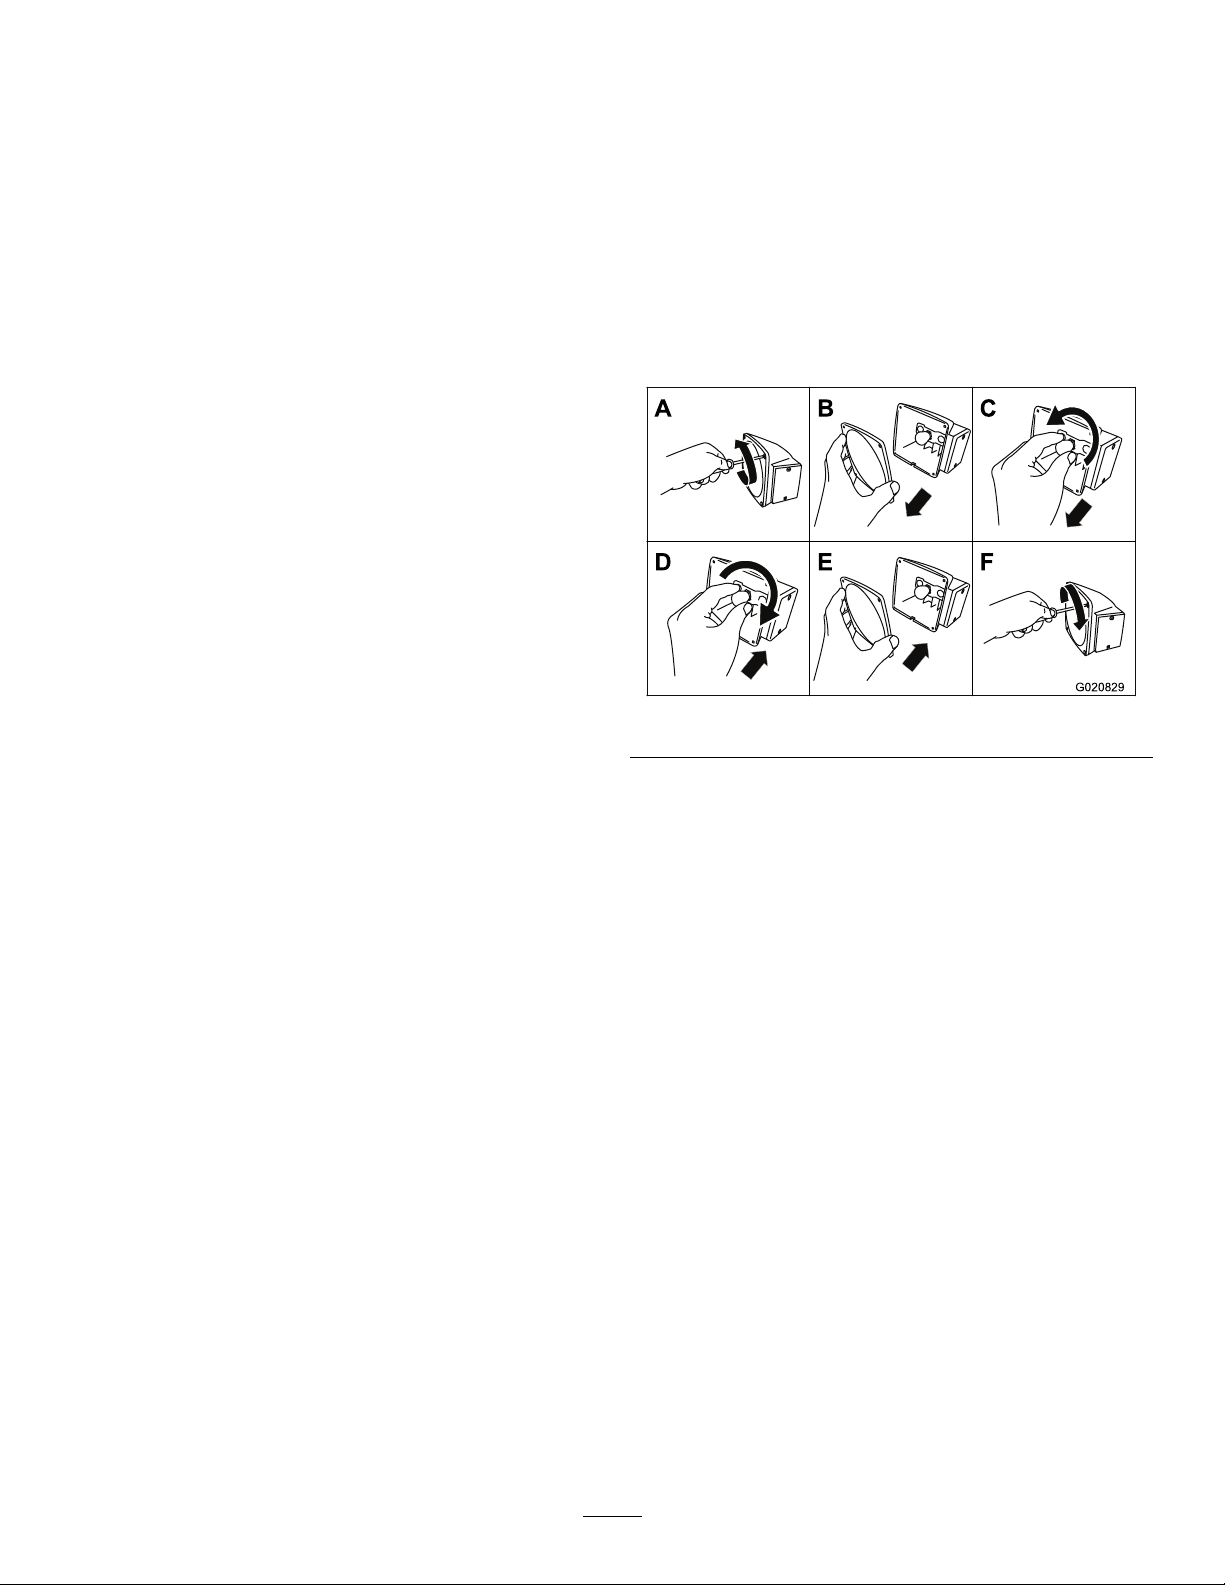
Note:Theleftrear-facingbulbalsoilluminatesthelicense
plate.
1.Useascrewdrivertoremovethe4screwsfromthe
largesquarelensonthelight(Figure45).
Figure45
2.Removethelens(Figure45).
3.Pushandtwistthebulbcounterclockwisetoremoveit
fromthesocket(
4.Pushanew1157bulbintothesocketandthentwistit
clockwise(Figure45).
5.Installthelensandthe4screws(Figure45).
Figure45).
32
Page 33
ReplacingtheSide-facing
A
B
C
E
F
G020830
Bulbs
Cleaning
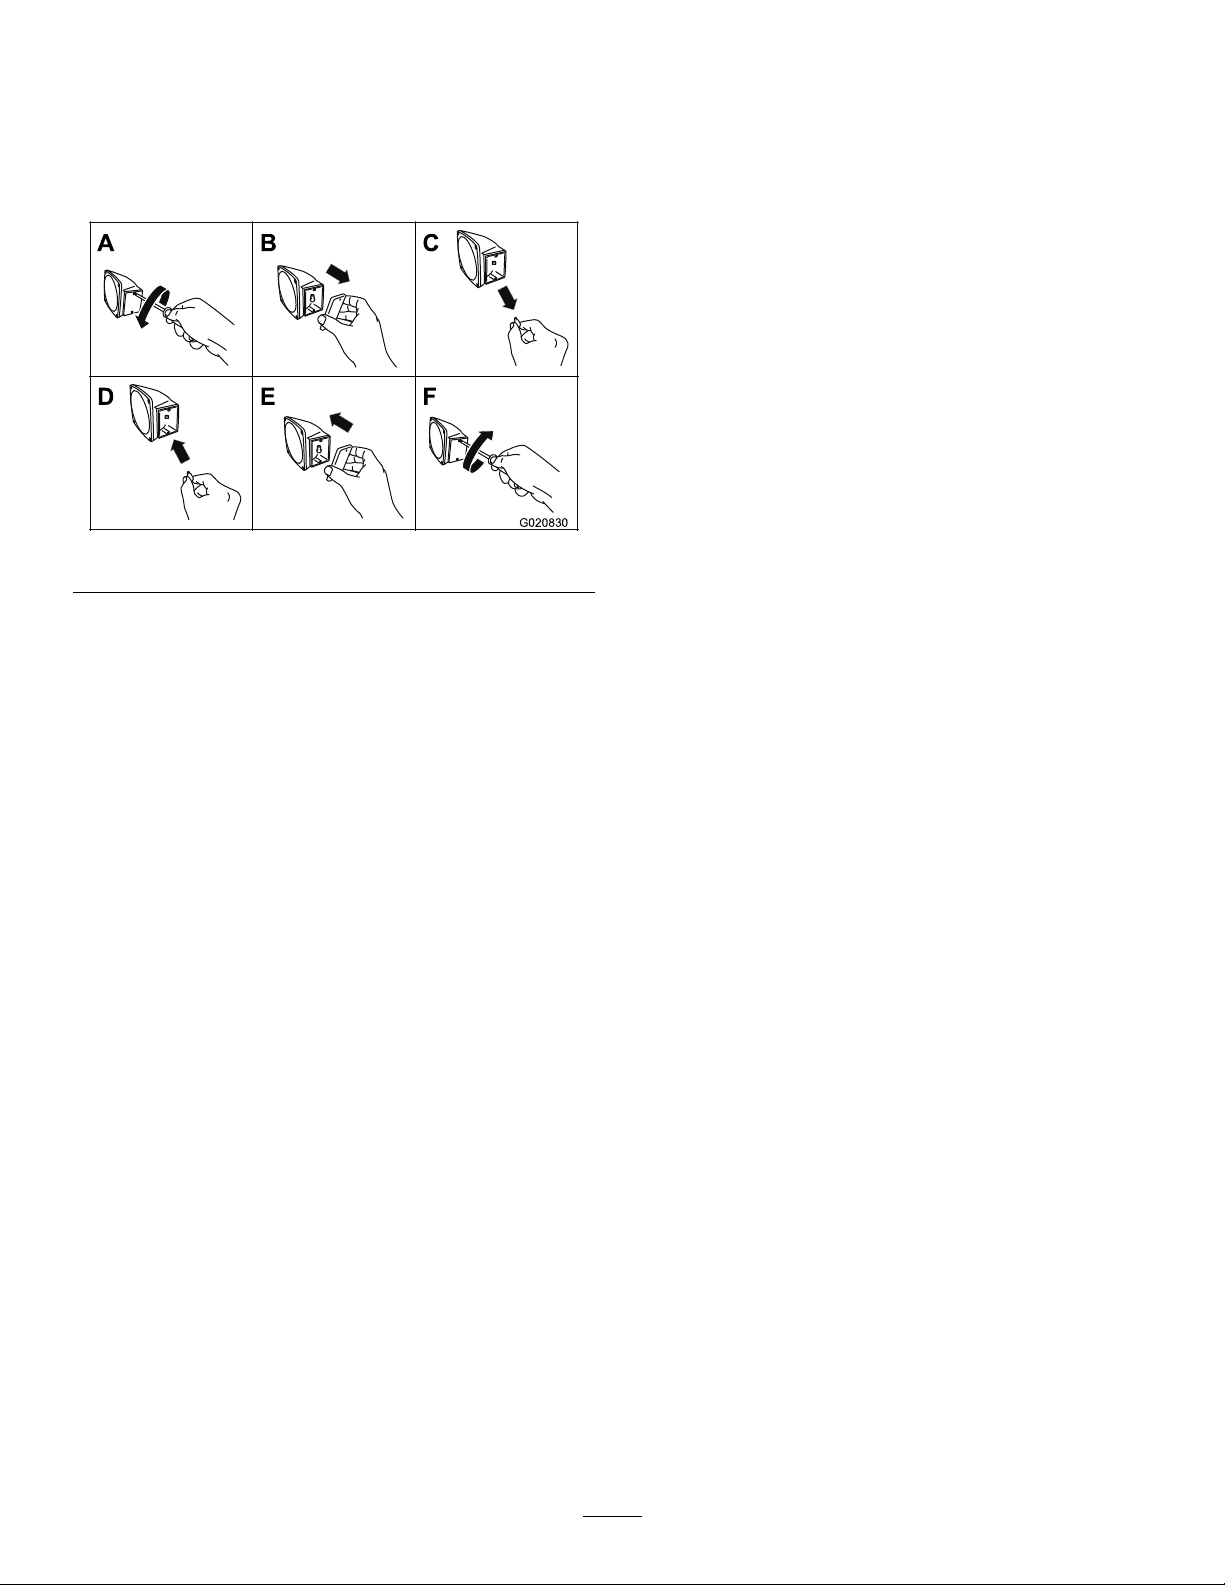
1.Useascrewdrivertoremovethe2screwsfromthe
smallrectangularlensonthesideofthelight(Figure
46).
Figure46
2.Removethelens(Figure46).
3.Pullthebulboutofthesocket(Figure46).
4.Pushanew168bulbintothesocket(Figure46).
CleaningtheMachine
Regularcleaningandwashingwithmilddetergentandwater
willincreasethelifespanofthemachine.Cleanthemachine
aftereachusebeforethedirthardens.
Removedirtandgrimefromtheexternalpartsoftheentire
machine,especiallytheengine.Cleandirtandconcrete
materialsfromtheoutsideoftheengine.
Ensurethatthefuelcapandoilllcap/dipstickaresecureto
avoidgettingwaterintheengine.
Usecarewhenusingahigh-pressuresprayer,becauseitcan
damagesafetydecals,instructionsigns,andtheengine.
5.Installthelensandthe2screws(
Figure46).
33
Page 34

Storage
StoringtheMachine
Forstorageover30days,preparethemachineasfollows:
1.Cleanthemachine;refertoCleaningtheMachine
(page33).
2.Starttheengine.Allowtheenginetoidlefor3minutes
andthenstoptheengine.
3.Draintheengineoilwhiletheengineisstillwarm,
andlltheenginewithnewoil;refertoChangingthe
EngineOil(page27).
4.Pushthedecompressionleverdownandholditwhile
slowlypullingtherecoilstarter2or3times.
Note:Donotstarttheengine.
5.Drainthefueltankbyunscrewingfueldrainplugand
collectingfuelinafuelcontainer.
Note:Disposeofthefuelproperly;recycleit
accordingtolocalcodes.
6.Checkandtightenallbolts,nuts,andscrews.Repairor
replaceanypartthatisdamaged.
7.Paintallscratchedorbaremetalsurfaceswithpaint
availablefromyourAuthorizedServiceDealer.
8.Storethemachineinaclean,drygarageorstoragearea.
9.Coverthemachinetoprotectitandkeepitclean.
34
Page 35

Troubleshooting
Problem
Theenginewillnotstart.
Theenginerunsrough.
Thereiswhiteorblackexhaustsmoke.
PossibleCauseCorrectiveAction
1.Ontheenginecowl,theenginespeed
controlhandleisnotallthewayintothe
startposition.
2.ThefuelshutoffleverisintheOff
position.
3.Thefueltankisempty.3.Fillthetankwithfreshfuel.
4.Thefuelisbad;theenginewasstored
withouttreatingordrainingthefuel,or
itwaslledwithbaddiesel.
5.Thefuellterisclogged.5.Replacethefuellter.
1.Theairlterisclogged.1.Cleanorreplacetheairlter.
2.Thereiswaterorcontaminantsinthe
fuel.
3.Thereistoomuchoilintheengine.3.Draintheoiltotheproperlevel.
1.Theengineisoverloaded.1.Reducetheload.
2.Theaircleanerelementisclogged.
3.Improperdieselfuelhasbeenputin
thefueltank.
4.Thefuelinjectionsystemhasan
incorrectspraypattern.
5.Thereisexcessiveintakeorexhaust
valveclearance.
6.Theengineisburningoil.
1.Pulltheenginespeedcontrolhandleto
thestartpositionandlockit.
2.MovethefuelshutofflevertotheOn
position.
4.Drainthefueltankandllitwithfresh
diesel.
2.Drainandllthetankwithfreshfuel.
2.Cleantheelementorreplaceit.
3.Fillthetankwiththerecommended
dieselfuel.
4.ContactyourAuthorizedService
Dealer.
5.ContactyourAuthorizedService
Dealer.
6.ContactyourAuthorizedService
Dealer.
Thedrumdoesnotturn.1.Thechainislooseordamaged.
Thedrumdoesnottilt.1.Thedrum-tiltbrakeisengaged.1.Disengagethedrum-tiltbrake.
Thedrumchattersorturnserratically.
1.Teetharemissingfromthegears.1.ContactyourAuthorizedService
2.Thegearsaremisaligned.
1.Thereisdebrisinthedrum.1.Removethedebris. Themachinevibratesexcessively.
2.Themixingpaddlesaredamaged.
1.ContactyourAuthorizedService
Dealer.
Dealer.
2.ContactyourAuthorizedService
Dealer.
2.ContactyourAuthorizedService
Dealer.
35
Page 36

Alimitedwarranty(seewarrantyperiodsbelow)
TheToroWarranty
Concrete,Masonry,
andCompaction
Equipment
ConditionsandProductsCovered
TheT oroCompanyanditsafliate,T oroWarrantyCompany,pursuantto
anagreementbetweenthem,jointlywarrantyourT oroConcrete,Masonry ,
andCompactionEquipmentProductslistedbelowtobefreefromdefects
inmaterialsorworkmanship.
Thiswarrantycoversthecostofpartsandlabor,butyoumustpay
transportationcosts.
Thefollowingtimeperiodsapplyfromthedateofpurchase:
ProductsWarrantyPeriod
ConcreteMixers
•SpindleBearingsLifetime*(originalowneronly)
MortarMixers1year
•DrumBearingsandSealsLifetime*(originalowneronly)
ForwardPlateCompactors
ReversiblePlates1year
RammerCompactors
MudBuggy1year
VibratingTrenchRoller2years
ConcreteSaws
MasonrySaws
PowerTrowels1year
Screeds
ConcreteVibrators
Whereawarrantableconditionexists,wewillrepairtheProductatnocost
toyouincludingdiagnosis,labor,andparts.
*
LifetimeWarranty-Ifthebearing(s)orseal(s)onyourmixerfail,itwillbereplacedunderwarranty ,
atnocostforpartsorlabor.
1year
2years
2years
1year
1year
1year
1year
InstructionsforObtainingWarrantyService
IfyouthinkthatyourT oroProductcontainsadefectinmaterialsor
workmanship,followthisprocedure
1.ContactanyAuthorizedServicingOutlettoarrangeserviceattheir
dealership.Tolocateoneconvenienttoyou,accessourwebsiteat
www.T oro.com.Select“WheretoBuy”andselect“Contractor”under
producttype.Y oumayalsocallourtollfreenumberbelow.
2.Bringtheproductandyourproofofpurchase(salesreceipt)tothem.
3.IfforanyreasonyouaredissatisedwiththeServiceOutlet’s
analysisorwiththeassistanceprovided,contactusat:
SWSCustomerCareDepartment
ToroWarrantyCompany
811 1LyndaleAvenueSouth
Bloomington,MN55420-1 196
TollFree:800-888-9926
**
ToroAuthorizedRentalCustomerswhohavepurchasedproductsdirectlyfromT oroandhave
signedtheToroRentalCustomerAgreementhavetheabilitytoperformtheirownwarrantywork.
PleasevisitT oro’sRentalPortalforelectronicwarrantyclamlingproceduresorcallthetollfree
numberabove.
**
:
OwnerResponsibilities
YoumustmaintainyourT oroProductbyfollowingthemaintenance
proceduresdescribedintheOperator’sManual.Suchroutine
maintenance,whetherperformedbyadealerorbyyou,isatyourexpense.
Partsscheduledforreplacementasrequiredmaintenance(“Maintenance
Parts”),arewarrantedfortheperiodoftimeuptothescheduled
replacementtimeforthatpart.Failuretoperformrequiredmaintenance
andadjustmentscanbegroundsfordisallowingawarrantyclaim.
ItemsandConditionsNotCovered
Notallproductfailuresormalfunctionsthatoccurduringthewarranty
periodaredefectsinmaterialsorworkmanship.Thisexpresswarranty
doesnotcoverthefollowing:
•Productfailureswhichresultfromtheuseofnon-Tororeplacement
parts,orfrominstallationanduseofadd-on,modied,orunapproved
accessories
•Productfailureswhichresultfromfailuretoperformrequired
maintenanceand/oradjustments
•ProductfailureswhichresultfromoperatingtheProductinan
abusive,negligentorrecklessmanner
•Partssubjecttoconsumptionthroughuseunlessfoundtobe
defective.Examplesofpartswhichareconsumed,orusedup,during
normalproductoperationinclude,butarenotlimitedto,belts,wipers,
sparkplugs,tires,lters,gaskets,wearplates,seals,O-rings,drive
chains,clutches.
•Failurescausedbyoutsideinuence.Itemsconsideredtobeoutside
inuenceinclude,butarenotlimitedto,weather,storagepractices,
contamination,useofunapprovedcoolants,lubricants,additives,or
chemicals,etc.
•Normal“wearandtear”items.Normal“wearandtear”includes,butis
notlimitedto,wornpaintedsurfaces,scratcheddecals,etc.
•Anycomponentcoveredbyaseparatemanufacturer’swarranty
•Pickupanddeliverycharges
GeneralConditions
RepairbyanAuthorizedServicingOutletorSelf-ServiceasanAuthorized
RentalCustomerisyoursoleremedyunderthewarranty.
NeitherTheToroCompanynorToroWarrantyCompanyisliablefor
indirect,incidentalorconsequentialdamagesinconnectionwith
theuseoftheToroProductscoveredbythiswarranty ,including
anycostorexpenseofprovidingsubstituteequipmentorservice
duringreasonableperiodsofmalfunctionornon-usepending
completionofrepairsunderthiswarranty.Allimpliedwarranties
ofmerchantabilityandtnessforusearelimitedtotheduration
ofthisexpresswarranty.Somestatesdonotallowexclusionsof
incidentalorconsequentialdamages,orlimitationsonhowlong
animpliedwarrantylasts,sotheaboveexclusionsandlimitations
maynotapplytoyou.
Thiswarrantygivesyouspeciclegalrights,andyoumayalsohaveother
rightswhichvaryfromstatetostate.
ExceptfortheenginewarrantycoverageandtheEmissionswarranty
referencedbelow,ifapplicable,thereisnootherexpresswarranty .The
EmissionsControlSystemonyourProductmaybecoveredbyaseparate
warrantymeetingrequirementsestablishedbytheU.S.Environmental
ProtectionAgency(EPA)ortheCaliforniaAirResourcesBoard(CARB).
RefertotheCaliforniaEmissionControlW arrantyStatementsuppliedwith
yourProductorcontainedintheenginemanufacturer’sdocumentationfor
details.
CountriesOtherthantheUnitedStatesorCanada
CustomerswhohavepurchasedT oroproductsoutsidetheUnitedStatesorCanadashouldcontacttheirT oroDistributor(Dealer)toobtainguarantee
policiesforyourcountry,province,orstate.IfforanyreasonyouaredissatisedwithyourDistributor'sserviceorhavedifcultyobtainingguarantee
information,contacttheT oroimporter.Ifallotherremediesfail,youmaycontactusatT oroWarrantyCompany.
AustralianConsumerLaw:AustraliancustomerswillnddetailsrelatingtotheAustralianConsumerLaweitherinsidetheboxoratyourlocalT oro
Dealer.
374-0288RevB
 Loading...