

Page 1
FormNo.3421-314RevA
CM-1258Y-SDConcreteMixer
ModelNo.68011—SerialNo.402000000andUp
Registeratwww.T oro.com.
OriginalInstructions(EN)
*3421-314*A
Page 2
WARNING
accessoryinformation,helpndingadealer,orto
registeryourproduct.
CALIFORNIA
Proposition65Warning
Thisproductcontainsachemical
orchemicalsknowntotheStateof
Californiatocausecancer,birthdefects,
orreproductiveharm.
Dieselengineexhaustandsomeofits
constituentsareknowntotheStateof
Californiatocausecancer,birthdefects,
andotherreproductiveharm.
Useofthisproductmaycauseexposure
tochemicalsknowntotheStateof
Californiatocausecancer,birthdefects,
orotherreproductiveharm.
ItisaviolationofCaliforniaPublicResourceCode
Section4442or4443touseoroperatetheengineon
anyforest-covered,brush-covered,orgrass-covered
landunlesstheengineisequippedwithaspark
arrester,asdenedinSection4442,maintainedin
effectiveworkingorderortheengineisconstructed,
equipped,andmaintainedforthepreventionofre.
Wheneveryouneedservice,genuineToroparts,or
additionalinformation,contactanAuthorizedService
DealerorToroCustomerServiceandhavethemodel
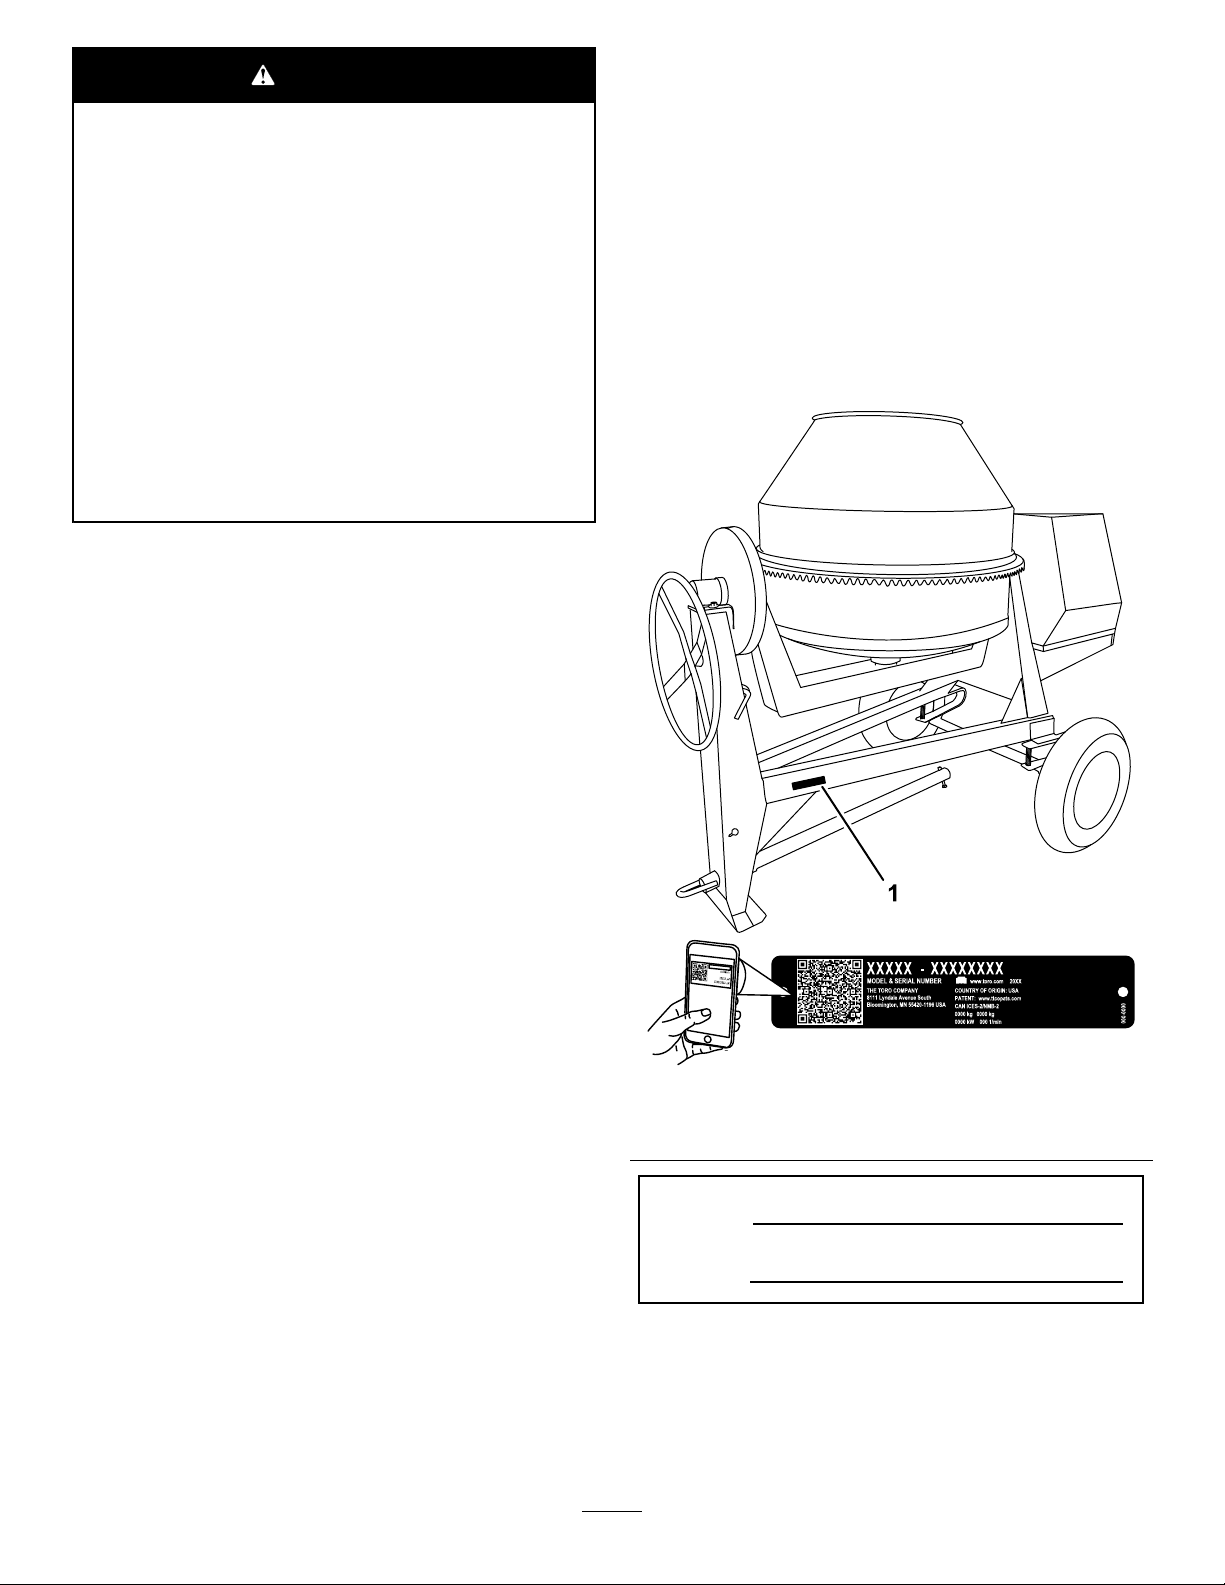
andserialnumbersofyourproductready .Figure1
identiesthelocationofthemodelandserialnumbers
ontheproduct.Writethenumbersinthespace
provided.
Important:Withyourmobiledevice,youcan
scantheQRcodeontheserialnumberdecal(if
equipped)toaccesswarranty,parts,andother
productinformation.
Theenclosedengineowner'smanualissupplied
forinformationregardingtheUSEnvironmental
ProtectionAgency(EPA)andtheCaliforniaEmission
ControlRegulationofemissionsystems,maintenance,
andwarranty.Replacementsmaybeorderedthrough
theenginemanufacturer.
TireInformation—TheDOTtireinformationislocated
onthesideofeachtire.Thisinformationgivesload
andspeedratings.Replacementtiresshouldhavethe
sameorbetterratings;refertoSpecications(page
14)toensurethatthetiresonyourmachinemeetor
exceedtheweightrequirementsofyourmachine.
Introduction
Thismachineisdesignedtomixconcrete,plaster,
reproongmaterial,grout,andothersmall-grained
concreteproducts.Youcantowthemachinebehinda
vehicleequippedwithahitchappropriateforthetype
oftowpoleyourmachinehas(ball,pintle,orpinhitch).
g242288
Figure1
1.Modelandserialnumberlocation
ModelNo.
SerialNo.
Readthisinformationcarefullytolearnhowtooperate
andmaintainyourproductproperlyandtoavoid
injuryandproductdamage.Youareresponsiblefor
operatingtheproductproperlyandsafely .
YoumaycontactTorodirectlyatwww.Toro.com
forproductsafetyandoperationtrainingmaterials,
©2017—TheToro®Company
8111LyndaleAvenueSouth
Bloomington,MN55420
Thismanualidentiespotentialhazardsandhas
safetymessagesidentiedbythesafety-alertsymbol
(Figure2),whichsignalsahazardthatmaycause
seriousinjuryordeathifyoudonotfollowthe
recommendedprecautions.
Contactusatwww.Toro.com.
2
PrintedintheUSA
AllRightsReserved
Page 3

Contents
Figure2
Safety-alertsymbol
Thismanualuses2wordstohighlightinformation.
Importantcallsattentiontospecialmechanical
informationandNoteemphasizesgeneralinformation
worthyofspecialattention.
g000502
Safety.......................................................................4
SafeOperatingPractices....................................4
SafetyandInstructionalDecals..........................7
Setup........................................................................9
1InstallingtheT owPole.....................................9
2InstallingtheSafetyChain..............................10
ProductOverview....................................................11
Controls............................................................11
Specications..................................................14
Operation................................................................14
PreparingtoT owtheMachine...........................14
TowingtheMachine..........................................18
PreparingtoUsetheMachine...........................19
OpeningandClosingtheCowl..........................19
AddingFuel......................................................20
CheckingtheEngine-OilLevel..........................22
StartingtheEngine...........................................23
ShuttingOfftheEngine.....................................24
UsingtheMachine............................................24
MixingtheMaterial...........................................25
UsingtheDrum.................................................25
Maintenance...........................................................27
RecommendedMaintenanceSchedule(s)...........27
Pre-MaintenanceProcedures..............................27
PreparingtheMachineforMaintenance............27
RemovingandInstallingtheDivider
Plate..............................................................27
Lubrication..........................................................28
LubricatingtheMachine....................................28
LubricatingtheDriveChain...............................29
EngineMaintenance...........................................29
ServicingtheAirCleaner..................................29
ChangingtheEngineOil...................................30
ServicingtheEngine-OilFilter...........................31
RemovingandInstallingtheEngine..................32
FuelSystemMaintenance...................................32
ServicingtheFuelSystem................................32
DriveSystemMaintenance..................................34
ServicingtheReductionCase...........................34
ServicingtheDriveChain.................................34
Cleaning..............................................................35
CleaningtheMachine.......................................35
Storage...................................................................36
StoringtheMachine..........................................36
Troubleshooting......................................................37
3
Page 4

Safety
Improperuseormaintenancebytheoperatoror
ownercanresultininjury.T oreducethepotential
forinjury ,complywiththesesafetyinstructions
andalwayspayattentiontothesafety-alertsymbol
(Figure2),whichmeans:Caution,Warning,or
Danger—personalsafetyinstruction.Failureto
complywiththeinstructionmayresultinpersonal
injuryordeath.
SafeOperatingPractices
Thisproductiscapableofamputatinghands.Always
followallsafetyinstructionstoavoidseriousinjuryor
death.
WARNING
Machiningorhandlingstone,masonry,
concrete,metal,andothermaterialscan
generatedust,mists,andfumescontaining
chemicals,suchassilica,knowntocause
seriousorfatalinjuryorillness,suchas
respiratorydisease,silicosis,cancer,birth
defects,orotherreproductiveharm.
•Controldust,mist,andfumesatthe
sourcewherepossible.Usewaterfordust
suppressionwhenfeasible.
•Usegoodworkpracticesandfollowthe
recommendationsofthemanufactureror
suppliers,OSHA,andotheroccupational
andtradeassociations.
•Alwaysfollowrespiratoryprecautions.
•Whenyoucannoteliminatethehazards
frominhalation,youandanybystanders
shouldweararespiratorapprovedby
OSHAforthematerialbeinghandled.
WARNING
Engineexhaustcontainscarbonmonoxide,
anodorless,deadlypoisonthatcankillyou.
Donotruntheengineindoorsorinan
enclosedarea.
Training
•ReadtheOperator'sManualandothertraining
material.Iftheoperator(s)ormechanic(s)cannot
readorunderstandtheinformation,itisthe
owner'sresponsibilitytoexplainthismaterialto
them.
•Becomefamiliarwiththesafeoperationofthe
equipment,operatorcontrols,andsafetysigns.
•Alloperatorsandmechanicsshouldbetrained.
Theownerisresponsiblefortrainingtheusers.
•Neverletchildrenoruntrainedpeopleoperateor
servicetheequipment.Localregulationsmay
restricttheageoftheoperator.
•Theowner/usercanpreventandisresponsible
foraccidentsorinjuriestopeopleordamageto
property.
Towing
Checkwithyourlocalcountyorstatetowingsafety
regulationsbeforetowingthemachine.
•Toreducethepossibilityofanaccidentwhile
transportingthemachineonpublicroads,ensure
thatthetowingvehicleismechanicallysoundand
ingoodoperatingcondition.
•Shutofftheenginebeforetransportingthe
machine.
•Whentowingwithaballhitch,ensurethattheball
hitchyouareusingisthepropersizeforthehitch
coupleronthemachine.
•Whentowingwithapintlehitch,ensurethatthe
eyeofthetowpoleisthecorrectdimensionfor
thepintlehook.
•Donottowwithoutthesafetypininsertedintothe
topofthereceiver.
•Inspectthehitchandcouplingforwear.Nevertow
themachinewithdamagedordefectivehitches,
couplings,chains,orothercomponents.
•Checkthetireairpressureonthetowingvehicle
andthemachine.
•Checkthetiretreadandsidewallfordamageand
wear.
•Properlyattachthesafetychainstothetowing
vehicle.
•Ensurethatthedirectionalandbrakelightsare
workingproperly(ifthemachineisequippedwith
thelightkit).
•Ensurethatthedirectional,backup,andbrake
lightsofthetowvehicleareworkingproperly(if
equipped).
•Beforetowing,ensurethatyourmachineis
correctlyandsecurelyattachedtothetowing
vehicle.
•Ensurethatthesafetychainsareproperlysecured
tothevehicle,andleaveenoughslackforturning.
•Donotcarryanymaterialinthemachinewhen
towing.
•Avoidsuddenstopsandstarts.Thiscancause
skidding,orjackkning.Smooth,gradualstarts
andstopswillimprovetowing.
•Avoidsharpturnstopreventrolling.T owonlywith
avehiclethathasahitchdesignedfortowing.Do
4
Page 5

notattachtowedequipmentexceptatthehitch
point.
•Donottowthemachinefasterthan88km/h(55
mph).
•Usecautionwhenbackingup;useaspotter
outsidethevehicletoguideyou.
•Donotallowanyonetositorrideonthemachine.
•Disconnectthemachinefromthetowvehicle
beforeusingit.
•Securethemachinefrommovementbeforeyou
towit.
•Placechockblocksunderneaththetirestoprevent
themfromrollingwhilethemachineisparked.
Preparation
Becomefamiliarwiththesafeoperationofthe
equipment,operatorcontrols,andsafetysigns.
•Useonlyaccessoriesandattachmentsapproved
bythemanufacturer.
•Wearpersonalprotectiveequipment(PPE)and
appropriateclothing,includingthefollowing:
–Hardhat
–Respiratorordustmask
–Faceshield
–Safetyglasses
–Hearingprotection
–Substantial,slip-resistantfootwear
–Longpants
–Shirtwithlongsleevesthataretightatthe
wrists
–Tight-ttinggloveswithoutdrawstringsorloose
cuffs
•Securelooseclothing,tiebacklonghair,anddo
notwearloosejewelry.
•Useextracarewhenhandlingfuels.Theyare
ammableandthevaporsareexplosive.Usethe
followingpracticeswhenhandlingfuel:
–Useonlyanapprovedfuelcontainer.
–Neverremovethefuelcaporaddfuelwiththe
enginerunning.
–Allowtheenginetocoolbeforerefueling.
–Donotsmoke.
–Neverrefuelordrainthemachineindoors.
–Installthefuelcapandtightenitsecurely.
–Keepthecontainernozzleincontactwiththe
tankduringlling.
–Neverllacontainerwhileitisinsideavehicle,
trunk,pickupbed,oranysurfaceotherthan
theground.
–Neverstorethemachineorfuelcontainer
insidewherethereisanopename,suchas
nearawaterheaterorfurnace.
–Ifyouspillfuel,wipeitofftheengineand
equipment.
•Ensurethatthemachineisonalevelsurface
beforeoperatingthemachine.
•Chockthetiresofthemachinetoprevent
unintendedmovement.
•Beforeeveryuse,dothefollowing:
–Inspectthecoupler,ball,andhitch.
–Ensurethatalllightsarefunctioningproperly
(ifequipped).
–Ensurethatthetiresareproperlyinatedas
recommended.
–Ensurethatthewheellugnutsaretightand
torquedproperly.
–Ensurethatthemachineisproperlysecured.
Operation
•Useyourfullattentionwhileoperatingthe
machine.Donotengageinanyactivitythat
causesdistractions;otherwise,injuryorproperty
damagemayoccur.
•Neverruntheengineinanenclosedorpoorly
ventilatedarea.
•Operatethemachineonlyingoodlighting
conditions.
•Beforestartingthemachine,ensurethatthere
arenopersonsorobstaclesnearorunderthe
machine.
•Shutofftheenginebeforeleavingthemachinefor
anyreason.
Neverleavearunningmachineunattended.
Alwaysshutofftheengineandverifythatall
movingpartshavestopped.
•Chockthetiresofthemachineorkeepitattached
tothetowingvehiclewhenitisnotinuse,to
preventitfromrolling.
•Avoidprolongedbreathingofexhaustfumes.
Engineexhaustfumescancausesicknessor
death.
•Keepyourhandsawayfromanymovingparts.
Keepyourfeetawayfromthetiresandthefront
post.
•Donotoperatethemachinewhileill,tired,or
undertheinuenceofalcoholordrugs.
•Keepbystanders,especiallysmallchildren,outof
theoperatingarea.Stopthemachineifanyone
entersthearea.
•Neverplaceyourhandsoranysolidobjectintothe
drumwhenthemachineisinoperation.
5
Page 6

•Donottouchpartswhichmaybehotfrom
operation.Allowthemtocoolbeforeattemptingto
maintain,adjust,orservicethemachine.
•Nevermovethemachinewhiletheengineis
running.
•Keepthecowlclosedandlatchedduringoperation.
•Ensurethatalltheguardsandshieldsaresecurely
inplacebeforeoperatingthemachine.
•Ifthemixingpaddlesstrikeaforeignobjectorifthe
machineshouldstartmakinganunusualnoiseor
vibration,shutofftheengineandemptythedrum.
Waitforallmovingpartstocometoacomplete
stopandcool.Vibrationisgenerallyawarningof
trouble.Inspectforcloggingordamage.Clean
andrepairand/orreplacedamagedparts.
•Donotchangetheenginegovernorsettingor
overspeedtheengine.
•Lightningcancausesevereinjuryordeath.Ifyou
seelightningorhearthunderinthearea,donot
operatethemachine;seekshelter.
MaintenanceandStorage
•Beforeperformingmaintenance,dothefollowing:
–Parkthemachineonalevelsurface.
–Shutofftheengine.Waitforallmovementto
stopandremovethesparkplugwirebefore
adjusting,cleaning,orrepairing.
–Allowtheenginetocoolbeforeperforming
maintenanceorstoring.
–Disengageallpowerandoperationcontrols
beforemakinganyrepairs.
•Neverlubricate,service,repair,oradjustthe
machinewhileitisrunning.
•Keepequipmentmaterialsclearfromthemufer
andenginetohelppreventres.Wipeupany
spilledoilorfuel.
•Neverallowuntrainedpersonneltoservicethe
machine.
•Keepyourhands,feet,andclothingawayfrom
movingparts.Ifpossible,donotmakeadjustments
withtheenginerunning.
•Keepallpartsingoodworkingconditionandall
hardwaretightened.Replaceallwornordamaged
decals.
•Removeanybuildupofgrease,oil,ordebrisfrom
themachine.
•Stopthemachine,shutofftheengine,andinspect
themachineifaforeignobjectentersthedrumor
causesanotherobstruction.Makeanynecessary
repairsbeforestartingthemachine.
•Donottamperwithsafetydevices.
•Securethemachinefrommovementandchock
thetireswhenstoringthemachine.
•Keepallnuts,bolts,screws,andhoseclamps
securelytightened.Keepthemachineingood
condition.
•UseonlygenuineT ororeplacementpartsto
ensurethattheoriginalstandardsaremaintained.
6
Page 7

SafetyandInstructionalDecals
Safetydecalsandinstructionsareeasilyvisibletotheoperatorandarelocatednearanyarea
ofpotentialdanger.Replaceanydecalthatisdamagedormissing.
133-5618
decal133-5618
decal132-7176
132–7176
1.ReadtheOperator’s
Manualforinformationon
howtotowthemachine.
125–8216
2.Warning—limittowing
speedtolessthan88km/h
(55mph)
1.Pulluptostarttheengine.
decal125-8216
2.Pushdowntoshutoffthe
engine.
125–8175
1.ReadtheOperator’sManualforinformationongreasing
themachine.
decal125-8175
7
Page 8
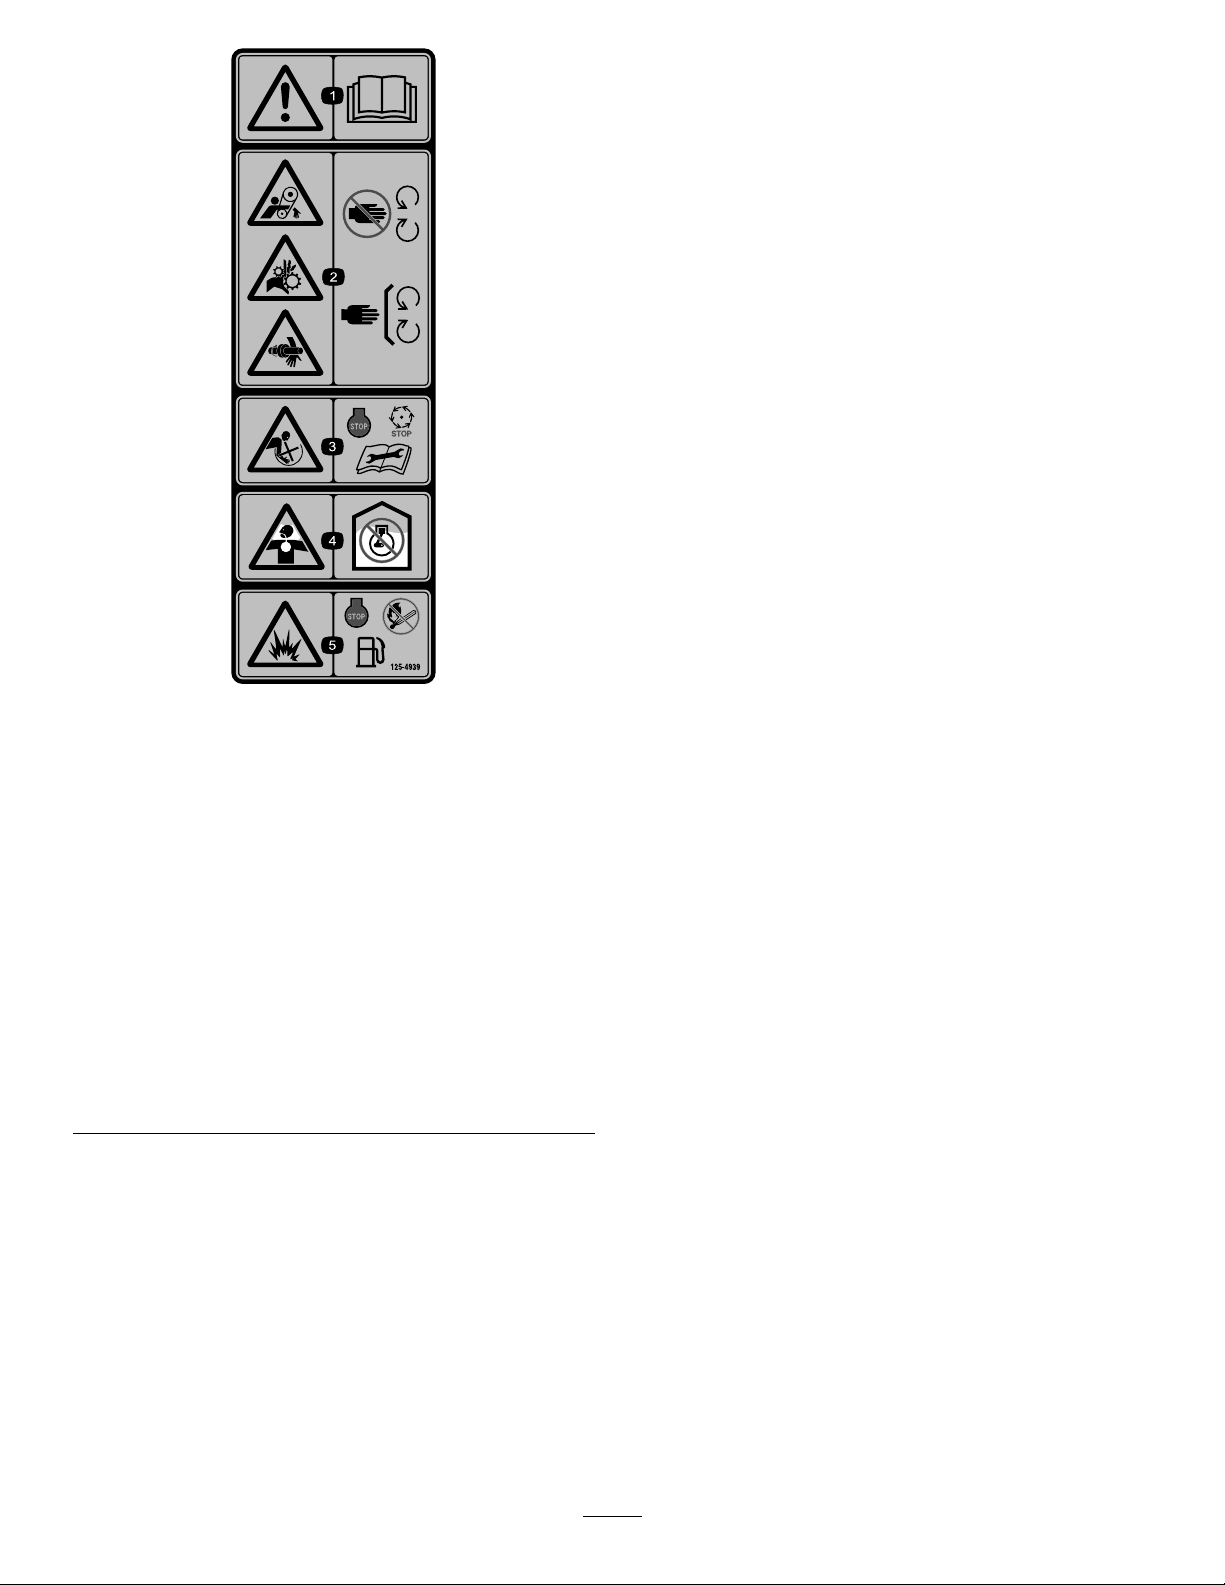
decal125-4939
125–4939
1.Warning—readthe
Operator’sManual.
2.Handandarm
entanglementatthechain
drive;crushinghazard
ofhand;entanglement
hazardofhandatthe
shaft—keephandsaway
frommovingparts;keep
allguardsandshieldsin
place.
3.Entanglementhazardat
paddles—stoptheengine
andwaitforallmoving
partstostopbefore
performingmaintenance.
4.Toxicgasinhalation
hazard—Donotrunthe
engineinanenclosed
space.
5.Explosionhazard—stop
theengineandkeep
awayfromameswhen
refueling.
8
Page 9
Setup
LooseParts
Usethechartbelowtoverifythatallpartshavebeenshipped.
ProcedureDescription
1
2
Towpolekit(soldseparately)
Safetychain
Connectinglink
1
InstallingtheTowPole
Partsneededforthisprocedure:
1
Towpolekit(soldseparately)
InstallingtheTowPoletothe
Machine
Note:Thetowpoleispurchasedseparatelyand
includesthenutandboltneededforinstallation.
Themachinehasthefollowingtowpoleoptions:
Qty.
1Installthetowpole.
1
2
1.Towpole4.Bolthole
2.Frontpost
3.Bolt6.Nut
Installthesafetychain.
Figure3
5.Frametting
Use
g019804
HitchTypeLength
50mm(2inch)ball—stamped127cm(50inches)
50mm(2inch)ball—forged127cm(50inches)
Pintle
1.Removetheboltandnutfromthetowpole
(Figure3).
127cm(50inches)
2.Slidethetowpoleforwardandaligntheholein
thepolewiththeholeintheframetting(Figure
3).
3.Inserttheboltthroughtheholesinthettingand
thepole(Figure3).
4.Threadthenutontotheboltandtightenthem
untiltheyaretightagainsttheframetting
(Figure3).
Note:Iftheself-lockingnyloninsertinthe
locknutwearswithuse,replacethenutwitha
newGrade5orGrade8locknut.
9
Page 10
2
InstallingtheSafetyChain
Partsneededforthisprocedure:
1
Safetychain
2
Connectinglink
InstallingtheSafetyChain
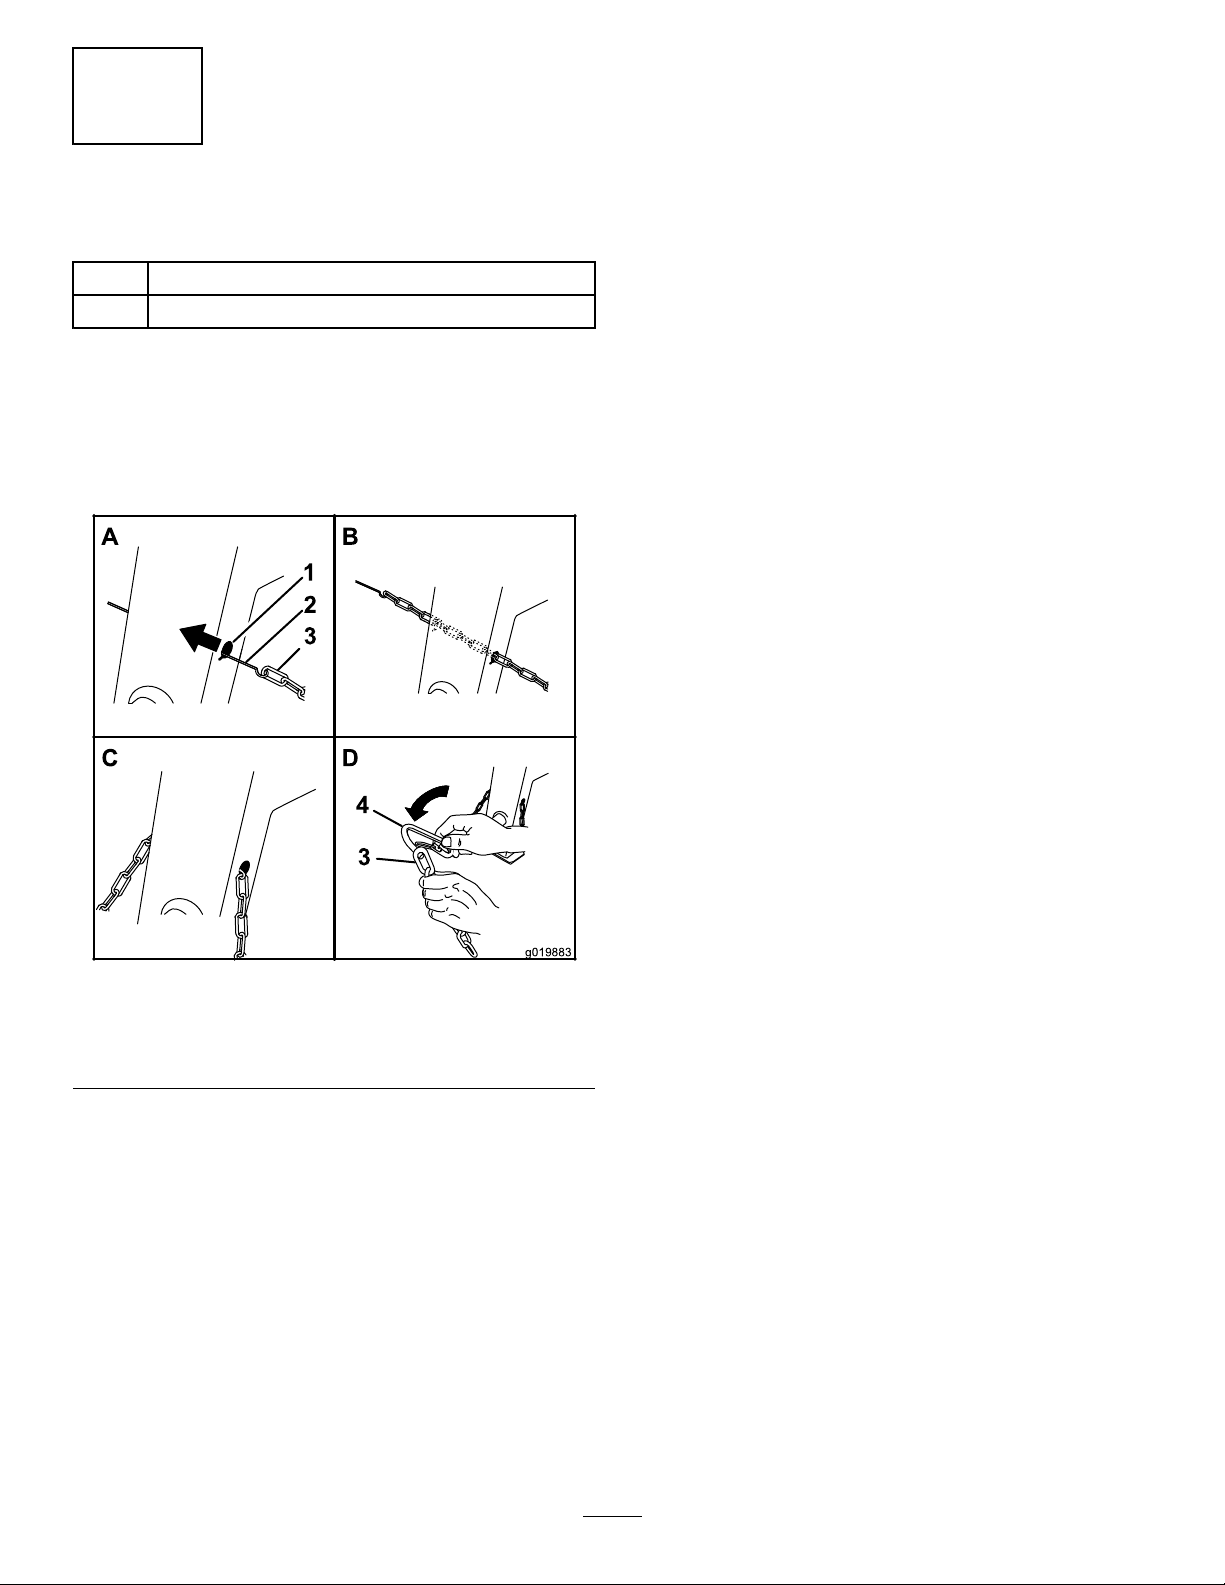
1.Formahookontheendofabendablepiece
ofrodorstiffwire(notincluded),andinsertit
throughbothkeyholesinthefrontpostofthe
machine(Figure4A).
3.Repeatsteps1and2toinstalltheother
connectinglinkintheotherendofthesafety
chain.
Figure4
1.Keyhole
2.Rodorwire(notincluded)4.Connectinglink
2.Attachthesafetychaintothelengthofrodor
wire(Figure4A).
3.Pulltherod,orwire,andthesafetychain
throughbothkeyholes(Figure4B).
Note:Ensurethatapproximatelyequallengths
ofsafetychainextendfromeithersideofthe
frontpost.
3.Safetychain
InstallingtheConnectingLinks
1.Aligntheconnectinglinktothelastlinkinone
endofthesafetychain(Figure4D).
2.Inserttheconnectinglinkthroughthechainlink
untiltheconnectinglinksnapsclosed.
g019883
10
Page 11

ProductOverview
Figure5
1.Enginecowl5.Towpole
2.Drum6.Drum-tiltbrake
3.Handwheel7.Rubberlatch
4.Safety-chainkeyholes
Controls
Becomefamiliarwithallofthecontrolsbeforeyou
starttheengineandoperatethemachine.
Handwheel
Thehandwheelcontrolsthetiltofthedrum.
Drum-TiltBrake
Thedrum-tiltbrakelocksthedrumintoposition.
g020003
11
Page 12
EngineControls
EngineSpeedControlHandle
Theengine-speed-controlhandle(Figure7)allows
theoperatortostartandshutofftheengine.Itis
locatedontheenginecowl,andisconnectedtothe
engine-speed-controlknob,whichislocatedonthe
engine(Figure8).T ocontroltheengine-speed-control
handle:
1.Rotatetheengine-speed-controlhandle
counterclockwisetounlockit.
2.Pullitallthewayoutandlockitbyrotatingit
clockwise.
3.Rotateitcounterclockwiseandpushitintostop
theengine.
Note:Thespeed-controlknobontheenginemustbe
loose(rotatedcounterclockwise)forthecowl-mounted
speed-controlhandletowork.
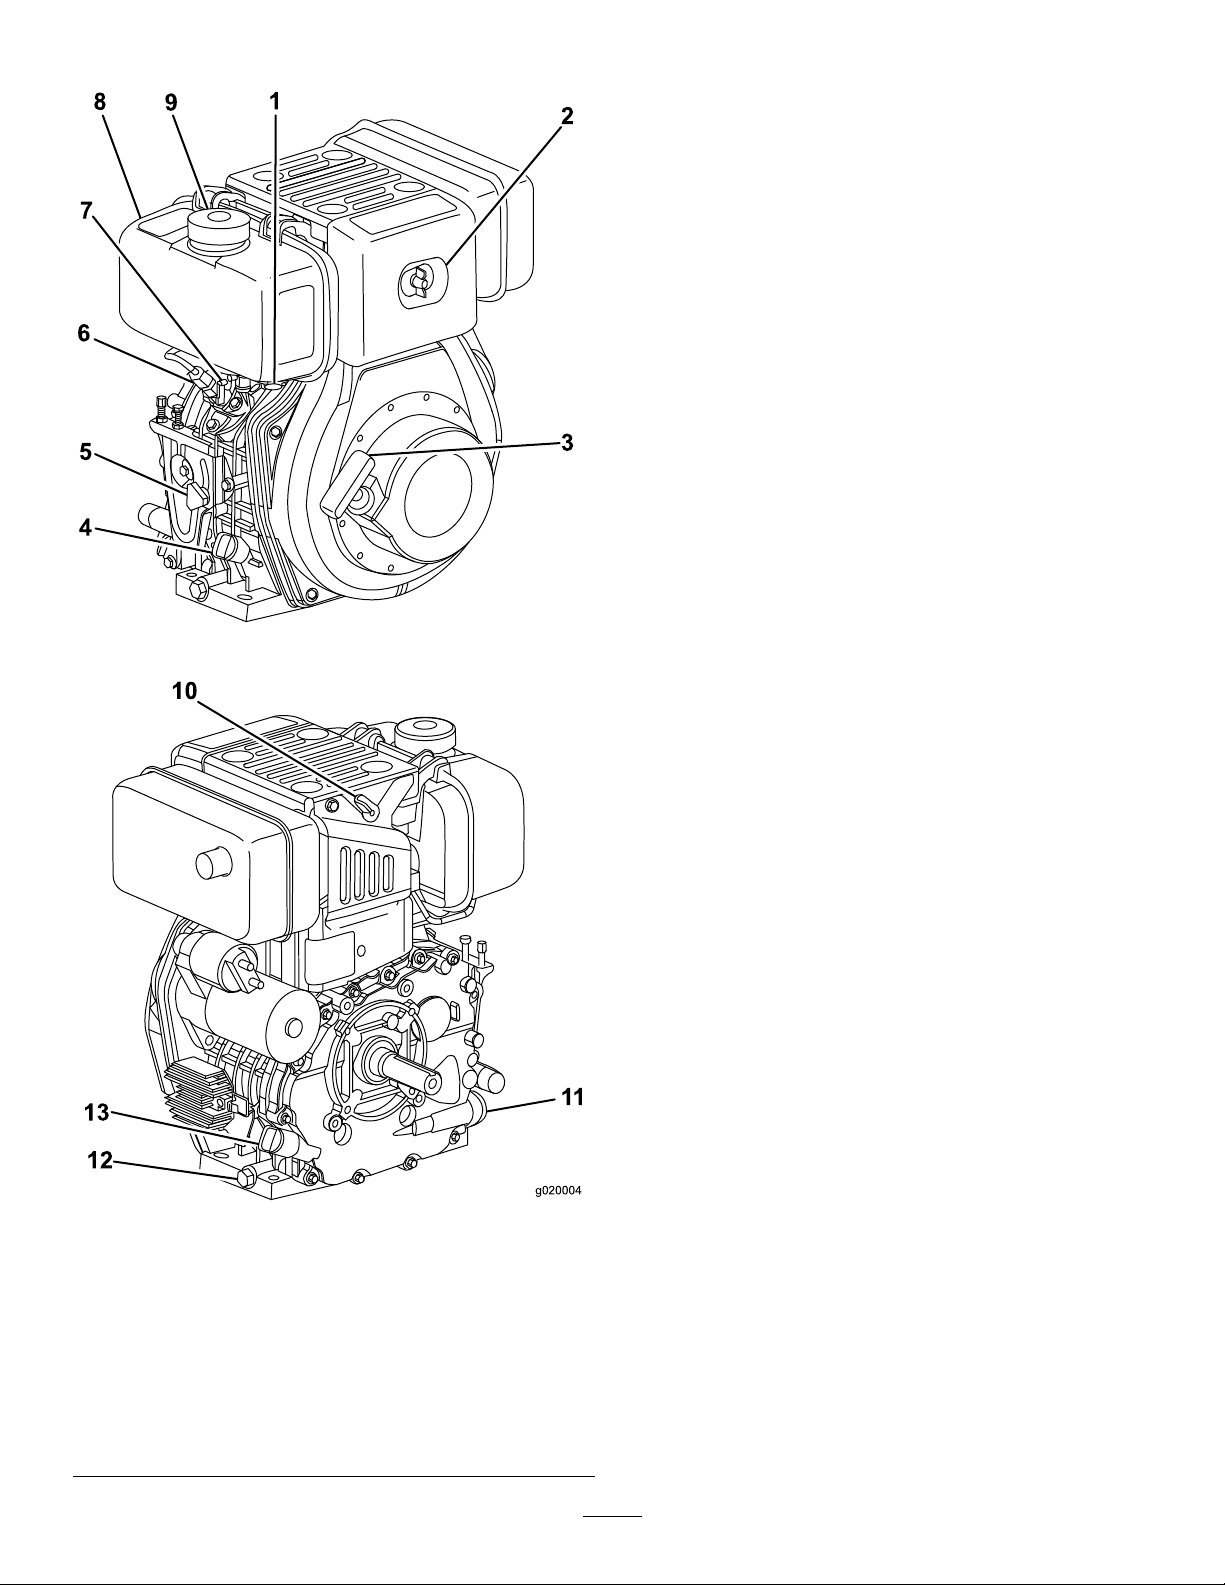
Figure6
1.Fueldrainplug8.Fueltank
2.Aircleaner9.Fuelcap
3.Recoil-starthandle10.Decompressionlever
4.Oilcap/dipstick11.Oillter
5.Engine-speed-control
knob
6.Fuel-injectionpump
7.Fuel-shutofflever
12.Oil-drainplug
13.Oilcap/dipstick
g020004
12
Page 13

Figure7
Fuel-ShutoffLever
Thefuel-shutoffleverislocatedunderneaththefuel
tank.Movethefuel-shutofflevertotheONposition
beforeattemptingtostarttheengine.Onceyouhave
nishedusingthemachineandyouhaveshutoffthe
engine,movethefuel-shutofflevertotheOFFposition.
g020357
1.Engine-speed-controlhandle
g020002
Figure9
1.Fuel-shutoffleverinOnposition
Recoil-StartHandle
Tostarttheengine,pulltherecoil-starthandle(Figure
6)quicklytoturntheengineover.Theenginecontrols
describedabovemustallbesetcorrectlyforthe
enginetostart.
1.Engine-speed-controlknob
g020001
Figure8
13
Page 14

Specications
Note:Specicationsanddesignaresubjectto
changewithoutnotice.
3
BatchCapacity
TotalVolume0.56m
Length241cm
Width142cm
Height178cm
Weight407kg
0.34m
(12ft3)
3
(19.8ft3)
(95inches)
(56inches)
(70inches)
(897lb)
Operation
Important:Beforeoperatingthemachine,check
thefuelandoillevelsandremovedebrisfromthe
machine.Ensurethattheareaisclearofpeople.
PreparingtoTowthe Machine
Important:Ensurethatyourtowvehiclehas
towingcapacityfortheweightofthemachine.
Important:UseaClass2orlargerreceiver.
Note:Ensurethatyourtowvehiclehasthe
appropriatehitchtotowthemachine;optionsinclude
a50mm(2inch)ballhitchorapintlehitch.
Note:Ifthemachineisequippedwithatrailer-light
kit,ensurethattheelectricalconnectorofthetow
vehicleiscompatiblewiththeelectricalconnectorof
themachine.Ifyourtowvehiclehasadifferenttype
ofplug,obtainanadapterfromanautomotiveparts
store.
1.Ensurethattheengineisstopped,the
fuel-shutoffleverisoff,andthedrumisempty.
2.Usingthehandwheel,positionthedrumsothatit
ispointingdowntowardtheground(Figure10).
Figure10
1.Drumpointingdown3.Towpoleboltedinplace
2.Drum-tiltbrakeengaged
3.Lockthedrumintopositionbypushingdownon
thedrum-tiltbrakehandle(Figure1 1).
14
g019995
Page 15

Figure11
Drum-TiltBrake
1.Unlockedposition2.Lockedposition
Note:RefertoSpecications(page14)andensure
thatallreplacementtiresmeetorexceedtheratings
forthismachine.
1.Visuallyinspectthetiresfordamageandwear
(Figure12andFigure13).
g020836
Figure12
1.Exampleoftirewearcausedbyunderination
g019733
4.Ensurethattheenginecowlisclosedand
latched;refertoClosingtheCowl(page19).
5.Inspectthetiresandwheels;refertoChecking
theTiresandWheels(page15).
CheckingtheTiresandWheels
ServiceInterval:Beforeeachuseordaily—Inspect
thetiresandwheels.
Aftereachuse—T orquethelugnutsto108to
122N-m(80to90ft-lb)aftertowing.
WARNING
Failuretomaintaincorrecttirepressure
mayresultintirefailureandlossofcontrol,
resultinginpropertydamageandserious
injuryordeath.
•Checkthetirepressurefrequentlyto
ensureproperination.Ifthetiresarenot
inatedtothecorrectpressure,theywill
wearprematurely .
g010293
Figure13
1.Exampleoftirewearcausedbyoverination
2.Ensurethatthetiresareinatedtothecorrect
air-pressure.Thefollowingratingindicatesthe
appropriateairpressureforthetiresasinstalled
atthefactory.
Important:Alwayschecktheinformationon
theactualtiresforthecorrectairpressure
requirement.
Important:Themostcommoncauseoftire
troubleisunderination.Maintainfullair
pressure.
AirPressure:Max241kPa(35psi)
3.Ensurethatthewheellugnutsaretorquedto
108to122N-m(80to90ft-lb).
•Inspectthetireconditionbeforetowing
andafteranyoperatingaccident.
TheDOTtireinformationislocatedonthesideof
eachtire.Thisinformationgivesloadandspeed
ratings.Replacementtiresshouldhavethesame
orbetterratings.Formoreinformationgoto
http://www.nhtsa.gov/Vehicle+Safety/Tires.
Note:Checkthetorqueofthewheellugnuts
initiallyandaftertowing.
Note:T orquethelugnutsinthesequence
showninFigure14.
15
Page 16

Figure14
HitchingaMachinewithaStamped BallCoupler
1.Applychassisgreasetothesocketofthecoupler
andtheareaoftheclampthatcontactstheball.
2.Oilthepivotpointsandslidingsurfacesofthe
couplerwithSAE30motoroil.
3.Openthecouplerlatch(Figure15).
g021107
g020359
Figure15
1.Bail
2.Safetypin
4.Positionthecouplerontopofthehitchball
(Figure15A).
5.Closethecouplerlatch(Figure15B).
6.Openthebailonthesafetypinandinsertthepin
throughtheholeinthelatch(Figure15B).
7.Rotatethefreeendofthebailovertheendof
thesafetypinthatisprotrudingthroughthelatch
(Figure15C).
8.Ifthemachineisequippedwithatrailer-lightkit,
connectthewireplugofthetowvehicletothe
wireplugofthemachine.
16
Page 17

HitchingaMachinewithaForged
HitchingaMachinewithaPintle
BallCoupler
1.Applyremovablethread-lockingcompoundto
thethreadsofthecouplerbolttopreventthe
couplerhandlefromcomingloose(Figure16).
Important:Applythread-lockingcompound
asneededinthefuture.
HitchTowPole
1.Removethepinfromthepintlehitchandopen
it(Figure17).
Figure16
1.Couplerhandle
2.Coupler
3.Clamp
4.Bolt
5.Hitchball
2.Applychassisgreasetothesocketofthecoupler
andtheareaoftheclampthatcontactstheball.
3.Pushthecouplerboltupthroughthecoupler
clampandthecouplertop,andconnectthe
couplerhandletothebolt(Figure16A).
4.Positionthecouplersothatthesocketisontop
ofthehitchballandtheclampisundertheball
(Figure16C).
5.Turnthecouplerhandleclockwisetothreadit
ontotheboltuntilitissecure(Figure16D).
Note:Useawrenchtokeeptheboltfrom
spinning.
6.Ifthemachineisequippedwithatrailer-lightkit,
connectthewireplugofthetowvehicletothe
wireplugofthemachine.
g019807
g019809
Figure17
2.Positiontheringonthetowpoleontothehook
ofthepintlehitch(Figure17).
3.Closethetopofthepintlehitchandsecureit
withthepin(Figure17).
4.Ifthemachineisequippedwithatrailer-lightkit,
connectthewireplugofthetowvehicletothe
wireplugofthemachine.
17
Page 18

ConnectingtheSafetyChainsto theTowVehicle
Connectthesafetychaintothemachineandthetow
vehicleasfollows:
1.Pullthesafetychainthroughtheslotsinthe
keyholeslocatedinthefrontpostofthemachine,
sothatthereisjustenoughslackoneachside
forturningaroundcornerswhentowingthe
machineFigure18).
Note:Stowtheexcesschaininsidethebottom
ofthefrontpostbypushingitintothekeyholes
andlatchingtheappropriatelinksintothe
keyholeslots.
2.Crossbothlengthsofchainunderthetowpole.
Note:Crossingthechainsdecreasesthe
chancesofthefrontofthemachinedropping
tothegroundifthehitchdoesnotholdthe
connection.
g021178
Figure19
1.Connectinglink3.Chainlink
2.Safetychainmounting
pointontowvehicle
TowingtheMachine
Figure18
1.Connectinglinks3.Chaincrossedundertow
pole
2.Keyholesinfrontpost
3.Connecteachlengthofchaintothesafety
chainmountingpointonthetowvehiclewiththe
connectinglinks(Figure19).
WARNING
Towingthemachineathighspeedincreases
theriskofahitchmalfunctionandtirefailure.
Higherspeedsalsoincreasethemomentum
ofthemachineandbrakingdistance.Ifthe
machinebecomesdetachedfromthetow
vehicleathighspeed,itcouldcausedamage
toproperty,orinjuryordeathtobystanders.
Donotexceed88km/h(55mph)whentowing
themachine.Forpoorroadconditionsor
g021177
inclementweather,reducespeedaccordingly.
WARNING
Towingthemachinewithmaterialinthedrum
increasestheriskofahitchmalfunctionand
tirefailure.Inaddition,materialcouldbounce
outofthedrumandhitothervehiclesand/or
people.Materialinthedrumincreasesthe
weight,whichaffectsmomentumandbraking
distance.
Donottowthemachinewithmaterialinthe
drum.
•ReviewandunderstandSafeOperatingPractices
(page4).
•Testthebrakesofthetowvehiclebeforetowing.
•Avoidsuddenstartsandstopswhiletowingthe
machine.
18
Page 19

PreparingtoUsethe Machine
•Reviewallofthesafetydecalsonthemachine.
•Useahard-hat,hearingprotection,ashirtwith
longsleevesthataretightatthewrists,tight-tting
gloveswithoutdrawstringsorloosecuffs,eye
protection,andadustmaskorrespirator.A
meshvisoralonedoesnotprovidesufcienteye
protection;supplementwithprotectiveglasses.
•Ensurethatyouarefamiliarwiththesafety
regulationsandshutdownproceduresdescribed
intheOperator’sManualandEngineOwner’s
Manual.
•Ensurethatallguardsareinplaceandingood
condition.
•Ensurethatthepaddlesareinplaceandingood
condition.
•Checkthefuelandoillevelsoftheengine.
•Whenpreparingtomixmaterial:
1.Movethemachinetoaleveljob-sitesurface.
2.Removethemachinefromthetowvehicle.
3.Chockthefrontandbackofthetiresto
preventthemachinefrommoving.
4.Ensurethatthedrumisinthemixposition
(upright).
5.Ensurethatthedrum-tiltbrakeisengaged
andthatthedrumdoesnotrotatetowardthe
dumpposition.
Figure20
Openingandclosingthecowl
1.Latch3.Receiver
2.Latchanchor
2.Repeat1ontheoppositesideofthemachine.
3.Atthebackofthemachinewheretherearcowl
meetstheframeofthemachine,graspthering
ofthelatchandpullitofffromthelatchanchor
onthecowl(Figure20).
4.V-tting
g021318
OpeningandClosingthe
Cowl
OpeningtheCowl
1.Atthesideofthemachinewherethefrontcowl
andrearcowlmeet,grasptheringofthelatch
andpullitofffromthelatchanchorontherear
cowl(Figure20).
4.Rotatetherearcowlupandforwarduntilitis
fullypositionedontopofthefrontcowl(Figure
20).
ClosingtheCowl
1.Rotatetherearcowlrearwardanddownuntil
thereceiveratthebottomcenterofthecowlis
alignedwiththeV-ttingandushontheframe
ofthemachine(Figure20).
2.Atthebackofthemachine,grasptheringofthe
latchandpullitontothelatchanchoronthe
rearcowl.
3.Atthesideofthemachine,grasptheringofthe
latchandpullitontothelatchanchorontherear
cowl.
4.Repeatstep3ontheoppositesideofthe
machine(Figure20).
19
Page 20

AddingFuel
DANGER
•Useonlyultra-lowsulfur(<15ppm)dieselfuel.
•Purchasefuelinquantitiesthatcanbeusedwithin
30daystoensurefuelfreshness.
•Usesummer-gradedieselfuel(Number2-D)at
temperaturesabove-7°C(20°F)andwinter-grade
dieselfuel(Number1-DorNumber1-D/2-Dblend)
below-7°C(20°F).
•Nevermixkerosene,usedengineoil,orresidual
fuelswiththedieselfuel.
•Donotstorefueleitherinthefueltankorfuel
containersoverthewinter.
•Fueladditivesarenotrecommended.Somefuel
additivesmaycausepoorengineperformance.
DANGER
Incertainconditions,dieselfuelisextremely
ammableandhighlyexplosive.Areor
explosionfromdieselcanburnyouand
othersandcandamageproperty.
Useonlydieselfuel.Fillingthefueltankwith
gasolinemayresultinare.
•Fillthefueltankandstorefuelina
well-ventilatedarea.
Incertainconditionsduringfueling,static
electricitycanbereleased,causingaspark
whichcanignitethefuelvapors.Areor
explosionfromfuelcanburnyouandothers
andcandamageproperty.
•Alwaysplacefuelcontainersontheground
awayfromyourvehiclebeforelling.
•Donotllfuelcontainersinsideavehicle
oronatruckortrailerbedbecauseinterior
carpetsorplastictruckbedlinersmay
insulatethecontainerandslowthelossof
anystaticcharge.
•Whenpractical,removefuel-powered
equipmentfromthetruckortrailerand
fueltheequipmentwiththewheelsonthe
ground.
•Ifthisisnotpossible,thenrefuelsuch
equipmentonatruckortrailerfroma
portablecontainerratherthanfroma
fuel-dispensernozzle.
•Ifyoumustuseafueldispensernozzle,
keepthenozzleincontactwiththerimof
thefueltankorcontaineropeningatall
timesuntilfuelingiscomplete.
•Donotrefuelthefueltankwhiletheengine
isrunning.
•Donotllthefueltankcompletelyfull.Add
fueluntilitisatthesamelevelasthered
ring.Thisemptyspaceinthetankallows
fueltoexpand.
•Neversmokewhenhandlingfuel,andstay
awayfromanopenameorwherefuel
maybeignitedbyaspark.
•Storedieselinanapprovedcontainerand
keepitoutofthereachofchildren.Donot
buymorethana30-daysupplyoffuel.
•Donotoperatewithouttheentireexhaust
systeminplaceandinproperworking
condition.
WARNING
Fuelisharmfulorfatalifswallowed.
Long-termexposuretovaporscancause
seriousinjuryandillness.
•Avoidprolongedbreathingofvapors.
•Keepyourfaceawayfromthenozzleand
thefueltankorconditioneropening.
•Keepfuelawayfromyoureyesandskin.
DieselFuelSpecications
Important:Donotmixoilwithdiesel.
Dieselfuelshouldcomplywiththefollowing
specication.Thetablelists7worldwide
specicationsfordieselfuels.
DieselFuelSpecications
Number2-D,Number
1-D,ASTMD975-94
Ultra-lowSulfur(<15ppm)
EN590:96EuropeanUnion
ISO8217DMX
BS2869-A1orA2
JISK2204GradeNumber2
Location
USA
International
UnitedKingdom
Japan
20
Page 21

DieselFuelSpecications
KSM-2610
GB252China
Location
Korea
UsingFuelStabilizer/Conditioner
Useadieselfuelstabilizer/conditionerinthemachine
tokeepthefuelfreshduringstorageof90daysor
less.Ifyouarestoringthemachineforlonger,drain
thefueltank;refertoDrainingtheFuelT ankand
ReplacingtheOutletFuelFilter(page33).
Important:Donotusefueladditivescontaining
methanolorethanol.
Addthecorrectamountoffuelstabilizer/conditionerto
thefuel,andfollowthedirectionsofthemanufacturer.
Note:Fuelstabilizer/conditionerismosteffective
whenmixedwithfreshfuel.
FillingtheFuelTank
Capacity:4.7L(1.25USgallons)
1.Parkthemachineonalevelsurface,stopthe
engine,andallowtheenginetocool.
2.Cleanaroundthefuelcapandremoveit(Figure
21).
g019997
Figure21
1.Fuelcap3.Redring
2.Inlet-fuelscreen
Important:Keeptheinlet-fuelscreenand
theredringinthefueltankwhilepouringthe
fuel.
3.Addfueltothefueltankuntilthelevelisupto
theredring(Figure22).
Important:Thisspaceinthetankallows
thefueltoexpand.Donotllthefueltank
completelyfull.
21
Page 22

Figure22
4.Securelyinstallthefuelcap(Figure21).
5.Wipeupanyfuelthatmayhavespilled.
CheckingtheEngine-Oil Level
ServiceInterval:Beforeeachuseordaily—Check
theengine-oillevel.
ToroPremiumEngineOilisavailablefromyour
AuthorizedT oroDealer.
g020376
Figure23
Important:Ensurethattheengineoil,engine
oilstoragecontainers,andengineoillling
equipmentarefreeofsedimentsandwater.
g020005
1.Placethemachineonaat,levelsurface,and
stoptheengine.
2.Allowtheenginetocool.
3.Cleanaroundthedipstick.
4.Removethedipstickandwipetheendclean
(Figure24).
Important:Use4-cycleengineoilthatmeets
orexceedsthefollowingguidelinesand
classications:
•APIServiceCategoriesCH-4,CI-4,CJ-4orhigher
•ACEAServiceCategoriesE-3,E-4,andE-5
•JASOServiceCategoryDH-1
Crankcasecapacity:1.6L(1.7USqt)
Important:Iftheoillevelinthecrankcaseistoo
lowortoohighandyouruntheengine,youmay
damagetheengine.Thistypeofdamageisnot
coveredbythewarranty.
Viscosity:RefertoFigure23.
g019993
Figure24
1.Dipstickupperlimit3.Fillport
2.Dipsticklowerlimit
22
Page 23

5.Slidethedipstickfullyintothellportwithout
threadingitintotheport(Figure24).
6.Removethedipstickandlookattheend.Ifthe
engineoillevelisbelowthehalfwaypointonthe
hatchmarks,slowlypouronlyenoughoilintothe
llporttoraisetheleveltothehalfwaypointon
thedipstick.
7.Installandsecurethedipstick(Figure24).
StartingtheEngine
1.ReadSafeOperatingPractices(page4)and
understandtheControls(page11)before
attemptingtostartthemachine.
2.Makesurethatthefuel-shutoffleverisinthe
ONposition.
g020001
Figure26
1.Engine-speed-controlknob
Figure25
1.Fuel-shutoffleverintheOnposition
3.Ensurethattheengine-speed-control
knobontheengineisloosebyrotatingit
counterclockwise(Figure26).
4.Rotatetheengine-speed-controlhandle
counterclockwisetounlockit,pullitalltheway
out,andlockitbyrotatingitclockwise(Figure
27).
g020002
1.Engine-speed-controlhandle
23
g020357
Figure27
Page 24

5.Pushthedecompressionlevertotheleft(Figure
6).
UsingtheMachine
Note:Thedecompressionleverstayscockedto
theleftandautomaticallyreturnstotheoriginal
positionwhentheyoupulltherecoil-starter
handleagain.
6.Grasptherecoil-starthandle,pullitoutslowly
untilyoufeelresistance,thenpullitalltheway
outwithastrongandevenmotion(Figure28).
Note:Use2handsifnecessary.
DANGER
Thismachineiscapableofamputatinghands.
•Stayintheoperator’spositionwhilethe
machineisrunning.
•Keepallbystandersasafedistancefrom
themachine.
•Stopthemachineimmediatelyifany
peopleoranimalsentertheworkarea.
•Neverplaceanypartofyourbodyintoa
positionthatcausesanunsafeoperating
condition.
1.Ensurethatthemachineisonlevelgroundand
thatthesurroundingareaisclearofobstacles.
Note:Disconnectthemachinefromthetow
vehicleandchockthefrontandbackofboth
tirestopreventanymovement.
2.Makesurethatyoureadalltherecommendations
fromtheSafetysection;refertoSafeOperating
Practices(page4)beforeusingthemachine.
Figure28
7.Slowlyreturntherecoil-starthandletotheinitial
position.
8.Iftheenginedoesnotstart,repeatsteps2
through7.
ShuttingOfftheEngine
1.Unlocktheengine-speed-controlhandleby
rotatingitcounterclockwise,andpushitin
slightly,totheidlesetting.
2.Runtheengineatlowidlespeedandwithout
aloadforatleast5minutestoallowengine
componentsthatoperateatahightemperature
tocooldown.
3.Pushtheengine-speed-controlhandletherest
ofthewayintoshutofftheengine.
3.Starttheengineandclosetheenginecowl.
g020367
Allowtheenginetowarmupatidlefor2minutes;
refertoStartingtheEngine(page23).
4.Usethehandwheeltomovethedrumintoan
upright,slightlytiltedpositiontoallowaccessfor
pouringmaterialsintothedrum.
Note:Thispositionalsoallowsthemixing
paddlestomixthematerialsmoreeffectively.
5.Pushthedrum-tiltbrakedowntolockthedrum
intopositionandavoidaccidentallydumpingthe
material.
Important:Ifyouneedtostopthemachine,use
theengine-speed-controlhandlelocatedonthe
cowl;refertoEngineSpeedControlHandle(page
12).
4.Movethefuel-shutofflevertotheCLOSED
positionaftertheenginestops.
Note:Iftheenginedoesnotstopafteryoupush
theengine-speed-controlhandleallthewayin,
stoptheenginebymovingthefuel-shutofflever
totheCLOSEDposition.
24
Page 25

MixingtheMaterial
1.Ensurethatthetiltbrakeisfullyengagedand
thatthedrumisoperatingatfullspeed.
DANGER
Eyeandskincontactwithconcretematerials
andbreathingthedustinvolvedishazardous
toyourhealth.
•Ensurethatthereisadequateair
ventilation.
•Wearadustmasktopreventinhalationof
dustwhileusingthemachine;refertoSafe
OperatingPractices(page4).
•Avoiddirectcontactofcementand
concretematerialswithskinandeyes.
Important:Donotaddmorematerialthan
thebatchcapacityofthemachine;referto
Specications(page14).
Note:Followthemanufacturer’sinstructionsthatare
printedonthepackagingoftheproduct.
Concretehasthefollowing4basicingredients:
•Sand
•Gravel
•Portlandcement
•Water
Dependingontheapplication,youcanusedifferent
ratiosofthese4ingredients.
Therearemanyvariationsofconcretemixrecipes,
dependingontheapplication.Itisimportanttouse
theappropriatequantityofwater.Usingtoolittlewater
resultsindryareasinthemix,butusingtoomuch
waterwillresultinweakerconcrete.Theamount
ofwaterneededvariesdependingonthemoisture
contentofthesandandgravel.Themixshouldhave
athicknesssimilarthatofpeanutbutter.
Keepthepouredconcretedampforseveraldaysto
obtainpropercuring.Evaporationresultsinweaker
concrete.Concretecuresthroughhydration,a
reactionbetweenwaterandcement.
2.Pourwaterintothedrum.
3.Addtherequiredamountofgravel.
4.AddtherequiredamountofPortlandcement.
5.Addtherequiredamountofsand.
6.Allowthedrumtoturnwhilethemixreachesthe
appropriateconsistency.
Note:Addingwaterandgravelbeforecementand
sandallowsthemixleftinthedrumfromtheprevious
batchtobetumbledoffthedrumandpaddlesandinto
thenextbatch.
UsingtheDrum
DANGER
Contactwiththemixingpaddlescouldcause
damageorinjury.
Neverputyourhandsinsidethedrumatany
time.
DumpingtheDrum
Note:Whendumpingabatchofmaterial,leavethe
enginerunningsothattherotatingdrumhelpsdump
thematerial.
1.Alignawheelbarroworsimilarcontainerof
adequatecapacityinthepathofthedrum
opening.
2.Whilethedrumisturning,rmlygraspthe
handwheelwithonehand.
3.Usingyourotherhand,pulluponthedrum-tilt
brakehandletoreleasethebrake.
4.Usingbothhands,slowlyturnthehandwheel,
allowingthedrumtotiltinthedesireddirection
anddumpthedesiredamountofmaterial.
MixingPre-MixConcrete
1.Ensurethatthetiltbrakeisfullyengagedand
thatthedrumisoperatingatfullspeed.
2.Pourwaterintothedrum.
3.Addtherequiredamountofdrypre-mix.
4.Allowthedrumtoturnwhilethemixreachesthe
appropriateconsistency.
MixingSand,Gravel,andCement
Thetypicalratioformixingconcreteis1partPortland
cement,2partssand,and3partsgravel.
5.Turnthehandwheelintheoppositedirectionto
returnthedrumintoanuprightposition.
6.Pushdownonthedrum-tiltbraketolock
thedrumintoposition,avoidingaccidental
dischargingofconcretemix.
7.Afterdumpingabatchofmaterial,cleanthe
drum;refertoCleaningtheDrum(page26).
Note:Thisstepwillcleanthepaddlesanddrum
betweenbatchesandpreventdriedmaterial
fromformingandcontaminatingthenextbatch
ofmaterial.
25
Page 26

CleaningtheDrum
ServiceInterval:Aftereachuse
Important:Donotstrikethedrumwitha
shovel,hammer,oranyotherdevicetoloosen
accumulationofdriedmaterials.
1.Whilethemachineisrunning,usethehandwheel
totiltthedrumslightly .
2.Engagethedrum-tiltbraketopreventthedrum
fromtiltingfurtheranddischargingthewater.
3.Asthedrumisrotating,sprayitthoroughlywith
waterbeforethematerialdries.
4.Allowthedrumtorotateandtumbletheloose
materialandwater,furtherlooseningtherestof
thematerial.
5.Continuetospraythedrumwithwatertoremove
allofthematerialfromthedrumandmixing
paddles.
6.Whenallthematerialhasbeenremovedfrom
thesurfacesofthedrumandmixingpaddles,
disengagethedrum-tiltbrakeandusethe
handwheeltotiltthedrumanddumpthewater
fromthedrum.
7.Ifsomematerialstillremainsinthedrum,spray
thedrumwithwaterwhileitistilteddownward,
allowingthewaterandmaterialtorunout.
26
Page 27

Maintenance
Important:Beforeperforminganymaintenanceprocedures,stoptheengineandwait5minutesto
allowallmovingpartstocometoacompletestopandcool.
RecommendedMaintenanceSchedule(s)
MaintenanceService
Interval
Aftertherst25hours
Aftertherst50hours
Beforeeachuseordaily
Aftereachuse
Every20hours
Every40hours
Every50hours
Every100hours
Every200hours
Every400hours
Every1,000hours
MaintenanceProcedure
•Changetheengineoil.
•Cleantheengine-oillter.Replaceitifitisdamaged.
•Inspectthetiresandwheels.
•Checktheengine-oillevel.
•Inspecttheaircleanerelements.
•Torquethelugnutsto108to122N-m(80to90ft-lb)aftertowing.
•Cleanthedrum.
•Inspectthedrivechainforrustanddebris.
•Inspectthedrivechaintensionandadjustitasnecessary .
•Lubricatethedrivechainwithanon-stickychainlubricant.
•Cleantheinlet-fuelscreen.
•Changetheengineoil.
•Cleantheaircleanerelements.Cleanthemmorefrequentlyindustyoperating
conditions.
•Replacetheoutlet-fuellter.
•Cleantheengineoil-lter.Replaceitifitisdamaged.
•Changethereductioncaseoil.
Monthly
•Greasethetrunnionsandthedrumspindle.
Pre-Maintenance
Procedures
PreparingtheMachinefor Maintenance
1.Parkthemachineonalevelsurface.
2.Removethemachinefromthetowvehicle.
3.Chockthetires.
4.Opentherearcowl;refertoOpeningtheCowl
(page19).
5.Ensurethattheengineandmuferarecool.
RemovingandInstalling theDividerPlate
Youneedtoremovethedividerplatetoprovideaccess
beforeperformingsomemaintenanceprocedures.
RemovingtheDividerPlate
1.Unlatchandopenthecowl;refertoOpeningthe
Cowl(page19).
2.Useawrenchtoremovethe4boltsthatsecure
thedividerplatetothefrontcowl.
Note:Keeptheboltsforinstallingthedivider
plate.
27
Page 28

Lubrication
LubricatingtheMachine
ServiceInterval:Monthly—Greasethetrunnionsand
thedrumspindle.
1.Cleanaroundeachgreasettingwitharagand
lifttheplasticcapoffthegreasetting(Figure
31).
Figure29
3.Toremovethedividerplate,liftitupwardand
rotateitcounterclockwisesothatitclears
variousenginecomponents.
InstallingtheDividerPlate
1.Guidethedividerplateintopositionagainstthe
frontcowl.
Note:Startwiththedividerplaterotatedslightly
counterclockwise,andthenrotateitclockwise
whileloweringitintoposition.
Ensurethatthedividerplateisnotbackward.
g020752
2.Useagreaseguntolubricatethegreasettings
ofbothtrunnionsandthedrumspindlewith
general-purposelithiumgrease(Figure31).
3.Wipeupanyexcessgrease.
Figure30
2.Aligntheboltholesinthedividerplateandthe
frontcowl.
3.Installeachofthe4bolts,andhand-tighten
themtopreventcross-threading.
4.Tightentheboltswithawrenchuntiltheyare
secure.
g020000
Figure31
g020753
Important:Donotlubricatethepiniongearand
ringgear.Lubricationwillcausethemtocollect
abrasivematerialsandacceleratewear.
28
Page 29

LubricatingtheDriveChain
ServiceInterval:Every40hours—Lubricatethe
drivechainwithanon-stickychain
lubricant.
Applyachainlubricantthatisnon-stickytohelp
preventdirtandabrasiveparticlesfromstickingtothe
chain(Figure32).
Figure32
EngineMaintenance
ServicingtheAirCleaner
ServiceInterval:Beforeeachuseordaily—Inspect
theaircleanerelements.
Every200hours/Y early(whichevercomes
rst)—Cleantheaircleanerelements.Clean
themmorefrequentlyindustyoperating
conditions.
Important:Donotoperatetheenginewithout
theairlterassembly;extremeenginedamage
willoccur.
1.Stoptheengineandwaitforallmovingpartsto
stop.
2.Turnthefuel-shutofflevertotheOFFposition.
3.Removethewingnutthatsecurestheair-cleaner
cover(Figure33).
g021306
1.Drivechain3.Enginesprocket
2.Reductioncase
g019996
Figure33
1.Wingnut3.Paperelement
2.Air-cleanercover4.Foamelement
4.Removetheair-cleanercover.
5.Removetheinternalwingnut.
6.Removethefoamandpaperelementsfromthe
base(Figure33).
7.Removethefoamelementfromthepaper
element(Figure33).
8.Inspectthefoamandpaperelements,and
replacethemiftheyaredamagedorexcessively
dirty.
Note:Nevertrytobrushdirtoffthepaper
element;brushingforcesthedirtintothebers.
9.Wipedirtfromthebaseandthecoverwitha
moistrag.
Note:Becarefultopreventdirtanddebris
fromenteringtheairductinsidetheair-cleaner
housing.
29
Page 30

10.Slidetheouterfoamelementoverthepaper
element.
DrainingtheEngineOil
11.Installtheaircleanerelementsandensurethat
theyareproperlypositioned.
12.Installtheinternalwingnut
13.Securelyinstallthecoverwiththeotherwingnut.
ChangingtheEngineOil
ServiceInterval:Aftertherst25hours—Change
theengineoil.
Every100hours—Changetheengineoil.
ToroPremiumEngineOilisavailablefromyour
AuthorizedT oroDealer.
Important:Use4-cycleengineoilthatmeets
orexceedsthefollowingguidelinesand
classications:
•APIServiceCategoriesCH-4,CI-4,CJ-4orhigher
•ACEAServiceCategoriesE-3,E-4,andE-5
•JASOServiceCategoryDH-1
Crankcasecapacity:1.6L(1.7USqt)
WARNING
Oilmaybehotaftertheenginehasbeenrun,
andcontactwithhotoilcancausesevere
personalinjury .
Avoidcontactingthehotengineoilwhenyou
drainit.
1.Stoptheengineandwaitforallmovingpartsto
stop.
2.Placeaoil-drainpanundertheoil-drainholeof
theengine(Figure35).
Important:Iftheoillevelinthecrankcaseistoo
lowortoohighandyouruntheengine,youmay
damagetheengine.Thistypeofdamageisnot
coveredbythewarranty.
Viscosity:RefertoFigure34.
Figure34
g020382
Figure35
1.Oil-drainplug3.Oil-drainpan
g020376
2.Oil-drainhole
3.Removethedrainplugandcatchtheoilinthe
oil-drainpan(Figure35).
4.Whentheoilhasdrainedcompletely,installthe
drainplugwithanewwasher(Figure35).
Note:Disposeoftheusedoilatacertied
recyclingcenter.
30
Page 31

FillingtheEngineCrankcasewith Oil
1.Removethedipstick(Figure36)andslowlypour
oilintothellholeuntiltheoilisbetweenthe
upperandlowerlimitonthedipstick.
ServicingtheEngine-Oil Filter
ServiceInterval:Aftertherst50hours—Cleanthe
engine-oillter.Replaceitifitis
damaged.
Every400hours—Cleantheengineoil-lter.
Replaceitifitisdamaged.
InspectingandCleaningthe Engine-OilFilter
1.Removetheoil-lterretainingbolt.
2.Pulltheoil-ltercapoutandremovetheoillter.
1.Dipstickupperlimit
2.Dipsticklowerlimit
2.Installandsecurethedipstick.
3.Wipeupanyspilledoil.
Figure36
3.Oil-llerport
g020389
Figure37
g019993
1.Oillter3.Oil-lterretainingbolt
2.Oil-ltercap
3.Cleantheoillterorreplaceitifitisdamaged.
4.Installtheoillter.
5.Makesurethattheoil-ltercapisfullyseated.
6.Installandtightentheoil-lter-retainingbolt.
7.Addnewengineoil;refertoFillingtheEngine
CrankcasewithOil(page31).
8.Warmuptheenginebyrunningitfor5minutes,
andcheckforanyengineoilleaks.
9.Aftertheengineiswarm,turnitoffandletitsit
for10minutes.
10.Checktheengineoillevelbyfullyinserting,but
notscrewingin,thedipstick.
11.Addengineoilasneeded;refertoCheckingthe
Engine-OilLevel(page22)
31
Page 32

RemovingandInstalling
FuelSystem
theEngine
RemovingtheEngine
1.Opentherearcowl;refertoOpeningtheCowl
(page19).
2.Removethe4nutsandboltsthatsecurethe
enginetotheengine-mountingplate(Figure38).
Maintenance
ServicingtheFuelSystem
CleaningtheInlet-FuelScreen
ServiceInterval:Every50hours—Cleantheinlet-fuel
screen.
1.Cleantheareaaroundthefuelcap.
2.Removethefuelcap.
3.Lifttheinlet-fuelscreenoutofthefueltank.
Figure38
1.Nutsandbolts
3.Slidetheenginetotheright,andmovethedrive
chainawayfromtheenginesprocket.
4.Carefullylifttheengineupandoffthe
engine-mountingplate.
InstallingtheEngine
1.Settheengineontheengine-mountingplate,
andaligntheboltholes(Figure38).
2.Installthe4boltsandsecurethemwiththenuts
torquedto24N-m(18ft-lb).
3.Checkthedrivechaintension,andadjustitif
necessary;refertoCheckingtheDriveChain
Tension(page34)andAdjustingtheDriveChain
Tension(page34).
4.Closetherearcowl;refertoClosingtheCowl
(page19).
g020391
g021309
Figure39
1.Fuelcap3.Fueltank
2.Inlet-fuelscreen
4.Cleantheinlet-fuelscreenorreplaceitifitis
damaged.
5.Installtheinlet-fuelscreen.
6.Installthefuelcapandhandtightenit.
Note:Overtighteningthefuelcapwilldamage
it.
32
Page 33

DrainingtheFuelTankand ReplacingtheOutletFuelFilter
ServiceInterval:Every200hours—Replacethe
outlet-fuellter.
1.Stoptheengineandwaitforallmovingpartsto
stop.
2.Placeanapprovedcontainerunderthefueltank
tocollectthefuel.
3.Removethefuelcap(Figure40).
g021307
Figure41
1.Outlet-fuellter4.O-ring
2.Gasket5.Fuel-shutofflever
3.Fillerport6.Nut
6.RemoveanddiscardtheO-ring(Figure41).
Figure40
1.Fuelcap3.Drainplug
2.Gasket
4.Removethedrainplugandgaskettodrainthe
fuel(Figure40).
5.Loosenthenutsunderthefuel-shutofflever
(Figure41).
g021311
7.Pulltheoutlet-fuellterandgasketoutofthe
llerport(Figure41).
8.Installanewoutlet-fuellterandgasketthrough
thellerport,andseattheminthefueltank
(Figure41).
9.InstallanewO-ringonthefuel-shutofflever,and
installtheassemblytothefueltankusingthe
nutsunderthefuel-shutofflever(Figure41).
10.Installthedrainplugwithanewgasket(Figure
40).
11.Installthefuelcapandhandtightenit.
Note:Overtighteningthefuelcapwilldamage
it.
33
Page 34

DriveSystem
ServicingtheDriveChain
Maintenance
ServicingtheReduction Case
ChangingtheReductionCaseOil
ServiceInterval:Every1,000hours
Oiltype:non-detergentmotoroilwithaviscosityof
SAE50orless
Capacity:0.24L(8.0oz)
1.Removetheengine;refertoRemovingthe
Engine(page32).
2.Removethedrainplugandthevented-llerbolt
onthereductioncase.
ServiceInterval:Every20hours—Inspectthedrive
chainforrustanddebris.
Every20hours—Inspectthedrivechaintension
andadjustitasnecessary.
CheckingtheDriveChain
1.Stoptheengineandlockthe
engine-speed-controlhandletotheStop
position;refertoShuttingOfftheEngine(page
24),andmovethefuel-shutofflevertotheOFF
position.
2.Usingaashlight,carefullyinspectthechain.If
rustanddebrisarepresent,removethemwith
abrush.
CheckingtheDriveChainTension
1.Layastraightedgealongthedrivechainfrom
onesprockettotheother.
2.Pushonthechainwith6.8kg(15lb)ofpressure,
midwaybetweenthesprockets.
Figure42
1.Reductioncase4.Drainplug
2.Fillhole5.Drainhole
3.Vented-llerbolt
3.Tiptheenginesothattheoildrainscompletely,
toavoidmixingdifferenttypesofoil.
Important:Toavoiddamagingpartsofthe
engineorthereductioncase,becareful
whentippingtheengine.
4.Installthedrainplugintothedrainhole.
5.Ensurethattheengineislevel,andpour0.24L
(8.0oz)ofoilintothellhole.
6.Installthevented-llerboltintothellhole.
7.Installtheengine;refertoInstallingtheEngine
(page32).
3.Measurethedistancefromthechainto
thestraightedge.Thedistanceshouldbe
approximately2.5cm(1inch).
4.Ifthechaintensionneedsadjustment,referto
AdjustingtheDriveChainTension(page34).
AdjustingtheDriveChainTension
1.Stoptheengineandwaitforallmovingpartsto
stop.
2.Loosenthe4nutsandboltsthatsecurethe
g021305
enginetotheengine-mountingplate(Figure43).
34
Page 35

Figure43
1.Engine-mountingnutsandbolts(4each)
3.Slidetheenginelefttoincreasetensiononthe
drivechainorrighttodecreasetension.
Cleaning
CleaningtheMachine
Regularcleaningandwashingwithmilddetergentand
waterwillincreasethelifespanofthemachine.Clean
themachineaftereachusebeforethedirthardens.
Removedirtandgrimefromtheexternalpartsofthe
entiremachine,especiallytheengine.Cleandirtand
concretematerialsfromtheoutsideoftheengine.
Ensurethatthefuelcapandoil-llcap/dipstickare
securetoavoidgettingwaterintheengine.
Usecarewhenusingahigh-pressuresprayer,
becauseitcandamagesafetydecals,instruction
g020391
signs,andtheengine.
4.Whenthechainhastheappropriateamount
oftension;refertoCheckingtheDriveChain
Tension(page34),torquethe4nutsandbolts
to24N•m(18ft-lb)each.
35
Page 36

Storage
StoringtheMachine
Wheneveryoustorethemachineover30days,
prepareitasfollows:
1.Cleanthemachine;refertoCleaningthe
Machine(page35).
2.Starttheengine.Allowtheenginetoidlefor3
minutesandthenstoptheengine.
3.Draintheengineoilwhiletheengineisstill
warm,andlltheenginewithnewoil;referto
ChangingtheEngineOil(page30).
4.Pushthedecompressionleverdownandholdit
whileslowlypullingtherecoilstarter2or3times.
Note:Donotstarttheengine.
5.Drainthefueltankbyunscrewingfueldrainplug
andcollectingfuelinafuelcontainer.
Note:Disposeofthefuelproperly;recycleit
accordingtolocalcodes.
6.Checkandtightenallbolts,nuts,andscrews.
Repairorreplaceanypartthatisdamaged.
7.Paintallscratchedorbaremetalsurfaceswith
paintavailablefromyourAuthorizedService
Dealer.
8.Storethemachineinaclean,drygarageor
storagearea.
9.Coverthemachinetoprotectitandkeepitclean.
36
Page 37

Troubleshooting
Problem
Theenginedoesnotstart.
Theenginerunsrough.
Thereiswhiteorblackexhaustsmoke.
PossibleCauseCorrectiveAction
1.Ontheenginecowl,the
engine-speed-controlhandleis
notallthewayintotheSTARTposition.
2.Thefuel-shutoffleverisintheOFF
position.
3.Thefueltankisempty.3.Fillthetankwithfreshfuel.
4.Thefuelisbad;theenginewasstored
withouttreatingordrainingthefuel,or
itwaslledwithbaddiesel.
5.Thefuellterisclogged.5.Replacethefuellter.
1.Theair-lterisclogged.1.Cleanorreplacetheairlter.
2.Thereiswaterorcontaminantsinthe
fuel.
3.Thereistoomuchoilintheengine.3.Draintheoiltotheproperlevel.
1.Theengineisoverloaded.1.Reducetheload.
2.Theair-cleanerelementisclogged.
3.Improperdieselfuelhasbeenputin
thefueltank.
4.Thefuel-injectionsystemhasan
incorrectspraypattern.
5.Thereisexcessiveintakeorexhaust
valveclearance.
6.Theengineisburningoil.
1.Pulltheengine-speed-controlhandle
totheSTARTpositionandlockit.
2.Movethefuel-shutofflevertotheON
position.
4.Drainthefueltankandllitwithfresh
diesel.
2.Drainandllthetankwithfreshfuel.
2.Cleantheelementorreplaceit.
3.Fillthetankwiththerecommended
dieselfuel.
4.ContactyourAuthorizedService
Dealer.
5.ContactyourAuthorizedService
Dealer.
6.ContactyourAuthorizedService
Dealer.
Thedrumdoesnotturn.1.Thechainislooseordamaged.
Thedrumdoesnottilt.1.Thedrum-tiltbrakeisengaged.1.Disengagethedrum-tiltbrake.
Thedrumchattersorturnserratically .
1.T eetharemissingfromthegears.
2.Thegearsaremisaligned.
1.Thereisdebrisinthedrum.1.Removethedebris. Themachinevibratesexcessively .
2.Themixingpaddlesaredamaged.
1.ContactyourAuthorizedService
Dealer.
1.ContactyourAuthorizedService
Dealer.
2.ContactyourAuthorizedService
Dealer.
2.ContactyourAuthorizedService
Dealer.
37
Page 38

Notes:
Page 39

Notes:
Page 40

 Loading...