

Page 1
FORM NO. 3318–841
SUPER RECYCLERr MOWER
BAGGING KIT
MODEL
MODEL NO. 59195
Since this instruction sheet covers only a minimal
amount of information necessary to maintain and
operate your mower, we suggest that you keep this
material with your Operator’s Manual so that both
may be referred to for instructions concerning safe
operation and proper maintenance procedures.
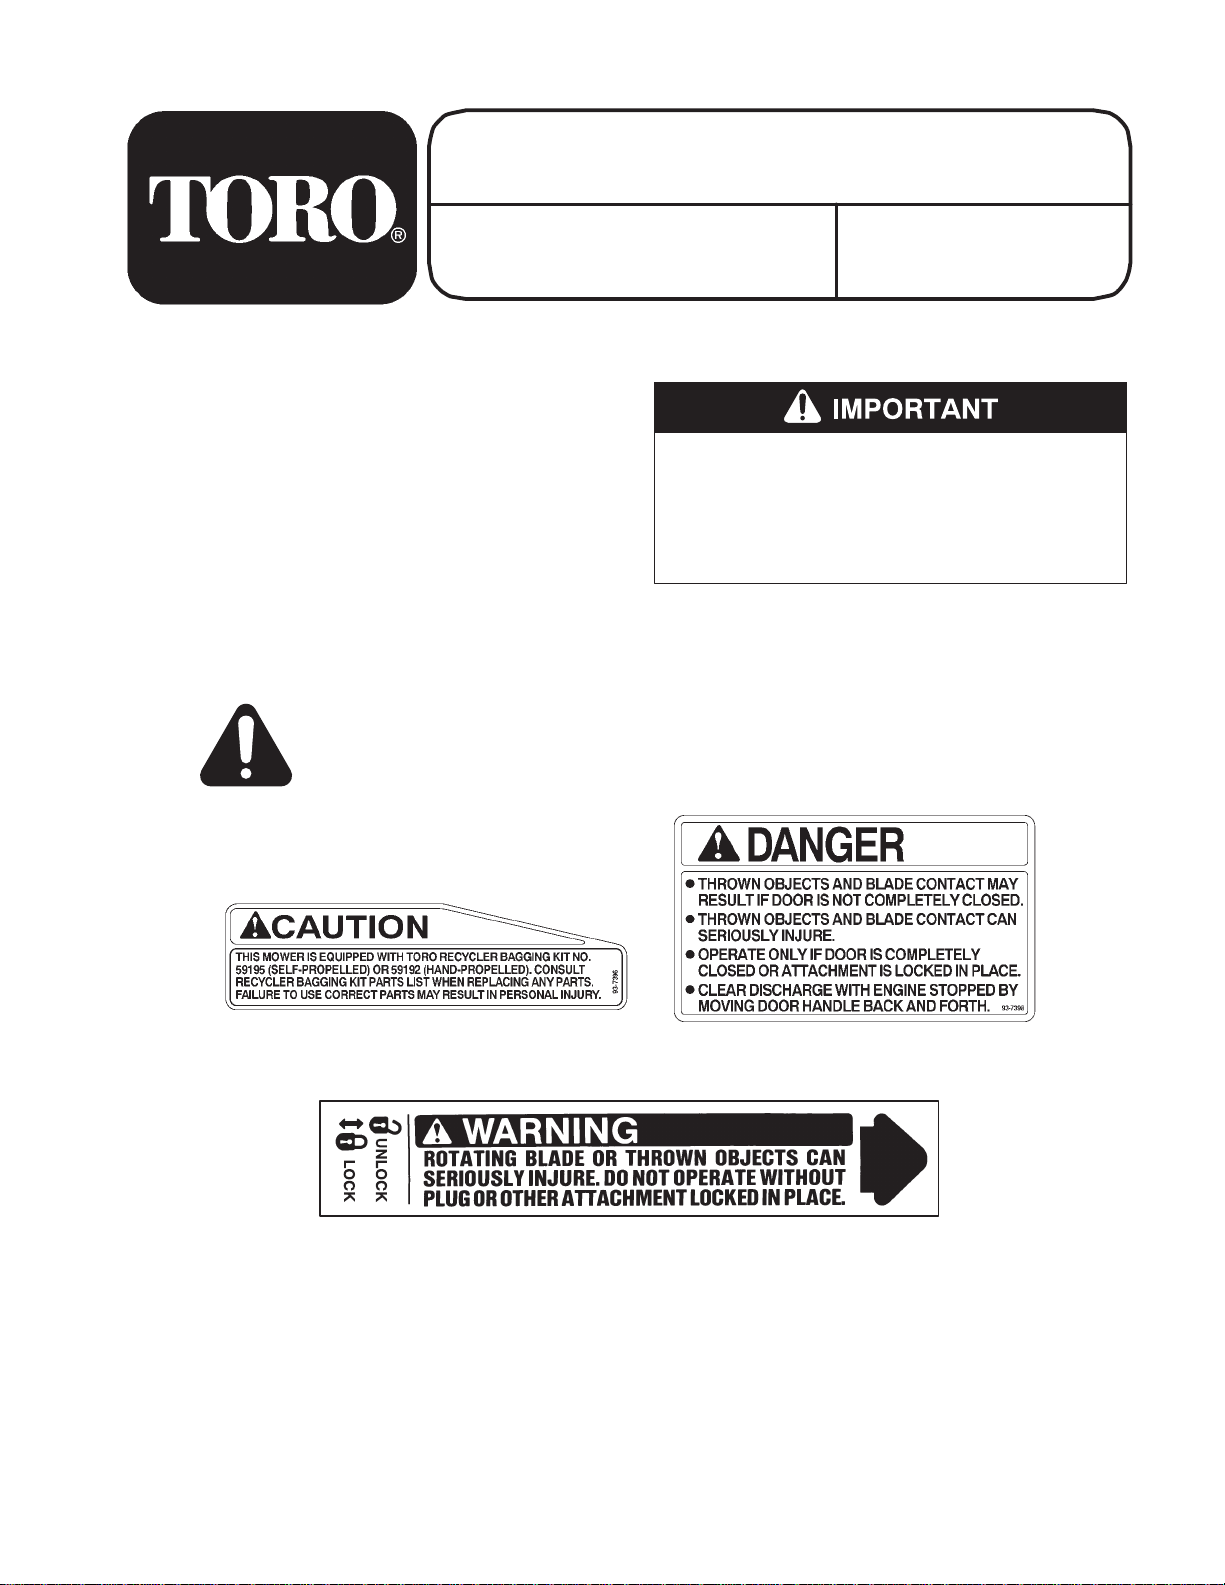
Safety
and Instruction Decals
Safety decals and instructions are easily visible to the operator and are located near
any area of potential danger. Replace any decal that is damaged or lost.
NO. 59192
INSTALLATION
INSTRUCTIONS
Y
our Recycler
permit bagging. Make sure that your dealer is
aware of this whenever parts are ordered or
servicing is r
r mower has been updated to
equired.
ON REAR OF MOWER DECK
(Part No. 93-7396)
ON DISCHARGE TUNNEL PLUG
E
The T
ON DISCHARGE TUNNEL
oro Company – 1996
All Rights Reserved
Page 2
Kit
Contents
DESCRIPTION QTY.
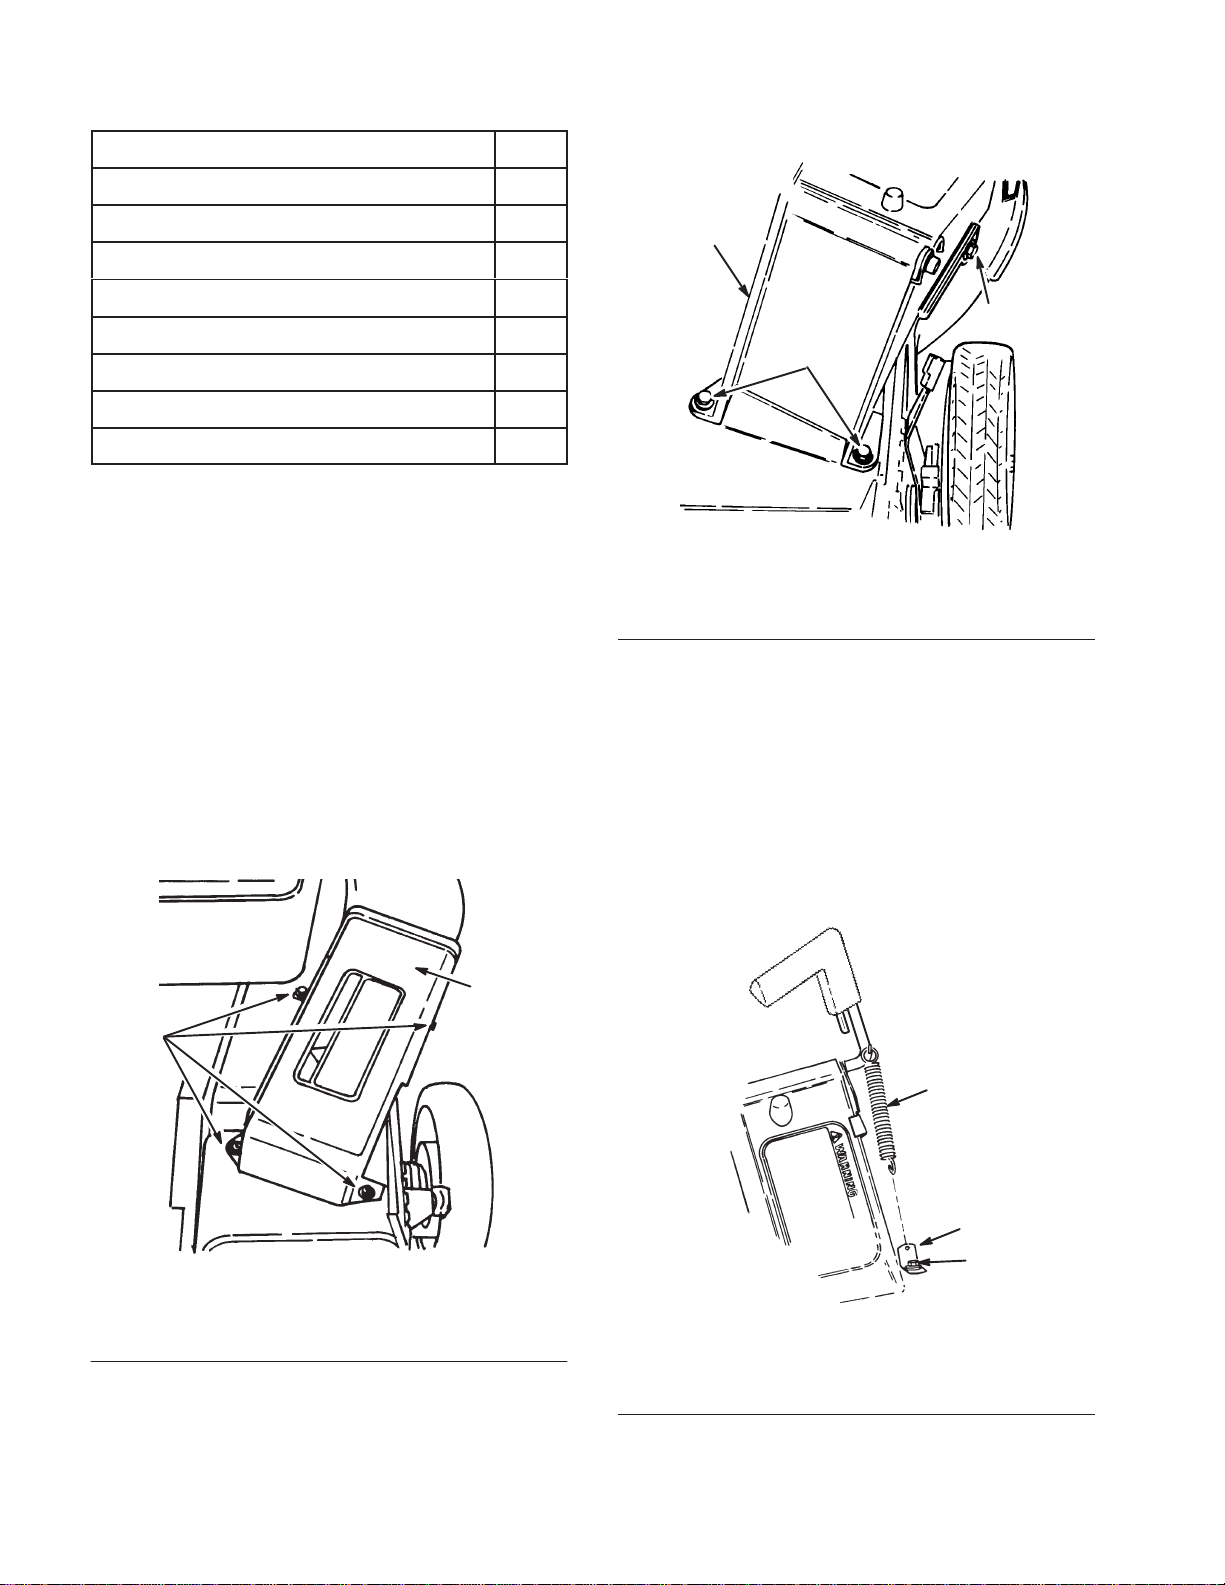
3. Position discharge tunnel and door assembly on
deck. Align holes in discharge tunnel with holes
in deck (Fig. 2).
Discharge
Discharge T
Spring 1
Spring Bracket
Grass Bag Assembly (model 59192)
Grass Bag Assembly (model 59195)
Decal 1
Installation Instruction Sheet
Plug Assembly
unnel Assembly
Assembly
Install
1. Remove spark plug wire from spark plug.
2. Remove and save the (4) bolts securing the
Discharge T
unnel
Note: Determine left and right sides of
mower by standing behind handles.
Recycler mower cover and deflector assembly
to the deck (Fig. 1). Save the assembly for
possible future reinstallation.
1
1
1
1
1
1
1. Discharge
2. V
1
tunnel
ertical bolts
2
Figure 2
3.
Horizontal bolt
3
420
4. Fasten the front right, rear right, and rear left
corners of discharge tunnel to deck, using the
bolts saved from step 2. Make sure the shorter
horizontal bolt is reinstalled in the front right
location from which it was removed in step 2.
5. Secure spring bracket and discharge tunnel to
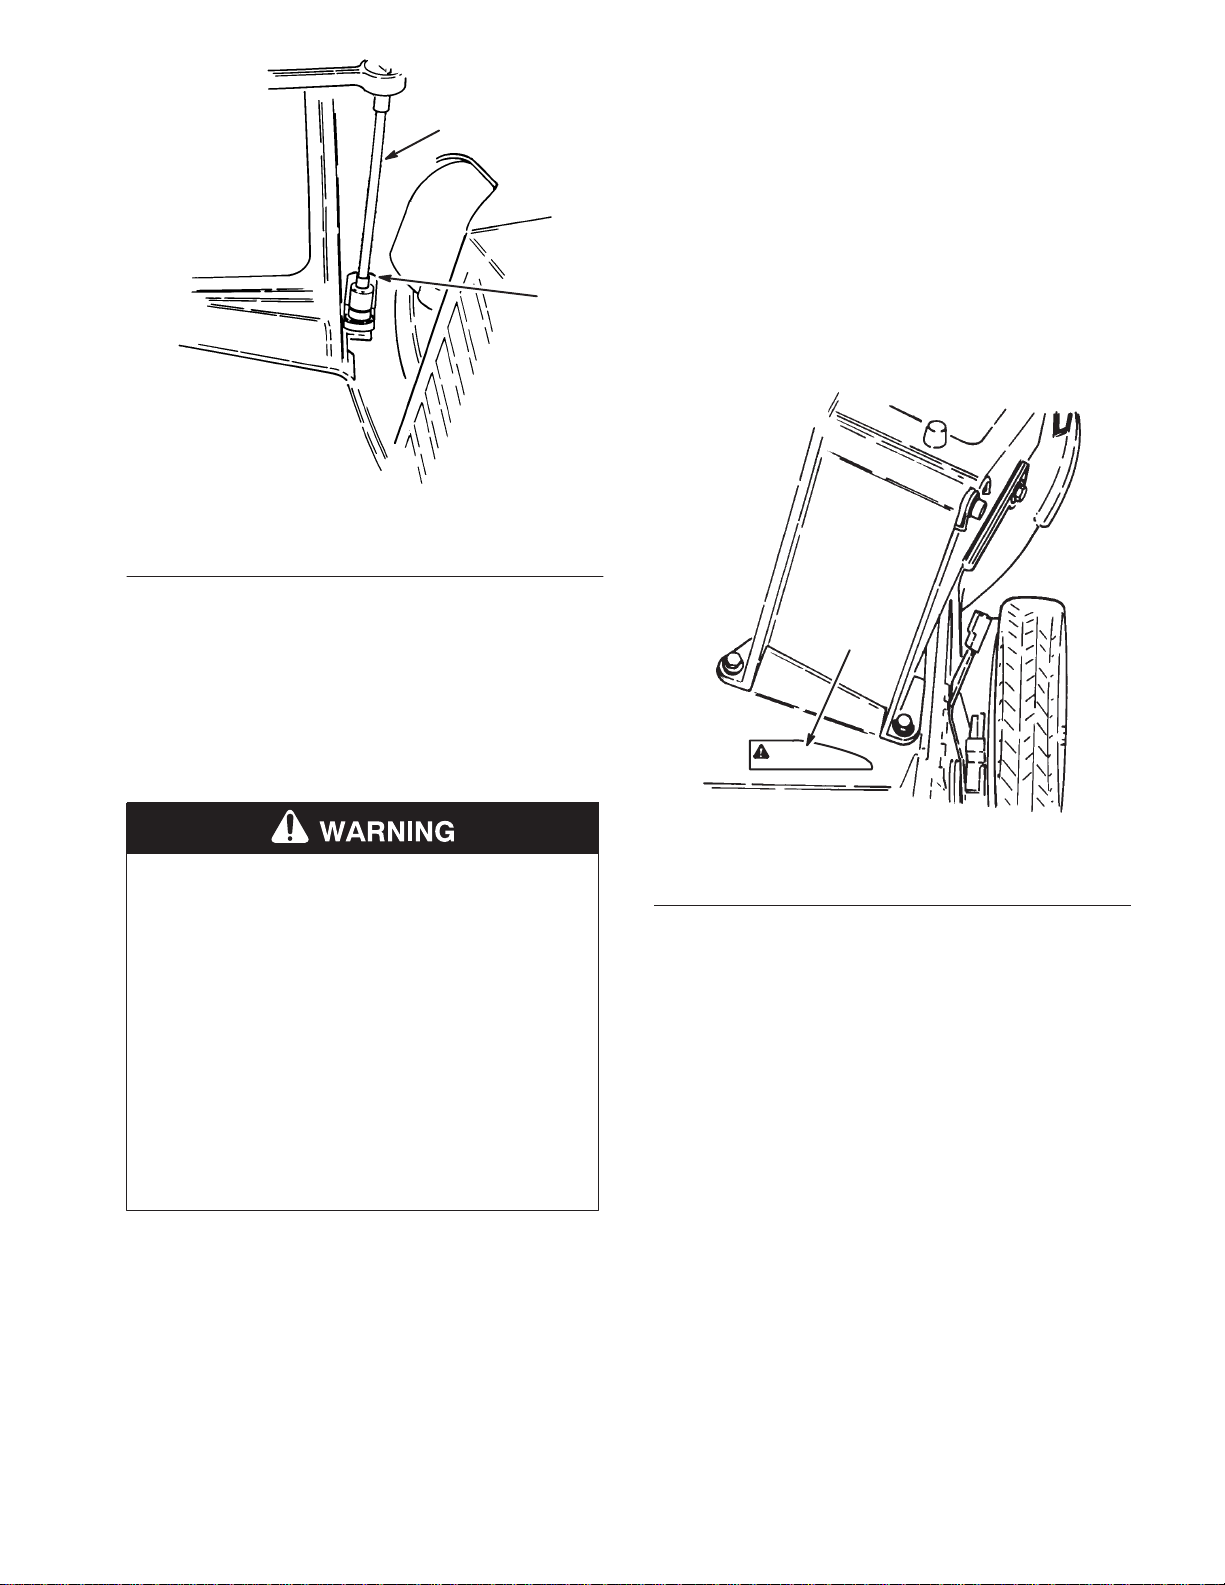
deck with left front bolt (Fig. 3). A socket set
extension may be necessary (Fig. 4).
1. Bolt
2
1
(4)
Figure 1
2.
Cover and deflector
assembly
2
1
2
503
1. Spring
2. Spring
bracket
Figure 3
3.
Left front bolt
3
1911
Page 3
Install
Bagging Decal
1
2
505
1. Socket
Figure
set extension
4
2.
Spring bracket
6. Hook end of spring through small hole on spring
bracket (Fig. 3).
7. Open and close discharge door to ensure that
spring is not contacting any part of engine. Make
sure discharge tunnel door closes when handle is
released.
1. Thoroughly clean flat area of mower deck
behind discharge tunnel with a soap and water
solution.
Note: Deck must be dry before installing
decal.
2. Install decal in area shown in Figure 5. Do not
place bagging decal over model/serial number
decal.
1
POTENTIAL HAZARD
•
Be sur
e that spring does not contact gas
tank or any other part of engine.
WHAT CAN HAPPEN
• Wear between spring and engine parts may
result in an unsafe operating condition.
HOW TO AV
OID THE HAZARD
• If spring contacts any part of engine, do not
install bagger kit on mower. If you need
assistance contact an Authorized Toro
Service Dealer before proceeding.
1. Decal
420
Figure 5
location
3
Page 4

Operation
Using
Grass Bag
1. Stop the engine and wait for all moving parts to
stop.
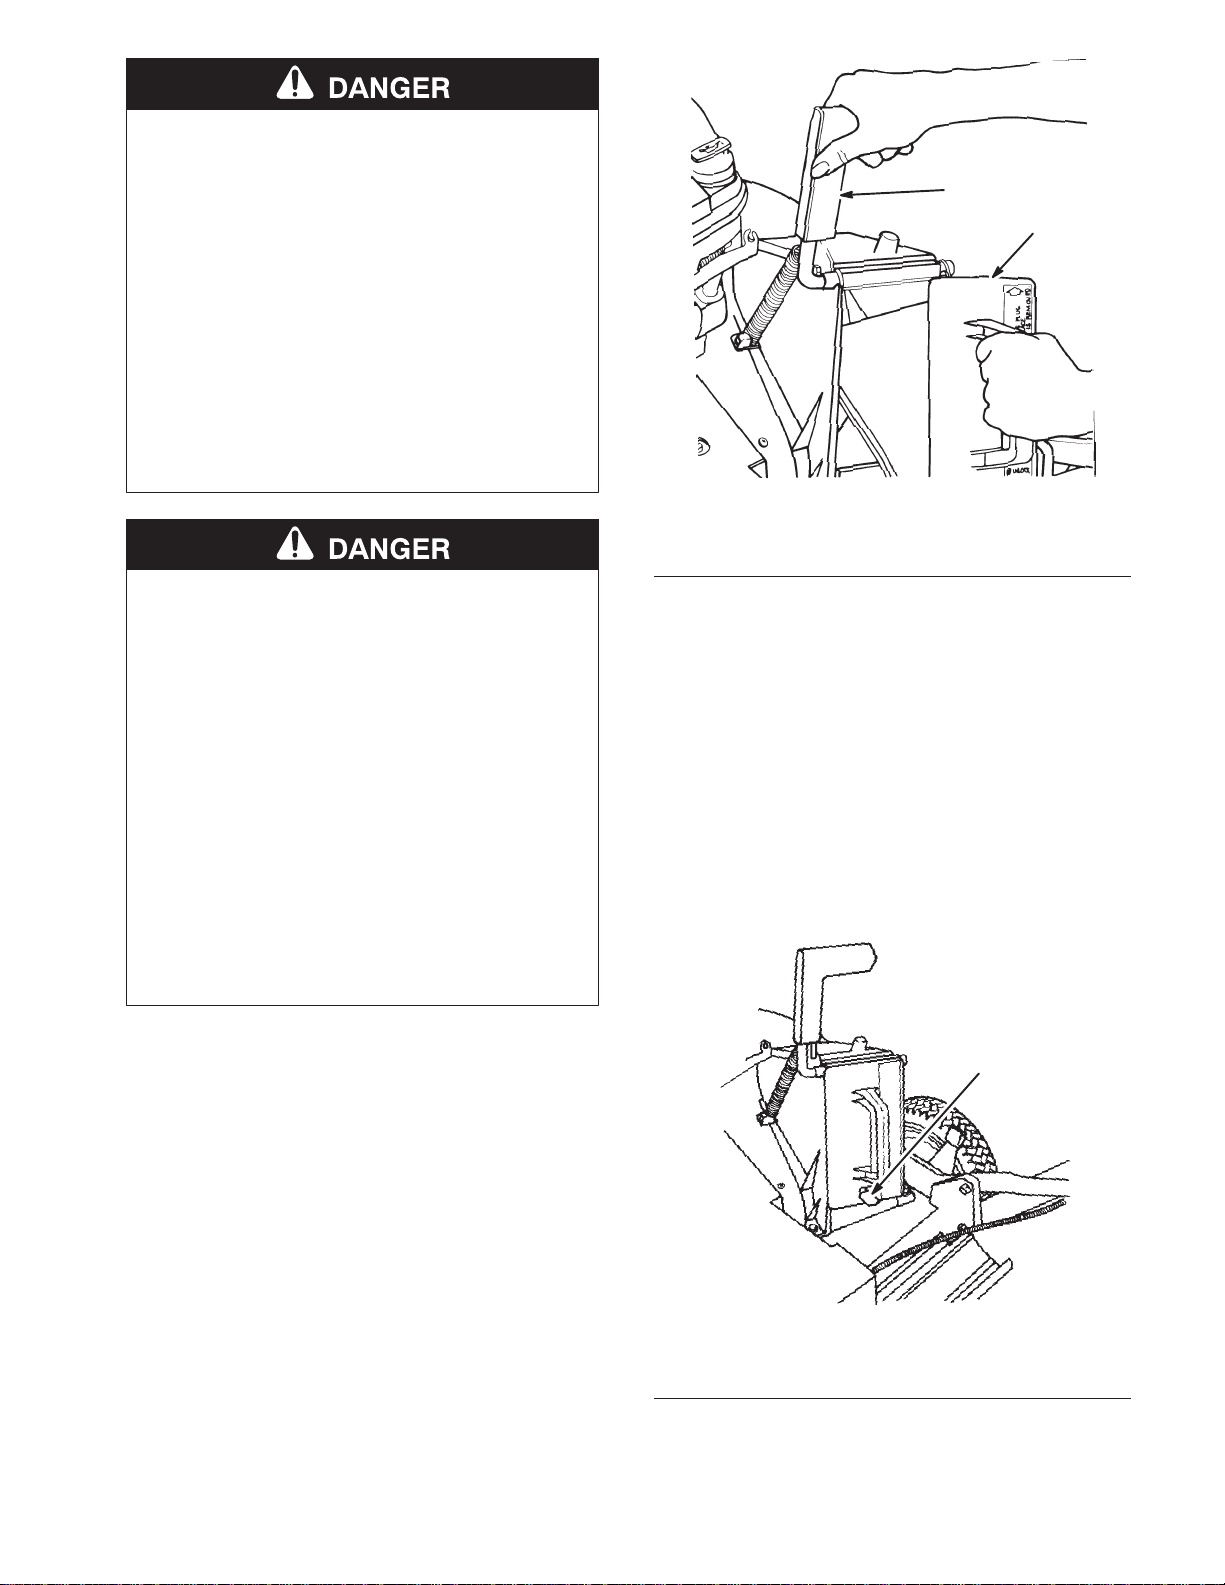
2. Ensure discharge door handle is fully forward
and pin is engaged in catch (Fig. 6).
2
1
3
1912
1
1913
Figure 7
1. Pin
in bag notch
5. EMPTYING BAG—Stop engine and wait for all
moving parts to stop. Lift discharge door handle
straight up and move it forward to contact latch
plate (Fig. 6). Grasp bag frame handle and rear
of grass bag and lift bag off mower. Gradually
tip bag forward to empty clippings.
Figure 6
1. Bag
frame on retaining
post
Pin contacting latch plate
2.
3.
Handle fully
forward–discharge door
closed
3. INSTALLING BAG—Slide hole in bag frame
onto retaining post on discharge tunnel (Fig. 6)
and set rear of bag frame onto lower handle.
4. Pull discharge door handle forward until pin
clears ramp on bag door and move handle
rearward until pin locks in bag notch (Fig. 7).
Discharge door in mower housing is now open.
6. To reinstall bag, repeat steps 2–4.
POTENTIAL HAZARD
• Grass clippings and other objects can be
thrown from an open discharge tunnel.
WHAT CAN HAPPEN
• Objects thrown with enough force could
cause serious personal injury or death to
operator or bystander.
HOW TO AV
OID THE HAZARD
• Never open door on discharge tunnel when
engine is running unless the grass bag,
optional side discharge attachment or
discharge tunnel plug is securely installed.
4
Page 5
POTENTIAL HAZARD
• A worn grass bag could allow small stones
and other similar debris to be thrown in
operator’s or bystanders direction.
WHAT CAN HAPPEN
• Thrown objects can cause serious personal
injury or death to operator or bystanders.
1
2
HOW TO AV
OID THE HAZARD
• Check the grass bag frequently. If it
damaged, install a new genuine TORO
replacement bag that has this or a similar
warning.
POTENTIAL HAZARD
• Thrown objects may result if discharge
door does not close completely.
WHAT CAN HAPPEN
• Thrown objects can cause serious personal
injury or death.
HOW TO AV
OID THE HAZARD
• If discharge door cannot be closed because
grass clippings clog discharge area, stop
engine and gently move discharge door
handle back and forth until door can be
closed completely. If door still cannot be
closed, remove obstruction with a stick, not
your hand.
Figure 8
1. Discharge
door handle
2.
Plug rotated clockwise
3. Push the plug all the way in until the spring clip
on the bottom of the plug clicks into place,
locking the plug securely into the discharge
tunnel (Fig. 9) Release the discharge door handle
to lock the top of the plug.
4. To remove the plug, move the discharge door
handle rearwards while at the same time lift up
the spring clip on the bottom of the plug. When
the plug is unlocked, pull it out of the discharge
tunnel.
1914
Using
Discharge T
unnel Plug
1. Make sure engine is shut off. Open the discharge
door by moving handle rearwards (Fig. 8). Hold
the discharge door handle to prevent the
spring–loaded door from closing while inserting
the plug.
2. Since the plug is slightly wider than the
discharge tunnel opening, you must rotate the
plug clockwise slightly while inserting it
(Fig. 8). Make sure the arrow on the plug decal
is pointing upwards.
1. Spring
1
1915
Figure 9
clip
5
Page 6

Check
Blade Brake Clutch
System
Maintenance
If your mower has a BBC (Blade Brake Clutch)
safety system, the grass bag can be used to check for
BBC system deterioration. (For an additional BBC
test, refer to “Check Control Bar” section in your
operator’s manual.)
1. Install the empty grass bag on the discharge
tunnel.
2. Push the control bar down to the lowest position
(Fig. 10).
3. Lift the control bar to the normal “blade engaged
position, about 2” below the handle. The bag
should begin to inflate which indicates the blade
is engaged and rotating.
4. Release control bar. If the bag does not
immediately deflate, it indicates the blade is still
rotating. Deterioration of the Blade Brake Clutch
mechanism may have set in, which could result
in an unsafe operating condition. Have mower
inspected by an Authorized TORO Service
Dealer.
2
Cleaning
To ensure best performance, the discharge tunnel plug
must be cleaned after each use. When grass is thick
and lush, clippings may collect on and around the
plug; this may make plug removal difficult. After
each use, remove plug from discharge tunnel and
clean off all debris.
Always be sure that discharge tunnel door closes
when handle is released. If debris prevents discharge
door from closing, clean inside of discharge tunnel
and door thoroughly.
1. Stop engine and pull wire off spark plug.
Remove key from switch (key start models).
2. Tip mower on side opposite from the spark plug.
Avoid rotating blade because starting problems
may result.
3. Remove dirt and grass clippings that stick to
housing with a hardwood scraper. Avoid burrs
and sharp edges.
4. Turn mower upright.
5. Remove debris from inside of discharge tunnel.
1. Control
bar
6. Remove screws securing belt cover (Fig. 11) to
mower housing. Lift off cover and brush out all
debris from belt area. Reinstall belt cover.
1
147
Figure 10
2. T
wo inches
1. Belt
cover
2
Figure 1
1
2.
1
281
Screw (2)
7. Clean discharge tunnel plug.
6
Page 7

FORM NO. 3318–841F
KIT DE SAC À HERBE POUR
TONDEUSE SUPER RECYCLER
r
MODÈLE N°
MODÈLE N° 59195
Ce feuillet d’instructions ne contient que le minimum
d’informations nécessaires pour l’utilisation et
l’entretien de la tondeuse. Conservez-le avec le
manuel d’utilisation de votre tondeuse pour les
consulter au besoin afin d’utiliser et entretenir la
tondeuse correctement, en toute sécurité.
Décalcomanies
Des décalcomanies et instructions de sécurité bien visibles sont placées près de
tous les endroits potentiellement dangereux. Remplacer toute décalcomanie
endommagée ou manquante.
de sécurité et instructions
59192
INSTRUCTIONS
DE MONTAGE
Si vous avez adapté votre tondeuse Recyclerr
pour l’utilisation d’un sac à herbe, n’oubliez
pas de le signaler au vendeur lors de la
commande de pièces ou de l’entretien.
A L
’ARRIERE DU CARTER DE T
(Réf. n° 93-7396)
SUR L
E
ONDEUSE
’OBTURA
The T
Tous droits réservés
TEUR D’EJECTION
oro Company – 1996
SUR LE CONDUIT D’EJECTION
Page 8

Contenu
DESCRIPTION NBRE
du kit
3. Placer l’ensemble de conduit d’éjection et volet
sur le carter de tondeuse, en faisant correspondre
les trous de montage (Fig. 2).
Obturateur
Ensemble de conduit d’éjection
Ressort 1
Ancrage de ressort
Sac à herbe (modèle 59192)
Sac à herbe (modèle 59195)
Décalcomanie 1
Feuille d’instructions de montage
d’éjection
Assemblage
Montage
Remarque : Pour identifier les côtés gauche et
1. Déconnecter le fil de la bougie.
du conduit d’éjection
droit de la tondeuse, se tenir en
position de conduite, derrière les
mancherons.
1
1
1
1
1
1
1. Conduit
2.
Boulons verticaux
1
d’éjection
2
Figure 2
3.
Boulon horizontal
3
420
4. Fixer les coins avant droit, arrière droit et arrière
gauche du conduit d’éjection au carter de
tondeuse, en utilisant les boulons mis de côté au
point 2. Le boulon horizontal, plus court, doit
être réinséré dans la position avant droit d’où on
l’avait retiré au point 2.
2. Retirer et mettre de côté les 4 boulons qui fixent
l’ensemble de couvercle et déflecteur de paillage
Recycler au carter de tondeuse (Fig. 1).
Conserver soigneusement l’ensemble pour un
remontage ultérieur éventuel.
2
1
Figure 1
1. Boulons
(4)
2.
Ensemble de couvercle et
déflecteur de paillage
503
5. Fixer l’ancrage de ressort et le conduit d’éjection
au carter à l’aide du boulon avant gauche
(Fig. 3). Il peut être nécessaire d’utiliser une
allonge de clé à douille (Fig. 4).
1
2
3
1911
Figure 3
1. Ressort
2. Ancrage
de ressort
3.
Boulon avant gauche
2
Page 9

Pose
de la décalcomanie de
1
2
Figure
1. Allonge
6. Accrocher l’extrémité du ressort dans le petit
7. Ouvrir et fermer le volet d’éjection pour vérifier
de clé à douille
trou de l’ancrage de ressort (Fig. 3).
que le ressort ne touche aucune partie du moteur.
Vérifier que le volet d’éjection se ferme
lorsqu’on lâche la poignée.
4
2.
Ancrage de ressort
sac à herbe
1. Nettoyer à fond la partie plate du carter de
tondeuse située derrière le conduit d’éjection,
avec de l’eau et du savon.
Remarque : Avant d’appliquer la décalco-
manie, s’assurer que la surface du
carter est parfaitement sèche.
2. Appliquer la décalcomanie à l’endroit indiqué à
la Figure 5. Ne pas poser la décalcomanie sur
celle de numéros de modèle et de série.
505
1
DANGER POTENTIEL
• Vérifier que le ressort ne touche pas le
réservoir d’essence, ni aucune autre partie
du moteur.
QUELS SONT LES RISQUES?
• L’usure due au frottement du r
une partie du moteur peut affecter la
sécurité d’utilisation.
COMMENT SE PROTÉGER?
essort contr
• Si le ressort touche une partie quelconque
du moteur, ne pas monter le kit de sac à
herbe sur la tondeuse. Demander
éventuellement conseil à un vendeur
réparateur Toro agréé avant de poursuivre.
420
Figure 5
1. Emplacement
e
Fonctionnement
Usage
1. Couper le moteur et attendre l’arrêt complet de
toutes les pièces mobiles.
2. Vérifier que la poignée du volet d’éjection est
entièrement abaissée vers l’avant et que l’ergot
est bien engagé dans l’encoche (Fig. 6).
de la décalcomanie
du sac à herbe
3
Page 10

3. ACCROCHAGE DU SAC—Glisser le trou de
l’armature du sac sur le tenon qui surmonte le
conduit d’éjection (Fig. 6) et poser l’arrière de
l’armature du sac sur le mancheron inférieur.
2
1
5. VIDAGE DU SAC—Couper le moteur et
attendre l’arrêt de toutes les pièces mobiles.
Soulever vers le haut la poignée du volet
d’éjection et abaisser la poignée vers l’avant
jusqu’à ce qu’elle touche la plaque de
verrouillage (Fig. 6). Prendre le sac par la
poignée de l’armature et par le fond, et le retirer
de la tondeuse. Incliner le sac progressivement
pour le vider.
6. Pour remettre le sac en place, répéter les points 2
à 4.
DANGER POTENTIEL
• Si le volet d’éjection est ouvert, les déchets
d’herbe et autres débris peuvent être
projetés.
3
Figure 6
1. Armature
accrochée sur le tenon
2.
Ergot contre la plaque de
verrouillage
du sac à herbe
Poignée à fond vers
3.
l’avant. V
fermé.
olet d’éjection
4. Tirer la poignée du volet d’éjection vers l’avant
pour dégager l’ergot de l’encoche, et ramener la
poignée vers l’arrière jusqu’à ce que l’ergot
s’engage dans le cran du sac (Fig. 7). Le volet
d’éjection à l’intérieur du carter de tondeuse est
alors ouvert.
1
1912
QUELS SONT LES RISQUES?
• Ces débris peuvent être projetés avec une
force suffisante pour infliger des blessures
graves, voire mortelles, à l’utilisateur ou
aux personnes à proximité.
COMMENT SE PROTÉGER?
• Ne jamais ouvrir le volet d’éjection lorsque
le moteur tourne s’il n’y a pas un sac à
herbe, un éjecteur latéral (en option) ou un
obturateur correctement verrouillé sur le
conduit d’éjection.
DANGER POTENTIEL
• Si le sac à herbe est usé, des gravillons ou
des débris similaires peuvent être projetés
dans la direction de l’opérateur ou des
personnes se tenant à proximité.
QUELS SONT LES RISQUES?
• Les objets projetés peuvent occasionner des
blessures graves, voire mortelles, à
l’utilisateur ou aux personnes à proximité.
1. Ergot
4
dans le cran du sac
Figure 7
1913
COMMENT SE PROTÉGER?
• Examiner fréquemment le sac. S’il est
endommagé, le remplacer par un sac
TORO neuf d’origine portant cet
avertissement ou une mise en garde
similaire.
Page 11

DANGER POTENTIEL
• Des objets risquent d’être projetés si le
volet d’éjection n’est pas complètement
fermé.
QUELS SONT LES RISQUES?
• Les objets projetés peuvent occasionner des
blessures graves, voire mortelles.
COMMENT SE PROTÉGER?
• Si le volet d’éjection ne peut pas être fermé
du fait d’un blocage par des déchets
d’herbe, couper le moteur et actionner
doucement la poignée dans un sens et dans
l’autre jusqu’à ce que le volet se ferme
entièrement. Si le volet ne se ferme toujours
pas, retirer ce qui l’obstrue à l’aide d’un
bâton, pas avec la main.
1. Poignée
d’éjection
du volet
Figure 8
1
2. Pivotement
de
droite à gauche
2
de
l’obturateur
1914
Usage
de l’obturateur
d’éjection
1. S’assurer que le moteur est arrêté. Ouvrir le volet
d’éjection en rabattant la poignée du volet vers
l’arrière (Fig. 8). Tenir la poignée du volet pour
empêcher celui-ci de se refermer durant
l’insertion de l’obturateur.
2. L’obturateur étant légèrement plus large que
l’ouverture de l’éjecteur, le faire pivoter
légèrement dans le sens des aiguilles d’une
montre pour l’insérer (Fig. 8). La flèche sur la
décalcomanie de l’obturateur doit être dirigée
vers le haut.
3. Insérer l’obturateur à fond jusqu’à ce que le
levier de verrouillage au bas de l’obturateur
clique en position et verrouille solidement
l’obturateur dans le conduit d’éjection (Fig. 9).
Lâcher la poignée du volet d’éjection pour
verrouiller le haut de l’obturateur.
1
1. Levier
de verrouillage
Contrôle
Figure
du système
9
d’embrayage de frein de lame
1915
4. Pour retirer l’obturateur, déplacer la poignée du
volet d’éjection vers l’arrière et soulever en
même temps le levier de verrouillage au bas de
l’obturateur. Lorsque l’obturateur est
déverrouillé, le retirer du conduit d’éjection.
(BBC)
Sur
les tondeuses équipées du système de sécurité
d’embrayage de frein de lame (BBC), le sac à herbe
peut être utilisé pour contrôler le bon fonctionnement
5
Page 12

du système BBC. (Un autre test de fonctionnement du
système BBC est décrit sous le titre “Contrôle de la
barre de commande” dans le manuel d’utilisation des
tondeuses.)
s’accumuler sur l’obturateur et tout autour, ce qui
peut rendre le retrait de l’obturateur difficile. Après
chaque utilisation, retirer l’obturateur de l’éjecteur et
le débarrasser de tous les débris.
1. Monter le sac à herbe vide sur le conduit
d’éjection.
2. Abaisser la barre de commande dans la position
la plus basse (Fig. 10).
3. Lever la barre de commande dans la position
normale d’embrayage de la lame, environ 2”
(5 cm) sous le mancheron. Le sac doit
commencer à se gonfler, ce qui indique que la
lame est embrayée et qu’elle tourne.
4. Lâcher la barre de commande. Si le sac ne se
dégonfle pas immédiatement, c’est que la lame
tourne encore. Le mécanisme d’embrayage de
frein de lame (BBC) est peut-être en train de se
détériorer, auquel cas la sécurité d’utilisation
n’est plus assurée. Faire inspecter la tondeuse
par un vendeur réparateur TORO agréé.
2
Toujours s’assurer que le volet d’éjection se referme
entièrement lorsqu’on lâche la poignée. Si des débris
empêchent la fermeture complète du volet d’éjection,
bien nettoyer l’intérieur du conduit d’éjection et du
volet.
1. Débrancher le fil de la bougie. Retirer la clé de
contact (modèles à démarrage électrique).
2. Basculer la tondeuse sur le côté opposé à la
bougie. Eviter de faire tourner la lame, pour ne
pas provoquer des problèmes de démarrage.
3. Eliminer la saleté et les débris d’herbe collés au
carter de la tondeuse à l’aide d’un racloir en
bois. Eviter les bavures et les bords tranchants.
4.
Redresser la tondeuse.
5. Nettoyer l’intérieur du conduit d’éjection.
6. Retirer les vis de fixation du carter de courroie
au carter de tondeuse (Fig. 11). Déposer le carter
de courroie, brosser tous les débris accumulés
dans la zone de la courroie, puis remonter le
carter de courroie.
1
Figure 10
1. Barre
de commande
2.
Deux pouces (5 cm)
Entretien
Nettoyage
Pour obtenir les meilleurs résultats, nettoyer
l’obturateur après chaque utilisation. Si l’herbe est
drue et fournie, les déchets de tonte risquent de
6
147
2
1. Carter
Figure 1
de courroie
1
2. V
is (2)
7. Nettoyer l’obturateur d’éjection.
1
281
Page 13

FORM NO. 3318–841ES
KIT DE ENSACADO PARA LA
CORTADORA DE CÉSPED
SUPER RECYCLER
r
MODELO
MODELO N° 59195
Dado que esta hoja de instrucciones cubre sólo una
cantidad mínima de la información necesaria para el
mantenimiento y funcionamiento de su cortadora de
césped, le sugerimos que la guarde junto con su
Manual del operario, de forma que pueda consultar
ambos documentos cuando necesite consejos sobre la
seguridad durante el funcionamiento y los
procedimientos de mantenimiento correctos.
Calcomanías
Las calcomanías de seguridad e instrucciones están colocadas en un lugar
fácilmente visible por el operador y cerca de las piezas potencialmente peligrosas.
Reemplace cualquier calcomanía dañada o despegada.
de seguridad e instrucciones
N° 59192
INSTALACIÓN
INSTRUCCIONES
Su cortadora de césped Recyclerr ha sido
actualizada de forma que permita la
operación de ensacado. Cerciór
notificarlo a su concesionario siempre que
pida piezas de repuesto o solicite
reparaciones.
ese de
EN LA P
CUBIERT
(Pieza N
ARTE TRASERA DE LA
A DE LA CORT
° 93-7396)
EN EL T
ADORA
APÓN DEL CANAL DE DESCARGA
E
The T
Todos los derechos reservados
EN EL CANAL DE DESCARGA
oro Company – 1996
Page 14

Contenido
DESCRIPCIÓN CANT.
Conjunto
Conjunto del canal de descarga
Resorte 1
del tapón de descarga
del kit
1
1
1
2
Soporte del resorte
Conjunto del saco para hierba
(modelo 59192)
Conjunto del saco para hierba
(modelo 59195)
Calcomanía 1
Hoja de instrucciones para la
instalación
Montaje
Instalación
descarga
Nota: Determine los lados izquierdo y
1. Desenchufe el cable de la bujía.
del canal de
derecho de la cortadora colocándose
detrás de la manija.
1
1
1
503
Figura 1
1
1. Perno
(4)
2.
Conjunto de tapa y
deflector
1
3
2
2. Saque y guarde los cuatro (4) pernos que sujetan
el conjunto del deflector y la tapa a la cubierta de
la cortadora de césped Recycler (Fig. 1).
Guarde el conjunto por si desea volver a
utilizarlo en el futuro.
3. Coloque el conjunto del canal de descarga y la
puerta en la cubierta. Alinee los orificios del
canal de descarga con los orificios de la cubierta
(Fig. 2).
4. Apriete las esquinas delantera derecha, delantera
izquierda y trasera izquierda del canal de
descarga a la cubierta, utilizando los pernos que
reservó en el paso 2. Cerciórese de que coloca el
perno horizontal más corto en la posición
delantera derecha, de donde fue retirado en el
paso 2.
Figura
2
1. Canal
2.
de descarga
Pernos verticales
3.
Perno horizontal
5. Sujete el soporte del resorte y el canal de
descarga a la cubierta con el perno delantero
izquierdo (Fig. 3). Puede ser necesario utilizar
una extensión para el juego de cubos (Fig. 4).
420
2
Page 15

1. Resorte
2. Soporte
del resorte
Figura 3
1
2
3
3.
Perno delantero izquierdo
1911
PELIGRO POTENCIAL
• Cerciórese de que el resorte no esté en
contacto con el depósito de gasolina ni
ninguna otra pieza del motor.
LO QUE PUEDE SUCEDER
• El roce entre el resorte y las piezas del
motor puede causar unas condiciones de
funcionamiento inseguras.
CÓMO EVIT
AR EL PELIGRO
• Si el resorte está en contacto con cualquier
pieza del motor, no instale el kit ensacador
en la cortadora de césped. Si necesita
asistencia antes de proceder con la
instalación, póngase en contacto con un
concesionario de servicio autorizado de
Toro.
1
2
1. Extensión
cubos
Figura
para el juego de
4
2. Soporte
del resorte
6. Enganche el extremo del resorte por el agujero
pequeño del soporte del resorte (Fig. 3).
7. Abra y cierre la puerta de descarga para
comprobar que el resorte no esté en contacto con
ninguna parte del motor. Cerciórese de que la
puerta del canal de descarga se cierra cuando se
suelta la manija.
505
Instalación
de la calcomanía
de ensacado
1. Limpie minuciosamente con agua jabonosa la
zona plana de la cubierta de la cortadora situada
detrás del canal de descarga.
Nota: Antes de instalar la calcomanía, la
cubierta debe estar completamente
seca.
2. Coloque la calcomanía en la zona indicada en la
Figura 5. No coloque la calcomanía de
ensacado encima de la calcomanía del
modelo/número de serie.
1
Figura 5
1. Ubicación
de la calcomanía
420
3
Page 16

Funcionamiento
Utilización
del saco para
hierba
1. Pare el motor y espere a que se detengan todas
las pieza móviles.
2. Compruebe que el asa de la puerta de descarga
esté completamente hacia adelante y que el
pasador esté en el enganche (Fig. 6).
2
1
3
Figura 6
1. Marco
2.
del saco en el
poste de retención
Pasador en contacto con
la placa de enganche
3.
Asa completamente hacia
adelante-puerta de
descarga cerrada
1912
1
Figura 7
1. Pasador
en la ranura del saco
5. VACIADO DEL SACO—Detenga el motor y
espere a que todas las piezas móviles se
detengan. Levante el asa de la puerta de descarga
y muévala hacia adelante de forma que haga
contacto con la placa de enganche (Fig. 6).
Sujete el asa del marco del saco y la parte trasera
del saco para hierba y despéguelo de la
cortadora. Voltee el saco gradualmente hacia
adelante para vaciarlo de recortes.
6. Para volver a instalar el saco, repita los
pasos 2–4.
1913
3. INSTALACIÓN DEL SACO—Deslice el
orificio del marco del saco sobre el poste de
retención del canal de descarga (Fig. 6) y
coloque la parte posterior del marco del saco
sobre la manija inferior.
4. Hale el asa de la puerta de descarga hacia
adelante hasta que el pasador no interfiera con la
rampa del saco y muévala hacia atrás hasta que
el pasador enganche en la ranura del saco
(Fig. 7). Ahora la puerta de descarga de la caja
de la cortadora estará abierta.
4
PELIGRO POTENCIAL
• Por un canal de descarga abierto pueden
salir disparados r
objetos.
LO QUE PUEDE SUCEDER
ecortes de hierba y otros
• Los objetos lanzados con suficiente fuerza
pueden causar serias lesiones personales o
la muerte al operador o a un espectador.
CÓMO EVIT
AR EL PELIGRO
• Nunca abra la puerta del canal de descarga
cuando el motor esté funcionando, a menos
que estén seguramente instalados el saco
para hierba, los aditamento de descarga
lateral o el tapón del canal de descarga.
Page 17

Empleo
del tapón del canal de
descarga
PELIGRO POTENCIAL
• Un saco para hierba gastado puede
ocasionar que las piedrecillas y otros
residuos de tierra similar
es sean lanzados
en dirección del operador o de un
espectador.
LO QUE PUEDE SUCEDER
• Los objetos lanzados pueden causar serias
lesiones personales o hasta la muerte al
operador o los espectadores.
CÓMO EVIT
AR EL PELIGRO
• Examine el saco para hierba
frecuentemente. Si estuviese dañado, instale
un saco nuevo TORO legítimo que presente
esta advertencia u otra similar.
PELIGRO POTENCIAL
• Si la puerta de descarga no está
completamente cerrada podrían salir
objetos disparados.
1. Cerciórese de que el motor está apagado. Mueva
hacia atrás las asas para abrir la puerta de
descarga (Fig. 8). Sujete el asa de la puerta de
descarga para evitar que el mecanismo de resorte
de la puerta haga que ésta se cierra mientras
introduce el tapón.
2. Dado que el tapón es ligeramente más ancho que
la abertura de la puerta de descarga, es necesario
girarlo en sentido de las agujas del reloj al
mismo tiempo que se introduce (Fig. 8).
Cerciórese de que la flecha que aparece en la
calcomanía del tapón quede apuntando hacia
arriba.
1
2
LO QUE PUEDE SUCEDER
• Los objetos lanzados pueden causar serias
lesiones personales o incluso la muerte.
CÓMO EVIT
AR EL PELIGRO
• Si la puerta de descarga no puede cerrarse
por atascamiento de recortes de hierba en
el área de descarga, detenga el motor y
cuidadosamente mueva el asa de la puerta
de descarga hacia atrás y hacia adelante
hasta que pueda cerrarse completamente.
Si aún no pudiese cerrarse la puerta,
detenga el motor y quite la obstrucción con
un palo, nunca con la mano.
1. Asa
descarga
de la puerta de
Figura 8
2. T
apón girado en sentido
de las agujas del reloj
1914
5
Page 18

3. Intoduzca comletamente el tapón hasta que la
presilla de resorte situada en la parte inferior del
tapón encaje en su sitio, bloqueando el tapón el
canal de descarga (Fig. 9) Suelte el asa de la
puerta de descarga para bloquear la parte
superior del tapón.
4. Para sacar el tapón, mueva hacia atrás el asa de
la puerta de descarga al mismo tiempo que
levanta la presilla de resorte de la parte inferior
del tapón. Cuando el tapón esté liberado,
extráigalo del canal de descarga.
1
3. Hale la barra de control hasta la posición normal
de “cuchilla engranada”, aproximadamente
2 pulgadas (5 cm) por debajo de la manija. El
saco debería comenzar a inflarse, lo que indica
que la cuchilla está engranada y girando.
4. Suelte la barra de control. Si el saco no se
desinfla inmediatamente, la cuchilla sigue
girando, lo que indica que el mecanismo del
embrague del freno de la cuchilla se ha
deteriorado, lo que podría causar un
funcionamiento inseguro. Haga que un
concesionario de servicio autorizado de TORO
inspeccione la cortadora de césped.
2
1915
Figura 9
1. Presilla
Revisión
de resorte
del sistema de
embrague del freno de la
cuchila
Si su cortadora está equipada con un sistema de
seguridad EFC (Embrague del freno de la cuchilla),
se puede utilizar el saco para hierba para detectar el
grado de deterioro del sistema EFC (Para obtener
información acerca de otras pruebas relacionadas con
el EFC, consulte la sección “Revisión de la barra de
control” en su manual del operador).
1. Instale el saco para hierba vacío en el canal de
descarga.
2. Empuje la barra de control hacia abajo hasta la
posición más baja (Fig. 10).
1
147
Figura 10
1. Barrar
de control
2.
Dos pulgadas (5 cm)
Mantenimiento
Limpieza
Para garantizar un funcionamiento óptimo, se debe
limpiar el tapón del canal de descar
cada utilización. Cuando la hierba es espesa y
exuberante, es posible que se acumulen recortes en el
tapón del canal de descarga, dificultando su
extracción. Después de cada uso, saque el tapón del
canal de descarga y limpie la suciedad.
Compruebe siempre que la puerta del canal de
descarga se cierra al soltar el asa. Si la suciedad
impide que la puerta se cierre, limpie minuciosamente
el interior del canal y la puerta.
ga después de
6
Page 19

1. Detenga el motor y desenchufe el cable de la
bujía. Saque la llave del interruptor (en los
modelos con arranque eléctrico).
2. Incline la cortadora hacia el lado opuesto a la
bujía. Evite girar la cuchilla ya que podrían
ocasionarse problemas de encendido.
2
3. Quite la suciedad y recortes de hierba adheridos
a la caja con un raspador de madera dura. Tenga
cuidado con las rebabas y bordes afilados.
4. Voltee la cortadora hacia su posición vertical.
5. Elimine la suciedad del interior del canal de
descarga.
6. Saque los tornillos que sujetan la tapa de la
corrrea (Fig. 11) a la caja de la cortadora.
Levante la tapa y elimine la suciedad de la zona
de la correa. Vuelva a instalar la tapa de la corea.
1
1. Tapa
Figura 1
de la correa
1
2. T
ornillo (2)
7. Limpie el tapón del canal de descarga.
281
7
Page 20

 Loading...