

Page 1
Form No. 3314-405 Rev A
Twin Bagger Grass Catcher
Rear Engine Rider and Lawn Tractor Attachment
Model No. 59184
Installation Instructions
Setup
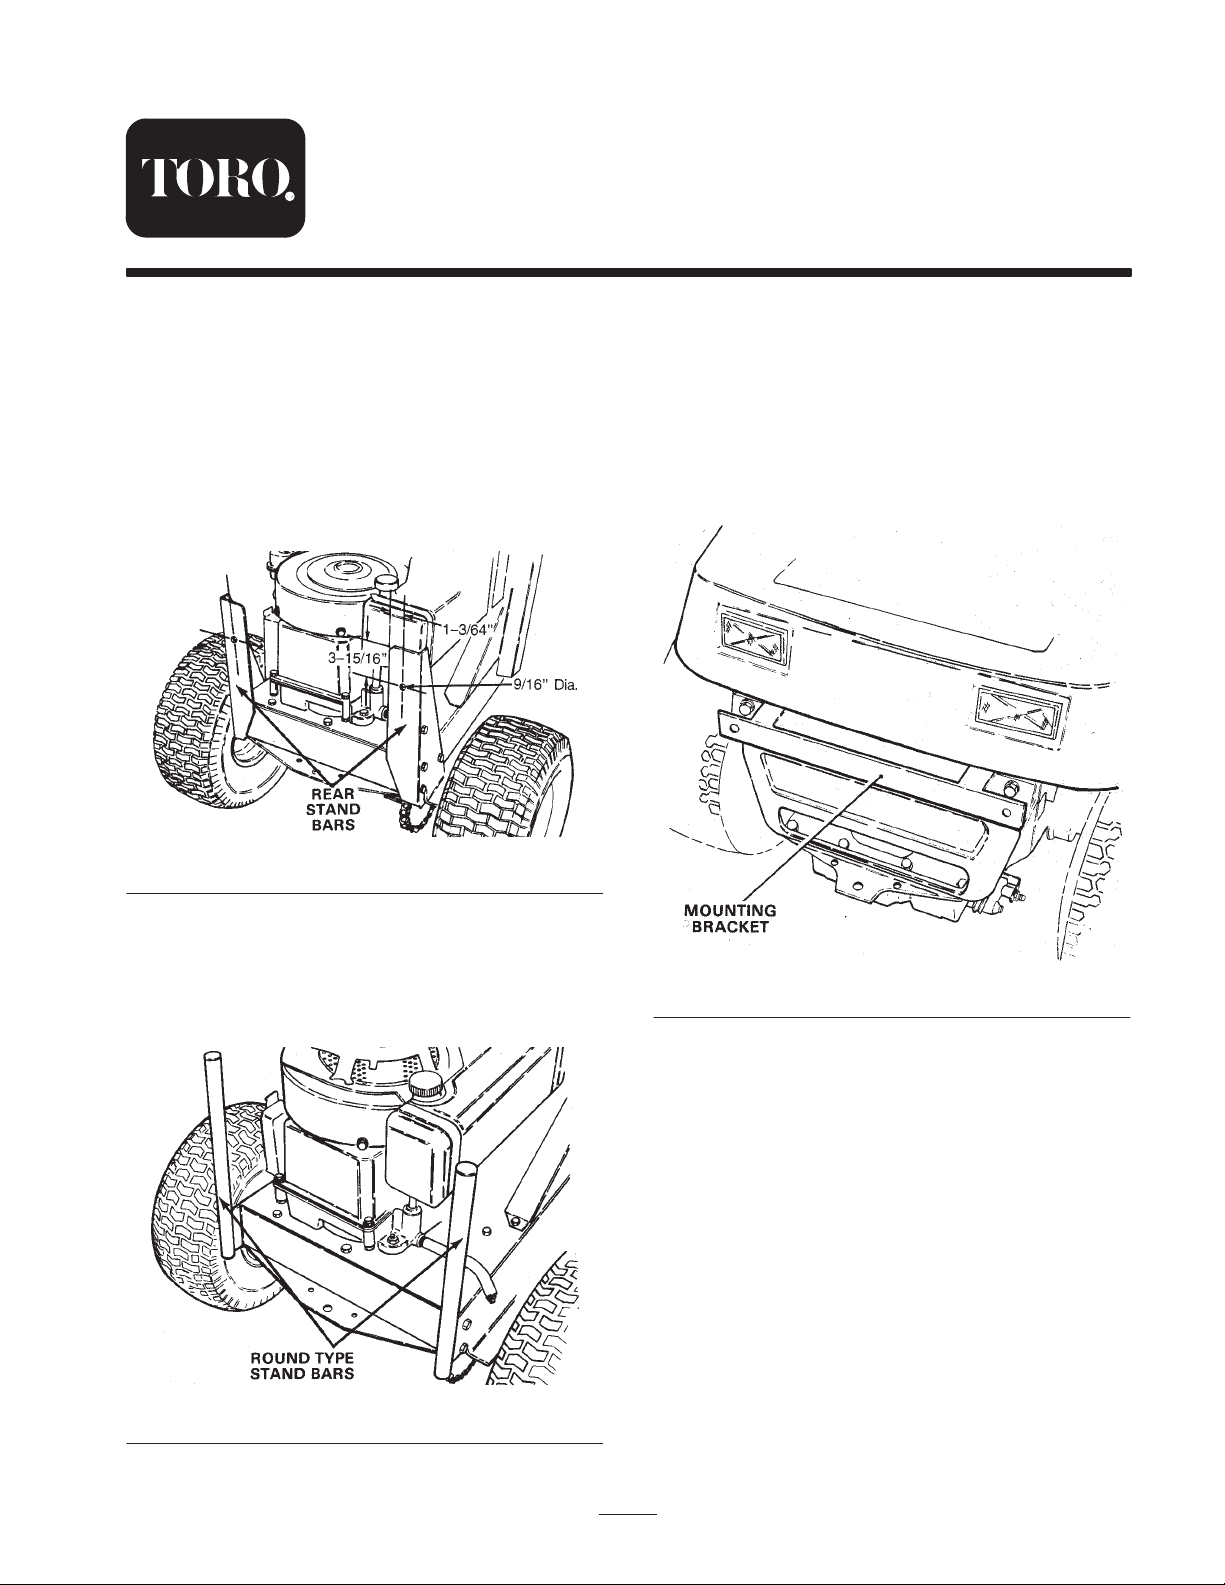
Updating the Stand Bars
(Rear Engine Riders Only)
Note: Step 1 pertains to riders with serial numbers
6000001 through 6999999, while step 2 is for riders with
serial number prior to 6000001.
1. Using dimensions shown in Figure 1, locate and drill a
9/16 in. diameter hole in each rear stand bar.
Figure 1
Installing the Mounting Bracket
(Lawn Tractors Only)
Note: Step 1 pertains to tractors with serial numbers
7000001 and Up while step 2 pertains to tractors with
serial number prior to 7000001.
1. Secure mounting bracket (supplied with tractor) to rear
frame with 2 capscrews (5/16 x 3/4 in.) and locknuts
(Fig. 3).
2. If rider is equipped with round type stand bars (Fig. 2),
they must be replaced with new ones, Toro Part No.
56-7440 (right-hand) and 56-7450 (left-hand). Stand
bars may be purchased from your local authorized
Toro dealer.
Figure 2
2001 by The Toro Company
8111 Lyndale Avenue South
Bloomington, MN 55420-1196
Figure 3
2. Mounting bracket, Toro Part No. 61-9730, must be
purchased from your local authorized Toro dealer.
After bracket is obtained, install it as instructed in
step 1.
Assembling the Mounting Frame to the
Grass Catcher Cover
1. Loosely secure mounting frame to grass catcher cover
with backup plate, 4 capscrews (5/16 x 1 in.), flat
washers, and locknuts (Fig. 4 and 5). Position the
washers on the outside of the grass catcher cover with
the backup plate inside the cover.
All Rights Reserved
1
Printed in the USA
Page 2
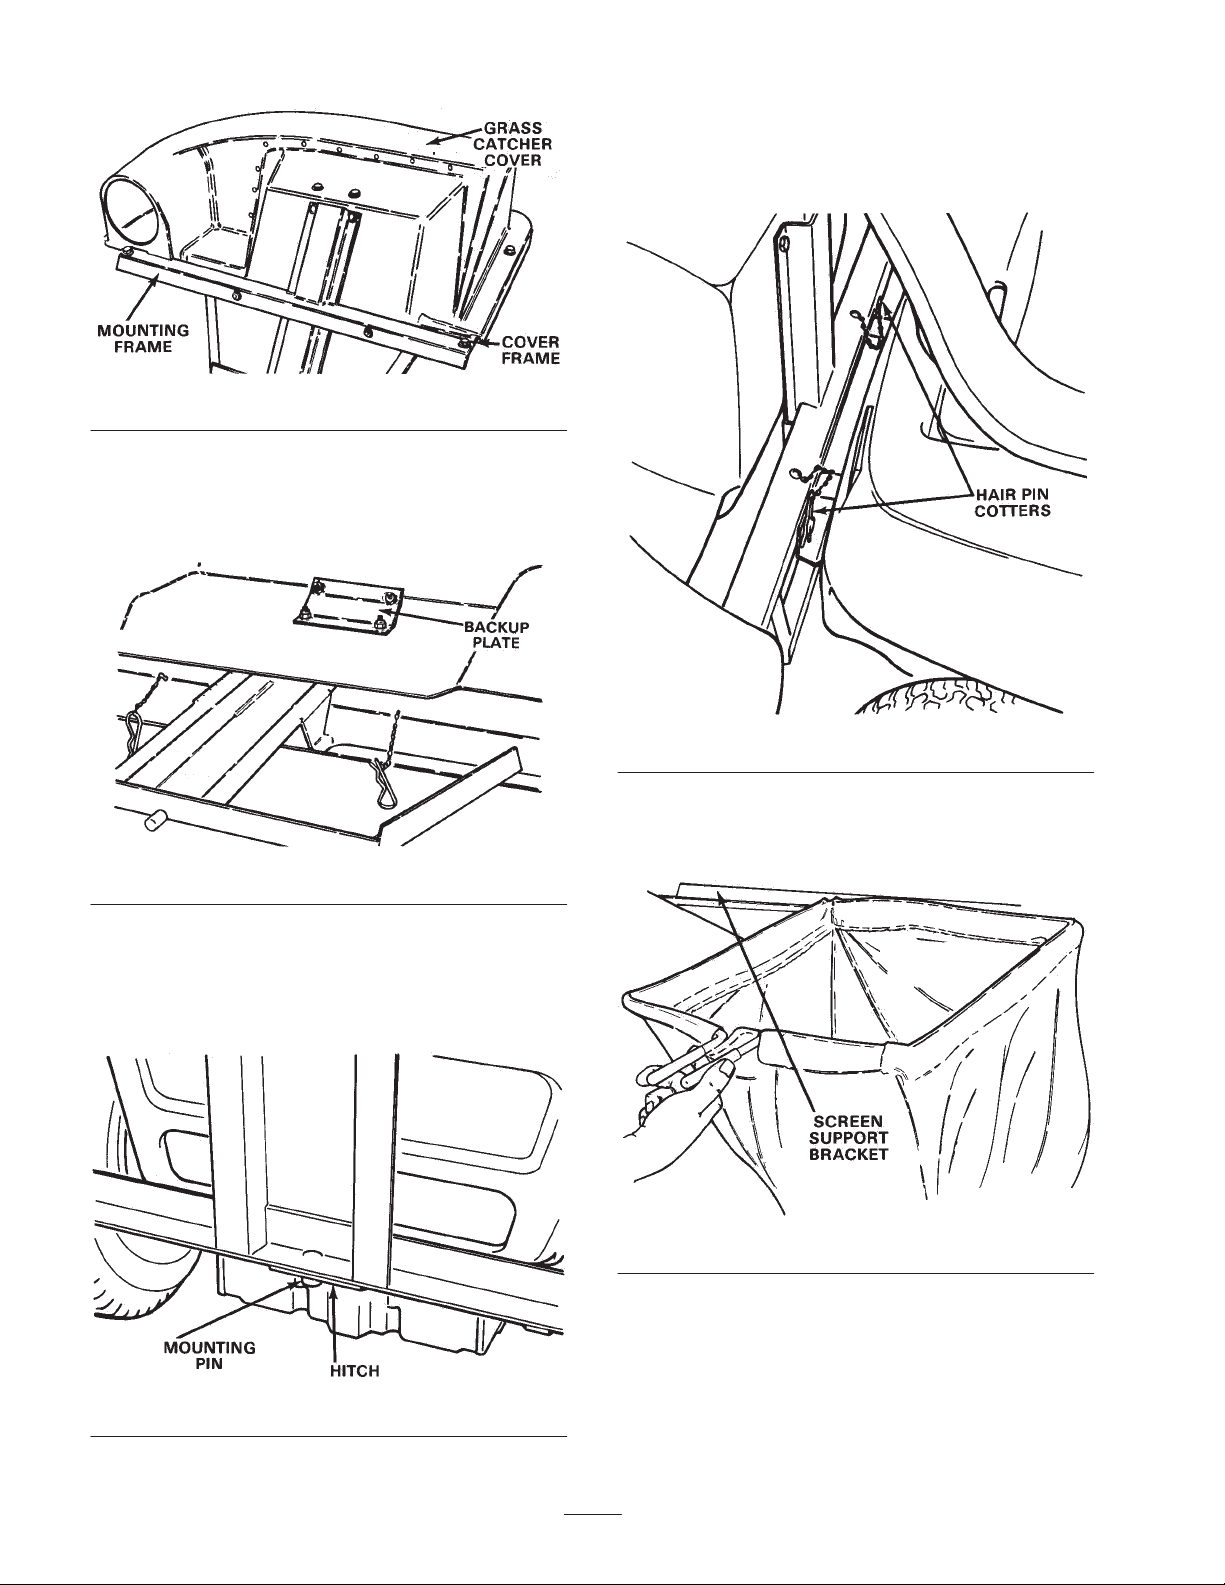
Figure 4
2. Secure mounting frame to grass catcher cover frame
with 2 capscrews (3/8 x 1 in.), flat washers, and
locknuts (Fig. 5). Position the washers on the top side
of the assembly. Tighten all mounting fasteners.
2. Rotate grass catcher up so mounting pins line up with
mounting holes in tractor mounting bracket or rider
stand bars. Push pins through holes and retain with
hairpin cotters (Fig. 7).
Figure 5
Installing the Grass Catcher and Bags
1. Slide grass catcher mounting pin into mounting hole in
hitch (Fig. 6).
Figure 7
3. Slide grass bag under bag frame cover, positioning
front edge of bag rod into screen support bracket on
bag frame (Fig. 8).
Figure 8
4. Lift rear of bag up to bag cover. Squeeze bag handles,
allowing them to be positioned in bag frame brackets.
Release bag handles, locking them in brackets (Fig. 9).
Figure 6
2
Page 3

Figure 9
Figure 11
Note: Plastic lawn bags may be inserted inside cloth bags
to aid in disposal of grass clippings.
To ease in the installation of plastic bags, insert bag
handles into frame brackets from the rear as shown in
Figure 10, and insert plastic bags.
Figure 10
3. After chute assembly and duct are assembled, slide
duct onto grass catcher.
4. Slide chute assembly under deflector. Hook rear chute
bracket around pivot post on deck. Slide front of chute
into locking position with mating part of hinge lock.
Insert locking pin (Fig. 12).
Figure 12
Note: Support bracket on chute assembly must hook
behind pivot post on deck.
Assembling and Installing the Chute
Assembly and Duct
1. Secure retainer to duct with barbed clip and spacer
fastener (Fig. 11).
2. Slide duct onto chute assembly, aligning duct retainer
with chute knob. Hook retainer onto knob, securing
assemblies (Fig. 11).
Operation
Bagging Conditions
To ensure efficient operation of the grass catcher, the
operating characteristics must be understood. In addition
to cutting turf uniformly, the blade also generates
high-velocity air currents. These air currents help propel
grass clippings from under the mower housing, through
the duct, and into the grass bags. However, certain
conditions may cause the rear grass catching system to
malfunction.
One condition that may cause a “conveying” malfunction
from the mower housing to the grass bags is when the
mower housing is set too low. Since air is required to
3
Page 4

propel grass clippings, there must be a source for this air.
And if the source is obstructed, conveying will be
inefficient. Thus, the height-of-cut must not be set too
low, because grass surrounding the mower housing will
prevent air from getting under the housing and entering
the conveying system.
A second condition that may cause a malfunction is when
excessively long and heavy grass clippings cannot be
propelled into the grass bags. Even though the supply of
air may be acceptable for efficient conveying, some grass
clippings may fall from the main air stream to the bottom
of the duct. This starts a progressive buildup of grass
clippings in the duct, discharge chute, and against the
inside of the mower housing. The chute and duct may
even plug. Therefore, to ensure efficient grass collecting,
experiment with different heights-of-cut until satisfaction
is obtained.
Another condition affecting conveying is moisture. If the
turf is wet from watering, morning dew, or internal
moisture content, the system may malfunction. Therefore,
to ensure efficiency, cut the grass when it is dry. Since dry
grass has some moisture content, clippings may stick to
the duct, discharge chute, and on the inside of the mower
housing. This slight buildup is normal, but the duct,
discharge chute, and housing must be cleaned to prevent
undesirable buildup of clippings.
• Overlap swaths to produce an even cutting pattern and
to minimize the load on the engine. Make sure grass
clippings move continuously through the duct.
• Empty the grass bags and do not let clippings “back
fill” into the duct. To empty bags, shift into Neutral,
move blade control to Disengage position, rotate
ignition key to Off, and set parking brake. Slide grass
bags under grass bag cover, positioning front edge of
bag rod into screen support bracket on bag frame. Lift
rear of bag up to bag cover. Squeeze bag handles,
allowing them to be positioned in bag frame brackets.
Release bag handles, locking them in brackets.
• While operating, glance frequently at the duct. If grass
clippings are not moving through the duct, there may
be an obstruction in the duct or discharge chute. The
obstruction can usually be cleared by moving gear
shift to neutral, raising mower housing to highest
position, and slapping the side of the installed clear
duct, near the obstruction. If the obstruction does not
pass into the grass bags when duct is slapped, move
blade control into Disengage position, rotate ignition
key to Off, and set parking brake. Then remove duct
and clear any obstruction from the duct or discharge
chute with a stick or similar object. After obstruction
is removed, install duct, restart engine, and continue
grass collecting.
When cutting in dry, dusty conditions, lower throttle speed
and shift gear selector to higher gear to maintain ground
speed.
A final condition to consider is ground speed. As the
engine overloads (slows down), air velocity decreases.
Therefore, ground speed of the rider must be slow enough
to allow all grass clippings to move continuously from
under the housing, through the duct, and into the grass
bag.
Warning
Do not operate mower without the grass deflector
or entire grass catcher in place.
Bagging Tips
• To ensure maximum air currents in the system, move
throttle to Fast and gear shift to first gear, which is the
slowest ground speed.
• Do not collect grass when it is wet or too long.
However, wet grass can be cut with the grass deflector
installed. Several hours later, pick up the dry grass
clippings with complete grass catcher installed.
• After using the grass catcher, remove mulch from
inside of hopper cover, duct, discharge chute, and from
underside of mower housing. If grass clippings remain
on inside of these parts, a malfunction will likely
result. To retain translucency, remove grass and dirt
stains from inside of duct by washing it with soap and
water. Keep the blade sharp to ensure good grooming
and conveying results.
Warning
The bags are made of material that will catch the
majority of foreign objects, such as small stones
that may be thrown into them. However, under
normal usage, this material is subject to
deterioration and wear.
• Check the bags frequently for deterioration and
wear.
• If bags are worn, replace them with a genuine
Toro part.
• Cut the grass often, especially when the turf growth is
rapid. High heights-of-cut produce good grooming
results. If shorter turf is desired, cut the grass again.
4
 Loading...