

Page 1
FORM NO. 3322-138 Rev A
Remote Air Cleaner Kit
Groundsmaster/Proline 117,118,120
Part No. 55–8460
Loose Parts
Note: Use the chart below to identify parts for assembly.
DESCRIPTION QTY. USE
Air Hose
Air Hose
Mounting Bracket
Air Cleaner Assembly
Hose Clamp
Cap Screw
Nut
1
1
1
1
2
4
1
Select air hose and mounting bracket
Install air cleaner for Groundsmaster 117 and
118 or 120
INSTALLATION
INSTRUCTIONS
Selecting Air Hose and
Mounting Bracket
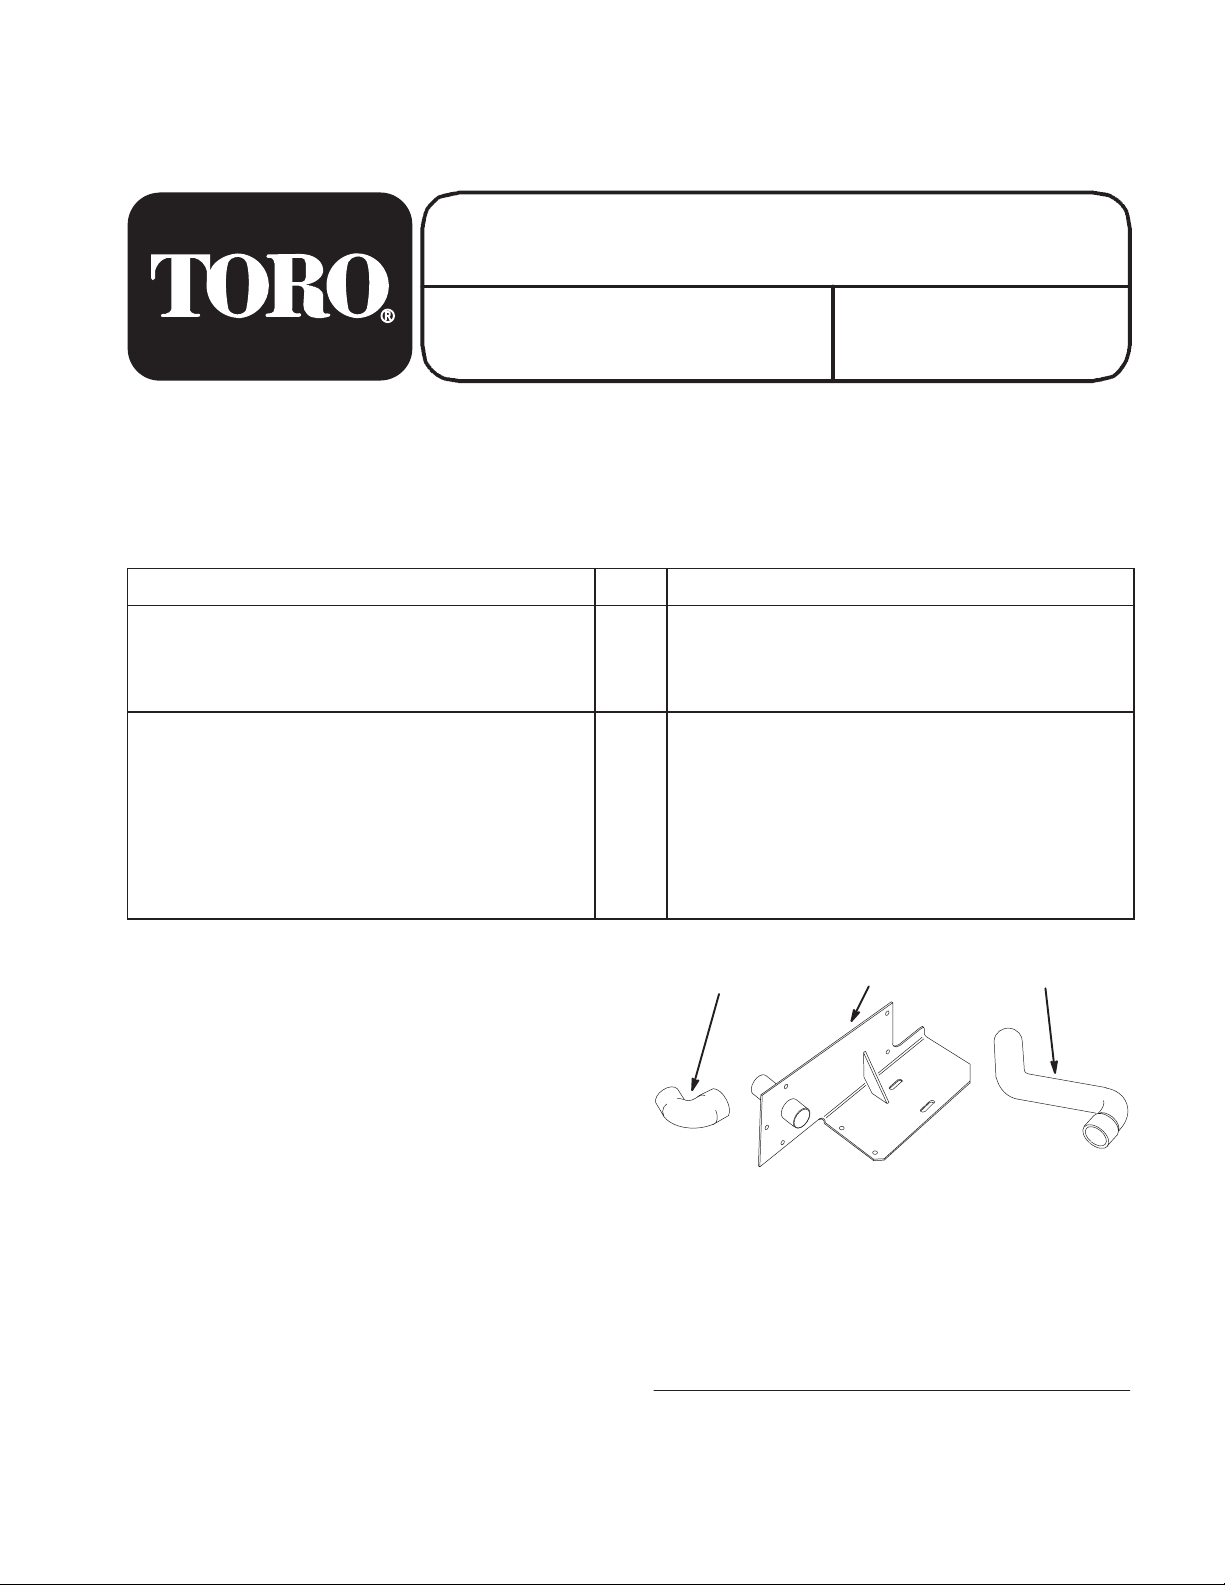
1. Select the proper air hose for your model of
Groundsmaster. Mounting bracket is used only
on Groundsmaster models 117 and 118 (Fig.1).
The Toro Company – 1998
Printed in USA
All Rights Reserved
1
1. Air Hose for
Groundsmaster models
117 and 118 only.
2. Mounting Bracket for
Grondsmaster models 117
and 118 only.
2 3
m–4107
Figure 1
3. Air Hose for
Groundsmaster model 120
only.
Page 2
Installation Instructions
Installing Air Cleaner for
Groundsmaster 117 and 118
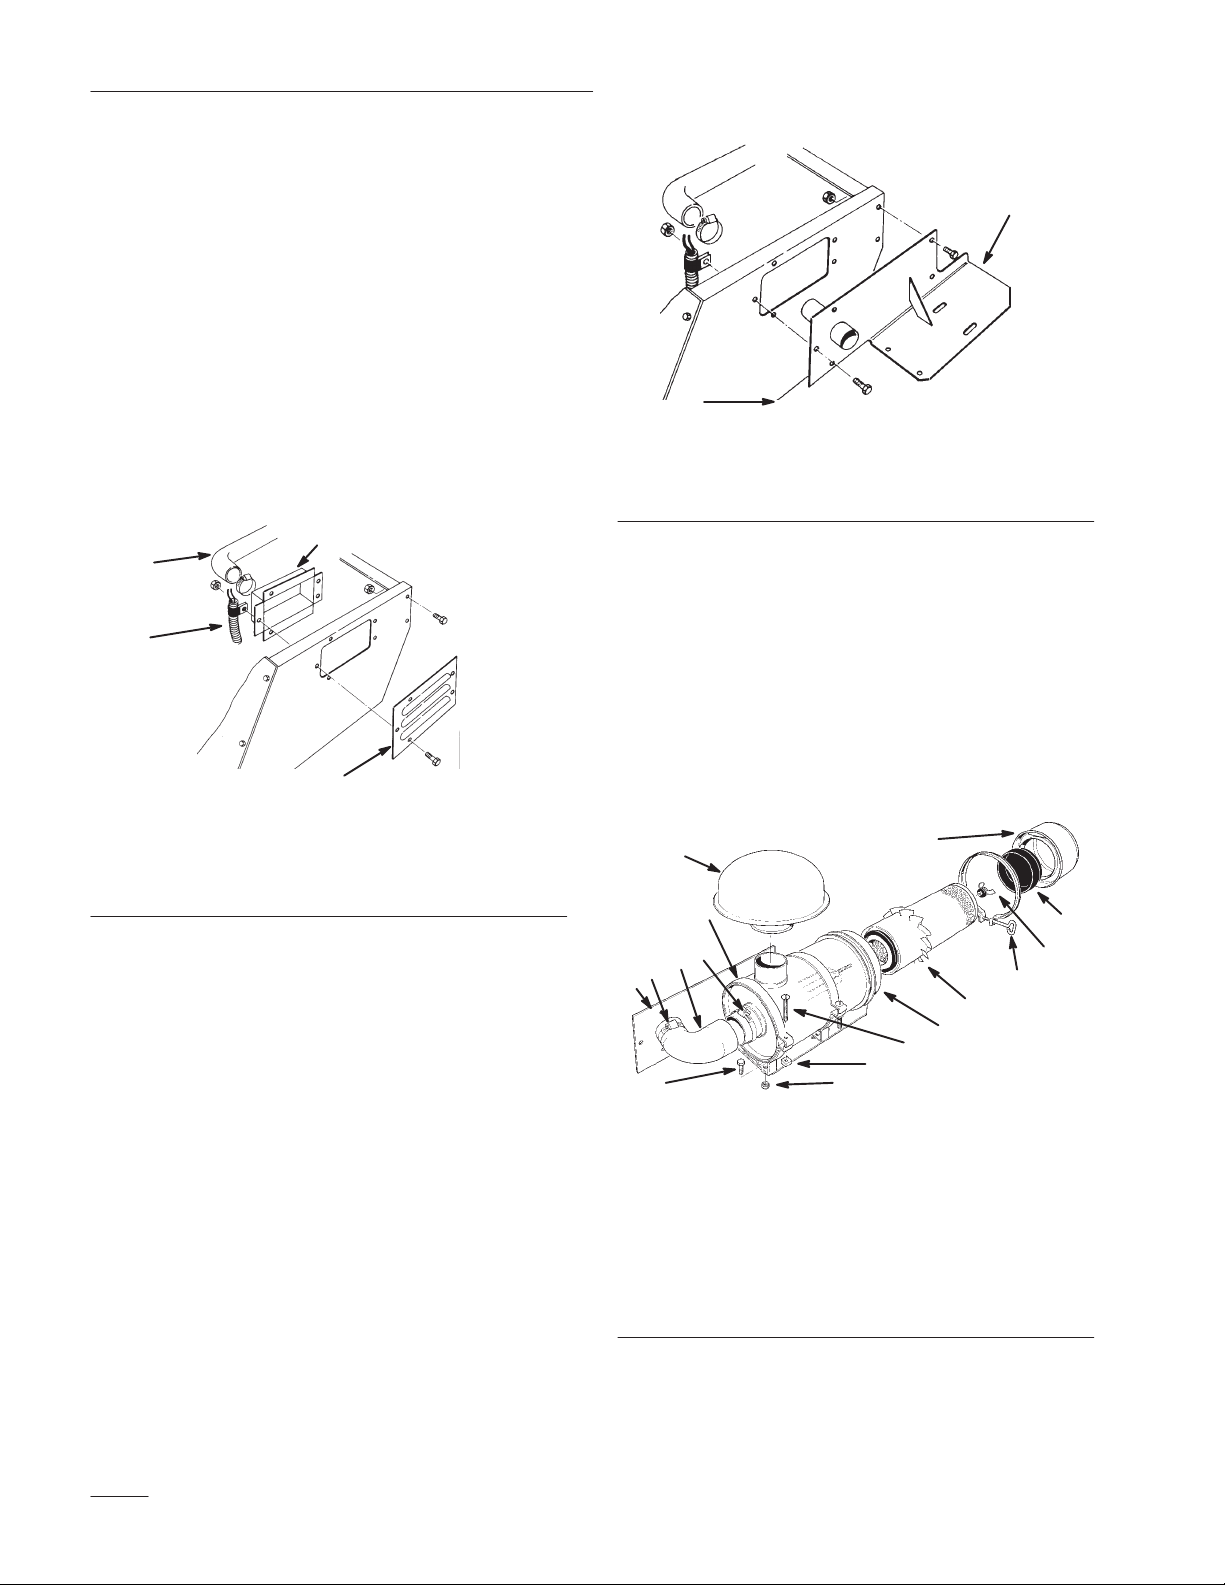
1. Loosen hose clamp securing air cleaner hose to
air chamber. Slide hose off air chamber (Fig. 2).
2. Remove (5) cap screws and locknuts securing air
chamber, wire harness R–clamp, and air chamber
cover to left seat support. Remove air chamber
and air chamber cover(Fig. 2).
3. Remove (2) capscrews and locknuts securing left
side of hood support to seat support (Fig. 2).
2
1
4
3
m–4104
1
3
m–4105
Figure 3
1. Air Cleaner Mounting
Bracket
5. Remove machine screws and square nuts
securing air cleaner mounting bands to air
cleaner body. Remove mounting bands (Fig. 4).
6. Secure mounting bands to mounting bracket
with capscrews and locknuts (Fig. 4).
7. Slide air cleaner body between mounting bands
and secure with machine screws and square nuts
previously removed (Fig.4).
Figure 2
1. Hose
2. Air Chamber
3. Air Chamber Cover
4. Wire Harness R–Clamp
4. Align mounting holes in air cleaner mounting
bracket with holes in seat support, and secure
with capscrews and locknuts previously removed
(Fig. 3).
Note: Make sure wire harness clamp and
hood support are reinstalled when
securing mounting bracket to seat
support. Make sure wires are routed
away from moving parts.
1
2
3
15
3
4
5 6
1. Air Inlet Hood
2. Mounting Band
3. Hose Clamps
4. Air Cleaner Mounting
Bracket
5. Capscrew
6. Locknut
7. Square Nut
Figure 4
14
11
10
9
8
7
8. Machining Screw
9. Air Cleaner Body
10. Filter Element
11. Clamp
12. Nut
13. Baffle
14. Dust Cap
15. Hose
13
12
m–4106
2
Page 3
Installation Instructions
8. Slide hose clamps onto air cleaner hose. Push
ends of hose onto air cleaner and mounting
bracket opening. Large end of hose fits air
cleaner outlet.
9. Position and tighten hose clamps so a good seal
is formed between inside of hose and mounting
surface.
10. Install air cleaner inlet hood.
Installing Air Cleaner for
Groundsmaster 120
1. Disengage the power take off (PTO), set the
parking brake, and turn the ignition key to
“OFF” to stop the engine. Remove the key.
2. Tilt seat forward and pull up hood.
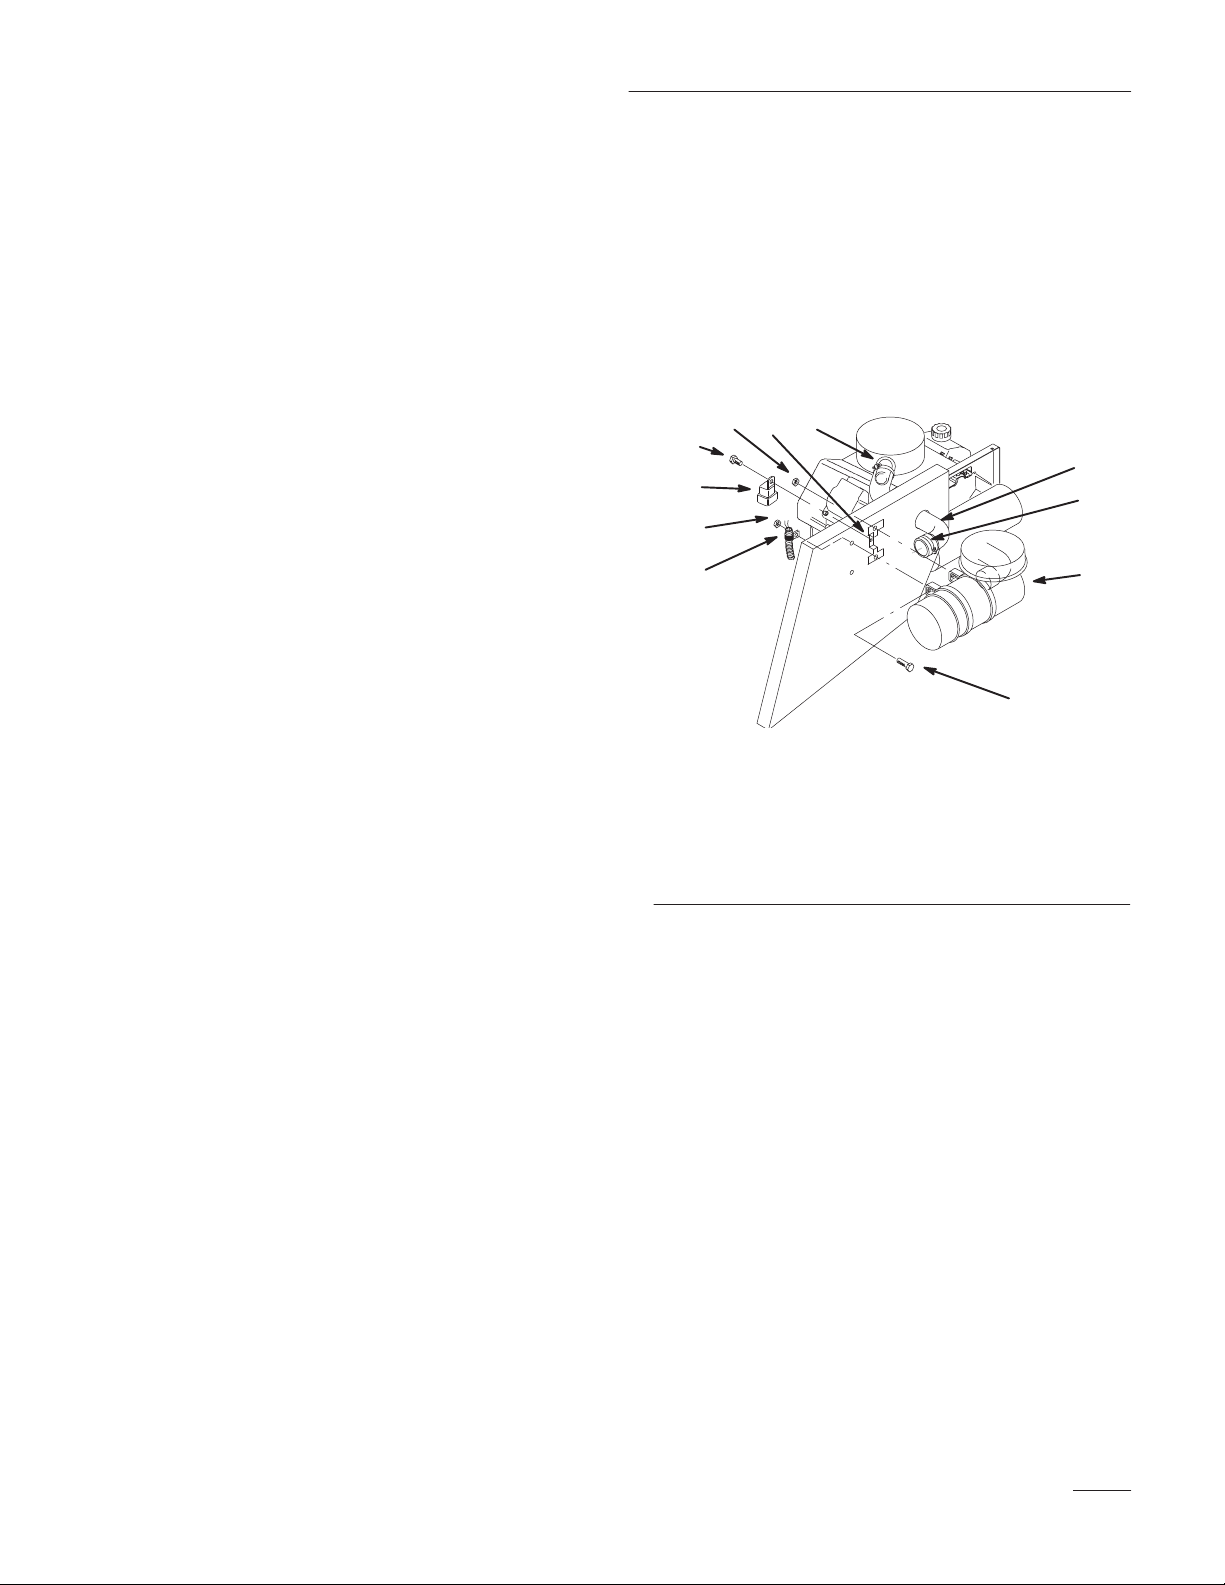
3. Remove screw and electrical relay attached to
electrical bracket (Fig. 5).
4. Remove two (2) cap screws and nuts holding
electrical bracket (Fig. 5).
5. Remove cap screw holding R–clamp and
electrical wire for seat (Fig. 5).
8. Place hose through hole in side panel (Fig. 5).
9. Place hose clamps onto hose for Groundsmaster
120 (Fig. 5).
10. Install hose onto the air cleaner and air intake on
top of motor. (Fig. 5).
11. Tighten hose clamps on the ends of the air hose
(Fig. 5).
1
2
5
9
8
5
3
1. Clamp
2. Electrical Bracket
3. R–Clamp
4. Capscrew
5. Nut
4
Figure 5
6. Air Cleaner
7. Air Hose
8. Electrical Relay
9. Screw
7
1
6
m–4108
6. Install capscrews through air cleaner assembly
and reinstall R–clamp and electrical bracket.
Tighten capscrews to secure air filter (Fig. 5).
7. Reinstall screw and electrical relay (Fig. 5).
3
Page 4

Installation Instructions
Servicing Air Cleaner
General Air Cleaner Maintenance
To prevent possible severe engine damage and ensure
maximum engine service life, periodically inspect the
air cleaner and hose assembly.
1. Assure hose between air cleaner and carburetor
is clamped securely in place. Replace the hose if
it is cracked or punctured.
2. Check air cleaner body for dents and other
damage which could possibly cause an air leak.
Replace a damaged air cleaner body.
3. Insure dust cup is sealing around bottom of air
cleaner body.
4. Mounting screws and nuts holding air cleaner in
place must be tight.
5. Inlet cap must be free of obstructions.
Service Dust Cup and Baffle
Inspect the dust cup and rubber baffle once a week or
every 50 hours operation; however, daily or more
frequent inspection is required when operating
conditions are extremely dusty and dirty. Never allow
dust to build up closer than 1 inch ( 25 mm) from the
slot in top of dust cup.
Note: If conditions are extremely dusty and
dirty, begin by checking dust cup and
baffle after each day’s operation to
establish approximately how long an
interval passes before dust cup should
be emptied. Base further maintenance
requirements on this figure. These
conditions may be particularly
prevalent if the rear discharge cutting
unit is attached.
1. Disengage the power take off (PTO), set the
parking brake, and turn the ignition key to
“OFF” to stop the engine. Remove the key.
2. Loosen thumb screw until dust cup and baffle
can be removed. Separate dust cup and baffle
(Fig. 4).
3. Dump dirt out of the dust cup. After cleaning
cup and baffle, reinstall both parts with TOP of
dust cup up (Fig. 4).
4
Page 5

Installation Instructions
Servicing Air Cleaner Filter
Service the air cleaner filter every 200 hours or more
frequently in extreme dusty or dirty conditions by
washing or using compressed air. Replace the element
after every six cleanings (1500 hours) or annually,
whichever comes first.
Note: If conditions are extremely dusty and
dirty, begin by checking dust cup and
baffle after each day’s operation to
establish approximately how long an
interval passes before dust cup should
be emptied.
1. Disengage the power take off (PTO), set the
parking brake, and turn the ignition key to
“OFF” to stop the engine. Remove the key.
2. Clean around the air cleaner to prevent dirt from
getting into the engine and causing damage.
3. Remove and service dust cup; refer to Service
Dust Cup and Baffle.
Inspecting Filter Element
1. Place bright light inside filter element.
2. Rotate filter slowly while checking for
cleanliness, ruptures, holes, and tears. Replace
defective filter element.
3. Check fin assembly, gasket, and screen for
damage.
Cleaning the Filter Element – Washing
Method 1
IMPORTANT: Replace filter if damage is
evident.
1. Clean filter element by washing in a solution of
filter cleaner (Toro Part No. 27-7220, available
from Toro) and water.
IMPORTANT: Do not remove plastic fin
assembly because washing removes dust from
beneath fins.
4. Remove wing nut w/gasket and slide filter
element out of air cleaner body (Fig. 4).
2. Prepare a solution of filter cleaner and water and
soak filter element about 15 minutes. Refer to
directions on filter cleaner carton for complete
information.
3. After soaking filter for 15 minutes, rinse with
clear water. Maximum water pressure must not
exceed 40 psi (276 kPa) to prevent damage to
the filter element.
4. Dry filter element using warm, flowing air
(160F (71C) max), or allow element to
air–dry. Do not use compressed air or a light
bulb to dry the filter element because damage
could result.
5
Page 6

Installation Instructions
Cleaning the Filter Element –
Compressed Air Method
IMPORTANT: Replace filter if damage is
evident.
Note: Compressed air is recommended when
element must be used immediately
after servicing because a washed
element must be dried before it is used.
By comparison, washing the element
cleans better than blowing dirt out with
compressed air.
IMPORTANT: Do not remove plastic fin
assembly because back-blowing with
compressed air removes dust from beneath
fins.
1. Blow compressed air from inside to the outside
of dry filter element. Do not exceed 100 psi
(689 kPa) to prevent damage to the element.
2. Keep air hose nozzle at least 1 inch (25 mm)
from pleated paper, and move nozzle up and
down while rotating the filter element. Inspect
element when dust and dirt are removed; refer to
Inspecting Filter Element.
3. Wipe inside of air cleaner body with a damp
cloth to remove excess dust. Slide filter into air
cleaner body and secure in place with wing nut
and gasket.
4. Install dust cup and baffle. Move thumb screw
behind air cleaner body and tighten it securely.
6
Page 7

Installation Instructions
7
Page 8

Installation Instructions
8
 Loading...