

Page 1

FormNo.3377-778RevB
48VChainSaw
ModelNo.51888—SerialNo.314000001andUp
ModelNo.51889—SerialNo.314000001andUp
ModelNo.51889T—SerialNo.314000001andUp
Operator'sManual
Ifyouhavequestionsorproblems,contactusatwww.Toro.comor
calltollfree1-800-237-2654(US)or1-800-248-3258(Canada)before
returningthisproduct.
WARNING
CALIFORNIA
Proposition65Warning
Thisproductcontainsachemicalorchemicals
knowntotheStateofCaliforniatocausecancer,
birthdefects,orreproductiveharm.
GeneralSafetyRules
Model51889Tdoesnotincludeabatteryoracharger.
WARNING:Whenusingelectricpowertools,basicsafety
precautionsshouldalwaysbefollowedtoreducetheriskofre,
electricshock,andpersonalinjury,includingthefollowing:
Readallinstructions.
Theterm“powertool”inallofthewarningsreferstoyour
mains-operated(corded)powertoolorbattery-operated(cordless)
powertool.
1.Workareasafety
A.Keepworkareacleanandwelllit.Clutteredordark
areasinviteaccidents
B.Donotoperatepowertoolsinexplosive
atmospheres,suchasinthepresenceofammable
liquids,gasesordust.Powertoolscreatesparks
whichmayignitethedustorfumes.
C.Keepchildrenandbystandersawaywhileoperating
apowertool.Distractionscancauseyoutolose
control.
2.Electricalsafety
A.Powertoolplugsmustmatchtheoutlet.Never
modifythepluginanyway .Donotuseany
adapterplugswithearthed(grounded)powertools.
Unmodiedplugsandmatchingoutletswillreducerisk
ofelectricshock.
B.Avoidbodycontactwithearthedorgrounded
surfacessuchaspipes,radiators,rangesand
refrigerators.Thereisanincreasedriskofelectric
shockifyourbodyisearthedorgrounded.
C.Donotexposepowertoolstorainorwetconditions.
Waterenteringapowertoolwillincreasetheriskof
electricshock.
D.Donotabusethecord.Neverusethecordfor
carrying,pullingorunpluggingthepowertool.
Keepcordawayfromheat,oil,sharpedgesor
movingparts.Damagedorentangledcordsincrease
theriskofelectricshock.
E.Whenoperatingapowertooloutdoors,usean
extensioncordsuitableforoutdooruse.Useofa
cordsuitableforoutdoorusereducestheriskofelectric
shock.
F.Ifoperatingapowertoolinadamplocationis
unavoidable,usearesidualcurrentdevice(RCD)
protectedsupply .UseofanRCDreducestheriskof
electricshock.
3.Personalsafety
A.Stayalert,watchwhatyouaredoinganduse
commonsensewhenoperatingapowertool.Do
notuseapowertoolwhileyouaretiredorunderthe
inuenceofdrugs,alcoholormedication.Amoment
ofinattentionwhileoperatingpowertoolsmayresult
inseriouspersonalinjury.
B.Usepersonalprotectiveequipment.Alwayswear
eyeprotection.Protectiveequipmentsuchasdust
mask,non-skidsafetyshoes,hardhat,orhearing
protectionusedforappropriateconditionswillreduce
personalinjuries.
C.Preventunintentionalstarting.Ensuretheswitch
isintheoff-positionbeforeconnectingtopower
sourceand/orbatterypack,pickinguporcarrying
thetool.Carryingpowertoolswithyourngeronthe
switchorenergizingpowertoolsthathavetheswitch
oninvitesaccidents.
D.Removeanyadjustingkeyorwrenchbeforeturning
thepowertoolon.Awrenchorakeyleftattachedto
thepowertoolmayresultinpersonalinjury.
E.Donotoverreach.Keepproperfootingandbalance
atalltimes.Thisenablesbettercontrolofthepower
toolinunexpectedsituations.
F.Dressproperly.Donotwearlooseclothingor
jewelry.Keepyourhair ,clothingandglovesaway
frommovingparts.Looseclothes,jewelry ,orlonghair
canbecaughtinmovingparts.
G.Ifdevicesareprovidedfortheconnectionofdust
extractionandcollectionfacilities,ensuretheseare
©2014—TheT oro®Company
8111LyndaleAvenueSouth
Bloomington,MN55420
Registeratwww.Toro.com.
OriginalInstructions(EN)
PrintedinChina.
AllRightsReserved
*3377-778*B
Page 2

connectedandproperlyused.Useofthesedevices
canreducedust-relatedhazards.
H.Keephandsandfeetawayfromthecuttingarea.
4.Powertooluseandcare
A.Donotforcethepowertool.Usethecorrectpower
toolforyourapplication.Thecorrectpowertoolwill
dothejobbetterandsaferattherateforwhichitwas
designed.
B.Donotusethepowertooliftheswitchdoesnotturn
itonandoff.Anypowertoolthatcannotbecontrolled
withtheswitchisdangerousandmustberepaired.
C.Disconnecttheplugfromthepowersourceand/or
thebatterypackfromthepowertoolbeforemaking
anyadjustments,changingaccessories,orstoring
powertools.Suchpreventivesafetymeasuresreduce
theriskofstartingthepowertoolaccidentally.
D.Storeidlepowertoolsoutofthereachofchildren
anddonotallowpersonsunfamiliarwiththepower
toolortheseinstructionstooperatethepowertool.
Powertoolsaredangerousinthehandsofuntrained
users.
E.Storeidleappliancesindoors.Whennotinuse,
appliancesshouldbestoredindoorsinadryandhigh
orlocked-upplace,outofthereachofchildren.
F.Maintainpowertools.Checkformisalignmentor
bindingofmovingparts,breakageofpartsand
anyotherconditionthatmayaffectthepowertools
operation.Ifdamaged,havethepowertoolrepaired
beforeuse.Manyaccidentsarecausedbypoorly
maintainedpowertools.
G.Keepcuttingtoolssharpandclean.Properly
maintainedcuttingtoolswithsharpcuttingedgesare
lesslikelytobindandareeasiertocontrol.
H.Usethepowertool,accessoriesandtoolbitsetc.,
inaccordancewiththeseinstructionsandinthe
mannerintendedfortheparticulartypeofpower
tool,takingintoaccounttheworkingconditions
andtheworktobeperformed.Useofthepowertool
foroperationsdifferentfromthoseintendedcouldresult
inahazardoussituation.
I.Keepguardsinplaceandinworkingorder.
5.ChainSawSafety
A.Holdthepowertoolbyinsulatedgrippingsurfaces
only,becausethesawchainmaycontacthidden
wiringoritsowncord.Sawchainscontactinga“live”
wiremaymakeexposedmetalpartsofthepowertool
“live”andcouldgivetheoperatoranelectricshock.
B.Wearsafetyglassesandhearingprotection.Further
protectiveequipmentforhead,hands,legs,and
feetisrecommended.Adequateprotectiveclothingwill
reducepersonalinjurybyyingdebrisoraccidental
contactwiththesawchain.
C.Donotoperateachainsawinatree.Operationof
achainsawwhileupinatreemayresultinpersonal
injury.
D.Alwayskeepproperfootingandoperatethechain
sawonlywhenstandingonaxed,secure,and
levelsurface.Slipperyorunstablesurfacessuchas
laddersmaycausealossofbalanceorcontrolofthe
chainsaw.
E.Whencuttingalimbthatisundertensionbealert
forspringback.Whenthetensioninthewoodbreis
releasedthespringloadedlimbmaystriketheoperator
and/orthrowthechainsawoutofcontrol.
F.Useextremecautionwhencuttingbrushand
saplings.Theslendermaterialmaycatchthesawchain
andbewhippedtowardyouorpullyouoffbalance.
G.Carrythechainsawbythefronthandlewiththe
chainsawswitchedoffandawayfromyourbody.
Whentransportingorstoringthechainsawalways
ttheguidebarcover.Properhandlingofthechain
sawwillreducethelikelihoodofaccidentalcontactwith
themovingsawchain.
H.Followinstructionsforlubricating,chaintensioning,
andchangingaccessories.Improperlytensioned
orlubricatedchainmayeitherbreakorincreasethe
chanceforkickback.
I.Keephandlesdry,clean,andfreefromoiland
grease.Greasy,oilyhandlesareslipperycausingloss
ofcontrol.
Kickbackmayoccurwhenthenoseortipoftheguidebar
touchesanobject,orwhenthewoodclosesinandpinches
thesawchaininthecut.
Tipcontactinsomecasesmaycauseasuddenreverse
reaction,kickingtheguidebarupandbacktowardsthe
operator.
Pinchingthesawchainalongthetopoftheguidebarmay
pushtheguidebarrapidlybacktowardstheoperator.
Eitherofthesereactionsmaycauseyoutolosecontrolof
thesawwhichcouldresultinaseriouspersonalinjury .Do
notrelyexclusivelyuponthesafetydevicesbuildintoyour
saw.Asachainsawuser,youshouldtakeseveralstepsto
keepyourcuttingjobsfreefromaccidentorinjury .
Kickbackistheresultoftoolmisuseand/orincorrect
operatingproceduresorconditionsandcanbeavoidedby
takingproperprecautionsasgivenbelow:
•Maintainarmgrip,withthumbsandngers
encirclingthechainsawhandles,withbothhands
onthesawandpositionyourbodyandarmtoallow
youtoresistkickbackforces.Kickbackforcescanbe
controlledbytheoperator ,ifproperprecautionsare
taken.Donotletgoofthechainsaw.
•Donotoverreachanddonotcutaboveshoulder
height.Thishelpspreventunintendedtipcontactand
enablesbettercontrolofthechainsawinunexpected
situations.
•Onlyusereplacementbarsandchainsspecied
bythemanufacturer.Incorrectreplacementbarsand
chainsmaycausechainbreakageand/orkickback.
•Followthemanufacturer’ssharpeningand
maintenanceinstructionsforthesaw
chain.Decreasingthedepthgaugeheightcan
leadtoincreasedkickback.
6.Service
Haveyourpowertoolservicedbyaqualiedrepair
personusingonlyidenticalreplacementparts.Thiswill
ensurethatthesafetyofthepowertoolismaintained.
7.BatterySafety
A.Donotchargepowertoolinrain,orinwetlocations.
B.Donotusebattery-operatedpowertoolintherain.
C.Useonlythefollowingtypeandsizebattery:T oro
batterymodel88508or88509andbatterycharger
88507or88510.
D.Removeordisconnectthebatterybeforeservicing,
cleaning,orremovingmaterialfromthepowertool.
2
Page 3
E.Donotdisposeofthebatteryinare.Thecellmay
explode.Checkwithlocalcodesforpossiblespecial
disposalinstructions.
F.Donotopenormutilatethebattery.Releasedelectrolyte
iscorrosiveandmaycausedamagetotheeyesorskin.
Itmaybetoxicifswallowed.
G.Donotopenormutilatethebattery.Releasedelectrolyte
isammableandcancausedamageifexposedtore.
H.Exercisecareinhandlingbatteriesinordernottoshort
thebatterywithconductingmaterialssuchasrings,
WARNING—T oreducetheriskofinjury,usermustreadinstruction
manual.
SAVETHESEINSTRUCTIONS
bracelets,andkeys.Thebatteryorconductormay
overheatandcauseburns.
I.Idealchargingtemperatureisbetween0degreesCand
50degreesC(32and122degreesF).Chargingoutside
ofthistemperaturerangewillincreasethecharging
time.
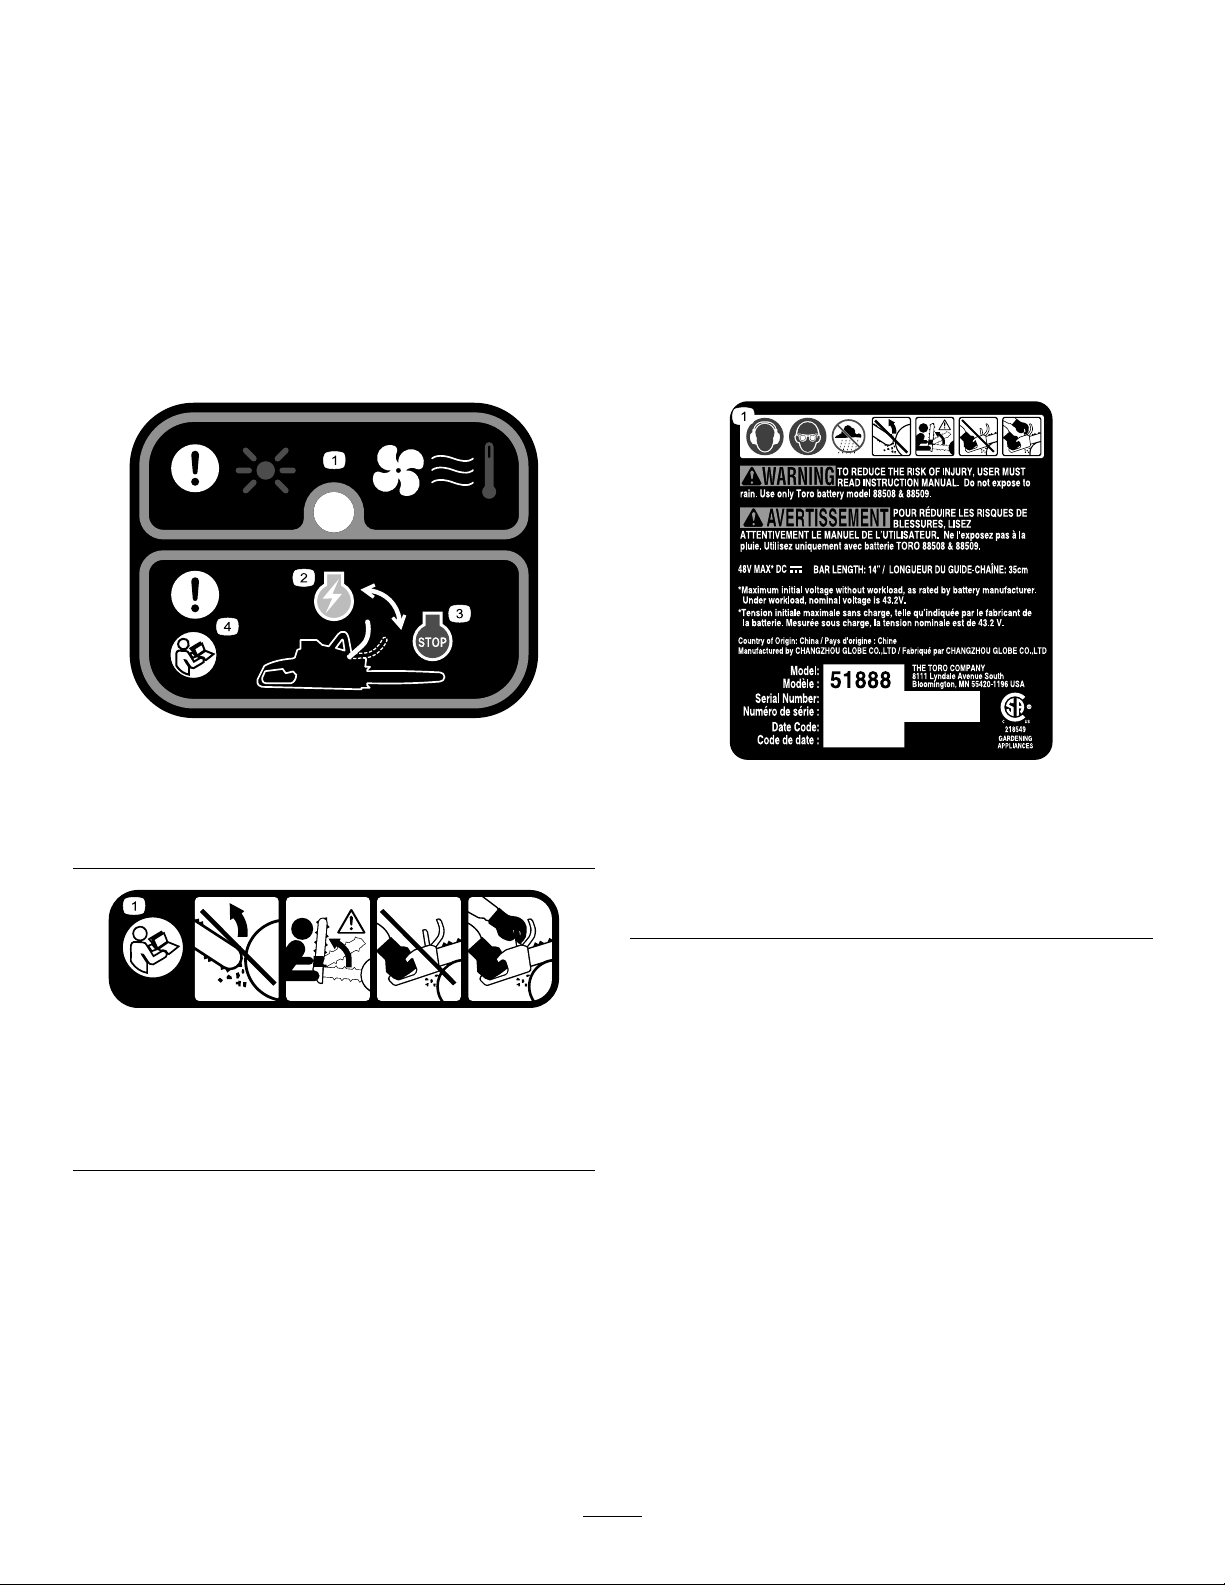
SafetyandInstructionalDecals
Important:Safetyandinstructiondecalsarelocatednearareasofpotentialdanger.Replacedamageddecals.
121-7647
1.Overheating/highamp
indicator
2.Handguard
backward—motorrun
3.Handguard
forward—motorstop
4.Warning—readthe
Operator'sManual
121-7652
1.ReadtheOperator'sManual—contactoftheguidebartip
withanyobjectshouldbeavoided;tipcontactcancause
theguidebartomovesuddenlyupwardandbackward,
whichcancauseseriousinjury;alwaysusetwohands
whenoperatingthechainsaw.
121-7644
1.Wearearprotection;weareyeprotection;donotoperatein
wetconditions;contactoftheguidebartipwithanyobject
shouldbeavoided;tipcontactcancausetheguidebarto
movesuddenlyupwardandbackward,whichcancause
seriousinjury;alwaysusetwohandswhenoperatingthe
chainsaw.
3
Page 4
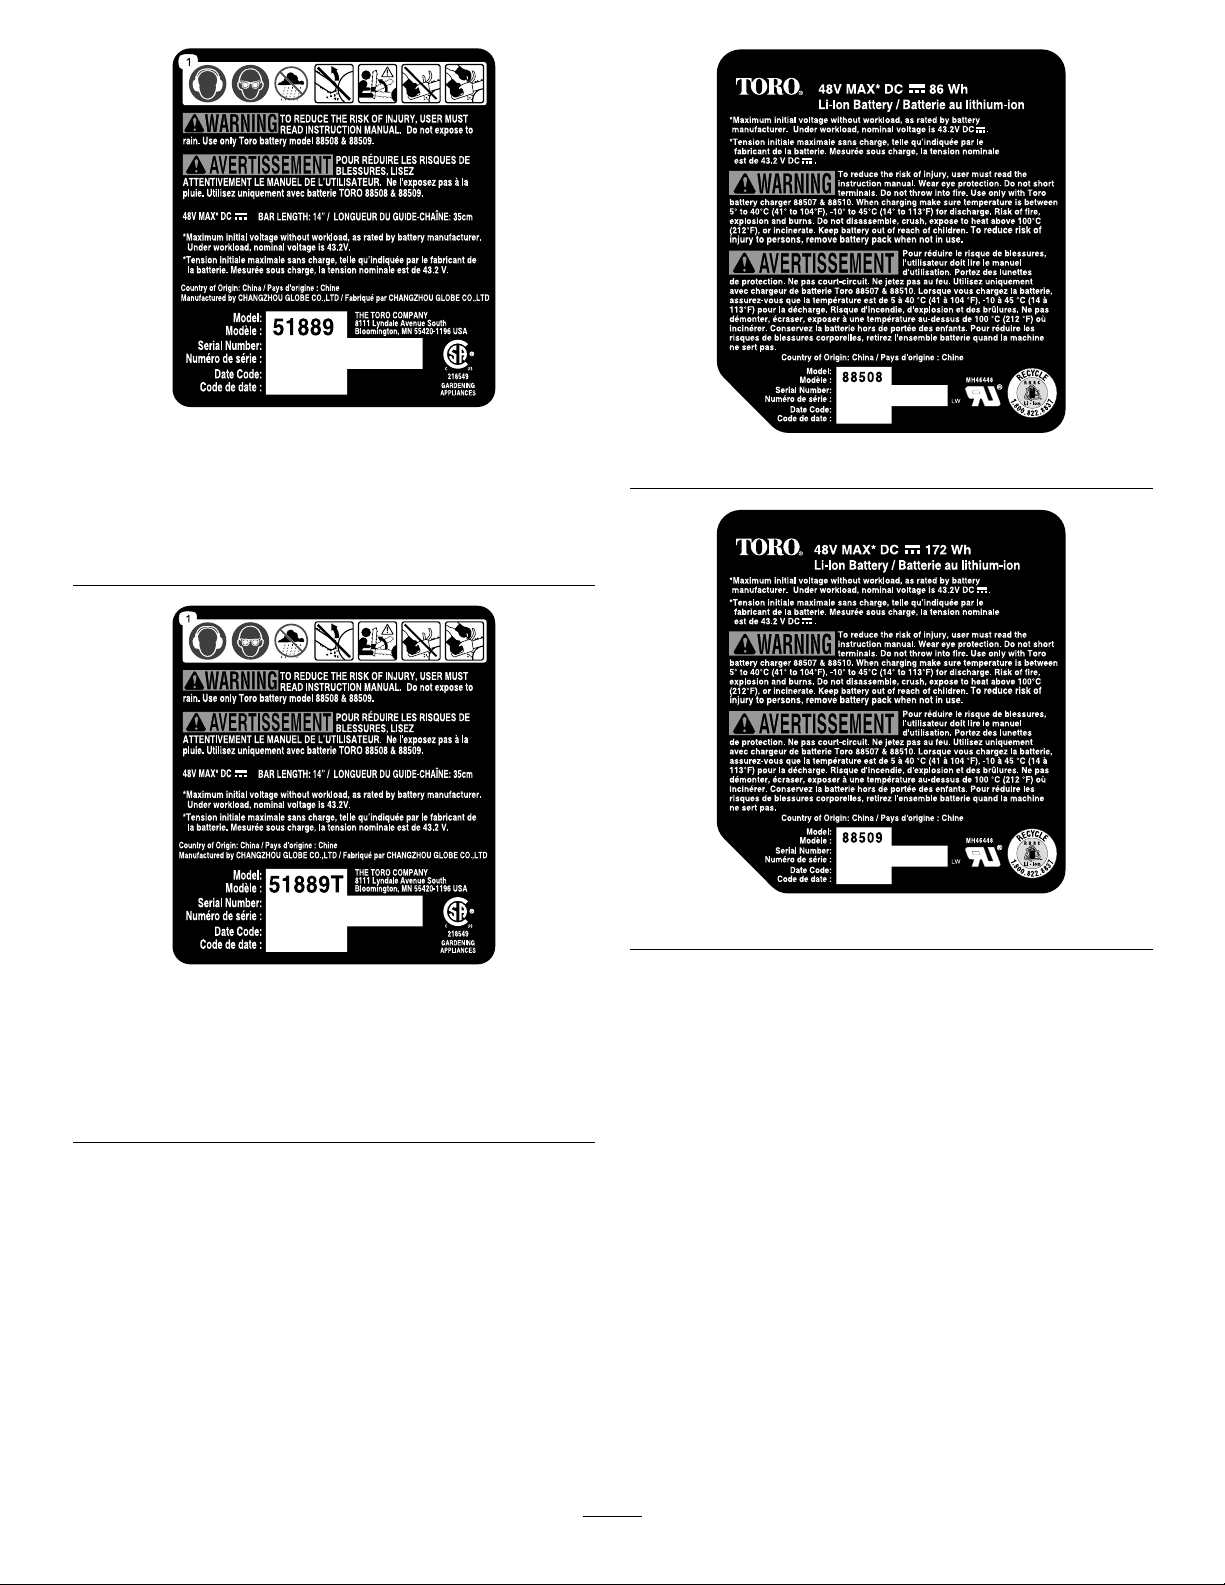
121–7648
1.Wearearprotection;weareyeprotection;donotoperatein
wetconditions;contactoftheguidebartipwithanyobject
shouldbeavoided;tipcontactcancausetheguidebarto
movesuddenlyupwardandbackward,whichcancause
seriousinjury;alwaysusetwohandswhenoperatingthe
chainsaw.
121–7699
125–3240
125–3299
1.Wearearprotection;weareyeprotection;donotoperatein
wetconditions;contactoftheguidebartipwithanyobject
shouldbeavoided;tipcontactcancausetheguidebarto
movesuddenlyupwardandbackward,whichcancause
seriousinjury;alwaysusetwohandswhenoperatingthe
chainsaw.
4
Page 5
125–8298
121–7654
125–8299
5
Page 6
Setup
AssemblingtheBarandChain
DANGER
Contactwiththechainsawteethcancauseserious
injury.
•Removethebatterybeforeperformingany
adjustmentsormaintenancetothechainsaw.
•Alwaysweargloveswhenperformingany
adjustmentsofmaintenancetothechainsaw.
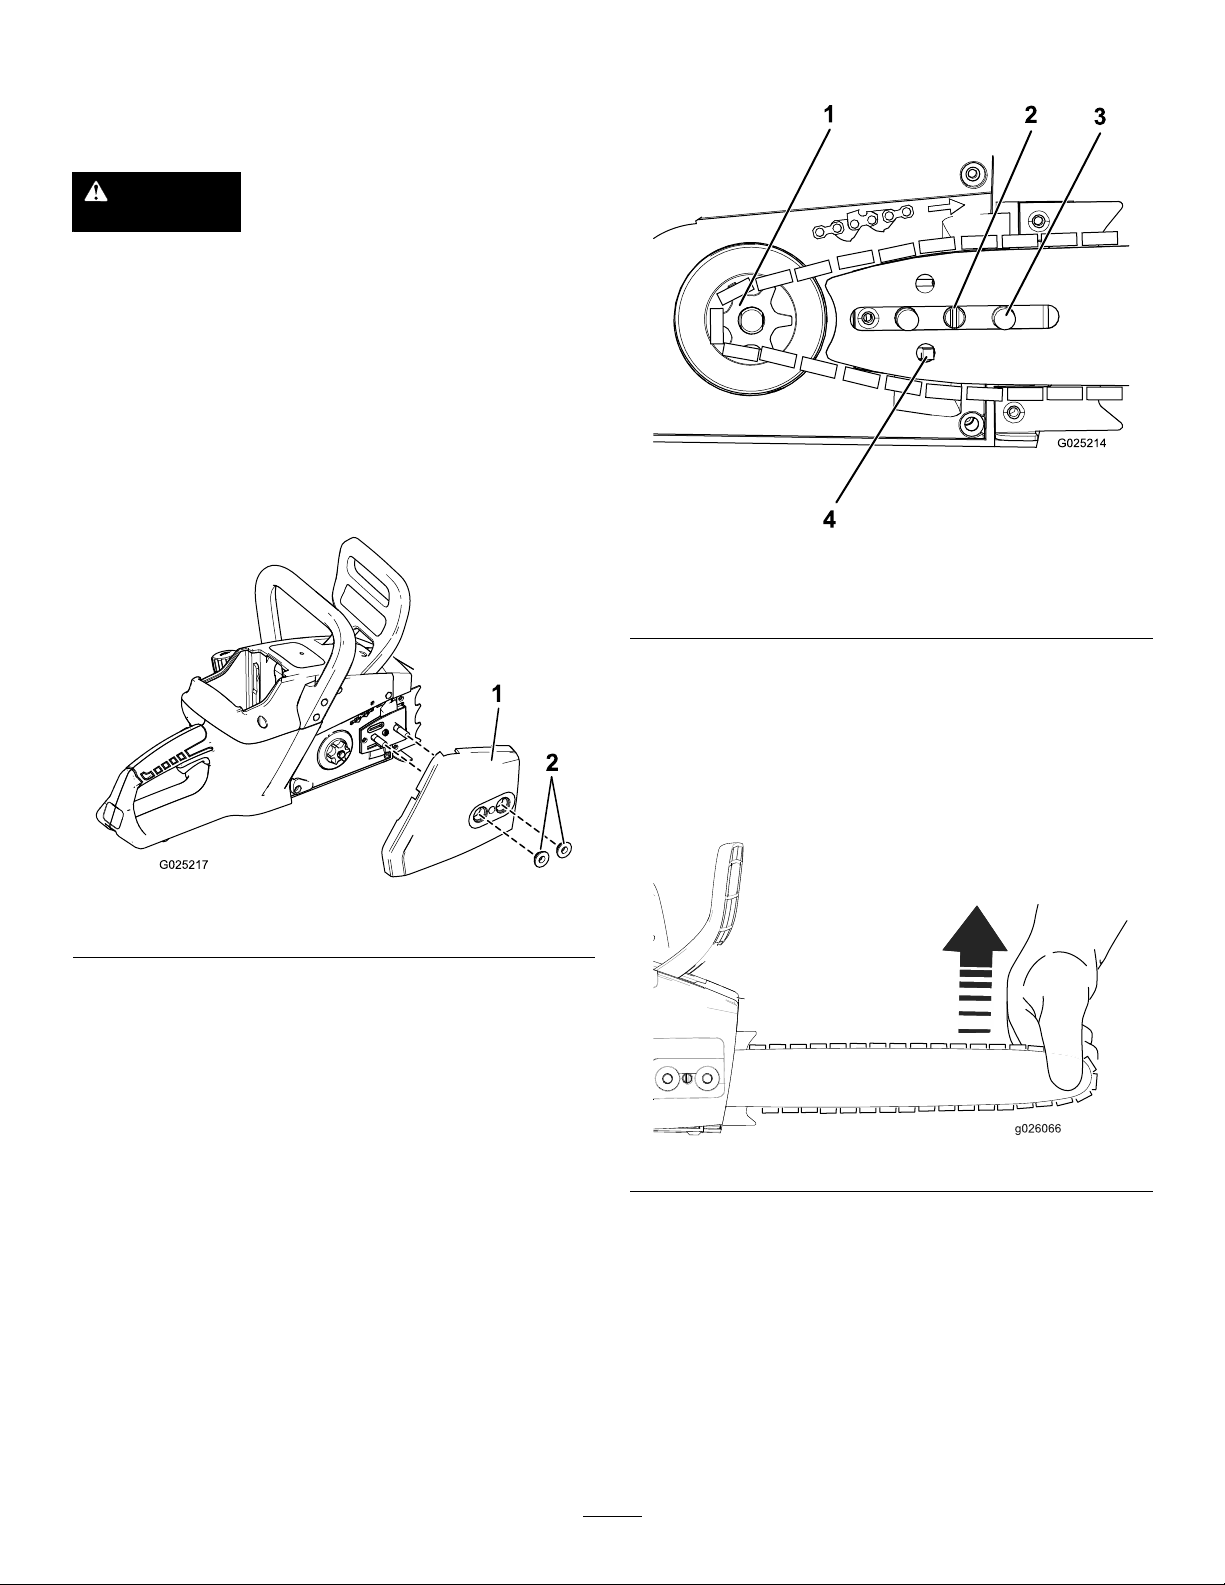
Ifthebarandchainarenotalreadyinstalled,performthefollowing
steps:
1.Placethechainsawonalevelsurface.
2.Removethetwoboltsthatsecurethecover(Figure1).
3.Turnthechaintensioningbolttothelefttomovethe
mountingplateclosetothesprocket(Figure2).
Figure2
1.Sprocket3.Stud(2)
2.Tensioningbolt4.Adjustingpin
4.Alignthebarwiththetwostudsandtheadjustingpin.
5.Placethechainaroundthedrivesprocket,withtheteethof
thechainfacingawayfromthesprocket(Figure2).
6.Feedthechainintothegrooveinthebar.
7.Installthecoverandthenuts,butdonotfullytightenthe
nuts.
8.Holdupthetipofthebar(Figure3).
Figure1
1.Cover
2.Nuts
Figure3
9.Tightenthechainbyturningthetensioningbolttotheright
(Figure2),untilthechaintouchestheundersideofthebar.
10.Tigthenthe2nuts(Figure1).
11.Checkthechaintension.Ifmoretensioningisrequired,
repeatthisprocedurestartingat7.
Note:Thechaintensioniscorrectwhenyouareable
touseaglovedhandtopullthechainsmoothlyaround
thebladebar
Note:Anewchainmayneedadjustingafterit’srst
use.RefertoAdjustingtheChainTension(page14).
6
Page 7

FillingtheChainSawWithOil
1.Placethechainsawonaatsurfaceandremovethebattery.
2.Cleantheareaaroundtheoilcap(Figure4).
Figure4
Operation
Important:Thebatterypackisnotfullychargedwhen
itispurchased.RefertoChargingtheBatteryPack
(page11).
StartingtheChainSaw
1.Setthechainsawdownonalevelsurface.
2.Alignthetongueofthebatterypackwiththebatterycavity
inthechainsaw(Figure5).
1.Oilcap
3.Removethecapandpouroilintothechainsawuntiltheoil
llsthewindow(Figure4).
2.Window
Note:Donotllthechainsawhigherthanthebottom
ofthellneck.
4.Cleanupanyspilledoilandreplacetheoilcap.
Figure5
1.Latch2.Tongue
3.Pushthebatterypackintothebatterycavityuntilthelatch
locksintoplace.
4.Withonehandontheauxiliaryhandleandtheotheron
thetriggerhandle,pressthetriggerlock,thensqueezethe
triggertostartthechainsaw(Figure6).
Figure6
1.Triggerlock3.Auxiliaryhandle
2.Triggerswitch
7
Page 8

UnderstandingtheAutomatic
1
g025219
1
g025220
MotorStopandChainBrake
Whenthebatteryisatriskofoverheatingorthebatteryis
deliveringahighamperage,themotorwillstoptopreventany
damagetothebattery,andthelightwillash(Figure7).
Releasethetriggerswitch,thenpressthetriggerswitch.Ifthe
motordoesnotstart,allowthebatterytocoolbeforecontinuing
operation.
Note:Removingthebatteryfromthechainsawmayhelp
thebatterytocooldownquicker.
Figure8
Whenkickbackoccurs,thehandguardmovesforwardtothestop
position(Figure9),activatingthechainbrakethatstopsthechain
andmotor.
Note:Itissafepracticetoactivatethechainbrakewhen
transportingthechainsaw.
Figure7
1.Batteryoverheatingor
highamp—lightwillash
2.Handguardnot
activated—motorwill
runiftriggerlockand
triggerswitchareheld.
3.Handguard
activated—motorwill
notrun.
WARNING
Kickbackcancauseseriousorfatalinjurytothe
operator.
Alwaysensurethechainbrakesystemisworking
properlybeforeoperation.
Thetwotypesofkickbackareasfollows:
•Afastupwardmotionofthechainsawthatoccurswhenthe
chainatthenoseortopofthebar(Figure8)contactsan
object.
•Afastbackwardmotionofthechainsawthatoccurswhen
thechainatthenoseortopofthebar(Figure8)ispinched
bytheobjectbeingcut.
Figure9
1.Handguard—stopposition
Torestartthemotor,movethehandguardbacktotheoperation
position(Figure10).
Note:Thereisanaudibleclicktoindicatethatthehand
guardhasbeenmovedtotheoperatingposition.
Figure10
1.Handguard—operationposition
8
Page 9

StoppingtheChainSaw
Tostopthechainsaw,releasethetriggerswitch.
Cutting
1.Gripthechainsawwithtwohandsasshownin(Figure11).
Note:Keepingyourleftarmstraightwithyourelbow
lockedwillhelpreduceanykickback.
Figure12
Figure11
2.Standonsolid,evengroundinfrontofthewoodtobecut.
3.Pressthechainsawlightlyagainstthewood,allowingthe
weightofthechainsawtodrivethecutting.
4.Keepsteadypressureonthechainsawthroughoutthecut,
andonlyreleasepressureneartheendofthecut.
Pruning
1.Beforepruning,ensurethatallbystandersareawayfromthe
areawherebranchesmayfall.
2.Gripthechainsawasshownin(Figure11).
3.Forsmallbranches,applylightpressuretothebranchto
becut.
4.Forlargerbranches,makeashallowundercutandthen
completethecutfromthetopsideofthebranch.
1.Retreatpath
2.45degreeangle
2.Gripthechainsawasshownin(Figure11).
3.Makeanotchingundercutthatgoesinone-thirdthediameter
ofthetree,perpendiculartothedesireddirectionoffall
(Figure13).
3.Directionoffall
Note:Makingtheundercutrstwillpreventthechain
sawfrombeingpinchedwhilemakingthesecondnotch.
FellingaTree
1.Beforestartingthefellingprocess,determineanappropriate
retreatpath.RefertoFigure12.
Figure13
1.Directionoffall
4.Makeabackcutparalleltothenotchingundercut,keeping
thebackcutatleast51mm(2inches)aboveandawayfrom
thenotchingundercut(Figure14).
9
2.Notchingundercut
Page 10

Figure14
1.Directionoffall4.51mm(2inches)
2.Notchingundercut5.Backcut
3.Hinge
5.Asthebackcutnearsthehinge(Figure14),thetreeshould
begintofall.Removethechainsaw ,stopthebladeby
releasingthetrigger,placethechainsawdown,andretreat
alongthepathyoudeterminedin1.
BuckingaLog
Ifthelogissupportedalongitsentirelength,cutalltheway
throughthelogfromthetop(Figure16).
Figure16
1.Cutfromthetop2.Chainsaw
Ifthelogissupportedononeend,cutone-thirdofthediameter
fromthebottom,thencutfromthetoptomeettherstcut(Figure
17).
Important:Ifthetreebeginstofallinanundesired
direction,immediatelystopthecutanduseawedge
toopenthecutandpushthetreeinthedesired
direction.
LimbingaTree
1.Gripthechainsawasshownin(Figure11).
2.Firstcutthesmallerbranches,leavinglarger,supporting
branchesforlast(Figure15).
Figure17
1.One-thirddiametercut
fromthebottom
2.Chainsaw
Ifthelogissupportedonbothendsbutnotinthemiddle,cut
one-thirdofthediameterfromthetop,thencutfromthebottomto
meettherstcut(Figure18).
3.Secondcutfromthetop
Figure15
1.Directionofcut
2.Chainsaw
3.Ifabranchisundertension,cutitfromtheundersideto
preventbindingofthechainsaw(Figure15).
3.Limb
10
Page 11

Figure18
1.One-thirddiametercut
fromthetop
2.Chainsaw
Ifthelogisonahill,alwaysstandontheuphillsideofthelog
(Figure19).
1.Directionofslope
3.Secondcutfromthe
bottom
Figure19
Figure20
1.Latch
RemovingtheBattery
1.Placethechainsawonaatsurface.
2.Pressdownonthelatchandremovethebatteryfromthe
cavity.
Note:Ifyouhavetroubleremovingthebattery,apply
somedielectricgreasetothebatteryterminals(Figure
21).Donotuseanyothertypeoflubricantasitcan
causedamagetotheterminals.
Figure21
1.Batteryterminals
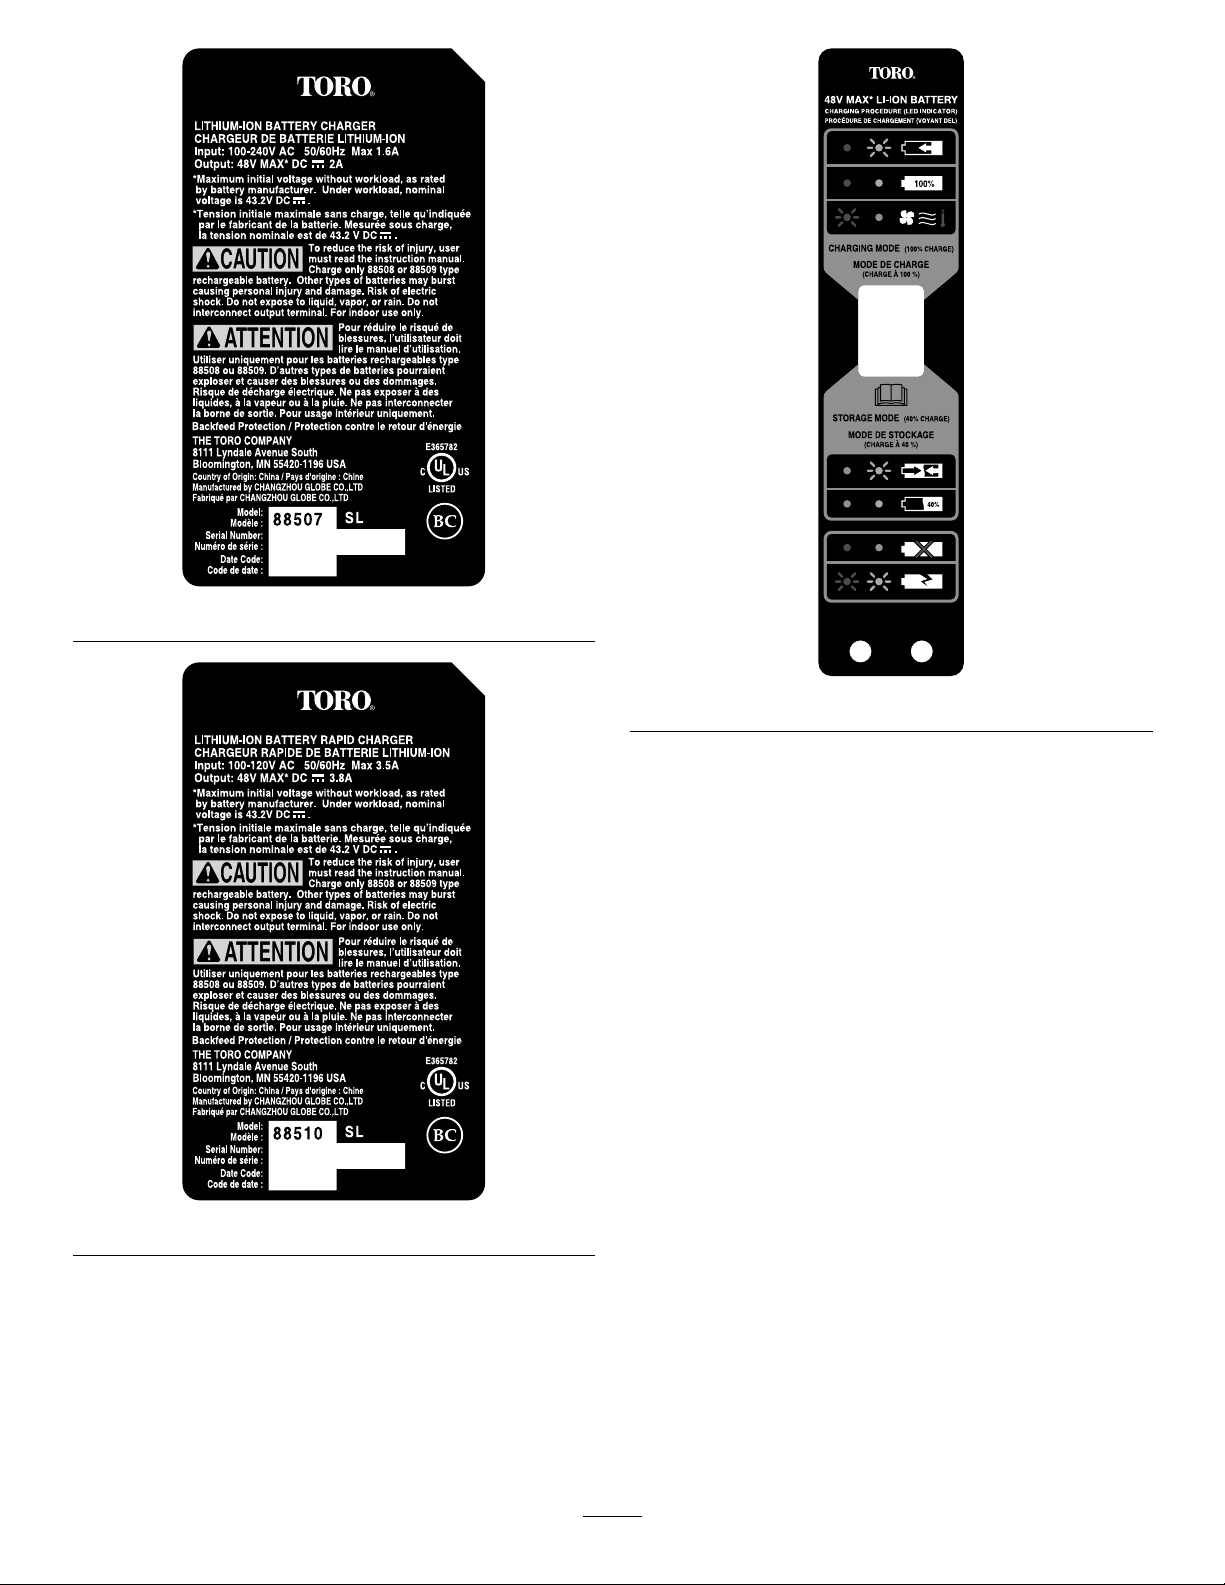
ChargingtheBatteryPack
WARNING
CALIFORNIA
Proposition65Warning
Batteryposts,terminals,andrelated
accessoriescontainleadandleadcompounds,
chemicalsknowntotheStateofCalifornia
tocausecancerandreproductiveharm.
Washhandsafterhandling.
Important:Forbestresults,yourbatterytoolshould
bechargedinalocationwherethetemperatureismore
11
Page 12

than5°C(41°F)butlessthan40°C(104°F).Toreduce
theriskofseriouspersonalinjury,donotstoreoutside
orinvehicles.Chargingtimewillbeincreasedifnot
chargedwithinthisrange.
1.Ifthepowercordisnotpluggedintothecharger,plugitin
tothecharger(Figure22),thenplugthepowercordinto
apowersocket.
2.Turnthebatteryupsidedownandlineupthebatteryterminal
withtheslotinthecharger(Figure22andFigure23).
5.RefertoFigure24tointerprettheLEDindicatorsonthe
batterycharger.
Figure22
1.Insertbatteryhere
2.LEDindicators4.Powercordplug-in
3.Charge/storagemode
switch
location
Figure23
1.LEDindicators(levelof
charge)
2.Releasebutton4.T estbutton
3.Slidethebatteryintothechargeruntilitclicksintoplace.
4.Toremovethebattery,pulluponthereleasebuttonand
slidethebatterybackwardsoutofthecharger.
3.Batteryterminal
Figure24
1.Redlighton;green
lightashing—batteryis
charging.
2.Redlighton;green
lighton—batteryisfully
charged.
3.Redlightashing;green
lightoff—abnormalbattery
temperature(greaterthan
40C(104F)orlessthan5
C(41F).
4.Charge/storagemode
switch
5.Redlightoff;green
lightashing—batteryis
preparingforstorage.
6.Redlightoff;greenlight
on—batteryisprepared
forstorage.
7.Redlighton;greenlight
off—nobatteryinserted.
8.Redlightashing;green
lightashing—batteryis
defective.
Important:Ifthechargerindicatesanabnormalbattery
temperature,allowthebatterytocoolorwarmupas
neededbeforeinsertingthebatteryintothecharger.
Storingalithium-ionbatteryat40%ofitscapacitymaximizes
batterylife.
Usestoragemode(Figure24)whenthebatterywillnotbeused
for1monthorlonger.
1.Insertthebatteryintothecharger .
2.Turnstoragemodeon.
3.Thebatterywillchargeordischargeasnecessaryto
approximately40%charge.
4.Whenthebatteryisreadyforstorage(Figure24,item6.),
removethebatteryfromthecharger.
12
Page 13

Maintenance
1
g025219
RecommendedMaintenanceSchedule(s)
MaintenanceService
Interval
Beforeeachuseordaily
Aftereachbatterydrain
cycle
MaintenanceProcedure
•Checktheoillevel.
•Checkthechainbrake.
•Cleanthebargrooveandoilpassageholes.
•Checkthesprocketforwear.
•Checkthewearonthebar.
•Checkthewearonthechain.
•Adjustthechaintension.
AddingOiltotheChainSaw
ServiceInterval:Beforeeachuseordaily
1.Placethechainsawonaatsurfaceandremovethebattery.
2.Checkthewindow.Iftheoilcannotbeseeninthewindow,
oilneedstobeaddedtothechainsaw(Figure25).
Figure25
1.Oilcap
3.Cleantheareaaroundtheoilcap(Figure25).
4.Removethecapandpouroilintothechainsawuntiltheoil
llsthewindow(Figure25).
2.Window
Note:Donotllthechainsawhigherthanthebottom
ofthellneck.
5.Cleanupanyspilledoilandreplacetheoilcap.
CheckingtheChainBrake
ServiceInterval:Beforeeachuseordaily
1.Placethechainsawonaatsurfaceandremovethebattery.
2.Engagethechainbrakebypushingthehandbrakeforward
tothestopposition(Figure26).
Figure26
1.Handbrake—stopposition
3.Usingaglovedhand,gripthechainandattempttopullit
aroundthebar.
4.Ifthechainbrakeisworkingproperly,thechainwillnot
rotatearoundthebar .
5.Disengagethehandbrake,thenpullthechainaroundthe
bartoensurethatthehandbrakedisengagesproperly.
CleaningtheBarGrooveand OilPassageHoles
ServiceInterval:Beforeeachuseordaily
1.Placethechainsawonaatsurfaceandremovethebattery.
2.Removethetwonutsthatsecurethecover(Figure27).
13
Page 14

1
2
G025216
Figure27
Ifthechaintensionneedstobeadjusted,performthefollowing
steps:
1.Placethechainsawonalevelsurface.
2.Loosenthe2nutsonthecoverwithoutremovingthecover
(Figure29).
1.Cover
3.Removethechainfromthebarandremovethebar.
4.Checkthebargroovesandtheoilpassageholefordebris,
andcleanitifnecessary(Figure28).
1.Oilpassage2.Oilgroove
5.Installthechain,bar,andcover.RefertoReplacingtheBar
andChain(page15).
2.Nuts
Figure28
AdjustingtheChainTension
ServiceInterval:Aftereachbatterydraincycle
Figure29
1.Tensioningbolt
2.Chain
3.Holdupthetipofthebar(Figure30).
4.Tightenthechainbyturningthetensioningbolttotheright,
untilthechaintouchestheundersideofthebar.
5.Tightenthe2nuts(Figure29).
6.Checkthechaintension.Ifmoretensioningisrequired,
repeatthisprocedure.
3.Nut(2)
Figure30
DANGER
Contactwiththechainsawteethcancauseserious
injury.
•Removethebatterybeforeperformingany
adjustmentsormaintenancetothechainsaw.
•Alwaysweargloveswhenperformingany
adjustmentsofmaintenancetothechainsaw.
Checkthechaintensionbypullingthechainaroundtheblade
barusingaglovedhand.
Note:Thechainshouldmovesmoothlyaroundtheblade
barwhenpulledbyhand,andshouldremainincontactwith
theundersideofthebar(Figure29).
CheckingandReplacingthe Sprocket
ServiceInterval:Beforeeachuseordaily
1.Removethecover,chainandguidebar;refertoReplacing
theBarandChain(page15).
2.RemovetheE-clip(Figure31).
14
Page 15

Figure31
1
2
G025216
1.Sprocket
2.Spacer
3.Removethespacer(Figure31).
4.Removethesprocket.
5.Ifthewearmarksonthesprocketaredeeperthan0.5mm
(0.02in)itshouldbereplaced(Figure31).
A.Placethenewsprocketonthecrankshaft.
B.Placethespacerandclipontothenewsprocket.
C.Installtheguidebarandthechain.
D.Checkthechaintension;refertoAdjustingtheChain
Tension(page14).
3.E-clip
ReplacingtheBarandChain
ServiceInterval:Beforeeachuseordaily
Beforeeachuseordaily
DANGER
Contactwiththechainsawteethcancauseserious
injury.
•Removethebatterybeforeperformingany
adjustmentsormaintenancetothechainsaw.
•Alwaysweargloveswhenperformingany
adjustmentsofmaintenancetothechainsaw.
1.Placethechainsawonalevelsurface.
2.Removethebattery .
3.Removethetwonutsthatsecurethecover(Figure32).
Figure32
1.Cover
4.Loosenthechainbyturningthechain-tighteningscrewto
theleft(Figure33).
2.Nuts
Note:Thebladebarwillmoveclosertothedrive
sprocket.
Figure33
1.Sprocket3.Stud(2)
2.Tensioningbolt4.Adjustingpin
5.Separatethechainfromtheblade.
6.Alignthebarwiththetwostudsandtheadjustingpin(Figure
33).
7.Placethenewchainaroundthedrivesprocket,withthe
teethofthechainfacingawayfromthesprocket(Figure33).
8.Feedthechainintothegrooveinthebladebar.
9.Installthecoverandthenuts,butdonotfullytightenthe
nuts.
10.Holdupthetipofthebar(Figure34).
15
Page 16

Figure34
11.Tightenthechainbyturningthetensioningbolttotheright
(Figure33),untilthechaintouchestheundersideofthebar.
12.Tightenthe2nuts(Figure32).
13.Checkthechaintension.Ifmoretensioningisrequired,
repeatthisprocedurestartingat9.
Note:Thechaintensioniscorrectwhenyouareable
touseaglovedhandtopullthechainsmoothlyaround
thebladebar
BatteryPackPreparationFor Recycling
WARNING
Uponremoval,coverthebatterypack’sterminalswith
heavy-dutyadhesivetape.Donotattempttodestroy
ordisassemblethebatterypackorremoveanyofits
components.Lithium-ionbatteriesmustberecycledor
disposedofproperlyatthenearestbatteryrecycling
facility.
Service
Shouldthisitemneedservice,taketheproducttoyourAuthorized
ToroServiceDealer.Y ourToroDealerisspeciallytrainedtorepair
ToroproductsandwillensurethatyourT orostays“All”T oro.
Storage
•Whenstoringortransportingthechainsaw,alwaysplacethe
protectivecoveroverthechainsawblade.
•Cleanallforeignmaterialfromtheproduct.
•Storeitinawell-ventilatedplacethatisinaccessibleto
children.
•Keepawayfromcorrosiveagentssuchasgardenchemicals
andde-icingsalts.
16
Page 17

Troubleshooting
Usingthebatterywhenitishotcanreducetheoperatingtime.
Thebatterywillautomaticallystopworkingwhenitisoverheated
topreventdamagetoit.Removethebatteryfromthechargerand
allowittocoolbeforeplacingitbackintothechainsaw.
Usingthebatterywhenthereismoistureontheleadscancause
thechainsawtomalfunction.Allowthebatterytodryorwipeit
drybeforeplacingitbackintothechainsaw.
Problem
Thechainoilis
notlubricating
properly.
PossibleCauseCorrectiveAction
1.Theoilportis
plugged.
2.Theoilgroove
inthebaris
plugged/
1.Cleanoutany
2.Cleanoutany
debrisfromthe
oilport.
debrisfromthe
oilgroove.
Problem
Themotordoes
notrunorruns
intermittently.
Themotoris
running,butthe
chaindoesnot
rotate.
PossibleCauseCorrectiveAction
1.Thechain
brakeis
engaged.
2.Thebatteryis
lowoncharge.
3.Thebatteryis
notfullyseated.
4.Thebatteryis
toohot.
5.Thebattery
hasexceeded
highamperage
limits.
6.Thereisdebris
underthe
cover.
1.Thechainis
notproperly
seatedonthe
sprocket.
1.Disengagethe
2.Chargethe
3.Makesure
4.Allowthe
5.Releasethe
6.Removethe
1.Reinstallthe
chainbrake
bypullingthe
handguard
towardthe
handleuntil
thereisan
audibleclick.
battery.
thebatteryis
pushedallthe
wayintothe
housing.
batterytocool.
triggerswitch,
thenpressthe
triggerswitch.
coverand
cleanoutany
debris.
chainand
ensurethelinks
areproperly
seatedinthe
sprocket.
Thechainbrake
doesnotengage.
Thechainsaw
doesnotproperly
cut.
1.Thereisa
chainbrake
malfunction
1.Thechainis
nottensioned
correctly.
2.Thechainis
dull.
3.Thechain
isinstalled
backwards.
4.Thechainis
dry.
1.Immediately
takethechain
sawtoa
localservice
location.
1.Settheproper
tensiononthe
chain.
2.Replacethe
chain.
3.Reinstallthe
chain.
4.Checktheoil
level.
17
Page 18

Notes:
18
Page 19

Notes:
19
Page 20

TheToroPromise-ElectricProducts
AThree-YearFullWarrantyforResidentialUsefortheUnitedStatesandCanada
TheToroCompanyanditsafliate,ToroWarrantyCompany,pursuanttoanagreementbetweenthem,jointlywarrantthisproductforthreeyears
againstdefectsinmaterialorworkmanshipwhenusedfornormalresidentialpurposes.*
IfyouthinkyourToroProductcontainsadefectinmaterialsorworkmanship,ifyouhavequestionsorproblems,andbeforereturningthisproductcall
tollfree:
Trimmers:Blowers:
1-800-237-2654(US)
1-800-248-3258(Canada)
Toreceiveareplacementorrepair,atouroption,returnthecompleteunittotheseller.UnitedStatesandCanadacustomersmayreturntheirproduct,
withproofofpurchase,toanyAuthorizedServiceDealer.UnitedStatescustomersmayalsoreturntheirproduct,withproofofpurchase,postage
prepaid,totheToroServiceCenter ,5500SEDelaware,Ankeny,IA50021.
Thiswarrantycoversproductdefectsonly.NeitherTheToroCompanynorToroWarrantyCompanyisliableforindirect,incidental,or
consequentialdamagesinconnectionwiththeuseoftheToroProductscoveredbythiswarranty ,includinganycostorexpenseof
providingsubstituteequipmentorserviceduringreasonableperiodsofmalfunctionornon-usependingcompletionofrepairsunderthis
warranty.Somestatesdonotallowexclusionsofincidentalorconsequentialdamages,sotheaboveexclusionsmaynotapplytoyou.This
warrantygivesyouspeciclegalrights,andyoumayalsohaveotherrightswhichvaryfromstatetostate.
1-888-367-6631(US)
1-888-430-1687(Canada)
Snowthrowers:
1-800-808-2963(US)
1-800-808-3072(Canada)
CountriesOtherthantheUnitedStatesandCanada
CustomerswhohavepurchasedToroproductsexportedfromtheUnitedStatesorCanadashouldcontacttheirT oroDistributor(Dealer)toobtain
guaranteepoliciesforyourcountry,province,orstate.IfforanyreasonyouaredissatisedwithyourDistributor’sserviceorhavedifcultyobtaining
guaranteeinformation,contacttheToroimporter.Ifallotherremediesfail,youmaycontactusatT oroWarrantyCompany.
AustralianConsumerLaw
AustraliancustomerswillnddetailsrelatingtotheAustralianConsumerLaweitherinsidetheboxoratyourlocalT oroDealer.
*Residentialusemeansuseoftheproductonthesamelotasyourhome.PartNumber374-0262Rev.F
374-0262RevF
 Loading...