


FormNo.3440-153RevD
Flex-ForcePowerSystem
or15in60VMAXStringTrimmer
ModelNo.51831—SerialNo.320000001andUp
ModelNo.51831T—SerialNo.320000001andUp
™
13in
Registeratwww.T oro.com.
OriginalInstructions(EN)
*3440-153*

Forassistance,pleasesee
www.Toro.com/support
forinstructionalvideos
orcontact1-888-384-9939
beforereturningthis
product.
WARNING
CALIFORNIA
Proposition65Warning
Thepowercordonthisproductcontains
lead,achemicalknowntotheState
ofCaliforniatocausebirthdefects
orotherreproductiveharm.Wash
handsafterhandling.
Useofthisproductmaycauseexposure
tochemicalsknowntotheStateof
Californiatocausecancer,birthdefects,
orotherreproductiveharm.
thelocationofthemodelandserialnumbersonthe
product.Writethenumbersinthespaceprovided.
Important:Withyourmobiledevice,youcan
scantheQRcodeontheserialnumberdecal(if
equipped)toaccesswarranty,parts,andother
productinformation.
Introduction
Thistrimmerisintendedtobeusedbyresidential
homeownerstotrimgrassasneededoutdoors.It
isdesignedtouselithium-ionbatterypackModels
88620(providedwithModel51831),88625,Model
88640,Model88650,Model88660,orModel88675.
Thesebatterypacksaredesignedtobechargedonly
bybatterychargerModel88602,Model88605,or
Model88610(providedwithModel51831).Usingthis
productforpurposesotherthanitsintendedusecould
provedangeroustoyouandbystanders.
Model51831Tdoesnotincludeabatteryora
charger.
Readthisinformationcarefullytolearnhowtooperate
andmaintainyourproductproperlyandtoavoid
injuryandproductdamage.Youareresponsiblefor
operatingtheproductproperlyandsafely .
g360584
Figure1
1.Modelandserialnumberlocation
ModelNo.
SerialNo.
Thismanualidentiespotentialhazardsandhas
safetymessagesidentiedbythesafety-alertsymbol
(Figure2),whichsignalsahazardthatmaycause
seriousinjuryordeathifyoudonotfollowthe
recommendedprecautions.
g000502
Figure2
Safety-alertsymbol
Visitwww.T oro.comforproductsafetyandoperation
trainingmaterials,accessoryinformation,helpnding
adealer,ortoregisteryourproduct.
Wheneveryouneedservice,genuinethe
manufacturerparts,oradditionalinformation,contact
anAuthorizedServiceDealerorthemanufacturer
CustomerServiceandhavethemodelandserial
numbersofyourproductready.Figure1identies
©2021—TheToro®Company
8111LyndaleAvenueSouth
Bloomington,MN55420
Thismanualuses2wordstohighlightinformation.
Importantcallsattentiontospecialmechanical
informationandNoteemphasizesgeneralinformation
worthyofspecialattention.
2
Contactusatwww.Toro.com.
PrintedinChina
AllRightsReserved

Safety
WARNING—Whenusingelectricgardening
appliances,alwaysreadandfollowbasicsafety
warningsandinstructionstoreducetheriskofre,
electricshock,andpersonalinjury,includingthe
following:
IMPORTANTSAFETY
INSTRUCTIONS
I.Training
1.Theoperatoroftheapplianceisresponsiblefor
anyaccidentsorhazardsoccurringtoothersor
theirproperty.
2.Donotallowchildrentouseorplaywiththe
appliance,batterypack,orthebatterycharger;
localregulationsmayrestricttheageofthe
operator.
3.Donotallowchildrenoruntrainedpeopleto
operateorservicethisdevice.Allowonlypeople
whoareresponsible,trained,familiarwiththe
instructions,andphysicallycapabletooperate
orservicethedevice.
4.Beforeusingtheappliance,batterypack,and
batterycharger,readalltheinstructionsand
cautionarymarkingsontheseproducts.
5.Becomefamiliarwiththecontrolsandproper
useoftheappliance,batterypack,andbattery
charger.
II.Preparation
1.Keepbystandersandchildrenawayfromthe
operatingarea.
2.UseonlythebatterypackspeciedbyToro.
Usingotheraccessoriesandattachmentsmay
increasetheriskofinjuryandre.
3.Pluggingthebatterychargerintoanoutletthatis
not120Vcancauseareorelectricshock.Do
notplugthebatterychargerintoanoutletother
than120V .Foradifferentstyleofconnection,
useanattachmentplugadapteroftheproper
congurationforthepoweroutletifneeded.
4.Donotuseadamagedormodiedbattery
packorbatterycharger,whichmayexhibit
unpredictablebehaviorthatresultsinre,
explosion,orriskofinjury .
5.Ifthesupplycordtothebatterychargeris
damaged,contactanAuthorizedServiceDealer
toreplaceit.
6.Donotusenon-rechargeablebatteries.
7.Chargethebatterypackwithonlythebattery
chargerspeciedbyT oro.Achargersuitablefor
1typeofbatterypackmaycreateariskofre
whenusedwithanotherbatterypack.
8.Chargethebatterypackinawell-ventilatedarea
only.
9.Donotexposeabatterypackorbatterycharger
toreortotemperatureshigherthan68°C
(154°F).
10.Followallcharginginstructionsanddo
notchargethebatterypackoutsideofthe
temperaturerangespeciedintheinstructions.
Otherwise,youmaydamagethebatterypack
andincreasetheriskofre.
11.Donotoperatetheappliancewithoutallguards
andothersafetyprotectivedevicesinplaceand
functioningproperlyontheappliance.
12.Dressproperly—Wearappropriateclothing,
includingeyeprotection;longpants;substantial,
slip-resistantfootwear;rubbergloves;and
hearingprotection.Tiebacklonghairanddo
notwearlooseclothingorloosejewelrythatcan
getcaughtinmovingparts.Wearadustmaskin
dustyoperatingconditions.
III.Operation
1.Avoiddangerousenvironments—Donotusethe
applianceinrainorindamporwetlocations.
2.Usetheproperapplianceforyour
application—Usingtheappliancefor
purposesotheranitsintendedusecouldprove
dangeroustoyouandbystanders.
3.Preventunintentionalstarting—Ensurethatthe
switchisintheOFFpositionbeforeconnecting
tothebatterypackandhandlingtheappliance.
Donotcarrytheappliancewithyourngeron
theswitchorenergizetheappliancewiththe
switchintheONposition.
4.Operatetheapplianceonlyindaylightorgood
articiallight.
5.Removethebatterypackfromtheappliance
beforeadjustingitorchangingaccessories.
6.Keepyourhandsandfeetawayfromthecutting
areaandallmovingparts.
7.Stoptheappliance,removethebatterypack
fromtheappliance,andwaitforallmovement
tostopbeforeadjusting,servicing,cleaning,or
storingtheappliance.
8.Removethebatterypackfromtheappliance
wheneveryouleaveitunattended.
9.Donotforcetheappliance—Allowtheappliance
todothejobbetterandsaferattheratefor
whichitwasdesigned.
10.Donotoverreach—Keepproperfootingand
balanceatalltimes,especiallyonslopes.Walk,
neverrunwiththeappliance.
3

11.Stayalert—Watchwhatyouaredoinganduse
commonsensewhenoperatingtheappliance.
Donotusetheappliancewhileill,tired,orunder
theinuenceofalcoholordrugs.
12.Ensurethattheventilationopeningsarekept
clearofdebris.
13.Underabusiveconditions,thebatterypackmay
ejectliquid;avoidcontact.Ifyouaccidently
comeintocontactwiththeliquid,ushwith
water.Iftheliquidcontactsyoureyes,seek
medicalhelp.Liquidejectedfromthebattery
packmaycauseirritationorburns.
14.CAUTION—Amistreatedbatterypackmay
presentariskofreorchemicalburn.Donot
disassemblethebatterypack.Donotheatthe
batterypackabove68°C(154°F)orincinerate
it.ReplacethebatterypackwithagenuineToro
batterypackonly;usinganothertypeofbattery
packmaycauseareorexplosion.Keep
batterypacksoutofthereachofchildrenand
intheoriginalpackaginguntilyouarereadyto
usethem.
IV.MaintenanceandStorage
replacementpartstoensurethattheproductis
safelymaintained.
8.Storeanidleapplianceindoorsinaplacethatis
dry,secure,andoutofthereachofchildren.
9.Donotdisposeofthebatteryinare.The
cellmayexplode.Checkwithlocalcodesfor
possiblespecialdisposalinstructions.
SAVETHESE
INSTRUCTIONS
1.Maintaintheappliancewithcare—Keepitclean
andingoodrepairforbestperformanceandto
reducetheriskofinjury.Followtheinstructions
forlubricatingandchangingaccessories.Keep
handlesdry ,clean,andfreefromoilandgrease.
2.Whenthebatterypackisnotinuse,keepit
awayfrommetalobjectssuchaspaperclips,
coins,keys,nails,andscrewsthatcanmakea
connectionfrom1terminaltoanother.Shorting
thebatteryterminalsmaycauseburnsorare.
3.Keepyourhandsandfeetawayfrommoving
parts.
4.Stoptheappliance,removethebatterypack
fromtheappliance,andwaitforallmovement
tostopbeforeadjusting,servicing,cleaning,or
storingtheappliance.
5.Checktheappliancefordamagedparts—Ifthere
aredamagedguardsorotherparts,determine
whetheritwilloperateproperly .Checkfor
misalignedandbindingmovingparts,broken
parts,mounting,andanyotherconditionthat
mayaffectitsoperation.Unlessindicatedinthe
instructions,haveanAuthorizedServiceDealer
repairorreplaceadamagedguardorpart.
6.Donotreplacetheexistingnon-metalliccutting
meansontheappliancewithametalliccutting
means.
7.Donotattempttoserviceorrepairtheappliance,
batterypack,orbatterychargerexceptas
indicatedintheinstructions.HaveanAuthorized
ServiceDealerperformserviceusingidentical
4

SafetyandInstructionalDecals
Safetydecalsandinstructionsareeasilyvisibletotheoperatorandarelocatednearanyarea
ofpotentialdanger.Replaceanydecalthatisdamagedormissing.
1.Thebatterypackis
charging.
2.Thebatterypackisfully
charged.
144-3094
3.Thebatterypackisover
orundertheappropriate
temperaturerange.
4.Batterypackchargingfault
decal144-3094
144-3098
decal144-3098
decal144-3096
144-3096
decal144-3088
144-3088
decal144-3084
144-3084
5

decal144-3085
144-3085
decal139-5210
139-5210
1.Warning—readtheOperator’sManual;stayawayfrom
movingparts;keepallguardsinplace;weareyeprotection;
donotoperateinwetconditions.
decal140-8475
140-8475
1.ReadtheOperator’s
Manual.
2.Call2Recycle®battery
recyclingprogram
1.Batterychargestatus
3.Keepawayfromopenre
orames.
4.Donotexposetorain.
decal137-9461
137-9461
6

Setup
LooseParts
Usethechartbelowtoverifythatallpartshavebeenshipped.
ProcedureDescription
1
2
3
Important:Thebatterypackisnotfullycharged
whenyoupurchaseit.Beforeusingthetoolfor
thersttime,refertoChargingtheBatteryPack
(page13).
Allenwrench1
Auxiliaryhandleassembly1
Screwdriver(notincluded)
Guard
Screwdriver(notincluded)
Qty.
Use
Unfoldthehandle.
–
1
–
Installtheauxiliaryhandle.
Installtheguard.
7

1
UnfoldingtheHandle
Partsneededforthisprocedure:
1Allenwrench
Procedure
1.Unfoldthehandle(AofFigure3).
2.Alignthelockingbuttononthelowershaftwiththeslottedholeontheuppershaftandslidethe2shafts
together(BandCofFigure3).
Note:Thelockingbuttonclicksintotheslottedholewhentheshaftsaresecured(DofFigure3).
3.UsingtheprovidedAllenwrench,tightenthescrewontheshaftconnectoruntilitissecure(EofFigure3).
Figure3
8
g330189

2
InstallingtheAuxiliaryHandle
Partsneededforthisprocedure:
1Auxiliaryhandleassembly
–
Screwdriver(notincluded)
Procedure
1.UsingaPhillipsheadscrewdriver,separatetheauxiliaryhandlefromthehandleplatebyremoving
the2screws(AofFigure4).
2.Lineuptheauxiliaryhandlewithauxiliaryhandleplateonthetrimmerhandle(BofFigure4).
3.Securetheauxiliaryhandletothehandleplatewiththe2previouslyremovedscrews(CofFigure4).
Figure4
g331072
9

3
InstallingtheGuard
Partsneededforthisprocedure:
1
Guard
–
Screwdriver(notincluded)
Procedure
1.UsingaPhillipsheadscrewdriver,removethe2screws,2washers,and2spacersfromthetrimmer
base(AofFigure5).
2.Aligntheguardontothetrimmerbase(BofFigure5).
3.Securetheguardontothebaseofthetrimmerwiththe2screws,2washers,and2spacerspreviously
removed(CofFigure4).
Figure5
g330190
10

ProductOverview
Specications
Model
Rated
Voltage
Charger
Type
BatteryType
51831/T
60VDCmaximum,54VDCnominalusage
88602,88605,or88610(includedwith51831)
88620(includedwith51831),88625,88640,
88650,88660,or88675
AppropriateTemperatureRanges
Figure6
1.Batterylatch4.Runtrigger
2.Lockouttrigger
3.Auxiliaryhandle
5.Guard
6.String
Charge/storethebatterypack
at
Usethebatterypackat
Usethetrimmerat
Storethetrimmerat0°C(32°F)to49°C(120°F)*
5°C(41°F)to40°C(104°F)*
-30°C(-22°F)to49°C(120°F)
0°C(32°F)to49°C(120°F)
*Chargingtimewillincreaseifyoudonotchargethe
batterywithinthisrange.
Storethetool,batterypack,andbatterychargerinan
enclosedclean,dryarea.
g335846
1.BatterychargerModel
88610(includedwith
Model51831)
g330065
Figure7
2.BatterypackModel88620
(includedwithModel
51831)
11

Operation
StartingtheTrimmer
1.Makesurethattheventsonthetrimmerare
clearofanydustanddebris.
g330416
Figure10
1.Lockouttrigger2.Runtrigger
ShuttingOfftheTrimmer
Toshutoffthetrimmer,releasebothtriggers.
Wheneveryouarenotusingthetrimmerorare
transportingthetrimmertoorfromtheworkarea,
removethebatterypack.
RemovingtheBatteryPack
Figure8
1.Trimmerventingareas
2.Alignthecavityinthebatterypackwiththe
tongueonthehandlehousing(Figure9).
3.Pushthebatterypackintothehandleuntilthe
batterylocksintothelatch(Figure9).
Figure9
1.Batterylatch
g330191
g330417
fromtheTrimmer
Pressthebatterylatchonthemachinetoreleasethe
batterypackandslidethebatterypackoutofthe
machine(Figure11).
g331067
Figure11
1.Batterylatch
4.Tostartthetrimmer,squeezethelockouttrigger,
thensqueezetheruntrigger(Figure10).
12

ChargingtheBatteryPack
Important:Thebatterypackisnotfullycharged
whenyoupurchaseit.Beforeusingthetoolfor
thersttime,placethebatterypackinthecharger
andchargeituntiltheLEDdisplayindicatesthe
batterypackisfullycharged.Readallsafety
precautions.
Important:Chargethebatterypackonlyin
temperaturesthatarewithintheappropriate
range;refertoSpecications(page11).
Note:Atanytime,pressthebattery-charge-indicator
buttononthebatterypacktodisplaythecurrent
charge(LEDindicators).
1.Ensurethattheventsonthebatteryandcharger
areclearofanydustanddebris.
Red
Red
blinking
Batterypackand/orbatterychargerisoverorunder
theappropriatetemperaturerange
Batterypackchargingfault*
*RefertoTroubleshooting(page18)formore
information.
Important:Thebatterycanbeleftonthecharger
forshortperiodsbetweenuses.
Ifthebatterywillnotbeusedforlongerperiods,
removethebatteryfromthecharger;referto
Storage(page17).
Figure12
1.Batterypackcavity
2.Batterypackventingareas6.Handle
3.Batterypackterminals
4.Battery-charge-indicator
button
5.LEDindicators(current
charge)
7.Charger
2.Lineupthechargerwiththecavityontheback
ofthebatterypack(Figure12).
3.Slidethechargerintothebatterypackuntilitis
fullyseated(Figure12).
4.Toremovethecharger,slidethecharger
backwardoutofthebattery.
5.RefertothefollowingtabletointerprettheLED
indicatorlightonthebatterycharger.
Indicator
light
Off
Green
blinking
Green
Indicates
Nobatterypackinserted
Batterypackischarging
Batterypackischarged
g330066
13
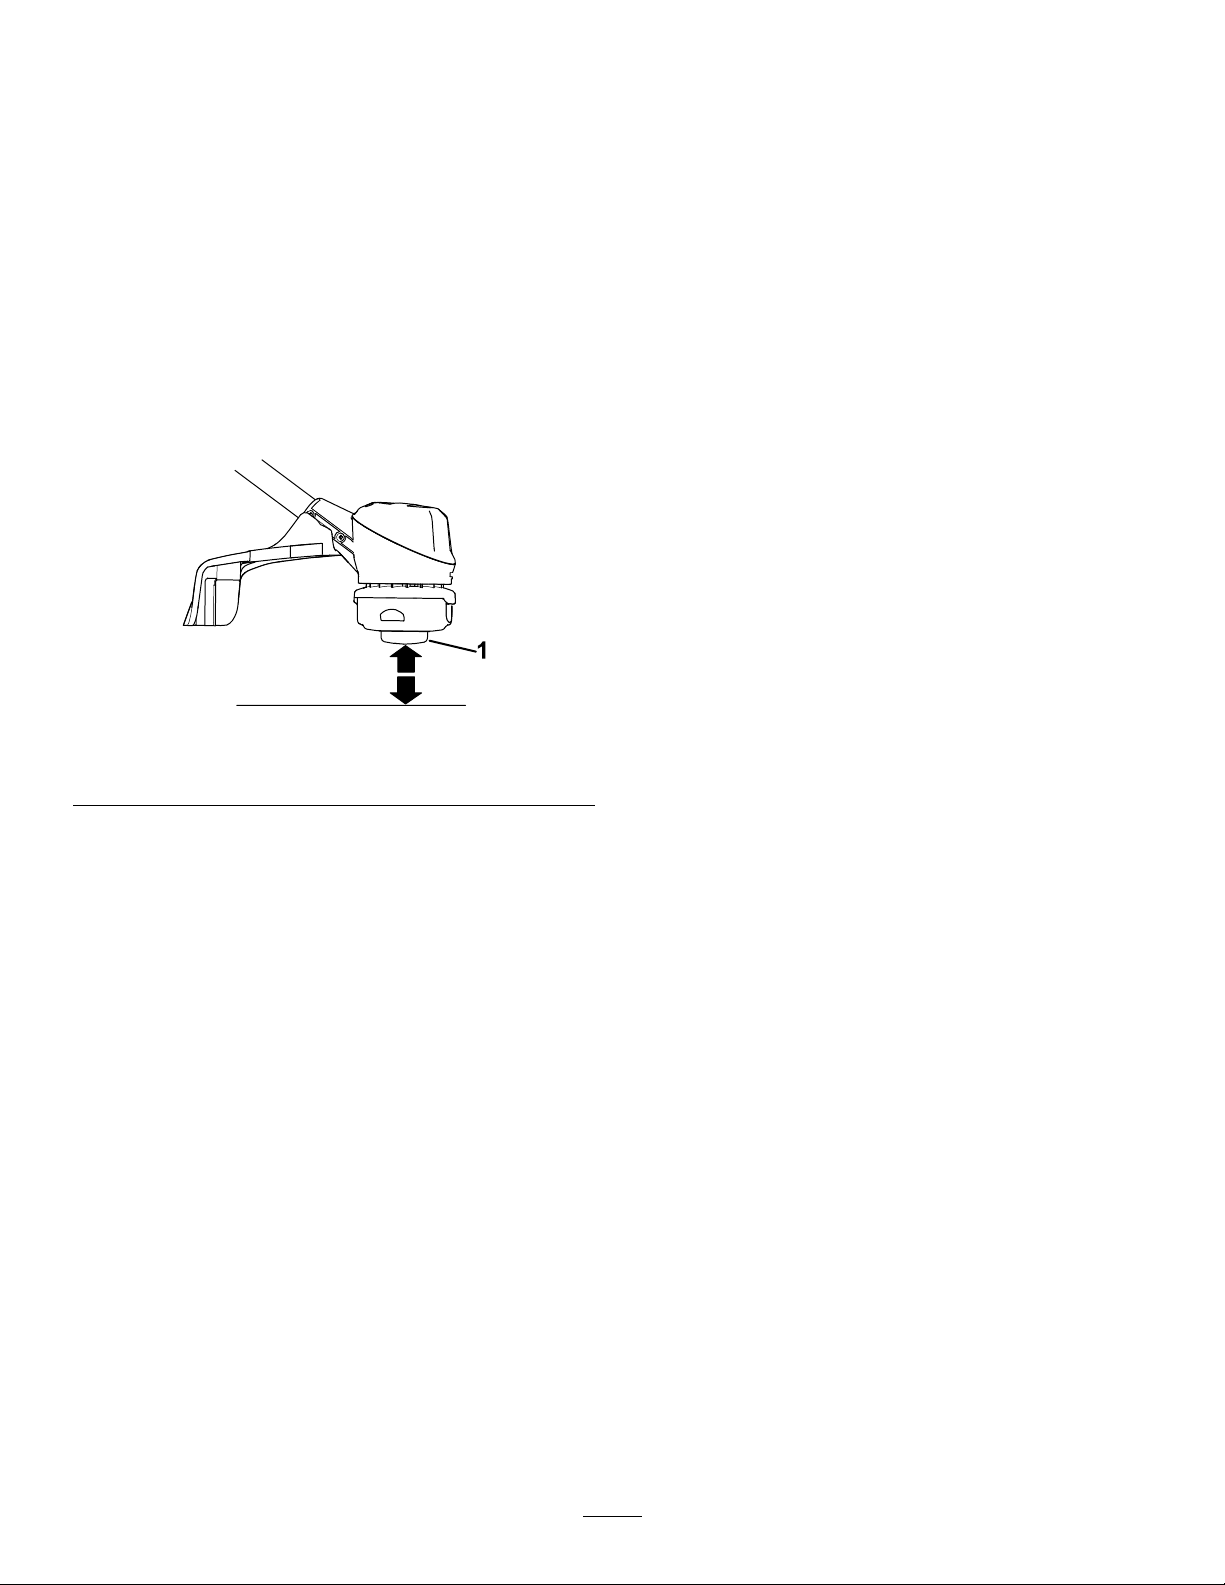
AdvancingtheLineUsing
theBumpFeed
1.Runthetoolatfullthrottle.
2.Tapthebumpbuttononthegroundtoadvance
theline.Thelineadvanceseachtimethebump
buttonistapped.Donotholdthebumpbutton
ontheground.
Note:Thelinetrimmingcut-offbladeonthe
grassdeectorcutsthelinetothecorrectlength.
Note:Ifthelineisworntooshort,youmaynot
beabletoadvancethelinebytappingitonthe
ground.Ifso,releasebothtriggersandreferto
AdvancingtheLineManually(page14).
Figure13
1.Bumpbutton
AdvancingtheLine
Manually
Removethebatterypackfromthetrimmer,thenpush
thebumpbuttonatthebaseofthespoolretainer
whilepullingonthetrimmerlinetomanuallyadvance
theline.
g330186
14

AdjustingtheCuttingSwath
Thetrimmercomesfromthefactorywithacuttingswathof33.0cm(13inches)asshowninAofFigure14.
Refertothefollowinginstructionstoadjusttheswathto38.1cm(15inches)asshowninDofFigure14.
1.Removetheswathbladefromthebottomoftheguardbyremovingthe2screwsholdingitinplaceusing
theprovidedAllenwrench(BofFigure14)androtatetheswathblade180°.
2.Oncetheswathbladeisrotated,installitontotheguardusingthe2screwspreviouslyremoved(Cof
Figure14).
Figure14
g330415
OperatingTips
•Keepthetrimmertiltedtowardtheareabeingcut;
thisisthebestcuttingarea.
•Thestringtrimmercutswhenyoumoveitfromleft
toright.Thispreventsthetrimmerfromthrowing
debrisatyou.
•Usethetipofthestringtodothecutting;donot
forcethestringheadintouncutgrass.
•Wireandpicketfencescancausethestringto
wearrapidlyandevenbreak.Stoneandbrick
walls,curbs,andwoodcanalsocausethestring
towearrapidly.
•Avoidtreesandshrubs.Thestringcaneasily
damagetreebark,woodmoldings,siding,and
fenceposts.
g330188
Figure15
1.Directionofrotation2.Stringpath
15

Maintenance
Aftereachuseofthetrimmer,completethefollowing:
1.Removethebatteryfromthetrimmer.
2.Wipethetrimmercleanwithadampcloth.Do
nothosethetrimmerdownorsubmergeitin
water.
ReplacingtheString
Important:Useonly2mm(0.080inch)
monolamentreplacementstring(the
manufacturerPartNo.88201),orpurchase
pre-woundspoolPartNo.88615orpre-wound
spool3-packPartNo.88616.
1.Removethebatterypackandcleananydebris
fromthetrimmerhead.
CAUTION
Thelinecutoffbladeonthedeectoris
sharpandcancutyou.
Donotuseyourhandstocleanthe
deectorshieldandblade.
3.Wipeorscrapecleanthecuttingheadareaany
timethereisanaccumulationofdebris.
4.Checkandtightenallfasteners.Ifanypartis
damagedorlost,repairorreplaceit.
5.Brushdebrisawayfromairintakeventsand
exhaustonmotorhousingtopreventthemotor
fromoverheating.
2.Pressthetabssimultaneouslyonthesideof
thetrimmerheadandremovecoverandspool
(Figure16).
g330429
Figure16
1.Coverandspool2.Covertabs
3.Removethespoolfromthecoverandremove
anyremainingstringfromthespool.
4.Cut1pieceof2mm(0.080inch)stringto
approximately3m(10ft).
Important:Donotuseanyothergauge
ortypeofstring,asthiscoulddamagethe
trimmer.
5.Bendthenewstringatthemidpointandinsert
thebendintothestarterslotinthecenterrimof
thespool(Figure17).
Note:Ensurethatthelinesnapsintoposition
intheslot.
6.Wrapthe2halvesofthestringevenlyandrmly
aroundthespoolasshowninFigure17.
Note:Ensurethatthestringiswrapped
clockwisearoundthespoolwhenlookingatthe
bottomofthespool.
16

Figure17
1.Guideslotforstringend
(oncefullywound)
2.Centerrimspoolstarter
slot
3.Newstring
7.Windthestring,leavingjustenoughextending
fromthespooltocontacttheswathblade,and
snaptheendsintotheguideslotsonthespool
(Figure17).
8.Installthespoolintothecoverandroutethe
endsofthestringthroughtheholesinthecover
asshowninFigure18.
Storage
Important:Storethetool,batterypack,and
chargeronlyintemperaturesthatarewithinthe
appropriaterange;refertoSpecications(page
11).
Important:Ifyouarestoringthebatterypack
fortheoff-season,chargeituntil2or3LED
indicatorsturngreenonthebattery.Donotstore
afullychargedorfullydepletedbattery .When
youarereadytousethemachineagain,charge
thebatterypackuntiltheleftindicatorlightturns
g330440
greenonthechargerorall4LEDindicatorsturn
greenonthebattery.
•Disconnecttheproductfromthepowersupply
(i.e.,removetheplugfromthepowersupplyorthe
batterypack)andcheckfordamageafteruse.
•Donotstorethemachinewiththebatterypack
installed.
•Cleanallforeignmaterialfromtheproduct.
•Whennotinuse,storethetool,batterypack,and
batterychargeroutofthereachofchildren.
•Keepthetool,batterypack,andbatterycharger
awayfromcorrosiveagents,suchasgarden
chemicalsandde-icingsalts.
Figure18
1.Stringexitholes
9.Installthespoolandcoverassemblytothe
trimmerhead,pushuntilthecovertabssnap
intoplace.
•Toreducetheriskofseriouspersonalinjury,do
notstorethebatterypackoutsideorinvehicles.
•Storethetool,batterypack,andbatterycharger
inanenclosedclean,dryarea.
PreparingtheBatteryPack
forRecycling
Important:Uponremoval,covertheterminalsof
thebatterypackwithheavy-dutyadhesivetape.
Donotattempttodestroyordisassemblethe
g330442
batterypackorremoveanyofitscomponents.
Lithium-ionbatterypackslabeledwiththe
Call2Recyclesealcanberecycledatany
participatingretailerorbatteryrecycling
facilityintheCall2Recycleprogram(US
andCanadaonly).T olocateaparticipating
retailerorfacilityclosesttoyou,pleasecall
1-800-822-8837orvisitwww.call2recycle.org.
Ifyoucannotlocateaparticipatingretaileror
facilitynearby,orifyourrechargeablebattery
isnotlabeledwiththeCall2Recycleseal,
pleasecontactyourlocalmunicipalityformore
informationonhowtoresponsiblyrecyclethe
battery.IfyouarelocatedoutsideoftheUS
andCanada,pleasecontactyourauthorized
Torodistributor.
17

Troubleshooting
Performonlythestepsdescribedintheseinstructions.Allfurtherinspection,maintenance,andrepairwork
mustbeperformedbyanauthorizedservicecenterorasimilarlyqualiedspecialistifyoucannotsolvethe
problemyourself.
Problem
Thetooldoesnotstart.
Thetooldoesnotreachfullpower.
Thetoolisproducingexcessivevibration
ornoise.
Thebatterypackloseschargequickly .1.Thebatterypackisoverorunderthe
Thebatterychargerisnotworking.
1.Thebatteryisnotfullyinstalledinthe
tool.
2.Thebatterypackisnotcharged.
3.Thebatterypackisdamaged.3.Replacethebatterypack.
4.Thereisanotherelectricalproblem
withthetool.
1.Thebatterypackchargecapacityis
toolow .
2.Theairventsareblocked.
1.Thereisdebrisonthedrumareaon
thetrimmer .
2.Thespoolisnotproperlywound.2.Advancethelineusingthetrigger
appropriatetemperaturerange.
1.Thebatterychargerisoverorunder
theappropriatetemperaturerange.
2.Theoutletthatthebatterychargeris
pluggedintodoesnothavepower .
PossibleCauseCorrectiveAction
1.Removeandthenreplacethebattery
intothetool,makingsurethatitisfully
installedandlatched.
2.Removethebatterypackfromthetool
andchargeit.
4.ContactanAuthorizedServiceDealer.
1.Removethebatterypackfromthetool
andfullychargethebatterypack.
2.Cleantheairvents.
1.Cleananydebrisoffofthedrumarea.
switchand/orremovethelineonthe
spoolandwindthespoolagain.
1.Movethebatterypacktoaplace
whereitisdryandthetemperatureis
between5°C(41°F)and40°C(104°F).
1.Unplugthebatterychargerandmove
ittoaplacewhereitisdryandthe
temperatureisbetween5°C(41°F)
and40°C(104°F).
2.Contactyourlicensedelectricianto
repairtheoutlet.
TheLEDindicatorlightonthebattery
chargerisred.
TheLEDindicatorlightonthebattery
chargerisblinkingred.
Thetooldoesnotrunorruncontinuously.
1.Thebatterychargerand/orbattery
packisoverorundertheappropriate
temperaturerange.
1.Thereisanerrorinthecommunication
betweenthebatterypackandthe
charger.
2.Thebatterypackisweak.
1.Thereismoistureontheleadsofthe
batterypack.
2.Thebatteryisnotfullyinstalledintothe
tool.
1.Unplugthebatterychargerandmove
thebatterychargerandbatterypack
toaplacewhereitisdryandthe
temperatureisbetween5°C(41°F)
and40°C(104°F).
1.Removethebatterypackfromthe
batterycharger,unplugthebattery
chargerfromtheoutlet,andwait10
seconds.Plugthebatterychargerinto
theoutletagainandplacethebattery
packonthebatterycharger.IftheLED
indicatorlightonthebatterychargeris
stillblinkingred,repeatthisprocedure
again.IftheLEDindicatorlighton
thebatterychargerisstillblinkingred
after2attempts,properlydisposeof
thebatterypackatabatteryrecycling
facility.
2.Properlydisposeofthebatterypackat
abatteryrecyclingfacility .
1.Allowthebatterypacktodryorwipeit
dry.
2.Removeandthenreplacethebattery
intothetoolmakingsurethatitisfully
installedandlatched.
18

CaliforniaProposition65WarningInformation
Whatisthiswarning?
Youmayseeaproductforsalethathasawarninglabellikethefollowing:
WARNING:CancerandReproductiveHarm—www.p65Warnings.ca.gov.
WhatisProp65?
Prop65appliestoanycompanyoperatinginCalifornia,sellingproductsinCalifornia,ormanufacturingproductsthatmaybesoldinorbroughtinto
California.ItmandatesthattheGovernorofCaliforniamaintainandpublishalistofchemicalsknowntocausecancer,birthdefects,and/orother
reproductiveharm.Thelist,whichisupdatedannually,includeshundredsofchemicalsfoundinmanyeverydayitems.ThepurposeofProp65isto
informthepublicaboutexposuretothesechemicals.
Prop65doesnotbanthesaleofproductscontainingthesechemicalsbutinsteadrequireswarningsonanyproduct,productpackaging,orliteraturewith
theproduct.Moreover,aProp65warningdoesnotmeanthataproductisinviolationofanyproductsafetystandardsorrequirements.Infact,the
CaliforniagovernmenthasclariedthataProp65warning“isnotthesameasaregulatorydecisionthataproductis‘safe’or‘unsafe.’”Manyofthese
chemicalshavebeenusedineverydayproductsforyearswithoutdocumentedharm.Formoreinformation,gotohttps://oag.ca.gov/prop65/faqs-view-all
AProp65warningmeansthatacompanyhaseither(1)evaluatedtheexposureandhasconcludedthatitexceedsthe“nosignicantrisklevel”;or(2)
haschosentoprovideawarningbasedonitsunderstandingaboutthepresenceofalistedchemicalwithoutattemptingtoevaluatetheexposure.
Doesthislawapplyeverywhere?
Prop65warningsarerequiredunderCalifornialawonly.ThesewarningsareseenthroughoutCaliforniainawiderangeofsettings,includingbutnot
limitedtorestaurants,grocerystores,hotels,schools,andhospitals,andonawidevarietyofproducts.Additionally,someonlineandmailorder
retailersprovideProp65warningsontheirwebsitesorincatalogs.
.
HowdotheCaliforniawarningscomparetofederallimits?
Prop65standardsareoftenmorestringentthanfederalandinternationalstandards.TherearevarioussubstancesthatrequireaProp65warning
atlevelsthatarefarlowerthanfederalactionlimits.Forexample,theProp65standardforwarningsforleadis0.5μg/day,whichiswellbelow
thefederalandinternationalstandards.
Whydon’tallsimilarproductscarrythewarning?
•ProductssoldinCaliforniarequireProp65labellingwhilesimilarproductssoldelsewheredonot.
•AcompanyinvolvedinaProp65lawsuitreachingasettlementmayberequiredtouseProp65warningsforitsproducts,butothercompanies
makingsimilarproductsmayhavenosuchrequirement.
•TheenforcementofProp65isinconsistent.
•CompaniesmayelectnottoprovidewarningsbecausetheyconcludethattheyarenotrequiredtodosounderProp65;alackofwarningsfora
productdoesnotmeanthattheproductisfreeoflistedchemicalsatsimilarlevels.
Whydoesthemanufacturerincludethiswarning?
themanufacturerhaschosentoprovideconsumerswithasmuchinformationaspossiblesothattheycanmakeinformeddecisionsabouttheproducts
theybuyanduse.themanufacturerprovideswarningsincertaincasesbasedonitsknowledgeofthepresenceofoneormorelistedchemicalswithout
evaluatingthelevelofexposure,asnotallthelistedchemicalsprovideexposurelimitrequirements.Whiletheexposurefromthemanufacturerproducts
maybenegligibleorwellwithinthe“nosignicantrisk”range,outofanabundanceofcaution,themanufacturerhaselectedtoprovidetheProp65
warnings.Moreover,ifthemanufacturerdoesnotprovidethesewarnings,itcouldbesuedbytheStateofCaliforniaorbyprivatepartiesseekingto
enforceProp65andsubjecttosubstantialpenalties.
RevA

 Loading...