

Page 1

FormNo.3417-969RevC
PowerPlex™40VMAXAxial
Blower
51690,51690T
SopladoraxialPowerPlex™40
VMAX
51690,51690T
SoufeuraxialPowerPlex™40
VMAX
51690,51690T
www.T oro.com.
*3417-969*C
Page 2
FormNo.3417-966RevC
PowerPlex
™
40VMAXAxial
Blower
ModelNo.51690—SerialNo.318000001andUp
ModelNo.51690T—SerialNo.318000001andUp
Registeratwww.T oro.com.
OriginalInstructions(EN)
CV
*3417-966*C
Page 3

Ifyouhavequestionsor
problems,calltollfree
1-888-367-6631(US)or
1-888-430-1687(Canada)
beforereturningthis
product.
Safety
WARNING:Whenusingelectricgardeningappliances,
alwaysfollowbasicsafetyprecautionstoreduce
theriskofre,electricshock,andpersonalinjury,
includingthefollowing:
WARNING
WARNING
CALIFORNIA
Proposition65Warning
Thisproductcontainsachemical
orchemicalsknowntotheStateof
Californiatocausecancer,birthdefects,
orreproductiveharm.
Introduction
Thisblowerisintendedtobeusedbyresidential
homeownerstomoveleaf-likedebrisasneeded
outdoors.Itisdesignedprimarilytousebatterypack
Model88540(providedwithModel51690)or88541.
Readthisinformationcarefullytolearnhowtooperate
andmaintainyourproductproperlyandtoavoid
injuryandproductdamage.Y ouareresponsiblefor
operatingtheproductproperlyandsafely .
YoumaycontactT orodirectlyatwww.Toro.comfor
productandaccessoryinformation,helpndinga
dealer,completewarrantydetails,ortoregisteryour
product.
Model51690Tdoesnotincludeabatteryora
charger.
Failuretofollowallwarningsandinstructions
mayresultinelectricshock,reand/or
seriouspersonalinjury.
Readallsafetywarningsandallinstructions.
Saveallwarningsandinstructionsforfuture
reference.
Theterm“powertool”inallthewarningsrefers
toyourmains-operated(corded)powertoolor
battery-operated(cordless)powertool.
1.Workareasafety
A.Keeptheworkareacleanandwelllit.
Clutteredordarkareasinviteaccidents.
B.Donotoperatepowertoolsinexplosive
atmospheres,suchasinthepresence
ofammableliquids,gasses,ordust.
Powertoolscreatesparkswhichmayignite
thedustorfumes.
C.Keepchildrenandbystandersaway
whileoperatingapowertool.Distractions
cancauseyoutolosecontrol.
2.Personalsafety
A.Stayalert;watchwhatyouaredoing
andusecommonsensewhenoperating
apowertool.Donotuseapowertool
whileyouaretiredorundertheinuence
ofdrugs,alcohol,ormedication.A
momentofinattentionwhileoperatingpower
toolsmayresultinseriouspersonalinjury .
B.Usepersonalprotectiveequipment.
Alwaysweareyeprotection.Protective
equipmentsuchasadustmask,non-skid
safetyshoes,ahardhat,orhearing
protectionusedforappropriateconditions
willreducepersonalinjuries.
C.Preventunintentionalstarting.Ensure
thattheswitchisintheOFFposition
beforeconnectingtoapowersource
and/orbatterypackandpickingupor
carryingthetool.Carryingpowertools
withyourngerontheswitchorenergizing
powertoolsthathavetheswitchoninvites
accidents.
D.Donotoverreach.Keepproper
footingandbalanceatalltimes.This
©2018—TheToro®Company
8111LyndaleAvenueSouth
Bloomington,MN55420
Contactusatwww.T oro.com.
2
PrintedinChina
AllRightsReserved
Page 4

enablesbettercontrolofthepowertoolin
unexpectedsituations.
fromthoseintendedcouldresultina
hazardoussituation.
E.Dressproperly.Donotwearloose
clothingorjewelry .Keepyourhairtied
backandkeepyourhair,clothing,and
glovesawayfromventingareasLoose
clothes,jewelry,orlonghaircanbecaught
inmovingparts.
F.Keepyourhandsandfeetawayfromthe
cuttingarea.
3.Powertooluseandcare
A.Donotforcethepowertool.Usethe
correctpowertoolforyourapplication.
Thecorrectpowertoolwilldothejob
betterandsaferattherateforwhichitwas
designed.
B.Donotusethepowertooliftheswitch
doesnotturnitonandoff.Anypowertool
thatcannotbecontrolledwiththeswitchis
dangerousandmustberepaired.
C.Removethebatterypackfromthepower
toolbeforemakinganyadjustments,
changingaccessories,orstoringpower
tools.Suchpreventivesafetymeasures
reducetheriskofstartingthepowertool
accidentally.
D.Storeidlepowertoolsoutofthereach
ofchildrenanddonotallowpersons
unfamiliarwiththepowertoolorthese
instructionstooperatethepowertool.
Powertoolsaredangerousinthehandsof
untrainedusers.
E.Storeidleappliancesindoors.Whennot
inuse,appliancesshouldbestoredindoors
inadryandhighorlocked-upplace,outof
thereachofchildren.
F.Maintainpowertools.Checkfor
misalignmentorbindingofmoving
parts,breakageofpartsandanyother
conditionthatmayaffectthepowertools
operation.Ifdamaged,havethepower
toolrepairedbeforeuse.Manyaccidents
arecausedbypoorlymaintainedpower
tools.
I.Keepguardsinplaceandinworking
order.
4.Service
Haveyourpowertoolservicedbya
qualiedrepairpersonusingonlyidentical
replacementparts.Thiswillensurethatthe
safetyofthepowertoolismaintained.
5.BatterySafety
A.Donotchargeapplianceinrain,orinwet
locations.
B.Donotusebattery-operatedappliancein
therain.
C.Useonlythefollowingtypeandsize
battery(ies):TorobatteryModel88540or
88541.
D.Removeordisconnectthebatterybefore
servicing,cleaning,orremovingmaterial
fromthegardeningappliance.
E.Donotdisposeofthebattery(ies)ina
re.Thecellmayexplode.Checkwith
localcodesforpossiblespecialdisposal
instructions.
F.Donotopenormutilatethebattery(ies).
Releasedelectrolyteiscorrosiveandmay
causedamagetotheeyesorskin.Itmay
betoxicifswallowed.
G.Exercisecareinhandlingbatteriesinorder
nottoshortthebatterywithconducting
materialssuchasrings,bracelets,andkeys.
Thebatteryorconductormayoverheatand
causeburns.
SAVETHESEINSTRUCTIONS
G.Keepcuttingtoolssharpandclean.
Properlymaintainedcuttingtoolswithsharp
cuttingedgesarelesslikelytobindandare
easiertocontrol.
H.Usethepowertoolinaccordancewith
theseinstructionsandinthemanner
intendedfortheparticulartypeofpower
tool,takingintoaccounttheworking
conditionsandtheworktobeperformed.
Usingthepowertoolforoperationsdifferent
3
Page 5
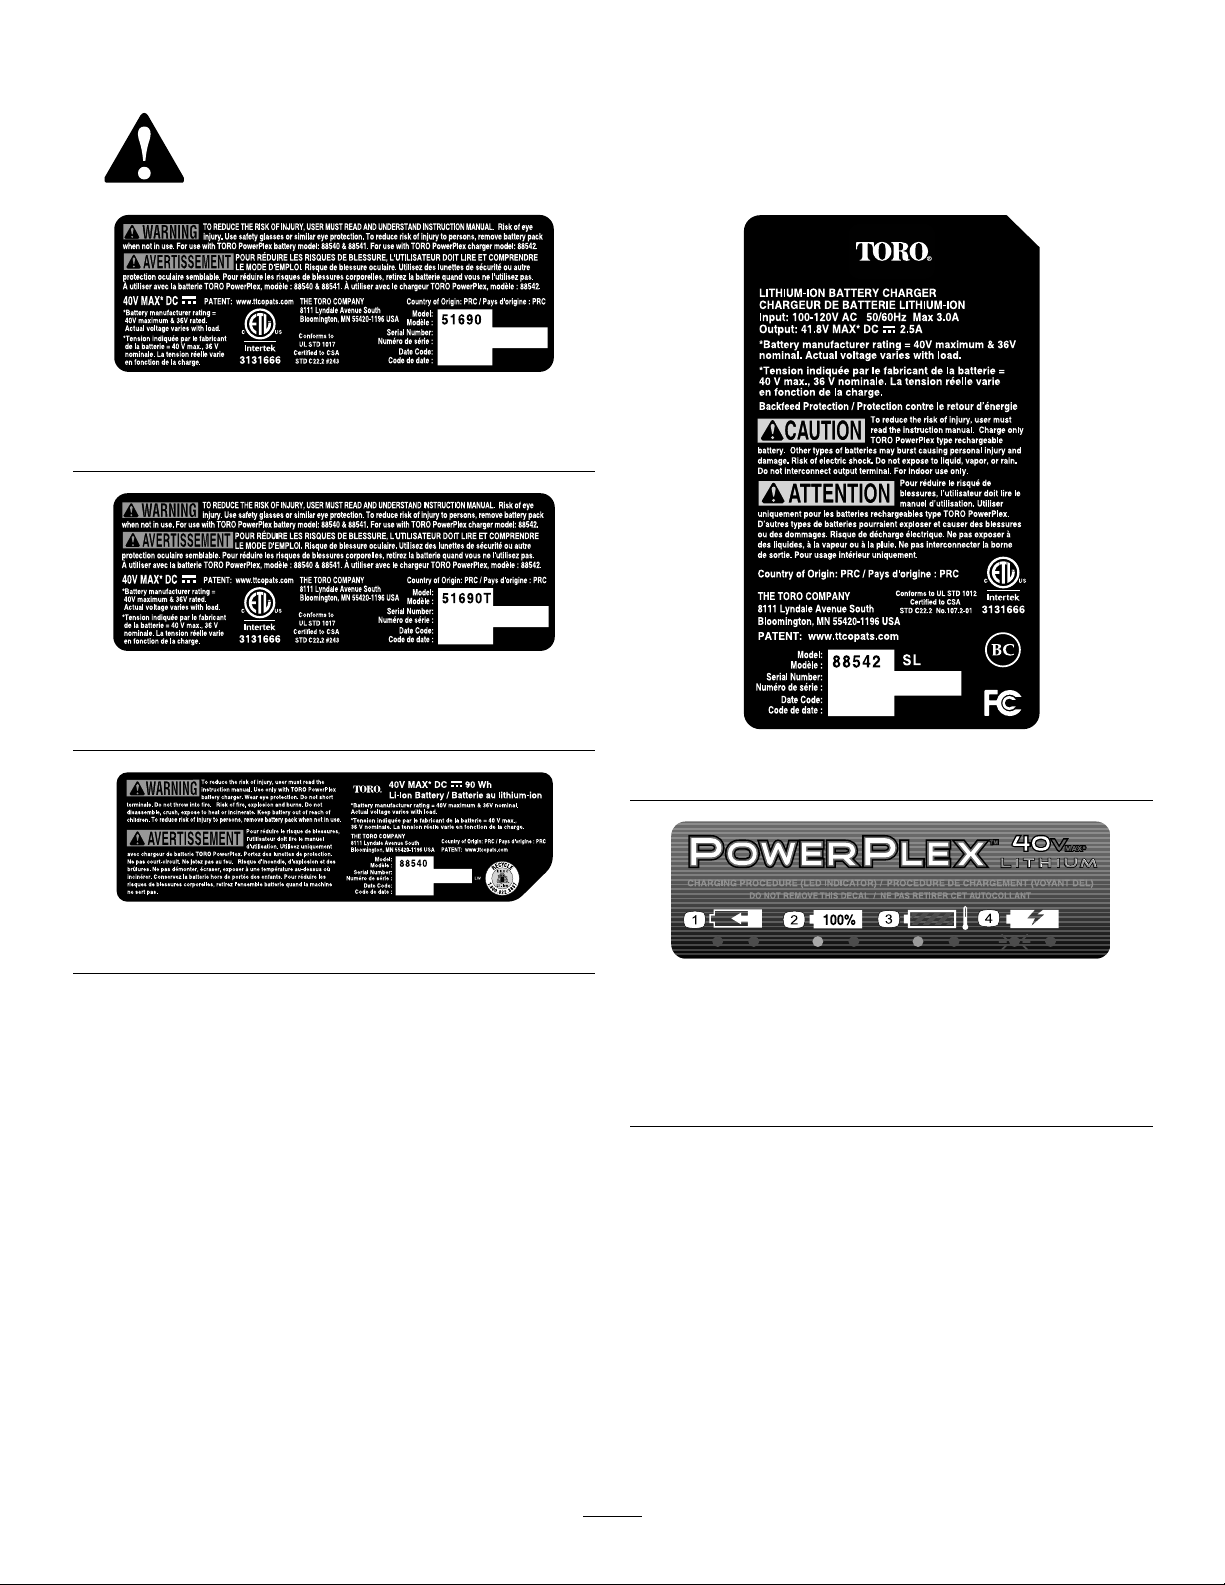
SafetyandInstructionalDecals
Safetydecalsandinstructionsareeasilyvisibletotheoperatorandarelocatednearanyarea
ofpotentialdanger.Replaceanydecalthatisdamagedormissing.
136-2467
Model51690
decal136-2467
decal136-2468
136-2468
Model51690T
decal136-2473
136-2473
decal136-2471
136-2471
decal136-2476
136-2476
1.Thebatterypackis
charging.
2.Thebatterypackisfully
charged.
3.Thebatterypackistoo
warm.
4.Replacethebatterypack.
4
Page 6
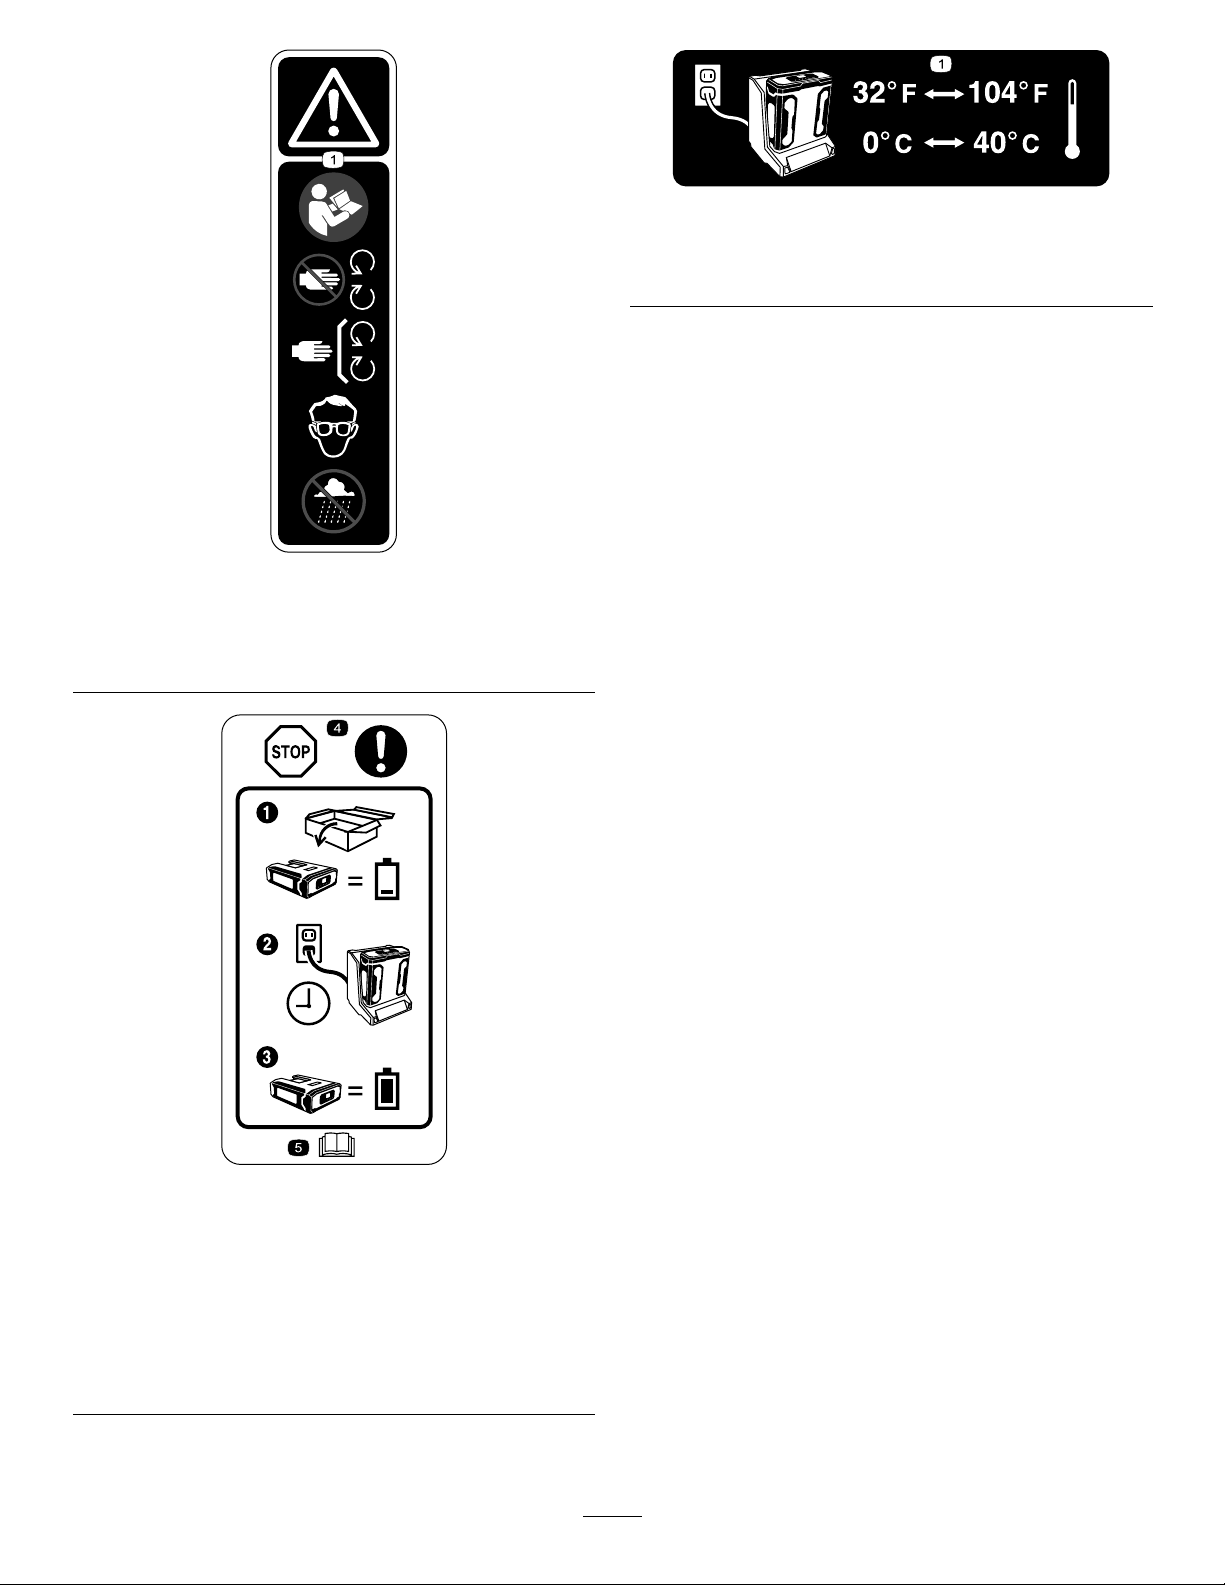
136-2533
1.Warning—readtheOperator’sManual;keepawayfrom
movingparts;keepallguardsandcoversinplace;wear
eyeprotection;donotoperateinwetconditions.
decal136-2539
136–2539
1.Chargethebatterywherethetemperatureisbetween0°C
and40°C(32°Fand104°F).
decal136-2533
1.Thebatterydoesnot
comeoutoftheboxfully
charged.
2.Placethebatteryinthe
batterycharger.
3.Waituntilthebatteryis
fullychargedbeforethe
rstuse.
decal136-2534
136-2534
4.Stop—followthese
instructionsbeforerst
use.
5.ReadtheOperator’s
Manual.
5
Page 7
Setup
Note:Thebatterypackisnotfullychargedwhenyou
purchaseit.Beforeusingthetoolforthersttime,
refertoChargingtheBatteryPack(page8).
MountingtheBattery
Charger(Optional)
Ifdesired,mountthebatterychargersecurelyona
wallusingthewall-mountkeyholesonthebackof
thecharger.
Mountitindoors(suchasagarageorotherdryplace),
nearapoweroutlet,andoutofthereachofchildren.
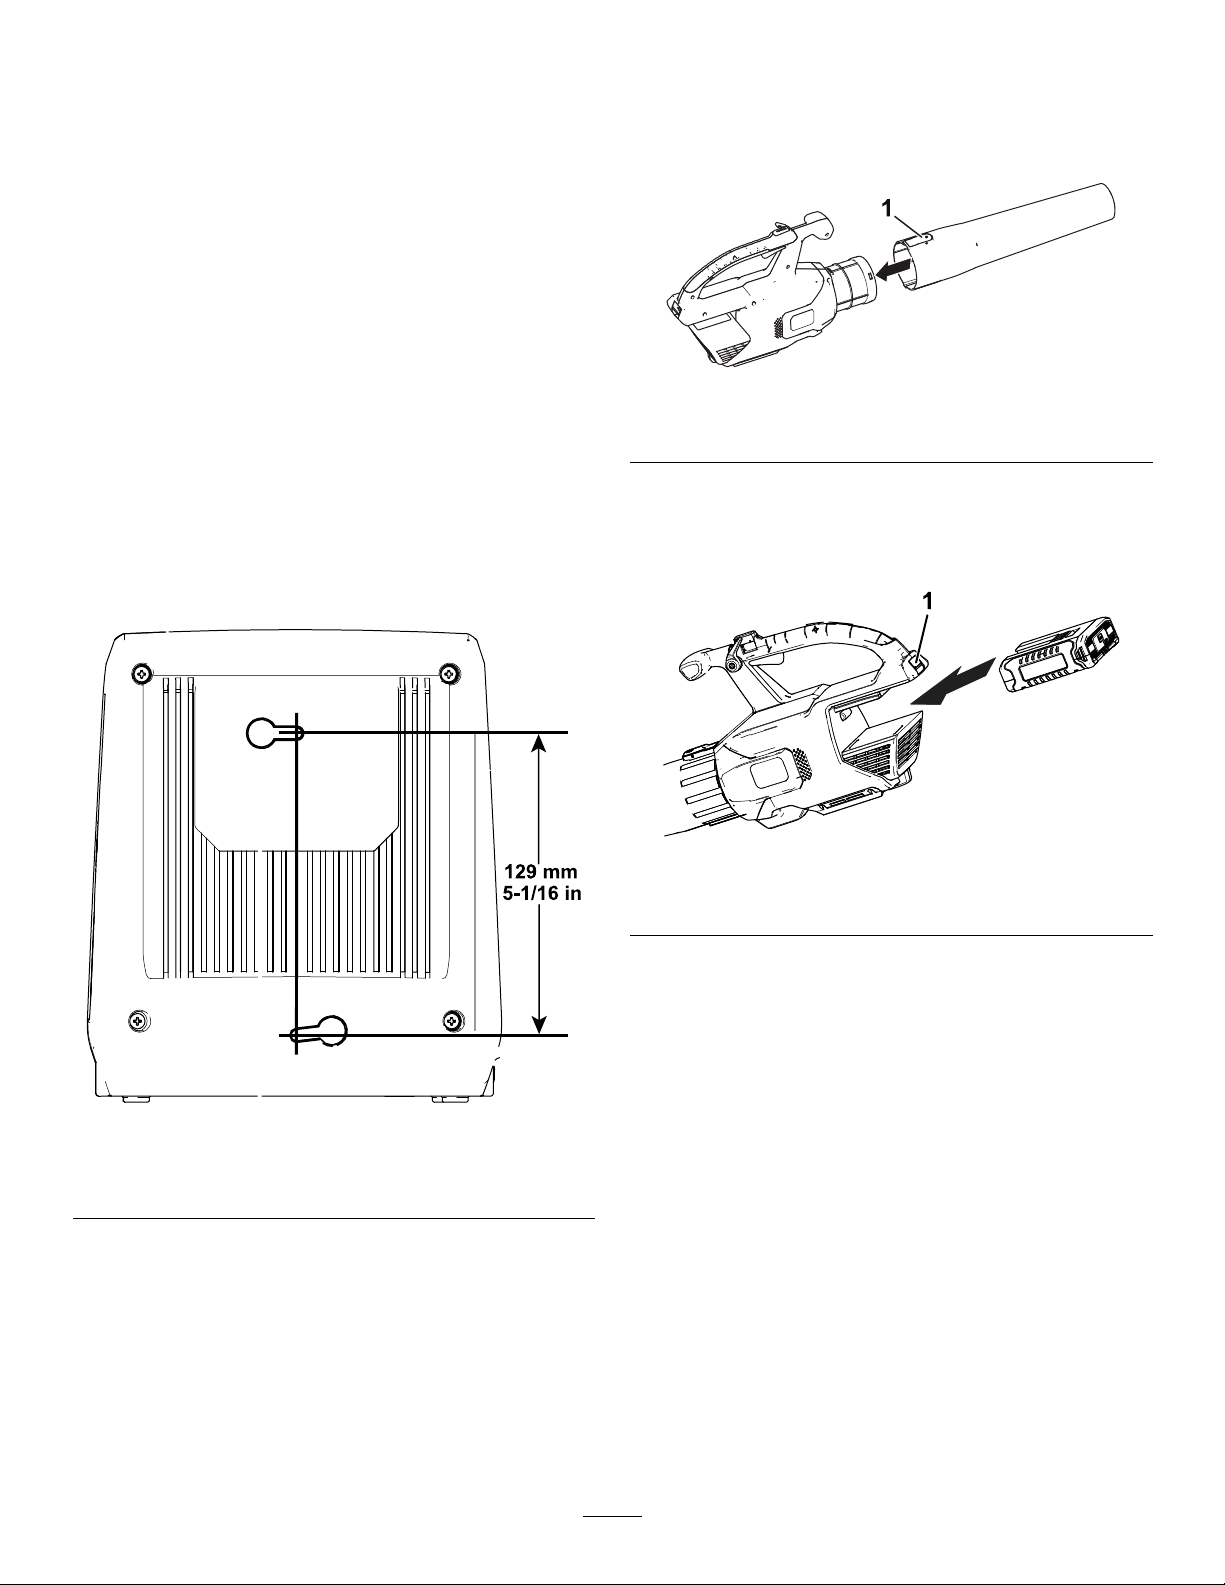
AssemblingtheBlower
1.Slidetheblowertubeontotheblowerhousing.
Youmayneedtopressdownonthetabforthe
blowertubetolockintoplace(Figure2).
g190102
Figure2
1.Tab
RefertoFigure1forassistanceinmountingthe
charger.
Note:Slideandtwistthechargeroverthe
appropriatelypositionedhardwaretosecurethe
chargerinplace(hardwarenotincluded).
2.Alignthecavityonthebatterypackwiththe
tongueinthehandlehousing,graspthehandle,
andpushthebatterypackintothehandleuntil
thelatchlocksintoplace(Figure3).
g194149
Figure3
1.Batterylatch
Figure1
g194202
6
Page 8
ProductOverview
Operation
Specications
AppropriateTemperatureRanges
Chargethebatteryat0°C(32°F)to40°C(104°F)*
Useproductsat
Storeproductsat-15°C(5°F)to60°C(140°F)
UnplugthechargerifBelow0°C(32°F)orabove
*Chargingtimewillincreaseifyoudonotchargethe
batterywithinthisrange.
Storethetool,batterypack,andbatterychargerinan
enclosedclean,dryarea.
-15°C(5°F)to60°C(140°F)
40°C(104°F)
WARNING
Theblowercanthrowdebris,possibly
causingseriouspersonalinjurytoyouor
bystanders.
•Donotblowhardobjects,suchasnails,
bolts,orrocks.
•Donotoperatetheblowernearbystanders
orpets.
•Useextracarewhencleaningdebrisfrom
stairsorothertightareas.
•Wearsafetygogglesorothersuitableeye
protection,longpants,andshoes.
StartingtheBlower
1.Makesurethattheventsontheblowerareclear
ofanydustanddebris.
2.T ostarttheblower,squeezethevariable-speed
trigger(Figure4).
Note:Engagethespeedlocktokeepthe
machineonwithoutpressingthevariable-speed
trigger(Figure4).
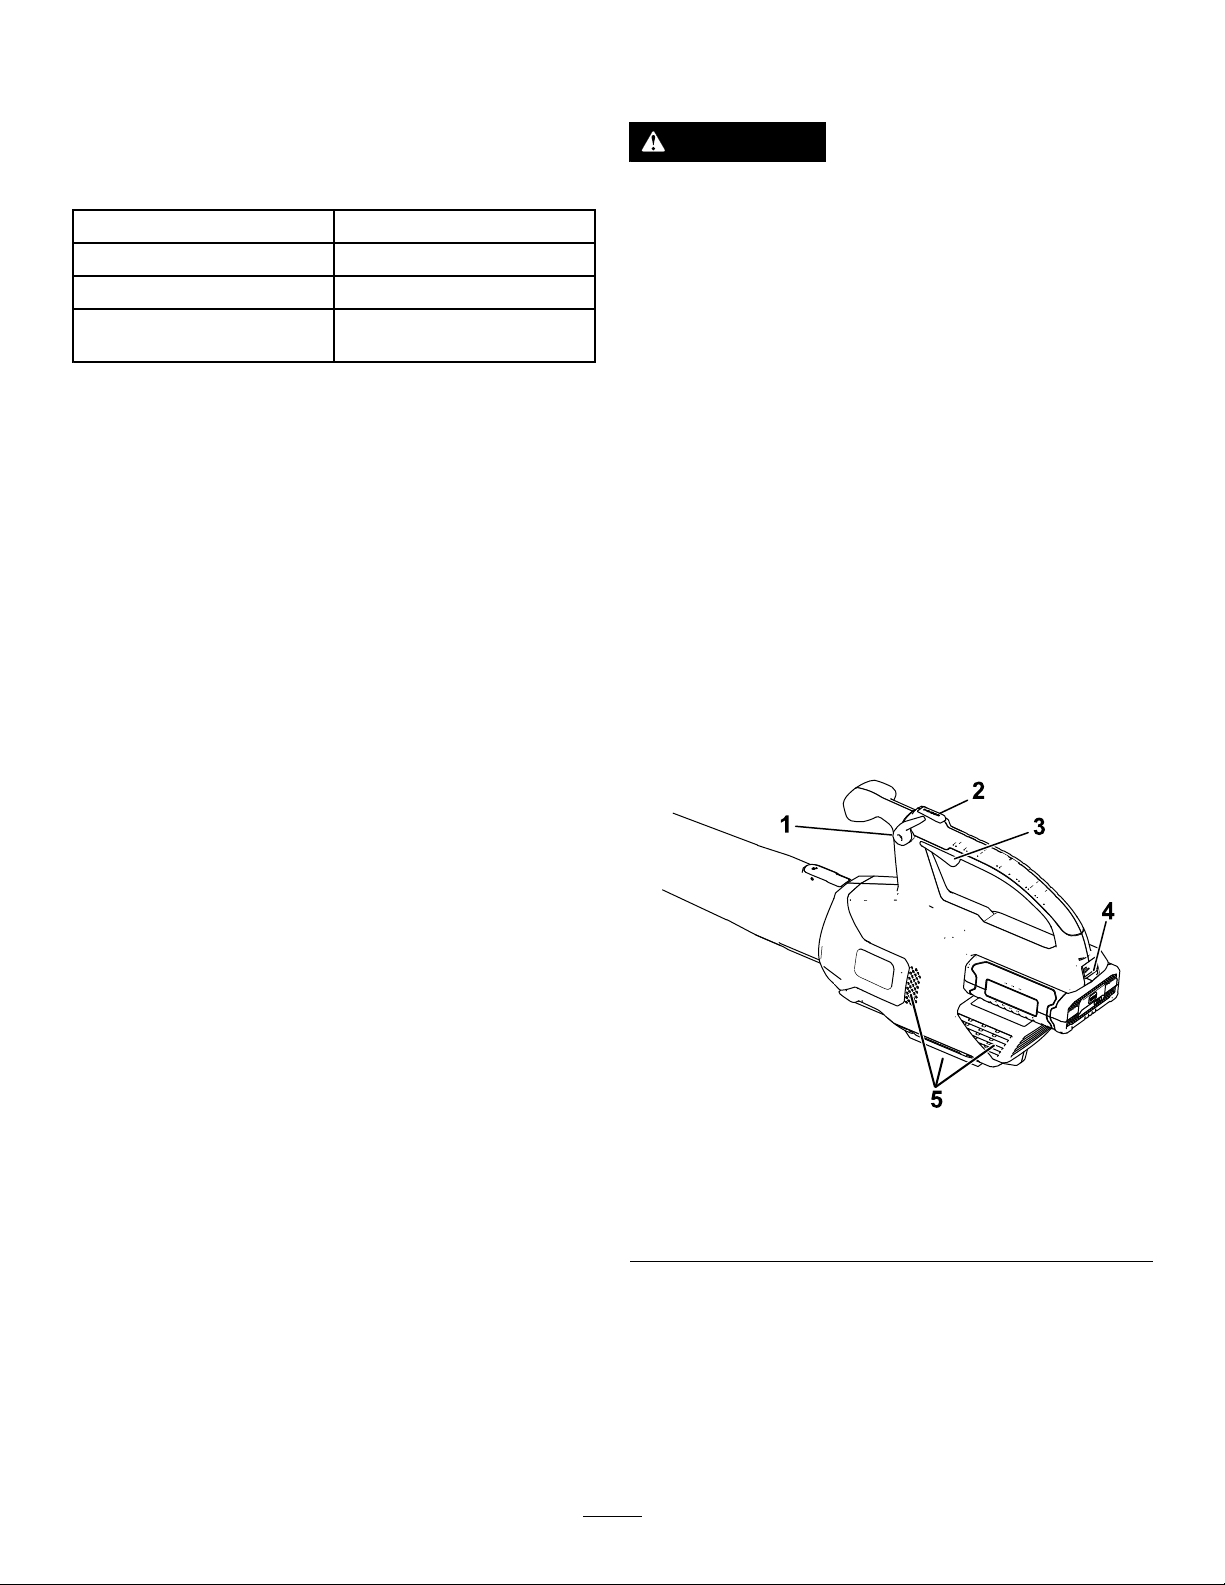
Figure4
1.Speedlock
2.Turboboostbutton5.Blowerventingareas
3.Variable-speedtrigger
4.Batterylatch
AdjustingtheAirSpeedof theBlower
Toacceleratetheblowerspeed,pressandholdthe
turboboostbuttonforthedesiredamountoftime
(Figure4).
7
g194437
Page 9

Toadjusttheairspeedasyoublow,usethe
variable-speedtrigger(Figure4).
Tomaintainthecurrentairspeed,engagethespeed
lock(Figure4).
ShuttingOfftheBlower
Toshutofftheblower,disengagethespeedlock(ifin
use)andreleasethevariable-speedtrigger(Figure4).
Important:Afterstoppingtheblower,donot
leavethespeedlockengagedwiththebattery
packintheblower.
Wheneveryouarenotusingtheblowerorare
transportingtheblowertoorfromtheworkarea,
removethebatterypack.
UsingtheAttachments
Usetheprovidedattachmentsasneeded.
Note:TheGutterCleanerKit(Model51667)and
OscillatingTube(Model51664)aresoldseparately.
g194438
Figure7
RemovingtheBlowerTube
Pressdownonthetabtoseparatetheblowertube
fromtheblower(Figure5).
Figure5
1.Tab
RemovingtheBatteryfrom theBlower
Pressdownonthebatterylatchtoseparatethe
batteryfromtheblower(Figure6).
1.Guttercleaneradaptor3.Oscillator/MPHinsert
2.Blowertube4.MPHinsert
adapter
ChargingtheBatteryPack
Important:Readallsafetyprecautions.
Important:Chargethebatterypackonlyin
temperaturesthatarewithintheappropriate
range;refertoSpecications(page7).
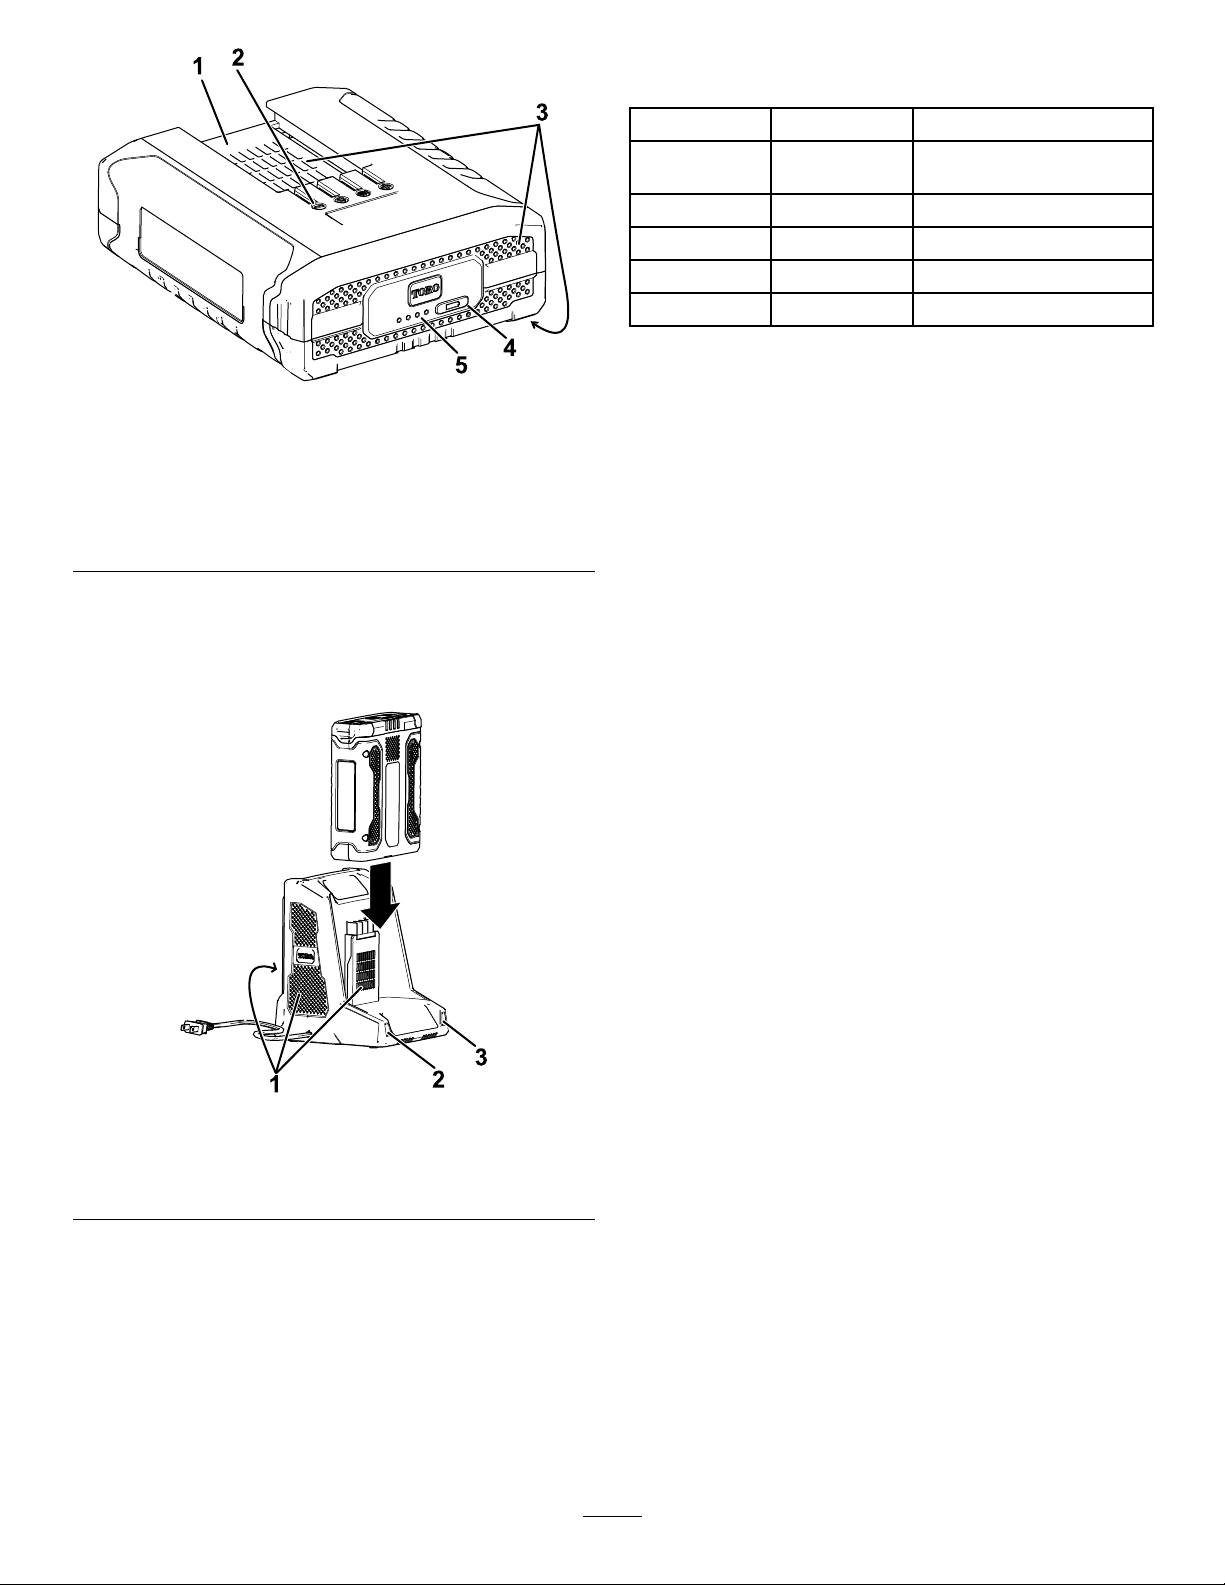
g228499
Note:Atanytime,pressthebattery-charge-indicator
buttononthebatterypacktodisplaythecurrent
charge(LEDindicators).
1.Makesurethattheventsonthebatteryareclear
ofanydustanddebris.
2.Lineupthecavityinthebatterypack(Figure8)
withthetongueonthecharger.
1.Batterylatch
g194150
Figure6
8
Page 10
6.RefertothefollowingtabletointerprettheLED
indicatorsonthebatterycharger.
Figure8
1.Batterypackcavity4.Battery-charge-indicator
2.Batterypackterminals
3.Batterypackventingareas
button
5.LEDindicators(current
charge)
3.Makesurethattheventsonthebatterycharger
areclearofanydustanddebris.
4.Slidethebatterypackintothechargeruntilitis
fullyseated(Figure9).
LeftLight
Off
RedRedBatterypackischarging
Green
Orange
RedBlinkingRedReplacethebatterypack
g228487
Storage
RightLight
Red
RedBatterypackischarged
RedBatterypackistoowarm
Indicates:
Chargerison;nobattery
packinserted
Important:Storethetool,batterypack,and
chargeronlyintemperaturesthatarewithinthe
appropriaterange;refertoSpecications(page7).
Important:Ifyouarestoringthetoolforayear
orlonger,removethebatterypackfromthetool
andchargethebatterypackuntil2or3LED
indicatorsturnblueonthebattery.Donotstorea
fullychargedorfullydepletedbattery.Whenyou
arereadytousethetoolagain,chargethebattery
packuntiltheleftindicatorlightturnsgreenon
thechargerorall4LEDindicatorsturnblueon
thebattery.
Figure9
1.Chargerventingareas
2.Leftindicatorlight
3.Rightindicatorlight
5.T oremovethebatterypack,slidethebattery
backwardoutofthecharger.
•Disconnecttheproductfromthepowersupply
(i.e.,removetheplugfromthepowersupplyorthe
batterypack)andcheckfordamageafteruse.
•Cleanallforeignmaterialfromtheproduct.
•Whennotinuse,storethetool,batterypack,and
batterychargeroutofthereachofchildren.
•Keepthetool,batterypack,andbatterycharger
awayfromcorrosiveagents,suchasgarden
chemicalsandde-icingsalts.
•T oreducetheriskofseriouspersonalinjury,do
notstorethebatterypackoutsideorinvehicles.
•Storethetool,batterypack,andbatterycharger
g194423
inanenclosedclean,dryarea.
9
Page 11

PreparingtheBatteryPack forRecycling
Important:Uponremoval,covertheterminalsof
thebatterypackwithheavy-dutyadhesivetape.
Donotattempttodestroyordisassemblethe
batterypackorremoveanyofitscomponents.
Recycleorproperlydisposeoflithium-ionbattery
packsatabatteryrecyclingfacility.
Formoreinformationonrecyclinglithium-ion
batterypacksandtolocatethebattery
recyclingfacilityclosesttoyou,visit
www.Call2Recycle.org(USandCanadaonly).
IfyouarelocatedoutsideoftheUSand
Canada,pleasecontactyourauthorizedT oro
distributor.
10
Page 12

Troubleshooting
Performonlythestepsdescribedintheseinstructions.Allfurtherinspection,maintenance,andrepairwork
mustbeperformedbyanauthorizedservicecenterorasimilarlyqualiedspecialistifyoucannotsolvethe
problemyourself.
Problem
Thebatterypackloseschargequickly.1.Thebatterypackisoverorunderthe
Thebatterychargerisnotworking.
Thetooldoesnotrunorruncontinuously .
Thebatterypackshowsonly3LED
indicatorsafteronlyafewsecondsof
usingafullychargedbattery .
All4LEDindicatorsareblinkingon
thebatterypackafteryoupressthe
battery-charge-indicatorbuttononthe
batterypackandthecurrentcharge
displays(whenthebatterypackisnotin
use).
appropriatetemperaturerange.
1.Thebatterychargerisoverorunder
theappropriatetemperaturerange.
2.Theoutletthatthebatterychargeris
pluggedintodoesnothavepower.
1.Thereismoistureontheleadsofthe
batterypack.
2.Thebatteryisnotfullyinstalledinthe
tool.
3.Thebatterypackislowoncharge.
1.Thisisanormaloccurrence.
1.Thebatterypackisoverorunderthe
appropriatetemperaturerange.
PossibleCauseCorrectiveAction
1.Movethebatterypacktoaplace
whereitisdryandthetemperatureis
between0°C(32°F)and40°C(104°F).
1.Unplugthebatterychargerandmove
ittoaplacewhereitisdryandthe
temperatureisbetween0°C(32°F)
and40°C(104°F).
2.Contactyourlicensedelectricianto
repairtheoutlet.
1.Allowthebatterypacktodryorwipeit
dry.
2.Removeandthenreplacethebattery
inthetool,ensuringthatitisfully
installedandlatched.
3.Chargethebatterypack.
1.Stopthetoolandpressthe
battery-charge-indicatorbuttonor
theremovethebatteryfromthetoolto
displaytheactualbatterycharge.
1.Movethebatterypacktoaplace
whereitisdryandthetemperatureis
between0°C(32°F)and40°C(104°F).
All4LEDindicatorsareblinkingonthe
batterypackafterreleasingthetrigger
(whenthebatterypackisinuse).
2LEDindicatorsareblinkingon
thebatterypackafteryoupressthe
battery-charge-indicatorbuttononthe
batterypackandthecurrentcharge
displays(whenthebatterypackisnotin
use).
2LEDindicatorsareblinkingonthe
batterypackafterreleasingthetrigger
(whenthebatterypackisinuse).
1LEDindicatorisblinkingonthebattery
pack.
Itisdifculttoremovethebatterypack
fromthetool.
Thespeedlockdoesnotholdwhen
engaged.
1.Thebatterypackisoverorunderthe
appropriatetemperaturerange.
1.Thereisadifferenceinvoltage
betweencellsinthebatterypack.
1.Thereisadifferenceinvoltage
betweencellsinthebatterypack.
1.Thebatterypackvoltageislow.1.Placethebatterypackonthecharger.
1.Thebatterypack/toolisneworthere
iscorrosioninthebatteryterminals
and/ortheterminalsonthetool.
1.Thespeedlockscrewisloose.1.Tightenthespeedlockscrewby
1.Movethebatterypacktoaplace
whereitisdryandthetemperatureis
between0°C(32°F)and40°C(104°F).
1.Placethebatteryonthechargeruntil
itisfullycharged.
1.Placethebatteryonthechargeruntil
itisfullycharged.
1.Cleantheterminalsonthebatterypack
andthetool.Thenapplydielectric
greasetothebatteryterminals;donot
useanyothertypeoflubricantasitcan
damagetheterminals.
turningthespeedlockscrew¼turn.If
thespeedlockstilldoesnotholdwhen
engaged,turnthespeedlockscrewan
additional¼turn.
11
Page 13

Page 14

FormNo.3417-967RevC
SopladoraxialPowerPlex
MAX
Nºdemodelo51690—Nºdeserie318000001ysuperiores
Nºdemodelo51690T—Nºdeserie318000001ysuperiores
™
40V
Registresuproductoenwww.Toro.com.
Traduccióndeloriginal(ES)
CV
*3417-967*C
Page 15

Siustedtienealguna
preguntaoalgún
problema,llamealteléfono
gratuito1-888-367-6631
(EE.UU.)o1-888-430-1687
(Canadá)antesdedevolver
esteproducto.
Seguridad
ADVERTENCIA:Cuandoseutilizanaparatosde
jardineríaeléctricos,esnecesarioobservarunas
normasbásicasdeseguridad,incluyendolas
siguientes,andereducirelriesgodeincendio,
descargaeléctricaylesionespersonales:
ADVERTENCIA
ADVERTENCIA
CALIFORNIA
AdvertenciadelaPropuesta65
Esteproductocontieneunaomás
sustanciasquímicasqueelEstado
deCaliforniaconsideracausantesde
cáncer,defectoscongénitosotrastornos
delsistemareproductor.
Introducción
Estesopladorestádiseñadoparaserusadopor
usuariosdomésticosparamoverhojasyotros
residuossimilaresenespaciosexteriores.Está
diseñadoprincipalmenteparausarbateríasmodelo
88540(suministradaconelmodelo51690)o88541.
Leaestemanualdetenidamenteparaaprendera
utilizarymantenercorrectamentesuproducto,y
paraevitarlesionesydañosalproducto.Ustedes
responsabledeutilizarelproductodeformacorrecta
ysegura.
Ustedpuedeponerseencontactodirectamentecon
Toroenwww.Toro.comsideseainformaciónsobre
productosyaccesorios,sinecesitalocalizarun
distribuidor,buscardatoscompletossobresugarantía
oregistrarsuproducto.
ElModelo51690Tnoincluyebateríanicargador.
Sinoseobservantodaslasadvertenciase
instrucciones,puedenproducirsedescargas
eléctricas,incendiosy/olesionesgraves.
Leatodaslasadvertenciaseinstrucciones
deseguridad.
Guardetodaslasadvertenciaseinstrucciones
parasureferenciafutura.
Eltérmino"herramientaeléctrica"queapareceenlas
advertenciassereeresiempreaunaherramienta
accionadaporelsuministroeléctricodelared(con
cable)ounaherramientaeléctricaaccionadapor
batería(sincable).
1.Seguridaddelazonadetrabajo
A.Mantengalazonadetrabajolimpiay
bieniluminada.Laszonasdesordenadas
uoscurassonunainvitaciónalaccidente.
B.Noutiliceherramientaseléctricas
enatmósferasexplosivas,comopor
ejemploenpresenciadelíquidos
inamables,gasesopolvo.Las
herramientaseléctricascreanchispasque
puedeninamarelpolvoolosvapores.
C.Mantengaalejadosaniñosyotras
personasmientrasutilizauna
herramientaeléctrica.Lasdistracciones
puedenhacerquepierdaelcontrol.
2.Seguridadpersonal
A.Manténgasealerta,estéatentoa
loqueestáhaciendoyutiliceel
sentidocomúnmientrasutilizauna
herramientaeléctrica.Noutiliceun
herramientaeléctricasiestácansado
obajolainuenciadedrogas,alcohol
omedicamentos.Unabrevefaltade
atenciónmientrasutilizaunaherramienta
eléctricapodríaprovocarlesiones
personalesgraves.
B.Utiliceequiposdeprotecciónpersonal.
Llevesiempreprotecciónocular.El
usodeequiposdeprotecciónpersonal
comomascarillas,calzadodeseguridad
antideslizante,cascoyprotecciónauditiva
encondicionesapropiadasreduciráel
riesgodelesionespersonales.
©2018—TheToro®Company
8111LyndaleAvenueSouth
Bloomington,MN55420
Póngaseencontactoconnosotrosenwww.Toro.com.
2
Reservadostodoslosderechos
ImpresoenChina
Page 16

C.Eviteelencendidoaccidental.
Asegúresedequeelinterruptorestá
enlaposicióndeAPAGADOantesde
conectarlaherramientaalatomade
corrientey/oalabatería,yantesde
levantarotransportarlaherramienta.
Transportarlasherramientaseléctricas
coneldedosobreelinterruptoroenchufar
herramientaseléctricasconelinterruptoren
laposicióndeencendidoesunainvitación
alaccidente.
D.Nointentealcanzarzonasdemasiado
alejadas.Pisermeymantengael
equilibrioentodomomento.Estopermite
unmayorcontroldelaherramientaen
situacionesimprevistas.
E.Utilicelaropaadecuada.Nolleveropas
ojoyassueltas.Mantengaelpeloatado
ylaropaylosguantesalejadosde
lasáreasdeventilaciónLaropasuelta,
lasjoyasyelpelolargopuedenquedar
atrapadosenlaspiezasmóviles.
F.Mantengalasmanosylospiesalejados
delazonadecorte.
3.Usoycuidadodelasherramientaseléctricas
A.Nofuercelaherramientaeléctrica.
Utilicelaherramientaeléctricaadecuada
paraeltrabajoarealizar.Laherramienta
eléctricacorrectarealizaráeltrabajomejor
yconmayorseguridadalavelocidadpara
laquefuediseñada.
unlugarseco,enaltoobajollave,yfuera
delalcancedelosniños.
F.Mantenimientodelasherramientas
eléctricas.Compruebequelaspiezas
móvilesestáncorrectamentealineadas
yquesemuevenlibrementesin
agarrotarse,quenohaypiezasrotas,
yquenohayotrascircunstanciasque
podríanafectaralusodelaherramienta
eléctrica.Siexistendaños,haga
repararlaherramientaeléctricaantes
deusarla.Muchosaccidentessedeben
aunmantenimientodecientedelas
herramientaseléctricas.
G.Mantengalasherramientasdecorte
aladasylimpias.Unaherramientade
cortebienmantenidaconlosbienalados
esmásfácildecontrolaryhaymenos
probabilidadesdequeseagarrote.
H.Utilicelaherramientaeléctricasegún
loindicadoenestasinstruccionesy
delamaneraprevistaparacadatipo
deherramientaeléctrica,teniendoen
cuentalascondicionesdetrabajoyel
trabajoarealizar.Usarlaherramienta
eléctricaparaoperacionesdiferentesdelas
previstaspodríadarlugaraunasituación
depeligro.
I.Mantengalosprotectorescolocadosy
enbuenestadodefuncionamiento.
4.Mantenimiento
B.Noutilicelaherramientaeléctricasi
elinterruptornolaenciendeyapaga.
Cualquierherramientaeléctricaqueno
puedasercontroladaconelinterruptores
peligrosaydebeserreparada.
C.Retirelabateríadelaherramienta
eléctricaantesderealizarcualquier
ajuste,cambiardeaccesorioo
almacenarlaherramienta.Estasmedidas
deseguridadpreventivasreducenelriesgo
deunarranqueaccidentaldelaherramienta
eléctrica.
D.Sinolaestáusando,guardela
herramientaeléctricafueradelalcance
delosniños,ynopermitaquela
utilicenpersonasnofamiliarizadascon
laherramientaeléctricaoconestas
instruccionesdeuso.Lasherramientas
eléctricassonpeligrosasenmanosde
usuariosinexpertos.
E.Guardebajotecholosaparatosqueno
seestánutilizando.Cuandonoseestán
utilizando,losaparatosdebenguardarseen
Elmantenimientodesuherramienta
eléctricadebeserrealizadoporuntécnico
dereparacionesdebidamentecualicado,
utilizandoúnicamentepiezasderepuesto
idénticas.Sólodeestamanerasegarantiza
elmantenimientodelaseguridaddela
herramientaeléctrica.
5.Seguridaddelasbaterías
A.Nocargueelaparatobajolalluviaoen
lugareshúmedos.
B.Noutiliceaparatosalimentadosporbatería
bajolalluvia.
C.Utiliceúnicamentebateríasdelsiguiente
tipoytamaño:bateríaT oromodelo88540
o88541.
D.Retireodesconectelabateríaantesde
realizartareasdemantenimientoolimpieza,
yantesderetirarmaterialesdelaparatode
jardinería.
E.Notirelasbateríasalfuego.Lasceldas
puedenexplosionar.Compruebesila
3
Page 17

normativalocalcontienealgunainstrucción
especialsobrelaeliminacióndelas
baterías.
F.Noabranimutilela(s)batería(s).El
electrolitoliberadoescorrosivoypuede
causardañosenlosojosolapiel.Puede
sertóxicosiesingerido.
Pegatinasdeseguridadeinstrucciones
Laspegatinasdeseguridadeinstruccionesestánalavistadeloperadoryestánubicadas
cercadecualquierzonadepeligropotencial.Sustituyacualquierpegatinaqueestédañadao
quefalte.
136-2467
Modelo51690
G.Almanipularlasbaterías,tengacuidado
paraevitarcortocircuitosconmateriales
conductores,talescomoanillos,pulseraso
llaves.Labateríaoelconductorpueden
sobrecalentarseycausarquemaduras.
GUARDEEST ASINSTRUCCIONES
decal136-2467
decal136-2468
136-2468
Modelo51690T
decal136-2473
136-2473
decal136-2471
136-2471
decal136-2476
136-2476
1.Labateríaseestá
cargando.
2.Labateríaestá
completamentecargada.
3.Labateríaestádemasiado
caliente.
4.Sustituyalabatería.
4
Page 18

136-2533
1.Advertencia:leaelManualdeloperador;manténgase
alejadodelaspiezasmóviles;mantengacolocadostodos
losprotectoresycubiertas;utiliceprotecciónocular;no
utiliceencondicioneshúmedas.
decal136-2539
136-2539
1.Carguelabateríaaunatemperaturadeentre0°Cy40°C
(32°Fy104°F).
decal136-2533
1.Labateríanosesuministra
totalmentecargada.
2.Coloquelabateríaenel
cargador.
3.Espereaquelabatería
estetotalmentecargada
antesdelprimeruso.
decal136-2534
136-2534
4.Pare:sigaestas
instruccionesantesdel
primeruso.
5.LeaelManualdel
operador.
5
Page 19

Montaje
Nota:Enelmomentodelacompralabateríanoestá
totalmentecargada.Antesdeusarlaherramientapor
primeravez,consulteCargadelabatería(página8).
Cómomontarelcargador
delabatería(opcional)
Silodesea,monteelcargadordelabatería
rmementeenlaparedutilizandolosoriciosde
montajeenparedenlapartetraseradelcargador.
Mónteloenunespaciointerior(talcomoungarajeu
otrolugarseco),cercadeunatomadecorrientey
fueradelalcancedelosniños.
Montajedelsoplador
1.Desliceeltubodelsopladorsobrelacarcasa
delsoplador.Puedesernecesariopresionar
haciaabajosobrelapestañaparaqueeltubo
delsopladorencajeensusitio(Figura2).
g190102
Figura2
1.Pestaña
ConsultelaFigura1paraobtenerasistenciasobre
elmontajedelcargador.
Nota:Coloqueelcargadorsobrelasjaciones
correctamenteposicionadasygíreloparajarloensu
lugar(jacionesnoincluidas).
2.Alineeelhuecodelabateríaconlalengüeta
delalojamientodelaempuñadura,sujetela
empuñadura,eintroduzcalabateríaenla
empuñadurahastaqueelcierreencajeensu
sitio(Figura3).
g194149
Figura3
1.Cierredelabatería
Figura1
g194202
6
Page 20

Elproducto
Operación
Especicaciones
Intervalosdetemperaturaadecuados
CarguelabateríaaEntre0°Cy40°C(32°Fy
Utiliceelproductoa
Almaceneelproductoa
DesenchufeelcargadoraMenosde0°C(32°F)omás
*Eltiempodecargaserámayorsilatemperaturano
estáenesteintervalodurantelacarga.
Guardelaherramienta,labateríayelcargadorenun
lugarcerrado,limpioyseco.
104°F)*
Entre-15°Cy60°C(5°Fy
140°F)
Entre-15°Cy60°C(5°Fy
140°F)
de40°C(104°F)
ADVERTENCIA
Elsopladorpuedearrojarresiduos,que
podríancausargraveslesionespersonalesa
ustedoaotraspersonas.
•Nosopleobjetosduroscomoclavos,
pernosopiedras.
•Noutiliceelsopladorcercadeotras
personasoanimalesdomésticos.
•Extremeelcuidadoalsoplarresiduos
enescalerasuotroslugaresdeespacio
reducido.
•Llevegafasdeseguridaduotraprotección
ocularadecuada,pantalónlargoyzapatos.
Cómoarrancarelsoplador
1.Compruebequelosoriciosdeventilacióndel
sopladorestánlibresdepolvoyresiduos.
2.Paraarrancarelsoplador,aprieteelgatillode
velocidadvariable(Figura4).
Nota:Activeelbloqueodevelocidadpara
mantenerlamáquinaencendidasintenerque
apretarelgatillodevelocidadvariable(Figura4).
Figura4
1.Bloqueodevelocidad
2.Botóndepotenciaturbo5.Zonasdeventilacióndel
3.Gatillodevelocidad
variable
4.Cierredelabatería
soplador
g194437
7
Page 21

Cómoajustarlavelocidad
Cómoretirarlabateríadel
delairedelsoplador
Paraaumentarlavelocidaddelsoplador,mantenga
presionadoelbotóndepotenciaturboduranteel
tiempodeseado(Figura4.
Paraajustarlavelocidaddelairemientrasopla,utilice
elgatillodevelocidadvariable(Figura4).
Paramantenerlavelocidadactualdelaire,activeel
bloqueodevelocidad(Figura4).
Cómoapagarelsoplador
Paraapagarelsoplador,desactiveelbloqueode
velocidad(siloestáusando)ysuelteelgatillode
velocidadvariable(Figura4).
Importante:Despuésdeapagarelsoplador,no
dejepuestoelbloqueodevelocidadconlabatería
instaladaenelsoplador.
Cuandonoestéutilizandoelsopladoroloesté
transportandohaciaodesdeeláreadetrabajo,retire
labatería.
Desmontajedeltubodel
soplador
Presionehaciaabajosobreelcierredelabateríapara
separarlabateríadelsoplador(Figura6).
g194150
Figura6
1.Cierredelabatería
Usodelosaccesorios
Utilicelosaccesoriosprovistossegúnseanecesario.
Nota:ElKitdelimpiadordecanalones(Modelo
51667)yelTubooscilante(Modelo51664)sevenden
porseparado.
soplador
Presionehaciaabajosobrelapestañaparaseparar
eltubodelsopladordelsoplador(Figura5).
Figura5
1.Pestaña
g194438
Figura7
g228499
1.Adaptadordellimpiador
decanalones
2.Tubodelsoplador4.Insertodepotencia
3.Adaptadordeltubo
oscilante/insertode
potencia
Cargadelabatería
Importante:Leatodaslasprecaucionesde
seguridad.
Importante:Carguelabateríasoloatemperaturas
queesténdentrodelintervaloapropiado;consulte
Especicaciones(página7).
Nota:Encualquiermomento,presioneelbotóndel
indicadordecargadelabateríadelabateríapara
mostrarlacargaactual(indicadoresLED).
8
Page 22

1.Compruebequelosoriciosdeventilacióndela
bateríaestánlibresdepolvoyresiduos.
6.Consultelatablasiguienteparainterpretarlos
indicadoresLEDdelcargadordelabatería.
2.Alineeelhuecodelabatería(Figura8)conla
lengüetadelcargador.
Figura8
1.Huecodelabatería4.Botóndelindicadorde
2.Terminalesdelabatería
3.Zonasdeventilacióndela
batería
cargadelabatería
5.IndicadoresLED(carga
actual)
3.Compruebequelosoriciosdeventilacióndel
cargadordelabateríaestánlibresdepolvoy
residuos.
4.Introduzcalabateríaenelcargadorhastaque
estécompletamenteasentada(Figura9).
Indicador
izquierdo
ApagadoRojo
RojoRojoLabateríaseestácargando
VerdeRojoLabateríaestácargada
NaranjaRojo
Rojo
intermitente
Indicador
derecho
Rojo
Indica:
Cargadorencendido,sin
batería
Labateríaestádemasiado
caliente
Sustituyalabatería
Almacenamiento
g228487
Importante:Almacenelaherramienta,la
bateríayelcargadorsoloatemperaturasque
esténdentrodelintervaloapropiado;consulte
Especicaciones(página7).
Importante:Sivaaalmacenarlaherramienta
duranteunañoomás,retirelabateríadela
herramientaycarguelabateríahastaque2o3de
losindicadoresLEDdelabateríacambienaazul.
Noalmacenelabateríacompletamentecargada
nicompletamentedescargada.Antesdevolvera
usarlaherramienta,carguelabateríahastaque
seenciendaelindicadorizquierdodelcargador
enverde,ohastaquelos4indicadoresLEDdela
bateríasevuelvanazules.
•Desconecteelproductodelsuministrodeenergía
(esdecir,retireelenchufedelsuministrode
energíaolabatería)ycompruebesihaydaños
despuésdeluso.
Figura9
1.Zonasdeventilacióndel
cargador
2.Indicadorizquierdo
3.Indicadorderecho
5.Pararetirarlabatería,deslicelabateríahacia
atrásparasacarladelcargador.
•Limpiecualquiermaterialextrañodelproducto.
•Cuandonoseesténutilizando,almacenela
herramienta,labateríayelcargadordelabatería
fueradelalcancedelosniños.
•Mantengalaherramienta,labateríayelcargador
delabateríaalejadosdeagentescorrosivoscomo
productosquímicosdejardínosalparadeshielo.
•Parareducirelriesgodelesionespersonales
graves,noalmacenelabateríaenelexterioroen
unvehículo.
g194423
•Guardelaherramienta,labateríayelcargadoren
unlugarcerrado,limpioyseco.
9
Page 23

Preparacióndelabatería paraelreciclado
Importante:Alretirarla,cubralosterminalesde
labateríaconcintaadhesivadeserviciopesado.
Nointentedestruirodesmontarlabateríani
intenteretirarcualquieradeloscomponentesde
lamisma.Recicleoelimineadecuadamentelas
bateríasdelitio-ionenuncentroderecicladode
baterías.
Sideseaobtenermásinformaciónsobre
elreciclajedelasbateríasdeiones
delitioolocalizarlasinstalacionesde
reciclajedebateríasmáspróximas,visite
www.Call2Recycle.org(EE.UU.yCanadá
únicamente).Siseencuentrafuerade
EE.UU.oCanadá,póngaseencontactocon
sudistribuidorT oroautorizado.
10
Page 24

Solucióndeproblemas
Realicesololospasosdescritosenestasinstrucciones.Cualquierotrotrabajodeinspección,mantenimientoo
reparacióndebeserrealizadoporunServicioTécnicoAutorizadooporunespecialistaautorizadosino
puedesolucionarelproblemaustedmismo.
ProblemaPosiblecausa
Labateríasedescargarápidamente.1.Latemperaturadelabateríaestápor
Elcargadordelabateríanofunciona.
Laherramientanofunciona,ofuncionade
formaintermitente.
Labateríamuestrasolo3indicadores
LEDdespuésdepocossegundosdeuso
deunabateríacompletamentecargada.
Los4indicadoresLEDdelabatería
parpadeandespuésdepresionarelbotón
delindicadordecargadelabatería,yse
muestralacargaactual(cuandolabatería
noseestáusando).
encimaopordebajodelintervalode
temperaturaadecuado.
1.Latemperaturadelcargadordela
bateríaestáporencimaopordebajo
delintervalodetemperaturaadecuado.
2.Latomadecorrienteenlaqueestá
enchufadoelcargadordelabateríano
tienecorriente.
1.Hayhumedadenloscablesdela
batería.
2.Labateríanoestácorrectamente
instaladaenlaherramienta.
3.Labateríatienepocacarga.
1.Estoesnormal.1.Parelaherramientaypresioneelbotón
1.Latemperaturadelabateríaestápor
encimaopordebajodelintervalode
temperaturaadecuado.
Accióncorrectora
1.Trasladelabateríaaunlugarseco
cuyatemperaturaseadeentre0°Cy
40°C(32°Fy104°F).
1.Desenchufeelcargadordelabatería
ytrasládeloaunlugarsecocuya
temperaturaseadeentre0°Cy40°C
(32°Fy104°F).
2.Póngaseencontactoconun
electricistaautorizadoparaquerepare
latomadecorriente.
1.Dejequelabateríasesequeoséquela
conunpaño.
2.Retireyluegovuelvaacolocar
labateríaenlaherramienta,
asegurándosedequeestá
completamenteinstaladaybloqueada.
3.Carguelabatería.
delindicadordecargadelabateríao
retirelabateríadelaherramientapara
mostrarlacargarealdelabatería.
1.Trasladelabateríaaunlugarseco
cuyatemperaturaseadeentre0°Cy
40°C(32°Fy104°F).
Los4indicadoresLEDdelabatería
parpadeandespuésdeliberarelgatillo
(cuandolabateríaseestáusando).
2indicadoresLEDdelabatería
parpadeandespuésdepresionarelbotón
delindicadordecargadelabatería,yse
muestralacargaactual(cuandolabatería
noseestáusando).
2indicadoresLEDdelabateríaparpadean
despuésdeliberarelgatillo(cuandola
bateríaseestáusando).
1indicadorLEDdelabateríaparpadea.1.Elvoltajedelabateríaesbajo.
Esdifícilretirarlabateríadela
herramienta.
Elbloqueodevelocidadsedesactivasolo.1.Eltornillodelbloqueodevelocidadno
1.Latemperaturadelabateríaestápor
encimaopordebajodelintervalode
temperaturaadecuado.
1.Existeunadiferenciadevoltajeentre
lasceldasdelabatería.
1.Existeunadiferenciadevoltajeentre
lasceldasdelabatería.
1.Labatería/herramientaesnueva
ohaycorrosiónenlosterminales
delabateríaolosterminalesdela
herramienta.
estábienapretado.
1.Trasladelabateríaaunlugarseco
cuyatemperaturaseadeentre0°Cy
40°C(32°Fy104°F).
1.Coloquelabateríaenelcargadorhasta
queestécompletamentecargada.
1.Coloquelabateríaenelcargadorhasta
queestécompletamentecargada.
1.Coloquelabateríaenelcargador.
1.Limpielosterminalesdelabatería
ydelaherramienta.Apliquegrasa
dieléctricaenlosterminalesdela
batería;noutiliceotrotipodelubricante
porquepodríadañarlosterminales.
1.Aprieteeltornillodelbloqueode
velocidadgirándolo¼devuelta.Si
elbloqueodevelocidadaúnnose
mantieneactivado,gireeltornillodel
bloqueodevelocidad¼devueltamás.
11
Page 25

Page 26

FormNo.3417-968RevC
SoufeuraxialPowerPlex
MAX
N°demodèle51690—N°desérie318000001etsuivants
N°demodèle51690T—N°desérie318000001etsuivants
™
40V
Enregistrezvotreproduitàwww.Toro.com.
Traductiondutexted'origine(FR)
CV
*3417-968*C
Page 27

Pourtoutconseil
ourenseignement,
appeleznotrenuméro
vert1-888-367-6631
(États-Unis)ou
1-888-430-1687(Canada)
avantderenvoyerce
produit.
ATTENTION
CALIFORNIE
Proposition65-Avertissement
Ceproduitcontientuneoudessubstances
chimiquesconsidéréesparl'étatde
Californiecommecapablesdeprovoquer
descancers,desanomaliescongénitales
oud'autrestroublesdelareproduction.
Introduction
Cesoufeurestdestinéaugrandpublic,pourdéblayer
lesdébrisassimilablesauxfeuillesenextérieur,
selonlesbesoins.Ilestconçuprincipalementpour
fonctionneraveclabatteriemodèle88540(fournie
aveclemodèle51690)ou88541.
Lisezattentivementcettenoticepourapprendre
commentutiliseretentretenircorrectementvotre
produit,etéviterdel'endommageroudevousblesser.
Vousêtesresponsabledel'utilisationsûreetcorrecte
duproduit.
VouspouvezcontacterTorodirectementsur
www.T oro.compourtoutrenseignementconcernant
unproduitouunaccessoire,pourobtenirl'adresse
desdépositaires,pourconnaîtretouslesdétails
concernantlagarantieoupourenregistrervotre
produit.
Lemodèle51690Tnecomprendpasdebatterie
nidechargeur.
Sécurité
ATTENTION:Quandvousutilisezdesoutils
dejardinageélectriques,respecteztoujoursles
précautionsélémentairespourréduirelerisque
d'incendie,dechocélectriqueetdeblessure,y
compriscequisuit:
ATTENTION
Lenonrespectdetouslesavertissementset
touteslesconsignespeutentraînerdeschocs
électriques,unincendieet/oudesblessures
graves.
Liseztouteslesmisesengardeetconsignes
desécurité.
Conservezprécieusementtouteslesmisesen
gardeetconsignesdesécuritépourréférence
ultérieure.
Leterme«outilélectrique»utilisédanstoutes
lesmisesengarderenvoieàvotreoutilélectrique
branchésurlesecteur(câblé)oualimentéparbatterie
(sansl).
1.Sécuritésurlazonedetravail
A.Lazonedetravaildoitêtrepropreet
bienéclairée.Lesendroitssombreset
encombréssontpropicesauxaccidents.
B.N'utilisezjamaisd'outilsélectriques
dansdesatmosphèresexplosives,en
présencedeliquides,gazoupoussière
inammablesparexemple.Lesoutils
électriquesproduisentdesétincellesqui
peuventenammerlapoussièreoules
vapeurs/émanations.
C.Tenezenfantsetspectateursàdistance
pendantl'utilisationd'unoutilélectrique.
Lesdistractionspeuvententraînerlaperte
decontrôledel'outil.
2.Sécuritépersonnelle
A.Restezvigilant;regardezoùvousallezet
faitespreuvedebonsenslorsquevous
utilisezunoutilélectrique.N'utilisez
jamaisunoutilélectriquesivousêtes
fatiguéousousl'emprisedel'alcool,de
droguesoudemédicaments.Unseul
momentd'inattentionpendantl'utilisation
peutentraînerdegravesblessures.
B.Utilisezdeséquipementsdeprotection
individuelle.Porteztoujoursune
protectionoculaire.Leséquipements
deprotectioncommelesmasques
antipoussière,leschaussuresdesécurité
àsemelleantidérapante,lescasques
etlesprotectionsantibruitutilisésde
©2018—TheToro®Company
8111LyndaleAvenueSouth
Bloomington,MN55420
Contactez-noussurwww.Toro.com.
2
ImpriméenChine
Tousdroitsréservés
Page 28

manièrepertinenteréduisentlesrisquesde
blessures.
sontdangereuxs'ilssontmisentreles
mainsd'utilisateursnovices.
C.Éviteztoutdémarrageaccidentel.
Assurez-vousquel'interrupteur
marche/arrêtestenpositionARRÊT
avantdeconnecterl'outilàunesource
d'alimentationet/ouàlabatterie,dele
prendreenmainoudeletransporter.
Desaccidentspeuventseproduiresivous
transportezunoutilélectriqueengardant
ledoigtsurl'interrupteurd'alimentationou
sivouslemettezsoustensionsansavoir
placél'interrupteurenpositionarrêt.
D.Netravaillezpastroploindevantvous.
Gardeztoujourslespiedsbienposésà
terreetfaitesensortedenepasperdre
l'équilibre.Vouspourrezainsigarder
lecontrôledel'outilencasd'événement
inattendu.
E.Portezdesvêtementsadéquats.Ne
portezpasdevêtementsamplesnide
bijouxpendants.Attachezvoscheveux
etn'approchezpaslescheveux,les
vêtementsnilesgantsdeséventsLes
vêtementsamples,lesbijouxpendantsou
lescheveuxlongspeuventseprendredans
lespiècesmobiles.
F.N'approchezpaslespiedsetlesmains
delazonedecoupe.
3.Utilisationetentretiendesoutilsélectriques
A.Nefaitespasforcerl'outilélectrique.
Utilisezl'outilélectriquecorrectpour
latâcheàaccomplir.Unoutilélectrique
adaptédonnerademeilleursrésultatset
seramoinsdangereuxs'ilestutilisédans
leslimitesprévues.
B.Nevousservezpasdel'outilélectrique
sil'interrupteurmarche/arrêtnepermet
pasdelemettreenmarcheetdel'arrêter
correctement.Unoutilélectriquequine
peutpasêtrecommandéparl'interrupteur
marche/arrêtestdangereuxetdoitêtre
réparé.
E.Rangezlesoutilsélectriquesàl'intérieur
lorsqu'ilsneserventpas.Lorsqueles
outilsnesontpasutilisés,rangez-lesdans
unlocalsecenhauteurousousclé,hors
delaportéedesenfants.
F.Maintenezlesoutilsélectriquesenétat
demarche.Vériezsidespiècessont
malalignées,grippées,casséesou
présententtoutautredéfautsusceptible
d'affecterlebonfonctionnementde
l'outilélectrique.S'ilestendommagé,
faitesréparerl'outilélectriqueavant
del'utiliser.Denombreuxaccidents
sontcauséspardesoutilsélectriquesen
mauvaisétat.
G.Gardezlesoutilsdecoupepropres
etbienaffûtés.Desoutilsdecoupe
entretenuscorrectementetbienaffûtés
sontmoinssusceptiblesdecoinceretsont
plusfacilesàcontrôler.
H.Utilisezl'outilélectriqueconformément
auxinstructionsdecettenoticeetde
lamanièreprévuepourcetyped'outil
spécique,entenantcomptedes
conditionsdetravailetdelatâcheà
réaliser.L'utilisationdel'outilélectrique
pourdesopérationsautresquecelles
prévuespeutengendrerunesituation
dangereuse.
I.Lesdéecteursdoiventtoujoursêtreen
placeetenbonétat.
4.Entretien
Conezl'entretiendevotreoutilélectriqueà
unréparateurqualiéutilisantexclusivement
despiècesderechangeidentiques.La
sécuritédevotreoutilélectriqueseraainsi
maintenue.
5.Consignesdesécuritérelativesàlabatterie
A.Nechargezpasl'outilsouslapluieoudans
unlieuhumide.
C.Retirezlabatteriedel'outilélectrique
avantd'effectuerdesréglages,de
changerd'accessoireouderanger
l'outilélectrique.Cesmesuresde
sécuritépréventivesréduisentlerisquede
démarrageaccidenteldel'outil.
D.Rangezlesoutilsélectriquesnonutilisés
horsdeportéedesenfantsetneconez
leurutilisationqu'àdespersonnes
connaissantleurmaniementetayantlu
cesinstructions.Lesoutilsélectriques
B.N'utilisezpasunoutilalimentéparbatterie
souslapluie.
C.Utilisezuniquementletypeetlataillede
batterie(s)suivants:batterieT oromodèle
88540ou88541.
D.Retirezoudébranchezlabatterieavant
d'effectuerunentretien,denettoyeroude
retirerdesdébrisdel'outildejardinage.
E.Nejetezpaslesbatteriesaufeu.
L'élémentpourraitexploser.Vériez
3
Page 29

silaréglementationlocaleimposedes
procéduresdemiseaurebutspéciales.
F.N'ouvrezpasetn'endommagezpasles
batteries.L'électrolyteestcorrosifetpeut
causerdeslésionsoculairesetcutanées.
Soningestionpeutêtretoxique.
G.Manipulezlesbatteriesavecprécaution
pournepasprovoquerdecourt-circuiten
Autocollantsdesécuritéetd'instruction
Desautocollantsdesécuritéetdesinstructionsbienvisiblesparl'opérateursontplacésprès
detouslesendroitspotentiellementdangereux.Remplaceztoutautocollantendommagé
oumanquant.
136-2467
Modèle51690
casdecontactavecunconducteurcomme
desbagues,desbraceletsetdesclés.La
batterieouleconducteurpeutsurchauffer
etcauserdesbrûlures.
CONSERVEZCESINSTRUCTIONS
decal136-2467
decal136-2468
136-2468
Modèle51690T
decal136-2473
136-2473
decal136-2471
136-2471
decal136-2476
136-2476
1.Labatterieestencharge.3.Labatterieesttrop
2.Labatterieest
complètementchargée.
chaude.
4.Remplacezlabatterie.
4
Page 30

136-2533
1.Attention–lisezlemanueldel'utilisateur;n'approchezpas
despiècesenmouvement;laisseztouteslesprotections
etcapotsenplace;protégez-vouslesyeux;n'utilisezpas
l'appareilpartempshumide.
decal136-2539
136-2539
1.Chargezlabatterieàunetempératureambiantecomprise
entre0°Cet40°C(32°Fet104°F).
decal136-2533
1.Labatterien'estpas
chargéeaudépart.
2.Placezlabatteriedansle
chargeurdebatterie.
3.Attendezquelabatterie
soitcomplètement
chargéeavantlapremière
utilisation.
decal136-2534
136-2534
4.Stop–suivezces
instructionsavantla
premièreutilisation.
5.LisezleManuelde
l'utilisateur.
5
Page 31

Miseenservice
Remarque:Quandvousl'achetez,labatterien'est
pascomplètementchargée.Avantlatoutepremière
utilisationdel'outil,voirChargedelabatterie(page8).
Montageduchargeurde
batterie(option)
Sivouslesouhaitez,xezlechargeurdebatterie
solidementàunmuràl'aidedesfentesdexation
muralesituéesaudos.
Montez-leàl'intérieur(parexempledansungarage
outoutautreendroitàl'abridel'humidité),àproximité
d'uneprisedecourantethorsdelaportéedes
enfants.
Pourvousaideràmonterlechargeur,reportez-vousà
laFigure1.
Remarque:Pourxerlechargeurenplace,
insérez-leetfaites-lepivotersurlesxations
correctementinstallées(xationsnonincluses).
Assemblagedusoufeur
1.Glissezletubedusoufeursurlecarterdu
soufeur.Vousdevrezéventuellementappuyer
surlalanguettedutubedusoufeurpourle
bloquerenposition(Figure2).
g190102
Figure2
1.Languette
2.Alignezlecreuxdelabatteriesurlalanguette
danslecorpsdelapoignée,saisissezlapoignée
etpoussezlabatterieàl'intérieurjusqu'àceque
leverrous'enclencheenposition(Figure3).
Figure1
g194149
Figure3
1.Verroudebatterie
g194202
6
Page 32

Vued'ensembledu
Utilisation
produit
Caractéristiques
techniques
Plagesdetempératureadéquates
Chargerlabatterieentre0°C(32°F)et40°C(104°F)*
Utiliserlesproduitsentre
Remiserlesproduitsentre
Débrancherlechargeur
*Letempsdechargeserapluslongendehorsde
cetteplagedetempérature.
Rangezl'outil,labatterieetlechargeurdansunlieu
fermé,propreetsec.
-15°C(5°F)et60°C(140°F)
-15°C(5°F)et60°C(140°F)
au-dessousde0ºC(-32ºF)ou
au-dessusde40ºC(104ºF)
ATTENTION
Lesoufeurpeutprojeterdesdébrisetvous
blessergravement,ainsiquetoutepersonne
àproximité.
•Nesoufezpassurdesobjetsdursdutype
clous,boulonsoupierres.
•N'utilisezpaslesoufeurprèsde
personnesoud'animaux.
•Soyezparticulièrementprudentlorsque
vousnettoyezdesescaliersoud'autres
endroitspeuaccessibles.
•Portezdeslunettesdesécuritéouune
autreprotectionoculaireappropriée,un
pantalonetdeschaussures.
Démarragedusoufeur
1.Assurez-vousqueleséventsdusoufeursont
exemptsdetoutepoussièreettoutdébris.
2.Pourmettrelesoufeurenmarche,serrezla
gâchettedevitessevariable(Figure4).
Remarque:Enclenchezleblocagedevitesse
pourlaisserlamachinetournersansavoirà
appuyersurlagâchettedevitessevariable
(Figure4).
Figure4
1.Blocagedevitesse4.Verroudebatterie
2.BoutonTurboBoost
3.Gâchettedevitesse
variable
5.Éventsdusoufeur
g194437
7
Page 33

Réglagedudébitd'airdu
Retraitdelabatteriedu
soufeur
Pouraccélérerledébit,appuyezsurleboutonTurbo
Boostetmaintenez-leenfoncépendantladurée
souhaitée(Figure4).
Pourréglerledébitdusoufeurenmarche,serrezla
gâchettedevitessevariable(Figure4).
Pourmaintenirledébitd'airactuel,engagezle
blocagedevitesse(Figure4).
Arrêtdusoufeur
Pourarrêterlesoufeur,déverrouillezleblocagede
vitesse(lecaséchéant)etrelâchezlagâchettede
vitessevariable(Figure4).
Important:Aprèsavoirarrêtélesoufeur,ne
laissezpasleblocagedevitesseenclenchéalors
quelabatteriesetrouvesurlesoufeur.
Chaquefoisquevouscessezd'utiliserlesoufeurou
quevousletransportezversoudelazonedetravail,
enlevezlabatterie.
Retraitdutubedusoufeur
soufeur
Appuyezsurleverroudebatteriepourséparerla
batteriedusoufeur(Figure6).
g194150
Figure6
1.Verroudebatterie
Utilisationdesaccessoires
Utilisezlesaccessoiresfournisaubesoin.
Remarque:Lekitdenettoyagedegouttière
(modèle51667)etletubeoscillant(modèle51664)
sontvendusséparément.
Appuyezsurlalanguettepourséparerletubedu
soufeur(Figure5).
Figure5
1.Languette
g228499
1.Emboutdenettoyagede
gouttière
2.Tubedesoufeur
Figure7
3.Emboutoscillant/grande
vitesse
4.Insertgrandevitesse
g194438
Chargedelabatterie
Important:Liseztouteslesconsignesde
sécurité.
Important:Chargezlabatterieuniquementàdes
températurescomprisesdanslaplageadéquate;
voirCaractéristiquestechniques(page7).
Remarque:Àtoutmoment,appuyezsurlebouton
indicateurdechargedelabatteriepourafcherla
chargeactuelle(diodes).
8
Page 34

1.Assurez-vousqueleséventssurlabatteriesont
exemptsdetoutepoussièreettoutdébris.
2.Alignezlecreuxdelabatterie(Figure8)surla
languetteduchargeur.
Figure8
1.Creuxdelabatterie
2.Bornesdelabatterie
3.Éventsdelabatterie
4.Boutonindicateurde
charge
5.Diodes(chargeactuelle)
3.Assurez-vousqueleséventssurlechargeur
debatteriesontexemptsdetoutepoussièreet
toutdébris.
4.Glissezlabatteriedanslechargeurjusqu'àce
qu'ellesoitbienenclenchée(Figure9).
6.Reportez-vousautableauci-dessouspour
interpréterlesindicationsdesdiodessurle
chargeurdebatterie.
Voyant
gauche
Éteint
RougeRougeLabatterieestencharge
VertRougeLabatterieestchargée
Orange
Rouge
clignotant
Voyantdroit
Rouge
RougeLabatterieesttropchaude
RougeRemplacezlabatterie
Indique:
Lechargeurestenmarche;
aucunebatterien'est
insérée
Remisage
g228487
Important:Remisezl'outil,labatterieetle
chargeuruniquementàdestempératures
comprisesdanslaplageadéquate;voir
Caractéristiquestechniques(page7).
Important:Sivousremisezl'outilpendantunan
ouplus,retirezlabatterieetchargez-lajusqu'à
ceque2ou3desesdiodesdeviennentbleues.
Neremisezpasunebatterieàpleinechargeou
complètementdéchargée.Avantderéutiliser
l'outil,chargezlabatteriejusqu'àcequelevoyant
gauchedeviennevertsurlechargeur,ouqueles
4diodesdelabatteriedeviennentbleues.
•Débranchezleproduitdel'alimentation(autrement
dit,retirezlaprisedel'alimentationoulabatterie)
etrechercheztoutdommageéventuelaprès
utilisation.
Figure9
1.Éventsduchargeur
2.Voyantgauche
3.Voyantdroit
5.Pourretirerlabatterie,faites-laglisserhorsdu
chargeur.
•Débarrassezl'appareildetoutcorpsétranger.
•Lorsqu'ilsnesontpasutilisés,rangezl'outil,la
batterieetlechargeurdebatteriehorsdelaportée
desenfants.
•N'approchezpasl'outil,labatterieetlechargeur
desagentscorrosifs,telslesproduitschimiques
dejardinageetlesselsdedégivrage.
•Pourréduirelesrisquesdeblessuresgraves,ne
rangezpaslabatterieàl'extérieuroudansun
véhicule.
g194423
•Rangezl'outil,labatterieetlechargeurdansun
lieufermé,propreetsec.
9
Page 35

Préparationdelabatterie pourlerecyclage
Important:Aprèsavoirretirélabatterie,
recouvrezlesbornesderubanadhésifépais.
N'essayezpasdedétruireoudedémonterla
batterienidedéposeraucundesescomposants.
Recyclezoudébarrassez-vouscorrectement
desbatteriesaulithium-iondansuncentrede
recyclage.
Pourplusderenseignementssurle
recyclagedesbatterieslithium-ionet
pourtrouverlecentrederecyclagede
batteriesleplusproche,rendez-voussur
www.Call2Recycle.org(États-UnisetCanada
seulement).HorsdesÉtats-Unisetdu
Canada,veuillezcontactervotredépositaire
Toroagréé.
10
Page 36

Dépistagedesdéfauts
Effectuezuniquementlesopérationsdécritesdanscettenotice.T outautretravaild'inspection,d'entretienou
deréparationdoitêtreréaliséparuncentred'entretienagrééouautrespécialistequaliésivousn'arrivez
pasàrésoudreleproblèmevous-même.
ProblèmeCausepossible
Labatteriesedéchargerapidement.1.Labatterieestàunetempérature
Lechargeurdebatterieestdéfectueux.
L'outilnefonctionnepasoufonctionnepar
intermittence.
Troisdiodesseulementsontalluméessur
labatterieauboutdequelquessecondes
seulementd'utilisation,alorsqu'elleest
complètementchargée.
Les4diodesclignotentsurlabatterie
aprèsavoirappuyésurlebouton
indicateurdecharge,etlachargeactuelle
s'afche(quandlabatterien'estpas
utilisée).
supérieureouinférieureàlaplagede
températuresappropriée.
1.Lechargeurdebatterieestàune
températuresupérieureouinférieureà
laplagedetempératuresappropriée.
2.Laprisesurlaquellelechargeurest
branchén'estpasalimentée.
1.Ilyadel'humiditésurleslsdela
batterie.
2.Labatterien'estpascomplètement
installéedansl'outil.
3.Lachargedelabatterieestfaible.
1.Celaestparfaitementnormal.
1.Labatterieestàunetempérature
supérieureouinférieureàlaplagede
températuresappropriée.
Mesurecorrective
1.Placezlabatteriedansunendroitsec,
àunetempératurecompriseentre0°C
(32°F)et40°C(104°F).
1.Débranchezlechargeurdebatterie
etplacez-ledansunendroitsec,à
unetempératurecompriseentre0°C
(32°F)et40°C(104°F).
2.Adressez-vousàunélectricienqualié
pourréparerlaprise.
1.Laissezsécherlabatterieou
essuyez-la.
2.Retirezetremettezlabatterieenplace
dansl'outil,envériantqu'elleest
complètementinséréeetenclenchée.
3.Rechargezlabatterie.
1.Arrêtezl'outiletappuyezsurlebouton
indicateurdechargedelabatterie,ou
retirezlabatteriedel'outilpourafcher
lachargeréelle.
1.Placezlabatteriedansunendroitsec,
àunetempératurecompriseentre0°C
(32°F)et40°C(104°F).
Les4diodesclignotentsurlabatterie
aprèsavoirrelâchélagâchette(quandla
batterieestutilisée).
Deuxdiodesclignotentsurlabatterie
aprèsavoirappuyésurlebouton
indicateurdecharge,etlachargeactuelle
s'afche(quandlabatterien'estpas
utilisée).
Deuxdiodesclignotentsurlabatterie
aprèsavoirrelâchélagâchette(quandla
batterieestutilisée).
Unediodeclignotesurlabatterie.
Ilestdifcilederetirerlabatteriedel'outil.1.Labatterie/l'outilsontneufs,oules
Leblocagedevitessenerestepas
enclenchéquandlacommandeest
engagée.
1.Labatterieestàunetempérature
supérieureouinférieureàlaplagede
températuresappropriée.
1.Ilyaunedifférencedetensionentre
lesélémentsdelabatterie.
1.Ilyaunedifférencedetensionentre
lesélémentsdelabatterie.
1.Latensiondelabatterieestfaible.
bornesdelabatterieet/oulesbornes
del'outilsontcorrodées.
1.Lavisdeblocagedevitesseest
desserrée.
1.Placezlabatteriedansunendroitsec,
àunetempératurecompriseentre0°C
(32°F)et40°C(104°F).
1.Placezlabatteriesurlechargeur
jusqu'àcequ'ellesoitcomplètement
chargée.
1.Placezlabatteriesurlechargeur
jusqu'àcequ'ellesoitcomplètement
chargée.
1.Placezlabatteriesurlechargeur.
1.Nettoyezlesbornesdelabatterie
etdel'outil.Appliquezensuitedela
graissediélectriquesurlesbornesde
labatterie;n'utilisezaucunautretype
delubriantaurisqued'endommager
lesbornes.
1.Resserrezlavisdeblocagedevitesse
enlatournantd'unquartdetour.Sile
blocagedevitessenerestetoujours
pasenclenché,tournezlavisd'un
quartdetoursupplémentaire.
11
 Loading...