

Toro 41594, Multi-Pro 5800 Operator's Manual
FormNo.3391-858RevB
Multi-Pro5800TurfSprayer
ModelNo.41594—SerialNo.315000001andUp
Registeratwww.T oro.com.
OriginalInstructions(EN)
*3391-858*B
TheMulti-Pro
®
turfsprayerisadedicatedturfspray
applicationvehicleandisintendedtobeusedbyprofessional,
hiredoperatorsincommercialapplications.Itisprimarily
designedforsprayingonwell-maintainedlawnsinparks,golf
courses,sportselds,andoncommercialgrounds.
ThisproductcomplieswithallrelevantEuropeandirectives;
fordetails,pleaseseetheseparateproductspecicDeclaration
ofConformity(DOC)sheet.
WARNING
CALIFORNIA
Proposition65Warning
Thisproductcontainsachemicalorchemicals
knowntotheStateofCaliforniatocausecancer,
birthdefects,orreproductiveharm.
Theengineexhaustfromthisproduct
containschemicalsknowntotheStateof
Californiatocausecancer,birthdefects,
Useofthisproductmaycauseexposureto
chemicalsknowntotheStateofCalifornia
orotherreproductiveharm.
tocausecancer,birthdefects,orother
reproductiveharm.
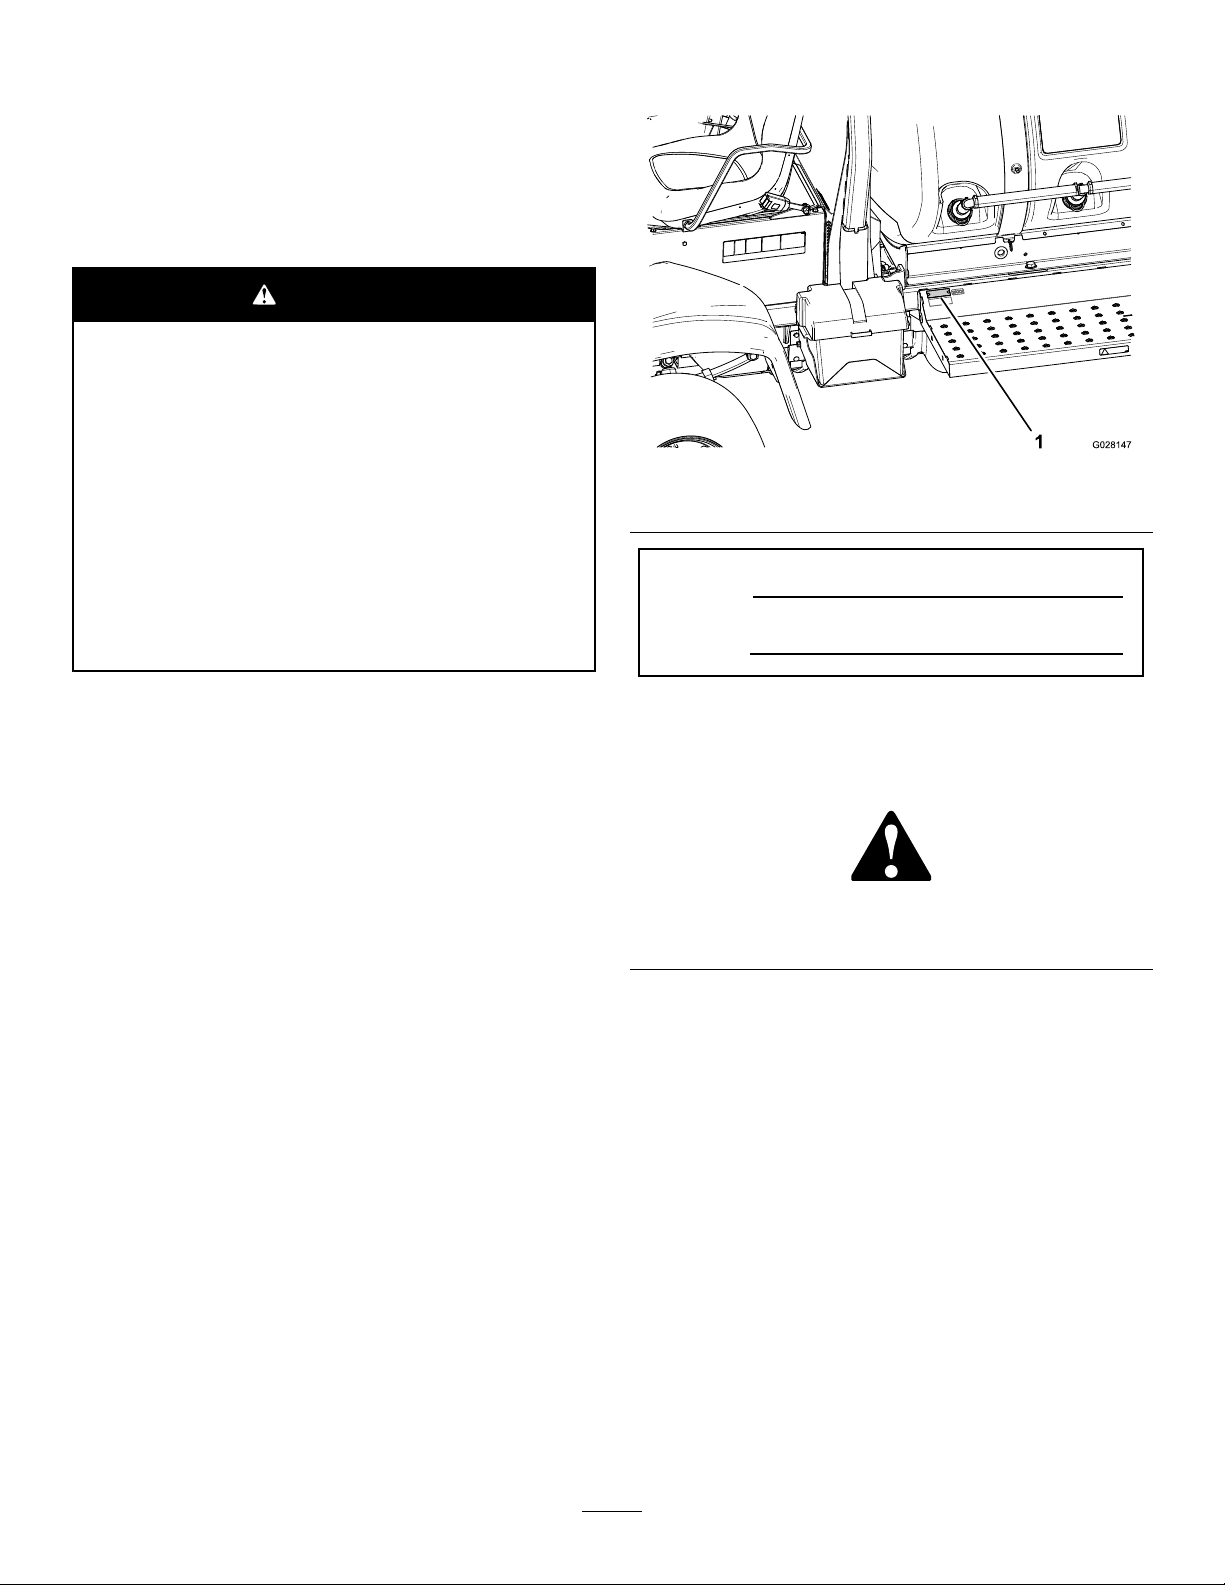
yourproductready.Figure1illustratesthelocationofthe
modelandserialnumbersontheproduct.
Figure1
1.Locationofthemodelandserialnumbers
ModelNo.
SerialNo.
Important:Thisengineisnotequippedwithaspark
arrestermufer.ItisaviolationofCaliforniaPublic
ResourceCodeSection4442touseoroperatetheengine
onanyforest-covered,brush-covered,orgrass-covered
land.Otherstatesorfederalareasmayhavesimilarlaws.
ThissparkignitionsystemcomplieswithCanadianICES-002.
Theenclosed
Engine Owner's Man ual
issuppliedfor
informationregardingtheUSEnvironmentalProtection
Agency(EPA)andtheCaliforniaEmissionControl
Regulationofemissionsystems,maintenance,and
warranty.Replacementsmaybeorderedthroughthe
enginemanufacturer.
Introduction
Readthismanualcarefullytolearnhowtooperateand
maintainyourproductproperly.Theinformationinthis
manualcanhelpyouandothersavoidinjuryandproduct
damage.AlthoughTorodesignsandproducessafeproducts,
youareresponsibleforoperatingtheproductproperlyand
safely.YoumaycontactTorodirectlyatwww.Toro.comfor
productandaccessoryinformation,helpndingadealer,or
toregisteryourproduct.
Thismanualidentiespotentialhazardsandhassafety
messagesidentiedbythesafetyalertsymbol(Figure2),
whichsignalsahazardthatmaycauseseriousinjuryordeath
ifyoudonotfollowtherecommendedprecautions.
Figure2
1.Safetyalertsymbol.
Thismanualuses2wordstohighlightinformation.
Importantcallsattentiontospecialmechanicalinformation
andNoteemphasizesgeneralinformationworthyofspecial
attention.
Wheneveryouneedservice,genuineT oroparts,oradditional
information,contactanAuthorizedServiceDealerorToro
CustomerServiceandhavethemodelandserialnumbersof
©2015—TheToro®Company
8111LyndaleAvenueSouth
Bloomington,MN55420
Contactusatwww.Toro.com.
2
PrintedintheUSA.
AllRightsReserved

Contents
Safety...........................................................................4
SafeOperatingPractices...........................................4
ChemicalSafety.......................................................5
WhileOperating......................................................6
Maintenance...........................................................7
SoundPower..........................................................8
SoundPressure.......................................................8
Hand-ArmVibration...............................................8
WholeBodyVibration.............................................8
SafetyandInstructionalDecals.................................8
Setup...........................................................................14
1CheckingtheBoomHingeSprings.........................14
2RemovingtheShippingBumper.............................15
ProductOverview.........................................................16
Controls...............................................................17
VehicleControls.................................................17
Specications........................................................21
Operation....................................................................22
ThinkSafetyFirst...................................................22
PerformingPre-StartingChecks...............................22
PreparingtoDrivetheMachine................................22
UsingtheInfoCenter..............................................26
PreparingtoUsetheSprayer....................................29
OperatingtheMachine............................................30
BreakinginaNewSprayer.......................................31
OperatingtheSprayer.............................................31
FillingtheFreshWaterTank....................................31
FillingtheSprayTank..............................................31
OperatingtheBooms..............................................32
Spraying................................................................32
TurfCarePrecautionswhileOperatinginStationary
Modes...............................................................33
SprayingTips.........................................................33
UncloggingaNozzle..............................................33
SelectingaNozzle..................................................33
CleaningtheSprayer...............................................33
CalibratingtheSectionValves...................................34
AgitationBypassValveKnobPosition.......................35
CalibratingtheAgitationBypassValve.......................35
Pump....................................................................36
TransportingtheSprayer.........................................36
TowingtheSprayer.................................................36
Maintenance.................................................................38
RecommendedMaintenanceSchedule(s)......................38
DailyMaintenanceChecklist....................................39
NotationforAreasofConcern.................................39
PremaintenanceProcedures........................................40
JackingtheSprayerUp............................................40
AccessingtheEngine..............................................40
Lubrication...............................................................42
GreasingtheSprayer...............................................42
GreasingtheBoomHinges......................................42
GreasingtheActuatorRodBearings..........................42
EngineMaintenance..................................................43
CheckingtheAirCleaner.........................................43
ServicingtheEngineOil..........................................44
CheckingthePCVValve..........................................46
FuelSystemMaintenance...........................................46
CheckingtheFuelLineandConnections...................46
ServicingtheFuelFilter...........................................46
DrainingtheFuelTank...........................................48
BleedingtheFuelSystem.........................................49
ElectricalSystemMaintenance....................................49
ReplacingtheFuses................................................49
ServicingtheBattery...............................................49
DriveSystemMaintenance.........................................51
InspectingtheWheels/Tires....................................51
ChangingthePlanetaryGearboxFluid.......................51
AdjustingtheFrontWheelToe-in.............................52
CoolingSystemMaintenance......................................53
ServicingtheCoolingSystem...................................53
BrakeMaintenance....................................................54
AdjustingtheBrakes...............................................54
BeltMaintenance......................................................55
ServicingtheAlternatorBelt....................................55
HydraulicSystemMaintenance....................................55
HydraulicFluidSpecication...................................55
ServicingtheHydraulicOil......................................56
SprayerSystemMaintenance........................................58
InspectingtheHoses..............................................58
ChangingthePressureFilter....................................58
InspectingtheSprayerPump....................................59
AdjustingtheActuators...........................................59
InspectingtheNylonPivotBushings.........................60
Cleaning...................................................................60
CleaningtheRadiatorCoolingFins...........................60
CleaningtheSprayerValves.....................................60
Storage........................................................................70
Troubleshooting...........................................................71
Schematics...................................................................74
3

Safety
Improperuseormaintenancebytheoperatororownercan
resultininjury.Toreducethepotentialforinjury,comply
withthesesafetyinstructionsandalwayspayattentionto
thesafetyalertsymbol,whichmeansCaution,Warning,or
Danger—“personalsafetyinstruction.”Failuretocomply
withtheinstructionmayresultinpersonalinjuryordeath.
ThemachinemeetstherequirementsofSAEJ2258.
SafeOperatingPractices
Important:Important:Themachineisdesigned
primarilyasanoff-roadvehicleandisnotintendedfor
extensiveuseonpublicroads.Whenusingthemachine
onpublicroads,followalltrafcregulationsanduse
anyadditionalaccessoriesthatmayberequiredbylaw,
suchaslights,turnsignals,slowmovingvehicle(SMV)
sign,andothersasrequired.
TheMulti-Pro5800TurfSprayerwasdesignedandtestedto
offersafeservicewhenoperatedandmaintainedproperly.
Althoughhazardcontrolandaccidentpreventionpartiallyare
dependentuponthedesignandcongurationofthemachine,
thesefactorsarealsodependentupontheawareness,concern,
andpropertrainingofthepersonnelinvolvedintheoperation,
maintenanceandstorageofthemachine.Improperuseor
maintenanceofthemachinecanresultininjuryordeath.
NotalloftheattachmentsthatadapttotheMulti-Pro5800
TurfSprayerarecoveredinthismanual.Seethespecic
Operator’sManualprovidedwitheachattachmentfor
additionalsafetyinstructions.Readthesemanuals.
Toreducethepotentialforinjuryordeath,complywiththe
followingsafetyinstructions:
Supervisor'sResponsibilities
•Makesurethatoperatorsarethoroughlytrainedand
familiarwiththeOperator'sManual,engineowner’smanual,
andalllabelsonthesprayer.
•Establishyourownspecialproceduresandworkrules
forunusualoperatingconditions(e.g.slopestoosteep
forsprayeroperation).
Note:Localregulationsmayrestricttheageofthe
operator.
•Theowner/usercanpreventandisresponsiblefor
accidentsorinjuriesoccurringtohimselforherself,other
people,ordamagetoproperty.
BeforeOperating
•Operatethemachineonlyafterreadingandunderstanding
thecontentsofthismanual.
•Neverallowchildrentooperatethesprayer.
•Neverallowotheradultstooperatethesprayerwithout
rstreadingandunderstandingtheOperator'sManual.
Onlytrainedandauthorizedpersonsshouldoperatethis
sprayer.Makesurethatalloperatorsarephysicallyand
mentallycapableofoperatingthesprayer.
•Thissprayerisdesignedtocarryonlyyou,theoperator
andonepassengerintheseatprovidedbythe
manufacturer.Nevercarryanyadditionalpassengerson
thesprayer.
•Neveroperatethesprayerwhenundertheinuence
ofdrugsoralcohol.Evenprescriptiondrugsandcold
medicinescancausedrowsiness.
•Donotdrivethesprayerwhenyouaretired.Besureto
takeoccasionalbreaks.Itisveryimportantthatyoustay
alertatalltimes.
•Becomefamiliarwiththecontrolsandknowhowtostop
theenginequickly.
•Keepallshields,safetydevices,anddecalsinplace.Ifa
shield,safetydevice,ordecalismalfunctioning,illegible,
ordamaged,repairorreplaceitbeforeoperatingthe
machine.
•Wearappropriateclothing;includingsafetyglasses,long
pants,substantialslip-resistantfootwearorrubberboots,
gloves,andhearingprotection.Tiebacklonghair.Do
notwearjewelry.
CAUTION
Thismachineproducessoundlevelsinexcess
of85dBAattheoperator’searandcancause
hearinglossthroughextendedperiodsof
exposure.
Training
•ReadtheOperator'sManualandothertrainingmaterial
beforeoperatingthemachine.
Note:Iftheoperator(s)ormechanic(s)cannotreadthe
manuallanguage,itistheowner'sresponsibilitytoexplain
thismaterialtothem.
•Becomefamiliarwiththesafeoperationoftheequipment,
operatorcontrols,andsafetysigns.
•Alloperatorsandmechanicsshouldbetrained.The
ownerisresponsiblefortrainingtheusers.
•Neveruntrainedpeopleoperateorservicetheequipment.
Wearhearingprotectionwhenoperatingthis
machine.
•Avoiddrivingwhenitisdark,especiallyinunfamiliar
areas.Ifyoumustdrivewhenitisdark,besuretodrive
cautiously,usetheheadlights,andevenconsideradding
additionallights.
•Beextremelycarefulwhenoperatingaroundpeople.
Alwaysbeawareofwherebystandersmightbelocated
andkeepthemawayfromtheworkarea.
•Beforeoperatingthesprayer,alwayscheckthedesignated
areasofthesprayerthatarestatedinthePre-Starting
4

ChecksintheOperationsection.Ifthemachinedoes
notfunctioncorrectlyorisdamagedinanyway ,donot
usethesprayer.Makesurethattheproblemiscorrected
beforethesprayerorattachmentisoperated.
•Makesuretheoperatorandpassengerareaiscleanand
freefromchemicalresidueanddebrisbuildup.
•Ensurethatalluidlineconnectorsaretightandallhoses
areingoodconditionbeforeapplyingpressuretothe
system.
Note:Donotusethesprayerifitisleakingordamaged.
•Sincefuelishighlyammable,handleitcarefully.
–Useanapprovedfuelcontainer.
–Donotremovethecapfromthefueltankwhenthe
engineishotorrunning.Allowtheenginetocool
beforefuelingthemachine.
–Donotsmokewhilehandlingfuel.
–Fillthefueltankofthemachineoutdoors.
–Fillthefueltankofthemachinetoabout25mm(1
inch)belowthetopofthetank(thebottomofthe
llerneck).Donotoverllthefueltank.
ChemicalSafety
WARNING
Chemicalsubstancesusedinthespreader-sprayer
systemmaybehazardousandtoxictoyou,
bystanders,animals,plants,soilsorotherproperty.
•Carefullyreadandfollowthechemicalwarning
labelsandMaterialSafetyDataSheets(MSDS)
forallchemicalsusedandprotectyourself
accordingtothechemicalmanufacturer's
recommendations.Ensurethataslittleskin
aspossibleisexposedwhileusingchemicals.
UseappropriatePersonalProtectiveEquipment
(PPE)toguardagainstpersonalcontactwith
chemicals,suchas:
–safetyglasses,goggles,and/orfaceshield
–respiratororltermask
–chemicalresistantgloves
–rubberbootsorothersubstantialfootwear
–hearingprotection
–Wipeupanyspilledfuel.
–cleanchangeofclothes,soap,anddisposable
towels,tobekepton-hand,intheeventof
achemicalspill.
•Keepinmindthattheremaybemorethan
onechemicalused,andinformationoneach
chemicalshouldbeassessed.
•Refusetooperateorworkonthesprayerifthis
informationisnotavailable!
•Beforeworkingonasprayersystem,make
surethatthesystemhasbeentriplerinsedand
neutralizedaccordingtotherecommendations
ofthechemicalmanufacturer(s)andallofthe
valveshavebeencycled3times.
•Verifythereisanadequatesupplyofcleanwater
andsoapnearby,andimmediatelywashoffany
chemicalsthatcontactyou.
•Obtainpropertrainingbeforeusingorhandling
chemicals.
•Usethecorrectchemicalforthejob.
•Followthechemicalmanufacturer'sinstructionsfor
thesafeapplicationofthechemical.Donotexceed
recommendedsystemapplicationpressure.
•Donotll,calibrate,orcleantheunitwhenpeople,
especiallychildren,orpetsareinthearea.
•Handlechemicalsinawellventilatedarea.
•Havecleanwateravailableespeciallywhenllingthe
spraytank.
•Donoteat,drink,orsmokewhileworkingwithchemicals.
5

•Donotcleanspraynozzlesbyblowingthroughthemor
placinginmouth.
•Alwayswashyourhandsandotherexposedareasassoon
aspossibleafteryounishworkingwithchemicals.
•Keepchemicalsintheiroriginalpackagesandstoredin
asafelocation.
•Properlydisposeofunusedchemicalsandchemical
containersasinstructedbythechemicalmanufacturer
andyourlocalcodes.
•Chemicalsandfumesaredangerous;neverenterthetank
orplaceyourheadoverorintheopeningofatank.
•Followalllocal,state,federalregulationsforspreading
orsprayingchemicals.
–Watchoutfortrafcwhenyouarenearorcrossing
roads.Alwaysyieldtherightofwaytopedestrians
andothervehicles.Thissprayerisnotdesignedfor
useonstreetsorhighways.Alwayssignalyourturns
orstopearlyenoughsothatotherpeopleknowwhat
youplantodo.Obeyalltrafcrulesandregulations.
–Theelectricalandexhaustsystemsofthesprayercan
producesparkscapableofignitingexplosivematerials.
Neveroperatethesprayerinornearanareawhere
thereisdustorfumesintheairwhichareexplosive.
–Ifyouareeverunsureaboutsafeoperation,stop
workandaskyoursupervisor.
•Donottouchtheengineormuferwhiletheengineis
runningorsoonafterithasstopped.Theseareasmaybe
hotenoughtocauseburns.
WhileOperating
WARNING
Engineexhaustcontainscarbonmonoxide,which
isanodorless,deadlypoisonthatcankillyou.
Donotrunengineindoorsorinanenclosedarea.
•Theoperator(andpassenger)shouldremainseated
wheneverthesprayerisinmotion.Theoperatorshould
keepbothhandsonthesteeringwheelwheneverpossible.
Keepyourarmsandlegswithinthesprayerbodyatall
times.
•Alwayswatchoutforandavoidlowoverhangssuchas
treelimbs,doorjambs,andoverheadwalkways.Make
surethereisenoughroomoverheadtoeasilyclearthe
sprayerandyourhead.
•Failuretooperatethesprayersafelymayresultinan
accident,tipoverofthesprayer,andseriousinjuryor
death.Drivecarefully .Topreventtippingorlossof
control:
–Useextremecaution,reducespeed,andmaintain
asafedistancearoundsandtraps,ditches,creeks,
ramps,unfamiliarareas,oranyareasthathaveabrupt
changesingroundconditionsorelevation.
–Watchforholesorotherhiddenhazards.
–Useextracautionwhenoperatingthesprayeronwet
surfaces,inadverseweatherconditions,athigher
speeds,orwithafullload.Stoppingtimeanddistance
willincreasewithafullload.
–Avoidsuddenstopsandstarts.Donotgofrom
reversetoforwardorforwardtoreversewithoutrst
comingtoacompletestop.
–Slowdownbeforeturning.Donotattemptsharp
turnsorabruptmaneuversorotherunsafedriving
actionsthatmaycausealossofsprayercontrol.
•Ifthemachineevervibratesabnormally,stopimmediately ,
waitforallmotiontostop,andinspectthesprayerfor
damage.Repairalldamagebeforeresumingoperation.
•Beforegettingoffoftheseat:
1.Stopthemovementofthemachine.
2.Removeyourfootfromthetractionpedalandset
theparkingbrake.
3.TurnthekeyforthestarterswitchtotheOff
position.
4.Removethekeyfromthestarterswitch.
Important:Donotparkthemachineonan
incline.
•Lightningcancausesevereinjuryordeath.Iflightning
isseenorthunderisheardinthearea,donotoperate
themachine;seekshelter.
Braking
•Slowdownbeforeyouapproachanobstacle.Thisgives
youextratimetostoporturnaway.Hittinganobstacle
candamagethesprayeranditscontents.Moreimportant,
itcaninjureyou.
•GrossVehicleWeight(GVW)hasamajorimpactonyour
abilitytostopand/orturn.Heavyloadsandattachments
makeasprayerhardertostoporturn.Theheavierthe
load,thelongerittakestostop.
•Turfandpavementaremuchmoreslipperywhenthey
arewet.Itcantake2to4timesaslongtostoponwet
surfacesasondrysurfaces.Ifyoudrivethroughstanding
waterdeepenoughtogetthebrakeswet,theywillnot
workwelluntiltheyaredry.Afterdrivingthroughwater,
youshouldtestthebrakestomakesuretheywork
properly.Iftheydonot,driveslowlywhileputtinglight
pressureonthebrakepedal.Thiswilldrythebrakesout.
–Beforebackingup,looktotherearandensurethat
nooneisbehindyou.Backupslowly.
6

OperatingonHillsandRoughTerrain
Operatingthesprayeronahillmaycausetippingorrolling
ofthesprayer,ortheenginemaystallandyoucouldlose
headwayonthehill.Thiscouldresultinpersonalinjury.
•Donotacceleratequicklyorslamonthebrakeswhen
backingdownahill,especiallywithaload.
•Neverdriveacrossasteephill;alwaysdrivestraightupor
downorgoaroundthehill.
•Iftheenginestallsoryoubegintoloseheadwaywhile
climbingahill,graduallyapplythebrakesandslowlyback
straightdownthehill.
•Turningwhiletravelingupordownhillscanbedangerous.
Ifyouhavetoturnwhileonahill,doitslowlyand
cautiously.Nevermakesharporfastturns.
•Heavyloadsaffectstability.Reducetheweightoftheload
andyourspeedwhenoperatingonhills.
•Avoidstoppingonhills,especiallywithaload.Stopping
whilegoingdownahillwilltakelongerthanstopping
onlevelground.Ifthesprayermustbestopped,avoid
suddenspeedchanges,whichmayinitiatetippingor
rollingofthesprayer.Donotslamonthebrakes
whenrollingbackward,asthismaycausethesprayerto
overturn.
•Usetheseatbeltwhenoperatingthemachineandbe
certainthatitcanbereleasedquicklyintheeventofan
emergency.
•Checkcarefullyforoverheadclearances(i.e.branches,
doorways,electricalwires)beforedrivingunderany
objectsanddonotcontactthem.
•Donotremovetherolloverprotectionsystem(ROPS).
•Reducespeedandloadwhenoperatingonroughterrain,
unevenground,andnearcurbs,holes,andothersudden
changesinterrain.Loadsmayshift,causingthesprayer
tobecomeunstable.
WARNING
Suddenchangesinterrainmaycauseabrupt
steeringwheelmovement,possiblyresultingin
handandarminjuries.
•Reduceyourspeedwhenoperatingonroughterrainand
nearcurbs.
•Gripthesteeringwheellooselyaroundtheperimeter.
Keepyourhandsclearofthesteeringwheelspokes.
Loading
Theweightofthecargocanchangethesprayercenterof
gravityandsprayerhandling.Toavoidlossofcontroland
personalinjury,followtheseguidelines:
•Reducetheweightoftheloadwhenoperatingonhills
androughterraintoavoidtippingoroverturningofthe
sprayer.
•Liquidloadscanshift.Thisshiftinghappensmostoften
whileturning,goingupordownhills,suddenlychanging
speeds,orwhiledrivingoverroughsurfaces.Shifting
loadscancausethesprayertotipover.
•Whenoperatingwithaheavyload,reduceyourspeedand
allowforsufcientbrakingdistance.Donotsuddenly
applythebrakes.Useextracautiononslopes.
•Beawarethatheavyloadsincreaseyourstoppingdistance
andreduceyourabilitytoturnquicklywithouttipping
over.
Maintenance
•Onlypermitqualiedandauthorizedpersonnelto
maintain,repair,adjust,orinspectthesprayer.
•Beforeperforminganymaintenance,ensurethatthe
systemhasbeenthoroughlyrinsedandcleaned.
•Beforeservicingormakingadjustmentstothemachine,
stoptheengine,settheparkingbrake,andremovethe
keyfromthestarterswitchtopreventsomeonefrom
accidentallystartingtheengine.
•Tomakesurethattheentiremachineisingoodcondition,
keepallnuts,bolts,andscrewsproperlytightened.
•Toreducethepotentialforre,keeptheengineareafree
ofexcessivegrease,grass,leaves,andaccumulationofdirt.
•Neveruseanopenametocheckthelevelorleakageof
fuelorbatteryelectrolyte.
•Iftheenginemustberunningtoperformamaintenance
adjustment,keepyourhands,feet,clothing,andanyparts
ofyourbodyawayfromtheengineandanymovingparts.
Keepeveryoneaway.
•Donotuseopenpansoffuelorammablecleaning
uidswhencleaningparts.
•Donotadjustthetractioncontrolspeed.Toensure
safetyandaccuracy ,haveanAuthorizedToroDistributor
checkthegroundspeed.
•Keepyourbodyandhandsawayfrompinholeleaksor
nozzlesthatejecthighpressureuid.Usecardboardor
papertondleaks.Fluidescapingunderpressurecan
penetrateskinandcauseinjuryrequiringsurgerywithina
fewhoursbyaqualiedsurgeonorgangrenemayresult.
•Ifmajorrepairsareeverneededorassistanceisrequired,
contactanAuthorizedToroDistributor.
•Tobesureofoptimumperformanceandsafety ,
alwayspurchasegenuineTororeplacementpartsand
accessories.Replacementpartsandaccessoriesmadeby
othermanufacturerscouldbedangerous.Alteringthis
sprayerinanymannerthatmayaffectsprayeroperation,
performance,durability ,oritsuse,mayresultininjuryor
death.Suchusecouldvoidtheproductwarranty.
7
SoundPower
Thisunithasaguaranteedsoundpowerlevelof101dBA,
whichincludesanUncertaintyValue(K)of1dBA.
Soundpowerlevelwasdeterminedaccordingtothe
proceduresoutlinedinISO11094.
SoundPressure
Hand-ArmVibration
Measuredvibrationlevelforrighthand=0.2m/s
Measuredvibrationlevelforlefthand=0.3m/s
UncertaintyValue(K)=0.1m/s
Measuredvaluesweredeterminedaccordingtotheprocedures
outlinedinEN1032.
2
2
2
Thisunithasasoundpressurelevelattheoperator’searof90
dBA,whichincludesanUncertaintyValue(K)of1dBA.
Soundpressurelevelwasdeterminedaccordingtothe
proceduresoutlinedinENISO11201.
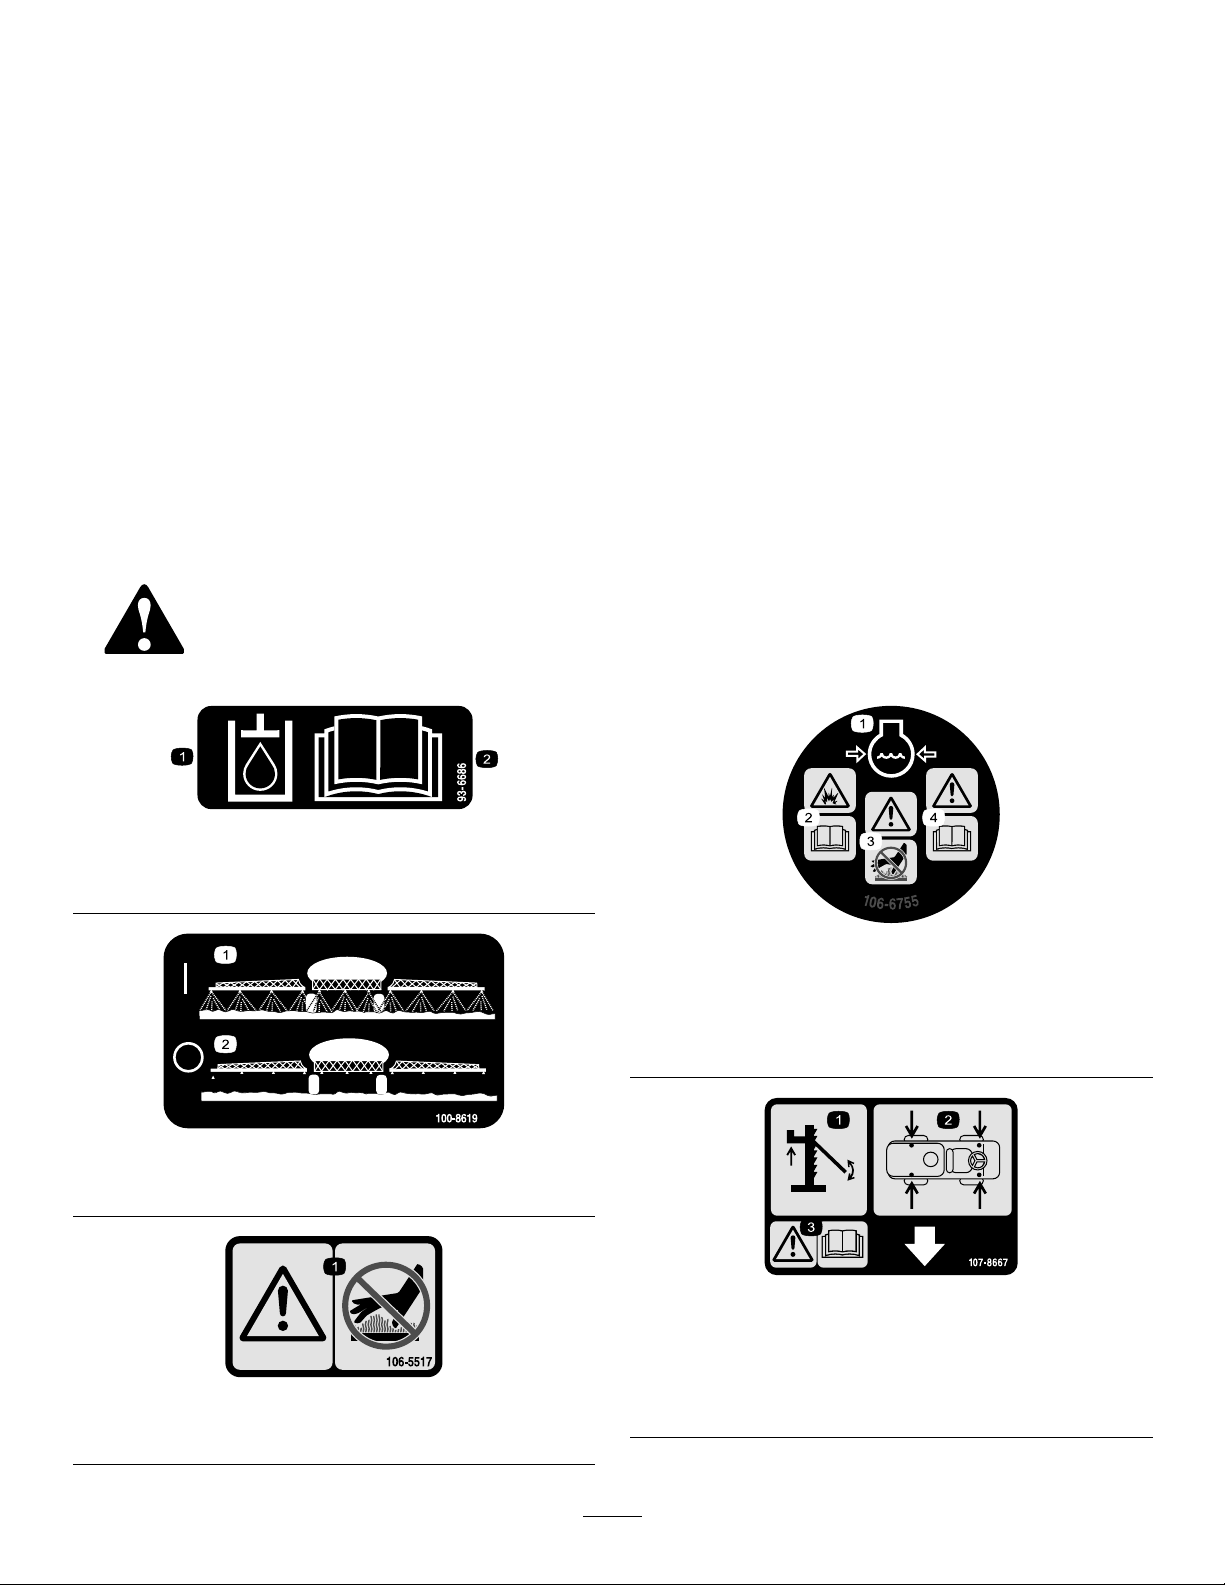
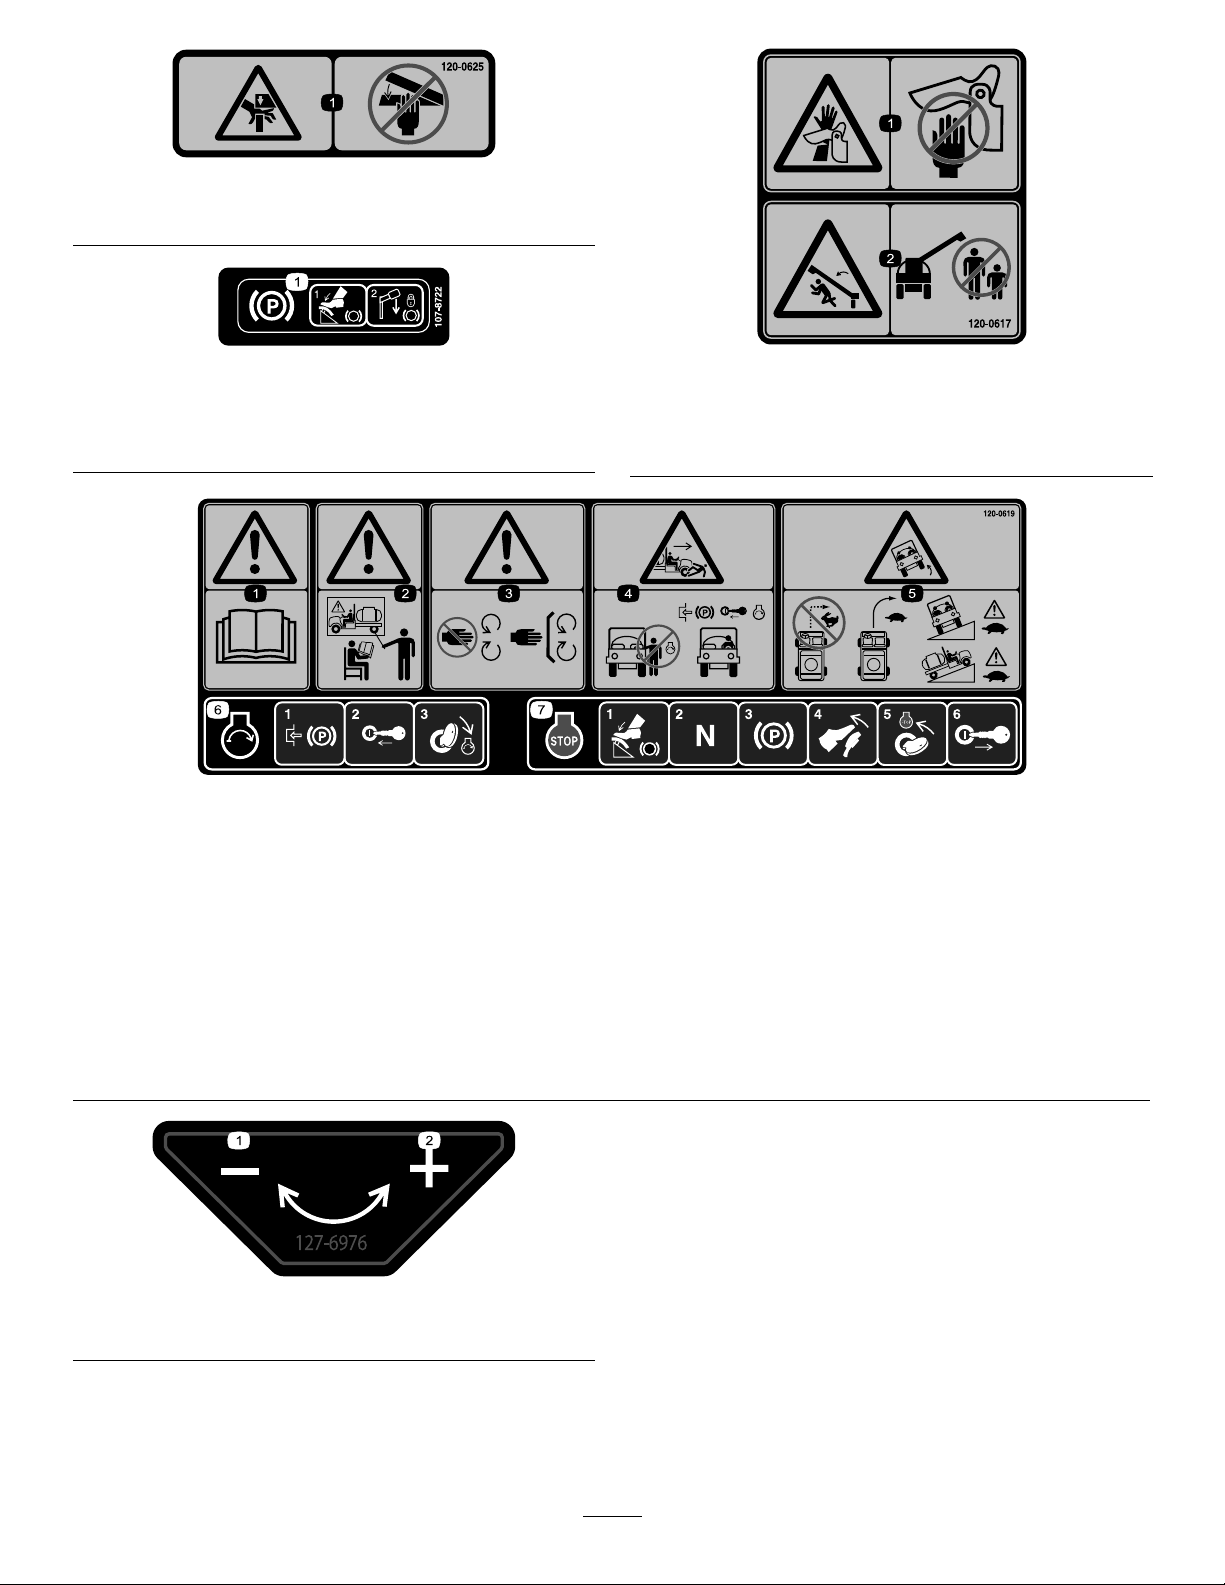
SafetyandInstructionalDecals
Safetydecalsandinstructionsareeasilyvisibletotheoperatorandarelocatednearanyareaofpotential
danger.Replaceanydecalthatisdamagedorlost.
93–6686
1.Hydraulicoil
2.ReadtheOperator's
Manual.
WholeBodyVibration
Measuredvibrationlevel=0.14m/s
UncertaintyValue(K)=0.07m/s
Measuredvaluesweredeterminedaccordingtotheprocedures
outlinedinEN1032.
2
2
100-8619
1.Sprayon2.Sprayoff
106-5517
1.Warning—donottouchthehotsurface.
106-6755
1.Enginecoolantunder
pressure.
2.Explosionhazard—read
theOperator'sManual.
1.Jacking
2.Jackpointlocations
3.Warning—ReadtheOperator'sManualformoreinformation
onjackingthevehicle
3.Warning—donottouchthe
hotsurface.
4.Warning—readthe
Operator'sManual.
107-8667
8

107-8724
1.Tractiondrive3.Todriveinreverse,press
2.Todriveforward,pressthe
topofthetractionpedal
forwardanddown.
thebottomofthepedal
rearwardanddown.
4.Vehiclespeedincreases
withmorepedalpressure.
107-8731
1.Warning—readtheOperator'sManual.
2.Torquelugnutsto75to102N-m(55to75ft-lb).
107-8732
1.Warning—readtheOperator'sManual.
2.Torquelugnutsto95to122N-m(75to90ft-lb).
117-4955
1.Warning—readtheOperator'sManual;weartheseatbelt
whenseatedintheoperator'sposition;avoidtippingthe
machine.
2.Warning—wearhearingprotection.
120-0759
1.Decrease
2.Continuousvariable
setting,spraypressure
3.Increase
4.Rinsefromcleanwater
tank
5.Off
6.On
7.Mixeductor
8.Sonicboom
9.Hazardlights
117–2718
9
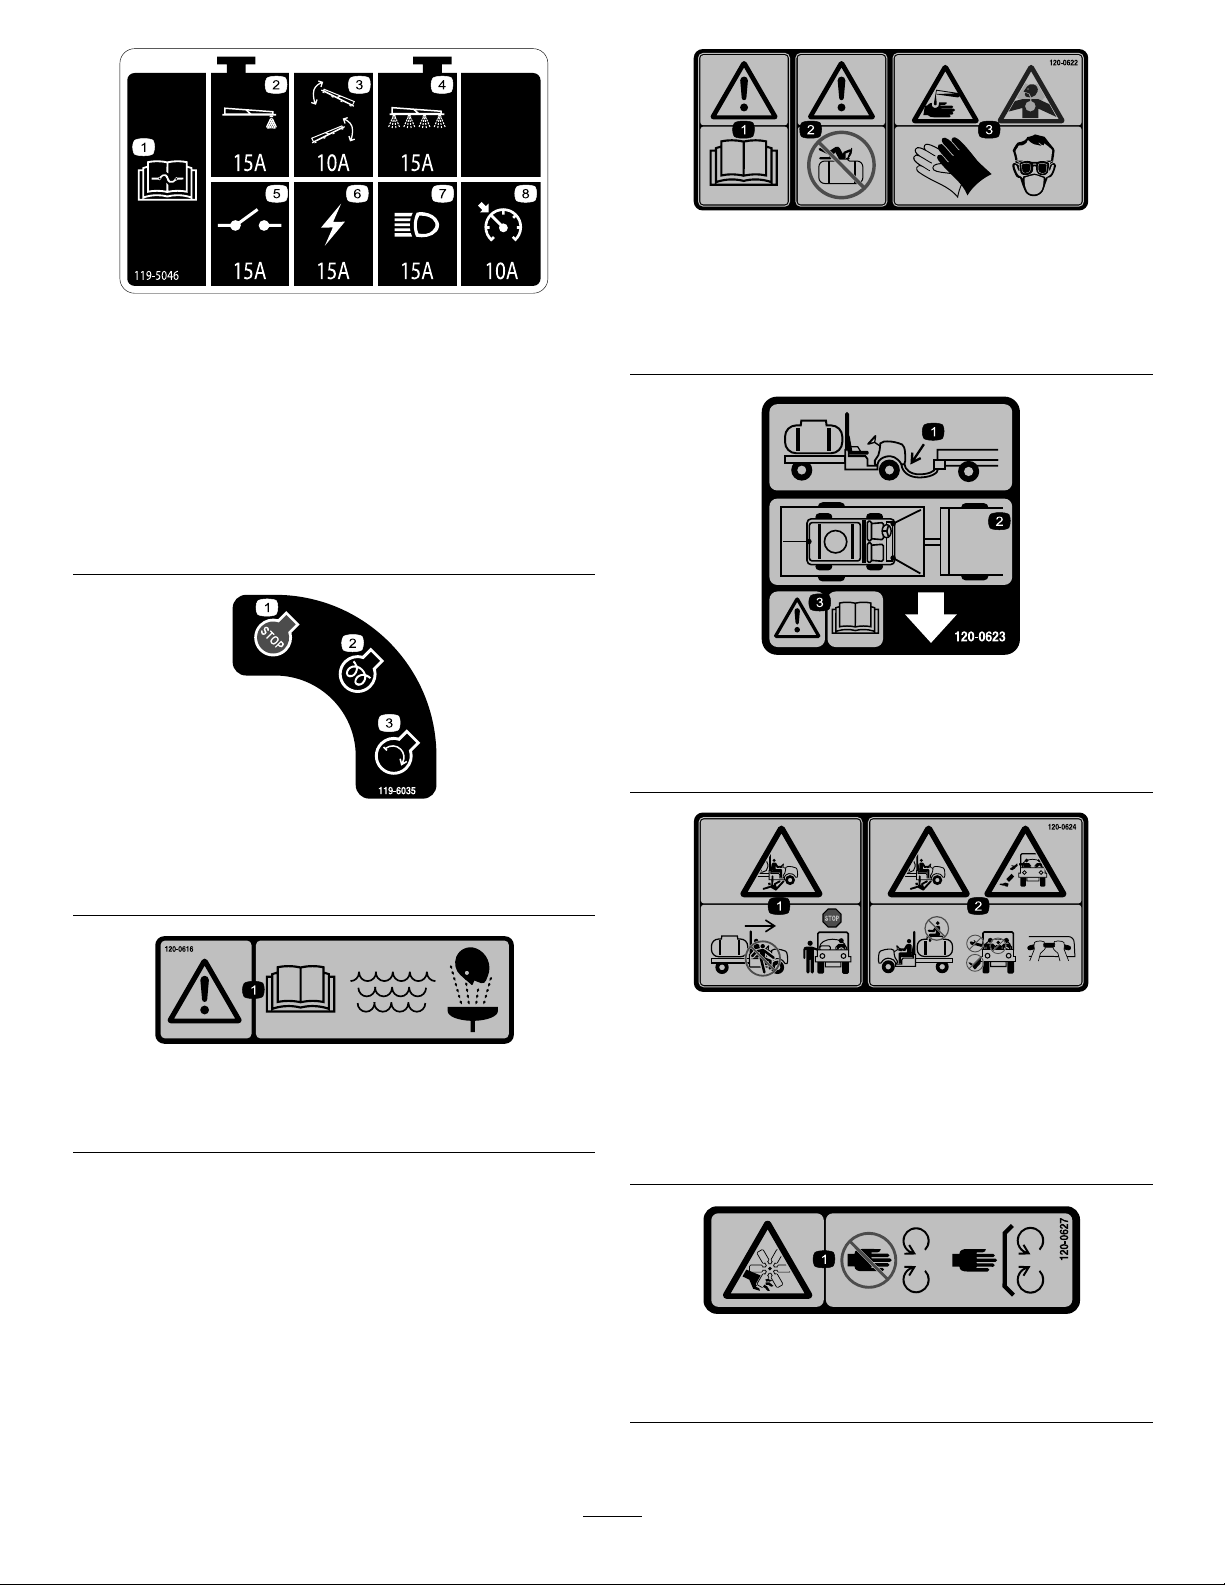
119-5046
1.ReadtheOperator'sManualforinformationonfuses.
2.Foammarker—15amp
3.Boomlift—10amp
4.Spraysystem—15amp
5.Breakerswitch—15amp
6.Ignition—15amp
7.Headlights—15amp
8.Ground-speedlockswitch—10amp
120-0622
1.Warning—readtheOperator'sManual.
2.Warning—donotenterthetank.
3.Causticliquid/chemicalburnandtoxicgasinhalation
hazards—wearhand,skin,eye,andrespiratoryprotection.
120-0623
1.Towhitchlocation
2.Tiedownlocations
3.Warning—ReadtheOperator'sManual.
119-6035
1.Engine—stop3.Engine—start
2.Engine—run,preheat
120–0616
1.Warning—readtheOperator'sManual;usefresh,clean
waterforrst-aidwashing.
120-0624
1.Crushing/dismembermenthazardofbystanders—donot
exitorenterthemachinewhileitismoving;stopthe
machinebeforeenteringorexiting.
2.Falling,crushinghazard—noridersontank;keeparms
andlegsinsideofthevehicleatalltimes,usepassenger
handholds.
120-0627
1.Cutting/dismembermenthazard,fan—stayawayfrom
movingparts,keepallguardsandshieldsinplace.
10
120-0625
1.Pinchpoint,hand—keephandsaway.
107-8722
1.Engagingtheparkingbrake—1)Pushdownontheparking
brakepedal;2)Pulldownontheparkingbrakelevertolock
theparkingbrake.
1.Pinchpoint,hand—keephandsawayfromhinge.
2.Crushinghazard,boom—keepbystandersasafedistance
fromthemachine.
120-0617
120-0619
1.Warning—readtheOperator'sManual.5.Tippinghazard—donotturnsharplywhiletravelingfast,drive
2.Warning—donotoperatethismachineunlessyouaretrained.6.T ostarttheengine,engagetheparkingbrake,insertthe
3.Warning—stayawayfrommovingparts,keepallguardsand
shieldsinplace.
4.Crushing/dismembermenthazardofbystanders—donotstart
theenginewhileenteringorexitingthevehicle;engagethe
parkingbrake,insertthekey,andstarttheenginewhile
seatedinthedriver’sseat.
slowlywhenturning;usecautionanddriveslowlywhen
travelingacrossorupanddownslopes.
ignitionkeyandturnittothestartposition.
7.Tostoptheengine,pressthebrake,putthegearselectorin
neutral,settheparkingbrake,releasethebrake,stopthe
engine,andremovethekey.
127-6976
1.Decrease2.Increase
11
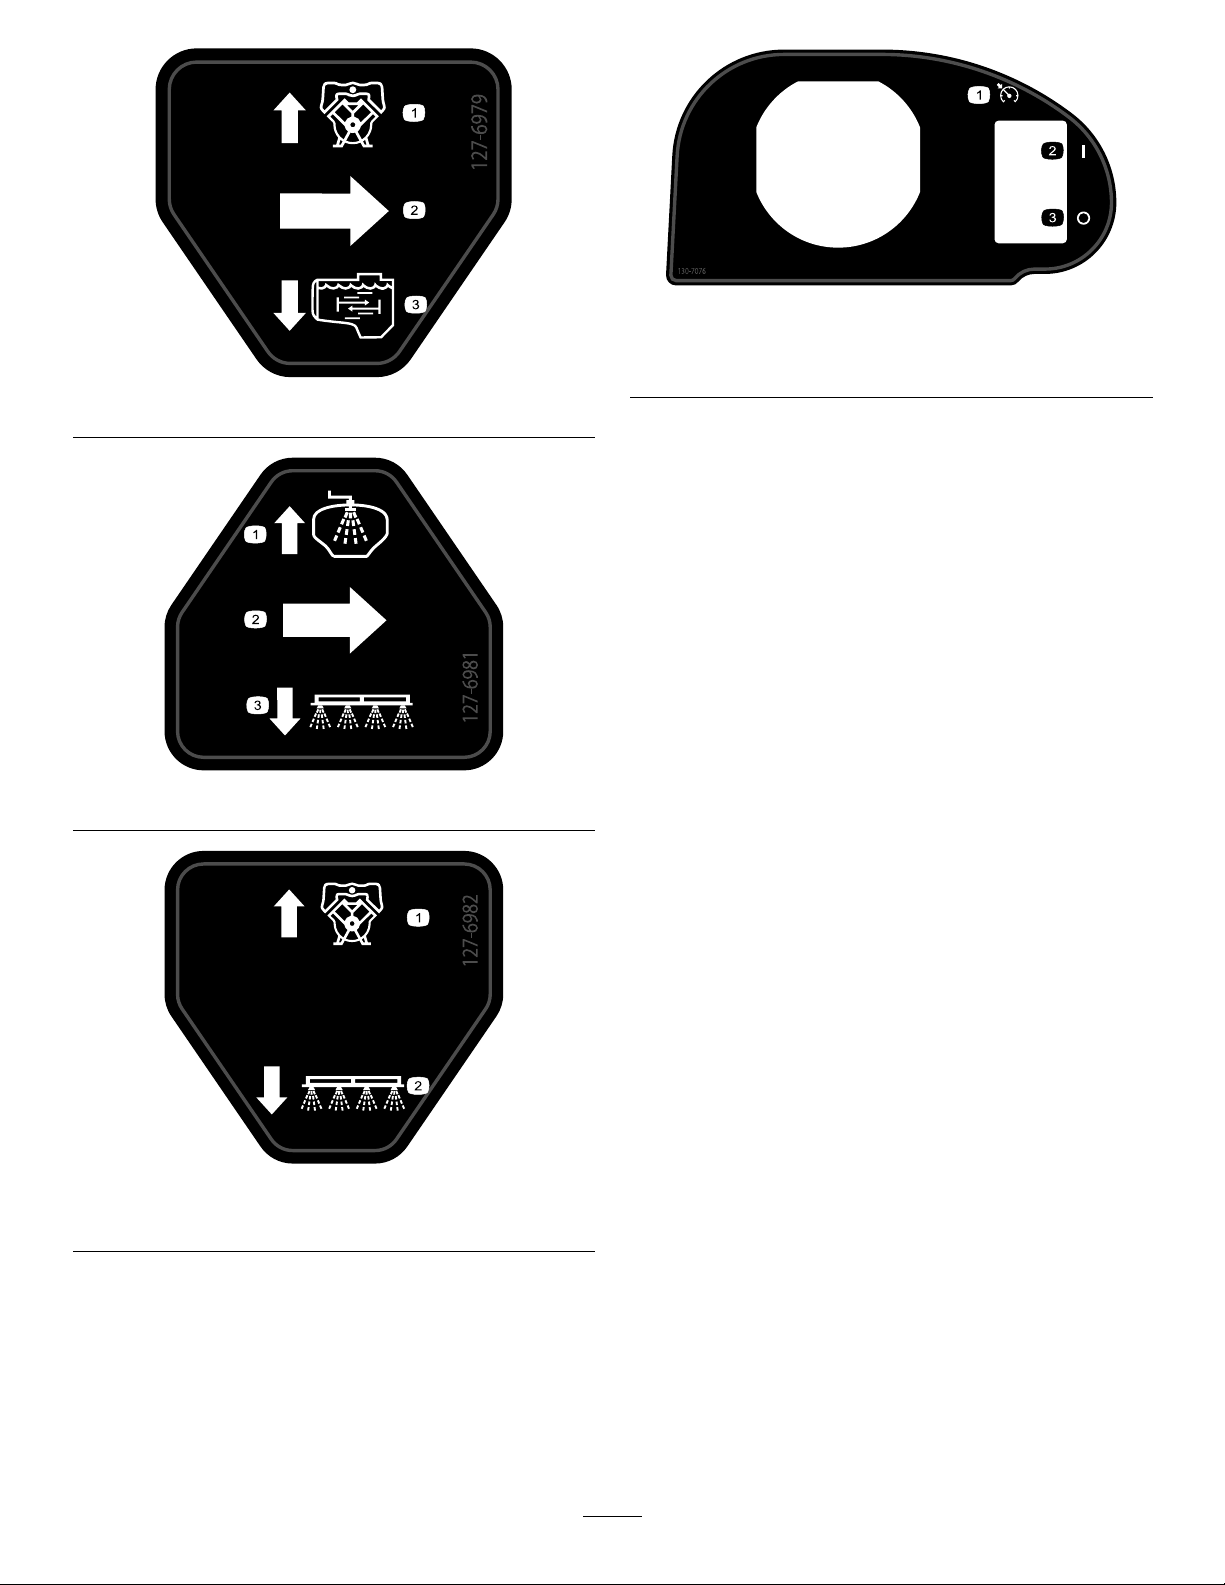
130-7076
1.Neutralenginespeedlock
2.On
3.Off
127-6979
127-6981
127-6982
1.Pump2.Boomspray
12
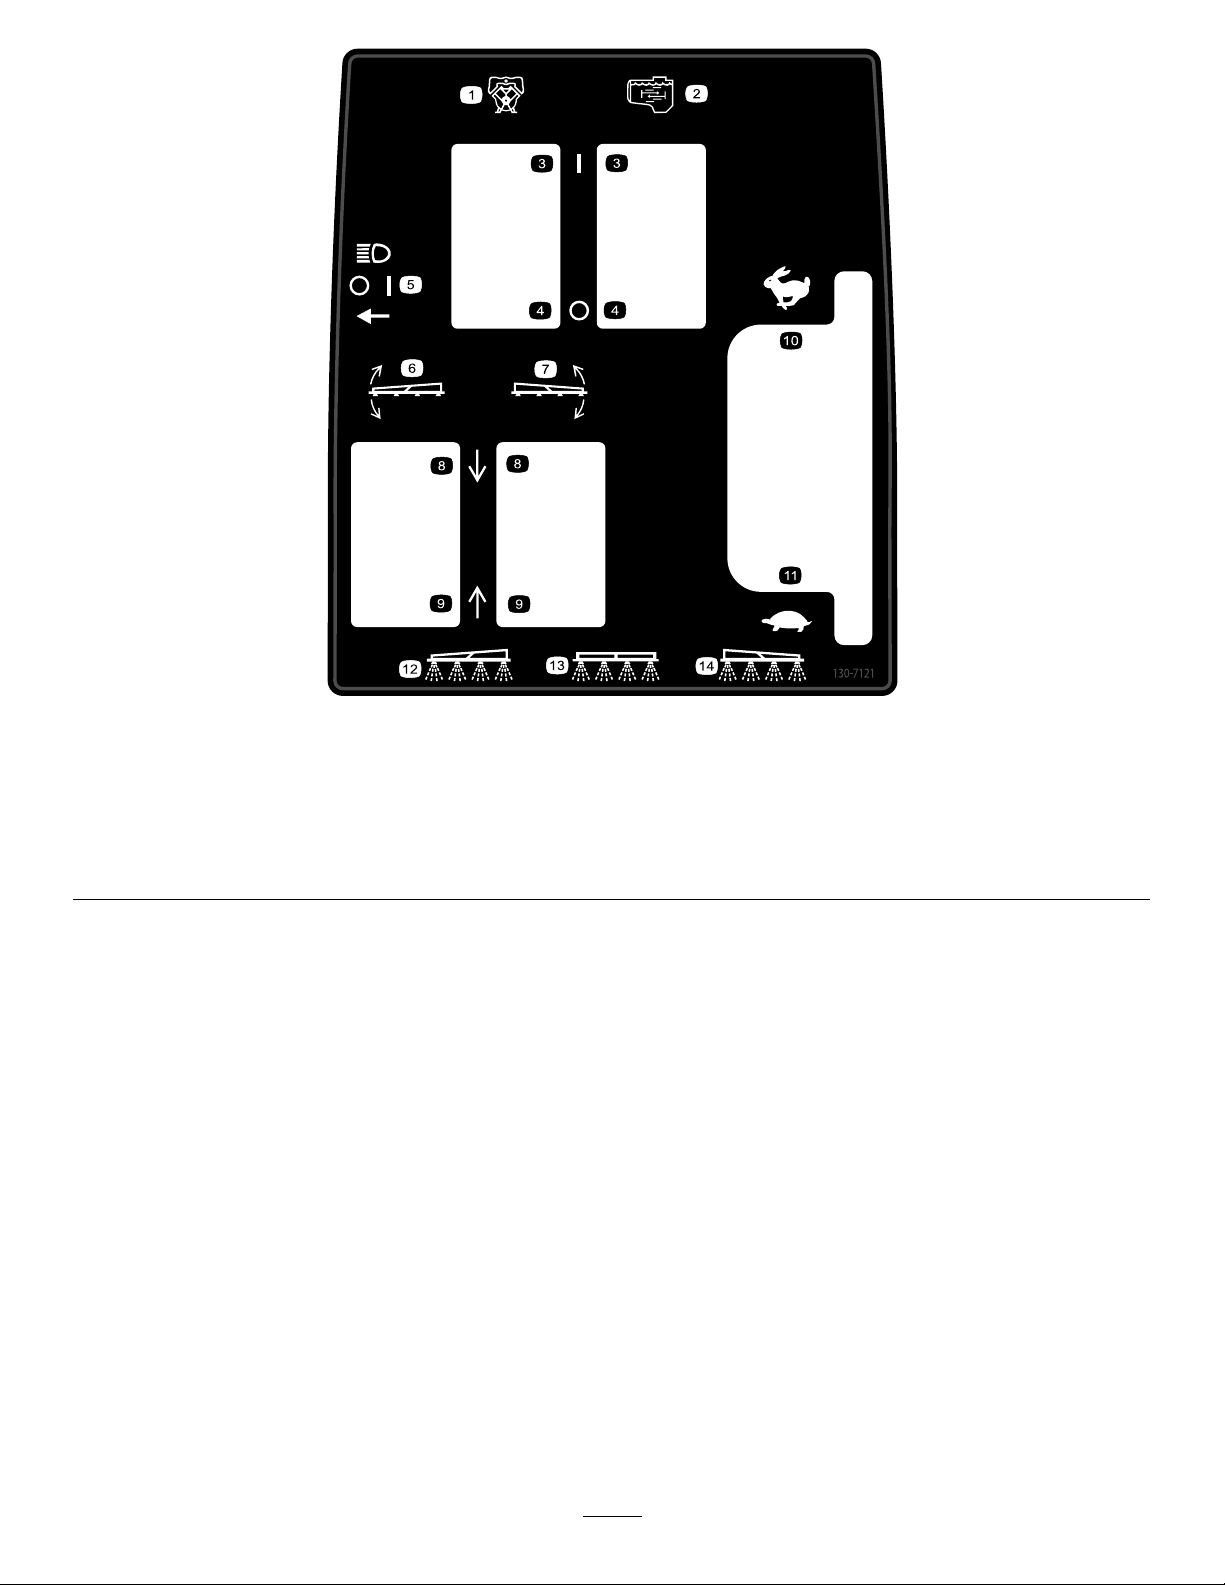
130-7121
1.Pump5.Lightswitchlocation9.Raiseboom
2.Agitation
3.On7.Rightboomraise/lower
4.Off
6.Leftboomraise/lower
8.Lowerboom
controls
controls
10.Fast14.Rightboomspray
11.Slow
12.Leftboomspray
13.Centerboomspray
13

Setup
LooseParts
Usethechartbelowtoverifythatallpartshavebeenshipped.
ProcedureDescription
1
2
Qty.
Nopartsrequired
Nopartsrequired
–
–
Checktheboomhingesprings.
Removetheshippingbumper.
Use
MediaandAdditionalParts
Description
Starterkey
Operator'sManual
Engineowner'sManual1
PartsCatalog
OperatorTrainingMaterials
Note:Determinetheleftandrightsidesofthemachinefromthenormaloperatingposition.
Note:Ifyouhavequestionsorneedadditionalinformationregardingthespraycontrolsystem,refertotheOperator’sManual
suppliedwiththesystem.
Important:Thissprayerissoldwithoutnozzlesandaapplication-ratecontroller.Eithera
Kit
or
Pr oContr ol
Tousethesprayer,
ontheavailableboomkitandaccessories.
Afteryouinstallyournozzlesandbeforeusingthesprayerforthersttime(ifyou
System),adjusttheboombypassvalvessothatthepressureandapplicationrateremainsthesameforallbooms
whenyouturnoneormoreboomsoff.RefertoCalibratingtheBoomBypassV alvessectionintheOperationsection.
™
™ ™
XPKit
y ou must obtain and install nozzles
isnecessaryfortheproperfunctionofthemachine.
Qty.
2
1
1
1
Readthemanualsandwatchthetrainingmaterialsbefore
operatingthemachine.
.ContactyourAuthorizedToroDistributorforinformation
Use
Man ual Spray Operation
do not
useProControl™ ™™XPSpray
1
CheckingtheBoomHinge Springs
NoPartsRequired
Procedure
Important:Operatingthespraysystemwiththeboom
hingespringsundertheincorrectcompressioncould
damagetheboomassembly.Measurethespringsand
usethejamnuttocompressthespringsto3.96cm(1.56
inches),ifnecessary.
Thesprayerisshippedwiththeboomextensionsswung
forwardtofacilitatepackagingofthemachine.Thesprings
arenotfullytightenedatthetimeofmanufacturetoallowthe
boomstobeinthispositionfortransit.Beforeoperatingthe
machine,adjustthespringstothecorrectcompression.
1.Ifnecessary,removethepackingcomponentsthat
securetherightandleftextensionboomsduring
shipping.
2.Supporttheboomswhiletheyareextendedtothe
sprayposition.
3.Attheboomhinge,measurethecompressionofthe
upperandlowerspringswhiletheboomsareintheir
extendedposition(Figure3).
A.Compressallspringsuntiltheymeasure3.96cm
(1.56inches).
B.Usethejamnuttocompressanyspringthat
measuregreaterthan3.96cm(1.56inches).
14
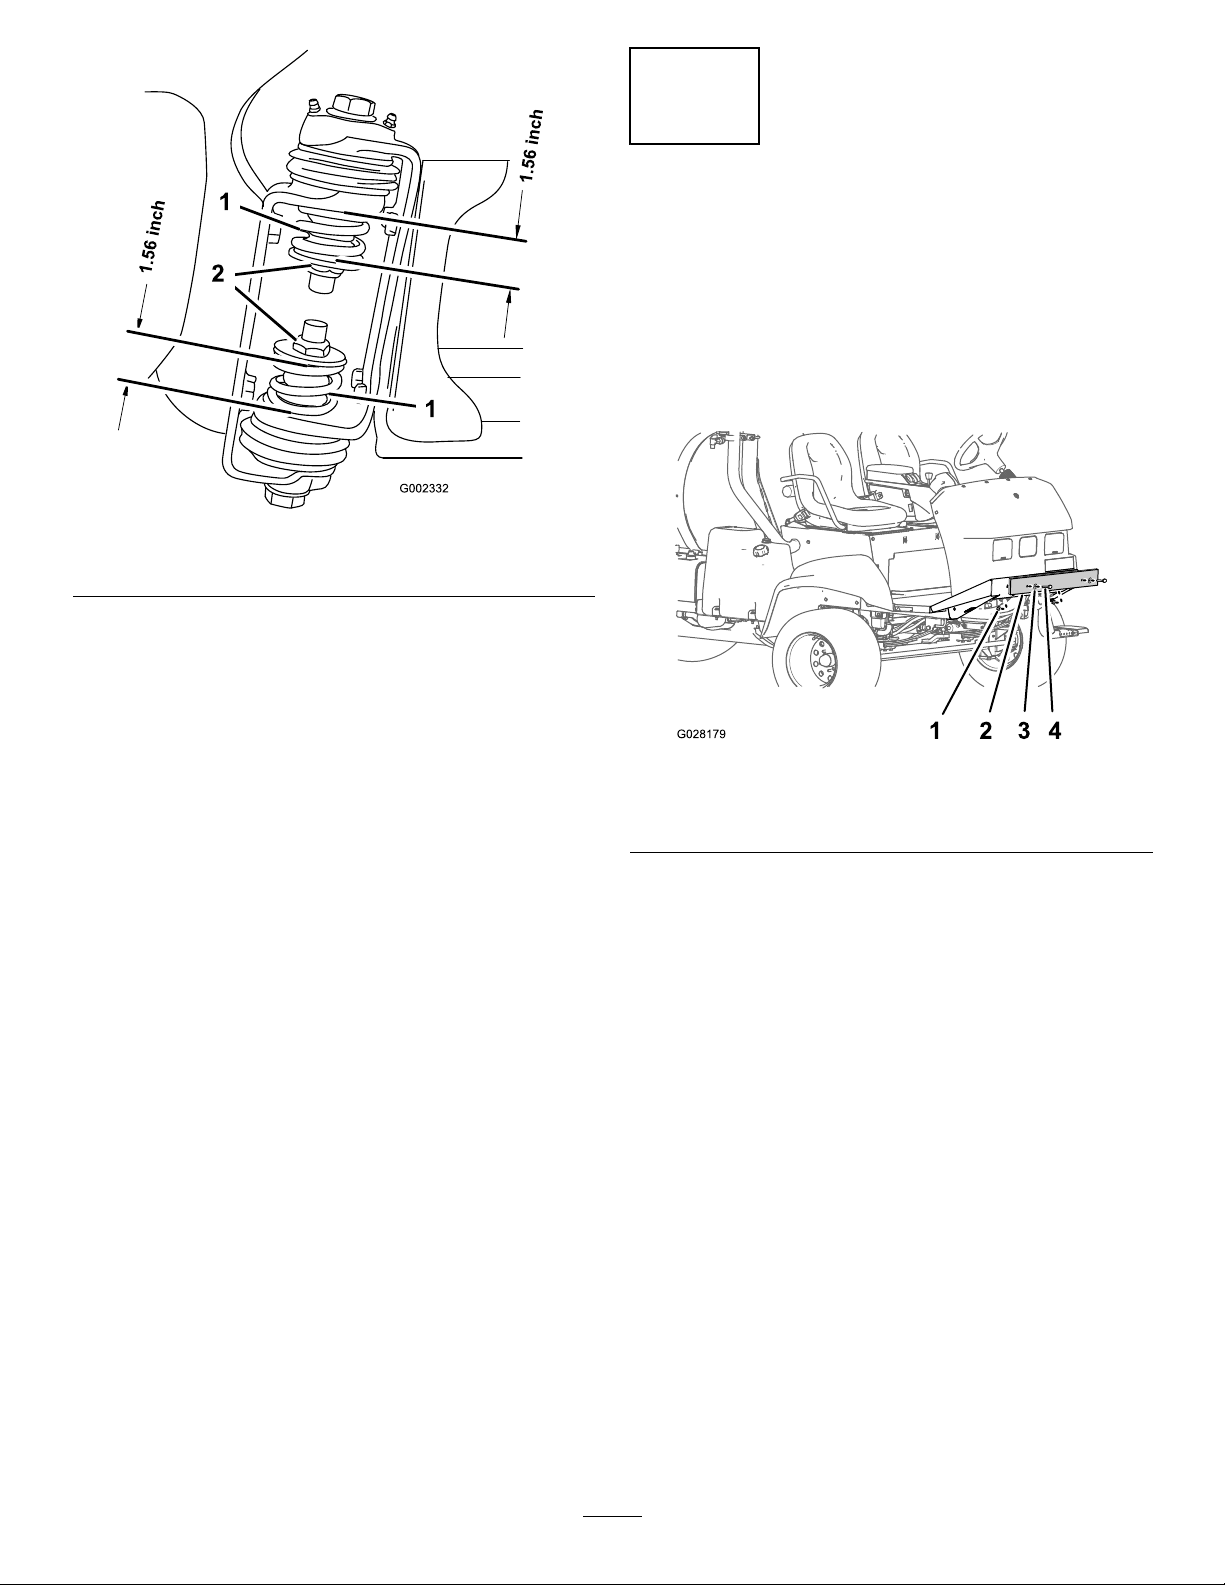
Figure3
1.Boomhingespring2.Jamnut
4.Repeattheprocedureforeachspringonbothboom
hinges.
5.Movetheboomsintothetransport“X”position;refer
toOperatingtheBooms(page32).
2
RemovingtheShipping Bumper
NoPartsRequired
Procedure
1.Removethebolts.washers,andnutsthatsecurethe
shippingbumpertothefrontchassisplate(Figure4).
Figure4
1.Nut3.Washer
2.Shippingbumper
2.Removetheshippingbumperfromthemachine
(Figure4).
Note:Discardthebolts.washers,nuts,andshipping
bumper.
4.Bolt
15
ProductOverview
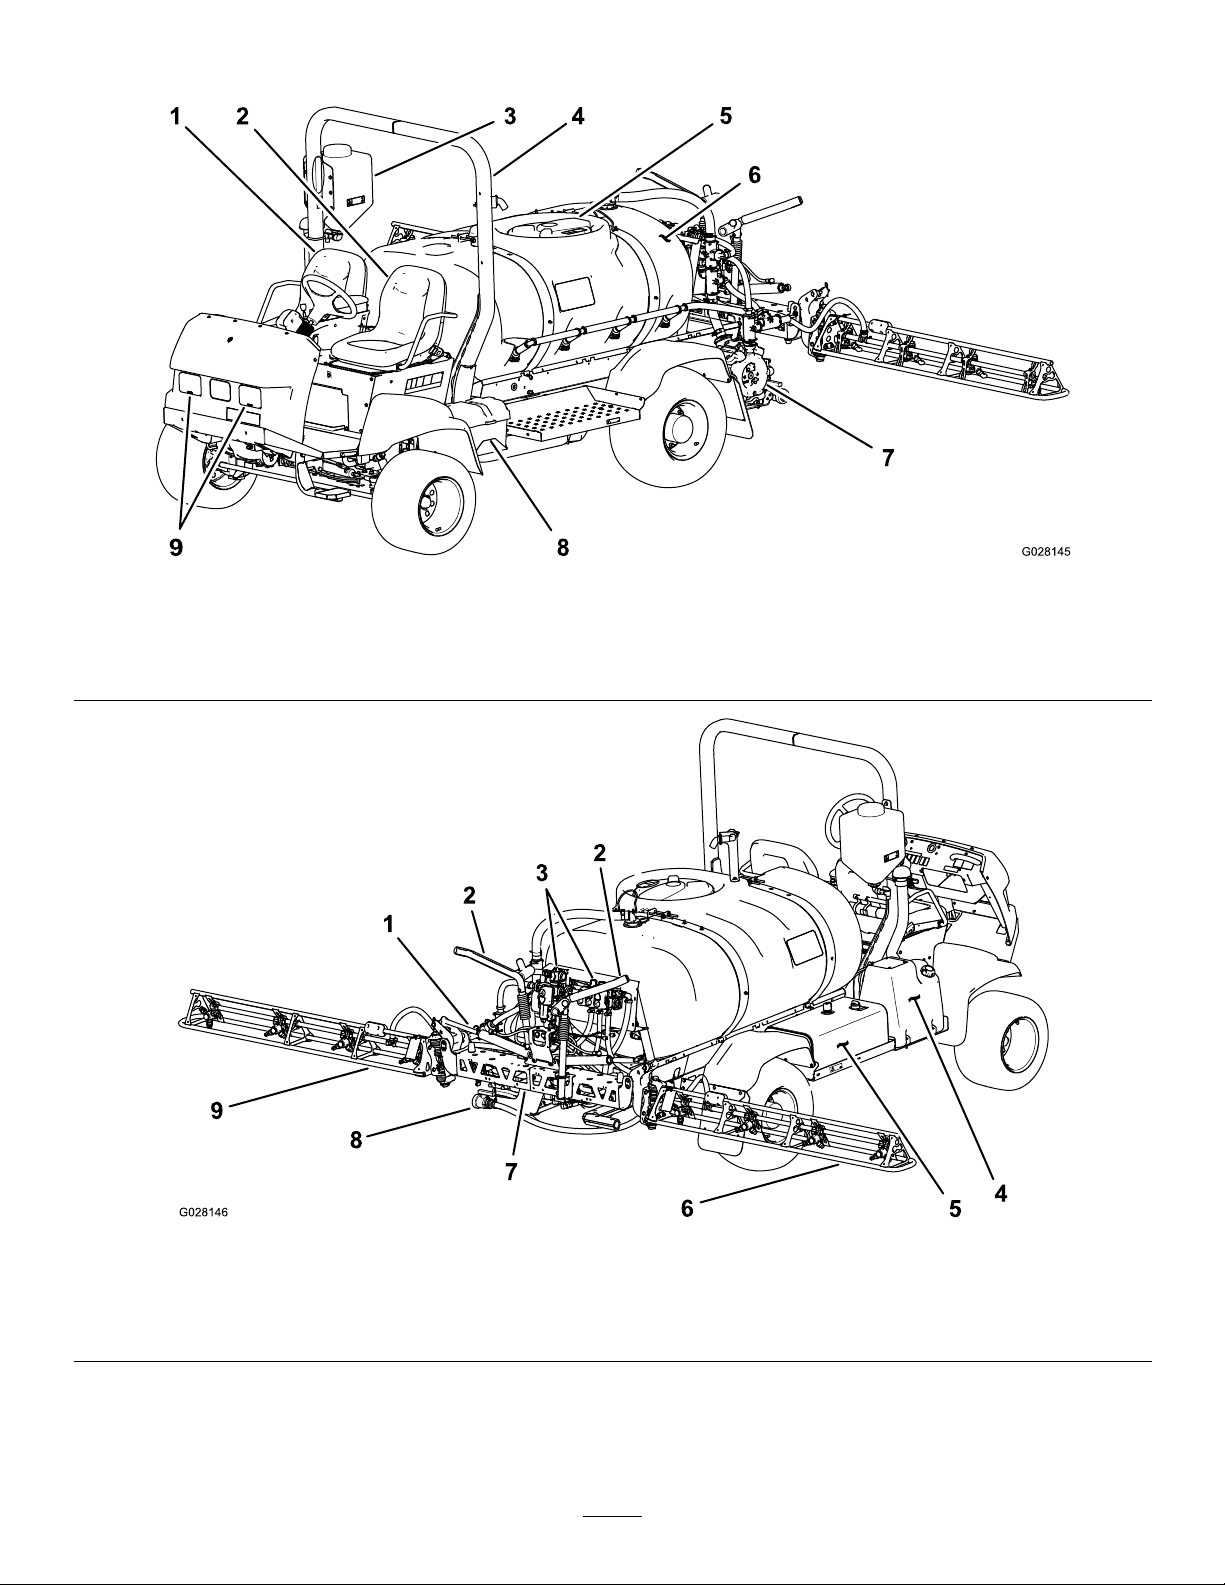
Figure5
1.Passengerseat
2.Operator’sseat
3.Freshwatertank
4.RollOverProtectionSystem(ROPS)
5.Tanklid8.Battery
6.Chemicaltank
7.Pump
9.Headlights
Figure6
1.Boomcontrolcylinder4.Fueltank
2.Boomtransportcradle5.Hydraulictank8.Tankdrainvalve
3.Valvecluster6.Rightboomsection
16
7.Centerboomsection
9.Leftboomsection
Controls
G013753
1
2
3
4
5
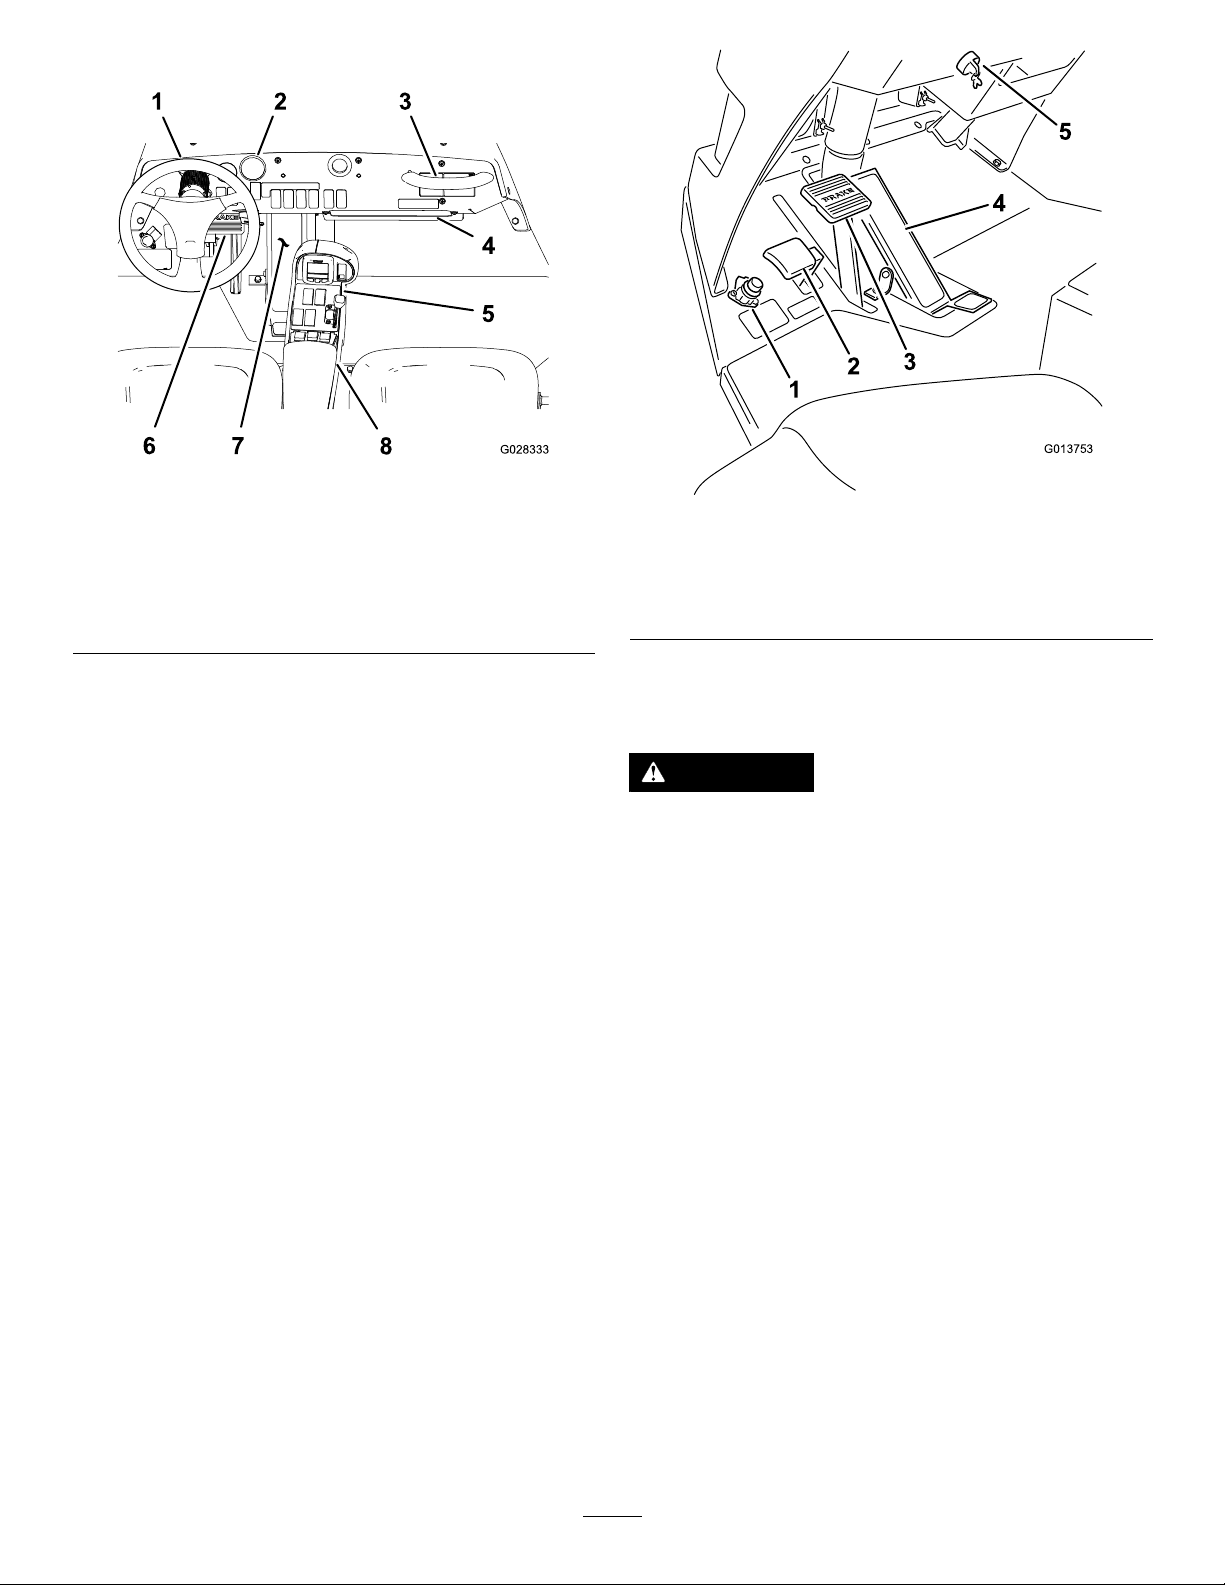
Figure7
1.Steeringwheel4.Storage
2.Pressure
gauge
3.Passenger
handhold
compartment
5.Centerconsole
6.Brake
7.Tractionpedal
8.Armrest
VehicleControls
TractionPedal
Thetractionpedal(Figure8)controlsthemovementofthe
machine,bothforwardandreverse.Usingtheheelandtoe
oftherightfoot,pressthetopofthepedaltomoveforward
orthebottomofthepedaltomoveinreverse.Releasethe
pedaltoslowandstop.
Important:Ensurethatyouallowthesprayertocome
toastopbeforeswitchingbetweentheForwardandthe
Reversepositions.
Note:Thefartheryoupressthepedalineitherdirection,the
fasterthesprayerwilltravel.Toobtainmaximumforward
speed,setthethrottlelevertotheFastpositionandpressthe
tractionpedalallthewayforward.
Note:Togetmaximumpowerunderheavyloadorwhen
ascendingahill,havethethrottleintheFastpositionwhile
pressingtractionpedalslightlytokeeptheenginespeedhigh.
Whentheenginespeedbeginstodecrease,releasethetraction
pedalslightlytoallowtheenginespeedtoincrease.
Figure8
1.Master-boomswitch4.Tractionpedal
2.Parking-brakepedal
3.Brakepedal
BrakePedal
5.Starterswitchandkey
Usethebrakepedaltostoporslowthesprayer(Figure8).
CAUTION
Ifyouoperatethesprayerwithpoorlyadjusted
orwornbrakes,youcouldlosecontrolofthe
sprayer,resultinginseriousinjuryordeathtoyou
orbystanders.
Alwayscheckthebrakesbeforeoperatingthe
sprayerandkeepthemproperlyadjustedand
repaired.
ParkingBrake
Theparkingbrakeisapedaltotheleftofthebrake(Figure
8).Engagetheparkingbrakewheneveryouplanonleaving
theseattopreventthesprayerfromaccidentlymoving.
Toengagetheparkingbrake,pressthebrakepedaland,
whileholdingthebrake,presstheparkingbrakepedal.T o
disengage,pressandreleasethebrakepedal.Ifthesprayeris
parkedonasteepgrade,applytheparkingbrakeandplace
blocksonthedownhillsideofthewheels.
StarterSwitch
Thestarterswitch(Figure8),usedtostartandstopthe
engine,has3positions:Off,On/PreheatandStart.
Ground-SpeedLockSwitch
Thegroundspeedlockswitchlocksthepositionofthe
tractionpedalatthetimetheswitchisset(Figure9).This
17
ensuresthesprayertravelsataconstantspeedwhiledriving
themachineonlevelground.
Figure9
1.Ground-speedlockswitch3.Centerconsole
2.Throttlelever4.Headlightswitch
ThrottleLever
Thethrottlelever,locatedonthecontrolpanelbetweenthe
seats(Figure9),controlsthespeedoftheengine.Pushthe
leverforwardtoincreasetheenginespeedandpullitrearward
todecreasetheenginespeed.
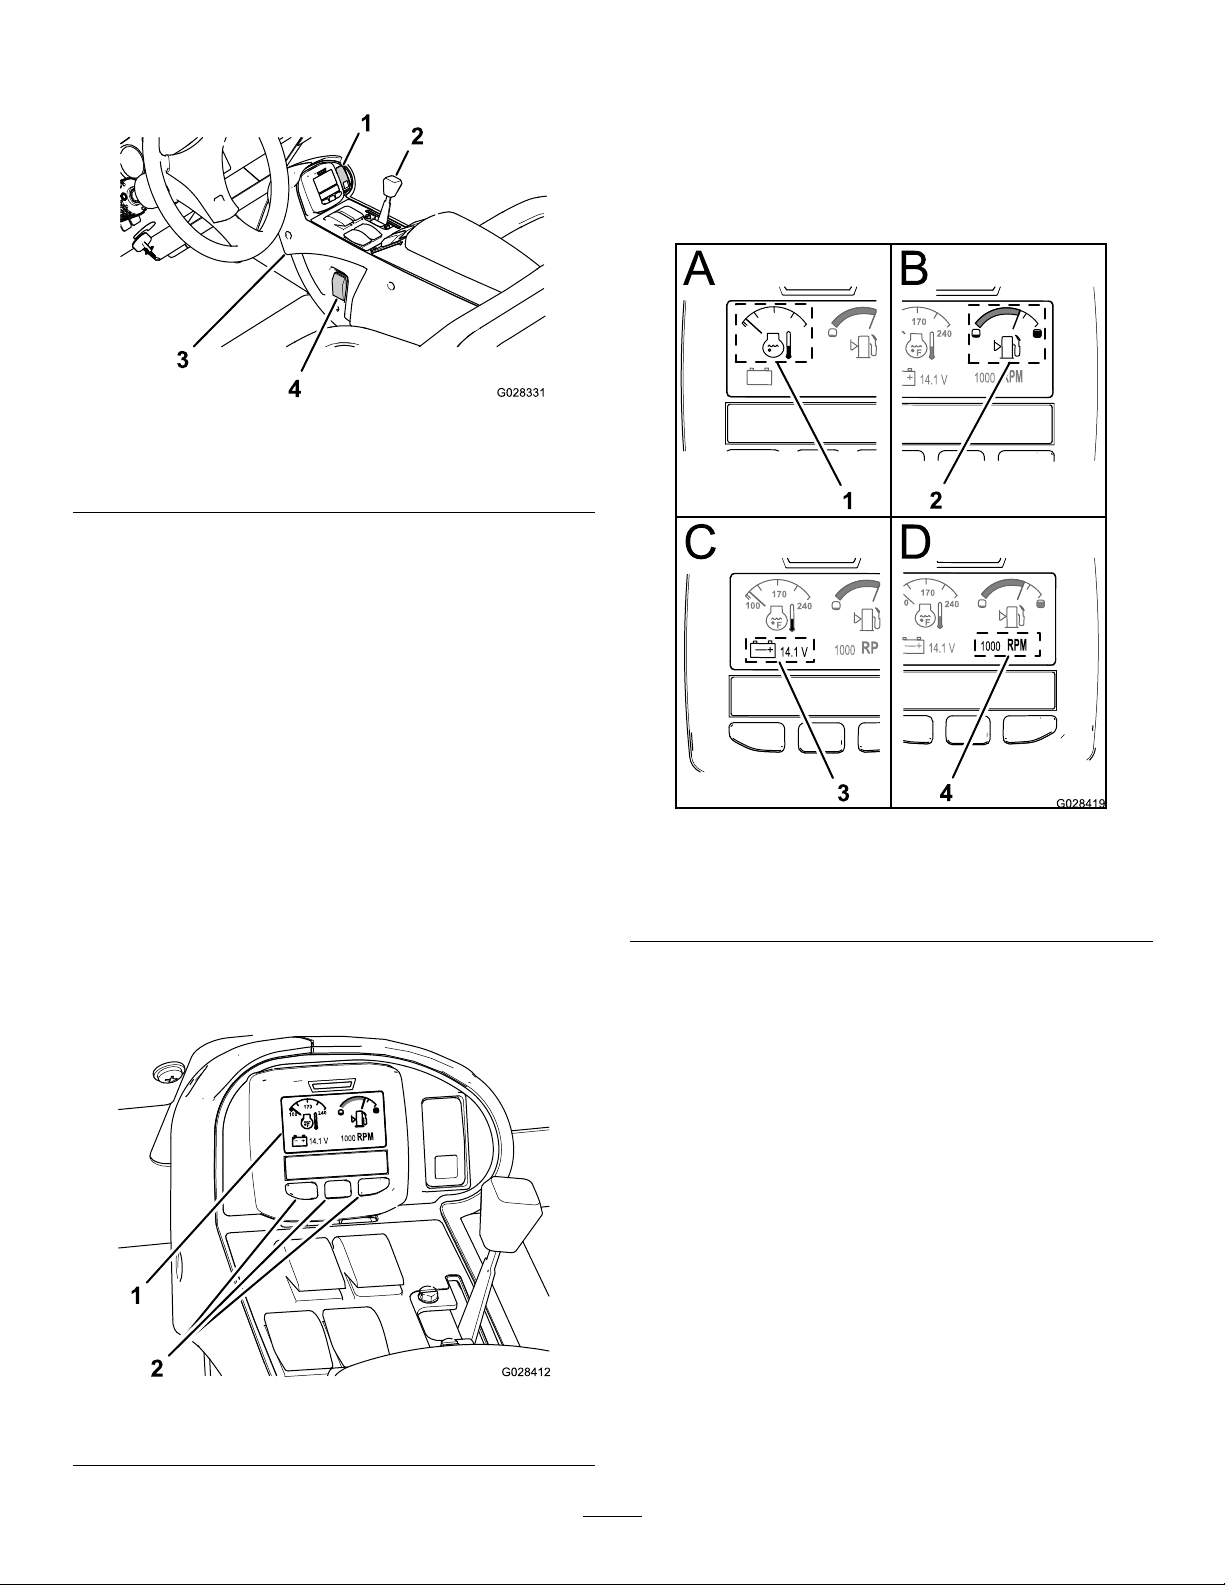
Engine-CoolantT emperatureIndicator
Usetheengine-coolantindicator(AofFigure11)toseethe
temperatureoftheenginecoolant.
Note:Youcanchangethetemperatureindicatorbetween
Englishandmetricunits;refertoChangingtheUnitsof
Measure(EnglishandMetric)(page27).
HeadlightSwitch
Toggletheswitchtooperatetheheadlights(Figure9).Pushit
forwardtoturnthelightsonandrearwardtoturnthemoff.
InfoCenter
UsetheInfoCentertoseethefollowinginformation.
•Coolanttemperatureindicator
•Fuellevelindicator
•Chargingsystemvoltage
•Enginespeed
Figure11
1.Engine-coolantindicator
2.Fuellevelindicator4.Enginespeedindicator
FuelLevelIndicator
3.Chargingsystemvoltage
indicator
Usethefuellevelindicator(BofFigure11)toseethelevel
offuelinthefueltank.
Note:Thefueltankcapacityisapproximately45L(12US
gallons).
Charging-SystemV oltageIndicator
Usethechargingsystemvoltageindicator(CofFigure11)to
seethevoltageofthebatterywhenthestarterswitchisinthe
Onpositionandtheengineisnotrunningorthealternator
voltagewhentheengineisrunning.
Figure10
1.Display(InfoCenter)2.Selectionbuttons
EngineSpeedIndicator
Usetheenginespeedindicator(DofFigure11)toseethe
enginespeedmeasuredinrevolutionsperminute(rpm).
18

HourMeter
Thehourmeter(Figure12)indicatesthetotalnumberof
hourstheenginehasrun.Thehourmeterstartstofunction
wheneverthekeyisturnedtotheRunposition.
Figure12
1.HourMeterlocation
SprayerControls
Figure14
1.Masterboomswitch
BoomLiftSwitches
Theboomliftswitchesarelocatedonthecontrolpaneltothe
rightoftheseatandusedtoraisetheleftandrightbooms
respectively(Figure15).
Figure13
1.Pressuregauge3.Keyandkeyswitch
2.Applicationrateswitch
ApplicationRateSwitch
Theapplicationrateswitchislocatedonthedashtotheright
ofthesteeringwheel(Figure13).Pressandholdtheswitch
forwardtoincreasethespraysystempressure,orpressand
holditrearwardtodecreasepressure.
PressureGauge
Thepressuregauge(Figure13)islocatedonthedash.This
gaugeshowsthepressureoftheuidinthesysteminpsi
andkPa.
MasterBoomSwitch
Themasterboomswitchislocatedontheoorboardofthe
machinecabandtotheleftoftheoperator.Itallowsyouto
startorstopthesprayoperation.Presstheswitchwithyour
foottoenableordisablethespraysystem(Figure14).
Figure15
1.InfoCenter6.Sectionliftswitch,left
2.Ground-speedlockswitch
3.Pumpswitch
4.Agitationswitch
5.Sectionliftswitch,right
boom
SectionSwitches
boom
7.Throttlelever
8.Sectionswitch,leftboom
9.Sectionswitch,center
boom
10.Sectionswitch,rightboom
Thesectionswitchesarelocatedonthecontrolpaneltothe
rightoftheseat(Figure15).Toggleeachswitchforwardto
turnthecorrespondingboomsectiononandrearwardto
turneachoff.WhentheswitchisintheOnposition,alight
willilluminateontheswitch.Theseswitcheswillonlyaffect
thespraysystemwhenthemasterboomswitchisintheOn
position.
PumpSwitch
Thepumpswitchislocatedonthecontrolpaneltotheright
oftheseat(Figure15).Togglethisswitchforwardtorun
thepumporrearwardtostopthepump.Whentheswitchis
turnedon,alightontheswitchilluminates.
19
Important:Onlyengagethepumpswitchwhenthe
G013787
1
2
engineisatlowidletoavoiddamagingthepumpdrive.
rotatetheknobonthevalveclockwisetoturnthevalveoffor
counterclockwisetoturniton.
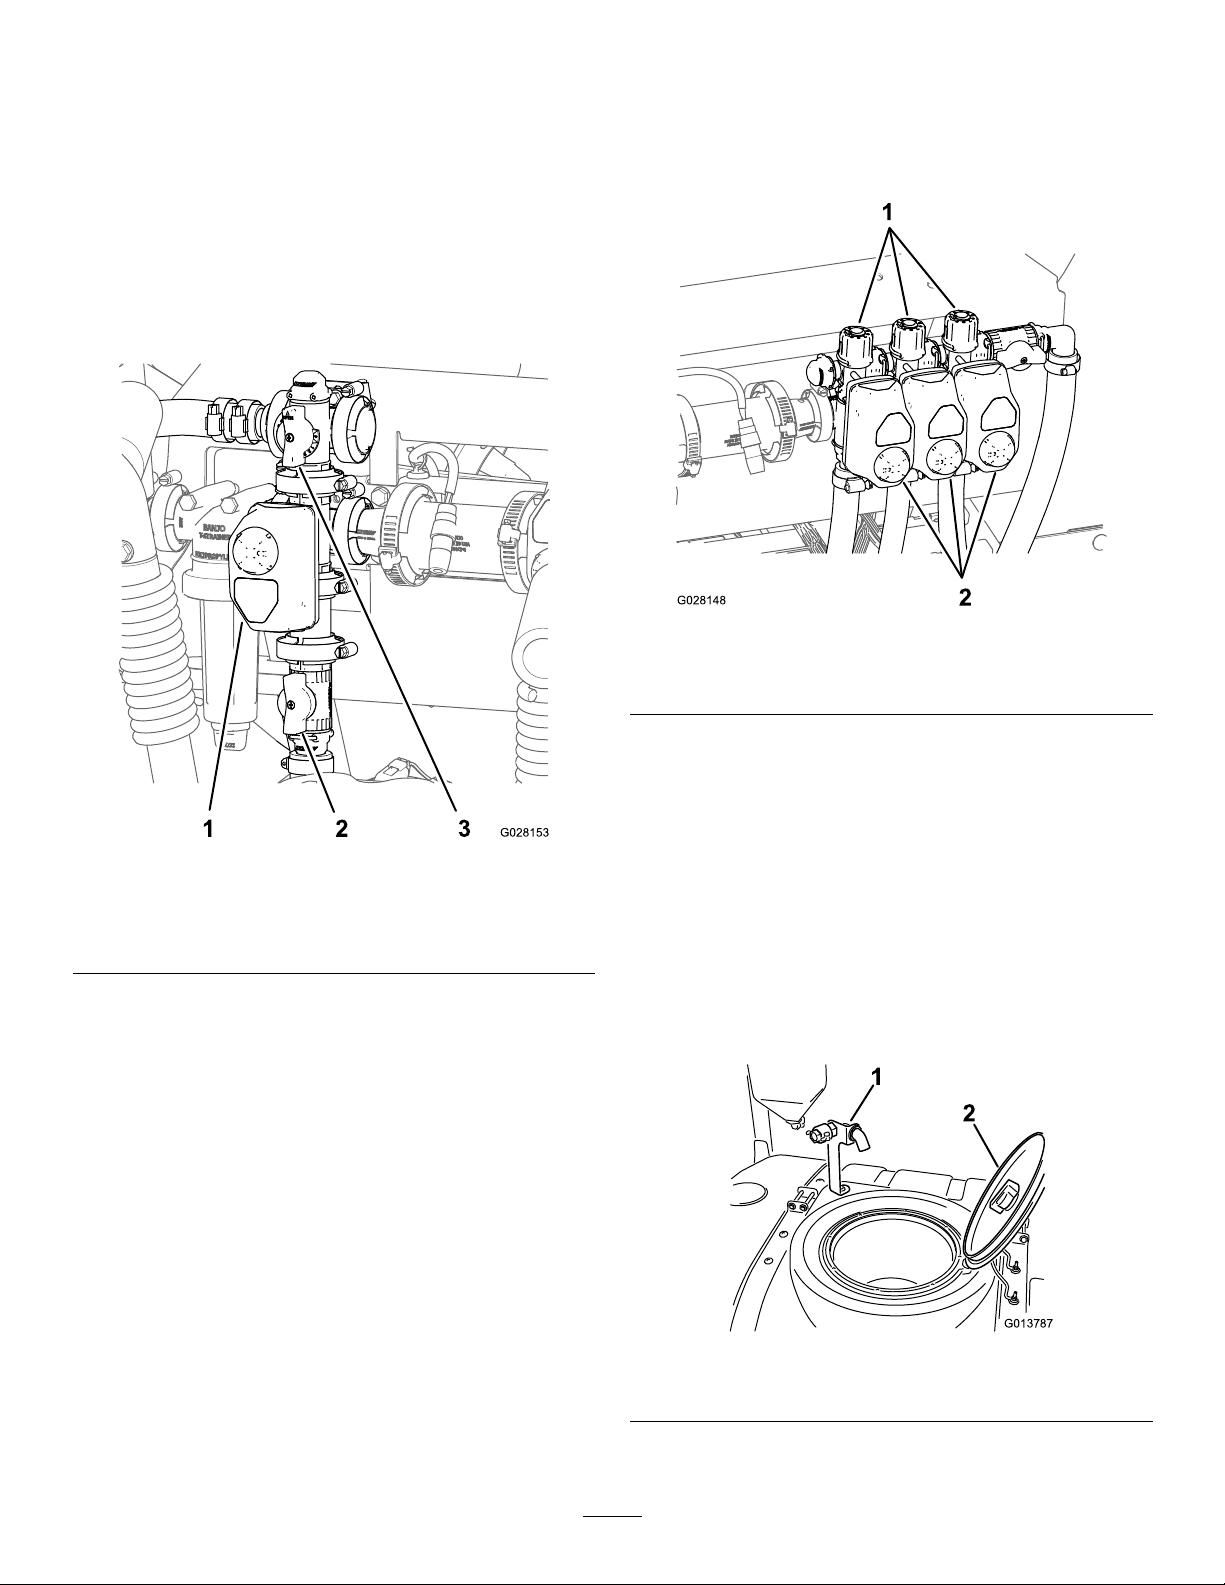
AgitationSwitch
Theagitationswitchislocatedonthecontrolpaneltothe
rightoftheseat(Figure15).T ogglethisswitchforwardto
turnontheagitationinthetankorrearwardtostopthe
agitation.Whentheswitchisturnedon,alightontheswitch
illuminates.Tooperatetheagitationfunction,youmustrun
thesprayersystempumpandyoumustruntheengineabove
anidle.Theagitationvalveislocatedbehindthetank(Figure
16)
Note:Turningthesectionvalvemanuallycaninterferewith
thefunctionofthefuses.Thefusesshouldbecheckedafter
manuallyrotatingthevalve.
Figure17
1.Knob(sectionbypass
valve)
2.Actuators(sectionvalve)
Figure16
1.Actuator(agitationvalve)3.Handle(agitationbypass)
2.Handle(agitationthrottle
valve)
AgitationBypassValve
Theagitationbypassvalveredirectstheowofuidtothe
sprayersystempumpwhenyouturnofftheagitationfunction
(Figure16).Theagitationbypassvalveislocatedattheabove
oftheagitationvalve.Youcanadjustthebypassvalveto
ensurethatpressureremainsconstantduringagitation;refer
toCalibratingtheAgitationBypassValve(page35).
AgitationThrottleValve
Theagitationthrottlevalveisamanuallyoperatedballvalve
thatcontrolsowtotheagitationnozzlesinthemaintank
(Figure16).Usingthisvalveallowstheusertocontrolthe
sprayersystempressureattheagitationnozzlesofthemain
tankwhenlargerapplicationratesarerequired.
SectionValves
Anti-siphonFillReceptacle
Tothefrontofthetankcoverisahosereceptaclewitha
threadedtting,a90-degreebarbedtting,andashorthose
whichyoucandirecttowardthetankopening.Thisreceptacle
allowsyoutoconnectawaterhosetoitandllthetankwith
waterwithoutcontaminatingthehosewiththechemicalsin
thetank.
Important:Donotlengthenthehosetoallowcontact
withthetankuids.Thedistancefromtheendofthe
hosetotheuppermostwaterlevelshouldbewithinlocal
regulatorylimits.
Figure18
1.Anti-siphonllreceptacle
2.Tankcover
Thesectionvalvescontrolowtothe3boomsections
(Figure17).Ifyoueverneedtomanuallyturnoffasection,
20

TankCover
Thetankcoverislocatedinthecenterofthetopofthetank.
Toopenit,turnofftheengine,thenturnthefronthalfof
thecovertotheleftandswingitopen.Youcanremovethe
strainerinsideforcleaning.Tosealthetank,closethecover
androtatethefronthalftowardtheright.
Specications
Note:Specicationsanddesignaresubjecttochange
withoutnotice.
Baseweight
Weightwithstandardspray
system,empty ,without
operator
Weightwithstandardspray
system,full,withoutoperator
Maximumgrossvehicleweight
(GVW)(onlevelground)
Tankcapacity
Overallwidthwithstandard
spraysystemboomsstoredin
theXposition
1135.6L(300USgallons)
1307kg(2,882lb)
1307kg(2,882lb)
2,499kg(5,510lb)
3,023kg(6,665lb)
189cm(74-3/4inches)
Overalllengthwithstandard
spraysystem
Overalllengthwithstandard
spraysystemtothetopofthe
boomsstoredintheXposition
Overallheightwithstandard
spraysystem
Overallheightwithstandard
spraysystemtothetopofthe
boomsstoredintheXposition
Groundclearance18.4cm(7.25inches)
Wheelbase
391cm(154inches)
442cm(174inches)
146cm(57.5inches)
231cm(91inches)
198cm(78inches)
OptionalEquipment
TheToroCompanyhasoptionalequipmentandaccessories
thatyoucanpurchaseseparatelyandinstallonyoursprayer.
ContactyourAuthorizedServiceDealerforacompletelistof
optionalequipmentthatiscurrentlyavailableforyoursprayer.
21

Operation
Note:Determinetheleftandrightsidesofthemachine
fromthenormaloperatingposition.
ThinkSafetyFirst
Pleasecarefullyreadallofthesafetyinstructionsanddecals
inthesafetysection.Knowingthisinformationcouldhelp
youorbystandersavoidinjury.
CheckingtheEngineOil
ServiceInterval:BeforeeachuseordailyChecktheengine
oillevelbeforeyoustarttheenginefor
thersttime.
Engineoilspecication:
•Oiltype:APIserviceclassicationSLorhigher.
•Oilviscosity:refertotheengineoilviscositytablebelow .
EngineOilViscosityTable
PerformingPre-Starting Checks
Checkthefollowingitemseachtimeyoubeginusingthe
sprayerfortheday:
•Checkthetirepressure.
Note:Thesetiresaredifferentthancartires;theyrequire
lesspressuretominimizeturfcompactionanddamage.
•Checkalluidlevelsandaddtheappropriateamountof
specieduids,ifanyarefoundtobelow .
•Checkthebrakepedaloperation.
•Checktoseethatthelightsareworking.
•Withtheengineoff,checkforoilleaks,looseparts,and
anyothernoticeablemalfunctions.
Ifanyoftheaboveitemsarenotcorrect,notifyyourmechanic
orcheckwithyoursupervisorbeforetakingthesprayerout
fortheday.Yoursupervisormaywantyoutocheckother
itemsonadailybasis,soaskwhatyourresponsibilitiesare.
PreparingtoDrivetheMachine
Ambienttemperaturerange
Above25C(77F)SAE30,SAE10W-30,or
0Cto25C(32Fto77F)SAE20orSAE10W-30
0Cto20C(32Fto-4F)SAE10WorSAE10W-30
ToroPremiumEngineOilisavailablefromyourdistributor
ineither15W40or10W30viscosity .RefertothePartsCatalog
forpartnumbers.
Note:Thebesttimetochecktheengineoiliswhenthe
engineiscool,beforeithasbeenstartedfortheday .Ifithas
alreadybeenrun,allowtheoiltodrainbackdowntothe
sumpforatleast10minutesbeforechecking.
Theengineisshippedwithoilinthecrankcase;however,the
levelofoilmustbecheckedbeforeyourststarttheengine
andafteryouhaverunit.
1.Positionthemachineonalevelsurface.
2.Removethedipstick,locatedunderthepassengerseat,
andwipeitwithacleanrag(Figure19).
Note:Insertthedipstickintothetubeandmakesure
itisseatedfully.Removethedipstickandcheckthe
oillevel.
Oilviscosity
SAE15W-40
CheckingtheTireAirPressure
ServiceInterval:Beforeeachuseordaily
Checkthetireairpressuretoensureproperlevels.Fillthe
tiresto124kPa(18psi).
Note:Also,checkthetiresforwearordamage.
22
CheckingtheCoolantLevel
ServiceInterval:BeforeeachuseordailyCheckthelevelof
coolantintheradiatorandtheexpansion
tankatthebeginningofeachdaybefore
startingtheengine.
Coolanttype:asolutionof50%softwaterand50%long
lifeethyleneglycolantifreeze
CAUTION
Iftheenginehasbeenrunning,thecoolantmay
behotandpressurized.Ifyouopentheradiator
capwhenthecoolantishot,itcouldsprayoutand
severelyburnyouorbystanders.
Allowtheenginetocoolforatleast15minutes
beforeopeningtheradiatorcap.
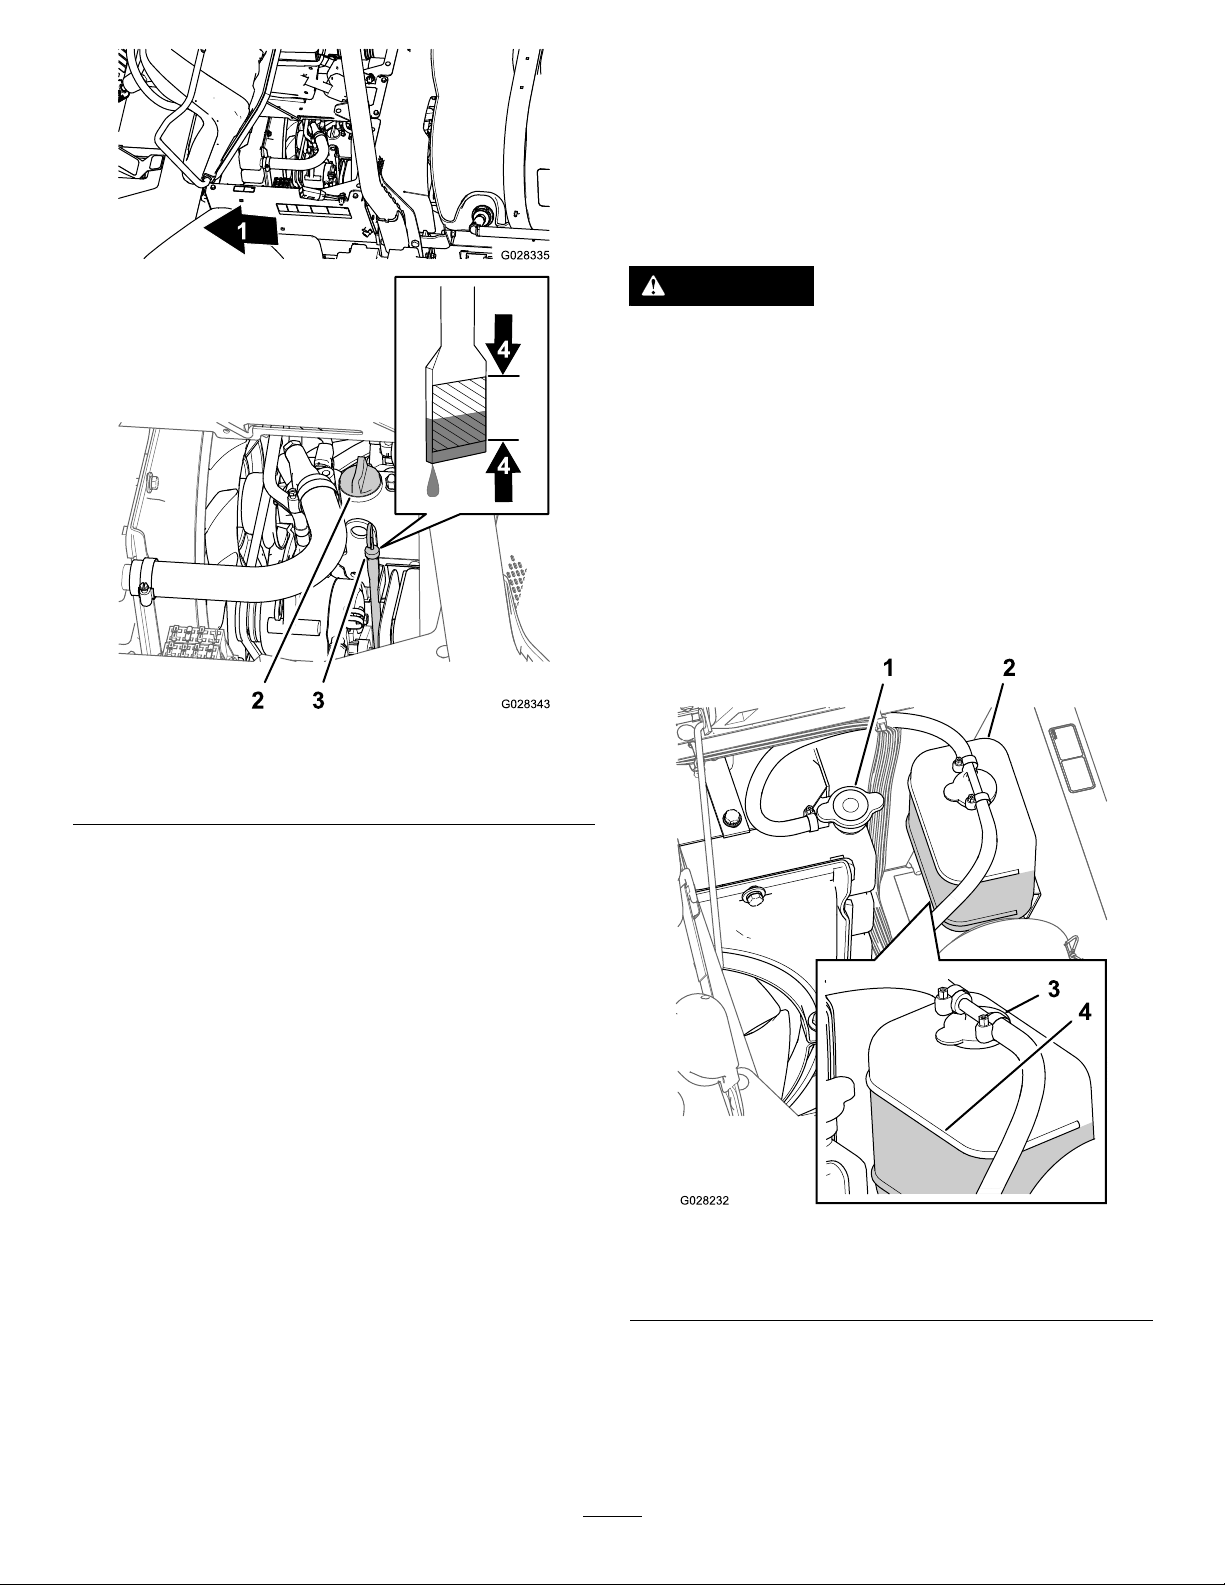
1.Positionthesprayeronalevelsurface.
2.Settheparkingbrake,stopthepump,stoptheengine,
andremovethekeyfromthestarterswitch.
3.Carefullyremovetheradiatorcapandtheexpansion
tankcap(Figure20).
Figure19
1.Frontofthemachine
2.Oilllercap
3.Dipstick
3.Iftheoillevelislow,removethellercapfromthe
valvecover(Figure19)andpouroilintothellerneck
untiltheoillevelisuptotheFullmarkonthedipstick.
Note:Addtheoilslowlyandchecktheleveloften
duringthisprocess.Donotoverll.
4.Installthellercap(Figure19).
5.Installthedipstickrmlyinplace(Figure19).
Figure20
1.Radiatorcap3.Expansiontankcap
2.Expansiontank4.Fullline,expansiontank
4.Checkthecoolantlevelintheradiatorandinthe
expansiontank.
Note:Theradiatorshouldbelledtothetopofthe
llerneckandtheexpansiontanklledtotheFull
markonthetank(Figure20).
23
 Loading...