

Toro 41165, Multi-Pro 1250, Multi-Pro 1200, 41106, 41163 Operator's Manual

Form No. 3351-876
Multi-Pro) 1250 Turf Sprayer
Model No. 41165—Serial No. 240000401 and Up
Operator’s Manual
Register your product at www.Toro.com
Original Instructions (EN, GB)

Warning
CALIFORNIA
Proposition 65 Warning
The engine exhaust from this product contains
chemicals known to the State of California to cause
cancer, birth defects, or other reproductive harm.
Important The engine in this product is not equipped
with a spark arrester muffler. It is a violation of California
Public Resource Code Section 4442 to use or operate this
engine on any forest-covered, brush-covered, or
grass-covered land as defined in CPRC 4126. Other states
or federal areas may have similar laws.
This spark ignition system complies with Canadian
ICES-002.
Ce système d’allumage par étincelle de véhicule est
conforme à la norme NMB-002 du Canada.
Contents
Page
Introduction 3. . . . . . . . . . . . . . . . . . . . . . . . . . . . . . . . .
Safety 3. . . . . . . . . . . . . . . . . . . . . . . . . . . . . . . . . . . . . .
Safe Operating Practices 3. . . . . . . . . . . . . . . . . . . .
Chemical Safety 4. . . . . . . . . . . . . . . . . . . . . . . . . . .
Before Operating 4. . . . . . . . . . . . . . . . . . . . . . . . . .
While Operating 5. . . . . . . . . . . . . . . . . . . . . . . . . . .
Maintenance 6. . . . . . . . . . . . . . . . . . . . . . . . . . . . . .
Sound Pressure 7. . . . . . . . . . . . . . . . . . . . . . . . . . . .
Vibration 7. . . . . . . . . . . . . . . . . . . . . . . . . . . . . . . . .
Safety and Instruction Decals 7. . . . . . . . . . . . . . . . .
Specifications 11. . . . . . . . . . . . . . . . . . . . . . . . . . . . . . . .
Optional Equipment 11. . . . . . . . . . . . . . . . . . . . . . . .
Setup 12. . . . . . . . . . . . . . . . . . . . . . . . . . . . . . . . . . . . . .
Loose Parts 12. . . . . . . . . . . . . . . . . . . . . . . . . . . . . . .
Installing the Anti-siphon Fill Receptacle 13. . . . . . .
Installing the Spray Pro Monitor 13. . . . . . . . . . . . . .
Before Operating 14. . . . . . . . . . . . . . . . . . . . . . . . . . . . .
Checking the Engine Oil 14. . . . . . . . . . . . . . . . . . . .
Checking the Tire Pressure 14. . . . . . . . . . . . . . . . . .
Adding Fuel 14. . . . . . . . . . . . . . . . . . . . . . . . . . . . . .
Checking the Air Intake Screen 15. . . . . . . . . . . . . . .
Checking the Brake Fluid 15. . . . . . . . . . . . . . . . . . . .
Checking the Transaxle/Hydraulic Fluid 16. . . . . . . .
Filling the Fresh Water Tank 16. . . . . . . . . . . . . . . . .
Operation 17. . . . . . . . . . . . . . . . . . . . . . . . . . . . . . . . . . .
Think Safety First 17. . . . . . . . . . . . . . . . . . . . . . . . . .
Vehicle Controls 17. . . . . . . . . . . . . . . . . . . . . . . . . . .
Pre-Starting Checks 18. . . . . . . . . . . . . . . . . . . . . . . .
Starting the Engine 19. . . . . . . . . . . . . . . . . . . . . . . . .
Driving the Sprayer 19. . . . . . . . . . . . . . . . . . . . . . . .
Stopping the Engine 19. . . . . . . . . . . . . . . . . . . . . . . .
New Sprayer Break-In 19. . . . . . . . . . . . . . . . . . . . . .
Transporting the Sprayer 19. . . . . . . . . . . . . . . . . . . .
Towing the Sprayer 20. . . . . . . . . . . . . . . . . . . . . . . .
Sprayer Controls and Components 20. . . . . . . . . . . .
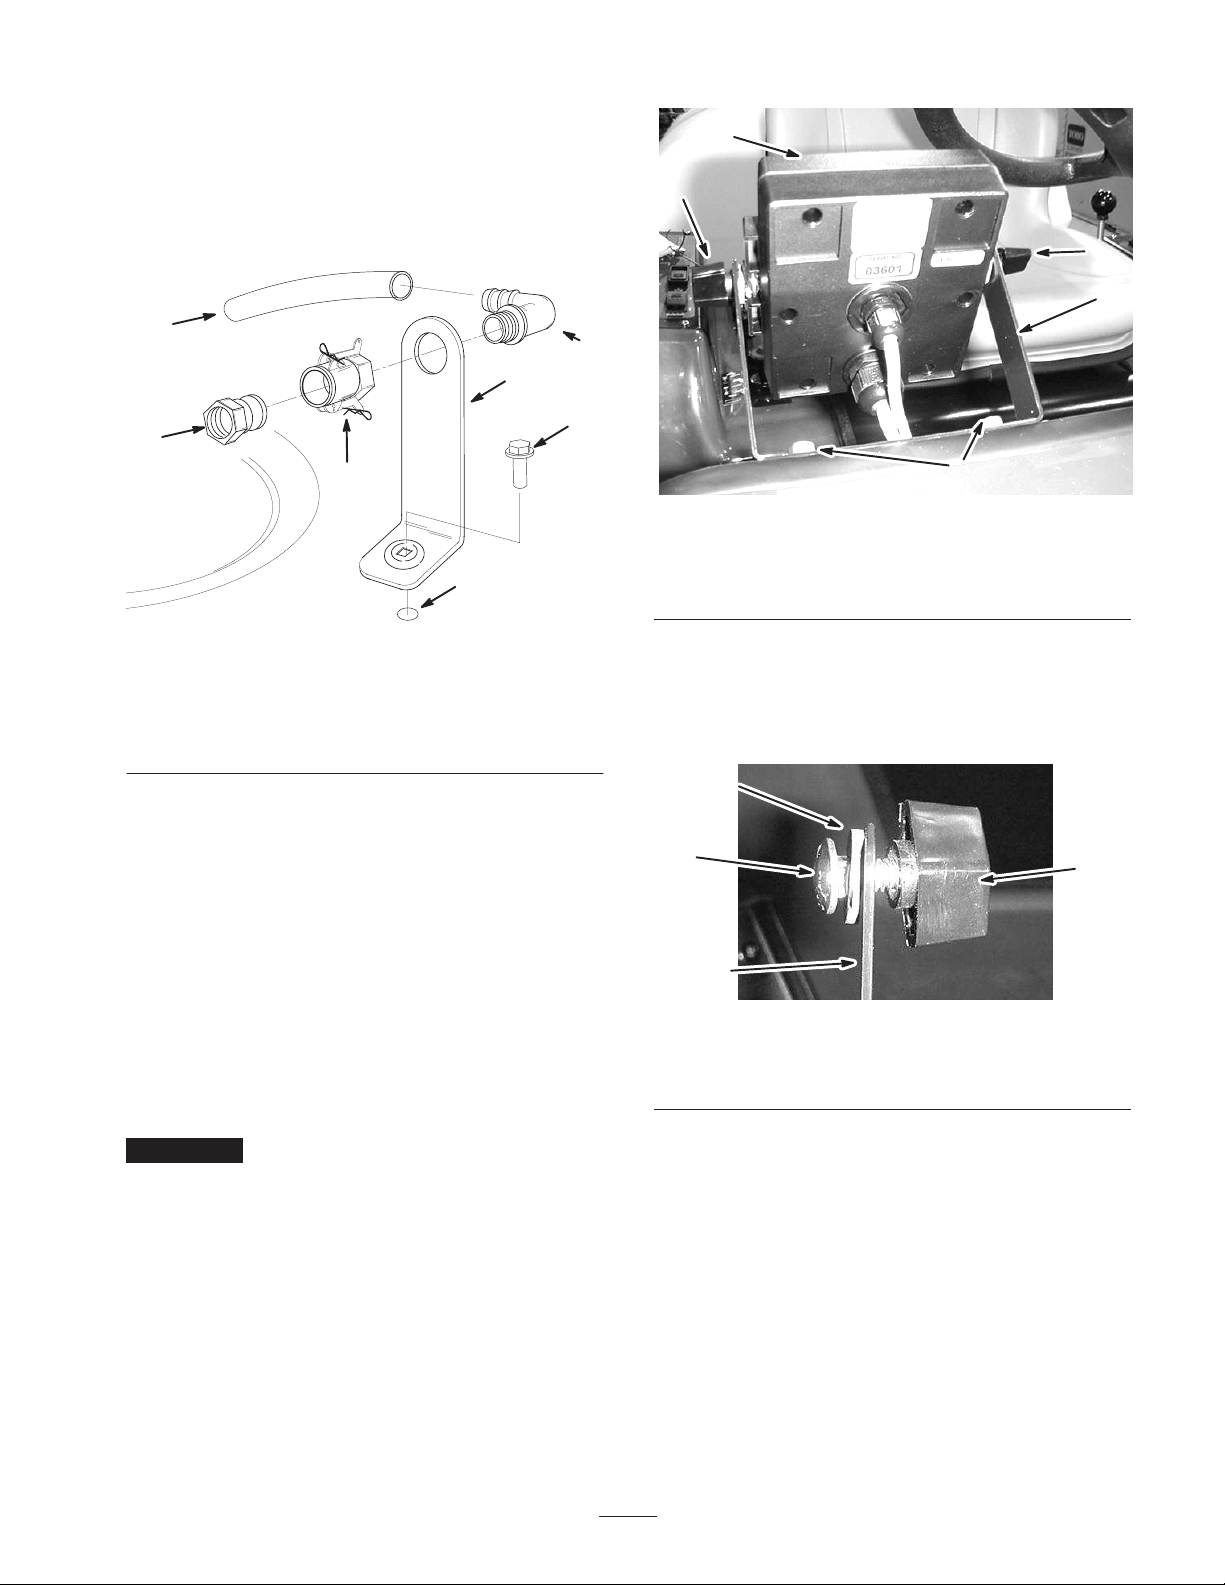
Spray Pro Monitor 23. . . . . . . . . . . . . . . . . . . . . . . . .
Calibrating the Spray Pro Monitor 24. . . . . . . . . . . . .
Adjusting the Boom Bypass Valves 25. . . . . . . . . . . .
Operating the Sprayer 26. . . . . . . . . . . . . . . . . . . . . .
Maintenance 28. . . . . . . . . . . . . . . . . . . . . . . . . . . . . . . . .
Recommended Maintenance Schedule 28. . . . . . . . .
Daily Maintenance Checklist 30. . . . . . . . . . . . . . . . .
Jacking the Sprayer 31. . . . . . . . . . . . . . . . . . . . . . . .
Inspecting the Wheels/Tires 31. . . . . . . . . . . . . . . . . .
Servicing the Air Cleaner 31. . . . . . . . . . . . . . . . . . . .
Servicing the Engine Oil 33. . . . . . . . . . . . . . . . . . . .
Greasing the Sprayer 34. . . . . . . . . . . . . . . . . . . . . . .
Replacing the Fuel Filter 35. . . . . . . . . . . . . . . . . . . .
Changing Transaxle/Hydraulic Fluid 36. . . . . . . . . . .
Replacing the Hydraulic Filter 36
Changing the Pump Drive Gearbox Fluid 37. . . . . . .
Inspecting the Brakes 37. . . . . . . . . . . . . . . . . . . . . . .
Adjusting the Parking Brake 37. . . . . . . . . . . . . . . . .
Adjusting the Front Wheel Toe-In 37. . . . . . . . . . . . .
Servicing the Drive Belt 38. . . . . . . . . . . . . . . . . . . . .
Adjusting the Steering Pump Belt 39. . . . . . . . . . . . .
Maintaining the Primary Drive Clutch 39. . . . . . . . . .
Changing the Spark Plugs 40. . . . . . . . . . . . . . . . . . .
Replacing the Fuses 41. . . . . . . . . . . . . . . . . . . . . . . .
Servicing the Battery 41. . . . . . . . . . . . . . . . . . . . . . .
Cleaning the Suction Strainer 43. . . . . . . . . . . . . . . .
Cleaning the Flowmeter 43. . . . . . . . . . . . . . . . . . . . .
Storage 44. . . . . . . . . . . . . . . . . . . . . . . . . . . . . . . . . . . . .
Troubleshooting 45. . . . . . . . . . . . . . . . . . . . . . . . . . . . . .
Troubleshooting the Engine and Vehicle 45. . . . . . . .
Troubleshooting the Spray System 48. . . . . . . . . . . .
Troubleshooting the Spray Pro Monitor 48. . . . . . . .
The Toro General Commercial Products Warranty 52. . .
. . . . . . . . . . . . . . . .
Page
W 2004 by The Toro Company
8111 Lyndale Avenue South
Bloomington, MN 55420-1196
Contact us at www.Toro.com
All Rights Reserved
2
Printed in the USA
Introduction
Safety
Read this manual carefully to learn how to operate and
maintain your product properly. The information in this
manual can help you and others avoid injury and product
damage. Although Toro designs and produces safe
products, you are responsible for operating the product
properly and safely.
Whenever you need service, genuine Toro parts, or
additional information, contact an Authorized Service
Dealer or Toro Customer Service and have the model and
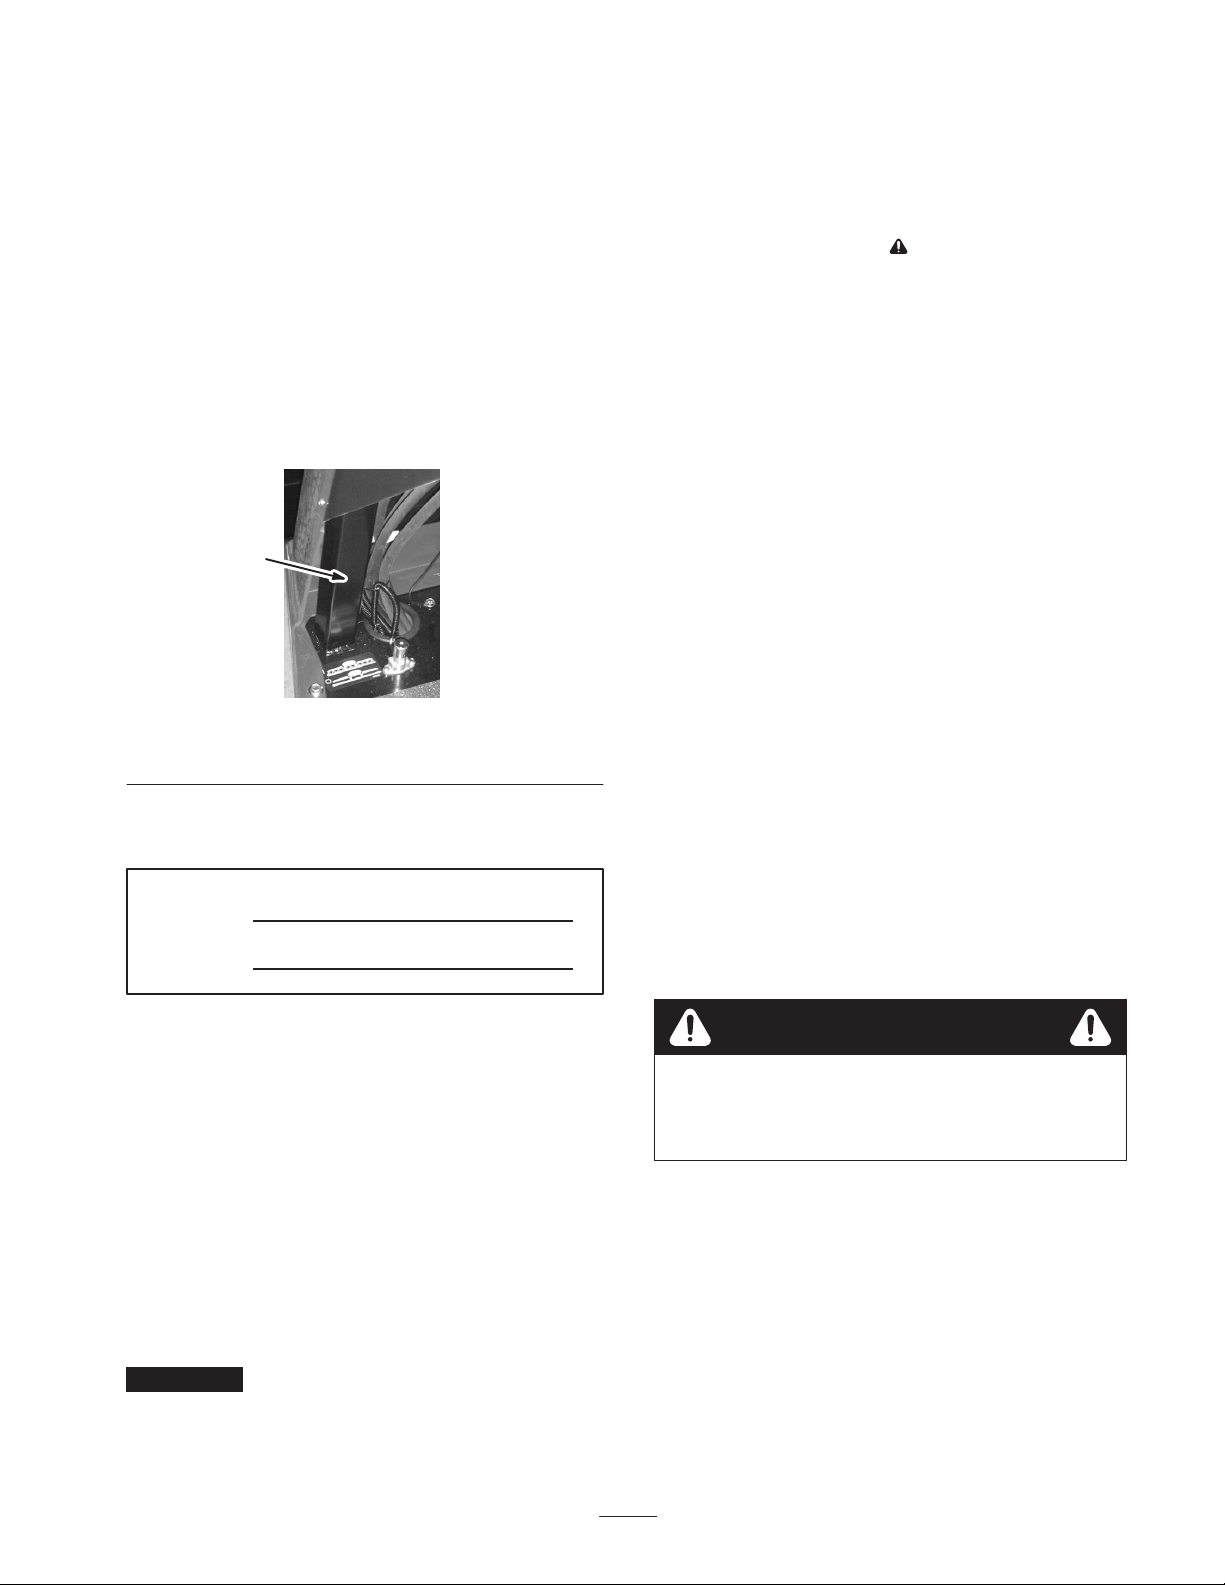
serial numbers of your product ready. Figure 1 illustrates
the location of the model and serial numbers on the
product.
1
Figure 1
1. Location of the model and serial numbers
Write the product model and serial numbers in the space
below:
Model No.
Improper use or maintenance by the operator or owner
can result in injury. To reduce the potential for injury,
comply with these safety instructions and always pay
attention to the safety alert
CAUTION, WARNING, or DANGER—“personal
safety instruction.” Failure to comply with the
instruction may result in personal injury or death.
Supervisors, operators, and service persons should be
familiar with the following standards and publications:
(The material may be obtained from the address shown).
• Flammable and Combustible Liquids Code:
ANSI/NFPA 30
• National Fire Protection Association:
ANSI/NFPA #505; Powered Industrial Trucks
National Fire Prevention Association
Barrymarch Park
Quincy, Massachusetts 02269 U.S.A.
• ANSI/ASME B56.8 Personal Burden Carriers
American National Standards Institute, Inc.
1430 Broadway
New York, New York 10018 U.S.A.
• ANSI/UL 558; Internal Combustion Engine Powered
Industrial Trucks
American National Standards Institute, Inc.
1430 Broadway
New York, New York 10018 U.S.A.
or
Underwriters Laboratories
333 Pfingsten Road
Northbrook, Illinois 60062 U.S.A.
symbol, which means
Serial No.
This manual identifies potential hazards and has special
safety messages that help you and others avoid personal
injury and even death. Danger, Warning, and Caution are
signal words used to identify the level of hazard. However,
regardless of the hazard, be extremely careful.
Danger signals an extreme hazard that will cause serious
injury or death if you do not follow the recommended
precautions.
Warning signals a hazard that may cause serious injury or
death if you do not follow the recommended precautions.
Caution signals a hazard that may cause minor or moderate
injury if you do not follow the recommended precautions.
This manual uses two other words to highlight information.
Important calls attention to special mechanical
information and Note: emphasizes general information
worthy of special attention.
Safe Operating Practices
Warning
The sprayer is an off-highway vehicle only and is
not designed, equipped, or manufactured for use
on public streets, roads, or highways.
Supervisor’s Responsibilities
• Make sure that operators are thoroughly trained and
familiar with the Operator’s Manual, Engine Manual,
and all labels on the sprayer.
• Establish your own special procedures and work rules
for unusual operating conditions (e.g. slopes too steep
for sprayer operation).
3

Chemical Safety
Warning
• Never allow other adults to operate the sprayer without
first reading and understanding the Operator’s Manual.
Only trained and authorized persons should operate this
sprayer. Make sure that all operators are physically and
mentally capable of operating the sprayer.
Chemicals are hazardous and can injure you,
bystanders, animals, plants, soils, or other
property.
• Carefully read and follow the chemical
manufacturer’s instructions for the safe
preparation, use, and disposal of the chemical.
• Keep chemicals off of your or bystander’s skin.
if contact should occur, wash it off immediately
with clean water and detergent.
• Wear goggles and other protective equipment as
instructed by the chemical manufacturer.
• Obtain proper training before using or handling
chemicals.
• Use the correct chemical for the job.
• Follow the chemical manufacturer’s instructions for the
safe application of the chemical.
• Handle chemicals in a well ventilated area.
• Wear goggles and other protective equipment as
instructed by the chemical manufacturer. Ensure that as
little skin as possible is exposed while using chemicals.
• Have clean water available especially when filling the
spray tank.
• Do not eat, drink, or smoke while working with
chemicals.
• Always wash your hands and other exposed areas as
soon as possible after finishing the work.
• Properly dispose of unused chemicals and chemical
containers as instructed by the chemical manufacturer
and your local codes.
• Chemicals and fumes in the tanks are dangerous; never
enter the tank or place your head over or in the opening.
Before Operating
• Operate the machine only after reading and
understanding the contents of this manual.
• Never allow children to operate the sprayer. Anyone
who operates the sprayer should have a motor vehicle
license.
• This sprayer is designed to carry only you, the operator.
Never carry any passengers on the sprayer.
• Never operate the sprayer when under the influence of
drugs or alcohol. Even prescription drugs and cold
medicines can cause drowsiness.
• Do not drive the sprayer when you are tired. Be sure to
take occasional breaks. It is very important that you stay
alert at all times.
• Become familiar with the controls and know how to
stop the engine quickly.
• Keep all shields, safety devices, and decals in place. If a
shield, safety device, or decal is malfunctioning,
illegible, or damaged, repair or replace it before
operating the machine.
• Always wear substantial shoes. Do not operate the
machine while wearing sandals, tennis shoes, or
sneakers. Do not wear loose fitting clothing or jewelry
which could get caught in moving parts and cause
personal injury.
• Wearing safety glasses, safety shoes, long pants, and a
helmet is advisable and required by some local safety
and insurance regulations.
• Avoid driving when it is dark, especially in unfamiliar
areas. If you must drive when it is dark, be sure to drive
cautiously, use the headlights, and even consider adding
additional lights.
• Be extremely careful when operating around people.
Always be aware of where bystanders might be and
keep them away from the work area.
• Before operating the sprayer, always check the
designated areas of the sprayer that are stated in the
Pre-Starting section of this manual, page 18. If
something is wrong, do not use the sprayer. Make sure
that the problem is corrected before the sprayer or
attachment is operated.
• Ensure that all fluid line connectors are tight and all
hoses are in good condition before applying pressure to
the system.
• Since gasoline is highly flammable, handle it carefully.
– Use an approved gasoline container.
– Do not remove the cap from the fuel tank when the
engine is hot or running.
– Do not smoke while handling gasoline.
4

– Fill the fuel tank outdoors, and fill it to about 1 inch
(25 mm) below the top of the tank (the bottom of
the filler neck). Do not overfill it.
– Wipe up any spilled gasoline.
While Operating
Warning
– The electrical and exhaust systems of the sprayer
can produce sparks capable of igniting explosive
materials. Never operate the sprayer in or near an
area where there is dust or fumes in the air which
are explosive.
– If you are ever unsure about safe operation, stop
work and ask your supervisor.
• Do not touch the engine or muffler while the engine is
running or soon after it has stopped. These areas may be
hot enough to cause burns.
Engine exhaust contains carbon monoxide, which
is an odorless, deadly poison that can kill you.
Do not run engine indoors or in an enclosed area.
• The operator should remain seated whenever the
sprayer is in motion. The operator should keep both
hands on the steering wheel whenever possible. Keep
your arms and legs within the sprayer body at all times.
• Always watch out for and avoid low overhangs such as
tree limbs, door jambs, and over-head walkways. Make
sure there is enough room over head to easily clear the
sprayer and your head.
• Failure to operate the sprayer safely may result in an
accident, tip over of the sprayer, and serious injury or
death. Drive carefully. To prevent tipping or loss of
control:
– Use extreme caution, reduce speed, and maintain a
safe distance around sand traps, ditches, creeks,
ramps, unfamiliar areas, or any areas that have
abrupt changes in ground conditions or elevation.
– Watch for holes or other hidden hazards.
– Use extra caution when operating the sprayer on wet
surfaces, in adverse weather conditions, at higher
speeds, or with a full load. Stopping time and
distance will increase with a full load.
– Avoid sudden stops and starts. Do not go from
reverse to forward or forward to reverse without
first coming to a complete stop.
– Slow down before turning. Do not attempt sharp
turns or abrupt maneuvers or other unsafe driving
actions that may cause a loss of sprayer control.
– Before backing up, look to the rear and ensure that
no one is behind you. Back up slowly.
– Watch out for traffic when you are near or crossing
roads. Always yield the right of way to pedestrians
and other vehicles. This sprayer is not designed for
use on streets or highways. Always signal your turns
or stop early enough so that other people know what
you plan to do. Obey all traffic rules and
regulations.
• If the machine ever vibrates abnormally, stop
immediately, wait for all motion to stop, and inspect the
sprayer for damage. Repair all damage before resuming
operation.
• Before getting off of the seat:
A. Stop the movement of the machine.
B. Place the range selector in Neutral and set the
parking brake.
C. Turn the ignition key to Off.
D. Remove the ignition key.
Note: If the sprayer is stopped on an incline, block the
wheels after getting off the sprayer.
Braking
• Slow down before you approach an obstacle. This gives
you extra time to stop or turn away. Hitting an obstacle
can damage the sprayer and its contents. More
important, it can injure you and your passenger.
• Gross Vehicle Weight (GVW) has a major impact on
your ability to stop and/or turn. Heavy loads and
attachments make a sprayer harder to stop or turn. The
heavier the load, the longer it takes to stop.
• Turf and pavement are much more slippery when they
are wet. It can take 2 to 4 times as long to stop on wet
surfaces as on dry surfaces. If you drive through
standing water deep enough to get the brakes wet, they
will not work well until they are dry. After driving
through water, you should test the brakes to make sure
they work properly. If they do not, drive slowly while
putting light pressure on the brake pedal. This will dry
the brakes out.
Operating on Hills and Rough Terrain
Operating the sprayer on a hill may cause tipping or rolling
of the sprayer, or the engine may stall and you could lose
headway on the hill. This could result in personal injury.
• Do not accelerate quickly or slam on the brakes when
backing down a hill, especially with a load.
5

• Never drive across a steep hill; always drive straight up
or down or go around the hill.
• If the engine stalls or you begin to lose headway while
climbing a hill, gradually apply the brakes and slowly
back straight down the hill.
• Turning while traveling up or down hills can be
dangerous. If you have to turn while on a hill, do it
slowly and cautiously. Never make sharp or fast turns.
• Heavy loads affect stability. Reduce the weight of the
load and your speed when operating on hills.
• Avoid stopping on hills, especially with a load.
Stopping while going down a hill will take longer than
stopping on level ground. If the sprayer must be
stopped, avoid sudden speed changes, which may
initiate tipping or rolling of the sprayer. Do not slam on
the brakes when rolling backward, as this may cause the
sprayer to overturn.
• The Toro Company strongly recommends installing the
optional ROPS Kit when operating on hilly terrain. If
you install a ROPS, always wear the seat belt when
driving the sprayer.
• Reduce speed and load when operating on rough terrain,
uneven ground, and near curbs, holes, and other sudden
changes in terrain. Loads may shift, causing the sprayer
to become unstable.
Warning
Sudden changes in terrain may cause abrupt
steering wheel movement, possibly resulting in
hand and arm injuries.
• Reduce your speed when operating on rough
terrain and near curbs.
• Grip the steering wheel loosely around the
perimeter. Keep your hands clear of the steering
wheel spokes.
• Be aware that heavy loads increase your stopping
distance and reduce your ability to turn quickly without
tipping over.
Maintenance
• Only permit qualified and authorized personnel to
maintain, repair, adjust, or inspect the sprayer.
• Before servicing or making adjustments to the machine,
stop the engine, set the parking brake, and remove the
key from the ignition to prevent someone from
accidentally starting the engine.
• To make sure that the entire machine is in good
condition, keep all nuts, bolts, and screws properly
tightened.
• To reduce the potential for fire, keep the engine area
free of excessive grease, grass, leaves, and
accumulation of dirt.
• Never use an open flame to check the level or leakage
of fuel or battery electrolyte.
• If the engine must be running to perform a maintenance
adjustment, keep your hands, feet, clothing, and any
parts of your body away from the engine and any
moving parts. Keep everyone away.
• Do not use open pans of fuel or flammable cleaning
fluids when cleaning parts.
• Do not adjust the ground speed governor. To ensure
safety and accuracy, have an Authorized Toro
Distributor check the ground speed.
• Keep your body and hands away from pin hole leaks or
nozzles that eject high pressure fluid. Use cardboard or
paper to find leaks. Fluid escaping under pressure can
penetrate skin and cause injury requiring surgery within
a few hours by a qualified surgeon or gangrene may
result.
• If major repairs are ever needed or assistance is
required, contact an Authorized Toro Distributor.
Loading
The weight of the cargo can change the sprayer center of
gravity and sprayer handling. To avoid loss of control and
personal injury, follow these guidelines:
• Reduce the weight of the load when operating on hills
and rough terrain to avoid tipping or overturning of the
sprayer.
• Liquid loads can shift. This shifting happens most often
while turning, going up or down hills, suddenly
changing speeds, or while driving over rough surfaces.
Shifting loads can cause the sprayer to tip over.
• When operating with a heavy load, reduce your speed
and allow for sufficient braking distance. Do not
suddenly apply the brakes. Use extra caution on slopes.
• To be sure of optimum performance and safety, always
purchase genuine Toro replacement parts and
accessories. Replacement parts and accessories made by
other manufacturers could be dangerous. Altering this
sprayer in any manner that may affect sprayer
operation, performance, durability, or its use, may result
in injury or death. Such use could void the product
warranty.
6
Sound Pressure
Vibration
This unit has a maximum sound pressure level at the
operator’s ear of 82 dBA, based on measurements of
identical machines per Directive 98/37/EC.
Safety and Instruction Decals
Safety decals and instructions are easily visible to the operator and are located near any area
of potential danger. Replace any decal that is damaged or lost.
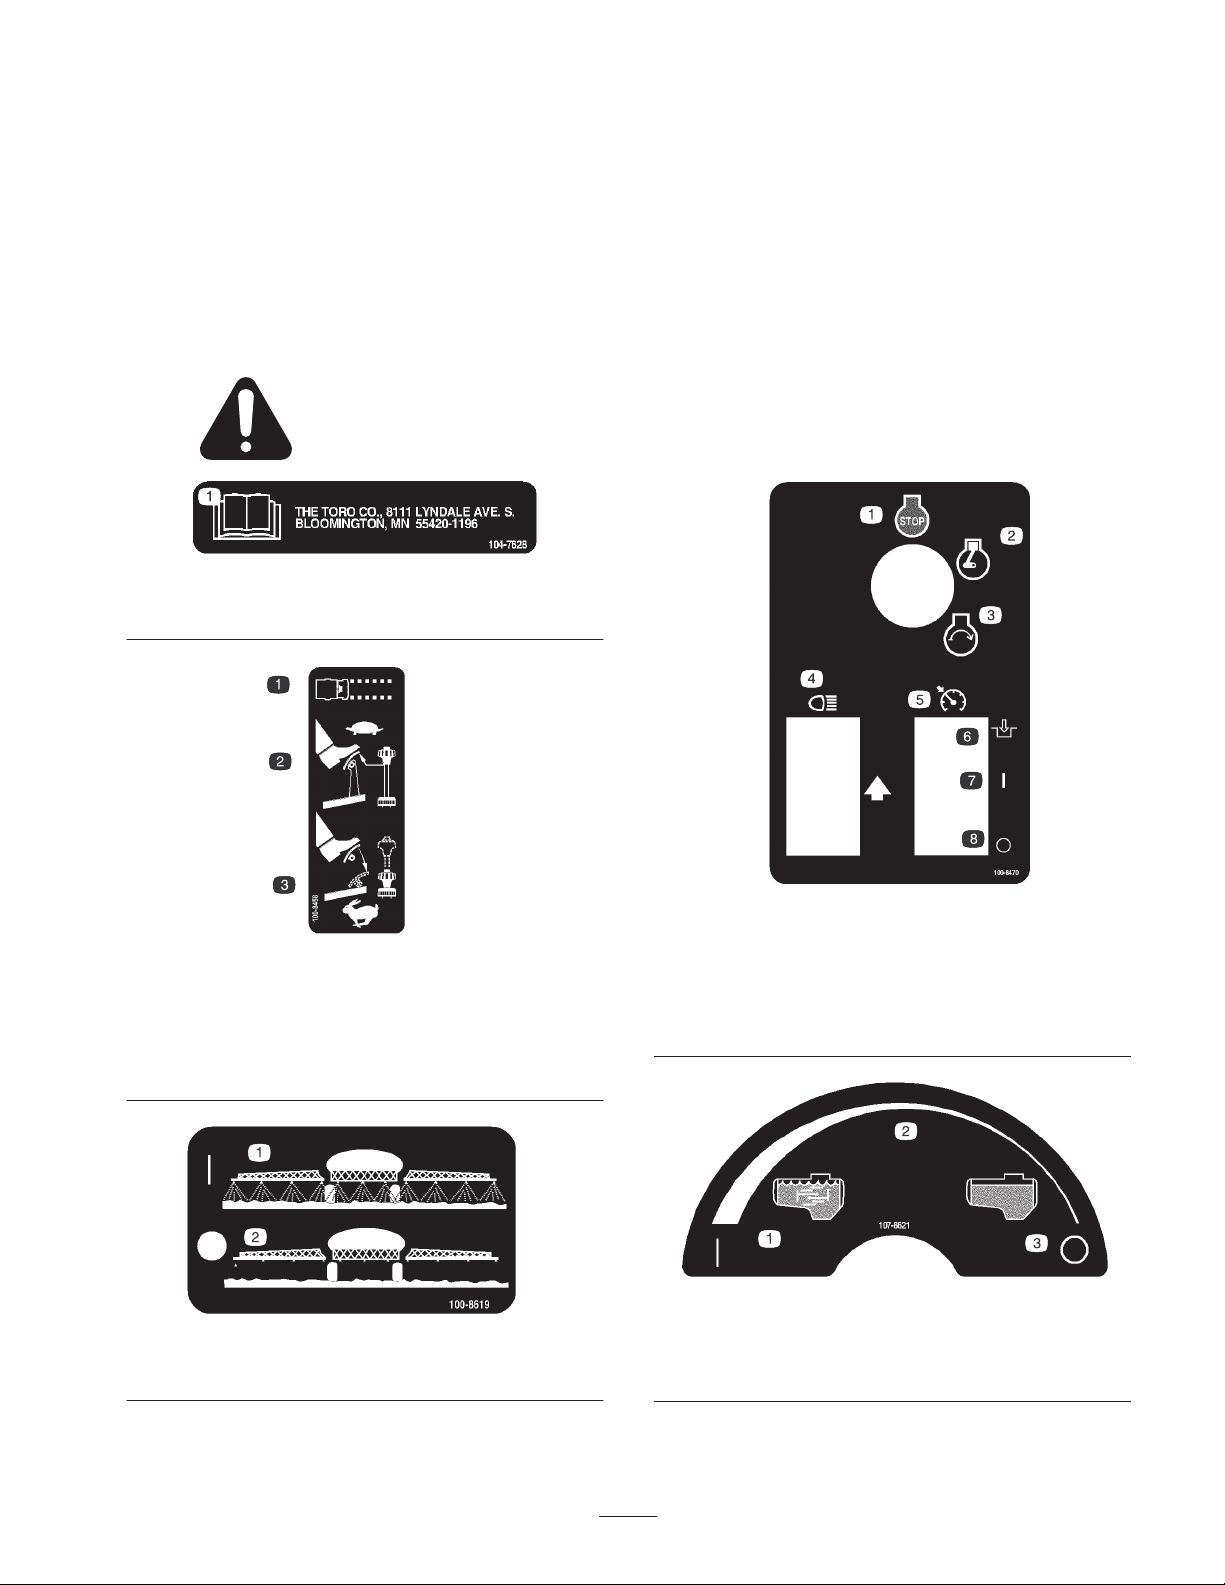
104-7628
1. Read the Operator’s Manual.
This unit does not exceed a hand/arm vibration level of
2
2.5 m/s
, based on measurements of identical machines per
Directive 98/37/EC.
This unit does not exceed a whole body vibration level of
2
0.5 m/s
, based on measurements of identical machines per
Directive 98/37/EC.
100-8458
1. Machine speed
2. To set the machine to a slow speed, reduce pressure on the
accelerator and pull up on the speed limiter.
3. To set the machine to a fast speed, press the accelerator pedal
and push down on the speed limiter.
100-8619
1. Spray on 2. Spray off
1. Engine—stop
2. Engine—run
3. Engine—start
4. Headlights
1. Agitation on
2. Continuous variable
setting
100-8470
5. Neutral engine speed
control
6. Engage
7. On
8. Off
107-8621
3. Agitation off
7
1. Left boom
2. Center boom
3. Right boom
4. Spray on
5. Spray off
6. Pump
7. On
8. Off
9. Continuous variable
setting, spray pressure
100-8489
10. Increase
11. Decrease
12. Locked
13. Unlocked
14. Lower the boom.
15. Raise the boom.
16. Automatic
17. Manual
18. Left boom foam marker
19. Right boom foam marker
100-8454
1. Read the Operator’s Manual for information on the
transmission.
2. To start the engine, sit on the operator’s seat, press the brake,
set the range selector to Neutral, turn the ignition key to
Engine-start, set the range selector to the desired gear, release
the brake pedal and parking brake, and press the accelerator
pedal to the desired speed.
3. To stop the engine, press the brake, set the range selector to
Neutral, set the brake, and turn the ignition key to Engine-stop.
4. Range selector gear pattern
100-8386
1. Fuel
2. Empty
3. Half-full
4. Full
106-1355
1. Warning—do not enter the tank.
8
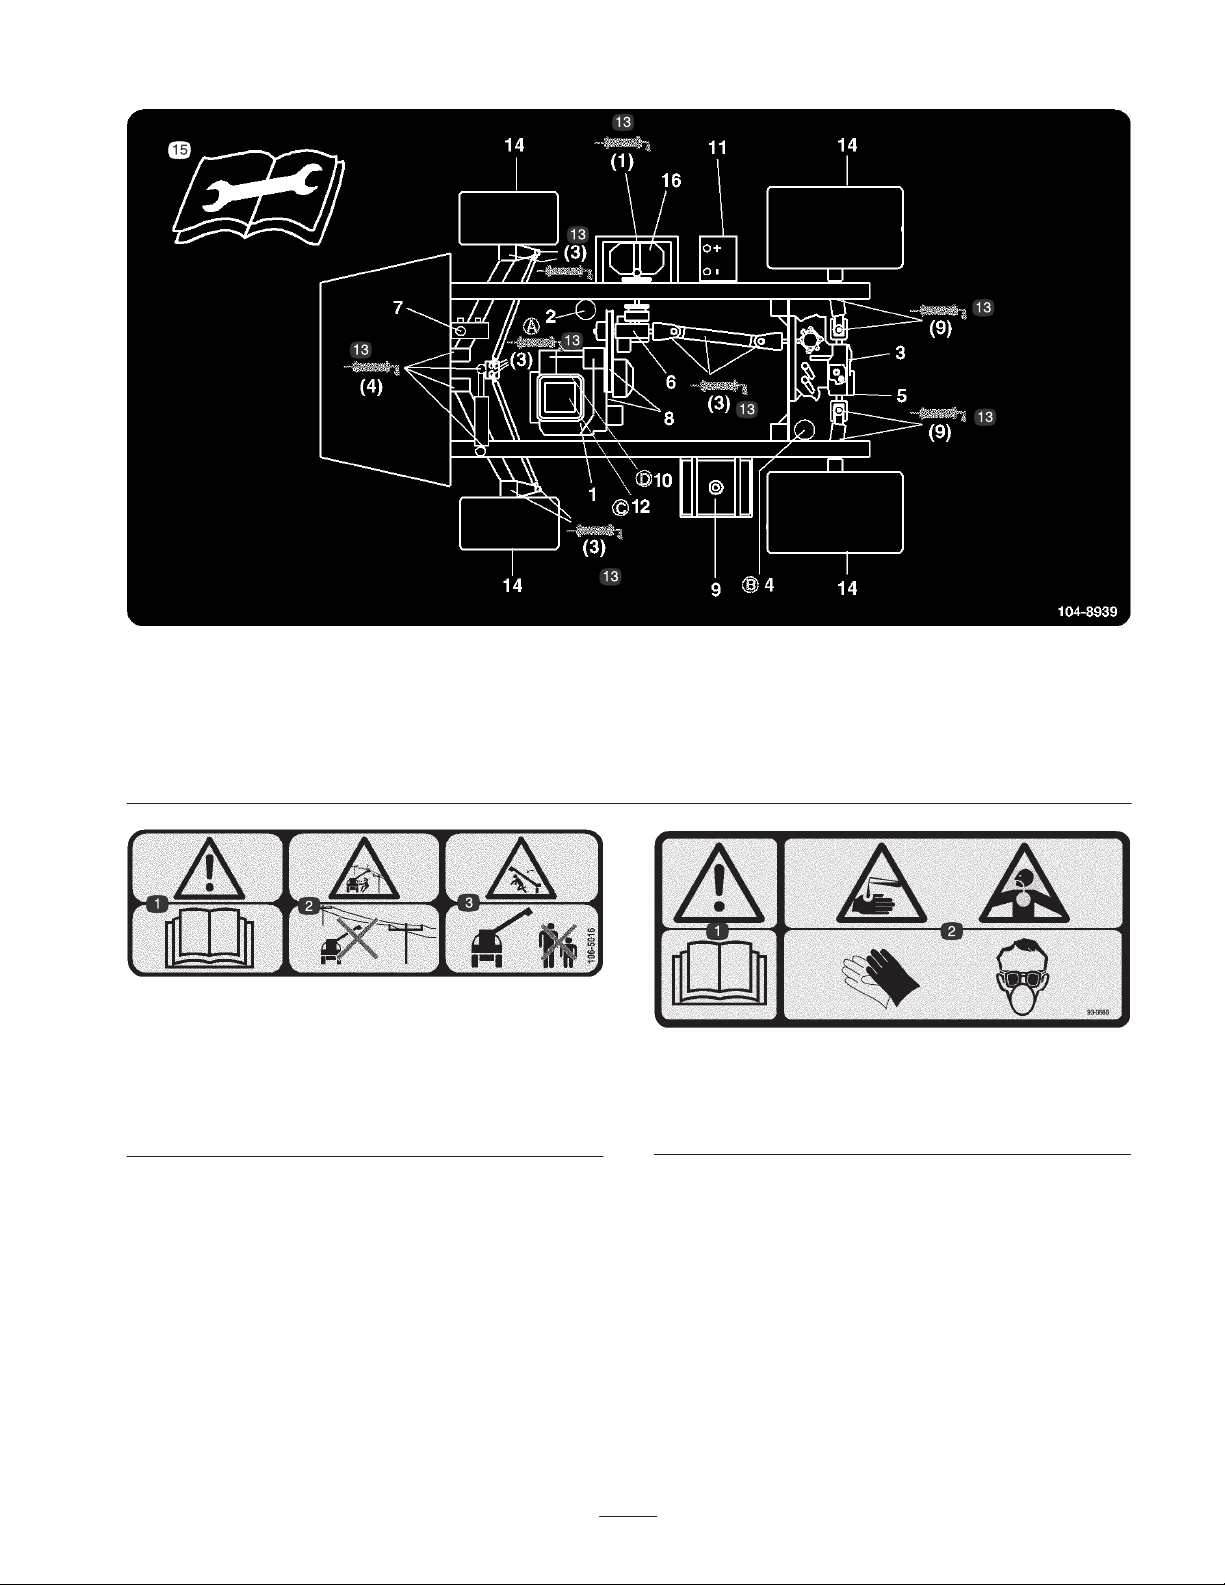
1. Engine oil level (dipstick)
2. Engine oil filter
3. Transaxle/hydraulic fluid
level (dipstick)
4. Transaxle hydraulic filter
1. Warning—read the
Operator’s Manual.
2. Electric shock hazard,
overhead power
lines—stay away from
overhead power lines.
5. Hydraulic strainer
6. Gear box fluid level
7. Brake fluid
8. Belts, steering and drive
9. Fuel, unleaded only
106-5016
3. Crushing hazard,
boom—keep bystanders
a safe distance from the
machine.
104-8939
10. Fuel filter
11. Battery
12. Air cleaner
13. Grease
14. Tire pressure
1. Warning—read the Operator’s Manual.
2. Caustic liquid/chemical burn and toxic gas inhalation
15. Read the instructions before
servicing or performing
maintenance.
16. Pump
93-0688
hazards—wear hand, skin, eye, and respiratory protection.
9
100-8621
1. Warning—read the Operator’s Manual.
2. Tipping Hazard—drive slowly over rough terrain and when
turning.
3. The maximum load is 1290 lb (585 kg), the operator and
accessory weight is 350 lb (158 kg), the vehicle weight is
1260 lb (572 kg), and the maximum gross vehicle weight is
3500 lb (1589 kg).
4. Falling and arm/leg injury hazards—do not carry passengers
and keep arms and legs inside of the vehicle at all times.
5. To stop the engine, press the brake, move the range selector to
Neutral, set the parking brake, release the brake pedal, turn the
ignition key to Engine-stop, and remove the key.
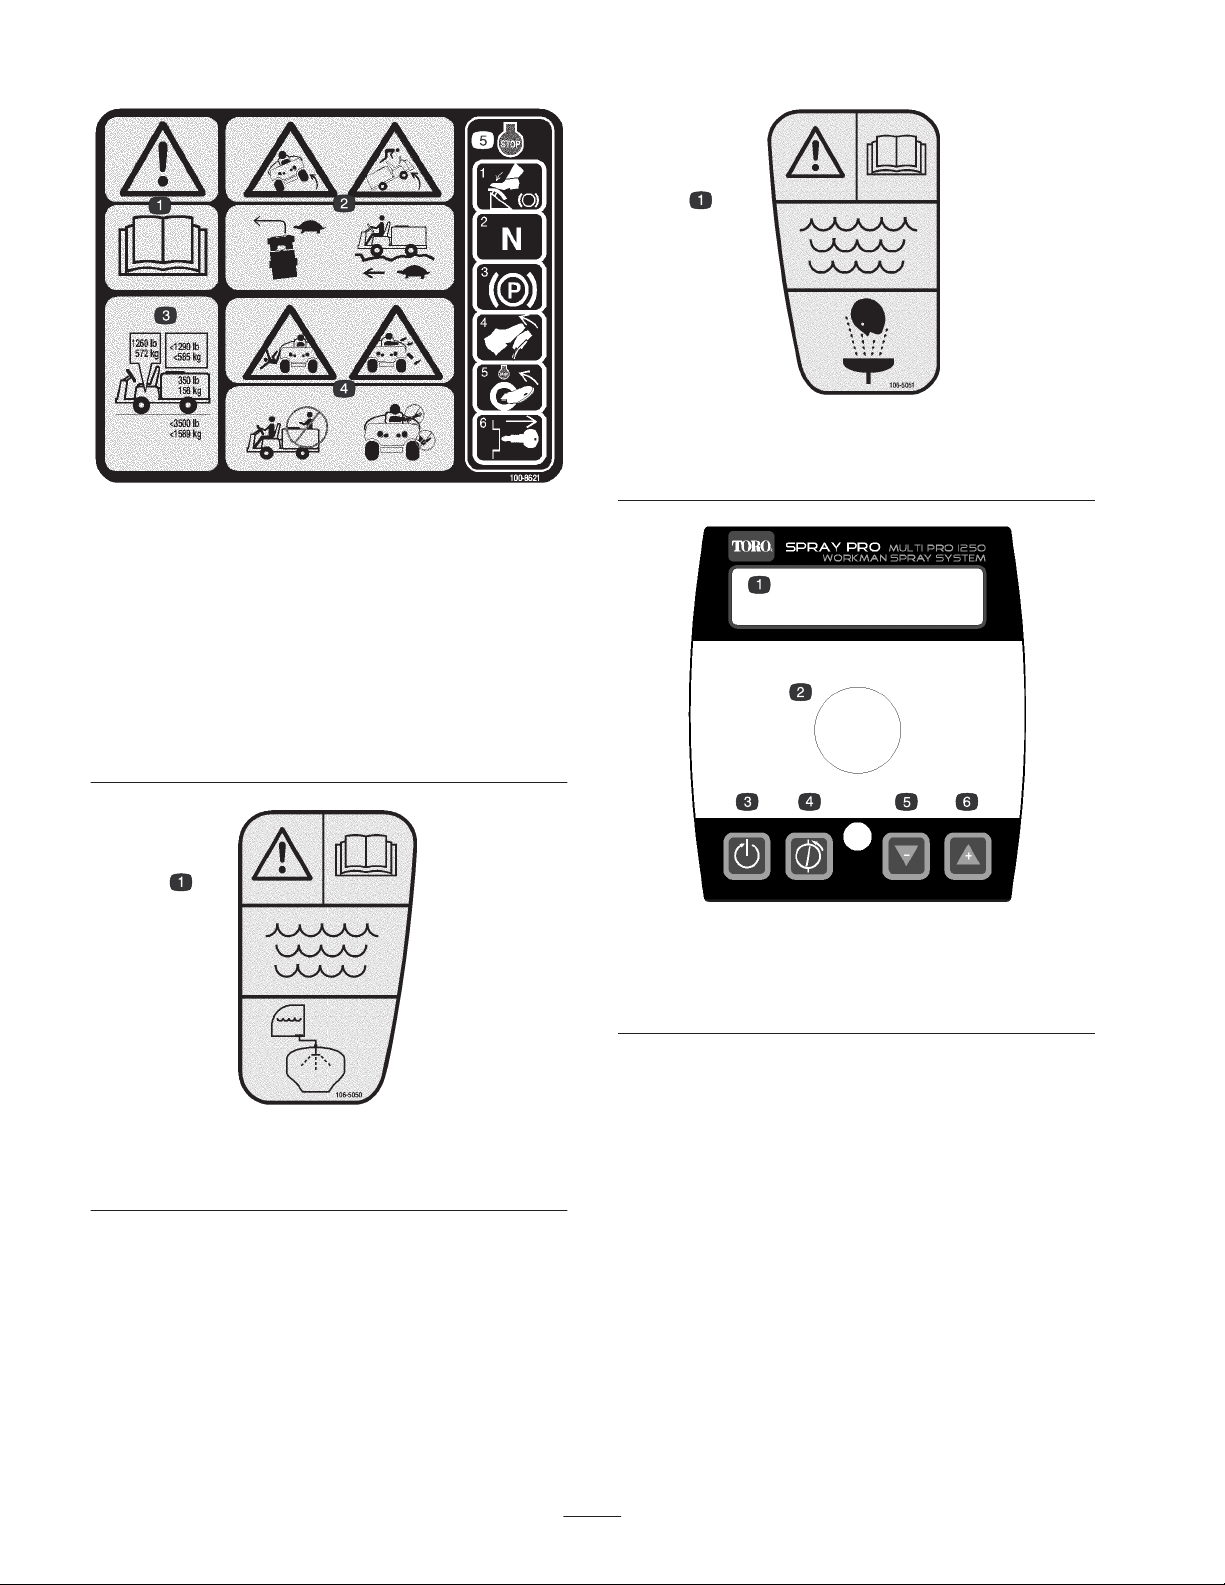
106-5051
1. Warning—read the Operator’s Manual; use fresh, clean water
for first-aid washing.
108-3312
1. LCD screen
2. Selection dial
3. Reset
4. Calibrate
5. Decrease
6. Increase
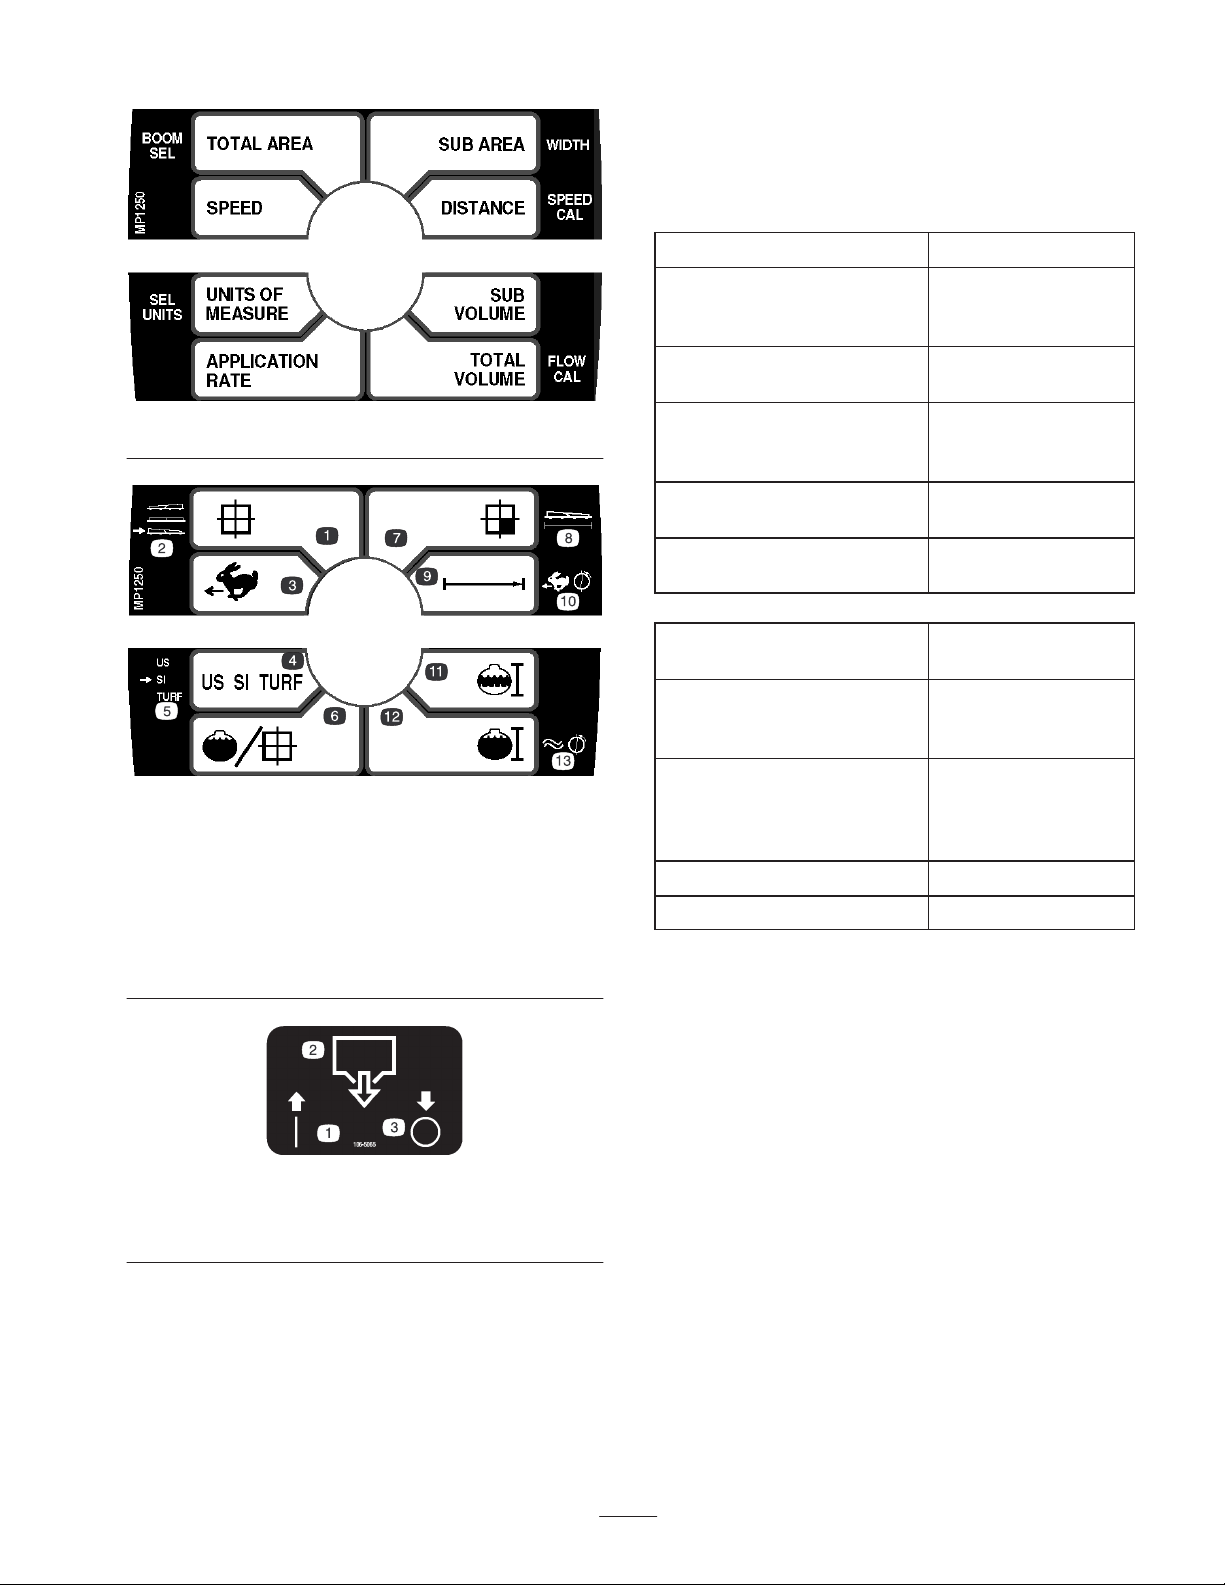
106-5050
1. Warning—read the Operator’s Manual; use fresh, clean water
for rinsing the tank.
10
Specifications
Note: Specifications and design are subject to change
without notice.
1. Total area
2. Boom select
3. Speed
4. Units of Measure
5. Select units
6. Application rate
7. Sub area
108-3307
108-3309
8. Width
9. Distance
10. Speed calibration
11. Sub volume
12. Total volume
13. Flowmeter calibration
Base weight
Weight with standard spray
1,673 lb (759 kg)
1,778 lb (806.5 kg)
system, empty, without
operator
Weight with standard spray
3,378 lb (1,532 kg)
system, full, without operator
Maximum gross vehicle
3,626 lb (1,645 kg)
weight (GVW)
(on level ground)
Tank capacity (includes the
CE 5% overflow)
Overall width without
175 US gallons
(662 L)
56 inches (142 cm)
standard spray system
Overall length with standard
120 inches (305 cm)
spray system
Overall height with standard
spray system to the top of
37.5 inches
(95.25 cm)
the tank
Overall height with standard
74 inches (188 cm)
spray system to the top of
the booms stored in the X
pattern
Ground clearance 4.5 inches (11.4 cm)
Wheel base 62 inches (157 cm)
Optional Equipment
The Toro Company has optional equipment and accessories
that you can purchase separately and install on your
sprayer. Contact your Authorized Service Dealer for a
complete list of optional equipment that is currently
available for your sprayer.
1. On
2. Tank drain
106-5065
3. Off
11

Setup
Note: Determine the left and right sides of the machine from the normal operating position.
To use the sprayer, you must obtain and install a boom kit and nozzles. Contact your Authorized Toro Distributor for
information on the available boom kits and accessories. After you install your booms and nozzles and before using the
sprayer for the first time, adjust the boom bypass valves so that the pressure and application rate remains the same for all
booms when you turn one or more booms off. Refer to Adjusting the Boom Bypass valves, page 25.
Caution
Without a boom kit installed, the sprayer may spray chemicals out of the boom valves, possibly
injuring bystanders or causing property damage.
Do not run the sprayer without a boom kit and nozzles installed.
Loose Parts
Note: Use the chart below to verify that all parts have been shipped.
Description Qty. Use
90 degree fitting
Quick coupler
Hose adapter
Fill receptacle bracket
Flange-head bolt, 5/16 x 3/4 inch
Anti-siphon hose
Spray Pro Monitor
Spray Pro Decal
Bracket
Flange-head bolt, 3/4 inch
Flange nut, 1/4 inch
Knob
Washer
Carriage bolt
Key 2 Use in the ignition switch.
Operator’s Manual
Engine Operator’s Manual
Operator Video 1 Watch before operating the machine.
1
1
1
1
1
1
1
1
1
2
2
2
2
2
1
1
Install the anti-siphon fill receptacle.
Install the Spray Pro monitor.
Read before operating the machine.
Parts Catalog 1 Use for ordering replacement parts.
Registration Card 1 Complete and return to Toro.
Predelivery Inspection Form 1 Complete and file in your customer history portfolio.
12
Installing the Anti-siphon Fill
Receptacle
1. Place the fill receptacle bracket over the threaded hole
in the tank and secure it with a flange-head bolt
(5/16 x 3/4 inch) (Fig. 2).
7
1
6
5
2
m-7368
Figure 2
1. Fill receptacle bracket
2. Threaded hole in the tank
3. Flange bolt,
5/16 x 3/4 inch
4. 90 degree elbow fitting
5. Quick coupler
6. Hose adapter
7. Anti-siphon hose
1
4
4
2
4
3
3
Figure 3
1. Spray Pro monitor
2. Bracket
3. Flange-head bolts,
1/4 x 3/4 inch
4. Knob
2. Loosely install the 2 carriage bolts, rubber washers, and
knobs on the bracket as illustrated in Figure 3 and 4.
Note: Install the carriage bolts and rubber washers inside of
the bracket and the knobs on the outside.
2. Place the threaded end of the 90 degree elbow fitting
through the bracket and thread the quick coupler onto it,
securing it to the bracket (Fig. 2).
Note: Install the fitting with the open end pointing
toward the tank opening so the water will arc into the
tank when you fill it.
3. Install the hose adapter into the quick coupler (Fig. 2).
4. Lock the adapter into place by swinging the levers
toward the adapter and then secure them with the
hairpin cotters (Fig. 2).
5. Install the anti-siphon hose on the barbed end of the 90
degree elbow fitting (Fig. 2).
Important Do not lengthen the hose to allow contact
with the tank fluids.
Installing the Spray Pro
Monitor
1. Install the monitor bracket on the dash (Fig. 3) using 2
flange-head bolts (1/4 x 3/4 inch) and 2 flange nuts
(1/4 inch).
2
1
3
4
Figure 4
1. Carriage bolt
2. Rubber washer
3. Knob
4. Bracket
3. Remove the large grommet from the hole in the dash
and thread the cables on the monitor through the
grommet and the dash.
4. Install the grommet into the dash.
5. Apply the Spray Pro Decal to the monitor. Be sure to
orient the decal as shown in Figure 27.
6. Install the Spray Pro monitor over the carriage bolt
heads (Fig. 3) and tighten the knobs to secure it.
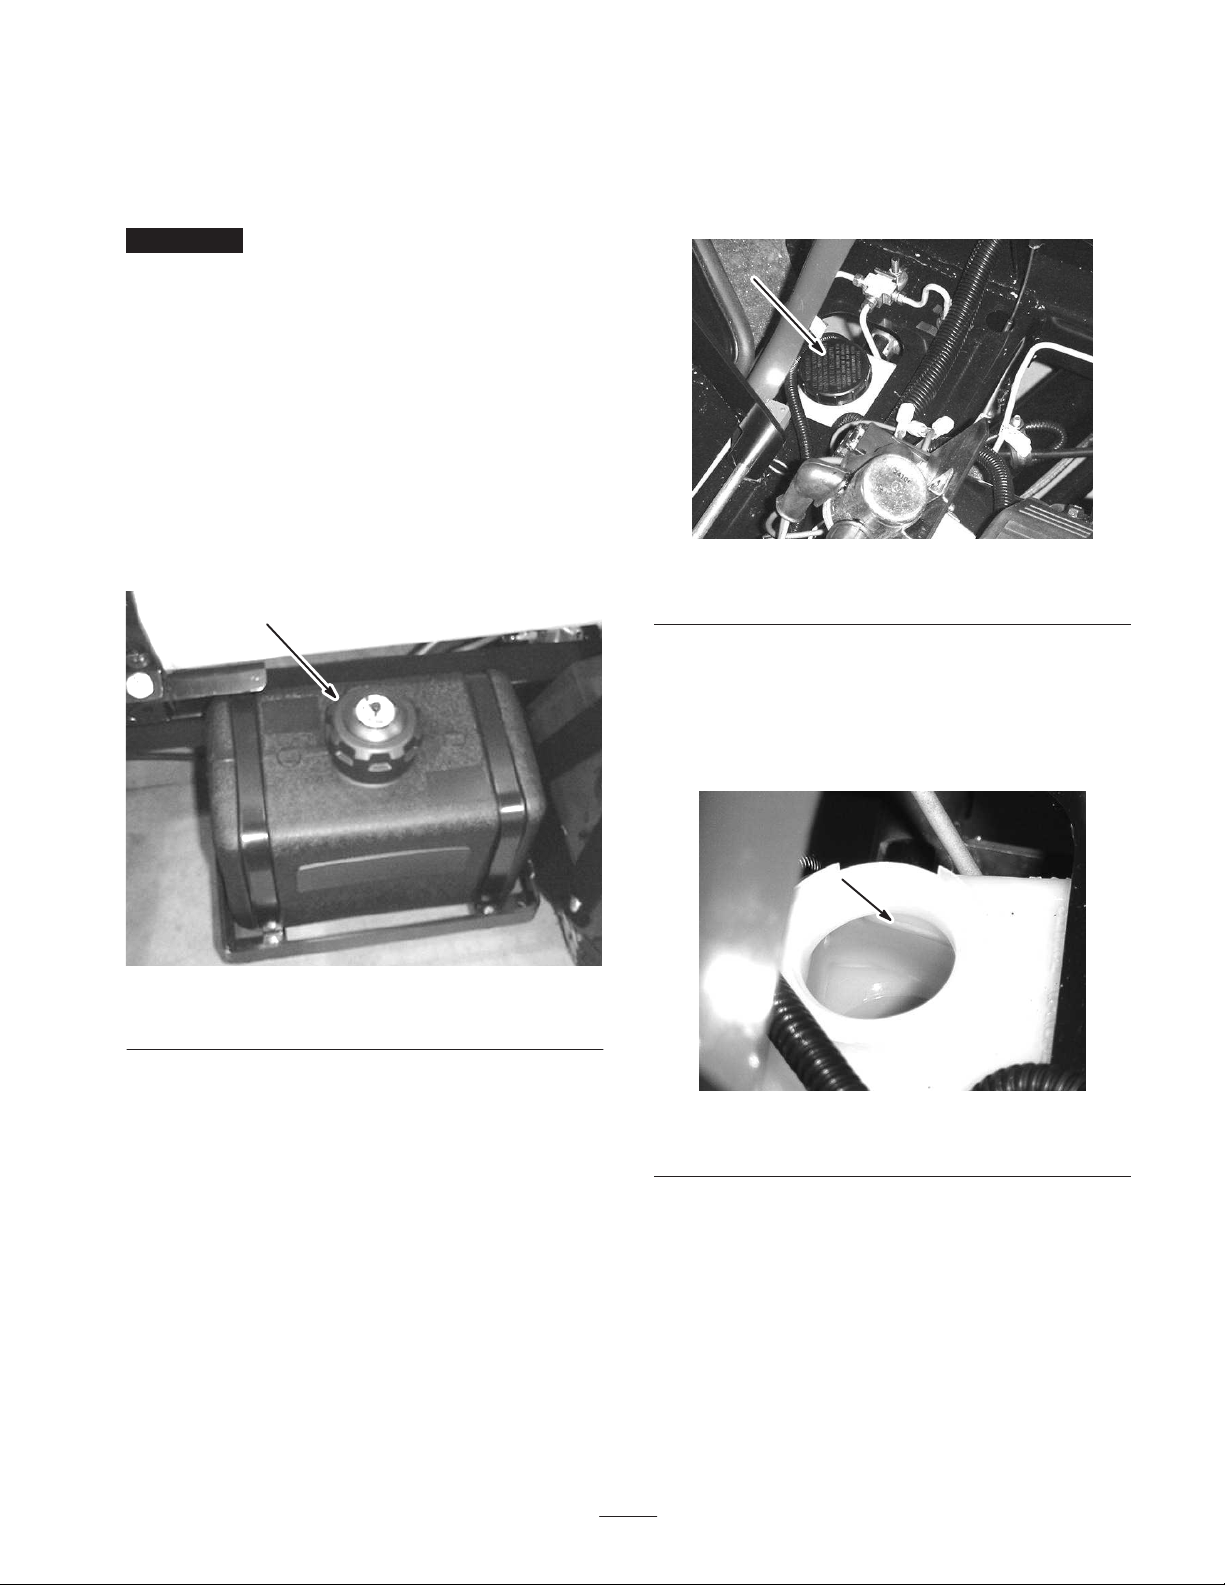
7. Connect the Spray Pro wire connectors to the wire
connectors located under the dash (Fig. 5).
13
3. If the oil level is low, remove the filler cap from the
valve cover (Fig. 6) and pour oil into the opening until
1
2
the oil level is up to the Full mark on the dipstick; refer
to Servicing Engine Oil, page 33, for the proper oil type
and viscosity. Add the oil slowly and check the level
often during this process. Do not overfill.
4. Install the dipstick firmly in place.
Checking the Tire Pressure
Figure 5
1. Connectors from the
sprayer
2. Connectors from the
monitor
Before Operating
Checking the Engine Oil
The engine is shipped with oil in the crankcase; however,
the level of oil must be checked before you first start the
engine and after you have run it.
1. Position the machine on a level surface.
2. Remove the dipstick and wipe it with a clean rag
(Fig. 6). Insert the dipstick into the tube and make sure
it is seated fully. Remove the dipstick and check the oil
level.
1
2
Figure 6
1. Dipstick 2. Filler cap
Check the tire pressure every 8 hours or daily to ensure
proper levels. Fill the tires to 18 psi (124 kPa). Also,
check the tires for wear or damage.
Adding Fuel
Danger
In certain conditions, gasoline is extremely
flammable and highly explosive. A fire or
explosion from gasoline can burn you and others
and can damage property.
• Fill the fuel tank outdoors, in an open area,
when the engine is cold. Wipe up any gasoline
that spills.
• Do not fill the fuel tank completely full. Add
gasoline to the fuel tank until the level is 1 inch
(25 mm) below the bottom of the filler neck.
This empty space in the tank allows gasoline to
expand.
• Never smoke when handling gasoline and stay
away from an open flame or where gasoline
fumes may be ignited by a spark.
• Store gasoline in an approved container and
keep it out of the reach of children. Never buy
more than a 30-day supply of gasoline.
• Always place gasoline containers on the ground
away from your sprayer before filling.
• Do not fill gasoline containers inside a vehicle or
on a truck or trailer bed because interior
carpets or plastic truck bed liners may insulate
the container and slow the loss of any static
charge.
• When practical, remove gas-powered equipment
from the truck or trailer and refuel the
equipment with its wheels on the ground.
• If this is not possible, then refuel such
equipment on a truck or trailer from a portable
container, rather than from a gasoline dispenser
nozzle.
• If a gasoline dispenser nozzle must be used, keep
the nozzle in contact with the rim of the fuel
tank or container opening at all times until
fueling is complete.
14
Recommended Gasoline
Use fresh, clean, unleaded regular gasoline suitable for
automotive use (87 pump octane minimum). Leaded
gasoline may be used if unleaded regular is not available.
Important Never use gasoline containing methanol,
gasoline containing more than 10% ethanol, gasoline
additives, or white gas because engine fuel system damage
could result.
Filling the Fuel Tank
The fuel tank capacity is approximately 6 US gallons
(21 L).
Note: The fuel tank cap contains a gauge which shows the
fuel level; check it frequently.
1. Shut the engine off and set the parking brake.
Checking the Brake Fluid
The brake fluid reservoir is shipped from the factory filled
with DOT 3 brake fluid. Check the level before starting the
engine each day.
1
2. Clean the area around the fuel tank cap (Fig. 7).
1
Figure 7
1. Fuel tank cap
3. Remove the fuel tank cap.
4. Fill the tank to about one inch below the top of the tank,
(bottom of the filler neck). This space in the tank allows
gasoline to expand. Do not overfill.
Figure 8
1. Brake fluid reservoir
1. Position the sprayer on a level surface, set the parking
brake, stop the pump, stop the engine, and remove the
ignition key.
2. The fluid level should be up to the Full line on the
reservoir (Fig. 9).
1
Figure 9
1. Full line
5. Install the fuel tank cap securely.
6. Wipe up any fuel that may have spilled.
Checking the Air Intake Screen
Check and clean as necessary the air intake screen on the
front of the engine every 8 operating hours.
3. If the fluid level is low, clean the area around the
reservoir cap, remove the cap, and fill the reservoir to
the proper level. Do not overfill it.
15

Checking the
Filling the Fresh Water Tank
Transaxle/Hydraulic Fluid
1. Position the sprayer on a level surface, set the parking
brake, stop the pump, stop the engine, and remove the
ignition key.
2. Remove the transaxle dipstick and wipe it with a clean
rag (Fig. 10).
1
2
Figure 10
1. Dipstick 2. Fill hole
Important Be very careful not to get dirt or other
contaminants into the opening when checking the
transmission oil.
The sprayer is equipped with a fresh water tank (Fig. 11)
for you to wash chemicals off of your skin, eyes, or other
surfaces in the case of accidental exposure. Always fill the
fresh water tank with clean water before handling or
mixing any chemicals.
1
2
3
Figure 11
1. Filler cap
2. Fresh water tank
To open the fresh water tank spigot, turn the lever on the
spigot.
3. Spigot
3. Insert the dipstick into the tube and make sure it is
seated fully. Remove the dipstick and check the oil
level.
4. The transaxle fluid level should be at the top of the flat
portion of the dipstick. If it is not, fill the reservoir with
the appropriate fluid; refer to Changing the
Transaxle/Hydraulic Fluid, page 36.
5. Install the dipstick firmly in place.
16
 Loading...