


PowerMax
ModelNo.39926—SerialNo.400000000andUp
ModelNo.39926T—SerialNo.400000000andUp
®
e2660VSnowthrower
Introduction
Thismachineisintendedtobeusedbyresidential
homeowners.Itisdesignedprimarilyforremoving
snowfrompavedsurfaces,suchasdrivewaysand
sidewalks,andothersurfacesfortrafconresidential
orcommercialproperties.Itisnotdesignedfor
removingmaterialsotherthansnow.Itisdesignedto
useToroFlex-Forcelithium-ionbatterypackModel
88675(2providedwithModel39926),88660,88650,
88640,88625,or88620.Thesebatterypacksare
designedtobechargedonlybybatterycharger
Models88602(providedwithModel39926),88605,
or88610.Usingthisproductforpurposesotherthan
itsintendedusecouldprovedangeroustoyouand
bystanders.
Model39926Tdoesnotincludeabatteryora
charger.
FormNo.3450-408RevB
Operator'sManual
g344085
Figure1
1.Modelandserialnumberlocation
Readthisinformationcarefullytolearnhowtooperate
andmaintainyourproductproperlyandtoavoid
injuryandproductdamage.Youareresponsiblefor
operatingtheproductproperlyandsafely.
Visitwww.T oro.comforproductsafetyandoperation
trainingmaterials,accessoryinformation,helpnding
adealer,ortoregisteryourproduct.
Wheneveryouneedservice,genuineToroparts,or
additionalinformation,contactanAuthorizedService
DealerorToroCustomerServiceandhavethemodel
andserialnumbersofyourproductready .Figure1
identiesthelocationofthemodelandserialnumbers
ontheproduct.Writethenumbersinthespace
provided.
Important:Withyourmobiledevice,youcan
scantheQRcodeontheserialnumberdecal(if
equipped)toaccesswarranty,parts,andother
productinformation.
ModelNo.
SerialNo.
Thismanualidentiespotentialhazardsandhas
safetymessagesidentiedbythesafety-alertsymbol
(Figure2),whichsignalsahazardthatmaycause
seriousinjuryordeathifyoudonotfollowthe
recommendedprecautions.
g000502
Figure2
Safety-alertsymbol
Thismanualuses2wordstohighlightinformation.
Importantcallsattentiontospecialmechanical
informationandNoteemphasizesgeneralinformation
worthyofspecialattention.
©2021—TheT oro®Company
8111L yndaleAvenueSouth
Bloomington,MN55420Registeratwww.Toro.com.
OriginalInstructions(EN)
PrintedinMexico
AllRightsReserved
*3450-408*

WARNING
Contents
CALIFORNIA
Proposition65Warning
Thepowercordonthisproductcontains
lead,achemicalknowntotheState
ofCaliforniatocausebirthdefects
orotherreproductiveharm.Wash
handsafterhandling.
Useofthisproductmaycauseexposure
tochemicalsknowntotheStateof
Californiatocausecancer,birthdefects,
orotherreproductiveharm.
Introduction...............................................................1
Safety.......................................................................3
SafetyandInstructionalDecals..........................6
Setup........................................................................9
1MountingtheBatteryCharger
(Optional)........................................................9
2InstallingtheChute..........................................9
3InstallingtheUpperHandle............................10
4InstallingtheTraction-ControlLinkage............11
5InstallingtheChute-ControlRod.....................11
6InstallingtheSnow-CleanoutT ool..................12
7CheckingtheTirePressure............................12
8CheckingtheSkidsandScraper....................13
9AdjustingtheAuger/ImpellerCable................13
10CheckingtheOperationoftheTraction
Drive.............................................................13
ProductOverview...................................................14
Specications..................................................15
Attachments/Accessories.................................15
Operation................................................................16
BeforeOperation.................................................16
InstallingtheBatteryPack................................16
TurningOntheHeadlightand
Handwarmers...............................................16
OperatingtheHandwarmers.............................17
DuringOperation.................................................17
StartingtheMachine.........................................17
ActivatingECOMode.......................................17
ChargingtheBatteryPack................................18
OperatingtheTractionDrive.............................19
OperatingtheSpeedSelector...........................19
OperatingtheAuger/ImpellerDrive...................19
OperatingtheQuickStick®...............................20
ClearingaCloggedDischargeChute................21
OperatingTips.................................................21
AfterOperation....................................................22
ShuttingOfftheMachine..................................22
RemovingtheBatteryPackfromthe
Machine........................................................22
PreventingFreeze-upafterUse........................22
Maintenance...........................................................23
RecommendedMaintenanceSchedule(s)...........23
PreparingforMaintenance...............................23
CheckingandAdjustingtheSkidsand
Scraper.........................................................23
CheckingandAdjustingtheTraction
Cable............................................................24
CheckingandAdjustingtheAuger/Impeller
Cable............................................................25
CheckingtheAuger-Gearbox-OilLevel.............26
LubricatingtheHexShaft..................................26
AdjustingtheDischarge-ChuteLatch................27
ReplacingtheDriveBelts..................................27
Storage...................................................................28
StoringtheMachine..........................................28
2

Troubleshooting......................................................29
Safety
WARNING—Whenusinganelectricmachine,always
readandfollowbasicsafetywarningsandinstructions
toreducetheriskofre,electricshock,orinjury,
includingthefollowing:
READALLINSTRUCTIONS
WARNING—Whenusinganelectricalmachine,
basicsafetyprecautionsshouldalwaysbefollowed
toreducetheriskofre,electricshock,orinjury,
includingthefollowing:
I.Training
1.Theoperatorofthemachineisresponsiblefor
anyaccidentsorhazardsoccurringtoothersor
theirproperty.
2.Readandunderstandthecontentsofthis
Operator’sManualbeforeyoustartthemachine.
Ensurethateveryoneusingthismachineknows
howtouseit,knowshowtoshutitoffquickly,
andunderstandsthewarnings.
3.Donotallowchildrentouseorplaywiththe
machine,batterypack,orthebatterycharger;
localregulationsmayrestricttheageofthe
operator.
4.Donotallowchildrenoruntrainedpeopleto
operateorservicethisdevice.Allowonlypeople
whoareresponsible,trained,familiarwiththe
instructions,andphysicallycapabletooperate
orservicethedevice.
5.Beforeusingthemachine,batterypack,and
batterycharger,readalltheinstructionsand
cautionarymarkingsontheseproducts.
6.Becomefamiliarwiththecontrolsandproper
useofthemachine,batterypack,andbattery
charger.
II.Preparation
1.Keepbystandersandchildrenoutofthe
operatingarea.
2.Neverallowchildrentooperatethemachine.
3.Donotoperatethemachinewithoutallguards
andsafetydevicesinplaceandfunctioning
properlyonthemachine.
4.Inspecttheareawhereyouwillusethemachine
andremoveallobjectsthatcouldinterferewith
theoperationofthemachineorthatthemachine
couldthrow.
5.UseonlythebatterypackspeciedbyT oro.
Usingotheraccessoriesandattachmentsmay
increasetheriskofinjuryandre.
6.Pluggingthebatterychargerintoanoutletthat
isnot120Vcancauseareorelectricshock.
Donotplugthebatterychargerintoanoutlet
otherthan120V.
7.Donotuseadamagedormodiedbattery
packorbatterycharger,whichmayexhibit
unpredictablebehaviorthatresultsinre,
explosion,orriskofinjury.
8.Ifthesupplycordtothebatterychargeris
damaged,contactanAuthorizedServiceDealer
toreplaceit.
9.Donotusenon-rechargeablebatteries.
10.Chargethebatterypackwithonlythebattery
chargerspeciedbyToro.Achargersuitablefor
1typeofbatterypackmaycreateariskofre
whenusedwithanotherbatterypack.
11.Chargethebatterypackinawell-ventilatedarea
only.
12.Donotexposeabatterypackorbatterycharger
toreortotemperatureshigherthan68°C
(154°F).
13.Followallcharginginstructionsanddo
notchargethebatterypackoutsideofthe
temperaturerangespeciedintheinstructions.
Otherwise,youmaydamagethebatterypack
andincreasetheriskofre.
14.Dressproperly—Wearappropriateclothing,
includingeyeprotection;longpants;substantial,
slip-resistantrubberboots;andhearing
protection.Tiebacklonghairanddonotwear
looseclothingorloosejewelrythatcanget
caughtinmovingparts.
III.Operation
1.Contactwiththemovingrotorwillcauseserious
injury.Keepyourhandsandfeetawayfromall
movingpartsofthemachine.Keepclearofany
dischargeopening.
2.Staybehindthehandlesandawayfromthe
dischargeopeningwhileoperatingthemachine.
3.Usingthismachineforpurposesotherthanits
intendedusecouldprovedangeroustoyouand
bystanders.
4.Preventunintentionalstarting—Ensurethatthe
electric-startkeyisremovedfromthekeyswitch
beforeconnectingthebatterypackandhandling
themachine.
5.Useyourfullattentionwhileoperatingthe
machine.Donotengageinanyactivitythat
causesdistractions;otherwise,injuryorproperty
damagemayoccur.
6.Disengageallclutchesandshiftintoneutral
beforestartingthemachine.
3

7.Stopthemachine,removetheelectric-startkey,
removethebatterypackfromthemachine,and
waitforallmovementtostopbeforeadjusting,
servicing,cleaning,orstoringthemachine.
8.Removethebatterypackandelectric-start
keyfromthemachinewheneveryouleaveit
unattendedorbeforechangingaccessories.
9.Donotforcethemachine—Allowthemachineto
dothejobbetterandsaferattherateforwhichit
wasdesigned.
10.Stayalert—Watchwhatyouaredoinganduse
commonsensewhenoperatingthemachine.
Donotusethemachinewhileill,tired,orunder
theinuenceofalcoholordrugs.
11.Operatethemachineonlyingoodvisibilityand
appropriateweatherconditions.
12.Useextremecautionwhenreversingorpulling
themachinetowardyou.
13.Keepproperfootingandbalanceatalltimes,
especiallyonslopes.Useextremecautionwhen
changingdirectionsonslopes.Donotoperate
themachineonexceedinglysteepslopes.Walk,
neverrunwiththemachine.
14.Whennotactivelyclearingsnow,disengage
powertotheauger.
15.Donotdirectthedischargematerialtoward
anyone.Avoiddischargingmaterialagainsta
wallorobstruction;materialmayricochettoward
you.Stopthemachinewhencrossinggravel
surfaces.
16.Exerciseextremecautionwhenoperatingthe
machineonorcrossinggraveldrives,walks,or
roads.Stayalertforhiddenhazardsortrafc.
17.Ifthemachinestrikesanobjectorstartsto
vibrate,immediatelyshutoffthemachine,
removethekey ,removethebatterypack,and
waitforallmovementtostopbeforeexamining
themachinefordamage.Makeallnecessary
repairsbeforeresumingoperation.
18.Shutoffthemachinewheneveryouleavethe
operatingpositionforanyreason.
19.Shutoffthemachineandremovethekeybefore
uncloggingthemachineandalwaysuseastick
oracleanouttooltoremovetheclog.
20.Stopthemachineandremovetheelectric-start
keybeforeloadingthemachineforhauling.
21.Underabusiveconditions,thebatterypackmay
ejectliquid;avoidcontact.Ifyouaccidently
comeintocontactwiththeliquid,ushwith
water.Iftheliquidcontactsyoureyes,seek
medicalhelp.Liquidejectedfromthebattery
packmaycauseirritationorburns.
22.Neveroperatethemachineathightransport
speedsonslipperysurfaces.
IV.MaintenanceandStorage
1.Stopthemachine,removetheelectric-startkey,
removethebatterypackfromthemachine,and
waitforallmovementtostopbeforeadjusting,
servicing,cleaning,orstoringthemachine.
2.Donotattempttorepairthemachineexceptas
indicatedintheinstructions.HaveanAuthorized
ServiceDealerperformserviceonthemachine
usingidenticalreplacementparts.
3.Wearglovesandeyeprotectionwhenservicing
themachine.
4.Whenservicingtherotor,beawarethattherotor
canstillmoveeventhoughthepowersource
isoff.
5.Forbestperformance,useonlygenuineT oro
replacementpartsandaccessories.Other
replacementpartsandaccessoriescouldbe
dangerous,andsuchusecouldvoidtheproduct
warranty.
6.Maintainthemachine—Keephandlesdry,clean,
andfreefromoilandgrease.Keepguards
inplaceandinworkingorder.Useidentical
replacementpartsonly.
7.Checkallfastenersatfrequentintervalsfor
propertightnesstoensurethatthemachineisin
safeworkingcondition.
8.Checkthemachinefordamagedparts.Check
formisalignedandbindingmovingparts,broken
parts,mounting,andanyotherconditionthat
mayaffectitsoperation.Unlessindicatedinthe
instructions,haveanAuthorizedServiceDealer
repairorreplaceadamagedguardorpart.
9.Whenthebatterypackisnotinuse,keepit
awayfrommetalobjectssuchaspaperclips,
coins,keys,nails,andscrewsthatcanmakea
connectionfrom1terminaltoanother.Shorting
thebatteryterminalsmaycauseburnsorare.
10.Whenyouarenotusingthemachine,storeit
indoorsinadry,secureplaceoutofthereach
ofchildren.
11.Whenstoringthemachineformorethan30
days,refertoStorage(page28)forimportant
information.
12.CAUTION—Amistreatedbatterypackmay
presentariskofreorchemicalburn.Donot
disassemblethebatterypack.Donotheatthe
batterypackabove68°C(154°F)orincinerate
it.ReplacethebatterypackwithagenuineToro
batterypackonly;usinganothertypeofbattery
packmaycauseareorexplosion.Keep
4

batterypacksoutofthereachofchildrenand
intheoriginalpackaginguntilyouarereadyto
usethem.
13.Donotdisposeofthebatteryinare.The
cellmayexplode.Checkwithlocalcodesfor
possiblespecialdisposalinstructions.
SAVETHESE
INSTRUCTIONS
5

SafetyandInstructionalDecals
Safetydecalsandinstructionsareeasilyvisibletotheoperatorandarelocatednearanyarea
ofpotentialdanger.Replaceanydecalthatisdamagedormissing.
94-8072
decal94-8072
121-6817
1.Cutting/dismembermenthazardofhandorfoot,impeller
andauger—keepbystandersaway.
decal121-6823
decal121-6817
1.Fast
2.Forwardspeeds4.Reversespeeds
121-6823
3.Slow
decal137-6198
137-6198
1.Cutting/dismemberment
hazardofthengersor
hand,impeller—donot
placeyourhandinthe
chute.
2.Warning—shutoffthe
motorbeforeusingthetool
toclearthechute.
6

decal137-6249
137-6249
1.Squeezethelevertoengagethetractiondrive.4.Cutting/dismembermentofngersorhand,impeller
blade—keepawayfrommovingparts;keepallguardsand
shieldsinplace;removethekeyfromtheignitionbefore
servicingthemachine.
2.Warning—readtheOperator’sManual.
3.Cutting/dismembermentofngersorhand,impellerblade—do
5.Thrownobjecthazard—keepbystandersaway.
6.Squeezethelevertoengagetheimpeller.
notplaceyourhandinthechute;shutoffthemotorbefore
usingthetooltoclearthechute.
137-9462
decal137-9462
1.Thebatterypackischarging.
2.Thebatterypackisfullycharged.
3.Thebatterypackisoverorundertheappropriatetemperaturerange.
4.Batterypackchargingfault
decal137-9463
137-9463
7

decal137-9456
137-9456
1.ReadtheOperator’s
Manual.
2.Keepawayfromopenre
orames.
1.Batterychargestatus
3.Donotexposetorain.
decal137-9461
137-9461
decal133-8061
133-8061
8

Setup
Important:Thebatterypackisnotfullychargedwhenyoupurchaseit.Beforeusingthemachinefor
thersttime,refertoChargingtheBatteryPack(page18).
1
MountingtheBatteryCharger(Optional)
Partsneededforthisprocedure:
2
Mountinghardware(notincluded)
Procedure
Ifdesired,mountthebatterychargersecurelyonawallusingthewall-mountkeyholesonthebackofthe
charger.
Mountitindoors(suchasagarageorotherdryplace),nearapoweroutlet,andoutofthereachofchildren.
RefertoFigure3forassistanceinmountingthecharger.
Slidethechargerovertheappropriatelypositionedhardwaretosecurethechargerinplace(hardwarenot
included).
Figure3
g290534
9

2
InstallingtheChute
NoPartsRequired
Procedure
g359038
10
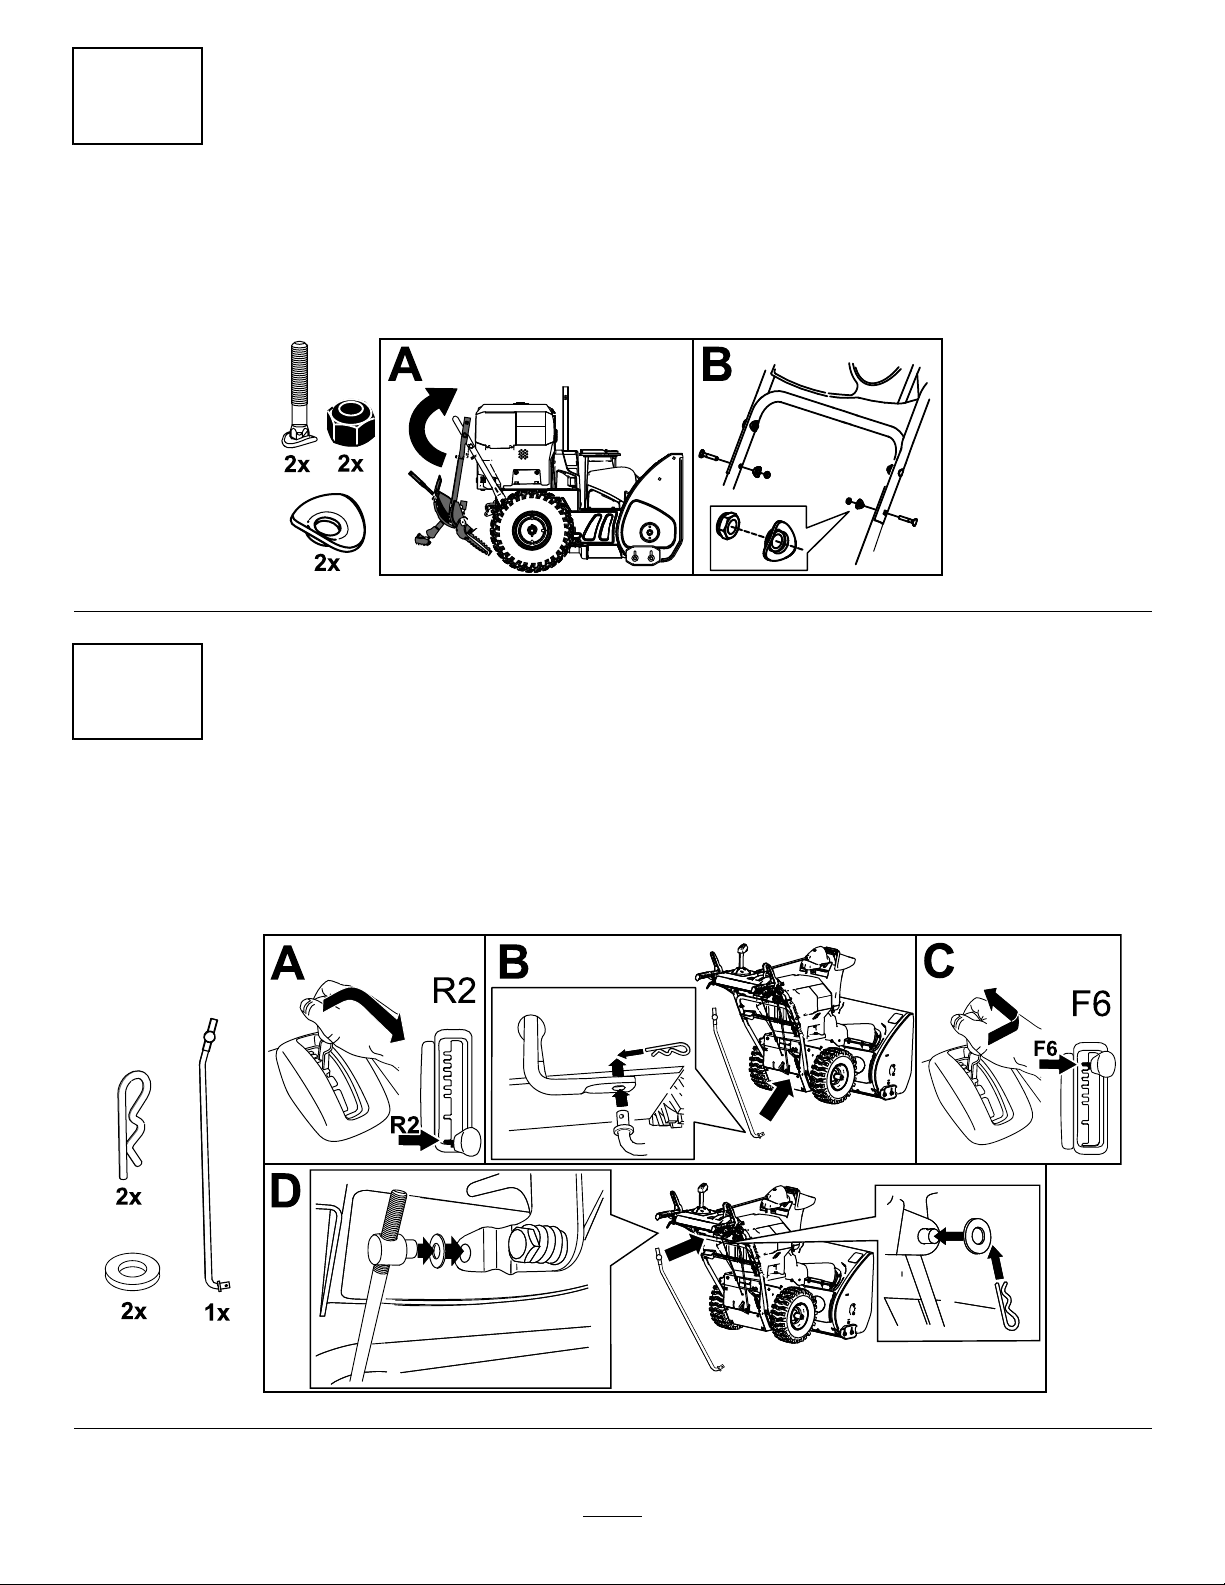
3
InstallingtheUpperHandle
NoPartsRequired
Procedure
g344102
4
InstallingtheTraction-ControlLinkage
NoPartsRequired
Procedure
g344097
11
5
InstallingtheChute-ControlRod
NoPartsRequired
Procedure
g344094
6
InstallingtheSnow-CleanoutTool
NoPartsRequired
Procedure
g344095
12
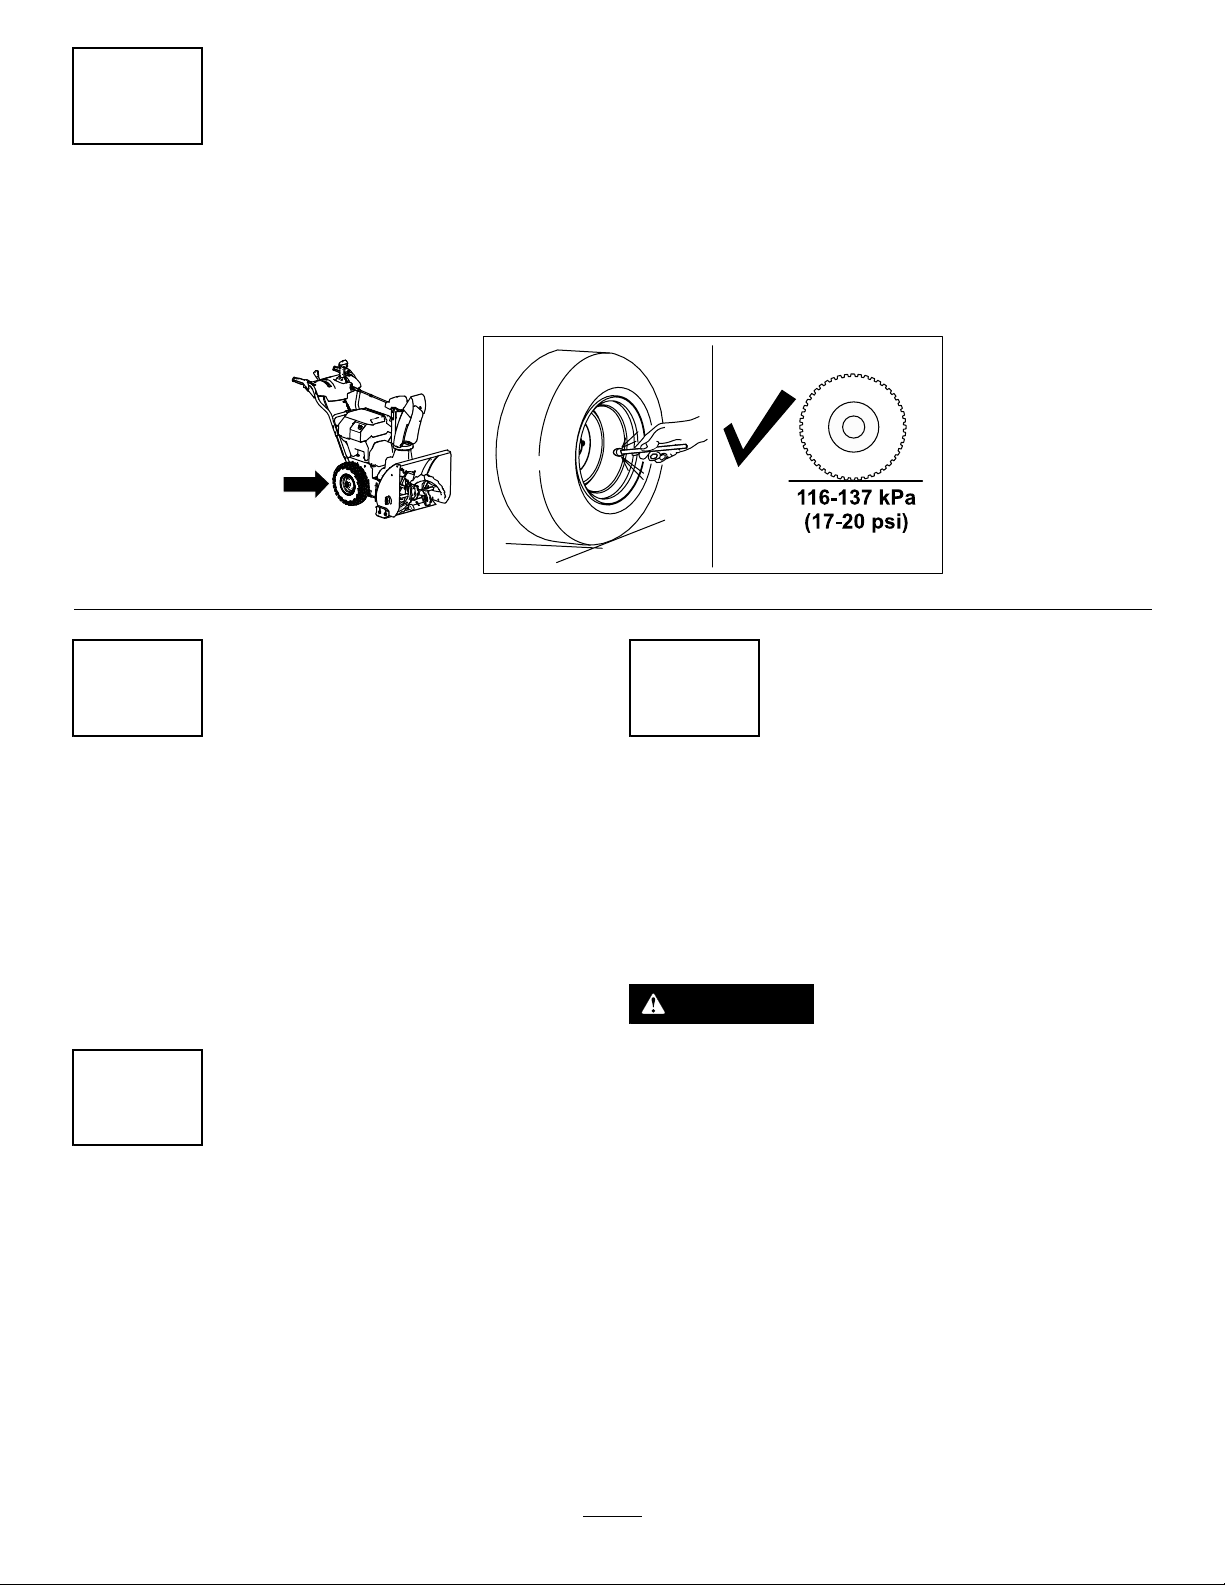
7
CheckingtheTirePressure
NoPartsRequired
Procedure
g344084
8
CheckingtheSkidsand
Scraper
NoPartsRequired
Procedure
RefertoCheckingandAdjustingtheSkidsand
Scraper(page23).
9
Adjustingthe
Auger/ImpellerCable
NoPartsRequired
Procedure
Checkandadjusttheauger/impellercablebefore
rstuse;refertoCheckingandAdjustingthe
Auger/ImpellerCable(page25).
10
CheckingtheOperationof
theTractionDrive
NoPartsRequired
Procedure
CAUTION
Ifthetractiondriveisnotproperlyadjusted,
themachinemaymoveinthedirection
oppositeofwhatyouintended,causinginjury
and/orpropertydamage.
Carefullycheckthetractiondriveandadjustit
properly,ifnecessary.
1.Startthemachine;refertoStartingtheMachine
(page17).
2.MovethespeedselectortoPositionR1;referto
OperatingtheSpeedSelector(page19).
3.Squeezetheleft(traction)levertothehandgrip
(Figure10).
13

Figure10
Themachineshouldmoverearward.Ifthe
machinedoesnotmoveormovesforward,
completethefollowing:
A.Releasethetractionleverandshutoffthe
machine;refertoShuttingOfftheMachine
(page22).
B.Disconnectthetrunnionfromthe
speed-selectorlever.
C.Turnthetrunniondownward(clockwise)on
thespeed-controlrod.
D.Connectthetrunniontothespeed-selector
lever.
4.Releasethetractionlever.
5.MovethespeedselectortoPosition1;referto
OperatingtheSpeedSelector(page19).
6.Squeezetheleft(traction)levertothehandgrip
(Figure10).
Themachineshouldmoveforward.Ifthe
machinedoesnotmoveormovesrearward,
completethefollowing:
A.Releasethetractionleverandshutoffthe
machine.
g001011
ProductOverview
Figure11
1.Handgrip(2)10.Chutedeector
2.Auger/impellerlever
3.Lockswitch
4.Speed-selectorlever
5.Handwarmerswitch
6.QuickStick
discharge-chutecontrol
7.Tractionlever
8.Mainbattery-compartment
lid
9.Electric-startkey18.Headlight
®
g361064
11.Dischargechute
12.Scraper
13.Auger
14.Skid(2)
15.Controlpanel
16.Secondary
battery-compartment
lid
17.Snow-cleanouttool
B.Disconnectthetrunnionfromthe
speed-selectorlever.
C.Turnthetrunnionupward(counterclockwise)
onthespeed-controlrod.
D.Connectthetrunniontothespeed-selector
lever.
7.Ifyoumadeanyadjustments,repeatthis
procedureuntilnoadjustmentsarerequired.
Important:Ifthemachinemoveswhenthe
tractionleverisinthereleasedposition,checkthe
tractioncable;refertoCheckingandAdjusting
theTractionCable(page24)ortakethemachine
toanAuthorizedServiceDealerforservice.
14

1.Batterychargelights
2.ECObutton
Figure12
Figure13
3.KeyswitchinOFFposition
Specications
ModelWeightLengthWidthHeight
84.4kg142cm71cm117cm
39926
BatteryPack
Model88675
g347780
Batterypackcapacity
Batterymanufacturerrating=60Vmaximumand54Vnominal.
Actualvoltagevarieswithload.
BatteryCharger
Model88602
Type
g344092
Input
Output60VMAXDC2.0A
(186lb)(56
60VMAXLithium-IonBatteryCharger
120VAC50/60HzMax2.0A
inches)
7.5Ah
405Wh
(28
inches)
(46
inches)
1.Snow-cleanouttool(attachedtothehandle)
Figure14
1.BatterychargerModel
88602(includedwith
Model39926)
2.BatterypackModel88675
(includedwithModel
39926)
3.BatterypackModel88625
(notincluded)
AppropriateTemperatureRanges
Charge/storethebatterypack
at
Usethebatterypackat
Usethemachineat
*Chargingtimewillincreaseifyoudonotchargethe
batterywithinthisrange.
Storethemachine,batterypack,andbatterycharger
g360884
inanenclosedclean,dryarea.
5°C(41°F)to40°C(104°F)*
-30°C(-22°F)to49°C(120°F)*
-30°C(-22°F)to49°C(120°F)*
Attachments/Accessories
AselectionofToroapprovedattachmentsand
accessoriesisavailableforusewiththemachine
toenhanceandexpanditscapabilities.Contact
yourAuthorizedServiceDealerorauthorizedT oro
distributororgotowww.T oro.comforalistofall
approvedattachmentsandaccessories.
Toensureoptimumperformanceandcontinuedsafety
certicationofthemachine,useonlygenuineToro
replacementpartsandaccessories.Replacement
partsandaccessoriesmadebyothermanufacturers
couldbedangerous,andsuchusecouldvoidthe
productwarranty.
15

Operation
TurningOntheHeadlight
andHandwarmers
BeforeOperation
InstallingtheBatteryPack
1.Ensurethattheventsonthebatterypacksare
clearofanydustanddebris.
2.Liftupthebattery-compartmentlid.
3.Lineupthecavityinthebatterypackwiththe
tongueonthemachineandslidethebattery
packintothecompartmentuntilitlockintoplace
(Figure9).
4.Closethebattery-compartmentlid.
5.Repeatfortheother2batterycavities(if
needed).
Note:Thecombinedamphoursofallthe
installedbatteriesmustaddupto6.0orgreater,
otherwisethemachinecannotstart.
Note:Ifthebattery-compartmentliddoesnot
closecompletely,thebatteryisnotfullyinstalled.
Youcanturnonthepowertothehandwarmersand
theheadlightbeforeoperatingthemachine;turnthe
keytotheACCESSORYposition(Figure16).
IntheACCESSORYpositionyoucanalsoviewthestate
ofchargeofeachinstalledbattery .Thepositionof
eachsetoflightscorrespondstotherelatedbattery
cavity.Ifthebatterystateofchargeistoolowand
needstobecharged,orifthereisnobatteryinthe
correspondingcavity,thebatterypresencelightdoes
notturnon.
g348182
Figure16
Figure15
1.State-of-chargelights
2.Batterypresencelights
g344093
3.Keyswitchinthe
ACCESSORYposition
16

Operatingthe
Handwarmers
Operatethehandwarmersasfollows:
•PresstheswitchtotheONpositiontoturnonthe
handwarmers.
•PresstheswitchtotheOFFpositiontoturnoffthe
handwarmers.
Figure17
g347864
Figure18
1.KeyswitchinONposition
Note:Ifthemachineisturnedonandleftidling
oroperatingwithouttheaugerengagedforan
extendedperiod,themotorshutofftimeoutwill
engage,shuttingoffthemachine.Whenthe
machineshutsoffthiswayitbeepstoindicate
thatthetimeoutwasengaged.
g026460
ActivatingECOMode
1.On/Offswitch3.OFFposition
2.ONposition
DuringOperation
StartingtheMachine
Note:Usethebatterypackonlyintemperatures
thatarewithintheappropriaterange;referto
Specications(page15).
1.Ensurethatthebatterypack(s)areinstalledin
themachine;refertoInstallingtheBatteryPack
(page16).
2.Inserttheelectric-startkeyintothecontrolpanel.
3.TurnthekeytotheACCESSORYposition.
4.TurnthekeytotheONpositiontoturnonthe
machine(Figure18).
Note:IfthekeyisturnedfromOFFpositionto
theONtooquickly,themachinemaynotstart;
ensurethatthekeystopsbrieyinthemiddle
ACCESSORYposition.
UsingECOmodemayextendbatterylifebyreducing
rotorspeed;useECOmodewheneveryouare
movinglightsnow,ormovingsnowashortdistance.
ActivateECOmodeusingtheECObuttonasshown
inFigure19.
g347866
Figure19
1.ECOmodebutton
17
ChargingtheBatteryPack
Important:Thebatterypackisnotfullycharged
whenyoupurchaseit.Beforeusingthetoolfor
thersttime,placethebatterypackinthecharger
andchargeituntiltheLEDdisplayindicatesthe
batterypackisfullycharged.Readallsafety
precautions.
Important:Chargethebatterypackonlyin
temperaturesthatarewithintheappropriate
range;refertoSpecications(page15).
Note:Atanytime,pressthebattery-charge-indicator
buttononthebatterypacktodisplaythecurrent
charge(LEDindicators).
1.Ensurethattheventsonthebatteryandcharger
areclearofanydustanddebris.
4.Toremovethebatterypack,slidethebattery
backwardoutofthecharger.
5.RefertothefollowingtabletointerprettheLED
indicatorlightonthebatterycharger.
Indicator
light
Off
Green
blinking
Green
Red
Red
blinking
Indicates
Nobatterypackinserted
Batterypackischarging
Batterypackischarged
Batterypackand/orbatterychargerisoverorunder
theappropriatetemperaturerange
Batterypackchargingfault*
*RefertoTroubleshooting(page29)formore
information.
Important:Thebatterycanbeleftonthecharger
forshortperiodsbetweenuses.
Ifthebatterywillnotbeusedforlongerperiods,
removethebatteryfromthecharger;referto
Storage(page28).
g290533
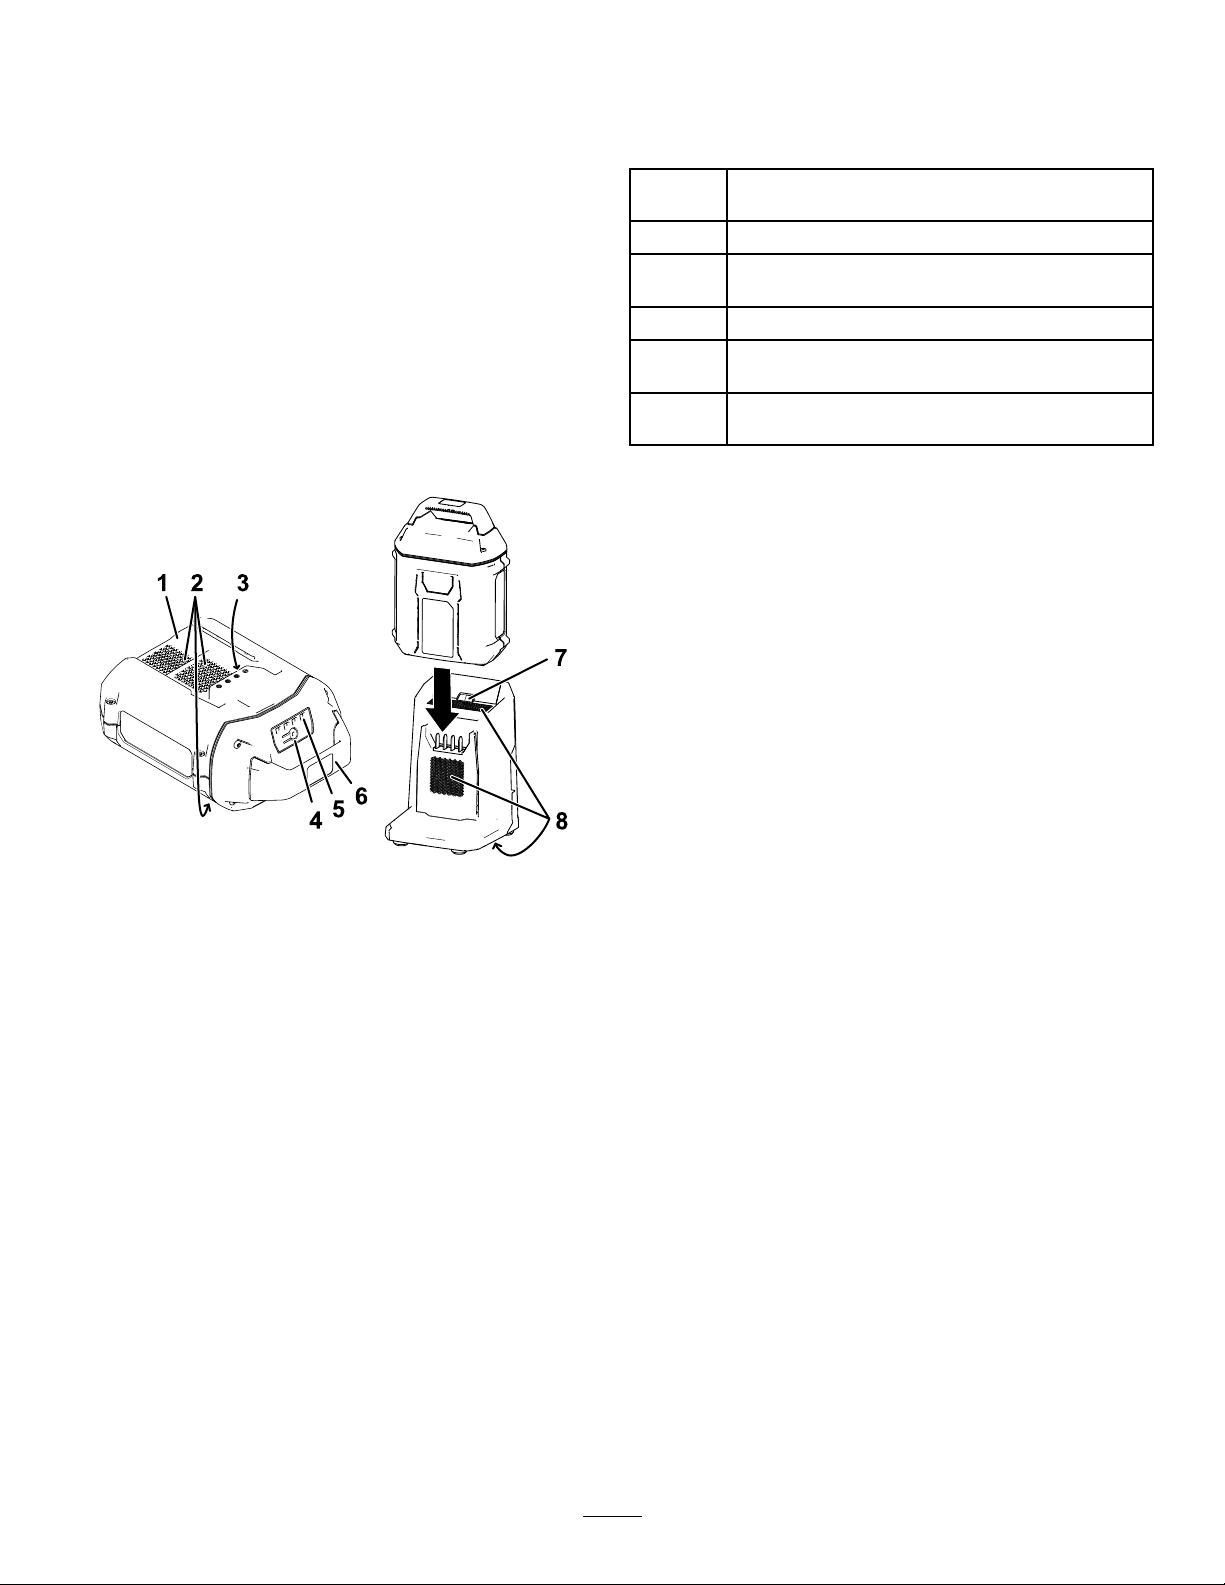
Figure20
1.Batterypackcavity
2.Batterypackventingareas6.Handle
3.Batterypackterminals
4.Battery-charge-indicator
button
5.LEDindicators(current
charge)
7.ChargerLEDindicator
light
8.Chargerventingareas
2.Lineupthecavityinthebatterypack(Figure20)
withthetongueonthecharger.
3.Slidethebatterypackintothechargeruntilitis
fullyseated(Figure20).
18
OperatingtheTraction
OperatingtheSpeed
Drive
CAUTION
Ifthetractiondriveisnotproperlyadjusted,
themachinemaymoveinthedirection
oppositeofwhatyouintended,causinginjury
and/orpropertydamage.
Carefullycheckthetractiondriveandadjust
itproperly,ifnecessary;referto10Checking
theOperationoftheTractionDrive(page13)
formoreinformation.
Important:Ifthemachinemoveswhenthe
tractionleverisinthereleasedposition,checkthe
tractioncable;refertoCheckingandAdjusting
theTractionCable(page24)ortakethemachine
toanAuthorizedServiceDealerforservice.
1.Toengagethetractiondrive,squeezetheleft
(traction)levertothehandgrip(Figure21).
Selector
Thespeedselectorhas6forwardand2reverse
gears.T ochangespeeds,releasethetractionlever
andshiftthespeed-selectorlevertothedesired
position(Figure22).Theleverlocksinanotchat
eachspeedselection.
g322971
Figure22
Operatingthe
Auger/ImpellerDrive
1.Toengagetheauger/impellerdrive,moveback
thelockswitchonthelever,thensqueezethe
right(auger/impeller)levertothehandgrip
(Figure23).
Figure21
2.Tostopthetractiondrive,releasethetraction
lever.
g322974
g360687
Figure23
2.Tostoptheaugerandimpeller,releasetheright
lever.
19

Important:Whenyouengageboththe
auger/impellerleverandthetractionlever,
thetractionleverlockstheauger/impeller
leverdown,freeingyourrighthand.To
releasebothlevers,simplyreleasetheleft
(traction)lever.
3.Iftheaugerandimpellercontinuetorotatewhen
youreleasetheauger/impellerlever,donot
operatethemachine.Checktheauger/impeller
cable;refertoCheckingandAdjustingthe
Auger/ImpellerCable(page25)andadjustitif
necessary.Otherwise,takethemachinetoan
AuthorizedServiceDealerforservice.
WARNING
OperatingtheQuickStick®
HoldthebluetriggercapdowntousetheQuickStick
tomovethedischargechuteandthechutedeector.
Releasethetriggercaptolockthedischargechute
andchutedeectorintoposition(Figure24).
Iftheaugerandimpellercontinue
torotatewhenyoureleasethe
auger/impellerlever,youcouldseriously
injureyourselforothers.
Donotoperatethemachine.Takeittoan
AuthorizedServiceDealerforservice.
g001014
Figure24
MovingtheDischargeChute
HoldthebluetriggercapdownandmovetheQuick
Sticktothelefttomovethedischargechutetothe
left;movetheQuickSticktotherighttomovethe
dischargechutetotheright(Figure25).
Figure25
•Ifthechutedoesnotmove,refertoAdjustingthe
Discharge-ChuteLatch(page27).
•Ifthechutedoesnotturnasfartotheleftasit
doestotheright,ensurethatthecableisroutedto
theinsideofthehandles.Referto3Installingthe
UpperHandle(page10).
•Ifthechutedoesnotlockintoplacewhenyou
releasethetriggercap,refertoAdjustingthe
Discharge-ChuteLatch(page27).
20
g018894

MovingtheChuteDeector
HoldthebluetriggercapdownandmovetheQuick
Stickforwardtolowerthechutedeector;moveit
rearwardtoraisethechutedeector(Figure26).
Figure26
ClearingaClogged
DischargeChute
OperatingTips
DANGER
Whenthemachineisinoperation,theimpeller
andaugerrotateandcaninjureoramputate
handsorfeet.
•Beforeadjusting,cleaning,inspecting,
troubleshooting,orrepairingthemachine,
shutoffthemachineandwaitforall
movingpartstostop.Removethekeyand
thebatteryfromthemachinetoprevent
someonefromaccidentallystartingthe
machine.
•Removeanyobstructionsfromthe
g001016
dischargechute;refertoClearinga
CloggedDischargeChute(page21).Use
thesnow-cleanouttool(Figure13),not
yourhands,toremoveanobstructionfrom
thedischargechute.
•Staybehindthehandlesandawayfrom
thedischargeopeningwhileoperatingthe
machine.
WARNING
Iftheauger/impellerisrunningbutthereisno
snowcomingoutofthedischargechute,the
dischargechutemaybeclogged.
Neveruseyourhandstoclearaclogged
dischargechute.Thiscouldresultinpersonal
injury.
•T ounclogthedischargechute,stayinthe
operatingpositionandreleasetheleft(traction)
lever.Whilerunningtheauger/impeller,pushdown
onthehandlestoraisethefrontofthemachinea
fewcentimeters(inches)offthepavement.Then
liftthehandlesquicklytobumpthefrontofthe
machineonthepavement.Repeatifnecessary
untilastreamofsnowcomesoutthedischarge
chute.
•Ifyoucannotunclogthedischargechuteby
bumpingthefrontofthemachine,shutoffthe
machine,waitforallmovingpartstostop,and
usethesnow-cleanouttool(Figure13).
Important:Uncloggingthedischargechute
bybumpingthefrontofthemachineonthe
pavementmaycausetheskidstomove.Adjust
theskidsandtightentheskidboltssecurely;
refertoCheckingandAdjustingtheSkidsand
Scraper(page23).
•Keepyourface,hands,feet,andanyother
partofyourbodyorclothingawayfrom
concealed,moving,orrotatingparts.
WARNING
Theimpellercanthrowstones,toys,andother
foreignobjectsandcauseseriouspersonal
injurytoyouorbystanders.
•Keeptheareatobeclearedfreeofall
objectsthattheaugercouldpickupand
throw.
•Keepallchildrenandpetsawayfromthe
areaofoperation.
Forbestresults,considerthefollowing:
•Ifthemachineslowsdownunderaloadorthe
wheelsslip,shiftthemachineintoalowergear;
refertoOperatingtheSpeedSelector(page19).
•Ifthefrontofthemachineridesup,shiftthe
machineintoalowergear.Ifthefrontcontinuesto
rideup,liftuponthehandles.
•Removethesnowassoonaspossibleafteritfalls.
•Pushthemachineforward,butallowittoworkat
itsownpace.
•Overlapeachswathtoensurecompletesnow
removal.
•Dischargethesnowdownwindwheneverpossible.
21

AfterOperation
PreventingFreeze-upafter
Use
ShuttingOfftheMachine
1.Releasethetractionandauger/impellerlevers.
2.TurnthekeytotheOFFpositionandremoveit
fromthecontrolpanel(Figure12).
3.Removethebatterypack(s);refertoRemoving
theBatteryPackfromtheMachine(page22).
Note:Wheneveryouarenotusingthemachine,
removethebatterypack(s)andthekeyfrom
themachine.
Note:Ifthemachineisturnedonandleftidling
oroperatingwithouttheaugerengagedforan
extendedperiod,themotorshutofftimeoutwill
engage,shuttingoffthemachine.Whenthe
machineshutsoffthiswayitbeepstoindicate
thatthetimeoutwasengaged.
TorestartthemachinerefertoStartingthe
Machine(page17).
RemovingtheBatteryPack
fromtheMachine
•Insnowyandcoldconditions,somecontrolsand
movingpartsmayfreeze.Donotuseexcessive
forcewhentryingtooperatefrozencontrols.
Ifyouhavedifcultyoperatinganycontrolorpart,
startthemachineandletitrunforafewminutes.
•Afterusingthemachine,letthemachinerunfora
fewminutestopreventmovingpartsfromfreezing.
Engagetheauger/impellertoclearanyremaining
snowfrominsidethehousing.RotatetheQuick
Sticktopreventitfromfreezing.Shutoffthe
machine,waitforallmovingpartstostop,remove
thekeyandthebattery,andremovealliceand
snowfromthemachine.
•Cleanoffanysnowandicefromthebaseofthe
chute.
•Rotatethedischargechuteleftandrighttofree
itfromanyicebuildup.
1.Liftupthebattery-compartmentlid.
2.Pressthebatterypack-latchtoreleasethe
batterypackandremovethebatterypack
(Figure27).
Figure27
3.Closethebattery-compartmentlid.
g347853
22
Maintenance
RecommendedMaintenanceSchedule(s)
MaintenanceService
Interval
Aftertherst2hours
Yearly
Yearlyorbeforestorage
MaintenanceProcedure
•Inspectthetractioncableandadjustitifnecessary.
•Inspecttheauger/impellercableandadjustitifnecessary .
•Checktheskidsandthescraperandadjustthemifnecessary.
•Inspectthetractioncableandadjustorreplaceitifnecessary.
•Inspecttheauger/impellercableandadjustorreplaceitifnecessary.
•Checktheauger-gearboxoilandaddoilifnecessary.
•Lubricatethehexshaft.
•Checktheairpressureinthetiresandinatethemto1 16to137kPa(17to20psi).
•HaveanAuthorizedServiceDealerinspectandreplacethetraction-drivebeltand/or
PreparingforMaintenance
1.Movethemachinetoalevelsurface.
2.Stopthemachine,removetheelectric-start
key,waitforallmovementtostop,andremove
thebatterypack(s)fromthemachinebefore
adjusting,servicing,cleaning,orstoringthe
machine.
theauger/impellerdrivebelt,ifnecessary.
CheckingandAdjustingthe
SkidsandScraper
ServiceInterval:Y early—Checktheskidsand
thescraperandadjustthemif
necessary.
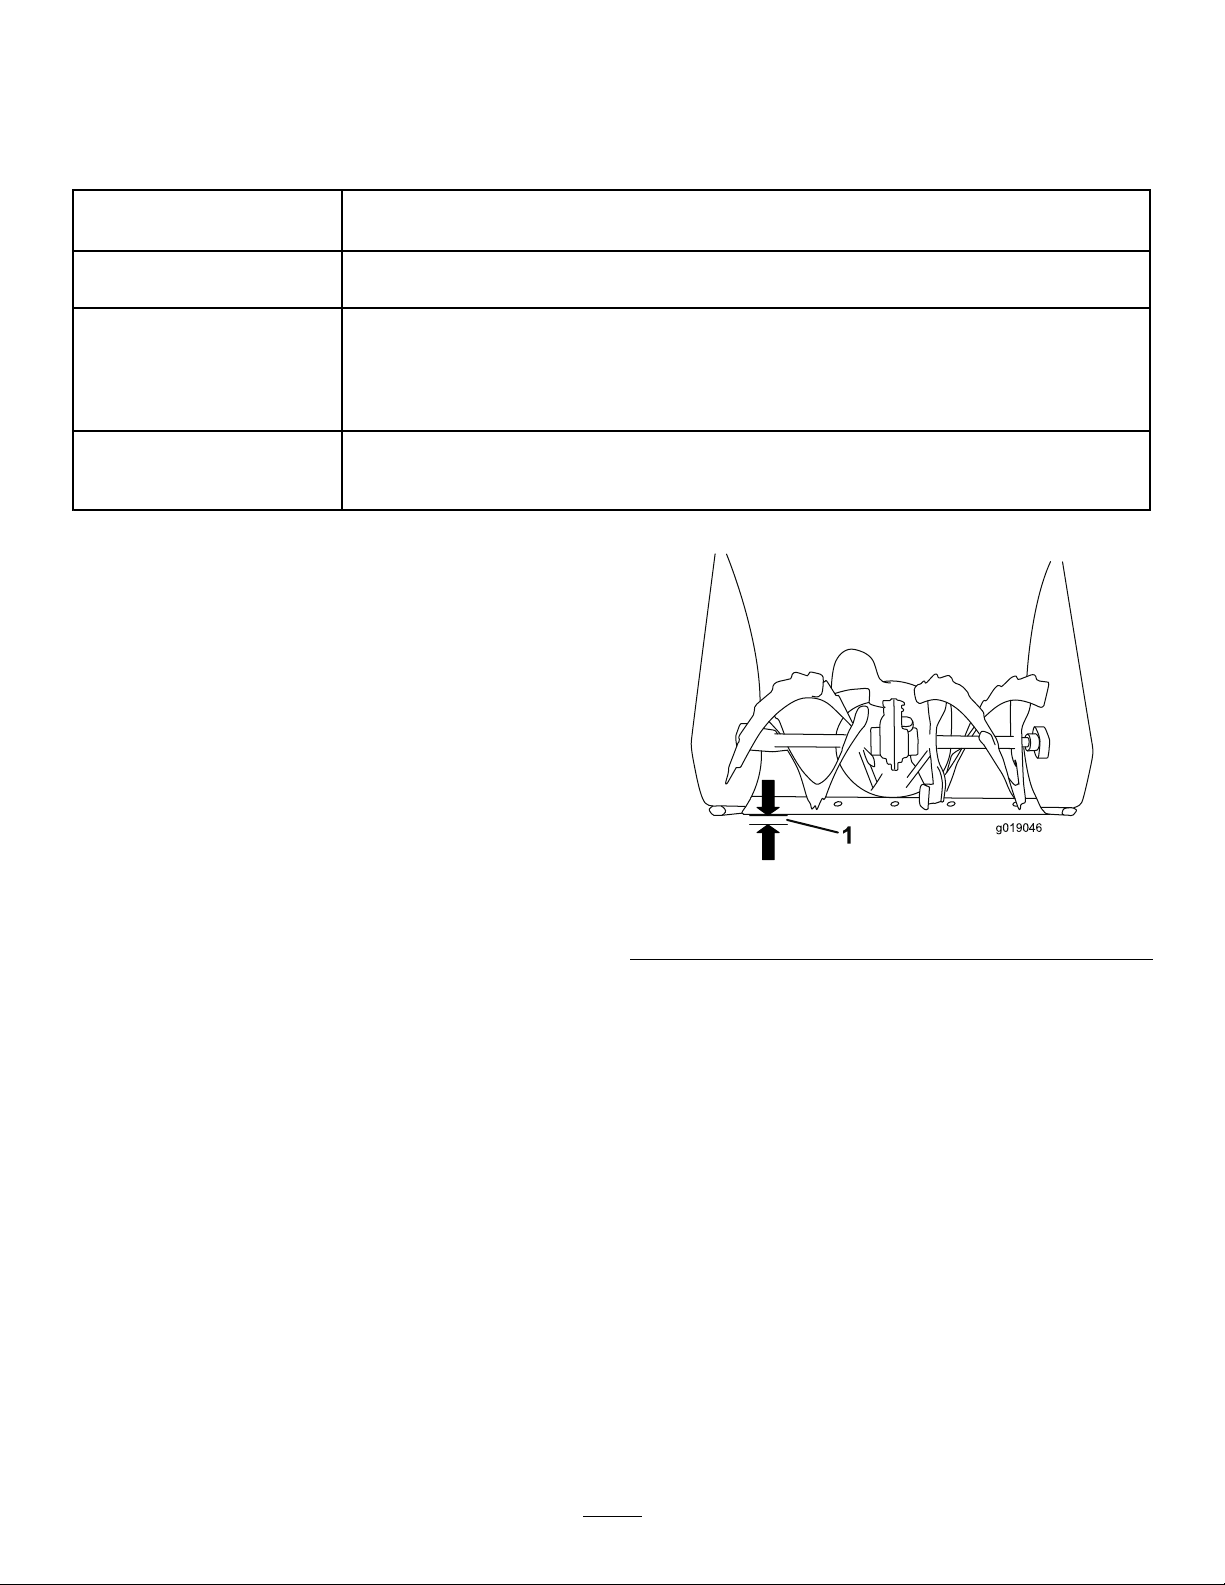
Checktheskidsandthescrapertoensurethatthe
augerdoesnotcontactthepavedorgravelsurface.
Adjusttheskidsandthescraperasneededto
compensateforwear.
1.Checkthetirepressure;referto7Checkingthe
TirePressure(page12).
2.Loosenthenutsthatsecurebothskidstothe
augersidesuntiltheskidsslideupanddown
easily.
Important:Theaugerbladesmustbe
supportedabovethegroundbytheskids.
g019046
Figure28
1.3mm(1/8inch)
3.Ensurethatthescraperis3mm(1/8inch)above
andparalleltoalevelsurface.
Note:Ifthepavementiscracked,rough,or
uneven,adjusttheskidstoraisethescraper.For
gravelsurfaces,adjusttheskidsfurtherdownto
preventthemachinefrompickinguprocks.
4.Movetheskidsdownuntiltheyareevenwith
theground.
5.Firmlytightenthenutsthatsecurebothskids
totheaugersides.
Note:T oeasilyadjusttheskidsiftheyloosen,
supportthescraper3mm(1/8inch)offthe
pavement,thenadjusttheskidsdowntothe
pavement.
Note:Iftheskidsbecomeexcessivelyworn,
youcanturnthemoverandsettheunusedside
towardthepavement.
23

CheckingandAdjustingthe
TractionCable
ServiceInterval:Aftertherst2hours—Inspect
thetractioncableandadjustitif
necessary.
Yearly—Inspectthetractioncableandadjustor
replaceitifnecessary.
Ifthemachinedoesnotdriveintheforwardorreverse
speedsoritdriveswhenyoureleasethetractionlever,
adjustthetractioncable.
Iftheleft(traction)cableisnotproperlyadjusted,do
thefollowingsteps:
1.Loosenthejamnut.
2.Engagethetractionleverandholditinplace
(Figure29).
g030998
Figure30
Figure29
3.Loosenortightentheturnbuckletoadjustthe
springlengthto5.5cm(2–3/16inches)as
showninFigure30.
1.Jamnut
2.Turnbuckle
3.Spring
4.5.5cm(2–3/16inches)
4.Tightenthejamnut(Figure30),ensuringthat
thereisslighttensiononthecable.
5.Ifthetractioncableisproperlyadjustedbuta
g322974
problemremains,contactanAuthorizedService
Dealer.
24

CheckingandAdjustingthe
Auger/ImpellerCable
ServiceInterval:Aftertherst2hours—Inspectthe
auger/impellercableandadjustitif
necessary.
Yearly—Inspecttheauger/impellercableand
adjustorreplaceitifnecessary.
1.Loosenthejamnut(Figure32).
2.Engagetheauger/impellerleverandholditin
place(Figure31).
g371834
Figure32
Figure31
3.Loosenortightentheturnbuckletoadjustthe
springlengthto6.6cm(2-3/5inches)asshown
inFigure32.
1.Turnbuckle
2.Jamnut
3.Spring
4.6.6cm(2-3/5inches)while
theauger/impellerleveris
helddown.
4.Tightenthejamnut(Figure32),ensuringthat
thereisslighttensiononthecable.
5.Turnonthemachineandattempttoengagethe
auger/impellerdrivewithoutmovingthelock
switchback;iftheaugerrotates,loosenthe
turnbucklesothattheaugerdoesnotengage.
6.Iftheauger/impellercableisproperlyadjusted
butaproblemremains,contactanAuthorized
ServiceDealer.
g360687
25
Checkingthe
LubricatingtheHexShaft
Auger-Gearbox-OilLevel
ServiceInterval:Y early—Checktheauger-gearbox
oilandaddoilifnecessary.
1.Movethemachinetoalevelsurface.
2.Cleantheareaaroundthepipeplug(Figure33).
Figure33
1.Pipeplug
3.Removethepipeplugfromthegearbox.
4.Checktheoillevelinthegearbox.Theoilshould
be9.5mm(3/8inch)belowthelleropening.
5.Iftheoillevelislow,addGL-5orGL-6,SAE
80-90EPgearoillubricanttothegearboxuntil
theoillevelis9.5mm(3/8inch)belowtheller
opening.
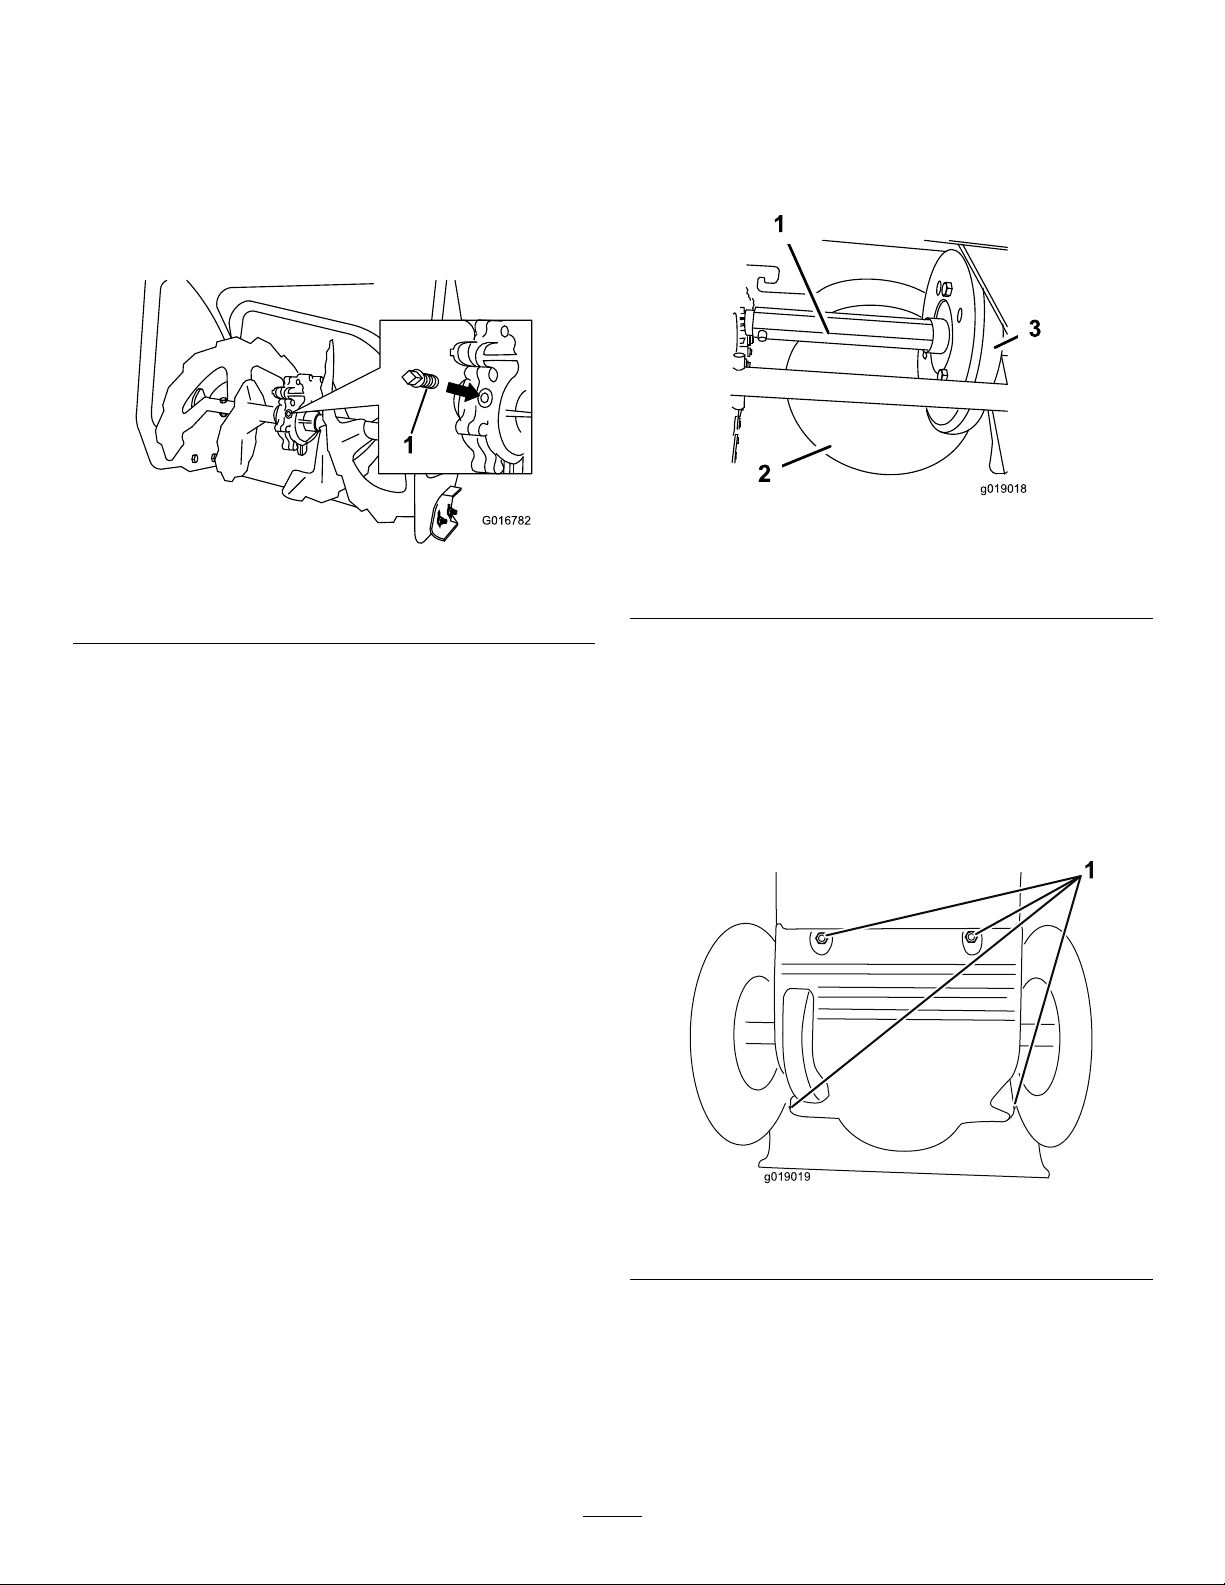
ServiceInterval:Yearly—Lubricatethehexshaft.
Lightlylubricatethehexshaftyearlywithautomotive
engineoil(Figure34).
g019018
Figure34
g016782
1.Hexshaft
2.Steelfrictionpulley
3.Rubberwheel
Important:Donotgetoilontherubberwheelor
thesteelfrictionpulleybecausethetractiondrive
willslip(Figure34).
1.Drainthefuelfromthefueltank.
2.Tipthemachineforwardontoitsaugerhousing
andblockitsothatitcannotfall.
3.Removethebackcover(Figure35).
Note:Donotusesyntheticoil.
6.Installthepipepluginthegearbox.
g019019
Figure35
1.Screws
4.Movethespeed-selectorlevertoPositionR2.
5.Dipyourngerinautomotiveengineoiland
lightlylubricatethehexshaft.
6.Movethespeed-selectorlevertoPosition6.
7.Lubricatetheotherendofthehexshaft.
26
8.Movethespeed-selectorleverforwardand
rearwardafewtimes.
9.Installthebackcoverandreturnthemachineto
theoperatingposition.
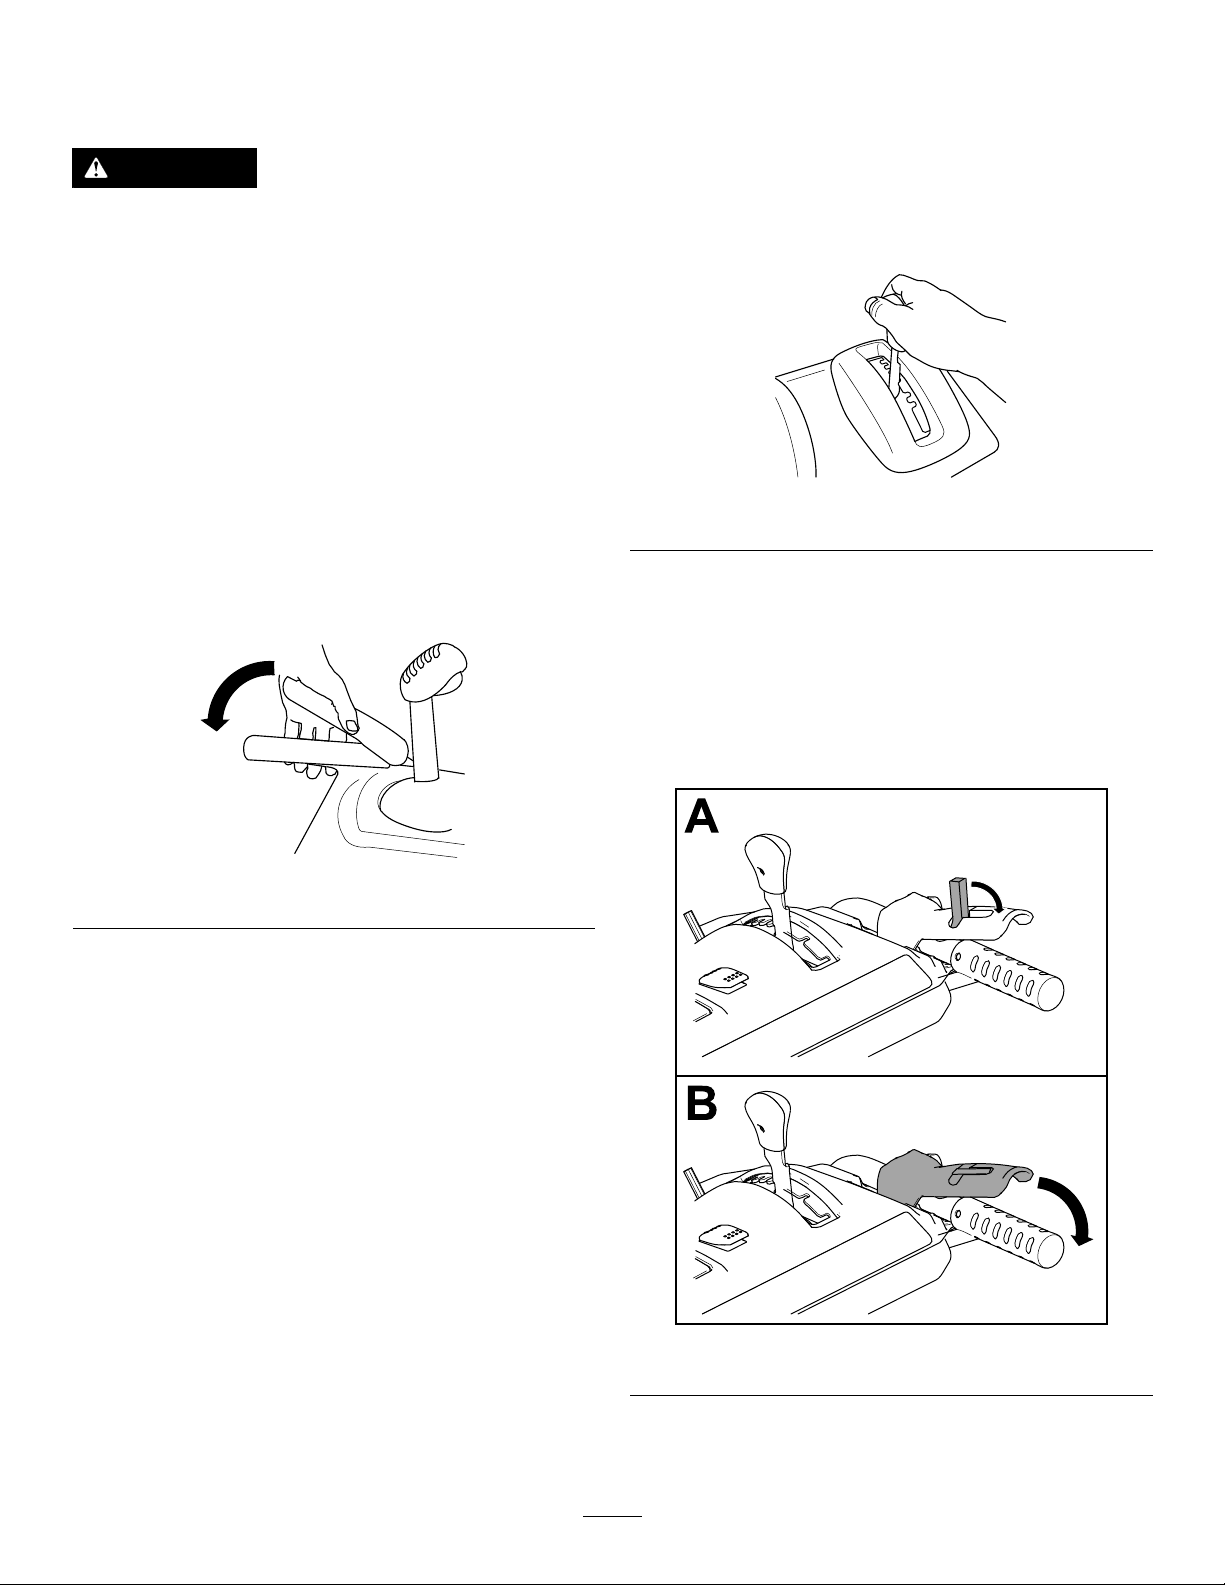
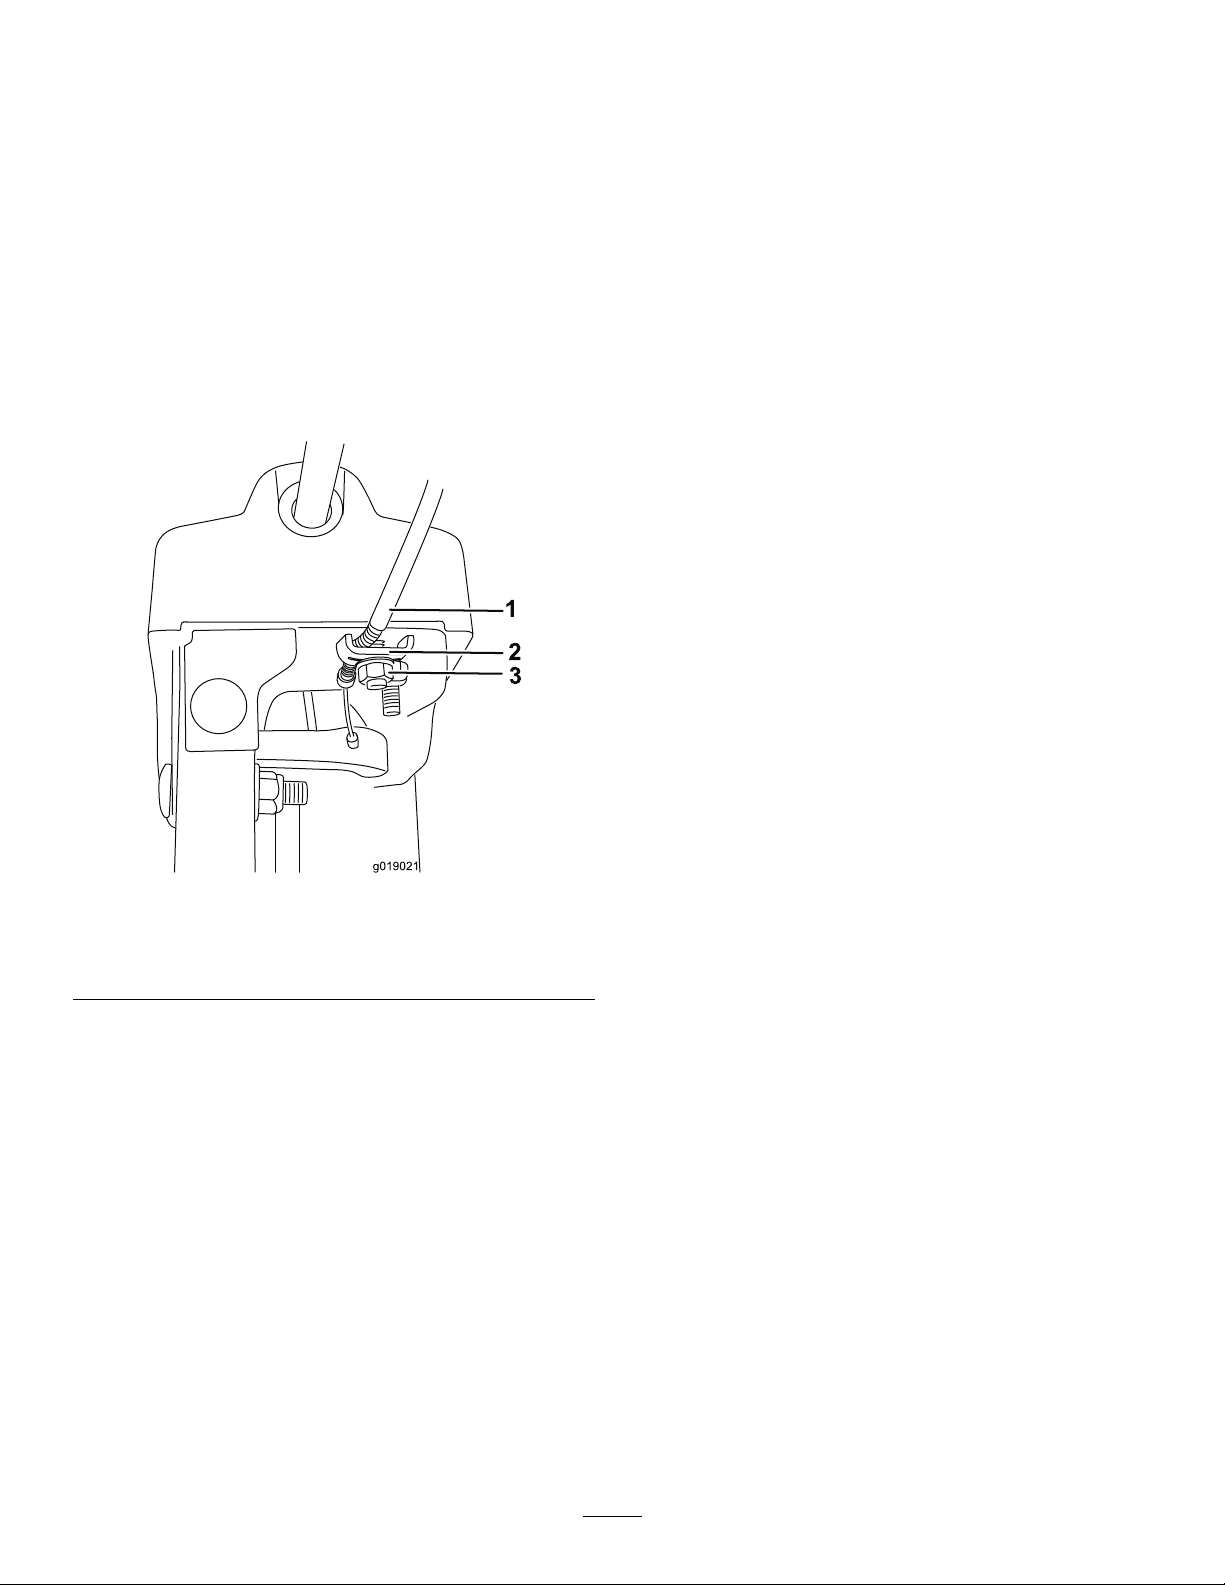
Adjustingthe
Discharge-ChuteLatch
Ifthedischargechutedoesnotlockintothedesired
positionordoesnotunlocksothatyoucanmoveitto
anotherposition,adjustthedischarge-chutelatch.
1.Loosentheclampfasteneronthechute-support
plateuntilthecableisfree.
Figure36
1.Cableconduit3.Clampfastener
2.Cableclamp
2.Removeanyslackinthecablebypullingthe
cableconduitrearward.
3.Tightentheclampfastenerwhileholdingthe
cableinplace.
ReplacingtheDriveBelts
Iftheauger/impellerdrivebeltorthetraction-drivebelt
becomesworn,oil-soaked,orotherwisedamaged,
haveanAuthorizedServiceDealerreplacethebelt.
g019021
27

Storage
StoringtheMachine
Important:Storethemachine,batterypack,and
chargeronlyintemperaturesthatarewithinthe
appropriaterange;refertoSpecications(page
15).
Important:Ifyouarestoringthebatterypack
fortheoff-season,chargeituntil2or3LED
indicatorsturngreenonthebattery.Donotstore
afullychargedorfullydepletedbattery.When
youarereadytousethemachineagain,charge
thebatterypackuntiltheleftindicatorlightturns
greenonthechargerorall4LEDindicatorsturn
greenonthebattery.
•Disconnecttheproductfromthepowersupply
(i.e.,removetheplugfromthepowersupplyor
thebatterypack),removethekey,andcheckfor
damageafteruse.
•Cleanallforeignmaterialfromtheproduct.
Lithium-ionbatterypackslabeledwiththe
Call2Recyclesealcanberecycledatany
participatingretailerorbatteryrecycling
facilityintheCall2Recycleprogram(US
andCanadaonly).T olocateaparticipating
retailerorfacilityclosesttoyou,pleasecall
1-800-822-8837orvisitwww.call2recycle.org.
Ifyoucannotlocateaparticipatingretaileror
facilitynearby ,orifyourrechargeablebattery
isnotlabeledwiththeCall2Recycleseal,
pleasecontactyourlocalmunicipalityformore
informationonhowtoresponsiblyrecyclethe
battery.IfyouarelocatedoutsideoftheUS
andCanada,pleasecontactyourauthorized
Torodistributor.
•Donotstorethetoolwiththebatterypackinstalled.
•Whennotinuse,storethemachine,battery
pack,key,andbatterychargeroutofthereachof
children.
•Keepthemachine,batterypack,key ,andbattery
chargerawayfromcorrosiveagents,suchas
gardenchemicalsandde-icingsalts.
•T oreducetheriskofseriouspersonalinjury ,do
notstorethebatterypackoutsideorinvehicles.
•T ouchupchippedsurfaceswithpaintavailable
fromanAuthorizedServiceDealer.Sandaffected
areasbeforepainting,andusearustpreventative
topreventthemetalpartsfromrusting.
•Tightenallloosescrews,bolts,andlocknuts.
Repairorreplaceanydamagedparts.
•Storethemachine,batterypack,key,andbattery
chargerinanenclosedclean,dryarea.
PreparingtheBatteryPackfor
Recycling
Important:Uponremoval,covertheterminalsof
thebatterypackwithheavy-dutyadhesivetape.
Donotattempttodestroyordisassemblethe
batterypackorremoveanyofitscomponents.
28

Troubleshooting
Problem
Themachinedoesnotrunordoesnotrun
continuously.
Themachinedoesnotreachfullpower.
PossibleCauseCorrectiveAction
1.Themotorshutofftimeoutwasreached
becausetheaugerwasnotengaged
foranextendedperiodoftime.
2.ThekeywasturnedfromOFFtoON
tooquickly.
3.Thebatterypackislowoncharge.
4.Thebatterypackisnotfullyseated.
5.Thebatterypackisoverorunderthe
appropriatetemperaturerange.
6.Thebatterypackhasexceededhigh
amperagelimits.
7.Thereismoistureontheleadsofthe
batterypack.
8.Thebatterypackisdamaged.8.Replacethebatterypack.
9.Thereisanotherelectricalproblem
withthemachine.
1.Thebatterypackchargecapacityis
toolow.
2.Theairventsareblocked.
1.Noissue,restartthemachine.The
machinebeepstoindicatethatthe
motorshutofftimeoutwasreached.
2.Turnthekeyslower,ensurethat
thekeystopsbrieyinthemiddle
ACCESSORYposition.
3.Chargethebatterypack.
4.Ensurethatthebatterypackisinserted
allthewayintothehousing.
5.Movethebatterypacktoaplace
whereitisdryandthetemperatureis
between5°C(41°F)and40°C(104°F).
6.Releasethetrigger,thenpressthe
triggerswitch.
7.Allowthebatterypacktodryorwipeit
dry.
9.ContactanAuthorizedServiceDealer.
1.Removethebatterypackfromthe
machineandfullychargethebattery
pack.
2.Cleantheairvents.
Themachineisproducingabeeping
sound.
Themachineruns,butthemachine
dischargessnowpoorlyornotatall.
1.Themotorshutofftimeoutwasreached
becausetheaugerwasnotengaged
foranextendedperiodoftime.
2.Thebatterypackislowoncharge.
3.Themachineisoverloaded.3.Walkataslowerpacewhileclearing
4.Thereisanotherelectricalproblem
withthemachine.
1.Themachineismovingtoofasttoclear
thesnow.
2.Y ouaretryingtoremovetoomuch
snowperswath.
3.Y ouaretryingtoremoveextremely
heavyorwetsnow.
4.Thedischargechuteisplugged.4.Unclogthedischargechute.
5.Theauger/impellerdrivebeltisloose
orisoffthepulley.
6.
Theauger/impellerdrivebeltisworn
orbroken.
1.Noissue,restartthemachine.The
machinebeepstoindicatethatthe
motorshutofftimeoutwasreached.
2.Chargethebatterypack.
snoworbreakupalargepileofsnow
beforeclearingit.
4.Attempttheothertroubleshooting
actions,ifthealarmstillsounds,
contactanAuthorizedServiceDealer .
1.Shiftthemachineintoalowergear.
2.Reducetheamountofsnowremoved
perswath.
3.Donotoverloadthemachinewith
extremelyheavyorwetsnow.
5.Installand/oradjusttheauger/impeller
drivebelt;refertowww.Toro.com
forservicinginformationortakethe
machinetoanAuthorizedService
Dealer.
6.
Replacetheauger/impellerdrivebelt;
refertowww.Toro.comforservicing
informationortakethemachinetoan
AuthorizedServiceDealer.
Thedischargechuteeitherdoesnotlock
intoplaceordoesnotmove.
1.Thedischarge-chutelatchisnot
properlyadjusted.
29
1.Adjustthedischarge-chutelatch.

Problem
PossibleCauseCorrectiveAction
Themachinedoesnotproperlyclearthe
snowoffthesurface.
Thebatterypackloseschargequickly.
Thebatterychargerisnotworking.
TheLEDindicatorlightonthebattery
chargerisred.
TheLEDindicatorlightonthebattery
chargerisblinkingred.
1.Theskidsand/orscraperarenot
properlyadjusted.
2.Thepressureinthetiresisnotequal.
1.Thebatterypackisoverorunderthe
appropriatetemperaturerange.
2.Themachineisoverloaded.
1.Thebatterychargerisoverorunder
theappropriatetemperaturerange.
2.Theoutletthatthebatterychargeris
pluggedintodoesnothavepower.
1.Thebatterychargerand/orbattery
packisoverorundertheappropriate
temperaturerange.
1.Thereisanerrorinthecommunication
betweenthebatterypackandthe
charger.
2.Thebatterypackisweak.
1.Adjusttheskidsand/orthescraper.
2.Checkandadjustthepressurein1or
bothtires.
1.Movethebatterypacktoaplace
whereitisdryandthetemperatureis
between5°C(41°F)and40°C(104°F).
2.Pushthemachinewithlessforce.
1.Unplugthebatterychargerandmove
ittoaplacewhereitisdryandthe
temperatureisbetween5°C(41°F)
and40°C(104°F).
2.Contactyourlicensedelectricianto
repairtheoutlet.
1.Unplugthebatterychargerandmove
thebatterychargerandbatterypack
toaplacewhereitisdryandthe
temperatureisbetween5°C(41°F)
and40°C(104°F).
1.Removethebatterypackfromthe
batterycharger,unplugthebattery
chargerfromtheoutlet,andwait10
seconds.Plugthebatterychargerinto
theoutletagainandplacethebattery
packonthebatterycharger.IftheLED
indicatorlightonthebatterychargeris
stillblinkingred,repeatthisprocedure
again.IftheLEDindicatorlighton
thebatterychargerisstillblinkingred
after2attempts,properlydisposeof
thebatterypackatabatteryrecycling
facility.
2.Contactyourauthorizedservicedealer
ifthebatteryisinwarranty,orproperly
disposeofthebatterypackatabattery
recyclingfacility.
30

CaliforniaProposition65WarningInformation
Whatisthiswarning?
Youmayseeaproductforsalethathasawarninglabellikethefollowing:
WARNING:CancerandReproductiveHarm—www.p65Warnings.ca.gov.
WhatisProp65?
Prop65appliestoanycompanyoperatinginCalifornia,sellingproductsinCalifornia,ormanufacturingproductsthatmaybesoldinorbroughtinto
California.ItmandatesthattheGovernorofCaliforniamaintainandpublishalistofchemicalsknowntocausecancer,birthdefects,and/orother
reproductiveharm.Thelist,whichisupdatedannually,includeshundredsofchemicalsfoundinmanyeverydayitems.ThepurposeofProp65isto
informthepublicaboutexposuretothesechemicals.
Prop65doesnotbanthesaleofproductscontainingthesechemicalsbutinsteadrequireswarningsonanyproduct,productpackaging,orliteraturewith
theproduct.Moreover ,aProp65warningdoesnotmeanthataproductisinviolationofanyproductsafetystandardsorrequirements.Infact,the
CaliforniagovernmenthasclariedthataProp65warning“isnotthesameasaregulatorydecisionthataproductis‘safe’or‘unsafe.’”Manyofthese
chemicalshavebeenusedineverydayproductsforyearswithoutdocumentedharm.Formoreinformation,gotohttps://oag.ca.gov/prop65/faqs-view-all
AProp65warningmeansthatacompanyhaseither(1)evaluatedtheexposureandhasconcludedthatitexceedsthe“nosignicantrisklevel”;or(2)
haschosentoprovideawarningbasedonitsunderstandingaboutthepresenceofalistedchemicalwithoutattemptingtoevaluatetheexposure.
Doesthislawapplyeverywhere?
Prop65warningsarerequiredunderCalifornialawonly.ThesewarningsareseenthroughoutCaliforniainawiderangeofsettings,includingbutnot
limitedtorestaurants,grocerystores,hotels,schools,andhospitals,andonawidevarietyofproducts.Additionally ,someonlineandmailorder
retailersprovideProp65warningsontheirwebsitesorincatalogs.
.
HowdotheCaliforniawarningscomparetofederallimits?
Prop65standardsareoftenmorestringentthanfederalandinternationalstandards.TherearevarioussubstancesthatrequireaProp65warning
atlevelsthatarefarlowerthanfederalactionlimits.Forexample,theProp65standardforwarningsforleadis0.5μg/day,whichiswellbelow
thefederalandinternationalstandards.
Whydon’tallsimilarproductscarrythewarning?
•ProductssoldinCaliforniarequireProp65labellingwhilesimilarproductssoldelsewheredonot.
•AcompanyinvolvedinaProp65lawsuitreachingasettlementmayberequiredtouseProp65warningsforitsproducts,butothercompanies
makingsimilarproductsmayhavenosuchrequirement.
•TheenforcementofProp65isinconsistent.
•CompaniesmayelectnottoprovidewarningsbecausetheyconcludethattheyarenotrequiredtodosounderProp65;alackofwarningsfora
productdoesnotmeanthattheproductisfreeoflistedchemicalsatsimilarlevels.
WhydoesToroincludethiswarning?
Torohaschosentoprovideconsumerswithasmuchinformationaspossiblesothattheycanmakeinformeddecisionsabouttheproductstheybuyand
use.Toroprovideswarningsincertaincasesbasedonitsknowledgeofthepresenceofoneormorelistedchemicalswithoutevaluatingthelevelof
exposure,asnotallthelistedchemicalsprovideexposurelimitrequirements.WhiletheexposurefromT oroproductsmaybenegligibleorwellwithinthe
“nosignicantrisk”range,outofanabundanceofcaution,T orohaselectedtoprovidetheProp65warnings.Moreover,ifT orodoesnotprovidethese
warnings,itcouldbesuedbytheStateofCaliforniaorbyprivatepartiesseekingtoenforceProp65andsubjecttosubstantialpenalties.
RevA

 Loading...