

Page 1

FormNo.3444-291RevB
PowerMax®e2460VSnowthrower
39924
LanzanievesPowerMax®e2460V
39924
SoufeuseàneigePowerMax®e24de60V
39924
www.T oro.com.
*3444-291*
Page 2

Page 3

PowerMax
ModelNo.39924—SerialNo.400000000andUp
®
e2460VSnowthrower
Introduction
Thismachineisintendedtobeusedbyresidential
homeowners.Itisdesignedprimarilyforremoving
snowfrompavedsurfaces,suchasdrivewaysand
sidewalks,andothersurfacesfortrafconresidential
orcommercialproperties.Itisnotdesignedfor
removingmaterialsotherthansnow.Itisdesignedto
useToroFlex-Forcelithium-ionbatterypackModel
88675(2providedwithModel39924),88660,88650,
88640,88625,or88620.Thesebatterypacksare
designedtobechargedonlybybatterycharger
Models88602(providedwithModel39926),88605,
or88610.Usingthisproductforpurposesotherthan
itsintendedusecouldprovedangeroustoyouand
bystanders.
Readthisinformationcarefullytolearnhowtooperate
andmaintainyourproductproperlyandtoavoid
injuryandproductdamage.Youareresponsiblefor
operatingtheproductproperlyandsafely.
FormNo.3444-288RevB
Operator'sManual
g344085
Figure1
1.Modelandserialnumberlocation
Visitwww.T oro.comforproductsafetyandoperation
trainingmaterials,accessoryinformation,helpnding
adealer,ortoregisteryourproduct.
Wheneveryouneedservice,genuineToroparts,or
additionalinformation,contactanAuthorizedService
DealerorToroCustomerServiceandhavethemodel
andserialnumbersofyourproductready .Figure1
identiesthelocationofthemodelandserialnumbers
ontheproduct.Writethenumbersinthespace
provided.
Important:Withyourmobiledevice,youcan
scantheQRcodeontheserialnumberdecal(if
equipped)toaccesswarranty,parts,andother
productinformation.
ModelNo.
SerialNo.
Thismanualidentiespotentialhazardsandhas
safetymessagesidentiedbythesafety-alertsymbol
(Figure2),whichsignalsahazardthatmaycause
seriousinjuryordeathifyoudonotfollowthe
recommendedprecautions.
g000502
Figure2
Safety-alertsymbol
Thismanualuses2wordstohighlightinformation.
Importantcallsattentiontospecialmechanical
informationandNoteemphasizesgeneralinformation
worthyofspecialattention.
©2021—TheT oro®Company
8111LyndaleAvenueSouth
Bloomington,MN55420Registeratwww.Toro.com.
OriginalInstructions(EN)
PrintedinMexico
AllRightsReserved
*3444-288*
Page 4

WARNING
Contents
CALIFORNIA
Proposition65Warning
Thepowercordonthisproductcontains
lead,achemicalknowntotheState
ofCaliforniatocausebirthdefects
orotherreproductiveharm.Wash
handsafterhandling.
Useofthisproductmaycauseexposure
tochemicalsknowntotheStateof
Californiatocausecancer,birthdefects,
orotherreproductiveharm.
Introduction...............................................................1
Safety.......................................................................3
SafetyandInstructionalDecals..........................6
Setup........................................................................9
1MountingtheBatteryCharger
(Optional)........................................................9
2InstallingtheUpperHandle..............................9
3InstallingtheChute........................................10
4InstallingtheTraction-ControlLinkage...........10
5InstallingtheChute-ControlRod.....................11
6InstallingtheSnow-CleanoutT ool..................12
7CheckingtheTirePressure............................13
8CheckingtheSkidsandScraper....................14
9AdjustingtheAuger/ImpellerCable................14
10CheckingtheOperationoftheTraction
Drive.............................................................14
ProductOverview...................................................15
Specications..................................................16
Attachments/Accessories.................................16
Operation................................................................16
BeforeOperation.................................................16
InstallingtheBatteryPack................................16
CheckingtheStateofCharge...........................17
DuringOperation.................................................17
StartingtheMachine.........................................17
ActivatingECOMode.......................................17
ChargingtheBatteryPack................................18
OperatingtheTractionDrive.............................19
OperatingtheSpeedSelector...........................19
OperatingtheAuger/ImpellerDrive...................20
OperatingtheQuickStick®...............................21
ClearingaCloggedDischargeChute................21
OperatingTips.................................................22
AfterOperation....................................................23
ShuttingOfftheMachine..................................23
RemovingtheBatteryPackfromthe
Machine........................................................23
PreventingFreeze-upafterUse........................23
Maintenance...........................................................24
RecommendedMaintenanceSchedule(s)...........24
PreparingforMaintenance...............................24
CheckingandAdjustingtheSkidsand
Scraper.........................................................24
CheckingandAdjustingtheTraction
Cable............................................................25
CheckingandAdjustingtheAuger/Impeller
Cable............................................................26
CheckingtheAuger-Gearbox-OilLevel.............27
LubricatingtheHexShaft..................................27
AdjustingtheDischarge-ChuteLatch................28
ReplacingtheDriveBelts..................................28
Storage...................................................................29
StoringtheMachine..........................................29
Troubleshooting......................................................30
2
Page 5

Safety
WARNING—Whenusinganelectricmachine,always
readandfollowbasicsafetywarningsandinstructions
toreducetheriskofre,electricshock,orinjury,
includingthefollowing:
READALLINSTRUCTIONS
WARNING—Whenusinganelectricalmachine,
basicsafetyprecautionsshouldalwaysbefollowed
toreducetheriskofre,electricshock,orinjury,
includingthefollowing:
I.Training
1.Theoperatorofthemachineisresponsiblefor
anyaccidentsorhazardsoccurringtoothersor
theirproperty.
2.Readandunderstandthecontentsofthis
Operator’sManualbeforeyoustartthemachine.
Ensurethateveryoneusingthismachineknows
howtouseit,knowshowtoshutitoffquickly,
andunderstandsthewarnings.
3.Donotallowchildrentouseorplaywiththe
machine,batterypack,orthebatterycharger;
localregulationsmayrestricttheageofthe
operator.
4.Donotallowchildrenoruntrainedpeopleto
operateorservicethisdevice.Allowonlypeople
whoareresponsible,trained,familiarwiththe
instructions,andphysicallycapabletooperate
orservicethedevice.
5.Beforeusingthemachine,batterypack,and
batterycharger,readalltheinstructionsand
cautionarymarkingsontheseproducts.
6.Becomefamiliarwiththecontrolsandproper
useofthemachine,batterypack,andbattery
charger.
II.Preparation
1.Keepbystandersandchildrenoutofthe
operatingarea.
2.Neverallowchildrentooperatethemachine.
3.Donotoperatethemachinewithoutallguards
andsafetydevicesinplaceandfunctioning
properlyonthemachine.
4.Inspecttheareawhereyouwillusethemachine
andremoveallobjectsthatcouldinterferewith
theoperationofthemachineorthatthemachine
couldthrow.
5.UseonlythebatterypackspeciedbyT oro.
Usingotheraccessoriesandattachmentsmay
increasetheriskofinjuryandre.
6.Pluggingthebatterychargerintoanoutletthat
isnot120Vcancauseareorelectricshock.
Donotplugthebatterychargerintoanoutlet
otherthan120V.
7.Donotuseadamagedormodiedbattery
packorbatterycharger,whichmayexhibit
unpredictablebehaviorthatresultsinre,
explosion,orriskofinjury.
8.Ifthesupplycordtothebatterychargeris
damaged,contactanAuthorizedServiceDealer
toreplaceit.
9.Donotusenon-rechargeablebatteries.
10.Chargethebatterypackwithonlythebattery
chargerspeciedbyToro.Achargersuitablefor
1typeofbatterypackmaycreateariskofre
whenusedwithanotherbatterypack.
11.Chargethebatterypackinawell-ventilatedarea
only.
12.Donotexposeabatterypackorbatterycharger
toreortotemperatureshigherthan68°C
(154°F).
13.Followallcharginginstructionsanddo
notchargethebatterypackoutsideofthe
temperaturerangespeciedintheinstructions.
Otherwise,youmaydamagethebatterypack
andincreasetheriskofre.
14.Dressproperly—Wearappropriateclothing,
includingeyeprotection;longpants;substantial,
slip-resistantrubberboots;andhearing
protection.Tiebacklonghairanddonotwear
looseclothingorloosejewelrythatcanget
caughtinmovingparts.
III.Operation
1.Contactwiththemovingrotorwillcauseserious
injury.Keepyourhandsandfeetawayfromall
movingpartsofthemachine.Keepclearofany
dischargeopening.
2.Staybehindthehandlesandawayfromthe
dischargeopeningwhileoperatingthemachine.
3.Usingthismachineforpurposesotherthanits
intendedusecouldprovedangeroustoyouand
bystanders.
4.Preventunintentionalstarting—Ensurethatthe
electric-startkeyisremovedfromthekeyswitch
beforeconnectingthebatterypackandhandling
themachine.
5.Useyourfullattentionwhileoperatingthe
machine.Donotengageinanyactivitythat
causesdistractions;otherwise,injuryorproperty
damagemayoccur.
6.Disengageallclutchesandshiftintoneutral
beforestartingthemachine.
7.Stopthemachine,removetheelectric-startkey,
removethebatterypackfromthemachine,and
3
Page 6

waitforallmovementtostopbeforeadjusting,
servicing,cleaning,orstoringthemachine.
8.Removethebatterypackandelectric-start
keyfromthemachinewheneveryouleaveit
unattendedorbeforechangingaccessories.
9.Donotforcethemachine—Allowthemachineto
dothejobbetterandsaferattherateforwhichit
wasdesigned.
10.Stayalert—Watchwhatyouaredoinganduse
commonsensewhenoperatingthemachine.
Donotusethemachinewhileill,tired,orunder
theinuenceofalcoholordrugs.
11.Operatethemachineonlyingoodvisibilityand
appropriateweatherconditions.
12.Useextremecautionwhenreversingorpulling
themachinetowardyou.
13.Keepproperfootingandbalanceatalltimes,
especiallyonslopes.Useextremecautionwhen
changingdirectionsonslopes.Donotoperate
themachineonexceedinglysteepslopes.Walk,
neverrunwiththemachine.
14.Whennotactivelyclearingsnow,disengage
powertotheauger.
15.Donotdirectthedischargematerialtoward
anyone.Avoiddischargingmaterialagainsta
wallorobstruction;materialmayricochettoward
you.Stopthemachinewhencrossinggravel
surfaces.
16.Exerciseextremecautionwhenoperatingthe
machineonorcrossinggraveldrives,walks,or
roads.Stayalertforhiddenhazardsortrafc.
17.Ifthemachinestrikesanobjectorstartsto
vibrate,immediatelyshutoffthemachine,
removethekey ,removethebatterypack,and
waitforallmovementtostopbeforeexamining
themachinefordamage.Makeallnecessary
repairsbeforeresumingoperation.
18.Shutoffthemachinewheneveryouleavethe
operatingpositionforanyreason.
19.Shutoffthemachineandremovethekeybefore
uncloggingthemachineandalwaysuseastick
oracleanouttooltoremovetheclog.
20.Stopthemachineandremovetheelectric-start
keybeforeloadingthemachineforhauling.
21.Underabusiveconditions,thebatterypackmay
ejectliquid;avoidcontact.Ifyouaccidently
comeintocontactwiththeliquid,ushwith
water.Iftheliquidcontactsyoureyes,seek
medicalhelp.Liquidejectedfromthebattery
packmaycauseirritationorburns.
22.Neveroperatethemachineathightransport
speedsonslipperysurfaces.
IV.MaintenanceandStorage
1.Stopthemachine,removetheelectric-startkey,
removethebatterypackfromthemachine,and
waitforallmovementtostopbeforeadjusting,
servicing,cleaning,orstoringthemachine.
2.Donotattempttorepairthemachineexceptas
indicatedintheinstructions.HaveanAuthorized
ServiceDealerperformserviceonthemachine
usingidenticalreplacementparts.
3.Wearglovesandeyeprotectionwhenservicing
themachine.
4.Whenservicingtherotor,beawarethattherotor
canstillmoveeventhoughthepowersource
isoff.
5.Forbestperformance,useonlygenuineT oro
replacementpartsandaccessories.Other
replacementpartsandaccessoriescouldbe
dangerous,andsuchusecouldvoidtheproduct
warranty.
6.Maintainthemachine—Keephandlesdry ,clean,
andfreefromoilandgrease.Keepguards
inplaceandinworkingorder.Useidentical
replacementpartsonly.
7.Checkallfastenersatfrequentintervalsfor
propertightnesstoensurethatthemachineisin
safeworkingcondition.
8.Checkthemachinefordamagedparts.Check
formisalignedandbindingmovingparts,broken
parts,mounting,andanyotherconditionthat
mayaffectitsoperation.Unlessindicatedinthe
instructions,haveanAuthorizedServiceDealer
repairorreplaceadamagedguardorpart.
9.Whenthebatterypackisnotinuse,keepit
awayfrommetalobjectssuchaspaperclips,
coins,keys,nails,andscrewsthatcanmakea
connectionfrom1terminaltoanother.Shorting
thebatteryterminalsmaycauseburnsorare.
10.Whenyouarenotusingthemachine,storeit
indoorsinadry,secureplaceoutofthereach
ofchildren.
11.Whenstoringthemachineformorethan30
days,refertoStorage(page29)forimportant
information.
12.CAUTION—Amistreatedbatterypackmay
presentariskofreorchemicalburn.Donot
disassemblethebatterypack.Donotheatthe
batterypackabove68°C(154°F)orincinerate
it.ReplacethebatterypackwithagenuineToro
batterypackonly;usinganothertypeofbattery
packmaycauseareorexplosion.Keep
batterypacksoutofthereachofchildrenand
intheoriginalpackaginguntilyouarereadyto
usethem.
4
Page 7

13.Donotdisposeofthebatteryinare.The
cellmayexplode.Checkwithlocalcodesfor
possiblespecialdisposalinstructions.
SAVETHESE
INSTRUCTIONS
5
Page 8

SafetyandInstructionalDecals
Safetydecalsandinstructionsareeasilyvisibletotheoperatorandarelocatednearanyarea
ofpotentialdanger.Replaceanydecalthatisdamagedormissing.
94-8072
decal94-8072
121-6817
1.Cutting/dismembermenthazardofhandorfoot,impeller
andauger—keepbystandersaway.
decal121-6823
decal121-6817
1.Fast
2.Forwardspeeds4.Reversespeeds
121-6823
3.Slow
decal137-6198
137-6198
1.Cutting/dismemberment
hazardofthengersor
hand,impeller—donot
placeyourhandinthe
chute.
2.Warning—shutoffthe
motorbeforeusingthetool
toclearthechute.
6
Page 9

decal121-1240
121-1240
1.Tractiondrive—squeezethelevertoengage;releasethe
levertodisengage.
2.Warning—readtheOperator’sManual.
3.Cutting/dismembermenthazardofhand,impeller—donot
placeyourhandinthechute;shutoffthemotorbeforeleaving
theoperatingposition;usethetooltoclearthechute.
4.Cutting/dismembermenthazardofhand,impeller—stayaway
frommovingparts;keepallguardsandshieldsinplace;
removethekeyandreadtheOperator’sManualbefore
performingmaintenance.
5.Thrownobjecthazard—keepbystandersaway.
6.Auger/impellerdrive—squeezethelevertoengage;release
thelevertodisengage.
decal137-9462
137-9462
1.Thebatterypackischarging.
2.Thebatterypackisfullycharged.
3.Thebatterypackisoverorundertheappropriatetemperaturerange.
4.Batterypackchargingfault
decal137-9463
137-9463
7
Page 10

decal137-9456
137-9456
1.ReadtheOperator’s
Manual.
2.Keepawayfromopenre
orames.
1.Batterychargestatus
3.Donotexposetorain.
decal137-9461
137-9461
decal133-8061
133-8061
8
Page 11

Setup
Important:Thebatterypackisnotfullychargedwhenyoupurchaseit.Beforeusingthemachinefor
thersttime,refertoChargingtheBatteryPack(page18).
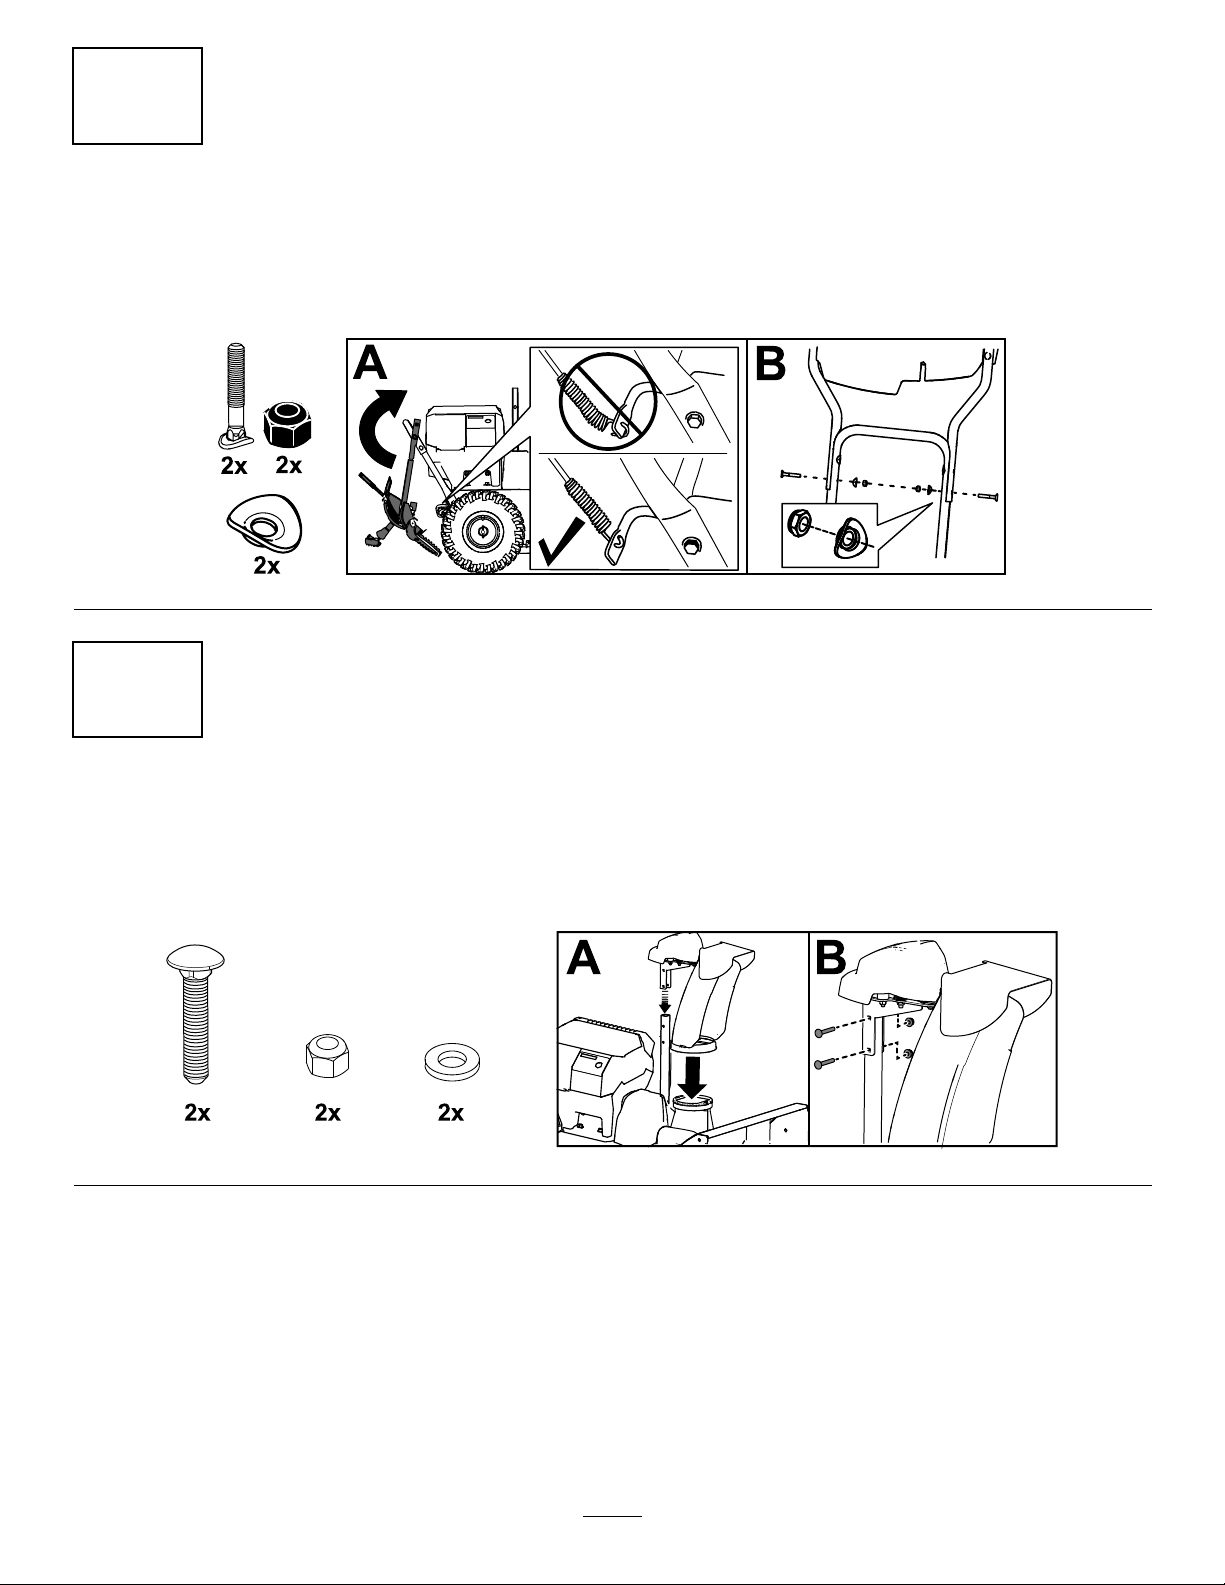
1
MountingtheBatteryCharger(Optional)
Partsneededforthisprocedure:
2
Mountinghardware(notincluded)
Procedure
Ifdesired,mountthebatterychargersecurelyonawallusingthewall-mountkeyholesonthebackofthe
charger.
Mountitindoors(suchasagarageorotherdryplace),nearapoweroutlet,andoutofthereachofchildren.
RefertoFigure3forassistanceinmountingthecharger.
Slidethechargerovertheappropriatelypositionedhardwaretosecurethechargerinplace(hardwarenot
included).
Figure3
g290534
9
Page 12

2
InstallingtheUpperHandle
NoPartsRequired
Procedure
g344090
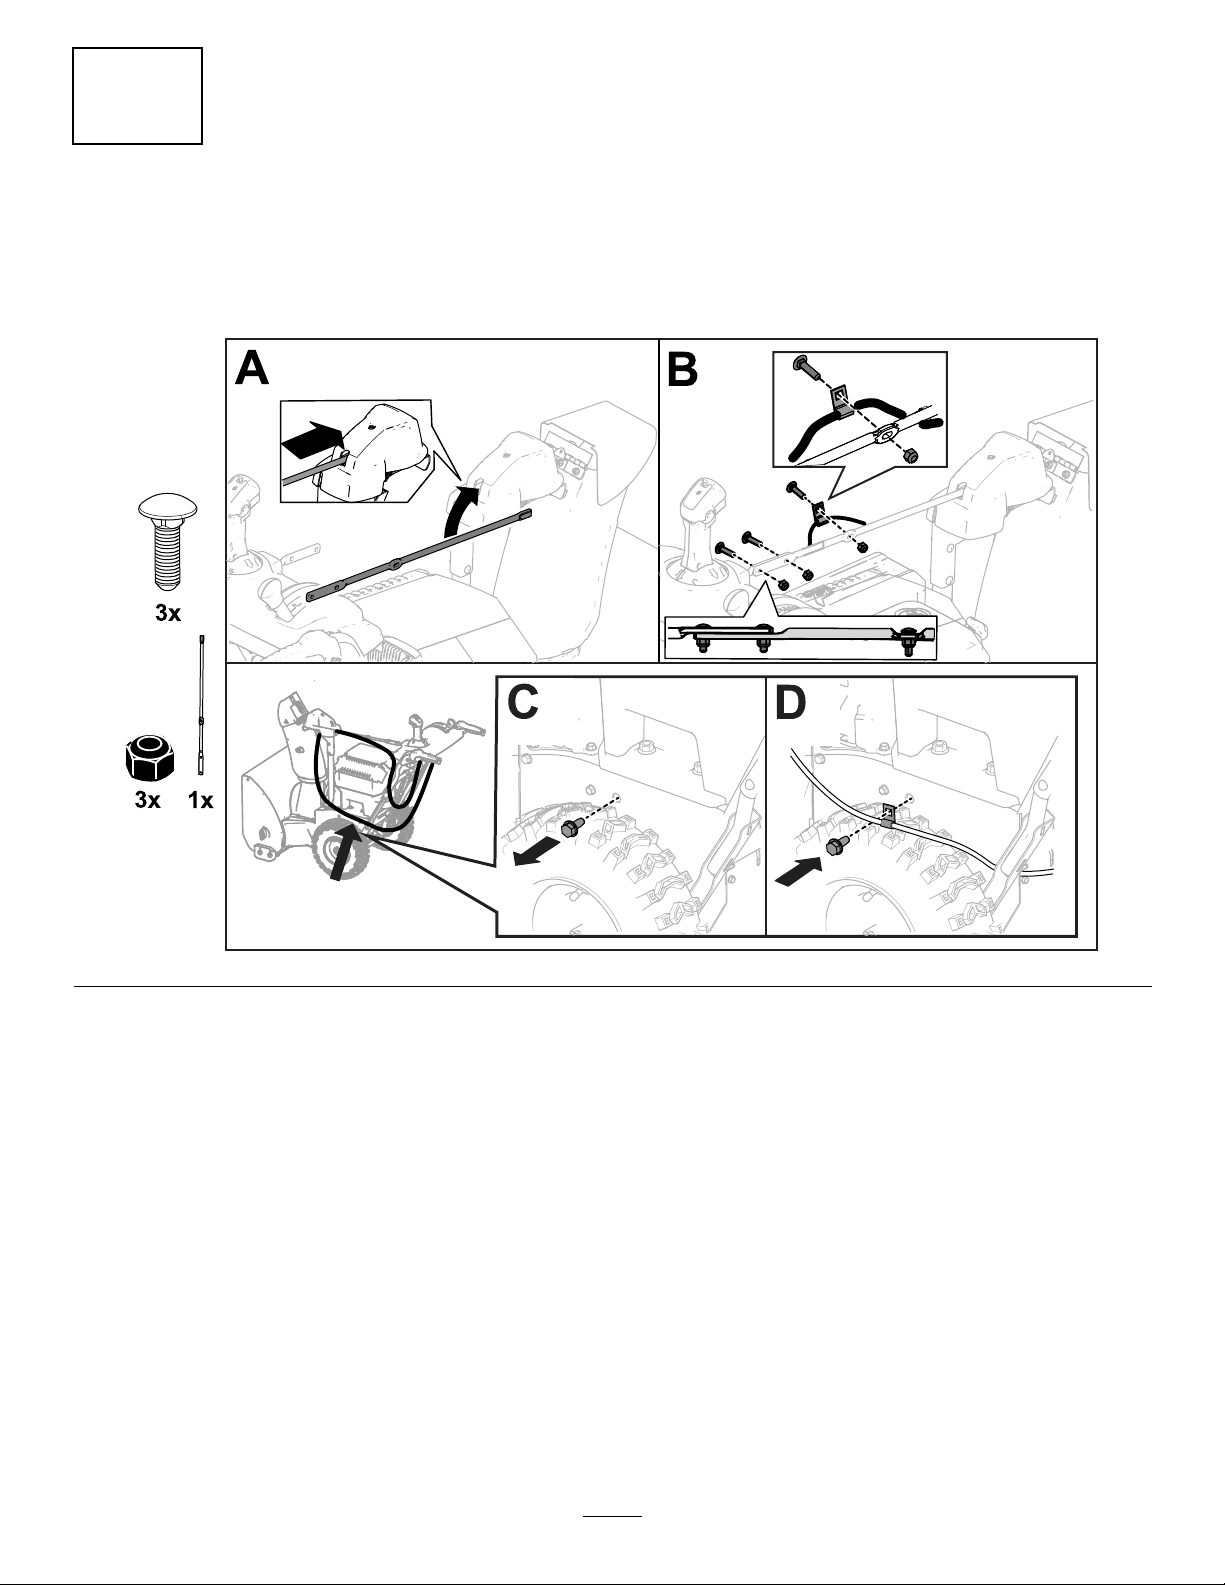
3
InstallingtheChute
NoPartsRequired
Procedure
g344087
10
Page 13

4
InstallingtheTraction-ControlLinkage
NoPartsRequired
Procedure
g344089
11
Page 14

5
InstallingtheChute-ControlRod
NoPartsRequired
Procedure
g344086
12
Page 15

6
InstallingtheSnow-CleanoutTool
NoPartsRequired
Procedure
g344088
7
CheckingtheTirePressure
NoPartsRequired
Procedure
g344084
13
Page 16

8
CheckingtheSkidsand
Scraper
NoPartsRequired
Procedure
2.MovethespeedselectortoPositionR1;referto
OperatingtheSpeedSelector(page19).
3.Squeezetheleft(traction)levertothehandgrip
(Figure10).
RefertoCheckingandAdjustingtheSkidsand
Scraper(page24).
9
Adjustingthe
Auger/ImpellerCable
NoPartsRequired
Procedure
Checkandadjusttheauger/impellercablebefore
rstuse;refertoCheckingandAdjustingthe
Auger/ImpellerCable(page26).
10
g001011
Figure10
Themachineshouldmoverearward.Ifthe
machinedoesnotmoveormovesforward,
completethefollowing:
A.Releasethetractionleverandshutoffthe
machine;refertoShuttingOfftheMachine
(page23).
B.Disconnectthetrunnionfromthe
speed-selectorlever.
C.Turnthetrunniondownward(clockwise)on
thespeed-controlrod.
D.Connectthetrunniontothespeed-selector
lever.
4.Releasethetractionlever.
5.MovethespeedselectortoPosition1;referto
OperatingtheSpeedSelector(page19).
6.Squeezetheleft(traction)levertothehandgrip
(Figure10).
CheckingtheOperationof
theTractionDrive
NoPartsRequired
Procedure
CAUTION
Ifthetractiondriveisnotproperlyadjusted,
themachinemaymoveinthedirection
oppositeofwhatyouintended,causinginjury
and/orpropertydamage.
Carefullycheckthetractiondriveandadjustit
properly,ifnecessary.
1.Startthemachine;refertoStartingtheMachine
(page17).
Themachineshouldmoveforward.Ifthe
machinedoesnotmoveormovesrearward,
completethefollowing:
A.Releasethetractionleverandshutoffthe
machine.
B.Disconnectthetrunnionfromthe
speed-selectorlever.
C.Turnthetrunnionupward(counterclockwise)
onthespeed-controlrod.
D.Connectthetrunniontothespeed-selector
lever.
7.Ifyoumadeanyadjustments,repeatthis
procedureuntilnoadjustmentsarerequired.
Important:Ifthemachinemoveswhenthe
tractionleverisinthereleasedposition,checkthe
tractioncable;refertoCheckingandAdjusting
theTractionCable(page25)ortakethemachine
toanAuthorizedServiceDealerforservice.
14
Page 17

ProductOverview
g347780
Figure12
Figure11
1.Handgrip(2)9.Chutedeector
2.Auger/impellerlever
3.Lockswitch
4.Speed-selectorlever
5.QuickStick
discharge-chutecontrol
6.Tractionlever
7.Mainbattery-compartment
lid
8.Electric-startkey
®
10.Dischargechute
11.Scraper
12.Auger
13.Skid(2)
14.Controlpanel
15.Secondary
16.Snow-cleanouttool
1.Batterychargelights
2.ECObutton
3.KeyswitchinOFFposition
g344092
Figure13
1.Snow-cleanouttool(attachedtothehandle)
g360898
g360884
Figure14
1.BatterychargerModel
battery-compartment
lid
88602(includedwith
Model39924)
2.BatterypackModel88675
(includedwithModel
39924)
3.BatterypackModel88625
(notincluded)
15
Page 18

Specications
ModelWeightLengthWidthHeight
78kg142cm62.5cm11 1.8cm
39924
(172lb)(56
inches)
Operation
Note:Determinetheleftandrightsidesofthe
machinefromthenormaloperatingposition.
(24.6
inches)
(44.0
inches)
BatteryPack
Model88675
Batterypackcapacity
Batterymanufacturerrating=60Vmaximumand54Vnominal.
Actualvoltagevarieswithload.
7.5Ah
405Wh
BatteryCharger
Model88602
Type
Input
Output60VMAXDC2.0A
60VMAXLithium-IonBatteryCharger
120VAC50/60HzMax2.0A
AppropriateTemperatureRanges
Charge/storethebatterypack
at
Usethebatterypackat
Usethemachineat
5°C(41°F)to40°C(104°F)*
-30°C(-22°F)to49°C(120°F)*
-30°C(-22°F)to49°C(120°F)*
BeforeOperation
InstallingtheBatteryPack
1.Ensurethattheventsonthebatterypacksare
clearofanydustanddebris.
2.Liftupthebattery-compartmentlid.
3.Lineupthecavityinthebatterypackwiththe
tongueonthemachineandslidethebattery
packintothecompartmentuntilitlockintoplace
(Figure9).
4.Closethebattery-compartmentlid.
5.Repeatfortheother2batterycavities(if
needed).
Note:Thecombinedamphoursofallthe
installedbatteriesmustaddupto6.0orgreater,
otherwisethemachinecannotstart.
Note:Ifthebattery-compartmentliddoesnot
closecompletely,thebatteryisnotfullyinstalled.
*Chargingtimewillincreaseifyoudonotchargethe
batterywithinthisrange.
Storethemachine,batterypack,andbatterycharger
inanenclosedclean,dryarea.
Attachments/Accessories
AselectionofToroapprovedattachmentsand
accessoriesisavailableforusewiththemachine
toenhanceandexpanditscapabilities.Contact
yourAuthorizedServiceDealerorauthorizedT oro
distributororgotowww.T oro.comforalistofall
approvedattachmentsandaccessories.
Toensureoptimumperformanceandcontinuedsafety
certicationofthemachine,useonlygenuineToro
replacementpartsandaccessories.Replacement
partsandaccessoriesmadebyothermanufacturers
couldbedangerous,andsuchusecouldvoidthe
productwarranty.
g348180
Figure15
16
Page 19

CheckingtheStateof
Charge
Youcanviewtheexactstateofchargeofeach
installedbattery;turnthekeytotheACCESSORY
position(Figure16).Thepositionofeachsetoflights
correspondstotherelatedbatterycavity .Ifthebattery
stateofchargeistoolowandneedstobecharged,or
ifthereisnobatteryinthecorrespondingcavity,the
batterypresencelightdoesnotturnon.
Figure16
g347864
Figure17
1.KeyswitchinONposition
ActivatingECOMode
UsingECOmodemayextendbatterylifebyreducing
rotorspeed;useECOmodewheneveryouare
movinglightsnow,ormovingsnowashortdistance.
g348182
ActivateECOmodeusingtheECObuttonasshown
inFigure18.
1.State-of-chargelights
2.Batterypresencelights
3.Keyswitchinthe
ACCESSORYposition
DuringOperation
StartingtheMachine
Note:Usethebatterypackonlyintemperatures
thatarewithintheappropriaterange;referto
Specications(page16).
1.Ensurethatthebatterypack(s)areinstalledin
themachine;refertoInstallingtheBatteryPack
(page16).
2.Inserttheelectric-startkeyintothecontrolpanel
3.TurnthekeytotheRUNpositiontoturnonthe
machine(Figure17).
g347866
Figure18
1.ECOmodebutton
17
Page 20

ChargingtheBatteryPack
Important:Thebatterypackisnotfullycharged
whenyoupurchaseit.Beforeusingthetoolfor
thersttime,placethebatterypackinthecharger
andchargeituntiltheLEDdisplayindicatesthe
batterypackisfullycharged.Readallsafety
precautions.
Important:Chargethebatterypackonlyin
temperaturesthatarewithintheappropriate
range;refertoSpecications(page16).
Note:Atanytime,pressthebattery-charge-indicator
buttononthebatterypacktodisplaythecurrent
charge(LEDindicators).
1.Ensurethattheventsonthebatteryandcharger
areclearofanydustanddebris.
Green
Red
Red
blinking
Batterypackischarged
Batterypackand/orbatterychargerisoverorunder
theappropriatetemperaturerange
Batterypackchargingfault*
*RefertoTroubleshooting(page30)formore
information.
Important:Thebatterycanbeleftonthecharger
forshortperiodsbetweenuses.
Ifthebatterywillnotbeusedforlongerperiods,
removethebatteryfromthecharger;referto
Storage(page29).
g290533
Figure19
1.Batterypackcavity
2.Batterypackventingareas6.Handle
3.Batterypackterminals
4.Battery-charge-indicator
button
5.LEDindicators(current
charge)
7.ChargerLEDindicator
light
8.Chargerventingareas
2.Lineupthecavityinthebatterypack(Figure19)
withthetongueonthecharger.
3.Slidethebatterypackintothechargeruntilitis
fullyseated(Figure19).
4.T oremovethebatterypack,slidethebattery
backwardoutofthecharger.
5.RefertothefollowingtabletointerprettheLED
indicatorlightonthebatterycharger.
Indicator
light
Off
Green
blinking
Indicates
Nobatterypackinserted
Batterypackischarging
18
Page 21

OperatingtheTraction
OperatingtheSpeed
Drive
CAUTION
Ifthetractiondriveisnotproperlyadjusted,
themachinemaymoveinthedirection
oppositeofwhatyouintended,causinginjury
and/orpropertydamage.
Carefullycheckthetractiondriveandadjust
itproperly,ifnecessary;referto10Checking
theOperationoftheTractionDrive(page14)
formoreinformation.
Important:Ifthemachinemoveswhenthe
tractionleverisinthereleasedposition,checkthe
tractioncable;refertoCheckingandAdjusting
theTractionCable(page25)ortakethemachine
toanAuthorizedServiceDealerforservice.
1.T oengagethetractiondrive,squeezetheleft
(traction)levertothehandgrip(Figure20).
Selector
Thespeedselectorhas6forwardand2reverse
gears.Tochangespeeds,releasethetractionlever
andshiftthespeed-selectorlevertothedesired
position(Figure21).Theleverlocksinanotchat
eachspeedselection.
g322971
Figure21
Figure20
2.T ostopthetractiondrive,releasethetraction
lever.
g001011
19
Page 22

Operatingthe
WARNING
Auger/ImpellerDrive
1.T oengagetheauger/impellerdrive,moveback
thelockswitchonthelever,thensqueezethe
right(auger/impeller)levertothehandgrip
(Figure22).
Iftheaugerandimpellercontinue
torotatewhenyoureleasethe
auger/impellerlever,youcouldseriously
injureyourselforothers.
Donotoperatethemachine.Takeittoan
AuthorizedServiceDealerforservice.
Figure22
2.T ostoptheaugerandimpeller,releasetheright
lever.
Important:Whenyouengageboththe
auger/impellerleverandthetractionlever,
thetractionleverlockstheauger/impeller
leverdown,freeingyourrighthand.To
releasebothlevers,simplyreleasetheleft
(traction)lever.
3.Iftheaugerandimpellercontinuetorotatewhen
youreleasetheauger/impellerlever,donot
operatethemachine.Checktheauger/impeller
cable;refertoCheckingandAdjustingthe
Auger/ImpellerCable(page26)andadjustitif
necessary.Otherwise,takethemachinetoan
AuthorizedServiceDealerforservice.
g360687
20
Page 23

OperatingtheQuickStick®
MovingtheChuteDeector
HoldthebluetriggercapdowntousetheQuickStick
tomovethedischargechuteandthechutedeector.
Releasethetriggercaptolockthedischargechute
andchutedeectorintoposition(Figure23).
Figure23
MovingtheDischargeChute
HoldthebluetriggercapdownandmovetheQuick
Sticktothelefttomovethedischargechutetothe
left;movetheQuickSticktotherighttomovethe
dischargechutetotheright(Figure24).
HoldthebluetriggercapdownandmovetheQuick
Stickforwardtolowerthechutedeector;moveit
rearwardtoraisethechutedeector(Figure25).
g001014
Figure25
g001016
ClearingaClogged
DischargeChute
WARNING
Figure24
•Ifthechutedoesnotmove,refertoAdjustingthe
Discharge-ChuteLatch(page28).
•Ifthechutedoesnotturnasfartotheleftasit
doestotheright,ensurethatthecableisroutedto
theinsideofthehandles.Referto2Installingthe
UpperHandle(page9).
•Ifthechutedoesnotlockintoplacewhenyou
releasethetriggercap,refertoAdjustingthe
Discharge-ChuteLatch(page28).
Iftheauger/impellerisrunningbutthereisno
snowcomingoutofthedischargechute,the
dischargechutemaybeclogged.
Neveruseyourhandstoclearaclogged
dischargechute.Thiscouldresultinpersonal
injury.
•Tounclogthedischargechute,stayinthe
operatingpositionandreleasetheleft(traction)
lever.Whilerunningtheauger/impeller,pushdown
onthehandlestoraisethefrontofthemachinea
fewcentimeters(inches)offthepavement.Then
liftthehandlesquicklytobumpthefrontofthe
machineonthepavement.Repeatifnecessary
untilastreamofsnowcomesoutthedischarge
g018894
chute.
•Ifyoucannotunclogthedischargechuteby
bumpingthefrontofthemachine,shutoffthe
machine,waitforallmovingpartstostop,and
usethesnow-cleanouttool(Figure13).
Important:Uncloggingthedischargechute
bybumpingthefrontofthemachineonthe
pavementmaycausetheskidstomove.Adjust
theskidsandtightentheskidboltssecurely;
refertoCheckingandAdjustingtheSkidsand
Scraper(page24).
21
Page 24

OperatingTips
DANGER
Whenthemachineisinoperation,theimpeller
andaugerrotateandcaninjureoramputate
handsorfeet.
•Beforeadjusting,cleaning,inspecting,
troubleshooting,orrepairingthemachine,
shutoffthemachineandwaitforall
movingpartstostop.Removethekeyand
thebatteryfromthemachinetoprevent
someonefromaccidentallystartingthe
machine.
•Removeanyobstructionsfromthe
dischargechute;refertoClearinga
CloggedDischargeChute(page21).Use
thesnow-cleanouttool(Figure13),not
yourhands,toremoveanobstructionfrom
thedischargechute.
•Staybehindthehandlesandawayfrom
thedischargeopeningwhileoperatingthe
machine.
•Keepyourface,hands,feet,andanyother
partofyourbodyorclothingawayfrom
concealed,moving,orrotatingparts.
WARNING
Theimpellercanthrowstones,toys,andother
foreignobjectsandcauseseriouspersonal
injurytoyouorbystanders.
•Keeptheareatobeclearedfreeofall
objectsthattheaugercouldpickupand
throw.
•Keepallchildrenandpetsawayfromthe
areaofoperation.
Forbestresults,considerthefollowing:
•Ifthemachineslowsdownunderaloadorthe
wheelsslip,shiftthemachineintoalowergear;
refertoOperatingtheSpeedSelector(page19).
•Ifthefrontofthemachineridesup,shiftthe
machineintoalowergear.Ifthefrontcontinuesto
rideup,liftuponthehandles.
•Removethesnowassoonaspossibleafteritfalls.
•Pushthemachineforward,butallowittoworkat
itsownpace.
•Overlapeachswathtoensurecompletesnow
removal.
•Dischargethesnowdownwindwheneverpossible.
22
Page 25

AfterOperation
PreventingFreeze-upafter
Use
ShuttingOfftheMachine
1.Releasethetractionandauger/impellerlevers.
2.TurnthekeytotheOFFpositionandremoveit
fromthecontrolpanel(Figure12).
3.Removethebatterypack(s);refertoRemoving
theBatteryPackfromtheMachine(page23).
Note:Wheneveryouarenotusingthemachine,
removethebatterypack(s)andthekeyfrom
themachine.
RemovingtheBatteryPack
fromtheMachine
1.Liftupthebattery-compartmentlid.
2.Pressthebatterypack-latchtoreleasethe
batterypackandremovethebatterypack
(Figure26).
•Insnowyandcoldconditions,somecontrolsand
movingpartsmayfreeze.Donotuseexcessive
forcewhentryingtooperatefrozencontrols.
Ifyouhavedifcultyoperatinganycontrolorpart,
startthemachineandletitrunforafewminutes.
•Afterusingthemachine,letthemachinerunfora
fewminutestopreventmovingpartsfromfreezing.
Engagetheauger/impellertoclearanyremaining
snowfrominsidethehousing.RotatetheQuick
Sticktopreventitfromfreezing.Shutoffthe
machine,waitforallmovingpartstostop,remove
thekeyandthebattery,andremovealliceand
snowfromthemachine.
•Cleanoffanysnowandicefromthebaseofthe
chute.
•Rotatethedischargechuteleftandrighttofree
itfromanyicebuildup.
Figure26
3.Closethebattery-compartmentlid.
g347853
23
Page 26

Maintenance
RecommendedMaintenanceSchedule(s)
MaintenanceService
Interval
Aftertherst2hours
Yearly
Yearlyorbeforestorage
MaintenanceProcedure
•Inspectthetractioncableandadjustitifnecessary.
•Inspecttheauger/impellercableandadjustitifnecessary .
•Checktheskidsandthescraperandadjustthemifnecessary.
•Inspectthetractioncableandadjustorreplaceitifnecessary.
•Inspecttheauger/impellercableandadjustorreplaceitifnecessary .
•Checktheauger-gearboxoilandaddoilifnecessary.
•Lubricatethehexshaft.
•Checktheairpressureinthetiresandinatethemto116to137kPa(17to20psi).
•HaveanAuthorizedServiceDealerinspectandreplacethetraction-drivebeltand/or
theauger/impellerdrivebelt,ifnecessary.
PreparingforMaintenance
1.Movethemachinetoalevelsurface.
2.Stopthemachine,removetheelectric-startkey,
waitforallmovementtostop,andremovethe
batterypackfromthemachinebeforeadjusting,
servicing,cleaning,orstoringthemachine.
CheckingandAdjustingthe
SkidsandScraper
ServiceInterval:Y early—Checktheskidsand
thescraperandadjustthemif
necessary.
Checktheskidsandthescrapertoensurethatthe
augerdoesnotcontactthepavedorgravelsurface.
Adjusttheskidsandthescraperasneededto
compensateforwear.
1.Checkthetirepressure;referto7Checkingthe
TirePressure(page13).
2.Loosenthenutsthatsecurebothskidstothe
augersidesuntiltheskidsslideupanddown
easily.
Figure27
1.3mm(1/8inch)
Important:Theaugerbladesmustbe
supportedabovethegroundbytheskids.
g019046
24
Page 27

3.Ensurethatthescraperis3mm(1/8inch)above
andparalleltoalevelsurface.
Note:Ifthepavementiscracked,rough,or
uneven,adjusttheskidstoraisethescraper.For
gravelsurfaces,adjusttheskidsfurtherdownto
preventthemachinefrompickinguprocks.
4.Movetheskidsdownuntiltheyareevenwith
theground.
5.Firmlytightenthenutsthatsecurebothskids
totheaugersides.
Note:Toquicklyadjusttheskidsiftheyloosen,
supportthescraper3mm(1/8inch)offthe
pavement,thenadjusttheskidsdowntothe
pavement.
Note:Iftheskidsbecomeexcessivelyworn,
youcanturnthemoverandsettheunusedside
towardthepavement.
g030998
Figure29
CheckingandAdjustingthe
TractionCable
ServiceInterval:Aftertherst2hours—Inspect
thetractioncableandadjustitif
necessary.
Yearly—Inspectthetractioncableandadjustor
replaceitifnecessary.
Ifthemachinedoesnotdriveintheforwardorreverse
speedsoritdriveswhenyoureleasethetractionlever,
adjustthetractioncable.
Iftheleft(traction)cableisnotproperlyadjusted,do
thefollowingsteps:
1.Loosenthejamnut.
2.Engagethetractionleverandholditinplace
(Figure28).
1.Jamnut
2.Turnbuckle
3.Spring
4.5.5cm(2–3/16inches)
4.Tightenthejamnut(Figure29),ensuringthat
thereisslighttensiononthecable.
5.Ifthetractioncableisproperlyadjustedbuta
problemremains,contactanAuthorizedService
Dealer.
Figure28
3.Loosenortightentheturnbuckletoadjustthe
springlengthto5.5cm(2–3/16inches)as
showninFigure29.
g001011
25
Page 28

CheckingandAdjustingthe
Auger/ImpellerCable
ServiceInterval:Aftertherst2hours—Inspectthe
auger/impellercableandadjustitif
necessary.
Yearly—Inspecttheauger/impellercableand
adjustorreplaceitifnecessary.
1.Loosenthejamnut(Figure31).
2.Engagetheauger/impellerleverandholditin
place(Figure30).
g031000
Figure31
Figure30
3.Loosenortightentheturnbuckletoadjustthe
springlengthto7cm(2-3/4inches)asshown
inFigure31.
1.Jamnut
2.Turnbuckle
3.Spring
4.7cm(2-3/4inches)
4.Tightenthejamnut(Figure31),ensuringthat
thereisslighttensiononthecable.
5.Turnonthemachineandattempttoengagethe
auger/impellerdrivewithoutmovingthelock
switchback;iftheaugerrotates,loosenthe
turnbucklesothattheaugerdoesnotengage.
6.Iftheauger/impellercableisproperlyadjusted
butaproblemremains,contactanAuthorized
ServiceDealer.
g360687
26
Page 29

Checkingthe
LubricatingtheHexShaft
Auger-Gearbox-OilLevel
ServiceInterval:Yearly—Checktheauger-gearbox
oilandaddoilifnecessary.
1.Movethemachinetoalevelsurface.
2.Cleantheareaaroundthepipeplug(Figure32).
Figure32
1.Pipeplug
3.Removethepipeplugfromthegearbox.
4.Checktheoillevelinthegearbox.Theoilshould
be9.5mm(3/8inch)belowthelleropening.
5.Iftheoillevelislow,addGL-5orGL-6,SAE
80-90EPgearoillubricanttothegearboxuntil
theoillevelis9.5mm(3/8inch)belowtheller
opening.
ServiceInterval:Yearly—Lubricatethehexshaft.
Lightlylubricatethehexshaftyearlywithautomotive
engineoil(Figure33).
g019018
Figure33
g016782
1.Hexshaft
2.Steelfrictionpulley
3.Rubberwheel
Important:Donotgetoilontherubberwheelor
thesteelfrictionpulleybecausethetractiondrive
willslip(Figure33).
1.Drainthefuelfromthefueltank.
2.Tipthemachineforwardontoitsaugerhousing
andblockitsothatitcannotfall.
3.Removethebackcover(Figure34).
Note:Donotusesyntheticoil.
6.Installthepipepluginthegearbox.
g019019
Figure34
1.Screws
4.Movethespeed-selectorlevertoPositionR2.
5.Dipyourngerinautomotiveengineoiland
lightlylubricatethehexshaft.
6.Movethespeed-selectorlevertoPosition6.
7.Lubricatetheotherendofthehexshaft.
27
Page 30

8.Movethespeed-selectorleverforwardand
rearwardafewtimes.
9.Installthebackcoverandreturnthemachineto
theoperatingposition.
Adjustingthe
Discharge-ChuteLatch
Ifthedischargechutedoesnotlockintothedesired
positionordoesnotunlocksothatyoucanmoveitto
anotherposition,adjustthedischarge-chutelatch.
1.Loosentheclampfasteneronthechute-support
plateuntilthecableisfree.
Figure35
1.Cableconduit3.Clampfastener
2.Cableclamp
2.Removeanyslackinthecablebypullingthe
cableconduitrearward.
3.Tightentheclampfastenerwhileholdingthe
cableinplace.
ReplacingtheDriveBelts
Iftheauger/impellerdrivebeltorthetraction-drivebelt
becomesworn,oil-soaked,orotherwisedamaged,
haveanAuthorizedServiceDealerreplacethebelt.
g019021
28
Page 31

Storage
StoringtheMachine
Important:Storethemachine,batterypack,and
chargeronlyintemperaturesthatarewithinthe
appropriaterange;refertoSpecications(page
16).
Important:Ifyouarestoringthebatterypack
fortheoff-season,chargeituntil2or3LED
indicatorsturngreenonthebattery.Donotstore
afullychargedorfullydepletedbattery.When
youarereadytousethemachineagain,charge
thebatterypackuntiltheleftindicatorlightturns
greenonthechargerorall4LEDindicatorsturn
greenonthebattery.
•Disconnecttheproductfromthepowersupply
(i.e.,removetheplugfromthepowersupplyor
thebatterypack),removethekey,andcheckfor
damageafteruse.
•Cleanallforeignmaterialfromtheproduct.
Lithium-ionbatterypackslabeledwiththe
Call2Recyclesealcanberecycledatany
participatingretailerorbatteryrecycling
facilityintheCall2Recycleprogram(US
andCanadaonly).T olocateaparticipating
retailerorfacilityclosesttoyou,pleasecall
1-800-822-8837orvisitwww.call2recycle.org.
Ifyoucannotlocateaparticipatingretaileror
facilitynearby ,orifyourrechargeablebattery
isnotlabeledwiththeCall2Recycleseal,
pleasecontactyourlocalmunicipalityformore
informationonhowtoresponsiblyrecyclethe
battery.IfyouarelocatedoutsideoftheUS
andCanada,pleasecontactyourauthorized
Torodistributor.
•Donotstorethetoolwiththebatterypackinstalled.
•Whennotinuse,storethemachine,battery
pack,key,andbatterychargeroutofthereachof
children.
•Keepthemachine,batterypack,key,andbattery
chargerawayfromcorrosiveagents,suchas
gardenchemicalsandde-icingsalts.
•Toreducetheriskofseriouspersonalinjury,do
notstorethebatterypackoutsideorinvehicles.
•Touchupchippedsurfaceswithpaintavailable
fromanAuthorizedServiceDealer.Sandaffected
areasbeforepainting,andusearustpreventative
topreventthemetalpartsfromrusting.
•Tightenallloosescrews,bolts,andlocknuts.
Repairorreplaceanydamagedparts.
•Storethemachine,batterypack,key,andbattery
chargerinanenclosedclean,dryarea.
PreparingtheBatteryPackfor
Recycling
Important:Uponremoval,covertheterminalsof
thebatterypackwithheavy-dutyadhesivetape.
Donotattempttodestroyordisassemblethe
batterypackorremoveanyofitscomponents.
29
Page 32

Troubleshooting
Problem
Themachinedoesnotrunordoesnotrun
continuously.
Themachinedoesnotreachfullpower.
Themachineruns,butthemachine
dischargessnowpoorlyornotatall.
PossibleCauseCorrectiveAction
1.Thebatterypackislowoncharge.
2.Thebatterypackisnotfullyseated.
3.Thebatterypackisoverorunderthe
appropriatetemperaturerange.
4.Thebatterypackhasexceededhigh
amperagelimits.
5.Thereismoistureontheleadsofthe
batterypack.
6.Thebatterypackisdamaged.6.Replacethebatterypack.
7.Thereisanotherelectricalproblem
withthemachine.
1.Thebatterypackchargecapacityis
toolow.
2.Theairventsareblocked.
1.Themachineismovingtoofasttoclear
thesnow.
2.Y ouaretryingtoremovetoomuch
snowperswath.
3.Y ouaretryingtoremoveextremely
heavyorwetsnow.
4.Thedischargechuteisplugged.4.Unclogthedischargechute.
5.Theauger/impellerdrivebeltisloose
orisoffthepulley.
6.Theauger/impellerdrivebeltisworn
orbroken.
1.Chargethebatterypack.
2.Ensurethatthebatterypackisinserted
allthewayintothehousing.
3.Movethebatterypacktoaplace
whereitisdryandthetemperatureis
between5°C(41°F)and40°C(104°F).
4.Releasethetrigger,thenpressthe
triggerswitch.
5.Allowthebatterypacktodryorwipeit
dry.
7.ContactanAuthorizedServiceDealer.
1.Removethebatterypackfromthe
machineandfullychargethebattery
pack.
2.Cleantheairvents.
1.Shiftthemachineintoalowergear.
2.Reducetheamountofsnowremoved
perswath.
3.Donotoverloadthemachinewith
extremelyheavyorwetsnow.
5.Installand/oradjusttheauger/impeller
drivebelt;refertowww.Toro.com
forservicinginformationortakethe
machinetoanAuthorizedService
Dealer.
6.Replacetheauger/impellerdrivebelt;
refertowww.Toro.comforservicing
informationortakethemachinetoan
AuthorizedServiceDealer.
Thedischargechuteeitherdoesnotlock
intoplaceordoesnotmove.
Themachinedoesnotproperlyclearthe
snowoffthesurface.
Thebatterypackloseschargequickly.
Thebatterychargerisnotworking.
1.Thedischarge-chutelatchisnot
properlyadjusted.
1.Theskidsand/orscraperarenot
properlyadjusted.
2.Thepressureinthetiresisnotequal.
1.Thebatterypackisoverorunderthe
appropriatetemperaturerange.
2.Themachineisoverloaded.
1.Thebatterychargerisoverorunder
theappropriatetemperaturerange.
2.Theoutletthatthebatterychargeris
pluggedintodoesnothavepower.
30
1.Adjustthedischarge-chutelatch.
1.Adjusttheskidsand/orthescraper.
2.Checkandadjustthepressurein1or
bothtires.
1.Movethebatterypacktoaplace
whereitisdryandthetemperatureis
between5°C(41°F)and40°C(104°F).
2.Pushthemachinewithlessforce.
1.Unplugthebatterychargerandmove
ittoaplacewhereitisdryandthe
temperatureisbetween5°C(41°F)
and40°C(104°F).
2.Contactyourlicensedelectricianto
repairtheoutlet.
Page 33

Problem
PossibleCauseCorrectiveAction
TheLEDindicatorlightonthebattery
chargerisred.
TheLEDindicatorlightonthebattery
chargerisblinkingred.
1.Thebatterychargerand/orbattery
packisoverorundertheappropriate
temperaturerange.
1.Thereisanerrorinthecommunication
betweenthebatterypackandthe
charger.
2.Thebatterypackisweak.
1.Unplugthebatterychargerandmove
thebatterychargerandbatterypack
toaplacewhereitisdryandthe
temperatureisbetween5°C(41°F)
and40°C(104°F).
1.Removethebatterypackfromthe
batterycharger,unplugthebattery
chargerfromtheoutlet,andwait10
seconds.Plugthebatterychargerinto
theoutletagainandplacethebattery
packonthebatterycharger.IftheLED
indicatorlightonthebatterychargeris
stillblinkingred,repeatthisprocedure
again.IftheLEDindicatorlighton
thebatterychargerisstillblinkingred
after2attempts,properlydisposeof
thebatterypackatabatteryrecycling
facility.
2.Contactyourauthorizedservicedealer
ifthebatteryisinwarranty,orproperly
disposeofthebatterypackatabattery
recyclingfacility.
31
Page 34

CaliforniaProposition65WarningInformation
Whatisthiswarning?
Youmayseeaproductforsalethathasawarninglabellikethefollowing:
WARNING:CancerandReproductiveHarm—www.p65Warnings.ca.gov.
WhatisProp65?
Prop65appliestoanycompanyoperatinginCalifornia,sellingproductsinCalifornia,ormanufacturingproductsthatmaybesoldinorbroughtinto
California.ItmandatesthattheGovernorofCaliforniamaintainandpublishalistofchemicalsknowntocausecancer,birthdefects,and/orother
reproductiveharm.Thelist,whichisupdatedannually,includeshundredsofchemicalsfoundinmanyeverydayitems.ThepurposeofProp65isto
informthepublicaboutexposuretothesechemicals.
Prop65doesnotbanthesaleofproductscontainingthesechemicalsbutinsteadrequireswarningsonanyproduct,productpackaging,orliteraturewith
theproduct.Moreover ,aProp65warningdoesnotmeanthataproductisinviolationofanyproductsafetystandardsorrequirements.Infact,the
CaliforniagovernmenthasclariedthataProp65warning“isnotthesameasaregulatorydecisionthataproductis‘safe’or‘unsafe.’”Manyofthese
chemicalshavebeenusedineverydayproductsforyearswithoutdocumentedharm.Formoreinformation,gotohttps://oag.ca.gov/prop65/faqs-view-all
AProp65warningmeansthatacompanyhaseither(1)evaluatedtheexposureandhasconcludedthatitexceedsthe“nosignicantrisklevel”;or(2)
haschosentoprovideawarningbasedonitsunderstandingaboutthepresenceofalistedchemicalwithoutattemptingtoevaluatetheexposure.
Doesthislawapplyeverywhere?
Prop65warningsarerequiredunderCalifornialawonly.ThesewarningsareseenthroughoutCaliforniainawiderangeofsettings,includingbutnot
limitedtorestaurants,grocerystores,hotels,schools,andhospitals,andonawidevarietyofproducts.Additionally ,someonlineandmailorder
retailersprovideProp65warningsontheirwebsitesorincatalogs.
.
HowdotheCaliforniawarningscomparetofederallimits?
Prop65standardsareoftenmorestringentthanfederalandinternationalstandards.TherearevarioussubstancesthatrequireaProp65warning
atlevelsthatarefarlowerthanfederalactionlimits.Forexample,theProp65standardforwarningsforleadis0.5μg/day,whichiswellbelow
thefederalandinternationalstandards.
Whydon’tallsimilarproductscarrythewarning?
•ProductssoldinCaliforniarequireProp65labellingwhilesimilarproductssoldelsewheredonot.
•AcompanyinvolvedinaProp65lawsuitreachingasettlementmayberequiredtouseProp65warningsforitsproducts,butothercompanies
makingsimilarproductsmayhavenosuchrequirement.
•TheenforcementofProp65isinconsistent.
•CompaniesmayelectnottoprovidewarningsbecausetheyconcludethattheyarenotrequiredtodosounderProp65;alackofwarningsfora
productdoesnotmeanthattheproductisfreeoflistedchemicalsatsimilarlevels.
WhydoesToroincludethiswarning?
Torohaschosentoprovideconsumerswithasmuchinformationaspossiblesothattheycanmakeinformeddecisionsabouttheproductstheybuyand
use.Toroprovideswarningsincertaincasesbasedonitsknowledgeofthepresenceofoneormorelistedchemicalswithoutevaluatingthelevelof
exposure,asnotallthelistedchemicalsprovideexposurelimitrequirements.WhiletheexposurefromT oroproductsmaybenegligibleorwellwithinthe
“nosignicantrisk”range,outofanabundanceofcaution,T orohaselectedtoprovidetheProp65warnings.Moreover,ifT orodoesnotprovidethese
warnings,itcouldbesuedbytheStateofCaliforniaorbyprivatepartiesseekingtoenforceProp65andsubjecttosubstantialpenalties.
RevA
Page 35

LanzanievesPowerMax
Nºdemodelo39924—Nºdeserie400000000ysuperiores
Introducción
Estamáquinaestádiseñadaparaserusadapor
usuariosdomésticos.Estádiseñadaprincipalmente
paraquitarlanievedesuperciespavimentadas,
porejemplo,caminosdeaccesoyaceras,yotras
superciesdetránsitoenncasresidencialeso
comerciales.Noestádiseñadapararetirarmateriales
quenoseannieve.Estádiseñadoparausarla
bateríadeionesdelitioFlex-ForcedeToro,modelo
88675(sesuministran2conelmodelo39924),
88660,88650,88640,88625o88620.Estasbaterías
estándiseñadasparasercargadasúnicamentecon
elcargadordebateríasmodelo88602(suministrado
conelmodelo39926),88605o88610.Elusode
esteproductoparaotrospropósitosquelosprevistos
podríaserpeligrosoparaustedyparaotraspersonas.
®
e2460V
FormNo.3444-289RevB
Manualdeloperador
g344085
Figura1
Leaestemanualdetenidamenteparaaprendera
utilizarymantenercorrectamentesuproducto,y
paraevitarlesionesydañosalproducto.Ustedes
responsabledeutilizarelproductodeformacorrecta
ysegura.
Visitewww.toro.comparabuscarmaterialesde
formaciónyseguridadoinformaciónsobreaccesorios,
paralocalizarundistribuidoropararegistrarsu
producto.
Cuandonecesiteasistenciatécnica,piezasgenuinas
Torooinformaciónadicional,póngaseencontacto
conunServicioTécnicoAutorizadooconAtención
alclientedeT oro,ytengaamanolosnúmerosde
modeloyseriedesuproducto.LaFigura1identica
laubicacióndelosnúmerosdeserieydemodelo
enelproducto.Escribalosnúmerosenelespacio
provisto.
Importante:Consudispositivomóvil,puede
escanearelcódigoQRdelapegatinadelnúmero
deserie(ensucaso)paraaccederainformación
sobrelagarantía,laspiezas,yotrainformación
sobreelproducto.
1.Ubicacióndelosnúmerosdemodeloydeserie
Nºdemodelo
Nºdeserie
Estemanualidenticapeligrospotencialesycontiene
mensajesdeseguridadidenticadosporelsímbolo
dealertadeseguridad(Figura2),queseñalaun
peligroquepuedecausarlesionesgravesolamuerte
siustednosiguelasprecaucionesrecomendadas.
g000502
Figura2
Símbolodealertadeseguridad
Estemanualutiliza2palabraspararesaltar
información.Importantellamalaatenciónsobre
informaciónmecánicaespecial,yNotaresalta
informacióngeneralquemereceunaatención
especial.
©2021—TheT oro®Company
8111LyndaleAvenueSouth
Bloomington,MN55420Registresuproductoenwww.T oro.com.
Traduccióndeloriginal(ES)
Reservadostodoslosderechos
ImpresoenMéxico
*3444-289*
Page 36

ADVERTENCIA
Contenido
CALIFORNIA
AdvertenciadelaPropuesta65
Elcableeléctricodeesteproducto
contieneplomo,queelEstadode
Californiasabequecausadefectos
congénitosuotrospeligrosparala
reproducción.Láveselasmanosdespués
demanejarelmaterial.
Elusodeesteproductopuedeprovocarla
exposiciónasustanciasquímicasqueel
EstadodeCaliforniaconsideracausantes
decáncer,defectoscongénitosuotros
trastornosdelsistemareproductor.
Introducción..............................................................1
Seguridad.................................................................3
Pegatinasdeseguridadeinstrucciones.............6
Montaje.....................................................................9
1Cómomontarelcargadordelabatería
(opcional)........................................................9
2Instalacióndelmanillarsuperior.......................9
3Instalacióndelconducto................................10
4Instalacióndelacoplamientodecontrolde
tracción.........................................................10
5Instalacióndelavarilladecontroldel
conducto........................................................11
6Instalacióndelaherramienta
desatascadora..............................................12
7Comprobacióndelapresióndelos
neumáticos...................................................13
8Comprobacióndelospatinesyel
rascador........................................................14
9Ajustedelcabledelsinfín/impulsor................14
10Compruebeelfuncionamientodela
transmisióndetracción.................................14
Elproducto..............................................................15
Especicaciones..............................................16
Accesorios........................................................16
Operación...............................................................17
Antesdelfuncionamiento....................................17
Instalacióndelabatería....................................17
Comprobacióndelestadodecarga...................17
Duranteelfuncionamiento...................................17
Arranquedelamáquina....................................17
ActivacióndelmodoECO.................................18
Cargadelabatería...........................................18
Operacióndelatransmisióndetracción............19
Usodelselectordevelocidad...........................19
Usodelsinfín/impulsor.....................................20
UsodelQuickStick®.......................................20
Cómolimpiarunconductodedescarga
atascado.......................................................21
Consejosdeoperación....................................22
Despuésdelfuncionamiento...............................22
Apagadodelamáquina....................................22
Cómoretirarlabateríadelamáquina................22
Paraevitarlacongelacióndespuésdel
uso................................................................23
Mantenimiento........................................................24
Calendariorecomendadodemanteni-
miento..........................................................24
Preparaciónparaelmantenimiento..................24
Comprobaciónyajustedelospatinesyel
rascador........................................................24
Comprobaciónyajustedelcablede
tracción.........................................................25
Comprobaciónyajustedelcabledel
sinfín/impulsor...............................................26
2
Page 37

Comprobacióndelniveldeaceitedelacaja
deengranajesdelsinfín................................27
Lubricacióndelejehexagonal...........................27
Ajustedelcierredelconductode
descarga.......................................................28
Sustitucióndelascorreasde
transmisión...................................................28
Almacenamiento.....................................................29
Almacenamientodelamáquina........................29
Solucióndeproblemas...........................................30
Seguridad
ADVERTENCIA–alutilizarunamáquinaeléctrica,
leayobservesiemprelasnormaseinstrucciones
deseguridadbásica,andereducirelriesgode
incendio,descargaeléctricaolesiones,incluyendo
lassiguientes:
LEATODASLASINSTRUCCIONES
ADVERTENCIA–cuandoseutilizaunamáquina
eléctrica,esnecesarioobservarunasnormasbásicas
deseguridad,incluyendolassiguientes,ande
reducirelriesgodeincendio,descargaeléctricao
lesiones:
I.Formación
1.Eloperadordelamáquinaesresponsablede
cualquieraccidenteopeligroqueafecteaotras
personasoasupropiedad.
2.Leaycomprendaelcontenidodeeste
Manualdeloperadorantesdearrancar
lamáquina.Asegúresedequetodaslas
personasqueutilicenestamáquinasepancómo
utilizarla,sepancómoapagarlarápidamentey
comprendanlasadvertencias.
3.Nodejequelosniñosutilicenojueguenconla
máquina,labateríaoelcargadordelabatería;
lanormativalocalpuederestringirlaedaddel
operador.
4.Nopermitaqueestedispositivoseautilizado
omantenidoporniñosoporpersonasque
nohayanrecibidolaformaciónadecuada.
Sólopermitaquemanejenorevisenel
dispositivopersonasresponsables,formadas,
familiarizadasconlasinstruccionesy
físicamentecapacesdeutilizarorevisarla
máquina.
5.Antesdeutilizarlamáquina,labateríay
elcargadordelabatería,leatodaslas
instruccionesysímbolosdeadvertenciade
estosproductos.
6.Familiaríceseconloscontrolesyconeluso
correctodelamáquina,labateríayelcargador
delabatería.
II.Preparación
1.Mantengaaotraspersonasyalosniños
alejadosdelazonadetrabajo.
2.Nuncapermitaquelamáquinaseautilizadapor
niños.
3.Nohagafuncionarlamáquinasinquetodoslos
protectoresydispositivosdeseguridadestén
colocadosyquefuncionencorrectamenteen
lamáquina.
4.Inspeccioneeláreadondesevaautilizarla
máquina,yretirecualquierobjetoquepudiera
interferirconelfuncionamientodelamáquinao
quepudieraserarrojadoporlamáquina.
5.Utiliceúnicamentelabateríaespecicada
porT oro.Elusodeotrosaccesoriospuede
aumentarelriesgodeincendioylesiones.
6.Siseenchufaelcargadorenunatomade
corrientequenoseade120voltios,puede
causarunincendioounadescargaeléctrica.No
enchufeelcargadorenunatomadecorriente
quenoseade120voltios.
7.Noutilicelabateríaoelcargadordelabatería
siestándañadosomodicados,porquepodrían
mostraruncomportamientoimpredeciblecon
resultadodeincendio,explosiónoriesgode
lesiones.
8.Sielcabledealimentacióndelcargadordela
bateríaestádañado,póngaseencontactocon
unServicioTécnicoAutorizadoparacambiarlo.
9.Noutilicebateríasnorecargables.
10.Carguelabateríaúnicamenteconelcargador
debateríaespecicadoporT oro.Uncargador
diseñadoparauntipodeterminadodebatería
puedecrearunriesgodeincendiosiseutiliza
conotrabatería.
11.Carguelabateríaúnicamenteenunazonabien
ventilada.
12.Noexpongalabateríaoelcargadoralfuegooa
temperaturassuperioresa68°C(154°F).
13.Sigatodaslasinstruccionesdecargayno
carguelabateríasilatemperaturaestáfueradel
intervaloespecicadoenlasinstrucciones.De
locontrario,podríadañarlabateríayaumentar
elriesgodeincendio.
14.Vestimentaadecuada–lleveropaadecuada,
incluidaprotecciónocular,pantalónlargo,
botasdegomaresistentesyantideslizantes,
yprotecciónauditiva.Sitieneelpelolargo,
recójaselo,ynolleveprendasholgadasojoyas
sueltasquepuedanquedaratrapadasenlas
piezasmóviles.
III.Operación
3
Page 38

1.Cualquiercontactoconelrotorenmovimiento
causarálesionesgraves.Mantengalasmanos
ylospiesalejadosdetodaslaspiezasen
movimientodelamáquina.Manténgasealejado
decualquieraperturadedescarga.
2.Permanezcadetrásdelasempuñadurasy
alejadodelconductodedescargamientras
utilizalamáquina.
3.Elusodeestamáquinaparaotrospropósitos
quelosprevistospodríaserpeligrosopara
ustedyparaotraspersonas.
4.Eviteelarranqueaccidental–asegúresede
quelallavedelarranqueeléctricoseretiradel
interruptordeencendidoantesdeconectarla
bateríaymanejarlamáquina.
5.Dediquetodasuatenciónalmanejodela
máquina.Norealiceningunaactividadque
pudieradistraerle;delocontrario,pueden
producirselesionesodañosmateriales.
6.Desengranetodoslosembraguesyponga
puntomuertoantesdearrancarlamáquina.
7.Parelamáquina,retirelallavedelarranque
eléctrico,retirelabateríadelamáquinayespere
aquesedetengatodomovimientoantesde
ajustar,revisar,limpiaroalmacenarlamáquina.
8.Retirelabateríaylallavedelarranqueeléctrico
delamáquinaantesdedejarladesatendidao
antesdecambiardeaccesorio.
9.Nofuercelamáquina–dejequelamáquina
hagaeltrabajomejoryconmásseguridadala
velocidadparalaquefuediseñada.
10.Manténgasealerta–estéatentoaloqueestá
haciendoyutiliceelsentidocomúnmientras
trabajeconlamáquina.Noutilicelamáquinasi
estáenfermo,cansado,obajolainuenciade
alcoholodrogas.
obstrucción;elmaterialpodríarebotarhacia
usted.Parelamáquinaalcruzarsupercies
degrava.
16.Extremelasprecaucionesalcruzaroconducirla
máquinasobrecaminos,senderosocarreteras
degravilla.Estéalertaaobstáculosocultosy
aotrosvehículos.
17.Silamáquinagolpeaunobjetooempiezaa
vibrar,apagueinmediatamentelamáquina,
retirelallavedelarranqueeléctrico,retire
labateríayespereaquesedetengatodo
movimientoantesdeexaminarlamáquinaen
buscadedaños.Hagatodaslasreparaciones
necesariasantesdevolverautilizarlamáquina.
18.Apaguelamáquinaantesdeabandonarla
posicióndeloperadorporcualquiermotivo.
19.Apaguelamáquinayretirelallaveantesde
desatascarlamáquina,yutilicesiempreunpalo
ounaherramientadelimpiezaparaeliminarel
atasco.
20.Parelamáquinayretirelallavedelarranque
eléctricoantesdecargarlamáquinaparael
transporte.
21.Encondicionesabusivas,labateríapuede
expulsarlíquido;eviteelcontacto.Encasode
uncontactoaccidentalconellíquido,enjuague
conagua.Siellíquidoentraencontactocon
susojos,busqueayudamédica.Ellíquido
expulsadodelabateríapuedecausarirritación
oquemaduras.
22.Nuncautilicelamáquinaagrandesvelocidades
deavancesobresuperciesresbaladizas.
11.Utilicelamáquinasoloenbuenascondiciones
devisibilidadybajocondicionesmeteorológicas
apropiadas.
12.Extremelasprecaucionesalirhaciaatrásotirar
delamáquinahaciausted.
13.Pisermeymantengaelequilibrioentodo
momento,sobretodoenpendientes.Extreme
lasprecaucionesalcambiardedirecciónen
cuestasopendientes.Noutilicelamáquina
enpendientesextremadamentepronunciadas.
Camine,nocorranuncaconlamáquina.
14.Cuandonoestéutilizandolamáquinapara
despejarlanieve,desengranelatransmisión
delsinfín.
15.Nodirijaelmaterialdedescargahacianadie.
Evitedescargarmaterialcontraunapareduotra
4
Page 39

IV.Mantenimientoyalmacenamiento
1.Parelamáquina,retirelallavedelarranque
eléctrico,retirelabateríadelamáquinayespere
aquesedetengatodomovimientoantesde
ajustar,revisar,limpiaroalmacenarlamáquina.
2.Nointenterepararlamáquina,salvocon
arregloaloindicadoenlasinstrucciones.Haga
queunServicioTécnicoAutorizadorealiceel
mantenimientodelamáquinausandopiezasde
repuestoidénticas.
3.Lleveguantesyprotecciónocularalrealizarel
mantenimientodelamáquina.
4.Alrealizarelmantenimientodelrotor,sepaque
elrotorpuedemoverseaunquelafuentede
alimentaciónestéapagada.
5.Paraobtenerelmejorrendimiento,utilice
solamentepiezasyaccesoriosgenuinosde
Toro.Otrosaccesoriosypiezasderepuesto
podríanserpeligrosos,ydichousopodría
invalidarlagarantíadelproducto.
6.Mantenimientodelamáquina–mantengael
manillarseco,limpioylibredeaceiteygrasa.
Mantengalosprotectorescolocadosyenbuen
estadodefuncionamiento.Utilicesolamente
piezasderepuestoidénticas.
7.Compruebefrecuentementequetodaslas
jacionesestáncorrectamenteapretadaspara
quelamáquinasemantengaenperfectas
condicionesdefuncionamiento.
8.Inspeccionelamáquinaenbuscadepiezas
dañadas.Compruebequelaspiezasmóviles
estáncorrectamentealineadasyquese
muevenlibrementesinagarrotarse,queestán
correctamentemontadas,quenohaypiezas
rotas,yquenohayotrascircunstanciasque
pudieranafectarasuuso.Amenosquese
indiquelocontrarioenlasinstrucciones,haga
queunServicioTécnicoAutorizadorepareo
sustituyacualquierprotectorocomponente
dañado.
9.Cuandolabateríanoestáenuso,debe
mantenersealejadadeobjetosmetálicoscomo
clips,monedas,llaves,clavosytornillosque
pudieranhacerunaconexiónentreunterminal
yotro.Uncortocircuitoentrelosterminales
delabateríapuedecausarquemadurasoun
incendio.
10.Cuandonoestéutilizandolamáquina,guárdela
enunlugarcerrado,secoyseguro,fueradel
alcancedelosniños.
11.Cuandovayaaalmacenarlamáquinadurante
másde30días,consultelainformación
importantedelasecciónAlmacenamiento
(página29).
12.CUIDADO–unabateríamaltratadapuede
representarunriesgodeincendiooquemadura
química.Nodesmontelabatería.Nocalientela
bateríaamásde68°C(154°F)nilaincinere.
Sustituyalabateríaúnicamenteconunabatería
Torogenuina;elusodeotrotipodebatería
podríaprovocarunincendioounaexplosión.
Mantengalasbateríasfueradelalcancedelos
niñosyenelembalajeoriginalhastasuuso.
13.Notirelabateríausadaalfuego.Lacelda
puedeexplosionar.Compruebesilanormativa
localcontienealgunainstrucciónespecialsobre
laeliminacióndelasbaterías.
GUARDEESTAS
INSTRUCCIONES
5
Page 40

Pegatinasdeseguridadeinstrucciones
Laspegatinasylasinstruccionesdeseguridadestánalavistadeloperadoryestánubicadas
cercadecualquierzonadepeligropotencial.Sustituyacualquierpegatinaqueestédañadao
quefalte.
decal94-8072
94-8072
121-6817
1.Peligrodecorte/desmembramientodemanoopie,impulsor
ysinfín–mantengaalejadasaotraspersonas.
decal121-6817
121-6823
1.Rápido3.Lento
2.Velocidadeshacia
adelante
137-6198
1.Peligrode
corte/desmembramiento
delosdedosolamano,
impulsor–nointroduzca
lamanoenelconducto.
decal121-6823
4.Velocidadeshaciaatrás
decal137-6198
2.Advertencia–apagueel
motorantesdeutilizarla
herramientaparadespejar
elconducto.
6
Page 41

decal121-1240
121-1240
1.Transmisióndetracción–aprietelapalancaparaengranar,
sueltelapalancaparadesengranar.
4.Peligrodecorte/desmembramientodelamano,impulsor–no
seacerquealaspiezasenmovimiento;mantengacolocados
todoslosprotectoresydefensas;retirelallaveyleaelManual
deloperadorantesderealizarelmantenimiento.
2.Advertencia–leaelManualdeloperador.5.Peligrodeobjetosarrojados–mantengaalejadasaotras
personas.
3.Peligrodecorte/desmembramientodelamano,impulsor–
nointroduzcalamanoenelconducto;apagueelmotorantes
6.Transmisióndesinfín/impulsor–aprietelapalancapara
engranar,sueltelapalancaparadesengranar.
deabandonarelpuestodeloperador;utilicelaherramienta
paralimpiarelconducto.
137-9462
decal137-9462
137-9463
1.Labateríaseestácargando.
2.Labateríaestácompletamentecargada.
3.Latemperaturadelabateríaestáporencimaopordebajodelintervalodetemperaturaadecuado.
4.Fallodecargadelabatería
decal137-9463
7
Page 42

decal137-9456
137-9456
1.LeaelManualdel
operador.
2.Mantengaalejadode
fuegosollamasdesnudas.
1.Estadodecargadelabatería
3.Noexponeralalluvia.
decal137-9461
137-9461
decal133-8061
133-8061
8
Page 43

Montaje
Importante:Enelmomentodelacompralabateríanoestátotalmentecargada.Antesdeutilizarla
máquinaporprimeravez,consulteCargadelabatería(página18).
1
Cómomontarelcargadordelabatería(opcional)
Piezasnecesariasenestepaso:
2
Fijacionesdemontaje(noincluidas)
Procedimiento
Silodesea,monteelcargadordelabateríarmementeenlaparedutilizandolosoriciosdemontajeen
paredenlapartetraseradelcargador.
Mónteloenunespaciointerior(talcomoungarajeuotrolugarseco),cercadeunatomadecorrienteyfuera
delalcancedelosniños.
ConsultelaFigura3paraobtenerasistenciasobreelmontajedelcargador.
Coloqueelcargadorsobrelasjacionescorrectamenteposicionadasparajarloensulugar(jacionesno
incluidas).
Figura3
g290534
9
Page 44
2
Instalacióndelmanillarsuperior
Nosenecesitanpiezas
Procedimiento
g344090
3
Instalacióndelconducto
Nosenecesitanpiezas
Procedimiento
g344087
10
Page 45

4
Instalacióndelacoplamientodecontroldetracción
Nosenecesitanpiezas
Procedimiento
g344089
11
Page 46
5
Instalacióndelavarilladecontroldelconducto
Nosenecesitanpiezas
Procedimiento
g344086
12
Page 47

6
Instalacióndelaherramientadesatascadora
Nosenecesitanpiezas
Procedimiento
g344088
7
Comprobacióndelapresióndelosneumáticos
Nosenecesitanpiezas
Procedimiento
g344084
13
Page 48

1.Arranquelamáquina;consulteArranquedela
máquina(página17).
8
Comprobacióndelos
patinesyelrascador
Nosenecesitanpiezas
Procedimiento
ConsulteComprobaciónyajustedelospatinesyel
rascador(página24).
9
Ajustedelcabledel
sinfín/impulsor
Nosenecesitanpiezas
Procedimiento
Compruebeyajusteelcabledelsinfín/impulsorantes
delprimeruso;consulteComprobaciónyajustedel
cabledelsinfín/impulsor(página26).
2.Muevaelselectordevelocidadesalaposición
R1;consulteUsodelselectordevelocidad
(página19).
3.Aprietelapalancaizquierda(tracción)contrala
empuñadura(Figura10).
g001011
Figura10
Lamáquinadebedesplazarsehaciaatrás.Si
lamáquinanosemueve,osisemuevehacia
adelante,hagalosiguiente:
A.Sueltelapalancadetracciónyapaguela
máquina;consulteApagadodelamáquina
(página22).
B.Desconectelatuercadeajustedela
palancaselectoradevelocidad.
C.Girelatuercadeajustehaciaabajo(sentido
horario)enlavarilladecontroldelas
marchas.
10
Compruebeel
funcionamientodela
transmisióndetracción.
Nosenecesitanpiezas
Procedimiento
CUIDADO
Silatransmisióndetracciónnoestá
correctamenteajustada,lamáquinapuede
desplazarseenladirecciónopuestadela
deseada,causandodañospersonalesy/o
materiales.
Compruebecuidadosamentelatransmisión
detracciónyajústela,siesnecesario.
D.Conectelatuercadeajustealapalanca
selectoradevelocidad.
4.Sueltelapalancadetracción.
5.Muevaelselectordevelocidadesalaposición
1;consulteUsodelselectordevelocidad
(página19).
6.Aprietelapalancaizquierda(tracción)contrala
empuñadura(Figura10).
Lamáquinadebedesplazarsehaciaadelante.
Silamáquinanosemueve,osisemuevehacia
atrás,hagalosiguiente:
A.Sueltelapalancadetracciónyapaguela
máquina.
B.Desconectelatuercadeajustedela
palancaselectoradevelocidad.
C.Girelatuercadeajustehaciaarriba(sentido
antihorario)enlavarilladecontroldelas
marchas.
D.Conectelatuercadeajustealapalanca
selectoradevelocidad.
14
Page 49

7.Siharealizadoalgúnajuste,repitaeste
procedimientohastaqueyanoserequiera
ajustealguno.
Importante:Silamáquinasedesplazacuando
lapalancadetracciónestáenposiciónde
Desengranado,compruebeelcabledetracción
(consulteComprobaciónyajustedelcablede
tracción(página25))ollevelamáquinaaun
ServicioTécnicoAutorizadoparaquelarevisen.
Elproducto
Figura11
1.Empuñadura(2)9.Deectordelconducto
2.Palancadel
sinfín/impulsor
3.Interruptordebloqueo11.Rascador
4.Palancaselectorade
velocidad
5.Controldelconductode
descargaQuickStick
6.Palancadetracción14.Paneldecontrol
7.Tapadelcompartimento
delabateríaprincipal
8.Llavedelarranque
eléctrico
®
10.Conductodedescarga
12.Sinfín
13.Patín(2)
15.Tapadelcompartimento
delabateríasecundaria
16.Herramienta
desatascadora
g360898
15
Page 50

Figura12
1.Indicadoresdecargadela
batería
2.BotónECO
Figura13
1.Herramientadesatascadora(sujetaalmanillar)
3.Interruptordeencendido
enlaposiciónde
DESACTIVADO.
Especicaciones
ModeloPesoLongitudAnchuraAltura
78kg142cm62.5cm112cm
39924
Batería
Modelo88675
g347780
Capacidaddelabatería
Voltajesegúnelfabricantedelabatería=60Vmáximoy54V
nominal.Elvoltajerealdependedelacarga.
Cargadordebaterías
Modelo88602
Tipo
Entrada
g344092
Salida60VCCmáx2.0A
Intervalosdetemperaturaadecuados
Cargue/guardelabateríaa5°Ca40°C(41°Fa104°F)*
Utilicelabateríaa
Utilicelamáquinaa
(172li-
bras)
(56")(24.6")(44")
7.5Ah
405Wh
Cargadordebateríasdeionesdelitio
60VMAX
120VCA50/60HzMáx.2.0A
-30°C(-22°F)a49°C(120
°F)*
-30°C(-22°F)a49°C(120
°F)*
1.Cargadordebatería
modelo88602(incluido
conelmodelo39924)
2.Bateríamodelo88675
(incluidaconelmodelo
39924)
Figura14
3.Bateríamodelo88625(no
incluida)
*Eltiempodecargaserámayorsilatemperaturano
estáenesteintervalodurantelacarga.
Guardelamáquina,labateríayelcargadorenun
g360884
lugarcerrado,limpioyseco.
Accesorios
Estádisponibleunaseleccióndeaccesorios
homologadosporT oroquesepuedenutilizarcon
lamáquinaandepotenciaryaumentarsus
prestaciones.PóngaseencontactoconsuServicio
TécnicoAutorizadooconsudistribuidorautorizado
Toro,ovisitewww.T oro.comparaobtenerunalistade
todoslosaperosyaccesorioshomologados.
Paraasegurarunrendimientoóptimoymantener
lacerticacióndeseguridaddelamáquina,utilice
solamentepiezasyaccesoriosgenuinosToro.Las
piezasderecambioyaccesoriosdeotrosfabricantes
podríanserpeligrosos,ysuusopodríainvalidarla
garantíadelproducto.
16
Page 51

Operación
Comprobacióndelestado
Nota:Losladosderechoeizquierdodelamáquina
sedeterminandesdelaposiciónnormaldeloperador.
Antesdel
funcionamiento
Instalacióndelabatería
1.Compruebequelosoriciosdeventilaciónde
lasbateríasestánlibresdepolvoyresiduos.
2.Levantelatapadelcompartimentodelabatería.
3.Alineeelhuecodelabateríaconlalengüeta
delamáquina,eintroduzcalabateríaenel
compartimentohastaqueseengancheensu
sitio(Figura9).
4.Cierrelatapadelcompartimentodelabatería.
5.Repitaparalosotros2huecosdebatería(sies
necesario).
Nota:Lashoras-amperiocombinadasdetodas
lasbateríasinstaladasdebensumarunmínimo
de6.0;delocontrariolamáquinanopuede
arrancar.
decarga
Puedeverelestadoexactodecargadecadabatería
instalada;girelallavealaposiciónACCESORIO
(Figura16).Laposicióndecadaconjuntodeluces
correspondealhuecodelabateríacorrespondiente.
Sielestadodecargadelabateríaesdemasiadobajo
ynecesitacargarse,osinohaybateríaenelhueco
correspondiente,laluzdepresenciadelabateríano
seenciende.
g348182
Figura16
1.Lucesdeestadodecarga3.Interruptordeencendido
enlaposiciónACCESORIO
2.Lucesdepresenciadelas
baterías
Nota:Silatapadelcompartimentodela
bateríanosecierraporcompleto,labateríano
estácorrectamenteinstalada.
Figura15
Duranteel
funcionamiento
Arranquedelamáquina
Nota:Utilicelabateríasoloatemperaturasque
esténdentrodelintervaloapropiado;consulte
Especicaciones(página16).
1.Asegúresedequehayunaomásbaterías
instaladasenlamáquina;consulteInstalación
delabatería(página17).
g348180
2.Insertelallavedelarranqueeléctricoenelpanel
decontrol
3.GirelallavealaposicióndeMARCHApara
encenderlamáquina(Figura17).
17
Page 52

Figura17
1.InterruptordeencendidoenlaposicióndeMARCHA.
1.Compruebequelosoriciosdeventilaciónde
labateríaydelcargadorestánlibresdepolvo
yresiduos.
g347864
ActivacióndelmodoECO
ElusodelmodoECOpuedealargarlavidadela
batería,alreducirlavelocidaddelrotor;utiliceel
modoECOparamovernieveligera,omoverlanieve
acortadistancia.ActiveelmodoECOusandoel
botónECOcomosemuestraenlaFigura18.
Figura18
1.BotóndelmodoECO
Cargadelabatería
Importante:Enelmomentodelacomprala
bateríanoestátotalmentecargada.Antesdeusar
laherramientaporprimeravez,coloquelabatería
enelcargadorycárguelahastaqueelindicador
LEDindiquequelabateríaestácompletamente
cargada.Leatodaslasprecaucionesde
seguridad.
Importante:Carguelabateríasoloatemperaturas
queesténdentrodelintervaloapropiado;consulte
Especicaciones(página16).
Nota:Encualquiermomento,presioneelbotóndel
indicadordecargadelabateríadelabateríapara
mostrarlacargaactual(indicadoresLED).
g290533
Figura19
1.Huecodelabatería
2.Zonasdeventilacióndela
batería
3.Terminalesdelabatería
4.Botóndelindicadorde
cargadelabatería
5.IndicadoresLED(carga
actual)
6.Asa
7.IndicadorLEDdel
cargador
8.Zonasdeventilacióndel
cargador
2.Alineeelhuecodelabatería(Figura19)conla
lengüetadelcargador.
3.Introduzcalabateríaenelcargadorhastaque
estécompletamenteasentada(Figura19).
4.Pararetirarlabatería,deslicelabateríahacia
atrásparasacarladelcargador.
g347866
5.Consultelatablasiguienteparainterpretarel
indicadorLEDdelcargadordelabatería.
Indicador
ApagadoNohaybateríainsertada
Verde
intermitente
VerdeLabateríaestácargada
Rojo
Rojointermitente
Indica
Labateríaseestácargando
Labateríay/oelcargadordelabateríaestápor
encimaopordebajodelintervalodetemperatura
adecuado
Fallodecargadelabatería*
*ConsulteSolucióndeproblemas(página30)si
deseamásinformación.
Importante:Labateríapuededejarseconectada
alcargadorduranteperiodoscortosentreusos.
18
Page 53

Silabateríanosevaautilizarduranteperiodos
prolongados,retirelabateríadelcargador;
consulteAlmacenamiento(página29).
Operacióndela
transmisióndetracción
CUIDADO
Silatransmisióndetracciónnoestá
correctamenteajustada,lamáquinapuede
desplazarseenladirecciónopuestadela
deseada,causandodañospersonalesy/o
materiales.
Compruebecuidadosamentelatransmisión
detracciónyajústelasiesnecesario;
consulte10Compruebeelfuncionamientode
latransmisióndetracción.(página14)para
obtenermásinformación.
Importante:Silamáquinasedesplazacuando
lapalancadetracciónestáenposiciónde
Desengranado,compruebeelcabledetracción
(consulteComprobaciónyajustedelcablede
tracción(página25))ollevelamáquinaaun
ServicioTécnicoAutorizadoparaquelarevisen.
1.Paraengranarlatransmisióndetracción,
aprietelapalancaizquierda(tracción)hastala
empuñadura(Figura20).
g322971
Figura21
Figura20
2.Paradetenerlatracción,sueltelapalancade
tracción.
Usodelselectorde
velocidad
Elselectordevelocidadtiene6marchashacia
adelantey2haciaatrás.Paracambiardemarcha,
sueltelapalancadetracciónymuevalapalanca
selectoradevelocidadalaposicióndeseada(Figura
21).Lapalancaseenganchaenlamuescaprovista
encadamarchaseleccionada.
g001011
19
Page 54

Usodelsinfín/impulsor
ADVERTENCIA
1.Paraengranarlatransmisióndelsinfín/impulsor,
muevahaciaatráselinterruptordebloqueode
lapalanca,yacontinuación,aprietelapalanca
derecha(sinfín/impulsor)contralaempuñadura
(Figura22).
Sielsinfínyelimpulsorsiguengirando
cuandoustedsueltelapalancadel
sinfín/impulsor,podríacausargraves
lesionesaustedmismooaotras
personas.
Noutilicelamáquina.Llévelaaun
ServicioTécnicoAutorizadoparaquela
revisen.
UsodelQuickStick®
PresionelatapaazuldelgatilloparautilizarelQuick
Stickparaorientarelconductodedescargayel
deectordelconducto.Sueltelatapadelgatillopara
bloquearelconductodedescargayeldeectordel
conductoenesaposición(Figura23).
Figura22
2.Paradetenerelsinfínyelimpulsor,sueltela
palancaderecha.
Importante:Alaccionartantolapalancadel
sinfín/impulsorcomolapalancadetracción,
lapalancadetracciónbloquealapalancadel
sinfín/impulsorenlaposicióndeactivada,
dejandolibrelamanoderecha.Parasoltar
ambaspalancas,simplementesueltela
palancaizquierda(detracción).
3.Sielsinfínyelimpulsorsiguengirandocuando
ustedsueltalapalancadelsinfín/impulsor,
noutilicelamáquina.Compruebeelcable
delsinfín/impulsor;consulteComprobacióny
ajustedelcabledelsinfín/impulsor(página26)y
ajústelosiesnecesario.Denoserasí,llevela
máquinaaunServicioTécnicoAutorizadopara
quelarevisen.
g360687
g001014
Figura23
Cómomoverelconductode
descarga
PresionelatapaazuldelgatilloymuevaelQuick
Stickalaizquierdaparadesplazarelconductode
descargahacialaizquierda;muevaelQuickSticka
laderechaparadesplazarelconductodedescarga
hacialaderecha(Figura24).
20
Page 55

Figura24
•Sielconductonosemueve,consulteAjustedel
cierredelconductodedescarga(página28).
•Sielconductonogiralamismadistanciahaciala
izquierdaquehacialaderecha,asegúresedeque
elcablepasaporelinteriordelmanillar.Consulte
2Instalacióndelmanillarsuperior(página9).
•Sielconductonosebloqueacorrectamenteal
soltarlatapadelgatillo,consulteAjustedelcierre
delconductodedescarga(página28).
Cómolimpiarunconducto
dedescargaatascado
ADVERTENCIA
Sielsinfín/impulsorestáenmarchaperono
salenieveporelconductodedescarga,el
conductopuedeestaratascado.
Noutilicenuncalasmanosparalimpiarun
conductodedescargaatascado.Estopodría
causarlesionespersonales.
•Paradesatascarelconductodedescarga,
permanezcaenelpuestodeloperadorysuelte
g018894
lapalancaizquierda(detracción).Conel
sinfín/impulsorenmarcha,presionehaciaabajo
sobrelasempuñadurasparaelevarlaparte
delanteradelamáquinaunoscuantoscentímetros
delsuelo.Luegolevantelaspalancasrápidamente
paraquelapartedelanteradelamáquinagolpee
elsuelo.Repitasiesnecesariohastaquesalga
unchorrodenievedelconductodedescarga.
•Sinopuededesatascarelconductodedescarga
golpeandolapartedelanteradelamáquinacontra
elsuelo,apaguelamáquina,espereaquese
detengantodaslaspiezasenmovimientoy
utilicelaherramientadesatascadora(Figura
13).
Cómomovereldeectordel
conducto
PresionelatapaazuldelgatilloymuevaelQuickStick
haciaadelanteparabajareldeectordelconducto;
muévalohaciaatrásparaelevareldeectordel
conducto(Figura25).
Figura25
Importante:Sisedesatascaelconductode
descargagolpeandolapartedelanteradela
máquinacontraelsuelo,lospatinespueden
desplazarse.Ajustelospatinesyapriete
rmementelospernosdelospatines;consulte
Comprobaciónyajustedelospatinesyel
rascador(página24).
g001016
21
Page 56

Consejosdeoperación
•Retirelanieveloantesposibledespuésdela
nevada.
PELIGRO
Cuandolamáquinaestáenmarcha,el
impulsoryelsinfíngiran,ypuedencausar
lesionesoamputarmanosopies.
•Antesdeajustar,limpiar,inspeccionar,
localizaraveríasorepararlamáquina,
apaguelamáquinayespereaquese
detengantodaslaspiezasenmovimiento.
Retirelallaveylabateríadelamáquina
paraevitarquealguienarranque
accidentalmentelamáquina.
•Retirecualquierobstruccióndelconducto
dedescarga;consulteCómolimpiarun
conductodedescargaatascado(página
21).Utilicelaherramientadesatascadora
(Figura13),nolasmanos,pararetirar
obstruccionesdelconductodedescarga.
•Permanezcadetrásdelasempuñadurasy
alejadodelconductodedescargamientras
utilizalamáquina.
•Mantengalacara,lasmanos,los
piesyotraspartesdelcuerpoodela
ropaalejadosdepiezasocultasoen
movimiento.
•Empujelamáquinahaciaadelante,perodejeque
funcioneasupropioritmo.
•Solapecadapasadaparaasegurarlaeliminación
completadelanieve.
•Descarguelanieveafavordelvientosiempreque
seaposible.
Despuésdel
funcionamiento
Apagadodelamáquina
1.Sueltelaspalancasdetracciónydel
sinfín/impulsor.
2.GirelallavealaposicióndeDESCONECTADOy
retíreladelpaneldecontrol(Figura12).
3.Retirela(s)batería(s);consulteCómoretirarla
bateríadelamáquina(página22).
Nota:Siemprequenoestéutilizandola
máquina,retirela(s)batería(s)ylallavedela
máquina.
Cómoretirarlabateríade
ADVERTENCIA
Elimpulsorpuedearrojarpiedras,juguetes
yotrosobjetosextraños,causandograves
lesionespersonalesaustedoaotras
personas.
•Mantengalazonaalimpiarlibrede
cualquierobjetoquepudieraserrecogido
yarrojadoporlaspalasdelsinfín.
•Mantengaalosniñosylosanimales
domésticosalejadosdelazonadetrabajo.
Paraobtenerlosmejoresresultados,tengaencuenta
losiguiente:
•Silamáquinaseralentizabajocargaolas
ruedaspatinan,seleccioneunamarchamásbaja,
consulteUsodelselectordevelocidad(página
19).
•Silapartedelanteradelamáquinaselevanta,
seleccioneunamarchamásbaja.Silaparte
delanterasiguelevantándose,levantelas
empuñaduras.
lamáquina
1.Levantelatapadelcompartimentodelabatería.
2.Presioneelcierredelabateríaparaliberarla
batería,yretirelabatería(Figura26).
g347853
Figura26
3.Cierrelatapadelcompartimentodelabatería.
22
Page 57

Paraevitarlacongelación
despuésdeluso
•Encondicionesdemuchanieveofrío,algunos
controlesypiezasmóvilespuedencongelarse.No
utiliceunafuerzaexcesivaalintentaraccionar
loscontrolessiestáncongelados.Sitiene
dicultadesparahacerfuncionarcualquiercontrol
ocomponente,arranquelamáquinaydéjelaen
marchaduranteunosminutos.
•Despuésdeutilizarlamáquina,dejelamáquina
enmarchaduranteunosminutosparaevitar
quelaspiezasmóvilessecongelen.Engraneel
sinfín/impulsorparaeliminarcualquierrestode
nievededentrodelacarcasa.GireelQuickStick
paraevitarquesecongele.Apaguelamáquina,
espereaquesedetengantodaslaspiezasen
movimientoyeliminetodoelhieloylanievede
lamáquina.
•Limpieelhieloylanievedelabasedelconducto.
•Gireelconductodedescargaalaizquierdayala
derechaparaliberarlodecualquieracumulación
dehielo.
23
Page 58

Mantenimiento
Calendariorecomendadodemantenimiento
Intervalodemanteni-
mientoyservicio
Despuésdelasprimeras
2horas
Cadaaño
Cadaañooantesdel
almacenamiento
Procedimientodemantenimiento
•Inspeccioneelcabledetracciónyajústelosiesnecesario.
•Inspeccioneelcabledelsinfín/impulsoryajústelosiesnecesario.
•Compruebelospatinesyelrascadoryajústelossiesnecesario.
•Inspeccioneelcabledetracciónyajústeloocámbielosiesnecesario.
•Inspeccioneelcabledelsinfín/impulsoryajústeloocámbielosiesnecesario.
•Compruebeelaceitedelacajadeengranajesdelsinfínyañadamásaceitesi
•Lubriqueelejehexagonal.
•Compruebelapresióndeairedelosneumáticoseínelosa1.16–1.37bar(17
•HagaqueunServicioTécnicoAutorizadoinspeccioneycambie,siesnecesario,la
Preparaciónparael
mantenimiento
1.Trasladelamáquinaaunasupercienivelada.
2.Parelamáquina,retirelallavedelarranque
eléctrico,espereaquesedetengatodo
movimientoyretirelabateríadelamáquina
antesdeajustar,revisar,limpiaroalmacenar
lamáquina.
esnecesario.
–20psi).
correadetransmisióndetracción,y/olacorreadetransmisióndelsinfín/impulsor .
Comprobaciónyajustede
lospatinesyelrascador
Intervalodemantenimiento:Cada
año—Compruebelospatinesy
elrascadoryajústelossiesnecesario.
Compruebelospatinesyelrascadorparaasegurarse
dequeelsinfínnotocasuperciespavimentadaso
degrava.Ajustelospatinesyelrascadorsegúnsea
necesarioparacompensareldesgaste.
1.Compruebelapresióndelosneumáticos;
consulte7Comprobacióndelapresióndelos
neumáticos(página13).
2.Aojelastuercasquesujetanlospatinesa
losladosdelsinfínhastaquelospatinesse
deslicenfácilmentehaciaarribayhaciaabajo.
g019046
Figura27
1.3mm(⅛")
24
Page 59

Importante:Lospatinesdebenmantener
laspalasdelsinfínporencimadelsuelo.
3.Asegúresedequeelrascadorquedaa3mm
(⅛")porencimadeunasupercienivelada,y
paraleloaella.
Nota:Sielpavimentoestáagrietado,osi
presentadesigualdadesodesniveles,ajustelos
patinesparaelevarelrascador.Ensupercies
degrava,bajelospatinesparaevitarquela
máquinarecojapiedras.
4.Muevalospatineshaciaabajohastaqueestén
enrasadosconelsuelo.
5.Aprietermementelastuercasquesujetanlos
patinesaloscostadosdelsinfín.
Nota:Paraajustarlospatinesrápidamentesi
seaojan,apoyeelrascadoraunadistancia
de3mm(⅛")delsuelo,luegobajelospatines
hastaquetoquenelsuelo.
Nota:Silospatinessedesgastandemasiado,
puededarleslavueltaycolocarelbordeno
desgastadocontralesuelo.
3.Aojeoaprieteeltensorparaajustarlalongitud
delmuellea5.5cm(2-3/16"),comosemuestra
enlaFigura29.
g030998
Figura29
Comprobaciónyajustedel
cabledetracción
Intervalodemantenimiento:Despuésdelas
primeras2horas—Inspeccioneel
cabledetracciónyajústelosies
necesario.
Cadaaño—Inspeccioneelcabledetraccióny
ajústeloocámbielosiesnecesario.
Silamáquinanosedesplazahaciaadelanteohacia
atrás,osisedesplazadespuésdesoltarselapalanca
detracción,esnecesarioajustarelcabledetracción.
Sielcabledetracciónizquierdonoestácorrectamente
ajustado,completelossiguientespasos:
1.Aojelacontratuerca.
2.Engranelapalancadetracciónysujételaen
esaposición(Figura28).
1.Contratuerca
2.Tensor
3.Muelle
4.5.5cm(2-3/16")
4.Aprietelacontratuerca(Figura29),
asegurándosedequehayunaligeratensiónen
elcable.
5.Sielcabledetracciónestácorrectamente
ajustadoperosiguehabiendounproblema,
póngaseencontactoconelServicioTécnico
Autorizado.
Figura28
g001011
25
Page 60

Comprobaciónyajustedel
cabledelsinfín/impulsor
Intervalodemantenimiento:Despuésdelas
primeras2horas—Inspeccioneel
cabledelsinfín/impulsoryajústelo
siesnecesario.
Cadaaño—Inspeccioneelcabledel
sinfín/impulsoryajústeloocámbielosies
necesario.
1.Aojelacontratuerca(Figura31).
2.Engranelapalancadelsinfín/impulsorysujétela
enesaposición(Figura30).
g031000
Figura31
Figura30
3.Aojeoaprieteeltensorparaajustarlalongitud
delmuellea7cm(2¾"),comosemuestraen
laFigura31.
1.Contratuerca
2.Tensor
3.Muelle
4.7cm(2¾")
4.Aprietelacontratuerca(Figura31),
asegurándosedequehayunaligeratensiónen
elcable.
5.Enciendalamáquinaeintenteengranarel
sinfín/impulsorsinmoverelinterruptorde
bloqueohaciaatrás;sielsinfíngira,aojeel
tensorparaqueelsinfínnoseengrane.
6.Sielcabledelsinfín/impulsorestácorrectamente
ajustadoperosiguehabiendounproblema,
póngaseencontactoconelServicioTécnico
Autorizado.
g360687
26
Page 61

Comprobacióndelnivel
Lubricacióndeleje
deaceitedelacajade
engranajesdelsinfín
Intervalodemantenimiento:Cada
año—Compruebeelaceitede
lacajadeengranajesdelsinfíny
añadamásaceitesiesnecesario.
1.Trasladelamáquinaaunasupercienivelada.
2.Limpielazonaalrededordeltapón(Figura32).
Figura32
hexagonal
Intervalodemantenimiento:Cadaaño—Lubrique
elejehexagonal.
Lubriqueligeramenteelejehexagonalcadaañocon
aceitedemotorparaautomóviles(Figura33).
g019018
Figura33
g016782
1.Ejehexagonal3.Ruedadegoma
2.Poleadefriccióndeacero
1.Tapón
3.Retireeltapóndelacajadeengranajes.
4.Compruebeelniveldeaceitedelacajade
engranajes.Elaceitedebeestara9.5mm(⅜")
pordebajodeloriciodellenado.
5.Sielniveldeaceiteesbajo,añadaaceitepara
engranajesGL-5oGL-6,SAE80-90EP ,ala
cajadeengranajeshastaqueelniveldelaceite
estéa9.5mm(⅜")pordebajodeloriciode
llenado.
Nota:Noutiliceaceitesintético.
6.Instaleeltapónenlacajadeengranajes.
Importante:Nomanchedeaceitelaruedade
gomaolapoleadefriccióndeacero,porquela
transmisiónpatinaría(Figura33).
1.Dreneelcombustibledeldepósitode
combustible.
2.Inclinelamáquinahaciaadelantesobrela
carcasadelsinfínyapóyelasobrebloquespara
quenopuedacaerse.
3.Retirelacubiertatrasera(Figura34).
Figura34
1.Tornillos
4.MuevaelselectordevelocidadesalaPosición
R2.
27
g019019
Page 62

5.Mojeeldedoenaceitedemotorpara
automóviles,ylubriqueligeramenteeleje
hexagonal.
6.Muevaelselectordevelocidadesalaposición6.
7.Lubriqueelotroextremodelejehexagonal.
8.Muevaelselectordevelocidadeshaciaadelante
yhaciaatrásunascuantasveces.
9.Instalelacubiertatraseraypongalamáquina
ensuposicióndeuso.
Ajustedelcierredel
conductodedescarga
Sielconductodedescarganosebloqueaenla
posicióndeseadaonosedesbloqueaparapoder
colocarloenotraposición,ajusteelcierredel
conductodedescarga.
1.Aojelajacióndelaabrazaderadelaplacade
apoyodelconductohastaqueelcablequede
libre.
Sustitucióndelascorreas
detransmisión
Silacorreadetransmisióndelsinfín/impulsorola
correadelatransmisióndetracciónsedesgasta,se
empapadeaceiteoresultadañada,hagaqueun
ServicioTécnicoAutorizadocambielacorrea.
Figura35
1.Conductodelcable
2.Abrazadera
2.Eliminecualquierholguradelcabletirandodela
cubiertadelcablehaciaatrás.
3.Aprietelajacióndelaabrazaderamientras
sujetaelcableensuposición.
3.Fijacióndelaabrazadera
g019021
28
Page 63

Almacenamiento
Preparacióndelabateríaparael
reciclado
Almacenamientodela
máquina
Importante:Almacenelamáquina,labateríayel
cargadorsoloatemperaturasqueesténdentrodel
intervaloapropiado;consulteEspecicaciones
(página16).
Importante:Sivaaalmacenarlabateríahasta
latemporadasiguiente,cárguelahastaque2o
3delosindicadoresLEDdelabateríacambien
averde.Noalmacenelabateríacompletamente
cargadanicompletamentedescargada.Antesde
volverausarlamáquina,carguelabateríahasta
quesevuelvaverdeelindicadorizquierdodel
cargador,ohastaquelos4indicadoresLEDdela
bateríasevuelvanverdes.
•Desconecteelproductodelsuministrodeenergía
(esdecir,retireelenchufedelsuministrode
energíaolabatería),retirelallaveycompruebesi
haydañosdespuésdeluso.
•Limpiecualquiermaterialextrañodelproducto.
•Noalmacenelaherramientaconlabatería
instalada.
Importante:Despuésderetirarla,cubralos
terminalesdelabateríaconcintaadhesivade
serviciopesado.Nointentedestruirodesmontar
labateríaniintenteretirarcualquieradelos
componentesdelamisma.
Lasbateríasdeionesdelitioetiquetadascon
elselloCall2Recyclepuedenserrecicladasen
cualquiercomerciooinstalacióndereciclado
debateríasadscritoalprogramaCall2Recycle
(soloEE.UU.yCanadá).Paralocalizar
uncomercioounainstalaciónparticipante
cercano,llameal1-800-822-8837ovisite
www.call2recycle.org.Sinopuedelocalizarun
comerciooinstalaciónparticipantecercano,o
sisubateríarecargablenoestáetiquetadacon
elselloCall2Recycle,póngaseencontacto
consuayuntamientoparaobtenermás
informaciónsobreelrecicladoresponsablede
labatería.SiseencuentrafueradeEE.UU.
oCanadá,póngaseencontactoconsu
distribuidorT oroautorizado.
•Cuandonoseestéutilizando,guardelamáquina,
labatería,lallaveyelcargadordelabateríafuera
delalcancedelosniños.
•Mantengalamáquina,labatería,lallaveyel
cargadordelabateríaalejadosdeagentes
corrosivoscomoproductosquímicosdejardíno
salparadeshielo.
•Parareducirelriesgodelesionespersonales
graves,noalmacenelabateríaenelexterioroen
unvehículo.
•Retoquecualquiersuperciedesconchadacon
pintura,quepuedeadquirirenunServicioTécnico
Autorizado.Lijelaszonasafectadasantesde
pintar,yutiliceuninhibidordecorrosiónparaevitar
queseoxidenlaspiezasmetálicas.
•Aprietecualquiertuerca,pernoocontratuercaque
estésuelto.Repareocambielaspiezasdañadas.
•Guardelamáquina,labatería,lallaveyel
cargadorenunlugarcerrado,limpioyseco.
29
Page 64

Solucióndeproblemas
ProblemaPosiblecausa
Lamáquinanofuncionaonofuncionade
formacontinua.
Lamáquinanoalcanzalamáxima
potencia.
Lamáquinafunciona,peronodescarga
nieveolohacemal.
Accióncorrectora
1.Labateríatienepocacarga.
2.Labateríanoestábienasentada.2.Asegúresedequelabateríase
3.Latemperaturadelabateríaestápor
encimaopordebajodelintervalode
temperaturaadecuado.
4.Labateríahasuperadoloslímites
máximosdeamperaje.
5.Hayhumedadenloscablesdela
batería.
6.Labateríaestádañada.
7.Hayotroproblemaeléctricoconla
máquina.
1.Lacapacidaddecargadelabatería
esdemasiadobaja.
2.Losoriciosdeventilaciónestán
obstruidos.
1.Lamáquinaavanzademasiadorápido
paradespejarlanieve.
2.Estáintentandoquitardemasiada
nieveencadapasada.
3.Estáintentandoquitarnievemuy
pesadaohúmeda.
4.Elconductodedescargaestá
obstruido.
5.Lacorreadetransmisióndel
sinfín/impulsorestásueltaoseha
salidodelapolea.
6.Lacorreadetransmisióndel
sinfín/impulsorestádesgastadaorota.
1.Carguelabatería.
haintroducidoporcompletoenel
alojamiento.
3.Trasladelabateríaaunlugarseco
cuyatemperaturaseadeentre5°Cy
40°C(41°Fy104°F).
4.Suelteelgatilloyluegopresioneel
interruptordelgatillo.
5.Dejequelabateríasesequeoséquela
conunpaño.
6.Sustituyalabatería.
7.PóngaseencontactoconelServicio
TécnicoAutorizado.
1.Retirelabateríadelamáquinay
carguecompletamentelabatería.
2.Limpielosoriciosdeventilación.
1.Pongaunamarchamásbaja.
2.Reduzcalacantidaddenieveaquitar
encadapasada.
3.Nosobrecarguelamáquinasilanieve
estámuypesadaohúmeda.
4.Desatasqueelconductodedescarga.
5.Instaley/oajustelacorreade
transmisióndelsinfín/impulsor;visite
www.T oro.comsideseainformación
sobremantenimiento,ollevela
máquinaaunServicioTécnico
Autorizado.
6.Cambielacorreadetransmisióndel
sinfín/impulsor;visitewww.Toro.com
sideseainformaciónsobre
mantenimiento,ollevelamáquinaa
unServicioTécnicoAutorizado.
Elconductodedescarganosebloquea
ensulugar,onosemueve.
Lamáquinanobarrelanieve
correctamente.
Labateríasedescargarápidamente.
Elcargadordelabateríanofunciona.
1.Elenganchedelconductodedescarga
noestácorrectamenteajustado.
1.Lospatinesy/oelrascadornoestán
correctamenteajustados.
2.Losneumáticosnotienenlamisma
presión.
1.Latemperaturadelabateríaestápor
encimaopordebajodelintervalode
temperaturaadecuado.
2.Lamáquinaestásobrecargada.
1.Latemperaturadelcargadordela
bateríaestáporencimaopordebajo
delintervalodetemperaturaadecuado.
2.Latomadecorrienteenlaqueestá
enchufadoelcargadordelabateríano
tienecorriente.
30
1.Ajusteelenganchedelconductode
descarga.
1.Ajustelospatinesy/oelrascador.
2.Compruebeyajustelapresióndeuno
delosneumáticos,odeambos.
1.Trasladelabateríaaunlugarseco
cuyatemperaturaseadeentre5°Cy
40°C(41°Fy104°F).
2.Empujelamáquinaconmenosfuerza.
1.Desenchufeelcargadordelabatería
ytrasládeloaunlugarsecocuya
temperaturaseadeentre5°Cy40°C
(41°Fy104°F).
2.Póngaseencontactoconun
electricistaautorizadoparaquerepare
latomadecorriente.
Page 65

ProblemaPosiblecausa
Accióncorrectora
ElindicadorLEDdelcargadordela
bateríaestárojo.
ElindicadorLEDdelcargadordela
bateríaparpadeaenrojo.
1.Elcargadordelabateríay/olabatería
estáporencimaopordebajodel
intervalodetemperaturaadecuado.
1.Hayunerrordecomunicacionesentre
labateríayelcargador .
2.Labateríaestácasiagotada.2.Póngaseencontactoconunservicio
1.Desenchufeelcargadordelabatería
ymuevaelcargadordelabatería
ylabateríaaunlugarsecocuya
temperaturaseadeentre5°C(41°F)
y40°C(104°F).
1.Retirelabateríadelcargador,
desconecteelcargadordelatoma
decorrienteyespere10segundos.
Vuelvaaenchufarelcargadorenla
tomadecorrienteycoloquelabatería
enelcargador.SielindicadorLED
delcargadorsigueparpadeandoen
rojo,repitaesteprocedimiento.Si
elindicadorLEDdelcargadorsigue
parpadeandodespuésde2intentos,
eliminelabateríacorrectamente
enunainstalaciónderecicladode
baterías.
técnicoautorizadosilabateríaestáen
garantía,oeliminecorrectamentela
bateríaenunainstalacióndereciclado
debaterías.
31
Page 66

InformaciónsobrelasAdvertenciasdelaProposición65deCalifornia
¿Quésignicaestaadvertencia?
Puedeverunproductoalaventaquellevaunaetiquetadeadvertenciacomolasiguiente:
ADVERTENCIA:Cáncerydañosreproductivos—www.p65Warnings.ca.gov.
¿QuéeslaProposición65?
LaProposición65afectaacualquierempresaquetengapresenciaenCalifornia,quevendaproductosenCalifornia,oquefabriqueproductosque
podríanserintroducidosovendidosenCalifornia.EstaleyexigequeelGobernadordeCaliforniamantengaypubliqueunalistadesustanciasquímicas
identicadascomocausantesdecáncer ,defectosdenacimientoy/uotrosdañosreproductivos.Lalista,queseactualizaanualmente,incluyecientos
deproductosquímicosqueseencuentranenmuchosartículosdeusodiario.ElpropósitodelaProposición65esinformaralpúblicosobrela
exposiciónaestosproductosquímicos.
LaProposición65noprohíbelaventadeproductosquecontenganestosproductosquímicos,sinoquerequierelapresenciadeadvertencias
enelproducto,elenvaseyladocumentaciónsuministradaconelproducto.Además,unaadvertenciadelaProposición65nosignicaqueel
productocontravenganingunanormaorequisitodeseguridad.Dehecho,elgobiernodeCaliforniahaaclaradoqueunaadvertenciabajola
Proposición65"noeslomismoqueunadecisiónlegalsobrela'seguridad'ola'inseguridad'deunproducto".Muchosdeestosproductosquímicos
hansidoutilizadosduranteañosenproductosdeusodiariosinquesehayanproducidodañosdocumentados.Paraobtenermásinformación,
visitehttps://oag.ca.gov/prop65/faqs-view-all.
UnaadvertenciadelaProposición65signicaqueunaempresa(1)haevaluadolaexposiciónyhaconcluidoquesuperaelnivelde"sinriesgo
signicativo";o(2)haoptadoporproporcionarunaadvertenciabasándoseensusconocimientosrespectoalapresenciadeunproductoquímicodelos
incluidosenlalista,sinintentarevaluarlaexposición.
¿Estaleyesaplicableentodaspartes?
LasadvertenciasdelaProposición65sólosonobligatoriasbajolalegislacióndeCalifornia.EstasadvertenciassevenportodaCaliforniaenunagran
variedaddeentornos,incluyendoentreotrosrestaurantes,tiendasdealimentación,hoteles,escuelasyhospitales,yenunaampliavariedaddeproductos.
Además,algunosminoristasdeInternetydelaventaporcorreoincluyenadvertenciasdelaProposición65ensussitiosweboensuscatálogos.
¿QuédiferenciahayentrelasadvertenciasdeCaliforniayloslímitesfederales?
LasnormasdelaProposición65sonamenudomásexigentesquelasnormasfederalesointernacionales.V ariassustanciasrequierenunaadvertencia
bajolaProposición65anivelesmuyinferioresaloslímitesfederales.Porejemplo,elnivelexigidoporlaProposición65paralasadvertenciassobreel
plomoesde0.5μg/día,queesmuyinferioraloqueexigenlasnormasfederaleseinternacionales.
¿Porquénollevanlaadvertenciatodoslosproductossimilares?
•LosproductosvendidosenCaliforniadebenllevaretiquetasbajolaProposición65,mientrasqueotrosproductossimilaresquesevendenen
otroslugaresnolasnecesitan.
•UnaempresapuedeestarobligadaaincluiradvertenciasdeProposición65ensusproductoscomocondicióndeunacuerdotrasunprocedimiento
legalrelacionadoconlaProposición65,perootrasempresasquefabricanproductossimilaresnotienennecesariamentelamismaobligación.
•LaaplicacióndelaProposición65noesuniforme.
•AlgunasempresaspuedenoptarpornoproporcionaradvertenciasporqueconcluyenquenoestánobligadasahacerlobajolaProposición65;la
faltadeadvertenciasenunproductonosignicaqueelproductoestélibredelosproductosquímicosincluidosenlalistaanivelessimilares.
¿PorquéincluyeToroestaadvertencia?
Torohaoptadoporproporcionaralosconsumidoreslamayorcantidadposibledeinformaciónparaquepuedatomardecisionesinformadassobrelos
productosquecomprayutiliza.Toroproporcionaadvertenciasenciertoscasosbasándoseensusconocimientossobrelapresenciadeunoomás
productosquímicosdelalista,sinevaluarelniveldeexposición,puestoquelalistanoincluyelímitesdeexposiciónparatodoslosproductosquímicos
quecontiene.AunquelaexposiciónqueprovocanlosproductosT oropuedeserinsignicante,oestardentrodeloslímitesdelacategoría"sinriesgo
signicativo",TorohaoptadoporproporcionarlasadvertenciasdelaProposición65porsimpleprecaución.Además,siT oronoproporcionaraestas
advertencias,podríaserdemandadaporelEstadodeCaliforniaoporparticularesbajolaProposición65,yestarsujetaaimportantessanciones.
RevA
Page 67

SoufeuseàneigePowerMax
N°demodèle39924—N°desérie400000000etsuivants
Introduction
Cettemachineestdestinéeaugrandpublic.Elleest
conçueprincipalementpourdéblayerlaneigesurles
surfacesrevêtues,tellesalléesettrottoirs,etautres
surfacesdecirculationdespropriétésrésidentielles
etcommerciales.Ellen'estpasconçuepourenlever
autrechosequelaneige.Elleestconçuepour
fonctionneraveclabatterieion-lithiumToroFlex-Force
modèle88675(2fourniesaveclemodèle39924),
88660,88650,88640,88625ou88620.Cesbatteries
sontconçuespourêtrechargéesuniquementavec
leschargeursdebatteriemodèles88602(fourniavec
lemodèle39926),88605ou88610.L'utilisationde
ceproduitàd'autresnsquecelleprévuepeutêtre
dangereusepourvous-mêmeettoutepersonneà
proximité.
FormNo.3444-290RevB
®
e24de60V
Manueldel'utilisateur
Figure1
g344085
Lisezattentivementcettenoticepourapprendre
commentutiliseretentretenircorrectementvotre
produit,etéviterainsidel'endommageroudevous
blesser.Vousêtesresponsabledel'utilisationsûreet
correcteduproduit.
Rendez-voussurwww.T oro.compourtoutdocument
deformationàlasécuritéetàl'utilisationdesproduits,
pourtoutrenseignementconcernantunproduitouun
accessoire,pourobtenirl'adressedesdépositairesou
pourenregistrervotreproduit.
Pourobtenirdesprestationsdeservice,des
piècesTorod'origineoudesrenseignements
complémentaires,munissez-vousdesnuméros
demodèleetdesérieduproduitetcontactezun
dépositaire-réparateurouleserviceclientToroagréé.
LaFigure1indiquel'emplacementdesnumérosde
modèleetdesérieduproduit.Inscrivezlesnuméros
dansl'espaceréservéàceteffet.
Important:Avecvotreappareilmobile,vous
pouvezscannerlecodeQRsurl'autocollantdu
numérodesérie(lecaséchéant)pouraccéderà
l'informationsurlagarantie,lespiècesdétachées
etautresrenseignementsconcernantleproduit.
1.Emplacementdesnumérosdemodèleetdesérie
N°demodèle
N°desérie
Lesmisesengardedecemanuelsoulignentdes
dangerspotentielsetsontsignaléesparlesymbole
desécurité(Figure2),quiindiqueundangerpouvant
entraînerdesblessuresgravesoumortellessiles
précautionsrecommandéesnesontpasrespectées.
g000502
Figure2
Symboledesécurité
Cemanuelutilisedeuxtermespourfairepasserdes
renseignementsessentiels.Important,pourattirer
l'attentionsuruneinformationd'ordremécanique
spécique,etRemarque,poursoulignerune
informationd'ordregénéralméritantuneattention
particulière.
©2021—TheT oro®Company
8111LyndaleAvenueSouth
Bloomington,MN55420
Enregistrezvotreproduità
www.T oro.com.
Traductiondutexted'origine(FR)
ImpriméauMexique
Tousdroitsréservés
*3444-290*
Page 68

ATTENTION
Tabledesmatières
CALIFORNIE
Proposition65-Avertissement
Lecordond'alimentationdecette
machinecontientduplomb,une
substancechimiqueconsidéréepar
l'étatdeCaliforniecommesusceptible
deprovoquerdesmalformations
congénitalesetautrestroublesdela
reproduction.Lavez-vouslesmains
aprèsavoirmanipulélabatterie.
L'utilisationdeceproduitpeutentraîner
uneexpositionàdessubstances
chimiquesconsidéréespasl'étatde
Californiecommecapablesdeprovoquer
descancers,desanomaliescongénitales
oud'autrestroublesdelareproduction.
Introduction...............................................................1
Sécurité....................................................................3
Autocollantsdesécuritéetd'instruction..............6
Miseenservice.........................................................9
1Montageduchargeurdebatterie
(option)............................................................9
2Montagedelapartiesupérieuredu
guidon.............................................................9
3Montagedelagoulotte...................................10
4Montagedelatringleriedecommandede
déplacement.................................................10
5Montagedelatiged'orientationdela
goulotte..........................................................11
6Montagedel'outildenettoyagedela
neige.............................................................12
7Contrôledelapressiondespneus..................13
8Contrôledelalameracleuseetdes
patins............................................................14
9Réglageducâbledecommandedelavis
sansn/turbine.............................................14
10Contrôledufonctionnementdela
transmission..................................................14
Vued'ensembleduproduit......................................15
Caractéristiquestechniques............................16
Accessoires/outils.............................................16
Utilisation................................................................17
Avantl'utilisation..................................................17
Installationdelabatterie...................................17
Contrôledel'étatdecharge..............................17
Pendantl'utilisation.............................................17
Démarragedelamachine.................................17
ActivationdumodeECO...................................18
Chargelabatterie.............................................18
Fonctionnementdelatransmissionaux
roues.............................................................19
Utilisationdusélecteurdevitesses...................19
Utilisationdelacommandedetarièreà
neige/turbine.................................................19
UtilisationdulevierQuickStick®.......................20
Dégagementdelagoulotted'éjection...............21
Conseilsd'utilisation........................................21
Aprèsl'utilisation.................................................23
Arrêtdelamachine...........................................23
Retraitdelabatteriedelamachine...................23
Préventiondublocageparlegelaprès
utilisation.......................................................23
Entretien.................................................................24
Programmed'entretienrecommandé..................24
Préparationàl'entretien....................................24
Contrôleetréglagedespatinsetdelalame
racleuse........................................................24
Contrôleetréglageducâbledecommande
dedéplacement............................................25
Contrôleetréglageducâbledecommande
delavissansn/turbine................................26
2
Page 69

Contrôleduniveaud'huiledansleboîtier
d'engrenagesdelavissansn......................27
Graissagedel'arbrehexagonal........................27
Réglageduverroudelagoulotte.......................28
Remplacementdescourroies
d'entraînement..............................................28
Remisage...............................................................29
Remisagedelamachine..................................29
Dépistagedesdéfauts............................................30
Sécurité
AVERTISSEMENT–Quandvousutilisezune
machineélectrique,lisezetrespecteztoujoursles
misesengardeetconsignesdesécuritéélémentaires
pourréduirelesrisquesd'incendie,dechocélectrique
oudeblessure,notamment:
LISEZTOUTESLESINSTRUCTIONS
ATTENTION–L'utilisationdemachinesexige
d'observercertainesprécautionsélémentairespour
réduirelerisqued'incendie,dechocélectriqueoude
blessure,ycompriscequisuit:
I.Formationàl'utilisation
1.L'utilisateurdelamachineestresponsabledes
accidentsetdommagescausésauxautres
personnesetàleurspossessions.
2.Vousdevezlireetcomprendrelecontenude
ceManueldel'utilisateuravantdedémarrerla
machine.Assurez-vousquetouslesutilisateurs
decettemachineenconnaissentlemaniement,
saventcommentl'arrêterrapidementet
comprennenttouteslesmisesengarde.
3.N'autorisezpaslesenfantsàjoueravecla
machine,labatterieoulechargeurdebatterie;
certaineslégislationsimposentunâgeminimum
pourl'utilisationdecetypedemachine.
4.Nelaissezjamaisdesenfantsoudespersonnes
nonqualiéesutilisercetappareilouenfaire
l'entretien.Seuleslespersonnesresponsables,
forméesàl'utilisationdelamachine,ayantluet
comprislesinstructionsetphysiquementaptes
sontautoriséesàutiliserouentretenirl’appareil.
5.Avantd'utiliserlamachine,labatterieetle
chargeurdebatterie,liseztouteslesinstructions
etmisesengardequigurentsurcesproduits.
6.Familiarisez-vousaveclescommandesetle
maniementcorrectdelamachine,delabatterie
etduchargeurdebatterie.
2.N'autorisezjamaisunenfantàutiliserla
machine.
3.N'utilisezpaslamachines'ilmanquedescapots
oudesdispositifsdeprotection,ous'ilssonten
mauvaisétat.
4.Examinezlazonedetravailetdébarrassez-lade
toutobjetpouvantgênerlefonctionnementdela
machineouêtreprojetépendantsonutilisation.
5.Utilisezuniquementlabatteriespéciéepar
Toro.L'utilisationd'autresaccessoireset
outilspeutaccroîtrelerisquedeblessureet
d'incendie.
6.Vouspouvezcauserunincendieouunchoc
électriquesivousbranchezlechargeurde
batterieàuneprisequin'estpasde120V .Ne
branchezpaslechargeurdebatteriequ'àune
prisede120V.
7.N'utilisezpaslabatterieoulechargeurs'ils
sontendommagésoumodiés,carleur
comportementpourraitêtreimprévisibleet
causerunincendie,uneexplosionoudes
blessures.
8.Silecordond'alimentationreliéauchargeur
debatterieestendommagé,contactezun
dépositaire-réparateuragréépourlefaire
remplacer.
9.N'utilisezpasdebatteriesnonrechargeables.
10.Chargezlabatterieuniquementaveclechargeur
spéciéparToro.Unchargeurconvenantàun
certaintypedebatteriepeutcréerunrisque
d'incendies'ilestutiliséavecuneautrebatterie.
11.Nechargezlabatteriequedansunendroitbien
aéré.
12.N'exposezpaslabatterieoulechargeurau
feuouàdestempératuressupérieuresà68ºC
(154ºF).
13.Suiveztouteslesinstructionsdechargeetne
chargezpaslabatteriehorsdelaplagede
températurespéciéedanslesinstructions.
Vousrisquezsinond'endommagerlabatterieet
d'accroîtrelerisqued'incendie.
14.Portezdesvêtementsadéquats–Portezune
tenueappropriée,ycomprisuneprotection
oculaire,unpantalon,desbottesencaoutchouc
solidesàsemelleantidérapanteetdes
protecteursd'oreilles.Sivoscheveuxsont
longs,attachez-lesetneportezpasde
vêtementsamplesnidebijouxpendantsqui
pourraientseprendredanslespiècesmobiles.
II.Avantl'utilisation
1.N'admettezpersonne,notammentlesenfants,
danslepérimètredetravail.
III.Utilisation
1.Lecontactaveclerotorenmouvemententraîne
degravesblessures.N'approchezpaslesmains
3
Page 70

nilespiedsdespiècesmobilesdelamachine.
Nevoustenezpasdevantl'ouvertured'éjection.
2.Restezderrièreleguidonetn'approchezpas
del'ouvertured'éjectiondurantl'utilisationde
lamachine.
3.L'utilisationdecettemachineàd'autresns
quecelleprévuepeutêtredangereusepour
vous-mêmeettoutepersonneàproximité.
4.Évitezlesdémarragesaccidentels–Vériez
quelaclédedémarrageélectriqueestretiréedu
commutateuràcléavantdebrancherlabatterie
etdemanipulerlamachine.
5.Accordeztoutevotreattentionàl'utilisationde
lamachine.Nevouslivrezàaucuneactivité
risquantdevousdistraire,aurisquedecauser
desdommagescorporelsoumatériels.
6.Vériezquetouteslescommandessont
débrayéesetquelechangementdevitesseest
aupointmortavantdemettrelamachineen
marche.
7.Arrêtezlamachine,retirezlaclédedémarrage
électrique,enlevezlabatteriedelamachineet
attendezl'arrêtdetoutmouvementavantde
régler,réviser,nettoyerouremiserlamachine.
8.Enlevezlabatterieetlaclédedémarrage
électriquedelamachinechaquefoisquevous
lalaissezsanssurveillanceouavantdechanger
d'accessoires.
9.Nefaitespasforcerlamachine–Elledonnera
debienmeilleursrésultatsetseraplussûresi
vousl'utilisezàlavitessepourlaquelleelleest
prévue.
10.Restezalerte–Concentrez-voussurvotre
tâcheetfaitespreuvedebonsenslorsquevous
utilisezlamachine.N'utilisezpaslamachinesi
vousêtesmaladeoufatigué(e),nisousl'emprise
del'alcool,dedroguesoudemédicaments.
15.Nedirigezpasl’éjectionversquiquecesoit.
N'éjectezpasl'herbecoupéecontreunmurou
unobstacle,carellepourraitricocherdansvotre
direction.Arrêtezlamachineavantdetraverser
dugravier.
16.Faitespreuvedelaplusgrandeprudence
lorsquevoustraversezoudéneigezdesroutes,
trottoirsoualléesdegravieraveclamachine.
Faitesattentionauxdangerscachésetàla
circulation.
17.Silamachineheurteunobjetousemetà
vibrer,arrêtez-laimmédiatement,retirezlaclé,
enlevezlabatterieetattendezl'arrêtcomplet
detoutmouvementavantdevérierl'étatde
lamachine.Effectueztouteslesréparations
nécessairesavantderéutiliserlamachine.
18.Coupezlemoteurdelamachinechaquefois
quevousquittezlapositiondeconduitepour
quelqueraisonquecesoit.
19.Coupezlemoteuretretirezlacléavantde
déboucherlamachineetfaites-letoujoursavec
unbâtonouunoutildenettoyage.
20.Arrêtezlamachineetretirezlaclédedémarrage
électriqueavantdechargerlamachinepourle
transport.
21.Dansdesconditionsd'utilisationabusive,du
liquidepeutjaillirhorsdelabatterie;éviteztout
contact.Encasdecontactaccidentelavecle
liquide,rincezàl'eau.Encasdecontactdu
liquideaveclesyeux,consultezunmédecin.
Leliquideéjectédelabatteriepeutcauserdes
irritationsoudesbrûlures.
22.N'utilisezjamaislamachineàgrandevitesse
surunsolglissant.
11.N'utilisezlamachinequesilavisibilitéest
sufsanteetdansdebonnesconditions
météorologiques.
12.Redoublezdeprudencelorsquevousfaites
marchearrièreouquevoustirezlamachine
versvous.
13.Gardeztoujourslespiedsbienposésàterre
etmaintenezvotreéquilibre,enparticuliersur
lespentes.Changezdedirectionaveclaplus
grandeprudencesurlesterrainsenpente.
N'utilisezpaslamachinesurdespentestrès
escarpées.Avanceztoujoursàuneallure
normaleaveclamachine,necourezpas.
14.Désengagezlavissansnlorsquevousne
déblayezpaslaneigeactivement.
4
Page 71

IV.Entretienetremisage
1.Arrêtezlamachine,retirezlaclédedémarrage
électrique,enlevezlabatteriedelamachineet
attendezl'arrêtdetoutmouvementavantde
régler,réviser,nettoyerouremiserlamachine.
2.N'essayezpasderéparerlamachinesaufen
suivantlesinstructions.Conezl'entretiendela
machineàundépositaire-réparateuragrééqui
utilisedespiècesderechangeidentiques.
3.Portezdesgantsetuneprotectionoculairepour
fairel'entretiendelamachine.
4.Lorsquevousfaitesl'entretiendurotor,
n'oubliezpasqu'ilpeutencorebougermêmesi
l'alimentationélectriqueestcoupée.
labatterie.N'exposezpaslabatterieàune
températuresupérieureà68ºC(154ºF)etne
l'incinérezpas.Remplaceztoujourslabatterie
parunebatterieTorod'origine;l'utilisationde
toutautretypedebatteriepeutentraînerun
incendieouuneexplosion.Conservezles
batterieshorsdeportéedesenfantsetdansleur
emballaged'originejusqu'auderniermoment
avantdelesutiliser.
13.Nejetezpaslabatterieaufeu.L'élément
pourraitexploser.Vériezsilaréglementation
localeimposedesprocéduresdemiseaurebut
spéciales.
CONSERVEZCES
5.Pourobtenirdesrésultatsoptimaux,utilisez
uniquementdespiècesderechangeetdes
accessoiresTorod'origine.Lesautrespièces
derechangeetaccessoirespeuventêtre
dangereuxetleurutilisationrisqued'annulerla
garantieproduit.
6.Faitesl'entretiendelamachine–Gardezles
poignéespropresetsèches,etexemptesd'huile
etdegraisse.Gardeztoujourslesprotections
enplaceetenbonétat.Utilisezuniquementdes
piècesderechangeidentiques.
7.Contrôlezfréquemmentleserragedetoutesles
xationspourgarantirlefonctionnementsûrde
lamachine.
8.Vériezqu'aucunepiècedelamachinen'est
endommagée.Vériezqu'aucunedespièces
mobilesn'estmalalignéeougrippée,et
qu'aucunepiècen'estcassée,malxéeoune
présentetoutautredéfautsusceptibled'affecter
sonfonctionnement.Saufindicationcontraire
danslesinstructions,faitesréparerouremplacer
lesprotectionsoulespiècesendommagéespar
undépositaire-réparateuragréé.
INSTRUCTIONS
9.Lorsqu'ellenesertpas,rangezlabatterieà
l'écartd'objetsmétalliquestelsquetrombones,
piècesdemonnaie,clés,clousetvisquipourrait
relierlesbornesentreelles.Uncourt-circuitaux
bornesdelabatteriepeutcauserdesbrûlures
ouunincendie.
10.Lorsquevousn'utilisezpaslamachine,
rangez-ladansunlocalsecetsécurisé,ethors
deportéedesenfants.
11.Sivousremisezlamachineplusd'unmois,
reportez-vousàlasectionRemisage(page29)
pourprendreconnaissancederenseignements
importants.
12.PRUDENCE–labatteriepeutprésenterun
risqued'incendieoudebrûlurechimiqueen
casdemauvaistraitement.Nedémontezpas
5
Page 72

Autocollantsdesécuritéetd'instruction
Desautocollantsdesécuritéetdesinstructionsbienvisiblesparl'opérateursontplacésprès
detouslesendroitspotentiellementdangereux.Remplaceztoutautocollantendommagé
oumanquant.
94-8072
decal94-8072
121-6817
1.Risquedecoupure/mutilationdesmainsoudespieds
parlaturbineetlavissansn–n'autorisezpersonneà
s'approcher.
decal121-6817
121-6823
1.Hautevitesse3.Bassevitesse
2.Vitessesenmarcheavant4.Vitessesenmarchearrière
137-6198
1.Risquede
coupure/mutilationdes
doigtsoudesmainsparla
turbine–neplacezpasles
mainsdanslagoulotte.
2.Attention–coupezle
moteuravantd'introduire
l'outildanslagoulottepour
ladégager.
decal121-6823
decal137-6198
6
Page 73

decal121-1240
121-1240
1.Transmissionauxroues–serrezlelevierpourl'engager;
desserrezlelevierpourladésengager.
4.Risquedecoupure/mutilationdesmainsparlaturbine–
n'approchezpasdespiècesmobiles;laisseztoutesles
protectionsettouslescapotsenplace;enlevezlacléetlisez
leManueldel'utilisateuravantd'effectuertoutentretien.
2.Attention–lisezleManueldel'utilisateur.5.Risquedeprojectiond'objets–n'autorisezpersonneà
s'approcherdelamachine.
3.Risquedecoupure/mutilationdesmainsparlaturbine–ne
placezpaslesmainsdanslagoulotte;coupezlemoteur
6.Entraînementdelavissansn/turbine–serrerlelevierpour
l'engagement;desserrerlelevierpourledésengagement.
avantdequitterlapositiond'utilisation;dégagezlagoulotte
avecl'outildenettoyage.
137-9462
decal137-9462
137-9463
1.Labatterieestencharge.
2.Labatterieestcomplètementchargée.
3.Latempératuredelabatterieestsupérieureouinférieureàlaplagedetempératureappropriée.
4.Anomaliedechargedelabatterie
decal137-9463
7
Page 74

decal137-9456
137-9456
1.LisezleManuelde
l'utilisateur.
2.Teniràl'écartdufeuou
desammes
1.Étatdechargedelabatterie
3.Nepasexposeràlapluie.
decal137-9461
137-9461
decal133-8061
133-8061
8
Page 75

Miseenservice
Important:Labatterien'estpascomplètementchargéeàl'achat.Avantlatoutepremièreutilisation
delamachine,voirChargelabatterie(page18).
1
Montageduchargeurdebatterie(option)
Piècesnécessairespourcetteopération:
2
Matérieldemontage(noninclus)
Procédure
Sivouslesouhaitez,vouspouvezxerlechargeurdebatteriesurunmuràl'aidedesfentesentroude
serruresituéesaudos.
Montez-leàl'intérieur(parexempledansungarageoutoutautreendroitàl'abridel'humidité),àproximité
d'uneprisedecourantethorsdelaportéedesenfants.
VoirlaFigure3pourvousaideràmonterlechargeur.
Pourxerlechargeurenplace,insérez-lesurlesxationscorrectementpositionnées(xationsnonincluses).
Figure3
g290534
9
Page 76

2
Montagedelapartiesupérieureduguidon
Aucunepiècerequise
Procédure
g344090
3
Montagedelagoulotte
Aucunepiècerequise
Procédure
g344087
10
Page 77

4
Montagedelatringleriedecommandededéplacement
Aucunepiècerequise
Procédure
g344089
11
Page 78

5
Montagedelatiged'orientationdelagoulotte
Aucunepiècerequise
Procédure
g344086
12
Page 79

6
Montagedel'outildenettoyagedelaneige
Aucunepiècerequise
Procédure
g344088
7
Contrôledelapressiondespneus
Aucunepiècerequise
Procédure
g344084
13
Page 80

8
10
Contrôledelalame
racleuseetdespatins
Aucunepiècerequise
Procédure
VoirContrôleetréglagedespatinsetdelalame
racleuse(page24).
9
Réglageducâblede
commandedelavissans
n/turbine
Aucunepiècerequise
Contrôledufonctionnementdelatransmission
Aucunepiècerequise
Procédure
PRUDENCE
Silatransmissionn'estpasréglée
correctement,lamachinerisquedese
déplacerdansladirectionopposéeàcelle
recherchée,etdecauserdesblessureset/ou
desdommagesmatériels.
Vériezsoigneusementlatransmissionet
réglez-laaubesoin.
1.Démarrezlamachine;voirDémarragedela
machine(page17).
2.PlacezlesélecteurdevitesseàlapositionR1;
voirUtilisationdusélecteurdevitesses(page
19).
Procédure
Contrôlezetréglezlecâbledecommandedelavis
sansn/turbineavantlapremièreutilisation;voir
Contrôleetréglageducâbledecommandedelavis
sansn/turbine(page26).
3.Serrezleleviergauche(déplacement)contre
lapoignée(Figure10).
g001011
Figure10
Lamachinedevraitreculer.Sicen'estpas
lecas,ousilamachinesedéplaceenavant,
procédezcommesuit:
A.Relâchezlelevierdecommandede
déplacementetcoupezlemoteur;voirArrêt
delamachine(page23).
B.Détachezletourillondusélecteurde
vitesses.
C.T ournezletourillonverslebas(sens
horaire)surlatigedecommandede
vitesse.
14
Page 81

D.Remettezletourillonsurlesélecteurde
vitesses.
Vued'ensembledu
4.Relâchezlelevierdecommandede
déplacement.
5.Placezlesélecteurdevitesseàlaposition1;
voirUtilisationdusélecteurdevitesses(page
19).
6.Serrezleleviergauche(déplacement)contre
lapoignée(Figure10).
Lamachinedevraitavancer.Silamachinene
bougepasousedéplaceenarrière,procédez
commesuit:
A.Relâchezlelevierdecommandede
déplacementetcoupezlemoteur.
B.Détachezletourillondusélecteurde
vitesses.
C.T ournezletourillonverslehaut(sens
antihoraire)surlatigedecommandede
vitesse.
D.Remettezletourillonsurlesélecteurde
vitesses.
7.Recommencezcetteprocédurejusqu'àce
qu'aucunréglagesupplémentairenesoitrequis.
produit
Important:Silamachinesedéplacealorsquele
levierdecommandededéplacementestdesserré,
vériezlecâbledecommandededéplacement
(voirContrôleetréglageducâbledecommande
dedéplacement(page25))ouportezlamachine
chezundépositaire-réparateuragréépourlafaire
réviser.
Figure11
1.Poignée(2)9.Déecteurdegoulotte
2.Entraînementdelavis
sansn/turbine
3.Commutateurde
verrouillage
4.Leviersélecteurdevitesse
5.Commanded'orientation
delagoulotteQuickStick
6.Levierdecommandede
déplacement
7.Couvercledulogementde
batterieprincipal
8.Clédedémarrage
électrique
10.Goulotted'éjection
11.Lameracleuse
12.Vissansn
13.Patin(2)
®
14.Panneaudecommande
15.Couvercledulogementde
batteriesecondaire
16.Outildedéneigement
g360898
15
Page 82

Caractéristiques
techniques
Figure12
1.Témoinsdechargedela
batterie
2.BoutonECO
Figure13
1.Outildedéneigement(attachéauguidon)
3.Commutateuràcléen
positionOFF(Arrêt)
Modèle
39924
Poids
78kg142cm62,5cm11 1,8cm
(172lb)(56po)(24,6po)(44,0po)
LongueurLargeur
Hauteur
Batterie
g347780
Modèle
Capacitédelabatterie
Tensiondelabatterieselonlefabricant=60Vmax.,54V
nominale.Latensionréellevarieenfonctiondelacharge.
88675
7,5Ah
405Wh
Chargeurdebatterie
Modèle
Type
g344092
Entrée120Vc.a.50/60Hz2,0Amax.
Sortie
88602
Chargeurdebatterielithium-ionde60V
MAX
60Vc.c.MAX2,0A
Plagesdetempératureadéquates
Charger/rangerlabatterie
entre
Utiliserlabatterieentre
Utiliserlamachineentre
5ºC(41ºF)et40ºC(104ºF)*
-30ºC(-22ºF)et49ºC
(120ºF)*
-30ºC(-22ºF)et49ºC
(120ºF)*
1.Chargeurdebatterie
modèle88602(inclus
aveclemodèle39924)
2.Batteriemodèle88675
(incluseaveclemodèle
39924)
Figure14
3.Batteriemodèle88625
(nonincluse)
*Letempsdechargeestpluslongendehorsdecette
g360884
plagedetempérature.
Rangezlamachine,labatterieetlechargeurde
batteriedansunlocalfermé,propreetsec.
Accessoires/outils
Unesélectiond'outilsetaccessoiresagrééspar
Toroestdisponiblepouraugmenteretaméliorerles
capacitésdelamachine.Pourobtenirlalistede
touslesaccessoiresetoutilsagréés,contactezvotre
dépositaire-réparateuroudistributeurToroagréé,ou
rendez-voussurlesitewww.Toro.com.
Pourgarantirunrendementoptimaletconserver
lacerticationdesécuritédelamachine,utilisez
uniquementdespiècesderechangeetaccessoires
Torod'origine.Lespiècesderechangeetaccessoires
d'autresconstructeurspeuventêtredangereuxetleur
utilisationrisqued'annulerlagarantiedelamachine.
16
Page 83

Utilisation
Remarque:Lescôtésgaucheetdroitdelamachine
sontdéterminésd'aprèslapositiond'utilisation
normale.
Avantl'utilisation
Installationdelabatterie
1.Assurez-vousqueleséventssurlabatteriesont
exemptsdetoutepoussièreettoutdébris.
2.Soulevezlecouvercleducompartimentdela
batterie.
3.Placezlecreuxdelabatterieenfacede
lalanguettesurlamachine,etglissezla
batteriedanslecompartimentjusqu'àcequ'elle
s'enclencheenposition(Figure9).
4.Refermezlecouvercleducompartimentdela
batterie.
5.Procédezdelamêmemanièrepourlesdeux
autresbatteries(lecaséchéant).
Remarque:Lesampères-heurescombinées
detouteslesbatteriesinstalléesdoiventtotaliser
6,0Ahouplus,sinonlamachinenedémarrera
pas.
Contrôledel'étatdecharge
Vouspouvezvisualiserl’étatdechargeexactde
chaquebatterieinstallée;tournezlacléàlaposition
ACCESSOIRE(Figure16).Lapositiondechaque
ensembledetémoinslumineuxrenvoieaulogement
debatteriecorrespondant.Silachargedelabatterie
esttropfaibleetquelabatterieabesoind'être
chargée,ous'iln'yapasdebatteriedanslelogement
correspondant,letémoindeprésencedebatteriene
s'allumepas.
Figure16
1.Témoinsd'étatdecharge
2.Témoinsdeprésencede
labatterie
3.Commutateuràcléen
positionACCESSOIRE
g348182
Remarque:Silecouvercleducompartiment
delabatterienefermepascomplètement,c'est
quelabatterien'estpasentièrementinsérée.
Figure15
Pendantl'utilisation
Démarragedelamachine
Remarque:Utilisezlabatterieuniquementàdes
températurescomprisesdanslaplageadéquate;voir
Caractéristiquestechniques(page16).
1.Vériezquelaoulesbatteriessontinstallées
danslamachine;voirInstallationdelabatterie
(page17).
2.Insérezlaclédedémarrageélectriquedansle
panneaudecommande.
3.T ournezlacléàlapositionMARCHEpour
g348180
démarrerlamachine(Figure17).
17
Page 84

Figure17
1.CommutateuràcléenpositionMARCHE
1.Vériezqueleséventsdelabatterieetdu
chargeursontexemptsdepoussièreetde
débris.
g347864
ActivationdumodeECO
L'utilisationdumodeECOpeutprolongerlaviede
labatterieenréduisantlavitessedurotor;utilisezle
modeECOchaquefoisquevousdéblayezunefaible
quantitédeneigeouquevousdéplacezdelaneige
surunecourtedistance.ActivezlemodeECOavec
leboutonECO,commemontréàlaFigure18.
Figure18
1.BoutondemodeECO
Chargelabatterie
Important:Labatterien'estpascomplètement
chargéeàl'achat.Avantd'utiliserl'outilpourla
premièrefois,placezlabatteriedanslechargeur
etchargez-lajusqu'àcequel'afchageàDEL
indiquequelabatterieestcomplètementchargée.
Liseztouteslesconsignesdesécurité.
Important:Chargezlabatterieuniquementàdes
températurescomprisesdanslaplageadéquate;
voirCaractéristiquestechniques(page16).
Remarque:Àtoutmoment,appuyezsurlebouton
indicateurdechargedelabatteriepourafcherla
chargeactuelle(diodes).
g290533
Figure19
1.Creuxdelabatterie5.Diodes(chargeactuelle)
2.Éventsdelabatterie
3.Bornesdelabatterie7.Diodeduchargeur
4.Boutonindicateurde
charge
6.Poignée
8.Éventsduchargeur
2.Placezlecreuxdelabatterie(Figure19)devant
lalanguetteduchargeur.
3.Glissezlabatteriedanslechargeurjusqu'àce
qu'ellesoitcomplètementenclenchée(Figure
19).
4.Pourretirerlabatterieduchargeur,faites-la
glisserversl'arrière.
5.Reportez-vousautableauci-dessouspour
interpréterl'indicationdeladiodesurlechargeur
g347866
debatterie.
DiodeIndication
ArrêtPasdebatterieprésente
Clignotementvert
VerteBatteriechargée
Rouge
Clignotement
rouge
Batterieencharge
Latempératureduchargeuret/oudelabatterieest
supérieureouinférieureàlaplageappropriée.
Anomaliedechargedelabatterie*
*VoirlasectionDépistagedesdéfauts(page30)pour
plusdeprécisions.
Important:Ilestpossibledelaisserlabatterie
surlechargeurpendantdecourtespériodesentre
deuxutilisations.
Sivousneprévoyezpasd’utiliserlabatterie
pendantunepériodeprolongée,retirez-ladu
chargeur;voirRemisage(page29).
18
Page 85

Fonctionnementdela
Utilisationdusélecteurde
transmissionauxroues
PRUDENCE
Silatransmissionn'estpasréglée
correctement,lamachinerisquedese
déplacerdansladirectionopposéeàcelle
recherchée,etdecauserdesblessureset/ou
desdommagesmatériels.
Vériezsoigneusementlatransmissionet
réglez-laaubesoin;voir10Contrôledu
fonctionnementdelatransmission(page14)
pourplusderenseignements.
Important:Silamachinesedéplacealorsquele
levierdecommandededéplacementestdesserré,
vériezlecâbledecommandededéplacement
(voirContrôleetréglageducâbledecommande
dedéplacement(page25))ouportezlamachine
chezundépositaire-réparateuragréépourlafaire
réviser.
1.Pourengagerlatransmissionauxroues,serrez
leleviergauche(déplacement)contrelapoignée
(Figure20).
vitesses
Lesélecteurpermetdesélectionner6vitessesen
marcheavantet2enmarchearrière.Pourchanger
devitesse,relâchezlelevierdecommandede
déplacementetplacezlesélecteuràlaposition
voulue(Figure21).Leleviers'engagedansuncran
pourchaquevitessechoisie.
g322971
Figure21
Utilisationdelacommande
detarièreàneige/turbine
1.Pourengagerl’entraînementdevissans
n/turbine,déplacezlecommutateurde
verrouillageversl’arrièresurlelevier,puis
serrezlelevierdroit(vissansn/turbine)contre
lapoignée(Figure22).
Figure20
2.Pourarrêterledéplacementdelamachine,
relâchezlelevier.
g001011
g360687
Figure22
19
Page 86

2.Relâchezlelevierdroitpourarrêterlavissans
netlaturbine.
Important:Lorsquevousengagezàla
foislelevierdecommandedelavissans
n/turbineetlelevierdecommandede
déplacement,cedernierbloquelelevierdela
vissansn/turbine,cequilibèrevotremain
droite.Pourrelâcherlesdeuxleviers,ilsuft
derelâcherleleviergauche(déplacement).
3.Silavissansnetlaturbinecontinuentde
tourneraprèsquevousavezrelâchélelevierde
commande,n'utilisezpaslamachine.Contrôlez
lecâbledecommandedelavissansn/turbine
(voirContrôleetréglageducâbledecommande
delavissansn/turbine(page26))etréglez-le
aubesoin.Sinon,portezlamachinechez
undépositaire-réparateuragréépourlafaire
réviser.
UtilisationdulevierQuick
Stick®
Appuyezdefaçoncontinuesurledéclencheurbleu
pourutiliserlelevierQuickStickandedéplacerla
goulotteetsondéecteur.Relâchezledéclencheur
pourbloquerlagoulotteetledéecteurenposition
(Figure23).
ATTENTION
Silavissansnetlaturbinecontinuent
detourneraprèsquevousavezrelâché
lelevierdecommandedelavissans
n/turbine,vousrisquezdevousblesser
gravementoudeblesserd'autres
personnes.
N'utilisezpaslamachine.Portez-lachez
undépositaire-réparateurToroagréé
pourlafaireréviser.
g001014
Figure23
Déplacementdelagoulotte
Appuyezdefaçoncontinuesurledéclencheurbleu
puisdéplacezlelevierQuickStickverslagauche
pourorienterlagoulotteàgauche,ouversladroite
pourorienterlagoulotteàdroite(Figure24).
Figure24
•Silagoulottenebougepas,voirRéglagedu
verroudelagoulotte(page28).
•Silagoulottenetournepasautantàgauchequ'à
droite,vériezquelecâblepasseàl'intérieurdu
20
g018894
Page 87

guidon.Voir2Montagedelapartiesupérieure
duguidon(page9).
•Silagoulottenesebloquepasenpositionquand
vousrelâchezledéclencheur,voirRéglagedu
verroudelagoulotte(page28).
Déplacementdudéecteur
Maintenezledéclencheurbleuenfoncéetdéplacez
lelevierQuickStickversl'avantpourabaisserle
déecteur,ouversl'arrièrepourl'élever(Figure25).
Figure25
Important:Lespatinspeuventêtredéplacés
sivouscognezl'avantdelamachinesurle
solpourdéboucherlagoulotte.Réglezles
patinsetserrezleursboulonsfermement;voir
Contrôleetréglagedespatinsetdelalame
racleuse(page24).
Conseilsd'utilisation
DANGER
Quandlamachineestenmarche,lavissans
netlaturbinetournentetpeuventblesser
ousectionnerlesmainsoulespieds.
•Avantderégler,nettoyer,contrôler,
dépannerouréparerlamachine,coupez
lemoteuretattendezl'arrêtcompletde
touteslespiècesmobiles.Retirezlacléet
labatteriedelamachinepourévitertout
démarrageaccidenteldelamachine.
•Retirezl'obstructiondelagoulotte;voir
g001016
Dégagementdelagoulotted'éjection(page
21).Dégagezlagoulotteàl'aidedel'outil
denettoyage(Figure13),jamaisavecla
main.
Dégagementdelagoulotte
d'éjection
ATTENTION
Silavissansn/turbinefonctionnemaisque
laneigen'estpaséjectée,lagoulotteest
peut-êtrebouchée.
N'utilisezjamaisvosmainspourdéboucherla
goulottesielleestobstruée.V ouspourriez
vousblesser.
•Pourdéboucherlagoulotte,restezàlaposition
d'utilisationetdébloquezlelevier(dedéplacement)
gauche.Lavissansn/turbineétantenmarche,
appuyezsurlespoignéesduguidonpoursoulever
l'avantdelamachinedequelquescentimètres
(pouces).Soulevezensuiteleguidonrapidement
pourcognerlesolavecl'avantdelamachine.
Répétezcetteprocédureaubesoinjusqu'àceque
laneigesorterégulièrementparlagoulotte.
•S'ilestimpossiblededéboucherlagoulotteen
cognantl'avantdelamachinesurlesol,coupez
lemoteur,attendezl'arrêtcompletdetoutes
lespiècesmobiles,puisdégagezl'obstruction
àl'aidedel'outildenettoyage(Figure13).
•Restezderrièreleguidonetn'approchez
pasdel'ouvertured'éjectiondurant
l'utilisationdelamachine.
•Gardezlevisage,lesmains,lespieds
ettouteautrepartieducorpsouvos
vêtementsàl'écartdespiècescachées,
mobilesourotatives.
ATTENTION
Despierres,desjouetsoud'autresobjets
peuventêtreramassésetprojetésparla
turbineetvousblessergravementoublesser
despersonnesàproximité.
•Nelaissezpasd'objetssusceptiblesd'être
ramassésetprojetésparlavissansn
danslazoneàdéblayer.
•Tenezlesenfantsetlesanimaux
domestiquesàl'écartdelazonedetravail.
Pourunrésultatoptimal,envisagezdeprocéder
commesuit:
•Silamachineralentitsousl'effetd'unechargeou
silesrouespatinent,sélectionnezunevitesseplus
21
Page 88

basse;voirUtilisationdusélecteurdevitesses
(page19).
•Sil'avantdelamachinesesoulève,sélectionnez
unevitesseplusbasse.Sil'avantcontinuedese
soulever,soulevezlamachineparlespoignées.
•Enlevezlaneigeaussitôtquepossibleaprès
qu'elleesttombée.
•Poussezlamachineenavantenlalaissant
avanceràsonproprerythme.
•Veillezàcequelesbandesdéblayéesse
chevauchentpourbienenlevertoutelaneige.
•Rejeteztoujourslaneigedepréférencedansle
sensduvent.
22
Page 89

Aprèsl'utilisation
Préventiondublocagepar
legelaprèsutilisation
Arrêtdelamachine
1.Relâchezlesleviersdedéplacementet
d'entraînementdevissansn/turbine.
2.T ournezlacléenpositionARRÊTetretirez-ladu
panneaudecommande(Figure12).
3.Enlevezlaoulesbatteries;voirRetraitdela
batteriedelamachine(page23).
Remarque:Quandvousn'utilisezpasla
machine,déposezlaoulesbatteriesetretirezla
clédelamachine.
Retraitdelabatteriedela
machine
1.Soulevezlecouvercleducompartimentdela
batterie.
2.Appuyezsurleverroudelabatteriepourla
débloqueretlaretirer(Figure26).
•Partempsdeneigeetàbassestempératures,
certainescommandesetpiècesmobilespeuvent
êtrebloquéesparlegel.Neforcezjamaissur
lescommandespourlesfairefonctionner
lorsqu'ellessontgelées.Sicertaines
commandesoupiècessontdifcilesàutiliser,
démarrezlemoteurdelamachineetlaissez-le
tournerquelquesminutes.
•Aprèsutilisationdelamachine,laisseztourner
lemoteurquelquesminutespouréviterqueles
piècesmobilesnesoientbloquéesparlegel.
Engagezlavissansn/turbinepourévacuertoute
laneigeencoreprésentedanslecarter.Tournez
lelevierQuickStickpourl'empêcherd'êtrebloqué
parlegel.Coupezlemoteur,attendezl'arrêt
detouteslespiècesmobiles,retirezlacléetla
batterie,etenleveztoutelaglaceetlaneigequi
setrouventsurlamachine.
•Enlevezlaneigeetlaglaceaccumuléesaubas
delagoulotte.
•Tournezlagoulotteàdroiteetàgauchepourla
dégagerdelaglaceaccumulée.
Figure26
3.Refermezlecouvercleducompartimentdela
batterie.
g347853
23
Page 90

Entretien
Programmed'entretienrecommandé
Périodicitéd'entretienProcédured'entretien
Aprèsles2premières
heuresdefonctionnement
Unefoisparan
Unefoisparanouavant
leremisage
•Contrôlezetréglezlecâbledecommandededéplacementaubesoin.
•Contrôlezetréglezlecâbledecommandedelavissansn/turbineaubesoin.
•Contrôlezlespatinsetlalameracleuseetréglez-lesaubesoin.
•Contrôlezlecâbledecommandededéplacementetréglez-leouremplacez-le
aubesoin.
•Contrôlezlecâbledecommandedelavissansn/turbineetréglez-leou
remplacez-leaubesoin.
•Contrôlezleniveaud'huiledansleboîtierd'engrenagesdelavissansnetfaites
l'appointaubesoin.
•Graissezl'arbrehexagonal.
•Vériezlapressiondespneusdesrouesetgonez-lesentre1,17et1,38bar(17
et20psi).
•Demandezàundépositaire-réparateuragréédecontrôleretderemplacerla
courroiededéplacementet/oulacourroied'entraînementdelavissansn/turbine
lecaséchéant.
Préparationàl'entretien
1.Amenezlamachinesurunsolplatethorizontal.
2.Arrêtezlamachine,retirezlaclédedémarrage
électrique,attendezl'arrêtcompletdetoutes
lespiècesmobilesetretirezlabatteriedela
machineavantderégler,réviser,nettoyerou
remiserlamachine.
Contrôleetréglagedes
patinsetdelalameracleuse
Périodicitédesentretiens:Unefoispar
an—Contrôlezlespatinsetla
lameracleuseetréglez-lesau
besoin.
Contrôlezlespatinsetlalameracleusepourvérier
quelavissansnnetouchepaslesol.Réglezles
patinsetlalameracleuseselonlesbesoinspour
compenserl'usure.
1.Contrôlezlapressiondespneus;voir7Contrôle
delapressiondespneus(page13).
2.Desserrezlesécrousquixentlesdeuxpatins
auxcôtésdelavissansnjusqu'àcequeles
patinspuissentcoulisseraisémentverslehaut
etverslebas.
24
Page 91

1.3mm(⅛po)
levierdecommandededéplacement,réglezlecâble
dedéplacement.
Silecâbledecommandededéplacementgaucheest
malréglé,procédezcommesuit:
1.Desserrezl'écroudeblocage.
2.Engagezlelevierdecommandededéplacement
etmaintenez-leenplace(Figure28).
g019046
Figure27
Important:Lespatinsdoiventsupporterles
lamesdelavissansnau-dessusdusol.
3.Vériezquelalameracleuseestbienparallèle
età3mm(⅛po)delasurfacedusol.
Remarque:Silesolestssuré,inégalou
irrégulier,réglezlespatinsdemanièreàélever
lalameracleuse.Surlegravier,réglezlespatins
plusbaspouréviterquelamachineneramasse
descailloux.
4.Abaissezlespatinsjusqu'àcequ'ilssoientde
niveauaveclesol.
5.Serrezfermementlesécrousquixentlespatins
auxcôtésdelavissansn.
Remarque:Pourréglerrapidementlespatins
s'ilssontdesserrés,soutenezlalameracleuseà
3mm(⅛po)dusol,puisrapprochezlespatins
dusol.
Remarque:Silespatinssontexcessivement
usés,vouspouvezlesretourneretlesrégler
pourvousservirducôtéintact.
g001011
Figure28
3.Desserrezouserrezletendeurpourrégler
lalongueurduressortà5,5cm(2-3/16po),
commemontréàlaFigure29.
Contrôleetréglagedu
câbledecommandede
déplacement
Périodicitédesentretiens:Aprèsles
2premièresheuresde
fonctionnement—Contrôlezet
réglezlecâbledecommandede
déplacementaubesoin.
Unefoisparan—Contrôlezlecâblede
commandededéplacementetréglez-leou
remplacez-leaubesoin.
Silamachinenebougepasenmarcheavantou
arrière,ousiellesedéplacequandvousrelâchezle
Figure29
1.Écroudeblocage
2.Tendeur
4.Serrezl'écroudeblocage(Figure29)envériant
quelecâbleestlégèrementtendu.
5.Silecâblededéplacementestcorrectement
réglémaisqu'unproblèmesubsiste,contactez
undépositaire-réparateuragréé.
25
g030998
3.Ressort
4.5,5cm(2-3/16po)
Page 92

Contrôleetréglagedu
câbledecommandedela
vissansn/turbine
Périodicitédesentretiens:Aprèsles
2premièresheuresde
fonctionnement—Contrôlezet
réglezlecâbledecommandedela
vissansn/turbineaubesoin.
Unefoisparan—Contrôlezlecâblede
commandedelavissansn/turbineetréglez-le
ouremplacez-leaubesoin.
1.Desserrezl'écroudeblocage(Figure31).
2.Engagezlelevierdelavissansn/turbineet
maintenez-leenplace(Figure30).
g031000
Figure31
Figure30
1.Écroudeblocage
2.Tendeur
4.Serrezl'écroudeblocage(Figure31)envériant
quelecâbleestlégèrementtendu.
5.Mettezlamachineenmarcheetessayez
d'engagerl’entraînementdevissansn/turbine
sansdéplacerlecommutateurdeverrouillage
versl'arrière;silavissansntourne,desserrez
letendeurdesortequelavissansnne
s'engagepas.
6.Silecâbledecommandedelavissans
n/turbineestcorrectementréglémais
qu'unproblèmesubsiste,contactezun
dépositaire-réparateuragréé.
g360687
3.Ressort
4.7cm(2¾po)
3.Desserrezouserrezletendeurpourréglerla
longueurduressortà7cm(2¾po),comme
montréàlaFigure31.
26
Page 93

Contrôleduniveau
Graissagedel'arbre
d'huiledansleboîtier
d'engrenagesdelavissans
n
Périodicitédesentretiens:Unefoispar
an—Contrôlezleniveaud'huile
dansleboîtierd'engrenagesdela
vissansnetfaitesl'appointau
besoin.
1.Amenezlamachinesurunsolplatethorizontal.
2.Nettoyezlasurfaceautourdubouchondetuyau
(Figure32).
hexagonal
Périodicitédesentretiens:Unefoispar
an—Graissezl'arbrehexagonal.
Graissezlégèrementl'arbrehexagonalunefoisparan
avecdel'huilemoteurdetypeautomobile(Figure33).
g019018
Figure33
1.Arbrehexagonal3.Roueencaoutchouc
2.Poulieàfrictionenacier
Figure32
1.Obturateurdetuyau
3.Retirezlebouchondetuyauduboîtier
d'engrenages.
4.Vériezleniveaud'huiledansleboîtier
d'engrenages.Leniveaud'huiledoitsesituerà
9,5mm(⅜po)sousl'oricederemplissage.
5.Sileniveauesttropbas,ajoutezdel'huilepour
engrenagesGL-5ouGL-6,SAE80-90EPdans
leboîtierd'engrenagesjusqu'àcequeleniveau
soità9,5mm(⅜po)endessousdel'oricede
remplissage.
Remarque:N'utilisezpasd'huilesynthétique.
6.Remettezlebouchondetuyaudansleboîtier
d'engrenages.
Important:Veillezànepasfairecoulerd'huile
g016782
surlaroueencaoutchoucoulapoulieàfriction
enacier,carcelaferapatinerlatransmission
(Figure33).
1.Vidangezleréservoirdecarburant.
2.Basculezlamachineenavantsurlecarterdela
vissansnetcalez-lapourqu'ellenepuisse
pastomber.
3.Retirezlecouverclearrière(Figure34).
g019019
Figure34
1.Vis
4.PlacezlesélecteurdevitesseàlapositionR2.
5.Plongezledoigtdansdel'huilemoteuret
graissezlégèrementl'arbrehexagonal.
27
Page 94

6.Placezlesélecteurdevitesseàlaposition6.
7.Lubriezl'autreextrémitédel'arbrehexagonal.
8.Déplacezlesélecteurdevitessesenavanteten
arrièreàplusieursreprises.
9.Montezlecouverclearrièreetredressezla
machineenpositionnormale.
Réglageduverroudela
goulotte
Leréglageduverroudelagoulotteestnécessairesi
lagoulottenesebloquepasàlapositionvoulueou
nesedébloquepasquandvousvoulezmodiersa
position.
1.Desserrezlaxationduserre-câblesurla
plaquedesupportdelagoulottejusqu'àceque
lecâblesoitdégagé.
Figure35
1.Gaineducâble
2.Serre-câble
2.Éliminezlemouducâbleentirantlagaineen
arrière.
3.Serrezlaxationduserre-câbletouten
maintenantlecâbleenplace.
3.Fixationdeserre-câble
Remplacementdes
courroiesd'entraînement
Silacourroied'entraînementdelavissansn/turbine
oulacourroiedetransmissionestusée,imbibée
d'huileouautrementendommagée,demandezàun
dépositaire-réparateuragrééderemplacerlacourroie.
g019021
28
Page 95

Remisage
Remisagedelamachine
Important:Remisezlamachine,labatterieet
lechargeuruniquementàdestempératures
comprisesdanslaplageadéquate;voir
Caractéristiquestechniques(page16).
Important:Sivousremisezlabatterieàlande
lasaison,chargez-lajusqu'àceque2ou3deses
diodesdeviennentvertes.Neremisezpasune
batteriecomplètementchargéeoucomplètement
déchargée.Avantderéutiliserlamachine,chargez
labatteriejusqu'àcequelevoyantgauchedu
chargeurdeviennevertouqueles4diodesdela
batteriedeviennentvertes.
•Débranchezleproduitdel'alimentation(autrement
dit,retirezlaprisedel'alimentationoudela
batterie),retirezlacléetrechercheztoutdommage
éventuelaprèsutilisation.
•Débarrassezlamachinedesproduitsétrangers.
Lesbatteriesion-lithiumaveclelabel
Call2Recyclepeuventêtrerecycléesdans
n'importequelcentrederecyclageparticipant
auprogrammeCall2Recycle(États-Unis
etCanadaseulement).Pourtrouverle
revendeuroulecentreparticipantleplus
proche,téléphonezau1-800-822-8837ou
rendez-voussurwww.call2recycle.org.Si
vousnetrouvezpasderevendeuroudecentre
àproximité,ousivotrebatterierechargeable
neportepaslelabelCall2Recycle,contactez
votremunicipalitépourvousrenseignersurle
recyclageresponsabledelabatterie.Horsdes
États-UnisetduCanada,veuillezcontacter
votredépositaireToroagréé.
•Nerangezpasl'outilenlaissantlabatteriedessus.
•Lorsquevousn'utilisezpaslamachine,rangez-la,
ainsiquelabatterie,lacléetlechargeurde
batterie,horsdelaportéedesenfants.
•Gardezlamachine,labatterie,lacléetlechargeur
àdistancedesagentscorrosifs,telsqueproduits
chimiquesdejardinageetselsdedégivrage.
•Pourréduirelesrisquesdeblessuresgraves,ne
rangezpaslabatterieàl'extérieuroudansun
véhicule.
•Retouchezlessurfacesécailléesavecune
peintureenventechezundépositaire-réparateur
agréé.Poncezleszonesabîméesavantde
lespeindreetutilisezunproduitantirouillepour
prévenirlacorrosion.
•Serreztouteslesvis,touslesboulonsettous
lescontre-écrousquienontbesoin.Réparezou
remplacezlespiècesendommagées.
•Rangezlamachine,labatterie,lacléetlechargeur
debatteriedansunlocalfermé,propreetsec.
Préparationdelabatteriepourle
recyclage
Important:Aprèsavoirretirélabatterie,
recouvrezlesbornesderubanadhésifépais.
N'essayezpasdedétruireoudedémonterla
batterienidedéposeraucundesescomposants.
29
Page 96

Dépistagedesdéfauts
ProblèmeCausepossible
Lamachinenefonctionnepas,oupasen
continu.
Lamachinen'atteintpassapleine
puissance.
Lemoteurdelamachinetourne,maisla
neigeestmaloupasdutoutéjectée.
Mesurecorrective
1.Labatterieestfaible.1.Chargezlabatterie.
2.Labatterien'estpasbienenclenchée.2.Veillezàbieninsérerlabatterietoutau
3.Latempératuredelabatterieest
supérieureouinférieureàlaplagede
températureappropriée.
4.Labatterieadépasséleslimites
supérieuresd'intensité.
5.Ilyadel'humiditésurleslsdela
batterie.
6.Labatterieestendommagée.6.Remplacezlabatterie.
7.Unautreproblèmeélectriqueexiste
surlamachine.
1.Lacapacitédechargedelabatterie
esttropfaible.
2.Leséventssontbouchés.2.Nettoyezlesévents.
1.Lamachinesedéplacetroprapidement
pourdéneigercorrectement.
2.Voustentezdedéblayerunequantité
deneigetropimportanteparbande.
3.Voustentezdedéblayerdelaneige
trèslourdeoutrèsmouillée.
4.Lagoulotteestbouchée.4.Débouchezlagoulotte.
5.Lacourroiedelavissansn/turbine
estdétendueounesetrouveplussur
lapoulie.
6.Lacourroiedelavissansn/turbine
estuséeoucassée.
fonddesonlogement.
3.Placezlabatteriedansunendroitsec,
àunetempératurecompriseentre5et
40ºC(41et104ºF).
4.Relâchezlagâchettepuisactionnez-la
denouveau.
5.Laissezsécherlabatterieou
essuyez-la.
7.Contactezundépositaire-réparateur
agréé.
1.Enlevezlabatteriedelamachineet
chargez-lacomplètement.
1.Sélectionnezunrapportinférieur.
2.Réduisezlaquantitédeneigedéblayée
parbande.
3.Nesurchargezpaslamachineavecde
laneigetrèslourdeoumouillée.
5.Montezet/ouréglezlacourroie
d'entraînementdelavissans
n/turbine;rendez-voussur
www.T oro.compourplusdeprécisions
surl'entretienouportezlamachine
chezundépositaire-réparateuragréé.
6.Remplacezlacourroied'entraînement
delavissansn/turbine;rendez-vous
surwww.Toro.compourplus
deprécisionsurl'entretien
ouportezlamachinechezun
dépositaire-réparateuragréé.
Lagoulotteneseverrouillepasenplace
ounebougepas.
Lamachinenedéblayepascorrectement
laneige.
Labatteriesedéchargerapidement.
Lechargeurdebatterieestdéfectueux.
1.Leverroudelagoulotteestmalréglé.1.Réglezleverroudelagoulotte.
1.Lespatinset/oulalameracleusesont
malréglés.
2.Lespneusnesontpasgonésàla
mêmepression.
1.Latempératuredelabatterieest
supérieureouinférieureàlaplagede
températureappropriée.
2.Lamachineestsurchargée.2.Poussezlamachineavecmoinsde
1.Latempératureduchargeurdebatterie
estsupérieureouinférieureàlaplage
detempératureadéquate.
2.Laprisesurlaquellelechargeurest
branchén'estpassoustension.
1.Réglezlespatinset/oulalame
racleuse.
2.Contrôlezetajustezlapressiondel'un
oudesdeuxpneus.
1.Placezlabatteriedansunendroitsec,
àunetempératurecompriseentre5et
40ºC(41et104ºF).
force.
1.Débranchezlechargeurdebatterie
etplacez-ledansunendroitsecoùla
températureestcompriseentre5et
40ºC(41et104ºF).
2.Demandezàunélectricienqualiéde
réparerlaprise.
30
Page 97

ProblèmeCausepossible
Mesurecorrective
Ladiodeduchargeurdebatterieest
rouge.
Ladiodesurlechargeurdebatterie
clignoteenrouge.
1.Latempératureduchargeurdebatterie
et/oudelabatterieestsupérieureou
inférieureàlaplagedetempérature
adéquate.
1.Uneerreurdecommunications'est
produiteentrelabatterieetlechargeur.
2.Labatterieestfaible.
1.Débranchezlechargeurdebatterie
etplacez-le,ainsiquelabatterie,
dansunendroitsecoùlatempérature
estcompriseentre5et40ºC(41et
104ºF).
1.Retirezlabatterieduchargeur,
débranchezlechargeurdelapriseet
patientez10secondes.Rebranchez
lechargeurdanslapriseetinsérez
labatteriedanslechargeur.Sila
diodeclignoteencoreenrougesur
lechargeurdebatterie,répétez
cetteprocédure.Siladiodedu
chargeurdebatterieclignoteenrouge
après2tentatives,débarrassez-vous
correctementdelabatteriedansun
centrederecyclagedebatteries.
2.Adressez-vousàunréparateuragréé
silabatterieestsousgarantie;sinon,
débarrassez-vouscorrectementdela
batteriedansuncentrederecyclage
debatteries.
31
Page 98

Page 99

Page 100

Proposition65deCalifornie–Informationconcernantcetavertissement
Enquoiconsistecetavertissement?
Certainsproduitscommercialisésprésententuneétiquetted'avertissementsemblableàcequisuit:
AVERTISSEMENT:Cancerettroublesdelareproduction–
www.p65Warnings.ca.gov.
Qu’est-cequelaProposition65?
LaProposition65s'appliqueàtoutesociétéexerçantsonactivitéenCalifornie,quivenddesproduitsenCalifornieouquifabriquedesproduits
susceptiblesd'êtrevendusouimportésenCalifornie.EllestipulequeleGouverneurdeCaliforniedoitteniretpublierunelistedessubstances
chimiquesconnuescommecausantdescancers,malformationscongénitaleset/ouautrestroublesdelareproduction.Cetteliste,quiestmiseàjour
chaqueannée,comprenddescentainesdesubstanceschimiquesprésentesdansdenombreuxobjetsduquotidien.LaProposition65apourobjet
d'informerlepublicquantàl'expositionàcessubstanceschimiques.
LaProposition65n'interditpaslaventedeproduitscontenantcessubstanceschimiques,maisimposelaprésenced'avertissementssurtoutproduit
concerné,sursonemballageousurladocumentationfournieavecleproduit.D’autrepart,unavertissementdelaProposition65nesigniepasqu’un
produitesteninfractionaveclesnormesouexigencesdesécuritéduproduit.D'ailleurs,legouvernementcalifornienaclairementindiquéqu'un
avertissementdelaProposition65«n'estpasunedécisionréglementairequantaucaractère«sûr»ou«dangereux»d'unproduit».Bonnombre
decessubstanceschimiquessontutiliséesdansdesproduitsduquotidiendepuisdesannées,sansaucuneffetnocifdocumenté.Pourplusde
renseignements,rendez-voussurhttps://oag.ca.gov/prop65/faqs-view-all
UnavertissementdelaProposition65signiequ’unesociétéasoit(1)évaluél’expositionetconcluqu’elledépassaitle«niveauneposantaucun
risquesignicatif»;soit(2)choisid’émettreunavertissementsimplementsurlabasedesacompréhensionquantàlaprésenced’unesubstance
chimiquedelaliste,sanstenterd’enévaluerl’exposition.
.
Cettelois’applique-t-ellepartout?
LesavertissementsdelaProposition65sontexigésuniquementenvertudelaloicalifornienne.Cesavertissementssontprésentsdanstoutl'étatde
Californie,dansdesenvironnementstrèsvariés,notammentmaispasuniquementlesrestaurants,magasinsd'alimentation,hôtels,écolesethôpitaux,et
surunvasteéventaildeproduits.Enoutre,certainsdétaillantsenligneetparcorrespondancefournissentdesavertissementsdelaProposition65sur
leurssitesinternetoudansleurscatalogues.
QuellesdifférencesentrelesavertissementsdeCalifornieetleslimitesfédérales?
LesnormesdelaProposition65sontsouventplusstrictesquelesnormesfédéralesetinternationales.Diversessubstancesexigentunavertissement
delaProposition65àdesniveauxbieninférieursauxlimitesd'interventionfédérales.Parexemple,lanormedelaProposition65enmatière
d’avertissementspourleplombsesitueà0,5µg/jour,soitbienmoinsquelesnormesfédéralesetinternationales.
Pourquoil'avertissementnegure-t-ilpassurtouslesproduitssemblables?
•PourlesproduitscommercialisésenCalifornie,l'étiquetageProposition65estexigé,tandisqu’ilnel’estpassurdesproduitssimilaires
commercialisésailleurs.
•Ilsepeutqu’unesociétéimpliquéedansunprocèsliéàlaProposition65etparvenantàunaccordsoitobligéed’utiliserlesavertissementsdela
Proposition65poursesproduits,tandisqued’autressociétésfabriquantdesproduitssemblablespeuventnepasêtresoumisesàcetteobligation.
•L'applicationdelaProposition65n'estpasuniforme.
•Certainessociétéspeuventchoisirdenepasindiquerd'avertissementscarellesconsidèrentqu'ellesn'ysontpasobligéesautitredela
Proposition65;l'absenced'avertissementssurunproduitnesigniepasqueleproduitnecontientpasdesubstancesdelalisteàdesniveaux
semblables.
Pourquoicetavertissementapparaît-ilsurlesproduitsToro?
Toroachoisidefournirauxconsommateursleplusd'informationpossibleanqu'ilspuissentprendredesdécisionséclairéesquantauxproduits
qu'ilsachètentetutilisent.Torofournitdesavertissementsdanscertainscasd'aprèssesconnaissancesquantàlaprésencedel'uneouplusieurs
dessubstanceschimiquesdelaliste,sansenévaluerleniveaud'exposition,cardesexigencesdelimitesnesontpasfourniespourtouslesproduits
chimiquesdelaliste.Bienquel'expositionaveclesproduitsToropuisseêtrenégligeableouparfaitementdansleslimites«sansaucunrisque
signicatif»,parmesuredeprécaution,T oroadécidédefournirlesavertissementsdelaProposition65.Deplus,enl'absencedecesavertissements,
lasociétéT oropourraitêtrepoursuivieenjusticeparl'ÉtatdeCalifornieoupardesparticulierscherchantàfaireappliquerlaProposition65,et
doncassujettieàd'importantespénalités.
RevA
 Loading...