

Toro 38890 Operator's Manual
PowerTRX
™
Commercial1428OHXEand1432
OHXESnowthrower
ModelNo.38890—SerialNo.408700000andUp
ModelNo.38891—SerialNo.408700000andUp
FormNo.3441-581RevA
Operator'sManual
Introduction
Thismachineisintendedtobeusedbyresidential
homeownersandprofessional,hiredoperators.It
isdesignedprimarilyforremovingsnowfrompaved
surfaces,suchasdrivewaysandsidewalks,and
othersurfacesfortrafconresidentialorcommercial
properties.Itisnotdesignedforremovingmaterials
otherthansnow.Usingthisproductforpurposes
otherthanitsintendedusecouldprovedangerousto
youandbystanders.
Readthisinformationcarefullytolearnhowtooperate
andmaintainyourproductproperlyandtoavoid
injuryandproductdamage.Youareresponsiblefor
operatingtheproductproperlyandsafely.
Visitwww.T oro.comforproductsafetyandoperation
trainingmaterials,accessoryinformation,helpnding
adealer,ortoregisteryourproduct.
Wheneveryouneedservice,genuineToroparts,or
additionalinformation,contactanAuthorizedService
DealerorToroCustomerServiceandhavethemodel
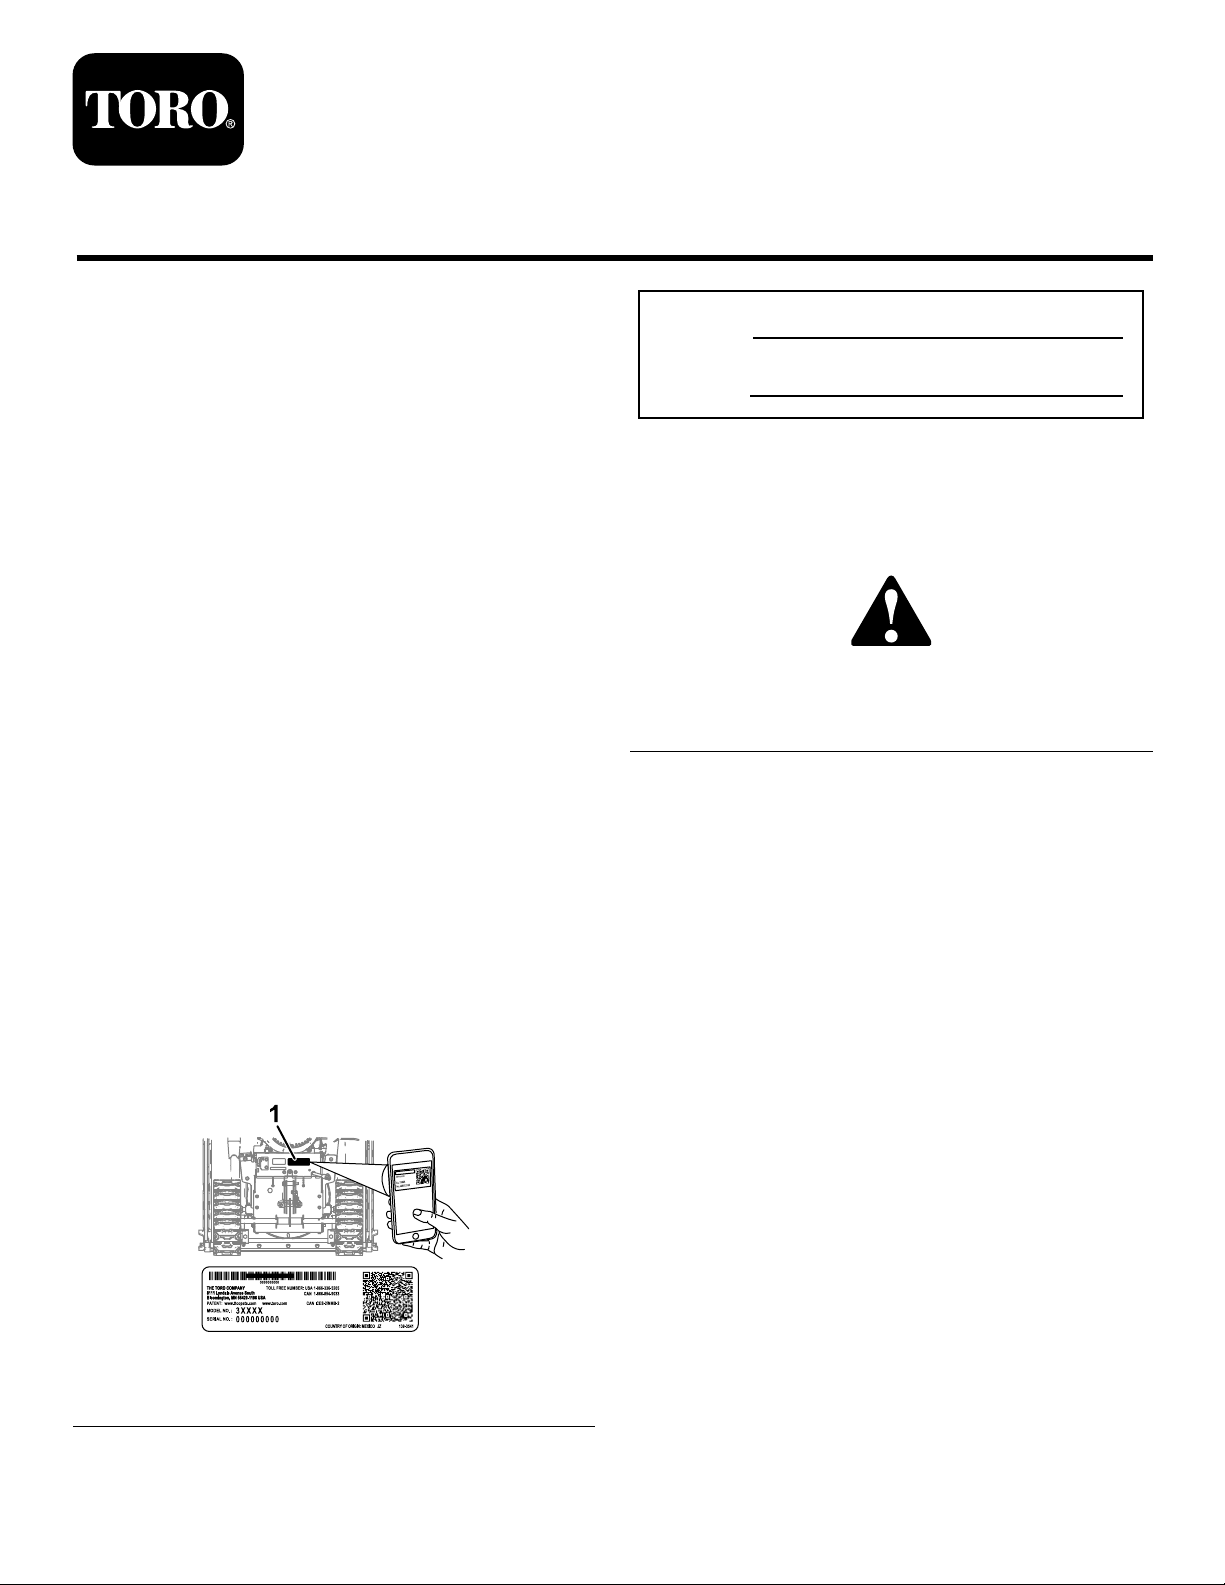
andserialnumbersofyourproductready .Figure1
identiesthelocationofthemodelandserialnumbers
ontheproduct.Writethenumbersinthespace
provided.
Important:Withyourmobiledevice,youcan
scantheQRcodeontheserialnumberdecal(if
equipped)toaccesswarranty,parts,andother
productinformation.
Figure1
1.Modelandserialnumberlocation
ModelNo.
SerialNo.
Thismanualidentiespotentialhazardsandhas
safetymessagesidentiedbythesafety-alertsymbol
(Figure2),whichsignalsahazardthatmaycause
seriousinjuryordeathifyoudonotfollowthe
recommendedprecautions.
g000502
Figure2
Safety-alertsymbol
Thismanualuses2wordstohighlightinformation.
Importantcallsattentiontospecialmechanical
informationandNoteemphasizesgeneralinformation
worthyofspecialattention.
ThisproductcomplieswithallrelevantEuropean
directives;fordetails,pleaseseetheseparateproduct
specicDeclarationofConformity(DOC)sheet.
Important:Ifyouareusingthismachineabove
1500m(5,000ft)foracontinuousperiod,ensure
thattheHighAltitudeKithasbeeninstalled
sothattheenginemeetsCARB/EPAemission
regulations.TheHighAltitudeKitincreases
engineperformancewhilepreventingspark-plug
fouling,hardstarting,andincreasedemissions.
Onceyouhaveinstalledthekit,attachthe
high-altitudelabelnexttotheserialdecalonthe
machine.ContactanyAuthorizedToroService
DealertoobtaintheproperHighAltitudeKitand
high-altitudelabelforyourmachine.Tolocate
adealerconvenienttoyou,accessourwebsite
atwww.Toro.comorcontactourToroCustomer
g323172
CareDepartmentatthenumber(s)listedinyour
EmissionControlWarrantyStatement.Remove
thekitfromtheengineandrestoretheengineto
itsoriginalfactorycongurationwhenrunningthe
engineunder1500m(5,000ft).Donotoperatean
enginethathasbeenconvertedforhigh-altitude
©2020—TheT oro®Company
8111LyndaleAvenueSouth
Bloomington,MN55420
Registeratwww.T oro.com.
OriginalInstructions(EN)
PrintedintheUSA
AllRightsReserved
*3441-581*

useatloweraltitudes;otherwise,youcould
overheatanddamagetheengine.
Ifyouareunsurewhetherornotyourmachinehas
beenconvertedforhigh-altitudeuse,lookforthe
followinglabel(Figure3).
Figure3
WARNING
CALIFORNIA
Proposition65Warning
Theengineexhaustfromthisproduct
containschemicalsknowntotheStateof
Californiatocausecancer,birthdefects,
orotherreproductiveharm.
Useofthisproductmaycauseexposure
tochemicalsknowntotheStateof
Californiatocausecancer,birthdefects,
orotherreproductiveharm.
Contents
OperatingtheAuger-HeightLever.....................11
OperatingtheTractionDrive.............................12
UsingtheWheel-ClutchLevers.........................12
OperatingtheSpeedSelector...........................12
OperatingtheAuger/ImpellerDrive...................13
OperatingtheQuickStick®...............................13
ClearingaCloggedDischargeChute................13
OperatingTips.................................................14
AfterOperation....................................................14
AfterOperationSafety......................................14
PreventingFreeze-upafterUse........................14
Maintenance...........................................................15
decal127-9363
RecommendedMaintenanceSchedule(s)...........15
MaintenanceSafety..........................................15
PreparingforMaintenance...............................15
CheckingtheEngine-OilLevel..........................16
CheckingandAdjustingtheAugerSkidsand
Scraper.........................................................16
CheckingandAdjustingtheTrack
Skids.............................................................17
CheckingandAdjustingtheTrack
Tension.........................................................17
CheckingandAdjustingtheTraction
Cable............................................................18
CheckingandAdjustingtheAuger/Impeller
Cable............................................................19
CheckingtheAuger-Gearbox-OilLevel.............19
ChangingtheEngineOil...................................20
ReplacingtheSparkPlug.................................21
ReplacingtheDriveBelts..................................21
ReplacingtheHeadlight....................................22
Storage...................................................................22
StorageSafety..................................................22
StoringtheMachine..........................................22
RemovingtheMachinefromStorage................23
Troubleshooting......................................................24
Introduction...............................................................1
Safety.......................................................................2
GeneralSafety...................................................2
SafetyandInstructionalDecals..........................3
Setup........................................................................5
1CheckingtheEngine-OilLevel.........................5
2CheckingtheSkidsandScraper......................5
3CheckingtheOperationoftheTraction
Drive...............................................................5
4ExtendingtheDriftBreakers............................6
ProductOverview.....................................................7
Specications....................................................7
Attachments/Accessories...................................7
Operation..................................................................8
BeforeOperation...................................................8
BeforeOperationSafety.....................................8
FillingtheFuelT ank............................................8
DuringOperation...................................................8
DuringOperationSafety.....................................8
StartingtheEngine.............................................9
ShuttingOfftheEngine......................................11
OperatingtheHandwarmers..............................11
Safety
Thismachinehasbeendesignedinaccordancewith
ANSI/OPEIB71.3specications.
GeneralSafety
Thisproductiscapableofamputatinghandsand
feetandofthrowingobjects.Alwaysfollowallsafety
instructionstoavoidseriouspersonalinjury .
•Readandunderstandthecontentsofthis
Operator’sManualbeforeyoustarttheengine.
Ensurethateveryoneusingthisproductknows
howtouseit,knowshowtoshutofftheengine
quickly,andunderstandsthewarnings.
•Shutofftheenginewheneveryouleavethe
operatingpositionforanyreason.
•Donotputyourhandsorfeetnearmovingparts
onthemachine.
2
•Donotoperatethemachinewithoutallguards
x 3
1
2
3
4
5
120-9805
andothersafetyprotectivedevicesinplaceand
working.
SafetyandInstructionalDecals
Safetydecalsandinstructionsareeasilyvisibletotheoperatorandarelocatednearanyarea
ofpotentialdanger.Replaceanydecalthatisdamagedormissing.
•Keepclearofanydischargeopening.Keep
bystanders,especiallysmallchildren,outofthe
operatingarea.
•Neverallowchildrentooperatethemachine.
decal120-9805
120-9805
1.Insertthekey.
2.Primetheengine3times.
3.Engagethechoke.
4.Pullthestartercord.
5.Oncetheengineisrunning,disengagethechoke.
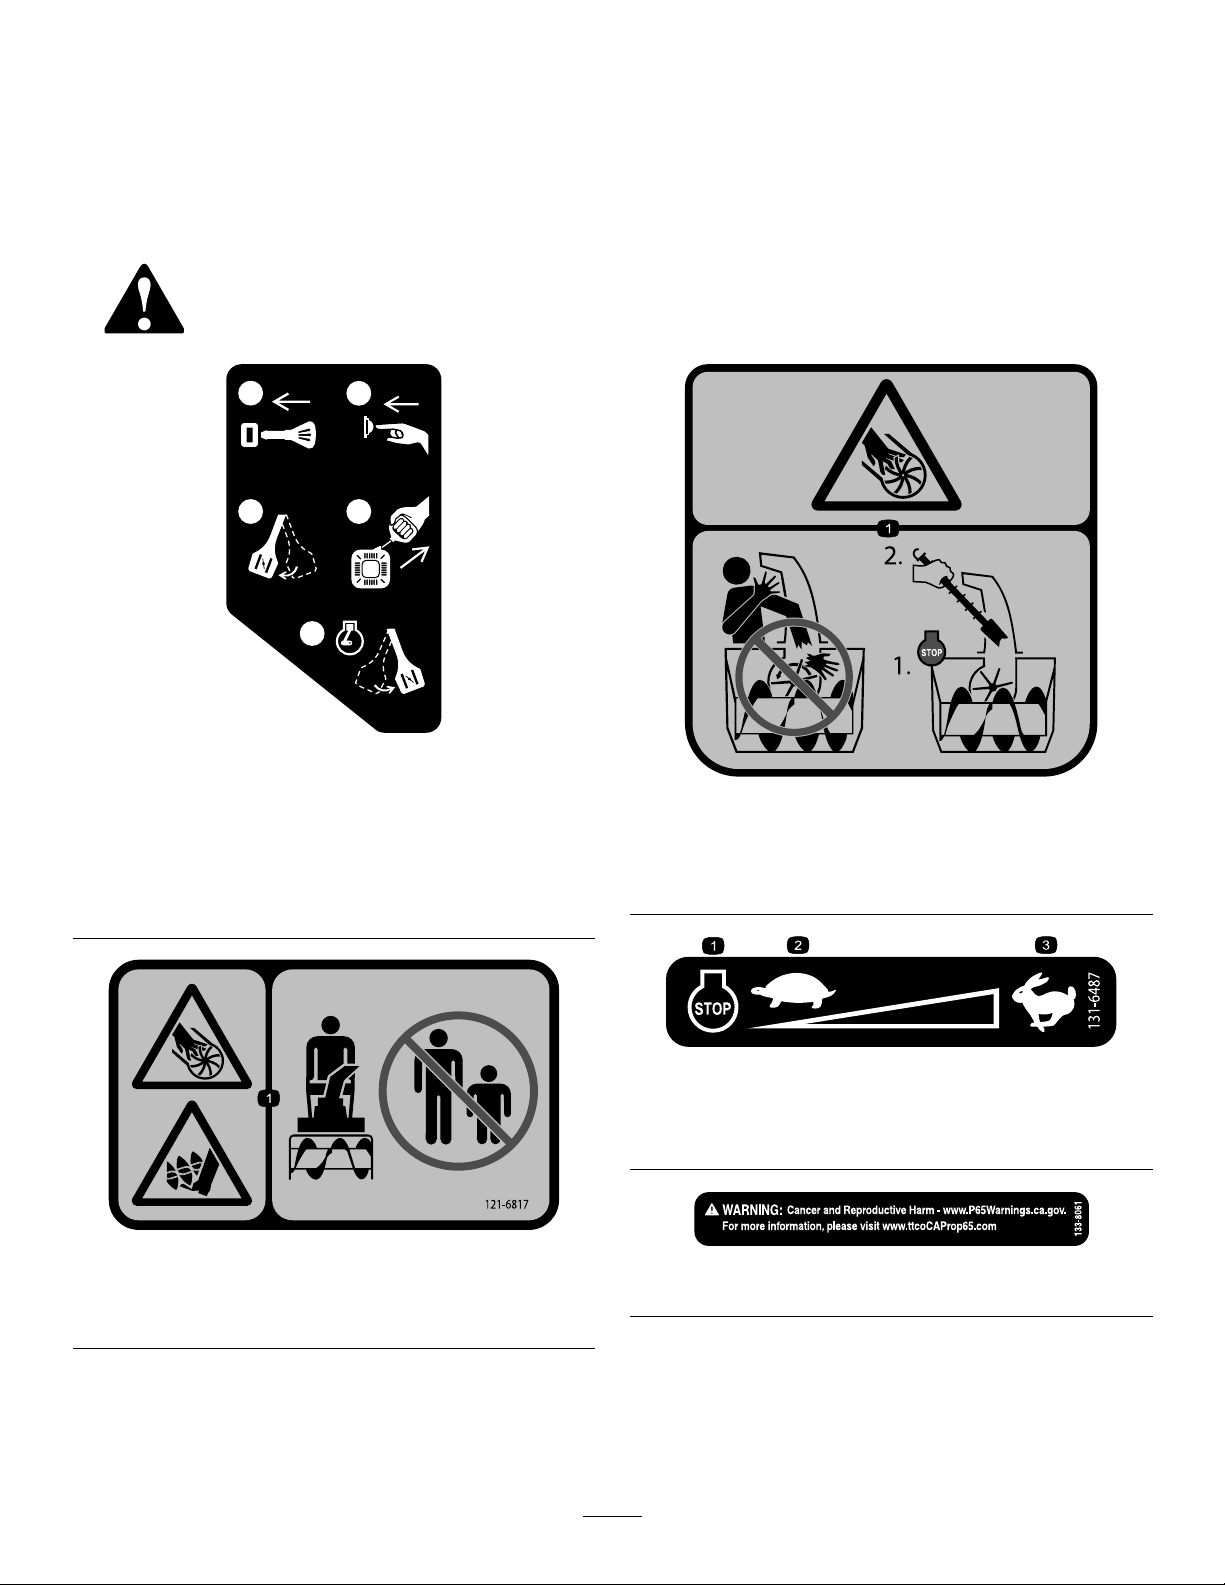
121-6847
1.Cutting/dismembermenthazardofthengersorhand,
impeller—donotplaceyourhandinthechute;shutoffthe
enginebeforeusingthetooltoclearthechute.
decal121-6847
decal131-6487
131-6487
1.Engine—shutoff
2.Slow
121-6817
decal121-6817
3.Fast
decal133-8061
133-8061
1.Cutting/dismembermenthazardofhandorfoot,impeller
andauger—keepbystandersaway.
3
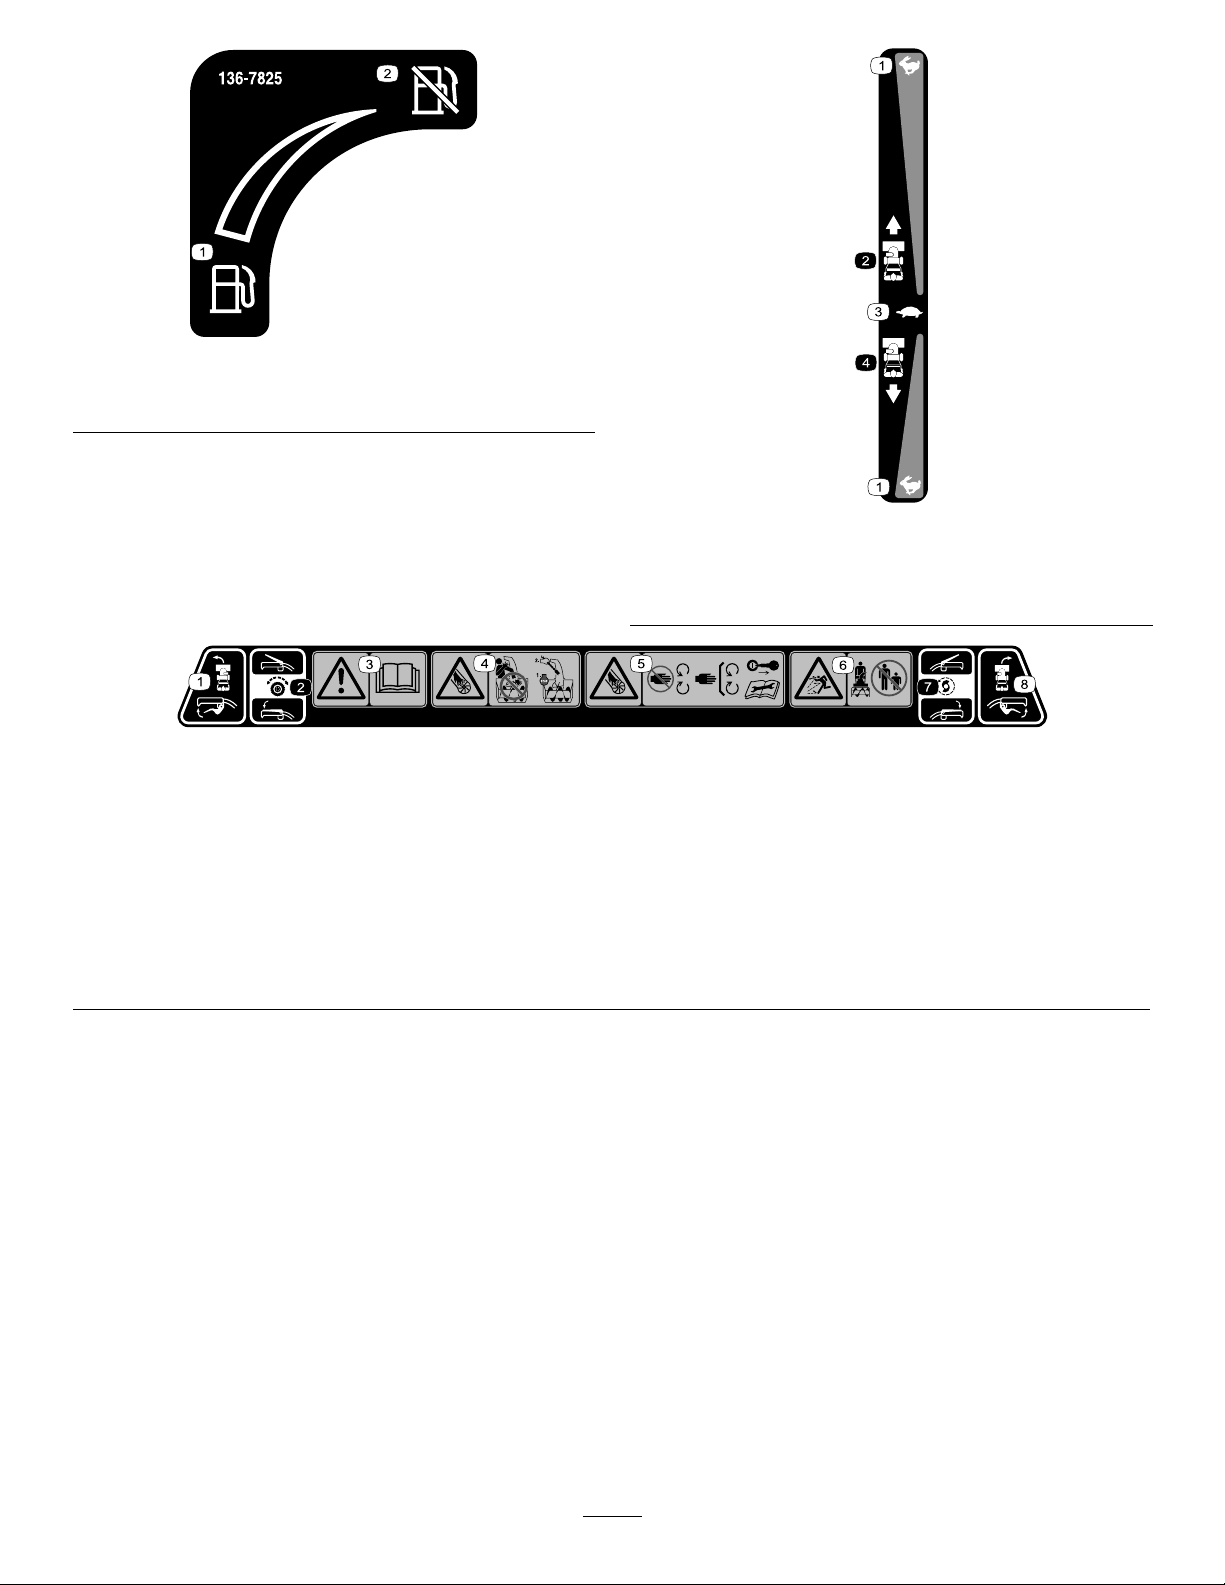
decal136-7825
136-7825
1.Fuel
2.Fuelshutoff
144-0326
1.Fast
2.Forwardspeed4.Reversespeed
3.Slow
138-0650
1.Squeezethelowerlevertoturnleft.5.Cutting/dismembermentofngersorhand,impeller
2.Squeezetheupperlevertoengagethetractiondrive.
3.Warning—readtheOperator’sManual.7.Squeezetheupperlevertoengagetheimpeller.
4.Cutting/dismembermentofngersorhand,impellerblade—do
notplaceyourhandinthechute;shutofftheenginebefore
usingthetooltoclearthechute.
blade—keepawayfrommovingparts;keepallguardsand
shieldsinplace;removethekeyfromtheignitionbefore
servicingthemachine.
6.Thrownobjecthazard—keepbystandersaway.
8.Squeezethelowerlevertoturnright.
decal144-0326
decal138-0650
4
Setup
3
1
CheckingtheEngine-Oil
Level
NoPartsRequired
Procedure
Note:Y ourmachinecomeswithoilintheengine
crankcase.Beforestartingtheengine,checktheoil
levelandaddoilifnecessary.
RefertoCheckingtheEngine-OilLevel(page16).
2
CheckingtheSkidsand
Scraper
NoPartsRequired
CheckingtheOperationof
theTractionDrive
NoPartsRequired
Procedure
CAUTION
Ifthetractiondriveisnotproperlyadjusted,
themachinemaymoveinthedirection
oppositeofwhatyouintended,causinginjury
and/orpropertydamage.
Carefullycheckthetractiondriveandadjustit
properly,ifnecessary.
1.Starttheengine;refertoStartingtheEngine
(page9).
2.Pullthespeedselectorslightlyoutoftheneutral
position;refertoOperatingtheSpeedSelector
(page12).
3.Squeezetheleft(traction)levertothehandgrip
(Figure4).
Procedure
RefertoCheckingandAdjustingtheAugerSkidsand
Scraper(page16).
g322974
Figure4
Themachineshouldmoverearward.Ifthe
machinedoesnotmoveormovesforward,
completethefollowing:
A.Releasethetractionleverandshutoffthe
engine.
B.Loosenthe2nutsonthespeedcable
restingonthespeed-selector-leverbracket,
locatedunderthecontrolpanel(Figure5).
5

5.Pushthespeedselectorslightlyoutofthe
neutralposition;refertoOperatingtheSpeed
Selector(page12).
6.Squeezetheleft(traction)levertothehandgrip
(Figure4).
Themachineshouldmoveforward.Ifthe
machinedoesnotmoveormovesrearward,
completethefollowing:
A.Releasethetractionleverandshutoffthe
engine.
B.Loosenthe2nutsonthespeedcable
restingonthespeed-selector-leverbracket,
locatedunderthecontrolpanel(Figure5).
C.Pushthecableupward.
Figure5
1.Nutsonthespeedcable
C.Pullthecabledownward.
D.Tightenthe2nuts.
4.Releasethetractionlever.
4
ExtendingtheDriftBreakers
NoPartsRequired
Procedure
Extendthedriftbreakersasneeded.
g326129
D.Tightenthe2nuts.
7.Ifyoumadeanyadjustments,repeatthis
procedureuntilnoadjustmentsarerequired.
Important:Ifthemachinemoveswhenthe
tractionleverisinthereleasedposition,checkthe
tractioncable;refertoCheckingandAdjusting
theTractionCable(page18)ortakethemachine
toanAuthorizedServiceDealerforservice.
g258084
6
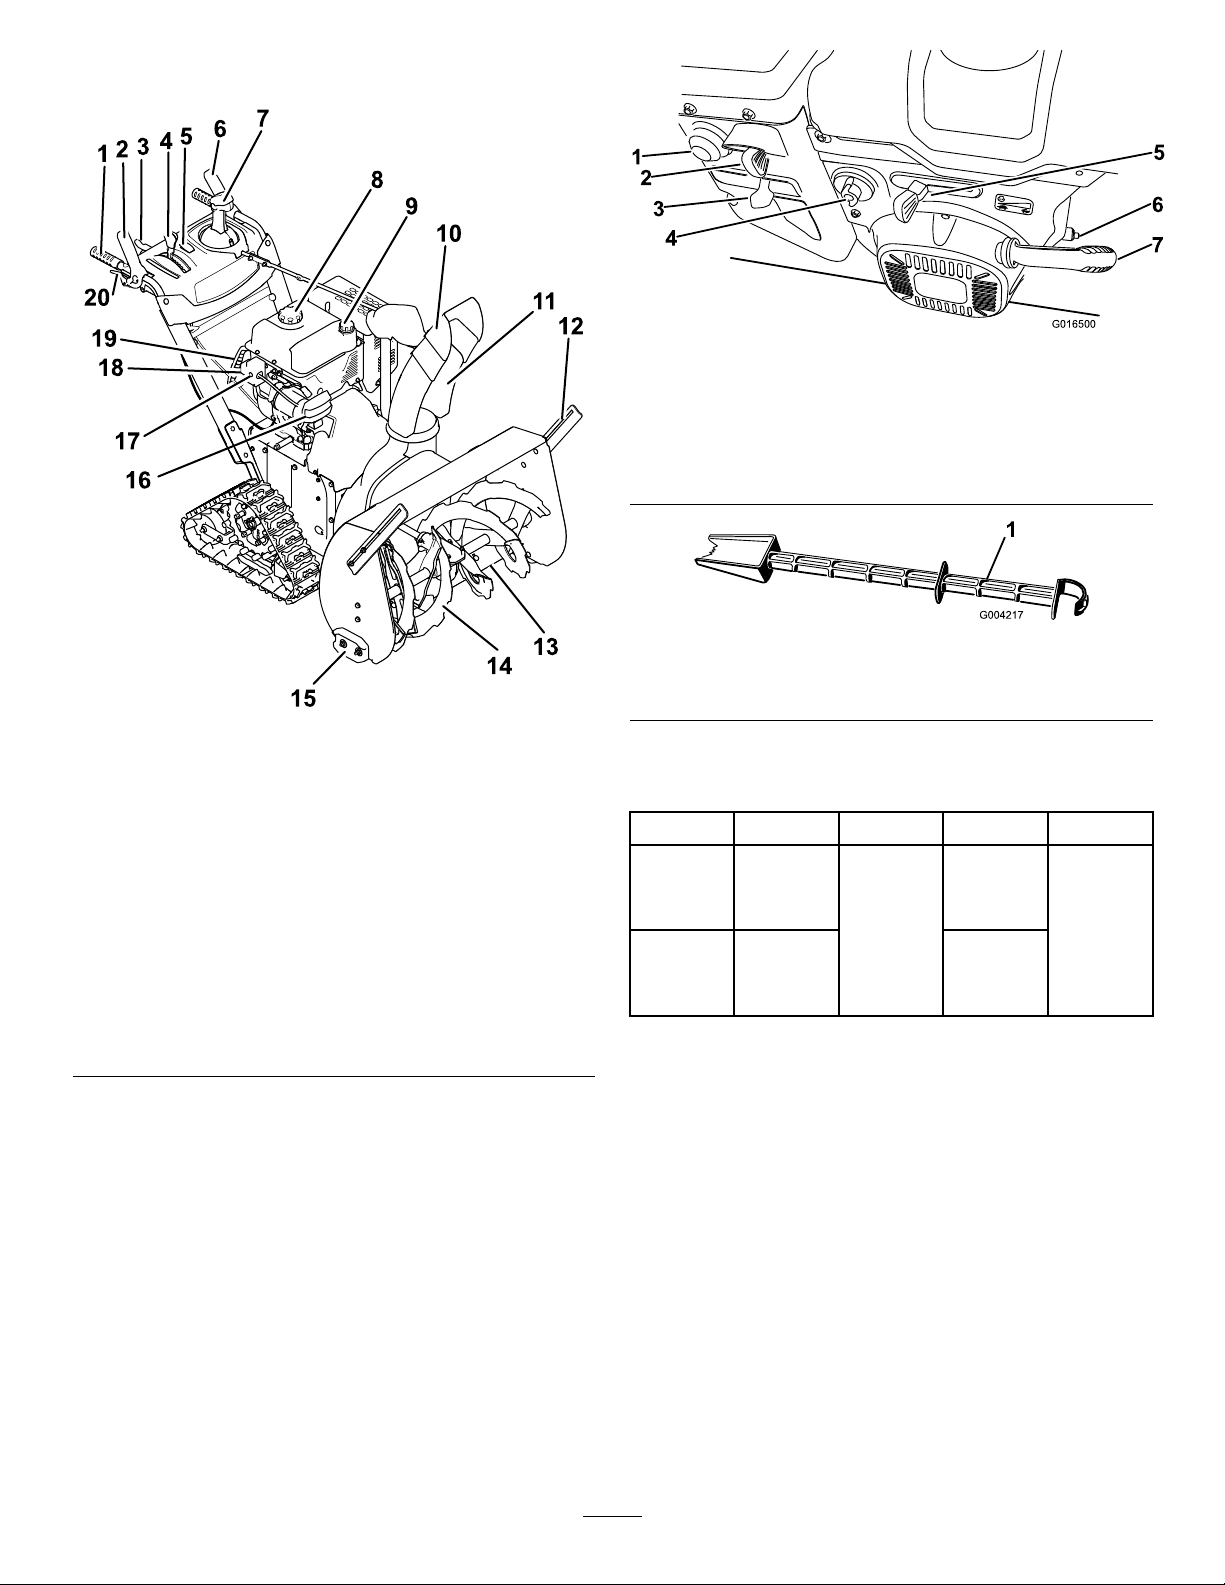
ProductOverview
g016500
Figure8
1.Primer5.Throttle
2.Key
3.Choke
4.Fuel-shutoffvalve
6.Oil-drainplug
7.Recoil-starthandle
g004217
Figure9
Figure7
1.Handgrip(2)
2.Auger/impellerlever12.Driftbreaker(2)
3.Auger-heightlever
4.Speed-selectorlever
5.Handwarmerswitch
6.Tractionlever16.Headlight
7.QuickStick®
discharge-chutecontrol
8.Fuel-tankcap18.Electric-startplug-in
9.Oil-lltube/dipstick
10.Chutedeector20.Wheel-clutchlever(2)
11.Dischargechute
13.Scraper
14.Auger
15.Skid(2)
17.Electric-startbutton
19.Recoil-starthandle
1.Snow-cleanouttool(attachedtothehandle)
g323249
Specications
ModelWeightLengthWidthHeight
138kg74cm
38890
38891
Attachments/Accessories
AselectionofToroapprovedattachmentsand
accessoriesisavailableforusewiththemachine
toenhanceandexpanditscapabilities.Contact
yourAuthorizedServiceDealerorauthorizedT oro
distributororgotowww.T oro.comforalistofall
approvedattachmentsandaccessories.
(304lb)
141kg84cm
(311lb)
160cm
(63
inches)
(29
inches)
(33
inches)
114cm
(45
inches)
Toensureoptimumperformanceandcontinuedsafety
certicationofthemachine,useonlygenuineToro
replacementpartsandaccessories.Replacement
partsandaccessoriesmadebyothermanufacturers
couldbedangerous,andsuchusecouldvoidthe
productwarranty.
7
Operation
FillingtheFuelTank
Note:Determinetheleftandrightsidesofthe
machinefromthenormaloperatingposition.
BeforeOperation
BeforeOperationSafety
GeneralSafety
•Forelectric-startmodelsonly:Useextension
cordsandreceptaclesasspeciedinthemanual.
Inspecttheelectricalcordbeforepluggingitinto
apowersource.Ifthecordisdamaged,replace
it.Unplugthepowercordwheneveryouarenot
startingthemachine.
•Wearappropriateclothing,includingeye
protection;longpants;substantial,slip-resistant
footwear;andhearingprotection.Tiebacklong
hair,securelooseclothing,anddonotwearloose
jewelry.
TypeUnleadedgasoline
Minimumoctanerating
Ethanol
MethanolNone
MTBE(methyltertiarybutyl
ether)
OilDonotaddtothefuel
Useonlyclean,fresh(nomorethan30daysold),fuel
fromareputablesource.
FillthefueltankasshowninFigure10;donotll
abovethebottomofthefueltankneck.
87(US)or91(research
octane;outsidetheUS)
Nomorethan10%byvolume
Lessthan15%byvolume
Figure10
g216203
•Thoroughlyinspecttheareawhereyouwillusethe
machine,andremovealldoormats,sleds,boards,
wires,andotherforeignobjects.
•Ifashield,safetydevice,ordecalisdamaged,
illegible,ormissing,repairorreplaceitbefore
beginningoperation.Also,tightenanyloose
fasteners.
•Adjustthecollectorhousingheighttocleara
gravelorcrushed-rocksurface.
FuelSafety
Fuelisextremelyammableandexplosive.Areor
explosionfromfuelcanburnyouandothers.
•Topreventastaticchargefromignitingthefuel,
placethecontainerand/ormachineontheground
beforelling,notinavehicleoronanobject.
•Fillthefueltankoutdoorswhentheengineiscold.
Replacethefuelcapsecurelyandwipeupspills.
•Donothandlefuelwhensmokingoraroundan
openameorsparks.
•Storefuelinanapprovedfuelcontainer,outofthe
reachofchildren.
•Whenfuelisinthetank,tipthemachineonlyas
directedintheinstructions.
•Ifyouspillfuelonyourclothing,changeyour
clothingimmediately.
Important:Forbestresults,purchaseonlythe
quantityoffuelthatyouexpecttousein30days.
Otherwise,addfuelstabilizer/conditionertofresh
fuelasdirectedbythefuel-stabilizer/conditioner
manufacturer.
DuringOperation
DuringOperationSafety
GeneralSafety
•Shutofftheenginebeforeuncloggingthe
machineandalwaysuseastickorthe
snow-cleanouttool(ifprovided).
•Staybehindthehandlesandawayfromthe
dischargeopeningwhileoperatingthemachine.
Keepyourface,hands,feet,andanyotherpart
ofyourbodyorclothingawayfrommovingor
rotatingparts.
•Neverdirectthedischargetowardpeopleorareas
wherepropertydamagecanoccur.
•Useyourfullattentionwhileoperatingthe
machine.Donotengageinanyactivitythat
causesdistractions;otherwise,injuryorproperty
damagemayoccur.
•Exercisecautiontoavoidslippingorfalling,
especiallywhenoperatingthemachineinreverse.
8

•Alwaysbesureofyourfooting,andkeeparm
holdonthehandles.Walk;neverrun.
•Exerciseextremecautionwhenoperatingthe
machineonaslope.
•Donotoperatethemachinewithoutgoodvisibility
orlight.
•Lookbehindandusecarewhenbackingupthe
machine.
•Whennotactivelyclearingsnow,disengagepower
totheauger.
•Exerciseextremecautionwhenoperatingthe
machineonorcrossinggraveldrives,walks,or
roads.Stayalertforhiddenhazardsortrafc.
•Neverattempttomakeanyadjustmentswhile
theengineisrunning,exceptasdirectedinthe
instructions.
•Afterstrikingaforeignobject,shutofftheengine,
removethekey,andinspectthemachinefor
StartingtheEngine
damage.Repairanydamagebeforestartingthe
machine.
•Ifthemachinestartstovibrateabnormally,shutoff
theengineandcheckimmediatelyforthecause.
•Donotruntheengineindoors;exhaustfumesare
dangerous.
•Donotoverloadthemachinecapacityby
attemptingtoclearsnowattoofastarate.
•Disengageallclutchesandshiftintoneutralbefore
startingtheengine.
•Shutofftheenginewheneveryouleavethe
operatingposition,beforeclearingorunclogging
thecollector,impeller,ordischargechute,and
whenmakinganyrepairs,adjustments,or
inspections.
•Neveroperatethemachineathightransport
speedsonslipperysurfaces.
UsingElectricStart
Note:T ousetheelectricstarter(electric-startmodelsonly),connectapowercordtotheplug-inrstandthen
toapoweroutlet.UseonlyaUL-listed,16-gaugeextensioncordrecommendedforoutdoorusethatisnot
longerthan15m(50ft).
WARNING
Theelectricalcordcanbecomedamaged,causingashockorre.
Thoroughlyinspecttheelectricalcordbeforeusingthemachine.Ifthecordisdamaged,do
notuseit.Replaceorrepairthedamagedcordimmediately.ContactanAuthorizedService
Dealerforassistance.
CAUTION
Ifyouleavethemachinepluggedintoapoweroutlet,someonecaninadvertentlystartthe
machineandinjurepeopleordamageproperty.
Unplugthepowercordwheneveryouarenotstartingthemachine.
9
 Loading...