

Page 1
SnowMax724ZXRSnowthrower
ModelNo.38720—SerialNo.400000000andUp
FormNo.3415-769RevA
Operator'sManual
Introduction
Thismachineisintendedtobeusedbyresidential
homeowners.Itisdesignedprimarilyforremoving
snowfrompavedsurfaces,suchasdrivewaysand
sidewalks,andothersurfacesfortrafconresidential
orcommercialproperties.Itisnotdesignedfor
removingmaterialsotherthansnow,norisitdesigned
forclearingoffgravelsurfaces.
Readthisinformationcarefullytolearnhowtooperate
andmaintainyourproductproperlyandtoavoid
injuryandproductdamage.Youareresponsiblefor
operatingtheproductproperlyandsafely.
YoumaycontactT orodirectlyatwww.T oro.comfor
machineandaccessoryinformation,helpndinga
dealer,ortoregisteryourmachine.
Wheneveryouneedservice,genuineToroparts,or
additionalinformation,contactanAuthorizedService
DealerorToroCustomerServiceandhavethemodel
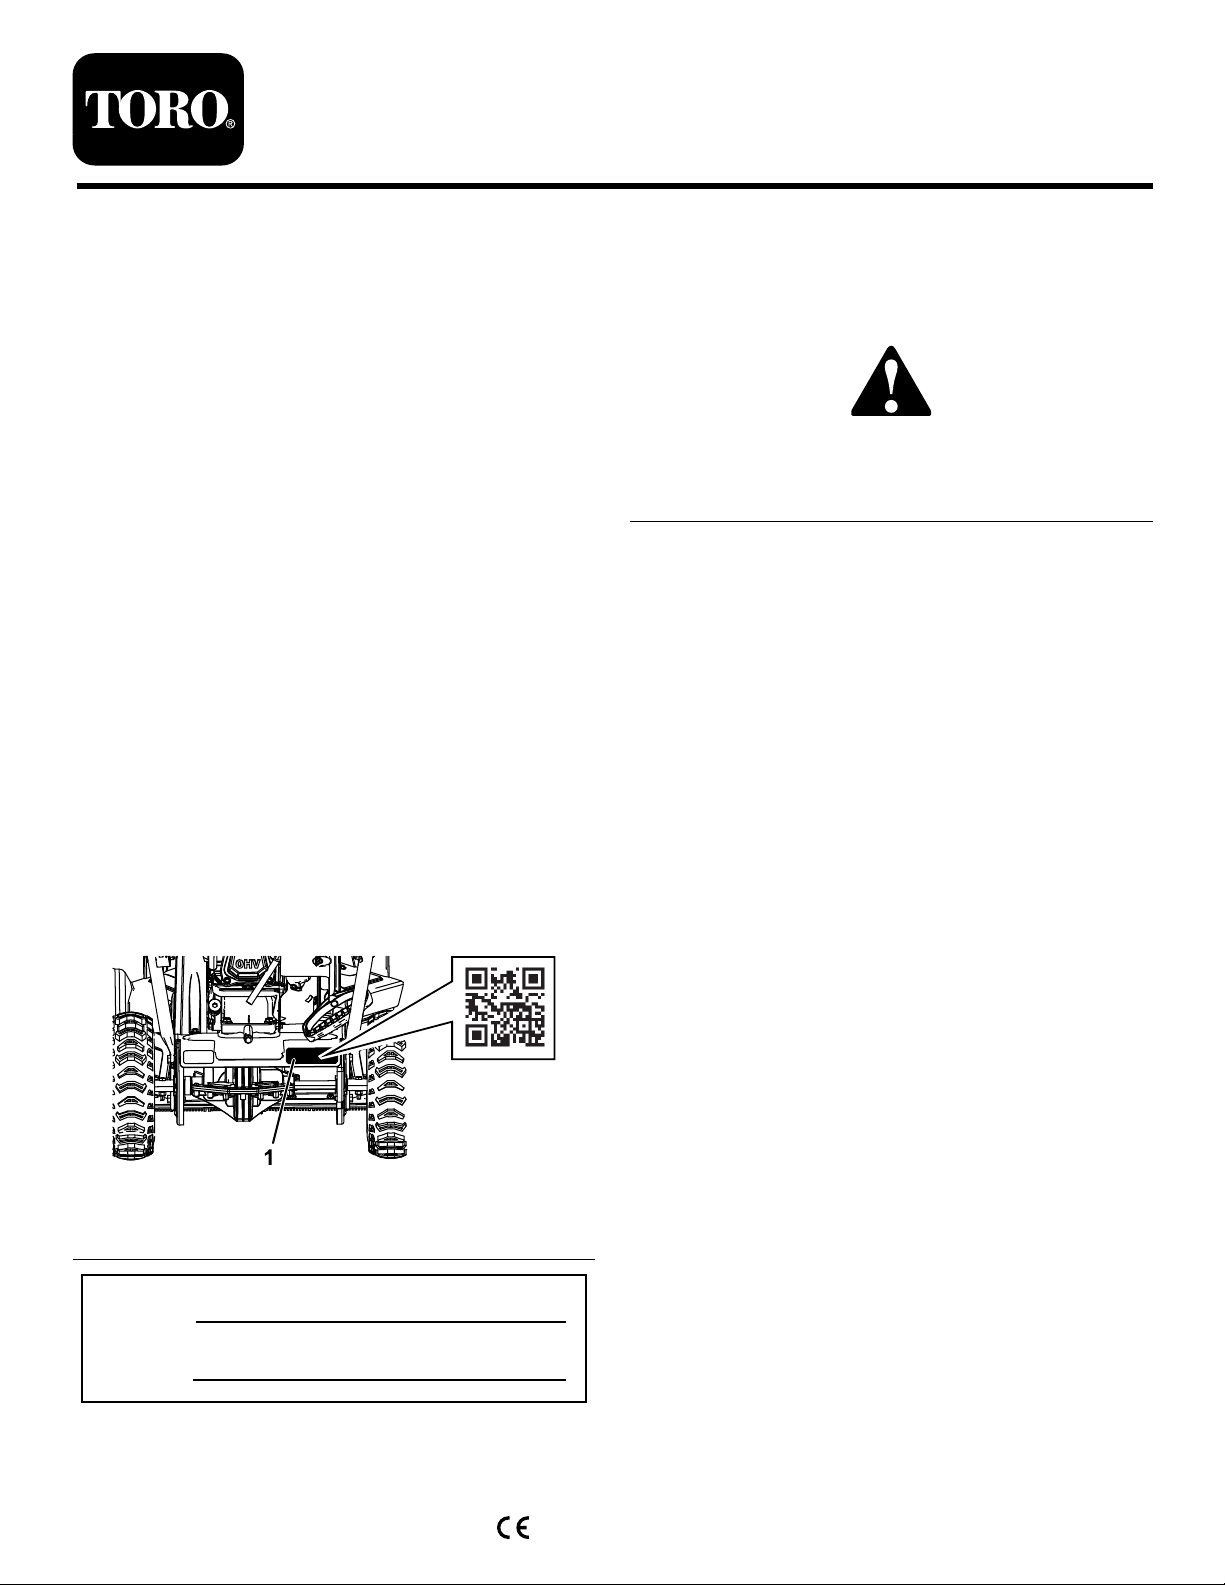
andserialnumbersofyourmachineready.Figure1
identiesthelocationofthemodelandserialnumbers
onthemachine.Writethenumbersinthespace
provided.
Important:Withyoursmartphoneortablet,scan
theQRcodeontheserialnumberdecaltoaccess
warranty,parts,andotherproductinformation.
Figure1
1.Modelandserialnumberlocation
ModelNo.
SerialNo.
(Figure2),whichsignalsahazardthatmaycause
seriousinjuryordeathifyoudonotfollowthe
recommendedprecautions.
g000502
Figure2
Safety-alertsymbol
Thismanualuses2wordstohighlightinformation.
Importantcallsattentiontospecialmechanical
informationandNoteemphasizesgeneralinformation
worthyofspecialattention.
ThisproductcomplieswithallrelevantEuropean
directives;fordetails,pleaseseetheseparateproduct
specicDeclarationofConformity(DOC)sheet.
Important:Ifyouareusingthismachineabove
1500m(5,000ft)foracontinuousperiod,ensure
thattheHighAltitudeKithasbeeninstalled
sothattheenginemeetsCARB/EPAemission
regulations.TheHighAltitudeKitincreases
engineperformancewhilepreventingspark-plug
fouling,hardstarting,andincreasedemissions.
Onceyouhaveinstalledthekit,attachthe
high-altitudelabelnexttotheserialdecalonthe
machine.ContactanyAuthorizedToroService
DealertoobtaintheproperHighAltitudeKitand
high-altitudelabelforyourmachine.T olocate
adealerconvenienttoyou,accessourwebsite
atwww.Toro.comorcontactourToroCustomer
CareDepartmentatthenumber(s)listedinyour
EmissionControlWarrantyStatement.Remove
thekitfromtheengineandrestoretheengineto
g215659
itsoriginalfactorycongurationwhenrunningthe
engineunder1500m(5,000ft).Donotoperatean
enginethathasbeenconvertedforhigh-altitude
useatloweraltitudes;otherwise,youcould
overheatanddamagetheengine.
Ifyouareunsurewhetherornotyourmachinehas
beenconvertedforhigh-altitudeuse,lookforthe
followinglabel(Figure3).
Thismanualidentiespotentialhazardsandhas
safetymessagesidentiedbythesafety-alertsymbol
©2017—TheT oro®Company
8111LyndaleAvenueSouth
Bloomington,MN55420
Registeratwww.Toro.com.
OriginalInstructions(EN)
PrintedinMexico
AllRightsReserved
*3415-769*A
Page 2

Figure3
Safety
GeneralSafety
ThismachinecomplieswithANSIB71.3specications.
decal127-9363
•Readandunderstandthecontentsofthis
Operator’sManualbeforeyoustarttheengine.
Ensurethateveryoneusingthisproductknows
howtousetheproductandunderstandsthe
warnings.
Contents
Introduction...............................................................1
Safety.......................................................................2
GeneralSafety...................................................2
SafetyandInstructionalDecals..........................3
Setup........................................................................4
UnfoldingtheHandle..........................................4
InstallingtheDischargeChute............................4
CheckingtheEngine-OilLevel............................5
AdjustingtheTirePressure.................................5
ProductOverview.....................................................6
Operation..................................................................6
BeforeOperation...................................................6
BeforeOperationSafety.....................................6
FillingtheFuelT ank............................................7
CheckingtheEngine-OilLevel............................7
DuringOperation...................................................7
DuringOperationSafety.....................................7
StartingtheEngine.............................................8
EngagingtheAuger............................................8
DisengagingtheAuger.......................................8
Self-PropellingtheMachine................................8
ShuttingOfftheEngine.......................................9
AdjustingtheDischargeChuteandChute
Deector.........................................................9
ClearingaCloggedDischargeChute..................9
OperatingTips...................................................9
AfterOperation....................................................10
AfterOperationSafety......................................10
PreventingFreeze-upafterUse........................10
Maintenance............................................................11
RecommendedMaintenanceSchedule(s)............11
MaintenanceSafety...........................................11
CheckingtheEngine-OilLevel..........................12
CheckingandAdjustingtheSkids.....................12
InspectingtheThrowingEdges.........................13
ChangingtheEngineOil...................................13
ReplacingtheSparkPlug.................................14
AdjustingtheAugerCable................................15
AdjustingtheTransmissionCable.....................15
CheckingtheTirePressure...............................15
Storage...................................................................16
PreparingtheMachineforStorage...................16
•Donotputyourhandsorfeetnearmoving
componentsonthemachine.
•Donotoperatethemachinewithoutallguards
andothersafetyprotectivedevicesinplaceand
workingonthemachine.
•Keepclearofanydischargeopening.Keep
bystandersasafedistanceawayfromthe
machine.
•Keepchildrenoutoftheoperatingarea.Never
allowchildrentooperatethemachine.
•Shutofftheenginebeforeunclogging,servicing,
orfuelingthemachine.
Youcanndadditionalitemsofsafetyinformationin
theirrespectivesectionsthroughoutthismanual.
2
Page 3
SafetyandInstructionalDecals
x 3
1
2
3
4
5
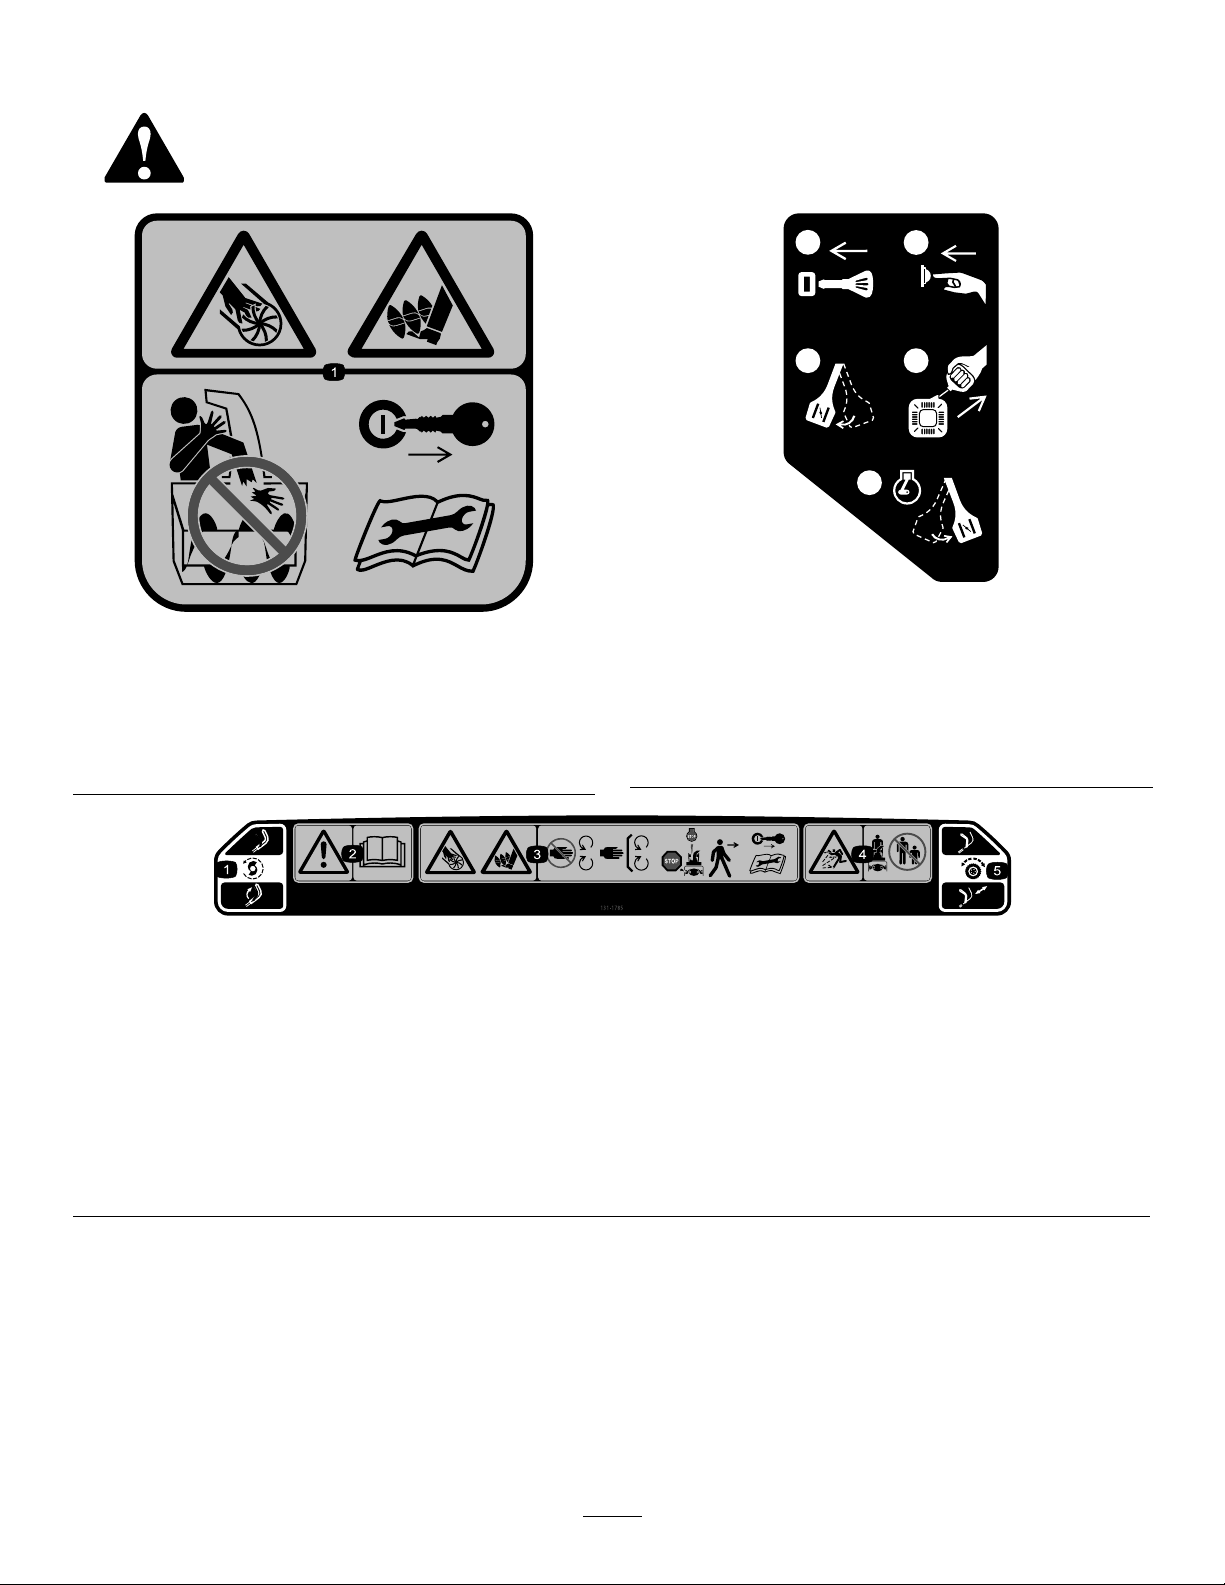
120-9805
Safetydecalsandinstructionsareeasilyvisibletotheoperatorandarelocatednearanyarea
ofpotentialdanger.Replaceanydecalthatisdamagedormissing.
131-5914
OrderPartNo.131-5916
1.Cutting/dismembermenthazardofhandorfoot,auger—do
notplaceyourhandinthechute;removetheignitionkey
andreadtheinstructionsbeforeservicingorperforming
maintenance.
decal120-9805
decal131-5914
1.Insertthekey.
2.Primetheengine3times.
3.Engagethechoke.
4.Pullthestartercord.
5.Oncetheengineisrunning,disengagethechoke.
120-9805
decal131-1785
131-1785
OrderPartNo.131-5921
1.Augerdrive—squeezethelevertoengage;releasethelever
todisengage.
2.Warning—readtheOperator'sManual.5.Self-propeldrive—pushdownonthehandletoengagethe
3.Cutting/dismembermenthazardofhandorfoot,auger—keep
awayfrommovingparts;keepallguardsandshieldsinplace;
shutofftheengineandwaitfortheaugertostopbefore
leavingthemachine;removetheignitionkeyandreadthe
instructionsbeforeservicingorperformingmaintenance.
4.Thrownobjecthazard—keepbystandersasafedistance
awayfromthesnowthrower.
self-propeldrive.
3
Page 4
Setup
A
B
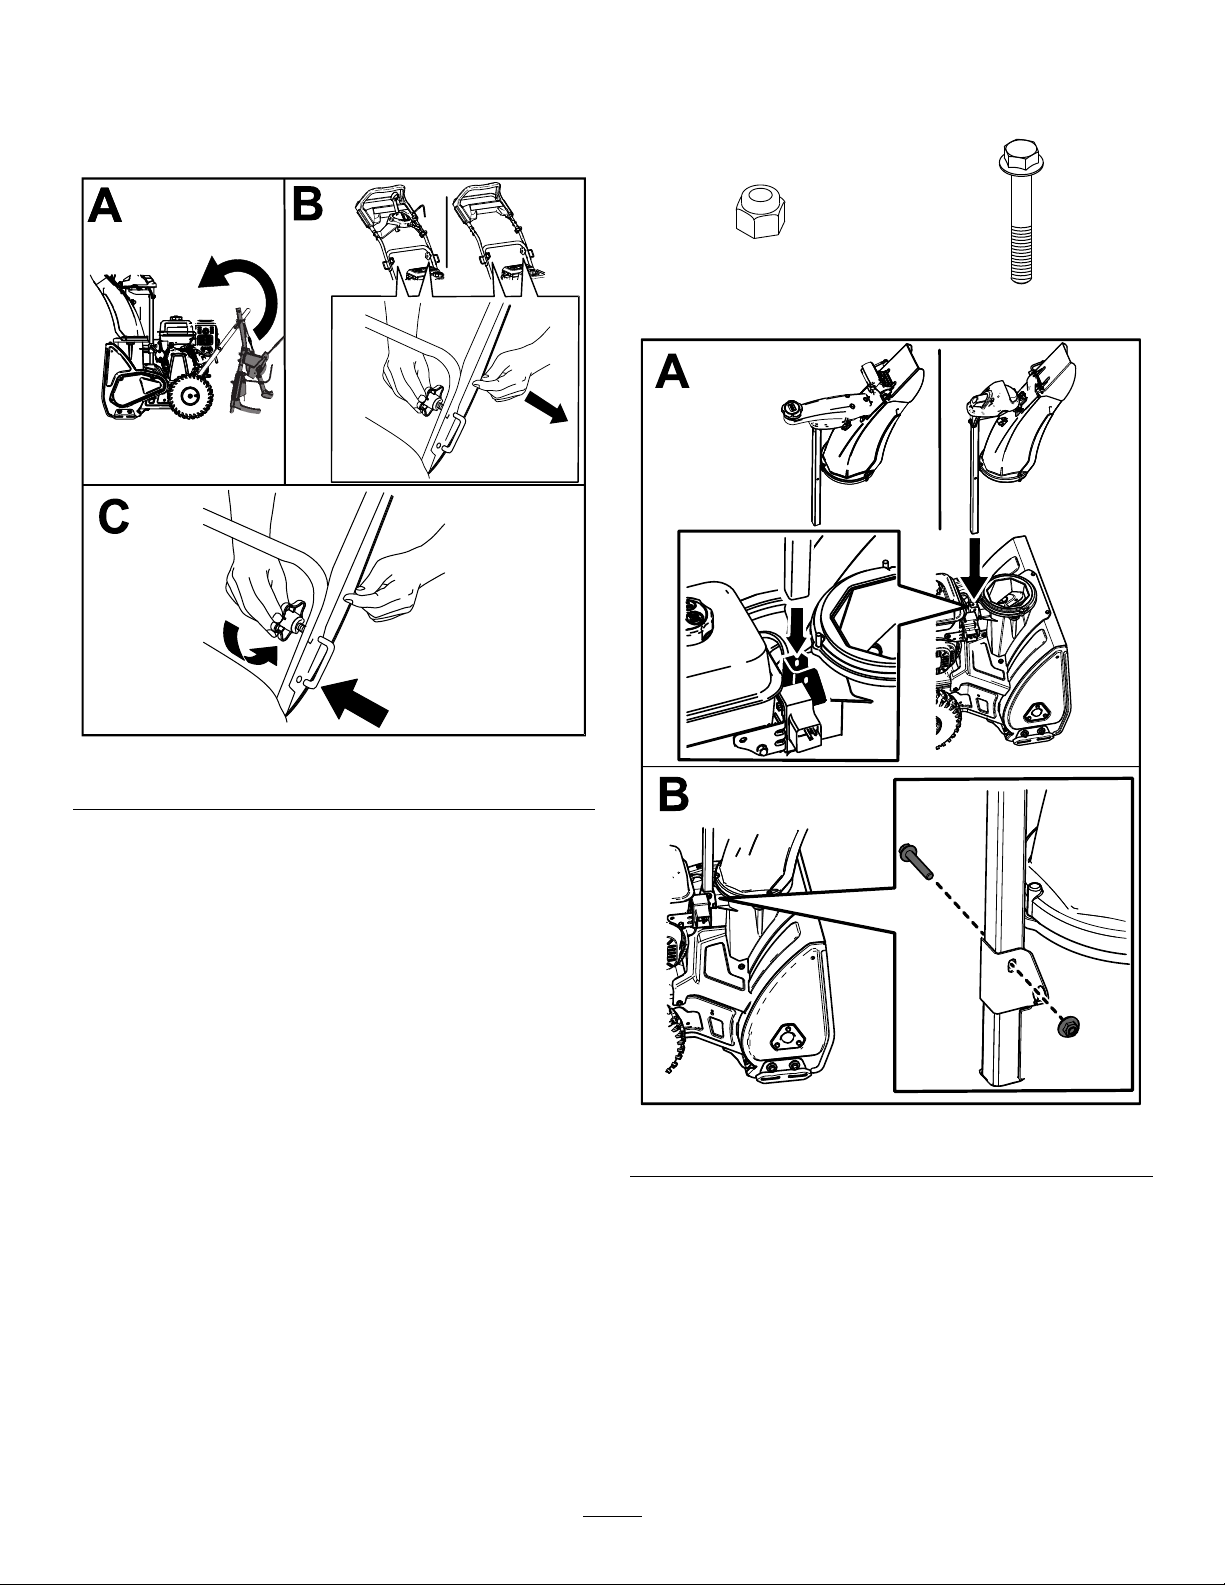
UnfoldingtheHandle
InstallingtheDischarge
Chute
1x1x
g212678
Figure4
g209258
Figure5
4
Page 5
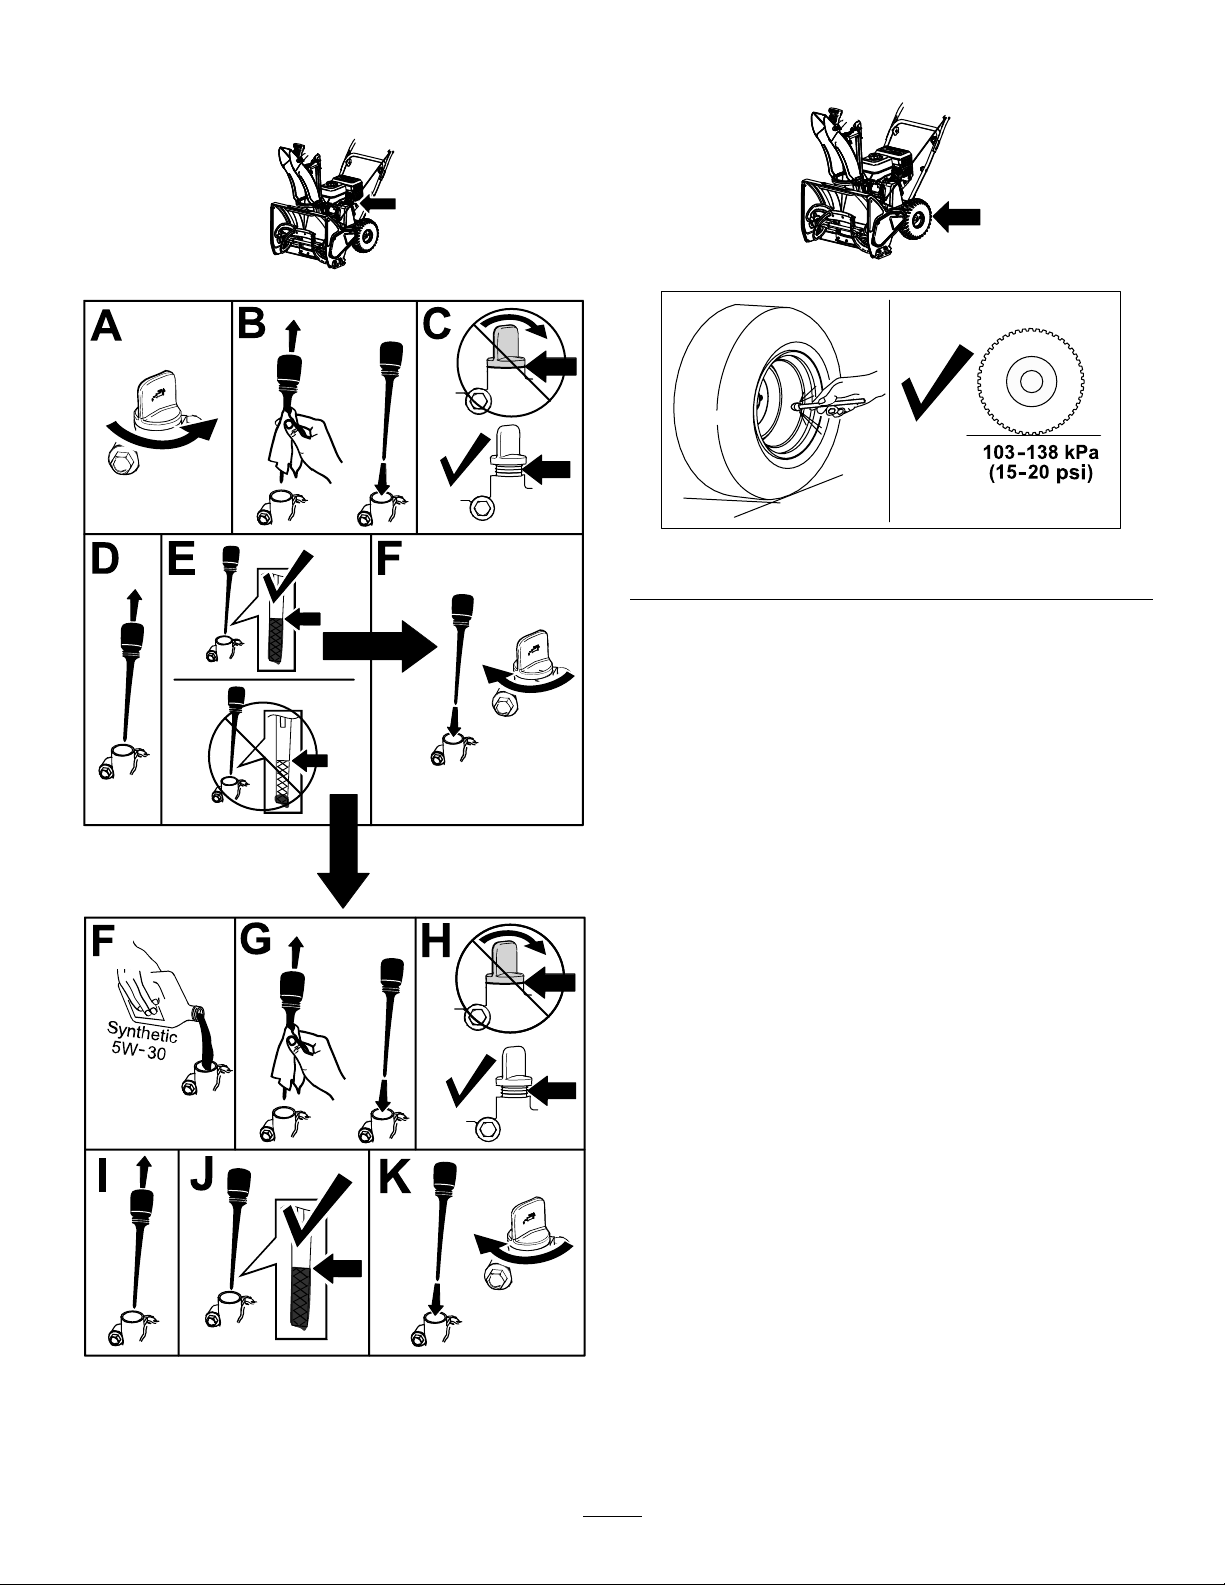
CheckingtheEngine-Oil
Level
AdjustingtheTirePressure
g215484
Figure7
g210347
g211051
Figure6
g214777
5
Page 6
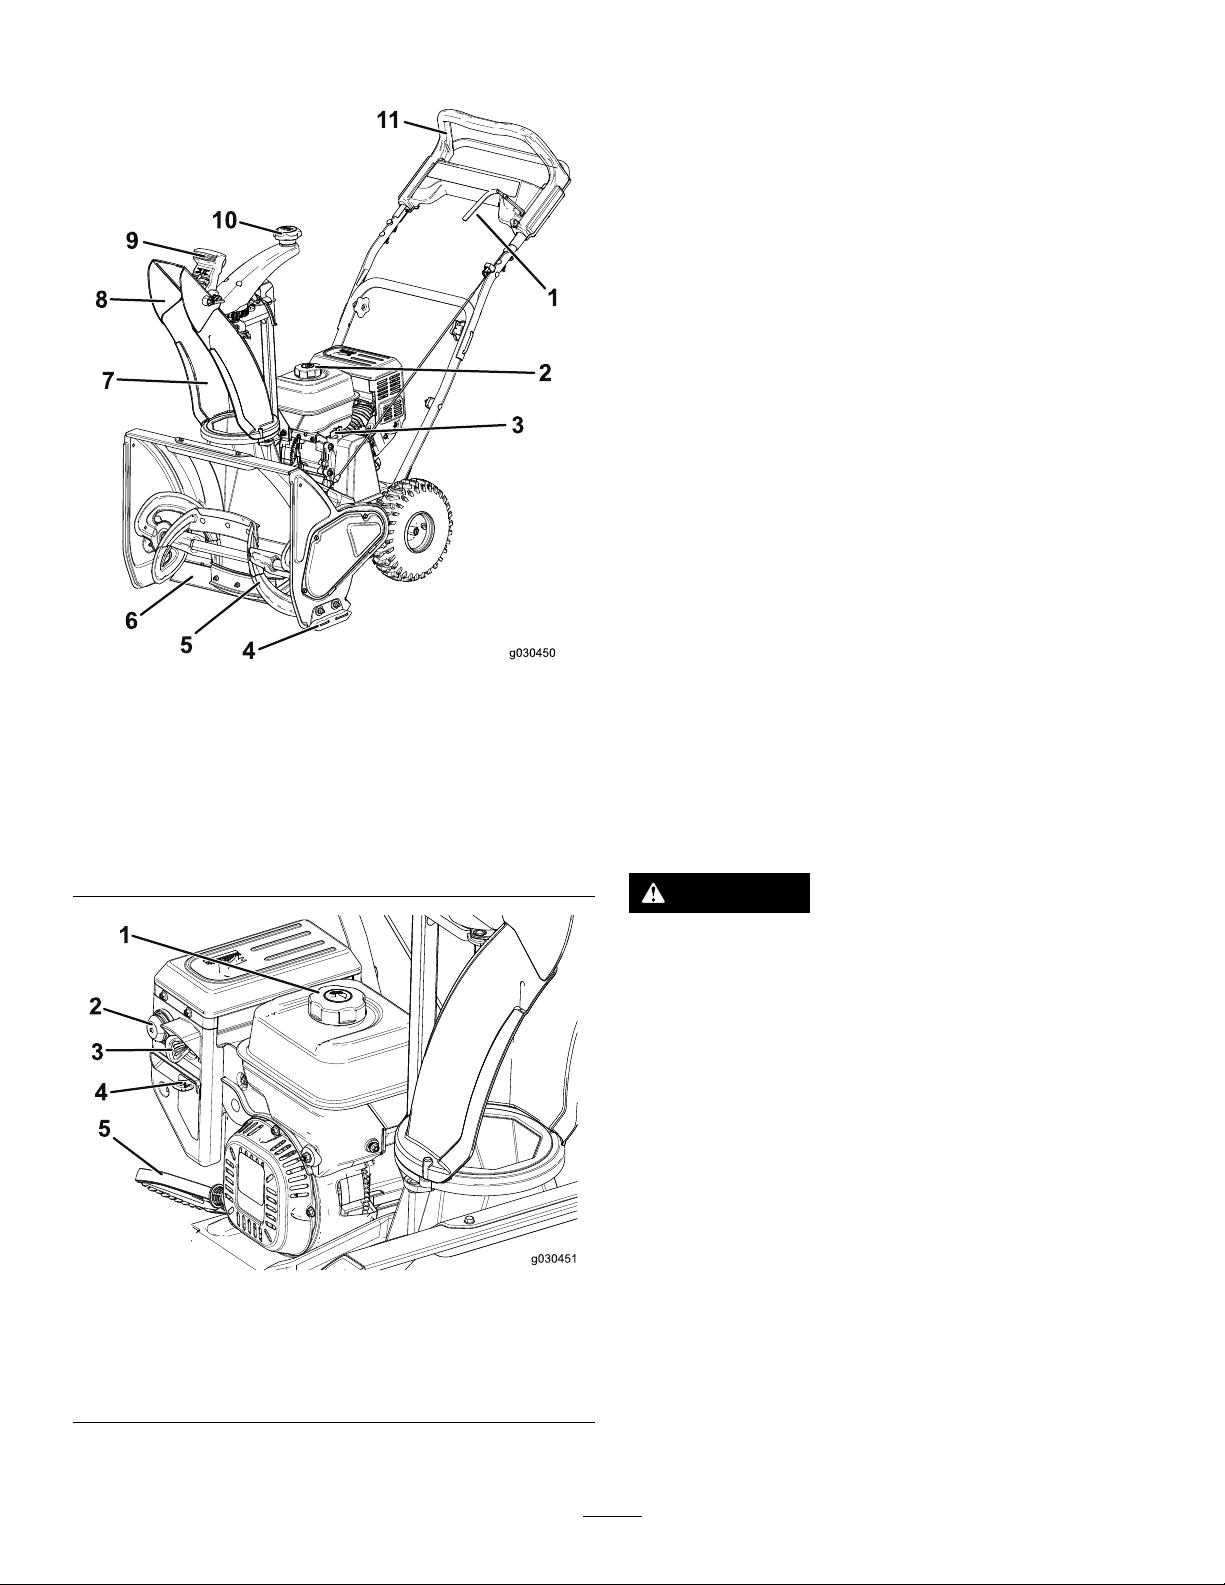
ProductOverview
Figure8
1.Augerlever7.Dischargechute
2.Fueltankcap
3.Dipstick
4.Skid
5.Auger11.Upperhandle
6.Scraper
8.Chutedeector
9.Chutedeectorcontrol
10.Dischargechutecontrol
Operation
BeforeOperation
BeforeOperationSafety
•Forelectric-startmodelsonly:Useextension
cordsandreceptaclesasspeciedinthemanual.
Thoroughlyinspecttheelectricalcordbefore
pluggingitintoapowersource.Ifthecordis
damaged,donotuseit.Replacethedamaged
cord.Unplugthepowercordwheneveryouare
notstartingthemachine.
•Wearadequatewintergarmentswhenever
youoperatethemachine.Wearsubstantial,
slip-resistantfootwearthatimprovesfootingon
slipperysurfaces.Avoidloose-ttingclothingthat
cangetcaughtinmovingparts.
•Alwaysweareyeprotectionduringoperationor
whileperforminganadjustmentorrepairtoprotect
youreyesfromforeignobjectsthatthemachine
maythrow.
g030450
•Thoroughlyinspecttheareawhereyouwillusethe
machine,andremovealldoormats,sleds,boards,
wires,andotherforeignobjects.
•Ifashield,safetydevice,ordecalisdamaged,
illegible,ormissing,repairorreplaceitbefore
beginningoperation.Also,tightenanyloose
fasteners.
Figure9
1.Fueltankcap
2.Primer5.Recoilstarter
3.Ignitionkey
4.Choke
DANGER
Fuelisextremelyammableandexplosive.A
reorexplosionfromfuelcanburnyouand
others.
•Topreventastaticchargefromignitingthe
fuel,placethecontainerand/ormachineon
thegroundbeforelling,notinavehicle
oronanobject.
•Fillthetankoutdoorswhentheengineis
cold.Wipeupspills.
•Donothandlefuelwhensmokingor
aroundanopenameorsparks.
g030451
•Storefuelinanapprovedfuelcontainer,
outofthereachofchildren.
•Donottipthemachineeitherforward
orbackwardwithfuelinthefueltank;
otherwise,fuelmayleakoutofthe
machine.
6
Page 7

FillingtheFuelTank
•Forbestresults,useonlyclean,fresh(lessthan
30daysold),unleadedgasolinewithanoctane
ratingof87orhigher((R+M)/2ratingmethod).
•Ethanol:Gasolinewithupto10%ethanol
(gasohol)or15%MTBE(methyltertiarybutyl
ether)byvolumeisacceptable.EthanolandMTBE
arenotthesame.Gasolinewith15%ethanol
(E15)byvolumeisnotapprovedforuse.Never
usegasolinethatcontainsmorethan10%ethanol
byvolume,suchasE15(contains15%ethanol),
E20(contains20%ethanol),orE85(contains85%
ethanol).Usingunapprovedgasolinemaycause
performanceproblemsand/orenginedamage
whichmaynotbecoveredunderwarranty .
•Donotusegasolinecontainingmethanol.
•Donotstorefueleitherinthefueltankorfuel
containersoverthewinterunlessyouuseafuel
stabilizer.
•Donotaddoiltogasoline.
Important:Toreducestartingproblems,addfuel
stabilizertothefuelallseason,mixingitwith
gasolinelessthan30daysold.
DuringOperation
DuringOperationSafety
•Arotatingaugercaninjurehandsorfeet.Stay
behindthehandlesandawayfromthedischarge
openingwhileoperatingthemachine.Keepyour
face,hands,feet,andanyotherpartofyour
bodyorclothingawayfrommovingorrotating
parts.
•Neverdirectthedischargetowardpeopleorareas
wherepropertydamagecanoccur.
•Exercisecautiontoavoidslippingorfalling.
Alwaysbesureofyourfooting,andkeeparm
holdonthehandles.Walk;neverrun.
•Exerciseextremecautionwhenoperatingon
slopes.
•Neveroperatethemachinewithoutgoodvisibility
orlight.
•Donotoperatethemachinewhileill,tired,or
undertheinuenceofalcoholordrugs.
•Lookbehindandusecarewhenbackingupwith
themachine.
CheckingtheEngine-Oil
Figure10
•Whennotactivelyclearingsnow,disengagepower
totheauger.
•Exerciseextremecautionwhenoperatingonor
crossinggraveldrives,walks,orroads.Stayalert
forhiddenhazardsortrafc.
•Neverattempttomakeanyadjustmentswhilethe
engineisrunning.
•Afterstrikingaforeignobject,shutofftheengine,
removetheignitionkey(electric-startmodels
only),thoroughlyinspectthemachineforany
damage,andrepairthedamagebeforestarting
andoperatingthemachine.
•Ifthemachineshouldstarttovibrateabnormally,
shutofftheengineandcheckforthecause.
•Donotruntheengineindoors,exceptwhen
startingtheengineandfortransportingthe
g214834
machineinoroutofthebuilding.Opentheoutside
doors;exhaustfumesaredangerous.
•Donotoverloadthemachinecapacityby
attemptingtoclearsnowattoofastarate.
•Nevertouchahotengineormufer.
Level
RefertoCheckingtheEngine-OilLevel(page7).
7
Page 8

StartingtheEngine
EngagingtheAuger
g030452
g214712
Figure12
DisengagingtheAuger
Todisengagetheauger,releasetheaugerlever.
Self-PropellingtheMachine
Figure11
Tooperatetheself-propeldrive,simplywalkwithyour
handsontheupperhandleandyourelbowsatyour
sides,andthemachineautomaticallykeepspacewith
you(Figure13).
Note:Youcanself-propelthemachinewiththeauger
engagedordisengaged.
g210708
g214714
Figure13
8
Page 9

ShuttingOfftheEngine
AdjustingtheDischarge
Figure14
ClearingaClogged DischargeChute
WARNING
Iftheauger/impellerisrunningbutthereisno
snowcomingoutofthedischargechute,the
dischargechutemaybeclogged.
Neveruseyourhandstoclearaclogged
dischargechute.Thiscouldresultinpersonal
injury.
1.Whileremainingintheoperatingposition,
releasetheself-propelhandle.
2.Engagetheauger.
3.Pushdownonthehandletoraisethefrontof
themachineafewcentimeters(inches)offthe
g210831
pavement,thenliftthehandlesquicklytobump
thefrontofthemachineontothepavement.
4.Disengagetheauger.
5.Repeatsteps1through4,ifnecessary ,until
astreamofsnowcomesoutofthedischarge
chute.
ChuteandChuteDeector
Toraiseorlowertheangleofthechutedeector,
pressthetriggeronthechutedeectorandmovethe
chutedeectorupordown.
Toadjustthedischargechute,movethechutehandle.
Note:Disengagetheaugerbeforeadjustingthe
chuteorchutedeector.
Important:Ifyoucannotunclogthedischarge
chutebybumpingthefrontofthemachine,shut
offtheengine,waitforallmovingpartstostop,
anduseasnow-cleanouttool(notincluded).
Important:Uncloggingthedischargechute
bybumpingthefrontofthemachineonthe
pavementmaycausetheskidstomove.Adjust
theskidsandtightentheskidboltssecurely;refer
toCheckingandAdjustingtheSkids(page12).
OperatingTips
WARNING
Theaugercanthrowstones,toys,andother
foreignobjectsandcauseseriouspersonal
injurytoyouorbystanders.
•Keeptheareatobeclearedfreeofall
objectsthattherotorbladescouldpickup
andthrow.
•Keepallchildrenandpetsawayfromthe
areaofoperation.
•Removethesnowassoonaspossibleafteritfalls.
g030530
Figure15
1.Trigger
2.Chutehandle
•Overlapeachswathtoensurecompletesnow
removal.
•Dischargethesnowdownwindwheneverpossible.
•Ifthemachinedoesnotpropelitselfforwardon
slipperysurfacesorinheavysnow,pushforward
9
Page 10

onthehandle,butallowthemachinetoworkat
itsownpace.
AfterOperation
AfterOperationSafety
•Neverstorethemachinewithfuelinthefuel
tankinsideabuildingwhereignitionsourcesare
present,suchashotwaterheaters,spaceheaters,
orclothesdryers.Allowtheenginetocoolbefore
storinginanyenclosure.
•Whenstoringthemachineformorethan30days,
refertoStorage(page16)forimportantdetails.
PreventingFreeze-upafter Use
•Lettheenginerunforafewminutestoprevent
movingpartsfromfreezing.Shutofftheengine,
waitforallmovingpartstostop,andremoveice
andsnowfromthemachine.
•Cleanoffanysnowandicefromthebaseofthe
chute.
•Rotatethedischargechuteleftandrighttofree
itfromanyicebuildup.
•WiththeignitionkeyintheOFFposition,pullthe
recoil-starthandleseveraltimesorconnectthe
electricalcordtoapowersourceandthemachine
andpushtheelectric-startbuttononcetoprevent
therecoilstarterand/ortheelectricstarterfrom
freezingup(electric-startmodelsonly).
•Insnowyandcoldconditions,somecontrolsand
movingpartsmayfreeze.Donotuseexcessive
forcewhentryingtooperatefrozencontrols.Ifyou
havedifcultyoperatinganycontrolorpart,start
theengineandletitrunforafewminutes.
•Donotusethechutecontroltoattempttomovea
frozendischargechute.Holddowntheblueknob
anduseyourhandstorotatethechute.
•Transportingthemachineinanopentraileror
vehiclecancausethecontrolsordischargechute
tofreeze.
10
Page 11

Maintenance
Note:Determinetheleftandrightsidesofthemachinefromthenormaloperatingposition.
RecommendedMaintenanceSchedule(s)
MaintenanceService
Interval
Afterthersthour
Aftertherst2hours
Beforeeachuseordaily
Every100hours
Yearly
Yearlyorbeforestorage
MaintenanceSafety
MaintenanceProcedure
•Checkforloosefastenersandtightenthemifnecessary.
•Changetheengineoil.
•Inspecttheaugercableandadjustitifnecessary.
•Inspectthetransmissioncableandadjustitifnecessary .
•Checktheengineoillevelandaddoilifnecessary.
•Replacethesparkplug.
•Checktheskidsandadjustthemifnecessary .
•InspectthethrowingedgesandhaveanAuthorizedServiceDealerreplacethe
throwingedgesandscraperifnecessary.
•Changetheengineoil.
•Inspecttheaugercableandadjustitifnecessary.
•Inspectthetransmissioncableandadjustitifnecessary .
•Checkthetirepressure.
•Checkforloosefastenersandtightenthemifnecessary.
•HaveanAuthorizedServiceDealerinspectthedrivebeltandreplaceitifnecessary.
•Preparethemachineforstorage.
Readthefollowingsafetyprecautionsbefore
performinganymaintenanceonthemachine:
•Beforeperforminganymaintenance,service,or
adjustment,shutofftheengineandremovethe
key.Ifmajorrepairsareeverneeded,contactan
AuthorizedServiceDealer.
•Checkallfastenersatfrequentintervalsforproper
tightnesstoensurethatthemachineisinsafe
workingcondition.
•Donotchangethegovernorsettingsontheengine.
•PurchaseonlygenuineTororeplacementparts
andaccessories.
11
Page 12

CheckingtheEngine-Oil
CheckingandAdjustingthe
Level
ServiceInterval:Beforeeachuseordaily
Skids
ServiceInterval:Yearly
Checktheskidstoensurethattheaugerdoesnot
contactthepavedsurface.Adjusttheskidsasneeded
tocompensateforwear(Figure17).
1.Loosentheskidbolts.
g210346
2.Slidea5mm(3/16inch)boardunderneaththe
scraper.
Note:Usingathinnerboardwillresultinamore
aggressivescraper.Athickerboardwillresultin
alessaggressivescraper.
3.Lowertheskidstotheground.
Note:Ensurethattheskidsareatonthe
ground.
4.Tightentheskidbolts.
Figure16
g215482
g214777
Figure17
g214716
12
Page 13

InspectingtheThrowing Edges
ServiceInterval:Yearly—Inspectthethrowingedges
andhaveanAuthorizedService
Dealerreplacethethrowingedges
andscraperifnecessary .
Beforeeachsession,inspectthethrowingedges
forwear.Whenathrowingedgehasworndownto
thewear-indicatorhole,haveanAuthorizedService
Dealerreplacethethrowingedges(Figure18).
backwardanddraintheusedoilintheoil-drain
pan(Figure19).
g030122
Figure19
1.Oil-drainplug
3.Afterdrainingtheusedoil,returnthemachineto
theoperatingposition.
4.Installtheoil-drainplugandtightenitsecurely.
Figure18
1.Thewear-indicatorhole
isintact;youdonotneed
toreplacethethrowing
edges.
2.Thewear-indicatorhole
isexposed;replaceboth
throwingedges.
ChangingtheEngineOil
ServiceInterval:Aftertherst2hours
Yearly
Ifpossible,runtheengineforafewminutesbefore
changingtheoiltowarmit.Warmoilowsbetterand
carriesmorecontaminants.
5.Cleanaroundtheoil-llcap.
6.UseFigure20toselectthebestoilviscosityfor
theoutdoortemperaturerangeexpected:
g030128
g013802
Figure20
EngineOilSpecications
Engineoilcapacity
OilviscosityRefertoFigure20.
APIserviceclassicationSJorhigher
1.Movethemachinetoalevelsurface.
2.Placeanoil-drainpanundertheoil-drainplug,
removetheoil-drainplug,andtipthemachine
0.50L(17oz)
13
Page 14

ReplacingtheSparkPlug
ServiceInterval:Every100hours—Replacethe
sparkplug.
WARNING
Replacingthesparkplugwhiletheengineis
hotcanresultinburns.
g030449
Waituntiltheengineiscooltoreplacethe
sparkplug.
UseaT orosparkplugorequivalent(Champion®
RN9YCorNGKBPR6ES).
1.Removetheboot(Figure22).
g030123
Figure22
1.Spark-plugboot
Figure21
2.Cleanaroundthebaseofthesparkplug.
3.Removeanddiscardtheoldsparkplug.
Note:Youwillneedaratchetwrenchextension
toremovethesparkplug.
4.Setthegapbetweentheelectrodesonanew
sparkplugat0.76mm(0.030inch)asshown
inFigure23.
g001029
Figure23
1.0.76mm(0.030inch)
g214777
14
Page 15

AdjustingtheAugerCable
ServiceInterval:Aftertherst2hours
Yearly
Ifthedrivebeltslipsorsquealsunderheavyload,
adjusttheaugercable.
1.Loosenthenutonthelowercableclamp,butdo
notremoveit(Figure24).
g030446
Figure25
Figure24
1.Nut
2.Cable4.Spring
2.Pullthecableuptoremovesomeslack(Figure
24).
3.Connector
Important:Donotremovealltheslack
fromthecable.Removingalltheslackfrom
thecablepreventstheaugerfromstopping
properly.
3.Holdthecableinplaceandtightenthenut
(Figure24).
AdjustingtheTransmission
1.Nut
2.Pullthecabledowntoremovemostoftheslack
inthecable(Figure25).
2.Cable
Important:Donotremovealltheslack
g030444
fromthecable.Removingalltheslackfrom
thecablemaycausethewheelstoengage
withoutengagingtheself-propelhandle.
3.Tightenthenut(Figure25).
CheckingtheTirePressure
ServiceInterval:Yearly
g210347
Cable
ServiceInterval:Aftertherst2hours
Yearly
Ifthewheelseasilystallout,orifthewheelsdrive
withoutengagingtheself-propelhandle,adjustthe
transmissioncable.
1.Loosenthenutontheuppercableclamp,butdo
notremoveit(Figure25).
g211051
Figure26
15
Page 16

Storage
PreparingtheMachinefor Storage
11.Installthesparkplugbyhandandthentorqueit
to27to30N∙m(20to22ft-lb).
12.WiththeignitionkeyintheOFFposition,pullthe
recoil-starthandleslowlytodistributetheoilon
theinsideofthecylinder.
13.Cleanthemachine.
WARNING
Fuelfumesarehighlyammable,explosive,
anddangerousifinhaled.Ifyoustorethe
productinanareawithanopename,thefuel
fumesmayigniteandcauseanexplosion.
•Donotstorethemachineinahouse(living
area),basement,oranyotherareawhere
ignitionsourcesmaybepresent,such
ashotwaterandspaceheaters,clothes
dryers,furnaces,andotherappliances.
•Donottipthemachineeitherforward
orbackwardwithfuelinthefueltank;
otherwise,fuelmayleakoutofthe
machine.
•Donotstorethemachinewithitshandle
tippeddownontotheground;otherwise,
oilleaksintotheenginecylinderandonto
theground,andtheenginedoesnotstart
orrun.
1.Onthelastrefuelingoftheseason,addfuel
stabilizertofreshfuelasdirectedbytheengine
manufacturer.
14.Touchupchippedsurfaceswithpaintavailable
fromanAuthorizedServiceDealer.Sand
affectedareasbeforepainting,andusearust
preventativetopreventthemetalpartsfrom
rusting.
15.Tightenanyloosefasteners.Repairorreplace
anydamagedparts.
16.Coverthemachineandstoreitinaclean,dry
placeoutofthereachofchildren.Allowthe
enginetocoolbeforestoringthemachineinany
enclosure.
Important:Donotstorefuellonger
thanthatsuggestedbythefuel-stabilizer
manufacturer.
2.Runtheenginefor10minutestodistributethe
conditionedfuelthroughthefuelsystem.
3.Shutofftheengine,allowittocool,andsiphon
thefueltankorruntheengineuntilitshutsoff.
4.Starttheengineandrunituntilitshutsoff.
5.Chokeorprimetheengine,startitathirdtime,
andruntheengineuntilitdoesnotstart.
6.Drainthefuelinthecarburetorthroughthe
carburetor-drainboltintoanapprovedgasoline
container.
7.Disposeofunusedfuelproperly.Recycleit
accordingtolocalcodes,oruseitinyour
automobile.
8.Whiletheengineisstillwarm,changetheengine
oil.RefertoChangingtheEngineOil(page13).
9.Removethesparkplug.
10.Squirt10ml(2tsp)ofoilintothespark-plughole.
16
Page 17

Notes:
Page 18

Notes:
Page 19

Notes:
Page 20

EuropeanPrivacyNotice
TheInformationT oroCollects
ToroWarrantyCompany(T oro)respectsyourprivacy .Inordertoprocessyourwarrantyclaimandcontactyouintheeventofaproductrecall,weaskyou
tosharecertainpersonalinformationwithus,eitherdirectlyorthroughyourlocalT orocompanyordealer.
TheTorowarrantysystemishostedonserverslocatedwithintheUnitedStateswhereprivacylawmaynotprovidethesameprotectionasapplies
inyourcountry.
BYSHARINGYOURPERSONALINFORMATIONWITHUS,YOUARECONSENTINGTOTHEPROCESSINGOFYOURPERSONALINFORMATION
ASDESCRIBEDINTHISPRIV ACYNOTICE.
TheWayT oroUsesInformation
Toromayuseyourpersonalinformationtoprocesswarrantyclaims,tocontactyouintheeventofaproductrecallandforanyotherpurposewhichwetell
youabout.T oromayshareyourinformationwithT oro'safliates,dealersorotherbusinesspartnersinconnectionwithanyoftheseactivities.Wewillnot
sellyourpersonalinformationtoanyothercompany .Wereservetherighttodisclosepersonalinformationinordertocomplywithapplicablelawsand
withrequestsbytheappropriateauthorities,tooperateoursystemsproperlyorforourownprotectionorthatofotherusers.
RetentionofyourPersonalInformation
Wewillkeepyourpersonalinformationaslongasweneeditforthepurposesforwhichitwasoriginallycollectedorforotherlegitimatepurposes
(suchasregulatorycompliance),orasrequiredbyapplicablelaw.
Toro'sCommitmenttoSecurityofY ourPersonalInformation
Wetakereasonableprecautionsinordertoprotectthesecurityofyourpersonalinformation.Wealsotakestepstomaintaintheaccuracyandcurrent
statusofpersonalinformation.
AccessandCorrectionofyourPersonalInformation
Ifyouwouldliketorevieworcorrectyourpersonalinformation,pleasecontactusbyemailatlegal@toro.com.
AustralianConsumerLaw
AustraliancustomerswillnddetailsrelatingtotheAustralianConsumerLaweitherinsidetheboxoratyourlocalToroDealer .
374-0282RevC
 Loading...