

Page 1
PowerMax
ModelNo.38624—SerialNo.290000001andUp
®
826OESnowthrower
FormNo.3360-742RevA
Operator'sManual
Introduction
Readthisinformationcarefullytolearnhowtooperate
andmaintainyourproductproperlyandtoavoidinjury
andproductdamage.Youareresponsibleforoperating
theproductproperlyandsafely.
YoumaycontactTorodirectlyatwww.Toro.comfor
productandaccessoryinformation,helpndinga
dealer,ortoregisteryourproduct.
Wheneveryouneedservice,genuineToroparts,or
additionalinformation,contactanAuthorizedService
DealerorToroCustomerServiceandhavethemodel
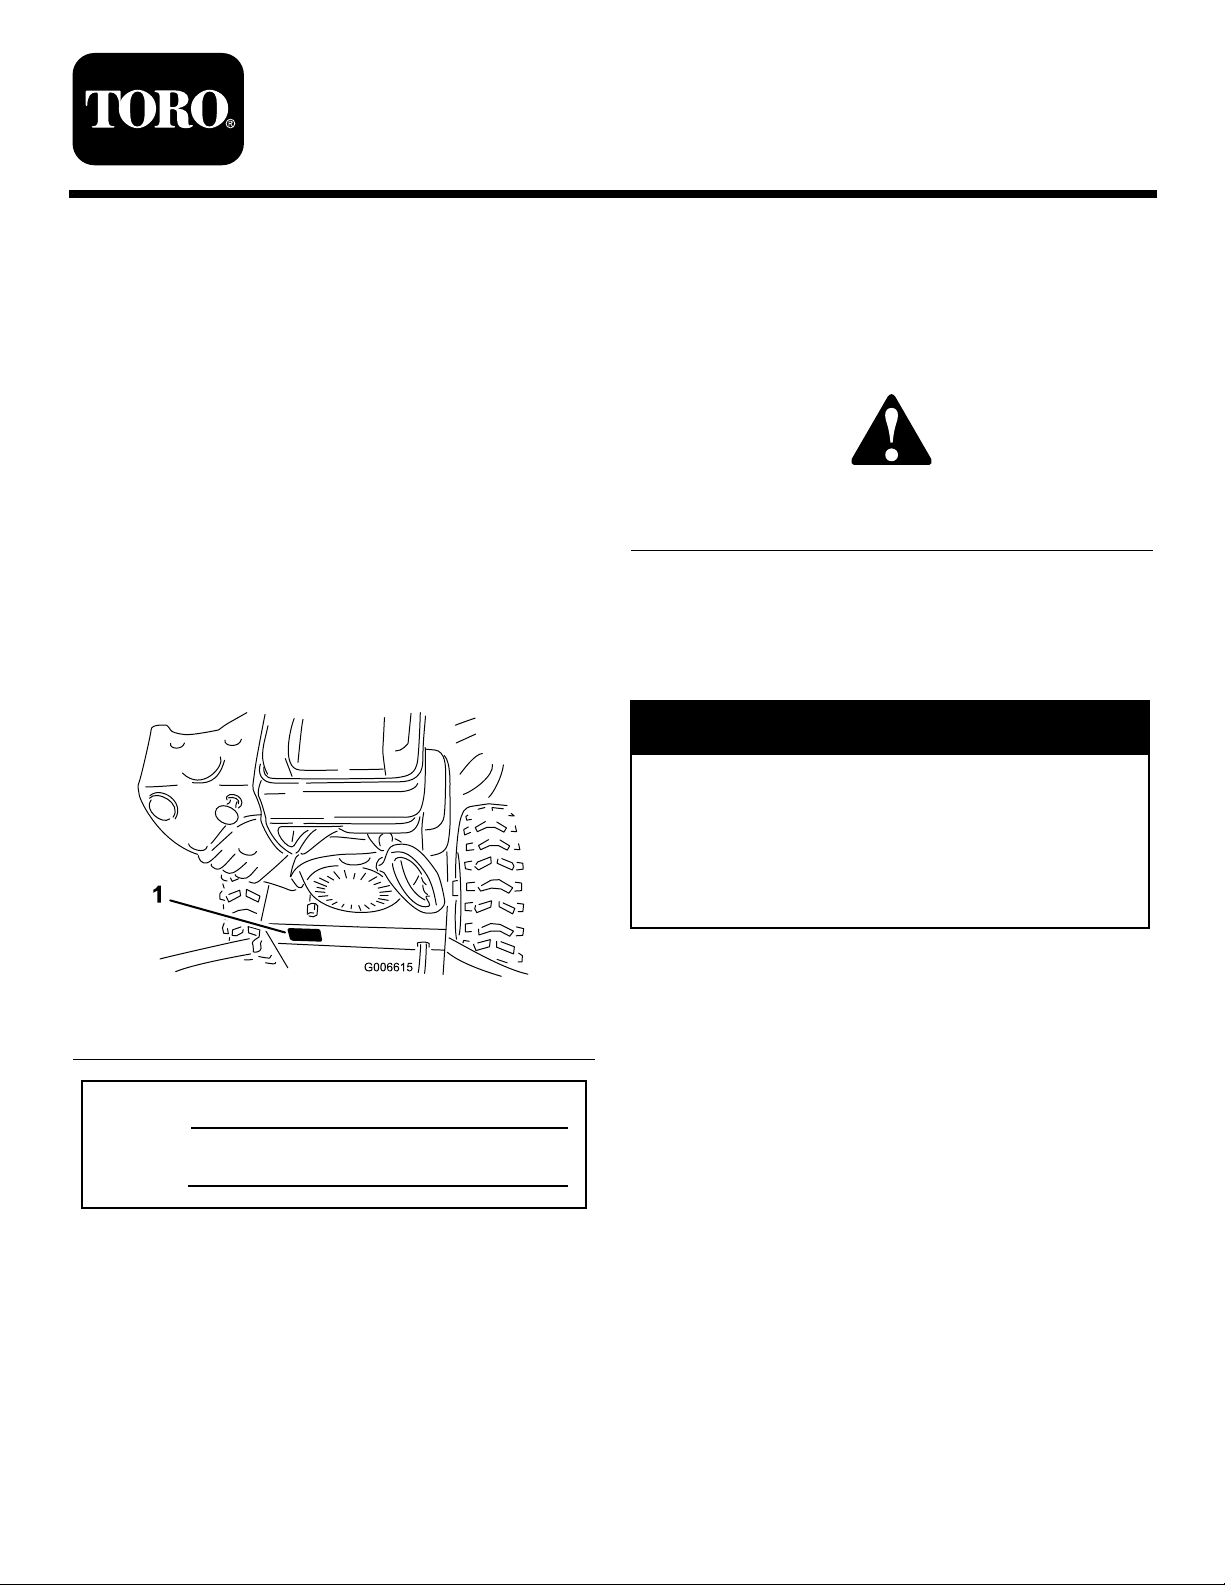
andserialnumbersofyourproductready.Figure1
identiesthelocationofthemodelandserialnumbers
ontheproduct.Writethenumbersinthespace
provided.
Thismanualidentiespotentialhazardsandhas
safetymessagesidentiedbythesafetyalertsymbol
(Figure2),whichsignalsahazardthatmaycauseserious
injuryordeathifyoudonotfollowtherecommended
precautions.
Figure2
1.Safetyalertsymbol
Thismanualuses2wordstohighlightinformation.
Importantcallsattentiontospecialmechanical
informationandNoteemphasizesgeneralinformation
worthyofspecialattention.
Warning
CALIFORNIA
Proposition65Warning
Theengineexhaustfromthisproduct
containschemicalsknowntotheStateof
Californiatocausecancer,birthdefects,
orotherreproductiveharm.
1.Modelandserialnumberlocation
ModelNo.
SerialNo.
©2008—TheT oro®Company
8111LyndaleAvenueSouth
Bloomington,MN55420
Figure1
Registeratwww.Toro.com.
ThissparkignitionsystemcomplieswithCanadian
ICES-002.
Theenclosed
Engine Owner’ s Man ual
issupplied
forinformationregardingtheUSEnvironmental
ProtectionAgency(EPA)andtheCalifornia
EmissionControlRegulationofemissionsystems,
maintenance,andwarranty.Replacementsmaybe
orderedthroughtheenginemanufacturer.
OriginalInstructions(EN)
PrintedintheUSA
AllRightsReserved
Page 2
Safety
BeforeOperating
?
?
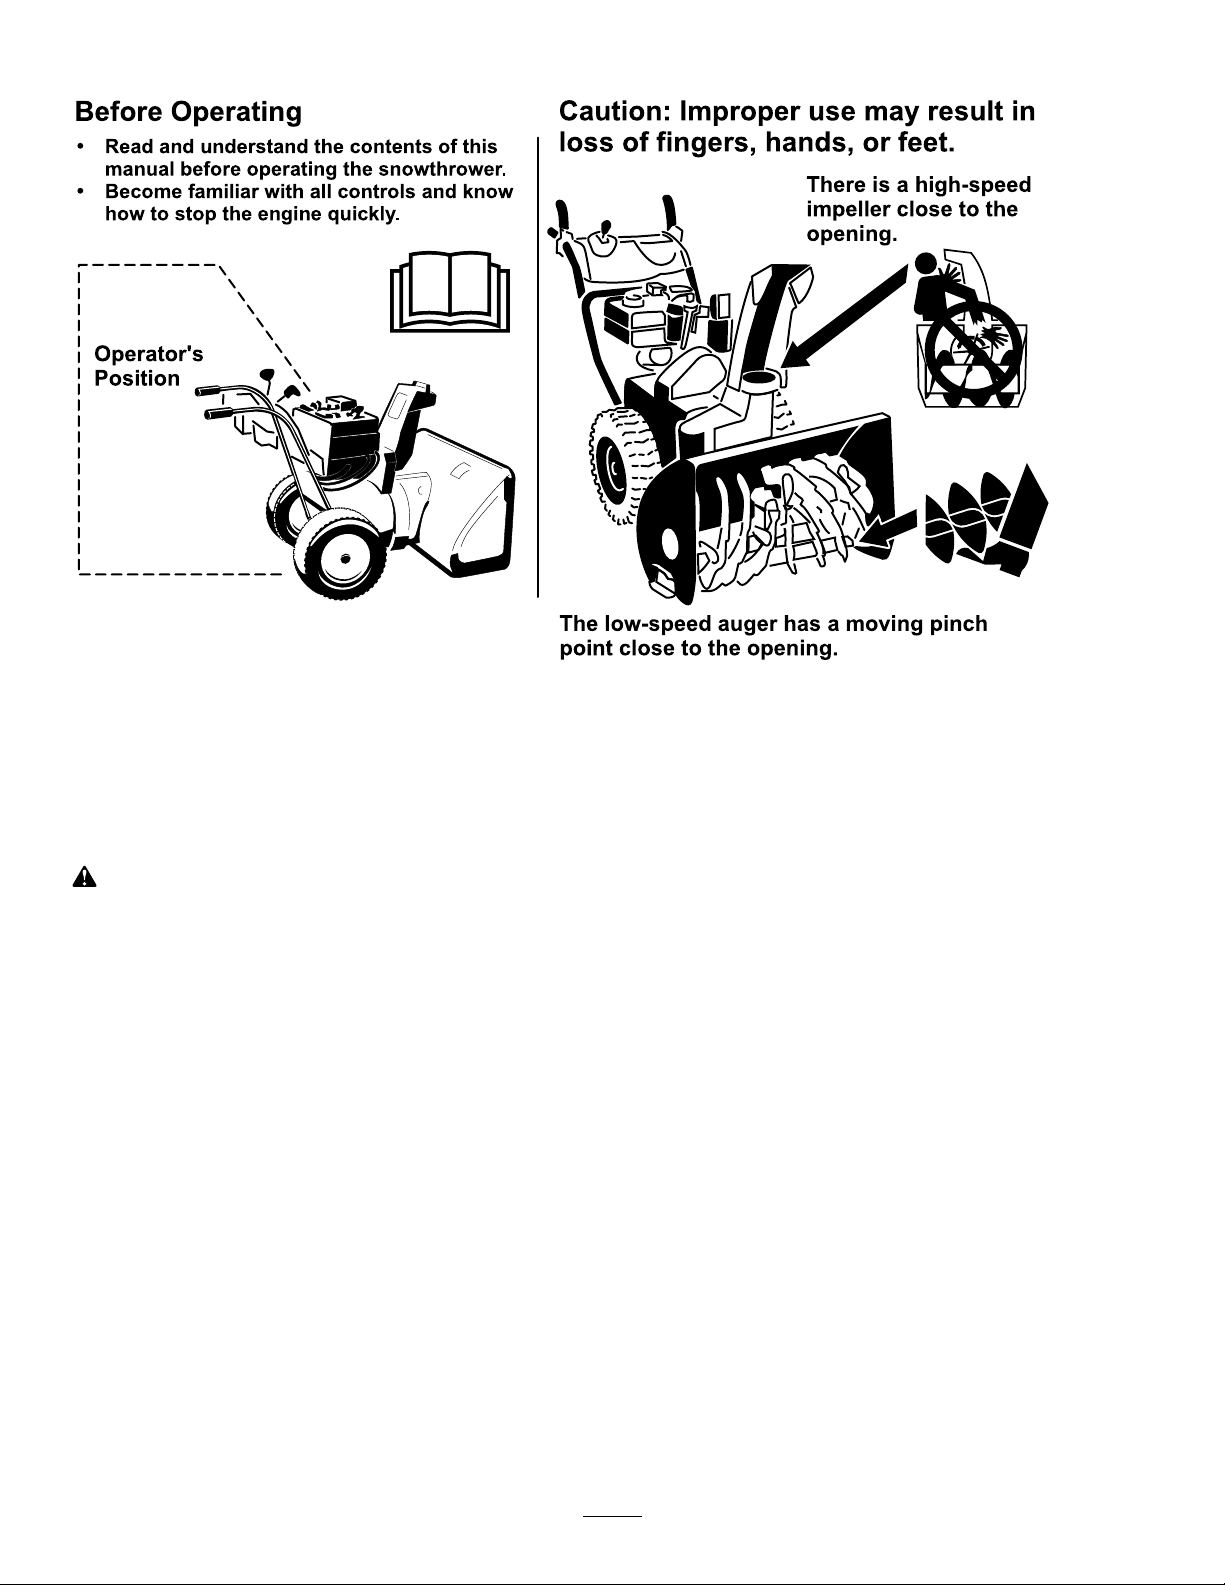
Readandunderstandthecontentsofthis
manualbeforeoperatingthesnowthrower .
Becomefamiliarwithallcontrolsandknow
howtostoptheenginequickly .
Operator 's
Position
Thelow-speedaugerhasamovingpinch
pointclosetotheopening.
Caution:Improperusemayresultin
lossoffingers,hands,orfeet.
Thereisahigh-speed
impellerclosetothe
opening.
ThissnowthrowermeetsorexceedstheB71.3
specicationsoftheAmericanNationalStandards
Instituteineffectatthetimeofproduction.
Readandunderstandthecontentsofthismanual
beforeyoustarttheengine.
Thisisthesafetyalertsymbol.Itisusedtoalert
youtopotentialpersonalinjuryhazards.Obeyall
safetymessagesthatfollowthissymboltoavoid
possibleinjuryordeath.
Improperlyusingormaintainingthissnowthrower
couldresultininjuryordeath.Toreducethis
potential,complywiththefollowingsafety
instructions.
Thissnowthroweriscapableofamputatinghandsand
feetandofthrowingobjects.Failuretoobservethe
followingsafetyinstructionscouldresultinserious
injury.
Training
•Read,understandandfollowallinstructionsonthe
machineandinthemanual(s)beforeoperatingthis
unit.Bethoroughlyfamiliarwiththecontrolsand
theproperuseoftheequipment.Knowhowtostop
theunitanddisengagethecontrolsquickly .
•Neverallowchildrentooperatetheequipment.
Neverallowadultstooperatetheequipmentwithout
properinstruction.
•Keeptheareaofoperationclearofallpersons,
particularlysmallchildren.
•Exercisecautiontoavoidslippingorfalling,
especiallywhenoperatingthesnowthrowerin
reverse.
Preparation
•Thoroughlyinspecttheareawheretheequipmentis
tobeusedandremovealldoormats,sleds,boards,
wires,andotherforeignobjects.
•Disengageallclutchesandshiftintoneutralbefore
startingtheengine.
•Donotoperatetheequipmentwithoutwearing
adequatewintergarments.Avoidloosetting
clothingthatcangetcaughtinmovingparts.Wear
footwearthatwillimprovefootingonslippery
surfaces.
•Handlefuelwithcare;itishighlyammable.
–Useanapprovedfuelcontainer.
–Neveraddfueltoarunningengineorhotengine.
–Fillfueltankoutdoorswithextremecare.Never
llfueltankindoors.
2
Page 3

–Neverllcontainersinsideavehicleorona
truckortrailerbedwithaplasticliner.Always
placecontainersontheground,awayfromyour
vehicle,beforelling.
–Whenpractical,removegas-poweredequipment
fromthetruckortrailerandrefuelitonthe
ground.Ifthisisnotpossible,thenrefuelsuch
equipmentonatrailerwithaportablecontainer,
ratherthanfromagasolinedispensernozzle.
–Keepthenozzleincontactwiththerimof
thefueltankorcontaineropeningatalltimes,
untilrefuelingiscomplete.Donotuseanozzle
lock-opendevice.
–Replacegasolinecapsecurelyandwipeupspilled
fuel.
–Iffuelisspilledonclothing,changeclothing
immediately.
•Useextensioncordsandreceptaclesasspeciedby
themanufacturerforallunitswithelectricstarting
motors.
•Adjustthecollectorhousingheighttocleargravel
orcrushedrocksurface.
•Neverattempttomakeanyadjustmentswhile
theengineisrunning(exceptwhenspecically
recommendedbymanufacturer).
•Alwayswearsafetyglassesoreyeshieldsduring
operationorwhileperforminganadjustmentor
repairtoprotecteyesfromforeignobjectsthatmay
bethrownfromthemachine.
Operation
•Donotputhandsorfeetnearorunderrotatingparts.
Keepclearofthedischargeopeningatalltimes.
•Exerciseextremecautionwhenoperatingonor
crossinggraveldrives,walks,orroads.Stayalertfor
hiddenhazardsortrafc.
•Afterstrikingaforeignobject,stoptheengine,
removethewirefromthesparkplug,thoroughly
inspectthesnowthrowerforanydamage,andrepair
thedamagebeforerestartingandoperatingthesnow
thrower.
•Iftheunitshouldstarttovibrateabnormally,stop
theengineandcheckimmediatelyforthecause.
Vibrationisgenerallyawarningoftrouble.
•Stoptheenginewheneveryouleavetheoperating
position,beforeuncloggingtheauger/impeller
housingordischargechute,andwhenmakingany
repairs,adjustmentsorinspections.
•Whencleaning,repairingorinspectingthesnow
thrower,stoptheengineandmakecertainthe
auger/impellerandallmovingpartshavestopped.
Disconnectthesparkplugwireandkeepthewire
awayfromtheplugtopreventsomeonefrom
accidentallystartingtheengine.
•Donotruntheengineindoors,exceptwhenstarting
theengineandfortransportingthesnowthrower
inoroutofthebuilding.Opentheoutsidedoors;
exhaustfumesaredangerous.
•Exerciseextremecautionwhenoperatingonslopes.
•Neveroperatethesnowthrowerwithoutproper
guards,andothersafetyprotectivedevicesinplace
andworking.
•Neverdirectthedischargetowardpeopleorareas
wherepropertydamagecanoccur.Keepchildren
andothersaway.
•Donotoverloadthemachinecapacitybyattempting
toclearsnowattoofastarate.
•Neveroperatethemachineathightransportspeeds
onslipperysurfaces.Lookbehindandusecarewhen
operatinginreverse.
•Disengagepowertotheauger/impellerwhensnow
throweristransportedornotinuse.
•Useonlyattachmentsandaccessoriesapprovedby
themanufacturerofthesnowthrower(suchaswheel
weights,counterweights,orcabs).
•Neveroperatethesnowthrowerwithoutgood
visibilityorlight.Alwaysbesureofyourfooting,and
keeparmholdonthehandles.Walk;neverrun.
•Nevertouchahotengineormufer.
ClearingaCloggedDischarge
Chute
Handcontactwiththerotatingrotorbladesinsidethe
dischargechuteisthemostcommoncauseofinjury
associatedwithsnowthrowers.Neveruseyourhandto
cleanoutthedischargechute.
Toclearthechute:
•Shuttheengineoff!
•Wait10secondstobesuretheimpellerbladeshave
stoppedrotating.
•Alwaysuseaclean-outtool,notyourhands.
3
Page 4

MaintenanceandStorage
•Checkallfastenersatfrequentintervalsforproper
tightnesstobesuretheequipmentisinsafeworking
condition.
•Ifashield,safetydevice,ordecalisdamaged,
illegible,orlost,repairorreplaceitbeforebeginning
operation.
•Donotsmokewhilehandlinggasoline.
•Neverstorethemachinewithfuelinthefueltank
insideabuildingwhereignitionsourcesarepresent,
suchashotwaterheaters,spaceheaters,orclothes
dryers.Allowtheenginetocoolbeforestoringin
anyenclosure.
•AlwaysrefertotheOperator’sManualforimportant
detailsifthesnowthroweristobestoredforan
extendedperiod.
•Maintainorreplacesafetyandinstructionlabels,as
necessary.
•Runthemachineafewminutesafterthrowingsnow
topreventfreeze-upoftheauger/impellerblades.
ToroSnowthrowerSafety
Thefollowinglistcontainssafetyinformationspecic
toToroproductsorothersafetyinformationthatyou
mustknow.
•Rotatingauger/impellercancutofforinjure
ngersorhands.Staybehindthehandlesand
awayfromthedischargeopeningwhileoperating
thesnowthrower.Keepyourface,hands,feet,
andanyotherpartofyourbodyorclothingaway
frommovingorrotatingparts.
•Donotusethesnowthroweronaroof.
•Donottouchtheenginewhileitisrunningorsoon
afterithasstoppedbecausetheenginemaybehot
enoughtocauseaburn.
•Performonlythosemaintenanceinstructions
describedinthismanual.Beforeperformingany
maintenance,service,oradjustment,stoptheengine,
removetheignitionkey ,anddisconnectthewire
fromthesparkplug.Ifmajorrepairsareeverneeded,
contactanAuthorizedServiceDealer.
•Donotchangethegovernorsettingsontheengine.
•Whenstoringthesnowthrowerformorethan
30days,drainthefuelfromthefueltanktoprevent
apotentialhazard.Storefuelinanapprovedfuel
container.Removethekeyfromtheignitionswitch
beforestoringthesnowthrower.
•PurchaseonlygenuineTororeplacementpartsand
accessories.
•Beforeadjusting,cleaning,inspecting,
troubleshooting,orrepairingthesnowthrower,stop
theengine,removetheignitionkey,andwaitfor
allmovingpartstostop.Disconnectthewire
fromthesparkplugandkeepitawayfromthe
sparkplugtopreventsomeonefromaccidentally
startingtheengine.
•Beforeleavingtheoperatingposition,stopthe
engine,removetheignitionkey,andwaitforall
movingpartstostop.
•Tounclogthedischargechute,stayintheoperating
positionandreleasethelefthand(traction)lever.
Whilerunningtheauger/impeller,pushdownon
thehandlestoraisethefrontofthesnowthrowera
fewinches(centimeters)offthepavement.Thenlift
thehandlesquicklytobumpthefrontofthesnow
throweronthepavement.Repeatifnecessaryuntila
streamofsnowcomesoutthedischargechute.
•Ifyoucannotunclogthedischargechutebybumping
thefrontofthesnowthrower,stoptheengine,
waitforallmovingpartstostop,andusethe
clean-outtool;neveruseyourhand.
4
Page 5
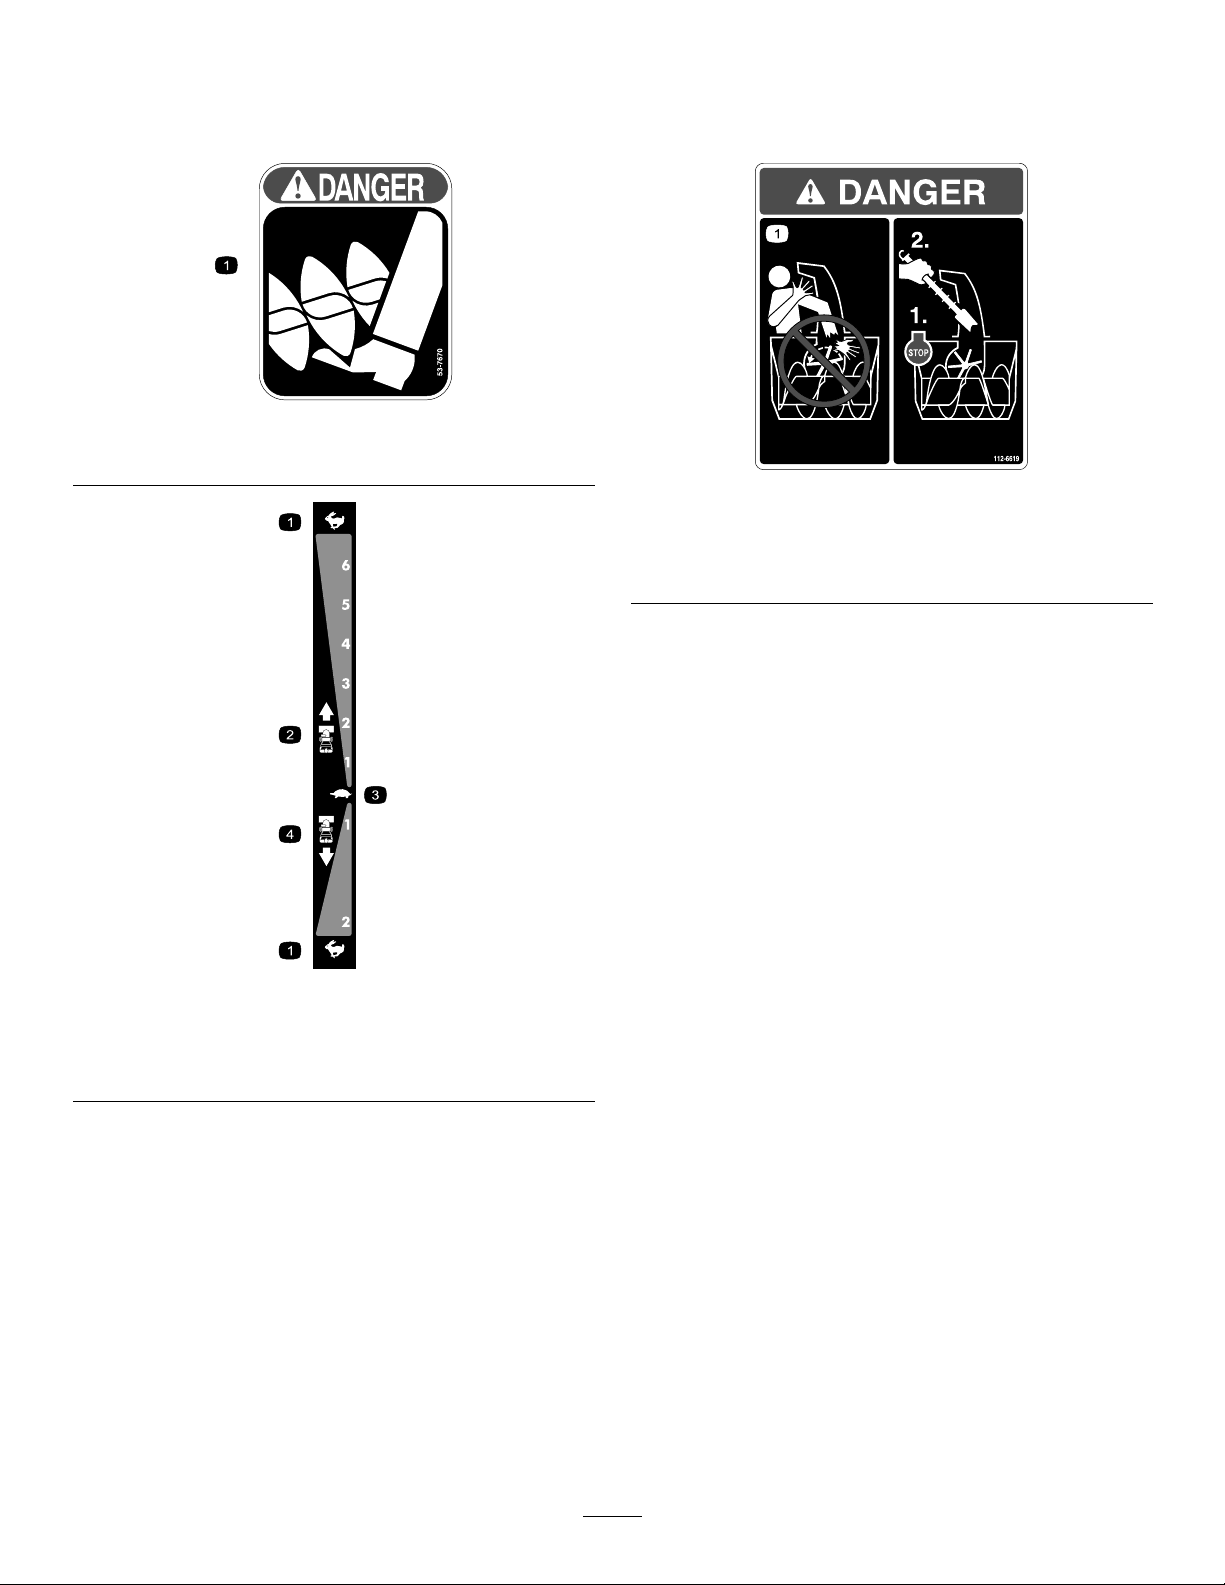
SafetyandInstructionalDecals
Important:Safetyandinstructiondecalsarelocatednearareasofpotentialdanger.Replacedamaged
decals.
53-7670
1.Cutting/dismembermentoffoot,auger
112-6619
Reorderpartno.1 12-6606
1.Donotplaceyourhandinthechute;stoptheenginebefore
leavingtheoperator’sposition,usethetoolclearthechute.
106-4525
Reorderpartno.1 12-6630
1.Fast
2.Forwardspeeds4.Reversespeeds
3.Slow
5
Page 6
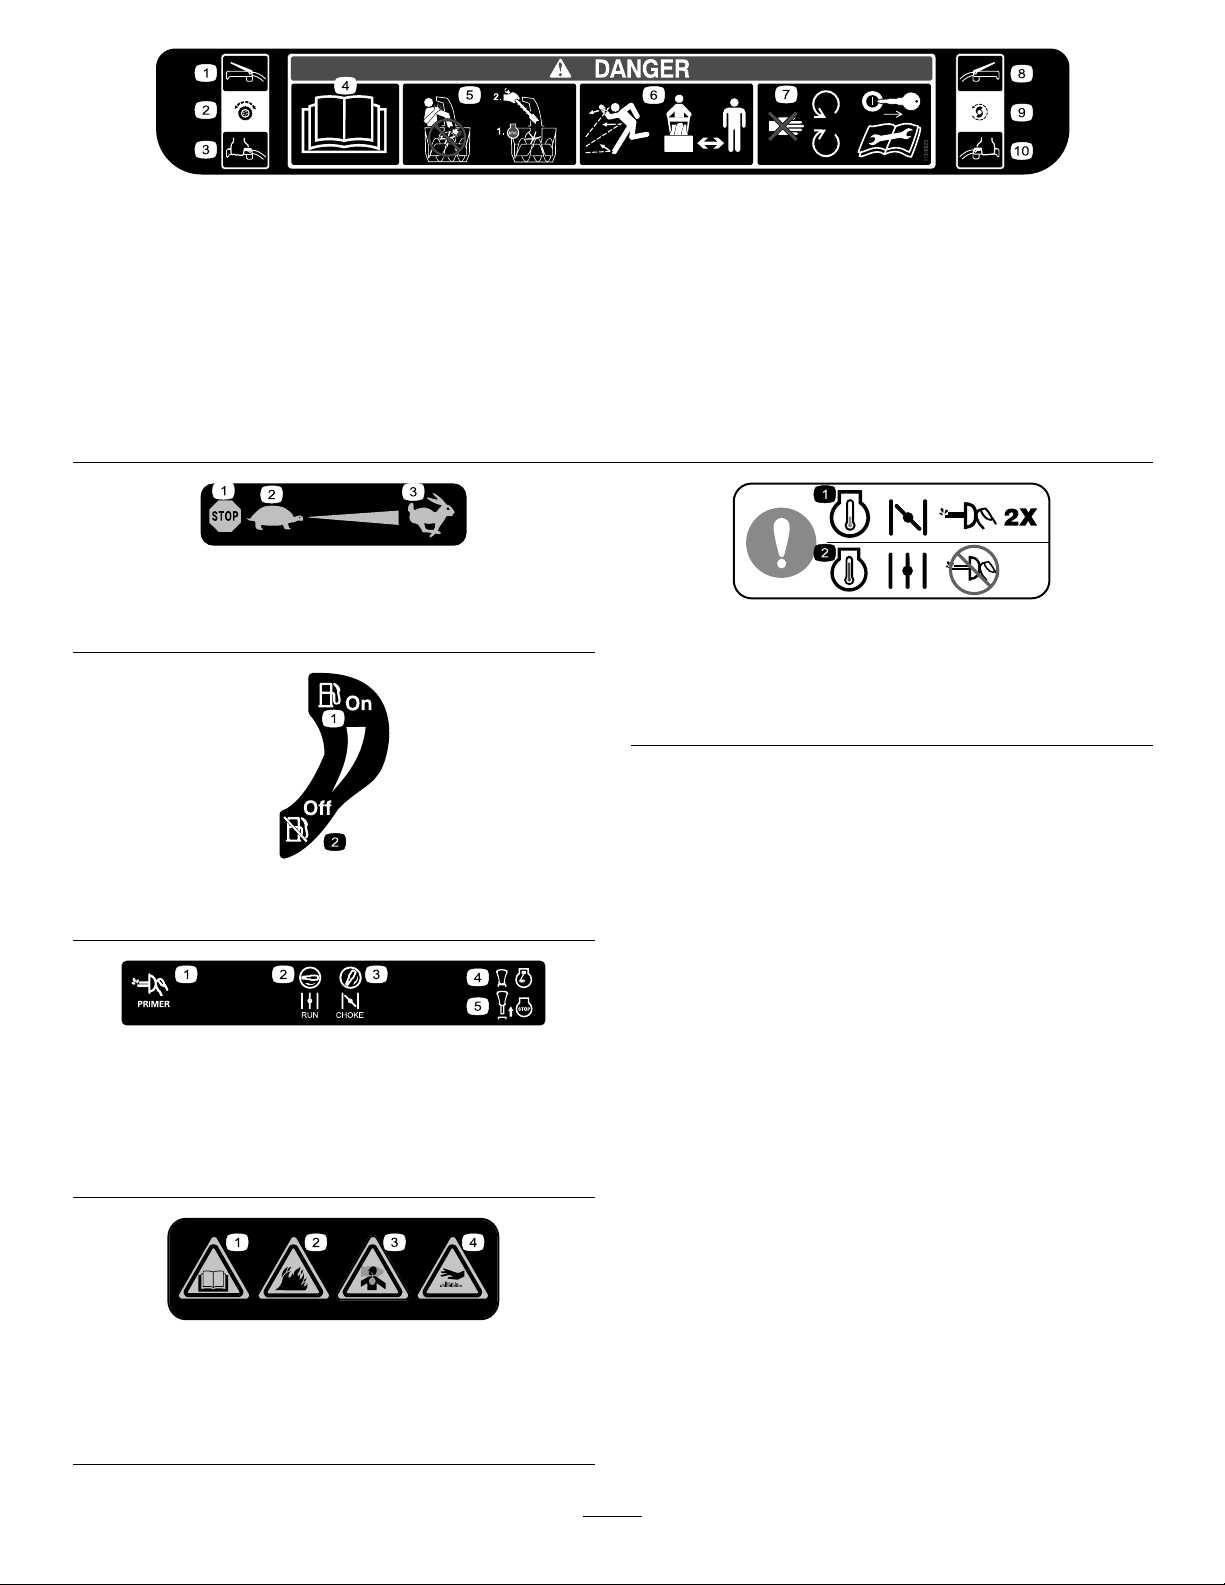
112-6623
1.Disengage5.Donotplaceyourhandinthechute;
2.Wheeldrive6.Thrownobjects,keepbystandersa
3.Engage
4.ReadtheOperator’sManual.
stoptheenginebeforeleavingthe
operator’sposition,usethetoolto
clearthechute.
safedistancefromthesnowthrower.
7.Keepawayfrommovingparts,
removetheignitionkeyandread
theinstructionsbeforeservicingor
performingmaintenance.
8.Disengage
BriggsPartNo.273676
1.Stop
2.Slow
3.Fast
1.Whenstartingacold
engine,closethechoke
andpresstheprimertwo
times.
9.Augerdrive
10.Engage
BriggsPartNo.277566
2.Whenstartingawarm
engine,openthechoke
anddonotpressthe
primer.
BriggsPartNo.274681
1.Fuel—On2.Fuel—Off
BriggsPartNo.276923
1.Primer4.Ignitionkeyin
2.Chokeoff(Run)
3.Chokeon(Choke)
(Engine—Run)
5.Ignitionkeyout
(Engine—Stop)
BriggsPartNo.276925
1.Warning—readthe
Operator’sManual.
2.Warning—rehazard.
3.Warning—toxicgas
inhalationhazard.
4.Warning—hot
surface/burnhazard.
6
Page 7
Setup
LooseParts
Usethechartbelowtoverifythatallpartshavebeenshipped.
ProcedureDescription
Handlebolts4
1.
2.
3.
4.
5.
6.
7.
8.
Curvedwashers
Locknuts4
Nopartsrequired
Carriagebolts
Locknuts2
Cableties
Nopartsrequired
Nopartsrequired
Nopartsrequired
Nopartsrequired
1.InstallingtheUpperHandle
Qty.
Use
4
–
2
2
–
–
–
–
Installtheupperhandle.
Installthetractioncontrollinkage.
Installthechutecontrolrod.
Connectthewiretotheheadlight.
Filltheenginewithoil.
Checkthetirepressure.
Checktheskidsandscraper.
Checktheoperationofthetractiondrive.
4Handlebolts
4
Curvedwashers
4Locknuts
Procedure
Note:Donotremovetherubberbanduntilyouhave
installedtheupperhandle.
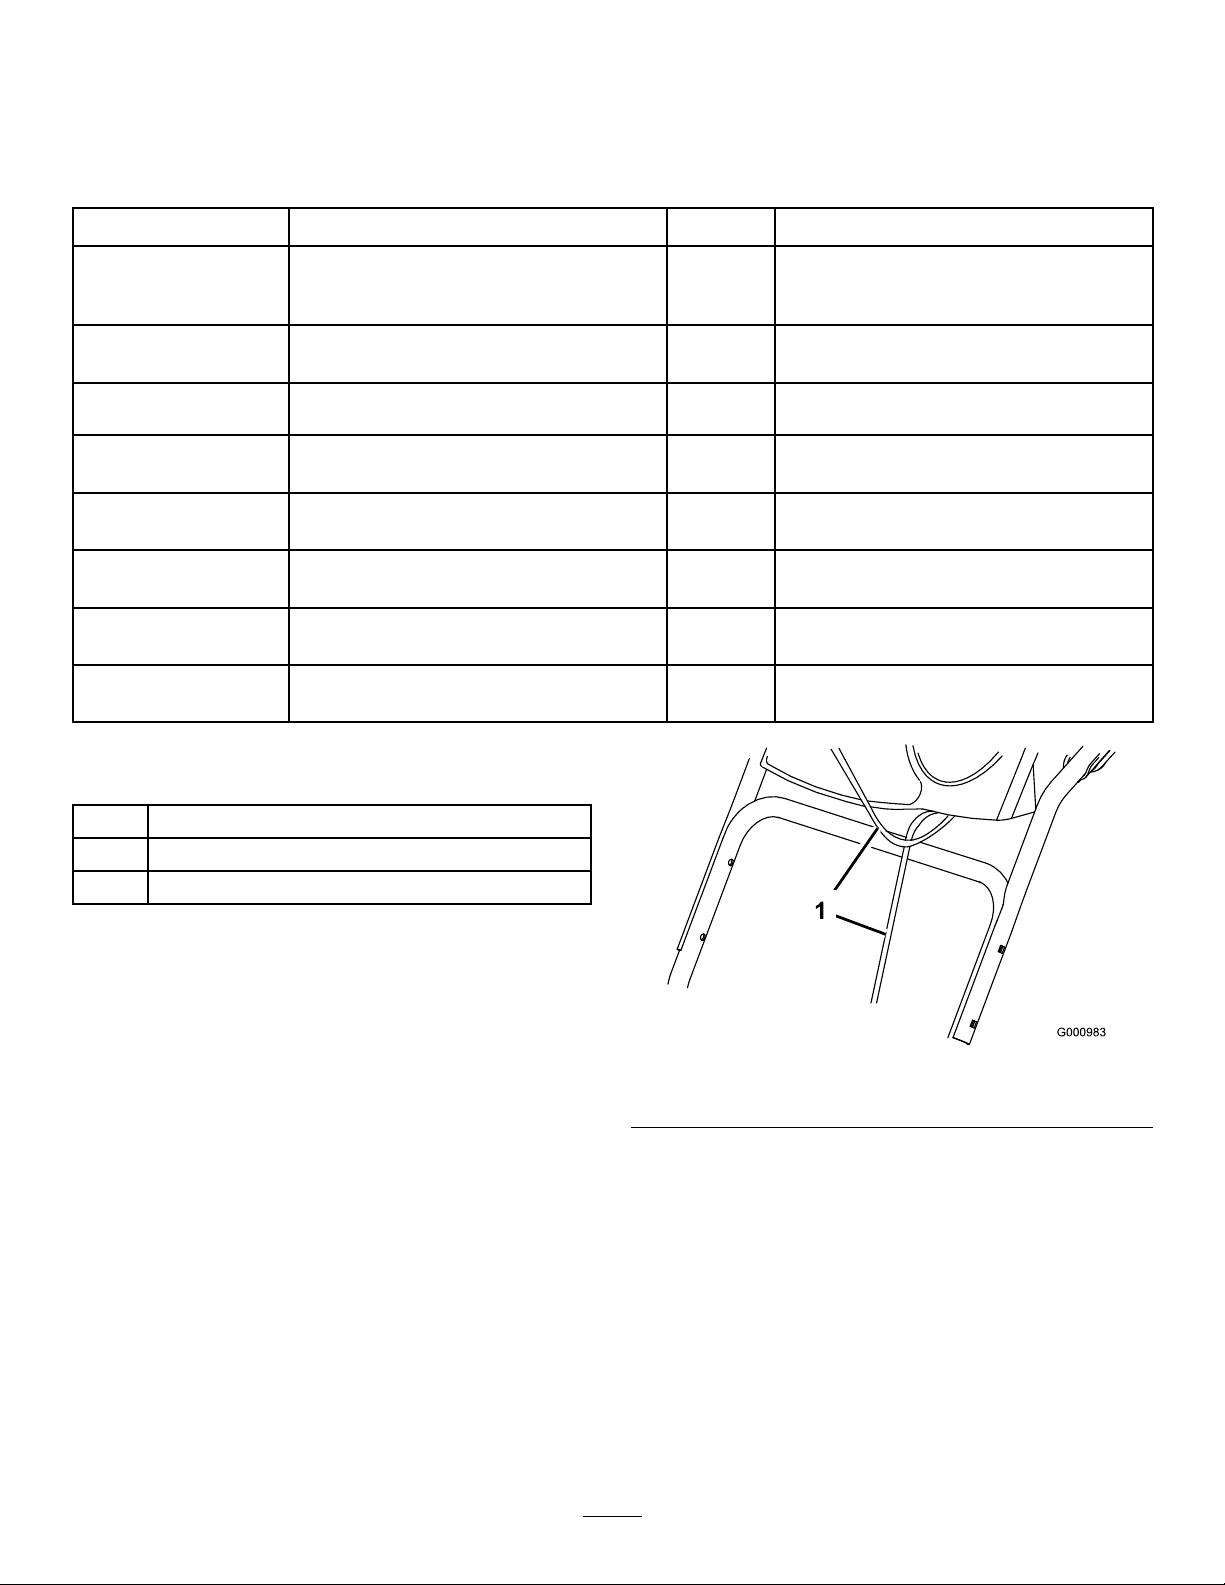
1.Liftandrotatetheupperhandleandpositionitover
thelowerhandle(Figure3).
Important:Routethecablesattachedtothe
QuickStickinsidetheupperhandlelegsand
ensurethatthecablesandthewireforthe
headlightarenotpinchedbetweenthehandle
sections.
Figure3
1.Cables
2.Securetheupperhandlewith4handlebolts,
4curvedwashers,and4locknutsfromtheloose
partsbag(Figure4).
7
Page 8
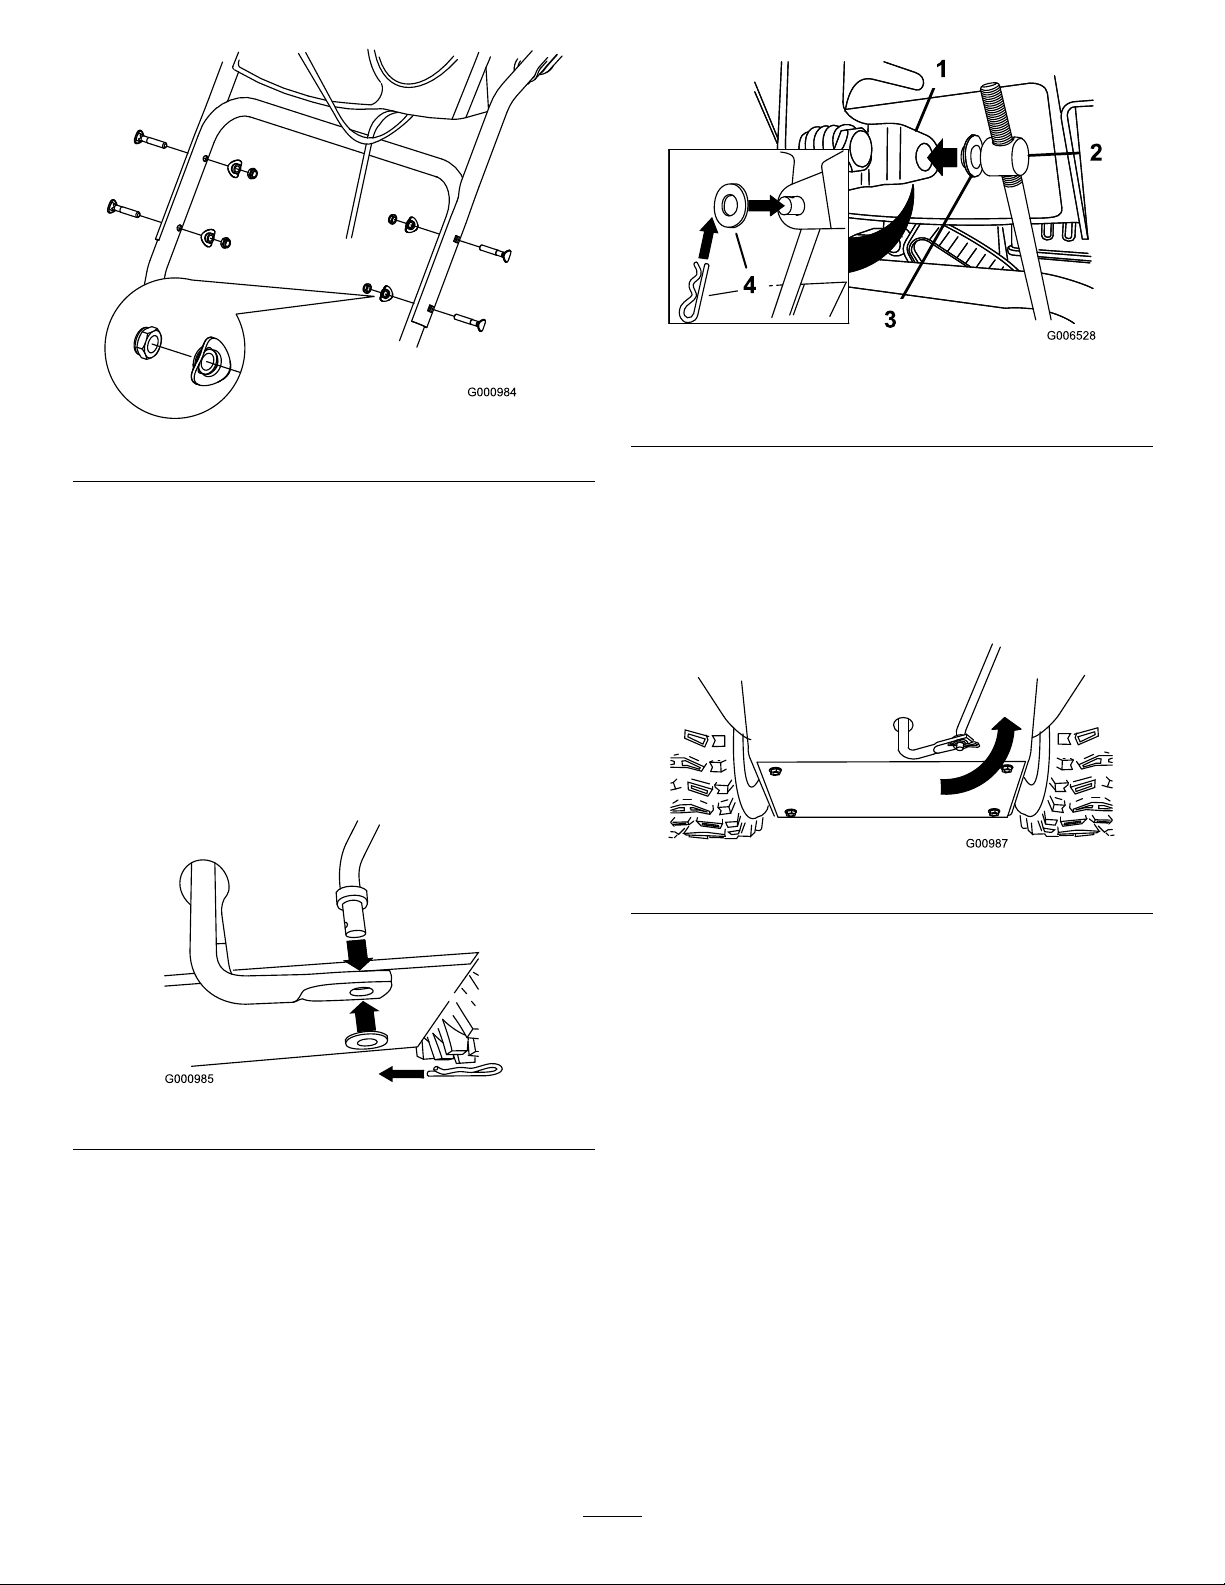
Figure4
Figure6
1.Speedselectorlever
2.Trunnion
3.Innerwasher
4.Outerwasher
Note:Tomakeinstallationeasier,leavetheinner
washeronthetrunnion(Figure6).
2.InstallingtheTraction
ControlLinkage
Procedure
1.Removethehairpincotterandwasherfromthe
lowerendofthespeedcontrolrodandinsertthe
lowerendoftherodintothelowerlinkarmsothat
thebentendofthespeedcontrolrodfacesrearward
(Figure5).
Figure5
4.ShiftthespeedselectorleverintoPositionR2.
5.Rotatethelowerlinkarmfullyupward
(counterclockwise)(Figure7).
Figure7
6.Liftuponthespeedcontrolrodandinsertthe
trunnionintotheholeinthespeedselectorlever
(Figure6).
Note:Ifthetrunniondoesnottintothehole
whenyouliftuponthespeedcontrolrod,rotatethe
trunnionupwardordownwardonthespeedcontrol
roduntilitts.
2.Securethelowerendofthespeedcontrolrodwith
thewasherandhairpincotterthatyoupreviously
removed.
3.Removethehairpincotterandtheouterwasher
fromthetrunnionontheupperendofthespeed
controlrod(Figure6).
7.Securethetrunnionandupperendofthespeed
controlrodwiththeouterwasherandhairpincotter
thatyoupreviouslyremoved.
8
Page 9
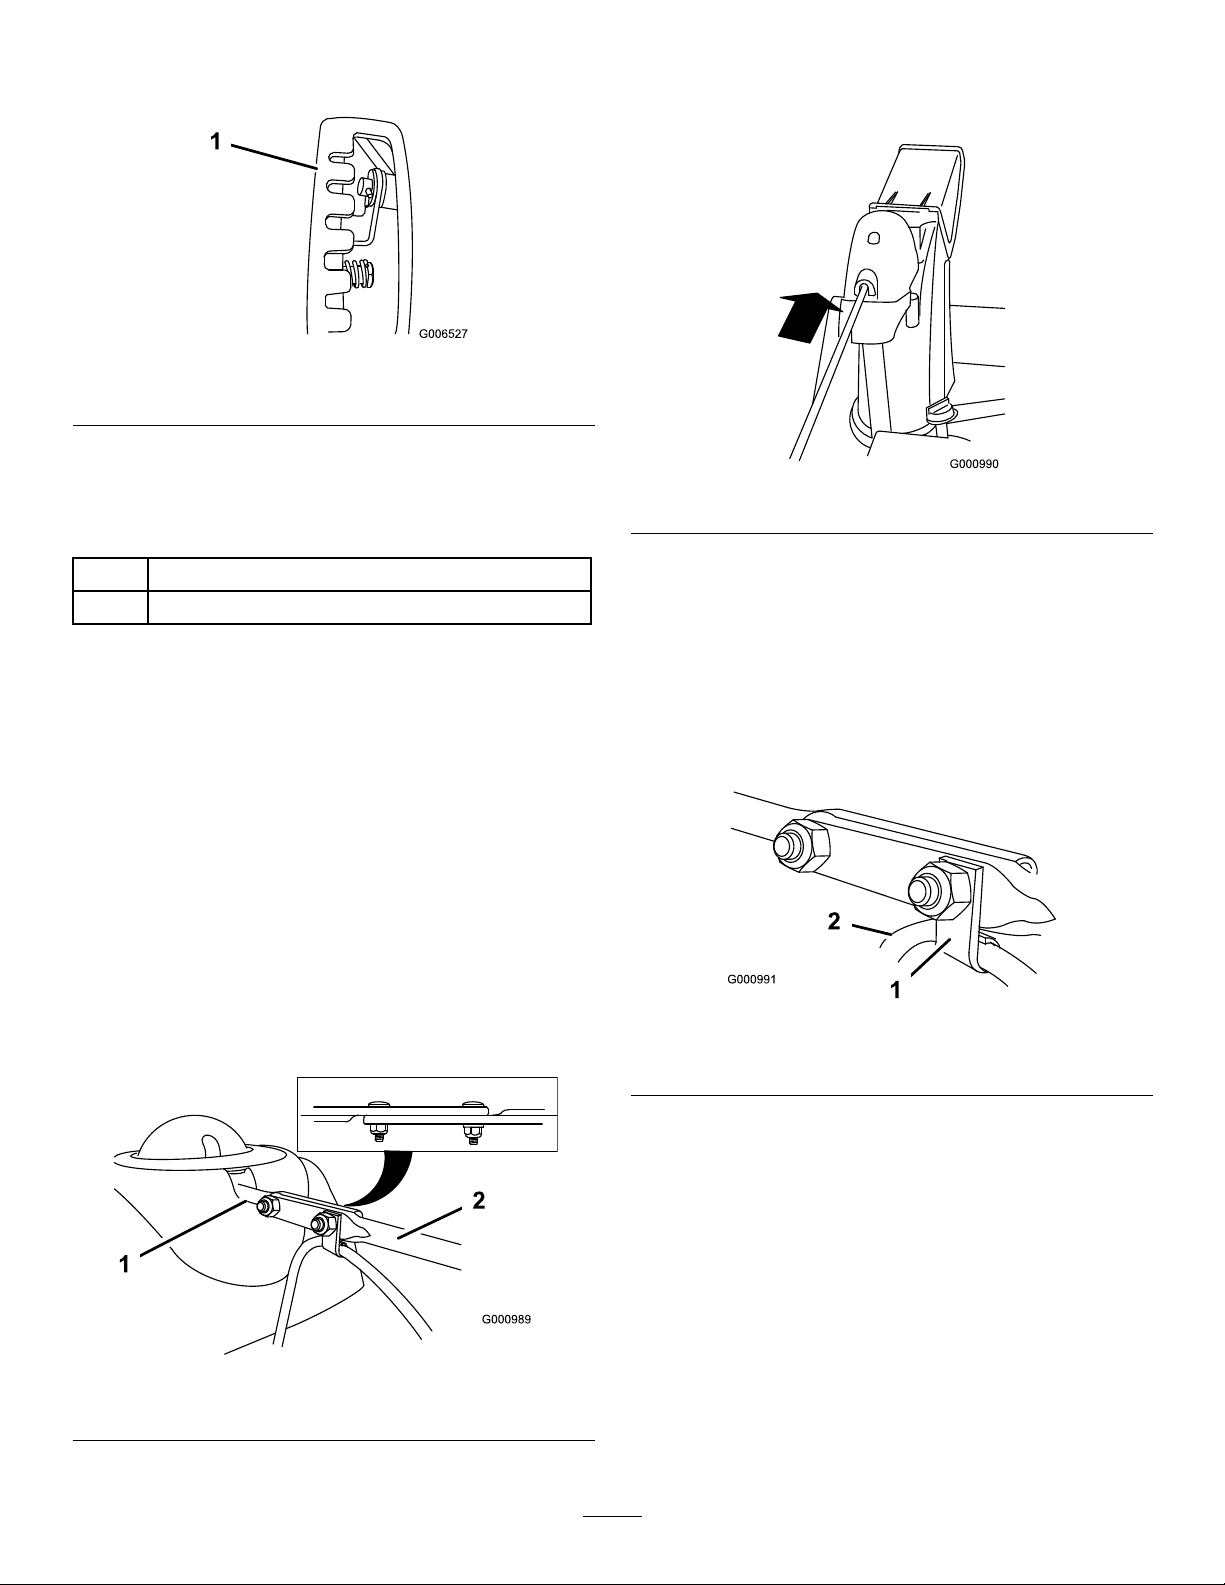
Note:Foreasierinstallation,lookdownthrough
theopeninginthespeedselector(Figure8).
Figure8
1.Speedselector
4.Insertthefrontendoftherodintotheopeningin
thebackofthechutegearcoveruntilitslidesinto
thechutegear(Figure10).
3.InstallingtheChuteControl
Rod
2
Carriagebolts
2Locknuts
Procedure
1.UnwraptheQuickStickandrotateitsothatitis
uprightandinthecenter.
2.Holdthebluetriggercapdownandpullthelever
fullyrearward.
Note:Thedischargechuteanddeectorshould
faceforward.Iftheydonot,holdthebluetrigger
capdown(butdonotmovetheQuickStick)and
rotatethedischargechuteuntiltheydo.
3.Aligntheattenedbackendofthelongchute
controlrodwiththeattenedfrontendoftheshort
rodthatextendsfromthecontrolpanelsothatthey
nesttogether(Figure9).
Figure10
5.Aligntheholesinthenestedendsoftherodsand
insert2carriagebolts(intheloosepartsbag)through
theshortrodfromtheleftsideofthesnowthrower
(fromtheoperatingposition).
6.Insertthecableclipthatsupportsthedeector
cableontotheforwardcarriagebolt,andsecurethe
carriageboltswithlocknutsfromtheloosepartsbag
(Figure11).
Figure11
1.Cableclip2.Deectorcable
1.Shortrod
7.HoldthebluetriggercapdownandrotatetheQuick
Stickinacircletoensurethatthechuteanddeector
operatesmoothly.
Figure9
2.Longchutecontrolrod
9
Page 10
4.ConnectingtheWiretothe
Headlight
2
Cableties
Procedure
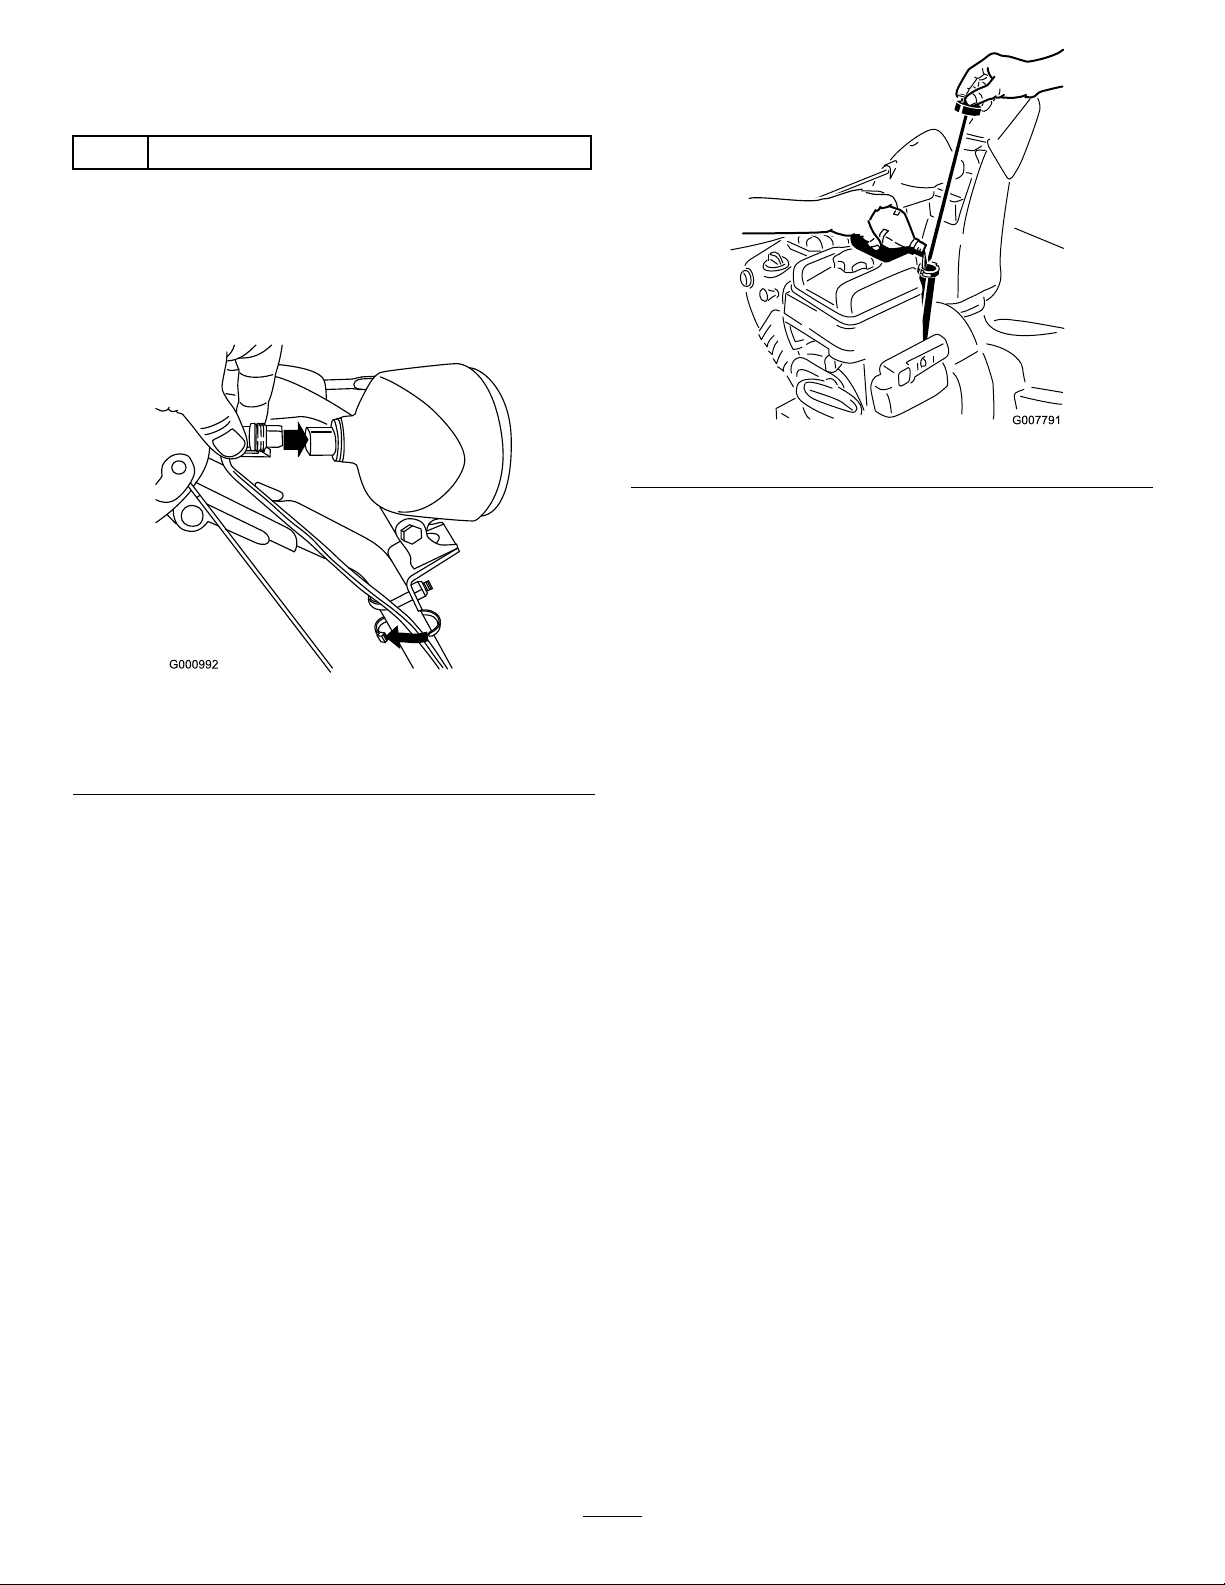
1.Insertthewireconnectoronthelooseendofthe
wirestraightintothebackoftheheadlightuntilitis
securelyinplace(Figure12).
Figure13
2.Installthedipsticksecurely.
Note:Donotspilloilaroundtheoillltube;oil
couldleakontotractionpartsandcausethetraction
toslip.
Figure12
1.Plasticcliponwire
connector
2.U-bolt
Note:Ensurethattheplasticcliponthewire
connectorisonthebottom(Figure12).
2.Secureacabletie(fromtheloosepartsbag)around
thewireandthehandleaboutaninch(2.5cm)below
theU-bolt(Figure12).
3.Cabletie
5.FillingtheEnginewithOil
Procedure
Yoursnowthrowercomeswith20oz.(0.59l)ofoilin
theenginecrankcase.
Note:Beforestartingtheengine,checktheoillevel
andaddoilifnecessary.
Max.ll:20oz.(0.59l),type:automotivedetergentoil
withanAPIserviceclassicationofSF ,SG,SH,SJ,SL,
orhigher.UseSAE5W30orSAE10W30oil.Referto
yourengineowner’smanual.
6.CheckingtheTirePressure
Procedure
Thetiresareoverinatedatthefactoryforshipping.
Reducethepressureequallyinbothtirestobetween17
and20psi(116and137kPa).
7.CheckingtheSkidsand
Scraper
Procedure
RefertoCheckingandAdjustingtheSkidsandScraper
inMaintenance.
1.Removethedipstickandslowlypouroilintotheoil
lltubetoraisetheoilleveltotheFullmarkonthe
dipstick.Donotoverll(Figure13).
10
Page 11
8.CheckingtheTractionDrive
Operation
Thesnowthrowershouldmoveforward.Ifthe
snowthrowerdoesnotmoveormovesrearward,
completethefollowing:
Procedure
Ifthetractiondriveisnotproperlyadjusted,
thesnowthrowermaymoveinthedirection
oppositeofwhatyouintended,causinginjury
and/orpropertydamage.
Carefullycheckthetractiondriveandadjustit
properly,ifnecessary.
Important:Tooperatethetractiondrive,you
mustoperatethesnowthrowerwiththeself-propel
featureengaged.RefertoFreewheelingorUsing
theSelf-propelDrive.
1.Starttheengine;refertoStartingtheEngine.
2.MovethespeedselectortoPositionR1;referto
OperatingtheSpeedSelector.
3.Squeezethelefthand(traction)levertothehand-grip
(Figure14).
A.Releasethetractionleverandstoptheengine.
B.Disconnectthetrunnionfromthespeedselector
lever(Figure6).
C.Turnthetrunnionupward(counterclockwise)on
thespeedcontrolrod(Figure6).
D.Connectthetrunnionfromthespeedselector
lever(Figure6).
7.Ifyoumadeanyadjustments,repeatthisprocedure
untilnoadjustmentsarerequired.
Important:Ifthesnowthrowermoveswhenthe
tractionleverisinthereleasedposition,checkthe
tractioncable(refertoCheckingandAdjusting
theTractionCable)ortakethesnowthrowertoan
AuthorizedServiceDealerforservice.
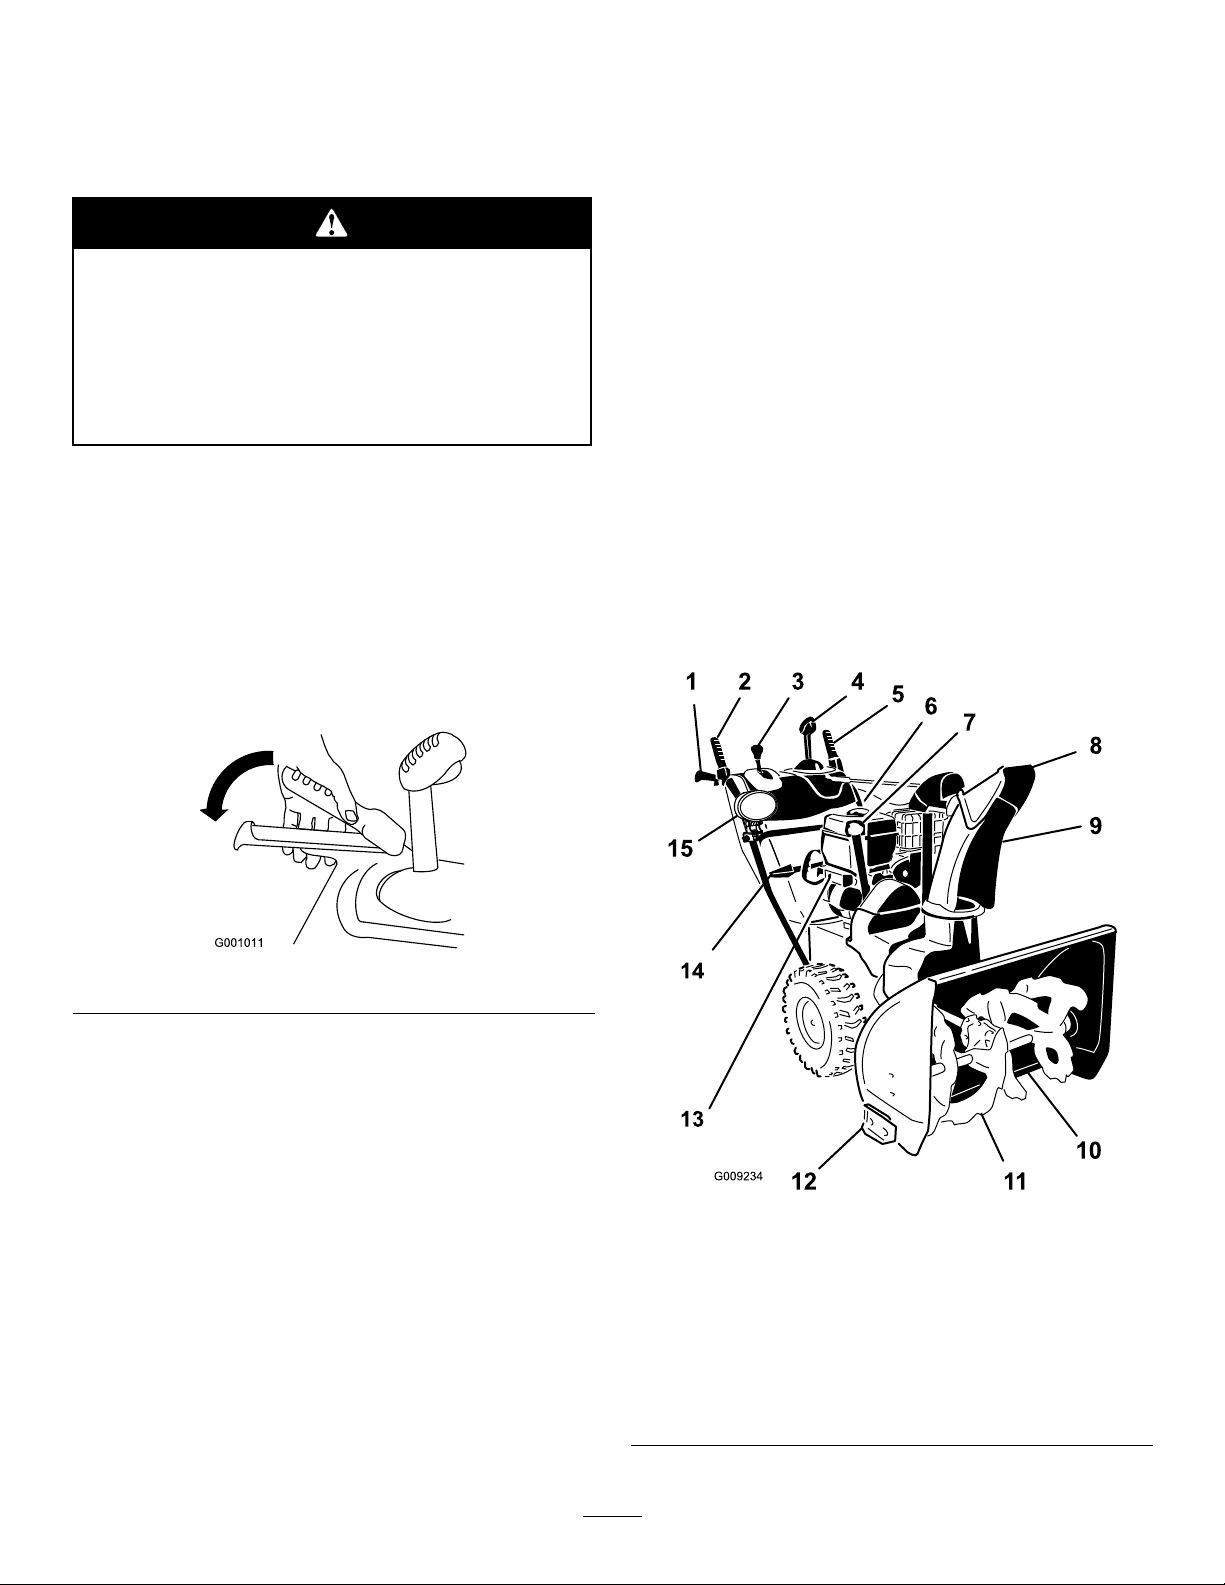
ProductOverview
Figure14
Thesnowthrowershouldmoverearward.Ifthe
snowthrowerdoesnotmoveormovesforward,
completethefollowing:
A.Releasethetractionleverandstoptheengine.
B.Disconnectthetrunnionfromthespeedselector
lever(Figure6).
C.Turnthetrunniondownward(clockwise)onthe
speedcontrolrod(Figure6).
D.Connectthetrunnionfromthespeedselector
lever(Figure6).
4.Releasethetractionlever.
5.MovethespeedselectortothePosition1;referto
OperatingtheSpeedSelector.
6.Squeezethelefthand(traction)levertothehand-grip
(Figure14).
Figure15
1.Hand-grip(2)
2.Auger/impellerlever10.Scraper
3.Speedselectorlever
4.QuickStick™discharge
chutecontrol
5.Tractionlever13.Electricstarter
6.Fueltank
7.Engineoillltube/dipstick
8.Chutedeector
11
9.Dischargechute
11.Auger
12.Skid(2)
14.Snowcleanouttool
15.Headlight
Page 12
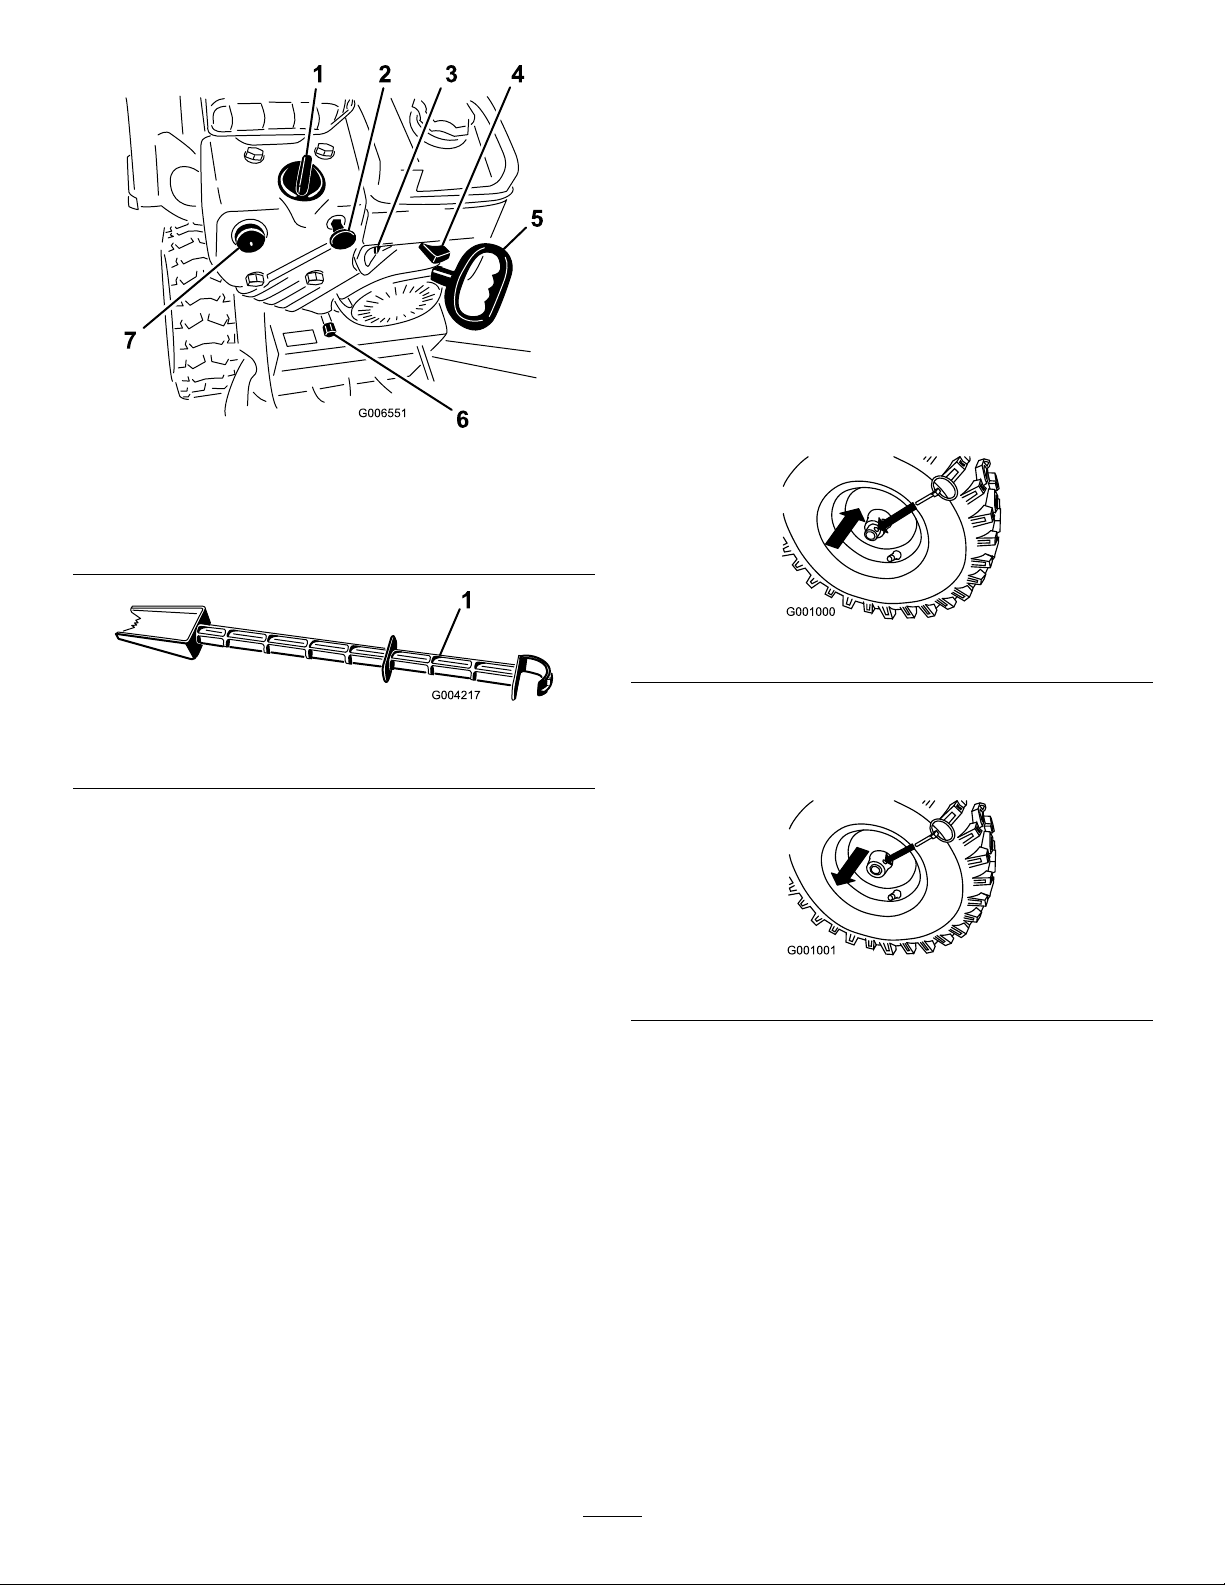
1.Choke
2.Ignitionswitch
3.Fuelshutoffvalve
4.Throttle
Operation
Note:Determinetheleftandrightsidesofthemachine
fromthenormaloperatingposition.
FreewheelingorUsingthe
Self-propelDrive
Youcanoperatethesnowthrowerwiththeself-propel
featureengagedordisengaged(freewheeling).
Tofreewheel,slidethewheelsinwardandinserttheaxle
pinsthroughtheouteraxleholes,butnotthroughthe
wheelhubs(Figure18).
Figure16
5.Recoilstarter
6.Oildrainplug
7.Primer
Figure18
Figure17
1.Snowcleanouttool(attachedtothehandle)
Toself-propel,slidethewheelsoutwardandinsertthe
axlepinsthroughtheholesinthewheelhubsandthe
inneraxleholes(Figure19).
Figure19
12
Page 13
FillingtheFuelTank
StartingtheEngine
1.Checktheengineoillevel.RefertoCheckingthe
EngineOilLevelinMaintenance.
Gasolineisextremelyammableandexplosive.
Areorexplosionfromgasolinecanburnyou
andothers.
•Topreventastaticchargefromigniting
thegasoline,placethecontainerand/or
snowthroweronthegroundbeforelling,
notinavehicleoronanobject.
•Fillthetankoutdoorswhentheengineis
cold.Wipeupspills.
•Donothandlegasolinewhensmokingor
aroundanopenameorsparks.
•Storegasolineinanapprovedfuelcontainer,
outofthereachofchildren.
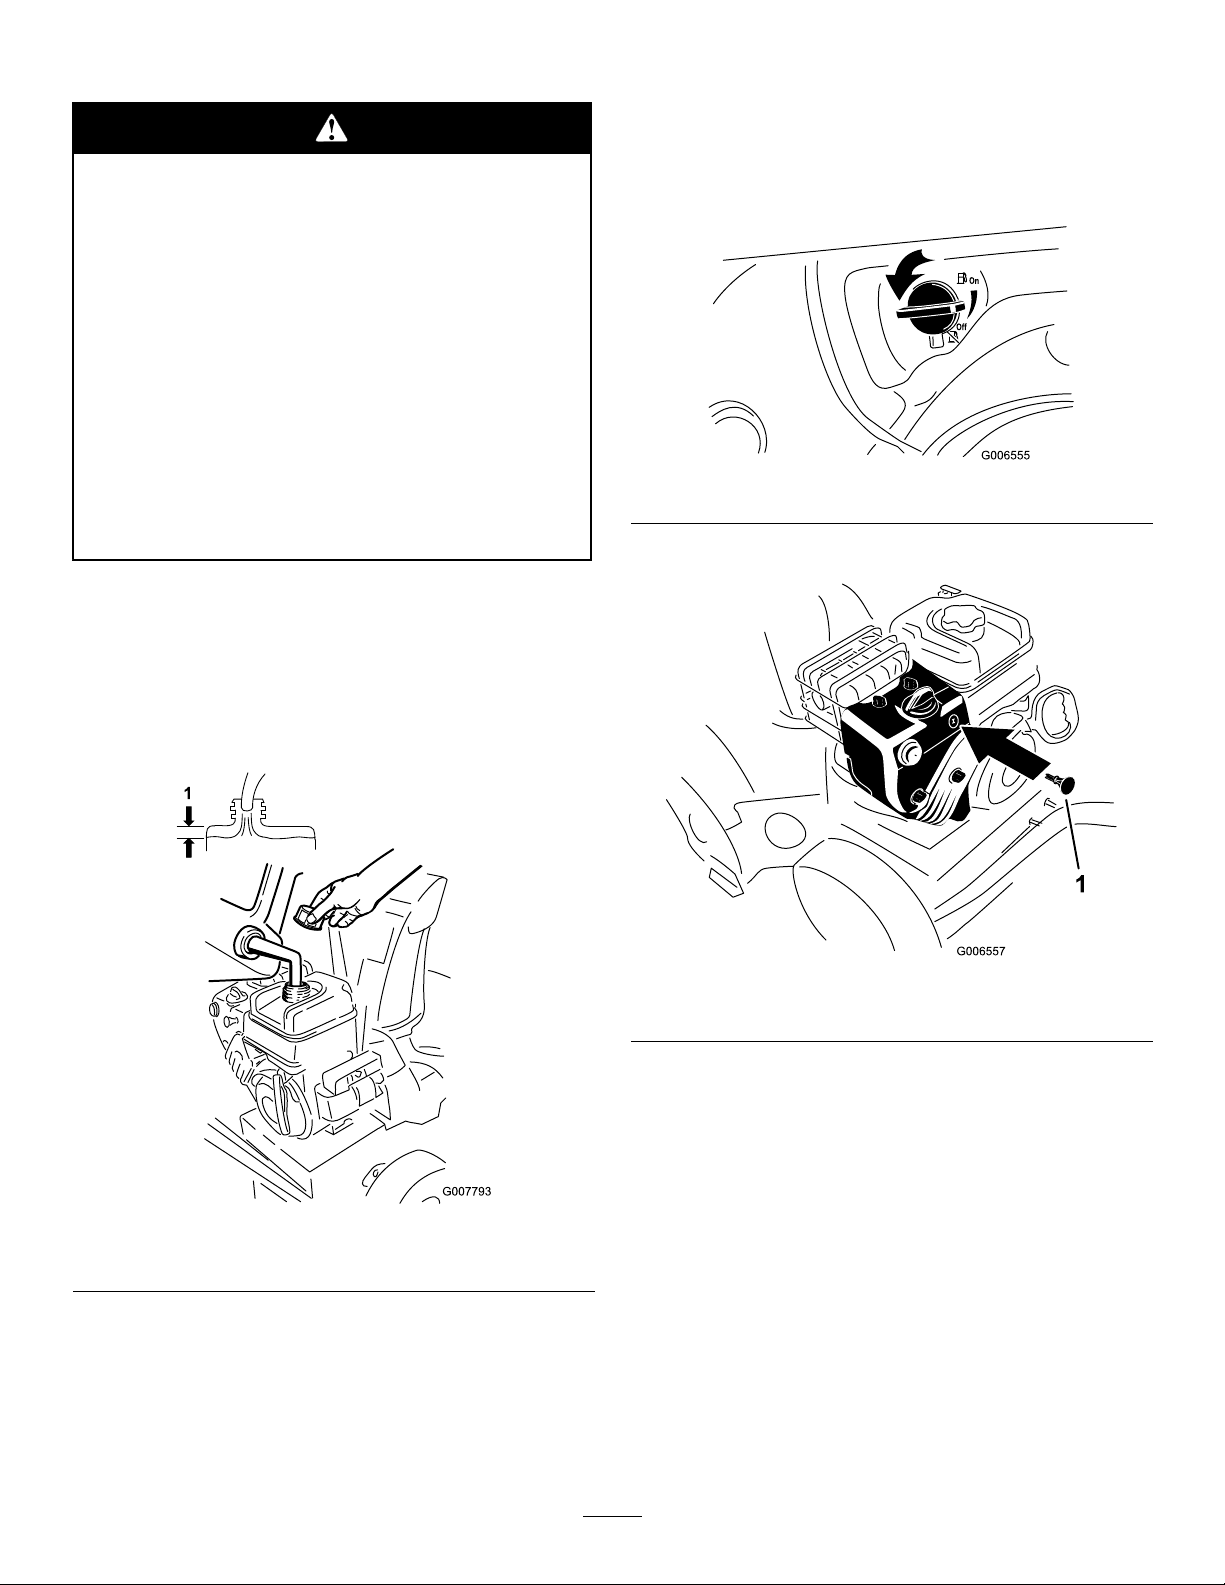
Fillthefueltankwithfreshunleadedregulargasoline
fromamajorname-brandservicestation(Figure20).
Important:Toreducestartingproblems,add
fuelstabilizertothefuelallseason,mixingitwith
gasolinelessthan30daysold.
Do not add oil to
the gasoline.
2.Turnthefuelshutoffvalve1/4turncounterclockwise
toopenit(Figure21).
Figure21
3.Inserttheignitionkey(Figure22).
1.1-1/2inch(3.8cm)
Figure22
1.Ignitionkey
4.Firmlypushintheprimerwithyourthumb2times
(15°For-9°Corabove)or4times(below15°For
-9°C),holdingtheprimerinforasecondbefore
releasingiteachtime(Figure23).
Figure20
13
Page 14
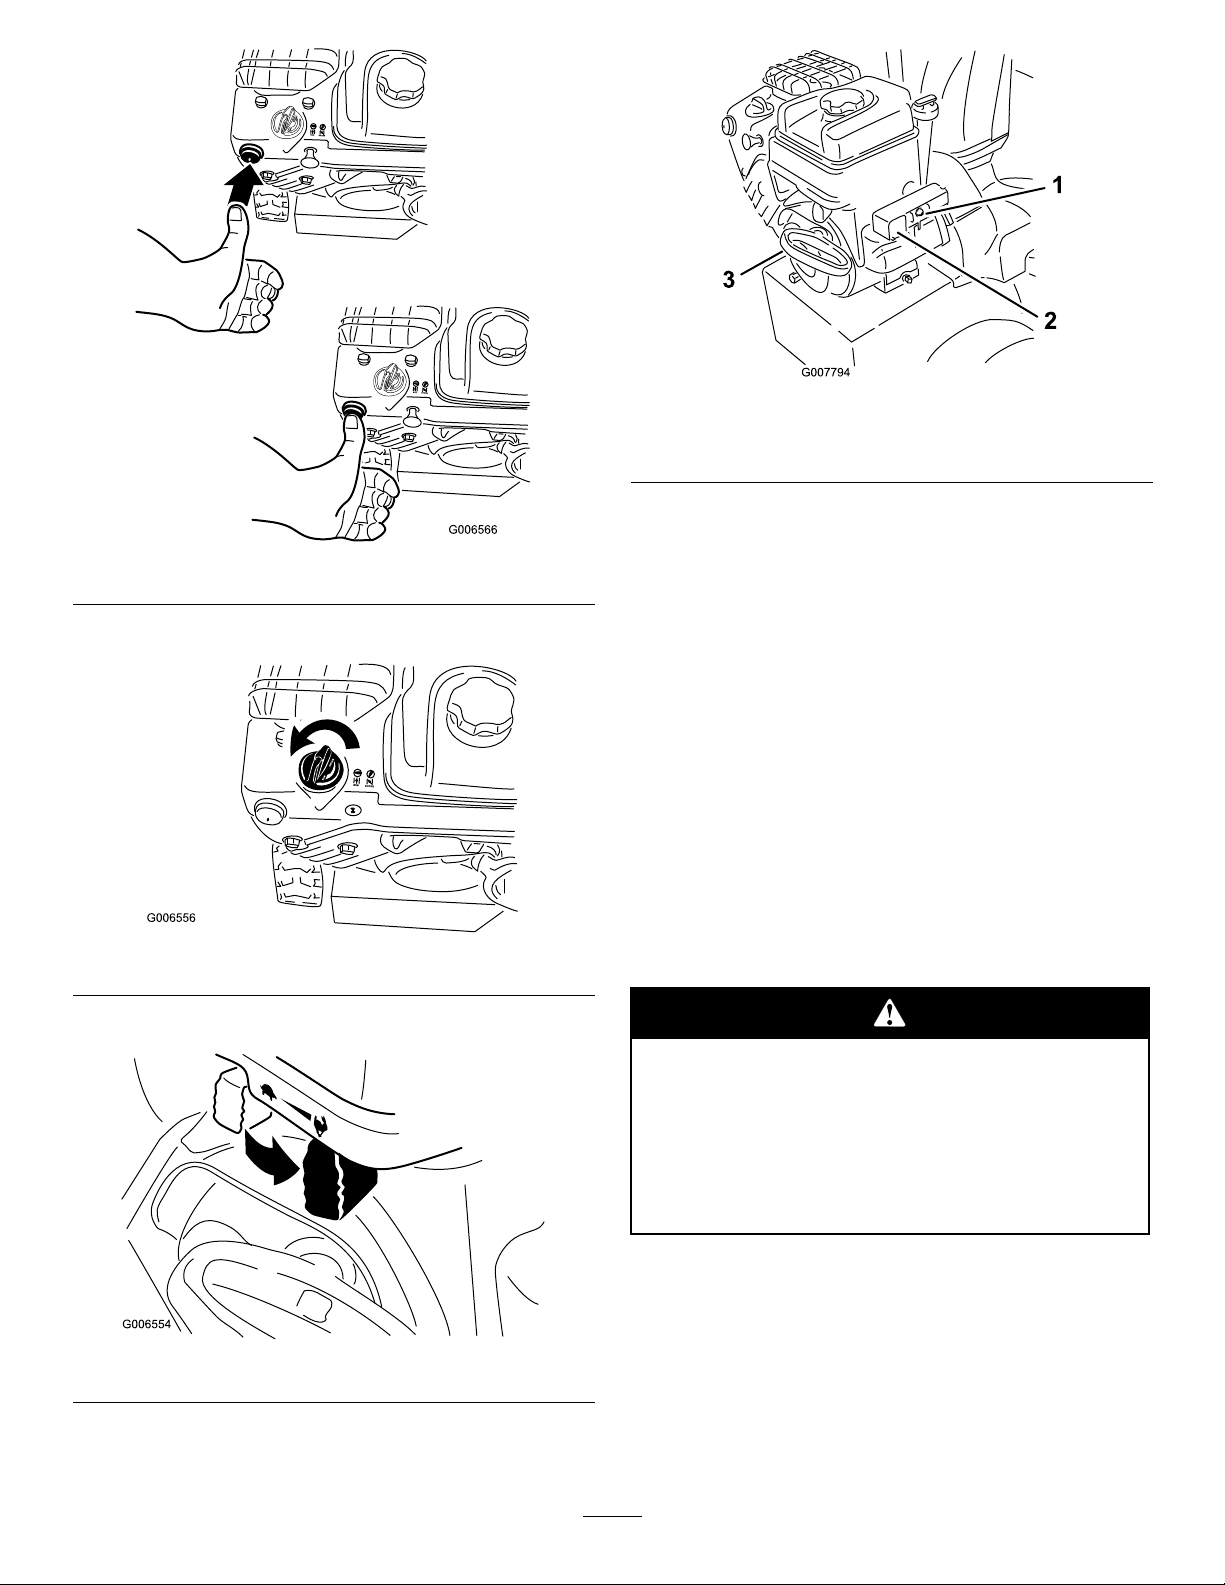
Figure23
5.RotatethechoketotheChokeposition(Figure24).
Figure24
Figure26
1.Electric-starterbutton3.Recoilstarter
2.Electricstarterplug
Note:Tousetheelectricstarter,connectapower
cordtotheelectricstarterplugrstandthentoa
poweroutlet.
Important:Topreventdamagingtheelectric
starter,runitinshortcycles(5seconds
maximum,thenwaitoneminutebeforetryingto
startitagain).Iftheenginestilldoesnotstart,
takethesnowthrowertoanAuthorizedService
Dealerforservice.
8.Disconnectthepowercordfromthepoweroutlet
rstandthenfromthesnowthrower(electricstart
only).
9.Allowtheenginetowarmupforseveralminutes,
movethechoketowardtheRunposition.Wait
fortheenginetorunsmoothlybeforeeachchoke
adjustment.
6.MovethethrottletotheFastposition(Figure25).
Figure25
7.Startthesnowthrowerpullingtherecoilstarteror
pressingtheelectric-starterbutton(Figure26).
Ifyouleavethesnowthrowerpluggedintoa
poweroutlet,someonecaninadvertentlystart
thesnowthrowerandinjurepeopleordamage
property.
Unplugthepowercordwheneveryouarenot
startingthesnowthrower.
14
Page 15
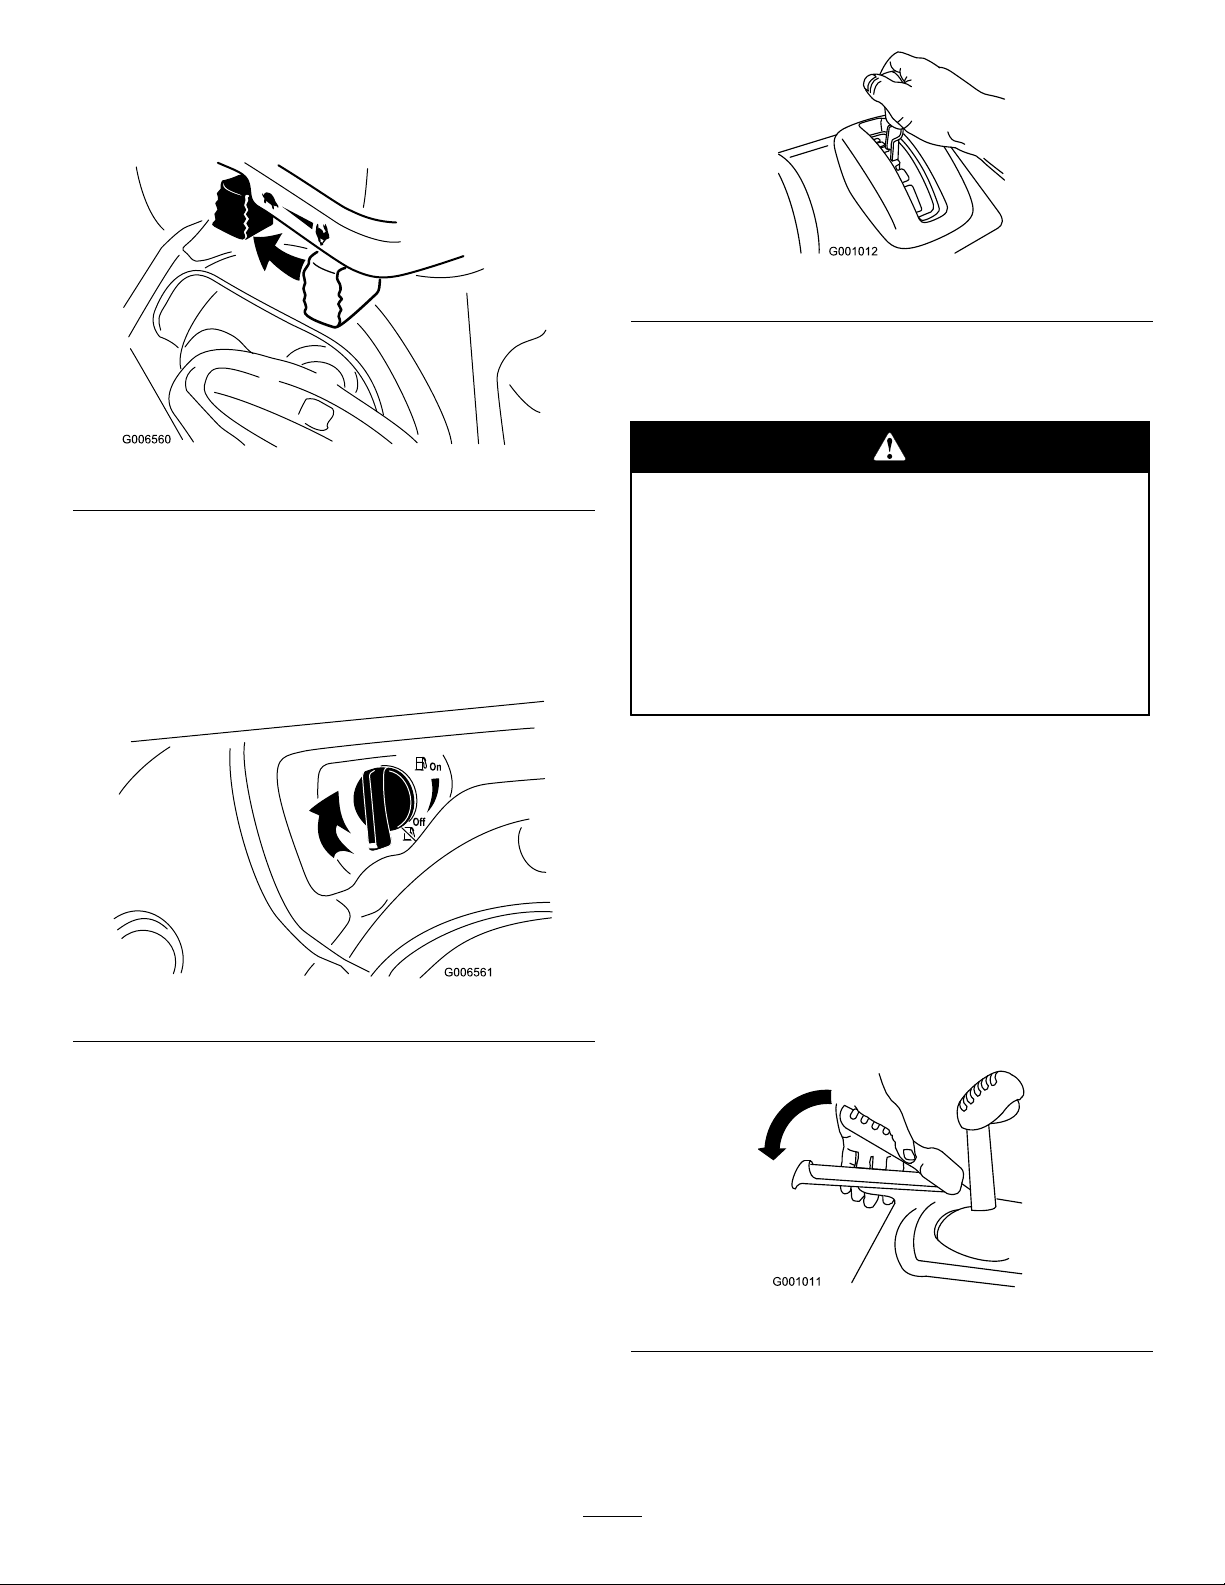
StoppingtheEngine
1.MovethethrottletotheSlowposition,andthento
theStopposition(Figure27).
Figure27
2.Waitforallmovingpartstostopbeforeleavingthe
operatingposition.
3.Removetheignitionkey .
4.Closethefuelshutoffvalvebyrotatingitclockwise
(Figure28).
Figure29
OperatingtheTractionDrive
Ifthetractiondriveisnotproperlyadjusted,
thesnowthrowermaymoveinthedirection
oppositeofwhatyouintended,causinginjury
and/orpropertydamage.
Carefullycheckthetractiondriveandadjust
itproperly,ifnecessary;refertoCheckingthe
TractionDriveOperationinSetupformore
information.
Figure28
5.Pulltherecoilstarter3or4times.Thishelpsprevent
therecoilstarterfromfreezingup.
OperatingtheSpeedSelector
Thespeedselectorhas6forwardand2reversegears.
Tochangespeeds,releasethetractionleverandshiftthe
speedselectorlevertothedesiredposition(Figure29).
Theleverlocksinanotchateachspeedselection.
Important:Ifthesnowthrowermoveswhenthe
tractionleverisinthereleasedposition,checkthe
tractioncable(refertoCheckingandAdjusting
theTractionCable)ortakethesnowthrowertoan
AuthorizedServiceDealerforservice.
Important:Tooperatethetractiondrive,you
mustoperatethesnowthrowerwiththeself-propel
featureengaged.RefertoFreewheelingorUsing
theSelf-propelDrive.
1.Toengagethetractiondrive,squeezethelefthand
(traction)levertothehandgrip(Figure30).
Figure30
2.Tostopthetractiondrive,releasethetractionlever.
15
Page 16
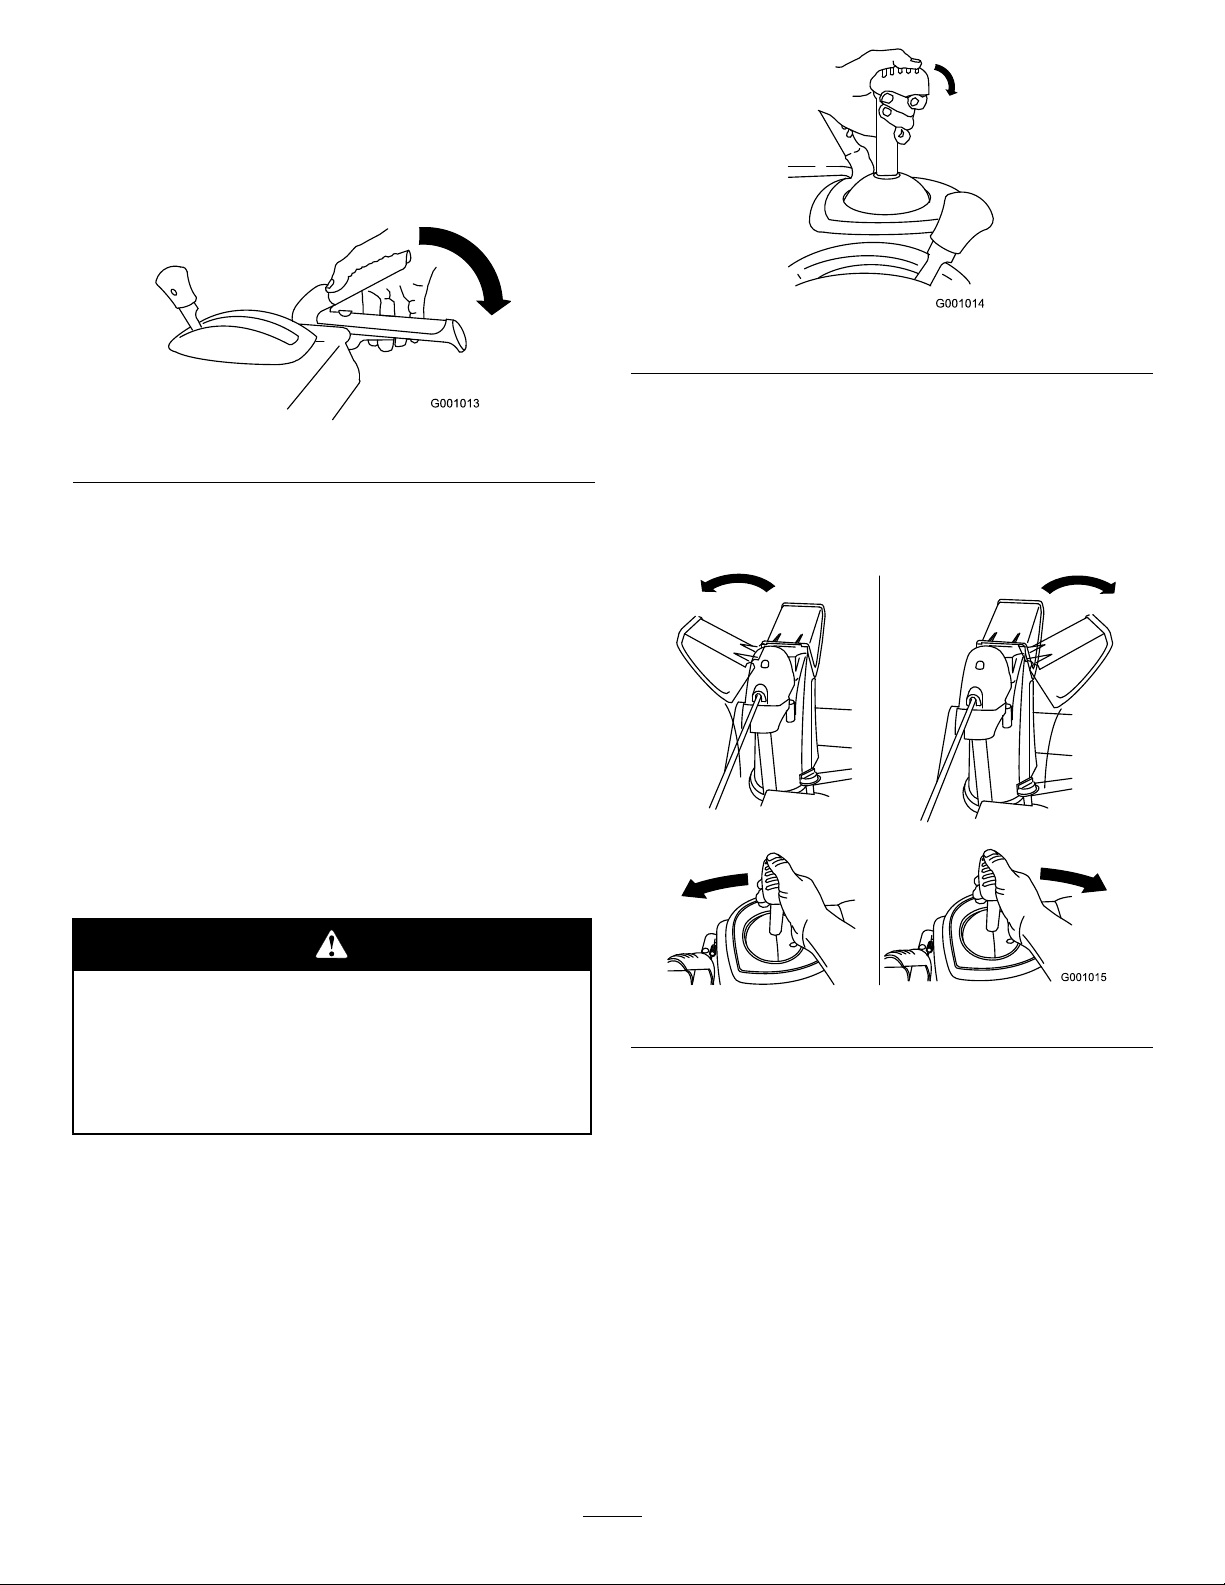
OperatingtheAuger/Impeller
Drive
1.Toengagetheauger/impellerdrive,squeezethe
righthand(auger/impeller)levertothehandgrip
(Figure31).
Figure32
Figure31
2.Tostoptheaugerandimpeller,releasetheright
handlever.
Important:Whenyouengageboththe
auger/impellerleverandthetractionlever,the
tractionleverlockstheauger/impellerlever
down,freeingyourrighthand.T oreleaseboth
levers,simplyreleasethelefthand(traction)
lever.
3.Iftheaugerandimpellercontinuetorotatewhen
youreleasetheauger/impellerlever,donotoperate
thesnowthrower.Checktheauger/impellercable
(refertoCheckingandAdjustingtheAuger/Impeller
Cable)andadjustitifnecessary.Otherwise,takethe
snowthrowertoanAuthorizedDealerforservice.
Iftheaugerandimpellercontinuetorotate
whenyoureleasetheauger/impellerlever,you
couldseriouslyinjureyourselforothers.
Donotoperatethesnowthrower.Takeittoan
AuthorizedServiceDealerforservice.
OperatingtheQuickStick™
HoldthebluetriggercapdowntousetheQuickStick
tomovethedischargechuteandthechutedeector.
Releasethetriggercaptolockthedischargechuteand
chutedeectorintoposition(Figure32).
MovingtheDischargeChute
HoldthebluetriggercapdownandmovetheQuick
Sticktothelefttomovethedischargechutetotheleft;
movetheQuickSticktotherighttomovethedischarge
chutetotheright(Figure33).
Figure33
•Ifthechutedoesnotmove,refertoAdjustingthe
DischargeChuteLatch.
•Ifthechutedoesnotturnasfartotheleftasitdoes
totheright,ensurethatthecableisroutedtothe
insideofthehandles.RefertoInstallingtheUpper
Handle.
•Ifthechutedoesnotlockintoplacewhenyourelease
thetriggercap,refertoAdjustingtheDischarge
ChuteLatch.
MovingtheChuteDeector
HoldthebluetriggercapdownandmovetheQuick
Stickforwardtolowerthechutedeector;moveit
rearwardtoraisethechutedeector(Figure34).
16
Page 17

waitforallmovingpartstostop,andremoveallice
andsnowfromthesnowthrower.
•Withtheengineoff,pulltherecoilstarterhandle
severaltimestopreventtherecoilstarterfrom
freezingup.
OperatingTips
Figure34
UncloggingtheDischarge
Chute
Iftheauger/impellerisrunningbutthereisnosnow
comingoutofthedischargechute,thedischargechute
maybeclogged.
•Tounclogthedischargechute,stayintheoperating
positionandreleasethelefthand(traction)lever.
Whilerunningtheauger/impeller,pushdownon
thehandlestoraisethefrontofthesnowthrower
afewinches(centimeters)offthepavement.Then
liftthehandlesquicklytobumpthefrontofthe
snowthroweronthepavement.Repeatifnecessary
untilastreamofsnowcomesoutthedischargechute.
•Ifyoucannotunclogthedischargechutebybumping
thefrontofthesnowthrower,stoptheengine,wait
forallmovingpartstostop,andusethesnow
cleanouttool;neveruseyourhand.
Whenthesnowthrowerisinoperation,the
impellerandaugercanrotateandcutoffor
injurehandsandfeet.
•Beforeadjusting,cleaning,inspecting,
troubleshooting,orrepairingthe
snowthrower,stoptheengineandwaitfor
allmovingpartstostop.Disconnectthe
wirefromthesparkplugandkeepitaway
fromtheplugtopreventsomeonefrom
accidentallystartingtheengine.
•Removeanobstructionfromthedischarge
chute;refertoUncloggingtheDischarge
Chute.Ifnecessary,usethesnowcleanout
tool,notyourhands,toremovean
obstructionfromthedischargechute.
•Staybehindthehandlesandawayfrom
thedischargeopeningwhileoperatingthe
snowthrower.
•Keepface,hands,feet,andanyotherpartof
yourbodyorclothingawayfromconcealed,
moving,orrotatingparts.
Important:Uncloggingthedischargechuteby
bumpingthefrontofthesnowthroweronthe
pavementmaycausetheskidstomove.Adjust
theskidsandtightentheskidboltssecurely.
PreventingFreeze-up
•Insnowyandcoldconditions,somecontrolsand
movingpartsmayfreeze.Donotuseexcessive
forcewhentryingtooperatefrozencontrols.If
youhavedifcultyoperatinganycontrolorpart,
starttheengineandletitrunforafewminutes.
•Afterusingthesnowthrower,lettheenginerunfora
fewminutestopreventmovingpartsfromfreezing.
Engagetheauger/impellertoclearanyremaining
snowfrominsidethehousing.RotatetheQuick
Sticktopreventitfromfreezing.Stoptheengine,
Therotorbladescanthrowstones,toys,and
otherforeignobjectsandcauseseriouspersonal
injurytotheoperatorortobystanders.
•Keeptheareatobeclearedfreeofallobjects
thattherotorbladescouldpickupand
throw.
•Keepallchildrenandpetsawayfromthe
areaofoperation.
•AlwayssetthethrottletotheFastpositionwhen
throwingsnow.
17
Page 18

•Iftheengineslowsdownunderaloadorthewheels
slip,shiftthesnowthrowerintoalowergear.
•Ifthefrontofthesnowthrowerridesup,shiftthe
snowthrowerintoalowergear.Ifthefrontcontinues
torideup,liftuponthehandles.
Maintenance
Note:Determinetheleftandrightsidesofthemachinefromthenormaloperatingposition.
RecommendedMaintenanceSchedule(s)
MaintenanceService
Interval
Aftertherst2hours
Aftertherst5hours
Beforeeachuseordaily
Every50hours
Every100hours
Yearly
Yearlyorbeforestorage
MaintenanceProcedure
•Checkthetractioncableandadjustitifnecessary .
•Checktheauger/impellercableandadjustitifnecessary.
•Changetheengineoil.
•Checktheengineoillevelandaddoilifnecessary .
•Changetheengineoil.Changetheengineoilevery25operatinghourswhen
operatingtheengineunderaheavyload.
•Replacethesparkplug.
•Checktheskidsandthescraperandadjustthemifnecessary.
•Checkthetractioncableandadjustorreplaceitifnecessary.
•Checktheauger/impellercableandadjustorreplaceitifnecessary.
•Checktheaugergearboxoilandaddoilifnecessary.
•Lubricatethehexshaft.
•Checktheairpressureinthetiresandinatethemto17–20psi(1 16–137kPa).
•Drainthegasolineandruntheenginetodryoutthefueltankandthecarburetorat
theendoftheseason.
•HaveanAuthorizedServiceDealerinspectandreplacethetractiondrivebeltand/or
theauger/impellerdrivebelt,ifnecessary.
Important:Youcanndmoreinformationaboutmaintainingandservicingyoursnowthrowerat
www.Toro.com.
Important:Refertoyourengineoperator’smanualforadditionalmaintenanceprocedures.Forengine
adjustments,repairs,orwarrantyservicenotcoveredinthismanual,contactanAuthorizedBriggs
&StrattonServicingDealer.
PreparingforMaintenance
1.Movethesnowthrowertoalevelsurface.
2.Stoptheengineandwaitforallmovingpartstostop.
3.Disconnectthesparkplugwire.RefertoReplacing
theSparkPlug.
18
Page 19
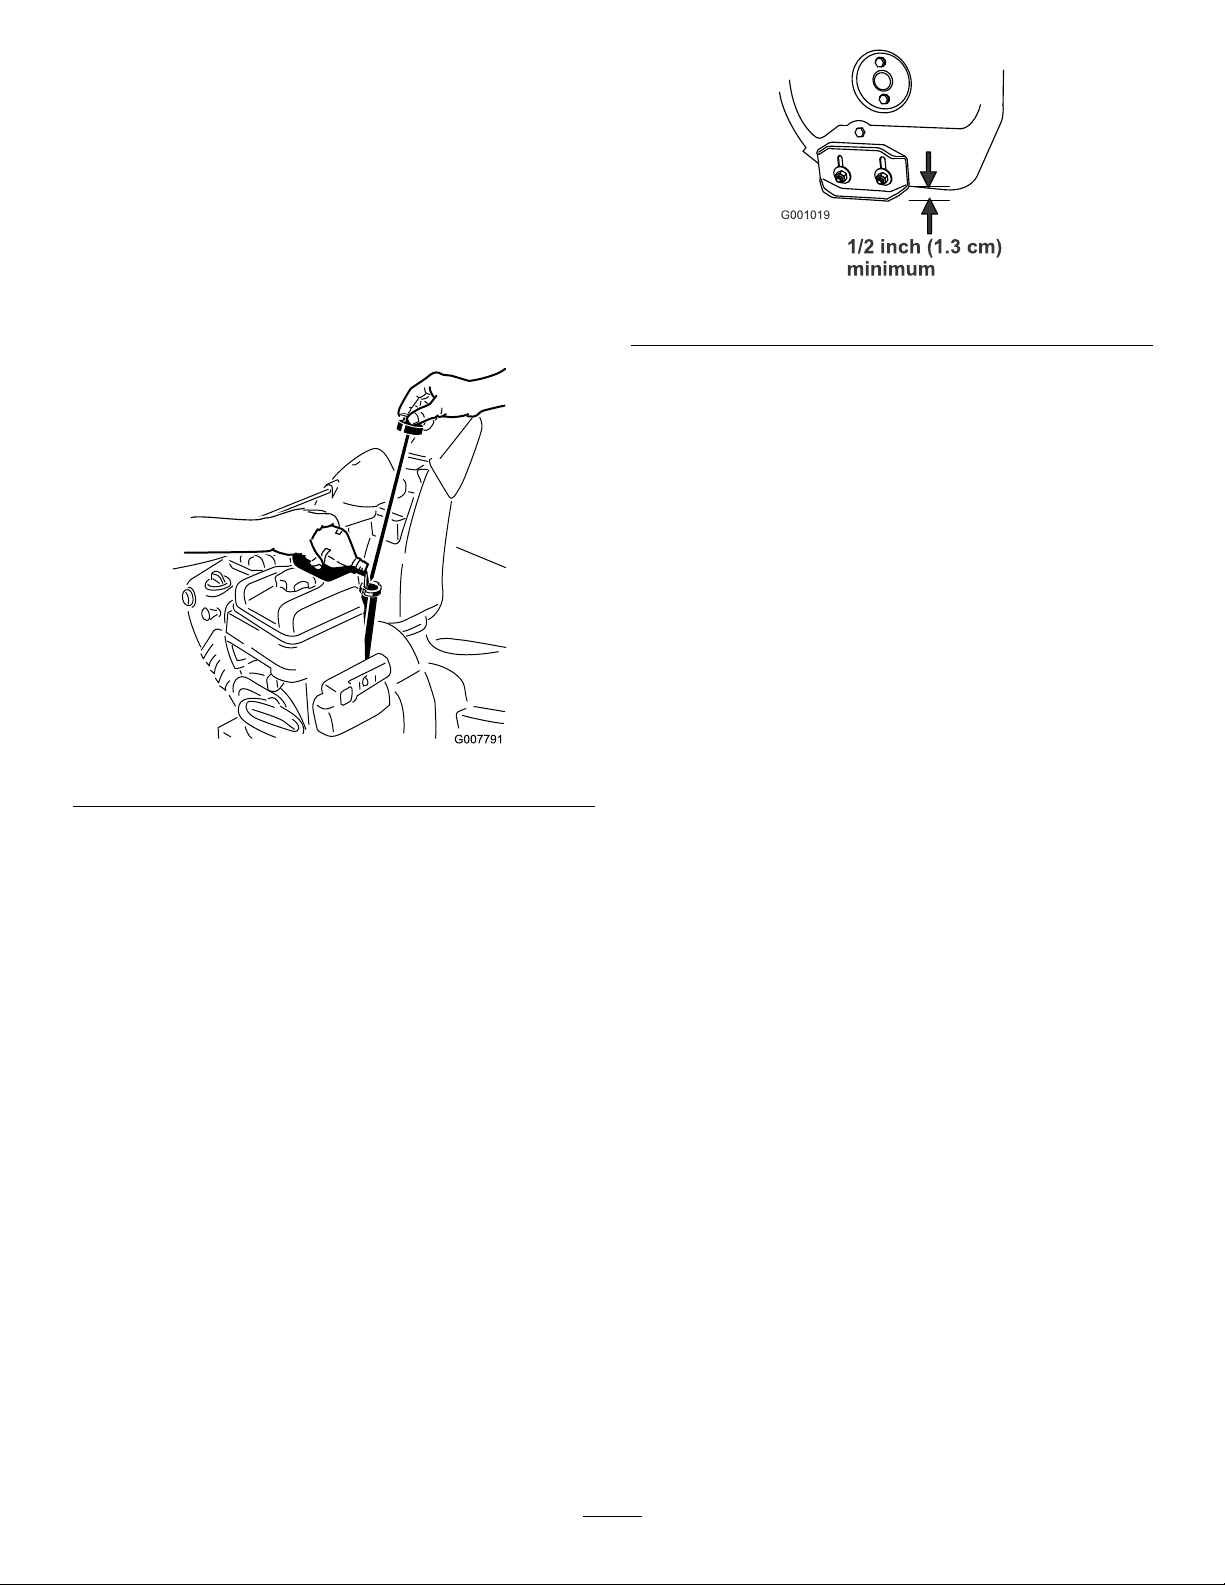
CheckingtheEngineOilLevel
ServiceInterval:Beforeeachuseordaily—Check
theengineoillevelandaddoilif
necessary.
1.Removethedipstick,wipeitclean,thenfullyinstall
thedipstick.
2.Removethedipstickandchecktheoillevel
(Figure35).IftheoillevelisbelowtheAddmark
onthedipstick,addoil.RefertoFillingtheEngine
withOil.
Figure35
Figure36
3.Supportthesideplatessothattheyareatleast1/2
inch(1.3cm)abovealevelsurface.
Important:Theaugerbladesmustbe
supportedabovethegroundbytheskids.
4.Ensurethatthescraperis1/8inch(3mm)above
andparalleltoalevelsurface.
Note:Ifthepavementiscracked,rough,oruneven,
adjusttheskidstoraisethescraper.Forgravel
surfaces,adjusttheskidsfurtherdowntoprevent
thesnowthrowerfrompickinguprocks.
5.Movetheskidsdownuntiltheyareevenwiththe
ground.
6.Firmlytightenthenutsthatsecurebothskidstothe
augersides.
CheckingandAdjustingthe
SkidsandScraper
ServiceInterval:Yearly
Checktheskidsandthescrapertoensurethattheauger
doesnotcontactthepavedorgravelsurface.Adjustthe
skidsandthescraperasneededtocompensateforwear.
1.Checkthetirepressure.RefertoCheckingtheTire
Pressure.
2.Loosenthenutsthatsecurebothskidstothe
augersidesuntiltheskidsslideupanddowneasily
(Figure36).
Note:Toquicklyadjusttheskidsiftheyloosen,
supportthescraper1/8inch(3mm)offthe
pavement,thenadjusttheskidsdowntothe
pavement.
Note:Iftheskidsbecomeexcessivelyworn,you
canturnthemoverandsettheunusedsidetoward
thepavement.
CheckingandAdjustingthe
TractionCable
ServiceInterval:Aftertherst2hours—Check
thetractioncableandadjustitif
necessary.
Yearly—Checkthetractioncableand
adjustorreplaceitifnecessary.
Ifthesnowthrowerdoesnotdriveintheforwardor
reversespeedsoritdriveswhenyoureleasethetraction
lever,adjustthetractioncable.
Withthetractionleverdisengaged,checkthepininthe
elongatedslotintheleftsideofthesnowthrowerabove
thetire.Thereshouldbeagapof1/32to1/16inch(1
to1.5mm)fromthefrontoftheslottothefrontedge
ofthepin(Figure37).
19
Page 20
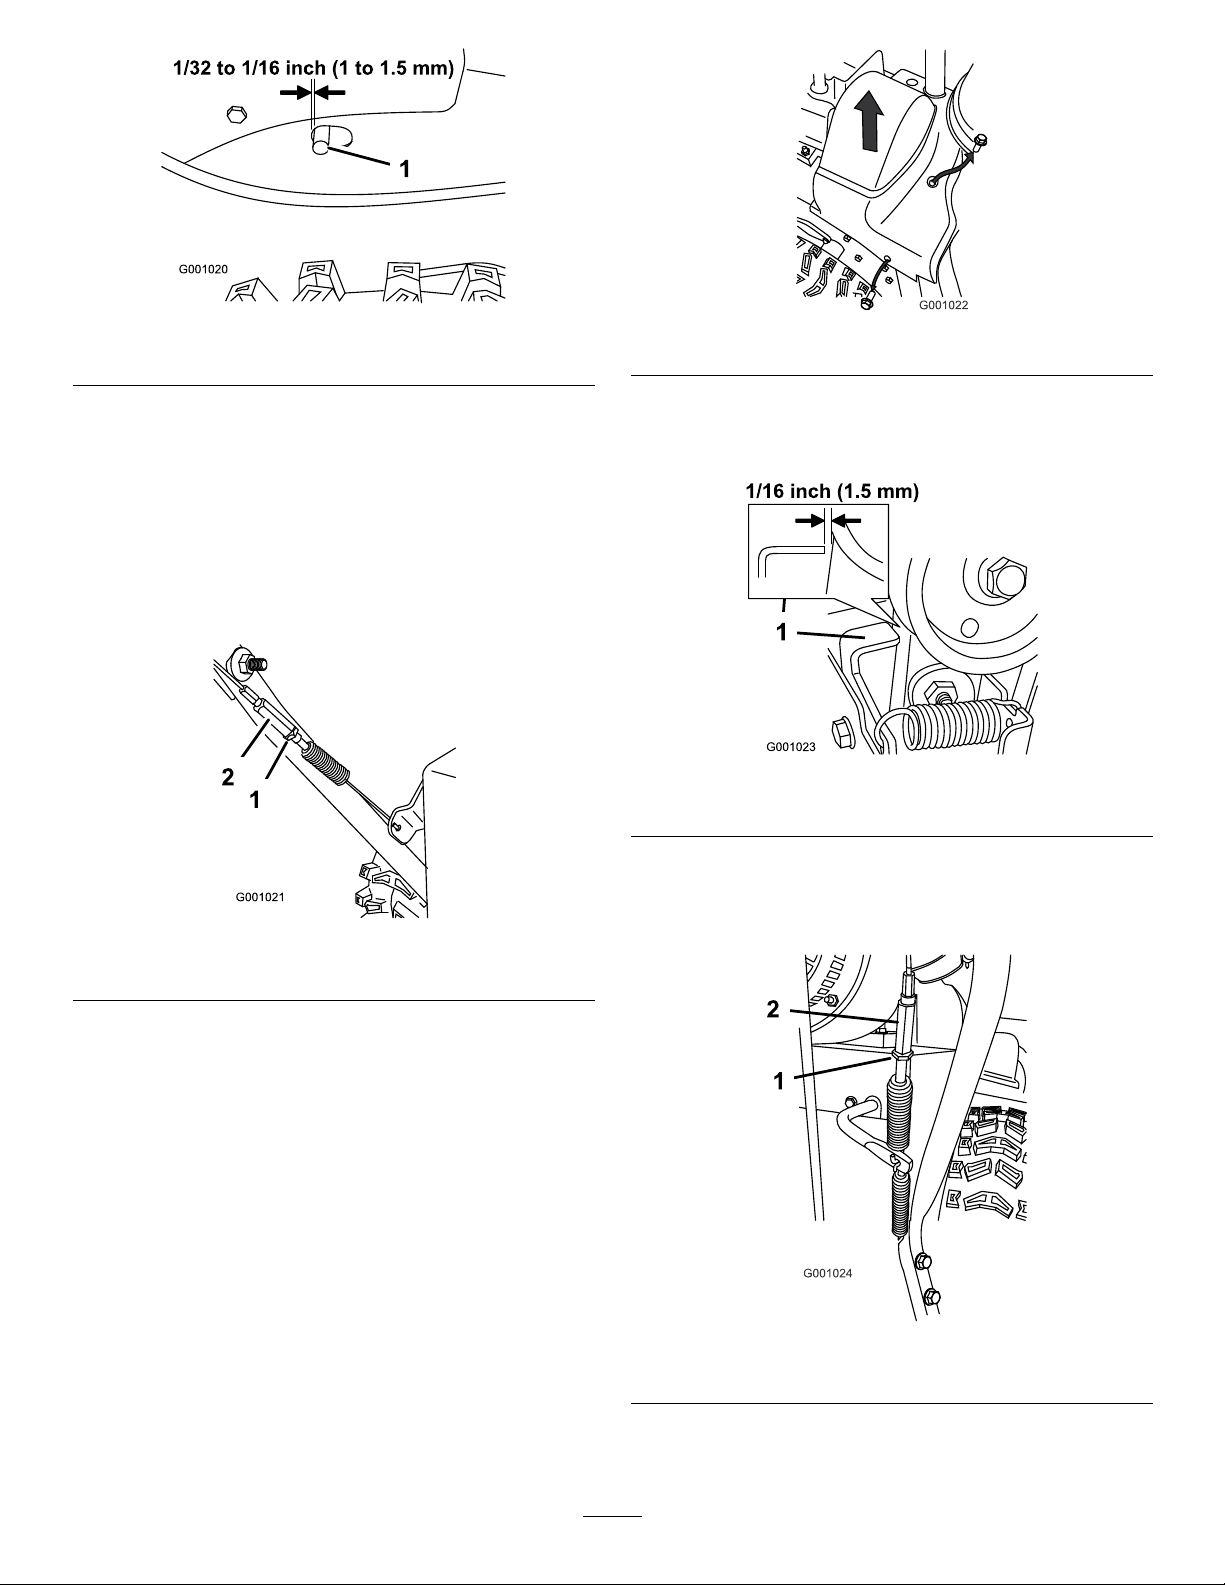
Figure37
1.Pin
Figure39
Ifthelefthand(traction)cableisnotproperlyadjusted,
dothefollowingsteps:
1.Loosenthejamnut.
2.Loosenortightentheturnbuckletoadjustthepin
untilitisthepropergapfromthefrontedgeofthe
slot.
3.Tightenthejamnut(Figure38).
Figure38
1.Jamnut2.Turnbuckle
3.Withtheauger/impellerleverdisengaged,ensure
thatthegapbetweentheaugerclutchassemblyand
thetabis1/16inch(1.5mm)(Figure40).
Figure40
1.Tab
4.Iftheauger/impellercableisnotproperlyadjusted,
dothefollowingsteps:
5.Loosenthejamnut(Figure41).
CheckingandAdjustingthe
Auger/ImpellerCable
ServiceInterval:Aftertherst2hours—Checkthe
auger/impellercableandadjustitif
necessary.
Yearly—Checktheauger/impeller
cableandadjustorreplaceitif
necessary.
1.Removethe2screwsfromtherightsideofthebelt
coverasshown.
2.Liftuptherightsideofthebeltcover(Figure39).
Figure41
1.Jamnut2.Turnbuckle
6.Loosenortightentheturnbucklethatadjuststhe
tensiononthecable(Figure41).
20
Page 21
7.Adjusttheturnbuckleuntilyouobtaintheproper
gap.
8.Tightenthejamnut.
9.Insertthe2screwsyoupreviouslyremovedonthe
beltcover.
10.Iftheauger/impellercableisproperlyadjustedbut
aproblemremains,contactanAuthorizedService
Dealer.
Max.ll:20oz.(0.55l),type:automotivedetergentoil
withanAPIserviceclassicationofSF ,SG,SH,SJ,SL,
orhigher.UseSAE5W30orSAE10W30oil.Referto
yourengineowner’smanual.
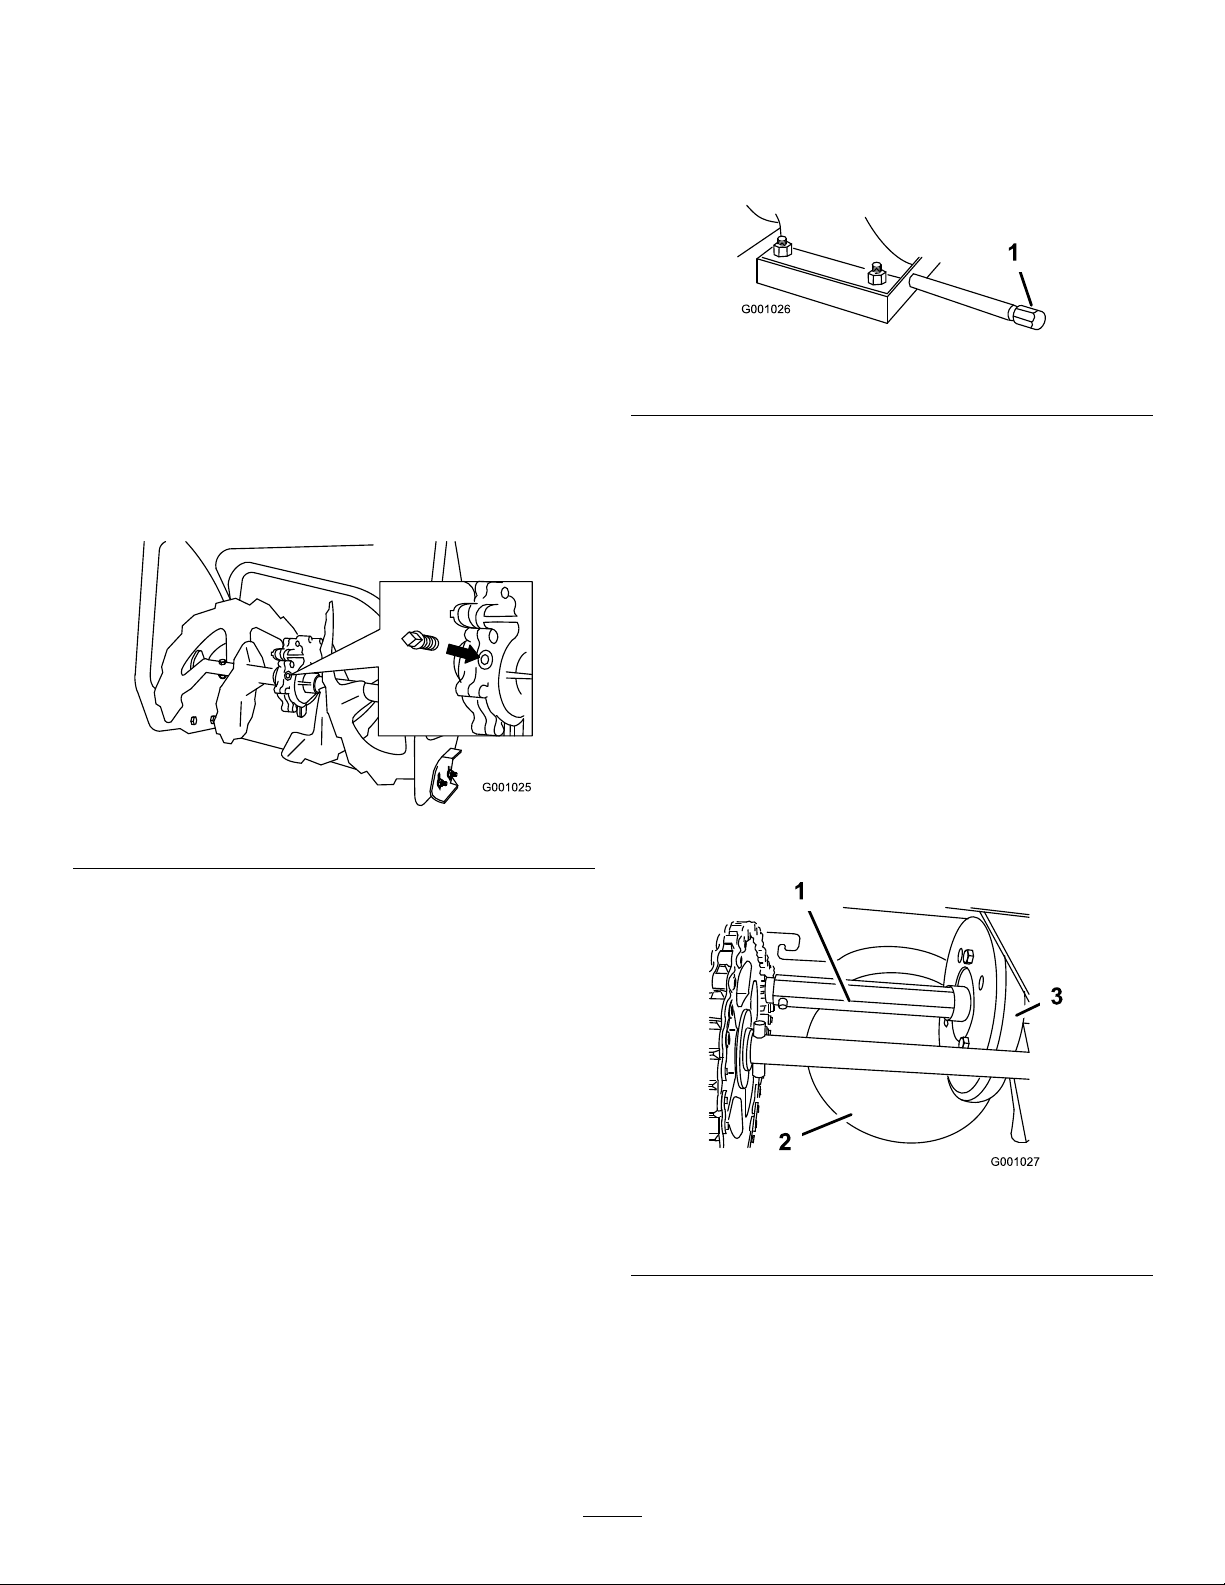
1.Cleantheareaaroundtheoildraincap(Figure43).
CheckingtheAugerGearbox
OilLevel
ServiceInterval:Yearly—Checktheaugergearboxoil
andaddoilifnecessary.
1.Movethesnowthrowertoalevelsurface.
2.Cleantheareaaroundthepipeplug(Figure42).
Figure42
3.Removethepipeplugfromthegearbox.
Figure43
1.Oildraincap
2.Slideanoildrainpanunderthedrainextensionand
removetheoildraincap.
3.Draintheoil.
Note:Disposeoftheusedoilproperlyatalocal
recyclingcenter.
4.Installtheoildraincap.
5.Fillthecrankcasewithoil.RefertoFillingthe
EngineCrankcasewithOil.
LubricatingtheHexShaft
ServiceInterval:Yearly
Lightlylubricatethehexshaftyearlywithautomotive
engineoil(Figure44).
4.Checktheoillevelinthegearbox.Theoilshouldbe
atthepointofoverowingatthelleropening.
5.Iftheoillevelislow,addGL-5orGL-6,SAE85-95
EPtransmissionoiltothegearboxuntilthepoint
ofoverow.
Note:Donotusesyntheticoil.
6.Installthepipepluginthegearbox.
ChangingtheEngineOil
ServiceInterval:Aftertherst5hours—Changethe
engineoil.
Every50hours—Changetheengine
oil.Changetheengineoilevery25
operatinghourswhenoperatingthe
engineunderaheavyload.
Ifpossible,runtheenginejustbeforechangingthe
oilbecausewarmoilowsbetterandcarriesmore
contaminants.
Figure44
1.Hexshaft
2.Aluminumfrictionplate
Important:Donotgetoilontherubberwheel
orthealuminumfrictiondriveplatebecausethe
tractiondrivewillslip(Figure44).
1.Drainthegasolinefromthefueltank.
2.Tipthesnowthrowerforwardontoitsaugerhousing
andblockitsothatitcannotfall.
3.Rubberwheel
21
Page 22
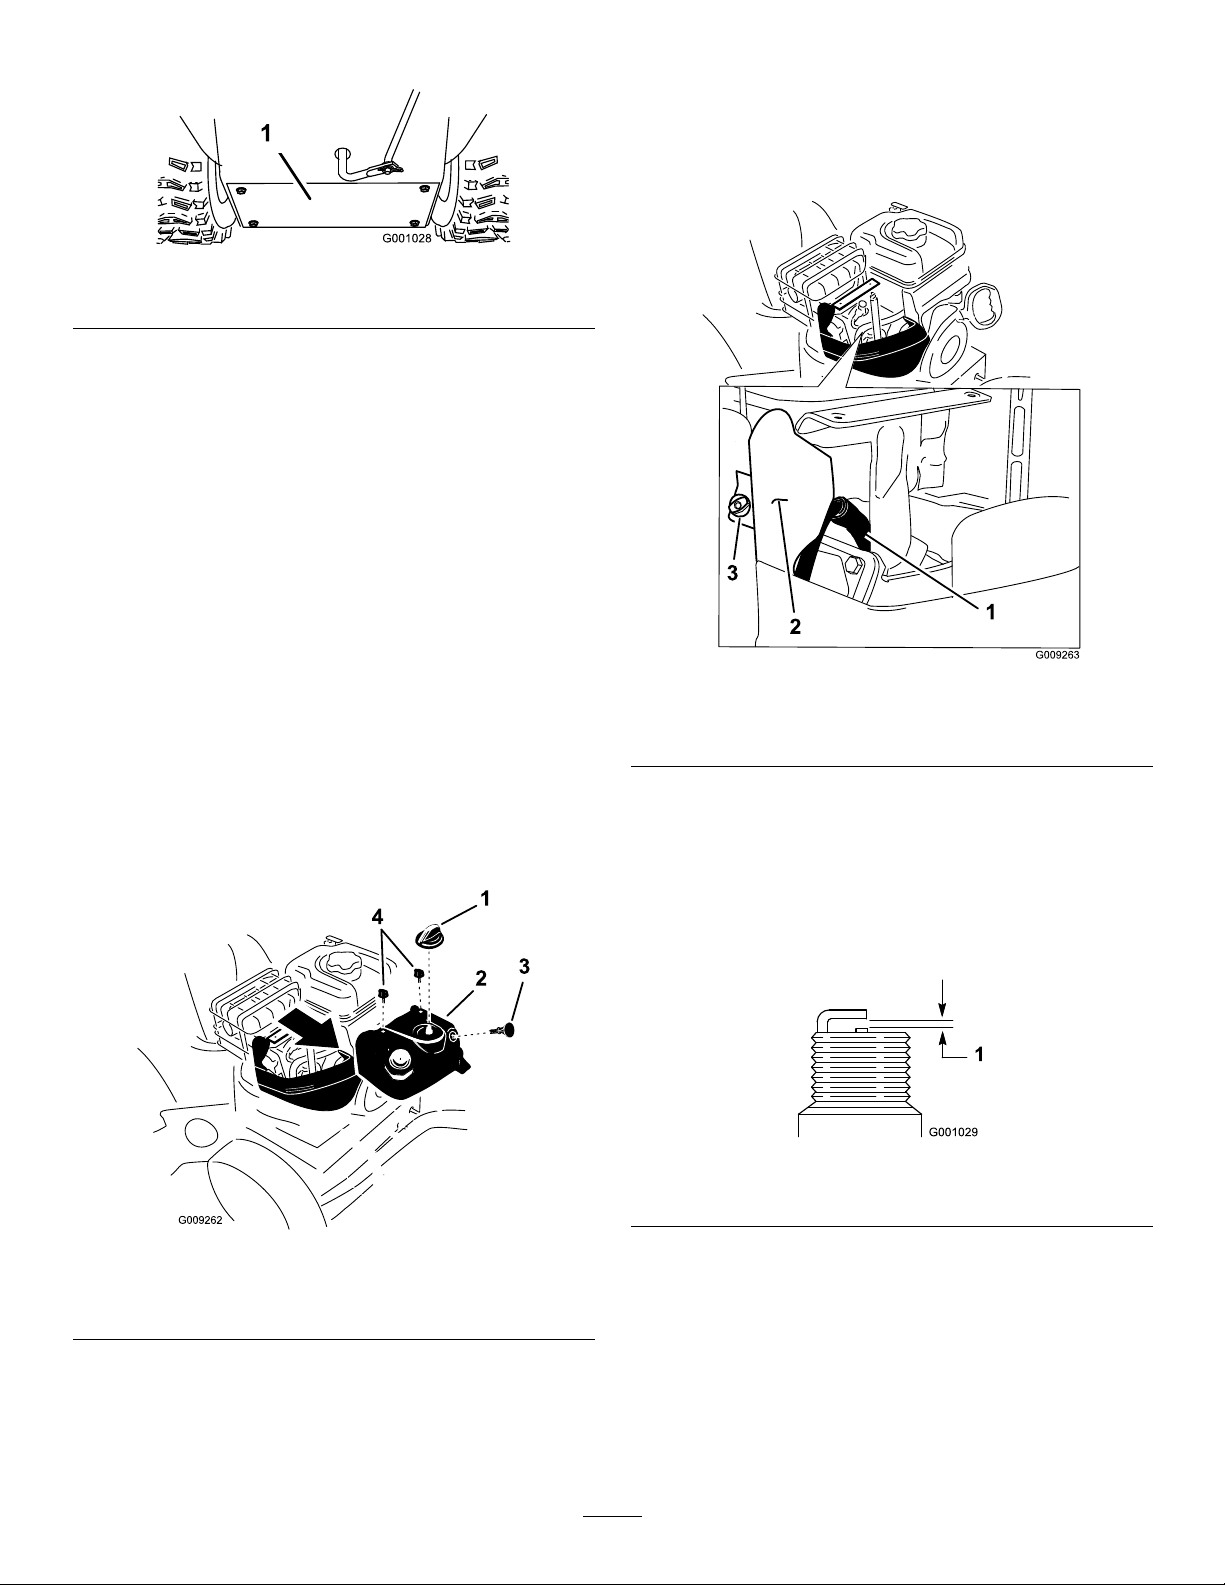
3.Removethebackcover(Figure45).
Figure45
1.Backcover
4.MovethespeedselectorlevertoPositionR2.
5.Dipyourngerinautomotiveengineoilandlightly
lubricatehexshaft.
6.MovethespeedselectorlevertoPosition6.
7.Lubricatetheotherendofthehexshaft.
8.Movethespeedselectorleverforwardandrearward
afewtimes.
9.Installthebackcoverandreturnthesnowthrower
totheoperatingposition.
3.Slowlyremovetheuppersnowhood,ensuringthat
theprimerbulbhoseandtheignitionwireremain
connected.
4.Removethebracketthumbscrewandthebracket
(Figure47)..
ReplacingtheSparkPlug
ServiceInterval:Every100hours—Replacethespark
plug.
UseaChampionQC12YCorequivalentsparkplug.
Note:T oaccessthesparkplug,youmustrstremove
theuppersnowhood(Figure46).
Figure46
1.Chokeknob
2.Uppersnowhood
1.Removethechokeknobandtheignitionkey
(Figure46).
2.Removethe2screwsthatsecuretheuppersnow
hoodtothesnowthrower(Figure46).
3.Ignitionkey
4.Screw(2)
Figure47
1.Spark-plugwire
2.Bracket
3.Thumbscrew
5.Cleanaroundthebaseofthesparkplug(Figure47).
6.Removeanddiscardtheoldsparkplug.
Note:Y ouwillneedaratchetwrenchextensionto
removethesparkplug.
7.Setthegapbetweentheelectrodesonanewspark
plugat0.030inch(0.76mm)(Figure48).
Figure48
1.0.030inch(0.76mm)
8.Installthenewsparkplugandtightenitrmly.
9.Installthebracketwiththethumbscrewthatyou
removedinstep1.
10.Ensurethattheprimerbulbhoseandtheignition
wireareconnectedandclearofthecarburetor
bracket.
11.Securetheuppersnowhoodtothesnowthrower
withthe2screwsthatyoupreviouslyremoved.
22
Page 23
12.Alignthetabonthechokecontrolknobwiththe
slotontheuppersnowhood.
13.Connectthechokecontrolknobtothechokeshaft
onthecarburetor.
AdjustingtheDischargeChute
Latch
Ifthedischargechutedoesnotlockintothedesired
positionordoesnotunlocksothatyoucanmoveitto
anotherposition,adjustthedischargechutelatch.
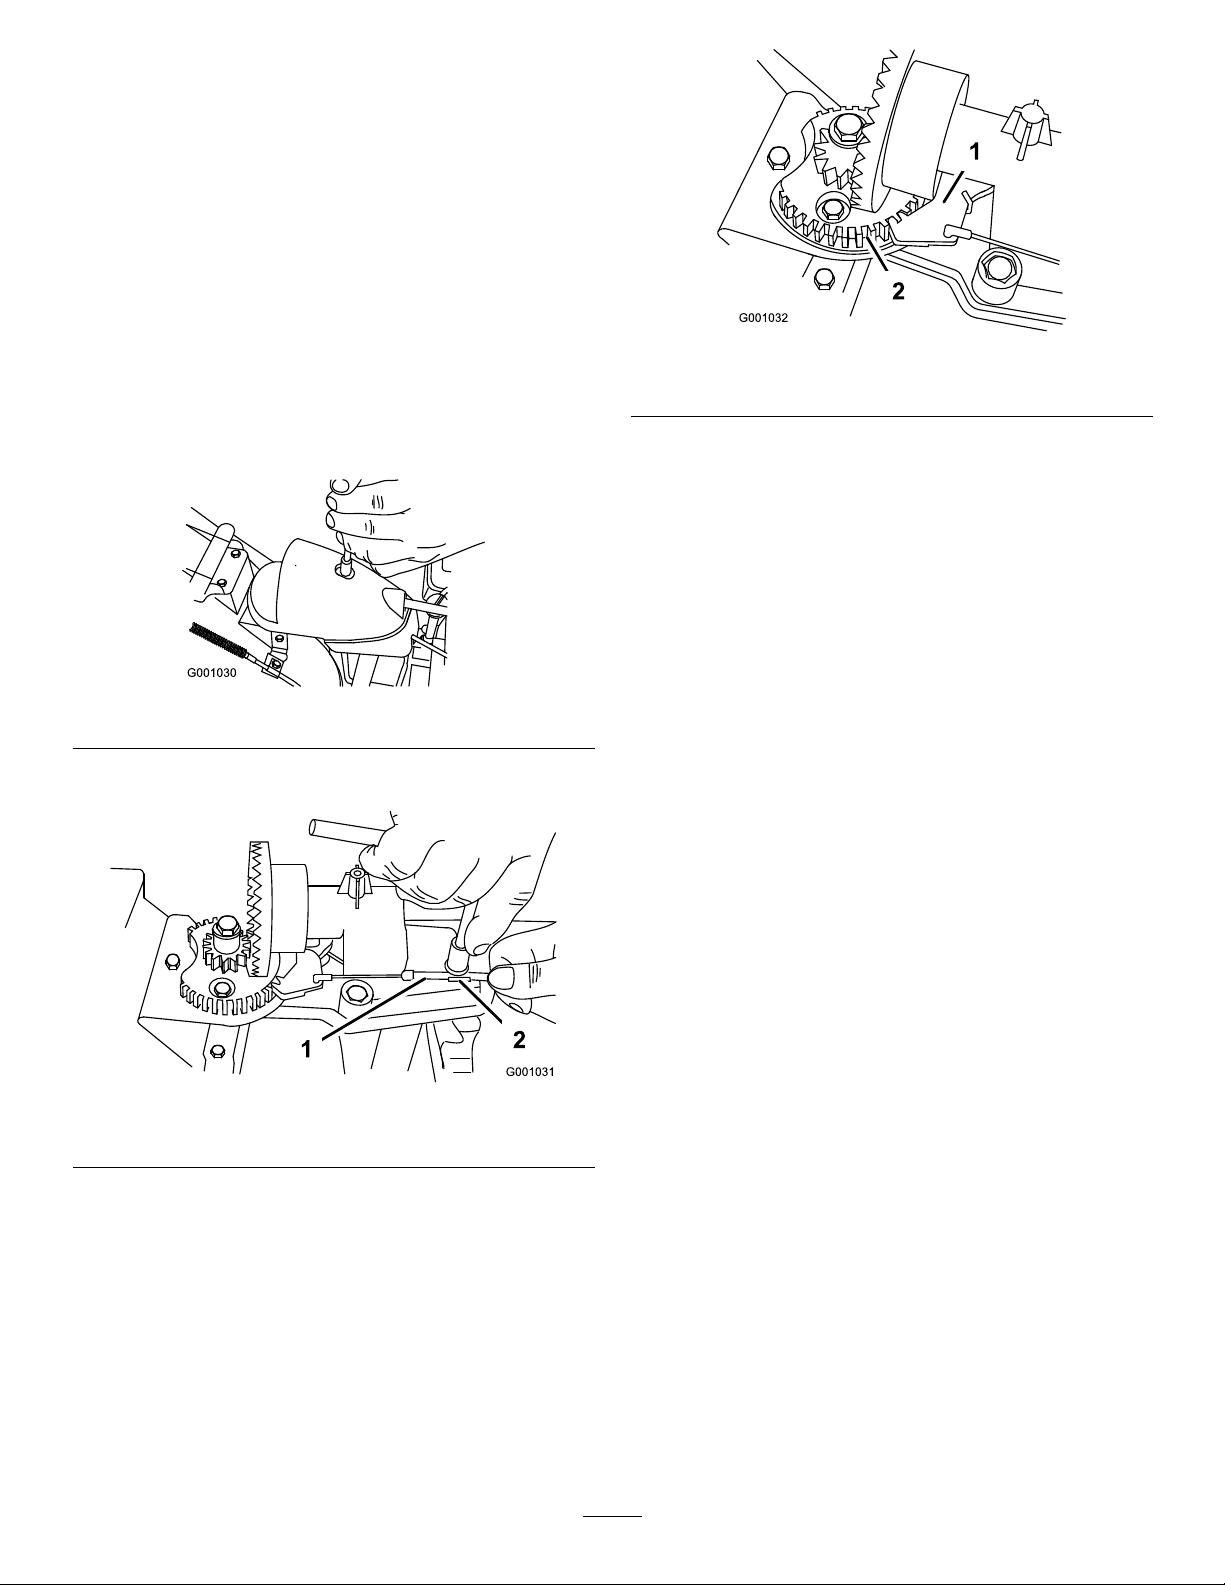
1.Removethefasteneronthegearcover(Figure49),
liftthefrontofthecoverup,andslideitbackand
outoftheway.
Figure51
1.Dischargechutelatch
Note:Thelatchisspringloadedandwillnaturally
moveintotheteethofthegear(Figure51).
4.Removeanyslackinthecablebypullingthecable
conduitrearward.
5.Tightentheboltonthecableclamp.
6.Installandsecurethegearcover.
2.Gearteeth
Figure49
2.Loosentheboltonthecableclamp(Figure50).
Figure50
1.Cableconduit2.Cableclamp
3.Graspthecableconduitandmoveittowardthefront
ofthemachineuntilthedischargechutelatchfully
engagesthegearteeth(Figure50andFigure51).
ReplacingtheDriveBelts
Iftheauger/impellerdrivebeltorthetractiondrivebelt
becomesworn,oil-soaked,orotherwisedamaged,go
towww.Toro.comforadditionalserviceinformationor
haveanAuthorizedServiceDealerreplacethebelt.
23
Page 24
ReplacingtheHeadlightBulb
UseaGE89216Whalogenlightbulb.Donottouch
thebulbwithyourhandsorallowdirtormoistureto
comeintocontactwiththebulb.
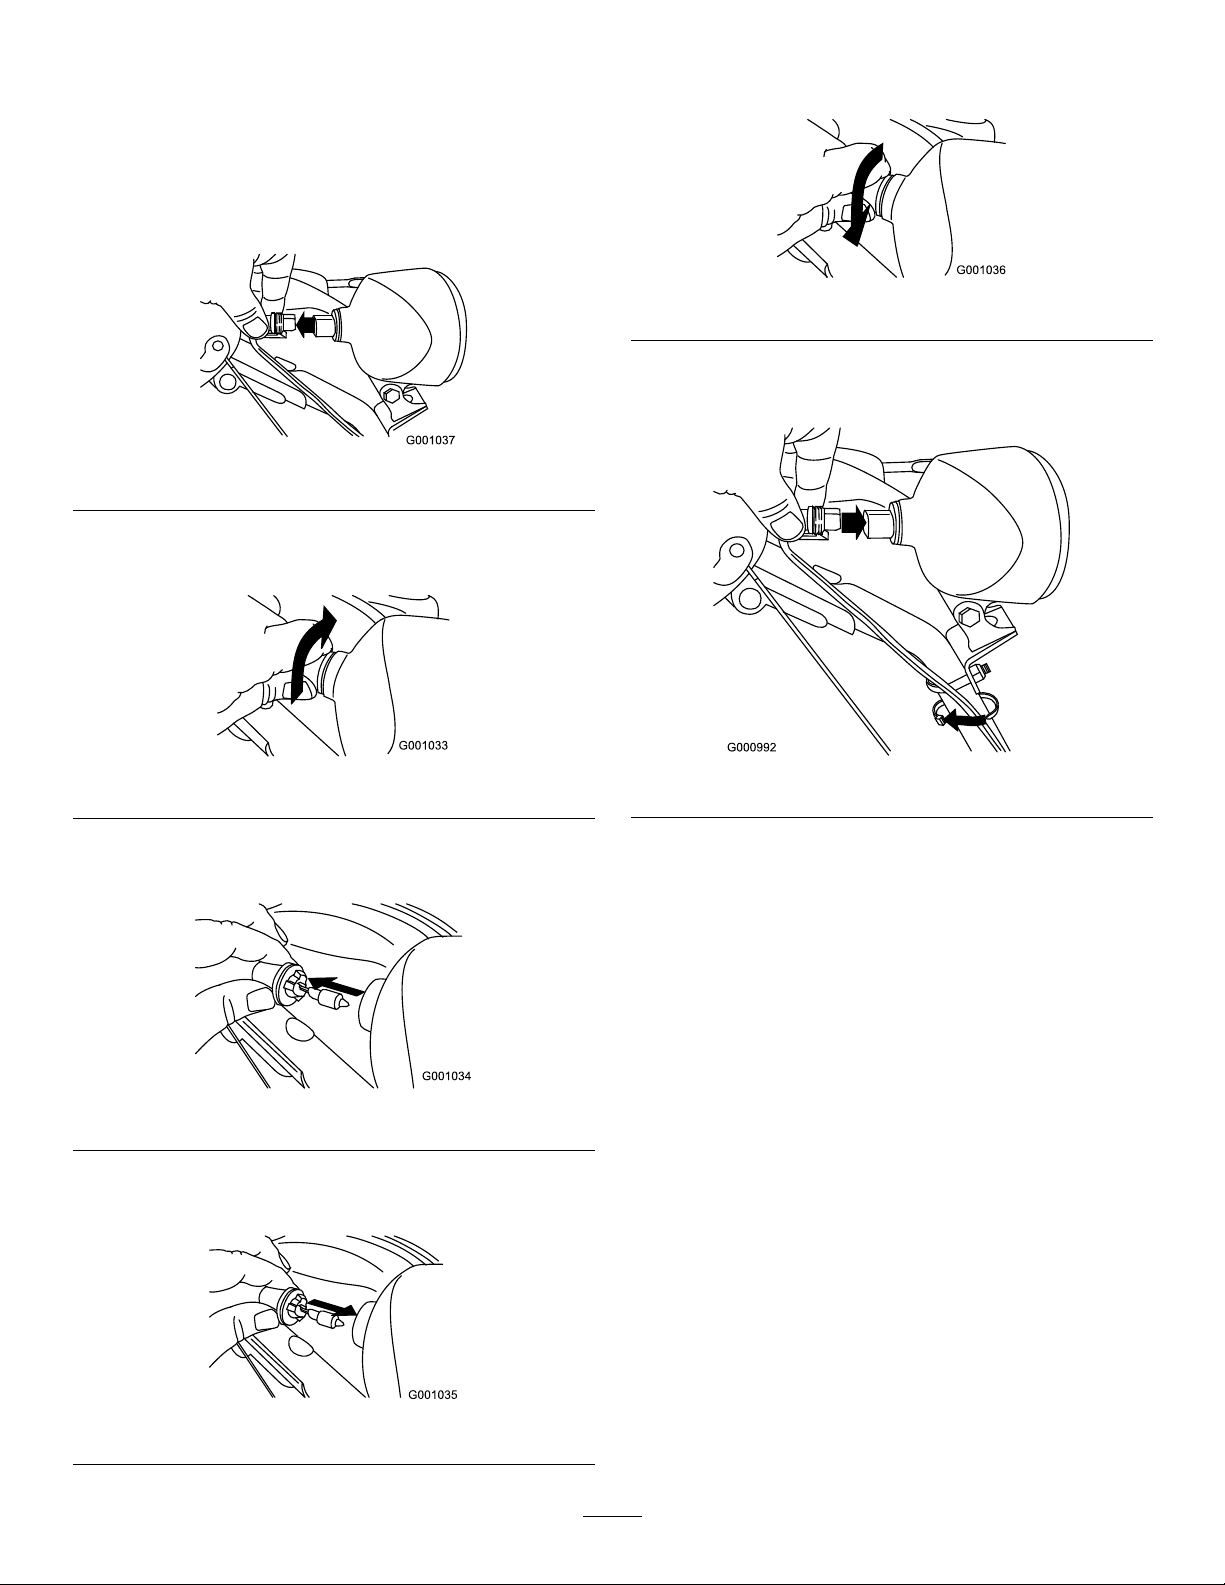
1.Removethewireconnectorfromthebackofthe
headlight(Figure52).
Figure52
2.Turnthebaseofthebulbcounterclockwiseuntilit
stops(Figure53).
5.Turnthebaseofthebulbclockwiseuntilitissnug
(Figure56).
Figure56
6.Insertthewireconnectorstraightintothebackof
theheadlightuntilitissecurelyinplace(Figure57).
Figure53
3.Removethebulbstraightoutfromthebackofthe
headlight(Figure54).
Figure54
4.Insertanewbulbintothebackoftheheadlight
(Figure55).
Figure57
Figure55
24
Page 25

Storage
•Gasolinevaporscanexplode.
•Donotstoregasolinemorethan30days.
•Donotstorethesnowthrowerinan
enclosurenearanopename.
•Allowtheenginetocoolbeforestoringit.
PreparingtheSnowthrower
forStorage
1.Onthelastrefuelingoftheyear,addfuelstabilizer
tofreshfuelasdirectedbytheenginemanufacturer.
2.Runtheenginefor10minutestodistributethe
conditionedfuelthroughthefuelsystem.
3.Loosenthehoseclampthatsecuresthefuellineto
thevalveandslidethefuellineoffthefuelshutoff
valve.
RemovingtheSnowthrower
fromStorage
1.Removethesparkplugandspintheenginerapidly
usingthestartertoblowtheexcessoilfromthe
cylinder.
2.Installthesparkplugbyhandandthentorqueitto
15ft-lb(20.4N-m).
3.Connectthesparkplugwire.
4.Performtheannualmaintenanceproceduresasgiven
intheRecommendedMaintenanceSchedule.
4.Openthefuelshutoffvalveandallowthefuelto
drainoutofthefueltankintoanapprovedfuel
container.
5.Installthefuellineontothefuelshutoffvalveand
secureitwithahoseclamp.
6.Runthesnowthroweruntiltheenginestopsfrom
runningoutoffuel.
7.Primetheengineandstartitagain.
8.Allowtheenginetorununtilitstops.Whenyoucan
nolongerstarttheengine,itissufcientlydry.
9.Stoptheengineandallowittocool.
10.Removetheignitionkey.
11.Disconnectthesparkplugwire.
12.Removethesparkplug,add1oz.(30ml)ofoil
throughthesparkplughole,andpullthestarterrope
slowlyseveraltimestodistributeoilthroughoutthe
cylindertopreventcylindercorrosionduringthe
off-season.
13.Looselyinstallthesparkplug.
14.Disposeofanyunusedfuelproperly.Recycleit
accordingtolocalcodes,oruseitinyourautomobile.
Note:Donotstorestabilizedfuelformorethan
90days.
15.Cleanthesnowthrowerthoroughly.
16.Tightenallloosescrews,bolts,andlocknuts.Repair
orreplaceanydamagedparts.
25
Page 26

Troubleshooting
Problem
Electricstarterdoesnotturn(electric-start
modelsonly)
Enginedoesnotstartorstartshard
PossibleCauseCorrectiveAction
1.Thepowercordisdisconnectedatthe
outletorthesnowthrower.
2.Thepowercordisworn,corroded,or
damaged.
3.Thepoweroutletisnotenergized.
1.Thekeyisnotintheignitionorisinthe
Stopposition.
2.ThechokeisintheOffpositionandthe
primerhasnotbeenpressed.
3.Thefuelshutoffvalveisnotopen.3.Openthefuelshutoffvalve.
4.ThethrottleisnotintheFastposition.4.MovethethrottletotheFastposition.
5.Thefueltankisemptyorthefuel
systemcontainsstalefuel.
6.Thesparkplugwireislooseor
disconnected.
7.Thesparkplugispitted,fouled,orthe
gapisincorrect.
8.Thefuelventcapisrestricted.
9.Theengineoillevelintheengine
crankcaseistoolowortoohigh.
1.Connectthepowercordtotheoutlet
and/orthesnowthrower.
2.Replacethepowercord.
3.Haveaqualiedelectricianenergize
theoutlet.
1.Insertthekeyintotheignitionandturn
ittotheOnposition.
2.MovethechoketotheOnpositionand
presstheprimer3times.
5.Drainand/orllthefueltankwithfresh
gasoline(notmorethan30daysold).
Iftheproblempersists,contactan
AuthorizedServiceDealer.
6.Connectthewiretothesparkplug.
7.Checkthesparkplugandadjustthe
gapifnecessary .Replacethespark
plugifitispitted,fouled,orcracked.
8.Removetheventrestrictionorreplace
thefuelcap.
9.Addordrainoiltoadjusttheoillevelin
theenginecrankcasetotheFullmark
onthedipstick.
Enginerunsrough
Engineruns,butthesnowthrower
dischargessnowpoorlyornotatall
1.ThechokeisintheOnposition.1.MovethechoketotheOffposition.
2.Thefuelshutoffvalveisnotcompletely
open.
3.Thefueltankisnearlyemptyor
containsstalefuel.
4.Thesparkplugwireisloose.
5.Thesparkplugispitted,fouled,orthe
gapisincorrect.
6.Theengineoillevelintheengine
crankcaseistoolowortoohigh.
1.ThethrottleisnotintheFastposition
whenthrowingsnow .
2.Thesnowthrowerismovingtoofastto
clearthesnow.
3.Y ouaretryingtoremovetoomuch
snowperswath.
4.Y ouaretryingtoremoveextremely
heavyorwetsnow.
5.Thedischargechuteisplugged.5.Unclogthedischargechute.
6.Theauger/impellerdrivebeltisloose
orisoffthepulley .
2.Openthefuelshutoffvalve.
3.Drainandllthefueltankwithfresh
gasoline(notmorethan30daysold).
Iftheproblempersists,contactan
AuthorizedServiceDealer.
4.Connectthewiretothesparkplug.
5.Checkthesparkplugandadjustthe
gapifnecessary .Replacethespark
plugifitispitted,fouled,orcracked.
6.Addordrainoiltoadjusttheoillevelin
theenginecrankcasetotheFullmark
onthedipstick.
1.MovethethrottletotheFastposition.
2.Shiftthesnowthrowerintoalowergear .
3.Reducetheamountofsnowremoved
perswath.
4.Don’toverloadthesnowthrowerwith
extremelyheavyorwetsnow.
6.Installand/oradjusttheauger/impeller
drivebelt;refertowww.Toro.com
forservicinginformationortakethe
snowthrowertoanAuthorizedService
Dealer.
26
Page 27

Problem
7.Theauger/impellerdrivebeltisworn
orbroken.
PossibleCauseCorrectiveAction
7.Replacetheauger/impellerdrivebelt;
refertowww.Toro.comforservicing
informationortakethesnowthrowerto
anAuthorizedServiceDealer.
Dischargechuteeitherdoesnotlockinto
placeordoesnotmove
snowoffthesurface
1.Thedischargechutelatchisnot
properlyadjusted.
1.Theskidsand/orscraperarenot
properlyadjusted.
2.Thepressureinthetiresisnotequal.
1.Adjustthedischargechutelatch.
1.Adjusttheskidsand/orthescraper. Snowthrowerdoesnotproperlyclearthe
2.Checkandadjustthepressureinone
orbothtires.
27
Page 28

Gas
Powered
Snow
Products
A Two-Year Full Warranty (Limited Warranty for Commercial Use)
The Toro Total Coverage Guarantee
Conditions and Products Covered
The Toro Company and its afliate, Toro Warranty Company,
pursuant to an agreement between them, jointly promise to
repair any Toro Product used for normal residential purposes* if
defective in materials or workmanship.
The following time periods apply from the date of purchase:
Snow Products
All products and attachments 2-year full warranty
Power Max™ snow products:
Chute 5-year full warranty
Chute deector 5-year full warranty
Impeller housing cover 5-year full warranty
This warranty includes the cost of parts and labor, but you must
pay transportation costs. Transportation within a fteen mile
radius of the servicing dealer is covered under this warranty for
two-stage snowthrowers only.
This warranty applies to all gasoline powered snow products.
* Normal residential purposes means use of the product on
the same lot as your home. Use at more than one location is
considered commercial use, and the commercial use warranty
would apply.
Warranty Period
Limited Warranty for Commercial Use
Toro Consumer Products used for commercial, institutional,
or rental use are warranted against defects in materials or
workmanship for 45 days from the date of purchase.
Instructions for Obtaining Warranty Service
If you think that your Toro Product contains a defect in materials
or workmanship, follow this procedure:
1. Contact any Toro Authorized or Master Service Dealer
to arrange service at their dealership. To locate a dealer
convenient to you, refer to the Yellow Pages of your
telephone directory (look under "Lawn Mowers") or access
our website at www.Toro.com. U.S. Customers may also call
800-248-8676 to use our 24-hour Toro dealer locator system.
2. Bring the product and your proof of purchase (sales receipt)
to the Service Dealer.
If for any reason you are dissatised with the Service Dealer’s
analysis or with the assistance provided, contact us at:
Owner Responsibilities
You must maintain your Toro Product by following the
maintenance procedures described in the operator’s manual.
Such routine maintenance, whether performed by a dealer or by
you, is at your expense.
Items and Conditions Not Covered
There is no other express warranty except for special emission
system coverage on some products and the Toro Starting
Guarantee on GTS engines. This express warranty does not cover:
• Cost of regular maintenance service or parts, such as lters,
fuel, lubricants, tune-up parts, brake and clutch adjustments
• Any product or part which has been altered, misused,
or required replacement or repair due to normal wear,
accidents, or lack of proper maintenance
• Repairs necessary due to improper fuel, contaminants in the
fuel system, or failure to properly prepare the fuel system
prior to any period of non-use over three months
All repairs covered by this warranty must be performed by an
Authorized Toro Service Dealer using Toro approved replacement
parts.
General Conditions
Repair by an Authorized Toro Service Dealer is your sole remedy
under this warranty.
Neither The Toro Company nor Toro Warranty Company is liable
for indirect, incidental or consequential damages in connection
with the use of the Toro Products covered by this warranty,
including any cost or expense of providing substitute equipment
or service during reasonable periods of malfunction or non-use
pending completion of repairs under this warranty.
Some states do not allow exclusions of incidental or consequential
damages, or limitations on how long an implied warranty lasts,
so the above exclusions and limitations may not apply to you.
This warranty gives you specic legal rights, and you may also
have other rights which vary from state to state.
Customer Care Department, Consumer Division
Toro Warranty Company
8111 Lyndale Avenue South
Bloomington, MN 55420-1196
866-336-5205 Toll free (U.S. customers)
866-854-9033 Toll free (Canada customers)
Countries Other than the United States or Canada
Customers who have purchased Toro products exported from the United States or Canada should contact their Toro Distributor
(Dealer) to obtain guarantee policies for your country, province, or state. If for any reason you are dissatised with your Distributor’s
service or have difculty obtaining guarantee information, contact the Toro importer. If all other remedies fail, you may contact us
at Toro Warranty Company.
374-0011 Rev B
 Loading...