


Form No. 3365-632 Rev A
Power Clear Snowthrower
Model No. 38587—Serial No. 311000001 and Up
Model No. 38593—Serial No. 311000001 and Up
Operator's Manual
Introduction
This machine is intended to be used by residential homeowners or professional, hired operators. It is designed primarily for removing snow from paved surfaces, such as driveways and sidewalks, and other surfaces for traffic on residential or commercial properties. It is not designed for removing materials other than snow, nor is it designed for clearing off gravel surfaces.
Read this information carefully to learn how to operate and maintain your machine properly and to avoid injury and machine damage. You are responsible for operating the machine properly and safely.
You may contact Toro directly at www.Toro.com for machine and accessory information, help finding a dealer, or to register your machine.
Whenever you need service, genuine Toro parts, or additional information, contact an Authorized Service Dealer or Toro Customer Service and have the model and serial numbers of your machine ready. Figure 1 identifies the location of the model and serial numbers on the machine. Write the numbers in the space provided.
Figure 1
1.Model and serial number location
Model No.
Serial No.
This manual identifies potential hazards and has safety messages identified by the safety alert symbol (Figure 2), which signals a hazard that may cause serious injury or death if you do not follow the recommended precautions.
Figure 2
1. Safety alert symbol
This manual uses 2 words to highlight information. Important calls attention to special mechanical information and Note emphasizes general information worthy of special attention.
WARNING
CALIFORNIA
Proposition 65 Warning
The engine exhaust from this product contains chemicals known to the State of California to cause cancer, birth defects, or other reproductive harm.
This spark ignition system complies with Canadian ICES-002.
The enclosed Engine Owner’s Manual is supplied for information regarding the US Environmental Protection Agency (EPA) and the California Emission Control Regulation of emission systems, maintenance, and warranty. Replacements may be ordered through the engine manufacturer.
Safety
This machine meets or exceeds the B71.3 specifications of the American National Standards Institute in effect at the time of production.
Read and understand the contents of this manual before you start the engine.
 This is the safety alert symbol. It is used to alert you to potential personal injury hazards. Obey all safety messages that follow this symbol to avoid possible injury or death.
Improperly using or maintaining this machine could result in injury or death. To reduce this
© 2010—The Toro® Company |
Register at www.Toro.com. |
Original Instructions (EN) |
8111 Lyndale Avenue South |
|
Printed in the USA |
Bloomington, MN 55420 |
|
All Rights Reserved |

potential, comply with the following safety instructions.
This machine is capable of amputating hands and feet and of throwing objects. Failure to observe the following safety instructions could result in serious injury.
Training
•Read, understand, and follow all instructions on the machine and in the manual(s) before operating this machine. Be thoroughly familiar with the controls and the proper use of the machine. Know how to stop the machine and disengage the controls quickly.
•Never allow children to operate the machine. Never allow adults to operate the machine without proper instruction.
•Keep the area of operation clear of all persons, particularly small children.
•Exercise caution to avoid slipping or falling.
Preparation
•Thoroughly inspect the area where the machine is to be used and remove all doormats, sleds, boards, wires, and other foreign objects.
•Do not operate the machine without wearing adequate winter garments. Avoid loose fitting clothing that can get caught in moving parts. Wear footwear that will improve footing on slippery surfaces.
•Handle fuel with care; it is highly flammable.
–Use an approved fuel container.
–Never add fuel to a running engine or hot engine.
–Fill fuel tank outdoors with extreme care. Never fill fuel tank indoors.
–Never fill containers inside a vehicle or on a truck or trailer bed with a plastic liner. Always place containers on the ground, away from your vehicle, before filling.
–When practical, remove gas-powered machinery from the truck or trailer and refuel it on the ground. If this is not possible, then refuel such machinery on a trailer with a portable container, rather than from a gasoline dispenser nozzle.
–Keep the nozzle in contact with the rim of the fuel tank or container opening at all times, until refueling is complete. Do not use a nozzle lock-open device.
–Replace gasoline cap securely and wipe up spilled fuel.
–If fuel is spilled on clothing, change clothing immediately.
•Use extension cords and receptacles as specified by the manufacturer for all machines with electric starting motors.
•Do not attempt to clear snow from a gravel or crushed rock surface. This machine is intended for use only on paved surfaces.
•Never attempt to make any adjustments while the engine is running (except when specifically recommended by manufacturer).
•Always wear safety glasses or eye shields during operation or while performing an adjustment or repair to protect eyes from foreign objects that may be thrown from the machine.
Operation
•Do not put hands or feet near or under rotating parts. Keep clear of the discharge opening at all times.
•Exercise extreme caution when operating on or crossing gravel drives, walks, or roads. Stay alert for hidden hazards or traffic.
•After striking a foreign object, stop the engine, remove the ignition key, thoroughly inspect the machine for any damage, and repair the damage before restarting and operating the machine.
•If the machine should start to vibrate abnormally, stop the engine and check immediately for the cause. Vibration is generally a warning of trouble.
•Stop the engine whenever you leave the operating position, before unclogging the rotor blade housing or discharge chute, and when making any repairs, adjustments or inspections.
•When cleaning, repairing, or inspecting the machine, stop the engine and make certain that the rotor blades and all moving parts have stopped.
•Do not run the engine indoors, except when starting the engine and for transporting the machine in or out of the building. Open the outside doors; exhaust fumes are dangerous.
•Exercise extreme caution when operating on slopes.
•Never operate the machine without proper guards and other safety protective devices in place and working.
•Never direct the discharge toward people or areas where property damage can occur. Keep children and others away.
•Do not overload the machine capacity by attempting to clear snow at too fast a rate.
2

•Look behind and use care when backing up with the machine.
•Disengage power to the rotor blades when the machine is transported or not in use.
•Never operate the machine without good visibility or light. Always be sure of your footing, and keep a firm hold on the handles. Walk; never run.
•Never touch a hot engine or muffler (Figure 3).
Figure 3
1.Symbol stamped on the exhaust baffle indicting a hot surface.
Clearing a Clogged Discharge
Chute
Hand contact with the rotating rotor blades inside the discharge chute is the most common cause of injury associated with snowthrowers. Never use your hand to clean out the discharge chute.
To clear the chute:
•Shut the engine off!
•Wait 10 seconds to be sure the rotor blades have stopped rotating.
•Always use a clean-out tool, not your hands.
Maintenance and Storage
•Check all fasteners at frequent intervals for proper tightness to be sure the machine is in safe working condition.
•Never store the machine with fuel in the fuel tank inside a building where ignition sources are present, such as hot water heaters, space heaters, or clothes dryers. Allow the engine to cool before storing in any enclosure.
•Always refer to the Operator’s Manual for important details if the machine is to be stored for an extended period.
•Maintain or replace safety and instruction labels, as necessary.
•Run the machine a few minutes after throwing snow to prevent freeze-up of moving parts.
Toro Snowthrower Safety
The following list contains safety information specific to Toro products or other safety information that you must know.
•Rotating rotor blades can injure fingers or hands. Stay behind the handles and away from the discharge opening while operating the machine.
Keep your face, hands, feet, and any other part of your body or clothing away from moving or rotating parts.
•Before adjusting, cleaning, repairing, and inspecting the machine, and before unclogging the discharge chute, stop the engine, remove the key, and wait for all moving parts to stop.
•Before leaving the operating position, stop the engine, remove the ignition key, and wait for all moving parts to stop.
•If a shield, safety device, or decal is damaged, illegible, or lost, repair or replace it before beginning operation. Also, tighten any loose fasteners.
•Do not smoke while handling gasoline.
•Do not use the machine on a roof.
•Do not touch the engine while it is running or soon after it has stopped because the engine may be hot enough to cause a burn.
•Perform only those maintenance instructions described in this manual. Before performing any maintenance, service, or adjustment, stop the engine and remove the key. If major repairs are ever needed, contact an Authorized Service Dealer.
•Do not change the governor settings on the engine.
•When storing the machine for more than 30 days, drain the fuel from the fuel tank to prevent a potential hazard. Store fuel in an approved fuel container. Remove the key from the ignition switch before storing the machine.
•Purchase only genuine Toro replacement parts and accessories.
3

Safety and Instructional Decals
Important: Safety and instruction decals are located near areas of potential danger. Replace damaged decals.
94-2577
1.To engage the rotor blades, hold the control bar against the handle.
2.To disengage the rotor blades, release the control bar.
110-9398
Order part no. 108-4928
1. |
Warning—read the |
5. |
Engine switch Off |
|
Operator’s Manual. |
6. |
Primer |
2. |
Cutting/dismemberment |
||
|
hazard, impeller—stop the |
|
|
|
engine before leaving the |
|
|
|
machine. |
|
|
3. |
Thrown object |
7. |
Push the primer twice to |
|
hazard—keep bystanders |
|
prime the engine. |
|
a safe distance from the |
|
|
|
machine. |
8. |
Plug the machine in to |
4. |
Engine switch On |
||
|
|
|
power the electric starter. |
|
|
|
|
114-1707
Order part no. 114-3752
1. |
Warning—read the |
5. |
Engine switch Off |
|
Operator’s Manual. |
6. |
Primer |
2. |
Cutting/dismemberment |
||
|
hazard, rotor blades—stop |
|
|
|
the engine before leaving |
|
|
|
the machine. |
|
|
3. |
Thrown object |
7. |
Push the primer twice to |
|
hazard—keep bystanders |
|
prime the engine. |
|
a safe distance from the |
|
|
|
machine. |
|
|
4. |
Engine switch On |
|
|
|
|
|
|
115-5660
1.Cutting dismemberment hazards, impeller and auger—do not place your hand in the chute; remove the ignition key and read the instructions before servicing or performing maintenance.
4
Setup
Loose Parts
Use the chart below to verify that all parts have been shipped.
Procedure |
Description |
Qty. |
Use |
|
|
|
|
1 |
No parts required |
– |
Unfold the handle. |
|
|
|
|
|
Discharge chute |
1 |
|
2 |
Chute handle |
1 |
Install the discharge chute. |
Phillips head screws |
3 |
||
Washers |
3 |
|
|
|
|
||
|
Locknuts |
3 |
|
1
Unfolding the Handle
No Parts Required
Procedure
Figure 5
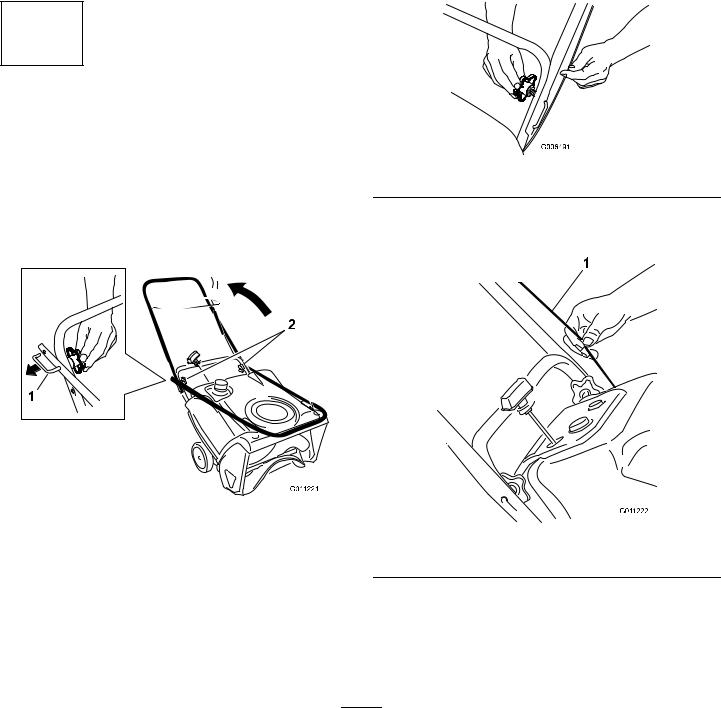
1.Loosen the handle knobs, pull out the “U”-shaped handle locks until you can move the handle freely, and rotate the handle to the operating position (Figure 4).
Important: Ensure that you do not pinch or kink the control cable (Figure 6).
Figure 4
1. “U”-shaped handle lock (2) 2. Handle knobs |
Figure 6 |
|
|
1. |
Control cable |
|
||
2.Insert the end of the “U”-shaped handle lock into the open hole in the handle and tighten the handle knobs until they are snug (Figure 5).
5
 Loading...