

Page 1
CCR
G016241
ModelNo.38564—SerialNo.314000001andUp
™
6053QuickClearSnowthrower
FormNo.3384-525RevA
Operator'sManual
Introduction
Thismachineisintendedtobeusedbyresidential
homeownersorprofessional,hiredoperators.Itis
designedprimarilyforremovingsnowfrompaved
surfaces,suchasdrivewaysandsidewalks,andother
surfacesfortrafconresidentialorcommercial
properties.Itisnotdesignedforremovingmaterials
otherthansnow,norisitdesignedforclearingoffgravel
surfaces.
Readthisinformationcarefullytolearnhowtooperateand
maintainyourmachineproperlyandtoavoidinjuryand
machinedamage.Youareresponsibleforoperatingthe
machineproperlyandsafely.
YoumaycontactTorodirectlyatwww .Toro.comformachine
andaccessoryinformation,helpndingadealer,ortoregister
yourmachine.
Wheneveryouneedservice,genuineT oroparts,oradditional
information,contactanAuthorizedServiceDealerorToro
CustomerServiceandhavethemodelandserialnumbersof
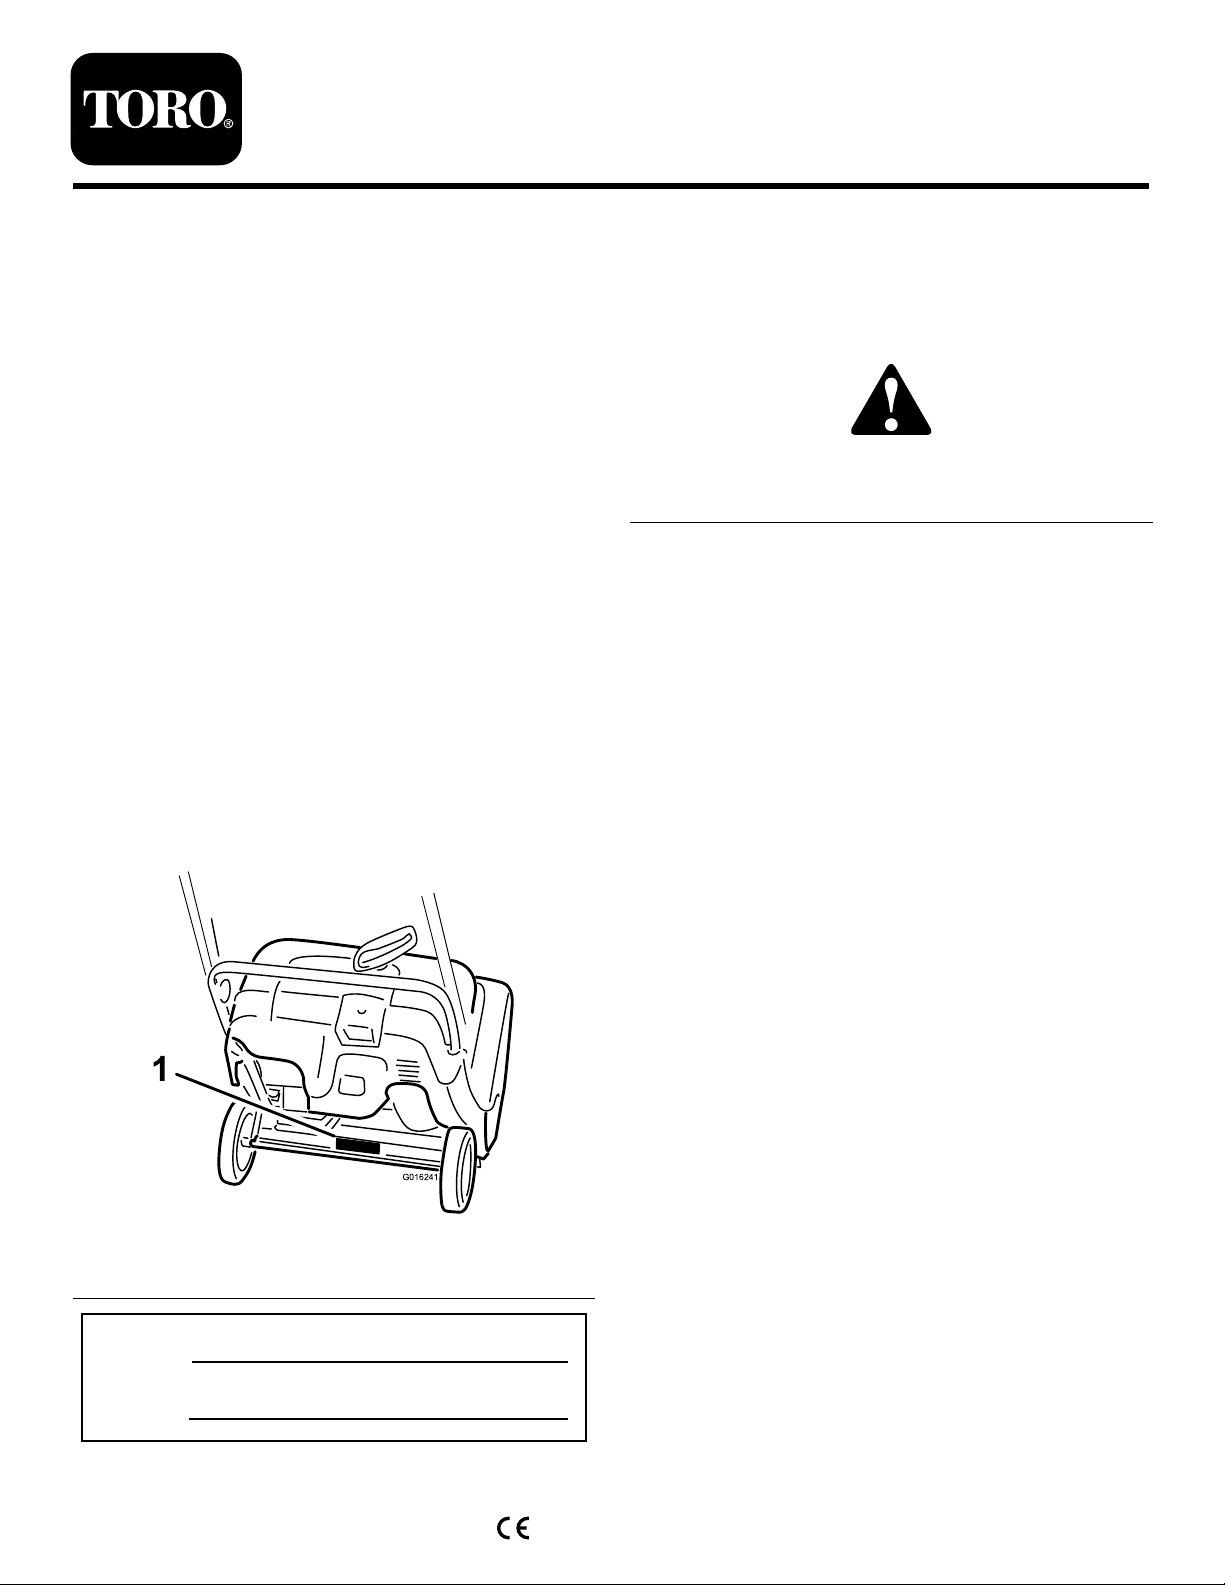
yourmachineready.Figure1identiesthelocationofthe
modelandserialnumbersonthemachine.Writethenumbers
inthespaceprovided.
Figure1
1.Modelandserialnumberlocation
ModelNo.
SerialNo.
Thismanualidentiespotentialhazardsandhassafety
messagesidentiedbythesafetyalertsymbol(Figure2),
whichsignalsahazardthatmaycauseseriousinjuryordeath
ifyoudonotfollowtherecommendedprecautions.
Figure2
1.Safetyalertsymbol
Thismanualuses2wordstohighlightinformation.
Importantcallsattentiontospecialmechanicalinformation
andNoteemphasizesgeneralinformationworthyofspecial
attention.
Contents
Introduction..................................................................1
Training.................................................................2
Preparation.............................................................2
Operation...............................................................2
ClearingaCloggedDischargeChute..........................3
MaintenanceandStorage..........................................3
ToroSnowthrowerSafety.........................................3
SoundPressure.......................................................4
SoundPower..........................................................4
Hand-ArmVibration...............................................4
SafetyandInstructionalDecals.................................4
Setup............................................................................5
1UnfoldingtheHandle............................................5
2InstallingtheDischargeChute................................5
3FillingtheEnginewithOil......................................6
4AdjustingtheControlCable...................................7
ProductOverview..........................................................7
Operation.....................................................................7
FillingtheFuelTank................................................8
CheckingtheEngine-OilLevel..................................8
StartingtheEngine..................................................8
EngagingtheRotorBlades........................................9
DisengagingtheRotorBlades..................................10
StoppingtheEngine...............................................10
AdjustingtheDischargeChute.................................10
ClearingaCloggedDischargeChute.........................10
PreventingFreeze-upafterUse.................................10
OperatingTips......................................................11
Maintenance.................................................................11
RecommendedMaintenanceSchedule(s)......................11
©2014—TheT oro®Company
8111LyndaleAvenueSouth
Bloomington,MN55420
Registeratwww.T oro.com.
OriginalInstructions(EN)
PrintedintheUSA
AllRightsReserved
*3384-525*A
Page 2

AdjustingtheControlCable.....................................12
InspectingtheRotorBlades.....................................13
ChangingtheEngineOil.........................................13
Storage........................................................................15
StoringtheSnowthrower.........................................15
Safety
Readandunderstandthecontentsofthismanualbefore
youstarttheengine.
Thesafetyalertsymbolshownin
alertyoutopotentialpersonalinjuryhazards.Obeyall
safetymessagesthatfollowthissymboltoavoidpossible
injuryordeath.
Improperlyusingormaintainingthismachinecould
resultininjuryordeath.Toreducethispotential,
complywiththefollowingsafetyinstructions.
Thismachineiscapableofamputatinghandsandfeet
andofthrowingobjects.Failuretoobservethefollowing
safetyinstructionscouldresultinseriousinjury.
Training
•Read,understand,andfollowallinstructionsonthe
machineandinthemanual(s)beforeoperatingthis
machine.Bethoroughlyfamiliarwiththecontrolsand
theproperuseofthemachine.Knowhowtostopthe
machineanddisengagethecontrolsquickly.
•Neverallowchildrentooperatethemachine.Neverallow
adultstooperatethemachinewithoutproperinstruction.
•Keeptheareaofoperationclearofallpersons,particularly
smallchildren.
•Exercisecautiontoavoidslippingorfalling.
Preparation
•Thoroughlyinspecttheareawherethemachineistobe
usedandremovealldoormats,sleds,boards,wires,and
otherforeignobjects.
•Donotoperatethemachinewithoutwearingadequate
wintergarments.Avoidloosettingclothingthatcanget
caughtinmovingparts.W earfootwearthatwillimprove
footingonslipperysurfaces.
•Handlefuelwithcare;itishighlyammable.
–Useanapprovedfuelcontainer.
–Neveraddfueltoarunningengineorhotengine.
–Fillfueltankoutdoorswithextremecare.Neverll
fueltankindoors.
–Neverllcontainersinsideavehicleoronatruckor
trailerbedwithaplasticliner.Alwaysplacecontainers
ontheground,awayfromyourvehicle,beforelling.
–Whenpractical,removegas-poweredmachineryfrom
thetruckortrailerandrefuelitontheground.If
Figure2isusedto
thisisnotpossible,thenrefuelsuchmachineryona
trailerwithaportablecontainer,ratherthanfroma
gasolinedispensernozzle.
–Keepthenozzleincontactwiththerimofthefuel
tankorcontaineropeningatalltimes,untilrefueling
iscomplete.Donotuseanozzlelock-opendevice.
–Replacegasolinecapsecurelyandwipeupspilledfuel.
–Iffuelisspilledonclothing,changeclothing
immediately.
•Useextensioncordsandreceptaclesasspeciedby
themanufacturerforallmachineswithelectricstarting
motors.
•Donotattempttoclearsnowfromagravelorcrushed
rocksurface.Thismachineisintendedforuseonlyon
pavedsurfaces.
•Neverattempttomakeanyadjustmentswhiletheengine
isrunning(exceptwhenspecicallyrecommendedby
manufacturer).
•Alwayswearsafetyglassesoreyeshieldsduringoperation
orwhileperforminganadjustmentorrepairtoprotect
eyesfromforeignobjectsthatmaybethrownfromthe
machine.
Operation
•Donotputhandsorfeetnearorunderrotatingparts.
Keepclearofthedischargeopeningatalltimes.
•Exerciseextremecautionwhenoperatingonorcrossing
graveldrives,walks,orroads.Stayalertforhidden
hazardsortrafc.
•Afterstrikingaforeignobject,stoptheengine,remove
theignitionkey ,thoroughlyinspectthemachineforany
damage,andrepairthedamagebeforerestartingand
operatingthemachine.
•Ifthemachineshouldstarttovibrateabnormally,stopthe
engineandcheckimmediatelyforthecause.Vibrationis
generallyawarningoftrouble.
•Stoptheenginewheneveryouleavetheoperating
position,beforeuncloggingtherotorbladehousing
ordischargechute,andwhenmakinganyrepairs,
adjustmentsorinspections.
•Whencleaning,repairing,orinspectingthemachine,stop
theengineandmakecertainthattherotorbladesandall
movingpartshavestopped.
•Donotruntheengineindoors,exceptwhenstarting
theengineandfortransportingthemachineinorout
ofthebuilding.Opentheoutsidedoors;exhaustfumes
aredangerous.
•Exerciseextremecautionwhenoperatingonslopes.
•Neveroperatethemachinewithoutproperguardsand
othersafetyprotectivedevicesinplaceandworking.
•Neverdirectthedischargetowardpeopleorareaswhere
propertydamagecanoccur.Keepchildrenandothers
away.
2
Page 3

•Donotoverloadthemachinecapacitybyattemptingto
clearsnowattoofastarate.
•Lookbehindandusecarewhenbackingupwiththe
machine.
•Disengagepowertotherotorbladeswhenmachineis
transportedornotinuse.
•Neveroperatethemachinewithoutgoodvisibilityor
light.Alwaysbesureofyourfooting,andkeeparm
holdonthehandles.Walk;neverrun.
•Nevertouchahotengineormufer(
Figure3
1.Symbolstampedontheexhaustbafeindicatingahot
surface.
Figure3).
ToroSnowthrowerSafety
ThefollowinglistcontainssafetyinformationspecictoToro
productsorothersafetyinformationthatyoumustknow .
•Rotatingrotorbladescaninjurengersorhands.
Staybehindthehandlesandawayfromthedischarge
openingwhileoperatingthemachine.Keepyourface,
hands,feet,andanyotherpartofyourbodyor
clothingawayfrommovingorrotatingparts.
•Beforeadjusting,cleaning,repairing,andinspectingthe
machine,andbeforeuncloggingthedischargechute,stop
theengine,removethekey,andwaitforallmoving
partstostop.
•Beforeleavingtheoperatingposition,stoptheengine,
removetheignitionkey,andwaitforallmovingpartsto
stop.
•Ifashield,safetydevice,ordecalisdamaged,illegible,or
lost,repairorreplaceitbeforebeginningoperation.Also,
tightenanyloosefasteners.
•Donotsmokewhilehandlinggasoline.
•Donotusethemachineonaroof.
ClearingaCloggedDischarge Chute
Handcontactwiththerotatingrotorbladesinsidethe
dischargechuteisthemostcommoncauseofinjury
associatedwithsnowthrowers.Neveruseyourhandtoclean
outthedischargechute.
Toclearthechute:
•Shuttheengineoff!
•Wait10secondstobesuretherotorbladeshavestopped
rotating.
•Alwaysuseaclean-outtool,notyourhands.
MaintenanceandStorage
•Checkallfastenersatfrequentintervalsforproper
tightnesstobesurethemachineisinsafeworking
condition.
•Neverstorethemachinewithfuelinthefueltankinsidea
buildingwhereignitionsourcesarepresent,suchashot
waterheaters,spaceheaters,orclothesdryers.Allowthe
enginetocoolbeforestoringinanyenclosure.
•Donottouchtheenginewhileitisrunningorsoonafter
ithasstoppedbecausetheenginemaybehotenoughto
causeaburn.
•Performonlythosemaintenanceinstructionsdescribedin
thismanual.Beforeperforminganymaintenance,service,
oradjustment,stoptheengineandremovethekey .If
majorrepairsareeverneeded,contactanAuthorized
ServiceDealer.
•Donotchangethegovernorsettingsontheengine.
•Whenstoringthemachineformorethan30days,drain
thefuelfromthefueltanktopreventapotentialhazard.
Storefuelinanapprovedfuelcontainer.Removethekey
fromtheignitionswitchbeforestoringthemachine.
•PurchaseonlygenuineTororeplacementpartsand
accessories.
•AlwaysrefertotheOperator’ sManualforimportantdetails
ifthemachineistobestoredforanextendedperiod.
•Maintainorreplacesafetyandinstructionlabels,as
necessary.
•Runthemachineafewminutesafterthrowingsnowto
preventfreeze-upoftherotorblades.
3
Page 4
SoundPressure
Hand-ArmVibration
Thismachinehasasoundpressurelevelattheoperator’sear
of88dBA,whichincludesanUncertaintyValue(K)of1
dBA.Thesoundpressurelevelwasdeterminedaccordingto
theproceduresoutlinedinENISO11201.
SoundPower
Thismachinehasaguaranteedsoundpowerlevelof104
dBA,whichincludesanUncertaintyValue(K)of3.75dBA.
Thesoundpowerlevelwasdeterminedaccordingtothe
proceduresoutlinedinENISO3744.
Measuredvibrationlevelforthelefthand=8.4m/s
Measuredvibrationlevelfortherighthand=10.7m/s
UncertaintyValue(K)=4.3m/s
Themeasuredvaluesweredeterminedaccordingtothe
proceduresoutlinedinENISO20643.
2
SafetyandInstructionalDecals
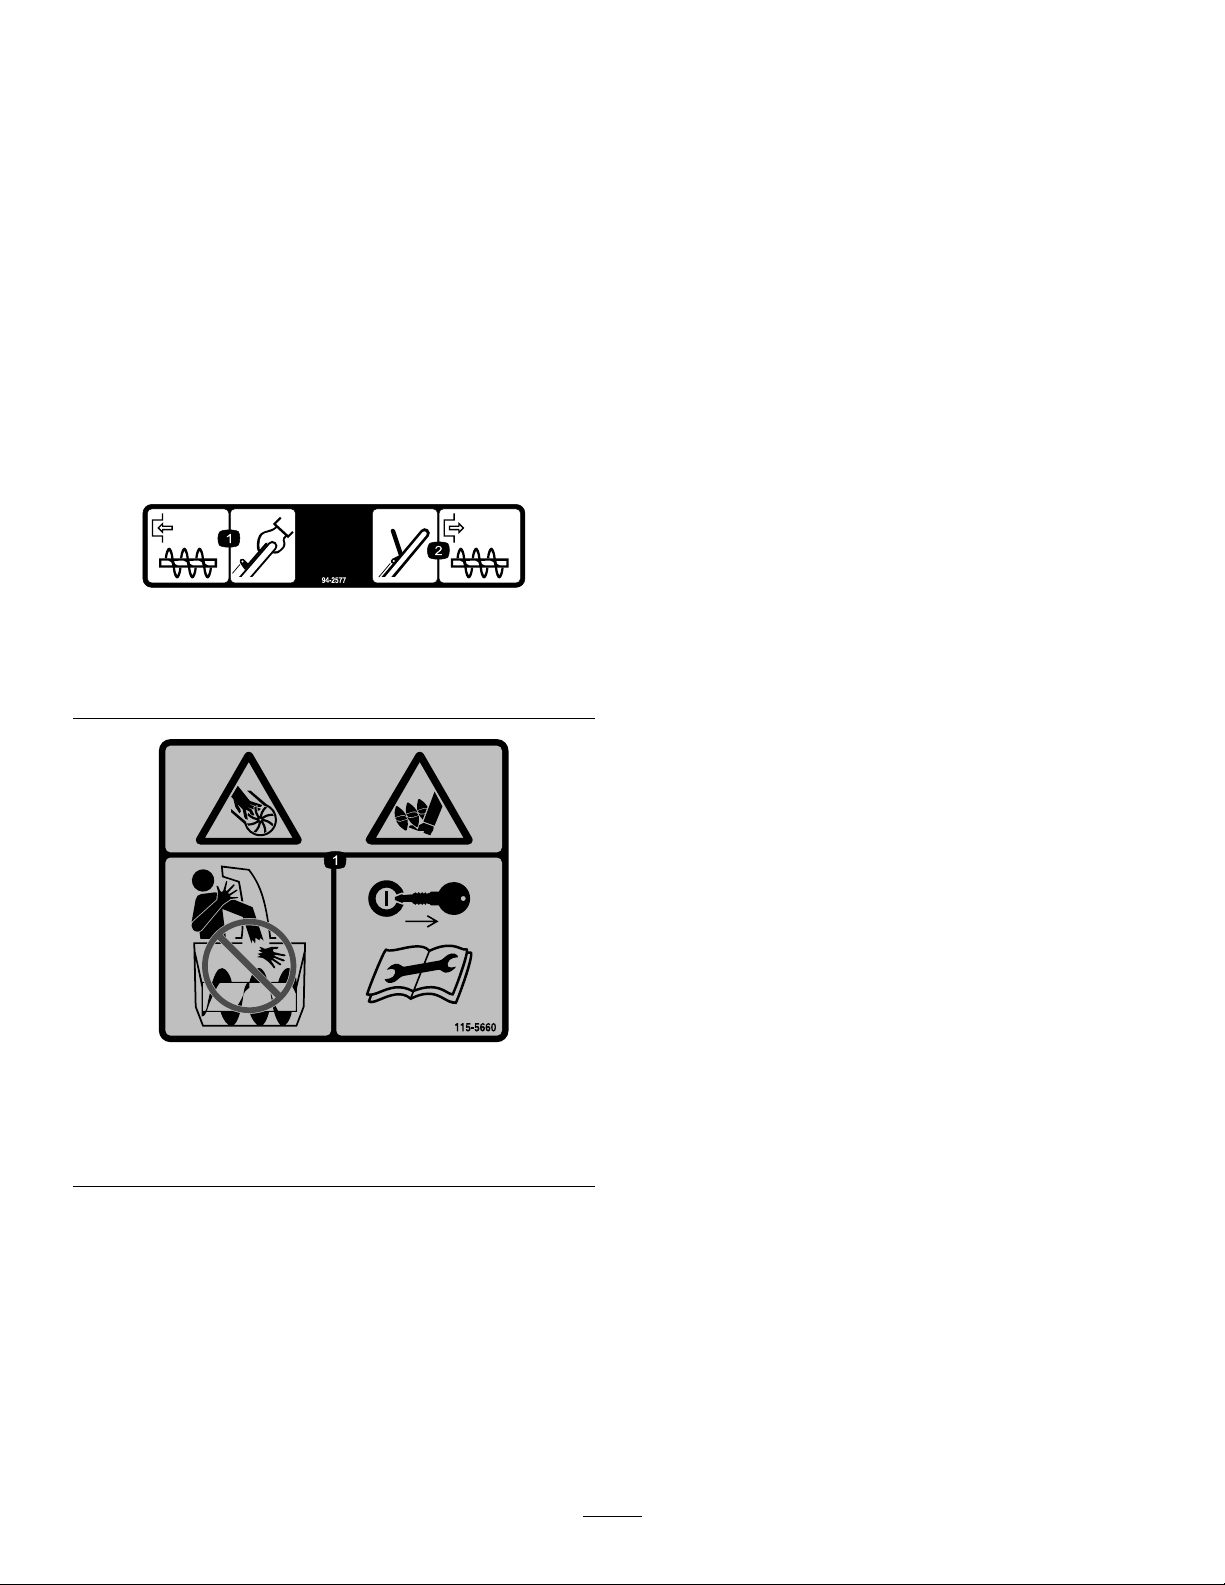
Important:Safetyandinstructiondecalsarelocatednearareasofpotentialdanger.Replacedamageddecals.
94-2577
1.Toengagetherotorblades,holdthecontrolbaragainst
thehandle.
2.Todisengagetherotorblades,releasethecontrolbar.
2
2
115-5660
1.Cuttingdismembermenthazards,impellerandauger—do
notplaceyourhandinthechute;removetheignitionkey
andreadtheinstructionsbeforeservicingorperforming
maintenance.
4
Page 5
Setup
G016242
LooseParts
Usethechartbelowtoverifythatallpartshavebeenshipped.
ProcedureDescription
1
2
Nopartsrequired
Dischargechute1
Chutehandle
Phillips-headbolts3
Washers3
Locknuts3
1
UnfoldingtheHandle
NoPartsRequired
Procedure
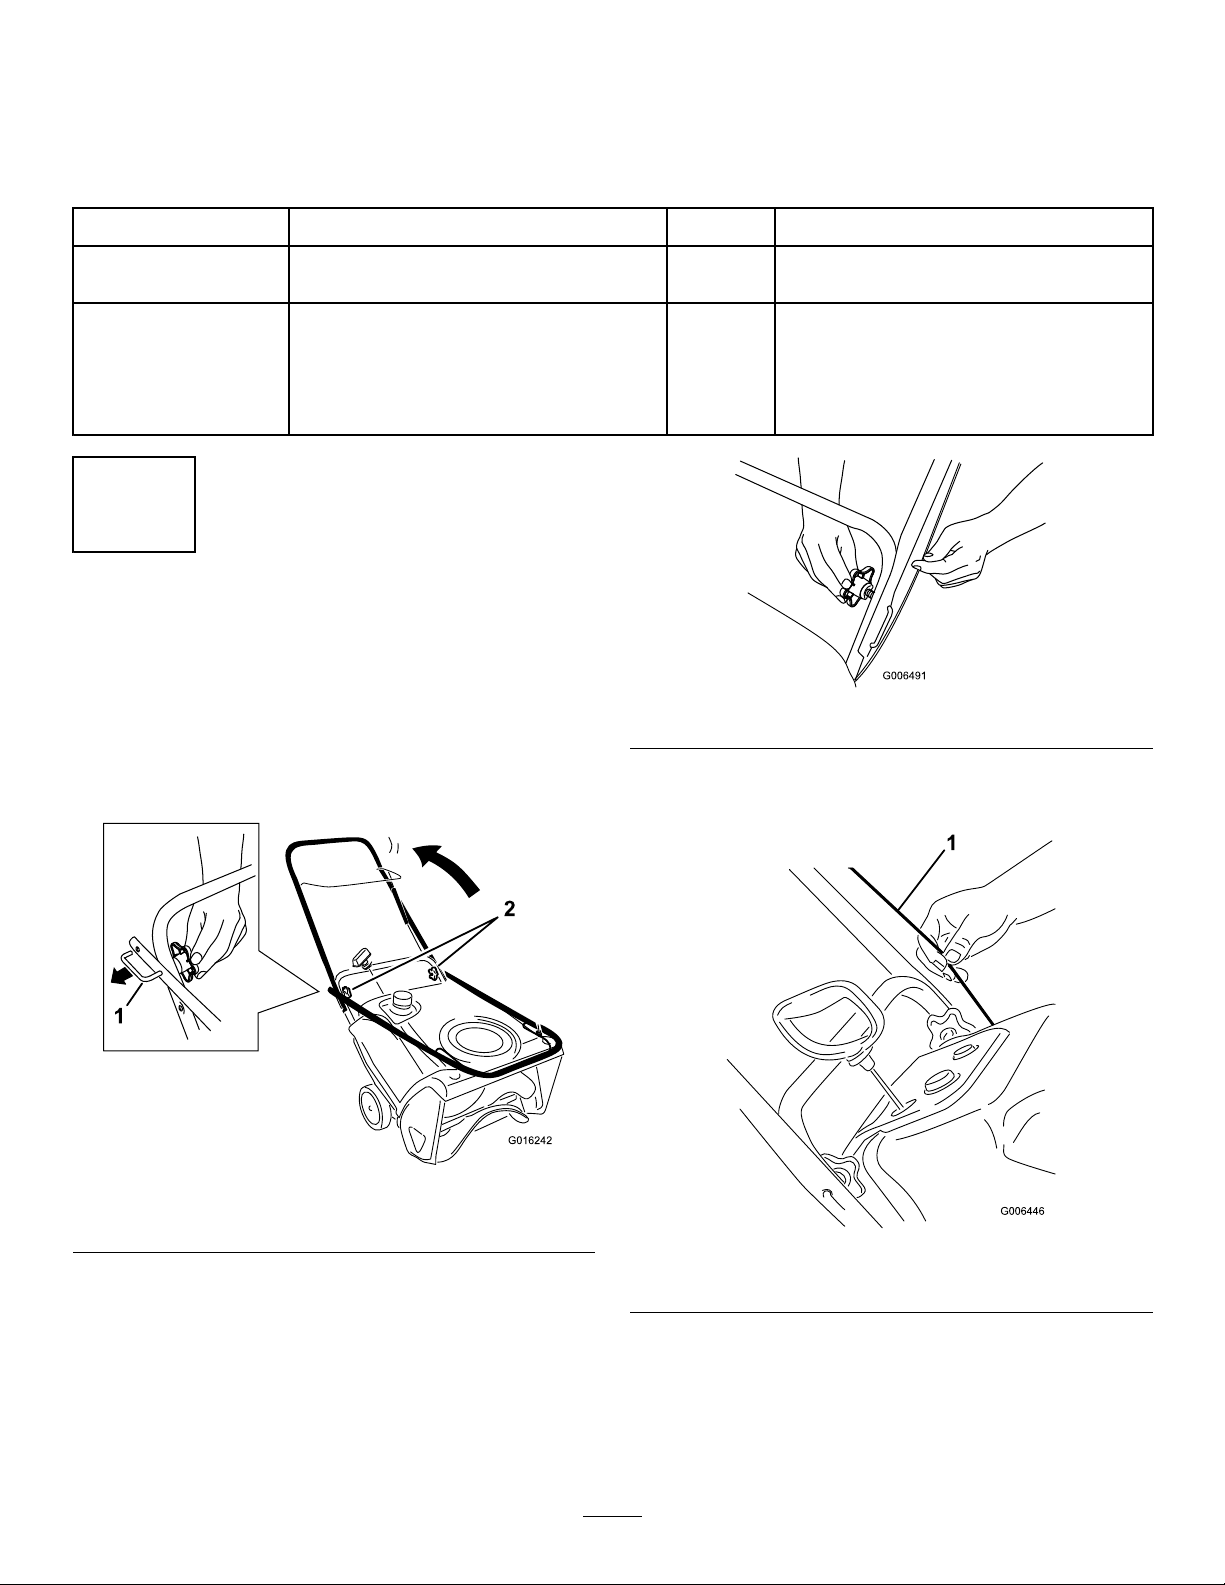
1.Loosenthehandleknobs,pullouttheU-shapedhandle
locksuntilyoucanmovethehandlefreely,androtate
thehandletotheoperatingposition(Figure4).
Qty.
–
1
Important:Ensurethatyoudonotpinchorkink
thecontrolcable(Figure6).
Unfoldthehandle.
Installthedischargechute.
Figure5
Use
Figure4
1.U-shapedhandlelock(2)
2.InserttheendoftheU-shapedhandlelockintothe
openholeinthehandleandtightenthehandleknobs
untiltheyaresnug(Figure5).
2.Handleknobs
Figure6
1.Controlcable
5
Page 6
2
3
InstallingtheDischargeChute
Partsneededforthisprocedure:
1Dischargechute
1
Chutehandle
3Phillips-headbolts
3Washers
3Locknuts
Procedure
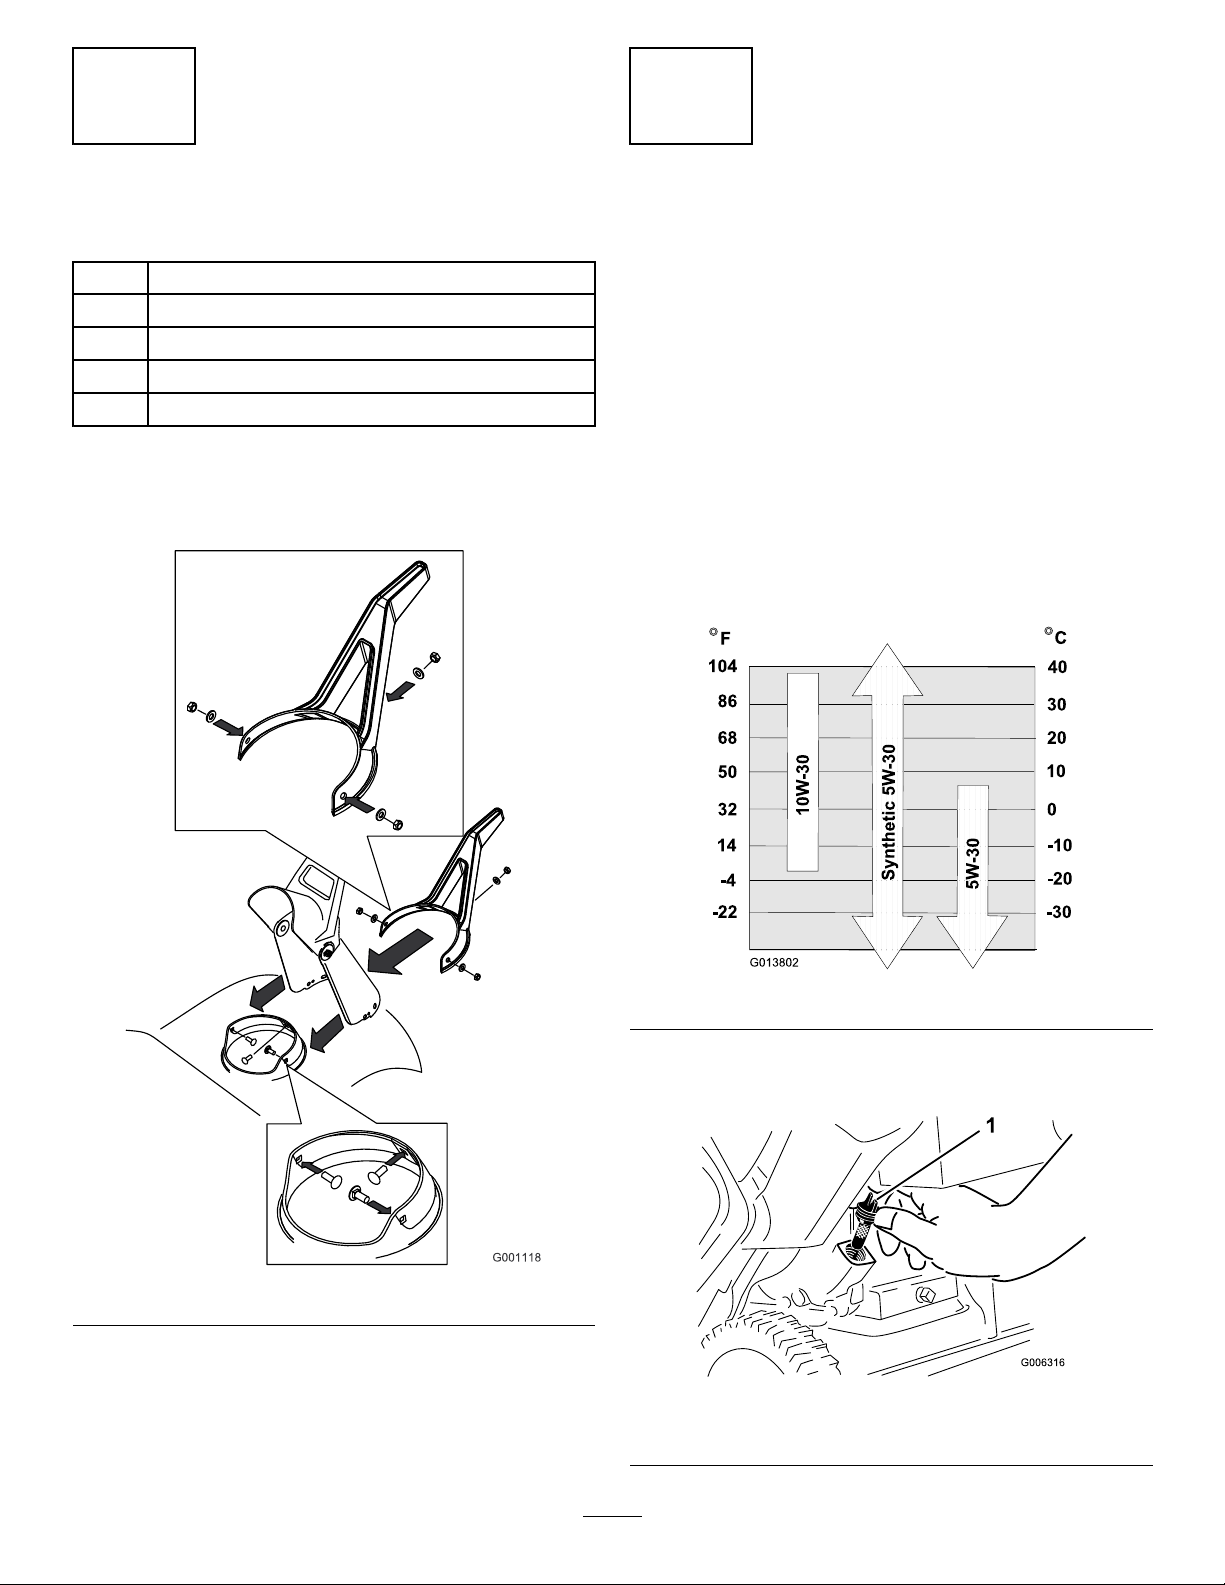
Installthedischargechuteasshown(Figure7).
FillingtheEnginewithOil
NoPartsRequired
Procedure
Yourmachinedoesnotcomewithoilintheengine,butit
doescomewithabottleofoil.
Important:Beforestartingtheengine,lltheengine
withoil.
Note:Thebottleofoilmaycontainanounceor2morethan
theenginerequires.Donotoverllorunderlltheengine.
Maxll:0.6l(20oz.),type:automotivedetergentoilwithan
APIserviceclassicationofSJ,SL,orhigher.
Use
Figure8belowtoselectthebestoilviscosityforthe
outdoortemperaturerangeexpected:
Figure7
Figure8
1.Movethemachinetoalevelsurface.
2.Cleanaroundtheoil-llcap(Figure9).
Figure9
1.Oil-llcap
6
Page 7
3.Unscrewtheoilllcapandremoveit.
4.Withthemachineintheoperatingposition,carefully
pouroilintothecrankcase.Wait3minutesfortheoil
tosettleandaddenoughtobringittothepointof
overow .Thereshouldbeverylittle,ifany,oilleftin
thebottle.
Note:Youmaytipthemachineforward(handleup)
tomakeaddingoileasier.Remembertoreturnthe
machinetotheoperatingpositionbeforecheckingthe
oillevel.
Important:Donottipthemachinealltheway
forwardontoitsnose,orfuelmayleakoutofthe
machine.
5.Screwtheoil-llcapintotheoilllholeandtightenit
securely.
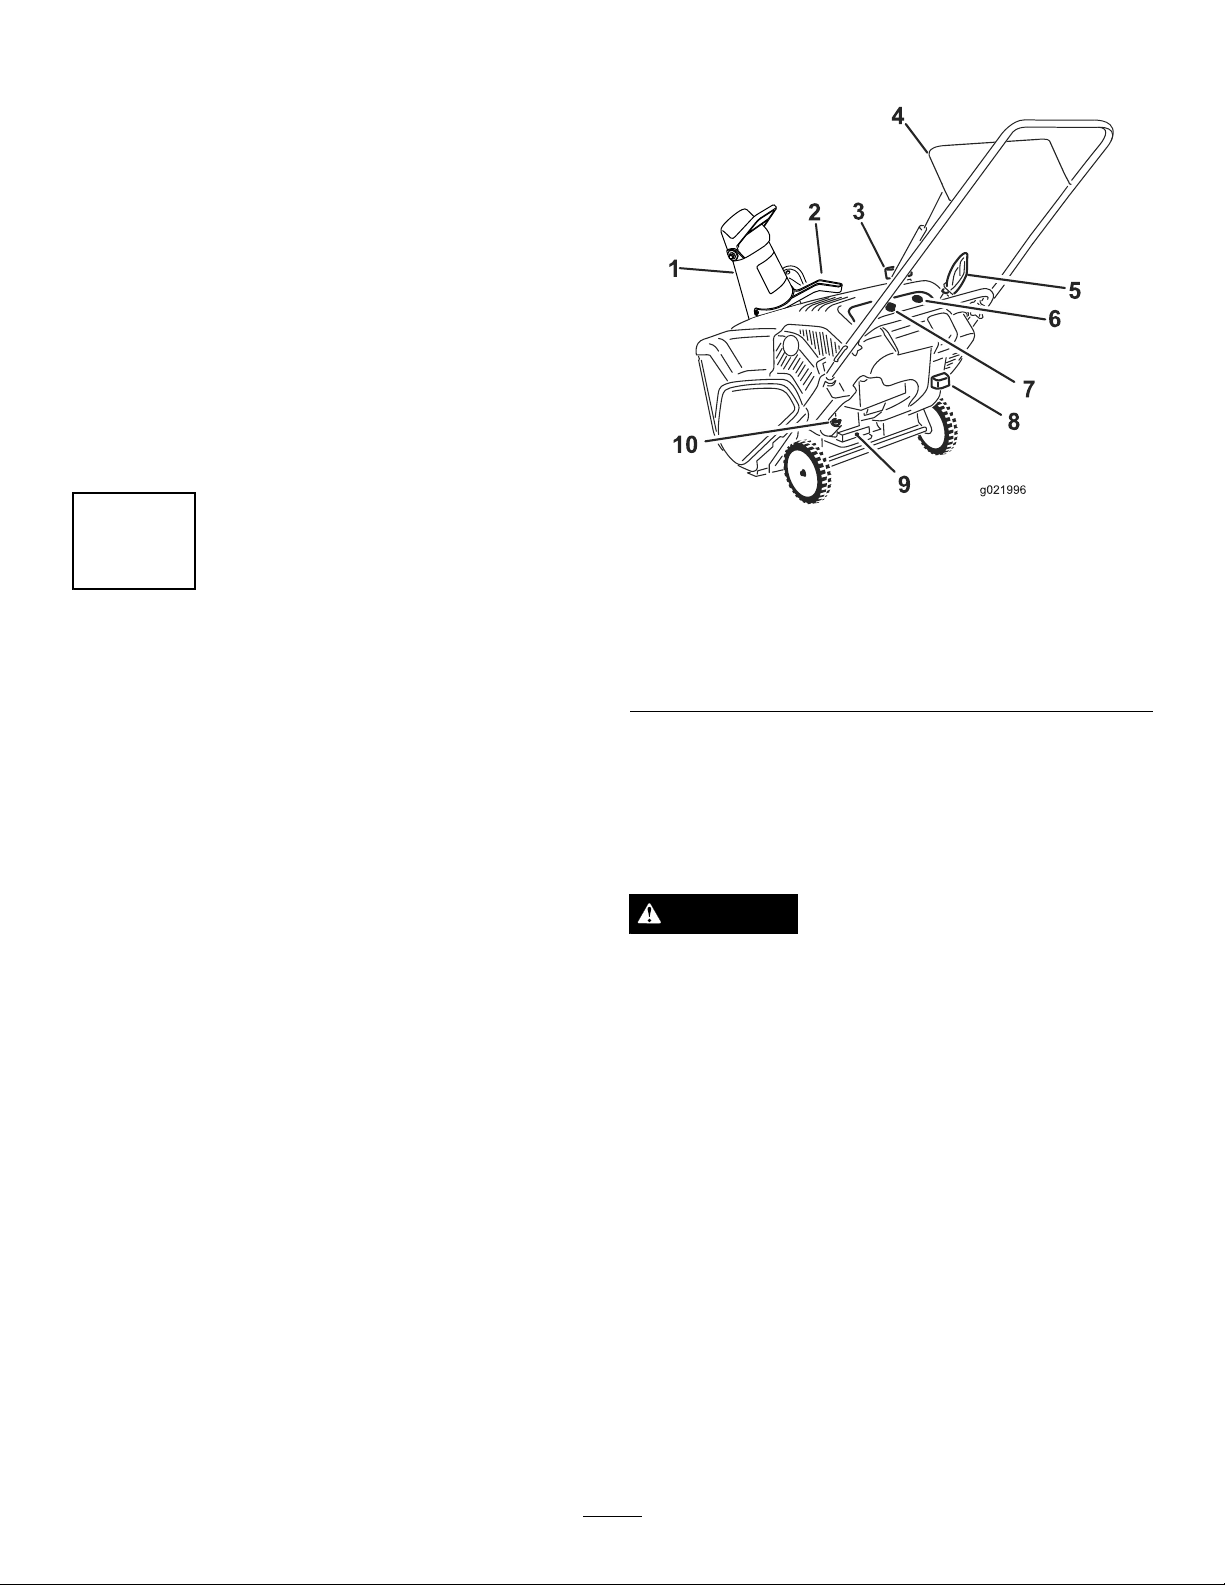
ProductOverview
Figure10
4
AdjustingtheControlCable
NoPartsRequired
Procedure
Referto(page).
1.Dischargechute6.Primer
2.Discharge-chutehandle7.Ignitionkey
3.Fuel-tankcap
4.Controlbar9.Oil-drainplug
5.Recoil-starthandle
8.Chokelever
10.Oil-llcap
Operation
Note:Determinetheleftandrightsidesofthemachine
fromthenormaloperatingposition.
DANGER
Gasolineisextremelyammableandexplosive.A
reorexplosionfromgasolinecanburnyouand
others.
•Topreventastaticchargefromignitingthe
gasoline,placethecontainerand/ormachine
onthegroundbeforelling,notinavehicleor
onanobject.
•Fillthetankoutdoorswhentheengineiscold.
Wipeupspills.
•Donothandlegasolinewhensmokingoraround
anopenameorsparks.
•Storegasolineinanapprovedfuelcontainer,out
ofthereachofchildren.
•Donottipthemachinebackwardwithfuelin
thefueltank;otherwise,fuelmayleakoutof
themachine.
7
Page 8
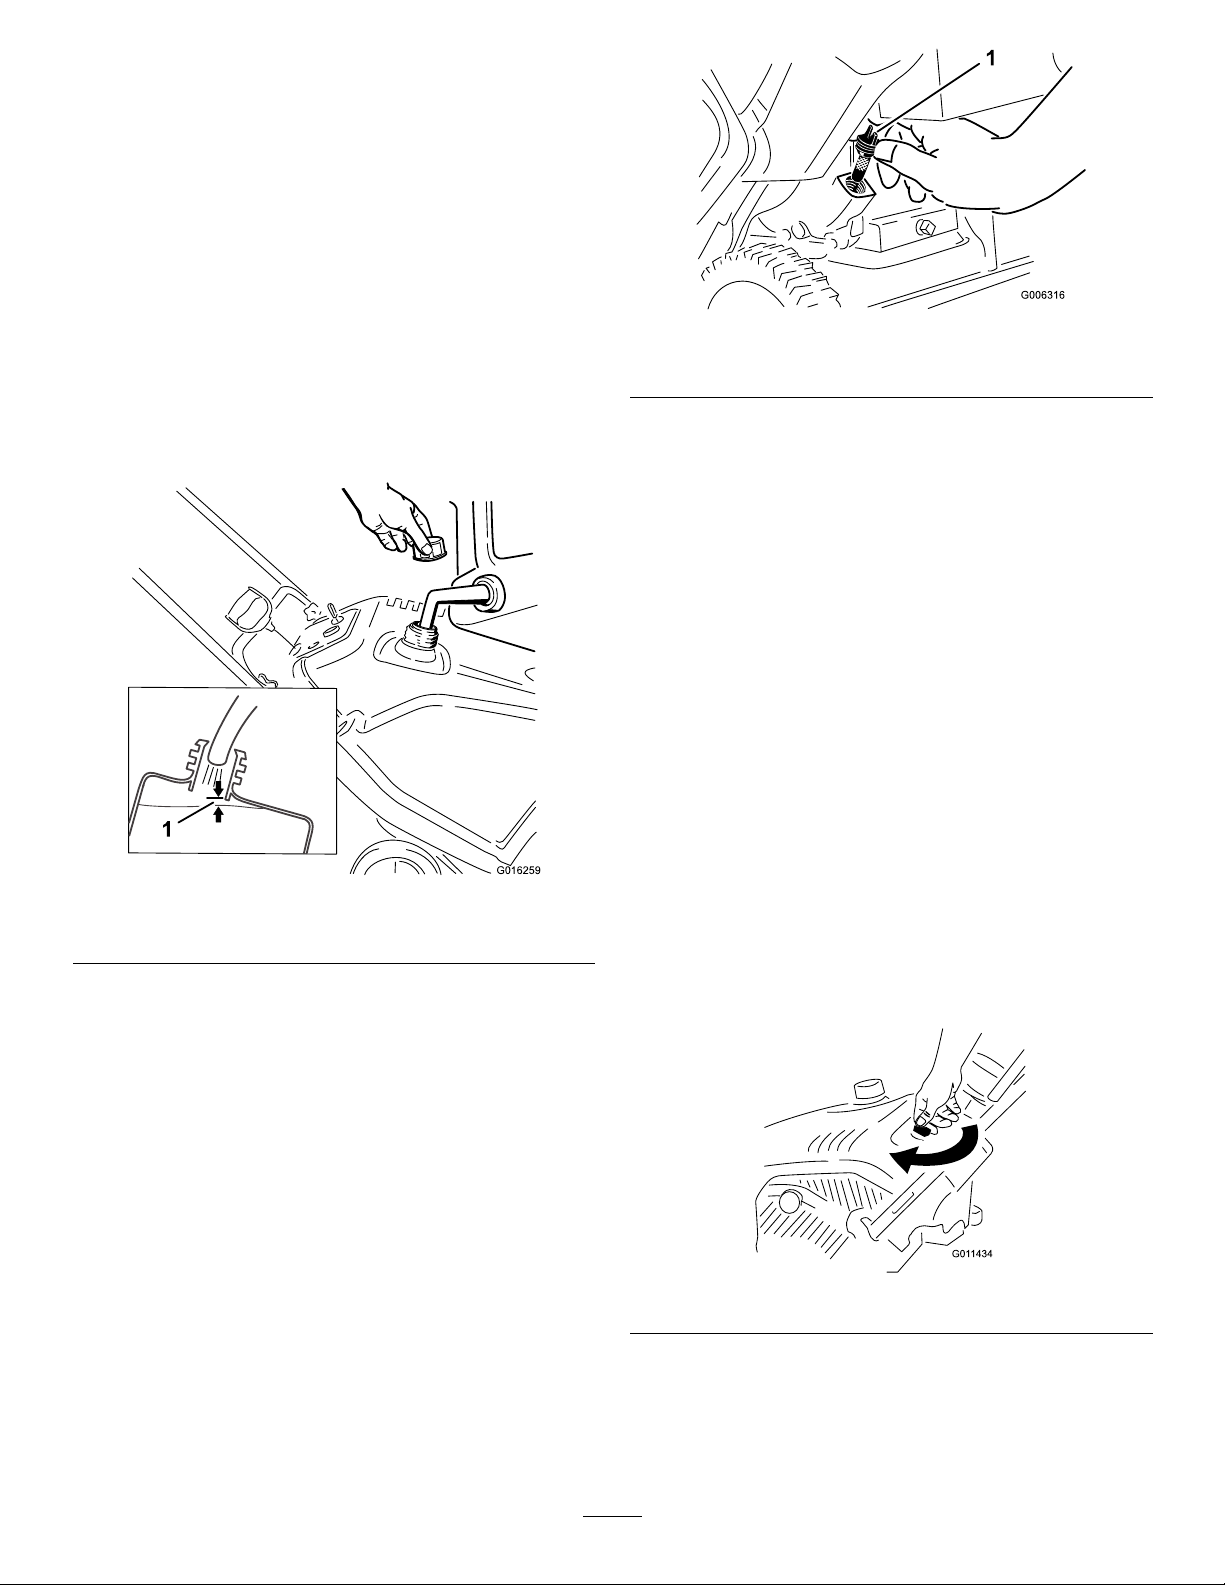
FillingtheFuelTank
G016259
•Forbestresults,useonlyclean,fresh,unleadedgasoline
withanoctaneratingof87orhigher((R+M)/2rating
method).
•Oxygenatedfuelwithupto10%ethanolor15%MTBE
byvolumeisacceptable.
•Donotuseethanolblendsofgasoline(suchasE15
orE85)withmorethan10%ethanolbyvolume.
Performanceproblemsand/orenginedamagemayresult
whichmaynotbecoveredunderwarranty.
•Donotusegasolinecontainingmethanol.
•Donotstorefueleitherinthefueltankorfuelcontainers
overthewinterunlessafuelstabilizerisused.
•Donotaddoiltogasoline.
Figure12
1.Oilllcap
3.Unscrewtheoil-llcapandremoveit.
4.Iftheoillevelislow,keepthemachineintheoperating
positionandcarefullypouroilintothecrankcase
untilthepointofoverow .Wait3minutesfortheoil
tosettleandaddenoughtobringittothepointof
overow .(Max.ll:0.6l(20oz.),type:automotive
detergentoilwithanAPIserviceclassicationofSJ,
SL,orhigher.)
Figure11
1.1/4inch(6mm)
Note:Forbestresults,purchaseonlythequantityofgasoline
thatyouexpecttousein30days.Otherwise,youmayadd
fuelstabilizertonewlypurchasedgasolinetokeepitfreshfor
upto6months.
CheckingtheEngine-OilLevel
ServiceInterval:Beforeeachuseordaily—Checktheengine
oillevelandaddoilifnecessary.
Note:Youmaytipthemachineforward(handleup)
tomakeaddingoileasier.Remembertoreturnthe
machinetotheoperatingpositionbeforecheckingthe
oillevel.
Important:Donottipthemachinealltheway
forwardontoitsnose,orfuelmayleakoutofthe
machine.
5.Screwtheoil-llcapintotheoil-llholeandhand
tightenitsecurely.
StartingtheEngine
1.TurntheignitionkeyclockwisetotheOnposition
(
Figure13).
1.Movethemachinetoalevelsurface.
2.Cleanaroundtheoil-llcap(Figure12).
Figure13
2.Pulloutthechokelever(Figure14andFigure15).
8
Page 9
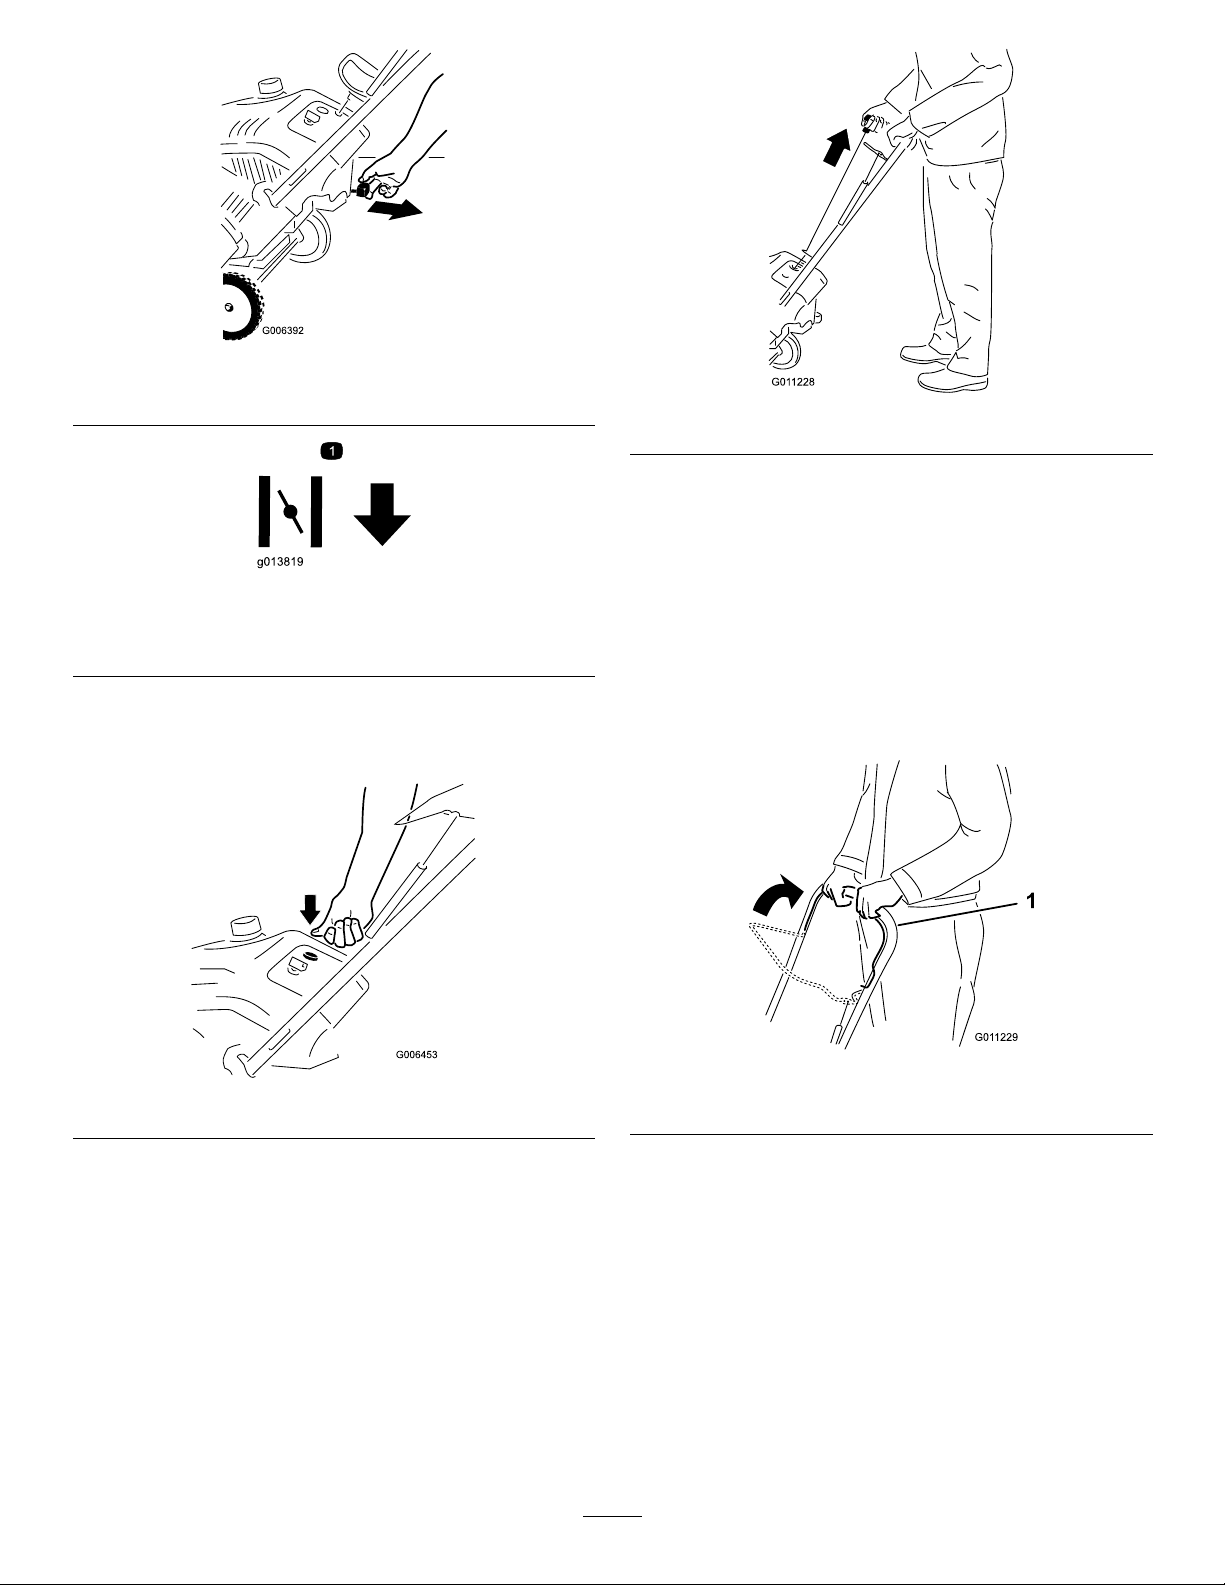
Figure14
1.Chokelever
Figure15
1.Symbolsonthechokeleverindicatingtomovethechoke
levertotherighttoactivatethechoke.
3.Firmlypushintheprimer3timeswithyourthumb,
holdingtheprimerinaforasecondbeforereleasingit
eachtime(Figure16).
Figure17
Note:Ifyoupulltherecoilhandleandfeelno
resistance,thestartermaybefrozen.Thawoutthe
starterbeforeattemptingtostartthemachine.
5.Whiletheengineisrunning,pushinthechokelever
slowly.
EngagingtheRotorBlades
Toengagetherotorblades,holdthecontrolbaragainstthe
handle(Figure18).
Figure16
Note:Removeyourglovewhenyoupushinthe
primersothataircannotescapefromtheprimerhole.
Important:Donotusetheprimerorthechokeif
theenginehasbeenrunningandishot.Excessive
primingmayoodtheengineandpreventitfrom
starting.
4.Pulltherecoil-starthandle(Figure17).
Figure18
1.Controlbar
9
Page 10
DisengagingtheRotorBlades
G0 16 29 7
ClearingaCloggedDischarge
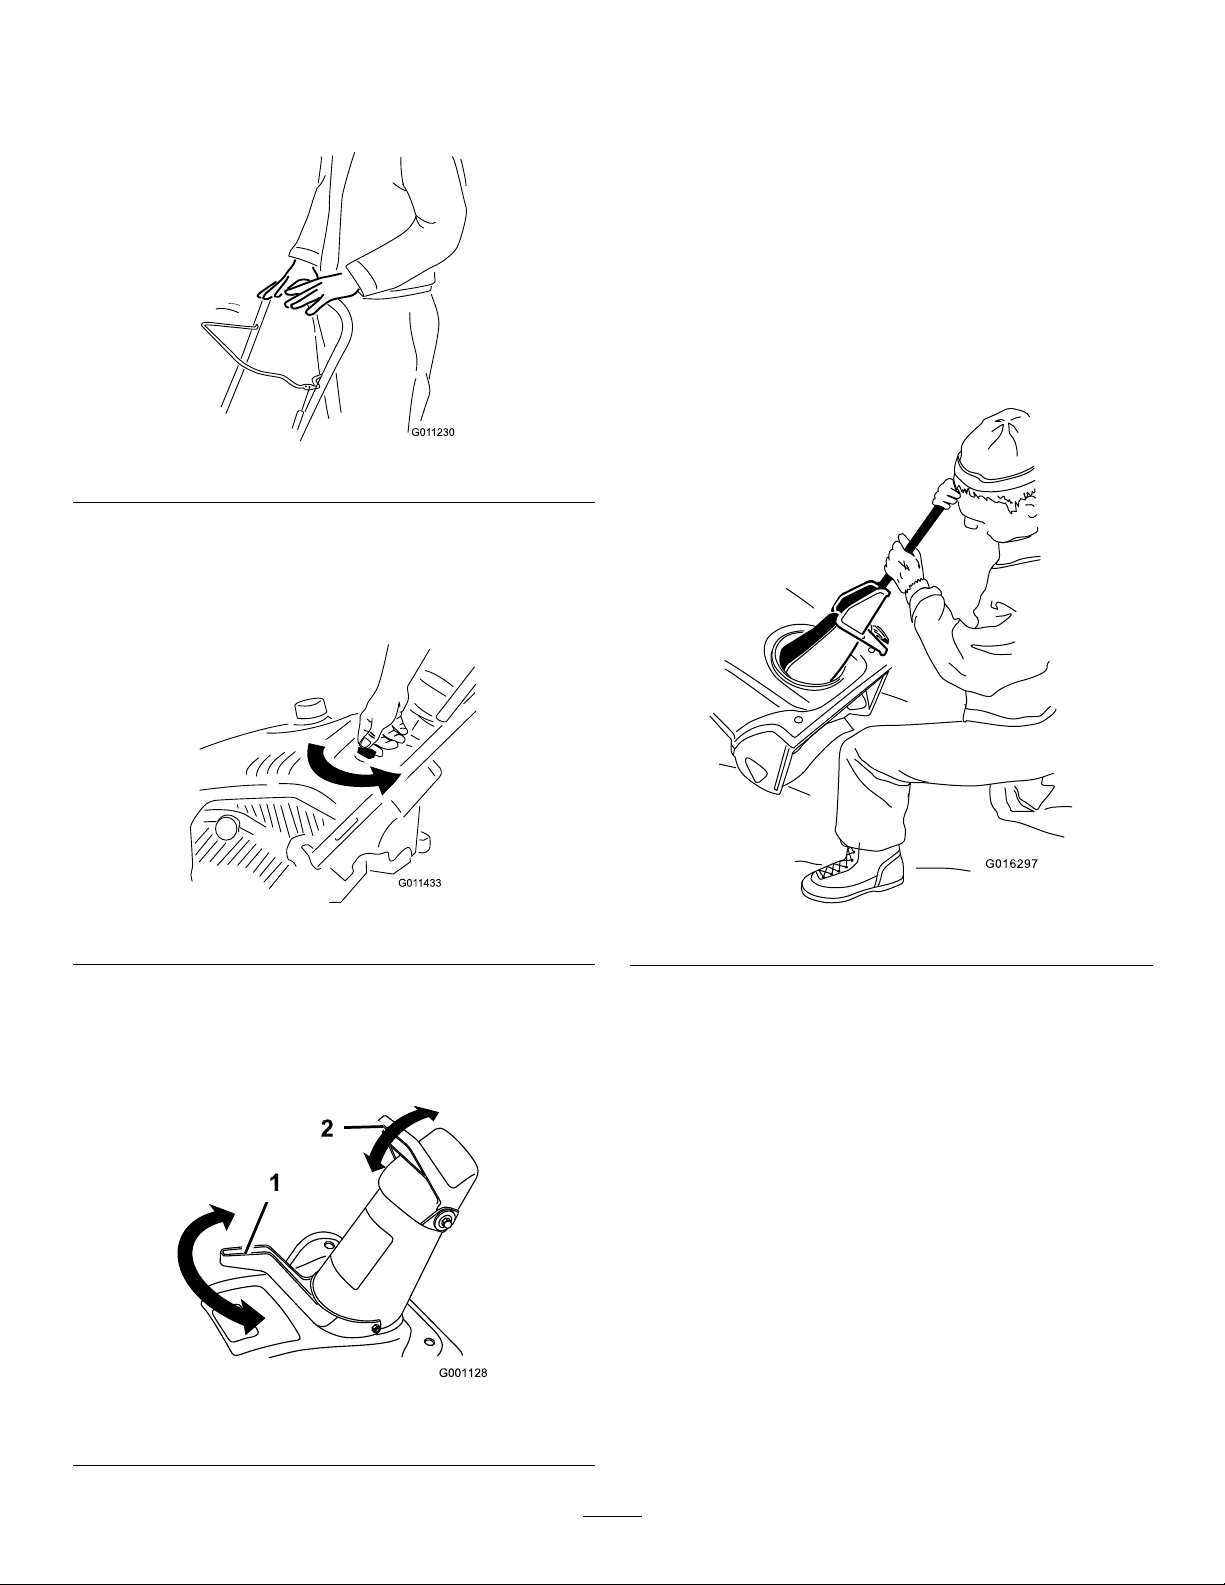
Todisengagetherotorblades,releasethecontrolbar(Figure
19).
Figure19
StoppingtheEngine
Tostoptheengine,turntheignitionkeycounterclockwiseto
theOffposition(Figure20).
Chute
Important:Handcontactwiththerotatingrotorblades
insidethedischargechuteisthemostcommoncauseof
injuryassociatedwithsnowthrowers.Neveruseyour
handtocleanoutthedischargechute.
Toclearthechute:
•Shuttheengineoff!
•Wait10secondstobesuretherotorbladeshavestopped
rotating.
•Alwaysuseaclean-outtool,notyourhands(
Figure22).
Figure20
AdjustingtheDischargeChute
Toadjustthedischargechute,movethechutehandleandthe
chute-deectorhandleasshown(
Figure21
1.Chutehandle2.Chute-deectorhandle
Figure21).
Figure22
PreventingFreeze-upafterUse
•Lettheenginerunforafewminutestopreventmoving
partsfromfreezing.Stoptheengine,waitforallmoving
partstostop,andremoveiceandsnowfromthemachine.
•Cleanoffanysnowandicefromthebaseofthechute.
•Rotatethedischargechuteleftandrighttofreeitfrom
anyicebuildup.
•WiththeignitionkeyintheOffposition,pulltherecoil
starterhandleseveraltimesorconnecttheelectricalcord
toapowersourceandthemachineandpushtheelectric
startbuttononcetopreventtherecoilstarterand/orthe
electricstarterfromfreezingup.
•Insnowyandcoldconditions,somecontrolsandmoving
partsmayfreeze.Donotuseexcessiveforcewhen
tryingtooperatefrozencontrols.Ifyouhavedifculty
operatinganycontrolorpart,starttheengineandletit
runforafewminutes.
10
Page 11
1
2
G016654
3
4
OperatingTips
WARNING
Therotorbladescanthrowstones,toys,andother
foreignobjectsandcauseseriouspersonalinjuryto
theoperatorortobystanders.
•Keeptheareatobeclearedfreeofallobjects
thattherotorbladescouldpickupandthrow.
•Keepallchildrenandpetsawayfromthearea
ofoperation.
•Removethesnowassoonaspossibleafteritfalls.
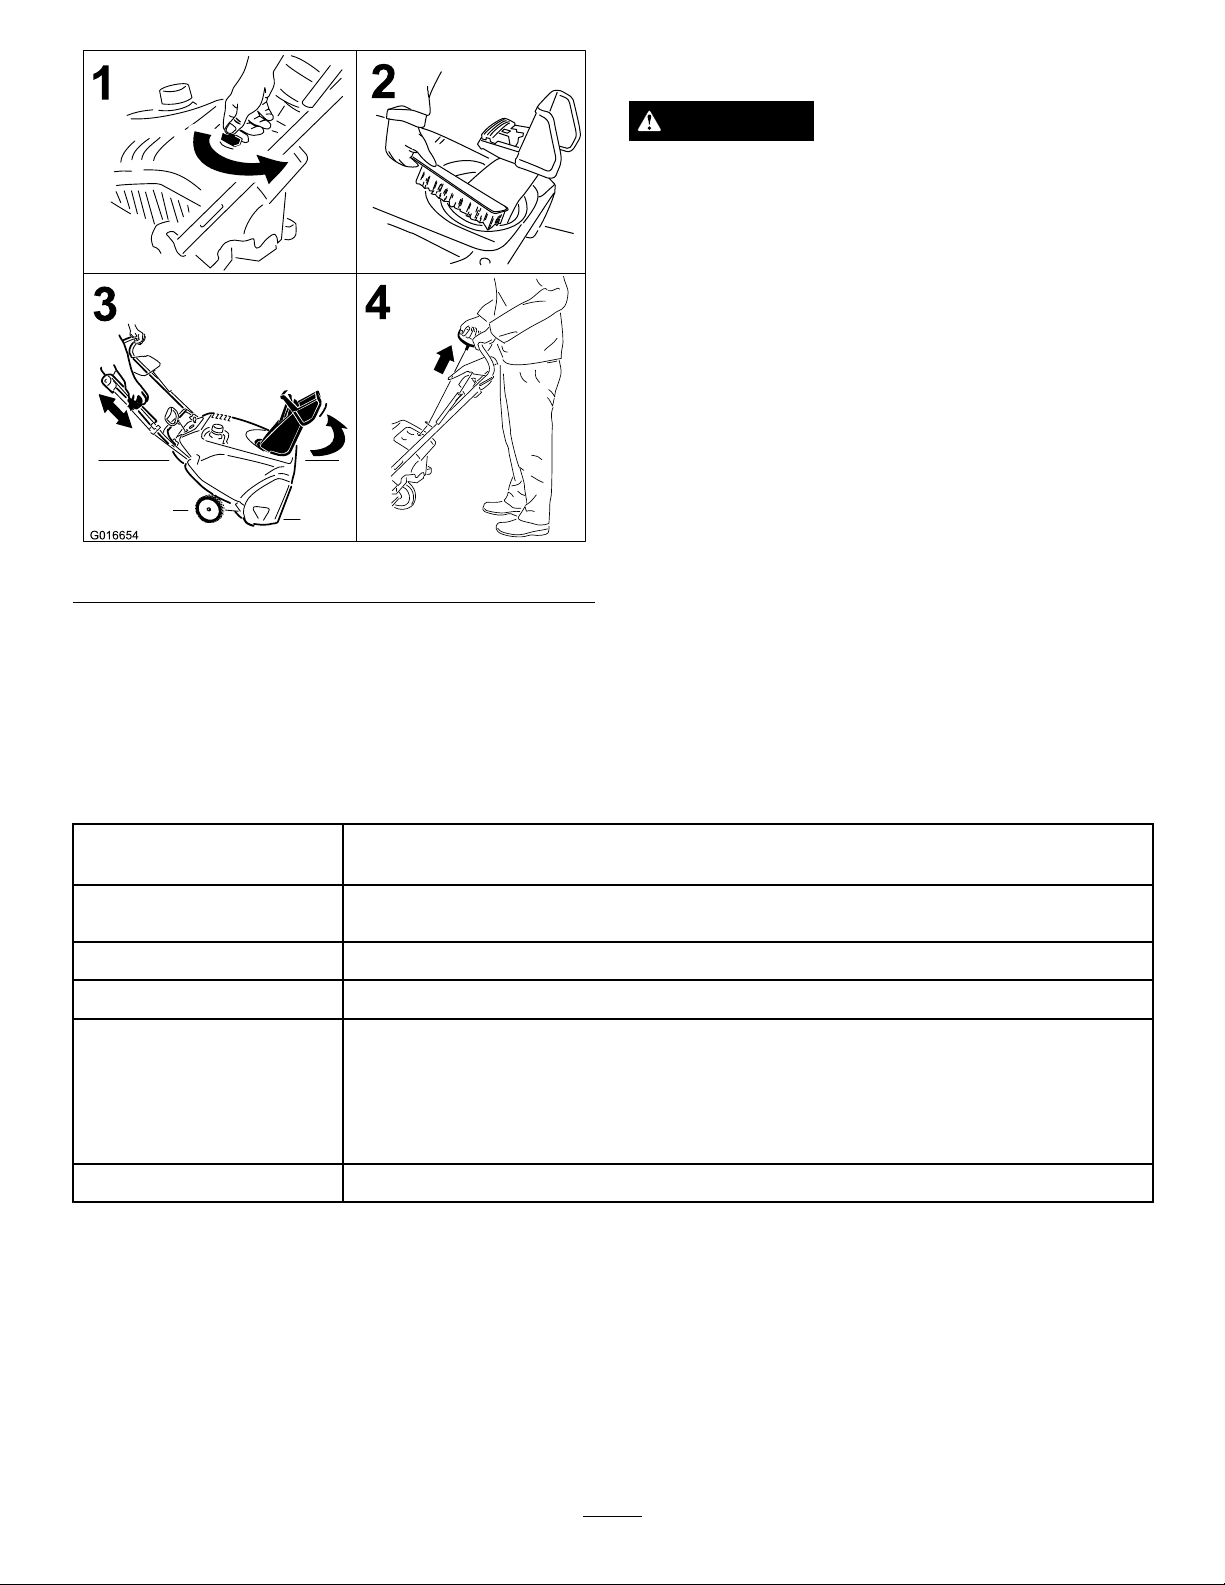
•Ifthemachinedoesnotpropelitselfforwardonslippery
surfacesorinheavysnow,pushforwardonthehandle,
butallowthemachinetoworkatitsownpace.
•Overlapeachswathtoensurecompletesnowremoval.
Figure23
•Dischargethesnowdownwindwheneverpossible.
Maintenance
Note:Determinetheleftandrightsidesofthemachinefromthenormaloperatingposition.
RecommendedMaintenanceSchedule(s)
MaintenanceService
Interval
Afterthersthour
Aftertherst2hours
Beforeeachuseordaily
Yearly
MaintenanceProcedure
•Checkthecontrolcableandadjustitifnecessary.
•Checkforloosefastenersandtightenthemifnecessary.
•Changetheengineoil.
•Checktheengineoillevelandaddoilifnecessary.
•Checkthecontrolcableandadjustitifnecessary.
•InspecttherotorbladesandhaveanAuthorizedServiceDealerreplacetherotor
bladesandscraperifnecessary.
•Changetheengineoil.
•Checkforloosefastenersandtightenthemifnecessary.
•HaveanAuthorizedServiceDealerinspectthedrivebeltandreplaceitifnecessary.
Yearlyorbeforestorage
•Preparethemachineforstorage.
11
Page 12
AdjustingtheControlCable
g011233
CheckingtheControlCable
ServiceInterval:Afterthersthour—Checkthecontrol
cableandadjustitifnecessary.
Yearly—Checkthecontrolcableandadjustitif
necessary.
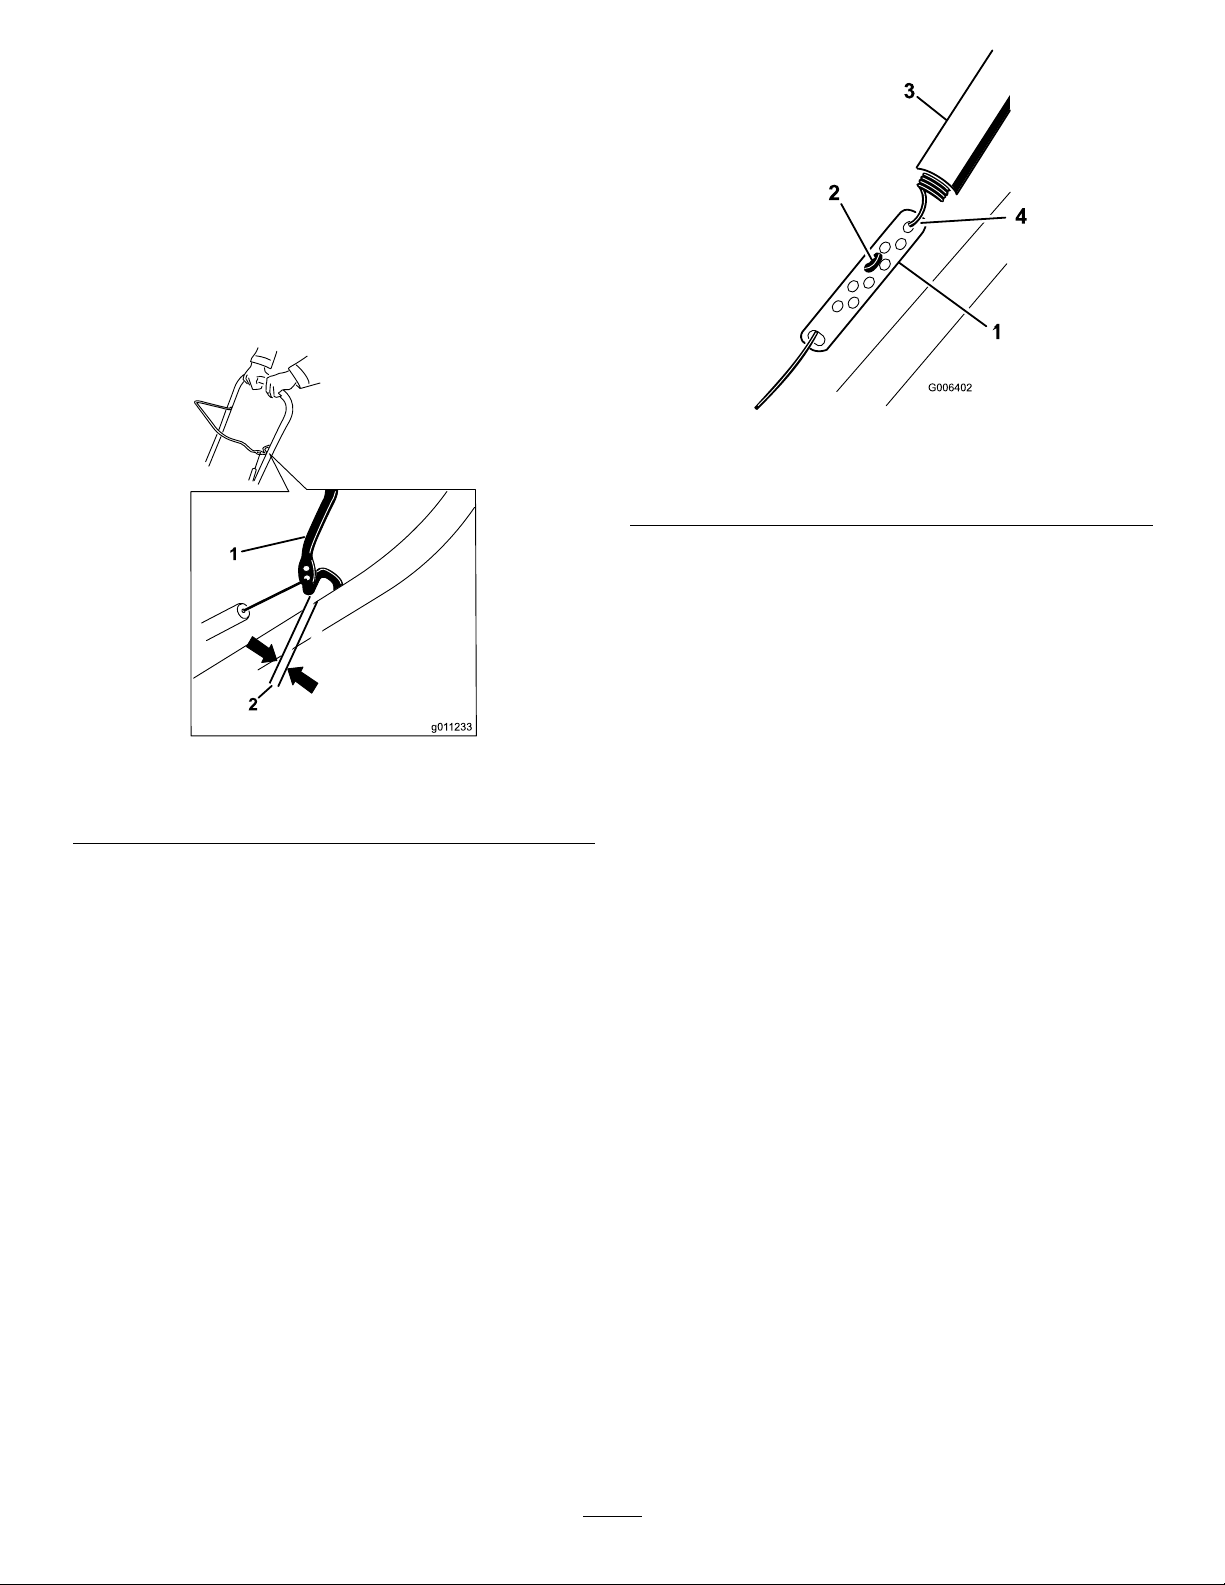
Movethecontrolbarbacktowardthehandletoremovethe
slackinthecontrolcable(Figure24).
Figure25
Figure24
1.Controlbar2.1/16-inchto1/8-inch(2
mmto3mm)gap
Note:Ensurethata2mmto3mm(1/16-inchto1/8-inch)
gapexistsbetweenthecontrolbarandthehandle(Figure24).
Important:Thecontrolcablemustcontainsomeslack
whenyoudisengagethecontrolbarfortherotorblades
tostopproperly.
AdjustingtheControlCable
1.Slideupthespringcoverandunhookthespringfrom
theadjusterlink(Figure25).
1.Adjusterlink
2.Z-tting
3.Springcover
4.Unhookthespringhere.
Note:Youcanpulluptheadjusterlinkandcableto
makeunhookingthespringeasier.
2.MovetheZ-ttingtoahigherorlowerholeonthe
adjusterlinkasneededtoobtainthe1/16-inchto
1/8-inch(2mmto3mm)gapbetweenthecontrolbar
andthehandle(Figure25).
Note:MovingtheZ-ttinghigherdecreasesthegap
betweenthecontrolbarandthehandle;movingit
lowerincreasesthegap.
3.Hookthespringtotheadjusterlinkandslidethespring
coverovertheadjusterlink.
4.Checktheadjustment;refertoCheckingtheControl
Cable(page12).
Note:Afterextendeduse,thedrivebeltmaywear
andloseitsproperbelttension.Ifthedrivebeltslips
(continuouslysqueals)underaheavyload,disconnect
thespringfromtheadjustorlinkandmovetheupper
endofthespringtotheholethatisfurtherfrom
thepivotpointinthecontrolbar(Figure26).Then
connectthespringtotheadjustorlinkandadjustthe
controlcable.
12
Page 13
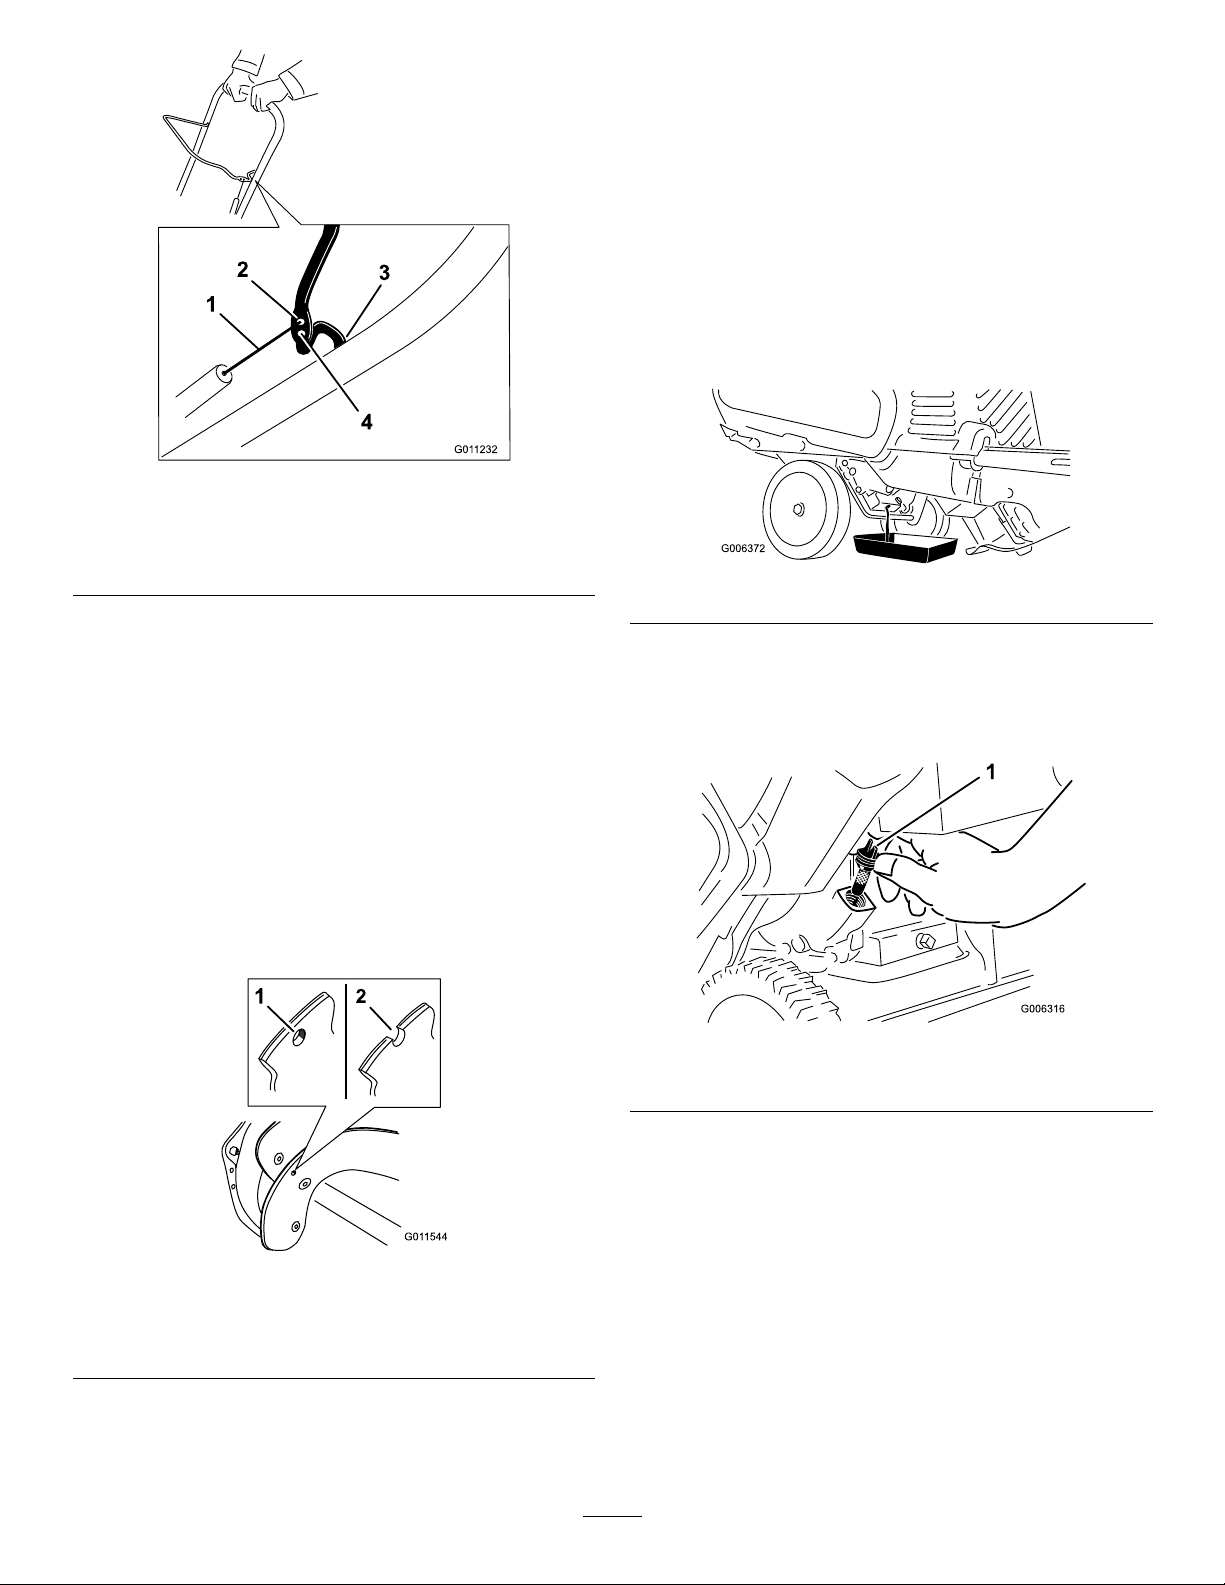
Figure26
ChangingtheEngineOil
ServiceInterval:Aftertherst2hours
Yearly
Runtheengineafewminutesbeforechangingtheoiltowarm
it.Warmoilowsbetterandcarriesmorecontaminants.
1.Siphonthefuelfromthefueltankintoanapproved
fuelcontainer,orruntheengineuntilitstops.
2.Movethemachinetoalevelsurface.
3.Placeanoildrainpanundertheoildrainplug,remove
theoildrainplug,andtipthemachinebackwardand
draintheusedoilintheoildrainpanFigure28).
1.Upperendofspring
2.Inserttheupperendof
springintothishole
3.Pivotpoint
4.Removetheupperendof
springfromthishole
Note:Thebeltmayslip(squeal)inwetconditions;
todryoutthedrivesystem,starttherotorandrunit
withoutaloadfor30seconds.
InspectingtheRotorBlades
ServiceInterval:Y early—Inspecttherotorbladesandhave
anAuthorizedServiceDealerreplacethe
rotorbladesandscraperifnecessary.
Beforeeachsession,inspecttherotorbladesforwear.When
arotorbladeedgehasworndowntothewearindicatorhole,
haveanAuthorizedServiceDealerreplacetherotorblades
andthescraper(Figure27).
Figure28
4.Afterdrainingtheusedoil,returnthemachinetothe
operatingposition.
5.Installtheoildrainplugandtightenitsecurely .
6.Cleanaroundtheoilllcap(Figure29).
Figure29
1.Oilllcap
1.Thewearindicatorholeis
intact;youdonotneedto
replacetherotorblades.
Figure27
2.Thewearindicatorholeis
exposed;replacetherotor
blades.
7.Unscrewtheoilllcapandremoveit(Figure29).
8.Withthemachineintheoperatingposition,carefully
pouroilintotheoilllhole.Wait3minutesforthe
oiltosettleandaddenoughtobringittothepointof
overow .Thereshouldbeverylittle,ifany,oilleftin
thebottle(Figure31).
Note:Youmaytipthemachineforward(handleup)
tomakeaddingoileasier.Remembertoreturnthe
machinetotheoperatingpositionbeforecheckingthe
oillevel.
Important:Donottipthemachinealltheway
forwardontoitsnose,orfuelmayleakoutofthe
machine.
13
Page 14
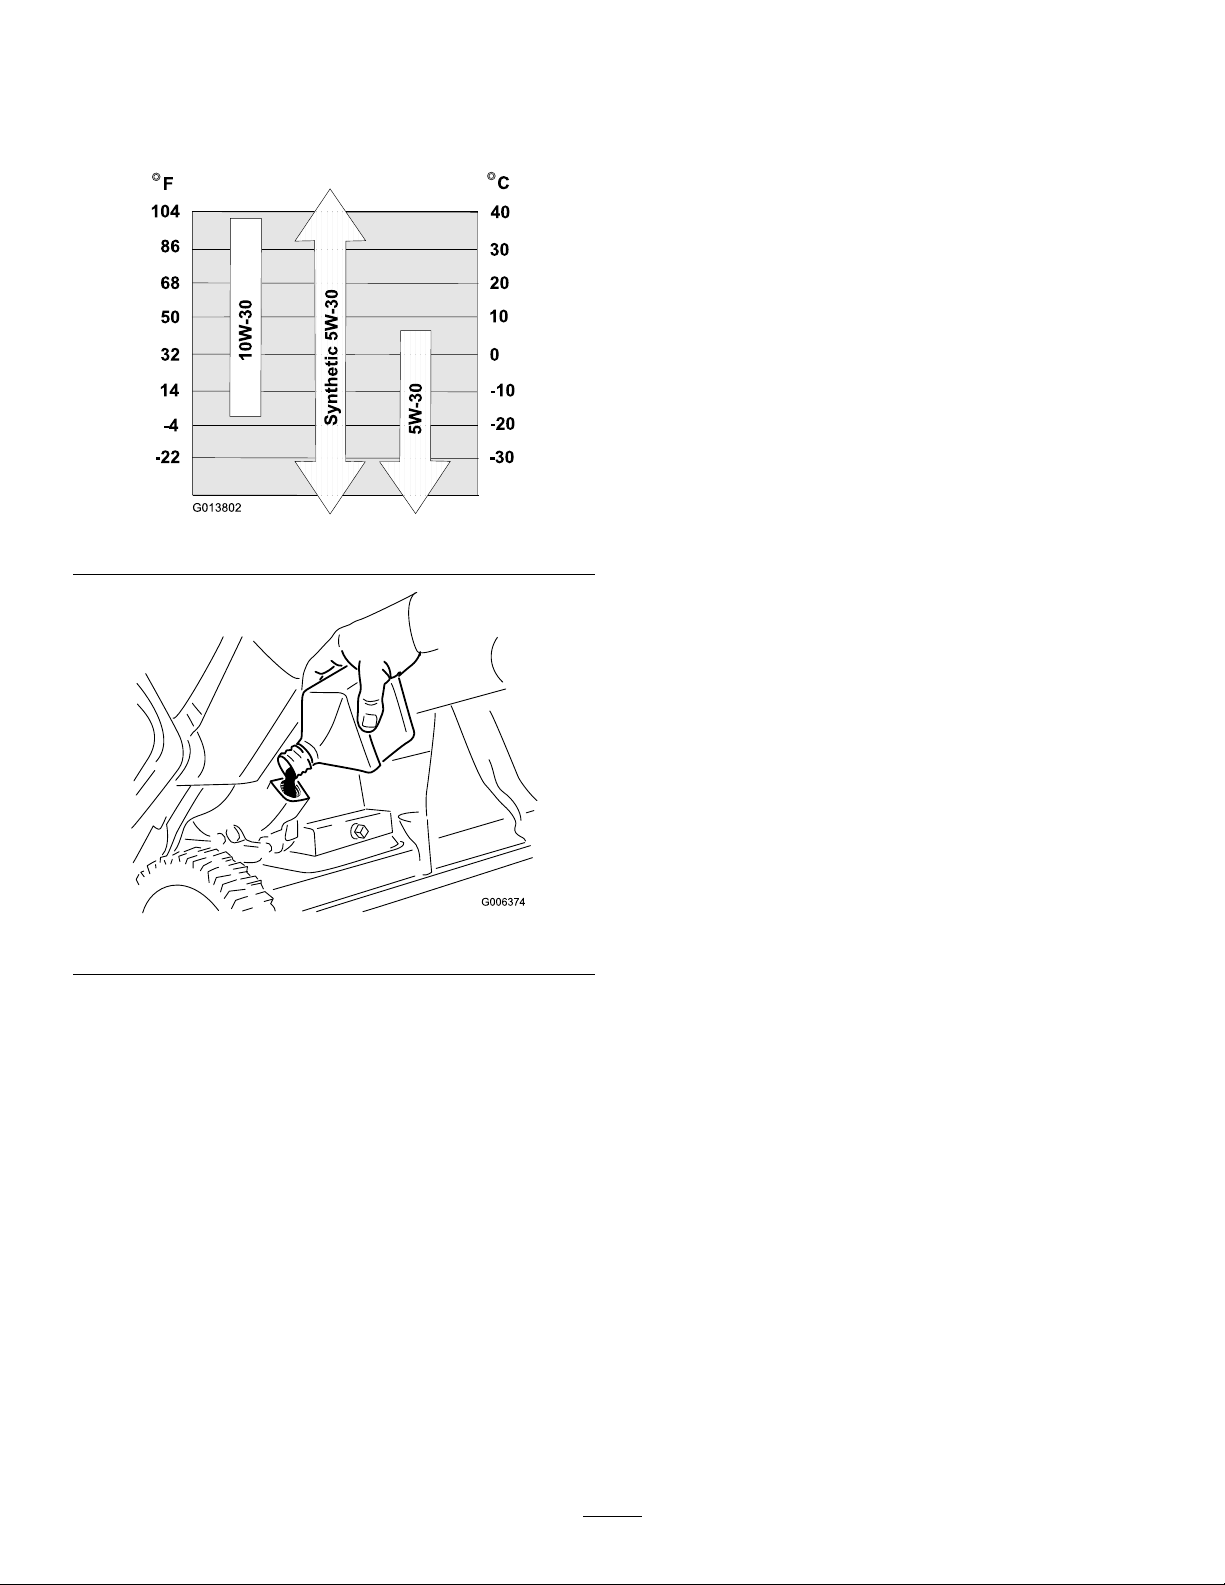
Maxll:0.6L(20oz.),type:automotivedetergentoil
withanAPIserviceclassicationofSJ,SL,orhigher.
UseFigure30belowtoselectthebestoilviscosityfor
theoutdoortemperaturerangeexpected:
Figure30
Figure31
9.Screwtheoilllcapintotheoilllhole,andhand
tightenitsecurely.
10.Wipeupanyspilledoil.
11.Disposeoftheusedoilproperlyatalocalrecycling
center.
14
Page 15

Storage
StoringtheSnowthrower
WARNING
•Gasolinefumesarehighlyammable,explosive,
anddangerousifinhaled.Ifyoustorethe
machineinanareawithanopename,the
gasolinefumesmayigniteandcausean
explosion.
•Donotstorethemachineinahouse(living
area),basement,oranyotherareawhereignition
sourcesmaybepresent,suchashotwaterand
spaceheaters,clothesdryers,furnaces,and
otherlikeappliances.
•Donottipthemachinebackwardwithfuelin
thefueltank;otherwise,fuelmayleakoutof
themachine.
1.Onthelastrefuelingoftheseason,addfuelstabilizer
tofreshfuelasdirectedbytheenginemanufacturer.
16.Coverthemachineandstoreitinaclean,dryplace
outofthereachofchildren.Allowtheenginetocool
beforestoringitinanyenclosure.
2.Runtheenginefor10minutestodistributethe
conditionedfuelthroughthefuelsystem.
3.Stoptheengine,allowittocool,andsiphonthefuel
tankorruntheengineuntilitstops.
4.Starttheengineandrunituntilitstops.
5.Chokeorprimetheengine,startitathirdtime,and
runtheengineuntilitwillnotstart.
6.Drainthefuelinthecarburetorthroughthecarburetor
drainboltintoanapprovedgasolinecontainer.
7.Disposeofunusedfuelproperly.Recycleitaccording
tolocalcodes,oruseitinyourautomobile.
8.Whiletheengineisstillwarm,changetheengineoil.
Referto
9.Removethesparkplug.
10.Squirt2teaspoonsofoilintothesparkplughole.
11.Installthesparkplugbyhandandthentorqueitto
27–30N-m(20–22ft-lb).
12.WiththeignitionkeyintheOffposition,pulltherecoil
starterslowlytodistributetheoilontheinsideofthe
cylinder.
ChangingtheEngineOil(page13).
13.Cleanthemachine.
14.Touchupchippedsurfaceswithpaintavailablefroman
AuthorizedServiceDealer.Sandaffectedareasbefore
painting,andusearustpreventativetopreventthe
metalpartsfromrusting.
15.Tightenanyloosefasteners.Repairorreplaceany
damagedparts.
15
Page 16

Notes:
16
Page 17

Notes:
17
Page 18

Notes:
18
Page 19

InternationalDistributorList
Distributor:
AgrolancKft
BalamaPrimaEngineeringEquip.HongKong85221552163
B-RayCorporation
CascoSalesCompany
CeresS.A.CostaRica
CSSCTurfEquipment(pvt)Ltd.SriLanka
CyrilJohnston&Co.
CyrilJohnston&Co.RepublicofIreland
EquiverMexico525553995444ParklandProductsLtd.NewZealand6433493760
FemcoS.A.Guatemala
ForGarderOU
G.Y .K.CompanyLtd.
GeomechanikiofAthensGreece
GolfinternationalTurizm
GuandongGoldenStarChina
HakoGroundandGardenSweden
HakoGroundandGarden
HayterLimited(U.K.)
HydroturfInt.CoDubai
HydroturfEgyptLLC
IrrimacPortugal351212388260ToroEuropeNVBelgium3214562960
IrrigationProductsInt'lPvtLtd.India00914424494387ValtechMorocco212537663636
JeanHeybroekb.v .Netherlands31306394611VictusEmakPoland48618238369
Country:
Hungary3627539640
Korea82325512076
PuertoRico7877888383
NorthernIreland442890813121
Estonia3723846060
Japan81726325861
Turkey902163365993Riversa
Norway4722907760
UnitedKingdom441279723444
UnitedArabEmirates97143479479T-MarktLogisticsLtd.Hungary3626525500
Egypt2025194308ToroAustraliaAustralia61395807355
PhoneNumber:Distributor:
5062391 138
94112746100
442890813121
5024423277
30109350054
862087651338
4635100000
MaquiverS.A.Colombia
MaruyamaMfg.Co.Inc.
Mountelda.s.CzechRepublic
Mountelda.s.Slovakia
MunditolS.A.
NormaGarden
OslingerTurfEquipmentSA
OyHakoGroundandGardenAb
Perfetto
PratoverdeSRL.
Prochaska&Cie
RTCohen2004Ltd.
LelyTurfcare
SolvertS.A.S.
SpyprosStavrinidesLimitedCyprus
SurgeSystemsIndiaLimited
Country:
Japan81332522285
Argentina541 148219999
Russia74954116120
Ecuador59342396970
Finland35898700733
Poland48618208416
Italy390499128128
Austria4312785100
Israel97298617979
Spain
Denmark4566109200
France33130817700
India911292299901
PhoneNumber:
5712364079
420255704220
420255704220
34952837500
35722434131
EuropeanPrivacyNotice
TheInformationT oroCollects
ToroWarrantyCompany(T oro)respectsyourprivacy.Inordertoprocessyourwarrantyclaimandcontactyouintheeventofaproductrecall,weaskyou
tosharecertainpersonalinformationwithus,eitherdirectlyorthroughyourlocalT orocompanyordealer.
TheTorowarrantysystemishostedonserverslocatedwithintheUnitedStateswhereprivacylawmaynotprovidethesameprotectionasapplies
inyourcountry.
BYSHARINGYOURPERSONALINFORMATIONWITHUS,YOUARECONSENTINGTOTHEPROCESSINGOFYOURPERSONALINFORMA TION
ASDESCRIBEDINTHISPRIVACYNOTICE.
TheW ayToroUsesInformation
Toromayuseyourpersonalinformationtoprocesswarrantyclaims,tocontactyouintheeventofaproductrecallandforanyotherpurposewhichwetell
youabout.T oromayshareyourinformationwithT oro'safliates,dealersorotherbusinesspartnersinconnectionwithanyoftheseactivities.Wewillnot
sellyourpersonalinformationtoanyothercompany.Wereservetherighttodisclosepersonalinformationinordertocomplywithapplicablelawsand
withrequestsbytheappropriateauthorities,tooperateoursystemsproperlyorforourownprotectionorthatofotherusers.
RetentionofyourPersonalInformation
Wewillkeepyourpersonalinformationaslongasweneeditforthepurposesforwhichitwasoriginallycollectedorforotherlegitimatepurposes
(suchasregulatorycompliance),orasrequiredbyapplicablelaw.
Toro'sCommitmenttoSecurityofY ourPersonalInformation
Wetakereasonableprecautionsinordertoprotectthesecurityofyourpersonalinformation.Wealsotakestepstomaintaintheaccuracyandcurrent
statusofpersonalinformation.
AccessandCorrectionofyourPersonalInformation
Ifyouwouldliketorevieworcorrectyourpersonalinformation,[email protected].
AustralianConsumerLaw
AustraliancustomerswillnddetailsrelatingtotheAustralianConsumerLaweitherinsidetheboxoratyourlocalT oroDealer.
374-0269RevH
Page 20

TheToro2-YearGTSStartingGuaranteeand
TheT oroTotalCoverageGuarantee
AT wo-YearFullWarranty(45DayLimitedWarrantyforCommercialUse)
PowerClear
Single-StageSnowthrowers
TheToroStartingGuarantee
TheT oroCompanyanditsafliate,ToroWarrantyCompany,pursuant
toanagreementbetweenthem,jointlyguaranteethatyourT oroGTS
(GuaranteedtoStart)engine,whenusedforresidentialpurposes*,will
startontherstorsecondpullfortwo(2)yearsfromthedateofpurchase,
ifyouprovidetheroutinemaintenanceitrequires,orwewillxitfreeof
charge.
Thiswarrantycoversthecostofpartsandlabor,butyoumustpay
transportationcosts.
TheToroTotalCoverageGuarantee
TheToroCompanyanditsafliate,T oroWarrantyCompany,pursuantto
anagreementbetweenthem,jointlypromisetorepairtheT oroProduct
listedbelowifusedforresidentialpurposes*,ifdefectiveinmaterialsor
workmanshiporifitstopsfunctioningduetothefailureofacomponent
fortheperiodlistedbelow.
Thiswarrantycoversthecostofpartsandlabor,butyoumustpay
transportationcosts.
Thefollowingtimeperiodsapplyfromthedateofpurchase:
ProductsWarrantyPeriod
PowerClearSnowthrowersandAttachments
2years
LimitedWarrantyforCommercialUse
Gas-poweredT oroProductsusedforcommercial,institutional,or
rentaluse,arewarrantedfor45daysagainstdefectsinmaterialsor
workmanship.Componentsfailingduetonormalweararenotcovered
bythiswarranty.
InstructionsforObtainingWarrantyService
IfyouthinkthatyourT oroProductcontainsadefectinmaterialsor
workmanship,followthisprocedure:
1.ContactanyAuthorizedToroServiceDealertoarrangeservice
attheirdealership.Tolocateadealerconvenienttoyou,referto
theY ellowPagesofyourtelephonedirectory(lookunder“Lawn
Mowers”)oraccessourwebsiteatwww .T oro.com.Youmayalso
callthenumberslistedinitem#3tousethe24-hourT oroDealer
locatorsystem.
2.Bringtheproductandyourproofofpurchase(salesreceipt)tothe
ServiceDealer.Thedealerwilldiagnosetheproblemanddetermine
ifitiscoveredunderwarranty.
3.IfforanyreasonyouaredissatisedwiththeServiceDealer’s
analysisorwiththeassistanceprovided,contactusat:
CustomerCareDepartment,ConsumerDivision
TheT oroCompany
811 1LyndaleAvenueSouth
Bloomington,MN55420-1196
Tollfreeat866-336-5205(U.S.customers)
Tollfreeat866-854–9033(Canadiancustomers)
OwnerResponsibilities
YoumustmaintainyourT oroProductbyfollowingthemaintenance
proceduresdescribedintheOperator'sManual.Suchroutine
maintenance,whetherperformedbyadealerorbyyou,isatyourexpense.
ItemsandConditionsNotCovered
Thereisnootherexpresswarrantyexceptforspecialemissionsystem
coverageandenginewarrantycoverageonsomeproducts.Thisexpress
warrantydoesnotcoverthefollowing:
•Costofregularmaintenanceorreplacementofwearparts,suchas
rotorblades(paddles),scraperblades,belts,fuel,lubricants,oil
changes,sparkplugs,cable/linkageorbrakeadjustments
•Anyproductorpartwhichhasbeenalteredormisusedandrequires
replacementorrepairduetoaccidentsorlackofpropermaintenance
•Repairsnecessaryduetofailuretousefreshfuel(lessthanone
monthold),orfailuretoproperlypreparetheunitpriortoanyperiod
ofnon-useoveronemonth
•Pickupanddeliverycharges
•Operationalmisuse,neglect,oraccidents
•RepairsorattemptedrepairsbyanyoneotherthananAuthorized
ToroServiceDealer
•Repairsoradjustmentstocorrectstartingdifcultiesduetothe
following:
–failuretofollowpropermaintenanceprocedures
–snowthrowerauger/paddlesstrikinganobject
–contaminantsinthefuelsystem
–improperfuel(consultyourOperator'sManualifindoubt)
–failuretodrainthefuelsystempriortoanyperiodofnon-use
overonemonth
•Specialoperationalconditionswherestartingmayrequiremorethan
twopulls:
–rsttimestartsafterextendedperiodofnon-useoverthree
monthsorseasonalstorage
–improperstartingprocedures
–startingin-10°F(-23°C)orbelowtemperatures
Ifyouarehavingdifcultystartingyourunit,pleasechecktheOperator's
Manualtoensurethatyouareusingthecorrectstartingprocedures.This
cansaveanunnecessaryvisittoaServiceDealer.
GeneralConditions
Allrepairscoveredbythesewarrantiesmustbeperformedbyan
AuthorizedToroServiceDealerusingT oroapprovedreplacementparts.
RepairbyanAuthorizedT oroServiceDealerisyoursoleremedyunder
thiswarranty .
NeitherTheToroCompanynorToroWarrantyCompanyisliablefor
indirect,incidental,orconsequentialdamagesinconnectionwiththe
useoftheToroProductscoveredbythesewarranties,includingany
costorexpenseofprovidingsubstituteequipmentorserviceduring
reasonableperiodsofmalfunctionornon-usependingcompletionof
repairsunderthesewarranties.
Somestatesdonotallowexclusionsofincidentalorconsequential
damages,sotheaboveexclusionsmaynotapplytoyou.
Thiswarrantygivesyouspeciclegalrights,andyoumayalsohaveother
rightswhichvaryfromstatetostate.
CountriesOtherthantheUnitedStatesorCanada
CustomerswhohavepurchasedToroproductsexportedfromtheUnitedStatesorCanadashouldcontacttheirT oroDistributor(Dealer)toobtain
guaranteepoliciesforyourcountry,province,orstate.IfforanyreasonyouaredissatisedwithyourDistributor'sserviceorhavedifcultyobtaining
guaranteeinformation,contacttheT oroimporter.Ifallotherremediesfail,youmaycontactusatT oroWarrantyCompany.
AustralianConsumerLaw:AustraliancustomerswillnddetailsrelatingtotheAustralianConsumerLaweitherinsidetheboxoratyourlocalT oro
Dealer.
*Residentialpurposesmeansuseoftheproductonthesamelotasyourhome.Useatmorethanonelocation,orinstitutionalorrentaluse,isconsidered
commercialuse,andthecommercialusewarrantywouldapply.
374-0264RevE
 Loading...