

Page 1

1800PowerCurve
®
Snowthrower
ModelNo.38381—SerialNo.311000001andUp
FormNo.3365-268RevB
Operator'sManual
IMPORTANTSAFETY
INSTRUCTIONS
Whenusinganelectricalappliance,basicprecautionsshould
alwaysbefollowed,includingthefollowing:
READALLINSTRUCTIONSBEFORE
USINGTHISAPPLIANCE
WARNING—Toreducetheriskofre,electricshock,
orinjury,followthesesafetyinstructions.
Itisessentialthatyouoranyotheroperatoroftheappliance
readandunderstandthecontentsofthismanualbeforeoperating
theappliance.Payparticularattentiontothesafetyalertsymbol
whichmeansCAUTION,WARNING,orDANGER—personalsafety
instruction.Readandunderstandtheinstructionbecauseithastodo
withsafety.Failuretocomplywiththeseinstructionsmayresultin
personalinjury,riskofre,orelectricalshock.
Replacementparts—Whenservicingtheappliance,useonlyidentical
replacementparts.Thepowercordandswitchusedonthismachine
cannotbereplaced.Ifthecordorswitchbecomedamaged,dispose
ofthemachine.
Donotusetheapplianceongraveledsurfaceunlessitisadjustedfor
suchasurfaceinaccordancewiththeOperator’sManual.
Keepchildrenandbystandersaway—Allvisitorsshouldbekept
atadistancefromtheworkarea.
Dressproperly—Donotwearlooseclothingorjewelry.Theycan
becaughtinmovingparts.
Wearrubberbootswhenoperatingtheappliance.
Operatingtheapplianceinthehand-heldpositionisunsafe,exceptin
accordancewiththespecialinstructionsforsuchuseprovidedinthe
Operator’sManual.
Keepguardsinplaceandinworkingorder.
Donotforcetheappliance—Itwillperformbetterandsaferattherate
forwhichitwasdesigned.
Donotoverreach—Watchyourfootingandkeepyourbalanceatall
times.
Iftheappliancestrikesaforeignobject,followthesesteps:
•Immediatelyreleasethecontrolbartostoptheappliance.
•Unplugthepowercord.
•Inspectfordamage.
•Repairanydamagebeforestartingandoperatingtheappliance.
Disconnecttheappliance—Disconnecttheappliancefromthepower
supplywhennotinuse,beforeservicing,whenchangingaccessories,
etc.
Storeanidleapplianceindoors.Whentheapplianceisnotinuse,
itshouldbestoredindoorsinadry,securedplaceoutofthereach
ofchildren.
Maintaintheappliancewithcare—Followinstructionsforchanging
accessories.
ThisappliancemeetsorexceedstheB71.3specicationsofthe
AmericanNationalStandardsInstituteineffectatthetimeof
production.
Readandunderstandthecontentsofthismanualbeforeyoustart
themotor.
Thisisthesafetyalertsymbol.Itisusedtoalertyouto
potentialpersonalinjuryhazards.Obeyallsafetymessagesthat
followthissymboltoavoidpossibleinjuryordeath.
Improperlyusingormaintainingthisappliancecouldresultin
injuryordeath.Toreducethispotential,complywiththefollowing
safetyinstructions.
Thisapplianceiscapableofamputatinghandsandfeetand
ofthrowingobjects.Failuretoobservethefollowingsafety
instructionscouldresultinseriousinjury.
Warning—T opreventelectricshock,usetheapplianceonlywithan
extensioncordsuitableforoutdooruse.
Extensioncords—T opreventtheappliancecordandtheextension
cordfromdisconnectingduringoperation,connecttheextensioncord
totheapplianceasshowninFigure9.
Avoidaccidentalstarting—Donotcarrytheappliancewithyour
ngerontheswitch.Ensurethattheswitchisoffwhenpluggingin
theappliance.
Iftheappliancecordisdamagedinanymannerwhileitispluggedin,
disconnecttheextensioncordfromthewallreceptacleandcontactan
AuthorizedServiceDealer.
Donotabusethecord—Nevercarrytheappliancebyitscordoryank
ontheextensioncordtodisconnecttheappliancefromthereceptacle.
Keepthecordfromheat,oil,andsharpedges.
Keephandsawayfrommovingparts.
©2011—TheToro®Company
8111LyndaleAvenueSouth
Bloomington,MN55420
Registeratwww.Toro.com.
Training
•Read,understand,andfollowallinstructionsontheapplianceand
inthemanual(s)beforeoperatingthisappliance.Bethoroughly
familiarwithallthecontrolsandtheproperuseoftheappliance.
Knowhowtostoptheapplianceanddisengagethecontrols
quickly.
•Neverallowchildrentooperatetheappliance.Neverallowadults
tooperatetheappliancewithoutproperinstruction.
•Keeptheareaofoperationclearofallpersons,particularlysmall
children.
•Exercisecautiontoavoidslippingorfalling.
Preparation
•Thoroughlyinspecttheareawheretheapplianceistobeused
andremovealldoormats,sleds,boards,wires,andotherforeign
objects.
OriginalInstructions(EN)
PrintedintheUSA
AllRightsReserved
Page 2
•Donotoperatetheappliancewithoutwearingadequatewinter
garments.Avoidloosettingclothingthatcangetcaughtinmoving
parts.Wearfootwearthatwillimprovefootingonslipperysurfaces.
•Donotattempttoclearsnowfromagravelorcrushedrocksurface.
Thisapplianceisintendedforuseonlyonpavedsurfaces.
•Neverattempttomakeanyadjustmentswhilethemotorisrunning
(exceptwhenspecicallyrecommendedbymanufacturer).
•Alwayswearsafetyglassesoreyeshieldsduringoperationor
whileperforminganadjustmentorrepairtoprotecteyesfrom
foreignobjectsthatmaybethrownfromtheappliance.
•Maintainorreplacesafetyandinstructionlabelsasneeded.
•Runtheapplianceforafewminutesafterthrowingsnowtoprevent
freeze-upoftherotorblades.
SAVETHESEINSTRUCTIONS
SafetyandInstructionalDecals
Operation
•Donotputhandsorfeetnearorunderrotatingparts.Keepclear
ofthedischargeopeningatalltimes.
•Exerciseextremecautionwhenoperatingonorcrossinggravel
drives,walks,orroads.Stayalertforhiddenhazardsortrafc.
•Afterstrikingaforeignobject,stopthemotor,unplugtheextension
cord,removethekey,andthoroughlyinspecttheappliancefor
anydamage.Repairanydamagebeforestartingandoperating
theappliance.
•Iftheapplianceshouldstarttovibrateabnormally,stopthemotor
andcheckimmediatelyforthecause.Vibrationisgenerallya
warningoftrouble.
•Stopthemotor,removethekey,andunplugtheappliance
wheneveryouleavetheoperatingposition,beforeuncloggingthe
rotorbladehousingordischargechute,andwhenmakingany
repairs,adjustments,orinspections.
•Whencleaning,repairing,orinspectingtheappliance,stopthe
motor,removethekey,unplugtheappliance,andensurethatthe
rotorbladesandallmovingpartshavestopped.
•Exerciseextremecautionwhenoperatingonslopes.
•Neveroperatetheappliancewithoutproperguardsandother
safetyprotectivedevicesinplaceandworking.
•Neverdirectthedischargetowardpeopleorareaswhereproperty
damagecanoccur.Keepchildrenandothersaway.
•Donotoverloadthecapacityoftheappliancebyattemptingto
clearsnowattoofastarate.
•Lookbehindandusecarewhenbackingupwiththeappliance.
•Neveroperatetheappliancewithoutgoodvisibilityorlight.Always
besureofyourfooting,andkeeparmholdonthehandle.Walk;
neverrun.
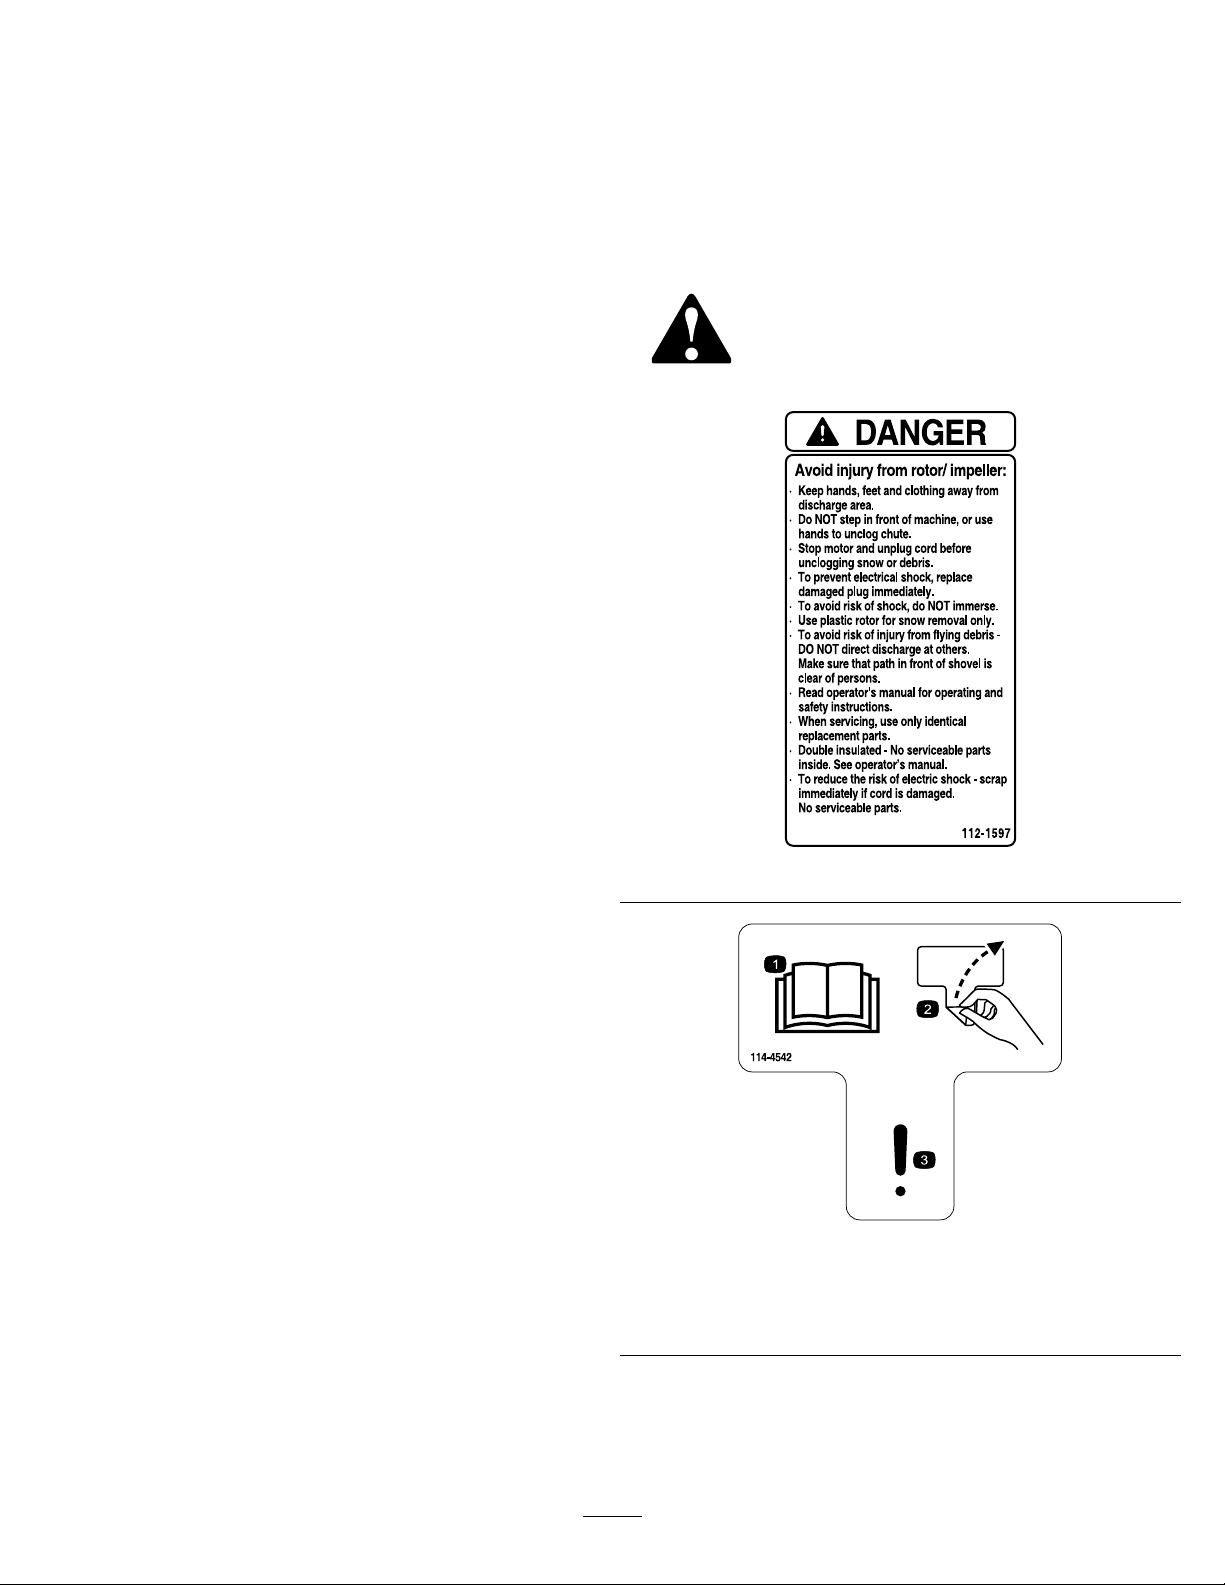
Safetydecalsandinstructionsareeasilyvisible
totheoperatorandarelocatednearanyarea
ofpotentialdanger.Replaceanydecalthatis
damagedorlost.
112-1597
ClearingaCloggedDischargeChute
Handcontactwiththerotatingrotorbladesinsidethedischargechute
isthemostcommoncauseofinjuryassociatedwithsnowthrowers.
Neveruseyourhandtocleanoutthedischargechute.
Toclearthechute:
•Shutthemotoroff,removethekey ,andunplugtheextension
cordfromthemachine!
•Wait10secondstobesuretherotorbladeshavestoppedrotating.
•Alwaysuseaclean-outtool,notyourhands.
MaintenanceandStorage
•Checkallfastenersatfrequentintervalsforpropertightnessto
ensurethattheapplianceisinsafeworkingcondition.
•AlwaysrefertotheOperator’sManualforimportantdetailsifthe
applianceistobestoredforanextendedperiod.
114-4542
1.ReadtheOperator'sManual.
2.Removedecal
3.Warning
2
Page 3
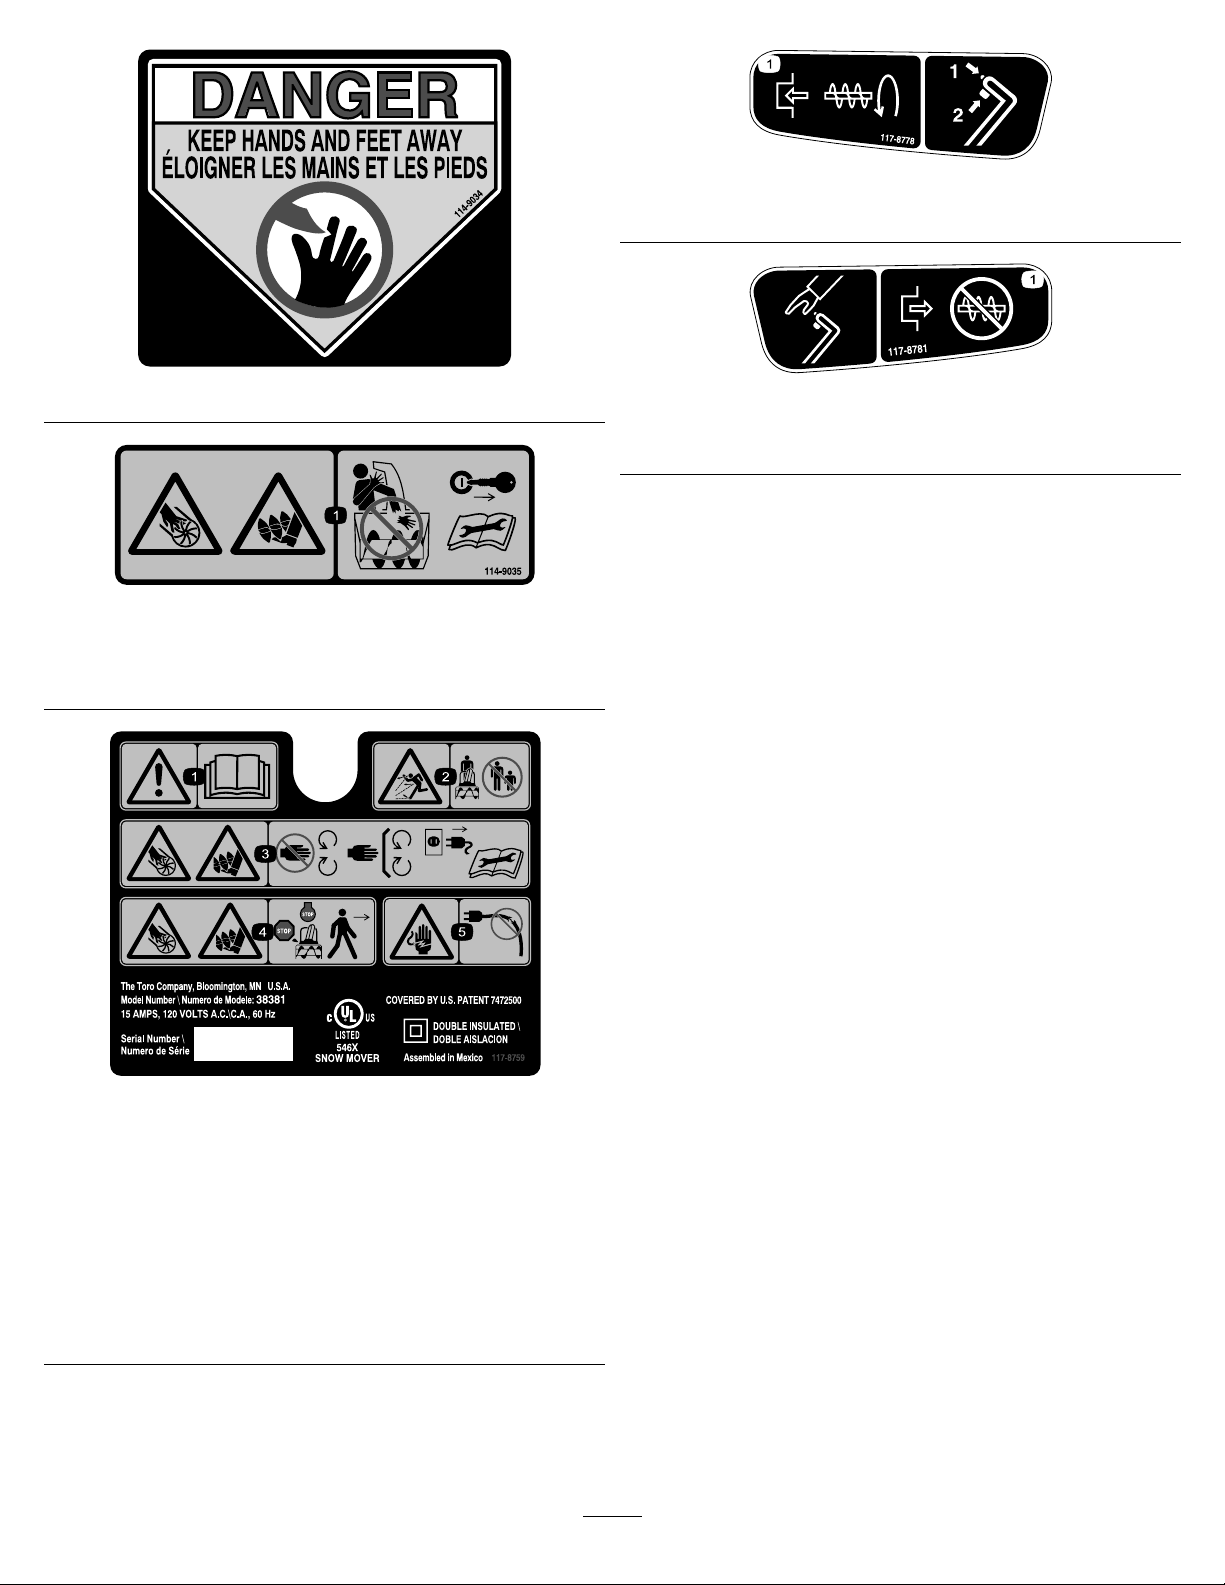
117-8778
1.Toengagetherotor,presstheinterlockswitchonthehandle.
114-9034
114-9035
1.Cutting/dismembermenthazard,rotor—donotplaceyourhand
inthechute;removetheignitionkeyandreadtheinstructions
beforeservicingorperformingmaintenance.
117-8781
1.Todisengagetherotor,releasetheinterlockswitchonthe
handle.
117-8760
1.Warning—readtheOperator'sManual.
2.Thrownobjecthazard—keepbystandersasafedistancefrom
themachine.
3.Cutting/dismembermenthazard,rotor—stayawayfrommoving
parts,keepallguardsandshieldsinplace;disconnectpower
cordfrompowersourceandreadtheinstructionsbefore
servicingorperformingmaintenance.
4.Cutting/dismembermenthazard,rotor—stoptheengineand
machinebeforeleavingthemachine.
5.Electricshockhazard—donotuseadamagedpowercord.
3
Page 4
Setup
Note:Determinetheleftandrightsidesofthemachinefromthe
normaloperatingposition.
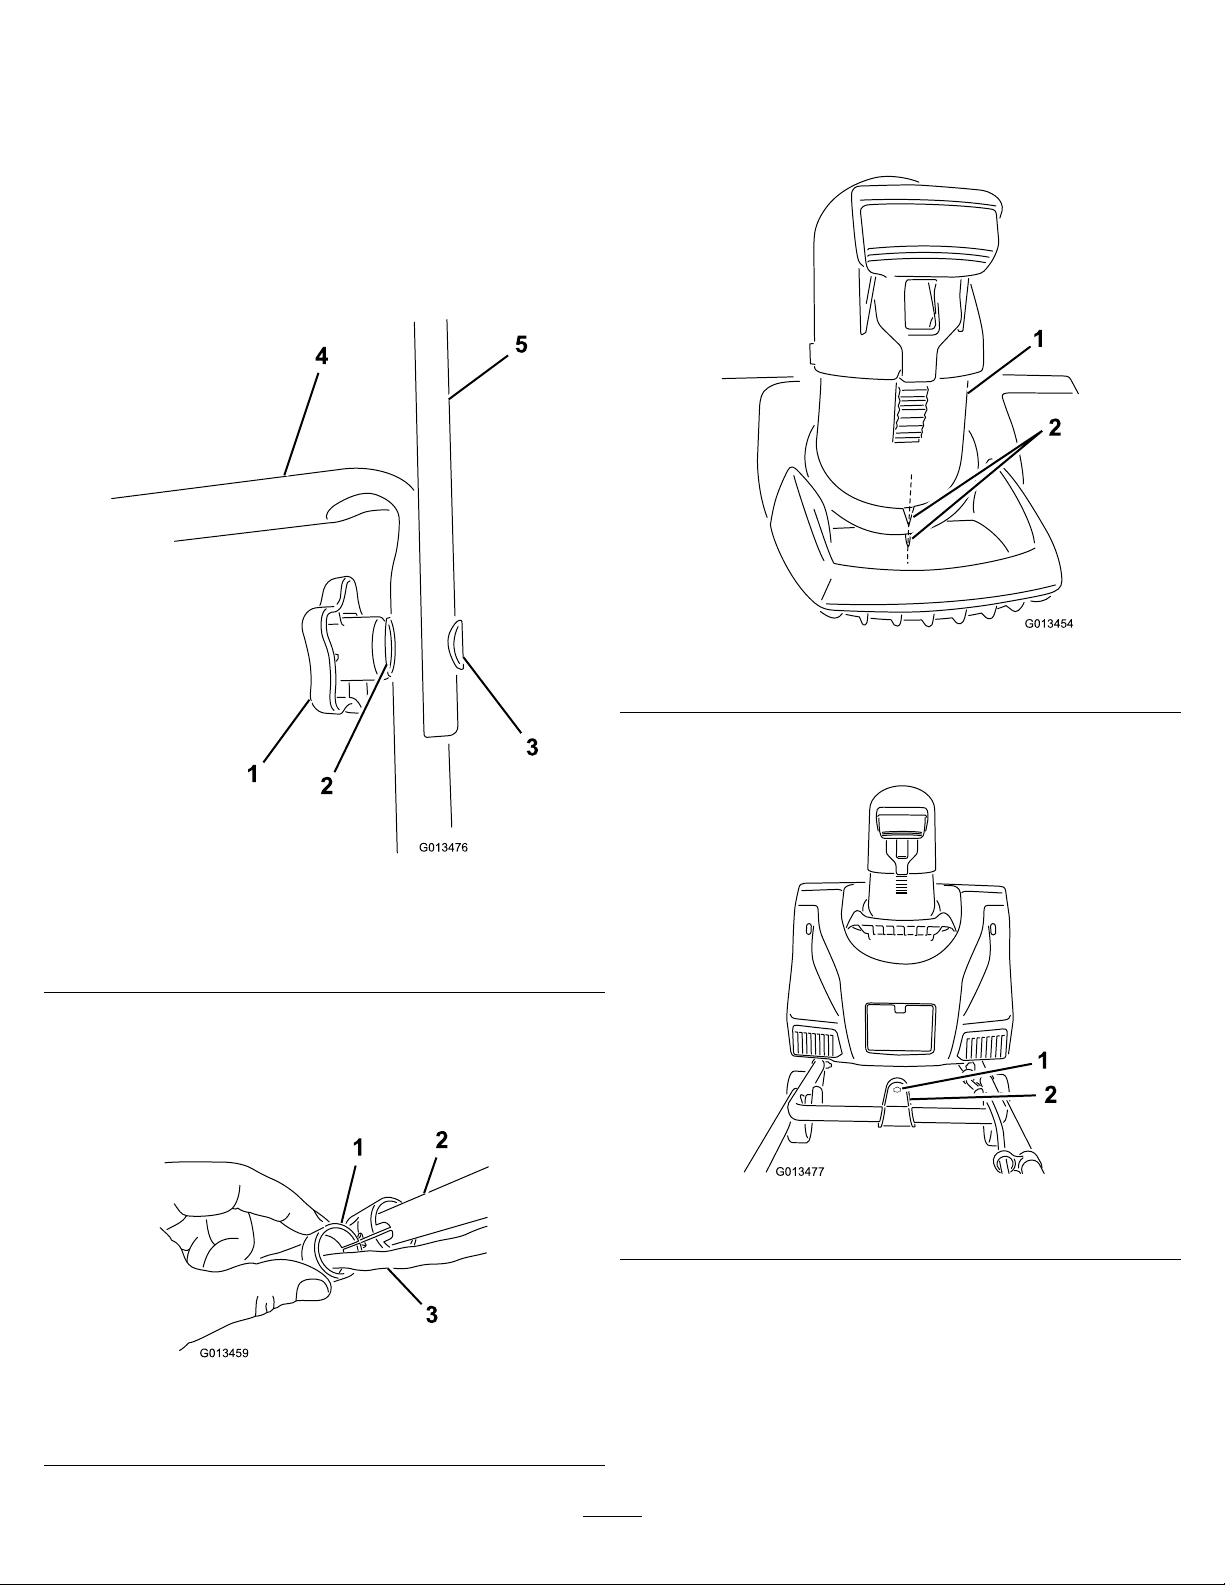
InstallingtheUpperHandle
1.Removethehandleknobs,ovalbolts,andcurvedwashersfrom
thelowerhandle.
2.Installtheupperhandletothelowerhandleofthemachinewith
thehandleknobs,curvedwashers,andovalboltsasshownin
Figure1.
InstallingtheChuteControlRod
1.Positionthedischargechutesothatitfacesforward.
NOTICE!Alignthearrowonthedischargechutewiththe
arrowonthehousing(Figure3).
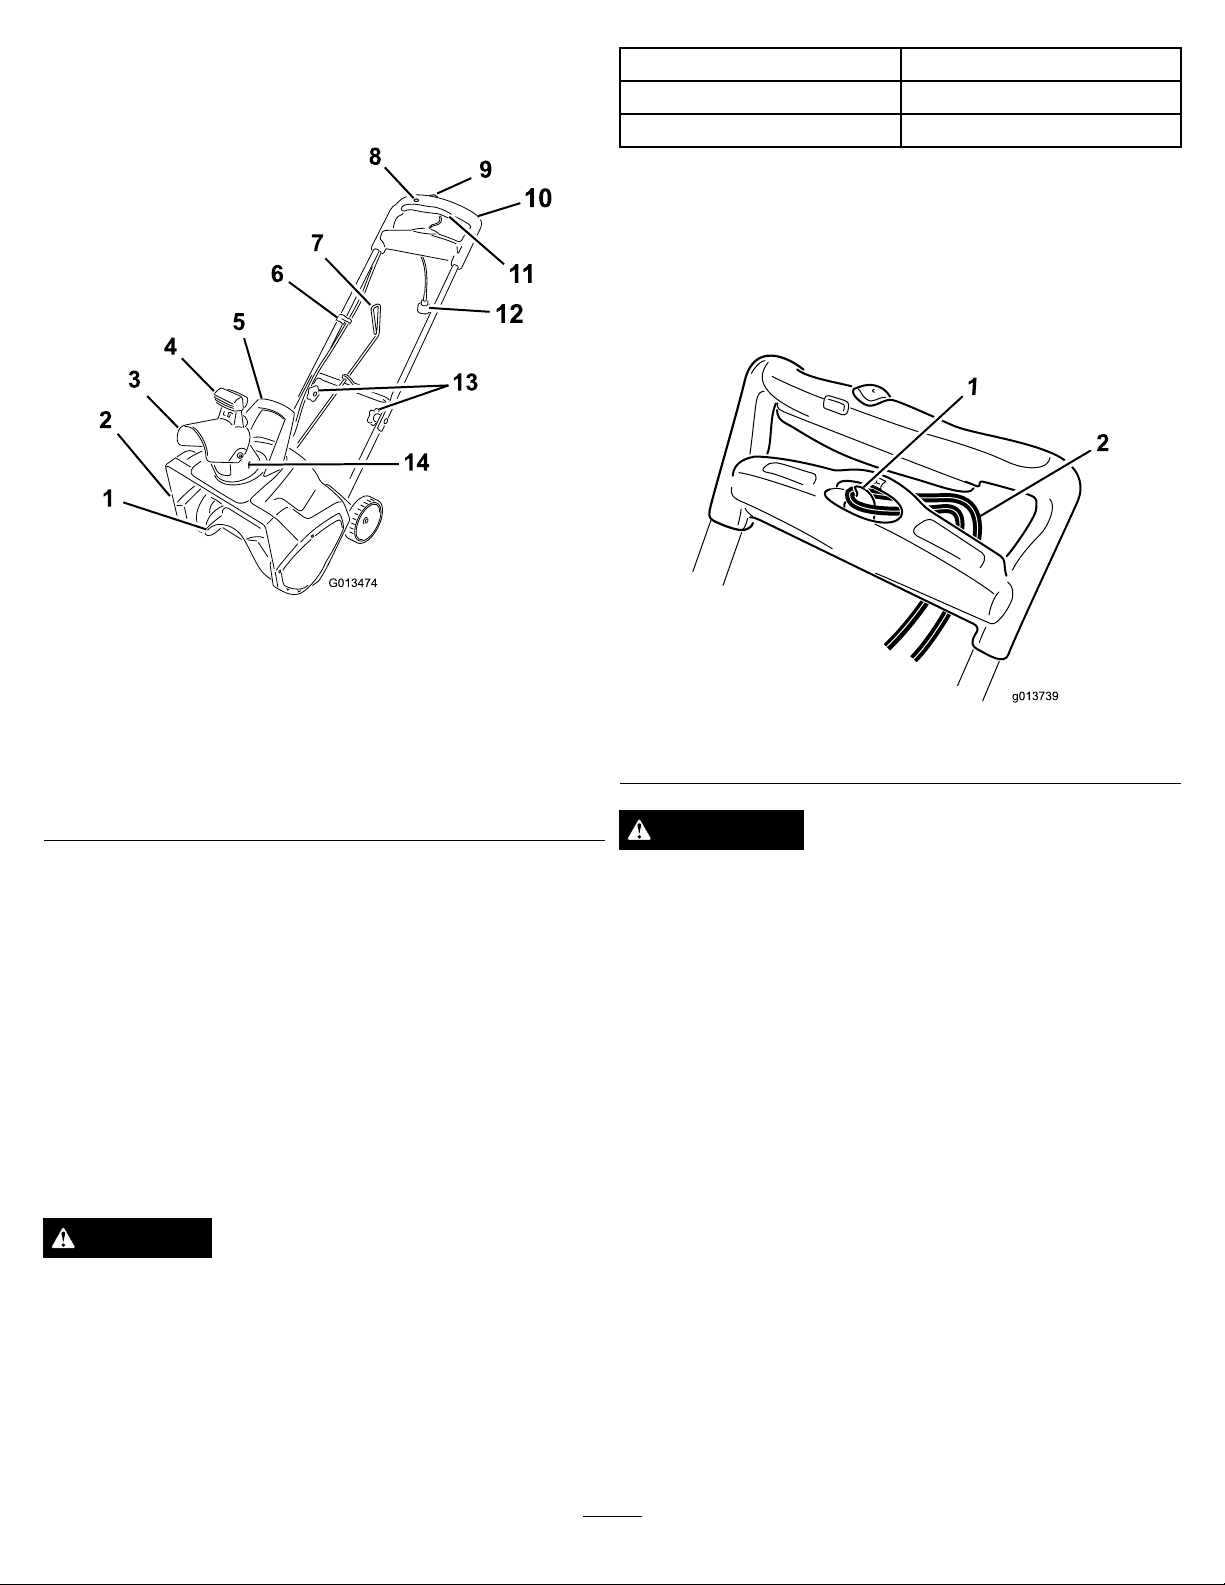
Figure1
1.Handleknob(2)
2.Curvedwasher(2)
3.Ovalbolt(2)
Note:Ensurethatthepowercordattachedtothemachineis
routedoverthelowerhandleandtotheinsideofthehandle
assembly.
3.Tightenthehandleknobsrmlybyhand.
4.Attachthecordguidetothehandle(Figure2).
4.Lowerhandle
5.Upperhandle
Figure3
1.Dischargechute2.Alignthearrows
2.Inserttheendofthechutecontrolrodthroughthekeyedholeinthe
bracketthatisattachedtothetopofthelowerhandle(Figure4).
Figure4
Figure2
1.Cordguide3.Cord
2.Handle
1.Keyedhole2.Bracket
3.Removethedecalthatcoversthekeyedholeinthebackofthe
housing(Figure5).
4
Page 5
Figure5
1.Decal2.Keyedhole
4.Ensurethatthehandleofthechutecontrolrodpointsupward
(Figure6),andinserttherodintothekeyedholeinthebackof
thehousing.
Figure7
Figure6
1.Handleonthechutecontrolrod
5.Firmlypushtherodintothekeyedholeinthebackofthehousing
untilitsnapsintoplace.
6.Movethehandleonthechutecontrolrodtoensurethatitmovesin
thesamedirectionasthechute(Figure7).
5
Page 6
Operation
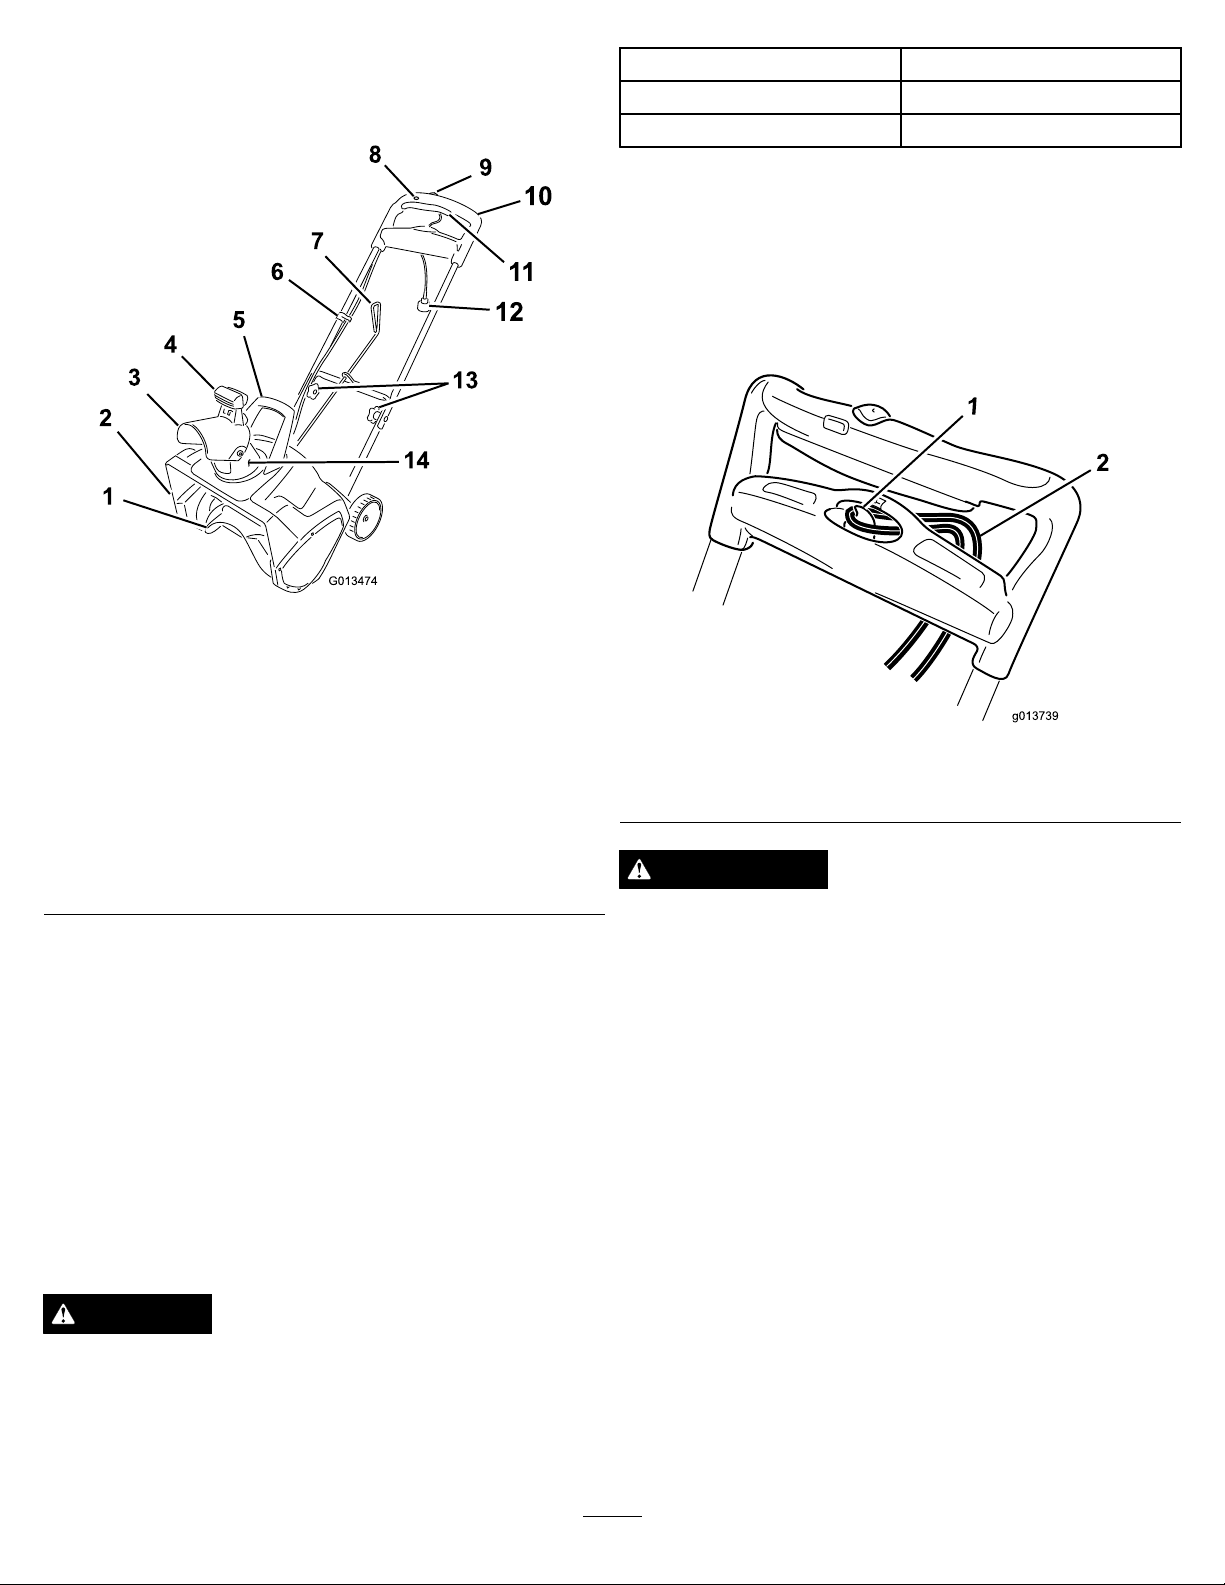
ProductOverview
ExtensionCordLengthMinimumWireGauge(A.W.G.)
100feet
150feet
Note:Donotuseanextensioncordover150feet.
NOTICE!Checktheextensioncordfrequentlyduringuseforholes
orcracksintheinsulation.Donotuseadamagedcord.Donot
runthecordthroughstandingwaterorwetgrass.
Note:Topreventtheextensioncordfromdisconnectingduring
operation,usethecordlockontheupperhandlebeforeyouconnectit
tothemachine(Figure9).
14
12
Figure8
1.Rotorblades8.Interlockbutton
2.Beltcover(notshown)
3.Chutedeector
4.Chutedeectortrigger
5.Dischargechutehandle
6.Cordguide
7.Chutecontrolrod
NOTICE!Thismachineisintendedforoutdoor,residentialuse
only.Donotuseitindoorsorforcommercialorindustrial
purposes.
9.Key
10.Upperhandle
11.Powercontrolbar
12.Cord
13.Handleknobs
14.Dischargechute
ConnectingtoaPowerSource
Toreducetheriskofelectricshock,thismachinehasapolarizedplug
(i.e.,onebladeiswiderthantheother).Useonlyapolarizedplug,
UL-listed(CSAcertiedinCanada)extensioncordrecommended
foroutdooruse.Apolarizedplugwilltinapolarizedcordonlyone
way.Iftheplugdoesnottfullyinthecord,reversethecord.Ifit
stilldoesnott,purchaseapolarizedextensioncord.Ifyouhavea
polarizedextensioncordandtheextensioncordplugdoesnottfully
intothewallreceptacle,reversetheplug.Ifitstilldoesnott,contact
aqualiedelectriciantoinstalltheproperoutlet.Donotchangethe
machineorextensioncordpluginanyway.
Figure9
1.Cordlock
2.Extensioncord
WARNING
Adamagedappliancecordcancauseashockorre.
Thoroughlyinspecttheappliancecordbeforeusingthemachine.
Ifthecordisdamaged,donotoperatethemachine.Thesupply
cordorswitchofthisequipmentcannotbereplaced,andthe
equipmentshallbescrapped.
StartingandStoppingtheMotor
1.Tostartthemotor,insertthekey,pressandholdtheinterlock
button,andsqueezethepowercontrolbar(Figure10).
DANGER
Contactwithwaterwhileoperatingthemachinecouldcause
electricshock,causinginjuryordeath.
•Don'thandletheplugorthemachinewithwethandsorwhile
standinginwater.
•Useonlyanextensioncordrecommendedforoutdoor
cold-weatheruse.
6
Page 7
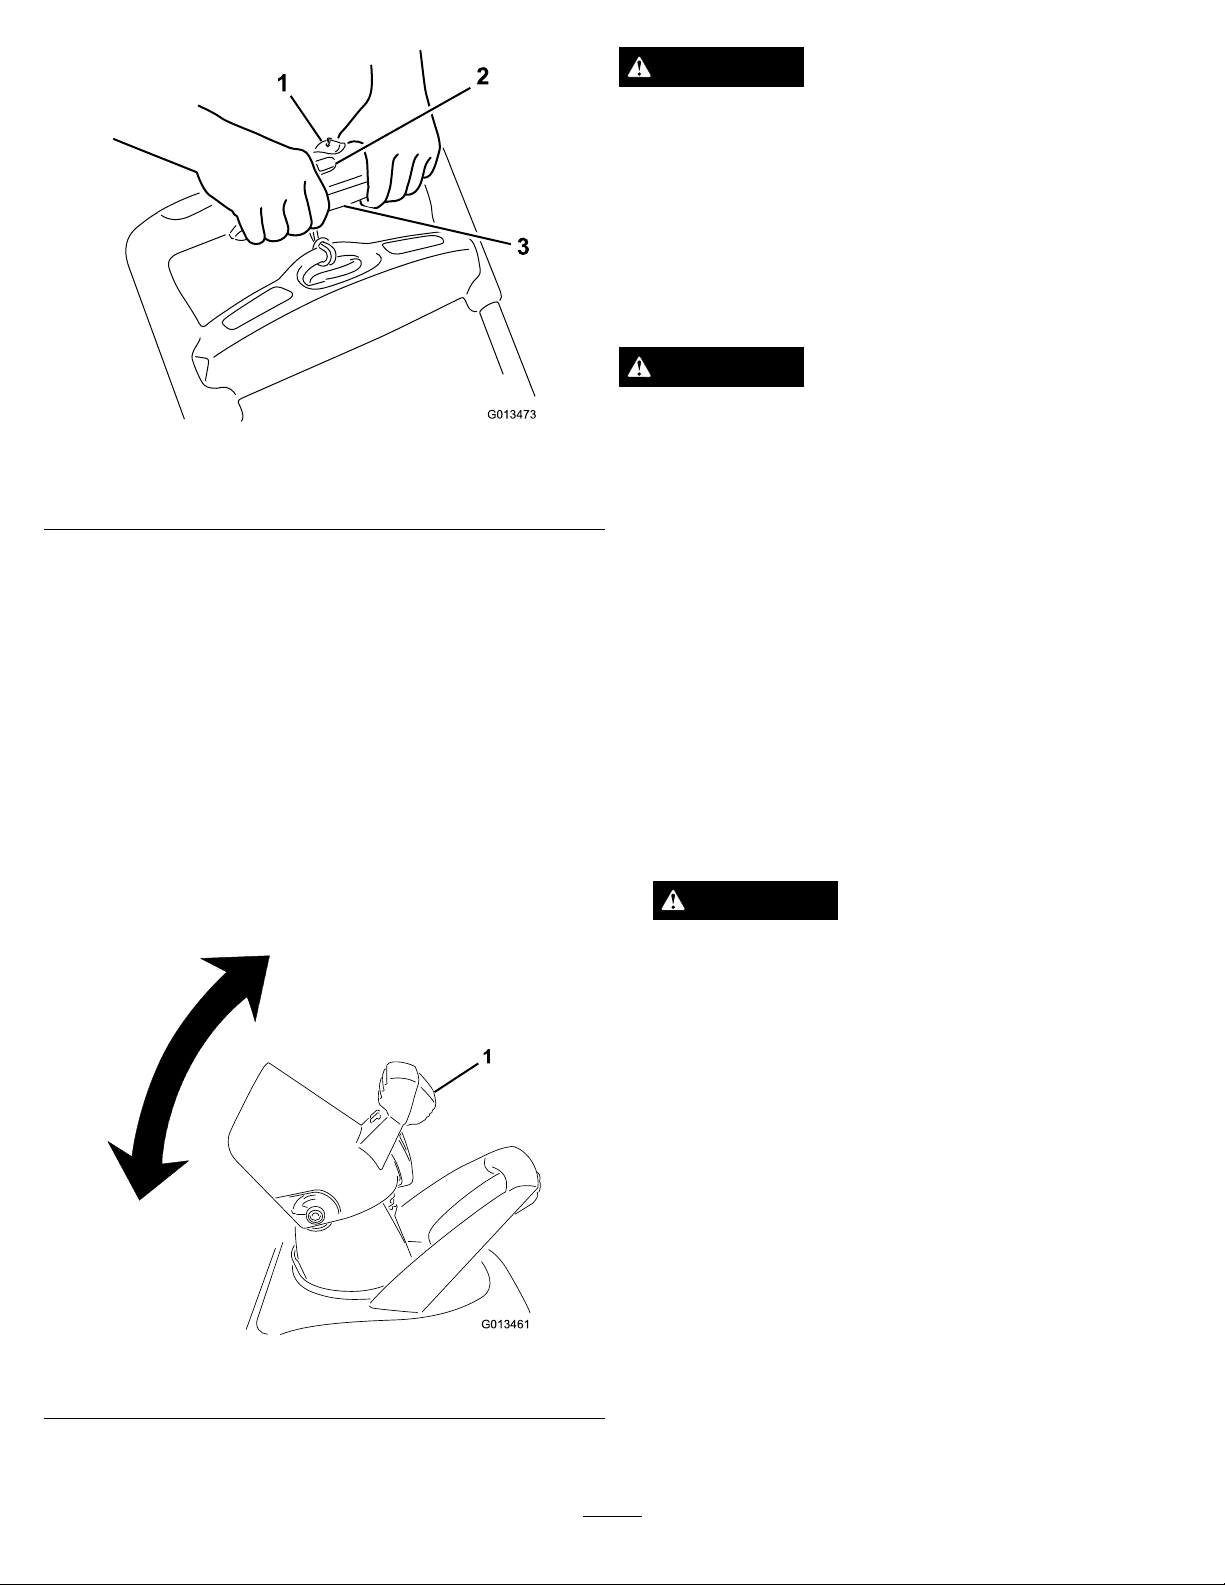
Figure10
WARNING
Agapbetweenthedischargechuteandthechutedeectormay
allowthemachinetothrowsnowandobjectsinthedirectionof
theoperator.Thrownobjectscouldcauseseriouspersonalinjury.
•Donotforcethechutedeectortoofarforwardsothatagap
appearsbetweenthedischargechuteandchutedeector.
•Donotadjustthechutedeectorwiththepowercontrolbar
engaged.Releasethepowercontrolbarbeforeadjustingthe
chutedeector.
OperatingTips
WARNING
Ifthemachinehitsanobjectwhileinoperation,theobjectcould
bethrowninoperator'sorbystander'sdirection.Thrownobjects
couldcauseseriouspersonalinjury.
1.Key3.Powercontrolbar
2.Interlockbutton
Note:Youmayreleasetheinterlockbuttonafteryousqueezeand
holdthepowercontrolbartothehandle.
2.Tostopthemotor,releasethepowercontrolbar.
Note:Whenyoustopthemachineafteryouhavenished
removingthesnow,alsoremovethekeyanddisconnectthe
extensioncord.
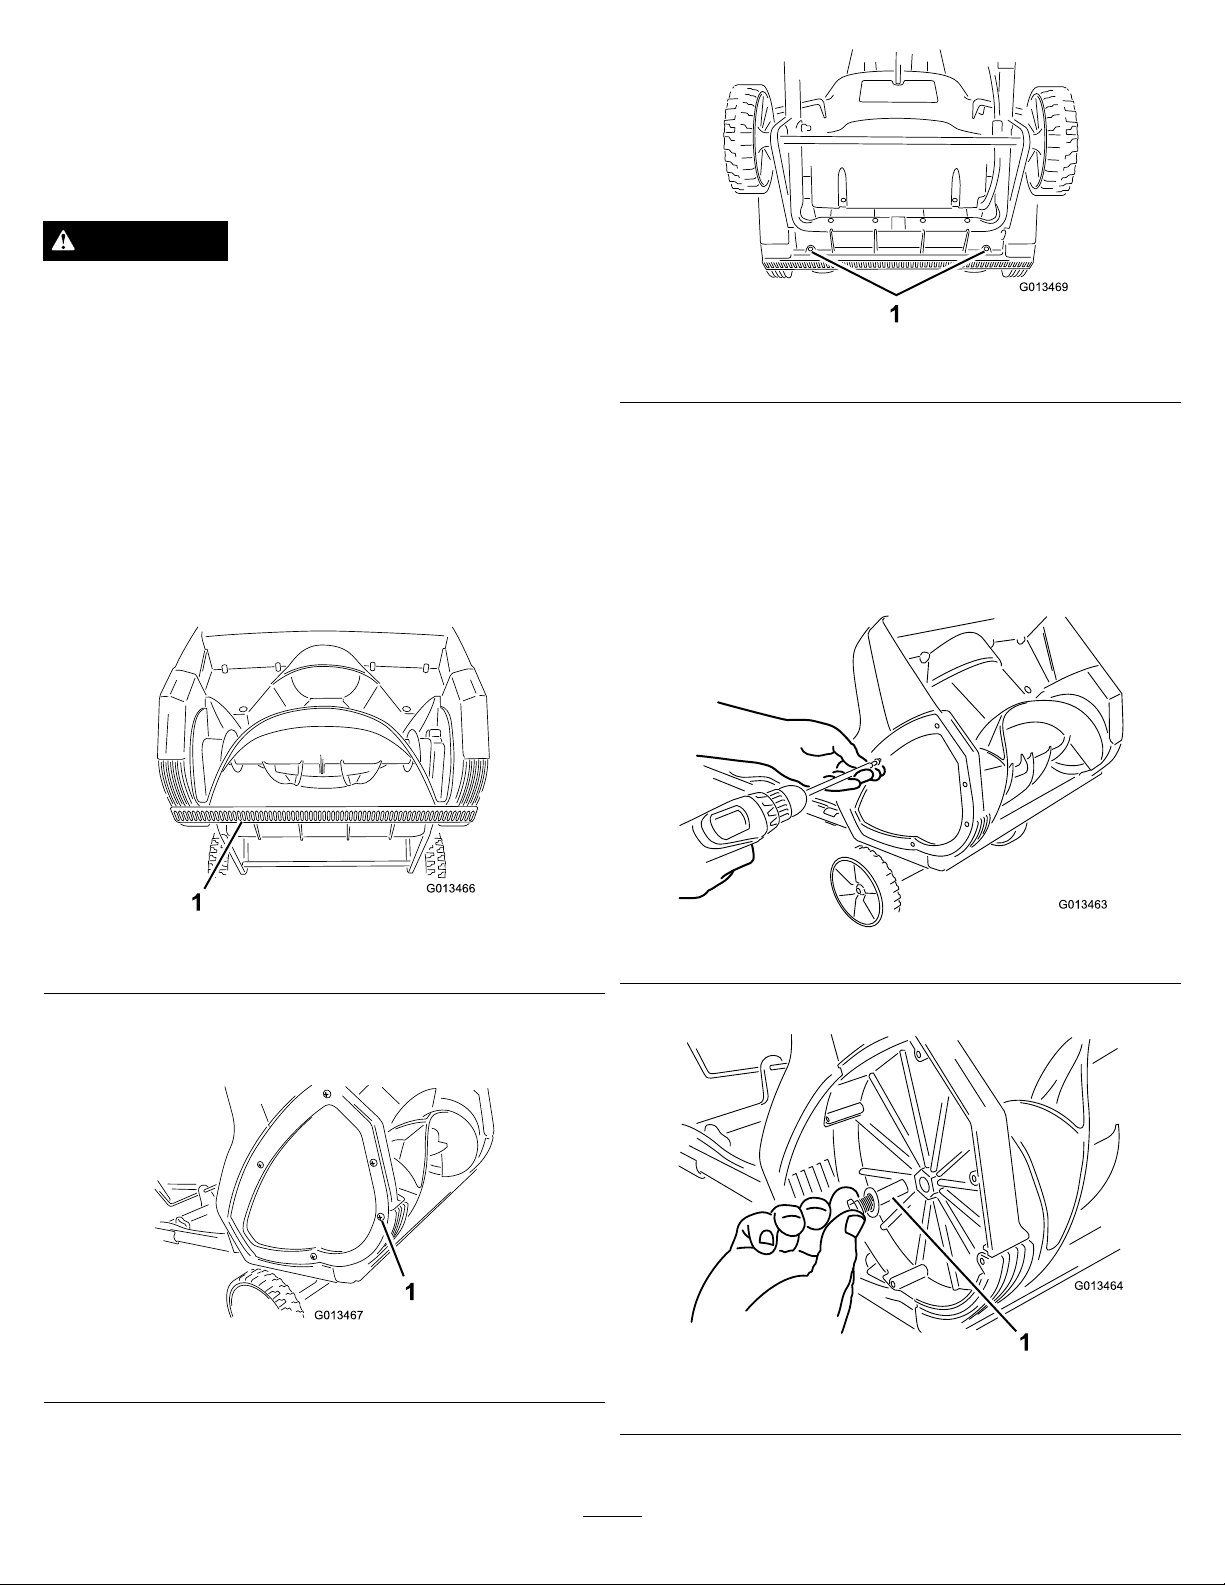
AdjustingtheDischargeChuteandChute
Deector
Toadjustthedischargechute,movethehandleonthechutecontrolrod
inthedirectionthatyouwishtodirectthesnowstream(Figure6and
Figure7).
Toadjustthechutedeector(andthereforetheheightofthesnow
stream),squeezethetriggerandraiseorlowerthechutedeector
(Figure11).
Keeptheareatobeclearedfreeofallobjectswhichmaybe
pickedupandthrownbytherotorblades.
•Checktheconditionofthemachinebeforeoperatingittoensure
thattherotorturnsfreely.
•Alwayskeepchildrenandpetsawayfromtheareaofoperation.
•Keeptheareatobeclearedfreeofstones,toys,orotherobjects
whichtherotorbladescanthrow.Suchitemscouldbecoveredby
snowfallandgounnoticed.Ifthemachinestrikesanobjectduring
operation,stopthemachine,unplugtheextensioncord,remove
theobstruction,andcheckthemachinefordamage.
•Beginremovingsnowneartheelectricaloutletandworkoutward.
Blowbackandforth,notawayfromandtowardtheoutlet.
•Whenturningattheendofaswath,stepoverthecordandturn
themachine.
•Alwaysoverlapeachswathanddischargethesnowdownwind
whenpossible.
WARNING
Whenusingthedischargechutehandle,neverdirectthe
snowdischargechuteattheoperatororbystanders.The
machinecanthrowobjectsandcauseseriouspersonalinjury.
Whenusingthedischargechutehandle,alwaysturnthe
dischargechuteintheoppositedirectionfromwhereyouor
bystandersarestanding.
1.Chutedeectortrigger
Figure11
•Keeptheextensioncordclearofobstructions,sharpobjects,and
allmovingparts.Donotpullsharplyoncordorabuseitinany
manner.Inspecttheextensioncordfrequentlyfordamagethat
mayresultinanelectricshock.Iftheextensioncordisdamaged,
replaceit.
•Incoldandsnowyweatherconditions,somecontrolsandmoving
partsmayfreeze.Therefore,ifanycontrolbecomesdifcultto
operate,stopthemotor,disconnecttheextensioncord,andcheck
forfrozenparts.Donotuseexcessiveforcewhentryingtooperate
frozencontrols.Bringthemachineindoorstothawfrozencontrols
beforeoperatingit.
•Whenoperatingthemachine,keepthewheels1inch(2.5cm)off
thepavementbytippingthemachineforward.Thishelpsprevent
thesnowfrombuildinguponthewheels.
•Afterclearingthesnow,letthemotorrunforafewminutessothat
movingpartsdonotfreeze.Thenshutoffthemotor,waitforall
movingpartstostop,andwipetheiceandsnowoffthemachine.
Rotatethechutecrankseveraltimestoremoveanysnow.
7
Page 8
Maintenance
NOTICE!Allelectricalrepairsshouldbeperformedbyan
AuthorizedServiceDealeronly.
Note:Determinetheleftandrightsidesofthemachinefromthe
normaloperatingposition.
WARNING
Iftheextensioncordispluggedintothemachine,someone
couldaccidentallyoperatethemachinewhileyouareperforming
maintenanceonit,causingseriouspersonalinjury.
Removethekeyanddisconnecttheextensioncordbeforeyou
performanymaintenanceonthemachine.
Figure14
1.Screws
LubricatingtheMachine
Youdonotneedtolubricatethemachine;allthebearingshavebeen
lubricatedatthefactoryforthelifeofthemachine.
ReplacingtheScraper
Thescraperislocatedatthebottomoftherotorhousingasshownin
Figure12.
Figure12
1.Scraper
2.Removeanddiscardtheoldscraper.
3.Installthenewscraper,andfastenitsecurelywiththe4screws
thatyoupreviouslyremoved.
ReplacingtheRotor
1.Removethescrewsthatsecuretherightsideplatetothemachine
frame(Figure15).
Figure15
1.Removethescrewfromeachsideplatethatholdsthescraper
(Figure13)and2screwsfromunderthemachine(Figure14)that
securethescrapertothemachine.
Figure13
1.Screw(2)
2.Removetherotorpin(Figure16).
Figure16
1.Rotorpin
3.Removetheoldrotor.
8
Page 9

4.Installthenewrotorbyinsertingtheendoftherotorontothetted
endinthehousingandrotatingtherotoruntilitsnapsintoplace
(Figure17).
Figure17
1.Fittedendoftherotor
Note:Ensurethatthenutthatsecurestherotorpinremainsinside
therecessedholeintherightinsidewallofthehousing.
Storage
1.Runthemachineforafewminutesandwipeawayanymelted
snowonthemachine.
2.Removethekeyanddisconnecttheextensioncordfromthe
machine.
3.Examinetheextensioncordthoroughlyforsignsofwearor
damage.Replaceitifitiswornordamaged.
4.Examinethemachinethoroughlyforworn,loose,ordamaged
parts.T orepairorreplaceparts,contactanAuthorizedService
Dealerforassistance.
5.Storetheextensioncordwiththemachine.
6.Storethemachineinaclean,dryplace.
Note:Thehousingwillexwhenyouinstalltherotor.
5.Tightentheboltonthesideofthehousing.
6.Installtherightsideplatewiththescrewsthatyouremovedin
step1.
Service
Torohasdesignedthismachinetogiveyouyearsoftrouble-free
use.Shoulditneedservice,bringthemachinetoanAuthorizedToro
ServiceDealer,whoisspeciallytrainedtorepairT oroproductsandwill
ensurethatyourTorostays“all”T oro.
Double-insulatedAppliances
Inadouble-insulatedappliance,twosystemsofinsulationare
providedinsteadofgrounding.Nogroundingmeansisprovidedon
adouble-insulatedappliance,norshouldameansforgrounding
beaddedtotheappliance.Servicingadouble-insulatedappliance
requiresextremecareandknowledgeofthesystem,andshouldbe
doneonlybythequaliedservicepersonnelatanAuthorizedT oro
ServiceDealer.Replacementpartsforadouble-insulatedappliance
mustbeidenticaltothepartstheyreplace.Adouble-insulated
applianceismarkedwiththewords“DoubleInsulation”or“Double
Insulated.”Thesymbol(squarewithinasquare)
markedontheappliance.
mayalsobe
ProductInformation
Amodelandserialnumberdecalislocatedonthehousing.Always
refertospecicnumbersonthedecalincorrespondenceorwhenyou
needreplacementparts.
9
Page 10

TheToroPromise-ElectricSnowthrowersandBrooms
ATwo-YearFullWarrantyforResidentialUsefortheUnitedStatesandCanada
TheToroCompanyanditsafliate,ToroWarrantyCompany,pursuanttoanagreementbetweenthem,jointlywarrantthisproductfortwoyearsagainstdefects
inmaterialorworkmanshipwhenusedfornormalresidentialpurposes.*
IfyouthinkyourToroProductcontainsadefectinmaterialsorworkmanship,followthisprocedure:
Ifyouhavequestionsorproblems,orbeforereturningthisproduct,calltollfree:1-800-808-2963(US)or1-800-808-3072(Canada).
•
Toreceiveareplacementorrepair,atouroption,returnthecompleteunittotheseller.UnitedStatesandCanadacustomersmayreturntheirproduct,with
•
proofofpurchase,toanyAuthorizedServiceDealer.UnitedStatescustomersmayalsoreturntheirproduct,withproofofpurchase,postageprepaid,tothe
ToroServiceCenter,21350CedarAvenueS.,Lakeville,MN55044-9090.
Thiswarrantycoversproductdefectsonly.NeitherTheToroCompanynorT oroWarrantyCompanyisliableforindirect,incidentalorconsequential
damagesinconnectionwiththeuseoftheToroProductscoveredbythiswarranty,includinganycostorexpenseofprovidingsubstituteequipment
orserviceduringreasonableperiodsofmalfunctionornon-usependingcompletionofrepairsunderthiswarranty.Somestatesdonotallow
exclusionsofincidentalorconsequentialdamages,sotheaboveexclusionsmaynotapplytoyou.Thiswarrantygivesyouspeciclegalrights,andyou
mayalsohaveotherrightswhichvaryfromstatetostate.
CountriesOtherthantheUnitedStatesandCanada
CustomerswhohavepurchasedT oroproductsexportedfromtheUnitedStatesorCanadashouldcontacttheirToroDistributor(Dealer)toobtainguarantee
policiesforyourcountry,province,orstate.IfforanyreasonyouaredissatisedwithyourDistributor’sserviceorhavedifcultyobtainingguaranteeinformation,
contacttheT oroimporter.Ifallotherremediesfail,youmaycontactusatToroWarrantyCompany .
*Residentialusemeansuseoftheproductonthesamelotasyourhome.PartNumber374-0262Rev.C
10
Page 11

Notes:
11
Page 12

Page 13

Soufeuseàneige1800PowerCurve
N°demodèle38381—N°desérie311000001etsuivants
FormNo.3365-268RevB
®
Manueldel'utilisateur
CONSIGNESDESÉCURITÉ
IMPORTANTES
L'utilisationd'unappareilélectriqueexigedeprendrecertaines
précautionsélémentaires,notamment:
LIRETOUTESLESINSTRUCTIONS
AVANTD'UTILISERCETAPPAREIL
ATTENTION—Respectezcesconsignesdesécurité
pourréduirelerisqued'incendie,d'électrocutionoudeblessures.
Toututilisateurdel'appareildoitimpérativementlireet
comprendrelecontenudecemanuelavantd'utiliserl'appareil.Faites
particulièrementattentionauxsymbolesdesécurité
PRUDENCE,ATTENTIONouDANGERetconcernentlasécuritédes
personnes.Veillezàlireetbiencomprendrecesdirectivesquiportent
survotresécurité.Nepaslesrespecter,c'estrisquerdevous
blesser,devousélectrocuteroudeprovoquerunincendie.
Piècesderechange–Lorsdel'entretiendel'appareil,n'utilisezque
despiècesderechangeidentiques.Lecordond'alimentationetle
commutateurutiliséssurcettemachinenesontpasremplaçables.Si
l'undesdeuxestendommagé,mettezlamachineaurebut.
N'utilisezpasl'appareilsurdugravier,saufs'ilestréglépourcetusage
spéciqueetconformémentauxinstructionsduManueldel'utilisateur.
Tenezlesenfantsetlesspectateursàdistance–Nelaissez
approcherpersonnedelazonedetravail.
Portezdesvêtementsadéquats–Neportezpasdevêtements
amplesoudebijouxpendants.Ilsrisquentdeseprendredansles
piècesmobiles.
Portezdesbottesencaoutchoucchaquefoisquevousutilisez
l'appareil.
L'utilisationdel'appareilrouesdécolléesdusolestdangereuse,saufsi
onrespectelesinstructionsspécialesduManueldel'utilisateur.
Attention–Pourévitertoutrisqued'électrocution,utiliseztoujoursune
rallongeprévuepourl'utilisationextérieure.
Rallonges–Pouréviterquelecordond'alimentationnesedébranche
delarallongependantl'utilisation,raccordezlarallongeàl’appareil
commeillustréàlaFigure9.
Évitezlesdémarragesaccidentels–Neposezpaslesdoigts
surl'interrupteurlorsquevoustransportezl'appareil.Vériezque
l'interrupteurestenpositionarrêtquandvousbranchezl'appareil.
Silecordond'alimentationestendommagédequelquemanièrequece
soitalorsqu'ilestbranché,débranchezlarallongedelaprisemurale
etcontactezunréparateuragréé.
Nemaltraitezpaslecordond'alimentation–Netransportezjamais
l'appareilparlecordonetnetirezpassurlarallongepourdébrancher
l'appareildelaprise.Éloignezlecordondessurfaceschaudes,dela
graisseetdesarêtesvives.
N'approchezpaslesmainsdespiècesenmouvement.
Lesdéecteursdoiventtoujoursêtreenplaceetenbonétat.
quisignient
Neforcezpassurl'appareil–Vousobtiendrezdesperformances
supérieuresetplussûressivousl'utilisezàlavitessepourlaquelle
ilestprévu.
Netravaillezpastroploindevantvous–Gardeztoujourslespieds
bienposésàterreetfaitesensortedenepasperdrel'équilibre.
Sil'appareilheurteunobstacle,procédezcommesuit:
•Relâchezimmédiatementlabarredecommandepourarrêter
l'appareil.
•Débranchezlecordond'alimentation.
•Recherchezlesdégâtséventuels.
•Effectuezlesréparationsnécessairesavantderemettrel'appareil
enmarche.
Débranchezl'appareil–Débranchezl'appareildusecteurlorsqu'ilne
sertpas,avanttoutentretien,avantdechangerd'accessoire,etc.
Rangezl'appareilàl'intérieurlorsqu'ilnesertpas.Lorsquel'appareil
nesertpas,rangez-letoujoursdansunlocalsûretsec,horsdeportée
desenfants.
Gardezl'appareilenbonétat–Suivezlesinstructionsdechangement
desaccessoires.
Cetappareilestconformeauxoudépasselesspécicationsde
lanormeB71.3del'AmericanNationalStandardsInstituteen
vigueuraumomentdelaproduction.
Lisezetassimilezlecontenudecemanuelavantdemettrele
moteurenmarche.
Voiciletriangledesécurité.Ilsignalelesdangerspotentiels
susceptiblesdecauserdesblessures.Respecteztousles
messagesdesécuritéquisuiventcesymbolepouréviterdes
accidents,potentiellementmortels.
L'usageoul'entretienincorrectdecetappareilpeutoccasionner
desaccidents,parfoismortels.Pourréduirelesrisques,
respectezlesconsignesdesécuritésuivantes.
Cetappareilpeutsectionnerlesmainsoulespiedsetprojeter
desobjets.Lenon-respectdesconsignesdesécuritéquisuivent
peutentraînerdesaccidentsgraves.
Apprendreàseservirdelamachine
•Avantd'utiliserl'appareil,vousdevezlire,comprendreetrespecter
touteslesinstructionsquigurentsurl'appareiletdansle(s)
manuel(s).Familiarisez-vousavectouslescommandeset
l'utilisationcorrectedel'appareil.Sachezcommentarrêter
l'appareiletdébrayerlescommandesrapidement.
•Nelaissezjamaisunenfantutiliserl'appareil.Nelaissezpersonne
utiliserl'appareilsansinstructionsadéquates.
•N'admettezpersonnedanslazonedetravail,etsurtoutpas
d'enfants.
•Faitesattentiondenepasglisseroutomber.
©2011—TheToro®Company
8111LyndaleAvenueSouth
Bloomington,MN55420
Enregistrezvotreproduitàwww.T oro.com.Traductiondutexted'origine(FR)
ImpriméauxÉtats-Unis
Tousdroitsréservés
Page 14

Avantd'utiliserlamachine
•Inspectezsoigneusementlazonedetravailetenleveztousles
paillassons,traîneaux,planches,lsdeferouautresobjetsqui
s'ytrouvent.
•N'utilisezjamaisl'appareilsansporterdesvêtementsd'hiver
adaptés.Neportezpasdevêtementsamplesquirisquentde
s'accrocherdanslespiècesmobiles.Portezdeschaussures
offrantunebonneprisesurlessurfacesglissantes.
•N'essayezpasdedéblayerlessurfacescouvertesdecaillouxou
degravier.Cetappareilestuniquementdestinéauxsurfaces
revêtues.
•N'entreprenezjamaisderéglageslorsquelemoteuresten
marche,saufsilefabricantledemandeexpressément.
•Porteztoujoursdeslunettesdesécuritéouuneprotectionoculaire
pendantletravail,etlorsdetoutréglageoutouteréparationpour
protégervosyeuxdesobjetspouvantêtreprojetésparl'appareil.
Utilisation
•N'approchezpaslesmainsnilespiedsdespiècesenrotation.Ne
voustenezjamaisdevantl'ouvertured'éjection.
•Soyeztrèsprudentlorsquevoustraversezoudéneigezdesroutes,
trottoirsoualléesdegravier.Faitesattentionauxdangerscachés
etàlacirculation.
•Sil'appareilheurteunobstacle,arrêtezlemoteur,débranchez
larallonge,enlevezlacléetvériezsoigneusementsil'appareil
estendommagé.Effectuezlesréparationsnécessairesavantde
remettrel'appareilenmarche.
•Sil'appareilsemetàvibrerdefaçonanormale,arrêtezlemoteur
etcherchez-enimmédiatementlacause.Lesvibrationsindiquent
généralementlaprésenced'unproblème.
•Arrêteztoujourslemoteur,enlevezlacléetdébranchezl'appareil
avantdequitterlapositionded'utilisation,dedégagerlelogement
deslamesdelafraiseoul'éjecteur,oud'entreprendredes
réglages,descontrôlesoudesréparations.
•Avantdenettoyer,répareroucontrôlerl'appareil,arrêtezlemoteur,
enlevezlaclé,débranchezl'appareiletattendezl'arrêtcompletde
lafraiseetdetouteslespiècesmobiles.
•Soyezextrêmementprudentsurunterrainenpente.
•N'utilisezpasl'appareilsitouslescapotsetautresdispositifsde
protectionappropriésnesontpasenplaceetenbonétatde
marche.
•Nedirigezjamaisl'éjectionversdespersonnesoudesendroitsqui
pourraientsubirdesdommagesmatériels.Tenezlesenfantset
lesanimauxàdistance.
•Nesurchargezpasl'appareilenessayantdedéblayertropvite.
•Regardezderrièrevousetsoyeztrèsprudentlorsquevousfaites
marchearrière.
•N'utilisezjamaisl'appareilàmoinsdedisposerd'unevisibilitéet
d'unéclairagesufsants.Veillezànepasperdrel'équilibreet
tenezfermementleguidon.Marchez,necourezpas.
Entretienetremisage
•Contrôlezfréquemmentleserragedetouteslesxationspour
garantirlefonctionnementsûrdel'appareil.
•Suiveztoujourslesinstructionsderemisagequigurentdansle
Manueldel'utilisateuravantderemiserl'appareilpourunedurée
prolongée,anden'oublieraucuneopérationimportante.
•Remplacezlesautocollantsd'instructionoudesécuritémanquants
ouendommagésaubesoin.
•Aprèsavoirutilisél'appareil,laissez-letourneràvidequelques
minutespouréviterquelafraisenesoitbloquéeparlegel.
CONSERVEZCESINSTRUCTIONS
Autocollantsdesécuritéetd'instruction
Desautocollantsdesécuritéetdesinstructions
bienvisiblessontplacésprèsdetouslesendroits
potentiellementdangereux.Remplaceztout
autocollantendommagéoumanquant.
112-1597
Pourdéboucherl'éjecteur
Lecontactaveclerotorenmarcheàl'intérieurdel'éjecteurestune
causecourantedeblessuresassociéesauxsoufeusesàneige.
N'utilisezjamaisvosmainspournettoyerl'éjecteur.
Pourdéboucherl'éjecteur:
•Arrêtezlemoteur,enlevezlacléetdébranchezlarallongede
lamachine!
•Attendez10secondesquelespalesdurotornetournentplus.
•Utiliseztoujoursunoutilpournettoyerl'éjecteur,jamaislesmains.
2
Page 15
114-4542
1.LisezleManueldel'utilisateur.
2.Enlevezl'autocollant
3.Attention
114-9034
117-8760
1.Attention–lisezleManueldel'utilisateur.
2.Risquedeprojections–tenezlesspectateursàbonnedistance
delamachine.
3.Risquedeblessure/mutilationparlafraise–Nevousapprochez
pasdespiècesenmouvement,laisseztouteslesprotections
enplace,débranchezlecordond'alimentationdelasource
d'alimentationetlisezlesinstructionsavantdeprocéderàdes
entretiensoudesrévisions.
4.Risquedecoupure/mutilationparlafraise–arrêtezlemoteuret
lamachineavantdequitterlamachine.
5.Risqued'électrocution–n'utilisezpaslecordond'alimentation
s'ilestendommagé.
117-8778
1.Pourengagerlafraise,appuyezsurl'interrupteurdesécurité
surleguidon.
114-9035
1.Risquedecoupure/mutilationparlafraise–neplacezpasles
mainsdansl'éjecteur;enlevezlaclédecontactetlisezles
instructionsavantd'effectuerunentretienouunerévision.
117-8781
1.Pourdésengagerlafraise,relâchezl'interrupteurdesécurité
surleguidon.
3
Page 16

Miseenservice
Remarque:Lescôtésgaucheetdroitdelamachinesontdéterminés
d'aprèslapositiondeconduite.
Montagedelapartiesupérieureduguidon
1.Retirezlesboutonsduguidon,lesboulonsovalesetlesrondelles
bombéesdelapartieinférieureduguidon.
2.Montezlapartiesupérieureduguidonsurlapartieinférieureau
moyendesboutonsduguidon,desrondellesbombéesetdes
boulonsovales,commeillustréàlaFigure1.
Figure2
1.Guideducordon
d'alimentation
2.Guidon
3.Cordond'alimentation
Montagedelatiged'orientationde
l'éjecteur
1.Placezl'éjecteurfaceversl'avant.
AVIS!Alignezlaèchesituéesurl'éjecteuretlaèchesituée
surlecarter(Figure3).
Figure1
1.Boutonduguidon(2)4.Partieinférieureduguidon
2.Rondellebombée(2)
3.Boulonovale(2)
Remarque:Vériezquelecordond'alimentationxéàlamachine
estpassepardessuslapartieinférieureduguidonetàl'intérieur
duguidonassemblé.
3.Serrezsolidementlesboutonsduguidonàlamain.
4.Fixezleguideducordond'alimentationauguidon(Figure2).
5.Partiesupérieureduguidon
Figure3
1.Éjecteur
2.Insérezl'extrémitédelatiged'orientationdel'éjecteurdansletrou
declavettedusupportquiestxésurlehautdelapartieinférieure
duguidon(Figure4).
2.Alignezlesèches
4
Page 17

Figure4
1.Troudeclavette
3.Retirezl'autocollantquimasqueletroudeclavetteaudosdu
carter(Figure5).
2.Support
Figure5
1.Autocollant2.Troudeclavette
4.Vériezquelapoignéedelatiged'orientationdel'éjecteurest
dirigéeverslehaut(Figure6)etinsérezlatigedansletroude
clavetteaudosducarter.
Figure6
1.Poignéesurlatiged'orientationdel'éjecteur
5.Poussezfermementlatigedansletroudeclavetteaudosdu
carterjusqu'àcequ'elles'enclencheenplace.
6.Bougezlapoignéedelatiged'orientationpourvérierqu'elle
bougedanslamêmedirectionquel'éjecteur(Figure7).
Figure7
5
Page 18
Utilisation
Vued'ensembleduproduit
Figure8
Longueurdelarallonge
30m(100')
45,5m(150')
Remarque:N'utilisezpasderallongedeplusde45,5m(150pi).
AVIS!Aucoursdel'utilisation,vériezsouventquelagainedela
rallongeneprésentepasdeperforationsoudessures.N'utilisez
paslecordond'alimentations'ilestendommagé.Nefaitespas
passerlecordondansdesaquesd'eauoudel'herbedétrempée.
Remarque:Pouréviterquelarallongenesedébrancheencours
d'utilisation,utilisezledispositifdeblocagesurlapartiesupérieuredu
guidonavantdelaconnecteràlamachine(Figure9).
Calibredelminimum(A.W.G.)
14
12
1.Palesderotor8.Boutondesécurité
2.Couvercledecourroie(non
représentée)
3.Déecteurd'éjecteur
4.Actionneurdudéecteur
d'éjecteur
5.Poignéedel'éjecteur
6.Guideducordon
d'alimentation
7.Tiged'orientationde
l'éjecteur
AVIS!Cettemachineestuniquementdestinéeàl'usage
domestiqueenextérieur.Nel'utilisezpasàl'intérieurniàdesns
commercialesouindustrielles.
9.Clé
10.Partiesupérieureduguidon
11.Barredecommande
12.Cordond'alimentation
13.Boutonsdeguidon
14.Éjecteur
Raccordementàunesourced'alimentation
Pourréduirelesrisquesd'électrocution,l'appareilestmunid'uneche
polarisée(unebrocheestpluslargequel'autre).N'utilisezqu'uneche
polarisée,portéesurlalisteUL(certiéeCSAauCanada)etprévue
pourl'utilisationàl'extérieur.Uneprisepolariséenes'adapteàun
cordonpolariséqued'uneseulefaçon.Silaprisenes'adaptepas
parfaitementaucordon,inversezlecordon.Sileproblèmepersiste,
procurez-vousunerallongepolarisée.Sivousavezunerallonge
polariséeetquesachenes'adaptepasàlaprisemurale,inversez
lache.Sileproblèmepersiste,demandezàunélectricienqualié
d'installeruneprisemuraleadéquate.Nechangezsurtoutpasle
connecteurdelarallongeoudel'appareil.
Figure9
1.Dispositifdeblocagedu
cordond'alimentation
2.Rallonge
ATTENTION
Lecordond'alimentationpeutcauserunchocélectriqueouun
incendies'ilestendommagé.
Examinezsoigneusementlecordond'alimentationavantd'utiliser
lamachine.Silarallongeestendommagée,n'utilisezpasla
machine.Lecordond'alimentationoul'interrupteurdeceproduit
n'estpasremplaçable;leproduitdoitêtremisaurebut.
Démarrageetarrêtdumoteur
1.Pourdémarrerlemoteur,insérezlaclé,appuyezdemanière
prolongéesurleboutondesécuritéetserrezlabarrede
commande(Figure10).
DANGER
Uncontactavecl'eaupendantl'utilisationdelamachinepeut
causerdesblessuresoulamortparélectrocution.
•Nemanipulezpaslamachineouleconnecteursivousavez
lesmainsmouilléesoulespiedsdansl'eau.
•Utilisezuniquementunerallongeagrééeprévuepour
l'utilisationàl'extérieuràbassetempérature.
6
Page 19

1.Clé
2.Boutondesécurité
Figure10
3.Barredecommande
ATTENTION
Unespaceentrel'éjecteuretledéecteurpeutlaisserpasserde
laneigeetn'importequelobjetramasséparlamachineetles
projeterendirectiondel'utilisateur.Lesdébrisprojetéspeuvent
inigerdesblessuresgraves.
•Nepoussezpasledéecteurtropenavantpouréviterde
créerunespaceentrel'éjecteuretledéecteur.
•Neréglezpasledéecteurquandlabarredecommandeest
engagée.Relâchezlabarredecommandeavantderégler
ledéecteurd'éjecteur.
Conseilsd'utilisation
ATTENTION
Silamachineheurteunobstaclependantl'utilisation,celui-ci
risqued'êtreprojetéendirectiondel'utilisateuroud'une
personneàproximité.Lesdébrisprojetéspeuventinigerdes
blessuresgraves.
Nelaissezpasd'objetssusceptiblesd'êtreramassésetprojetés
parleslamesdelafraisedanslazoneàdéblayer.
Remarque:Vouspouvezrelâcherleboutondesécuritéunefois
quevousavezserréetquevousmaintenezlabarredecommande
contreleguidon.
2.Pourarrêterlemoteur,relâchezlabarredecommande.
Remarque:Lorsquevousarrêtezlamachineaprèsavoirnide
déblayerlaneige,enlevezlacléetdébranchezlarallonge.
Réglagedel'éjecteuretdudéecteur
d'éjection
Pourréglerl'éjecteur,déplacezlapoignéedelatiged'orientationdans
ladirectiondéjectiondelaneigerecherchée(Figure6etFigure7).
Pourréglerledéecteurd'éjecteur(etdonclahauteurd'éjectionde
laneige),serrezlagâchetteetrelevezouabaissezledéecteur
(Figure11).
•Vériezl'étatdelamachineavantdel'utiliser,andevérierque
lafraisetournelibrement.
•Tenezlesenfantsetlesanimauxdomestiquesàl'écartdelazone
detravail.
•Nelaissezpasdepierres,jouetsouautresobjetssusceptibles
d'êtreramassésetprojetésparlafraisedanslazoneàdéblayer.
Ilspourraientêtrerecouvertsparlaneigeetdisparaître.Sila
machineheurteunobstaclequelconquependantl'utilisation,
arrêtez-la,débranchezlarallonge,enlevezl'obstacleetvériez
quelamachinen'estpasendommagée.
•Commencezpardéblayerlaneigeprèsdelaprisemuraleet
travaillezenavançant.Travaillezlatéralementparrapportàla
prise,etnond'arrièreenavant.
•Lorsquevousarrivezauboutd'unebande,enjambezlecordon
d'alimentationetfaitesdemi-tour.
•Veillezàcequelesbandesdéblayéessechevauchentetéjectez
laneigedanslesensduventdepréférence.
ATTENTION
Lorsquevousutilisezlapoignéedel'éjecteur,nedirigez
jamaisl'éjecteurversvous-mêmeouversdespersonnes
àproximité.Lamachinepeutprojeterdesobjetsetblesser
quelqu'ungravement.
Lorsquevousutilisezlapoignéedel'éjecteur,tournez
toujoursl'éjecteurdansladirectionopposéeàcelleoùvous,
outouteautrepersonne,voustrouvez.
1.Actionneurdudéecteurd'éjecteur
Figure11
•Éloignezlarallongedesobstructions,desobjetstranchantsetdes
piècesmobiles.Netirezpasbrutalementsurlecordonetnele
maltraitezpasd'unemanièregénérale.Vériezfréquemmentl'état
delarallonge,carelleprésenteunrisqued'électrocutionsielleest
endommagée.Remplacezlarallongesielleestendommagée.
•Lorsqu'ilaneigéetpartempsfroid,certainescommandeset
piècesmobilespeuventêtrebloquéesparlegel.Danscecas,
arrêtezlemoteur,débranchezlarallongeetrecherchezles
piècesbloquées.Neforcezjamaislescommandespourlesfaire
fonctionnerlorsqu'ellessontgelées.Rentrezlamachinedansun
localpourpermettreauxcommandesdedégeleravantdel'utiliser.
•Lorsquevoustravaillez,gardezlesrouesà2,5cm(1")dusolen
basculantlamachineenavant.Vouséviterezainsiquelaneige
s'accumulesurlesroues.
•Aprèsutilisationdelamachine,laissezlemoteurtournerquelques
minutespouréviterquelespiècesenmouvementnesoient
7
Page 20

bloquéesparlegel.Arrêtezalorslemoteur,attendezl'arrêtde
touteslespiècesmobilesetenlevezlaglaceetlaneigequise
trouventsurlamachine.T ournezplusieursfoislamanivellede
l'éjecteurpourfairetomberlaneige.
Entretien
AVIS!Coneztouteslesréparationsélectriquesàunréparateur
agréé.
Remarque:Lescôtésgaucheetdroitdelamachinesontdéterminés
d'aprèslapositiondeconduite.
ATTENTION
Silarallongeestbranchéeàlamachine,celle-cipourraitêtre
miseenmarcheaccidentellementpendantl'entretienetblesser
quelqu'un.
Enlevezlacléetdébranchezlarallongeavantd'effectuer
l'entretiendelamachine.
Graissagedelamachine
Lamachinenenécessiteaucunelubrication,cartouslesroulements
sontlubriésàvieenusine.
Remplacementdelalameracleuse
Lalameracleuseestsituéeaubasducarterdefraise,commeillustré
àlaFigure12.
Figure12
1.Lameracleuse
1.Retirezlavisdechaqueplaquelatéraledexationdelalame
racleuse(Figure13)etles2vissouslamachine(Figure14)qui
xentlalameracleuseàlamachine.
Figure13
1.Vis(2)
8
Page 21

Figure14
1.Vis
2.Déposezlalameracleuseetmettez-laaurebut.
3.Montezlalameracleuseneuveetxez-lasolidementavecles
4visretiréesprécédemment.
Remplacementdelafraise
1.Retirezlesvisquixentlaplaquelatéraledroiteauchâssisde
lamachine(Figure15).
4.Montezlafraiseneuveeninsérantsonextrémitésurl’extrémité
ajustéeducarter,ettournezlafraisejusqu’àcequ’elles’enclenche
enposition(Figure17).
Figure17
1.Extrémitéajustéedelafraise
Remarque:Vériezquel'écrouquixel'axedelafraiseresteà
l'intérieurdutrouenretraitdanslaparoiintérieuredroiteducarter.
Figure15
2.Retirezl'axedelafraise(Figure16).
Remarque:Lecarteréchitlorsdel’installationdelafraise.
5.Serrezleboulonsurlecôtéducarter.
6.Fixezlaplaquelatéraledroiteaveclesvisretiréesàl'étape1.
Entretien
Toroaconçucettemachinepourqu'ellevousoffredesannées
debonsetloyauxservices.Lorsqu'unentretienestnécessaire,
conezlamachineàunréparateurToroagréé.Celui-cipossèdeles
compétencesvouluespourréparerlesproduitsToroetsauragarder
votremachineToro“exclusivement”T oro.
Appareilsàdoubleisolation
Cetyped'appareildisposededeuxsystèmesd'isolationaulieud'une
miseàlaterre.Aucundispositifdemiseàlaterren'estprévusurun
appareilàdoubleisolationetaucunnedoitluiêtreajouté.L'entretien
d'unappareilàdoubleisolationestdélicatetexigedebienconnaîtrele
système.Pourcetteraison,n'enconezl'entretienqu'aupersonnel
qualiéd'unréparateurToroagréé.Lespiècesderechanged'un
appareilàdoubleisolationdoiventêtreidentiquesauxpiècesd'origine.
Lesappareilsàdoubleisolationportentlesmots"DoubleInsulation"
ou"DoubleInsulated"("Doubleisolation"ou"Doublementisolé").Le
symbole(uncarréentouréd'uncarré)
estparfoisutiliséégalement.
1.Axedefraise
3.Déposezlafraiseusagée.
Informationssurleproduit
Unautocollantportantlesnumérosdemodèleetdesérieestcollésur
lecarter.Indiqueztoujourslesnumérosgurantsurl'autocollantdans
toutecorrespondanceetlorsdelacommandedepiècesdétachées.
Figure16
9
Page 22

Remisage
1.Faitesfonctionnerlamachinequelquesminutesetessuyezla
neigefonduerestantdessus.
2.Enlevezlacléetdébranchezlarallongedelamachine.
3.Vériezsoigneusementl'étatdelarallonge.Remplacez-lasielle
estuséeouendommagée.
4.Vériezminutieusementquelamachineneprésenteaucunepièce
usée,desserréeouendommagée.Adressez-vousàunréparateur
agréépourfaireremplacerouréparerlespièces.
5.Rangezlarallongeaveclamachine.
6.Remisezlamachinedansunlocalpropreetsec.
10
Page 23

LapromessedeToro–Soufeusesàneigeetbalaisélectriques
UnegarantieintégralededeuxanspourusagedomestiquevalableauxÉtats-UnisetauCanada.
TheT oroCompanyetsaliale,ToroWarrantyCompany ,envertud'unaccordmutuel,s'engagentconjointementàréparerleproduitutiliséàdesns
résidentiellesnormaless'ilprésenteundéfautdefabrication,pendantunepériodededeuxansàdaterdel'achat.*
SivouspensezquevotreproduitToroprésenteunvicedematériauoudefabrication,procédezcommesuit:
•
Sivousavezbesoindeconseilsouderenseignements,ouavantderenvoyerceproduit,appeleznotrenumérovert:1-800-808-2963(auxÉtats-Unis)
ou1-800-808-3072(auCanada).
•
Pourrecevoirunappareilderechangeouuneréparation,suivantnotrechoix,renvoyezl'appareilaucompletauvendeur.AuxÉtats-UnisetauCanada,le
produitpeutêtrerenvoyé,accompagnéd'unepreuved'achat,audépositaireagréé.Seulslesclientsaméricainspeuventrenvoyerleurproduit,accompagné
d'unepreuved'achat,portpayéàn'importequelréparateuragrééà:ToroServiceCenter,21350CedarAvenueS.,Lakeville,MN55044-9090.
Cettegarantiecouvrelesdéfautsdeproduituniquement.TheToroCompanyetT oroWarrantyCompanydéclinenttouteresponsabilitéencas
dedommagessecondairesouindirectsliésàl'utilisationdesproduitsTorocouvertsparcettegarantie,notammentquantauxcoûtset
dépensesencouruspourseprocurerunéquipementouunservicedesubstitutiondurantunepérioderaisonnablepourcausededéfaillance
oud'indisponibilitéenattendantlaréparationsousgarantie.L'exclusiondelagarantiedesdommagessecondairesouindirectsn'estpas
autoriséedanscertainsétatsoupays,etpeutdoncnepass'appliquerdansvotrecas.Cettegarantievousaccordedesdroitsspéciques,auxquels
peuvents'ajouterd'autresdroitsquivarientselonlesétats.
AutrespaysquelesÉtats-UnisetleCanada
PourlesproduitsT oroexportésdesÉtats-UnisouduCanada,demandezàvotredistributeur(dépositaire)T orolapolicedegarantieapplicabledansvotre
pays,régionouétat.Si,pouruneraisonquelconque,vousn'êtespassatisfaitdesservicesdevotredistributeur,ousivousavezdumalàvousprocurerles
informationsdegarantie,adressez-vousàl'importateurToro.Endernierrecours,adressez-vousàTheToroCompanyWarranty.
*L'usagerésidentielnormaldésignel'utilisationduproduitsurleterrainoùsetrouvevotredomicile.Réf.374-0262Rév.C
11
Page 24

 Loading...