

Page 1
FormNo.3373-145RevA
g014867
SGR-6StumpGrinder
ModelNo.22610—SerialNo.311000001andUp
ModelNo.22610G—SerialNo.311000001andUp
ModelNo.32610—SerialNo.312000001andUp
ToregisteryourproductordownloadanOperator'sManualorPartsCatalogatnocharge,gotowww.Toro.com.OriginalInstructions(EN)
Page 2
WARNING
g014868
1
Introduction
CALIFORNIA
Proposition65Warning
Theengineexhaustfromthisproduct
containschemicalsknowntotheStateof
Californiatocausecancer,birthdefects,
orotherreproductiveharm.
DANGER
Theremaybeburiedpower,gas,and/ortelephone
linesintheworkarea.Shockorexplosionmay
occurifyoudigintothem.
Havethepropertyorworkareamarkedforburied
linesanddonotdiginmarkedareas.Contactyour
localmarkingserviceorutilitycompanytohavethe
propertymarked(forexample,intheUnitedStates,
call811forthenationwidemarkingservice).
ThissparkignitionsystemcomplieswithCanadianICES-002.
Becauseinsomeareastherearelocal,state,orfederal
regulationsrequiringthatasparkarresterbeusedonthe
engineofthismachine,asparkarresterisavailableas
anoption.Ifyourequireasparkarrestor,contactyour
AuthorizedT oroServiceDealer.
Thismachineisdesignedtogrindandremovetreestumps
andsurfaceroots.Itisnotintendedtocutrockoranyother
materialotherthanwoodandthesoilaroundastump.
Readthisinformationcarefullytolearnhowtooperateand
maintainyourproductproperlyandtoavoidinjuryand
productdamage.Y ouareresponsibleforoperatingthe
productproperlyandsafely.
YoumaycontactT orodirectlyatwww.Toro.comforproduct
andaccessoryinformation,helpndingadealer,ortoregister
yourproduct.
Wheneveryouneedservice,genuineToroparts,oradditional
information,contactanAuthorizedServiceDealerorToro
CustomerServiceandhavethemodelandserialnumbersof
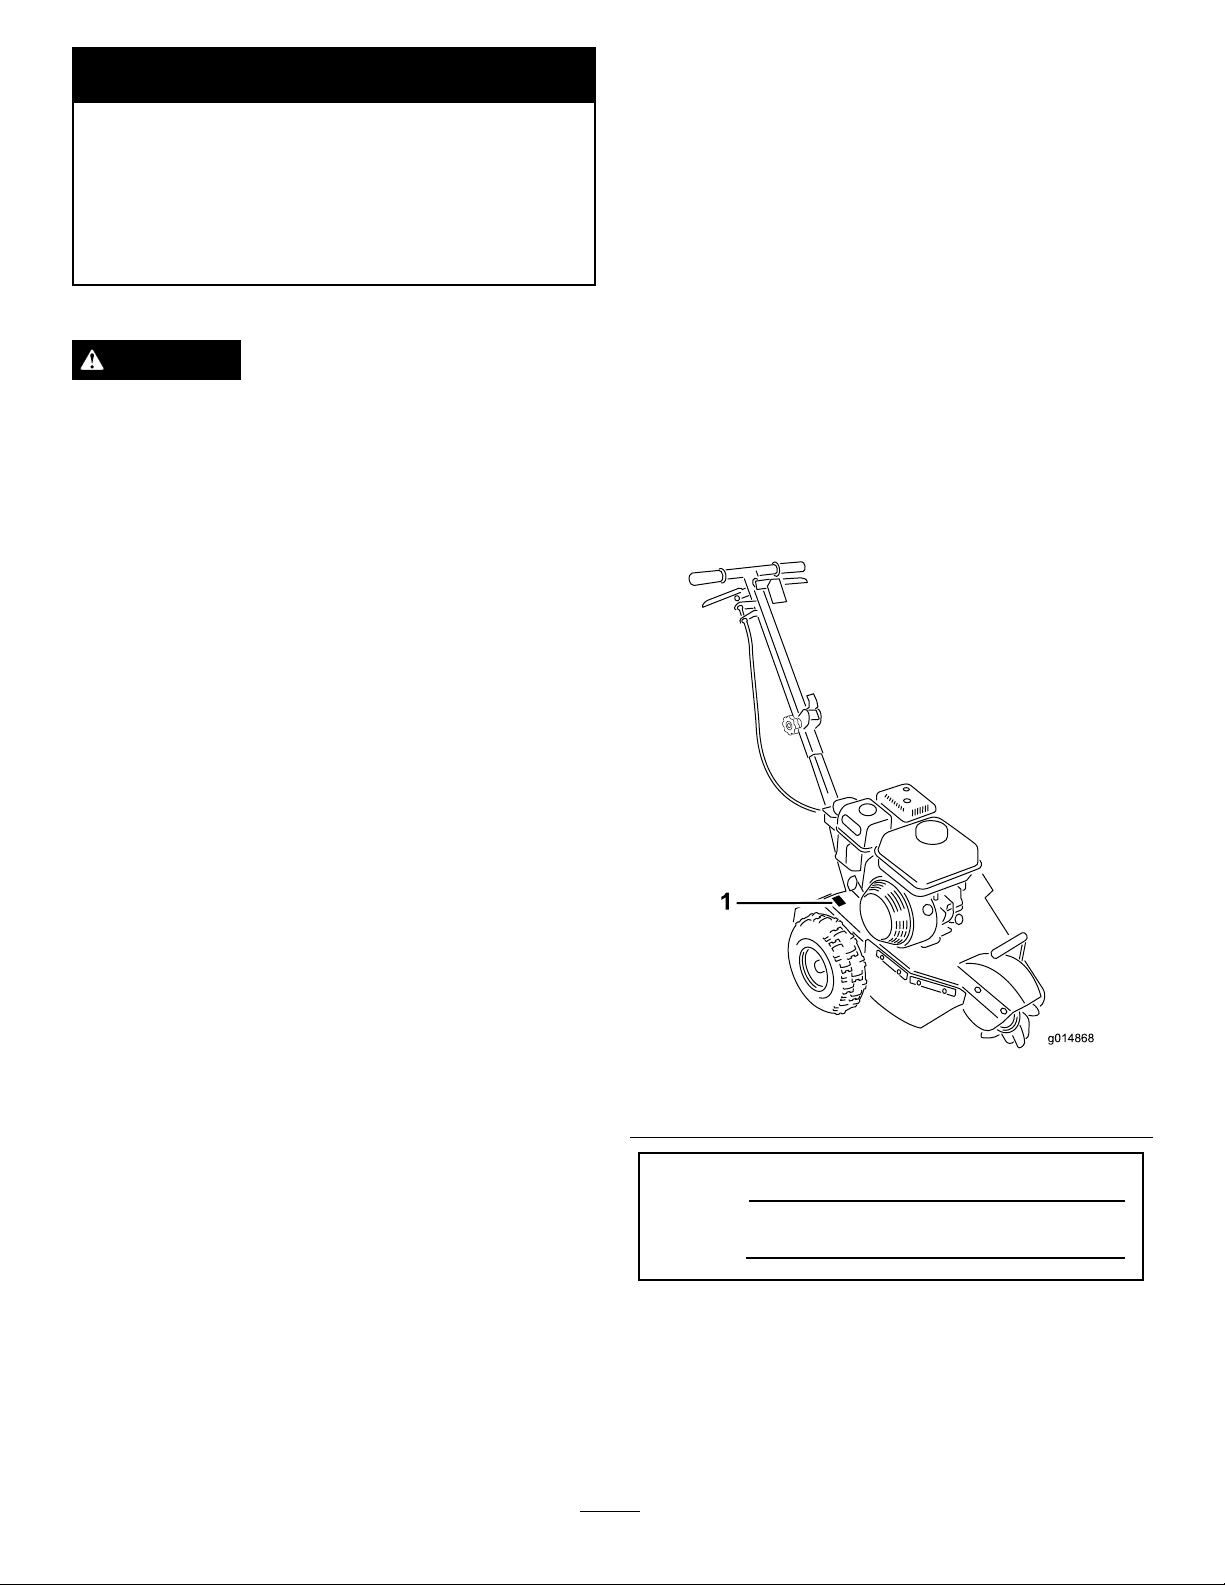
yourproductready.Figure1illustratesthelocationofthe
modelandserialnumbersontheproduct.Writethenumbers
inthespaceprovided.
GenuineTorosparkarrestersareapprovedbytheUSDA
ForestryService.
Important:ItisaviolationofCaliforniaPublic
ResourceCodeSection4442touseoroperatetheengine
onanyforest-covered,brush-covered,orgrass-covered
landwithoutasparkarrestermufermaintainedin
workingorder,ortheengineconstricted,equipped,and
maintainedforthepreventionofre.Otherstatesor
federalareasmayhavesimilarlaws.
Theenclosed
informationregardingtheUSEnvironmentalProtection
Agency(EPA)andtheCaliforniaEmissionControl
Regulationofemissionsystems,maintenance,and
warranty.Replacementsmaybeorderedthroughthe
enginemanufacturer.
Engine Owner's Man ual
issuppliedfor
Figure1
1.Modelandserialnumberplate
ModelNo.
SerialNo.
Thismanualidentiespotentialhazardsandhassafety
messagesidentiedbythesafetyalertsymbol(Figure2),
whichsignalsahazardthatmaycauseseriousinjuryordeath
ifyoudonotfollowtherecommendedprecautions.
©2012—TheT oro®Company
8111LyndaleAvenueSouth
Bloomington,MN55420
Contactusatwww.Toro.com.
2
PrintedintheUSA.
AllRightsReserved
Page 3

Safety
Figure2
1.Safetyalertsymbol
Thismanualuses2otherwordstohighlightinformation.
Importantcallsattentiontospecialmechanicalinformation
andNoteemphasizesgeneralinformationworthyofspecial
attention.
Contents
Introduction..................................................................2
Safety...........................................................................3
SafeOperatingPractices...........................................3
SafetyandInstructionalDecals.................................5
ProductOverview..........................................................6
Controls................................................................6
Specications.........................................................7
Attachments/Accessories.........................................7
Operation.....................................................................8
BeforeyouStart......................................................8
AddingFuel............................................................8
CheckingtheEngineOilLevel..................................9
StartingandStoppingtheEngine..............................10
GrindingaStump...................................................10
Maintenance.................................................................12
RecommendedMaintenanceSchedule(s)......................12
Lubrication...............................................................12
GreasingtheMachine.............................................12
EngineMaintenance..................................................13
ServicingtheAirCleaner.........................................13
ServicingtheEngineOil..........................................14
ServicingtheSparkPlug..........................................15
BeltMaintenance......................................................16
CheckingtheDriveBeltTension...............................16
AdjustingtheDriveBelt..........................................16
GrinderMaintenance..................................................17
CheckingtheCuttingWheelBlades...........................17
ReplacingtheCuttingWheelBlades..........................17
Cleaning...................................................................18
RemovingDebrisfromtheMachine..........................18
Storage........................................................................18
............................................................................18
Troubleshooting...........................................................19
Improperuseormaintenancebytheoperatororowner
canresultininjury.Toreducethepotentialforinjury ,
complywiththesesafetyinstructionsandalways
payattentiontothesafetyalertsymbol,which
means:
instruction.Failuretocomplywiththeinstructionmay
resultinpersonalinjuryordeath.
Caution
,
W ar ning
,or
Danger
—personalsafety
SafeOperatingPractices
Thisproductiscapableofamputatinghandsandfeet.Always
followallsafetyinstructionstoavoidseriousinjuryordeath.
WARNING
Engineexhaustcontainscarbonmonoxide,an
odorless,deadlypoisonthatcankillyou.
Donotruntheengineindoorsorinanenclosed
area.
Training
•ReadtheOperator'sManualandothertrainingmaterial.If
theoperator(s)ormechanic(s)cannotreadEnglish,itis
theowner'sresponsibilitytoexplainthismaterialtothem.
•Becomefamiliarwiththesafeoperationoftheequipment,
operatorcontrols,andsafetysigns.
•Alloperatorsandmechanicsshouldbetrained.The
ownerisresponsiblefortrainingtheusers.
•Neverletchildrenoruntrainedpeopleoperateorservice
theequipment.Localregulationsmayrestricttheageof
theoperator.
•Theowner/usercanpreventandisresponsiblefor
accidentsorinjuriesoccurringtohimselforherself,other
peopleorproperty.
Preparation
•Evaluatetheterraintodeterminewhataccessoriesand
attachmentsareneededtoproperlyandsafelyperform
thejob.Onlyuseaccessoriesandattachmentsapproved
bythemanufacturer.
•Wearappropriateclothingincludinghardhat,faceshield,
safetyglasses,longpants,safetyshoes,andhearing
protection.Longhair,looseclothingorjewelrymayget
tangledinmovingparts.
•Inspecttheareawheretheequipmentistobeusedand
removeallobjectssuchasrocks,toys,andwirewhichcan
bethrownbythemachine.
•Useextracarewhenhandlinggasolineandotherfuels.
Theyareammableandvaporsareexplosive.
–Useonlyanapprovedcontainer
–Neverremovethegascaporaddfuelwiththeengine
running.Allowtheenginetocoolbeforerefueling.
Donotsmoke.
3
Page 4

–Neverrefuelordrainthemachineindoors.
•Checkthattheoperatorpresencecontrols,safetyswitches,
andshieldsareattachedandfunctioningproperly.Donot
operateunlesstheyarefunctioningproperly.
•Checkthatthecuttingwheelhasstoppedrotatingwhen
youreducethethrottle.
Operation
•Neverrunanengineinanenclosedarea.
•Onlyoperateingoodlight,keepingawayfromholesand
hiddenhazards.
•Besurealldrivesareinneutralbeforestartingtheengine.
Onlystarttheenginefromtheoperator'sposition.
•Neveroperatewiththeguardsnotsecurelyinplace.Be
sureallinterlocksareattached,adjustedproperly,and
functioningproperly.
•Donotchangetheenginegovernorsettingoroverspeed
theengine.
•Stoponlevelground,lowerthegrinder,andshutoff
theenginebeforeleavingtheoperator'spositionforany
reason.
•Keephandsandfeetawayfromthemovinggrinderwheel
andteeth.
•Lookbehindanddownbeforebackinguptobesureof
aclearpath.
•Keeppetsandbystandersaway.
•Donotoperatethemachineundertheinuenceof
alcoholordrugs.
•Usecarewhenloadingorunloadingthemachineintoa
trailerortruck.
•Ensurethattheareaisclearofotherpeoplebefore
operatingthemachine.Stopthemachineifanyoneenters
thearea.
•Neverleavearunningmachineunattended.Alwaysstop
theengineandverifythecuttingwheelshasstopped
rotating.
•Neverjerkthecontrols;useasteadymotion.
•Watchfortrafcwhenoperatingnearorcrossing
roadways.
•Donottouchpartswhichmaybehotfromoperation.
Allowthemtocoolbeforeattemptingtomaintain,adjust,
orservice.
•Ensurethatyouoperatethemachineinareaswhere
therearenoobstaclesincloseproximitytotheoperator.
Failuretomaintainadequatedistancefromtrees,walls,
andotherbarriersmayresultininjuryasthemachine
backsupduringoperationiftheoperatorisnotattentive
tothesurroundings.Onlyoperatetheunitinareaswhere
thereissufcientclearancefortheoperatortosafely
maneuvertheproduct.
•Beforegrinding,havetheareamarkedforunderground
utilities,anddonotgrindinmarkedareas.
•Locatethepinchpointareasmarkedonthemachineand
keephandsandfeetawayfromtheseareas.
•Lightningcancausesevereinjuryordeath.Iflightning
isseenorthunderisheardinthearea,donotoperate
themachine;seekshelter.
MaintenanceandStorage
•Stoptheengine.Waitforallmovementtostopbefore
adjusting,cleaning,orrepairing.
•Cleandebrisfromthegrinder,drives,mufers,andengine
tohelppreventres.Cleanupoilorfuelspillage.
•Lettheenginecoolbeforestoringanddonotstorenear
ame.
•Donotstorefuelnearamesordrainindoors.
•Parkthemachineonlevelground.Neverallowuntrained
personneltoservicethemachine.
•Carefullyreleasepressurefromcomponentswithstored
energy.
•Removethesparkplugwirebeforemakinganyrepairs.
•Keephandsandfeetawayfrommovingparts.Ifpossible,
donotmakeadjustmentswiththeenginerunning.
•Keepallpartsingoodworkingconditionandallhardware
tightened.Replaceallwornordamageddecals.
•Keepnutsandboltstight.Keepequipmentingood
condition.
•Nevertamperwithsafetydevices.
•Keepthemachinefreeofgrass,leaves,orotherdebris
build-up.Cleanupoilorfuelspillage.Allowthemachine
tocoolbeforestoring.
•Useextracarewhenhandlinggasolineandotherfuels.
Theyareammableandvaporsareexplosive.
–Useonlyanapprovedcontainer.
–Neverremovethegascaporaddfuelwhenthe
engineisrunning.Allowtheenginetocoolbefore
refueling.Donotsmoke.
–Neverrefuelthemachineindoors.
–Neverstorethemachineorfuelcontainerinside
wherethereisanopename,suchasnearawater
heaterorfurnace.
–Neverllacontainerwhileitisinsideavehicle,trunk,
pick-upbed,oranysurfaceotherthantheground.
–Keepcontainernozzleincontactwiththetankduring
lling.
•Stopandinspecttheequipmentifyoustrikeanobject.
Makeanynecessaryrepairsbeforerestarting.
•UseonlygenuineTororeplacementpartstoensurethat
originalstandardsaremaintained.
4
Page 5
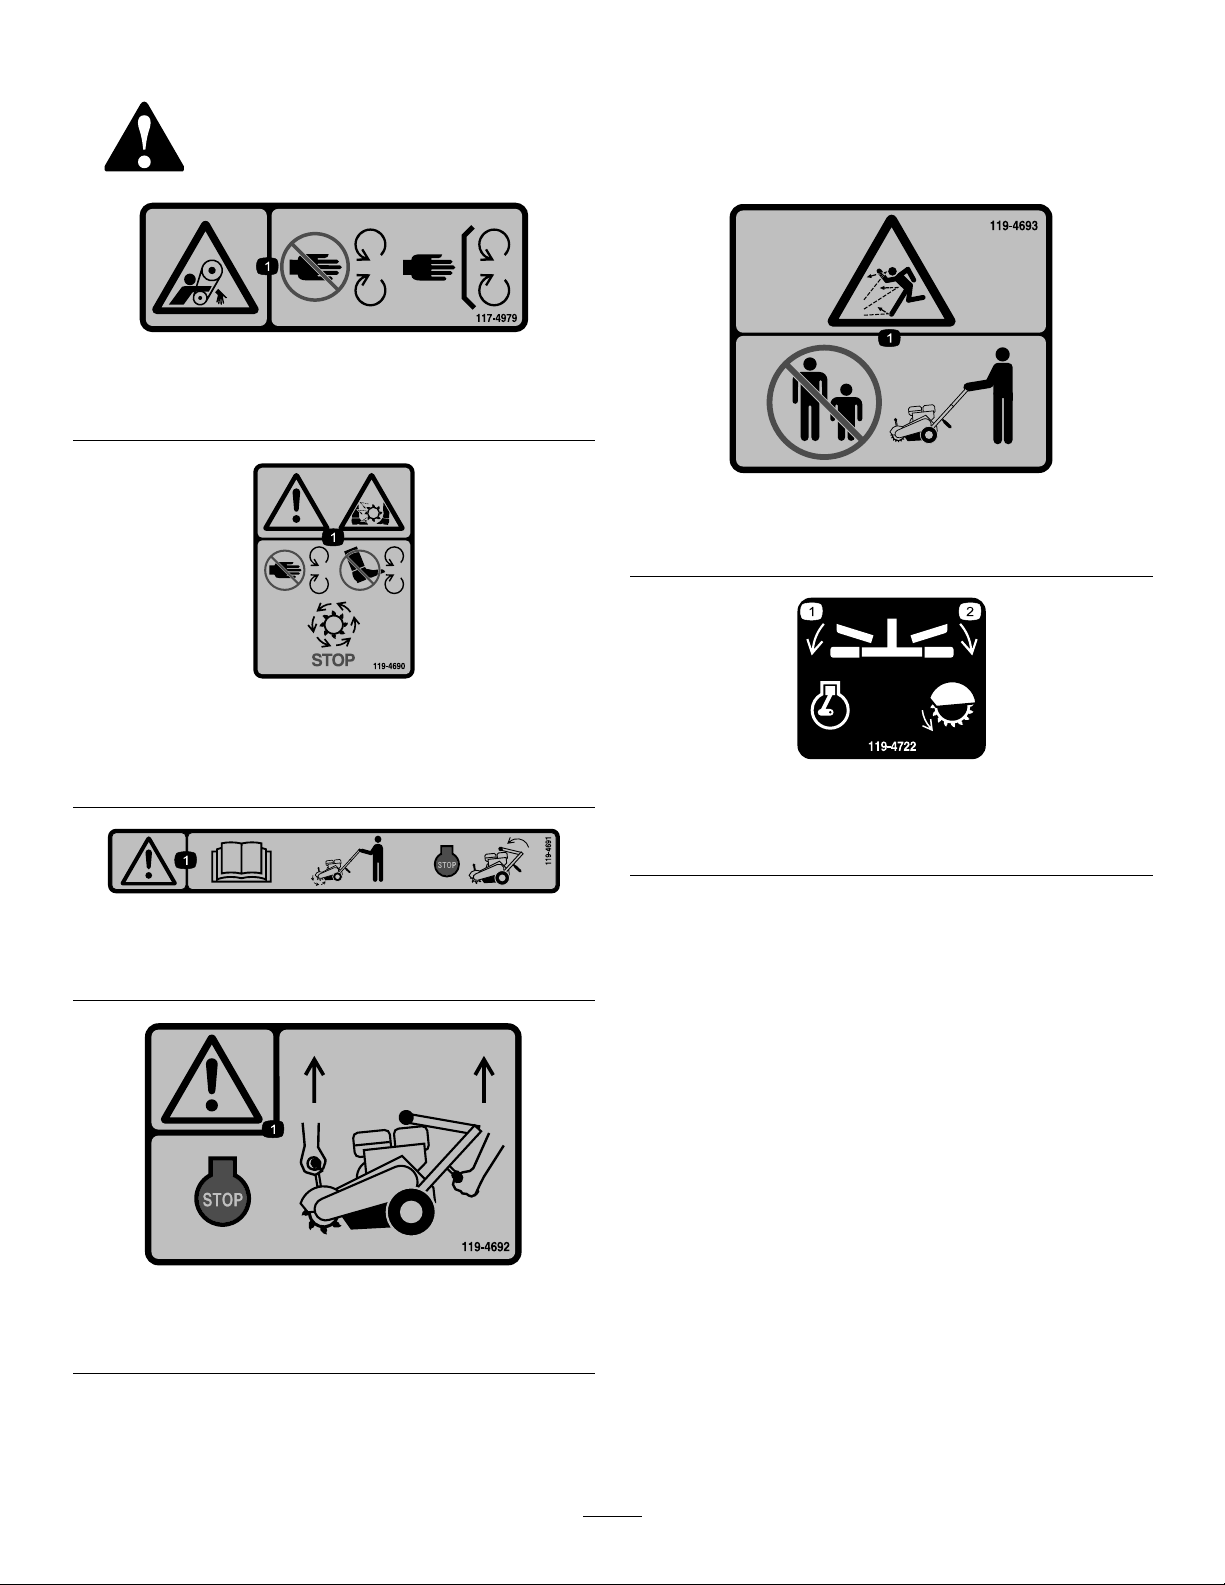
SafetyandInstructionalDecals
Safetydecalsandinstructionsareeasilyvisibletotheoperatorandarelocatednearanyareaofpotential
danger.Replaceanydecalthatisdamagedorlost.
117–4979
1.Entanglementhazard,belt—stayawayfrommovingparts,
keepallguardsandshieldsinplace.
119-4693
1.Thrownobjecthazard—keepbystandersasafedistance
fromthemachine.
119-4690
1.Warning;cutting/dismembermenthazard,grinding
blade—keephandsandfeetawayfromallmovingparts,
keepallshieldsinplace;waitforallmovingpartstostop.
119-4691
1.Warning—readtheOperator'sManual;waitforgrinder
bladetostop,stoptheengineandfoldthehandle.
119-4722
1.Engine—run
2.Grinderblade—engage
119-4692
1.Warning—stoptheengine;usebothhandholdstoliftthe
grinder.
5
Page 6
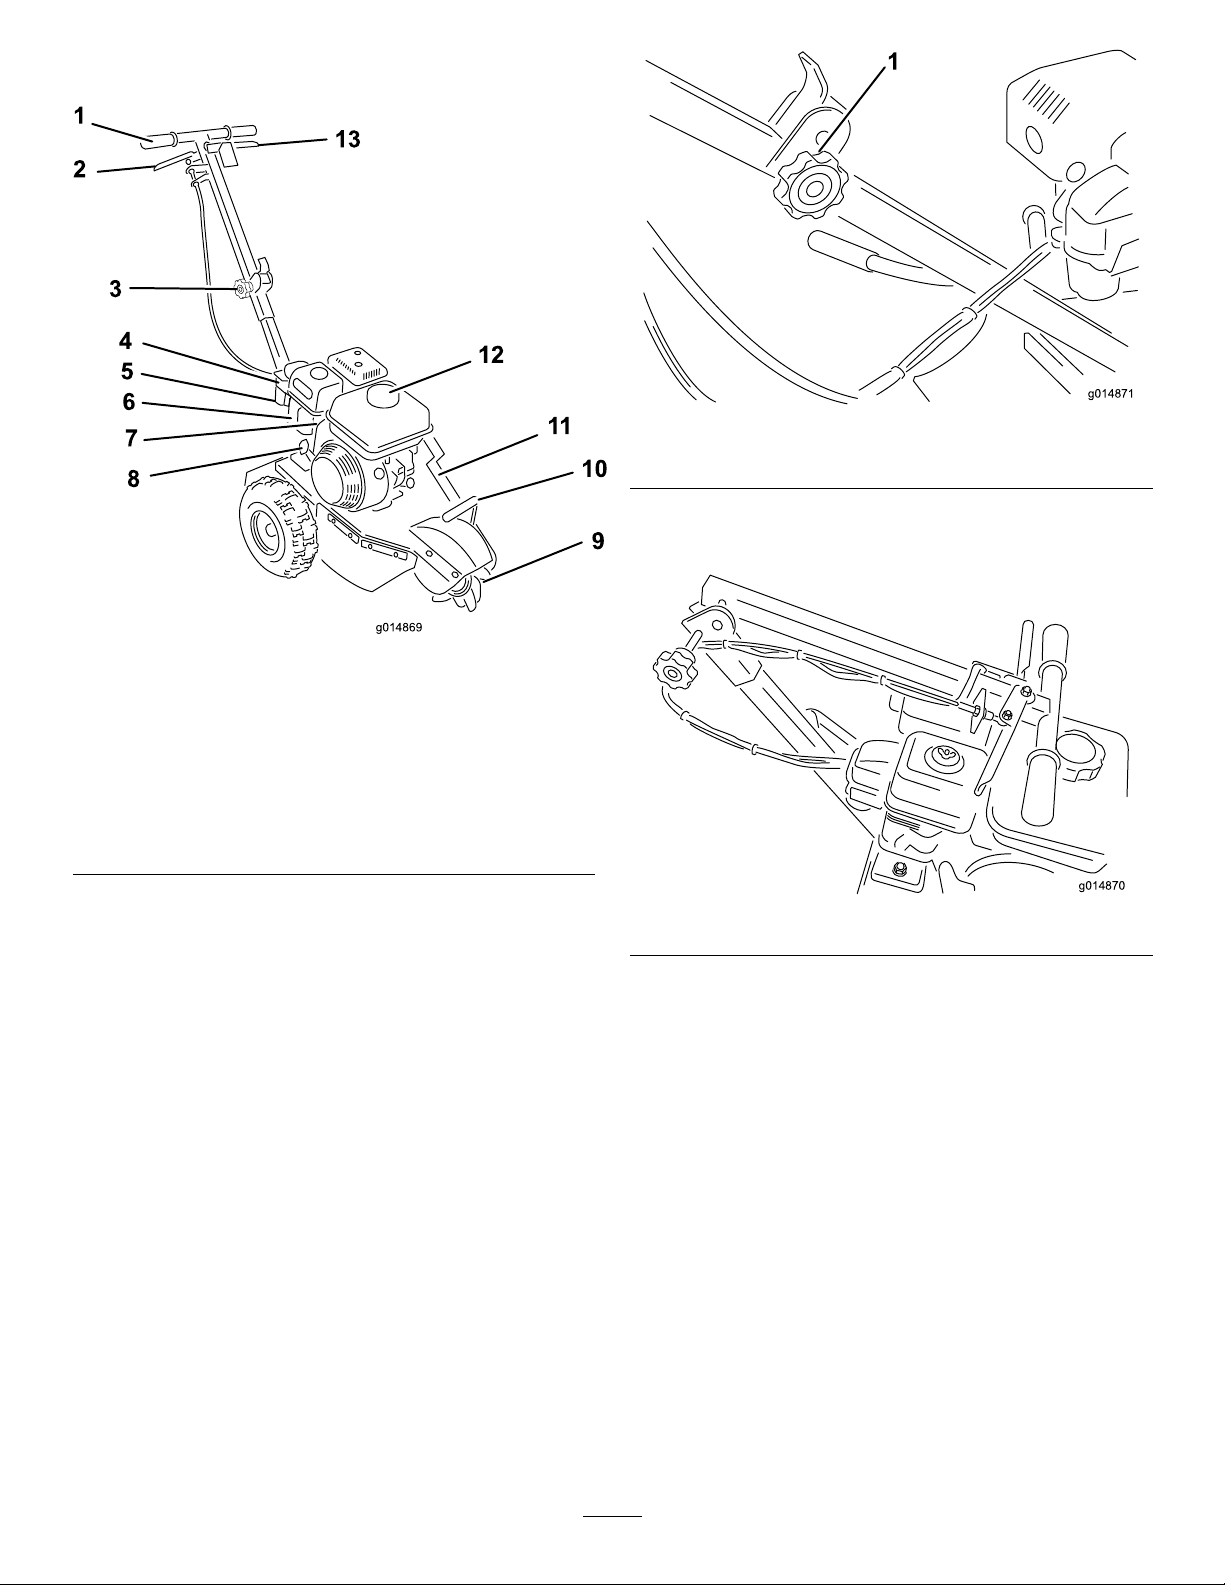
ProductOverview
g014869
3
9
1
2
4
5
6
7
8
10
11
12
13
g014871
1
g014870
Figure4
1.HandleReleaseKnob
Foldthehandledowntowardthemachineandscrewthe
knobbackontothehandle(
Figure3
Figure5).
1.Handle
2.Throttlelever
3.Handlereleaseknob
4.Airlter
5.Sedimentcup
6.Fuelvalve
7.Choke
8.Starter
9.Cuttingwheel
10.Lift
11.Beltcover
12.Fuelcap
13.Safetybail
Figure5
Controls
Becomefamiliarwithallthecontrols(Figure3andFigure6)
beforeyoustarttheengineandoperatethemachine.
HandleReleaseKnob
Thehandleonthismachinehasthecapabilitytobefolded
downforeasiertransport.Unscrewthehandlereleaseknob
fromthemachine(Figure4).
ThrottleLeverandSafetyBail
Thethrottlelevercontrolstheenginespeed.Withthelever
released,inthedisengagedposition,theenginerunsatidle.
Thisisalsothestartingposition.Whenyoupulltheleverto
thehandle,theenginespeedincreases,thecentrifugalclutch
engages,andthecuttingwheelrotates.
Thesafetybailcontrolstheengine.Holdthesafetybail
againstthehandletodeactivatetheenginekillswitchsothat
theenginewillstart.Releasethesafetybailtostoptheengine.
6
Page 7

g014874
2
1
g014872
g014873
Figure8
Figure6
1.Throttlelever
2.Safetybail
ParkingBrake
Theparkingbrake(Figure6andFigure7)holdstheleftwheel
fromturningtosecurethemachineandforeasymovement
ofthemachinefromsidetosidewhengrindingastump.
1.DisengagedBrake
Specications
Note:Specicationsanddesignaresubjecttochange
withoutnotice.
CuttingDepthApprox12inches(30.48cm)
Length
Width
Height
Weight
Attachments/Accessories
AselectionofToroapprovedattachmentsandaccessoriesare
availableforusewiththemachinetoenhanceandexpand
itscapabilities.ContactyourAuthorizedServiceDealeror
Distributororgotowww .Toro.comforalistofallapproved
attachmentsandaccessories.
50inches(127cm)
22inches(56cm)
42inches(107cm)
103lbs(47Kg)
1.Engagedbrake
Figure7
7
Page 8

Operation
Note:Determinetheleftandrightsidesofthemachine
fromthenormaloperatingposition.
Important:Beforeoperating,checkthefuelandoil
level,andremovedebrisfromthemachine.Also,ensure
thattheareaisclearofpeopleanddebris.Youshould
alsoknowandhavemarkedthelocationsofallutility
lines.
DANGER
Incertainconditions,gasolineisextremely
ammableandhighlyexplosive.Areorexplosion
fromgasolinecanburnyouandothersandcan
damageproperty.
•Fillthefueltankoutdoors,inanopenarea,
whentheengineiscold.Wipeupanygasoline
thatspills.
•Neverllthefueltankinsideanenclosedtrailer.
BeforeyouStart
•Digawaytheearthandremoveanystonesnearthetree
stumpthatmayinterferewithyourwork.Checkthatthe
groundisfreeofforeignobjects,suchaselectricalcables,
barbedwire,etc.
•Cutortrimthestumpusingapowersaw .
•Reviewallthemachine’ssafetydecals.
•Useahard-hat,hearing,andeyeprotection.Amesh
visoralonedoesnotprovidesufcienteyeprotection;
supplementwithprotectiveglasses.
•Ensurethatyouarefamiliarwithsafetyregulationsand
shutdownproceduresdescribedintheOperator’sManual.
•Ensurethatallguardsareinplaceandingoodcondition.
•Ensurethatthebladesandcuttersareinplaceandin
goodcondition.
•Ensurethattheworkarea,cutter,andstumpinparticular
arefreefrommetallicobjectssuchaswire,nails,etc.that
couldbethrownoutandinjurepersonsinthevicinity
anddamagetheequipment.
•Ensurethateveryone,includingchildrenandanimals,
maintainadistanceofatleast50feet(15m)fromthe
machine.Debriscanbethrownoutandinjurepeople
andanimals.
AddingFuel
Useunleadedgasoline(87pumpoctaneminimum).Leaded,
regulargasolinemaybeusedifunleadedisnotavailable.
•Donotllthefueltankcompletelyfull.Add
gasolinetothefueltankuntilthelevelis1/4to
1/2inch(6to13mm)belowthebottomofthe
llerneck.Thisemptyspaceinthetankallows
gasolinetoexpand.
•Neversmokewhenhandlinggasoline,andstay
awayfromanopenameorwheregasoline
fumesmaybeignitedbyaspark.
•Storegasolineinanapprovedcontainerand
keepitoutofthereachofchildren.Neverbuy
morethana30-daysupplyofgasoline.
•Donotoperatewithoutentireexhaustsystemin
placeandinproperworkingcondition.
DANGER
Incertainconditionsduringfueling,static
electricitycanbereleasedcausingasparkwhich
canignitethegasolinevapors.Areorexplosion
fromgasolinecanburnyouandothersandcan
damageproperty.
•Alwaysplacegasolinecontainersontheground
awayfromyourvehiclebeforelling.
•Donotllgasolinecontainersinsideavehicleor
onatruckortrailerbedbecauseinteriorcarpets
orplastictruckbedlinersmayinsulatethe
containerandslowthelossofanystaticcharge.
•Whenpractical,removegas-poweredequipment
fromthetruckortrailerandrefueltheequipment
withitswheelsontheground.
•Ifthisisnotpossible,thenrefuelsuch
equipmentonatruckortrailerfromaportable
container,ratherthanfromagasolinedispenser
nozzle.
•Ifagasolinedispensernozzlemustbeused,
keepthenozzleincontactwiththerimofthe
fueltankorcontaineropeningatalltimesuntil
fuelingiscomplete.
Important:Donotusemethanol,gasolinecontaining
methanol,orgasoholcontainingmorethan10%ethanol
8
Page 9

becausethefuelsystemcouldbedamaged.Donotmix
oilwithgasoline.
6.Wipeupanygasolinethatmayhavespilled.
UsingStabilizer/Conditioner
Useafuelstabilizer/conditionerinthemachinetoprovide
thefollowingbenets:
•Keepsgasolinefreshduringstorageof90daysorless.
Forlongerstorageitisrecommendedthatthefueltank
bedrained.
•Cleanstheenginewhileitruns.
•Eliminatesgum-likevarnishbuildupinthefuelsystem,
whichcauseshardstarting.
Important:Donotusefueladditivescontaining
methanolorethanol.
Addthecorrectamountofgasstabilizer/conditionertothe
gas.
Note:Afuelstabilizer/conditionerismosteffectivewhen
mixedwithfreshgasoline.Tominimizethechanceofvarnish
depositsinthefuelsystem,usefuelstabilizeratalltimes.
FillingtheFuelTank
1.Parkthemachineonalevelsurface,lowerthegrinder,
andstoptheengine.
CheckingtheEngineOilLevel
ServiceInterval:Beforeeachuseordaily
1.Tiltthemachinesotheengineislevel,andstopthe
engine.
2.Allowtheenginetocool.
3.Cleanaroundtheoildipstick.
4.Removethedipstickandwipetheendclean.
5.Slidethedipstickfullyintothedipsticktubewithout
threadingitintothellerneck.
6.Pullthedipstickoutandlookattheend.Theoilshould
betothetopoftheupperlimitrange(
Figure10).
2.Allowtheenginetocool.
3.Cleanaroundthefueltankcapandremoveit(Figure9).
Figure9
viewmayvarydependingonmodel
1.Fueltankcap
4.Addunleadedgasolinetothefueltank,untilthelevelis
1/4to1/2inchbelowthebottomofthellerneck.
Important:Thisspaceinthetankallowsgasoline
toexpand.Donotllthefueltankcompletelyfull.
Figure10
1.Oildipstick
Important:Runningtheenginewithlowoillevel
cancauseenginedamage.Thistypeofdamageis
notcoveredbywarranty.
Theengineisequippedwithanoilalertsystem
thatwillautomaticallystoptheenginebeforethe
oillevelfallsbelowthesafelimit.
7.Iftheoillevelislow,slowlypouronlyenoughoilinto
thecrankcasetoraisetheleveltotheupperlimit.
Important:Donotoverllthecrankcasewithoil
becausetheenginemaybedamaged.
8.Replacethedipstick.
5.Installthefueltankcapsecurely.
9
Page 10

StartingandStoppingthe
GrindingaStump
Engine
StartingtheEngine
1.MovethefuelvalvetotheOpenposition,alltheway
totheright(Figure11).
Figure11
1.Choke3.Starter
2.Fuelvalve
2.MovethechokeleverlefttotheOnpositionifyou
arestartingacoldengine.
Note:Awarmorhotenginemaynotrequirechoking.
3.Holdthesafetybailagainstthehandleandpushthe
handledownenoughtoraisethecuttingwheeloffthe
ground.
4.Pullthestarterhandlelightlyuntilyoufeelresistance,
thenpullthehandlebriskly.Returnthestarterhandle
gently(Figure11).
5.Aftertheenginestarts,graduallymovethechoke
leverbacktotheOffposition.Iftheenginestallsor
hesitates,movethechokebacktoOnagainuntilthe
enginewarmsup.ThenmoveittotheOffposition.
6.Holdthethrottleleveragainstthehandletospinthe
cuttingwheel.
StoppingtheEngine
1.Releaseyourhandfromthethrottlelever.
Note:Iftheenginehasbeenworkinghardorishot,
letitrunforaminutebeforereleasingthesafetybail.
Thishelpstocooltheenginebeforestopping.Inan
emergency,theenginemaybestoppedimmediately.
Placethemachineintopositionwiththecuttingwheelnear
thefront-topedgeofthestump.
DANGER
Themachinewillcutandamputatehandsandfeet.
•Stayintheoperator'spositionwhilethemachine
isrunningandkeepawayfromthecutting
wheel.
•Keepallbystandersasafedistancefromthe
machine.
•Stopthemachineimmediatelyifanypeopleor
animalsentertheworkarea.
WARNING
Grindingastumpwillthrowwoodchips,soil,and
otherdebrisintotheairwhichcouldinjureyouor
bystanders.
•Alwaysweareyeprotectionwhenusingthe
machine.
•Keepallbystandersasafedistancefromthe
machine.
1.ReleasethethrottlesothatitisinDisengagedposition.
2.Starttheengine;refertoStartingtheEngine(page10).
3.Allowenginetowarmupatidlefortwominutes.
4.Pushthehandledownenoughtoraisethecutting
wheelofftheground.
5.Holdthethrottleagainstthehandlesothatitisin
engagedposition,thiswillengagethecentrifugalclutch
andthecuttingwheelrotates.
6.Movethemachinetothefrontofthestumpandset
theparkingbrake.
7.Swingthecuttingwheeltooneside,thenlowerit
approximately1/2inchto1inchintothefront-top
cornerofthestump.Swingthecuttingwheelback
andforth,loweringthecuttingwheelapproximately
1/2inchto1inchbeforeeachsweep,untilyouhave
groundthefrontportionofthestumptogroundlevel
(Figure12).
2.Releasethesafetybailtostoptheengine.
3.MovethefuelvalvetotheClosedposition,alltheway
totheleft.
10
Page 11

g014502
1
2
3
4
5
6
8
7
Figure12
8.Raisethecuttingwheeluntilcenterofcuttingwheelis
justabovetopofthestump.
DANGER
Arotatingcuttingwheelisverydangerousand
cancutandamputatehandsandfeet.
Stayattheoperatingpositionandbesurethat
thecuttingwheelhascometoacompletestop
beforedoinganythingelse.
9.Withthecuttingwheelofftooneside,releasethe
parkingbrakeandadvancethemachineforward,reset
theparkingbrake.
10.Continuesweepingandcuttingwheelleftandright
acrossstump,advancingthemachinebeforeeach
sweep,cutting1/2inchto1inchdepthofcutwith
eachsweep.
11.Continuecuttinguntiltoplevelofstumpisallremoved,
makingsurenottocutstumpdeeperthangroundlevel
duringthisrststage.
12.ReleasethethrottlesothatitisinDisengagedposition,
pushthehandledownenoughtoraisethecutting
wheelofftheground.Waittensecondsforthecutting
wheeltostoprotatingthenreleasethebrakeandpull
themachineawayfromthestump.
13.Rakethechipsawayfromthestump.
14.Movethemachinetothefrontofthestumpandset
theparkingbrake.
15.Holdthethrottleagainstthehandlesothatitisin
engagedposition,thiswillengagethecentrifugalclutch
andthecuttingwheelrotates.
16.Continuecuttinguntilthelevelofstumpisdeeperthan
groundlevelasdesired.
17.Stopthemachine;referto
StoppingtheEngine(page10).
Note:Donotletthefrontoftheunittouchthe
grounduntilyouaresurethecuttingwheelhasstopped
turning.
11
Page 12

Maintenance
Note:Determinetheleftandrightsidesofthemachinefromthenormaloperatingposition.
Important:Themachinemaybetippedbackwardoronitssidetofacilitateaccessforcleaningorservice,butno
longerthan2minutes.Ifthemachineisheldinthispositionfortoolong,theenginecanbedamagedbygasoline
drainingintothecrankcase.Shouldthishappen,performanextraoilchangeontheengine.Thenturntheengine
overafewrevolutionswiththestarterhandlebeforestartingtheengineagain.
RecommendedMaintenanceSchedule(s)
MaintenanceService
Interval
Aftertherst25hours
Beforeeachuseordaily
Every25hours
Every50hours
Every100hours
Every200hours
Yearlyorbeforestorage
Important:Refertoyour
Lubrication
MaintenanceProcedure
•Changetheoil.
•Checktheengineoillevel.
•Greasethemachine.
•Checktheairlter.
•Checkthecuttingwheelblades.
•Removedebrisfromthemachine.
•Checkthedrivebelttension.
•Servicetheairlter.
•Changetheoil.
•Cleanthesedimentcup.
•Checkthesparkplugs.
•Replacetheairlter.
•Changetheoil.
•Cleanthesedimentcup.
Engine Operator's Man ual
foradditionalmaintenanceprocedures.
GreasingtheMachine
ServiceInterval:Beforeeachuseordaily
GreaseType:General-purposegrease.
1.Cleanthegreasettingswitharag.
2.Connectagreaseguntoeachtting.
3.Lubricatetwottings,oneoneachcuttingwheel
bearing.
Figure13
4.Pumpgreaseintothettingsuntilgreasebeginsto
oozeoutofthebearings(approximately3pumps).
5.Wipeupanyexcessgrease.
12
Page 13

Important:Pumpgreaseinslowlyandcarefully
topreventdamagetothebearingseals.
EngineMaintenance
ServicingtheAirCleaner
ServiceInterval:Beforeeachuseordaily
Thecycloneairltercollectsthelargestcontaminantparticles,
whichcollectinthecontainer.Whenyoucanseealayerof
dirtatthebottomofthecontainer,cleanthecyclonehousing,
airchannels,andairintakescreen.
ServicingtheCycloneAirFilter
ServiceInterval:Every50hours
1.Removethe3screwsholdingthecyclonehousing.
2.Removethehousingwiththeairintakescreenand
removetheairchannels.
Figure14
1.Cyclonehousing
2.Screw4.Cyclonehousingwithair
Note:Theairchannelsmayremainintheupper
portionorfollowalongwiththehousingwhen
removed.
3.Cleanthecomponents.Usewater,detergentanda
brush.Drycarefully .
4.Placetheairchannelsinthecyclonehousing.
5.Insertcyclonehousingintopositionandmakesureit
tsintheupperportion.Donotuseforce;alignitin
placebeforettingthescrews.
3.Airchannels
intakescreen
ReplacingtheAirFilter
ServiceInterval:Every200hours
Iftheengineislowonpower,producesblacksmokeorruns
unevenly,theairltermaybeclogged.
1.Removethewingnutandliftoffthecyclonelterwith
theairltercowling(Figure15).
13
Page 14

OilType:DetergentoilwithanAPIserviceofSJorhigher.
g014504
1
2
CrankcaseCapacity:.63qt(.6liters)
Viscosity:SAE10W-30isrecommendedforgeneraluse.
ChangingtheEngineOil
ServiceInterval:Aftertherst25hours
Every100hours
Yearlyorbeforestorage
1.Starttheengineandletitrunveminutes.Thiswarms
theoilsoitdrainsbetter.
2.Parkthemachinesothatthedrainsideisslightlylower
thantheoppositesidetoensurethattheoildrains
completely.
3.Settheparkingbrakeandstoptheengine.
4.Placeapanundertheoildrainhole.
5.Removethedrainpluganddraintheoilthroughthe
holeslotintheframe(
Figure16).
Figure15
1.Wingnut
2.Cycloneairlter5.Stud
3.Foampre-lter
4.Airlter
2.Removethefoampre-lterandcleanitasfollows
A.Washthepre-lterusingamilddetergentand
water.
B.Squeezeitdrywithacleancloth.
C.Soakitwithnewengineoil.
D.Gentlywindthelterinanabsorbentclothand
squeezeoutexcessoil.
3.Removethewingnutontopoftheairlterand
removethepaperlter.
4.Tapthepaperlteragainstaxedsurfacetoremove
dust.Ifthepaperlterisstilldirtyordamaged,replace
it.Thepaperltershouldbereplacedevery200hours.
Important:Donotusecompressedairtoblow
outthepaperelement,thiscandamageit.
5.Mountthepaperlterintheairlterhousingand
secureitwiththewingnut.
6.Positionthefoampre-lteroverthepaperlter.
7.Installthecyclonelterwiththeairltercoverand
secureitwiththewingnut.
Figure16
1.Oildrainhole2.Oilllcap
6.Whentheoilhasdrainedcompletely,installtheplug
andwipeupanyspilledoil.
Note:Disposeoftheusedoilatacertiedrecycling
center.
7.Removetheoilllcapandslowlypourapproximately
80percentofthespeciedamountofoilintothe
engine(Figure16).
8.Slowlyaddadditionaloiltobringtheoillevelto
theupperlimitmarkonthedipstick.Referto
CheckingtheEngineOilLevel(page9).
9.Installtheoilllcap.
ServicingtheEngineOil
Note:Changetheoilmorefrequentlywhentheoperating
conditionsareextremelydustyorsandy.
CleaningtheSedimentCup
ServiceInterval:Every100hours
Yearlyorbeforestorage
14
Page 15

Underneaththefuelvalveisasedimentcuptocatchdirtin
thefuel.
1.MovethefuelvalvetotheOffposition,alltheway
totheleft.
2.Unscrewthesedimentcup.Makesurenottomisplace
theo-ring(Figure17).
Figure18
Figure17
1.Sedimentcup2.O-Ring
3.Cleanthereservoirandtheo-ringusingacleaning
solventanddrycarefully.
Note:Makesurenottomisplacetheo-ring.
4.Puttheo-ringinplaceinthegrooveofthecupand
replacethesedimentcup.
5.TurnthefuelvalvetotheOnposition,allthewaytothe
right,andcheckforleaks.Ifitleaks,replacetheo-ring.
1.Sparkplug
3.Cleanaroundthesparkplug.
4.Removethesparkplugandthemetalwasher.
2.Wire
CheckingtheSparkPlug
1.Lookatthecenterofthesparkplug(Figure19).Ifyou
seelightbrownorgrayontheinsulator,theengineis
operatingproperly.Ablackcoatingontheinsulator
usuallymeansthattheaircleanerisdirty.
Important:Donotcleanthesparkplug.Always
replacethesparkplugwhenithasablackcoating,
wornelectrodes,anoilylm,orcracks.
ServicingtheSparkPlug
ServiceInterval:Every100hours—Checkthesparkplugs.
Ensurethattheairgapbetweenthecenterandsideelectrodes
iscorrectbeforeinstallingthesparkplug.Useasparkplug
wrenchforremovingandinstallingthesparkpluganda
gappingtool/feelergaugetocheckandadjusttheairgap.
Installanewsparkplugifnecessary.
Type:BPR6ES(NKG)orequivalent
AirGap:0.28–0.031inch(0.70-0.80mm)
RemovingtheSparkPlug
1.Lowerthegrinderandstopthemachine;Referto
StoppingtheEngine(page10).
2.Pullthewireoffofthesparkplug(Figure18).
Figure19
1.Centerelectrodeinsulator3.Airgap(nottoscale)
2.Sideelectrode
2.Checkthegapbetweenthecenterandsideelectrodes
(Figure19).Bendthesideelectrode(Figure19)ifthe
gapisnotcorrect.
InstallingtheSparkPlug
1.Threadthesparkplugintothesparkplughole.
2.Tightenthesparkplugto20ft-lb(27N-m).
3.Pushthewireontothesparkplug.
15
Page 16

BeltMaintenance
g014510
1
2
3
4
5
4
CheckingtheDriveBelt Tension
ServiceInterval:Every25hours
Note:Replacethebeltifitshowsanysignsofwear,cracks,
ordamage.
1.Shutofftheengineandwaitforallrotatingpartsto
stop.
2.Removebeltguardretainingscrews(
Figure20
Yourmodelmayvary
1.Beltguard4.Bolt
2.Lockwasher5.Nut
3.Washer
Figure20).
Figure21
1.Bolt3.Enginemountbolt
2.JamNut
3.Turnsquareheadadjustingboltontheframeclockwise
totightenthebelt,counterclockwisetoloosenthebelt
Important:Important:Makesuretotighten
allengineboltsafterproperbeltadjustmentis
achieved.
4.Installthebeltguardandsecurewithpreviously
removedhardware.
3.Tocheckbelttension,gentlysqueezethebeltspans
together.Youshouldbeabletopushthebeltdown
about1/4–3/8inch(6–10mm)fromtheoriginal
position.
Important:T oextendthebeltlife,propertensionmust
bemaintained.Aloosebeltwillcauseexcessivecutting
wheelslippageandearlybeltfailure.Abeltthatistoo
tightcancausebearingandshaftfailure,andrapidbelt
wear.
AdjustingtheDriveBelt
1.Removethebeltguard.
2.Loosenthe4enginemountingbolts,andjamnuts
holdingtheadjustmentbolt(Figure21).
16
Page 17

GrinderMaintenance
CheckingtheCuttingWheel Blades
ServiceInterval:Beforeeachuseordaily
Amongthemostcriticalelementsofthemachineisthe
cuttingwheelblades.Theyarealsothemostsubjectto
damageandwear.Inthecourseofgrindingstumpstheynot
onlymakecontactwiththewood,buttheyalsoencounter
numerousabrasivesandobjects,suchasdirt,stones,and
occasionallyalargerockorburiedscrap.
Thewearandlossofcuttingteethcansignicantlyimpairthe
efciencyandperformanceofthemachine.Therefore,itis
importanttomakefrequentchecksoftheconditionofall
ofthecuttingteethandreplaceanydamagedorwornblade
sections(
Figure22).
Figure23
3.Checkeachsectionforcracks.Replaceabladesection
ifitiscrackedorhasmissingorwornteeth.
Note:Whenreplacingcuttingwheelbladesections,
makesurebladesectionisplacedincorrectalignment
withbladerotation.
4.Insertthebladesectionbetweentheblademounting
anges(Figure23),andsecurethemwith2bolts,
lockwashers,andnuts.
Figure22
ReplacingtheCuttingWheel Blades
1.Cleanalldirtfromthecuttingwheelandmounting
anges.
2.Removethetwoboltsthatholdeachcuttingblade
section.Usecarenottoletasectiondropandchip
whentheybecomeloose(Figure23).
5.Torquethefastenersto27–33ft-lb(37–45N-m).
17
Page 18

Cleaning
RemovingDebrisfromthe Machine
Regularcleaningandwashingwillincreasethelifespanof
themachine.Cleanthemachinedirectlyafteruse,beforethe
dirthardens.
Checkbeforecleaningthatthefueltankcapisproperlyin
placetoavoidgettingwaterinthetank.
Usecarewhenusingahigh-pressuresprayerbecauseitcan
damagewarningdecals,instructionsigns,andtheengine
Storage
Forstorageover30days,preparetheunitasfollows:
1.Removedirtandgrimefromtheexternalpartsof
theentireunit,especiallytheengine.Cleandirtand
sawdustchipsfromtheoutsideoftheenginecylinder
headnsandblowerhousing.
Important:Y oucanwashtheunitwithmild
detergentandwater.
2.Addapetroleumbasedstabilizer/conditionertofuel
inthetank.Followmixinginstructionsfromstabilizer
manufacturer.(1oz.perUSgallon).Donotusean
alcoholbasedstabilizer(ethanolormethanol).
Important:Lubricatethecuttingwheelbladebearings
aftercleaning.
Note:Fuelstabilizer/conditionerismosteffective
whenmixedwithfreshgasolineandusedatalltimes.
Important:Donotstorestabilizer/conditioned
gasolineover90days.
3.Runtheenginetodistributeconditionedfuelthrough
thefuelsystem(5minutes).
4.Stoptheengine,allowittocool,anddrainthefueltank
usingapumptypesiphon.Disposeoffuelproperly;
recycleasperlocalcodes.
5.Starttheengineandrunituntilitstops.
6.Choketheengine.
7.Startandruntheengineuntilitwillnotstartagain.
8.Cleanthesedimentcup;referto
CleaningtheSedimentCup(page14).
9.Servicetheaircleaner;referto
ServicingtheCycloneAirFilter(page13)and,
ReplacingtheAirFilter(page13).
10.Changetheenginecrankcaseoil;referto
ChangingtheEngineOil(page14).
11.Removethesparkplugandcheckthecondition;refer
to
ServicingtheSparkPlug(page15).
12.Withthesparkplugremovedfromtheengine,pour
twotablespoonsofengineoilintothesparkplughole.
13.Pullthestarterslowlytocranktheengineanddistribute
theoilinsidethecylinder.
14.Installthesparkplug,butdonotinstallthewireon
thesparkplug.
15.Greasethecutterwheelbearings;referto
GreasingtheMachine(page12).
16.Checkandtightenallbolts,nuts,andscrews.Repairor
replaceanypartthatisdamaged.
17.Paintallscratchedorbaremetalsurfaces.Paintis
availablefromyourAuthorizedServiceDealer.
18.Storetheunitinaclean,drygarageorstoragearea.
19.Covertheunittoprotectitandkeepitclean.
18
Page 19

Troubleshooting
Problem
Theenginewillnotstart.
Theenginerunsrough.
Thebeltslipsorcomesoffthepulleys1.Thebelttensionisinsufcient.
Thecuttingwheeldoesnotrotate.
Thecuttingwheelcontinuestorotate.
1.TheengineswitchisintheOffposition.1.Holdthesafetybailagainstthehandle.
2.Thefuelshutoffvalveisclosed.2.Openthefuelvalve.
3.Thechokeisopen.
4.Thefueltankisempty .4.Filltankwithfreshfuel.
5.Thesparkplugwireislooseor
disconnected.
1.Thechokeislefton.1.Openthechoke.
2.Theairlterisclogged.2.Cleanorreplacetheairlter .
3.Thefuellineisclogged.3.Cleanthesedimentcup.
4.Thereiswaterorcontaminantsinthe
fuel.
5.Thesparkplugsarewornorhave
buildupontheelectrodes.
1.Theenginespeedisinsufcientto
activatethecentrifugalclutch.
2.Thebelttensionisinsufcient.
3.Theclutchshoesareworn.3.Replacetheclutch.
1.Theenginespeedisexcessive.1.MovethethrottletotheDisengaged
2.Thebeltisoffofthepulleysorbroken.
3.Clutchspringsareweakorbroken.
PossibleCauseCorrectiveAction
3.Closethechokewhenstartingacold
engine.
5.Checktheelectrodegapandcleanor
replacethesparkplug.
4.Drainandllthetankwithfreshfuel.
5.Checktheelectrodegapandcleanor
replacethesparkplug.
1.Adjustthebelttension.Reducethe
cuttingdepth.
1.MovethethrottletotheEngaged
position.
2.Adjustthebelttension.
position.
2.Replacethedrivebelt.
3.Replacetheclutch.
19
Page 20

ToroCompactUtilityEquipmentWarranty
AOne-YearLimitedWarranty
CUEProducts
ConditionsandProductsCovered
TheToro®Companyanditsafliate,T oroWarrantyCompany ,pursuant
toanagreementbetweenthem,jointlywarrantyourT oroCompactUtility
Equipment(“Product”)tobefreefromdefectsinmaterialsorworkmanship.
Thefollowingtimeperiodsapplyfromthedateofpurchase:
ProductsWarrantyPeriod
Loaders,Trenchers,StumpGrinders,
Chippers,LogSplittersandAttachments
KohlerEngines3years
AllotherEngines2years
Whereawarrantableconditionexists,wewillrepairtheProductatnocost
toyouincludingdiagnosis,labor,andparts.
1yearor1000operating
hours,whicheveroccursrst
InstructionsforObtainingWarrantyService
IfyouthinkthatyourT oroProductcontainsadefectinmaterialsor
workmanship,followthisprocedure:
1.ContactanyAuthorizedT oroCompactUtilityEquipment(CUE)
ServiceDealertoarrangeserviceattheirdealership.Tolocatea
dealerconvenienttoyou,accessourwebsiteatwww.T oro.com.
YoumayalsocallourT oroCustomerCareDepartmenttollfree
at888-865-5676(U.S.customers)or888-865-5691(Canadian
customers).
2.Bringtheproductandyourproofofpurchase(salesreceipt)tothe
ServiceDealer.
3.IfforanyreasonyouaredissatisedwiththeServiceDealer’s
analysisorwiththeassistanceprovided,contactusat:
LCBCustomerCareDepartment
ToroWarrantyCompany
811 1LyndaleAvenueSouth
Bloomington,MN55420-1196
TollFree:888-865-5676(U.S.customers)
TollFree:888-865-5691(Canadacustomers)
OwnerResponsibilities
YoumustmaintainyourT oroProductbyfollowingthemaintenance
proceduresdescribedintheOperator’sManual.Suchroutine
maintenance,whetherperformedbyadealerorbyyou,isatyourexpense.
Partsscheduledforreplacementasrequiredmaintenance(“Maintenance
Parts”),arewarrantedfortheperiodoftimeuptothescheduled
replacementtimeforthatpart.Failuretoperformrequiredmaintenance
andadjustmentscanbegroundsfordisallowingawarrantyclaim.
ItemsandConditionsNotCovered
Notallproductfailuresormalfunctionsthatoccurduringthewarranty
periodaredefectsinmaterialsorworkmanship.Thisexpresswarranty
doesnotcoverthefollowing:
•Productfailureswhichresultfromtheuseofnon-Tororeplacement
parts,orfrominstallationanduseofadd-on,modied,orunapproved
accessories
•Productfailureswhichresultfromfailuretoperformrequired
maintenanceand/oradjustments
•ProductfailureswhichresultfromoperatingtheProductinan
abusive,negligentorrecklessmanner
•Partssubjecttoconsumptionthroughuseunlessfoundtobe
defective.Examplesofpartswhichareconsumed,orusedup,during
normalProductoperationinclude,butarenotlimitedto,teeth,tines,
blades,sparkplugs,tires,tracks,lters,chains,etc.
•Failurescausedbyoutsideinuence.Itemsconsideredtobeoutside
inuenceinclude,butarenotlimitedto,weather,storagepractices,
contamination,useofunapprovedcoolants,lubricants,additives,or
chemicals,etc.
•Normal“wearandtear”items.Normal“wearandtear”includes,butis
notlimitedto,wornpaintedsurfaces,scratcheddecalsorwindows,
etc.
•Anycomponentcoveredbyaseparatemanufacturer’swarranty
•Pickupanddeliverycharges
GeneralConditions
RepairbyanAuthorizedT oroCompactUtilityEquipment(CUE)Service
Dealerisyoursoleremedyunderthiswarranty.
NeitherTheToro®CompanynorToroWarrantyCompanyisliable
forindirect,incidentalorconsequentialdamagesinconnectionwith
theuseoftheToroProductscoveredbythiswarranty ,including
anycostorexpenseofprovidingsubstituteequipmentorservice
duringreasonableperiodsofmalfunctionornon-usepending
completionofrepairsunderthiswarranty.Allimpliedwarranties
ofmerchantabilityandtnessforusearelimitedtotheduration
ofthisexpresswarranty .Somestatesdonotallowexclusionsof
incidentalorconsequentialdamages,orlimitationsonhowlong
animpliedwarrantylasts,sotheaboveexclusionsandlimitations
maynotapplytoyou.
Thiswarrantygivesyouspeciclegalrights,andyoumayalsohaveother
rightswhichvaryfromstatetostate.
ExceptfortheenginewarrantycoverageandtheEmissionswarranty
referencedbelow,ifapplicable,thereisnootherexpresswarranty.The
EmissionsControlSystemonyourProductmaybecoveredbyaseparate
warrantymeetingrequirementsestablishedbytheU.S.Environmental
ProtectionAgency(EPA)ortheCaliforniaAirResourcesBoard(CARB).
ThehourlimitationssetforthabovedonotapplytotheEmissions
ControlSystemWarranty .RefertotheCaliforniaEmissionControl
WarrantyStatementsuppliedwithyourProductorcontainedintheengine
manufacturer’sdocumentationfordetails.
CountriesOtherthantheUnitedStatesorCanada
CustomerswhohavepurchasedT oroproductsexportedfromtheUnitedStatesorCanadashouldcontacttheirToroDistributor(Dealer)toobtain
guaranteepoliciesforyourcountry ,province,orstate.IfforanyreasonyouaredissatisedwithyourDistributor’sserviceorhavedifcultyobtaining
guaranteeinformation,contacttheToroimporter.Ifallotherremediesfail,youmaycontactusatToroWarrantyCompany .
374-0261RevB
 Loading...