

FormNo.3441-358RevB
Flex-ForcePowerSystem™60VMAXSnowthrower
31853and31853T
SněhováfrézasesystémemnapájeníFlexForcePowerSystem™
60VMAX
31853and31853T
FlexForcePowerSystem™60VMAX-sneslynge
31853and31853T
Flex-ForcePowerSystem™60VMAXSchneefräse
31853and31853T
LanzanievesFlex-ForcePowerSystem™60VMAX
31853and31853T
FraiseàneigeFlex-ForcePowerSystem™60VMAX
31853and31853T
SpazzaneveFlex-ForcePowerSystem™60VMAX
31853and31853T
Flex-ForcePowerSystem™60VMAXsneeuwfrees
31853and31853T
Flex-ForcePowerSystem™-snøfreser60VMAX
31853and31853T
Odśnieżarka60VMAXFlex-ForcePowerSystem™
31853and31853T
Limpa-neveFlex-ForcePowerSystem™60VMAX
31853and31853T
Flex-ForcePowerSystem™60VMAXsnöslunga
31853and31853T
www.T oro.com.
*3441-358*


FormNo.3437-688RevB
Flex-ForcePowerSystem
MAXSnowthrower
ModelNo.31853—SerialNo.400000000andUp
ModelNo.31853T—SerialNo.400000000andUp
™
60V
Registeratwww.T oro.com.
OriginalInstructions(EN)
*3437-688*
Forassistance,pleasesee
www.Toro.com/support
forinstructionalvideosor
contactyourAuthorized
ServiceDealerbefore
returningthisproduct.
Introduction
Thismachineisintendedtobeusedbyresidential
homeowners.Itisdesignedforremovingupto30cm
(12inches)ofsnowfrompatios,sidewalks,andsmall
driveways.Itisnotdesignedforremovingmaterials
otherthansnow,norisitdesignedforclearingoff
gravelsurfaces.Itisdesignedtouselithium-ion
batterypackModel81875(providedwithModel
31853),81860,81850,or81825.Usingthisproduct
forpurposesotherthanitsintendedusecouldprove
dangeroustoyouandbystanders.
Model31853Tdoesnotincludeabatteryora
charger.
Readthisinformationcarefullytolearnhowtooperate
andmaintainyourproductproperlyandtoavoid
injuryandproductdamage.Y ouareresponsiblefor
operatingtheproductproperlyandsafely .
Visitwww.T oro.comformoreinformation,including
safetytips,trainingmaterials,accessoryinformation,
helpndingadealer,ortoregisteryourproduct.
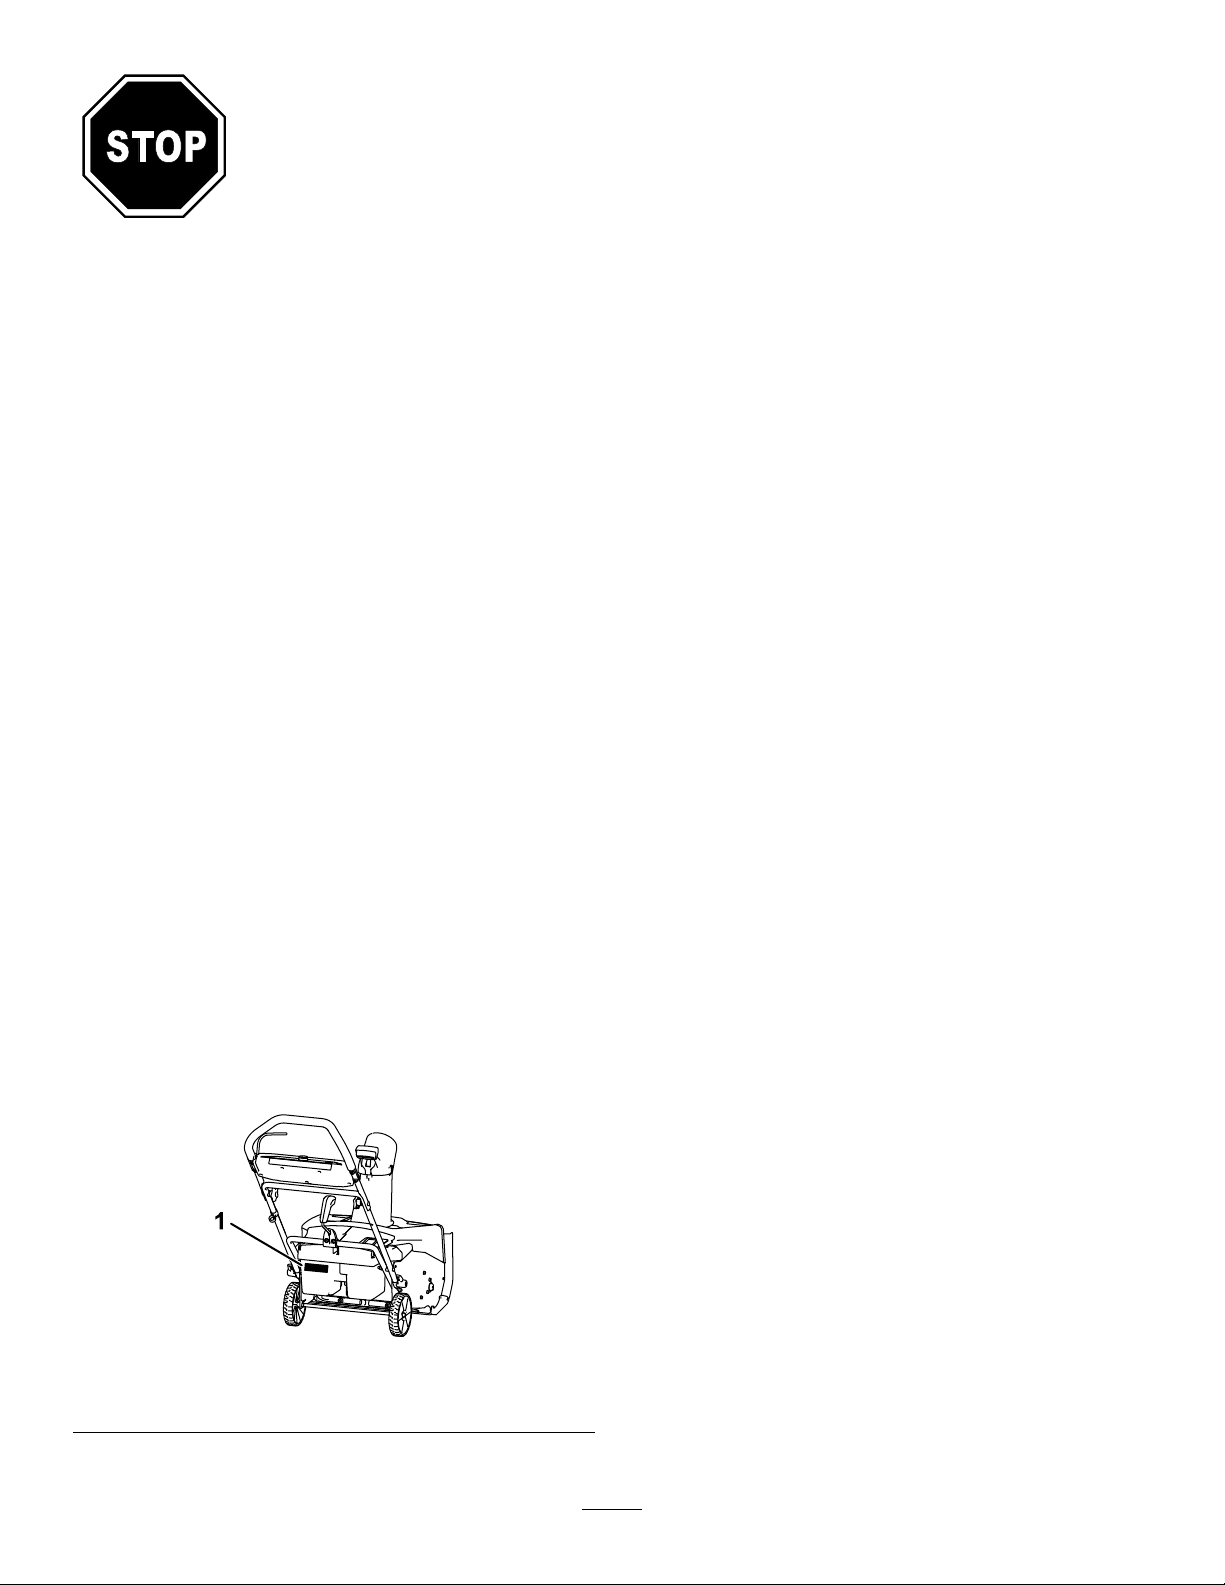
Wheneveryouneedservice,genuinethe
manufacturerparts,oradditionalinformation,contact
anAuthorizedServiceDealerorthemanufacturer
CustomerServiceandhavethemodelandserial
numbersofyourproductready.Figure1identies
thelocationofthemodelandserialnumbersonthe
product.Writethenumbersinthespaceprovided.
Safety
READALLINSTRUCTIONS
WARNING—Whenusinganelectricalmachine,
basicsafetyprecautionsshouldalwaysbefollowed
toreducetheriskofre,electricshock,orinjury ,
includingthefollowing:
I.Training
1.Theoperatorofthemachineisresponsiblefor
anyaccidentsorhazardsoccurringtoothersor
theirproperty.
2.Readandunderstandthecontentsofthis
Operator’sManualbeforeyoustartthemachine.
Ensurethateveryoneusingthismachineknows
howtouseit,knowshowtoshutitoffquickly,
andunderstandsthewarnings.
3.Donotallowchildrentouseorplaywiththe
machine,batterypack,orthebatterycharger;
localregulationsmayrestricttheageofthe
operator.
4.Donotallowpeoplewithreducedphysical,
sensory,ormentalcapabilitiesorwithout
experienceandknowledgetousethemachine,
batterypack,orbatterychargerunlessthey
receiveinstructionorsupervisiononusingit
safelyandunderstandthehazardsinvolved
whileusingit.
5.Beforeusingthemachine,batterypack,and
batterycharger,readalltheinstructionsand
cautionarymarkingsontheseproducts.
6.Becomefamiliarwiththecontrolsandproper
useofthemachine,batterypack,andbattery
charger.
II.Preparation
1.Keepbystandersandchildrenoutofthe
operatingarea.
2.Neverallowchildrentooperatethemachine.
3.Donotoperatethemachinewithoutallguards
andsafetydevicesinplaceandfunctioning
properlyonthemachine.
1.Modelandserialnumberlocation
©2021—TheToro®Company
8111LyndaleAvenueSouth
Bloomington,MN55420
Figure1
4.Inspecttheareawhereyouwillusethemachine
andremoveallobjectsthatcouldinterferewith
theoperationofthemachineorthatthemachine
couldthrow.
5.UseonlythebatterypackspeciedbyT oro.
g288478
2
Usingotheraccessoriesandattachmentsmay
increasetheriskofinjuryandre.
6.Pluggingthebatterychargerintoanoutletthat
isnot100to240Vcancauseareorelectric
shock.Donotplugthebatterychargerintoan
outletotherthan100to240V.
Contactusatwww.Toro.com.
PrintedintheUSA
AllRightsReserved

7.Donotuseadamagedormodiedbattery
packorbatterycharger,whichmayexhibit
unpredictablebehaviorthatresultsinre,
explosion,orriskofinjury .
8.Ifthesupplycordtothebatterychargeris
damaged,contactanAuthorizedServiceDealer
toreplaceit.
9.Donotusenon-rechargeablebatteries.
10.Chargethebatterypackwithonlythebattery
chargerspeciedbyT oro.Achargersuitablefor
1typeofbatterypackmaycreateariskofre
whenusedwithanotherbatterypack.
11.Chargethebatterypackinawell-ventilatedarea
only.
12.Donotexposeabatterypackorbatterycharger
toreortotemperatureshigherthan68°C
(154°F).
13.Followallcharginginstructionsanddo
notchargethebatterypackoutsideofthe
temperaturerangespeciedintheinstructions.
Otherwise,youmaydamagethebatterypack
andincreasetheriskofre.
14.Dressproperly—Wearappropriateclothing,
includingeyeprotection;longpants;andrubber
boots.Tiebacklonghairanddonotwearloose
jewelrythatcangetcaughtinmovingparts.
III.Operation
1.Contactwiththemovingrotorwillcauseserious
injury.Keepyourhandsandfeetawayfromall
movingpartsofthemachine.Keepclearofany
dischargeopening.
2.Usingthismachineforpurposesotherthanits
intendedusecouldprovedangeroustoyouand
bystanders.
3.Preventunintentionalstarting—Ensurethatthe
electric-startbuttonisremovedfromtheignition
beforeconnectingthebatterypackandhandling
themachine.
4.Useyourfullattentionwhileoperatingthe
machine.Donotengageinanyactivitythat
causesdistractions;otherwise,injuryorproperty
damagemayoccur.
5.Stopthemachine,removetheelectric-start
button,removethebatterypackfromthe
machine,andwaitforallmovementtostop
beforeadjusting,servicing,cleaning,orstoring
themachine.
6.Donotusethemachineonagravelsurface.
7.Removethebatterypackandelectric-start
buttonfromthemachinewheneveryouleaveit
unattendedorbeforechangingaccessories.
8.Donotforcethemachine—Allowthemachineto
dothejobbetterandsaferattherateforwhichit
wasdesigned.
9.Stayalert—Watchwhatyouaredoinganduse
commonsensewhenoperatingthemachine.
Donotusethemachinewhileill,tired,orunder
theinuenceofalcoholordrugs.
10.Operatethemachineonlyingoodvisibilityand
appropriateweatherconditions.
11.Useextremecautionwhenreversingorpulling
themachinetowardyou.
12.Keepproperfootingandbalanceatalltimes,
especiallyonslopes.Useextremecautionwhen
changingdirectionsonslopes.Donotoperate
themachineonexceedinglysteepslopes.Walk,
neverrunwiththemachine.
13.Donotdirectthedischargematerialtoward
anyone.Avoiddischargingmaterialagainsta
wallorobstruction;materialmayricochettoward
you.Stopthemachinewhencrossinggravel
surfaces.
14.Ifthemachinestrikesanobjectorstartsto
vibrate,immediatelyshutoffthemachine,
removetheelectric-startbutton,removethe
batterypack,andwaitforallmovementtostop
beforeexaminingthemachinefordamage.
Makeallnecessaryrepairsbeforeresuming
operation.
15.Shutoffthemachinewheneveryouleavethe
operatingpositionforanyreason.
16.Shutoffthemachinebeforeuncloggingthe
machineandalwaysuseastickoracleanout
tooltoremovetheclog.
17.Stopthemachineandremovetheelectric-start
buttonbeforeloadingthemachineforhauling.
18.Underabusiveconditions,thebatterypackmay
ejectliquid;avoidcontact.Ifyouaccidently
comeintocontactwiththeliquid,ushwith
water.Iftheliquidcontactsyoureyes,seek
medicalhelp.Liquidejectedfromthebattery
packmaycauseirritationorburns.
IV.MaintenanceandStorage
1.Stopthemachine,removetheelectric-start
button,removethebatterypackfromthe
machine,andwaitforallmovementtostop
beforeadjusting,servicing,cleaning,orstoring
themachine.
2.Donotattempttorepairthemachineexceptas
indicatedintheinstructions.HaveanAuthorized
ServiceDealerperformserviceonthemachine
usingidenticalreplacementparts.
3.Wearglovesandeyeprotectionwhenservicing
themachine.
3

4.Whenservicingtherotor,beawarethattherotor
canstillmoveeventhoughthepowersource
isoff.
5.Forbestperformance,useonlygenuineT oro
replacementpartsandaccessories.Other
replacementpartsandaccessoriescouldbe
dangerous,andsuchusecouldvoidtheproduct
warranty.
6.Maintainthemachine—Keephandlesdry,clean,
andfreefromoilandgrease.Keepguards
inplaceandinworkingorder.Useidentical
replacementpartsonly.
7.Checkallhardwareatfrequentintervalsfor
propertightnesstoensurethatthemachineisin
safeworkingcondition.
8.Checkthemachinefordamagedparts.Check
formisalignedandbindingmovingparts,broken
parts,mounting,andanyotherconditionthat
mayaffectitsoperation.Unlessindicatedinthe
instructions,haveanAuthorizedServiceDealer
repairorreplaceadamagedguardorpart.
9.Whenthebatterypackisnotinuse,keepit
awayfrommetalobjectssuchaspaperclips,
coins,keys,nails,andscrewsthatcanmakea
connectionfrom1terminaltoanother.Shorting
thebatteryterminalsmaycauseburnsorare.
10.Whenyouarenotusingthemachine,storeit
indoorsinadry,secureplaceoutofthereach
ofchildren.
11.CAUTION—Amistreatedbatterypackmay
presentariskofreorchemicalburn.Donot
disassemblethebatterypack.Donotheatthe
batterypackabove68°C(154°F)orincinerate
it.ReplacethebatterypackwithagenuineT oro
batterypackonly;usinganothertypeofbattery
packmaycauseareorexplosion.Keep
batterypacksoutofthereachofchildrenand
intheoriginalpackaginguntilyouarereadyto
usethem.
12.Donotdisposeofthebatteryinare.The
cellmayexplode.Checkwithlocalcodesfor
possiblespecialdisposalinstructions.
SAVETHESE
INSTRUCTIONS
4
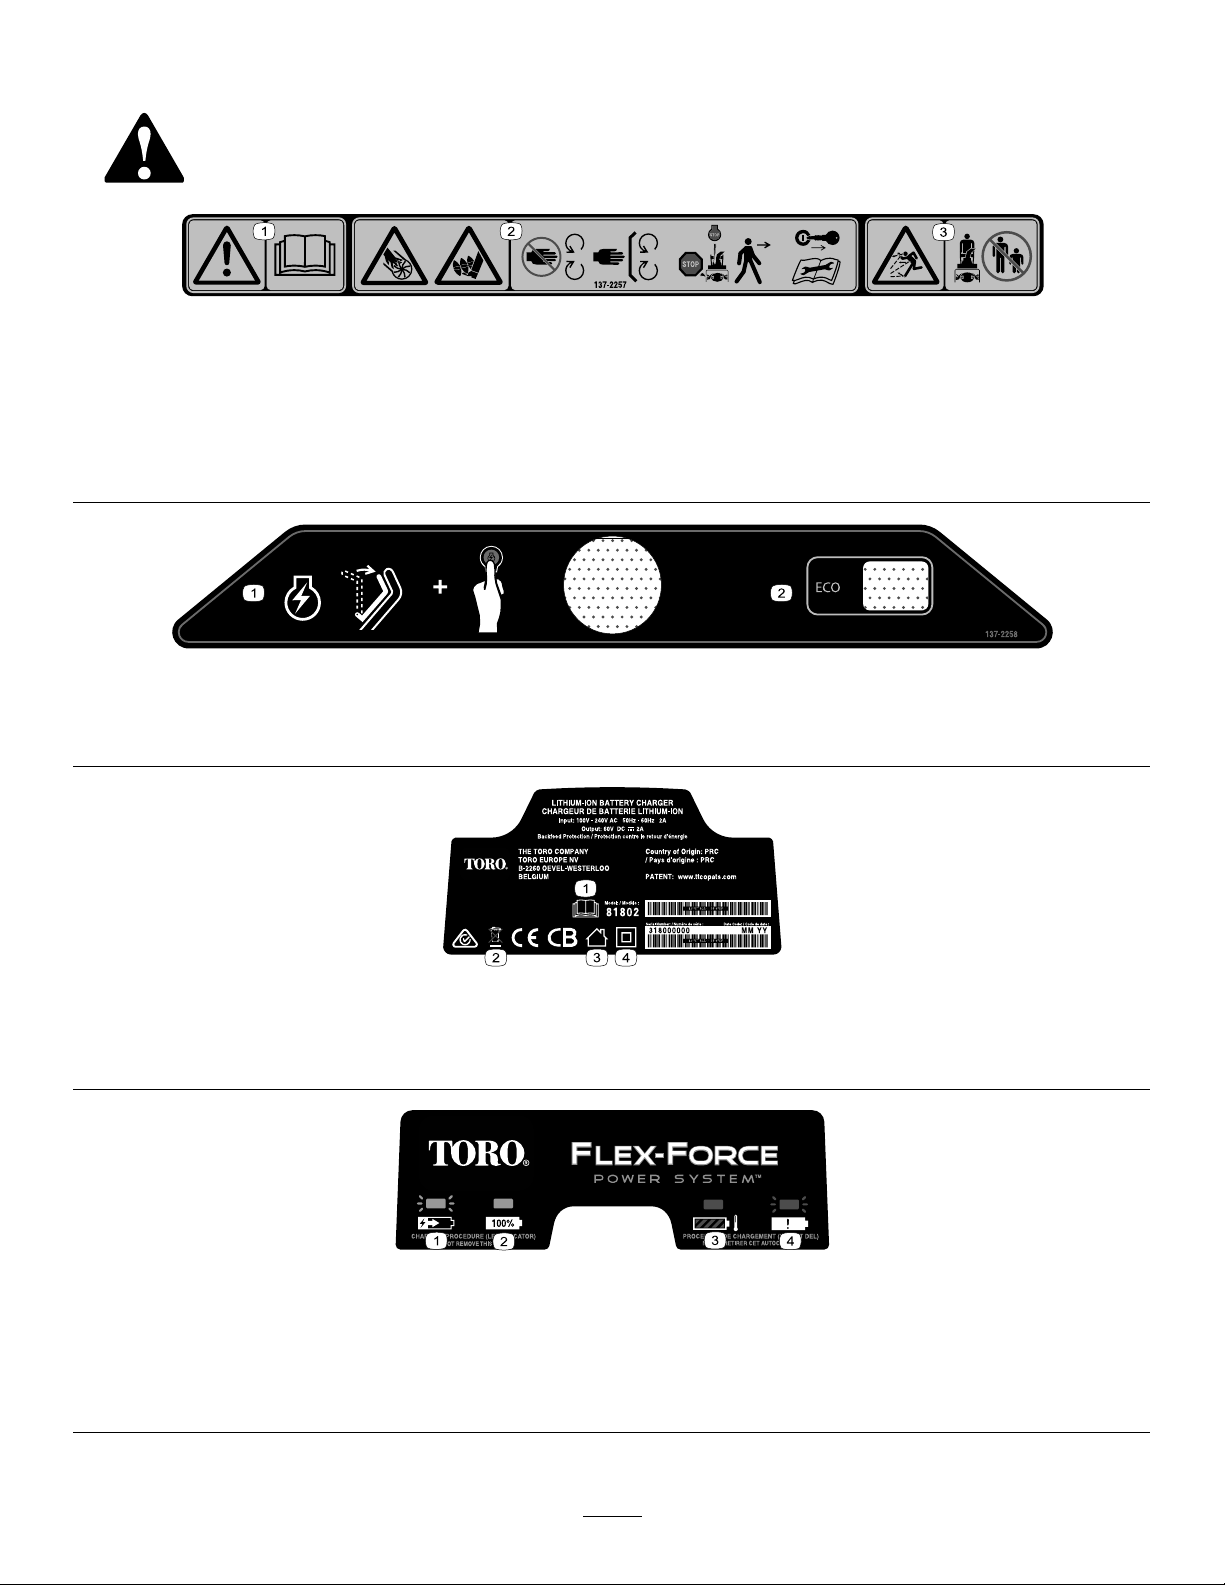
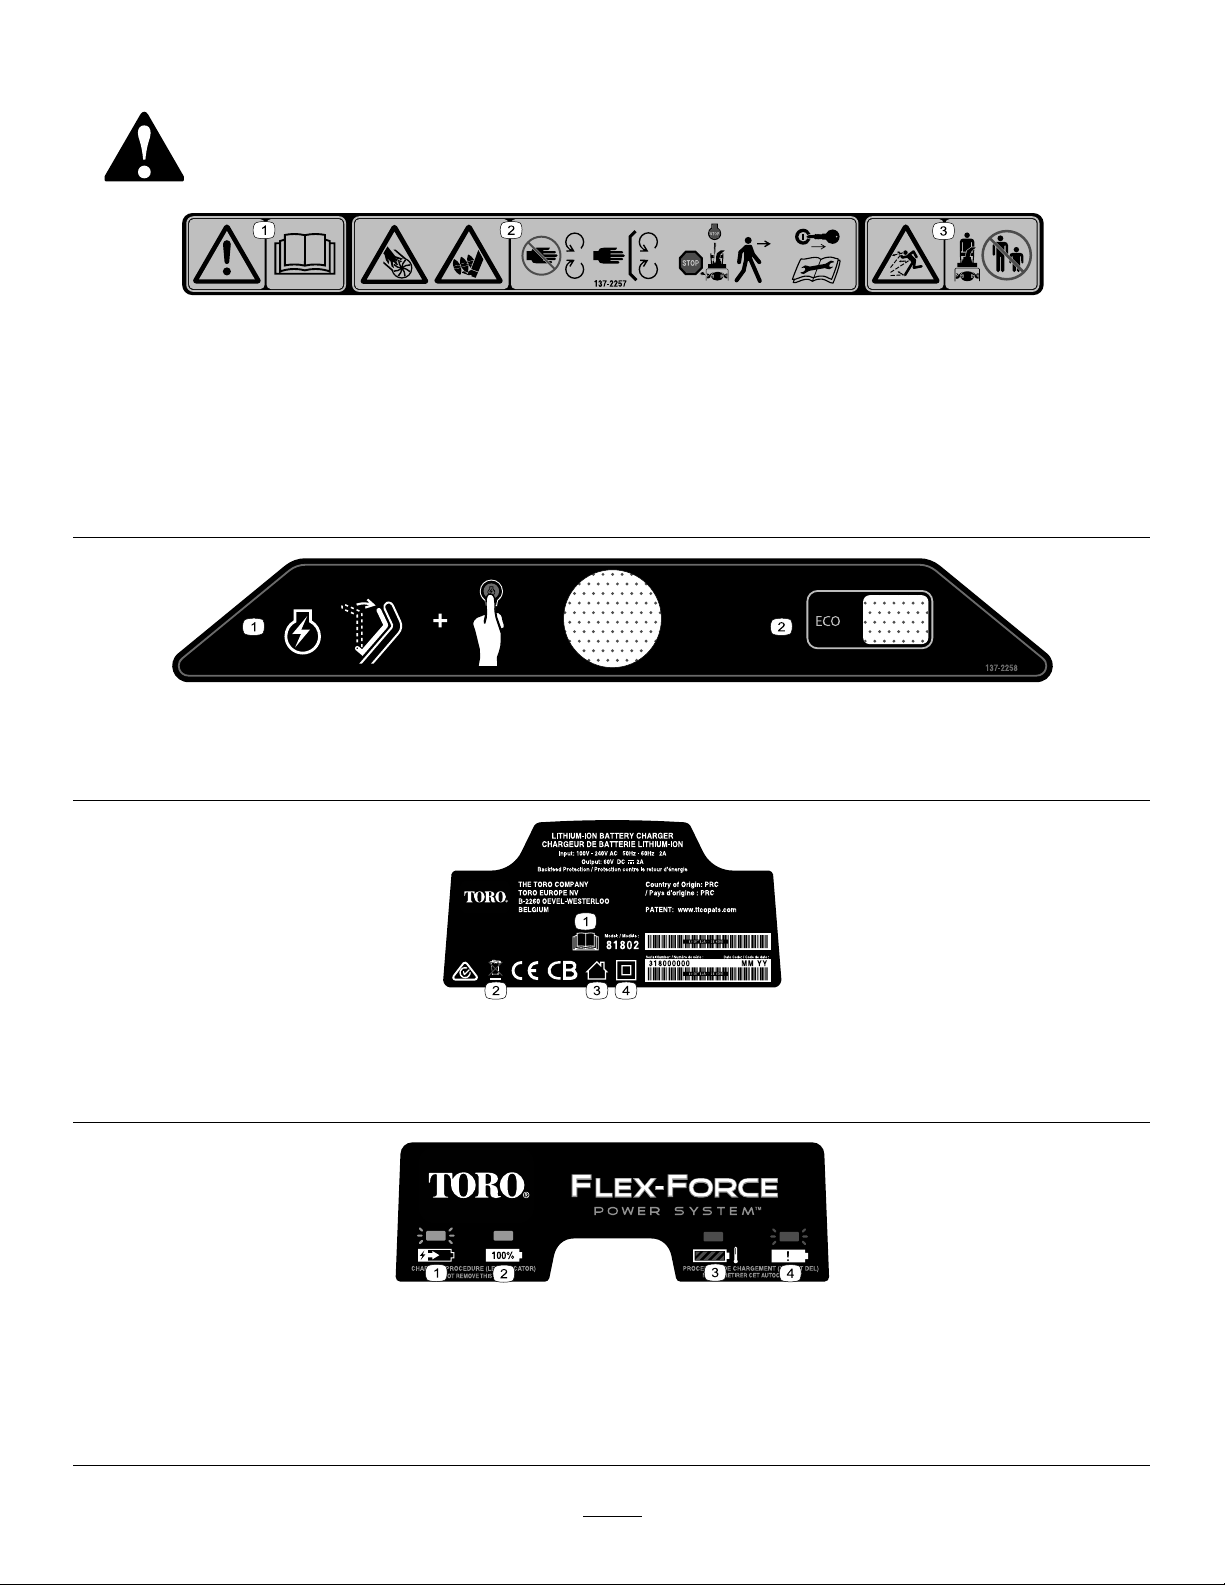
SafetyandInstructionalDecals
Safetydecalsandinstructionsareeasilyvisibletotheoperatorandarelocatednearanyarea
ofpotentialdanger.Replaceanydecalthatisdamagedormissing.
decal137-2257
137-2257
1.Warning—readtheOperator’sManual.
2.Cutting/dismembermentofhandhazard,impeller;
cutting/entanglementoffoothazard,auger—stayawayfrom
movingparts;keepallguardsandshieldsinplace;shutoff
theengineandremovethekeybeforeleavingthemachine;
readtheOperator’sManualbeforeperformingmaintenance.
1.Tostarttheengine,bringthebailtothehandleandpress
theignitionbutton.
3.Thrownobjecthazard—keepbystandersaway.
decal137-2258
137-2258
2.ECO
137-9495
1.ReadtheOperator’sManual.
2.Donotdiscard.4.Doubleinsulated
3.Forindooruse.
137-9463
1.Thebatterypackischarging.
2.Thebatterypackisfullycharged.
3.Thebatterypackisoverorundertheappropriatetemperaturerange.
4.Batterypackchargingfault
5
decal137-9495
decal137-9463

decal137-9461
137-9461
1.Batterychargestatus
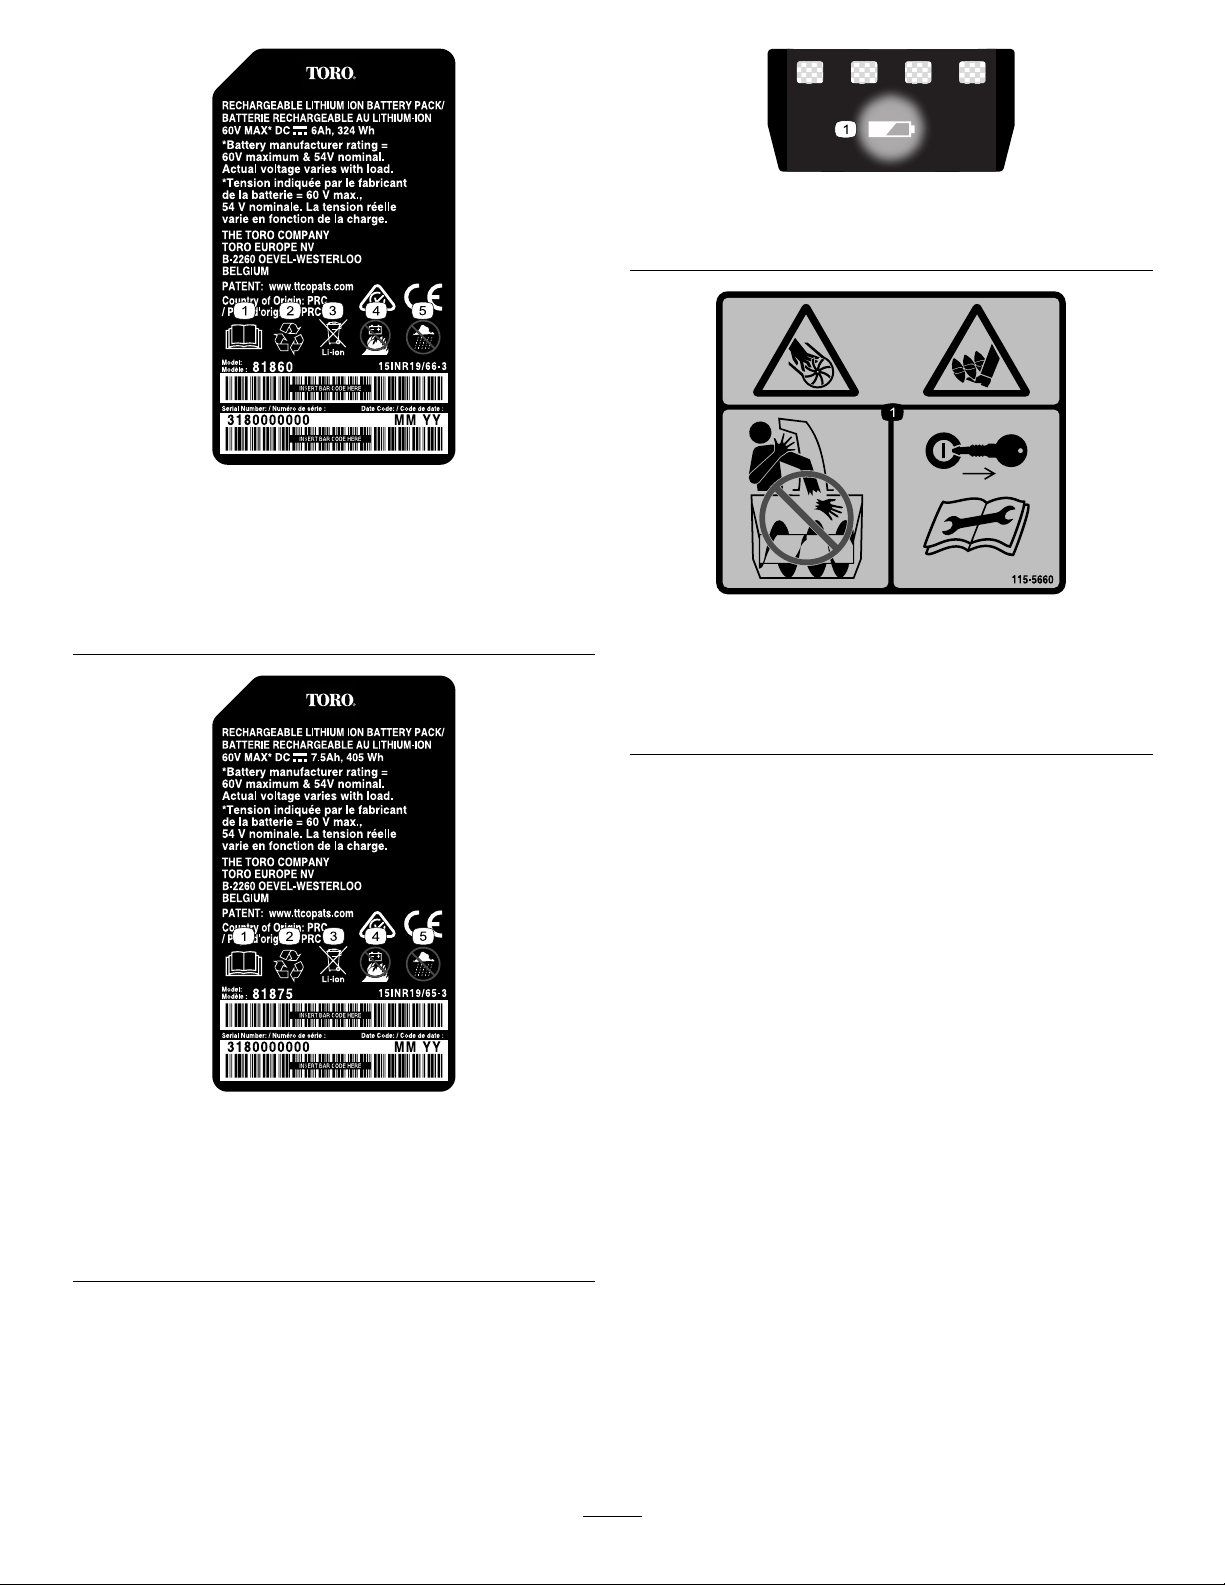
decal137-9489
137-9489
1.ReadtheOperator’s
Manual.
4.Keepawayfromopen
ames.
2.Recycle5.Donotexposetorain.
3.Containslithiumions;do
notdiscard.
137-9490
decal115-5660
115-5660
1.Cutting/dismembermenthazardsofhandorfoot,impeller
andauger—donotplaceyourhandinthechute;remove
theignitionkeyandreadtheinstructionsbeforeservicing
orperformingmaintenance.
decal137-9490
1.ReadtheOperator’s
Manual.
4.Keepawayfromopen
ames.
2.Recycle5.Donotexposetorain.
3.Containslithiumions;do
notdiscard.
6

Setup
LooseParts
Usethechartbelowtoverifythatallpartshavebeenshipped.
ProcedureDescription
1
2
3
4
Note:Thebatterypackisnotfullychargedwhenyou
purchaseit.Beforeusingthemachinefortherst
time,refertoChargingtheBatteryPack(page13).
Nopartsrequired
Nopartsrequired
Chutedeector
Chute-controlrod
1
MountingtheBattery
Charger(Optional)
Qty.
–
–
1
1Installthechute-controlrod.
Mountthebatterycharger(optional).
Unfoldthehandle.
Installthechutedeector.
Use
NoPartsRequired
Procedure
Ifdesired,mountthebatterychargersecurelyona
wallusingthewall-mountkeyholesonthebackof
thecharger.
Mountitindoors(suchasagarageorotherdryplace),
nearapoweroutlet,andoutofthereachofchildren.
RefertoFigure2forassistanceinmountingthe
charger.
Slidethechargerovertheappropriatelypositioned
hardwaretosecurethechargerinplace(hardware
notincluded).
g247359
Figure2
7
5.Movethelowerhandleintoplaceandinstallthe
lowerhandleknobsasshowninFigure5.
2
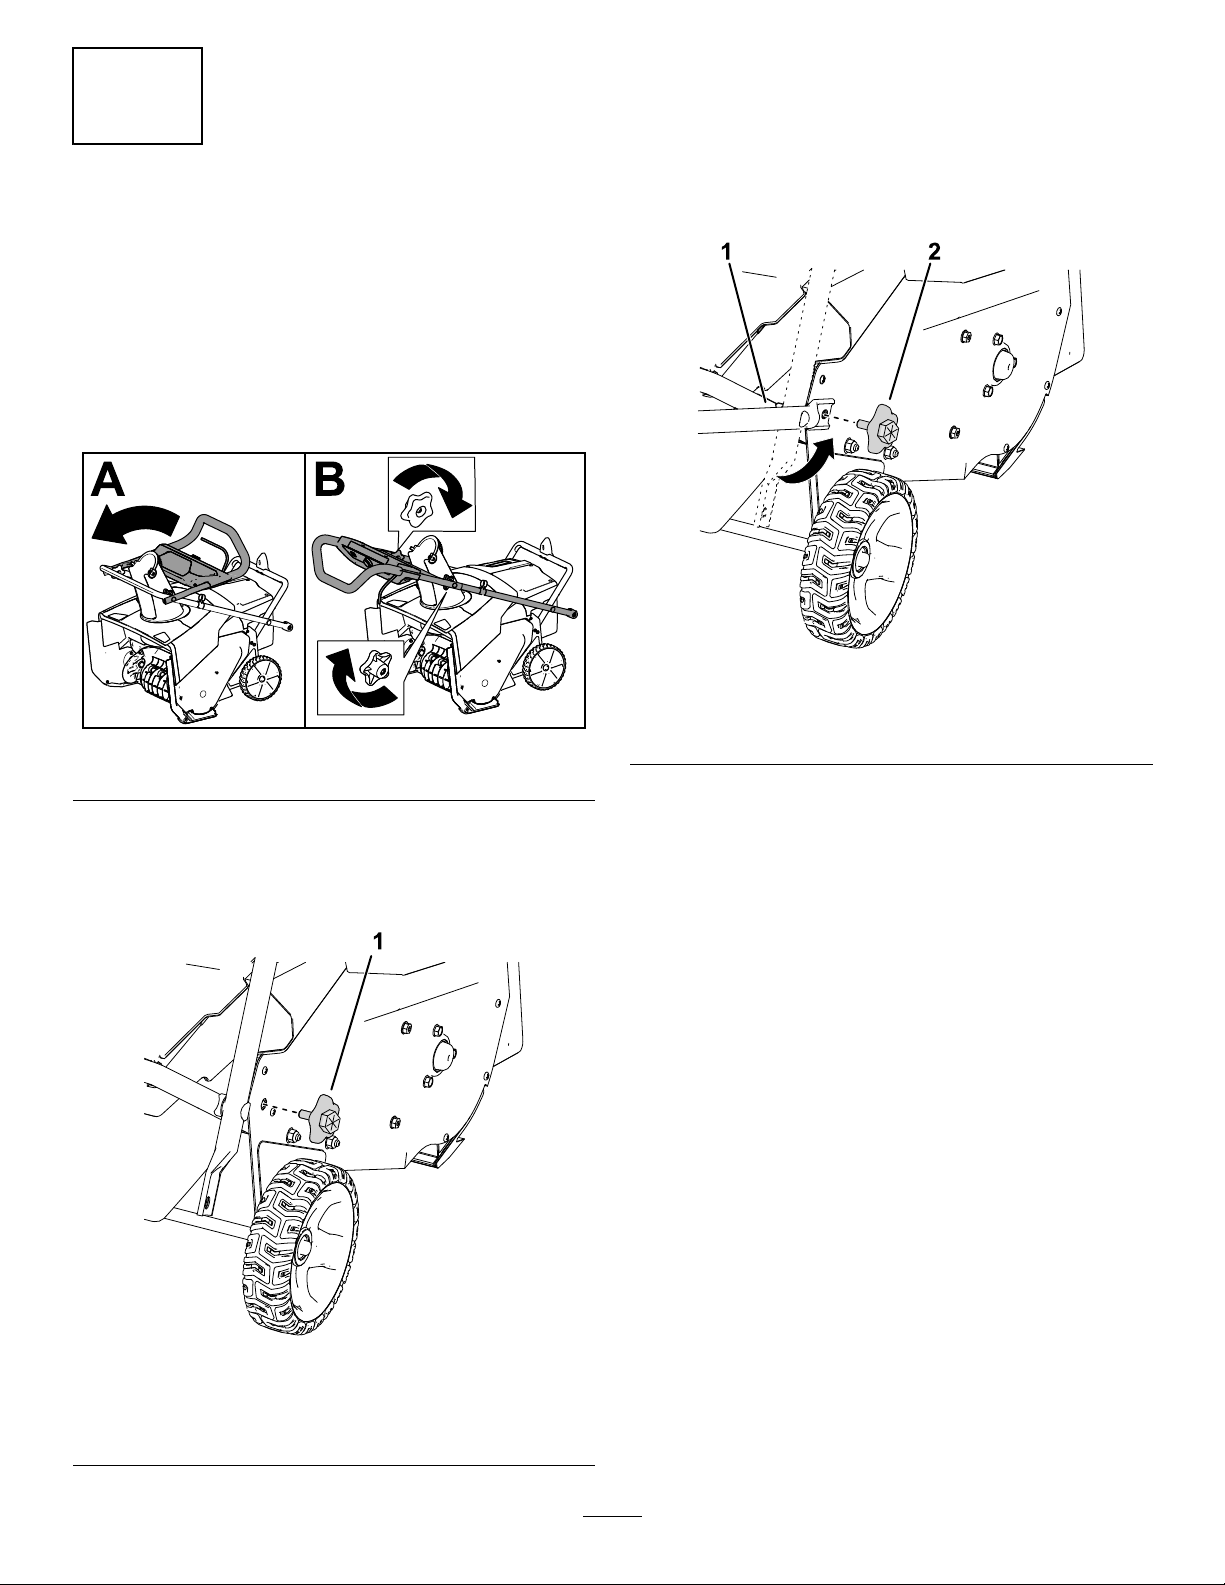
UnfoldingtheHandle
NoPartsRequired
Procedure
1.Removethemachinefromthebox.
2.Unfoldtheupperhandleandallowtheupper
handleknobstosnapintoplace(AofFigure3).
3.Tightenthehandleknobs(BofFigure3).
Note:Youmayuseawrenchonthehexonthe
outsideoftheknobtotightentheknob.
Important:Tightentheknobsuntilthe
handlebartouchesthesideplatewithnogap.
g303595
Figure5
Figure3
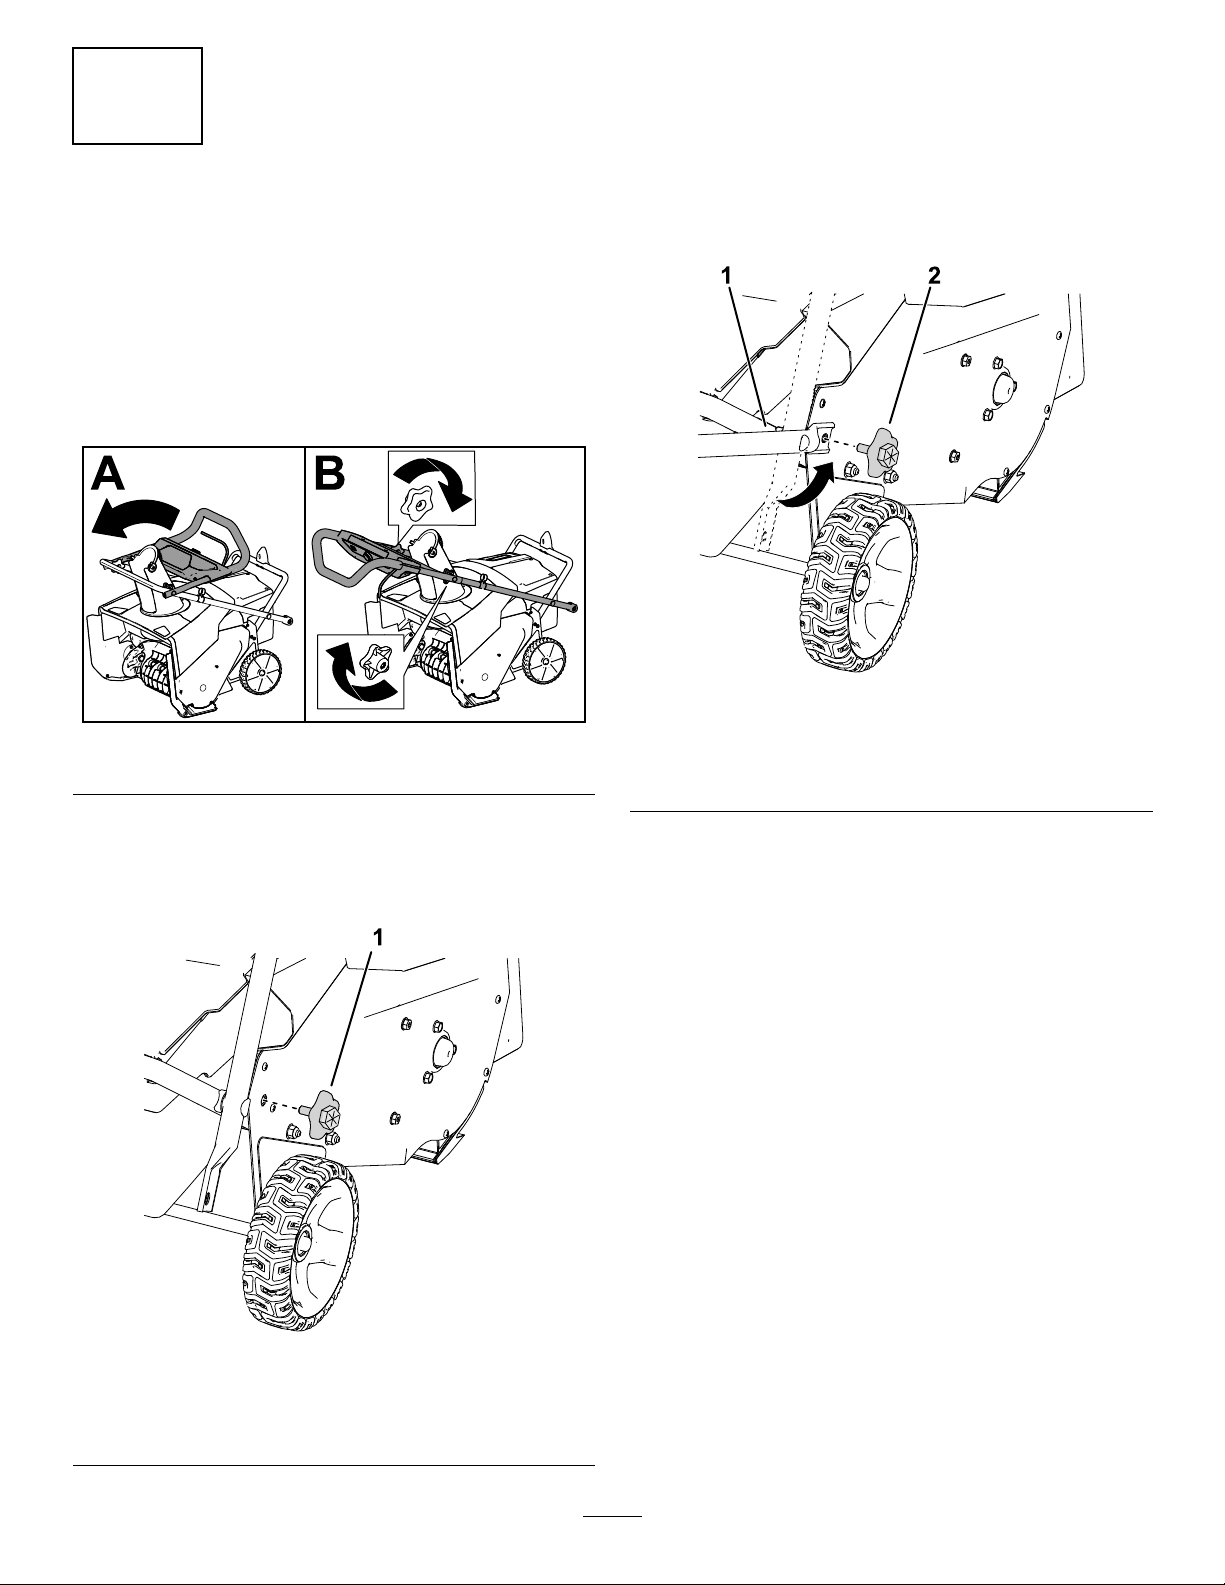
4.Removethelowerhandleknobsfrombothsides
ofthemachine(Figure4).
Note:Thelowerknobsareinstalledtoaweld
nutinthesideofthemachine.
1.Alignthelowerhandlewith
g282574
theweldnuts.
2.Installthelowerhandle
knobs.
1.Lowerhandleknob
g303594
Figure4
Rightsideshown
8
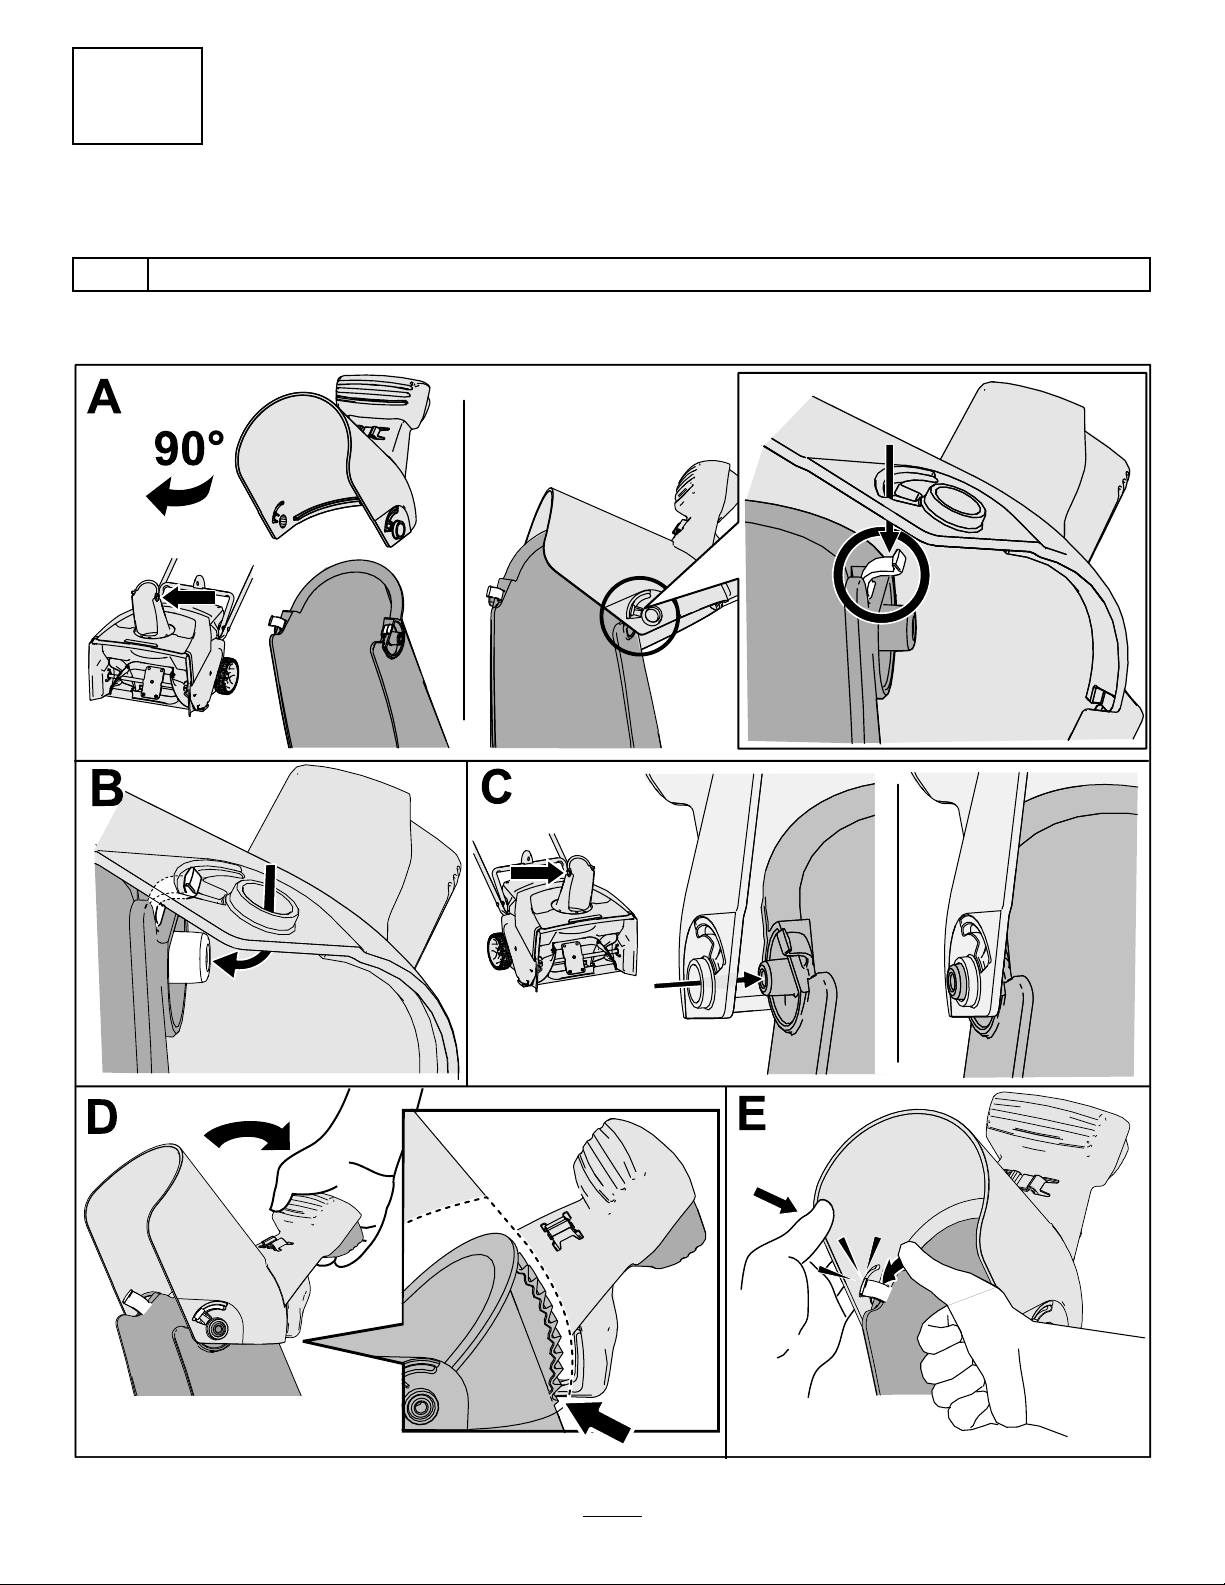
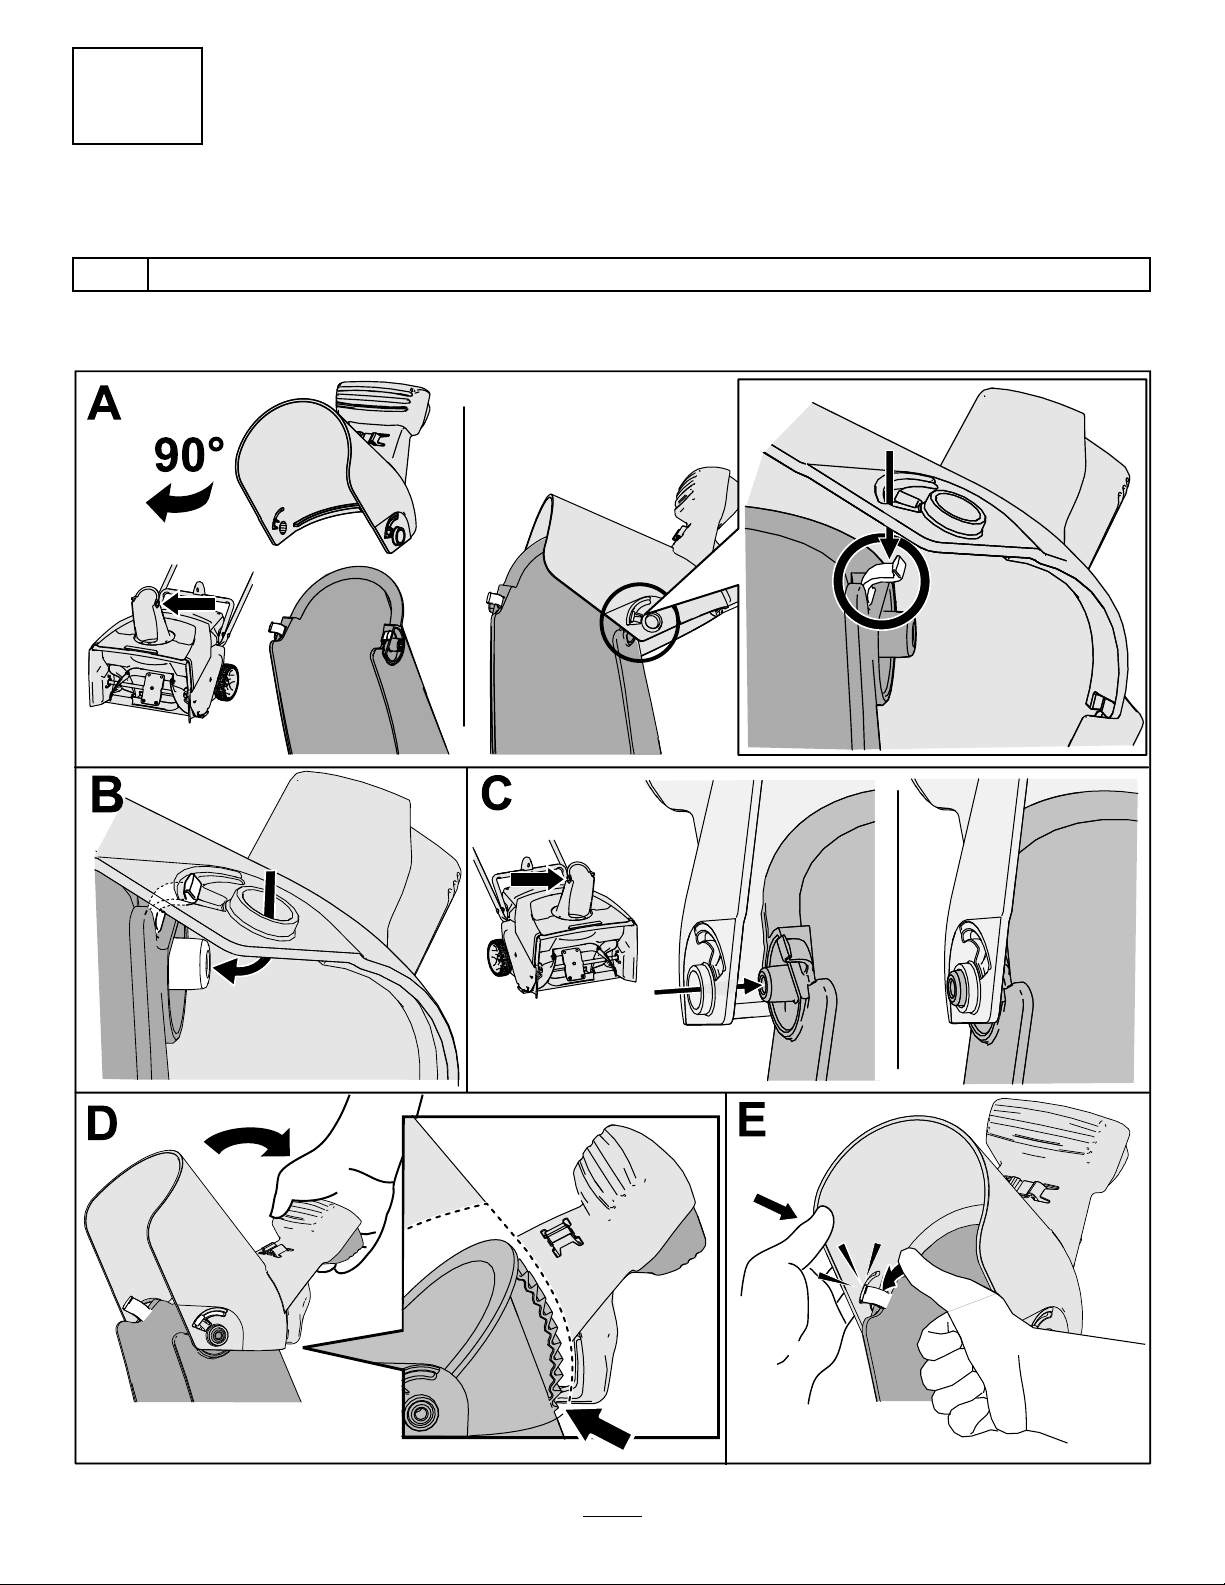
3
InstallingtheChuteDeector
Partsneededforthisprocedure:
1
Chutedeector
Procedure
Figure6
9
g316999
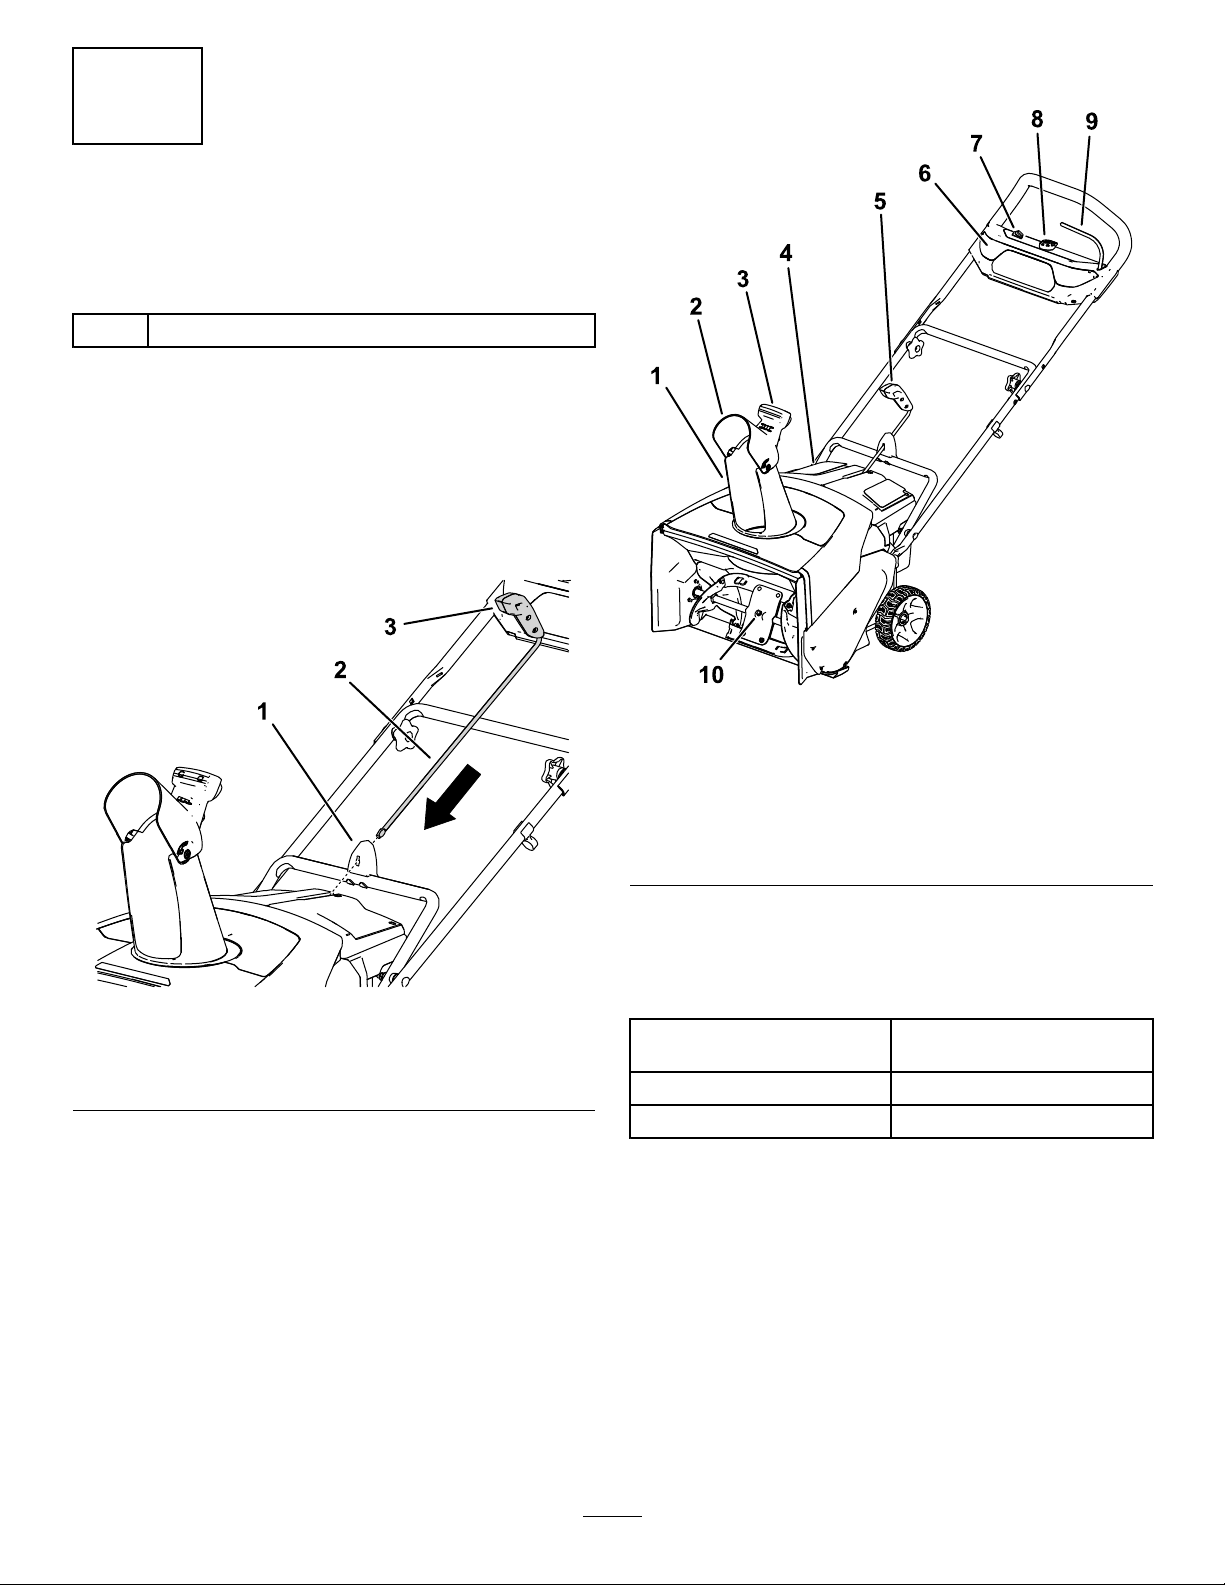
4
InstallingtheChute-Control
Rod
Partsneededforthisprocedure:
1
Chute-controlrod
Procedure
1.Ensurethatthechuteisfacingforward(Figure
7).
2.Withthehandlefacingforward,installthe
chute-controlrodintotheguideandpushitdown
untilitsnapsintoplace(Figure7).
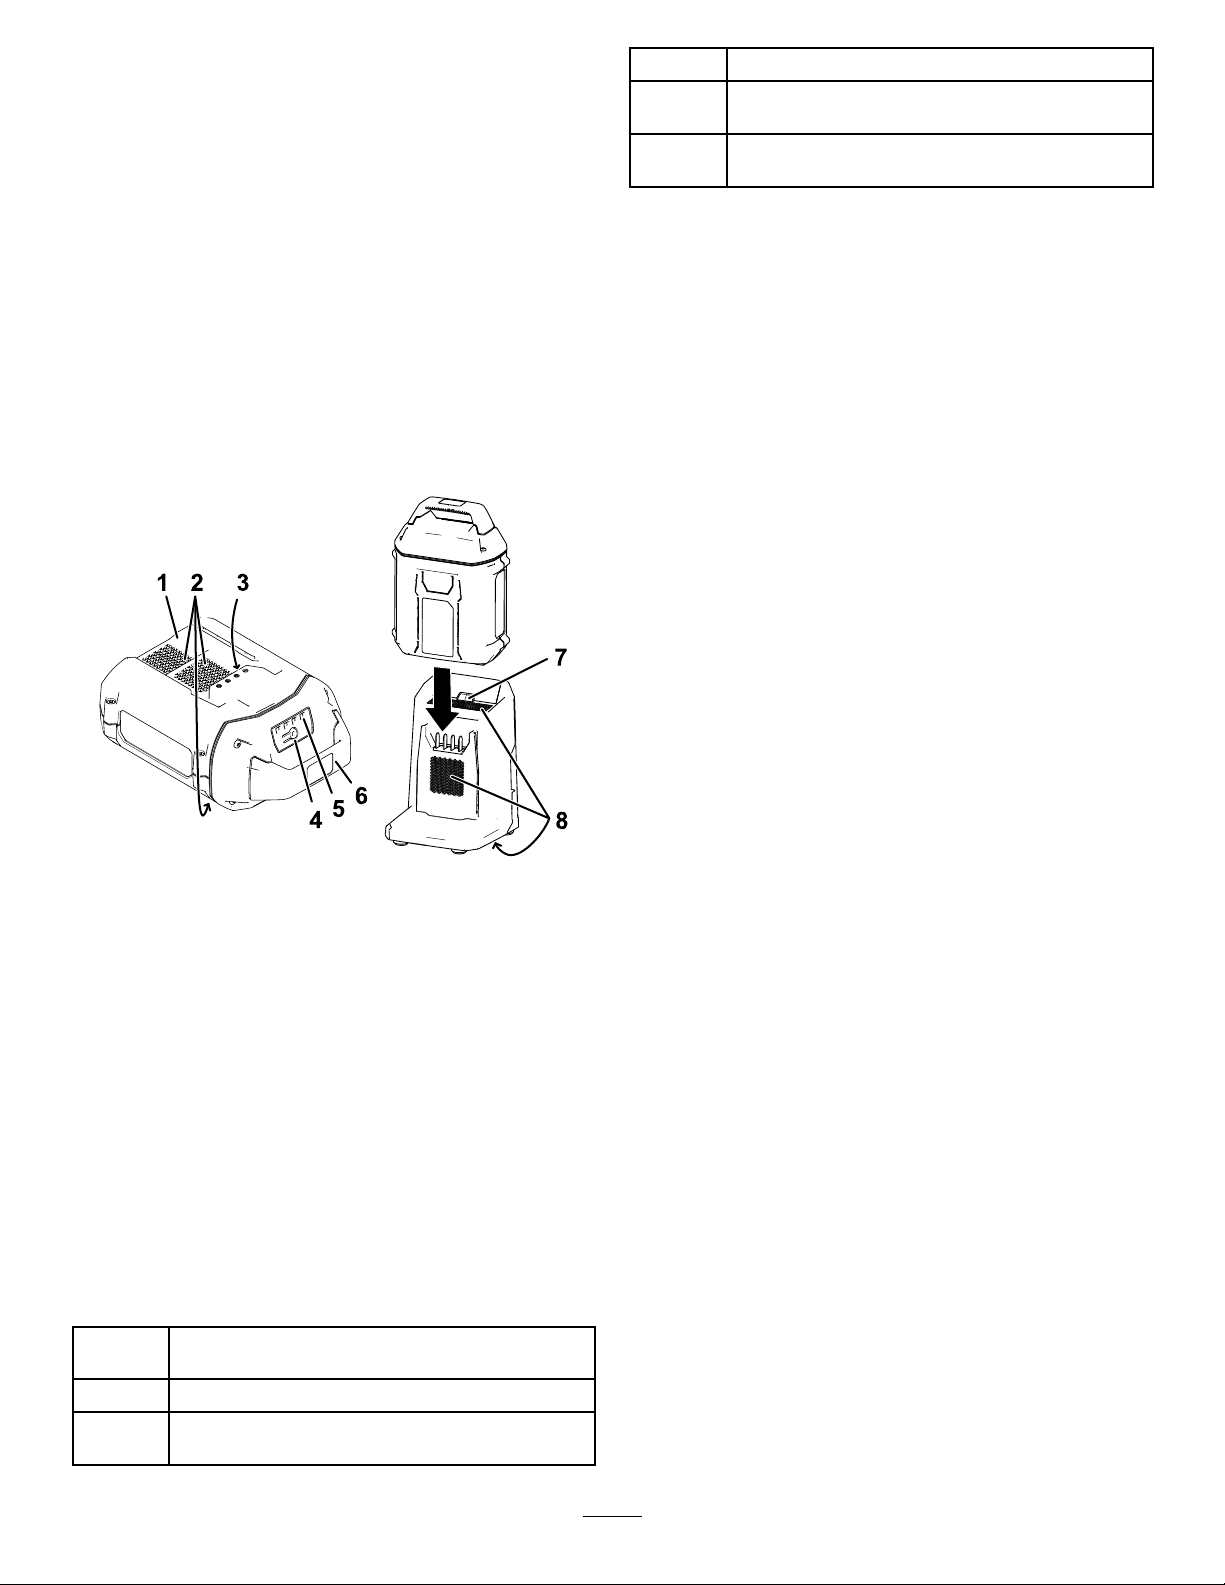
ProductOverview
Figure7
1.Chute-controlguide3.Chute-controlhandle
2.Chute-controlrod
g318456
Figure8
1.Dischargechute6.Headlight
2.Chutedeector7.ECOswitch
3.Chute-deectorhandle
4.Battery-compartmentlid9.Bail
5.Chute-controlrod
8.Electric-startbutton
10.Rotorblades
Specications
g282249
AppropriateTemperatureRanges
Charge/storethebatterypack
at
Usethebatterypackat
Usethemachineat
*Chargingtimewillincreaseifyoudonotchargethe
batterywithinthisrange.
Storethemachine,batterypack,andbatterycharger
inanenclosedclean,dryarea.
5°C(41°F)to40°C(104°F)*
-30°C(-22°F)to49°C(120°F)*
-30°C(-22°F)to49°C(120°F)*
10
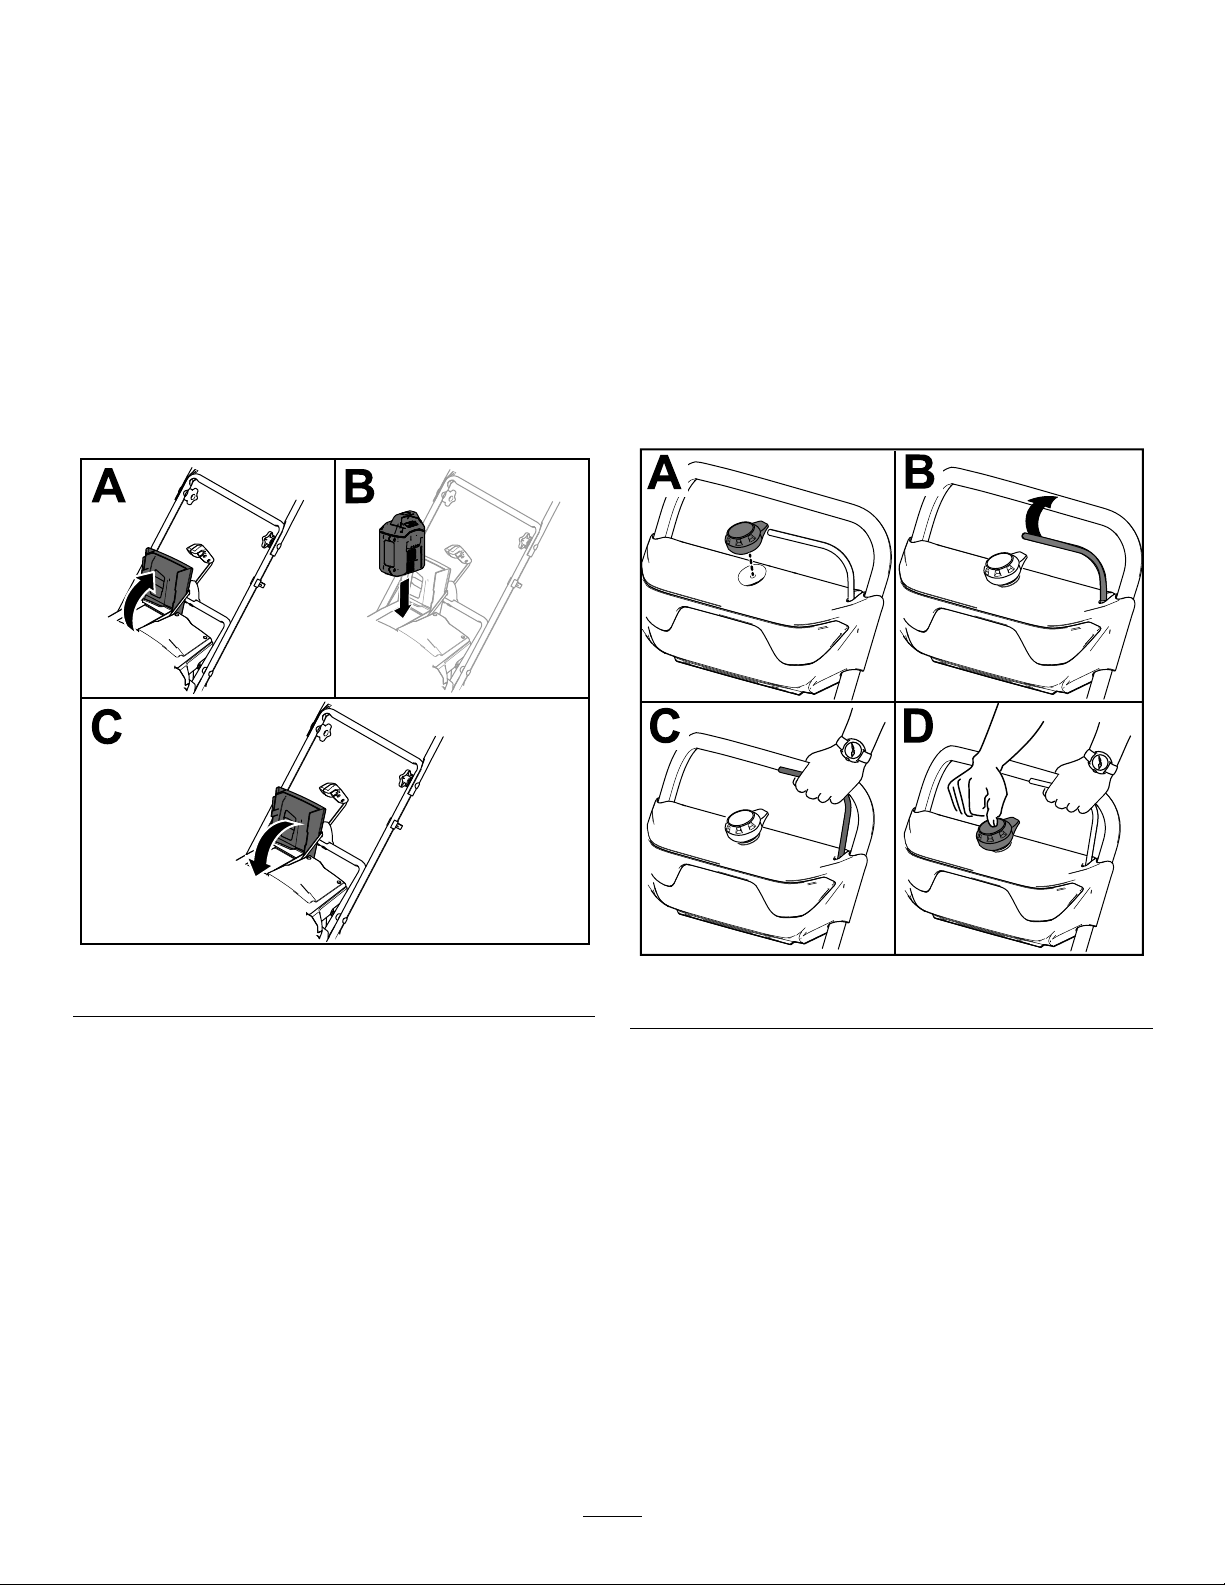
Operation
InstallingtheBatteryPack
1.Makesurethattheventsonthebatteryareclear
ofanydustanddebris.
2.Liftupthebattery-compartmentlid(AofFigure
9).
3.Lineupthecavityinthebatterypackwiththe
tongueonthemachineandslidethebattery
packintothecompartmentuntilitlockintoplace
(BofFigure9).
4.Closethebattery-compartmentlid(CofFigure
9).
StartingtheMachine
1.Ensurethatthebatterypackisinstalledinthe
machine;refertoInstallingtheBatteryPack
(page11).
2.Inserttheelectric-startbuttonintotheelectric
starter(AofFigure10).
3.Squeezethebailandholdittothehandle(B
andCofFigure10).
Note:Whenyousqueezethebail,thelights
turnonandthebattery-chargeindicatorlightson
thebatteryilluminate.
4.Presstheelectric-startbuttonuntilthemotor
starts(DofFigure10).
Figure9
g282250
Figure10
g288479
11
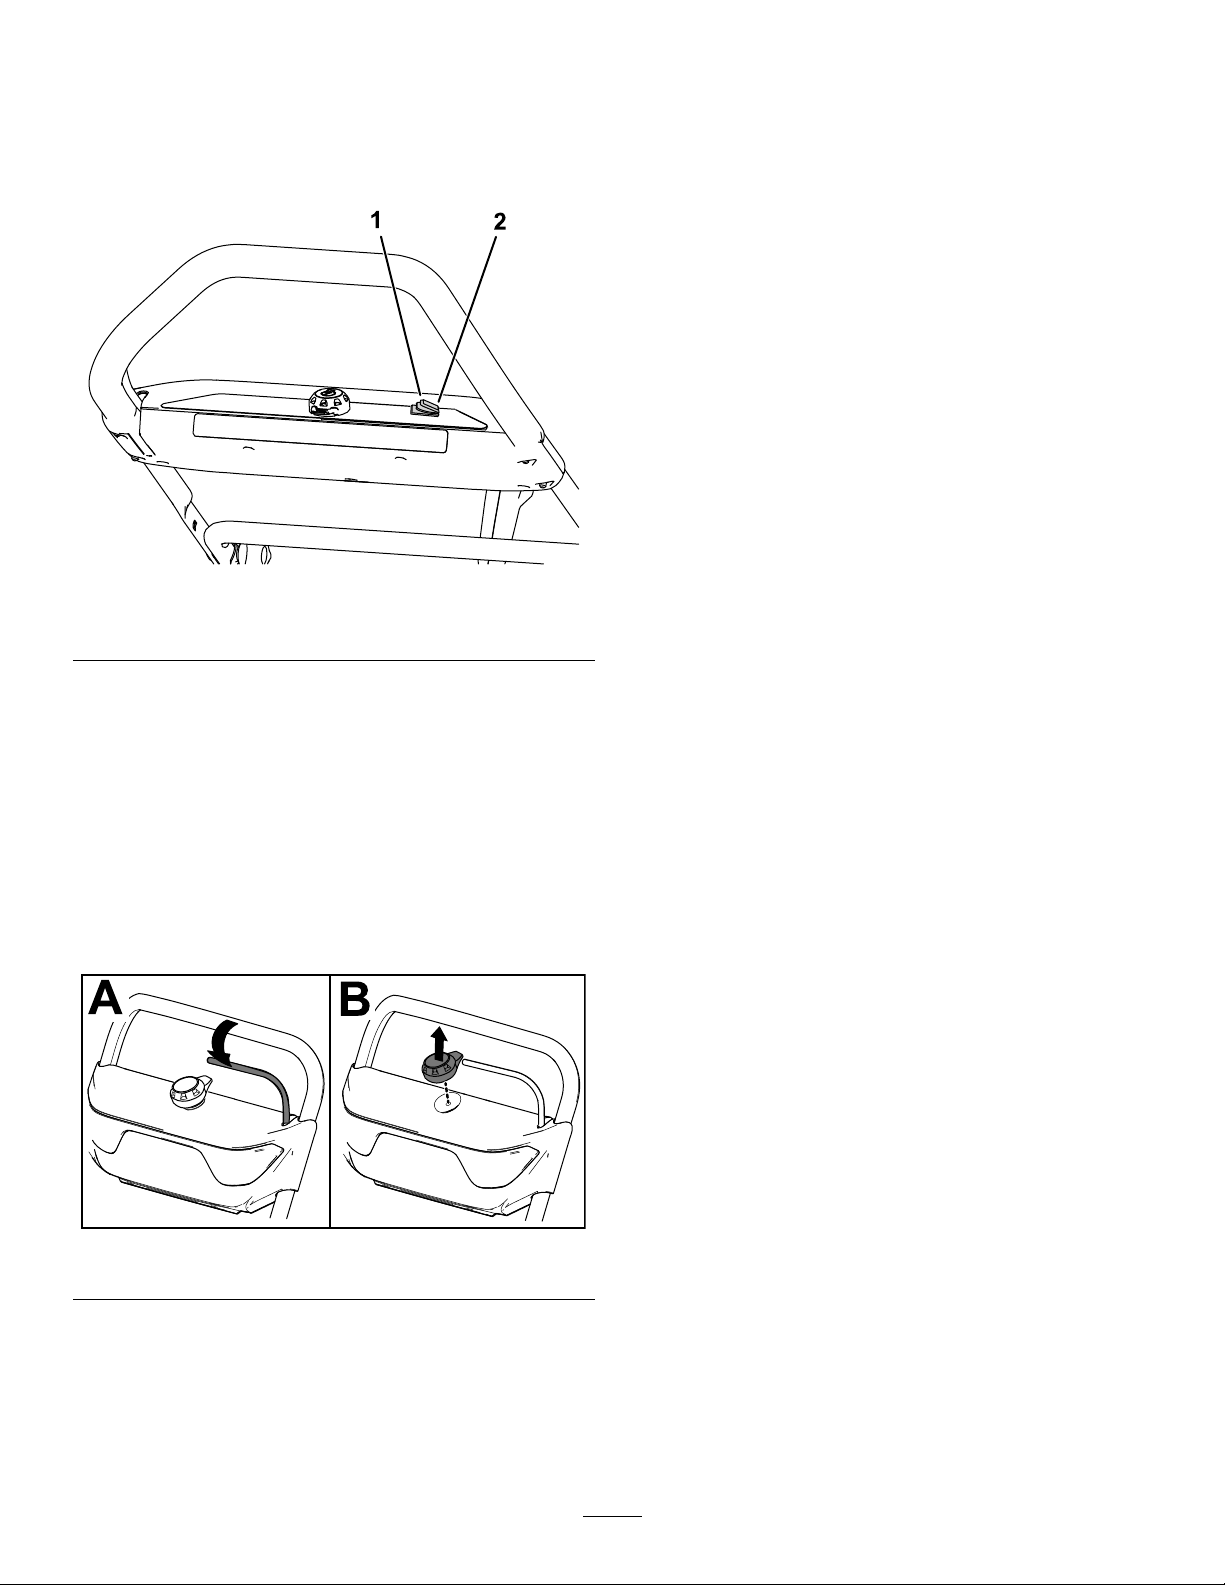
ActivatingECOMode
RemovingtheBatteryPack
UsingECOmodemayextendbatterylifebyreducing
rotorspeed;useECOmodewheneveryouare
movingsnowashortdistance.ActivateECOmode
usingtheECOswitchasshowninFigure8.
Figure11
1.TurnECOmodeon2.TurnECOmodeoff
fromtheMachine
1.Liftupthebattery-compartmentlid.
2.Pressthebatterypack-latchtoreleasethe
batterypackandremovethebatterypack.
3.Closethebattery-compartmentlid.
g318457
ShuttingOfftheMachine
1.Releasethebail(AofFigure12).
2.Removetheelectric-startbuttonfromtheelectric
starter(BofFigure12).
3.Removethebatterypack;refertoRemovingthe
BatteryPackfromtheMachine(page12).
Note:Wheneveryouarenotusingthe
appliance,removethebatterypack.
Figure12
g247446
12
ChargingtheBatteryPack
Important:Thebatterypackisnotfullycharged
whenyoupurchaseit.Beforeusingthetoolfor
thersttime,placethebatterypackinthecharger
andchargeituntiltheLEDdisplayindicatesthe
batterypackisfullycharged.Readallsafety
precautions.
Important:Chargethebatterypackonlyin
temperaturesthatarewithintheappropriate
range;refertoSpecications(page10).
Note:Atanytime,pressthebattery-charge-indicator
buttononthebatterypacktodisplaythecurrent
charge(LEDindicators).
1.Ensurethattheventsonthebatteryandcharger
areclearofanydustanddebris.
Green
Red
Red
blinking
Batterypackischarged
Batterypackand/orbatterychargerisoverorunder
theappropriatetemperaturerange
Batterypackchargingfault*
*RefertoTroubleshooting(page17)formore
information.
Important:Thebatterycanbeleftonthecharger
forshortperiodsbetweenuses.
Ifthebatterywillnotbeusedforlongerperiods,
removethebatteryfromthecharger;referto
Storage(page16).
g290533
Figure13
1.Batterypackcavity
2.Batterypackventingareas6.Handle
3.Batterypackterminals
4.Battery-charge-indicator
button
5.LEDindicators(current
charge)
7.ChargerLEDindicator
light
8.Chargerventingareas
2.Lineupthecavityinthebatterypack(Figure13)
withthetongueonthecharger.
3.Slidethebatterypackintothechargeruntilitis
fullyseated(Figure13).
4.T oremovethebatterypack,slidethebattery
backwardoutofthecharger.
5.RefertothefollowingtabletointerprettheLED
indicatorlightonthebatterycharger.
Indicator
light
Off
Green
blinking
Indicates
Nobatterypackinserted
Batterypackischarging
13

AdjustingtheDischarge
ClearingaClogged
ChuteandChuteDeector
Toadjustthedischargechute,movethehandleon
thechute-controlrodinthedirectionthatyouwishto
directthesnowstream.
Toadjustthechutedeector(andthereforetheheight
ofthesnowstream),squeezethetriggerandraiseor
lowerthechutedeector(Figure14).
DischargeChute
WARNING
Contactingarotatingrotorwithyourhands
insidethedischargechutecouldcause
seriouspersonalinjury.
Neveruseyourhandstocleanoutthe
dischargechute.
1.Shutoffthemotor,removetheelectric-start
button,andremovethebatterypack.
2.Wait10secondstoensurethattherotorblades
havestoppedrotating.
3.Alwaysuseaclean-outtool,notyourhands,to
clearthechute.
Figure14
1.Chutedeectortrigger
WARNING
Agapbetweenthedischargechuteandthe
chutedeectormayallowthemachineto
throwsnowandobjectsinthedirectionofthe
operator.Thrownobjectscouldcauseserious
personalinjury.
•Donotforcethechutedeectortoofar
forwardsothatagapappearsbetweenthe
dischargechuteandchutedeector.
•Donotadjustthechutedeectorwiththe
powercontrolbarengaged.Releasethe
powercontrolbarbeforeadjustingthe
chutedeector.
g318452
14

OperatingTips
WARNING
Therotorcanthrowstones,toys,andother
foreignobjectsandcauseseriouspersonal
injurytoyouorbystanders.
PreventingFreeze-upafter
Use
•Letthemotorrunforafewminutestoprevent
movingpartsfromfreezing.Shutoffthemachine,
waitforallmovingpartstostop,andremoveice
andsnowfromthemachine.
•Keeptheareatobeclearedfreeofall
objectsthattherotorbladescouldpickup
andthrow.
•Keepallchildrenandpetsawayfromthe
areaofoperation.
•Removethesnowassoonaspossibleafteritfalls.
•Pushthemachineforward,butallowittoworkat
itsownpace.
•Overlapeachswathtoensurecompletesnow
removal.
•Dischargethesnowdownwindwheneverpossible.
•Cleanoffanysnowandicefromthebaseofthe
chute.
•Rotatethedischargechuteleftandrighttofree
itfromanyicebuildup.
•Insnowyandcoldconditions,somecontrolsand
movingpartsmayfreeze.Donotuseexcessive
forcewhentryingtooperatefrozencontrols.Ifyou
havedifcultyoperatinganycontrolorpart,start
themachineandletitrunforafewminutes.
15
Maintenance
Storage
Stopthemachine,removetheelectric-startbutton,
removethebatterypackfromthemachine,andwait
forallmovementtostopbeforeadjusting,servicing,
cleaning,orstoringthemachine.
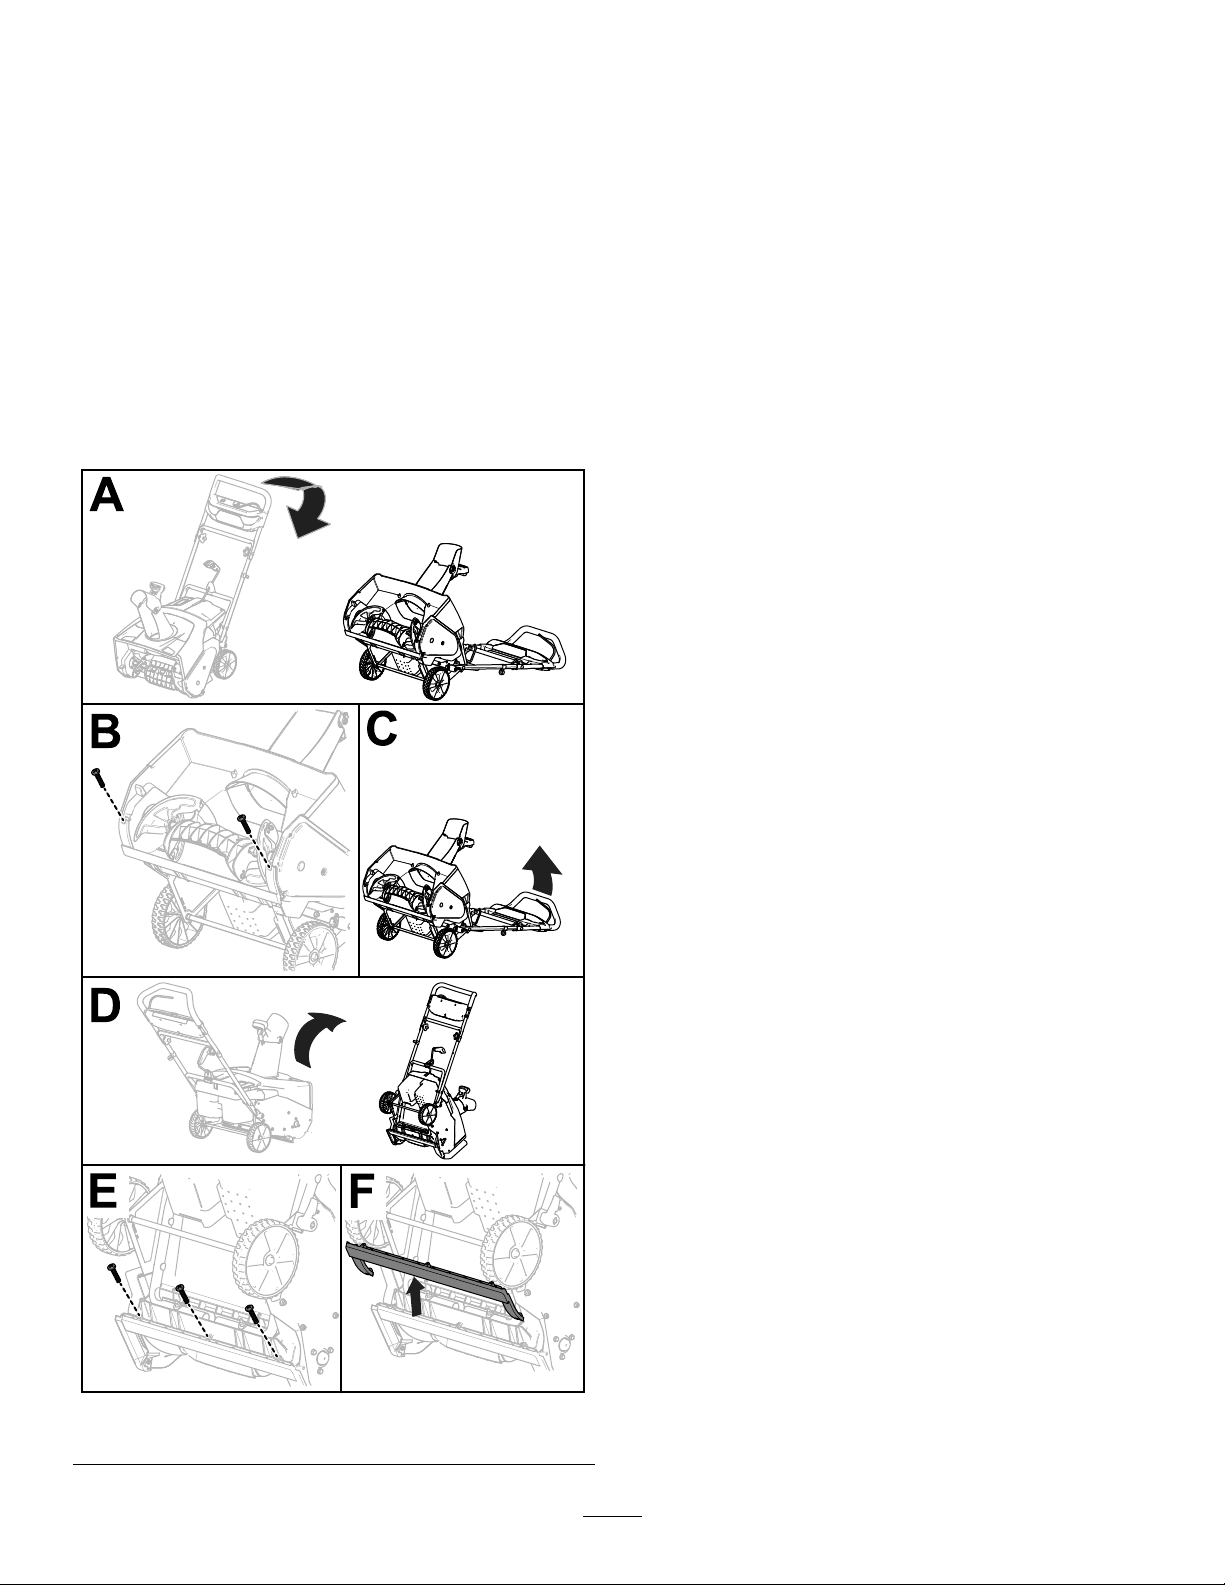
ReplacingtheScraper
ServiceInterval:Every20hours
Replacethescraperbladeifitisdamagedorif
scrapingperformanceisgreatlyreduced.
Whenneeded,removeandreplacethescraperas
showninFigure15.
Important:Storethemachine,batterypack,and
chargeronlyintemperaturesthatarewithinthe
appropriaterange;refertoSpecications(page
10).
Important:Ifyouarestoringthebatterypack
fortheoff-season,chargeituntil2or3LED
indicatorsturngreenonthebattery.Donotstore
afullychargedorfullydepletedbattery .When
youarereadytousethemachineagain,charge
thebatterypackuntiltheleftindicatorlightturns
greenonthechargerorall4LEDindicatorsturn
greenonthebattery.
•Disconnecttheproductfromthepowersupply
(i.e.,removetheplugfromthepowersupplyorthe
batterypack)andcheckfordamageafteruse.
•Cleanallforeignmaterialfromtheproduct.
•Donotstorethetoolwiththebatterypackinstalled.
•Whennotinuse,storethemachine,batterypack,
andbatterychargeroutofthereachofchildren.
•Keepthemachine,batterypack,andbattery
chargerawayfromcorrosiveagents,suchas
gardenchemicalsandde-icingsalts.
•Toreducetheriskofseriouspersonalinjury,do
notstorethebatterypackoutsideorinvehicles.
•Storethemachine,batterypack,andbattery
chargerinanenclosedclean,dryarea.
PreparingtheBatteryPack
forRecycling
Important:Uponremoval,covertheterminalsof
thebatterypackwithheavy-dutyadhesivetape.
Donotattempttodestroyordisassemblethe
batterypackorremoveanyofitscomponents.
ContactyourlocalmunicipalityoryourauthorizedT oro
distributorformoreinformationonhowtoresponsibly
recyclethebattery.
Figure15
g248009
16

Troubleshooting
Performonlythestepsdescribedintheseinstructions.Allfurtherinspection,maintenance,andrepairwork
mustbeperformedbyanauthorizedservicecenterorasimilarlyqualiedspecialistifyoucannotsolvethe
problemyourself.
Problem
Themachinedoesnotrunordoesnotrun
continuously.
Themachinedoesnotreachfullpower.
Thebatterypackloseschargequickly.
Thebatterychargerisnotworking.
PossibleCauseCorrectiveAction
1.Thebatterypackislowoncharge.
2.Thebatterypackisnotfullyseated.
3.Thebatterypackisoverorunderthe
appropriatetemperaturerange.
4.Thebatterypackhasexceededhigh
amperagelimits.
5.Thereismoistureontheleadsofthe
batterypack.
6.Thebatterypackisdamaged.6.Replacethebatterypack.
7.Thereisanotherelectricalproblem
withthemachine.
1.Thebatterypackchargecapacityis
toolow.
2.Theairventsareblocked.
1.Thebatterypackisoverorunderthe
appropriatetemperaturerange.
2.Themachineisoverloaded.
1.Thebatterychargerisoverorunder
theappropriatetemperaturerange.
2.Theoutletthatthebatterychargeris
pluggedintodoesnothavepower.
1.Chargethebatterypack.
2.Ensurethatthebatterypackisinserted
allthewayintothehousing.
3.Movethebatterypacktoaplace
whereitisdryandthetemperatureis
between5°C(41°F)and40°C(104°F).
4.Releasethetrigger,thenpressthe
triggerswitch.
5.Allowthebatterypacktodryorwipeit
dry.
7.ContactanAuthorizedServiceDealer.
1.Removethebatterypackfromthe
machineandfullychargethebattery
pack.
2.Cleantheairvents.
1.Movethebatterypacktoaplace
whereitisdryandthetemperatureis
between5°C(41°F)and40°C(104°F).
2.Pushthemachinewithlessforce.
1.Unplugthebatterychargerandmove
ittoaplacewhereitisdryandthe
temperatureisbetween5°C(41°F)
and40°C(104°F).
2.Contactyourlicensedelectricianto
repairtheoutlet.
TheLEDindicatorlightonthebattery
chargerisred.
TheLEDindicatorlightonthebattery
chargerisblinkingred.
1.Thebatterychargerand/orbattery
packisoverorundertheappropriate
temperaturerange.
1.Thereisanerrorinthecommunication
betweenthebatterypackandthe
charger.
2.Thebatterypackisweak.
1.Unplugthebatterychargerandmove
thebatterychargerandbatterypack
toaplacewhereitisdryandthe
temperatureisbetween5°C(41°F)
and40°C(104°F).
1.Removethebatterypackfromthe
batterycharger,unplugthebattery
chargerfromtheoutlet,andwait10
seconds.Plugthebatterychargerinto
theoutletagainandplacethebattery
packonthebatterycharger.IftheLED
indicatorlightonthebatterychargeris
stillblinkingred,repeatthisprocedure
again.IftheLEDindicatorlighton
thebatterychargerisstillblinkingred
after2attempts,properlydisposeof
thebatterypackatabatteryrecycling
facility.
2.Contactyourauthorizedservicedealer
ifthebatteryisinwarranty,orproperly
disposeofthebatterypackatabattery
recyclingfacility.
17

EEA/UKPrivacyNotice
Toro’sUseofY ourPersonalInformation
TheT oroCompany(“T oro”)respectsyourprivacy.Whenyoupurchaseourproducts,wemaycollectcertainpersonalinformationaboutyou,eitherdirectly
fromyouorthroughyourlocalT orocompanyordealer.T orousesthisinformationtofullcontractualobligations-suchastoregisteryourwarranty,
processyourwarrantyclaimortocontactyouintheeventofaproductrecall-andforlegitimatebusinesspurposes-suchastogaugecustomer
satisfaction,improveourproductsorprovideyouwithproductinformationwhichmaybeofinterest.Toromayshareyourinformationwithoursubsidiaries,
afliates,dealersorotherbusinesspartnersinconnectiontheseactivities.Wemayalsodisclosepersonalinformationwhenrequiredbylaworin
connectionwiththesale,purchaseormergerofabusiness.Wewillneversellyourpersonalinformationtoanyothercompanyformarketingpurposes.
RetentionofyourPersonalInformation
Torowillkeepyourpersonalinformationaslongasitisrelevantfortheabovepurposesandinaccordancewithlegalrequirements.Formoreinformation
aboutapplicableretentionperiodspleasecontactlegal@toro.com.
Toro’sCommitmenttoSecurity
YourpersonalinformationmaybeprocessedintheUSoranothercountrywhichmayhavelessstrictdataprotectionlawsthanyourcountryofresidence.
Wheneverwetransferyourinformationoutsideofyourcountryofresidence,wewilltakelegallyrequiredstepstoensurethatappropriatesafeguardsare
inplacetoprotectyourinformationandtomakesureitistreatedsecurely .
AccessandCorrection
Youmayhavetherighttocorrectorreviewyourpersonaldata,orobjecttoorrestricttheprocessingofyourdata.T odoso,pleasecontactusbyemail
atlegal@toro.com.IfyouhaveconcernsaboutthewayinwhichT orohashandledyourinformation,weencourageyoutoraisethisdirectlywithus.
PleasenotethatEuropeanresidentshavetherighttocomplaintoyourDataProtectionAuthority .
374-0282RevC
FormNo.3437-772RevB
FlexForcePowerSystem
MAX-sneslynge
Modelnr.31853—Serienr.400000000ogderover
Modelnr.31853T—Serienr.400000000ogderover
™
60V
Registrerditproduktpåwww.Toro.com.
Oversættelseaforiginal(DA)
*3437-772*
Fåhjælpvedatgåtil
www.Toro.com/support,
hvordunder
instruktionsvideoer,
ellervedatkontakte
dinautoriserede
serviceforhandler,inden
dureturnererdette
produkt.
Indledning
Dennemaskineerberegnettilbrugforboligejere.
Denerberegnettilatryddeterrasser,fortoveog
mindreindkørslerforsnepåoptil30cm.Denerikke
konstruerettilrydningafandrematerialerendsne,og
denerhellerikkekonstruerettilrydningafgrusbelagte
overader.Denerkonstruerettilatanvendeen
lithium-ion-batteripakke,model81875(leveresmed
model31853),81860,81850eller81825.Brugaf
detteprodukttilandreenddettiltænkteformålkan
udsættedigselvogomkringståendeforfare.
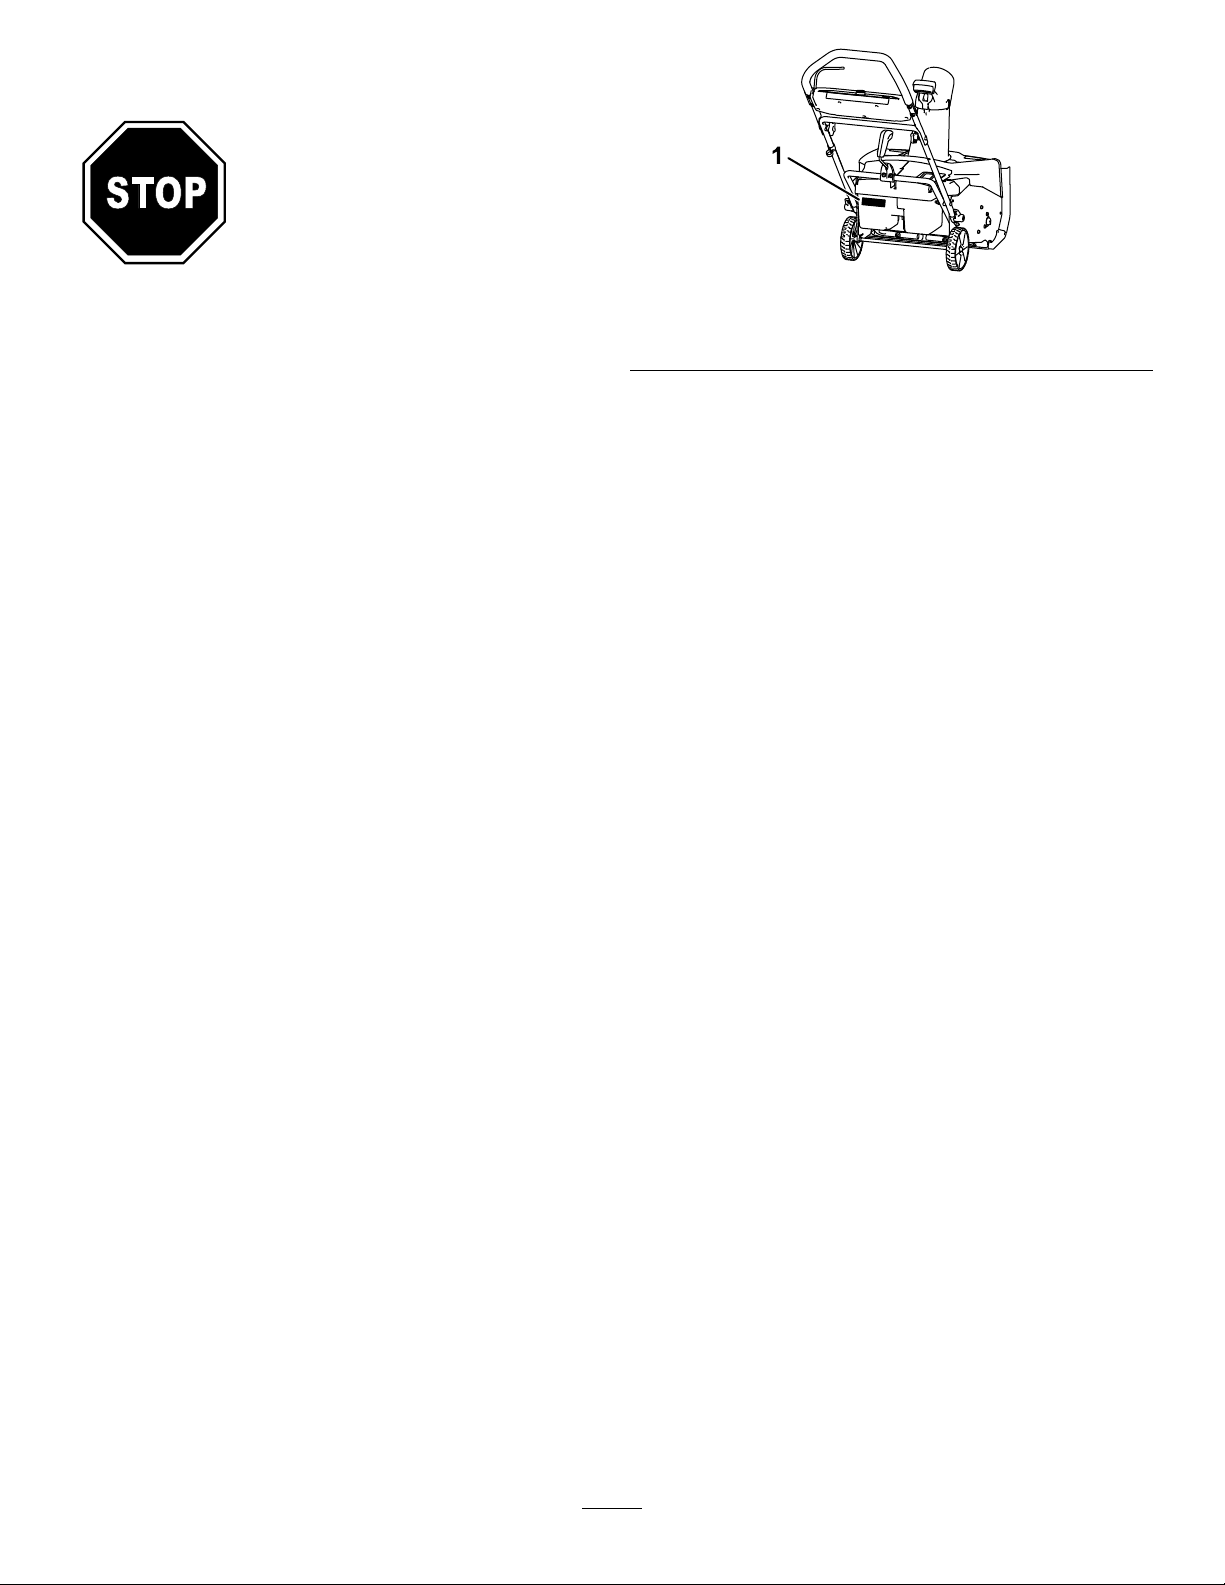
g288478
Figur1
1.Model-ogserienummeretsplacering
Model31853Tleveresikkemedetbatterielleren
oplader.
Læsdennevejledningomhyggeligt,sådukanlæreat
betjeneogvedligeholdeproduktetkorrektsamtundgå
person-ogproduktskade.Deterditansvaratbetjene
produktetkorrektogsikkert.
Besøgwww.Toro.comforatfåereoplysninger,
herundersikkerhedstip,undervisningsmaterialer,
oplysningeromtilbehør,hjælptilatndeenforhandler
ellerforatregistrereditprodukt.
Nårduharbrugforservice,originaldelefra
fabrikantenelleryderligereoplysninger,bedes
dukontakteenautoriseretserviceforhandlereller
fabrikantenskundeservicesamthaveproduktets
model-ogserienummerparat.Figur1visermodel-
ogserienummeretsplaceringpåproduktet.Skriv
numrene,hvorderergjortpladstildette.
©2021—TheToro®Company
8111LyndaleAvenueSouth
Bloomington,MN55420
Kontaktospåwww.T oro.com.
2
Allerettighederforbeholdes
TryktiUSA

Sikkerhed
LÆSALLEINSTRUKTIONERNE
ADVARSEL–Overholdaltidgrundlæggende
sikkerhedsforanstaltningeriforbindelsemed
anvendelseafelektriskemaskinerforatreducere
risikoenforbrand,elektriskstødogpersonskade,
herunderfølgende:
I.Uddannelse
1.Maskinensoperatøreransvarligforeventuelle
ulykkerellerfarer,dermåtterammeandre
menneskerellerdissesejendom.
6.Tilslutningafbatteriopladerentilenstikkontakt,
derikkeer100-240V,kanforårsagebrandeller
elektriskstød.Sætikkebatteriopladereniandre
stikkontakterendénpå100-240V .
7.Brugikkeenbeskadigetellermodiceret
batteripakkeellerbatterioplader,derkanudvise
uforudsigeligadfærd,somkanmedførebrand,
eksplosionellerrisikoforpersonskade.
8.Hvisbatteriopladerensnetledningerbeskadiget,
skaldukontakteenautoriseretserviceforhandler
medhenblikpåudskiftning.
9.Dermåikkeanvendesikke-genopladelige
batterier.
2.Læsogforståindholdetidenne
betjeningsvejledning,førdustartermaskinen.
Sørgfor,atallebrugereerfortroligemed
betjeningenafmaskinen,erbekendtmed,
hvordanderhurtigtslukkesforden,ogforstår
advarslerne.
3.Ladikkebørnanvendeellerlegemedmaskinen,
batteripakkenellerbatteriopladeren.Vær
opmærksompå,atlokaleforskrifterkanangive
enmindstealderforoperatøren.
4.Tilladikke,atpersonermednedsattefysiske,
sensoriskeellermentaleevnerellerpersoner
udenrelevanterfaringellerkendskabanvender
maskinen,batterietellerbatteriopladeren,
medmindredemodtagerundervisningeller
vejledningisikkerbrugafproduktetogforstår
defarer,dererforbundetmedbrugenheraf.
5.Førdutagermaskinen,batteripakkenog
batteriopladerenibrug,skaldulæsesamtlige
instruktionerogadvarselsmærkerpådisse
produkter.
6.Blivfortroligmedbetjeningsanordningernesamt
korrektbrugafmaskinen,batteripakkenog
batteriopladeren.
II.Forberedelser
1.Holdbørnogandreomkringståendevækfra
arbejdsområdet.
2.Ladaldrigbørnbetjenemaskinen.
10.Batteripakkenmåudelukkendeopladesmed
denbatterioplader,dererangivetafT oro.En
oplader,dereregnettiléntypebatteripakke,
kanforårsagebrandfare,nårdenanvendes
sammenmedenandenbatteripakke.
11.Batteripakkenmåudelukkendeopladesiet
områdemedgodventilation.
12.Udsætikkeenbatteripakkeelleren
batteriopladerforildellertemperaturerpåover
68°C.
13.Følgalleopladningsinstruktioner,og
undladatopladebatteripakkenudenfor
dettemperaturområde,dererangiveti
instruktionerne.Imodsatfaldkandubeskadige
batteripakkenogøgerisikoenforbrand.
14.Klæddighensigtsmæssigt–bærpassende
beklædning,herunderøjenbeskyttelse,lange
bukseroggummistøvler.Sætlangthårop,og
bærikkeløsthængendesmykker,derkansidde
fastibevægeligedele.
III.Betjening
1.Kontaktmeddenbevægeligerotorforårsager
alvorligpersonskade.Holdhænderogfødder
vækfraallemaskinensbevægeligedele.Hold
afstandtiludblæsningsåbninger.
2.Brugafdennemaskinetilandreenddettiltænkte
formålkanudsættedigselvogomkringstående
forfare.
3.Betjenikkemaskinen,medmindrealle
afskærmningerogsikkerhedsanordningerer
monteretpåmaskinenogigoddriftsmæssig
stand.
4.Efterseområdet,hvormaskinenskalbetjenes,
ogfjernallegenstande,somkanforstyrre
maskinensdrift,ellersommaskinenkanrisikere
atudslynge.
5.Brugkundenbatteripakke,dererspeciceretaf
Toro.Brugafandettilbehørogandreredskaber
kanøgerisikoenforpersonskadeogbrand.
3.Undgåutilsigtetstart–sørgfor,atdenelektriske
startknapertagetudaftændingeninden
tilslutningafbatteripakkenoghåndteringaf
maskinen.
4.Betjeningafmaskinenkræverdinfulde
opmærksomhed.Betjenikkemaskinensamtidig
medandredistraherendeaktiviteter,dadette
kanmedføreperson-ellertingsskade.
5.Stopmaskinen,tagdenelektriskestartknapud,
fjernbatteripakkenframaskinen,ogventpå,
atalbevægelsestandser,indendujusterer,
3

efterserellerrengørmaskinenellerstillerden
tilopbevaring.
6.Maskinenmåikkeanvendespågrusbelagte
overader.
7.Fjernbatteripakkenogdenelektriskestartknap
framaskinen,nårduefterladerdenudenopsyn,
ellerførduskiftertilbehør.
8.Udsætikkemaskinenfortrykpåvirkning–
maskinenudføreropgavenbedreogmere
sikkertveddenfrekvens,denerkonstruerettil.
9.Væragtpågivende–holdøjemed,hvaddu
foretagerdig,ogbrugsundfornuft,nårdu
betjenermaskinen.Anvendikkemaskinen,hvis
duersyg,trætellerpåvirketafalkoholeller
medicin.
10.Betjenkunmaskinenvedgodsigtbarhedog
hensigtsmæssigevejrforhold.
11.Udvisstørsteforsigtighed,nårdubakkermed
maskinenellertrækkerdenmoddigselv.
12.Sørgforatopretholdeordentligtfodfæste
ogbalancetilenhvertid,isærpåskråninger.
Væryderstforsigtig,nårduskifterretningpå
skråninger.Betjenikkemaskinenpåmeget
stejleskråninger.Gå,ogløbaldrigmed
maskinen.
13.Undladatrettedetudblæstematerialemod
nogen.Undgåatudkastematerialemodenmur
ellerforhindring–materialetkankastestilbage
moddig.Stopmaskinen,nårdupasserer
grusbelagteoverader.
14.Hvismaskinenrammerengenstandeller
begynderatryste,skaldustraksslukkefor
motoren,tagedenelektriskestartknapud,fjerne
batteripakkenogventepå,atalbevægelse
standser,førdueftersermaskinenforskader.
Foretagallenødvendigereparationer,inden
driftengenoptages.
15.Slukformaskinen,nårduforlader
betjeningspositionen–uansetårsagen.
16.Slukformaskinen,førdurengørmaskinen,og
brugaltidenpindelleretrenseværktøjtilat
fjernetilstopninger.
17.Stopmaskinen,ogtagdenelektriskestartknap
ud,indendulæssermaskinenmedhenblikpå
bugsering.
18.Vedfejlagtiganvendelseellerugunstigeforhold
kanbatteripakkensprøjtevæskeud–undgå
kontaktmeddennevæske.Hvisdukommeri
kontaktmedvæskenvedetuheld,skalduskylle
medvand.Søglægehjælp,hvisdufårvæsken
iøjnene.Væske,derlækkerfrabatteripakken,
kanforårsageirritationellerforbrændinger.
IV.Vedligeholdelseogopmagasinering
1.Stopmaskinen,tagdenelektriskestartknapud,
fjernbatteripakkenframaskinen,ogventpå,
atalbevægelsestandser,indendujusterer,
efterserellerrengørmaskinenellerstillerden
tilopbevaring.
2.Forsøgikkeatrepareremaskinenpåandre
måder,endhvaddererangivetiinstruktionerne.
Fåenautoriseretserviceforhandlertilatreparere
maskinenvedhjælpafidentiskereservedele.
3.Bærhandskerogbeskyttelsesbrilleriforbindelse
medvedligeholdelseogreparationafmaskinen.
4.Nårduefterserrotoren,skalduvære
opmærksompå,atrotorenstadigkanbevæge
sig,selvomstrømkildenerdeaktiveret.
5.Medhenblikpåatopretholdebedstmuligydelse
måderkunanvendesoriginaleT oro-reservedele
og-tilbehør.Detkanværefarligtatanvende
andrereservedeleogandettilbehør,ogbrug
herafkanugyldiggøregarantien.
6.Holdmaskinenvedlige–sørgfor,athåndtagene
holdestørre,reneogfriforolieogfedt.Sørg
for,atafskærmningerneerpåpladsogigod
driftsmæssigstand.Brugudelukkendeidentiske
reservedele.
7.Kontrollermedjævnemellemrum,atalle
fastgørelsesanordningererordentligttilspændt
foratsikre,atmaskinenerisikkerdriftsmæssig
stand.
8.Eftersemaskinenforbeskadigededele.Efterse
maskinenforfejljusteredeogfastsiddende
bevægeligedele,beskadigededele,ophængog
andreforhold,derkanpåvirkemaskinensdrift.
Medmindreandeterangivetiinstruktionerne,
skaldufåenautoriseretserviceforhandler
tilatreparereellerudskifteenbeskadiget
afskærmningellerdel.
9.Nårbatteripakkenikkeeribrug,skaldenholdes
vækframetalgenstandesåsompapirclips,
mønter,nøgler,sømogskruer,derkan
opretteenforbindelsefraénpoltilenanden.
Kortslutningafbatteripolernekanforårsage
forbrændingerellerbrand.
10.Nårduikkeanvendermaskinen,skalden
opbevaresindendørspåettørtogsikkertsted,
dererutilgængeligtforbørn.
11.FORSIGTIG–Enforkerthåndteretbatteripakke
kanudgøreenrisikoforbrandellerkemiske
forbrændinger.Batteripakkenmåikkeskilles
ad.Batteripakkenmåikkeudsættesfor
temperaturerover68°Cellerantændes.
Batteripakkenmåudelukkendeudskiftesmed
enoriginalToro-batteripakke.Brugafen
andentypebatteripakkekanforårsagebrand
ellereksplosion.Opbevarbatteripakkerne
4

utilgængeligtforbørnogidenoriginale
emballage,indtilduerklartilatbrugedem.
12.Batterietmåikkedestrueresvedforbrænding.
Cellenkaneksplodere.Rådførdigmedlokale
reglementerforatndeudaf,omdergælder
særligeanvisningerforbortskaffelseafbatterier.
GEMDISSE
ANVISNINGER
5
Sikkerheds-oginstruktionsmærkater
Sikkerheds-oginstruktionsmærkaternekannemtsesafoperatørenogerplacerettætpå
potentiellerisikoområder.Beskadigedeellerbortkomnemærkaterskaludskiftes.
decal137-2257
137-2257
1.Advarsel–læsbetjeningsvejledningen.
2.Fareforskæring/lemlæstelseafhænder,rotor;farefor
atfødderskæres/trækkesind,snegl–holdafstandtil
bevægeligedele,sørgfor,atalleafskærmningerermonteret,
slukformotoren,ogtagnøglenud,indenduforlader
maskinen.Læsbetjeningsvejledningen,førderudføres
vedligeholdelsesarbejde.
1.Foratstartemotorenskalduyttebøjlentilhåndtagetog
trykkepåtændingsknappen.
3.Fareforudslyngedegenstande–holdomkringståendepå
afstand.
decal137-2258
137-2258
2.ØKO
137-9495
1.Læsbetjeningsvejledningen.3.Tilindendørsbrug.
2.Måikkekasseres.
4.Dobbeltisoleret
137-9463
1.Batteripakkenoplades.
2.Batteripakkenerfuldtopladet.
3.Batteripakkenbendersigoverellerunderdethensigtsmæssigetemperaturområde.
4.Opladningsfejlibatteripakke
6
decal137-9495
decal137-9463
decal137-9461
137-9461
1.Statusforbatteriopladning
decal137-9489
137-9489
1.Læsbetjeningsvejledningen.
2.Genbrug
3.Indeholderlithium-ioner–
måikkekasseres.
4.Holdesvækfraåbenild.
5.Måikkeudsættesforregn.
decal115-5660
115-5660
1.Fareforskæring/amputeringafhåndellerfod,rotorog
snegl–førikkehåndenindislisken.T agtændingsnøglen
ud,oglæsanvisningerne,førderforetageseftersyneller
vedligeholdelsesarbejde.
decal137-9490
137-9490
1.Læsbetjeningsvejledningen.
2.Genbrug
3.Indeholderlithium-ioner–
måikkekasseres.
4.Holdesvækfraåbenild.
5.Måikkeudsættesforregn.
7

Opsætning
Løsdele
Brugskemaetherundertilatkontrollere,atalledeleerblevetleveret.
Fremgangsmåde
1
2
3
4
Bemærk:Batteripakkenleveresikkefuldtopladet.
SeOpladningafbatteripakken(side14),førmaskinen
tagesibrugførstegang.
Kræveringendele
Kræveringendele
Sliskedeektor
Sliskekontrolstang
1
Monteringafbatteriopladeren(ekstraudstyr)
BeskrivelseAntalAnvendelse
–
–
1
1
Monteringafbatteriopladeren
(ekstraudstyr).
Udfoldningafhåndtaget.
Monteringafsliskedeektoren.
Monteringafsliskekontrolstangen.
Kræveringendele
Fremgangsmåde
Hvisduønskerdet,kanbatteriopladerenmonteres
forsvarligtpåenvægvedhjælpafnøglehullernetil
vægmonteringpåopladerensbagside.
Monterdenindendørs(såsomiengarageellerpå
etandettørtsted),inærhedenafenstikkontaktog
utilgængeligtforbørn.
SeFigur2foratfåhjælptilatmontereopladeren.
Skubopladerenhenoverdekorrektanbragte
fastgørelsesanordningerforatmontereopladeren
forsvarligt(fastgørelsesanordningermedfølgerikke).
g247359
Figur2
8
5.Flytdetnederstehåndtagpåplads,ogmonter
denederstehåndtagsknappersomvistiFigur5.
2
Udfoldningafhåndtaget
Kræveringendele
Fremgangsmåde
1.T agmaskinenudafkassen.
2.Folddetøverstehåndtagud,ogladdeøverste
håndtagsknapperklikkepåplads(AiFigur3).
3.Tilspændhåndtagsknapperne(BiFigur3).
Figur3
Bemærk:Dukanbrugeenskruenøglepå
sekskantenpåknappensydersidetilatspænde
knappen.
Vigtigt:Spændknapperne,indtilstyrebøjlen
berørersidepladenudenmellemrum.
g303595
Figur5
g282574
1.Justerdetnederste
håndtagmed
svejsemøtrikkerne.
2.Monterdenederste
håndtagsknapper.
4.Fjerndenederstehåndtagsknapperfrabegge
siderafmaskinen(Figur4).
Bemærk:Denedersteknapperermonteretpå
ensvejsemøtrikisidenafmaskinen.
Figur4
Setfrahøjreside
g303594
1.Nederstehåndtagsknap
9
3
Monteringafsliskedeektoren
Dele,derskalbrugestildettetrin:
1
Sliskedeektor
Fremgangsmåde
Figur6
10
g316999
 Loading...