

Toro 31598N, Groundsmaster 5900, Groundsmaster 5910, 31599N, 31599 Operator's Manual
...
FormNo.3391-812RevA
Groundsmaster
®
5900and5910
RotaryMower
ModelNo.31598N—SerialNo.315000001andUp
ModelNo.31599N—SerialNo.315000001andUp
Registeratwww.T oro.com.
OriginalInstructions(EN)
*3391-812*A
WARNING
CALIFORNIA
Proposition65Warning
Thisproductcontainsachemicalorchemicals
knowntotheStateofCaliforniatocausecancer,
birthdefects,orreproductiveharm.
Dieselengineexhaustandsomeofits
constituentsareknowntotheStateof
Californiatocausecancer,birthdefects,
andotherreproductiveharm.
Becauseinsomeareastherearelocal,state,orfederal
regulationsrequiringthatasparkarresterbeusedonthe
engineofthismachine,asparkarresterisincorporatedwith
themuferassembly.
GenuineT orosparkarrestersareapprovedbytheUSDA
ForestryService.
Important:Thisengineisequippedwithaspark
arrestermufer.ItisaviolationofCaliforniaPublic
ResourceCodeSection4442touseoroperatetheengine
onanyforest-covered,brush-covered,orgrass-covered
landwithoutasparkarrestermufermaintainedin
workingorder,ortheengineconstricted,equipped,and
maintainedforthepreventionofre.Otherstatesor
federalareasmayhavesimilarlaws.
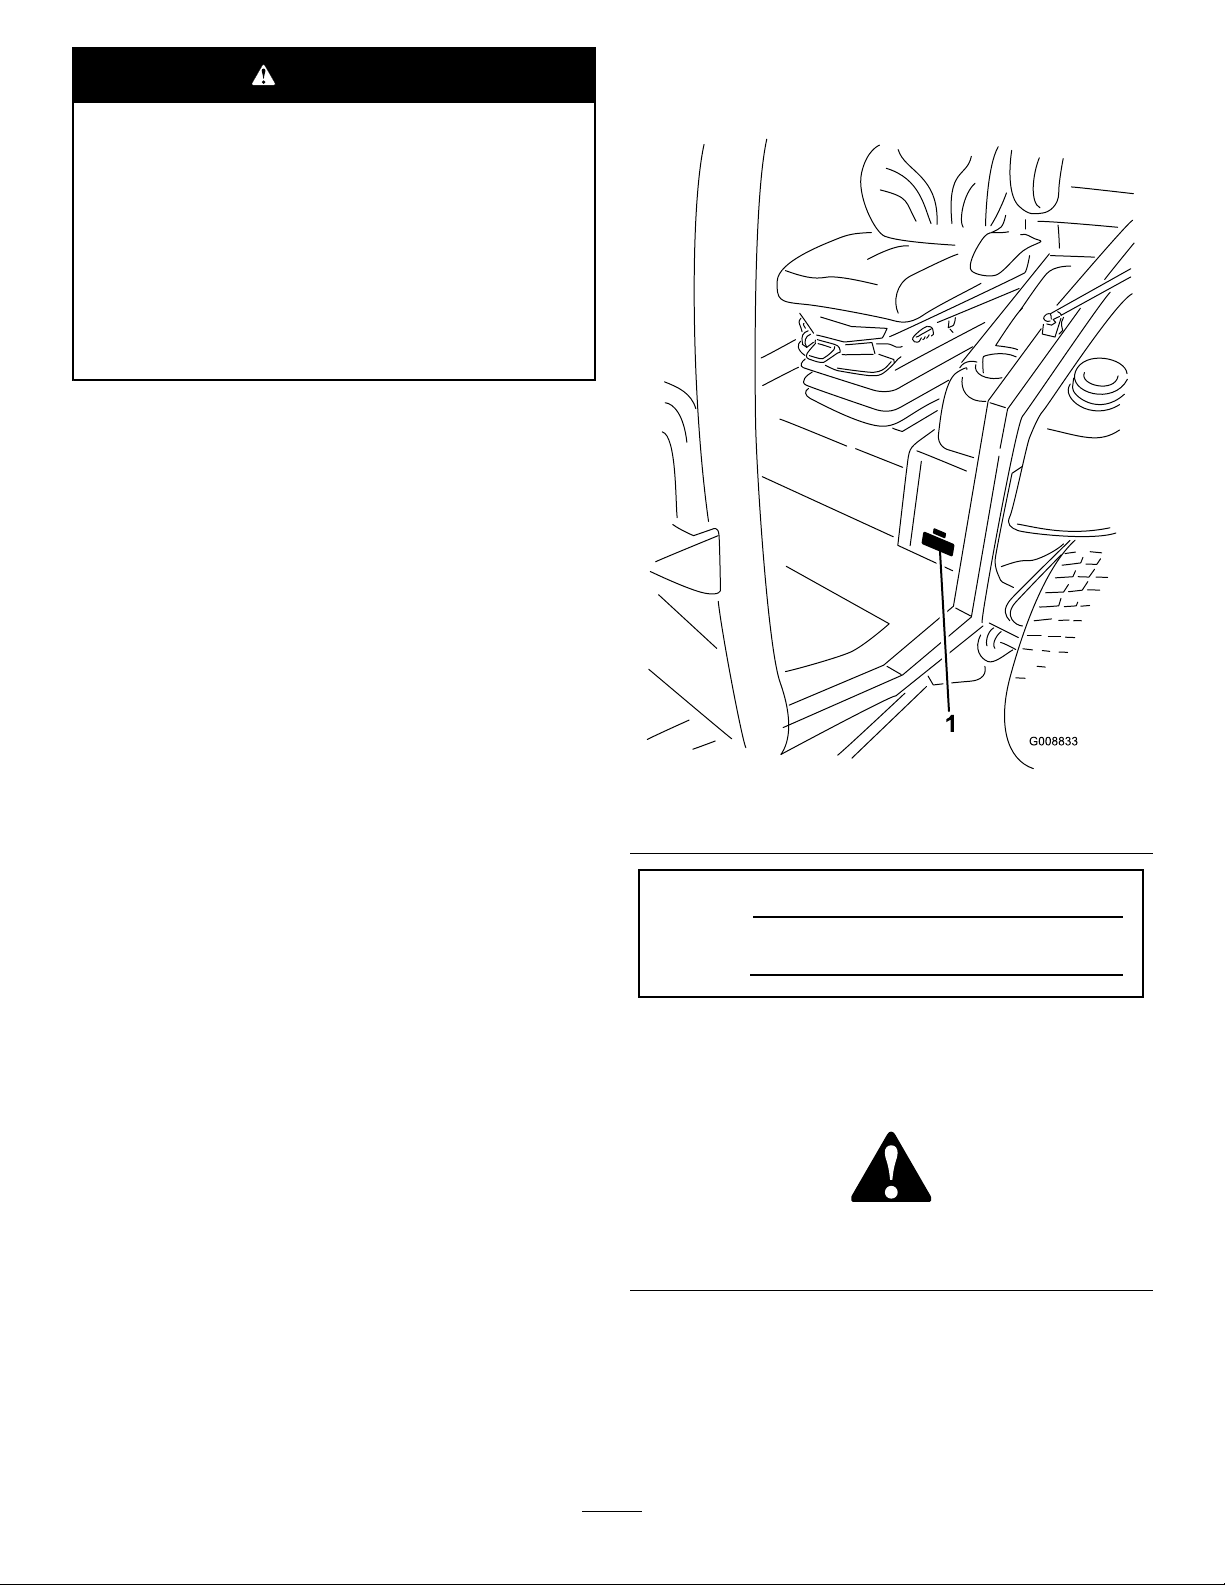
yourproductready.Figure1identiesthelocationofthe
modelandserialnumbersontheproduct.Writethenumbers
inthespaceprovided.
Figure1
Introduction
Thismachineisaride-on,rotary-bladelawnmowerintended
tobeusedbyprofessional,hiredoperatorsincommercial
applications.Itisprimarilydesignedforcuttinggrasson
well-maintainedlawnsinparks,golfcourses,sportselds,
andoncommercialgrounds.Itisnotdesignedforcutting
brush,mowinggrassandothergrowthalongsidehighways,
orforagriculturaluses.
Readthisinformationcarefullytolearnhowtooperateand
maintainyourproductproperlyandtoavoidinjuryand
productdamage.Youareresponsibleforoperatingthe
productproperlyandsafely.
YoumaycontactT orodirectlyatwww .Toro.comforproduct
safetyandoperationtrainingmaterials,accessoryinformation,
helpndingadealer,ortoregisteryourproduct.
YoumaycontactT orodirectlyatwww .Toro.comforproduct
andaccessoryinformation,helpndingadealer,ortoregister
yourproduct.
Wheneveryouneedservice,genuineT oroparts,oradditional
information,contactanAuthorizedServiceDealerorToro
CustomerServiceandhavethemodelandserialnumbersof
1.Modelandserialnumberlocation
ModelNo.
SerialNo.
Thismanualidentiespotentialhazardsandhassafety
messagesidentiedbythesafetyalertsymbol(Figure2),
whichsignalsahazardthatmaycauseseriousinjuryordeath
ifyoudonotfollowtherecommendedprecautions.
Figure2
1.Safetyalertsymbol
Thismanualuses2wordstohighlightinformation.
Importantcallsattentiontospecialmechanicalinformation
andNoteemphasizesgeneralinformationworthyofspecial
attention.
©2014—TheToro®Company
8111LyndaleAvenueSouth
Bloomington,MN55420
Contactusatwww.Toro.com.
2
PrintedintheUSA.
AllRightsReserved

Contents
Safety...........................................................................4
SafeOperatingPractices...........................................4
ToroMowerSafety..................................................6
SafetyandInstructionalDecals.................................7
Setup...........................................................................15
1RemoveSideDeckShippingStrapand
Brace................................................................15
2LoweringtheFrontDeckWinglets.........................15
3LevelingtheFrontCenterDeck.............................17
4LevelingtheWingletDeckstotheFrontCenter
Deck.................................................................17
5CheckingtheTirePressure....................................18
6CheckingtheFluidLevels.....................................18
7GreasingtheMachine...........................................18
ProductOverview.........................................................19
Controls...............................................................19
Specications........................................................26
Attachments/Accessories........................................26
Operation....................................................................27
CheckingtheEngineOilLevel.................................27
CheckingtheCoolingSystem...................................27
CheckingtheHydraulicSystem................................27
AddingFuel...........................................................27
CheckingtheTirePressure......................................28
CheckingtheTorqueofWheelLugNuts....................28
AdjustingtheHeight-of-Cut....................................28
AdjustingtheSkids.................................................31
AdjustingtheCuttingUnitAnti-ScalpRollers.............31
CheckingtheMismatchBetweenCutting
Units.................................................................32
AdjustingtheMirrors..............................................33
AimingtheHeadlights............................................33
StartingandStoppingtheEngine..............................33
CheckingtheInterlockSwitches...............................34
PushingorTowingtheMachine................................34
JackingPoints........................................................35
TieDowns............................................................35
OperatingCharacteristics........................................36
ReversingFanOperation.........................................36
OperatingTips......................................................37
Maintenance.................................................................38
RecommendedMaintenanceSchedule(s)......................38
ServiceIntervalChart.............................................39
PremaintenanceProcedures........................................39
InnerWingDeckCovers.........................................39
Lubrication...............................................................40
GreasingtheBearingsandBushings..........................40
EngineMaintenance..................................................43
AirCleanerMaintenance.........................................43
ServicingtheEngineOil..........................................44
AdjustingtheValveClearance..................................45
FuelSystemMaintenance...........................................45
ServicingtheFuelSystem........................................45
ServicingtheWaterSeparator..................................45
ReplacingtheFuelFilter..........................................46
ElectricalSystemMaintenance....................................47
Fuses....................................................................47
BatteryCare...........................................................48
JumpStarting/BatteryCharging..............................48
RecalibrateTractionPedal.......................................48
DriveSystemMaintenance.........................................49
AdjustingtheTractionPedalAngle...........................49
CheckingthePlanetaryDriveGear/Brake
Oil....................................................................49
ChangingthePlanetaryDriveGear/Brake
Oil....................................................................49
CheckingtheRearWheelToe-In..............................50
CoolingSystemMaintenance......................................51
CheckingtheCoolingSystem...................................51
ServicingtheEngineCoolingSystem........................52
BrakeMaintenance....................................................52
AdjustingtheServiceBrakes....................................52
BeltMaintenance......................................................53
ServicingtheAlternatorBelt....................................53
ServicingtheCompressorBelt.................................53
ReplacingtheBladeDriveBelts................................53
FrontCuttingUnit..................................................53
SideCuttingDecks.................................................54
HydraulicSystemMaintenance....................................55
CheckingtheHydraulicFluid...................................55
ChangingtheHydraulicFluidandFilters....................56
CheckingtheHydraulicLinesandHoses....................56
HydraulicSystemTestPorts.....................................57
MowerMaintenance...................................................57
Pivoting(Tilting)theFrontCuttingUnit
Upright.............................................................57
PivotingtheFrontCuttingUnitDown.......................58
AdjustingtheCuttingUnitPitch...............................58
ServicingtheCastorArmBushings...........................59
ServicingtheCastorWheelsandBearings..................59
BladeMaintenance.....................................................60
CheckingforaBentBlade........................................60
RemovingandInstallingtheCutterBlade(s)...............60
InspectingandSharpeningtheCutterBlade(s)............61
CorrectingtheCuttingUnitMismatch.......................62
MiscellaneousMaintenance.........................................62
ServicingtheSparkArrestorMufer.........................62
CleaningtheCabAirFilters(For31599N
Models).............................................................62
CleaningtheAirConditioningCoil...........................63
Storage........................................................................64
PreparingforSeasonalStorage.................................64
3

Safety
Thismachinehasbeendesignedinaccordancewith
ANSIB71.4-2012.
Improperuseormaintenancebytheoperatoror
ownercanresultininjury.Toreducethepotential
forinjury,complywiththesesafetyinstructionsand
alwayspayattentiontothesafetyalertsymbol,which
meansCaution,Warning,orDanger—personalsafety
instruction.Failuretocomplywiththeinstructionmay
resultinpersonalinjuryordeath.
•Thoroughlyinspecttheareawheretheequipmentisto
beusedandremoveallobjectswhichmaybethrownby
themachine.
•Replacefaultysilencers/mufers.
•Beforeusing,alwaysvisuallyinspecttoseethatthe
blades,bladebolts,andcuttingassemblyarenotworn
ordamaged.Replacewornordamagedbladesandbolts
insetstopreservebalance.
•Evaluatetheterraintodeterminewhataccessoriesand
attachmentsareneededtoproperlyandsafelyperform
thejob.Onlyuseaccessoriesandattachmentsapproved
bythemanufacturer.
SafeOperatingPractices
Training
•ReadtheOperator'sManualandothertrainingmaterial
carefully.Befamiliarwiththecontrols,safetysigns,and
theproperuseoftheequipment.
•Neverallowchildrenorpeopleunfamiliarwiththese
instructionstousethemower.Localregulationsmay
restricttheageoftheoperator.
•Nevermowwhilepeople,especiallychildren,orpetsare
nearby.
•Keepinmindthattheoperatororuserisresponsiblefor
accidentsorhazardsoccurringtohimselforherself,other
people,orproperty.
•Donotcarrypassengers.
•Alldriversandmechanicsshouldseekandobtain
professionalandpracticalinstruction.Theowneris
responsiblefortrainingtheusers.Suchinstructionshould
emphasize:
–theneedforcareandconcentrationwhenworking
withride-onmachines;
–controlofaride-onmachineslidingonaslopewill
notberegainedbytheapplicationofthebrake.The
mainreasonsforlossofcontrolare:
◊insufcientwheelgrip;
◊beingdriventoofast;
◊inadequatebraking;
◊thetypeofmachineisunsuitableforitstask;
◊lackofawarenessoftheeffectofground
conditions,especiallyslopes;
◊incorrecthitchingandloaddistribution.
•Checkthatoperatorspresencecontrols,safetyswitches,
andshieldsareattachedandfunctioningproperly.Donot
operateunlesstheyarefunctioningproperly.
SafeHandlingofFuels
•Toavoidpersonalinjuryorpropertydamage,use
extremecareinhandlinggasoline.Gasolineisextremely
ammableandthevaporsareexplosive.
•Extinguishallcigarettes,cigars,pipes,andothersources
ofignition.
•Useonlyanapprovedfuelcontainer.
•Neverremovefuelcaporaddfuelwiththeengine
running.
•Allowenginetocoolbeforerefueling.
•Neverrefuelthemachineindoors.
•Neverstorethemachineorfuelcontainerwherethereis
anopename,spark,orpilotlightsuchasonawater
heateroronotherappliances.
•Neverllcontainersinsideavehicleoronatruckor
trailerbedwithaplasticliner.Alwaysplacecontainerson
thegroundawayfromyourvehiclebeforelling.
•Removeequipmentfromthetruckortrailerandrefuelit
ontheground.Ifthisisnotpossible,thenrefuelsuch
equipmentwithaportablecontainer,ratherthanfroma
fueldispensernozzle.
•Keepthenozzleincontactwiththerimofthefueltank
orcontaineropeningatalltimesuntilfuelingiscomplete.
Donotuseanozzlelockopendevice.
•Iffuelisspilledonclothing,changeclothingimmediately.
•Neveroverllfueltank.Replacefuelcapandtighten
securely.
Preparation
•Whilemowing,alwayswearsubstantialfootwear,long
trousers,hardhat,safetyglasses,andearprotection.Long
hair,looseclothingorjewelrymaygettangledinmoving
parts.Donotoperatetheequipmentwhenbarefootor
wearingopensandals.
Operation
•Donotoperatetheengineinaconnedspacewhere
dangerouscarbonmonoxidefumescancollect.
•Mowonlyindaylightoringoodarticiallight.
•Beforeattemptingtostarttheengine,disengagethePTO,
shiftintoneutral,andengagetheparkingbrake.Only
4

starttheenginefromtheoperatorsposition.Useseat
belts,ifprovided.
•Rememberthereisnosuchthingasasafeslope.Travel
ongrassslopesrequiresparticularcare.Toguardagainst
overturning:
–Donotstoporstartsuddenlywhengoingupor
downhill.
–Themachinespeedshouldbekeptlowonslopesand
duringtightturns.
–Stayalertforhumpsandhollowsandotherhidden
hazards.
–Nevermowacrossthefaceoftheslope,unlessthe
machineisdesignedforthatpurpose.
•Stayalertforholesintheterrainandotherhiddenhazards.
•Usecarewhenusingheavyequipment.
–Donotturnsharply.Usecarewhenreversing.
–Usecounterweight(s)orwheelweightswhen
suggestedintheOperator'sManual.
•Watchoutfortrafcwhencrossingornearroadways.
•Stopthebladesfromrotatingbeforecrossingsurfaces
otherthangrass.
•Whenusinganyattachments,neverdirectdischargeof
materialtowardbystandersnorallowanyonenearthe
machinewhileinoperation.
•Neveroperatethemachinewithdamagedguards,shields,
orwithoutsafetyprotectivedevicesinplace.Besureall
interlocksareattached,adjustedproperly ,andfunctioning
properly.
•Donotchangetheenginegovernorsettingsoroverspeed
theengine.Operatingtheengineatexcessivespeedmay
increasethehazardofpersonalinjury.
•Beforeleavingtheoperatorsposition:
–Stoponlevelground.
–Disengagethepowertake-offandlowerthe
attachments.
–Changeintoneutralandsettheparkingbrake.
–Stoptheengineandremovethekey.
•Disengagedrivetoattachments,stoptheengineand
removetheignitionkey:
–beforeclearingblockages;
–beforechecking,cleaning,orworkingonthemachine;
–afterstrikingaforeignobject.Inspectthemachine
fordamageandmakerepairsbeforerestartingand
operatingtheequipment.Torqueallthespindlepulley
nutsto176to203N-m(130to150ft-lb)andallthe
bladeboltsto115to149N-m(85to110ft-lb),
–ifthemachinestartstovibrateabnormally(check
immediately).
•Disengagedrivetoattachmentswhentransportingornot
isuse.
•Stoptheengineanddisengagedrivetoattachment:
–beforerefuelling;
–beforemakingheightadjustmentunlessadjustment
canbemadefromtheoperatorsposition.
•Reducethethrottlesettingbeforestoppingengineand,if
theengineisprovidedwithafuelshut-offvalve,turnthe
fueloffattheconclusionofmowing.
•Neverraisedeckwiththebladesrunning.
•Keephandsandfeetawayfromthecuttingunits.
•Lookbehindanddownbeforebackinguptobesureof
aclearpath.
•Slowdownandusecautionwhenmakingturnsand
crossingroadsandsidewalks.
•Donotoperatethemowerundertheinuenceofalcohol
ordrugs.
•Lightningcancausesevereinjuryordeath.Iflightning
isseenorthunderisheardinthearea,donotoperate
themachine;seekshelter.
•Usecarewhenloadingorunloadingthemachineintoa
trailerortruck.
•Theoperatorshallturnonashingwarninglights
whenevertravelingonapublicroad,exceptwheresuch
useisprohibitedbylaw.
MaintenanceandStorage
•Keepallnuts,bolts,andscrewstighttobesurethe
equipmentisinsafeworkingcondition.
•Neverstoretheequipmentwithfuelinthetankinsidea
buildingwherefumesmayreachanopenameorspark.
•Allowtheenginetocoolbeforestoringinanyenclosure
anddonotstorenearame.
•Toreducetherehazard,keeptheenginecompartment,
silencer/mufer,batterycompartment,cuttingunits,
drives,andfuelstorageareafreeofgrass,leaves,or
excessivegrease.Cleanupoilorfuelspillage.
•Replacewornordamagedpartsforsafety.
•Ifthefueltankhastobedrained,dothisoutdoors.
•Onmulti-bladedmachines,takecareasrotatingoneblade
cancauseotherbladestorotate.
•Whenmachineistobeparked,stored,orleftunattended,
lowerthecuttingunitsunlessapositivemechanicallock
isprovided.
•Disengagedrives,lowerthecuttingunits,movetraction
pedaltoNeutral,setparkingbrake,movethethrottle
switchtothelowidleposition,stopengineandremove
ignitionkey.Waitforallmovementtostopbefore
adjusting,cleaningorrepairing.
•Shutofffuelwhilestoringortransporting.Donotstore
fuelnearames.
•Parkmachineonlevelground.Neverallowuntrained
personneltoservicemachine.
•Usejackstandstosupportcomponentswhenrequired.
•Carefullyreleasepressurefromcomponentswithstored
energy.
5

•Disconnectbatterybeforemakinganyrepairs.Disconnect
thenegativeterminalrstandthepositivelast.Reconnect
positiverstandnegativelast.
•Usecarewhencheckingblades.Wrapthebladesor
weargloves,andusecautionwhenservicingthem.Only
replaceblades.Neverstraightenorweldthem.
•Keephandsandfeetawayfrommovingparts.Ifpossible,
donotmakeadjustmentswiththeenginerunning.
•Chargebatteriesinanopenwellventilatedarea,away
fromsparkandames.Unplugchargerbeforeconnecting
ordisconnectingfrombattery.W earprotectiveclothing
anduseinsulatedtools.
•Makesureallhydrauliclineconnectorsaretightandall
hydraulichosesandlinesareingoodconditionbefore
applyingpressuretothesystem.
•Keepyourbodyandhandsawayfrompinholeleaksor
nozzlesthatejecthydraulicuidunderhighpressure.
Usepaperorcardboard,notyourhands,tosearchfor
leaks.Hydraulicuidescapingunderpressurecanhave
sufcientforcetopenetratetheskinandcauseserious
injury.Ifuidisinjectedintotheskinitmustbesurgically
removedwithinafewhoursbyadoctorfamiliarwiththis
formofinjuryorgangrenemayresult.
Hauling
•Usecarewhenloadingorunloadingthemachineintoa
trailerortruck.
•Usefullwidthrampsforloadingmachineintotraileror
truck.
•Tiethemachinedownsecurelyusingstraps,chains,cable,
orropes.Bothfrontandrearstrapsshouldbedirected
downandoutwardfromthemachine
ToroMowerSafety
ThefollowinglistcontainssafetyinformationspecictoToro
productsorothersafetyinformationthatyoumustknowthat
isnotincludedintheCEN,ISO,orANSIstandards.
Thisproductiscapableofamputatinghandsandfeetand
throwingobjects.Alwaysfollowallsafetyinstructionsto
avoidseriousinjuryordeath.
Useofthisproductforpurposesotherthanitsintendeduse
couldprovedangeroustouserandbystanders.
Operation
•Beforeoperatingthemachinebecertainthattheseat
beltsareattached.
•Knowhowtostopthemachineandenginequickly .
•Donotoperatethemachinewhilewearingtennisshoes
orsneakers.
•Wearingsafetyshoesandlongpantsisadvisableand
requiredbysomelocalordinancesandinsurance
regulations.
•Keephands,feet,andclothingawayfrommovingparts
andthemowerdischargeareaandundersideofthe
mowerwhiletheengineisrunning.
•Fillfueltankuntillevelis25mm(1inch)belowthe
bottomofthellerneck.Donotoverll.
•Checkthesafetyinterlockswitchesdailyforproper
operation.Ifaswitchshouldfail,replacetheswitch
beforeoperatingthemachine.
•Checkcarefullyforoverheadclearances(i.e.branches,
doorways,electricalwires)beforedrivingunderany
objectsanddonotcontactthem.
•Donotmowinreverseunlessabsolutelynecessary.
•Reducespeedwhenmakingsharpturns.
•Avoidstartingorstoppingonaslope.Iftireslosetraction,
disengagethebladesandproceedslowlystraightdown
theslope.Avoidraisingthesidecuttingunitsonaslope.
•Avoidturningonslopes.Ifyoumustturn,turnslowly
andgraduallydownhill,ifpossible.
•NeverremovetheROPSfromthemachine.
•Alwaysweartheseatbeltwhenoperatingthemachine.
•Becertainthattheseatbeltcanbereleasedquicklyifthe
machineisdrivenorrollsintoapondorwater.
•Watchfortrafcwhennearorcrossingroads.Always
yieldtheright-of-way.
•Donotmowneardrop-offs,ditches,orembankments.
Themachinecouldsuddenlyturnoverifawheelgoes
overtheedgeofaclifforditchorifanedgegivesway .
•Donotmowonwetgrass.Reducedtractioncouldcause
sliding.
•Machineshouldnotbeusedasatowvehicle.
•Useextracarewithotherattachments.Thesecanchange
thestabilityofthemachine.
•Turnoffthebladeswhennotmowing.
•Foroperatingenvironmentsexceeding43degreesC(110
degreesF),consultToroforspecialmachineneeds.
•Donotoperatetheenginebelow1350rpm.
MaintenanceandStorage
•Donottouchequipmentorattachmentpartswhichmay
behotfromoperation.Allowtocoolbeforeattempting
tomaintain,adjust,orservice.
•Neverstorethemachineorfuelcontainerinsidewhere
thereisanopename,suchasnearawaterheateror
furnace.
•Keepnutsandboltstight,especiallythebladeattachment
bolts.Keepequipmentingoodcondition.
•Iftheenginemustberunningtoperformamaintenance
adjustment,keephands,feet,clothing,andanypartsof
thebodyawayfromthecuttingunits,attachments,and
anymovingparts.Keepeveryoneaway.
6
•Checkbrakeoperationfrequently.Adjustandserviceas
required.
•Batteryacidispoisonousandcancauseburns.Avoid
contactwithskin,eyes,andclothing.Protectyourface,
eyes,andclothingwhenworkingwithabattery.
•Batterygasescanexplode.Keepcigarettes,sparks,and
amesawayfromthebattery.
•DonotusehighpressurewaternearInfoCenter.
SafetyandInstructionalDecals
Safetydecalsandinstructionsareeasilyvisibletotheoperatorandarelocatednearanyareaofpotential
danger.Replaceanydecalthatisdamagedorlost.
•Theenginemustbeshutoffbeforecheckingtheoilor
addingoiltothecrankcase.
•Ifmajorrepairsareeverneededorifassistanceisdesired,
contactanAuthorizedToroDistributor.
•Tomakesureofoptimumperformanceandcontinued
safetycerticationofthemachine,useonlygenuineToro
replacementpartsandaccessories.Replacementparts
andaccessoriesmadebyothermanufacturerscouldbe
dangerous,andsuchusecouldvoidtheproductwarranty.
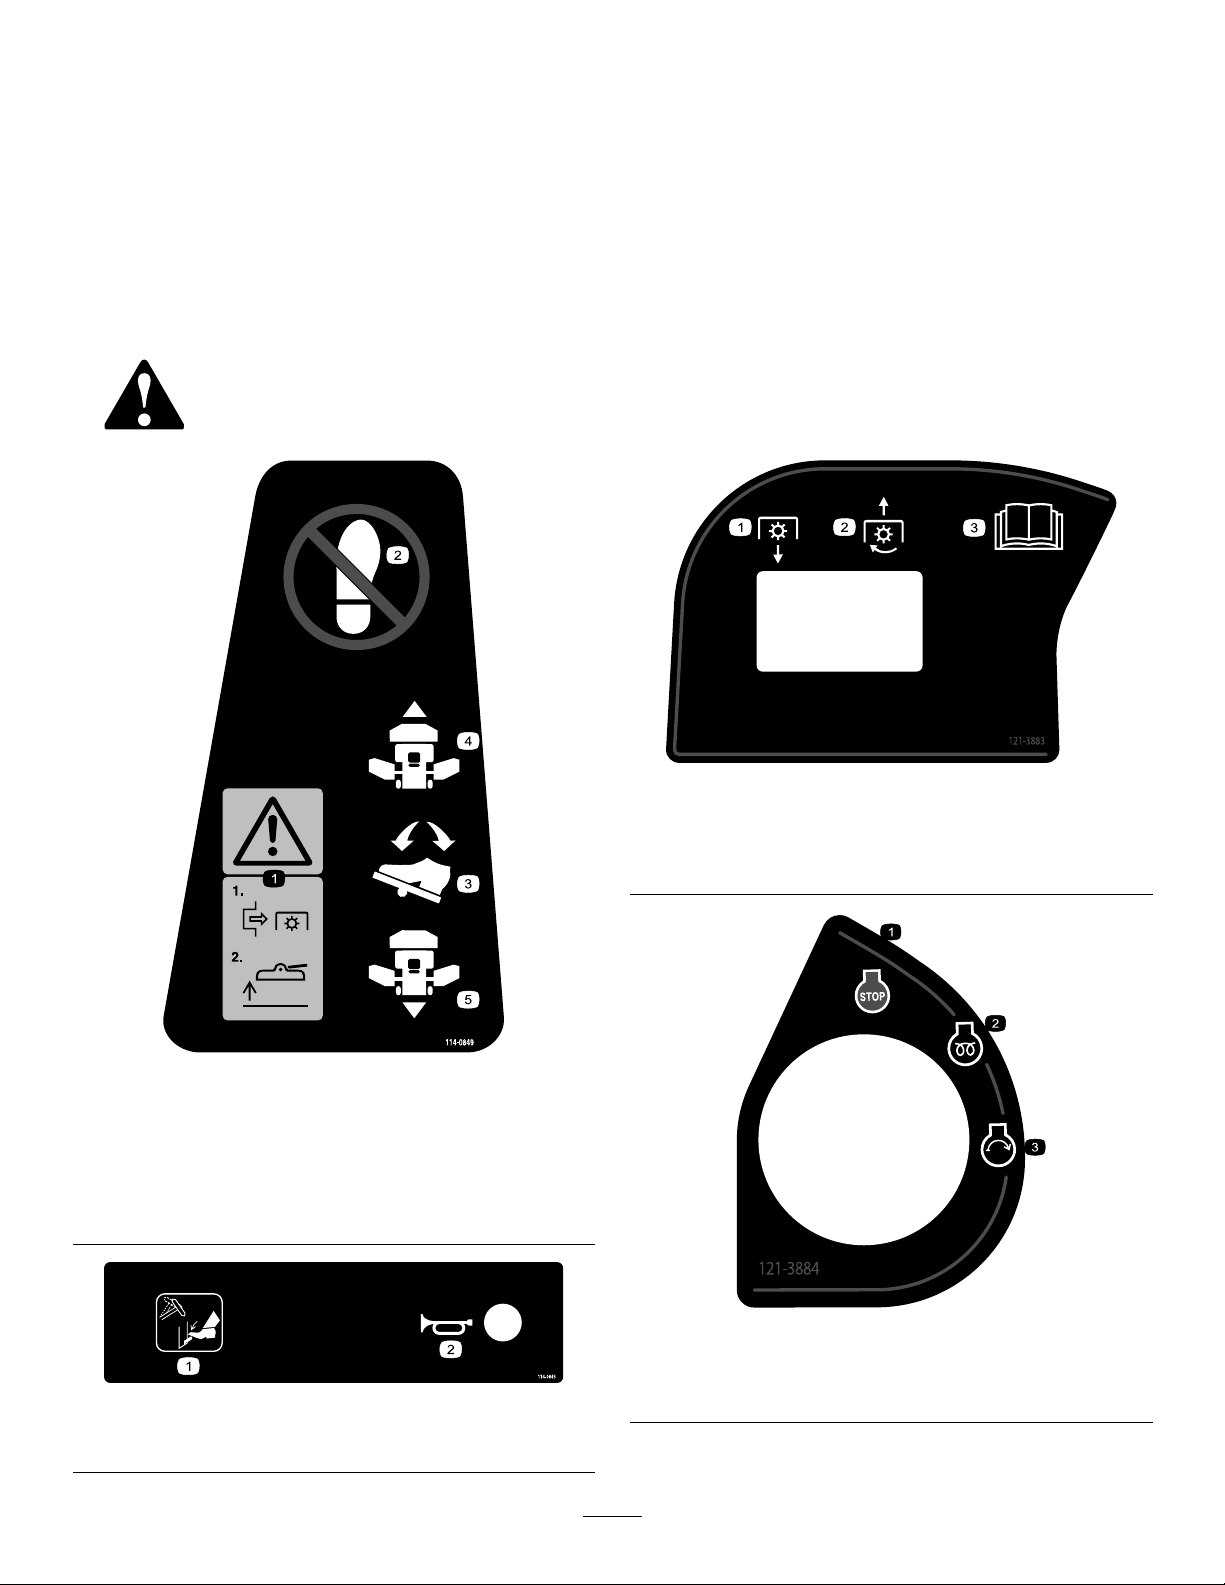
114-0849
1.Warning—disengagethePTOthenraisethedeck.
2.Nostep
3.Tractioncontrolpedal
4.Forward
5.Reverse
121–3883
1.DisengagethePTO3.ReadtheOperator’s
Manual
2.EngagethePTO
121–3884
114-0845
1.Tiltsteeringlever2.Horn
1.Engine—stop3.Engine—start
2.Engine—preheat
7
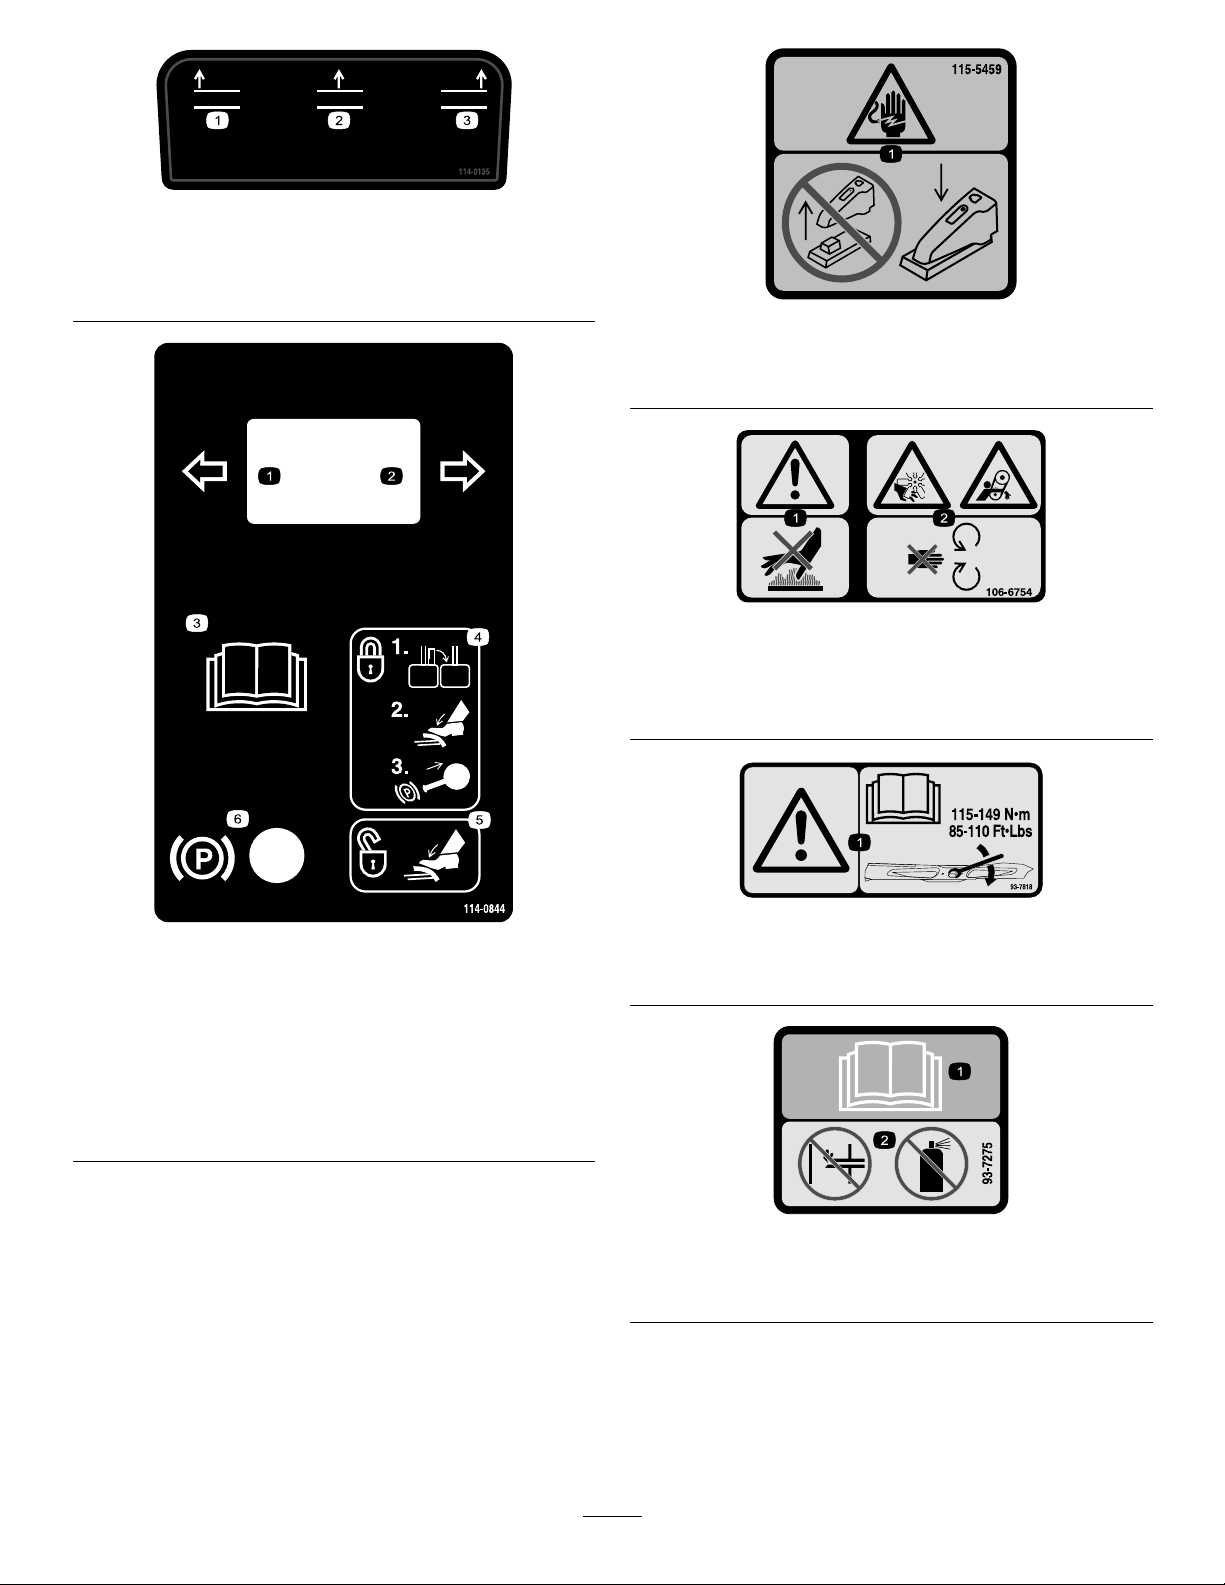
114-0135
1.Raisecuttingunits—left
2.Raisecutting
units—center
3.Raisecuttingunits—right
115-5459
1.Electricshockhazard—donotremovecover;keepcoverin
place.
106-6754
1.Warning—donottouchthehotsurface.
2.Cutting/dismembermenthazard,fanandentanglement
hazard,belt—stayawayfrommovingparts.
114-0844
1.Lefthandturnsignal
2.Righthandturnsignal5.Tounlocktheparking
3.ReadtheOperators
Manual.
4.Tolockthebrakes,close
latch,pressthebrake
pedalandpulluponthe
parkingbrakeknob.
brake,pressthebrake.
6.Parkingbrake
93-7818
1.Warning—readtheOperator'sManualforinstructionson
torquingthebladebolt/nutto115-149N-m(85-110ft-lb).
93–7275
1.ReadtheOperator’sManual—donotusestartinguidto
starttheengine.
8
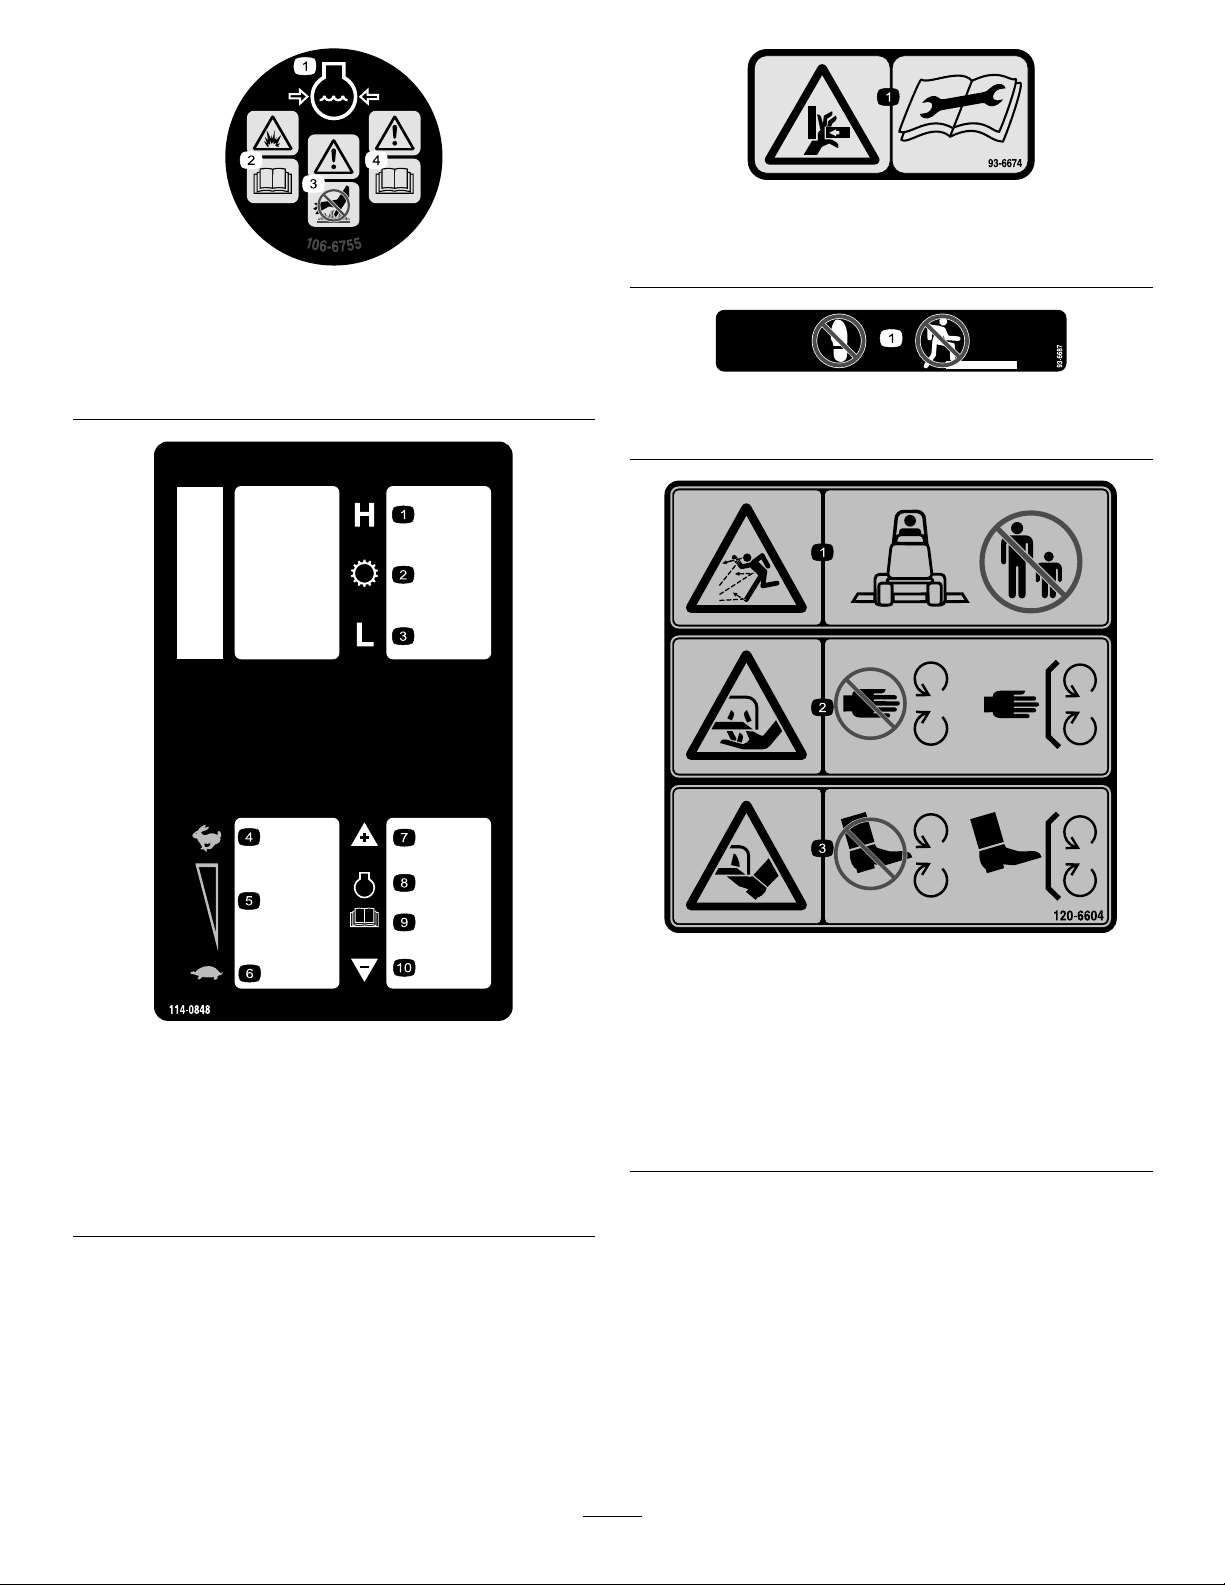
93-6674
1.Crushinghazard,hand—readtheinstructionsbefore
servicingorperformingmaintenance.
106-6755
1.Enginecoolantunder
pressure.
2.Explosionhazard—read
theOperator'sManual.
3.Warning—donottouchthe
hotsurface.
4.Warning—readthe
Operator'sManual.
93-6687
1.Donotstephere.
114-0848
1.Highrange6.Lowidle
2.Transmission7.Increaseenginespeed
3.Lowrange8.Engine
4.Highidle
5.Mididle10.Decreaseenginespeed
9.ReadtheOperator’s
Manual.
120-6604
1.Thrownobjecthazard—keepbystandersawayfromthe
machine.
2.Cutting/dismembermenthazardofhand,mower
blade—stayawayfrommovingparts,keepallguardsand
shieldsinplace.
3.Cutting/dismembermenthazardoffoot,mowerblade—stay
awayfrommovingparts,keepallguardsandshieldsin
place.
9
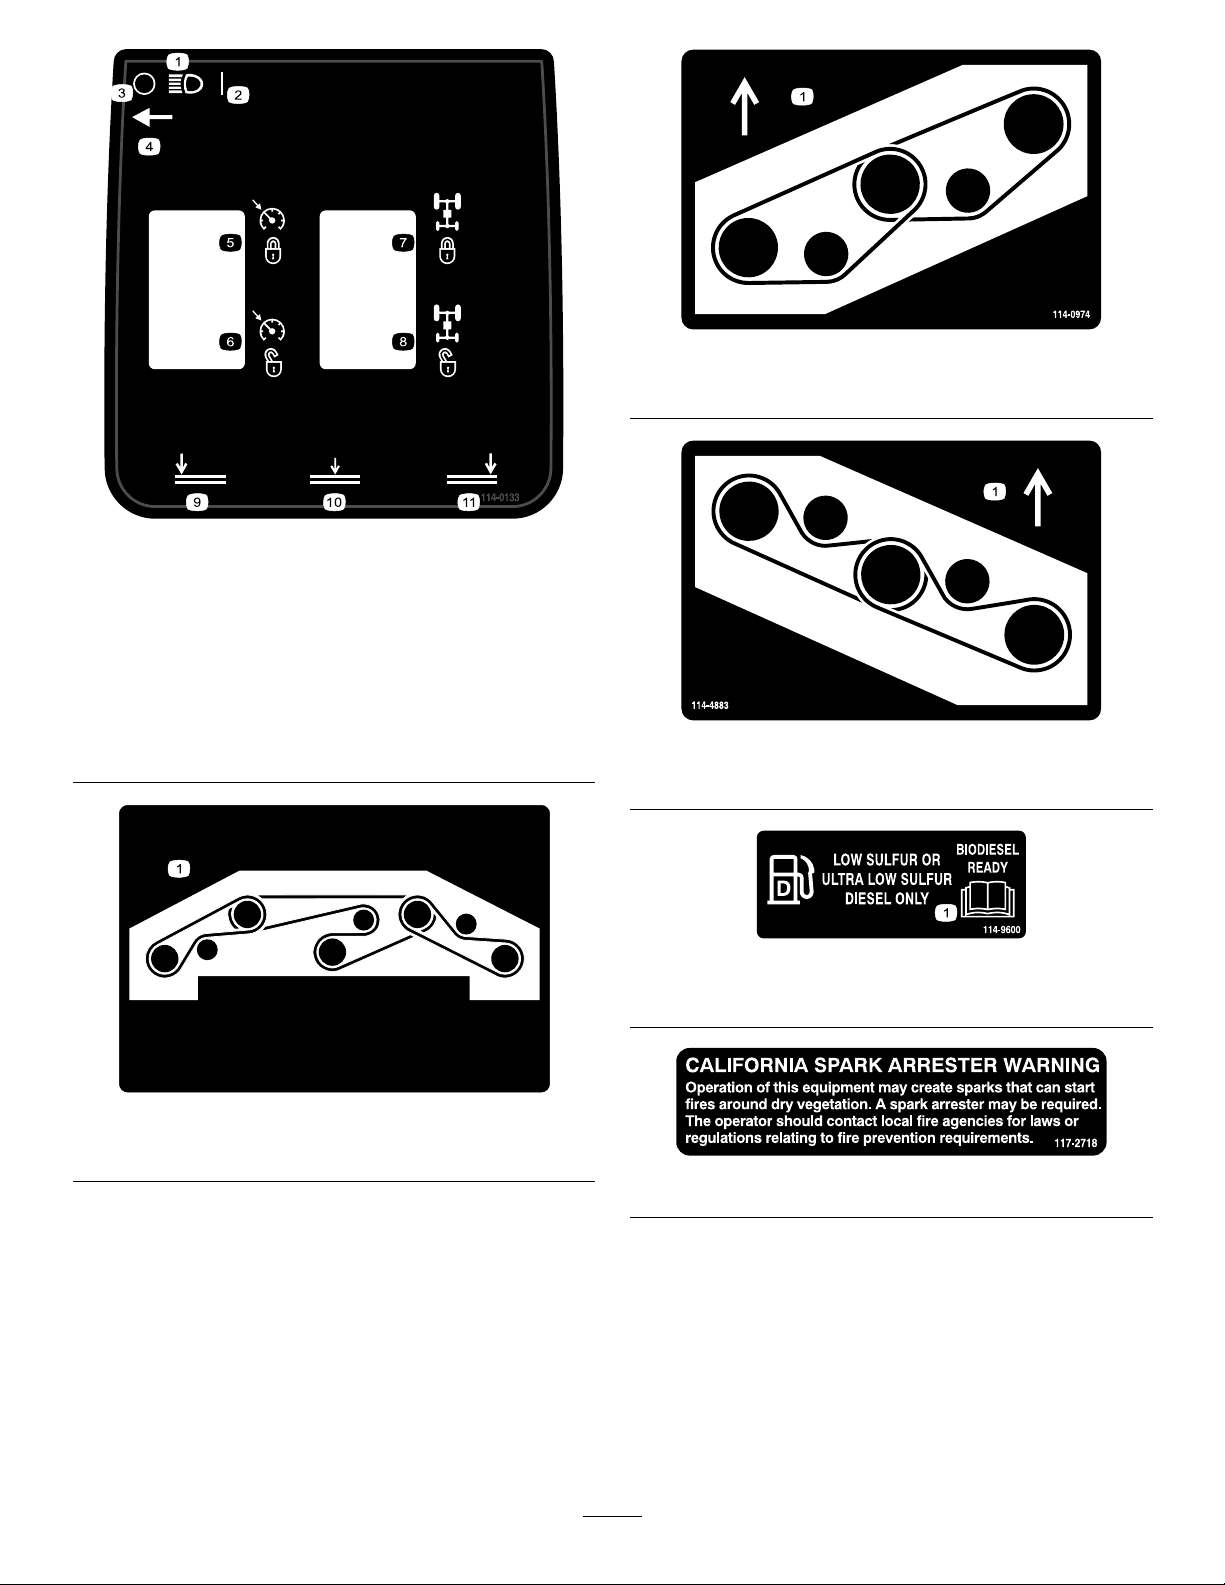
114-0133
114-0922
1.Headlights7.Tractionassist—engage
2.On
3.Off9.Lowercuttingunits—left
4.Headlightswitchlocation10.Lowercutting
5.Cruisecontrol—engage
6.Cruisecontrol—disengage
8.Traction
assist—disengage
units—center
11.Lowercuttingunits—right
114-0974
1.Beltrouting
114-4883
1.Beltrouting
114-9600
1.ReadtheOperator'sManual.
114-0922
1.Beltrouting
117–2718
10
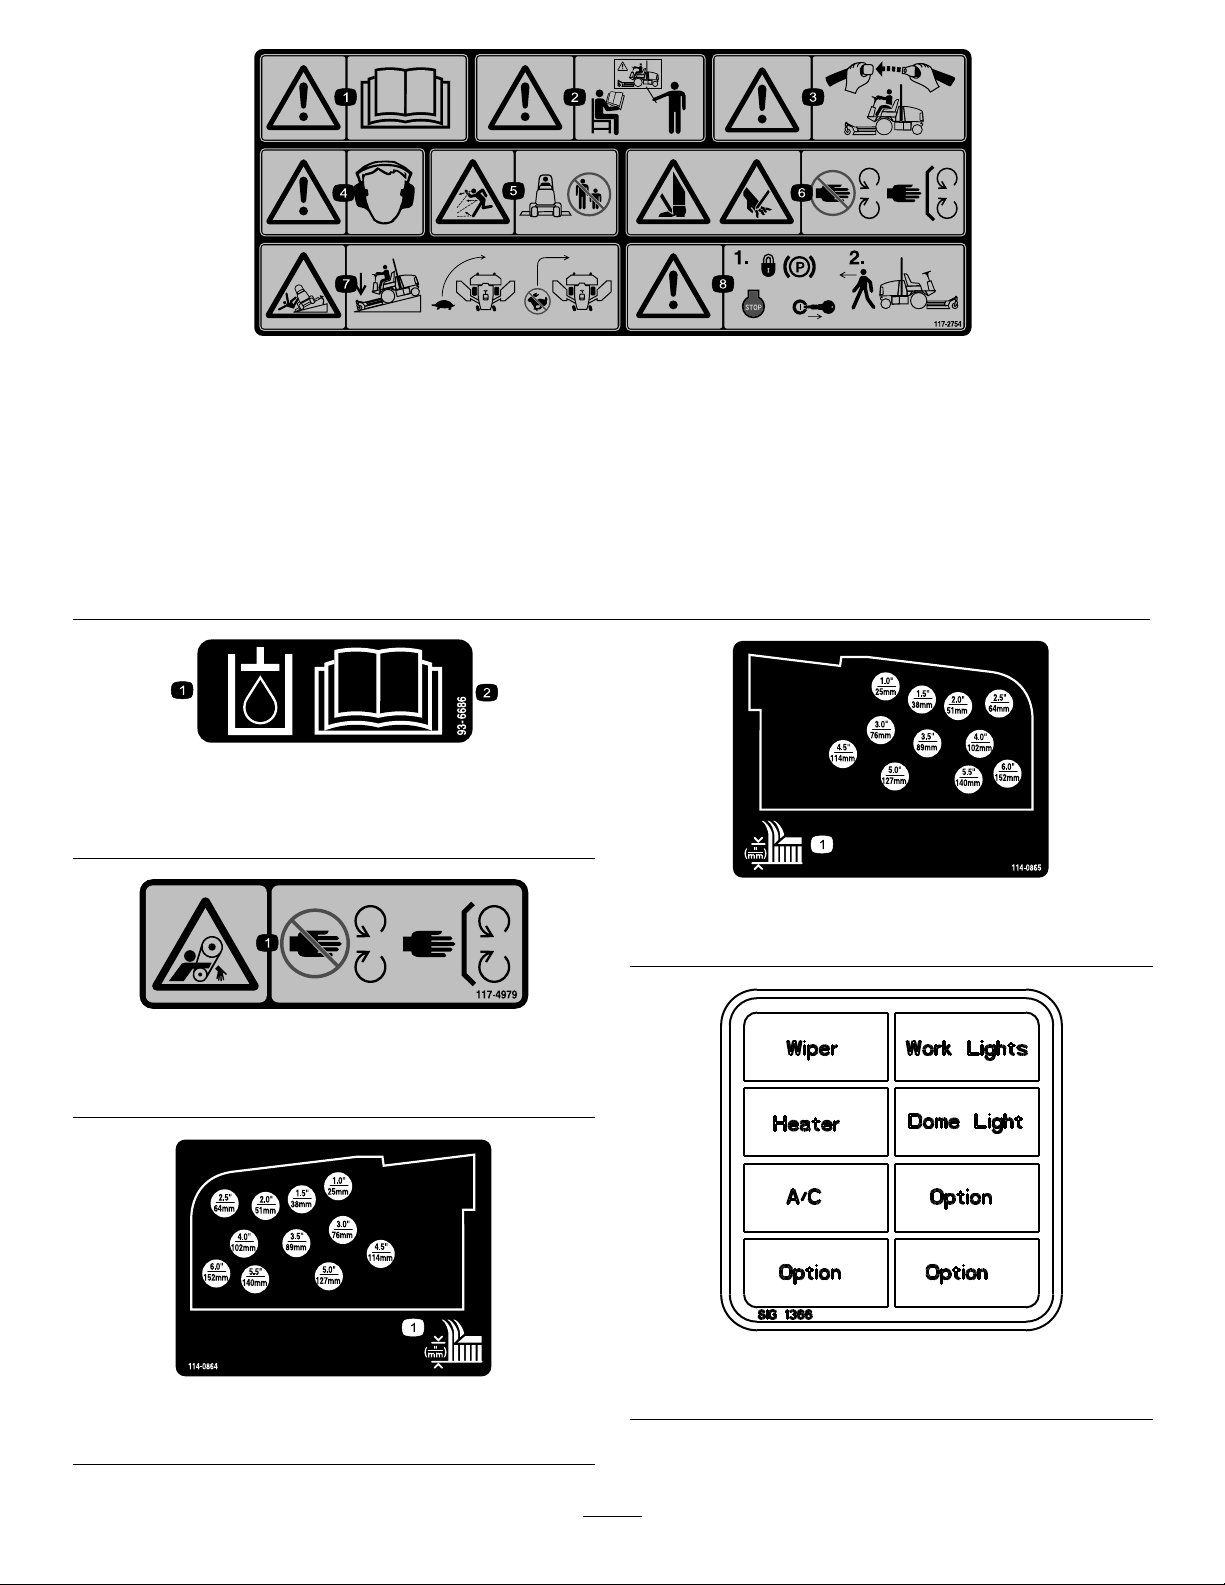
117–2754
1.Warning—readtheOperator'sManual.
2.Warning—donotoperatethismachineunlessyouaretrained.
3.Warning—weartheseatbeltwhenseatedintheoperator'sposition.
4.Warning—wearhearingprotection.
5.Thrownobjecthazard—keepbystandersasafedistancefromthemachine.
6.Cuttinghazardofhandorfoot—stayawayfrommovingparts;keepallguardsinplace.
7.Tippinghazard—lowerthecuttingunitwhendrivingdownslopes;slowmachinebeforeturning,donotturnathighspeeds
8.Warning—locktheparkingbrake,stoptheengineandremovetheignitionkeybeforeleavingthemachine.
93-6686
1.Hydraulicoil
2.ReadtheOperator'sManual.
114-0865
1.Heightofcutadjustment
117–4979
1.Entanglementhazard,belt—stayawayfrommovingparts,
keepallguardsandshieldsinplace.
114-0864
1.Heightofcutadjustment
115-5509
(Model31599Nonly)
11

115-5489
(Model31599Nonly)
1.Warning—whenthecabwindowsareopenwearhearing
protection.
2.Closetherearwindowbeforeattemptingtoopenthehood.
BatterySymbols
Someorallofthesesymbolsareonyourbattery
1.Explosionhazard
2.Nore,opename,or
smoking.
3.Causticliquid/chemical
burnhazard
4.Weareyeprotection9.Flusheyesimmediately
5.ReadtheOperator's
Manual.
6.Keepbystandersasafe
7.Weareyeprotection;
8.Batteryacidcancause
10.Containslead;donot
distancefromthebattery.
explosivegasescan
causeblindnessandother
injuries
blindnessorsevereburns.
withwaterandgetmedical
helpfast.
discard.
114-0975
1.Height-of-cut
12
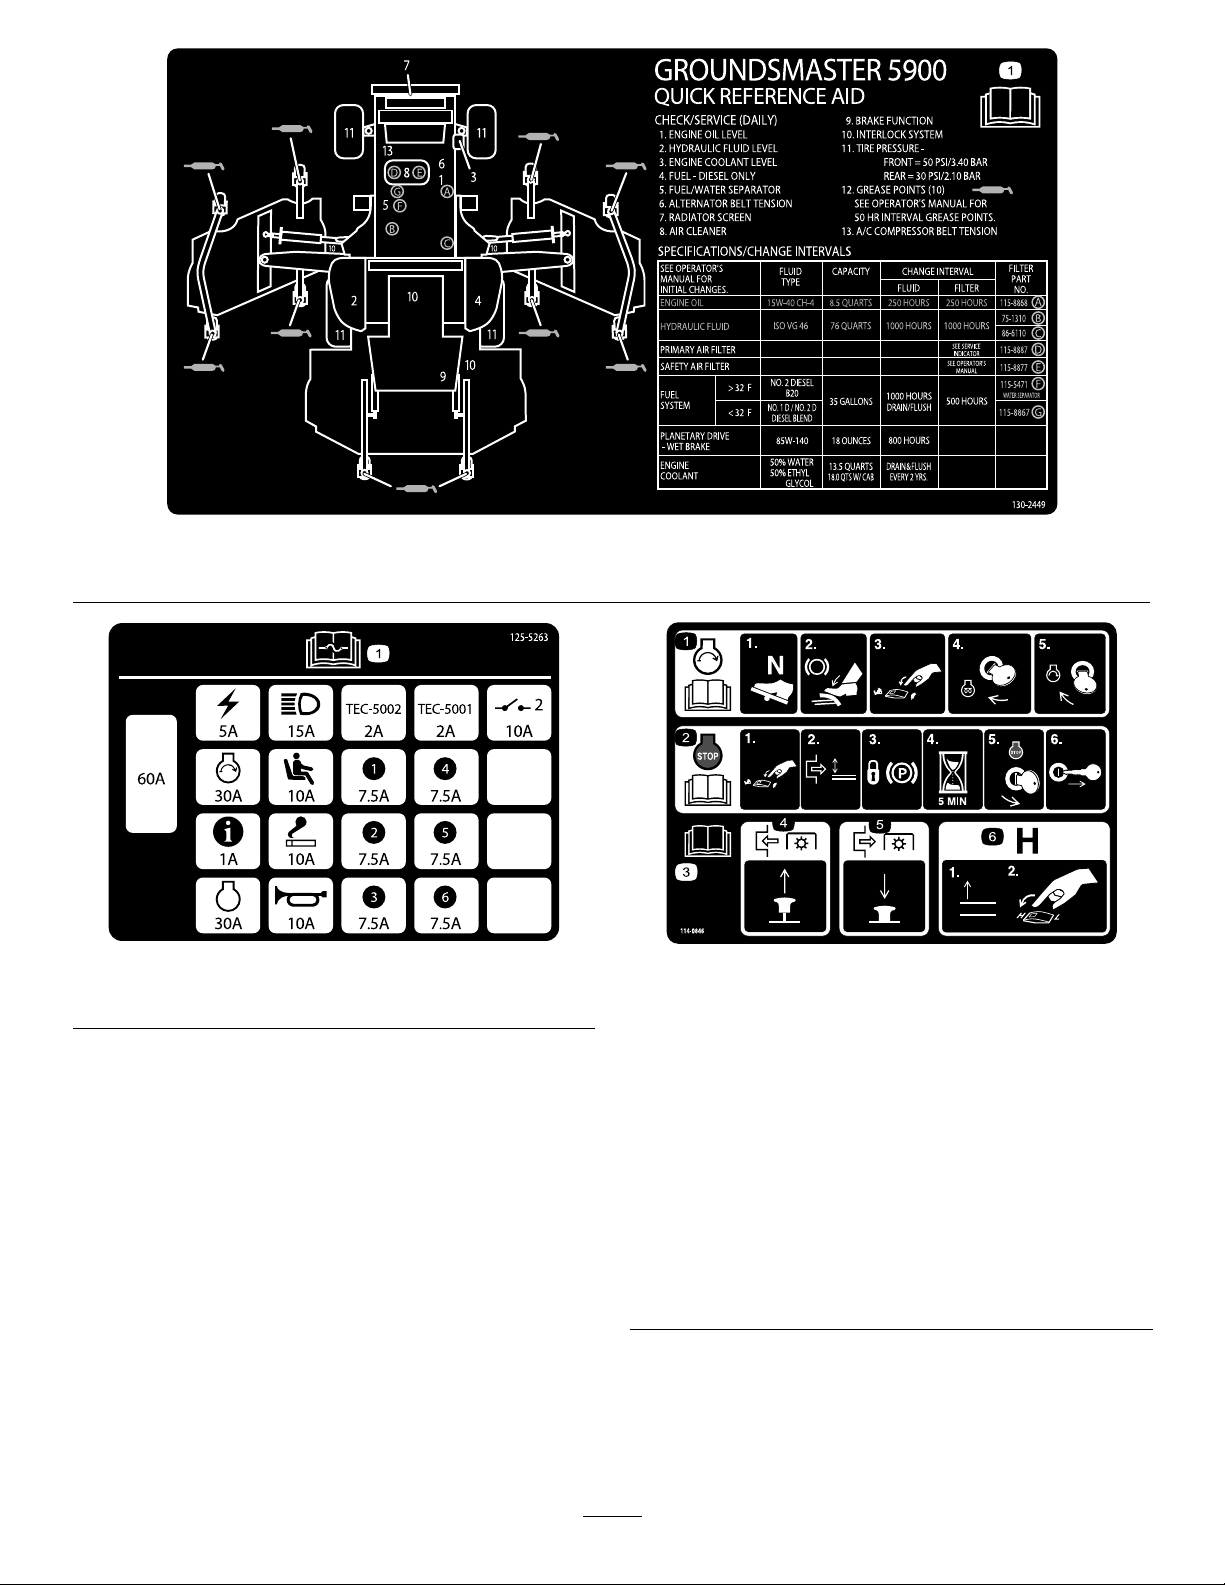
1.ReadtheOperator’sManualforinformationonmaintenance.
130–2449
125–5263
1.ReadtheOperator’sManualforinformationonfuses.
114-0846
1.ReadtheOperatorsManual;tostarttheengine,movethe
tractionpedaltoNeutral,applythebrake,movethethrottle
switchtolow,turntheignitionkeytoPreheat.Whenthe
WaittoStartAdvisoryclearsontheInfoCenterthenturn
theignitionkeytoStart.
2.ReadtheOperatorsManual;tostoptheengine,movethe
throttlelevertoslow,disengagethePTO,settheparking
brake,wait5minutes,turntheignitionkeytoStop,and
removethekey;readtheOperatorsManual.
3.ReadtheOperatorsManual.
4.ToengagethePTO,pulluponthePTOswitch.
5.TodisengagethePTO,pushdownonthePTOswitch.
6.Toswitchthetransmissiontohighspeed,fullyraisethe
attachmentsandswitchthespeedcontroltoHigh.
13

130-0458
1.ReadtheOperator's
Manualformore
informationonfuses
2.Electricalpower
accessory—15A
3.Domelight—15A7.Fan—15A
4.Windshieldwiper
uid—15A
5.Headlights—25A
6.CondenserfanandA/C
clutch—30A
8.Worklight—15A
14

Setup
LooseParts
Usethechartbelowtoverifythatallpartshavebeenshipped.
ProcedureDescription
1
2
3
4
5
6
7
MediaandAdditionalParts
Description
Operator'sManual
EngineOperator'sManual
OperatorTrainingMaterial
PartsCatalog
Nopartsrequired
DeckcoverR.H.1
DeckcoverL.H.1
V-Belt2
Nopartsrequired
Nopartsrequired
Nopartsrequired
Nopartsrequired
Nopartsrequired
Qty.
1
1
1
1
Providetheoperatorwithinformationontheuseand
maintenanceofthemachine
Orderingparts
Qty.
Use
–
–
–
–
–
–
Removethesidedeckstrapsandbrace
Lowerthefrontdeckwinglets
Levelthefrontcenterdeck
Levelthewingletdeckstothefront
centerdeck
Checkthetirepressure
Checktheuidlevels
Greasethemachine.
Use
DeclarationofConformity
Note:Determinetheleftandrightsidesofthemachine
fromthenormaloperatingposition.
Note:Somepartsmayhavealreadybeeninstalledatthe
factory.
1
RemoveSideDeckShipping StrapandBrace
NoPartsRequired
Procedure
Removethestrapandbracesecuringthesidedecksfor
shipping.
1
2
LoweringtheFrontDeck Winglets
Partsneededforthisprocedure:
1DeckcoverR.H.
1DeckcoverL.H.
2V-Belt
Procedure
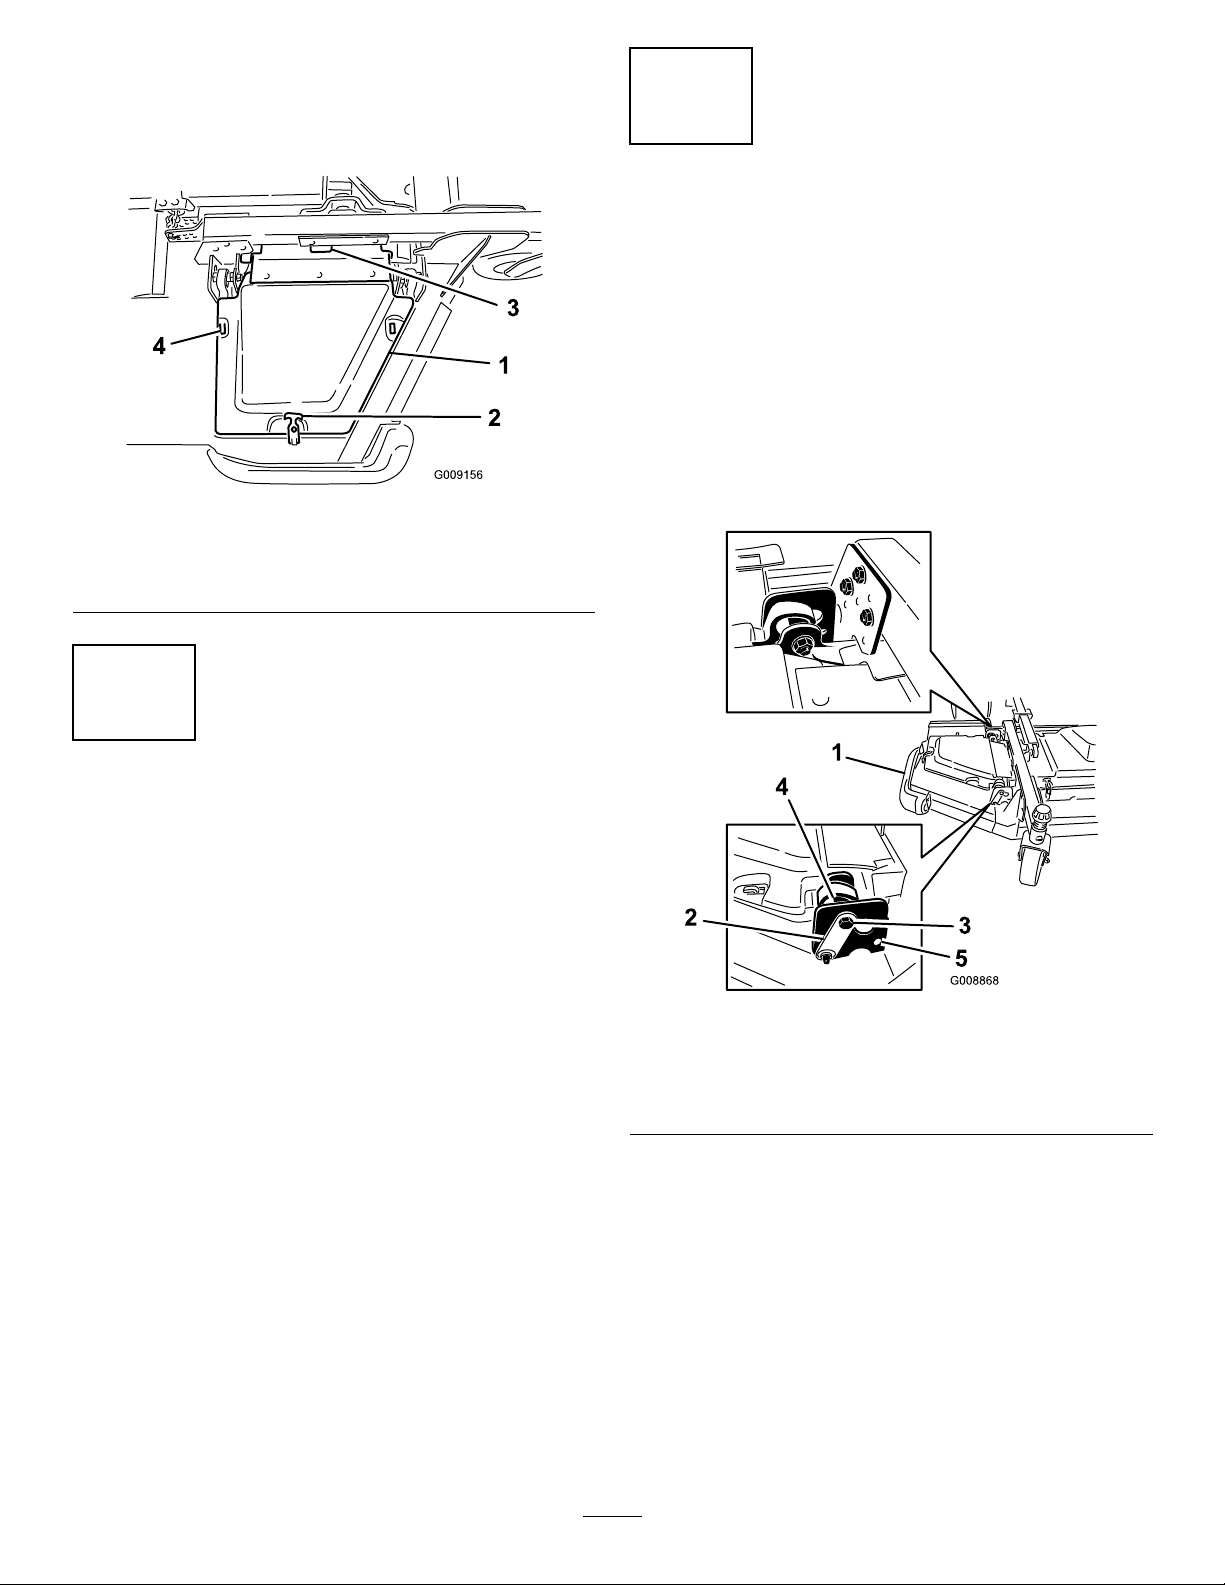
1.Removethenutssecuringthefrontandrearstopbolts
totherightwingletdeckmounts(Figure3).
2.Whilesupportingtherightwinglet,removethefront
andrearstopboltsfromthedeckmounts(Figure
15
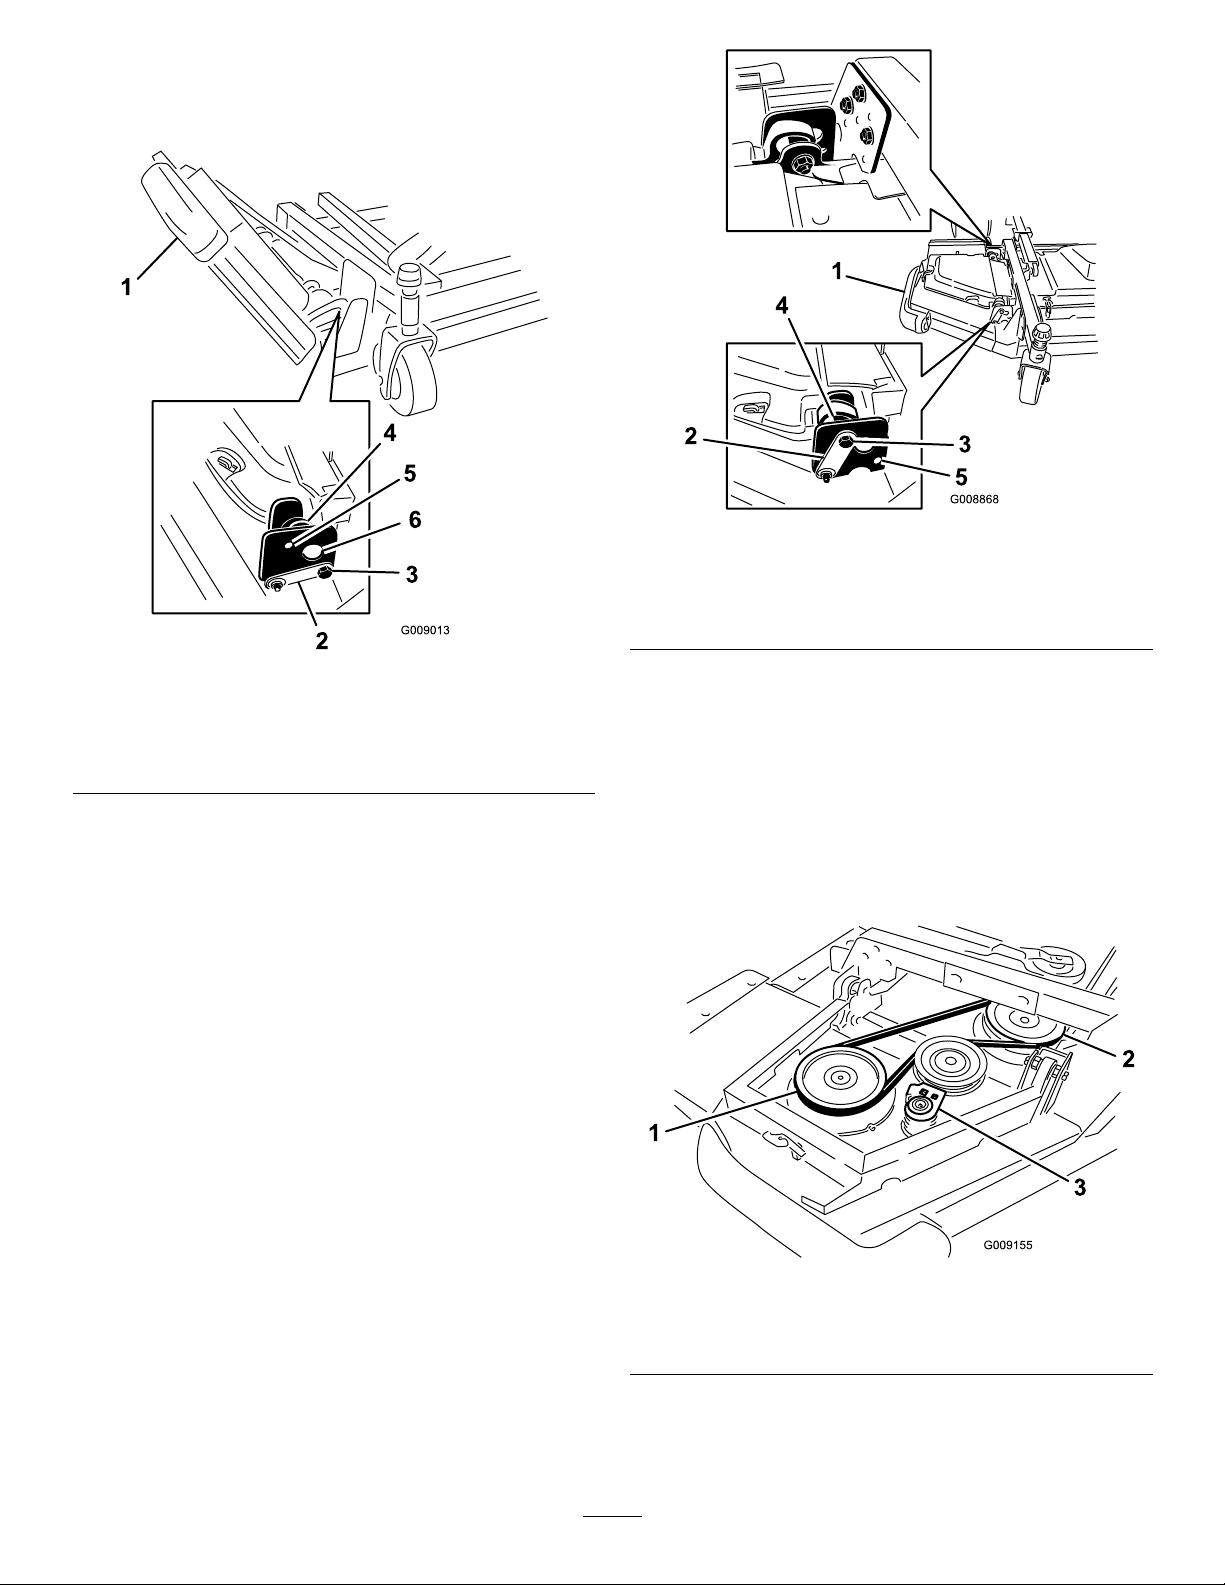
3).Leavetheeccentricspositionedbetweenthedeck
mounts.
3.Lowerthewinglettotheoperatingposition.
Figure4
1.Winglet4.Eccentric
2.Hingepin5.Lowerhole
3.Bolt
Figure3
1.Winglet4.Eccentric
2.Hingepin5.Upperhole
3.Stopbolt
6.Deckmounts
4.Installthefrontandrearstopboltsthroughtheupper
mountingholesandeccentrics.Makesurethestopbolt
engagesthetabonthehingepin.
5.Installthenutssecuringthestopboltsbutdonot
tightenatthistime.
6.Repeattheprocedureonleftwinglet.
7.Installthewingletbeltsasfollows:
•Startthebeltaroundthewingletspindlepulleyand
thefrontdeckspindlepulley(Figure5).
•Usingaratchetwrenchorsimilartool,movethe
idlerpulleyawayfromthepulleys(Figure5).
•Routethebeltaroundthewingletspindlepulley
andtheupperspindlepulleyonthefrontdeck.
•Releasetheidlerpulleytoputtensiononthebelt.
Figure5
1.Wingletspindlepulley3.Idlerpulleyassembly
2.Frontdeckspindlepulley
8.Installthewingletdeckcoverandsecurewithrubber
latch(Figure6).
16
Note:Makesuretoslidethecoverunderthefront
centerdeckcovertabsbeforeinsertingitontothe
mountinghooksandpost.
9.Repeattheprocedureontheotherwinglet.
Figure6
4
LevelingtheWingletDecksto theFrontCenterDeck
NoPartsRequired
Procedure
Levelthewingletdeckstothefrontdeckasfollows:
•Rotatethebladeoneachwingletsothatitpointsside
toside.
•Loosentheboltsandnutssecuringthetwoeccentric
spacerstothewinglets(Figure7).
1.Cover
2.Rubberlatch4.Mounthooks
3.Frontcenterdeckcover
tabs
3
LevelingtheFrontCenterDeck
NoPartsRequired
Procedure
RefertoAdjustingtheHeight-of-CutinOperation.
1.Rotatebladeoneachouterspindleuntiltheendsface
forwardandbackward.
2.Measurefromtheoortothefronttipoftheblade.
Adjustthe1/8inchshimsonthefrontcastorfork(s)
tomatchthedesiredheightofcut.
3.Rotatetheblades180°andnowmeasurefromtheoor
tothe(rearfacing)tipoftheblade.
4.Loosenthelowerjamnutsontheheight-of-cutchain
U-bolt.
5.Adjustthenutstoraiseorlowertherearofthecutting
unitsothatthefrontandrearbladetipshavethesame
measurement.Tightenthejamnuts.
6.Proceedtoprocedure4andlevelthewingletdecksto
thefrontcenterdeck.
Figure7
1.Winglet4.Eccentric
2.Hingepin5.Upperhole
3.Stopbolt
•Rotatetherear(closesttotractionunit)eccentricuntilthe
outsidebladetipisabout3mm(1/8inch)higherthan
thedesiredheightofcut(Figure7).
Note:Thereisanotchontheeccentrichexwhichis
180°fromthelobeontheeccentriccam(Figure8).Use
thenotchestoreferencethelocationofthelobeswhen
adjustingtheeccentrics.
17

6
CheckingtheFluidLevels
NoPartsRequired
Procedure
Figure8
1.Eccentricnotch
•Tightentheboltandnutforthiseccentricto149N-m
(110ft-lb).
•Adjusttheforwardeccentricuntilitjustmakescontact
withtheinnerslotsurfaceofthewingletpivotbrackets.
•Tightentheboltandnutforthiseccentricto149N-m
(110ft-lb).
•Repeattheprocedureontheoppositewinglet.Referto
AdjustingtheCuttingUnitPitchprocedureinMower
Maintenance.
5
CheckingtheTirePressure
NoPartsRequired
Procedure
Checktheairpressureinallthetiresbeforeoperatingthe
machine.Thecorrectairpressureinthefronttiresis345kPa
(50psi)andthereartiresis207kPa(30psi)(Figure9).
1.Checktheengineoillevelbeforestartingtheengine,
refertoCheckingtheEngineOilLevelinEngine
Maintenance.
2.Checkthehydraulicuidlevelbeforestartingthe
engine,refertoCheckingtheHydraulicFluidLevelin
HydraulicSystemMaintenance.
3.Checkthecoolingsystembeforestartingtheengine;
refertoCheckingtheCoolingSysteminCooling
SystemMaintenance.
7
GreasingtheMachine
NoPartsRequired
Procedure
Beforethemachineisoperated,itmustbegreasedto
ensureproperlubricatingcharacteristics;refertoGreasing
theBearingsandBushingsprocedureinLubricationinthe
MaintenanceSection.Failuretoproperlygreasethemachine
willresultinprematurefailureofcriticalparts.
Important:Maintainpressureinalltirestoensurea
goodquality-of-cutandpropermachineperformance.
Do not under -inate.
Figure9
18
ProductOverview
Controls
Note:Determinetheleftandrightsidesofthemachine
fromthenormaloperatingposition.
CAUTION
Thismachineproducessoundlevelsinexcessof85
dBAattheoperatorsearandcancausehearingloss
throughextendedperiodsofexposure.
Wearhearingprotectionwhenoperatingthis
machine.
TractionPedal
Thetractionpedal(Figure10)controlsforwardandreverse
operation.Pressthetopofthepedaltomoveforwardand
thebottomtomovebackward.Groundspeeddependson
howfaryoupressthepedal.Fornoload,maximumground
speed,fullypressthepedalwhilethethrottleisintheHi
idleposition.
HornButton
Pressthehornbutton(Figure10)toactivatethehorn.
ParkingBrakeLatch
Theknobontheleftsideoftheconsoleactuatestheparking
brakelock(Figure10).Toengagetheparkingbrake,connect
thepedalswiththelockinglatch,pushdownonbothpedals,
andpulltheparkingbrakelatchout.Toreleasetheparking
brake,pressbothpedalsuntiltheparkingbrakelatchretracts.
Tostop,reduceyourfootpressureonthetractionpedaland
allowittoreturntothecenterposition.
BrakePedals
Twofootpedals(Figure10)operateindividualwheelbrakes
forturningassistance,parking,andtoaidinobtainingbetter
sidehilltraction.Alatchconnectsthepedalsforparking
brakeoperationandtransport.
PedalLockingLatch
Thepedallockinglatch(Figure10)connectsthepedals
togethertoengagetheparkingbrake.
TiltSteeringLever
Pressthelever(Figure10)downtotiltthesteeringwheel
tothedesiredposition.Thenreleasethelevertolockthe
adjustment.
TurnSignalSwitch
Presstheleftsideoftheturnsignalswitch(Figure10)to
activatetheleftturnsignalandtherightsideoftheswitchto
activatetherightturnsignal.Thecenterpositionisoff.
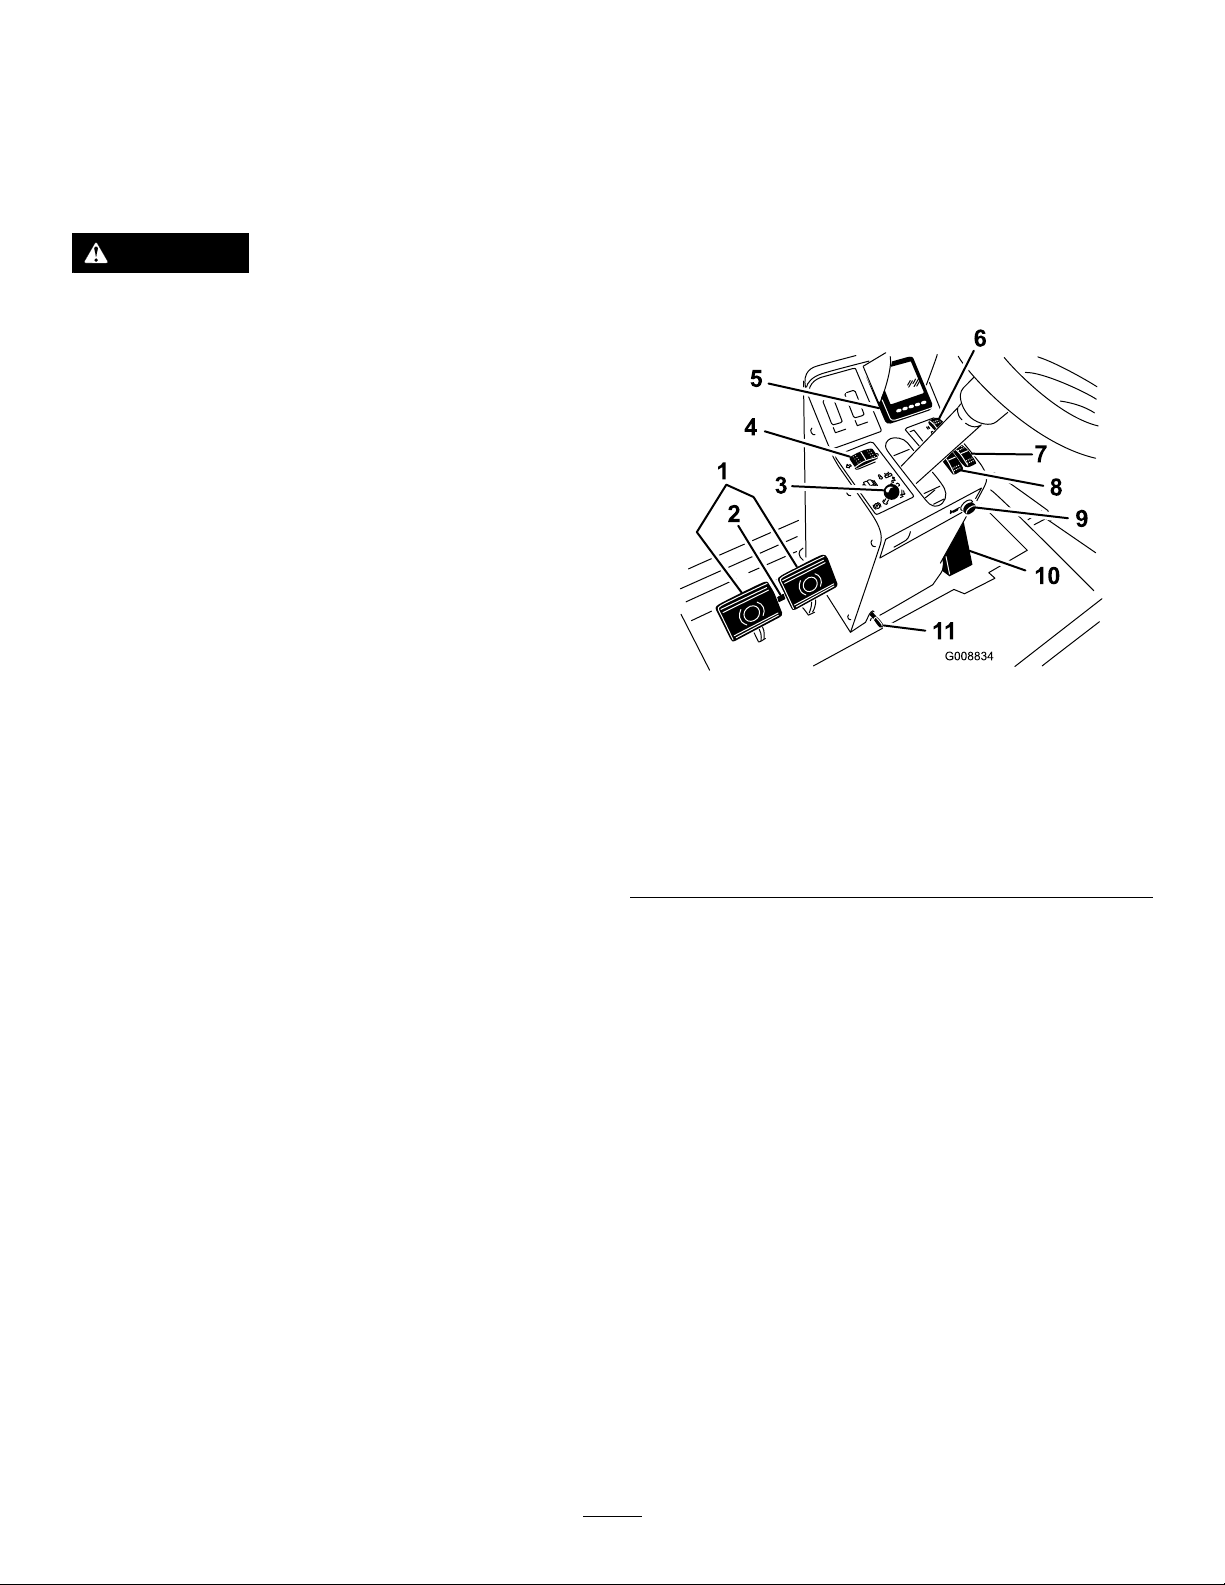
Figure10
1.Brakepedals7.Variablethrottleswitch
2.Pedallockinglatch8.Throttleswitch
3.Parkingbrakelatch9.Horn
4.Turnsignalswitch10.Tractionpedal
5.Infocenter
6.Hi-lorangespeedcontrol
11.Tiltsteeringlever
ThrottleSwitch
Thethrottleswitch(Figure11)hasthreepositionslowidle,
mididleandhighidle.
VariableThrottleSwitch
Thevariablethrottleswitch(Figure11)allowstheengine
speedtobeadjustedinsmallincrements.Pressthe“+”once
toincreasetheenginespeedandthe“-”oncetodecrease
theenginespeed.
Note:Movingthethrottleswitchwilloverrideandcancel
thevariablethrottlesetting.
Important:Donotoperatetheenginebelow1350rpm.
Hi-LoRangeSpeedSwitch
Pressthefrontoftheswitch(Figure10)toselecthighspeed
range.Presstherearoftheswitchtoselectlowspeedrange.
Themachinemustbestationaryortravelingataveryslow
speed,lessthan2mph,toshifttoHiorLo.
LiftSwitches
Theliftswitches(Figure11)raiseandlowerthecuttingunits.
Presstheswitchesforwardtolowerthecuttingunitand
backwardtoraisethecuttingunits.
19

Note:ThedeckswillnotlowerwhileintheHispeedrange.
andthedeckswillnotraiseorloweriftheoperatorisoutof
theseatwhentheengineisrunning.
LightSwitch
Presstheloweredgeoftheswitch(Figure11)toturnonthe
lights.Presstheupperedgeoftheswitchtoturnoffthelights.
KeySwitch
Thekeyswitch(Figure11)hasthreepositions:Stop,
Run/Preheat,andStart.
Figure11
1.PTOswitch5.Cruisecontrol
2.Keyswitch6.Lightswitch
3.Tractionassistswitch
4.Liftswitches
7.Powerpoint(ontheright
sideofconsole)
AudibleAlarm(Console)
Thealarmisactivatedwhenafaultisdetected.
Thebuzzersounds:
•continuouswhentheenginesendsastopfault.
•withashortpulsewhentheenginesendsacheckengine
fault.
•whenthereislowfuel.
PowerPoint
Thepowerpoint,locatednexttotheconsoleontheside
ofthepowercenter,isusedtopoweroptionalelectrical
accessories(Figure11).
SeatAdjustments
Weightgauge
Indicateswhentheseatisadjustedtotheweightofthe
operator(Figure12).Heightadjustmentismadeby
positioningthesuspensionwithintherangeofthegreen
region.
PTOSwitch
ThePTOswitch(Figure11)hastwopositions:Out(start)
andIn(stop).PullthePTObuttonouttoengagethe
implementorcuttingunitblades.Pushinthebuttonto
disengagetheimplementoperation.
TractionAssistSwitch
Whenmowing(lowspeedrange),pressandholdthe
tractionassistswitch(Figure11)toenhancetractiondrive
performanceincompromisedoperatingconditions.
Note:ThetractionassistonlyengagesinMow-Forward.
ThetractionassistwillnotengageinMow-ReverseorHi
speedrange.
CruiseControlSwitch
Thecruisecontrolswitch(Figure11)setsthespeedofthe
machine.Pressingtherearoftheswitchturnsoffthecruise
control,themiddlepositionoftheswitchenablesthecruise
controlfunctionandthefrontoftheswitchsetsthedesired
groundspeed.
Note:Pressingeitherbrakepedalormovingthetraction
pedalintothereverseposition,foronesecond,willalso
disengagethecruisecontrol.
Figure12
1.Weightgauge
2.Weightadjustinglever5.Armrestadjustingknob
3.ForeandAftadjusting
lever
WeightAdjustingLever
Adjustforoperatorweight(Figure12).Pulluponthelever
toincreasetheairpressureandpushdowntodecreasetheair
4.Seatbackadjustinglever
20
pressure.Theproperadjustmentisattainedwhentheweight
gaugeisinthegreenregion.
ForeandAftAdjustingLever
Pulloutonthelevertoslidetheseatforeoraft(Figure12).
SeatBackAdjustingLever
Movethelevertoadjusttheseatbackangle(Figure12).
SeatArmRestAdjustingKnob
Rotatetheknobtoadjusttheseatarmrestangle(Figure12).
CabControls
Model31599and31599Nonly
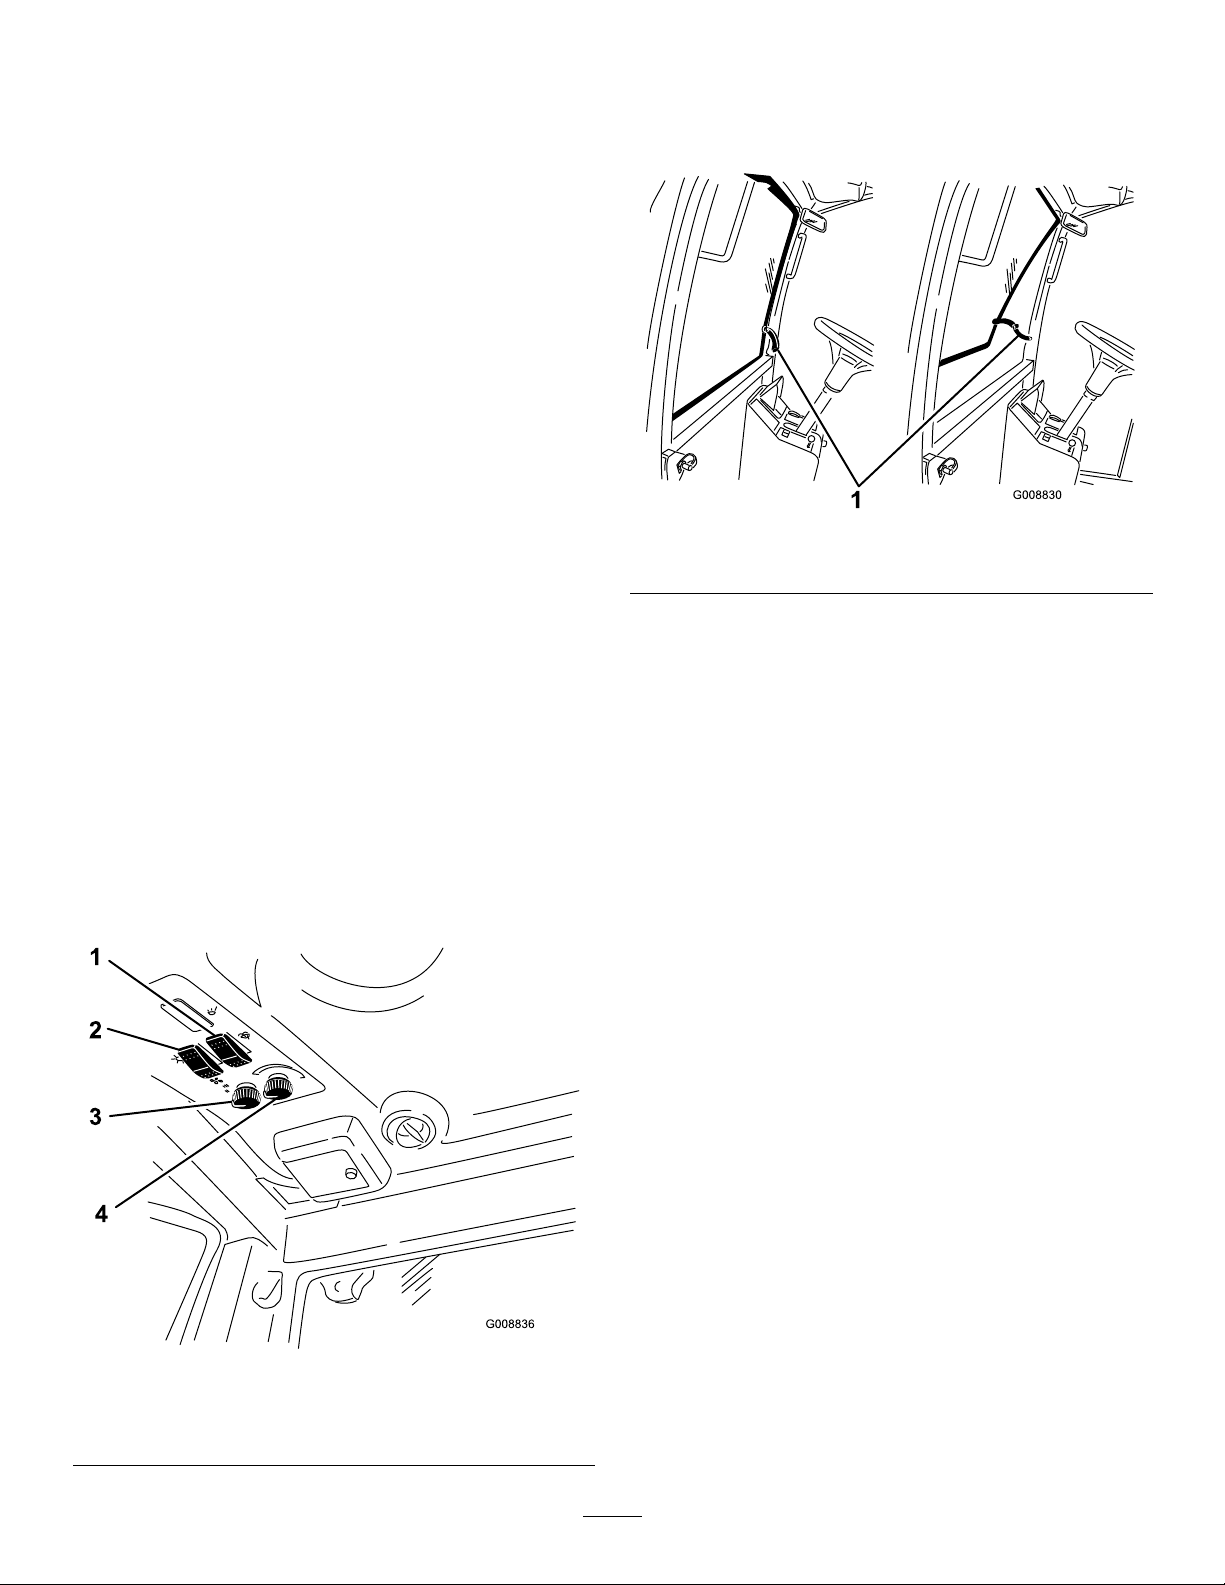
WindShieldLatch
Liftuponlatchestoopenthewindshield(Figure14).Press
inonlatchtolockwindshieldinopenposition.Pulloutand
downonlatchtocloseandsecurewindshield.
WindShieldWiperSwitch
Pressfrontofswitchtoactivatethewindshieldwipers
(Figure13)andrearofswitchtoturnoffthewipers.
AirConditioningSwitch
Pressfrontofswitchtoactivatetheairconditioning(Figure
13)andrearofswitchtoturnofftheairconditioning.
FanControl
Rotatethefancontrolknobtoregulatethespeedofthefan
(Figure13).
TemperatureControl
Rotatethetemperaturecontrolknobtoregulatetheair
temperatureinthecab(Figure13).
Figure14
1.Windshieldlatch
RearWindowLatch
Liftuponlatchestoopentherearwindow .Pressinonlatch
tolockwindowinopenposition.Pulloutanddownonlatch
tocloseandsecurewindow(Figure14).
Important:Therearwindowmustbeclosedbefore
openingthehoodordamagemayoccur.
InfoCenter
ScreenFunctions
•Pressthecorrespondingbuttontoviewscreen1orscreen
2,tostopaudiblealarm,toviewfaultscreenortoexit
(Figure15).
•Ifafaultappearsonthescreen,pressanykeytoviewthe
activefaultadvisory.Contactyoursupervisorormechanic
torelayfaultadvisoryanddeterminecourseofaction.
Figure13
1.Windshieldwiperswitch3.Fancontrol
2.Airconditioningswitch4.T emperaturecontrol
•Pressthearrowkeystonavigatethefaultscreen.
•Pressanykeytorevealtheinformationkeysonthescreen.
21
 Loading...