

Toro 31201, Groundsmaster 360 Operator's Manual

FormNo.3391-891RevA
Groundsmaster
®
3602-Wheel
DriveMulti-PurposeMachine
ModelNo.31201—SerialNo.315000001andUp
Registeratwww.T oro.com.
OriginalInstructions(EN)
*3391-891*A
ThisproductcomplieswithallrelevantEuropeandirectives;
fordetails,pleaseseetheseparateproductspecicDeclaration
ofConformity(DOC)sheet.
WARNING
CALIFORNIA
Proposition65Warning
Thisproductcontainsachemicalorchemicals
knowntotheStateofCaliforniatocausecancer,
birthdefects,orreproductiveharm.
Dieselengineexhaustandsomeofits
constituentsareknowntotheStateof
Californiatocausecancer,birthdefects,
andotherreproductiveharm.
yourproductready.Figure1identiesthelocationofthe
modelandserialnumbersontheproduct.Writethenumbers
inthespaceprovided.
Becauseinsomeareastherearelocal,state,orfederal
regulationsrequiringthatasparkarresterbeusedonthe
engineofthismachine,asparkarresterisavailableas
anoption.Ifyourequireasparkarrester,contactyour
AuthorizedToroServiceDealer.
GenuineT orosparkarrestersareapprovedbytheUSDA
ForestryService.
Important:ItisaviolationofCaliforniaPublic
ResourceCodeSection4442touseoroperatetheengine
onanyforest-covered,brush-covered,orgrass-covered
landwithoutasparkarrestermufermaintainedin
workingorder,ortheengineconstricted,equipped,and
maintainedforthepreventionofre.Otherstatesor
federalareasmayhavesimilarlaws.
Introduction
Thismachineisaride-on,rotary-blademachineintended
tobeusedbyprofessional,hiredoperatorsincommercial
applications.Itisprimarilydesignedforcuttinggrass
onwell-maintainedlawnsinparks,sportselds,andon
commercialgrounds.Itisnotdesignedforcuttingbrush,
mowinggrassandothergrowthalongsidehighways,orfor
agriculturaluses.
Figure1
1.Modelandserialnumberlocation
ModelNo.
SerialNo.
Thismanualidentiespotentialhazardsandhassafety
messagesidentiedbythesafetyalertsymbol(Figure2),
whichsignalsahazardthatmaycauseseriousinjuryordeath
ifyoudonotfollowtherecommendedprecautions.
Figure2
1.Safetyalertsymbol
Thismanualalsouses2wordstohighlightinformation.
Importantcallsattentiontospecialmechanicalinformation
andNoteemphasizesgeneralinformationworthyofspecial
attention.
Readthisinformationcarefullytolearnhowtooperateand
maintainyourproductproperlyandtoavoidinjuryand
productdamage.Youareresponsibleforoperatingthe
productproperlyandsafely.
YoumaycontactTorodirectlyatwww .Toro.comforproduct
andaccessoryinformation,helpndingadealer,ortoregister
yourproduct.
Wheneveryouneedservice,genuineT oroparts,oradditional
information,contactanAuthorizedServiceDealerorToro
CustomerServiceandhavethemodelandserialnumbersof
©2015—TheToro®Company
8111LyndaleAvenueSouth
Bloomington,MN55420
Contactusatwww.Toro.com.
2
PrintedintheUSA.
AllRightsReserved

Contents
Safety...........................................................................4
SafeOperatingPractices...........................................4
ToroRidingMowerSafety........................................5
SafetyandInstructionalDecals.................................6
Setup...........................................................................12
1AdjustingtheROPS.............................................12
2CheckingtheTirePressure....................................12
3CheckingtheFluidLevels.....................................13
4InstallingtheDriveShafttoanOptionalMower
DeckorQAS.....................................................13
ProductOverview.........................................................14
Controls...............................................................14
Specications........................................................16
Attachments/Accessories........................................16
Operation....................................................................16
AddingFuel...........................................................16
FillingtheFuelTank...............................................17
UsingtheRolloverProtectionSystem(ROPS)............17
ThinkSafetyFirst...................................................18
StartingandStoppingtheEngine..............................18
DrivingtheMachine...............................................19
StoppingtheMachine.............................................20
OperatingtheMower..............................................20
AdjustingtheHeight-of-Cut....................................20
TheSafetyInterlockSystem.....................................21
PositioningtheStandardSeat...................................22
PositioningtheDeluxeSeat......................................23
Raising/LoweringtheSeat.......................................24
PushingtheMachinebyHand..................................24
LoadingMachines..................................................25
TransportingMachines............................................26
OperatingTips......................................................27
Maintenance.................................................................28
RecommendedMaintenanceSchedule(s)......................28
DailyMaintenanceChecklist....................................29
PremaintenanceProcedures........................................30
UsingtheHoodPropRod.......................................30
Lubrication...............................................................31
GreasingtheBearingsandBushings..........................31
EngineMaintenance..................................................33
ServicingtheAirCleaner.........................................33
CheckingtheEngine-OilLevel.................................34
ChangingtheEngineOilandFilter...........................35
AdjustingtheThrottle.............................................35
FuelSystemMaintenance...........................................36
ServicingtheWaterSeparator..................................36
BleedingtheFuelSystem.........................................36
BleedingAirfromtheFuelInjectors..........................37
CleaningtheFuelTank............................................37
FuelLinesandConnections.....................................37
ElectricalSystemMaintenance....................................38
CheckingtheFuses.................................................38
ServicingtheBattery...............................................38
StoringtheBattery..................................................38
DriveSystemMaintenance.........................................39
CheckingtheTirePressure......................................39
CorrectingSteeringMisalignment.............................39
CoolingSystemMaintenance......................................39
CheckingtheCoolingSystem..................................39
CleaningtheRadiator..............................................40
BrakeMaintenance....................................................41
AdjustingtheServiceBrakes....................................41
AdjustingtheParkingBrake....................................41
BeltMaintenance......................................................42
CheckingtheAlternatorBelt...................................42
ControlsSystemMaintenance.....................................42
AdjustingtheTractionDriveforNeutral....................42
AdjustingtheMaximumGroundSpeed.....................43
HydraulicSystemMaintenance....................................44
CheckingtheHydraulicSystem................................44
ChangingtheHydraulicOilAndFilter.......................44
Cleaning...................................................................45
CleaningundertheMower.......................................45
WasteDisposal.......................................................45
Storage........................................................................46
Engine..................................................................46
Machine................................................................46
3

Safety
ThismachinehasbeendesignedinaccordancewithENISO
5395:2013andANSIB71.4-2012(withtheappropriateCE
kitisinstalled).
Improperuseormaintenancebytheoperatororownercan
resultininjury.Toreducethepotentialforinjury,comply
withthesesafetyinstructionsandalwayspayattentiontothe
safetyalertsymbol,whichmeansCaution,Warning,or
Danger—personalsafetyinstruction.Failuretocomplywith
theinstructionmayresultinpersonalinjuryordeath.
SafeOperatingPractices
Thisproductiscapableofamputatinghandsandfeetand
throwingobjects.Alwaysfollowallsafetyinstructionsto
avoidseriousinjuryordeath.
Training
•ReadtheOperator'sManualandothertrainingmaterial
carefully.Befamiliarwiththecontrols,safetysigns,and
theproperuseoftheequipment.
•Neverallowchildrenorpeopleunfamiliarwiththese
instructionstousethelawnmachine.Localregulations
canrestricttheageoftheoperator.
•Nevermowwhilepeople,especiallychildren,orpetsare
nearby.
•Keepinmindthattheoperatororuserisresponsiblefor
accidentsorhazardsoccurringtootherpeopleortheir
property.
•Donotcarrypassengers.
•Alldriversshouldseekandobtainprofessionaland
practicalinstruction.Suchinstructionshouldemphasize:
–theneedforcareandconcentrationwhenworking
withride-onmachines;
–controlofaride-onmachineslidingonaslopewill
notberegainedbytheapplicationofthebrake.The
mainreasonsforlossofcontrolare:
◊insufcientwheelgrip,especiallyonwetgrass;
◊beingdriventoofast;
◊inadequatebraking;
◊thetypeofmachineisunsuitableforitstask;
◊lackofawarenessoftheeffectofground
conditions,especiallyslopes;
◊incorrectloaddistribution.
Preparation
•Whilemowing,alwayswearsubstantialfootwearandlong
trousers.Donotoperatetheequipmentwhenbarefoot
orwearingopensandals.
•Thoroughlyinspecttheareawheretheequipmentisto
beusedandremoveallobjectswhichmaybethrownby
themachine.
•Replacefaultysilencers/mufers.
•Beforeusing,alwaysvisuallyinspecttoseethattheblades,
bladeboltsandcutterassemblyarenotwornordamaged.
Replacewornordamagedbladesandboltsinsetsto
preservebalance.
SafeHandlingofFuels
•Toavoidpersonalinjuryorpropertydamage,use
extremecareinhandlinggasoline.Gasolineisextremely
ammableandthevaporsareexplosive.
•Extinguishallcigarettes,cigars,pipes,andothersources
ofignition.
•Useonlyanapprovedfuelcontainer.
•Neverremovefuelcaporaddfuelwiththeengine
running.
•Allowenginetocoolbeforerefueling.
•Neverrefuelthemachineindoors.
•Neverstorethemachineorfuelcontainerwherethereis
anopename,spark,orpilotlightsuchasonawater
heateroronotherappliances.
•Neverllcontainersinsideavehicleoronatruckor
trailerbedwithaplasticliner.Alwaysplacecontainerson
thegroundawayfromyourvehiclebeforelling.
•Removeequipmentfromthetruckortrailerandrefuelit
ontheground.Ifthisisnotpossible,thenrefuelsuch
equipmentwithaportablecontainer,ratherthanfroma
fueldispensernozzle.
•Keepthenozzleincontactwiththerimofthefueltank
orcontaineropeningatalltimesuntilfuelingiscomplete.
Donotuseanozzlelockopendevice.
•Iffuelisspilledonclothing,changeclothingimmediately.
•Neveroverllfueltank.Replacefuelcapandtighten
securely.
Operation
•Bealert,slowdownandusecautionwhenmakingturns.
Lookbehindandtothesidebeforechangingdirections.
•Donotoperatetheengineinaconnedspacewhere
dangerouscarbonmonoxidefumescancollect.
•Mowonlyindaylightoringoodarticiallight.
•Beforeattemptingtostarttheengine,disengageallblade
attachmentclutchesandshiftintoneutral.
•Rememberthereisnosuchthingasasafeslope.Travel
ongrassslopesrequiresparticularcare.T oguardagainst
overturning:
–donotstoporstartsuddenlywhenonaslope;
–useslowspeedsonslopesandduringtightturns;
–stayalertforhumpsandhollowsandotherhidden
hazards;
•Watchoutfortrafcwhencrossingornearroadways.
4

•Stopthebladesfromrotatingbeforecrossingsurfaces
otherthangrass.
•Whenusinganyattachments,neverdirectdischargeof
materialtowardbystandersnorallowanyonenearthe
machinewhileinoperation.
•Neveroperatethemachinewithdamagedguards,shields,
orwithoutsafetyprotectivedevicesinplace.
•Donotchangetheenginegovernorsettingsoroverspeed
theengine.Operatingtheengineatexcessivespeedmay
increasethehazardofpersonalinjury.
•Beforeleavingtheoperator'sposition:
–disengagethepowertake-offandlowerthe
attachments;
–settheparkingbrake;
–stoptheengineandremovethekey.
•Disengagedrivetoattachments,stoptheengine,and
removetheignitionkey:
–beforeclearingblockagesoruncloggingchute;
–beforechecking,cleaningorworkingonthemachine;
–afterstrikingaforeignobject.Inspectthemachine
fordamageandmakerepairsbeforerestartingand
operatingtheequipment;
–ifthemachinestartstovibrateabnormally(check
immediately).
•Donotoperatethemachineundertheinuenceof
alcoholordrugs.
•Lightningcancausesevereinjuryordeath.Iflightning
isseenorthunderisheardinthearea,donotoperate
themachine;seekshelter.
•Disengagedrivetoattachmentswhentransportingornot
inuse.
•Stoptheengineanddisengagedrivetoattachmentbefore
refueling.
RolloverProtectionSystem(ROPS)UseandMaintenance
•TheROPSisanintegralandeffectivesafetydevice.Keep
afoldingROPSintheraisedandlockedpositionanduse
theseatbeltwhenoperatingthemachine.
•LowerafoldingROPStemporarilyonlywhenabsolutely
necessary.Donotweartheseatbeltwhenfoldeddown.
•Beawarethereisnorolloverprotectionwhenafolded
ROPSisinthedownposition.
•Becertainthattheseatbeltcanbereleasedquicklyin
theeventofanemergency.
•Checktheareatobemowedandneverfolddowna
foldingROPSinareaswherethereareslopes,dropoffs
orwater.
•Checkcarefullyforoverheadclearances(i.e.branches,
doorways,electricalwires)beforedrivingunderany
objectsanddonotcontactthem.
•KeeptheROPSinsafeoperatingconditionby
periodicallythoroughlyinspectingfordamageand
keepingallmountingfastenerstight.
•ReplaceadamagedROPS.Donotrepairorrevise.
•DonotremovetheROPS.
•AnyalterationstoaROPSmustbeapprovedbythe
manufacturer.
•Keeptherollbarintheraisedandlockedpositionand
usetheseatbeltwhenoperatingthemachine.
•Becertainthattheseatbeltcanbereleasedquicklyin
theeventofanemergency.
•Beawarethereisnorolloverprotectionwhentheroll
barisdown.
•ChecktheareatobemowedandneverfoldtheROPSin
areaswherethereareslopes,dropoffsorwater.
•Lowertherollbaronlywhenabsolutelynecessary.Do
notweartheseatbeltwiththerollbarfoldeddown.
•Checkcarefullyforoverheadclearances(i.e.branches,
doorways,electricalwires)beforedrivingunderany
objectsanddonotcontactthem.
MaintenanceandStorage
•Keepallnuts,boltsandscrewstighttobesurethe
equipmentisinsafeworkingcondition.
•Neverstoretheequipmentwithfuelinthetankinsidea
buildingwherefumesmayreachanopenameorspark.
•Allowtheenginetocoolbeforestoringinanyenclosure.
•Toreducetherehazard,keeptheengine,
silencer/mufer,batterycompartmentandfuelstorage
areafreeofgrass,leaves,orexcessivegrease.
•Replacewornordamagedpartsforsafety.
•Ifthefueltankhastobedrained,dothisoutdoors.
•Onmulti-bladedmachines,takecareasmanuallyrotating
onebladecancauseotherbladestorotate.
•Whenmachineistobeparked,storedorleftunattended,
lowerthemowerdeck.
Hauling
•Usecarewhenloadingorunloadingthemachineintoa
trailerortruck.
•Usefullwidthrampsforloadingmachineintotraileror
truck.
•Tiethemachinedownsecurelyusingstraps,chains,cable,
orropes.Bothfrontandrearstrapsshouldbedirected
downandoutwardfromthemachine
ToroRidingMowerSafety
ThefollowinglistcontainssafetyinformationspecictoToro
productsorothersafetyinformationthatyoumustknowthat
isnotincludedintheCENstandard.
5
•Engineexhaustcontainscarbonmonoxide,whichisan
odorless,deadlypoisonthatcankillyou.Donotrun
engineindoorsorinanenclosedarea.
•Donotmowslopeswhengrassiswet.Slippery
conditionsreducetractionandcouldcauseslidingand
lossofcontrol.
•Keephands,feet,hairandlooseclothingawayfrom
attachmentdischargearea,undersideofmowerandany
movingpartswhileengineisrunning.
•Donottouchequipmentorattachmentpartswhichmay
behotfromoperation.Allowtocoolbeforeattempting
tomaintain,adjust,orservice.
•Batteryacidispoisonousandcancauseburns.Avoid
contactwithskin,eyesandclothing.Protectyourface,
eyes,andclothingwhenworkingwithabattery.
•Thismachineisnotdesignedorequippedforon-road
useandisa“slow-movingvehicle.”Ifyoumustcross
ortravelonapublicroad,youshouldbeawareofand
complywithlocalregulations,suchasrequiredlights,
slowmovingvehiclesigns,andreectors.
•Batterygasescanexplode.Keepcigarettes,sparksand
amesawayfrombattery.
•UseonlygenuineTororeplacementpartstoensurethat
originalstandardsaremaintained.
•UseonlyToroapprovedattachments.Warrantymaybe
voidedifusedwithunapprovedattachments.
SlopeOperation
•Donotmakesuddenturnsorrapidspeedchanges.
•Useawalkbehindmowerand/orahandtrimmernear
drop-offs,ditches,steepbanksorwater.
•Reducespeedanduseextremecautiononslopes.
•Removeormarkobstaclessuchasrocks,treelimbs,etc.
fromthemowingarea.Tallgrasscanhideobstacles.
•Watchforditches,holes,rocks,dips,andrisesthatchange
theoperatingangle,asroughterraincouldoverturnthe
machine.
•Avoidsuddenstartswhenmowinguphillbecausethe
machinemaytipbackwards.
•Beawarethatlossoftractionmayoccurgoingdownhill.
Weighttransfertothefrontwheelsmaycausedrive
wheelstoslipandcauselossofbrakingandsteering.
•Alwaysavoidsuddenstartingorstoppingonaslope.
Iftireslosetraction,disengagethebladesandproceed
slowlyofftheslope.
•Followthemanufacturer'srecommendationsforwheel
weightsorcounterweightstoimprovestability.
•Useextremecarewithattachments.Thesecanchangethe
stabilityofthemachineandcauselossofcontrol.
•Donotmowneardrop-offs,ditches,steepbanksor
water.Wheelsdroppingoveredgescancauserollovers,
whichmayresultinseriousinjury,death,ordrowning.
SafetyandInstructionalDecals
Safetydecalsandinstructionsareeasilyvisibletotheoperatorandarelocatednearanyareaofpotential
danger.Replaceanydecalthatisdamagedorlost.
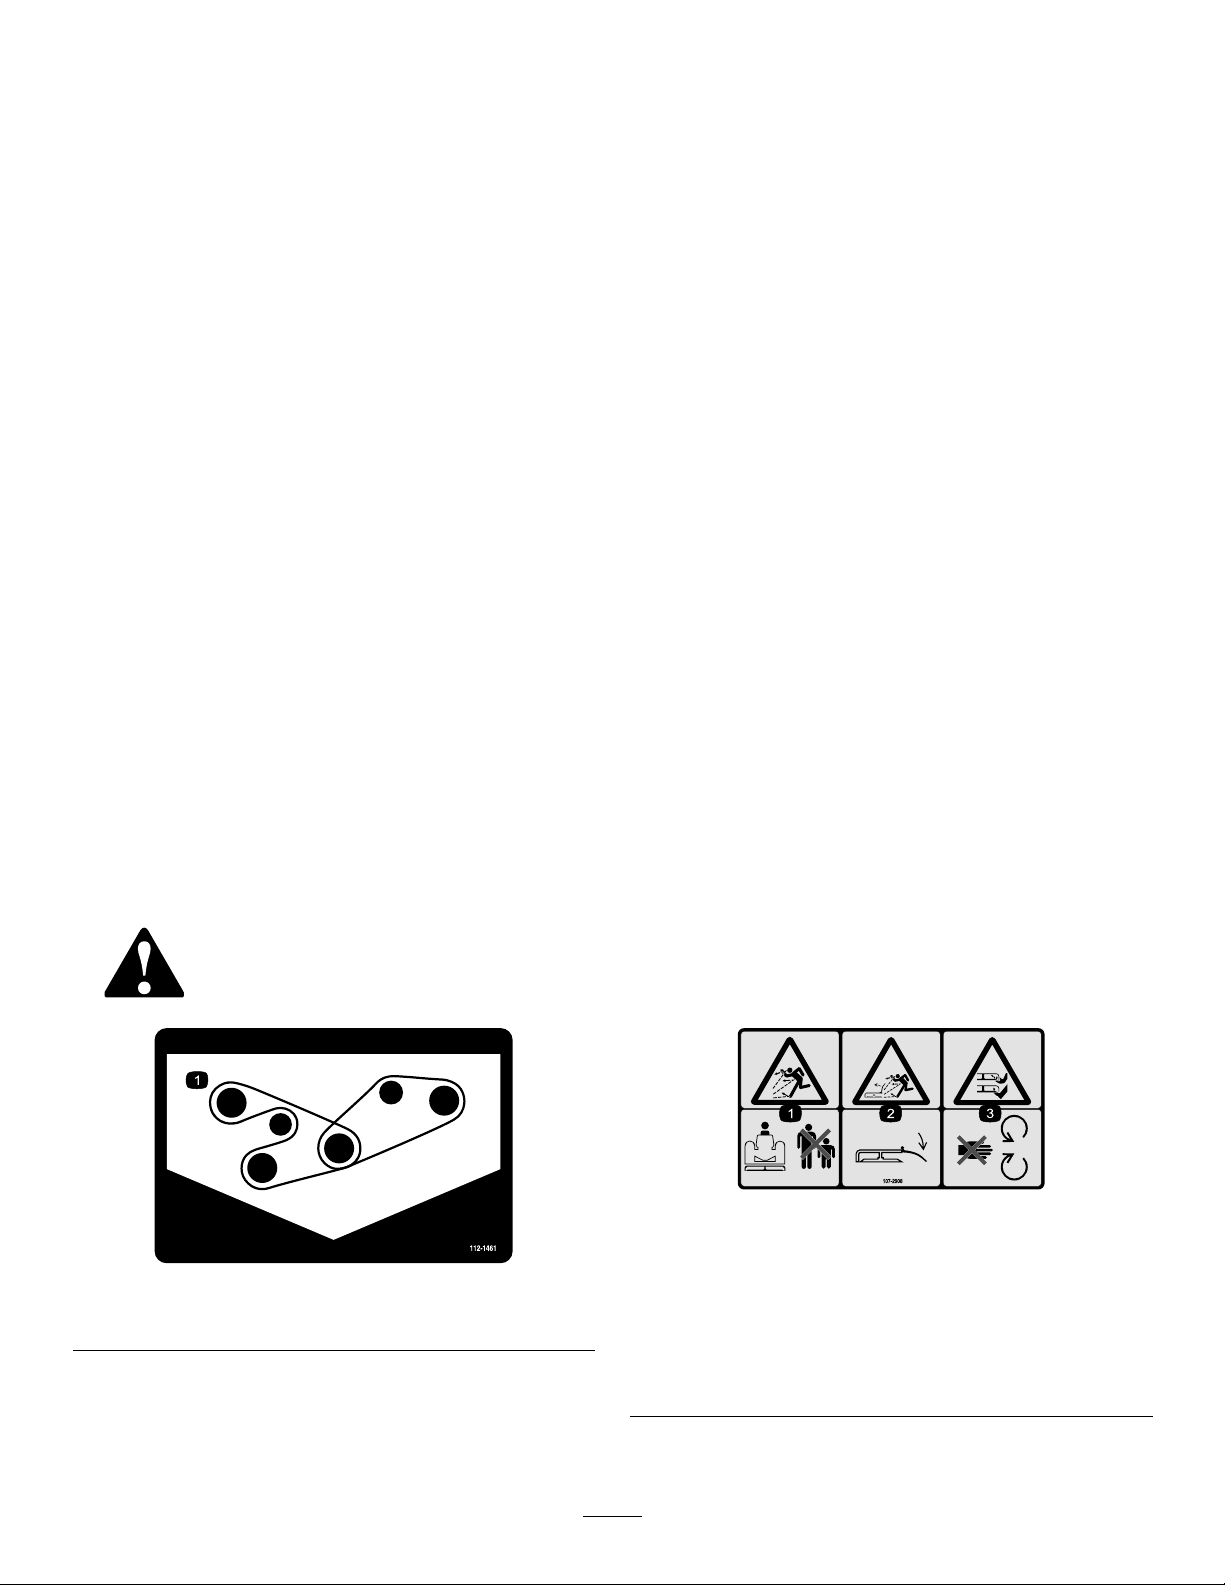
112-1461
1.Beltrouting
107-2908
CEmodelsonly
1.Thrownobjecthazard—keepbystandersasafedistance
fromthemachine.
2.Thrownobjecthazard—donotoperatethemowerwiththe
deectoruporremoved,keepthedeectorinplace.
3.Cutting/dismembermenthazardofhandorfoot,mower
blade—stayawayfrommovingparts.
6
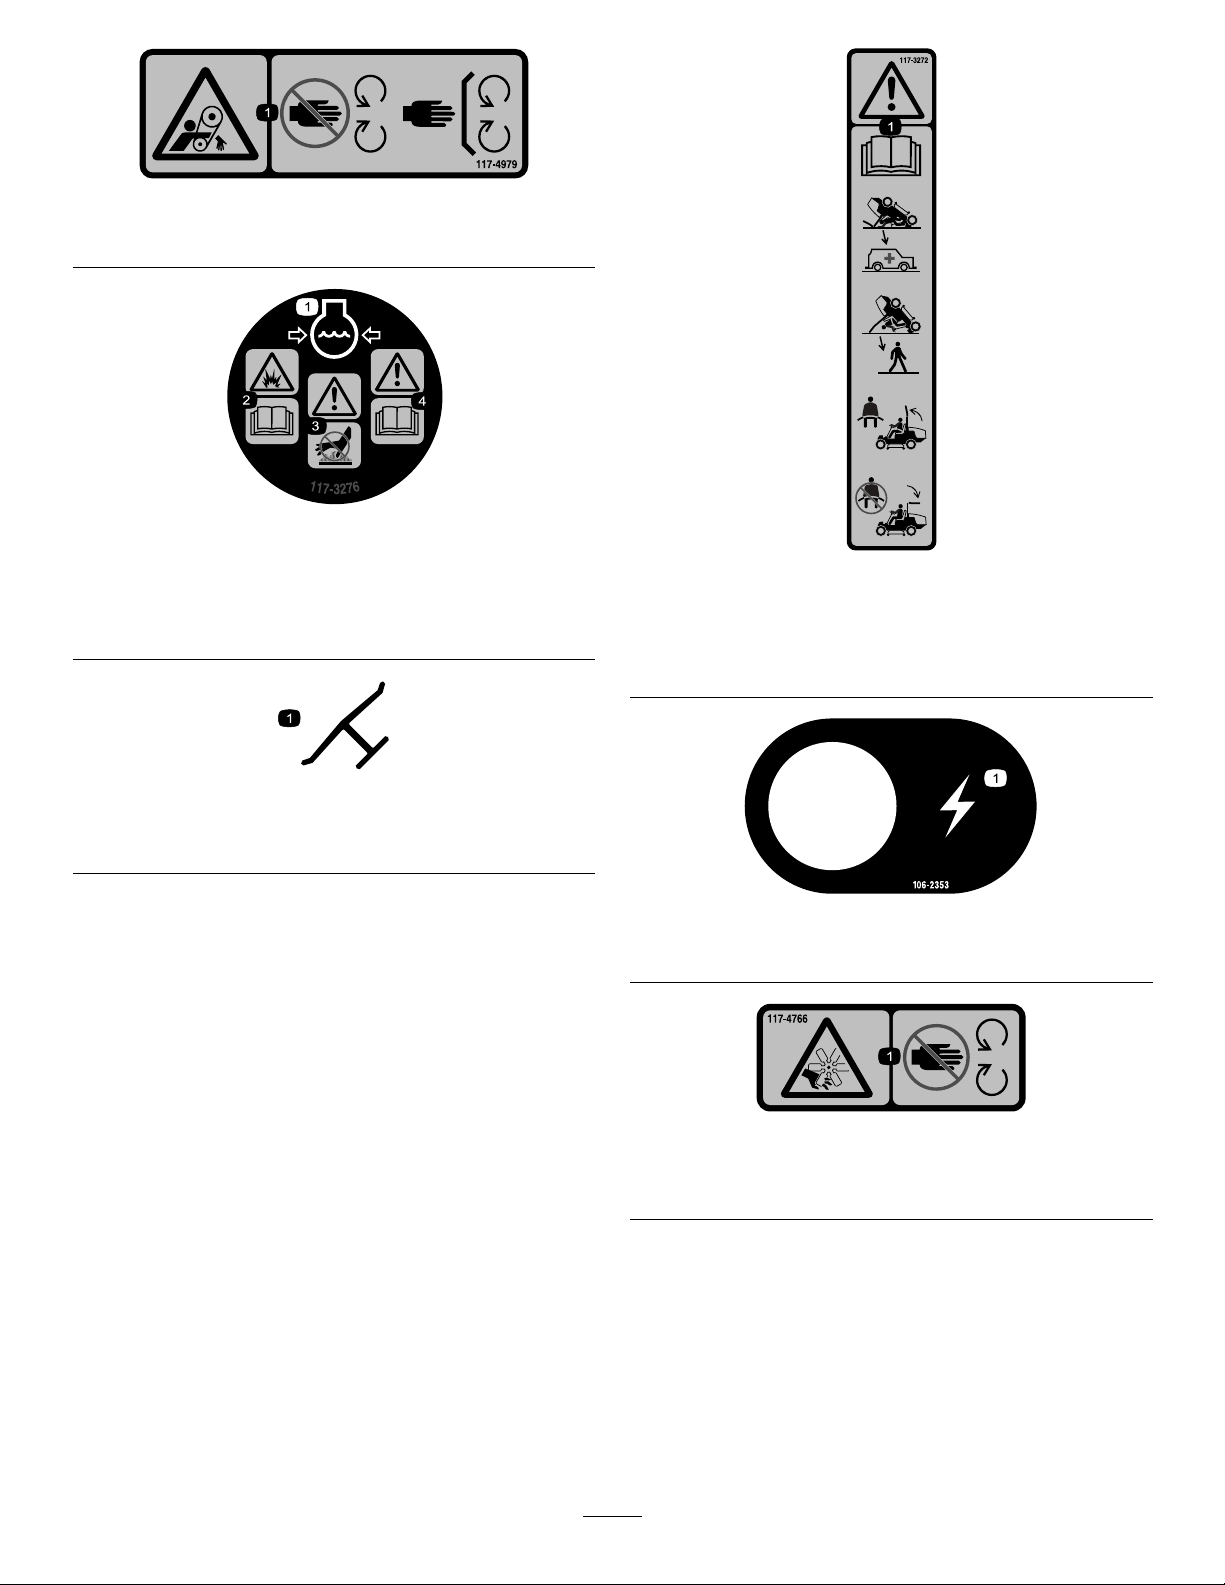
117–4979
1.Rotatingbelt—Keepguardinplace
117-3276
1.Enginecoolantunder
pressure
2.Explosionhazard—read
theOperator'sManual.
3.Warning—donottouchthe
hotsurface.
4.Warning—readthe
Operator'sManual.
Manufacturer'sMark
1.Indicatesthebladeisidentiedasapartfromtheoriginal
machinemanufacturer.
117-3272
1.Warning—readtheOperator'sManual;failuretousethe
rolloverprotectionsystem(ROPS)canresultininjuryin
theeventofarollover;wearaseatbeltwhenaROPSisin
place,donotwearaseatbeltwhenROPSislowered.
106-2353
1.Electricalpowerpoint
117-4766
1.Cutting/dismembermenthazard;fan—stayawayfrom
movingparts,keepallguardsandshieldsinplace.
7
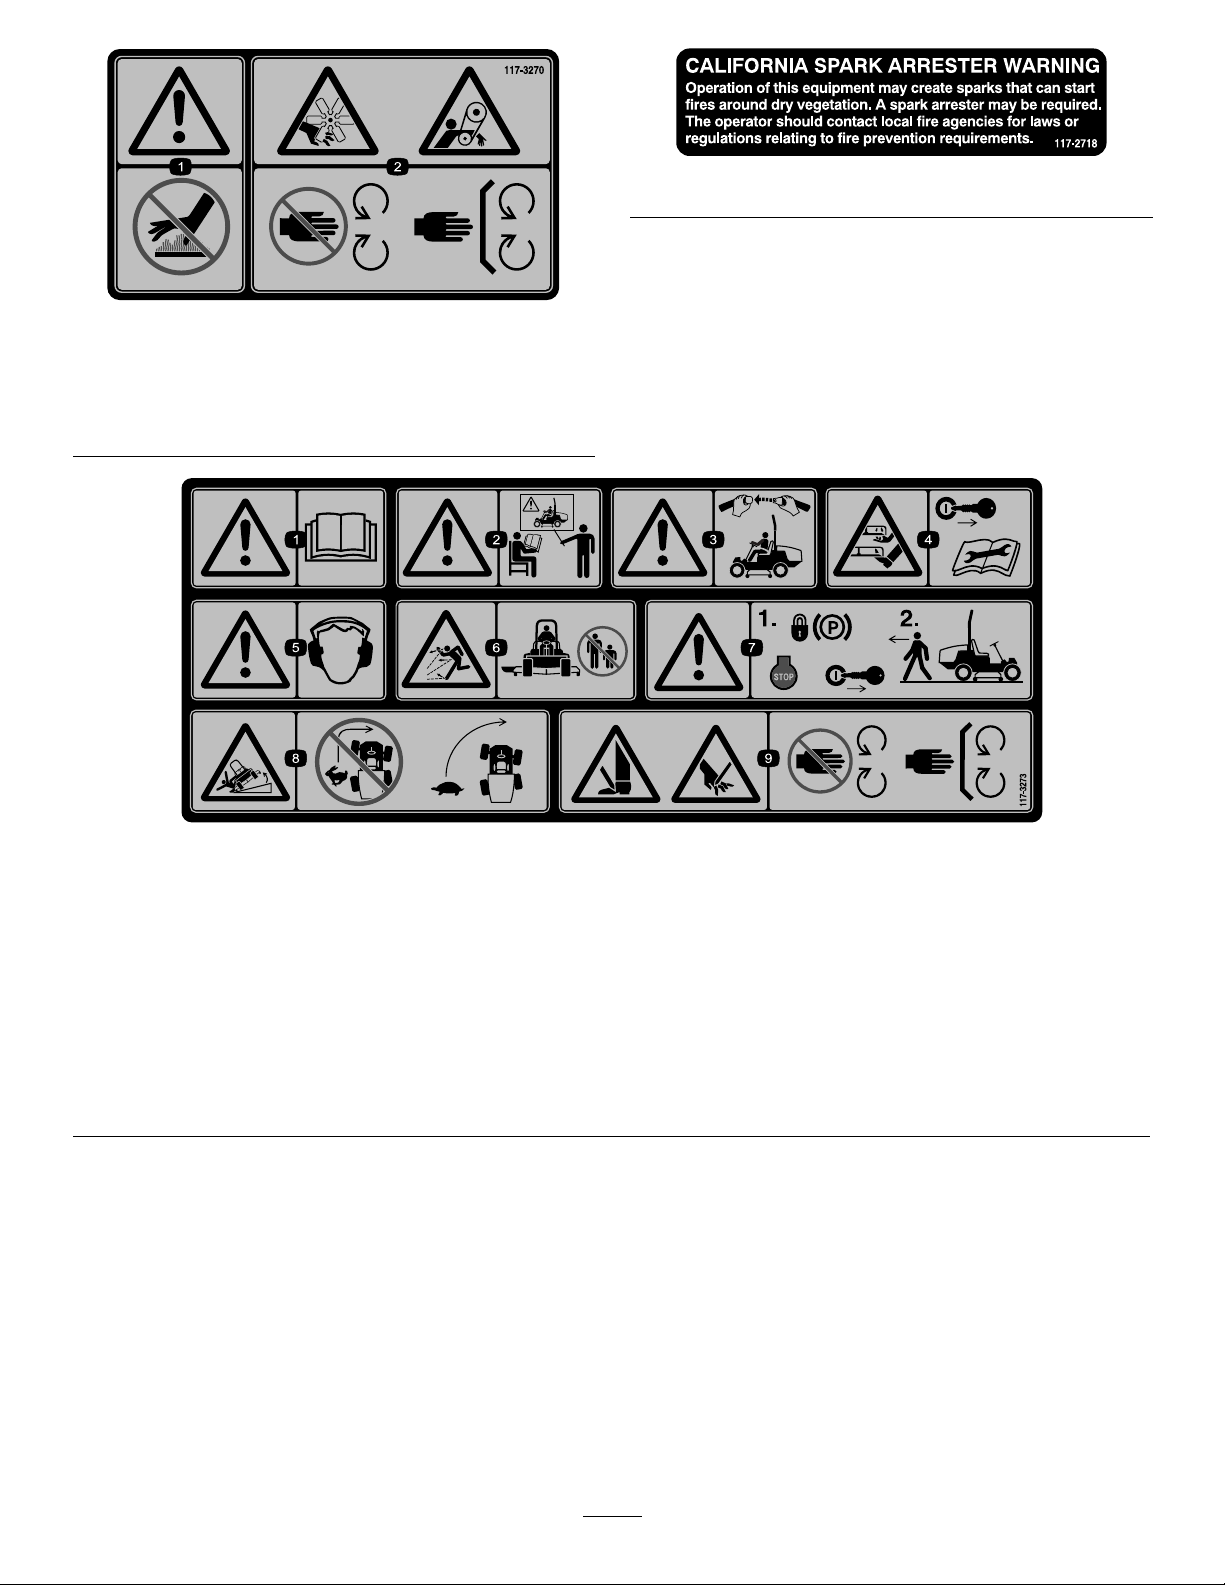
117-3270
1.Warning—donottouchthehotsurface.
2.Cutting/dismembermenthazard,hand;entanglement
hazard,belt—stayawayfrommovingparts,keepallguards
andshieldsinplace.
117–2718
117-3273
1.Warning—readtheOperator'sManual.6.Thrownobjecthazard—keepbystandersasafedistancefrom
2.Warning—donotoperatethismachineunlessyouaretrained.7.Warning—locktheparkingbrake,stoptheengineandremove
3.Warning—weartheseatbeltwhenseatedintheoperator's
position.
4.Cutting/dismembermenthazardofhandorfoot—removethe
ignitionkeyandreadtheinstructionsbeforeservicingor
performingmaintenance.
5.Warning—wearhearingprotection.
themachine.
theignitionkeybeforeleavingthemachine.
8.Tippinghazard—lowerthecuttingunitwhendrivingdown
slopes;slowmachinebeforeturning,donotturnathigh
speeds
9.Cuttinghazardofhandorfoot—stayawayfrommovingparts;
keepallguardsinplace.
8

106-9206
117-3232
2Wheeldrivemodels
1.ReadtheOperator'sManualforinformationonfuses.
2.Differentiallockout—10amp
3.Engine—10amp
4.Lights,powerpoint—15amp
5.Powerswitch,engineignition—10amp
6.Lights—15amp
7.Operatorpresenceswitch—10amp
8.Computer—2amp
9.Headlights,deckactuator—10amp
1.Wheeltorquespecications
2.ReadtheOperator'sManual.
1.Inputs5.Inseat
2.Notactive
3.Hightemperatureshutdown
4.Hightemperaturewarning8.Neutral
6.PowerTake-off(PTO)10.PowerTakeOff(PTO)
7.ParkingbrakeOff11.Start
106-9290
9.Outputs13.Start
14.Power
12.EnergizetoRun(ETR)
9
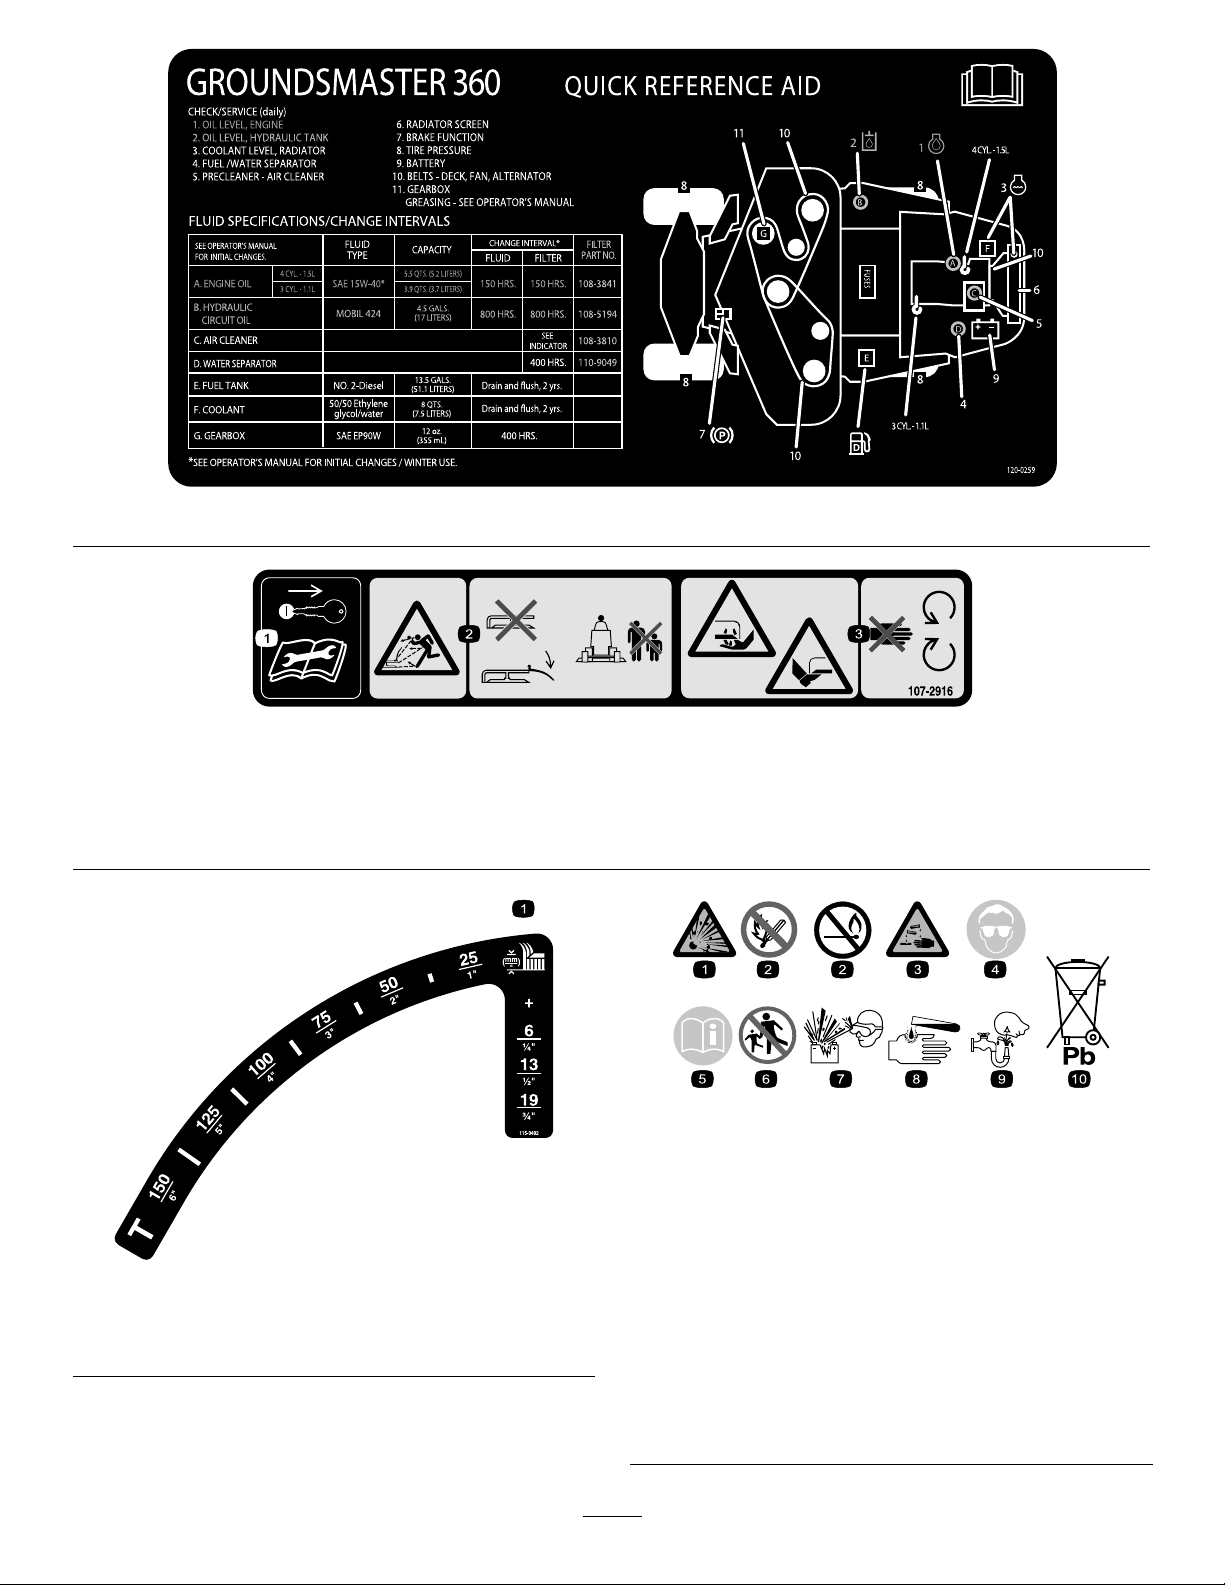
120–0259
107-2916
1.Removetheignitionkeyandreadthe
Operator'sManualbeforeservicingor
performingmaintenance.
115-0492
Non-cabmodels
1.Heightofcut(mm)
2.Thrownobjecthazard—donotoperate
themowerwiththedeectorupor
removed,keepthedeectorinplace;
keepbystandersasafedistancefrom
themachine.
1.Explosionhazard
2.Nore,opename,or
3.Causticliquid/chemical
4.Weareyeprotection9.Flusheyesimmediately
5.ReadtheOperator's
3.Cutting/dismembermenthazardof
handorfoot,mowerblade—stayaway
frommovingparts.
BatterySymbols
Someorallofthesesymbolsareonyourbattery
6.Keepbystandersasafe
distancefromthebattery.
7.Weareyeprotection;
smoking.
burnhazard
Manual.
explosivegasescan
causeblindnessandother
injuries
8.Batteryacidcancause
blindnessorsevereburns.
withwaterandgetmedical
helpfast.
10.Containslead;donot
discard.
10
120-0257
Two-wheel-drivemodels
1.Lowerdecks
2.Raisedecks7.Fast
3.Engine—stop
4.Engine—run
5.Engine—start
6.Differentiallock
8.Continuousvariable
setting
9.Slow
11

Setup
LooseParts
Usethechartbelowtoverifythatallpartshavebeenshipped.
ProcedureDescription
1
2
3
4
MediaandAdditionalParts
Description
Operator'sManual
EngineOperator'sManual
PartsCatalog
OperatorTrainingMaterial
Nopartsrequired
Nopartsrequired
Nopartsrequired
Driveshaft
Screw,5/16x1–3/4inch
Locknut,5/16inch
Rollpin,3/16x1–1/2inch
Qty.
Qty.
–
–
–
1
4
4
2
1
1
1
1
Readbeforeoperatingthemachine
Readbeforeoperatingthemachine
Usereferencepartnumbers
Viewthevideobeforeoperatingthemachine
AdjusttheROPS.
Checkthetirepressure.
Checkthehydraulicuid,engineoil,
andcoolantlevels.
Installthedriveshafttoaoptionaldeck
orQAS
Use
Use
1
AdjustingtheROPS
NoPartsRequired
Procedure
1.Removethehairpincotterpinsandthepinsfromthe
rollbar(Figure3).
2.Raisetherollbartotheuprightpositionandinstallthe
2pinsandsecurethemwiththehairpincotterpins
(Figure3).
Note:Ifyoumustlowertherollbar,pushthebar
forwardtorelievepressureonthepins,removethe
pins,lowerthebarslowly,andsecureitwiththepinsso
thatitdoesnotdamagethehood.
Figure3
1.Rollbar3.Hairpincotter
2.Pin
12
1.Parkmachineonalevelsurface,stopengine,engage
G018339
1
G018340
1
2
3
4
5
parkingbrakeandremovekeyfromtheignitionswitch.
2
CheckingtheTirePressure
NoPartsRequired
Procedure
Thetiresareoverinatedforshipping.Therefore,release
someoftheairtoreducethepressure.Thecorrectair
pressurefornon-cabmodelsis103kPa(15psi)inthefront
tiresand172kPa(25psi)inthereartires.Ifacabisinstalled
onthemachine,thefrontandreartiresshouldbeinatedto
172kPa(25psi).
3
CheckingtheFluidLevels
NoPartsRequired
WARNING
Donotstarttheengineandengagethe
PTOswitchwhenthePTOdriveshaftis
disconnectedfromthecuttingdeck.Ifthe
engineisstartedandthePTOshaftisallowed
torotate,seriouspersonalinjuryandmachine
damagecouldresult.BeforethePTOdrive
shaftisdisconnectedfromthecuttingdeck,
disconnectPTOsolenoidcoilconnector
fromwireharnesstopreventunintentional
engagementofthePTOclutch.
2.TopreventtheunintentionalengagementofthePTO
clutch,disconnectthewireharnesselectricalconnector
fromthePTOsolenoidvalvecoilconnector(Figure4).
Procedure
1.Checkthehydraulicuidlevelbeforestartingthe
engine,refertoCheckingtheHydraulicSystem(page
44).
2.Checktheengineoillevelbeforestartingtheengine,
refertoCheckingtheEngine-OilLevel(page34).
3.Checkthecoolingsystembeforestartingtheengine;
refertoCheckingtheCoolingSystem(page39).
4
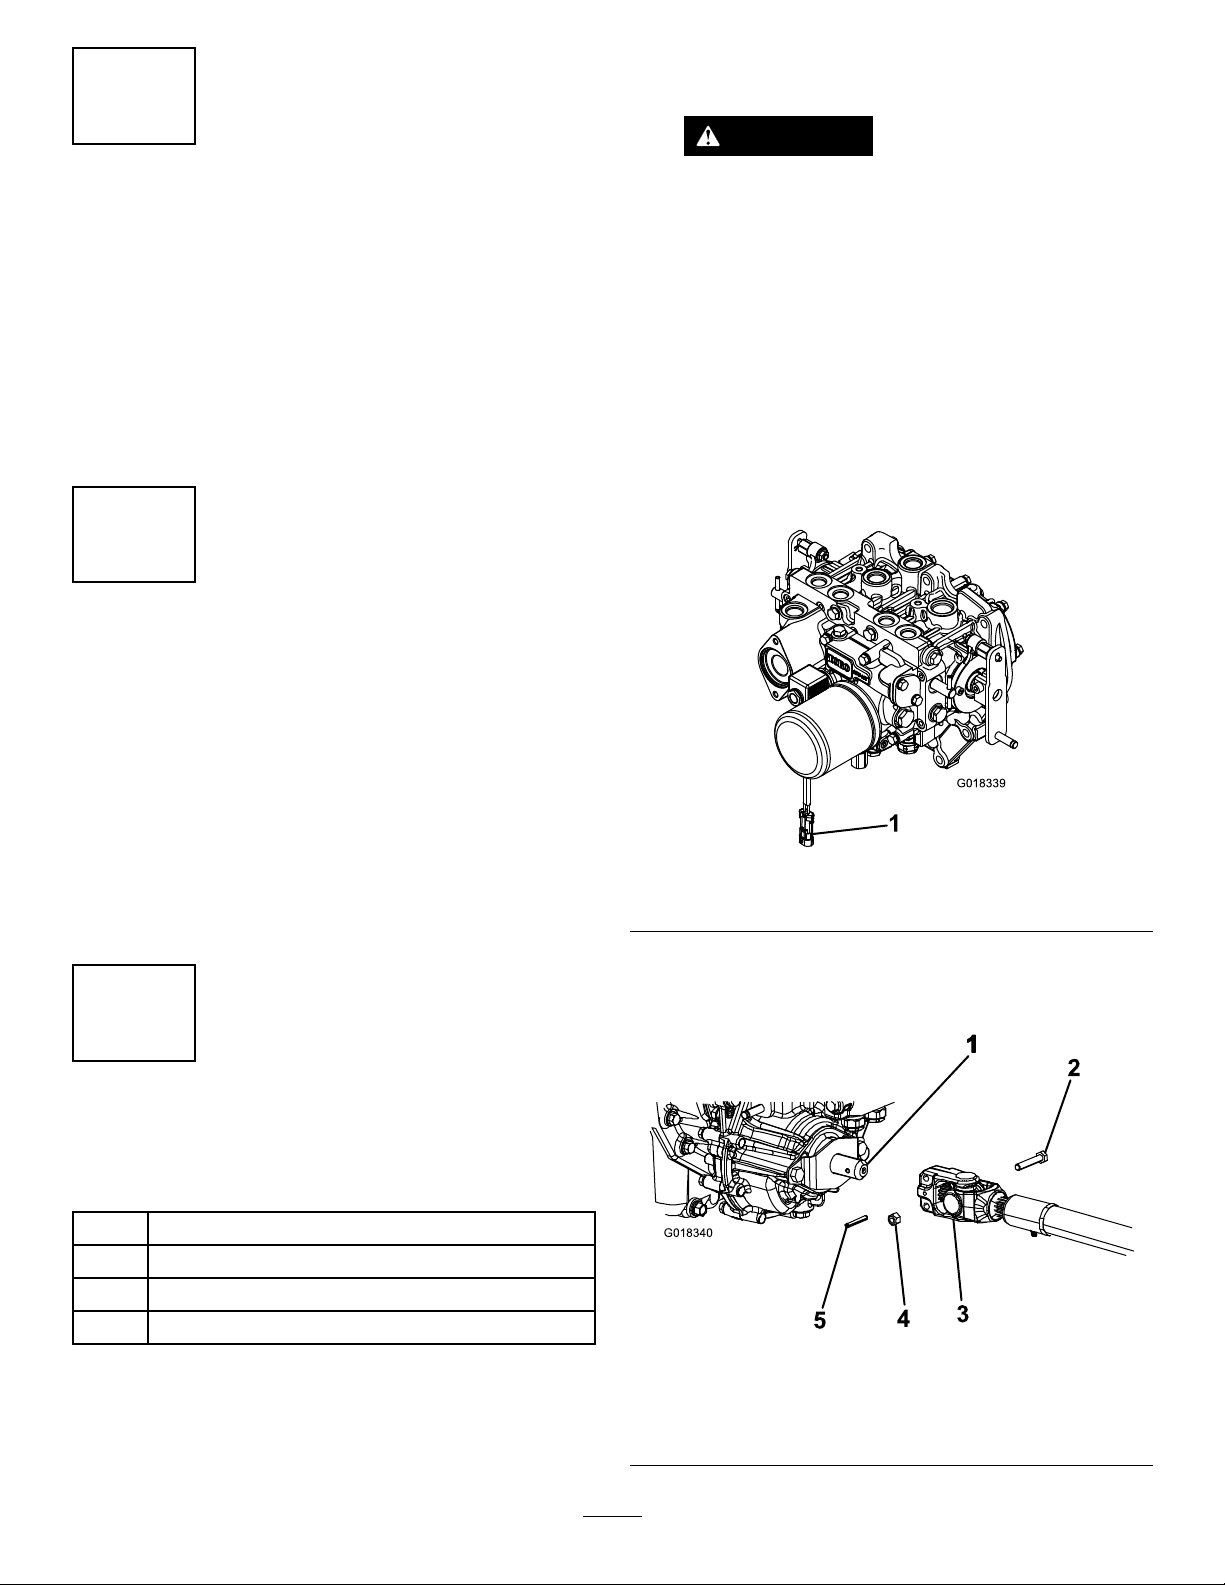
InstallingtheDriveShafttoan OptionalMowerDeckorQAS
Partsneededforthisprocedure:
1
Driveshaft
4
Screw,5/16x1–3/4inch
4
Locknut,5/16inch
2
Rollpin,3/16x1–1/2inch
Figure4
1.Wireharnesselectricalconnector
3.PositionthePTOdriveshaftunderthefrontofthe
machine.Makesurethatthedriveshaftslipshaftyoke
(Figure5)istowardthetransmissionPTOshaft.
Figure5
Procedure
Note:PTOdriveshaftinstallationiseasierifthemachineis
positionedonahoist.
1.Transmissiondriveshaft
2.Capscrew
3.PTOshaft
13
4.Locknut
5.Rollpin
4.Alignthesplineandrollpinholeofdriveshaftyoke
withthetransmissionshaft.
ProductOverview
5.SlidePTOdriveshaftendyokeontothetransmission
PTOshaft.
6.SecuretheendyokeofthePTOdriveshaftasfollows:
A.Installtherollpinintheendyokeandshaft.
B.Installthecapscrewsthruthedrivesshaftend
yoke.
C.Installandtightenthelocknutstosecuretheend
yoketothePTOshaft.Torquethelocknutsto20
to25N-m(175to225in-lb).
Note:Retaintheremainingcapscrews,locknuts
androllpintosecuretheotherendofthedrive
shafttotheattachmentgearboxshaft.
7.LubricatethePTOdriveshaftgreasettings.
8.Aftertheotherendofthedriveshaftisconnected
totheattachmentgearboxshaft,connectthewire
harnesselectricalconnectortothePTOsolenoidvalve
coilconnector(Figure4).
Controls
Becomefamiliarwithallthecontrolsbeforeyoustartthe
engineandoperatethemachine.
TractionPedal
Thetractionpedal(Figure6)controlstheforwardandreverse
operation.Pressthetopofthepedaltomoveforwardandthe
bottomtomoverearward.Groundspeeddependsonhow
faryoupressthepedal.Fornoload,maximumgroundspeed,
fullypressthepedalwhilethethrottleisintheFastposition.
Tostop,reducefootpressureonthetractionpedalandallow
ittoreturntothecenterposition.
Figure6
1.Parkingbrake4.Tractionpedal
2.Brakepedal5.Mowspeedlimiter
3.Tiltsteeringpedal
BrakePedal
Thebrakepedalisusedinconjunctionwiththebrakepedal
latchtoengageanddisengagetheparkingbrake(Figure6)T o
stopthemachine,releasethetractionpedalandallowitto
returntothecenterposition.Thebrakecanassistinstopping
inanemergencysituation.
ParkingBrake
Toengagetheparkingbrake,pushdownonthebrakepedal
andpressthetopforwardtolatch(Figure6).T oreleasethe
parkingbrake,pressthebrakepedaluntiltheparking-brake
latchretracts.
14
TiltSteeringPedal
HourMeter
Totiltthesteeringwheeltowardsyou,pressthefootpedal
down,andpullthesteeringtowertowardyoutothemost
comfortablepositionandthenreleasethepedal(Figure6).
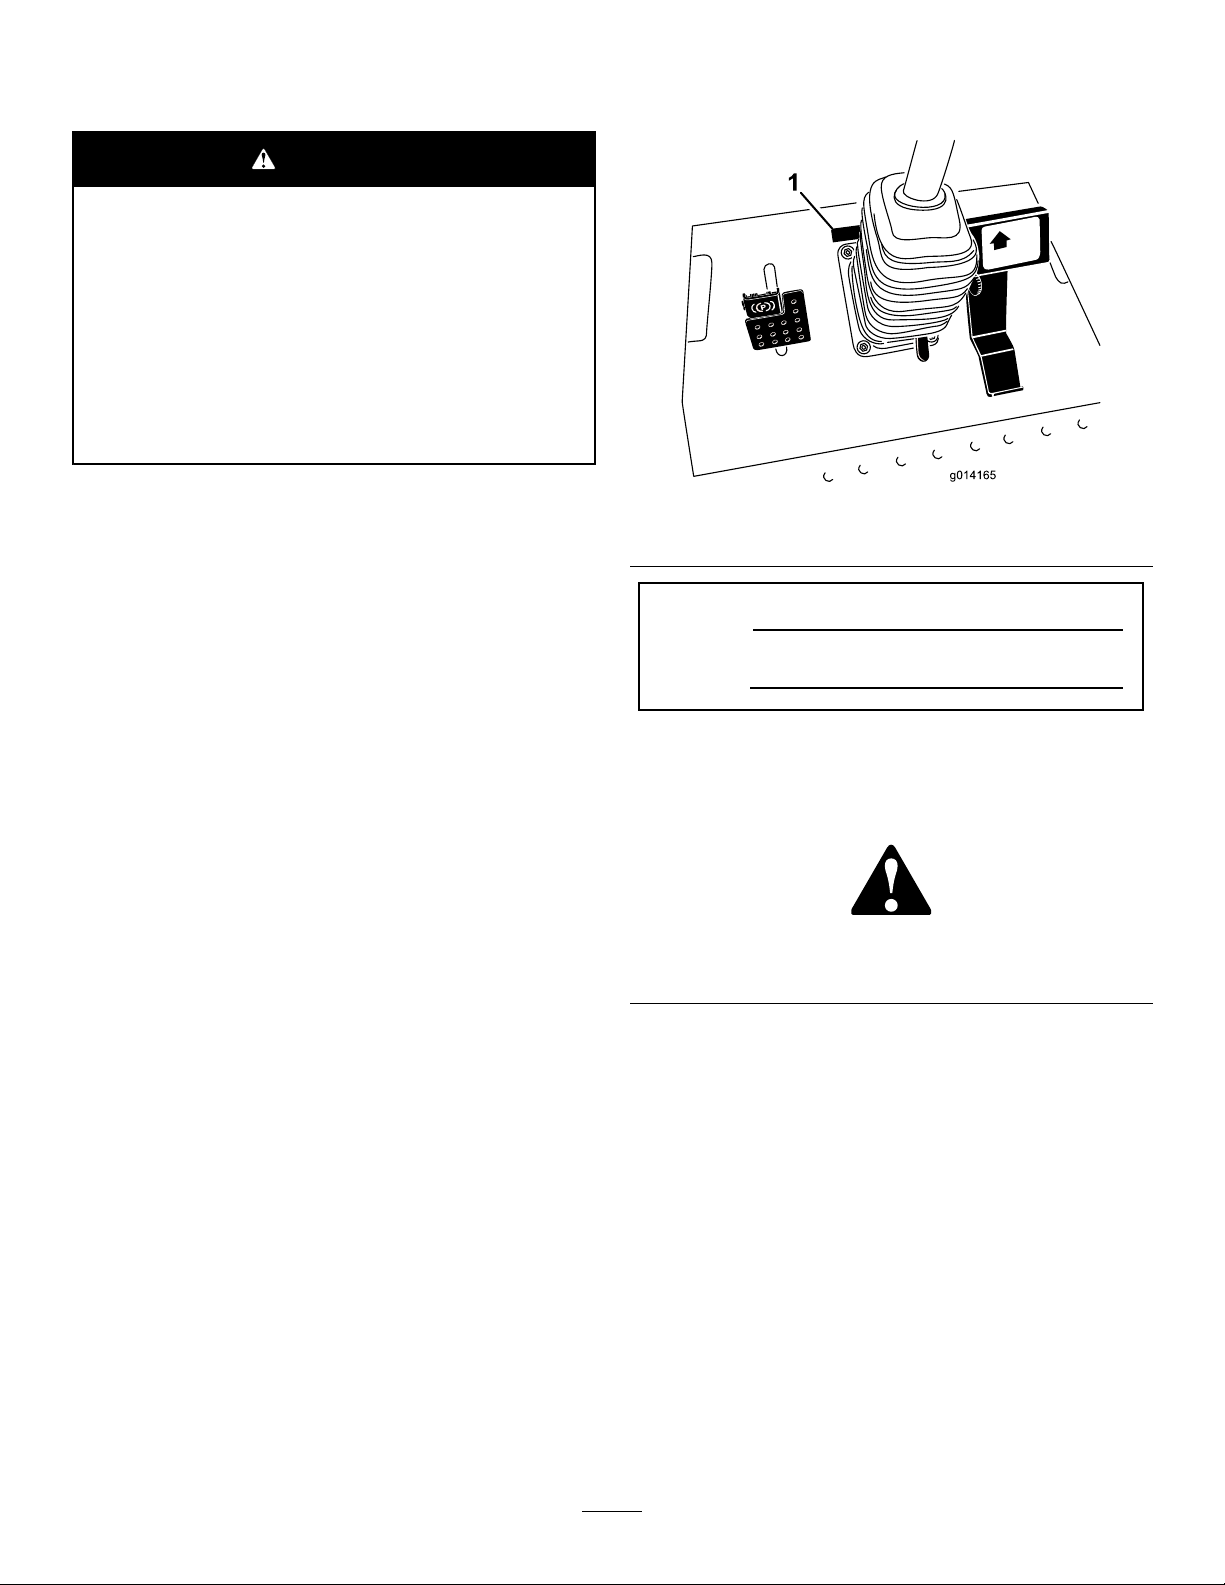
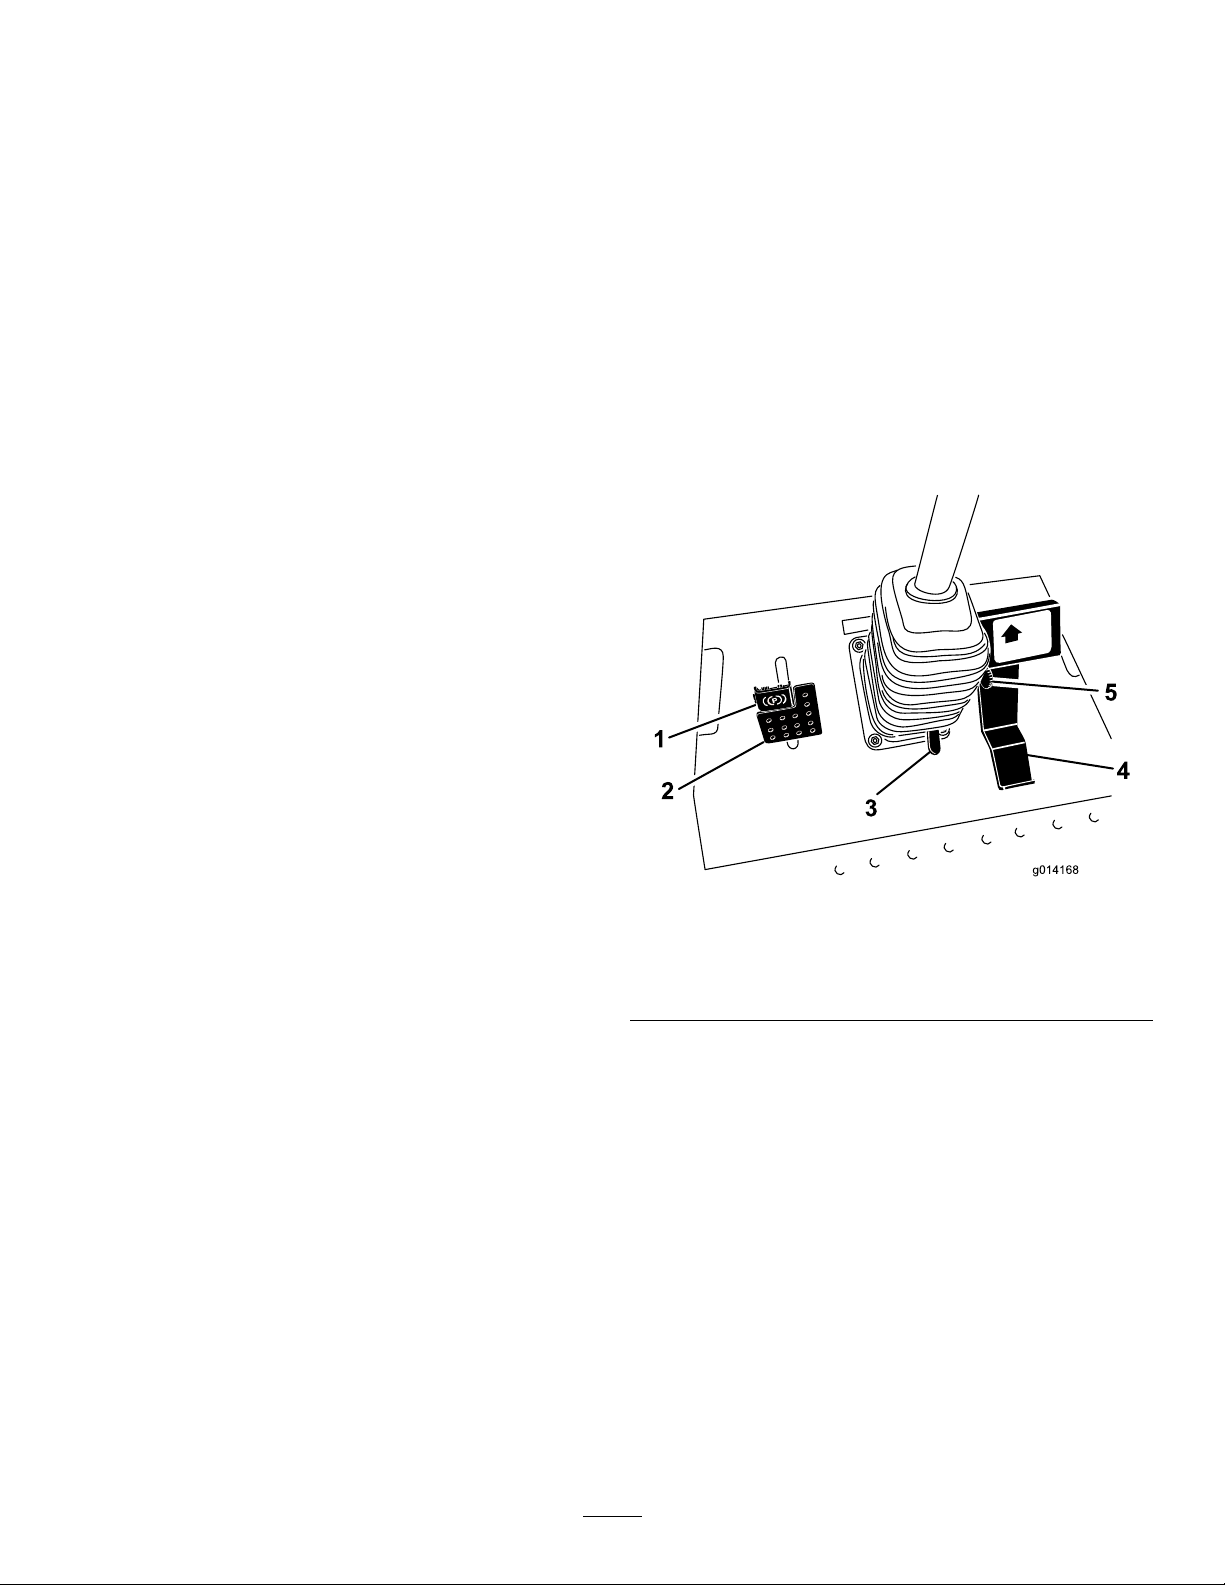
IgnitionSwitch
Theignitionswitchhasthreepositions:Off,On/Preheat,
andStart(Figure7).
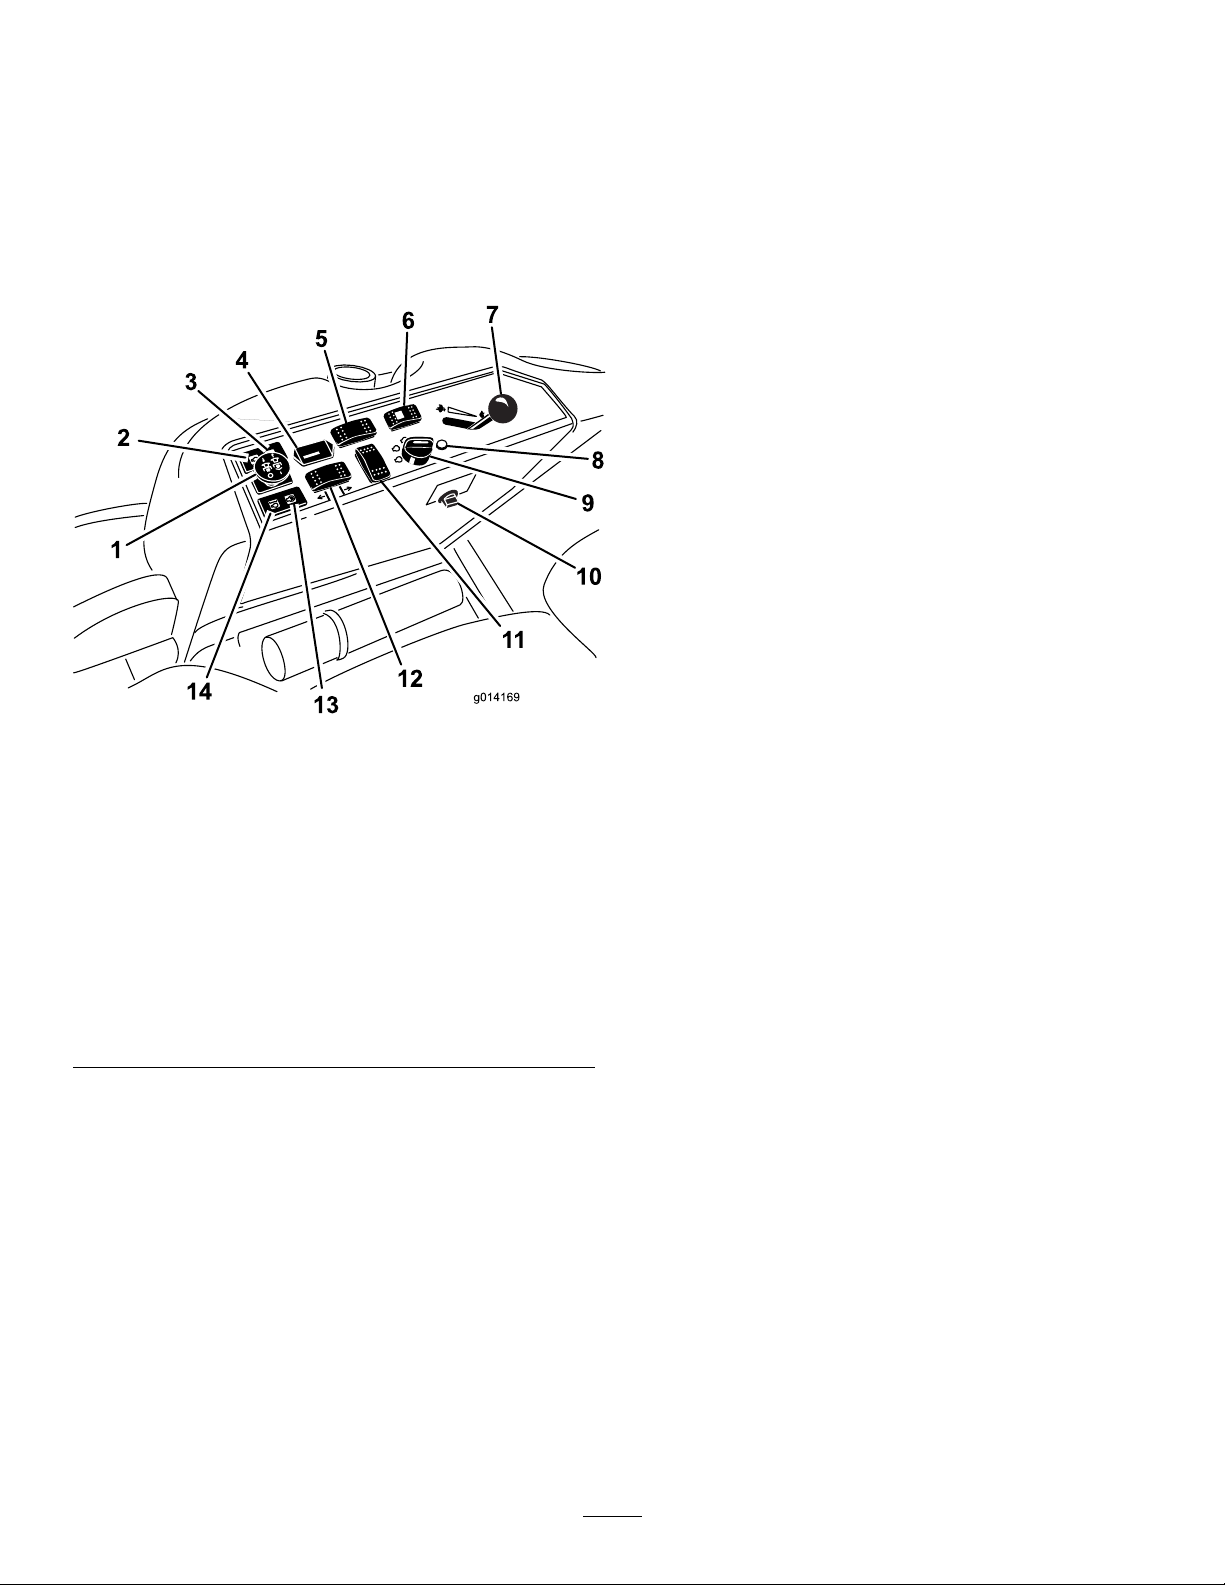
Figure7
1.Powertake-off(PTO)
Switch
2.Oil-pressure-warninglight
3.Charge-indicatorlight
4.Hourmeter
5.Differential-lockswitch
(2-wheeldriveonly)
6.Steering-selectorswitch
(4-wheeldriveonly)
7.Throttlelever14.Engine-coolant
8.Diagnosticlight(4-wheel
driveonly)
9.Ignitionswitch
10.Powerpoint
11.Optionalswitch
12.Deck-liftswitch
13.Glow-pluglight
temperature-warning
light
Thehourmeter(Figure7)recordsthenumberofhoursthe
enginehasoperated.Itoperateswhenthekeyswitchisin
theRunposition.Usethesetimesforschedulingregular
maintenance.
DifferentialLockSwitch
(2-wheel-drive-modelsonly)
Pressthefrontoftheswitchandholditdowntoengagethe
differentiallock(Figure7).
GlowPlugLight(OrangeLight)
Theglowplugindicatorlight(Figure7)turnsonwhenthe
ignitionswitchisturnedtotheOnposition.Itremainslit
for6seconds.Whenthelightturnsoff,theengineisready
tobestarted.
Engine-Coolant-Temperature-Warning
Light
Thislightglowsandthecuttingbladesstopiftheengine
coolanttemperatureishigh(Figure7).Ifthemachineisnot
stoppedandthecoolanttemperaturerisesanother-7°C(20°
F),theenginewillstop.
Important:Ifthemowerdeckshutsdownandthe
temperaturewarninglightison,pushPTOknobdown,
drivetoasafeatarea,movethethrottlelevertothe
Slowposition,allowthetractionpedaltomovetothe
neutralposition,andengagetheparkingbrake.Allow
theenginetoidleforseveralminuteswhileitcoolstoa
safelevel.Stoptheengineandcheckthecoolingsystem;
refertoCheckingtheCoolingSystem.
ChargeIndicator
Illuminateswhenthechargingsystemcircuitmalfunctions
(Figure7).
ThrottleLever
Thethrottlelever(Figure7)controlsthespeedoftheengine.
MovingthethrottleleverforwardtowardtheFastposition
increasestheenginespeed.Movingitrearwardtowardthe
Slowpositiondecreasestheenginespeed.Thethrottle
controlsthespeedofthebladesand,inconjunctionwiththe
tractionpedal,controlsgroundspeedofthemachine.Always
runthemachinewiththethrottleintheFastpositionwhen
cuttinggrass.
PowerTake-off(PTO)Switch
Thepowertake-off(PTO)switchstartsandstopsthemower
blades(Figure7).
Oil-Pressure-WarningLight
Theoilpressurewarninglight(Figure7)glowswhenthe
oilpressureintheenginedropsbelowasafelevel.Iflow
oilpressureeveroccurs,stoptheengineanddeterminethe
cause.Repairthedamagebeforestartingtheengineagain.
FuelGauge
Thefuelgauge(Figure8)indicatesthefuellevelremaining
inthefueltank.
15
 Loading...