

Page 1
Greensmaster ® 3100/3050
Preface
This publication provides the service technician with
information for troubleshooting, testing, and repair of
major systems and components on the
Greensmaster 3100 and 3050.
REFER TO THE TRACTION UNIT, CUTTING UNIT
AND ACCESSORY OPERATOR’S MANUALS FOR
OPERATING, MAINTENANCE AND ADJUSTMENT
INSTRUCTIONS. Space is provided at the end
of Chapter 2 in this publication to insert the Operator’s
Manuals and Parts Catalogs for your machine. Replacement Operator’s Manuals are available by sending complete Model and Serial Number of traction unit and
cutting unit to:
The Toro Company
8111 Lyndale Avenue South
Minneapolis, MN 55420
The Toro Company reserves the right to change product
specifications or this publication without notice.
Part No. 92784SL, Rev. E
Service Manual
This safety symbol means DANGER, WARNING, or CAUTION, PERSONAL SAFETY INSTRUCTION. When you see this symbol,
carefully read the instructions that follow.
Failure to obey the instructions may result in
personal injury.
NOTE: A NOTE will give general information about the
correct operation, maintenance, service, testing or repair of the machine.
IMPORTANT: The IMPORTANT notice will give important instructions which must be followed to prevent damage to systems or components on the
machine.
© The Toro Company - 1991, 1998, 2002, 2004, 2005
Page 2

This page is intentionally blank.
Page 3

Table Of Contents
Chapter 1 - Safety
Safety Instructions . . . . . . . . . . . . . . . . . . . . . . . . 1 - 1
Chapter 2 - Product Records and Manuals
Product Records. . . . . . . . . . . . . . . . . . . . . . . . . . 2 - 1
Equivalents and Conversions. . . . . . . . . . . . . . . . 2 - 2
Torque Specifications . . . . . . . . . . . . . . . . . . . . . . 2 - 3
Maintenance Interval Charts. . . . . . . . . . . . . . . . . 2 - 4
Equipment Operational and
Service Historical Report Record
Chapter 3 - Engine
Specifications . . . . . . . . . . . . . . . . . . . . . . . . . . . . 3 - 1
Adjustments . . . . . . . . . . . . . . . . . . . . . . . . . . . . . 3 - 2
Repairs . . . . . . . . . . . . . . . . . . . . . . . . . . . . . . . . . 3 - 5
BRIGGS & STRATTON VANGUARD V-TWIN OHV
SERVICE & REPAIR INSTRUCTIONS
Chapter 4 - Hydraulic System
Specifications . . . . . . . . . . . . . . . . . . . . . . . . . . . . 4 - 2
General Information . . . . . . . . . . . . . . . . . . . . . . . 4 - 3
Hydraulic Flow Diagrams . . . . . . . . . . . . . . . . . . . 4 - 5
Hydraulic Schematic. . . . . . . . . . . . . . . . . . . . . . 4 - 12
Special Tools . . . . . . . . . . . . . . . . . . . . . . . . . . . 4 - 13
Troubleshooting . . . . . . . . . . . . . . . . . . . . . . . . . 4 - 16
Testing . . . . . . . . . . . . . . . . . . . . . . . . . . . . . . . . 4 - 27
Adjustments . . . . . . . . . . . . . . . . . . . . . . . . . . . . 4 - 36
Repairs . . . . . . . . . . . . . . . . . . . . . . . . . . . . . . . . 4 - 39
Chapter 5 - Electrical System
Wiring Schematic . . . . . . . . . . . . . . . . . . . . . . . . . 5 - 2
Turf Guardian Leak Detection System . . . . . . . . . 5 - 3
Special Tools. . . . . . . . . . . . . . . . . . . . . . . . . . . . . 5 - 4
Troubleshooting . . . . . . . . . . . . . . . . . . . . . . . . . . 5 - 6
Testing . . . . . . . . . . . . . . . . . . . . . . . . . . . . . . . . . 5 - 9
Repairs . . . . . . . . . . . . . . . . . . . . . . . . . . . . . . . . 5 - 13
Chapter 6 - Wheels, Steering and Brakes
Specifications . . . . . . . . . . . . . . . . . . . . . . . . . . . . 6 - 2
Adjustments . . . . . . . . . . . . . . . . . . . . . . . . . . . . . 6 - 3
Repairs . . . . . . . . . . . . . . . . . . . . . . . . . . . . . . . . . 6 - 4
Chapter 7 - 4 Bolt Adjust Cutting Units
Specifications . . . . . . . . . . . . . . . . . . . . . . . . . . . . 7 - 2
Special Tools. . . . . . . . . . . . . . . . . . . . . . . . . . . . . 7 - 3
Troubleshooting . . . . . . . . . . . . . . . . . . . . . . . . . . 7 - 5
Set Up and Adjustments . . . . . . . . . . . . . . . . . . . . 7 - 7
Repairs . . . . . . . . . . . . . . . . . . . . . . . . . . . . . . . . 7 - 15
Chapter 8 - Single Point Adjust Cutting Units
Specifications . . . . . . . . . . . . . . . . . . . . . . . . . . . . 8 - 3
Special Tools. . . . . . . . . . . . . . . . . . . . . . . . . . . . . 8 - 4
Troubleshooting . . . . . . . . . . . . . . . . . . . . . . . . . . 8 - 6
Set Up and Adjustments . . . . . . . . . . . . . . . . . . . . 8 - 6
Repairs . . . . . . . . . . . . . . . . . . . . . . . . . . . . . . . . 8 - 19
Chapter 9 - Grooming Reel Cutting Units
Greensmaster
®
3100
Specifications . . . . . . . . . . . . . . . . . . . . . . . . . . . . 9 - 3
Special Tools. . . . . . . . . . . . . . . . . . . . . . . . . . . . . 9 - 4
Troubleshooting . . . . . . . . . . . . . . . . . . . . . . . . . . 9 - 6
Set Up and Adjustments . . . . . . . . . . . . . . . . . . . 9 - 10
Repairs . . . . . . . . . . . . . . . . . . . . . . . . . . . . . . . . 9 - 21
Chapter 10 - Dual Point Adjust Cutting Units
Specifications . . . . . . . . . . . . . . . . . . . . . . . . . . . 10 - 2
Special Tools . . . . . . . . . . . . . . . . . . . . . . . . . . . 10 - 3
Troubleshooting . . . . . . . . . . . . . . . . . . . . . . . . . 10 - 5
Setup and Adjustments . . . . . . . . . . . . . . . . . . . .10 - 7
Repairs . . . . . . . . . . . . . . . . . . . . . . . . . . . . . . . . 10 - 8
Rev. D
Page 4

This page is intentionally blank.
Page 5

Table of Contents
Chapter 1
Safety
SAFETY INSTRUCTIONS . . . . . . . . . . . . . . . . . . . . 1
Before Operating. . . . . . . . . . . . . . . . . . . . . . . . . 1
While Operating. . . . . . . . . . . . . . . . . . . . . . . . . . 2
Safety Instructions
The Greensmaster 3100 has been tested and certified
for compliance with the B71.4-1984 specifications of the
American National Standards Institute (ANSI) for riding
mowers when 40 lbs. of ballast is added to rear wheel.
Hazard control and accident prevention are dependent
upon the awareness, concern, and proper training of the
personnel involved in the operation, transport, maintenance and storage of the machine. Improper use or
maintenance of the machine can result in personal injury or death. To reduce the potential for injury or death,
comply with the following safety instructions.
Before Operating
While Doing Maintenance, Troubleshooting,
Testing, Adjustments or Repairs . . . . . . . . . . . . . 3
CAUTION
Obey the following safety instructions. Read
and understand these instructions before operating the Greensmaster 3100 or doing maintenance, troubleshooting, testing,
adjustments or repairs. Failure to comply with
the safety instructions may result in personal injury.
1. Read and understand the Operator’s Manual before
starting, operating, maintaining or repairing the machine. Replacement Operator’s Manuals are available
by sending complete Model and Serial Number of traction unit and cutting units to:
The Toro Company
8111 Lyndale Avenue South
Minneapolis, MN 55420
Use the Model and Serial Number when referring to your
machine. If you have questions about this Service Information, please contact:
The Toro Company
Commercial Service Department
8111 Lyndale Avenue South
Minneapolis, MN 55420
2. Never allow children to operate the machine or adults
to operate it without proper instruction.
Greensmaster®3100 Page 1 - 1 Safety Instructions
3. Become familiar with the controls and know how to
stop the machine and engine quickly.
4. Keep all shields, safety devices and decals in place.
If a shield, safety device or decal is defective or damaged, repair or replace it before operating the machine.
5. Always wear substantial shoes. Do not operate machine wearing sandals, tennis shoes, sneakers or when
barefoot. Do not wear loose fitting clothing that could get
caught in moving parts and possibly cause personal
injury.
6. Wearing safety glasses, safety shoes, long pants and
a helmet is advisable and required by some local ordinances and insurance regulations.
7. Make sure the work area is clear of objects which
might be picked up and thrown by the reels.
Page 6

8. Do not carry passengers on the machine. Keep
everyone, especially children and pets, away from the
areas of operation.
9. Since gasoline is highly flammable, handle it
carefully:
A. Use an approved fuel container.
While Operating
B. Do not remove fuel tank cap while engine is hot
or running.
C. Do not smoke while handling fuel.
D. Fill fuel tank outdoors and only to within an inch
(25 mm) from the top of the tank, not the filler neck.
Do not overfill.
E. Wipe up any spilled fuel.
10. Do not run engine in a confined area without adequate ventilation. Exhaust is hazardous and could be
deadly.
11. Sit on the seat when starting and operating the
machine.
12. Check interlock switches daily for proper operation.
If a switch fails, replace it before operating the machine.
The interlock system is for your protection, so do not
bypass it. Replace all interlock switches every two
years.
13. To start the engine:
A. Sit on the seat, depress lift pedal and release it to
disengage cutting units.
B. Verify that traction system is in neutral.
C. Verify that parking brake is set.
D. Proceed to start the engine.
14. Using the machine demands attention. To prevent
loss of control:
A. Mow only in daylight or when there is good artificial light.
B. Watch for holes or other hidden hazards.
C. Be extremely careful when operating close to
sand traps, ditches, creeks, steep hillsides or other
hazards.
D. Reduce speed when making sharp turns. Avoid
sudden stops and starts.
E. Look to the rear to assure no one is behind the
machine before backing up.
F. Watch for traffic when near or crossing roads.
Always yield the right-of-way.
G. Apply the service brakes when going down hill to
keep forward speed slow and to maintain control of
the machine.
15. Keep hands, feet and clothing away from moving
parts and the reels. The grass baskets must be in place
during operation of the reels or thatchers for maximum
safety. Shut the engine off before emptying the baskets.
16. Raise cutting units when driving from one work area
to another.
17. Do not touch engine, muffler or exhaust pipe while
engine is running or soon after it is stopped. These areas
could be hot enough to cause burns.
18. Stay clear of rotating screen at side of engine to
prevent direct contact with body or clothing.
19. If cutting unit strikes a solid object or vibrates abnormally, stop immediately, turn engine off, set parking
brake and wait for all motion to stop. Inspect for damage.
If reel or bedknife is damaged, repair or replace it before
operating.
20. Before getting off the seat:
A. Move shift selector to N (neutral).
B. Depress the lift pedal to raise the cutting units,
wait for the reels to stop spinning and release
lift pedal.
C. Set the parking brake.
E. Stop engine and remove key from switch.
21. Traverse slopes carefully. Do not start or stop suddenly when traveling uphill or downhill.
22. Operator must be skilled and trained in how to drive
on hillsides. Failure to use caution on slopes or hills may
cause loss of control and vehicle to tip or roll, possibly
resulting in personal injury or death.
23. If engine stalls or loses headway and cannot make
it to the top of a slope, do not turn machine around.
Always back slowly straight down the slope.
24. DO NOT TAKE AN INJURY RISK! When a person
or pet appears unexpectedly in or near the mowing area,
STOP MOWING. Careless operation, combined with
terrain angles, ricochets, or improperly positioned
guards can lead to thrown object injuries. Do not resume
mowing until area is cleared.
25. Whenever machine is left unattended, make sure
cutting units are fully raised and reels are not spinning,
key is removed from ignition switch and parking brake
is set.
Safety Instructions Page 1 - 2 Greensmaster
®
3100
Page 7

While Doing Maintenance, Troubleshooting, Testing, Adjustments or Repairs
26. Before servicing or making adjustments to the machine, stop the engine, remove key from ignition switch
and pull wires off spark plugs to prevent accidental
starting of the engine.
27. Make sure the entire machine is properly maintained
and in good operating condition. Frequently tighten all
nuts bolts. and screws.
28. Make sure all hydraulic line connectors are tight and
all hydraulic hoses and lines are in good condition
before applying pressure to the system.
29. Keep body and hands away from pin hole leaks or
nozzles that eject high pressure hydraulic fluid. Use
cardboard or paper to find hydraulic leaks. Hydraulic
fluid escaping under pressure can penetrate the skin
and cause injury. Fluid accidentally injected into the skin
must be surgically removed within a few hours by a
doctor or gangrene may occur.
30. Before disconnecting or performing any work on the
hydraulic system, all pressure in system must be relieved by stopping engine and lowering cutting units and
attachments to the ground.
31. To reduce potential fire hazard, keep engine area
free of excessive grease, grass, leaves and dirt. Do not
use flammable solvents for cleaning parts. Do not use
diesel fuel, kerosene or gasoline.
32. If the engine must be running to perform an inspection or procedure, use extreme caution. Always use two
people, with the operator at the controls able to see the
person doing the inspection or procedure. Keep hands,
feet, clothing, and body away from cutting units and
other moving parts.
33. Do not overspeed the engine by changing governor
settings. Maximum governed engine speed should be
2850 rpm.
34. Shut engine off before checking or adding oil to the
engine crankcase.
35. Be sure you understand a service procedure before
working on the machine. Unauthorized modifications to
the machine may impair the function, safety and life of
the machine. If major repairs are ever needed, or assistance is desired, contact your TORO Distributor.
36. Wear safety glasses, goggles or a face shield to
prevent possible eye injury when using compressed air
for cleaning or drying components.
37. When changing attachments or performing other
service, use the correct blocks and hoists. Always use
jackstands to safely support the machine when it is
raised by a jack or hoist.
38. Do not use your hand to prevent cutting unit reel
from turning while servicing; this can result in personal
injury. Use a 1/2 in. thick x 3 in. wide x 8 in. long piece
of hardwood inserted into front of cutting unit between
reel blades.
39. For optimum performance and safety, use genuine
Toro replacement parts and accessories. Replacement
parts and accessories made by other manufacturers
could be dangerous and my void the product warranty
of The Toro Company.
Greensmaster
®
3100 Page 1 - 3 Safety Instructions
Page 8

Safety Instructions Page 1 - 4 Greensmaster®3100
Page 9

Table of Contents
Rev. D
Chapter 2
Product Records and Manuals
PRODUCT RECORD FORM . . . . . . . . . . . . . . . . . . 1
EQUIVALENTS AND CONVERSIONS . . . . . . . . . . 2
Decimal and Millimeter Equivalents . . . . . . . . . . 2
U.S. to Metric Conversions . . . . . . . . . . . . . . . . . 2
Product Records
Insert Operator's Manual and Parts Catalog for your
Greensmaster 3100 or 3050 at the end of this chapter.
Refer to Operator's Manual for recommended
maintenance intervals. Additionally, insert Installation
Instructions, Operator's Manuals and Parts Catalogs for
any accessories that have been installed on your
Greensmaster 3100 or 3050 at the end of this section.
TORQUE SPECIFICATIONS . . . . . . . . . . . . . . . . . . 3
Capscrew Markings and Torque Values - U.S. . . 3
Capscrew Markings and Torque Values - Metric . 3
Greensmaster®3100 Page 2 - 1 Product Records
Rev. B
Page 10

Equivalents and Conversions
Decimal and Millimeter Equivalents
_________________________________________________________ __________________________________________
Fractions Decimals mm Fractions Decimals mm
_________________________________________________________ __________________________________________
1/64 0.015625 — 0.397 33/64 0.515625 — 13.097
1/32 ––––– 0.03125 — 0.794 17/32 –––– 0.53125 — 13.494
3/64 0.046875 — 1.191 35/64 0.546875 — 13.891
1/16 –––––––––––– 0.0625 — 1.588 9/16 –––––––––––– 0.5625 — 14.288
5/64 0.078125 — 1.984 37/64 0.578125 — 14.684
3/32 ––––– 0.9375 — 2.381 19/32 –––– 0.59375 — 15.081
7/64 0.109275 — 2.778 39/64 0.609375 — 15.478
1/8 ––––––––––––– 0.1250 — 3.175 5/8 ––––––––––––– 0.6250 — 15.875
9/64 0.140625 — 3.572 41/64 0.640625 — 16.272
5/32 ––––– 0.15625 — 3.969 21/32 –––– 0.65625 — 16.669
11/64 0.171875 — 4.366 43/64 0.671875 — 17.066
3/16 –––––––––––– 0.1875 — 4.762 11/16 ––––––––––– 0.6875 — 17.462
13/64 0.203125 — 5.159 45/64 0.703125 — 17.859
7/32 ––––– 0.21875 — 5.556 23/32 –––– 0.71875 — 18.256
15/64 0.234375 — 5.953 47/64 0.734375 — 18.653
1/4 ––––––––––––– 0.2500 — 6.350 3/4 ––––––––––––– 0.7500 — 19.050
17/64 0.265625 — 6.747 49/64 0.765625 — 19.447
9/32 ––––– 0.28125 — 7.144 25/32 –––– 0.78125 — 19.844
19/64 0.296875 — 7.541 51/64 0.796875 — 20.241
5/16 –––––––––––– 0.3125 — 7.541 13/16 ––––––––––– 0.8125 — 20.638
21/64 0.328125 — 8.334 53/64 0.828125 — 21.034
11/32 –––– 0.34375 — 8.731 27/32 –––– 0.84375 — 21.431
23/64 0.359375 — 9.128 55/64 0.859375 — 21.828
3/8 ––––––––––––– 0.3750 — 9.525 7/8 ––––––––––––– 0.8750 — 22.225
25/64 0.390625 — 9.922 57/64 0.890625 — 22.622
13/32 –––– 0.40625 — 10.319 29/32 –––– 0.90625 — 23.019
27/64 0.421875 — 10.716 59/64 0.921875 — 23.416
7/16 –––––––––––– 0.4375 — 11.112 15/16 ––––––––––– 0.9375 — 23.812
29/64 0.453125 — 11.509 61/64 0.953125 — 24.209
15/32 –––– 0.46875 — 11.906 31/32 –––– 0.96875 — 24.606
31/64 0.484375 — 12.303 63/64 0.984375 — 25.003
1/2 ––––––––––––– 0.5000 — 12.700 1 –––––––––––––– 1.000 — 25.400
1 mm = 0.03937 in. 0.001 in. = 0.0254 mm
_________________________________________________________ __________________________________________
U.S to Metric Conversions
_________________________________________________________ __________________________________________
_________________________________________________________ __________________________________________
Linear Miles Kilometers 1.609
Measurement Yards Meters 0.9144
_________________________________________________________ __________________________________________
Area Square Miles Square Kilometers 2.59
_________________________________________________________ __________________________________________
Volume Cubic Yards Cubic Meters 0.7646
_________________________________________________________ __________________________________________
Weight Tons (Short) Metric Tons 0.9078
_________________________________________________________ __________________________________________
Pressure Pounds/Sq. In. Kilopascal 6.895
_________________________________________________________ __________________________________________
Work Foot-pounds Newton-Meters 1.356
_________________________________________________________ __________________________________________
Liquid Volume Quarts Liters 0.9463
_________________________________________________________ __________________________________________
Liquid Flow Gallons/Minute Liters/Minute 3.785
_________________________________________________________ __________________________________________
Temperature Fahrenheit Celsius 1. Subract 32
_________________________________________________________ __________________________________________
To Convert Into Multiply By
Feet Meters 0.3048
Feet Centimeters 30.48
Inches Meters 0.0254
Inches Centimeters 2.54
Inches Millimeters 25.4
Square Feet Square Meters 0.0929
Square Inches Square Centimeters 6.452
Acre Hectare 0.4047
Cubic Feet Cubic Meters 0.02832
Cubic Inches Cubic Centimeters 16.39
Pounds Kilograms 0.4536
Ounces (Avdp.) Grams 28.3495
Foot-pounds Kilogram-Meters 0.1383
Inch-pounds Kilogram-Centimeters 1.152144
Gallons Liters 3.785
o
2. Multiply by 5/9
Equivalents and Conversions Page 2 - 2 Greensmaster®3100
Page 11
Torque Specifications
Use these torque values when specific torque values
are not given. DO NOT use these values in place of
The torque values listed below are for lubricated
threads. Plated threads are considered to be lubricated.
specified values.
Capscrew Markings and Torque Values - U.S. Customary
SAE Grade Number 5 8
_______________________________________________________ _________________________________________________________________________________________________
Capscrew Head Markings
_______________________________________________________ _________________________________________________________________________________________________
Capscrew Body Size Cast Iron Aluminum Cast Iron Aluminum
_______________________________________________________ _________________________________________________________________________________________________
1/4-20 79681115912
_______________________________________________________ _________________________________________________________________________________________________
_______________________________________________________ _________________________________________________________________________________________________
_______________________________________________________ _________________________________________________________________________________________________
_______________________________________________________ _________________________________________________________________________________________________
_______________________________________________________ _________________________________________________________________________________________________
_______________________________________________________ _________________________________________________________________________________________________
_______________________________________________________ _________________________________________________________________________________________________
_______________________________________________________ _________________________________________________________________________________________________
-28 9 12 7 9 13 18 10 14
5/16-18 1520121622301824
-24 1723141924331925
3/8-16 3040202540553040
-24 3040253545603545
7/16-14 4560354565905065
-20 5065405570955575
1/2-13 709555759513075100
-20 75 100 60 80 110 150 90 120
9/16-12 100 135 80 110 140 190 110 150
-18 110 150 85 115 155 210 125 170
5/8-11 135 180 110 150 190 255 150 205
-18 155 210 120 160 215 290 170 230
3/4-10 240 325 190 255 340 460 270 365
-16 270 365 210 285 380 515 300 410
7/8-9 360 490 280 380 550 745 440 600
_______________________________________________________ _________________________________________________________________________________________________
-14 390 530 310 420 610 825 490 660
1-8 530 720 420 570 820 1100 660 890
-14 590 800 480 650 890 1200 710 960
Capscrew Torque - Grade 5 Capscrew Torque - Grade 8
ft-lb Nm ft-lb Nm ft-lb Nm ft-lb Nm
Capscrew Markings and Torque Values – Metric
Commercial Steel Class 8.8 10.9 12.9
_______________________________________________________ _________________________________________________________________________________________________
Capscrew Head Markings
_______________________________________________________ _________________________________________________________________________________________________
Thread Capscrew Torque - Class 8.8 Capscrew Torque - Class 10.9 Capscrew Torque - Class 12.9
Diameter Cast Iron Aluminum Cast Iron Aluminum Cast Iron Aluminum
mm ft-lb Nm ft-lb Nm ft-lb Nm ft-lb Nm ft-lb Nm ft-lb Nm
_______________________________________________________ _________________________________________________________________________________________________
_______________________________________________________ _________________________________________________________________________________________________
_______________________________________________________ _________________________________________________________________________________________________
_______________________________________________________ _________________________________________________________________________________________________
_______________________________________________________ _________________________________________________________________________________________________
_______________________________________________________ _________________________________________________________________________________________________
_______________________________________________________ _________________________________________________________________________________________________
_______________________________________________________ _________________________________________________________________________________________________
Greensmaster®3100 Page 2 - 3 Torque Specifications
65947914711914711
7 914 7111418 111418231418
8182514182332182527362128
10 30 40 25 30 45 60 35 45 50 70 40 55
12 55 70 40 55 75 105 60 80 95 125 75 100
14 85 115 65 90 120 160 95 125 145 195 110 150
16 130 180 100 140 175 240 135 190 210 290 165 220
18 170 230 135 180 240 320 185 250 290 400 230 310
Page 12

This page is intentionally blank.
Page 13

Table of Contents
Rev. D
Chapter 3
Engine
SPECIFICATIONS . . . . . . . . . . . . . . . . . . . . . . . . . . 1
ADJUSTMENTS. . . . . . . . . . . . . . . . . . . . . . . . . . . . 2
Throttle Control Adjustment. . . . . . . . . . . . . . . . . 2
Choke Control Adjustment . . . . . . . . . . . . . . . . . 2
Governor Adjustment. . . . . . . . . . . . . . . . . . . . . . 3
ENGINE REMOVAL AND INSTALLATION . . . . . . . . 5
Removing the Engine . . . . . . . . . . . . . . . . . . . . . 5
Installing the Engine . . . . . . . . . . . . . . . . . . . . . . 5
BRIGGS & STRATTON VANGUARD V-TWIN OHV
SERVICE & REPAIR INSTRUCTIONS
Carburetor and Speed Control Adjustment . . . . . 4
Specifications
Item Specification
___________________________________________________________________________________________
Make/Designation Briggs & Stratton Vanguard ® V-Twin OHV,
_______________________________________________________ _________________________________________________________________________________________________
Crankcase Oil Capacity See Operator's Manual
_______________________________________________________ _________________________________________________________________________________________________
Oil See Operator's Manual
_______________________________________________________ _________________________________________________________________________________________________
Fuel Unleaded Regular Gasoline
_______________________________________________________ _________________________________________________________________________________________________
High Idle Speed (no load) 2800
_______________________________________________________ _________________________________________________________________________________________________
Low Idle Speed (no load) 1400 ± 50 RPM
air cooled, gas engine with cast iron cylinder sleeves
+50
/
RPM
–100
Greensmaster®3100 Page 3 - 1 Specifications
Page 14
Adjustments
Throttle Control Adjustment (Fig. 1)
Before adjusting carburetor, make sure throttle control
is operating properly.
1. Loosen cable clamp screw securing cable to engine.
2. Move remote throttle control lever forward to FAST
position.
3. Pull firmly on throttle cable until back of swivel contacts stop.
4. Tighten cable clamp screw.
2
6
5
7
1
4
3
Figure 1
1. Throttle casing clamp screw
2. Throttle cable
3. Swivel
4. Stop
5. Choke casing clamp screw
6. Choke cable
7. Choke butterfly
Choke Control Adjustment (Fig. 1)
1. Loosen cable clamp screw securing cable to engine.
2. Move remote choke control lever forward to CLOSED
position.
3. Pull firmly on choke cable until choke butterfly is
completely closed, then tighten cable clamp screw.
Adjustments Page 3 - 2 Greensmaster®3100
Page 15
Governor Adjustment (Before starting engine)
IMPORTANT: If carburetor has been removed or
governor linkage disassembled, the governor lever,
throttle restrictor and secondary governor spring
must be adjusted before the engine is started.
Governor Lever Adjustment (Fig. 2)
All linkage must be installed to make adjustment.
Loosen governor lever bolt and nut. Push on governor
lever until throttle is wide open. DO NOT bend governor
link. Hold lever in this position and rotate governor shaft
counterclockwise as far as it will go. Hold lever and shaft
in position and torque governor lever bolt and nut to
70 in-lb.
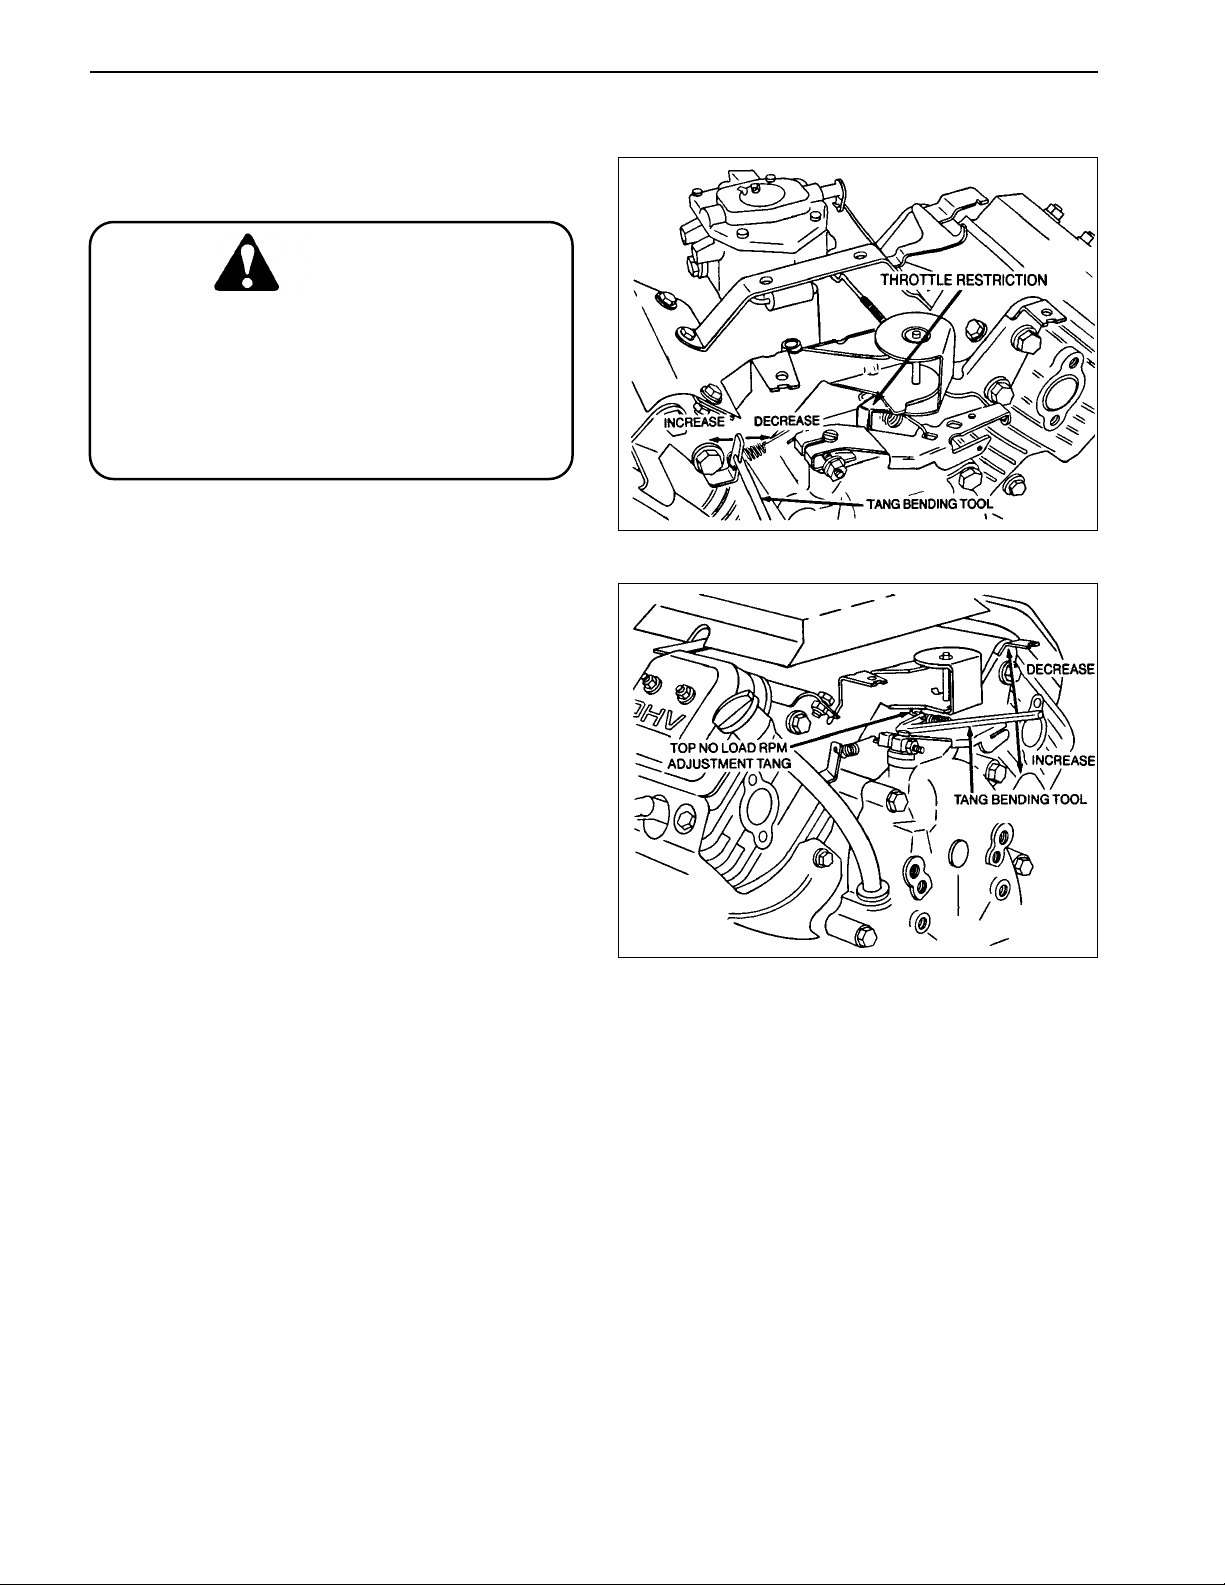
Throttle Restrictor Adjustment (Fig. 3)
Move throttle control lever to SLOW position. Hold
governor lever so that throttle lever touches idle speed
adjustment screw. Use tang bender (Briggs & Stratton
Tool #19352) and bend throttle restrictor tang so throttle
opening is limited to 1/4 in. travel when governor lever
is released.
Figure 2
Secondary Spring Adjustments (Fig. 4)
With throttle control lever in SLOW position, install
adjustment gauge (Brigss & Stratton Tool #19385) over
end of governor lever as shown. Holding gauge in
position, bend tab so that all slack is removed from
secondary governor spring between its two anchor
points. DO NOT STRETCH SPRING. Remove adjustment gauge.
Figure 3
Figure 4
Greensmaster®3100 Page 3 - 3 Adjustments
Page 16
Carburetor and Speed Control Adjustment (Fig. 5, 6)
IMPORTANT: Before carburetor and speed control
are adjusted, the throttle and choke controls must
be adjusted properly.
WARNIN G
Engine must be running during adjustment of
carburetor and speed control. To guard
against possible personal injury, shift into
neutral and engage parking brake. Keep
hands, feet, face and other parts of the body
away from the cutter blades and any rotating
engine parts.
1. Start engine and let it run at half throttle for approximately five (5) minutes to warm up.
2. Move throttle control to SLOW position. Hold governor lever so throttle lever is in the idle position (against
idle stop screw) and turn idle stop screw in or out to get
1400 ± 50 RPM. Check speed with a tachometer.
Figure 5
3. Adjust idle mixture screw:
A. Turn idle mixture screw slowly clockwise (lean
mixture) until engine speed just starts to decrease.
Note position of screw.
B. Now turn idle mixture screw slowly counterclockwise (rich mixture) until engine speed just starts to
decrease. Note position of screw.
C. Set the idle mixture screw half way between the
rich and lean settings.
4. After idle mixture has been adjusted, hold governor
lever so throttle lever is in idle position (against idle stop
screw) and adjust idle stop screw to bring engine speed
to 1200 ± RPM.
5. With governor control lever in governed idle position
(no tension on high speed spring) bend governed idle
spring anchor tang to get a governed idle speed of
1400 ± RPM (Fig. 5).
6. Move throttle control to FAST position. Bend high
speed spring anchor tang to bring engine speed to
2800 +50/–100 RPM (Fig. 6).
Figure 6
Adjustments Page 3 - 4 Greensmaster®3100
Page 17
Engine Removal and Installation
Removing the Engine
1. Disconnect the negative (–) and positive (+) battery
cables from the battery.
2. Close the fuel shut-off valve and disconnect the fuel
line.
WARNIN G
Gasoline is highly flammable. Use caution
while handling it. Do not smoke cigarettes,
cigars or pipes. Dispose of the gasoline in a
safe place immediately after draining.
Installing the Engine
1. Support the engine, align it with the engine mounts,
and instal the pump hub over the engine shaft and key.
Be sure that the key is properly positioned and aligned
with the keyway.
2. Install the engine mount bolts, washers and nuts.
3. Remove the starter cable, throttle and choke cable
and ground wire from engine.
4. Disconnect the wiring harness connector.
5. Loosen the two (2) set screws securing the pump hub
onto the engine shaft. Remove the two (2) capscrews
securing the pump to the pump mount. DO NOT disconnect the hydraulic hoses from the pump.
6. Support the engine and remove the engine mount
bolts, nuts and washers to remove the engine.
4. Re-connect the fuel line, wire connectors and the
cables to the engine and battery.
5. Make sure the crankcase is filled the correct oil. Open
the fuel shut-off valve. Fill the fuel tank. Start the engine
and check for proper operation.
3. Mount the pump to the pump housing and tighten the
set screws to secure the hub to the shaft.
Greensmaster®3100 Page 3 - 5 Engine Removal and Installation
Page 18

Engine Removal and Installation Page 3 - 6 Greensmaster®3100
Page 19

Table of Contents
Chapter 4
Hydraulic System
SPECIFICATIONS . . . . . . . . . . . . . . . . . . . . . . . . . . 2
GENERAL INFORMATION . . . . . . . . . . . . . . . . . . . 3
Hydraulic Hoses . . . . . . . . . . . . . . . . . . . . . . . . . 3
Hydraulic Fitting Installation . . . . . . . . . . . . . . . . 3
HYDRAULIC FLOW DIAGRAMS . . . . . . . . . . . . . . . 5
Traction, No. 1 Position . . . . . . . . . . . . . . . . . . . . 5
Traction, No. 2 Position . . . . . . . . . . . . . . . . . . . . 6
Traction, Reverse Position . . . . . . . . . . . . . . . . . 7
Reel Drive, Mowing Operation . . . . . . . . . . . . . . 8
Reel Drive, Lower Cutting Units . . . . . . . . . . . . . 9
Reel Drive, Raising Cutting Units . . . . . . . . . . . 10
Power Steering, R.H. Turn . . . . . . . . . . . . . . . . . 11
HYDRAULIC SCHEMATIC. . . . . . . . . . . . . . . . . . . 12
SPECIAL TOOLS . . . . . . . . . . . . . . . . . . . . . . . . . . 13
TROUBLESHOOTING . . . . . . . . . . . . . . . . . . . . . . 16
Slow Groundspeed in All Traction Selections . . 17
Slow or No Ground Speed in No. 1
and Reverse, No. 2 Appears Normal . . . . . . . . 18
No Increase in Speed From No. 1 to No. 2 . . . . 19
One or More Cutting Units Slow
or No Reel Drive Action. . . . . . . . . . . . . . . . . . . 20
All Reels Slow or Will Not Turn . . . . . . . . . . . . . 21
Mow Pedal Won’t Stay Engaged -
Reels Slow Down or Stop . . . . . . . . . . . . . . . . . 22
Cutting Unit(s) Drop During Transport. . . . . . . . 23
Cutting Units Lift Too Slowly or Not At All . . . . . 24
Lift Pedal Binding . . . . . . . . . . . . . . . . . . . . . . . 25
Center (#1) Cutting Unit
Operates In Raised Position . . . . . . . . . . . . . . . 25
Center (#1) Cutting Unit Drops Before
Front Cutting Units or Drops Too Fast. . . . . . . . 25
Steering Loss, Steering Wander or Free Play. . 26
TESTING . . . . . . . . . . . . . . . . . . . . . . . . . . . . . . . . 27
Test Hook Up No. 1, Traction Pump
Flow and Traction Relief Setting . . . . . . . . . . . . 28
Test Hook Up No. 2, Traction
Motors Mechanical Drag, Valve
Bank Leakage,Traction Motors Efficiency . . . . . 28
Test Hook Up No. 3,
Reel Drive Pump Efficiency . . . . . . . . . . . . . . . . 32
Test Hook Up No. 4, Reel Drive Motor Flow,
Reel Drive Relief Setting, Reel Motor Efficiency 33
Test Hook Up No. 5, Steering Pump
Flow and Steering Pump Relief Setting. . . . . . . 35
ADJUSTMENTS . . . . . . . . . . . . . . . . . . . . . . . . . . . 36
Lift and Mow Pedal Height Adjustment . . . . . . . 36
Traction Pedal Adjustment. . . . . . . . . . . . . . . . . 37
Rear Camshaft Adjustment . . . . . . . . . . . . . . . . 38
REPAIRS . . . . . . . . . . . . . . . . . . . . . . . . . . . . . . . . 39
Reel Motor Removal and Installation. . . . . . . . . 39
Reel Motor Shaft Seal Replacement . . . . . . . . . 39
Reel Motor Repair . . . . . . . . . . . . . . . . . . . . . . . 40
Pump Removal and Installation. . . . . . . . . . . . . 42
Pump Repair . . . . . . . . . . . . . . . . . . . . . . . . . . . 43
Control Valve Removal and Installation. . . . . . . 44
Relief Valve Removal and Installation . . . . . . . . 45
Control Valve Spool Seal Replacement. . . . . . . 46
Control Valve Internal Seal Replacement . . . . . 47
Control Valve No. 1 Spool Detent Replacement 48
Control Valve No. 4 Spool Detent Replacement 49
Lift Cylinder Removal and Installation . . . . . . . . 50
Lift Cylinder Repair . . . . . . . . . . . . . . . . . . . . . . 52
Wheel Motor Removal and Installation . . . . . . . 54
Wheel Motor Repair. . . . . . . . . . . . . . . . . . . . . . 55
Steering Cylinder Removal and Installation. . . . 58
Steering Cylinder Repair . . . . . . . . . . . . . . . . . . 59
Steering Control Unit Removal and Installation. 60
Steering Control Unit Repair . . . . . . . . . . . . . . . 61
Greensmaster®3100 Page 4 - 1 Table of Contents
Page 20

Specifications
Item Description
__________________________________________________________________________________________
Hydraulic Pump External gear type
Steering relief pressure (Greensmaster 3100) 850 psi
_________________________________________________________________ _______________________________________________________________________________________
Wheel Motor (2) Orbit rotor type
_________________________________________________________________ _______________________________________________________________________________________
Reel Motor (3) External gear type
_________________________________________________________________ _______________________________________________________________________________________
Control Valve 5 section spool type
Main and No. 1 section port relief pressure 2000 psi
No. 2 and 3 section port relief pressure 2000 psi
No. 4 (traction) section port relief pressure 1850 psi
_________________________________________________________________ _______________________________________________________________________________________
Power Steering Control Gerotor type steering control unit
_________________________________________________________________ _______________________________________________________________________________________
Hydraulic Oil See Operator's Manual
_________________________________________________________________ _______________________________________________________________________________________
Reservoir Capacity See Operator's Manual
_________________________________________________________________ _______________________________________________________________________________________
Oil filter Screw-on cartridge type, 10 micron
5 section (Greensmaster 3100)
4 section (Greensmaster 3050)
Specifications Page 4 - 2
Figure 1a
(Greensmaster 3050)
1. Hydraulic reservoir 2. Screen
Rev. D
Greensmaster
®
3100
Page 21
General Information
Hydraulic Hoses
Hydraulic hoses are subject to extreme conditions such
as, pressure differentials during operation and exposure
to weather, sun, chemicals, very warm storage conditions or mishandling during operation or maintenance.
These conditions can cause damage or premature deterioration. Some hoses, such as reel motor hoses, are
more susceptible to these conditions than others. Inspect the hoses frequently for signs of deterioration or
damage. To prevent possible problems it is recommended that hoses are replaced periodically, regardless
of condition.
When replacing a hydraulic hose, be sure that the hose
is straight (not twisted) before tightening the fittings. This
can be done by observing the imprint on the hose. Use
two wrenches; one to hold the hose straight and one to
tighten the hose swivel nut onto the fitting.
WARNING
Before disconnecting or performing any work
on the hydraulic system, all pressure in the
system must be relieved by stopping the engine and lowering the cutting units to the
ground.
Keep body and hands away from pin hole
leaks or nozzles that eject hydraulic fluid under high pressure. Use paper or cardboard,
not hands, to search for leaks. Hydraulic fluid
escaping under pressure can have sufficient
force to penetrate the skin and do serious
damage. If fluid is injected into the skin, it
must be surgically removed within a few
hours by a doctor familiar with this type of
injury or gangrene may result.
Hydraulic Fitting Installation
O-Ring Face Seal (Fig. 1, 2)
1. Make sure both threads and sealing surfaces are free
of burrs, nicks, scratches, or any foreign material.
2. Make sure the O-ring is installed and properly seated
in the groove. It is recommended that the O-ring be
replaced any time the connection is opened.
3. Lubricate the O-ring with a light coating of oil.
4. Put the tube and nut squarely into position on the face
seal end of the fitting and tighten the nut until finger tight.
5. Mark the nut and fitting body. Hold the body with a
wrench. Use another wrench to tighten the nut to the
correct flats from finger tight (F.F.F.T.). The markings on
the nut and fitting body will verify that the connection has
been tightened.
Size F.F.F.T.
4 (1/4 in. nominal hose or tubing) .75 ± .25
6 (3/8 in.) .75 ± .25
8 (1/2 in.) .75 ± .25
10 (5/8 in.) 1.00 ± .25
12 (3/4 in.) .75 ± .25
16 (1 in.) .75 ± .25
Nut
Sleeve
Seal
Body
Figure 1
Mark Nut
and Body
Finger Tight After Proper Tightening
Final
Position
Extend Line
Initial
Position
Figure 2
Greensmaster®3100 Page 4 - 3 General Information
Page 22
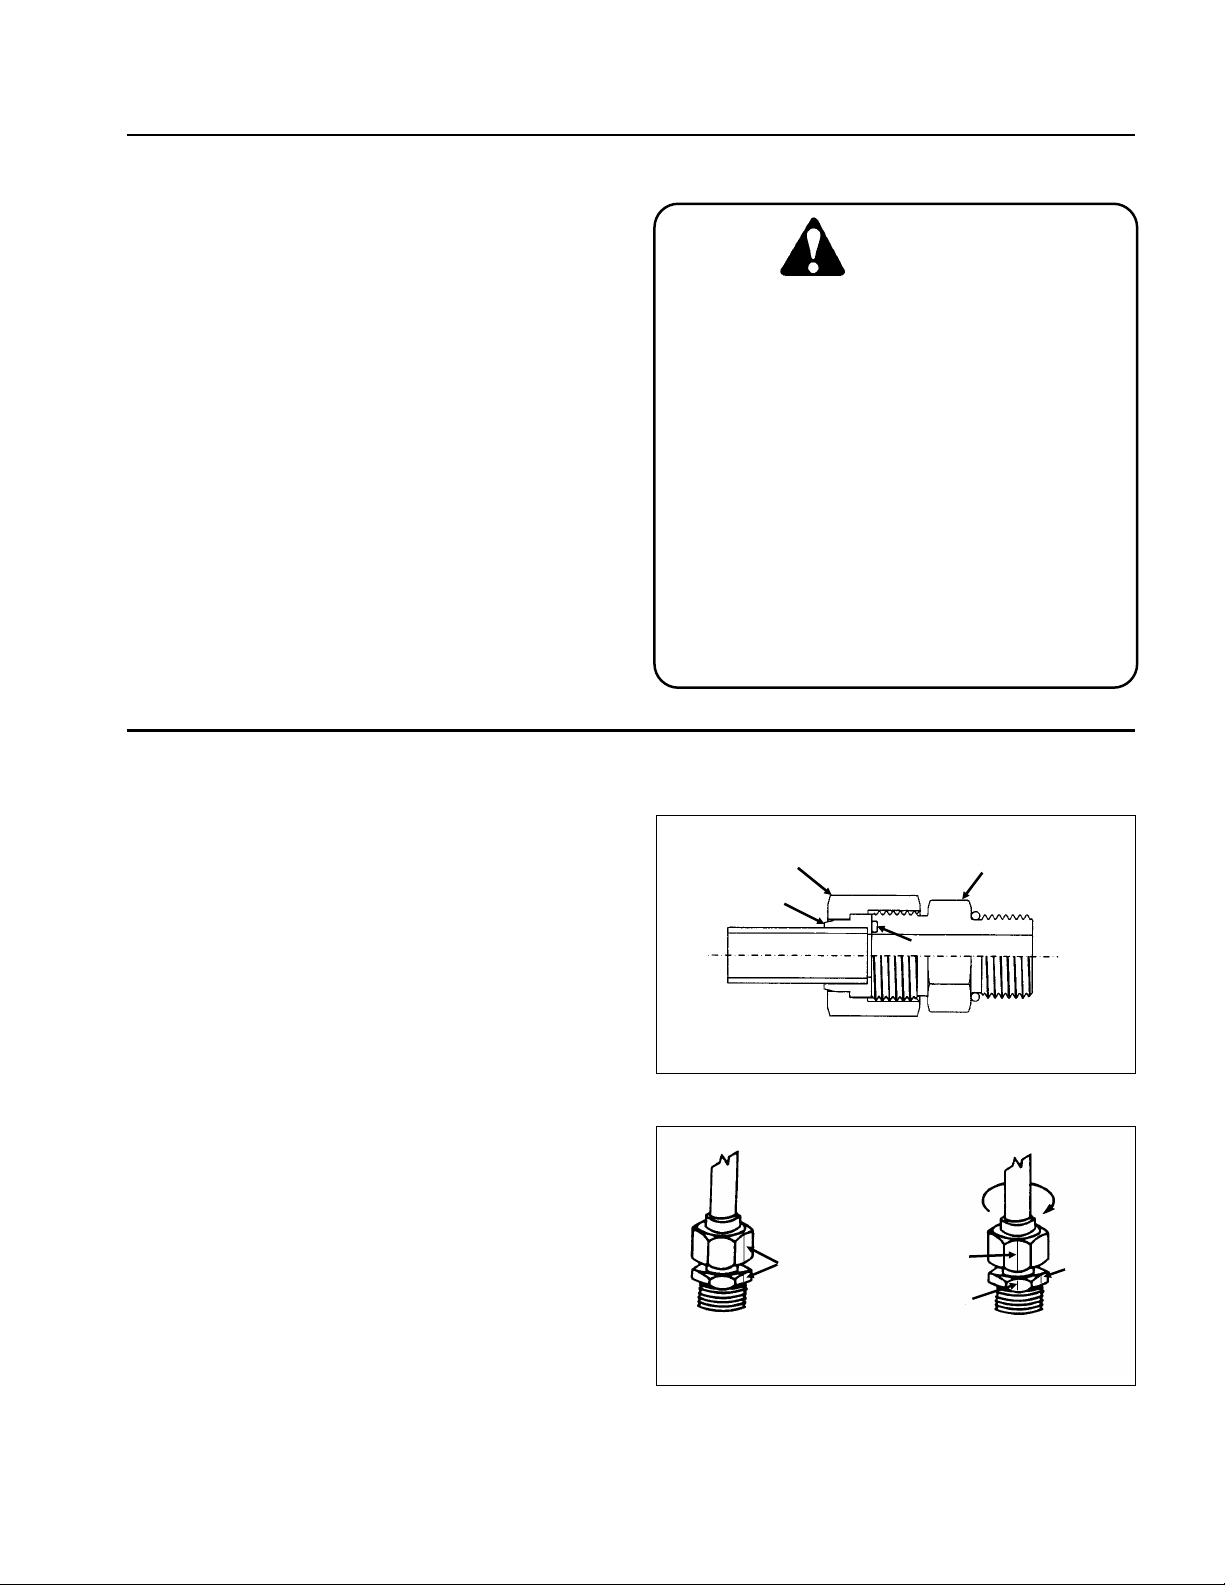
SAE Straight Thread O-Ring Port (Non-adjustable)
(Fig. 3)
1. Make sure both threads and sealing surfaces are free
of burrs, nicks, scratches, or any foreign material.
2. Always replace the O-ring seal when this type of fitting
shows signs of leakage.
3. Lubricate the O-ring with a light coating of oil.
4. Install the fitting into the port and tighten it down full
length until finger tight.
5. Tighten the fitting to the correct flats from finger tight
(F.F.F.T.).
Size F.F.F.T.
4 (1/4 in. nominal hose or tubing) 1.00 ± .25
6 (3/8 in.) 1.50 ± .25
8 (1/2 in.) 1.50 ± .25
10 (5/8 in.) 1.50 ± .25
12 (3/4 in.) 1.50 ± .25
16 (1 in.) 1.50 ± .25
O-Ring
Figure 3
SAE Straight Thread O-Ring Port (Adjustable)
(Fig. 4, 5)
1. Make sure both threads and sealing surfaces are free
of burrs, nicks, scratches, or any foreign material.
2. Always replace the O-ring seal when this type of fitting
shows signs of leakage.
3. Lubricate the O-ring with a light coating of oil.
4. Turn back the jam nut as far as possible. Make sure
the back up washer is not loose and is pushed up as far
as possible (Step 1).
5. Install the fitting into the port and tighten finger tight
until the washer contacts the face of the port (Step 2).
6. To put the fitting in the desired position, unscrew it by
the required amount, but no more than one full turn
(Step 3).
7. Hold the fitting in the desired position with a wrench
and turn the jam nut with another wrench to the correct
flats from finger tight (F.F.F.T.) (Step 4)
Step 1
Lock Nut
Back-Up Washer
O-Ring
Figure 4
Step 3
Size F.F.F.T.
4 (1/4 in. nominal hose or tubing) 1.00 ± .25
6 (3/8 in.) 1.50 ± .25
8 (1/2 in.) 1.50 ± .25
10 (5/8 in.) 1.50 ± .25
12 (3/4 in.) 1.50 ± .25
16 (1 in.) 1.50 ± .25
Step 2
Step 4
Figure 5
General Information Page 4 - 4 Greensmaster®3100
Page 23
Hydraulic Flow Diagrams
Traction, No. 1 Position
When engine is started, pump draws oil from reservoir
through two suction lines. Oil from one section of pump
passes through fitting in No. 4 spool valve into valve.
Traction lever, when located in No. 1, positions spool so
oil is directed to flow into the No. 5 metering valve
section. When the traction pedal is pushed forward oil
flows out lines at rear of metering valve section to each
motor to drive the motors. Low pressure oil returns to
valve through valve and main return line, through filter
to reservoir.
Greensmaster®3100 Page 4 - 5 Hydraulic Flow Diagrams
Page 24
Traction, No. 2 Position
When the traction lever is positioned in No. 2, flow from
one pump section passes through same lines as for No.
1 traction position. This flow is joined by additional flow
from two other pump sections. The additional flow increases the RPM of the wheel motors to increase ground
speed.
Hydraulic Flow Diagrams Page 4 - 6 Greensmaster®3100
Page 25
Traction, Reverse Position
Traction lever is positioned in No. 1 or No. 2. When
traction pedal is pushed rearward, flow from one pump
section goes through No. 4 selector valve section into
No. 5 metering section and out the lines at the front of
the valve to the traction motors, which drive the traction
wheels, to operate in reverse.
Greensmaster®3100 Page 4 - 7 Hydraulic Flow Diagrams
Page 26
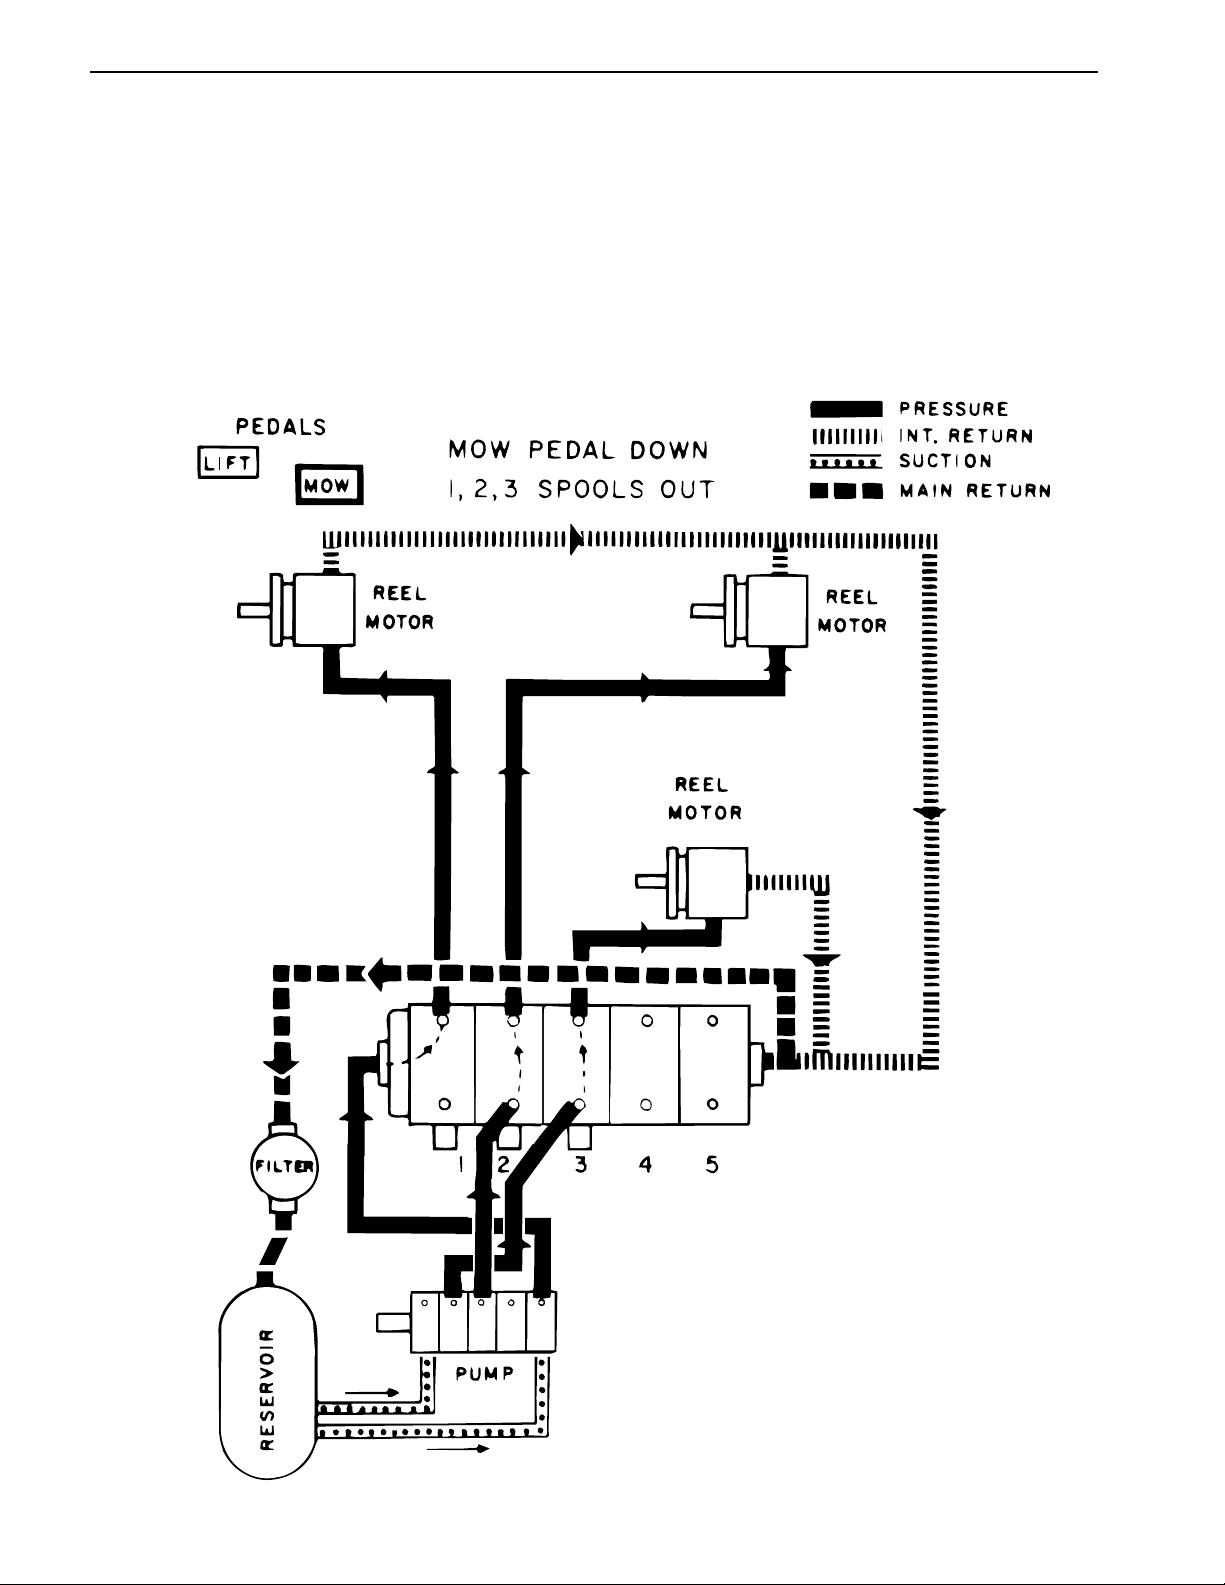
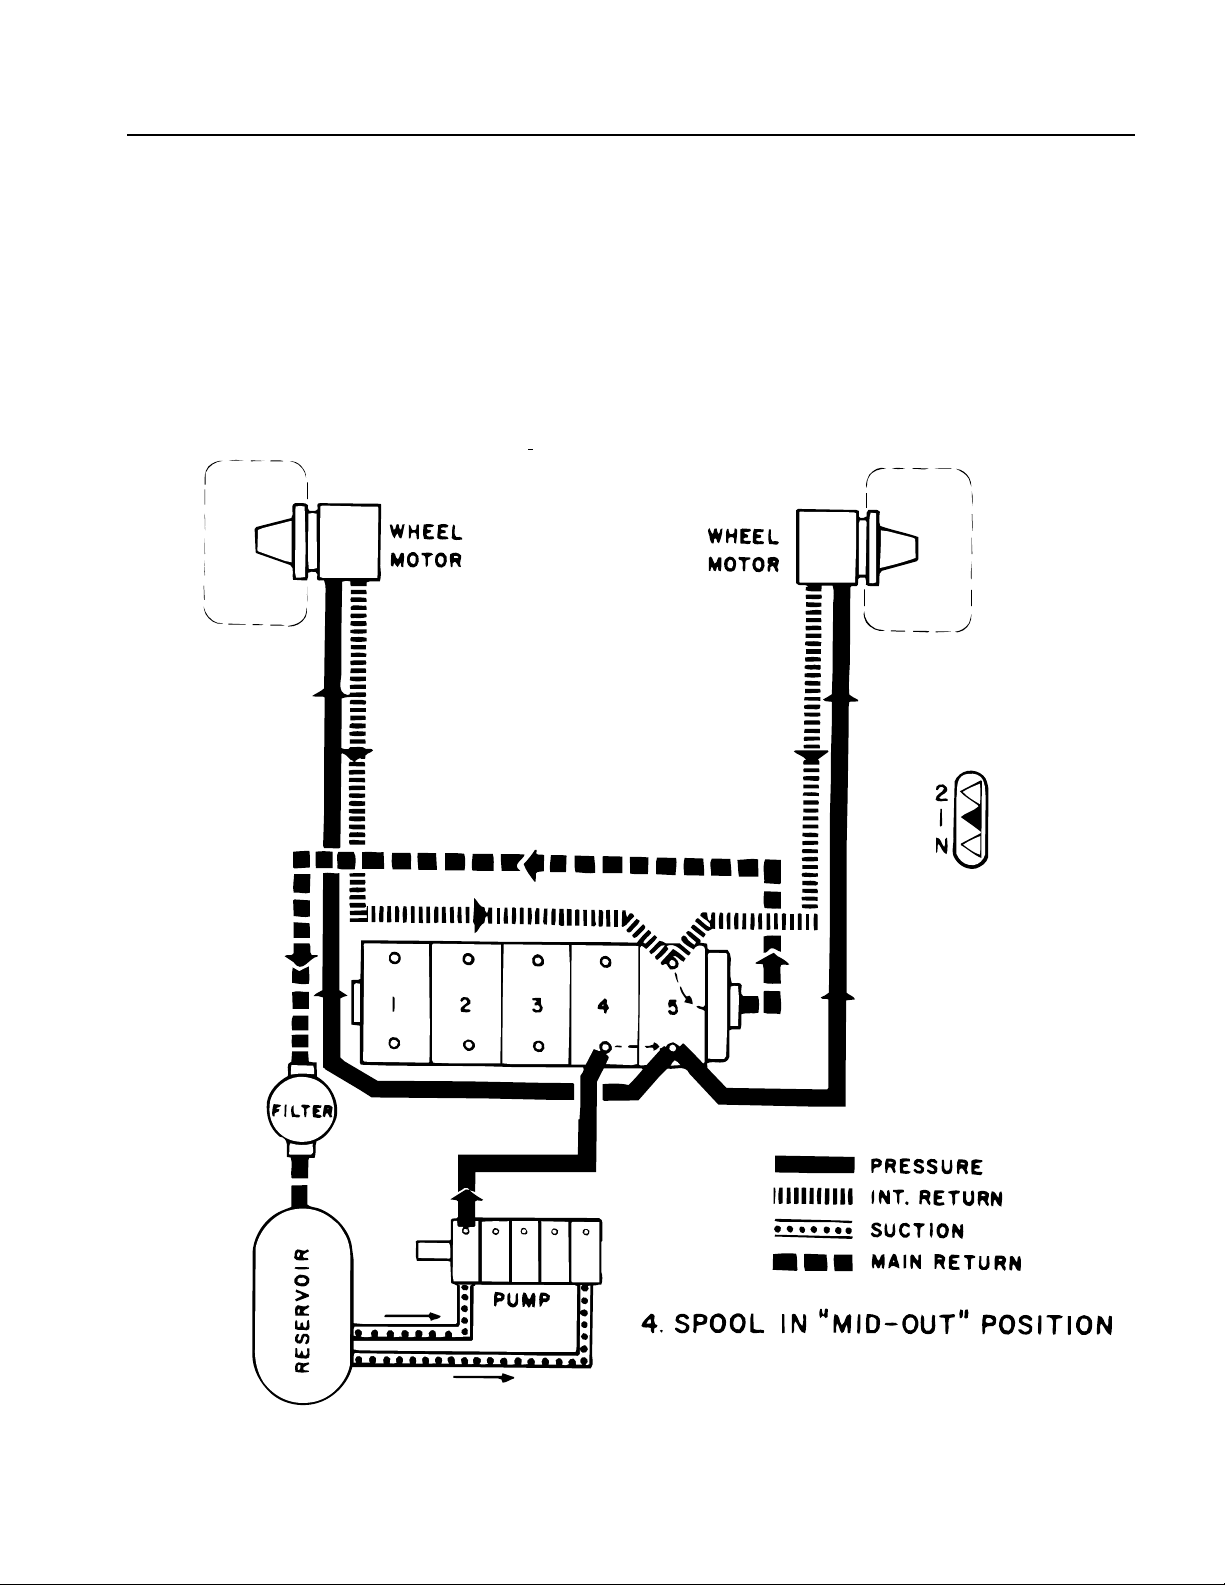
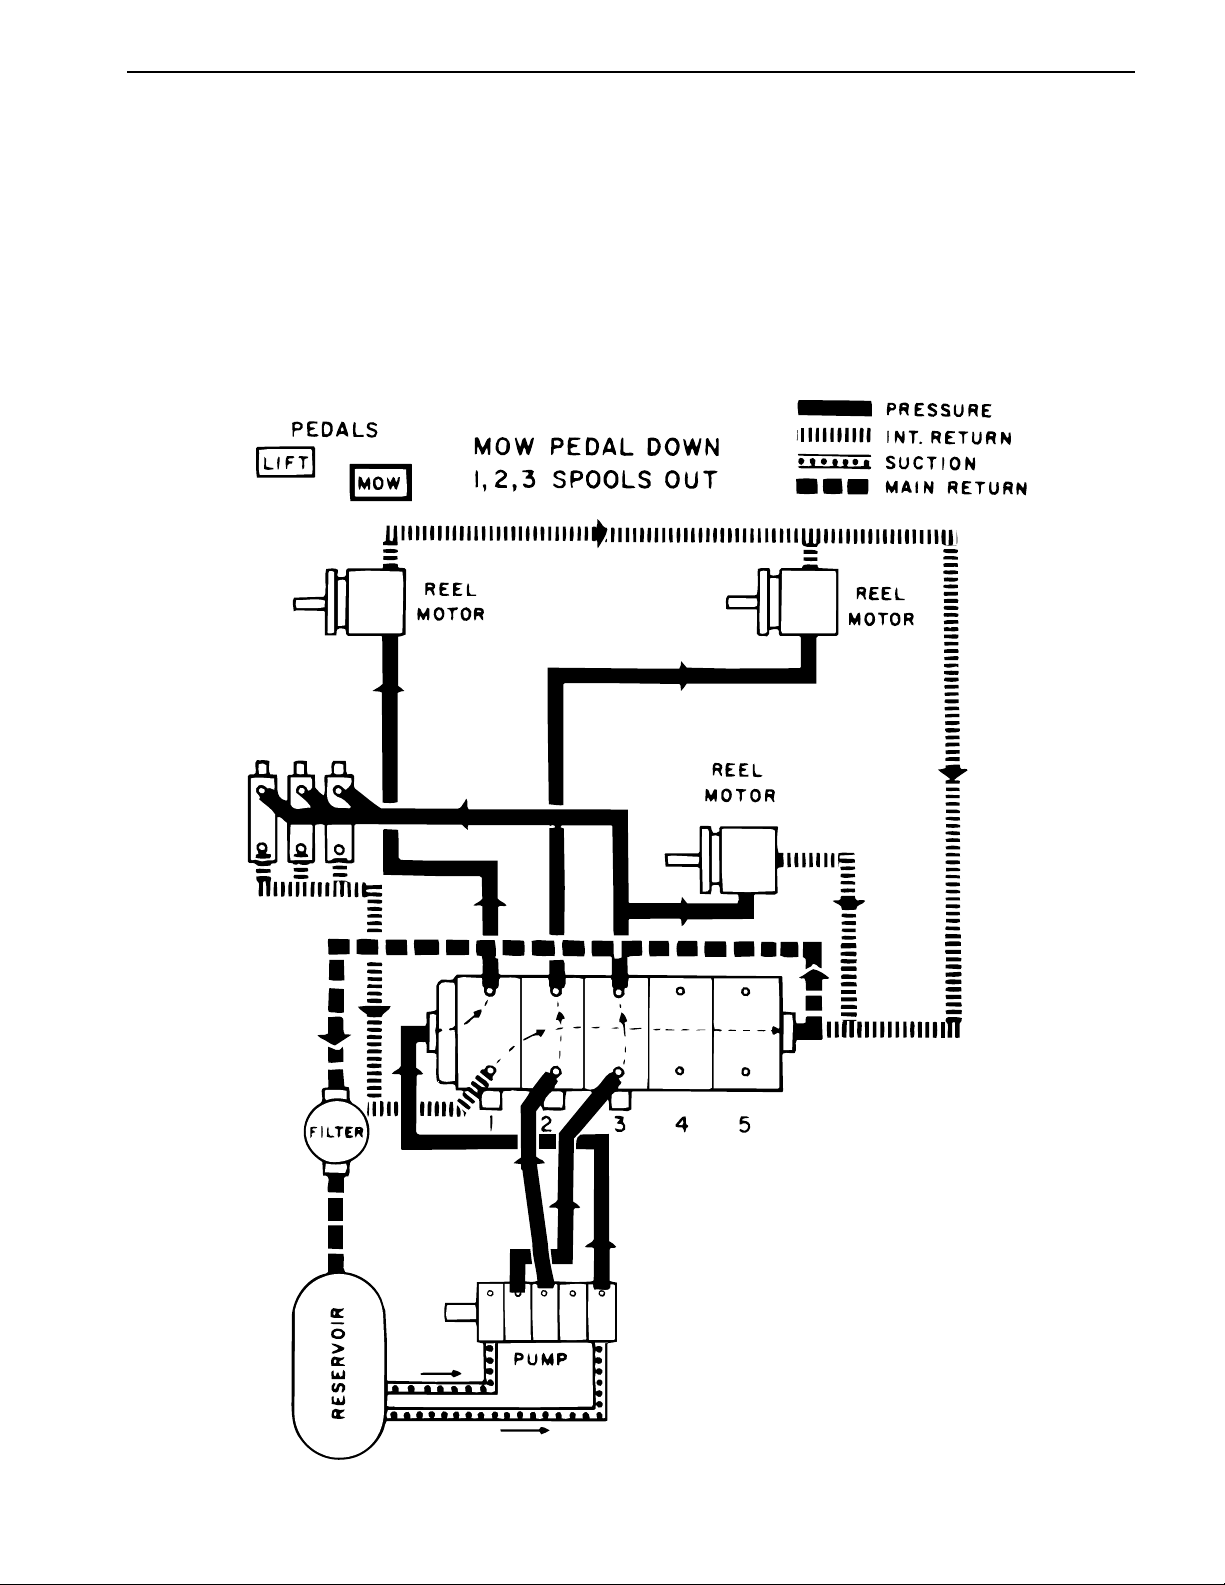
Reel Drive, Mowing Operation
GR3100 WITH DANFOSS PUMP SHOWN.
MACHINES WITH PARKER PUMP USE
CENTER 3 PUMP SECTIONS FOR REEL
DRIVE CIRCUITS.
Rev. E
The MOW pedal is depressed, which causes the No. 1,
2 and 3 spools to be positioned fully out of valve bank.
This directs flow from one pump section to pass through
left end cover and out line lead ing to left front cutting unit
drive motor. Flow causes motor to turn, driving reel.
Flow from separate pump section passes through No. 2
valve section and out a line to right front cutting unit
motor. Return oil from two front cutting units joins together and returns to right end of valve section, where
is passes into the main return line and flows back to
reservoir.
Flow from another separate pump section passes
through No. 3 spool section and out through a line to the
rear cutting unit drive motor. Return oil from the motor
passes through a line leading to the right hand end of
the valve bank, where it also joins with the main return
line back to the reservoir.
Hydraulic Flow Diagram s Page 4 - 8 Greensmaster® 3100
Page 27
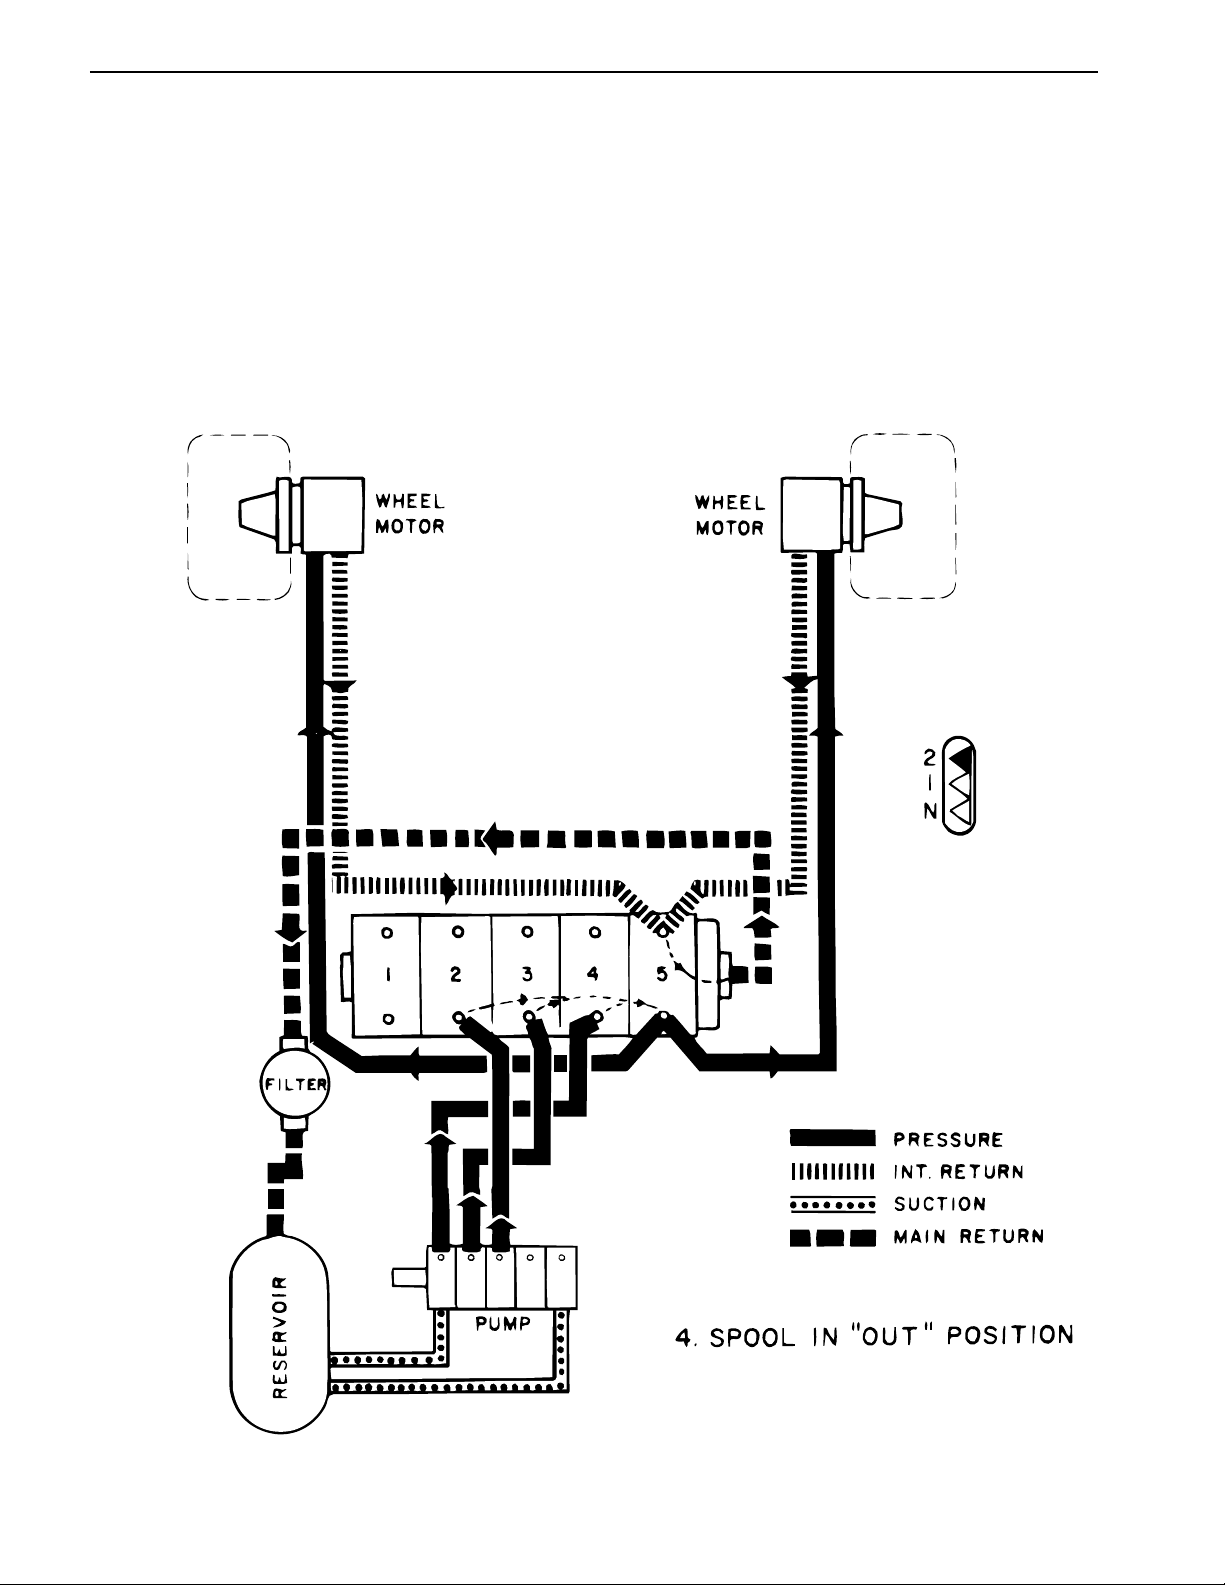
Reel Drive, Lower Cutting Units
GR3100 WITH DANFOSS PUMP SHOWN.
MACHINES WITH PARKER PUMP USE
CENTER 3 PUMP SECTIONS FOR REEL
DRIVE CIRCUITS.
Rev. E
The MOW pedal is depressed to start reel drive operation, flow from one pump section passes throu gh No. 3
spool section and out three lines, each leading to a lift
cylinder. This actuates the lift cylinders and lowers the
cutting units. Oil is returned to a three -way fit ting on the
No. 1 spool section through lines on the top end of each
cylinder, where it passes through the valve section and
returns to the reservoir through the main return line.
When the cylinders complete their travel, oil flow from
the No. 3 spool section is then directed to the rear cut ting
unit drive motor.
Greensmaster® 3100 Page 4 - 9 Hydraulic Flow Diagrams
Page 28

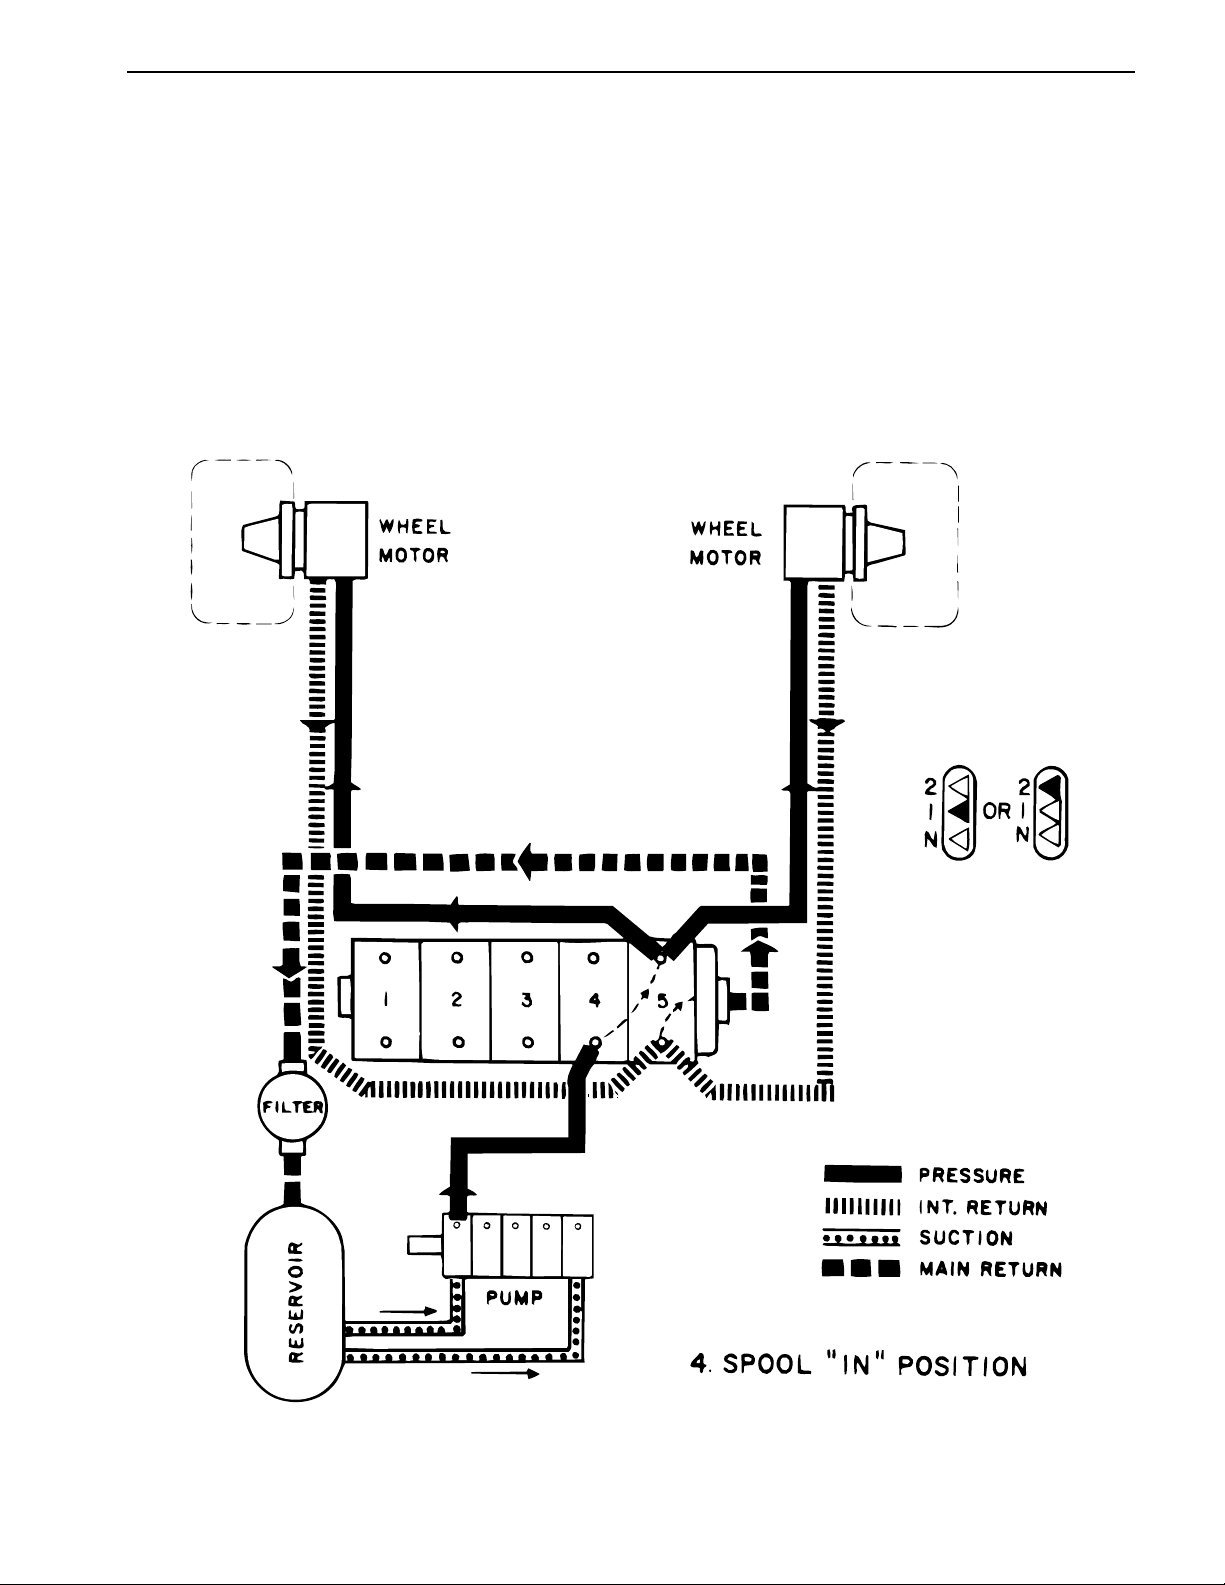
Reel Drive, Raising Cutting Units
GR3100 WITH DANFOSS PUMP SHOWN.
MACHINES WITH PARKER PUMP USE
FOURTH PUMP SECTION FOR LIFT.
Rev. E
When the LIFT pedal is depressed, No. 1, 2 and 3 spools
are pushed inward. When spools pass neutral, cutting
units stop operation. Holding pedal depressed keeps
spools fully in. This directs flow from one pump section
to pass through end cover and No. 1 spool valve, out
three lines leading to lift cylinders, causing cylinders to
raise the cutting units. Oil forced out of c ylinders travels
through lines leading to No. 3 spool section, th rough the
valve bank and back to reservoir through main return line.
Hydraulic Flow Diagrams Page 4 - 10 Greensmaster® 3100
Page 29
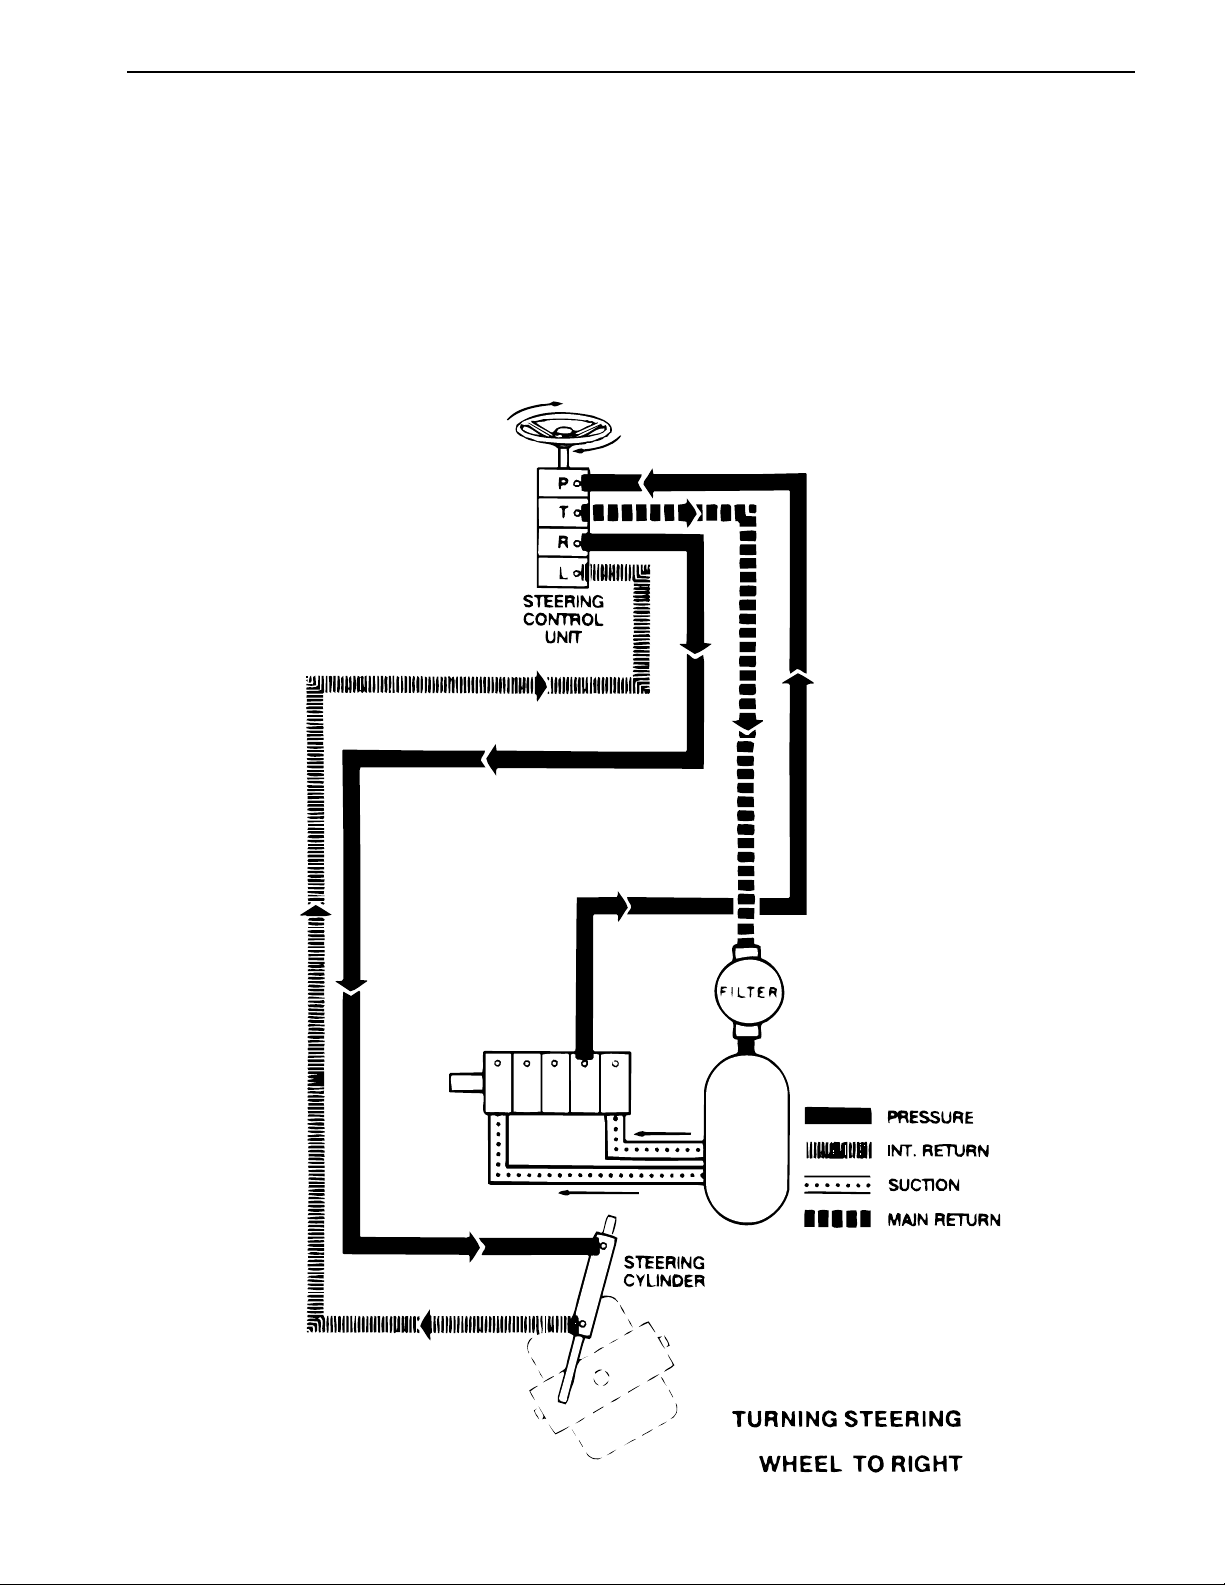
Power Steering, R.H. Turn (Greensmaster 3100)
GR3100 WITH DANFOSS PUMP SHOWN.
MACHINES WITH PARKER PUMP USE
LAST PUMP SECTION FOR STEERING
CIRCUIT.
Rev. E
Oil is supplied to port “P” of the steering control unit from
the pump steering section. When the steering wheel is
turned to the right, the control se ction within the steering
valve shifts to direct oil supplied by the pump to the
metering section of the steering valve. As the steering
wheel turns, system oil is metered out port “R” to the
steering cylinder. Oil displaced by the other end of the
steering cylinder returns to the steering valve through
port “L” which directs it out port “T” back to reservoir.
When the steering wheel stops turning , th e cont rol s ection within the steering valve shifts back to neutral
allowing all oil from the pump to flow through the s teering
valve out port “T” back to reservoir. Oil in the rest of the
steering circuit is then trapped.
Greensmaster® 3100 Page 4 - 11 Hydraulic Flow Diagrams
Page 30
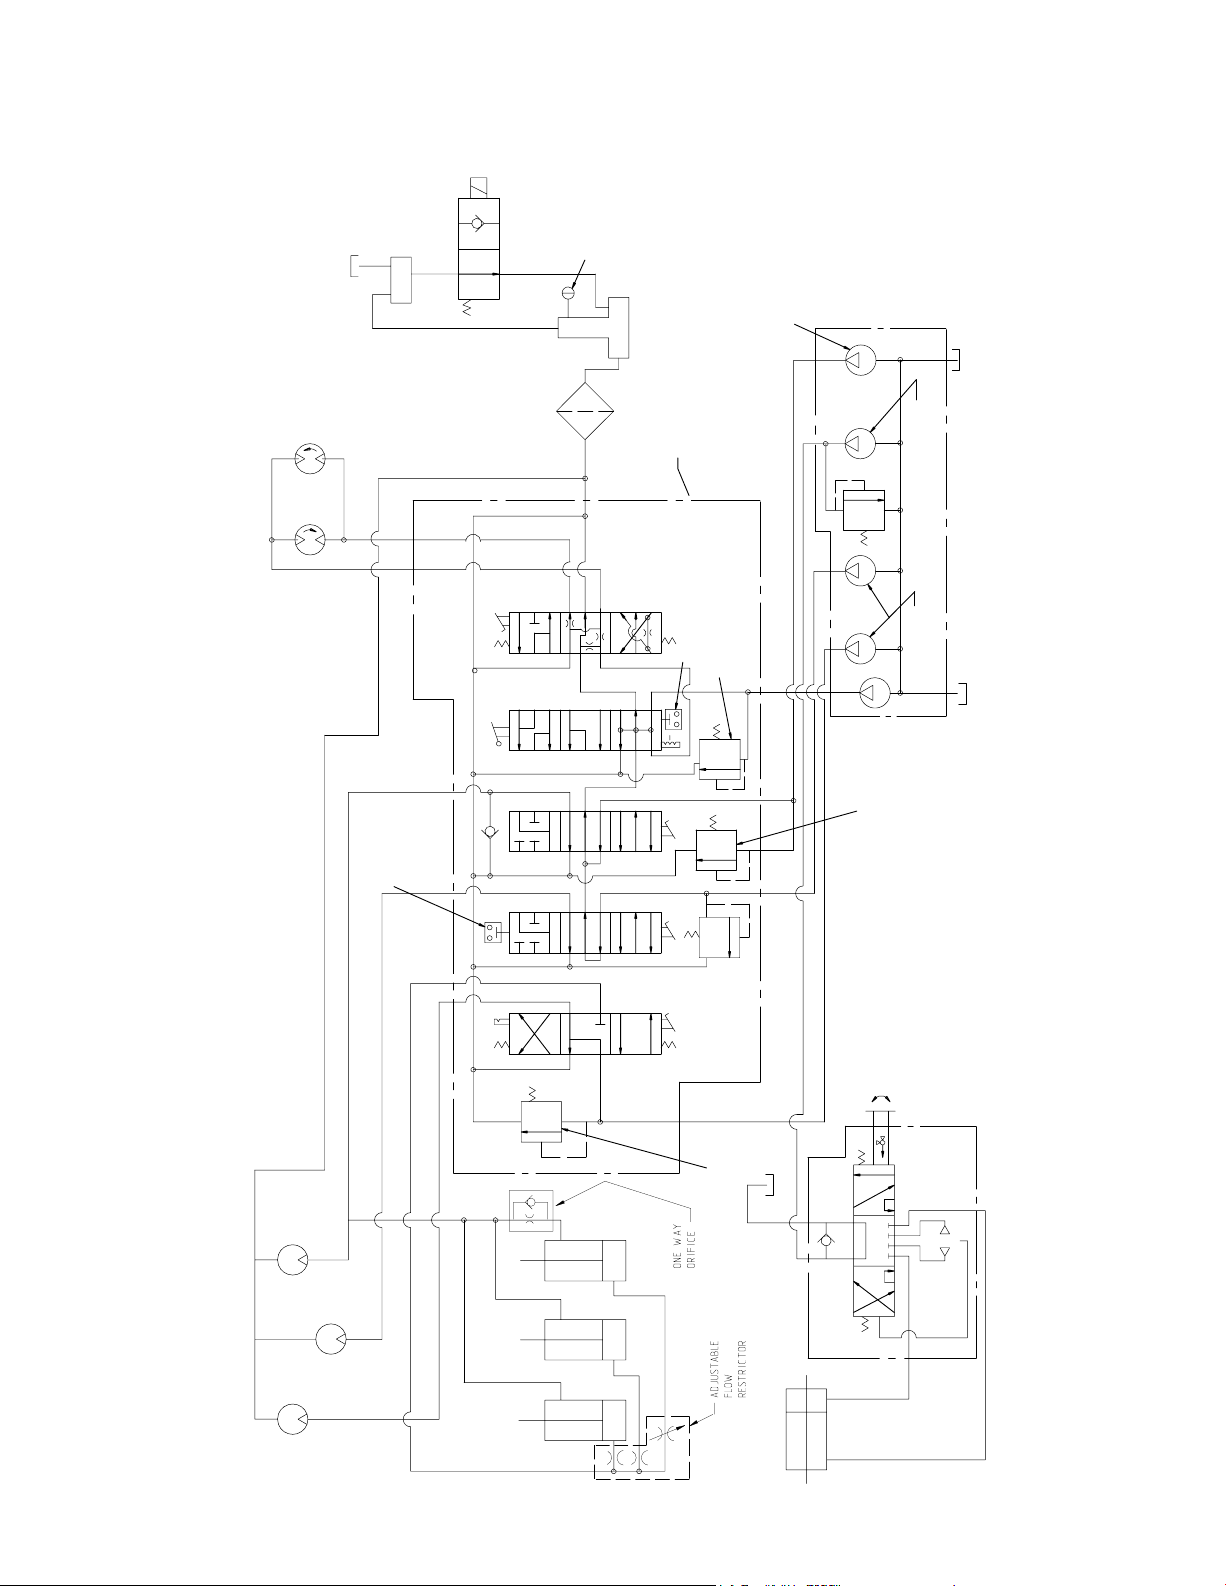
Hydraulic Schematic
(Greensmaster 3100 2WD Serial Number Below 230000000)
LEVEL
SENSOR
HYDRAULIC
TANK
40 MICRON
TANK BREATHER
AUXILIARY
HYDRAULIC
TANK
NORMALLY OPEN
SOLENOID VALVE
3
.33 IN /REV
(5.4 CU CM/REV)
2850 RPM MAX
PUMP (DANFOSS)
10.3 CU. IN/REV.
(169 CU. CM/REV)
WHEEL DRIVE MOTORS
RH
OIL FILTER
10 MICRON
LH
N
FWD
2ND
1ST
SAFETY
INTERLOCK
SWITCH
VALVE BANK
REV
SWITCH
SAFETY INTERLOCK
1850 PSI
(130 KG/SQ CM)
N
2000 PSI
3
.18 IN /REV
850 PSI
(60 KG/SQ CM)
3
.33 IN /REV
3
.58 IN /REV
2000 PSI
(141 KG/SQ CM)
(2.9 CU CM/REV)
(5.4 CU CM/REV)
(9.5 CU CM/REV)
REEL MOTORS
.43 CU. IN/REV.
(7 CU. CM/REV.)
Hydraulic Schematics
CENTER
LH
RH
CENTER
RH
LH
Page 4 – 12
LIFT CYLINDERS
Rev. E
(141 KG/SQ CM)
2000 PSI
(141 KG/SQ CM)
STEERING CYLINDER
TP
LR
STEERING CONTROL VALVE
4.5 CU. IN/REV.
(75 CU. CM/REV)
Greensmaster 3100
Page 31

Hydraulic Schematic
(Greensmaster 3100 2WD Serial Number Above 230000000)
LEVEL
SENSOR
HYDRAULIC
TANK
40 MICRON
TANK BREATHER
AUXILIARY
HYDRAULIC
TANK
NORMALLY OPEN
SOLENOID VALVE
3
.18 IN /REV
(2.9 CU CM/REV)
PUMP (PARKER)
2850 RPM MAX
10.3 CU. IN/REV.
(169 CU. CM/REV)
WHEEL DRIVE MOTORS
RH
OIL FILTER
10 MICRON
LH
N
FWD
2ND
1ST
SAFETY
INTERLOCK
SWITCH
VALVE BANK
REV
SWITCH
SAFETY INTERLOCK
1850 PSI
(130 KG/SQ CM)
N
2000 PSI
850 PSI
(60 KG/SQ CM)
3
.32 IN /REV
3
.57 IN /REV
2000 PSI
(141 KG/SQ CM)
(5.2 CU CM/REV)
(9.3 CU CM/REV)
REEL MOTORS
CENTER
RH
.43 CU. IN/REV.
(7 CU. CM/REV.)
LH
RH
LH
CENTER
LIFT CYLINDERS
Greensmaster 3100 Page 4 – 12.1 Hydraulic SchematicsRev. E
(141 KG/SQ CM)
2000 PSI
(141 KG/SQ CM)
STEERING CYLINDER
TP
LR
STEERING CONTROL VALVE
4.5 CU. IN/REV.
(75 CU. CM/REV)
Page 32

Hydraulic Schematic (Greensmaster 3100 3WD)
TANK
AUXILIARY
RH
40 MICRON
TANK BREATHER
WHEEL DRIVE MOTOR
20 CU IN/REV
(328 CU CM/REV)
HYDRAULIC
OIL FILTER
10 MICRON
LEVEL
SENSOR
TANK
HYDRAULIC
VALVE
BANK
3
.33 IN /REV
(5.4 CU CM/REV)
2850 RPM MAX.
PUMP (DANFOSS)
3
.18 IN /REV
(2.9 CU CM/REV)
10.3 CU IN/REV
(169 CU CM/REV)
WHEEL DRIVE MOTORS
REAR
LH
SAFETY
SWITCH
INTERLOCK
FWD
2ND
1ST
N
REV
SAFETY
SWITCH
INTERLOCK
1850 PSI
(130 KG/SQ.CM)
N
3
.58 IN /REV
2000 PSI
(141 KG/SQ CM)
2000 PSI
(141 KG/SQ CM)
850 PSI
3
.33 IN /REV
(9.5 CU CM/REV)
(60 KG/SQ. CM)
(5.4 CU CM/REV)
4.5 CU IN/REV
(75 CU CM/REV)
STEERING CONTROL VALVE
.43 CU IN/REV
(7 CU CM/REV)
REEL MOTORS
CENTER
LH
RH
CENTER
RH
LH
2000 PSI
(141 KG/SQ CM)
LIFT CYLINDERS
PT
R
L
STEERING CYLINDER
Greensmaster 3100Page 4 – 12.2Hydraulic Schematics Rev. E
Page 33

Hydraulic Schematic (Greensmaster 3050)
HYDRAULIC
OIL FILTER
10.3 CU. IN/REV.
(169 CU. CM/REV)
WHEEL DRIVE MOTORS
LH RH
TANK
VALVE BANK
3
.33 IN /REV
(5.4 CU CM/REV)
PUMP
2850 RPM MAX
SAFETY
INTERLOCK
SWITCH
2ND
FWD
1ST
N
REV
SWITCH
SAFETY INTERLOCK
1850 PSI
(130 KG/SQ CM)
N
2000 PSI
(141 KG/SQ CM)
2000 PSI
(141 KG/SQ CM)
3
.33 IN /REV
(5.4 CU CM/REV)
3
.58 IN /REV
(9.5 CU CM/REV)
REEL MOTORS
CENTER
RH
.43 CU. IN/REV.
(7 CU. CM/REV.)
LH
RH
LH
CENTER
LIFT CYLINDERS
Greensmaster 3100 Page 4 – 12.3 Hydraulic SchematicsRev. E
2000 PSI
(141 KG/SQ CM)
Page 34

This page is blank.
Greensmaster 3100Page 4 – 12.4Hydraulic Schematics Rev. E
Page 35

Special Tools
NOTE: Order special tools from the TORO SPECIAL
TOOLS AND APPLICATIONS GUIDE (COMMERCIAL
PRODUCTS). Some tools may be listed in the
Greensmaster 3100 Parts Catalog. Some tools may
also be available from a local supplier.
Hydraulic Tester (Fig. 6)
Low Pressure
Gauge
Load Valve
Outlet
Hose
Gauge
Protector Valve
Inlet Hose
You must have o-ring face seal (ORFS) adapter fittings
for this tester to use it on the Greensmaster 3100.
1. INLET HOSE: Hose connected from the system
circuit to the inlet side of the hydraulic tester.
2. LOAD VALVE: If required, upon turning the valve to
restrict flow, a simulated working load is created in the
circuit.
3. LOW PRESSURE GAUGE: Low range gauge to
provide accurate reading at low pressure, 0 - 1000 psi
(0 - 6895 kPa).
Flow Meter
High Pressure
Gauge
Figure 6
4. HIGH PRESSURE GAUGE: High range gauge to
accommodate pressure beyond the capacity of the low
pressure gauge, 0 - 5000 (0 - 34475 kPa).
5. FLOW METER: This meter measures actual oil flow
in the operation circuit. The reading is given in gallons
per minute (GPM) and liters per minute (LPM) with a
gauge rated at 15 GPM (57 LPM).
6. OUTLET HOSE: Hose from the outlet side of the
hydraulic tester to be connected to the hydraulic system
circuit.
This gauge has a protector valve which cuts out
when pressure is about to exceed the normal range
for the gauge. The cutout pressure is adjustable.
Greensmaster®3100 Page 4 - 13 Special Tools
Page 36

Seal Protector (Fig. 7)
Slide the protector (Item 1) over the reel motor shaft
before installing the shaft seal to protect the seal from
damage. Apply a light coating of clean oil to the seal
protector to ease movement of the seal over the tools.
Use the installer (Item 2) and a small hammer to drive
the reel motor shaft seal into position in the bore of the
reel motor body.
Detent Installation Tool (Fig. 8)
Use this tool with a 3/8 in. drive torque wrench to tighten
the detent stud in the No. 1 spool of the control valve.
Apply Loctite 222 or equivalent to the threads of the
detent stud. Tighten the stud to a torque of 10 - 14 ft-lb.
Figure 7
Figure 8
Special Tools Page 4 - 14 Greensmaster®3100
Page 37

Seal Installation Tool (Fig. 9)
Use to assure proper fit and positioning of lip seals used
in the TRW Torqmotor hydraulic wheel motor. Put the
seal inside the ring (Item 2) with the seal lip toward the
motor. Slide the main tube (Item 1) of the tool into the
ring. Put the tool into position in the bore of the motor
housing. Tap against the main tube of the tool to seat
the seal.
Assembly Studs (Fig. 10)
Use for proper alignment of internal parts during disassembly and repair of the TRW Torqmotor hydraulic
wheel motor.
Figure 9
IMPORTANT: The wheel motor geroters are indexed
and must be kept in their original position.
Control Valve Spool Seal Installation Tools (Fig. 11)
This tool can be made to the dimensions shown.
Soak new seal in clean hydraulic fluid before installing.
Install seal into end of large diameter tool with open side
of seal facing out. Install small diameter tool into large
diameter tool against flat (closed) side of seal. Carefully
install seal and tools over valve spool, hold large tool
against valve body and push seal into bore with small
diameter tool.
Figure 10
0.75
DIA
2.5
NOTE: REMOVE SHARP EDGES.
0.991/
0.994
DIA
0.997/
1.000
DIA
1.5
Dimensions shown in inches.
1.25
DIA
Figure 11
Greensmaster®3100 Page 4 - 15 Special Tools
Page 38

Troubleshooting
The cause of an improperly functioning hydraulic system is best diagnosed with the use of proper testing
equipment and a thorough understanding of the complete hydraulic system.
A hydraulic system with an excessive increase in heat
or noise is a potential failure. Should either of these
conditions be noticed, immediately stop the machine,
turn off the engine, locate the cause of the trouble, and
correct it before allowing the machine to be used again.
Continued use of an improperly functioning hydraulic
system could lead to extensive internal component
damage.
The charts that follow contain detailed information to
assist in troubleshooting. There may possibly be more
than one cause for a machine malfunction. All causes
should be checked in the order in which they are listed
on the charts; do not deviate from this procedure.
Refer to the Testing section of this Chapter for precautions and specific test procedures.
Troubleshooting Page 4 - 16 Greensmaster
®
3100
Page 39

Slow Groundspeed in All Traction Selections
* Check
engine
RPM
OK
* Check
hydraulic
oil level
OK
Check
hydraulic
oil filter
OK
* Check shift
lever bracket
and rear
camshaft
OK
Improper
Improper
Clogged
Misadjusted
or damaged
Adjust –
use
tachometer
* Reels also affected.
Fill to
proper
level
Replace
filter
Adjust
Check brakes and
brake linkage
for binding
OK
Check traction
pump flow.
Test hook up
No. 1 Test A
OK
Check traction
relief. Test
hook up
No. 1 Test B
OK
Check traction mo-
tors for mech.
drag. Test hook up
No. 2 Test A
OK
Binding
Low
Defective
Drag
Free linkage
and adjust
brakes
Check for
restriction in
pump intake line
Repair
or replace
traction relief
valve
Remove brake
drum and
repeat test
OK
Drag
Repair
or replace
pump
Repair or
replace
defective motor
Check traction mo-
tor efficiency.
Test hook up
No. 2 Test C
Inefficient
Repair or
replace
defective motor
Greensmaster®3100 Page 4 - 17 Troubleshooting
Page 40

Slow or No Ground Speed in No. 1 and Reverse
No. 2 Appears Normal
Check
control
linkage
OK
Check traction
pump flow.
Test hook up
No. 1 Test A
OK
Check for internal
valve bank leakage.
Test hook up
No. 2 Test B
Misadjusted
or damaged
Low
Leaking
Adjust
or
repair
Check for
restriction in
pump intake line
Check disk seal
between #3 and
#4 valve sections
OK
Defective
Repair or
replace
traction pump
Remove valve bank
and replace
disk seal
Troubleshooting Page 4 - 18 Greensmaster®3100
Page 41

No Increase in Speed from No. 1 to No. 2
Check
hydraulic
oil level
OK
Check traction
Check traction
lever
lever
OK
Check rear
camshaft
OK
Check #2 and #3
pump section flow.
Test hook up No. 3
Test A
OK
Low
Misadjuste
or damaged
Misadjusted
or damaged
Fill to
proper
level
Adjust or
repair
Adjust or
Adjust or
repair
repair
Check for
restriction in
pump intake line
OKLow
Repair or
replace
pump
Check #2 and #3
valve section re-
liefs. Test hook up
No. 4 Test B
Defective
Repair or
replace
relief valve
Greensmaster®3100 Page 4 - 19 Troubleshooting
Page 42

One or More Cutting Units Slow or
No Reel Drive Action
Check
Pedal
Linkage
OK
Check rear-
ward valve
spool trave
OK
Check
bedknife
adjustment
OK
Check for
tight
reel bearings
OK
Misadjusted
or Damaged
Insufficient
Tight
Tight
Adjust or repair
and
lubricate
Adjust or repair
rear camshaft
Adjust
bedknife
Adjust
bearings. Replace
if necessary.
Check reel pump
flow. Test hook up
No. 3 Test A
OK
Check reel motor
flow. Test hook up
No. 4 Test A
OK
Check reel drive
relief. Test hook
up No. 4 Test B
OK
Check reel motor
efficiency. Test
hook up No. 4
Test B
Low
Low
Defective
Defective
Check for
restriction in pump
intake line(s).
Check for flow re-
striction.
Repair or replace
reel drive
relief valve
Repair or replace
reel drive motor
OK
Repair or
replace pump
Troubleshooting Page 4 - 20 Greensmaster®3100
Page 43

All Reels Slow or Will Not Turn
Check
engine
RPM
OK
Check
hydraulic
oil level
OK
Check
hydraulic
oil filter
OK
Check linkage
and roll pin
on end of mow
pedal shaft
OK
Low
Low
Clogged
Worn or
broken
Adjust –
use tachometer
Fill to proper
level
Replace
filter
Repair
linkage
Check reel pump
flow. Test hook up
No. 3 Test A
Low
Repair or
replace pump
Greensmaster®3100 Page 4 - 21 Troubleshooting
Page 44

Mow Pedal Won’t Stay Engaged –
Reels Slow Down or Stop
Check linkage
from pedal
to valve bank
OK
Check roll pin in
end of mow pedal
shaft
OK
Check rearward
valve spool
travel
OK
Check the
spool detent
Misadjusted
or damaged
Worn
or broken
Insufficient
Defective
Adjust, repair and
lubricate linkage
Replace
pin
Adjust rear
camshaft
Lubricate or
repair valve spool
detent
Troubleshooting Page 4 - 22 Greensmaster®3100
Page 45

Cutting Unit(s) Drop During Transport
Check that valve
spool returns to
neutral
OK
Check for internal
lift cylinder leakage
OK
Check lift check
plug o-rings in #1
valve section
OK
Check valve
spool detent for
binding
Binding
Leaking
Leaking
Binding
Lubricate and
adjust camshaft
Repair or replace
cylinder(s)
Replace
o-ring
Lubricate or repair
valve spool detent
Greensmaster®3100 Page 4 - 23 Troubleshooting
Page 46

Cutting Units Lift Too Slowly or Not At All
Check for binding
lift assemblies
OK
Check forward
valve spool travel
OK
Check for
restriction in
lines to or from
cylinders
OK
Check for
leaking cylinder
OK
Binding
Insufficient
Restricted
Leaking
Loosen and
lubricate lift
assemblies
Adjust rear
camshaft
Replace restricted
line or fitting
Repair or
replace cylinder
Check lift section
of pump. Test
hook up No. 3
Test A
Defective
Repair or replace
pump
Troubleshooting Page 4 - 24 Greensmaster®3100
Page 47

Lift Pedal Binding
Check pedal
linkage
OK
Check valve spool
detent assembly
Misadjusted
or Damaged
Binding or
Damaged
Adjust or repair link-
age and
lubricate
Lubricate and repair
detent
Center (#1) Cutting Unit Operates in Raised Position
shaft for #3 spool
too far out of body
OK
Check for restric-
tion in brazed tube
assembly on #3
valve section
Misadjusted
Restricted
Adjust camshaftCheck rear cam-
Remove
restriction
OK
Check for restriction
in valve return port
between #3 section
and R.H. cover
Defective
Remove valve bank
and disassemle to
remove restriction
Center (#1) Cutting Unit Drops
Before Front Cutting Units or Drops Too Fast
Check for missing
orifce reducer in cylin-
der line attached to
center fitting on crows-
foot
OK
Check for
incorrect crows
foot fitting
Missing
Incorrect
Install orifice re-
ducer in cylinder line
Replace crows foot
fitting with correct fit-
ting
Greensmaster®3100 Page 4 - 25 Troubleshooting
Page 48

Steering Loss, Steering Wander or Free Play
Check steering cyl-
inder
ball joints
OK
Disconnect cylin-
der and check cas-
tor fork movement
OK
Check steering cyl-
inder for
internal leakage
OK
Check for
restriction in hy-
draulic hose or fit-
ting
OK
Loose
Binding
Leakage
Restriction
Tighten castle nuts
and jam nut
Repair and
lubricate castor fork
and bushings
Repair or replace
steering cylinder
Replace restricted
line or fitting
OK
Replace ball
joint(s)
Check steering
pump flow. Test
hook up No. 5
Test A
OK
Check for dam-
aged steering
wheel or shaft
OK
Worn or damaged
steering control
unit. *Thermal
shock
Defective OK
Defective
Defective
Check for
restriction in pump
intake line
Replace steering
wheel or shaft
Repair or replace
steering
control unit
Repair or replace
pump
* Thermal shock - A condition caused when the hydraulic system is operated for some time without turning
the steering wheel so that fluid in the reservoir and system is hot and the steering control unit is relatively
cool (more than 50
o
F temperature differential). This can also happen when washing the machine. When the
steering wheel is turned quickly the result is temporary seizure and possible damage to internal parts of the
steering control unit. The temporary seizure may be followed by total free wheeling.
Troubleshooting Page 4 - 26 Greensmaster
®
3100
Page 49

Testing
The most effective method for isolating troubles in the
hydraulic system is by using hydraulic test equipment
such as pressure gauges and flow meters in the circuits
during various operational checks. (See the Special
Tools section in this Chapter.)
Hydraulic testers may vary significantly in size, construction, accuracy, and cost. The decision as to which
tester to purchase should be influenced by what type of
tests will be performed on all of the hydraulically-powered equipment in the shop.
All obvious areas such as oil supply, filter, binding
linkage, loose fasteners, or improper adjustments must
be checked before assuming that a hydraulic component is the source of the problem being experienced.
WARNING
Before disconnecting or performing any work
on the hydraulic system, all pressure in the
system must be relieved by stopping the engine and lowering the implement to the
ground.
Keep body and hands away from pin hole
leaks or nozzles that eject hydraulic fluid under high pressure. Use paper or cardboard,
not hands, to search for leaks. Hydraulic fluid
escaping under pressure can have sufficient
force to penetrate skin and do serious damage. If fluid is injected into the skin, it must be
surgically removed within a few hours by a
doctor familiar with this type of injury or gangrene may result.
Before Performing Hydraulic Tests
2. Put caps or plugs on any hydraulic lines left open or
exposed during testing or removal of components.
3. The engine must be in good operating condition.
ALWAYS use a tachometer when making a hydraulic
test. Engine speed will affect the accuracy of the tester
readings.
4. To prevent damage to the tester or components, the
inlet and the outlet hoses must be properly connected,
and not reversed (tester with pressure and flow capabilities).
5. To minimize the possibility of damaging the components, completely open the load valve by turning it
counterclockwise (tester with pressure and flow capabilities).
IMPORTANT: The pump used on the Greensmaster
3100 is a positive displacement type. If its output
flow is completely restricted or stopped, damage to
the pump or other components could occur.
6. Install fittings finger tight, far enough to insure that
they are not cross-threaded, before tightening with a
wrench.
7. Position the tester hoses so that rotating machine
parts will not make contact with them and result in hose
or tester damage.
8. Check the oil level in the reservoir.
9. Check the control linkage for improper adjustment,
binding or broken parts.
10. All hydraulic tests should be made with the hydraulic
oil at normal operating temperature (hoses warm to the
touch).
1. Thorough clean the machine before disconnecting or
disassembling any hydraulic components. Always keep
in mind the need for cleanliness when working on hydraulic equipment.
Greensmaster®3100 Page 4 - 27 Testing
Page 50

TEST HOOK UP NO. 1
Traction Pump Flow
Traction Relief Setting
TESTER CONNECTION:
Tester in series between traction pump outlet line and valve bank port on No. 4 section of
valve bank.
(Tester Flow Control Valve Open)
CAUTION: Keep everyone away from the front of the machine during traction
system tests. Operator must be on seat or the safety interlock will stop the
engine when the traction lever is engaged.
TESTER
TEST A: TRACTION PUMP FLOW
PROCEDURE
Traction lever in neutral.
Engine RPM 2800 RPM.
Hydraulic oil at operating temperature.
While watching flow and pressure gauges, slowly close flow control valve until 1000 PSI
is obtained.
TESTER READINGS
Flow not lower than 5 GPM at 1000 PSI.
Record pressure and flow readings.
If flow is lower than 5 GPM or a pressure of 1000 PSI cannot be obtained, check for
restriction in pump intake line. If not restricted, remove pump and repair as necessary.
Testing Page 4 - 28 Greensmaster
®
3100
Page 51

TEST HOOK UP NO. 1 (continued)
TEST B: RELIEF VALVE SETTING
PROCEDURE
Tester flow control valve open.
Block up traction wheels off floor.
Apply brakes and engage park lock.
Engine RPM 2800.
Hydraulic oil at normal operating temperature.
Engage transmission lever to No. 1 position.
Push traction pedal to forward position.
TESTER READINGS
Pressure: 1850 to 1950 PSI.
If pressure is not in listed range, remove traction relief cartridge and examine for
contamination or damage.
Greensmaster
®
3100 Page 4 - 29 Testing
Page 52

TEST HOOK UP NO.2
Traction Motors Mechanical Drag
Valve Bank Leakage
Traction Motors Efficiency
TESTER CONNECTION:
Disconnect hydraulic hose that leads to front right wheel motor from T fitting on rear outlet port of valve bank section
No. 5. Connect tester in series between fitting and disconnected hose.
(Tester Flow Control Valve Open)
Note: On machines that have a “U” tube between the elbow fitting on rear outlet port of valve bank section No. 5 and
hydraulic tube leading to front wheel motors, remove “U” tube and install tester in series between the two exposed
fittings.
CAUTION: Keep everyone away from the front of the machine during traction system tests. Operator must be on seat or the safety interlock will stop the engine when the traction lever is engaged.
CAP
(TEST B AND C)
(TEST B AND C)
CAP
1
2345
TESTER
TEST A: TRACTION MOTORS MECHANICAL DRAG
PROCEDURE
Block up the machine so traction wheels are off floor. If machine is equipped with 3WD, rear wheel needs to be
off floor as well.
Disconnect brake control rod on wheel being tested.
Apply brake and engage park lock.
Engine RPM 2800.
Hydraulic oil at normal operating temperature.
Engage transmission lever to No. 1 position.
Push traction pedal to forward position. Front wheel that is NOT locked by brake should rotate.
Greensmaster 3100 Page 4 – 30
Rev. E
Testing
Page 53

TEST HOOK UP NO.2 (continued)
TESTER READINGS
Pressure should not exceed 400 PSI.
If higher reading is obtained, check hydraulic line to and from motor for restriction. If no restriction, remove
wheel and brake drum. Repeat test.
If pressure is still excessive, remove traction motor and repair as necessary.
Repeat the test for the opposite wheel if required.
NOTE: Reconnect brake control rod after each test is completed.
TEST B:
PROCEDURE
TESTER READINGS
TEST C:
PROCEDURE
TESTER READINGS
Testing
VALVE BANK LEAKAGE
Disconnect both hydraulic hoses that lead to left front wheel motor from hydraulic tubes on left side of machine. Cap
open ends of tubes and hoses.
Block up the machine so traction wheels are off floor. If machine is equipped with 3WD, rear wheel needs to be
off floor as well.
Disconnect brake control rod on front right wheel.
Engine RPM 2800.
Hydraulic oil at normal operating temperature.
Engage transmission lever to No. 1 position.
Push traction pedal to forward position. Front right wheel should rotate.
While watching flow and pressure gauges, slowly close flow control valve until 1000 PSI is obtained.
Flow not less than 5 GPM at minimum 1000 PSI.
If flow is lower than 5 GPM or pressure of 1000 PSI cannot be obtained, there is internal valve bank leakage. Check:
1. Relief valve
2. No. 4 spool position
3. Disc seal between No. 3 and No. 4 valve bank sections
TRACTION MOTOR EFFICIENCY
Tester Flow Control Valve Open.
Disconnect hydraulic hoses (pressure and return) that lead to front left motor. Install caps to open ends of tubes and
hoses.
Block up the machine so traction wheels are off floor. If machine is equipped with 3WD, rear wheel needs to be
off floor as well.
Apply brake and engage park lock.
Engine RPM 2800.
Hydraulic oil at normal operating temperature.
Engage transmission lever to No. 1 position.
Push traction pedal to forward position.
Flow not more than 1.5 GPM at a pressure of 1850 to 1950 PSI.
If flow is higher than 1.5 GPM, remove right wheel motor and repair as necessary.
If pressure is not in listed range, remove traction relief cartridge from valve bank and examine for contamination or
damage.
If needed, test left front wheel motor by placing tester in left side pressure hose and blocking flow to right motor.
Page 4 – 31
Rev. E
Greensmaster 3100
Page 54

TEST HOOK UP NO. 3
GR3100 WITH DANFOSS PUMP SHOWN.
MACHINES WITH PARKER PUMP USE
CENTER 3 PUMP SECTIONS FOR REEL
DRIVE CIRCUITS.
Rev. E
Reel Drive Pump Efficiency
TESTER CONNECTION:
T e ster in series between reel pump outlet hose on susp ected bad section and its valve bank
fitting. Section being checked should be one that supplies oil for reel unit not operating
properly.
(Tester Flow Control Open)
CAUTION: Keep everyone away from the front of the machine during reel
system tests. Operator must be on seat or the saf ety interlock will stop the
engine when the mow pedal is engaged.
TESTER
TEST A: REEL DRIVE PUMP EFFICIENCY
PROCEDURE
Traction lever in neutral position.
Engine RPM 2800.
Hydraulic oil at operating temperature.
While watching pressure gauges, slowly close flow control valve until 1000 PSI is
obtained. Read flow gauge.
TESTER READINGS
Flow not less than 2.5 GPM at 1000 PSI.
If unable to get 1000 PSI or flow is be low 2.5 GPM, check for restrictio n in inta ke line to
reel drive pump. If not restricted, remove pump and repair as necessary.
Testing Page 4 - 32 Greensmaster
®
3100
Page 55

TEST HOOK UP NO. 4
MACHINES WITH PARKER PUMP USE
CENTER 3 PUMP SECTIONS FOR REEL
DRIVE CIRCUITS.
GR3100 WITH DANFOSS PUMP SHOWN.
Rev. E
Reel Drive Motor Flow
Reel Drive Relief Setting
Reel Motor Efficiency
TESTER CONNECTION:
Tester in series between pressure hose and motor fitting on suspected bad motor.
(Tester Flow Control Valve Open)
CAUTION: Keep everyone away from the front of the machine during reel
system tests. Operator must be on seat or the saf ety interlock will stop the
engine when the mow pedal is engaged.
TESTER
TEST A: REEL DRIVE MOTOR FLOW
PROCEDURE
Engine RPM 2800.
Mow pedal engaged.
While watching pressure gauges, slowly close flow control valve until 1000 PSI is
obtained. Read flow gauge.
TESTER READINGS
Flow not less than 2.5 GPM at 1000 PSI.
If unable to get 1000 PSI or flow is below 2.5 GPM, check rearward sp ool travel. If spool
position is good, remove relief cartridge and examine for contamination or wear.
®
Greensmaster
3100 Page 4 - 33 Testing
Page 56

TEST HOOK UP NO. 4 (continued)
TEST B: REEL DRIVE RELIEF SETTING AND REEL MOTOR EFFICIENCY
PROCEDURE
With engine off, insert a block of wood between cutting unit reel blades and front cross
tube to prevent reel from turning.
Engine RPM 2800.
Hydraulic oil at operating temperature.
Engage mow pedal.
TESTER READINGS
Flow not more than 0.5 GPM at 2000 to 2100 PSI.
If flow is above 0.5 GPM, remove motor and repair as necessary.
If pressure is is not in listed range, remove relief valve controlling reel being checked
and examine for wear or contamination.
Testing Page 4 - 34 Greensmaster
®
3100
Page 57

TEST HOOK UP NO. 5 (Greensmaster 3100)
GR3100 WITH DANFOSS PUMP SHOWN.
MACHINES WITH PARKER PUMP USE
LAST PUMP SECTION FOR STEERING
Rev. E
CIRCUIT.
Steering Pump Flow and Relief Pressure
TESTER CONNECTION:
Tester in series between steering pu mp outlet line and fitting on P (pressu re) port of steering
control unit.
(Tester Flow Control Valve Open)
CAUTION: Keep everyone away from the front of the machine during steering
system tests.
TESTER
TEST A: STEERING PUMP FLOW
PROCEDURE
Traction Lever in neutral.
Engine RPM 2800.
Hydraulic oil at operating temperature.
While watching flow and pressure gauges, slowly close flow co ntrol v alve until 600 PSI
is obtained.
TESTER READINGS
Flow not lower than 1.5 GPM at 750 to 850 PSI
If flow is less than 1.5 GPM, check for restriction in pump intake line. If not restricted,
remove pump and repair as necessary.
If pressure not within listed range, remove steering relief cartridge and examine for
contamination or damage. Adjust steering relief valve if necessary.
Greensmaster
®
3100 Page 4 - 35 Testing
Page 58

Adjustments
Lift and Mow Pedal Height Adjustment (Fig. 13)
Adjust the lift and mow pedal to equal height to gain
proper spool travel in the valve bank as follows:
1. Put 1, 2 and 3 spools in neutral (center of travel) and
remove transfer rod guard from foot panel.
2. Loosen jam nut securing yoke on front of long control
rod, remove cotter pin and clevis pin.
3. Move adjustment lever by hand to level the mow and
lift pedals and adjust yoke on control rod until hole in
yoke lines up with the adjustment lever hole.
4. Install the clevis pin and cotter pin. tighten the jam nut
and install the transfer rod guard.
5. Actuate the mow pedal by hand. Be sure the lift pivot
under the pedals clears the stop welded to the frame,
thereby allowing full spool travel.
2
1
3
4
Figure 13
1. Jam nut
2. Yoke
3. Control rod
4. Adjustment lever
Adjustments Page 4 - 36 Greensmaster®3100
Page 59

Traction Pedal Adjustment (Fig. 14)
To check forward and reverse operation of traction pedal
use the following procedure:
Reverse
1. Push down on rear of traction pedal (reverse) until
No. 5 section spool valve is completely pushed in.
2. Check distance between bottom of pedal and footrest. Distance should be approximately 3/16 in. If distance is greater or less than 3/16 in. dimension, an
adjustment to the traction control rod is required.
3. Remove jamnut and balljoint securing control rod to
traction shaft pivot.
4. Loosen jamnuts securing balljoints to control rod and
adjust balljoints and control rod to get 3/16 in..
Forward
1. Push the traction pedal fully forward until No. 5
section valve spool is completely pulled out.
2. Pedal should contact pedal stop. If pedal contacts
stop before spool is completely out, or if pedal does not
make contact with stop, an adjustment to the stop is
necessary.
Figure 14
1. Fully forward 3. Reverse
2. Pedal stop 4. Control rod
3. Loosen hex nut securing threaded rod to frame. Turn
flange nut on rod to raise or lower stop (rod), while
checking pedal.
4. When completed, retighten nut.
Traction Return Linkage (Fig. 14a)
If shift selector does not return to Neutral or No. 1
position from No. 2 position when mow pedal is engaged, an adjustment to the traction return linkage is
required.
1. Loosen front jam nut securing cable assembly to
mow/lift control rod bracket.
2. Move shift lever to No. 1 position.
3. While holding mow/lift control rod in rear position,
tighten rear locknut to remove almost all slack from
cable assembly. Do not over-tension cable.
4. Tighten front jam nut ot lock adjustment.
Figure 14a
5. Check operation and adjust again as necessary.
Greensmaster®3100 Page 4 - 37 Adjustments
1. Cable assembly 3. Mow/lift control rod
2. Mow/lift control rod bracket
Rev. B
Page 60

Rear Camshaft Adjustment (Fig. 15)
A camshaft misaligned with the valve bank may cause
the following:
A. No increase in ground speed in No. 2 (transport)
traction selection.
B. Mow pedal will not stay depressed (in detent)
without foot pressure.
C. Slow lift of the cutting units.
D. Slow or no drive to the cutting units.
If one or more malfunctions occur, loosen the rear
camshaft mounting capscrews and relocate the camshaft until the condition is corrected.
Retighten the capscrews.
CAUTION
You must readjust the mow-lift switch when
the camshaft adjustment is completed. (See
Mow-Lift Switch Adjustment in the Adjustments section of Chapter 5 - Electrical System). The lift and mow pedal height must also
be adjusted. (See Lift and Mow Pedal Height
Adjustment in this section.)
1
Figure 15
1. Mounting capscrews
Adjustments Page 4 - 38 Greensmaster®3100
Page 61

Repairs
Reel Motor Removal and Installation (Fig. 16)
1. Disconnect hydraulic lines. Put caps or plugs on
fittings and hoses to prevent contamination. Tag hydraulic lines for proper reassembly.
2. Loosen motor mount nuts.
3. Rotate motor clockwise so motor flanges clear studs
and pull motor out.
4. Reverse steps 1 - 3 to reinstall motor.
Reel Motor Shaft Seal Replacement (Fig. 17)
1. Disconnect and reverse hydraulic lines on affected
motor (connect pressure line to outlet fitting on motor
and return line to inlet fitting on motor).
IMPORTANT: Make sure hydraulic lines are connected properly after shaft seal is replaced.
2. Loosen motor mount nuts.
3. Rotate motor clockwise so motor flanges clear studs
and pull motor out.
1
2
Figure 16
1. Motor mount nuts 2. Motor
10. Apply “Loctite 515 Gasket Eliminator” or equivalent
to outside diameter of new seal.
11. Apply generous amount grease to inside diameter
of new shaft seal.
12. Use seal installation tool to install new shaft seal.
Make sure seal is installed square with the seal bore.
4. Remove snap ring from motor.
5. Start the engine. DO NOT engage the mow pedal.
Back pressure in the hydraulic system will push shaft
seal out of motor. Stop the engine.
NOTE: Seal may also be removed by punching two
holes in face of seal 180
and pulling seal out by grasping the screws.
6. Disconnect hydraulic lines from motor.
7. Remove and discard shaft seal and spacer.
8. Install a new spacer on motor shaft.
9. Put seal protector on motor shaft or apply tape on the
shaft. Be careful to prevent the shaft spline from damaging the new seal.
Greensmaster®3100 Page 4 - 39 Repairs
o
apart, installing metal screws
Figure 17
1. Seal protector
2. Seal installation tool
Page 62

Reel Motor 70-9800 Repair (Fig. 18)
17
1
3
2
4
13 16
5
6
7
8
9
1415
13
12
11
10
Figure 18
1. Plug ports and wash exterior of motor with mineral
spirits or solvent. Make sure parts and work area are
clean.
IMPORTANT: Extreme caution must be used when
using a vise to avoid distorting any parts.
2. Draw a line across the seam areas on the motor case
with a scribe or marker to ensure proper reassembly.
3. Remove four socket head capscrews.
4. Put your hand on the cover assembly and gently tap
the drive shaft with a soft face hammer to separate the
body from the cover. Be careful not to drop parts or
disengage gear mesh.
5. Before removing gear set, apply marking dye to
mating teeth to retain “timing” when reassembling.
6. Be careful when disassembling. The needle bearings
may be of the loose grease retained type. Pack these
with general purpose grease to retain them for reassembly. It is recommended NOT to remove the bearing races
from the cover and body.
7. Remove and discard the bridging insert, gasket insert, anti-extrusion block, snap ring, shaft seal, spacer,
seal assembly, wear plate and o-ring, (Items 5, 6, 8-11,
14, 15 and 17). These items are available in a repair kit.
8. Clean all parts and check for burrs, scoring,
nicks, etc.
9. Rub mating surfaces of body and cover with 400 grit
or finer sandpaper to remove any Loctite residue. Wash
body and cover to remove abrasive material.
10. Apply grease to bridging insert and put in cover, tab
side down.
11. Apply grease to gasket insert and put in place over
bridging insert.
12. Stone gears if wear plate appears scored. Replace
as set if necessary. Oil the inside of cover and insert the
gear set, maintaining the original timing and locations.
13. Apply grease to wear plate and slip over shafts with
wider cross section next to bridging insert. If the wear
plate is made of steel backed bronze, the bronze side
must face gears.
Repairs Page 4 - 40
Rev. B
Greensmaster
®
3100
Page 63

14. Apply grease to anti-extrusion block and put in
recess of seal assembly, with ground face showing.
15. Apply grease to seal assembly and put in body
counterbore. Anti-extrusion block must face body on the
tank port side when the motor is assembled (same side
as bridging insert).
18. Before tightening the capscrews, rotate the drive
shaft in the direction of normal rotation (counterclockwise) to check for binding. You may not be able to rotate
the drive shaft by hand. Protect the shaft if using a pliers.
19. Tighten the capscrews evenly in a crossing pattern
to a torque of 190-210 in-lb.
16. Mating surfaces of body and cover must be clean,
free of oil and dry. Clean both surfaces with “Locquick”
primer or clean shop solvent. Spread a thin, even coating of “Loctite 515 Gasket Eliminator” or equivalent on
one surface.
17. Assemble the body to the cover, making sure that
none of the parts become displaced. Insert the capscrews and washers and hand tighten.
20. Carefully install a new spacer, shaft seal and snap
ring. (Perform steps 8 - 12 under Reel Motor Shaft Seal
Replacement in this section of the book).
21. Allow 60 minutes for liquid gasket material to harden
before operating motor.
Greensmaster
®
3100 Page 4 - 41 Repairs
Page 64

Reel Motor 94–3506 Repair (Fig. 18a)
1
2
3
4
5
14
6
7
8
9
5
10
11
5
12
13
Figure 18a
1. Plug ports and wash exterior of motor with mineral
spirits or solvent. Make sure parts and work area are
clean.
IMPORTANT: Extreme caution must be used when
using a vise to avoid distorting any parts.
2. Draw a line across the seam areas on the motor case
with a scribe or marker to ensure proper reassembly.
3. Remove four socket head capscrews (1) and washers
(2).
4. Put your hand on the cover assembly (4) and gently
tap the drive shaft with a soft face hammer to separate
the body (10) from the cover. Be careful not to drop parts
or disengage gear mesh.
5. Before removing gear set, apply marking dye to mating teeth to retain “timing” when reassembling. Motor
efficiency may be affected if the teeth are not installed
in the same position during reassembly.
IMPORTANT: To prevent damage to load plate or
cover during motor operation, do not mark gears
with a punch or scribe.
6. Be careful when disassembling. The needle bearings
(5) may be of the loose grease retained type. Pack these
with general purpose grease to retain them for re–
asembly. It is recommended NOT to remove the bearing
races from the cover and body.
7. Remove the load plate assembly (9).
8. Remove and discard the seal ring (8), snap ring (13),
shaft seal (12), and spacer (11). These items are available in a repair kit.
9. Clean and air dry all parts. Check for burrs, scoring,
nicks, etc.
10. Replace gears as set if excessively scored or worn.
Replace load plate if worn or scored.
11. Apply grease or petroleum jelly to load plate assembly (9) and install in body.
12. Dip gears in oil and install in body, maintaining original timing and locations.
13. Apply grease or petroleum jelly to ring seal (8) and
install in body.
14. Apply hydraulic oil to inside of cover (4) and
assemble cover to body, making sure that none of the
parts become displaced. Insert the cap screws and
washers and hand tighten.
Repairs
Page 4 – 41.1
Rev. B
Greensmaster 3100
Page 65

15. Before tightening the capscrews, rotate the drive
shaft in the direction of normal rotation (counterclock–
wise) to check for binding. You may not be able to rotate
the drive shaft by hand. Protect the shaft if using a pliers.
16. Tighten the capscrews evenly in a crossing pattern
to a torque of 17 ft–lb.
17. Carefully install a new spacer, shaft seal and snap
ring. (Perform steps 8 – 12 under Reel Motor Shaft Seal
Replacement in this section of the book).
Greensmaster 3100 Page 4–41.2 RepairsRev. B
Page 66

Reel Motor 105–9770 Repair (Fig. 18b)
33 to 40 ft–lb
(45 to 55 Nm)
6
5
7
9
8
7
5
10
1
2
6
11
3
4
Figure 18b
1. Rear cover
2. Drive gear
3. Seal
4. Tab washer
5. Pressure seal
6. Back–up ring
7. O–ring
8. Body
Disassembly
1. Plug motor ports and clean the outside of the motor
thoroughly. After cleaning, remove plugs and drain any
oil out of the motor.
2. Use a marker or scribe to make a diagonal mark
across the front flange, body, and rear cover for reassembly purposes (Fig.18c).
9. Idler gear
10. Cap screw
11. Front flange
DIAGONAL MARK
Repairs
Page 4 – 41.3
Rev. D
Figure 18c
Greensmaster 3100
Page 67

IMPORTANT: Avoid using excessive clamping
pressure on the motor flange to prevent distorting
the casting.
3. Clamp mounting flange of motor in a vise with the
shaft end down.
4. Loosen cap screws on the rear cover.
5. Take motor from the vise and remove cap screws.
6. Remove front flange from the body, then remove rear
cover. Locate and remove dowel pins from body.
IMPORTANT: Mark the relative positions of the gear
teeth and the bearing blocks so they can be reassembled in the same position. Do not touch the
gear surfaces as residue on hands may be corrosive
to gear finish.
7. Place the motor on its side and push on the rear bearing block to remove the bearing block and gear set (Fig.
18d).
8. Carefully remove and discard o–rings, pressure
seals, and back–up rings (Fig. 18e) from motor. Do not
cause any damage to the machined grooves during the
removal process.
1
2
Figure 18d
1. Motor body 2. Bearing block & gear set
IMPORTANT: Make sure not to damage the counter
bore when removing the shaft seal from the front
plate.
9. Position front flange with seal side up. Remove shaft
seal.
Inspection
1. Remove any nicks and burrs from all motor components with emery cloth.
CAUTION
Use eye protection such as goggles when using
compressed air.
2. Clean all motor components with solvent. Dry all
parts with compressed air.
Figure 18e
1
2
3
3
1. Drive gear
2. Idler gear
Greensmaster 3100 Page 4–41.4 RepairsRev. D
Figure 18f
3. Bearing block
Page 68

3. Inspect drive gear, idler gear and bearing blocks
(Fig. 18f) for the following:
A. Gear shafts should be free of rough surfaces and
excessive wear at bushing points and sealing areas.
Scoring, rough surfaces, or wear on gear shafts indicates need for replacement.
B. Gear teeth should be free of excessive scoring
and wear. Any broken or nicked gear teeth must be
replaced.
C. Inspect gear face edge for sharpness. Sharp
edges of gears will mill into bearing blocks and, thus,
must be replaced.
D. Bearing areas of bearing blocks should not have
excessive wear or scoring.
E. Face of bearing blocks that are in contact with
gears should be free of wear, roughness or scoring.
5. Lubricate gear faces and bearing surfaces of drive
gear, idler gear, and bearing blocks. Carefully assemble
bearing blocks and gears noting identification marks
made during disassembly.
6. Position the motor body on its side. Carefully slide
bearing block and gear assembly into the body cavity
using identification marks made during disassembly.
7. Remove any excess lubrication from mating surfaces of body, rear cover, and front flange. Make sure
that these surfaces are clean and dry.
8. Install dowel pins in body.
IMPORTANT: Do not dislodge o–rings, pressure
seals, or back–up rings during final assembly.
9. Gently slide the rear cover onto the assembly using
marker or scribe mark for proper location. Firm hand
pressure should be sufficient to engage the dowel pins.
4. Inspect front flange and rear cover for damage or
wear.
Reassembly
NOTE: When reassembling the motor, check the identi-
fication marks made during disassembly to make sure
the parts are properly aligned during reassembly.
1. Lubricate o–rings, pressure seals, back–up gaskets,
and seal grooves with a thin coat of petroleum jelly. Lubricate all other internal parts freely with clean hydraulic
oil.
2. Install new shaft seal into front flange.
3. Install lubricated pressure seals into the grooves in
the front flange and rear cover. Follow by carefully placing the back–up rings into the grooves.
4. Install new o–rings to the body.
10.Position the motor with rear cover downwards. Carefully slide the front flange onto the assembly using marker or scribe mark for proper location.
11. Install the four cap screws and hand tighten.
IMPORTANT: Avoid using excessive clamping
pressure on the motor housing to prevent distorting
the housing.
12.Place motor front flange in a vise and alternately
torque the cap screws from 33 to 40 ft–lb (45 to 55 N–m).
13.Put a small amount of hydraulic oil in port on motor
and rotate driveshaft one revolution. Protect the shaft if
using a pliers. If drive shaft binds, disassemble motor
and repeat assembly process.
14.Remove motor from vise.
Repairs
Page 4 – 41.5
Rev. D
Greensmaster 3100
Page 69

This page is intentionally blank.
Page 70

Hydraulic Pump Removal and Installation - Greensmaster 3100 shown (Fig. 19)
Figure 19
Disassembly
1. Drain the hydraulic reservoir.
2. Remove the hydraulic lines from the pump (Fig. 9).
Put plugs in the pump ports. Put covers on the fittings.
IMPORTANT: When disassembling hydraulic lines
make sure hydraulic plugs are placed in the open
end of the hydraulic line to prevent debris from
contaminating hydraulic fluid. It is also a good idea
to tag hydraulic lines when disassembling so that
they can be properly reassembled. Keep all hydraulic and suction lines clean and free from debris.
During replacement avoid overtightening fittings
(see the Hydraulic Hose and Fitting Information
section of this chapter). Check hydraulic lines for
breaks or cracks. Check the hydraulic reservoir for
proper fluid level after replacement of any large
component.
3. Loosen the set screws (Item 13) securing the pump
hub (Item 22) to the shaft, remove the capscrews
(Item 24) mounting the pump to the pump mount and
remove the pump.
Reassembly
1. Fill pump with clean hydraulic fluid and cap fittings.
2. Assemble the pump to the engine in reverse of the
disassembly procedures. Check all lines for clearance
from the frame and other components.
3. Start machine and check for proper performance.
Repairs Page 4 - 42 Greensmaster®3100
Page 71

Pump Repair - Greensmaster 3100 shown (Fig. 22)
Figure 22
Relief Valve Service
1. Remove cap (Item 10). Remove valve adjuster
(Item 9), spring (Item 8), and ball (Item 7).
2. Remove o-ring (Item 32) from cap.
3. Inspect ball for burrs or roughness. Inspect relief
valve bore and seat in bearing plate (Item 28).
4. Inspect spring for damage.
5. Clean and dry all parts. Apply hydraulic oil to parts.
Install ball, spring and valve adjuster.
6. Install new o-ring on cap and install cap.
7. Before operating the machine, check steering relief
pressure and adjust to 800 psi. To adjust, remove cap,
turn adjuster clockwise to increase pressure and counterclockwise decrease pressure. (See Test Hook Up No.
5, Steering Pump Flow and Steering Pump Relief Setting in the Testing section of this chapter.)
Pump Service
1. Plug ports and wash exterior of pump with mineral
spirits or solvent. Make sure parts and work area are
clean.
2. Draw a line across the seam areas on the pump case
with a scribe or marker to ensure proper reassembly.
IMPORTANT: Use caution when using a vise to avoid
distorting any parts.
3. Secure the flange end of the pump (Item 15) in a vise
with the drive shaft (Item 20) pointing down.
4. Remove the four locknuts (Item 1) and lockwashers
(Item 2).
5. Put your hand on the pump case and gently tap the
pump case with a soft face hammer to loosen the pump
sections. Be careful not to drop parts or disengage gear
mesh.
6. Before removing each gear set, apply marking dye to
mating teeth to retain “timing” when reassembling.
Greensmaster®3100 Page 4 - 43 Repairs
Page 72

7. Be careful when disassembling. The needle bearings
in the body assembly (Item 15) may be of the loose
grease retained type. Pack these with general purpose
grease to retain them for reassembly. It is recommended
NOT to remove the bearing races from the flange assembly.
8. Remove and discard the oil seal and seal rings
(Items 17 and 23) as the pump is disassembled.
11. Assemble pump sections starting at the body assembly (Item 15). Install woodruff keys (Item 19) and
align keyways in gears as they are installed over the
shafts. Apply grease to new seal rings (Item 23) before
installing.
12. After pump has been assembled, tighten locknuts
by hand. Rotate the drive shaft to check for binding.
Protect the shaft if using a pliers.
9. Clean all parts. All parts must be check for burrs,
scoring, nicks, etc. Check the bushings in the plate
assemblies (Items 22, 26 and 28) and cover assembly
(Item 31) for excessive wear or scoring. Replace the
assemblies as necessary. The bushings are not serviceable.
10. Stone gears if plate surfaces appear scored. Replace gears as sets if necessary. Oil the inside of gear
plates (Items 14, 25 and 30) and insert gear sets,
maintaining the original timing and locations.
13. Tighten the locknuts evenly in a crossing pattern to
a torque of 17 to 19 ft-lb.
14. Before installing oil seal (Item 17) put seal protector
on pump shaft or apply tape on the shaft.
15. Before installing fill volume between lips of new seal
with Master Lubricant Co. “Lubrico M-6”, Lubriplate
“Aero Lube” or equivalent. Apply grease to inside diameter of new oil seal. Carefully install a new oil seal.
Assemble spring loaded lip of seal toward bearing.
Repairs Page 4 - 44 Greensmaster
®
3100
Page 73

Control Valve Removal and Installation (Fig. 23)
1. Remove knob from the shift lever and disassemble
the right side panel from the machine.
2. Remove the seat or secure it in an up position,
disconnect the wires from the safety switch located on
the valve bank and place a drain pan under the valve
bank.
3. Disassemble the chain links from all five (5) spools.
4. Tag and identify the lines leading to the valve bank,
disconnect and cap the lines and fittings with plastic
plugs.
5. Loosen the capscrews securing the valve bank to the
frame and remove the valve bank.
NOTE: Shims may be installed between the bank and
frame. Note the quantity and mounting location and
install in proper location upon reassembly.
6. Reverse steps 1 - 5 to install the valve bank. Do not
over-tighten fittings. Use two wrenches to secure flexible line connectors, one wrench to prevent the Line
from twisting, the other to tighten the connection. (See
the Hydraulic Lines and Fittings section of this chapter.)
7. Check to be sure all lines are routed correctly and are
not in contact with one another or other components. It
should be possible to slip a strip of paper between any
lines and other components in close relationship. Relocate if necessary.
8. Adjust the traction linkage, switches and reel drive
camshaft as necessary.
Relief Valve Removal and Installation (Fig. 24)
Figure 23
1. Be careful not to interchange parts, such as springs
or shims, between relief valves. The same number and
thickness of shims must be installed when reassembling
the relief valve.
2. Clean and inspect relief valve parts and the valve
section housing. Replace parts as necessary. Install
new seals and back-up rings. Apply hydraulic oil to parts
before installing.
3. Before operating the machine, check the relief pressure for the affected relief valve. (See the Testing
section of this chapter.) Adjust relief valve by adding or
removing shims between the spring and poppet.
Figure 24
1. Main & No. 1 section relief 3. No. 3 section port relief
2. No. 2 section port relief 4. No. 4 (traction) relief
Greensmaster®3100 Page 4 - 45 Repairs
Page 74

Control Valve Spool Seal Replacement
IMPORTANT: To prevent leakage, make sure you
keep foreign material such as dirt, sand or paint
chips out of valve body seal grooves.
NOTE: Except for the seal under No. 4 spool bonnet,
the valve bank does not normally have to be removed
from the machine to replace spool seals.
Front (Chain Link) Side (Fig. 25)
1. Remove the chain link, boot and breather washer
from the spool.
2. Remove the seal retainer, back-up washer and lip
seal from the valve body. Clean the seal groove.
Figure 25
3. Soak the new seal in clean hydraulic fluid. INSTALL
THE SEAL WITH THE OPEN (LIP) SIDE FACING IN
TOWARDS THE VALVE BODY. Install the back-up
washer and seal retainer
4. Install the breather washer, boot and chain link. Start
the engine and check for leaks.
Rear (Bonnet) Side (Fig. 26)
1. Remove the bonnet.
NOTE: The valve bank must be removed in order to
replace the spool seal under the bonnet on No. 4 spool.
2. Disassemble the components attached to the rear of
the spool. (See Control Valve No. 1 Spool Detent Replacement and Control Valve No. 4 Spool Detent Replacement in this section of the book.)
NOTE: The assemblies under each spool bonnet are
different from one another. Pay close attention to how
they are disassembled so they will be reassembled
correctly.
1. Boot 4. Back-up washer
2. Breather washer 5. Lip seal
3. Seal retainer
Figure 26
1. Seal retainer
2. Back-up washer
3. Lip seal
3. Remove the seal retainer, back-up washer, and lip
seal from the valve body and clean the seal groove.
4. Soak the new seal in clean hydraulic fluid. INSTALL
THE SEAL WITH THE OPEN (LIP) SIDE FACING IN
TOWARDS THE VALVE BODY. Install the back-up
washer, seal retainer and remaining components.
IMPORTANT: Make sure the switch is correctly positioned and adjusted when bonnet is installed on
No. 2 or No. 4 spool. (See Mow/Lift Switch Replacement and Adjustment or Traction Switch Replacement and Adjustment in Chapter 6 - Electrical
System.)
Repairs Page 4 - 46 Greensmaster®3100
Page 75

Control Valve Internal Seal Replacement (Fig. 27)
2.5 in. traction spring
1.5 in. spring
These components
changed locations after
serial no. 210000701
5
4
3
2
1
Figure 27
1. Internal seals (4 between ea. sect.) 3. No. 2 section relief valve 5. No. 4 (traction) section relief valve
2. Main & No. 1 section relief valve 4. No. 3 section relief valve
NOTE: Replace all internal seals whenever valve sections are disassembled. Original seals may not seal
for any imperfections or contaminants which could
cause leakage to occur.
after the valve assembly is installed on the machine.
5. Soak the replacement o-rings in clean hydraulic fluid
1. Remove the valve bank. (See Control Valve Removal
and Installation in this section of the book.)
2. Put the valve bank in a vertical position in a bench
vise, and remove the locknuts from the three (3) bolts
and install them into the ring grooves as you stack each
section on top of another.
6. Install the locknuts onto the studs and torque them to
15-20 ft-lb (20.4-27.2 Nm).
securing the sections together (Fig. 27).
IMPORTANT: Do not overtorque. This will distort the
3. Slide each section off the studs. Identify them so they
valve bodies and cause binding of the spools.
will not be reassembled in the wrong location.
7. Install the valve bank onto the machine.
4. Remove all original o-ring seals, clean the o-ring
grooves and check the mating surfaces of each section
Greensmaster®3100 Page 4 - 47 Repairs
Page 76

Control Valve No. 1 Spool Detent Replacement (Fig. 28, 29)
NOTE: These procedures can be done with the control
valve assembly installed on the machine.
1. Remove the entire detent assembly from the control
valve. Keep the backup washer, seal retainer and seal
with the spool.
2. Apply Locktite 222 or equivalent to threads of detent
stud (Item 9) and assemble into spring and stop collars
(Items 6 and 8). Thread the assembly into the No. 1
spool. The spring (Item 6) needs to be compressed to
get detent stud started. Anchor the slotted end of the
spool and apply 10-14 ft-lb (13.6-19 Nm) torque to
detent stud (Item 9).
3. Slip bonnet (Item 1) over the entire assembly and
secure it to the valve body with the two capscrews. Be
sure slot in mounting face of bonnet is at bottom before
installation.
4. Install the thrust plate (Item 5) into the bonnet (Item 1)
so it bottoms out. Apply approximately 1/4 in. (6 mm) of
#2 multi-purpose Lithium-base grease on top of thick
washer (Item 5).
1. Bonnet 6. Spring
2. Spring 7. Capscrew
3. Race 8. Stop collars
4. Ball 9. Detent stud
5. Thrust plate 10. Adjustment cap
Figure 28
5. Install twelve balls (Item 4) into thrust plate (Item 5).
IMPORTANT: If the detent bonnet contains a vent
pocket, do not let the balls fall into the vent.
6. Insert race (Item 3) on top of balls with ramp of race
facing inward as shown. Rotate race (Item 3) until you
are sure all balls are resting properly against the surfaces of the race and thrust plate (Items 3 and 5).
7. Insert spring (Item 2) into bonnet (Item 1).
8. Apply Locktite 222 or equivalent to the threads of
adjustment cap (Item 10) and thread into bonnet. Turn
adjustment cap in to compress the spring (Item 2).
Actuate the spool assembly, then turn the adjustment
cap until the desired detent action is obtained. This will
usually be within three turns from bottoming out the
adjustment cap..
NOTE: Each turn of adjustment cap (Item 10) changes
the “Feel” of the detent action about 20%.
Figure 29
Repairs Page 4 - 48 Greensmaster®3100
Page 77

Control Valve No. 4 Spool Detent Replacement (Fig. 30)
NOTE: The control valve assembly must be removed to
replace this assembly. (See Control Valve Removal and
Installation in this section of the book.)
1. Be sure No. 4 spool is in neutral and remove the
bonnet, large spring, and stop collar.
2. Hold one hand in front of detent sleeve and push the
front of the spool in very slowly until the detent balls pop
out. Be sure to remove all four (4) balls.
3. Push the front of the spool in carefully until the holes
in the detent adapter are just past the edge of the detent
sleeve.
IMPORTANT: Do not push the spool too far or the
rear spool seal may be cut by the spool.
Figure 30
4. Hold the front of the spool from turning, insert a drift
punch through the holes in the adapter and rotate the
adapter counter-clockwise to remove it from the spool.
5. Remove the detent sleeve.
Reassemble With the Following Procedures:
1. Mount the detent sleeve and the detent adapter. Lock
the adapter securely to the spool.
2. Apply a light coat of grease to the adapter holes, insert
the small spring, the four balls, and the ball follower.
3. Stand the valve bank assembly up so the front (clevis
end) of No. 4 spool is facing downward.
4. Slide the detent sleeve up to the four balls. Apply light
pressure against the balls with the sleeve. Push against
the center of the ball follower with a drift punch to allow
the balls to slip into the adapter holes and the sleeve to
slide over the assembly.
IMPORTANT: Do not push spool too far or the rear
spool seal may be cut by the spool.
1. Bonnet 5. Balls (4)
2. Spring 6. Detent adapter
3. Stop collar 7. Spring
4. Detent sleeve 8. Ball follower
5. Assemble the stop collar, large spring and bonnet to
the valve body. Check the spool for proper detent operation and mount the valve bank onto the machine.
6. Adjust the traction switch. (See Traction Switch Removal, Installation and Adjustment in the Repairs section of Chapter 5 - Electrical System.)
Greensmaster®3100 Page 4 - 49 Repairs
Page 78

Lift Cylinder Removal and Installation
No. 1 (Center) Lift Cylinder (Fig. 32)
Figure 32
1. Put drain pan under machine.
2. Remove hydraulic lines.
3. Remove capscrew (Item 25) and locknut (Item 29)
securing pin (Item 26) in barrel end of cylinder (Item 10).
4. Remove pin (Item 26) securing barrel end of cylinder
to the frame.
5. Remove cylinder (Item 10) by lowering barrel end and
sliding shaft/clevis end off of the lift arm (Item 21).
6. Reverse steps 2 - 5 to install the cylinder. Coat
cylinder pivot on lift arm (Item 21) with Never-Seez or
grease to achieve free pivot action of lift arm in cylinder
clevis before reinstalling.
IMPORTANT: When disassembling hydraulic lines
make sure hydraulic plugs are placed in the open
end of the hydraulic line to prevent foreign debris
from contaminating hydraulic oil. It is also a good
idea to tag the hydraulic lines when disassembling
so they can be properly reassembled. Keep all hydraulic lines clean and free from foreign debris.
During replacement of lift cylinder, avoid overtightening fittings. Check hydraulic lines for cracks or
breaks. If a hydraulic leak should appear after replacement of lift cylinder, replace the fitting or line
that is leaking. Check hydraulic reservoir for level
of hydraulic fluid after replacement of lift cylinder.
Repairs Page 4 - 50 Greensmaster®3100
Page 79

No. 2 and 3 Lift Cylinders (Fig. 33)
Figure 33
(L.H. side shown)
1. Remove the tool box to gain access to No. 2 cylinder.
Remove the cover plate to gain access to No. 3 cylinder.
Other disassembly procedures are the same for both
cylinders.
2. Put drain pan under machine and remove hydraulic
lines.
3. Remove cotter pin (Item 5) and clevis pin (Item 4)
from cylinder rod.
4. Remove capscrew (Item 1) securing pin (Item 7) to
frame and remove pin and cylinder (Item 6) from machine.
5. Reverse steps 2 - 5 to install the lift cylinder. Coat the
hinge pin with Never-Seez or grease to achieve free
pivot action of the cylinder before reassembling.
IMPORTANT: When disassembling hydraulic lines
make sure hydraulic plugs are placed in the open
end of the hydraulic line to prevent foreign debris
from contaminating hydraulic oil. It is also a good
idea to tag the hydraulic lines when disassembling
so they can be properly reassembled. Keep all hydraulic lines clean and free from foreign debris.
During replacement of lift cylinder, avoid overtightening fittings. Check hydraulic lines for cracks or
breaks. If a hydraulic leak should appear after replacement of lift cylinder, replace the fitting or line
that is leaking. Check hydraulic reservoir for level
of hydraulic fluid after replacement of lift cylinder.
Greensmaster®3100 Page 4 - 51 Repairs
Page 80

Lift Cylinder Repair – No. 1 (Center) (Fig. 34)
Figure 34
IMPORTANT: To prevent damage when clamping the
cylinder barrel in a vise, clamp only on the pivot end.
Do not clamp the vise jaws against the smooth shaft
surface. Protect the shaft surface before mounting
in the vise.
1. After removing the cylinder, pump the oil out of the
cylinder into a drain pan by SLOWLY moving the cylinder’s piston in and out of the cylinder bore.
2. Plug the ports and clean the outside of the cylinder.
3. Mount the cylinder in a vise so the shaft end of the
cylinder is tilted up slightly. Do not close the vise so
firmly that the barrel could become distorted.
4. Remove the retaining ring (Item 10). Grasp clevis end
of shaft (Item 11) and use a twisting and pulling motion
to carefully extract piston (Item 4), shaft (Item 11), and
head (Item 8) from the barrel (Item 1).
5. Securely mount the shaft (Item 11) in a vise and
remove the lock nut (Item 2) from the piston end of the
shaft. Remove the piston (Item 4). Slide the head
(Item 8) off of the shaft.
6. Remove and discard all seals and back-up rings
(Items 3, 5, 6, 7, 9).
7. Wash the parts in a safe solvent. Dry the parts with
compressed air. DO NOT wipe them dry with a cloth or
paper as lint and dirt may remain.
8. Inspect the internal surface of the barrel (Item 1) for
damage (deep scratches, out-of-round, etc.). Inspect
the head (Item 8), shaft (Item 11) and piston (Item 4) for
evidence of excessive scoring, pitting, or wear. Replace
any defective parts.
9. Put a light coating of hydraulic oil on all new seals and
back-up washers. Install the new seals and back-up
washers (Items 3, 5, 6, 7, 9). Install the head (Item 8)
onto the shaft (Item 11). Install the piston (Item 4) onto
the shaft and tighten the lock nut (Item 2).
10. Put a light coating of hydraulic oil on all cylinder parts
to ease assembly. Slide the shaft assembly and head
into the barrel. Install the retaining ring (Item 10) to
secure the assembly in the barrel.
Repairs Page 4 - 52 Greensmaster®3100
Page 81

Lift Cylinder Repair – No. 2 and 3 (Left and Right) (Fig. 35)
Figure 35
IMPORTANT: To prevent damage when clamping the
cylinder barrel in a vise, clamp only on the pivot end.
Do not clamp the vise jaws against the smooth shaft
surface. Protect the shaft surface before mounting
in the vise.
1. After removing the cylinder, pump the oil out of the
cylinder into a drain pan by SLOWLY moving the cylinder’s piston in and out of the cylinder bore.
2. Plug the ports and clean the outside of the cylinder.
3. Mount the cylinder in a vise so the shaft end of the
cylinder is tilted up slightly. Do not close the vise so
firmly that the barrel could become distorted.
4. Remove the retaining ring (Item 10). Grasp clevis
(Item 13) at end of shaft and use a twisting and pulling
motion to carefully extract piston (Item 3), shaft (Item 6),
and head (Item 9) from the barrel (Item 1).
5. Securely mount the shaft (Item 6) in a vise and
remove the lock nut (Item 2) from the piston end of the
shaft. Remove the piston (Item 3). Slide the head
(Item 9) off of the shaft.
6. Remove and discard all seals and back-up rings
(Items 4, 5, 12, 7, 8, 11).
7. Wash the parts in a safe solvent. Dry the parts with
compressed air. DO NOT wipe them dry with a cloth or
paper as lint and dirt may remain.
8. Inspect the internal surface of the barrel for damage
(deep scratches, out-of-round, etc.). Inspect the head,
shaft and piston for evidence of excessive scoring,
pitting, or wear. Replace any defective parts.
9. Put a light coating of hydraulic oil on all new seals and
back-up washers. Install the new seals and back-up
washers (Items 4, 5, 12, 7, 8, 11). Install the head
(Item 9) onto the shaft (Item 6). Install the piston (Item 3)
onto the shaft and tighten the lock nut (Item 2).
10. Put a light coating of hydraulic oil on all cylinder parts
to ease assembly. Slide the piston, shaft and head into
the barrel. Install the retaining ring (Item 10) to secure
the assembly in the barrel.
Greensmaster®3100 Page 4 - 53 Repairs
Page 82

Wheel Motor Removal and Installation (Fig. 36)
Figure 36
1. Put blocks on each side off opposite drive wheel. Lift
the frame with a jack and use blocks or a jack stand to
support the frame.
2. Remove wheel nuts (Item 29) and remove wheel
(Item 3). Remove large nut (Item 4) from wheel hub
(Item 5).
IMPORTANT: To prevent damage to wheel motor, DO
NOT hit wheel hub with a hammer during removal
or installation.
3. Mount a wheel puller to wheel mount studs and
remove wheel hub (Item 5) and brake drum (Item 6).
Remove key (Item 11) from wheel motor shaft.
4. Disconnect hydraulic lines from fittings on wheel
motor (Item 22). Put caps on open lines and fittings to
prevent contamination.
5. Remove four (4) capscrews (Item 9) and lock nuts
(Item 19) to remove wheel motor (Item 22) and brake
brackets (Item 12) from frame.
6. Reverse steps 1 - 6 to install the wheel motor. Tighten
nut (Item 4) to a torque of 250 - 400 ft-lb.
IMPORTANT: When disassembling hydraulic lines
make sure hydraulic plugs are placed in the open
end of the hydraulic line to prevent foreign debris
from contaminating hydraulic oil. It is also a good
idea to tag the hydraulic lines when disassembling
so they can be properly reassembled. Keep all hydraulic lines clean and free from foreign debris.
During replacement of wheel motor, avoid overtightening fittings. Check hydraulic lines for cracks or
breaks. If a hydraulic leak should appear after replacement of lift cylinder, replace the fitting or line
that is leaking. Check hydraulic reservoir for level
of hydraulic fluid after replacement of lift cylinder.
Repairs Page 4 - 54 Greensmaster®3100
Page 83

Wheel Motor Repair (Fig. 37, 38)
Figure 37
Disassembly of Motor (Fig. 37)
1. Place motor in a vise, clamping down on housing
(Item 3) port bosses with coupling shaft (Item 11)
pointed down.
CAUTION
If motor is not firmly held in the vise, it could
be dislodged during the service procedures,
causing personal injury.
2. Remove the seven (7) special bolts (Item 14) using a
9/16 inch thin wall socket. Inspect bolts for damaged
threads, or sealing ring under bolt head. Replace damaged bolts.
3. Remove end cover assembly (Item 24) and seal ring
(Item 5).
4. Thoroughly wash cover in solvent and blow dry. Make
sure cover valve apertures, including internal orifice
plug, are free of contamination. Inspect end cover for
cracks and the bolt head recesses for good bolt head
sealing surfaces. Replace cover as necessary.
5. Remove commutator ring (Item 23), commutator
(Item 16), and manifold (Item 22).
6. Remove commutator seal (Item 15) from commutator
(Item 16), using an air hose to blow air into ring groove
until seal ring is lifted out and discard seal. Inspect
commutator and commutator ring for cracks or burrs.
Inspect commutator for wear, scoring, spalling or
brinelling. If any of these conditions exist, replace commutator and commutator ring as a matched set.
7. Remove manifold (Item 22). Inspect manifold for
cracks, surface scoring, brinelling or spalling. Replace
manifold that shows any of these conditions. A polished
pattern on the ground surfaces from commutator or rotor
rotation is normal.
8. Remove rotor set (Item 19, 20, 21) and wear plate
(Item 18). Retain rotor set in its assembled form to
maintain the same rotor vane to stator contact surfaces.
Inspect rotor set in its assembled form for nicks, scoring,
or spalling, on any surface and broken or worn rotor
splines. If any rotor set component requires replacement, the complete rotor set must be replaced as it is a
matched set. Inspect the wear plate for cracks,
brinelling, or scoring.
Greensmaster®3100 Page 4 - 55 Repairs
Page 84

9. Place rotor set on a flat surface and center rotor
(Item 19) in stator (Item 21) such that two rotor lobes
are 180° apart and a roller vane (Item 20) centerline are
on the same stator centerline. Check the rotor lobe to
roller vane clearance with a feeler gage at this common
centerline. If there is more than .005 inches (0.13 mm)
of clearance, replace rotor set.
10. Remove drive link (Item 13) from coupling shaft
(Item 11) if it was not removed with rotor set and wear
plate. Inspect drive link for cracks and for worn or
damaged splines. There should be no lash (play) between mating spline parts.
Before Assembling Motor
Replace all seals and seal rings with new ones. Lubricate all seals and seal rings with hydraulic oil or clean
grease before assembly.
NOTE: Unless otherwise indicated, do not oil or grease
parts before assembly.
Wash all parts in clean petroleum-based solvents before
assembly. Blow them dry with compressed air. Remove
any paint chips from mating surfaces of the end cover,
sleeve, and housing and from port and sealing areas.
11. Remove thrust bearing (Item 12) and inspect for
wear, brinelling, corrosion, and a complete set of rollers
retained in position.
12. Remove coupling shaft (Item 11) by pushing on the
output end of shaft. Inspect coupling shaft bearing and
seal surfaces for spalling, nicks, grooves, severe wear
or corrosion and discoloration. Inspect for damaged or
worn keyway. Replace coupling shaft if any of these
conditions exist.
NOTE: Minor shaft wear in seal area is permissible. If
wear exceeds .020 inches (0.51 mm) diametrically,
replace coupling shaft.
A slight “polish” is permissible in the shaft bearing area.
Anything more would require coupling shaft replacement.
13. Remove inner seal (Item 7), back-up washer
(Item 6) and back-up washer (Item 4). Discard seal and
back up rings.
14. Remove housing (Item 3) from vise, turn over and
re-clamp in vise with dirt seal (Item 1) end pointed up.
15. Remove dirt seal (Item 1) and discard.
16. Inspect housing (Item 3) assembly for cracks, the
machined surfaces for nicks, burrs, brinelling or corrosion. Remove burrs that can be removed without changing dimensional characteristics. Inspect tapped holes
for thread damage.
17. Inspect the bearings (Item 2, 9, 10) and thrust
washers (Item 8). The bearing rollers must be firmly
retained in the bearing cages, but must rotate and orbit
freely. All rollers and the thrust washers must be free of
brinelling and corrosion.
Assembly of Motor (Fig. 37, 38)
1. Place housing (Item 3) in a vise and clamp down on
housing port bosses with large bore end pointed up.
Apply clean grease to new seal (Item ) and assemble
into housing with seal lip pointed inward.
2. Install back-up washer (Item 4) into housing. Install
back-up washer (Item 6) into housing with beveled side
facing out so it will mate to inner seal (Item 7).
3. Apply a small amount of clean grease to back side of
new inner seal (Item 7) and assemble into housing.
4. Lubricate and assemble coupling shaft (Item 11),
firmly seating it against thrust washer (Item 8).
5. Assemble thrust bearing (Item 12) onto end of coupling shaft (Item 11).
6. Assemble drive link (Item 13) into coupling shaft
(Item 11) with their splines in mesh. Align hole in drive
link with hole in coupling shaft.
NOTE: Two alignment studs screwed finger tight into
housing (Item ) bolt holes, approximately 180° apart, will
facilitate the assembly and alignment of components as
required in the following procedures.
NOTE: Make sure new seal rings (Item 5) are installed
between each section of motor as it is assembled.
7. Assemble wear plate (Item 18) over drive link and
studs onto housing.
8. Install assembled rotor set (Item 21) with counterbore
in rotor (Item 19) down, if applicable, and splines in
mesh with drive link splines.
NOTE: If necessary, go to “Rotor, Stator, Vane Assembly” procedures on next page.
Repairs Page 4 - 56 Greensmaster
®
3100
Page 85

9. Assemble manifold (Item 22) and then the commutator ring (Item 23) over the drive link onto rotor set. Be
sure swirls in manifold and manifold plate are installed
facing together.
Rotor, Stator and Vane Assembly (Fig. 37, 38)
1. Place stator (Item 21) onto wear plate (Item 18) after
doing motor assembly procedures 1 through 7.
10. Assemble a new commutator seal (Item 15), flat side
up, into commutator (Item 16) and assemble commutator over end of drive link onto manifold with seal side up.
11. Install end cover (Item 24). Assemble special bolts
(Item 14) and screw in finger tight. Removal of the two
alignment studs should be made after at least two bolts
have been assembled. Alternately and progressively
tighten the bolts to pull end cover assembly into place
with final torque of 50 ± 5 ft.lbs. (68 ± 8 Nm).
12. Invert housing in vise so the coupling shaft (Item 11)
is pointing up and install dust seal (Item 1). Seal should
be pressing in flush to 0.02 inch below face.
NOTE: Torque required to rotate coupling shaft should
not be more than 50 ft-lb (68 Nm).
23
22
19,20,21
18
12
2. If assembly alignment studs are not being used, align
stator bolt holes with wear plate bolt holes and turn two
(2) bolts (Item 14) finger tight into bolt holes 180° apart
to keep stator and wear plate stationary.
3. Assemble six vanes (Item 20) into the stator vane
pockets.
4. Assemble rotor (Item 19), counterbore down, if applicable, into stator (Item 21) and onto wear plate (Item 18)
with rotor splines in mesh with drive link splines.
5. Grasp output end of coupling shaft (Item 11) and
rotate coupling shaft, drive link and rotor to seat the rotor
and assembled vanes into stator, creating necessary
clearance to assemble seventh (7th) vane. Assemble
the seven (7) vanes using minimum force.
6. Remove the two assembled bolts if used to retain
stator and wear plate.
13
11
9
3
17
14
24
15
10
5
16
8
7
2
4
6
Press seal in flush
to 0.020 inch below
face
1
Figure 38
Greensmaster®3100 Page 4 - 57 Repairs
Page 86

Steering Cylinder Removal and Installation - Greensmaster 3100 (Fig. 39)
Figure 39
1. Disconnect the hydraulic hoses (Item 28, 29) from
steering cylinder (Item 33). Put caps or plugs on all the
fittings and hoses to prevent contamination.
NOTE: To ease reassembly, tag each of the hoses to
show their correct position on the steering cylinder.
2. Remove jam nuts (Item 21) securing cylinder end to
castor fork (Item 19).
3. Remove locknut (Item 26) and washer (Item 27) to
remove cylinder from frame.
IMPORTANT: Before installing the cylinder make
sure the distance between ball joint centers is
14.4 in. with cylinder rod completely retracted.
Loosen jam nut and adjust ball joint if necessary,
then tighten jam nut.
4. Reverse steps 1 - 3 to install the steering cylinder.
5. After installing the cylinder, start the engine and turn
the steering wheel left and right from lock to lock several
times to get air out of the cylinder.
IMPORTANT: When disassembling hydraulic lines
make sure hydraulic plugs are placed in the open
end of the hydraulic line to prevent foreign debris
from contaminating hydraulic oil. It is also a good
idea to tag the hydraulic lines when disassembling
so they can be properly reassembled. Keep all hydraulic lines clean and free from foreign debris.
During replacement of steering cylinder, avoid overtightening fittings. Check hydraulic lines for cracks
or breaks. If a hydraulic leak should appear after
replacement of lift cylinder, replace the fitting or line
that is leaking. Check hydraulic reservoir for level
of hydraulic fluid after replacement of lift cylinder.
Repairs Page 4 - 58 Greensmaster®3100
Page 87

Steering Cylinder Repair - Greensmaster 3100 (Fig. 40)
Figure 40
IMPORTANT:To prevent damage when clamping the
cylinder barrel in a vise, clamp only on the pivot end.
Do not clamp the vise jaws against the smooth shaft
surface. Protect the shaft surface before mounting
in the vise.
1. After removing the cylinder, pump the oil out of
cylinder ports into a drain pan by SLOWLY moving rod
in and out of cylinder bore.
2. Plug the ports and clean the outside of the cylinder.
3. Mount the cylinder in a vise by clamping vise on
center mounting location of cylinder.
4. Loosen setscrews (Item 1) and remove threaded end
caps (Item 2) from each end of barrel (Item 12).
5. Grasp flats on threaded end of rod and use a twisting
and pulling motion to carefully remove rod assembly
(Item 9) and head from the barrel. Remove head
(Item 5) from other end of barrel.
6. Slide head off of rod assembly.
7. Remove and discard all seals and back-up rings.
8. Wash parts in solvent. Dry the parts with compressed
air. DO NOT wipe them dry with a cloth or paper as lint
and dirt may remain.
9. Inspect internal surface of barrel for damage (deep
scratches, out-of-round, etc.). Inspect head and rod
assembly for evidence of excessive scoring, pitting, or
wear. Replace any damaged or worn parts.
10. Put a light coating of hydraulic oil on all new seals
and back-up washers. Install the new seals and back-up
washers.
11. Put a light coating of hydraulic oil on all cylinder parts
to ease assembly. Slide rod assembly (Item 9) into
barrel. Install head (Item 5) to each end of barrel.
12. Install threaded cap (Item 2) on each end of barrel
and tighten setscrews (Item 1).
Greensmaster®3100 Page 4 - 59 Repairs
Page 88

Steering Control Unit Removal and Installation - Greensmaster 3100 (Fig. 41)
Figure 41
1. Remove six (6) capscrews (Item 21) and remove the
steering cover (Item 25).
2. Clean the outside of the steering valve and the area
around the hydraulic fittings. Disconnect the hydraulic
hoses from the steering valve (Item 24). Put caps or
plugs on all the fittings and hoses and tubes to prevent
contamination.
NOTE: To ease reassembly, tag each of the hoses to
show their correct position on the steering valve.
3. Remove the steering wheel cap (Item 9) from the
steering wheel (Item 11). Remove the locknut (Item 10)
that secures the steering wheel to the shaft. Pull the
steering wheel off the shaft.
NOTE: It may be necessary to use a jaw-type puller to
remove the steering wheel from the steering shaft.
IMPORTANT: DO NOT hit the steering shaft with a
hammer. This could damage the steering valve components.
4. Remove four capscrews (Item 7) and lower the steering valve (Item 24) and steering column (Item 23) out of
the steering arm.
5. Reverse steps 1 - 4 to install the steering valve.
Tighten the steering wheel nut so the top surface of the
nut is flush with the top of the steering column.
IMPORTANT: When disassembling hydraulic lines
make sure hydraulic plugs are placed in the open
end of the hydraulic line to prevent foreign debris
from contaminating hydraulic oil. It is also a good
idea to tag the hydraulic lines when disassembling
so they can be properly reassembled. Keep all hydraulic lines clean and free from foreign debris.
During replacement of steering valve, avoid overtightening fittings. Check hydraulic lines for cracks
or breaks. If a hydraulic leak should appear after
replacement of lift cylinder, replace the fitting or line
that is leaking. Check hydraulic reservoir for level
of hydraulic fluid after replacement of lift cylinder.
Repairs Page 4 - 60 Greensmaster®3100
Page 89

Steering Control Unit Repair - Greensmaster 3100 (Fig. 42)
Figure 42
1. Dust seal 10. Housing 19. Capscrew
2. Retaining ring 11. Control sleeve 20. Centering pin kit
3. Gland bushing seal 12. Control spool centering springs 21. Check ball retainer
4. O-ring 13. Control spool 22. Check ball
5. Backup ring 14. O-ring 23. O-ring
6. O-ring 15. Spacer plate 24. Check ball seat
7. Seal 16. Drive 25. O-ring
8. Bearing race 17. Gerotor 26. Setscrew
9. Needle thrust bearing 18. End cap
Disassembly
Cleanliness is extremely important when repairing a
steering control unit. Work in a clean area. Before
disconnecting lines, clean port area of unit thoroughly.
Use a wire brush to remove foreign material and debris
from around exterior joints of the unit.
Although not all drawings show the unit in a vise, it is
recommended that you keep the unit in the vise during
disassembly. Follow the clamping procedures explained
in the instructions.
Greensmaster®3100 Page 4 - 61 Repairs
Page 90

Meter (Gerotor) End Disassembly
1. Clamp unit in vise, meter end up. Clamp lightly on
edges of mounting area. Use protective material on vise
jaws. Housing distortion could result if jaws are overtightened.
2. Remove 5/16" cap screws.
3. Remove end cap.
4. Remove seal from end cap.
Figure 43
5. Remove meter. Be careful not to drop star.
6. Remove seal from meter.
Figure 44
Figure 45
Repairs Page 4 - 62 Greensmaster®3100
Page 91

7. Remove drive.
8. Remove spacer plate.
9. Remove seal from housing.
Control End Disassembly
10. Remove housing from vise. Place housing on a
clean soft cloth to protect surface finish. Use a thin blade
screwdriver to pry retaining ring from housing.
Figure 46
11. Rotate spool and sleeve until pin is horizontal. Push
spool and sleeve assembly forward with your thumbs
just far enough to free gland bushing from housing.
Remove bushing.
Figure 47
Figure 48
Greensmaster®3100 Page 4 - 63 Repairs
Page 92

12. Remove quad-ring seal from seal gland bushing.
13. Use a thin blade screwdriver to pry dust seal from
seal gland bushing. Do not damage bushing.
14. Remove 2 bearing races and the needle thrust
bearing from spool and sleeve assembly.
Figure 49
15. Remove spool and sleeve assembly from 14 hole
end of housing.
IMPORTANT: Do not bind spool and sleeve in housing. Rotate spool and sleeve assembly slowly when
removing from housing.
16. Push pin from spool and sleeve assembly.
Figure 50
Figure 51
Repairs Page 4 - 64 Greensmaster®3100
Page 93

17. Push spool partially from control end of sleeve, then
remove 6 centering springs from spool carefully by hand
18. Push spool back through and out of sleeve. Rotate
spool slowly when removing from sleeve.
19. Remove seal from housing.
20. Remove set screw from housing.
21. Screw a #10-24 machine screw into end of check
ball seat. Then by pulling on screw, with a pliers, lift seat
out of housing.
Figure 52
22. Remove two (2) seals from check valve seat.
23. Tip housing to remove check ball and check ball
retainer.
Figure 53
Greensmaster®3100 Page 4 - 65 Repairs
Page 94

Reassembly
Check all mating surfaces. Replace any parts that have
scratches or burrs that could cause leakage. Clean all
metal parts in clean solvent. Blow dry with air. Do not
wipe dry with cloth or paper towel because lint or other
matter can get into the hydraulic system and cause
damage. Do not use a coarse grit or try to file or grind
these parts.
NOTE: Lubricate all seals with clean petroleum jelly
such as Vaseline.
Do not use excessive lubricant on seals for meter
section.
Refer to parts listings covering your steering control unit
when ordering replacement parts. A good service policy
is to replace all old seals with new seals.
Control End Reassembly
1. Use a needle nose pliers to lower check ball retainer
into check valve hole of housing. Make sure retainer is
straight (not tilted on edge) in housing.
2 Install check ball in housing.
3 Lubricate 5/8" diameter seal and 7/16" diameter seal.
Install seals on check ball seat as shown
4. Lubricate check ball seat and seals thoroughly before
installing seat in housing. When installing seat do not
twist or damage seals. Install check ball seat in housing,
insert open end of seat first. Push check ball seat to
shoulder of hole.
5. Install set screw. Use a 1/4" allen wrench to torque
set screw to 100 inch pounds. To prevent interference,
make sure top of set screw is slightly below housing
mounting surface.
6. Assemble spool and sleeve carefully so that the
spring slots line up at the same end. Rotate spool while
sliding parts together. Some spool and sleeve sets have
identification marks, align these marks as shown. Test
for free rotation. Spool should rotate smoothly in sleeve
with finger tip force applied at splined end.
Figure 54
Figure 55
Repairs Page 4 - 66 Greensmaster®3100
Page 95

7. Bring spring slots of both parts in line and stand parts
on end of bench. Insert spring installation tool through
spring slots of both parts. Tool is available from a Eaton
Hydraulics supplier as Eaton part no. 600057. Position
3 pairs of centering springs (or 2 sets of 3 each) on
bench so that extended edge is down and arched center
section is together. In this position, insert one end of
entire spring set into spring installation tool with spring
notches facing sleeve.
8. Compress extended end of centering spring set and
push into spool sleeve assembly withdrawing installation tool at the same time.
9. Center the spring set in the parts so that they push
down evenly and flush with the upper surface of the
spool and sleeve.
10. Install pin through spool and sleeve assembly until
pin becomes flush at both sides of sleeve.
11. Position the spool and sleeve assembly so that the
splined end of the spool enters the 14 hole end of
housing first.
Figure 56
IMPORTANT: Be extremely careful that the parts do
not tilt out of position while inserting. Push parts
gently into place with slight rotating action, keep pin
nearly horizontal. Bring the spool assembly entirely
within the housing bore until the parts are flush at
the meter end or 14 hole end of housing. Do not pull
the spool assembly beyond this point to prevent the
cross pin from dropping into the discharge groove
of the housing. With the spool assembly in this flush
position, check for free rotation within the housing
by turning with light finger tip force at the splined
end.
12. Place housing on clean, lint free cloth. Install 2-1/8"
diameter seal in housing.
13. Install two (2) bearing races and the needle thrust
bearing in the order shown .
Figure 57
Figure 58
Greensmaster®3100 Page 4 - 67 Repairs
Page 96

14. Install 1-1/4" diameter dust seal in seal gland bushing, flat or smooth side of dust seal must face down
towards bushing, see Fig. 60.
15. Install the quad-ring seal in seal gland bushing.
Smooth seal in place with your finger. Do not use any
seal that falls freely into pocket of bushing, see Fig. 60.
16. Install seal gland bushing over the spool end with a
twisting motion. Tap the bushing in place with a rubber
hammer. Make sure the bushing is flush against the
bearing race.
17. Install retaining ring (see Fig. 59 - 60) in housing.
After installing ring, tap on ring end or pry with screwdriver around entire circumference of ring to properly
seat ring in groove.
Figure 59
Figure 60
Repairs Page 4 - 68 Greensmaster®3100
Page 97

18. Clamp housing in vise, as shown. Clamp lightly on
edges of mounting area. Do not over tighten jaws.
NOTE: Check to insure that the spool and sleeve are
flush or slightly below the 14 hole surface of the housing.
IMPORTANT: Clean the upper surface of the housing by wiping with the palm of clean hand. Clean
each of the flat surfaces of the meter section parts
in a similar way when ready for reassembly. Do not
use cloth or paper to clean surfaces.
19. Install 3" diameter seal in housing.
20. Install spacer plate. Align bolt holes in spacer plate
with tapped holes in housing.
Figure 61
Figure 62
Greensmaster®3100 Page 4 - 69 Repairs
Page 98

21. Rotate spool and sleeve assembly until pin is parallel with port face. Install drive, make sure you engage
drive with pin, To assure proper alignment, mark drive
as shown in Fig. 65 (ref. B). Note relationship between
slotted end of drive to splined end of drive when marking.
22. Install 3" diameter seal in meter.
Figure 63
23. With seal side of meter toward spacer plate, align
star valleys (ref. A) on drive (ref. B). Note the parallel
relationship of reference lines A, B, C, and D. Align bolt
holes without disengaging meter from drive.
Figure 64
Figure 65
Repairs Page 4 - 70 Greensmaster®3100
Page 99

24. Install 3" diameter seal in end cap.
25. Install end cap on gerotor, align holes.
26. Install seven (7) DRY cap screws with new seal
washers in end cap. Pre-tighten screws to 150 inch
pounds, then torque screws to 275 inch pounds in
sequence shown.
Figure 66
Figure 67
Greensmaster®3100 Page 4 - 71 Repairs
Page 100

Repairs Page 4 - 72 Greensmaster®3100
 Loading...