

Toro 30643, Groundsmaster 4110 Operator's Manual

FormNo.3400-151RevA
Groundsmaster
®
4110Rotary
Mower
ModelNo.30643—SerialNo.316000001andUp
Registeratwww.T oro.com.
OriginalInstructions(EN)
*3400-151*A
ThisproductcomplieswithallrelevantEuropeandirectives;
g028455
1
fordetails,pleaseseetheseparateproductspecicDeclaration
ofConformity(DOC)sheet.
WARNING
CALIFORNIA
Proposition65Warning
Thisproductcontainsachemicalorchemicals
knowntotheStateofCaliforniatocausecancer,
birthdefects,orreproductiveharm.
Dieselengineexhaustandsomeofits
constituentsareknowntotheStateof
Californiatocausecancer,birthdefects,
andotherreproductiveharm.
GenuineT orosparkarrestersareapprovedbytheUSDA
ForestryService.
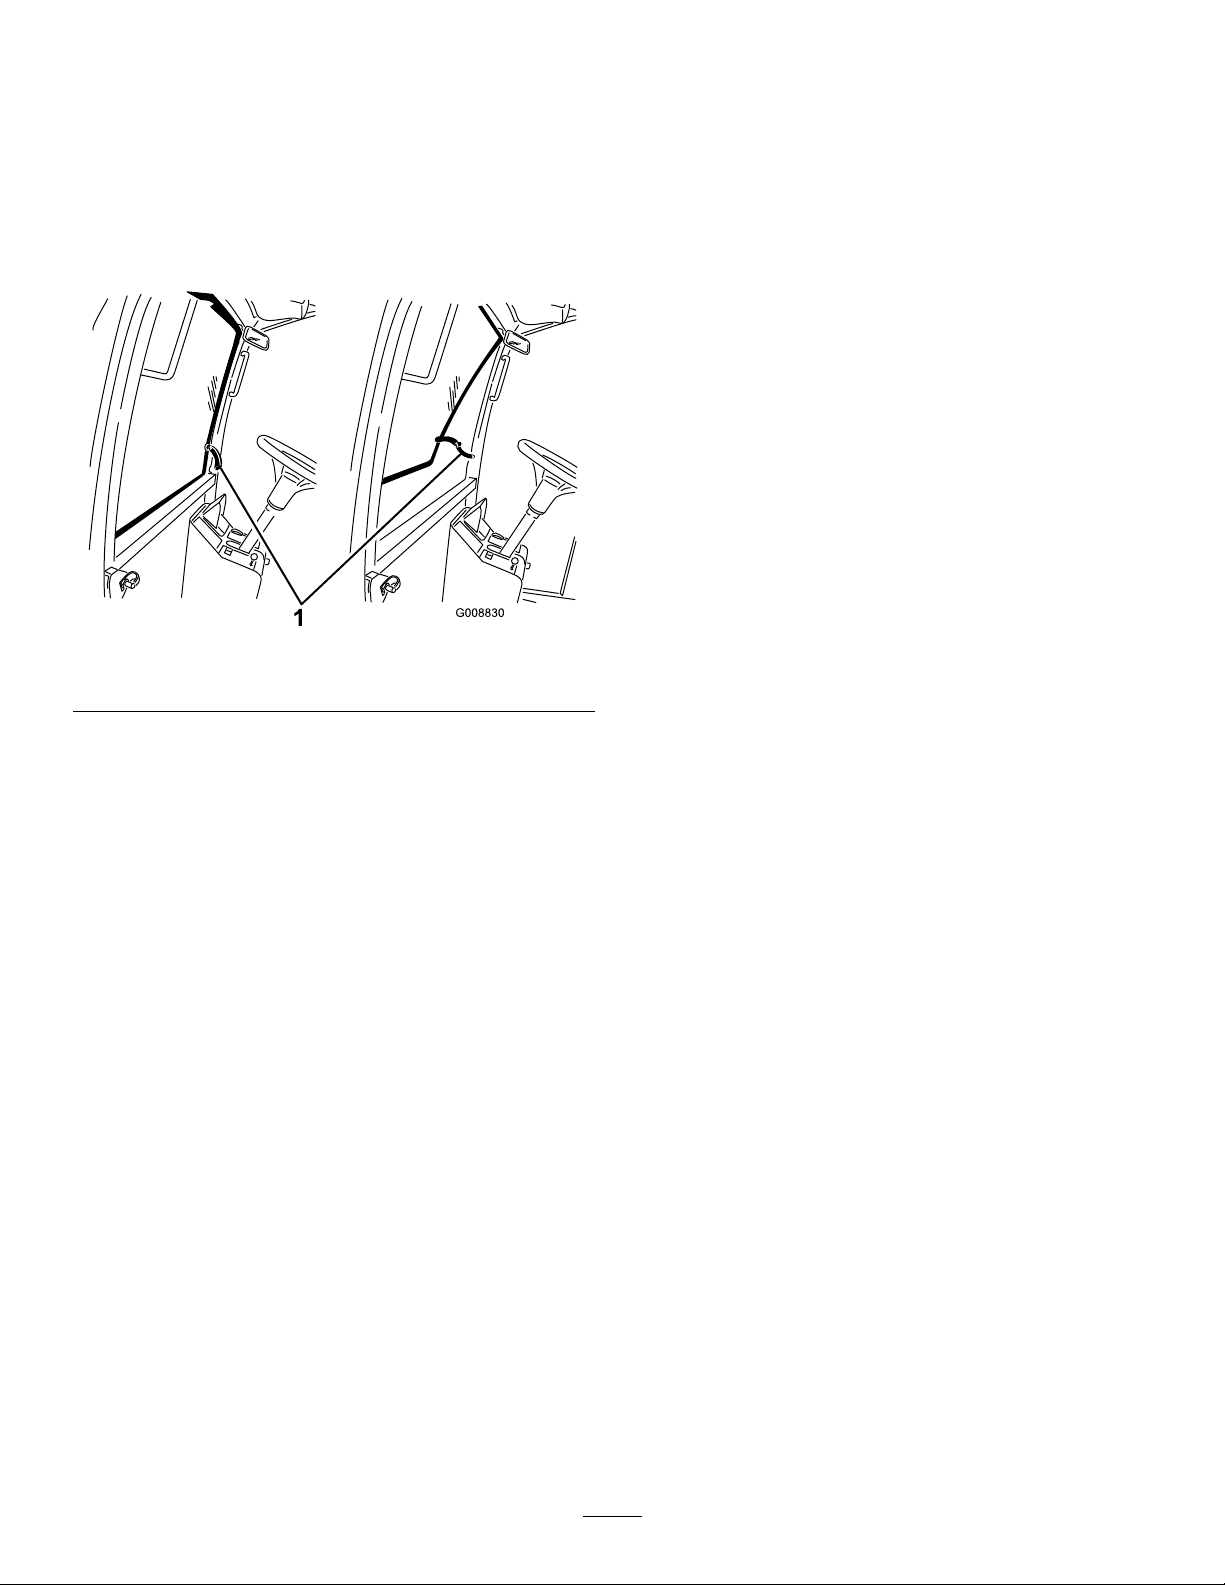
Figure1
1.Modelandserialnumberlocation
ModelNo.
ItisaviolationofCaliforniaPublicResourceCode
Section4442or4443touseoroperatetheengineonany
forest-covered,brush-covered,orgrass-coveredlandunless
theengineisequippedwithasparkarrester,asdenedin
Section4442,maintainedineffectiveworkingorderorthe
engineisconstructed,equipped,andmaintainedforthe
preventionofre.
Introduction
Thismachineisaride-on,rotary-bladelawnmowerintended
tobeusedbyprofessional,hiredoperatorsincommercial
applications.Itisprimarilydesignedforcuttinggrass
onwell-maintainedlawnsinparks,sportselds,andon
commercialgrounds.Itisnotdesignedforcuttingbrush,
mowinggrassandothergrowthalongsidehighways,orfor
agriculturaluses.
Readthisinformationcarefullytolearnhowtooperateand
maintainyourproductproperlyandtoavoidinjuryand
productdamage.Youareresponsibleforoperatingthe
productproperlyandsafely.
SerialNo.
Thismanualidentiespotentialhazardsandhassafety
messagesidentiedbythesafety-alertsymbol(Figure2),
whichsignalsahazardthatmaycauseseriousinjuryordeath
ifyoudonotfollowtherecommendedprecautions.
Figure2
1.Safety-alertsymbol
Thismanualuses2wordstohighlightinformation.
Importantcallsattentiontospecialmechanicalinformation
andNoteemphasizesgeneralinformationworthyofspecial
attention.
YoumaycontactTorodirectlyatwww .Toro.comforproduct
andaccessoryinformation,helpndingadealer,ortoregister
yourproduct.
Wheneveryouneedservice,genuineT oroparts,oradditional
information,contactanAuthorizedServiceDealerorToro
CustomerServiceandhavethemodelandserialnumbersof
yourproductready.Figure1identiesthelocationofthe
modelandserialnumbersontheproduct.Writethenumbers
inthespaceprovided.
©2016—TheToro®Company
8111LyndaleAvenueSouth
Bloomington,MN55420
Contactusatwww.Toro.com.
2
PrintedintheUSA
AllRightsReserved

Contents
Safety...........................................................................4
GeneralSafety.........................................................4
SoundPowerLevel..................................................5
SoundPressureLevel...............................................5
VibrationLevel......................................................5
EngineEmissionCertication...................................5
SafetyandInstructionalDecals.................................6
Setup...........................................................................15
1GreasingtheMachine...........................................15
2ReplacingtheWarningDecal.................................15
3CheckingtheTirePressure....................................15
4CheckingtheFluidLevels.....................................16
ProductOverview.........................................................16
Controls...............................................................16
MachineControls...............................................16
CabControls......................................................18
Specications........................................................20
Attachments/Accessories........................................21
BeforeOperation......................................................22
BeforeOperationSafety..........................................22
CheckingtheEngine-OilLevel.................................23
CheckingtheCoolingSystem...................................23
CheckingtheHydraulicSystem................................23
DrainingtheWaterSeparator...................................23
FillingtheFuelTank...............................................23
CheckingtheTirePressure......................................24
CheckingtheTorqueoftheWheel-Lug
Nuts.................................................................24
AdjustingtheMirrors..............................................25
AimingtheHeadlights............................................25
AdjustingtheHeight-of-Cut....................................25
AdjustingtheSkids.................................................27
AdjustingtheMower-DeckRollers...........................27
AdjustingtheBlade.................................................28
CorrectingaMismatchBetweenMower
Decks................................................................28
CheckingtheSafety-InterlockSwitches......................30
UsingtheInfoCenterControl..................................30
DuringOperation.....................................................34
DuringOperationSafety.........................................34
StartingandShuttingOfftheEngine.........................35
UnderstandingSmartPower™Traction....................36
ReversingtheFanOperation....................................36
UnderstandingtheAutoIdle....................................36
UsingtheCruiseControl.........................................36
UsingtheEngine-SpeedSwitch................................36
AdjustingtheMowingSpeed....................................36
AdjustingtheTransportSpeed.................................36
UnderstandingtheOperatingCharacteristicsofthe
Machine............................................................37
OperatingTips......................................................37
AfterOperation........................................................38
AfterOperationSafety............................................38
PushingorTowingtheMachine................................38
LocatingtheJackingPoints......................................39
HaulingtheMachine...............................................39
LocatingtheTie-DownPoints..................................39
Maintenance.................................................................40
RecommendedMaintenanceSchedule(s)......................40
DailyMaintenanceChecklist....................................41
ServiceIntervalChart.............................................42
PremaintenanceProcedures........................................43
Pre-MaintenanceSafety...........................................43
PreparingtheMachineforMaintenance.....................43
RemovingtheHood...............................................43
Lubrication...............................................................44
GreasingtheBearingsandBushings..........................44
EngineMaintenance..................................................46
EngineSafety.........................................................46
ServicingtheAirCleaner.........................................46
CheckingtheEngine-OilLevel.................................47
ChangingtheEngineOilandFilter...........................48
FuelSystemMaintenance...........................................49
ServicingtheFuelSystem........................................49
ServicingtheWaterSeparator...................................49
ElectricalSystemMaintenance....................................50
ElectricalSystemSafety...........................................50
ServicingtheBattery...............................................50
Fuses....................................................................51
DriveSystemMaintenance.........................................52
AdjustingtheTraction-PedalAngle...........................52
CheckingthePlanetary-Gear-DriveOil.....................52
ChangingthePlanetary-Gear-DriveOil.....................52
CheckingtheRear-AxleLubricant.............................53
CheckingtheRear-Axle-GearboxLubricant...............53
ChangingtheRear-AxleLubricant............................53
CheckingtheRearWheelToe-In..............................54
ChangingtheFrontTires.........................................54
CoolingSystemMaintenance......................................55
CoolingSystemSafety.............................................55
CheckingtheCoolingSystem...................................55
ServicingtheEngine-CoolingSystem........................55
BrakeMaintenance....................................................56
AdjustingtheServiceBrakes....................................56
BeltMaintenance......................................................57
ServicingtheAlternatorBelt....................................57
ServicingtheAirConditionerCompressor
Belt...................................................................57
TensioningtheBlade-DriveBelts..............................57
ReplacingtheBlade-DriveBelt.................................57
HydraulicSystemMaintenance....................................58
HydraulicSystemSafety..........................................58
CheckingtheHydraulicFluid...................................58
ChangingtheHydraulicFluid...................................59
ReplacingtheHydraulicFilters.................................60
CheckingtheHydraulicLinesandHoses....................60
AdjustingtheCounterbalancePressure......................61
MowerMaintenance...................................................61
Pivoting(Tilting)theCenterMowerDecktothe
UprightPosition.................................................61
PivotingtheCenterMowerDeckDown.....................62
AdjustingtheMower-DeckPitch..............................62
ServicingtheCaster-ArmBushings...........................63
ServicingtheCasterWheelsandBearings...................63
3

ReplacingtheMower-Deck-HingeCovers.................64
BladeMaintenance.....................................................65
BladeSafety...........................................................65
CheckingforaBentBlade........................................65
RemovingandInstallingtheMowerBlade(s)..............65
InspectingandSharpeningtheMower
Blade(s).............................................................65
CorrectingaMower-DeckMismatch.........................66
CabMaintenance.......................................................67
PressureWashingtheCab........................................67
CleaningtheCab-AirFilters.....................................68
CleaningtheAir-ConditioningCoil..........................68
Storage........................................................................69
PreparingforSeasonalStorage.................................69
Safety
ThismachinehasbeendesignedinaccordancewithEN
ISO5395:2013andANSIB71.4-2012.
Improperuseormaintenancebytheoperatoror
ownercanresultininjury.Toreducethepotential
forinjury,complywiththesesafetyinstructionsand
alwayspayattentiontothesafetyalertsymbol,which
meansCaution,Warning,orDanger—personalsafety
instruction.Failuretocomplywiththeinstructionmay
resultinpersonalinjuryordeath.
GeneralSafety
Thisproductiscapableofamputatinghandsandfeetand
ofthrowingobjects.Alwaysfollowallsafetyinstructionsto
avoidseriouspersonalinjury.
Usingthisproductforpurposesotherthanitsintendeduse
couldprovedangeroustoyouandbystanders.
•ReadandunderstandthecontentsofthisOperator’ sManual
beforeyoustarttheengine.Ensurethateveryoneusing
thisproductknowshowtouseitandunderstandsthe
warnings.
•Donotputyourhandsorfeetnearmovingcomponents
ofthemachine.
•Donotoperatethemachinewithoutallguardsandother
safetyprotectivedevicesinplaceandworkingonthe
machine.
•Keepclearofanydischargeopening.Keepbystandersa
safedistancefromthemachine.
•Keepchildrenoutoftheoperatingarea.Neverallow
childrentooperatethemachine.
•Stopthemachineandshutofftheenginebeforeservicing,
fueling,oruncloggingthemachine.
Improperlyusingormaintainingthismachinecanresult
ininjury.T oreducethepotentialforinjury,complywith
thesesafetyinstructionsandalwayspayattentiontothe
safety-alertsymbol,whichmeansCaution,Warning,or
Danger—personalsafetyinstruction.Failuretocomplywith
theseinstructionsmayresultinpersonalinjuryordeath.
Youcanndadditionalitemsofsafetyinformationintheir
respectivesectionsthroughoutthismanual.
4

SoundPowerLevel
Thisunithasaguaranteedsoundpowerlevelof104dBA,
whichincludesanUncertaintyValue(K)of1dBA.
Soundpowerlevelwasdeterminedaccordingtothe
proceduresoutlinedinISO11094.
SoundPressureLevel
Thisunithasasoundpressurelevelattheoperator’searof85
dBA,whichincludesanUncertaintyValue(K)of1dBA.
Soundpressurelevelwasdeterminedaccordingtothe
proceduresoutlinedinENISO5395:2013.
VibrationLevel
Hand-Arm
Measuredvibrationlevelforrighthand=1.1m/s
Measuredvibrationlevelforlefthand=1m/s
UncertaintyValue(K)=0.5m/s
Measuredvaluesweredeterminedaccordingtotheprocedures
outlinedinENISO5395:2013.
WholeBody
Measuredvibrationlevel=0.29m/s
UncertaintyValue(K)=0.5m/s
Measuredvaluesweredeterminedaccordingtotheprocedures
outlinedinENISO5395:2013.
2
2
2
EngineEmissionCertication
TheengineinthismachineisEUstage3acompliant.
2
2
5
SafetyandInstructionalDecals
Safetydecalsandinstructionsareeasilyvisibletotheoperatorandarelocatednearanyareaofpotential
danger.Replaceanydecalthatisdamagedorlost.
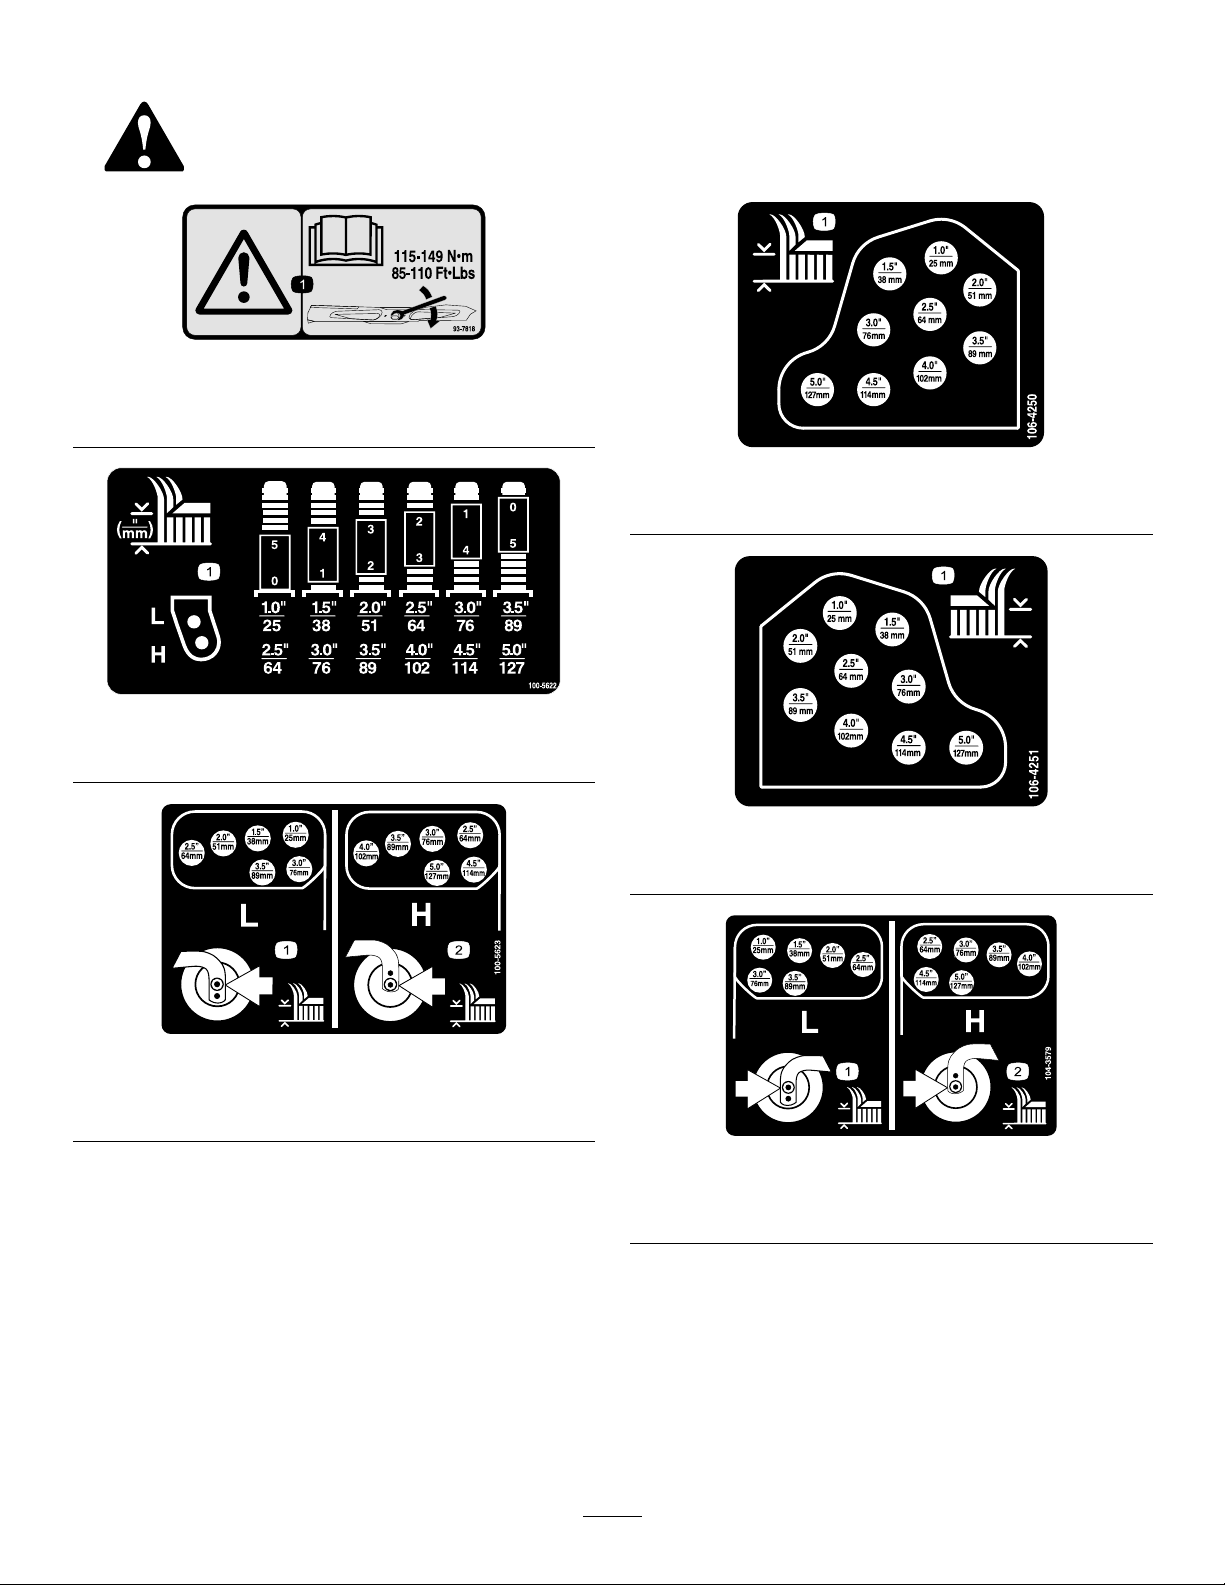
93-7818
1.Warning—readtheOperator'sManualforinstructionson
torquingthebladebolt/nutto115-149N-m(85-110ft-lb).
106-4250
1.Height-of-cut
1.Height-of-cutadjustment
1.Lowheight-of-cut
adjustment
100-5622
106-4251
1.Height-of-cut
100-5623
2.Highheight-of-cut
adjustment
104-3579
1.Lowheight-of-cut
adjustment
2.Highheight-of-cut
adjustment
6
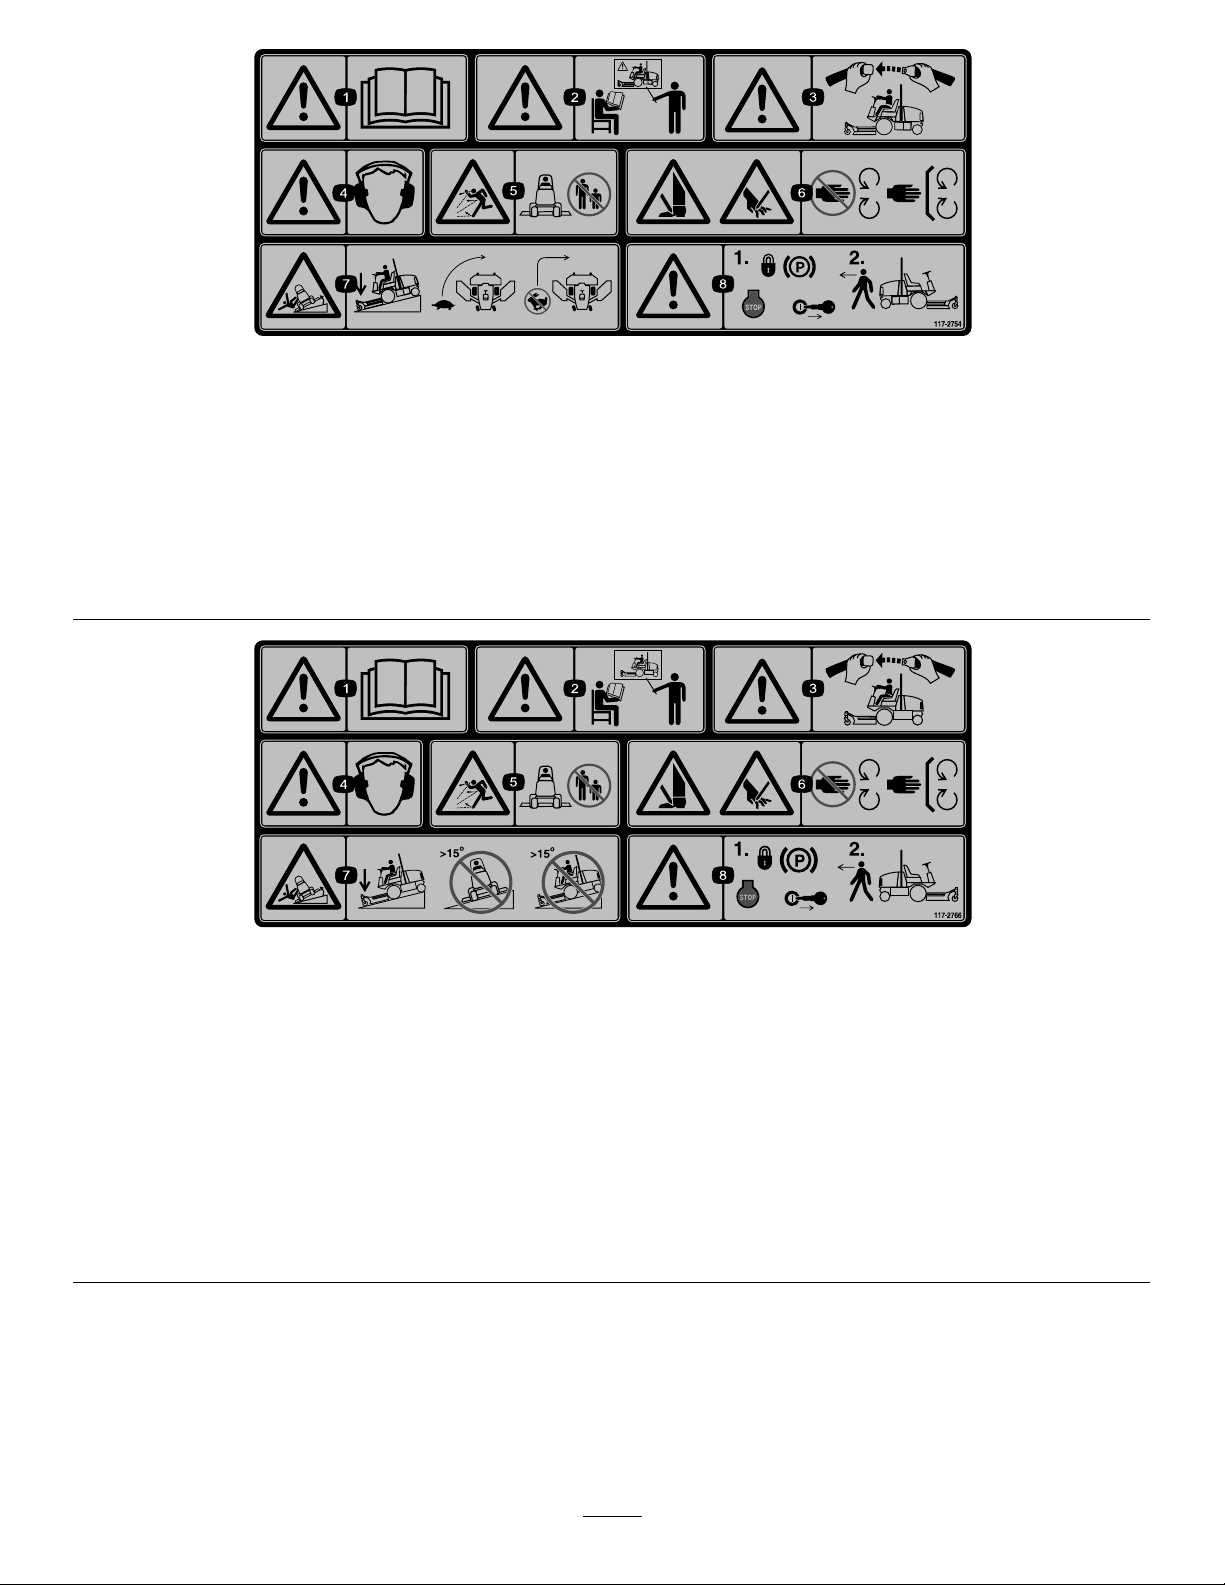
117–2754
1.Warning—readtheOperator'sManual.
2.Warning—donotoperatethismachineunlessyouaretrained.
3.Warning—weartheseatbeltwhenseatedintheoperator'sposition.
4.Warning—wearhearingprotection.
5.Thrownobjecthazard—keepbystandersasafedistancefromthemachine.
6.Cuttinghazardofhandorfoot—stayawayfrommovingparts;keepallguardsinplace.
7.Tippinghazard—lowerthecuttingunitwhendrivingdownslopes;slowmachinebeforeturning,donotturnathighspeeds
8.Warning—locktheparkingbrake,shutofftheengineandremovetheignitionkeybeforeleavingthemachine.
117–2766
(Afxoverpartno.117–2754forCE*)
*ThissafetydecalincludesaslopewarningrequiredonthemachineforcompliancetotheEuropeanLawnMowerSafetyStandardEN836:1997.Theconservativemaximum
slopeanglesindicatedforoperationofthismachineareprescribedbyandrequiredbythisstandard.
1.Warning—readtheOperator'sManual.
2.Warning—donotoperatethismachineunlessyouaretrained.
3.Warning—weartheseatbeltwhenseatedintheoperator'sposition.
4.Warning—wearhearingprotection.
5.Thrownobjecthazard—keepbystandersasafedistancefromthemachine.
6.Cuttinghazardofhandorfoot—stayawayfrommovingparts;keepallguardsinplace.
7.Tippinghazard—lowerthecuttingunitwhendrivingdownslopes;donotoperatemachineonslopesgreaterthan15degrees.
8.Warning—locktheparkingbrake,shutofftheengineandremovetheignitionkeybeforeleavingthemachine.
7
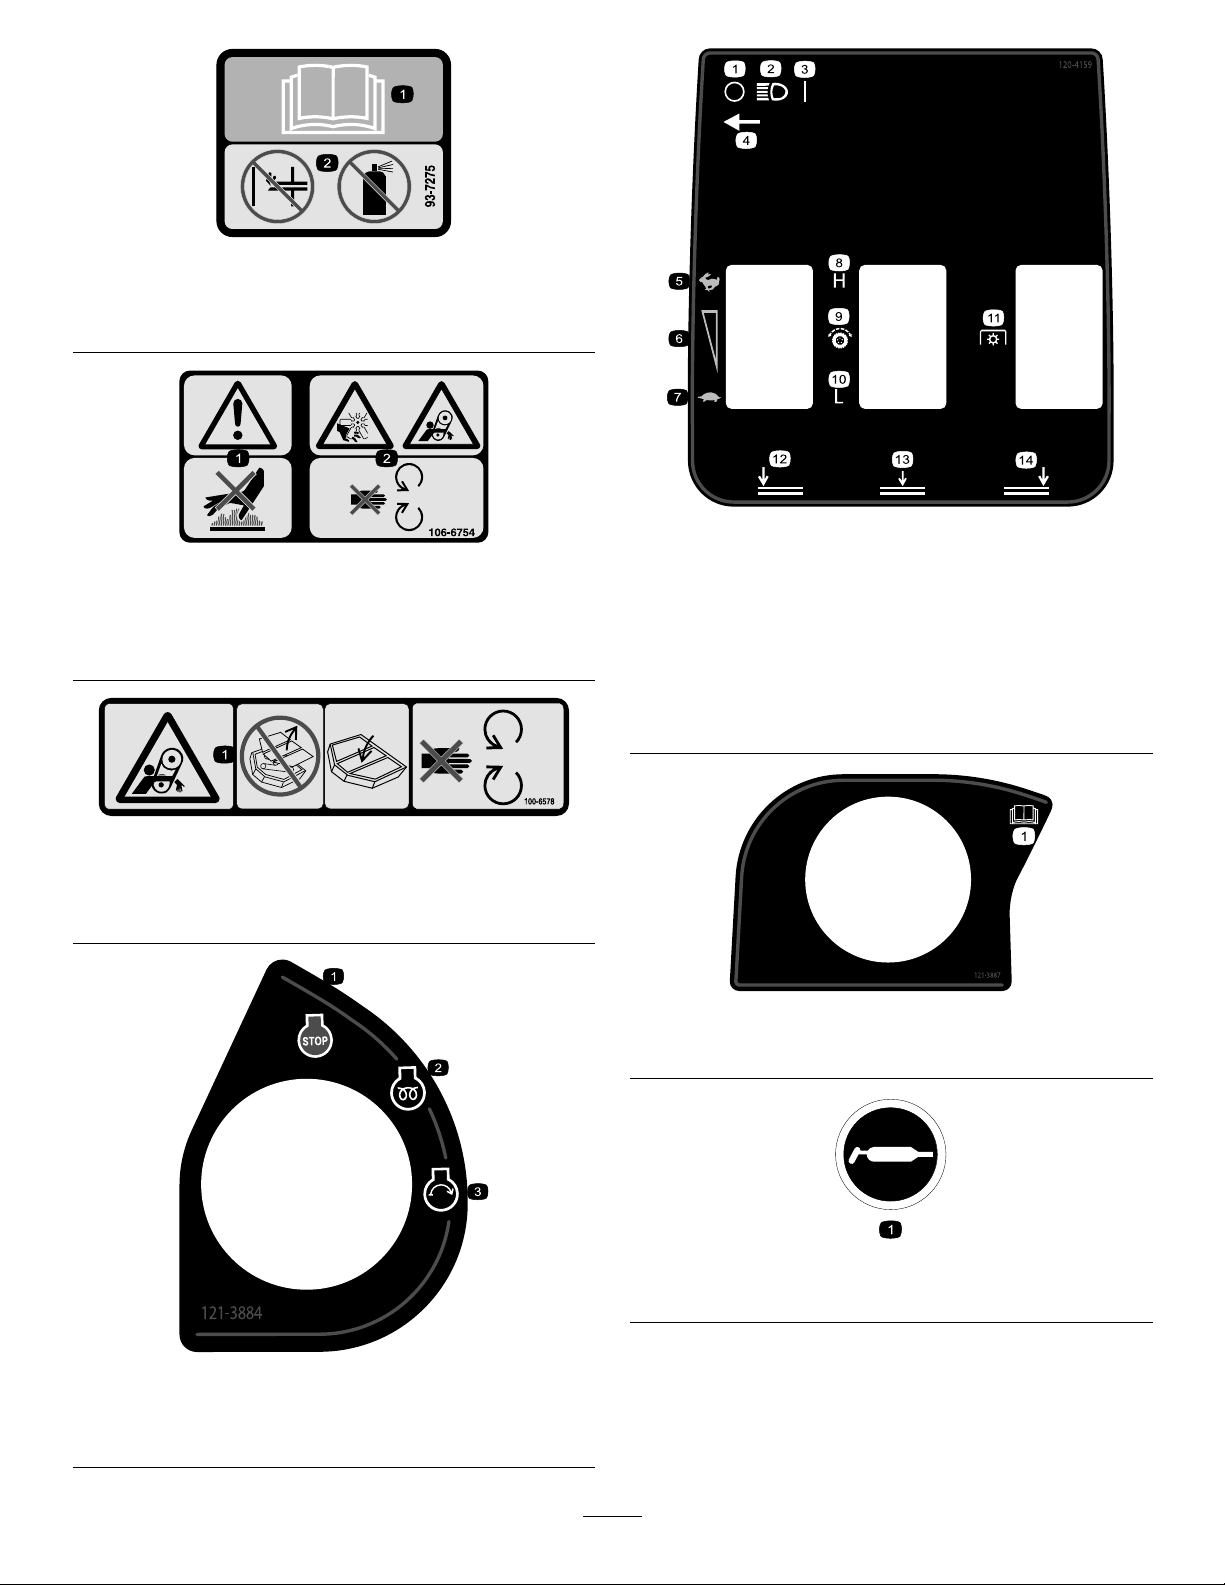
1.ReadtheOperator'sManual.
2.Donotusestartingaids.
93-7275
120–4159
106-6754
1.Warning—donottouchthehotsurface.
2.Cutting/dismembermenthazard,fanandentanglement
hazard,belt—stayawayfrommovingparts.
100-6578
1.Entanglementhazard,belt—donotoperatethemachine
withtheshieldsorguardsremoved;alwayskeeptheshields
andguardsinplace;stayawayfrommovingparts.
1.Off
2.Lights9.Tractiondrive
3.On
4.Lightswitchlocation
5.Fast
6.Variable-speedadjustment13.Lowercenterdeck
7.Slow
8.High
10.Low
11.Powertake-off(PTO)
12.Lowerleftdeck
14.Lowerrightdeck
121–3887
1.ReadtheOperator’sManual.
1.Engine—shutoff
2.Engine—preheat
58-6520
1.Grease
121–3884
3.Engine—start
8
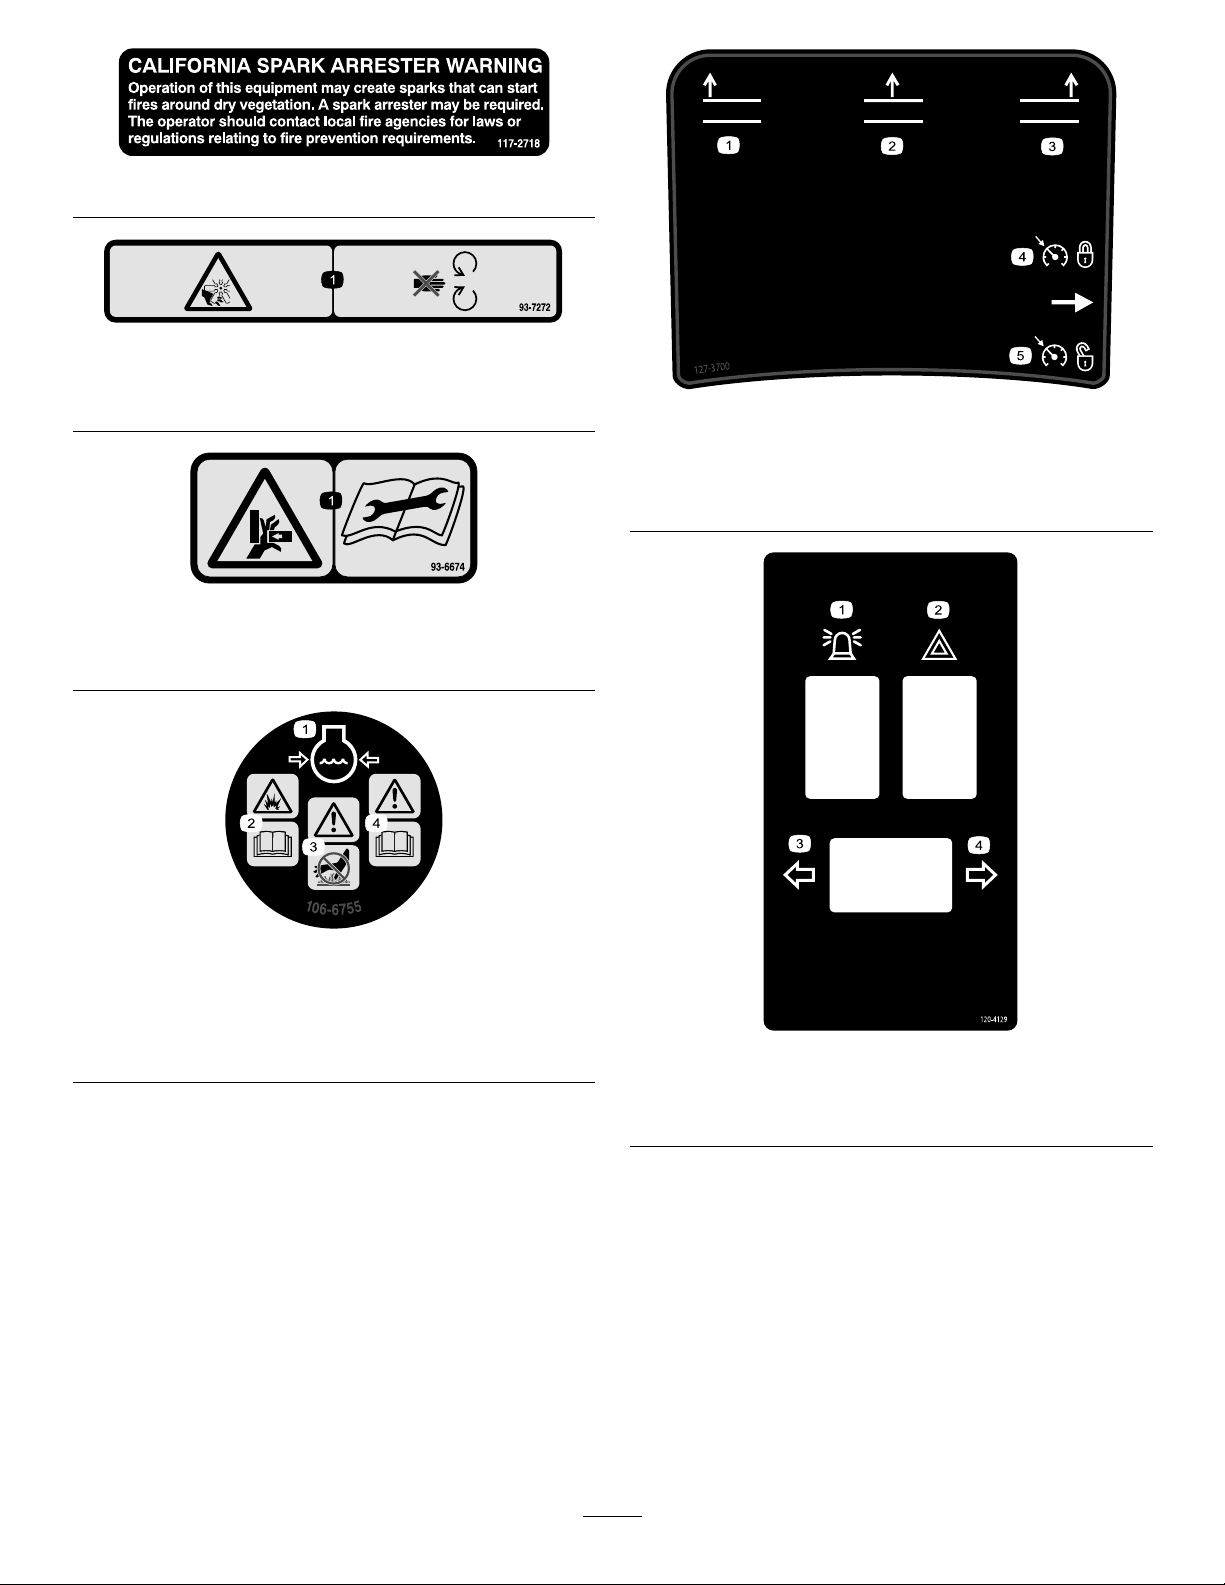
117–2718
93-7272
1.Cutting/dismembermenthazard;fan—stayawayfrom
movingparts.
127–3700
93-6674
1.Crushinghazard,hand—readtheinstructionsbefore
servicingorperformingmaintenance.
106-6755
1.Enginecoolantunder
pressure.
2.Explosionhazard—read
theOperator'sManual.
3.Warning—donottouchthe
hotsurface.
4.Warning—readthe
Operator'sManual.
1.Raiseleftdeck
2.Raisecenterdeck5.Unlockenginespeed
3.Raiserightdeck
4.Lockenginespeed
120–4129
1.Beacon
2.Hazardlight4.Rightturnsignal
9
3.Leftturnsignal

1.ReadtheOperator’s
Manual.
2.Toengagetheparking
brake—1)Lockthepedals
together;2)Pushdownon
thebrake;3)Pulloutthe
parkingbrakeknob.
120–4130
3.Parkingbrake
4.Todisengagetheparking
brake,pushdownonthe
brakepedal.
1.Warning—1)Disengage
thePTO;2)Raisethedeck
2.Donotplaceyourfoot
here.
3.Directionpedal
114–0849
4.Forwarddirection
5.Reversedirection
114–0845
121–1599
1.ReadtheOperator’sManualforinformationonfuses.
1.Steering-wheel-tiltlever
10
2.Horn
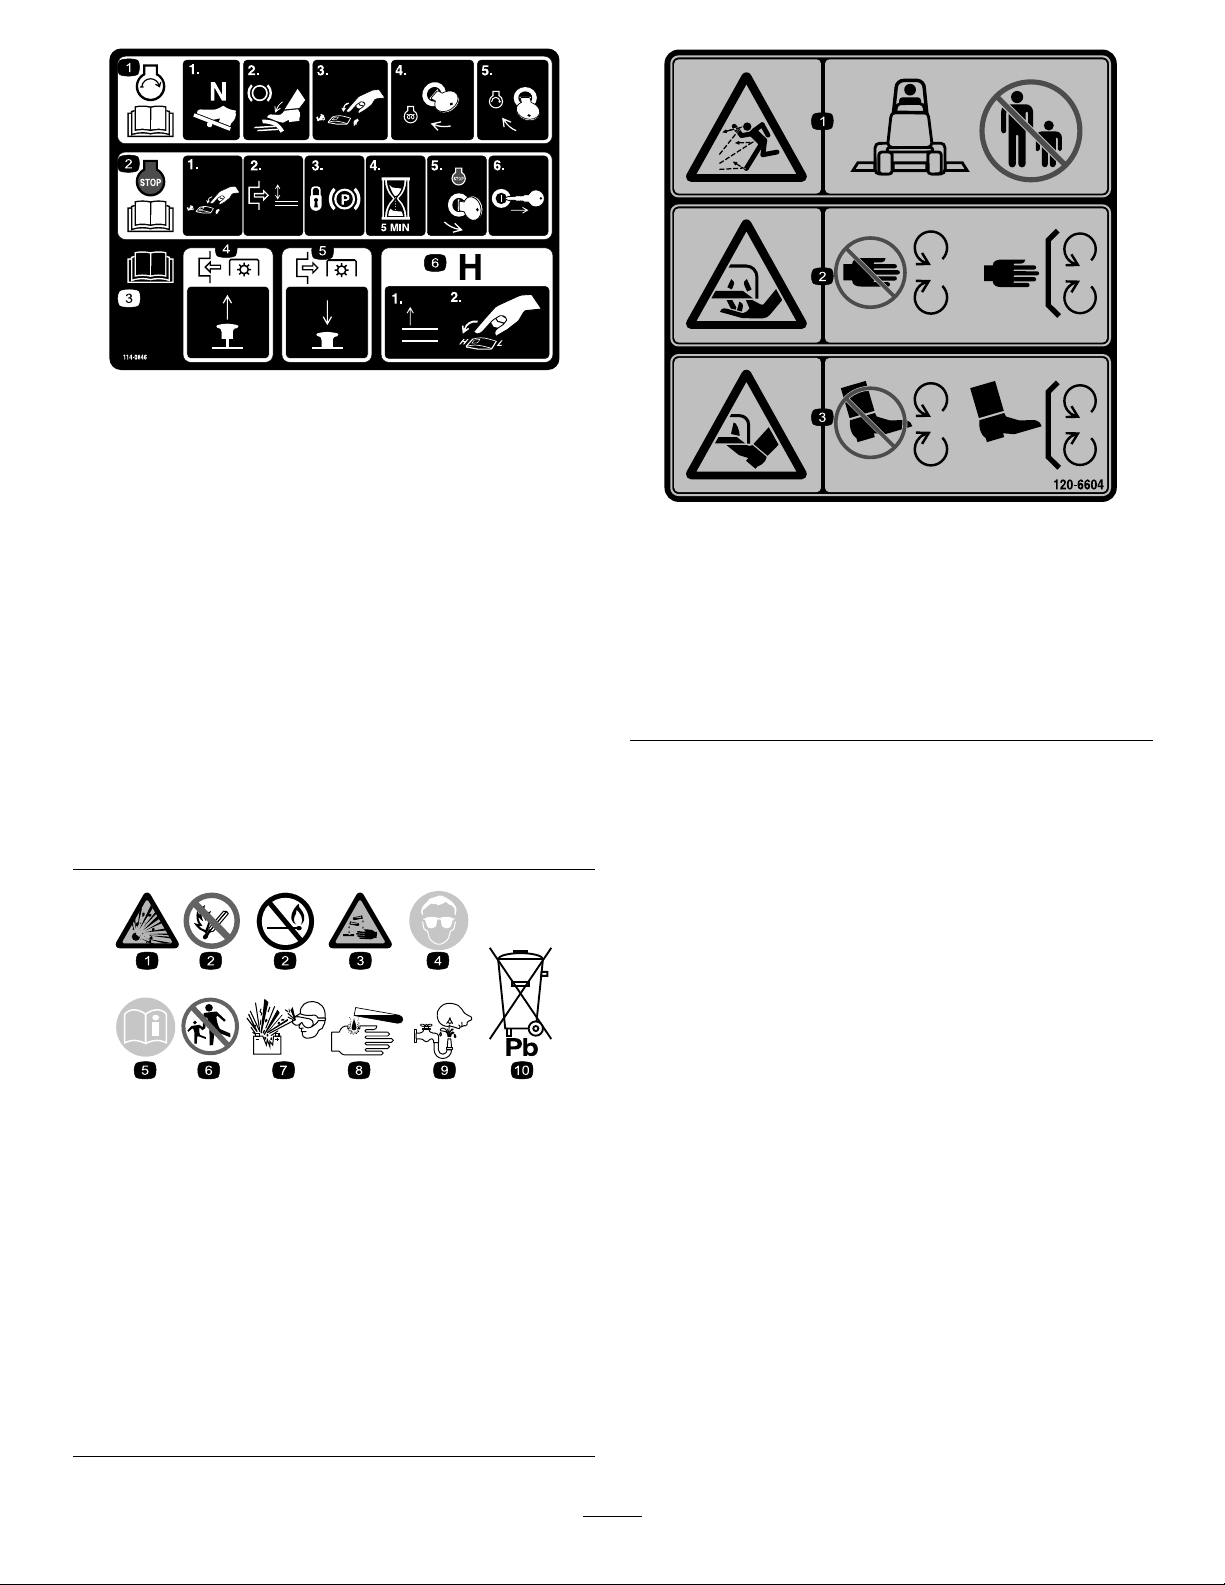
114–0846
1.ReadtheOperator’s
Manualforinformationon
startingtheengine—1)Set
toneutral;2)Engagethe
brake;3)Settheengine
speedtoslow;4)Turnthe
ignitionkeytopreheat;5)
Turntheignitionkeyto
enginestart.
2.ReadtheOperator’s
Manualforinformationon
shuttingofftheengine—1)
Settheenginespeedto
slow;2)Disengagethe
deck;3)Locktheparking
brake;4)Wait5minutes;
5)Turntheignitionkeyto
enginestop;6)Remove
thekeyfromtheignition.
3.ReadtheOperator’s
Manual.
4.Pulltheknoboutto
engagethePTO.
5.Pushtheknobinto
disengagethePTO.
6.RaisethedeckstogotoH
range.
120-6604
1.Thrownobjecthazard—keepbystandersawayfromthe
machine.
2.Cutting/dismembermenthazardofhand,mower
blade—stayawayfrommovingparts;keepallguardsand
shieldsinplace.
3.Cutting/dismembermenthazardoffoot,mowerblade—stay
awayfrommovingparts;keepallguardsandshieldsin
place.
BatterySymbols
Someorallofthesesymbolsareonyourbattery
1.Explosionhazard
2.Nore,opename,or
smoking
3.Causticliquid/chemical
burnhazard
4.Weareyeprotection.9.Flusheyesimmediately
5.ReadtheOperator's
Manual.
6.Keepbystandersasafe
7.Weareyeprotection;
8.Batteryacidcancause
10.Containslead;donot
distancefromthebattery.
explosivegasescan
causeblindnessandother
injuries
blindnessorsevereburns.
withwaterandgetmedical
helpfast.
discard
11
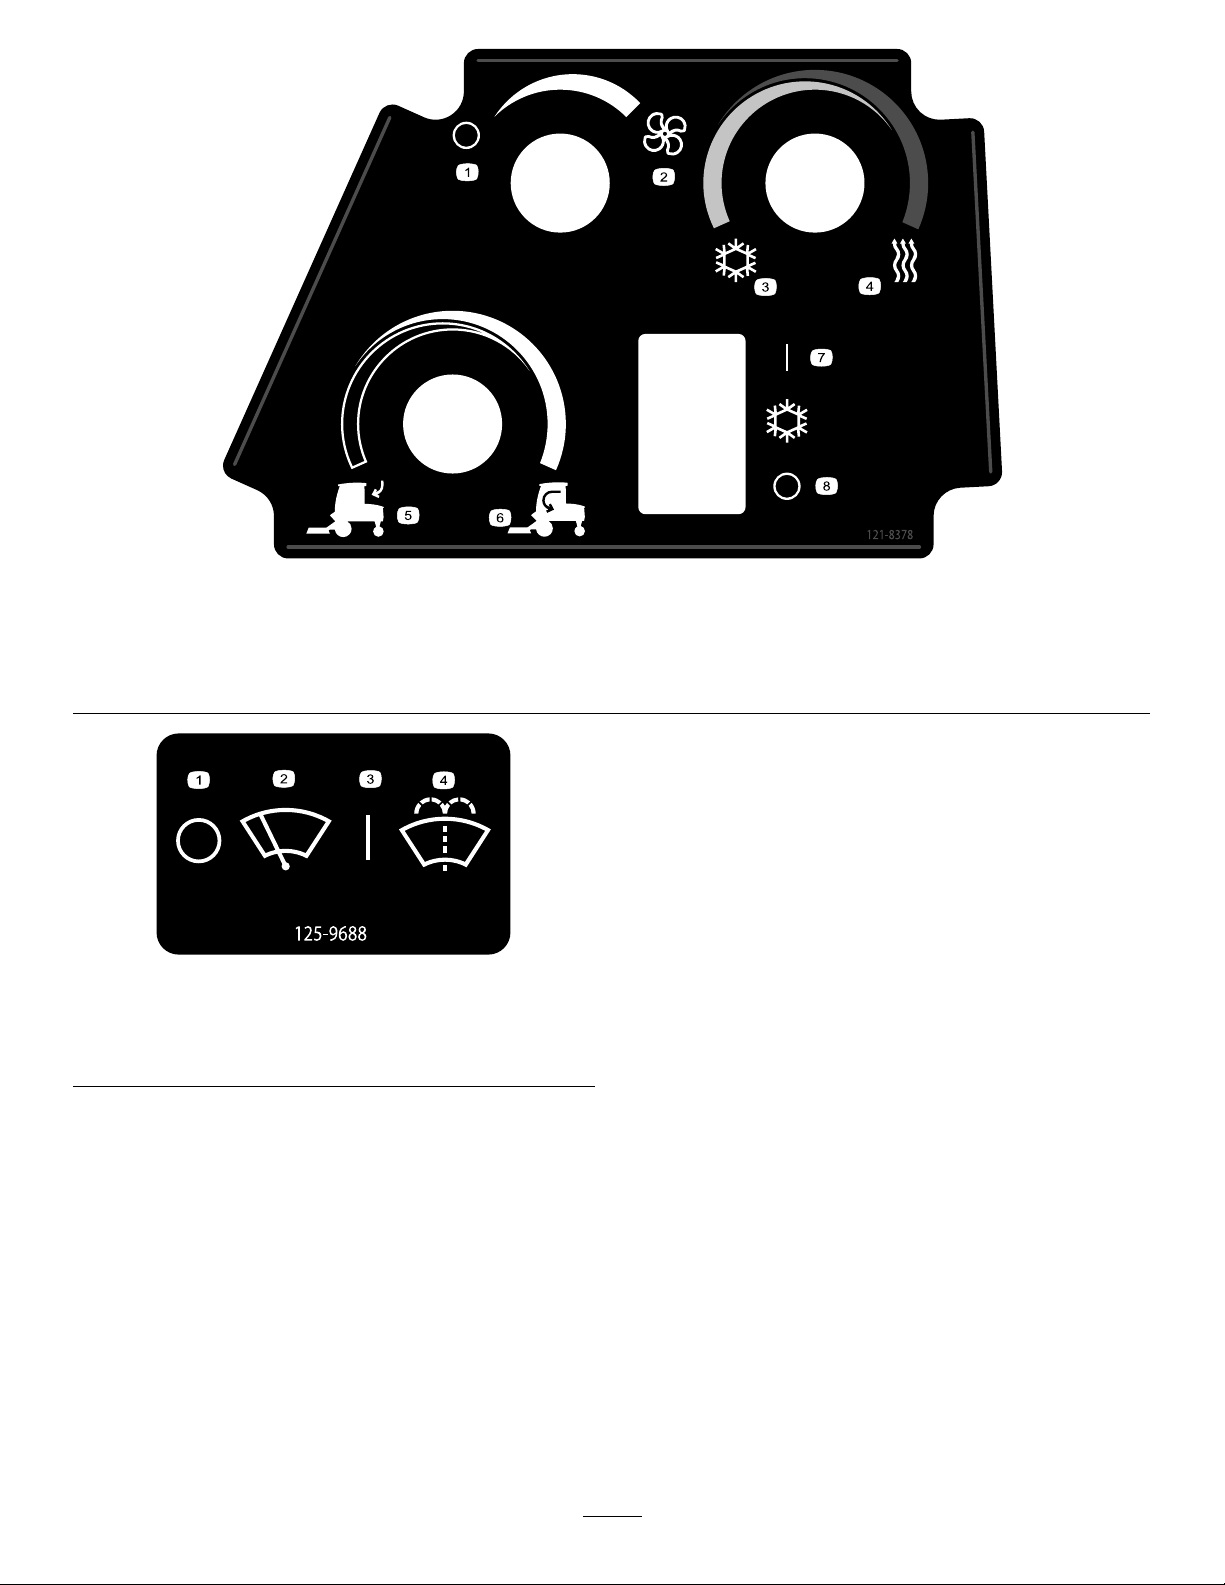
121-8378
1.Fan—off3.Coldair
2.Fan—onfull
4.Hotair6.Internalair
125-9688
1.Windshieldwipers—off
2.Windshieldwipers
3.Windshieldwipers—on
4.Spraywindshield-washer
uid
5.Externalair
7.Airconditioner—on(If
equipped)
8.Airconditioner—off(If
equipped)
12
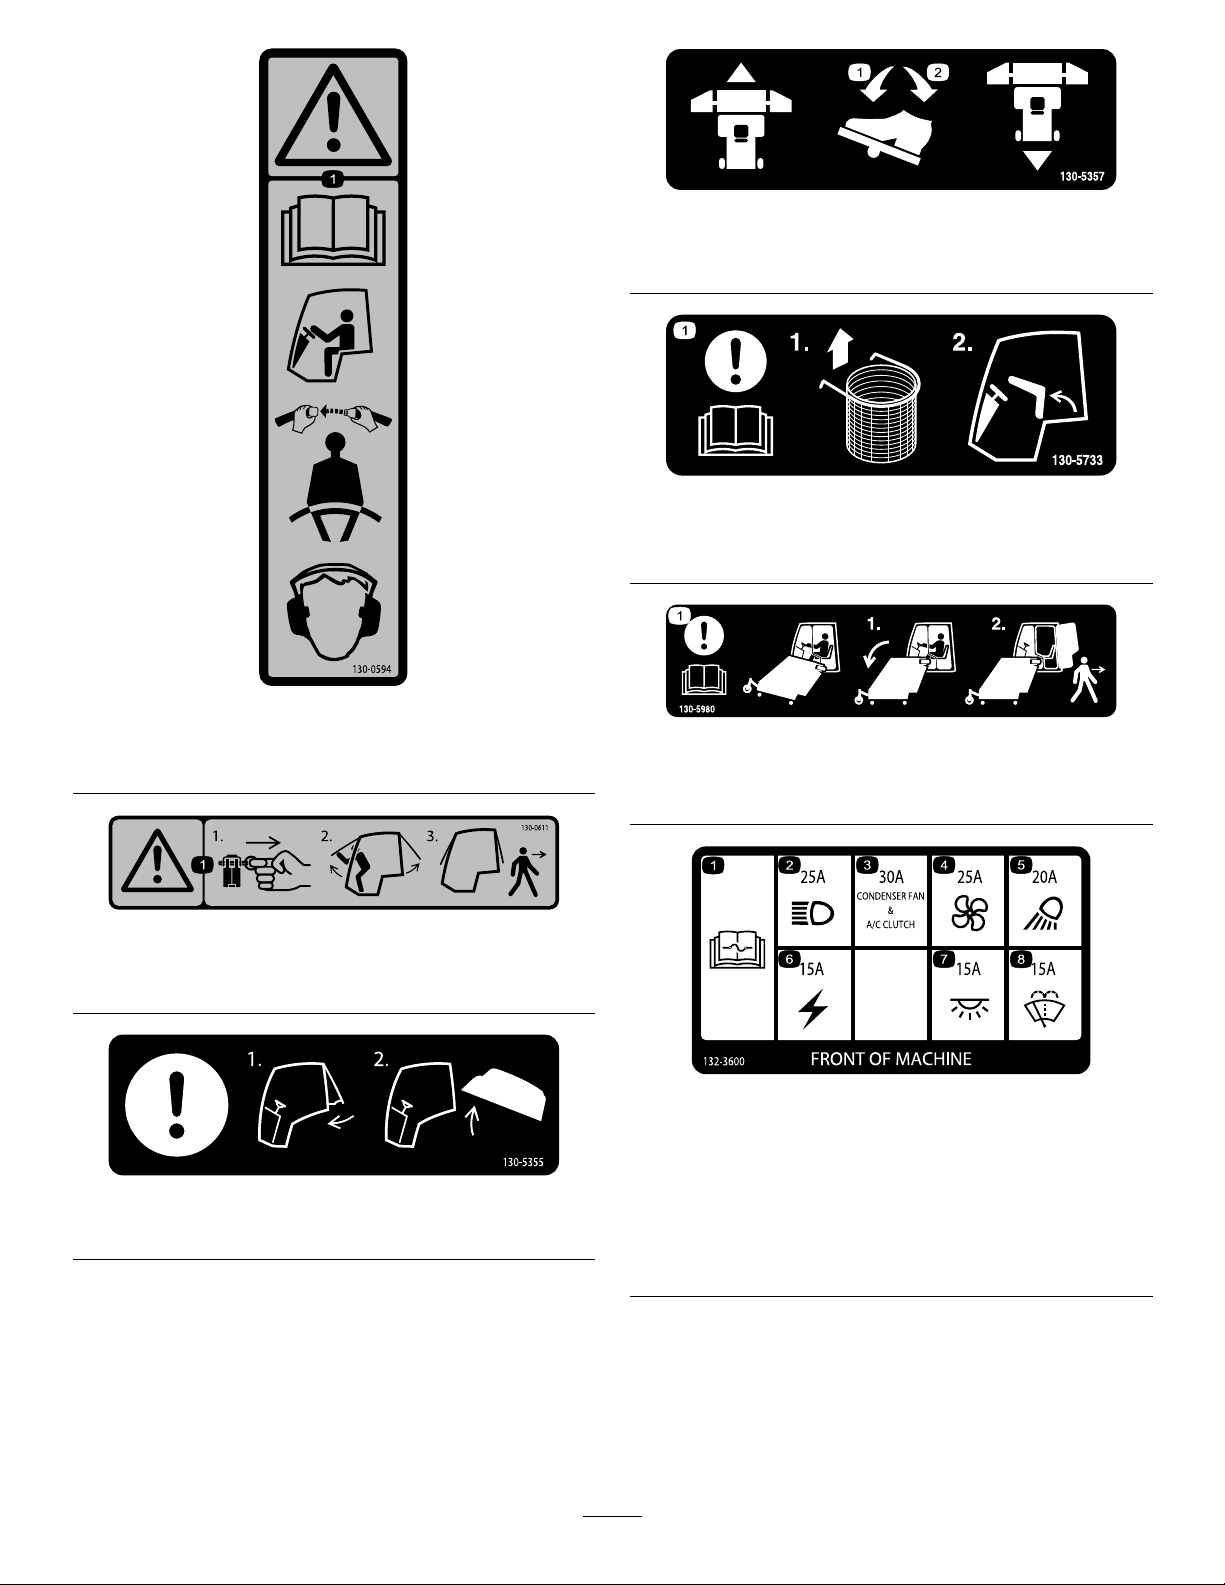
130-5357
130-0594
1.Warning—readtheOperator’sManual;whensittinginthe
cab,alwayswearaseatbelt;wearhearingprotection.
1.Pushforwardtomove
forward.
2.Pushbacktoreverse.
130-5733
1.Attention;readtheOperator'sManual—1)Removethe
optionaltrashbag;2)Tilttheseatforward.
130-5980
1.Attention;readtheOperator'sManual—T oleavethe
machine:1)Lowerthecuttingdeck;2)Leavethemachine.
130-0611
1.Warning—1)Removethepin;2)Raisethedoors;3)Exit
thecab.
130-5355
1.Closetherearwindow.
2.Raisethehood.
132-3600
1.ReadtheOperator's
Manualformore
informationonfuses.
2.Headlight—25A6.Auxiliarypower—15A
3.CondenserfanandA/C
clutch—30A
4.Fan—25A8.Windshieldwipers—15A
5.Workinglight—20A
7.Cablight—15A
13
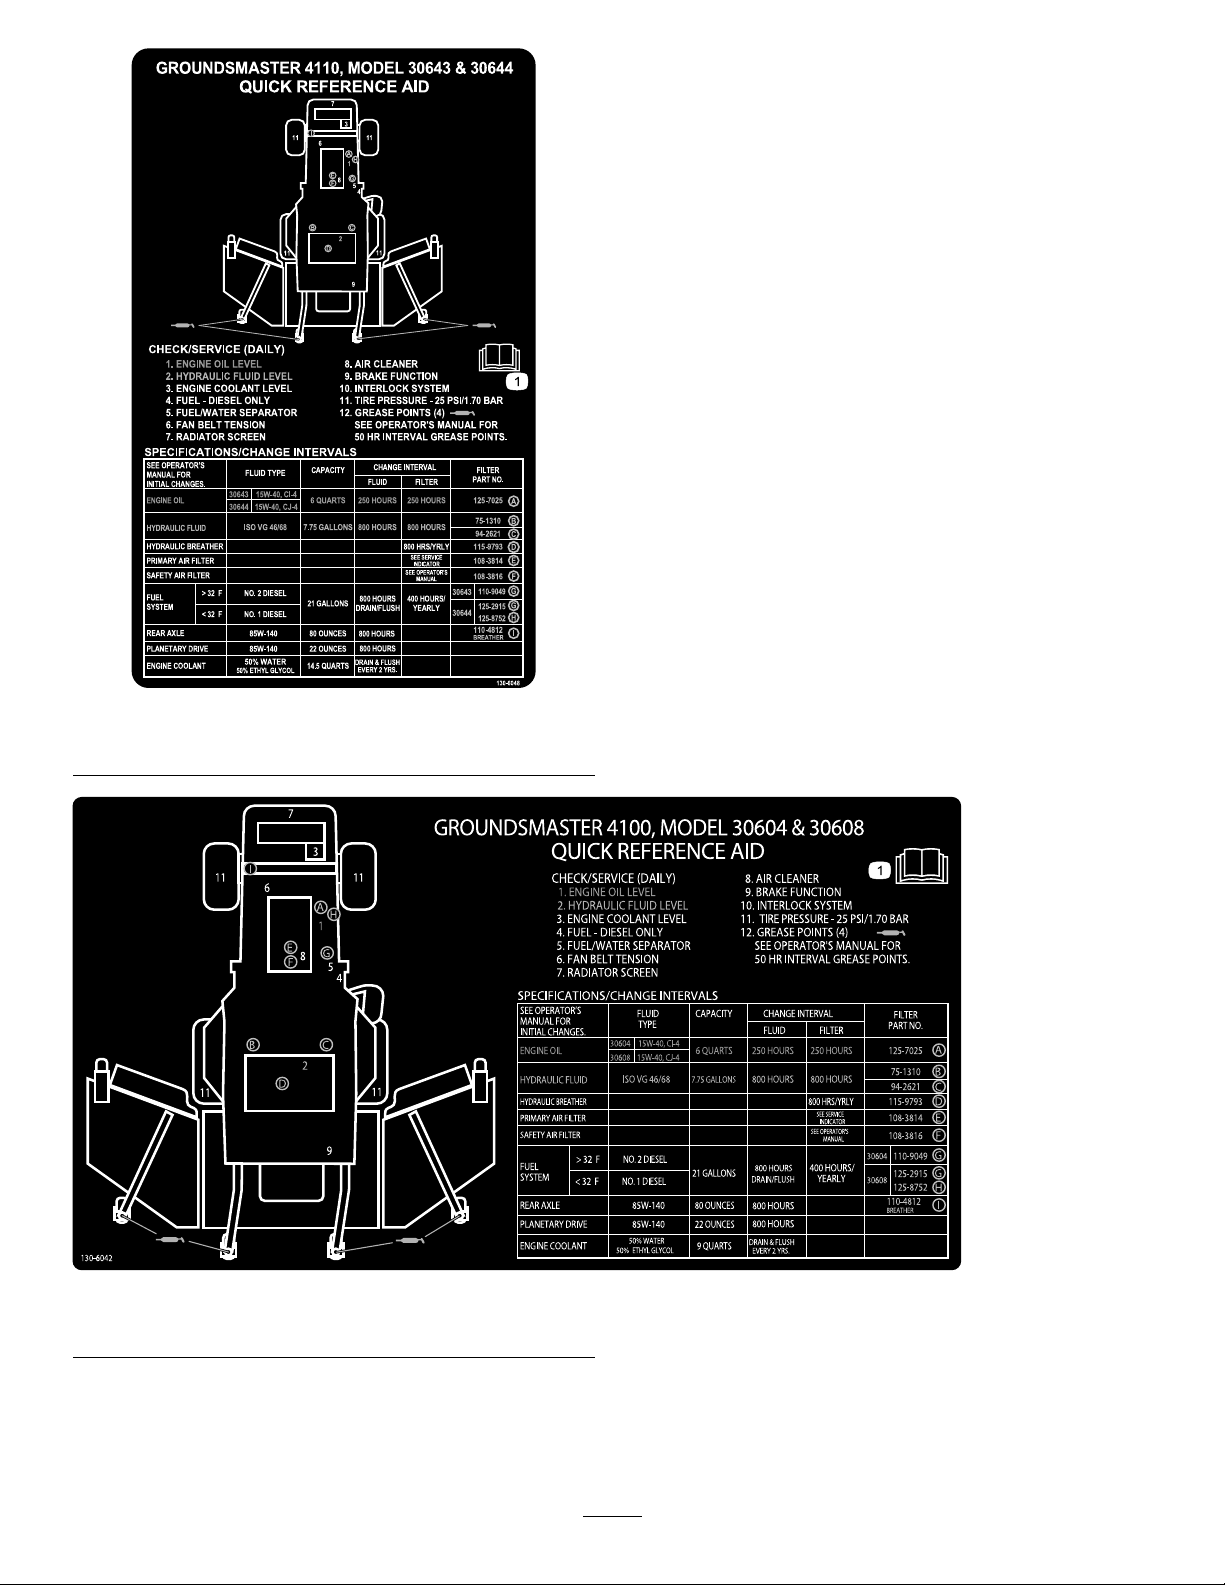
GRO UNDSMAS TER 41 10, MODEL 30643 & 30644
QUICK REFE RENCE AID
SPE CIFICATIONS /CHANGE INTER VALS
SEE OPERATOR’S
MANUAL FOR
INITIAL CHANGES.
ENGINE OIL
HYDRAULIC FLUID
HYDRAULIC BREATHER
PRIMARY AIR FILTER
SAFETY AIR FILTER
FUEL
SYSTEM
ENGINE COOLANT
> 32 F
< 32 F
FLUID TYPE
15W-40, C I-430643
30644
30643
30644
15W-40, C J-4
ISO VG 46/68
50% WATER
50% ETHYL GLYCOL
NO. 2 DIESEL
NO. 1 DIESEL
CAPACITY
6 QUARTS
7.75 G ALLONS
14.5 QUARTS
21 GALLONS
80 OUNCES
CHANGE INTERVAL
250 HOURS
800 HOURS
800 HRS /YRLY
DRAIN & FLUSH
EVERY 2 YRS.
800 HOURS
DRAIN/FLUSH
800 HOURS
800 HOURS
250 HOURS
800 HOURS
SEE S ERVICE
INDICATOR
SEE O PERATOR'S
MANUAL
400 HOURS /
YEARLY
FILTER
PART NO.
125-70 25
75-131 0
94-262 1
115-97 93
108-38 14
108-38 16
110-90 49
125-29 15
125-87 52
FLUID FILTER
A
B
C
F
D
G
G
I
H
E
REAR AXLE
PLANETARY DRIVE
85W-140
85W-140
22 OUNCES
BREATHER
110-48 12
1. ENGINE OIL LE VEL
2. HYDRAULIC F LUID LEVEL
3. ENGINE CO OLANT LEVEL
4. FUEL - DIES EL ONLY
5. FUEL/WATER SEP ARATOR
6. FAN BELT TENSION
7. RADIATOR S CREE N
8. AIR C LEANER
9. BRAKE F UNCTION
10. INTER LOCK S YSTE M
11.
TIRE PR ESSUR E - 25 PS I/1.70 BAR
12. GREAS E P OINTS (4)
SEE OPE RATOR'S MANUAL FOR
50 HR INTERVAL G REASE POINTS .
CHEC K/SER VICE (DAILY)
130-6 048
A
B C
F
D
G
E
1
2
3
5
4
6
7
8
9
11
11
1111
I
H
130–6048
1.ReadtheOperator’sManual.
1.ReadtheOperator’sManual.
130–6042(UnderCab)
14

Setup
LooseParts
Usethechartbelowtoverifythatallpartshavebeenshipped.
ProcedureDescription
1
2
3
4
Nopartsrequired
Warningdecal1Replacethewarningdecal.
Nopartsrequired
Nopartsrequired
MediaandAdditionalParts
Description
Operator'sManual
Engineowner'sManual1
PartsCatalog
Operatortrainingmaterials
DeclarationofConformity
Qty.
Qty.
–
–
–
1
1
1
1
Reviewbeforeoperatingmachine
Usetoreferenceengineinformation
Usetoreferencepartnumbers
Reviewbeforeoperatingmachine
Greasethemachine.
Checkthetirepressure.
Checktheuidlevels.
Use
Use
Note:Determinetheleftandrightsidesofthemachine
fromthenormaloperatingposition.
1
GreasingtheMachine
NoPartsRequired
Procedure
Beforeoperatingthemachine,greaseittoensureproper
lubricatingcharacteristics;refertoGreasingtheBearingsand
Bushings(page44).
Important:Failuretoproperlygreasethemachinewill
resultinprematurefailureofcriticalparts.
2
ReplacingtheWarningDecal
ForCEModelsOnly
Partsneededforthisprocedure:
1Warningdecal
Procedure
OnmachinesrequiringEuropeanCEcompliance,replace
thewarningdecalPartNo.117-2754withthewarningdecal
PartNo.117-2766.
15
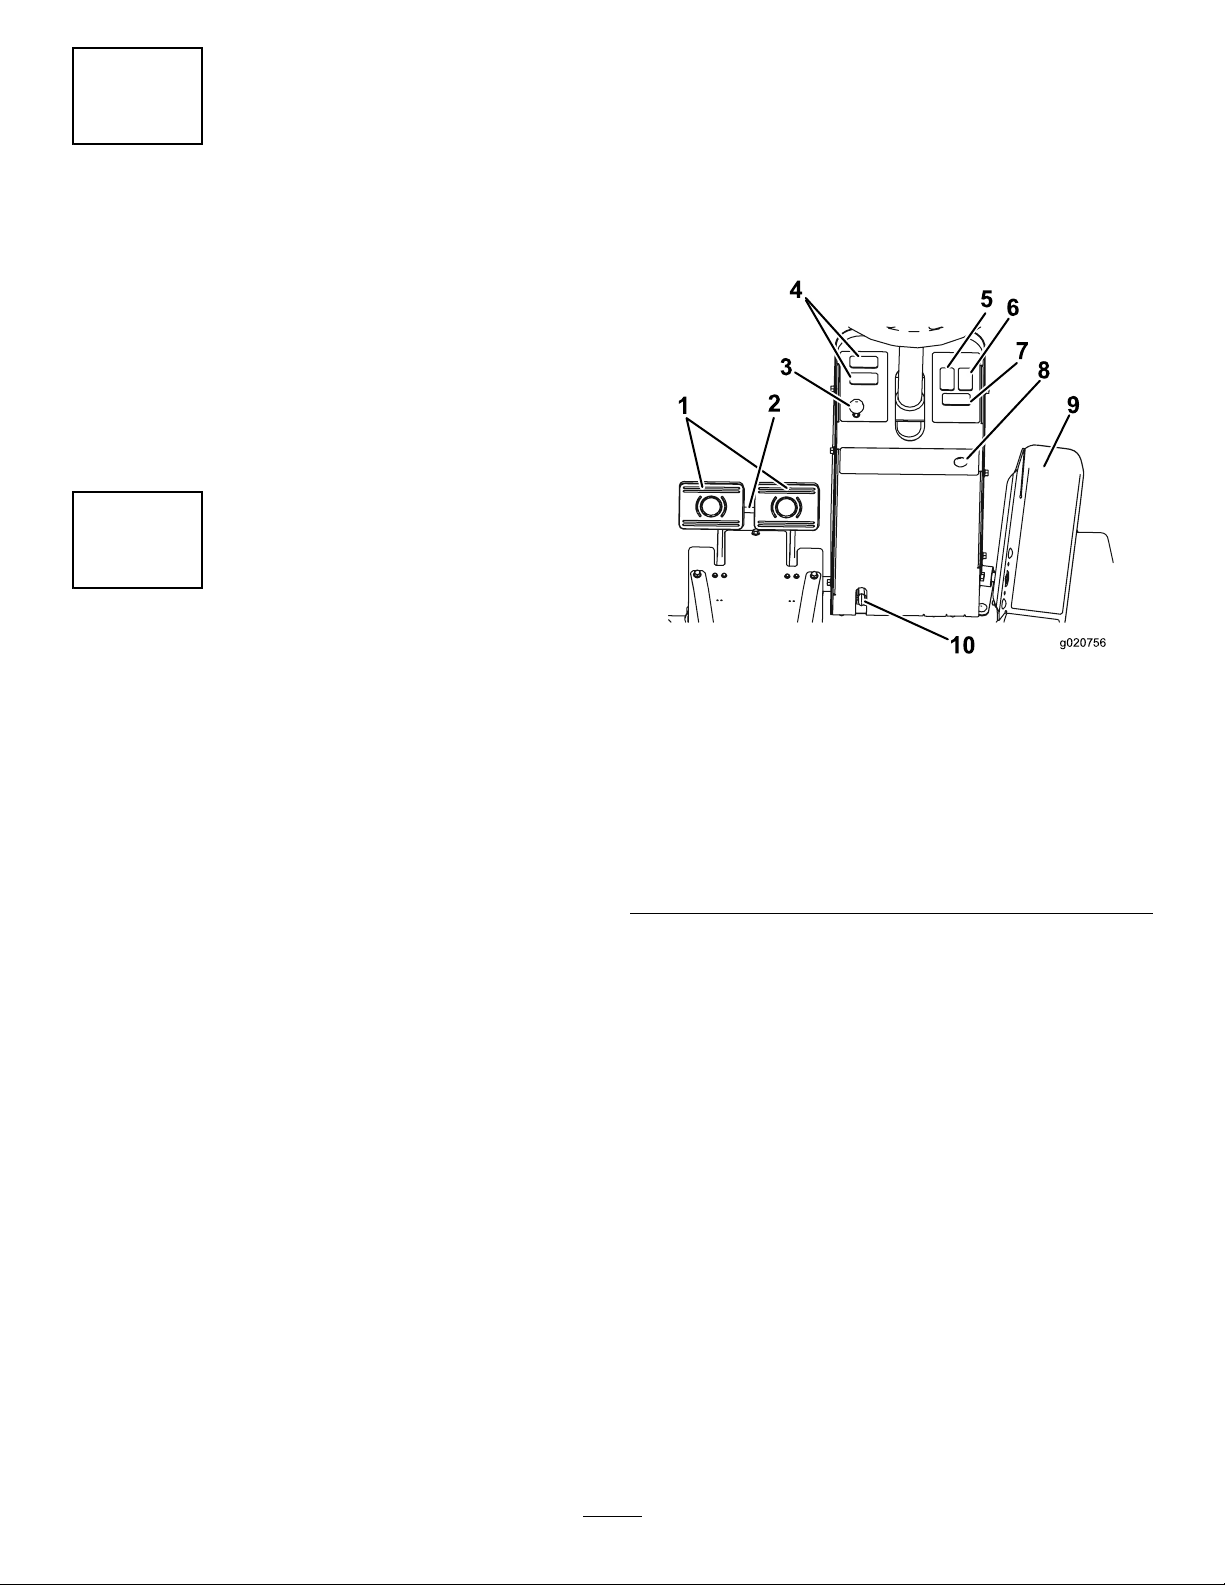
ProductOverview
9
10
g020756
3
CheckingtheTirePressure
NoPartsRequired
Procedure
Checkthetirepressure;refertoCheckingtheTirePressure
(page24).
Important:Maintainpressureinalltirestoensurea
goodquality-of-cutandpropermachineperformance.
Donotunderinatethetires.
4
CheckingtheFluidLevels
NoPartsRequired
Procedure
1.Checktheengine-oillevel;refertoCheckingthe
Engine-OilLevel(page47).
2.Checkthehydraulicuidlevel;refertoCheckingthe
HydraulicFluid(page58).
3.Checkthecoolingsystem;refertoCheckingthe
CoolingSystem(page55).
4.Checktheplanetary-gear-driveoil;refertoChecking
thePlanetary-Gear-DriveOil(page52).
5.Checktherear-axlelubricant;refertoCheckingthe
Rear-AxleLubricant(page53).
Controls
Note:Determinetheleftandrightsidesofthemachine
fromthenormaloperatingposition.
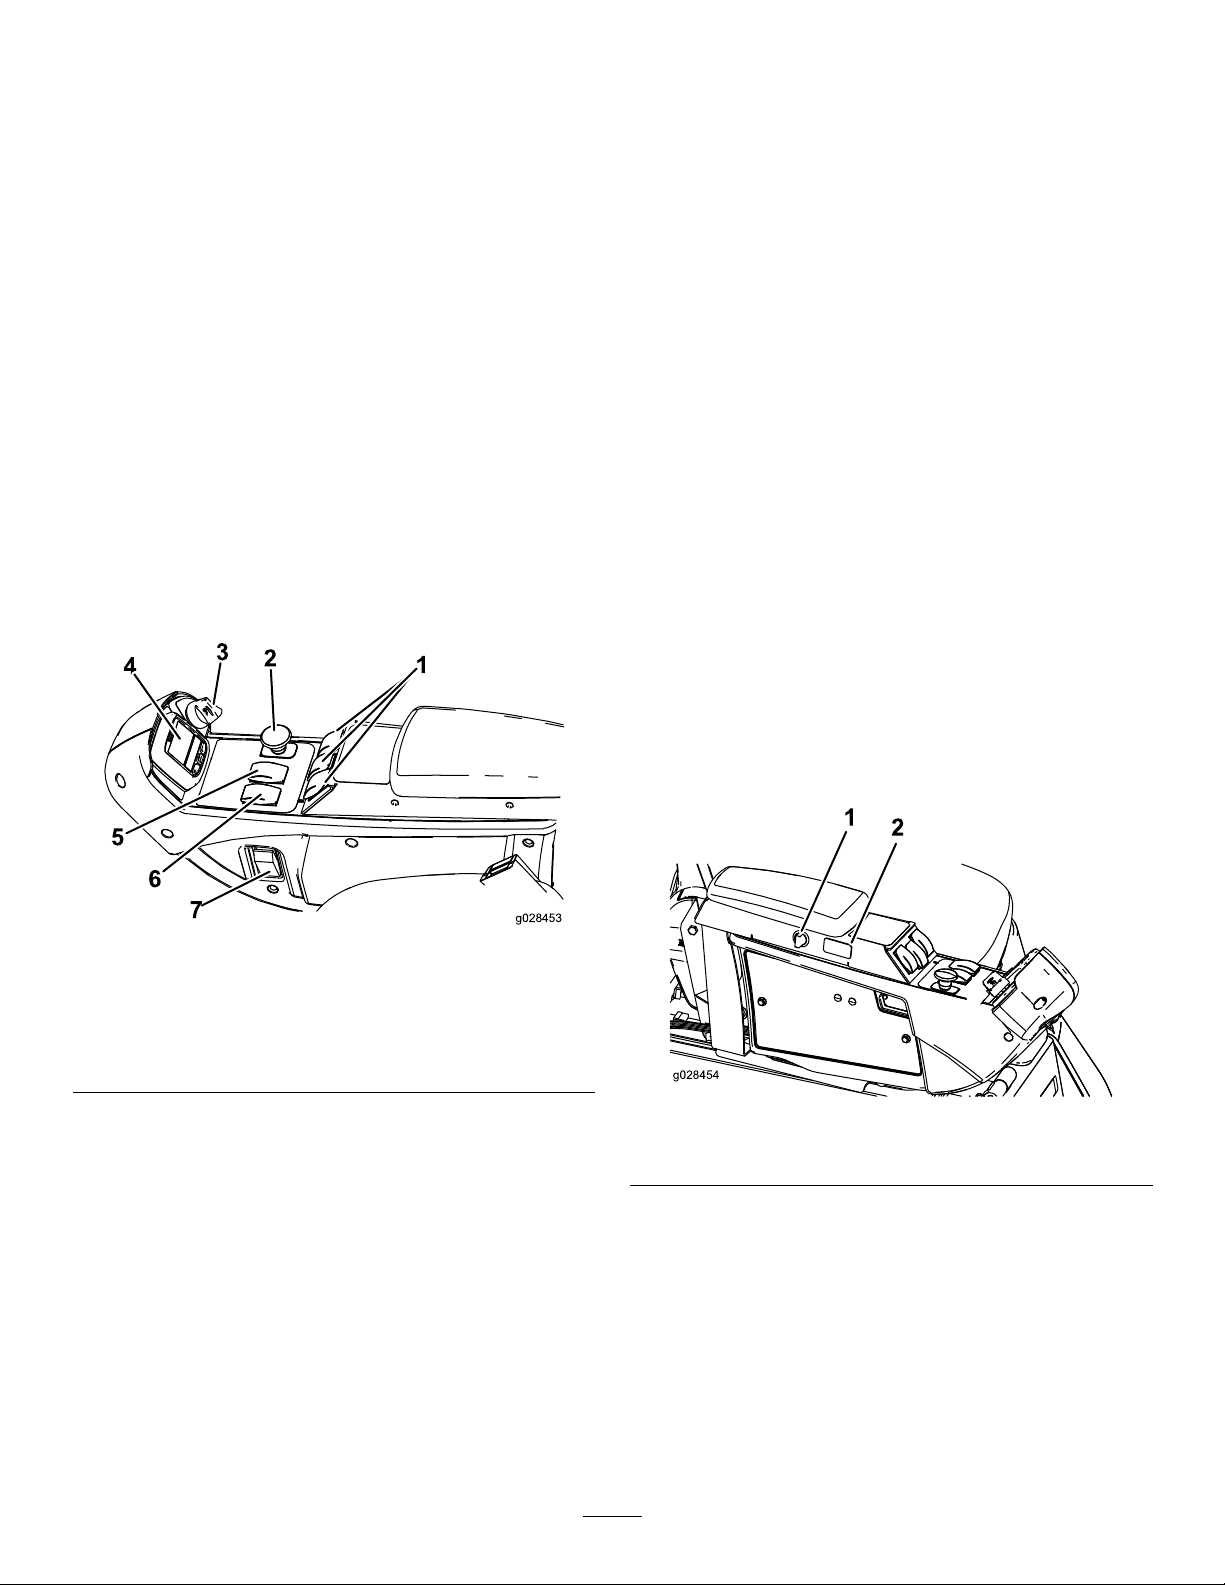
MachineControls
Figure3
1.Brakepedals6.Hazard-lightswitch
2.Pedal-lockinglatch7.Turn-signalswitch
3.Parking-brakelatch
4.Spaceforoptional
accessory
5.Beaconswitch(optional)
TractionPedal
Tostopthemachine,reduceyourfootpressureonthe
tractionpedalandallowittoreturntothecenterposition
(Figure3).
(optional)
(optional)
8.Hornbutton(optional)
9.Tractionpedal
10.Tilt-steeringlever
6.Checktherear-axle-gearboxlubricant;referto
CheckingtheRear-Axle-GearboxLubricant(page53).
BrakePedals
Thereare2footpedalsthatoperateindividualwheelbrakes
forturningassistance,parking,andtoaidinbetterside-hill
traction.Alatchconnectsthepedalsforparking-brake
operationandtransport(Figure3).
Pedal-LockingLatch
Thepedal-lockinglatchconnectsthepedalstogetherto
engagetheparkingbrake(Figure3).
Tilt-SteeringLever
Pressthetilt-steeringleverdowntotiltthesteeringwheel
tothedesiredposition,thenreleasethelevertolockthe
adjustment(Figure3).
16
Parking-BrakeLatch
g028453
1
2
3
4
5
6
7
g028454
1
2
PTOSwitch
Aknobontheleftsideoftheconsoleactuatesthe
parking-brakelock(Figure3).
Toengagetheparkingbrake,connectthepedalswiththe
lockinglatch,pushdownonbothpedals,andpullthe
parking-brakelatchout.T oreleasetheparkingbrake,press
bothpedalsuntiltheparking-brakelatchretracts.
Hazard-LightSwitch(Optional)
Pressthehazard-lightswitchtoactivatethehazardlights
(Figure3).
Turn-SignalSwitch(Optional)
Presstheleftsideoftheturn-signalswitchtoactivatethe
left-turnsignalandtherightsideoftheswitchtoactivatethe
right-turnsignal(Figure3).
KeySwitch
Thekeyswitch(Figure4)has3positions:OFF,
ON/PREHEAT,andSTART.
ThePTOswitchhas2positions:OUT(START)andIN(STOP).
PullthePTObuttonouttoengagethemower-deckblades.
Pushthebuttonintodisengagethemower-deckblades
(Figure4).
LiftSwitches
Theliftswitchesraiseandlowerthemowerdecks(Figure
4).Presstheswitchesforwardtolowerthemowerdecks
andrearwardtoraisethemowerdecks.Whenstartingthe
machine,withthemowerdecksinthedownposition,press
theliftswitchdowntoallowthemowerdeckstooatand
mow .
Note:ThedecksdonotlowerwhileintheHigh-speedrange
andtheydonotraiseorloweriftheoperatorisoutoftheseat
whentheengineisrunning.Also,thedeckslowerwiththe
keyintheONpositionandtheoperatorintheseat.
Cruise-ControlSwitch
Thecruise-controlswitchlocksinthepedalpositionto
maintainthedesiredgroundspeed(Figure5).Pressingthe
rearoftheswitchturnsoffthecruisecontrol,themiddle
positionoftheswitchenablesthecruise-controlfunction,
andthefrontoftheswitchsetsthedesiredgroundspeed.
Figure4
1.Liftswitches
2.PTOswitch
3.Keyswitch
4.InfoCenter
Engine-SpeedSwitch
5.High-Lowspeedcontrol
6.Engine-speedswitch
7.Lightswitch(optional)
Theengine-speedswitchhas2modestochangetheengine
speed(Figure4).
Bymomentarilytappingtheswitch,youcanincreaseor
decreasetheenginespeedin100-rpmincrements.Whenyou
holdtheswitchdown,theengineautomaticallymovesto
HIGHorLOWIDLE,dependingonwhichswitchyoupress.
Note:Pressingeitherbrakepedalormovingthetraction
pedalintotheREVERSEposition,for1second,also
disengagesthepedalposition.
Figure5
1.Power-pointport
Power-PointPort
2.Cruise-controlswitch
Thepower-pointportisusedtopoweroptionalelectrical
accessories(Figure5).
17
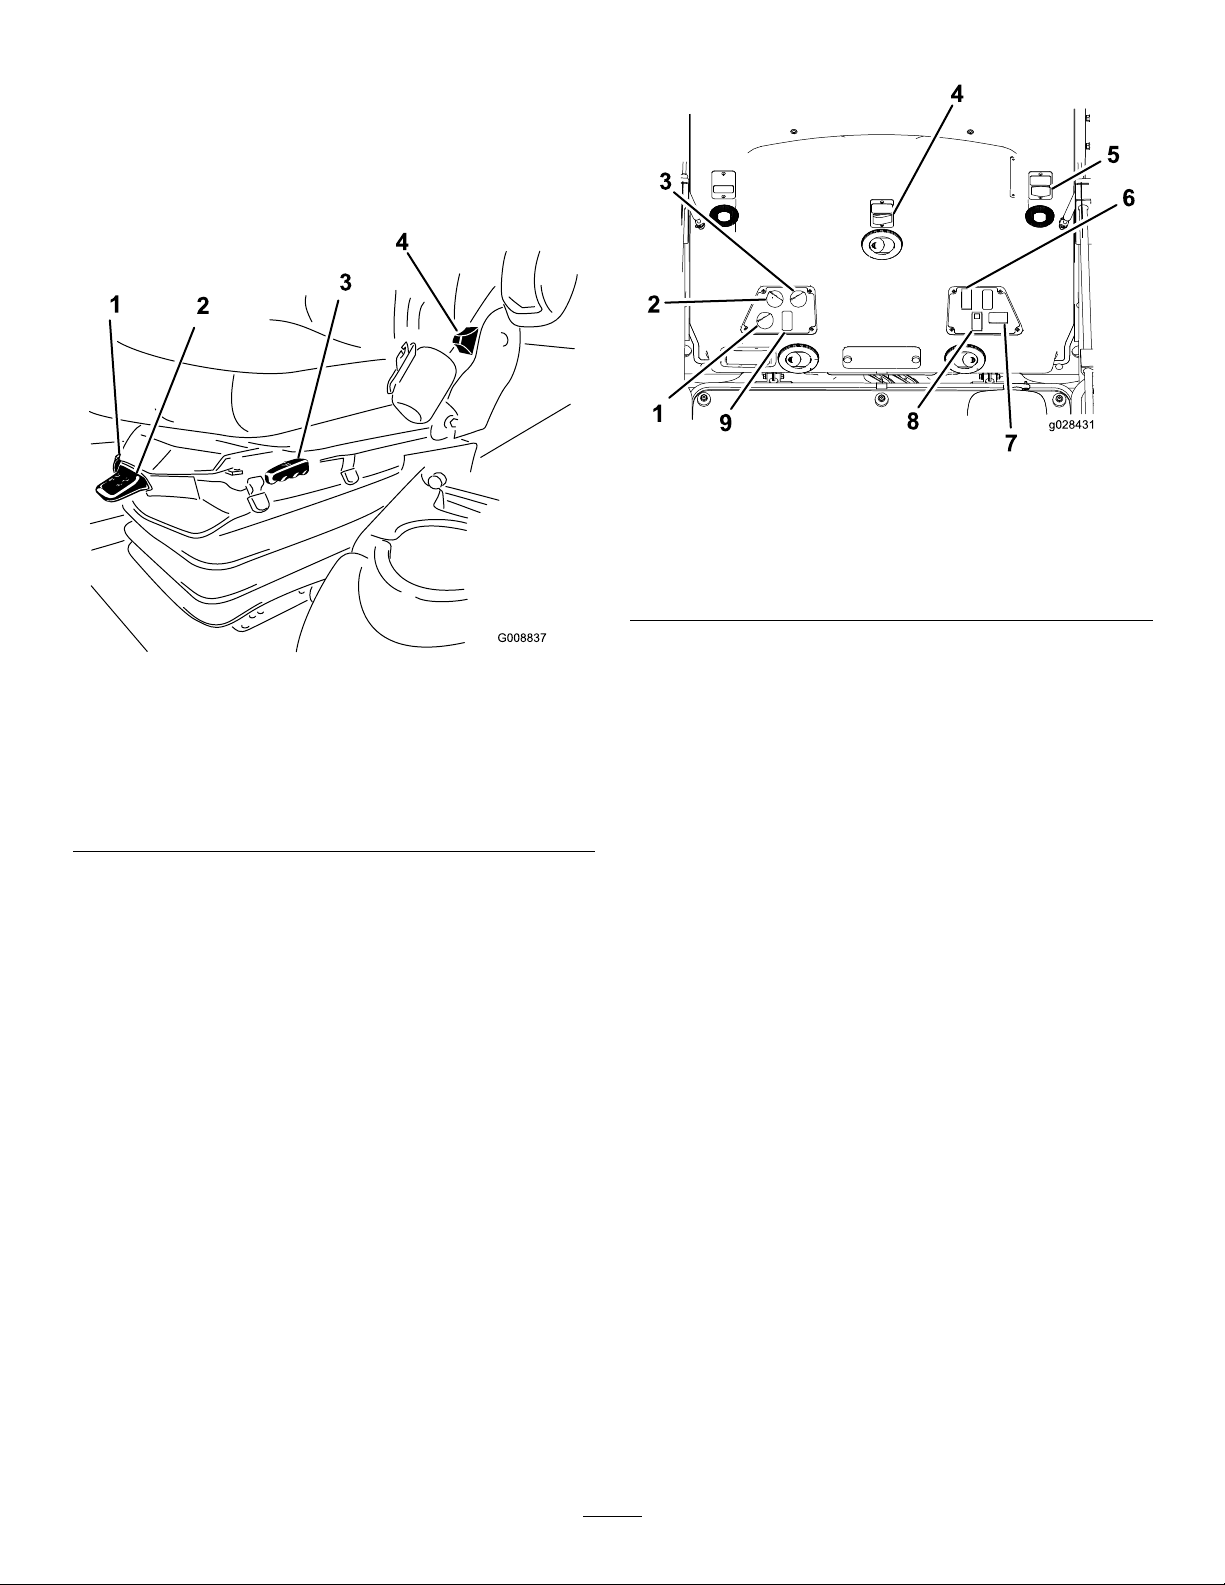
SeatControls
1
2
3
4
5
6
7
8
g028431
9
Seat-AdjustmentLever
Movetheseat-adjustmentleveronthesideoftheseat
outward,slidetheseattothedesiredposition,andreleasethe
levertolocktheseatintoposition(Figure6).
CabControls
Figure7
1.Air-recirculationcontrol5.Poweroutlet
2.Fancontrol6.Lightsswitch
3.Temperaturecontrol7.Flashersswitch
4.Windshield-wiperswitch8.Air-conditioningswitch
Figure6
1.Weightgauge
2.Weight-adjustmentlever5.Armrest-adjustmentknob
3.Seat-adjustmentlever
Armrest-AdjustmentKnob
4.Seat-backadjustment
lever
(notshown;locatedunder
armrest)
Rotatetheknobtoadjustthearmrestangle(Figure6).
Seat-Back-AdjustmentLever
Movethelevertoadjusttheseat-backangle(Figure6).
WeightGauge
Theweightgaugeindicateswhentheseatisadjustedto
theweightoftheoperator(Figure6).Adjusttheheightby
positioningthesuspensionwithintherangeofthegreen
region.
Weight-AdjustmentLever
Usethislevertoadjusttotheproperweightoftheoperator
(Figure6).Pullupthelevertoincreasetheairpressure
andpushdowntodecreasetheairpressure.Theproper
adjustmentiscorrectwhentheweightgaugeisinthegreen
region.
AirRecirculationControl
Setsthecabtoeitherrecirculatetheairinthecabinortodraw
airintothecabinfromoutside(Figure7).
•Setittorecirculatetheairwhenusingtheairconditioning.
•Setittodrawairinwhenusingtheheaterorfan.
FanControl
Rotatethefancontrolknobtoregulatethespeedofthefan
(Figure7).
TemperatureControl
Rotatethetemperaturecontrolknobtoregulatetheair
temperatureinthecab(Figure7).
WindShieldWiperSwitch
Usethisswitchtoturnthewindshieldwipersonoroff
(Figure7).
PowerOutlet
Usethis15A,12VDCpoweroutlettopowercompatible
devices(Figure7).
LightsSwitch
Usethisswitchtoturntheheadlightsandtaillightonoroff
(Figure7).
FlashersSwitch
Usethisswitchtoturntheashers(hazardlights)onoroff
(Figure7).
18
Air-ConditioningSwitch
Usethisswitchtoturntheairconditioningonoroff(Figure
7).
WindShieldLatch
Liftupthelatchestoopenthewindshield(Figure8).Pressin
thelatchtolockwindshieldtotheOPENposition.Pullout
anddownonthelatchtocloseandsecurethewindshield.
Figure8
1.Windshieldlatch
RearWindowLatch
Liftupthelatchestoopentherearwindow .Pressinthelatch
tolockthewindowintheOPENposition.Pulloutanddown
onthelatchtocloseandsecurethewindow(Figure8).
Important:Y oumustclosetherearwindowbefore
openingthehoodordamagetothehoodorwindowmay
occur.
19
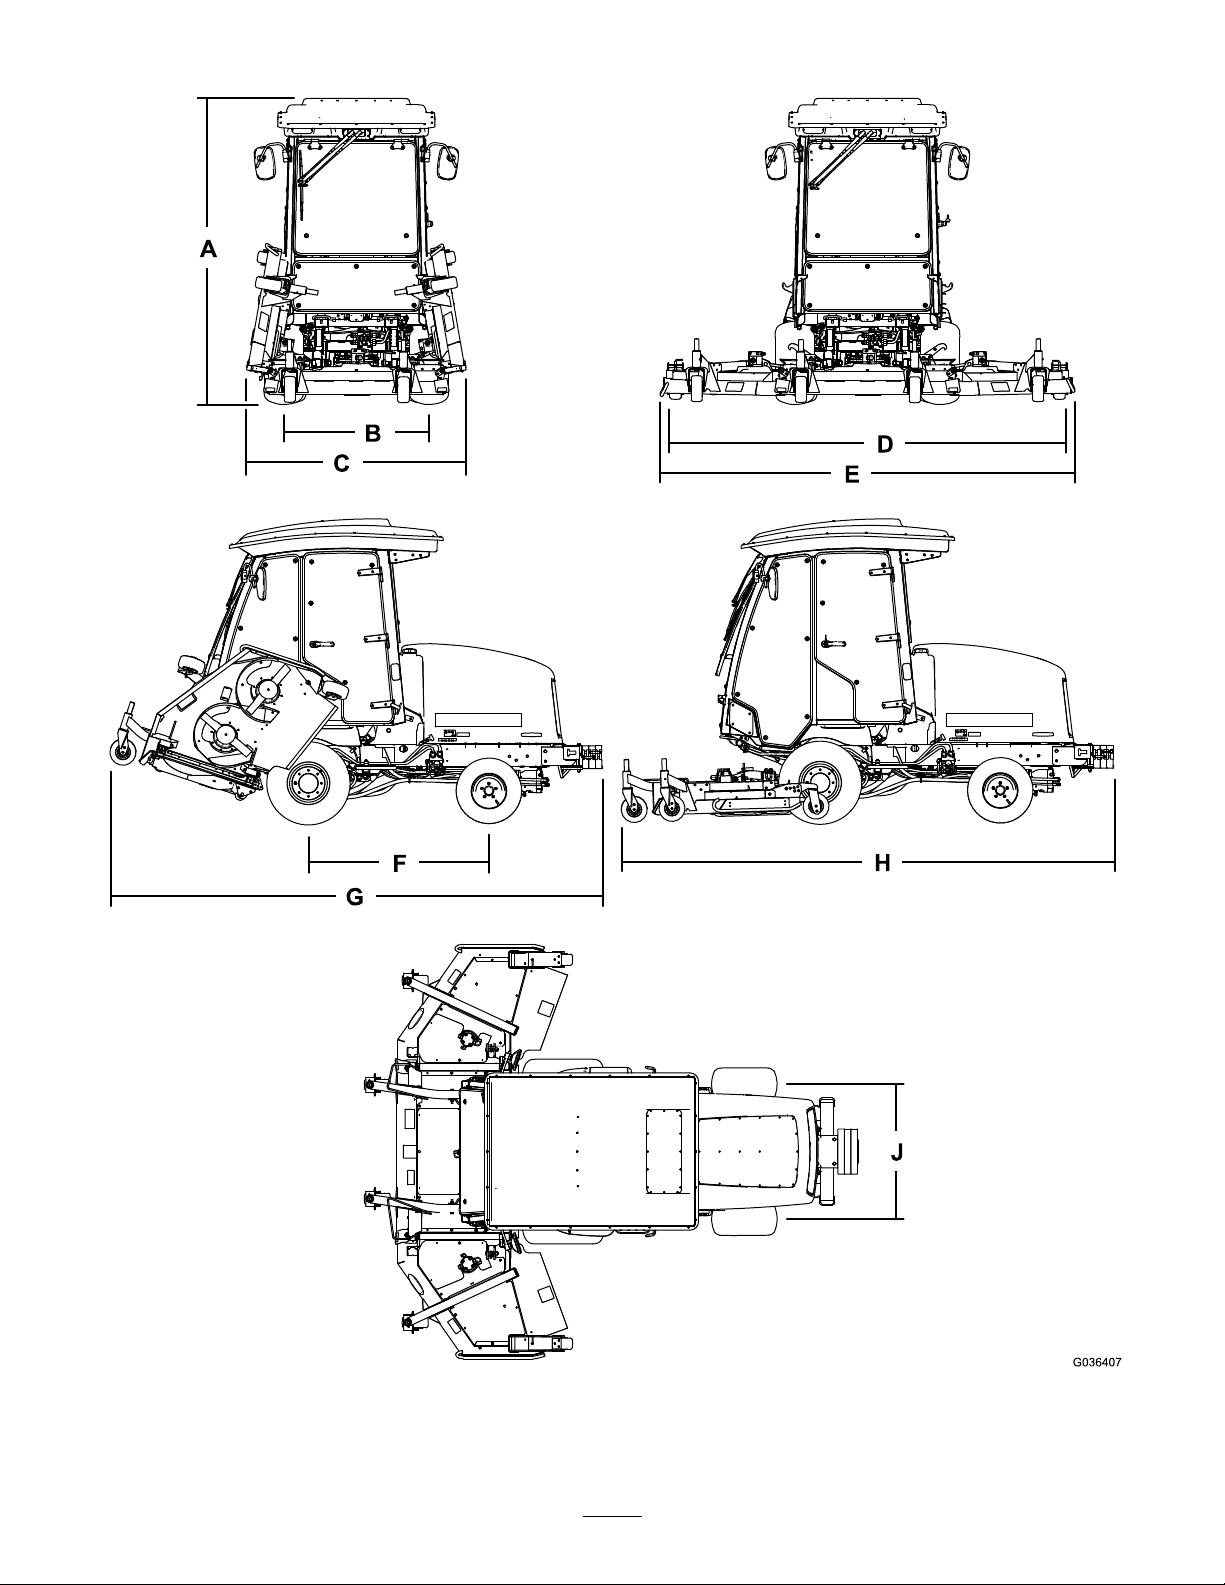
Specications
Figure9
20

DescriptionFigure9
Heightwithcab
Height(excludingthecab)140cm(55inches)
Overalllength
LengthforstorageG184cm(151inches)
Widthofcut
overall
frontcuttingunit137cm(54inches)
sidecuttingunit
frontandonesidecuttingunit226cm(89inches)
Overallwidth
cuttingunitsdown
cuttingunitsup(transportposition)C180cm(71inches)
Wheelbase
Wheeltread(tirecentertocenter)
front
rear
Groundclearance15cm(6inches)
NetWeight
reference
A
H
D
E
F
B
J
DimensionorWeight
237cm(93.3inches)
186cm(152inches)
315cm(124inches)
94cm(37inches)
323cm(127inches)
141cm(55-1/2inches)
114cm(45inches)
107cm(42inches)
2114kg(4660lbs.)
Note:Specicationsanddesignaresubjecttochangewithoutnotice.
Attachments/Accessories
AselectionofToroapprovedattachmentsandaccessoriesisavailableforusewiththemachinetoenhanceandexpand
itscapabilities.ContactyourAuthorizedServiceDealerorDistributororgotowww.Toro.comforalistofallapproved
attachmentsandaccessories.
21

Operation
FuelSafety
Note:Determinetheleftandrightsidesofthemachine
fromthenormaloperatingposition.
BeforeOperation
BeforeOperationSafety
GeneralSafety
•Neverallowchildrenoruntrainedpeopletooperateor
servicethemachine.Localregulationsmayrestrictthe
ageoftheoperator.Theownerisresponsiblefortraining
alloperatorsandmechanics.
•Becomefamiliarwiththesafeoperationoftheequipment,
operatorcontrols,andsafetysigns.Knowhowtostop
themachineandshutoffenginequickly .
•Checkthatallsafetydevicesareattachedand
functioningproperly.Thisincludes,butisnotlimitedto,
operator-presencecontrols;safetyswitchesandshields;
therolloverprotectionsystem(ROPS);attachments;and
brakes.Donotoperatethemachineunlessallsafety
devicesareinpositionandfunctioningasintendedby
themanufacturer.
•Alwaysinspectthemachinetoensurethattheblades,
bladebolts,andcuttingassemblyarenotwornor
damaged.Replacewornordamagedbladesandboltsin
setstopreservebalance.
•Inspecttheareawhereyouwillusethemachineand
removeallobjectsthatthemachinecouldpotentially
throw .
•Evaluatetheterraintodeterminetheappropriate
equipmentandanyattachmentsoraccessoriesrequiredto
operatethemachineproperlyandsafely.
DANGER
Incertainconditions,fuelisextremelyammable
andhighlyexplosive.Areorexplosionfromfuel
canburnyouandothersandcandamageproperty.
•Fillthefueltankoutdoors,inanopenarea,when
theengineiscold.Wipeupanyfuelthatspills.
•Neverllthefueltankinsideanenclosedtrailer.
•Neversmokewhenhandlingfuel,andstayaway
fromanopenameorwherefuelfumesmaybe
ignitedbyaspark.
•Storefuelinanapprovedcontainerandkeepit
outofthereachofchildren.Neverbuymore
thana180-daysupplyoffuel.
•Donotoperatethemachinewithouttheentire
exhaustsysteminplaceandinproperworking
condition.
WARNING
Fuelisharmfulorfatalifswallowed.Long-term
exposuretovaporscancauseseriousinjuryand
illness.
•Avoidprolongedbreathingofvapors.
•Keepyourhandsandfaceawayfromthenozzle
andthefuel-tankopening.
•Keepfuelawayfromyoureyesandskin.
•Useonlyanapprovedfuelcontainer.
•Neverremovethefuelcaporaddfueltothefueltank
whiletheengineisrunning.
•Neverllcontainersinsideavehicleoronatruckor
trailerbedwithaplasticliner.Alwaysplacecontainerson
thegroundandawayfromyourvehiclebeforelling.
•Removetheequipmentfromthetruckortrailerandadd
fueltoitwhileitisontheground.Ifthisisnotpossible,
thenaddfuelusingaportablecontainerratherthanfrom
afuel-dispensernozzle.
•Keepthefuel-dispensernozzleincontactwiththerimof
thefueltankorcontaineropeningatalltimesuntilfueling
iscomplete.Donotuseanozzlelock-opendevice.
•Ifyouspillfuelonyourclothing,changeyourclothing
immediately.
•Fillthefueltankuntilthefuellevelis25mm(1inch)
belowthebottomofthellerneck.Donotoverllthe
fueltank.Replacethefuel-tankcapandtightenitsecurely .
22
 Loading...