

Toro 30635, Groundsmaster 4010 Operator's Manual

FormNo.3388-892RevA
Groundsmaster
®
4010Rotary
Mower
ModelNo.30635—SerialNo.315000001andUp
Registeratwww.T oro.com.
OriginalInstructions(EN)
*3388-892*A
ThisproductcomplieswithallrelevantEuropeandirectives;
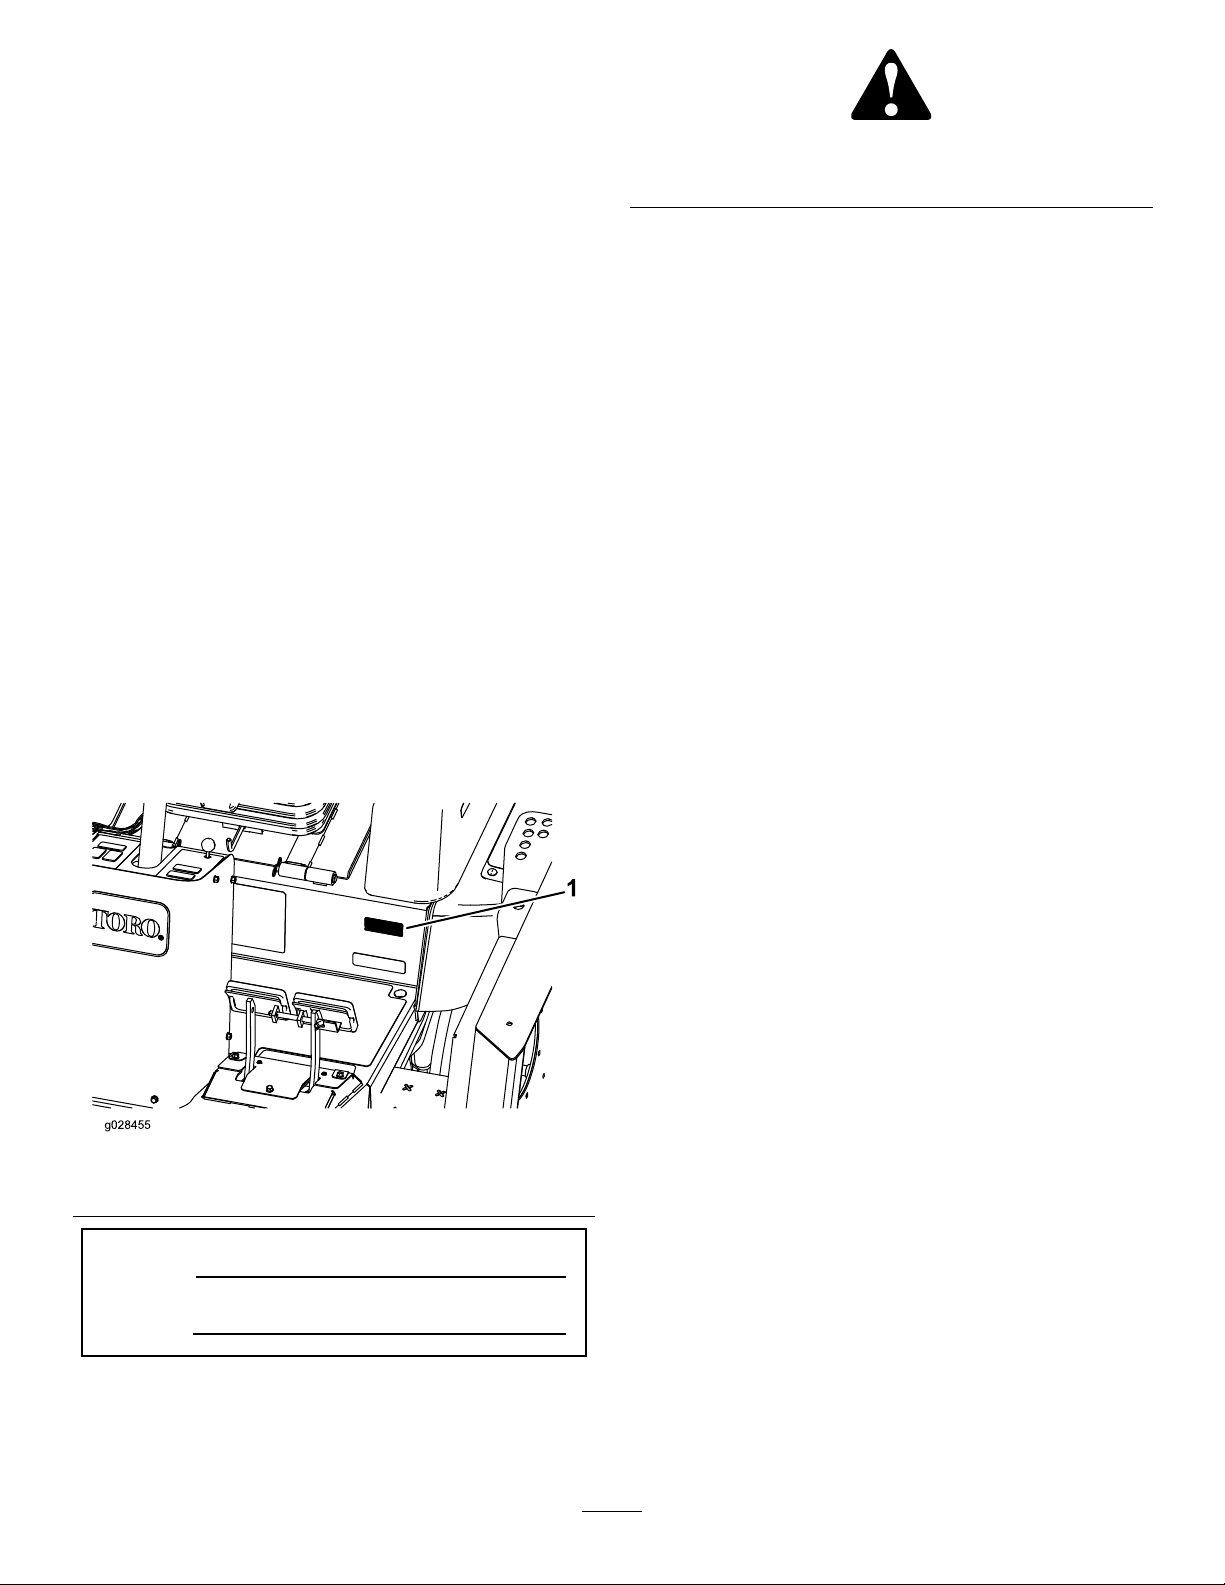
g028455
1
fordetails,pleaseseetheseparateproductspecicDeclaration
ofConformity(DOC)sheet.
Figure2
1.Safetyalertsymbol
Introduction
Thismachineisaride-on,rotary-bladelawnmowerintended
tobeusedbyprofessional,hiredoperatorsincommercial
applications.Itisprimarilydesignedforcuttinggrass
onwell-maintainedlawnsinparks,sportselds,andon
commercialgrounds.Itisnotdesignedforcuttingbrush,
mowinggrassandothergrowthalongsidehighways,orfor
agriculturaluses.
Readthisinformationcarefullytolearnhowtooperateand
maintainyourproductproperlyandtoavoidinjuryand
productdamage.Youareresponsibleforoperatingthe
productproperlyandsafely.
YoumaycontactTorodirectlyatwww .Toro.comforproduct
andaccessoryinformation,helpndingadealer,ortoregister
yourproduct.
Wheneveryouneedservice,genuineT oroparts,oradditional
information,contactanAuthorizedServiceDealerorToro
CustomerServiceandhavethemodelandserialnumbersof
yourproductready.Figure1identiesthelocationofthe
modelandserialnumbersontheproduct.Writethenumbers
inthespaceprovided.
Thismanualuses2wordstohighlightinformation.
Importantcallsattentiontospecialmechanicalinformation
andNoteemphasizesgeneralinformationworthyofspecial
attention.
Figure1
1.Modelandserialnumberlocation
ModelNo.
SerialNo.
Thismanualidentiespotentialhazardsandhassafety
messagesidentiedbythesafetyalertsymbol(Figure2),
whichsignalsahazardthatmaycauseseriousinjuryordeath
ifyoudonotfollowtherecommendedprecautions.
©2014—TheToro®Company
8111LyndaleAvenueSouth
Bloomington,MN55420
Contactusatwww.Toro.com.
2
PrintedintheUSA
AllRightsReserved

Contents
Safety...........................................................................4
SafeOperatingPractices...........................................4
ToroMowerSafety..................................................6
SoundPowerLevel..................................................7
SoundPressureLevel...............................................7
VibrationLevel......................................................7
EngineEmissionCertication...................................7
SafetyandInstructionalDecals.................................8
Setup...........................................................................16
1GreasingtheMachine...........................................16
2ReplacingtheWarningDecal.................................16
ProductOverview.........................................................17
Controls...............................................................17
CabControls......................................................19
Specications........................................................23
Attachments/Accessories........................................23
Operation....................................................................24
BeforeOperating...................................................24
AdjustingtheMirrors..............................................32
AimingtheHeadlights............................................32
StartingandStoppingtheEngine..............................33
SmartPower..........................................................33
ReversingFanOperation.........................................33
AutoIdle...............................................................33
MowSpeed............................................................33
TransportSpeed.....................................................33
CheckingtheInterlockSwitches...............................34
PushingorTowingtheMachine................................34
JackingPoints........................................................34
TieDowns............................................................35
OperatingCharacteristics........................................35
OperatingTips......................................................35
Maintenance.................................................................37
RecommendedMaintenanceSchedule(s)......................37
ServiceIntervalChart.............................................38
Lubrication...............................................................39
GreasingtheBearingsandBushings..........................39
EngineMaintenance..................................................41
AirCleanerMaintenance.........................................41
ServicingtheEngineOilandFilter............................42
FuelSystemMaintenance...........................................43
ServicingtheFuelSystem........................................43
ServicingtheWaterSeparator..................................43
ElectricalSystemMaintenance....................................44
BatteryCare...........................................................44
Fuses....................................................................44
DriveSystemMaintenance.........................................46
AdjustingtheTractionPedalAngle...........................46
ChangingthePlanetaryGearDriveOil......................46
ChangingtheRearAxleLubricant.............................47
CheckingtheRearWheelToe-In..............................47
CoolingSystemMaintenance......................................48
ServicingtheEngineCoolingSystem........................48
BrakeMaintenance....................................................48
AdjustingtheServiceBrakes....................................48
BeltMaintenance......................................................49
ServicingtheAlternatorBelt....................................49
ServicingtheCompressorBelt.................................49
TensioningtheBladeDriveBelts..............................50
ReplacingtheBladeDriveBelt.................................50
HydraulicSystemMaintenance....................................51
ChangingtheHydraulicFluid...................................51
ReplacingtheHydraulicFilters.................................51
CheckingtheHydraulicLinesandHoses....................52
AdjustingtheCounterbalancePressure......................52
MowerMaintenance...................................................53
Pivoting(Tilting)theFrontCuttingUnit
Upright.............................................................53
PivotingtheFrontCuttingUnitDown.......................53
AdjustingtheCuttingUnitPitch...............................53
ServicingtheCastorArmBushings...........................54
ServicingtheCastorWheelsandBearings..................54
BladeMaintenance.....................................................55
CheckingforaBentBlade........................................55
RemovingandInstallingtheCutterBlade(s)...............55
InspectingandSharpeningtheCutterBlade(s)............56
CorrectingCuttingUnitMismatch............................57
CabMaintenance.......................................................58
CleaningtheCabAirFilters.....................................58
CleaningtheAirConditioningCoil...........................58
Storage........................................................................59
PreparingforSeasonalStorage.................................59
3

Safety
Thismachinehasbeendesignedinaccordancewith
ENISO5395:2013andANSIB71.4-2012specications
ineffectatthetimeofproduction.
•Thoroughlyinspecttheareawheretheequipmentisto
beusedandremoveallobjectswhichmaybethrownby
themachine.
•Warning–fuelishighlyammable.Takethefollowing
precautions:
Improperuseormaintenancebytheoperatoror
ownercanresultininjury.Toreducethepotential
forinjury,complywiththesesafetyinstructionsand
alwayspayattentiontothesafetyalertsymbol,which
meansCaution,Warning,orDanger—personalsafety
instruction.Failuretocomplywiththeinstructionmay
resultinpersonalinjuryordeath.
SafeOperatingPractices
Training
•ReadtheOperator'sManualandothertrainingmaterial
carefully.Befamiliarwiththecontrols,safetysigns,and
theproperuseoftheequipment.
•Neverallowchildrenorpeopleunfamiliarwiththese
instructionstousethemower.Localregulationsmay
restricttheageoftheoperator.
•Nevermowwhilepeople,especiallychildren,orpetsare
nearby.
•Keepinmindthattheoperatororuserisresponsiblefor
accidentsorhazardsoccurringtohimselforherself,other
people,orproperty.
•Donotcarrypassengers.
•Alldriversandmechanicsshouldseekandobtain
professionalandpracticalinstruction.Theowneris
responsiblefortrainingtheusers.Suchinstructionshould
emphasize:
–theneedforcareandconcentrationwhenworking
withride-onmachines;
–controlofaride-onmachineslidingonaslopewill
notberegainedbytheapplicationofthebrake.The
mainreasonsforlossofcontrolare:
◊insufcientwheelgrip;
◊beingdriventoofast;
◊inadequatebraking;
◊thetypeofmachineisunsuitableforitstask;
◊lackofawarenessoftheeffectofground
conditions,especiallyslopes;
◊incorrecthitchingandloaddistribution.
–Storefuelincontainersspecicallydesignedforthis
purpose.
–Refueloutdoorsonlyanddonotsmokewhile
refuelling.
–Addfuelbeforestartingtheengine.Neverremove
thecapofthefueltankoraddfuelwhiletheengineis
runningorwhentheengineishot.
–Iffuelisspilled,donotattempttostarttheengine
butmovethemachineawayfromtheareaofspillage
andavoidcreatinganysourceofignitionuntilfuel
vaporshavedissipated.
–Replaceallfueltankandcontainercapssecurely.
•Replacefaultysilencers/mufers.
•Beforeusing,alwaysvisuallyinspecttoseethatthe
blades,bladebolts,andcuttingassemblyarenotworn
ordamaged.Replacewornordamagedbladesandbolts
insetstopreservebalance.
•Onmulti-bladedmachines,takecareasrotatingoneblade
cancauseotherbladestorotate.
•Evaluatetheterraintodeterminewhataccessoriesand
attachmentsareneededtoproperlyandsafelyperform
thejob.Onlyuseaccessoriesandattachmentsapproved
bythemanufacturer.
•Checkthatoperatorspresencecontrols,safetyswitches,
andshieldsareattachedandfunctioningproperly.Donot
operateunlesstheyarefunctioningproperly.
Operation
•Donotoperatetheengineinaconnedspacewhere
dangerouscarbonmonoxideandotherexhaustgasses
cancollect.
•Mowonlyindaylightoringoodarticiallight.
•Beforeattemptingtostarttheengine,disengageallblade
attachmentclutchesandengagetheparkingbrake.Only
starttheenginefromtheoperator'sposition.Alwaysuse
theseatbeltandROPStogether.
•Rememberthereisnosuchthingasasafeslope.Travel
ongrassslopesrequiresparticularcare.T oguardagainst
overturning:
Preparation
•Whilemowing,alwayswearsubstantial,slip-resistant
footwear,longtrousers,hardhat,safetyglasses,and
hearingprotection.Longhair,looseclothingorjewelry
maygettangledinmovingparts.Donotoperatethe
equipmentwhenbarefootorwearingopensandals.
–Donotstoporstartsuddenlywhengoingupor
downhill.
–Themachinespeedshouldbekeptlowonslopesand
duringtightturns.
–Stayalertforhumpsandhollowsandotherhidden
hazards.
4

–Nevermowacrossthefaceoftheslope,unlessthe
machineisdesignedforthatpurpose.
•Stayalertforholesintheterrainandotherhiddenhazards.
•Usecarewhenusingheavyequipment.
–Donotturnsharply.Usecarewhenreversing.
•Usecarewhenloadingorunloadingthemachineintoa
trailerortruck.
•Theoperatorshallturnonashingwarninglights,if
provided,whenevertravelingonapublicroad,except
wheresuchuseisprohibitedbylaw .
–Usecounterweight(s)orwheelweightswhen
suggestedintheOperator'sManual.
•Watchoutfortrafcwhencrossingornearroadways.
•Stopthebladesfromrotatingbeforecrossingsurfaces
otherthangrass.
•Whenusinganyattachments,neverdirectdischargeof
materialtowardbystandersnorallowanyonenearthe
machinewhileinoperation.
•Neveroperatethemachinewithdamagedguards,shields,
orwithoutsafetyprotectivedevicesinplace.Besureall
interlocksareattached,adjustedproperly ,andfunctioning
properly.
•Beforeleavingtheoperatorsposition:
–Stoponlevelground.
–Disengagethepowertake-off.
–Settheparkingbrake.
–Stoptheengineandremovethekey.
•Disengagedrivetoattachments,stoptheengine,and
removetheignitionkey:
–beforeclearingblockages;
–beforechecking,cleaning,orworkingonthemachine;
–afterstrikingaforeignobject.Inspectthemachine
fordamageandmakerepairsbeforerestartingand
operatingtheequipment.Torqueallthespindlepulley
nutsto176to203N-m(130to150ft.-lb);
–ifthemachinestartstovibrateabnormally(check
immediately).
•Disengagedrivetoattachmentswhentransportingornot
inuse.
•Stoptheengineanddisengagedrivetoattachment:
–beforerefuelling;
–beforemakingheightadjustment.
•Reducethethrottletolowidlebeforestoppingengine.
•Keephandsandfeetawayfromthecuttingunits.
•Lookbehindbeforebackinguptobesureofaclearpath.
•Slowdownandusecautionwhenmakingturnsand
crossingroadsandsidewalks.
•Donotoperatethemowerundertheinuenceofalcohol
ordrugs.
•Lightningcancausesevereinjuryordeath.Iflightning
isseenorthunderisheardinthearea,donotoperate
themachine;seekshelter.
MaintenanceandStorage
•Keepallnuts,bolts,andscrewstighttobesurethe
equipmentisinsafeworkingcondition.
•Neverstoretheequipmentwithfuelinthetankinsidea
buildingwherefumesmayreachanopenameorspark.
•Allowtheenginetocoolbeforestoringinanyenclosure
anddonotstorenearame.
•Toreducetherehazard,keeptheengine,
silencer/mufer,batterycompartment,cuttingunits,
drives,andfuelstorageareafreeofgrass,leaves,or
excessivegrease.Cleanupoilorfuelspillage.
•Replacewornordamagedpartsforsafety.
•Ifthefueltankhastobedrained,dothisoutdoors.
•Onmulti-bladedmachines,takecareasrotatingoneblade
cancauseotherbladestorotate.
•Whenmachineistobeparked,stored,orleftunattended,
lowerthecuttingunitsunlessapositivemechanicallock
isprovided.
•Disengagedrives,lowerthecuttingunits,movetraction
pedaltoNeutral,setparkingbrake,stopengineand
removekey.Waitforallmovementtostopbefore
adjusting,cleaningorrepairing.
•Parkmachineonlevelground.Neverallowuntrained
personneltoservicemachine.
•Usejackstandstosupportcomponentswhenrequired.
•Carefullyreleasepressurefromcomponentswithstored
energy.
•Disconnectbatterybeforemakinganyrepairs.Disconnect
thenegativeterminalrstandthepositivelast.Reconnect
positiverstandnegativelast.
•Usecarewhencheckingblades.Wrapthebladesor
weargloves,andusecautionwhenservicingthem.Only
replaceblades.Neverstraightenorweldthem.
•Keephandsandfeetawayfrommovingparts.Ifpossible,
donotmakeadjustmentswiththeenginerunning.
•Chargebatteriesinanopenwellventilatedarea,away
fromsparkandames.Unplugchargerbeforeconnecting
ordisconnectingfrombattery.W earprotectiveclothing
anduseinsulatedtools.
•Makesureallhydrauliclineconnectorsaretightandall
hydraulichosesandlinesareingoodconditionbefore
applyingpressuretothesystem.
•Keepyourbodyandhandsawayfrompinholeleaksor
nozzlesthatejecthydraulicuidunderhighpressure.
Usepaperorcardboard,notyourhands,tosearchfor
5

leaks.Hydraulicuidescapingunderpressurecanhave
sufcientforcetopenetratetheskinandcauseserious
injury.Ifuidisinjectedintotheskinitmustbesurgically
removedwithinafewhoursbyadoctorfamiliarwiththis
formofinjuryorgangrenemayresult.
ToroMowerSafety
ThefollowinglistcontainssafetyinformationspecictoToro
productsorothersafetyinformationthatyoumustknowthat
isnotincludedintheCEN,ISO,orANSIstandards.
Thisproductiscapableofamputatinghandsandfeetand
throwingobjects.Alwaysfollowallsafetyinstructionsto
avoidseriousinjuryordeath.
Useofthisproductforpurposesotherthanitsintendeduse
couldprovedangeroustouserandbystanders.
•WhenoperatingamachinewithaROPS,alwaysusea
seatbelt.
•Becertainthattheseatbeltcanbereleasedquicklyifthe
machineisdrivenorrollsintoapondorwater.
•Watchfortrafcwhennearorcrossingroads.Always
yieldtheright-of-way.
•Thismachineisnotdesignedorequippedforon-road
useandisa“slow-movingvehicle”.Ifyoumustcross
ortravelonapublicroad,youshouldbeawareofand
complywithlocalregulations,suchasrequiredlights,
slowmovingvehiclesigns,andreectors.
•Donotmowneardrop-offs,ditches,orembankments.
Themachinecouldsuddenlyturnoverifawheelgoes
overtheedgeofaclifforditch,orifanedgecavesin.
•Donotmowonwetgrass.Reducedtractioncouldcause
sliding.
WARNING
Engineexhaustcontainscarbonmonoxide,which
isanodorless,deadlypoisonthatcankillyou.
Donotrunengineindoorsorinanenclosedarea.
Operation
•BeforeoperatingamachinewithROPS(rollover
protectionsystem),becertainthattheseatbeltsare
attachedandtheseatislatchedtopreventtheseatfrom
pivotingforward.
•Knowhowtostopthemachineandenginequickly.
•Donotoperatethemachinewhilewearingtennisshoes
orsneakers.
•Wearingsafetyshoesandlongpantsisadvisableand
requiredbysomelocalordinancesandinsurance
regulations.
•Keephands,feet,andclothingawayfrommovingparts
andthemowerdischargeareaandundersideofthe
mowerwhiletheengineisrunning.
•Fillfueltankuntillevelis25mm(1inch)belowthe
bottomofthellerneck.Donotoverll.
•Checkthesafetyinterlockswitchesdailyforproper
operation.Ifaswitchshouldfail,replacetheswitch
beforeoperatingthemachine.
•Checkcarefullyforoverheadclearances(i.e.branches,
doorways,electricalwires)beforedrivingunderany
objectsanddonotcontactthem.
•Donotmowinreverseunlessabsolutelynecessary.
•Reducespeedwhenmakingsharpturns.
•Avoidstartingorstoppingonaslope.Iftireslosetraction,
disengagethebladesandproceedslowlystraightdown
theslope.Avoidraisingthesidecuttingunitsonaslope.
•Avoidturningonslopes.Ifyoumustturn,turnslowly
andgraduallydownhill,ifpossible.
•Useextracarewithotherattachments.Thesecanchange
thestabilityofthemachine.
•Turnoffthebladeswhennotmowing.
MaintenanceandStorage
•Donottouchequipmentorattachmentpartswhichmay
behotfromoperation.Allowtocoolbeforeattempting
tomaintain,adjust,orservice.
•Neverstorethemachineorfuelcontainerinsidewhere
thereisanopename,suchasnearawaterheateror
furnace.
•Keepnutsandboltstight,especiallythebladeattachment
bolts.Keepequipmentingoodcondition.
•Iftheenginemustberunningtoperformamaintenance
adjustment,keephands,feet,clothing,andanypartsof
thebodyawayfromthecuttingunits,attachments,and
anymovingparts.Keepeveryoneaway.
•Checkbrakeoperationfrequently.Adjustandserviceas
required.
•Batteryacidispoisonousandcancauseburns.Avoid
contactwithskin,eyes,andclothing.Protectyourface,
eyes,andclothingwhenworkingwithabattery.
•Batterygasescanexplode.Keepcigarettes,sparks,and
amesawayfromthebattery.
•Theenginemustbeshutoffbeforecheckingtheoilor
addingoiltothecrankcase.
•Ifmajorrepairsareeverneededorifassistanceisdesired,
contactanAuthorizedToroDistributor.
•Tomakesureofoptimumperformanceandcontinued
safetycerticationofthemachine,useonlygenuineToro
replacementpartsandaccessories.Replacementparts
andaccessoriesmadebyothermanufacturerscouldbe
dangerous,andsuchusecouldvoidtheproductwarranty.
6

SoundPowerLevel
Thisunithasaguaranteedsoundpowerlevelof104dBA,
whichincludesanUncertaintyValue(K)of1dBA.
Soundpowerlevelwasdeterminedaccordingtothe
proceduresoutlinedinISO11094.
SoundPressureLevel
Thisunithasasoundpressurelevelattheoperator’searof85
dBA,whichincludesanUncertaintyValue(K)of1dBA.
Soundpressurelevelwasdeterminedaccordingtothe
proceduresoutlinedinENISO5395:2013.
VibrationLevel
Hand-Arm
Measuredvibrationlevelforrighthand=0.58m/s
Measuredvibrationlevelforlefthand=0.63m/s
UncertaintyValue(K)=0.32m/s
Measuredvaluesweredeterminedaccordingtotheprocedures
outlinedinENISO5395:2013.
WholeBody
Measuredvibrationlevel=0.26m/s
UncertaintyValue(K)=0.13m/s
Measuredvaluesweredeterminedaccordingtotheprocedures
outlinedinENISO5395:2013.
2
2
2
EngineEmissionCertication
TheengineinthismachineisEP ATier4iandstage3a
compliant.
2
2
7
SafetyandInstructionalDecals
Safetydecalsandinstructionsareeasilyvisibletotheoperatorandarelocatednearanyareaofpotential
danger.Replaceanydecalthatisdamagedorlost.
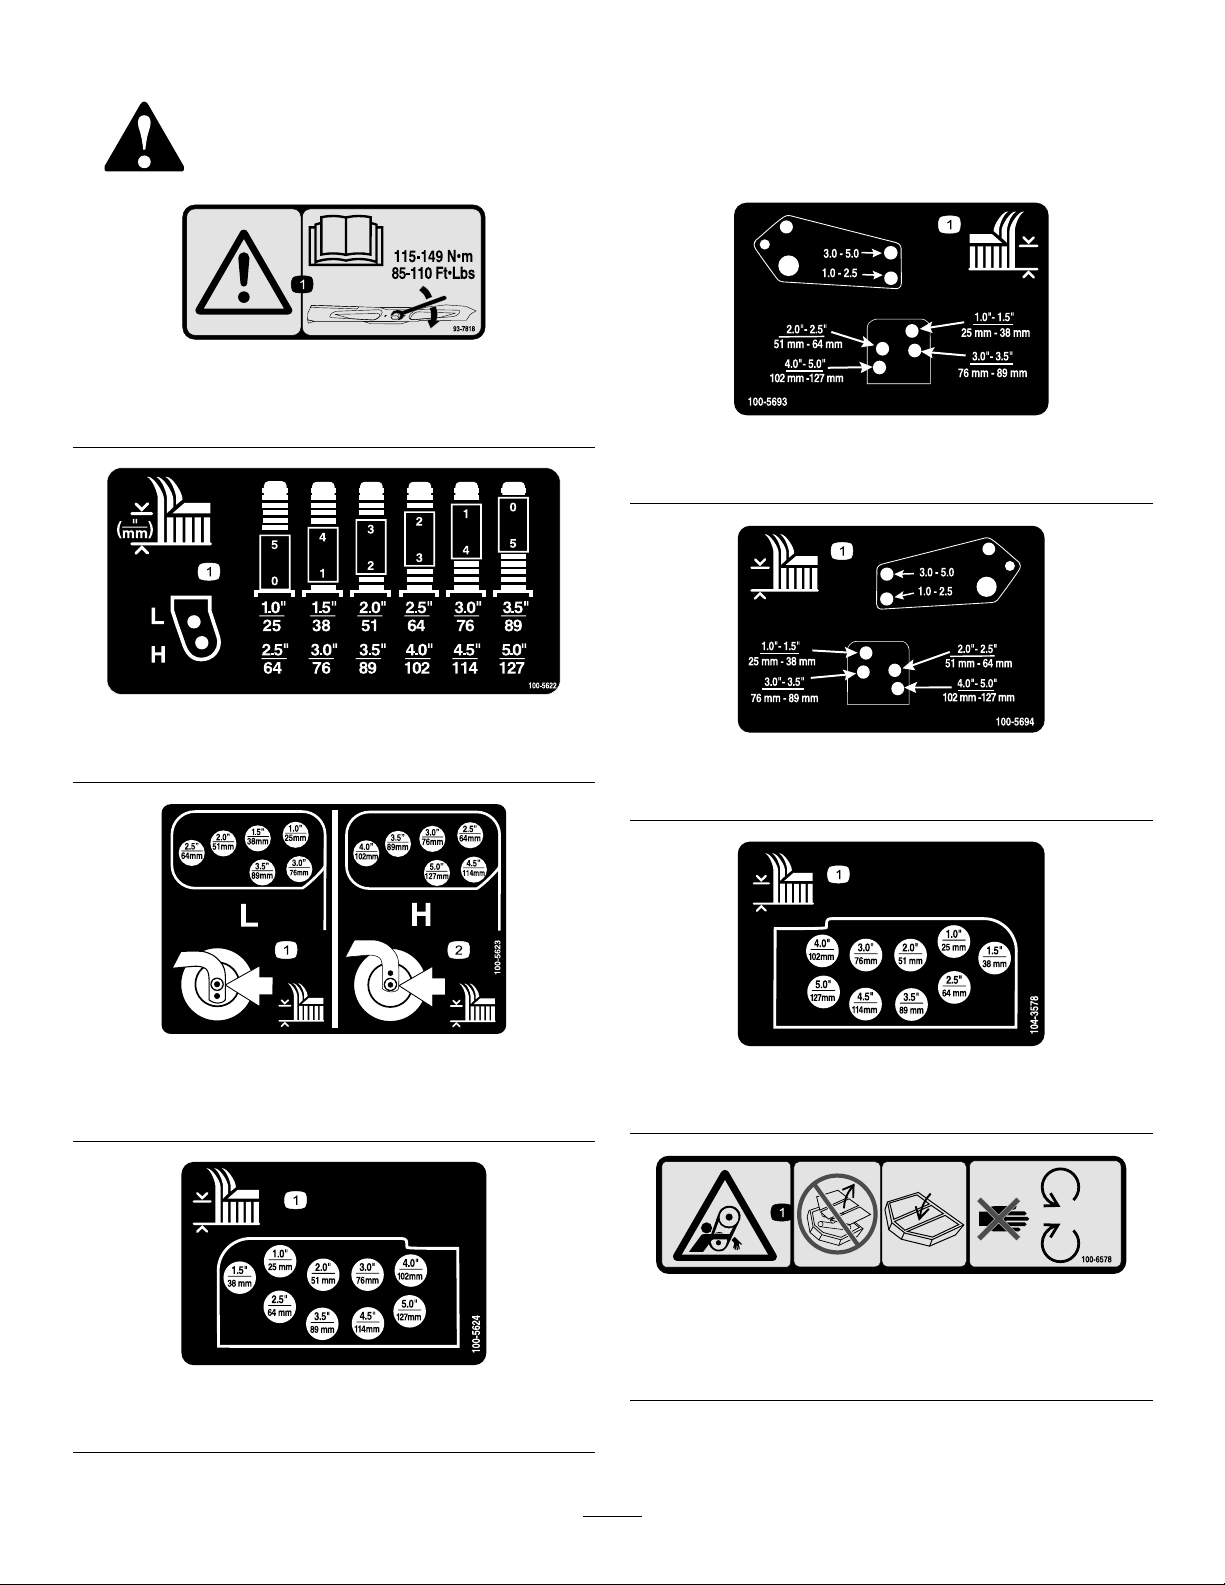
93-7818
1.Warning—readtheOperator'sManualforinstructionson
torquingthebladebolt/nutto115-149N-m(85-110ft-lb).
100-5693
1.Heightofcutadjustment
1.Heightofcutadjustment
1.Lowheightofcut
adjustment
100-5622
100-5623
2.Highheightofcut
100-5694
1.Heightofcutadjustment
104-3578
adjustment
1.Heightofcutadjustment
100-6578
1.Heightofcutadjustment
1.Entanglementhazard,belt—donotoperatethemachine
withtheshieldsorguardsremoved;alwayskeeptheshields
100-5624
andguardsinplace;stayawayfrommovingparts.
8
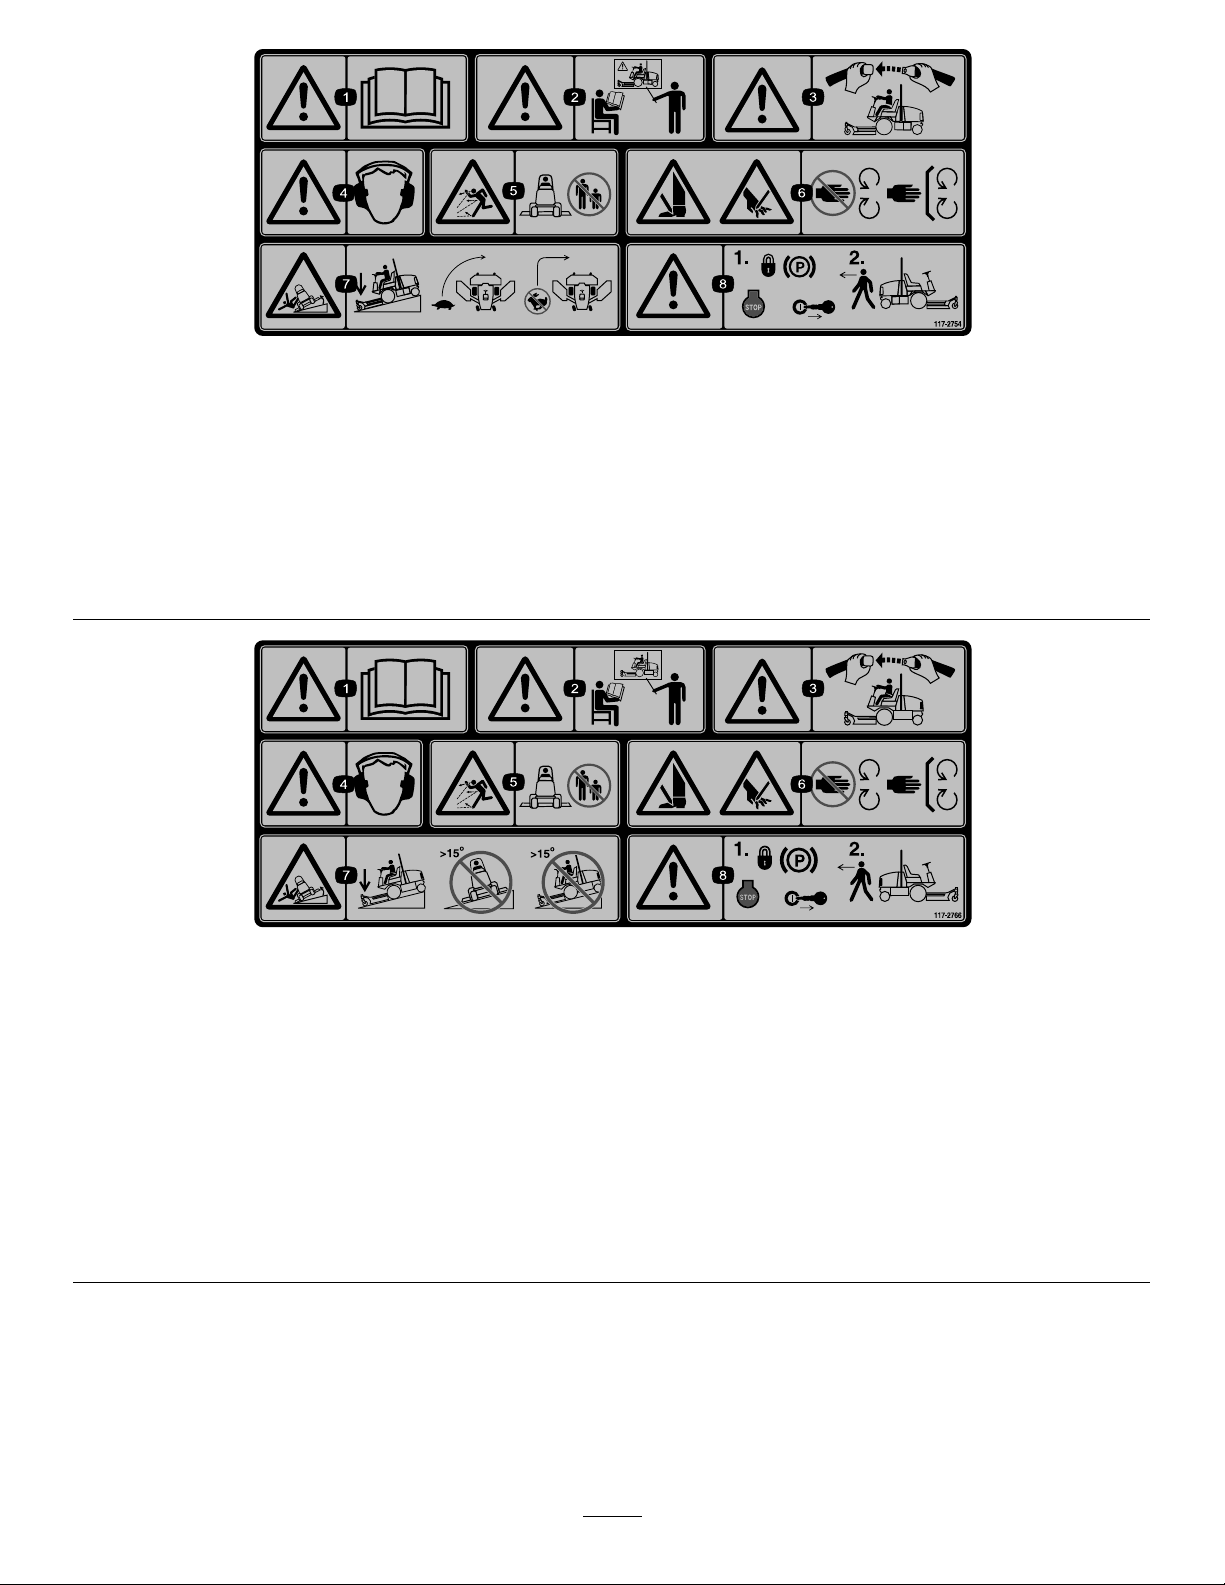
117–2754
1.Warning—readtheOperator'sManual.
2.Warning—donotoperatethismachineunlessyouaretrained.
3.Warning—weartheseatbeltwhenseatedintheoperator'sposition.
4.Warning—wearhearingprotection.
5.Thrownobjecthazard—keepbystandersasafedistancefromthemachine.
6.Cuttinghazardofhandorfoot—stayawayfrommovingparts;keepallguardsinplace.
7.Tippinghazard—lowerthecuttingunitwhendrivingdownslopes;slowmachinebeforeturning,donotturnathighspeeds
8.Warning—locktheparkingbrake,stoptheengineandremovetheignitionkeybeforeleavingthemachine.
117–2766
(Afxoverpartno.117–2754forCE*)
*ThissafetydecalincludesaslopewarningrequiredonthemachineforcompliancetotheEuropeanLawnMowerSafetyStandardEN836:1997.Theconservativemaximum
slopeanglesindicatedforoperationofthismachineareprescribedbyandrequiredbythisstandard.
1.Warning—readtheOperator'sManual.
2.Warning—donotoperatethismachineunlessyouaretrained.
3.Warning—weartheseatbeltwhenseatedintheoperator'sposition.
4.Warning—wearhearingprotection.
5.Thrownobjecthazard—keepbystandersasafedistancefromthemachine.
6.Cuttinghazardofhandorfoot—stayawayfrommovingparts;keepallguardsinplace.
7.Tippinghazard—lowerthecuttingunitwhendrivingdownslopes;donotoperatemachineonslopesgreaterthan15degrees.
8.Warning—locktheparkingbrake,stoptheengineandremovetheignitionkeybeforeleavingthemachine.
9
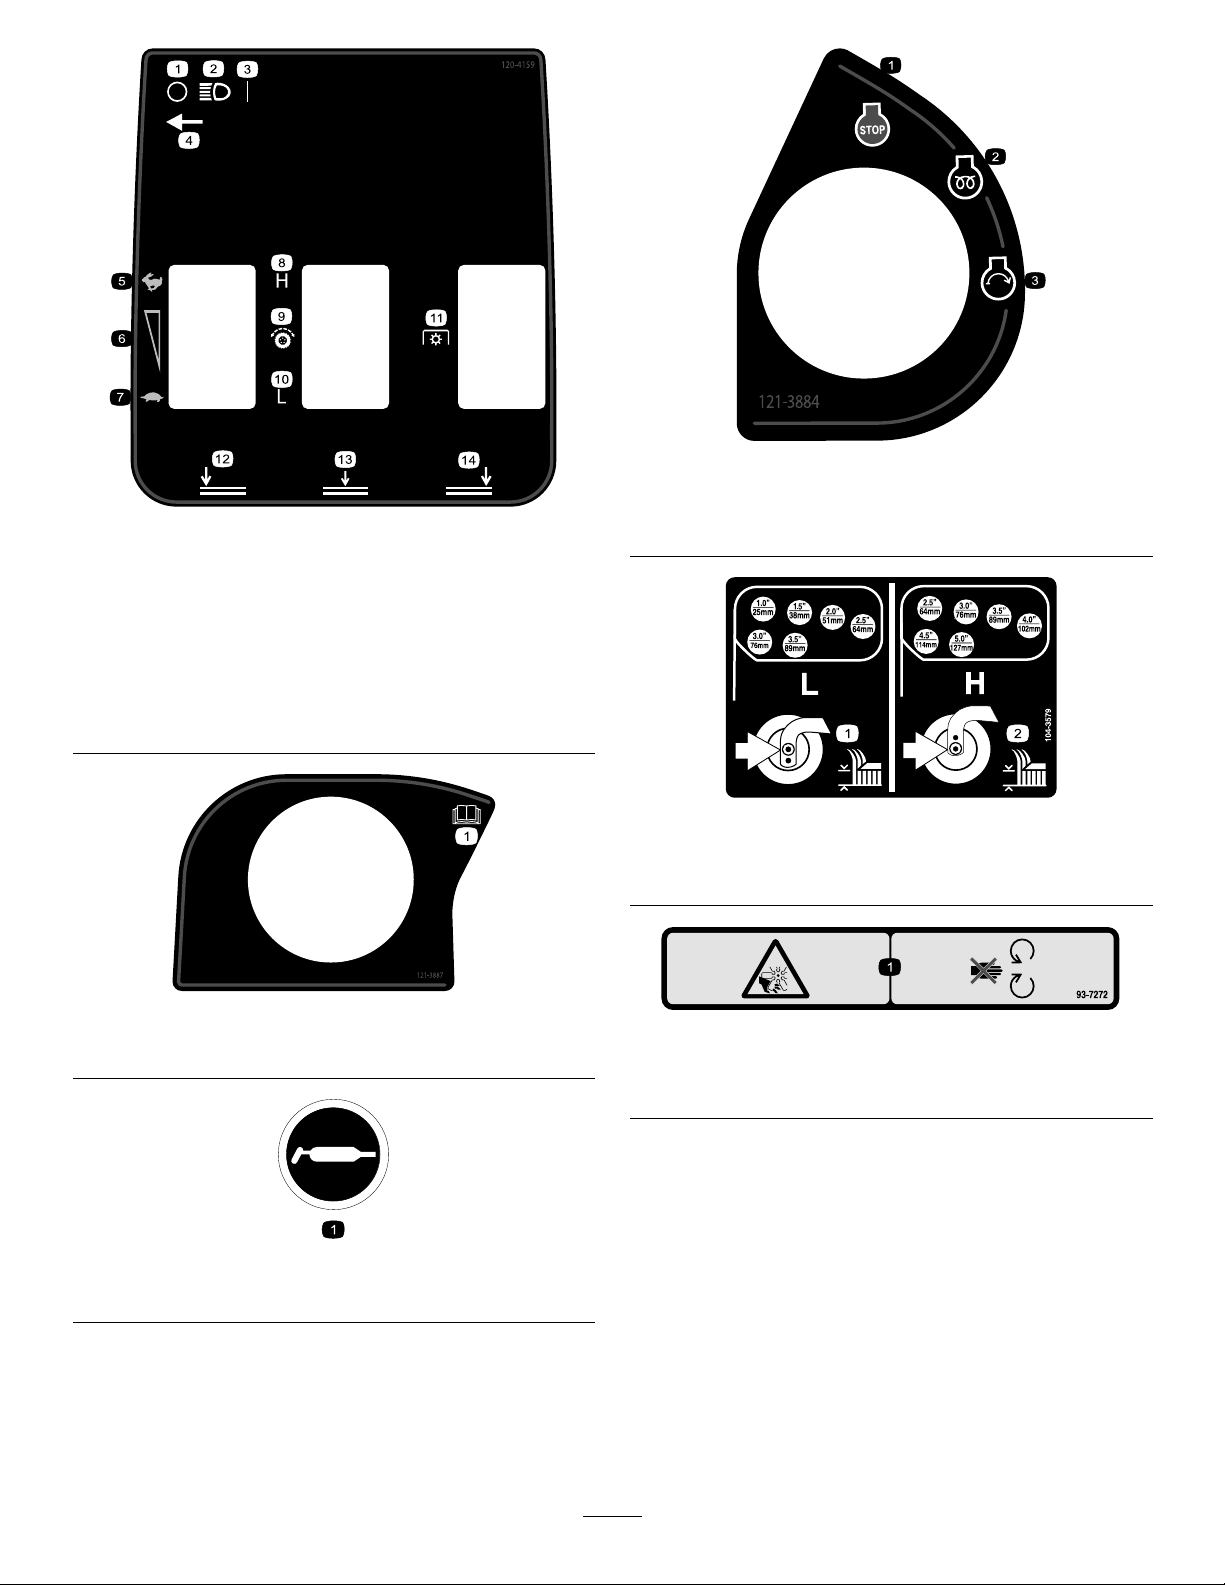
121–3884
1.Engine—stop3.Engine—start
120–4159
2.Engine—preheat
1.Off
2.Lights9.Tractiondrive
3.On
4.Lightswitchlocation
5.Fast
6.Variablespeedadjustment13.Lowercenterdeck
7.Slow
8.High
10.Low
11.Powertake-off(PTO)
12.Lowerleftdeck
14.Lowerrightdeck
121–3887
1.ReadtheOperator’sManual.
104-3579
1.Lowheightofcut
adjustment
2.Highheightofcut
adjustment
93-7272
1.Cutting/dismembermenthazard;fan—stayawayfrom
movingparts.
58-6520
1.Grease
10
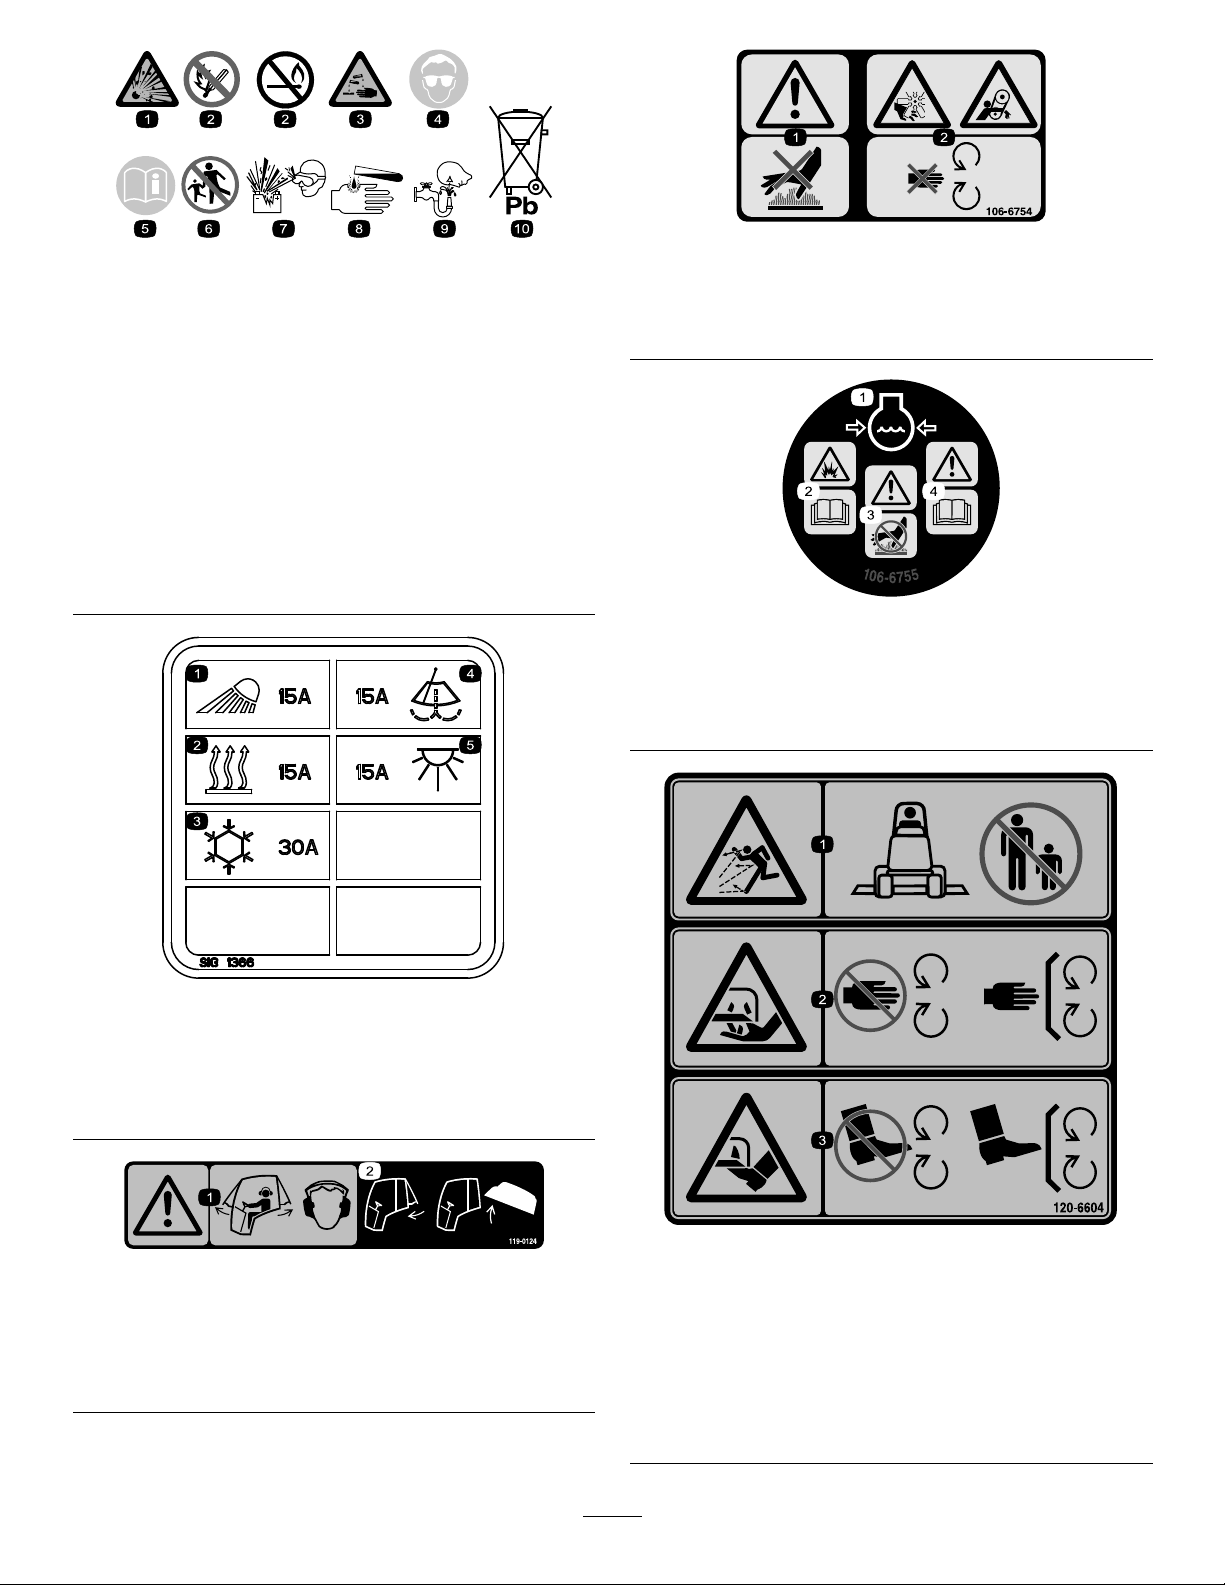
BatterySymbols
Someorallofthesesymbolsareonyourbattery
1.Explosionhazard
2.Nore,opename,or
smoking.
3.Causticliquid/chemical
burnhazard
4.Weareyeprotection9.Flusheyesimmediately
5.ReadtheOperator's
Manual.
6.Keepbystandersasafe
7.Weareyeprotection;
8.Batteryacidcancause
10.Containslead;donot
distancefromthebattery.
explosivegasescan
causeblindnessandother
injuries
blindnessorsevereburns.
withwaterandgetmedical
helpfast.
discard.
106-6754
1.Warning—donottouchthehotsurface.
2.Cutting/dismembermenthazard,fanandentanglement
hazard,belt—stayawayfrommovingparts.
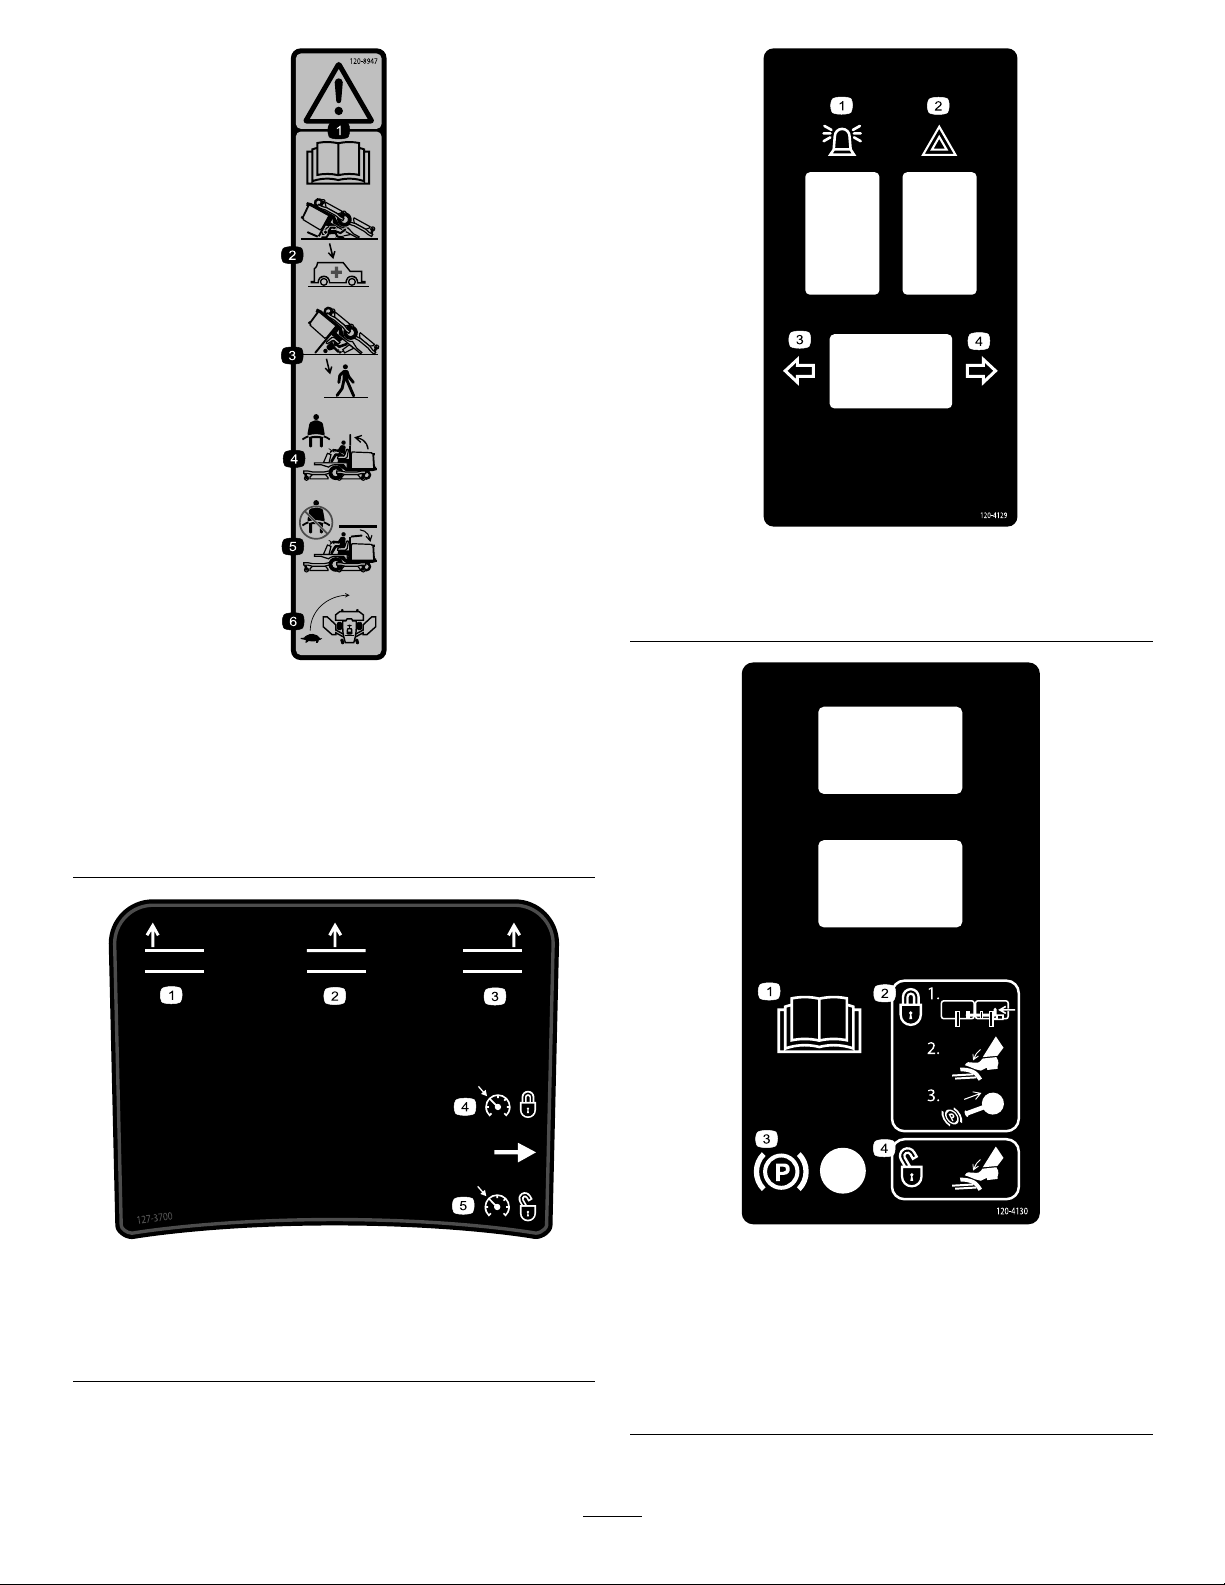
106-6755
117–2787
1.Headlights,15Afuse
2.Heater,15Afuse5.Domelight,15Afuse
3.Airconditioning,30Afuse
4.Windshieldwipers,15A
fuse
1.Enginecoolantunder
pressure.
2.Explosionhazard—read
theOperator'sManual.
3.Warning—donottouchthe
hotsurface.
4.Warning—readthe
Operator'sManual.
119–0124
(Cabmodels)
1.Warning—whenthecabwindowsareopenwearhearing
protection.
2.Closetherearwindowbeforeattemptingtoopenthehood.
120-6604
1.Thrownobjecthazard—keepbystandersawayfromthe
machine.
2.Cutting/dismembermenthazardofhand,mower
blade—stayawayfrommovingparts,keepallguardsand
shieldsinplace.
3.Cutting/dismembermenthazardoffoot,mowerblade—stay
awayfrommovingparts,keepallguardsandshieldsin
place.
11
120–4129
1.Warning—readthe
Operator’sManual.
2.Thereisnorollover
protectionwhentheroll
barisdown.
3.Thereisrolloverprotection
whentherollbarisup.
120–8947
4.Iftherollbarisraised,
weartheseatbelt.
5.Iftherollbarislowered,
donotweartheseatbelt.
6.Driveslowlywhenturning.
1.Beacon
2.Hazardlight4.Rightturnsignal
3.Leftturnsignal
127–3700
1.Raisetheleftdeck
2.Raisethecenterdeck5.Unlockenginespeed
3.Raisetherightdeck
4.Lockenginespeed
1.ReadtheOperator’s
Manual.
2.Toengagetheparking
brake—1)Lockthepedals
together;2)Pushdownon
thebrake;3)Pulloutthe
parkingbrakeknob.
12
120–4130
3.Parkingbrake
4.Todisengagetheparking
brake,pushdownonthe
brakepedal.
121–1599
1.ReadtheOperator’sManualforinformationonfuses.
1.ReadtheOperator’s
Manualforinformationon
startingtheengine—1)Set
toneutral;2)Engagethe
brake;3)Settheengine
speedtoslow;4)Turnthe
ignitionkeytopreheat;
5)Turntheignitionkeyto
enginestart.
2.ReadtheOperator’s
Manualforinformation
onstoppingthe
engine—1)Setthe
enginespeedtoslow;
2)Disengagethedeck;
3)Locktheparkingbrake;
4)Wait5minutes;5)Turn
theignitionkeytoengine
stop;6)Removethekey
fromtheignition.
3.ReadtheOperator’s
Manual.
114–0846
4.Pulltheknoboutto
engagethePTO.
5.Pushtheknobinto
disengagethePTO.
6.RaisethedeckstogotoH
range.
1.Warning—1)Disengage
thePTO;2)Raisethedeck
2.Donotplaceyourfoot
here.
3.Directionpedal
114–0849
4.Forwarddirection
5.Reversedirection
1.Steeringwheeltiltlever
114–0845
2.Horn
13
1.ReadtheOperator’sManual.
130–6043
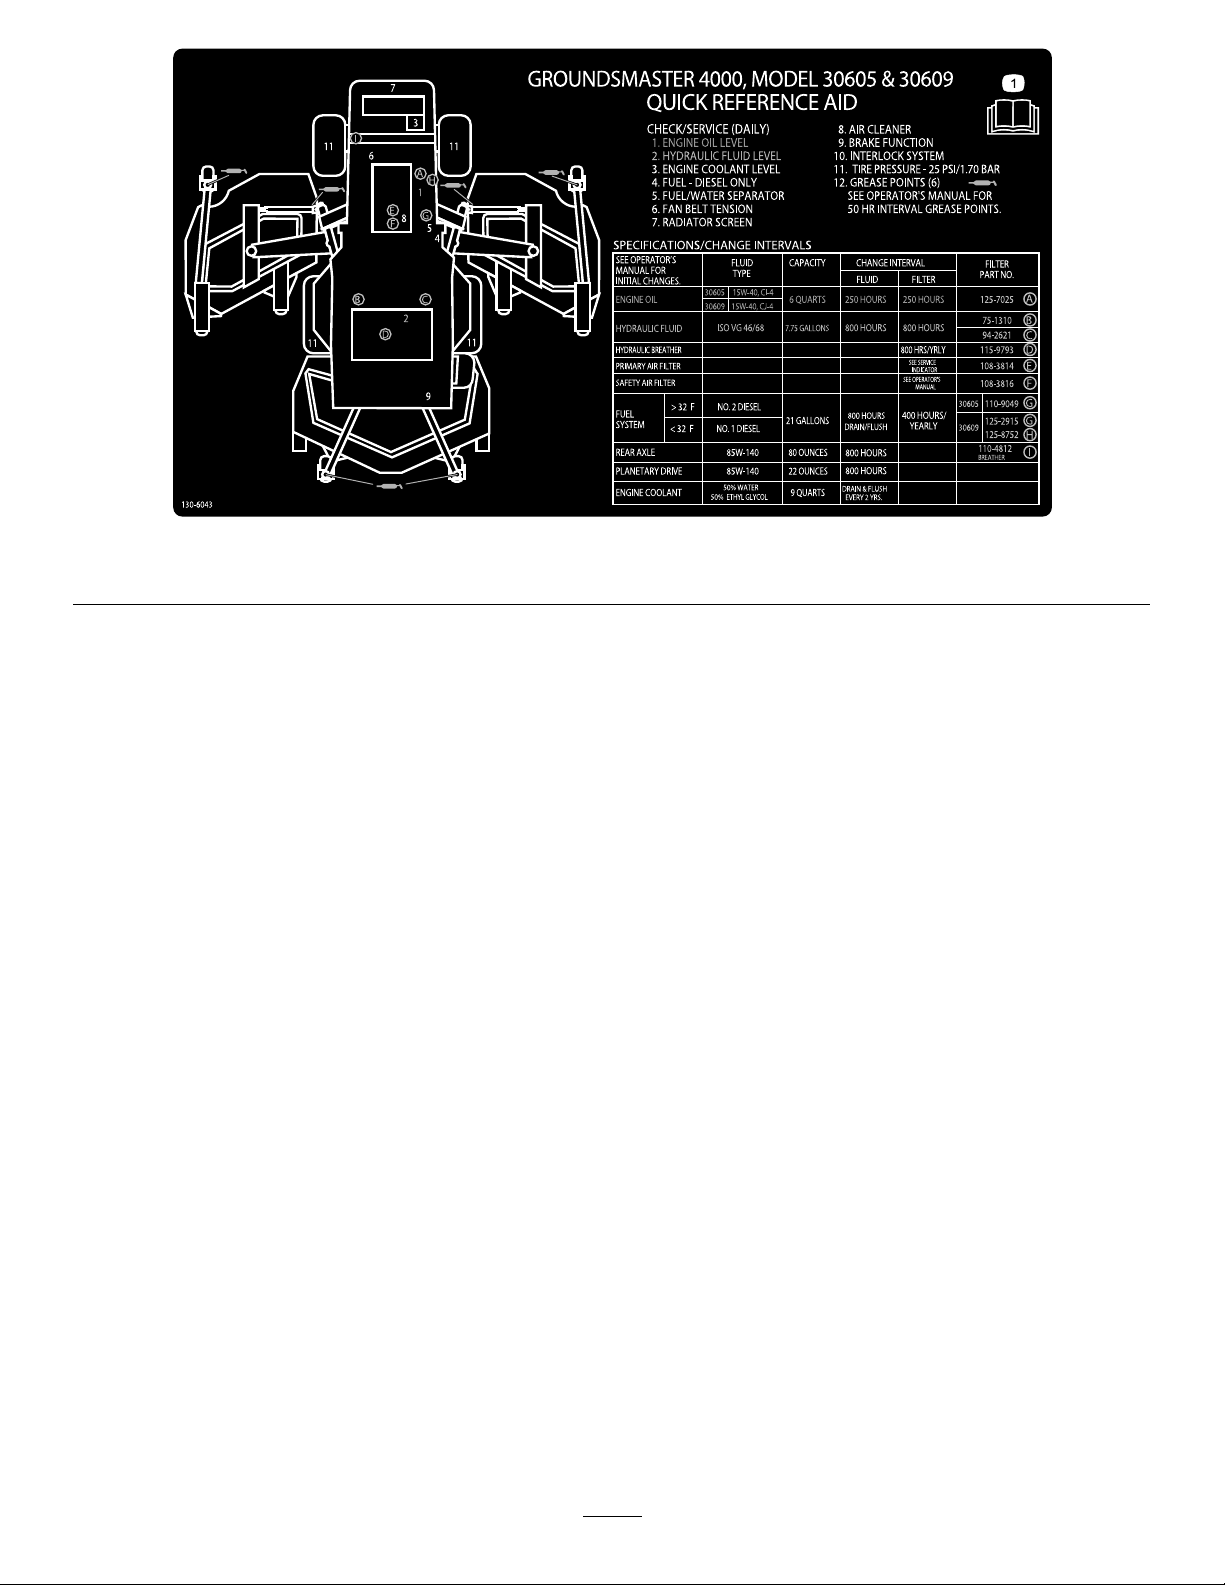
14

1.ReadtheOperator’sManual.
130–6046
15

Setup
LooseParts
Usethechartbelowtoverifythatallpartshavebeenshipped.
ProcedureDescription
1
2
Nopartsrequired
Warningdecal1
MediaandAdditionalParts
Description
Operator'sManual
Engineoperator'smanual1
PartsCatalog
Operatortrainingmaterials
Declarationofconformity
Note:Determinetheleftandrightsidesofthemachine
fromthenormaloperatingposition.
Qty.
Qty.
–
1
1
1
1
Reviewbeforeoperatingmachine
Usetoreferenceengineinformation
Usetoreferencepartnumbers
Reviewbeforeoperatingmachine
Greasethemachine.
Usedonlyonmachinesrequiring
EuropeanCEcompliance.
Use
Use
2
1
GreasingtheMachine
NoPartsRequired
Procedure
Beforethemachineisoperated,itmustbegreasedtoensure
properlubricatingcharacteristics;refertoGreasingthe
BearingsandBushings(page39).Failuretoproperlygrease
themachinewillresultinprematurefailureofcriticalparts.
ReplacingtheWarningDecal
Partsneededforthisprocedure:
1Warningdecal
Procedure
OnmachinesrequiringEuropeanCEcompliance,replace
thewarningdecal,partno.117–2754withthewarningdecal
partno.117–2766.
16
ProductOverview
9
10
g020756
g028453
1
2
3
4
5
6
7
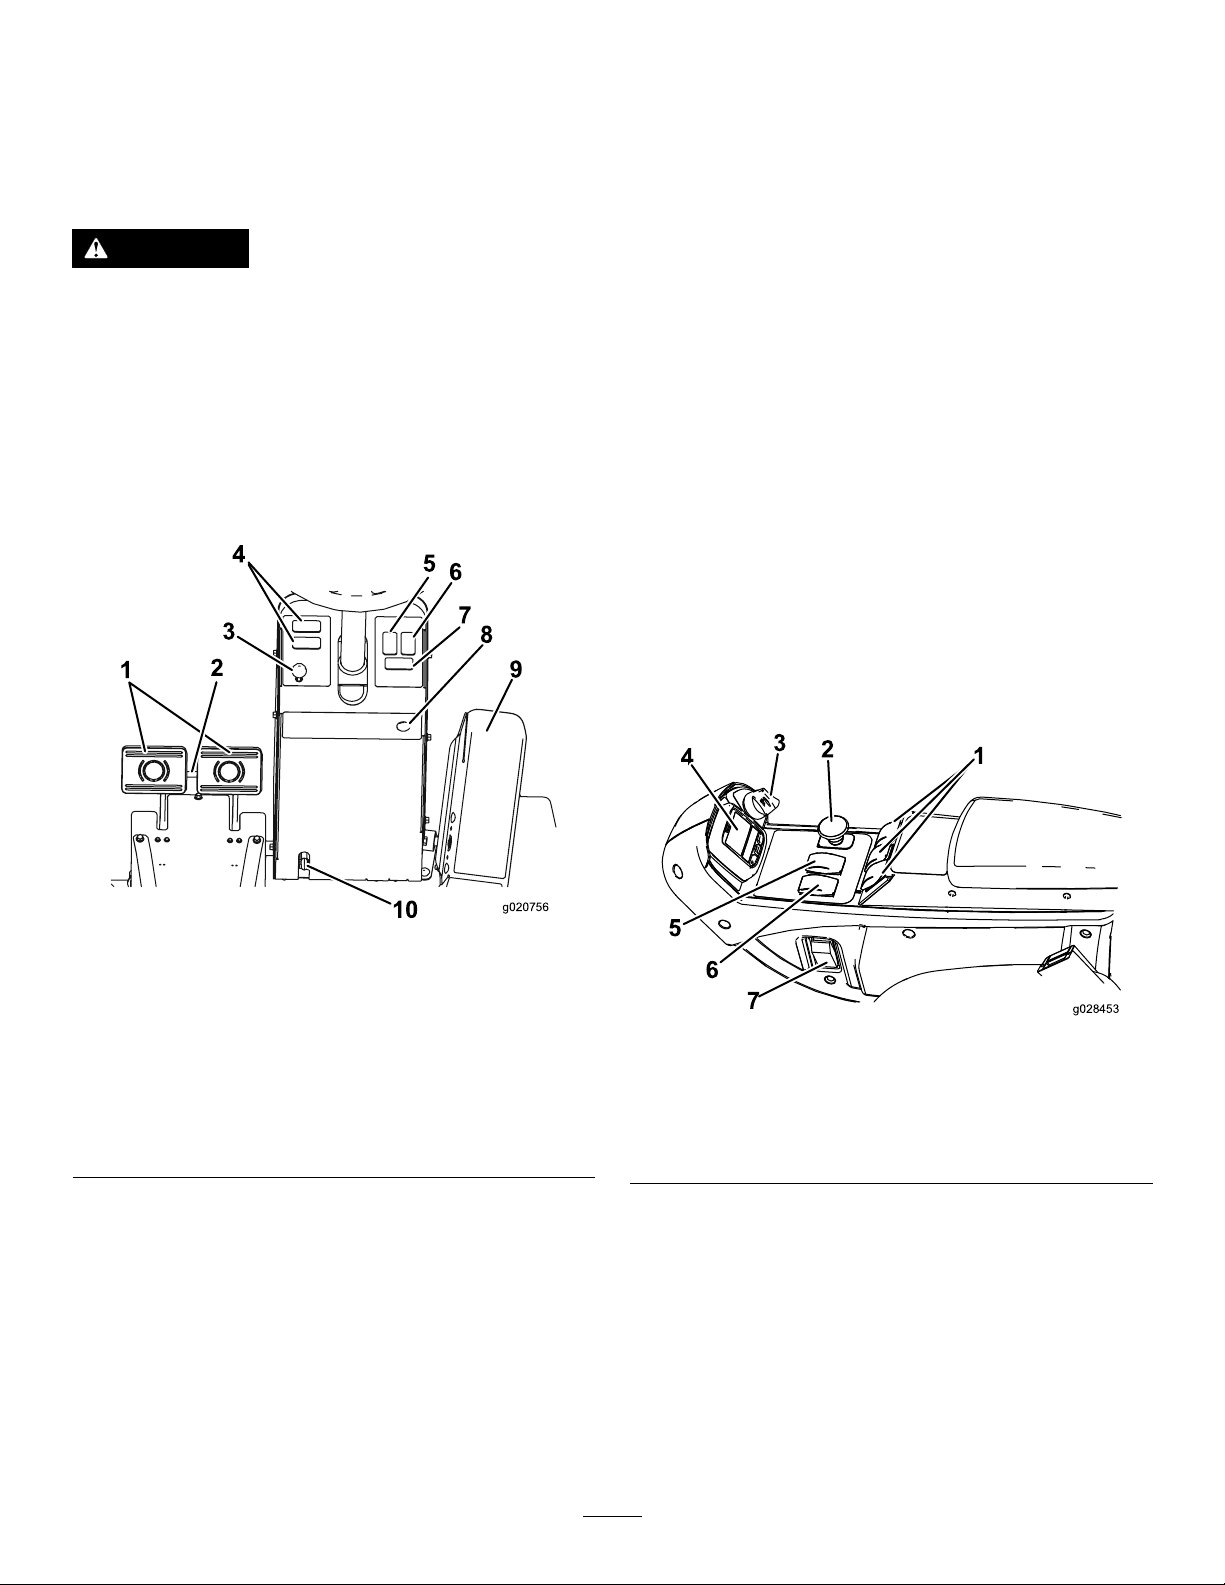
Controls
Note:Determinetheleftandrightsidesofthemachine
fromthenormaloperatingposition.
TiltSteeringLever
Pressthelever(Figure3)downtotiltthesteeringwheel
tothedesiredposition.Thenreleasethelevertolockthe
adjustment.
ParkingBrakeLatch
CAUTION
Thismachineproducessoundlevelsinexcessof85
dBAattheoperatorsearandcancausehearingloss
throughextendedperiodsofexposure.
Wearhearingprotectionwhenoperatingthis
machine.
TractionPedal
Tostop,reduceyourfootpressureonthetractionpedaland
allowittoreturntothecenterposition(Figure3).
Aknobontheleftsideoftheconsoleactuatestheparking
brakelock(Figure3).Toengagetheparkingbrake,connect
thepedalswiththelockinglatch,pushdownonbothpedals,
andpulltheparkingbrakelatchout.Toreleasetheparking
brake,pressbothpedalsuntiltheparkingbrakelatchretracts.
HazardLightSwitch(Optional)
Pressthehazardlightswitch(Figure3)toactivatethehazard
lights.
TurnSignalSwitch(Optional)
Presstheleftsideoftheturnsignalswitch(Figure3)to
activatetheleftturnsignalandtherightsideoftheswitchto
activatetherightturnsignal.Thecenterpositionisoff.
KeySwitch
Thekeyswitch(Figure4)hasthreepositions:Off,
On/Preheat,andStart.
Figure3
1.Brakepedals6.Hazardlightswitch
2.Pedallockinglatch7.Turnsignalswitch
3.Parkingbrakelatch
4.Spaceforoptional
accessory
5.Beaconswitch(optional)
BrakePedals
Twofootpedals(Figure3)operateindividualwheelbrakes
forturningassistance,parking,andtoaidinobtainingbetter
sidehilltraction.Alatchconnectsthepedalsforparking
brakeoperationandtransport.
PedalLockingLatch
Thepedallockinglatch(Figure3)connectsthepedals
togethertoengagetheparkingbrake.
(optional)
(optional)
8.Hornbutton(optional)
9.Tractionpedal
10.Tiltsteeringlever
Figure4
1.Liftswitches
2.PTOswitch
3.Keyswitch
4.InfoCenter
5.Hi-Lospeedcontrol
6.Enginespeedswitch
7.Lightswitch(optional)
PTOSwitch
ThePTOswitch(Figure4)hastwopositions:Out(start)
andIn(stop).PullthePTObuttonouttoengagethecutting
unitblades.Pushinthebuttontodisengagethecuttingunit
blades.
Hi-LowSpeedControl
Theswitch(Figure4)allowsthespeedrangetoincreasefor
transportofthemachine.Cuttingdeckswillnotoperatein
17

highrange.ToswitchbetweentheHighandLowrange,
g028454
1
2
thedecksmustberaised,PTOdisengaged,cruisecontrol
disengaged,tractionpedalinneutralpositionandthemachine
mustbemovingataslowspeed.
SeatBackAdjustingLever
Movethelevertoadjusttheseatbackangle(Figure6).
WeightGauge
LiftSwitches
Theliftswitches(Figure4)raiseandlowerthecutting
units.Presstheswitchesforwardtolowerthecuttingunits
andbackwardtoraisethecuttingunits.Whenstartingthe
machine,withthecuttingunitsinthedownposition,pressthe
liftswitchdowntoallowthecuttingunitstooatandmow .
Note:ThedeckswillnotlowerwhileintheHIspeedrange
andtheywillnotraiseorloweriftheoperatorisoutofthe
seatwhentheengineisrunning.Also,thedeckswilllower
withthekeyintheOnpositionandtheoperatorintheseat.
CruiseControlSwitch
Thecruisecontrolswitch(Figure5)locksinthepedal
positiontomaintainthedesiredgroundspeed.Pressingthe
rearoftheswitchturnsoffthecruisecontrol,themiddle
positionoftheswitchenablesthecruisecontrolfunctionand
thefrontoftheswitchsetsthedesiredgroundspeed.
Note:Pressingeitherbrakepedalormovingthetraction
pedalintothereverseposition,foronesecond,willalso
disengagethepedalposition.
PowerPoint
Thepowerpoint(Figure5)isusedtopoweroptionalelectrical
accessories.
Indicateswhentheseatisadjustedtotheweightofthe
operator(Figure6).Heightadjustmentismadebypositioning
thesuspensionwithintherangeofthegreenregion.
Figure6
1.Weightgauge
2.Weightadjustinglever5.Armrestadjustingknob
3.Foreandaftadjusting
lever
4.Seatbackadjustinglever
(notshown-locatedunder
armrest)
Figure5
1.Powerpoint
2.Cruisecontrolswitch
SeatAdjustments
ForeandAftAdjustingLever
Pulloutonthelevertoslidetheseatforeoraft(Figure6).
SeatArmRestAdjustingKnob
Rotatetheknobtoadjusttheseatarmrestangle(Figure6).
WeightAdjustingLever
Adjustforoperatorweight(Figure6).Pullupontheleverto
increasetheairpressureandpushdowntodecreasetheair
pressure.Theproperadjustmentisattainedwhentheweight
gaugeisinthegreenregion.
18
 Loading...