

Toro Groundsmaster 7210 Series, 30487TC, 30487TE, 30495, 30495TC Operator's Manual

FormNo.3428-854RevA
Groundsmaster
®
7210Series
TractionUnit
ModelNo.30487TC—SerialNo.403440001andUp
ModelNo.30487TE—SerialNo.400000000andUp
ModelNo.30495—SerialNo.403440001andUp
ModelNo.30495TC—SerialNo.403440001andUp
Registeratwww.T oro.com.
OriginalInstructions(EN)
*3428-854*A
ThisproductcomplieswithallrelevantEuropean
directives;fordetails,pleaseseetheseparate
product-specicDeclarationofConformity(DOC)
sheet.
ItisaviolationofCaliforniaPublicResourceCode
Section4442or4443touseoroperatetheengineon
anyforest-covered,brush-covered,orgrass-covered
landunlesstheengineisequippedwithaspark
arrester,asdenedinSection4442,maintainedin
effectiveworkingorderortheengineisconstructed,
equipped,andmaintainedforthepreventionofre.
Theenclosedengineowner'smanualissupplied
forinformationregardingtheUSEnvironmental
ProtectionAgency(EPA)andtheCaliforniaEmission
ControlRegulationofemissionsystems,maintenance,
andwarranty.Replacementsmaybeorderedthrough
theenginemanufacturer.
WARNING
CALIFORNIA
Proposition65Warning
Dieselengineexhaustandsomeofits
constituentsareknowntotheStateof
Californiatocausecancer,birthdefects,
andotherreproductiveharm.
Batteryposts,terminals,andrelated
accessoriescontainleadandlead
compounds,chemicalsknownto
theStateofCaliforniatocause
cancerandreproductiveharm.Wash
handsafterhandling.
Useofthisproductmaycauseexposure
tochemicalsknowntotheStateof
Californiatocausecancer,birthdefects,
orotherreproductiveharm.
injuryandproductdamage.Youareresponsiblefor
operatingtheproductproperlyandsafely.
Visitwww.Toro.comforproductsafetyandoperation
trainingmaterials,accessoryinformation,helpnding
adealer,ortoregisteryourproduct.
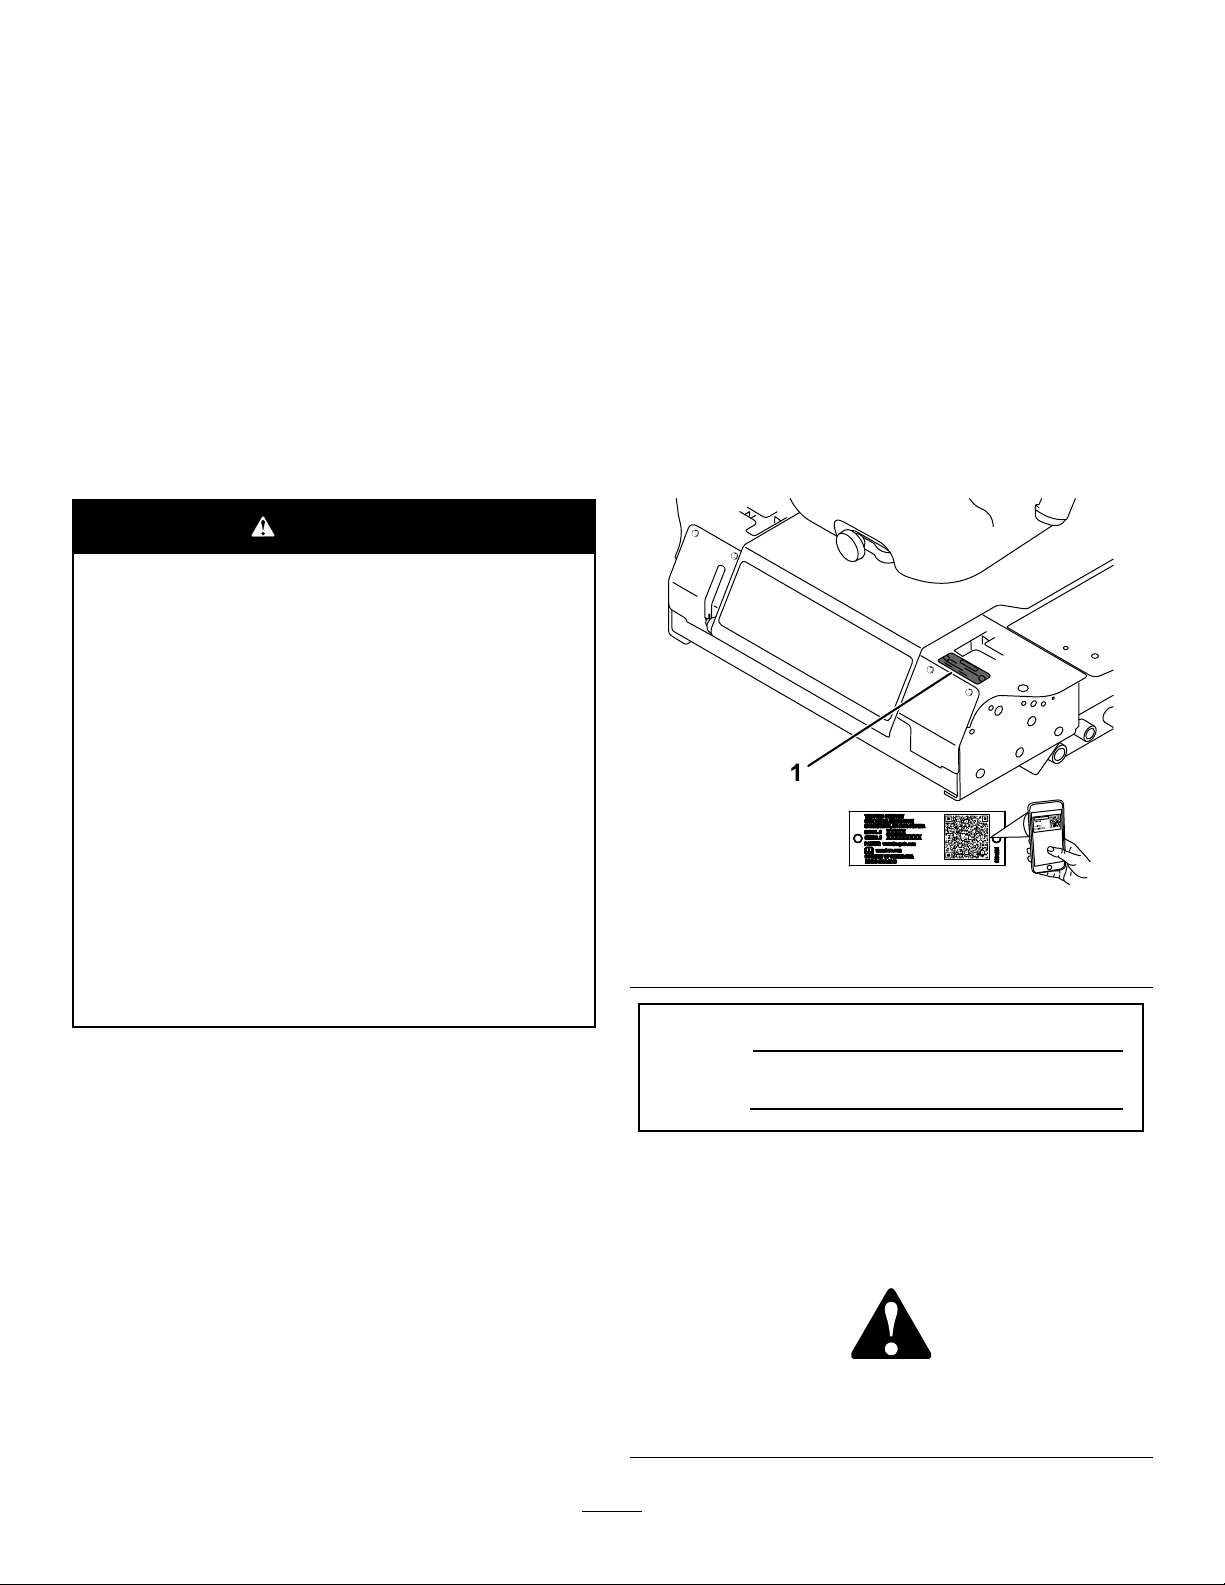
Wheneveryouneedservice,genuineT oroparts,or
additionalinformation,contactanAuthorizedService
DealerorToroCustomerServiceandhavethemodel
andserialnumbersofyourproductready.Figure1
identiesthelocationofthemodelandserialnumbers
ontheproduct.Writethenumbersinthespace
provided.
Important:Withyourmobiledevice,youcan
scantheQRcodeontheserialnumberdecal(if
equipped)toaccesswarranty,parts,andother
productinformation.
g241316
Figure1
1.Modelandserialnumberlocation
Introduction
Thismachineisaride-on,rotary-bladelawnmower
intendedtobeusedbyprofessional,hiredoperators
incommercialapplications.Itisprimarilydesigned
forcuttinggrassonwell-maintainedlawnsinparks,
sportselds,andoncommercialgrounds.Itisnot
designedforcuttingbrush,mowinggrassandother
growthalongsidehighways,orforagriculturaluses.
Usingthisproductforpurposesotherthanitsintended
usecouldprovedangeroustoyouandbystanders.
Readthisinformationcarefullytolearnhowtooperate
andmaintainyourproductproperlyandtoavoid
©2018—TheToro®Company
8111LyndaleAvenueSouth
Bloomington,MN55420
ModelNo.
SerialNo.
Thismanualidentiespotentialhazardsandhas
safetymessagesidentiedbythesafety-alertsymbol
(Figure2),whichsignalsahazardthatmaycause
seriousinjuryordeathifyoudonotfollowthe
recommendedprecautions.
Figure2
1.Safety-alertsymbol
Contactusatwww.Toro.com.
2
g000502
PrintedintheUSA
AllRightsReserved

Thismanualalsouses2wordstohighlightinformation.
Importantcallsattentiontospecialmechanical
informationandNoteemphasizesgeneralinformation
worthyofspecialattention.
3

Contents
Safety.......................................................................5
GeneralSafety...................................................5
SafetyandInstructionalDecals..........................5
Setup......................................................................12
1RaisingtheRollBar.......................................12
2InstallingtheCuttingUnit...............................12
3AdjustingtheLeft,FrontCaster
Wheel............................................................12
4CheckingtheTirePressure............................13
5InstallingWeights(forCE
Compliance)..................................................14
6CheckingtheFluidLevels..............................15
7InstallingtheDecal(CEMachines
Only).............................................................15
ProductOverview...................................................15
Controls...........................................................15
Specications..................................................18
Attachments/Accessories.................................19
BeforeOperation.................................................19
BeforeOperationSafety...................................19
AddingFuel......................................................20
CheckingtheEngine-OilLevel..........................21
CheckingtheCoolingSystem...........................21
CheckingtheHydraulicSystem........................21
AdjustingtheRollBar.......................................21
UsingtheSafety-InterlockSystem....................22
PositioningtheSeat..........................................23
ChangingtheSeatSuspension.........................24
UnlatchingtheSeat..........................................24
DuringOperation.................................................24
DuringOperationSafety...................................24
OperatingtheParkingBrake.............................26
StartingtheEngine...........................................26
DrivingtheMachine..........................................27
ShuttingOfftheEngine.....................................28
OperatingtheMower........................................28
AdjustingtheHeightofCut...............................29
OperatingTips.................................................29
AfterOperation....................................................30
GeneralSafety.................................................30
PushingtheMachine........................................30
HaulingtheMachine.........................................31
LoadingtheMachine........................................32
Maintenance...........................................................33
MaintenanceSafety..........................................33
RecommendedMaintenanceSchedule(s)...........33
DailyMaintenanceChecklist.............................35
Lubrication..........................................................36
GreasingtheBearingsandBushings................36
ServicingtheCutting-UnitGearbox
Lubricant.......................................................36
EngineMaintenance...........................................37
EngineSafety...................................................37
CheckingtheAirCleaner..................................37
ServicingtheAirCleaner..................................38
ServicingtheEngine-Oil...................................38
FuelSystemMaintenance...................................40
ServicingtheWaterSeparator.........................40
DrainingtheFuelT ank......................................40
InspectingtheFuelLinesand
Connections..................................................41
BleedingtheFuelSystem.................................41
BleedingAirfromtheInjectors..........................41
ElectricalSystemMaintenance...........................42
ElectricalSystemSafety...................................42
ServicingtheBattery.........................................42
StoringtheBattery............................................42
CheckingtheFuses..........................................42
DriveSystemMaintenance..................................43
CheckingtheTirePressure...............................43
ReplacingtheCasterWheelsand
Bearings........................................................44
CoolingSystemMaintenance..............................44
CoolingSystemSafety.....................................44
CheckingtheCoolingSystem..........................44
CleaningtheRadiator.......................................45
BrakeMaintenance.............................................45
AdjustingtheParking-BrakeInterlock
Switch...........................................................45
BeltMaintenance................................................46
CheckingtheAlternator-BeltT ension................46
ControlsSystemMaintenance.............................47
AdjustingtheControl-LeverNeutral-Interlock
Switch...........................................................47
AdjustingtheControl-LeverNeutral
Return...........................................................47
AdjustingtheTractionDriveforNeutral.............48
AdjustingtheMaximumGroundSpeed.............50
AdjustingtheTracking......................................51
HydraulicSystemMaintenance...........................52
HydraulicSystemSafety...................................52
HydraulicFluidCapacity...................................52
HydraulicFluidSpecication.............................52
CheckingtheHydraulicSystem........................52
ChangingtheHydraulicFluidAnd
Filter..............................................................53
Cleaning..............................................................53
CleaningUndertheCuttingUnit........................53
WasteDisposal.................................................53
Storage...................................................................54
StorageSafety..................................................54
PreparingtheMachineforStorage...................54
PreparingtheEngine........................................54
4

Safety
Thismachinehasbeendesignedinaccordancewith
CENstandardANSIB71.4-2017andISOEN5395
whenyouinstalltheproperCEKitsandcompletethe
setupprocedures.
•Donotoperatethemachinewithoutallguards
andothersafetyprotectivedevicesinplaceand
functioningproperlyonthemachine.
•Keepyourhandsandfeetawayfromrotating
parts.Keepclearofthedischargeopening.
•Keepbystandersandchildrenoutoftheoperating
area.Neverallowchildrentooperatethemachine.
GeneralSafety
Thisproductiscapableofamputatinghandsand
feetandofthrowingobjects.Alwaysfollowallsafety
instructionstoavoidseriouspersonalinjury .
•Readandunderstandthecontentsofthis
Operator’sManualbeforestartingtheengine.
•Useyourfullattentionwhileoperatingthe
machine.Donotengageinanyactivitythat
causesdistractions;otherwise,injuryorproperty
damagemayoccur.
SafetyandInstructionalDecals
Safetydecalsandinstructionsareeasilyvisibletotheoperatorandarelocatednearanyarea
ofpotentialdanger.Replaceanydecalthatisdamagedormissing.
Manufacturer'sMark
•Shutofftheengine,removethekey(ifequipped),
andwaitforallmovementtostopbeforeyouleave
theoperator’sposition,Allowthemachinetocool
beforeadjusting,servicing,cleaning,orstoringit.
Improperlyusingormaintainingthismachinecan
resultininjury .T oreducethepotentialforinjury ,
complywiththesesafetyinstructionsandalways
payattentiontothesafety-alertsymbol
meansCaution,Warning,orDanger—personalsafety
instruction.Failuretocomplywiththeseinstructions
mayresultinpersonalinjuryordeath.
decaloemmarkt
,which
1.Indicatesthebladeisidentiedasapartfromtheoriginal
machinemanufacturer.
BatterySymbols
Someorallofthesesymbolsareonyourbattery.
1.Explosionhazard6.Keepbystandersaway
2.Nore,opename,or
smoking
3.Causticliquid/chemical
burnhazard
4.Weareyeprotection.9.Flusheyesimmediately
5.ReadtheOperator's
Manual.
fromthebattery .
7.Weareyeprotection;
explosivegasescan
causeblindnessandother
injuries.
8.Batteryacidcancause
blindnessorsevereburns.
withwaterandgetmedical
helpfast.
10.Containslead;donot
discard
decalbatterysymbols
5

93-6696
1.Storedenergyhazard—readtheOperator'sManual.
decal93-6696
decal106-6755
106-6755
93-6697
1.ReadtheOperator's
Manual.
106-6754
1.Warning—donottouchthehotsurface.
2.Cutting/dismembermenthazard,fanandentanglement
hazard,belt—stayawayfrommovingparts.
2.AddSAE80w-90(API
GL-5)oilevery50hours.
1.Enginecoolantunder
pressure.
decal93-6697
2.Explosionhazard—read
theOperator'sManual.
3.Warning—donottouchthe
hotsurface.
4.Warning—readthe
Operator'sManual.
decal106-9206
106-9206
1.Wheeltorquespecications
decal106-6754
2.ReadtheOperator'sManual.
1.Inputs5.Inseat
2.Notactive
3.Hightemperatureshutdown
6.Powertakeoff(PTO)10.Powertakeoff(PTO)
7.Parkingbrakeoff11.Start
4.Hightemperaturewarning8.Neutral
decal106-9290
106-9290
9.Outputs13.Start
14.Power
12.Energizetorun(ETR)
6
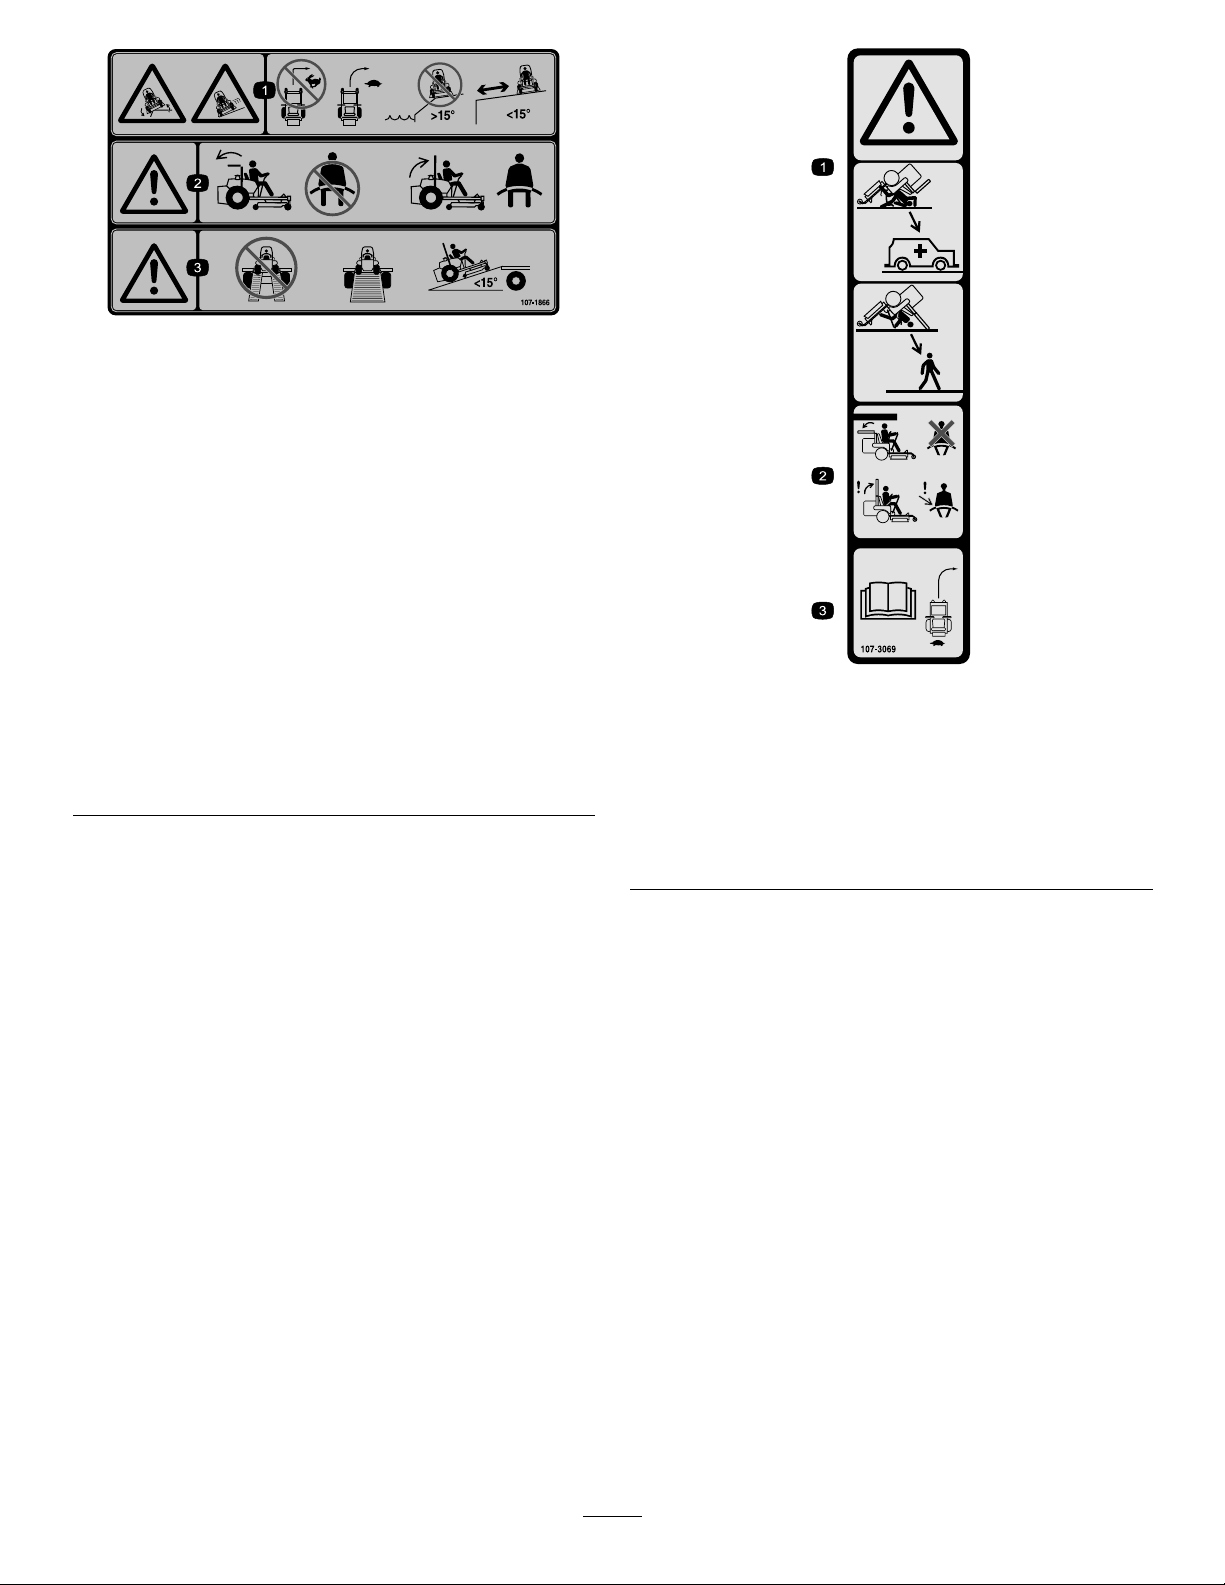
decal107-1866
107-1866
Note:Thismachinecomplieswiththeindustrystandard
stabilitytestinthestaticlateralandlongitudinaltestswiththe
maximumrecommendedslopeindicatedonthedecal.Reviewthe
instructionsforoperatingthemachineonslopesintheOperator’s
Manualaswellastheconditionsinwhichyouwouldoperatethe
machinetodeterminewhetheryoucanoperatethemachineinthe
conditionsonthatdayandatthatsite.Changesintheterraincan
resultinachangeinslopeoperationforthemachine.Ifpossible,
keepthecuttingunitsloweredtothegroundwhileoperatingthe
machineonslopes.Raisingthecuttingunitswhileoperatingon
slopescancausethemachinetobecomeunstable.
1.Sliding/lossofcontrolhazard;tippinghazard,drop-offs—do
notturnathighspeeds;turnatlowspeeds;donotuseon
slopesnearopenwater;donotuseonslopesgreaterthan
15°;stayawayfromdrop-offs.
2.Warning—iftherollbarislowered,donotweartheseatbelt;
iftherollbarisraised,weartheseatbelt.
3.Warning—donotusedualrampswhenloadingontoa
trailer;use1rampwideenoughforthemachine;usea
rampwithaslopelessthan15°.
decal107-3069
107-3069
1.Warning–thereisnorolloverprotectionwhentherollbaris
down.
2.T oavoidinjuryordeathfromarolloveraccident,keepthe
rollbarintheraisedandlockedpositionandweartheseat
belt.Lowertherollbaronlywhenabsolutelynecessary;do
notweartheseatbeltwhentherollbarisdown.
3.ReadtheOperator'sManual;driveslowlyandcarefully.
7

110-9796
1.ReadtheOperator'sManualforinformationonfuses.
decal110-9796
110-8253
1.PTO–Off4.Continuous-variable
2.PTO—On5.Slow
3.Fast
110-8254
1.Engine–Stop3.Engine—Start
2.Engine—Run
decal110-8253
decal133-5618
133-5618
setting
decal110-8254
8

decal110-8252
110-8252
1.ReadtheOperator'sManual.
3.Hydraulicoil5.Enginecoolant
2.Parkingbrake4.Fuel6.Engineoil
110-9781
1.Warning—readtheOperator'sManual.
2.Poisonhazard;causticliquid/chemicalburnhazard—keepchildrenawayfromthebattery.
3.Warning—donottouchthehotsurface.
4.Cutting/dismembermenthazard,fan;entanglementhazard,belt—stayawayfrommovingparts.
5.Hydraulicuidunderpressurehazard;highpressuresprayhazard;highpressureuidhazard,injectionintothebody—wear
handandskinprotection.
decal110-9781
9
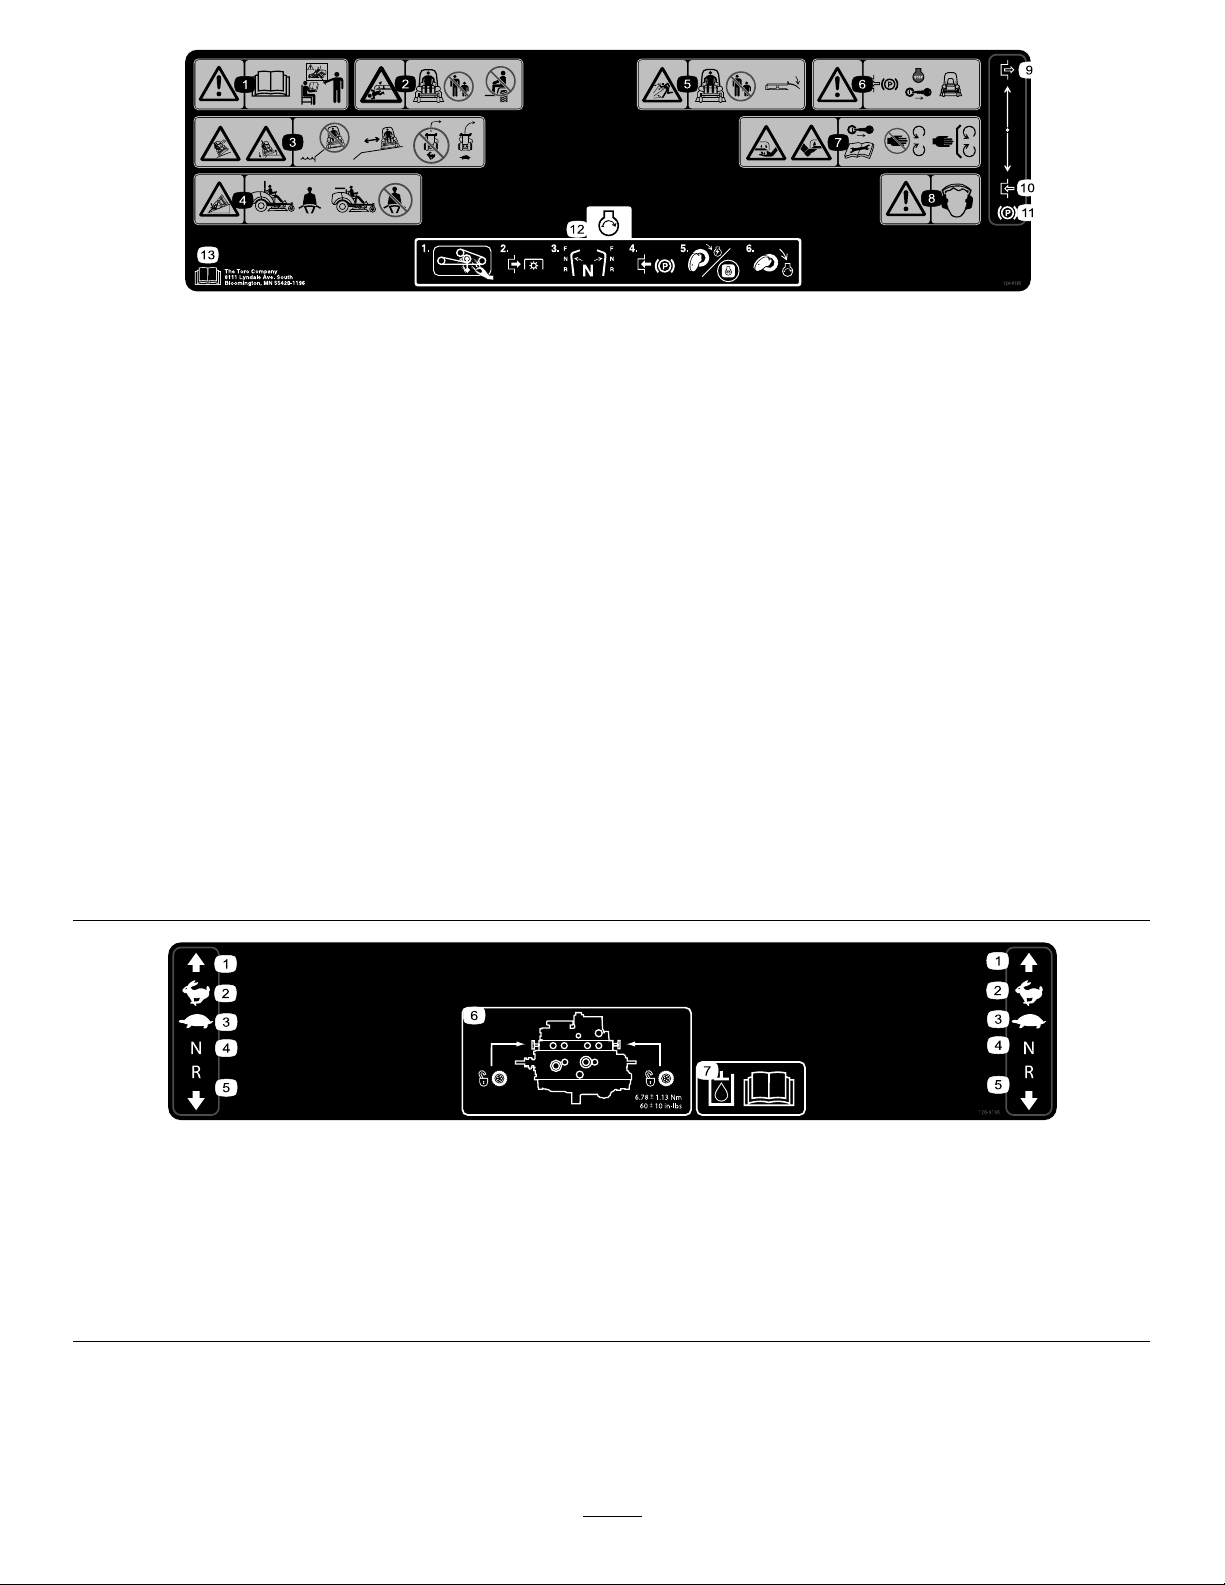
120-9195
Note:Thismachinecomplieswiththeindustrystandardstabilitytestinthestaticlateralandlongitudinaltestswiththemaximum
recommendedslopeindicatedonthedecal.ReviewtheinstructionsforoperatingthemachineonslopesintheOperator’sManualas
wellastheconditionsinwhichyouwouldoperatethemachinetodeterminewhetheryoucanoperatethemachineintheconditions
onthatdayandatthatsite.Changesintheterraincanresultinachangeinslopeoperationforthemachine.Ifpossible,keepthe
cuttingunitsloweredtothegroundwhileoperatingthemachineonslopes.Raisingthecuttingunitswhileoperatingonslopescan
causethemachinetobecomeunstable.
decal120-9195
1.Warning—readtheOperator’sManual;donotoperatethe
machineunlessyouaretrained.
2.Cutting/dismembermenthazard,mowerblade—keep
bystandersaway;donotcarrypassengersonthemachine.
3.Sliding/lossofcontrolhazard;tippinghazard,drop-offs—do
notmowneardrop-offs;keepawayfromdrop-offs;donotturn
athighspeeds;turnatlowspeeds.
4.Tippinghazard—weartheseatbeltwhenarollbarisinplace;
donotweartheseatbeltwhentherollbarislowered.
5.Thrownobjecthazard—keepbystandersaway;lowerthe
deectorbeforeusingthemachine.
6.Warning—engagetheparkingbrake,shutofftheengine,and
removethekeybeforeleavingthemachine.
7.Cutting/dismembermenthazardofhandsorfeet,mower
blade—removethekeyandreadtheOperator’sManual
beforeperformingmaintenance;stayawayfrommovingparts;
keepallguardsandshieldsinplace.
8.Warning—wearhearingprotection.
9.Disengage
10.Engage
11.Parkingbrake
12.Starttheengine—Cleangrassanddebrisfromthemower
beltandpulleys,disengagethePTO,setthedriveinneutral,
engagetheparkingbrake,turnthekeytopoweronthe
mower,andturnthekeyfullytostarttheengine.
13.ReadtheOperator’sManual.
120-9196
1.Forward
3.Slow
2.Fast4.Neutral6.T owvalvelocation;torque
5.Reverse
thetowvalvesto5.65to
7.91N∙m(50to70in-lb).
10
decal120-9196
7.ReadtheOperator's
Manualformore
informationonthehydraulic
uid.
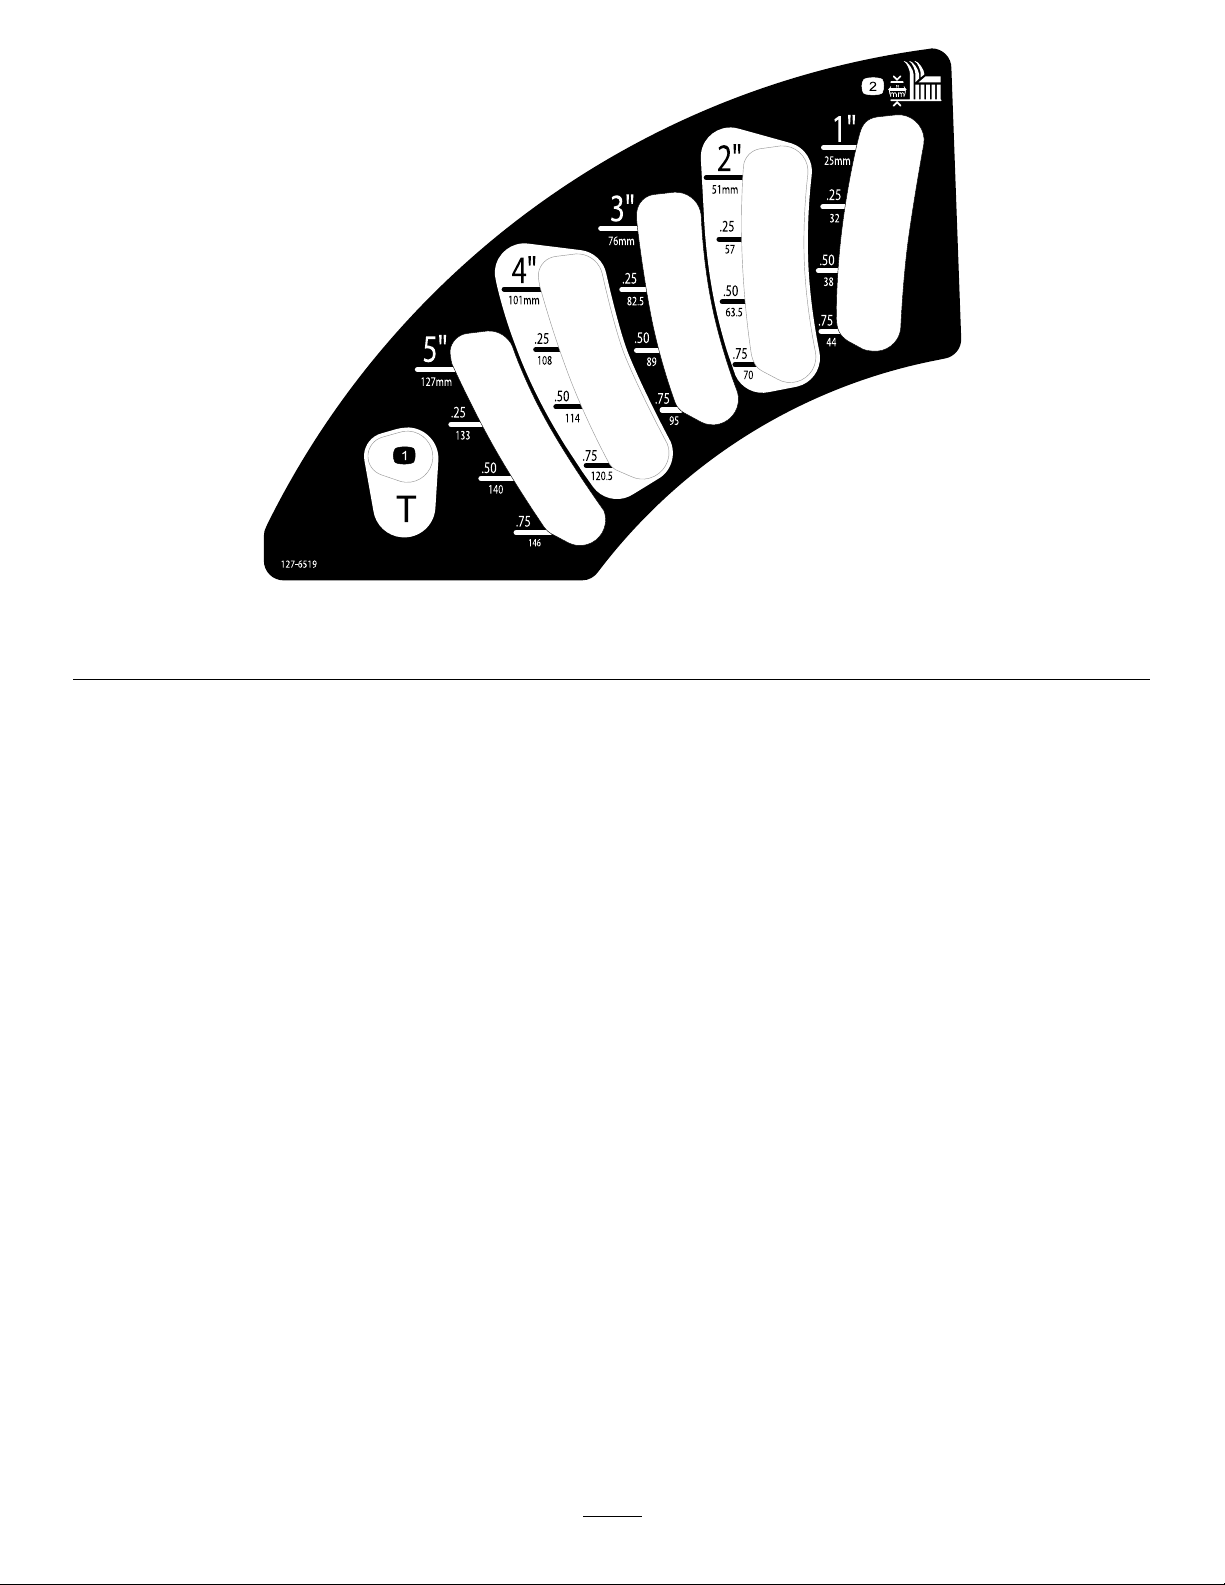
decal127-6519
127-6519
1.Transportposition
2.Heightofcut
11

Setup
LooseParts
Usethechartbelowtoverifythatallpartshavebeenshipped.
ProcedureDescription
1
2
3
4
5
6
7
MediaandAdditionalParts
Description
Operator'sManual
Nopartsrequired
CuttingunitInstallationInstructions
Nopartsrequired
Nopartsrequired
Nopartsrequired
Nopartsrequired
Production-yeardecal1
Qty.
1
Reviewitbeforeoperatingthemachine.
Qty.
–
1Installthecuttingunit.
–
–
–
–
RaisetheROPS.
Adjusttheleft,frontcasterwheel.
Checkthetirepressure.
Installweights.
Checkthehydraulicuid,engineoil,
andcoolantlevels.
Installthedecal(CEMachinesOnly).
Use
Use
Engineowner'smanual1
Ignitionkeys2
1
RaisingtheRollBar
NoPartsRequired
Procedure
Raisetherollbar;refertoAdjustingtheRollBar(page
21).
Useittoreferenceengineinformation.
Starttheengine.
2
InstallingtheCuttingUnit
Partsneededforthisprocedure:
1
CuttingunitInstallationInstructions
Procedure
InstallthecuttingunitusingtheInstallationInstructions
forthatcuttingunit.
12

3
AdjustingtheLeft,Front
CasterWheel
NoPartsRequired
Procedure
Adjusttheleft,frontcasterwheeltotheoutside
positionfor72-inchcuttingunitsandtotheinside
positionfor60-inchand62-inchcuttingunits.
4
CheckingtheTirePressure
NoPartsRequired
Procedure
Checkthetirepressure;refertoCheckingtheTire
Pressure(page43).
Important:Maintainpressureinalltiresto
ensureagoodquality-of-cutandpropermachine
performance.Donotunderinatethetires.
13

5
InstallingWeights(forCECompliance)
NoPartsRequired
Procedure
Machineswith183cm(72inch)decksinstalledandnootherattachmentsdonotneedaddedweighttomeet
CEstandards.However,youmayneedtopurchaseandinstalladditionalweightdependingonthemowerdeck
size/typeandtheattachmentsthatyouinstallonthemachine.Thefollowingtableliststhevariousattachment
congurationsandtheadditionalfrontweightneededforeachmodel:
AttachmentConguration
Groundsmaster7200/7210
TractionUnitwithnoAdded
Attachments
Groundsmaster7200/7210
TractionUnitandHardCanopy
Groundsmaster7200/7210
TractionUnit,HardCanopy,
andRoadLightKit
Groundsmaster7200/7210
TractionUnit,HardCanopy,
RoadLightKit,andJackStand
Groundsmaster7200/7210
TractionUnit,HardCanopy,
andJackStand
Groundsmaster7200/7210
TractionUnit,RoadLightKit,
andJackStand
Groundsmaster7200/7210
TractionUnitandRoadLight
Kit
Groundsmaster7200/7210
TractionUnitandJackStand
WeightRequiredwitha
157.5cm(62inch)Base
Deck(30457)
10kg(22lb)0kg(0lb)0kg(0lb)
34kg(75lb)9.5kg(21lb)15kg(33lb)
32.2kg(71lb)28.5kg(63lb)10kg(22lb)
18kg(40lb)17kg(37lb)10kg(22lb)
14kg(31lb)10kg(22lb)10kg(22lb)
0kg(0lb)0kg(0lb)0kg(0lb)
11.3kg(25lb)0kg(0lb)0kg(0lb)
0kg(0lb)0kg(0lb)0kg(0lb)
WeightRequiredwitha
183cm(72inch)Base
Deck(30353)
WeightRequiredwitha183
cm(72inch)Side-discharge
(30481)
ContactyourauthorizedT orodistributortoobtaintheappropriatekitsandweightsforyourmachine.
14
6
CheckingtheFluidLevels
NoPartsRequired
Procedure
1.Checkthehydraulic-uidlevelbeforestarting
theengine,refertoCheckingtheHydraulic
System(page52).
2.Checktheengine-oillevelbeforestartingthe
engine,refertoCheckingtheEngine-OilLevel
(page38).
3.Checkthecoolingsystembeforestartingthe
engine;refertoCheckingtheCoolingSystem
(page44).
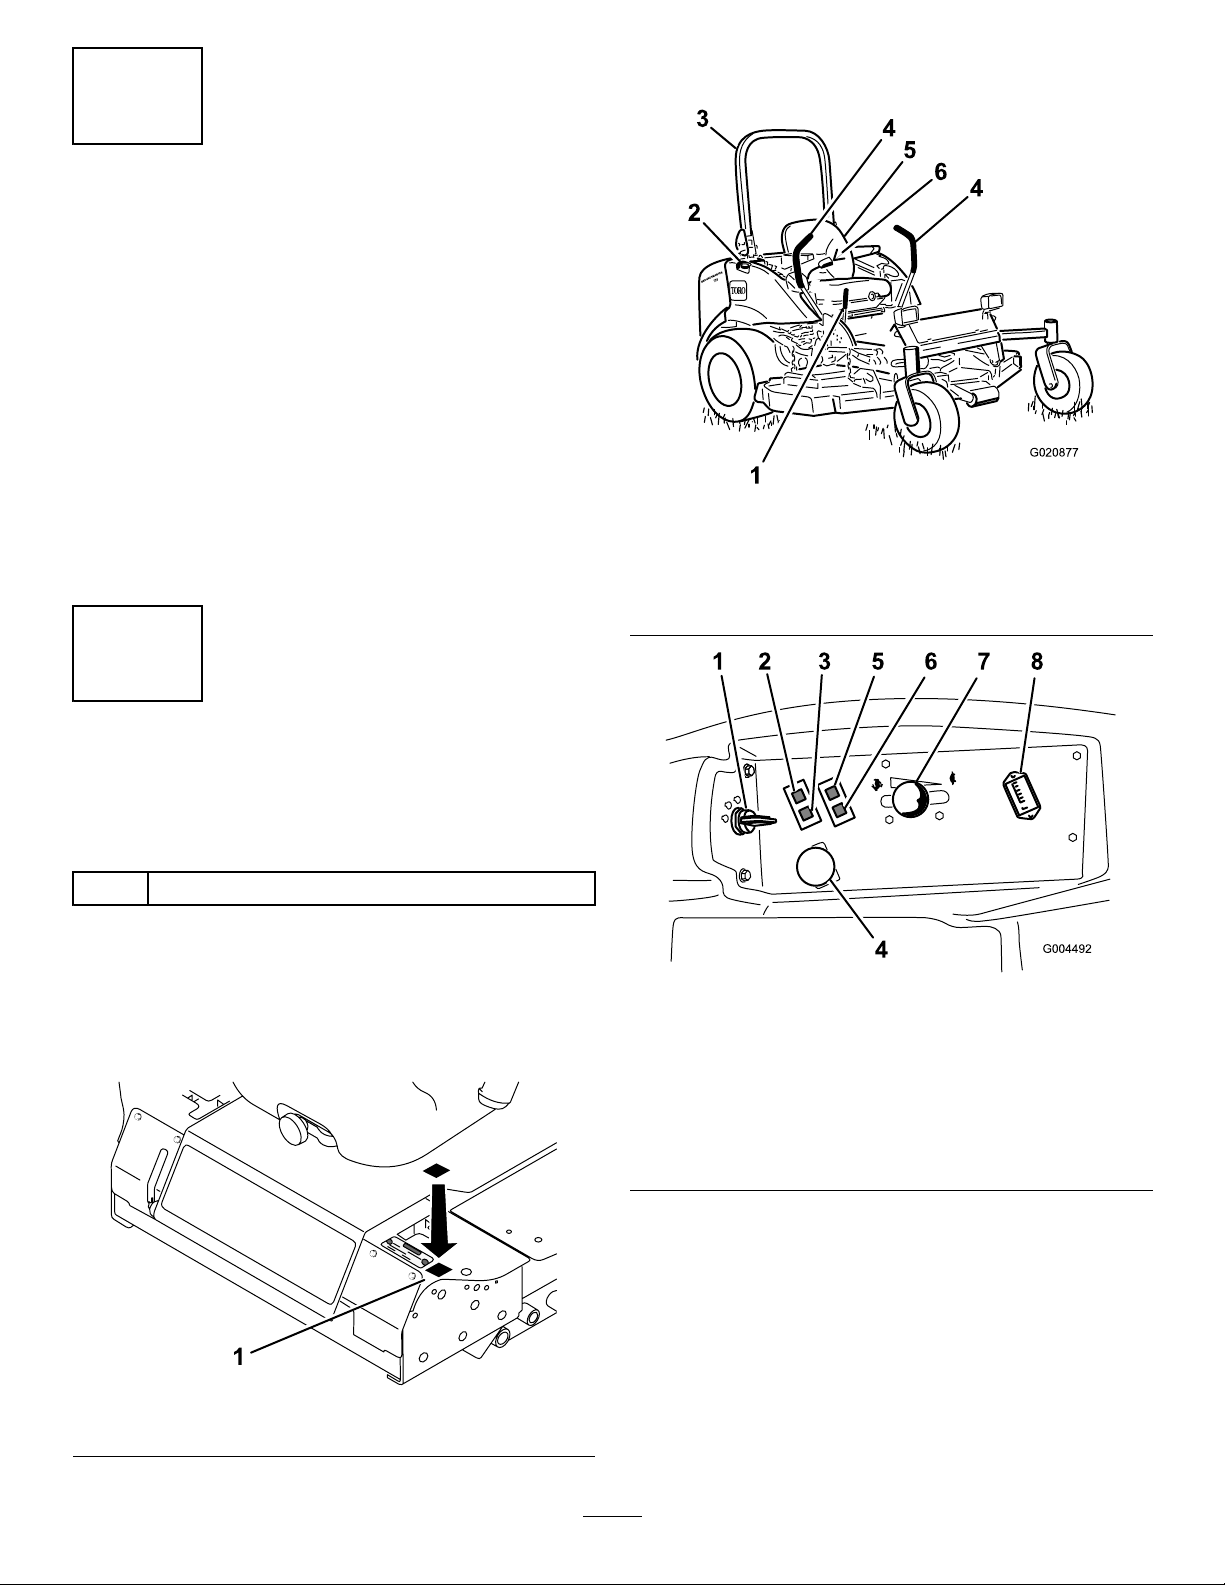
ProductOverview
Figure4
1.Parking-brakelever4.Motion-controllever
2.Fuelcap(bothsides)5.Seat
3.Rollbar
6.Seatbelt
g020877
7
InstallingtheDecal(CE
MachinesOnly)
Partsneededforthisprocedure:
1Production-yeardecal
Procedure
OnmachinesrequiringCEcompliance,installthe
production-yeardecalincludedinthelooseparts
(Figure3).
1.Ignitionswitch
2.Engine-coolant-temperature
warninglight
3.Glow-pluglight
4.Power-takeoff(PTO)
switch
Controls
g004492
Figure5
5.Oil-pressurewarninglight
6.Charge-indicatorlight
7.Throttlelever
8.Hourmeter
Figure3
Becomefamiliarwithallthecontrolsbeforeyoustart
theengineandoperatethemachine(Figure4and
Figure5).
g278244
15
Motion-ControlLevers
Glow-Plug-IndicatorLight(Orange
Themotion-controlleverscontroltheforwardand
rearwardmotionsaswellastheturningofthe
machine.RefertoDrivingtheMachine(page27).
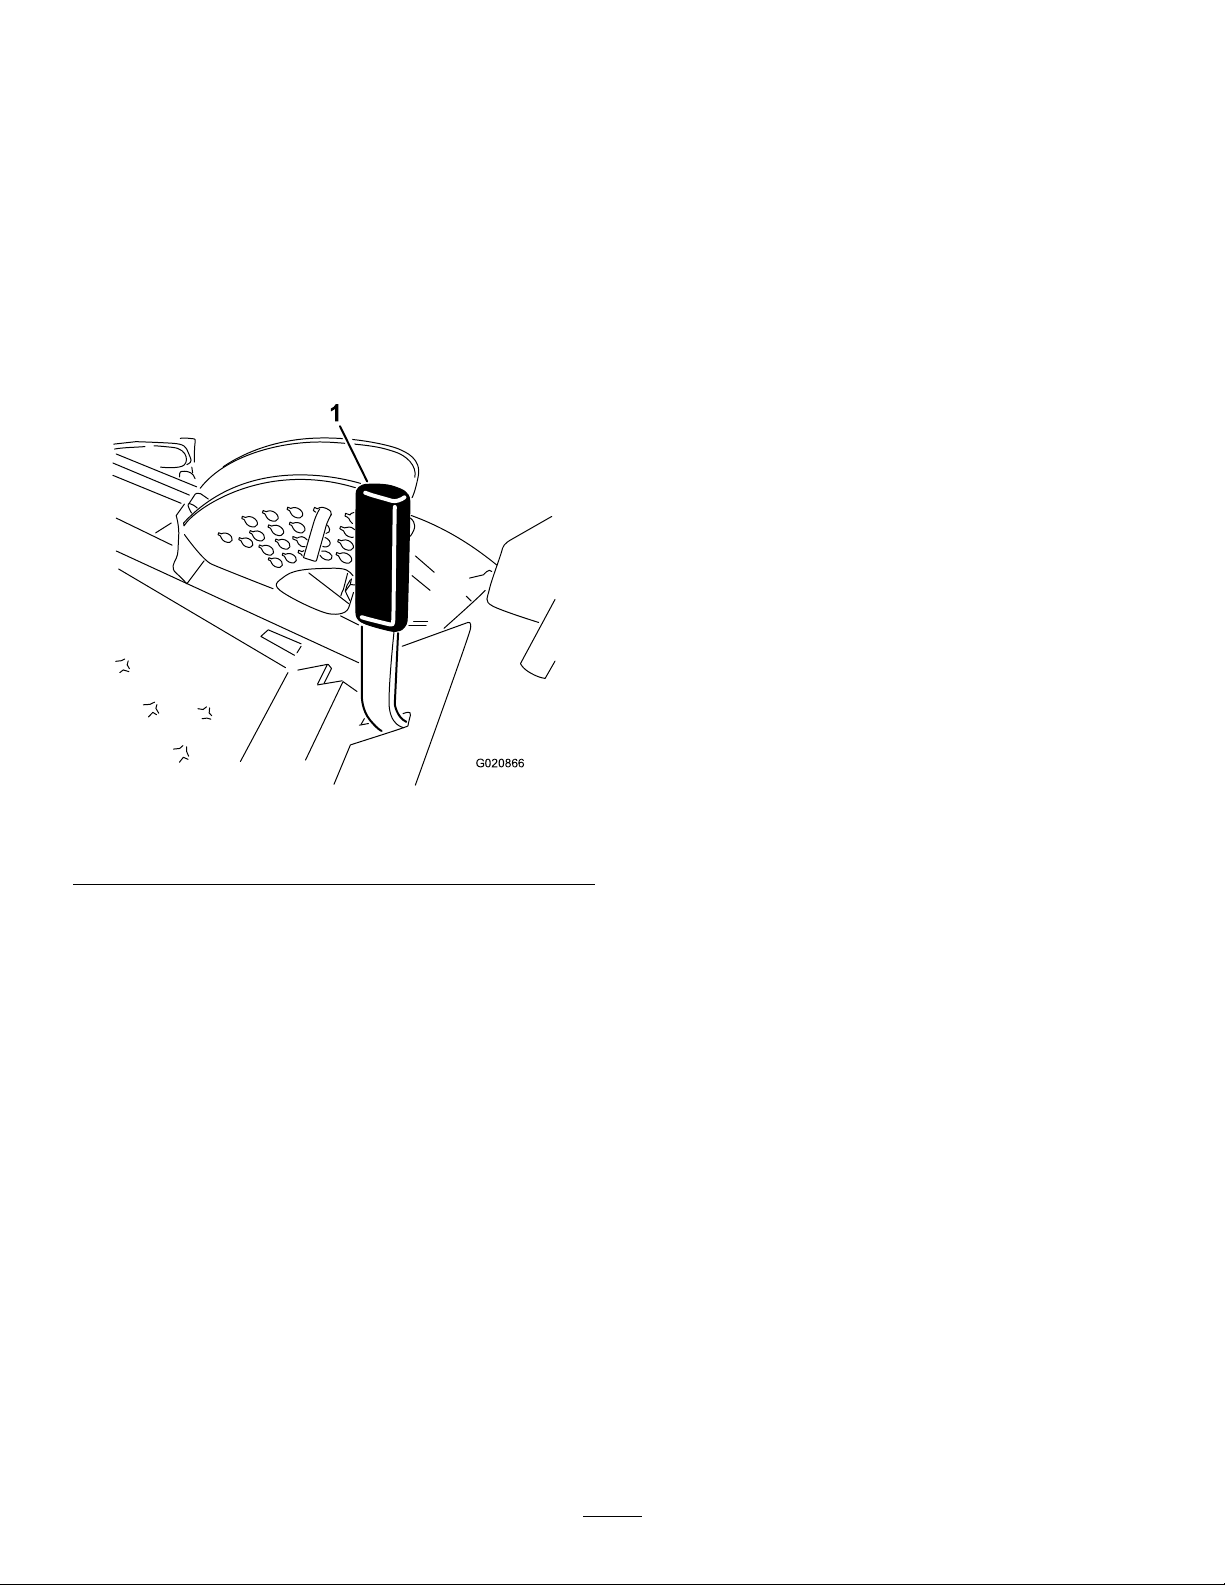
Parking-BrakeLever
Wheneveryoushutofftheengine,engagetheparking
braketopreventaccidentalmovementofthemachine.
Toengagetheparkingbrake,pulltheparking-brake
leverrearwardandup(Figure6).Toreleasethe
parkingbrake,pushtheparking-brakeleverforward
anddown.
Figure6
1.Parking-brakelever
Light)
Theglow-plug-indicatorlight(Figure5)turnsonwhen
youturntheignitionswitchtotheONposition.It
remainsonfor6seconds.Whenthelightturnsoff,
youcanstarttheengine.
HourMeter
Thehourmeterrecordsthenumberofhoursthat
youoperatethemachinewiththekeyswitchinthe
RUNposition.Usethesetimesforschedulingregular
maintenance.
Engine-Coolant-Temperature
WarningLight
Thislightilluminatesandthecuttingbladesstopif
theengine-coolanttemperatureishigh.Ifyoudonot
stopthemachineandthecoolanttemperaturerises
another11°C(20°F),theengineshutsoff.
Important:Ifthemowerdeckshutsdownand
thetemperaturewarninglightison,pushthe
PTOknobdown,drivetoasafe,atarea,move
thethrottlelevertotheSLOWposition,move
themotion-controlleversintotheNEUTRAL-LOCK
position,andengagetheparkingbrake.Idlethe
g020866
engineforseveralminuteswhileitcoolstoasafe
level.Shutofftheengineandcheckthecooling
system;refertoCheckingtheCoolingSystem
(page44).
IgnitionSwitch
Theignitionswitchhas3positions:OFF,ON/PREHEAT,
andST ART.
ThrottleLever
Thethrottlelevercontrolsthespeedoftheengine,
thespeedoftheblades,and,inconjunctionwith
motion-controllevers,thegroundspeedofthe
machine.Movingthethrottleleverforwardtowardthe
FASTpositionincreasestheenginespeed.Moving
itrearwardtowardtheSLOWpositiondecreasesthe
enginespeed.Alwaysrunthemachinewiththe
throttleintheFASTpositionwhencuttinggrass.
Power-Takeoff(PTO)Switch
Thepower-takeoff(PTO)switchstartsandstopsthe
mowerblades.
ChargeIndicator
Thechargeindicatorilluminatesifelectricalcharging
systemisoperatingaboveorbelowthenormal
operatingrange(Figure5).Checkand/orrepairthe
electricalchargingsystem.
Oil-PressureWarningLight
Theoil-pressurewarninglightglowsiftheengine-oil
pressuredropsbelowasafelevel(Figure5).Ifthe
oilpressureislow,shutofftheengineanddetermine
thecause.Repairtheengine-oilsystembeforeyou
starttheengineagain.
16
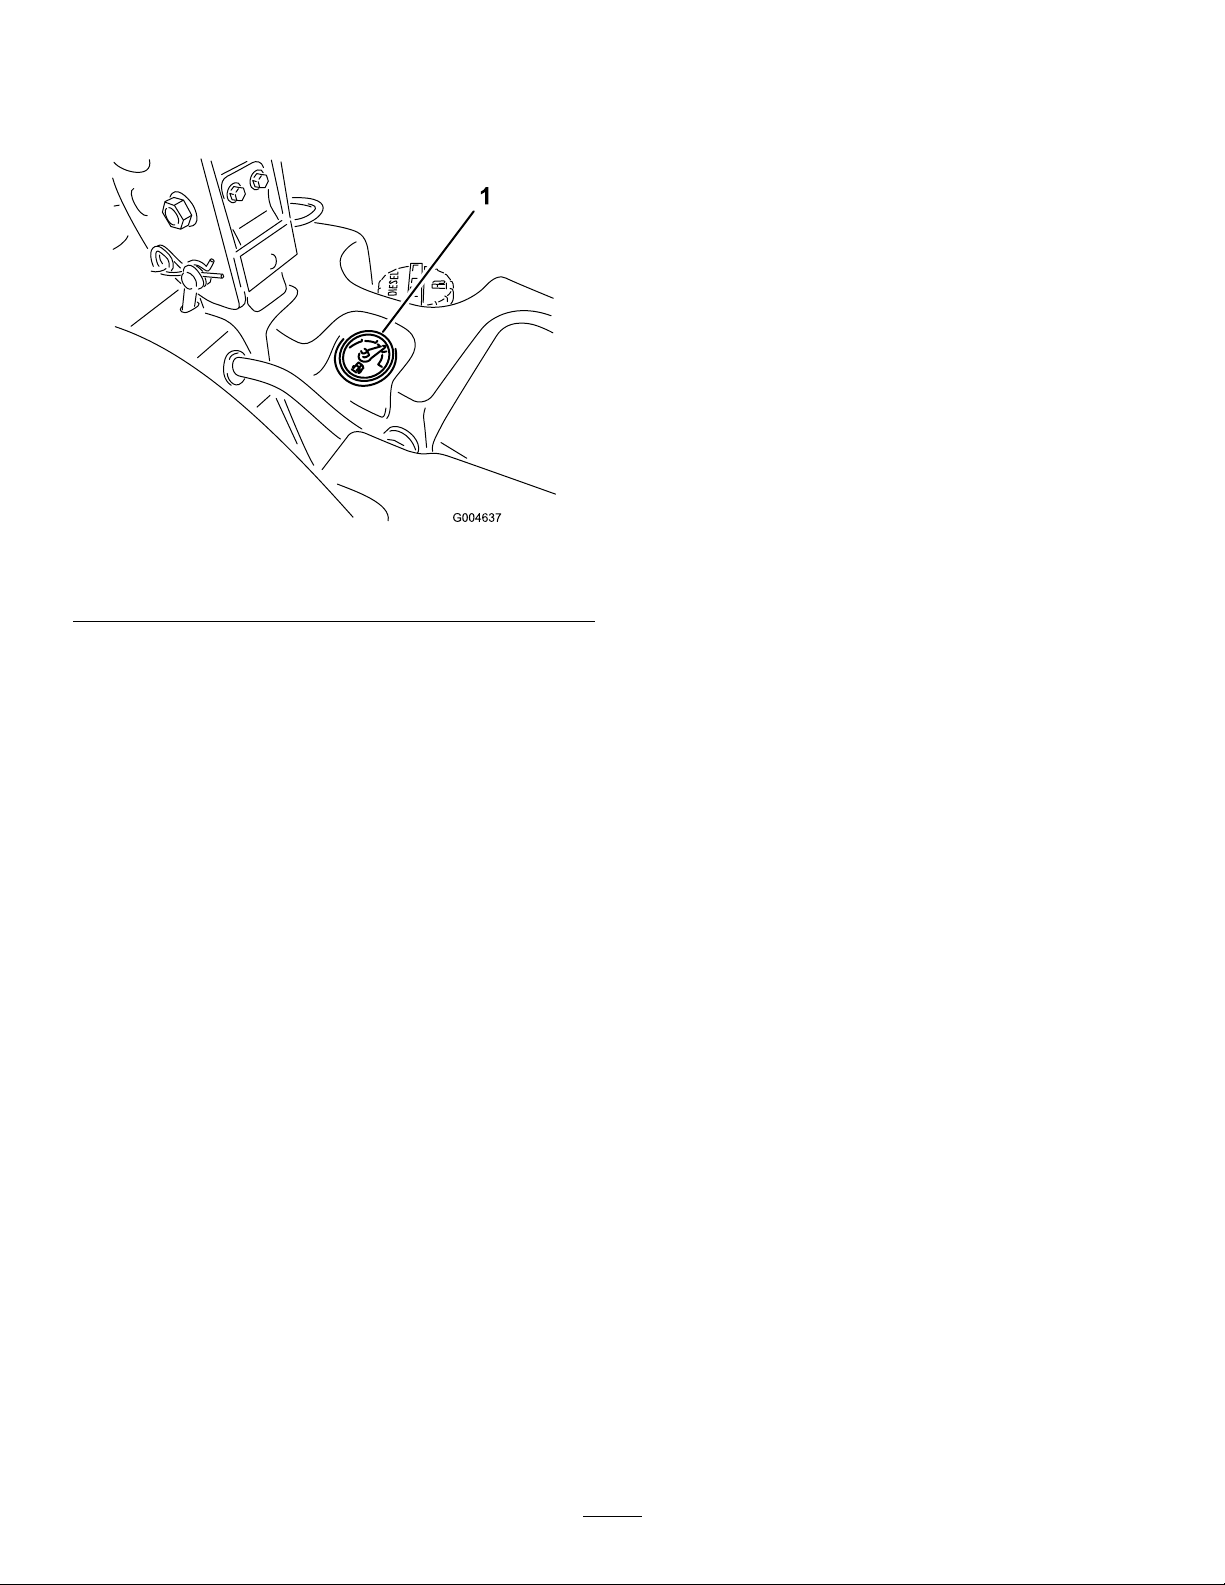
FuelGauge
Thefuelgauge(Figure7)indicatesthequantityoffuel
remaininginthefueltanks.
Figure7
1.Fuelgauge
g004637
17

Specications
Figure8
DescriptionFigure8
Heightwithrollbarup
Heightwithrollbardown
Overalllength
Overallwidth
Wheelbase
Wheeltread(tirecentertocenter)rear
reference
C183cm(72inches)
D
F
B
E
A
18
g242892
DimensionorWeight
125cm(49inches)
246cm(97inches)
145cm(57inches)
145cm(57-1/4inches)
114cm(45inches)
 Loading...