

Page 1
FormNo.3388-972RevA
DebrisBlower
Groundsmaster
ModelNo.30393—SerialNo.315000001andUp
®
7200/7210TractionUnit
Registeratwww.T oro.com.
OriginalInstructions(EN)
*3388-972*A
Page 2
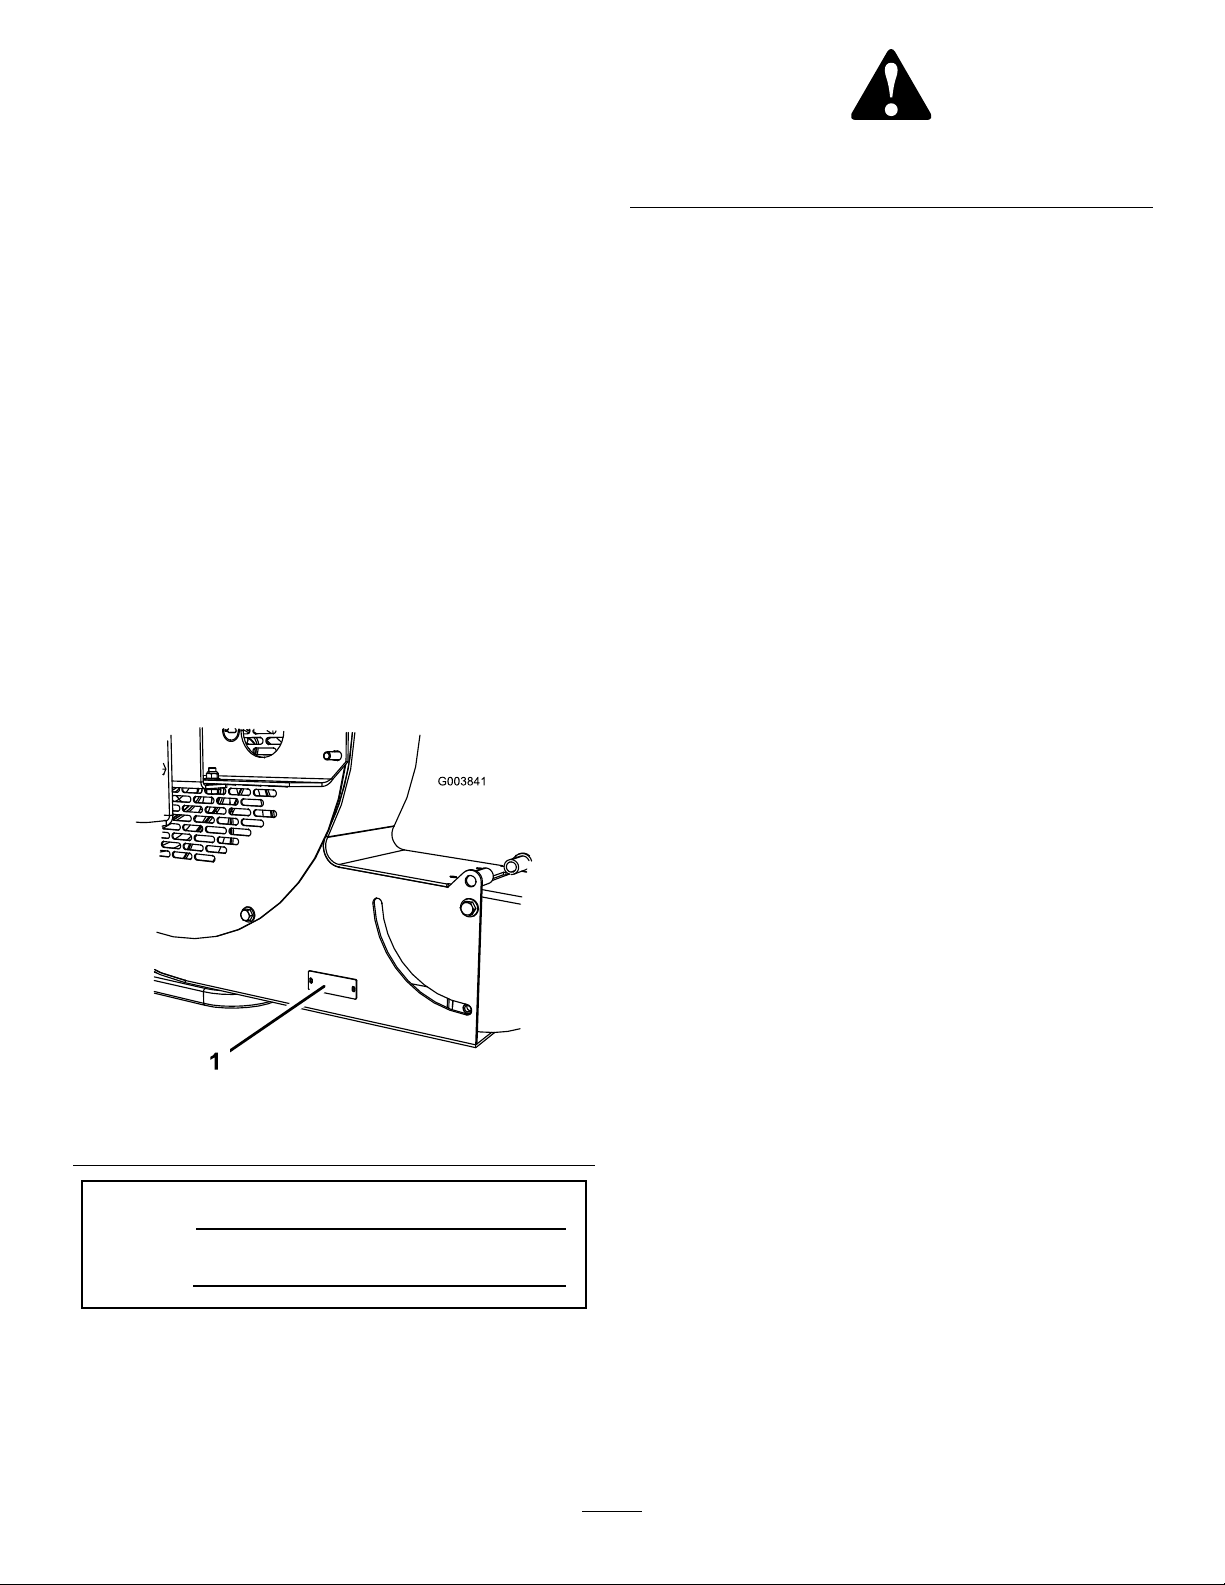
Figure2
Introduction
Thedebrisblowerismountedtoaride-onmachinewhich
isintendedtobeusedbyprofessional,hiredoperatorsin
commercialapplications.Itisprimarilydesignedtousewind
powertoquicklyclearlargeareasofunwanteddebrison
well-maintainedlawnsinparks,golfcourses,sportselds,
andoncommercialgrounds.
Readthisinformationcarefullytolearnhowtooperateand
maintainyourproductproperlyandtoavoidinjuryand
productdamage.Youareresponsibleforoperatingthe
productproperlyandsafely.
YoumaycontactTorodirectlyatwww .T oro.comforproduct
andaccessoryinformation,helpndingadealer,ortoregister
yourproduct.
Wheneveryouneedservice,genuineT oroparts,oradditional
information,contactanAuthorizedServiceDealerorToro
CustomerServiceandhavethemodelandserialnumbersof
yourproductready.Figure1identiesthelocationofthe
modelandserialnumbersontheproduct.Writethenumbers
inthespaceprovided.
1.Safetyalertsymbol
Thismanualuses2otherwordstohighlightinformation.
Importantcallsattentiontospecialmechanicalinformation
andNoteemphasizesgeneralinformationworthyofspecial
attention.
Contents
Safety...........................................................................3
BeforeOperating....................................................3
WhileOperating......................................................3
Maintenance...........................................................3
SafetyandInstructionalDecals.................................4
Setup............................................................................6
1MountingtheCastorWheel....................................6
2MountingtheDebrisBlowertotheTraction
Unit...................................................................7
3AdjustingtheLinkAssembly..................................7
4GreasingtheBlower..............................................8
5InstallingtheFrontW eight.....................................8
ProductOverview.........................................................11
Specications........................................................11
Attachments/Accessories........................................11
Operation....................................................................11
AdjustingtheDischargeOpening.............................11
SwitchOperation...................................................11
OperatingTips.......................................................12
Maintenance.................................................................13
Lubrication............................................................13
BearingAlignment..................................................13
TorquingFasteners.................................................14
ServicingtheCastorArmBushings...........................14
ServicingtheCastorWheelsandBearings..................15
Figure1
1.Modelandserialnumberlocation
ModelNo.
SerialNo.
Thismanualidentiespotentialhazardsandhassafety
messagesidentiedbythesafetyalertsymbol(Figure2),
whichsignalsahazardthatmaycauseseriousinjuryordeath
ifyoudonotfollowtherecommendedprecautions.
©2014—TheToro®Company
8111LyndaleAvenueSouth
Bloomington,MN55420
Contactusatwww.Toro.com.
2
PrintedintheUSA
AllRightsReserved
Page 3

Safety
Hazardcontrolandaccidentpreventionaredependent
upontheawareness,concern,andpropertraining
ofthepersonnelinvolvedintheoperation,transport,
maintenance,andstorageofthemachine.Improper
useormaintenanceofthemachinecanresultininjury
ordeath.T oreducethepotentialforinjuryordeath,
complywiththefollowingsafetyinstructions.
BeforeOperating
•ReadandunderstandthecontentsofthisOperator’ s
Manualbeforeoperatingthemachine.Becomefamiliar
withallofthecontrolsandknowhowtostopquickly.
Afreereplacementmanualisavailablebysendingthe
completeModelandSerialNumbertoTheToro®
Company,8111LyndaleAvenueSouth,Bloomington,
Minnesota55420-1196.
•Neverallowchildrentooperatethemachine.Do
notallowadultstooperatemachinewithoutproper
instruction.Onlytrainedoperatorswhohavereadthis
manualshouldoperatethismachine.
•Neveroperatethemachinewhenundertheinuenceof
drugsoralcohol.
•Keepallbystandersawayfromtheoperatingarea.
•Keepallshieldsandsafetydevicesinplace.Ifashield,
safetydevice,ordecalisillegibleordamaged,repairor
replaceitbeforeoperationiscommenced.Alsotighten
anyloosenuts,bolts,andscrewstoensurethatthe
machineisinsafeoperatingcondition.
•Donotoperatethemachinewhilewearingsandals,
tennisshoes,sneakers,orshorts.Also,donotwearloose
ttingclothingwhichcouldgetcaughtinmovingparts.
Alwayswearlongpantsandsubstantialshoes.Wearing
safetyglasses,safetyshoes,andahelmetisadvisable
andrequiredbysomelocalordinancesandinsurance
regulations.
WhileOperating
•Donotruntheengineinaconnedareawithout
adequateventilation.Exhaustfumesarehazardousand
couldpossiblybedeadly.
•Themaximumseatingcapacityisoneperson.Never
carrypassengers.
•Sitontheseatwhenstartingtheengineandoperating
themachine.
•Thisproductmayexceednoiselevelsof90dB(A)atthe
operatorposition.Earprotectorsarerecommendedfor
prolongedexposuretoreducethepotentialofpermanent
hearingdamage.
•Usingthemachinedemandsattention.Topreventloss
ofcontrol:
–Operateonlyindaylightorwhenthereisgood
articiallight.
–Driveslowlyandwatchforholesorotherhidden
hazards.
–Donotdriveclosetoasandtrap,ditch,creek,or
otherhazard.
–Reduceyourspeedwhenmakingsharpturnsand
whenturningonhillsides.
–Avoidsuddenstartsandstops.
–Beforebackingup,looktotherearandensurethat
nooneisbehindthemachine.
–Watchoutfortrafcwhennearorcrossingroads.
Alwaysyieldtheright-of-way.
•Stayawayfromthedischargeopeningwhenthemachine
isoperating.Keepallbystandersawayfromthedischarge
openinganddon’tdirectdischargetowardbystanders.
•Donotoperatethemachineundertheinuenceof
alcoholordrugs.
•Lightningcancausesevereinjuryordeath.Iflightning
isseenorthunderisheardinthearea,donotoperate
themachine;seekshelter.
•Iftheenginestallsorthemachinelosesheadwayand
cannotmakeittothetopofaslope,donotturnthe
machinearound.Alwaysbackslowlystraightdownthe
slope.
•Donottakeaninjuryrisk!Whenapersonorpet
appearsunexpectedlyinorneartheoperatingarea,stop
operation.Carelessoperation,combinedwithterrain
angles,ricochets,orimproperlypositionedguardscan
leadtothrownobjectinjuries.Donotresumeoperation
untiltheareaiscleared.
•Donottouchtheengineormuferwhiletheengineis
runningorsoonafteritisstopped.Theseareascouldbe
hotenoughtocauseaburn.
Maintenance
•Removethekeyfromtheignitionswitchtoprevent
accidentalstartingoftheenginewhenservicing,adjusting,
orstoringthemachine.
•Performonlythosemaintenanceinstructionsdescribedin
thismanual.Ifmajorrepairsareeverneededorassistance
isdesired,contactanAuthorizedT oroDistributor.
•Toreduceapotentialrehazard,keeptheenginefreeof
excessivegrease,grass,leaves,andaccumulationsofdirt.
Neverwashawarmengineoranyelectricalpartswith
water.
•Besurethatthemachineisinsafeoperatingconditionby
keepingnuts,bolts,andscrewstight.Checkthefanshaft
bearingmountingboltsandnutsfrequentlytobesure
thattheyaretightenedtospecication.
•Makesurethatallhydrauliclineconnectorsaretightand
allhydraulichosesandlinesareingoodconditionbefore
applyingpressuretothesystem.
•Keepyourbodyandhandsawayfrompinholeleaksin
hydrauliclinesthatejecthighpressurehydraulicuid.
3
Page 4
Usecardboardorpapertondhydraulicleaks.Hydraulic
uidescapingunderpressurecanpenetrateskinand
causeinjury.Fluidaccidentallyinjectedintotheskinmust
besurgicallyremovedwithinafewhoursbyadoctor
familiarwiththisformofinjuryorgangrenemayresult.
•Beforedisconnectingorperforminganyworkonthe
hydraulicsystem,allpressureinthesystemmustbe
relievedbystoppingtheengineandloweringtheblower
totheground.
•Iftheenginemustberunningtoperformamaintenance
adjustment,keephands,feet,clothing,andotherpartsof
thebodyawayfromthefanandothermovingparts.
•Donotoverspeedtheenginebychangingthegovernor
settings.Tobesureofsafetyandaccuracy,havean
SafetyandInstructionalDecals
Safetydecalsandinstructionsareeasilyvisibletotheoperatorandarelocatednearanyareaofpotential
danger.Replaceanydecalthatisdamagedorlost.
AuthorizedToroDistributorcheckthemaximumengine
speedwithatachometer.
•Theenginemustbeshutoffbeforecheckingtheoilor
addingoiltothecrankcase.
•Toensureoptimumperformanceandsafety,always
purchasegenuineT ororeplacementpartsandaccessories
tokeepthemachineallT oro.Neveruse“will-t”
replacementpartsandaccessoriesmadebyother
manufacturers.LookfortheTorologotoensure
genuineness.Usingunapprovedreplacementpartsand
accessoriescouldvoidthewarranty.
98-3110
1.Warning—readtheOperator’sManualandreceivetraining.
2.Warning—wearhearingprotection.
3.Thrownobjecthazard—weareyeprotectionandkeep
bystandersasafedistancefromthemachine.
4.Cuttinghazardofhandorfoot—waitformovingpartsto
stop.
98-3111
1.Pointofrotation
93-9083
1.Cutting/dismembermenthazard,fan—stayawayfrom
movingparts.
58-6520
1.Grease
106-5517
1.Warning—donottouchthehotsurface.
4
Page 5
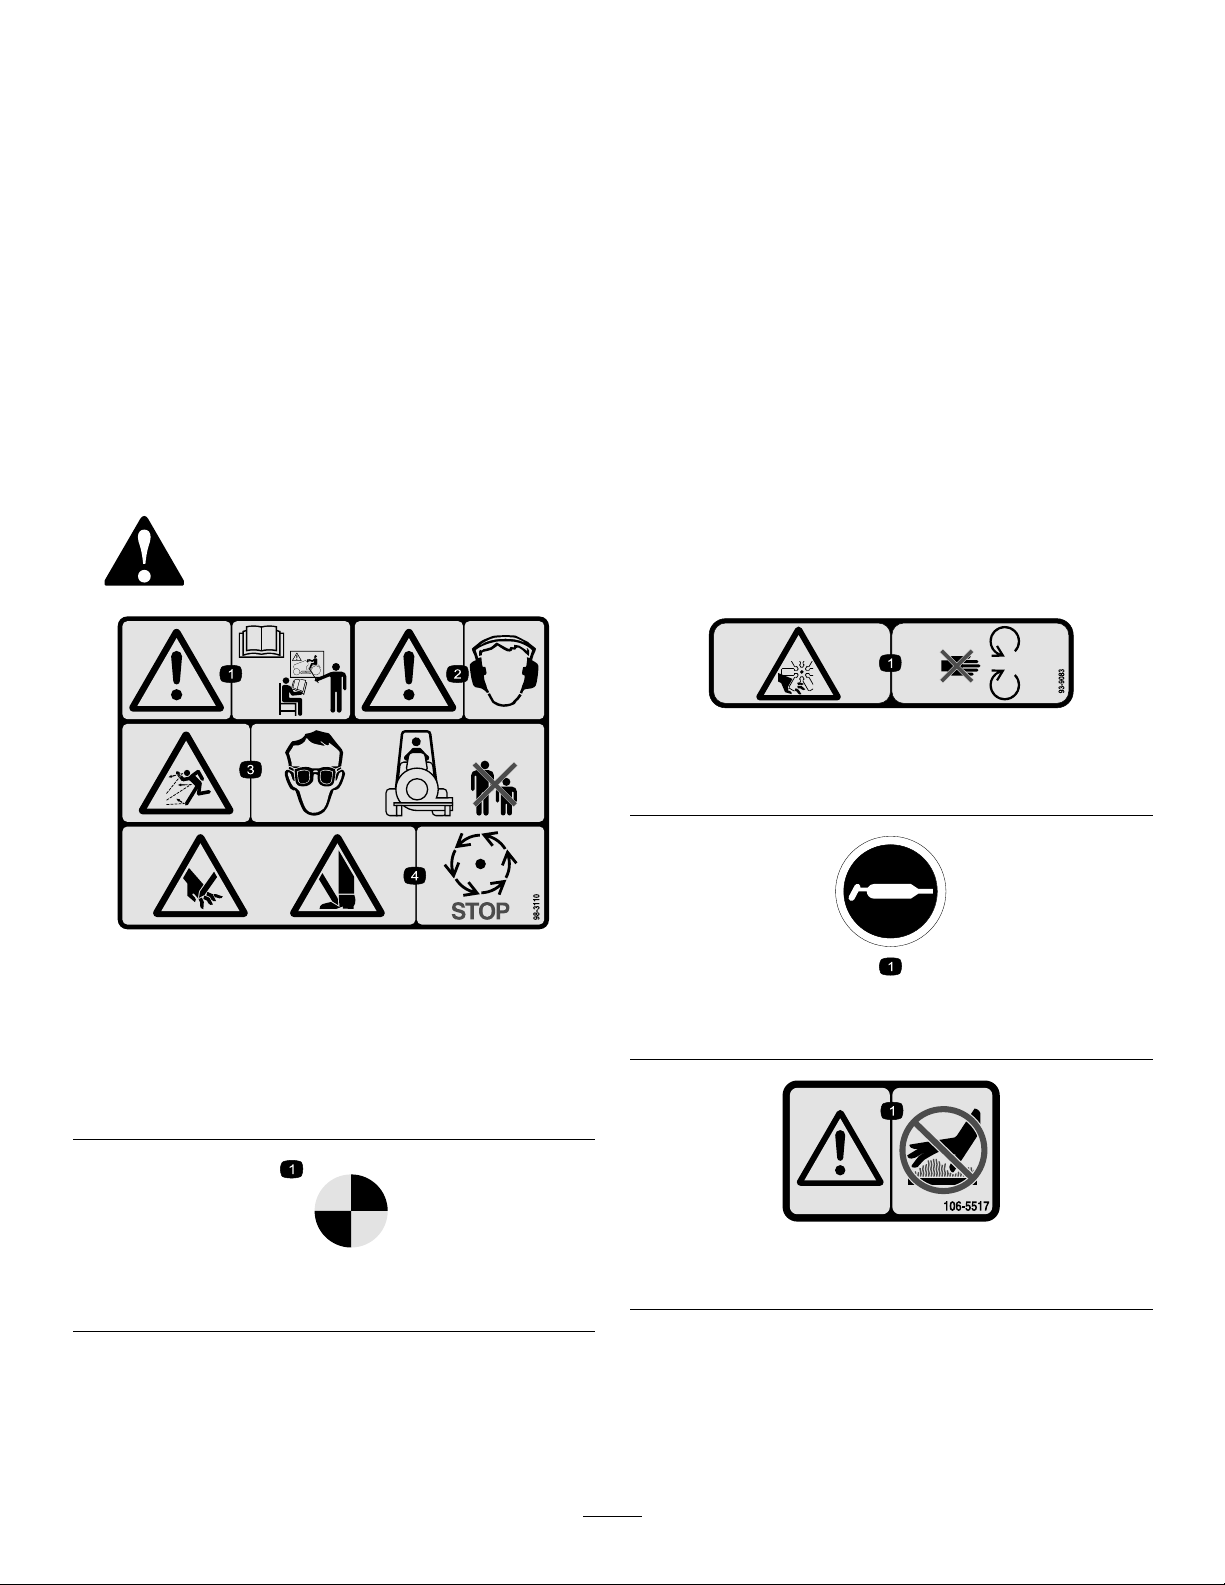
105-4593
1.Entanglementhazard,shaft—donotremovecoverwhile
partsaremoving,keepallguardsinplace.
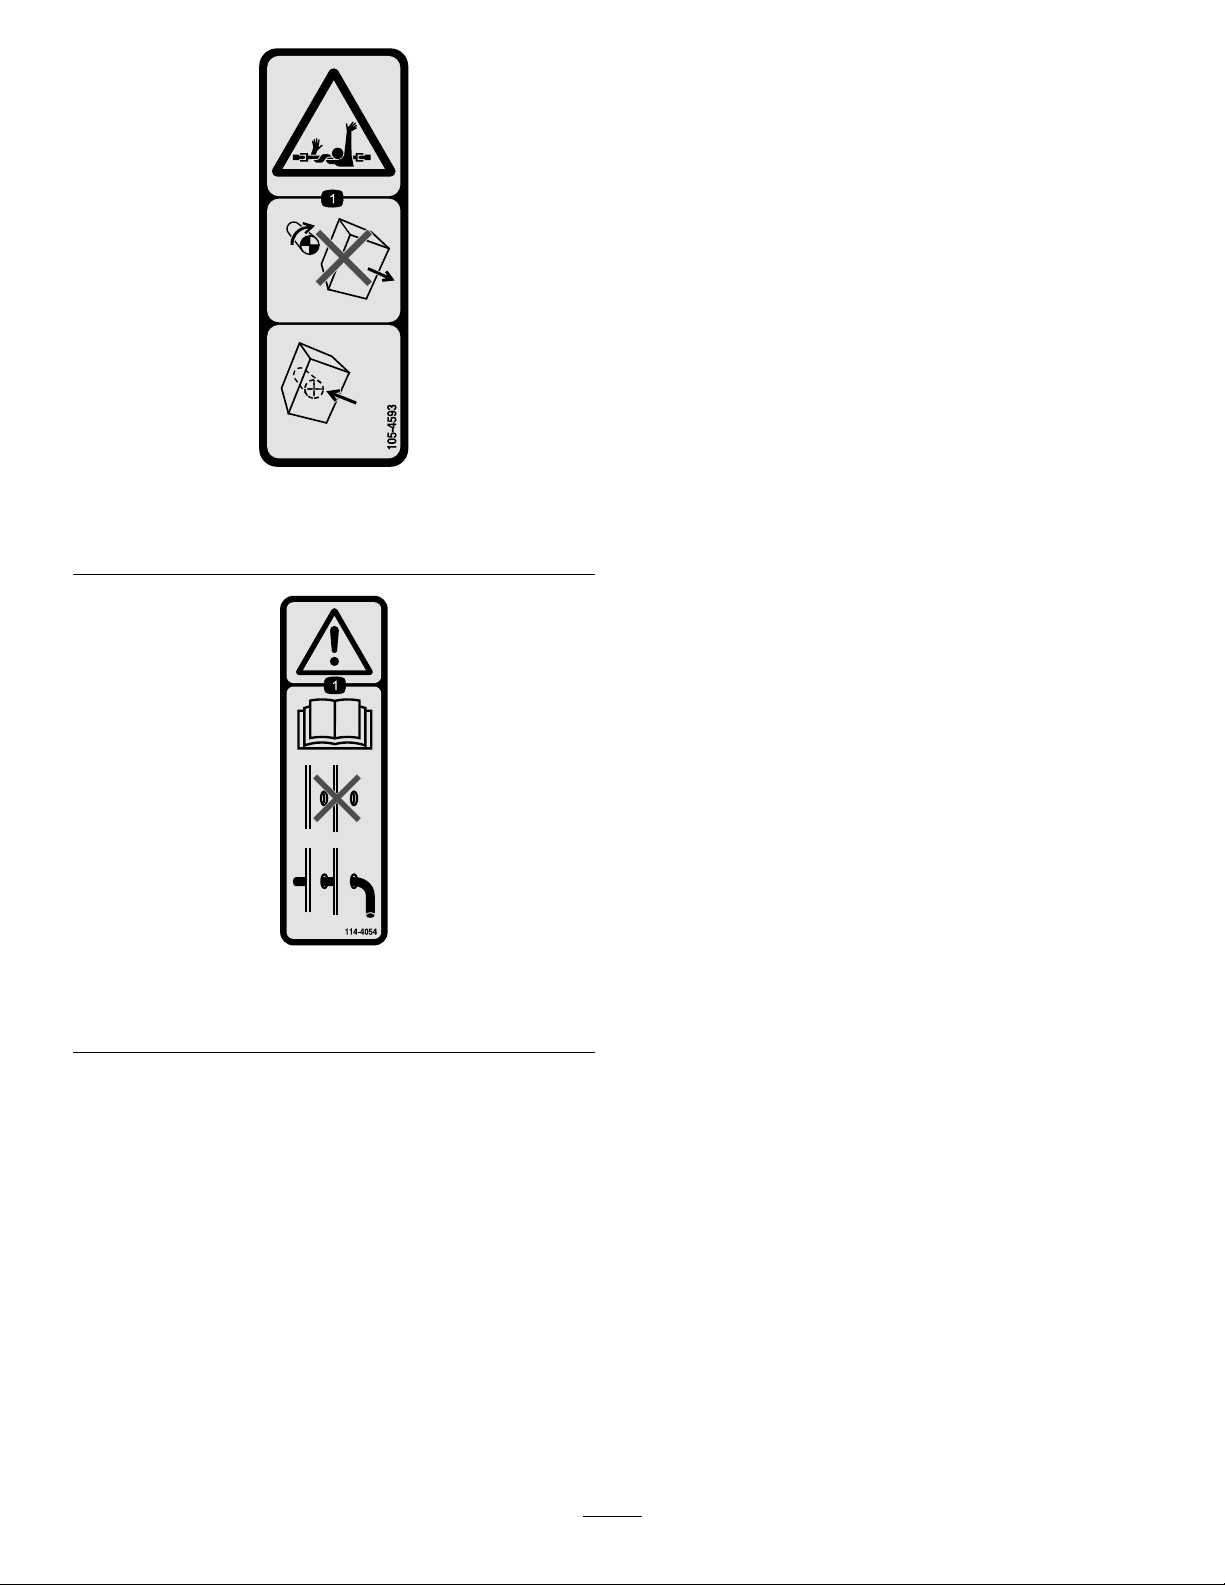
114–4054
1.Warning—readtheOperator’sManual,donotoperatethe
machinewithoutthecrosspininplace.
5
Page 6
Setup
LooseParts
Usethechartbelowtoverifythatallpartshavebeenshipped.
ProcedureDescription
1
2
3
4
5
Nopartsrequired
Debrisblowerassembly1
Lockingpin1
Hairpincotter1
Nopartsrequired
Nopartsrequired
Nopartsrequired
MediaandAdditionalParts
Description
Operator'sManual
PartsCatalog
Note:Determinetheleftandrightsidesofthemachine
fromthenormaloperatingposition.
Qty.
Qty.
–
–
–
–
1
1
Reviewthemanualbeforeoperatingthemachine.
Usethecatalogtoreferenceproductpartnumbers.
Mountthecastorwheel.
Mountthedebrisblowertothetraction
unit.
Adjustthelinkassembly .
Greasetheblower.
Installthefrontweight.
Use
Use
Note:Toinstallandoperatethedebrisblower,thetraction
unitmustbeequippedwiththeRearQuickAttachSystem,
Model30377andtheAuxiliaryHydraulicPowerKit,Model
30380.
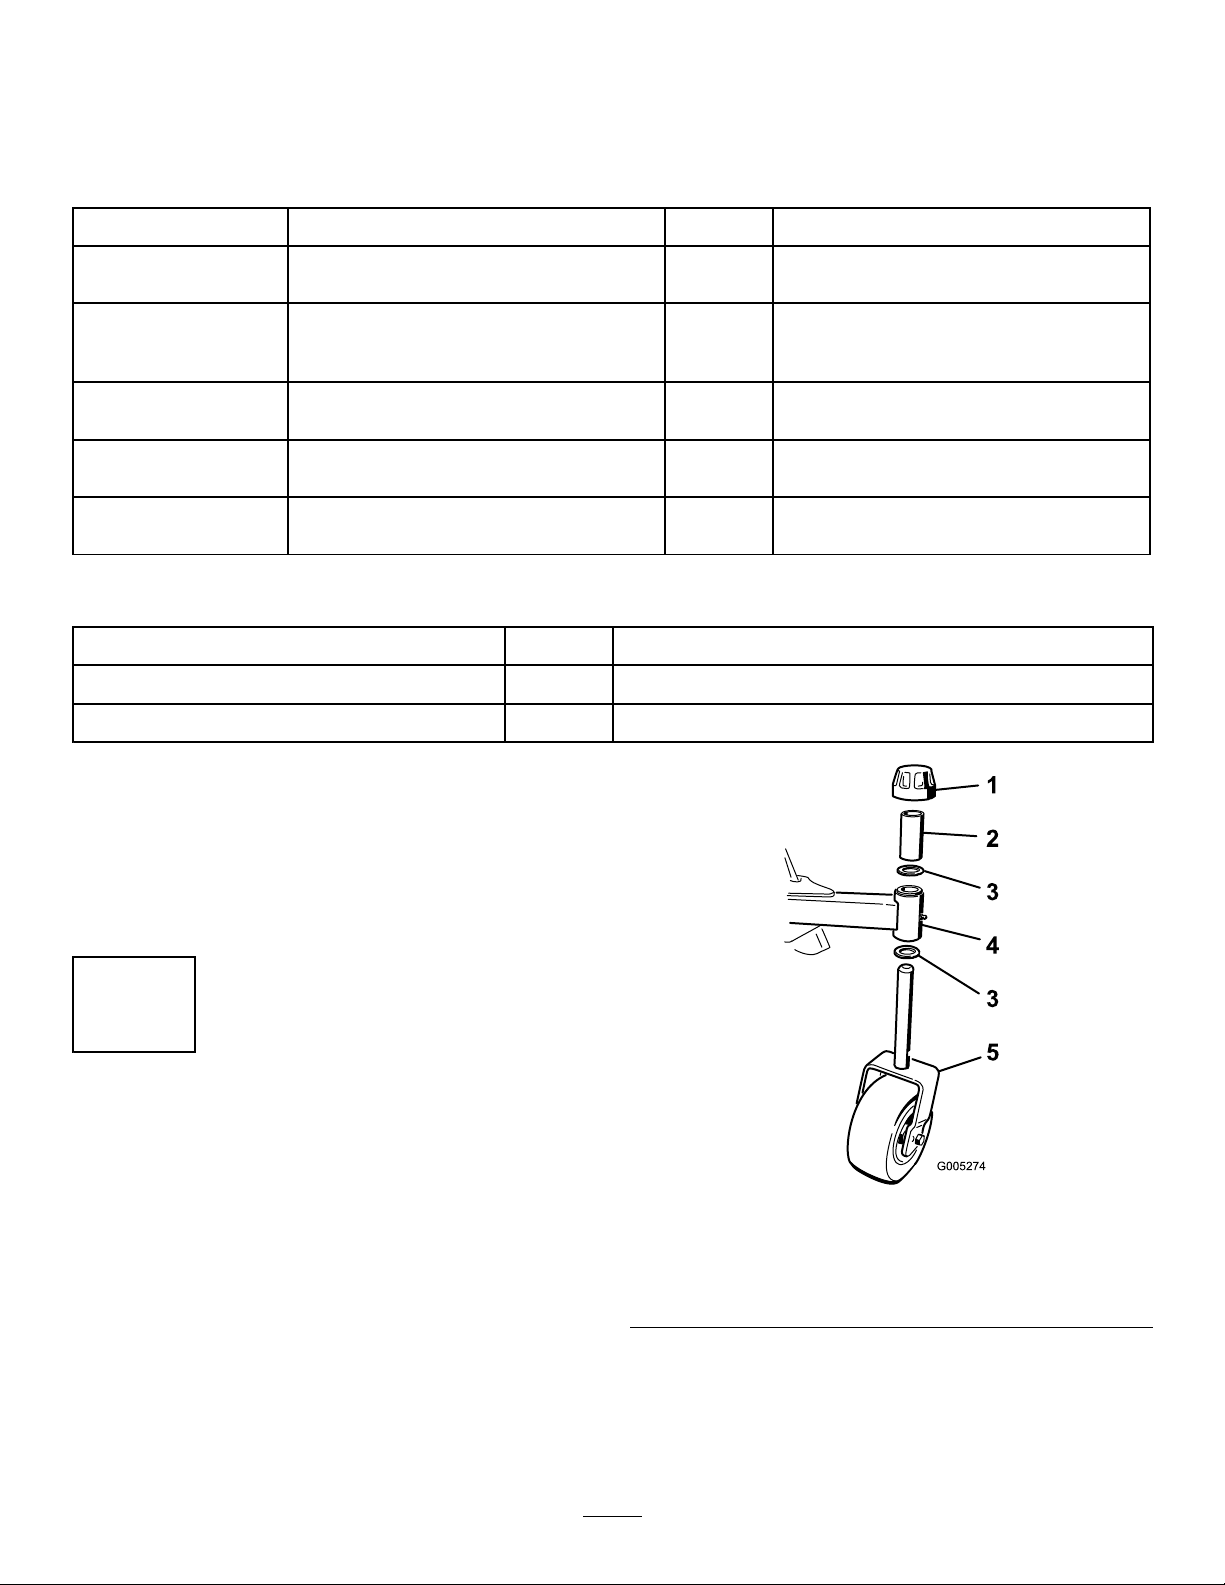
1
MountingtheCastorWheel
NoPartsRequired
Procedure
1.Removethetensioningcapfromthecastorwheel
spindleshaft(Figure3).Slidethespacerandonethrust
washeroffthespindleshaft.Leaveonethrustwasher
ontheshaft.
Figure3
1.Tensioningcap
2.Spacer5.Castorwheel
3.Thrustwasher(2)
2.Pushthecastorspindleupthroughthebushingsinthe
blowerframe,insertanotherthrustwasherontothe
shaft,slidethespacerontothespindleshaftandinstall
thetensioningcaptosecuretheassembly(Figure3).
4.Blowerframecastortube
6
Page 7

3.Makesurethecastorwheelassemblytireisinatedto
G003810
1
2
1
G006618
35to50psi.
2
MountingtheDebrisBlowerto theTractionUnit
Partsneededforthisprocedure:
1Debrisblowerassembly
1Lockingpin
1Hairpincotter
Procedure
5.Insertthelockingpinthroughtheadaptersandsecure
withahairpincotter(Figure5).
1.Removeanyattachmentfromtherearofthemachine.
2.Backthetractionunitintopositionbehindthe
attachmentadapter.
Note:Makesurethelockinglever(Figure4)ispivoted
totheleft(unlockedposition)asviewedfromtherear
ofthemachine.
1.Lockingpin
6.Routethehosesthroughthehosesupportloop.
7.Removethedustplugsfromthehydrauliccouplers
andmakesurethatthecouplersarefreeofanydirtor
contamination.
8.Connecttheattachmenthydraulichosecouplerstothe
hydrauliccouplersonthetractionunitrearauxiliary
hydraulicpowerkit.
Important:Wheneverthehydraulichosecouplers
aredisconnected,makesurethatthedustplugs
areinstalledtopreventcontaminationfrom
enteringeitherhydraulicsystem.
Figure5
3
AdjustingtheLinkAssembly
NoPartsRequired
Figure4
1.Attachmentadapter2.Lockinglever
3.Raisethetractionunitadapterintotheattachment
adapter.
4.Pivotthelockinglevertotherighttolocktheadapters
together.
Procedure
1.Withthedebrisblowermountedandsecuredonthe
tractionunit,raisetheattachment.
2.Measurethegapbetweenthetopwasherandthe
spacerinthelinkassemblyontheattachmentadapter
asshowninFigure6.
Note:Thegapbetweenthewasherandtheshoulder
shouldbe1.5to2.0mm(0.060to0.080inch).
7
Page 8

G00381 1
1
2
3
Figure6
5
InstallingtheFrontWeight
NoPartsRequired
Procedure
CAUTION
Whenanattachmentisnotinstalledonthe
machine,looseweightsmustberemoved.Never
operatethemachinewithnoattachmentinstalled
andfrontweightsonthemachine.
Usethefollowingweightchartstodeterminethecorrect
amountoffrontweightrequiredforyourmachine.
1.1.5to2.0mm(0.060to
0.080inch)
2.Jamnut
3.Adjustmentnut
4
GreasingtheBlower
NoPartsRequired
Procedure
BeforetheDebrisBlowerisoperated,itmustbegreasedto
assureproperlubrication.RefertotheLubricationsectionof
themanual.Failuretoproperlygreasetheunitwillresultin
prematurefailureofcriticalparts.
8
Page 9

72-inchwidthofcut
Groundsmaster7200/7210withNOhardcanopy
Attachment
RearQASandno
attachment(Model
30377)
QASnishgrader/box
rake(Model08754)
Steeldragmat(Model
08757)
Toothrake(Model
08751)
Toothrakewithspring
rake(Model08752)
Cocodragmat(Model
08758)
QASnaildrag(Model
08761)
QASdebrisblower
(Model08759)
Rahngroomer(allied
product)
Additionalfrontweight
0kg(0lb)n/a
0kg(0lb)n/a
0kg(0lb)n/a
0kg(0lb)n/a
0kg(0lb)n/a
30.4kg(67lb)
30.4kg(67lb)
49.4kg(109lb)
49.4kg(109lb)
required
Weightpartnumber(s)
114-4090and
114-4096
114-4090and
114-4096
114-4090and
114-4096
114-4090and
114-4096
Weightdescription
frontweightbracketand
19kg(42lb)frontweight
frontweightbracketand
19kg(42lb)frontweight
frontweightbracketand
19kg(42lb)frontweight
frontweightbracketand
19kg(42lb)frontweight
Qty
1
1
1
1
1
2
1
2
72-inchwidthofcut
Groundsmaster7200/7210withhardcanopy
Attachment
RearQASandno
attachment(Model
30377)
QASnishgrader/box
rake(Model08754)
Steeldragmat(Model
08757)
Toothrake(Model
08751)
Toothrakewithspring
rake(Model08752)
Cocodragmat(Model
08758)
QASnaildrag(Model
08761)
QASdebrisblower
(Model08759)
Rahngroomer(allied
product)
Additionalfrontweight
required
0kg(0lb)n/a
11.3kg(25lb)
11.3kg(25lb)
11.3kg(25lb)
11.3kg(25lb)
49.4kg(109lb)
49.4kg(109lb)
68.5kg(151lb)
68.5kg(151lb)
WeightpartnumberWeightdescription
114-4090or
Model30375
114-4090or
Model30375
114-4090or
Model30375
114-4090or
Model30375
114-4090and
114-4096
114-4090and
114-4096
114-4090and
114-4096
114-4090and
114-4096
frontweightbracketor
Jack-StandKit
frontweightbracketor
Jack-StandKit
frontweightbracketor
Jack-StandKit
frontweightbracketor
Jack-StandKit
frontweightbracketand
19kg(42lb)frontweight
frontweightbracketand
19kg(42lb)frontweight
frontweightbracketand
19kg(42lb)frontweight
frontweightbracketand
19kg(42lb)frontweight
Qty
1
1
1
1
1
1
1
1
1
2
1
2
1
3
1
3
9
Page 10

62-inchwidthofcut
Groundsmaster7200/7210withNOhardcanopy
Attachment
RearQASandno
attachment(Model
30377)
QASnishgrader/box
rake(Model08754)
Steeldragmat(Model
08757)
Toothrake(Model
08751)
Toothrakewithspring
rake(Model08752)
Cocodragmat(Model
08758)
QASnaildrag(Model
08761)
QASdebrisblower
(Model08759)
Rahngroomer(allied
product)
Additionalfrontweight
30.4kg(67lb)
68.5kg(151lb)
68.5kg(151lb)
49.4kg(109lb)
68.5kg(151lb)
68.5kg(151lb)
68.5kg(151lb)
68.5kg(151lb)
68.5kg(151lb)
requiredWeightpartnumber(s)WeightdescriptionQty
114-4090and
114-4096
114-4090and
114-4096
114-4090and
114-4096
114-4090and
114-4096
114-4090and
114-4096
114-4090and
114-4096
114-4090and
114-4096
114-4090and
114-4096
114-4090and
114-4096
frontweightbracketand
19kg(42lb)frontweight
frontweightbracketand
19kg(42lb)frontweight
frontweightbracketand
19kg(42lb)frontweight
frontweightbracketand
19kg(42lb)frontweight
frontweightbracketand
19kg(42lb)frontweight
frontweightbracketand
19kg(42lb)frontweight
frontweightbracketand
19kg(42lb)frontweight
frontweightbracketand
19kg(42lb)frontweight
frontweightbracketand
19kg(42lb)frontweight
1
1
1
3
1
3
1
2
1
3
1
3
1
3
1
3
1
3
62-inchwidthofcut
Groundsmaster7200/7210withhardcanopy
Attachment
RearQASandno
attachment(Model
30377)
QASnishgrader/box
rake(Model08754)
Steeldragmat(Model
08757)
Toothrake(Model
08751)
Toothrakewithspring
rake(Model08752)
Cocodragmat(Model
08758)
QASnaildrag(Model
08761)
QASdebrisblower
(Model08759)
Rahngroomer(allied
product)
Additionalfrontweight
required
49.4kg(109lb)
87.5kg(193lb)
87.5kg(193lb)
68.5kg(151lb)
87.5kg(193lb)
87.5kg(193lb)
87.5kg(193lb)
87.5kg(193lb)
87.5kg(193lb)
WeightpartnumberWeightdescription
114-4090and
114-4096
114-4090and
114-4096
114-4090and
114-4096
114-4090and
114-4096
114-4090and
114-4096
114-4090and
114-4096
114-4090and
114-4096
114-4090and
114-4096
114-4090and
114-4096
frontweightbracketand
19kg(42lb)frontweight
frontweightbracketand
19kg(42lb)frontweight
frontweightbracketand
19kg(42lb)frontweight
frontweightbracketand
19kg(42lb)frontweight
frontweightbracketand
19kg(42lb)frontweight
frontweightbracketand
19kg(42lb)frontweight
frontweightbracketand
19kg(42lb)frontweight
frontweightbracketand
19kg(42lb)frontweight
frontweightbracketand
19kg(42lb)frontweight
Qty
1
2
1
3
1
4
1
3
1
4
1
4
1
4
1
4
1
4
10
Page 11

ProductOverview
G003812
1
2
Operation
Specications
Note:Specicationsanddesignaresubjecttochange
withoutnotice.
Netweight
Attachments/Accessories
AselectionofToroapprovedattachmentsandaccessoriesis
availableforusewiththemachinetoenhanceandexpand
itscapabilities.ContactyourAuthorizedServiceDealeror
Distributororgotowww .Toro.comforalistofallapproved
attachmentsandaccessories.
107kg(235lb)
AdjustingtheDischarge Opening
Thedischargeopening(Figure7)isadjustabletoincrease
ordecreaseairoutputvelocityandvolume.Decreasingthe
dischargeopeningsizeincreasesthevelocity.
1.Loosendischargeopeningdeectormountingscrews
(Figure7).
Figure7
1.Dischargeopening
deector
2.Pivotthedeectortothedesiredopening.
3.Tightenthemountingscrews.
2.Mountingscrew
SwitchOperation
Lift/Lowerswitch(Figure8)—MoveswitchtotheLift
positiontoraisetheattachmentandtotheLowerpositionto
lowertheattachment.
Float/Power-downSwitch(Figure8)—Movingtheswitch
totheFloatpositionallowstheattachmenttofollowthe
contouroftheground.MovingtheswitchtothePower-down
positionaddsweightfromthemachinetoincreaseground
engagementforce.Highergroundengagementforce
decreasesthetractioncapacityofthemachine.
Important:Onlyrunthedebrisblowerinthe
mode.Neverrunitinthe
totheblowerwilloccur.
P o w er -do wn
mode,ordamage
F loat
11
Page 12

Figure8
G003783
1
1.Float
2.Power-down
3.Lift/Lower
OperatingTips
WARNING
Dischargedairhasconsiderableforceandcould
causeinjuryorlossoffooting.
•Stayawayfromdischargeopeningwhen
machineisoperating.
•Keepbystandersawayfromdischargeopening
whenmachineisrunning.
Practiceblowingmaterial.Itisadvisabletoblowthesame
directionthewindisblowingtopreventmaterialfrom
blowingbackintotheclearedarea.
Donotclimbcurbswiththedebrisblowermountedtothe
machine.Alwaysndaramp.
Note:Iftheattachmentadapterbecomesstucktothe
tractionunitadapter,insertaprybar/screwdriverintothepry
slottodisengagetheparts(Figure9).
Figure9
1.Pryslot
12
Page 13

Maintenance
G003730
G003731
G003814
1223
Lubrication
Thedebrisblowerhasbearingsandbushingsthatmustbe
lubricatedregularly.Ifthemachineisoperatedundernormal
conditions,lubricatethebearingswith#2general-purpose,
lithium-basedgreaseafterevery8hoursofoperationordaily,
whichevercomesrst.Lubricatethettingsimmediately
aftereverywashing,regardlessoftheintervallisted.
Thelubricationpointsandquantitiesareasfollows:
Fanshaft—2(Figure10)
GreasingtheAttachmentAdapter
Ifthelockingleverontheattachmentadapterdoesnotpivot
freelyandeasily,applyalightcoatofgreasetotheareashown
inFigure12.
Figure12
BearingAlignment
Castorarmtube(Figure11)
Castorwheel(Figure11)
Ifthemotormountingbracketsareeverremoved,theymust
berealignedbeforethedebrisblowerisoperated.Refertothe
PartCatalogfortheAlignmentToolpartnumber.
1.Makesurethatthemountingbracketsareinstalledto
theblowerhousingbuttheboltsandnutsareloose
(Figure13).
Figure10
Figure13
1.Alignmenttool3.Fancoupler
2.Mountingbracket
Figure11
2.Insertthebearingalignmenttoolthroughthemounting
bracketsandintothefancoupler(Figure13).Make
surethatthespidercoupler(Figure14)isnotinthe
coupler.
13
Page 14

G003815
1
4
2
3
Figure14
G003816
1
G003817
1
1.Motorcoupler
2.Fancoupler
3.Setscrew(2each)
4.Couplerspider
3.Tightenthecapscrewsandthenutssecuringthe
mountingbracketstogetherandtotheblowerhousing.
4.Removethealignmenttoolandnishassembly.
TorquingFasteners
Ifthebloweriseverdisassembled,thefollowingfasteners
mustbetorquedasspecied.Also,applyLoctite242tothe
threadsbeforeinstalling.
•Thesetscrewssecuringthemotorandfanshaftcouplers
(Figure14)mustbetorquedto58to82in-lb.
•Thefanshaftbearingsetscrews(Figure15)mustbe
torquedto58to82in-lb.
Figure16
1.Fanmountingnut
ServicingtheCastorArm Bushings
Thecastorarmshavebushingspressedintothetopand
bottomofthetubeandaftermanyhoursofoperation,the
bushingswillwear.Tocheckthebushings,movethecastor
forkbackandforthandfromsidetoside.Ifthecastor
spindleislooseinsidethebushings,thebushingsareworn
andmustbereplaced.
1.Raisethedebrisblowersothatthewheelsareoffofthe
oor.Blocktheblowersothatitcannotaccidentally
fall.
2.Removethetensioningcap,spacer,andthrustwasher
fromthetopofthecastorspindle.
3.Pullthecastorspindleoutofthemountingtube.Allow
thethrustwasherandspacertoremainonthebottom
ofthespindle.
Figure15
1.Setscrew
•Thefanmountingnut(Figure16)mustbetorquedto
500ft-lb.
4.Insertapinpunchintothetoporbottomofthe
mountingtubeanddrivethebushingoutofthetube
(Figure17).Also,drivetheotherbushingoutofthe
tube.Cleantheinsideofthetubestoremovedirt.
14
Page 15

Figure17
1.Bushings
2.Castorarmtube
5.Applygreasetotheinsideandoutsideofthenew
bushings.Usingahammerandatplate,drivethe
bushingsintothemountingtube.
6.Inspectthecastorspindleforwearandreplaceitifit
isdamaged
7.Pushthecastorspindlethroughthebushingsand
mountingtube.Slidethethrustwasherandspaceronto
thespindle.Installthetensioningcaponthecastor
spindletoretainallpartsinplace.
ServicingtheCastorWheels andBearings
1.Removethelocknutfromtheboltholdingthecastor
wheelassemblyandwashersbetweenthecastorfork
(Figure18).Graspthecastorwheelandslidethebolt
outofthefork.Removethetirespannerfrominside
thewheelassembly.
Figure18
1.Locknut
2.Washer
3.Tirespanner6.Bolt
4.Castorfork
5.Castorwheel
2.Removeoneoftheouterbearingsfromthewheelhub
andallowtheinnerbearingtofallout(Figure19).
Removethebearingfromtheoppositesideofthe
wheelhub.
Figure19
1.Bearing(outer)3.Bearing(inner)
2.Wheelassembly
3.Checkthebearings(innerandouter),tirespanner,and
insideofthewheelhubforwear.Replaceanydamaged
parts.
4.Toassemblethecastorwheel,pushaouterbearinginto
thewheelhub.Wheninstallingthebearings,presson
theouterraceofthebearing.
5.Slidetheinnerbearingintothewheelhub.Pushthe
otherbearingintotheopenendofthewheelhubto
captivatethebearingspacerinsidethewheelhub.
6.Insertthetirespannerintothewheelassembly.
7.Installthecastorwheelassemblyandwashersbetween
thecastorforkandsecureitinplacewiththeboltand
locknut.
15
Page 16

Notes:
16
Page 17

Notes:
17
Page 18

Notes:
18
Page 19

DeclarationofIncorporation
TheT oroCompany ,8111LyndaleAve.South,Bloomington,MN,USAdeclaresthatthefollowingunit(s)
conform(s)tothedirectiveslisted,wheninstalledinaccordancewiththeaccompanyinginstructionsontocertain
ToromodelsasindicatedontherelevantDeclarationsofConformity.
ModelNo.
30393315000001andUpDebrisBlower
SerialNo.
ProductDescriptionInvoiceDescription
GeneralDescription
DEBRISBLOWER-GM
7200/7210
DebrisBlower
Directive
2006/42/EC,
2000/14/EC
RelevanttechnicaldocumentationhasbeencompiledasrequiredperPartBofAnnexVIIof2006/42/EC.
Wewillundertaketotransmit,inresponsetorequestsbynationalauthorities,relevantinformationonthispartly
completedmachinery.Themethodoftransmissionshallbeelectronictransmittal.
ThismachineryshallnotbeputintoserviceuntilincorporatedintoapprovedToromodelsasindicatedonthe
associatedDeclarationofConformityandinaccordancewithallinstructions,wherebyitcanbedeclaredin
conformitywithallrelevantDirectives.
Certied:EUTechnicalContact:
PeterT etteroo
ToroEuropeNV
B-2260Oevel-Westerloo
Belgium
DavidKlisTel.003214562960
Sr.EngineeringManager
811 1LyndaleAve.South
Bloomington,MN55420,USA
September26,2013
Fax003214581911
19
Page 20

ToroGeneralCommercialProductWarranty
ATwo-YearLimitedWarranty
ConditionsandProductsCovered
TheToroCompanyanditsafliate,ToroWarrantyCompany,pursuant
toanagreementbetweenthem,jointlywarrantyourT oroCommercial
product(“Product”)tobefreefromdefectsinmaterialsorworkmanship
fortwoyearsor1500operationalhours*,whicheveroccursrst.This
warrantyisapplicabletoallproductswiththeexceptionofAerators
(refertoseparatewarrantystatementsfortheseproducts).Wherea
warrantableconditionexists,wewillrepairtheProductatnocosttoyou
includingdiagnostics,labor,parts,andtransportation.Thiswarranty
beginsonthedatetheProductisdeliveredtotheoriginalretailpurchaser.
*Productequippedwithanhourmeter.
InstructionsforObtainingWarrantyService
YouareresponsiblefornotifyingtheCommercialProductsDistributoror
AuthorizedCommercialProductsDealerfromwhomyoupurchasedthe
Productassoonasyoubelieveawarrantableconditionexists.Ifyouneed
helplocatingaCommercialProductsDistributororAuthorizedDealer,or
ifyouhavequestionsregardingyourwarrantyrightsorresponsibilities,
youmaycontactusat:
ToroCommercialProductsServiceDepartment
ToroWarrantyCompany
811 1LyndaleAvenueSouth
Bloomington,MN55420-1196
952–888–8801or800–952–2740
E-mail:commercial.warranty@toro.com
OwnerResponsibilities
AstheProductowner,youareresponsibleforrequiredmaintenanceand
adjustmentsstatedinyourOperator'sManual.Failuretoperformrequired
maintenanceandadjustmentscanbegroundsfordisallowingawarranty
claim.
ItemsandConditionsNotCovered
Notallproductfailuresormalfunctionsthatoccurduringthewarranty
periodaredefectsinmaterialsorworkmanship.Thiswarrantydoesnot
coverthefollowing:
•Productfailureswhichresultfromtheuseofnon-T ororeplacement
parts,orfrominstallationanduseofadd-on,ormodiednon-Toro
brandedaccessoriesandproducts.Aseparatewarrantymaybe
providedbythemanufactureroftheseitems.
•Productfailureswhichresultfromfailuretoperformrecommended
maintenanceand/oradjustments.Failuretoproperlymaintainyour
ToroproductpertheRecommendedMaintenancelistedinthe
Operator’sManualcanresultinclaimsforwarrantybeingdenied.
•ProductfailureswhichresultfromoperatingtheProductinanabusive,
negligent,orrecklessmanner.
•Partssubjecttoconsumptionthroughuseunlessfoundtobedefective.
Examplesofpartswhichareconsumed,orusedup,duringnormal
Productoperationinclude,butarenotlimitedto,brakepadsand
linings,clutchlinings,blades,reels,rollersandbearings(sealedor
greasable),bedknives,sparkplugs,castorwheelsandbearings,tires,
lters,belts,andcertainsprayercomponentssuchasdiaphragms,
nozzles,andcheckvalves,etc.
•Failurescausedbyoutsideinuence.Conditionsconsideredtobe
outsideinuenceinclude,butarenotlimitedto,weather,storage
practices,contamination,useofunapprovedfuels,coolants,lubricants,
additives,fertilizers,water,orchemicals,etc.
•Failureorperformanceissuesduetotheuseoffuels(e.g.gasoline,
diesel,orbiodiesel)thatdonotconformtotheirrespectiveindustry
standards.
•Normalnoise,vibration,wearandtear ,anddeterioration.
•Normal“wearandtear”includes,butisnotlimitedto,damagetoseats
duetowearorabrasion,wornpaintedsurfaces,scratcheddecalsor
windows,etc.
Parts
Partsscheduledforreplacementasrequiredmaintenancearewarranted
fortheperiodoftimeuptothescheduledreplacementtimeforthatpart.
Partsreplacedunderthiswarrantyarecoveredforthedurationofthe
originalproductwarrantyandbecomethepropertyofT oro.Torowillmake
thenaldecisionwhethertorepairanyexistingpartorassemblyorreplace
it.T oromayuseremanufacturedpartsforwarrantyrepairs.
DeepCycleandLithium-IonBatteryWarranty:
DeepcycleandLithium-Ionbatterieshaveaspeciedtotalnumberof
kilowatt-hourstheycandeliverduringtheirlifetime.Operating,recharging,
andmaintenancetechniquescanextendorreducetotalbatterylife.Asthe
batteriesinthisproductareconsumed,theamountofusefulworkbetween
chargingintervalswillslowlydecreaseuntilthebatteryiscompletelyworn
out.Replacementofwornoutbatteries,duetonormalconsumption,
istheresponsibilityoftheproductowner.Batteryreplacementmaybe
requiredduringthenormalproductwarrantyperiodatowner’sexpense.
Note:(Lithium-Ionbatteryonly):ALithium-Ionbatteryhasapartonly
proratedwarrantybeginningyear3throughyear5basedonthetime
inserviceandkilowatthoursused.RefertotheOperator'sManualfor
additionalinformation.
MaintenanceisatOwner’sExpense
Enginetune-up,lubrication,cleaningandpolishing,replacementoflters,
coolant,andcompletingrecommendedmaintenancearesomeofthe
normalservicesT oroproductsrequirethatareattheowner’sexpense.
GeneralConditions
RepairbyanAuthorizedToroDistributororDealerisyoursoleremedy
underthiswarranty.
NeitherTheToroCompanynorToroWarrantyCompanyisliablefor
indirect,incidentalorconsequentialdamagesinconnectionwiththe
useoftheToroProductscoveredbythiswarranty,includingany
costorexpenseofprovidingsubstituteequipmentorserviceduring
reasonableperiodsofmalfunctionornon-usependingcompletion
ofrepairsunderthiswarranty.ExceptfortheEmissionswarranty
referencedbelow,ifapplicable,thereisnootherexpresswarranty .All
impliedwarrantiesofmerchantabilityandtnessforusearelimitedto
thedurationofthisexpresswarranty.
Somestatesdonotallowexclusionsofincidentalorconsequential
damages,orlimitationsonhowlonganimpliedwarrantylasts,sotheabove
exclusionsandlimitationsmaynotapplytoyou.Thiswarrantygivesyou
speciclegalrights,andyoumayalsohaveotherrightswhichvaryfrom
statetostate.
Noteregardingenginewarranty:
TheEmissionsControlSystemonyourProductmaybecoveredby
aseparatewarrantymeetingrequirementsestablishedbytheU.S.
EnvironmentalProtectionAgency(EP A)and/ortheCaliforniaAirResources
Board(CARB).Thehourlimitationssetforthabovedonotapplytothe
EmissionsControlSystemWarranty.RefertotheEngineEmissionControl
WarrantyStatementsuppliedwithyourproductorcontainedintheengine
manufacturer’sdocumentationfordetails
CountriesOtherthantheUnitedStatesorCanada
CustomerswhohavepurchasedT oroproductsexportedfromtheUnitedStatesorCanadashouldcontacttheirT oroDistributor(Dealer)toobtain
guaranteepoliciesforyourcountry ,province,orstate.IfforanyreasonyouaredissatisedwithyourDistributor'sserviceorhavedifcultyobtaining
guaranteeinformation,contacttheT oroimporter.
374-0253RevC
 Loading...