


FormNo.3425-683RevA
3bu.SoftBag
36inandLargerFixedandFloatingDeck
Walk-BehindMower
ModelNo.30104
Registeratwww.T oro.com.
OriginalInstructions(EN)
*3425-683*A

Introduction
Readthisinformationcarefullytolearnhowtooperate
andmaintainyourproductproperlyandtoavoid
injuryandproductdamage.Youareresponsiblefor
operatingtheproductproperlyandsafely .
Visitwww.Toro.comforproductsafetyandoperation
trainingmaterials,accessoryinformation,helpnding
adealer,ortoregisteryourproduct.
Wheneveryouneedservice,genuineT oroparts,or
additionalinformation,contactanAuthorizedService
DealerorT oroCustomerServiceandhavethemodel
andserialnumbersofyourproductready .Figure1
identiesthelocationofthemodelandserialnumbers
ontheproduct.Writethenumbersinthespace
provided.
Thismanualidentiespotentialhazardsandhas
safetymessagesidentiedbythesafety-alertsymbol
(Figure1),whichsignalsahazardthatmaycause
seriousinjuryordeathifyoudonotfollowthe
recommendedprecautions.
Safety
DANGER
Theenginecanbecomehotwhenoperating.
Severeburnscanoccurfromcontactinghot
surfaces.
Allowengines,especiallythemufer,tocool
beforetouching.
DANGER
Debris,suchasleaves,grass,orbrushcan
catchre.Areintheengineareacancause
personalinjuryandpropertydamage.
•Keeptheengineandmuferareafreeof
debris.
•Takecarewhenopeningthebaggercover
tokeepdebrisfromfallingontotheengine
andmuferarea.
•Allowthemachinetocoolbeforestoringit.
Figure1
Safety-alertsymbol
Thismanualuses2wordstohighlightinformation.
Importantcallsattentiontospecialmechanical
informationandNoteemphasizesgeneralinformation
worthyofspecialattention.
Contents
Safety.......................................................................2
SafetyandInstructionalDecals..........................3
Setup........................................................................4
1AssemblingtheBagger....................................5
2AssemblingtheBagandFrame.......................6
3InstallingtheBaggerontotheMower................7
Operation..................................................................9
RemovingtheBaggerfromtheMachine.............9
EmptyingtheBagger..........................................9
ClearingObstructions.........................................9
OperatingTips.................................................10
Maintenance............................................................11
InspectingtheBagger........................................11
CleaningtheBagger..........................................11
StoringtheGrassCatcher.................................11
•Becomefamiliarwiththesafeoperationofthe
equipment,withtheoperatorcontrols,andsafety
g000502
signs.
•Useextracarewithgrasscatchersorother
attachments.Thesecanchangetheoperating
characteristicsandthestabilityofthemachine.
•Donotoperatewiththedischargedeectorraised,
removedoraltered,unlessusingagrasscatcher.
•Keephandsandfeetawayfrommovingparts.Do
notmakeadjustmentswiththeenginerunning.
•Stopthemachineonlevelground,disengage
thedrives,chockorblockthewheels,shutoff
theengine,andremovethekeybeforeleaving
theoperator'spositionforanyreason,including
emptyingthegrasscatcheroruncloggingthe
chute.
•Ifyouremovethegrasscatcher,installany
dischargedeectororguardthatmighthavebeen
removedtoinstallthegrasscatcher.Donot
operatethemachinewithouteithertheentiregrass
catcherorthegrassdeectorinplace.
•Grasscatchercomponentsaresubjecttowear,
damageanddeterioration,whichcouldexpose
movingpartsorallowobjectstobethrown.
Frequentlycheckcomponentsandreplace
withmanufacturer'srecommendedparts,when
necessary.
©2018—TheToro®Company
8111LyndaleAvenueSouth
Bloomington,MN55420
Contactusatwww.T oro.com.
2
PrintedintheUSA
AllRightsReserved
SafetyandInstructionalDecals
Safetydecalsandinstructionsareeasilyvisibletotheoperatorandarelocatednearanyarea
ofpotentialdanger.Replaceanydecalthatisdamagedormissing.
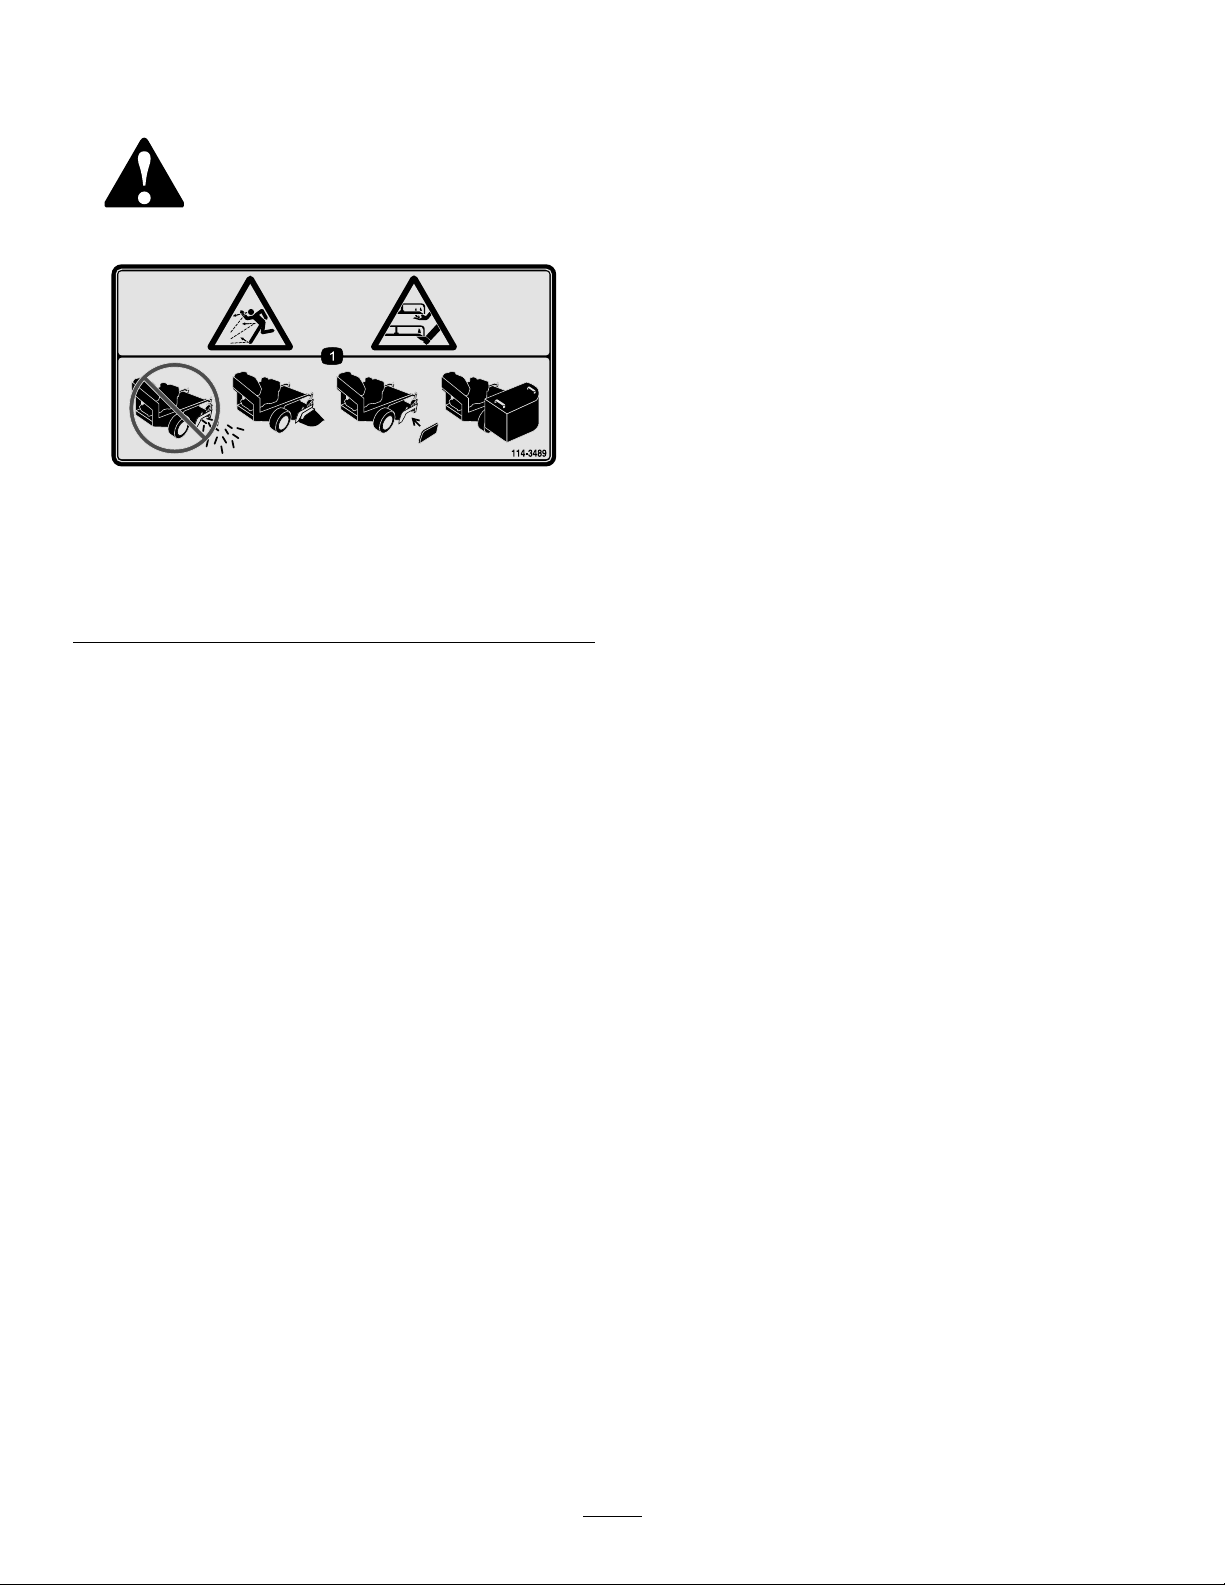
114-3489
1.Thrownobjecthazard;cutting/dismembermenthazard—do
notoperatethemachinewiththedischargeopening
uncovered;alwaysoperatethemachinewiththerear
dischargedeector,dischargecover,orgrasscollector
installed.
decal114-3489
3

Setup
LooseParts
Usethechartbelowtoverifythatallpartshavebeenshipped.
ProcedureDescription
1
2
3
Backplate1
Support
Mountingbracket1
Bolt(1/4x5/8inch)
Locknut(1/4inch)
Leftlatch
Rightlatch1
Phillipsheadscrew(#10)
Locknut(#10)
Lockwasher(#10)
Bagandpan1
Catcherframe
Handle2
Bolt(1/4x1inch)
Locknut(1/4inch)
Washer(1/4inch)
Baggerclamp1
Bolt(3/8x1inch)
Locknut(3/8inch)
Qty.
1
7
7
1
4
4
4
1
4
4
4
1
1
Note:Determinetheleftandrightsidesofthemachinefromthenormaloperatingposition.
Use
Assemblethebagger.
Assemblethebagandframe.
Installthebaggerontothemower.
4

1
AssemblingtheBagger
Partsneededforthisprocedure:
1Backplate
1
Support
1Mountingbracket
7
Bolt(1/4x5/8inch)
7
Locknut(1/4inch)
1
Leftlatch
1Rightlatch
4
Phillipsheadscrew(#10)
4
Locknut(#10)
4
Lockwasher(#10)
3.Installthelatchestobothsidesofthebackplate
using4phillips-headscrews,lockwashers,and
locknuts(#10)asshowninFigure3.
Important:Donotcompletelytightenthe
nuts;thelatchesshouldbeabletomoveup
anddown.
Procedure
1.Installthesupportonthebackplateusing4
bolts(1/4x5/8inch)andlocknuts(1/4inch)as
showninFigure2.
2.Installthemountingbracketonthebackplate
using3bolts(1/4x5/8inch)andlocknuts(1/4
inch)asshowninFigure2.
Figure2
g002156
Figure3
1.Locknut(#10)
2.Rightlatch5.Backplate
3.Lockwasher
g002155
4.Phillips-headscrew
6.Leftlatch
1.Backplate
2.Support5.Locknut(1/4inch)
3.Mountingbracket
4.Bolt(1/4x5/8inch)
5

2
AssemblingtheBagand Frame
Partsneededforthisprocedure:
1Bagandpan
1
Catcherframe
2Handle
4
Bolt(1/4x1inch)
4
Locknut(1/4inch)
4
Washer(1/4inch)
Procedure
1.Slidetheuppercurvedportionofthebagger
frameintothebagandthelongstraightrod
downtowardthepan.
5.Push2bolts(1/4x1inch)througheachhandle
andthefabricfromtheoutside,andsecurethem
with4washers(1/4inch),andlocknuts(1/4
inch)asshowninFigure5.
Figure5
1.Handle
2.Bolt(1/4x1inch)4.Locknut(1/4inch)
3.Washer(1/4inch)
g002159
2.SnaptheJ-stripsovertheframerods(Figure4).
Figure4
1.Rod2.J-strip
3.Arrangethebagaroundtheframe.
4.Placethehandlesovertheslotsoneachside
oftheframe.
g002158
6

3
InstallingtheBaggeronto theMower
Partsneededforthisprocedure:
1Baggerclamp
1
Bolt(3/8x1inch)
1
Locknut(3/8inch)
Procedure
WARNING
Anuncovereddischargeopeningcouldallow
thelawnmowertothrowobjectstowardyou
orbystanders,resultinginseriousinjury.
Also,contactwiththebladecouldoccur.
3.Placetherearhookoverthemowermounting
bracket(Figure6).
g002160
Figure6
1.Fronthook3.Frontslot
2.Rearhook4.Mowermountingbracket
•Donotoperatethemachinewithoutthe
baginstalledorthegrassdeectordown.
•Ensurethatthegrassdeectorisdown
whenthebackplateandbagareremoved.
Note:Inthestepsbelow,theboltsarethreaded
intothemowerdeck.Removethenutsrstbefore
removingbolts.
1.Liftthegrassdeectorallthewayup.
2.Positionthefronthookonthebaggermounting
bracketintothefrontslotofthemowermounting
bracket(Figure6).
7

4.Ifyouareinstallingthebaggerforthersttime
ormovingittoamowerofadifferentsize,install
ormovethebaggerclampasfollows:
A.Selecttheappropriateholeinthebackplate
foryourmowersize(Figure7).
B.Installthebaggerclampintheholeusinga
bolt(3/8x5/8inch)andlocknut(3/8inch),
asillustratedinFigure7.Theclampshould
toverthemowerframesecuringtheback
plate.
Note:Donotremoveorinstalltheclampto
removeorinstallthebackplatewhenusing
itonamowerofthesamesize.Lifttheback
plateoffofthemower.
6.Liftthelatchesandslidetheframesidepinsinto
them(Figure8).
7.Lowerthelatchestosecurethebagger.
g002161
Figure8
1.Backplateholes3.Latch
2.Framepin4.Lowerpin
Figure7
1.Backplate5.Baggerclamp
2.Slotfor36inchSFSmower
decksandallTurboForce
mowerdecks
3.Holefor52inchSFS
mowerdecks
4.Holefor44inchSFS
mowerdecks
6.Locknut(3/8inch)
7.Bolt(3/8x1inch)
5.Insertthelowerpinsofthebaggerframeintothe
holesinthebackplate(Figure8).
g002157
8

Operation
WARNING
Toavoidpersonalinjury,followthese
procedures:
•Becomefamiliarwithalloperatingand
safetyinstructionsintheOperator's
Manualforyourmachinebeforeusingthis
attachment.
•Beforedoinganyofthefollowing
proceduresorleavingtheoperator’s
position:
–DisengagethemachinePTO,movethe
motioncontrolleverstotheneutral
lockedposition,andsetthemachine
parkingbrake.
EmptyingtheBagger
1.DisengagethePTO,bringthemachineto
neutralpositionandsettheparkingbrake.
2.Shutofftheengine,removethekey ,andwait
forallmovingpartstostopbeforeleavingthe
operatingposition.
3.Liftthelatchesandremoveandemptythegrass
bag.
4.Insertthelowerpinsofthebaggerframeintothe
holesinthebackplate(Figure8).
5.Liftthelatchesandslidetheframesidepinsinto
them(Figure8).
6.Lowerthelatchestosecurethebagger.
ClearingObstructions
–Shutofftheengine,removethekey,and
waitforallmovingpartstostop.
•Donotremovethebagwhiletheengineis
running.
•Alwaysshutofftheengine,waitforall
movingpartstostop,andremovethekey
beforeclearinganobstructionfromthe
baggingsystem.
•Donotdomaintenanceorrepairswhilethe
engineisrunning.
RemovingtheBaggerfrom theMachine
1.DisengagethemachinePTO,movethemotion
controlleverstotheneutrallockedpositionand
setthemachineparkingbrake.
2.Shutofftheengine,removethekey ,andwait
forallmovingpartstostopbeforeleavingthe
operatingposition.
3.Liftthelatchesandremoveandemptythegrass
bag.
4.Liftthebackplateoffofthemower.
5.Lowerthegrassdeectorbackintoplace.
WARNING
Whenthemachineisinoperation,theblade
canberotatingandcutofforinjurehands.
•Beforeadjusting,cleaning,repairingand
inspectingtheblower,oruncloggingthe
chute,shutofftheengine,waitforall
movingpartstostop,andremovethekey.
•Useastick,notyourhands,toremovean
obstructionfromtheblowerandtube.
•Keepyourface,hands,feet,andanyother
partofyourbodyorclothingawayfrom
concealed,moving,orrotatingparts.
1.DisengagethePTO,movethemotioncontrol
leverstotheneutrallockedpositionandsetthe
parkingbrake.
2.Shutofftheengine,removethekey ,andwait
forallmovingpartstostopbeforeleavingthe
operatingposition.
3.Liftthelatchesandremoveandemptythegrass
bag.
4.Useastickorsimilarobject,notyourhands
toremoveandcleartheobstructionfromthe
mower.
5.Insertthelowerpinsofthebaggerframeintothe
holesinthebackplate(Figure8).
6.Liftthelatchesandslidetheframesidepinsinto
them(Figure8).
7.Lowerthelatchestosecurethebagger.
9

OperatingTips
MowerWidth
Themoweriswiderwiththebaggerinstalled.By
turningtoosharplyinconnedplacesyoumay
damagethebagger.
MowingSide
Mowwiththeleftsidetowardsobjectssuchastrees
orlandscaping.Donotmowwiththerightsideof
themowernearobjectsbecauseyoucoulddamage
thebagger.
MowingRoughTerrain
Whenmowingroughoruneventerrain,usecareto
avoiddamagingthebaggeragainsttheturf.
AvoidCuttingTooLow
Airowisrequiredtocutgrassandpropelitintothe
bag.Settingtheheight-of-cuttoolow,especiallyin
heavyorlonggrass,canrestricttheairowandplug
themowerorgrasscatcher.
AvoidPlugging
Toavoidpluggingwhencuttinglonggrass,double-cut
thegrass,rstatahighheight-of-cutandthenlower
themowertothedesiredsetting.Also,trytoleave
onesideofthemoweroutoftheuncutgrass,allowing
airtobedrawnintothemowerhousing.
10

Maintenance
CAUTION
Ifyouleavethekeyintheignitionswitch,
someonecouldaccidentlystarttheengine
andseriouslyinjureyouorotherbystanders.
Removethekeyfromtheignitionand
disconnectthewirefromthesparkplug
beforeyoudoanymaintenance.Setthewire
asidesothatitdoesnotaccidentallycontact
thesparkplug.
WARNING
Youorbystanderscouldbeseverely
injuredbyyingdebrisorthrownobjects
thatmaypassthroughtorn,worn,or
deterioratedgrassbags.
•Checkthegrassbagsforholes,rips,
wear,andotherdeterioration.
•Ifthebaghasdeteriorated,install
newgrassbagssuppliedby
themanufacturerofthisbagger
attachment.
DANGER
Enginescanbecomehotwhentheyare
operating.Severeburnscanoccurfrom
contactinghotsurfaces.
Allowengines,especiallythemufer,tocool
beforetouching.
DANGER
Debris,suchasleaves,grass,orbrushcan
catchre.Areintheengineareacancause
personalinjuryandpropertydamage.
•Keeptheengineandmuferareafreeof
debrisaccumulation.
•Takecarewhenopeningthebaggercover
tokeepdebrisfromfallingontotheengine
andmuferarea.
•Allowthemachinetocoolbeforestoringit.
CleaningtheBagger
ServiceInterval:Beforeeachuseordaily
Cleanthebaggeraftereachuse.
1.Removethebagandwashthebackplate
andtheundersideofthemower.Useamild
automotivedetergenttoremovestubborndirt.
Important:Donotpressurewashthe
bagger.
2.Removemattedgrassfromallparts.
3.Afterwashing,letallpartsdrythoroughly.
Note:Donotwashthegrassbags.
StoringtheGrassCatcher
1.Cleanthebagger;refertoCleaningtheBagger
(page11).
2.Inspectthebaggerfordamage;referto
InspectingtheBagger(page11).
3.Ensurethatthebagisemptyanddry.
InspectingtheBagger
ServiceInterval:Aftertherst10hours
Beforestorage
1.Inspectallthefastenersandlatches;replace
anythataremissingordamaged.
2.Inspectthebagfordamageandreplaceany
damagedparts.
3.Tightenallhardware.
4.Storethebaggerinaclean,dryplace,outof
directsunlight.Thisextendsthelifeofthe
bagger.Ifyoumuststoreitoutside,coveritwith
aweatherproofcover.
11

 Loading...