

Page 1

FormNo.3354-733RevB
SoftBagger(3bu.)
For36inandLargerFixedandFloatingDeck
Mid-SizeMowers
ModelNo.30104
ToregisteryourproductordownloadanOperator'sManualorPartsCatalogatnocharge,gotowww.T oro.com.OriginalInstructions(EN)
Page 2

Contents
Introduction
Readthisinformationcarefullytolearnhowtooperate
andmaintainyourproductproperlyandtoavoidinjury
andproductdamage.Youareresponsibleforoperating
theproductproperlyandsafely.
YoumaycontactTorodirectlyatwww.Toro.comfor
productandaccessoryinformation,helpndinga
dealer,ortoregisteryourproduct.
Wheneveryouneedservice,genuineToroparts,or
additionalinformation,contactanAuthorizedService
DealerorToroCustomerServiceandhavethemodel
numberofyourproductready.
Thismanualidentiespotentialhazardsandhas
safetymessagesidentiedbythesafetyalertsymbol
(Figure1),whichsignalsahazardthatmaycauseserious
injuryordeathifyoudonotfollowtherecommended
precautions.
Introduction.................................................................2
Safety...........................................................................3
SafetyandInstructionalDecals.............................3
Setup............................................................................4
1AssemblingtheBagger......................................4
2AssemblingtheBagandFrame...........................5
3InstallingtheBaggerontotheMower
........................................................................5
Operation.....................................................................7
RemovingtheBaggerfromtheMachine................7
EmptyingtheBagger............................................8
ClearingObstructions..........................................8
OperatingTips.....................................................8
Maintenance.................................................................9
InspectingtheBagger...........................................9
CleaningtheBagger..............................................9
CaringfortheGrassBagger..................................9
StoringtheGrassCatcher.....................................9
Figure1
1.Safetyalertsymbol
Thismanualuses2otherwordstohighlightinformation.
Importantcallsattentiontospecialmechanical
informationandNoteemphasizesgeneralinformation
worthyofspecialattention.
©2009—TheT oro®Company
8111LyndaleAvenueSouth
Bloomington,MN55420
Contactusatwww.T oro.com.
2
PrintedintheUSA.
AllRightsReserved
Page 3
Safety
Improperuseormaintenancebytheoperatororowner
canresultininjury.Toreducethepotentialforinjury,
complywiththesesafetyinstructionsandalwayspay
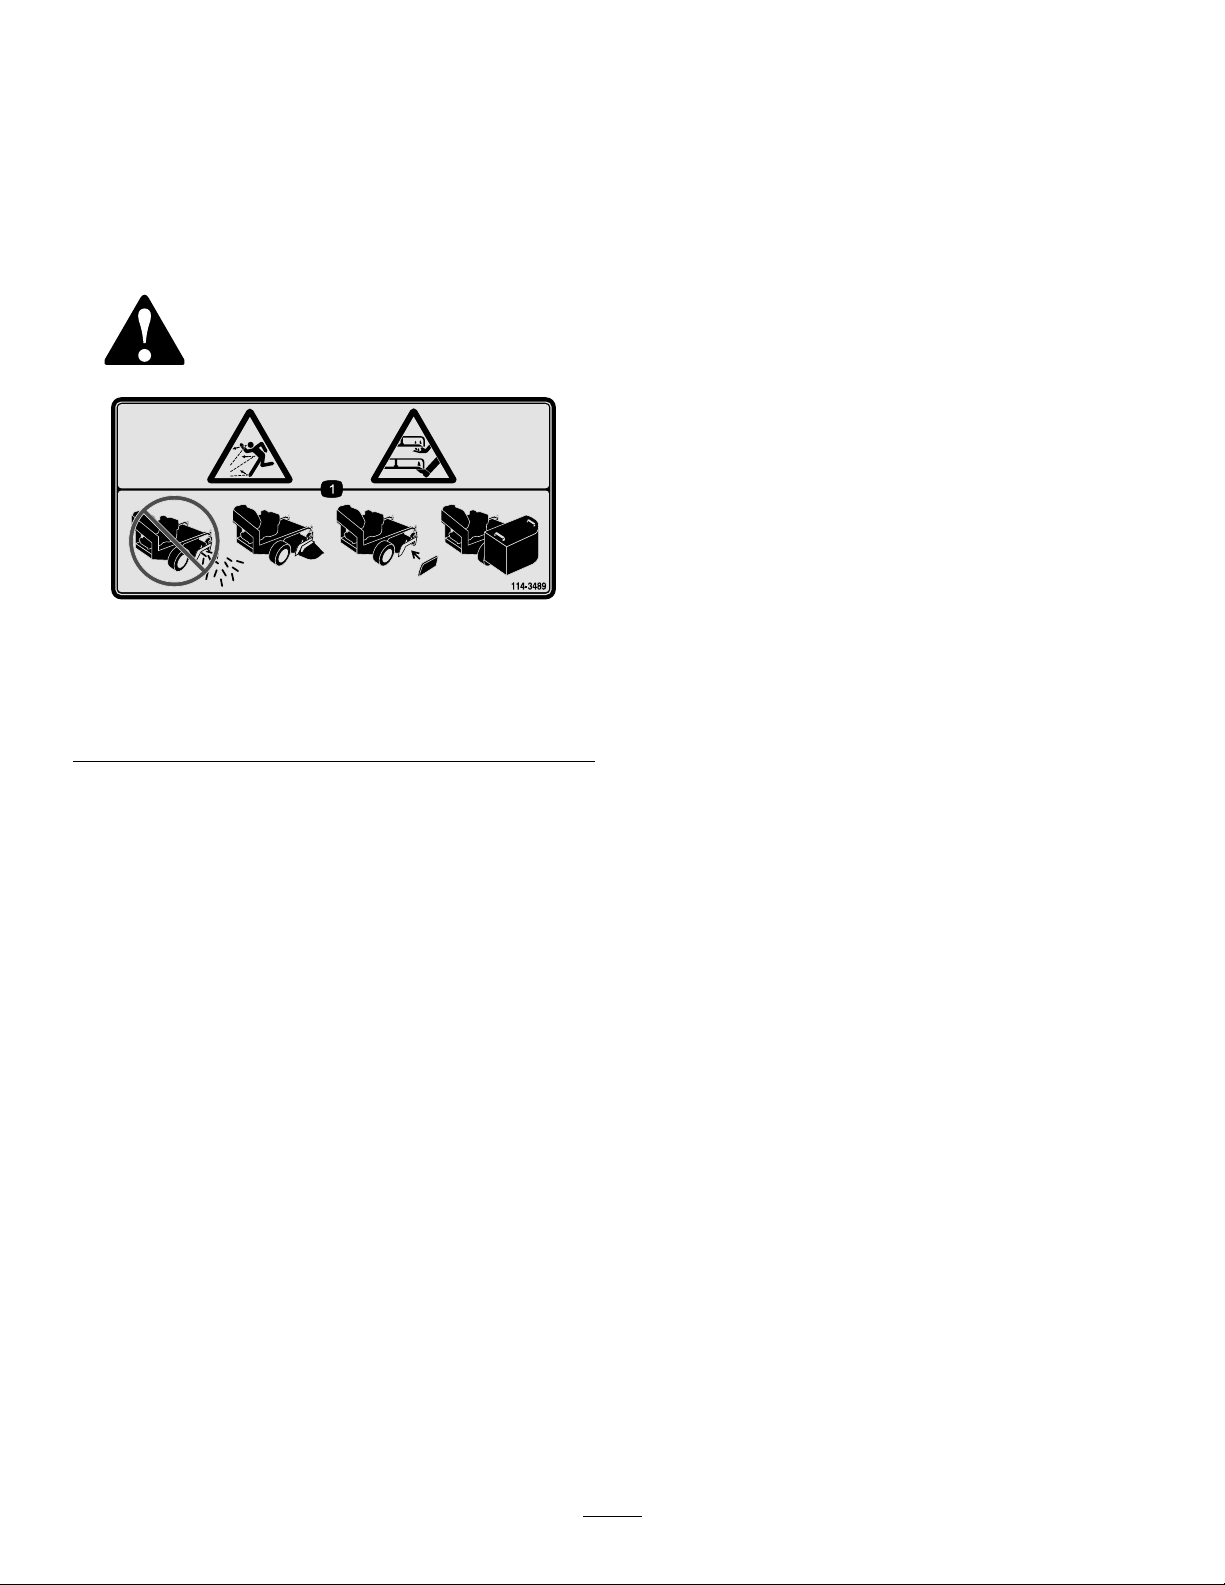
SafetyandInstructionalDecals
Safetydecalsandinstructionsareeasilyvisibletotheoperatorandarelocatednearanyareaof
potentialdanger.Replaceanydecalthatisdamagedorlost.
114-3489
1.Thrownobjecthazard;cutting/dismembermenthazard—do
notoperatethemachinewiththedischargeopening
uncovered;alwaysoperatethemachinewiththerear
dischargedeector,dischargecoverorgrasscollector
installed.
attentiontothesafetyalertsymbol,whichmeans
CAUTION,WARNING,orDANGER-“personal
safetyinstruction."Failuretocomplywiththe
instructionmayresultinpersonalinjuryordeath.
3
Page 4
Setup
LooseParts
Usethechartbelowtoverifythatallpartshavebeenshipped.
ProcedureDescription
1
2
3
1
Backplate1
Support
Mountingbracket1
Bolt,(1/4x5/8inch)
Locknut,(1/4inch)
Leftlatch
Rightlatch1
Phillipsheadscrew,(#10)
Locknut,(#10)
Lockwasher,(#10)
Bagandpan1
Catcherframe
Handle2
Bolt,(1/4x1inch)
Locknut,(1/4inch)
Washer,(1/4inch)
Baggerclamp1
Bolt,(3/8x1inch)
Locknut,(3/8inch)
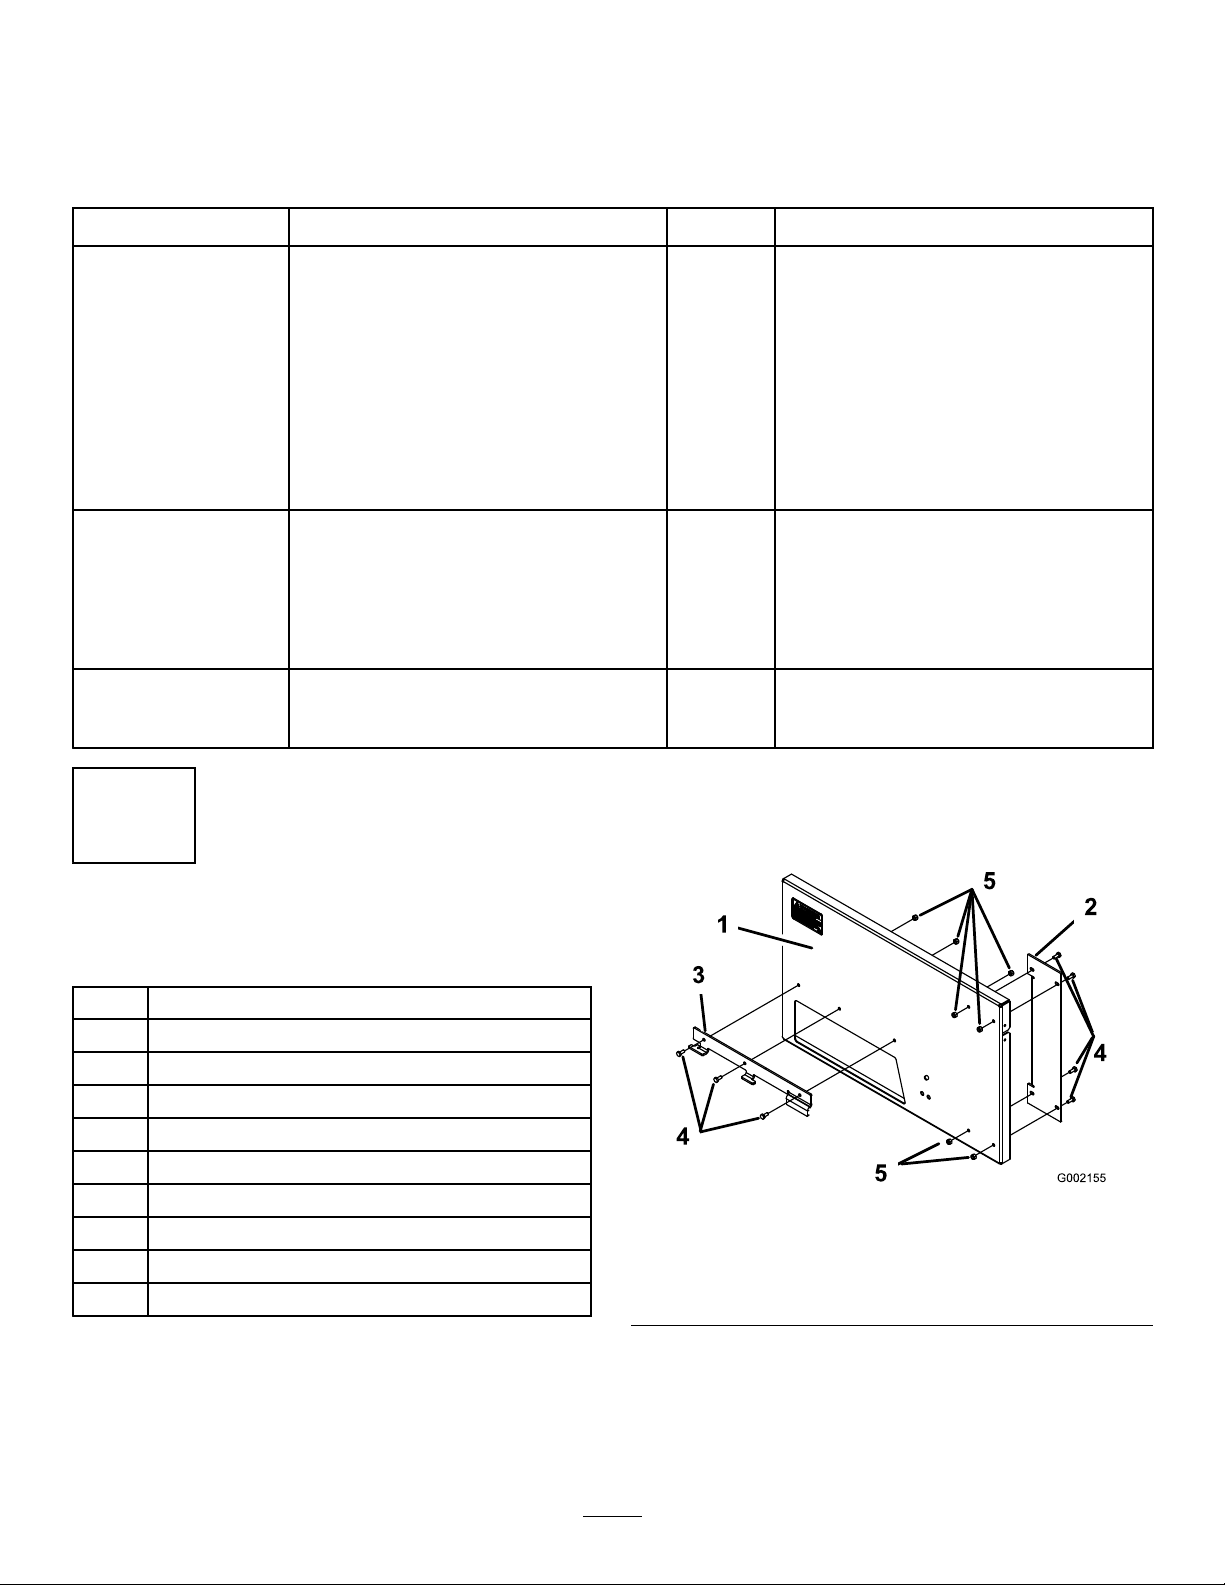
2.Installthemountingbracketonthebackplateusing
3bolts(1/4x5/8inch)andlocknuts(1/4inch)
(Figure2).
Qty.
Use
1
7
7
1
4
4
4
1
4
4
4
1
1
Assemblethebagger.
Assemblethebagandframe.
Removetheexistingbafes.
AssemblingtheBagger
Partsneededforthisprocedure:
1Backplate
1
Support
1Mountingbracket
7
Bolt,(1/4x5/8inch)
7
Locknut,(1/4inch)
1
Leftlatch
1Rightlatch
4
Phillipsheadscrew,(#10)
4
Locknut,(#10)
4
Lockwasher,(#10)
Procedure
1.Installthesupportonthebackplateusing4bolts
(1/4x5/8inch)andlocknuts(1/4inch)(Figure2).
Figure2
1.Backplate
2.Support5.Locknut,(1/4inch)
3.Mountingbracket
4.Bolt,(1/4x5/8inch)
3.Installthelatchestobothsidesofthebackplate
using4Phillipsheadscrews,lockwashers,and
locknuts(#10).Donotcompletelytightenthenuts;
thelatchesshouldbeabletomoveupanddown
(Figure3).
4
Page 5

Figure3
1.Locknut,(#10)
2.Right-handlatch5.Backplate
3.Lockwasher
4.Phillipsheadscrew
6.Left-handlatch
2
AssemblingtheBagand
Frame
Partsneededforthisprocedure:
Figure4
1.Rod2.J-strip
3.Arrangethebagaroundtheframe.
4.Placethehandlesovertheslotsoneachsideofthe
frame.
5.Push2bolts(1/4x1inch),througheachhandle
andthefabricfromtheoutside,andsecurethem
with4washers(1/4inch),andlocknuts(1/4inch)
(Figure5).
1Bagandpan
1
Catcherframe
2Handle
4
Bolt,(1/4x1inch)
4
Locknut,(1/4inch)
4
Washer,(1/4inch)
Procedure
1.Slidetheuppercurvedportionofthebaggerframe
intothebagandthelongstraightroddowntoward
thepan.
2.SnaptheJ-stripsovertheframerods(Figure4).
Figure5
1.Handle
2.Bolt,(1/4x1inch)4.Locknut,(1/4inch)
5
3.Washer,(1/4inch)
Page 6

illustratedinFigure7.Theclampshouldtover
themowerframesecuringthebackplate.
3
InstallingtheBaggerontothe
Mower
Partsneededforthisprocedure:
1Baggerclamp
1
Bolt,(3/8x1inch)
1
Locknut,(3/8inch)
Procedure
Note:Inthestepsbelow ,theboltsarethreadedinto
themowerdeck.Removethenutsrstbeforeremoving
bolts.
1.Liftthegrassdeectorallthewayup.
2.Positionthefronthookonthebaggermounting
bracketintothefrontslotofthemowermounting
bracket(Figure6).
Note:Donotremoveorinstalltheclamptoremove
orinstallthebackplatewhenusingitonamowerof
thesamesize.Liftthebackplateoffofthemower.
3.Placetherearhookoverthemowermounting
bracket(Figure6).
Figure6
1.Fronthook3.Frontslot
2.Rearhook4.Mowermountingbracket
4.Ifyouareinstallingthebaggerforthersttimeor
movingittoamowerofadifferentsize,installor
movethebaggerclampasfollows:
Figure7
1.Backplate5.Baggerclamp
2.Slotfor36SFSmower
decksandallTurboForce®
mowerdecks
3.Holefor52inchSFS
mowerdecks
4.Holefor44inchSFS
mowerdecks
6.Locknut,(3/8inch)
7.Bolt,(3/8x1inch)
5.Insertthelowerpinsofthebaggerframeintothe
holesinthebackplate(Figure8).
6.Liftthelatchesandslidetheframesidepinsinto
them(Figure8).
7.Lowerthelatchestosecurethebagger.
A.Selecttheappropriateholeinthebackplatefor
yourmowersize(Figure7).
B.Installthebaggerclampintheholeusingabolt
(3/8x5/8inch)andlocknut(3/8inch),as
6
Page 7

Operation
Note:Determinetheleftandrightsidesofthe
machinefromthenormaloperatingposition.
Toavoidpersonalinjury,followthese
procedures:
•Becomefamiliarwithalloperatingand
safetyinstructionsinthe
forthemowerbeforeusingthisattachment.
Operator’ s Man ual
Figure8
1.Backplateholes3.Latch
2.Framepin4.Lowerpin
•Neverremovethebaggerwhiletheengine
isrunning.
•Alwaysturntheengineoffandwaitforall
movingpartstostopbeforeclearingan
obstructionfromthebaggingsystem.
•Neverperformmaintenanceorrepairswhile
theengineisrunning.
RemovingtheBaggerfrom
theMachine
Withoutthegrassdeector,dischargecover,
orcompletegrasscatcherassemblymounted
inplace,youandothersareexposedtoblade
contactandthrowndebris.Contactwith
rotatingmowerblade(s)andthrowndebriswill
causeinjuryordeath.
•Neverremovethegrassdeectorfrom
themowerbecausethegrassdeector
routesmaterialdowntowardtheturf.Ifthe
grassdeectoriseverdamaged,replaceit
immediately.
•Neverputyourhandsorfeetunderthe
mower.
•Nevertrytoclearthedischargeareaor
mowerbladesunlessyoumovethepower
takeoff(PTO)totheoffposition,rotatethe
ignitionkeytooffandremovethekey.
•Makesurethegrassdeectorisinthedown
position.
1.DisengagethePTO ,movethemotioncontrol
leverstotheneutrallockedpositionandsetthe
parkingbrake.
7
Page 8

2.Stoptheengine,removethekey,andwaitforall
movingpartstostopbeforeleavingtheoperating
position.
3.Liftthelatchesandremoveandemptythegrassbag.
4.Liftthebackplateoffofthemower.
MowingSide
Mowwiththeleftsidetowardsobjectssuchastreesor
landscaping.Donotmowwiththerightsideofthe
mowernearobjectsbecauseyoucoulddamagethe
bagger.
5.Lowerthegrassdeectorbackintoplace.
EmptyingtheBagger
1.DisengagethePTO,bringthemachinetoneutral
positionandsettheparkingbrake.
2.Stoptheengine,removethekey,andwaitforall
movingpartstostopbeforeleavingtheoperating
position.
3.Liftthelatchesandremoveandemptythegrassbag.
4.Insertthelowerpinsofthebaggerframeintothe
holesinthebackplate(Figure8).
5.Liftthelatchesandslidetheframesidepinsinto
them(Figure8).
6.Lowerthelatchestosecurethebagger.
ClearingObstructions
1.DisengagethePTO ,movethemotioncontrol
leverstotheneutrallockedpositionandsetthe
parkingbrake.
MowingRoughTerrain
Whenmowingroughoruneventerrain,usecareto
avoiddamagingthebaggeragainsttheturf.
AvoidCuttingTooLow
Airowisrequiredtocutgrassandpropelitintothe
bag.Settingtheheight-of-cuttoolow,especiallyin
heavyorlonggrass,canrestricttheairowandplug
themowerorgrasscatcher.
AvoidPlugging
Toavoidpluggingwhencuttinglonggrass,double-cut
thegrass,rstatahighheight-of-cutandthenlower
themowertothedesiredsetting.Also,trytoleaveone
sideofthemoweroutoftheuncutgrass,allowingairto
bedrawnintothemowerhousing.
2.Stoptheengine,removethekey,andwaitforall
movingpartstostopbeforeleavingtheoperating
position.
3.Liftthelatchesandremoveandemptythegrassbag.
4.Carefullyremoveandcleartheobstructionfrom
themower.
5.Insertthelowerpinsofthebaggerframeintothe
holesinthebackplate(Figure8).
6.Liftthelatchesandslidetheframesidepinsinto
them(Figure8).
7.Lowerthelatchestosecurethebagger.
OperatingTips
MowerWidth
Themoweriswiderwiththebaggerinstalled.By
turningtoosharplyinconnedplacesyoumaydamage
thebagger.
8
Page 9

Maintenance
InspectingtheBagger
Thegrassbagmaterialmaytear,wear,and
eventuallydeteriorate,allowingdebristoyout
ofthebagwhichcouldseverelyinjureyouor
bystanders.
•Neverremovethegrassdeectorfrom
themowerbecausethegrassdeector
routesmaterialdowntowardtheturf.Ifthe
grassdeectoriseverdamaged,replaceit
immediately.
•Neverputyourhandsorfeetunderthe
mower.
•Nevertrytoclearthedischargeareaor
mowerbladesunlessyoumovethepower
takeoff(PTO)totheoffposition,rotatethe
ignitionkeytooffandremovethekey.
3.Ensurethatthebagisemptyanddry.
4.Storethebaggerinaclean,dryplace,outofdirect
sunlight.Thisextendsthelifeofthebagger.Ifyou
muststoreitoutside,coveritwithaweatherproof
cover.
•Makesurethegrassdeectorisinthedown
position.
Inspectthegrasscatcherafterthersttenhoursof
operationandmonthlythereafter.
1.Checkthebagfordamage.Replaceanydamaged
parts.
2.Tightenallnuts,bolts,andscrews.
CleaningtheBagger
1.Aftereachuse,removethebagandwashtheback
plateandtheundersideofthemower,usingwater
sprayedfromagardenhose.Useamildautomotive
detergenttoremovestubborndirt.Ensurethatyou
removemattedgrassfromallparts.
2.Afterwashing,letallpartsdrythoroughly.
Note:Donotwashthegrassbags.
CaringfortheGrassBagger
Topreventrapiddeteriorationofthebagmaterial,store
thebagsoitdriescompletelyaftereachuse.
StoringtheGrassCatcher
1.Cleanthebagger.
2.Inspectthegrasscatcherfordamage
9
Page 10

Notes:
10
Page 11

Notes:
11
Page 12

 Loading...