

Page 1

iMow
Robotic Lawn Mower
Model No. 30050
Form No. 3326-456
Operator ’s Manual
Domestic English (EN)
Page 2

Contents
Introduction 2. . . . . . . . . . . . . . . . . . . . . . . . . . . . . . . .
Important Safety Instructions 3. . . . . . . . . . . . . . . . . .
Safe Operating Practices 3. . . . . . . . . . . . . . . . . . .
Training 3. . . . . . . . . . . . . . . . . . . . . . . . . . . . . . . .
Preparation 3. . . . . . . . . . . . . . . . . . . . . . . . . . . . . .
Operation 3. . . . . . . . . . . . . . . . . . . . . . . . . . . . . . .
Maintenance and Storage 4. . . . . . . . . . . . . . . . . . .
Safety Features of the Lawn Mower 5. . . . . . . . . .
Safety and Instruction Decals 5. . . . . . . . . . . . . . .
Overview 6. . . . . . . . . . . . . . . . . . . . . . . . . . . . . . . . . .
The Lawn Mower 6. . . . . . . . . . . . . . . . . . . . . . . . .
The Perimeter Wire 6. . . . . . . . . . . . . . . . . . . . . . .
The Perimeter Switch 6. . . . . . . . . . . . . . . . . . . . . .
Setup 7. . . . . . . . . . . . . . . . . . . . . . . . . . . . . . . . . . . . .
Planning the Mowing Area Layout 7. . . . . . . . . . .
Loose Parts 9. . . . . . . . . . . . . . . . . . . . . . . . . . . . . .
Installing the Perimeter Switch 9. . . . . . . . . . . . . .
Laying the Perimeter Wire 10. . . . . . . . . . . . . . . . . .
Connecting the Perimeter Wire to the Perimeter
Switch 11. . . . . . . . . . . . . . . . . . . . . . . . . . . . . . . .
Installing the Fuse 11. . . . . . . . . . . . . . . . . . . . . . . .
Handling the Battery Pack 12. . . . . . . . . . . . . . . . . .
Adjusting the Cutting Height 12. . . . . . . . . . . . . . . .
Calibrating the Lawn Mower 13. . . . . . . . . . . . . . . .
Operation 14. . . . . . . . . . . . . . . . . . . . . . . . . . . . . . . . . .
Controls 14. . . . . . . . . . . . . . . . . . . . . . . . . . . . . . . .
Operating the Lawn Mower Manually 14. . . . . . . .
Switching from Manual to Automatic Mode 15. . . .
Operating the Perimeter Switch 15. . . . . . . . . . . . . .
Operating the Lawn Mower Automatically 15. . . . .
Stopping the Lawn Mower 16. . . . . . . . . . . . . . . . . .
Reviewing the Controller Menu Option Settings 16
Entering the Setting Mode 17. . . . . . . . . . . . . . . . . .
Setting the Sound On/Off 17. . . . . . . . . . . . . . . . . . .
Setting the Child Guard On/Off 17. . . . . . . . . . . . . .
Setting the Mowing On/Off 17. . . . . . . . . . . . . . . . .
Setting the Geo Location 18. . . . . . . . . . . . . . . . . . .
Setting the Language 18. . . . . . . . . . . . . . . . . . . . . .
Setting the Work Time 18. . . . . . . . . . . . . . . . . . . . .
Service 18. . . . . . . . . . . . . . . . . . . . . . . . . . . . . . . . .
Diagnostics 18. . . . . . . . . . . . . . . . . . . . . . . . . . . . . .
Exiting the Setting Mode 19. . . . . . . . . . . . . . . . . . .
Lawn Mowing Tips 19. . . . . . . . . . . . . . . . . . . . . . .
Maintenance 20. . . . . . . . . . . . . . . . . . . . . . . . . . . . . . . .
Recommended Maintenance Schedule 20. . . . . . . .
Cleaning the Lawn Mower Housing 21. . . . . . . . . .
Page
Page
Charging the Battery Pack 21. . . . . . . . . . . . . . . . . .
Replacing the Battery Pack 21. . . . . . . . . . . . . . . . .
Disposing of the Old Battery Pack 22. . . . . . . . . . .
Checking the Bumpers 22. . . . . . . . . . . . . . . . . . . . .
Checking the Lift-off Switch 23. . . . . . . . . . . . . . . .
Replacing the Blades 23. . . . . . . . . . . . . . . . . . . . . .
Replacing the Batteries in the Perimeter Switch 24.
Storage 24. . . . . . . . . . . . . . . . . . . . . . . . . . . . . . . . . . . .
Accessories 24. . . . . . . . . . . . . . . . . . . . . . . . . . . . . . . .
Troubleshooting 25. . . . . . . . . . . . . . . . . . . . . . . . . . . . .
The Toro Total Coverage Guarantee 28. . . . . . . . . . . . .
Introduction
Read this manual carefully to learn how to operate and
maintain your product properly. Also, review the
instructional video that comes with the lawn mower. The
information in this manual and in the video can help you
and others avoid injury and product damage. Although
Toro designs and produces safe products, you are
responsible for operating the product properly and safely.
Whenever you call 1-877-636-iMow (1-877-636-4669) for
help with service, genuine Toro parts, or additional
information, have the model and serial numbers of your
product ready. Figure 1 illustrates the location of the
model and serial numbers on the product.
1
m4993
Figure 1
1. Location o f the model and serial numbers decal (in the battery
pack compartment)
Write the product model and serial numbers in the space
below:
Model No.
Serial No.
2001 The Toro Company
All Rights Reserved
2
Printed in USA
Page 3

This manual identifies potential hazards and has special
safety messages that help you and others avoid personal
injury and even death. Danger, Warning, and Caution are
words used to identify the level of hazard.
Danger signals an extreme hazard that will cause serious
injury or death if you do not follow the recommended
precautions.
Warning signals a hazard that may cause serious injury or
death if you do not follow the recommended precautions.
Caution signals a hazard that may cause minor or
moderate injury if you do not follow the recommended
precautions.
This manual uses two other words to highlight
information. Important calls attention to special
mechanical information and Note: emphasizes general
information worthy of special attention.
Important Safety
Instructions
To ensure maximum safety and best performance, and
to gain knowledge of the product, it is essential that
you and any other operator of the robotic lawn mower
read and understand the contents of this manual before
the robotic lawn mower is ever started.
This is the safety alert symbol. It is used to alert
you to potential personal injury hazards. Obey all
safety messages that follow this symbol to avoid
possible injury or death.
Improperly using or maintaining this robotic lawn
mower could result in injury or death. To reduce this
potential, comply with the following safety instructions.
• Do not use the lawn mower for any purpose except
that for which it is intended.
• Never allow children or people unfamiliar with these
instructions to operate the lawn mower. Local
regulations may restrict the age of the operator.
• Never operate the lawn mower while people
(especially children) and pets are in or near the area of
operation.
• The operator is responsible for accidents or hazards
occurring to other people or their property.
Preparation
• Make sure that you layout and install the perimeter
wire according the instructions. Refer to Laying the
Perimeter Wire on page 10.
• Always wear long pants and substantial shoes when
operating the lawn mower in the manual mode.
• When operating in the manual mode, wear safety
glasses or eye shields during operation to protect eyes
from foreign objects that the lawn mower may throw.
(Regular eyeglasses are not safety glasses.)
• Thoroughly inspect the area where you will use the
lawn mower, and remove stones, sticks, wires, bones,
and other foreign objects. Objects struck by the blades
can be thrown and cause severe injuries to people.
• Before using the lawn mower, always remove the
battery pack and visually inspect the blades for wear or
damage. Replace any worn or damaged blades.
• Only use accessories and attachments designed for this
product. Using any accessory or attachment not
designed for this product may increase the risk of
injury.
Read all the instructions
before using this lawn mower.
Safe Operating Practices
This product is capable of amputating hands and feet and
of throwing objects. Always follow all safety instructions
to avoid serious injury or death.
This lawn mower is designed for cutting and mulching
grass. Any use for purposes other than these could prove
dangerous to the user or bystanders.
Training
• Read this manual carefully before operating the lawn
mower. Become familiar with the controls and the
proper use of the lawn mower.
• We recommend that you construct a low fence or other
physical barrier as a precaution to prevent the lawn
mower from accidently entering areas outside the
perimeter plot.
Operation
• Mow only in daylight or in good artificial light.
• Do not operate the lawn mower in the manual mode
while wearing open-toed shoes, jewelry, loose
clothing, or when barefoot; always wear long pants
and substantial shoes.
• Do not start the lawn mower in automatic mode
outside the plot bounded by the perimeter wire.
• Avoid dangerous environments. Avoid operating the
lawn mower in wet grass or damp locations. Do not
use the lawn mower in the rain.
3
Page 4

• Use extreme caution when moving the lawn mower
toward you.
• Keep all guards, shields, safety devices, and sensors in
place. Repair or replace damaged parts, including
decals. Do not operate the lawn mower if any parts
are damaged or worn. Never tamper with safety
devices. Check their proper operation regularly.
• Keep your face, hands, and feet away from the lawn
mower housing and the cutting blades when the lawn
mower is running. The blades can cause injury to
hands and feet.
• Always be sure of your footing on slopes when using
the lawn mower in the manual mode.
• Do not use the lawn mower to mow steep slopes.
• Never leave the lawn mower unattended while it is
running.
Maintenance and Storage
• Maintain, service, and store the lawn mower according
to the instructions.
• For best performance and safety, replace worn or
damaged parts with genuine Toro replacement parts
and accessories. Replacement parts and accessories
made by other manufacturers may result in
non-conformance with the safety standards, and that
could be dangerous.
• Stop the lawn mower, wait for all moving parts to stop,
and remove the battery pack before cleaning,
inspecting, adjusting, or servicing on the lawn mower.
• Perform only those maintenance instructions described
in this manual. If the lawn mower needs major
repairs or if you need assistance, call
1-877-636-iMow (1-877-636-4669).
• Stop the lawn mower, wait for all moving parts to stop,
and remove the battery pack before cleaning,
inspecting, or adjusting the lawn mower.
• Be alert and turn off the lawn mower if children enter
the area.
• Never allow anyone to ride on the lawn mower.
• When operating the lawn mower in manual mode,
keep a safe distance (at least one foot (0.3 meters)
away) from the lawn mower.
• Do not operate the lawn mower in gaseous, explosive
atmospheres. Normal sparking of the motor could
ignite fumes.
• When operating in manual mode, start the lawn mower
carefully according to the instructions and with feet
well away from the blades.
• Do not mow near drop-offs, ditches, or embankments.
• Do not operate the lawn mower if it has been dropped
or damaged in any way. Repair any damage before
operating the lawn mower.
• Do not operate the lawn mower if you hear an unusual
sound coming from it (such as unbalanced blades).
• If you must lift the lawn mower to transport it, stop the
lawn mower, wait for all moving parts to stop, and
remove the battery pack.
• Stop the blades when moving the lawn mower outside
the lawn area.
• Electronic devices that use radio signals may interfere
with the normal operation of the lawn mower.
• Do not charge the battery pack in the rain or in wet
locations.
• Do not charge the battery pack at temperatures above
140°F (60°C) or below –4°F (–20°C). Do not store the
battery pack at temperatures below –4°F (–20°C).
• To prevent an electric shock while charging, repair or
replace a damaged charging cord immediately.
• Do not abuse the charging cord while charging. Do not
yank the cord to remove it from the plug receptacle.
Keep the cord away from heat, oil, and sharp edges.
• Make sure that you charge the battery pack using the
charger supplied with the lawn mower. Incorrect use
may result in electric shock, overheating, or leakage of
corrosive liquid from the battery pack.
• Use only a Toro replacement battery pack.
• Do not dispose of the battery pack in a fire. Check
with local codes for special disposal instructions.
• Do not open or mutilate the battery pack. Released
electrolyte is corrosive and may damage the eyes or
skin. It may be toxic if swallowed.
• Exercise care in handling the battery pack to avoid
shorting it out (contacting both the positive and
negative battery posts) with conducting materials such
as rings, bracelets, and keys. The battery pack or
conductor may overheat and cause burns.
• Always keep sharp blades on your lawn mower. When
servicing the blades, refer to the blade maintenance
section for the proper installation and servicing
procedures. Use identical replacement blades only.
• Use only a wet cloth or a soft brush to remove grass
clippings and debris from the underside, the blades,
and the wheels. Do not use a water hose on the lawn
4
Page 5
mower when cleaning; the water can damage the
electronics. Ensure that the drainage holes are not
blocked.
Safety Features of the Lawn
Mower
The robotic lawn mower comes with the following safety
features:
• Child Guard—This feature prevents young children
from operating the lawn mower. Refer to Setting the
Child Guard On/Off on page 17.
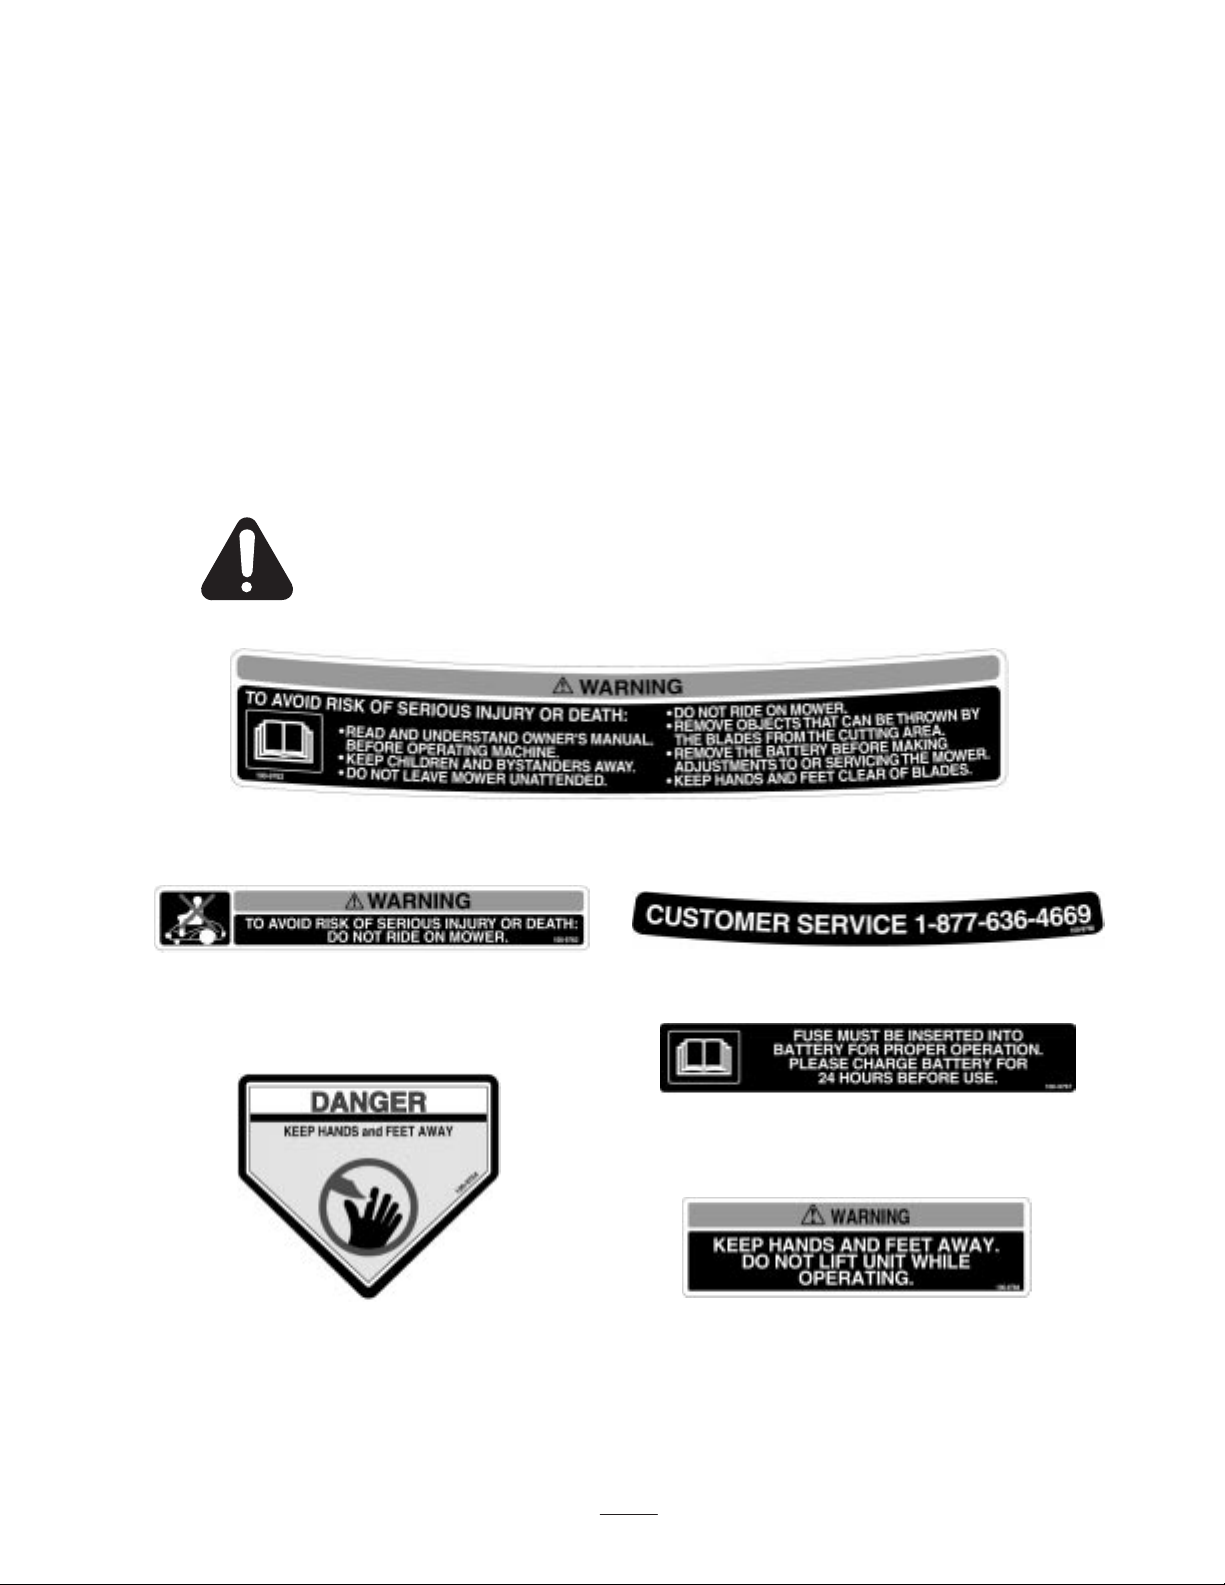
Safety and Instruction Decals
Safety and instruction decals are easily visible to the operator and are located near any area
of potential danger. Replace any decal that is damaged or lost.
On Mower Housing
(Part No. 100-9762)
• Automatic Blade Shut-off Mechanism—The blades
stop immediately when you lift the front end of the
lawn mower during operation.
• Crossing the Perimeter Wire—The blades and the rear
wheel drive stop immediately if the lawn mower is
forced outside the perimeter wire.
• Perimeter Switch Power Loss—The lawn mower does
not operate in the automatic mode if the perimeter
wire is cut or the perimeter switch is in the Off
position.
Save these instructions for
future reference.
On Mower Housing
(Part No. 100-9763)
On Mower Housing
(Part No. 100-9764)
On Mower Housing
(Part No. 100-9766)
On Mower Housing
(Part No. 100-9767)
On Mower Housing
(Part No. 100-9768)
5
Page 6
Overview
The robotic lawn mower can operate automatically or
manually. In the automatic mode, it cuts grass within an
area surrounded by an energized perimeter wire that
creates a virtual boundary around the mowing area. As the
lawn mower approaches the perimeter wire, it senses the
wire signal and stays within the mowing area defined by
the boundary.
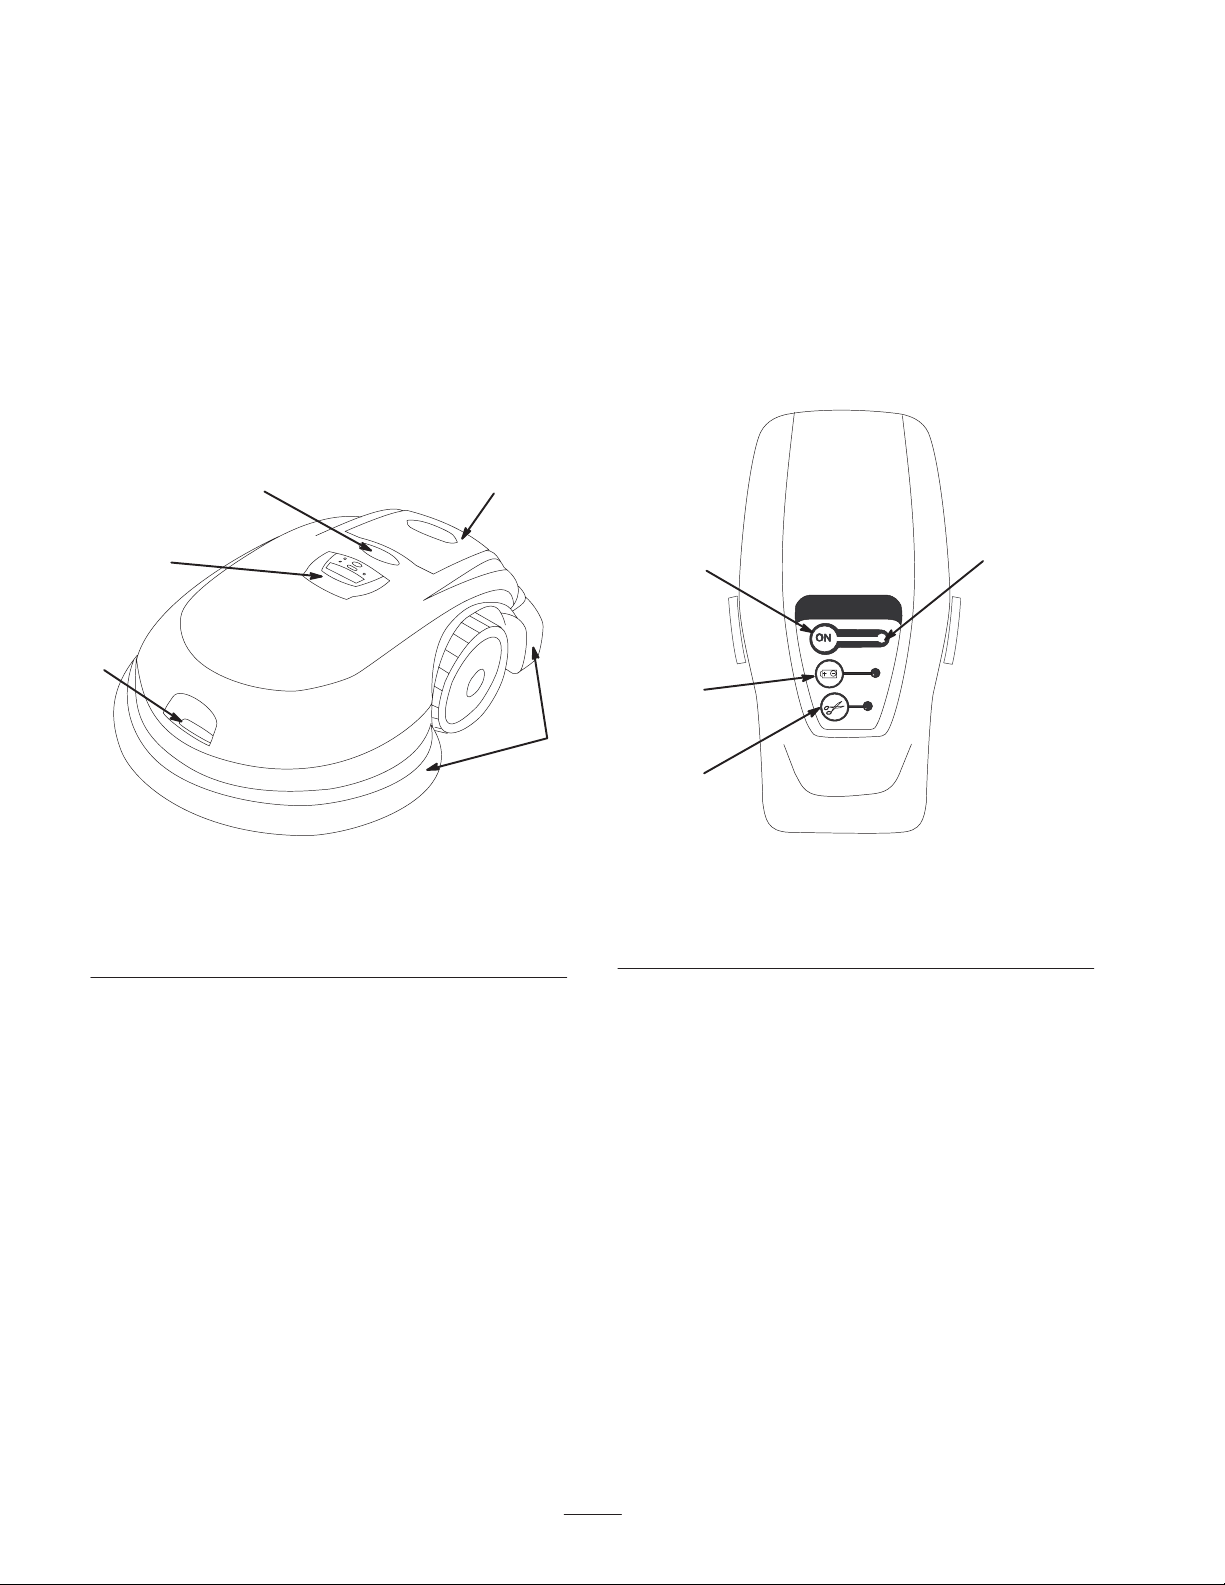
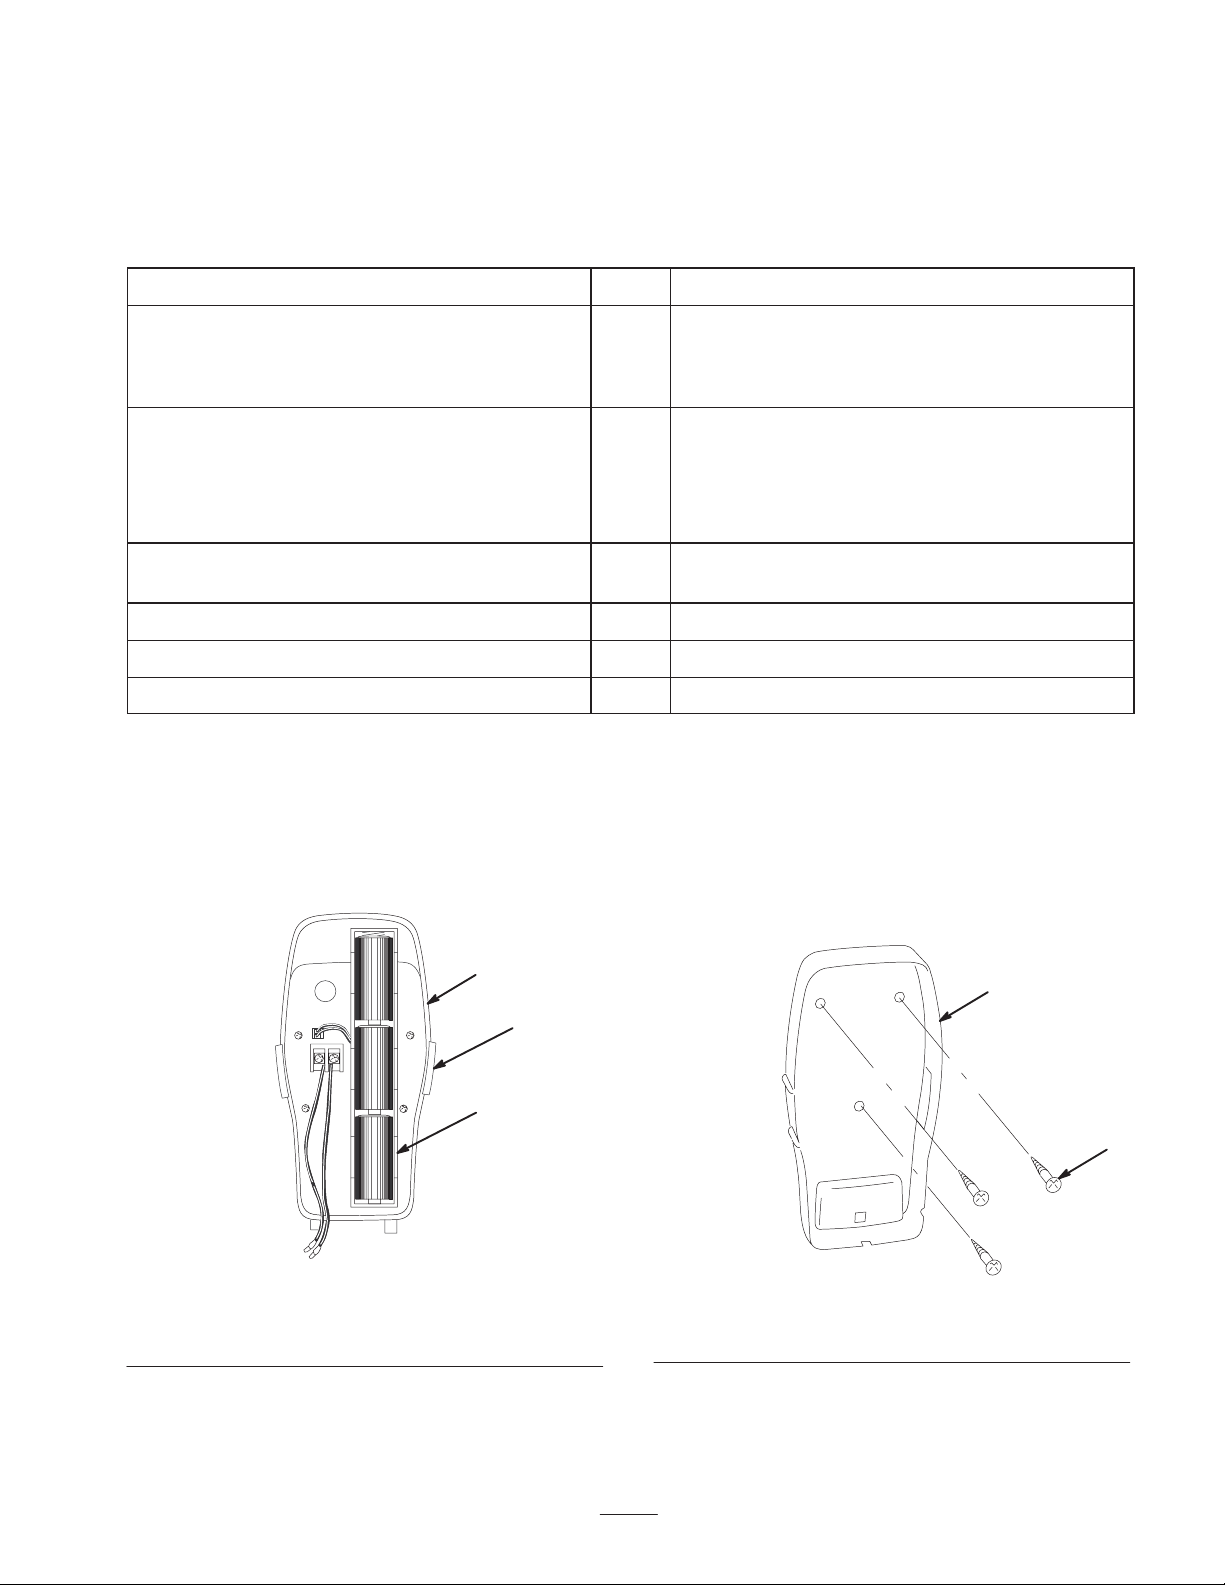
The Lawn Mower
Figure 2 illustrates the features of the robotic lawn
mower:
The Perimeter Wire
The perimeter wire transmits a low-voltage signal that the
lawn mower detects as it approaches the wire. The lawn
mower stays within the mowing area boundary created by
the perimeter wire.
The Perimeter Switch
The perimeter switch controls the low-voltage signal
transmitted through the perimeter wire. Figure 3 illustrates
the functions of the perimeter switch:
3
2
1
Figure 2
1. Front handle
2. Controller
3. Operation/Warning light
• Front Handle—The handle allows you to move the
lawn mower easily.
• Controller—A device containing software that allows
you to control the lawn mower operations in both
automatic and manual modes.
• Operation/Warning Light—A blinking light that
indicates when the lawn mower is in operation.
• Battery Pack—A rechargeable maintenance-free
battery that powers the lawn mower.
• Bumpers—A protective ring around the lawn mower
that contains sensors for protecting both the lawn
mower and objects in or near the lawn from damage.
4. Battery pack
5. Bumpers
4
m4987
1
2
5
3
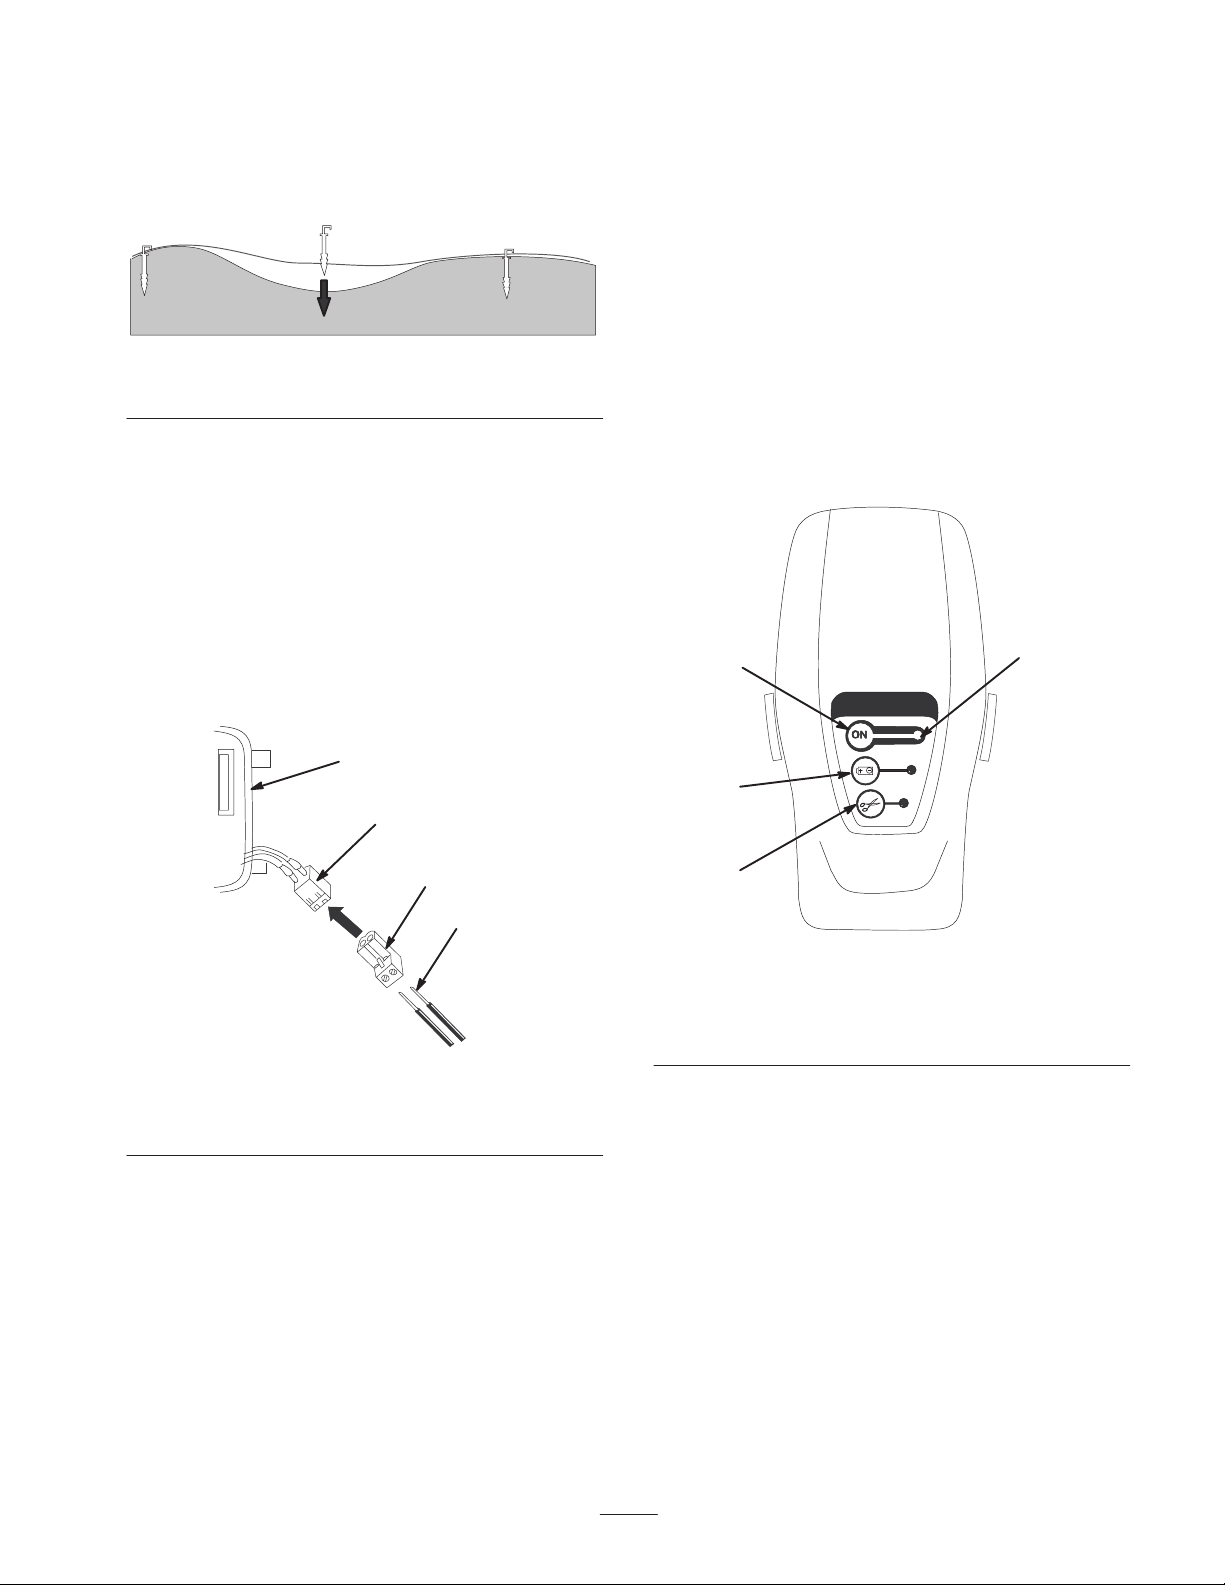
Figure 3
1. On button
2. Replace Batteries
indicator
• On Button—Pressing this button activates the
perimeter wire. Pressing it and holding it in for at least
three seconds deactivates the perimeter wire.
• Replace Batteries Indicator—A light that tells you to
replace the batteries in the perimeter switch.
• Wire Disconnected Indicator—A light that blinks
when there is a break in the perimeter wire or when
there is a bad connection.
• On Light—Blinks when the perimeter switch is on.
You can either temporarily or permanently mount the
perimeter switch on a building wall, a fence, a post, or a
perimeter mounting stake (included).
Note: The perimeter switch automatically shuts off after
approximately five hours.
3. Wire Disconnected
indicator
4. On light
4
m-5003
6
Page 7
Setup
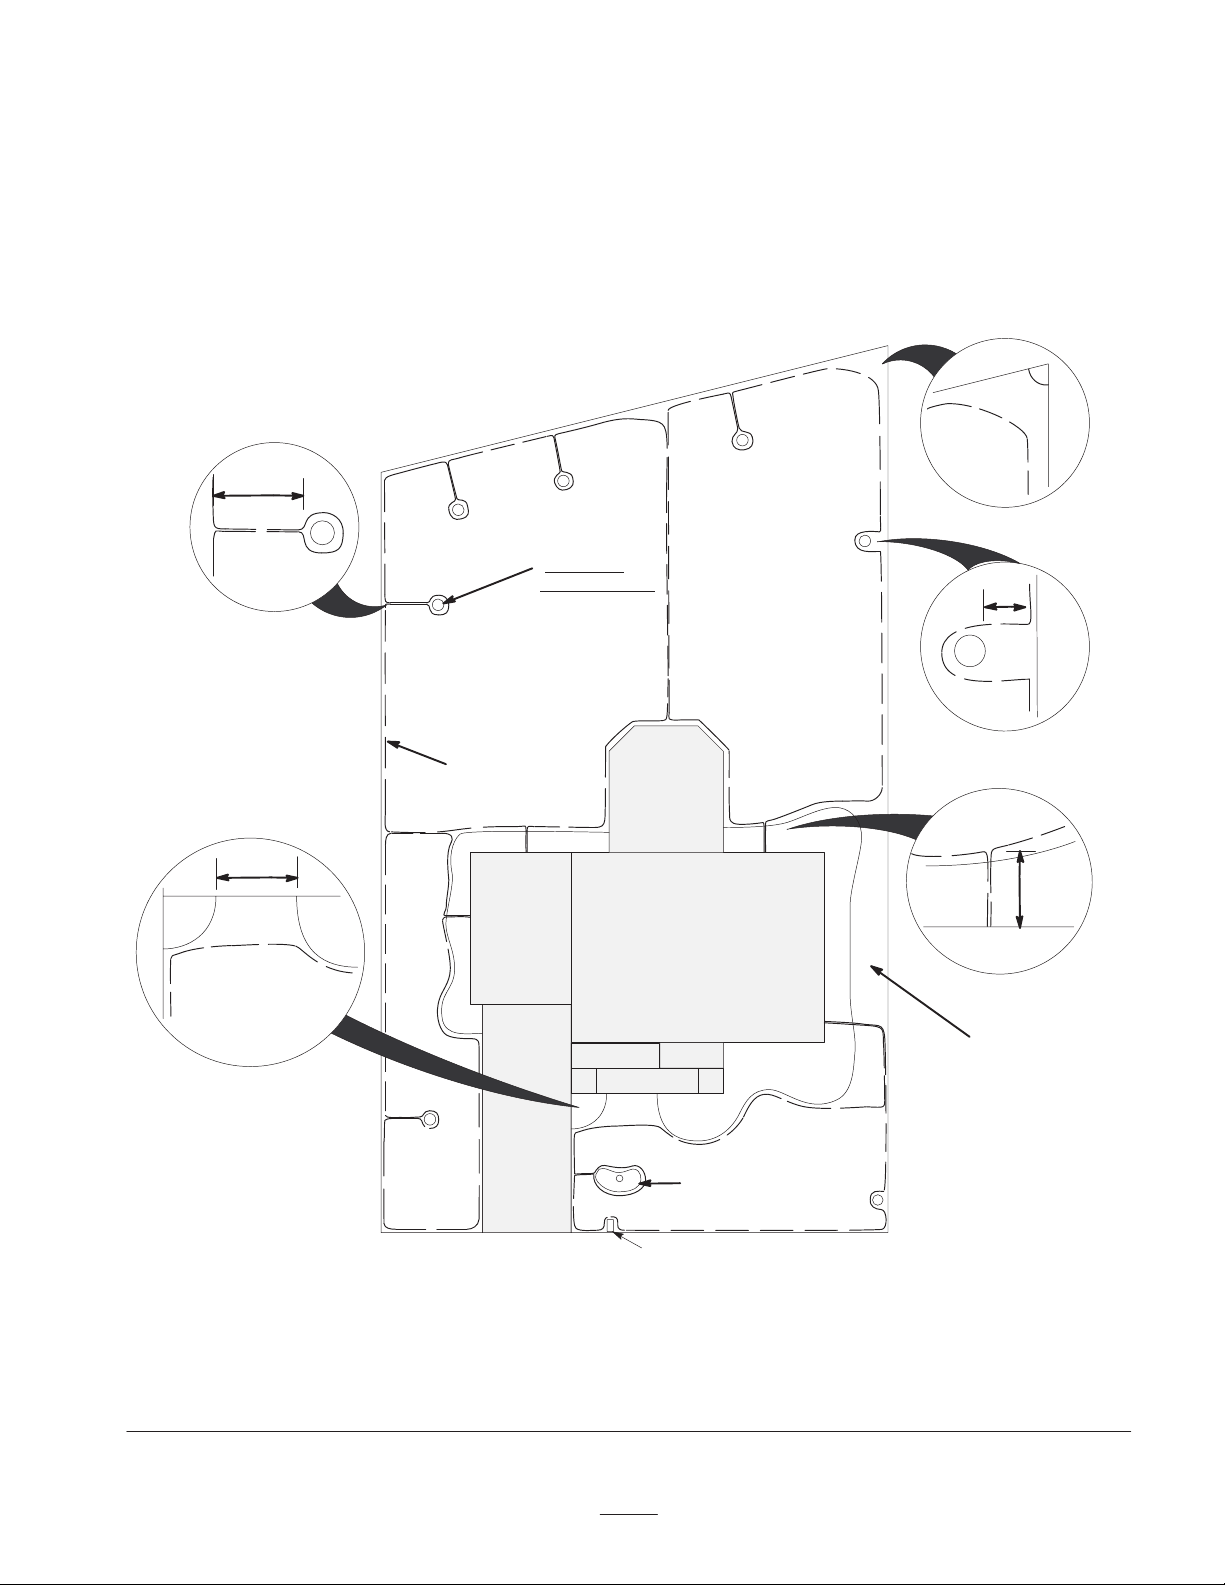
Planning the Mowing Area
Layout
Before using the robotic lawn mower for the first time,
plan out how you want the lawn mower to mow your
lawn. Figure 4 shows the top view of a typical lawn.
>5’
Small Tree
(2” dia. or less)
<90
3
<5’
o
<5’
2
1
Plot A Plot B
Perimeter
Wire
Patio
PSPS
4
5’
PS
Garage
House
PS
5
Plot C
Driveway
Sidewalk
PS
Landscaping
Plot D
Rock Garden
Steep slope
(more than 15 degrees)
PS=Perimeter switch
1. Perimeter island (more than
5 ft. (1.5 m) from the lawn
edge)
2. Indentation along the edge
(less than 5 ft. (1.5 m))
Mail Box
Figure 4
3. Sharp corner (avoid laying
perimeter wire in a corner
less than 90°)
7
4. Obstacle near the edge (less
than 5 ft. (1.5 m) from the
lawn edge)
5. Perimeter switch area
Page 8
When you are planning your mowing plot(s), think about
the following characteristics of your lawn:
• Overall size (in square feet or square meters)
If an obstacle is less than five feet (1.5 m) from the lawn
edge or wall, leave it outside the wired area (Inset 4 in
Fig. 4).
• Steep slopes
• Obstacles (fences, young trees, gardens, ponds, rocks,
etc.)
• Small, confined areas
Overall Size
The lawn mower can mow up to 2500 square feet
(230 square meters) before the battery pack needs
recharging. If your lawn is larger than 2500 square feet
(230 square meters) or if you have an area to mow that is
isolated from the rest of your lawn, you will need more
than one mowing plot. For laying out multiple plots, refer
to Laying out Multiple Mowing Plots on page 8 and to
Plots A, B, C, and D in Figure 4.
Steep Slopes
Do not use the lawn mower on slopes steeper than
15 degrees. Leave slopes greater than 15 degrees outside
the perimeter wire area; mow these slopes manually.
Obstacles
Fences, ditches, young trees, gardens, flowers, exposed
roots, and rocks in your yard not protected by a fence at
least six inches (15 cm) high pose as obstacles to your
lawn mower. You must take these obstacles into account
when you lay your perimeter wire. Obstacles are classified
as either perimeter islands or as edge obstacles depending
on how far they are from the lawn edge.
Small, Confined Areas
Small, confined areas are classified under two types: sharp
corners and indentations along the lawn edge. You must
manually mow the area outside the perimeter wire.
Sharp Corners
When you lay out the perimeter wire, avoid creating
corners less than 90 degrees (Inset 3 in Fig. 4). The lawn
mower cannot enter small, confined areas and may lose
track of the perimeter wire. You must manually mow the
sharp corner areas.
Indentations along the Edge
Do not wire the indentations along the edge of the lawn
that are less than five feet (1.5 m) wide. Instead, lay the
perimeter wire straight across the opening of the
indentation (Inset 2 in Fig. 4). You must manually mow
the indentations along the edge.
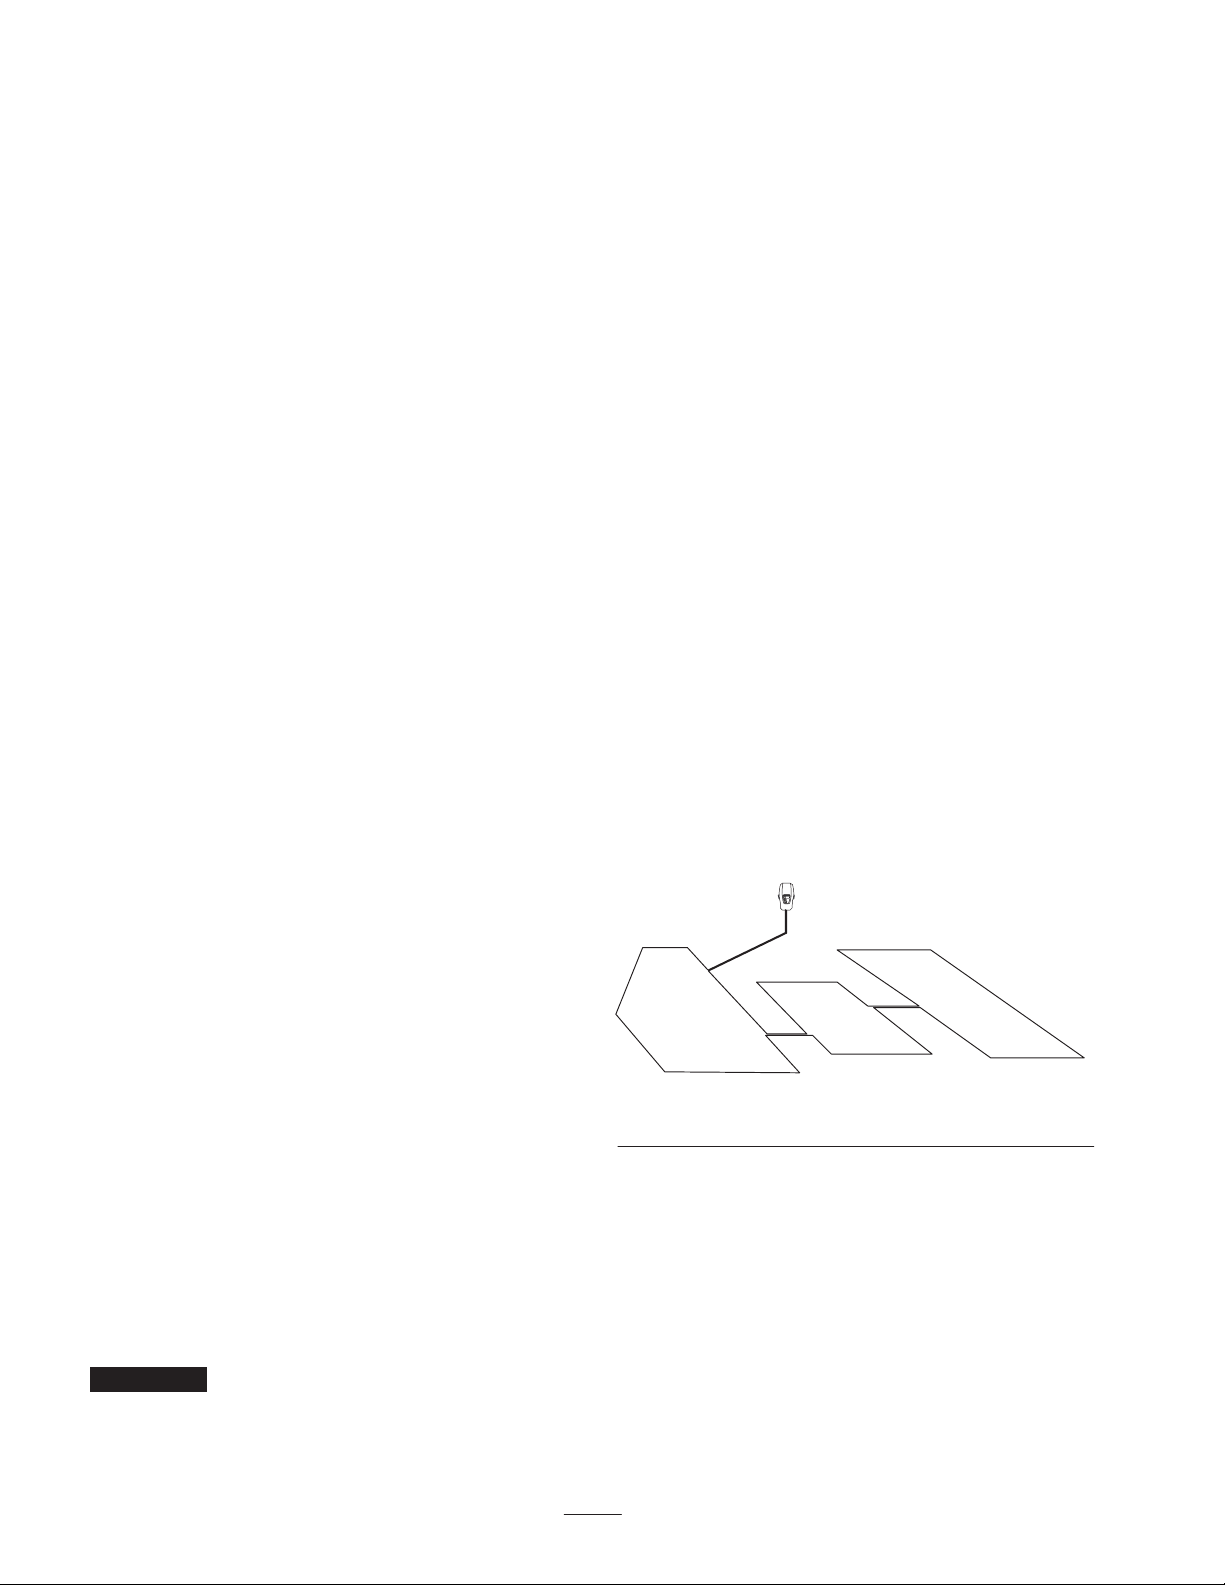
Laying out Multiple Mowing Plots
Two basic methods for laying out multiple mowing plots
include the following:
• One Perimeter Switch Location—Splice two wires
with a wire connector to connect one mowing plot to
another to form a continuous loop that terminates at
one perimeter switch location (Fig. 5).
Perimeter Switch
Perimeter Islands
If an obstacle is greater than five feet (1.5 m) from the
lawn edge or wall, create a perimeter island by laying the
perimeter wire around the obstacle (Inset 1 in Fig. 4). This
creates a double wire, with one wire leading from the edge
and the other wire going to the edge. The sides of the
double wire should be parallel and touching so that there
is no gap between them. Unlike a single wire, the lawn
mower does not detect a double wire and will travel over
it, effectively creating a separate perimeter around the
obstacle.
Note: For the purpose of illustration, Inset 1 in Figure 4
shows the wires leading to and from the perimeter island
having a space between them. These wires must be
parallel and touch each other for the lawn mower to
function properly. Secure both wires with the same pegs.
Important Do not cross the wires. Crossed wires may
cause the lawn mower to lose track of the perimeter wire.
Edge Obstacles
Plot A Plot B Plot C
m-5005
Figure 5
Note: The distance between two adjacent mowing plots
should be at least five feet (1.5 meters).
Note: When there is not a direct approach from the
perimeter switch, use concrete expansion joints in
driveways, sidewalks, flower beds, or steps to hide the
perimeter wire. Ensure that the wire is securely attached
to the surface to keep the lawn mower from cutting it and
to prevent a tripping hazard.
• Multiple Perimeter Switch Locations—Install each
mowing plot separately, with multiple perimeter
switch locations (Fig. 4). Wire each mowing plot and
move the perimeter switch from mowing plot to
8
Page 9
mowing plot, temporarily mounting it on a wall, a
fence, a post, or a perimeter mounting stake mounted
vertically at least five feet (1.5 meters) from the from
the perimeter wire plot edge.
Loose Parts
DESCRIPTION QTY. USE
Perimeter switch
1.5V C-cell batteries
Perimeter mounting stake
Ruler
Pegs
Perimeter wire—500 ft. (152 m)
Wire connectors
Switch connectors 4
1
3
1
1
100*
1*
5
Installing the Perimeter Switch
Laying the Perimeter Wire
Connecting the Perimeter Wire to the
Perimeter Switch
Fuse 1 Installing the Fuse
Battery Charger 1 Charging the Battery Pack
Instructional Video 1 Learning how to use the robotic lawn mower
*Additional pegs and perimeter wire are available. For assistance, call 1-877-636-iMow (1-877-636-4669).
Installing the Perimeter Switch
1. Open the perimeter switch case by squeezing the front
part of the tabs to the case (Fig. 6).
4. Mount the perimeter switch in a location out of the
reach of children by using one of the following
methods:
• Mount the perimeter switch permanently with three
screws (Fig. 7).
Figure 6
1. Perimeter switch case
2. Tab (2)
3. 1.5V C-cell battery (3)
2. Insert three 1.5V C-cell batteries (Fig. 6).
3. Close the perimeter switch case.
1
1
2
3
2
m5002
m–5224
Figure 7
1. Perimeter switch case 2. Screw (3)
• Mount the switch onto a perimeter mounting stake
that you can move from plot to plot (Fig. 8).
9
Page 10

1
1
2
3
2
m–5226
Figure 8
1. Perimeter switch case 2. Perimeter mounting stake
Warning
If the perimeter switch is mounted too close to the
perimeter wire edge, the lawn mower may go off
the perimeter and mow several feet (meters)
uncontrolled.
Whichever mounting method you use, ensure that
the perimeter switch is at least five feet
(1.5 meters) from the perimeter wire so that the
lawn mower cannot touch it (Inset 5 of Fig. 4).
10-1/2” (26.7 cm)
Figure 9
1. Perimeter wire
2. Edge
3. Ruler
Lay down the perimeter wire 15-1/2 inches
(40 centimeters) from the edge of the lawn near walls,
fences, rocks, or where there is a difference in height
between the lawn’s edge and the surrounding terrain
(Fig. 10).
1
15-1/2” (39.4 cm)
Figure 10
1. Perimeter wire
2. Obstacle or Wall
3. Ruler
m-4997
2
3
m-4997
Note: If you temporarily mount the perimeter switch,
disconnect the perimeter wire connector from the
perimeter switch (Fig. 13) after the lawn mower has
completed mowing, and store the perimeter switch
indoors in a safe place out of the reach of children.
Laying the Perimeter Wire
1. Starting at the perimeter switch, uncoil the perimeter
wire and lay it out on the lawn.
Note: Allow about six feet (two meters) at the
beginning of the perimeter wire for installing and
adjusting the perimeter switch.
2. Lay down the perimeter wire 10-1/2 inches
(27 centimeters) from the edge of the lawn, where the
edge is in a relatively flat area without obstacles
(Fig. 9).
Note: Use the ruler provided to easily measure these
distances.
3. If the ground is hard, lightly water the area.
4. Secure the perimeter wire along the boundary of the
plot to the ground with the pegs (Fig. 11) set about
three feet (one meter) apart. Keep the wire taut as you
go.
1
2
Figure 11
1. Peg 2. Wire
10
Page 11
Note: There is no need to bury the wire. The grass will
grow over the wire and cover it.
Note: Use additional pegs where the ground dips to
hold the perimeter wire to the ground (Fig. 12).
4. Connect the wire connector to the switch connector
(Fig. 13), making sure that the perimeter wire from the
perimeter switch to the ground is taut and at least five
feet (1.5 meters) away from the lawn edge (Inset 5 in
Fig. 4).
Note: If you have multiple mowing plots, do not leave
the wire connectors loose and lying on the ground;
attach them to a building wall, a fence, a post, or a
perimeter mounting stake.
m–5223
Figure 12
5. Attach the perimeter wire that leads to the perimeter
switch securely to the ground. Do not cross the wires.
Connecting the Perimeter Wire
to the Perimeter Switch
Complete the perimeter wire loop by attaching the two
wire ends together with a wire connector.
1. Strip 1/4 inch (6 mm) of insulation from each wire end
(Fig. 13).
1
2
3
4
5. Check the connections by pressing the On button of
the perimeter switch (Refer to Operating the Perimeter
Switch on page 15). The On light blinks when all the
connections are good. The Wire Disconnected light
blinks and an audio signal “beeps” when there are any
breaks in the perimeter wire or when there is a bad
connection (Fig. 14).
1
4
2
3
m-5003
m-5002
Figure 13
1. Perimeter switch case
2. Switch connector
3. Wire connector
4. Wire end (2)
2. Insert one end of each perimeter wire into each hole of
the wire connector (Fig. 13).
3. Tighten the screws.
Figure 14
1. On button
2. Replace Batteries
indicator
3. Wire Disconnected
indicator
4. On light
6. Repair any breaks and check the connections again.
Installing the Fuse
1. Remove the fuse from under the decal located on top
of the battery pack.
2. Install the fuse into the front of the battery pack as
shown in Figure 15.
11
Page 12

Adjusting the Cutting Height
Note: The lawn mower comes with a cutting-height level
set at three inches (7.6 centimeters).
1
m-4992
Figure 15
1. Fuse
Handling the Battery Pack
Insert the battery pack into the battery pack compartment
(Fig. 16). The lawn mower immediately turns on and
activates the display.
Danger
Adjusting the cutting height improperly could
bring your hands into contact with a moving blade
and result in serious injury.
Stop the lawn mower, wait for all moving parts to
stop, and remove the battery pack before
changing the cutting height.
The front wheel has six cutting-height levels and the rear
wheel has two cutting-height levels. Each rear
cutting-height level corresponds with three equivalent
front cutting-height levels.
Note: If the grass is tall, spongy (deeply thatched), or
uneven, set the cutting height to its highest level.
Note: Unless the terrain of your lawn is level, operate
your lawn mower with the cutting height at the highest
level for maximum maneuverability.
Adjusting the Front Cutting Height
1. Remove the battery pack (Fig. 16).
m-4991
Figure 16
Note: If the sound is on, the following audio message
says: “Always follow the safety instructions when
operating the Toro iMow robotic mower.”
To remove the battery pack, lift it out of the battery pack
compartment.
Important Charge the battery for at least 24 hours
before you use the lawn mower for the first time. Refer to
Charging the Battery Pack on page 21.
2. Raise the front end of the lawn mower.
3. Rotate the wheel base (Fig. 17) counterclockwise to
raise the cutting height or clockwise to lower the
cutting height.
12
m4994
Figure 17
1. Raising the cutting height 2. Lowering the cutting
height
Note: Each click represents approximately a 1/4 in.
(6 mm) adjustment.
Adjusting the Rear Cutting Height
1. Remove the battery pack (Fig. 16).
12
Page 13

2. Pull the flexible handle (located inside the battery
pack) out (Fig. 18).
Calibration req.
calibrate
1. Press the Go button.
Low
1
High
Figure 18
1. Slot 2. Flexible handle
3. Move the flexible handle into the desired slot to
change the rear cutting height (Fig. 18).
Note: Each click represents approximately a 1/2 in.
(13 mm) adjustment.
2
m-4993
Calibrating the Lawn Mower
The lawn mower has a geographic compass orientation
that is accurate to within a 100-mile radius of your area.
You need to calibrate the compass only once within that
100-mile radius; you do not need to calibrate the compass
for every operation or every mowing plot.
The following screen displays:
Activate Motors
Confirm
2. Press the Go button to calibrate the lawn mower.
Note: The lawn mower will rotate during calibration to
orient the compass to your yard. It will then stop and
display a number between 60 and 100 in the display
window of the controller (refer to Controls on page 14).
The number is the score of the calibration (any score is
good). If the calibration is unsuccessful, the following
message displays:
Re-try elsewhere
Move the lawn mower to another location on your lot and
repeat the steps 5 through 2 above until the calibration is
successful.
Note: An uneven surface can make calibration difficult
and result in Re-try elsewhere messages.
1. Move the lawn mower to a smooth and level surface
such as a driveway or a sidewalk.
2. Press the Go button on the controller. Refer to Controls
on page 14.
The following screen displays:
Set Geo Location
Location
3. Press the Go button.
The following screen displays:
Not set!
4. Using the scroll arrows, find your country name.
Note: The default is USA.
5. To select the country, press the Go button.
6. Press the Cancel button to return to the main menu.
If the geographical location is not accurate enough for
your yard, the following screen displays:
13
Page 14

Operation
Note: The lawn mower is intended for residential use
only.
Important Do not operate the lawn mower in
temperatures above 104°F (40°C) or below 41°F (5°C).
Controls
Figure 19 illustrates the features on the controller. For an
explanation of the controller menu option settings, refer to
Reviewing the Controller Menu Option Settings on
page 16.
3
2
1
4
• Cancel button—allows you to back up to a previous
menu level, and, when it is pressed together with the
Mow button, activates the lawn mower blades.
• Go button—the green button that operates the lawn
mower in the automatic mode, and allows you to select
the menu settings shown on the second line of the
display window.
• Stop button—stops the lawn mower at any stage of
operation.
• Scroll up and down arrows—allows you to review the
menu items shown in the display window.
Operating the Lawn Mower
Manually
1. Place your finger on the controller indentation and tilt
the controller drawer up (Fig. 20).
8
9
5
6
1. Display window
2. Mow button
3. Drive Speed button
4. Steering button
5. Cancel button
• Display window—displays the operating messages and
menu option settings.
• Mow button—a button that manually activates the
lawn mower blades when pressed together with the
Cancel button.
• Drive Speed button—changes the drive speed to one of
two speed settings (manual mode only).
• Steering button—guides the direction that the lawn
mower moves in the manual mode.
7
Figure 19
6. Go button
7. Stop button
8. Scroll up arrow
9. Scroll down arrow
m-4990
m-4989
Figure 20
2. Lift the controller out of the drawer and hold it in your
hands.
The following screen displays:
Manual
Settings
Maneuvering the Lawn Mower
While staying behind the lawn mower, use the Steering
button to move the lawn mower in the direction as shown
in Figure 21.
14
Page 15
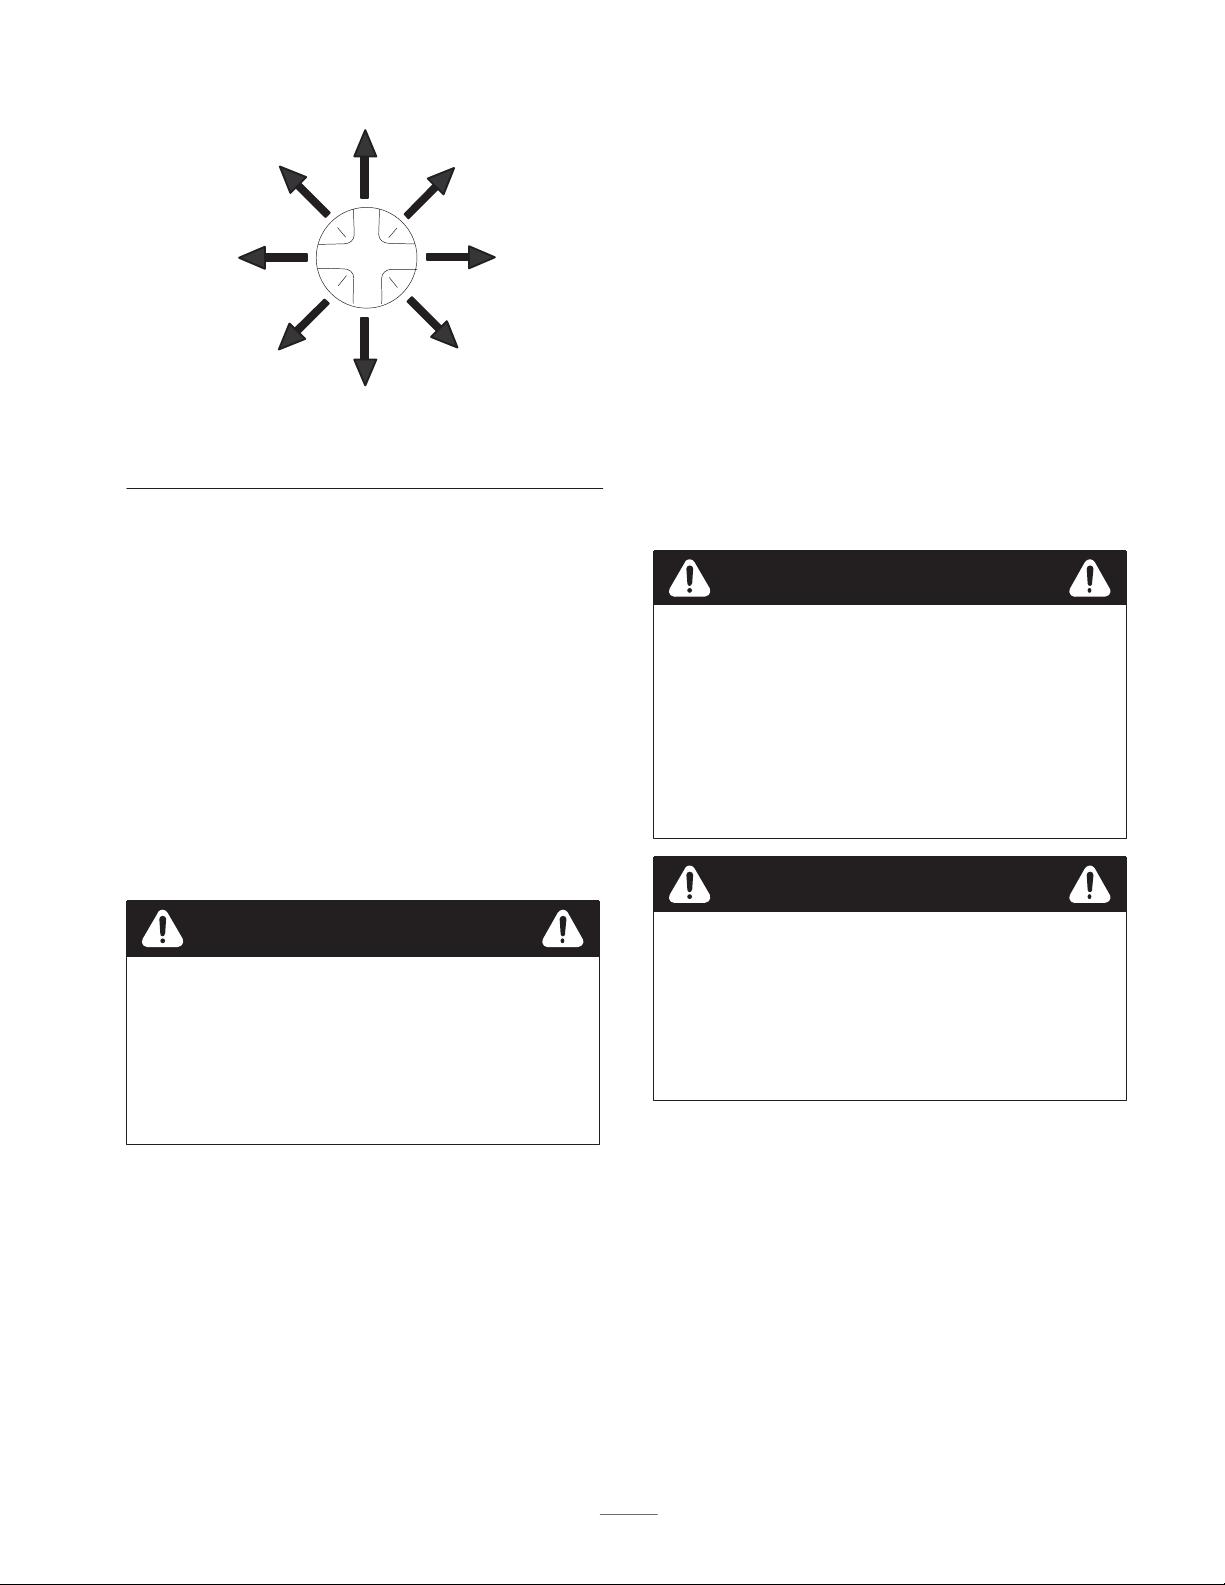
Forward
Left Right
Backward
Figure 21
Switching from Manual to
Automatic Mode
Insert the controller in the drawer (Fig. 20) and close the
drawer until it is flush with the top of the lawn mower
surface. Once the controller is in place, the lawn mower
switches from manual to automatic mode.
Operating the Perimeter Switch
To activate the perimeter switch, press the On/Off button
on the perimeter switch (Fig. 14); to deactivate, press the
On/Off button for at least three seconds.
Operating the Lawn Mower
Note: Practice maneuvering the lawn mower before
operating the blades.
Mowing Manually
1. Press and hold down the Cancel button.
2. Press and hold down the Mow button while holding
the Cancel button.
Note: The lawn mower blades start.
3. Release the Cancel button.
4. To stop the blades, release the mow button. The lawn
mower blades stop immediately.
5. Move the lawn mower using the Steering button.
Warning
Moving the lawn mower improperly could bring
your feet into contact with a moving blade and
result in serious injury.
Always walk behind the lawn mower and stay at
least one foot (30 centimeters) behind the rear
bumper.
Automatically
Warning
Children, adults, and pets may be attracted to the
lawn mower and may get in its path or attempt to
ride on it. The lawn mower blades can cut or
amputate hands and feet.
• Never leave the lawn mower unattended.
• Do not allow riders.
• Keep bystanders away from the area being
mowed.
Warning
Operating the lawn mower outside the plot
bounded by the perimeter wire can cause the lawn
mower to operate uncontrolled, possibly resulting
in serious injury or property damage.
Do not start the lawn mower in automatic mode
outside the plot bounded by the perimeter wire.
15
Page 16
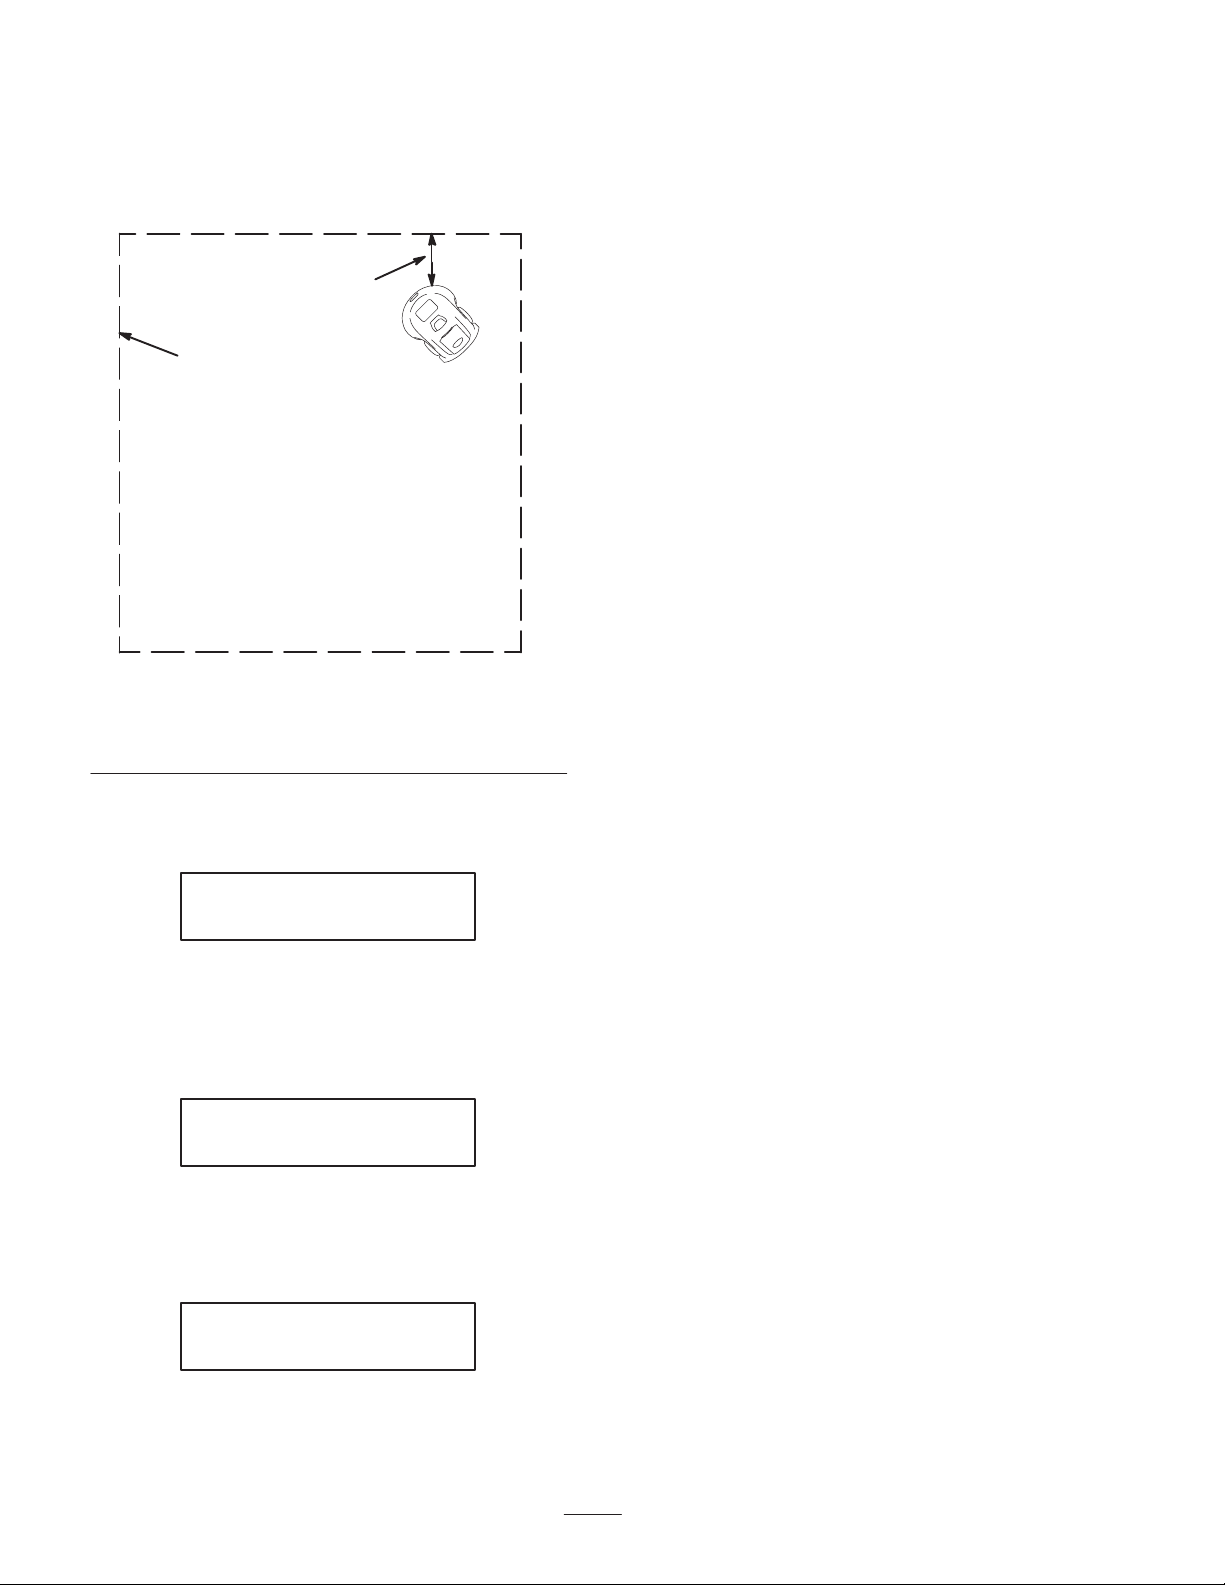
1. Manually drive the lawn mower to your lawn and
position it three feet (one meter) inside the perimeter
wire, along a straight section of the wire, and aimed to
the left (counterclockwise) and away from a corner
(Fig. 22).
2
1
Figure 22
1. Perimeter wire 2. 3 ft. (1 m)
m–5222
Note: If you want to change the work time (the default
is set to two hours), refer to Setting the Work Time on
page 18.
Note: To bypass mowing the edge of the lawn and go
straight to mowing the main area inside the wire, simply
press the Go button while the Skip Edge? message is still
in the display window.
Stopping the Lawn Mower
Press the Stop button on the control panel.
Reviewing the Controller Menu
Option Settings
The controller in the lawn mower comes with the
following menu option settings:
• Sound On/Off
The lawn mower can operate with or without sound.
However, important audible safety messages cannot be
turned off.
• Child Guard On/Off
This option, when turned on, prevents children from
operating the lawn mower. The display shows the
message Keys Locked when the option is activated.
2. Press the Go button on the control panel.
The following message displays for a few seconds:
Warming up...
Skip Edge?
The lawn mower then begins to move forward toward the
perimeter wire. After positioning itself on the perimeter
wire, the lawn mower then mows the edge one to two
times.
During this time the following message displays:
Edge
The lawn mower then turns left into the lawn and begins
to mow inside the perimeter wire until the end of its
designated work time.
During this time the following screen displays:
1:59 Roboscan2
• Mowing On/Off
This option allows the lawn mower to move with or
without cutting the grass. You can use the off mode
when you lay a perimeter wire to check its distance
from the lawn edge. If the wire is loose or is raised
above the grass, the blades will not cut it.
• Geo Location
You must set your country location; otherwise, the
lawn mower will display Set GEO Location and will
not move in the automatic mode.
• Language
This option allows you to set one of the languages in
the system for the display. When you select a
language, the menu then appears in that language.
• Work Time
You can set the amount of time you want the lawn
mower to mow your lawn nearly up to the duration of
the charge life of the battery pack.
Note: When you set the work time to MAX (the
duration of the charge life of the battery pack), the
lawn mower will mow until it reaches a set reserve
16
Page 17

charge in the battery pack that allows you to walk the
lawn mower off the plot before the battery pack is
fully discharged.
• Service
Use this option when you call 1-877-636-iMow
(1-877-636-4669) for service to diagnose any problem
in your lawn mower.
• Diagnostics
Use this option to reach the lower menu levels of
items that you can diagnose. The items to diagnose
include the following:
• DK (Direction Keeper) Calibration
• Wire Sensors
• Direction Keeper
• Front Wheel Sensor
• Bumpers
• Software Version
• Total Time
3. Use the scroll arrows to view the on or off option.
4. To select the desired option, press the Go button.
5. To go up a menu level, press the Cancel button.
Setting the Child Guard On/Off
To set the Child Guard feature either on or off, do the
following steps:
1. From the Settings menu, use the scroll arrows until you
see the following display:
Child guard off
set
2. Press the Go button.
3. Use the scroll arrows to view the on or off option.
4. To select the desired option, press the Go button.
5. To go up a menu level, press the Cancel button.
Note: If you select on, the following message displays:
• Buttons
• Miscellaneous
Entering the Setting Mode
1. Lift the controller out of the drawer.
The following screen displays:
Manual
Settings
2. Press the Go button.
The following screen displays:
Sound off
set
You are in the Settings menu.
Setting the Sound On/Off
To set the sound either on or off, do the following steps:
1. From the Settings menu, use the scroll arrows until you
see the following display:
Sound off
set
2. Press the Go button.
Keys locked
To go up a menu level, press the up arrow and the
Cancel button.
Note: To operate the lawn mower with the Child Guard
feature activated, do the following steps:
1. Press the up arrow.
2. Press the Cancel button.
3. Press the Go button.
4. Operate the lawn mower as you normally would.
When you stop operating the lawn mower, the Child
Guard will again activate, and you will need to repeat
steps 1 through 3 above to operate the lawn mower again.
Setting the Mowing On/Off
To set the mowing mode to either on or off, do the
following steps:
1. From the Settings menu, use the scroll arrows until you
see the following display:
Mowing off
set
2. Press the Go button.
3. Use the scroll arrows to view the on or off option.
17
Page 18

4. To select the desired option, press the Go button.
3. Use the scroll arrows to view the desired zone.
5. To go up a menu level, press the Cancel button.
Setting the Geo Location
To set the Geo location, do the following steps:
1. From the Settings menu, use the scroll arrows until you
see the following display:
GEO Location
set
2. Press the Go button.
3. Use the scroll arrows to view the desired location in
the menu.
4. To select the desired location, press the Go button.
5. To go up a menu level, press the Cancel button.
Setting the Language
The default language is English. To set the language, do
the following steps:
1. From the Settings menu, use the scroll arrows until you
see the following display:
4. To select the desired zone, press the Go button.
5. Use the scroll arrows to find the amount of work time
you desire.
Zone A 2:00
ok ↑
Note: You can set the time in 20-minute increments up to
two hours and 40 minutes; the final display in the menu
shows MAX, the battery time available until it needs
recharging.
6. To select the new work time, press the Go button.
7. Press the Cancel button to exit the set work time
display.
Note: You can set the work time on your lawn mower for
up to four different mowing plots (refer to Plots A, B, C,
and D in Fig. 4).
Note: The lawn mower can mow approximately
1000 square feet (100 square meters)—roughly about the
size of a tennis court—per hour.
Note: If you do not set the work time, the lawn mower
will use the work time default setting of two hours. The
perimeter switch turns off automatically after
approximately five hours.
Language
set
2. Press the Go button.
3. Use the scroll arrows to view the desired language in
the menu.
4. To select the desired language, press the Go button.
5. To go up a menu level, press the Cancel button.
Setting the Work Time
To set the work time, do the following steps:
1. From the Settings menu, use the scroll arrows until you
see the following display:
Work Time
set
2. Press the Go button.
The following screen displays:
Zone A 2:40
set
Service
This menu item is for a certified technician only.
Diagnostics
1. From the Settings menu, use the scroll arrows until you
see the following display:
Diagnostics
set
DK (Direction Keeper) Calibration
This feature allows you to calibrate the direction keeper
during the initial setup of the lawn mower.
1. From the Diagnostics menu, use the scroll arrows until
you see the following display:
DK Calibration
2. Press the Go button.
The following screen displays:
18
Page 19

Activate Motors
Confirm
Note: Call 1–877–iMow (4469) if you can’t find the
line or you have moved over 100 miles from where
you first calibrated the lawn mower.
3. Calibrate the lawn mower. Refer to Calibrating the
Lawn Mower on page 13.
Wire Sensors
Buttons
This feature is to help a certified technician to test the
response of the buttons on the controller.
Miscellaneous
This feature displays the voltage of the battery pack and
the temperature inside the lawn mower.
1. From the Diagnostics menu, use the scroll arrows until
you see the following display:
This feature is to help a certified technician to diagnose
and service problems with the wire sensors.
Direction Keeper
This feature is to help a certified technician to diagnose
and service problems with the direction keeper.
Front Wheel Sensor
Refer to Checking the Lift-off Switch on page 23.
Bumpers
Refer to Checking the Bumpers on page 22.
Software Version
This feature displays the software version of the controller
for the lawn mower.
1. From the Diagnostics menu, use the scroll arrows until
you see the following display:
S.W. Version:
V.3.19T
2. Press the Cancel button to exit the software version
menu.
Total Time
The total time feature shows the accumulated time that the
lawn mower has operated in the automatic mode.
1. From the Diagnostics menu, use the scroll arrows until
you see the following display:
Total time:
00 hr 00 m
Miscellaneous
ok
2. Press the Go button.
The following screen displays:
Batt V: 25.1
Temp:+36c +96F
Note: This display shows the battery pack voltage and
the temperature (in Celsius and Fahrenheit) of the
inside of the lawn mower.
3. Press the Cancel button to exit the miscellaneous
menu.
Exiting the Setting Mode
Press the Cancel button to return to a higher menu level.
Continue to press the Cancel button, going up a menu
level each time until you reach the Manual Settings
message in the display.
Lawn Mowing Tips
For the best cutting results and lawn appearance, follow
these instructions:
• To keep the lawn well groomed, operate the lawn
mower a few times a week. A larger mowing plot may
require three consecutive cuttings with a follow-up
every other day to achieve a uniform length of cut.
• Mow only dry grass and leaves. Wet grass and leaves
tend to clump on the yard and may cause the lawn
mower to plug and stall.
• Grass grows at different rates at different times of the
year. In the heat of summer, it is generally best to cut
the grass at a higher cutting-height setting. Cut only
about a third of the grass blade at one time.
2. Press the Cancel button to exit the total time.
19
Page 20

• When changing the cutting height from an established
setting to a lower setting, the grass may appear ragged
or uneven until the grass adjusts to the new established
cutting height and regains its normal appearance.
• When cutting grass over six inches (15 cm) tall, use a
conventional lawn mower first, then mow again with
the robotic lawn mower at the desired setting for the
best lawn appearance. If the grass is too long, the
robotic lawn mower may leave clumps on top of the
lawn or even plug and stall.
• When mowing a large plot (greater than 2500 sq. ft.
(250 sq. m), an extra battery pack is helpful,
effectively doubling the work time of the lawn mower.
Remember to activate the perimeter switch because it
shuts off automatically after approximately five hours.
• Moisture content of the grass—The more moisture
there is in the grass, the faster the battery pack will run
down.
• Cutting height—If the battery pack is running down
too fast, raise the cutting height one level.
• Blade Sharpness—Maintain sharp blades throughout
the cutting season. Periodically file down any nicks on
the blade. To remove the blades, refer to Replacing the
Blades on page 23.
If the finished cut lawn appearance is unsatisfactory, try
one or more of the following:
• Replace the blades.
• Raise the cutting height.
For a battery-powered lawn mower, the condition of the
grass will affect the how long the battery pack will run on
a single charge at each mowing. The following are some
things that affect the battery pack run time:
• Cut the grass more frequently.
• Set the cutting height on the front wheels one notch
lower than that of the rear wheels.
Maintenance
Note: Determine the left and right sides of the machine from the normal operating position.
Recommended Maintenance Schedule
Maintenance Service
Interval
Each Use
50 Hours
150 Hours
Maintenance Procedure
• Remove grass clippings and dirt on the housing.
• Charge the battery pack after every use and before and after storage.
• Check the bumpers to ensure that they are operating properly.
• Check the lift-off switch. If it does not operate properly, call 1-877-636-iMow
(1-877-636-4669) for repair.
• Replace the blades; replace them more frequently if the edges dull quickly in
rough or sandy conditions.
Important Do not attempt to open or modify your lawn mower; doing so will invalidate your warranty.
20
Page 21

Cleaning the Lawn Mower
Housing
Clean the lawn mower housing after every use.
Important You can charge the battery pack when the
temperature is between –4°F (–20°C) and 140°F (60°C).
1. Plug the charger into a standard 110 V household
outlet.
1. Stop the lawn mower and wait for all moving parts to
stop.
2. Remove the battery pack (Fig. 16).
3. Pull the front handle upward to lift the lawn mower to
an upright position.
4. Use a wet cloth or a soft brush to remove grass
clippings and debris from the underside, the blades,
and the wheels.
Note: Do not set the lawn mower upside down because
that can damage the controller.
5. Inspect the drainage holes and ensure that they are not
blocked (Fig. 23).
1
2. Pivot the controller up on its hinges.
3. Plug the charger into the charging socket under the
controller drawer (Fig. 24).
1
m-4989
Figure 24
1. Charging socket
4. Pivot the controller back to lie flush with the top of the
lawn mower surface.
m-5246
Figure 23
1. Drainage holes
Important Do not use a water hose on the lawn
mower when cleaning; the water can damage the
electronics.
Important Do not use metal objects to clean around
the battery pack. If metal objects contact the positive and
negative posts at the same time, this could short out the
battery pack. The battery pack or conductor may overheat
and cause burns.
Charging the Battery Pack
Charge the battery pack after every time you use the lawn
mower.
Important The charger is for indoor use only. Do not
expose the charger to moisture, and do not charge the
battery pack in or near water.
The following screen displays:
Charging
5. When the lawn mower is fully charged and ready to
operate, the screen displays:
Fully Charged
Note: Operating the lawn mower before it is fully charged
reduces the battery life.
Note: The lawn mower should be charging at all times
when it is not in use. Continuous charging does not harm
the battery pack. The battery pack is fully charged after
approximately 24 hours.
Replacing the Battery Pack
1. Stop the lawn mower and wait for all moving parts to
stop.
2. Remove the battery pack by pulling it out of the
battery pack compartment (Fig. 25).
21
Page 22

Checking the Bumpers
Check the bumpers to ensure that they can detect a hard
and solid obstacle at least six inches (15 centimeters) high
and tree trunks at least one inch (2.5 centimeters) in
diameter.
1. Take the controller out of the drawer.
1
Figure 25
1. Battery pack
3. Install a new battery pack in its place.
Disposing of the Old Battery
Pack
Warning
Battery posts, terminals, and related
accessories contain lead and lead compounds,
chemicals known to the State of California to
cause cancer and reproductive harm. Wash
hands after handling.
Important Do not place used batteries in your
household trash!
m-4991
The following screen displays:
Manual
Settings
2. Press the Go button.
The following screen displays:
Sound off
set
3. Use the scroll arrows until you see the following
display:
Bumpers
4. Press the Go button.
The following screen displays:
Lt:– Rt:– Rr:–
Note: Lt is the left bumper; Rt is the right bumper; and
Rr is the rear bumper. Figure 26 shows the location of
the bumpers on the lawn mower.
1
2
Important The battery pack must be collected,
recycled, or disposed of in an environmentally sound
manner.
Incinerating, landfilling, or mixing sealed lead (acid)
batteries with the municipal solid waste stream is
prohibited by law in most areas.
Return the old battery pack to an approved sealed lead
(acid) battery recycler.
Contact your local waste management officials for other
information regarding the environmentally sound
collection, recycling, and disposal of the battery pack.
1. Left bumper
2. Right bumper
22
m–5222
3
Figure 26
3. Rear bumper
Page 23

5. Press and hold the rear bumper area and check for a
star in the display as shown in the following display:
Lt:– Rt:– Rr:*
Front Wheel:
On the ground
6. Lift the front end of the lawn mower a few inches
(centimeters).
6. Repeat step 5 for the left and right bumper areas.
Important If the bumper does not respond (the star
does not appear), call 1-877-636-iMow (1-877-636-4669)
for service.
7. Press the Cancel button to return to the menu display.
Note: If the sound is activated, you will hear an electronic
sound when you press the bumper.
Checking the Lift-off Switch
The lift-off switch stops the blades if you raise the front
end of the lawn mower during operation. Check the
lift-off switch after every 50 operating hours.
1. Take the controller out of the drawer.
The following screen displays:
Manual
Settings
2. Press the Go button.
The following screen displays:
The following screen displays:
Front Wheel:
Lifted
Note: After two or three seconds an audio message says,
“Please remove battery pack before lifting.”
Important If the display is different from that shown
above, call 1-877-636-iMow (1-877-636-4669) for
service.
Replacing the Blades
Always mow with sharp blades. Sharp blades cut cleanly
without tearing or shredding the grass.
Warning
The blade is sharp; contacting the blade can result
in serious personal injury.
Use extreme care when replacing or cleaning the
blades.
Sound off
set
3. Use the scroll arrows until you see the following
display:
Diagnostics
4. Press the Go button.
The following screen displays:
Front Wheel Snsr
5. Press the Go button.
The following screen displays:
1. Stop the lawn mower and wait for all moving parts to
stop.
2. Remove the battery pack (Fig. 16).
3. Tip the lawn mower over.
4. Squeeze the black plastic tabs at the base of the blade
and pull the blade toward you (Figs. 27 and 28).
23
Page 24

2
1
m4996
Figure 27
1. Blade base 2. Blade
1
2
m-4995
Figure 28
1. Blade (3) 2. Spindle
5. Hold the new blade by its base and push it onto the
spindle until you hear and feel a positive click.
Replacing the Batteries in the
2. Remove the old batteries from the battery
compartment.
3. Insert three 1.5V C-cell batteries (Fig. 6).
4. Close the perimeter switch case.
Storage
Store the lawn mower in a cool, clean, and dry place such
as an unheated garage. Cover the lawn mower to keep it
clean and protected. Do not store the lawn mower on its
bumpers or with anything pressing on the bumpers.
1. Clean the lawn mower housing. Refer to Cleaning the
Lawn Mower Housing on page 21.
2. Remove grass clippings, dirt, and grime from external
parts of the shrouding and from the top of the lawn
mower housing.
3. Check the condition of the blades; if necessary, replace
the blades. Refer to Replacing the Blades on page 23.
Important Toro designed your lawn mower with a
built-in battery pack charger that checks the charging
status and charges the battery pack only when necessary.
Therefore, leave the battery pack plugged in whenever
you are not using the lawn mower during the mowing
season.
Important During the off-season, keep the battery
pack fully charged, remove it from the lawn mower, and
store it in a cool place no colder than –4°F (–20°C). You
can store a fully charged battery pack for up to six months
before recharging if it is stored in a cool, dry place.
Charge the battery pack before using the lawn mower for
the first time of the season.
Perimeter Switch
1. Open the perimeter switch case by squeezing the front
part of the tabs to the case (Fig. 6).
1
2
3
m5002
Figure 29
1. Perimeter switch case
2. Tab (2)
3. 1.5V C-cell battery (3)
Accessories
• Replacement Blades
• Replacement Battery Pack
• Battery Charger
• Perimeter Switch
• Pegs
• Wire
24
Page 25

Troubleshooting
Toro designed and built your lawn mower for trouble-free operation. Check the following components and items carefully.
If a problem continues, call 1-877-636-iMow (1-877-636-4669) for service.
PROBLEM POSSIBLE CAUSES CORRECTIVE ACTION
Lawn mower does not start (
Wire Signal
Lawn mower does not start (
Blocked
Lawn mower does not start (
Too Close
Lawn mower strikes an object
while mowing the edge
Lawn mower stops (
Battery
Lawn mower stops (
Needed
display)
display)
display)
Recharge
display)
User Help
display)
No
Path
Wire
1. The perimeter switch is not
turned on or is not properly
connected.
2. The perimeter wire is damaged
or cut.
3. The lawn mower is directly on
the perimeter wire.
1. The lawn mower bumps into an
obstacle at the beginning of its
motion.
1. The lawn mower is initiated
over or too close to the
perimeter wire.
1. The perimeter wire is too close
to the object.
1. The battery pack is not
charged.
1. The lawn mower is stuck.
2. The lawn mower is trapped
between two obstacles.
1. Make sure that the perimeter
switch is turned on and
properly connected.
2. Look at the perimeter switch
(Wire Disconnected Indicator)
and check for a broken or cut
perimeter wire; repair the wire
if necessary.
3. Move the lawn mower off the
perimeter wire and press the
Go button.
1. Move the lawn mower away
from the obstacle and press the
Go button.
1. Move the lawn mower away
from the perimeter wire.
1. Set the wire at a greater
distance from the obstacle.
1. Charge the battery pack for 24
hours.
1. Move the lawn mower.
2. Set the lawn mower away from
the obstacles.
Lawn mower does not cut the
grass (
Lawn mower moves but does not
mow (
Mowing Problem
Normal
display)
display)
1. The cutting height is too low.
2. The grass is wet.
3. The underside of lawn mower
deck is clogged with clippings.
4. The grass is too tall for the
lawn mower.
1. The lawn mower is set to
Mowing Off
.
25
1. Raise the cutting height.
2. Allow the grass to dry before
mowing.
3. Clean the underside of the lawn
mower deck.
4. Cut the grass with a
conventional lawn mower, then
mow again with the robotic
lawn mower to the final height.
1. If so, change to
the preferences menu.
Mowing On
in
Page 26

PROBLEM CORRECTIVE ACTIONPOSSIBLE CAUSES
Lawn mower does not completely
mow the edge (
display)
The charger does not charge
(
Charging Problem
User Help Needed
display)
1. The perimeter wire is too close
to an obstacle at the lawn
edge.
1. The charger is not plugged in.
2. The charger is plugged in, but
is not charging.
3. The charger is faulty.
1. Set the wire farther away from
the obstacle.
1. Plug the charger into a
standard 110 V household
outlet.
2. Unplug the charger and plug it
in again.
3. Replace the charger.
26
Page 27

27
Page 28

Robotic Mowers
The Toro Total Coverage Guarantee
A Three-Year Limited Warranty
Conditions and Products Covered
The Toro Company and its affiliate, Toro Warranty Company,
pursuant to an agreement between them, jointly promise to correct
any defect in materials or workmanship on any iMow Robotic
Product used for normal residential purposes.* At our option, we
will repair the unit or replace it with either a new or refurbished unit.
The following time periods apply from the date of purchase:
Products
• All Products 3 year limited warranty
• All Batteries 1 year limited warranty
This warranty includes the cost of parts, labor, and product return
freight to Toro. You must pay transportation costs to a local service
provider or retailer, if required.
* Normal residential purposes means use of the product on the
same lot as your home. Use at more than one location is
considered commercial use, and this warranty would not apply.
Warranty Period
Instructions for Obtaining Warranty Service
Should you feel your Toro Product contains a defect in materials or
workmanship, contact The Toro Company for assistance. You may
need proof of purchase (copy of registration card, sales receipt,
etc.) for warranty validation. Contact us at:
iMow Toro Customer Service Department
1414 West Walnut Hill Lane
Irving, TX 75038
1-877-636-imow or 1-877-636-4669
60 Day Satisfaction Guarantee
If for any reason you are not satisfied with your Toro Product within
the first 60 days of residential use, please contact The Toro
Company for a refund or replacement unit at 1-877-636-imow or
1-877-636-4669. Do not return the Toro Product to your retailer.
maintenance, whether performed by a service provider or by you,
is at your expense.
Items and Conditions Not Covered
This express warranty does not cover the following:
• Cost of regular maintenance service or parts, such as blade
sharpening
• Any product or part which has been altered or misused or
required replacement or repair due to accidents or lack of
proper maintenance
• Repairs necessary due to improper battery care, electrical
supply irregularities, or failure to properly prepare the mower
prior to any period of non-use
• Pickup and delivery charges
All repairs covered by this warranty must be performed by an
Authorized Service Provider using Toro approved replacement
parts.
General Conditions
There is no other express warranty. All implied warranties of
merchantability and fitness for use are limited to the duration of this
express warranty.
Neither The Toro Company nor Toro Warranty Company is liable
for indirect, incidental or consequential damages in connection
with the use of the Toro Products covered by this warranty,
including any cost or expense of providing substitute equipment or
service during reasonable periods of malfunction or non-use
pending completion of repairs under this warranty.
Some states do not allow exclusions of incidental or consequential
damages, or limitations on how long an implied warranty lasts, so
the above exclusions and limitations may not apply to you.
This warranty gives you specific legal rights, and you may also
have other rights which vary from state to state.
Owner Responsibilities
You must maintain your Toro Product by following the maintenance
procedures described in the operator’s manual. Such routine
Countries Other than the United States or Canada
Customers who have purchased Toro products exported from the United States or Canada should contact their Toro Distributor (Dealer)
to obtain guarantee policies for your country, province, or state. If for any reason you are dissatisfied with your Distributor’s service or
have difficulty obtaining guarantee information, contact the Toro importer. If all other remedies fail, you may contact us.
Part No. 374-0041 Rev. A
 Loading...