

Page 1
FormNo. 3363-687-ASM Rev B
50cmMulching/RearBaggingLawnMower
ModelNo.29642—SerialNo.310000001andUp
Operator'sManual
Introduction
Thisrotary-blade,walk-behindlawnmoweris
intendedtobeusedbyresidentialhomeowners.
Itisdesignedprimarilyforcuttinggrasson
well-maintainedlawnsonresidentialproperties.It
isnotdesignedforcuttingbrushorforagricultural
uses.
Readthisinformationcarefullytolearnhowtooperate
andmaintainyourproductproperlyandtoavoidinjury
andproductdamage.Youareresponsibleforoperating
theproductproperlyandsafely.
YoumaycontactTorodirectlyatwww.Toro.comfor
productandaccessoryinformation,helpndingadealer,
ortoregisteryourproduct.
Wheneveryouneedservice,genuineToroparts,
oradditionalinformation,contactanAuthorized
ServiceDealerorToroCustomerServiceandhave
themodelandserialnumbersofyourproductready.
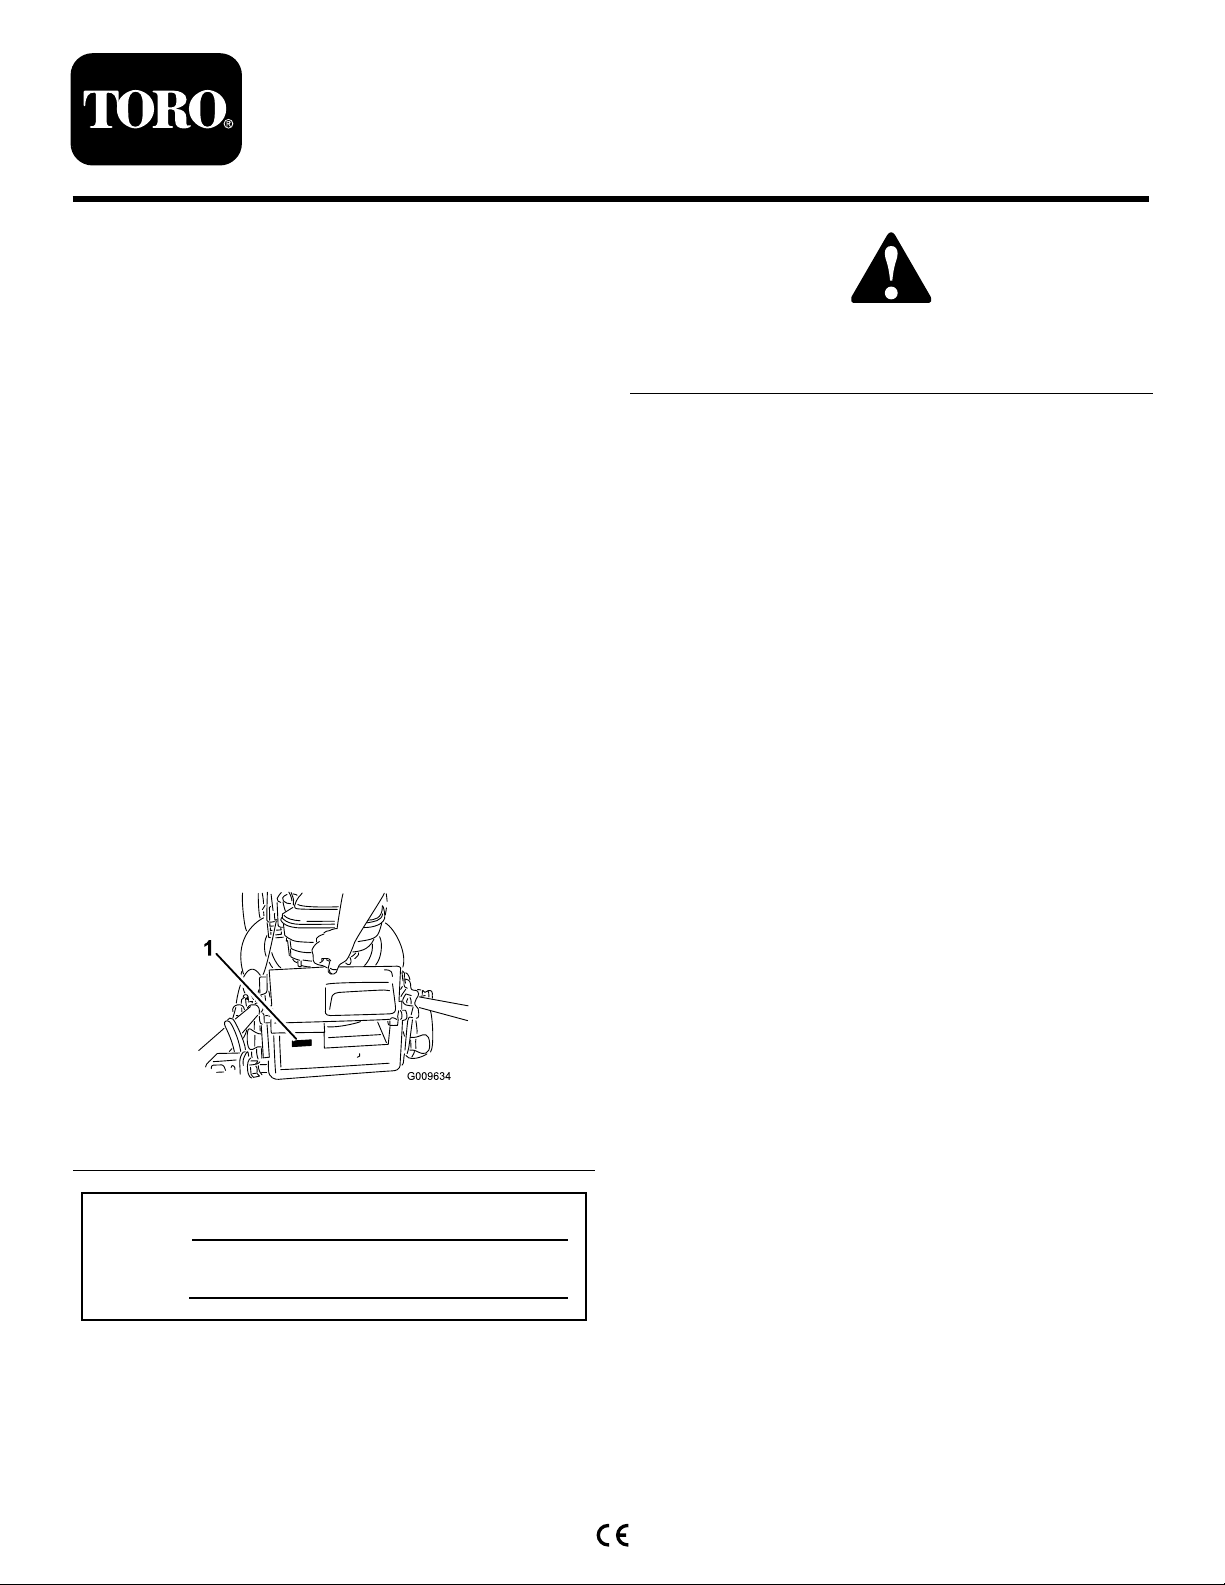
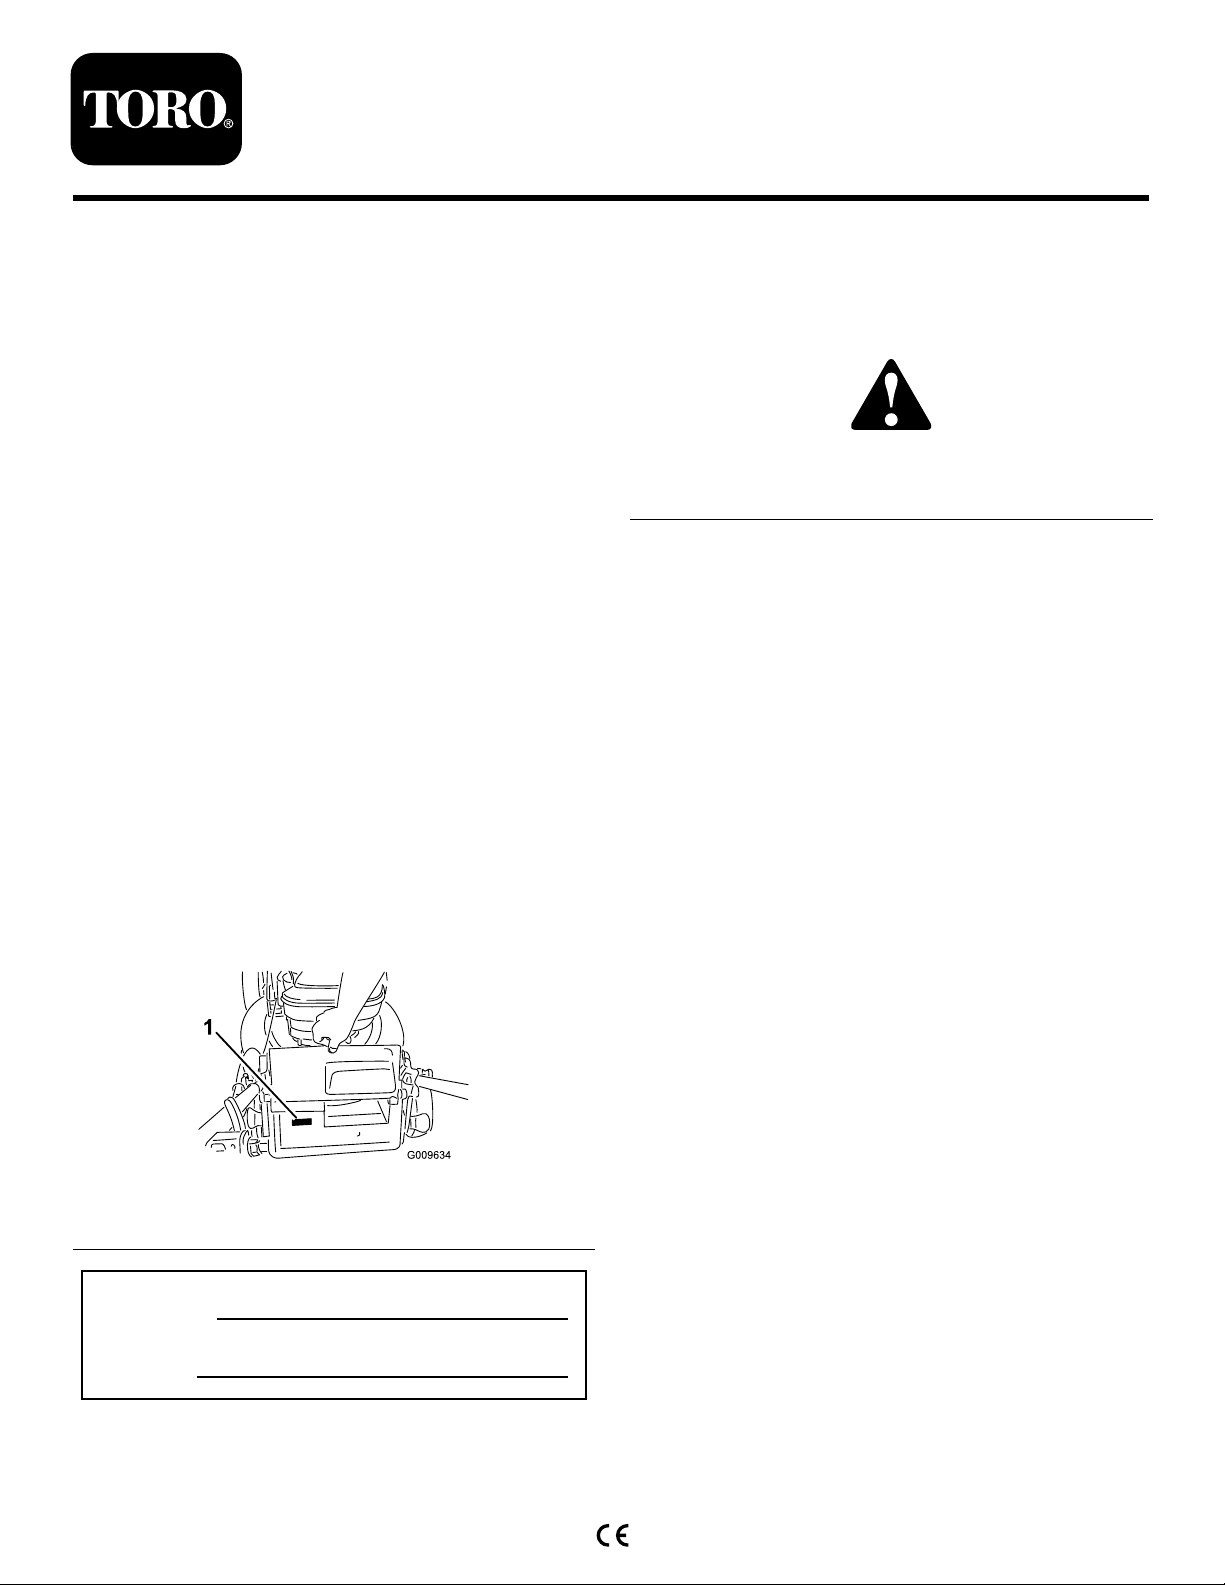
Figure1identiesthelocationofthemodelandserial
numbersontheproduct.Writethenumbersinthe
spaceprovided.
Figure2
1.Safetyalertsymbol
Thismanualusestwowordstohighlightinformation.
Importantcallsattentiontospecialmechanical
informationandNoteemphasizesgeneralinformation
worthyofspecialattention.
ThisproductcomplieswithallrelevantEuropean
directives.Fordetails,seetheseparateproductspecic
DeclarationofConformity(DOC)sheet.
Formodelswithstatedenginehorsepower,thegross
horsepoweroftheenginewaslaboratoryratedbythe
enginemanufacturerinaccordancewithSAEJ1940.
Asconguredtomeetsafety,emission,andoperating
requirements,theactualenginehorsepoweronthisclass
oflawnmowerwillbesignicantlylower.
Donottamperwiththeenginecontrolsoralterthe
governorspeed;doingsomaycreateanunsafecondition
resultinginpersonalinjury.
Figure1
1.Modelandserialnumberplate
ModelNo.
SerialNo.
Thismanualidentiespotentialhazardsandhassafety
messagesidentiedbythesafetyalertsymbol(Figure2),
whichsignalsahazardthatmaycauseseriousinjury
ordeathifyoudonotfollowtherecommended
precautions.
©2011—TheToro®Company
8111LyndaleAvenueSouth
Bloomington,MN55420
Registeratwww.Toro.com.
Safety
Improperlyusingormaintainingthismowercan
resultininjury.Toreducethepotentialforinjury,
complywiththesesafetyinstructions.
Torodesignedandtestedthismowerforreasonablysafe
service;however,failuretocomplywiththefollowing
instructionsmayresultinpersonalinjury.
Toensuremaximumsafety,bestperformance,and
togainknowledgeoftheproduct,itisessential
thatyouandanyotheroperatorofthemowerread
andunderstandthecontentsofthismanualbefore
theengineiseverstarted.Payparticularattention
tothesafetyalertsymbol(Figure2)whichmeans
Caution,Warning,orDanger—“personalsafety
instruction.”Readandunderstandtheinstruction
becauseithastodowithsafety.Failuretocomply
withtheinstructionmayresultinpersonalinjury.
OriginalInstructions(EN)
PrintedintheUSA
AllRightsReserved
Page 2

GeneralLawnMowerSafety
ThefollowinginstructionshavebeenadaptedfromEN
836.
Thiscuttingmachineiscapableofamputatinghands
andfeetandthrowingobjects.Failuretoobservethe
followingsafetyinstructionscouldresultinserious
injuryordeath.
Training
•Readtheinstructionscarefully.Befamiliarwiththe
controlsandtheproperuseoftheequipment.
•Neverallowchildrenorpeopleunfamiliarwiththese
instructionstousethemower.Localregulationscan
restricttheageoftheoperator.
•Keepinmindthattheoperatororuserisresponsible
foraccidentsorhazardsoccurringtootherpeopleor
theirproperty.
•Understandexplanationsforallpictogramsusedon
themowerorintheinstructions.
Gasoline
WARNING-Gasolineishighlyammable.Takethe
followingprecautions.
•Storefuelincontainersspecicallydesignedforthis
purpose.
•Refueloutdoorsonlyanddonotsmokewhile
refueling.
•Addfuelbeforestartingtheengine.Neverremove
thecapofthefueltankoraddgasolinewhilethe
engineisrunningorwhentheengineishot.
•Ifgasolineisspilled,donotattempttostartthe
enginebutmovethemowerawayfromtheareaof
spillageandavoidcreatinganysourceofignition
untilgasolinevaporshavedissipated.
•Replaceallfueltankandcontainercapssecurely.
Preparation
•Whilemowing,alwayswearsubstantialfootwearand
longtrousers.Donotoperatetheequipmentwhen
barefootorwearingopensandals.
•Thoroughlyinspecttheareawheretheequipmentis
tobeusedandremoveallstones,sticks,wires,bones
andotherforeignobjects.
•Beforeusing,alwaysvisuallyinspecttoseethat
guards,andsafetydevices,suchasdeectorsand/or
grasscatchers,areinplaceandworkingcorrectly.
•Beforeusing,alwaysvisuallyinspecttoseethatthe
blades,bladeboltsandcutterassemblyarenotworn
ordamaged.Replacewornordamagedbladesand
boltsinsetstopreservebalance.
Starting
•Donottiltmowerwhenstartingtheengineunless
themowerhastobetiltedforstarting.Inthiscase,
donottiltitmorethanabsolutelynecessaryandlift
onlythepart,whichisawayfromtheoperator.
•Starttheenginecarefullyaccordingtoinstructions
andwithfeetwellawayfromtheblade(s)andnotin
frontofthedischargechute.
Operation
•Nevermowwhilepeople,especiallychildren,orpets
arenearby.
•Mowonlyindaylightoringoodarticiallight.
•Stayalertforholesintheterrainandotherhidden
hazards.
•Donotputhandsorfeetnearorunderrotatingparts.
Keepclearofthedischargeopeningatalltimes.
•Neverpickuporcarryalawnmowerwhilethe
engineisrunning.
•Useextremecautionwhenreversingorpullinga
pedestriancontrolledlawnmowertowardsyou.
•Walk,neverrun.
•Slopes:
–Donotmowexcessivelysteepslopes.
–Exerciseextremecautionwhenonslopes.
–Mowacrossthefaceofslopes,neverupand
downandexerciseextremecautionwhen
changingdirectiononslopes.
–Alwaysbesureofyourfootingonslopes.
•Reducespeedonslopesandinsharpturnstoprevent
overturningorlossofcontrol.
•Stopthebladeifthelawnmowerhastobetiltedfor
transportationwhencrossingsurfacesotherthan
grassandwhentransportingthelawnmowertoand
fromtheareatobemowed.
•Donotoperatetheengineinaconnedspacewhere
dangerouscarbonmonoxidefumescancollect.
•Stoptheengine
–wheneveryouleavethelawnmower.
–beforerefueling.
–beforeremovingthegrasscatcher.
–beforemakingheightadjustmentunless
adjustmentcanbemadefromtheoperator's
position.
•Stoptheengineanddisconnectthespark-plugwire.
2
Page 3

–beforeclearingblockagesoruncloggingchute.
–beforechecking,cleaningorworkingonthelawn
mower.
–afterstrikingaforeignobject,inspectthelawn
mowerfordamageandmakerepairsbefore
restartingandoperatingthelawnmower.
SoundPressure
Thisunithasasoundpressurelevelattheoperator’s
earof87dBA,whichincludesanUncertaintyValue(K)
of1dBA.Thesoundpressurelevelwasdetermined
accordingtotheproceduresoutlinedinEN836.
–iflawnmowerstartstovibrateabnormally(check
immediately).
•Lightningcancausesevereinjuryordeath.Ifyousee
lightningorhearthunderinthearea,donotoperate
themachine;seekshelter.
•Watchoutfortrafcwhencrossingornearroadways.
MaintenanceandStorage
•Keepallnuts,boltsandscrewstighttobesurethe
equipmentisinsafeworkingcondition.
•Donotusepressurecleaningequipmentonmachine.
•Neverstoretheequipmentwithgasolineinthetank
andinsideabuildingwherefumescanreachanopen
ameorspark.
•Allowtheenginetocoolbeforestoringinany
enclosure.
•Toreducetherehazard,keeptheengine,silencer,
batterycompartmentandgasolinestoragearefreeof
grass,leaves,orexcessivegrease.
SoundPower
Thisunithasaguaranteedsoundpowerlevelof98dBA,
whichincludesanUncertaintyValue(K)of1dBA.The
soundpowerlevelwasdeterminedaccordingtothe
proceduresoutlinedinISO11094.
Hand-ArmVibration
Measuredvibrationlevelforthelefthand=3.5m/s
Measuredvibrationlevelfortherighthand=3.4m/s
UncertaintyValue(K)=1.8m/s
Themeasuredvaluesweredeterminedaccordingtothe
proceduresoutlinedinEN836.
2
.
2
2
•Checkgrasscatchercomponentsandthedischarge
guardfrequentlyandreplacewithmanufacturer's
recommendedparts,whennecessary.
•Replacewornordamagedpartsforsafety.
•Replacefaultysilencers.
•Ifthefueltankhastobedrained,dothisoutdoors.
•Donotchangetheenginegovernorsettingsor
overspeedtheengine.Operatinganengineat
excessivespeedcanincreasethehazardofpersonal
injury.
•Onmultibladedlawnmowers,takecareasrotating
oneblademaycauseotherstorotate.
•Becarefulduringadjustmentofthelawnmowerto
prevententrapmentofthengersbetweenmoving
bladesandxedpartsofthelawnmower.
•Toensurethebestperformanceandsafety,
purchaseonlygenuineTororeplacementparts
andaccessories.Donotuse
accessories;theymaycauseasafetyhazard.
willt
partsand
3
Page 4
SafetyandInstructional
Decals
Important:Safetyandinstructiondecalsare
locatednearareasofpotentialdanger.Replace
damageddecals.
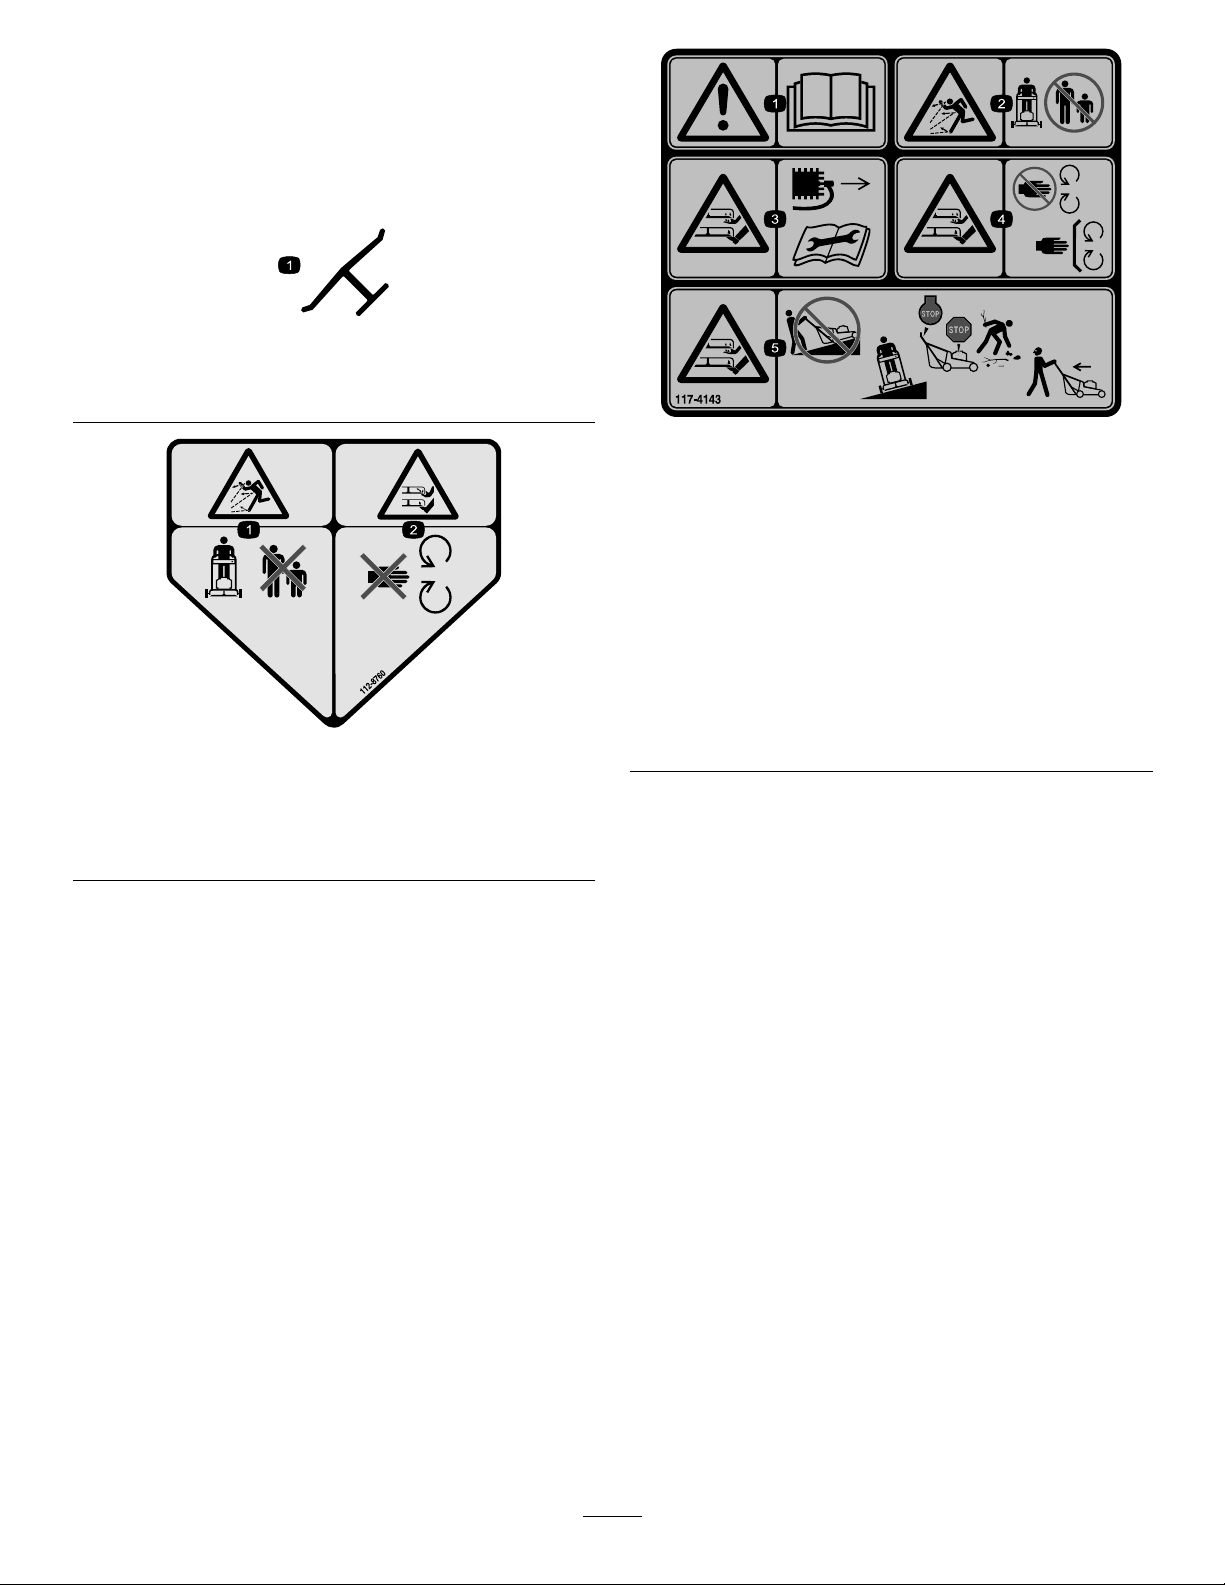
Manufacturer'sMark
1.Indicatesthebladeisidentiedasapartfromtheoriginal
machinemanufacturer.
112-8760
117-4143
1.Warning—readtheOperator'sManual.
2.Thrownobjecthazard—keepbystandersasafedistance
fromthemachine.
3.Cutting/dismembermenthazardofhandorfoot,mower
blade—disconnectthespark-plugwireandreadthe
instructionsbeforeservicingorperformingmaintenance.
4.Cutting/dismembermenthazardofhandorfoot,mower
blade—stayawayfrommovingpartsandkeepallguards
andshieldsinplace.
5.Cutting/dismembermenthazardofhandorfoot,mower
blade—donotmowupanddownslopes,onlymowacross;
stopthemowerandengine,pickupdebrisbeforeoperating;
lookbehindanddownwhenreversing.
1.Thrownobjecthazard—keepbystandersasafedistance
fromthemachine.
2.Cutting/dismembermentofhandorfoot—stayawayfrom
movingparts.
4
Page 5
Setup
Important:Removeanddiscardtheprotective
plasticsheetthatcoverstheengine.
1
UnfoldingtheHandle
NoPartsRequired
Procedure
WARNING
Foldingorunfoldingthehandleimproperlycan
damagethecables,causinganunsafeoperating
condition.
•Donotdamagethecableswhenfoldingor
unfoldingthehandle.
•Ifacableisdamaged,contactanAuthorized
ServiceDealer.
2
FillingtheEnginewithOil
NoPartsRequired
Procedure
Yourmowerdoesnotcomewithoilintheengine.
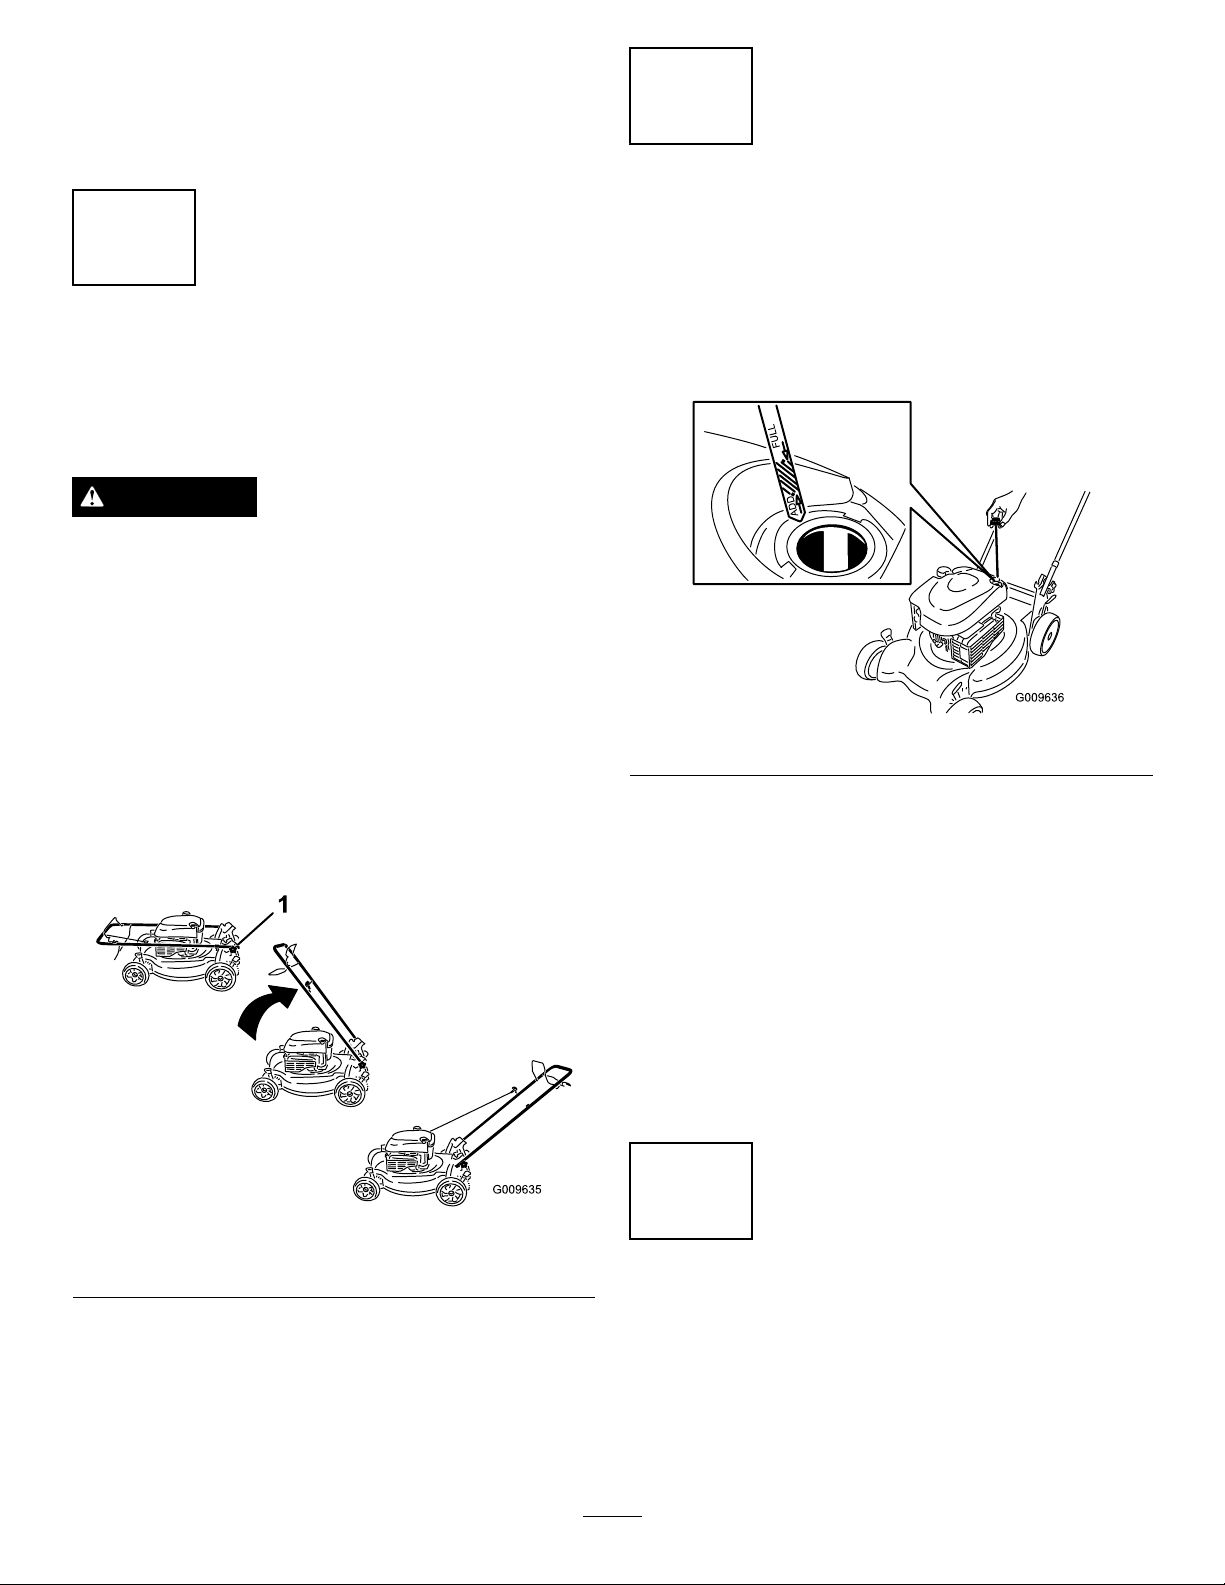
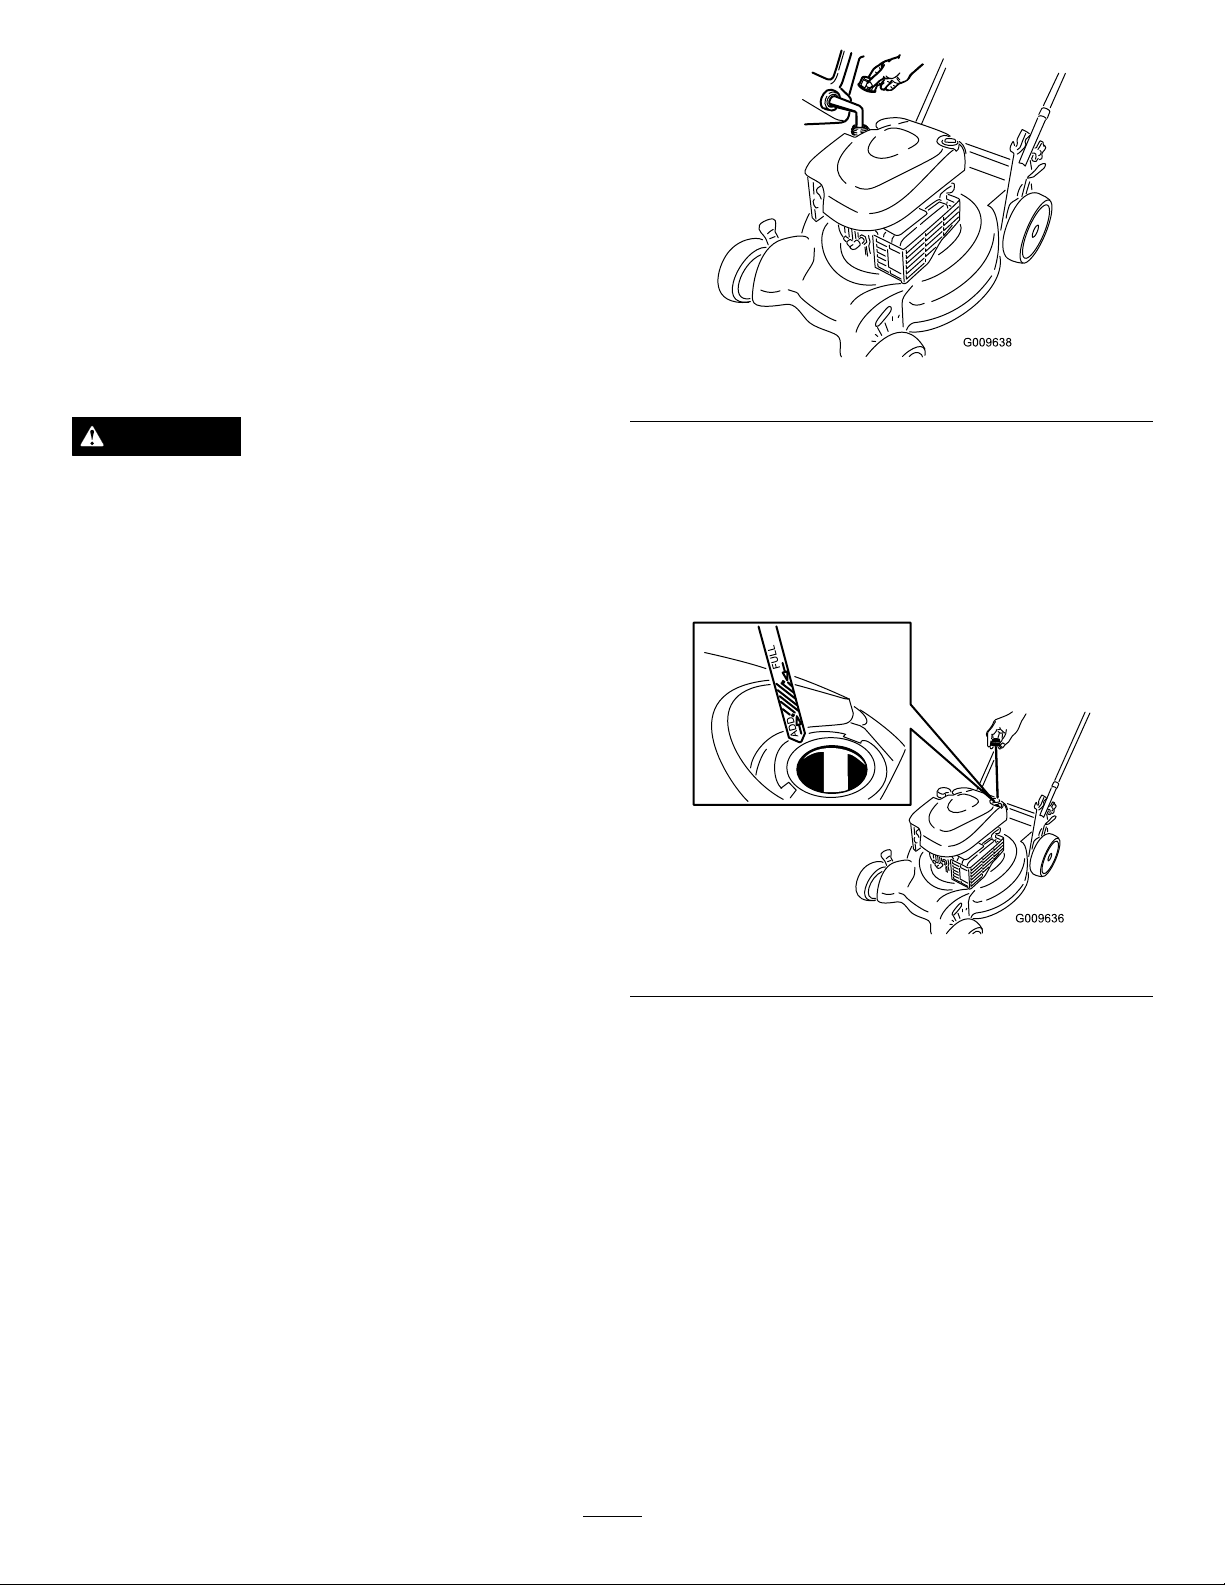
1.Removethedipstick(Figure4).
Figure4
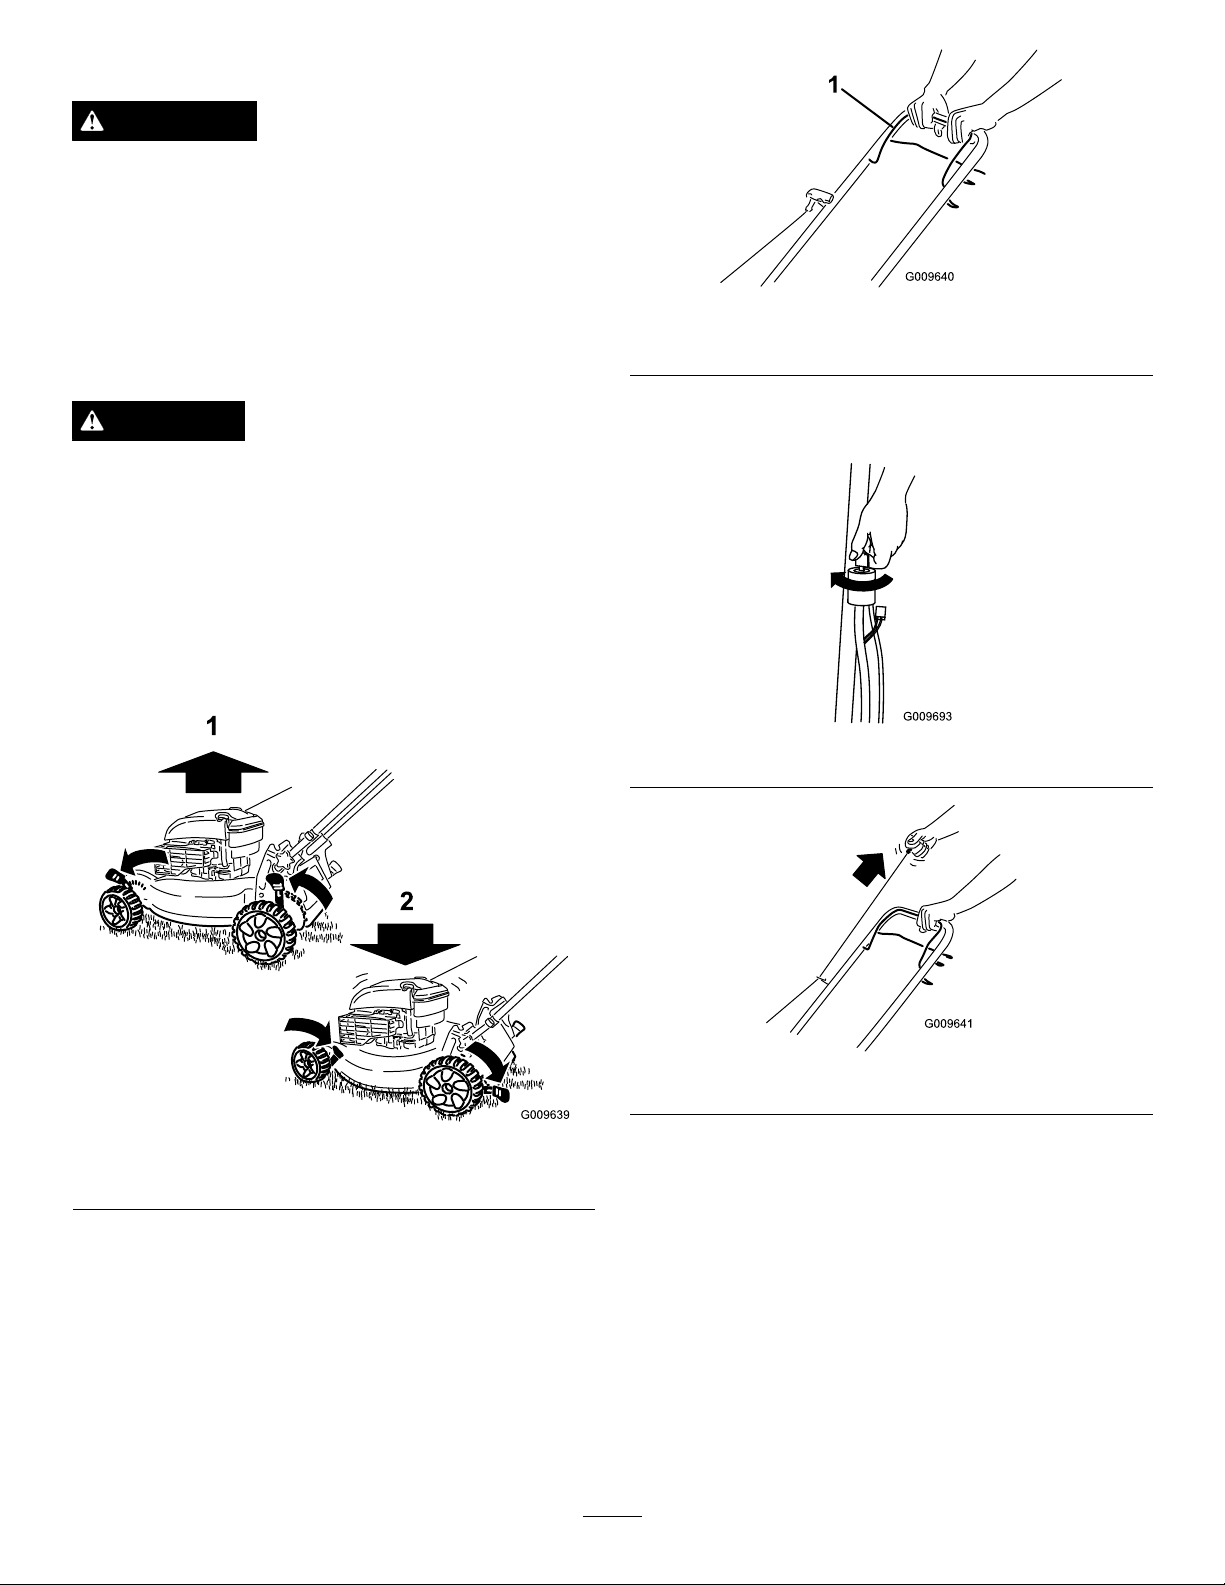
1.Removethehandleknobsfromthemowerhousing
(Figure3).
Important:Routethecablestotheoutsideof
thehandleasyouinstallthehandle.
Figure3
1.Handleknob(2)
2.Movethehandletotheoperatingposition.
2.Slowlypouroilintotheoillltubeuntiltheoillevel
reachestheFulllineonthedipstick(Figure4).Do
notoverll.(Max.ll:20oz.(0.59l),type:SAE30
detergentoilwithanAPIserviceclassicationofSF,
SG,SH,SJ,SL,orhigher.)
Note:Ifyouoverlltheengine,poursomeoilout
ofitasdirectedinChangingtheEngineOil.
3.Installthedipsticksecurely.
Important:
5operatinghours
RefertoChangingtheEngineOil.
Changetheengineoilaftertherst
;changeityearlythereafter.
3
ChargingtheBattery
NoPartsRequired
3.Installandtightenthehandleknobsthatyou
removedinstep1(Figure3).
Procedure
RefertoChargingtheBatteryintheMaintenance
section.
5
Page 6
4
InstallingtheFuse
NoPartsRequired
Procedure
RefertoReplacingtheFuseintheMaintenancesection.
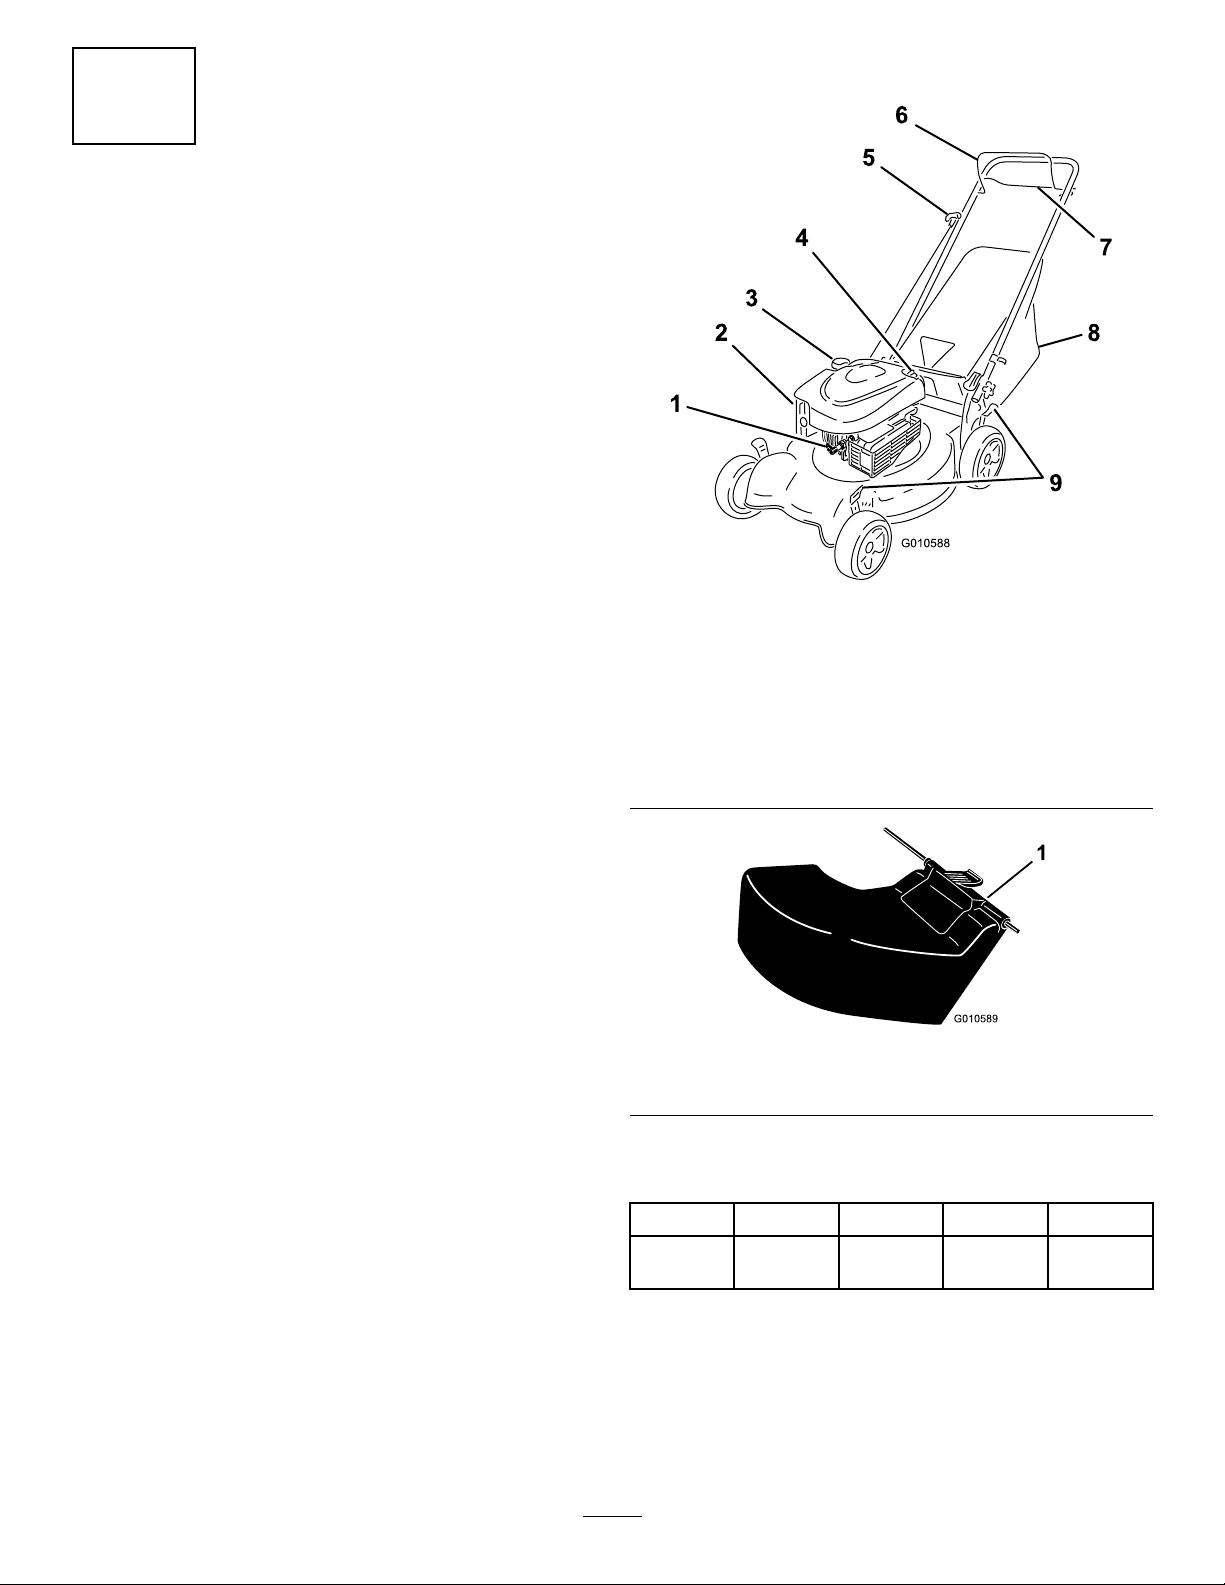
ProductOverview
Figure5
1.Sparkplug7.Self-propeldrivebar
2.Airlter
3.Fueltankcap
4.Oilll/Dipstick
5.Recoilstarthandle
6.Bladecontrolbar12.Batterycharger
8.Ignitionkey
9.Grassbag
10.Battery
11.Cuttingheightlevers(4)
Figure6
1.Reardischargedeector(optional)
Specications
ModelWeightLengthWidthHeight
2964279lb
(36kg)
6
57in
(145cm)
22in
(56cm)
39in
(99cm)
Page 7
Operation
Attachments/Accessories
AselectionofToroapprovedattachmentsand
accessoriesareavailableforusewiththemachineto
enhanceandexpanditscapabilities.Contactyour
AuthorizedServiceDealerorDistributororgoto
www.Toro.comforalistofallapprovedattachments
andaccessories.
FillingtheFuelTank
DANGER
Gasolineisextremelyammableandexplosive.A
reorexplosionfromgasolinecanburnyouand
others.
•Topreventastaticchargefromignitingthe
gasoline,placethecontainerand/ormower
directlyonthegroundbeforelling,notina
vehicleoronanobject.
•Fillthetankoutdoorswhentheengineiscold.
Wipeupspills.
•Donothandlegasolinewhensmokingoraround
anopenameorsparks.
•Storegasolineinanapprovedfuelcontainer,out
ofthereachofchildren.
Fillthefueltankwithfreshunleadedregulargasoline
fromamajorname-brandservicestation(Figure7).
Useunleadedregulargasolinesuitableforautomotive
use(87pumpoctaneminimum).Leadedregulargasoline
maybeusedifunleadedregularisnotavailable.
Note:Neverusemethanol,gasolinecontaining
methanol,orgasoholcontainingmorethan10%ethanol
becausethefuelsystemcouldbedamaged.Donotmix
oilwithgasoline.
Important:Toreducestartingproblems,add
fuelstabilizertothefuelallseason,mixingitwith
gasolinelessthan30daysold.
Figure7
CheckingtheEngineOilLevel
ServiceInterval:Beforeeachuseordaily
1.Removethedipstick,wipeitclean,andfullyinstall
thedipstick(Figure8).
Figure8
2.Removethedipstickandchecktheoillevel
(Figure8).IftheoillevelisbelowtheAddmarkon
thedipstick,slowlypouroilintotheoillltubeto
raisetheoilleveltotheFullmarkonthedipstick.
Donotoverll.(Max.ll:20oz.(0.59l),type:SAE
30detergentoilwithanAPIserviceclassicationof
SF,SG,SH,SJ,SL,orhigher.)
Note:Ifyouoverlltheengine,poursomeoilout
ofitasdirectedinChangingtheEngineOil.
3.Installthedipstick.
7
Page 8
AdjustingtheCuttingHeight
WARNING
Adjustingthecuttingheightmaybringyouinto
contactwiththemovingblade,causingserious
injury.
•Stoptheengineandwaitforallmovingparts
tostop.
•Donotputyourngersunderthehousingwhen
adjustingthecuttingheight.
Figure10
1.Bladecontrolbar
CAUTION
Iftheenginehasbeenrunning,themuferwillbe
hotandcanseverelyburnyou.Keepawayfromthe
hotmufer.
Adjustthecuttingheightasdesired.Setallfourwheels
tothesameheight.
Note:Toraisethemower,moveallthecuttingheight
leversforward;tolowerthemower,movetheallthe
cuttingheightleversrearward(Figure9).
2.Turntheignitionkey(Figure11)orpulltherecoil
starthandle(Figure12).
Figure11
Figure9
1.Raisethemower2.Lowerthemower
Note:Thecuttingheightsettingsare1inch(25mm);
1-1/2inch(38mm);2inches(51mm);2-1/2inches
(64mm);3inches(76mm);3-1/2inches(89mm);and
4inches(102mm).
StartingtheEngine
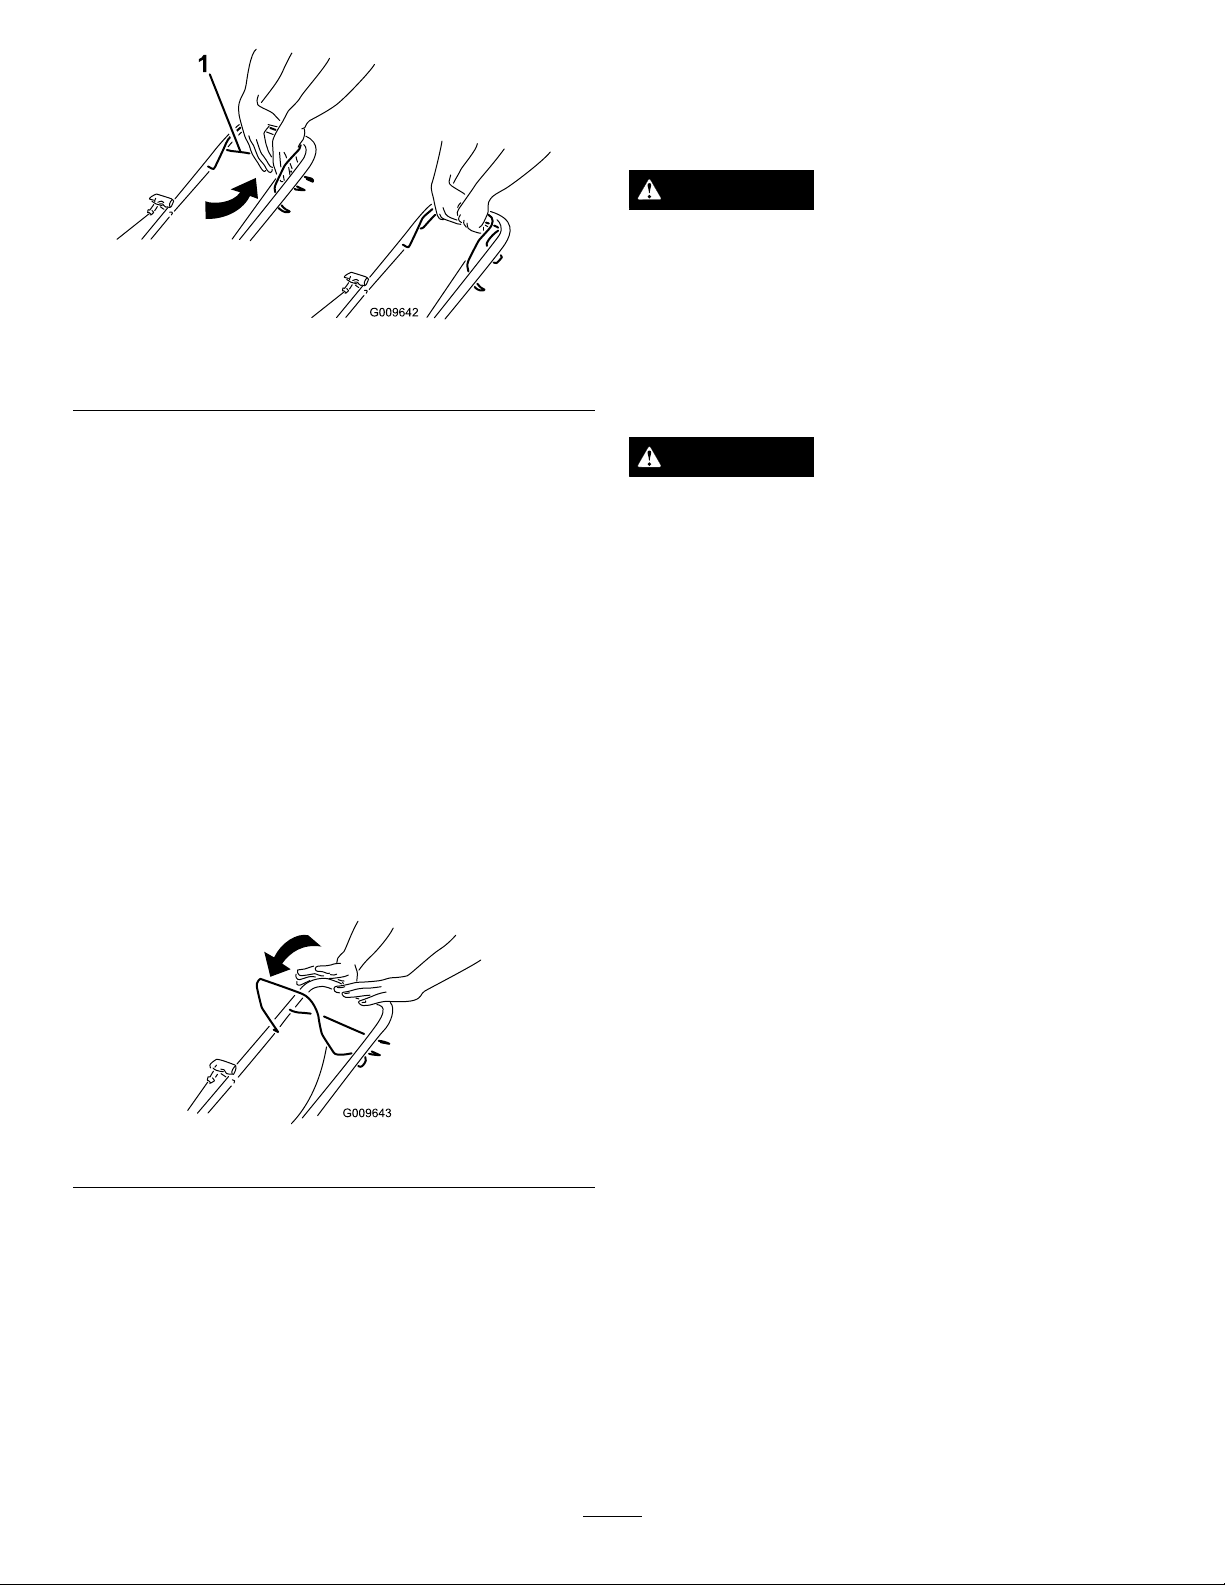
1.Holdthebladecontrolbar(Figure10)againstthe
handle.
Figure12
Note:Ifthemowerdoesnotstartafterseveral
attempts,contactanAuthorizedServiceDealer.
UsingtheSelf-propelDrive
Tooperatetheself-propeldrive,squeezetheself-propel
drivebar(Figure13)towardthehandleandholdit.
8
Page 9
1.Self-propeldrivebar
Figure13
BaggingtheClippings
Usethegrassbagwhenyouwanttocollectgrassand
leafclippingsfromthelawn.
WARNING
Aworngrassbagcouldallowsmallstonesand
othersimilardebristobethrownintheoperator'sor
bystander'sdirectionandresultinseriouspersonal
injuryordeathtotheoperatororbystanders.
Checkthegrassbagfrequently.Ifitisdamaged,
installanewTororeplacementbag.
Todisengagetheself-propeldrive,releasetheself-propel
drivebar.
Note:Themaximumself-propelgroundspeedisxed.
Toreducethegroundspeed,increasethespacebetween
theself-propeldrivebarandthehandle.
StoppingtheEngine
ServiceInterval:Beforeeachuseordaily
Tostoptheengine,releasethebladecontrolbar
(Figure14).
Important:Whenyoureleasethebladecontrol
bar,boththeengineandbladeshouldstopwithin
3seconds.Iftheydonotstopproperly,stopusing
yourmowerimmediatelyandcontactanAuthorized
ServiceDealer.
WARNING
Thebladeissharp;contactingthebladecanresult
inseriouspersonalinjury.
Stoptheengineandwaitforallmovingpartstostop
beforeleavingtheoperatingposition.
Figure14
MulchingtheClippings
Yourmowercomesfromthefactoryreadytomulchthe
grassandleafclippingsbackintothelawn.
Ifthegrassbagisonthemower,removeit(referto
RemovingtheGrassBag)beforemulchingtheclippings.
9
Page 10
InstallingtheGrassBag
1.Liftupthereardeector(Figure15).
Figure15
1.Reardeector
2.Insertthegrassbaghandleontothenotchesonthe
handlebracketsandmakesurethatitiswellseated
(Figure15).
Figure16
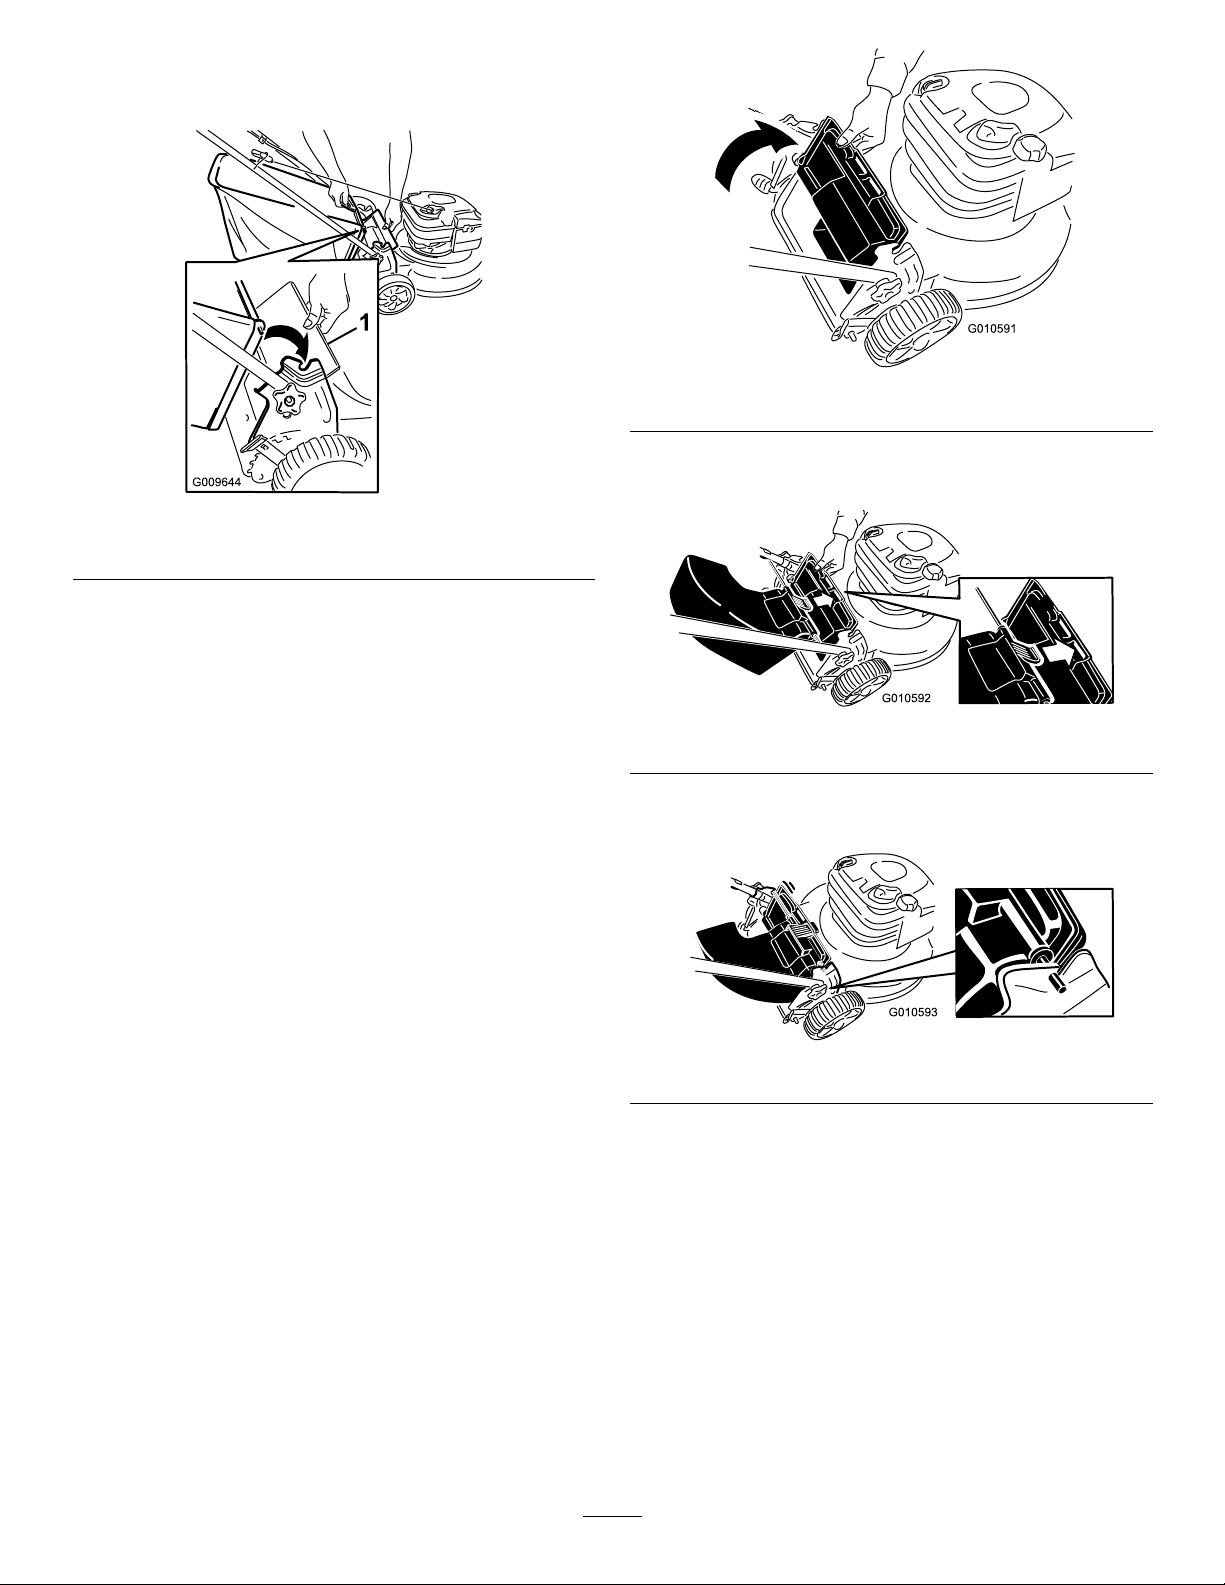
3.Insertthetabontherear-dischargedeectorintothe
right-handslotinthereardeector(Figure17).
RemovingtheGrassBag
1.Liftupthereardeector(Figure15).
2.Liftthegrassbaghandleoutfromthenotchesonthe
handlebracketsandremovethebagfromthemower.
3.Closethereardeector.
DischargingtheClippings
Usetherear-dischargedeectorforcuttingverytall
grass.
Note:Therear-dischargedeectorisanoptionalpiece
ofequipmentthatmustbepurchasedseparately.
InstallingtheRear-DischargeDeector
1.Ifthebagisonthemower,removeit.
2.Liftupthereardeectorandholdit(Figure16).
Figure17
4.Inserttherodontherear-dischargedeectorinto
thenotchesonthemower(Figure18).
Figure18
RemovingtheRear-DischargeDeector
Toremovetherear-dischargedeector,reversethesteps
above.
OperatingTips
GeneralMowingTips
•Cleartheareaofsticks,stones,wire,branches,and
otherdebristhatthebladecouldhit.
•Avoidstrikingsolidobjectswiththeblade.Never
deliberatelymowoveranyobject.
10
Page 11

•Ifthemowerstrikesanobjectorstartstovibrate,
immediatelystoptheengine,disconnectthewire
fromthesparkplug,andexaminethemowerfor
damage.
•Forbestperformance,installanewbladebeforethe
cuttingseasonbegins.
•ReplacethebladewhennecessarywithaToro
replacementblade.
CuttingGrass
•Cutonlyaboutathirdofthegrassbladeatatime.
Donotcutbelowthe2inch(51mm)settingunless
thegrassissparseoritislatefallwhengrassgrowth
beginstoslowdown.RefertoAdjustingtheCutting
Height.
•Whencuttinggrassover6inches(15cm)tall,mow
atthehighestcuttingheightsettingandwalkslower;
thenmowagainatalowersettingforthebestlawn
appearance.Ifthegrassistoolong,themowermay
plugandcausetheenginetostall.
•Iftherearemorethan5inches(13cm)ofleaves
onthelawn,setthefrontcuttingheightoneortwo
notcheshigherthantherearcuttingheight.
•Slowdownyourmowingspeedifthemowerdoes
notcuttheleavesnelyenough.
•Mowonlydrygrassorleaves.Wetgrassandleaves
tendtoclumpontheyardandcancausethemower
toplugortheenginetostall.
WARNING
Wetgrassorleavescancauseseriousinjuryif
youslipandcontacttheblade.Mowonlyindry
conditions.
•Alternatethemowingdirection.Thishelpsdisperse
theclippingsoverthelawnforevenfertilization.
•Ifthenishedlawnappearanceisunsatisfactory,try
oneormoreofthefollowing:
–Replacethebladeorhaveitsharpened.
–Walkataslowerpacewhilemowing.
–Raisethecuttingheightonyourmower.
–Cutthegrassmorefrequently.
–Overlapcuttingswathsinsteadofcuttingafull
swathwitheachpass.
–Setthecuttingheightonthefrontwheelsone
notchlowerthantherearwheels.Forexample,
setthefrontwheelsat2inches(51mm)andthe
rearwheelsat2-1/2inches(64mm).
CuttingLeaves
•Aftercuttingthelawn,ensurethathalfofthelawn
showsthroughthecutleafcover.Youmayneedto
makemorethanonepassovertheleaves.
11
Page 12
Maintenance
Note:Determinetheleftandrightsidesofthemachinefromthenormaloperatingposition.
RecommendedMaintenanceSchedule(s)
MaintenanceService
Interval
Aftertherst5hours
Beforeeachuseordaily
Every25hours
Beforestorage
Yearly
Important:Refertoyour
MaintenanceProcedure
•Changetheengineoil.
•Checktheengineoillevel.
•Ensurethattheenginestopswithin3secondsafterreleasingthebladecontrolbar.
•Cleangrassclippingsanddirtfromunderthemower.
•Replacetheairlter;replaceitmorefrequentlyindustyoperatingconditions.
•Emptythefueltankbeforerepairsasdirectedandbeforeannualstorage.
•Changetheengineoil.
•Replacethebladeorhaveitsharpened(morefrequentlyiftheedgedullsquickly).
•RefertoyourEngineOperator'sManualforanyadditionalyearlymaintenance
procedures.
EngineOperator'sManual
PreparingforMaintenance
1.Stoptheengineandwaitforallmovingpartstostop.
2.Disconnectthesparkplugwirefromthesparkplug
(Figure19)beforeperforminganymaintenance
procedure.
foradditionalmaintenanceprocedures.
WARNING
Tippingthemowermaycausethefueltoleak.
Gasolineisammable,explosiveandcancause
personalinjury.
Runtheenginedryorremovethegasolinewith
ahandpump;neversiphon.
Figure19
1.Sparkplugwire
3.Afterperformingthemaintenanceprocedure(s),
connectthesparkplugwiretothesparkplug.
Important:Beforetippingthemowertochange
theoilorreplacetheblade,allowthefueltank
torundrythroughnormalusage.Ifyoumust
tipthemowerpriortorunningoutoffuel,usea
handfuelpumptoremovethefuel.Alwaystip
themowerontoitssidewiththedipstickdown.
ReplacingtheAirFilter
ServiceInterval:Every25hours
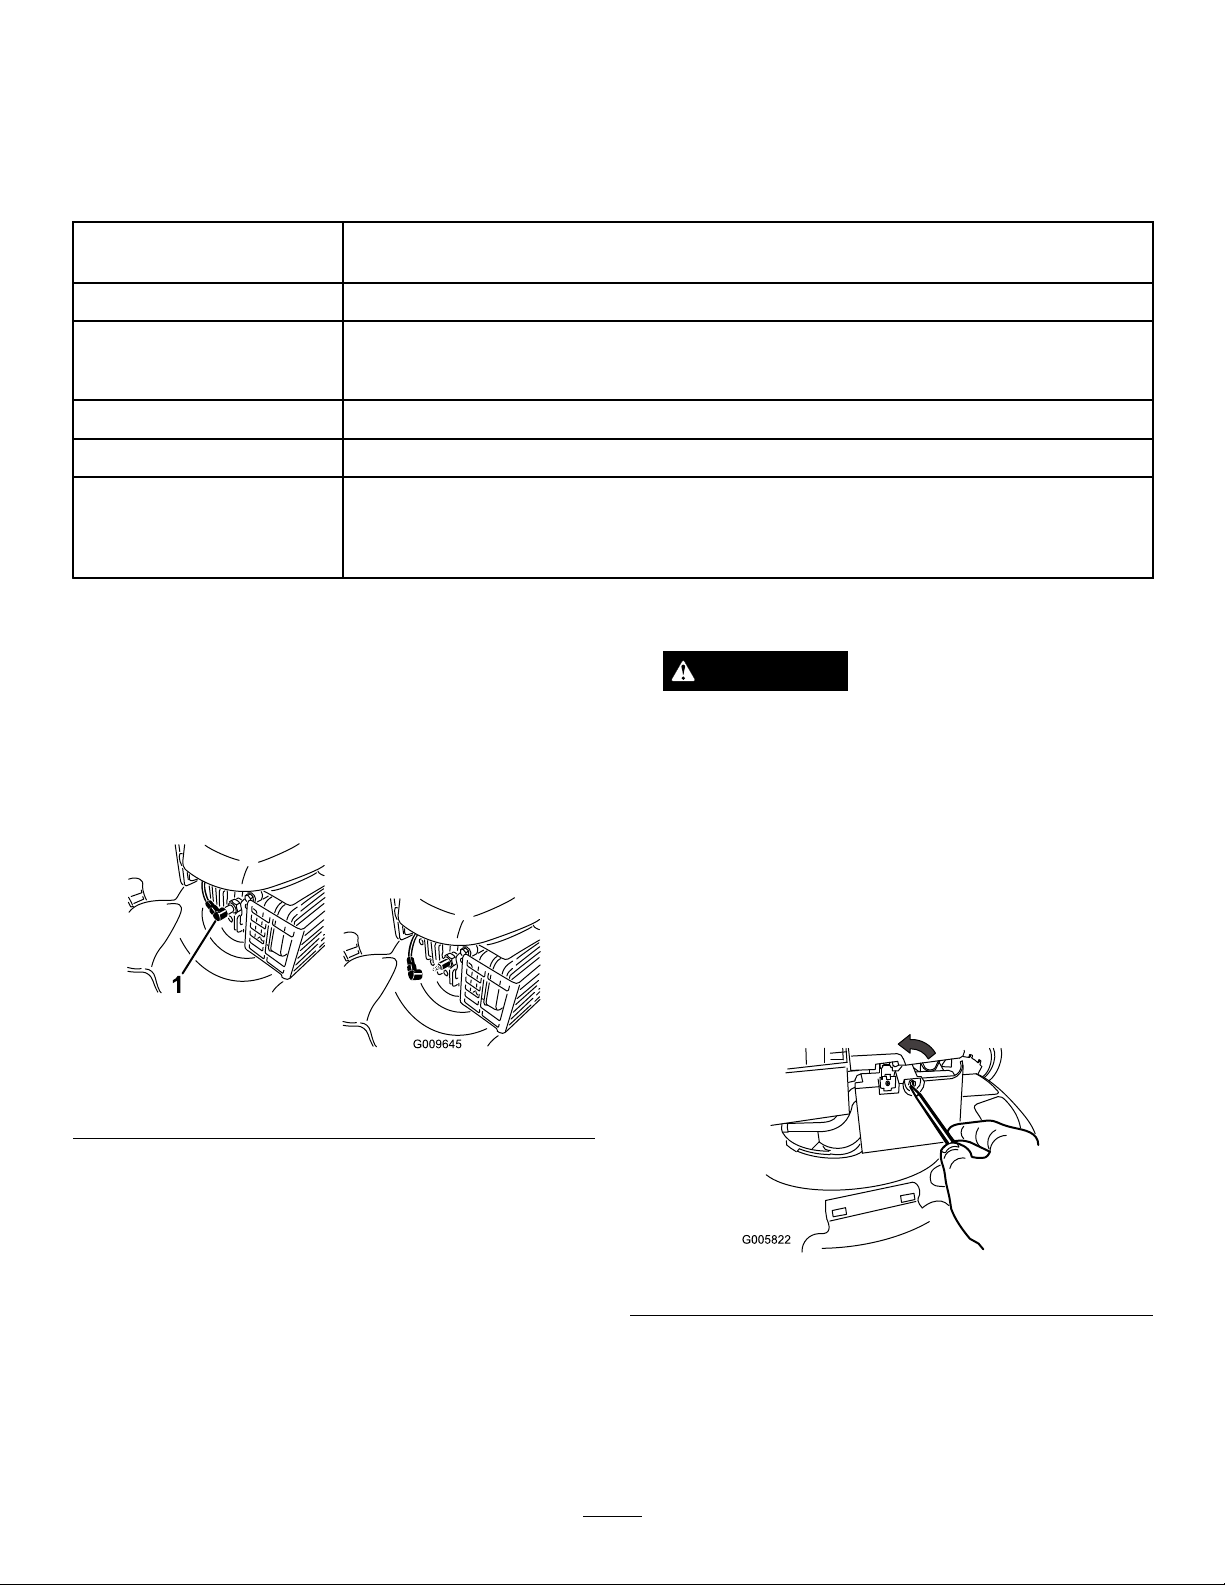
1.Useascrewdrivertoopentheairltercover
(Figure20).
Figure20
2.Replacetheairlter(Figure21).
12
Page 13
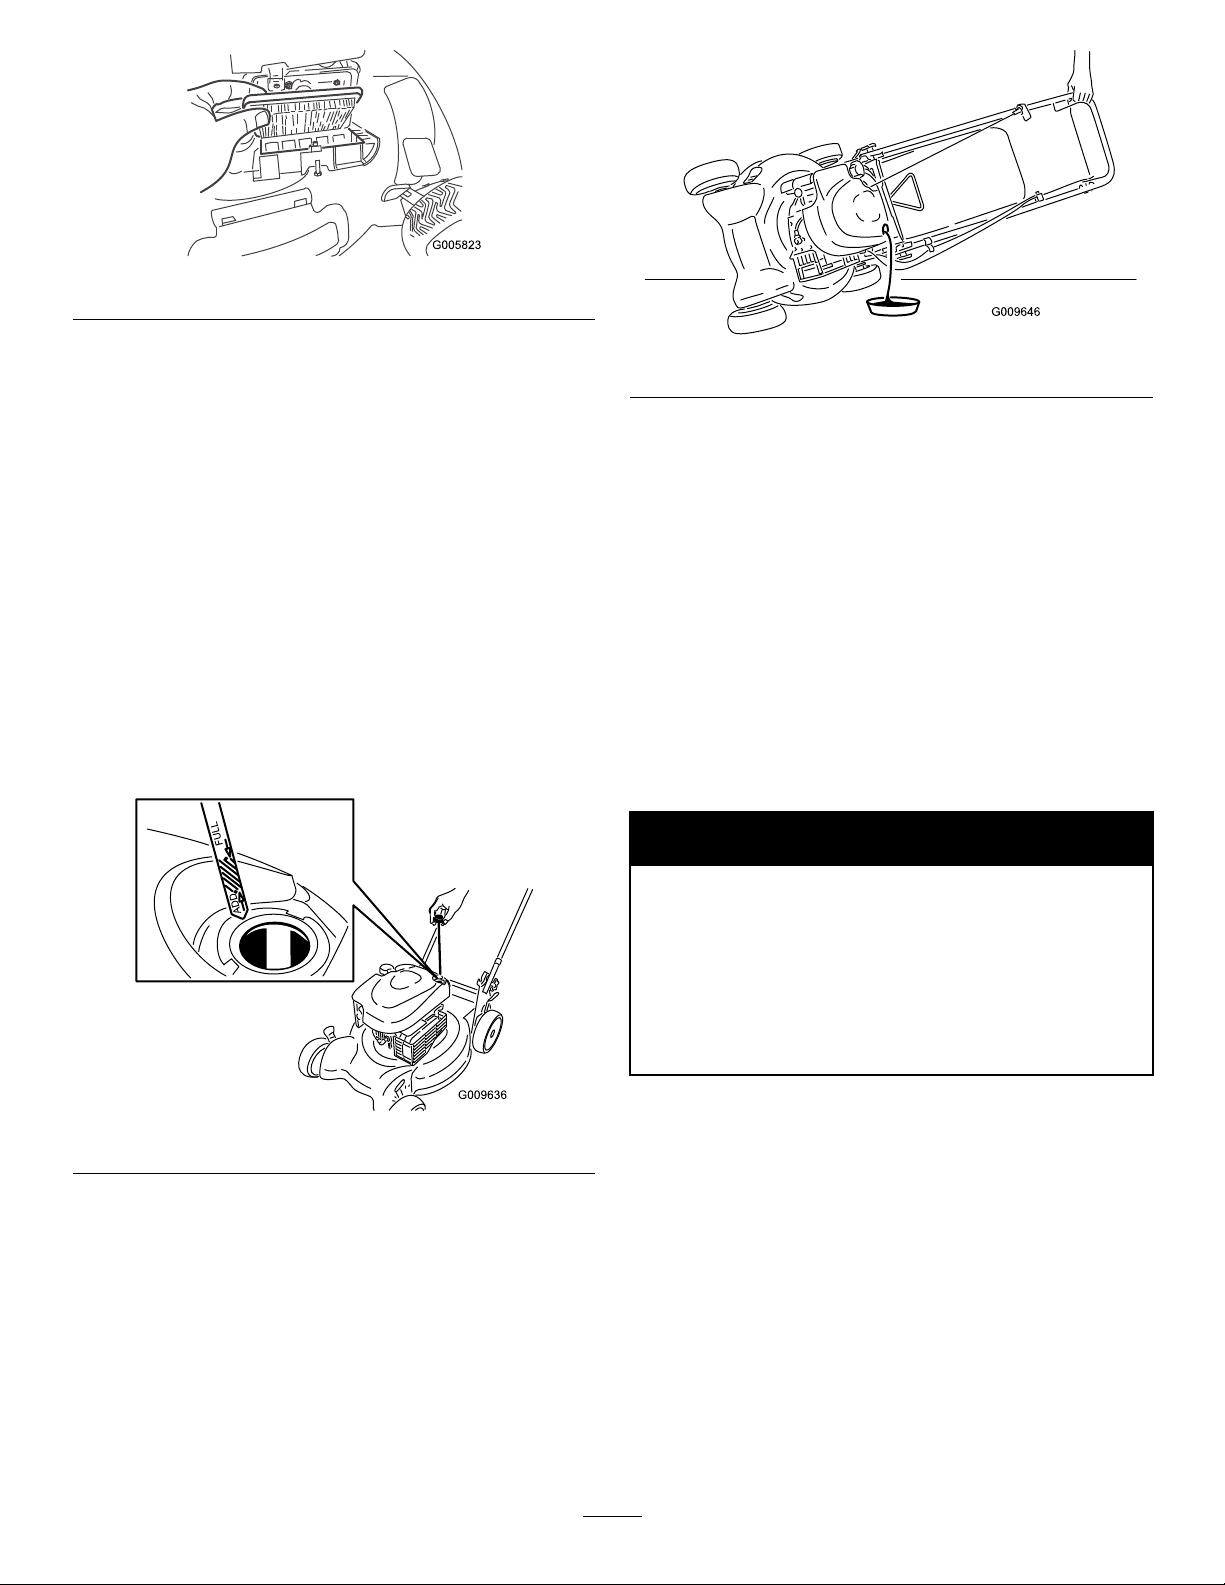
Figure21
3.Installthecover.
ChangingtheEngineOil
ServiceInterval:Aftertherst5hours
Yearly
Changetheengineoilaftertherst5operating
hours;changeityearlythereafter.
Runtheengineafewminutesbeforechangingtheoil
towarmit.Warmoilowsbetterandcarriesmore
contaminants.
1.Performthepre-maintenanceprocedures;referto
PreparingforMaintenance.
2.Removethedipstick(Figure22).
Figure23
4.Slowlypouroilintotheoillltubeuntiltheoillevel
reachestheFulllineonthedipstick(Figure22).Do
notoverll.(Max.ll:20oz.(0.59l),type:SAE30
detergentoilwithanAPIserviceclassicationofSF,
SG,SH,SJ,SL,orhigher.)
Note:Ifyouoverlltheengine,poursomeoilout
ofitasdirectedinstep3above.
5.Installthedipsticksecurely.
6.Disposeoftheusedoilproperlyatalocalrecycling
center.
ChargingtheBattery
WARNING
CALIFORNIA
Proposition65Warning
Figure22
3.Tipthemowerontoitsside,withthedipstickdown,
todraintheusedoiloutthroughtheoillltube
(Figure23).
Batteryposts,terminals,andrelated
accessoriescontainleadandleadcompounds,
chemicalsknowntotheStateofCalifornia
tocausecancerandreproductiveharm.
Washhandsafterhandling.
Chargethebatteryfor24hoursinitially,thenmonthly
(every25starts)orasneeded.Alwaysusethecharger
inashelteredareaandchargethebatteryatroom
temperature(70°For22°C)wheneverpossible.
1.Connectthechargertothemowerwireharness
locatedbelowtheignitionkey(Figure24).
13
Page 14
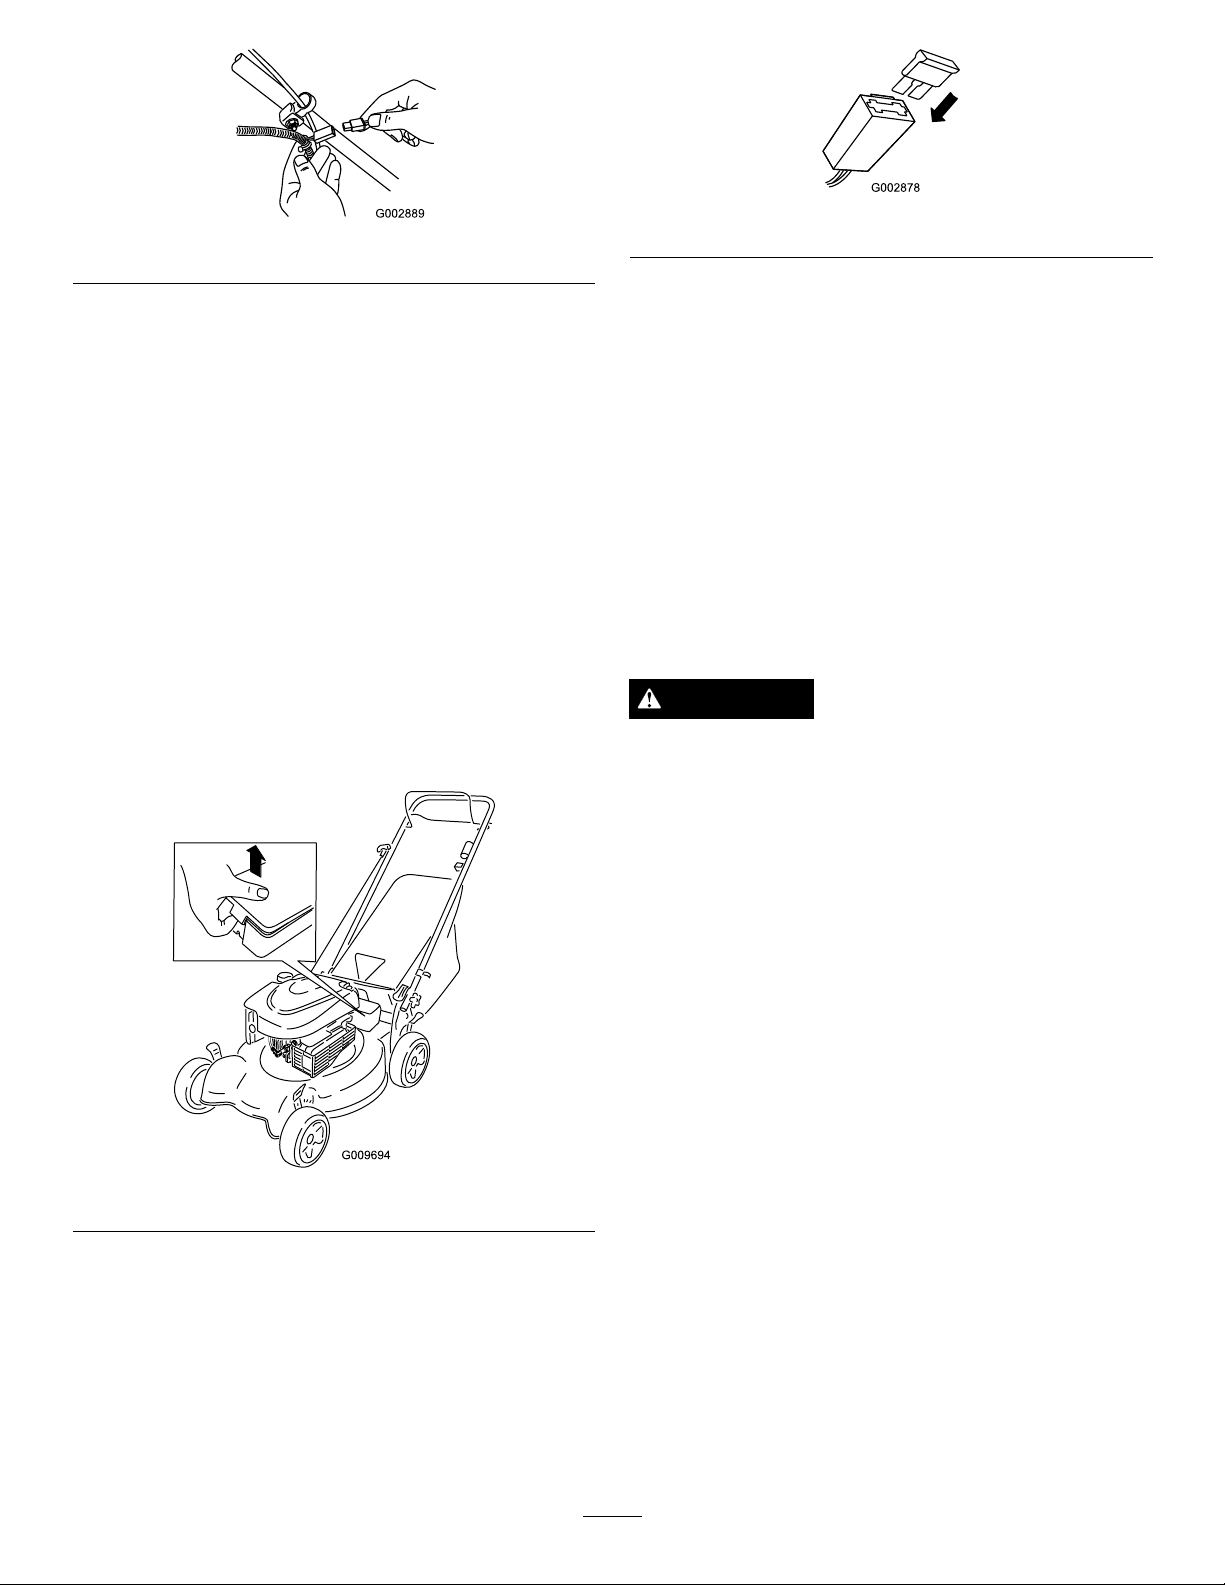
Figure24
2.Plugthechargerintoawalloutlet.
Figure26
3.Installthebatterycover.
Note:Whenthebatterynolongerholdsacharge,
recycleordisposeofthelead-acidbatteryaccording
tolocalcodes.
ReplacingtheFuse
Yourmowercomeswithafusethatprotectstheelectric
starter.Ifthebatterydoesnotchargeortheenginedoes
notrunwiththeelectricstarter,thefusemaybeblown.
Replaceitwitha40-ampplug-intypefuse.
Important:Youcannotstartthemowerwiththe
electricstarterorchargethebatteryunlessyou
installthefuse.
1.Unclipbothendsofthebatterycoverandremove
it(Figure25).
ReplacingtheBlade
ServiceInterval:Yearly
Important:
thebladeproperly
wrenchorareuncomfortableperformingthis
procedure,contactanAuthorizedServiceDealer.
Examinethebladewheneveryourunoutofgasoline.If
thebladeisdamagedorcracked,replaceitimmediately.
Ifthebladeedgeisdullornicked,haveitsharpenedor
replaceit.
WARNING
Thebladeissharp;contactingthebladecanresult
inseriouspersonalinjury.
Weargloveswhenservicingtheblade.
1.Disconnectthesparkplugwirefromthesparkplug.
RefertoPreparingforMaintenance.
2.Tipthemowerontoitsside,withtheairlterup.
Youwillneedatorquewrenchtoinstall
.Ifyoudonothaveatorque
Figure25
2.Insertthefuseintothefuseholder(Figure26).
3.Useablockofwoodtoholdthebladesteady.
4.Removetheblade(turnthebladebolt
counterclockwise),savingallthemountinghardware.
5.Installthenewblade(turnthebladeboltclockwise)
andallmountinghardware(Figure27).
14
Page 15
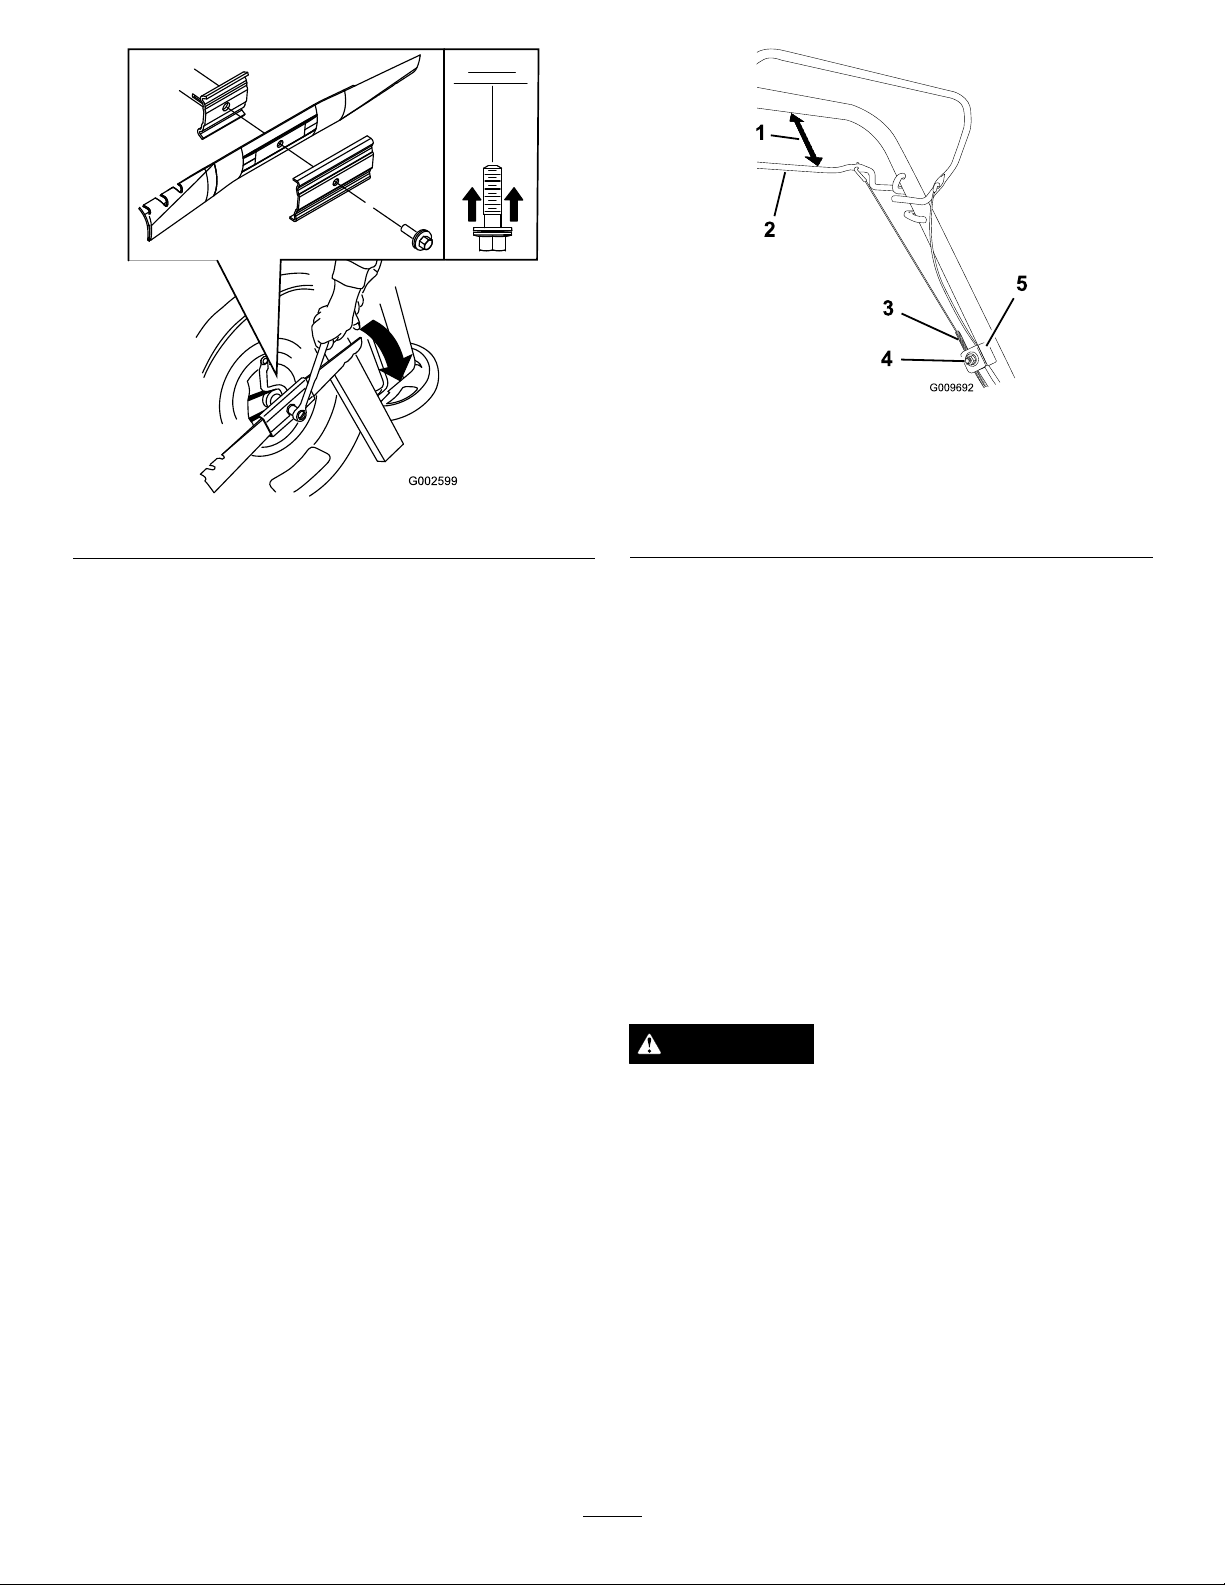
Figure28
Figure27
Important:Positionthecurvedendsofthe
bladetopointtowardthemowerhousing.
6.Useatorquewrenchtotightenthebladeboltto
60ft-lb(82N⋅ ⋅⋅m).
Important:Abolttorquedto60ft-lb(82N⋅ ⋅⋅m)
isverytight.Whileholdingthebladewitha
blockofwood,putyourweightbehindthe
ratchetorwrenchandtightentheboltsecurely.
Thisboltisverydifculttoovertighten.
AdjustingtheSelf-propelDrive
Cable
Wheneveryouinstallanewself-propelcableorif
theself-propeldriveisoutofadjustment,adjustthe
self-propeldrivecable.
1.Loosenthecablesupportnut(Figure28).
1.1to1-1/2inches(25to38
mm)
2.Self-propeldrivebar5.Cablesupport
3.Cablejacket
4.Cablesupportnut
2.Holdtheself-propelbail1to1-1/2inches(25to38
mm)fromthehandle(Figure28).
3.Pulldownthecablejacket(towardthemower)until
thereisnoslackinthecable(Figure28).
4.Tightenthenutonthecablesupport.
5.Releasetheself-propeldrivebarandensurethatthe
cableisloose.
Note:Thecablemustbeloosewiththeself-propel
drivebarinthereleasedposition;otherwise,the
mowermaycreepwhenthebarisdisengaged.
CleaningtheMower
ServiceInterval:Beforeeachuseordaily
WARNING
Themowermaydislodgematerialfromunderthe
mowerhousing.
•Weareyeprotection.
•Stayintheoperatingposition(behindthe
handle).
•Donotallowbystandersinthearea.
1.Withtheenginerunningonaatpavedsurface,
sprayastreamofwaterinfrontoftherightrear
wheel(Figure29).
Thewaterwillsplashintothepathoftheblade,
cleaningouttheclippings.
15
Page 16
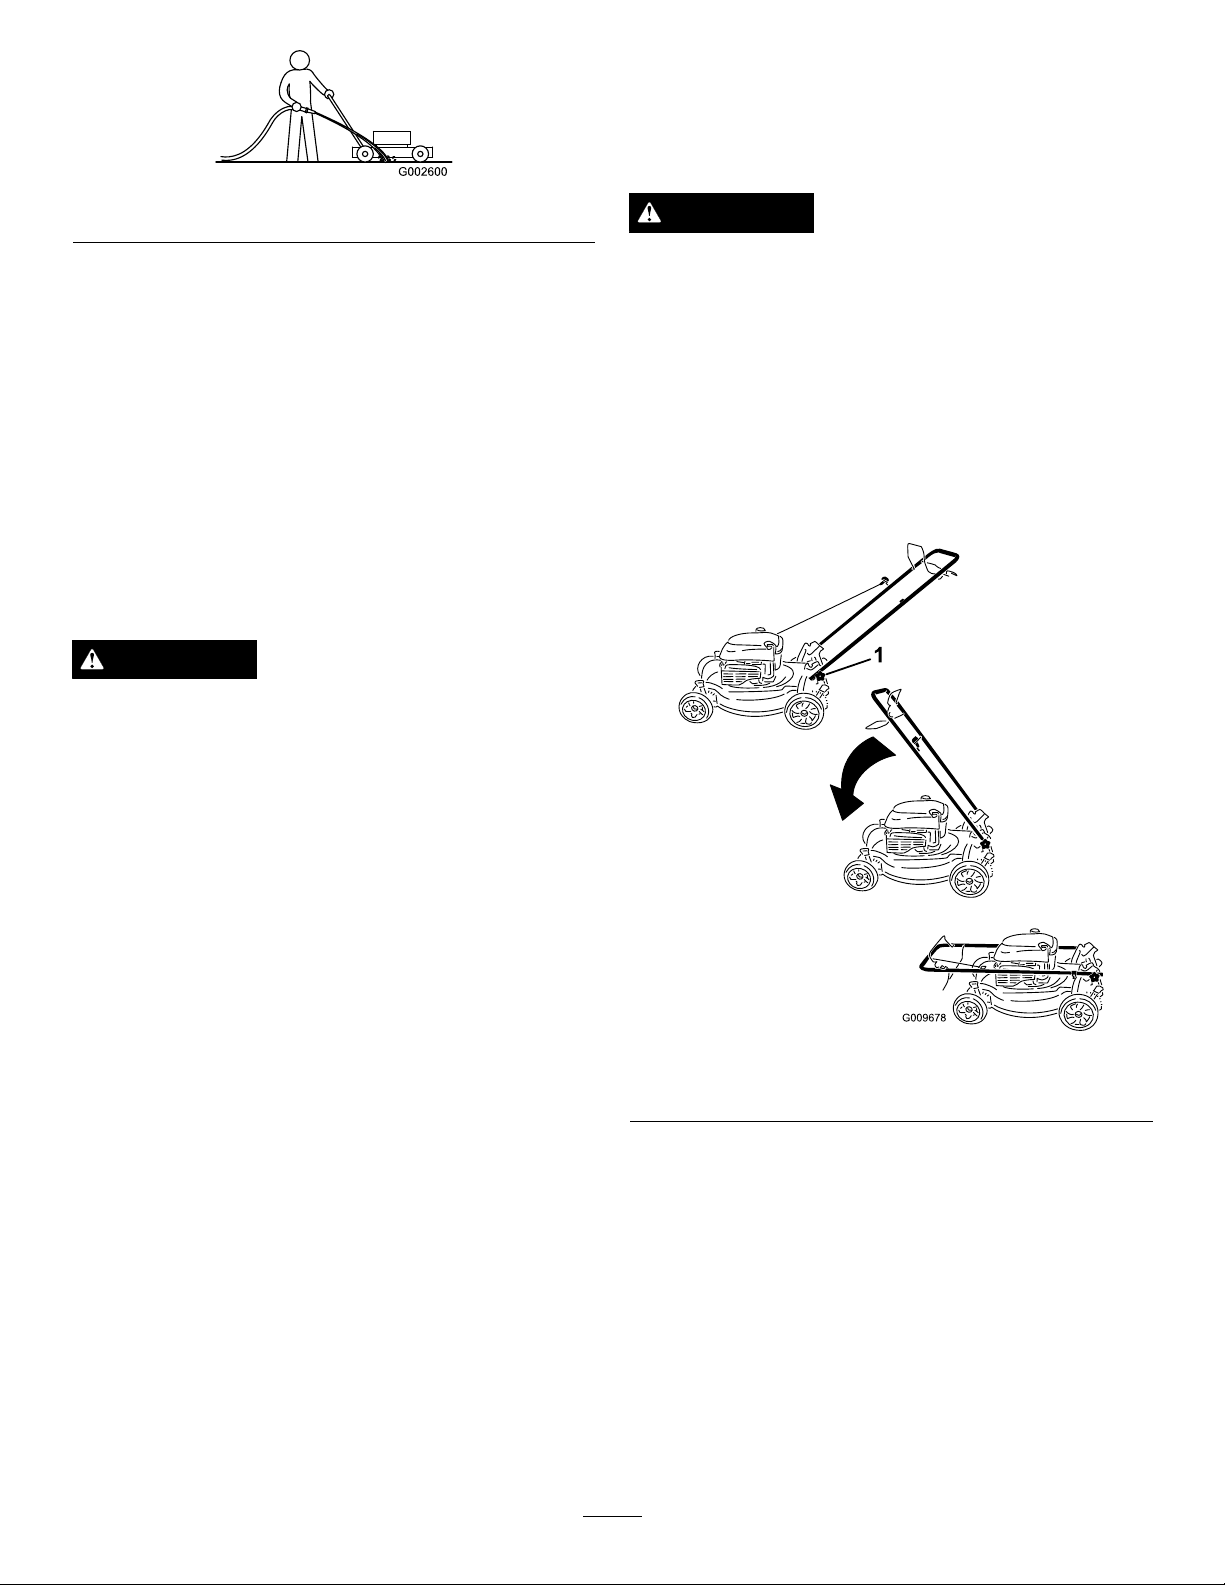
Figure29
2.Whennomoreclippingscomeout,stopthewater
andmovethemowertoadryarea.
3.Runtheengineforafewminutestodrythehousing
topreventitfromrusting.
Storage
area.Ifyoumuststorethemowerinaheatedarea,
youmustchargethebatteryevery90days.
FoldingtheHandle
WARNING
Foldingorunfoldingthehandleimproperlycan
damagethecables,causinganunsafeoperating
condition.
•Donotdamagethecableswhenfoldingor
unfoldingthehandle.
•Ifacableisdamaged,contactanAuthorized
ServiceDealer.
Storethemowerinacool,clean,dryplace.
PreparingtheMowerfor
Storage
WARNING
Gasolinevaporscanexplode.
•Donotstoregasolinemorethan30days.
•Donotstorethemowerinanenclosurenearan
opename.
•Allowtheenginetocoolbeforestoringit.
1.Onthelastrefuelingoftheyear,addfuelstabilizer
tothefuelasdirectedbytheenginemanufacturer.
2.Runthemoweruntiltheenginestopsfromrunning
outoffuel.
3.Primetheengineandstartitagain.
4.Allowtheenginetorununtilitstops.Whenyoucan
nolongerstarttheengine,itissufcientlydry.
1.Loosenthehandleknobsuntilyoucanmovethe
handlefreely(Figure30).
Figure30
1.Handleknob(2)
5.Disconnectthewirefromthesparkplugandconnect
thewireontotheretainingpost.
6.Removethesparkplug,add1oz.(30ml)ofoil
throughthesparkplughole,andpullthestarterrope
slowlyseveraltimestodistributeoilthroughoutthe
cylindertopreventcylindercorrosionduringthe
off-season.
7.Installthesparkplugandtightenitwithatorque
wrenchto15ft-lb(20N⋅m).
8.Tightenallnuts,bolts,andscrews.
9.Chargethebatteryfor24hours,thenunplugthe
batterychargerandstorethemowerinanunheated
2.MovethehandleforwardasshowninFigure30.
RemovingtheMowerfrom
Storage
1.Chargethebatteryfor24hours.
2.Connectthewiretothesparkplug.
16
Page 17

Troubleshooting
Problem
Theenginedoesnotstart
Theenginestartshardorlosespower
PossibleCauseCorrectiveAction
1.Thewireisnotconnectedtothespark
plug.
2.Thefuelcapventholeisplugged.2.Cleanthefuelcapventholeorreplace
3.Thesparkplugispitted,fouled,orthe
gapisincorrect.
4.Thefueltankisemptyorthefuel
systemcontainsstalefuel.
1.Thefuelcapventholeisplugged.1.Cleanthefuelcapventholeorreplace
2.Theairlterelementisdirtyandis
restrictingtheairow.
3.Theundersideofthemachinecontains
clippingsanddebris.
4.Thesparkplugispitted,fouled,orthe
gapisincorrect.
5.Theengineoillevelistoolow,toohigh,
orexcessivelydirty .
6.Thefueltankcontainsstalefuel.6.Drainandllthefueltankwithfresh
1.Connectthewiretothesparkplug.
thefuelcap.
3.Checkthesparkplugandadjustthe
gapifnecessary.Replacethespark
plugifitispitted,fouled,orcracked.
4.Drainand/orllthefueltankwith
freshgasoline.Iftheproblempersists,
contactanAuthorizedServiceDealer.
thefuelcap.
2.Cleantheairlterpre-cleanerand/or
replacethepaperairlter.
3.Cleanunderthemachine.
4.Checkthesparkplugandadjustthe
gapifnecessary.Replacethespark
plugifitispitted,fouled,orcracked.
5.Checktheengineoil.Changetheoilif
itisdirty;addordraintheoiltoadjust
theoilleveltotheFullmarkonthe
dipstick.
gasoline.
Theenginerunsrough
Themachineorenginevibrates
excessively
Thereisanunevencuttingpattern
Themachinedoesnotself-propel
1.Thewireisnotconnectedtothespark
plug.
2.Theairlterelementisdirtyandis
restrictingtheairow.
3.Thesparkplugispitted,fouled,orthe
gapisincorrect.
1.Theundersideofthemachinehousing
containsclippingsanddebris.
2.Theenginemountingboltsareloose.2.Tightentheenginemountingbolts.
3.Theblademountingnutsareloose.3.Tightentheblademountingnuts.
4.Thebladeisbentorisoutofbalance.4.Balancetheblade.Ifthebladeisbent,
1.Youaremowinginthesamepattern
repeatedly.
2.All4wheelsarenotatthesameheight.2.Placeall4wheelsatthesameheight.
3.Theundersideofthemachinehousing
containsclippingsanddebris.
4.Thebladeisdull.
1.Thereisdebrisunderthebeltcover.
2.Theself-propeldrivecableisoutof
adjustmentorisdamaged.
1.Connectthewiretothesparkplug.
2.Cleantheairlterpre-cleanerand/or
replacethepaperairlter.
3.Checkthesparkplugandadjustthe
gapifnecessary.Replacethespark
plugifitispitted,fouled,orcracked.
1.Cleanunderthemachinehousing.
replaceit.
1.Changethemowingpattern.
3.Cleanunderthemachinehousing.
4.Sharpenandbalancetheblade.
1.Cleanthedebrisfromunderthebelt
cover.
2.Adjusttheself-propeldrivecable.
Replacethecableifnecessary.
17
Page 18

Notes:
18
Page 19

InternationalDistributorList
Distributor:
AtlantisSuveSulamaSisstemleriLt
BalamaPrimaEngineeringEquip.HongKong85221552163
B-RayCorporation
CascoSalesCompany
CeresS.A.CostaRica
CSSCTurfEquipment(pvt)Ltd.SriLanka
CyrilJohnston&Co.
EquiverMexico525553995444
FemcoS.A.Guatemala
G.Y.K.CompanyLtd.
GeomechanikiofAthensGreece
GuandongGoldenStarChina
HakoGroundandGardenSweden
HakoGroundandGarden
HayterLimited(U.K.)
HydroturfInt.CoDubai
HydroturfEgyptLLC
IbeaS.P .A.
IrriamcPortugal351212388260
IrrigationProductsInt'lPvtLtd.India862283960789
JeanHeybroekb.v.Netherlands3130639461 1
Lely(U.K.)Limited
MaquiverS.A.Colombia
MaruyamaMfg.Co.Inc.
MetraKft
Mountelda.s.CzechRepublic
MunditolS.A.
OslingerTurfEquipmentSA
OyHakoGroundandGardenAb
ParklandProductsLtd.NewZealand6433493760
Prochaska&Cie
RTCohen2004Ltd.
Riversa
RothMotorgerateGmBh&Co.Germany
ScSvendCarlsenA/S
SolvertS.A.S.
SpyprosStavrinidesLimitedCyprus
SurgeSystemsIndiaLimited
T-MarktLogisticsLtd.Hungary3626525500
ToroAustraliaAustralia61395807355
ToroEuropeBVBABelgium3214562960
Country:
Turkey902163448674
Korea82325512076
PuertoRico7877888383
NorthernIreland442890813121
Japan81726325861
Norway4722907760
UnitedKingdom441279723444
UnitedArabEmirates97143479479
Egypt2025194308
Italy390331853611
UnitedKingdom441480226800
Japan81332522285
Hungary3613263880
Argentina541148219999
Ecuador59342396970
Finland35898700733
Austria4312785100
Israel97298617979
Spain
Denmark4566109200
France33130817700
India911292299901
PhoneNumber:
5062391138
941 12746100
5024423277
30109350054
862087651338
4635100000
5712364079
420255704220
34952837500
4971442050
35722434131
374-0269RevA
Page 20

TheToroWarranty
ConditionsandProductsCovered
TheToro®Companyanditsafliate,ToroWarrantyCompany,pursuantto
anagreementbetweenthem,jointlypromisetorepairtheT oroProduct
listedbelowifusedforresidentialpurposes*ifdefectiveinmaterialsor
workmanship.
Thefollowingtimeperiodsapplyfromthedateofpurchase:
ProductsWarrantyPeriod
WalkPowerMowers2yearlimitedwarranty
RearEngineRiders2yearlimitedwarranty
Lawn&GardenTractors
ElectricHandHeldProducts2yearlimitedwarranty
Snowthrowers
ConsumerZeroTurn
*OriginalPurchasermeansthepersonwhooriginallypurchasedtheT oro
Product
*Residentialpurposesmeansuseoftheproductonthesamelotasyour
home.Useatmorethanonelocation,orinstitutionalorrentaluse,is
consideredcommercialuse,andthecommercialusewarrantywouldapply.
2yearlimitedwarranty
2yearlimitedwarranty
2yearlimitedwarranty
LimitedWarrantyforCommercialUse
ToroConsumerProductsandattachmentsusedforcommercial,
institutional,orrentaluse,arewarrantedagainstdefectsinmaterials
orworkmanshipforthefollowingtimeperiodsfromthedateoforiginal
purchase:
ProductsWarrantyPeriod
WalkPowerMowers90daywarranty
RearEngineRiders90daywarranty
Lawn&GardenTractors
ElectricHandHeldProducts90daywarranty
Snowthrowers
ConsumerZeroTurn
90daywarranty
90daywarranty
45daywarranty
InstructionsforObtainingWarrantyService
IfyouthinkthatyourT oroProductcontainsadefectinmaterialsor
workmanship,followthisprocedure:
1.Contactyoursellertoarrangeserviceoftheproduct.Ifforanyreason
itisimpossibleforyoutocontactyourseller,youmaycontactany
ToroAuthorizedDistributortoarrangeservice.
2.Bringtheproductandyourproofofpurchase(salesreceipt)tothe
ServiceDealer.IfforanyreasonyouaredissatisedwiththeService
Dealer’sanalysisorwiththeassistanceprovided,contactusat:
CustomerCareDepartment,ConsumerDivision
TheT oroCompany
811 1LyndaleAvenueSouth
Bloomington,MN55420-1196
Manager:TechnicalProductSupport:001–952–887–8248
SeeattachedDistributorList
OwnerResponsibilities
YoumustmaintainyourToroProductbyfollowingthemaintenance
proceduresdescribedintheOperator'sManual.Suchroutine
maintenance,whetherperformedbyadealerorbyyou,isatyourexpense.
ItemsandConditionsNotCovered
Thisexpresswarrantydoesnotcoverthefollowing:
•Costofregularmaintenanceserviceorwearparts,suchasrotor
blades(paddles),scraperblades,belts,fuel,lubricants,oilchanges,
sparkplugs,cable/linkageorbrakeadjustments
•Anyproductorpartwhichhasbeenalteredormisusedandrequires
replacementorrepairduetoaccidentsorlackofpropermaintenance
•Repairsnecessaryduetofailuretousefreshfuel(lessthanone
monthold),orfailuretoproperlypreparetheunitpriortoanyperiod
ofnon-useoveronemonth
•Engineandtransmission.Thesearecoveredbytheappropriate
manufacturer’sguaranteeswithseparatetermsandconditions
Allrepairscoveredbythesewarrantiesmustbeperformedbyan
AuthorizedToroServiceDealerusingT oroapprovedreplacementparts.
GeneralConditions
Thepurchaseriscoveredbythenationallawsofeachcountry.Therights
towhichthepurchaserisentitledwiththesupportoftheselawsarenot
restrictedbythiswarranty.
374-0268RevA
Page 21
Tondeusemulching/àbacarrièrede50cm
N°demodèle29642—N°desérie310000001etsuivants
Manueldel'utilisateur
FormNo. 3363-687-ASM Rev B
Introduction
Cettetondeuseàconducteurmarchantàlame
rotativeestdestinéeaugrandpublic.Ilest
principalementconçupourtondrelespelouses
entretenuesrégulièrementdanslesterrainsprivés.
Ellen'estpasconçuepourcouperlesbroussailles
nipourunusageagricole.
Lisezattentivementcesinformationspourapprendre
commentutiliseretentretenircorrectementvotre
produit,etéviterdel'endommageroudevousblesser.
Vousêtesresponsabledel'utilisationsûreetcorrecte
duproduit.
VouspouvezcontacterTorodirectementà
www.Toro.compourtoutrenseignementconcernant
unproduitouunaccessoire,pourobtenirl'adressedes
concessionnairesoupourenregistrervotreproduit.
Lorsquevouscontactezundistributeurouunréparateur
Toroagréépourl'entretiendevotremachine,pourvous
procurerdespiècesTorod'origineoupourobtenirdes
renseignementscomplémentaires,soyezprêt(e)àlui
fournirlesnumérosdemodèleetdesérieduproduit.
Figure1indiquel'emplacementdesnumérosdemodèle
etdesérieduproduit.Inscrivezlesnumérosdans
l'espaceréservéàceteffet.
(Figure2),quiindiqueundangerpouvantentraîner
desblessuresgravesoumortellessilesprécautions
recommandéesnesontpasrespectées.
Figure2
1.Symboledesécurité
Deuxtermessontégalementutiliséspourfairepasser
desinformationsessentielles.Important,pourattirer
l'attentionsurdesinformationsmécaniquesspéciques,
etRemarque,poursignalerdesinformationsd'ordre
généralméritantuneattentionparticulière.
Ceproduitestconformeauxdirectiveseuropéennes
pertinentes.Pourtoutdétail,reportez-vousàla
Déclarationdeconformitéspéciqueduproduitfournie
séparément.
Pourlesmodèlesdontlapuissancedumoteurest
indiquée,lapuissancebrutedumoteuraétémesurée
enlaboratoireparleconstructeurdumoteurselon
SAEJ1940.Étantcongurépoursatisfaireauxnormes
desécurité,antipollutionetd'exploitation,lemoteur
montésurcetteclassedetondeuseauraunepuissance
effectivenettementinférieure.
Figure1
1.Plaquedesnumérosdemodèleetdesérie
N°demodèle
N°desérie
Lesmisesengardedecemanuelsoulignentdesdangers
potentielsetsontsignaléesparlesymboledesécurité
©2011—TheToro®Company
8111LyndaleAvenueSouth
Bloomington,MN55420
Enregistrezvotreproduitàwww.Toro.com. Traductiondutexted'origine(FR)
Nemodiezpasabusivementlescommandesdumoteur
nileréglagedurégulateurdevitesse,celarisqueraitde
compromettrelefonctionnementsûrdelamachineet
deprovoquerdesblessurescorporelles.
Sécurité
L'usageoul'entretienincorrectdecettetondeuse
peutoccasionnerdesaccidents.Pourréduire
lesrisques,respectezlesconsignesdesécurité
suivantes.
LasociétéToroaconçuettestévotretondeusepour
qu'ellefonctionnecorrectementetsansdangerà
conditionderespecterrigoureusementlesinstructions
desécuritéquisuivent.Lenon-respectdeces
instructionspeutcauserdesaccidents.
ImpriméauxÉtats-Unis
Tousdroitsréservés
Page 22

Pourassurerlemaximumdesécuritéetde
rendementetbienconnaîtreleproduit,ilest
essentielquevous-même,ettoutautreutilisateur
delamachine,lisiezetcompreniezlecontenudece
guideavantmêmedemettrelemoteurenmarche.
Faitesparticulièrementattentionausymbolede
sécuritéFigure2quisigniePrudence,Attention
ouDangeretconcernelasécuritédespersonnes.
Veillezàlireetbiencomprendrecesdirectivesqui
portentsurvotresécurité.Nepaslesrespecter,
c'estrisquerdevousblesser.
Sécuritégénéraledela
tondeuse
Lesinstructionssuivantessontadaptéesdelanorme
EN836.
Cettetondeusepeutsectionnerlesmainsetlespieds,
etprojeterdesobjets.Desaccidentsgravesoumortels
sontpossiblessilesconsignesdesécuritésuivantesne
sontpasrespectées.
éviteztoutesourcepossibled'inammationjusqu'à
dissipationcomplètedesvapeursd'essence.
•Refermezsoigneusementtouslesréservoirset
récipientscontenantducarburant.
Préliminaires
•Porteztoujoursunpantalonetdeschaussures
solidespourtravailler.Netondezpaspiedsnusou
ensandales.
•Inspectezsoigneusementlazonedetravailetenlevez
touslesobjetssusceptiblesd'êtreprojetésparla
machine(pierres,branches,câbles,etc.).
•Avantd'utiliserlamachine,vérieztoujourssi
lescapotsetlesdispositifsdesécurité,commeles
déecteurset/oulesbacsàherbe,sontenplaceet
fonctionnentcorrectement.
•Avantd'utiliserlamachine,vérieztoujourssiles
lames,boulonsdelamesetensemblesdecoupe
nesontpasusésouendommagés.Remplacezles
boulonsetleslamesusésouendommagésparpaires
pournepasmodierl'équilibre.
Apprendreàseservirdelamachine
•Lisezattentivementlesinstructions.
Familiarisez-vousaveclescommandeset
l'utilisationdelamachine.
•N'autorisezjamaisdesenfants,oudesadultesn'ayant
pasprisconnaissancedecesinstructions,àutiliser
latondeuse.Certaineslégislationsimposentunâge
minimumpourl'utilisationdecetyped'engin.
•N'oubliezjamaisquel'utilisateurestresponsable
detoutaccidentoudommagecauséauxautres
personnesetàleurspossessions.
•Apprenezlasignicationdetouslessymbolesutilisés
surlatondeuseoudanslesinstructions.
Essence
ATTENTION–L'essenceesttrèsinammable.
Prenezlesprécautionssuivantes:
•Conservezlecarburantdansunrécipient
spécialementconçuàceteffet.
•Faitestoujourslepleinàl'extérieur,etnefumez
jamaisdurantcetteopération.
•Faiteslepleinavantdemettrelemoteurenmarche.
N'enlevezjamaislebouchonduréservoirde
carburantetn'ajoutezjamaisdecarburantlorsquele
moteurtourneouqu'ilestchaud.
•Sivousrenversezdel'essence,nemettezpas
lemoteurenmarche.Éloignezlatondeuseet
Démarrage
•N'inclinezpaslatondeuselorsquevousdémarrez
lemoteur,àmoinsquecenesoitindispensable
audémarrage.Danscecas,nelarelevezpasplus
qu'iln'estindispensable,etnerelevezquelapartie
éloignéedel'utilisateur.
•Mettezlemoteurenmarcheavecprécaution,
conformémentauxinstructions,etn'approchezpas
lespiedsdeslamesoudel'avantdel'éjecteur.
Utilisation
•Netondezjamaislorsquedespersonnes,etsurtout
desenfantsoudesanimauxfamiliers,setrouvent
àproximité.
•Tondezuniquementàlalumièredujourouavecun
bonéclairagearticiel.
•Méez-vousdestrousetautresdangerscachésdela
zonedetravail.
•N'approchezpaslesmainsnilespiedsdespiècesen
rotation.Nevoustenezjamaisdevantl'ouverture
d'éjection.
•Nesoulevezetneportezjamaisunetondeusedont
lemoteurtourne.
•Soyezextrêmementprudentenmarchearrière
ouquandvoustirezunetondeuseàconducteur
marchantversvous.
•Marchez,necourezpas.
•Pentes:
2
Page 23

–Netondezpasdepentestropraides.
–Soyezextrêmementprudentsurunterrainen
pente.
–Travailleztransversalementàlapente,jamaisen
montantouendescendantetsoyezextrêmement
prudentpourfairedemi-tour.
–Surlesterrainsenpente,faitesparticulièrement
attentiondenepasglisser.
•Ralentissezsurlespentesetdanslesviragesserrés
pournepasperdrelecontrôledelamachineoula
retourner.
•Arrêtezlalameavantd'inclinerlatondeusepour
traverserdessurfacesnonherbeusesetpourvous
déplacerentrelessurfacesdetravail.
•Nefaitespastournerlemoteurdansunespaceclos
oùlemonoxydedecarbonedangereuxdégagépar
l'échappementrisquedes'accumuler.
•N'entreposezjamaisunemachinedontleréservoir
contientdel'essencedansunlocaloùlesvapeurs
risquentderencontreruneammenueouune
étincelle.
•Laissezrefroidirlemoteuravantderangerlamachine
dansunlocalfermé.
•Pourréduirelesrisquesd'incendie,débarrassezle
moteur,lesilencieux,lebacàbatterieetlelieude
stockagedel'essencedetoutexcèsdegraisse,débris
d'herbeetfeuilles.
•Vériezfréquemmentl'étatdescomposants
dubacàherbeetdudéecteurd'éjection,et
remplacezlespiècesquienontbesoinpardespièces
recommandéesparleconstructeur.
•Remplacezlespiècesuséesouendommagéespour
éviterlesaccidents.
•Remplacezlessilencieuxdéfectueux.
•Arrêtezlemoteur
–avantdequitterlatondeuse
–avantdefairelepleindecarburant
–avantderetirerlebacàherbe
–avantderéglerlahauteurdecoupe,saufsi
ceréglagepeutsefairedepuislapositionde
conduite.
•Coupezlemoteuretdébranchezlabougie
–avantdedégageroudésobstruerl'éjecteur.
–avanttoutcontrôle,toutnettoyageoutoute
interventionsurlatondeuse.
–aprèsavoirheurtéunobstacle,recherchezet
réparezlesdégâtséventuelsdelatondeuseavant
delaremettreenmarcheetdel'utiliser.
–silatondeusesemetàvibrerdemanière
inhabituelle(contrôlezimmédiatement).
•Lafoudrepeutprovoquerdesblessuresgravesou
mortelles.Sivousobservezlafoudreouquevous
entendezletonnerreàproximité,n'utilisezpasla
machineetmettez-vousàl'abri.
•Lavidangeduréservoirdecarburantdoit
impérativements'effectueràl'extérieur.
•Nemodiezpasleréglagedurégulateuretnefaites
pastournerlemoteurtropvite,souspeined'accroître
lesrisquesd'accidentsetdeblessurescorporelles.
•Attention,surlesmachinesàplusieurslames,la
rotationd'unelamepeutentraînerledéplacement
desautreslames.
•Soyezprudentpendantleréglagedelatondeuse
pouréviterdevouscoincerlesdoigtsentreleslames
enrotationetlespiècesxesdelatondeuse.
•Pourpréserverlebonfonctionnementetla
sécuritédelamachine,n'utilisezquedes
piècesderechangeetdesaccessoiresToro
d'origine.N'utilisezpasdepiècesetaccessoires
soit-disantcompatibles
risque.
,carilsprésententun
•Méez-vousdelacirculationprèsdesroutesetpour
traverser.
Entretienetremisage
•Gardeztouslesécrous,boulonsetvistoujoursbien
serréspourêtresûrdepouvoirutiliserlamachine
sansdanger.
•N'utilisezpasdematérieldenettoyagesouspression
pournettoyerlamachine.
3
Page 24

Niveaudepressionacoustique
Cettemachineproduitauniveaudel'oreillede
l'utilisateurunepressionacoustiquede87dBA,qui
comprendunevaleurd'incertitude(K)de1dBA.La
pressionacoustiqueestdéterminéeenconformitéavec
lesprocéduresénoncéesdanslanormeEN836.
Puissanceacoustique
Cettemachineaunniveaudepuissanceacoustique
garantide98dBA,quicomprendunevaleurd'incertitude
(K)de1dBA.Lapuissanceacoustiqueestdéterminée
enconformitéaveclesprocéduresénoncéesdansla
normeISO11094.
Vibrationsauniveaudes
mainsetdesbras
Niveaudevibrationsmesurépourlamaingauche=
3,5m/s
2
Niveaudevibrationsmesurépourlamaindroite=
3,4m/s
Valeurd'incertitude(K)=1,8m/s
Lesvaleursmesuréessontdéterminéesenconformité
aveclesprocéduresénoncéesdanslanormeEN836.
2
2
.
4
Page 25

Autocollantsdesécuritéet
d'instruction
Important:Lesautocollantsdesécuritéet
d'instructionsontplacésprèsdesendroits
potentiellementdangereux.Remplacezles
autocollantsendommagés.
Marquedufabricant
1.Identielalamecommepièced'origine.
112-8760
1.Risquedeprojections–tenezlesspectateursàbonne
distancedelamachine.
2.Risquedecoupure/mutilationdesmainsoudespieds–ne
vousapprochezpasdespiècesmobiles.
117-4143
1.Attention–lisezleManueldel'utilisateur.
2.Risquedeprojections–tenezlesspectateursàbonne
distancedelamachine.
3.Risquedecoupure/mutilationdesmainsoudespiedspar
lalameduplateaudecoupe–débranchezlabougieet
lisezlesinstructionsavantd'entreprendreunentretienou
unerévision.
4.Risquedecoupure/mutilationdesmainsetpiedsparla
lameduplateaudecoupe–nevousapprochezpasdes
piècesmobilesetgardeztouteslesprotectionsenplace.
5.Risquedecoupure/mutilationdesmainsetpiedsparla
lameduplateaudecoupe–netondezpasdanslesensde
lapente,travailleztoujourstransversalementàlapente;
arrêtezlamachineetlemoteur,ramassezlesdébrisavant
d'utiliserlamachine;vérieztoujourssilavoieestlibre
justederrièrelamachineetsursatrajectoireavantdefaire
marchearrière.
5
Page 26

Miseenservice
Important:Retirezetmettezaurebutlapellicule
deplastiquequiprotègelemoteur.
1
Dépliageduguidon
Aucunepiècerequise
Procédure
ATTENTION
Vousrisquezd'endommagerlescâblesetderendre
lamachinedangereuseàutilisersivouspliezou
dépliezmalleguidon.
•Veillezànepasendommagerlescâblesenpliant
oudépliantleguidon.
•Siuncâbleestendommagé,adressez-vousàun
réparateuragréé.
1.Retirezlesboutonsduguidonducarterduplateau
decoupe(Figure3).
Important:Faitespasserlescâblesàl'extérieur
duguidonquandvousmontezleguidon.
2
Pleind'huilemoteur
Aucunepiècerequise
Procédure
Lecartermoteurdelatondeuseestvideàlalivraison.
1.Retirezlajauge(Figure4).
Figure4
2.Versezdel'huilelentementdanslegoulotde
remplissagepourfairemonterleniveaudeliquide
jusqu'aurepèremaximum(Full)surlajauge
(Figure4).Neremplissezpasexcessivement.
(Remplissagemax.:0,59l,type:huiledétergente
SAE30declassedeserviceAPISF,SG,SH,SJ,SL
ousupérieure.)
Figure3
1.Boutonduguidon(2)
2.Placezleguidonenpositiond'utilisation.
3.Montezetserrezlesboutonsduguidonquevous
avezretirésàl'étape1(Figure3).
Remarque:Sivousremplissezexcessivementle
moteur,vidangezunpeud'huilecommeexpliquéàla
sectionVidangeetremplacementdel'huilemoteur.
3.Revissezlajaugefermementenplace.
Important:
5premièresheuresdefonctionnement
foisparan(voirVidangeetremplacementde
l'huilemoteur).
6
Changezl'huilemoteuraprèsles
,puisune
Page 27

Vued'ensembledu
3
Chargedelabatterie
Aucunepiècerequise
Procédure
Reportez-vousàChargedelabatteriesouslarubrique
Entretien.
4
Miseenplacedufusible
Aucunepiècerequise
Procédure
Reportez-vousàlasectionMiseenplacedufusiblesous
larubriqueEntretien.
produit
Figure5
1.Bougie7.Barred'autotraction
2.Filtreàair
3.Bouchonduréservoirde
carburant
4.Bouchonde
remplissage/jauge
5.Poignéedulanceur11.Leviersdehauteurde
6.Barredecommandedela
lame
8.Clédecontact
9.Bacàherbe
10.Batterie
coupe(4)
12.Chargeurdebatterie
Figure6
1.Déecteurd'éjectionarrière(option)
Caractéristiquestechniques
Modèle
2964236kg145cm56cm99cm
7
Poids
LongueurLargeur
Hauteur
Page 28

Utilisation
Accessoires/Équipements
Unchoixd'accessoiresetd'équipementsToroagréés
estproposépouramélioreretélargirlescapacitésde
lamachine.Pourobtenirlalistedesaccessoireset
équipementsagréés,contactezvotreConcessionnaire
ToroagrééouvotreDistributeurourendez-voussurle
www.Toro.com.
Remplissageduréservoirde
carburant
DANGER
L'essenceestextrêmementinammableet
explosive.Unincendieouuneexplosioncausé(e)
parl'essencepeutvousbrûler,ainsiqueles
personnessetenantàproximité.
•Pouréviterquel'électricitéstatiquen'enamme
l'essence,posezlerécipientet/oulatondeuse
directementsurlesol,pasdansunvéhiculeou
surunsupportquelconque,avantdefairele
plein.
•Faiteslepleinduréservoirdecarburantquand
lemoteurestfroid.Essuyezlecarburant
éventuellementrépandu.
•Nefumezjamaisenmanipulantdel'essenceet
tenez-vousàl'écartdesammesnuesoudes
sourcesd'étincelles.
Figure7
Contrôleduniveaud'huile
moteur
Périodicitédesentretiens:Àchaqueutilisationouune
foisparjour
1.Retirezlajauge,essuyez-lasurunchiffonet
remettez-ladansletubederemplissage(Figure8).
•Conservezl'essencedansunrécipient
homologué,horsdeportéedesenfants.
Faiteslepleinavecdel'essencesansplombordinaire
fraîched'unemarqueréputée(Figure7).
Utilisezdel'essenceordinairesansplombàusage
automobile(indiced'octaneminimum87àlapompe).
Àdéfautd'essenceordinairesansplomb,del'essence
ordinaireauplombpeutêtreutilisée.
Remarque:N'utilisezjamaisdeméthanol,d'essence
contenantduméthanoloudecarburolcontenantplus
de10%d'éthanol,souspeined'endommagerlecircuit
d'alimentation.Nemélangezpasd'huileàl'essence.
Important:Pourréduirelesproblèmesde
démarrage,ajoutezunstabilisateuràchaqueplein
etutilisezdel’essencestockéedepuismoinsd’un
mois.
Figure8
2.Sortezdenouveaulajaugeetcontrôlezleniveau
d'huile(Figure8).Sileniveaun'atteintpaslerepère
minimum(Add)delajauge,versezlentement
sufsammentd'huiledanslegoulotderemplissage
pourfairemonterleniveauaurepèremaximum
(Full).Neremplissezpasexcessivement.
(Remplissagemax.:0,59l,type:huiledétergente
SAE30declassedeserviceAPISF,SG,SH,SJ,SL
ousupérieure.)
Remarque:Sivousremplissezexcessivementle
moteur,vidangezunpeud'huilecommeexpliquéàla
sectionVidangeetremplacementdel'huilemoteur.
3.Remettezlajaugeenplace.
8
Page 29

Réglagedelahauteurde
coupe
ATTENTION
Pendantleréglagedelahauteurdecoupe,vous
risquezdetoucherlalameenmouvementetde
vousblessergravement.
•Arrêtezlemoteuretattendezl'arrêtdetoutes
lespiècesmobiles.
•Nemettezpaslesdoigtssouslecarterdu
plateaudecoupequandvousréglezlahauteur
decoupe.
Démarragedumoteur
1.Maintenezlabarredecommandedelalame
(Figure10)contreleguidon.
Figure10
1.Barredecommandedelalame
PRUDENCE
Silemoteurvientdetourner,lesilencieuxesttrès
chaudetrisquedevousbrûlergravement.Nevous
approchezpasdusilencieuxencorechaud.
Choisissezlahauteurdecoupevoulue.Réglezlesquatre
rouesàlamêmehauteur.
Remarque:Pouréleverleplateaudecoupe,déplacez
touslesleviersdehauteurdecoupeenavant;pour
abaisserleplateau,ramenezlesleviersenarrière
(Figure9).
2.Tournezlaclédecontact(Figure11)outirezla
poignéedulanceur(Figure12).
Figure11
Figure9
1.Élevezleplateaude
coupe.
Remarque:Leshauteursdecoupesuivantessont
disponibles:25mm,38mm,51mm,64mm,76mm,
89mm,et102mm.
2.Abaissezleplateaude
coupe
Figure12
Remarque:Silemoteurnedémarrepasaprès
plusieurstentatives,contactezunréparateuragréé.
Utilisationdelacommande
d'autotraction
Pouractionnerlesystèmed'autotraction,serrezet
maintenezlabarredecommande(Figure13)contrele
guidon.
9
Page 30

Ramassagedel'herbecoupée
Utilisezlebacàherbepourrecueillirlesdébrisd'herbe
etdefeuillesdéposéssurlapelouse.
ATTENTION
Silebacàherbeestusé,desgravillonsouautres
débrissimilairesrisquentd'êtreprojetésvers
l'utilisateuroudespersonnesàproximité,etde
causerdesblessuresgravesoumortelles.
Figure13
1.Barred'autotraction
Examinezfréquemmentlebac.S'ilestendommagé,
remplacez-leparunbacToroneufd'origine.
Pourdésengagerl'autotraction,relâchezlabarre
d'autotraction.
Remarque:Lavitessededéplacementmaximaleest
xe.Pourralentir,éloignezlabarred'autotractiondu
guidon.
Arrêtdumoteur
Périodicitédesentretiens:Àchaqueutilisationouune
foisparjour
Pourarrêterlemoteur,relâchezlabarredecommande
delalame(Figure14).
Important:Lorsquevousrelâchezlabarrede
commandedelalame,lemoteuretlalamedoivent
s'arrêterenmoinsde3secondes.Siteln'estpasle
cas,cessezimmédiatementd'utiliserlatondeuseet
adressez-vousàunconcessionnaireagréé.
ATTENTION
Lalameesttranchanteetvousrisquezdevous
blessergravementàsoncontact.
Coupezlemoteuretattendezl'arrêtdetoutesles
piècesenmouvementavantdequitterlaposition
deconduite.
Montagedubacàherbe
1.Soulevezledéecteurarrière(Figure15).
Figure14
Mulching
Àlalivraison,votretondeuseestprêtepourle
«mulching»,c.-à-d.prêteàdéchiqueterl'herbeetles
feuillescoupéespournourrirvotrepelouse.
Silebacàherbeestmontésurlatondeuse,retirez-le(voir
Retraitdubacàherbe)avantdeprocéderaumulching.
Figure15
1.Déecteurarrière
2.Insérezlapoignéedubacàherbedanslescransdes
supportsprévusetvériezqu'elleestbienengagée
(Figure15).
Retraitdubacàherbe
1.Soulevezledéecteurarrière(Figure15).
2.Soulevezlebacàherbepourdécrocherlapoignée
dessupportsetleretirerdelamachine.
3.Fermezledéecteurarrière.
10
Page 31

Éjectiondesdéchetsd'herbe
Utilisezledéecteurd'éjectionarrièrequandvous
tondezdel'herbetrèshaute.
Retraitdudéecteurd'éjectionarrière
Pourretirerledéecteurd'éjectionarrière,inversezla
procéduredécriteplushaut.
Remarque:Ledéecteurd'éjectionarrièreestun
équipementoptionnelquevousdevezvousprocurer
séparément.
Montagedudéecteurd'éjectionarrière
1.Enlevezlebacàherbes'ilsetrouvesurlatondeuse.
2.Soulevezledéecteurarrièreetmaintenez-ledans
cetteposition(Figure16).
Figure16
3.Insérezlalanguettedudéecteurd'éjectionarrière
danslafentedroitedudéecteurarrière(Figure17).
Conseilsd'utilisation
Conseilsdetontegénéraux
•Débarrassezlazonedetravaildesbranches,pierres,
câbles,bâtonsetautresdébrisquipourraientêtre
ramassésetprojetésparlalame.
•Évitezdeheurterdesobstaclesaveclalame.Ne
passezjamaisintentionnellementsurunobjetquel
qu'ilsoit.
•Silatondeuseaheurtéunobstacleoucommence
àvibrer,coupezimmédiatementlemoteur,
débranchezlabougieetvériezsilatondeusen'est
pasendommagée.
•Pourobtenirdemeilleursrésultats,montezunelame
neuveaudébutdelasaisondetonte.
•Remplacezlalamedèsquenécessaireparunelame
Torod'origine.
Latonte
•Netondezl'herbequesur1/3desahauteuràchaque
fois.N'utilisezpasunehauteurdecoupeinférieure
à51mm,saufsil'herbeestclairseméeouàlan
del'automnequandlapoussecommenceàralentir.
(voirRéglagedelahauteurdecoupe).
Figure17
4.Insérezlatigedudéecteurd'éjectionarrièredans
lescransdelatondeuse(Figure18).
Figure18
•Sil'herbefaitplusde15cm,effectuezunpremier
passageàvitesseréduiteàlahauteurdecoupelaplus
haute.Effectuezundeuxièmepassageàunehauteur
decoupeinférieurepourobtenirunecoupeplus
esthétique.L'herbetroplonguerisqued'obstruerla
tondeuseetdefairecalerlemoteur.
•Netondezquesil'herbeoulesfeuillessontsèches.
L'herbeetlesfeuilleshumidesonttendanceà
s'agglomérersurlapelouseetrisquentd'obstruerla
tondeuseetdefairecalerlemoteur.
ATTENTION
Entravaillantsurl'herbeoulesfeuilleshumides,
vousrisquezdeglisseretdevousblesser
gravementsivoustouchezlalameentombant.
Netondezquesil'herbeestsèche.
•Alternezladirectiondelatontepourdisperser
lesdéchetsplusuniformémentetobtenirune
fertilisationplushomogène.
•Sil'aspectdelapelousetonduen'estpassatisfaisant,
essayezuneouplusieursdessolutionssuivantes:
11
Page 32

–Remplacezlalameoufaites-laaiguiser.
–Tondezenavançantpluslentement.
–Augmentezlahauteurdecoupe.
–Tondezplussouvent.
–Empiétezsurlespassagesprécédentspourne
tondrequ'unelargeurdebanderéduite.
–Réglezlahauteurdecoupedesrouesavantun
cranendessousdecelledesrouesarrière.Par
exemple,réglezlesrouesavantà51mmetles
rouesarrièreà64mm.
Hachagedesfeuilles
•Aprèslatonte,50%delapelousedoitêtrevisible
souslacouchedefeuilleshachées.Àceteffet,
vousdevrezpeut-êtrerepasserplusieursfoissurles
feuilles.
•Silacouchedefeuillesfaitplusde13cmd'épaisseur,
réglezlesrouesavantunoudeuxcransplushautque
lesrouesarrière.
•Ralentissezlavitessededéplacementsilesfeuillesne
sontpashachéesassezmenues.
12
Page 33

Entretien
Remarque:Lescôtésgaucheetdroitdelamachinesontdéterminésd'aprèslapositiondeconduite.
Programmed'entretienrecommandé
Périodicitéd'entretienProcédured'entretien
Aprèsles5premières
heuresdefonctionnement
Àchaqueutilisationou
unefoisparjour
Toutesles25heures
Avantleremisage
Unefoisparan
Important:Reportez-vousau
•Vidangezetchangezl'huilemoteur.
•Contrôlezleniveaud'huilemoteur.
•Vériezquelemoteurs'arrêtedansles3secondessuivantlerelâchementdela
barredecommandedelalame.
•Enlevezl'herbecoupéeetautresdébrisaccumuléssousleplateaudecoupe.
•Remplacezleltreàairunefoisparanouplussouvents'ilyabeaucoupde
poussière.
•Vidangezleréservoirdecarburantavantleremisageetavantlesréparationsqui
lenécessitent
•Vidangezetchangezl'huilemoteur.
•Remplacezlalameoufaites-laaiguiser(plussouventsielles'émousserapidement).
•ConsultezvotreManueld'utilisationdumoteurpourtoutesprocéduresd'entretien
annuelsupplémentaires.
Manueld'utilisationdumoteur
supplémentaires.
Préparationàl'entretien
1.Arrêtezlemoteuretattendezl'arrêtdetoutesles
piècesmobiles.
2.Débranchezlabougie(Figure19)avantdeprocéder
àunquelconqueentretien.
pourtoutesprocéduresd'entretien
ATTENTION
Ducarburantpeuts'échapperlorsquela
tondeuseestbasculéesurlecôté.L'essenceest
inammableetexplosive,etpeutprovoquerdes
blessures.
Laisseztournerlemoteurjusqu'àcequ'il
s'arrêtefautedecarburantouvidangezlereste
d'essenceavecunepompemanuelle,pasun
siphon.
Figure19
1.Fildebougie
3.Lorsquel'entretienestterminé,rebranchezlabougie.
Important:Avantdebasculerlatondeusepour
vidangerl'huileouremplacerlalame,laissezle
moteurenmarchejusqu'àcequ'ils'arrêtefaute
decarburant.Sivousnepouvezpasattendre
quelemoteurs'arrêteparmanquedecarburant,
utilisezunepompemanuellepourviderlereste
decarburant.Basculeztoujourslatondeusesur
lecôté(jaugeenbas).
Remplacementdultreàair
Périodicitédesentretiens:Toutesles25heures
1.Ouvrezlecouvercledultreàairavecuntournevis
(Figure20)
Figure20
2.Remplacezleltreàair(Figure21).
13
Page 34

Figure21
3.Remettezlecouvercleenplace.
Vidangeetremplacementde
l'huilemoteur
Périodicitédesentretiens:Aprèsles5premières
heuresdefonctionnement
Unefoisparan
Changezl'huilemoteuraprèsles5premièresheures
defonctionnement,puisunefoisparan.
Faitestournerlemoteurpendantquelquesminutes
avantlavidangepourréchaufferl'huile.L'huilechaude
s'écouleplusfacilementetentraîneplusd'impuretés.
1.Effectuezlespréparatifsd'entretien(voirPréparation
àl'entretien).
2.Retirezlajauge(Figure22).
Figure23
4.Versezdel'huilelentementdanslegoulotde
remplissagepourfairemonterleniveaudeliquide
jusqu'aurepèremaximum(Full)surlajauge
(Figure22).Neremplissezpasexcessivement.
(Remplissagemax.:0,59l,type:huiledétergente
SAE30declassedeserviceAPISF,SG,SH,SJ,SL
ousupérieure.)
Remarque:Sivousremplissezlemoteur
excessivement,vidangezunepartiedel'huilecomme
expliquéàl'étape3plushaut.
5.Revissezlajaugefermementenplace.
6.Débarrassez-vouscorrectementdel'huileusagéeen
ladéposantdansuncentrederecyclageagréé.
Chargedelabatterie
ATTENTION
Figure22
3.Inclinezlatondeusesurlecôté(jaugeenbas)pour
vidangerl'huileusagéeparlegoulotderemplissage
(Figure23).
CALIFORNIE
Proposition65-Avertissement
Lesbornesdelabatterieetaccessoiresconnexes
contiennentduplombetdescomposésde
plomb.L'étatdeCalifornieconsidèreces
substanceschimiquescommesusceptibles
deprovoquerdescancersetdestroubles
delareproduction.Lavez-vouslesmains
aprèsavoirmanipulélabatterie.
Chargezlabatteriependant24heureslapremièrefois,
puistouslesmois(tousles25démarrages)ouselonles
besoins.Utiliseztoujourslechargeurdansunlieuàl'abri
etchargezlabatterieàlatempératureambiante(22°C)
danslamesuredupossible.
1.Branchezlechargeuraufaisceaudecâblagedela
tondeusesituésouslaclédecontact(Figure24).
14
Page 35

Figure24
2.Branchezlechargeuràuneprisemurale.
Figure26
3.Refermezlecouvercledelabatterie.
Remarque:Lorsquelabatterienepeutplus
êtrerechargée,recyclez-laoumettez-laaurebut
conformémentàlaréglementationlocaleenmatière
d'environnement.
Remplacementdufusible
Ledémarreurélectriquedelatondeuseestprotégé
parunfusiblefourniaveclamachine.Silabatteriene
sechargepasousilemoteurnetournepasavecle
démarreurélectrique,lefusibleaprobablementgrillé.
Remplacez-leparunfusibleenchablede40A
Important:Ledémarreurélectriquene
fonctionnerapasetlabatterienepourrapasêtre
chargéesilefusiblen'estpasenplace.
1.Dégagezlesdeuxextrémitésducouvercledela
batterieetdéposezlecouvercle(Figure25).
Remplacementdelalame
Périodicitédesentretiens:Unefoisparan
Important:
dynamométriquepourmonterlalame
correctement
vousnesentezpasêtrecapabled'effectuercette
procédure,adressez-vousàunréparateuragréé.
Examinezl'étatdelalamechaquefoisqueleréservoir
d'essenceestvide.Silalameestendommagéeoufêlée,
remplacez-laimmédiatement.Silalameestémousséeou
ébréchée,faites-laaiguiserouremplacez-la.
ATTENTION
Lalameesttranchanteetvousrisquezdevous
blessergravementàsoncontact.
Portezdesgantspoureffectuerl'entretiendela
lame.
1.Débranchezlabougie(voirPréparationàl'entretien).
Vousaurezbesoind'uneclé
.Sivousn'enpossédezpasousi
Figure25
2.Placezlefusibledansleporte-fusible(Figure26).
2.Basculezlatondeusesurlecôté(ltreàairversle
haut).
3.Immobilisezlalameavecunmorceaudebois.
4.Retirezlalame(tournezleboulondexationdans
lesensantihoraire),etmetteztouteslesxations
decôté.
5.Montezlalameneuve(tournezleboulondexation
danslesenshoraire)ainsiquetouteslesxations
(Figure27).
15
Page 36

Figure28
Figure27
Important:Lesextrémitésrelevéesdelalame
doiventêtredirigéesverslatondeuse.
6.Àl'aided'uneclédynamométrique,serrezle
boulondelalameà82Nm.
Important:Unboulonvisséà82Nmesttrès
serré.Bloquezlalameavecunecaleenbois,
appuyezdetoutvotrepoidssurlerochetou
laclé,etserrezleboulonsolidement.Ilest
pratiquementimpossibledetropserrerce
boulon.
Réglageducâbledela
commanded'autotraction
Lorsquevousinstallezunnouveaucâbledecommande
d'autotractionouquel'autotractionestdéréglée,vous
devezréglerlecâbledecommanded'autotraction.
1.Desserrezl'écroudusupportdeguidageducâble
(Figure28).
1.25à38mm
2.Barred'autotraction
3.Gaineducâble
4.Écroudesupportdecâble
5.Supportdecâble
2.Maintenezlabarredecommanded'autotractionà25
à38mmduguidon(Figure28).
3.Tirezlagaineducâbleverslebas(verslatondeuse)
pouréliminerlemouducâble(Figure28).
4.Serrezl'écroudusupportdeguidageducâble.
5.Relâchezlabarredecommanded'autotractionet
vérierquelecâbleestlâche.
Remarque:Lecâbledoitêtredétenduquand
labarredecommanded'autotractionestrelâchée,
sinonlatondeuserisquedesedéplacerquandla
barreestdésengagée.
Nettoyagedelatondeuse
Périodicitédesentretiens:Àchaqueutilisationouune
foisparjour
ATTENTION
Del'herbepeutêtreprojetéedesouslatondeuse.
•Portezdeslunettesdeprotection.
•Restezàlapositiondeconduite(derrièrele
guidon).
•Nelaissezpersonnepénétrerdanslazonede
travail.
1.Mettezlemoteurenmarchelorsquelatondeusese
trouvesurunesurfacerevêtueplaneetdirigezunjet
d'eaudevantlarouearrièredroite(Figure29).
L'eauéclabousseraendirectiondelalameetenlèvera
lesdébrisd'herbeagglomérés.
16
Page 37

Figure29
2.Lorsqu'ilneresteplusd'herbesurlalame,arrêtez
l'eauetdéplacezlatondeuseàunendroitsec.
3.Laisseztournerlemoteurpendantquelquesminutes
poursécherlecarteretl'empêcherderouiller.
8.Serreztouslesécrous,boulonsetvis.
9.Chargezlabatteriependant24heures,puis
débranchezlechargeuretremisezlatondeusedans
unlocalnonchauffé.Sivousnedisposezqued'un
localchauffé,rechargezlabatterietousles3mois.
Pliageduguidon
ATTENTION
Vousrisquezd'endommagerlescâblesetderendre
lamachinedangereuseàutilisersivouspliezou
dépliezmalleguidon.
Remisage
Remisezlatondeusedansunlocalfrais,propreetsec.
Préparationdelatondeuseau
remisage
ATTENTION
Lesvapeursd'essencesontexplosives.
•Neconservezpasl'essenceplusd'unmois.
•Neremisezpaslatondeusedansunlocalfermé
oùsetrouveuneammenue.
•Laissezrefroidirlemoteuravantderemiserla
machine.
1.Lorsdudernierpleindelasaison,ajoutezun
stabilisateuraucarburantselonlesinstructionsdu
constructeurdumoteur.
2.Laisseztournerlemoteurdelatondeusejusqu'àce
qu'ils'arrêtefautedecarburant.
•Veillezànepasendommagerlescâblesenpliant
oudépliantleguidon.
•Siuncâbleestendommagé,adressez-vousàun
réparateuragréé.
1.Desserrezlesboutonsduguidonjusqu'àcequele
guidonbougelibrement(Figure30).
3.Amorcezetremettezlemoteurenmarche.
4.Laissezlemoteurtournerjusqu'àcequ'ils'arrêtede
nouveau.Lemoteurestsufsammentseclorsqu'il
n'yaplusmoyendelefairedémarrer.
5.Débranchezlabougieetbranchezlelàlaborne
deretenue.
6.Retirezlabougieetversez30mld'huiledans
l'ouverturelaisséeparlabougie.Tirezensuitela
poignéedulanceurlentementàplusieursreprises
pourbienrépartirl'huileàl'intérieurducylindreet
empêchercelui-ciderouillerpendantleremisagede
lamachine.
7.Montezetserrezlabougieà20Nmàl'aided'une
clédynamométrique.
Figure30
1.Boutonduguidon(2)
2.Pliezleguidonenavantdelamanièreindiquée
(Figure30).
Remiseenserviceaprès
remisage
1.Chargezlabatteriependant24heures.
2.Branchezlabougie.
17
Page 38

Dépistagedesdéfauts
ProblèmeCausepossible
Lemoteurnedémarrepas.
Lemoteurdémarredifcilementouperd
delapuissance.
1.Labougien'estpasconnectée.1.Branchezlabougie.
2.L'éventdubouchonduréservoirde
carburantestbouché.
3.Labougieestpiquéeouencrassée,
oul'écartementdesélectrodesest
incorrect.
4.Leréservoirdecarburantestvideou
lecircuitd'alimentationcontientdu
carburantquin'estpasfrais.
1.L'éventdubouchonduréservoirde
carburantestbouché.
2.L'élémentltrantestencrassécequi
limiteledébitd'air.
3.Ledessousdelamachinecomporte
desdéchetsd'herbecoupéeetautres
débris.
4.Labougieestpiquéeouencrassée,
oul'écartementdesélectrodesest
incorrect.
5.Lehuilemoteuresttropbas,trophaut
oul'huileesttropencrassée.
6.Leréservoirdecarburantcontientdu
carburantquin'estpasfrais.
2.Nettoyezl'éventouremplacezle
bouchon.
3.Contrôlezlabougieetréglez
l'écartementdesélectrodesaubesoin.
Remplacezlabougiesielleestpiquée,
encrasséeoussurée.
4.Vidangezleréservoird'essenceet/ou
remplissez-led'essencefraîche.Si
leproblèmepersiste,consultezun
concessionnaireagréé.
1.Nettoyezl'éventouremplacezle
bouchon.
2.Nettoyezlepréltredultreàairet/ou
remplacezl'élémentenpapier.
3.Nettoyezledessousdelamachine.
4.Contrôlezlabougieetréglez
l'écartementdesélectrodesaubesoin.
Remplacezlabougiesielleestpiquée,
encrasséeoussurée.
5.Contrôlezleniveaud'huilemoteur.
Remplacezl'huilesielleestencrassée,
faitesl'appointouvidangezunepartie
del'huilejusqu'àobtentionduniveau
correct(repèremaximum)surlajauge.
6.Vidangezleréservoirdecarburantet
remplissez-led'essencefraîche.
Mesurecorrective
Lemoteurnetournepasrégulièrement.
Lamachineoulemoteurvibre
excessivement.
Latonten'estpasuniforme.
1.Labougien'estpasconnectée.1.Branchezlabougie.
2.L'élémentltrantestencrassécequi
limiteledébitd'air.
3.Labougieestpiquéeouencrassée,
oul'écartementdesélectrodesest
incorrect.
1.Ledessousducarterdelamachine
comportedesdéchetsd'herbecoupée
etautresdébris.
2.Boulonsdemontagedumoteur
desserrés.
3.Lesécrousdexationdelalamesont
desserrés.
4.Lalameestfausséeoudéséquilibrée.
1.Voustondezensuivantlemême
parcourschaquefois.
2.Lesquatrerouesnesontpasàla
mêmehauteur.
3.Ledessousducarterdelamachine
comportedesdéchetsd'herbecoupée
etautresdébris.
4.Lalameestémoussée.
2.Nettoyezlepréltredultreàairet/ou
remplacezl'élémentenpapier.
3.Contrôlezlabougieetréglez
l'écartementdesélectrodesaubesoin.
Remplacezlabougiesielleestpiquée,
encrasséeoussurée.
1.Nettoyezledessousducarterdela
machine.
2.Serrezlesboulonsdemontagedu
moteur.
3.Serrezlesécrousdexationdela
lame.
4.Équilibrezlalame.Remplacezlalame
sielleestfaussée.
1.Changezleparcoursdelatondeuse.
2.Réglezles4rouesàlamêmehauteur.
3.Nettoyezledessousducarterdela
machine.
4.Affûtezetéquilibrezlalame.
18
Page 39

ProblèmeCausepossible
Mesurecorrective
Lamachinen'avancepasautomatiquement.
1.Lecouvercledecourroiecomportedes
débris.
2.Lecâbledecommanded'autotraction
estdérégléouendommagé.
1.Enlevezlesdébrissouslecouvercle
delacourroie.
2.Réglezlecâbledecommande
d'autotraction.Remplacezlecâbleau
besoin.
19
Page 40

Remarques:
20
Page 41

Remarques:
21
Page 42

Remarques:
22
Page 43

Listedesdistributeursinternationaux
Distributeur:Pays:
AtlantisSuveSulamaSisstemleriLt
BalamaPrimaEngineeringEquip.HongKong85221552163
B-RayCorporationCorée
CascoSalesCompany
CeresS.A.CostaRica
CSSCTurfEquipment(pvt)Ltd.SriLanka
CyrilJohnston&Co.
EquiverMexique525553995444
FemcoS.A.Guatemala
G.Y.K.CompanyLtd.
GeomechanikiofAthensGrèce
GuandongGoldenStarChine
HakoGroundandGardenSuède
HakoGroundandGarden
HayterLimited(U.K.)
HydroturfInt.CoDubai
HydroturfEgyptLLC
IbeaS.P .A.
IrriamcPortugal351212388260
IrrigationProductsInt'lPvtLtd.Inde862283960789
JeanHeybroekb.v.Pays-Bas31306394611
Lely(U.K.)Limited
MaquiverS.A.Colombie
MaruyamaMfg.Co.Inc.
MetraKft
Mountelda.s.
MunditolS.A.
OslingerTurfEquipmentSA
OyHakoGroundandGardenAb
ParklandProductsLtd.Nouvelle-Zélande6433493760
Prochaska&Cie
RTCohen2004Ltd.
RiversaEspagne34952837500
RothMotorgerateGmBh&Co.
ScSvendCarlsenA/S
SolvertS.A.S.
SpyprosStavrinidesLimitedChypre
SurgeSystemsIndiaLimited
T-MarktLogisticsLtd.Hongrie3626525500
ToroAustraliaAustralie61395807355
ToroEuropeBVBABelgique3214562960
Turquie902163448674
PuertoRico7877888383
IrlandeduNord442890813121
Japon81726325861
Norvège4722907760
Royaume-Uni441279723444
ÉmiratsArabesUnis
Egypte2025194308
Italie390331853611
Royaume-Uni441480226800
Japon81332522285
Hongrie3613263880
Républiquetchèque420255704220
Argentine541148219999
Équateur
Finlande35898700733
Autriche4312785100
Israël97298617979
Allemagne4971442050
Danemark4566109200
France33130817700
Inde911292299901
Numérodetéléphone:
82325512076
5062391138
941 12746100
5024423277
30109350054
862087651338
4635100000
97143479479
5712364079
59342396970
35722434131
374-0269RevA
Page 44

LagarantieToro
Conditionsetproduitscouverts
TheTheToro®CompanyCompanyetsaliale,ToroWarrantyCompany,
envertudel'accordpasséentreelles,s'engagentconjointementàréparer
lesproduitsT oroci-dessouss'ilsprésententundéfautdefabricationou
dematériau.
Duréesdelagarantieàpartirdeladated'achat:
Produits
Tondeusesàconducteurmarchant
Tondeusesautoportéesàmoteurarrière
Tracteursdejardinettondeusesautoportées
Produitsélectriquesàmain
Fraisesàneige
Machinesàrayondebraquagezéroàusageprivé
*“Acheteurd'origine”signielapremièrepersonnequis'estportée
acquéreurduproduitToro.
*L'usagerésidentieldésignel'utilisationduproduitsurleterrainoùse
trouvevotrerésidence.L'utilisationdansplusieurslieuxoupardes
institutionsoulalocationestconsidéréecommeunusagecommercial,
couvertparlagarantiecommerciale.
Périodedegarantie
Garantielimitéede2ans
Garantielimitéede2ans
Garantielimitéede2ans
Garantielimitéede2ans
Garantielimitéede2ans
Garantielimitéede2ans
Garantielimitéepourusagecommercial
LesproduitsdeconsommationetaccessoiresToroutilisésàdesns
commerciales,pardesinstitutionsoudonnésenlocation,sontcouverts
contretoutdéfautdematériauoudefabricationpourlesduréessuivantes
àcompterdeladated'achatd'origine:
Produits
Tondeusesàconducteurmarchant
Tondeusesautoportéesàmoteurarrière
Tracteursdejardinettondeusesautoportées
Produitsélectriquesàmain
Fraisesàneige
Machinesàrayondebraquagezéroàusageprivé
Périodedegarantie
Garantiede90jours
Garantiede90jours
Garantiede90jours
Garantiede90jours
Garantiede90jours
Garantiede45jours
Commentfaireintervenirlagarantie?
SivouspensezquevotreproduitT oroprésenteundéfautdefabrication
oudematériau,procédezcommesuit:
1.Demandezàvotrerevendeurdeprendreenchargevotreproduit.
Sipouruneraisonquelconqueilvousestimpossibledecontacter
votrerevendeur,vouspouvezvousadresseràn'importequel
concessionnaireToroagréépourl'entretiendevotreproduit.
2.Lorsquevousvousrendezchezleréparateur,apportezleproduitet
unepreuved'achat(reçu).Si,pouruneraisonquelconque,vous
n'êtespassatisfaitdudiagnosticdevotreréparateuroudesconseils
prodigués,n'hésitezpasànouscontacteràl'adressesuivante:
CustomerCareDepartment,ConsumerDivision
TheT oroCompany
811 1LyndaleAvenueSouth
Bloomington,MN55420-1196,États-Unis
Directeur:Servicetechnique:001-952-887-8248
Consultezlalistedesdistributeursjointe.
Responsabilitésdupropriétaire
L'entretiendevotreproduitTorodoitêtreconformeauxprocédures
d'entretiendécritesdansleManueldel'utilisateur.Cetentretiencourant
estàvosfrais,qu'ilsoiteffectuéparvousouparunconcessionnaire.
Cequelagarantienecouvrepas
Cettegarantieexpressenecouvrepas:
•Lesfraisnormauxd'entretienetderemplacementdepiècestelles
quepalesdevissansn(palettes),lamesracleuses,courroies,
carburant,lubriants,changementsd'huile,bougies,câble/tringlerie
ouréglagesdesfreins.
•Lesproduitsoupiècesayantsubidesmodicationsouunusage
abusif,etnécessitantunremplacementouuneréparationenraison
d'unaccidentoud'undéfautd'entretien.
•Lesréparationsrequisesenraisondel'utilisationdecarburantnon
frais(vieuxdeplusd'unmois)oud'unemauvaisepréparationdela
machineavanttoutepériodedenonutilisationdeplusd'unmois.
•Moteurettransmission.Cescomposantssontcouvertspasles
garantiesduconstructeurpertinentesetpardesconditionsséparées.
Touteslesréparationscouvertesparcesgarantiesdoiventêtreeffectuées
parunréparateurToroagréé,àl'aidedepiècesderechangeagréées
parT oro.
Conditionsgénérales
L'acheteurestcouvertparlalégislationnationaledechaquepays.Les
droitsdel'acheteur,soutenusparlalégislation,nesontpaslimitéspar
laprésentegarantie.
374-0268RevA
Page 45

FormNo 3363-687-ASM Rev B
Gazonmaaiervan50cmmetmulchfunctieen
achtervanger
Modelnr.:29642—Serienr.:310000001enhoger
Gebruikershandleiding
Inleiding
Dezeloopmaaiermetdraaiendemessenisbedoeld
voorgebruikdoorparticulieren.Demachineis
voornamelijkontworpenvoorhetmaaienvangras
opgoedonderhoudenparticulieregazons.De
machineisnietontworpenvoorhetmaaienvan
borsteliggrasofvoorgebruikindelandbouw.
Leesdezeinformatiezorgvuldigdoor,zodatuweet
hoeudemachineopdejuistewijzemoetgebruikenen
onderhoudenenomletselenschadeaandemachinete
voorkomen.Ubentverantwoordelijkvoorhetjuisteen
veiligegebruikvandemachine.
UkuntrechtstreekscontactopnemenmetTorovia
www.Toro.comvoorinformatieoverproductenen
accessoires,omeendealertevindenofomuwproduct
teregistreren.
Alsuservice,origineleToro-onderdelenofaanvullende
informatienodighebt,kuntucontactopnemenmet
eenerkendeservicedealerofmetdeklantenservice
vanToro.Udienthierbijaltijdhetmodelnummeren
hetserienummervanhetproducttevermelden.De
locatievanhetplaatjemethetmodelnummerenhet
serienummervanhetproductisaangegevenopFiguur1.
Ukuntdenummersnotereninderuimtehieronder.
Erwordenindezehandleidingeenaantalmogelijke
gevareneneenaantalveiligheidsberichtengenoemd
(Figuur2)metdevolgendeveiligheidssymbolen,die
duidenopeengevaarlijkesituatiediezwaarlichamelijk
letselofdedoodtotgevolgkanhebbenwanneerde
veiligheidsvoorschriftennietinachtwordengenomen.
Figuur2
1.Veiligheidssymbool
Erwordenindezehandleidingtweewoordengebruikt
omuwaandachtopbijzondereinformatietevestigen.
Belangrijkattendeertuopbijzonderetechnische
informatieenOpmerkingduidtalgemeneinformatie
aandiebijzondereaandachtverdient.
DitproductvoldoetaanallerelevanteEuropese
richtlijnen.Zievoordetailsdeaparteproduct-specieke
conformiteitsverklaring.
VoormodelswaarvanhetaantalPKisaangegeven,
isdebrutoPKdoordemotorfabrikantgemeten
inlaboratoriumomstandighedengemetenvolgens
SAEJ1940.Omdatbijdeconguratierekening
isgehoudenmetdeveiligheids-,emissie-en
gebruiksvoorschriften,zaldemotorvandittype
gazonmaaiersindepraktijkveelminderPKhebben.
1.Plaatjemetmodelnummerenserienummer
Modelnr.:
Serienr.:
©2011—TheToro®Company
8111LyndaleAvenueSouth
Bloomington,MN55420
Figuur1
Registreeruwproductopwww.Toro.com.
Laatdebedieningsorganenenhetafgesteld
motortoerentalongemoeid,anderskanereenonveilige
situatieontstaanwaardooruletselkuntoplopen.
Veiligheid
Onjuistgebruikofonderhoudvandezemaaier
kanletseltotgevolghebben.Houduaandeze
veiligheidsinstructiesomhetrisicoopletselte
verminderen.
Toroheeftdezemaaierontworpenvoorengetestop
veiliggebruik.Alsuzichechterniethoudtaande
Vertalingvandeoorspronkelijketekst(NL)
GedruktindeVS
Allerechtenvoorbehouden
Page 46

volgendeinstructieskanditlichamelijkletseltotgevolg
hebben.
Hetisvanessentieelbelangdatueneventuele
anderegebruikersvandemaaierdeinhoudvandeze
handleidinglezenenbegrijpenvoordatdemotor
voorheteerstwordtgestartommaximaleveiligheid
endebesteprestatiestegaranderenenzodatu
kennisoverhetproductopdoet.Letmenname
ophetsymboolvoorveiligheidswaarschuwingen
(Figuur2)datVoorzichtig,Waarschuwingof
Gevaar-'instructievoorpersoonlijkeveiligheid'
kanbetekenen.Zorgdatudeinstructiesleest
enbegrijpt,ditisbelangrijkvoordeveiligheid.
Niet-nalevingvandeinstructiekanleidentot
lichamelijkletsel.
Algemeneveiligheidsregels
•Probeerdemotorniettestartenalserbrandstofis
gemorst.Verwijderdemachinedanuitdebuurtvan
deplekwaarisgemorst,envoorkomelkevormvan
openvuurofvonkentotdatdebrandstofdampen
volledigzijnverdwenen.
•Doesteedsdedopweerzorgvuldigopbrandstoftanks
en-containers.
Vóóringebruikname
•Draagtijdenshetmaaienaltijdeenlangebroeken
stevigeschoenen.Draaggeenschoenenmetopen
tenenenloopnietopblotevoeten.
•Inspecteereerstgrondighetterreinwaarude
machinewiltgebruikenenverwijderallestenen,
takken,draden,bottenofanderevreemde
voorwerpen.
metbetrekkingtotde
maaimachine
DevolgendeinstructieszijnontleendaanEN836.
Dezemachinekanhandenenvoetenafsnijdenen
voorwerpenuitwerpen.Alsudeveiligheidsinstructies
nietopvolgt,kanditleidentoternstigofdodelijkletsel.
Instructie
•Leesdezehandleidingaandachtigdoor.Zorgervoor
datuvertrouwdraaktmetbedieningsorganenen
weethoeudemachinemoetgebruiken.
•Laatnooitkinderenofpersonendiedeinstructies
nietkennen,demaaimachinegebruiken.Voor
debestuurderkaneenwettelijkeminimumleeftijd
gelden.
•Onthouddatdebestuurderverantwoordelijkisvoor
ongevallenofschadeaananderepersonenofhun
eigendommen.
•Zorgervoordatudeuitlegoverallepictogrammen
opdemaaimachineenindeinstructieshebtgelezen
enbegrepen.
Benzine
•Controleervóórgebruikaltijdofdebeschermplaten
enveiligheidsvoorzieningenzoalsgrasgeleidersen
grasvangers,ophunplaatszittenennaarbehoren
werken.
•Controleervóórhetgebruikdemessen,
bevestigingsboutenenhetmaaimechanismealtijd
opsporenvanslijtageofbeschadiging.Vervang
versletenofbeschadigdemessenenboutenaltijdals
completesetomeengoedebalanstebehouden.
Starten
•Houddemaaimachinenietschuinalsudemotor
aanzet,behalvealsudemachineschuinmoethouden
omtestarten.Houddemachineindatgevalniet
schuinerdannodigis,entilalleendezijdeopdiehet
verstvanuverwijderdis.
•Houdubijhetstartenvandemotorzorgvuldigaan
devoorschriftenenhouduwvoetenuitdebuurtvan
demaaimes(sen)ennietvóórdeafvoeropening.
Gebruiksaanwijzing
•Houdiedereenweguithetgebiedwaarinude
machinegebruikt,metnamekinderenenhuisdieren.
WAARSCHUWING:brandstofislichtontvlambaar.
Neemdevolgendevoorzorgsmaatregelen.
•Bewaarbrandstofuitsluitendintanksofblikkendie
speciaaldaarvoorbedoeldzijn.
•Vuldebrandstoftanknooitbinnenshuis;tijdenshet
bijvullennietroken.
•Vulbrandstofbijvoordatudemotorstart.Verwijder
nooitdedopvandebrandstoftankenvulnooit
benzinebijwanneerdemotorlooptofheetis.
•Maaiuitsluitendbijdaglichtofgoedkunstlicht.
•Letopkuileninhetterreinenandereverborgen
gevaren.
•Houdhandenenvoetenuitdebuurtvandraaiende
onderdelen.Blijfaltijduitdebuurtvande
afvoeropening.
•Umageenmaaimachinenooitoptillenofdragen
terwijldemotorloopt.
2
Page 47

•Gazeervoorzichtigtewerkalsueen
loopmaaimachineachteruitrijdtofnaaru
toetrekt.
•Lopen,nooitrennen.
•Hellingen:
–Maainietopaltesteilehellingen.
–Weesuiterstvoorzichtigophellingen.
–Maaidwarsovereenhelling,nooithellingopen
af,enweesuiterstvoorzichtigalsuopeenhelling
vanrichtingverandert.
–Zorgdatuophellingenaltijdstevigstaat.
•Verminderdesnelheidopeenhellingenineen
scherpebochtomtevoorkomendatdemachine
kanteltofdatudecontroleoverdemachineverliest.
•Zorgervoordathetmesstilstaatalsude
maaimachineschuinmoethoudenomoppervlakken
overtestekendienietmetgraszijnbegroeid,enals
udemachinenaarhetterreinbrengtwaarumoet
maaienofdaarweerweghaalt.
•Laatdemotornooitineenafgeslotenruimtelopen,
omdatzichdaargiftigekoolmonoxidedampen
kunnenverzamelen.
•Zetdemotoraf,
–alsudemaaimachineachterlaat.
–voordatubrandstofbijvult.
–voordatudegrasvangerverwijdert.
–voordatudemaaihoogteinstelt,tenzijdievanaf
debestuurderspositiekanwordeningesteld.
•Zetdemotorafenmaakdebougiekabellos:
–voordatuverstoppingenlosmaaktofhet
uitwerpkanaalontstopt.
–voordatudemaaimachinecontroleert,reinigtof
erwerkzaamhedenaanverricht.
–alsueenvreemdvoorwerpheeftgeraakt,moetu
demaaimachineopbeschadigingencontroleren
enreparatiesuitvoerenvoordatudemachine
opnieuwstartenweeringebruikneemt.
–alsdemaaimachineabnormaalbeginttetrillen
(directcontroleren).
•Bliksemkanernstigofdodelijkletselveroorzaken.
Alsubliksemzietofdonderhoortinhetgebied,
gebruikdemachinedanniet;gaschuilen.
•Letophetverkeeralsuindebuurtvaneenweg
werktofdezeoversteekt.
•Gebruikgeenhogedrukalsuwerktuigenopde
machinereinigt.
•Alserzichbrandstofindetankbevindt,magude
machinenietopslaanineenafgeslotenruimtewaar
brandstofdampenincontactkunnenkomenmet
openvuurofvonken.
•Laatdemotorafkoelenvoordatudemachineineen
afgeslotenruimteopslaat.
•Houddemotor,geluiddemper,accubehuizingende
brandstofopslagplaatsvrijvanovertolligvet,grasen
bladerenombrandgevaarteverminderen.
•Umoetdeonderdelenvandegrasvangerende
afvoergeleiderveelvuldigcontrolerenen,indien
nodig,vervangendooronderdelendiedefabrikant
heeftaanbevolen.
•Vervangversletenofbeschadigdeonderdelenmet
hetoogopeenveiliggebruik.
•Vervanggeluiddempersdiegebrekenvertonen.
•Alshetnodigisdebrandstoftankaftetappen,doe
ditdanbuiten.
•Veranderdeinstellingenvandemotornieten
voorkomoverbelastingvandemotor.Laatdemotor
nietmeteentehoogtoerentallopenomdatditde
kansopongevallenkanvergroten.
•Letopdatbijmachinesmetmeerderemessenandere
messenkunnengaandraaiendoordatueenmes
draait.
•Weesvoorzichtigalsudemachineafsteltenvoorkom
datuwvingersbekneldrakentussendedraaiende
messenendevasteonderdelenvandemachine.
•Omdebesteprestatieseneenveiliggebruik
teverzekeren,dientuuitsluitendoriginele
Toro-onderdelenenaccessoirestegebruiken.
Gebruiknooit
accessoires;dezekunnendeveiligheidingevaar
brengen.
universele
onderdelenen
Onderhoudenopslag
•Draaiallemoeren,boutenenschroevenregelmatig
strakaan,zodatdemachinesteedsveiligingebruikis.
3
Page 48

Geluidsdruk
Dezemachineoefenteengeluidsdrukvan87dBA
uitophetgehoorvandegebruiker,meteen
onzekerheidswaarde(K)van1dBA.Degeluidsdrukis
vastgesteldvolgensdeproceduresinEN836.
Geluidsniveau
Dezemachineheefteengegarandeerdgeluidsniveauvan
98dBAuitmeteenonzekerheidswaarde(K)van1dBA.
Hetgeluidsniveauisvastgesteldvolgensdeprocedures
inISO11094.
Hand-armvibratie
Gemetentrillingsniveauopdelinkerhand=3,5m/s
Gemetentrillingsniveauopderechterhand=3,4m/s
Onzekerheidswaarde(K)=1,8m/s
Degemetenwaardenzijnbepaaldvolgensdeprocedures
inEN836.
2
.
2
2
4
Page 49

Veiligheids-en
instructiestickers
Belangrijk:Veiligheidsstickersen
veiligheidsinstructiesbevindenzichbij
plaatsenwaargevaarkanontstaan.Vervang
beschadigdestickers.
Merktekenvanfabrikant
1.Geeftaandathetmesonderdeelvaneenoriginele
Toro-maaimachineis.
112-8760
1.Demachinekanvoorwerpenuitwerpen–Houdomstanders
opeenveiligeafstandvandemachine.
2.Handenofvoetenkunnenwordengesneden/geamputeerd
–Blijfuitdebuurtvanbewegendeonderdelen.
117-4143
1.Waarschuwing–LeesdeGebruikershandleiding.
2.Demachinekanvoorwerpenuitwerpen–Houdomstanders
opeenveiligeafstandvandemachine.
3.Handenofvoetenkunnenwordengesneden/geamputeerd,
maaimes–Trekdebougiekabellosenraadpleegde
instructiesvóóruservice-ofonderhoudswerkzaamheden
uitvoert.
4.Gevaarvoorhetafsnijdenvanhandenenvoeten–Blijfuit
debuurtvanbewegendedelen,houdallebeschermplaten
enveiligheidsvoorzieningenophunplaats.
5.Gevaarvoorhetafsnijdenvanhandenenvoeten–Maai
nooitheuvelopwaartsenheuvelafwaarts.Gebruikde
machinedwarsophellingen;stopdemaaierenzetde
motoraf,verwijderobstakelsvoorhetmaaienenkijknaar
achterenennaarbenedenalsuachteruitrijdt.
5
Page 50

Montage
Belangrijk:Verwijderdebeschermfolievande
motorengooidezeweg.
1
Dehandgreepuitklappen
Geenonderdelenvereist
Procedure
WAARSCHUWING
Alsdehandgreepverkeerdwordtin-enuitgeklapt,
kunnendekabelsschadeoplopen,waardoorde
machinenietveiligkanwordengebruikt.
•Zorgervoordatudekabelsnietbeschadigtals
udehandgreepin-ofuitklapt.
•Indieneenkabelisbeschadigd,moetucontact
opnemenmeteenerkendeServiceDealer.
2
Demotorbijvullenmetolie
Geenonderdelenvereist
Procedure
Demaaimachinewordtgeleverdzonderolieinhetcarter.
1.Verwijderdepeilstok(Figuur4).
Figuur4
1.Verwijderdehandgreepknoppenvande
maaierbehuizing(Figuur3).
Belangrijk:Leiddekabelsnaardebuitenzijde
vandehandgreepterwijludehandgreepplaatst.
Figuur3
1.Handgreepknoppen(2)
2.Zetdehandgreepindewerkstand.
3.Plaatsdehandgreepknoppendieutijdensstap1hebt
verwijderdterugendraaidezevast(Figuur3).
2.Gietlangzaamolieindevulbuistotdathetpeilde
Vol-markeringopdepeilstokbereikt(Figuur4).Niet
tevolvullen.(Maximalevulhoeveelheid:0,59l,type:
SAE30reinigingsolie,metonderhoudsclassicatie
SF,SG,SH,SJ,SLvanhetAmericanPetroleum
Institute[API]ofhoger).
Opmerking:Alsuteveelolieindemotorhebt
gedaan,moetuditeruitgietenzoalswordtuitgelegd
onder"Motorolieverversen".
3.Plaatsdepeilstokweerstevigopzijnplaats.
Belangrijk:
bedrijfsuren
ZieDemotorolieverversen.
Verversdemotorolienadeeerste5
;daarnamoetditelkjaargebeuren.
3
Deaccuopladen
Geenonderdelenvereist
Procedure
ZieAccuopladeninhethoofdstukOnderhoud.
6
Page 51

Algemeenoverzicht
4
Dezekeringmonteren
Geenonderdelenvereist
Procedure
ZieZekeringvervangeninhethoofdstukOnderhoud.
vandemachine
1.Bougie
2.Luchtlter8.Contactsleuteltje
3.Dopvanbrandstoftank9.Grasvanger
4.Vulbuis/Peilstok
5.Handgreepvanstartkoord
6.Bedieningsstangvoor
maaimes
Figuur5
7.Stangvoorzelfaandrijving
10.Accu
11.Maaihoogtehendels(4)
12.Acculader
Figuur6
1.Afvoergeleiderachterzijde(optie)
Specicaties
Type
2964236kg145cm56cm99cm
7
Gewicht
Lengte
BreedteHoogte
Page 52

Gebruiksaanwijzing
Werktuigen/Accessoires
EenbreedassortimentvandoorTorogoedgekeurde
werktuigenenaccessoiresisverkrijgbaarvoorgebruik
metdemachineomdemogelijkhedenervante
verbeterenenuittebreiden.Neemcontactopmet
uwErkendeToro-dealerofdistributeur,ofganaar
www.Toro.comvooreenlijstmetallegoedgekeurdeen
accessoires.
Debrandstoftankvullen
Figuur7
GEVAAR
Benzineisuitermateontvlambaarenexplosief.
Brandofexplosievanbenzinekanbrandwonden
veroorzaken.
•Omtevoorkomendateenstatischeladingde
benzinetotontbrandingkanbrengen,moetu
hetbenzinevaten/ofdemaaimachinevoordat
udetankvultopdegrondplaatsen,nietopeen
voertuigofeenanderobject.
•Vuldebrandstoftankindeopenluchtwanneer
demotorkoudis.Neemgemorstebenzineop.
•Rooknietalsuomgaatmetbenzine,enhoud
benzineuitdebuurtvanopenvuurofbrandstof.
•Bewaarbenzineineengoedgekeurdbenzinevat
enbuitenbereikvankinderen.
Vuldebrandstoftankmetverseloodvrije,normale
benzinevaneenbekendmerk(Figuur7).
Gebruiknormaleloodvrijebenzinevoorautomobielen
(octaangetalminimaal87).Gelodenormalebenzinekan
wordengebruiktalsloodvrijebenzinenietverkrijgbaaris.
Opmerking:Gebruiknooitmethanol,benzine
diemethanolbevat,gasoholdiemeerdan10%
ethanolbevat,omdatditkanleidentotschadeaanhet
brandstofsysteem.Geenoliebijdebenzinemengen.
Belangrijk:Omstartproblemenbijhetvolgende
seizoenteverminderen,moetuhetheleseizoeneen
stabilizertoevoegenaandebenzine.Gebruiknooit
benzinedieouderisdan30dagen.
Hetmotoroliepeilcontroleren
Onderhoudsinterval:Bijelkgebruikofdagelijks
1.Verwijderdepeilstokuitdebuisenveegdeze
schoon.Schuifdaarnadepeilstokweerhelemaal
terug(Figuur8).
Figuur8
2.Haaldepeilstokeruitencontroleerhetoliepeil
(Figuur8).AlshetpeilonderdeBijvullen-markering
opdepeilstokstaat,gietdanlangzaamvoldoende
olieindevulbuistotdathetpeildeVol-markeringop
depeilstokbereikt.Niettevolvullen.(Maximale
vulhoeveelheid:0,59l,type:SAE30reinigingsolie,
metonderhoudsclassicatieSF,SG,SH,SJ,SLvan
hetAmericanPetroleumInstitute[API]ofhoger).
Opmerking:Alsuteveelolieindemotorhebt
gedaan,moetuditeruitgietenzoalswordtuitgelegd
onder"Motorolieverversen".
8
3.Plaatsdepeilstok.
Page 53

Demaaihoogteinstellen
WAARSCHUWING
Bijhetinstellenvandemaaihoogtekuntuin
aanrakingkomenmeteenbewegendmes.Ditkan
ernstigletselveroorzaken.
•Zetdemotorafenwachttotdatallebewegende
onderdelentotstilstandgekomenzijn.
•Plaatsuwvingersnietonderdebehuizingalsu
demaaihoogteinstelt.
Figuur10
1.Bedieningsstangvoormaaimes
VOORZICHTIG
Alsdemotorheeftgelopen,kandegeluiddemper
heetzijnenernstigebrandwondenveroorzaken.
Blijfuitdebuurtvaneenhetegeluiddemper.
Zetdemaaihoogteopdegewenstestand.Stelallevier
wielenopdezelfdehoogtein.
Opmerking:Omdemaaimachinehogertezetten,
moetudemaaihoogtehendelsnaarvorenbewegen;om
demachinelagertezetten,moetuallehendelsnaar
achterenbewegen(Figuur9).
2.Draaihetcontactsleuteltje(Figuur11)oftrekaande
handgreepvanhetstartkoord(Figuur12).
Figuur11
Figuur9
1.Maaimachineomhoog
brengen
2.Maaimachineomlaag
brengen
Opmerking:Demaaihoogteinstellingenzijn25mm,
38mm,51mm,64mm,76mm,89mmen102mm.
Demotorstarten
1.Houddebedieningsstangvanhetmaaimes
(Figuur10)tegendehandgreep.
Figuur12
Opmerking:Alsdemotornaenkelepogingen
nietwilstarten,moetucontactopnemenmeteen
erkendeServiceDealer.
Dezelfaandrijvinggebruiken
Omdezelfaandrijvingtebedienenmoetude
aandrijfstangvandezelfaandrijving(Figuur13)inknijpen
inderichtingvandehendelenvasthouden.
9
Page 54

Figuur13
1.Stangvoorzelfaandrijving
Omdezelfaandrijvinguitteschakelenlaatudestanglos.
Hetmaaiselopvangen
Gebruikdegrasvangeralsumaaiselenbladafvalwilt
verzamelen.
WAARSCHUWING
Dooreenversletengrasvangerkunnensteentjes
enanderevoorwerpenwordenuitgeworpenin
derichtingvandegebruikerofdeomstanders.
Uitgeworpenvoorwerpenkunnenernstig
lichamelijkofdodelijkletseltoebrengenaande
gebruikerofomstanders.
Controleerdegrasvangerregelmatig.Plaatseen
nieuweToro-grasvangeralsdeoudeisbeschadigd.
Opmerking:Dezelfaandrijvingheefteenvaste
maximumsnelheid.Omdesnelheidteverminderen,
moetuderuimtetussendestangvoordezelfaandrijving
endehandgreepvergroten.
Demotorafzetten
Onderhoudsinterval:Bijelkgebruikofdagelijks
Omdemotoraftezetten,laatudebedieningsstangvan
hetmaaimeslos(Figuur14).
Belangrijk:Alsudebedieningsstangloslaat,
moetendemotorenhetmesbinnen3seconden
stoppen.Alsditnietgebeurt,magudemachine
nietverdergebruikenenmoetucontactopnemen
meteenerkendeservicedealer.
WAARSCHUWING
Hetmaaimesisscherp,contactmethetmaaimes
kanernstiglichamelijkletselveroorzaken.
Zetdemotorafenwachttotdatallebewegende
onderdelentotstilstandzijngekomenvoordatude
bestuurderspositieverlaat.
Degrasvangerplaatsen
1.Brengdeafvoergeleideraandeachterzijdeomhoog
(Figuur15).
Figuur14
Hetmaaiseluitstrooien
Alsdemachinewordtgeleverd,isdezegereedomhet
gazontebestrooienmetmaaiselenbladafval.
Alsdegrasvangeropdemachinezit,moetudie
verwijderen(zie"Degrasvangerverwijderen")vóóru
hetmaaiseluitstrooit.
Figuur15
1.Afvoergeleiderachterzijde
2.Brengdehandgreepvandegrasvangerinde
inkepingenvandehandgreepbeugelsenzorgervoor
datzegoedbevestigdis(Figuur15).
Degrasvangerverwijderen
1.Brengdeafvoergeleideraandeachterzijdeomhoog
(Figuur15).
10
Page 55

2.Tildegrasvangeruitdeinkepingenindebeugels
vandehandgreepenverwijderdegrasvangervan
demachine.
3.Sluitdeafvoergeleideraandeachterzijde.
Hetmaaiselafvoeren
Gebruikdeachteruitworpalsuzeerhooggrasmaait.
Opmerking:Deachteruitworpgeleideriseen
optioneelapparaatdatafzonderlijkmoetworden
aangekocht.
Deafvoergeleiderplaatsen
1.Verwijderdegrasvangeralsdezenogaandemaaier
isbevestigd.
2.Brengdeafvoergeleideromhoogenhouddeze
omhoog(Figuur16).
Figuur18
Deafvoergeleiderverwijderen
Omdeachterafvoergeleiderteverwijderen,voertu
bovenstaandestappeninomgekeerdevolgordeuit.
Tipsvoorbedieningengebruik
Algemenemaaitips
•Verwijderstokken,stenen,draden,takkenenander
vuildiehetmeskanraken,uithetwerkgebied.
Figuur16
3.Steekhetlipjeopdeafvoergeleiderindesleufaande
rechterzijdeindeafvoergeleider(Figuur17).
Figuur17
4.Steekdestangopdeafvoergeleiderindeinkepingen
opdemachine(Figuur18).
•Zorgervoordathetmesgeenvastevoorwerpen
raakt.Maainooitmetopzetovervoorwerpen.
•Alsdemaaimachinetocheenvoorwerpraaktof
beginttetrillen,moetumeteendemotorafzetten,
debougiekabellosmakenendemaaimachineop
beschadigingcontroleren.
•Debesteresultatenkrijgtudooreennieuwmeste
monterenvoordathetmaaiseizoenbegint.
•Vervangindiennodighetmaaimesdooreen
Toro-mes
Grasmaaien
•Umoettelkensnietmeerdanongeveereenderdevan
degrassprietenafmaaien.Maainietmeteenstand
lagerdan51mm,tenzijdegrasmatdunis,ofals
hetlaatinhetnajaariswanneerhetgraslangzamer
beginttegroeien.ZieDemaaihoogteinstellen.
•Alsugraswiltmaaiendatlangerdan15cmis,moet
umaaienopdemaximalemaaihoogteenmeteen
langzamereloopsnelheid.Vervolgensgaatumaaien
opeenlageremaaihoogteomhetgazoneenzofraai
mogelijkuiterlijktegeven.Alshetgrastehoogis,
kandemaaimachineverstoptrakenendemotor
afslaan.
•Maaiuitsluitenddrooggrasofdrogebladeren.Nat
grasennattebladerengaanaankoeken,waardoorde
maaimachineverstoptkanrakenofdemotorkan
afslaan.
11
Page 56

WAARSCHUWING
Alsunatgrasennattebladerenmaait,kuntu
uitglijden,inaanrakingkomenmethetmesen
ernstigletseloplopen.Maaiuitsluitendindroge
omstandigheden.
•Maaisteedsinwisselenderichtingen.Hierdoor
wordthetmaaiselbeteroverhetgazonverstrooid,
zodathetgazongelijkmatigwordtbemest.
•Alsumethetuiterlijkvanhetvoltooidegazonniet
tevredenbent,probeerdaneenofmeervande
volgendestappen:
–Vervanghetmaaimesoflaathetslijpen.
–Looplangzamertijdenshetmaaien.
–Steldemaaimachineinopeenhogere
maaihoogte.
–Maaihetgrasvaker.
–Laatdemaaibanenoverlappeninplaatsvan
steedseenvolledignieuwebaantemaaien.
–Steldemaaihoogtebijdevoorwielenéénstand
lagerindanbijdeachterwielen.Bijvoorbeeld:
zetdemaaihoogtevandevoorwielenop51mm
endievandeachterwielenop64mm.
Bladerenjnmaken
•Nahetmaaienmoetaltijd50%vanhetgazon
zichtbaarblijvendoordebladerlaag.Ditkaneenof
meerdererondgangenoverdebladerenvereisen.
•Alsereenlaagbladerenvanmeerdan12cmop
hetgazonligt,moetudevoorwieleneenoftwee
uitsparingenhogerzettendandeachterwielen.
•Alsdemaaimachinedebladerennietjngenoeg
maakt,ishetbeteromwatlangzamertemaaien.
12
Page 57

Onderhoud
Opmerking:Bepaalvanuitdenormalebedieningspositiedelinker-enrechterzijdevandemachine.
Aanbevolenonderhoudsschema
OnderhoudsintervalOnderhoudsprocedure
Nadeeerste5bedrijfsuren
Bijelkgebruikofdagelijks
Omde25bedrijfsuren
Vóórdestalling
Jaarlijks
Belangrijk:Ziede
gebruikershandleidingvandemotor
•Verversdemotorolie.
•Hetmotoroliepeilcontroleren.
•Controleerofdemotorbinnen3secondenstoptnadatudebedieningsstangvan
hetmaaimeshebtlosgelaten.
•Verwijdermaaiselenvuilvandeonderkantvandemaaimachine.
•Hetluchtltervervangen(vakeralsdemachinewordtgebruiktinstofgeofvuile
omstandigheden).
•Laatdebenzineuitdebrandstoftanklopenvoordatuvereistereparatiesuitvoertof
demachinestalt.
•Verversdemotorolie.
•Vervanghetmaaimesoflaathetslijpen(vakeralsdesnijrandsnelbotwordt).
•ZiedeGebruikershandleidingvandemotorvooreventueleverdere
onderhoudsprocedures.
Voorbereidingenvoor
onderhoudswerkzaamheden
1.Zetdemotorafenwachttotdatallebewegende
onderdelentotstilstandgekomenzijn.
2.Trekdebougiekabellosvandebougie(Figuur19)
voordatuonderhoudswerkzaamhedenuitvoert.
voorverdereonderhoudsprocedures.
demaaimachinealtijdopdezijkant,metde
peilstokomlaag.
WAARSCHUWING
Alsudemachinekantelt,kanerbenzineuit
detanklekken.Benzineisontvlambaaren
explosiefenkanbrandwondenveroorzaken.
Figuur19
1.Bougiekabel
3.Nadatudeonderhoudswerkzaamhedenhebt
uitgevoerd,moetudekabelweeraansluitenopde
bougie.
Belangrijk:Voordatudemachinekanteltom
olieteverversenofhetmestevervangen,moet
udemachinegebruikentotdatdebenzinetank
leegis.Alsudemachinemoetkantelenvoordat
debenzinetankleegis,dientudebenzinemet
eenhandpompuitdetanktepompen.Kantel
Laatdemotordrooglopenofpompdebenzine
meteenhandpompuitdetank.Gebruiknooit
eenhevel.
Hetluchtltervervangen
Onderhoudsinterval:Omde25bedrijfsuren
1.Gebruikeenschroevendraaieromhet
luchtlterdekselteopenen(Figuur20).
Figuur20
13
Page 58

2.Vervanghetluchtlter(Figuur21).
Figuur21
3.Plaatshetdekselterug.
Demotorolieverversen
Onderhoudsinterval:Nadeeerste5bedrijfsuren
Jaarlijks
Verversdemotorolienadeeerste5bedrijfsuren;
daarnamoetditelkjaargebeuren.
Voordatudeolieververst,moetudemotorenkele
minutenlatenlopenzodatdeoliewarmwordt.Warme
oliestroomtbeterenvoertvervuilingenbetermee.
1.Voerdevoorbereidingenvoorhetonderhouduit,zie
Voorbereidingenvooronderhoudswerkzaamheden.
2.Verwijderdepeilstok(Figuur22).
Figuur23
4.Gietlangzaamolieindevulbuistotdathet
peildeVol-markeringopdepeilstokbereikt
(Figuur22).Niettevolvullen.(Maximale
vulhoeveelheid:0,59l,type:SAE30reinigingsolie,
metonderhoudsclassicatieSF,SG,SH,SJ,SLvan
hetAmericanPetroleumInstitute[API]ofhoger).
Opmerking:Alsuteveelolieindemotorhebt
gedaan,moetuditeruitgietenzoalswordtuitgelegd
bijstap3hierboven.
5.Plaatsdepeilstokweerstevigopzijnplaats.
6.Geefdeoudeolieafbijeenerkendinzamelpunt.
Deaccuopladen
Figuur22
3.Kanteldemachineopdezijkant(metdepeilstok
omlaag)omdegebruikteolieviadevulbuiswegte
latenlopen(Figuur23).
WAARSCHUWING
CALIFORNIË
Proposition65Waarschuwing
Accuklemmen,accupolenendergelijke
onderdelenbevattenloodenloodverbindingen.
Vandezestoffenisbekenddatzekanker
enschadeaandevoortplantingsorganen
veroorzaken.Wasaltijduwhandennadatumet
dezeonderdeleninaanrakingbentgeweest.
Laaddeaccuvoorheteerstegebruikgedurende24uur
op,doeditvervolgenselkemaand(steedsna25keer
starten)ofwanneerditnodigis.Gebruikdeacculader
altijdopeenbeschutteplaatsenlaaddeaccuopbij
kamertemperatuur(22°C)indienditmogelijkis.
1.Sluitdeacculaderaanopdekabelboomvande
machine,diezichonderhetcontactsleuteltjebevindt
(Figuur24).
14
Page 59

2.Sluitdeacculaderaanopeenstopcontact.
Figuur26
Figuur24
3.Plaatshetaccudeksel.
Opmerking:Alsdeaccunietmeerkanworden
opgeladen,moetudezeafvoerenofverwerken
volgensdeplaatselijkgeldendevoorschriften.
Zekeringvervangen
DemaaimachinewordtgeleverdmeteenAzekering,
diehetelektrischestartsysteembeveiligt.Alsdeaccu
nietoplaadtofdemotornietgaatlopenmetbehulp
vandeelektrischestarter,isdezekeringwaarschijnlijk
doorgebrand.Monteereennieuwe40Ainsteekzekering.
Belangrijk:Ukuntdemachinepasstartenmethet
elektrischestartsysteemofdeaccuopladenalsde
zekeringisgemonteerd.
1.Maakbeideuiteindenvanhetaccudeksellosen
verwijderdit(Figuur25).
Hetmaaimesvervangen
Onderhoudsinterval:Jaarlijks
Belangrijk:
hetmesopcorrectewijzetemonteren
momentsleutelhebtofnietgoedweethoeude
montagemoetuitvoeren,kuntucontactopnemen
meteenerkendeservicedealer.
Controleerhetmeswanneerdebenzinetankleegis.
Eenbeschadigdofgescheurdmesmoetdirectworden
vervangen.Alsdesnijrandbotisofbramenvertoont,
moetuhetmeslatenslijpenofvervangen.
WAARSCHUWING
Hetmaaimesisscherp,contactmethetmaaimes
kanernstiglichamelijkletselveroorzaken.
Gebruikhandschoenenalsuhetmesmonteert.
1.Maakdebougiekabellosvandebougie.Zie
Voorbereidingenvooronderhoudswerkzaamheden.
Uhebteenmomentsleutelnodigom
.Alsugeen
Figuur25
2.Plaatsdezekeringindezekeringhouderzoalswordt
getoond(Figuur26).
2.Kanteldemaaimachineopzijnzijmethetluchtlter
naarboven.
3.Gebruikeenblokhoutomhetmesstiltehouden.
4.Verwijderhetmes(draaidemesboutlinksom)en
bewaarallebevestigingsmaterialen.
5.Plaatshetnieuwemes(draaidemesboutrechtsom)
enallebevestigingsmaterialen(Figuur27).
15
Page 60

Figuur27
Belangrijk:Degebogenuiteindenvanhetmes
moetennaardebehuizingvandemaaimachine
wijzen.
6.Gebruikeenmomentsleutelomdemesboutvast
tedraaienmeteentorsievan82Nm.
Belangrijk:Eenboutdieisvastgedraaidmet
eentorsievan82Nm,zitergvast.Zethet
mesvastmeteenstukhoutenplaatsuwvolle
gewichtachterde(dop)sleutelomdeboutgoed
vasttedraaien.Hetisergmoeilijkomdezebout
tevasttedraaien.
Kabelvanelfaandrijving
afstellen
Wanneerueennieuwekabelvoordezelfaandrijving
monteertofdezelfaandrijvingontsteldis,moetude
kabelafstellen.
1.Draaidemoervandekabelbeugellos(Figuur28).
Figuur28
1.25tot38mm4.Moervankabelbeugel
2.Stangvoorzelfaandrijving
3.Kabelmantel
2.Houddestangvandezelfaandrijving25tot38mm
vandehandgreepverwijderd(Figuur28).
3.Trekdekabelmantelomlaag(naardemaaimachine
toe)omallespelinguitdekabeltehalen(Figuur28).
4.Draaidemoeropdekabelbeugelvast.
5.Laatdestangvandezelfaandrijvinglosencontroleer
ofdekabellosis.
Opmerking:Dekabelmoetloszijnalsdestang
vandezelfaandrijvingisvrijgegeven,anderskande
machinegaankruipenalsdestangisontgrendeld.
5.Kabelbeugel
Demaaimachinereinigen
Onderhoudsinterval:Bijelkgebruikofdagelijks
WAARSCHUWING
Erkanmateriaallosrakendatzitvastgekoektaan
deonderkantvandemaaimachine.
•Draagoogbescherming.
•Blijfindebedrijfsstand(achterdehandgreep).
•Houdomstandersuitdebuurt.
1.Plaatsdemachineopeenvlak,verhardoppervlak,
laatdemotorlopenenspuiteenstraalwatervoor
hetrechterachterwiel(Figuur29).
Hetopspattendewaterkomtdanindebaanvanhet
maaimesenspoelthetmaaiselweg.
16
Page 61

stopcontactenstaldemachineineenonverwarmde
ruimte.Alsudemachinestaltineenverwarmde
ruimte,moetudeaccuomde90dagenopladen.
Figuur29
2.Alsergeenmaaiselmeerondervandaankomt,draait
udekraandichtenbrengtudemaaimachinenaar
eendrogeplaats.
3.Laatdemotoreenpaarminutenlopenomde
behuizingtedrogenzodatdezenietgaatroesten.
Stalling
Staldemaaimachineopeenkoele,schoneendroge
plaats.
Voorbereidingenvoorstalling
WAARSCHUWING
Benzinedampenkunnentotontplofngkomen.
•Bewaarbenzinenietlangerdan30dagen.
•Staldemaaimachinenooitineenafgesloten
ruimteindenabijheidvanopenvuur.
•Laatdemotorafkoelenvoordatudemachine
stalt.
Dehandgreepinklappen
WAARSCHUWING
Alsdehandgreepverkeerdwordtin-enuitgeklapt,
kunnendekabelsschadeoplopen,waardoorde
machinenietveiligkanwordengebruikt.
•Zorgervoordatudekabelsnietbeschadigtals
udehandgreepin-ofuitklapt.
•Indieneenkabelisbeschadigd,moetucontact
opnemenmeteenerkendeServiceDealer.
1.Draaideknoppenvandehandgreeplostotdatuhet
bovenstedeelvandehandgreepvrijkuntbewegen
(Figuur30).
1.Alsudetankvoordelaatstekeervanhetjaarvult,
moetueenstabilizertoevoegenaandebenzine
volgensdevoorschriftenvandefabrikant.
2.Laatdemotorlopentotdathijafslaatdoorgebrek
aanbenzine.
3.Gebruikdehulpstarterenstartdemotornogmaals.
4.Laatdemotorlopentotdatdezeafslaat.Alsdemotor
nietmeerwilstarten,isdebrandstofvoldoende
verbruikt.
5.Maakdebougielosvandebougieenbevestigdeze
aandesteunstang.
6.Verwijderdebougie,giet30mlolieinhetbougiegat
entrekverschillendekerenlangzaamaanhet
startkoordomdeolieoverdecilinderwandte
verspreidenteneindecorrosieindestallingsperiode
tevoorkomen.
7.Plaatsdebougieendraaihemmetbehulpvaneen
momentsleutelvastmeteentorsievan20Nm.
8.Draaiallemoeren,boutenenschroevengoedaan.
9.Laaddeaccuvoorheteerstegebruikgedurende
24uurop,haalvervolgensdeacculaderuithet
Figuur30
1.Handgreepknoppen(2)
2.Beweegdehandgreepnaarvorenzoalswordgetoond
inFiguur30.
Demaaimachineuitdestalling
halen
1.Laaddeaccugedurende24uurop.
2.Sluitdebougiekabelaanopdebougie.
17
Page 62

Problemen,oorzaakenremedie
ProbleemMogelijkeoorzaakRemedie
Demotorstartniet.
Demotorstartmoeilijkofverliest
vermogen
1.Debougiekabelisnietaangeslotenop
debougie.
2.Deventilatieopeninginde
brandstoftankdopisverstopt.
3.Debougieisaangetast,vuil,ofde
elektrodenafstandisnietcorrect
afgesteld.
4.Brandstoftankleegofoudebenzinein
hetbrandstofsysteem.
1.Deventilatieopeninginde
brandstoftankdopisverstopt.
2.Hetluchtlterelementisvuilen
belemmertdeluchtstroom.
3.Deonderkantvandemachineisbedekt
metmaaiselenvuil.
4.Debougieisaangetast,vuil,ofde
elektrodenafstandisnietcorrect
afgesteld.
5.Hetoliepeilistelaag,tehoogofdeolie
isheelergvuil.
6.Debrandstoftankbevatoudebenzine.6.Brandstoftankaftappenenvullenmet
1.Sluitdebougiekabelaanopdebougie.
2.Deventilatieopeningvande
brandstoftankdopreinigenofdop
vervangen.
3.Debougiecontrolerenenindiennodig
deelektrodenafstandafstellen.De
bougievervangenalsdezeaangetast,
vuilofgebarstenis.
4.Brandstoftankaftappenenvullenmet
versebenzine.Neemcontactopmet
eenerkendeservicedealer,alshet
probleemblijftvoortduren.
1.Deventilatieopeningvande
brandstoftankdopreinigenofdop
vervangen.
2.Hetschuimelementreinigenen/ofhet
papierelementvervangen.
3.Deonderkantvandemachinereinigen.
4.Debougiecontrolerenenindiennodig
deelektrodenafstandafstellen.De
bougievervangenalsdezeaangetast,
vuilofgebarstenis.
5.Motoroliepeilcontroleren.Verversde
oliealsdezevuilisoftapolieaftot
hetoliepeiltotdeVol-markeringopde
peilstokstaat.
versebenzine.
Demotorlooptonregelmatig
Demaaimachineofdemotortrilt
abnormaal
Ongelijkmatigmaaipatroon
1.Debougiekabelisnietaangeslotenop
debougie.
2.Hetluchtlterelementisvuilen
belemmertdeluchtstroom.
3.Debougieisaangetast,vuil,ofde
elektrodenafstandisnietcorrect
afgesteld.
1.Deonderkantvandemaaikastis
bedektmetmaaiselenvuil.
2.Debevestigingsboutenvandemotor
zittenlos.
3.Demontagemoerenvanhetmaaimes
zittenlos.
4.Hetmesisverbogenofuitbalans.
1.Umaaitsteedsinhetzelfdepatroon.
2.Allevierwielenstaannietopdezelfde
hoogte.
3.Deonderkantvandemaaikastis
bedektmetmaaiselenvuil.
4.Hetmesisbot.4.Messlijpenenbalanceren.
1.Sluitdebougiekabelaanopdebougie.
2.Hetschuimelementreinigenen/ofhet
papierelementvervangen.
3.Debougiecontrolerenenindiennodig
deelektrodenafstandafstellen.De
bougievervangenalsdezeaangetast,
vuilofgebarstenis.
1.Deonderkantvandemaaikastreinigen.
2.Debevestigingsboutenvandemotor
vastdraaien.
3.Demontagemoerenvastdraaien.
4.Hetmesbalanceren.Hetmes
vervangenalsditisverbogen.
1.Ineenanderpatroonmaaien.
2.Allevierdewieleninstellenopdezelfde
hoogte.
3.Deonderkantvandemaaikastreinigen.
18
Page 63

ProbleemMogelijkeoorzaakRemedie
Dezelfaandrijvingvandemaaimachine
werktniet.
1.Erzitvuilonderdedrijfriemkap.1.Hetvuilonderdedrijfriemkap
2.Dekabelvandezelfaandrijvingis
ontsteldofbeschadigd.
verwijderen.
2.Dekabelvandezelfaandrijving
afstellen.Dekabelvervangenindien
ditnodigis.
19
Page 64

Opmerkingen:
20
Page 65

Opmerkingen:
21
Page 66

Opmerkingen:
22
Page 67

Lijstmetinternationaledealers
Dealer:Land:
AtlantisSuveSulamaSisstemleriLt
BalamaPrimaEngineeringEquip.Hongkong85221552163
B-RayCorporation
CascoSalesCompany
CeresS.A.CostaRica
CSSCTurfEquipment(pvt)Ltd.SriLanka
CyrilJohnston&Co.
EquiverMexico525553995444
FemcoS.A.Guatemala
G.Y.K.CompanyLtd.
GeomechanikiofAthensGriekenland
GuandongGoldenStarChina
HakoGroundandGarden
HakoGroundandGarden
HayterLimited(U.K.)
HydroturfInt.CoDubai
HydroturfEgyptLLC
IbeaS.P .A.
IrriamcPortugal351212388260
IrrigationProductsInt'lPvtLtd.India862283960789
JeanHeybroekBV.Nederland31306394611
Lely(U.K.)Limited
MaquiverS.A.Colombia
MaruyamaMfg.Co.Inc.
MetraKft
Mountelda.s.
MunditolS.A.
OslingerTurfEquipmentSA
OyHakoGroundandGardenAb
ParklandProductsLtd.Nieuw-Zeeland6433493760
Prochaska&CieOostenrijk
RTCohen2004Ltd.
Riversa
RothMotorgerateGmBh&Co.
ScSvendCarlsenA/S
SolvertS.A.S.
SpyprosStavrinidesLimitedCyprus
SurgeSystemsIndiaLimited
T-MarktLogisticsLtd.Hongarije3626525500
ToroAustraliaAustralië61395807355
ToroEuropeBVBABelgië3214562960
Turkije902163448674
Korea82325512076
PuertoRico7877888383
Noord-Ierland442890813121
Japan81726325861
Zweden4635100000
Noorwegen4722907760
VerenigdKoninkrijk441279723444
VerenigdeArabischeEmiraten97143479479
Egypte2025194308
Italië390331853611
VerenigdKoninkrijk441480226800
Japan81332522285
Hongarije3613263880
Tsjechië420255704220
Argentinië541148219999
Ecuador59342396970
Finland35898700733
Israël97298617979
Spanje
Duitsland4971442050
Denemarken4566109200
Frankrijk33130817700
India911292299901
Telefoonnummer:
5062391138
941 12746100
5024423277
30109350054
862087651338
5712364079
4312785100
34952837500
35722434131
374-0269RevA
Page 68

ToroGarantie
Voorwaardenenproductenwaarvoordegarantiegeldt
TheT oro®CompanyendehieraangelieerdeondernemingToro
WarrantyCompany,gevenkrachtenseenovereenkomsttussenbeide
ondernemingengezamenlijkdegarantiealleonderstaandeToro-producten
tereparerenalsdezemateriaalgebrekenoffabricagefoutenvertonen,mits
hetproductuitsluitendvoorhuiselijkedoeleinden*isgebruikt.
Devolgendeperiodenzijnvantoepassingvanafdedatumvanaankoop:
Producten
Motorgazonmaaiers2jaargarantie
Riders2jaargarantie
Gazon-&Tuintractoren
Elektrischetrimmersenbladblazers2jaargarantie
Sneeuwruimers
ZeroTurnmaaiers2jaargarantie
*DeoorspronkelijkekoperisdepersoondiehetT oroproductoorspronkelijk
heeftgekocht
*Normalehuiselijkedoeleindenbetekentgebruikvanhetproductop
hetterreindatbijuwhuishoort.Gebruikopmeerdanéénlocatieof
gebruikopeenwerkplaatsofgebruikvoorverhuurwordtalscommercieel
gebruikbeschouwd.Hieropisdegarantievoorcommercieelgebruikvan
toepassing.
Garantieperiode
2jaargarantie
2jaargarantie
Garantievoorcommercieelgebruik
ToroOpconsumentenproductenenwerktuigendiewordengebruiktvoor
commerciëleeninstitutioneledoeleindenofwordenverhuurd,wordt
garantieverleendtegenmateriaalgebrekenenfabricagefoutengedurende
devolgendeperiodenvanafdedatumvandeoorspronkelijkeaankoop:
Producten
Motorgazonmaaiers90dagengarantie
Riders90dagengarantie
Gazon-&Tuintractoren
Elektrischetrimmersenbladblazers90dagengarantie
Sneeuwruimers
ZeroTurnmaaiers45dagengarantie
Garantieperiode
90dagengarantie
90dagengarantie
Aanwijzingenvooraanvraagvangarantieservice
AlsuvanmeningbentdateenToroproductmateriaalgebrekenof
fabricagefoutenvertoont,moetudezeprocedurevolgen:
1.Neemcontactopmetdeverkoperomhetproducttelatennakijken
ofterepareren.Alsuomwatvoorredendanookgeencontactkunt
opnemenmetdeverkoper,neemdancontactopmeteenandere
erkendeToro-dealeromonderhoudtelatenplegen.
2.Brenghetproductmetuwaankoopbewijs(kwitantie)naarde
servicedealer.Alsuomenigeredenontevredenbentoverhet
onderzoekvandeservicedealerofdeverleendehulp,verzoekenwij
ucontactmetonsoptenemenvia:
CustomerCareDepartment,ConsumerDivision
TheT oroCompany
811 1LyndaleAvenueSouth
Bloomington,MN55420-1196VS
Manager:TechnicalProductSupport:001–952–887–8248
Ziebijgevoegdelijstmetdealers
Plichtenvandeeigenaar
UdientuwT oroproductteonderhoudenzoalswordtbeschrevenin
deGebruikershandleiding.Ditroutineonderhoudisvooruwrekening,
ongeachtofditwordtuitgevoerddoordedealerofuzelf.
Zakenengevallendienietonderdegarantievallen
Buitendezeexplicietegarantievallen:
•Dekostenvoorregelmatigonderhoudofonderdelendieaanslijtage
onderhevigzijn,zoalsrotormessen(schoepen),schrapermessen,
riemen,brandstof,smeermiddelen,olieverversen,bougies,
kabels/koppelingenofafstellingvanremmen
•Elkproductofonderdeeldatisveranderdofverkeerdisgebruikt
enmoetwordenvervangenofwordengerepareerdalsgevolgvan
ongelukkenofgebrekkigonderhoud.
•Reparatiedienoodzakelijkisomdatoudebrandstof(ouderdanéén
maand)isgebruiktofhetbrandstofsysteemnietgoedisvoorbereid
opeenperiodevanbuitengebruikstellingvanlangerdanéénmaand.
•Motorentransmissie.Dezevallenonderdetoepasselijke
fabrieksgarantiemetapartealgemenevoorwaarden
Allereparatiewerkzaamhedendieonderdezegarantievallen,moeten
wordenuitgevoerddooreenErkendeT oroservicedealer,waarbijToro
goedgekeurdevervangingsonderdelendienentewordengebruikt.
Algemenevoorwaarden
Dekoperwordtbeschermddoordenationalewetgevingvanelkland.
Derechtenwaaroverdekoperbeschiktopgrondvandezewetgeving,
wordennietbeperktdoordezegarantie.
374-0268RevA
 Loading...