

Toro 29641 Operator's Manual
50cmMulching/RearBaggingLawnMower
ModelNo.29641—SerialNo.290000001andUp
FormNo.3362-343RevA
Operator'sManual
Introduction
Readthisinformationcarefullytolearnhowtooperate
andmaintainyourproductproperlyandtoavoidinjury
andproductdamage.Youareresponsibleforoperating
theproductproperlyandsafely.
YoumaycontactTorodirectlyatwww.Toro.comfor
productandaccessoryinformation,helpndinga
dealer,ortoregisteryourproduct.
Wheneveryouneedservice,genuineToroparts,or
additionalinformation,contactanAuthorizedService
DealerorToroCustomerServiceandhavethemodel
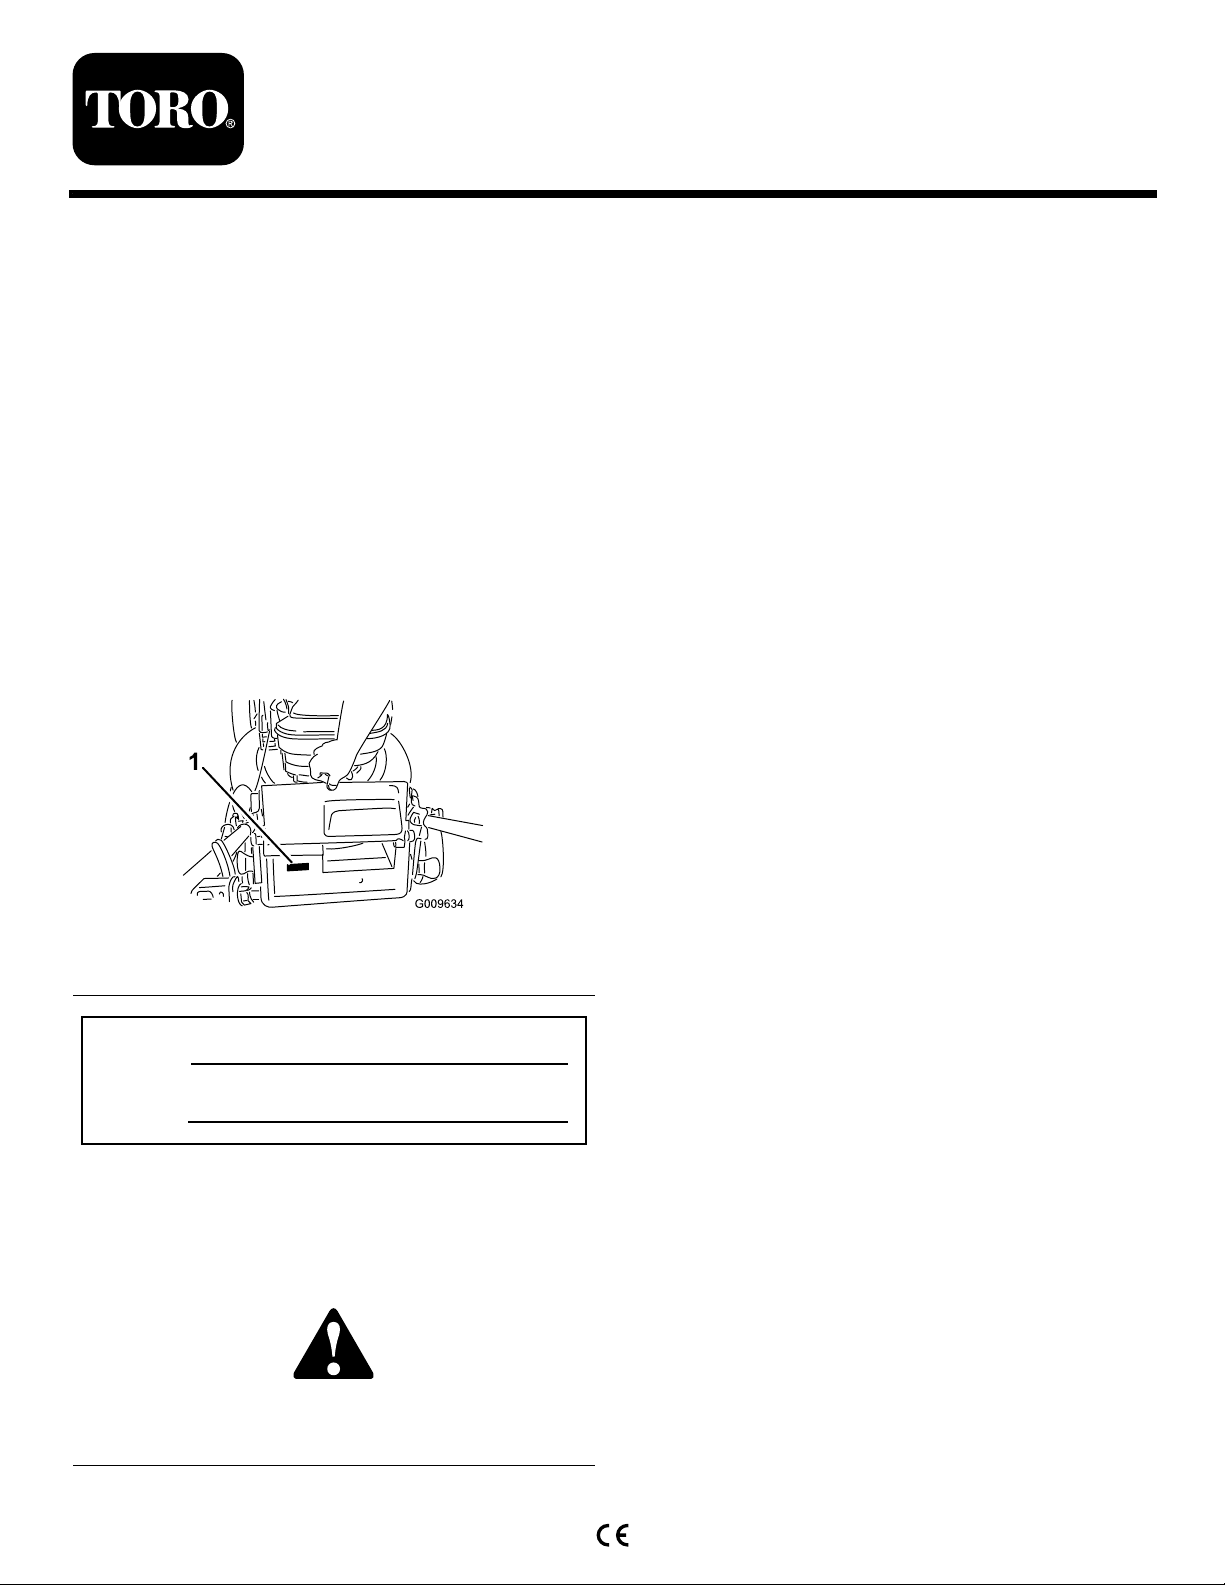
andserialnumbersofyourproductready.Figure1
identiesthelocationofthemodelandserialnumbers
ontheproduct.Writethenumbersinthespace
provided.
Thismanualusestwowordstohighlightinformation.
Importantcallsattentiontospecialmechanical
informationandNoteemphasizesgeneralinformation
worthyofspecialattention.
Formodelswithstatedenginehorsepower,thegross
horsepoweroftheenginewaslaboratoryratedbythe
enginemanufacturerinaccordancewithSAEJ1940.
Asconguredtomeetsafety,emission,andoperating
requirements,theactualenginehorsepoweronthisclass
oflawnmowerwillbesignicantlylower.
Donottamperwiththeenginecontrolsoralterthe
governorspeed;doingsomaycreateanunsafecondition
resultinginpersonalinjury.
Safety
Improperlyusingormaintainingthismowercan
resultininjury.T oreducethepotentialforinjury,
complywiththesesafetyinstructions.
Torodesignedandtestedthismowerforreasonablysafe
service;however,failuretocomplywiththefollowing
instructionsmayresultinpersonalinjury.
Figure1
1.Modelandserialnumberplate
ModelNo.
SerialNo.
Thismanualidentiespotentialhazardsandhas
safetymessagesidentiedbythesafetyalertsymbol
(Figure2),whichsignalsahazardthatmaycauseserious
injuryordeathifyoudonotfollowtherecommended
precautions.
Figure2
1.Safetyalertsymbol
©2009—TheToro®Company
8111LyndaleAvenueSouth
Bloomington,MN55420
Registeratwww.Toro.com.
Toensuremaximumsafety,bestperformance,and
togainknowledgeoftheproduct,itisessential
thatyouandanyotheroperatorofthemowerread
andunderstandthecontentsofthismanualbefore
theengineiseverstarted.Payparticularattention
tothesafetyalertsymbol(Figure2)whichmeans
Caution,Warning,orDanger—“personalsafety
instruction.”Readandunderstandtheinstruction
becauseithastodowithsafety .Failuretocomply
withtheinstructionmayresultinpersonalinjury.
GeneralLawnMowerSafety
ThefollowinginstructionshavebeenadaptedfromEN
836.
Thiscuttingmachineiscapableofamputatinghands
andfeetandthrowingobjects.Failuretoobservethe
followingsafetyinstructionscouldresultinserious
injuryordeath.
OriginalInstructions(EN)
PrintedintheUSA
AllRightsReserved

Training
•Readtheinstructionscarefully.Befamiliarwiththe
controlsandtheproperuseoftheequipment.
•Neverallowchildrenorpeopleunfamiliarwiththese
instructionstousethemower.Localregulationscan
restricttheageoftheoperator.
•Keepinmindthattheoperatororuserisresponsible
foraccidentsorhazardsoccurringtootherpeopleor
theirproperty.
•Understandexplanationsforallpictogramsusedon
themowerorintheinstructions.
absolutelynecessaryandliftonlythepart,whichis
awayfromtheoperator.
•Starttheengineorswitchonthemotorcarefully
accordingtoinstructionsandwithfeetwellaway
fromtheblade(s)andnotinfrontofthedischarge
chute.
Operation
•Nevermowwhilepeople,especiallychildren,orpets
arenearby.
•Mowonlyindaylightoringoodarticiallight.
Gasoline
WARNING-Gasolineishighlyammable.Takethe
followingprecautions.
•Storefuelincontainersspecicallydesignedforthis
purpose.
•Refueloutdoorsonlyanddonotsmokewhile
refueling.
•Addfuelbeforestartingtheengine.Neverremove
thecapofthefueltankoraddgasolinewhilethe
engineisrunningorwhentheengineishot.
•Ifgasolineisspilled,donotattempttostartthe
enginebutmovethemowerawayfromtheareaof
spillageandavoidcreatinganysourceofignition
untilgasolinevaporshavedissipated.
•Replaceallfueltankandcontainercapssecurely.
Preparation
•Whilemowing,alwayswearsubstantialfootwearand
longtrousers.Donotoperatetheequipmentwhen
barefootorwearingopensandals.
•Thoroughlyinspecttheareawheretheequipmentis
tobeusedandremoveallstones,sticks,wires,bones
andotherforeignobjects.
•Beforeusing,alwaysvisuallyinspecttoseethat
guards,andsafetydevices,suchasdeectorsand/or
grasscatchers,areinplaceandworkingcorrectly.
•Beforeusing,alwaysvisuallyinspecttoseethatthe
blades,bladeboltsandcutterassemblyarenotworn
ordamaged.Replacewornordamagedbladesand
boltsinsetstopreservebalance.
•Stayalertforholesintheterrainandotherhidden
hazards.
•Donotputhandsorfeetnearorunderrotatingparts.
Keepclearofthedischargeopeningatalltimes.
•Neverpickuporcarryalawnmowerwhilethe
engineisrunning.
•Useextremecautionwhenreversingorpullinga
pedestriancontrolledlawnmowertowardsyou.
•Walk,neverrun.
•Slopes:
–Donotmowexcessivelysteepslopes.
–Exerciseextremecautionwhenonslopes.
–Mowacrossthefaceofslopes,neverupand
downandexerciseextremecautionwhen
changingdirectiononslopes.
–Alwaysbesureofyourfootingonslopes.
•Uselowthrottlesettingswhenengagingthe
traction-clutch,especiallyinhighgears.Reduce
speedonslopesandinsharpturnstoprevent
overturningorlossofcontrol.
•Stopthebladeifthelawnmowerhastobetiltedfor
transportationwhencrossingsurfacesotherthan
grassandwhentransportingthelawnmowertoand
fromtheareatobemowed.
•Donotoperatetheengineinaconnedspacewhere
dangerouscarbonmonoxidefumescancollect.
•Stoptheengine
–wheneveryouleavethelawnmower.
–beforerefueling.
Starting
•Disengageallbladeanddriveclutchesandshiftinto
neutralbeforestartingtheengine.
•Donottiltmowerwhenstartingtheengineor
switchingonthemotor,unlessthemowerhastobe
tiltedforstarting.Inthiscase,donottiltitmorethan
–beforeremovingthegrasscatcher.
–beforemakingheightadjustmentunless
adjustmentcanbemadefromtheoperator’s
position.
•Stoptheengineanddisconnectthespark-plugwire.
–beforeclearingblockagesoruncloggingchute.
2

–beforechecking,cleaningorworkingonthelawn
mower.
–afterstrikingaforeignobject,inspectthelawn
mowerfordamageandmakerepairsbefore
restartingandoperatingthelawnmower.
SoundPressure
Thisunithasamaximumsoundpressurelevelatthe
operator’searof87dBA,basedonmeasurementsof
identicalmachinesperEN836andISO11201.
–iflawnmowerstartstovibrateabnormally(check
immediately).
•Watchoutfortrafcwhencrossingornearroadways.
MaintenanceandStorage
•Keepallnuts,boltsandscrewstighttobesurethe
equipmentisinsafeworkingcondition.
•Donotusepressurecleaningequipmentonmachine.
•Neverstoretheequipmentwithgasolineinthetank
andinsideabuildingwherefumescanreachanopen
ameorspark.
•Allowtheenginetocoolbeforestoringinany
enclosure.
•Toreducetherehazard,keeptheengine,silencer,
batterycompartmentandgasolinestoragearefreeof
grass,leaves,orexcessivegrease.
•Checkgrasscatchercomponentsandthedischarge
guardfrequentlyandreplacewithmanufacturer’s
recommendedparts,whennecessary.
SoundPower
Thisunithasaguaranteedsoundpowerlevelof98dBA,
basedonmeasurementsofidenticalmachinesperISO
11094.
Vibration,Hand/arm
Thisunitdoesnotexceedahand/armvibrationlevelof
3.5m/s
perEN836andEN1033.
2
,basedonmeasurementsofidenticalmachines
•Replacewornordamagedpartsforsafety.
•Replacefaultysilencers.
•Ifthefueltankhastobedrained,dothisout-doors.
•Donotchangetheenginegovernorsettingsor
overspeedtheengine.Operatinganengineat
excessivespeedcanincreasethehazardofpersonal
injury.
•Onmultibladedlawnmowers,takecareasrotating
oneblademaycauseotherstorotate.
•Becarefulduringadjustmentofthelawnmowerto
prevententrapmentofthengersbetweenmoving
bladesandxedpartsofthelawnmower.
•Toensurethebestperformanceandsafety,
purchaseonlygenuineTororeplacementparts
andaccessories.Donotuse
accessories;theymaycauseasafetyhazard.
will t
partsand
3
SafetyandInstructional
Decals
Important:Safetyandinstructiondecalsare
locatednearareasofpotentialdanger.Replace
damageddecals.
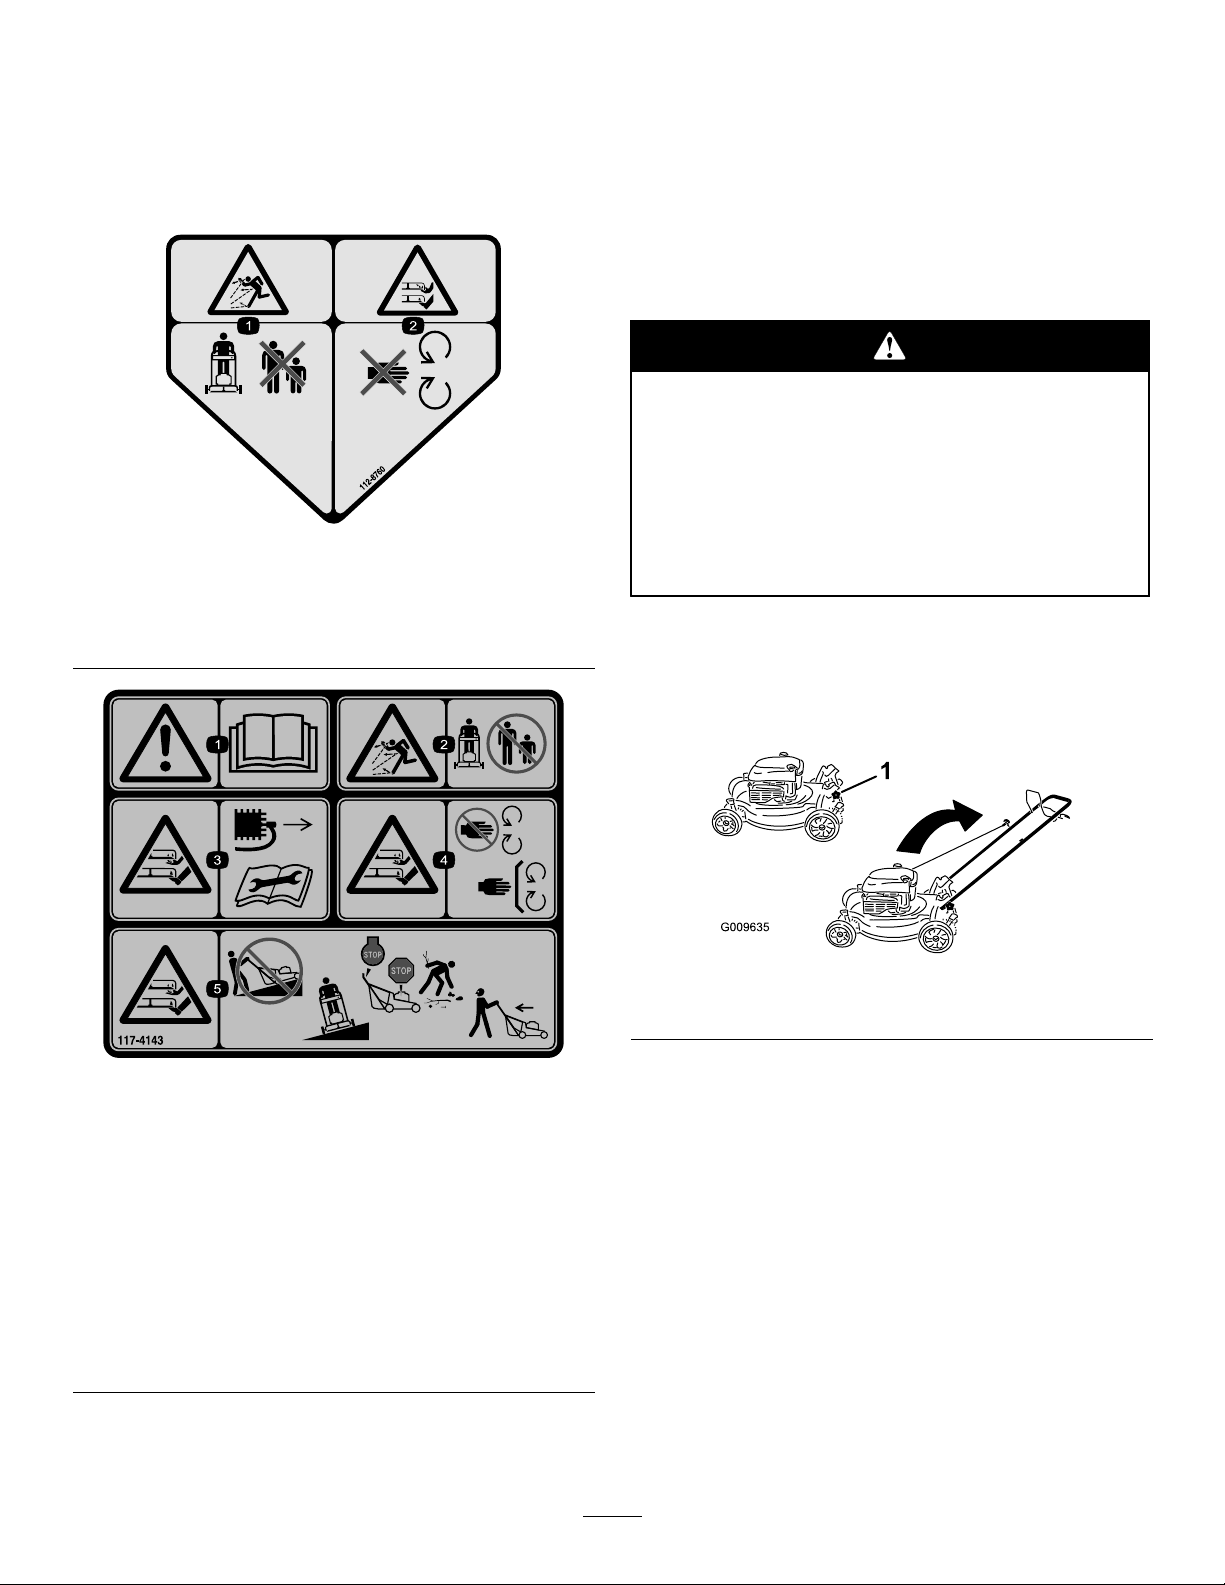
112-8760
1.Thrownobjecthazard—keepbystandersasafedistance
fromthemachine.
2.Cutting/dismembermentofhandorfoot—stayawayfrom
movingparts.
Setup
Important:Removeanddiscardtheprotective
plasticsheetthatcoverstheengine.
1.UnfoldingtheHandle
Procedure
Foldingorunfoldingthehandleimproperlycan
damagethecables,causinganunsafeoperating
condition.
•Donotdamagethecableswhenfoldingor
unfoldingthehandle.
•Ifacableisdamaged,contactanAuthorized
ServiceDealer.
1.Removethehandleknobsfromthemowerhousing
(Figure3).
117-4143
1.Warning—readtheOperator’sManual.
2.Thrownobjecthazard—keepbystandersasafedistance
fromthemachine.
3.Cutting/dismembermenthazardofhandorfoot,mower
blade—disconnectthesparkplugwireandreadthe
instructionsbeforeservicingorperformingmaintenance.
4.Cutting/dismembermenthazardofhandorfoot,mower
blade—stayawayfrommovingpartsandkeepallguards
andshieldsinplace.
5.Cutting/dismembermenthazardofhandorfoot,mower
blade—donotmowupanddownslopes,onlymowacross;
stopthemowerandengine,pickupdebrisbeforeoperating;
lookbehindanddownwhenreversing.
Important:Routethecablestotheoutsideof
thehandleasyouinstallthehandle.
Figure3
1.Handleknob(2)
2.Movethehandletotheoperatingposition.
3.Installandtightenthehandleknobsthatyou
removedinstep1(Figure3).
4
2.FillingtheEnginewithOil
Procedure
Yourmowerdoesnotcomewithoilintheengine,butit
doescomewithabottleofoil.
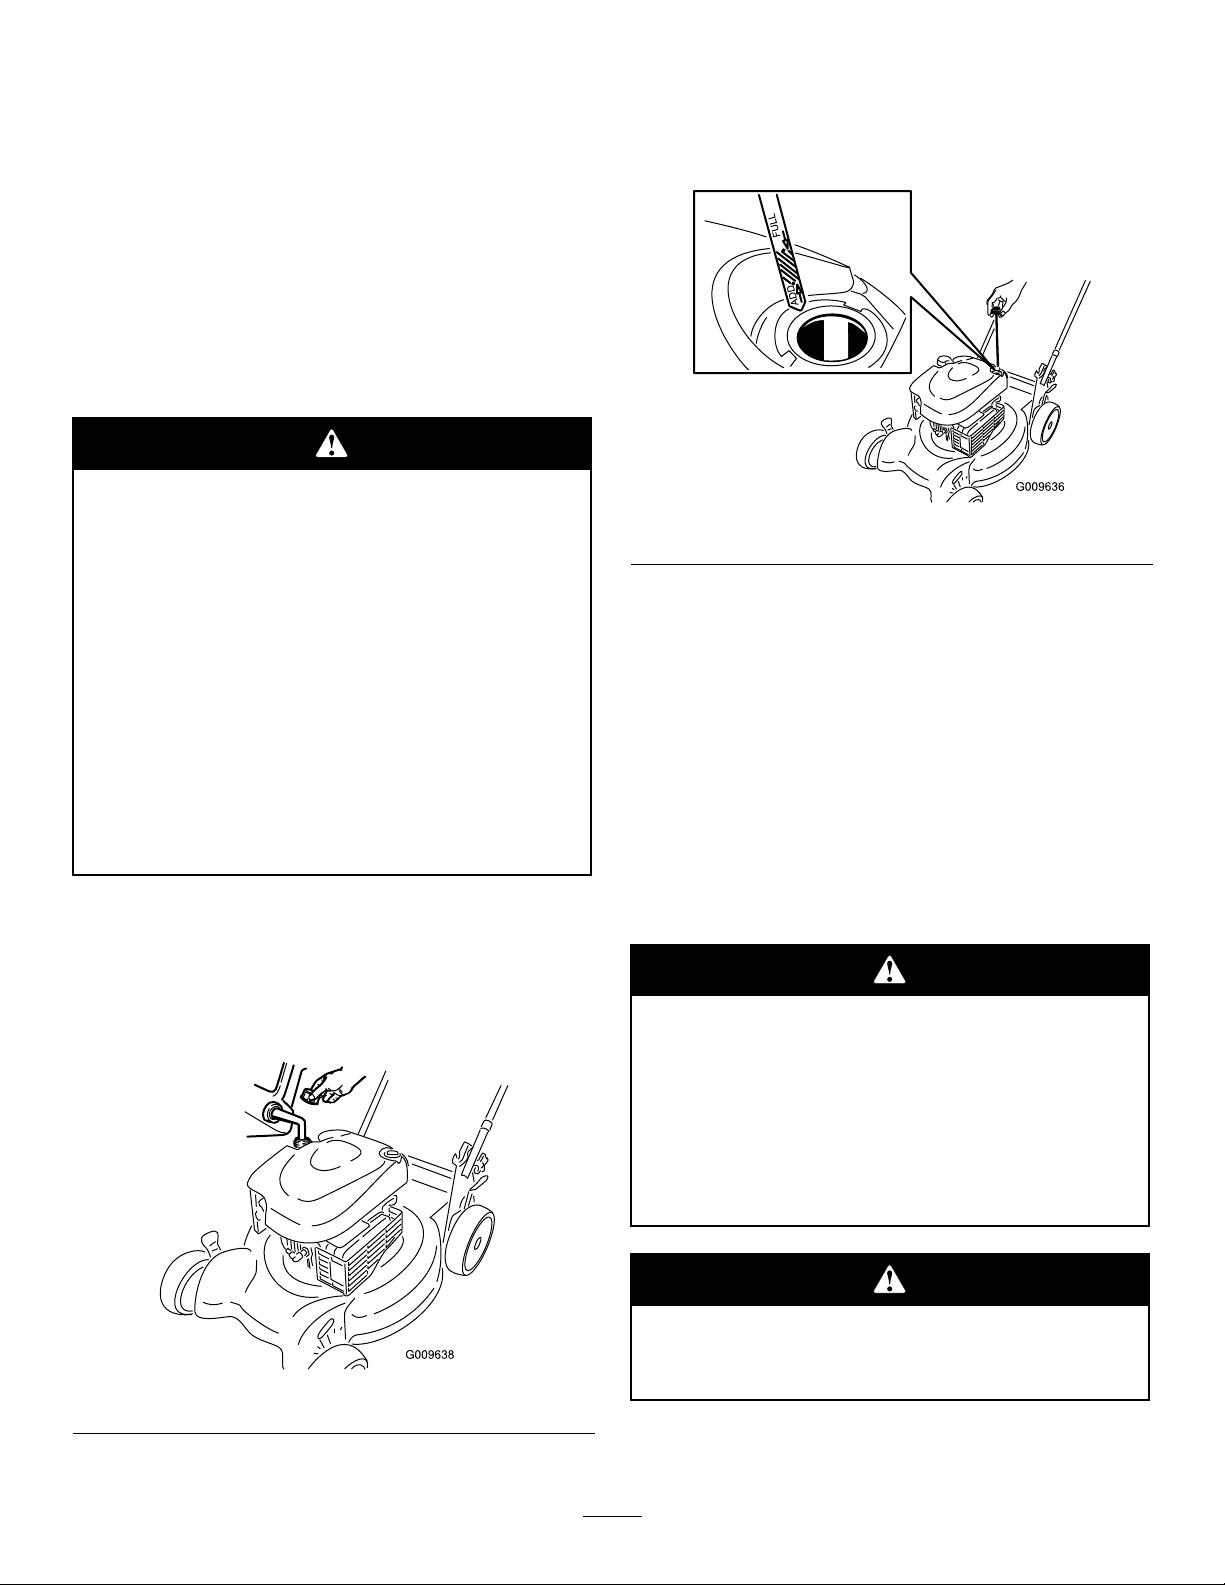
1.Removethedipstick(Figure4).
ProductOverview
Figure4
2.Slowlypouroilintotheoillltubeuntiltheoillevel
reachestheFulllineonthedipstick(Figure4).Do
notoverll.(Max.ll:20oz.(0.59l),type:SAE30
detergentoilwithanAPIserviceclassicationofSF,
SG,SH,SJ,SL,orhigher.)
Note:Ifyouoverlltheengine,poursomeoilout
ofitasdirectedinChangingtheEngineOil.
3.Installthedipsticksecurely.
Important:
5 operating hour s
Change the engine oil after the r st
;changeityearlythereafter.
RefertoChangingtheEngineOil.
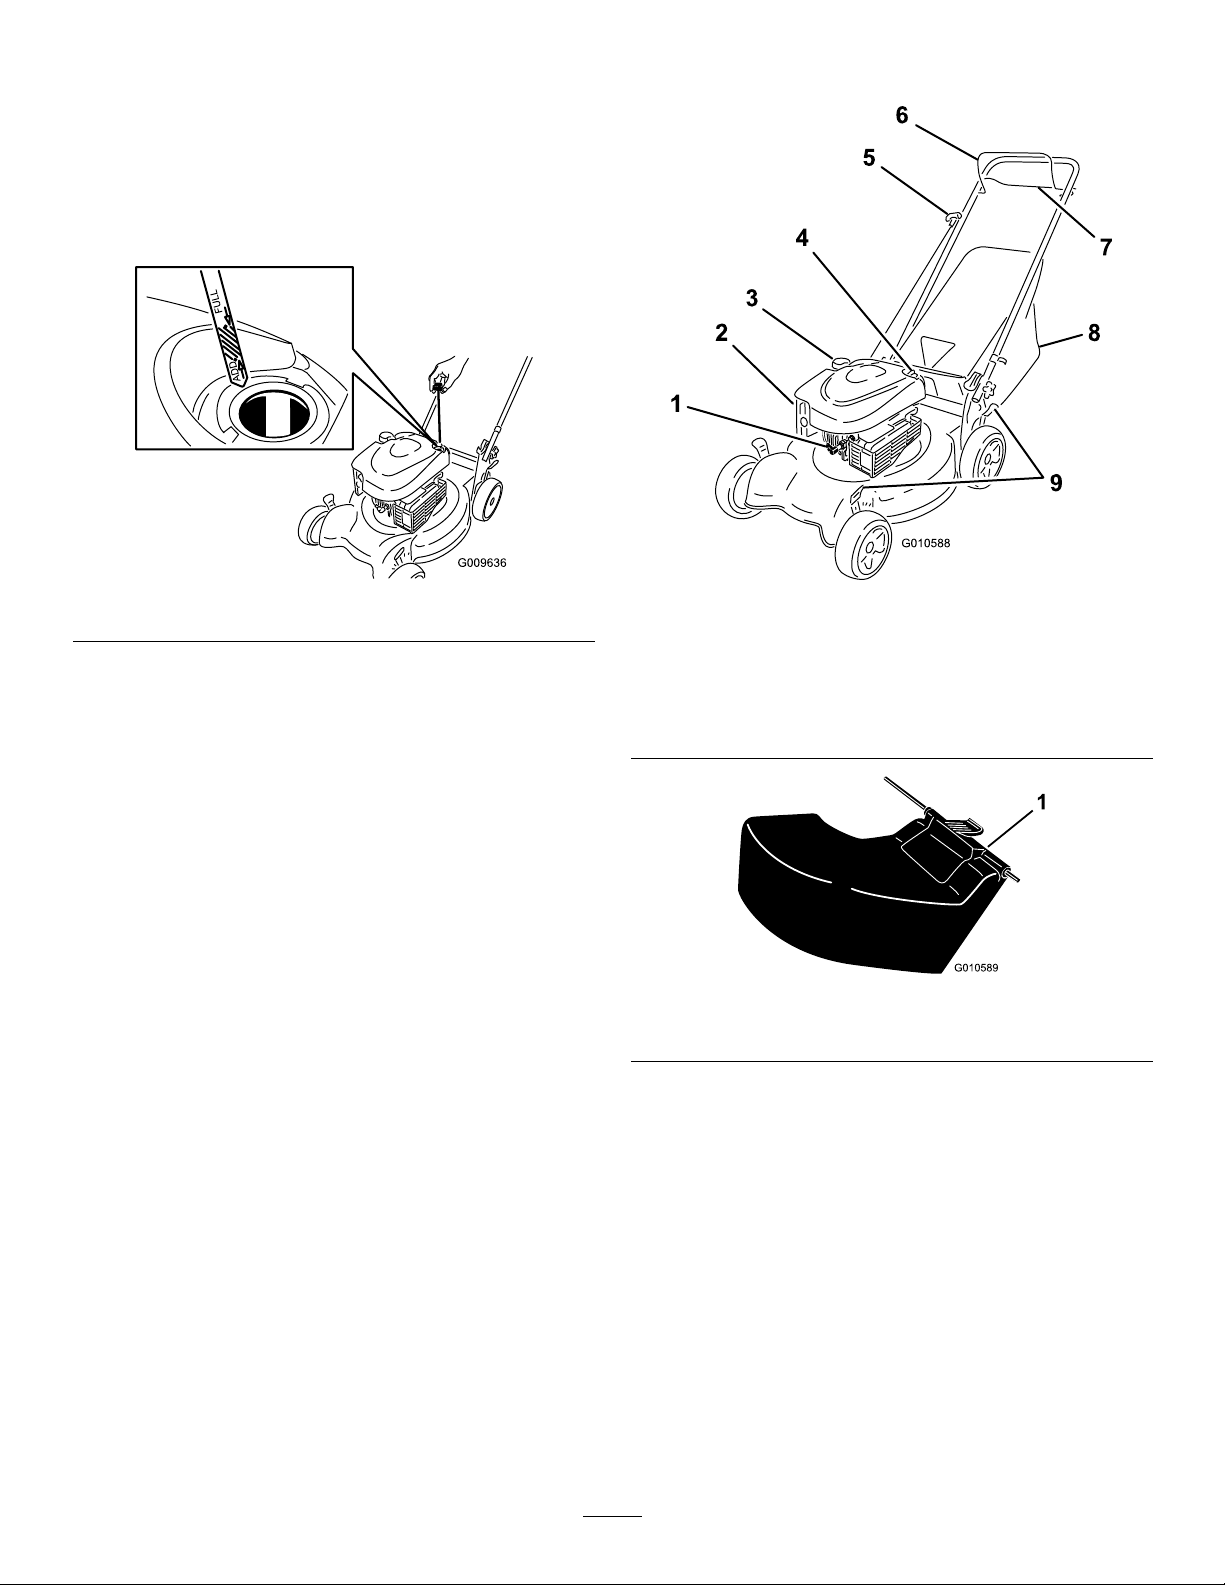
Figure5
1.Sparkplug
2.Airlter7.Self-propeldrivebar
3.Fueltankcap
4.Oilll/Dipstick9.Cuttingheightlevers(4)
5.Recoilstarthandle
1.Reardischargedeector
6.Bladecontrolbar
8.Grassbag
Figure6
5
Operation
Attachments/Accessories
AselectionofToroapprovedattachmentsand
accessoriesareavailableforusewiththemachineto
enhanceandexpanditscapabilities.Contactyour
AuthorizedServiceDealerorDistributororgoto
www.Toro.comforalistofallapprovedattachments
andaccessories.
FillingtheFuelTank
Gasolineisextremelyammableandexplosive.
Areorexplosionfromgasolinecanburnyou
andothers.
CheckingtheEngineOilLevel
ServiceInterval:Beforeeachuseordaily
1.Removethedipstick,wipeitclean,andfullyinstall
thedipstick(Figure8).
Figure8
•Topreventastaticchargefromignitingthe
gasoline,placethecontainerand/ormower
directlyonthegroundbeforelling,notina
vehicleoronanobject.
•Fillthetankoutdoorswhentheengineis
cold.Wipeupspills.
•Donothandlegasolinewhensmokingor
aroundanopenameorsparks.
•Storegasolineinanapprovedfuelcontainer,
outofthereachofchildren.
Fillthefueltankwithfreshunleadedregulargasoline
fromamajorname-brandservicestation(Figure7).
Important:Toreducestartingproblems,add
fuelstabilizertothefuelallseason,mixingitwith
gasolinelessthan30daysold.
2.Removethedipstickandchecktheoillevel
(Figure8).IftheoillevelisbelowtheAddmarkon
thedipstick,slowlypouroilintotheoillltubeto
raisetheoilleveltotheFullmarkonthedipstick.
Donotoverll.(Max.ll:20oz.(0.59l),type:SAE
30detergentoilwithanAPIserviceclassicationof
SF,SG,SH,SJ,SL,orhigher.)
Note:Ifyouoverlltheengine,poursomeoilout
ofitasdirectedinChangingtheEngineOil.
3.Installthedipstick.
AdjustingtheCuttingHeight
Adjustingthecuttingheightmaybringyouinto
contactwiththemovingblade,causingserious
injury.
•Stoptheengineandwaitforallmovingparts
tostop.
Figure7
•Donotputyourngersunderthehousing
whenadjustingthecuttingheight.
Iftheenginehasbeenrunning,themuferwill
behotandcanseverelyburnyou.Keepaway
fromthehotmufer.
Adjustthecuttingheightasdesired.Setallfourwheels
tothesameheight.
6
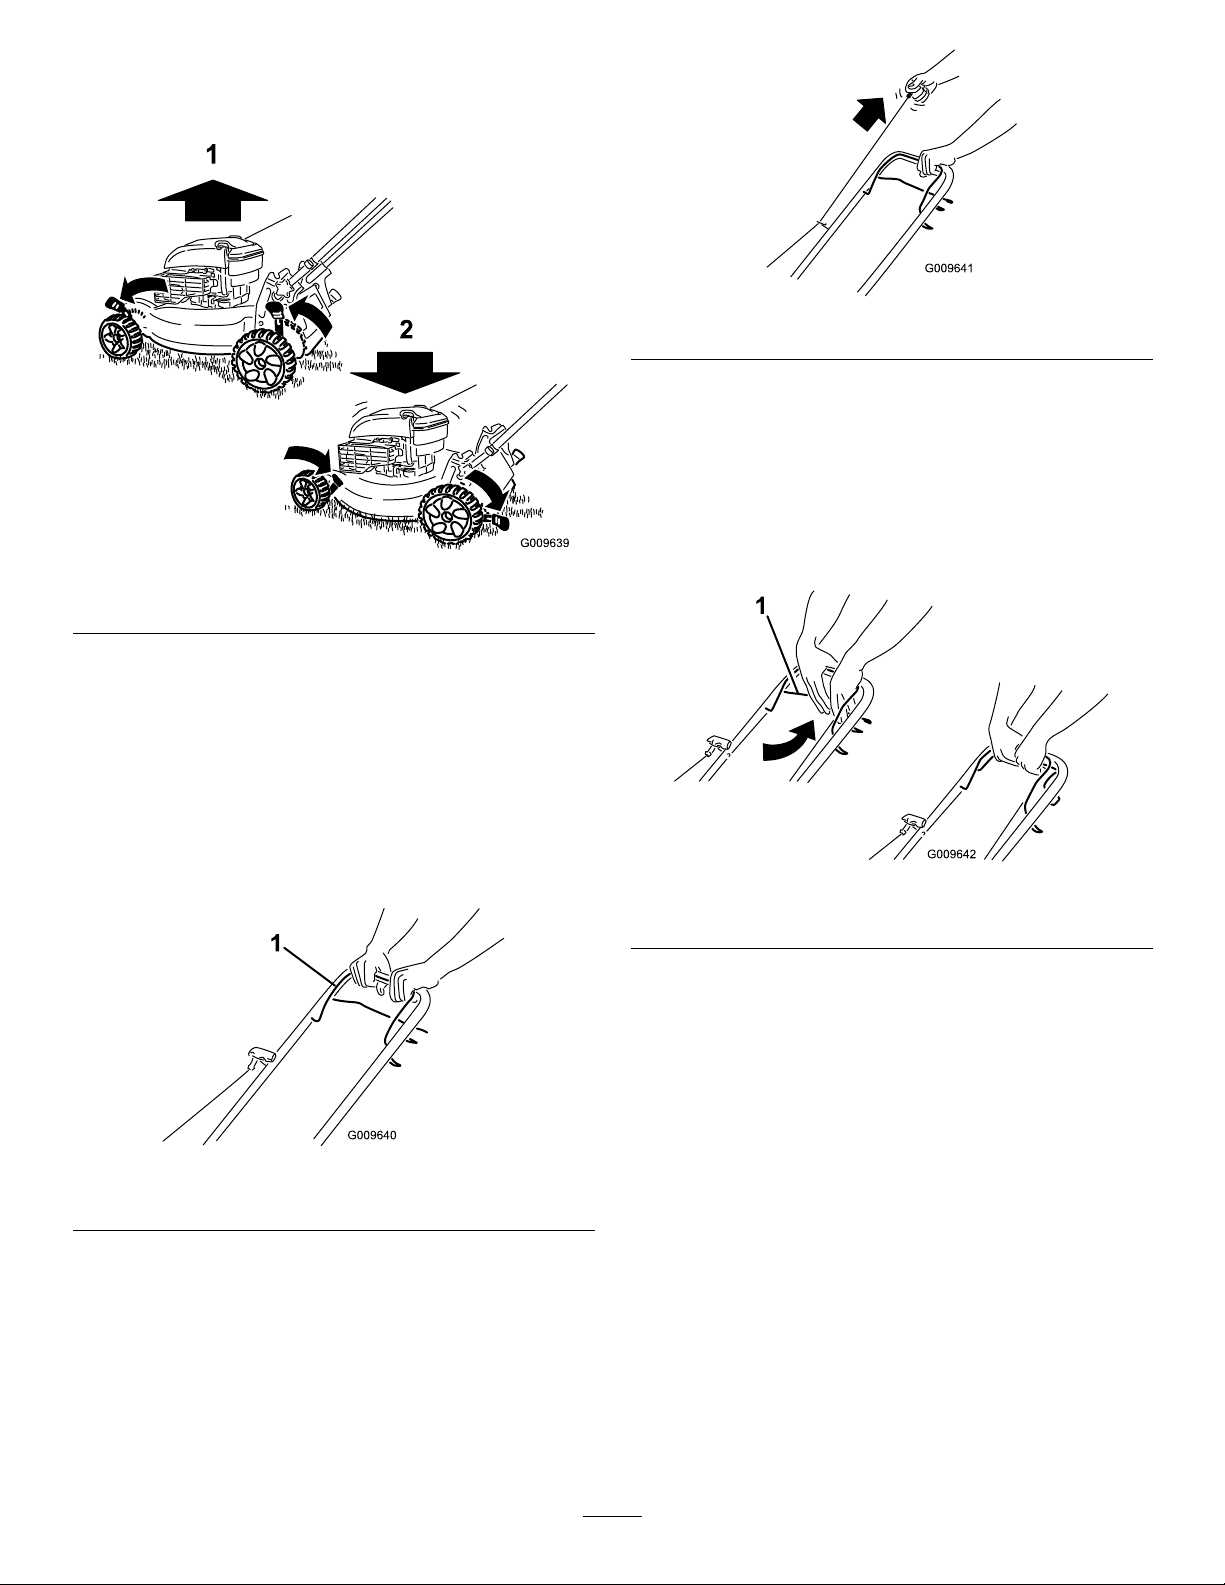
Note:Toraisethemower,moveallthecuttingheight
leversforward;tolowerthemower,movetheallthe
cuttingheightleversrearward(Figure9).
Figure9
1.Raisethemower2.Lowerthemower
Figure11
Note:Ifthemowerdoesnotstartafterseveral
attempts,contactanAuthorizedServiceDealer.
UsingtheSelf-propelDrive
Tooperatetheself-propeldrive,squeezetheself-propel
drivebar(Figure12)towardthehandleandholdit.
Note:Thecuttingheightsettingsare1inch(25mm);
1-1/2inch(38mm);2inches(51mm);2-1/2inches
(64mm);3inches(76mm);3-1/2inches(89mm);and
4inches(102mm).
StartingtheEngine
1.Holdthebladecontrolbar(Figure10)againstthe
handle.
Figure10
1.Bladecontrolbar
Figure12
1.Self-propeldrivebar
Todisengagetheself-propeldrive,releasetheself-propel
drivebar.
Note:Themaximumself-propelgroundspeedisxed.
Toreducethegroundspeed,increasethespacebetween
theself-propeldrivebarandthehandle.
StoppingtheEngine
ServiceInterval:Beforeeachuseordaily
2.Pullrecoilstarthandle(Figure11).
Tostoptheengine,releasethebladecontrolbar
(Figure13).
Important:Whenyoureleasethebladecontrol
bar,boththeengineandbladeshouldstopwithin
3seconds.Iftheydonotstopproperly,stopusing
yourmowerimmediatelyandcontactanAuthorized
ServiceDealer.
7
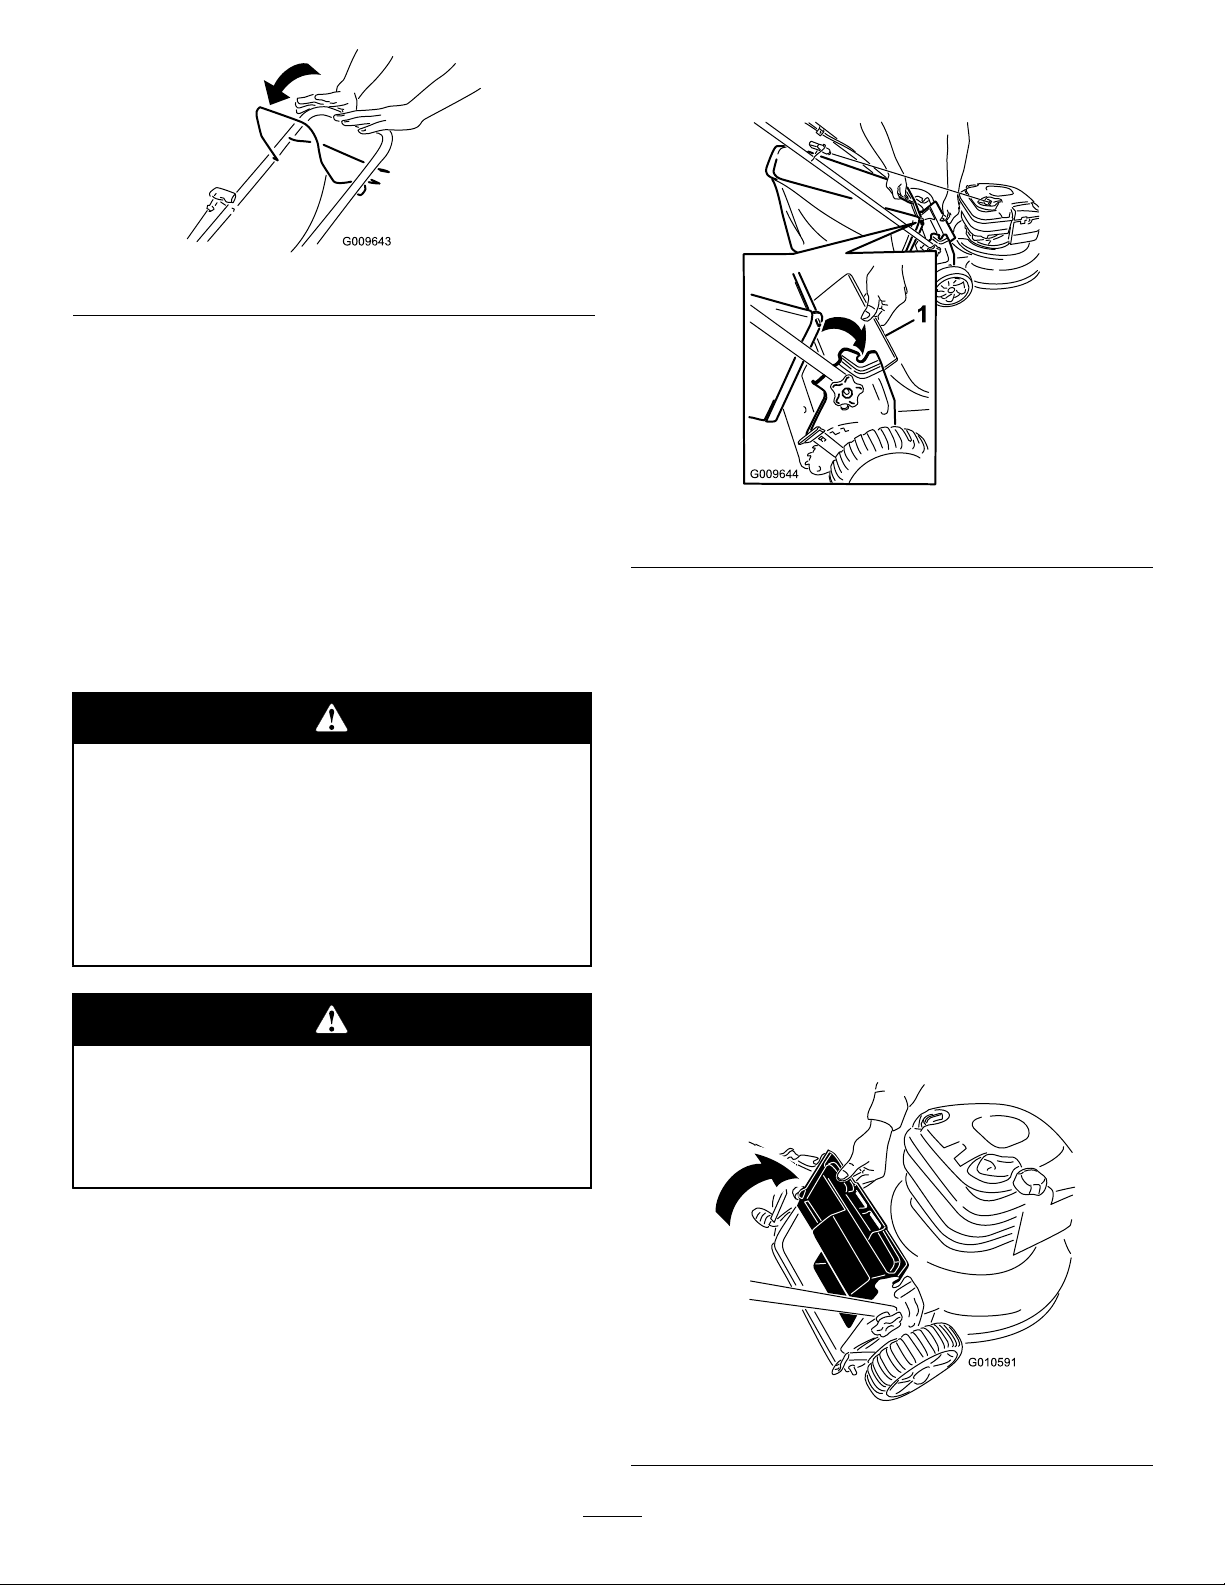
Figure13
MulchingtheClippings
Yourmowercomesfromthefactoryreadytomulchthe
grassandleafclippingsbackintothelawn.
InstallingtheGrassBag
1.Liftupthereardeector(Figure14).
Ifthegrassbagisonthemower,removeit(referto
RemovingtheGrassBag)beforemulchingtheclippings.
BaggingtheClippings
Usethegrassbagwhenyouwanttocollectgrassand
leafclippingsfromthelawn.
Aworngrassbagcouldallowsmallstones
andothersimilardebristobethrowninthe
operator’sorbystander’sdirectionandresultin
seriouspersonalinjuryordeathtotheoperator
orbystanders.
Checkthegrassbagfrequently.Ifitis
damaged,installanewTororeplacementbag.
Thebladeissharp;contactingthebladecan
resultinseriouspersonalinjury.
Figure14
1.Reardeector
2.Insertthegrassbaghandleontothenotchesonthe
handlebrackets(Figure14).
RemovingtheGrassBag
1.Liftupthereardeector(Figure14).
2.Liftthegrassbaghandleoutfromthenotchesonthe
handlebracketsandremovethebagfromthemower.
3.Closethereardeector.
DischargingtheClippings
Usetherear-dischargedeectorforcuttingverytall
grass.
InstallingtheRear-DischargeDeector
1.Ifthebagisonthemower,removeit.
2.Liftupthereardeectorandholdit(Figure15).
Stoptheengineandwaitforallmovingpartsto
stopbeforeleavingtheoperatingposition.
Figure15
8
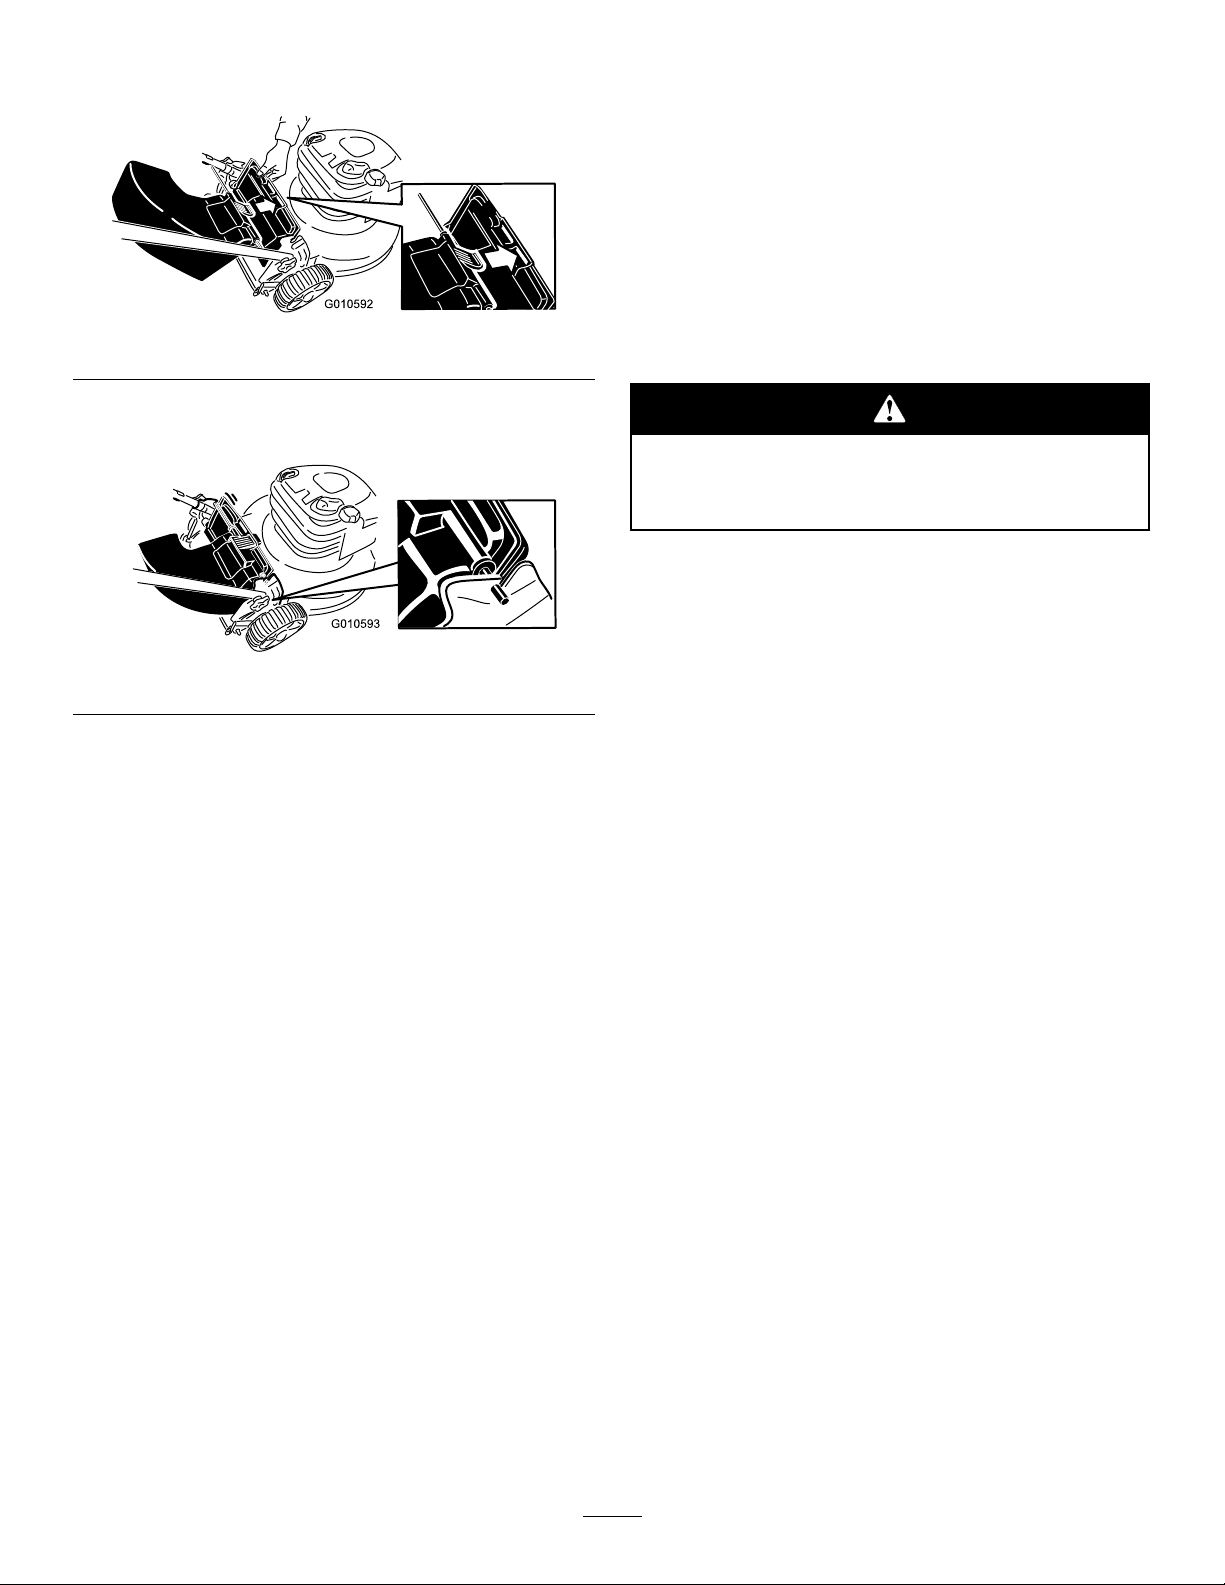
3.Insertthetabontherear-dischargedeectorintothe
right-handslotinthereardeector(Figure16).
Figure16
4.Inserttherodontherear-dischargedeectorinto
thenotchesonthemower(Figure17).
Figure17
thegrassissparseoritislatefallwhengrassgrowth
beginstoslowdown.RefertoAdjustingtheCutting
Height.
•Whencuttinggrassover6inches(15cm)tall,mow
atthehighestcuttingheightsettingandwalkslower;
thenmowagainatalowersettingforthebestlawn
appearance.Ifthegrassistoolong,themowermay
plugandcausetheenginetostall.
•Mowonlydrygrassorleaves.Wetgrassandleaves
tendtoclumpontheyardandcancausethemower
toplugortheenginetostall.
Wetgrassorleavescancauseseriousinjuryif
youslipandcontacttheblade.Mowonlyindry
conditions.
•Alternatethemowingdirection.Thishelpsdisperse
theclippingsoverthelawnforevenfertilization.
•Ifthenishedlawnappearanceisunsatisfactory,try
oneormoreofthefollowing:
–Replacethebladeorhaveitsharpened.
RemovingtheRear-DischargeDeector
Toremovetherear-dischargedeector,reversethesteps
above.
OperatingTips
GeneralMowingTips
•Cleartheareaofsticks,stones,wire,branches,and
otherdebristhatthebladecouldhit.
•Avoidstrikingsolidobjectswiththeblade.Never
deliberatelymowoveranyobject.
•Ifthemowerstrikesanobjectorstartstovibrate,
immediatelystoptheengine,disconnectthewire
fromthesparkplug,andexaminethemowerfor
damage.
•Forbestperformance,installanewbladebeforethe
cuttingseasonbegins.
•ReplacethebladewhennecessarywithaToro
replacementblade.
–Walkataslowerpacewhilemowing.
–Raisethecuttingheightonyourmower.
–Cutthegrassmorefrequently.
–Overlapcuttingswathsinsteadofcuttingafull
swathwitheachpass.
–Setthecuttingheightonthefrontwheelsone
notchlowerthantherearwheels.Forexample,
setthefrontwheelsat2inches(51mm)andthe
rearwheelsat2-1/2inches(64mm).
CuttingLeaves
•Aftercuttingthelawn,ensurethathalfofthelawn
showsthroughthecutleafcover.Youmayneedto
makemorethanonepassovertheleaves.
•Iftherearemorethan5inches(13cm)ofleaves
onthelawn,setthefrontcuttingheightoneortwo
notcheshigherthantherearcuttingheight.
•Slowdownyourmowingspeedifthemowerdoes
notcuttheleavesnelyenough.
CuttingGrass
•Cutonlyaboutathirdofthegrassbladeatatime.
Donotcutbelowthe2inch(51mm)settingunless
9
Maintenance
Note:Determinetheleftandrightsidesofthemachinefromthenormaloperatingposition.
RecommendedMaintenanceSchedule(s)
MaintenanceService
Interval
Aftertherst5hours
Beforeeachuseordaily
Every25hours
Beforestorage
Yearly
Important:Refertoyour
MaintenanceProcedure
•Changetheengineoil.
•Checktheengineoillevel.
•Ensurethattheenginestopswithin3secondsafterreleasingthebladecontrolbar.
•Cleangrassclippingsanddirtfromunderthemower.
•Replacetheairlter;replaceitmorefrequentlyindustyoperatingconditions.
•Emptythefueltankbeforerepairsasdirectedandbeforeannualstorage.
•Changetheengineoil.
•Replacethebladeorhaveitsharpened(morefrequentlyiftheedgedullsquickly).
•RefertoyourEngineOperator’sManualforanyadditionalyearlymaintenance
procedures.
Engine Operator’ s Man ual
PreparingforMaintenance
1.Stoptheengineandwaitforallmovingpartstostop.
2.Disconnectthesparkplugwirefromthesparkplug
(Figure18)beforeperforminganymaintenance
procedure.
foradditionalmaintenanceprocedures.
Tippingthemowermaycausethefueltoleak.
Gasolineisammable,explosiveandcancause
personalinjury.
Runtheenginedryorremovethegasolinewith
ahandpump;neversiphon.
Figure18
1.Sparkplugwire
3.Afterperformingthemaintenanceprocedure(s),
connectthesparkplugwiretothesparkplug.
Important:Beforetippingthemowertochange
theoilorreplacetheblade,allowthefueltank
torundrythroughnormalusage.Ifyoumust
tipthemowerpriortorunningoutoffuel,usea
handfuelpumptoremovethefuel.Alwaystip
themowerontoitssidewiththedipstickdown.
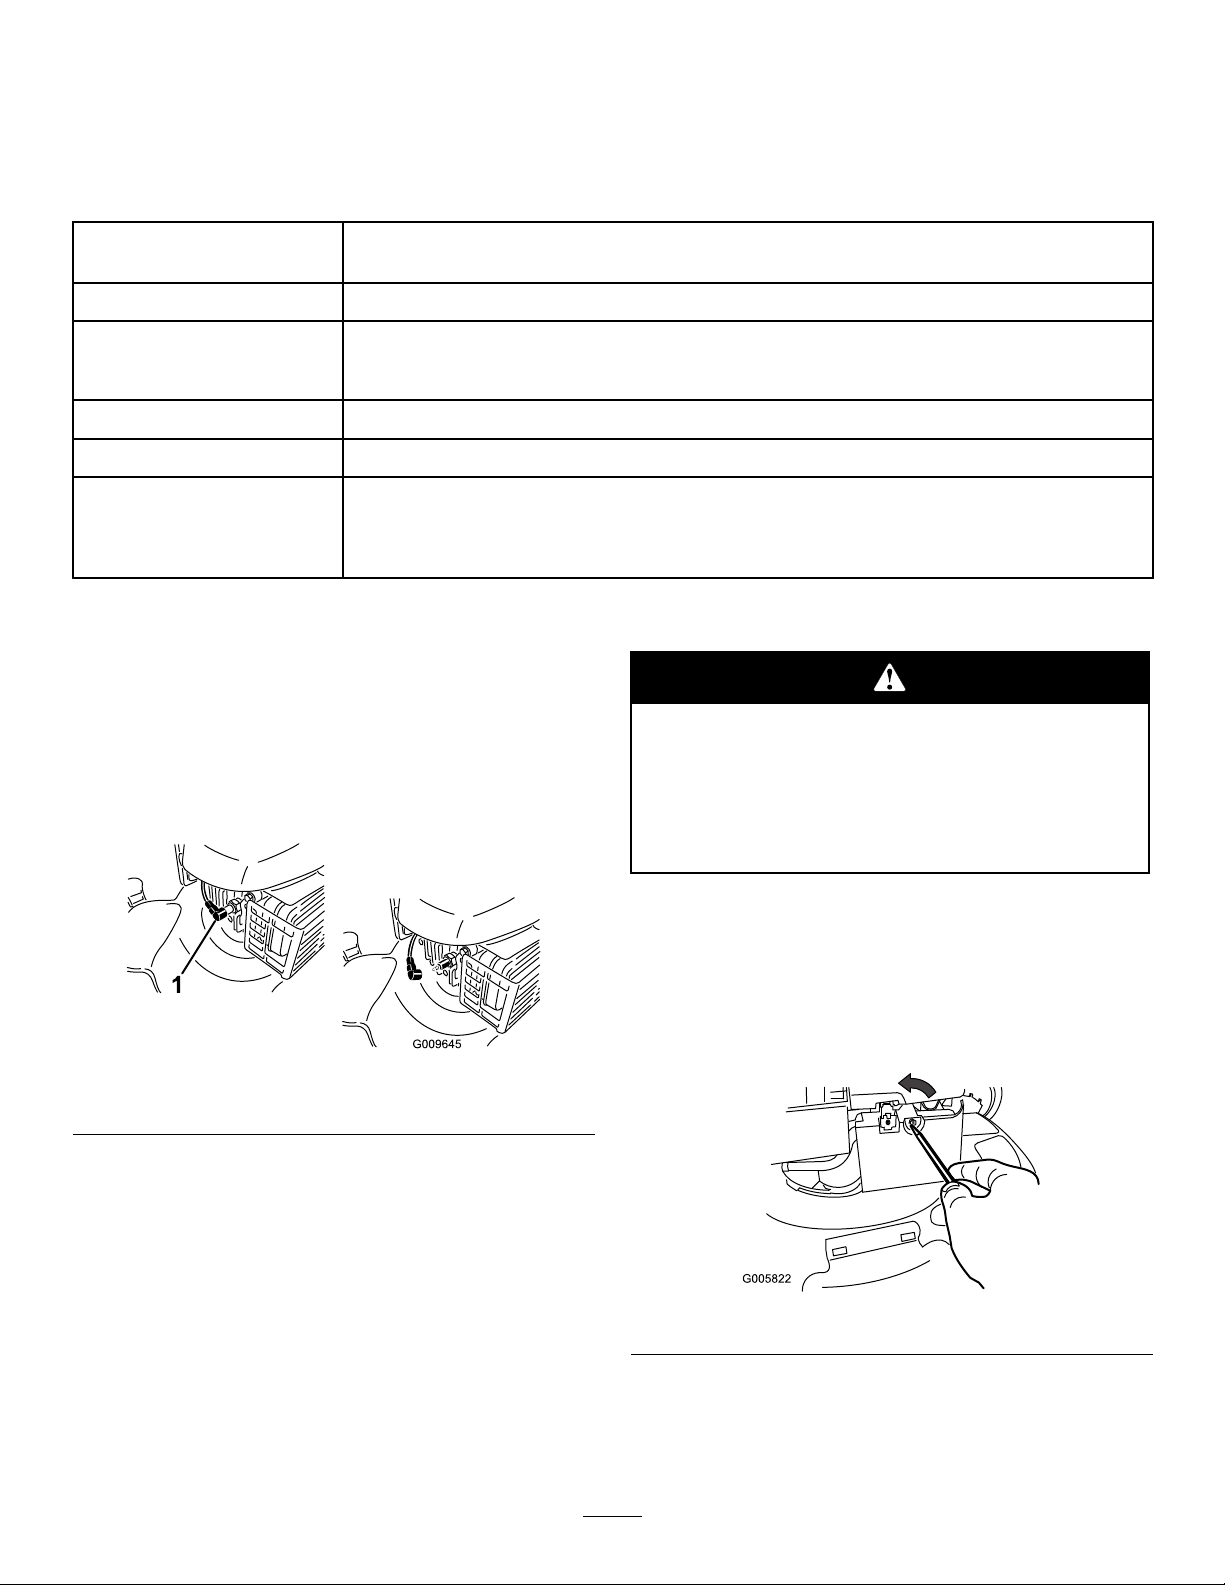
ReplacingtheAirFilter
ServiceInterval:Every25hours
1.Useascrewdrivertoopentheairltercover
(Figure19).
Figure19
2.Replacetheairlter(Figure20).
10
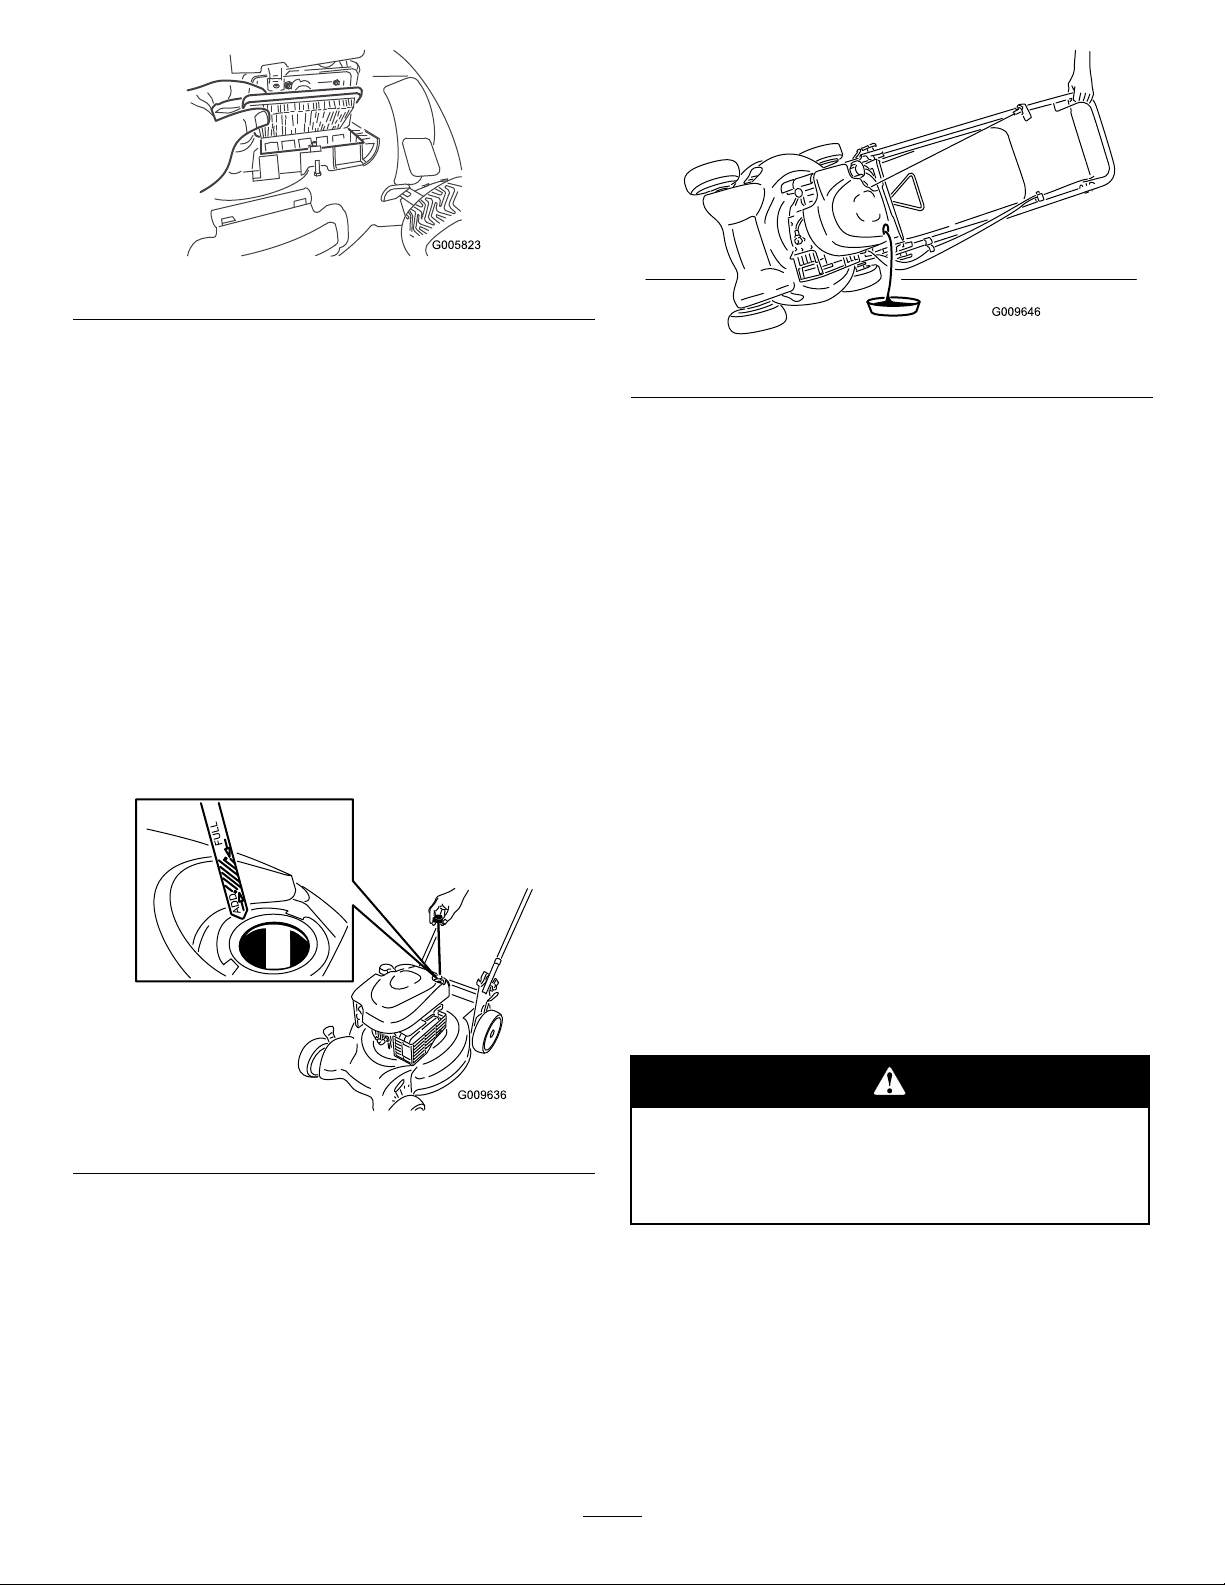
Figure20
3.Installthecover.
ChangingtheEngineOil
ServiceInterval:Aftertherst5hours
Yearly
Changetheengineoilaftertherst5operating
hours;changeityearlythereafter.
Runtheengineafewminutesbeforechangingtheoil
towarmit.Warmoilowsbetterandcarriesmore
contaminants.
1.Performthepre-maintenanceprocedures;referto
PreparingforMaintenance.
2.Removethedipstick(Figure21).
Figure22
4.Slowlypouroilintotheoillltubeuntiltheoillevel
reachestheFulllineonthedipstick(Figure21).Do
notoverll.(Max.ll:20oz.(0.59l),type:SAE30
detergentoilwithanAPIserviceclassicationofSF,
SG,SH,SJ,SL,orhigher.)
Note:Ifyouoverlltheengine,poursomeoilout
ofitasdirectedinstep3above.
5.Installthedipsticksecurely.
6.Disposeoftheusedoilproperlyatalocalrecycling
center.
ReplacingtheBlade
ServiceInterval:Yearly
Important:
the blade pr oper l y
wrenchorareuncomfortableperformingthis
procedure,contactanAuthorizedServiceDealer.
Y ou will need a torque wr ench to install
.Ifyoudonothaveatorque
Figure21
3.Tipthemowerontoitsside,withthedipstickdown,
todraintheusedoiloutthroughtheoillltube
(Figure22).
Examinethebladewheneveryourunoutofgasoline.If
thebladeisdamagedorcracked,replaceitimmediately.
Ifthebladeedgeisdullornicked,haveitsharpenedor
replaceit.
Thebladeissharp;contactingthebladecan
resultinseriouspersonalinjury.
Weargloveswhenservicingtheblade.
1.Disconnectthesparkplugwirefromthesparkplug.
RefertoPreparingforMaintenance.
2.Tipthemowerontoitsside,withtheairlterup.
3.Useablockofwoodtoholdthebladesteady.
4.Removetheblade(turnthebladebolt
counterclockwise),savingallthemountinghardware.
5.Installthenewblade(turnthebladeboltclockwise)
andallmountinghardware(Figure23).
11
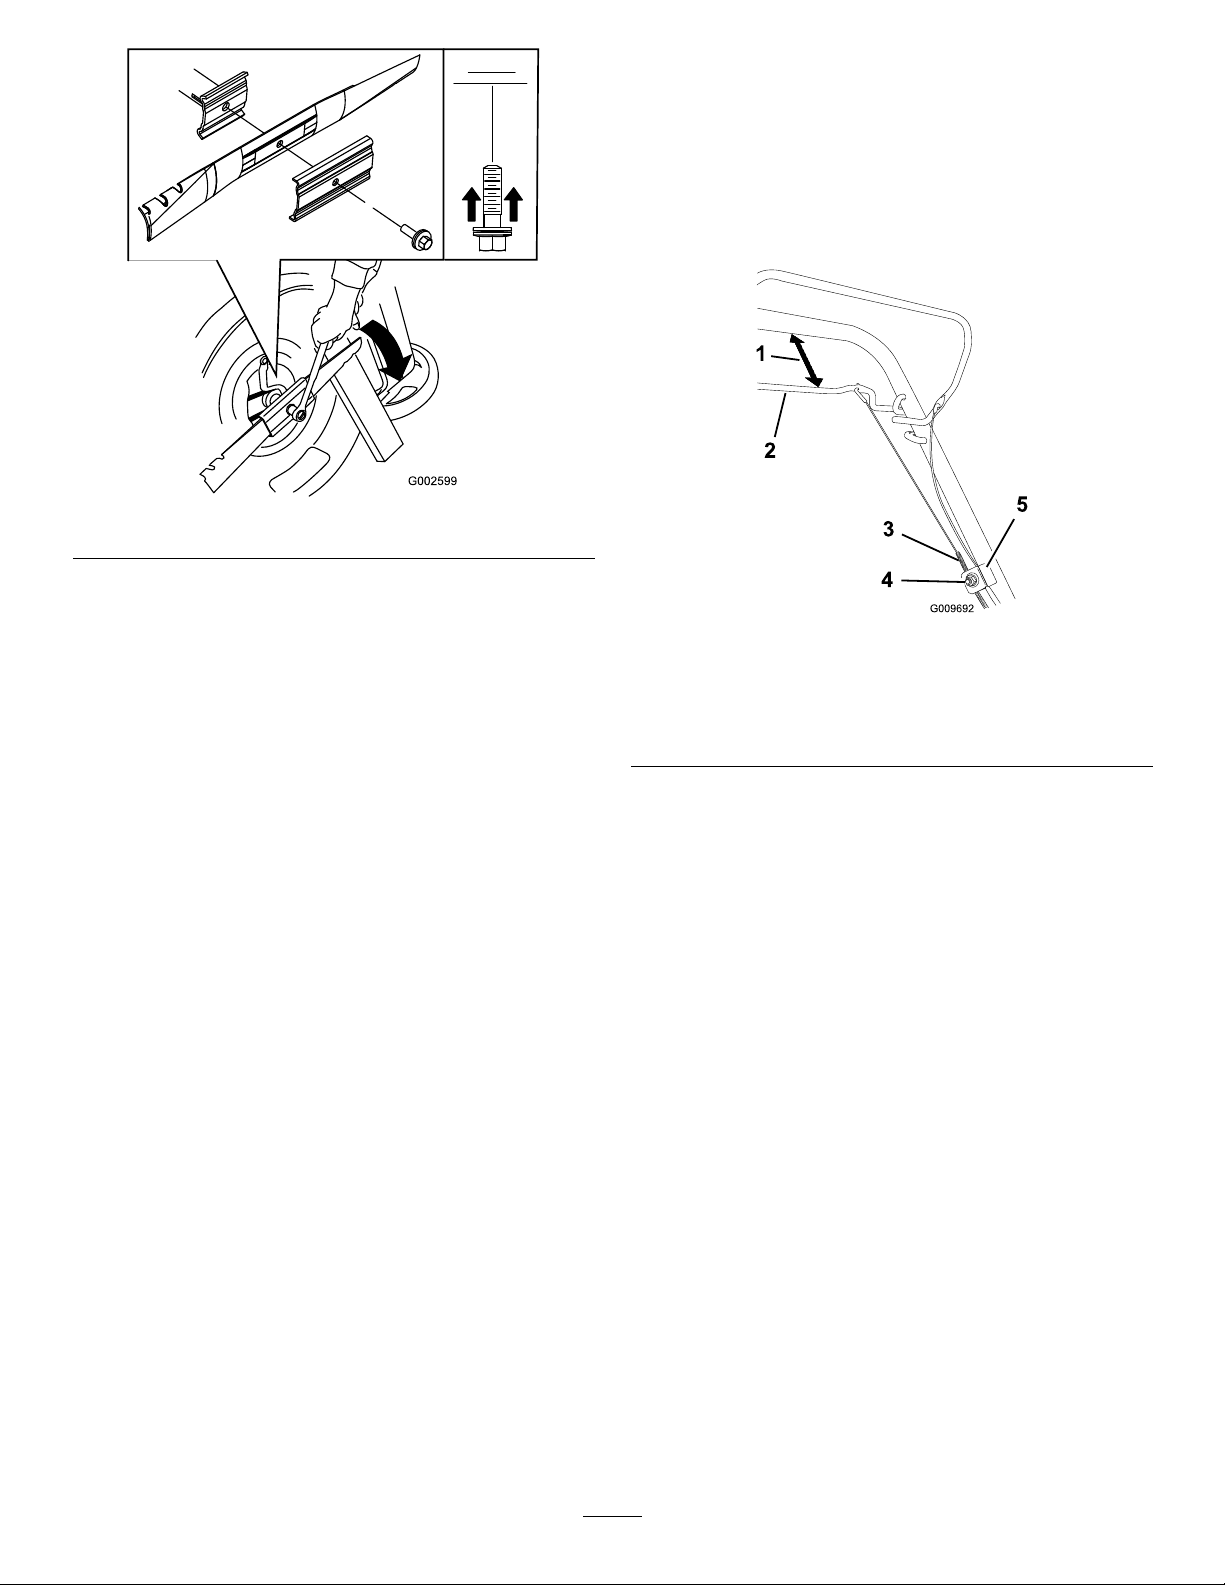
Figure23
Important:Positionthecurvedendsofthe
bladetopointtowardthemowerhousing.
6.Useatorquewrenchtotightenthebladeboltto
60ft-lb(82N⋅ ⋅⋅m).
Important:Abolttorquedto60ft-lb(82N⋅ ⋅⋅m)
isverytight.Whileholdingthebladewitha
blockofwood,putyourweightbehindthe
ratchetorwrenchandtightentheboltsecurely.
Thisboltisverydifculttoovertighten.
AdjustingtheSelf-propelDrive
Cable
Wheneveryouinstallanewself-propelcableorif
theself-propeldriveisoutofadjustment,adjustthe
self-propeldrivecable.
1.Loosenthecablesupportnut(Figure24).
Figure24
1.1to1-1/2inches(25to38
mm)
2.Self-propeldrivebar5.Cablesupport
3.Cablejacket
2.Holdtheself-propelbail1to1-1/2inches(25to38
mm)fromthehandle(Figure24).
3.Pulldownthecablejacket(towardthemower)until
thereisnoslackinthecable(Figure24).
4.Cablesupportnut
4.Tightenthenutonthecablesupport.
5.Releasetheself-propeldrivebarandensurethatthe
cableisloose.
Note:Thecablemustbeloosewiththeself-propel
drivebarinthereleasedposition;otherwise,the
mowermaycreepwhenthebarisdisengaged.
12

CleaningtheMower
ServiceInterval:Beforeeachuseordaily
Themowermaydislodgematerialfromunder
themowerhousing.
•Weareyeprotection.
•Stayintheoperatingposition(behindthe
handle).
Storage
Storethemowerinacool,clean,dryplace.
PreparingtheMowerfor
Storage
Gasolinevaporscanexplode.
•Donotallowbystandersinthearea.
1.Withtheenginerunningonaatpavedsurface,
sprayastreamofwaterinfrontoftherightrear
wheel(Figure25).
Thewaterwillsplashintothepathoftheblade,
cleaningouttheclippings.
Figure25
2.Whennomoreclippingscomeout,stopthewater
andmovethemowertoadryarea.
3.Runtheengineforafewminutestodrythehousing
topreventitfromrusting.
•Donotstoregasolinemorethan30days.
•Donotstorethemowerinanenclosurenear
anopename.
•Allowtheenginetocoolbeforestoringit.
1.Onthelastrefuelingoftheyear,addfuelstabilizer
tothefuelasdirectedbytheenginemanufacturer.
2.Runthemoweruntiltheenginestopsfromrunning
outoffuel.
3.Primetheengineandstartitagain.
4.Allowtheenginetorununtilitstops.Whenyoucan
nolongerstarttheengine,itissufcientlydry.
5.Disconnectthewirefromthesparkplugandconnect
thewireontotheretainingpost.
6.Removethesparkplug,add1oz.(30ml)ofoil
throughthesparkplughole,andpullthestarterrope
slowlyseveraltimestodistributeoilthroughoutthe
cylindertopreventcylindercorrosionduringthe
off-season.
7.Looselyinstallthesparkplug.
8.Tightenallnuts,bolts,andscrews.
13
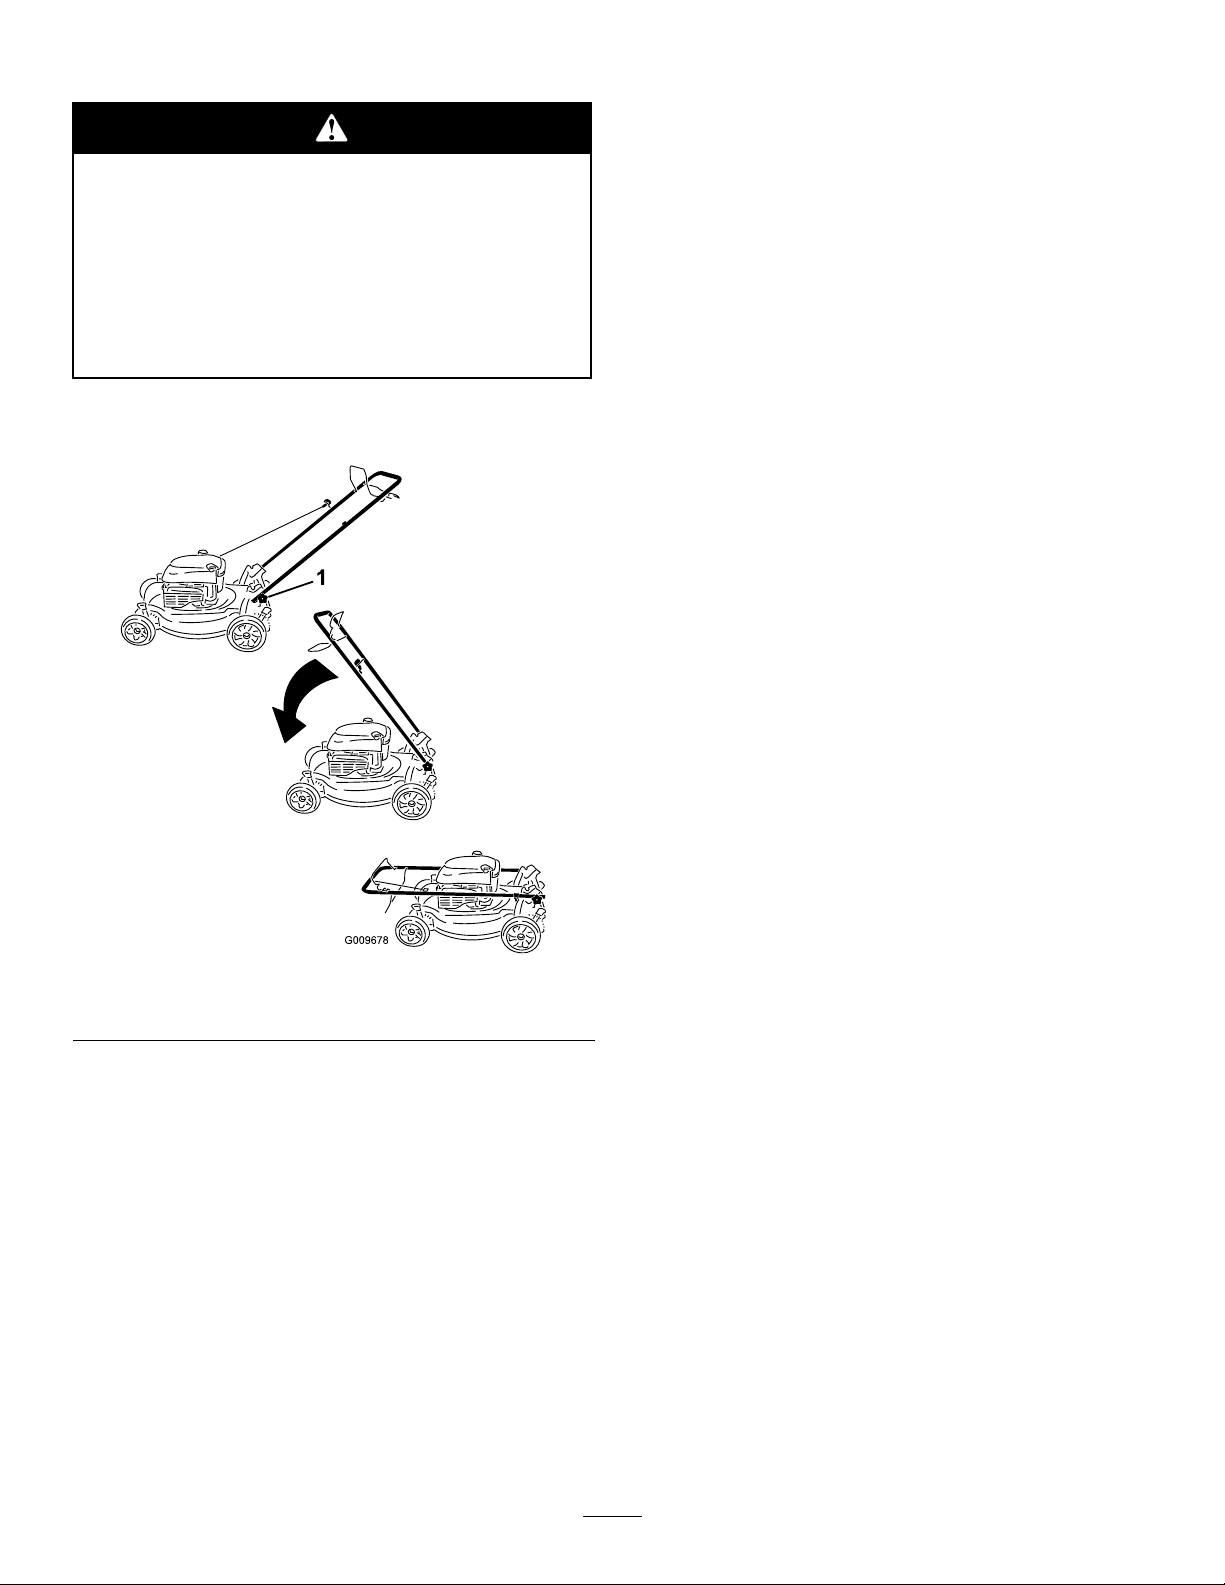
FoldingtheHandle
Foldingorunfoldingthehandleimproperlycan
damagethecables,causinganunsafeoperating
condition.
•Donotdamagethecableswhenfoldingor
unfoldingthehandle.
•Ifacableisdamaged,contactanAuthorized
ServiceDealer.
1.Loosenthehandleknobsuntilyoucanmovethe
handlefreely(Figure26).
Figure26
1.Handleknob(2)
2.MovethehandleforwardasshowninFigure26.
RemovingtheMowerfrom
Storage
1.Removethesparkplugandspintheenginerapidly
usingthestartertoblowtheexcessoilfromthe
cylinder.
2.Installthesparkplugandtightenitwithatorque
wrenchto15ft-lb(20N⋅m).
3.Connectthewiretothesparkplug.
14

International Distributor List
Distributor: Country: Phone Number:
Atlantis Su ve Sulama Sisstemleri Lt Turkey 90 216 344 86 74
Balama Prima Engineering Equip Hong Kong 852 2155 2163
B-Ray Corporation Korea 82 32 551 2076
Casco Sales Company Puerto Rico 787 788 8383
Ceres S.A Costa Rica 506 239 1138
CSSC Turf Equipment (pvt) Ltd Sri Lanka 94 11 2746100
Cyril Johnston & Co Northern Ireland 44 2890 813 121
Equiver Mexico 52 55 539 95444
Femco S.A. Guatemala 502 442 3277
G.Y.K. Company ltd. Japan 81 726 325 861
Geomechaniki of Athens Greece 30 10 935 0054
Guandong Golden Star China 86 20 876 51338
Hako Ground and Garden Sweden 46 35 10 0000
Hako Ground and Garden Norway 47 22 90 7760
Hayter Limited (U.K.) United Kingdom 44 1279 723 444
Hydroturf Int. Co Dubai United Arab Emirates 97 14 347 9479
Hydroturf Egypt LLC Egypt 202 519 4308
Ibea S.p.A. Italy 39 0331 853611
Irriamc Portugal 351 21 238 8260
Irrigation Products Int'l Pvt Ltd India 86 22 83960789
Jean Heybroek b.v. Netherlands 31 30 639 4611
Lely (U.K.) Limited United Kingdom 44 1480 226 800
Maquiver S.A. Colombia 57 1 236 4079
Maruyama Mfg. Co. Inc. Japan 81 3 3252 2285
Metra Kft Hungary 36 1 326 3880
Mountfield a.s. Czech Republic 420 255 704 220
Munditol S.A. Argentina 54 11 4 821 9999
Oslinger Turf Equipment SA Ecuador 593 4 239 6970
Oy Hako Ground and Garden Ab Finland 358 987 00733
Parkland Products Ltd New Zealand 64 3 34 93760
Prochaska & Cie Austria 43 1 278 5100
RT Cohen 2004 Ltd Israel 972 986 17979
Riversa Spain 34 9 52 83 7500
Roth Motorgerate GmBh & Co Germany 49 7144 2050
Sc Svend Carlsen A/S Denmark 45 66 109 200
Solvert S.A.S France 33 1 30 81 77 00
Spypros Stavrinides Limited Cyprus 357 22 434131
Surge Systems India Limited India 91 1 292299901
T-Markt Logistics Ltd Hungary 36 26 525 500
Toro Australia Australia 61 3 9580 7355
Toro Europe BVBA Belgium 32 14 562 960
374-0102 Rev D
 Loading...