

Page 1

FormNo.3376-660-ASMRevA
50cmMulching/RearBaggingLawnMower
ModelNo.29639—SerialNo.313000001andUp
Operator'sManual
Introduction
Thisrotary-blade,walk-behindlawnmowerisintended
tobeusedbyresidentialhomeownersorprofessional,
hiredoperators.Itisdesignedprimarilyforcuttinggrass
onwell-maintainedlawnsonresidentialorcommercial
properties.Itisnotdesignedforcuttingbrushorfor
agriculturaluses.
Readthisinformationcarefullytolearnhowtooperateand
maintainthismachineproperlyandtoavoidbothinjuryand
damagetothemachine.Youareresponsibleforoperatingthe
machineproperlyandsafely.
YoumaycontactTorodirectlyatwww .Toro.comforproduct
andaccessoryinformation,helpndingadealer,ortoregister
yourproduct.
Wheneveryouneedservice,genuineToroparts,oradditional
information,contactanAuthorizedServiceDealerorToro
CustomerServiceandhavethemodelandserialnumbersof
yourmachineready.Figure1identiesthelocationofthe
modelandserialnumbersonthemachine.Writethenumbers
inthespaceprovided.
Figure2
1.Safetyalertsymbol
Thismanualuses2wordstohighlightinformation.
Importantcallsattentiontospecialmechanicalinformation
andNoteemphasizesgeneralinformationworthyofspecial
attention.
ThisproductcomplieswithallrelevantEuropeandirectives.
Fordetails,seetheseparateproductspecicDeclarationof
Conformity(DOC)sheet.
Formodelswithstatedenginehorsepower,thegross
horsepoweroftheenginewaslaboratoryratedbytheengine
manufacturerinaccordancewithSAEJ1940.Ascongured
tomeetsafety,emission,andoperatingrequirements,the
actualenginehorsepoweronthisclassoflawnmowerwill
besignicantlylower.
Donottamperwiththeenginecontrolsoralterthegovernor
speed;doingsomaycreateanunsafeconditionresultingin
personalinjury.
Figure1
1.Modelandserialnumberplate
ModelNo.
SerialNo.
Thismanualidentiespotentialhazardsandhassafety
messagesidentiedbythesafetyalertsymbol(Figure2),
whichsignalsahazardthatmaycauseseriousinjuryordeath
ifyoudonotfollowtherecommendedprecautions.
Contents
Introduction..................................................................1
GeneralLawnMowerSafety.....................................2
SoundPressure.......................................................3
SoundPower..........................................................3
Vibration,Hand/arm...............................................3
SafetyandInstructionalDecals.................................4
Setup............................................................................5
1InstallingtheHandle.............................................5
2InstallingtheRecoil-starterRopeintheRope
Guide.................................................................5
3FillingtheEnginewithOil......................................5
ProductOverview..........................................................6
Specications.........................................................6
Operation.....................................................................7
FillingtheFuelTank................................................7
CheckingtheEngineOilLevel..................................7
AdjustingtheCuttingHeight....................................8
StartingtheEngine..................................................8
UsingtheSelf-propelDrive.......................................9
StoppingtheEngine................................................9
RecyclingtheClippings............................................9
BaggingtheClippings..............................................9
©2012—TheToro®Company
8111LyndaleAvenueSouth
Bloomington,MN55420
Registeratwww.Toro.com.
OriginalInstructions(EN)
PrintedintheUSA
AllRightsReserved
*3376-660-ASM*A
Page 2

DischargingtheClippings........................................10
OperatingTips......................................................10
Maintenance.................................................................12
RecommendedMaintenanceSchedule(s)......................12
PreparingforMaintenance.......................................12
ReplacingtheAirCleaner........................................12
ChangingtheEngineOil.........................................13
ServicingtheSparkPlug..........................................14
ReplacingtheBlade................................................14
AdjustingtheSelf-propelDriveCable........................15
CleaningundertheMachineHousing........................15
Storage........................................................................16
PreparingtheMachineforStorage............................16
FoldingtheHandle.................................................16
RemovingtheMachinefromStorage.........................16
Gasoline
WARNING
Gasolineishighlyammable.Takethefollowing
precautions.
•Storefuelincontainersspecicallydesignedfor
thispurpose.
•Refueloutdoorsonlyanddonotsmokewhile
refueling.
•Addfuelbeforestartingtheengine.Never
removethecapofthefueltankoraddgasoline
whiletheengineisrunningorwhentheengine
ishot.
Safety
Improperlyusingormaintainingthismowercanresult
ininjury.T oreducethepotentialforinjury,complywith
thesesafetyinstructions.
Torodesignedandtestedthismowerforreasonablysafe
service;however,failuretocomplywiththefollowing
instructionsmayresultinpersonalinjury.
Toensuremaximumsafetyandbestperformance,
andtogainknowledgeoftheproduct,itisessential
thatyouandanyotheroperatorofthemowerread
andunderstandthecontentsofthismanualbeforethe
engineiseverstarted.Payparticularattentiontothe
safetyalertsymbol(Figure2)whichmeansCaution,
Warning,orDanger—“personalsafetyinstruction.”
Readandunderstandtheinstructionbecauseithasto
dowithsafety.Failuretocomplywiththeinstruction
mayresultinpersonalinjury.
GeneralLawnMowerSafety
ThefollowinginstructionshavebeenadaptedfromEN836.
Thiscuttingmachineiscapableofamputatinghandsandfeet
andthrowingobjects.Failuretoobservethefollowingsafety
instructionscouldresultinseriousinjuryordeath.
Training
•Readtheinstructionscarefully.Befamiliarwiththe
controlsandtheproperuseoftheequipment.
•Neverallowchildrenorpeopleunfamiliarwiththese
instructionstousethemower.Localregulationscan
restricttheageoftheoperator.
•Keepinmindthattheoperatororuserisresponsiblefor
accidentsorhazardsoccurringtootherpeopleortheir
property.
•Ifgasolineisspilled,donotattempttostartthe
enginebutmovethemachineawayfromthe
areaofspillageandavoidcreatinganysourceof
ignitionuntilgasolinevaporshavedissipated.
•Replaceallfueltankandcontainercapssecurely.
Preparation
•Whilemowing,alwayswearsubstantialfootwearandlong
trousers.Donotoperatethemachinewhenbarefootor
wearingopensandals.
•Thoroughlyinspecttheareawherethemachineistobe
used,andremoveallstones,sticks,wires,bones,and
otherforeignobjects.
•Beforeusing,alwaysvisuallyinspecttoseethatguardsand
safetydevices,suchasdeectorsand/orgrasscatchers,
areinplaceandworkingcorrectly.
•Beforeusing,alwaysvisuallyinspecttoseethatthe
blades,bladebolts,andcutterassemblyarenotwornor
damaged.Replacewornordamagedbladesandboltsin
setstopreservebalance.
Starting
Starttheenginecarefully,accordingtoinstructionsandwith
feetwellawayfromtheblade(s)andnotinfrontofthe
dischargechute.
Operation
•Nevermowwhilepeople,especiallychildren,orpetsare
nearby.
•Mowonlyindaylightoringoodarticiallight.
•Stayalertforholesintheterrainandotherhiddenhazards.
•Donotputhandsorfeetnearorunderrotatingparts.
Keepclearofthedischargeopeningatalltimes.
•Understandexplanationsforallpictogramsusedonthe
mowerorintheinstructions.
•Neverpickuporcarrythemachinewhiletheengineis
running.
2
Page 3

•Useextremecautionwhenreversingorpullingthemower
towardsyou.
•Walk;neverrun.
•Slopes:
–Donotmowonexcessivelysteepslopes.
–Exerciseextremecautionwhenonslopes.
–Mowacrossthefaceofslopes,neverupanddown,
andexerciseextremecautionwhenchangingdirection
onslopes.
–Alwaysbesureofyourfootingonslopes.
•Reducespeedonslopesandinsharpturnstoprevent
overturningorlossofcontrol.
•Stopthebladeifthemachinehastobetiltedfor
transportationwhencrossingsurfacesotherthangrass
andwhentransportingthemachine.
•Donotoperatetheengineinaconnedspacewhere
dangerouscarbonmonoxidefumescancollect.
•Stoptheengine
•Checkgrasscatchercomponentsandthedischargeguard
frequentlyandreplacewithmanufacturer'srecommended
parts,whennecessary.
•Replacewornordamagedpartsforsafety.
•Replacefaultysilencers.
•Ifthefueltankhastobedrained,dothisoutdoors.
•Donotchangetheenginegovernorsettingsoroverspeed
theengine.Operatinganengineatexcessivespeedcan
increasethehazardofpersonalinjury.
•Onmultibladedmachines,usecaution,asrotatingone
blademaycauseotherstorotate.
•Becarefulduringadjustmentofthemowertoprevent
entrapmentofthengersbetweenmovingbladesand
xedpartsofthemower.
•Toensurethebestperformanceandsafety,
purchaseonlygenuineTororeplacementpartsand
accessories.Donotuse
theymaycauseasafetyhazard.
willt
partsandaccessories;
–wheneveryouleavethemachine.
–beforerefueling.
–beforeremovingthegrasscatcher.
–beforemakingheightadjustmentunlessadjustment
canbemadefromtheoperator'sposition.
•Stoptheengineanddisconnectthespark-plugwire
–beforeclearingblockagesoruncloggingthechute.
–beforechecking,cleaning,orservicingthemachine.
–afterstrikingaforeignobject;inspectthemachine
fordamageandmakerepairsbeforerestartingand
operatingthemachine.
–ifthemachinestartstovibrateabnormally(check
immediately).
•Lightningcancausesevereinjuryordeath.Ifyousee
lightningorhearthunderinthearea,donotoperatethe
machine;seekshelter.
•Watchoutfortrafcwhencrossingornearroadways.
MaintenanceandStorage
SoundPressure
Thisunithasasoundpressurelevelattheoperator’searof
90dBA,whichincludesanUncertaintyValue(K)of1dBA.
Thesoundpressurelevelwasdeterminedaccordingtothe
proceduresoutlinedinEN836.
SoundPower
Thisunithasaguaranteedsoundpowerlevelof98dBA,
whichincludesanUncertaintyValue(K)of1dBA.Thesound
powerlevelwasdeterminedaccordingtotheprocedures
outlinedinISO11094.
Vibration,Hand/arm
Thisunitdoesnotexceedhand/armvibrationlevelsof3.6
2
m/s
fortherighthandand3.6m/s
eachincludinganUncertaintyValue(K)of1.8m/s
measuredvaluesweredeterminedaccordingtotheprocedures
outlinedinEN836.
2
forthelefthand,
2
.The
•Keepallnuts,bolts,andscrewstighttobesurethe
machineisinsafeworkingcondition.
•Donotusepressurecleaningequipmentonthemachine.
•Neverstorethemachinewithgasolineinthetankand
insideabuildingwherefumescanreachanopename
orspark.
•Allowtheenginetocoolbeforestoringinanyenclosure.
•Toreducetheriskofre,keeptheengine,silencer,
batterycompartment,andgasolinestorageareafreeof
grass,leaves,orexcessivegrease.
3
Page 4
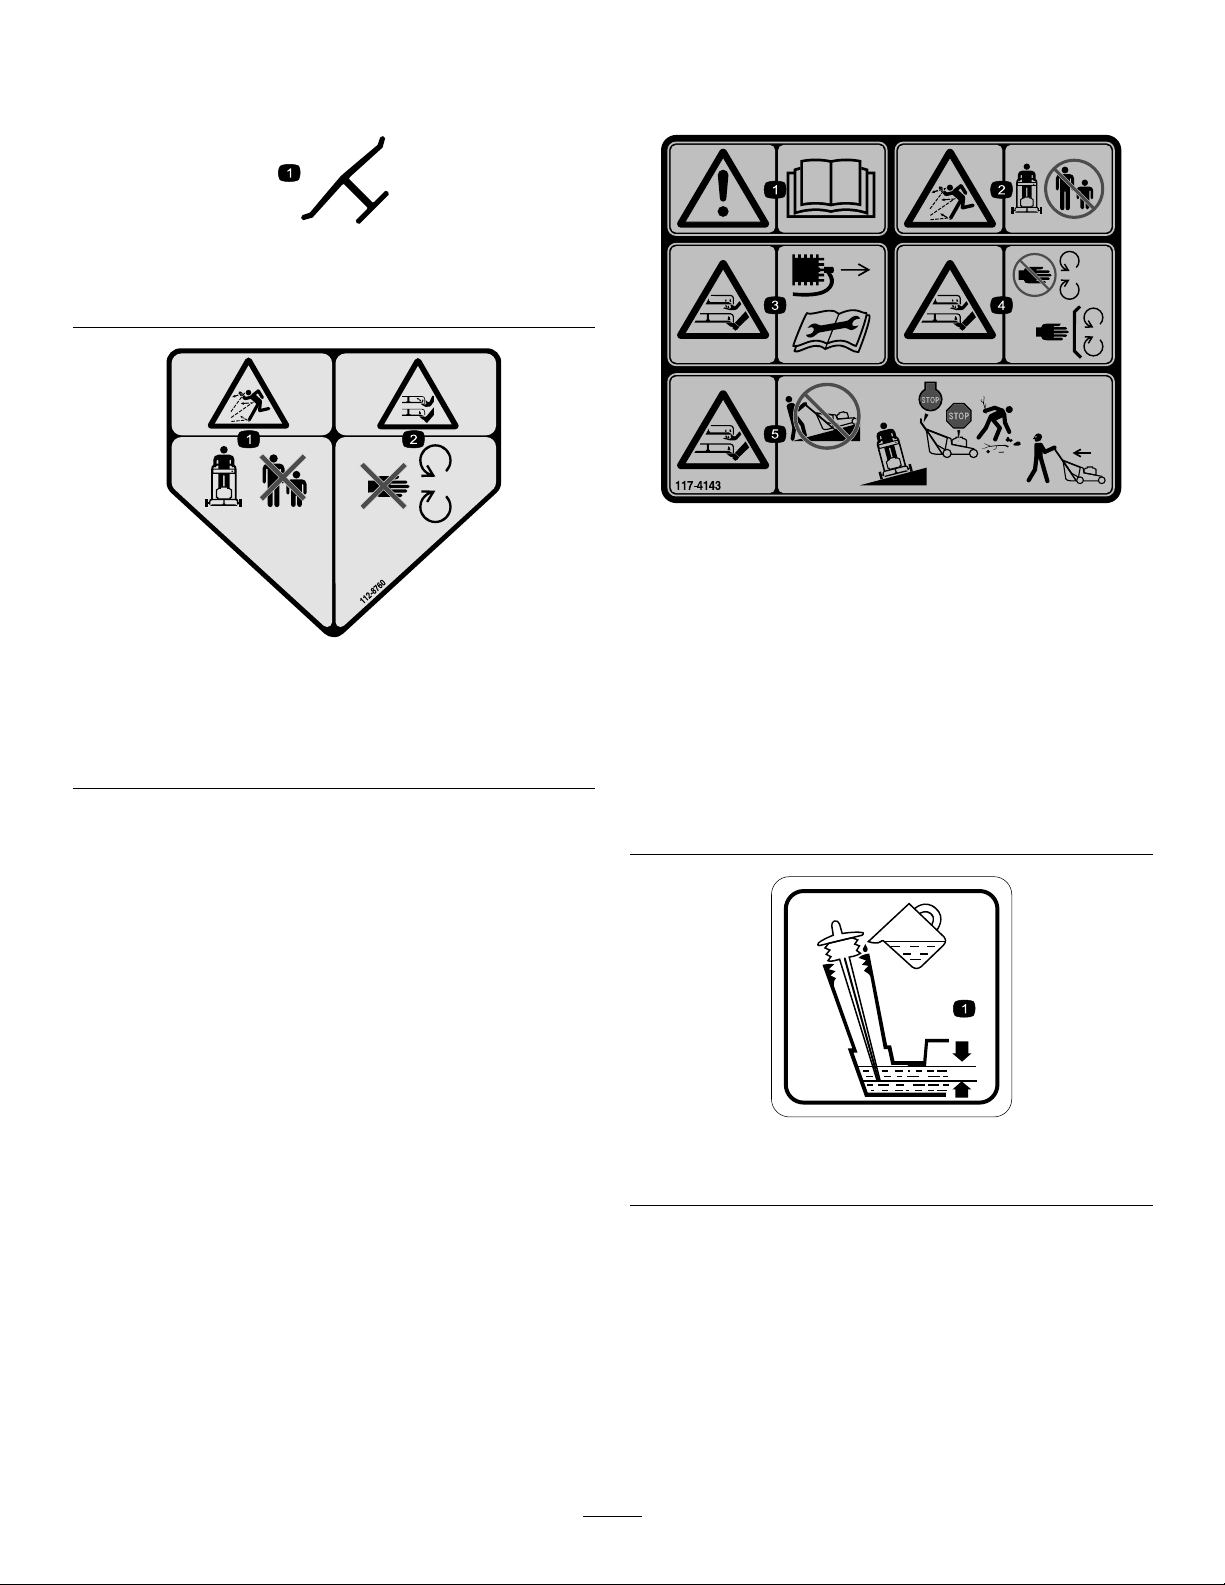
SafetyandInstructionalDecals
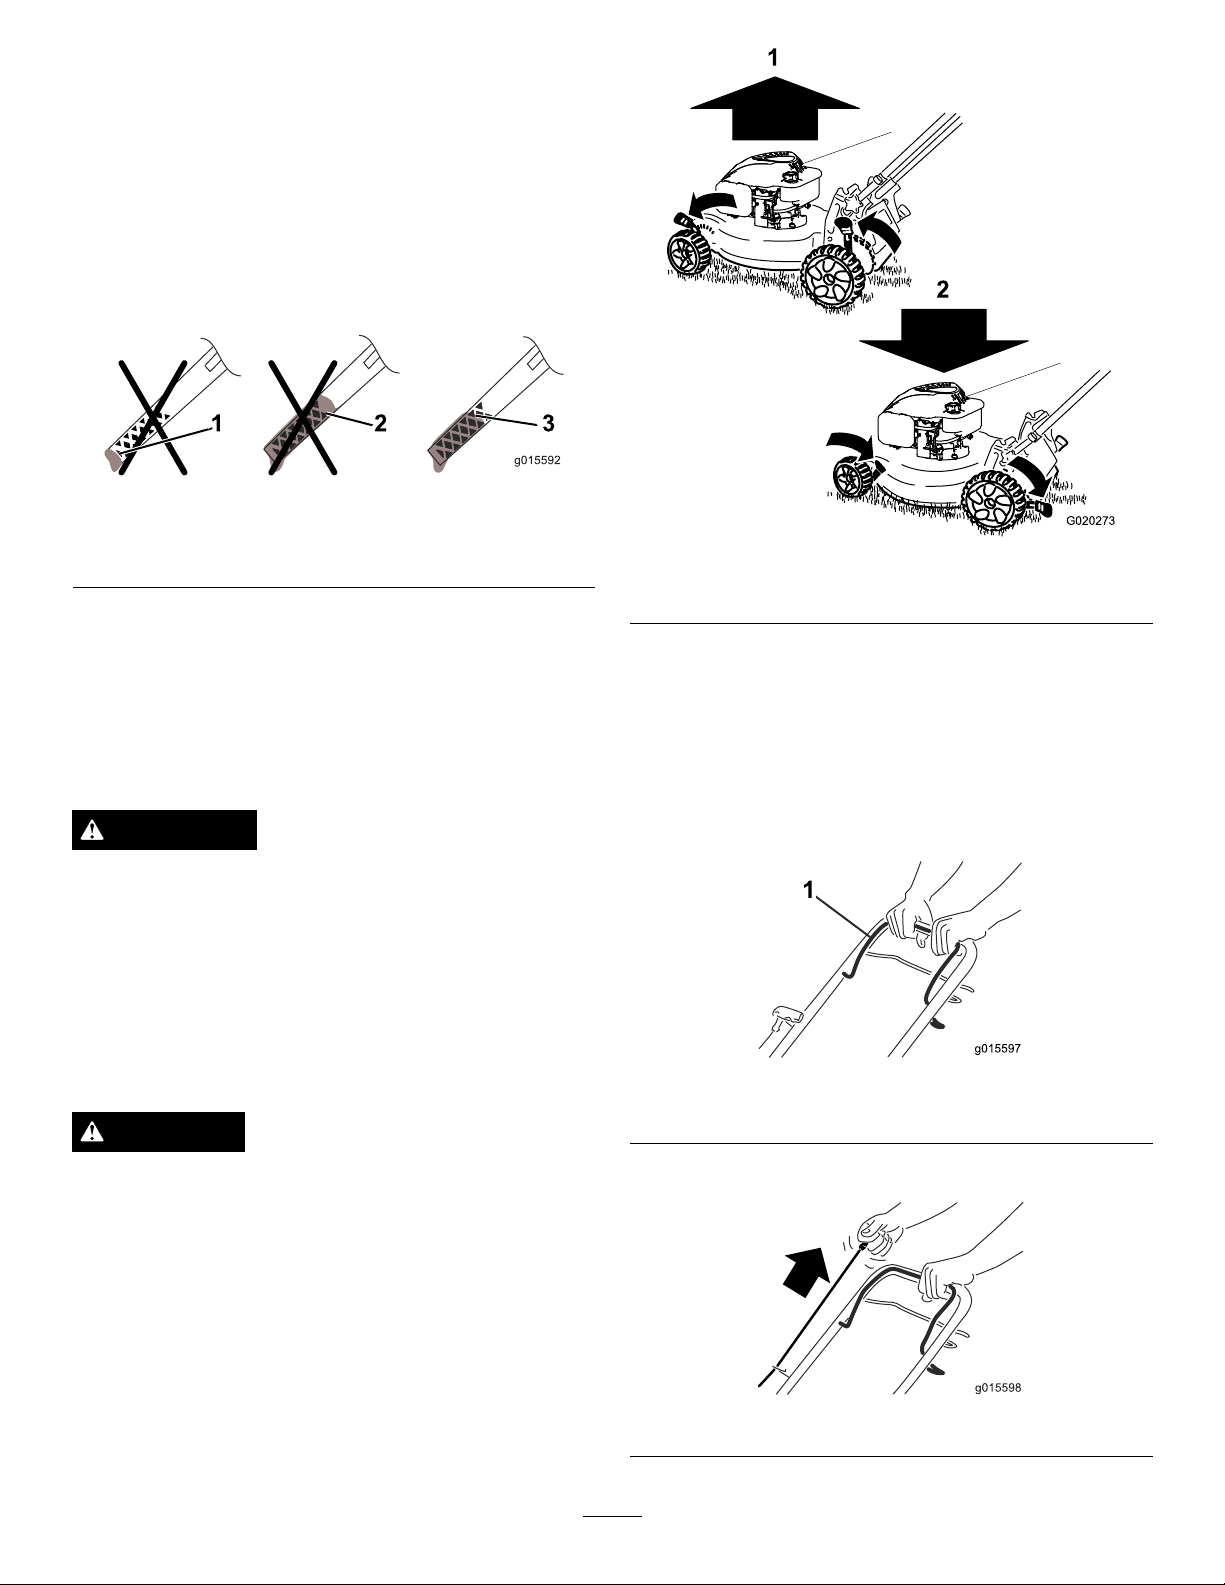
Important:Safetyandinstructiondecalsarelocatednearareasofpotentialdanger.Replacedamageddecals.
Manufacturer'sMark
1.Indicatesthebladeisidentiedasapartfromtheoriginal
machinemanufacturer.
117-4143
1.Warning—readtheOperator'sManual.
2.Thrownobjecthazard—keepbystandersasafedistance
fromthemachine.
3.Cutting/dismembermenthazardofhandorfoot,mower
112-8760
1.Thrownobjecthazard—keepbystandersasafedistance
fromthemachine.
2.Cutting/dismembermentofhandorfoot—stayawayfrom
movingparts.
blade—disconnectthespark-plugwireandreadthe
instructionsbeforeservicingorperformingmaintenance.
4.Cutting/dismembermenthazardofhandorfoot,mower
blade—stayawayfrommovingpartsandkeepallguards
andshieldsinplace.
5.Cutting/dismembermenthazardofhandorfoot,mower
blade—donotmowupanddownslopes,onlymowacross;
stopthemowerandengine,pickupdebrisbeforeoperating;
lookbehindanddownwhenreversing.
1.Optimumoillevel
4
117-9368
Page 5
Setup
2
1
InstallingtheHandle
NoPartsRequired
Procedure
WARNING
Foldingorunfoldingthehandleimproperlycan
damagethecables,causinganunsafeoperating
condition.
•Donotdamagethecableswhenfoldingor
unfoldingthehandle.
•Ifacableisdamaged,contactanAuthorized
ServiceDealer.
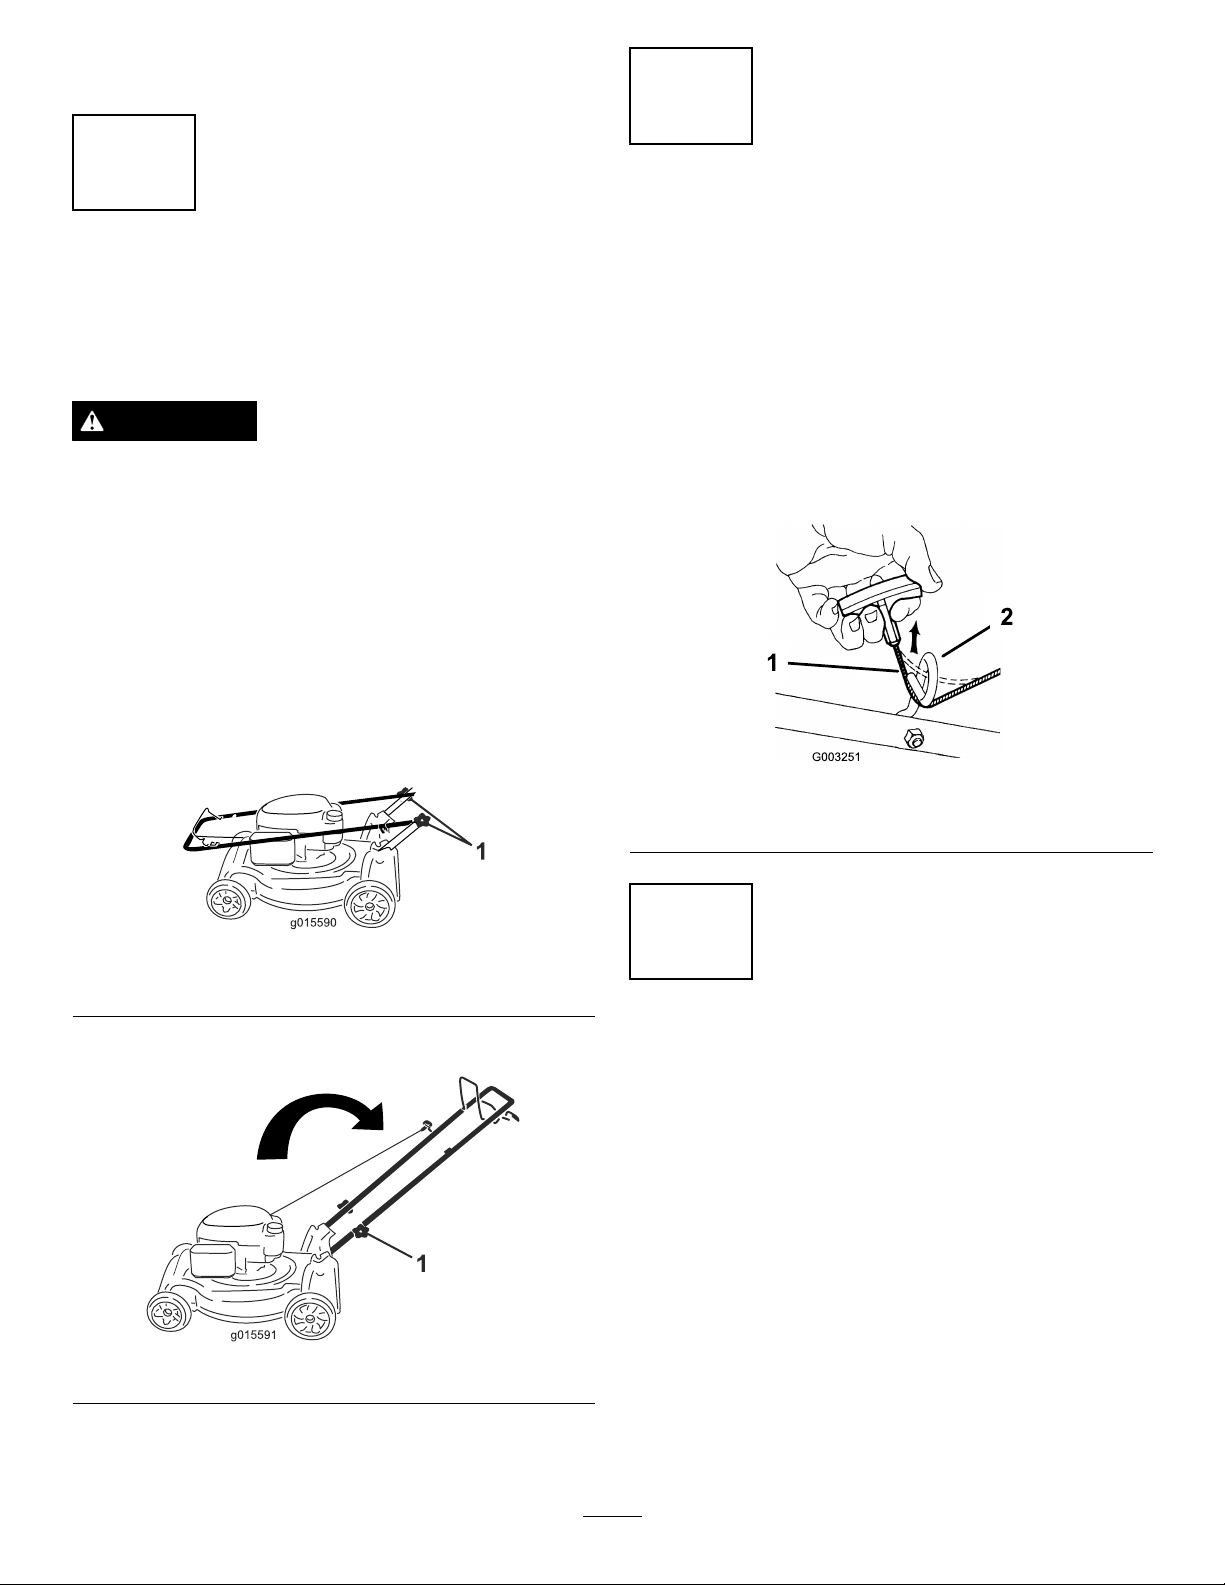
1.Loosenthehandleknobs(Figure3).
Important:Routethecablestotheoutsideofthe
handleasyouinstallthehandle.
InstallingtheRecoil-starter RopeintheRopeGuide
NoPartsRequired
Procedure
Important:Youmustinstalltherecoil-starterropein
theropeguide.
Holdtheblade-controlbartotheupperhandleandpullthe
recoil-starterropethroughtheropeguideonthehandle
(Figure5).
Figure5
Figure3
1.Handleknob(2)
2.Movethehandletotheoperatingposition(Figure4).
Figure4
3.Tightenthehandleknobsrmlybyhand(Figure3).
1.Recoil-starterrope2.Ropeguide
3
FillingtheEnginewithOil
NoPartsRequired
Procedure
Important:Thismachinedoesnotcomewithoilinthe
engine.Beforestartingtheengine,lltheenginewith
oil.
1.Movethemachinetoalevelsurface.
2.Removethedipstick(Figure6)andpourabout3/4of
thecrankcasecapacityofoilintotheoil-lltube.
Note:Max.ll:0.59L(20oz),type:SAE30orSAE
10W-30detergentoilwithanAPIserviceclassication
ofSF,SG,SH,SJ,SL,orhigher.
5
Page 6
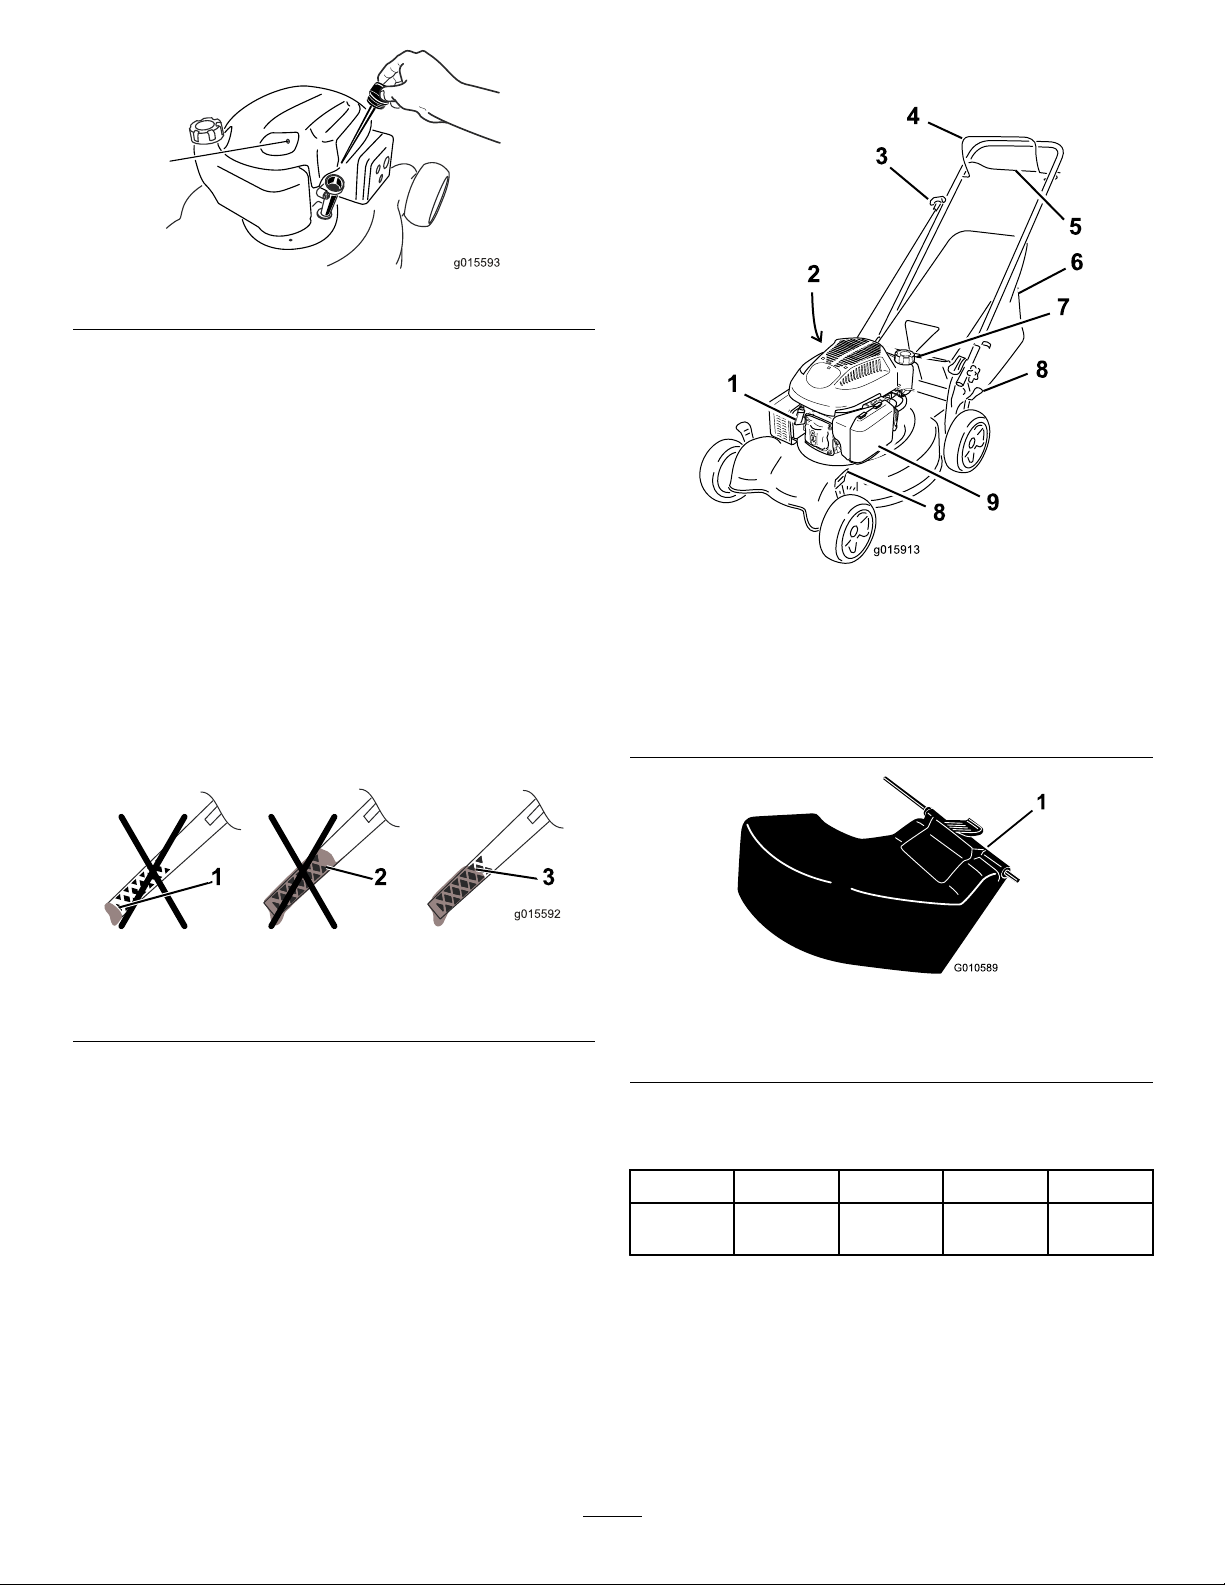
Figure6
3.Wipeoffthedipstickendwithacleancloth.
4.Insertthedipstickintotheoil-lltube,butdonot
screwitin.
5.Removethedipstickandreadtheoillevelonthe
dipstick(Figure7).
•Iftheoillevelistoolow,slowlypourasmall
amountofoilintotheoil-lltube,wait3minutes,
andthenrepeatsteps3through5untiltheoillevel
iscorrect.
•Iftheoillevelistoohigh,draintheexcessoiluntil
theoilleveliscorrect.Todraintheexcessoil,refer
toChangingtheEngineOil(page13).
Important:Iftheoillevelinthecrankcaseis
toolowortoohighandyouruntheengine,
youmaydamagetheengine.
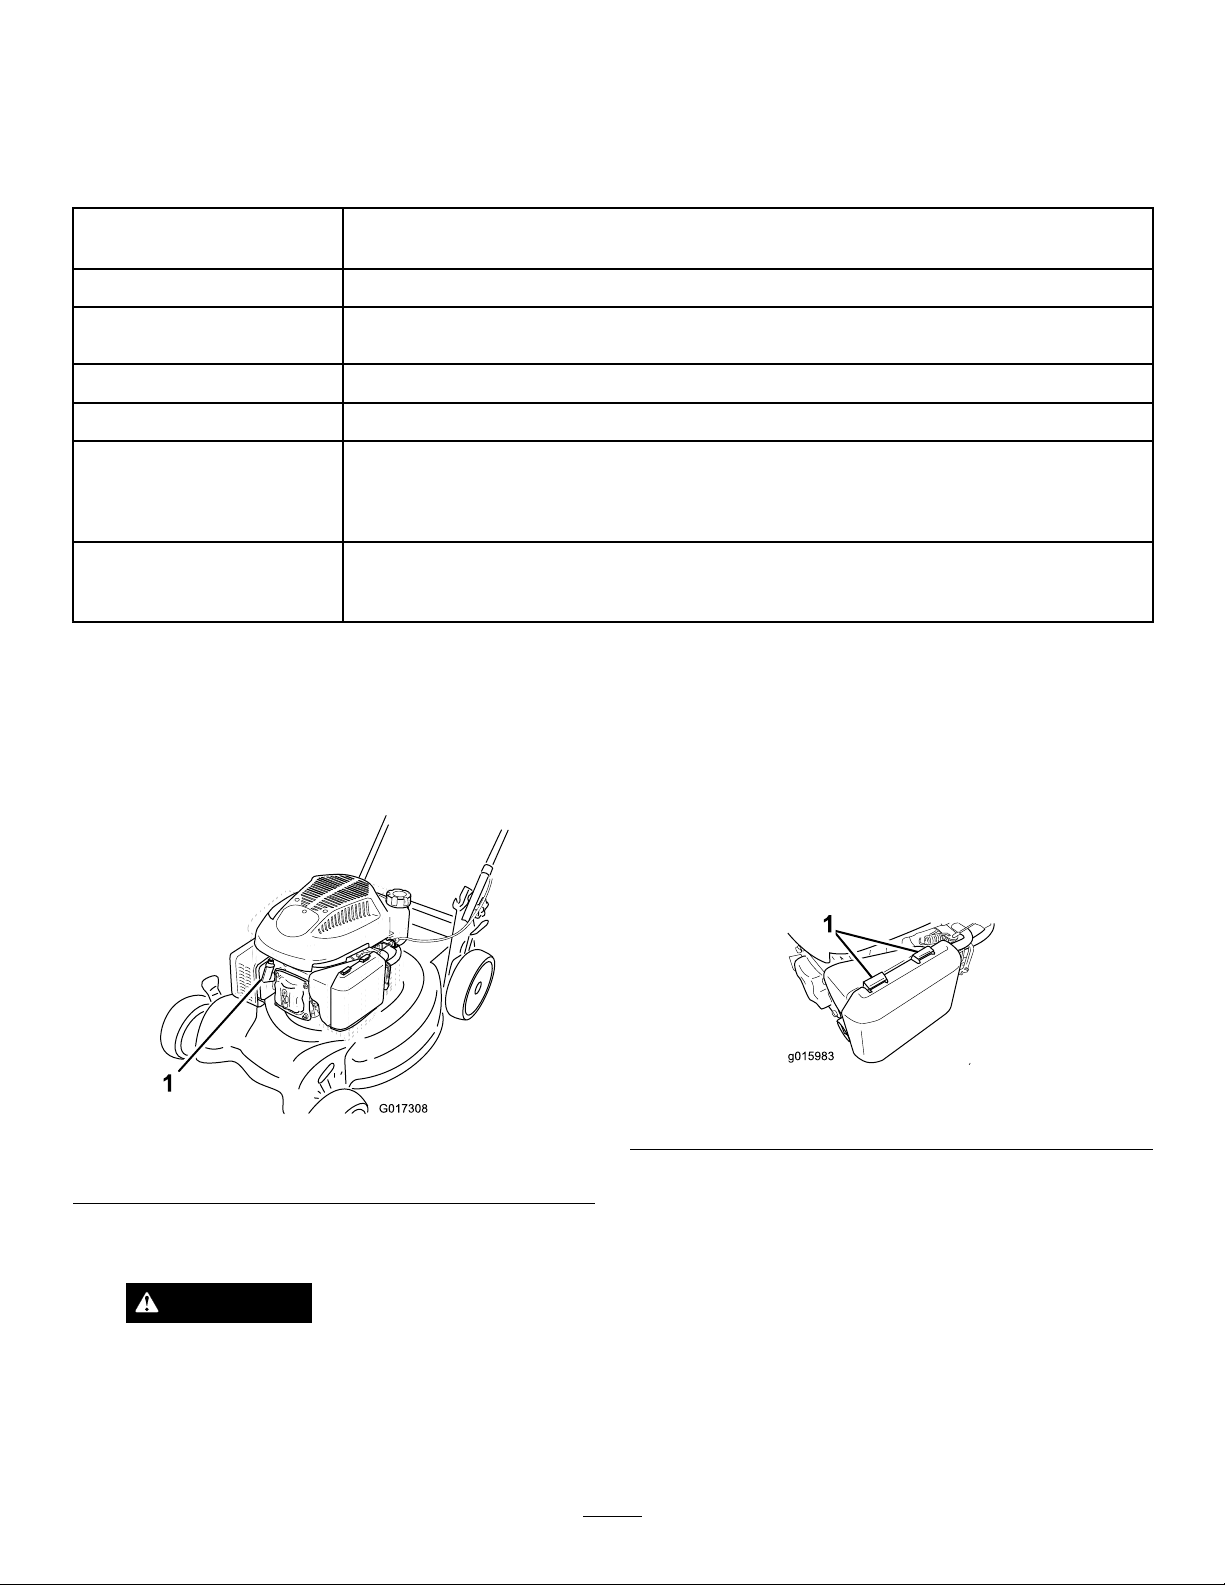
ProductOverview
Figure8
1.Sparkplug6.Grassbag
2.Oilll/dipstick(notshown)
3.Recoil-starthandle
4.Blade-controlbar
5.Self-propeldrivebar
7.Fuel-tankcap
8.Cutting-heightlevers(4)
9.Airlter
Figure7
1.Oillevelistoolow3.Oilleveliscorrect
2.Oillevelistoohigh
6.Installthedipstickintotheoil-lltubesecurely.
Important:
operatinghours
Changetheengineoilaftertherst5
;changeityearlythereafter;refer
toChangingtheEngineOil(page13).
Figure9
1.Rear-dischargedeector(optionalattachment;Toropart
89964)
Specications
ModelWeightLengthWidthHeight
2963934kg
(75lb)
144cm
(57inches)
54cm
(21inches)
145cm
(39inches)
6
Page 7
Operation
G020479
1
FillingtheFuelTank
DANGER
Gasolineisextremelyammableandexplosive.A
reorexplosionfromgasolinecanburnyouand
others.
•Topreventastaticchargefromignitingthe
gasoline,placethecontainerand/ormachine
directlyonthegroundbeforelling,notina
vehicleoronanobject.
•Fillthetankoutdoorswhentheengineiscold.
Wipeupspills.
•Donothandlegasolinewhensmokingoraround
anopenameorsparks.
•Storegasolineinanapprovedfuelcontainer,out
ofthereachofchildren.
•Forbestresults,useonlyclean,fresh,unleadedgasoline
withanoctaneratingof87orhigher((R+M)/2rating
method).
•Oxygenatedfuelwithupto10%ethanolor15%MTBE
byvolumeisacceptable.
•Donotuseethanolblendsofgasoline,suchasE15
orE85,withmorethan10%ethanolbyvolume.
Performanceproblemsand/orenginedamagemayresult,
whichmaynotbecoveredunderwarranty.
•Donotusegasolinecontainingmethanol.
•Donotstorefueleitherinthefueltankorinfuel
containersoverthewinterunlessfuelstabilizerhasbeen
addedtothefuel.
•Donotaddoiltogasoline.
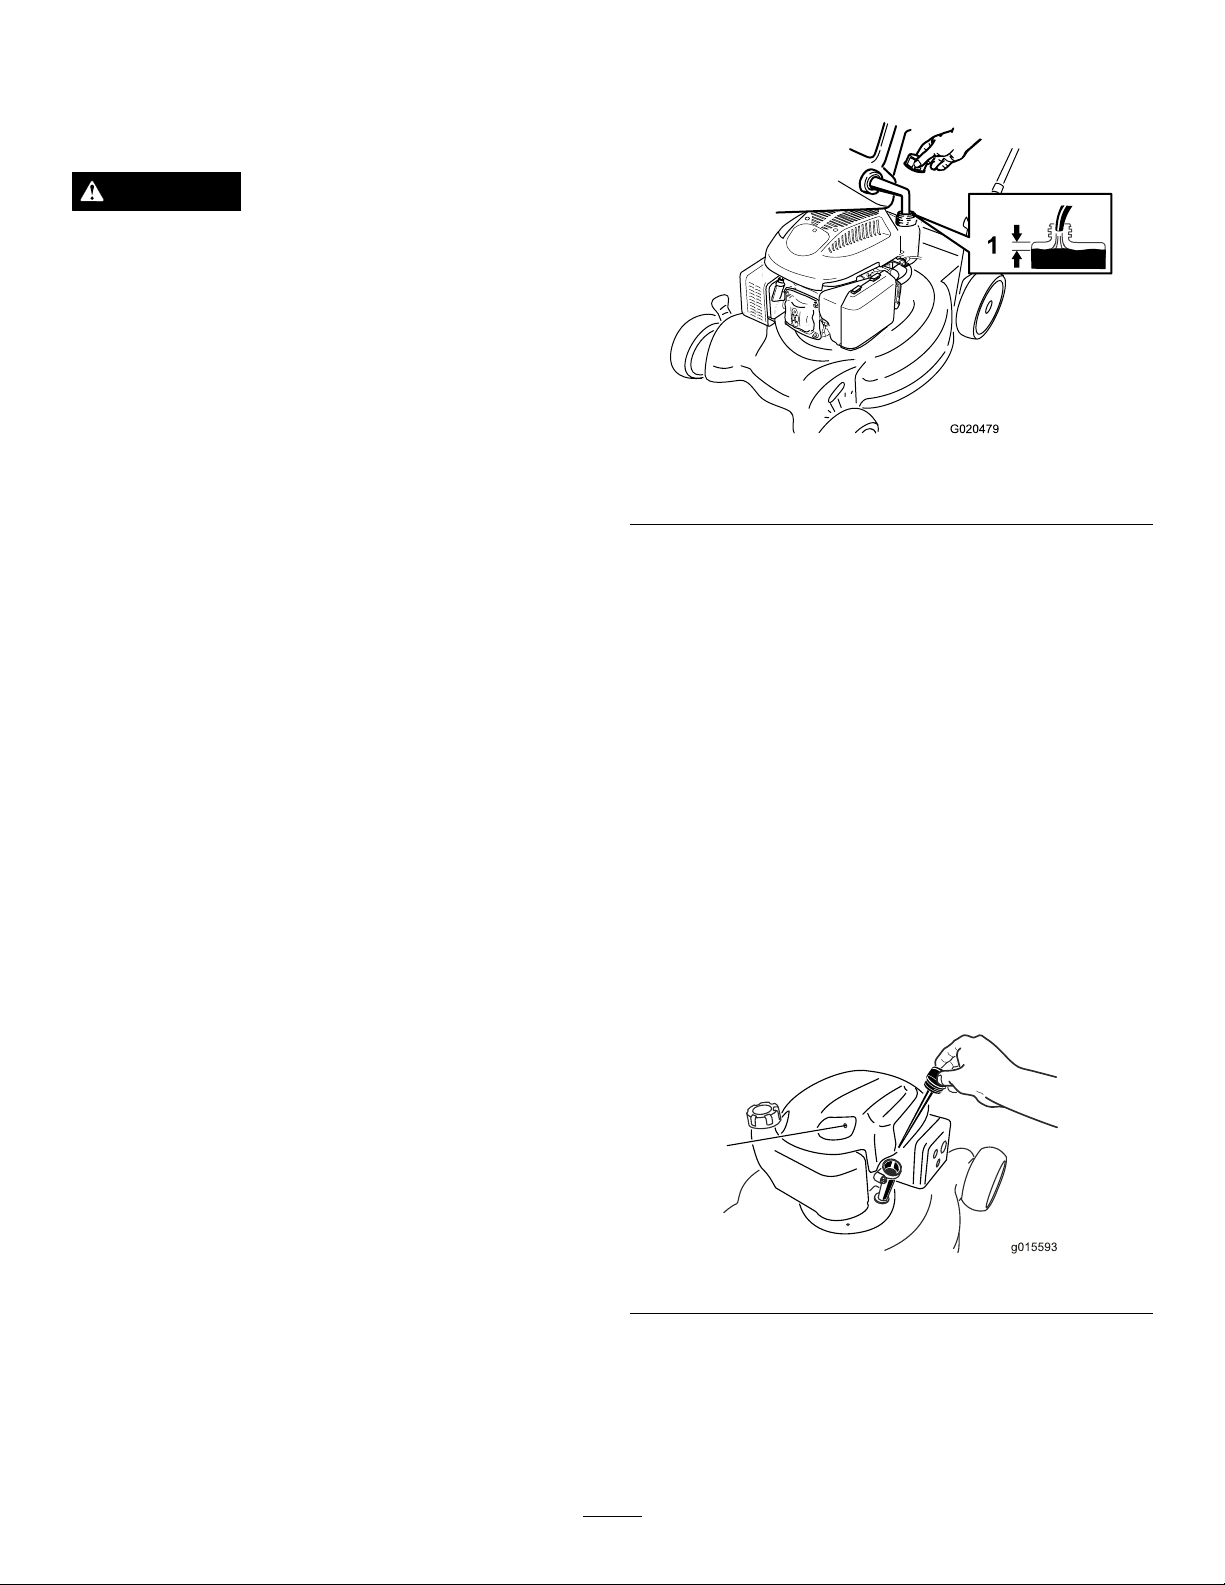
Figure10
1.6mm(1/4inch)
2.Fillthefueltank,leavingatleast6mm(1/4inch)from
thebottomoftheneckemptytoallowthegasoline
roomtoexpand.
3.Installthefueltankcapandtightenitsecurelybyhand.
CheckingtheEngineOilLevel
ServiceInterval:Beforeeachuseordaily
Important:Thismachinedoesnotcomewithoilinthe
engine.Beforestartingtheengine,lltheenginewith
oil.
1.Movethemachinetoalevelsurface.
2.Removethedipstick(Figure11)andpourabout3/4of
thecrankcasecapacityofoilintotheoil-lltube.
Note:Max.ll:0.59L(20oz),type:SAE30orSAE
10W-30detergentoilwithanAPIserviceclassication
ofSF,SG,SH,SJ,SL,orhigher.
Important:Toreducestartingproblems,addafuel
stabilizertothefuelallseason,mixingitwithgasoline
lessthan30daysold.
1.Cleanaroundthefueltankcap,andremovethecap
fromthetank(Figure10).
Figure11
3.Wipeoffthedipstickendwithacleancloth.
4.Insertthedipstickintotheoil-lltube,butdonot
screwitin.
5.Removethedipstickandreadtheoillevelonthe
dipstick(Figure12).
7
Page 8
•Iftheoillevelistoolow,slowlypourasmall
G020273
amountofoilintotheoil-lltube,wait3minutes,
andthenrepeatsteps3through5untiltheoillevel
iscorrect.
•Iftheoillevelistoohigh,draintheexcessoiluntil
theoilleveliscorrect.Todraintheexcessoil,refer
toChangingtheEngineOil(page13).
Important:Iftheoillevelinthecrankcaseis
toolowortoohighandyouruntheengine,
youmaydamagetheengine.
Figure12
1.Oillevelistoolow3.Oilleveliscorrect
2.Oillevelistoohigh
6.Installthedipstickintotheoil-lltubesecurely.
Figure13
1.Raisingthemachine2.Loweringthemachine
Important:
operatinghours
toChangingtheEngineOil(page13).
Changetheengineoilaftertherst5
;changeityearlythereafter;refer
AdjustingtheCuttingHeight
WARNING
Adjustingthecuttingheightmaybringyouinto
contactwiththemovingblade,causingserious
injury.
•Stoptheengineandwaitforallmovingparts
tostop.
•Donotputyourngersunderthehousingwhen
adjustingthecuttingheight.
CAUTION
Iftheenginehasbeenrunning,themuferwillbe
hotandcanseverelyburnyou.Keepawayfromthe
hotmufer.
Note:Thecutting-heightsettingsare25mm(1inch);38
mm(1-1/2inch);51mm(2inches);64mm(2-1/2inches);76
mm(3inches);89mm(3-1/2inches);and102mm(4inches).
StartingtheEngine
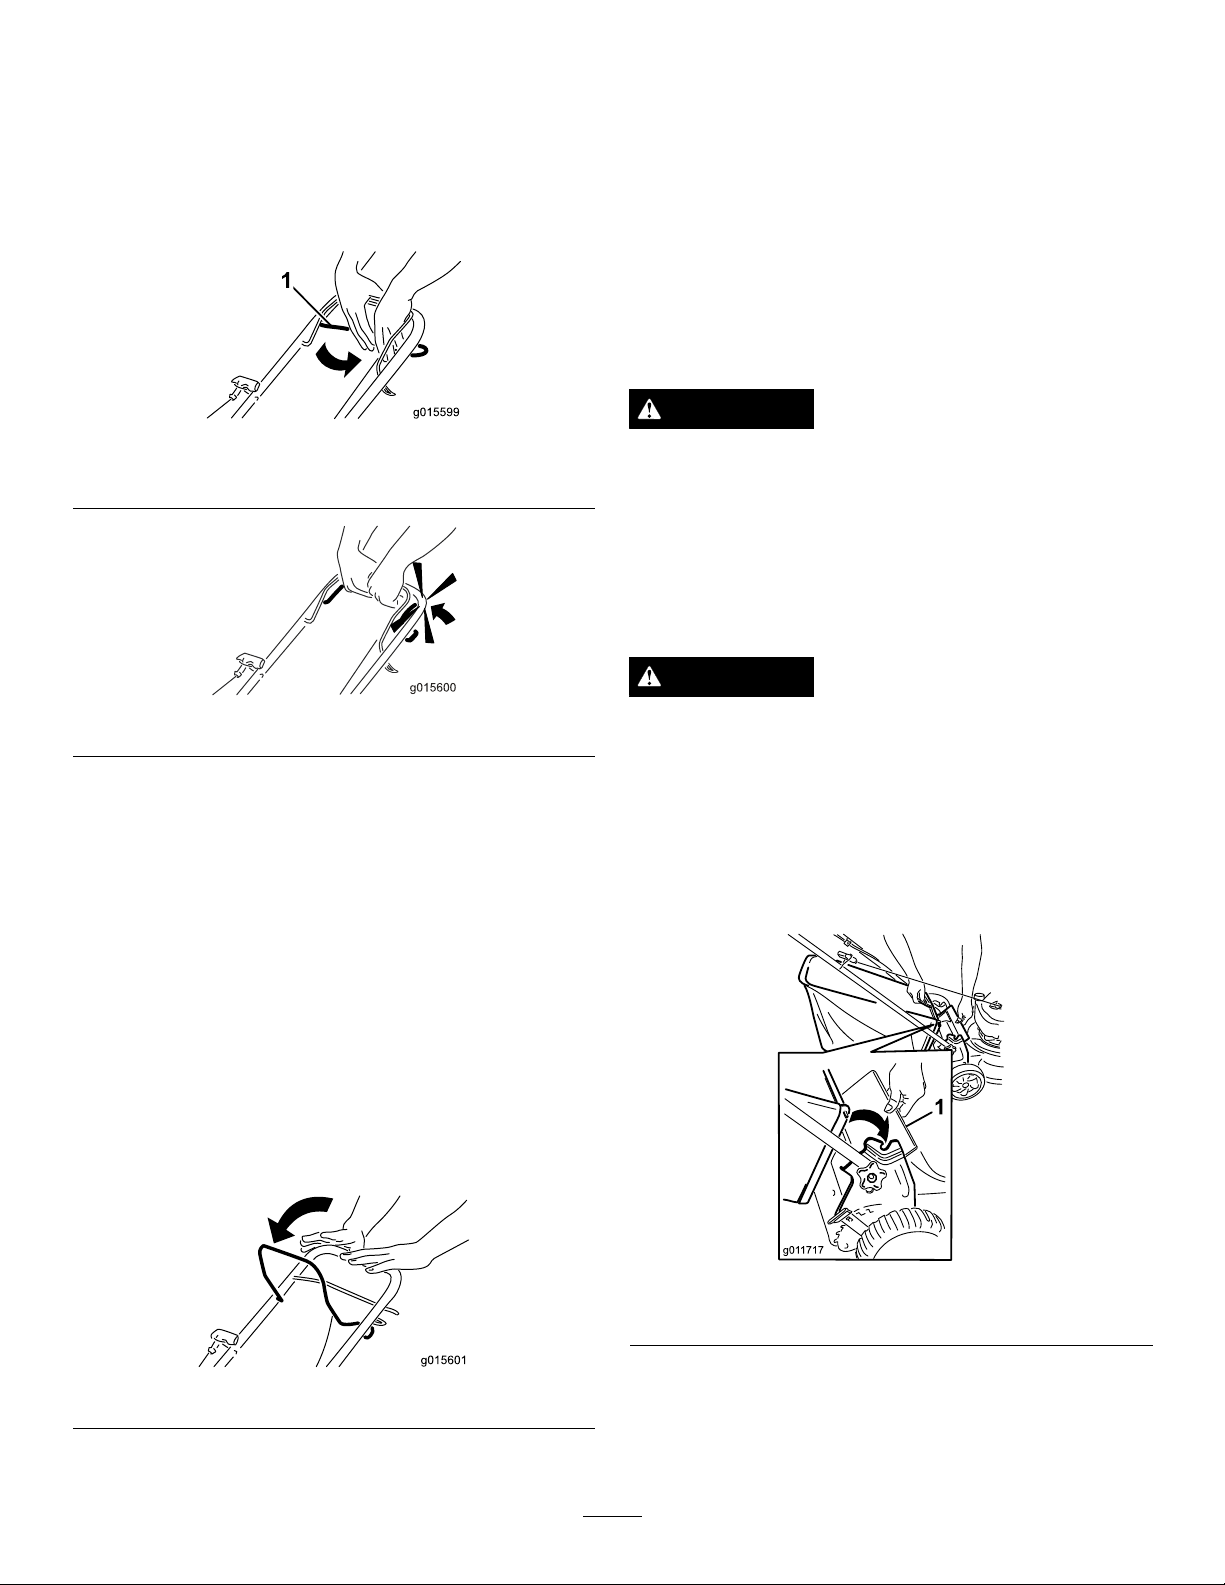
1.Holdtheblade-controlbar(Figure14)againstthe
handle.
Figure14
1.Bladecontrolbar
2.Pulltherecoil-starthandle(Figure15).
Adjustthecuttingheightasdesired.Setallthewheelstothe
sameheight.
Note:Toraisethemachine,moveallthecutting-height
leversforward;tolowerthemachine,movetheallthe
cutting-heightleversrearward(Figure13).
Figure15
8
Page 9
Note:Ifthemachinedoesnotstartafterseveral
attempts,contactanAuthorizedServiceDealer.
UsingtheSelf-propelDrive
Tooperatetheself-propeldrive,squeezetheself-propeldrive
bar(Figure16)towardthehandleandholdit(Figure17).
Figure16
1.Self-propeldrivebar
RecyclingtheClippings
Thismachinecomesfromthefactoryreadytorecyclethe
grassandleafclippingsbackintothelawn.
Ifthegrassbagisonthemachine,removeit;referto
RemovingtheGrassBag(page10)beforerecyclingthe
clippings.
BaggingtheClippings
Usethegrassbagwhenyouwanttocollectgrassandleaf
clippingsfromthelawn.
WARNING
Aworngrassbagcouldallowsmallstonesandother
similardebristobethrowntowardtheoperatoror
abystander,andresultinseriouspersonalinjury
ordeath.
Checkthegrassbagfrequently.Ifitisdamaged,
installanewTororeplacementbag.
Figure17
Todisengagetheself-propeldrive,releasetheself-propel
drivebar.
Note:Themaximumself-propelgroundspeedisxed.To
reducethegroundspeed,increasethespacebetweenthe
self-propeldrivebarandthehandle.
StoppingtheEngine
ServiceInterval:Beforeeachuseordaily
Tostoptheengine,releasetheblade-controlbar(Figure18).
Important:Whenyoureleasetheblade-controlbar,
boththeengineandbladeshouldstopwithin3seconds.
Iftheydonotstopproperly,stopusingthemachine
immediatelyandcontactanAuthorizedServiceDealer.
WARNING
Thebladeissharp;contactingthebladecanresult
inseriouspersonalinjury.
Stoptheengineandwaitforallmovingpartstostop
beforeleavingtheoperatingposition.
InstallingtheGrassBag
1.Liftupthereardeector(Figure19).
Figure18
Figure19
1.Reardeector
2.Insertthegrassbaghandleontothenotchesonthe
handlebrackets(Figure19).
9
Page 10

RemovingtheGrassBag
G020689
G020690
G020691
1.Liftupthereardeector(Figure19).
2.Liftthegrassbaghandleoutfromthenotchesonthe
handlebracketsandremovethebagfromthemachine.
3.Closethereardeector.
DischargingtheClippings
Usetherear-dischargedeector(optionalattachment;Toro
part89964)forcuttingverytallgrass.
InstallingtheRear-dischargeDeector
1.Ifthebagisonthemachine,removeit;referto
RemovingtheGrassBag(page10).
2.Liftupthereardeectorandholdit(Figure20).
Figure20
3.Insertthetabontherear-dischargedeectorintothe
right-handslotinthereardeector(Figure21).
Figure21
Figure22
RemovingtheRear-dischargeDeector
Toremovetherear-dischargedeector,reversethesteps
above.
OperatingTips
GeneralMowingTips
•Cleartheareaofsticks,stones,wire,branches,andother
debristhatthebladecouldhit.
•Avoidstrikingsolidobjectswiththeblade.Never
deliberatelymowoveranyobject.
•Ifthemachinestrikesanobjectorstartstovibrate,
immediatelystoptheengine,disconnectthewirefrom
thesparkplug,andexaminethemachinefordamage.
•Forbestperformance,installanewbladebeforethe
cuttingseasonbegins.
•ReplacethebladewhennecessarywithaToro
replacementblade.
CuttingGrass
•Cutonlyaboutathirdofthegrassbladeatatime.Do
notcutbelowthe51mmsettingunlessthegrassissparse
oritislatefallwhengrassgrowthbeginstoslowdown.
RefertoAdjustingtheCuttingHeight(page8).
•Whencuttinggrassover15cm(6inches)tall,mowatthe
highestcutting-heightsettingandwalkslower;thenmow
againatalowersettingforthebestlawnappearance.If
thegrassistoolong,themachinemaybecomeclogged
andcausetheenginetostall.
•Mowonlydrygrassorleaves.Wetgrassandleavestend
toclumpontheyardandcancausethemachineto
becomecloggedortheenginetostall.
4.Inserttherodontherear-dischargedeectorintothe
notchesonthemachine(Figure22).
WARNING
Wetgrassorleavescancauseseriousinjuryif
youslipandcontacttheblade.Mowonlyindry
conditions.
•Alternatethemowingdirection.Thishelpsdispersethe
clippingsoverthelawnforevenfertilization.
•Ifthenishedlawnappearanceisunsatisfactory,tryone
ormoreofthefollowing:
10
Page 11

–Replacethebladeorhaveitsharpened.
–Walkataslowerpacewhilemowing.
–Raisethecuttingheightonthemachine.
–Cutthegrassmorefrequently.
–Overlapcuttingswathsinsteadofcuttingafullswath
witheachpass.
–Setthecuttingheightonthefrontwheelsonenotch
lowerthantherearwheels.Forexample,setthefront
wheelsat51mmandtherearwheelsat64mm.
CuttingLeaves
•Aftercuttingthelawn,ensurethathalfofthelawnshows
throughthecutleafcover.Youmayneedtomakemore
thanonepassovertheleaves.
•Iftherearemorethan13cm(5inches)ofleavesonthe
lawn,setthefrontcuttingheightoneortwonotches
higherthantherearcuttingheight.
•Slowdownyourmowingspeedifthemachinedoesnot
cuttheleavesnelyenough.
11
Page 12
Maintenance
G017308
Note:Determinetheleftandrightsidesofthemachinefromthenormaloperatingposition.
RecommendedMaintenanceSchedule(s)
MaintenanceService
Interval
Aftertherst5hours
Beforeeachuseordaily
Aftereachuse
Every100hours
Beforestorage
Yearly
MaintenanceProcedure
•Changetheengineoil.
•Checktheengineoillevel.
•Ensurethattheenginestopswithin3secondsafterreleasingthebladecontrolbar.
•Cleangrassclippingsanddirtfromunderthemachine.
•Checkthesparkplugandreplaceitifnecessary.
•Emptythefueltankbeforerepairsasdirectedandbeforeannualstorage.
•Cleanthecoolingsystem;removegrassclippings,debris,ordirtfromtheengine
aircoolingnsandstarter.Cleanthesystemmorefrequentlyindirtyorhigh-chaff
conditions.
•Replacetheairlter;replaceitmorefrequentlyindustyoperatingconditions.
•Changetheengineoil.
•Replacethebladeorhaveitsharpened(morefrequentlyiftheedgedullsquickly).
PreparingforMaintenance
1.Stoptheengineandwaitforallmovingpartstostop.
2.Disconnectthespark-plugwirefromthesparkplug
(Figure23)beforeperforminganymaintenance
procedure.
Important:Alwaystipthemachineontoitsside
withthedipstickdown.
ReplacingtheAirCleaner
ServiceInterval:Yearly
Figure23
1.Spark-plugwire
3.Afterperformingthemaintenanceprocedure(s),
connectthespark-plugwiretothesparkplug.
WARNING
Tippingthemachinemaycausethefuelto
leak.Gasolineisammableandexplosive,
andcancausepersonalinjury.
1.Pressdownonthelatchtabsontopoftheair-cleaner
cover(Figure24).
Figure24
1.Latchtabs
2.Openthecover.
3.Removethepaperairlterandthefoampre-lter
(Figure25).
Runtheenginedryorremovethegasoline
withahandpump;neversiphon.
12
Page 13
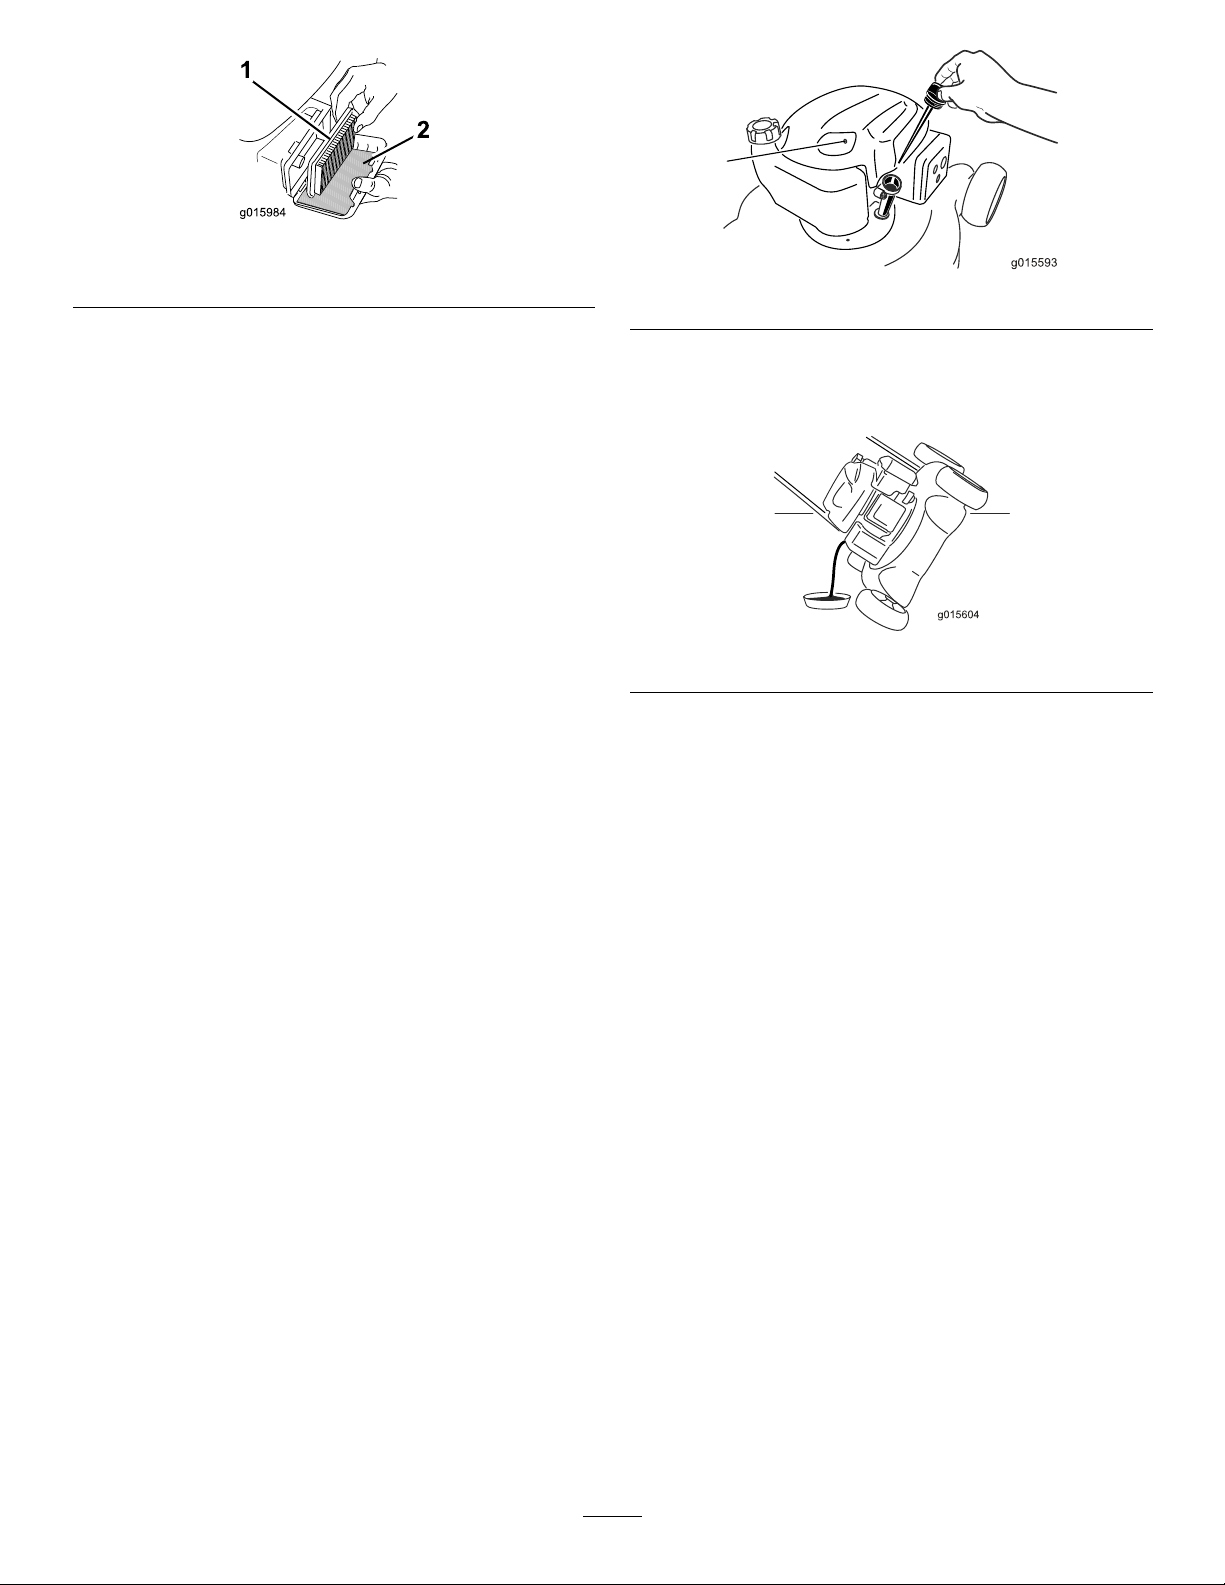
Figure25
1.Paperairlter2.Foampre-lter
4.Inspectthefoampre-lter,andreplaceitifitis
damagedorexcessivelydirty.
5.Inspectthepaperairlter.
A.Ifthepaperairlterisdamagedoriswetwithoil
orfuel,replaceit.
B.Ifthepaperairlterisdirty,tapitonahard
surfaceseveraltimesorblowcompressedairless
than207kPa(30psi)throughthesideofthelter
thatfacestheengine.
Note:Donotbrushthedirtoffthelter;
brushingforcesdirtintothebers.
6.Removedirtfromtheair-cleanerbodyandcover,using
amoistrag.Donotwipedirtintotheairduct.
7.Insertthefoampre-lterandthepaperairlterinto
theaircleaner.
8.Installthecover.
ChangingtheEngineOil
ServiceInterval:Aftertherst5hours
Yearly
1.Movethemachinetoalevelsurface.
2.Ensurethatthefueltankcontainslittleornofuelso
thatfueldoesnotleakoutwhenyoutipthemachine
ontoitsside.
3.Runtheengineforafewminutesbeforechangingthe
oiltowarmit.
Note:Warmoilowsbetterandcarriesmore
contaminants.
4.Disconnectthewirefromthesparkplug;refer
toPreparingforMaintenance(page12).
5.Placeanoil-drainpanbesidethemachineontheside
nearesttheoil-lltube.
6.Removethedipstickfromtheoil-lltube(Figure26).
Figure26
7.Tipthemachineontoitsside,withtheoil-lltube
down,todraintheusedoiloutthroughtheoil-lltube
intotheoil-drainpan(Figure27).
Figure27
8.Afterdrainingtheusedoil,returnthemachinetothe
operatingposition.
9.Pourabout3/4ofthecrankcasecapacityofoilinthe
crankcase.
Note:Max.ll:0.59L(20oz),type:SAE30or
10W-30detergentoilwithanAPIserviceclassication
ofSF,SG,SH,SJ,SL,orhigher.
10.Wait3minutesfortheoiltosettle.
11.Wipeoffthedipstickendwithacleancloth.
12.Insertthedipstickintotheoil-lltube,butdonot
screwitin.
13.Removethedipstickandreadtheoillevelonthe
dipstick(Figure28).
•Iftheoillevelistoolow,slowlypourasmall
amountofoilintotheoil-lltube,wait3minutes,
andthenrepeatsteps11through13untiltheoil
leveliscorrect.
•Iftheoillevelistoohigh,draintheexcessoiluntil
theoilleveliscorrect.Todraintheexcessoil,refer
toChangingtheEngineOil(page13).
Important:Iftheoillevelinthecrankcaseis
toolowortoohighandyouruntheengine,
youmaydamagetheengine.
13
Page 14
ReplacingtheBlade
ServiceInterval:Yearly
Figure28
1.Oillevelistoolow3.Oilleveliscorrect
2.Oillevelistoohigh
14.Installthedipstickintotheoil-lltubesecurely.
15.Disposeoftheusedoilproperlyatalocalrecycling
center.
ServicingtheSparkPlug
ServiceInterval:Every100hours
Checkthesparkplugafterevery100operatinghours.Usea
ChampionRN9YCsparkplugorequivalent.
1.Stoptheengineandwaitforallmovingpartstostop.
2.Disconnectthewirefromthesparkplug.
3.Cleanaroundthesparkplug.
4.Removethesparkplugfromthecylinderhead.
Important:Replaceacracked,fouled,ordirty
sparkplug.Donotcleanthetopofasparkplug
becausegritenteringthecylindercandamagethe
engine.
Important:
bladeproperly
areuncomfortableperformingthisprocedure,contact
anAuthorizedServiceDealer.
Examinethebladewheneveryourunoutofgasoline.Ifthe
bladeisdamagedorcracked,replaceitimmediately.Ifthe
bladeedgeisdullornicked,haveitsharpenedorreplaceit.
Youwillneedatorquewrenchtoinstallthe
.Ifyoudonothaveatorquewrenchor
WARNING
Thebladeissharp;contactingthebladecanresult
inseriouspersonalinjury.
•Disconnectthewirefromthesparkplug.
•Weargloveswhenservicingtheblade.
1.Disconnectthespark-plugwirefromthesparkplug.
RefertoPreparingforMaintenance(page12).
2.Tipthemachineontoitsside,withthedipstickdown.
3.Useablockofwoodtoholdthebladesteady.
4.Removetheblade(turnthebladebolt
counterclockwise),savingallthemounting
hardware.
5.Installthenewblade(turnthebladeboltclockwise)
andallmountinghardware(Figure30).
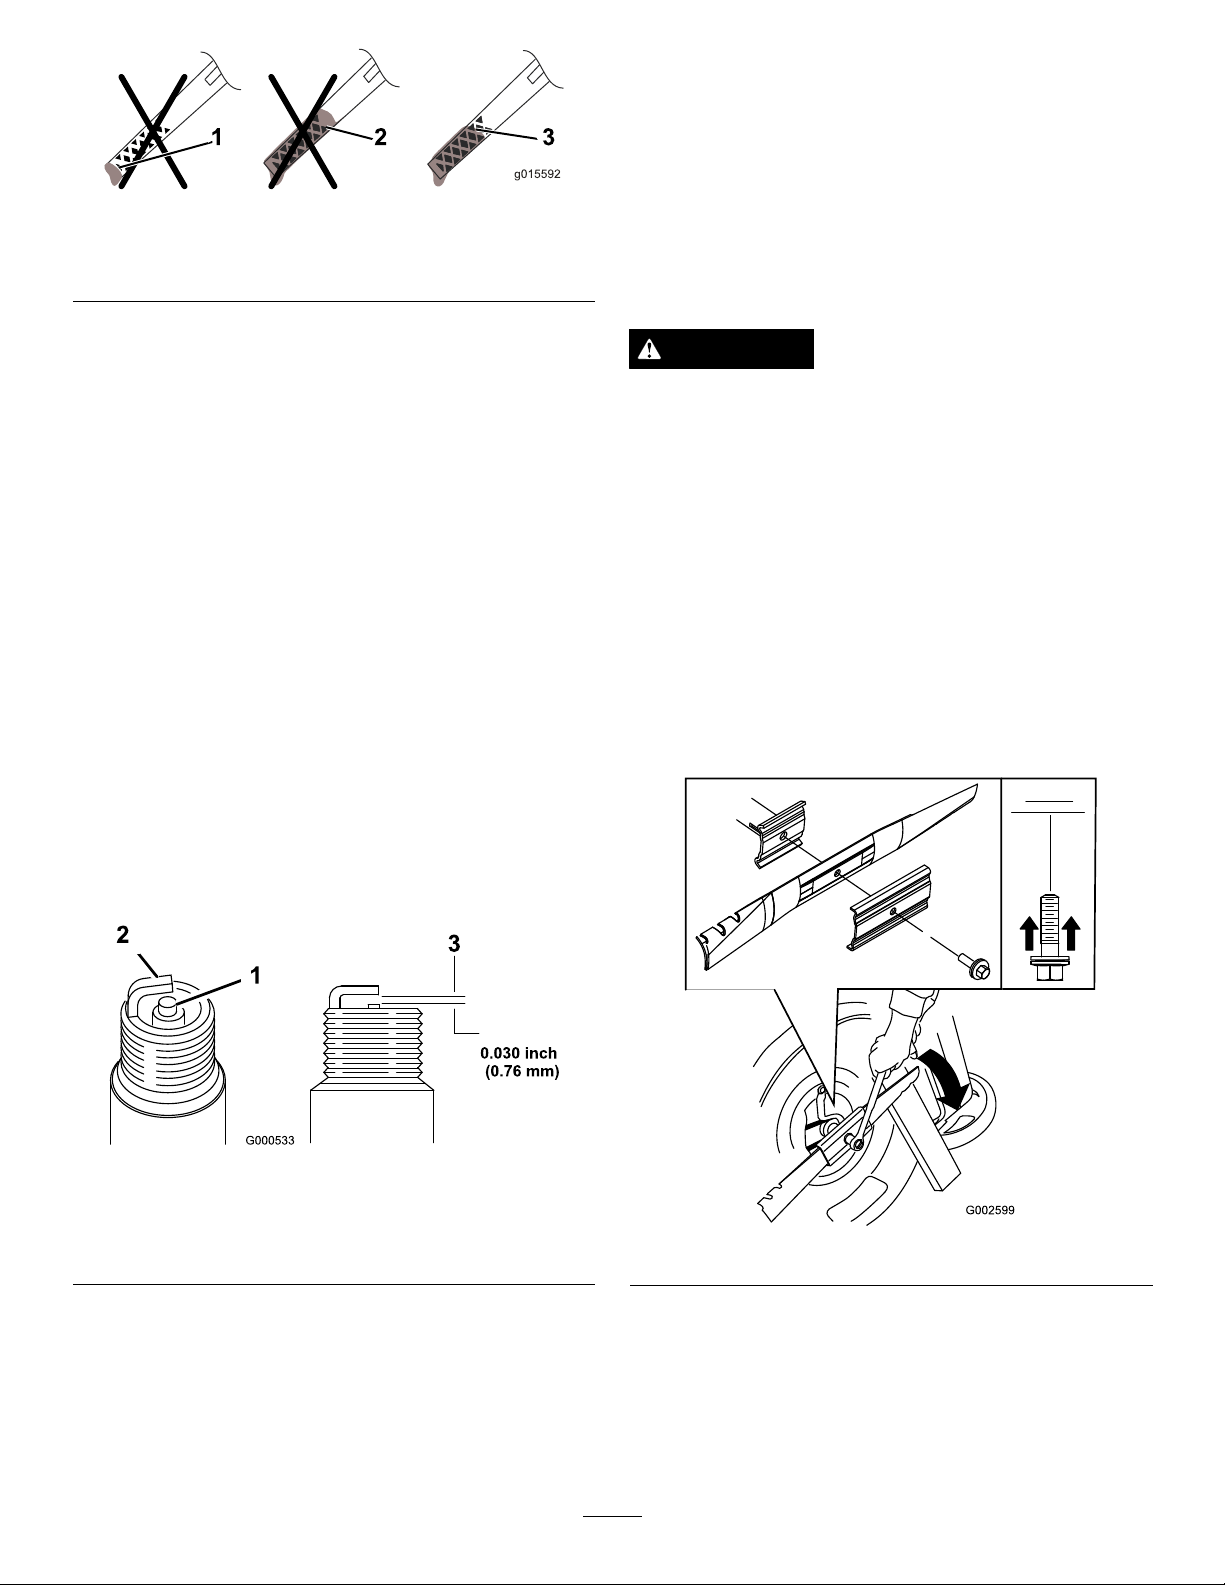
5.Setthegapontheplugto0.76mm(0.030inch)
(Figure29).
Figure29
1.Sideelectrode
2.Centerelectrode
3.Airgap(nottoscale)
6.Installthesparkplugandthegasketseal.
7.Torquetheplugto20N-m(15ft-lb).
8.Connectthewiretothesparkplug.
Figure30
Important:Positionthecurvedendsoftheblade
topointtowardthemachinehousing.
6.Useatorquewrenchtotightenthebladeboltto
82N-m(60ft-lb).
Important:Abolttorquedto82N-m(60ft-lb)is
verytight.Whileholdingthebladewithablock
14
Page 15
ofwood,putyourweightbehindtheratchetor
wrenchandtightentheboltsecurely.Thisboltis
verydifculttoovertighten.
AdjustingtheSelf-propelDrive Cable
Wheneveryouinstallanewself-propeldrivecableorifthe
self-propeldriveisoutofadjustment,adjusttheself-propel
drivecable.
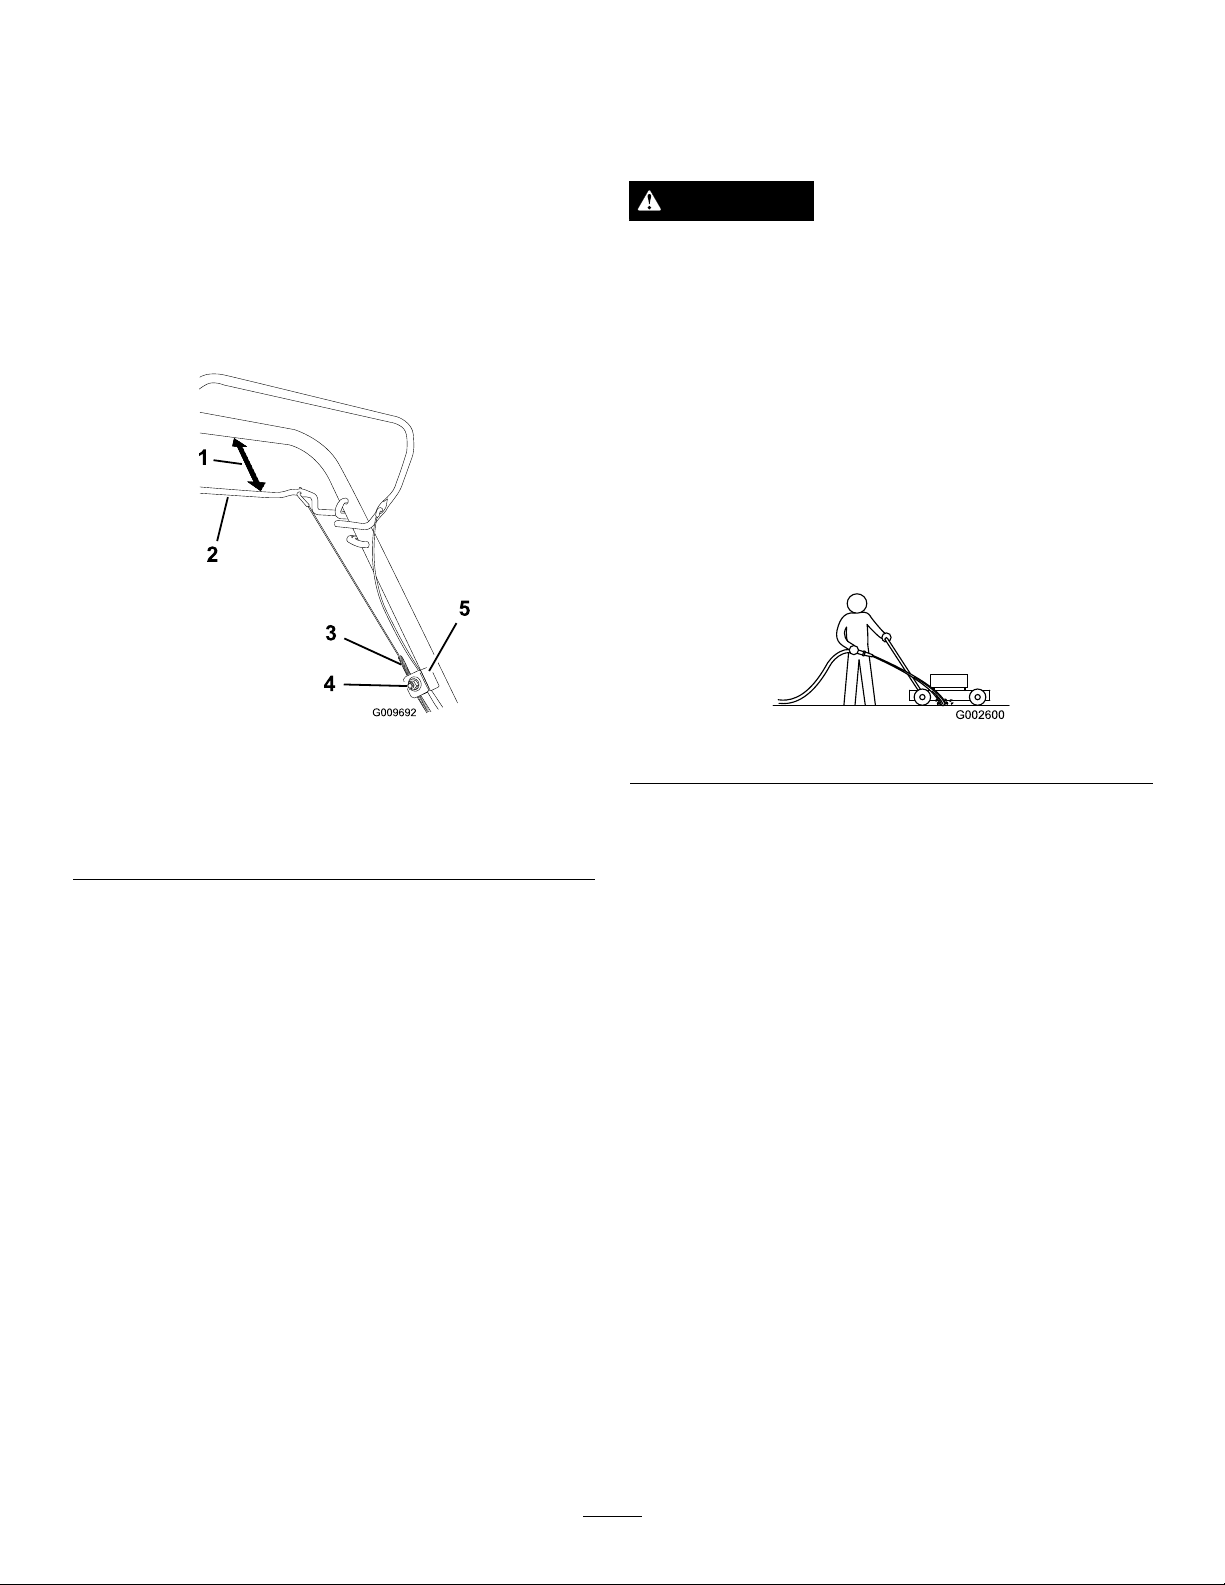
1.Loosenthecable-supportnut(Figure31).
CleaningundertheMachine Housing
ServiceInterval:Aftereachuse
WARNING
Themachinemaydislodgematerialfromunderthe
machinehousing.
•Weareyeprotection.
•Stayintheoperatingposition(behindthe
handle)whentheengineisrunning.
•Donotallowbystandersinthearea.
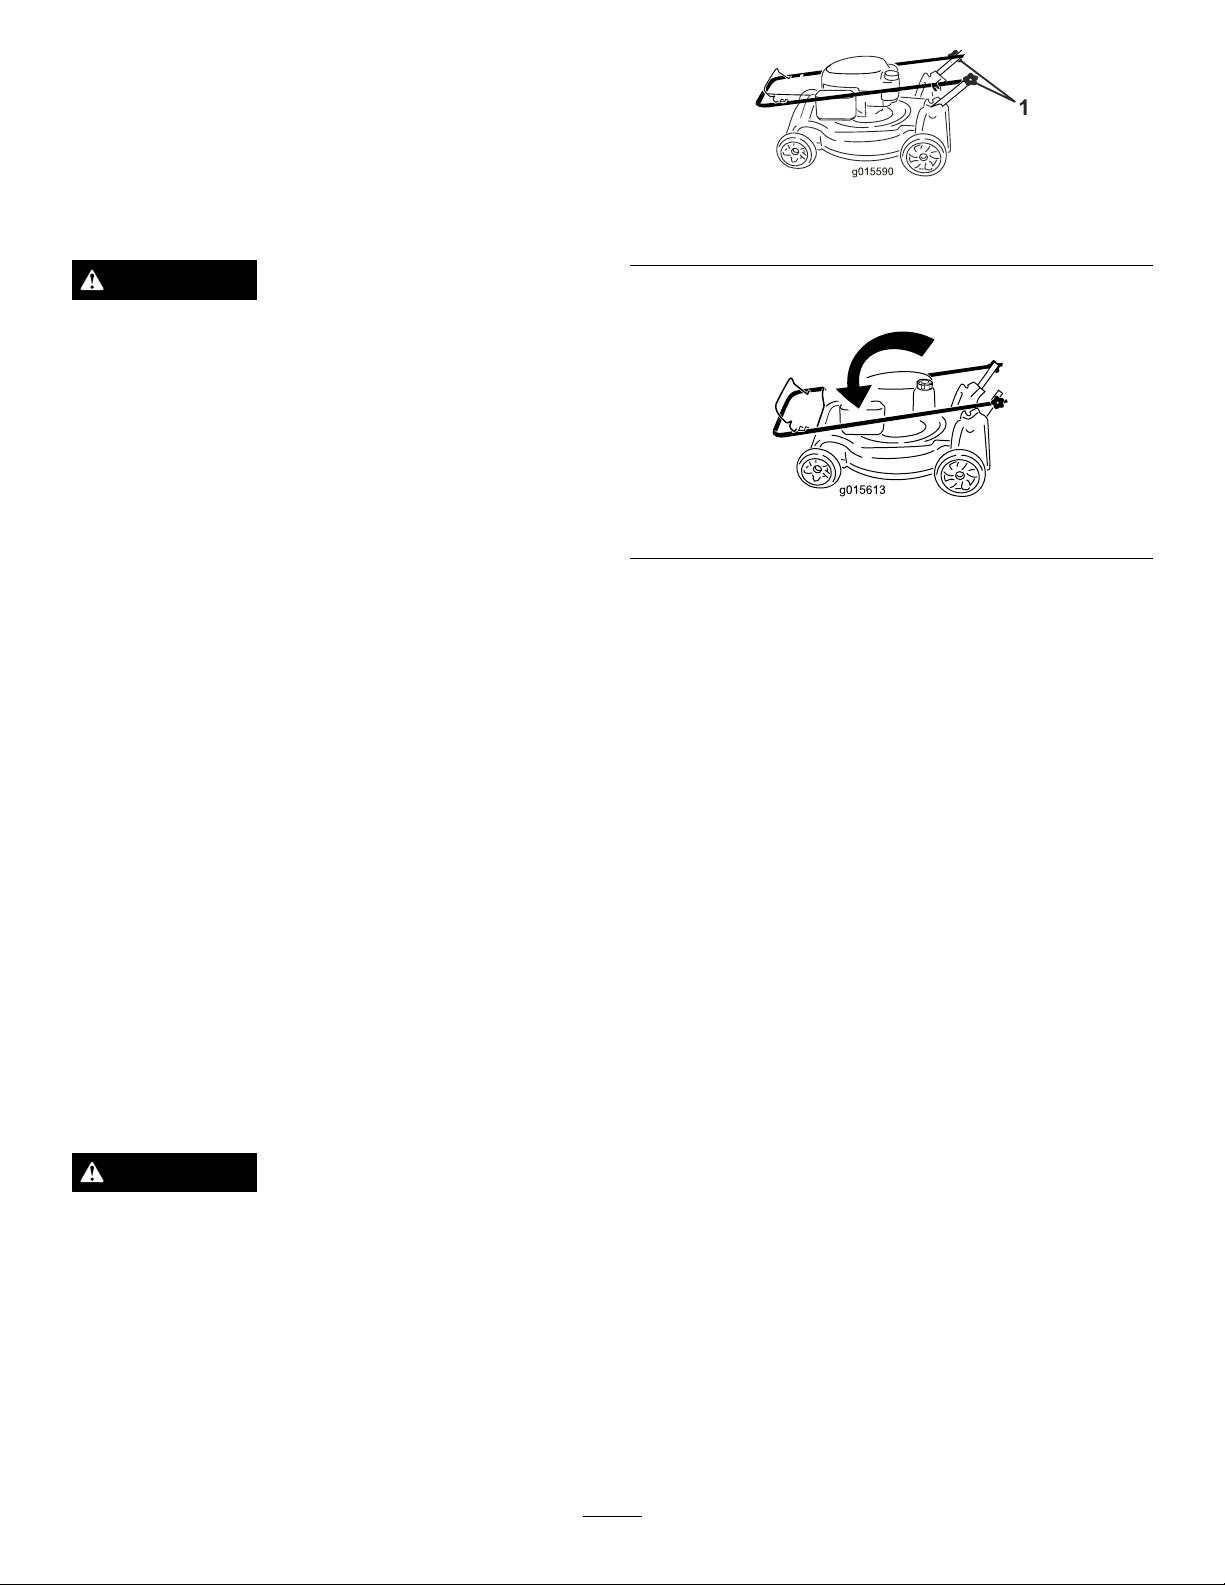
1.Withtheenginerunningonaatpavedsurface,spray
astreamofwaterinfrontoftherightrearwheel
(Figure32).
Thewaterwillsplashintothepathoftheblade,
cleaningouttheclippings.
Figure31
1.25to38mm(1to1-1/2
inches)
2.Self-propeldrivebar5.Cablesupport
3.Cablejacket
2.Holdtheself-propeldrivebar25to38mm(1to1-1/2
inches)fromthehandle(Figure31).
3.Pulldownthecablejacket(towardthemachine)until
thereisnoslackinthecable(Figure31).
4.Tightenthenutonthecablesupport.
5.Releasetheself-propeldrivebarandensurethatthe
cableisloose.
Note:Thecablemustbeloosewiththeself-propel
drivebarinthereleasedposition;otherwise,the
machinemaycreepwhenyoudisengagethebar.
4.Cable-supportnut
Figure32
2.Whennomoreclippingscomeout,stopthewaterand
movethemachinetoadryarea.
3.Runtheengineforafewminutestodrythehousing
topreventitfromrusting.
15
Page 16
Storage
Storethemachineinacool,clean,dryplace.
PreparingtheMachinefor Storage
WARNING
Gasolinevaporscanexplode.
•Donotstoregasolinemorethan30days.
•Donotstorethemachineinanenclosurenear
anopename.
•Allowtheenginetocoolbeforestoringit.
1.Onthelastrefuelingoftheyear,addfuelstabilizerto
thefuelasdirectedbytheenginemanufacturer.
2.Disposeofanyunusedfuelproperly.Recycleit
accordingtolocalcodes,oruseitinyourautomobile.
Note:Oldfuelinthefueltankistheleadingcauseof
hardstarting.Donotstorefuelwithoutstabilizermore
than30days,anddonotstorestabilizedfuelmorethan
90days.
3.Runthemachineuntiltheenginestopsfromrunning
outoffuel.
4.Starttheengineagain.
5.Allowtheenginetorununtilitstops.Whenyoucan
nolongerstarttheengine,itissufcientlydry.
6.Disconnectthewirefromthesparkplug.
7.Removethesparkplug,add30ml(1oz)ofoilthrough
thespark-plughole,andpullthestarterropeslowly
severaltimestodistributeoilthroughoutthecylinder
topreventcylindercorrosionduringtheoff-season.
8.Looselyinstallthesparkplug.
9.Tightenallnuts,bolts,andscrews.
Figure33
1.Handleknob(2)
2.MovethehandleforwardasshowninFigure33.
Figure34
RemovingtheMachinefrom Storage
1.Checkandtightenallfasteners.
2.Removethesparkplugandspintheenginerapidly
usingthestartertoblowexcessoilfromthecylinder.
3.Installthesparkplugandtightenitwithatorque
wrenchto20N-m(15ft-lb).
4.Performanyneededmaintenanceprocedures;referto
PreparingforMaintenance(page12).
5.Checktheengineoillevel;referto
CheckingtheEngineOilLevel(page7).
6.Fillthefueltankwithfreshgasoline;referto
FillingtheFuelTank(page7).
7.Connectthewiretothesparkplug.
FoldingtheHandle
WARNING
Foldingorunfoldingthehandleimproperlycan
damagethecables,causinganunsafeoperating
condition.
•Donotdamagethecableswhenfoldingor
unfoldingthehandle.
•Ifacableisdamaged,contactanAuthorized
ServiceDealer.
1.Loosenthehandleknobsuntilyoucanmovethe
handlefreely(Figure33).
16
Page 17

Notes:
17
Page 18

Notes:
18
Page 19

InternationalDistributorList
Distributor:
AtlantisSuveSulamaSisstemleriLt
BalamaPrimaEngineeringEquip.HongKong85221552163
B-RayCorporation
CascoSalesCompany
CeresS.A.CostaRica
CSSCTurfEquipment(pvt)Ltd.SriLanka
CyrilJohnston&Co.
EquiverMexico525553995444ParklandProductsLtd.NewZealand6433493760
FemcoS.A.Guatemala
G.Y.K.CompanyLtd.
GeomechanikiofAthensGreece
GuandongGoldenStarChina
HakoGroundandGardenSweden
HakoGroundandGarden
HayterLimited(U.K.)
HydroturfInt.CoDubai
HydroturfEgyptLLC
IrriamcPortugal351212388260ToroAustraliaAustralia61395807355
IrrigationProductsInt'lPvtLtd.India862283960789ToroEuropeNVBelgium3214562960
JeanHeybroekb.v.Netherlands31306394611
Country:
Turkey902163448674
Korea82325512076
PuertoRico7877888383
NorthernIreland442890813121
Japan81726325861
Norway4722907760
UnitedKingdom441279723444
UnitedArabEmirates97143479479
Egypt2025194308T-MarktLogisticsLtd.Hungary3626525500
PhoneNumber:Distributor:
5062391138
94112746100
5024423277
30109350054
862087651338Riversa
4635100000
MaquiverS.A.Colombia
MaruyamaMfg.Co.Inc.
AgrolancKft
Mountelda.s.CzechRepublic
MunditolS.A.
OslingerTurfEquipmentSA
OyHakoGroundandGardenAb
PratoV erdeS.p.A.
Prochaska&Cie
RTCohen2004Ltd.
ScSvendCarlsenA/S
SolvertS.A.S.
SpyprosStavrinidesLimitedCyprus
SurgeSystemsIndiaLimited
Country:
Japan81332522285
Hungary3627539640
Argentina541148219999
Ecuador59342396970
Finland35898700733
Italy390499128128
Austria4312785100
Israel97298617979
Spain
Denmark4566109200
France33130817700
India911292299901
PhoneNumber:
5712364079
420255704220
34952837500
35722434131
EuropeanPrivacyNotice
TheInformationToroCollects
ToroWarrantyCompany(Toro)respectsyourprivacy.Inordertoprocessyourwarrantyclaimandcontactyouintheeventofaproductrecall,weaskyou
tosharecertainpersonalinformationwithus,eitherdirectlyorthroughyourlocalT orocompanyordealer.
TheTorowarrantysystemishostedonserverslocatedwithintheUnitedStateswhereprivacylawmaynotprovidethesameprotectionasapplies
inyourcountry.
BYSHARINGYOURPERSONALINFORMATIONWITHUS,YOUARECONSENTINGTOTHEPROCESSINGOFYOURPERSONALINFORMATION
ASDESCRIBEDINTHISPRIVACYNOTICE.
TheWayToroUsesInformation
Toromayuseyourpersonalinformationtoprocesswarrantyclaims,tocontactyouintheeventofaproductrecallandforanyotherpurposewhichwetell
youabout.ToromayshareyourinformationwithT oro'safliates,dealersorotherbusinesspartnersinconnectionwithanyoftheseactivities.Wewillnot
sellyourpersonalinformationtoanyothercompany.Wereservetherighttodisclosepersonalinformationinordertocomplywithapplicablelawsand
withrequestsbytheappropriateauthorities,tooperateoursystemsproperlyorforourownprotectionorthatofotherusers.
RetentionofyourPersonalInformation
Wewillkeepyourpersonalinformationaslongasweneeditforthepurposesforwhichitwasoriginallycollectedorforotherlegitimatepurposes
(suchasregulatorycompliance),orasrequiredbyapplicablelaw.
Toro'sCommitmenttoSecurityofY ourPersonalInformation
Wetakereasonableprecautionsinordertoprotectthesecurityofyourpersonalinformation.Wealsotakestepstomaintaintheaccuracyandcurrent
statusofpersonalinformation.
AccessandCorrectionofyourPersonalInformation
Ifyouwouldliketorevieworcorrectyourpersonalinformation,pleasecontactusbyemailatlegal@toro.com.
AustralianConsumerLaw
AustraliancustomerswillnddetailsrelatingtotheAustralianConsumerLaweitherinsidetheboxoratyourlocalT oroDealer.
374-0269RevF
Page 20

TheToroWarranty
TheToroGTSStartingGuarantee
ConditionsandProductsCovered
TheT oroCompanyanditsafliate,ToroWarrantyCompany,pursuant
toanagreementbetweenthem,jointlypromisetorepairfortheoriginal
purchaser
workmanshiporiftheToroGTS(GuaranteedtoStart)enginewillnotstart
ontherstorsecondpull,providedtheroutinemaintenancerequiredin
theOperator'sManualhavebeenperformed.
Thefollowingtimeperiodsapplyfromthedateofpurchase:
ProductsWarrantyPeriod
WalkPowerMowers
•CastDeck
•Engine
•Battery2years
•SteelDeck
•Engine
TimeMasterMowers3yearsResidentialUse
•Engine
•Battery2years
ElectricHandHeldProducts2yearsResidentialUse
Snowthrowers
•SingleStage
•Engine
•TwoStage
•Chute,chutedeectorand
impellerhousingcover
ElectricSnowthrowers
AllRide-OnUnitsBelow
•Engine
•Battery2yearsResidentialUse
•Attachments2yearsResidentialUse
DHLawn&GardenTractors
XLSLawn&GardenTractors
TimeCutter
TITANMowers3yearsor240hours
•Frame
ZMasterMowers—2000Series
•Frame
1
OriginalPurchasermeansthepersonwhooriginallypurchasedtheToroProduct.
2
Residentialusemeansuseoftheproductonthesamelotasyourhome.Useatmorethanone
locationisconsideredcommercialuseandthecommercialusewarrantywouldapply .
3
TheT oroGTSStartingGuaranteedoesnotapplywhentheproductisusedcommercially.
1
theT oroProductlistedbelowifdefectiveinmaterialsor
5yearsResidentialUse
90DaysCommercialUse
5yearsGTSGuarantee,
ResidentialUse
3
2yearsResidentialUse
90DaysCommercialUse
2yearsGTSGuarantee,
ResidentialUse
3
90DaysCommercialUse
3yearsGTSGuarantee,
ResidentialUse
3
NoWarrantyforCommercialUse
2yearsResidentialUse
45DaysCommercialUse
2yearsGTSGuarantee,
ResidentialUse
3
3yearsResidentialUse
45DaysCommercialUse
Lifetime(originalowneronly)
2yearsResidentialUse
NoWarrantyforCommercialUse
Seeenginemanufacturer'swarranty
2yearsResidentialUse
90DaysCommercialUse
3yearsResidentialUse
90DaysCommercialUse
3yearsResidentialUse
90DaysCommercialUse
5
Lifetime(originalowneronly)
4yearsor500hours
5
Lifetime(originalowneronly)
2
2
2
2
2
2
2
2
2
2
2
2
and
4
SomeenginesusedonToroProductsarewarrantedbytheenginemanufacturer.
5
Whicheveroccursrst.
6
LifetimeFrameWarranty-Ifthemainframe,consistingofthepartsweldedtogethertoformthe
tractorstructurethatothercomponentssuchastheenginearesecuredto,cracksorbreaksin
normaluse,itwillberepairedorreplaced,atT oro'soption,underwarrantyatnocostforparts
andlabor.Framefailureduetomisuseorabuseandfailureorrepairrequiredduetorustor
corrosionarenotcovered.
Thiswarrantycoversthecostofpartsandlabor,butyoumustpay
transportationcosts.
Warrantymaybedeniedifthehourmeterisdisconnected,altered,or
showssignsofbeingtamperedwith.
OwnerResponsibilities
YoumustmaintainyourToroProductbyfollowingthemaintenance
proceduresdescribedintheOperator'sManual.Suchroutine
maintenance,whetherperformedbyadealerorbyyou,isatyourexpense.
InstructionsforObtainingWarrantyService
IfyouthinkthatyourToroProductcontainsadefectinmaterialsor
workmanship,followthisprocedure:
1.Contactyoursellertoarrangeserviceoftheproduct.Ifforany
reasonitisimpossibleforyoutocontactyourseller,youmaycontact
anyT oroAuthorizedDistributortoarrangeservice.Seeattached
DistributorList.
2.Bringtheproductandyourproofofpurchase(salesreceipt)to
theservicingoutlet.Ifforanyreasonyouaredissatisedwiththe
servicingoutlet’sanalysisorwiththeassistanceprovided,contact
usat:
ToroCustomerCareDepartment,RLCDivision
ToroWarrantyCompany
5
811 1LyndaleAvenueSouth
Bloomington,MN55420-1196
001–952–948–4707
ItemsandConditionsNotCovered
4
Thisexpresswarrantydoesnotcoverthefollowing:
•Costofregularmaintenanceserviceorwearparts,suchasblades,
rotorblades(paddles),scraperblades,belts,fuel,lubricants,oil
changes,sparkplugs,pneumatictires,cable/linkageorbrake
adjustments
•Anyproductorpartwhichhasbeenalteredormisusedandrequires
replacementorrepairduetoaccidentsorlackofpropermaintenance
•Repairsnecessaryduetofailuretousefreshfuel(lessthanone
monthold),orfailuretoproperlypreparetheunitpriortoanyperiod
6
6
ofnon-useoveronemonth
•Allrepairscoveredbythesewarrantiesmustbeperformedbyan
authorizedToroservicingoutletusingapprovedreplacementparts.
GeneralConditions
Thepurchaseriscoveredbythenationallawsofeachcountry .Therights
towhichthepurchaserisentitledwiththesupportoftheselawsarenot
restrictedbythiswarranty .
374-0268RevE
Page 21

FormNo.3376-660-ASMRevA
Mulch-/Heckfangsystem-Rasenmäher(50cm)
Modellnr.29639—Seriennr.313000001undhöher
Bedienungsanleitung
Einführung
DieserhandgeführteRasenmähermitSichelmessern
solltevonPrivatleutenodergeschultenLohnarbeitern
verwendetwerden.Eristhauptsächlichfürdas
MähenvonGrasaufgepegtenGrünächenin
Privat-oderöffentlichenAnlagengedacht.Erist
nichtfürdasSchneidenvonBüschenoderfüreinen
landwirtschaftlichenEinsatzgedacht.
LesenSiedieseInformationensorgfältigdurch,umsichmit
demordnungsgemäßenEinsatzundderWartungdesGeräts
vertrautzumachenundVerletzungenundeineBeschädigung
desGerätszuvermeiden.SietragendieVerantwortungfür
einenordnungsgemäßenundsicherenEinsatzdesGeräts.
SiekönnenTorodirektunterwww.Toro.comhinsichtlich
Produkt-undZubehörinformationen,Standorteines
HändlersoderRegistrierungdesProduktskontaktieren.
WendenSiesichandenofziellenToroVertragshändler
oderKundendienst,wennSieeineServiceleistung,Toro
OriginalersatzteileoderweitereInformationenbenötigen.
HabenSiedafürdieModell-undSeriennummernder
Maschinegriffbereit.Bild1zeigtdiePositionderModellundSeriennummernanderMaschine.TragenSiehierbitte
dieModell-undSeriennummerndesGerätsein.
Verletzungenführenkann,wennSiedieempfohlenen
Sicherheitsvorkehrungennichteinhalten.
Bild2
1.Sicherheitswarnsymbol
IndieserAnleitungwerdenzweiBegriffezurHervorhebung
vonInformationenverwendet.Wichtigweistaufspezielle
technischeInformationenhin,undHinweishebtallgemeine
Informationenhervor,dieIhrebesondereBeachtung
verdienen.
DiesesProduktentsprichtallenrelevanteneuropäischen
Richtlinien.WeitereAngabenndenSieinden
produktspezischenKonformitätsbescheinigungen.
BeiModellenmitangegebenenPSwurdedieBruttoleistung
desMotorsimLaborvomMotorherstellergemäßSAEJ1940
klassiziert.AufgrundderKongurationzurErfüllungvon
Sicherheits-,Emissions-undBetriebsanforderungenistdie
tatsächlicheMotorleistungindieserKlassederRasenmäher
wesentlichniedriger.
ModizierenSienichtdieMotorbedienelementeoderdie
GeschwindigkeitdesMotoriehkraftreglers,dadieszu
unsicherenEinsatzbedingungenundVerletzungenführen
kann.
Bild1
1.TypenschildmitModell-undSeriennummern
Modellnr.
Seriennr.
IndieserAnleitungwerdenpotenzielleGefahren
angeführt,undSicherheitsmeldungenwerdenvom
Sicherheitswarnsymbol(Bild2)gekennzeichnet,dasauf
eineGefahrhinweist,diezuschwerenodertödlichen
©2013—TheToro®Company
8111LyndaleAvenueSouth
Bloomington,MN55420
RegistrierenSieIhrProduktunter
Inhalt
Einführung...................................................................1
AllgemeineHinweisezurSicherheitvon
Rasenmähern......................................................2
Schalldruck.............................................................4
Schallleistung..........................................................4
Vibrationstest,Hand/Arm.......................................4
Sicherheits-undBedienungsschilder..........................5
Einrichtung...................................................................6
1MontierendesGriffs.............................................6
2BefestigendesRücklaufstarterseilsinder
Seilführung.........................................................6
3AuffüllendesMotorsmitÖl...................................6
Produktübersicht...........................................................7
TechnischeDaten...................................................7
Betrieb.........................................................................8
Betanken................................................................8
www.T oro.com.
Originaldokuments(DE)
AlleRechtevorbehalten
Druck:USA
*3376-660-ASM*A
Page 22

PrüfendesMotorölstands........................................8
EinstellenderSchnitthöhe........................................9
AnlassendesMotors................................................9
EinsatzdesSelbstantriebs........................................10
AbstellendesMotors..............................................10
Schnittgutrecyclen..................................................10
SammelndesSchnittguts.........................................10
EntleerendesSchnittguts........................................11
Betriebshinweise....................................................11
Wartung.......................................................................13
EmpfohlenerWartungsplan........................................13
VorbereitenfürdieW artung.....................................13
AuswechselndesLuftlters.....................................13
WechselndesMotoröls...........................................14
WartenderZündkerze............................................15
AuswechselndesMessers........................................15
EinstellendesSelbstantriebskabels............................16
ReinigenderUnterseitedesMaschinengehäu-
ses....................................................................16
Einlagerung.................................................................17
VorbereitendesRasenmähersfürdie
Einlagerung.......................................................17
ZusammenklappendesBügels.................................17
HerausnehmendesRasenmähersausder
Einlagerung.......................................................17
Schulung
•LesenSiedieseAnweisungengründlichdurch.Machen
SiesichmitdenBedienelementenunddemkorrekten
EinsatzdesGerätsvertraut.
•LassenSiedenRasenmähernievonKindernoder
Personenbedienen,diemitdiesenAnweisungennicht
vertrautsind.DasAlterdesFahrerskanndurchlokale
Vorschrifteneingeschränktsein.
•BedenkenSieimmer,dassderBedienerdieVerantwortung
fürUnfälleoderGefahrengegenüberanderenundihrem
Eigentumträgt.
•VerstehenSiealleErläuterungenderamRasenmäherund
inderAnleitungverwendetenSymbole.
Benzin
WARNUNG:
Benzinistleichtentzündlich.BefolgenSiedie
nachstehendenSicherheitsvorkehrungen:
•BewahrenSieKraftstoffnurinzugelassenen
Vorratskanisternauf.
Sicherheit
DerunsachgemäßeEinsatzoderdiefalscheWartung
diesesRasenmäherskannzuVerletzungenführen.
BefolgenSiezurReduzierungderVerletzungsgefahr
dieseSicherheitsanweisungen.
DieserRasenmäherwurdevonTorofüreinenangemessenen
undsicherenBetriebausgelegt.DasNichtbeachtender
folgendenAnweisungenkannjedochzuVerletzungenführen.
UmdiemaximaleSicherheit,optimaleLeistungund
dasnötigeWissenüberdieMaschinezuerhalten,
müssenSieundjederandereBenutzerdesRasenmähers
denInhaltdervorliegendenAnleitungvordem
AnlassendesMotorssorgfältiglesenundverstehen.
BesondereBeachtungistdemGefahrensymbolBild2zu
schenken,welchesVorsicht,WarnungoderGefahr–
Sicherheitshinweis“bedeutet.Lesenundverstehen
SiedieAnweisungen,dasiewichtigfürdieSicherheit
sind.DasNichtbeachtenderAnweisungenkannzu
Körperverletzungenführen.
AllgemeineHinweisezur SicherheitvonRasenmähern
DiefolgendenAnleitungenbasierenaufderEN-Norm836.
DieseMaschinekannHändeundFüßeamputierenund
Gegenständeaufschleudern.DasNichtbeachtender
folgendenSicherheitsvorschriftenkannzuschweren
VerletzungenoderzumTodführen.
•BetankenSienurimFreien,undrauchenSie
dabeinie.
•BetankenSiedieMaschine,bevorSiedenMotor
anlassen.EntfernenSiebeilaufendemoder
heißemMotorniedenKraftstofftankdeckeloder
betankendieMaschine.
•VersuchenSie,wennBenzinverschüttetwurde
nie,denMotorzustarten,sondernschieben
denRasenmähervomverschüttetenKraftstoff
wegundvermeidenoffeneFlammen,bisdie
Verschüttungverdunstetist.
•SchraubenSiedenTank-und
Benzinkanisterdeckelwiederfestauf.
Vorbereitung
•TragenSiebeimMähenimmerfesteSchuheundlange
Hosen.FahrenSiedieMaschineniebarfußodermit
offenenSandalen.
•InspizierenSiedenArbeitsbereichgründlichund
entfernenSteine,Stöcke,Drähte,Knochensowieandere
Fremdkörper.
•PrüfenSievorderInbetriebnahmevisuell,oballe
SchutzvorrichtungenundSicherheitsgeräte,wiez.B.
Ablenkblecheund/oderGrasfangkörbeeinwandfrei
montiertsindundrichtigfunktionieren.
•PrüfenSievordemEinsatzimmer,obdieSchnittmesser,
-schraubenunddasMähwerkabgenutztoderbeschädigt
sind.TauschenSieabgenutzteoderdefekteMesserund
2
Page 23

-schraubenalskompletteSätzeaus,umdieWuchtder
Messerbeizubehalten.
Anlassen
LassenSiedenMotorvorsichtigentsprechendden
Anweisungenan;haltenSiedieFüßesoweitwiemöglich
vondenMessernfernundstellenSiesichnievorden
Auswurfkanal.
Betrieb
•MähenSienie,wennsichPersonen,insbesondereKinder
oderHaustiere,inderNäheaufhalten.
•MähenSienurbeiTageslichtoderguterkünstlicher
Beleuchtung.
•AchtenSieaufKuhlenundandereversteckte
GefahrenstellenimGelände.
•HaltenSieHändeundFüßevonsichdrehendenTeilen
fern.BleibenSieimmervonderAuswurföffnungfern.
•HebenSiedieMaschineniebeilaufendemMotoranoder
tragensie.
•PassenSiebesondersauf,wennSierückwärtsgehenoder
denRasenmäherzusichziehen.
•GehenSie,laufenSienie.
•Hanglagen:
–VersuchenSienicht,steileHängezumähen.
–PassenSieanHängenbesondersauf.
–MähenSiequerzuHanglagen,d.h.niehangauf-
oder-abwärts,undgehenSieRichtungswechselan
HanglagenmitgrößterVorsichtvor.
–AchtenSieanHanglagenimmerdarauf,dassSie
einengutenHalthaben.
•ReduzierenSieanHängenundbevorSiescharfwenden
IhreGeschwindigkeit,umeinemUmkippenundeinem
Kontrollverlustvorzubeugen.
•StellenSiedasMesserab,wennSiedieMaschinezwischen
Mähbereichentransportieren,undderRasenmäherzum
TransportzumÜberquerenvonFlächengekipptwerden
muss.
•LassenSiedenMotornieinunbelüftetenRäumenlaufen,
dasichdortgefährlicheKohlenmonoxidgaseansammeln
können.
•StellenSiedenMotorindenfolgendenSituationenab:
–WennSiedieMaschineverlassen.
–VordemAuftanken.
–VordemEntfernendesFangkorbs.
–VordemVerstellenderSchnitthöhe.Esseidenn,
dieEinstellunglässtsichvonderFahrerpositionaus
bewerkstelligen.
•StellenSiedenMotorabundziehenSieden
Zündkerzensteckerab
–VordemEntfernenvonBehinderungenund
VerstopfungenausdemAuswurfkanal.
–VordemPrüfen,ReinigenoderWartenderMaschine.
–WennSieaufeinenFestkörperaufgepralltsindund
prüfendenRasenmäheraufeventuelleDefekte;
führenSiedanndieerforderlichenReparaturendurch,
bevorSiedenRasenmäherstartenundinBetrieb
nehmen.
–BeiungewöhnlichenVibrationenderMaschine
(sofortüberprüfen).
•BlitzschlagkannzuschwerenodertödlichenVerletzungen
führen.SetzenSiedieMaschinenichtein,wennSie
BlitzesehenoderDonnerhören,undgehenSieaneine
geschützteStelle.
•AchtenSiebeimÜberquerenundinderNähevon
StraßenaufdenVerkehr.
WartungundLagerung
•HaltenSiealleMutternundSchraubenfestangezogen,
damitdasGerätineinemsicherenBetriebszustandbleibt.
•VerwendenSiekeinenHochdruckreinigerander
Maschine.
•BewahrenSiedenRasenmäherniemitBenzinimTank
oderinnerhalbeinesGebäudesauf,woDämpfeeine
offeneFlammeoderFunkenerreichenkönnten.
•LassenSiedenMotorabkühlen,bevorSiedieMaschine
ineinemgeschlossenenRaumabstellen.
•HaltenSie,umdasBrandrisikozuverringern,denMotor,
Schalldämpfer,dasBatteriefachunddenBenzintankvon
Gras,LaubundüberüssigemFettfrei.
•PrüfenSiedieBestandteiledesFangkorbsunddes
Auswurfschutzblecheshäug,undwechselnSiesieggf.
mitdenvomHerstellerempfohlenenTeilenaus.
•TauschenSieabgenutzteundbeschädigteTeileaus
Sicherheitsgründenaus.
•WechselnSiedefekteAuspuffeaus.
•WennSiedenKraftstoffausdemTankablassenmüssen,
solltediesimFreiengeschehen.
•VerändernSieniedieEinstellungdesMotoriehkraftreg-
lers,undüberdrehenSieniemalsdenMotor.Durchdas
ÜberdrehendesMotorssteigtdieVerletzungsgefahr.
•GehenSiebeiMähernmitmehrerenMessernvorsichtig
vor,dadasDreheneinesMessersdieanderenMesser
mitdrehenkann.
•PassenSiebeimEinstellendesRasenmähersbesonders
auf,umeinEinklemmenderFingerzwischenden
beweglichenSchnittmessernundpermanentenTeilendes
Rasenmäherszuvermeiden.
•FüreineoptimaleLeistungundSicherheitsolltenSie
nurToroOriginalersatzteileund-zubehörkaufen.
VerwendenSienie
diesesindu.U.gefährlich.
Universal
-Teileund-Zubehör;
3
Page 24

Schalldruck
DiesesGeräterzeugteinenSchalldruckpegel,deramOhr
desBenutzers90dBAbeträgt(inkl.einesUnsicherheitswerts
(K)von1dBA.DerSchalldruckpegelwurdegemäßden
VorgabeninEN836gemessen.
Schallleistung
DiesesGeräterzeugteinenSchalldruckpegelvon98dBA
beträgt(inkl.einesUnsicherheitswerts(K)von1dBA.Der
SchalldruckpegelwurdegemäßdenVorgabeninISO11094
gemessen.
Vibrationstest,Hand/Arm
DieseMaschinehatander/demHand/Armder
BedienungspersoneinmaximalesVibrationsniveauvon3,6
2
m/s
fürdierechteHandund3,6m/s
jederWertenthälteinenUnsicherheitsfaktoron1,8m/s
WertewurdennachdenVorgabenvonEN836gemessen.
2
fürdielinkeHand;
2
.Die
4
Page 25

Sicherheits-undBedienungsschilder
Wichtig:Sicherheits-undBedienungsschildersindinderNähepotenziellerGefahrenbereicheangebracht.
TauschenSiebeschädigteSchilderaus.
Herstellermarke
1.Gibtan,dassdasMesserT eilderOriginalmaschinedes
Herstellersist.
117-4143
1.Warnung:LesenSiedieBedienungsanleitung.
2.GefahrdurchiegendeT eile:AchtenSiedarauf,dass
UnbeteiligtedenSicherheitsabstandzumGeräteinhalten.
3.Schnitt-bzw.AmputationsgefahranHändenundFüßen
112-8760
1.GefahrdurchiegendeT eile:AchtenSiedarauf,dass
UnbeteiligtedenSicherheitsabstandzumGeräteinhalten.
2.GefahreinerSchnittwundeund/oderderAmputationvon
HändenoderFüßen:HaltenSiesichvonbeweglichen
Teilenfern.
beimSchnittmesser:ZiehenSiedenZündkerzensteckerab
undlesenSiedieAnweisungen,bevorSieWartungs-oder
Reparaturarbeitenausführen.
4.Schnitt-undVerletzungsgefahrfürHändeoderFüßebeim
Schnittmesser:HaltenSiesichvonbeweglichenT eilenfern
undnehmenSiekeineSchutzvorrichtugenab.
5.Schnitt-bzw.AmputationsgefahrvonHändenoderFüßen
beimSchnittmesser:MähenSienichthangauf-oder
hangabwärtssondernnurquerzumHang;stellenSiedas
MähwerkunddenMotorab,entfernenSieFremdkörper
vordemMähen;schauenSiebeimRückwärtsfahrennach
hintenundunten.
5
117-9368
1.OptimalerÖlstand
Page 26

Einrichtung
2
1
MontierendesGriffs
KeineTeilewerdenbenötigt
Verfahren
WARNUNG:
WennSiedenBügelfalschauf-oder
zusammenklappen,könnenSiedieKabel
beschädigenunddensicherenGeräteeinsatz
gefährden.
•BeschädigenSiebeimAuf-oder
ZusammenklappendesBügelsnichtdie
Kabel.
•WendenSiesichbeieinembeschädigtenKabel
aneinenofziellenV ertragshändler.
1.LösenSiedieGriffhandräder(Bild3).
Wichtig:VerlegenSiebeimEinbauendesGriffs
dieKabelanderAußenseitedesGriffs.
Befestigendes Rücklaufstarterseilsinder Seilführung
KeineTeilewerdenbenötigt
Verfahren
Wichtig:SiemüssendasRücklaufstarterseilinder
Seilführungbefestigen.
DrückenSiedenSchaltbügelzumoberenBügelundziehen
SieamRücklaufstarterseildurchdieSeilführungamBügel
(Bild5).
Bild5
Bild3
1.Bügelhandrad(2)
2.SchiebenSiedenBügelindieBetriebsstellung(Bild4).
Bild4
3.ZiehenSiedieGriffhandrädermitderHandfest
(Bild3).
1.Rücklaufstarterseil2.Seilführung
3
AuffüllendesMotorsmitÖl
KeineTeilewerdenbenötigt
Verfahren
Wichtig:IhrGeräthatbeiderAuslieferungkeinÖl
imMotor.FüllenSiedenMotormitÖl,bevorSieihn
anlassen.
1.StellenSiedieMaschineaufeinerebenenFlächeab.
2.EntfernenSiedenPeilstab(Bild6)undfüllenSieÖlin
denEinfüllstutzenbisca.3/4desFüllvolumensdes
Kurbelgehäusesein.
Hinweis:Max.Füllstand:0,59l(20oz)desTyps:
WaschaktivesSAE30oderSAE10W-30Ölmitder
KlassizierungSF,SG,SH,SJ,SLoderhöherdurch
dasAmericanPetroleumInstitute(API).
6
Page 27

Bild6
3.WischenSiedasEndedesPeilstabsmiteinemsauberen
Lappenab.
4.SteckenSiedenPeilstabindenEinfüllstutzen,
schraubenSieihnjedochnichtein.
5.NehmenSiedenPeilstabherausundlesenSieden
Ölstandab(Bild7).
•FüllenSiebeieinemzuniedrigenÖlstandlangsam
etwasÖlindenÖleinfüllstutzen,wartenSiedrei
MinutenundwiederholenSiedanndieSchritte3
bis5,bisderÖlstandrichtigist.
•LassenSiebeieinemzuhohenÖlstandÖlab,bis
derÖlstandrichtigist.W eitereInformationen
zumAblassendesÖlsndenSieunter
WechselndesMotoröls(Seite14).
Wichtig:WennderÖlstandimKurbelgehäuse
zuhochoderzuniedrigist,undSiedenMotor
laufenlassen,könnenMotorschädenauftreten.
Produktübersicht
Bild8
1.Zündkerze6.Fangkorb
2.Ölmessstab(nicht
abgebildet)
3.Rücklaufstarterbügel8.Schnitthöhenhebel(4)
4.Schaltbügel9.Luftlter
5.Selbstantriebsbügel
7.Tankdeckel
Bild7
1.Ölstandistzuniedrig3.Ölstandistrichtig
2.Ölstandistzuhoch
6.SteckenSiedenPeilstabfestindenEinfüllstutzen.
Wichtig:
erstenfünfBetriebsstunden
WechselnSiedasMotorölnachden
unddanachjährlich;
sieheWechselndesMotoröls(Seite14).
Bild9
1.Heckauswurfablenkblech(optionalesAnbaugerät,T oro
Bestellnummer89964)
TechnischeDaten
Modell
2963934kg144cm54cm145cm
7
GewichtLänge
Breite
Höhe
Page 28

Betrieb
G020479
1
Betanken
GEFAHR
Benzinistbrennbarundexplodiertschnell.
FeuerundExplosionendurchBenzinkönnen
VerbrennungenbeiIhnenundanderenPersonen
verursachen.
•StellenSiedenKanisterbzw.dieMaschine
vordemAuftankenaufdenBodenundnicht
aufeinFahrzeugoderaufeinObjekt,umeine
elektrischeLadungdurchdasEntzündendes
Benzinszuvermeiden.
Bild10
•FüllenSiedenTankaußen,wennderMotorkalt
ist.WischenSieverschüttetenKraftstoffauf.
•RauchenSienichtbeimUmgangmitBenzin,
undgehenSienichtinderNähevonoffenem
FeueroderFunkenmitBenzinum.
•BewahrenSieBenzinnurinzugelassenen
KanisternundaneinemfürKinder
unzugänglichenOrtauf.
•DiebestenErgebnisseerhaltenSie,wennSiesauberes,
frisches,bleifreiesBenzinmiteinerMindestoktanzahlvon
87(R+M)/2verwenden.
•MitSauerstoffangereicherterKraftstoffmit10%Ethanol
oder15%MTBE(Volumenanteil)istauchgeeignet.
•VerwendenSiekeineBenzin-Ethanolmischungen
(z.B.E15oderE85)mitmehrals10%Ethanol
(Volumenanteil).SonstkönnenLeistungsprobleme
und/oderMotorschädenauftreten,dieggf.nichtvonder
Garantieabgedecktsind.
•VerwendenSiekeinBenzinmitMethanol.
•LagernSiekeinenKraftstoffimKraftstofftankoderin
KraftstoffbehälternüberdenWinter,wennSiekeinen
Kraftstoffstabilisatorverwenden.
1.6mm
2.FüllenSiedenKraftstofftank;lassenSiemindestens
einenLeerraumvon6mmbiszurUnterkantedes
Einfüllstutzens,damitsichdasBenzinausdehnenkann.
3.SetzenSiedenTankdeckelaufundziehenihnmitder
Handfest.
PrüfendesMotorölstands
Wartungsintervall:BeijederVerwendungodertäglich
Wichtig:IhrGeräthatbeiderAuslieferungkeinÖl
imMotor.FüllenSiedenMotormitÖl,bevorSieihn
anlassen.
1.StellenSiedieMaschineaufeinerebenenFlächeab.
2.EntfernenSiedenPeilstab(Bild11)undfüllenSieÖl
indenEinfüllstutzenbisca.3/4desFüllvolumensdes
Kurbelgehäusesein.
Hinweis:Max.Füllstand:0,59l(20oz)desTyps:
WaschaktivesSAE30oderSAE10W-30Ölmitder
KlassizierungSF,SG,SH,SJ,SLoderhöherdurch
dasAmericanPetroleumInstitute(API).
•VermischenSienieBenzinmitÖl.
Wichtig:FügenSiezurVermeidungvon
AnlassproblemenbeimKraftstoffinjederSaison
Kraftstoffstabilisatorzu.MischenSiedenStabilisator
mitBenzin,dasnichtälterals30Tageist.
1.ReinigenSiedenBereichumdenTankdeckelund
nehmendenDeckelab(Bild10).
Bild11
3.WischenSiedasEndedesPeilstabsmiteinemsauberen
Lappenab.
8
Page 29

4.SteckenSiedenPeilstabindenEinfüllstutzen,
G020273
schraubenSieihnjedochnichtein.
5.NehmenSiedenPeilstabherausundlesenSieden
Ölstandab(Bild12).
•FüllenSiebeieinemzuniedrigenÖlstandlangsam
etwasÖlindenÖleinfüllstutzen,wartenSiedrei
MinutenundwiederholenSiedanndieSchritte3
bis5,bisderÖlstandrichtigist.
•LassenSiebeieinemzuhohenÖlstandÖlab,bis
derÖlstandrichtigist.W eitereInformationen
zumAblassendesÖlsndenSieunter
WechselndesMotoröls(Seite14).
Wichtig:WennderÖlstandimKurbelgehäuse
zuhochoderzuniedrigist,undSiedenMotor
laufenlassen,könnenMotorschädenauftreten.
Bild12
Hinweis:WennSiedieMaschineanhebenmöchten,
schiebenSiealleEinstellhebelfürdieSchnitthöhenach
vorne.SchiebenSiedieHebelnachhinten,umdieMaschine
abzusenken(Bild13).
1.Ölstandistzuniedrig3.Ölstandistrichtig
2.Ölstandistzuhoch
6.SteckenSiedenPeilstabfestindenEinfüllstutzen.
Wichtig:
erstenfünfBetriebsstunden
sieheWechselndesMotoröls(Seite14).
WechselnSiedasMotorölnachden
unddanachjährlich;
EinstellenderSchnitthöhe
WARNUNG:
WennSiedieSchnitthöheeinstellen,könnenSie
mitdemMesserinKontaktkommenundschwere
Verletzungenerleiden.
•StellenSiedenMotorabundwartenSie,bisalle
beweglichenTeilezumStillstandgekommen
sind.
•FührenSieIhreFingerbeimEinstellender
SchnitthöhenieunterdasMähwerk.
Bild13
1.AnhebenderMaschine2.AbsenkenderMaschine
Hinweis:DieSchnitthöheneinstellungensind25mm,
38mm,51mm,64mm,76mm,89mmsowie102mm.
AnlassendesMotors
1.HaltenSiedenSchaltbügel(Bild14)gegendenBügel
gedrückt.
Bild14
1.Schaltbügel
ACHTUNG
WennderMotorgelaufenist,istderAuspuffsehr
heißundSiekönntensichverbrennen.Berühren
SieniedenheißenAuspuff.
StellenSiedieSchnitthöheein.StellenSiealleRäderaufdie
gleicheSchnitthöheein.
2.ZiehenSieamRücklaufstartergriff(Bild15).
9
Page 30

Bild15
abgestellt.WenndiesnichtderFallist,nehmenSiedas
GerätumgehendaußerBetriebundwendenSiesich
sofortaneinenofziellenVertragshändler.
Hinweis:WennderRasenmähernachmehreren
Versuchennichtanspringt,wendenSiesichanden
ofziellenVertragshändler.
EinsatzdesSelbstantriebs
DerSelbstantriebwirdeingekuppelt,wennSieden
Selbstantriebsbügel(Bild16)gegendenBügelhalten(Bild17).
Bild16
1.Selbstantriebsbügel
Bild18
Schnittgutrecyclen
DieseMaschineistwerksseitigaufdasRecyclenvon
SchnittgutundLaubeingestellt.
NehmenSieggf.denFangkorbvomGerätab(siehe
EntfernendesFangkorbs(Seite11)),bevorSieden
RasenmäheralsRecyclereinsetzen.
SammelndesSchnittguts
VerwendenSiedenFangkorb,wennSieSchnittgutundLaub
imFangkorbsammelnmöchten.
WARNUNG:
EinverschlissenerFangkorbkanndas
AusschleudernkleinerSteineundähnlicher
GegenständeinRichtungdesBenutzersund
Unbeteiligterzulassen.Daskannschwereoder
tödlicheVerletzungenfürdenBedienerund
Unbeteiligtebedeuten.
Bild17
LassenSiedenSelbstantriebsbügellos,umdenSelbstantrieb
auszukuppeln.
Hinweis:DieHöchstgeschwindigkeitfürdenSelbstantrieb
kannnichtgeändertwerden.ZumVerringernder
FahrgeschwindigkeitkönnenSiedenAbstandzwischendem
SelbstantriebsbügelunddemGriffvergrößern.
AbstellendesMotors
Wartungsintervall:BeijederVerwendungodertäglich
LassenSiezumAbstellendesMotorsdenSchaltbügellos
(Bild18).
Wichtig:WennSiedenSchaltbügelloslassen,werden
derMotorunddasMesserinnerhalbvon3Sekunden
PrüfenSiedenFangkorbregelmäßig.Tauschen
Sieihn,wennerbeschädigtist,gegeneinenneuen
ToroErsatzkorbaus.
WARNUNG:
DasMesseristscharf;einKontaktdamitkannzu
schwerenVerletzungenführen.
StellenSiedenMotorabundwartenSie,bisalle
sichdrehendenTeilezumStillstandgekommen
sind,bevorSiedieBedienungspositionverlassen.
MontierendesFangkorbs
1.HebenSiedashintereAblenkblechan(Bild19).
10
Page 31

G020689
3.SetzenSiedieLascheamHeckauswurfablenkblechin
G020690
G020691
denrechtenSchlitzamhinterenAblenkblech(Bild21).
Bild21
Bild19
1.HinteresAblenkblech
2.HakenSiedenFangkorbgriffindieKerbenanden
Griffhalterungenein(Bild19).
EntfernendesFangkorbs
1.HebenSiedashintereAblenkblechan(Bild19).
2.HebenSiedenFangkorbgriffausdenKerbenanden
GriffhalterungenundnehmendenFangkorbvom
Rasenmäherab.
3.SchließenSiedashintereAblenkblech.
EntleerendesSchnittguts
SchneidenSiesehrhohesGrasmitdemHeckauswurfablenkblech(optionalesAnbaugerät,ToroBestellnummer89964).
EinbauendesHeckauswurfablenkblechs
1.WennderFangkorbamRasenmäher
montiertist,nehmenSieihnab,siehe
EntfernendesFangkorbs(Seite11).
2.HebenundhaltenSiedashintereAblenkblechhoch
(Bild20).
4.SetzenSiedieStangeamHeckauswurfablenkblechin
dieKerbenamRasenmäher(Bild22).
Bild22
EntfernendesHeckauswurfablenkblechs
FührenSiedieobigenSchritteinumgekehrterReihenfolge
aus,wennSiedasHeckauswurfablenkblechentfernen
möchten.
Betriebshinweise
AllgemeineMähtipps
•RäumenSieGehölz,Steine,Drähte,Ästeundandere
Fremdkörper,aufdiedasMesseraufprallenkönnte,aus
demArbeitsbereich.
•VermeidenSie,dassdasMesseraufFremdkörper
aufprallt.MähenSienieabsichtlichüberirgendwelchen
Gegenständen.
•StellenSiedenMotorsofortab,wennderMäheraufeinen
Gegenstandaufpralltoderanfängtzuvibrieren,ziehen
denKerzensteckervonderZündkerzeunduntersuchen
SiedenMäheraufeventuelleBeschädigungen.
•MontierenSiefürdieoptimaleLeistungvordem
SaisonbeginneinneuesMesser.
•TauschenSiedieMesserbeiBedarfdurcheinToro
Originalersatzmesseraus.
Bild20
Mähen
•MähenSieimmernureinDritteldesGrashalmsin
einemDurchgang.MähenSienurmitderEinstellung
11
Page 32

(51mm),wenndasGrassehrfeinwächst,oderim
Spätherbst,wenndasGraswachstumnachlässt.Siehe
EinstellenderSchnitthöhe(Seite9).
•WennSieGrasmähen,dasslängerals15cm(6")ist,
mähenSiemitderhöchstenSchnitthöheneinstellungund
gehenSielangsamer;mähenSiedannnocheinmalmit
einerniedrigerenSchnitthöhe,umeingutesSchnittbildzu
erhalten.WenndasGraszulangist,kanndasMähwerk
verstopfen,diesführtzueinemAbstellendesMotors.
•MähenSienurtrockenesGrasoderLaub.NassesGras
undLaubneigenzumVerklumpenimGartenund
könneneinVerstopfenderMaschineundeinAbstellen
desMotorsverursachen.
WARNUNG:
NassesGrasund/odernasseBlätterkönnen
zuschwerenVerletzungenführen,solltenSie
daraufausrutschenundmitdemMesserin
Berührungkommen.MähenSienurunter
trockenenBedingungen.
•WechselnSiehäugdieMährichtung.Dadurchverteilt
sichdasSchnittgutbesseraufderRasenächeund
bewirkteineffektiveresDüngen.
•ProbierenSiebeieinemunbefriedigenden
ErscheinungsbildderRasenächeeinederfolgenden
Abhilfenaus:
–WechselnSiedasMesserausoderlassenSiees
schärfen.
–GehenSiebeimMähenlangsamer.
–HebenSiedieSchnitthöhederMaschinean.
–MähenSiehäuger.
–LassenSiedieBahnenüberlappen,anstellebeijedem
GangeineneueBahnzumähen.
–StellenSiedieSchnitthöhevorneumeine
AuskerbungtieferalsandenHinterrädern.Stellen
SiebeispielsweisedieVorderräderauf51mmunddie
Hinterräderauf64mm.
SchnetzelnvonLaub
•StellenSienachdemMähensicher,dassdieHälftedes
RasensdurchdieSchnittgutdeckesichtbarist.Dabei
müssenSieunterUmständenmehrmalsüberBlätter
mähen.
•StellenSiedievordereSchnitthöheumeineoderzwei
Auskerbungenhöheralsdiehintere,wenneineBlattdecke
vonmehrals13cmaufdemRasenliegt.
•MähenSielangsamer,wenndieMaschinedasLaubnicht
feingenughäckselt.
12
Page 33

Wartung
G017308
Hinweis:BestimmenSiedielinkeundrechteSeitederMaschineanhandderüblichenEinsatzposition.
EmpfohlenerWartungsplan
Wartungsintervall
NachfünfBetriebsstunden
BeijederVerwendung
odertäglich
NachjederVerwendung
Alle100Betriebsstunden
VorderEinlagerung
Jährlich
Wartungsmaßnahmen
•WechselnSiedasMotoröl.
•PrüfenSiedenÖlstandimMotor.
•StellenSiesicher,dassderMotorinnerhalbvon3SekundennachdemLoslassen
desSchaltbügelsabstellt.
•EntfernenSieSchnittgutundSchmutzvonderUnterseitedesMähwerks.
•PrüfenSiedieZündkerzeundtauschensiebeiBedarfaus.
•EntleerenSiedenKraftstofftanklautAnweisungvordenReparaturenundder
jährlichenEinlagerung.
•ReinigenSiedieKühlanlageundentfernenSieSchnittgut,Schmutz-und
FettrückständevondenKühlrippendesMotorsundvomAnlasser.ReinigenSiedie
AnlagebeischmutzigenBedingungenoderstarkemHäckselaufkommenhäuger.
•WechselnSiedenLuftlteraus(häugerunterstaubigenBedingungen).
•WechselnSiedasMotoröl.
•WechselnSiedasMesserausoderlassenSieesschärfen(öfter,wenndieKanten
schnellstumpfwerden).
VorbereitenfürdieWartung
1.StellenSiedenMotorabundwartenSie,bisalle
beweglichenTeilezumStillstandgekommensind.
2.ZiehenSiedasZündkabelvonderZündkerze(Bild23)
ab,bevorSieWartungsarbeitenausführen.
WARNUNG:
EinKippenderMaschinekannzueinem
VerschüttenvonKraftstoffführen.Benzinist
entammbar,explosivundkannVerletzungen
verursachen.
LassenSiedenMotorlaufen,biskein
KraftstoffmehrimTankist,oderpumpenSie
denKraftstoffab.SiesolltenaufkeinenFall
versuchen,Kraftstoffabzusaugen.
Bild23
1.Zündkerzenstecker
3.SteckenSienachdemAbschlussderWartungsarbeiten
dasZündkabelwiederaufdieZündkerze.
Wichtig:KippenSiedieMaschineimmersoauf
dieSeite,dassderPeilstabnachuntenzeigt.
AuswechselndesLuftlters
Wartungsintervall:Jährlich
1.DrückenSiedieVerriegelungsnasenobenander
Liftlterabdeckungnachunten(Bild24).
Bild24
1.Verriegelungslaschen
13
Page 34

2.ÖffnenSiedieAbdeckung.
3.EntfernenSiedenPapierlterunddenSchaumvorlter
(Bild25).
Bild25
1.Papierluftlter2.Schaumvorlter
4.PrüfenSiedenSchaumvorlterundwechselnihnaus,
wennerbeschädigtodersehrverschmutztist.
5.PrüfenSiedenPapierlter.
A.WennderPapierlterbeschädigtodermitÖloder
Kraftstoffbefeuchtetist,wechselnSieihnaus.
B.WennderPapierlterschmutzigist,klopfenSie
ihnmehrmalsaufeinerfestenOberächeausoder
blasenSieDruckluft(unter207kPAbzw.30psi)
durchdieSeitedesFilters,diezumMotorzeigt.
Bild26
7.KippenSiedieMaschinezurSeite,derEinfüllstutzen
zeigtnachunten,umdasAltölüberdenEinfüllstutzen
ineineAuffangwanneabzulassen(Bild27).
Bild27
Hinweis:BürstenSieSchmutznievomFilter
ab.EinBürstendrücktdenSchmutznochtiefer
indieFasern.
6.EntfernenSiedenSchmutzvomLiftltergehäuse
undvonderAbdeckungmiteinemfeuchtenLappen.
WischenSiekeinenSchmutzindenLuftschacht.
7.SetzenSiedenSchaumvorlterunddenPapierlter
indenLuftlterein.
8.SetzenSiedieAbdeckungauf.
WechselndesMotoröls
Wartungsintervall:NachfünfBetriebsstunden
Jährlich
1.StellenSiedieMaschineaufeinerebenenFlächeab.
2.StellenSiesicher,dassderKraftstofftanknurwenig
oderkeinenKraftstoffenthält,sodasskeinKraftstoff
ausläuft,wennSiedenRasenmäherseitlichkippen.
3.LassenSiedenMotoreinpaarMinutenlaufen,bevor
SiedasÖlwechseln,umesaufzuwärmen.
Hinweis:WarmesÖließtbesserundführtmehr
Fremdstoffemitsich.
4.KlemmenSiedasZündkabelvonderZündkerzeab
VorbereitenfürdieWartung(Seite13).
5.StellenSieeineÖlauffangwanneanderSeiteneben
demÖleinfüllstutzennebendieMaschine.
6.NehmenSiedenPeilstabausdemÖleinfüllstutzen
(Bild26).
8.StellenSiedieMaschinenachdemAblassendesAltöls
wiederindieBetriebsstellung.
9.GießenSiecircadreiVierteldermaximalenFüllmenge
indasKurbelgehäuse.
Hinweis:Max.Füllstand:0,59l(591,47cm³)des
Typs:Waschaktives30oderSAE10W-30Ölmitder
KlassizierungSF,SG,SH,SJ,SLoderhöherdurch
dasAmericanPetroleumInstitute(API).
10.WartenSiedreiMinuten,damitsichdasÖlsetzenkann.
11.WischenSiedasEndedesPeilstabsmiteinemsauberen
Lappenab.
12.SteckenSiedenPeilstabindenEinfüllstutzen,
schraubenSieihnjedochnichtein.
13.NehmenSiedenPeilstabherausundlesenSieden
Ölstandab(Bild28).
•FüllenSiebeieinemzuniedrigenÖlstandlangsam
etwasÖlindenÖleinfüllstutzen,wartenSiedrei
MinutenundwiederholenSiedanndieSchritte11
bis13,bisderÖlstandrichtigist.
•LassenSiebeieinemzuhohenÖlstandÖlab,bis
derÖlstandrichtigist.W eitereInformationen
zumAblassendesÖlsndenSieunter
WechselndesMotoröls(Seite14).
Wichtig:WennderÖlstandimKurbelgehäuse
zuhochoderzuniedrigist,undSiedenMotor
laufenlassen,könnenMotorschädenauftreten.
14
Page 35

AuswechselndesMessers
Wartungsintervall:Jährlich
Bild28
1.Ölstandistzuniedrig3.Ölstandistrichtig
2.Ölstandistzuhoch
14.SteckenSiedenPeilstabfestindenEinfüllstutzen.
15.EntsorgenSiedasAltölbeieinemzugelassenen
Recyclingcenter.
WartenderZündkerze
Wartungsintervall:Alle100Betriebsstunden
PrüfenSiedieZündkerzealle100Betriebsstunden.
VerwendenSieeineChampionRN9YCodergleichwertige
Zündkerze.
1.StellenSiedenMotorabundwartenSie,bisalle
beweglichenTeilezumStillstandgekommensind.
2.SchließenSiedenZündkerzensteckerab.
3.ReinigenSiedenBereichumdieZündkerzeherum.
4.EntfernenSiedieZündkerzeausdemZylinderkopf.
Wichtig:Siemüsseneinegerissene,verrußte
oderverschmutzteZündkerzeaustauschen.
ReinigenSieniedieOberseitederZündkerze,da
AbschabungenindenZylindereindringenund
denMotorbeschädigenkönnten.
5.StellenSiedenElektrodenabstandauf0,76mmein
(Bild29).
Wichtig:
MesserseinenDrehmomentschlüssel
DrehmomentschlüsselhabenoderdieseArbeitnicht
ausführenmöchten,wendenSiesichaneinenofziellen
Vertragshändler.
PrüfenSiedasMesser,wennderKraftstofftankleerist.
WechselnSiedasMessersofortaus,wennesbeschädigtoder
gerissenist.SchärfenSiedieMesserkante,wennsiestumpfist
oderEinkerbungenaufweist.WechselnSieggf.dasMesser
aus.
SiebenötigenfürdenrichtigenEinbaudes
.WennSiekeinen
WARNUNG:
DasMesseristscharf;einKontaktdamitkannzu
schwerenVerletzungenführen.
•KlemmenSiedasZündkabelvonderZündkerze
ab.
•TragenSieHandschuhe,wennSiedasMesser
warten.
1.ZiehenSiedenKerzensteckervonderZündkerzeab,
sieheVorbereitenfürdieWartung(Seite13).
2.KippenSiedieMaschineimmersoaufdieSeite,dass
derPeilstabnachuntenzeigt.
3.StabilisierenSiedasMessermiteinemHolzblock.
4.EntfernenSiedasMesser(drehenSiedie
Messerschraubenachlinks)undbewahrenSiealle
Befestigungenauf.
5.InstallierenSieeinneuesMesser(drehenSiedie
Messerschraubenachrechts)undalleBefestigungen
(Bild30).
Bild29
1.SeitlicheElektrode
2.MittlereElektrode
3.Elektrodenabstand(nichtmaßstabsgetreu)
6.SchraubenSiedieZündkerzemiteinerKerzendichtung
ein.
7.ZiehenSiedieKerzemit20N-man.
8.SchließenSiedenZündkerzensteckerwiederandie
Zündkerzean.
Bild30
15
Page 36

Wichtig:DasgebogeneEndedesMesserssollte
zumMähwerkgehäusezeigen.
6.ZiehenSiedieMesserschraubemiteinem
Drehmomentschlüsselauf82Nman.
ReinigenderUnterseitedes Maschinengehäuses
Wartungsintervall:NachjederVerwendung
Wichtig:Eineauf82NmangezogeneSchraube
istsehrfest.ArretierenSiedasMessermiteinem
HolzstückundverlagernSiegleichzeitigdas
GewichtaufdenSchlüsselundziehenSiedie
Schraubefest.DieseSchraubekannfastnichtzu
festangezogenwerden.
EinstellendesSelbstantriebskabels
BeimEinbaueinesneuesSelbstantriebskabelsoderbei
einerfalschenEinstellungdesSelbstantriebsmüssenSiedas
Selbstantriebskabeleinstellen.
1.LösenSiedieKabelstützenmutter(Bild31).
WARNUNG:
DieMaschinekannAblagerungenunterdem
Maschinengehäuselockern.
•TragenSieeineSchutzbrille.
•BleibenSieinderEinsatzstellung(hinterdem
Griff)wennderMotorläuft.
•HaltenSieUnbeteiligtevomBereichfern.
1.LassenSiedenMotoraufeinerachen,befestigten
OberächelaufenundsprühenSieWasservordas
rechteHinterrad(Bild32).
DasWasserspritztdannindenMesserlaufwegund
spültdasSchnittgutaus.
Bild32
Bild31
1.25mmbis38mm4.MutteramKabelhalter
2.Selbstantriebsbügel
3.Kabelmantel
2.HaltenSiedenSelbstantriebsbügel25mmbis38mm
vomBügelentfernt(Bild31).
3.ZiehenSiedenKabelmantel(zurMaschine),bisdas
Kabelstrammist(Bild31).
4.ZiehenSiedieMutteranderKabelstützefest.
5.LassenSiedenSelbstantriebsbügellosundstellenSie
sicher,dassdasKabelnichtstrammist.
Hinweis:DasKabeldarfnichtstraffgespannt
sein,wennderSelbstantriebsbügellosgelassenist,
sonstkriechtderRasenmäher,wennSiedenBügel
auskuppeln.
5.Zugstütze
2.StellenSiedasWasserab,wennkeinSchnittgutmehr
herausgespültwird,undschiebenSiedenRasenmäher
aufeinentrockenenBereich.
3.LassenSiedenMotorfüreinpaarMinutenlaufen,
damitdasGehäuseaustrocknetundnichtrostet.
16
Page 37

Einlagerung
ZusammenklappendesBügels
LagernSiedieMaschineaneinemkühlen,sauberenund
trockenenOrtein.
VorbereitendesRasenmähers fürdieEinlagerung
WARNUNG:
Benzindämpfekönnenexplodieren.
•LagernSieBenzinnichtlängerals30Tage.
•LagernSiedieMaschinenichtingeschlossenen
RäumeninderNähevonoffenemFeuerein.
•LassenSievordemEinlagerndenMotor
abkühlen.
1.FüllenSiebeimletztenBetankenfürdasJahrdem
frischenBenzineinenKraftstoffstabilisatorzu.Folgen
SiedabeidenAnweisungendesMotorherstellers.
2.EntsorgenSienichtverwendetenKraftstoff
ordnungsgemäß.RecycelnSiedenKraftstoff
vorschriftsmäßigoderverwendenSieihnfürIhrAuto.
Hinweis:AlterKraftstoffimKraftstofftankistdie
häugsteUrsachefürschweresAnspringen.LagernSie
KraftstoffohneStabilisatornichtfürmehrals30Tage.
LagernSieKraftstoffmitStabilisatornichtfürmehr
als90Tage.
WARNUNG:
WennSiedenBügelfalschauf-oder
zusammenklappen,könnenSiedieKabel
beschädigenunddensicherenGeräteeinsatz
gefährden.
•BeschädigenSiebeimAuf-oder
ZusammenklappendesBügelsnichtdie
Kabel.
•WendenSiesichbeieinembeschädigtenKabel
aneinenofziellenV ertragshändler.
1.LösenSiedieGriffhandräder,bisSiedenGriff
ungehindertbewegenkönnen(Bild33).
Bild33
1.Griffhandrad(2)
2.SchiebenSiedenGriffnachvorne,sieheBild33.
3.LassenSiedieMaschinesolangelaufen,bissieinfolge
vonBenzinknappheitabstellt.
4.LassenSiedenMotorwiederan.
5.LassenSiedenMotorlaufen,biserabstellt.Wennsich
derMotornichtmehrstartenlässt,isterausreichend
trocken.
6.KlemmenSiedasZündkabelvonderZündkerzeab.
7.NehmenSiedieZündkerzeheraus,füllenSie30ml
ÖlindasZündkerzenlochundziehenSiemehrmals
langsamamStarterkabel,umdasÖlimZylinderzu
verteilenundeineKorrosiondesZylinderswährend
derEinlagerungzuvermeiden.
8.SteckenSiedieZündkerzelockerauf.
9.ZiehenSiealleSchraubenundMutternan.
Bild34
Herausnehmendes Rasenmähersausder Einlagerung
1.ZiehenSiealleBefestigungsteilean.
2.EntfernenSiedieZündkerzeunddrehendenMotor
schnellmitHilfedesStarters,umüberüssigesÖlaus
demZylinderzuentfernen.
3.SetzenSiedieZündkerzeeinundziehenSiesiemit
einemDrehmomentschlüsselauf20N-man.
4.FührenSiedieempfohlenenWartungsarbeitendurch,
sieheVorbereitenfürdieWartung(Seite13).
5.PrüfenSiedenÖlstandimMotor,siehe
PrüfendesMotorölstands(Seite8).
6.FüllenSiefrischesBenzinindenKraftstofftank,siehe
Betanken(Seite8).
17
Page 38

7.SchließenSiedenZündkerzensteckerwiederandie
Zündkerzean.
18
Page 39

InternationaleHändlerliste
Vertragshändler:
AtlantisSuveSulamaSisstemleriLt
BalamaPrimaEngineeringEquip.Hongkong85221552163
B-RayCorporation
CascoSalesCompany
CeresS.A.CostaRica
CSSCTurfEquipment(pvt)Ltd.SriLanka
CyrilJohnston&Co.
EquiverMexiko525553995444ParklandProductsLtd.Neuseeland6433493760
FemcoS.A.Guatemala
G.Y.K.CompanyLtd.
GeomechanikiofAthensGriechenland
GuandongGoldenStarChina
HakoGroundandGardenSchweden
HakoGroundandGarden
HayterLimited(U.K.)Großbritannien
HydroturfInt.CoDubai
HydroturfEgyptLLC
IrriamcPortugal351212388260ToroAustraliaAustralien61395807355
IrrigationProductsInt'lPvtLtd.Indien862283960789ToroEuropeNVBelgien3214562960
JeanHeybroekb.v.Niederlande31306394611
Land:
Türkei902163448674
Korea82325512076
PuertoRico7877888383
Nordirland442890813121
Japan81726325861
Norwegen4722907760
VereinigteArabische
Emirate
Ägypten
Telefonnummer:Vertragshändler:
5062391138
94112746100
5024423277
30109350054
862087651338Riversa
4635100000
441279723444
97143479479
2025194308T-MarktLogisticsLtd.Ungarn3626525500
MaquiverS.A.
MaruyamaMfg.Co.Inc.
AgrolancKft
Mountelda.s.
MunditolS.A.
OslingerTurfEquipmentSA
OyHakoGroundandGardenAb
PratoV erdeS.p.A.
Prochaska&Cie
RTCohen2004Ltd.
ScSvendCarlsenA/S
SolvertS.A.S.
SpyprosStavrinidesLimited
SurgeSystemsIndiaLimited
Land:
Kolumbien5712364079
Japan81332522285
Ungarn3627539640
Tschechische
Republik
Argentinien541148219999
Ecuador59342396970
Finnland35898700733
Italien390499128128
Österreich
Israel97298617979
Spanien
Dänemark4566109200
Frankreich33130817700
Zypern35722434131
Indien911292299901
Telefonnummer:
420255704220
4312785100
34952837500
EuropäischerDatenschutzhinweis
DievonT orogespeichertenInformationen
ToroWarrantyCompany(Toro)respektiertIhrePrivatsphäre.ZumBearbeitenIhresGarantieanspruchsundzurKontaktaufnahmebeieinem
ProduktrückrufbittetT oroSie,TorodirektoderüberdenlokalenVertragshändlerbestimmtepersönlicheInformationenmitzuteilen.
DasGarantiesystemvonT orowirdaufServerninUSAgehostet;dortgeltenggf.andereVorschriftenzumDatenschutzggf.alsinIhremLand.
WennSieToropersönlicheInformationenmitteilen,stimmenSiederVerarbeitungderpersönlichenInformationenzu,wieindiesemDatenschutzhinweis
beschrieben.
VerwendungderInformationendurchToro
TorokannIhrepersönlichenInformationenzumBearbeitenvonGarantieansprüchen,zurKontaktaufnahmebeieinemProduktrückrufoderanderen
Zwecken,dieToroIhnenmitteilt,verwenden.T orokanndieInformationenimRahmendieserAktivitätenanT oroTochtergesellschaften,Händler
oderGeschäftspartnerweitergeben.ToroverkauftIhrepersönlichenInformationenankeineanderenUnternehmen.T orohatdasRecht,persönliche
Informationenmitzuteilen,umgeltendeVorschriftenundAnfragenvonentsprechendenBehördenzuerfüllen,umdieSystemerichtigzupegenoderToro
oderandereBenutzerzuschützen.
SpeicherungpersönlicherInformationen
TorospeichertpersönlicheInformationensolange,wieesfürdenZweckerforderlichist,fürdendieInformationengesammeltwurden,oderfürandere
legitimeZwecke(z.B.EinhaltungvonVorschriften)oderGesetzesvorschriften.
TorosEngagementzurSicherungIhrerpersönlichenInformationen
TorotrifftangemesseneSicherheitsmaßnahmen,umIhrepersönlichenInformationenzuschützen.T orounternimmtauchSchritte,umdieGenauigkeit
unddenaktuellenStatusderpersönlichenInformationenzuerhalten.
ZugriffaufpersönlicheInformationenundRichtigkeitpersönlicherInformationen
WennSiedieRichtigkeitIhrerpersönlichenInformationenprüfenmöchten,sendenSiebitteeineE-Mailanlegal@toro.com.
AustralischesVerbrauchergesetz
KundeninAustralienndenweitereDetailszumaustralischenVerbrauchergesetzentwederinderVerpackungoderkönnensichandenörtlichen
ToroVertragshändlerwenden.
374-0269RevF
Page 40

DieGarantievonToro
und
DieGTS-LeichtstartgarantievonToro
BedingungenundabgedeckteProdukte
TheToroCompanyunddieVertragshändler,T oroWarrantyCompany ,gewährleisten
imRahmeneinesgegenseitigenAbkommensdieaufgeführtenProduktefür
denErstkäufer
Herstellungsfehleraufweisen,aufgrundeinesBestandteildefektsausfallen,oder
wennderToroGTS-Leichtstartmotor(GuaranteedtoStart)nichtbeimerstenoder
zweitenZiehenanspringt,wenndieinderBedienungsanleitungaufgeführten
regelmäßigenWartungsarbeitenausgeführtwurden.
DiefolgendenGarantiezeiträumegeltenabdemKaufdatum:
Produkte
HandrasenmähermitSelbstantrieb
•Gussmähwerk
•Motor
•Batterie2Jahre
•Stahlmähwerk
•Motor
TimeMaster-Mäher3JahrebeiPrivatpersonen-Verwendung
•Motor
•Batterie2Jahre
TragbareElektroprodukte2JahrebeiPrivatpersonen-Verwendung
Schneefräsen
•Einstug
•Motor
•Zweistug
•Auswurfkanal,Ablenkblechund
Räumwerkgehäuseabdeckung
ElektrischeSchneefräsen
AlleuntenaufgeführtenAufsitzmäher
•Motor
•Batterie2JahrebeiPrivatpersonen-Verwendung
•Anbaugeräte2JahrebeiPrivatpersonen-Verwendung
Rasen-undGartentraktoreDH
Rasen-undGartentraktoreXLS
TimeCutter
TITAN-Rasenmäher
•Rahmen
MäherderSerieZMaster20004Jahreoder500Stunden
•Rahmen
1
ErstkäuferistdiePerson,diedasToroProduktneugekaufthat.
2
NormalerPrivatgebrauchbedeutetdieVerwendungdesProduktesaufdemselbenGrundstückwie
dasEigenheim.DerEinsatzanmehrerenStandortenwirdalskommerziellerGebraucheingestuft,
undindiesenSituationenwürdediekommerzielleGarantiegelten.
3
DieT oroGTS-StartgarantiegiltnichtbeikommerziellemGebrauch.
4
EinigeMotoren,dieinT oroProdukteneingesetztwerden,habeneineGarantievom
Motorhersteller.
5
Jenachdem,waszuersteintritt.
6
LebenslangeRahmengarantie:WennderHauptrahmen,derausdengeschweißtenTeilen
besteht,diedieTraktorstrukturergeben,anderandereBestandteile,u.a.derMotor,befestigt
sind,beinormalenGebrauchRissezeigtoderbricht,wirderimRahmenderGarantie(nach
ErmessenvonT oro)kostenfrei(keineMaterial-undLohnkosten)repariertoderausgewechselt.Ein
RahmenversagenaufgrundvonMissbrauchodernichtausgeführtenReparaturen,dieaufgrund
vonRostoderKorrosionerforderlichsind,istnichtabgedeckt.
DieseGarantiedecktdieLohn-undMaterialkostenab,Siemüssendie
Transportkostenübernehmen.
DieGarantieansprüchewerdenggf.abgelehnt,wennderBetriebsstundenzähler
abgeschlossenodermodiziertwurdeoderZeicheneinerModizierungaufweist.
1
)vonT orozureparieren,wenndieProdukteMaterial-oder
Garantiezeitraum
5JahrebeiPrivatpersonen-Verwendung
90TagebeikommerziellerVerwendung
5JahreGTS-Garantie,
Privatverwendung
3
2JahrebeiPrivatpersonen-Verwendung
90TagebeikommerziellerVerwendung
2JahreGTS-Garantie,
Privatverwendung
3
90TagebeikommerziellerVerwendung
3JahreGTS-Garantie,
Privatverwendung
3
KeineGarantiefürkommerziellenGebrauch
2JahrebeiPrivatpersonen-Verwendung
45TagebeikommerziellerVerwendung
2JahreGTS-Garantie,
Privatverwendung
3
3JahrebeiPrivatkunden-Verwendung
45TagebeikommerziellerVerwendung
Lebenslang(nurErstkäufer)
2JahrebeiPrivatpersonen-Verwendung
KeineGarantiefürkommerziellenGebrauch
SieheGarantiedesMotorherstellers
2JahrebeiPrivatpersonen-Verwendung
90TagebeikommerziellerVerwendung
3JahrebeiPrivatpersonen-Verwendung
90TagebeikommerziellerVerwendung
3JahrebeiPrivatpersonen-Verwendung
90TagebeikommerziellerVerwendung
3Jahreoder240Stunden
Lebenslang(nurErstkäufer)
Lebenslang(nurErstkäufer)
5
5
6
5
6
VerantwortungdesEigentümers
SiemüssendasProduktvonTorogemäßderinderBedienungsanleitung
aufgeführtenWartungsarbeitenpegen.FürsolcheRoutinewartungsarbeiten,die
vonIhnenodereinemHändlerdurchgeführtwerden,kommenSieauf.
AnweisungenfürdieInanspruchnahmevonWartungsarbeitenunter
Garantie
HaltenSiediesesVerfahrenein,wennSiederMeinungsind,dassIhreProdukte
vonToroMaterial-oderHerstellungsfehleraufweisen.
1.WendenSiesichandieVerkaufsstelle,umeinenKundendienstfürdasProdukt
2
2
zuvereinbaren.WennSiedenVerkäufernichtkontaktierenkönnen,können
SiesichauchanjedenofziellenVertragshändlervonT orowenden.Siehe
beiliegendeListederVertragshändler.
2.BringenSiedasProduktunddenKaufnachweis(Rechnung)zumHändler .
WennSiemitderAnalyseoderdemSupportdesVertragshändlersnicht
zufriedensind,wendenSiesichanT orounter:
ToroCustomerCareDepartment,RLCDivision
ToroWarrantyCompany
2
811 1LyndaleAvenueSouth
Bloomington,MN55420-1196
001–952–948–4707
2
NichtvonderGarantieabgedecktePunkteundBedingungen
DieseausdrücklicheGarantieschließtFolgendesaus:
2
•KostenfürregelmäßigeWartungsarbeitenoderTeile,diesichabnutzen,wie
z.B.Messer,Rotormesser(Schaufeln),Abstreifermesser,Riemen,Kraftstoff,
Schmiermittel,Ölwechsel,Zündkerzen,Reifen,EinstellenderKabel,des
2
2
4
2
2
2
2
2
GestängesoderderBremsen
•JedesProduktoderTeil,dasmodiziertodermissbrauchtwurdeundaufgrund
einesUnfallsoderfehlenderWartungersetztoderrepariertwerdenmuss
•Reparaturen,dieaufgrundvonNichtverwendenvonfrischemKraftstoff(weniger
alseinMonat)oderfalscherVorbereitungdesGerätsvoreinerEinlagerungvon
mehralseinemMonatenzurückzuführensind.
•AllevondieserGarantieabgedecktenReparaturenmüssenvoneinem
ofziellenVertragshändlermitOriginalersatzteilenvonT oroausgeführtwerden.
AllgemeineBedingungen
FürdenKäufergeltendiegesetzlichenVorschriftenjedesLandes.DieRechte,
diedemKäuferausdiesengesetzlichenVorschriftenzustehen,werdennichtvon
dieserGarantieeingeschränkt.
374-0268RevE
Page 41

FormNo.3376-660-ASMRevA
Gazonmaaiervan50cmmetmulchfunctieen
achtervanger
Modelnr.:29639—Serienr.:313000001enhoger
Gebruikershandleiding
Inleiding
Dezeloopmaaiermetdraaiendemessenisbedoeldvoor
gebruikdoorparticulierenofprofessionelebestuurders.
Demachineisvoornamelijkontworpenvoorhet
maaienvangrasopgoedonderhoudenparticuliereof
commerciëlegazons.Demachineisnietontworpen
voorhetmaaienvanborsteliggrasofvoorgebruikin
delandbouw.
Leesdezeinformatiezorgvuldig,zodatuweethoeuhet
productopdejuistewijzekuntgebruikenenonderhouden
enletselenschadeaandemachinekuntvoorkomen.Ubent
verantwoordelijkvoorhetjuisteenveiligegebruikvande
machine.
UkuntrechtstreekscontactopnemenmetToroop
www.Toro.comvoorinformatieoverproductenen
accessoires,hulpbijhetvindenvaneendealerofomuw
productteregistreren.
Alsuservice,origineleToro-onderdelenofaanvullende
informatienodighebt,kuntucontactopnemenmeteen
erkendeServiceDealerofmetdeklantenservicevanToro.U
dienthierbijaltijdhetmodelnummerenhetserienummer
vanuwmachinetevermelden.Delocatievanhetplaatjemet
hetmodelnummerenhetserienummervandemachineis
aangegevenopFiguur1.Ukuntdenummersnotereninde
ruimtehieronder.
Erwordenindezehandleidingeenaantalmogelijkegevaren
eneenaantalveiligheidsberichtengenoemd(Figuur2)metde
volgendeveiligheidssymbolen,dieduidenopeengevaarlijke
situatiediezwaarlichamelijkletselofdedoodtotgevolg
kanhebbenwanneerdeveiligheidsvoorschriftennietinacht
wordengenomen.
Figuur2
1.Veiligheidssymbool
Erwordenindezehandleidingtweewoordengebruikt
omuwaandachtopbijzondereinformatietevestigen.
Belangrijkattendeertuopbijzonderetechnischeinformatie
enOpmerkingduidtalgemeneinformatieaandiebijzondere
aandachtverdient.
DitproductvoldoetaanallerelevanteEuropese
richtlijnen.Zievoordetailsdeaparteproduct-specieke
conformiteitsverklaring.
VoormodelswaarvanhetaantalPKisaangegeven,
isdebrutoPKdoordemotorfabrikantgemetenin
laboratoriumomstandighedengemetenvolgensSAEJ1940.
Omdatbijdeconguratierekeningisgehoudenmetde
veiligheids-,emissie-engebruiksvoorschriften,zaldemotor
vandittypegazonmaaiersindepraktijkveelminderPK
hebben.
1.Plaatjemetmodelnummerenserienummer
Modelnr.:
Serienr.:
©2013—TheToro®Company
8111LyndaleAvenueSouth
Bloomington,MN55420
Figuur1
Registreeruwproductopwww.T oro.com.
Laatdebedieningsorganenenhetafgesteldmotortoerental
ongemoeid,anderskanereenonveiligesituatieontstaan
waardooruletselkuntoplopen.
Inhoud
Inleiding.......................................................................1
Algemeneveiligheidsregelsmetbetrekkingtotde
maaimachine.......................................................2
Geluidsdruk...........................................................4
Geluidsniveau.........................................................4
Trillingophanden/armen........................................4
Veiligheids-eninstructiestickers................................5
Montage.......................................................................6
1Dehandgreepbevestigen.......................................6
Vertalingvandeoorspronkelijketekst(NL)
Allerechtenvoorbehouden
GedruktindeVS
*3376-660-ASM*A
Page 42

2Destartkoordaanbrengeninde
koordgeleider......................................................6
3Demotorbijvullenmetolie....................................6
Algemeenoverzichtvandemachine.................................7
Specicaties...........................................................7
Gebruiksaanwijzing........................................................8
Debrandstoftankvullen...........................................8
Hetmotoroliepeilcontroleren...................................8
Demaaihoogteinstellen...........................................9
Demotorstarten.....................................................9
Dezelfaandrijvinggebruiken...................................10
Motorafzetten.......................................................10
Maaiselrecyclen.....................................................10
Hetmaaiselopvangen.............................................10
Hetmaaiselafvoeren...............................................11
Tipsvoorbedieningengebruik................................11
Onderhoud..................................................................13
Aanbevolenonderhoudsschema..................................13
Voorbereidingenvooronderhoudswerkzaamhe-
den...................................................................13
Hetluchtltervervangen.........................................13
Demotorolieverversen...........................................14
Onderhoudvandebougie.......................................15
Hetmaaimesvervangen..........................................15
Kabelvanelfaandrijvingafstellen..............................16
Deonderkantvandemachinebehuizing
reinigen.............................................................16
Stalling........................................................................17
Voorbereidingenvoorstalling..................................17
Dehandgreepinklappen.........................................17
Demaaimachineuitdestallinghalen.........................17
Veiligheid
Onjuistgebruikofonderhoudvandezemaaier
kanletseltotgevolghebben.Houduaandeze
veiligheidsinstructiesomhetrisicoopletselte
verminderen.
Toroheeftdezemaaierontworpenvoorengetestopveilig
gebruik.Alsuzichechterniethoudtaandevolgende
instructieskanditlichamelijkletseltotgevolghebben.
Hetisvanessentieelbelangdatueneventuele
anderegebruikersvandemaaierdeinhoudvandeze
handleidinglezenenbegrijpenvoordatdemotorvoor
heteerstwordtgestartommaximaleveiligheidende
besteprestatiestegaranderenenzodatukennisover
hetproductopdoet.Letmennameophetsymboolvoor
veiligheidswaarschuwingen(Figuur2)datVoorzichtig,
WaarschuwingofGevaar-'instructievoorpersoonlijke
veiligheid'kanbetekenen.Zorgdatudeinstructies
leestenbegrijpt,ditisbelangrijkvoordeveiligheid.
Niet-nalevingvandeinstructiekanleidentotlichamelijk
letsel.
Algemeneveiligheidsregels metbetrekkingtotde maaimachine
DevolgendeinstructieszijnontleendaanEN836.
Dezemachinekanhandenenvoetenafsnijdenenvoorwerpen
uitwerpen.Alsudeveiligheidsinstructiesnietopvolgt,kandit
leidentoternstigofdodelijkletsel.
Instructie
•Leesdezehandleidingaandachtigdoor.Zorgervoordat
uvertrouwdraaktmetbedieningsorganenenweethoeu
demachinemoetgebruiken.
•Laatnooitkinderenofpersonendiedeinstructiesniet
kennen,demaaimachinegebruiken.Voordebestuurder
kaneenwettelijkeminimumleeftijdgelden.
•Onthouddatdebestuurderverantwoordelijkisvoor
ongevallenofschadeaananderepersonenofhun
eigendommen.
•Zorgervoordatudeuitlegoverallepictogrammenop
demaaimachineenindeinstructieshebtgelezenen
begrepen.
Benzine
WAARSCHUWING
Benzineisuiterstontvlambaar.Neemdevolgende
voorzorgsmaatregelen.
•Bewaarbrandstofuitsluitendintanksofblikken
diespeciaaldaarvoorbedoeldzijn.
•Vuldebrandstoftanknooitbinnenshuis;tijdens
hetbijvullennietroken.
•Vulbrandstofbijvoordatudemotorstart.
Verwijdernooitdedopvandebrandstoftanken
vulnooitbenzinebijwanneerdemotorlooptof
heetis.
•Alserbrandstofgemorstmagudemotorniet
aanzetten,maardientueerstdemaaimachine
verplaatsen.Zorgervoordatergeen
ontstekingsbronnenindebuurtvandegemorste
brandstofkomentotdatallebenzinedampen
verdwenenzijn.
•Doesteedsdedopweerzorgvuldigop
brandstoftanksen-containers.
Vóóringebruikname
•Draagtijdenshetmaaienaltijdeenlangebroekenstevige
schoenen.Draaggeenschoenenmetopentenenenloop
nietopblotevoeten.
•Inspecteereerstgrondighetterreinwaarudemachine
wiltgebruikenenverwijderallestenen,takken,draden,
bottenofanderevreemdevoorwerpen.
2
Page 43

•Controleervóórgebruikaltijdofdebeschermplaten
enveiligheidsvoorzieningenzoalsgrasgeleidersen
grasvangers,ophunplaatszittenennaarbehorenwerken.
•Controleervóórhetgebruikdemessen,
bevestigingsboutenenhetmaaimechanismealtijd
opsporenvanslijtageofbeschadiging.Vervangversleten
ofbeschadigdemessenenboutenaltijdalscompleteset
omeengoedebalanstebehouden.
Starten
Houdubijhetstartenvandemotorzorgvuldigaande
voorschriftenenhouduwvoetenuitdebuurtvande
maaimes(sen)ennietvóórdeafvoeropening.
–voordatudemachinegaatcontroleren,schoonmaken
ofonderhoudswerkzaamhedengaatuitvoeren.
–alsueenvreemdvoorwerpheeftgeraakt,moetu
demaaimachineopbeschadigingencontrolerenen
reparatiesuitvoerenvoordatudemachineopnieuw
startenweeringebruikneemt.
–controleerdemachineonmiddellijkalsdeze
abnormaalbeginttetrillen.
•Bliksemkanernstigofdodelijkletselveroorzaken.Alsu
bliksemzietofdonderhoortinhetgebied,gebruikde
machinedanniet;gaschuilen.
•Letophetverkeeralsuindebuurtvaneenwegwerktof
dezeoversteekt.
Gebruiksaanwijzing
•Houdiedereenweguithetgebiedwaarinudemachine
gebruikt,metnamekinderenenhuisdieren.
•Maaiuitsluitendbijdaglichtofgoedkunstlicht.
•Letopkuileninhetterreinenandereverborgengevaren.
•Houdhandenenvoetenuitdebuurtvandraaiende
onderdelen.Blijfaltijduitdebuurtvandeafvoeropening.
•Demachinemagnooitwordenopgetildofgedragen
terwijldemotornogloopt.
•Gazeervoorzichtigtewerkalsudemaaieromkeertof
naarutoetrekt.
•Loopstapvoets;nooitrennen.
•Hellingen:
–Maainietopaltesteilehellingen.
–Weesuiterstvoorzichtigophellingen.
–Maaidwarsovereenhelling,nooithellingopenaf,
enweesuiterstvoorzichtigalsuopeenhellingvan
richtingverandert.
–Zorgdatuophellingenaltijdstevigstaat.
•Verminderdesnelheidopeenhellingenineenscherpe
bochtomtevoorkomendatdemachineomkanteltofdat
udecontroleoverdemachineverliest.
•Stophetmaaimesalsudemachinemoetkantelenvoor
transportoveranderedangrasoppervlakkenenbijhet
vervoerenvandemachine.
•Laatdemotornooitineenafgeslotenruimtelopen,
omdatzichdaargiftigekoolmonoxidedampenkunnen
verzamelen.
•Zetdemotoraf,
–elkekeeralsudemachineverlaat.
–voordatubrandstofbijvult.
–voordatudegrasvangerverwijdert.
–voordatudemaaihoogteinstelt,tenzijdievanafde
bestuurderspositiekanwordeningesteld.
•Zetdemotorafenmaakdebougiekabellos
–voordatuverstoppingenlosmaaktofdeafvoertunnel
ontstopt.
Onderhoudenopslag
•Draaiallemoeren,boutenenschroevenregelmatigstrak
aan,zodatdemachinesteedsveiligtegebruikenis.
•Gebruikgeenhogedrukalsuwerktuigenopdemachine
reinigt.
•Alserzichbrandstofindetankbevindt,magude
machinenietopslaanineenafgeslotenruimtewaar
brandstofdampenincontactkunnenkomenmetopen
vuurofvonken.
•Laatdemotorafkoelenvoordatudemachineineen
afgeslotenruimteopslaat.
•Omhetbrandgevaarteverminderenmoetudemotor,de
geluiddemper,hetaccucompartimentendebenzinetank
vrijvangras,bladerenenovertolligvethouden.
•Umoetdeonderdelenvandegrasvangerende
afvoergeleiderveelvuldigcontrolerenen,indiennodig,
vervangendooronderdelendiedefabrikantheeft
aanbevolen.
•Vervangversletenofbeschadigdeonderdelenmethetoog
opeenveiliggebruik.
•Vervanggeluiddempersdiegebrekenvertonen.
•Alshetnodigisdebrandstoftankaftetappen,doedit
danbuiten.
•Veranderdeinstellingenvandemotornietenvoorkom
overbelastingvandemotor.Laatdemotornietmeteen
tehoogtoerentallopenomdatditdekansopongevallen
kanvergroten.
•Letopdatbijmachinesmetmeerderemessen:een
bepaaldmesdraaienkanervoorzorgendatandere
messengaandraaien.
•Weesvoorzichtigalsudemachineafstelt,teneindete
voorkomendatuwvingersbekneldrakentussende
draaiendemessenendevasteonderdelenvandemachine.
•Omdebesteprestatieseneenveiliggebruik
teverzekeren,dientuuitsluitendoriginele
Toro-onderdelenenaccessoirestegebruiken.
Gebruiknooit
dezekunnendeveiligheidingevaarbrengen.
universele
onderdelenenaccessoires;
3
Page 44

Geluidsdruk
Dezemachineoefenteengeluidsdrukvan90dBAuitop
hetgehoorvandegebruiker,meteenonzekerheidswaarde
(K)van1dBA.Hetgeluidsniveauwerdbepaaldvolgensde
proceduresinEN836.
Geluidsniveau
Dezemachineheefteengegarandeerdgeluidsniveauvan
98dBAuitmeteenonzekerheidswaarde(K)van1dBA.Het
geluidsniveauwerdbepaaldvolgensdeproceduresinISO
11094.
Trillingophanden/armen
Dezemachineheefteenmaximaaltrillingsniveauvan3,6
2
m/s
opderechterhanden3,6m/s
meteenonzekerheidswaarde(K)van1,8m/s
waardenzijnbepaaldvolgensdeproceduresinEN836.
2
opdelinkerhand,elk
2
.Degemeten
4
Page 45

Veiligheids-eninstructiestickers
Belangrijk:Veiligheidsstickersenveiligheidsinstructiesbevindenzichbijplaatsenwaargevaarkanontstaan.
Vervangbeschadigdestickers.
Merktekenvanfabrikant
1.Geeftaandathetmesonderdeelvaneenoriginele
Toro-maaimachineis.
117-4143
1.Waarschuwing–LeesdeGebruikershandleiding.
2.Demachinekanvoorwerpenuitwerpen–Houdomstanders
opeenveiligeafstandvandemachine.
3.Handenofvoetenkunnenwordengesneden/geamputeerd,
112-8760
1.Demachinekanvoorwerpenuitwerpen–Houdomstanders
opeenveiligeafstandvandemachine.
2.Handenofvoetenkunnenwordengesneden/geamputeerd
–Blijfuitdebuurtvanbewegendeonderdelen.
maaimes–Trekdebougiekabellosenraadpleegde
instructiesvóóruservice-ofonderhoudswerkzaamheden
uitvoert.
4.Gevaarvoorhetafsnijdenvanhandenenvoeten–Blijfuit
debuurtvanbewegendedelen,houdallebeschermplaten
enveiligheidsvoorzieningenophunplaats.
5.Gevaarvoorhetafsnijdenvanhandenenvoeten–Maai
nooitheuvelopwaartsenheuvelafwaarts.Gebruikde
machinedwarsophellingen;stopdemaaierenzetde
motoraf,verwijderobstakelsvoorhetmaaienenkijknaar
achterenennaarbenedenalsuachteruitrijdt.
5
117-9368
1.Optimaaloliepeil
Page 46

Montage
2
1
Dehandgreepbevestigen
Geenonderdelenvereist
Procedure
WAARSCHUWING
Alsdehandgreepverkeerdwordtin-enuitgeklapt,
kunnendekabelsschadeoplopen,waardoorde
machinenietveiligkanwordengebruikt.
•Zorgervoordatudekabelsnietbeschadigtals
udehandgreepin-ofuitklapt.
•Indieneenkabelisbeschadigd,moetucontact
opnemenmeteenerkendeServiceDealer.
1.Draaideknoppenvandehandgreeplos(Figuur3).
Belangrijk:Leiddekabelsnaardebuitenzijde
vandehandgreepterwijludehandgreepplaatst.
Destartkoordaanbrengenin dekoordgeleider
Geenonderdelenvereist
Procedure
Belangrijk:Umoetdestartkoordaanbrengeninde
koordgeleider.
Houddebedieningsstangtegendebovenstehandgreepen
trekdestartkoorddoordekoordgeleideraandehandgreep
(Figuur5).
Figuur5
Figuur3
1.Handgreepknoppen(2)
2.Zetdehandgreepindewerkstand(Figuur4).
Figuur4
3.Draaideknoppenmetdehandstevigvast(Figuur3).
1.Startkoord
2.Koordgeleider
3
Demotorbijvullenmetolie
Geenonderdelenvereist
Procedure
Belangrijk:Dezemaaimachinewordtgeleverdzonder
olieinhetcarter.Vulhetcartermetolievoordatude
motorstart.
1.Plaatsdemachineopeenhorizontaaloppervlak.
2.Neemdepeilstokeruit(Figuur6)engietongeveer3/4
vandecapaciteitvanhetoliecarterindevulbuis.
Opmerking:Maximaalvullen:0,59l,type:
SAE30ofSAE10W-30reinigingsolie,met
onderhoudsclassicatieSF,SG,SH,SJ,SLvanhet
AmericanPetroleumInstitute(API)ofhoger.
6
Page 47

Figuur6
3.Veeghetuiteindevandepeilstokafmeteenschone
doek.
4.Steekdepeilstokhelemaalindevulbuis,maardraai
dezeernietin.
5.Haaldepeilstokeruitencontroleerhetoliepeil
(Figuur7).
•Alshetoliepeiltelaagis,moetutraageenkleine
hoeveelheidolieindevulbuisgieten,3minuten
wachtenenvervolgensstappen3tot5herhalen
totdatdeoliehetjuistepeilheeftbereikt.
•Alshetoliepeiltehoogis,taptudeovertollige
olieaftothetjuisteoliepeilisbereikt.
Voorhetaftappenvanovertolligeolie,zie
Demotorolieverversen(bladz.14).
Belangrijk:Alshetoliepeilinhetcarterte
hoogoftelaagisenulaatdemotortoch
draaien,kuntudezebeschadigen.
Algemeenoverzicht
vandemachine
1.Bougie
2.Peilstok/vulbuis(niet
afgebeeld)
3.Handgreepvanstartkoord
4.Bedieningsstangvoor
maaimes
5.Stangvoorzelfaandrijving
Figuur8
6.Grasvanger
7.Dopvanbrandstoftank
8.Maaihoogtehendels(4)
9.Luchtlter
Figuur7
1.Oliepeilistelaag3.Oliepeilisgoed
2.Oliepeilistehoog
6.Plaatsdepeilstokgoedindevulbuis.
Belangrijk:
bedrijfsuren
Verversdemotorolienadeeerste5
;daarnamoetditelkjaargebeuren;
raadpleegDemotorolieverversen(bladz.14).
Figuur9
1.Afvoergeleider(optioneleaccessoire;T oroonderdeelnr.
89964)
Specicaties
Type
2963934kg144cm54cm145cm
7
Gewicht
Lengte
BreedteHoogte
Page 48

Gebruiksaanwijzing
G020479
1
Debrandstoftankvullen
GEVAAR
Benzineisuitermateontvlambaarenexplosief.
Brandofexplosievanbenzinekanbrandwonden
veroorzaken.
•Omtevoorkomendateenstatischeladingde
benzinetotontbrandingkanbrengen,moet
uhetbenzinevaten/ofdemachinevoordatu
detankvultopdegrondplaatsen,nietopeen
voertuigofeenanderobject.
•Vuldebrandstoftankindeopenluchtwanneer
demotorkoudis.Neemgemorstebenzineop.
•Rooknietalsuomgaatmetbenzine,enhoud
benzineuitdebuurtvanopenvuurofbrandstof.
•Bewaarbenzineineengoedgekeurdbenzinevat
enbuitenbereikvankinderen.
Figuur10
1.6mm
2.Vuldebrandstoftanktoternogminstens6mmonder
deonderkantvandevulbuisvrijblijft,zodatdebenzine
kanuitzetten.
3.Draaidebrandstofdopstevigvastmetdehand.
•Gebruikvoordebesteresultatenuitsluitendschone,
verse,loodvrijebenzinemeteenoctaangetalvan87of
hoger(indelingsmethode(R+M)/2).
•Metzuurstofverrijktebenzinemettenhoogste10%
ethanolof15%MTBEisgeschikt.
•Geenethanolmengselsvanbenzinegebruiken(zoalsE15
ofE85)metmeerdan10%ethanolpervolume.Ditkan
leidentotverminderdeprestatiesen/ofmotorschadedie
mogelijknietgedektwordtdoordegarantie.
•Geenbenzinegebruikendiemethanolbevat.
•Tijdensdewintergeenbrandstofbewareninde
brandstoftankofinbrandstofblikken,tenzijeenstabilizer
aandebrandstofwerdtoegevoegd.
•Mengnooitoliedoorbenzine.
Belangrijk:Omstartproblemenbijhetvolgende
seizoenteverminderen,moetuhetheleseizoeneen
stabilizertoevoegenaandebenzine.Gebruiknooit
benzinedieouderisdan30dagen.
1.Reinigdeomgevingvandetankdopenverwijderde
dop(Figuur10).
Hetmotoroliepeilcontroleren
Onderhoudsinterval:Bijelkgebruikofdagelijks
Belangrijk:Dezemaaimachinewordtgeleverdzonder
olieinhetcarter.Vulhetcartermetolievoordatude
motorstart.
1.Plaatsdemachineopeenhorizontaaloppervlak.
2.Neemdepeilstokeruit(Figuur11)engietongeveer
3/4vandecapaciteitvanhetoliecarterindevulbuis.
Opmerking:Maximaalvullen:0,59l,type:
SAE30ofSAE10W-30reinigingsolie,met
onderhoudsclassicatieSF,SG,SH,SJ,SLvanhet
AmericanPetroleumInstitute(API)ofhoger.
Figuur11
3.Veeghetuiteindevandepeilstokafmeteenschone
8
doek.
4.Steekdepeilstokindevulbuis,maardraaihemer
nietin.
Page 49

5.Haaldepeilstokeruitencontroleerhetoliepeil
G020273
(Figuur12).
•Alshetoliepeiltelaagis,moetutraageenkleine
hoeveelheidolieindevulbuisgieten,3minuten
wachtenenvervolgensstappen3tot5herhalen
totdatdeoliehetjuistepeilheeftbereikt.
•Alshetoliepeiltehoogis,taptudeovertollige
olieaftothetjuisteoliepeilisbereikt.
Voorhetaftappenvanovertolligeolie,zie
Demotorolieverversen(bladz.14).
Belangrijk:Alshetoliepeilinhetcarterte
hoogoftelaagisenulaatdemotortoch
draaien,kuntudezebeschadigen.
Figuur12
1.Oliepeilistelaag3.Oliepeilisgoed
2.Oliepeilistehoog
6.Plaatsdepeilstokgoedindevulbuis.
Belangrijk:
bedrijfsuren
raadpleegDemotorolieverversen(bladz.14).
Verversdemotorolienadeeerste5
;daarnamoetditelkjaargebeuren;
Demaaihoogteinstellen
WAARSCHUWING
Bijhetinstellenvandemaaihoogtekuntuin
aanrakingkomenmeteenbewegendmes.Ditkan
ernstigletselveroorzaken.
•Zetdemotorafenwachttotdatallebewegende
onderdelentotstilstandgekomenzijn.
•Plaatsuwvingersnietonderdebehuizingalsu
demaaihoogteinstelt.
Figuur13
1.Demachinehogerzetten2.Demachinelagerzetten
Opmerking:Demaaihoogte-instellingenzijn25mm,
38mm,51mm,64mm,76mm,89mmen102mm.
Demotorstarten
1.Houddebedieningsstangvanhetmaaimes(Figuur14)
tegendehandgreep.
Figuur14
1.Bedieningsstangvoormaaimes
VOORZICHTIG
Alsdemotorheeftgelopen,kandegeluiddemper
heetzijnenernstigebrandwondenveroorzaken.
Blijfuitdebuurtvaneenhetegeluiddemper.
Zetdemaaihoogteopdegewenstestand.Stelallewielen
opdezelfdehoogtein.
Opmerking:Omdemachinehogertezetten,moetude
maaihoogtehendelsnaarvorenbewegen;omdemachine
lagertezetten,moetuallehendelsnaarachterenbewegen
(Figuur13).
2.Trekaandehandgreepvanhetstartkoord(Figuur15)
Figuur15
9
Page 50

Opmerking:Alsdemotornaenkelepogingenniet
wilstarten,moetucontactopnemenmeteenerkende
ServiceDealer.
Maaiselrecyclen
Alsdemachinewordtgeleverd,isdezegereedommaaiselen
bladafvalnaarhetgazonterecyclen.
Dezelfaandrijvinggebruiken
Omdezelfaandrijvingtebedienenmoetudeaandrijfstang
vandezelfaandrijving(Figuur16)inknijpeninderichtingvan
dehendelenvasthouden(Figuur17).
Figuur16
1.Stangvoorzelfaandrijving
Figuur17
Alsdegrasvangeropdemachinezit,moetudieverwijderen
(zieDegrasvangerverwijderen(bladz.11))alvorenshet
maaiselterecyclen.
Hetmaaiselopvangen
Gebruikdegrasvangeralsumaaiselenbladafvalwilt
verzamelen.
WAARSCHUWING
Eenversletengraszakkankleinesteentjesenandere
voorwerpenuitwerpen,waardoordegebruikerof
omstandersernstiglichamelijkofdodelijkletsel
kunnenoplopen.
Controleerdegraszakregelmatig.Plaatseen
nieuweToro-grasvangeralsdeoudeisbeschadigd.
WAARSCHUWING
Hetmaaimesisscherp,contactmethetmaaimes
kanernstiglichamelijkletselveroorzaken.
Omdezelfaandrijvinguitteschakelenlaatudestanglos.
Opmerking:Dezelfaandrijvingheefteenvaste
maximumsnelheid.Omdesnelheidteverminderen,moet
uderuimtetussendestangvoordezelfaandrijvingende
handgreepvergroten.
Motorafzetten
Onderhoudsinterval:Bijelkgebruikofdagelijks
Omdemotoraftezetten,laatudebedieningsstangvanhet
maaimeslos(Figuur18).
Belangrijk:Alsudebedieningsstangloslaat,moeten
demotorenhetmesbinnen3secondenstoppen.Alsdit
nietgebeurt,magudemachinenietverdergebruikenen
moetucontactopnemenmeteenerkendeservicedealer.
Zetdemotorafenwachttotdatallebewegende
onderdelentotstilstandzijngekomenvoordatude
bestuurderspositieverlaat.
Degrasvangerplaatsen
1.Brengdeafvoergeleideraandeachterzijdeomhoog
(Figuur19).
Figuur19
Figuur18
1.Afvoergeleiderachterzijde
2.Plaatsdehandgreepvandegrasvangerindeinkepingen
opdebeugelsvandehandgreep(Figuur19).
10
Page 51

Degrasvangerverwijderen
G020689
G020690
G020691
1.Brengdeafvoergeleideraandeachterzijdeomhoog
(Figuur19).
2.Tildegrasvangeruitdeinkepingenindebeugelsvande
handgreepenverwijderdegrasvangervandemachine.
3.Sluitdeafvoergeleideraandeachterzijde.
Hetmaaiselafvoeren
Gebruikdeafvoergeleider(optioneleaccessoire;Toro
onderdeelnr.89964)alsuzeerhooggrasmaait.
Deafvoergeleiderplaatsen
1.Verwijderdegrasvangeralsdezenogaandemaaieris
bevestigd;zieDegrasvangerverwijderen(bladz.11).
2.Brengdeafvoergeleideromhoogenhouddeze
omhoog(Figuur20).
Figuur22
Deafvoergeleiderverwijderen
Omdeachterafvoergeleiderteverwijderen,voertu
bovenstaandestappeninomgekeerdevolgordeuit.
Tipsvoorbedieningengebruik
Algemenemaaitips
•Verwijderstokken,stenen,draden,takkenenandervuil
diehetmeskanraken,uithetwerkgebied.
•Zorgervoordathetmesgeenvastevoorwerpenraakt.
Maainooitmetopzetovervoorwerpen.
Figuur20
3.Steekhetlipjeopdeafvoergeleiderindesleufaande
rechterzijdeindeafvoergeleider(Figuur21).
Figuur21
4.Steekdestangopdeafvoergeleiderindeinkepingen
opdemachine(Figuur22).
•Alsdemaaimachinetocheenvoorwerpraakten
beginttetrillen,moetumeteendemotorafzetten,
debougiekabellosmakenendemaaimachineop
beschadigingcontroleren.
•Debesteresultatenkrijgtudooreennieuwmeste
monterenvoordathetmaaiseizoenbegint.
•VervangindiennodighetmaaimesdooreenToro-mes.
Grasmaaien
•Umoettelkensnietmeerdanongeveereenderdevande
grassprietenafmaaien.Maainietmeteenstandlagerdan
51mm,tenzijdegrasmatdunis,ofalshetlaatinhet
najaariswanneerhetgraslangzamerbeginttegroeien.
ZieDemaaihoogteinstellen(bladz.9).
•Alsugraswiltmaaiendatlangerdan15cmis,moetu
maaienopdemaximalemaaihoogteentragerstappen.
Vervolgensgaatumaaienopeenlageremaaihoogteom
hetgazoneenzofraaimogelijkuiterlijktegeven.Als
hetgrastelangis,kandemachineverstoptrakenende
motorafslaan.
•Maaiuitsluitenddrooggrasofdrogebladeren.Nat
grasennattebladerengaanaankoeken,waardoorde
maaimachineverstoptkanrakenofdemotorkanafslaan.
WAARSCHUWING
Alsunatgrasennattebladerenmaait,kuntu
uitglijden,inaanrakingkomenmethetmesen
ernstigletseloplopen.Maaiuitsluitendindroge
omstandigheden.
11
Page 52

•Maaisteedsinwisselenderichtingen.Hierdoorwordthet
maaiselbeteroverhetgazonverstrooid,zodathetgazon
gelijkmatigwordtbemest.
•Alsumethetuiterlijkvanhetvoltooidegazonniet
tevredenbent,probeerdaneenofmeervandevolgende
stappen:
–Vervanghetmaaimesoflaathetslijpen.
–Looplangzamertijdenshetmaaien.
–Steldemaaimachineinopeenhogeremaaihoogte.
–Maaihetgrasvaker.
–Laatdemaaibanenoverlappeninplaatsvansteeds
eenvolledignieuwebaantemaaien.
–Steldemaaihoogtebijdevoorwielenéénstandlager
indanbijdeachterwielen.Bijvoorbeeld:zetde
maaihoogtevandevoorwielenopstand51mmen
dievandeachterwielenopstand64mm.
Bladerenjnmaken
•Nahetmaaienmoetaltijd50%vanhetgazonzichtbaar
blijvendoordebladerlaag.Ditkaneenofmeerdere
rondgangenoverdebladerenvereisen.
•Alsereenlaagbladerenvanmeerdan13cmophetgazon
ligt,moetudevoorwieleneenoftweeuitsparingenhoger
zettendandeachterwielen.
•Alsdemaaimachinedebladerennietjngenoegmaakt,is
hetbeteromwatlangzamertemaaien.
12
Page 53

Onderhoud
G017308
Opmerking:Bepaalvanuitdenormalebestuurderspositiedelinker-enrechterzijdevandemachine.
Aanbevolenonderhoudsschema
OnderhoudsintervalOnderhoudsprocedure
Nadeeerste5bedrijfsuren
Bijelkgebruikofdagelijks
Naelkgebruik
Omde100bedrijfsuren
Vóórdestalling
Jaarlijks
•Verversdemotorolie.
•Controleerhetmotoroliepeil.
•Controleerofdemotorbinnen3secondenstoptnadatudebedieningsstangvan
hetmaaimeshebtlosgelaten.
•Verwijdermaaiselenvuilvandeonderkantvandemachine.
•Bougiecontrolerenenindiennodigvervangen.
•Laatdebenzineuitdebrandstoftanklopenvoordatuvereistereparatiesuitvoertof
demachinestalt.
•Reinighetkoelsysteem,verwijdermaaiselofvuilvandekoelribbenvandemotoren
vandestartmotor.Reinighetsysteemvakerinvuileomstandigheden.
•Hetluchtltervervangen(vakeralsdemachinewordtgebruiktinstofgeofvuile
omstandigheden).
•Verversdemotorolie.
•Vervanghetmaaimesoflaathetslijpen(vakeralsdesnijrandsnelbotwordt).
Voorbereidingenvoor onderhoudswerkzaamheden
1.Zetdemotorafenwachttotdatallebewegende
onderdelentotstilstandgekomenzijn.
2.Trekdebougiekabellosvandebougie(Figuur23)
voordatuonderhoudswerkzaamhedenuitvoert.
WAARSCHUWING
Alsudemachinekantelt,kanerbenzineuit
detanklekken.Benzineisontvlambaaren
explosiefenkanbrandwondenveroorzaken.
Laatdemotordrooglopenofpompdebenzine
meteenhandpompuitdetank.Gebruiknooit
eenhevel.
Figuur23
1.Bougiekabel
3.Nadatudeonderhoudswerkzaamhedenhebt
uitgevoerd,moetudekabelweeraansluitenopde
bougie.
Belangrijk:Kanteldemaaimachinealtijdopde
zijkant,metdepeilstokomlaag.
Hetluchtltervervangen
Onderhoudsinterval:Jaarlijks
1.Drukdelippenvandevergrendelingbovenopde
luchtlterdekselomlaag(Figuur24).
Figuur24
1.Lippenvanvergrendeling
2.Openhetdeksel.
3.Verwijderhetpapierelementenhetschuimelement
(Figuur25).
13
Page 54

Figuur25
1.Papierelement
4.Inspecteerhetschuimlterenvervangditalshet
beschadigdofheelergvuilis.
5.Inspecteerhetpapierenluchtlterelement.
A.Alshetpapierenluchtlterelementbeschadigd
isofnatisvanolieofbrandstof,moetuhet
vervangen.
B.Alshetpapierenluchtltervuilis,kloperdaneen
paarkeermeeopeenhardeondergrondofblaas
metpersluchtondereendrukvanminderdan
207kPa(30psi)doordezijdevanhetlterdie
naardemotorisgericht.
Opmerking:Borstelhetvuilnietuithetlter,
alsuborsteltwordthetvuilindevezelsgeduwd.
6.Verwijdervuilvandeluchtlterbehuizingenhet
dekselmeteenvochtigedoek.Veeggeenvuilinde
luchtgang.
7.Plaatshetpapierenlterelementenhetschuimlterop
dejuisteplaats.
8.Plaatshetdekselterug.
2.Schuimlter
Figuur26
7.Kanteldemachineopzijnkantmetdevulbuisomlaag
omdegebruikteolielangsdevulbuistelatenuitlopen
ineenbak(Figuur27).
Figuur27
8.Nadatdegebruikteolieisafgetapt,zetude
maaimachineterugindewerkstand.
9.Vulhetcartervoorongeveerdriekwartmetolie.
Opmerking:Maximaalvullen:0,59l,type:
SAE30ofSAE10W-30reinigingsolie,met
onderhoudsclassicatieSF,SG,SH,SJ,SLvanhet
AmericanPetroleumInstitute(API)ofhoger.
Demotorolieverversen
Onderhoudsinterval:Nadeeerste5bedrijfsuren
Jaarlijks
1.Plaatsdemachineopeenhorizontaaloppervlak.
2.Controleerofdebrandstoftankweinigofgeen
brandstofbevatzodatdebrandstofnietlektalsude
maaieropdezijkantkantelt.
3.Voordatudeolieververst,moetudemotorenkele
minutenlatenlopenzodatdeoliewarmwordt.
Opmerking:Warmeoliestroomtbeterenvoert
vervuilingenbetermee.
4.Verwijderdebougiekabelvandebougie;raadpleeg
Voorbereidingenvooronderhoudswerkzaamheden(bladz.13).
5.Plaatseenopvangbakvoordeolienaastdemachine,
aandekantvandevulbuis.
6.Neemdepeilstokuitdevulbuis(Figuur26).
10.Wacht3minutentotdeoliegezaktis.
11.Veeghetuiteindevandepeilstokafmeteenschone
doek.
12.Steekdepeilstokhelemaalindevulbuis,maardraai
dezeernietin.
13.Haaldepeilstokeruitencontroleerhetoliepeil
(Figuur28).
•Alshetoliepeiltelaagis,moetutraageenkleine
hoeveelheidolieindevulbuisgieten,3minuten
wachtenenvervolgensstappen11tot13herhalen
totdatdeoliehetjuistepeilheeftbereikt.
•Alshetoliepeiltehoogis,taptudeovertollige
olieaftothetjuisteoliepeilisbereikt.
Voorhetaftappenvanovertolligeolie,zie
Demotorolieverversen(bladz.14).
Belangrijk:Alshetoliepeilinhetcarterte
hoogoftelaagisenulaatdemotortoch
draaien,kuntudezebeschadigen.
14
Page 55

Hetmaaimesvervangen
Onderhoudsinterval:Jaarlijks
Figuur28
1.Oliepeilistelaag3.Oliepeilisgoed
2.Oliepeilistehoog
14.Plaatsdepeilstokgoedindevulbuis.
15.Geefdeoudeolieafbijeenerkendinzamelpunt.
Onderhoudvandebougie
Onderhoudsinterval:Omde100bedrijfsuren
Controleerdebougieomde100bedrijfsuren.Gebruikeen
ChampionRN9YCbougieofeenbougievaneenequivalent
type.
1.Zetdemotorafenwachttotdatallebewegende
onderdelentotstilstandgekomenzijn.
2.Verwijderdebougiekabelvandebougie.
3.Maakdeomgevingvandebougieschoon.
4.Haaldebougieuitdecilinderkop.
Belangrijk:Alsdebougiegebarstenofvuil
is,moetdezewordenvervangen.Umagde
bovenkantvaneenbougienietreinigenomdat
hierdoorgruisindecilinderterechtkankomen.
Ditleidtmeestaltotbeschadigingvandemotor.
Belangrijk:
hetmesopcorrectewijzetemonteren
momentsleutelhebtofnietgoedweethoeudemontage
moetuitvoeren,kuntucontactopnemenmeteen
erkendeservicedealer.
Controleerhetmeswanneerdebenzinetankleegis.Een
beschadigdofgescheurdmesmoetdirectwordenvervangen.
Alsdesnijrandbotisofbramenvertoont,moetuhetmes
latenslijpenofvervangen.
Uhebteenmomentsleutelnodigom
.Alsugeen
WAARSCHUWING
Hetmaaimesisscherp,contactmethetmaaimes
kanernstiglichamelijkletselveroorzaken.
•Verwijderdebougiekabelvandebougie.
•Gebruikhandschoenenalsuhetmesmonteert.
1.Maakdebougiekabellosvandebougie;zie
Voorbereidingenvooronderhoudswerkzaamheden(bladz.13).
2.Kanteldemaaimachineopdezijkant,metdepeilstok
omlaag.
3.Gebruikeenblokhoutomhetmesstiltehouden.
4.Verwijderhetmes(draaidemesboutlinksom)en
bewaarallebevestigingsmaterialen.
5.Plaatshetnieuwemes(draaidemesboutrechtsom)en
allebevestigingsmaterialen(Figuur30).
5.Steldeelektrodenafstandinop0,76mm(Figuur29).
Figuur29
1.Massa-elektrode
2.Centraleelektrode
3.Elektrodenafstand(nietopschaalweergegeven)
6.Plaatsdebougieendepakkingafdichting.
7.Draaidebougievastmeteentorsievan20Nm.
8.Sluitdebougiekabelaanopdebougie.
Figuur30
Belangrijk:Degebogenuiteindenvanhetmes
moetennaardemachinewijzen.
6.Gebruikeenmomentsleutelomdemesboutvast
tedraaienmeteentorsievan82Nm.
15
Page 56

Belangrijk:Eenboutdieisvastgedraaidmeteen
torsievan82Nmzitergvast.Zethetmesvastmet
eenstukhoutenplaatsuwvollegewichtachterde
(dop)sleutelomdeboutgoedvasttedraaien.Het
isergmoeilijkomdezebouttevasttedraaien.
Kabelvanelfaandrijving afstellen
Deonderkantvande machinebehuizingreinigen
Onderhoudsinterval:Naelkgebruik
WAARSCHUWING
Erkanmateriaallosrakendatzitvastgekoektaan
deonderkantvandemaaimachine.
Wanneerueennieuwekabelvoordezelfaandrijvingmonteert
ofdezelfaandrijvingontsteldis,moetudekabelafstellen.
1.Draaidemoervandekabelbeugellos(Figuur31).
Figuur31
1.25tot38mm4.Moervankabelbeugel
2.Stangvoorzelfaandrijving
3.Kabelmantel
5.Kabelbeugel
•Draagoogbescherming.
•Blijfindebedieningspositie(achterde
handgreep)staanalsdemotorloopt.
•Houdomstandersuitdebuurt.
1.Plaatsdemachineopeenvlak,verhardoppervlak,
laatdemotorlopenenspuiteenstraalwatervoorhet
rechterachterwiel(Figuur32).
Hetopspattendewaterkomtdanindebaanvanhet
maaimesenspoelthetmaaiselweg.
Figuur32
2.Alsergeenmaaiselmeerondervandaankomt,draaitu
dekraandichtenbrengtudemachinenaareendroge
plaats.
2.Houddestangvandezelfaandrijving25tot38mmvan
dehandgreepverwijderd(Figuur31).
3.Trekdekabelmantelomlaag(naardemaaimachinetoe)
omallespelinguitdekabeltehalen(Figuur31).
4.Draaidemoeropdekabelbeugelvast.
5.Laatdestangvandezelfaandrijvinglosencontroleer
ofdekabellosis.
Opmerking:Dekabelmoetloszijnalsdestang
vandezelfaandrijvingisvrijgegeven,anderskande
machinegaankruipenalsdestangisontgrendeld.
3.Laatdemotoreenpaarminutenlopenomdebehuizing
tedrogenzodatdezenietgaatroesten.
16
Page 57

Stalling
Staldemaaimachineopeenkoele,schone,drogeplaats.
Voorbereidingenvoorstalling
WAARSCHUWING
1.Draaideknoppenvandehandgreeplostotdatuhet
bovenstedeelvandehandgreepvrijkuntbewegen
(Figuur33).
Benzinedampenkunnentotontplofngkomen.
•Bewaarbenzinenietlangerdan30dagen.
•Staldemachinenooitineenafgeslotenruimte
indenabijheidvanopenvuur.
•Laatdemotorafkoelenvoordatudemachine
stalt.
1.Alsudetankvoordelaatstekeervanhetjaarvult,
moetueenstabilizertoevoegenaandebenzinevolgens
devoorschriftenvandefabrikant.
2.Umoetongebruiktebrandstofopdejuistewijze
afvoeren.Voerdezebrandstofafvolgensdeplaatselijk
geldendevoorschriftenofgebruikdezevooruwauto.
Opmerking:Oudebrandstofindetankisde
belangrijksteoorzaakvoorstartproblemen.Bewaar
benzinezonderstabilizernietlangerdan30dagenen
benzinewaaraanstabilizeristoegevoegd,nietlanger
dan90dagen.
3.Laatdemotorlopentotdathijafslaatdoorgebrekaan
benzine.
4.Startdemotoropnieuw.
5.Laatdemotorlopentotdatdezeafslaat.Alsdemotor
nietmeerwilstarten,isdebrandstofvoldoende
verbruikt.
6.Verwijderdebougiekabelvandebougie.
7.Verwijderdebougie,giet30mlolieinde
bougieopeningentrekverschillendekerenlangzaam
aanhetstartkoordomdeolieoverdecilinderwandte
verspreidenteneindecorrosieindestallingsperiodete
voorkomen.
8.Monteerdebougiezonderdezevasttedraaien.
9.Draaiallemoeren,boutenenschroevengoedaan.
Figuur33
1.Handgreepknoppen(2)
2.Beweegdehandgreepnaarvorenzoalswordgetoond
inFiguur33.
Figuur34
Demaaimachineuitdestalling halen
1.Controleerallebevestigingenendraaidezevast.
2.Verwijderdebougieendraaidemotorsnelrondmet
behulpvanhetstartkoordomovertolligeolieuitde
cilinderteverwijderen.
3.Plaatsdebougieendraaihemmetbehulpvaneen
momentsleutelvastmeteentorsievan20Nm.
4.Voerdevereisteonderhoudsproceduresuit;zie
Voorbereidingenvooronderhoudswerkzaamheden(bladz.13).
5.Controleerhetoliepeilindemotor;zie
Hetmotoroliepeilcontroleren(bladz.8).
6.Vuldebrandstoftankmetversebenzine;zie
Debrandstoftankvullen(bladz.8).
Dehandgreepinklappen
WAARSCHUWING
Alsdehandgreepverkeerdwordtin-enuitgeklapt,
kunnendekabelsschadeoplopen,waardoorde
machinenietveiligkanwordengebruikt.
•Zorgervoordatudekabelsnietbeschadigtals
udehandgreepin-ofuitklapt.
•Indieneenkabelisbeschadigd,moetucontact
opnemenmeteenerkendeServiceDealer.
7.Sluitdebougiekabelaanopdebougie.
17
Page 58

Opmerkingen:
18
Page 59

Lijstmetinternationaledealers
Dealer:Land:
AtlantisSuveSulamaSisstemleriLt
BalamaPrimaEngineeringEquip.Hongkong85221552163
B-RayCorporation
CascoSalesCompany
CeresS.A.CostaRica
CSSCTurfEquipment(pvt)Ltd.SriLanka
CyrilJohnston&Co.
EquiverMexico525553995444ParklandProductsLtd.Nieuw-Zeeland6433493760
FemcoS.A.Guatemala
G.Y.K.CompanyLtd.
GeomechanikiofAthensGriekenland
GuandongGoldenStarChina
HakoGroundandGarden
HakoGroundandGarden
HayterLimited(U.K.)
HydroturfInt.CoDubai
HydroturfEgyptLLC
IrriamcPortugal351212388260ToroAustraliaAustralië61395807355
IrrigationProductsInt'lPvtLtd.India862283960789ToroEuropeNVBelgië3214562960
JeanHeybroekBV.Nederland31306394611
Turkije902163448674
Korea82325512076
PuertoRico7877888383
Noord-Ierland442890813121
Japan81726325861
Zweden4635100000
Noorwegen4722907760
VerenigdKoninkrijk441279723444
VerenigdeArabische
Emiraten
Egypte2025194308T-MarktLogisticsLtd.Hongarije3626525500
Telefoonnummer:
5062391138
94112746100
5024423277
30109350054
862087651338Riversa
97143479479
Dealer:Land:
MaquiverS.A.Colombia
MaruyamaMfg.Co.Inc.
AgrolancKft
Mountelda.s.
MunditolS.A.
OslingerTurfEquipmentSA
OyHakoGroundandGardenAb
PratoV erdeS.p.A.
Prochaska&CieOostenrijk
RTCohen2004Ltd.
ScSvendCarlsenA/S
SolvertS.A.S.
SpyprosStavrinidesLimitedCyprus
SurgeSystemsIndiaLimited
Telefoonnummer:
Japan81332522285
Hongarije3627539640
Tsjechië420255704220
Argentinië541 148219999
Ecuador59342396970
Finland35898700733
Italië390499128128
Israël97298617979
Spanje
Denemarken4566109200
Frankrijk33130817700
India911292299901
5712364079
4312785100
34952837500
35722434131
PrivacyverklaringvoorEuropa
DeinformatiedieToroverzamelt
ToroWarrantyCompany(Toro)respecteertuwprivacy.Omuwaanspraakopgarantietebehandelenencontactmetuoptenemeninhetgevalvaneen
terugroepactievragenwijombepaaldepersoonlijkeinformatie,hetzijdirectofviauwlokaleT oro-dealer.
HetTorogarantiesysteemwordtgehostopserversindeVerenigdeStaten,waardeprivacywetmogelijknietdezelfdebeschermingbiedtalsinuwland.
DOORUWPERSOONLIJKEGEGEVENSMETONSTEDELENSTEMTUINMETDEVERWERKINGVANUWPERSOONSGEGEVENSZOALS
BESCHREVENINDEZEPRIVACYVERKLARING.
HoeT oroinformatiegebruikt
Torokanuwpersoonsgegevensgebruikenomuwaanspraakopgarantietebehandelen,contactmetuoptenemeninhetgevalvaneenterugroepactie,
ofvooreenanderdoeleindewaarvanweuopdehoogtebrengen.Torokanuwinformatiedelenmetzijnafdelingen,verdelersofanderezakenpartnersin
verbandmetdezeactiviteiten.Weverkopenuwpersoonsgegevensnietaananderebedrijven.Webehoudenonshetrechtvoorompersoonsgegevenste
delenteneindetevoldoenaangeldendewettenenverzoekenvandeaangewezenautoriteiten,opdatwijonzesystemennaarbehorenkunnengebruiken
ofmethetoogoponzeeigenbeschermingofdievananderegebruikers.
Behoudvanuwpersoonlijkeinformatie
Wijbewarenuwpersoonsgegevenszolangalsnodigisvoordedoeleindenwaarvoorzeoorspronkelijkwerdenverzameldofvooranderelegitieme
doeleinden(zoalsnalevingvanvoorschriften),ofzolangalsvereistisdoordevantoepassingzijndewet.
Toro'sengagementvoordebeschermingvanuwpersoonlijkeinformatie
Wijnemenredelijkevoorzorgenomuwpersoonlijkeinformatietebeschermen.Weproberenbovendiendenauwkeurigheidengeldigheidvan
persoonlijkegegevenstewaarborgen.
Toegangtotenaanpassingvanuwpersoonlijkeinformatie
Alsutoegangwensttotuwpersoonlijkegegevensofdezewiltaanpassen,gelievedaneene-mailtesturennaarlegal@toro.com.
Australischeconsumentenwet
AustralischeklantenkunnenvoorinformatieoverdeAustralischeconsumentenwet(AustralianConsumerLaw)terechtbijdelokaleT oro-verdelerofze
kunnendezeinformatieindedoosvinden.
374-0269RevF
Page 60

ToroGarantie
DeToroGTS-startgarantie
Voorwaardenenproductenwaarvoordegarantiegeldt
DeT oroCompanyendehieraangelieerdeonderneming,Toro
WarrantyCompany,biedenkrachtenseenovereenkomsttussenbeide
ondernemingendeoorspronkelijkekoper
datzehethierondervermeldeT oro-productzullenreparerenalshet
materiaalgebrekenoffabricagefoutenvertoontofalsdeT oroGTS
(GuaranteedtoStart)motornietstartbijdeeersteofdetweedepoging,
opvoorwaardedathetroutineonderhouddatvereistwordtdoorde
Gebruikershandleidinguitgevoerdis.
Devolgendeperiodenzijnvantoepassingvanafdedatumvanaankoop:
Producten
Motorgazonmaaiers
•Gegotenmaaidek
•Motor
•Accu2jaar
•Maaiersmetstalenmaaidek2jaarthuisgebruik
•Motor
TimeMastermaaiers3jaarthuisgebruik
•Motor
•Accu2jaar
Elektrischetrimmersenbladblazers2jaarthuisgebruik
Sneeuwruimers
•Enkelstadium2jaarthuisgebruik
•Motor
•Tweestadia3jaarthuisgebruik
•Kanaal,kanaalgeleideren
kapvanrotorbehuizing
Elektrischesneeuwruimers2jaarthuisgebruik
Alleonderstaandezitmaaiers
•MotorRaadpleegdegarantievande
•Accu2jaarthuisgebruik
•Werktuigen2jaarthuisgebruik
DHgazon-entuintractoren2jaarthuisgebruik
XLSgazon-entuintractoren
TimeCutter
TITANmaaiers
•Frame
ZMastermaaiers2000-serie
•Frame
1
Oorspronkelijkekoper:depersoondiehetToro-productoorspronkelijkheeftgekocht.
2
Thuisgebruikbetekentgebruikvanhetproductophetterreindatbijuwhuishoort.Gebruik
opmeerderelocatieswordtbeschouwdalscommercieelgebruik.Hieropisdegarantievoor
commercieelgebruikvantoepassing.
3
DeT oroGTS-startgarantieisnietvantoepassingopproductendiecommercieelgebruiktworden.
1
gezamenlijkdegarantie
Garantieperiode
5jaarthuisgebruik
90dagencommercieelgebruik
5jaarGTS-garantie,
thuisgebruik
3
90dagencommercieelgebruik
2jaarGTS-garantie,
thuisgebruik
3
90dagencommercieelgebruik
3jaarGTS-garantie,
thuisgebruik
3
Geengarantievoorcommercieel
gebruik
45dagencommercieelgebruik
2jaarGTS-garantie,
thuisgebruik
3
45dagencommercieelgebruik
Levenslang(alleenoorspronkelijke
eigenaar)
5
Geengarantievoorcommercieel
gebruik
motorfabrikant
90dagencommercieelgebruik
3jaarthuisgebruik
90dagencommercieelgebruik
3jaarthuisgebruik
90dagencommercieelgebruik
3jaarof240uur
Levenslang(alleenoorspronkelijke
eigenaar)
6
4jaarof500uur
Levenslang(alleenoorspronkelijke
eigenaar)
6
2
2
2
2
2
2
2
4
2
2
2
2
2
5
5
en
4
VoorbepaaldemotorenvanT oro-productengeldteengarantievandefabrikantvandemotor.
5
Deoptiediezichheteerstaandient,moetwordenaangehouden.
6
Levenslangegarantieophetframe–Alshethoofdframe,bestaanduitdeonderdelendieaan
elkaarzijngelastendiesamendestructuurvandetractorvormenenwaaraanandereonderdelen
zoalsdemotorzijnbevestigd,scheurenofbreukenvertoontnanormaalgebruik,wordthetframe
ondergarantiegerepareerdofvervangen,naardevoorkeurvanhetbedrijfToro,zonderkosten
vooronderdelenofarbeid.Alshetframegebrekenvertoonttengevolgevanmisbruikofverkeerd
gebruikoftengevolgevancorrosie,dandektdegarantiedatniet.
Dezegarantiedektdekostenvanonderdelenenarbeid,maarde
transportkostenzijnvoorrekeningvandeklant.
Degarantiekanvervallenalsdeuurmeterisafgekoppeldofaangepast,of
alseraanwijzingenzijndatermeegeknoeidis.
Plichtenvandeeigenaar
UdientuwT oro-productteonderhoudenzoalswordtbeschrevenin
deGebruikershandleiding.Ditroutineonderhoudisvooruwrekening,
ongeachtofditwordtuitgevoerddoordedealerofuzelf.
Aanwijzingenvooraanvraagvangarantieservice
AlsuvanmeningbentdateenToro-productmateriaalgebrekenof
fabricagefoutenvertoont,moetudezeprocedurevolgen:
1.Neemcontactopmetdeverkoperomhetproducttelatennakijken
ofterepareren.Alsuomwatvoorredendanookgeencontactkunt
opnemenmetdeverkoper,neemdancontactopmeteenandere
erkendeToro-dealeromonderhoudtelatenplegen.Ziebijgevoegde
lijstmetdealers.
2.Brenghetproductmetuwaankoopbewijs(kwitantie)naarde
onderhoudsgarage.Alsuomwatvoorredendanookontevreden
bentoverhetonderzoekvandeonderhoudsgarageofdeverleende
hulp,verzoekenwijucontactmetonsoptenemenvia:
ToroCustomerCareDepartment,RLCDivision
ToroWarrantyCompany
811 1LyndaleAvenueSouth
Bloomington,MN55420-1196VS
001–952–948–4707
Zakenengevallendienietonderdegarantievallen
Buitendezeexplicietegarantievallen:
•Dekostenvoorregelmatigonderhoudofonderdelendieaan
slijtageonderhevigzijn,zoalsmessen,rotormessen(schoepen),
schrapermessen,riemen,brandstof,smeermiddelen,olieverversen,
bougies,luchtbanden,kabels/koppelingenofafstellingvanremmen.
•Elkproductofonderdeeldatisveranderdofverkeerdisgebruikt
enmoetwordenvervangenofwordengerepareerdalsgevolgvan
ongelukkenofgebrekkigonderhoud.
•Reparatiedienoodzakelijkisomdatoudebrandstof(ouderdanéén
maand)isgebruiktofhetbrandstofsysteemnietgoedisvoorbereid
opeenperiodevanbuitengebruikstellingvanlangerdanéénmaand.
•Allereparatiewerkzaamhedendieonderdezegarantievallen,moeten
wordenuitgevoerddooreenerkendeToro-onderhoudsgaragedie
goedgekeurdeToro-vervangingsonderdelengebruikt.
Algemenevoorwaarden
Dekoperwordtbeschermddoordenationalewetgevingvanelkland.
Derechtenwaaroverdekoperbeschiktopgrondvandezewetgeving,
wordennietbeperktdoordezegarantie.
374-0268RevE
 Loading...