

Page 1
FormNo.3404-531RevA
g025335
18inDethatcher
ModelNo.23513—SerialNo.316000001andUp
Registeratwww.T oro.com.
OriginalInstructions(EN)
*3404-531*A
Page 2
ThisproductcomplieswithallrelevantEuropeandirectives;
g025340
1
fordetails,pleaseseetheseparateproductspecicDeclaration
ofConformity(DOC)sheet.
WARNING
CALIFORNIA
Proposition65Warning
Thisproductcontainsachemicalorchemicals
knowntotheStateofCaliforniatocausecancer,
birthdefects,orreproductiveharm.
Theengineexhaustfromthisproduct
containschemicalsknowntotheStateof
Californiatocausecancer,birthdefects,
orotherreproductiveharm.
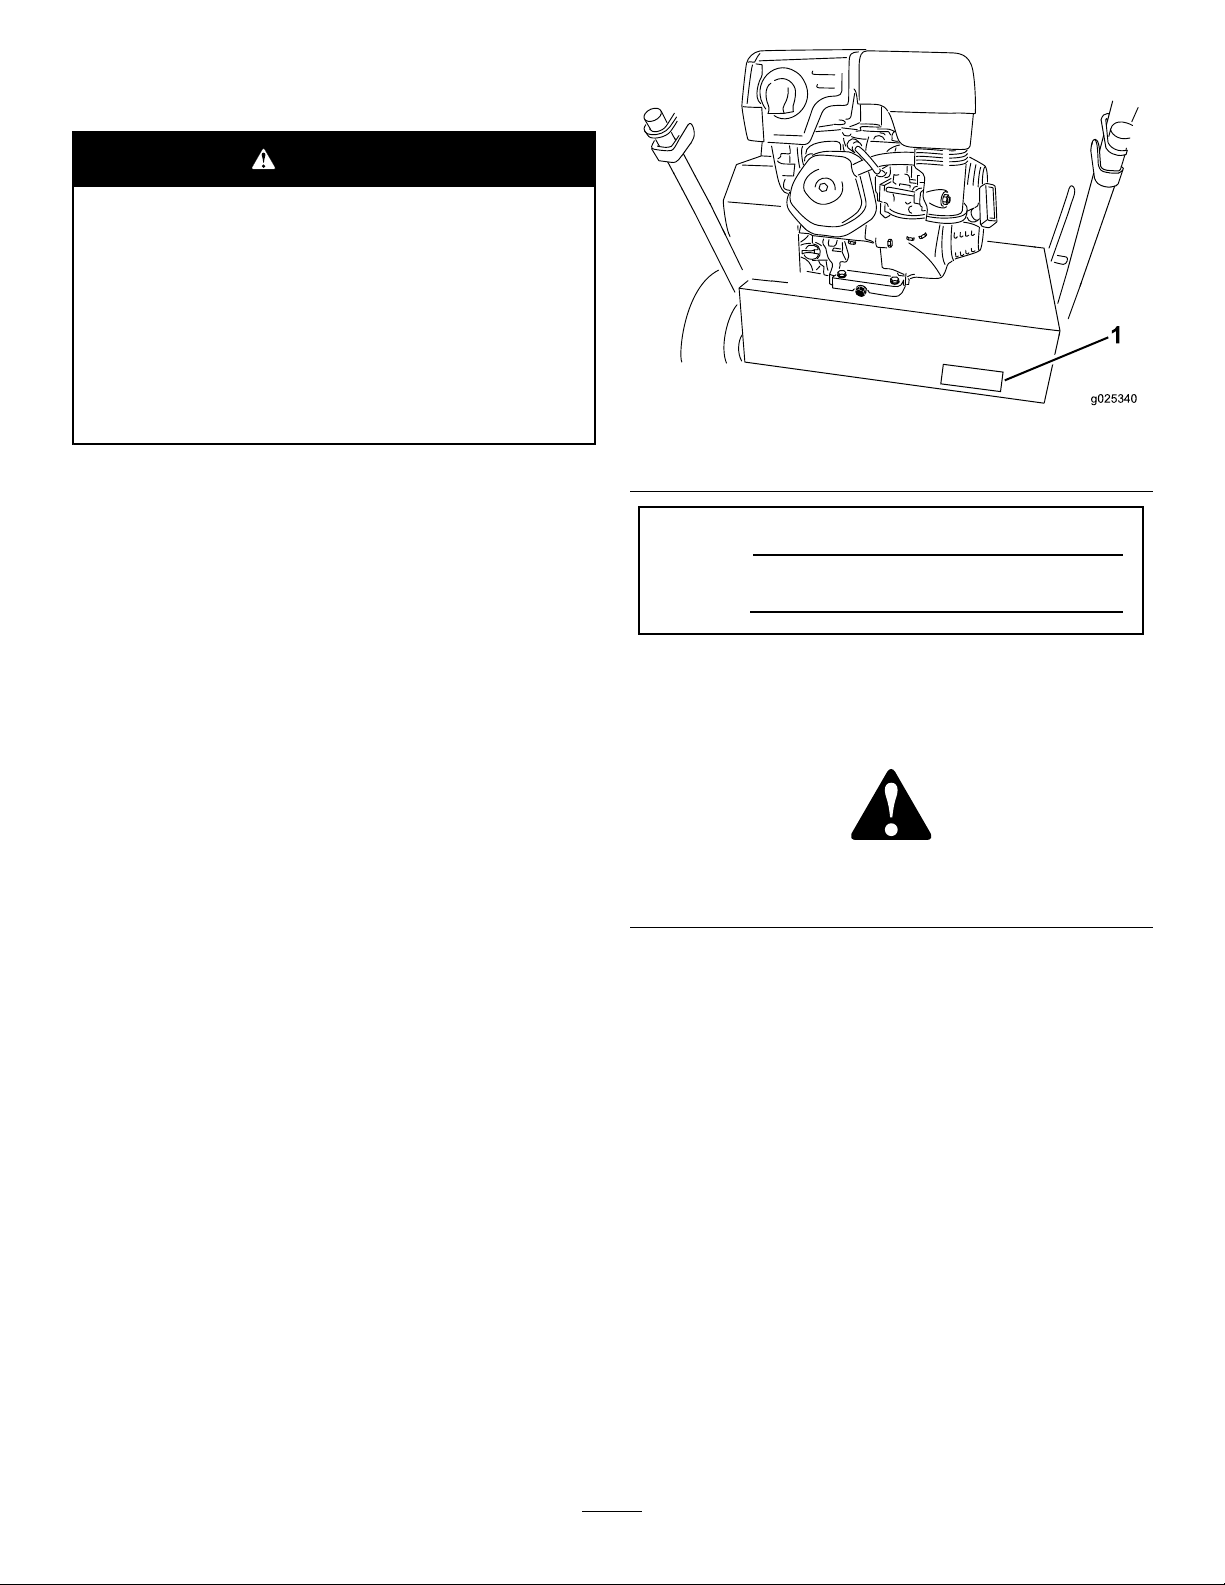
Figure1
ItisaviolationofCaliforniaPublicResourceCode
Section4442or4443touseoroperatetheengineonany
forest-covered,brush-covered,orgrass-coveredlandunless
theengineisequippedwithasparkarrester,asdenedin
Section4442,maintainedineffectiveworkingorderorthe
engineisconstructed,equipped,andmaintainedforthe
preventionofre.
ThissparkignitionsystemcomplieswithCanadianICES-002.
Introduction
Thismachinedethatchesturf.Itisintendedforsmallto
mediumsizedlawnapplicationsinresidentialandcommercial
properties.
Readthisinformationcarefullytolearnhowtooperateand
maintainyourproductproperlyandtoavoidinjuryand
productdamage.Youareresponsibleforoperatingthe
productproperlyandsafely.
YoumaycontactTorodirectlyatwww .Toro.comforproduct
andaccessoryinformation,helpndingadealer,ortoregister
yourproduct.
1.Locationofthemodelandserialnumbers
ModelNo.
SerialNo.
Thismanualidentiespotentialhazardsandhassafety
messagesidentiedbythesafety-alertsymbol(Figure2),
whichsignalsahazardthatmaycauseseriousinjuryordeath
ifyoudonotfollowtherecommendedprecautions.
Figure2
1.Safety-alertsymbol
Thismanualuses2wordstohighlightinformation.
Importantcallsattentiontospecialmechanicalinformation
andNoteemphasizesgeneralinformationworthyofspecial
attention.
Wheneveryouneedservice,genuineT oroparts,oradditional
information,contactanAuthorizedServiceDealerorToro
CustomerServiceandhavethemodelandserialnumbersof
yourproductready.Figure1illustratesthelocationofthe
modelandserialnumbersontheproduct.Writethenumbers
inthespaceprovided.
©2016—TheToro®Company
8111LyndaleAvenueSouth
Bloomington,MN55420
Contactusatwww.Toro.com.
2
PrintedintheUSA
AllRightsReserved
Page 3

Contents
Safety
Safety...........................................................................3
SafeOperatingPractices...........................................3
SafetyandInstructionalDecals.................................4
Setup............................................................................6
UnfoldingtheHandle..............................................6
CheckingtheEngine-OilLevel..................................6
ProductOverview..........................................................6
Controls................................................................6
Specications.........................................................8
Attachments/Accessories.........................................8
Operation.....................................................................9
CheckingtheEngine-OilLevel..................................9
CleaningDebrisfromtheMachine.............................9
AddingFuel............................................................9
StartingandShuttingOfftheEngine.........................11
OperatingtheMachine............................................11
OperatingTips......................................................11
Maintenance.................................................................12
RecommendedMaintenanceSchedule(s)......................12
PremaintenanceProcedures........................................12
DisconnectingtheSpark-PlugWire...........................12
EngineMaintenance..................................................13
ServicingtheAirCleaner.........................................13
ServicingtheEngineOil..........................................13
CleaningtheSedimentCup......................................14
ServicingtheSparkPlug..........................................14
BeltMaintenance......................................................15
CheckingtheBeltTension.......................................15
AdjustingtheBeltTension.......................................16
MaintainingtheFlailBlades.........................................16
InspectingtheFlailBlades.......................................16
ReplacingtheFlailBlades........................................16
Storage........................................................................18
RemovingtheMachinefromStorage.........................18
Improperuseormaintenancebytheoperatoror
ownercanresultininjury.Toreducethepotential
forinjury,complywiththesesafetyinstructionsand
alwayspayattentiontothesafetyalertsymbol,which
means
instruction.Failuretocomplywiththeinstructionmay
resultinpersonalinjuryordeath.
Caution
,
W ar ning
,or
Danger
—personalsafety
SafeOperatingPractices
ThefollowinginstructionsarebasedontheANSI
B71.4—2004standard.
Training
•ReadtheOperator’ sManualandothertrainingmaterial.If
theoperator(s)ormechanic(s)cannotreadEnglish,itis
theowner’sresponsibilitytoexplainthismaterialtothem.
•Becomefamiliarwiththesafeoperationoftheequipment,
operatorcontrols,andsafetysigns.
•Alloperatorsandmechanicsshouldbetrained.The
ownerisresponsiblefortrainingtheusers.
•Neverletchildrenoruntrainedpeopleoperateorservice
theequipment.Localregulationsmayrestricttheageof
theoperator.
•Theowner/usercanpreventandisresponsiblefor
accidentsorinjuriesoccurringtohimselforherself,other
people,orproperty.
Preparation
•Evaluatetheterraintodeterminewhataccessoriesand
attachmentsareneededtoproperlyandsafelyperform
thejob.Onlyuseaccessoriesandattachmentsapproved
bythemanufacturer.
•Wearappropriateclothingincludingeyeprotection;
slip-resistant,substantialfootwear;andhearing
protection.Tiebacklonghairanddonotwearjewelry.
•Inspecttheareawheretheequipmentistobeusedand
removeallobjectssuchasrocks,toys,andwire,whichcan
becontactedbythemachine.
•Useextracarewhenhandlingfuelandotheruids.They
areammableandvaporsareexplosive.
–Useonlyanapprovedcontainer.
–Neverremovethefuel-tankcaporaddfuelwiththe
enginerunning.
–Allowtheenginetocoolbeforerefueling.
–Donotsmoke.
–Neverrefuelordrainthemachineindoors.
•Checkthattheoperatorpresencecontrols,safetyswitches,
andshieldsareattachedandfunctioningproperly.Donot
operatethemunlesstheyarefunctioningproperly.
3
Page 4
Operation
•Neverrunanengineinanenclosedarea.
•Onlyoperateingoodlight,keepingawayfromholesand
hiddenhazards.
•Starttheengineonlyfromtheoperator’sposition.
•Neveroperatewithouttheshields,covers,orotherguards
securelyinplace.Besureallinterlocksarefunctioning
properly.
•Donotchangetheenginegovernorsettingoroverspeed
theengine.
•Raisetheailblades,stopthemachine,andshutoffthe
enginebeforeleavingtheoperator’spositionforany
reason.
•Stoptheequipmentandinspecttheailbladesafter
strikinganobjectorifanabnormalvibrationoccurs.
Makenecessaryrepairsbeforeresumingoperation.
•Keephandsandfeetawayfromtheailbladearea.
•Keeppetsandbystandersawayfromthemachine.
•Bealert,slowdown,andusecautionwhenmakingturns.
Lookbehindandtothesidebeforechangingdirections.
•Donotoperatethemachinewhileill,tired,orunderthe
inuenceofalcoholordrugs.
•Lightningcancausesevereinjuryordeath.Iflightning
isseenorthunderisheardinthearea,donotoperate
themachine;seekshelter.
•Useextremecarewhenloadingorunloadingthemachine
intoatrailerortruck.
•Usecarewhenapproachingblindcorners,shrubs,trees,
orotherobjectsthatmayobscurevision.
•Alwaysbeawareofobstaclesthatmaybeinthearea
ofoperation.Planyourpathtoavoidcontactwithany
obstaclebyyouorthemachine.
SlopeOperation
•Donotoperateonslopeswhengrassiswet.Slippery
conditionsreducetractionandcouldcauseslidingand
lossofcontrol.
•Removeormarkobstaclessuchasrocks,treelimbs,etc.
fromtheoperatingarea.
•Alwaysavoidsuddenstartingorstoppingonaslope.If
tireslosetraction,disengagetheailbladesandproceed
slowlyofftheslope.
MaintenanceandStorage
•Waitforallmovementtostopbeforeadjusting,cleaning,
orrepairing.Raisetheailblades,stopthemachine,shut
offtheengine,anddisconnectthespark-plugwire.
•Cleangrassanddebrisfromtheblades,drives,mufers,
andenginetohelppreventres.Cleanupoilorfuelspills.
•Lettheenginecoolbeforestoring,anddonotstorethe
machinenearaame.
•Shutoffthefuelwhilestoringortransportingthemachine
ontrailers.Donotstorefuelnearamesordrainindoors.
•Parkthemachineonalevelsurface.Neverallow
untrainedpersonneltoserviceit.
•Usejackstandsorsafetylatchestosupportcomponents
whenrequired.
•Carefullyreleasepressurefromcomponentswithstored
energy.
•Removethespark-plugwirebeforemakinganyrepairs.
•Keephandsandfeetawayfrommovingparts.Ifpossible,
donotmakeadjustmentswiththeenginerunning.
•Keepallpartsingoodworkingconditionandallhardware
tightened.Replaceallwornordamageddecals.
•UseonlyT oro-approvedattachments.Thewarranty
maybevoidedifthemachineisusedwithunapproved
attachments.
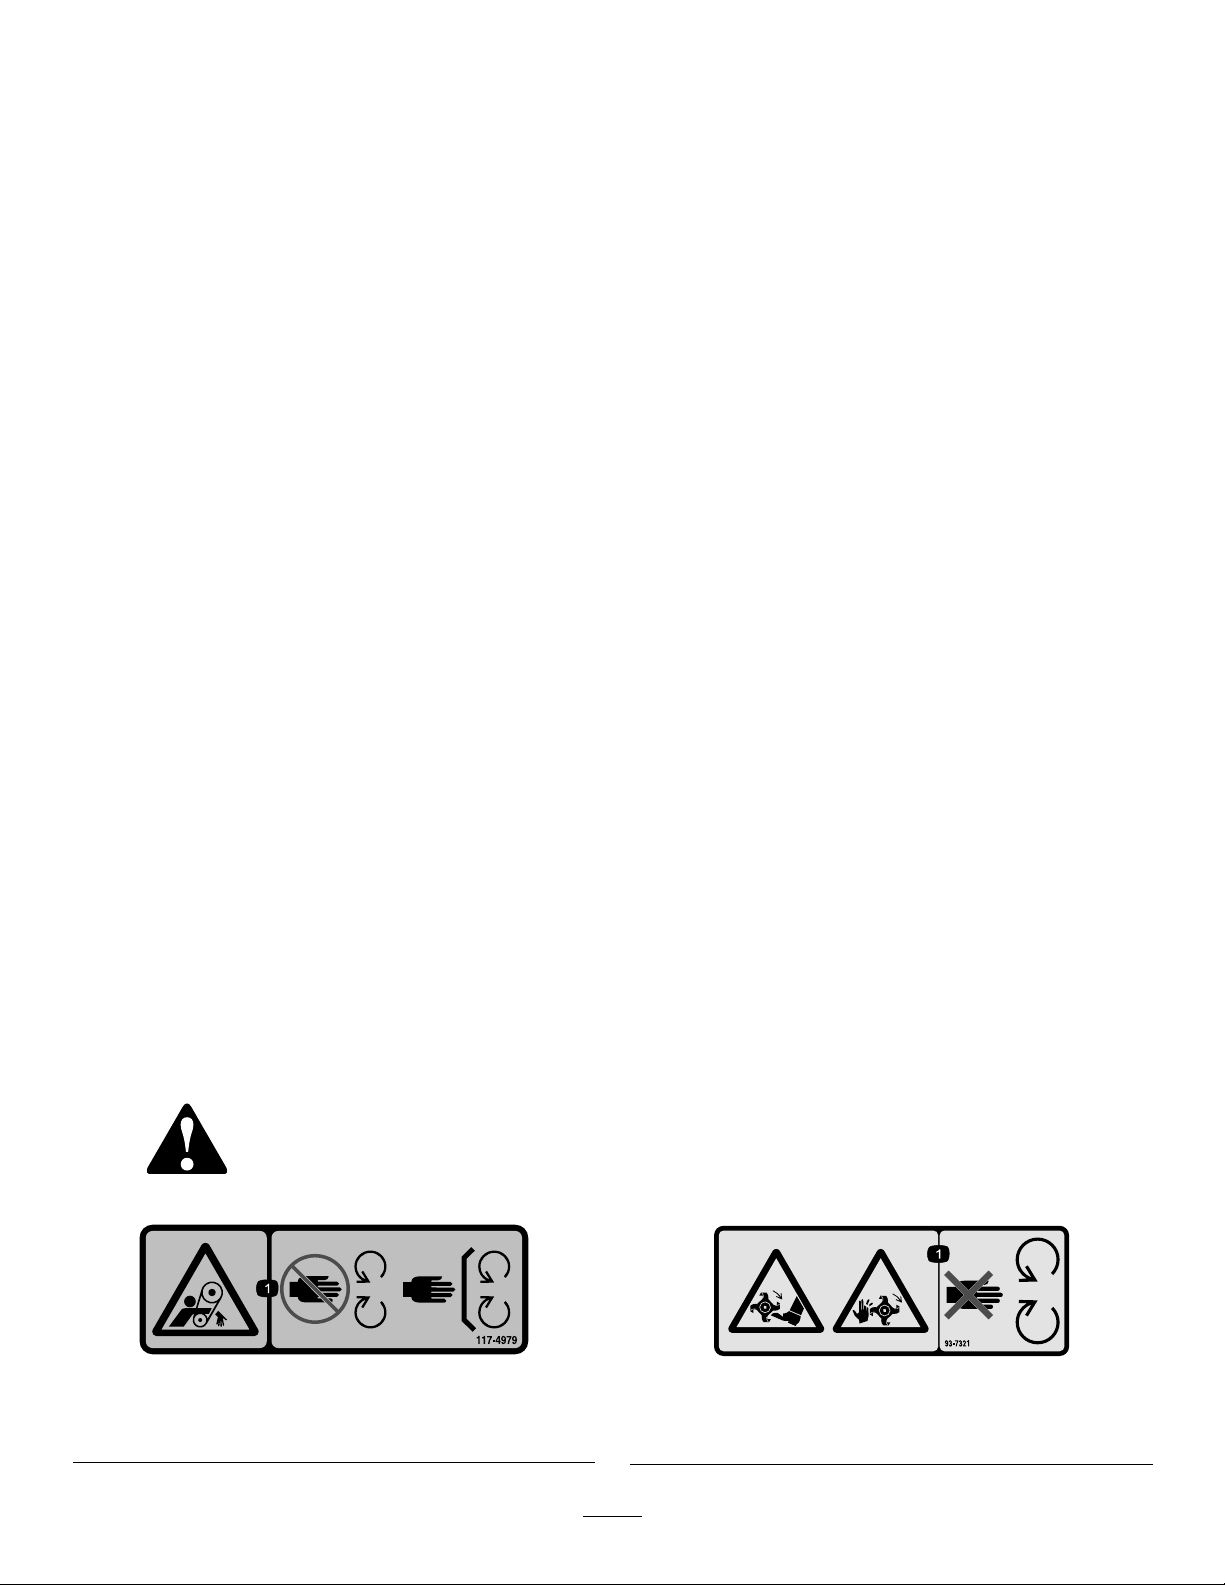
SafetyandInstructionalDecals
Safetydecalsandinstructionsareeasilyvisibletotheoperatorandarelocatednearanyareaof
potentialdanger.Replaceanydecalthatisdamagedorlost.
117-4979
1.Warning—stayawayfrommovingparts;keepallguardsin
place.
93-7321
1.Warning—stayawayfrommovingparts;keepallguardsin
place.
4
Page 5
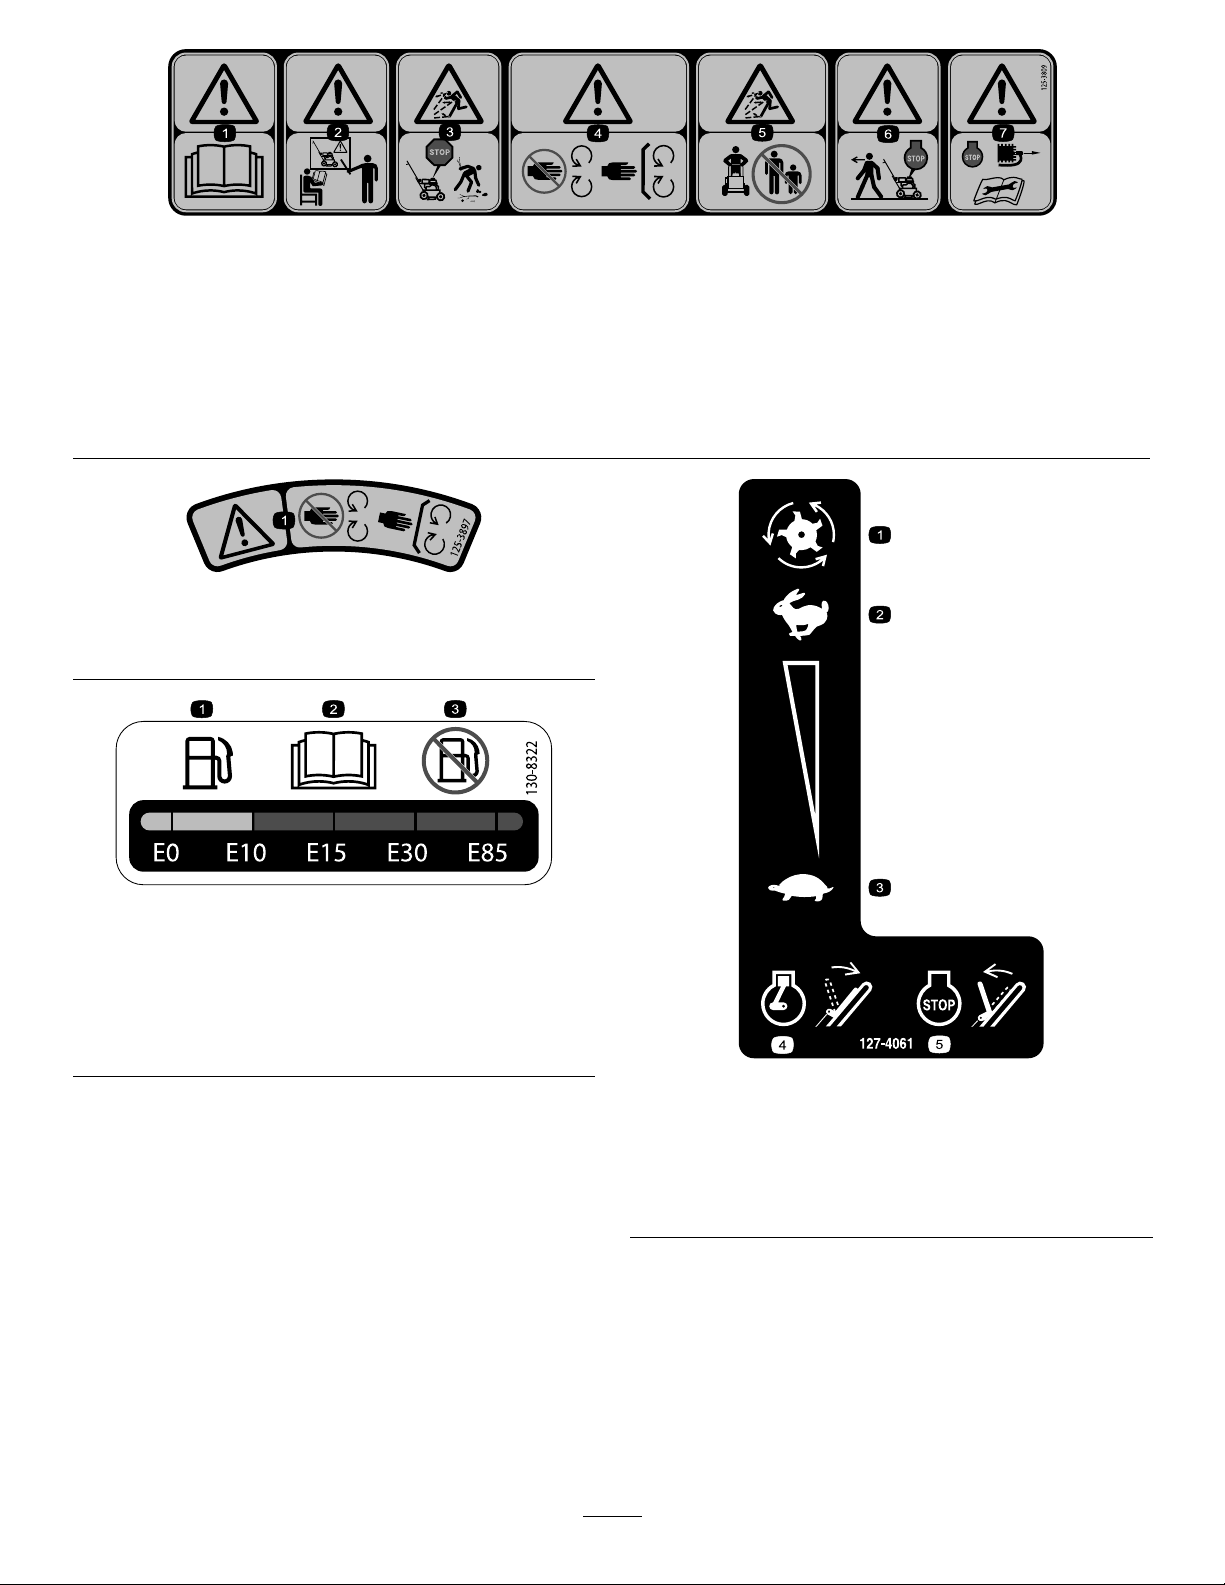
125-3809
1.Warning—readtheOperator’sManual.5.Thrownobjecthazard—keepbystandersawayfromthe
2.Warning—donotoperatethismachineunlessyouaretrained.
3.Thrownobjecthazard—shutofftheengineandremoveany
debrisfromyourpath.
4.Warning—stayawayfrommovingparts;keepallguardsin
place.
machine.
6.Warning—shutofftheenginebeforewalkingawayfromthe
machine.
7.Warning—shutofftheengineanddisconnectthesparkplug
wirebeforeperformingmaintenanceonthemachine.
125-3897
1.Warning-stayawayfrommovingparts;keepallguardsand
shieldsinplace.
1.Onlyusefuelwithan
alcoholcontentbyvolume
under10%.
2.ReadtheOperator's
Manualformore
informationonfuel.
130-8322
3.Donotusefuelwithan
alcoholcontentbyvolume
greaterthan10%.
127-4061
1.Cuttingblades
2.Fast5.Releasethehandletoshut
3.Slow
4.Holdthehandletostart
theengine.
offtheengine.
5
Page 6
Setup
g025336
g025337
1
2
3
4
5
6
G023178
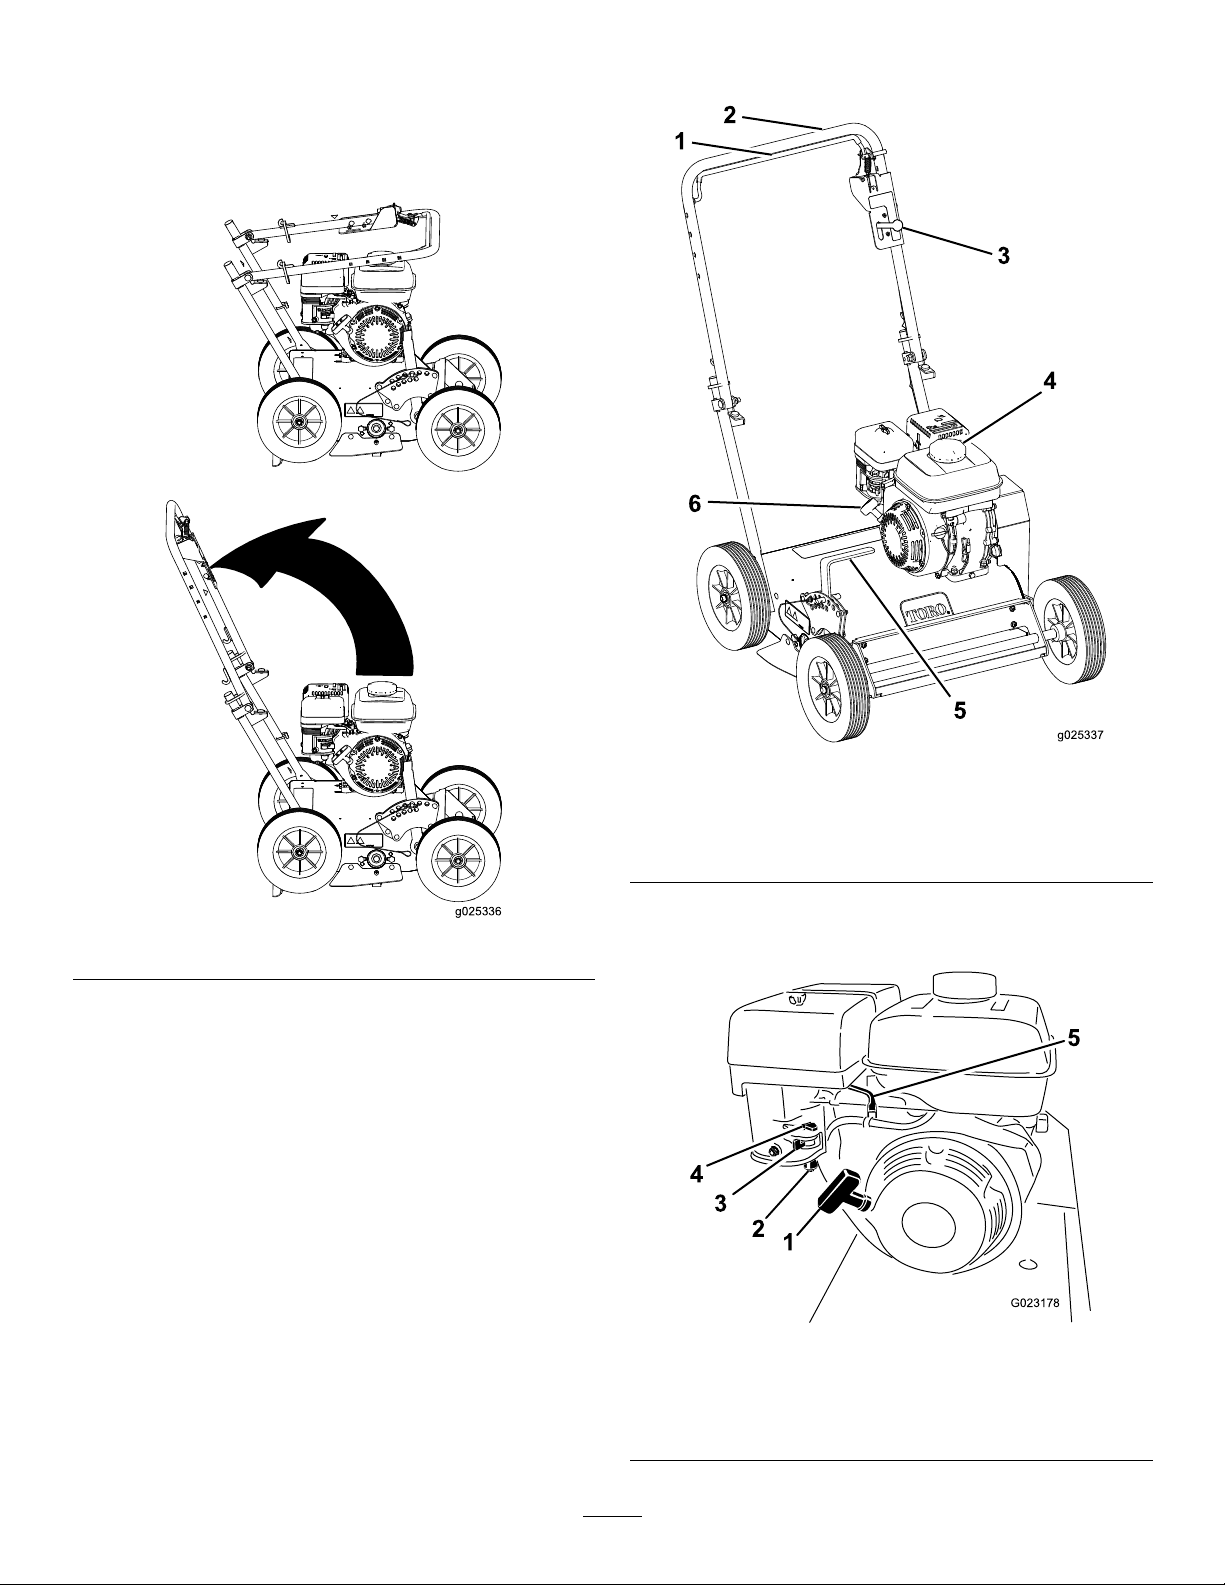
UnfoldingtheHandle
1.Raisethehandletotheoperatingposition(Figure3).
ProductOverview
Figure4
1.Operator-presencebail
2.Handle5.Depth-controllever
3.Throttle-controllever6.Recoil-starterhandle
Figure3
Controls
4.Fueltank
2.Slidetheovallockingringsdowneachsideofthe
upperhandleoverthelowerhandle,lockingthehandle
sectionstogether(Figure3).
CheckingtheEngine-OilLevel
Themachinecomesfromthefactorywithoilintheengine
crankcase,however,itmaybenecessarytoaddoil;referto
ServicingtheEngineOil(page13).
1.Recoilstarter
2.Sedimentcup
3.Fuel-shutoffvalve
6
Figure5
4.Chokelever
5.Throttlelever
Page 7

RecoilStarter
Pulltherecoil-starterhandletostarttheengine(Figure5).
Fuel-ShutoffValve
Closethefuel-shutoffvalvewhentransportingorstoringthe
machine(Figure5).
ChokeLever
Beforestartingacoldengine,movethechokeleverforward.
Aftertheenginestarts,regulatethechoketokeeptheengine
runningsmoothly.Assoonaspossible,movethechokelever
allthewayrearward.
Note:Awarmenginerequireslittleornochoking.
Operator-PresenceBail
Theoperator-presencebailallowsthemachinetostart/run.
Tostartthemachine,holddowntheoperatorpresencebail
(Figure6).Continuetoholddowntheoperatorpresencebail
toallowthemachinetorun.
1.Operator-presencebail
7
Figure6
Page 8

ThrottleLever
1
2
3
4
g025338
Movethecontrolforwardtoincreasetheenginespeed,and
rearwardtodecreasespeed(Figure7).
Figure7
1.Throttlelever
Figure8
1.Depth-controllever3.Hairpincotter
2.Transport-positionhole4.Lockingpin
Specications
Note:Specicationsanddesignaresubjecttochange
withoutnotice.
Depth-ControlLever
Thedepth-controlleverallowsyoutosetthedepthofthe
ailbladesin10differentcuttingpositionsalongwith1
positionfortransportation.
Toadjustthedepth,removethehairpincotter,pullthe
lockingpinout,andmovetheleverforwardorrearwardto
thedesireddepthsetting(Figure8).
Important:Donotpulltheleverside-to-side,asthis
bendsthelever.
Width
Length(operating)11 1.8cm(44inches)
Length(withhandlestored)86.4cm(34inches)
Height(operating)94cm(37inches)
Height(withhandlestored)63.5cm(25inches)
Weight
69.9cm(27.5inches)
61.2kg(135lb)
Attachments/Accessories
Approvedattachmentsandaccessoriesareavailableforuse
withthemachinetoenhanceandexpanditscapabilities.
ContactanAuthorizedServiceDealerorDistributororgo
towww .T oro.comforalistofallapprovedattachmentsand
accessories.
8
Page 9

Operation
1
2
3
4
g019686
5
Note:Determinetheleftandrightsidesofthemachine
fromthenormaloperatingposition.
CheckingtheEngine-OilLevel
ServiceInterval:Beforeeachuseordaily
1.Shutofftheengine,disengagetheailblades,andwait
forallmovingpartstostop.
2.Cleanaroundthedipsticktopreventdirtfromfalling
intothellerhole,whichcausesdamagetotheengine
(Figure9).
Note:Ensurethattheengineislevel.
Figure10
1.Fillertube4.Lowerlimit
2.Dipstick
3.Upperlimit
5.Oil-drainbolt
1.Dipstick
3.Unscrewthedipstickandwipetheendclean(Figure9).
4.Insertthedipstickfullyontothellertube(Figure9).
Important:Donotscrewitin.
5.Removethedipstickagainandlookattheend(Figure
10).
Note:Iftheengine-oillevelislow,slowlypouronly
enoughoilintothellertubetoraisetheleveltothe
middleofthedipstick
Figure9
Important:Donotoverllthecrankcasewith
engineoilandruntheengine;enginedamage
mayresult.
CleaningDebrisfromthe Machine
ServiceInterval:Beforeeachuseordaily
1.Disengagetheailblades,shutofftheengine,andwait
forallmovingpartstostop.
2.Brushdirtanddebrisawayfromtheaircleanerand
engineopenings.
AddingFuel
RecommendedFuel:
•Forbestresults,useonlyclean,fresh(lessthan30days
old),unleadedfuelwithanoctaneratingof87orhigher
((R+M)/2ratingmethod).
•Ethanol:Fuelwithupto10%ethanol(gasohol)or
15%MTBE(methyltertiarybutylether)byvolumeis
acceptable.EthanolandMTBEarenotthesame.Fuel
with15%ethanol(E15)byvolumeisnotapprovedfor
use.Neverusefuelthatcontainsmorethan10%
ethanolbyvolume,suchasE15(contains15%ethanol),
E20(contains20%ethanol),orE85(containsupto85%
ethanol).Usingunapprovedfuelmaycauseperformance
problemsand/orenginedamagewhichmaynotbe
coveredunderwarranty.
•Donotusefuelcontainingmethanol.
9
Page 10
•Donotstorefueleitherinthefueltankorfuelcontainers
g013315
overthewinterunlessafuelstabilizerisused.
•Donotaddoiltofuel.
Important:T oreducestartingproblems,addfuel
stabilizertothefuelallseason,mixingitwithfuelless
than30daysold;runthemachinedrybeforestoringit
formorethan30days.
Donotusefueladditivesotherthanafuel
stabilizer/conditioner.Donotusefuelstabilizers
withanalcoholbasesuchasethanol,methanol,or
isopropanol.
DANGER
Incertainconditions,fuelisextremelyammable
andhighlyexplosive.Areorexplosionfromfuel
canburnyouandothersandcandamageproperty.
•Fillthefueltankoutdoors,inanopenarea,when
theengineiscold.Wipeupanyfuelthatspills.
•Neverllthefueltankinsideanenclosedtrailer.
•Donotllthefueltankcompletelyfull.Add
fueltothefueltankuntilthelevelis6to13mm
(1/4to1/2inch)belowthebottomoftheller
neck.Thisemptyspaceinthetankallowsfuel
toexpand.
•Neversmokewhenhandlingfuel,andstayaway
fromanopenameorwherefuelfumesmaybe
ignitedbyaspark.
•Storefuelinanapprovedcontainerandkeepit
outofthereachofchildren.Neverbuymore
thana30-daysupplyoffuel.
DANGER
Incertainconditionsduringfueling,static
electricitycanbereleased,causingasparkwhich
canignitethefuelvapors.Areorexplosionfrom
fuelcanburnyouandothersandcandamage
property.
•Alwaysplacefuelcontainersonthegroundaway
fromyourvehiclebeforelling.
•Donotllfuelcontainersinsideavehicleoron
atruckortrailerbed,becauseinteriorcarpets
orplastictruckbedlinersmayinsulatethe
containerandslowthelossofanystaticcharge.
•Whenpractical,removefuel-poweredequipment
fromthetruckortrailer,andrefuelthe
equipmentwithitswheelsontheground.
•Ifthisisnotpossible,thenrefuelsuchequipment
onatruckortrailerfromaportablecontainer
ratherthanfromafuel-dispensernozzle.
•Ifafuel-dispensernozzlemustbeused,keepthe
nozzleincontactwiththerimofthefueltank
orcontaineropeningatalltimesuntilfuelingis
complete.
FillingtheFuelTank
1.Disengagetheailblades,shutofftheengine,andwait
forallmovingpartstostop.
2.Allowtheenginetocool.
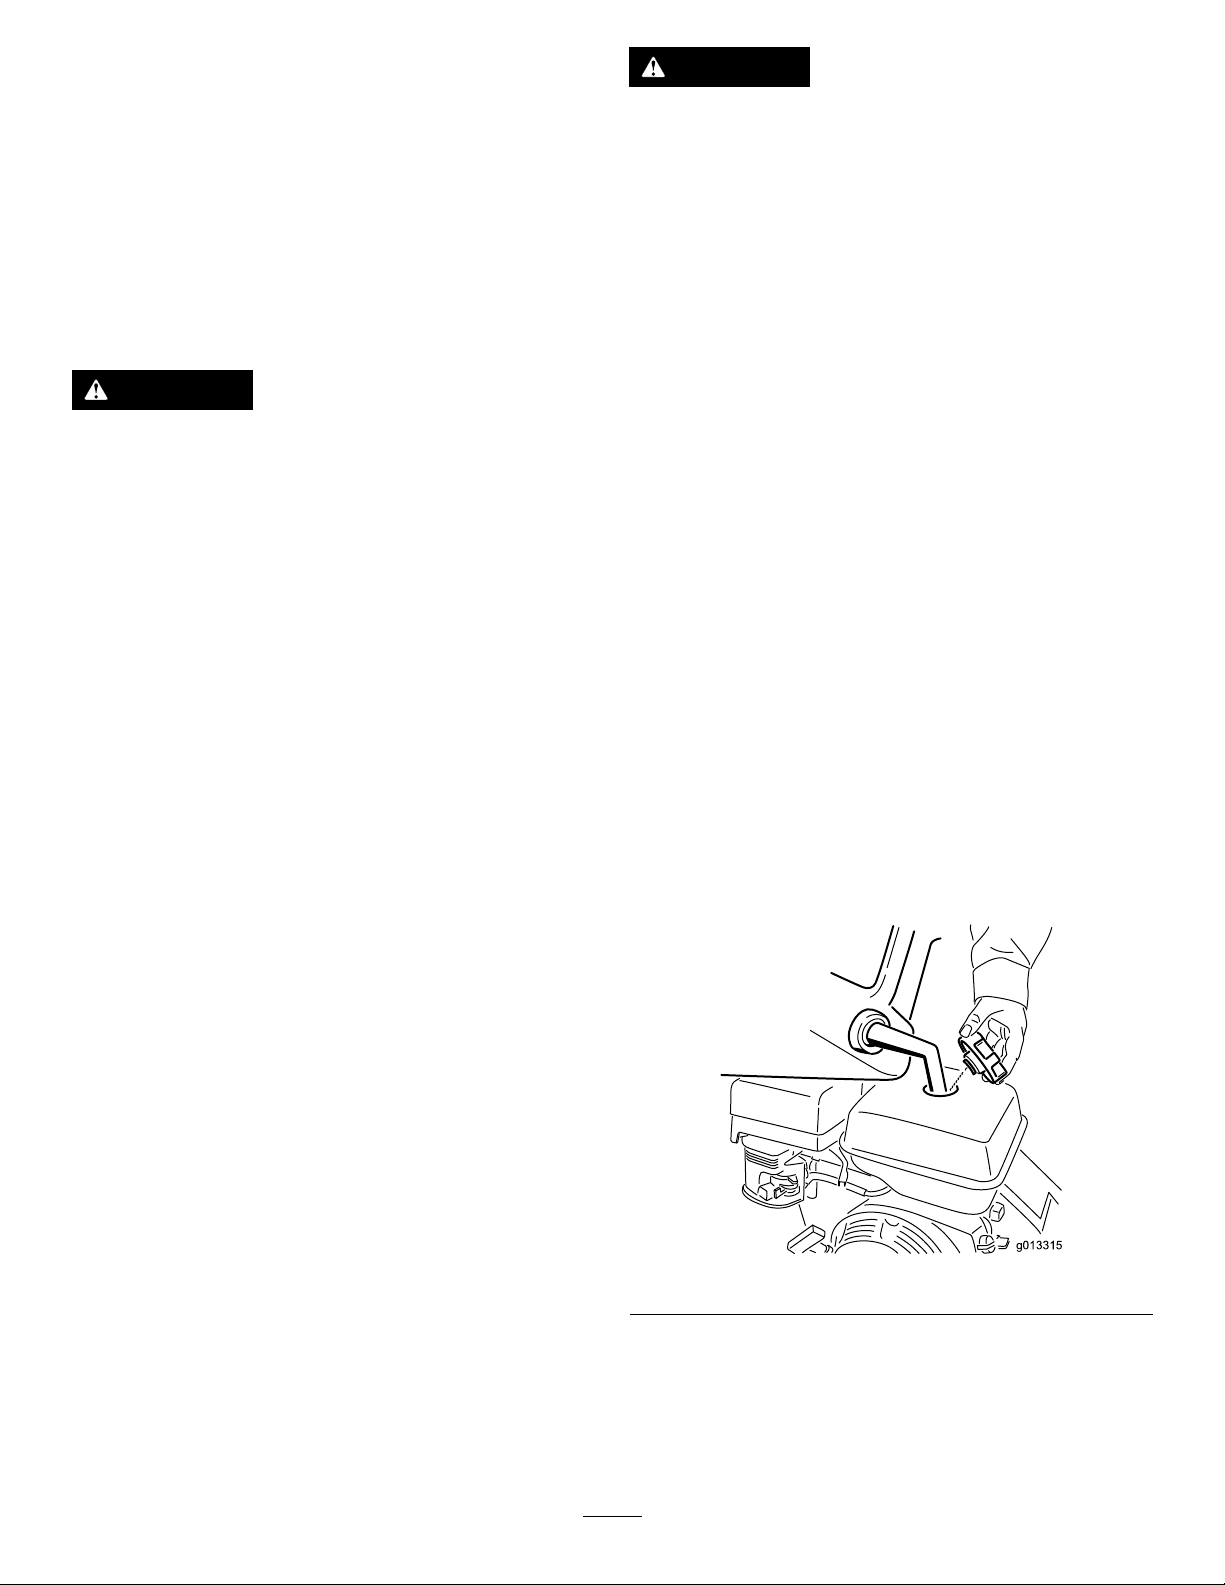
3.Cleanaroundthefuel-tankcapandremoveit(Figure
11).
Note:Thecapistetheredtothefueltank.
•Donotoperatewithouttheentireexhaust
systeminplaceandinproperworkingcondition.
Figure11
4.Addunleadedfueltothefueltankuntilthelevelisjust
insidethemeshlterbasket.
Important:Thisspaceinthetankallowsfuelto
expand.Donotllthefueltankcompletelyfull.
5.Installthefuel-tankcapsecurely .
10
Page 11

6.Wipeupanyspilledfuel.
StartingandShuttingOffthe Engine
OperatingtheMachine
1.Movethedepth-controllevertothedesiredsetting.
2.Starttheengine.
3.Pushdownonthehandletoraisethefrontwheelsoff
theground.
StartingtheEngine
1.Turnonthefuelvalve.
2.Movethechokeleverforwardifyouarestartingacold
engine.
3.MovethethrottlelevermidwaybetweentheSLOW
(turtle)andFAST(rabbit)positions.
Note:Awarmorhotenginemaynotrequirechoking.
4.Withonehand,holddowntheoperator-presencebail.
5.Pulltherecoilhandlesharplytostarttheengine.
6.Aftertheenginestarts,graduallymovethechoketo
theright.
Note:Iftheenginestallsorhesitates,movethechoke
leftagainuntiltheenginewarmsup.
7.Movethethrottlelevertodesiredsetting.
ShuttingOfftheEngine
1.Releasetheoperator-presencebail.
2.Turnthefuelvalveoff.
3.Waitforallmovingpartstostop.
4.Slowlylowerthefrontwheelstotheground,allowing
thebladestograduallyworkintothegrassandsoil.
5.Whennished,releasetheoperatorpresencebail,
shutofftheengine,andraisethecuttingbladestothe
transportsetting.
OperatingTips
Dethatching
•Settheailblades3to6mm(1/8to1/4inch)intothe
earth(belowthezeroposition).
•Mowyardshorterthannormalmowinglengthbefore
dethatching.
•Dethatchalawnbeforetheprimegrowingseason.
•Afterdethatching,removethatchanddebrisfromlawn
withrake.
•Usetimeofsoilexposuretofertilizeandseedlawn.
•Givelawnextrawateringafterdethatching.
PowerRaking/Renovation
Tobreaknewgroundortillanexistinglawn,settheail
blades6to12mm(1/4to1/2inch)intotheearth(below
thezeroposition).Allowthemachinetomoveatitsown
pacethroughthesoil,goingforwardandbackwardoverthe
areatobeleveled,ormakingmultiplepassesfromdifferent
directions.
11
Page 12

Maintenance
G019426
RecommendedMaintenanceSchedule(s)
MaintenanceService
Interval
Aftertherst25hours
Beforeeachuseordaily
Every50hours
Every100hours
Every200hours
Every300hours
Yearlyorbeforestorage
MaintenanceProcedure
•Changetheengineoil.
•Checktheengine-oillevel.
•Cleandebrisfromthemachine.
•Inspecttheair-cleanerelements.
•Checkthebelttension.Iftheengineisworkingbuttheailsseemunderpowered,
checkthebelttension
•Checktheailbladesforwearordamage.
•Checkforloosefasteners.
•Cleantheair-lterelements.Cleanthemmorefrequentlyindustyoperating
conditions.
•Changetheengineoil.
•Cleanthesedimentcup.
•Inspect,clean,andadjustthesparkplug;replaceitifnecessary.
•Replacethesparkplug.
•Replacethepaperair-cleanerelement.Replaceitmorefrequentlyindusty
operatingconditions.
•T ouchupchippedpaint.
Premaintenance
Procedures
DisconnectingtheSpark-Plug Wire
Beforeperforminganymaintenanceontheengine,belts,or
cuttingblades,disconnectthespark-plugwirefromthespark
plug(Figure12).
Figure12
1.Spark-plugwire
12
Page 13

EngineMaintenance
G019427
g013375
0 20 40 60 80 100 F
-20 -10 0 10 20 30 40 C
o
o
30
5W - 30 / 10W - 30
ServicingtheAirCleaner
Note:Nevertrytobrushdirtoffthepaperelement;
brushingforcesthedirtintothebers.
10.Cleanthefoamelementinwarm,soapywaterorin
anonammablesolvent.
ServiceInterval:Beforeeachuseordaily—Inspectthe
air-cleanerelements.
Every50hours—Cleantheair-lterelements.Clean
themmorefrequentlyindustyoperatingconditions.
Every300hours/Yearly(whichevercomes
rst)—Replacethepaperair-cleanerelement.Replace
itmorefrequentlyindustyoperatingconditions.
Important:Donotoperatetheenginewithoutthe
air-lterassembly;extremeenginedamagewilloccur.
1.Shutofftheengineandwaitforallmovingpartsto
stop.
2.Disconnectthewirefromthesparkplug.
3.Removethenutthatsecuresthecover(Figure13).
11.Rinseanddrythefoamelementthoroughly.
12.Dipthefoamelementincleanengineoil,thensqueeze
outtheexcessoil.
Note:Excessoilinthefoamelementrestrictstheair
owthroughtheelementandmayreachthepaper
lterandclogit.
13.Wipedirtfromthebaseandthecoverwithamoistrag.
Note:Becarefultopreventdirtanddebrisfrom
enteringtheairductleadingtothecarburetor.
14.Installtheair-cleanerelementsandensurethattheyare
properlypositioned.
15.Securelyinstallthecoverwiththenut.
ServicingtheEngineOil
OilType:Detergentoil(APIserviceSJorhigher)
CrankcaseCapacity:1.1L(37oz)
Viscosity:Seethetablebelow(Figure14).
Figure13
1.Nut3.Paperelement
2.Cover
4.Removethecover.
Note:Becarefultopreventdirtanddebrisfrom
fallingintothebase.
5.Removethenut-restrainingair-lterassembly.
6.Removethefoamandpaperelementsfromthebase
(Figure13).
7.Removethefoamelementfromthepaperelement
(Figure13).
8.Inspectthefoamandpaperelements,andreplacethem
iftheyaredamagedorexcessivelydirty.
9.Ifthepaperelementisexcessivelydirty,replaceit.
4.Foamelement
Figure14
ChangingtheEngineOil
ServiceInterval:Aftertherst25hours
Every100hours
WARNING
Oilmaybehotaftertheenginehasbeenrun,and
contactwithhotoilcancauseseverepersonalinjury.
Avoidcontactingthehotengineoilwhenyoudrain
it.
1.Shutofftheenginebyreleasingtheoperator-presence
bail,disengagetheailblades,andwaitforallmoving
partstostop.
13
Page 14

2.Disconnectthewirefromthesparkplug.
G019428
1
2
g020282
2.Disconnectthewirefromthesparkplug.
3.Raisethefrontwheelsafewinchesoffthegroundand
placeapanunderthedrainplugtocatchtheoil.
4.Removethedrainplug(Figure15).
Figure15
1.Drainplug
5.Whentheoilhasdrainedcompletely,lowerthefront
wheelstotheground,replacethedrainplug,and
torqueto18N∙m(13ft-lb).
Note:Disposeoftheusedoilatacertiedrecycling
center.
6.Removethedipstickandslowlypouroilintotheller
holeuntiltheoillevelreachesthemiddleofthedipstick
(Figure10).
7.Replaceandsecurethedipstick.
3.Movethefuel-shutoffvalvetotheOFFposition.
4.RemovethesedimentcupandO-ring(Figure16).
Figure16
1.O-ring2.Sedimentcup
5.Washthesedimentcupinanon-ammablesolventand
dryitthoroughly .
6.PlacetheO-ringinthefuelvalveandinstallthe
sedimentcup,tighteningitsecurely.
7.Movethefuel-shutofflevertotheONposition.
Note:Ifanyfuelleaks,repeatthisprocedureand
replacetheO-ring.
8.Wipeupanyspilledoil.
9.Connectthewiretothesparkplug.
CleaningtheSedimentCup
ServiceInterval:Every100hours
DANGER
Incertainconditions,fuelisextremelyammable
andhighlyexplosive.Areorexplosionfromfuel
canburnyouandothersandcandamageproperty.
•Shutofftheengineandkeepheat,sparks,and
ameaway .
•Handlefuelonlyoutdoors.
•Wipeupspillsimmediately.
•Donotsmokewhilehandlingfuel.
1.Shutofftheengineandwaitforallmovingpartsto
stop.
ServicingtheSparkPlug
ServiceInterval:Every100hours—Inspect,clean,and
adjustthesparkplug;replaceitif
necessary.
Every200hours—Replacethesparkplug.
UseanNGKBPR6ESsparkplugorequivalent.
1.Shutofftheengineandwaitforallmovingpartsto
stop.
2.Disconnectthewirefromthesparkplug.
3.Cleanaroundthesparkplug.
4.Removethesparkplugfromthecylinderhead.
Important:Replaceacracked,fouled,ordirty
sparkplug.Donotcleantheelectrodesbecause
gritenteringthecylindercandamagetheengine.
5.Setthegapontheplugto0.76mm(0.03inch)as
showninFigure17.
14
Page 15

BeltMaintenance
CheckingtheBeltTension
ServiceInterval:Beforeeachuseordaily—Checkthebelt
tension.Iftheengineisworkingbutthe
ailsseemunderpowered,checkthebelt
tension
Figure17
1.Center-electrodeinsulator
2.Sideelectrode
3.Airgap(nottoscale)
6.Carefullyinstallthesparkplugbyhand(toavoidcross
threading)untilitishandtight.
7.Tightenthesparkpluganadditional1/2turnifitis
new;otherwise,tightenitanadditional1/8to1/4turn.
Important:Aloosesparkplugcanbecomevery
hotandcandamagetheengine;overtighteninga
sparkplugmaydamagethethreadsinthecylinder
head.
8.Connectthewiretothesparkplug.
1.Stopthemachineonalevelsurface,shutoffthe
engine,disconnectthespark-plugwire,andraisethe
ailbladestothehighestposition.
2.Removethebeltcoverfromtheleftsideofthemachine
(Figure18).
Figure18
1.Belt
2.Cover
3.Checkthetensionofthebelt(Figure18).
Note:Thebeltshouldnotexmorethana12mm
(1/2inch)withmoderatengerpressureappliedtothe
spanjustabovethemachineframe.
4.Ifthebelttensionisloose,refertoAdjustingtheBelt
Tension(page16).
5.Installthebeltcoverbeforeoperatingthemachine.
15
Page 16

AdjustingtheBeltTension
1
g025339
1.Stopthemachineonalevelsurfaceandshutoffthe
enginebyreleasingtheoperator-presencebail.
2.Totightenthebelt,loosenthe4mountingnuts
securingtheenginetotheframe.
MaintainingtheFlail Blades
InspectingtheFlailBlades
ServiceInterval:Beforeeachuseordaily—Checktheail
bladesforwearordamage.
Whentheailbladesareworndownandarenolonger
functioningproperly,refertoReplacingtheFlailBlades(page
16).
Important:Performthisprocedurewhenthefueltank
isemptyornearlyempty.Tipthemachineforwardto
keepairlterup.
ReplacingtheFlailBlades
Whentheailbladesareworndownandnolonger
functioningproperly ,replacethemasfollows:
Important:Preformthisprocedurewhenthefueltank
isemptyornearlyempty.
Figure19
1.Mountingnuts
3.Movetheenginetotightenthebelttotheproper
tension.
4.Securethe4mountingnutsandbolts.
Note:Torquetheboltsthatsecuretheenginetothe
frameto271N∙m(200in-lb).
1.Stopthemachineonalevelsurfaceandshutoffthe
enginebyreleasingtheoperator-presencebail.
2.Lowertheailbladestothelowestposition.
3.Tiltthemachineforwardontoitsnose,andrestitona
blockofwood.
Note:Itwilltake2peopletotipthemachineforward
safely.
4.Spintheail-bladeassembly.
Note:Itshouldspinfreely.Ifitmakesagrinding
noiseandishalting,thebearingsareworn;replace
themwhenyoureplacetheblades.
5.Removethecotterpinfromtherodwiththeworn
downail(Figure20).
6.Carefullypullouttherodtoreleasetheailsand
spacers(Figure20).
7.Replaceworndownailswithnewonesanddiscard
theoldails.
16
Page 17

Figure20
1.Rod
2.Flail
3.Spacer
4.Cotterpin
8.Carefullyaddailsandspacerstorodinthesameorder
astheywereremoved.
Important:Aligntherodwiththeformedhead
towardthecenterofthemachine.
9.Addthecotterpintolocktherod,ails,andspacers
intoplace.
17
Page 18

Storage
1.Raisetheailblades,stopthemachine,shutoffthe
engine,anddisconnectthespark-plugwire.
2.Removedirtandgrimefromtheentiremachine.
Important:Youcanwashthemachinewithmild
detergentandwater.Donotpressurewashthe
machine.Avoidexcessiveuseofwater,especially
neartheengine.
3.Servicetheaircleaner;refertoServicingtheAir
Cleaner(page13).
4.Changetheengineoil;refertoChangingtheEngine
Oil(page13).
5.Forstorageover30days,preparethemachineas
follows:
A.Addapetroleum-basedstabilizer/conditioner
tothefuelinthetank.Followthemixing
instructionsfromthestabilizermanufacturer.Do
notuseanalcohol-basedstabilizer(ethanol
ormethanol).
RemovingtheMachinefrom Storage
1.Checkandtightenallfasteners.
2.Inspectthesparkplugandreplaceitifitisdirty,worn,
orcracked;refertotheengineOwner’sManual.
3.Installthesparkpluguntilitishand-tight,thenan
additional1/2turnifitisnew,otherwise,tightenitan
additional1/8to1/4turn.
4.Performanyneededmaintenanceprocedures;referto
Maintenance(page12).
5.Checktheengine-oillevel;refertoCheckingthe
Engine-OilLevel(page9).
6.Fillthefueltankwithfreshfuel;refertoAddingFuel
(page9).
7.Connectthewiretothesparkplug.
Note:Afuelstabilizer/conditionerismost
effectivewhenmixedwithfreshfuelandusedat
alltimes.
B.Runtheengineuntilitstopsfromrunningout
offuel.
C.Choketheengine.
D.Startandruntheengineuntilitwillnotstartagain.
E.Disposeoffuelproperly .Recyclethefuel
accordingtolocalcodes.
Important:Donotstorestabilizer/conditioned
fuelover90days.
6.Checkandtightenallbolts,nuts,andscrews.Repairor
replaceanypartthatisdamaged.
7.Paintallscratchedorbaremetalsurfaceswithpaint
fromanAuthorizedServiceDealer.
8.Storethemachineinaclean,drygarageorstoragearea.
9.Coverthemachinetoprotectitandkeepitclean.
18
Page 19

InternationalDistributorList
Distributor:
AgrolancKft
AsianAmericanIndustrial(AAI)
B-RayCorporation
BrisaGoodsLLC
CascoSalesCompany
CeresS.A.CostaRica
CSSCTurfEquipment(pvt)Ltd.SriLanka
CyrilJohnston&Co.
CyrilJohnston&Co.RepublicofIreland
FatDragon
FemcoS.A.Guatemala
FIVEMANSNew-T echCo.,LtdChina
ForGarderOU
G.Y .K.CompanyLtd.
GeomechanikiofAthensGreece
GolfinternationalTurizm
HakoGroundandGardenSweden
HakoGroundandGarden
HayterLimited(U.K.)
HydroturfInt.CoDubai
HydroturfEgyptLLC
IrrimacPortugal351212388260ToroEuropeNVBelgium3214562960
IrrigationProductsInt'lPvtLtd.India00914424494387ValtechMorocco212537663636
JeanHeybroekb.v.Netherlands31306394611VictusEmakPoland48618238369
Country:
Hungary3627539640
HongKong85224977804
Korea82325512076
Mexico12104952417
PuertoRico7877888383
NorthernIreland442890813121
China
Estonia3723846060
Japan81726325861Riversa
Turkey902163365993
Norway4722907760
UnitedKingdom441279723444
UnitedArabEmirates97143479479T-MarktLogisticsLtd.Hungary3626525500
Egypt2025194308ToroAustraliaAustralia61395807355
PhoneNumber:Distributor:
MaquiverS.A.Colombia
MaruyamaMfg.Co.Inc.
Mountelda.s.CzechRepublic
Mountelda.s.Slovakia
5062391138
94112746100
442890813121ParklandProductsLtd.NewZealand6433493760
8861080841322
5024423277
86-10-63816136
30109350054
4635100000
MunditolS.A.
NormaGarden
OslingerTurfEquipmentSA
OyHakoGroundandGardenAb
Perfetto
PratoverdeSRL.
Prochaska&Cie
RTCohen2004Ltd.
LelyTurfcare
Lely(U.K.)Limited
SolvertS.A.S.
SpyprosStavrinidesLimitedCyprus
SurgeSystemsIndiaLimited
Country:
Japan81332522285
Argentina541 148219999
Russia749541 16120
Ecuador59342396970
Finland35898700733
Poland48618208416
Italy390499128128
Austria4312785100
Israel97298617979
Spain
Denmark4566109200
UnitedKingdom441480226800
France33130817700
India911292299901
PhoneNumber:
5712364079
420255704220
420255704220
34952837500
35722434131
EuropeanPrivacyNotice
TheInformationToroCollects
ToroWarrantyCompany(T oro)respectsyourprivacy.Inordertoprocessyourwarrantyclaimandcontactyouintheeventofaproductrecall,weaskyou
tosharecertainpersonalinformationwithus,eitherdirectlyorthroughyourlocalT orocompanyordealer.
TheT orowarrantysystemishostedonserverslocatedwithintheUnitedStateswhereprivacylawmaynotprovidethesameprotectionasapplies
inyourcountry.
BYSHARINGYOURPERSONALINFORMATIONWITHUS,YOUARECONSENTINGTOTHEPROCESSINGOFYOURPERSONALINFORMATION
ASDESCRIBEDINTHISPRIV ACYNOTICE.
TheWayT oroUsesInformation
Toromayuseyourpersonalinformationtoprocesswarrantyclaims,tocontactyouintheeventofaproductrecallandforanyotherpurposewhichwetell
youabout.ToromayshareyourinformationwithT oro'safliates,dealersorotherbusinesspartnersinconnectionwithanyoftheseactivities.Wewillnot
sellyourpersonalinformationtoanyothercompany.Wereservetherighttodisclosepersonalinformationinordertocomplywithapplicablelawsand
withrequestsbytheappropriateauthorities,tooperateoursystemsproperlyorforourownprotectionorthatofotherusers.
RetentionofyourPersonalInformation
Wewillkeepyourpersonalinformationaslongasweneeditforthepurposesforwhichitwasoriginallycollectedorforotherlegitimatepurposes
(suchasregulatorycompliance),orasrequiredbyapplicablelaw .
Toro'sCommitmenttoSecurityofYourPersonalInformation
Wetakereasonableprecautionsinordertoprotectthesecurityofyourpersonalinformation.Wealsotakestepstomaintaintheaccuracyandcurrent
statusofpersonalinformation.
AccessandCorrectionofyourPersonalInformation
Ifyouwouldliketorevieworcorrectyourpersonalinformation,pleasecontactusbyemailatlegal@toro.com.
AustralianConsumerLaw
AustraliancustomerswillnddetailsrelatingtotheAustralianConsumerLaweitherinsidetheboxoratyourlocalT oroDealer.
374-0269RevK
Page 20

Alimitedwarranty(seewarrantyperiodsbelow)
TheToroWarranty
SWS
TurfRenovation
ConditionsandProductsCovered
TheT oroCompanyanditsafliate,ToroWarrantyCompany,pursuanttoan
agreementbetweenthem,jointlywarrantyourToroProductslistedbelowto
befreefromdefectsinmaterialsorworkmanship.
Thiswarrantycoversthecostofpartsandlabor,butyoumustpay
transportationcosts.
Thefollowingtimeperiodsapplyfromthedateofpurchase:
ProductsWarrantyPeriod
TurfRenovation
Walk-BehindAerator1year
•Engine2years
Stand-OnAerator
•Battery90daysPartsandLabor
•Engine2years
Dethatcher1year
•Engine2years
TurfSeeder
•Engine2years
Stand-OnSpreaderSprayer
•Battery90daysPartsandLabor
•Engine2years
Walk-BehindRotaryBroom1year
•Engine2years
Whereawarrantableconditionexists,wewillrepairtheProductatnocost
toyouincludingdiagnosis,labor,andparts.
1year
1yearPartsOnly
1year
1year
1yearPartsOnly
InstructionsforObtainingWarrantyService
IfyouthinkthatyourT oroProductcontainsadefectinmaterialsor
workmanship,followthisprocedure
1.ContactanyAuthorizedServicingOutlettoarrangeserviceattheir
dealership.T olocateoneconvenienttoyou,accessourwebsiteat
www.T oro.com.Select“WheretoBuy”andselect“Contractor”under
producttype.Y oumayalsocallourtollfreenumberbelow.
2.Bringtheproductandyourproofofpurchase(salesreceipt)tothem.
3.IfforanyreasonyouaredissatisedwiththeServiceOutlet’sanalysis
orwiththeassistanceprovided,contactusat:
SWSCustomerCareDepartment
ToroWarrantyCompany
811 1LyndaleAvenueSouth
Bloomington,MN55420-1196
TollFree:888-384-9939
**
ToroAuthorizedRentalCustomerswhohavepurchasedproductsdirectlyfromT oroandhave
signedtheT oroRentalCustomerAgreementhavetheabilitytoperformtheirownwarrantywork.
PleasevisitT oro’sRentalPortalforelectronicwarrantyclamlingproceduresorcallthetollfree
numberabove.
**
:
OwnerResponsibilities
YoumustmaintainyourToroProductbyfollowingthemaintenance
proceduresdescribedintheOperator’sManual.Suchroutinemaintenance,
whetherperformedbyadealerorbyyou,isatyourexpense.Parts
scheduledforreplacementasrequiredmaintenance(“MaintenanceParts”),
arewarrantedfortheperiodoftimeuptothescheduledreplacementtime
forthatpart.Failuretoperformrequiredmaintenanceandadjustmentscan
begroundsfordisallowingawarrantyclaim.
ItemsandConditionsNotCovered
Notallproductfailuresormalfunctionsthatoccurduringthewarrantyperiod
aredefectsinmaterialsorworkmanship.Thisexpresswarrantydoesnot
coverthefollowing:
•Productfailureswhichresultfrominstallationanduseofadd-on,
modied,orunapprovedaccessories
•Failuretoperformrequiredmaintenanceand/oradjustments
•Repairsnecessaryduetofailuretofollowrecommendedfuel
procedure(consultOperator'sManualformoredetails)
–Removingcontaminantsfromthefuelsystemisnotcovered
–Useofoldfuel(morethanonemonthold)orfuelwhichcontains
morethan10%ethanolormorethat15%MTBE
–Failuretodrainthefuelsystempriortoanyperiodofnon-use
overonemonth
•Productfailureswhichresultfromoperatingtheproductinanabusive,
negligentorrecklessmanner
•Partssubjecttoconsumptionthroughuseunlessfoundtobedefective.
Examplesofpartswhichareconsumed,include,belts,cutters,blades,
teeth,sparkplugs,tires,lters,etc.
•Failurescausedbyoutsideinuenceinclude,weather,storage,
contamination,lubricants,additives,orchemicals,etc.
•Normal“wearandtear”itemsincudespaintedsurfacesandscratched
decals,etc.
•Anycomponentcoveredbyaseparatemanufacturer’swarranty
•Pickupanddeliverycharges
GeneralConditions
RepairbyanAuthorizedServicingOutletorSelf-ServiceasanAuthorized
RentalCustomerisyoursoleremedyunderthewarranty.
NeitherTheToroCompanynorToroWarrantyCompanyisliablefor
indirect,incidentalorconsequentialdamagesinconnectionwiththe
useoftheToroProductscoveredbythiswarranty,includingany
costorexpenseofprovidingsubstituteequipmentorserviceduring
reasonableperiodsofmalfunctionornon-usependingcompletionof
repairsunderthiswarranty .Allimpliedwarrantiesofmerchantability
andtnessforusearelimitedtothedurationofthisexpresswarranty.
Somestatesdonotallowexclusionsofincidentalorconsequential
damages,orlimitationsonhowlonganimpliedwarrantylasts,sothe
aboveexclusionsandlimitationsmaynotapplytoyou.
Thiswarrantygivesyouspeciclegalrights,andyoumayalsohaveother
rightswhichvaryfromstatetostate.
ExceptfortheenginewarrantycoverageandtheEmissionswarranty
referencedbelow,ifapplicable,thereisnootherexpresswarranty .The
EmissionsControlSystemonyourProductmaybecoveredbyaseparate
warrantymeetingrequirementsestablishedbytheU.S.Environmental
ProtectionAgency(EPA)ortheCaliforniaAirResourcesBoard(CARB).
RefertotheCaliforniaEmissionControlWarrantyStatementsuppliedwith
yourProductorcontainedintheenginemanufacturer’sdocumentationfor
details.
CountriesOtherthantheUnitedStatesorCanada
CustomerswhohavepurchasedT oroproductsoutsidetheUnitedStatesorCanadashouldcontacttheirToroDistributor(Dealer)toobtainguarantee
policiesforyourcountry,province,orstate.IfforanyreasonyouaredissatisedwithyourDistributor'sserviceorhavedifcultyobtainingguarantee
information,contacttheT oroimporter.Ifallotherremediesfail,youmaycontactusatToroWarrantyCompany.
AustralianConsumerLaw:AustraliancustomerswillnddetailsrelatingtotheAustralianConsumerLaweitherinsidetheboxoratyourlocalT oro
Dealer.
374-0289RevE
 Loading...