

Page 1
FormNo.3396-721RevA
SoilCultivator
CompactUtilityLoader
ModelNo.23102—SerialNo.280000001andUp
Registeratwww.T oro.com.
OriginalInstructions(EN)
*3396-721*A
Page 2
ThisproductcomplieswithallrelevantEuropeandirectives.
Fordetails,pleaseseetheDeclarationofIncorporation(DOI)
atthebackofthispublication.
ModelNo.
WARNING
CALIFORNIA
Proposition65Warning
Thisproductcontainsachemicalorchemicals
knowntotheStateofCaliforniatocausecancer,
birthdefects,orreproductiveharm.
Introduction
ThissoilcultivatorisintendedtobeusedonaTorocompact
utilityloader.Itisdesignedprimarilyforburyingstones,
soilclods,debris,andgrasswhichcreatestheperfect
germinationenvironmentforfreshseedsorsodonresidential
orcommercialproperties.Itisnotdesignedforuseon
non-Torotractionunits.
Readthisinformationcarefullytolearnhowtooperateand
maintainyourproductproperlyandtoavoidinjuryand
productdamage.Youareresponsibleforoperatingthe
productproperlyandsafely.
YoumaycontactTorodirectlyatwww .Toro.comforproduct
safetyandoperationtrainingmaterials,accessoryinformation,
helpndingadealer,ortoregisteryourproduct.
Wheneveryouneedservice,genuineT oroparts,oradditional
information,contactanAuthorizedServiceDealerorToro
CustomerServiceandhavethemodelandserialnumbersof
yourproductready.Figure1identiesthelocationofthe
modelandserialnumbersontheproduct.Writethenumbers
inthespaceprovided.
SerialNo.
Thismanualidentiespotentialhazardsandhassafety
messagesidentiedbythesafetyalertsymbol(Figure2),
whichsignalsahazardthatmaycauseseriousinjuryordeath
ifyoudonotfollowtherecommendedprecautions.
Figure2
1.Safetyalertsymbol
Thismanualuses2wordstohighlightinformation.
Importantcallsattentiontospecialmechanicalinformation
andNoteemphasizesgeneralinformationworthyofspecial
attention.
Contents
Safety...........................................................................3
StabilityRatings.......................................................4
SafetyandInstructionalDecals.................................4
Setup............................................................................5
InstallingtheRoller..................................................5
ProductOverview..........................................................6
Specications.........................................................6
Attachments/Accessories.........................................6
Operation.....................................................................6
RemovingtheRoller................................................6
SettingtheDiggingDepth........................................7
AdjustingtheGraderBlade.......................................7
ChangingtheHorizontalPositionofthe
Roller.................................................................8
OperatingtheCultivator...........................................8
OperatingTips.......................................................9
Maintenance.................................................................10
RecommendedMaintenanceSchedule(s)......................10
GreasingtheCultivator...........................................10
ChangingtheDrive-ChainOil..................................10
AdjustingtheDrive-ChainTension...........................11
ReplacingTines......................................................11
Storage........................................................................12
Troubleshooting...........................................................13
1.Modelandserialnumberlocation
©2015—TheToro®Company
8111LyndaleAvenueSouth
Bloomington,MN55420
Figure1
Contactusatwww.Toro.com.
2
PrintedintheUSA
AllRightsReserved
Page 3

Safety
Improperuseormaintenancebytheoperatororowner
canresultininjury.Toreducethepotentialforinjury,
complywiththesesafetyinstructionsandthoseinthe
tractionunit
thesafetyalertsymbol,whichmeans
or
Danger
complywiththeinstructionmayresultinpersonalinjury
ordeath.
Toensureoptimumperformanceandcontinuedsafety
certicationofthemachine,useonlygenuineToro
replacementpartsandaccessories.Replacementpartsand
accessoriesmadebyothermanufacturerscouldbedangerous,
andsuchusecouldvoidtheproductwarranty.
Operator's Man ual
—personalsafetyinstruction.Failureto
.Alwayspayattentionto
Caution
,
W ar ning
WARNING
Whentheengineisoff,attachmentsintheraised
positioncangraduallylower.Someonenearbymay
bepinnedorinjuredbytheattachmentasitlowers.
Alwayslowertheattachmentlifteachtimeyou
,
shutoffthetractionunit.
WARNING
Whengoingupordownhill,themachinecould
overturniftheheavyendistowardthedownhill
side.Someonemaybepinnedorseriouslyinjured
bythemachineifitoverturns.
WARNING
Theremaybeburiedpower,gas,and/ortelephone
linesintheworkarea.Shockorexplosionmay
occurifyoudigintothem.
Havethepropertyorworkareamarkedforburied
linesanddonotdiginmarkedareas.Contactyour
localmarkingserviceorutilitycompanytohavethe
propertymarked(forexample,intheUnitedStates,
call811forthenationwidemarkingservice).
DANGER
Thisproductiscapableofamputatinghandsand
feet.Alwaysfollowallsafetyinstructionstoavoid
seriousinjury.
•Keephands,feet,andanyotherpartofyour
bodyorclothingawayfrommovingparts.
•Beforeadjusting,cleaning,repairing,or
inspectingthecultivator,lowerthecultivatorto
theground,stoptheengine,waitforallmoving
partstostop,andremovethekey.
Operateupanddownslopeswiththeheavyendof
themachineuphill.Anattachedcultivatormakes
thefrontendheavy.
WARNING
Ifyoudonotfullyseattheattachmentlocking
pinsintheattachmentmountplateholes,the
attachmentcouldfalloffthetractionunitseverely
injuringyouorbystanders.
•Ensurethatyoufullyseattheattachment
lockingpinsthroughtheholesintheattachment
mountplatebeforeliftingtheattachment.
•Ensurethattheattachmentmountplateisfreeof
anydirtordebristhatmayhindertheconnection
ofthetractionunittotheattachment.
•Refertoyourtractionunit
fordetailedinformationonsafelyconnectingan
attachmenttoyourtractionunit.
Operator's Man ual
WARNING
WARNING
Tinescanthrowdirt,debris,andsmallrocks
injuringtheoperatororbystanders;keepall
bystandersawayfromtheworkarea.
Wearahardhat,safetyglasses,hearingprotection,
andsubstantialfootwearwhileoperatingthe
cultivator.
Hydraulicuidescapingunderpressurecan
penetrateskinandcauseinjury.Fluidinjectedinto
theskinmustbesurgicallyremovedwithinafew
hoursbyadoctorfamiliarwiththisformofinjury;
otherwise,gangrenemayresult.
•Keepyourbodyandhandsawayfrompin
holeleaksornozzlesthatejecthigh-pressure
hydraulicuid.
•Usecardboardorpapertondhydraulicleaks;
neveruseyourhands.
3
Page 4
CAUTION
SafetyandInstructional
Hydrauliccouplers,hydrauliclines/valves,and
hydraulicuidmaybehotandcanburnyouifyou
touchthem.
•Weargloveswhenoperatingthehydraulic
couplers.
•Allowthetractionunittocoolbeforetouching
hydrauliccomponents.
•Donottouchhydraulic-uidspills.
StabilityRatings
Todeterminethedegreeofslopeyoucantraversewiththe
cultivatorinstalledonatractionunit,ndthestabilityrating
forthehillpositionyouwanttotravelintheappropriatetable
below,thenndthedegreeofslopeforthesameratingand
hillpositionintheStabilityDatasectionofthetractionunit
Operator'sManual.
WARNING
Exceedingthemaximumrecommendedslope
cancausethetractionunittotip,crushingyouor
bystanders.
Donotdrivethetractionunitonaslopesteeper
thanthemaximumrecommendedslope,as
determinedinthefollowingtablesandthetraction
Operator's Man ual
unit
.
Decals
Safetydecalsandinstructionsareeasily
visibletotheoperatorandarelocatednear
anyareaofpotentialdanger.Replaceany
decalthatisdamagedorlost.
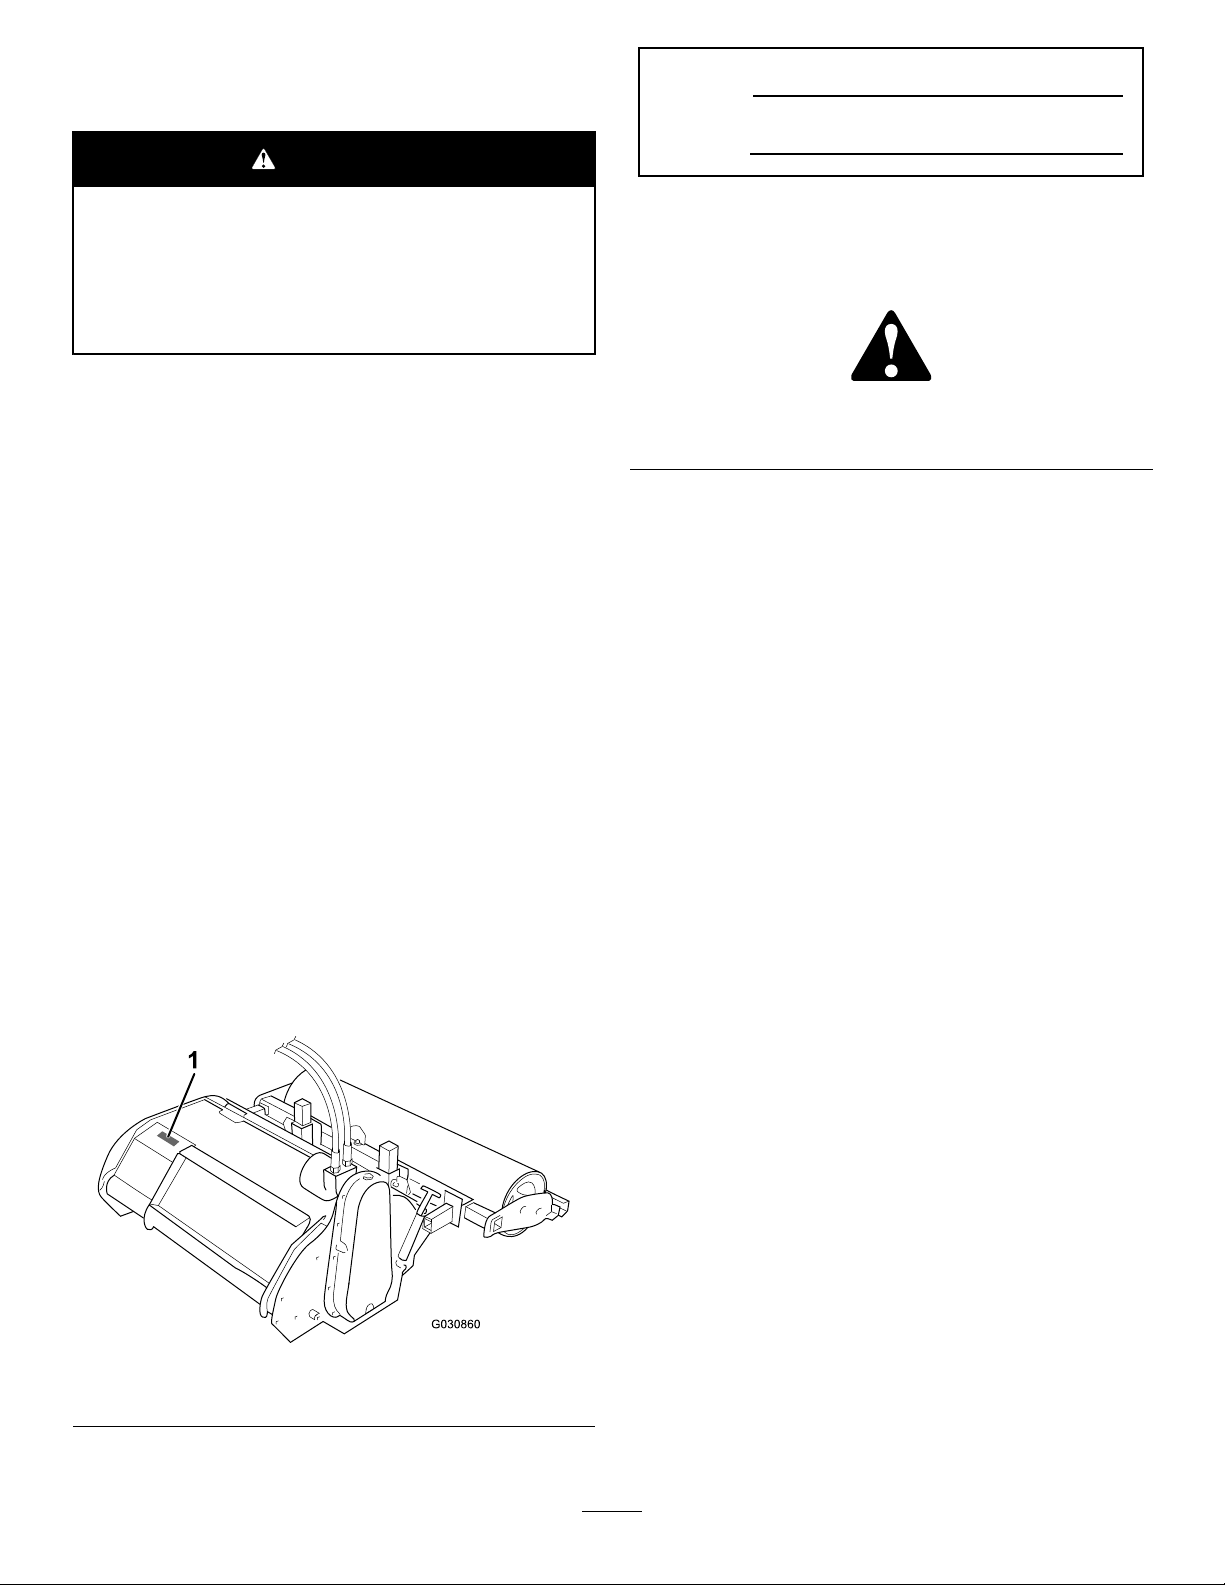
93-7321
1.Cutting/dismembermenthazardofhandsandfeet,rotating
knives—stayawayfrommovingparts.
100-4708
1.Thrownobjecthazard—keepbystandersasafedistance
fromthetractionunit.
Important:Ifyouhaveatractionunitotherthanthe
TX,usethecounterweightonthetractionunitwhen
usingthecultivator.Failuretousethecounterweight
causesthetractionunittobecomeunstable.
OrientationStabilityRating
FrontUphill
B
RearUphill
D
SideUphill
C
108-1287
1.Crushinghazard,hand—stayawayfrommovingparts.
4
Page 5
Setup
InstallingtheRoller
1.Removetherollerfromtheshippingstand.
2.Installthecultivatoronthetractionunitandremoveit
fromtheshippingstand.
Note:RefertoyourtractionunitOperator’sManualfor
moreinformationoninstallingattachmentsonyour
tractionunit.
3.Lowerthecultivatortotheground.
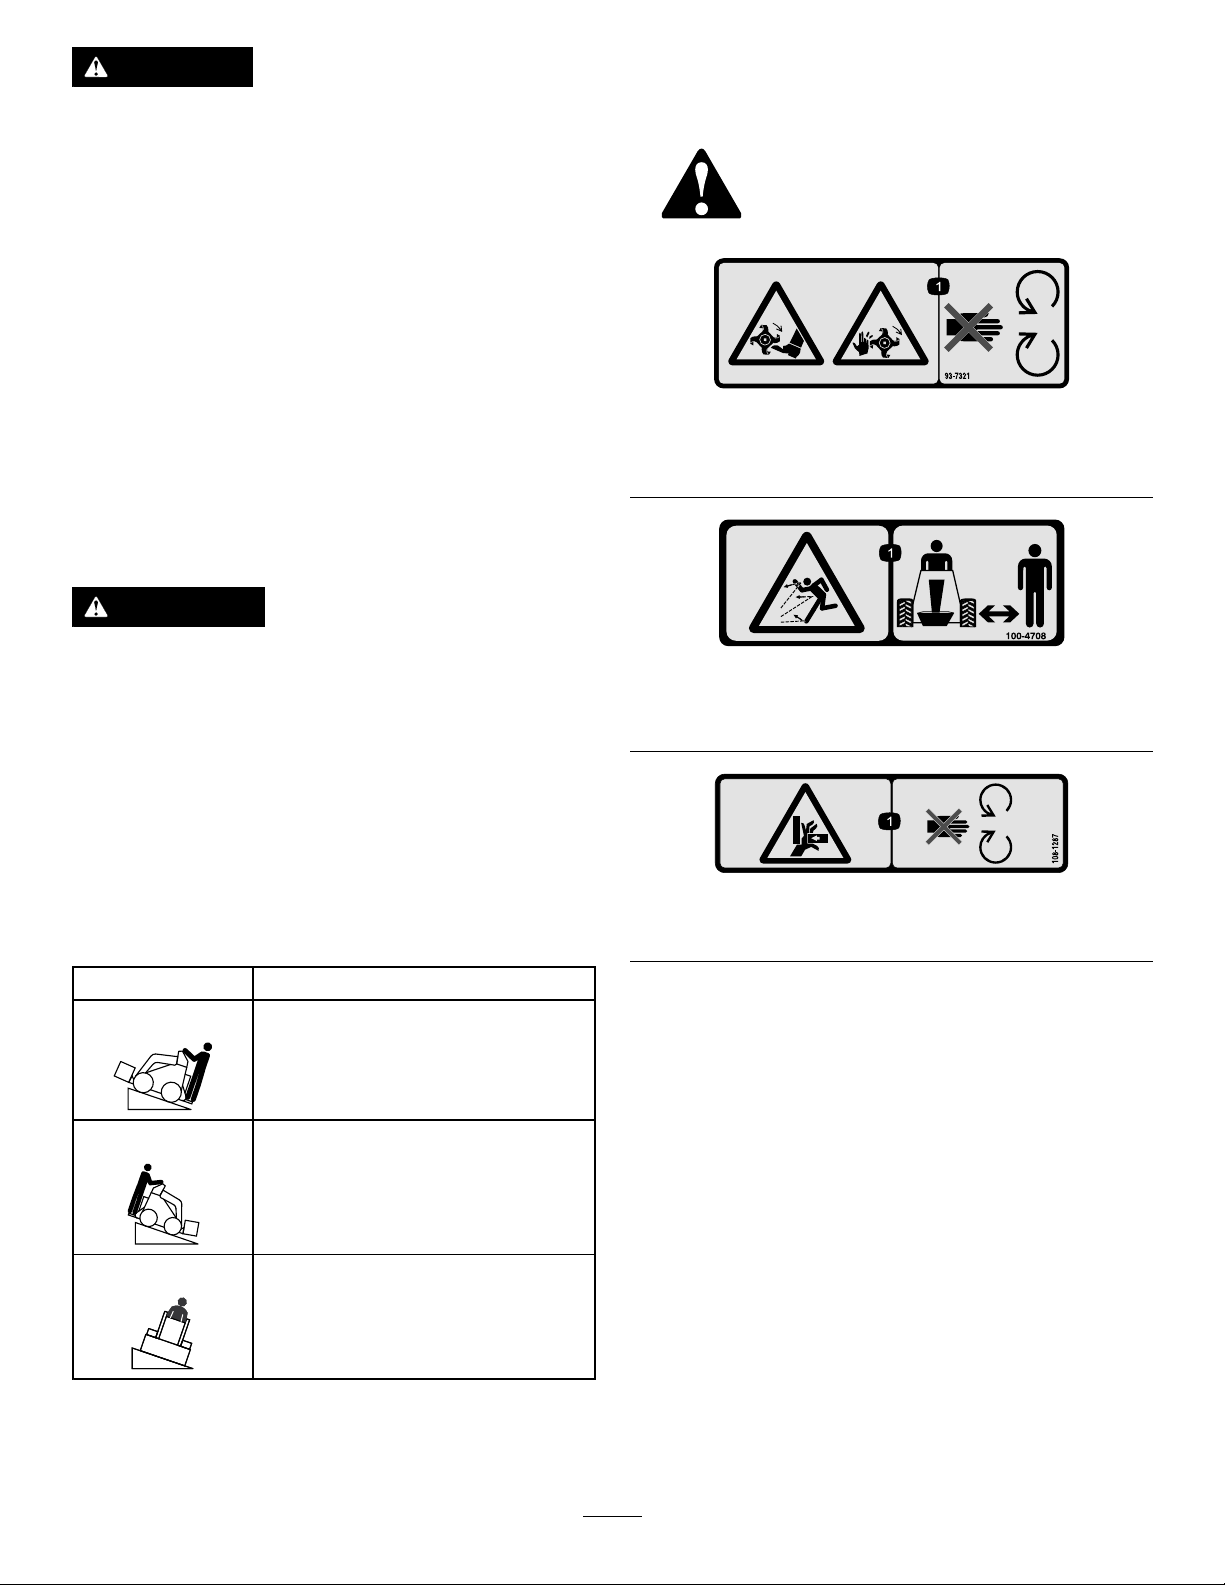
4.Removethesnap-ringclevispinsfromthedriftpins
(Figure3).
5.Removethedriftpinsfromthearmsofthecultivator
(Figure3).
Figure3
1.Driftpin3.Cultivatorarm
2.Snap-ringclevispin
6.Slidethearmsontherollerintothearmsonthe
cultivatorandconnectthemwiththedriftpins(Figure
3).
7.Securethedriftpinswiththeattachedsnap-ringclevis
pins.
4.Rollerarm
5
Page 6

ProductOverview
1.Drive-chainhousing
2.Hydraulichoses5.Roller
3.Diggingtinesandtine
guard
Figure4
4.Graderblade
Operation
RefertoyourtractionunitOperator’sManualformore
informationoninstallingandremovingattachmentsonyour
tractionunit.
Important:Alwaysusethetractionunittoliftandmove
theattachment.
Note:Determinetheleftandrightsidesofthemachine
fromthenormaloperatingposition.
RemovingtheRoller
Tousethecultivatorasatillerwithoutthegraderorroller,or
toperformvariousadjustmentsandmaintenanceprocedures,
removetherollerandgraderasfollows:
1.Tilttheattachmenttoraisetherolleroffoftheground.
2.Removethedriftpinsfromthearmsofthecultivator
(Figure5).
Specications
Note:Specicationsanddesignaresubjecttochange
withoutnotice.
Width
Length
Height
Weight
Attachments/Accessories
AselectionofToroapprovedattachmentsandaccessoriesis
availableforusewiththemachinetoenhanceandexpand
itscapabilities.ContactyourAuthorizedServiceDealeror
Distributororgotowww .Toro.comforalistofallapproved
attachmentsandaccessories.
Tobestprotectyourinvestmentandmaintainoptimal
performanceofyourToroequipment,countonTorogenuine
parts.Whenitcomestoreliability ,Torodeliversreplacement
partsdesignedtotheexactengineeringspecicationofour
equipment.Forpeaceofmind,insistonT orogenuineparts.
130cm(51inches)
130cm(51inches)
53cm(21inches)
250kg(550lb)
Figure5
1.Driftpin3.Cultivatorarm
2.Snap-ringclevispin
3.Pulltherolleroffthecultivator(Figure5).
4.Storethepinsinthearmsoftherollerforfutureuse.
Note:Toinstalltheroller,refertoInstallingtheRoller(page
5).
4.Rollerarm
6
Page 7

SettingtheDiggingDepth
G031069
Setthedigdepthofthecultivatoraccordingtotheworkyou
areperformingupto13.9cm(5.5inches).Thedepthofcut
isdeterminedbythepositionoftheroller.Youcanmovethe
rollerupanddownbychangingthemountinglocationofthe
armsonthecultivatorasfollows:
1.Removetherollerfromthecultivator.
2.Removetheboltssecuringthearmstothecultivator
(Figure6).
Figure7
Figure6
3.Movethearmstothesetofholescorrespondingtothe
desireddepth(Figure6).
•Movethearmsuptosetthediggingdepthdeeper
•Movethearmsdowntosetthediggingdepth
shallower.
4.Securethearmsusingtheboltsandnutsremoved
previously.
5.Installtheroller.
1.Driftpin
2.Snap-ringclevispin4.Grader-blademounting
3.Slidethegraderbladeupordowntothedesiredhole
position.
4.Placethedriftpinsintomountingposts.
5.Placetheattachedsnap-ringclevispinsintothe2drift
pins.
6.Swingthesnapringsdownovertheendsofthepin
tosecurethegraderblade.
7.Lowertherollertotheground.
3.Roller
post
AdjustingtheGraderBlade
Youcanadjustthegraderbladethatsitsjustbehindtheroller
togivethedesirednish.Typically,youshouldadjustitso
thattheedgeofthebladeisjustslightlyhigherthanthe
bottomoftheroller.
1.Tilttheattachmenttoraisetherollerofftheground.
2.Removethedriftpinsfromthegrader-blademounting
posts(Figure7).
7
Page 8

ChangingtheHorizontal PositionoftheRoller
Therollerhas3horizontalpositions.Tocultivatealongthe
edgeoftheworkarea,aligntheedgesoftherollerwiththe
edgesofthecultivator.Tocultivateandareawithnomessy
edgesbetweencultivationpasses,offsettherollertoeither
sidesothatabout15cm(6inches)oftherolleroverlapsthe
lastcultivatingpass.
1.Removethedriftpin(Figure8).
2.Pulltheauxiliary-hydraulicslevertotheoperatorgrip
tostartthecultivator.
3.Slowlylowerthecultivatoruntilthebladesdigintothe
soilandtherollertouchestheground.
4.Slowlymoverearward.
5.Whenthepassisnished,stopthehydraulicsandraise
thecultivator.
Important:Donotdrivethemachineacrosspavement
orotherhardsurfaceswithoutrstraisingthecultivator.
Crossinghardsurfaceswiththetineslowereddamages
thetinesandtheproperty.
Figure8
1.Snap-ringclevispin
2.Driftpin
2.Slidetherollertothedesiredposition(Figure8).
3.Insertthedriftpinthroughtheroller-supportbar.
4.Inserttheattachedsnap-ringclevispinthroughthe
driftpintosecuretheroller.
3.Roller-supportbar
OperatingtheCultivator
1.Lowerthecultivatortothegroundandensurethatthe
chaincaseisperpendiculartotheground(Figure9).
Figure9
8
Page 9

OperatingTips
•Inspecttheareawherethecultivatoristobeusedand
removeallobjectssuchaslargerocks,trash,andbranches
beforecultivatingtopreventequipmentdamage.
•Alwaysbegincultivatingwiththeslowestgroundspeed
possible.Increasespeedifconditionspermit.
•Alwaysusefullthrottle(maximumenginespeed).
•Cultivateinlong,straightpasses.Turningwiththetines
loweredcausesequipmentandpropertydamage.
•Ifarockorotherobstructiongetsintothetines,stop
thehydraulicsanddrivethetractionunitforwarduntil
theobstructionisdislodged.
•Ifyouareusingatractionunitwithaowdivider(some
wheeledunitshaveowdividers;refertoyourtraction
unitOperator’ sManual),youcanusetheowdividerto
achievetheoptimalrotorandgroundspeedforyoursoil
conditionsasfollows:
1.Settheowdividertothe9o’clockpositionand
thespeedselectortotheturtleposition.
2.Pulltheauxiliaryhydraulicslevertotheoperator
griptostartthecultivator.
3.Movetheowdividerleverwhilemovingthe
tractionunitrearwarduntilthecultivationresults
areideal.
9
Page 10

Maintenance
RecommendedMaintenanceSchedule(s)
MaintenanceService
Interval
Aftertherst5hours
Every25hours
Every200hours
Beforestorage
MaintenanceProcedure
•Adjustthedrive-chaintension.
•Greasethecultivator.
•Adjustthedrive-chaintension.
•Changethedrive-chainoil.
•Greasethecultivator.
•Paintchippedsurfaces.
CAUTION
Ifyouleavethekeyintheignitionswitch,someonecouldstarttheengine.Accidentalstartingofthe
enginecouldseriouslyinjureyouorotherbystanders.
Removethekeyfromtheignitionswitchbeforeyoudoanymaintenance.
GreasingtheCultivator
ServiceInterval:Every25hours
Beforestorage
Greasethe2ttingsontheendsoftherollerand1ttingon
the4-boltangeontheleftsideofthemainhousing.
GreaseType:General-purposegrease
Important:Greaseimmediatelyaftereverywashing
1.TurnthekeyintheignitionswitchtotheOFFposition
andremovethekey.
2.Cleanthegreasettingswitharag.
3.TurnthekeyintheignitionswitchtotheOFFposition
4.Opentheoil-llholeontopofthedrive-chaincase
WARNING
Mechanicalorhydraulicjacksortheliftarms
mayfailtosupportthecultivatorandcausea
seriousinjury;usejackstandstosupportthe
cultivator.
Donotusetheliftarmsaloneorhydraulic
jacks.
andremovethekey.
(Figure10).
3.Connectagreaseguntoeachtting.
4.Pumpgreaseintothettingsuntilgreasebeginsto
oozeoutofthebearings.
5.Wipeupanyexcessgrease.
ChangingtheDrive-ChainOil
ServiceInterval:Every200hours
Checkthegearlubricationoillevelinthegearcaseevery25
operatinghoursandchangeitevery200operatinghoursor
onceayear,whichevercomesrst.
OilType:85W140
1.Parkthecultivatoronaatsurfaceandensurethatthe
drivechaincoverisperpendiculartotheground.
2.Raisetheattachmenthighenoughtogetapanunder
thedrive-chaincaseandsupportitwithjackstands.
Figure10
1.Oil-llhole3.Sideplug
2.Drainplug
5.Placealargedrippanunderthedrive-chaincase.
10
Page 11

6.Removethedrainplug(Figure10).
7.Whenalloftheoilhasdrainedfromthecase,replace
andtightenthedrainplug.
8.Removethesideplug(Figure10).
9.Pouroilintothellholeslowlyuntiloilrunsoutthe
side-plughole.
10.Replacethesideplugandoil-llholeplugandtighten
them.
11.Wipeupanyspilledoil.
AdjustingtheDrive-Chain Tension
ServiceInterval:Aftertherst5hours
Every25hours
1.Lowertheloaderarms,turnthekeyintheignition
switchtotheOFFposition,andremovethekey.
2.Loosenthejamnutonthechain-adjustingscrew
(Figure11).
Figure11
1.Jamnut
3.Turnthescrewbyhanduntilyoufeelresistance(Figure
11).
4.Markthescrewwithapencilandthenunscrewit1turn.
5.Tightenthejamnut.
2.Chain-adjustingscrew
ReplacingTines
Figure12
4.Openthetinecover(Figure12).
5.Removeoldtines,1atatime,andinstallthenewtines
(Figure13).
Note:Eachcenterhubhas4tines(2right-handand2
left-hand).Theleftandrighttinesarealternatedonthe
hub.Ensurethatyoureplaceeachtinewiththesame
typeoftinethatwasinstalledpreviously.
Checkandreplacetineswhentheybecomewornordull.
Wornordulltinesdegradetheperformanceofthecultivator
1.Lowertheloaderarms,turnthekeyintheignition
switchtotheOFFposition,andremovethekey.
2.Removetherollerassemblyfromthecultivator.
3.Liftupandreleasethespringcatchonthesideofthe
cultivator(Figure12).
Figure13
1.Lefttine
6.Torquethetine-mountingboltsto86to104N-m(63
to77ft-lb).
7.Closethetinecoverandsecureitwiththespringlatch.
11
2.Righttine
Page 12

8.Installtherollerassembly.
Storage
1.Beforelong-termstorage,washtheattachmentwith
milddetergentandwatertoremovedirtandgrime.
2.Greaseallttings.
3.Checkandadjustthetensionofthedrivechain.
4.Checkandtightenallbolts,nuts,andscrews.Repairor
replaceanydamagedorwornparts.
5.Ensurethatallhydrauliccouplersareconnected
togethertopreventcontaminationofthehydraulic
system.
6.Paintallscratchedorbaremetalsurfaces.Paintis
availablefromyourAuthorizedServiceDealer.
7.Storetheattachmentinaclean,drygarageorstorage
area.Coverittoprotectitandkeepitclean.
12
Page 13

Troubleshooting
Thecultivatordoesnotoperate.
Problem
1.Ahydrauliccouplerisnotcompletely
connected.
2.Ahydrauliccouplerisdamaged.
3.Thereisanobstructioninahydraulic
hose.
4.Ahydraulichoseiskinked.4.Replacethekinkedhose.
5.Theauxiliaryvalveonthetractionunit
isnotopening.
6.Ahydraulicvalveorthedrivemotoris
damaged.
7.Thereisanobstructioninthecultivator
(eg,rockorroot).
8.Thedrivechainisloose.8.Adjustthechaintension.
9.Thedrivechainisbroken.9.Repairorreplacethechain.
PossibleCauseCorrectiveAction
1.Checkandtightenallcouplers.
2.Checkthecouplersandreplaceany
thataredamaged.
3.Findandremovetheobstruction.
5.Repairthevalve.
6.ContactyourAuthorizedService
Dealer.
7.Findandremovetheobstruction.
13
Page 14

DeclarationofIncorporation
ModelNo.
23102280000001andUp
SerialNo.
ProductDescriptionInvoiceDescription
SoilCultivator ,Compact
UtilityLoader
GeneralDescription
SOILCULTIVATORCompactUtilityLoader2006/42/EC
Directive
RelevanttechnicaldocumentationhasbeencompiledasrequiredperPartBofAnnexVIIof2006/42/EC.
Wewillundertaketotransmit,inresponsetorequestsbynationalauthorities,relevantinformationonthispartly
completedmachinery.Themethodoftransmissionshallbeelectronictransmittal.
ThismachineryshallnotbeputintoserviceuntilincorporatedintoapprovedToromodelsasindicatedonthe
associatedDeclarationofConformityandinaccordancewithallinstructions,wherebyitcanbedeclaredin
conformitywithallrelevantDirectives.
Certied:EUTechnicalContact:
MarcVermeiren
ToroEuropeNV
B-2260Oevel-Westerloo
Belgium
JoeHagerTel.003214562960
Sr.EngineeringManager
811 1LyndaleAve.South
Bloomington,MN55420,USA
June22,2015
Fax003214581911
14
Page 15

InternationalDistributorList
Distributor:
AgrolancKft
AsianAmericanIndustrial(AAI)
B-RayCorporation
BrisaGoodsLLC
CascoSalesCompany
CeresS.A.CostaRica
CSSCTurfEquipment(pvt)Ltd.SriLanka
CyrilJohnston&Co.
CyrilJohnston&Co.RepublicofIreland
FatDragon
FemcoS.A.Guatemala
FIVEMANSNew-T echCo.,LtdChina
ForGarderOU
G.Y .K.CompanyLtd.
GeomechanikiofAthensGreece
GolfinternationalTurizm
HakoGroundandGardenSweden
HakoGroundandGarden
HayterLimited(U.K.)
HydroturfInt.CoDubai
HydroturfEgyptLLC
IrrimacPortugal351212388260T oroEuropeNVBelgium3214562960
IrrigationProductsInt'lPvtLtd.India00914424494387ValtechMorocco212537663636
JeanHeybroekb.v.Netherlands31306394611VictusEmakPoland48618238369
Country:
Hungary3627539640
HongKong85224977804
Korea82325512076
Mexico12104952417
PuertoRico7877888383
NorthernIreland442890813121
China
Estonia3723846060
Japan81726325861Riversa
Turkey902163365993
Norway4722907760
UnitedKingdom441279723444
UnitedArabEmirates97143479479T-MarktLogisticsLtd.Hungary3626525500
Egypt2025194308ToroAustraliaAustralia61395807355
PhoneNumber:Distributor:
MaquiverS.A.Colombia
MaruyamaMfg.Co.Inc.
Mountelda.s.CzechRepublic
Mountelda.s.Slovakia
5062391138
94112746100
442890813121ParklandProductsLtd.NewZealand6433493760
8861080841322
5024423277
86-10-63816136
30109350054
4635100000
MunditolS.A.
NormaGarden
OslingerTurfEquipmentSA
OyHakoGroundandGardenAb
Perfetto
PratoverdeSRL.
Prochaska&Cie
RTCohen2004Ltd.
LelyTurfcare
Lely(U.K.)Limited
SolvertS.A.S.
SpyprosStavrinidesLimitedCyprus
SurgeSystemsIndiaLimited
Country:
Japan81332522285
Argentina541 148219999
Russia749541 16120
Ecuador59342396970
Finland35898700733
Poland48618208416
Italy390499128128
Austria4312785100
Israel97298617979
Spain
Denmark4566109200
UnitedKingdom441480226800
France33130817700
India911292299901
PhoneNumber:
5712364079
420255704220
420255704220
34952837500
35722434131
EuropeanPrivacyNotice
TheInformationToroCollects
ToroWarrantyCompany(T oro)respectsyourprivacy.Inordertoprocessyourwarrantyclaimandcontactyouintheeventofaproductrecall,weaskyou
tosharecertainpersonalinformationwithus,eitherdirectlyorthroughyourlocalT orocompanyordealer.
TheT orowarrantysystemishostedonserverslocatedwithintheUnitedStateswhereprivacylawmaynotprovidethesameprotectionasapplies
inyourcountry.
BYSHARINGYOURPERSONALINFORMATIONWITHUS,YOUARECONSENTINGTOTHEPROCESSINGOFYOURPERSONALINFORMATION
ASDESCRIBEDINTHISPRIV ACYNOTICE.
TheWayT oroUsesInformation
Toromayuseyourpersonalinformationtoprocesswarrantyclaims,tocontactyouintheeventofaproductrecallandforanyotherpurposewhichwetell
youabout.ToromayshareyourinformationwithT oro'safliates,dealersorotherbusinesspartnersinconnectionwithanyoftheseactivities.Wewillnot
sellyourpersonalinformationtoanyothercompany.Wereservetherighttodisclosepersonalinformationinordertocomplywithapplicablelawsand
withrequestsbytheappropriateauthorities,tooperateoursystemsproperlyorforourownprotectionorthatofotherusers.
RetentionofyourPersonalInformation
Wewillkeepyourpersonalinformationaslongasweneeditforthepurposesforwhichitwasoriginallycollectedorforotherlegitimatepurposes
(suchasregulatorycompliance),orasrequiredbyapplicablelaw .
Toro'sCommitmenttoSecurityofYourPersonalInformation
Wetakereasonableprecautionsinordertoprotectthesecurityofyourpersonalinformation.Wealsotakestepstomaintaintheaccuracyandcurrent
statusofpersonalinformation.
AccessandCorrectionofyourPersonalInformation
Ifyouwouldliketorevieworcorrectyourpersonalinformation,pleasecontactusbyemailatlegal@toro.com.
AustralianConsumerLaw
AustraliancustomerswillnddetailsrelatingtotheAustralianConsumerLaweitherinsidetheboxoratyourlocalToroDealer.
374-0269RevK
Page 16

ToroCompactUtilityEquipmentWarranty
AOne-Y earLimitedWarranty
CompactUtilityEquipment
(CUE)Products
ConditionsandProductsCovered
TheT oroCompanyanditsafliate,T oroWarrantyCompany,pursuantto
anagreementbetweenthem,jointlywarrantyourToroCompactUtility
Equipment(“Product”)tobefreefromdefectsinmaterialsorworkmanship.
Thefollowingtimeperiodsapplyfromthedateofpurchase:
ProductsWarrantyPeriod
ProSneak
CompactUtilityLoaders,
Trenchers,StumpGrinders,
andAttachments
KohlerEngines3years
AllotherEngines2years
Whereawarrantableconditionexists,wewillrepairtheProductatnocost
toyouincludingdiagnosis,labor,andparts.
*
SomeenginesusedonToroProductsarewarrantedbytheenginemanufacturer .
1yearor1000operatinghours,
whicheveroccursrst
*
*
InstructionsforObtainingWarrantyService
IfyouthinkthatyourT oroProductcontainsadefectinmaterialsor
workmanship,followthisprocedure:
1.ContactanyAuthorizedT oroCompactUtilityEquipment(CUE)
ServiceDealertoarrangeserviceattheirdealership.T olocatea
dealerconvenienttoyou,accessourwebsiteatwww .Toro.com.You
mayalsocallourToroCustomerCareDepartmenttollfreeatthe
numberbelow.
2.Bringtheproductandyourproofofpurchase(salesreceipt)tothe
ServiceDealer.
3.IfforanyreasonyouaredissatisedwiththeServiceDealer’s
analysisorwiththeassistanceprovided,contactusat:
SWSCustomerCareDepartment
ToroWarrantyCompany
811 1LyndaleAvenueSouth
Bloomington,MN55420-1196
TollFree:888-384-9940
OwnerResponsibilities
YoumustmaintainyourToroProductbyfollowingthemaintenance
proceduresdescribedintheOperator’sManual.Suchroutinemaintenance,
whetherperformedbyadealerorbyyou,isatyourexpense.Parts
scheduledforreplacementasrequiredmaintenance(“MaintenanceParts”),
arewarrantedfortheperiodoftimeuptothescheduledreplacementtime
forthatpart.Failuretoperformrequiredmaintenanceandadjustmentscan
begroundsfordisallowingawarrantyclaim.
ItemsandConditionsNotCovered
Notallproductfailuresormalfunctionsthatoccurduringthewarrantyperiod
aredefectsinmaterialsorworkmanship.Thisexpresswarrantydoesnot
coverthefollowing:
•Productfailureswhichresultfromtheuseofnon-T ororeplacement
parts,orfrominstallationanduseofadd-on,modied,orunapproved
accessories
•Productfailureswhichresultfromfailuretoperformrequired
maintenanceand/oradjustments
•ProductfailureswhichresultfromoperatingtheProductinanabusive,
negligentorrecklessmanner
•Partssubjecttoconsumptionthroughuseunlessfoundtobedefective.
Examplesofpartswhichareconsumed,orusedup,duringnormal
productoperationinclude,butarenotlimitedto,belts,wipers,spark
plugs,tires,lters,gaskets,wearplates,seals,O-rings,drivechains,
clutches.
•Failurescausedbyoutsideinuence.Itemsconsideredtobeoutside
inuenceinclude,butarenotlimitedto,weather,storagepractices,
contamination,useofunapprovedcoolants,lubricants,additives,or
chemicals,etc.
•Normal“wearandtear”items.Normal“wearandtear”includes,butis
notlimitedto,wornpaintedsurfaces,scratcheddecals,etc.
•Repairsnecessaryduetofailuretofollowrecommendedfuel
procedure(consultOperator'sManualformoredetails)
–Removingcontaminantsfromthefuelsystemisnotcovered
–Useofoldfuel(morethanonemonthold)orfuelwhichcontains
morethan10%ethanolormorethat15%MTBE
–Failuretodrainthefuelsystempriortoanyperiodofnon-use
overonemonth
•Anycomponentcoveredbyaseparatemanufacturer’swarranty
•Pickupanddeliverycharges
GeneralConditions
RepairbyanAuthorizedT oroCompactUtilityEquipment(CUE)Service
Dealerisyoursoleremedyunderthiswarranty .
NeitherTheToroCompanynorToroWarrantyCompanyisliablefor
indirect,incidentalorconsequentialdamagesinconnectionwiththe
useoftheToroProductscoveredbythiswarranty,includingany
costorexpenseofprovidingsubstituteequipmentorserviceduring
reasonableperiodsofmalfunctionornon-usependingcompletionof
repairsunderthiswarranty .Allimpliedwarrantiesofmerchantability
andtnessforusearelimitedtothedurationofthisexpresswarranty.
Somestatesdonotallowexclusionsofincidentalorconsequential
damages,orlimitationsonhowlonganimpliedwarrantylasts,sothe
aboveexclusionsandlimitationsmaynotapplytoyou.
Thiswarrantygivesyouspeciclegalrights,andyoumayalsohaveother
rightswhichvaryfromstatetostate.
ExceptfortheenginewarrantycoverageandtheEmissionswarranty
referencedbelow,ifapplicable,thereisnootherexpresswarranty .The
EmissionsControlSystemonyourProductmaybecoveredbyaseparate
warrantymeetingrequirementsestablishedbytheU.S.Environmental
ProtectionAgency(EPA)ortheCaliforniaAirResourcesBoard(CARB).
ThehourlimitationssetforthabovedonotapplytotheEmissions
ControlSystemWarranty.RefertotheCaliforniaEmissionControl
WarrantyStatementsuppliedwithyourProductorcontainedintheengine
manufacturer’sdocumentationfordetails.
CountriesOtherthantheUnitedStatesorCanada
CustomerswhohavepurchasedT oroproductsoutsidetheUnitedStatesorCanadashouldcontacttheirT oroDistributor(Dealer)toobtainguarantee
policiesforyourcountry,province,orstate.IfforanyreasonyouaredissatisedwithyourDistributor'sserviceorhavedifcultyobtainingguarantee
information,contacttheT oroimporter.Ifallotherremediesfail,youmaycontactusatT oroWarrantyCompany.
AustralianConsumerLaw:AustraliancustomerswillnddetailsrelatingtotheAustralianConsumerLaweitherinsidetheboxoratyourlocalT oro
Dealer.
374-0261RevE
 Loading...