

Toro 22in Recyler User Manual

FormNo.3407-661RevA
22inRecyler®LawnMower
20370
CortacéspedRecycler®56cm
(22")
20370
TondeuseRecycler®de56cm
(22po)
20370
www.T oro.com.
*3407-661*A

22inRecycler
G017301
ModelNo.20370—SerialNo.312000001andUp
ModelNo.20371—SerialNo.312000001andUp
ModelNo.20377—SerialNo.312000001andUp
ModelNo.20378—SerialNo.312000001andUp
ReplacementpartsareavailablefromanAuthorizedServiceDealeroratwww.shoptoro.com.
®
LawnMower
Introduction
FormNo.3407-658RevA
Operator'sManual
Readthisinformationcarefullytolearnhowtooperateand
maintainyourproductproperlyandtoavoidinjuryand
productdamage.Youareresponsibleforoperatingthe
productproperlyandsafely.
YoumaycontactT orodirectlyatwww.Toro.comforproduct
andaccessoryinformation,helpndingadealer,ortoregister
yourproduct.
Wheneveryouneedservice,genuineToroparts,oradditional
information,contactanAuthorizedServiceDealerorToro
CustomerServiceandhavethemodelandserialnumbersof
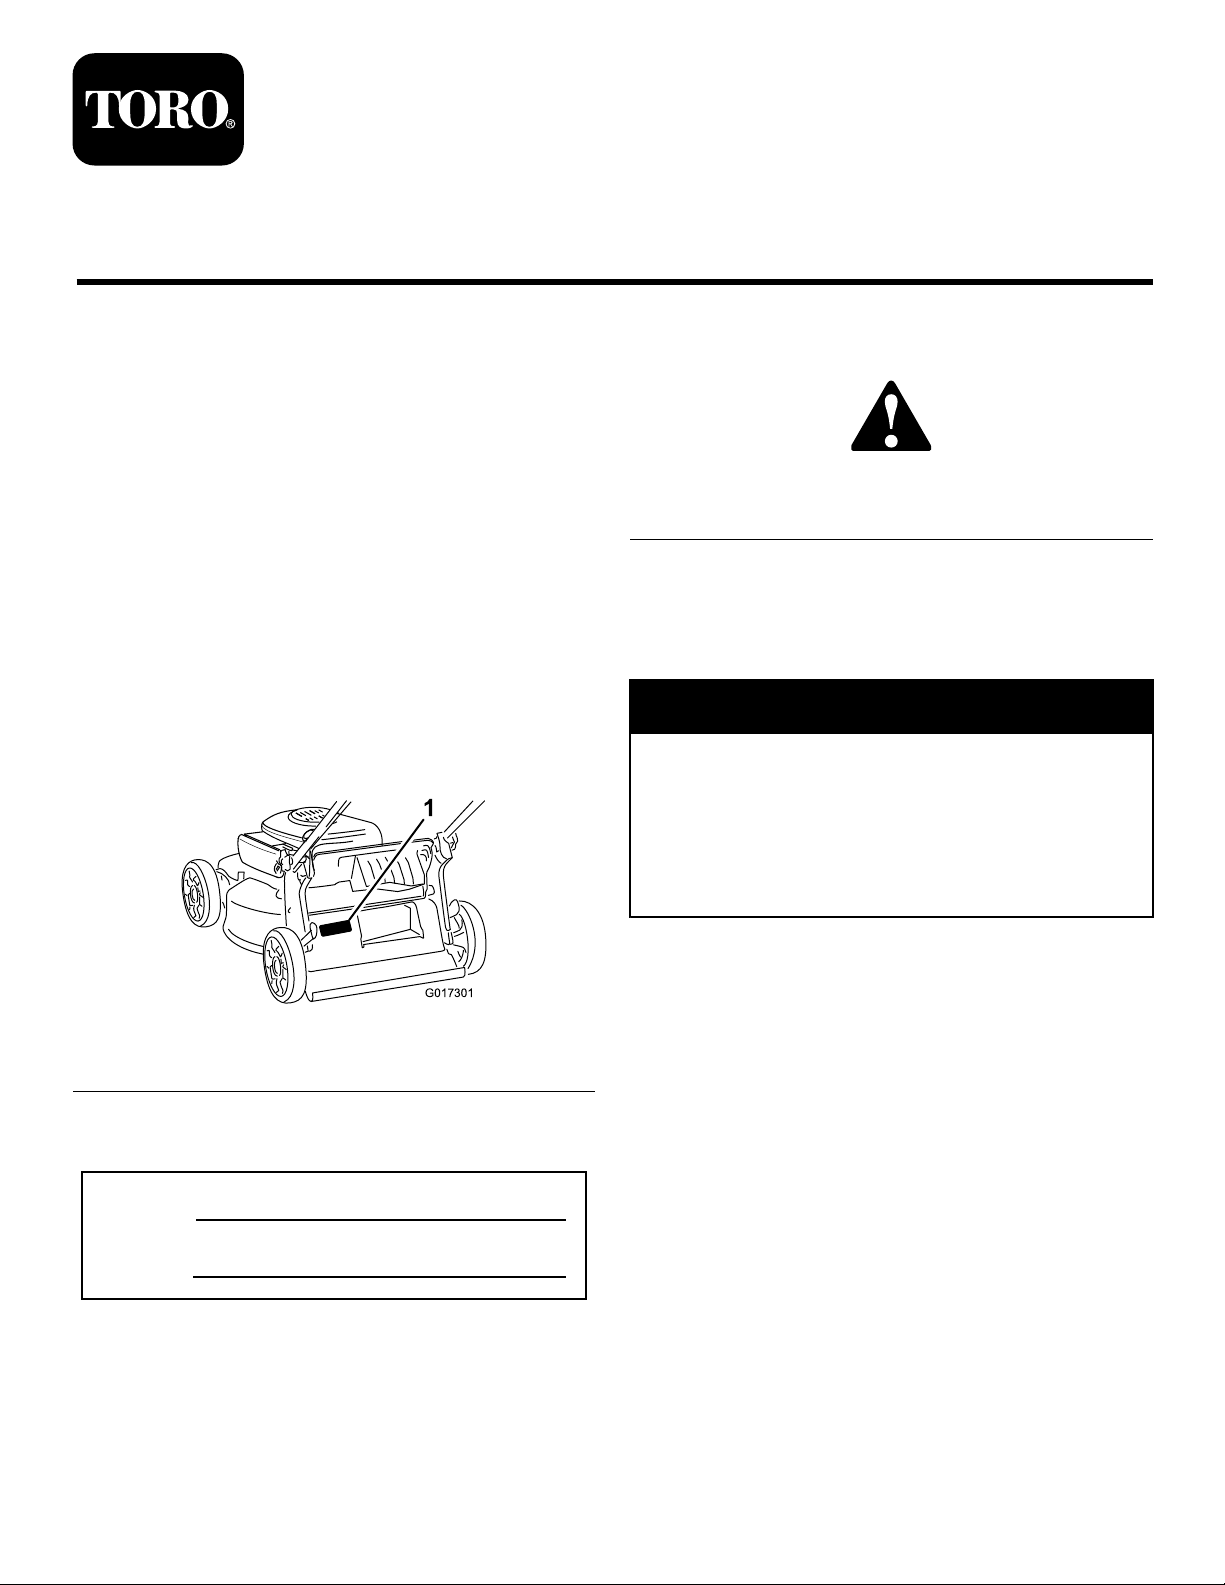
yourproductready.Figure1identiesthelocationofthe
modelandserialnumbersontheproduct.
Figure1
1.Modelandserialnumberplate
Figure2
1.Safety-alertsymbol
Thismanualuses2wordstohighlightinformation.
Importantcallsattentiontospecialmechanicalinformation
andNoteemphasizesgeneralinformationworthyofspecial
attention.
WARNING
CALIFORNIA
Proposition65Warning
Theengineexhaustfromthisproduct
containschemicalsknowntotheStateof
Californiatocausecancer,birthdefects,
orotherreproductiveharm.
Important:Thisengineisnotequippedwithaspark
arrestermufer.ItisaviolationofCaliforniaPublic
ResourceCodeSection4442touseoroperatetheengine
onanyforest-covered,brush-covered,orgrass-covered
land.Otherstatesorfederalareasmayhavesimilarlaws.
Writetheproductmodelandserialnumbersinthespace
below:
ModelNo.
SerialNo.
Thismanualidentiespotentialhazardsandhassafety
messagesidentiedbythesafety-alertsymbol(Figure2),
whichsignalsahazardthatmaycauseseriousinjuryordeath
ifyoudonotfollowtherecommendedprecautions.
©2016—TheToro®Company
8111LyndaleAvenueSouth
Bloomington,MN55420
Registeratwww.Toro.com.
CV
ThissparkignitionsystemcomplieswithCanadianICES-002.
Theenclosed
Engine Owner's Man ual
issuppliedfor
informationregardingtheUSEnvironmentalProtection
Agency(EPA)andtheCaliforniaEmissionControl
Regulationofemissionsystems,maintenance,and
warranty.Replacementsmaybeorderedthroughthe
enginemanufacturer.
Formodelswithstatedenginehorsepower,thegross
horsepoweroftheenginewaslaboratoryratedbytheengine
manufacturerinaccordancewithSAEJ1940.Ascongured
tomeetsafety,emission,andoperatingrequirements,the
actualenginehorsepoweronthisclassoflawnmowerwill
besignicantlylower.
OriginalInstructions(EN)
PrintedintheUSA
AllRightsReserved
*3407-658*A

Contents
Safety
Introduction..................................................................1
Safety...........................................................................2
GeneralSafety.........................................................2
SafetyandInstructionalDecals.................................3
Setup............................................................................4
1InstallingtheHandle.............................................4
2FillingtheEnginewithOil......................................4
ProductOverview..........................................................5
Operation.....................................................................5
BeforeOperation.......................................................5
BeforeOperationSafety...........................................5
FillingtheFuelTank................................................6
CheckingtheEngine-OilLevel..................................6
AdjustingtheCuttingHeight....................................6
DuringOperation......................................................7
DuringOperatingSafety...........................................7
StartingtheEngine..................................................7
UsingtheSelf-PropelDrive......................................8
ShuttingOfftheEngine...........................................8
RecyclingtheClippings............................................8
BaggingtheClippings..............................................8
Side-DischargingtheClippings..................................9
OperatingTips......................................................10
AfterOperation........................................................10
AfterOperatingSafety............................................10
FoldingtheHandle.................................................10
Maintenance.................................................................12
RecommendedMaintenanceSchedule(s)......................12
MaintenanceSafety.................................................12
PreparingforMaintenance.......................................12
ServicingtheAirCleaner.........................................13
ChangingtheEngineOil.........................................13
ReplacingtheBlade................................................14
AdjustingtheSelf-Propel-DriveCable.......................14
CleaningtheMachine..............................................15
Storage........................................................................16
PreparingtheMachineforStorage............................16
RemovingtheMachinefromStorage.........................16
ThislawnmowermeetstheCPSCbladesafetyrequirements
forwalk-behindrotarylawnmowersandtheB71.1
specicationsoftheAmericanNationalStandardsInstitute.
GeneralSafety
Thisproductiscapableofamputatinghandsandfeetand
ofthrowingobjects.Alwaysfollowallsafetyinstructionsto
avoidseriouspersonalinjury.
Usingthisproductforpurposesotherthanitsintendeduse
couldprovedangeroustoyouandbystanders.
•ReadandunderstandthecontentsofthisOperator’ sManual
beforeyoustarttheengine.Ensurethateveryoneusing
thisproductknowshowtouseitandunderstandsthe
warnings.
•Donotputyourhandsorfeetnearmovingcomponents
ofthemachine.
•Donotoperatethemachinewithoutallguardsandother
safetyprotectivedevicesinplaceandworkingonthe
machine.
•Keepclearofanydischargeopening.Keepbystandersa
safedistanceawayfromthemachine.
•Keepchildrenoutoftheoperatingarea.Neverallow
childrentooperatethemachine.
•Stopthemachineandshutofftheenginebeforeservicing,
fueling,oruncloggingthemachine.
Improperlyusingormaintainingthismachinecanresult
ininjury.Toreducethepotentialforinjury,complywith
thesesafetyinstructionsandalwayspayattentiontothe
safety-alertsymbol,whichmeansCaution,Warning,or
Danger—personalsafetyinstruction.Failuretocomplywith
theseinstructionsmayresultinpersonalinjuryordeath.
Youcanndadditionalitemsofsafetyinformationintheir
respectivesectionsthroughoutthismanual.
2
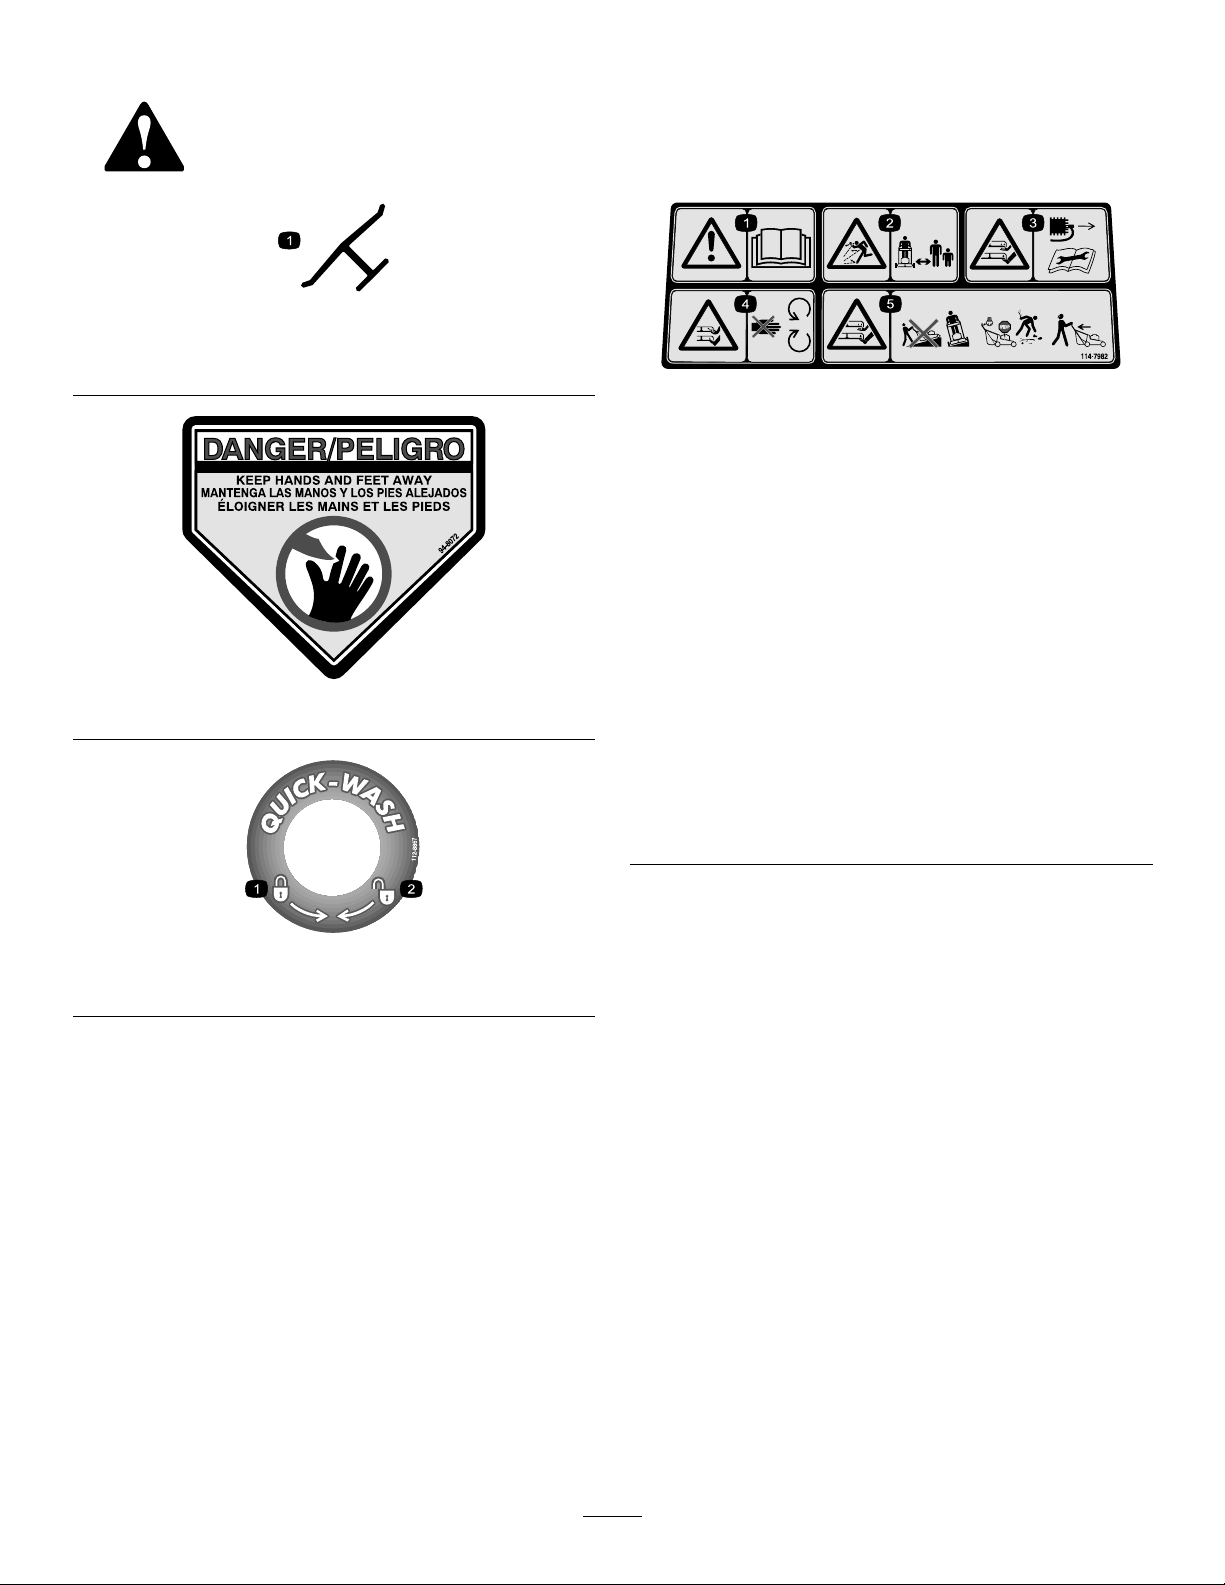
SafetyandInstructionalDecals
Safetydecalsandinstructionsareeasilyvisibletotheoperatorandarelocatednearanyareaof
potentialdanger.Replaceanydecalthatisdamagedormissing.
Manufacturer'sMark
1.Indicatesthebladeisidentiedasapartfromtheoriginal
machinemanufacturer.
114-7982
94-8072
112-8867
1.Lock2.Unlock
1.Warning—readthe
Operator'sManual.
2.Thrownobject
hazard—keepbystanders
asafedistanceawayfrom
themachine.
3.Cutting/dismemberment
hazardofhandorfoot,
mowerblade—remove
theignitionkeyandread
theinstructionsbefore
servicingorperforming
maintenance.
4.Cutting/dismemberment
hazardofhandorfoot,
mowerblade—stayaway
frommovingparts.
5.Cutting/dismemberment
hazardofhandorfoot,
mowerblade—donot
operateupanddown
slopes;operatesideto
sideonslopes;shutoff
theenginebeforeleaving
theoperatingposition;
andlookbehindyouwhen
backingup.
3
Setup
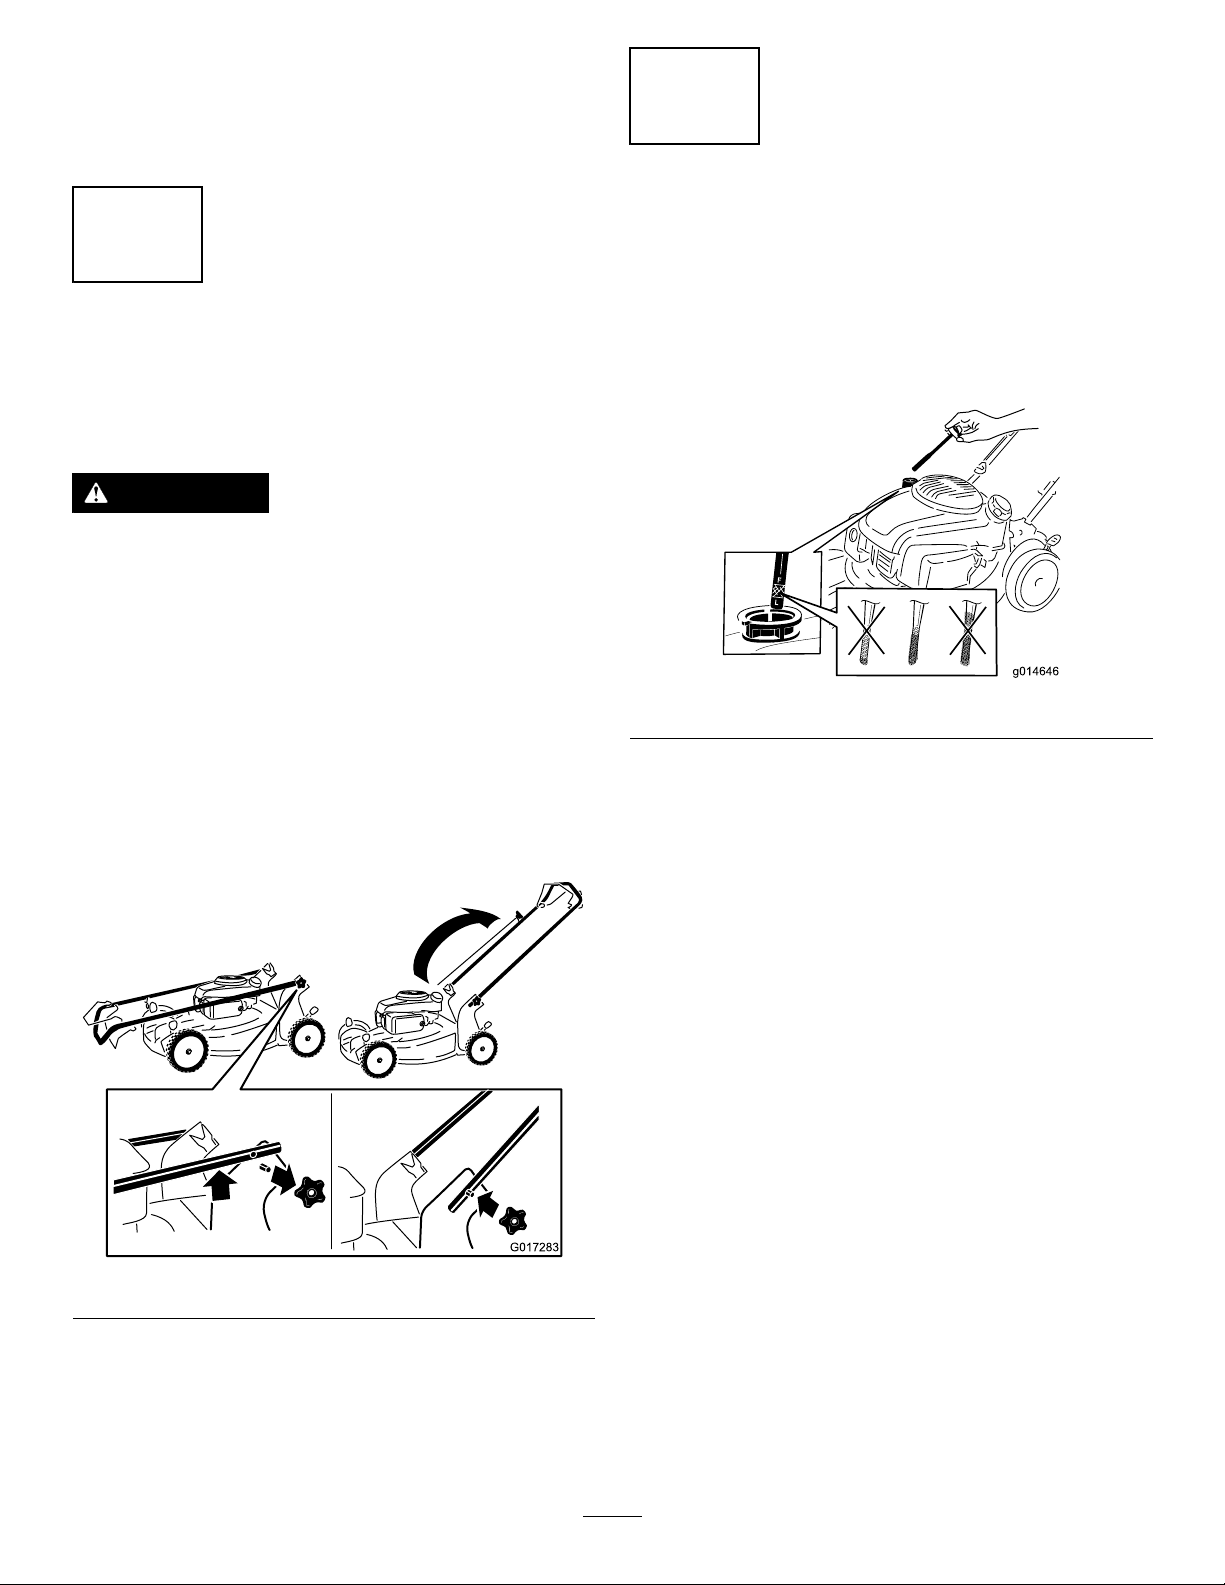
G017283
Important:Removeanddiscardtheprotectiveplastic
sheetthatcoverstheengine.
1
InstallingtheHandle
NoPartsRequired
Procedure
WARNING
Foldingorunfoldingthehandleimproperlycan
damagethecables,causinganunsafeoperating
condition.
•Donotdamagethecableswhenfoldingor
unfoldingthehandle.
•Ifacableisdamaged,contactanAuthorized
ServiceDealer.
2
FillingtheEnginewithOil
NoPartsRequired
Procedure
Yourmachinedoesnotcomewithoilintheengine.
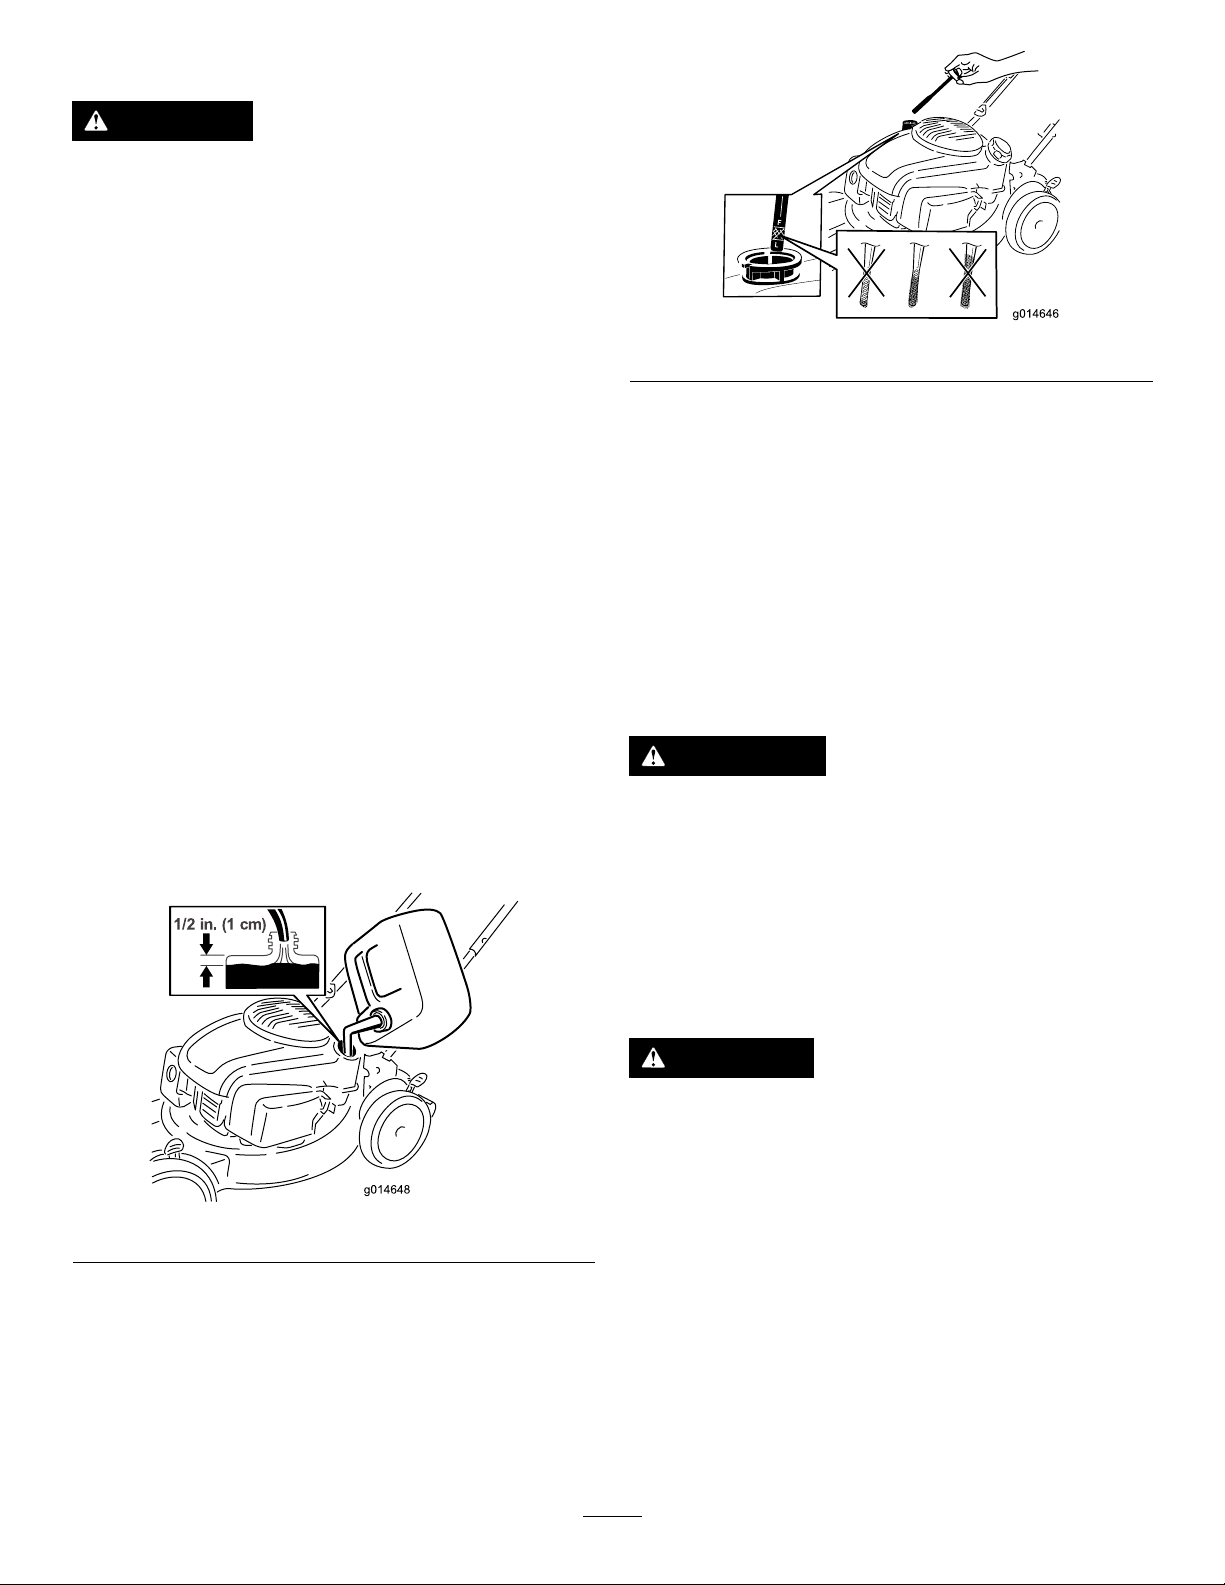
1.Removethedipstick(Figure4).
Figure4
1.Removethehandleknobsfromthemachinehousing
(Figure3).
Important:Routethecablestotheoutsideofthe
handleknobsasyouinstallthehandle.
Figure3
2.Slowlypouroilintotheoil-lltubeuntiltheoillevel
reachestheFulllineonthedipstick(Figure4).Donot
overll.(Max.ll:0.65L(22oz),type:10W-30or
SAE30detergentoilwithanAPIserviceclassication
ofSJorhigher.)
Note:Eachtimeyouchecktheoillevel,removethe
dipstickandwipeitclean,insertitintotheoilller
neck(butdonotscrewitin),thenremoveitagainand
checkthelevel(Figure4).
Note:Ifyouoverlltheengine,poursomeoiloutof
it;refertoChangingtheEngineOil(page13).
3.Installthedipsticksecurely.
Important:
operating hour s
toChangingtheEngineOil(page13).
Change the engine oil after the r st 5
;changeityearlythereafter.Refer
2.Movethehandletotheoperatingposition.
3.Installandtightenthehandleknobsthatyouremoved
instep1(Figure3).
4
ProductOverview
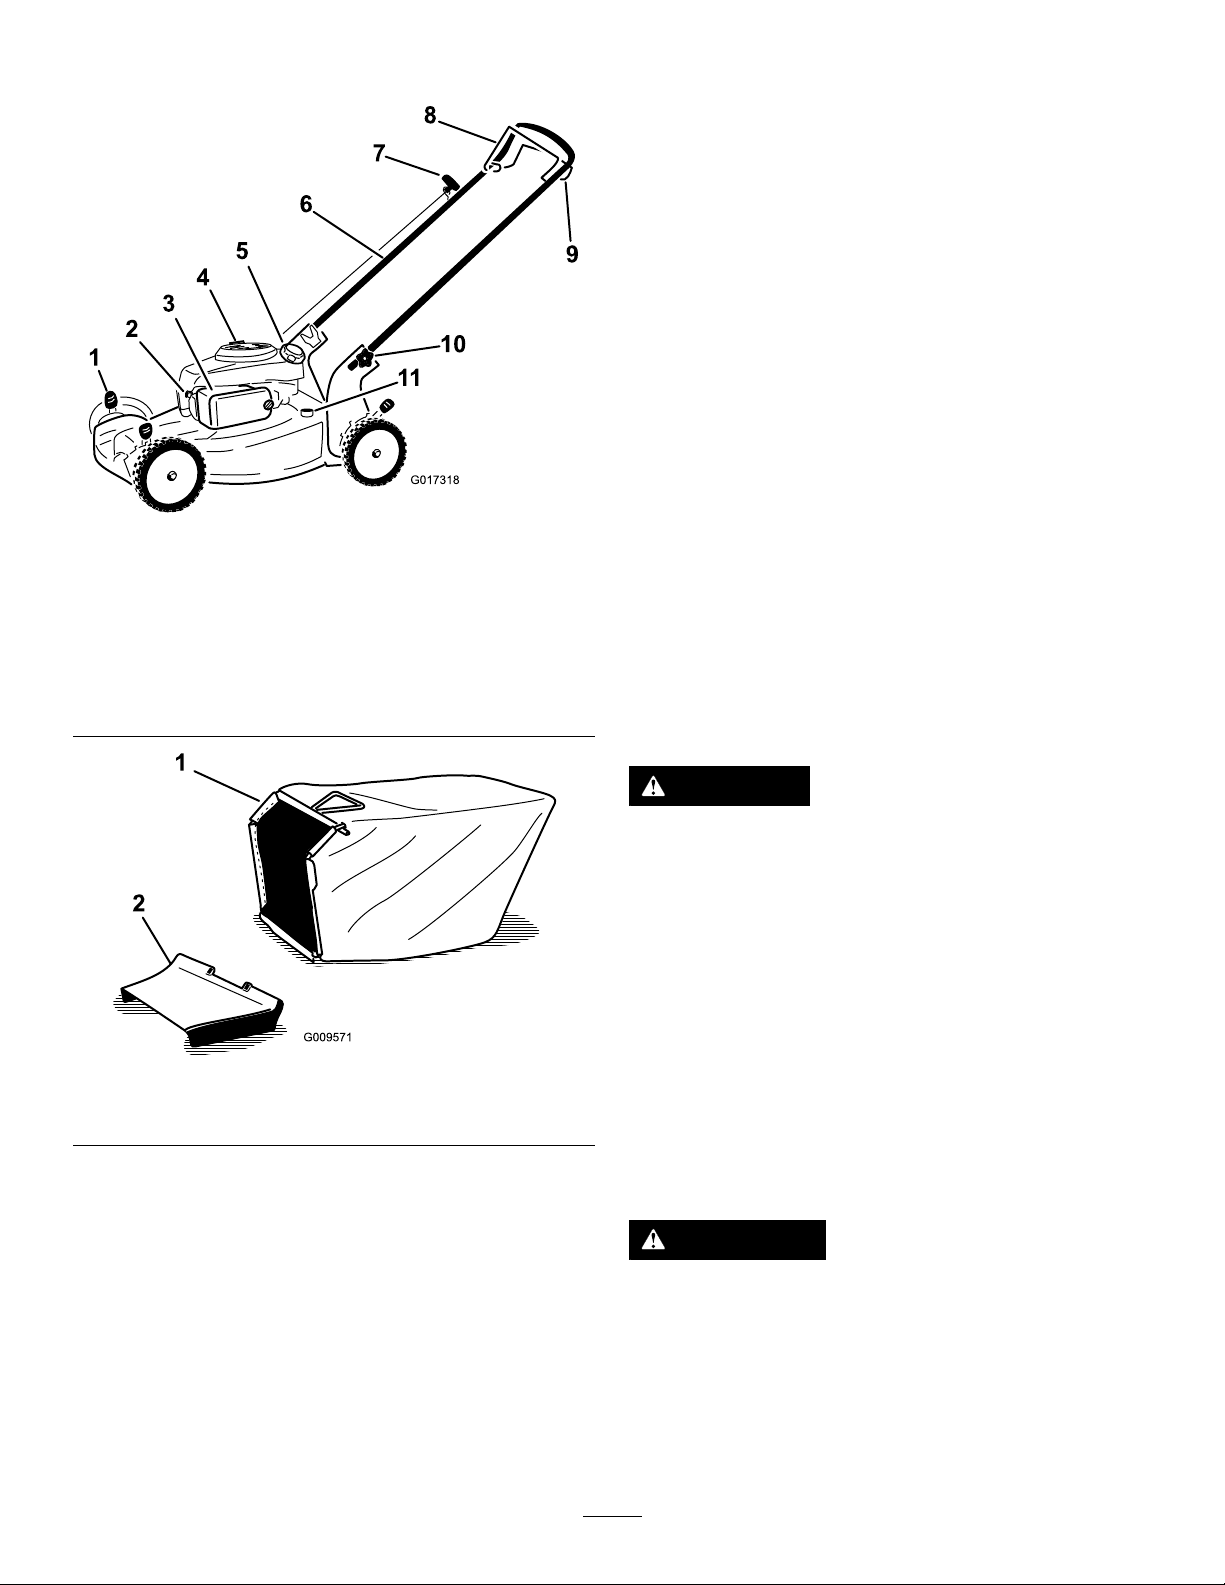
G017318
Figure5
1.Cutting-heightlever(4)
2.Sparkplug
3.Airlter(notshown)9.Self-propel-drivebar
4.Oilll/dipstick10.Handleknob(2)
5.Fuel-tankcap11.Washoutport
6.Handle
7.Recoil-starthandle
8.Blade-controlbar
Operation
BeforeOperation
BeforeOperationSafety
GeneralSafety
•Becomefamiliarwiththesafeoperationoftheequipment,
operatorcontrols,andsafetysigns.
•Checkthatallguardsandsafetydevices,suchasdeectors
and/orgrasscatcher,areinplaceandworkingproperly .
•Alwaysinspectthemachinetoensurethattheblades,
bladebolts,andcuttingassemblyarenotwornor
damaged.
•Inspecttheareawhereyouwillusethemachineand
removeallobjectsthatthemachinecouldthrow.
•Adjustingthecuttingheightmaybringyouintocontact
withthemovingblade,causingseriousinjury.
–Shutofftheengineandwaitforallmovingpartsto
stop.
–Donotputyourngersunderthehousingwhen
adjustingthecuttingheight.
FuelSafety
Figure6
1.Grassbag2.Side-dischargechute
DANGER
Fuelisextremelyammableandhighlyexplosive.
Areorexplosionfromfuelcanburnyouand
othersandcandamageproperty.
•Topreventastaticchargefromignitingthefuel,
placethecontainerand/ormachinedirectlyon
thegroundbeforelling,notinavehicleoron
anobject.
•Fillthefueltankoutdoors,inanopenarea,when
theengineiscold.Wipeupanyfuelthatspills.
•Donothandlefuelwhensmokingoraroundan
openameorsparks.
•Storefuelinanapprovedcontainerandkeepit
outofthereachofchildren.
WARNING
Fuelisharmfulorfatalifswallowed.Long-term
exposuretovaporscancauseseriousinjuryand
illness.
•Avoidprolongedbreathingofvapors.
•Keepyourhandsandfaceawayfromthenozzle
andthefuel-tankopening.
•Keepfuelawayfromyoureyesandskin.
5
FillingtheFuelTank
DANGER
Gasolineisextremelyammableandexplosive.A
reorexplosionfromgasolinecanburnyouand
others.
•Topreventastaticchargefromignitingthe
gasoline,placethecontainerand/ormachine
directlyonthegroundbeforelling,notina
vehicleoronanobject.
•Fillthetankoutdoorswhentheengineiscold.
Wipeupspills.
•Donothandlegasolinewhensmokingoraround
anopenameorsparks.
•Storegasolineinanapprovedfuelcontainer,out
ofthereachofchildren.
Figure8
2.Removethedipstickandchecktheoillevel(Figure8).
IftheoillevelisbelowtheAddmarkonthedipstick,
slowlypouroilintotheoil-lltubetoraisetheoillevel
totheFullmarkonthedipstick.Donotoverll.(Max.
ll:0.65L(22oz),type:10W -30orSAE30detergent
oilwithanAPIserviceclassicationofSJorhigher.)
Fillthefueltankwithfreshunleadedregulargasolinefroma
majorname-brandservicestation(Figure7).
Useunleadedregulargasolinesuitableforautomotiveuse
(87pumpoctaneminimum).Leadedregulargasolinemaybe
usedifunleadedregularisnotavailable.
Note:Neverusemethanol,gasolinecontainingmethanol,or
gasoholcontainingmorethan10%ethanolbecausethefuel
systemcouldbedamaged.Donotmixoilwithgasoline.
Important:T oreducestartingproblems,addfuel
stabilizertothefuelallseason,mixingitwithgasoline
lessthan30daysold.
Note:Ifyouoverlltheengine,poursomeoiloutof
itasdirectedinChangingtheEngineOil(page13).
3.Installthedipsticksecurely.
AdjustingtheCuttingHeight
WARNING
Adjustingthecuttingheightmaybringyouinto
contactwiththemovingblade,causingserious
injury.
•Shutofftheengineandwaitforallmovingparts
tostop.
•Donotputyourngersunderthehousingwhen
adjustingthecuttingheight.
CAUTION
Iftheenginehasbeenrunning,themuferwillbe
hotandcanseverelyburnyou.Keepawayfromthe
hotmufer.
Figure7
CheckingtheEngine-OilLevel
ServiceInterval:Beforeeachuseordaily
1.Removethedipstick,wipeitclean,andinsertitintothe
oilllerneck,butdonotscrewitin(Figure8).
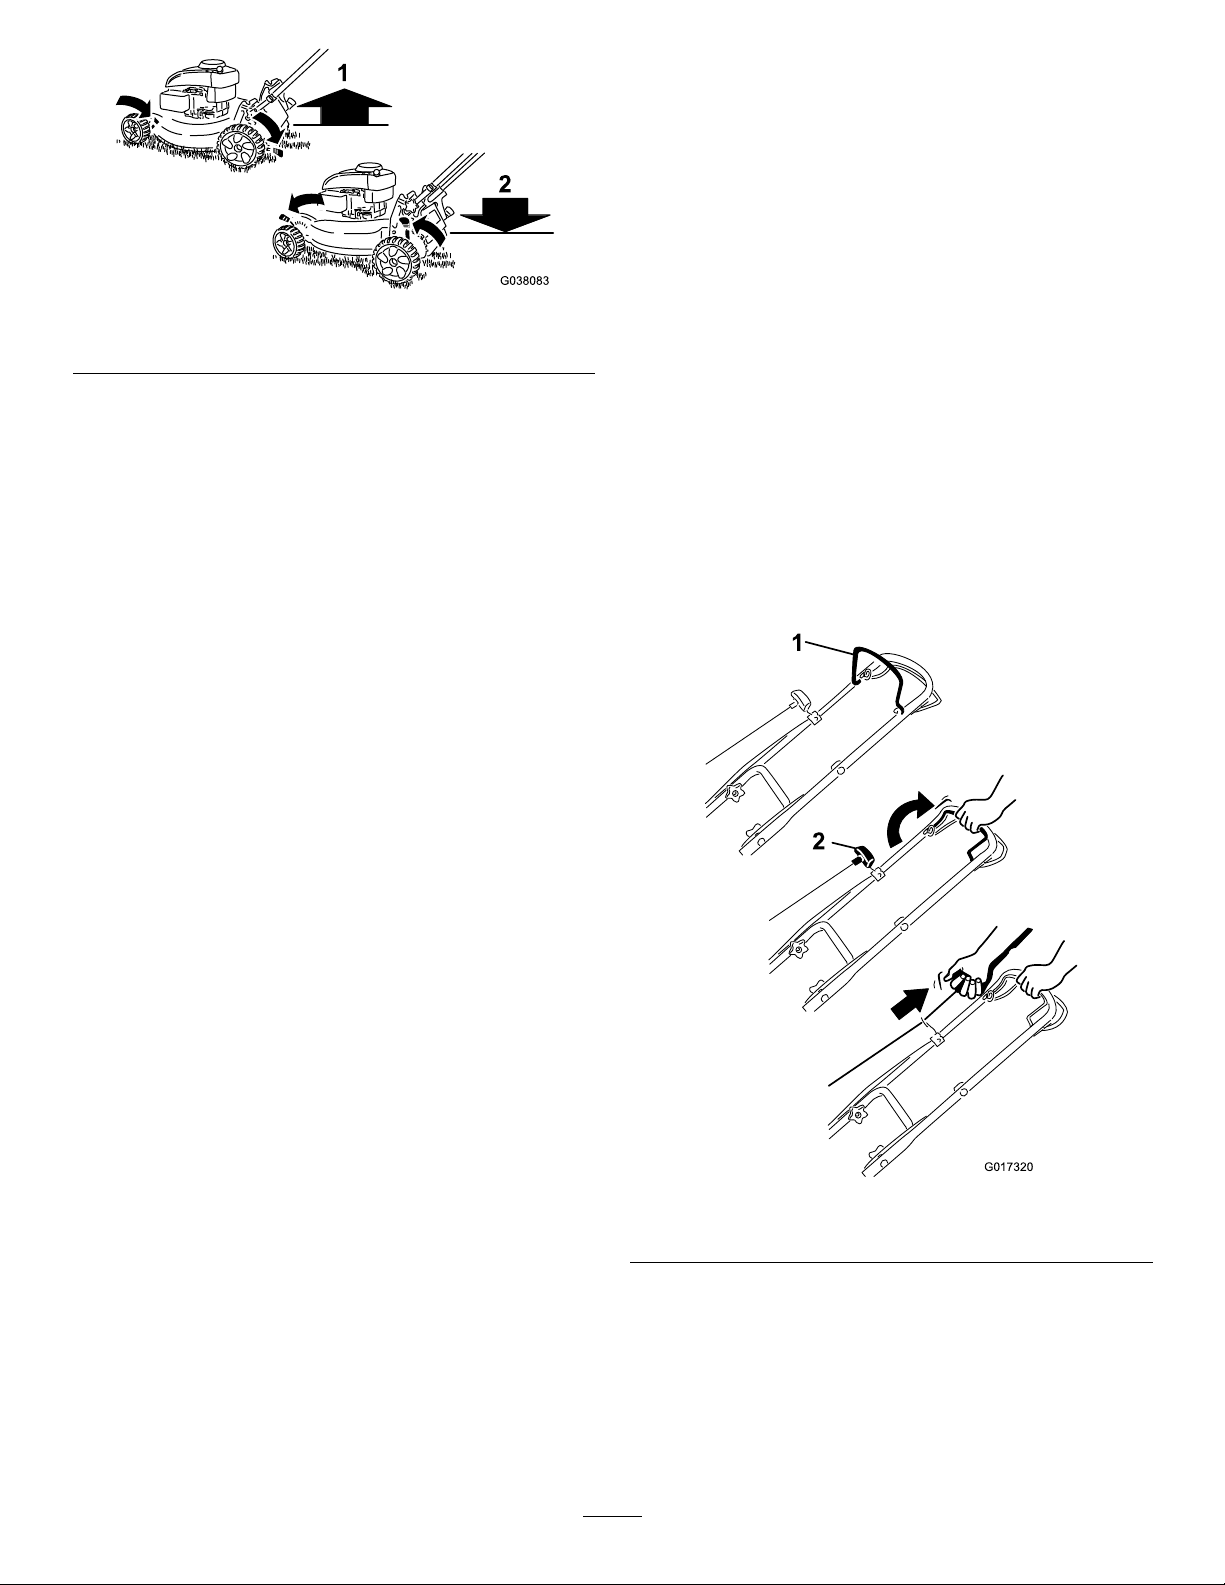
Adjustthecuttingheightasdesired.Setthefrontwheelsto
thesameheightastherearwheels.
Note:Toraisethemachine,moveallthecutting-height
leversrearward.Tolowerthemachine,moveallthe
cutting-heightleversforward(Figure9).
6
•Iftheenginehasbeenrunningthemuferwillbehotand
G017320
canseverelyburnyou.Keepawayfromthehotmufer.
•Checkthegrasscatchercomponentsandthedischarge
guardfrequentlyandreplacethemwiththemanufacturer’s
recommendedpartswhennecessary.
•UseaccessoriesandattachmentsapprovedbytheThe
Toro®Companyonly.
Figure9
1.Raisethemachine2.Lowerthemachine
Note:Thecuttingheightsettingsare25mm(1inch);35mm
(1-3/8inches);44mm(1-3/4inches);54mm(2-1/8inches);
64mm(2-1/2inches);73mm(2-7/8inches);83mm(3-1/4
inches);92mm(3-5/8inches);and102mm(4inches).
DuringOperation
DuringOperatingSafety
GeneralSafety
•Wearappropriateclothing,includingeyeprotection;
slip-resistant,substantialfootwear;andhearing
protection.Tiebacklonghair,securelooseclothing,and
donotwearjewelry.
•Donotoperatethemachinewhileill,tired,orunderthe
inuenceofalcoholordrugs.
•Thebladeissharp;contactingthebladecanresultin
seriouspersonalinjury.Shutofftheengineandwaitfor
allmovingpartstostopbeforeleavingtheoperating
position.
•Whenyoureleasetheblade-controlbar,theengineshould
shutoffandthebladeshouldstopwithin3seconds.If
not,stopusingyourmachineimmediatelyandcontactan
AuthorizedServiceDealer.
•Operatethemachineonlyingoodvisibilityand
appropriateweatherconditions.Donotoperatethe
machinewhenthereistheriskoflighting.
•Wetgrassorleavescancauseseriousinjuryifyouslipand
contacttheblade.Mowonlyindryconditions.
•Useextremecarewhenapproachingblindcorners,
shrubs,trees,orotherobjectsthatmayblockyourview.
•Watchforholes,ruts,bumps,rocks,orotherhidden
objects.Uneventerraincouldcauseaslip-and-fall
accident.
•Stopthemachineandinspectthebladesafterstrikingan
objectorifthereisanabnormalvibrationinthemachine.
Makeallnecessaryrepairsbeforeresumingoperation.
•Beforeleavingtheoperatingposition,shutofftheengine,
removethekey(electricstartonly),andwaitforall
movingpartstostop.
SlopeSafety
•Mowacrossthefaceofslopes;neverupanddown.Use
extremecautionwhenchangingdirectiononslopes.
•Donotmowonexcessivelysteepslopes.Poorfooting
couldcauseaslip-and-fallaccident.
•Donotmowneardrop-offs,ditches,orembankments.
Youcouldloseyourfootingorbalance.
StartingtheEngine
1.Holdtheblade-controlbaragainstthehandle(Figure
10).
Figure10
1.Blade-controlbar2.Recoil-starthandle
2.Pulltherecoil-starthandlelightlyuntilyoufeel
resistance,thenpullitsharply .Allowtheropetoreturn
tothehandleslowly(Figure10).
Note:Ifthemachinedoesnotstartafterseveral
attempts,contactanAuthorizedServiceDealer.
7
UsingtheSelf-PropelDrive
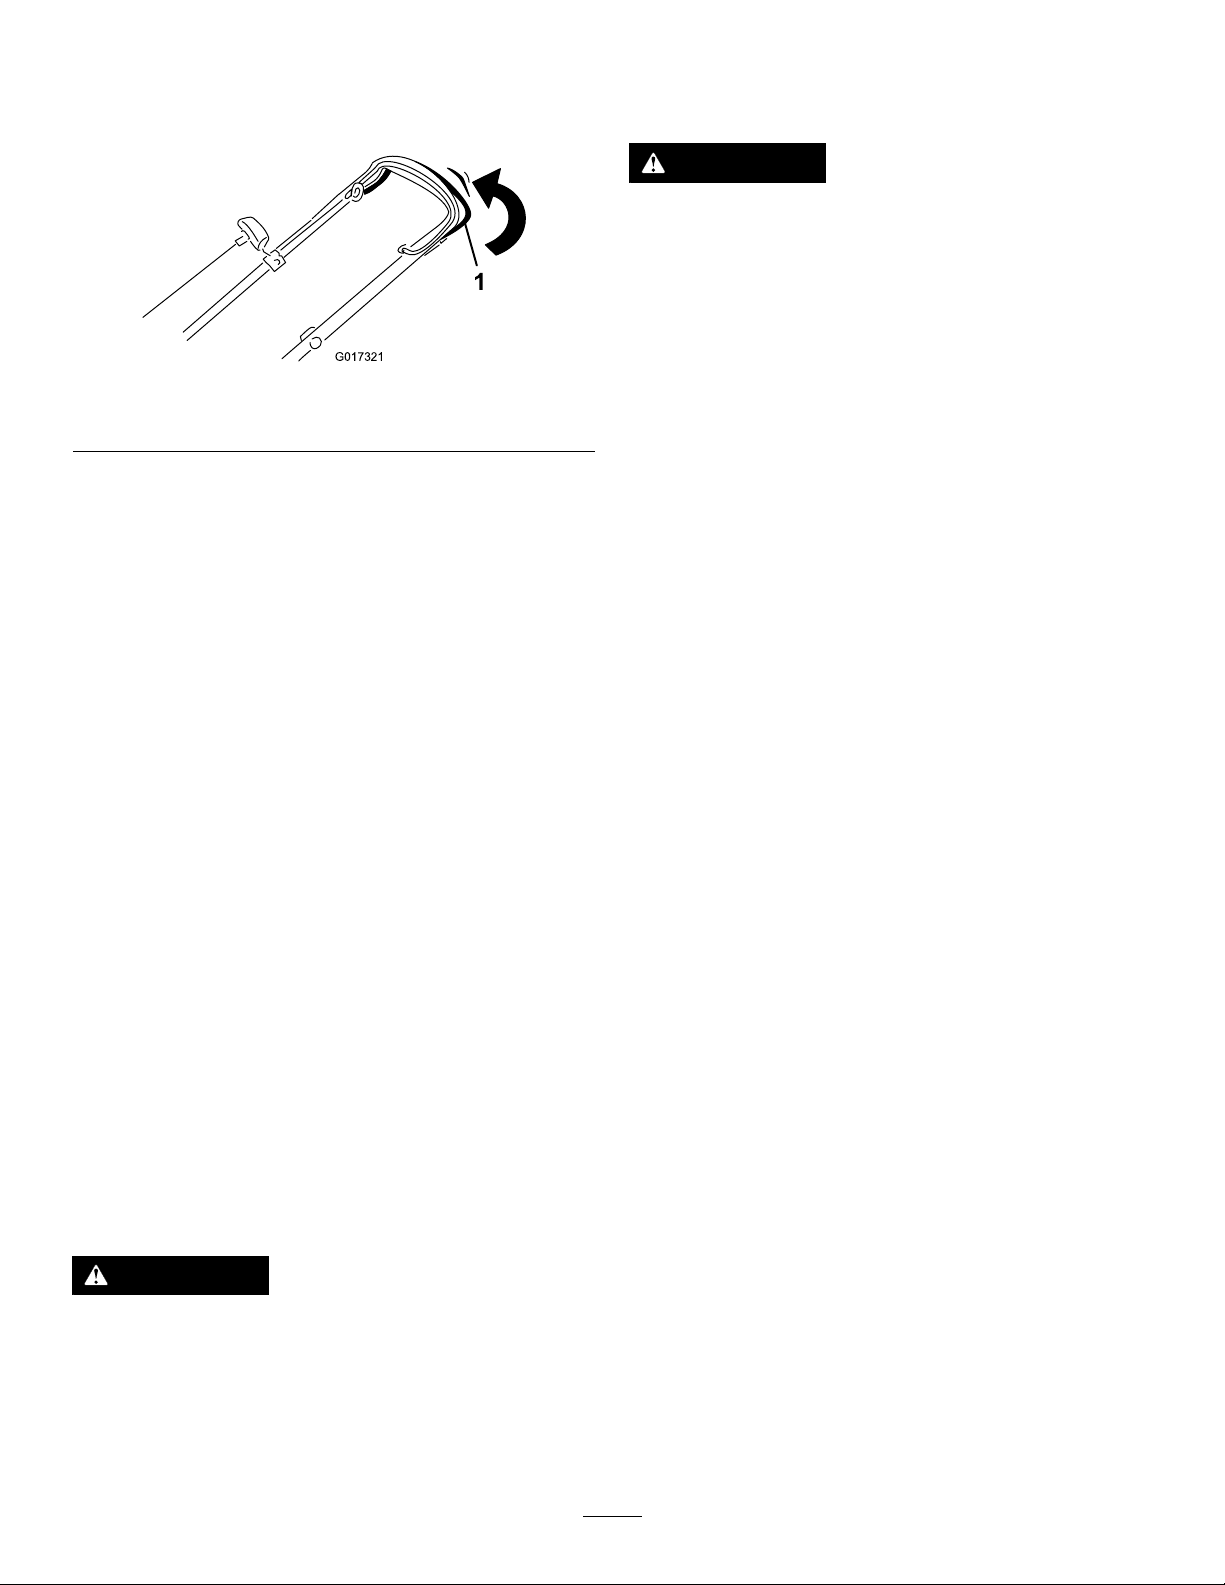
G017321
Tooperatetheself-propeldrive,squeezetheself-propel-drive
bar(Figure11)towardthehandleandholdit.
Figure11
1.Self-propel-drivebar
Todisengagetheself-propeldrive,releasetheself-propel-drive
bar.
Note:Themaximumself-propelgroundspeedisxed.To
reducethegroundspeed,increasethespacebetweenthe
self-propel-drivebarandthehandle.
Iftheside-dischargechuteisonthemachine,removeitbefore
baggingtheclippings;refertoRemovingtheSide-Discharge
Chute(page10).
WARNING
Thebladeissharp;contactingthebladecanresult
inseriouspersonalinjury.
Shutofftheengineandwaitforallmovingpartsto
stopbeforeleavingtheoperatingposition.
InstallingtheGrassBag
Note:Ensurethebagisseatedinthecorrectposition.
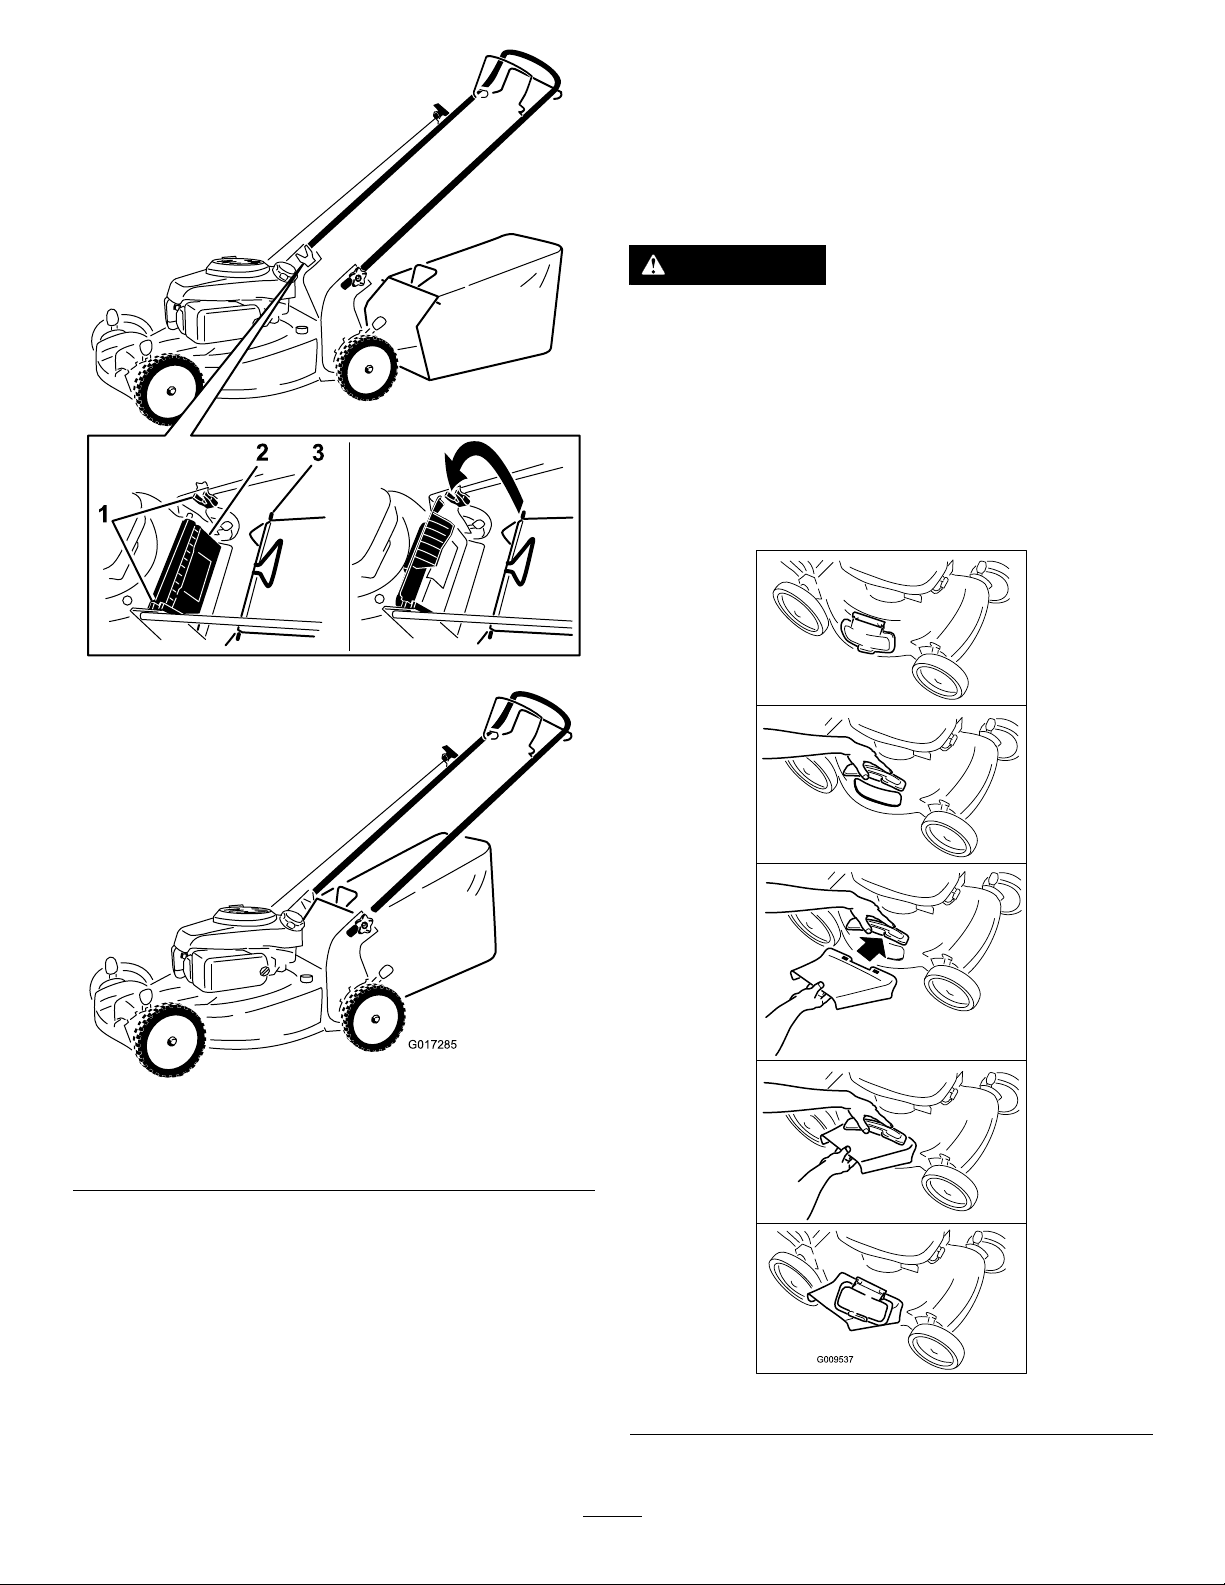
1.Raiseandholdupthereardeector(Figure12).
ShuttingOfftheEngine
Toshutofftheengine,releasetheblade-controlbar.
Important:Whenyoureleasetheblade-controlbar,the
engineshouldshutoffandthebladeshouldstopwithin
3seconds.Iftheydonot,stopusingyourmachine
immediatelyandcontactanAuthorizedServiceDealer.
RecyclingtheClippings
Yourmachinecomesfromthefactoryreadytorecyclethe
grassandleafclippingsbackintothelawn.
Ifthegrassbagisonthemachine,removeitbeforerecycling
theclippings;refertoRemovingtheGrassBag(page9).If
theside-dischargechuteisonthemachine,removeitbefore
recyclingtheclippings;refertoRemovingtheSide-Discharge
Chute(page10)
BaggingtheClippings
Usethegrassbagwhenyouwanttocollectgrassandleaf
clippingsfromthelawn.
Note:Ensurethatthebagisseatedinthecorrectposition.
WARNING
Aworngrassbagcouldallowsmallstonesand
othersimilardebristobethrowntowardyouor
bystander's,resultinginseriouspersonalinjuryor
death.
Checkthegrassbagfrequently.Ifitisdamaged,
installanewTororeplacementbag.
8
G017285
Side-Dischargingthe Clippings
Usethesidedischargeforcuttingverytallgrass.
Ifthebagisonthemachine,removeitbeforeside-discharging
theclippings.
WARNING
Thebladeissharp;contactingthebladecanresult
inseriouspersonalinjury.
Shutofftheengineandwaitforallmovingpartsto
stopbeforeleavingtheoperatingposition.
InstallingtheSide-DischargeChute
Liftupthesidedeectorandinstalltheside-dischargechute
(Figure13).
Figure12
1.Notches
2.Reardeector
2.Installthegrassbag,ensuringthatthepinsonthebag
restinthenotchesonthehandle(Figure12).
3.Lowerthereardeector.
3.Grass-bagpin(2)
RemovingtheGrassBag
Toremovethebag,reversethestepsabove.
Figure13
9

RemovingtheSide-DischargeChute
Toremovetheside-dischargechute,liftupthesidedeector,
removetheside-dischargechute,andlowertheside-discharge
deector.
OperatingTips
GeneralMowingTips
•Cleartheareaofsticks,stones,wire,branches,andother
debristhatthebladecouldhit.
•Avoidstrikingsolidobjectswiththeblade.Never
deliberatelymowoveranyobject.
•Ifthemachinestrikesanobjectorstartstovibrate,
immediatelyshutofftheengine,disconnectthewirefrom
thesparkplug,andexaminethemachinefordamage.
•Forbestperformance,installanewbladebeforethe
cuttingseasonbegins.
•ReplacethebladewhennecessarywithaToro
replacementblade.
CuttingGrass
•Cutonlyaboutathirdofthegrassbladeatatime.Donot
cutbelowthe54mm(2-1/8-inch)settingunlessthegrass
issparseoritislatefallwhengrassgrowthbeginstoslow
down.RefertoAdjustingtheCuttingHeight(page6).
•Whencuttinggrassover15cm(6inches)tall,mowatthe
highestcutting-heightsettingandwalkslower;thenmow
againatalowersettingforthebestlawnappearance.If
thegrassistoolong,themachinemayplugandcause
theenginetostall.
•Mowonlydrygrassorleaves.Wetgrassandleavestend
toclumpontheyardandcancausethemachinetoplug
ortheenginetostall.
WARNING
CuttingLeaves
•Aftercuttingthelawn,ensurethathalfofthelawnshows
throughthecutleafcover.Y oumayneedtomakemore
thanasinglepassovertheleaves.
•Iftherearemorethan13cm(5inches)ofleavesonthe
lawn,setthefrontcuttingheight1or2notcheshigher
thantherearcuttingheight.
•Slowdownyourmowingspeedifthemachinedoesnot
cuttheleavesnelyenough.
AfterOperation
AfterOperatingSafety
GeneralSafety
•Cleangrassanddebrisfromthemachinetohelpprevent
res.Cleanupoilorfuelspills.
•Allowtheenginetocoolbeforestoringthemachinein
anyenclosure.
•Neverstorethemachineorfuelcontainerwherethereis
anopename,spark,orpilotlight,suchasonawater
heateroronotherappliances.
HaulingSafety
•Usecarewhenloadingorunloadingthemachineintoa
trailerortruck.
•Usefull-widthrampsforloadingthemachineintoa
trailerortruck.Donotexceeda15°anglebetweenthe
rampandthetrailerortruck.
•Tiethemachinedownsecurelyusingstraps,chains,cable,
orropes.Bothfrontandrearstrapsshouldbedirected
downandoutwardfromthemachine.
Wetgrassorleavescancauseseriousinjuryif
youslipandcontacttheblade.Mowonlyindry
conditions.
•Beawareofapotentialrehazardinverydryconditions,
followalllocalrewarnings,andkeepthemachinefree
ofdrygrassandleafdebris.
•Alternatethemowingdirection.Thishelpsdispersethe
clippingsoverthelawnforevenfertilization.
•Ifthenishedlawnappearanceisunsatisfactory,try1
ormoreofthefollowing:
–Replacethebladeorhaveitsharpened.
–Walkataslowerpacewhilemowing.
–Raisethecuttingheightonyourmachine.
–Cutthegrassmorefrequently.
–Overlapcuttingswathsinsteadofcuttingafullswath
witheachpass.
FoldingtheHandle
WARNING
Foldingorunfoldingthehandleimproperlycan
damagethecables,causinganunsafeoperating
condition.
•Donotdamagethecableswhenfoldingor
unfoldingthehandle.
•Ifacableisdamaged,contactanAuthorized
ServiceDealer.
1.Loosenthehandleknobsuntilyoucanmovetheupper
handlefreely.
2.FoldtheupperhandleforwardasshowninFigure14.
Important:Routethecablestotheoutsideofthe
handleknobsasyoufoldthehandle.
10

G017287
Figure14
3.Tounfoldthehandle,reversethestepsabove.
11
Maintenance
Note:Determinetheleftandrightsidesofthemachinefromthenormaloperatingposition.
RecommendedMaintenanceSchedule(s)
MaintenanceService
Interval
Aftertherst5hours
Beforeeachuseordaily
Every25hours
Every50hours
Every100hours
Beforestorage
Yearly
Important:Refertoyourengineoperator'smanualforadditionalmaintenanceprocedures.
Note:ReplacementpartsareavailablefromanAuthorizedServiceDealer(gotowww .Toro.comtondthenearestdealer)
oratwww.shoptoro.com.
MaintenanceProcedure
•Changetheengineoil.
•Checktheengine-oillevel.
•Ensurethattheenginestopswithin3secondsafterreleasingtheblade-controlbar.
•Cleangrassclippingsanddirtfromunderthemachine.
•Checktheaircleanerfordirty,loose,ordamagedparts,andcleanorreplacethem
ifnecessary.
•Changetheengineoil.
•Replacetheair-cleanerelement(morefrequentlywhenoperatingthemachine
industyordirtyoperatingconditions).
•Emptythefueltankbeforerepairsasdirectedandbeforeannualstorage.
•Replacethebladeorhaveitsharpened;replaceorsharpenitmorefrequentlyif
theedgedullsquickly .
•Cleantheair-coolingsystem;cleanitmorefrequentlyindustyoperatingconditions.
Refertoyourengineoperator'smanual.
•Refertoyourengineoperator'smanualforanyadditionalyearlymaintenance
procedures.
MaintenanceSafety
•Disconnectthespark-plugwirefromthesparkplugand
removetheelectric-startbuttonbeforeperformingany
maintenanceprocedure.
•Wearglovesandeyeprotectionwhenservicingthe
machine.
•Thebladeissharp;contactingthebladecanresultin
seriouspersonalinjury.W eargloveswhenservicingthe
blade.
•Nevertamperwithsafetydevices.Checktheirproper
operationregularly.
•Tippingthemachinemaycausethefueltoleak.Fuelis
ammableandexplosive,andcancausepersonalinjury.
Runtheenginedrytoremovethefuelwithahandpump;
neversiphonthefuel.
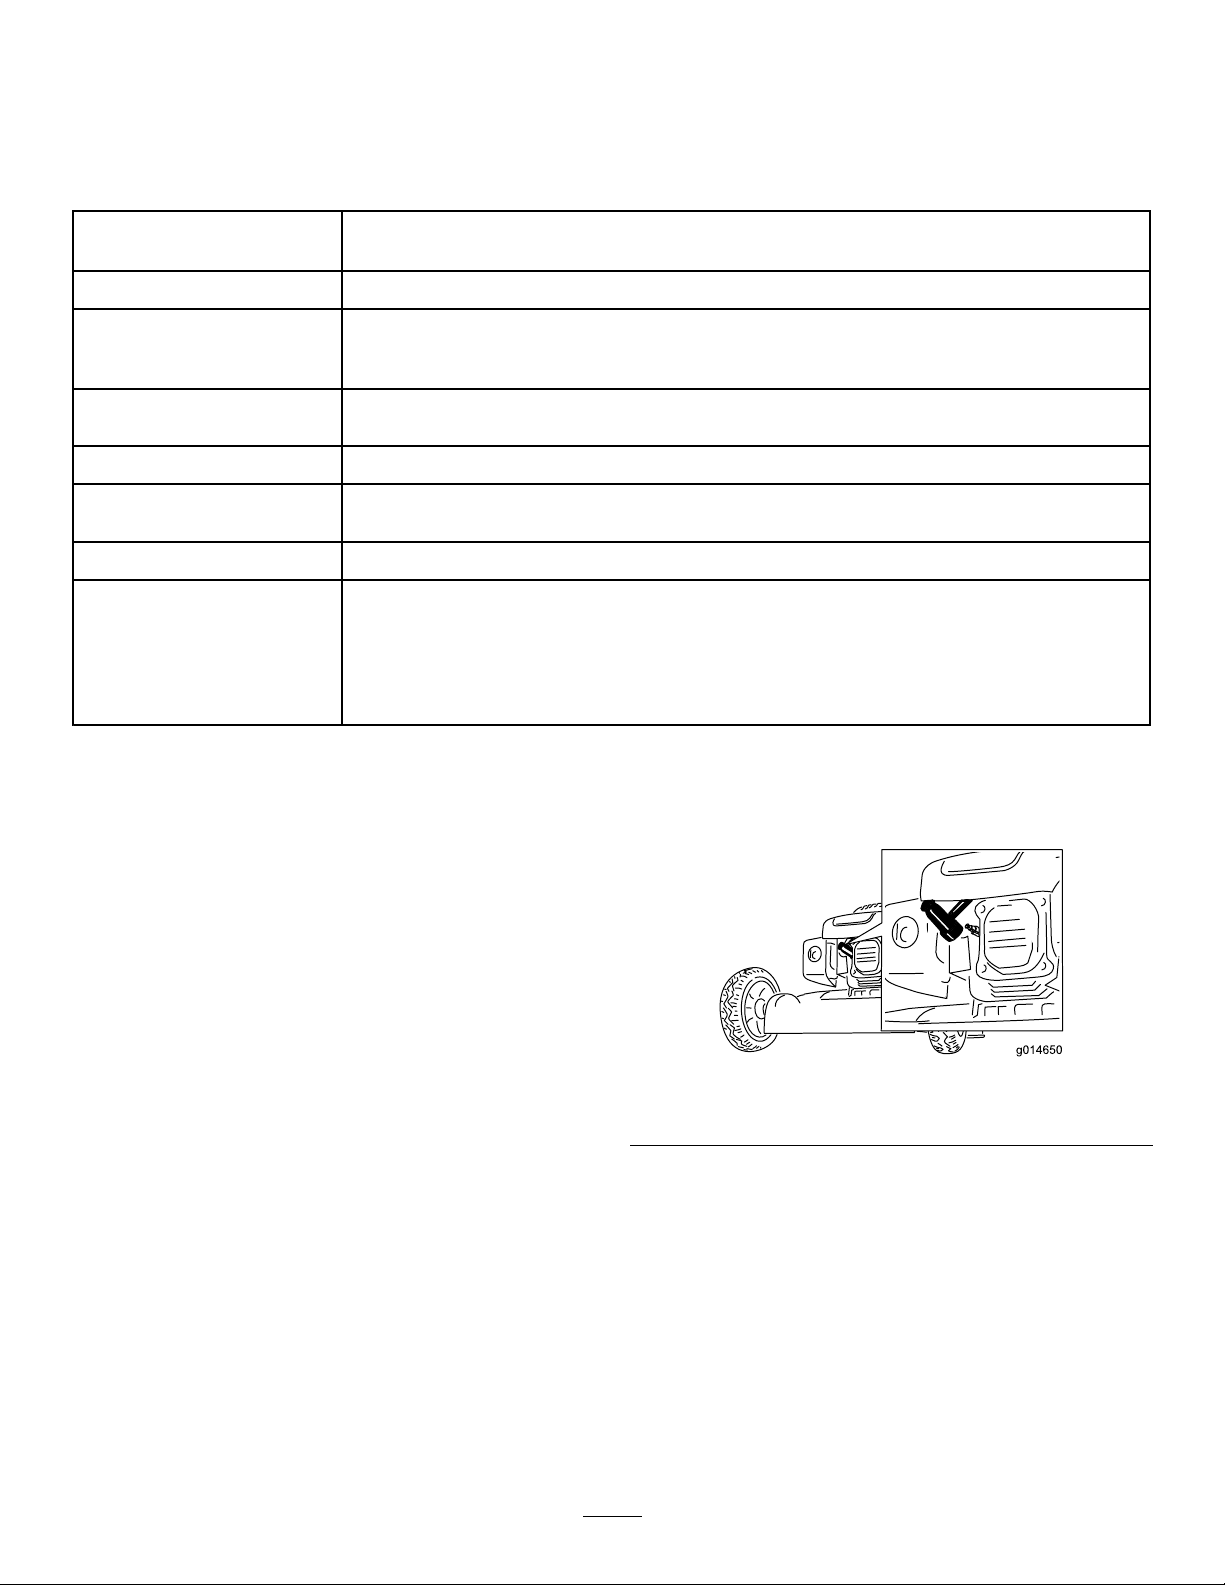
PreparingforMaintenance
1.Shutofftheengineandwaitforallmovingpartsto
stop.
2.Disconnectthespark-plugwirefromthesparkplug
(Figure15)beforeperforminganymaintenance
procedure.
Figure15
1.Spark-plugwire
3.Afterperformingthemaintenanceprocedure(s),
connectthespark-plugwiretothesparkplug.
Important:Beforetippingthemachinetochange
theoilorreplacetheblade,allowthefueltankto
rundrythroughnormalusage.Ifyoumusttip
themachinepriortorunningoutoffuel,usea
handfuelpumptoremovethefuel.Alwaystipthe
machineontoitssidewiththedipstickdown.
12
WARNING
G014713
1
2
3
G017322
Tippingthemachinemaycausethefuelto
leak.Fuelisammable,explosiveandcan
causepersonalinjury.
Runtheenginedryorremovethefuelwitha
handpump;neversiphon.
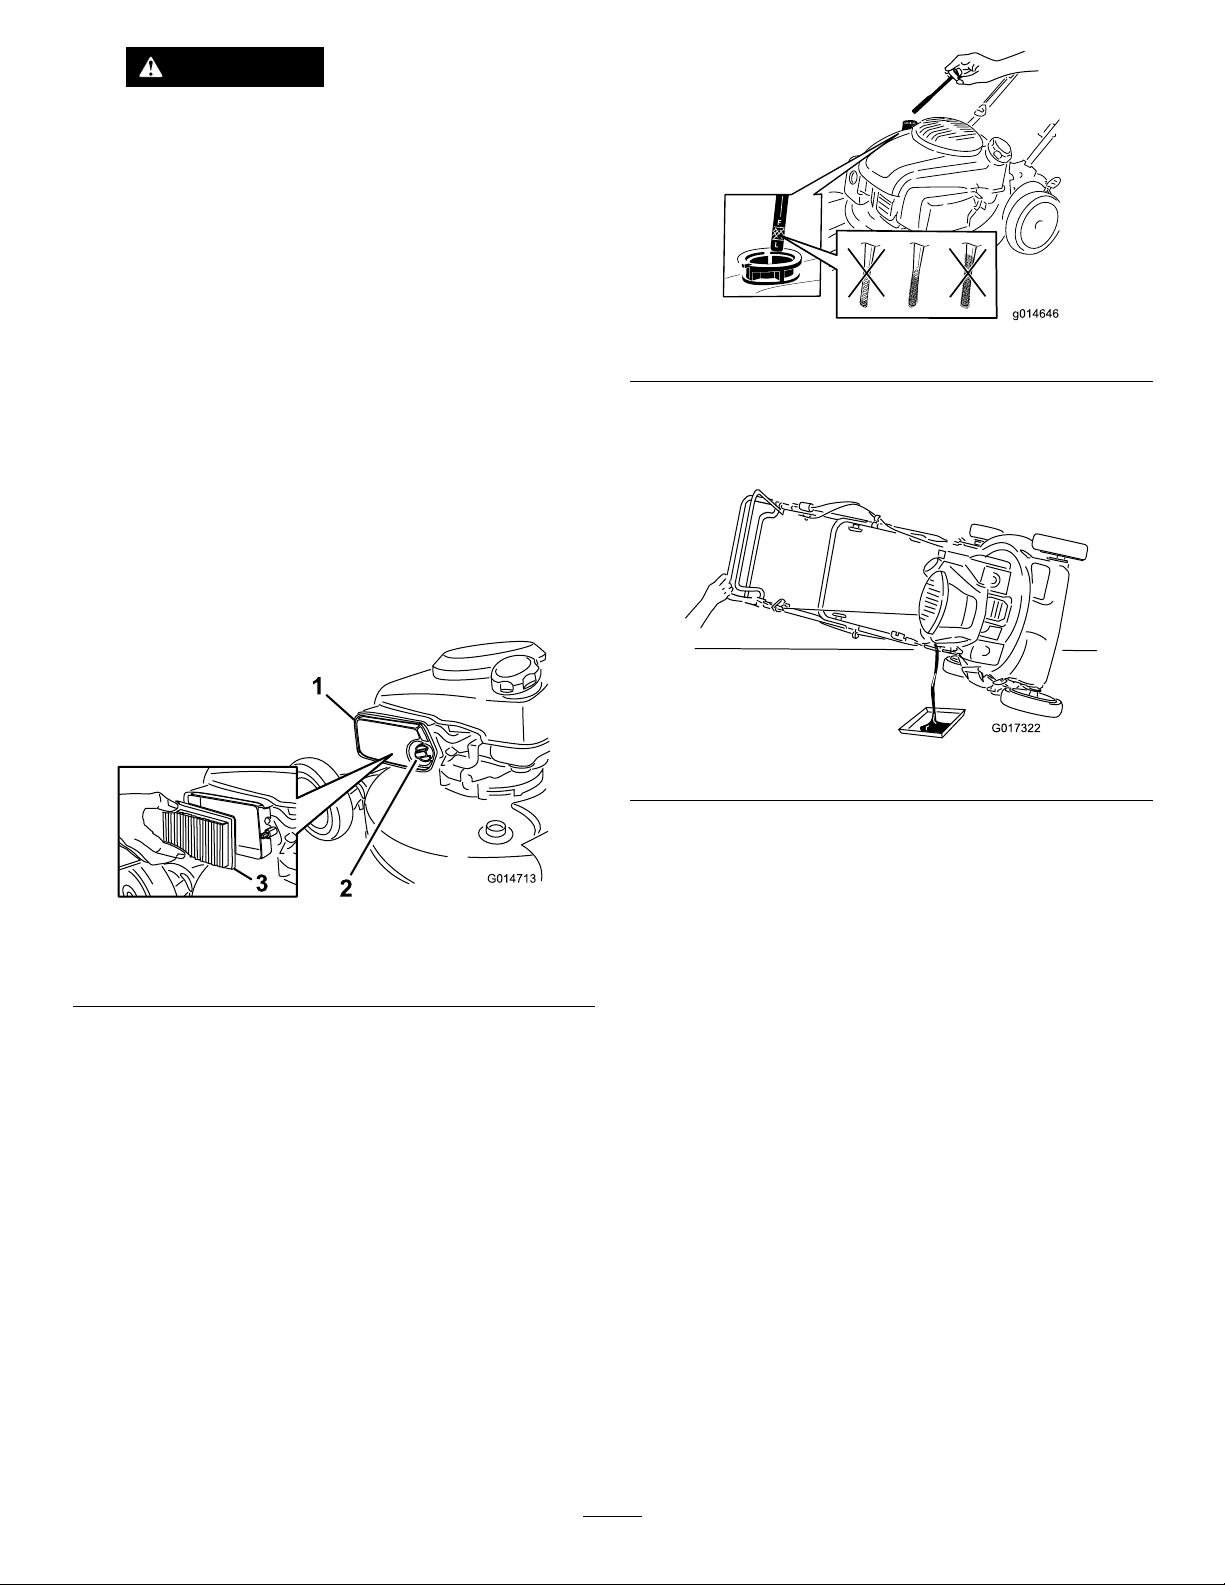
ServicingtheAirCleaner
ServiceInterval:Every25hours/Yearly(whichevercomes
rst)—Checktheaircleanerfordirty,
loose,ordamagedparts,andcleanor
replacethemifnecessary.
Every100hours/Y early(whichevercomes
rst)—Replacetheair-cleanerelement(more
frequentlywhenoperatingthemachineindustyor
dirtyoperatingconditions).
1.Performthepre-maintenanceprocedures;referto
PreparingforMaintenance(page12).
2.Unscrewandopentheair-cleanercover(Figure16).
Figure16
1.Screw
2.Air-cleanercover
3.Replacetheair-cleanerelement.
4.Installtheair-cleanercover.
3.Air-cleanerelement
Figure17
3.Tipthemachineontoitsside,withtheairlterup,then
removethedipsticktodraintheusedoiloutthrough
theoil-lltube(Figure18).
Figure18
4.Slowlypouroilintotheoil-lltubeuntiltheoillevel
reachestheFulllineonthedipstick(Figure17).Do
notoverll.(Max.ll:0.65L(22oz),type:10W-30or
SAE30detergentoilwithanAPIserviceclassication
ofSJorhigher.)
Note:Eachtimeyouchecktheoillevel,removethe
dipstickandwipeitclean,insertitintotheoilller
neck(butdonotscrewitin),thenremoveitagainand
checkthelevelofthedipstick.
Note:Ifyouoverlltheengine,poursomeoilout
ofit.
ChangingtheEngineOil
ServiceInterval:Aftertherst5hours
Every50hours/Yearly(whichevercomesrst)
Runtheengineafewminutesbeforechangingtheoiltowarm
it.Warmoilowsbetterandcarriesmorecontaminants.
1.Performthepre-maintenanceprocedures;referto
PreparingforMaintenance(page12).
2.Removethedipstick(Figure17).
5.Installthedipsticksecurely.
6.Disposeoftheusedoilproperlyatalocalrecycling
center.
13
ReplacingtheBlade
ServiceInterval:Yearly
Important:
blade pr oper l y
areuncomfortableperformingthisprocedure,contact
anAuthorizedServiceDealer.
Examinethebladewheneveryourunoutoffuel.Iftheblade
isdamagedorcracked,replaceitimmediately.Iftheblade
edgeisdullornicked,haveitsharpenedandbalanced,or
replaceit.
Y ou will need a torque wr ench to install the
.Ifyoudonothaveatorquewrenchor
WARNING
Thebladeissharp;contactingthebladecanresult
inseriouspersonalinjury.
Weargloveswhenservicingtheblade.
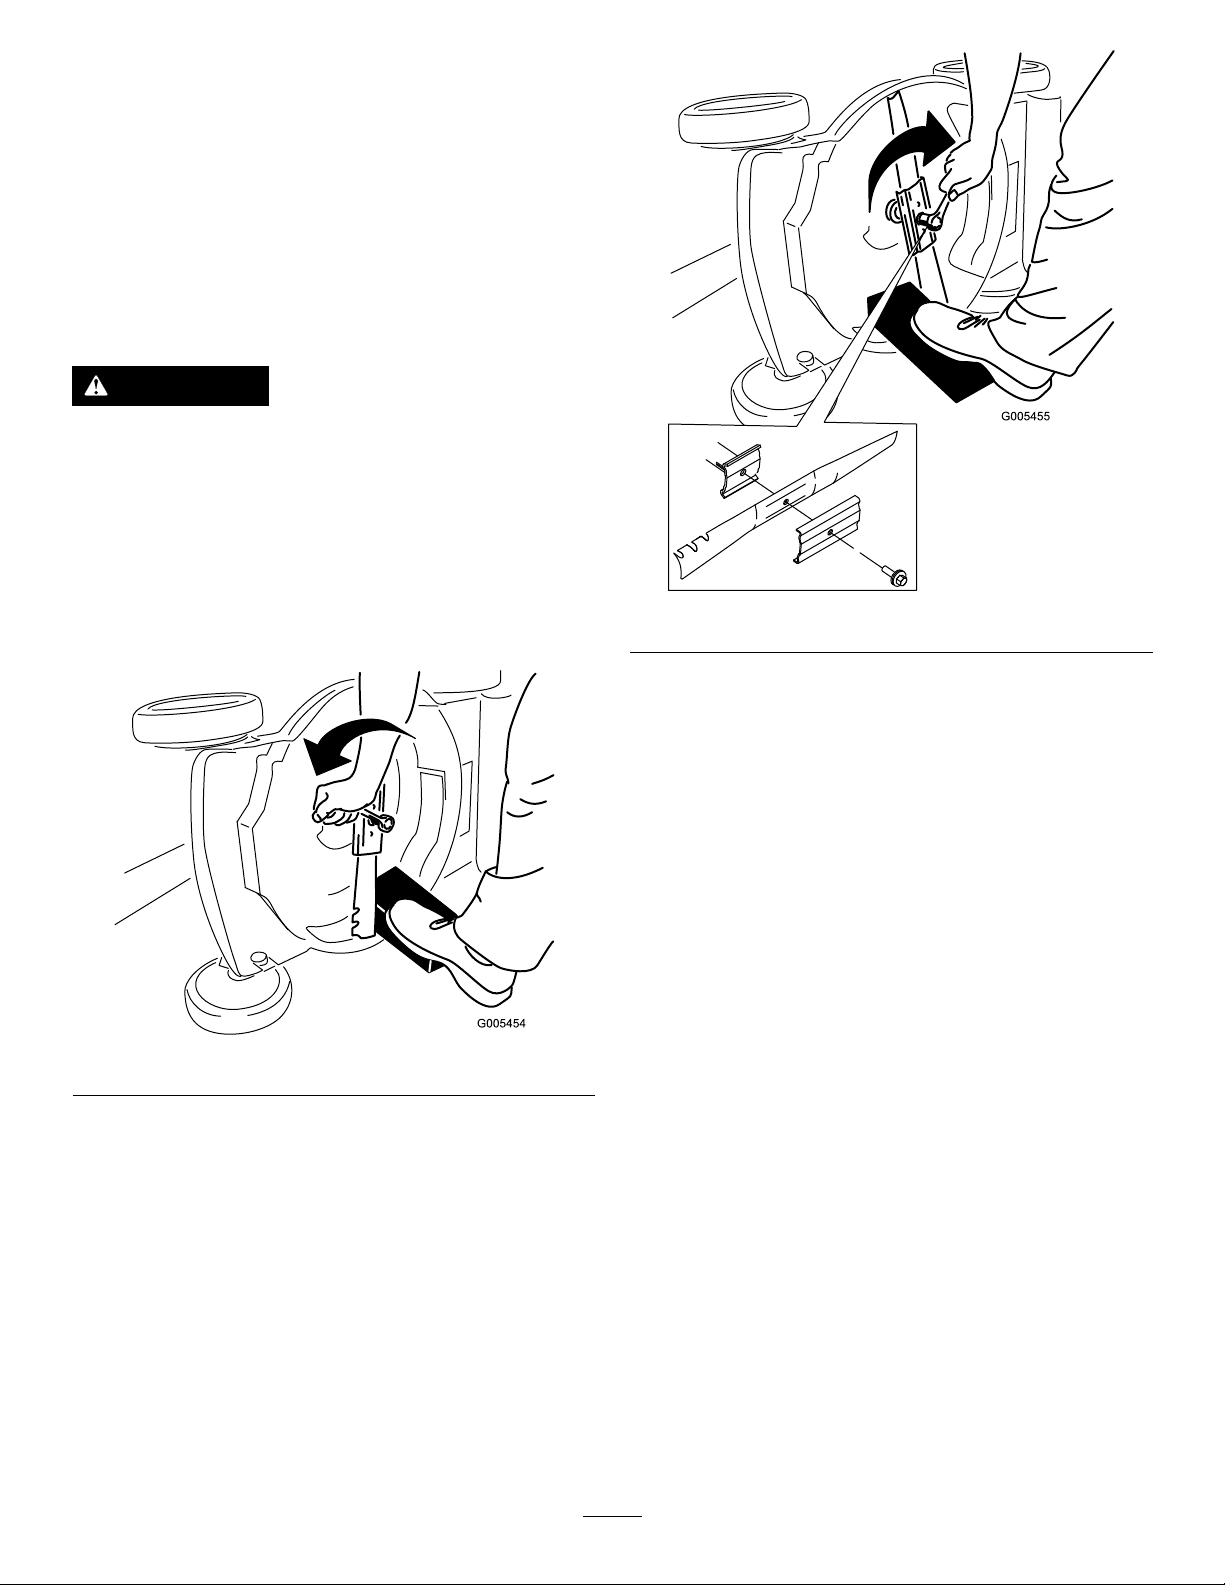
1.RefertoPreparingforMaintenance(page12).
2.Tipthemachineontoitssidewiththeairlterup.
3.Useablockofwoodtoholdthebladesteady(Figure
19).
Figure20
Important:Positionthecurvedendsoftheblade
topointtowardthemachinehousing.
Figure19
4.Removetheblade,savingallmountinghardware
(Figure19).
5.Installthenewbladeandallmountinghardware
(Figure20).
6.Useatorquewrenchtotightenthebladeboltto
82N∙m(60ft-lb).
Important:Abolttorquedto82N∙m(60ft-lb)is
verytight.Whileholdingthebladewithablock
ofwood,putyourweightbehindtheratchetor
wrenchandtightentheboltsecurely.Thisboltis
verydifculttoovertighten.
Adjustingthe Self-Propel-DriveCable
Wheneveryouinstallanewself-propelcableorif
theself-propeldriveisoutofadjustment,adjustthe
self-propel-drivecable.
1.Loosenthecablesupportnut(Figure21).
14
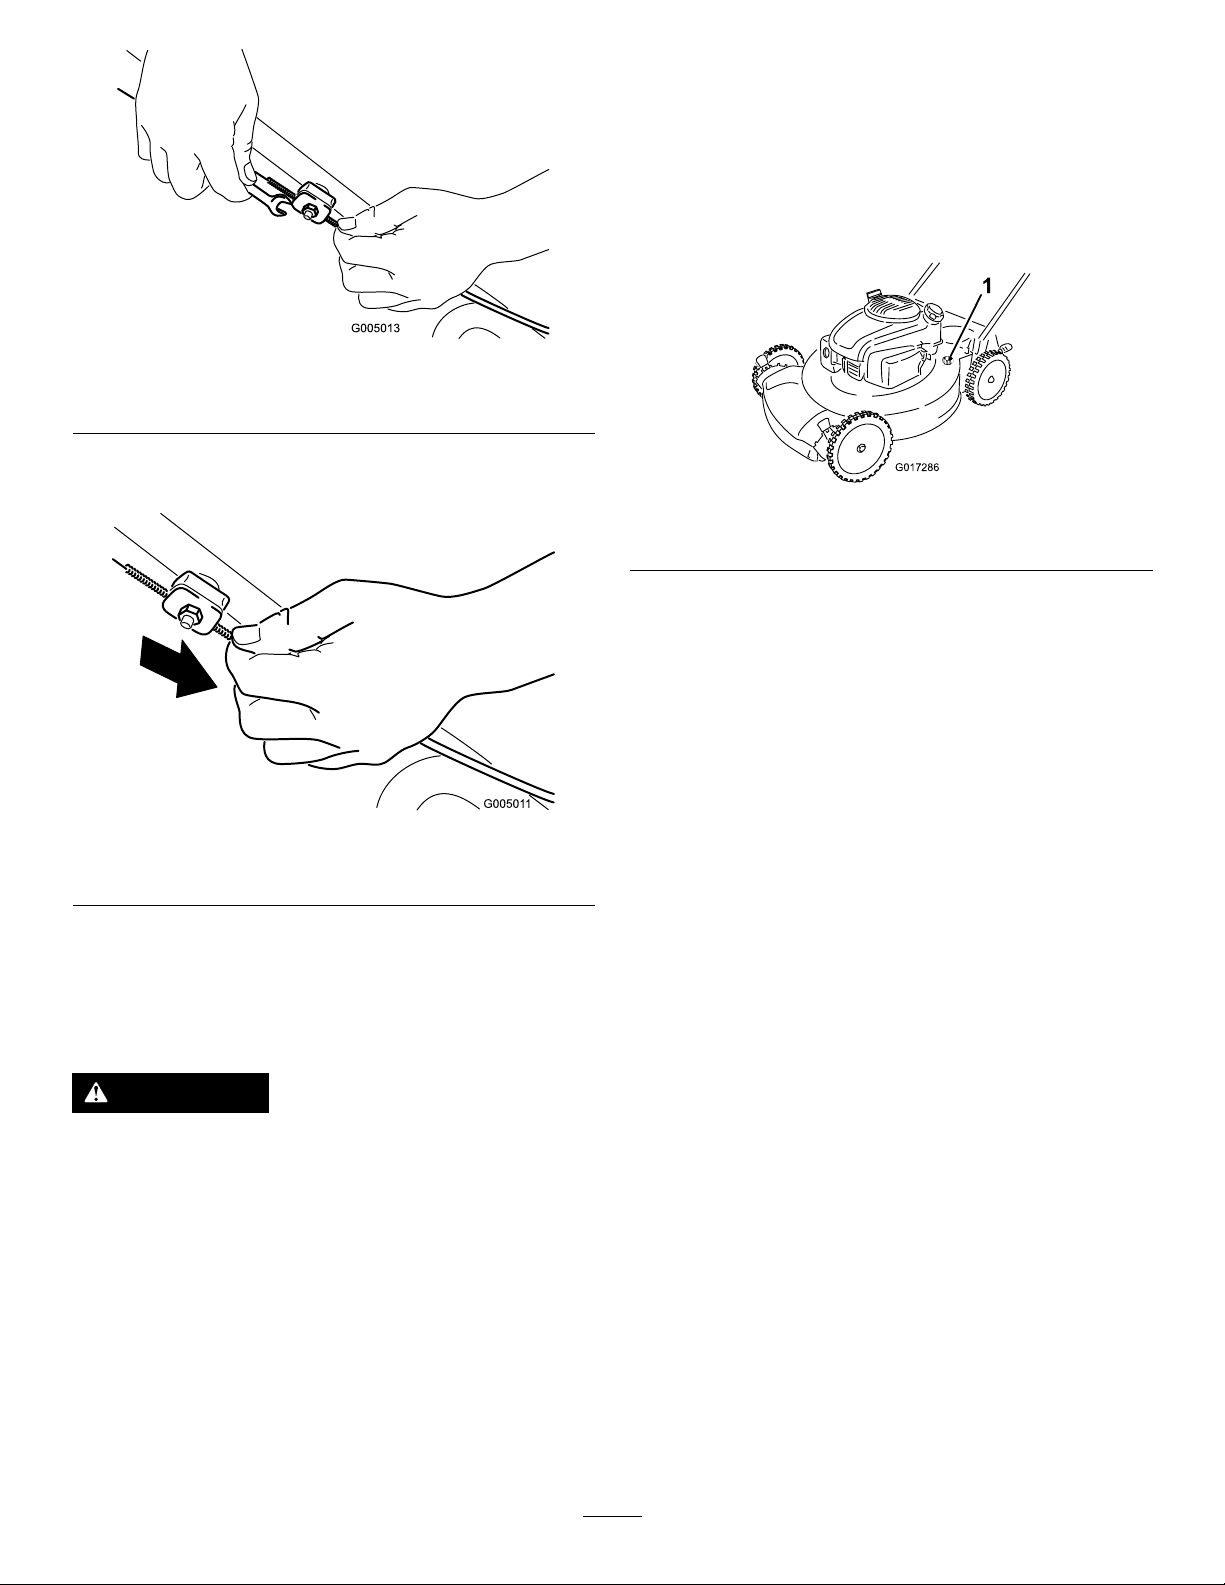
Figure21
G017286
Thisgureissimpliedforthepurposeofclarity.
2.Pulldownthecablejacket(towardthemachine)until
thereisnoslackinthecable(Figure22).
3.Washouttheareaunderthereardeectorwherethe
clippingsgofromthehousingtothegrassbag.
Note:W ashouttheareawiththebag-on-demandin
boththefullyforwardandfullyrearwardpositions.
4.Attachagardenhosethatisconnectedtoawater
supplytothewashoutportonthemachinehousing
(Figure23).
Figure23
1.Washoutport
5.Turnthewateron.
6.Starttheengineandrunituntiltherearenomore
clippingsthatcomeoutfromunderthemachine
housing.
Figure22
Thisgureissimpliedforthepurposeofclarity.
3.Tightenthenutonthecablesupport.
CleaningtheMachine
ServiceInterval:Beforeeachuseordaily
WARNING
Themachinemaydislodgematerialfromunderthe
machinehousing.
•Weareyeprotection.
•Stayintheoperatingposition(behindthe
handle)whentheengineisrunning.
•Donotallowbystandersinthearea.
7.Shutofftheengine.
8.Shutoffthewateranddisconnectthegardenhose
fromthemachine.
9.Starttheengineandrunitforafewminutestodrythe
housingtopreventitfromrusting.
10.Allowtheenginetocoolbeforestoringthemachine
inanenclosedarea.
Forbestresults,cleanthemachinesoonafteryouhave
completedmowing.
1.Lowerthemachinetoitslowestcuttingheightsetting.
RefertoAdjustingtheCuttingHeight(page6).
2.Movethemachineontoaatpavedsurface.
15

Storage
Storethemachineinacool,clean,dryplace.
PreparingtheMachinefor Storage
1.Onthelastrefuelingoftheyear,addfuelstabilizerto
thefuelasdirectedbytheenginemanufacturer.
2.Disposeofanyunusedfuelproperly.Recycleit
accordingtolocalcodes,oruseitinyourautomobile.
Note:Oldfuelinthefueltankistheleadingcauseof
hardstarting.Donotstorefuelwithoutstabilizermore
than30days,anddonotstorestabilizedfuelmorethan
90days.
3.Runthemachineuntiltheenginestopsfromrunning
outoffuel.
4.Starttheengineagain.
5.Allowtheenginetorununtilitstops.Whenyoucan
nolongerstarttheengine,itissufcientlydry.
6.Disconnectthewirefromthesparkplug.
7.Removethesparkplug,add30ml(1oz)ofoilthrough
thespark-plughole,andpullthestarterropeslowly
severaltimestodistributeoilthroughoutthecylinder
topreventcylindercorrosionduringtheoff-season.
8.Looselyinstallthesparkplug.
9.Tightenallnuts,bolts,andscrews.
RemovingtheMachinefrom Storage
1.Removethesparkplugandspintheenginerapidlyby
pullingtherecoil-starthandletoblowtheexcessoil
fromthecylinder.
2.Installthesparkplugandtightenitwithatorque
wrenchto20N∙m(15ft-lb).
3.Connectthewiretothesparkplug.
16
 Loading...